
Bulk Message Menu
Through the Bulk Message Menu, you can access created bulk messages, create new bulk message campaigns, and track the sending processes. Messages can be filtered by their statuses: ongoing, scheduled, completed, paused, failed, or canceled. This way, bulk message processes can be easily managed.
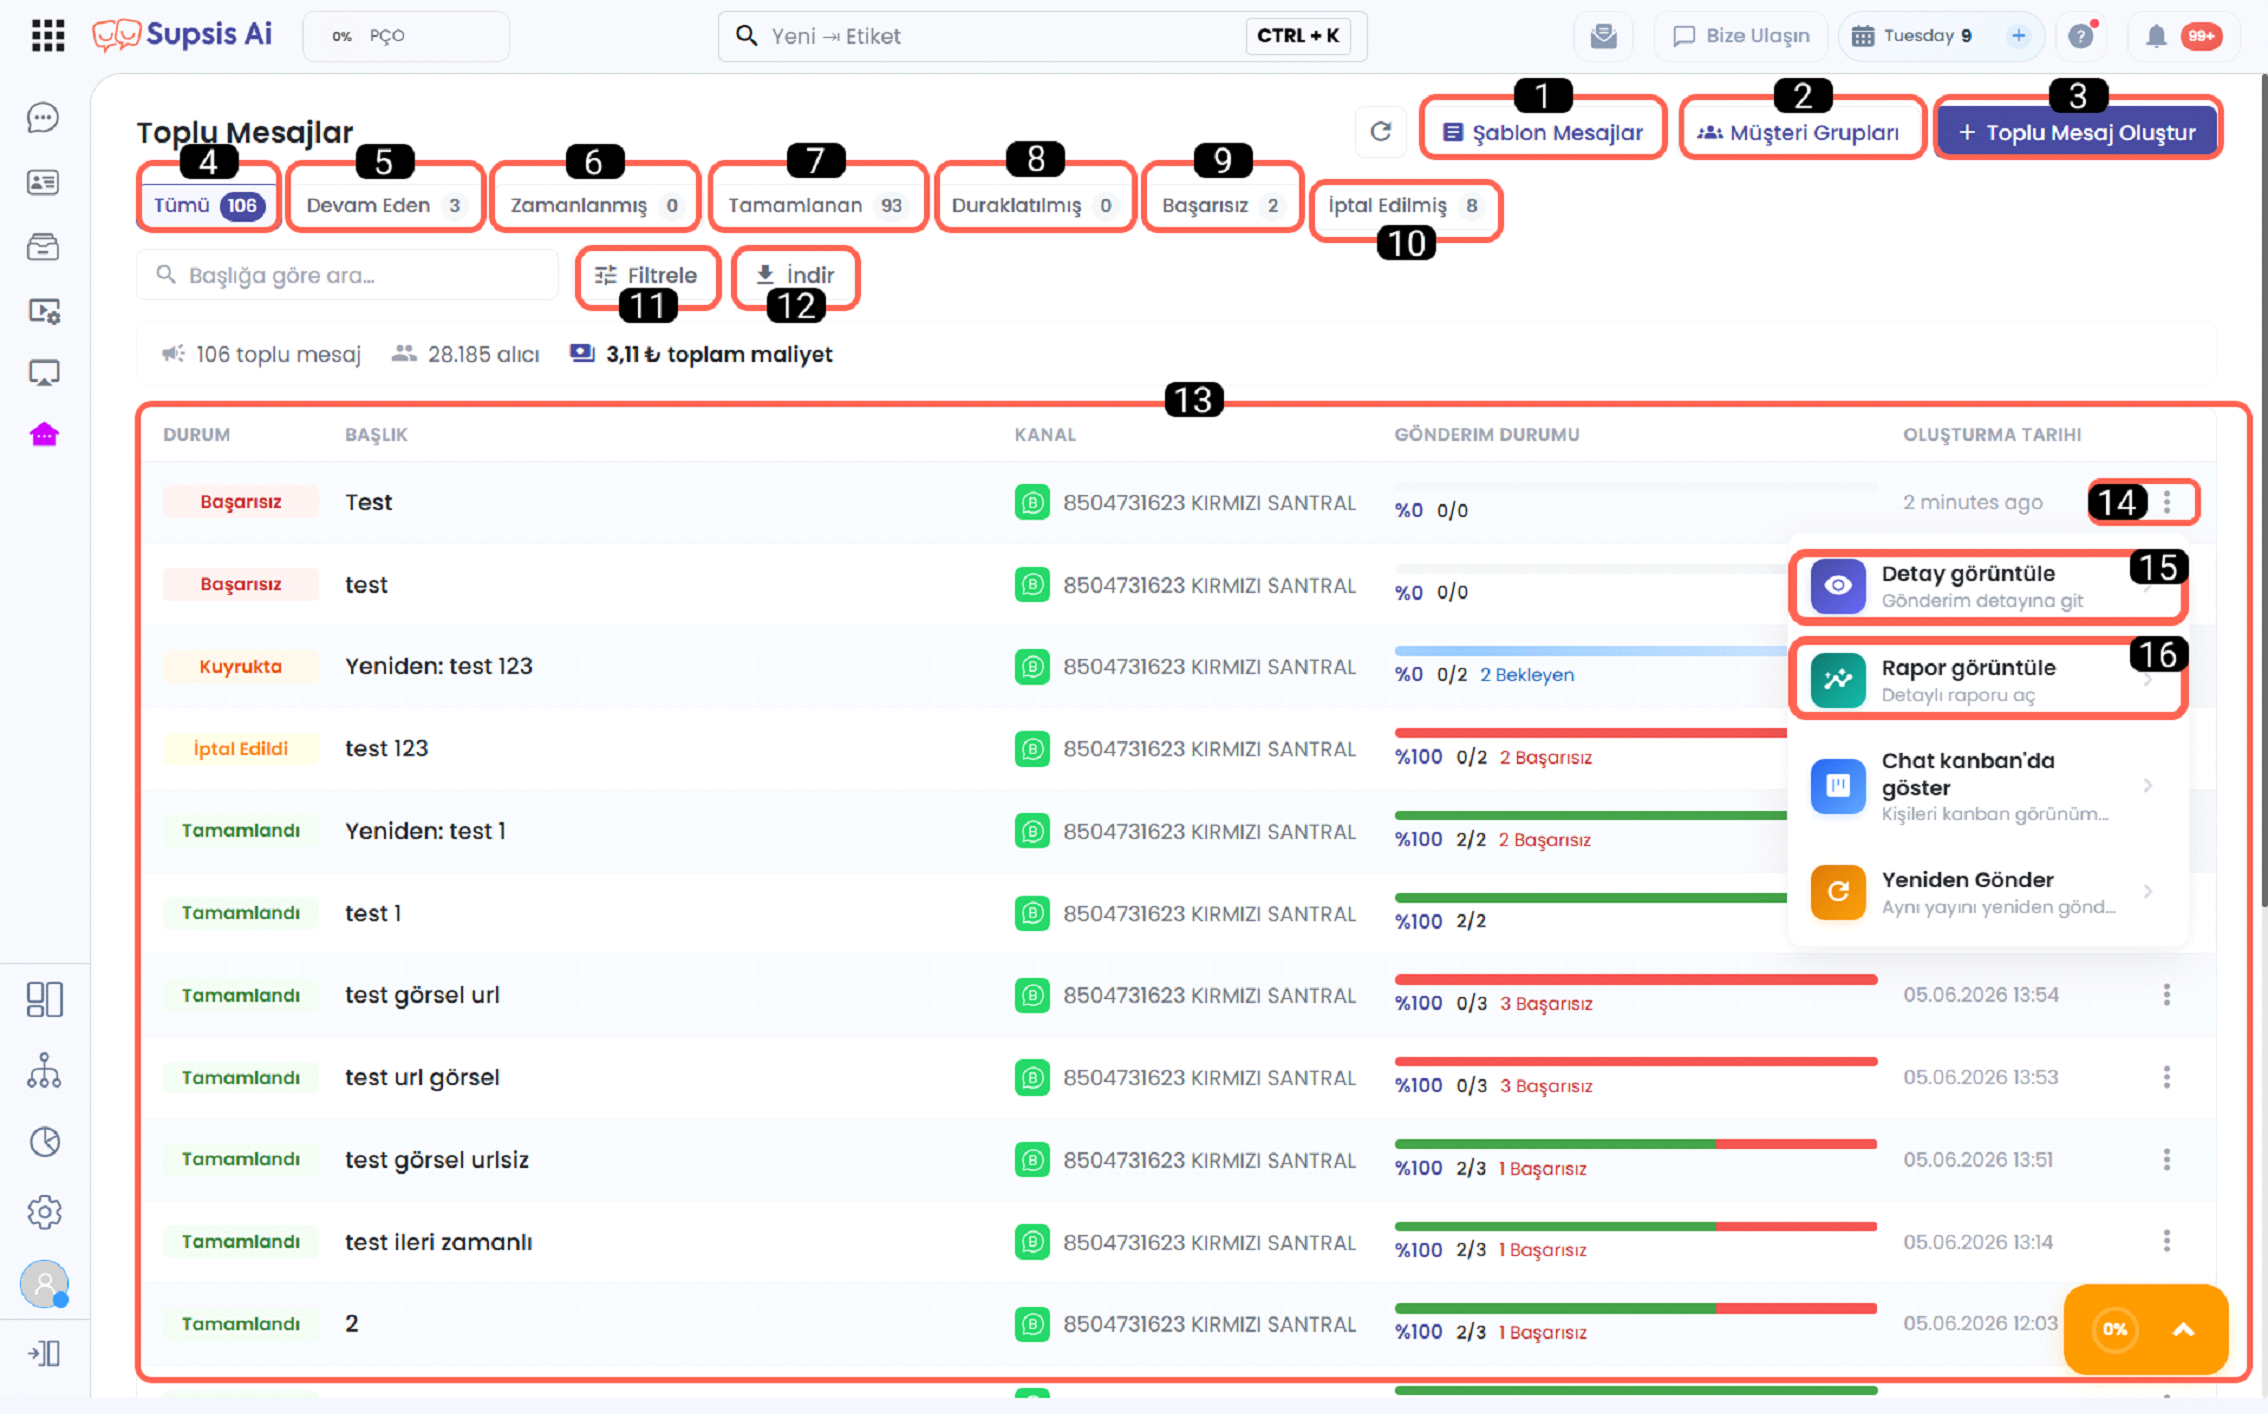
| No | Menu |
|---|---|
| 1 | Template Messages |
| 2 | Customer Groups |
| 3 | Create Bulk Message |
| 4 | All |
| 5 | Ongoing |
| 6 | Scheduled |
| 7 | Completed |
| 8 | Paused |
| 9 | Failed |
| 10 | Canceled |
| 11 | Filtering |
| 12 | Download |
| 13 | Bulk Message List |
| 14 | Options |
1-) Template Messages
The Template Messages area is the section where message templates used in WhatsApp Business channels are displayed. In this area, templates in approved or different statuses can be listed, and templates can be filtered by category, language, status, channel, and content features. The user can preview the message on the template cards and create a new template.
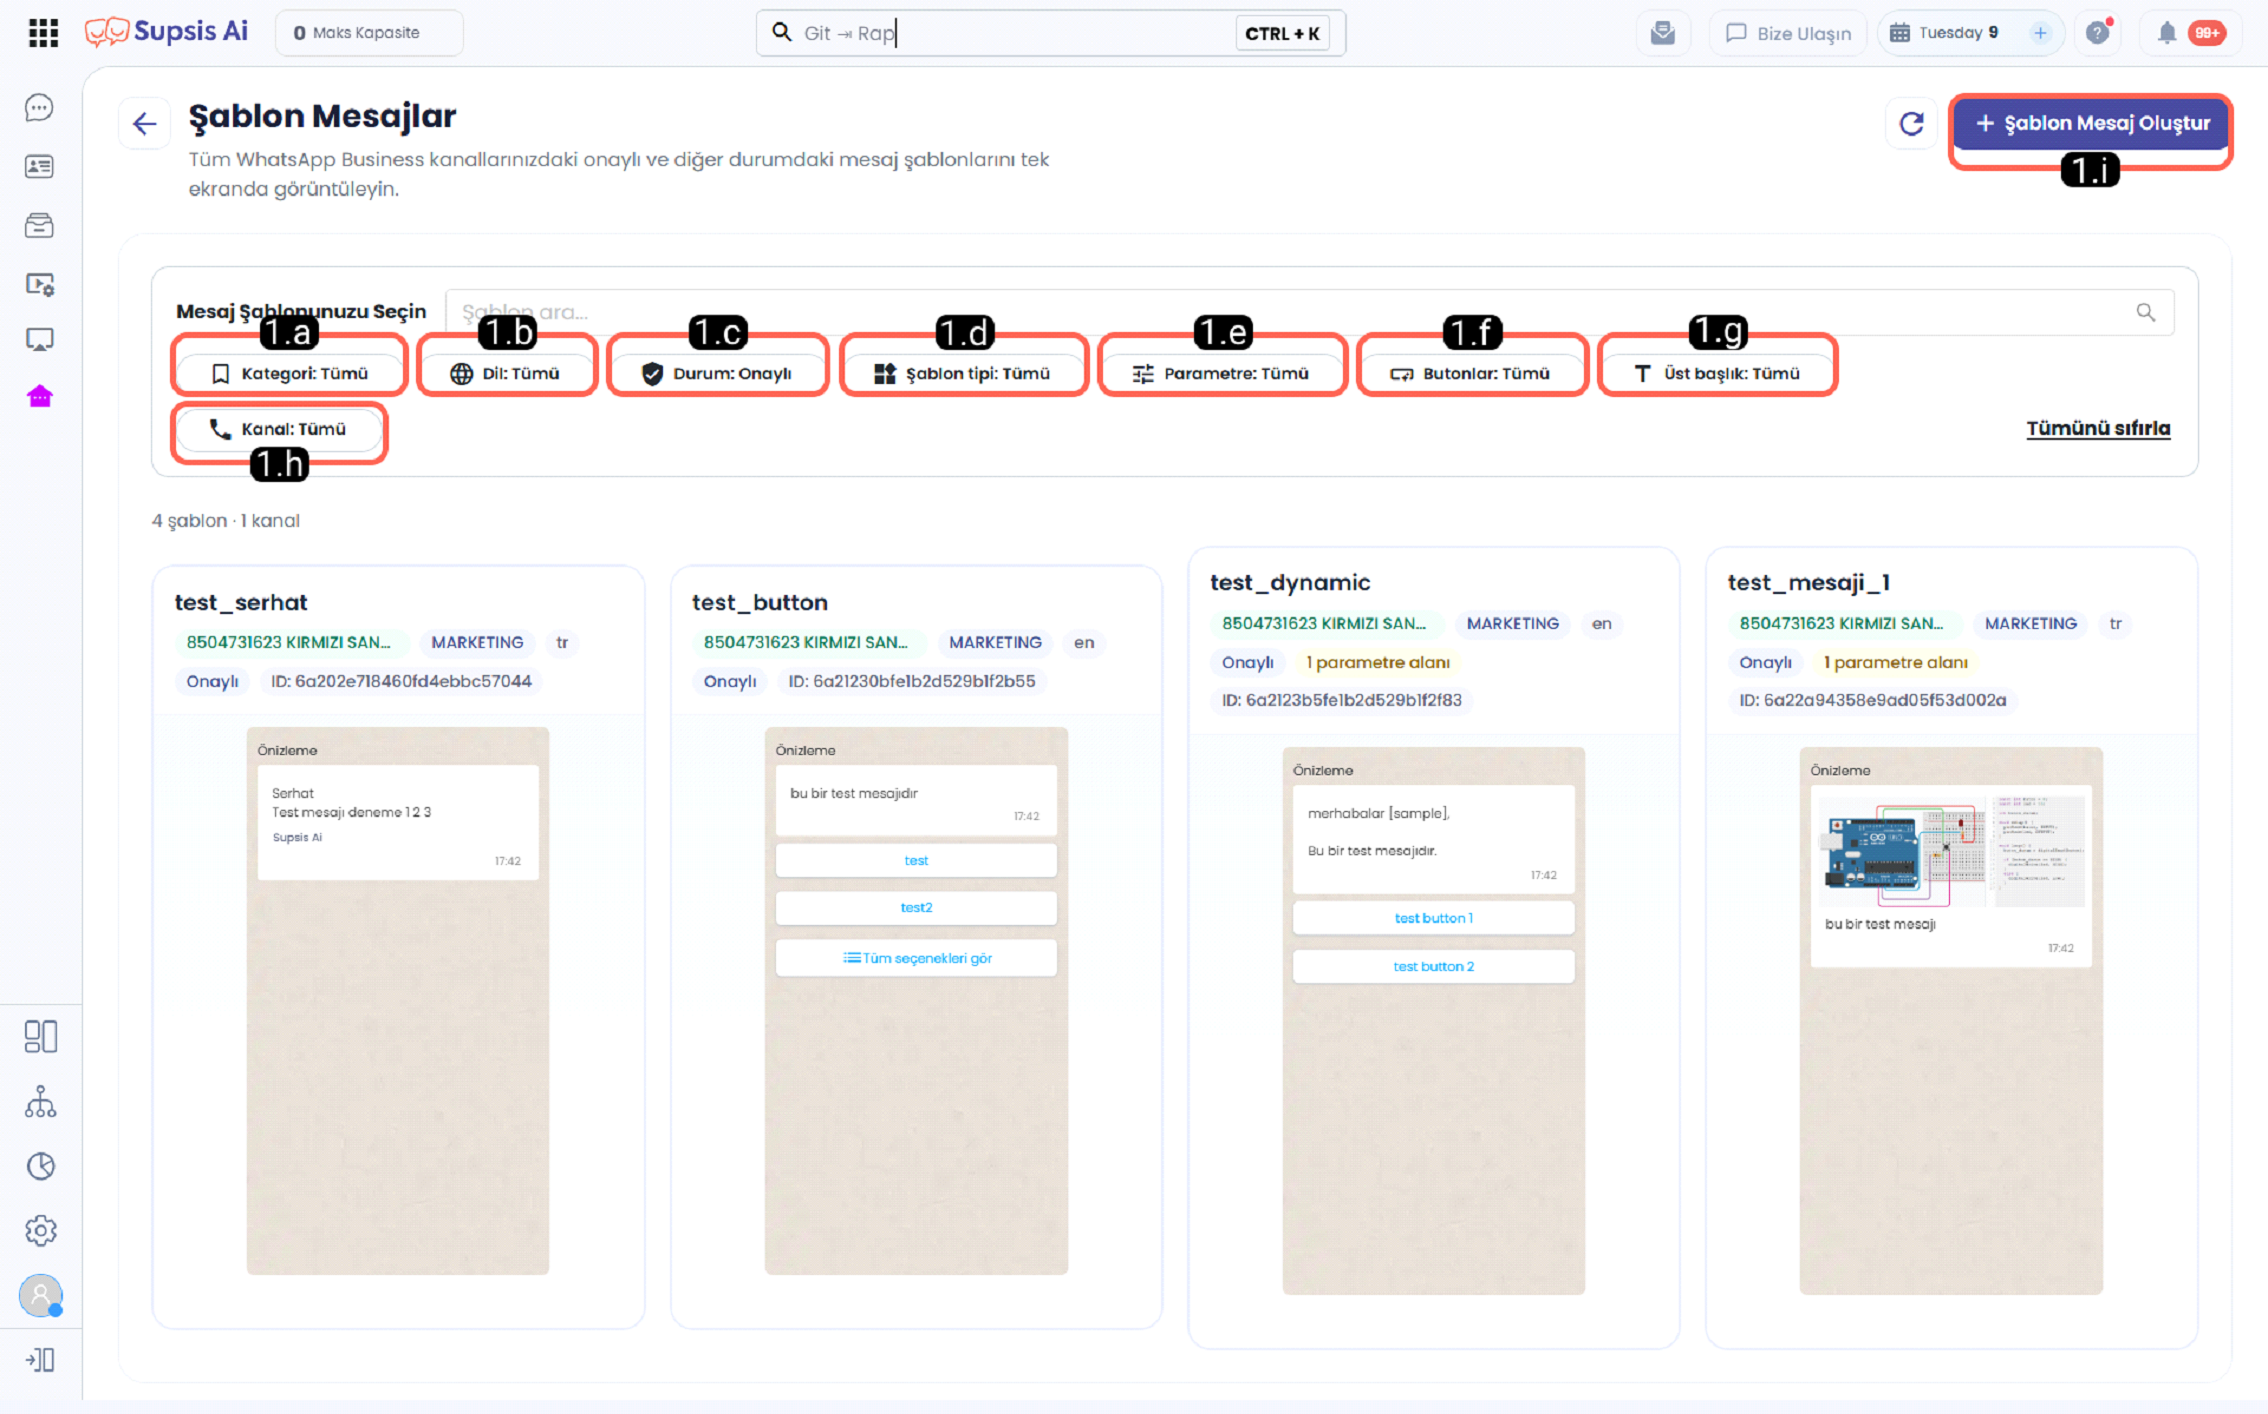
1.a - Category
The Category filter is used to list message templates according to their intended use. Through this field, templates belonging to a specific category can be separated and viewed faster.
1.b - Language
The Language filter allows filtering according to the language in which the message templates are prepared. Among the templates created in different languages, the ones belonging to the desired language can be easily listed.
1.c - Status
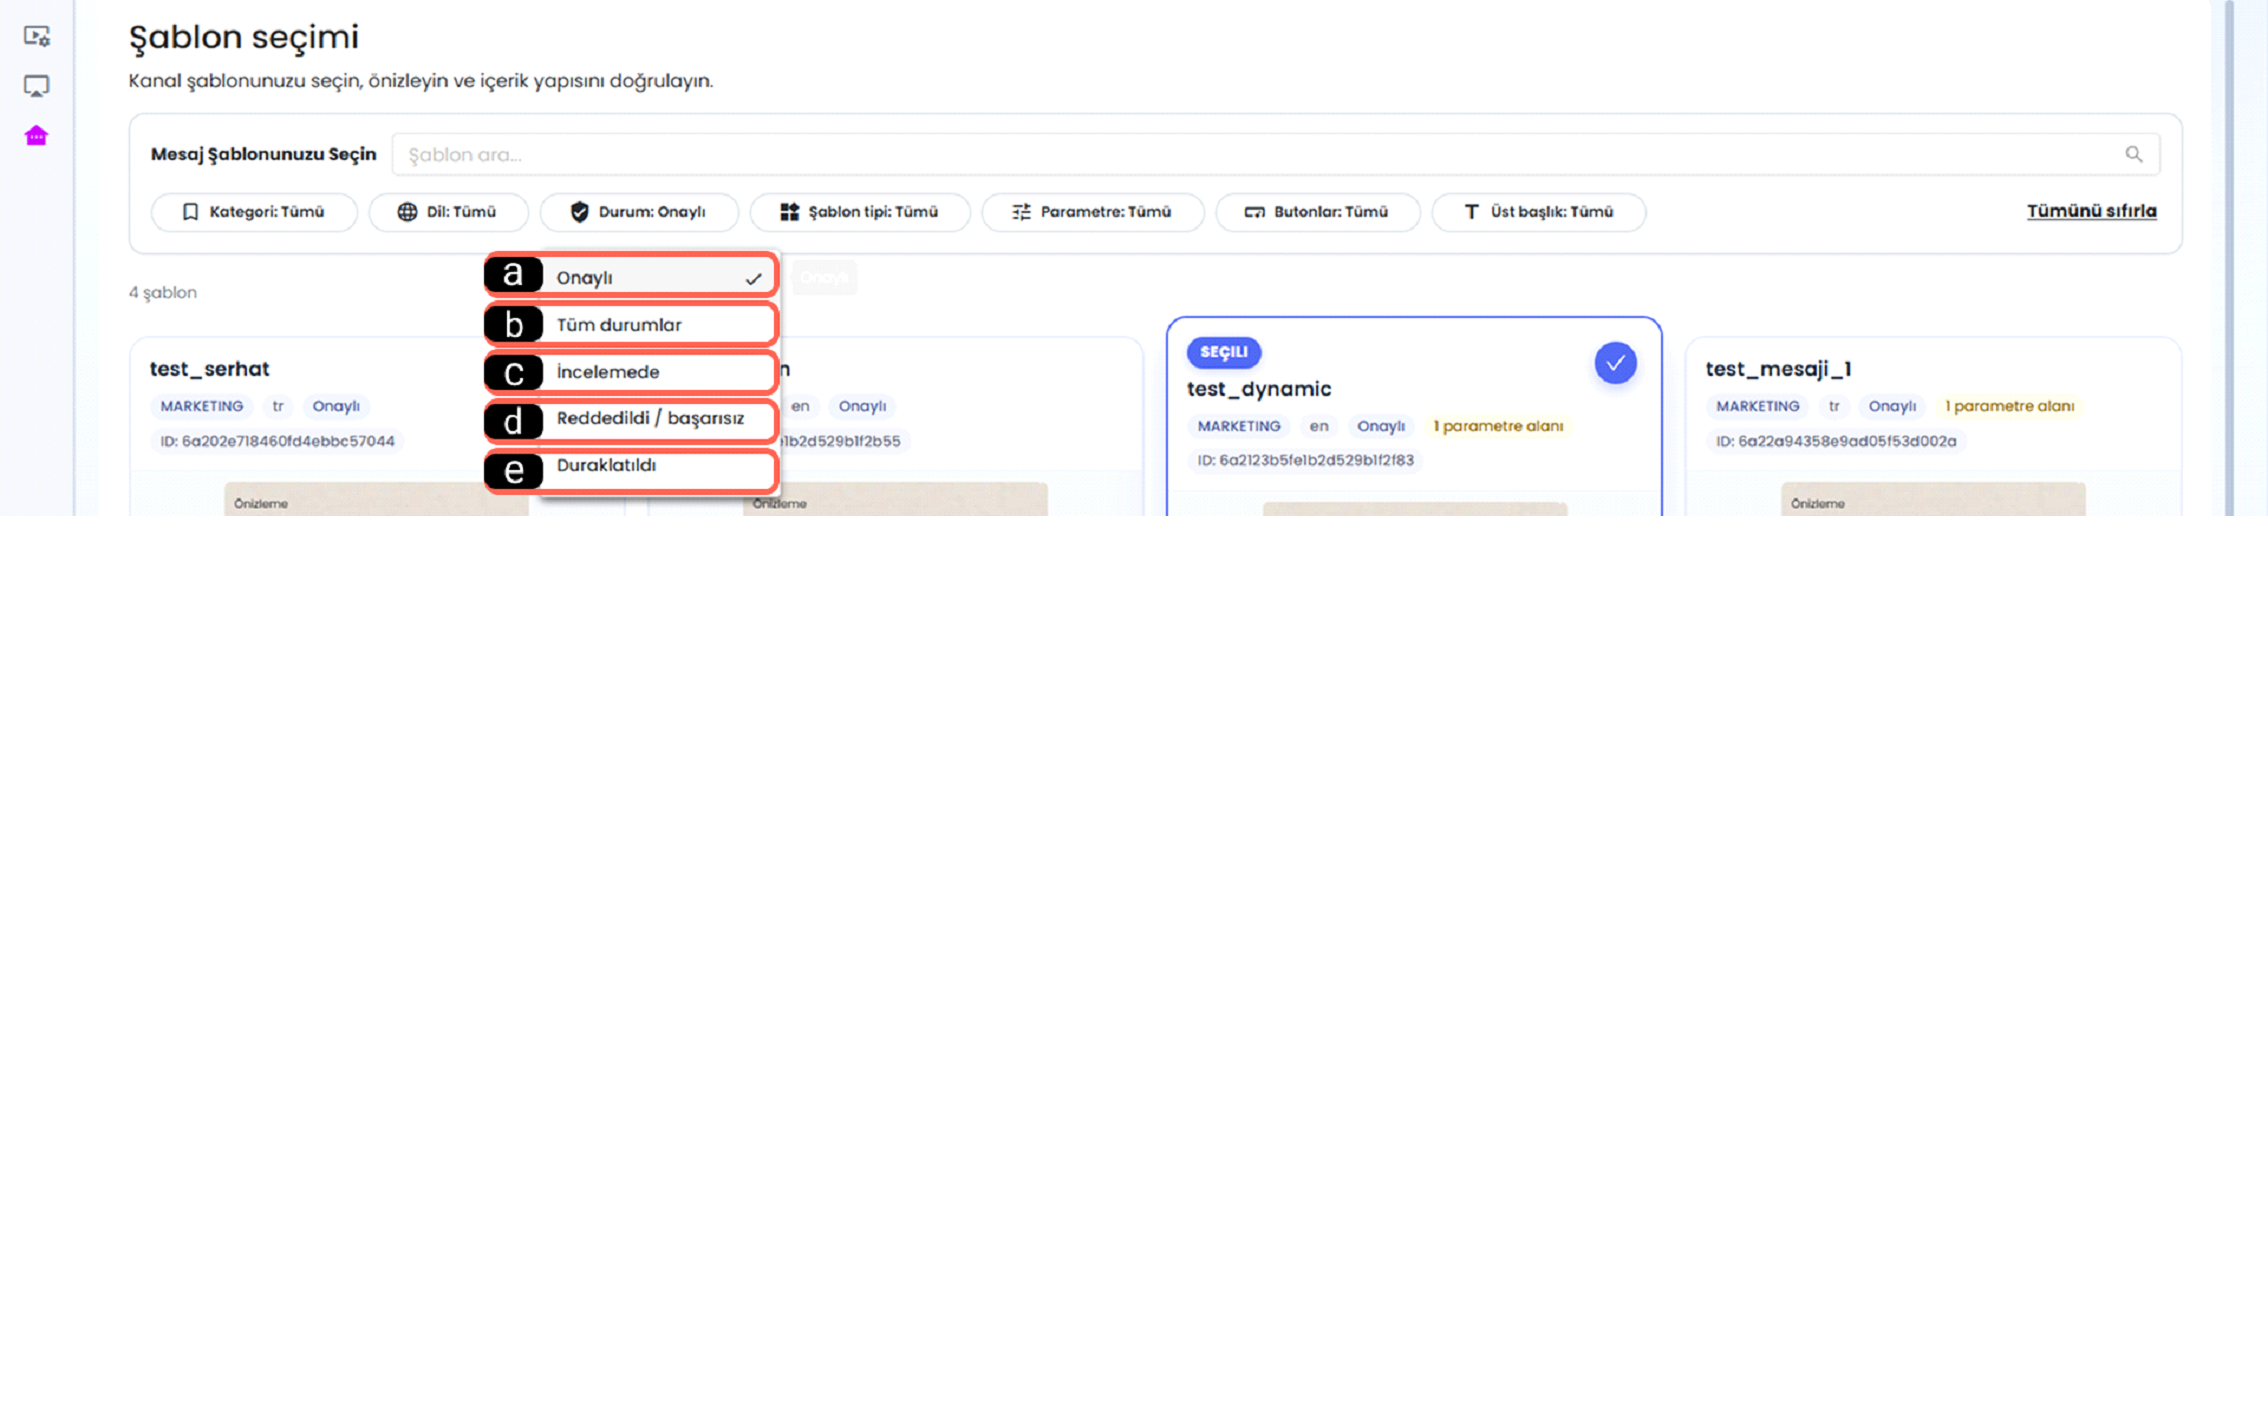
The Status filter allows message templates to be displayed according to their approval status. Approved, in review, rejected, or paused templates can be separated using this filter.
-
a - Approved
The Approved option is used to list message templates that are ready for sending and have been approved by the system. These templates can be used in bulk message sending.
-
b - All Statuses
The All Statuses option allows all message templates to be displayed without applying any status filter. All approved, in review, rejected, or paused templates are listed together.
-
c - In Review
The In Review option shows message templates whose approval process has not yet been completed. Templates in this status are in the evaluation phase.
-
d - Rejected / Failed
The Rejected / Failed option is used to list message templates that have failed the approval process or are deemed unsuitable. These templates may require editing.
-
e - Paused
The Paused option shows message templates whose usage has been temporarily stopped. Templates in this status may not be available for active sends.
1.d - Template Type
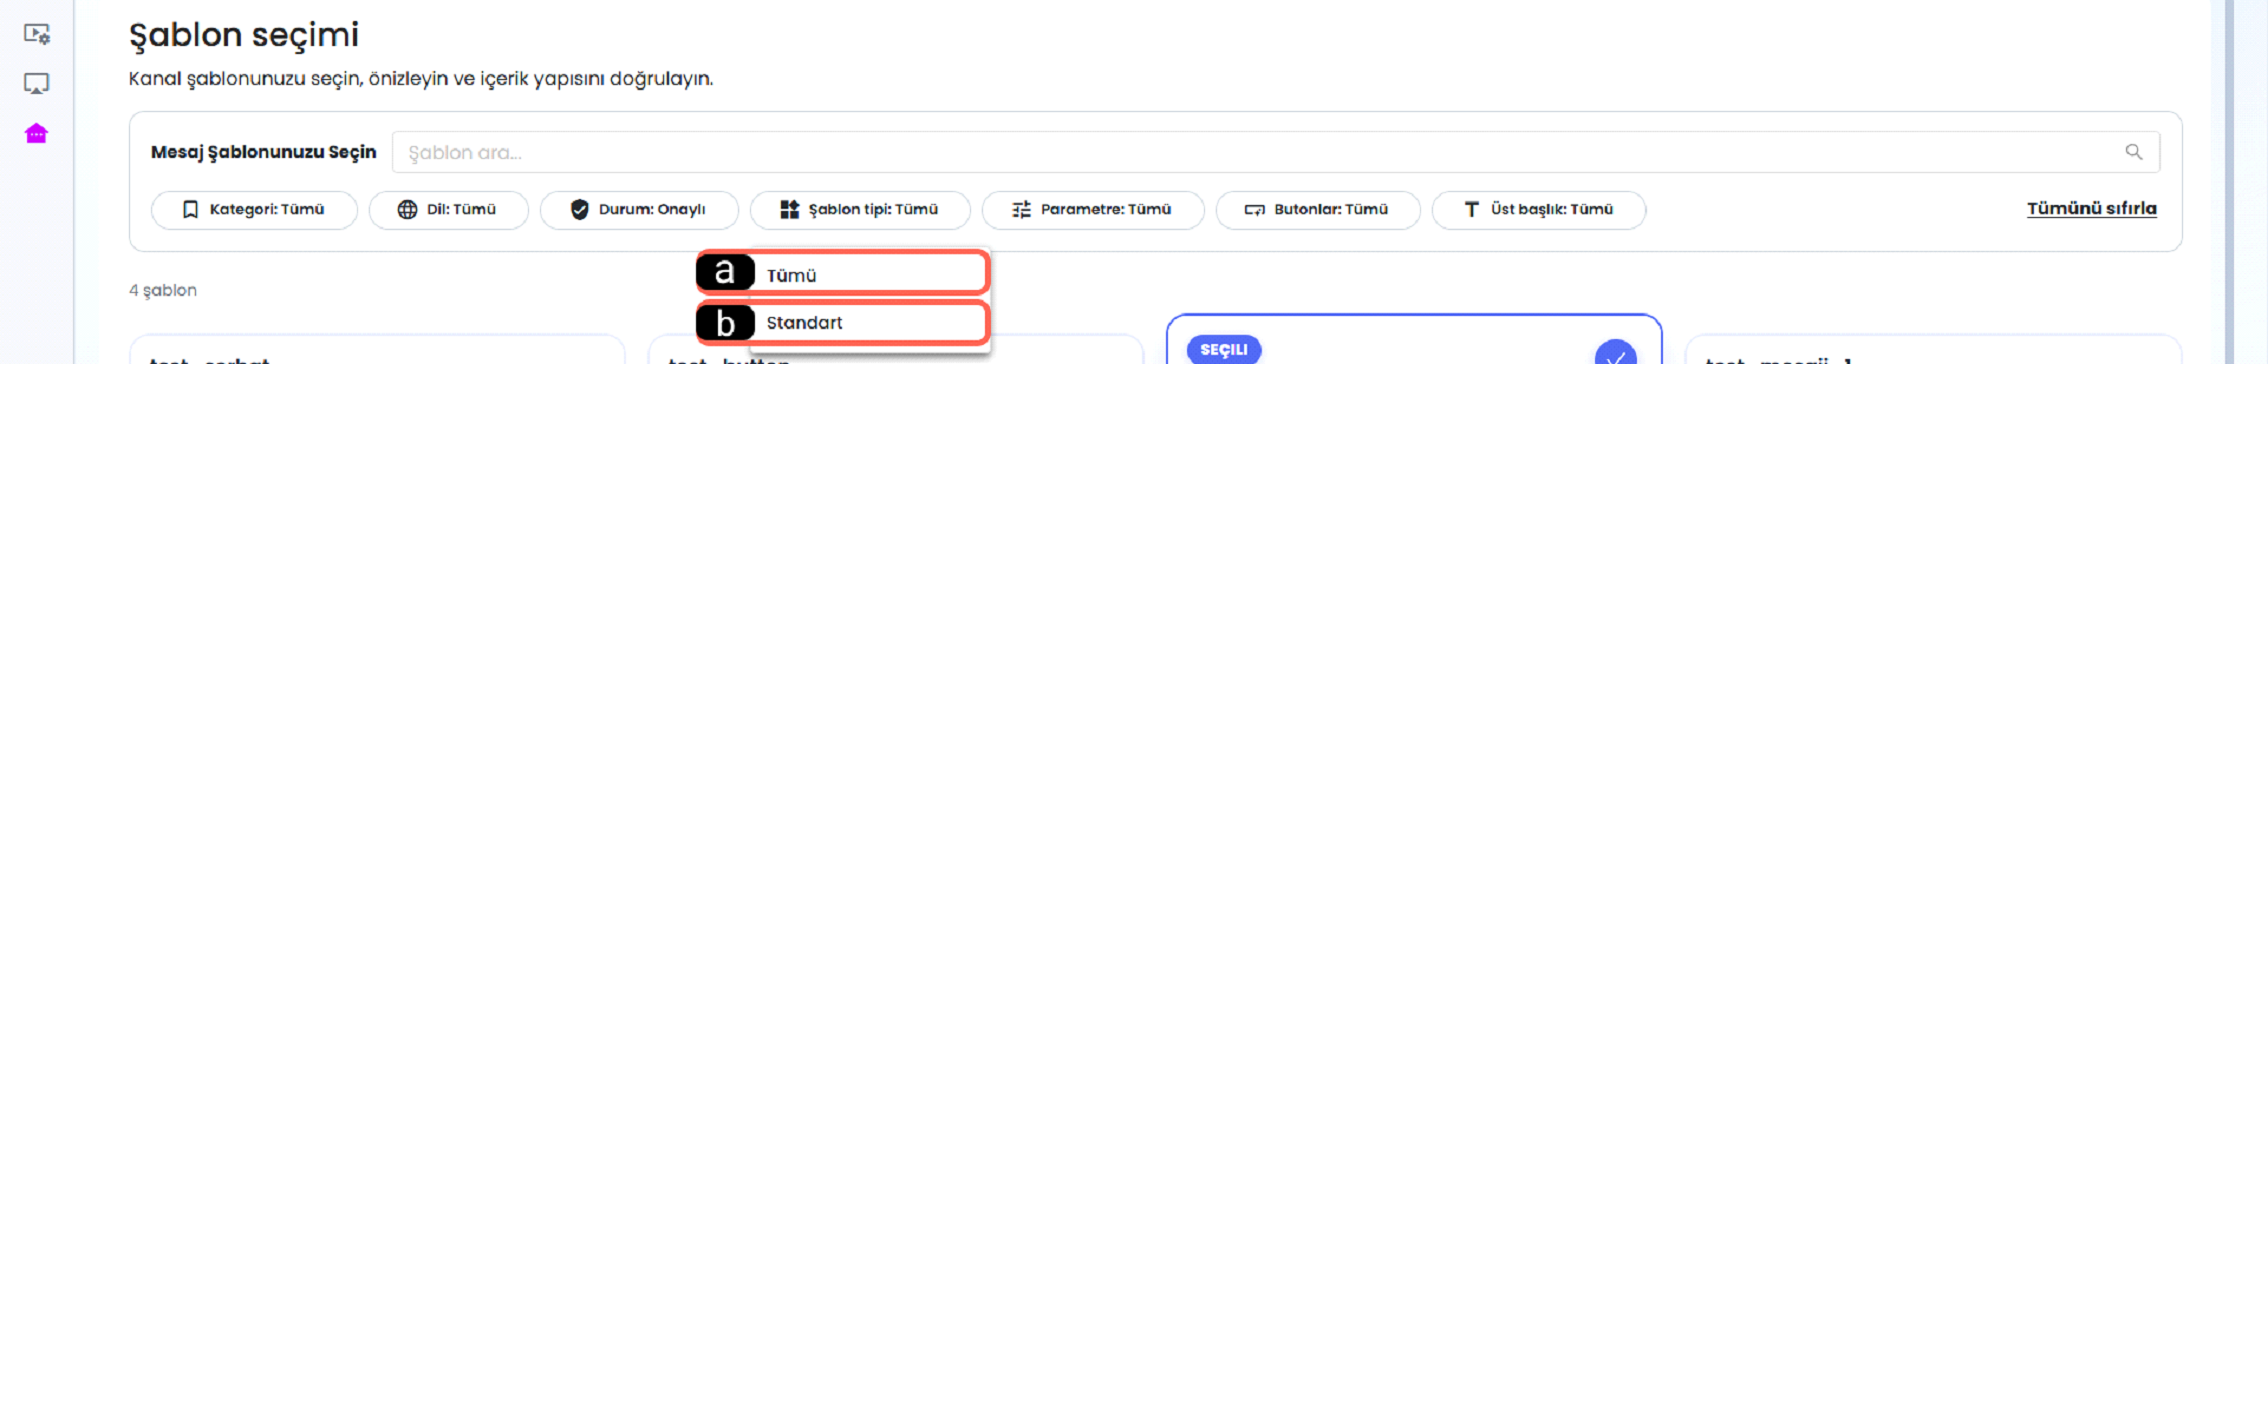
The Template Type filter allows message templates to be listed according to their type. Through this field, the user can more easily find template types that suit their needs.
-
a - All
The All option allows listing of all message templates in the system without distinguishing between template types. When this option is selected, standard or different type templates can be viewed together.
-
b - Standard
The Standard option is used to list message templates created in a standard structure. These templates contain basic message formats that can be used in bulk message sending.
1.e - Parameter
The Parameter filter is used to display whether there are variable fields within the template. Thanks to this field, templates with or without parameters can be listed separately.
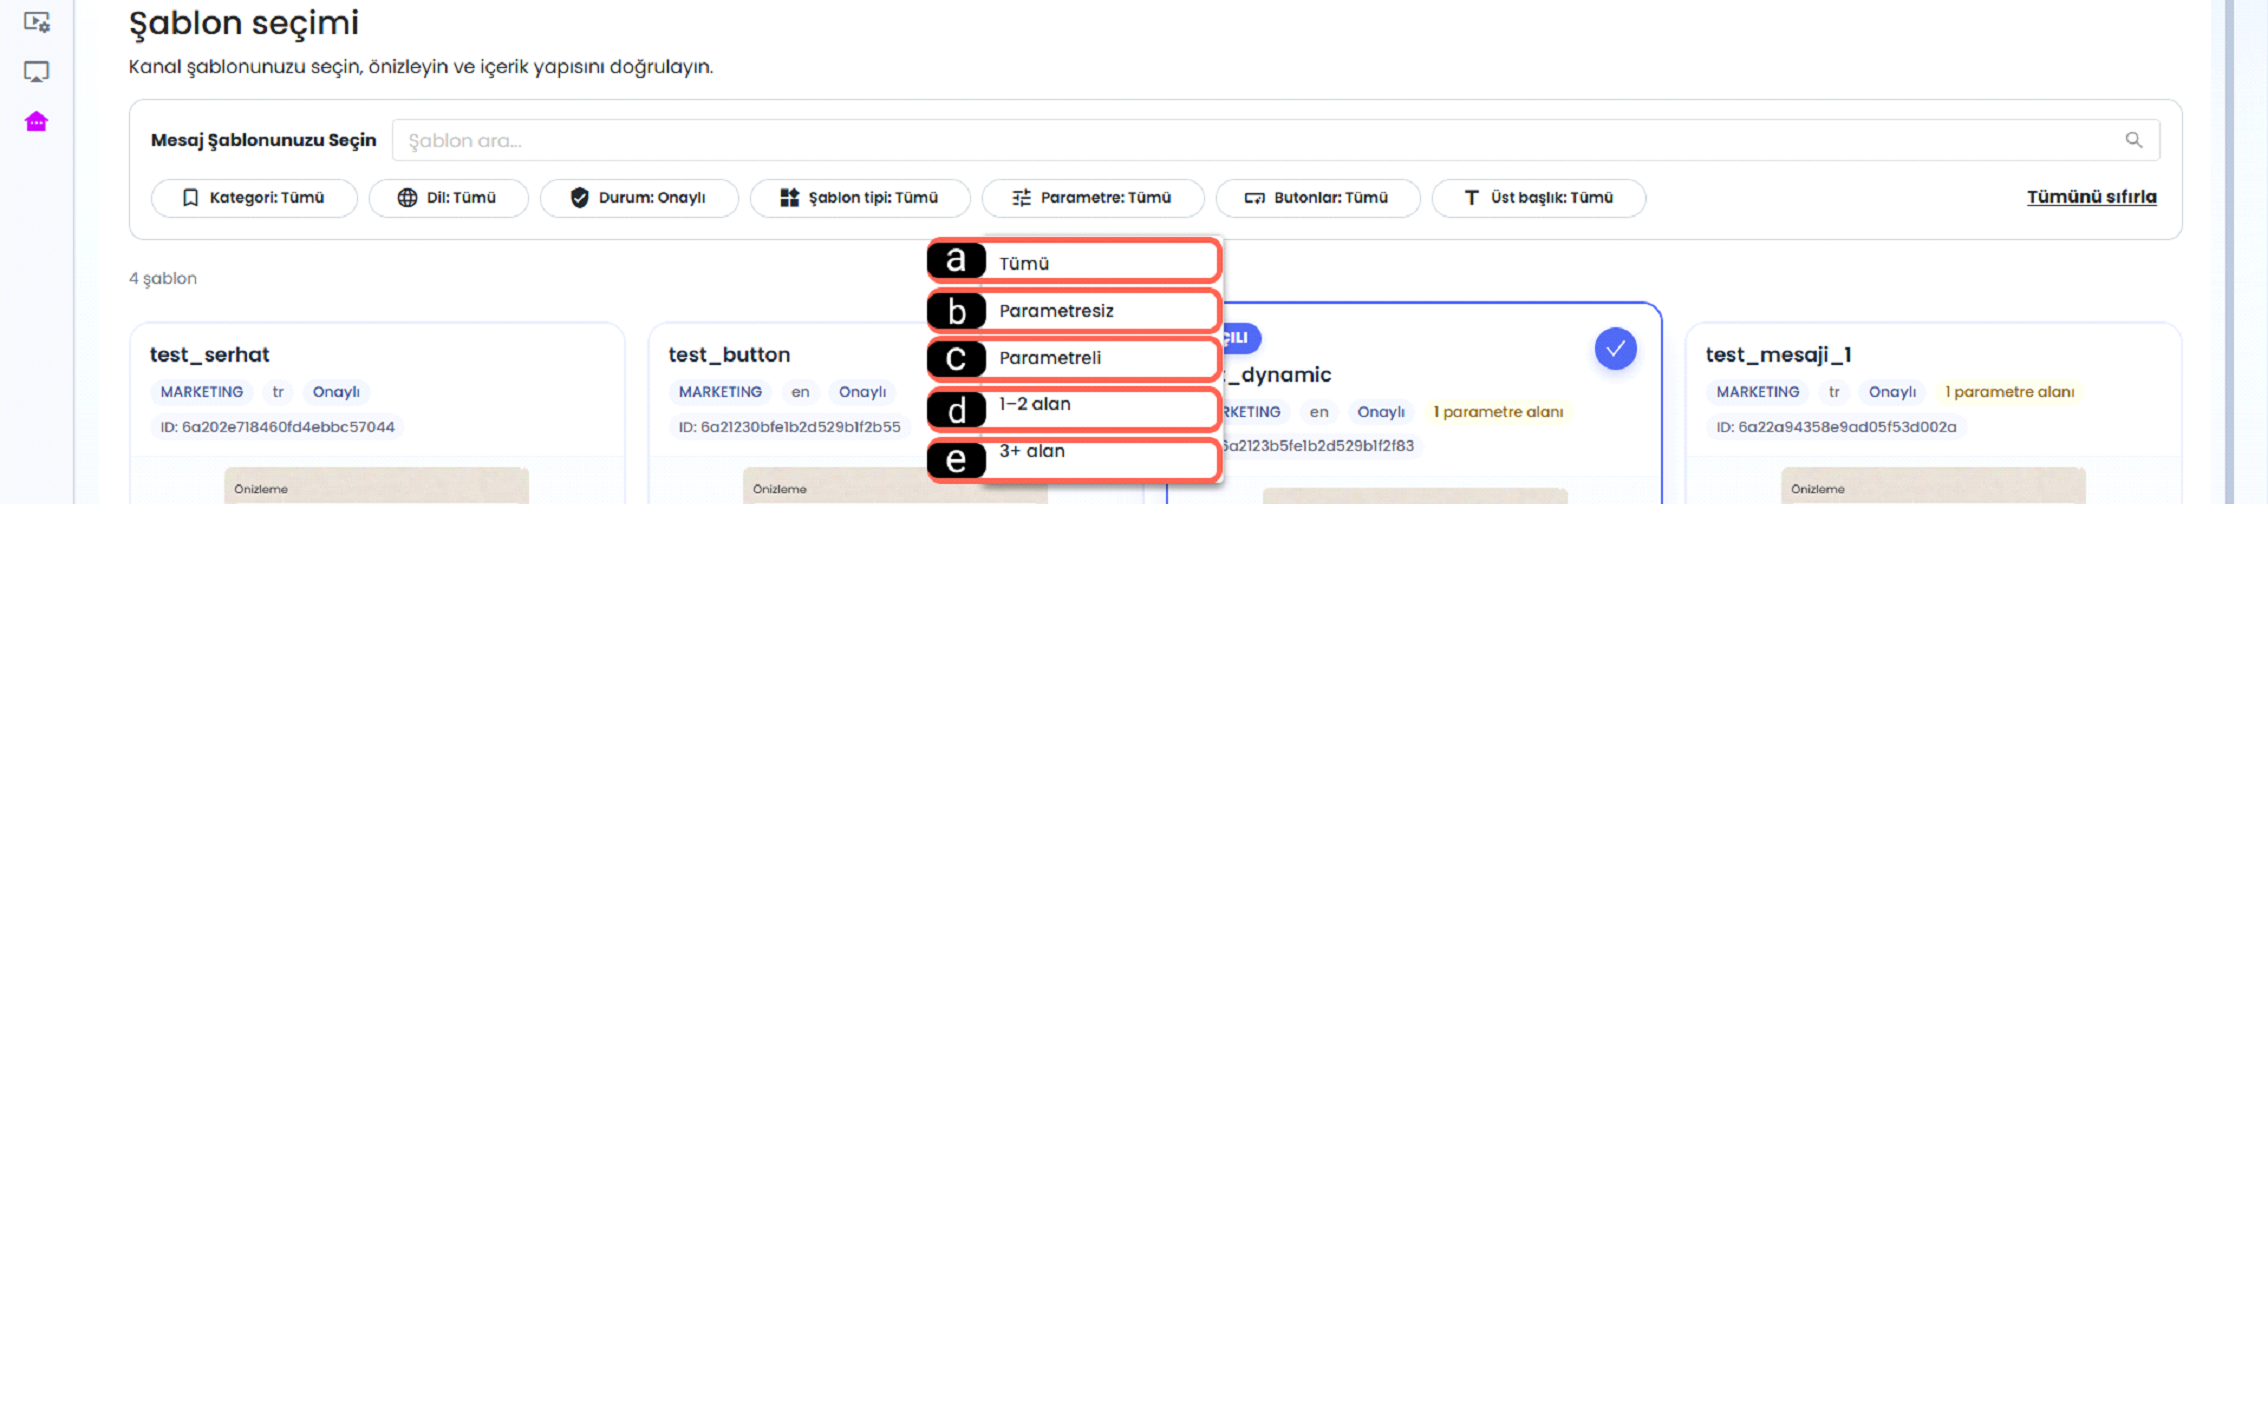
-
a - All
The All option allows all message templates to be listed regardless of parameter status. When this option is selected, all templates with or without parameters are displayed together.
-
b - Without Parameter
The Without Parameter option is used to list message templates that do not contain variable fields. In these templates, the message content is sent exactly the same for all recipients.
-
c - With Parameter
The With Parameter option is used to display templates that contain variable fields within the message. Thanks to these fields, recipient name, specific information, or different content can be changed per person.
-
d - 1-2 Fields
The 1-2 Fields option filters message templates that contain a small number of variable fields. This option is used to find templates that involve simpler and limited personalization.
-
e - 3+ Fields
The 3+ Fields option lists message templates that contain three or more variable fields. Templates containing more detailed and personalized information can be viewed with this filter.
1.f - Buttons
The Buttons filter is used to filter whether a button is used in message templates. With this option, the user can easily separate templates with or without buttons.
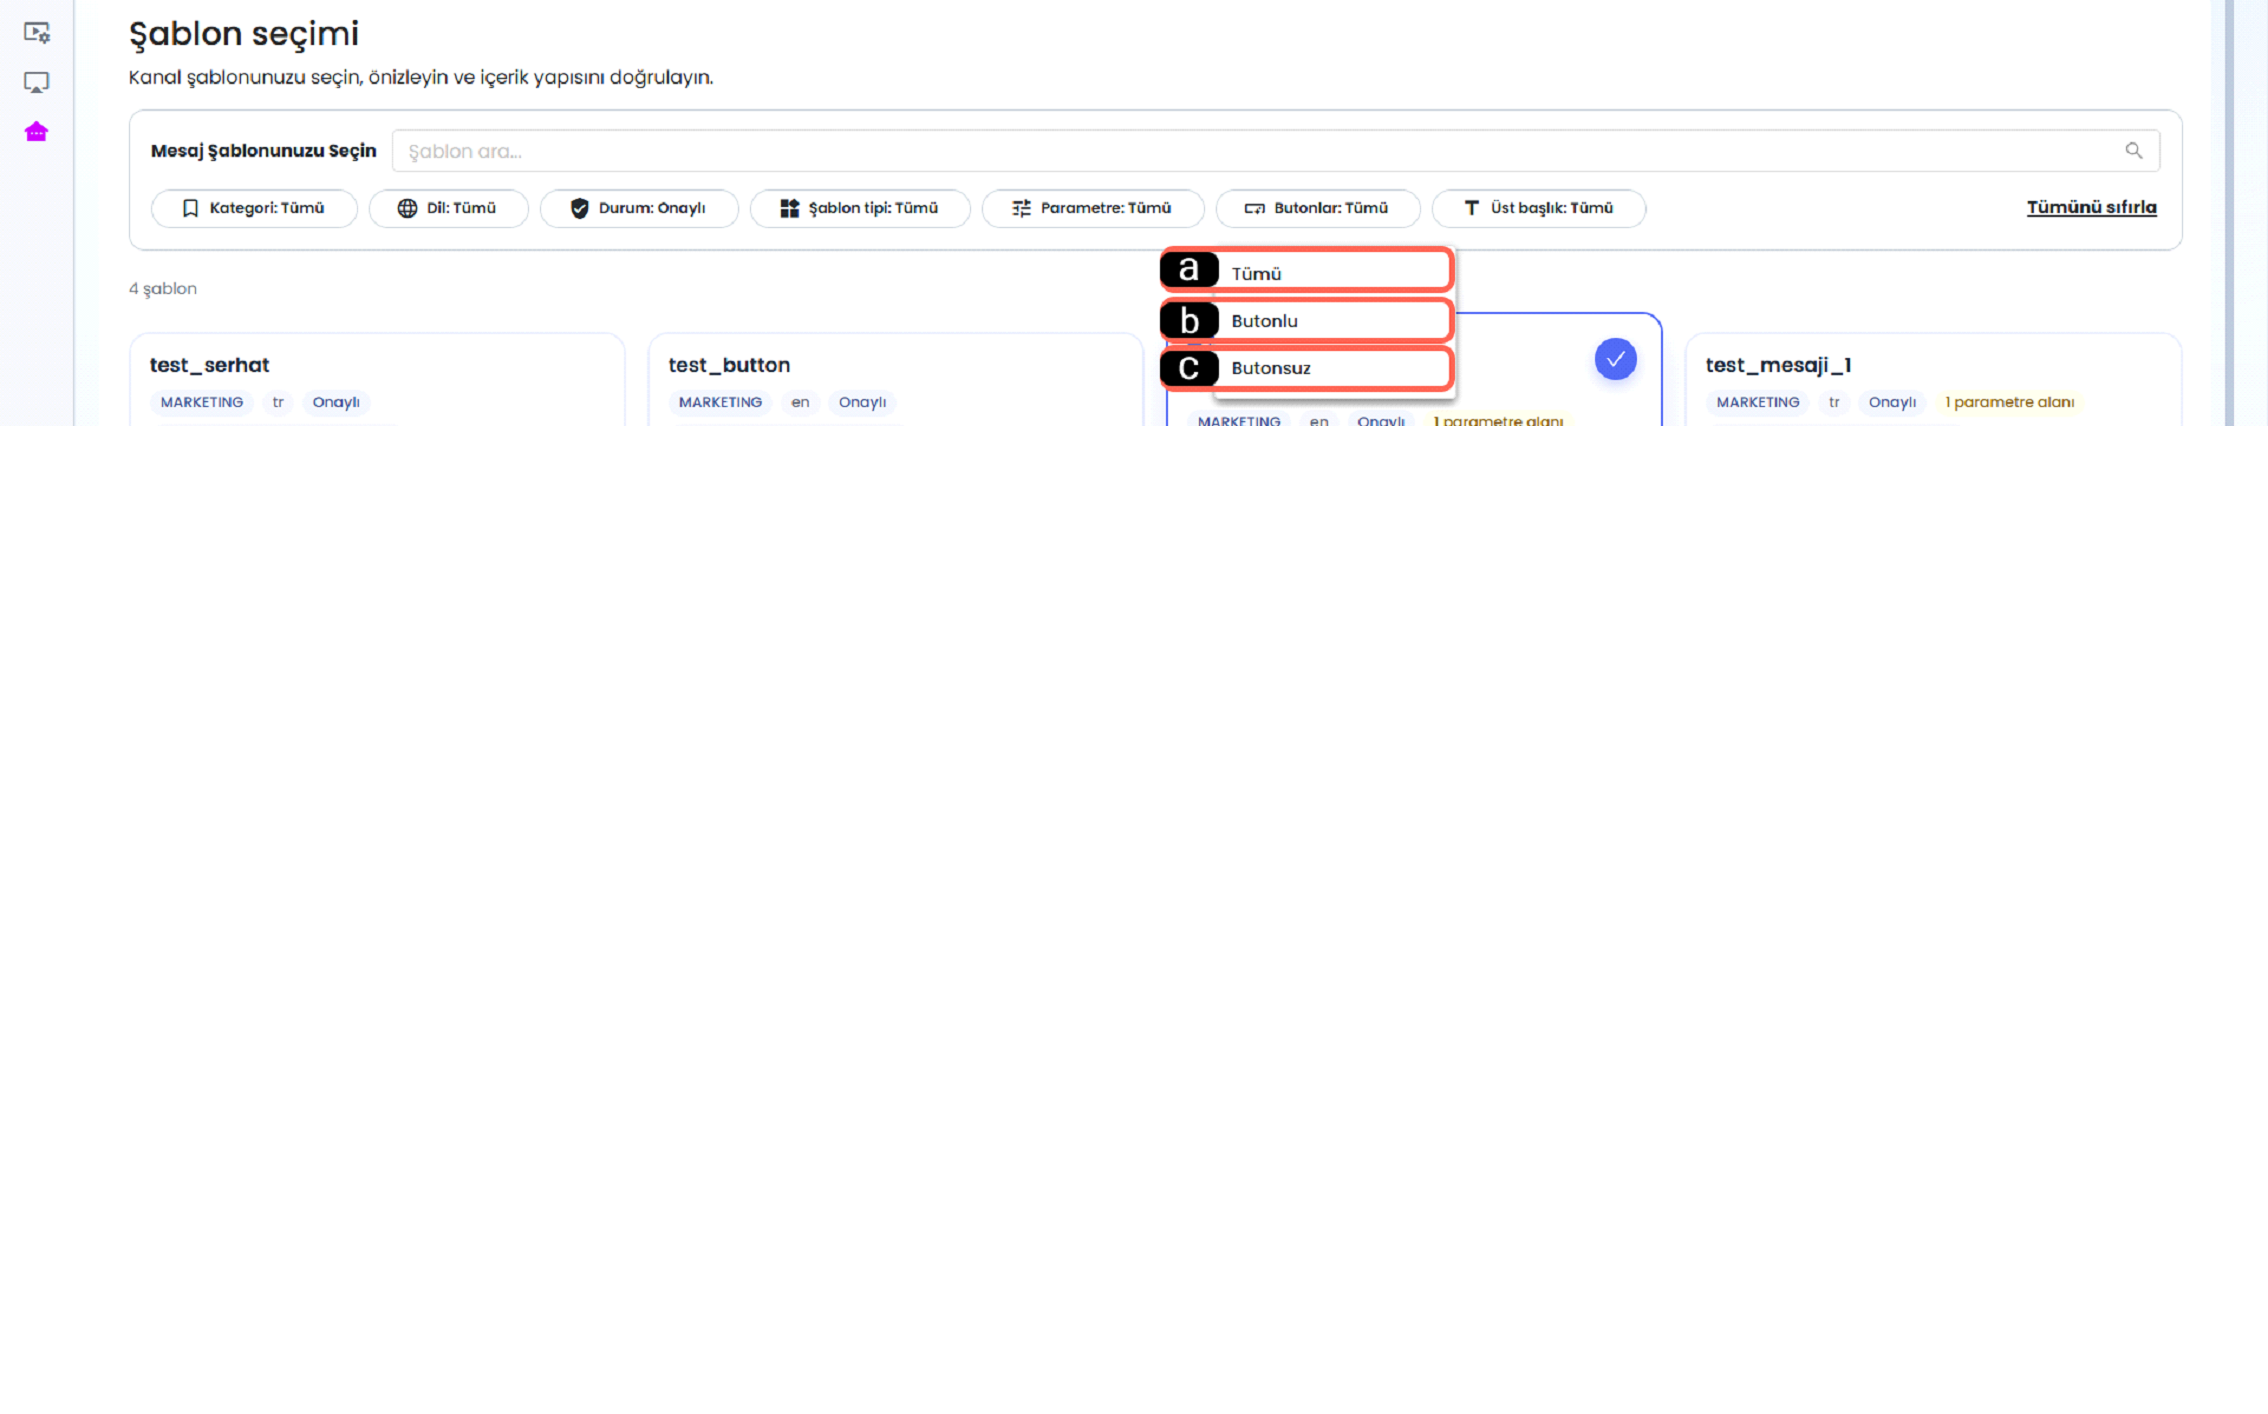
-
a - All
The All option allows listing of all message templates in the system regardless of button status. When this option is selected, all templates with or without buttons are displayed together.
-
b - With Button
Used to filter templates that contain buttons in the message content. Thanks to this filter, only message templates containing buttons are listed.
-
c - Without Button
The Without Button option displays message templates that do not contain any buttons. These templates can only be used to send out text, images, or informational content.
1.g - Header
The Header filter allows filtering based on whether there is a header or media area at the top of the template. This makes it easier to select templates suitable for the message structure.
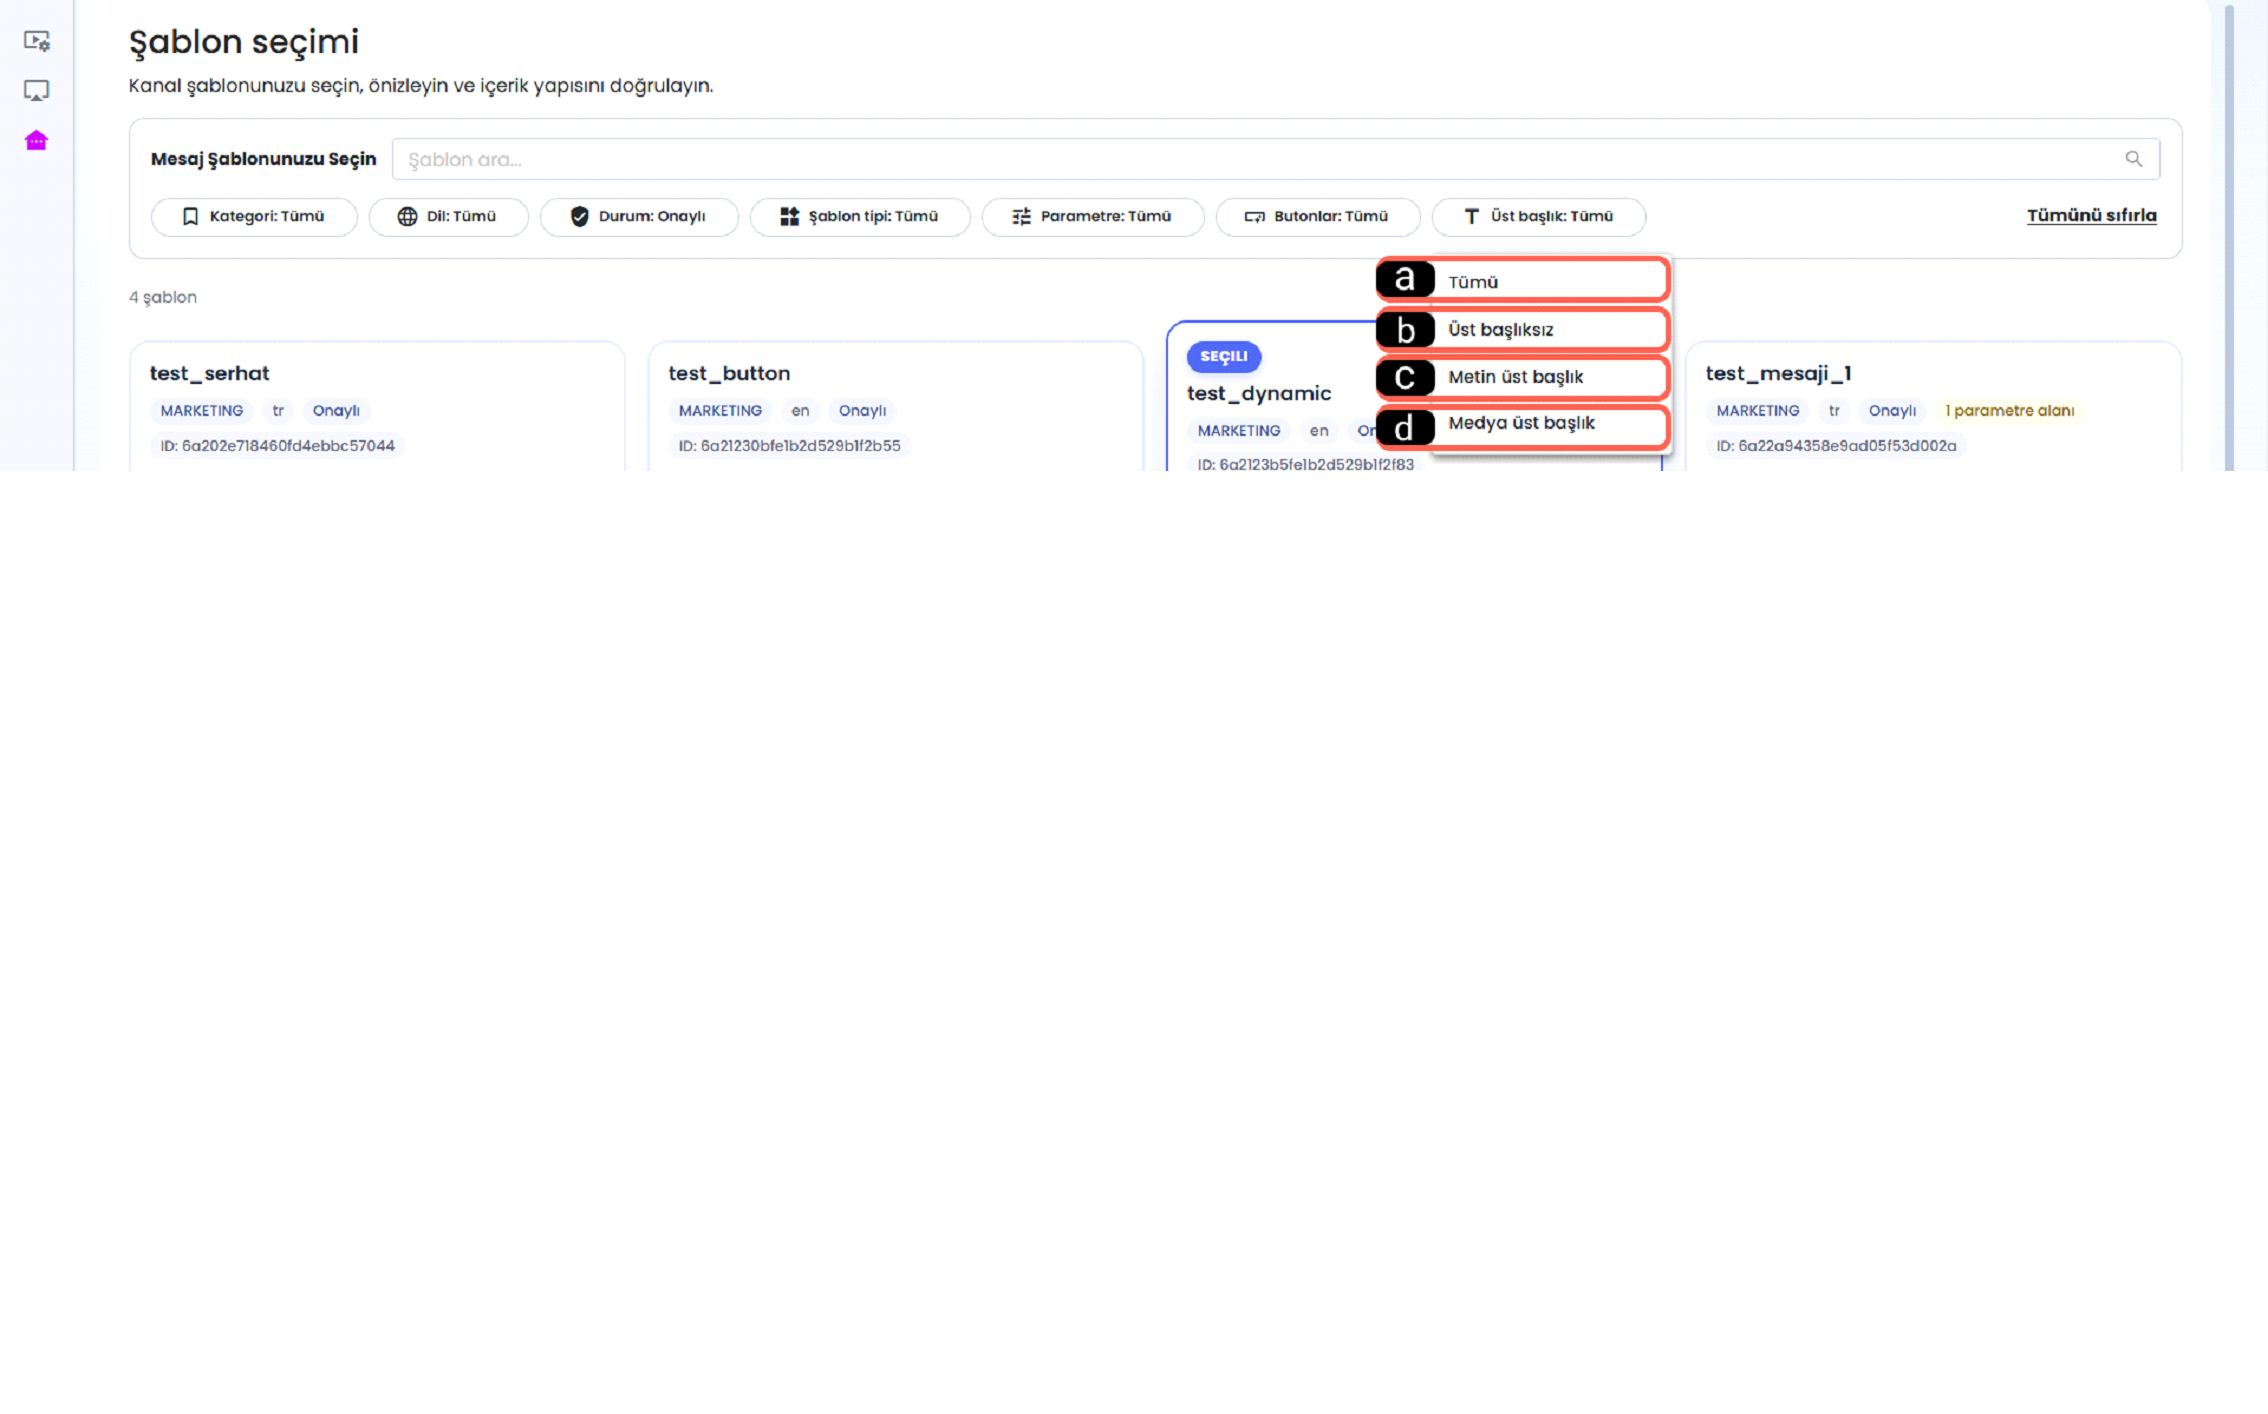
-
a- All
The All option allows all message templates in the system to be listed regardless of header status. When this option is selected, all templates with or without headers are displayed together.
-
b - Without Header
The Without Header option is used to list templates that do not have any header area at the top of the message. These templates typically start directly with the message content.
-
c - Text Header
The Text Header option displays templates that have a text format header at the top of the message. This header is used to show the user the subject or purpose of the message more clearly.
-
d - Media Header
The Media Header option is used to list message templates that have media content such as images, videos, or files at the top. These templates are preferred to make the message visually more striking.
1.h - Channel
The Channel filter is used to list message templates according to the WhatsApp Business channels they are connected to. Thanks to this area, templates belonging to a specific channel can be viewed.
1.i - Create Template Message
The Create Template Message option is used to create a new WhatsApp message template. The user can prepare new template content via this button and add it to the system to be used in sends.
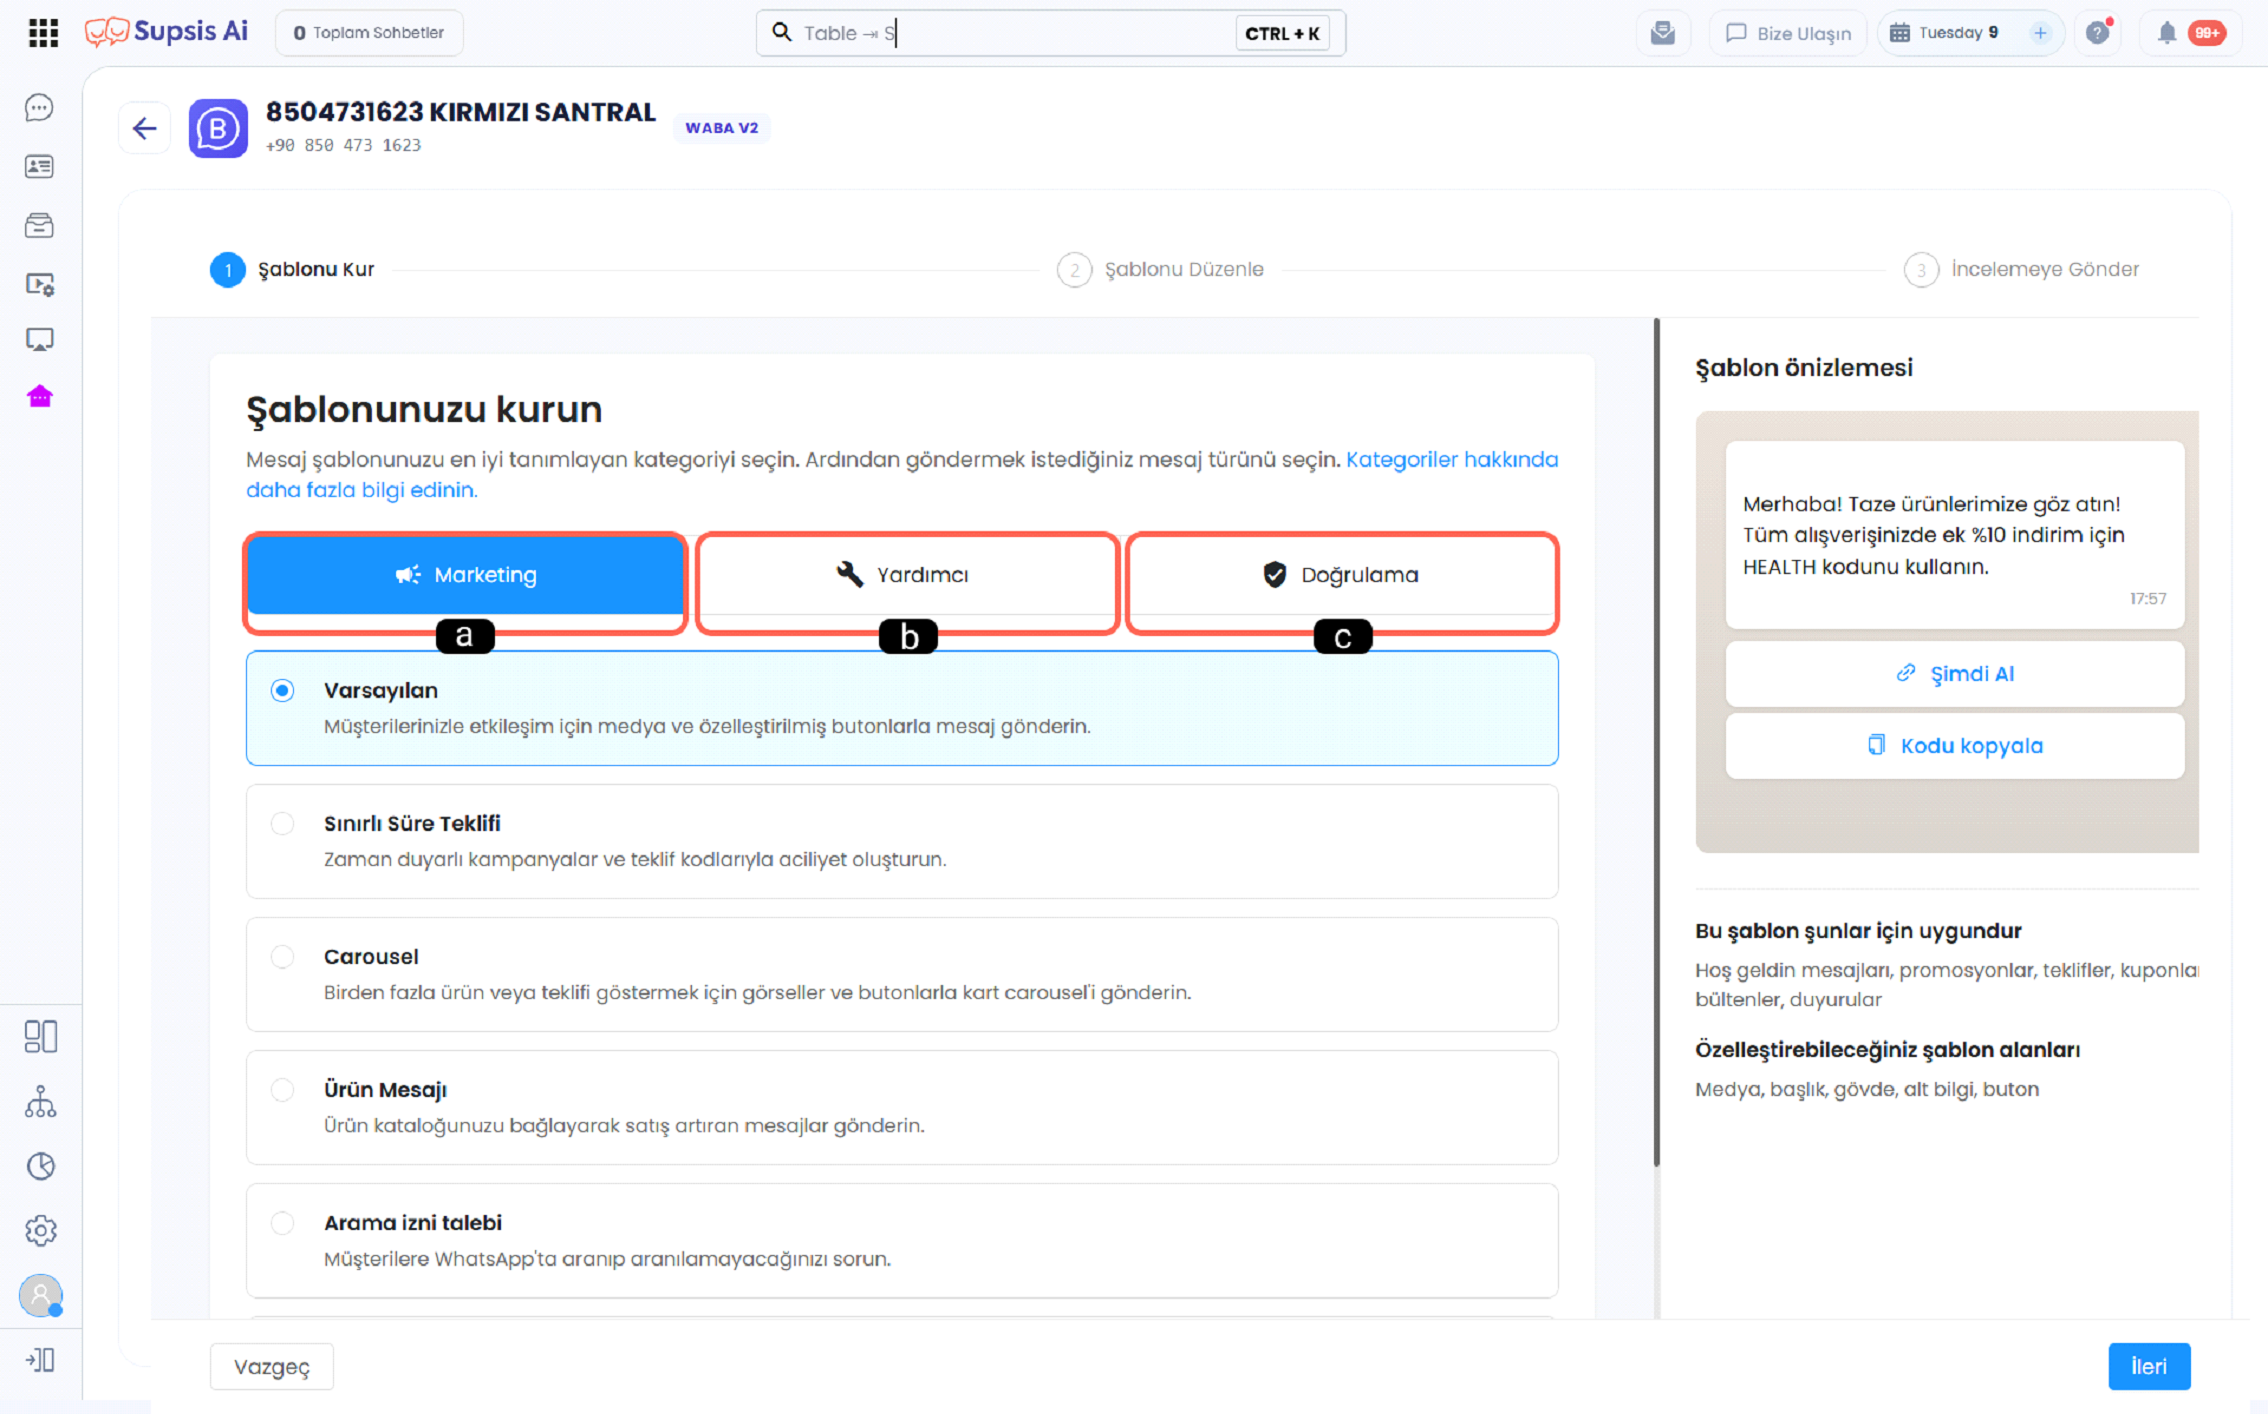
a - Marketing
The Marketing option is used to create message templates for campaign, discount, announcement, and promotional purposes. It is preferred for interacting with customers, promoting products or services, and sending marketing content messages. Broadcasts sent via Marketing templates work in integration with Meta's Marketing Messages API (MM Lite) smart delivery infrastructure to optimize delivery and engagement rates.
b - Utility
The Utility option is used to create message templates supported for information and transactions. Order status, appointment reminders, account notifications, or operational messages that benefit the user can be prepared under this category.
c - Authentication
The Authentication option is used to create message templates for verification purposes for user identity or transaction security. Messages such as one-time passwords (OTP), login approvals, or security verifications are included in this category.
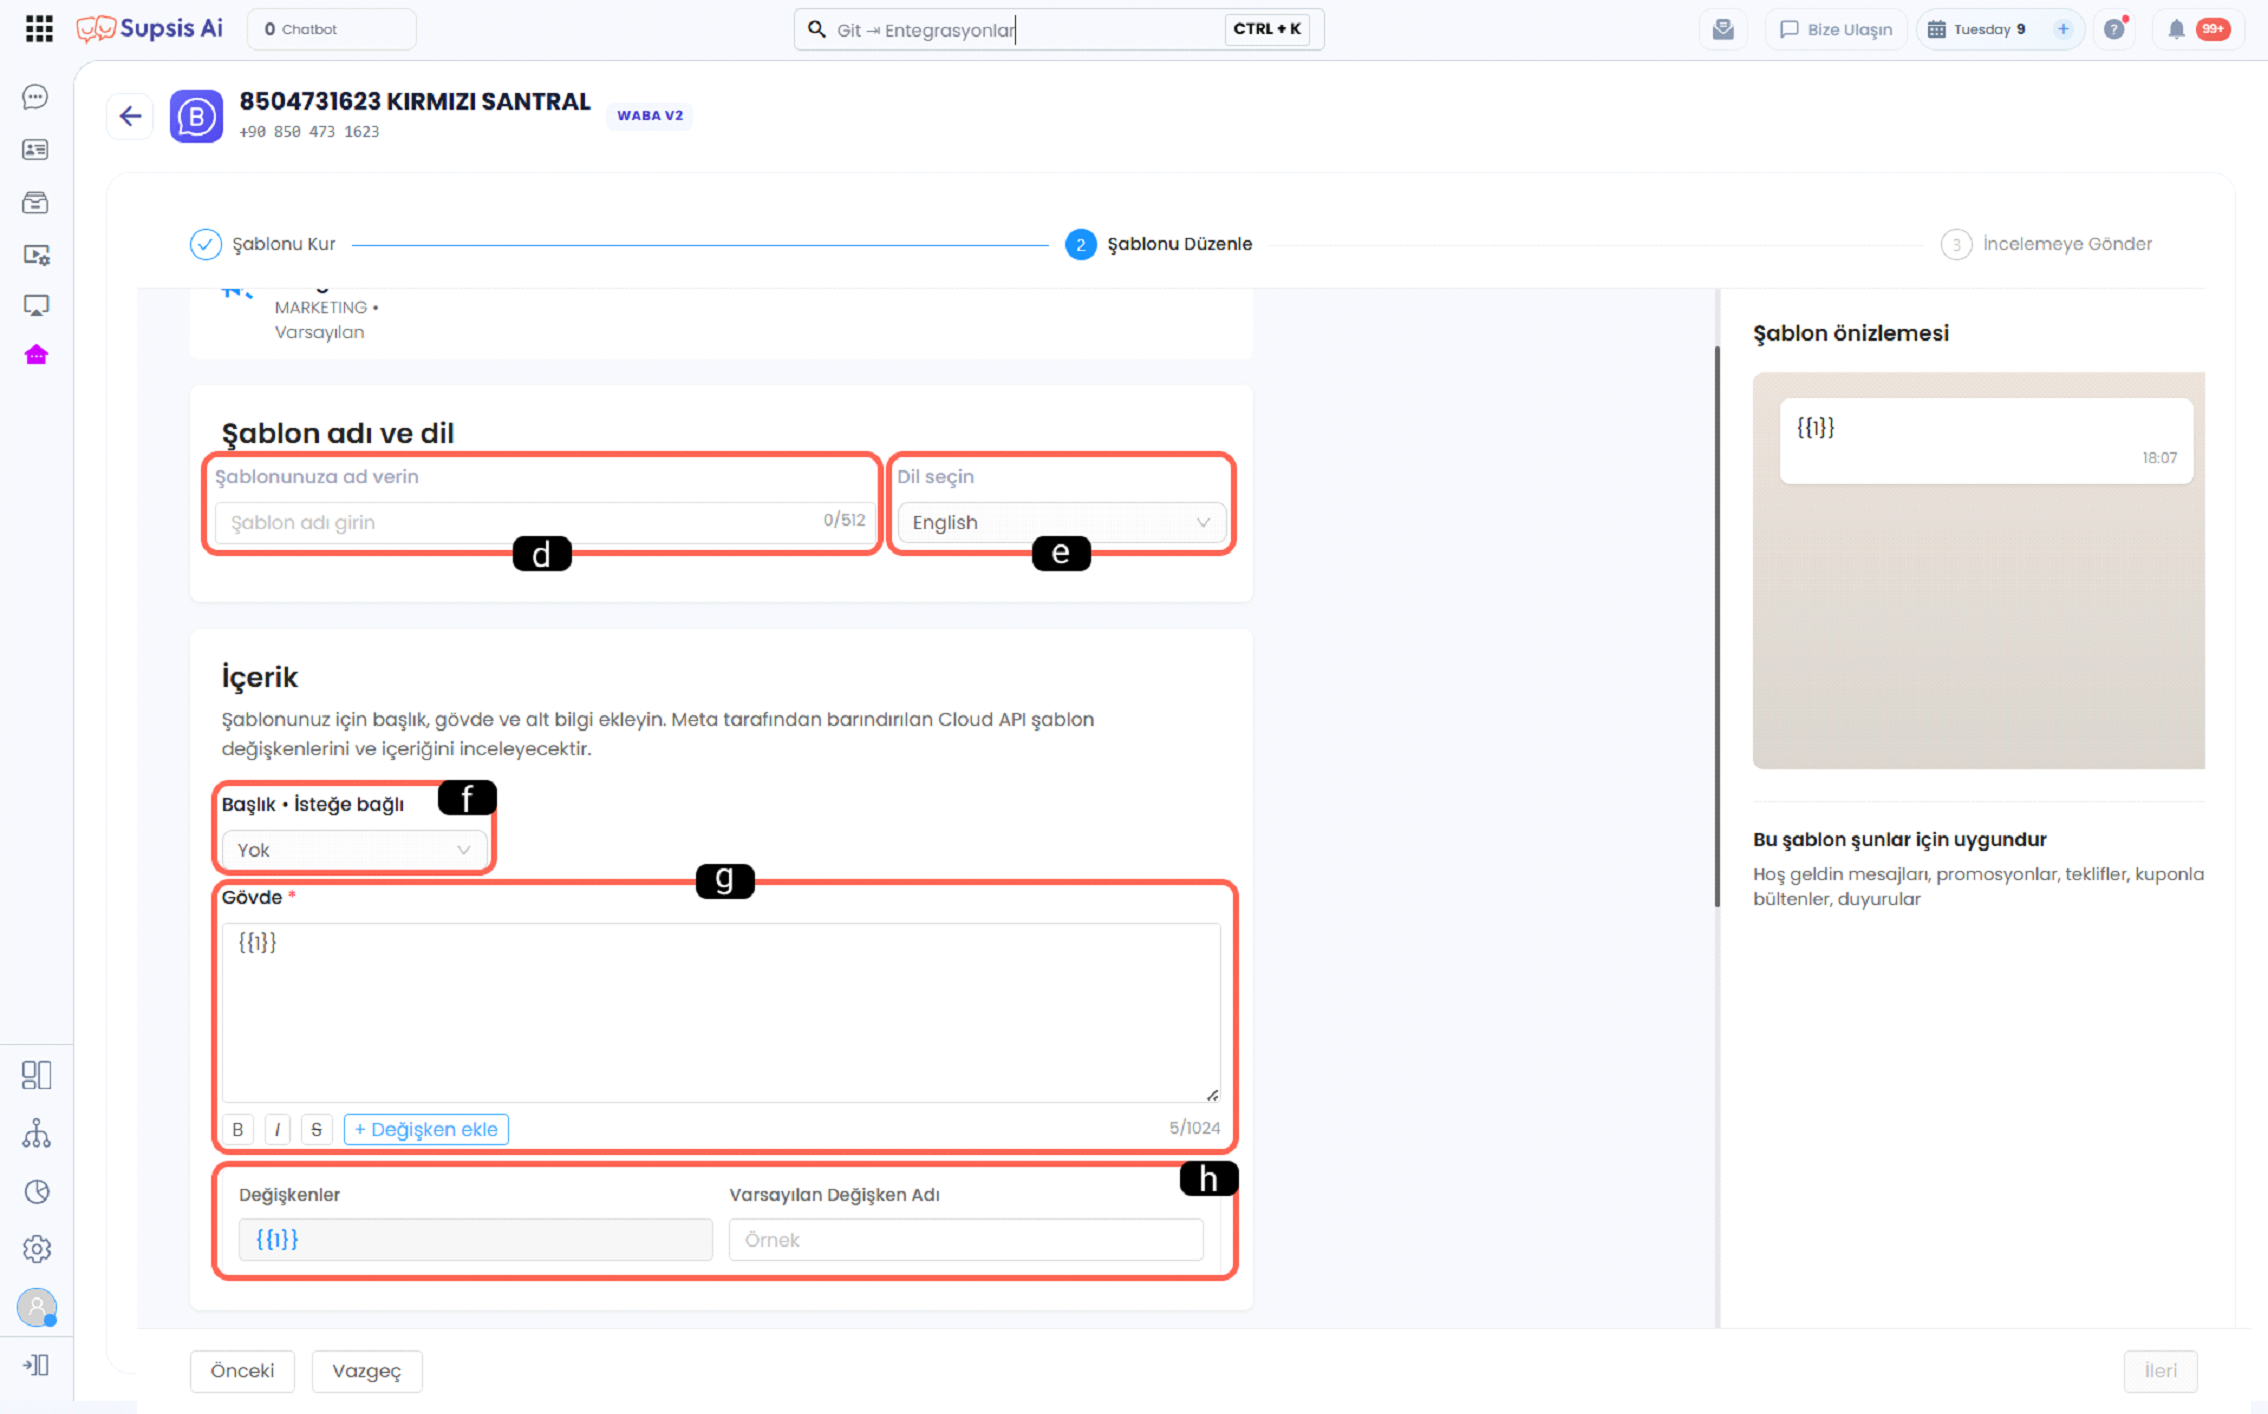
d - Template Name
The Template Name field is used to name the created message template. This name allows the template to be easily found in the system and distinguished from other templates.
e - Language Selection
The Language Selection field is used to determine which language the message template will be prepared in. The selected language ensures that the template content is created in the appropriate language for the target user.
f - Header
The Header field is used to specify the optional header information that will appear at the top of the message. The user can add a header from this field or continue without using a header.
g - Body
The Body field is the section where the main content of the message template is written. The user can add the message text to be sent to this field and personalize the message by using variable fields when necessary.
h - Variables
The Variables field is the section where variable expressions used in the body are defined. Thanks to this field, custom values within the message can be determined and the template can be made more dynamic.
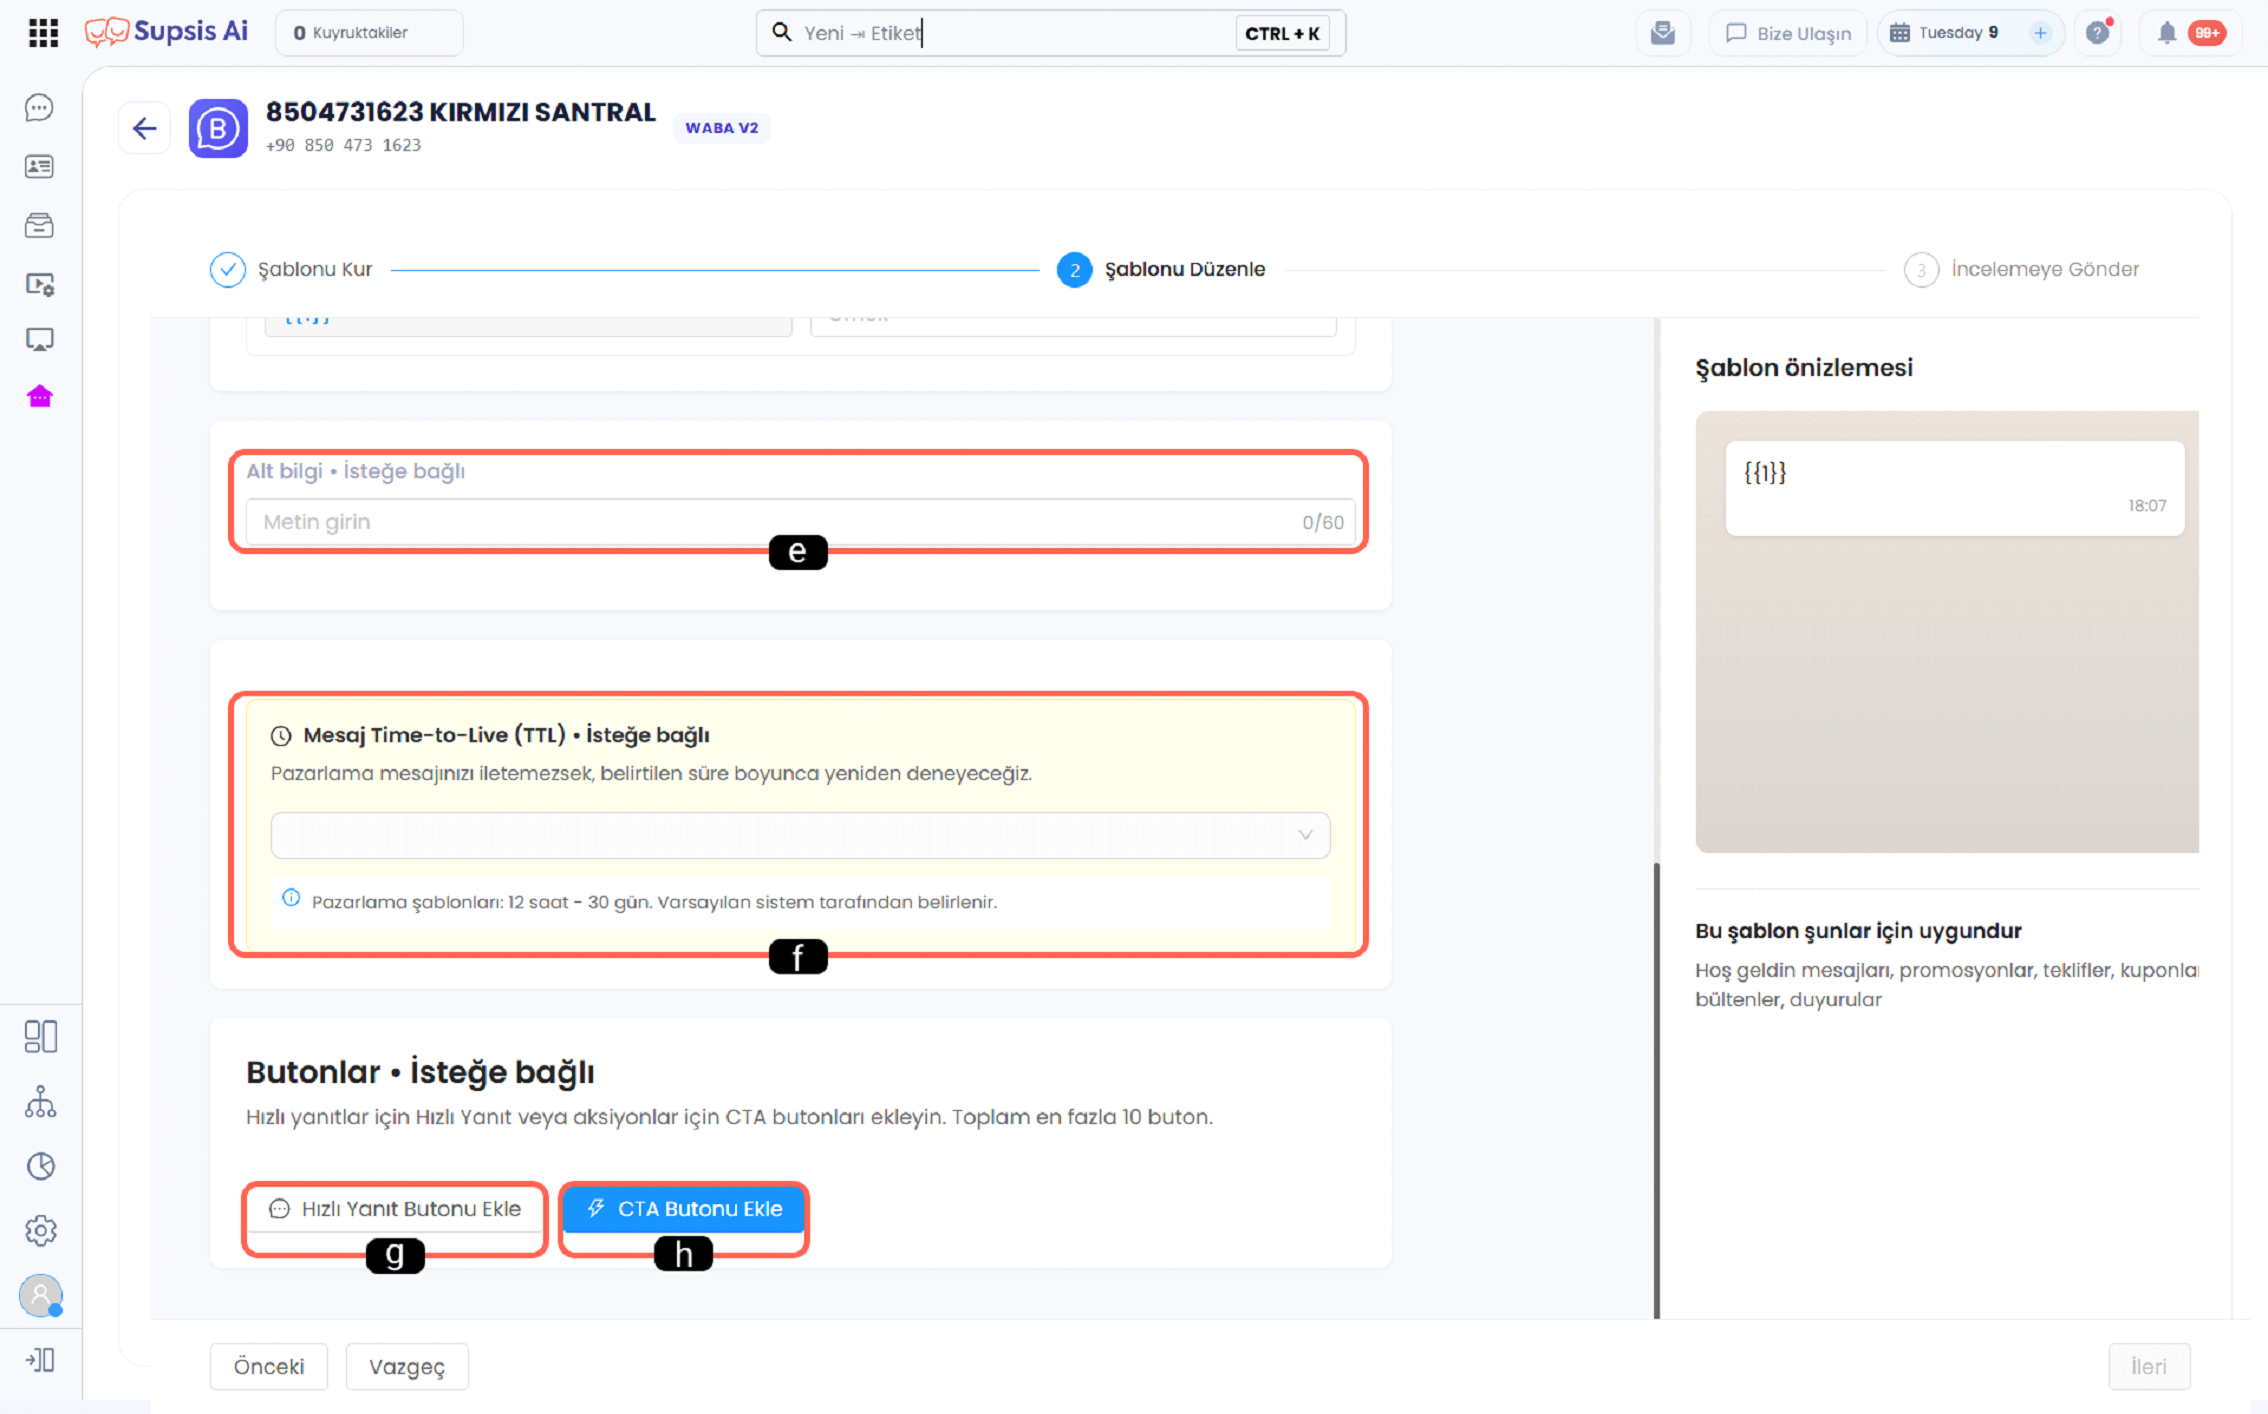
e - Footer
The Footer field is used to add a short explanatory text that will appear at the bottom of the message template. This field is optional and is generally used for informational, note, or additional explanation purposes.
f - Message Time-to-Live (TTL)
The Message Time-to-Live field allows the system to retry for a certain period when the message cannot be delivered to the recipient. Within this period, the message sending can be retried, and when the period expires, the sending process is terminated.
g - Add Quick Reply Button
The Add Quick Reply Button option is used to add ready-made reply buttons into the message that the user can respond to with a single click. These buttons make user interaction easier.
h - Add CTA Button
The Add CTA (Call to Action) Button option is used to add a button into the message that directs the user to a specific action, such as visiting a website or making a phone call.
h.1 - Static & Dynamic URL Configuration in URL Buttons (WABA v1 & v2)
In WhatsApp Utility and Marketing message templates, website redirection buttons are configured according to your channel version (WABA v1 vs v2):
- Classic WhatsApp Business API (v1 Channels):
- Button Type Selection: Select
URLfrom the Button Type dropdown in the Buttons panel, click+ Add Button, and enter the label in Button Text (e.g. Track Order). - Select URL type: Choose
Static(fixed URL) orDynamic(dynamic personalized URL). -
Button Value & Sample URL: Enter the base URL into Button Value (e.g.
https://supsis.com/tracking/). When Dynamic is selected, entering a test sample into Sample dynamic URL with variable ({{1}}) automatically defines the{{1}}variable at the end of the URL path. -
WhatsApp Business API v2 (Meta Cloud WABA Channels):
- CTA & Button Action: Select "Call to Action" as the button category and "Visit Website" as the action type.
-
URL Format: Set URL Type to Dynamic URL and append the
{{1}}parameter to the base root URL (e.g.https://yourdomain.com/tracking/{{1}}). -
Broadcast & Automation Parameter Mapping:
-
Map customer order or tracking attributes (
{Contact_Cargo_Code}) to the{{1}}URL variable during broadcasts or automation flows to redirect recipients directly tohttps://supsis.com/tracking/KR-98765. -
Automation SDK / JS Scripting Usage:
i - Banned (Opt-Out / Blacklist) Button & Custom Button Label
WhatsApp v2 template creation supports the Banned (Yasakla) button feature, allowing recipients to unsubscribe or block communication.
* Rigid text restrictions (#Yasakla#) have been removed; you can type any custom text into the button label input box (e.g. "Unsubscribe", "Stop Messages", "Block").
* When a recipient clicks this button on WhatsApp, their contact profile in Supsis AI is automatically marked as banned/blacklisted, preventing any future bulk message broadcasts from being delivered to them.
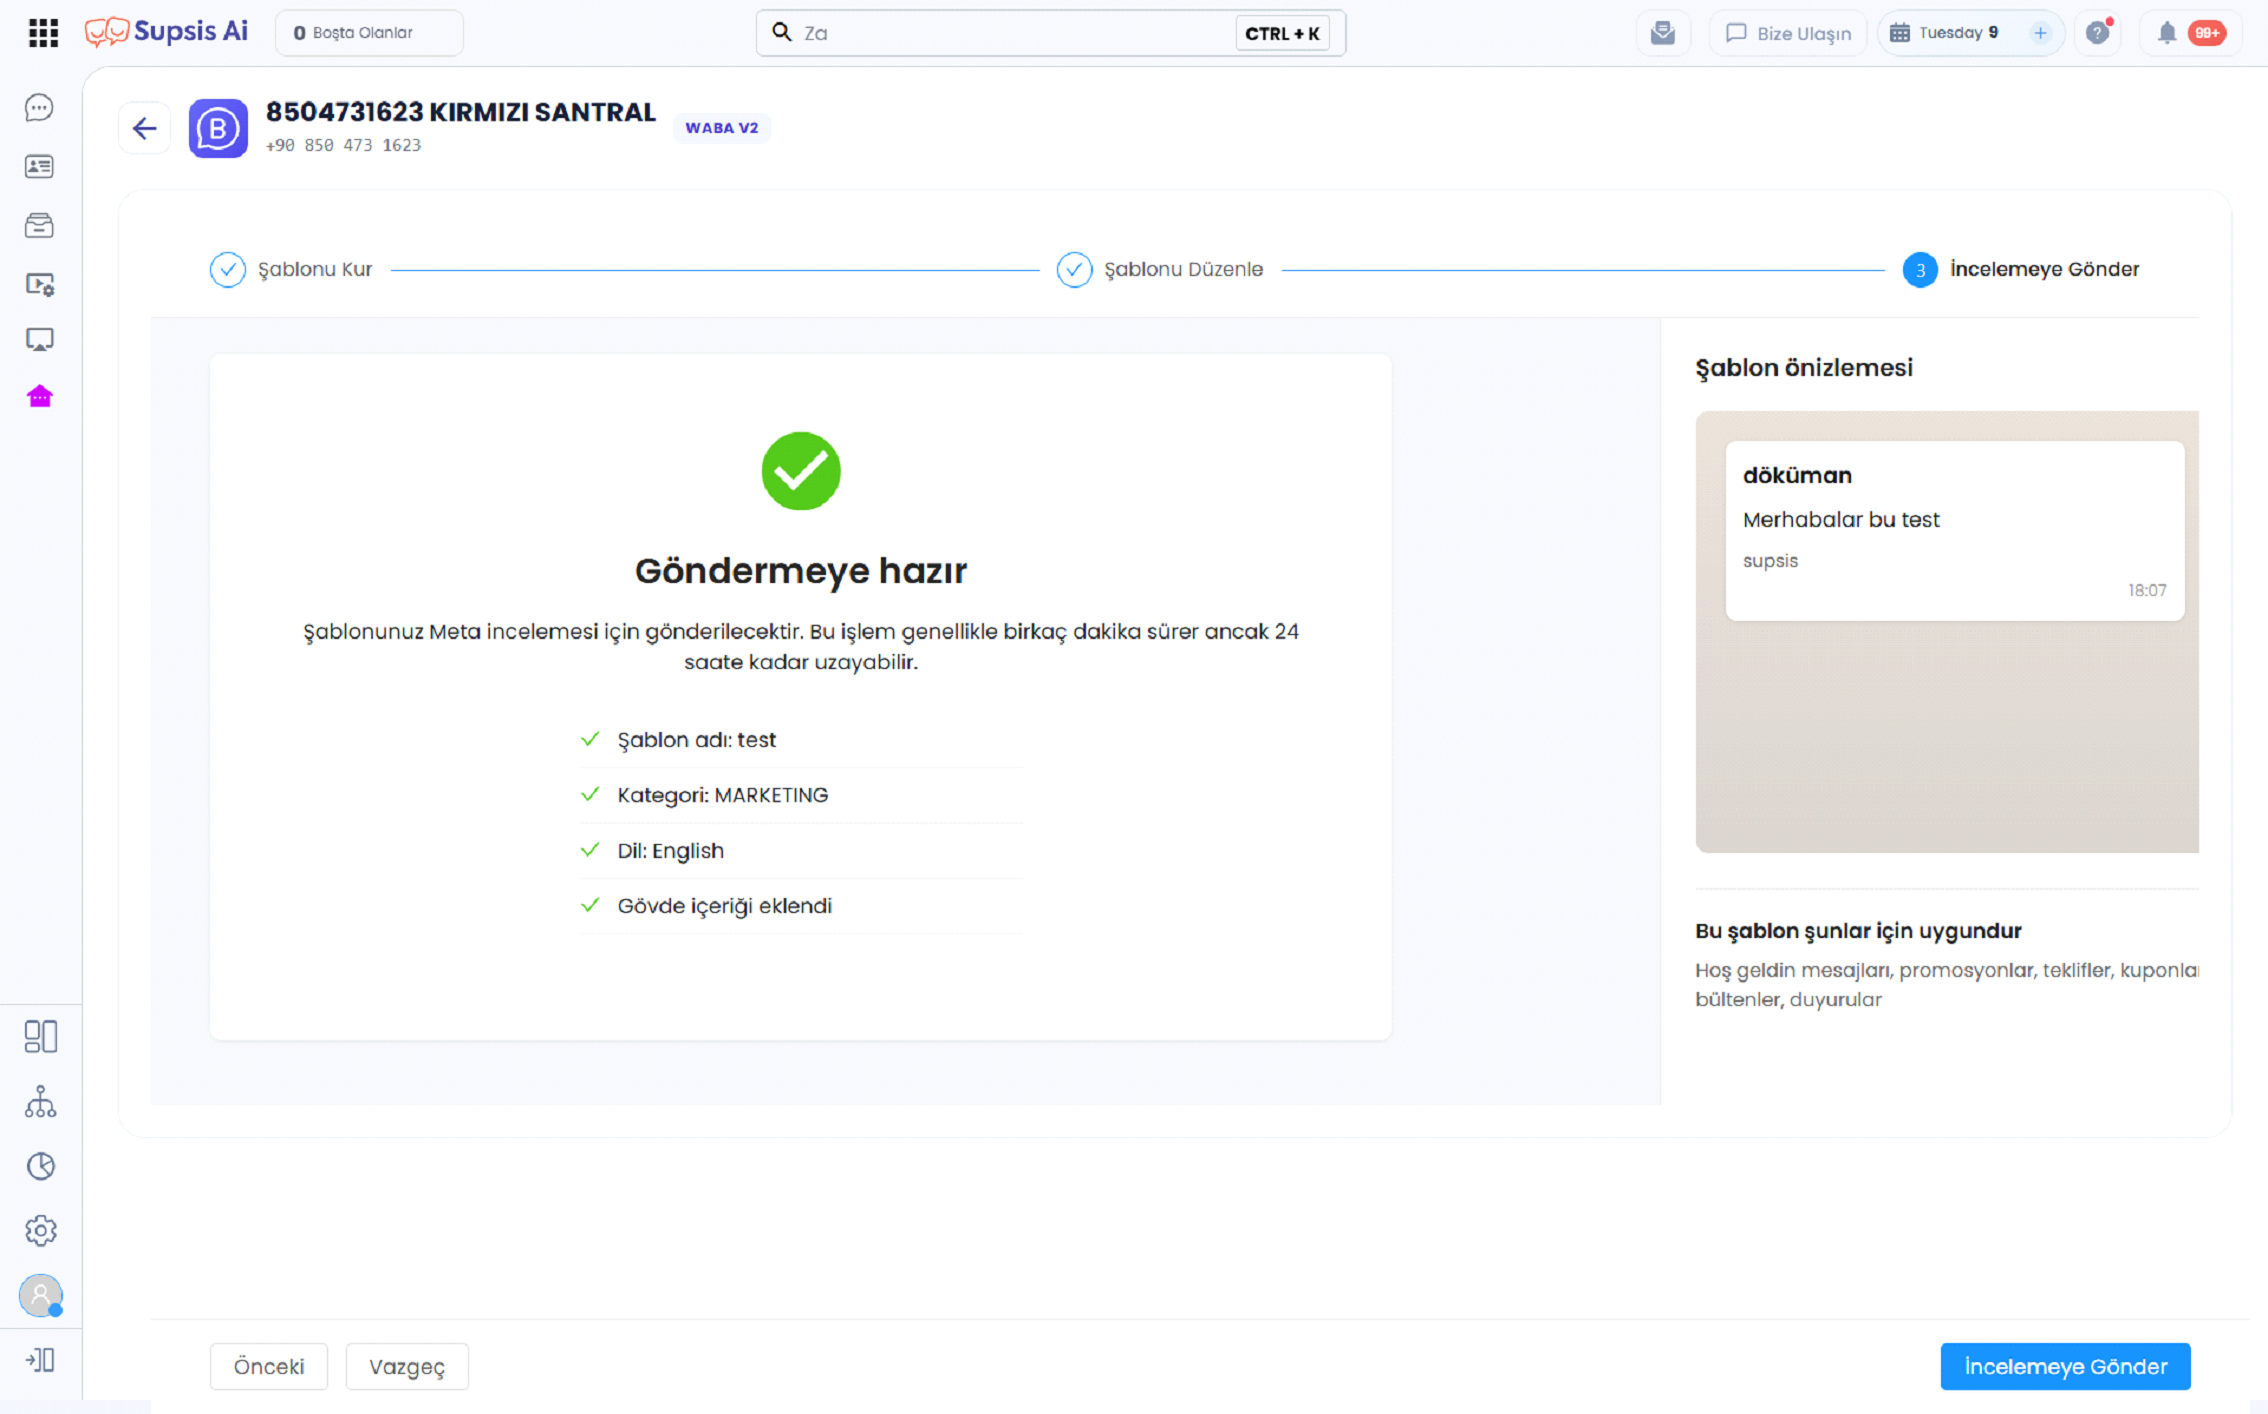
The Send for Review screen is the section where the created message template is checked for the last time before being sent for Meta approval. On this screen, basic information such as template name, category, language, and body content are verified. Thanks to the template preview on the right side, how the message will look on the recipient side can be viewed. If all information is correct, the template is sent to the Meta review process by using the Send for Review button.
2-) Customer Groups
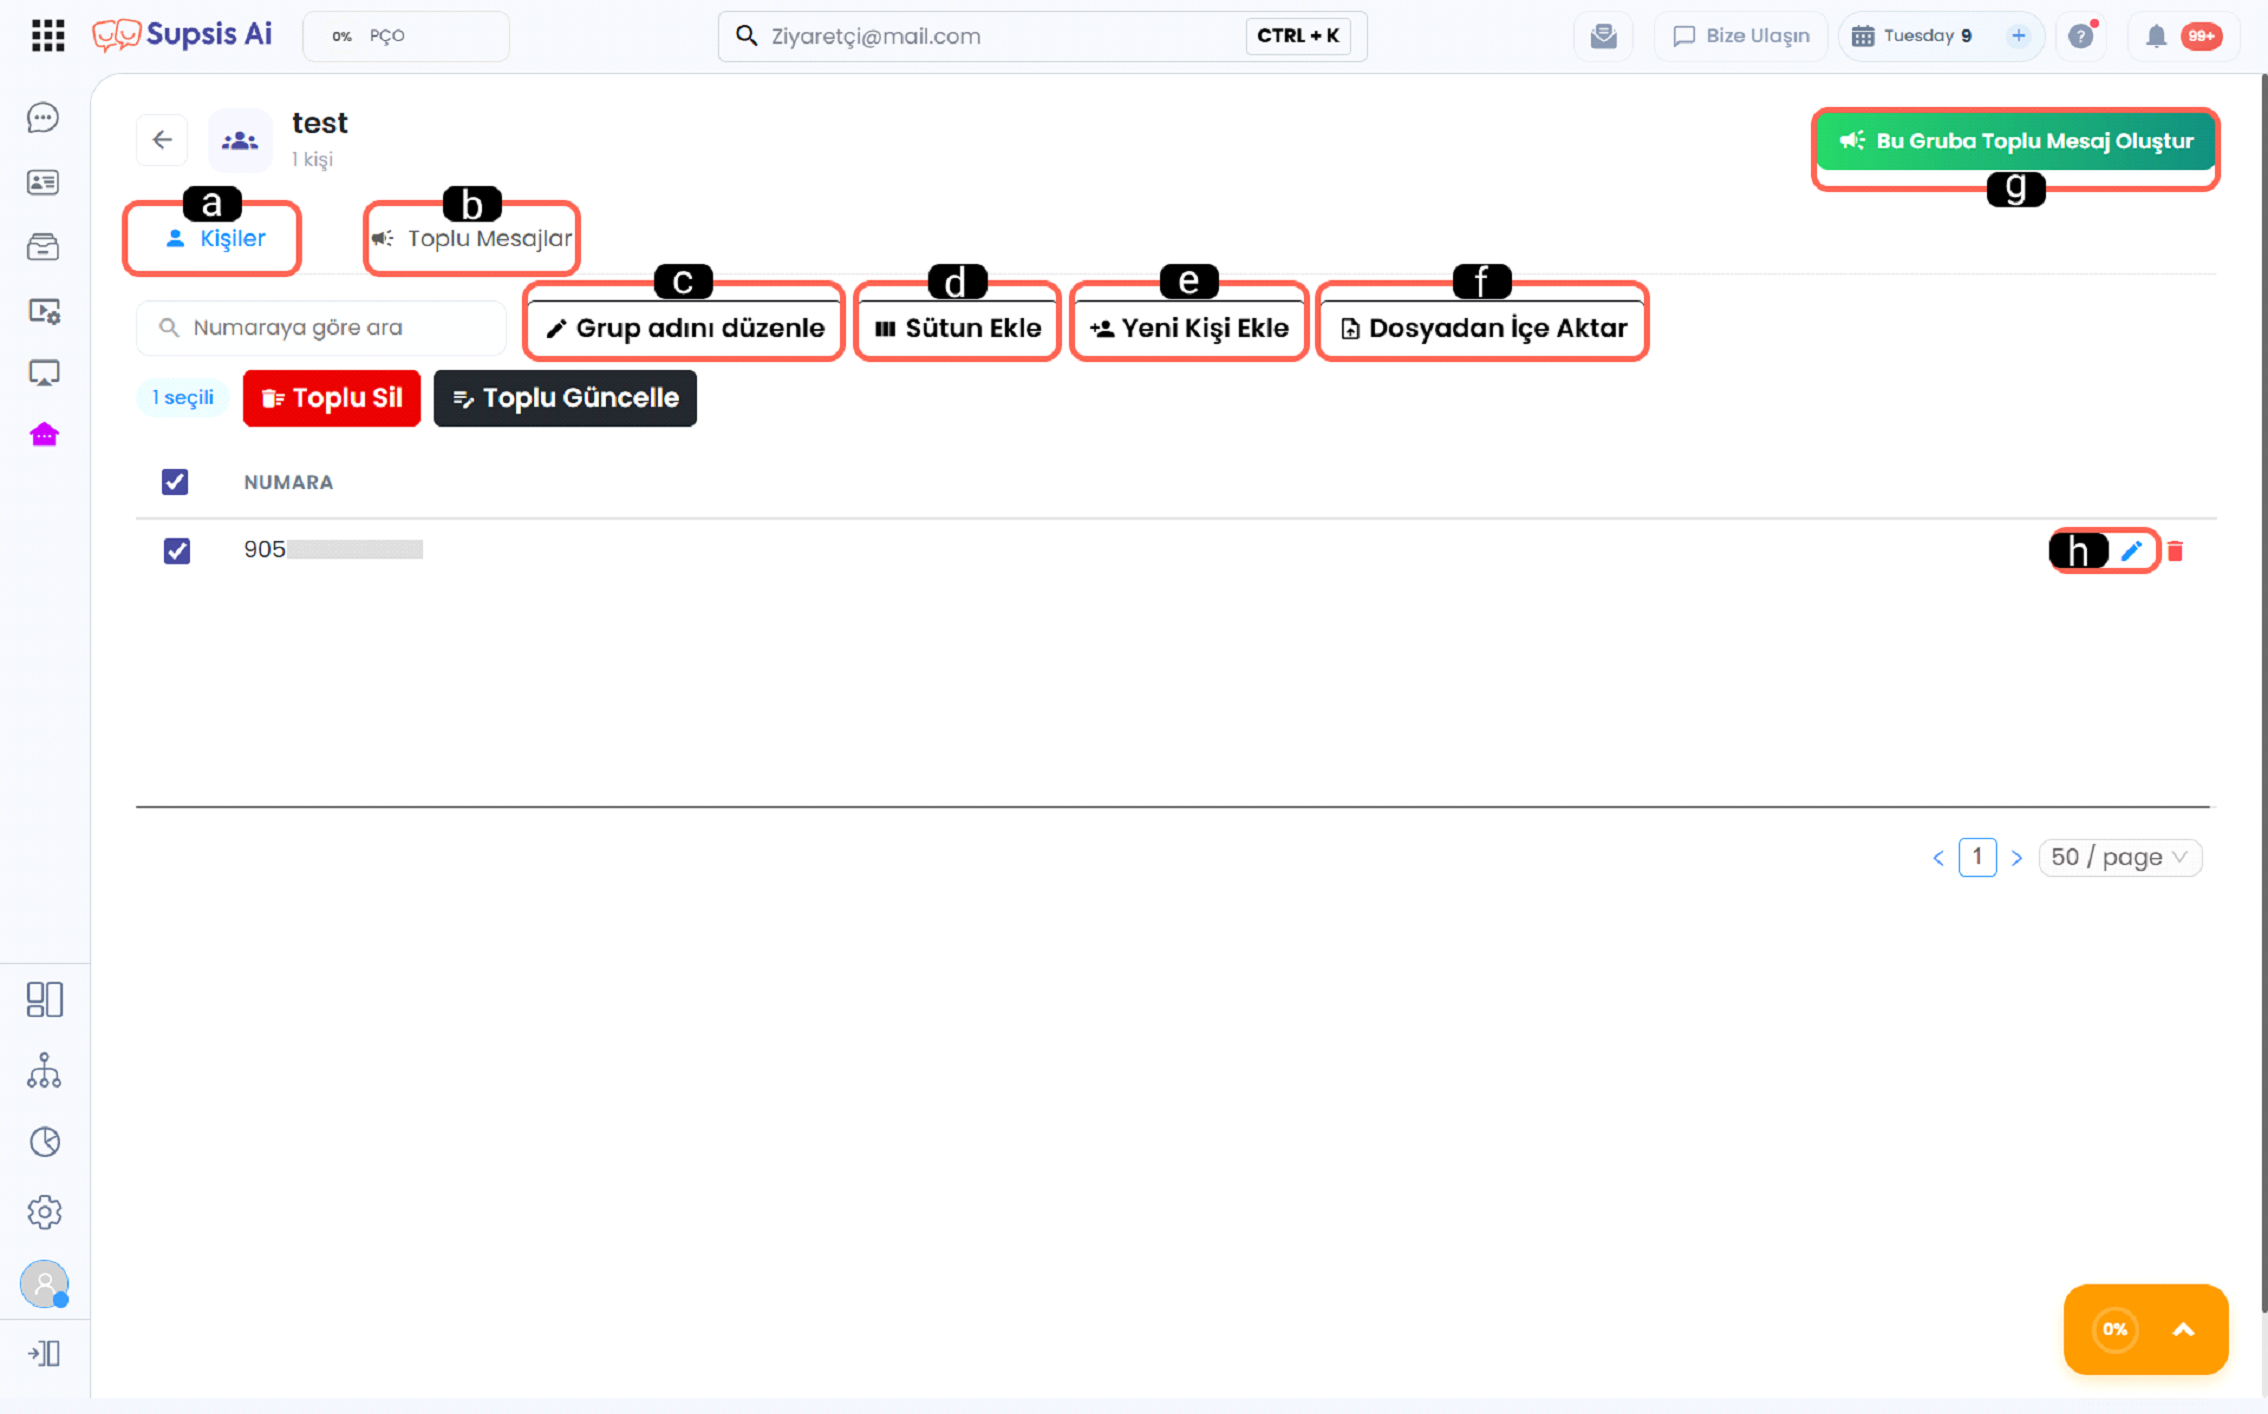
Customer Groups is the area that allows you to gather and manage specific contact or customer lists under a single group. Through this section, you can add new people to the group, import bulk data from a file, create custom columns, and edit existing records. Created customer groups facilitate the selection of target audiences in bulk message sending, helping communication processes to be carried out faster and more organized.
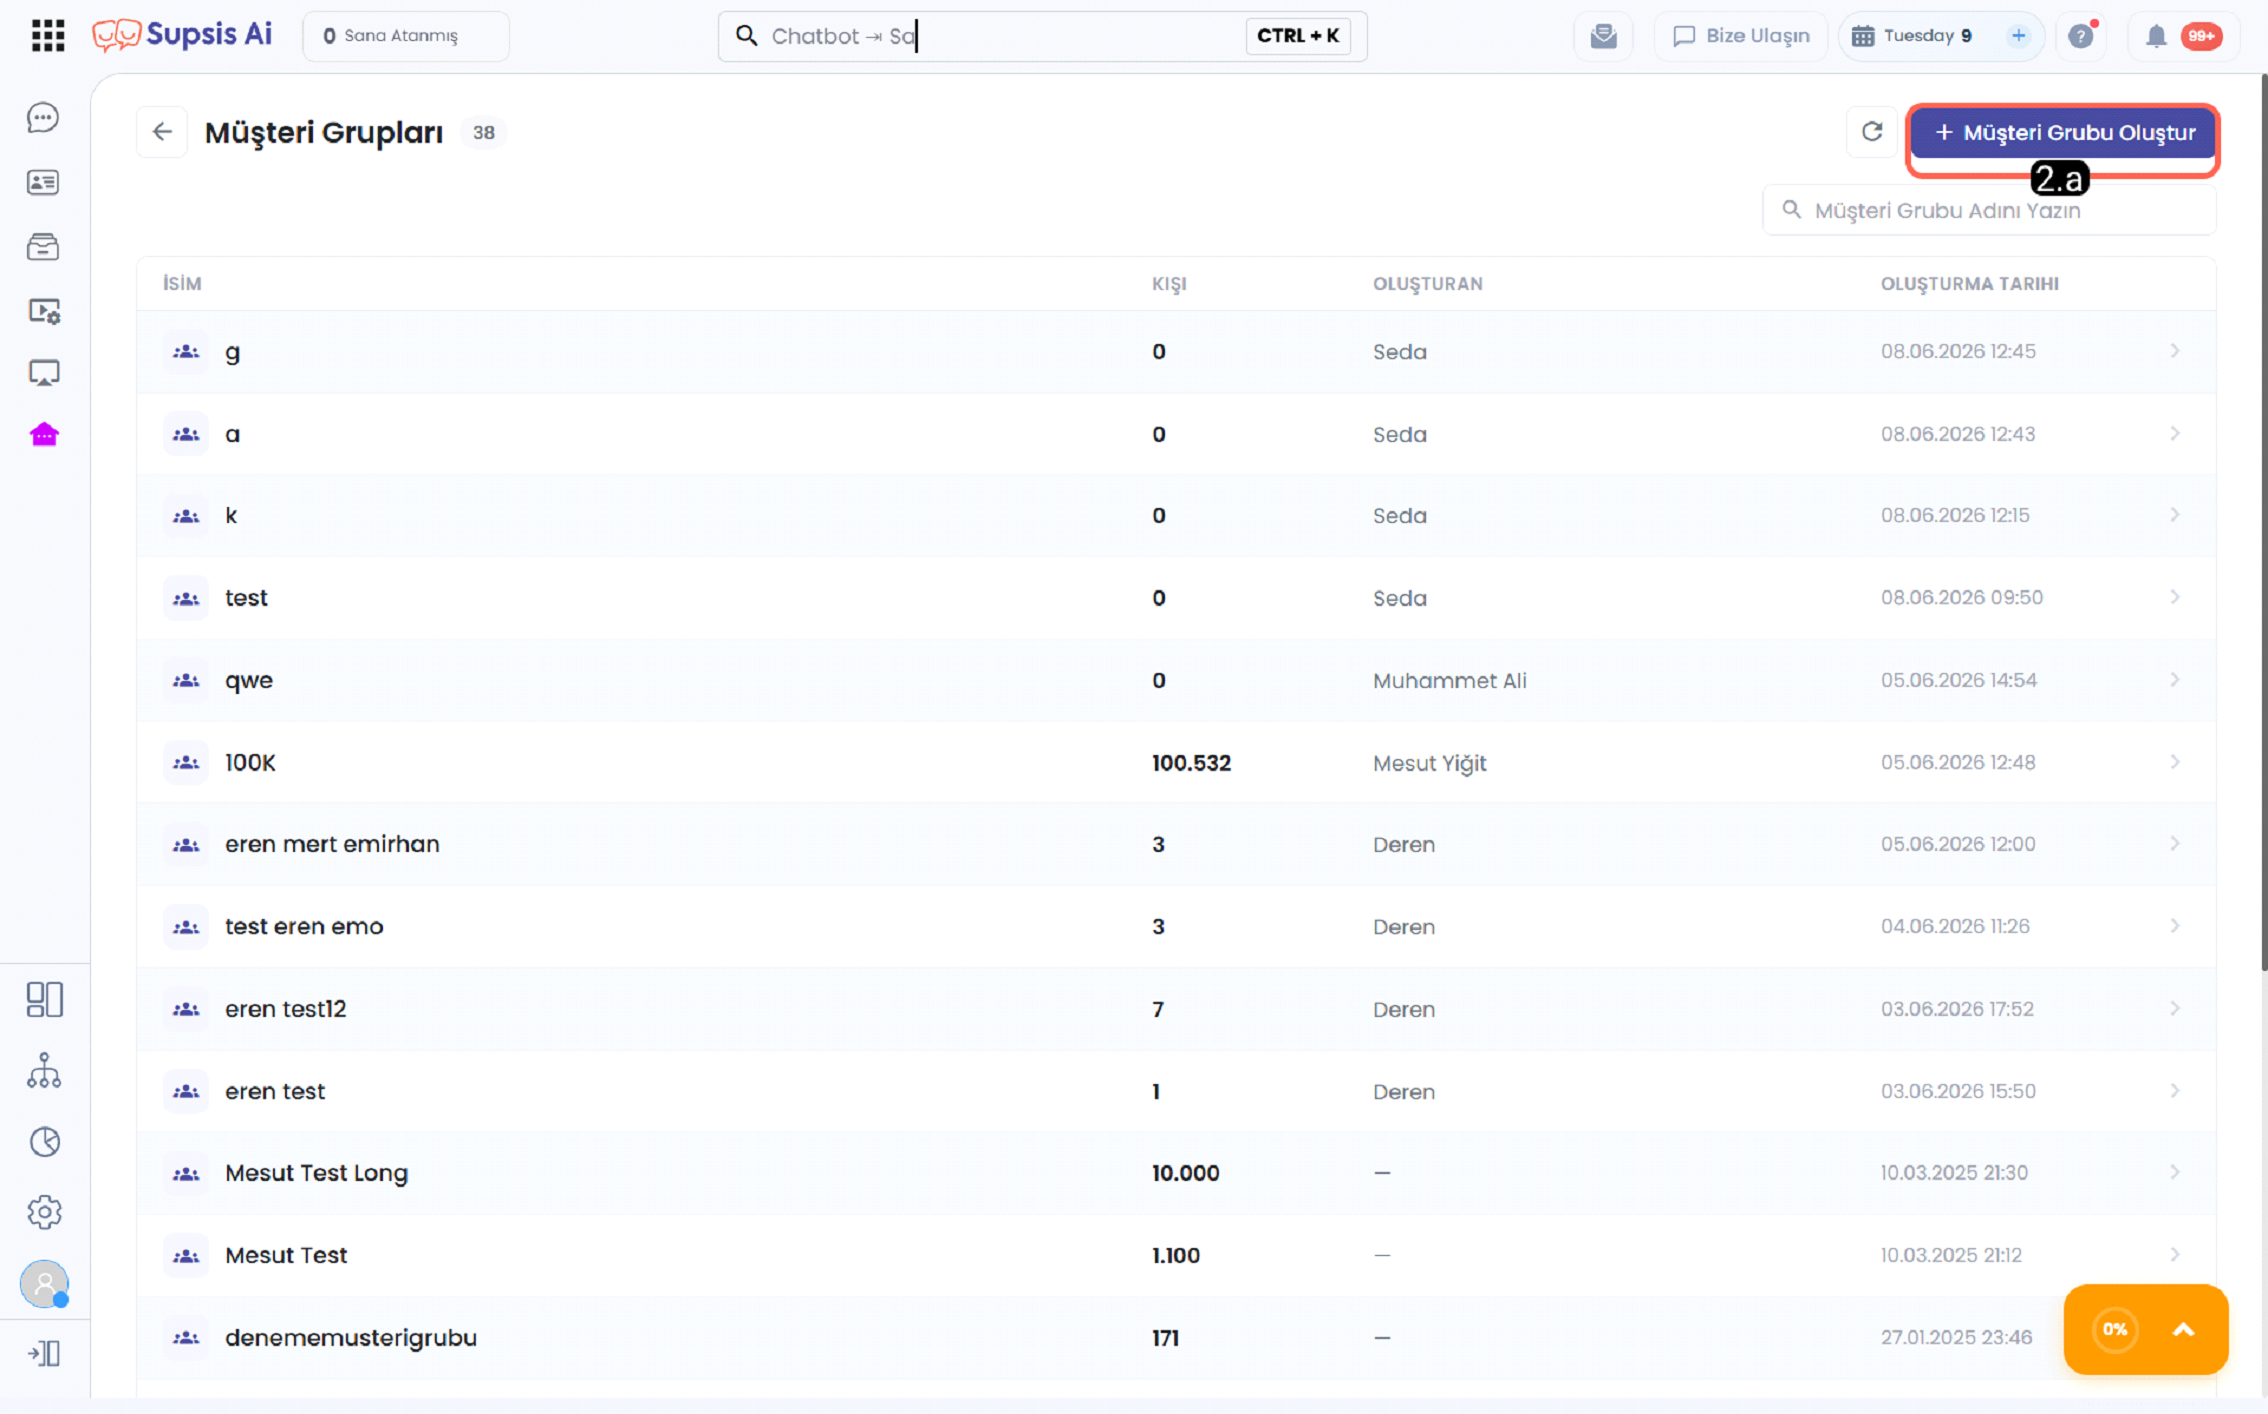
2.a Create customer group
Used to create new customer groups and gather selected contacts under the same group. Created groups can be selected as the target audience in bulk message sends.
-
a - Contacts
The Contacts tab is used to view the contact records in the selected customer group. Phone numbers belonging to the group and added contact information are listed in this area.
-
b - Bulk Messages
The Bulk Messages tab is used to view the bulk message records previously sent to the selected customer group. Sending status and message history can be tracked from this section.
-
c - Edit Group Name
The Edit Group Name option is used to change the name of the existing customer group. This way, the group name can be made more understandable or suitable for its intended use.
-
d - Add Column
The Add Column option is used to add new information fields to the customer group. For example, an additional column can be created for name, surname, email, or special information.
-
d.1 - Delete Column
The Delete Column option allows you to permanently remove custom columns (groupAttributes) previously added to the customer group contact table. With this feature, users can not only add custom attributes but also purge unnecessary, erroneous, or obsolete columns from the group schema.
- Menu Path:
Bulk Messages → Customer Groups → Select Group → Contacts Tab → "Delete Column" Button on Toolbar. - Workflow & Confirmation: Clicking the Delete Column button opens a modal listing all custom attributes defined for the group. Once a column is selected and confirmed, it is removed from the group schema and table view.
- Step-by-Step Usage Guide:
- Navigate to
Bulk Messages → Customer Groupsand open the desired group. - Click the Delete Column button on the toolbar inside the Contacts tab.
- Select the custom column you wish to remove from the dropdown modal.
- Click Delete and confirm the operation in the confirmation dialog.
- The column is removed from the group schema and the contacts table updates automatically.
- Navigate to
- Use Cases:
- Purging accidentally created or unused custom attribute columns.
- Cleaning up obsolete personalization tags before initiating bulk messaging campaigns.
- Simplifying group schemas to enhance table readability and data hygiene.
- Customer Benefits: Ensures customer data structures remain clean and organized. During data imports, record editing, and campaign preparation, only relevant fields remain visible.
-
Control & Technical Rules:
- Phone column cannot be deleted; only custom group schema attributes (
groupAttributes) can be removed. - If no removable custom attributes exist in the group schema, an informative warning message is displayed.
- Leverages the existing
deleteGroupAttributeAPI endpoint under the hood. - Fully supported across TR, EN, DE, FR, ES, IT, RU, and AR languages.
- Phone column cannot be deleted; only custom group schema attributes (
-
e - Add New Contact
The Add New Contact option is used to manually add a new person to the existing customer group. The added person is displayed in the group list and can be included in the bulk message target audience.
-
f - Import from File
The Import from File option is used to add contact information to the customer group in bulk via a file. This process provides a faster transfer instead of adding many people one by one.
-
g - Create Bulk Message for This Group
The Create Bulk Message for This Group option allows creating a new bulk message using the selected customer group as the target audience. With this process, direct bulk message sending can be prepared for the people in the group.
-
h - Contact Actions
The Contact Actions area is used to perform editing or deletion operations on the contact record in the list. The user can update the information of the relevant person or remove the record from the group via this area.
2.b Remote List (Remote Dynamic Audience Integration)
Remote List is a feature that enables you to fetch live customer lists from external systems (CRM, ERP, custom databases) via REST API and JSON format.
With Remote List, you can send HTTP GET/POST requests to your external API, define API Key/Token authentication headers, map the target phone number column and dynamic template parameters ({{1}}, {{2}}), and launch personalized bulk messaging campaigns immediately.
For detailed setup instructions and usage guidance, please refer to our Remote List (Remote Dynamic Audience Integration) documentation.
3-) Create Bulk Message
Through the Create Bulk Message section; new messages aimed at the target audience can be prepared, the sending channel can be selected, and the message sending process can be started. The status of the created bulk messages can then be tracked from the list screen.
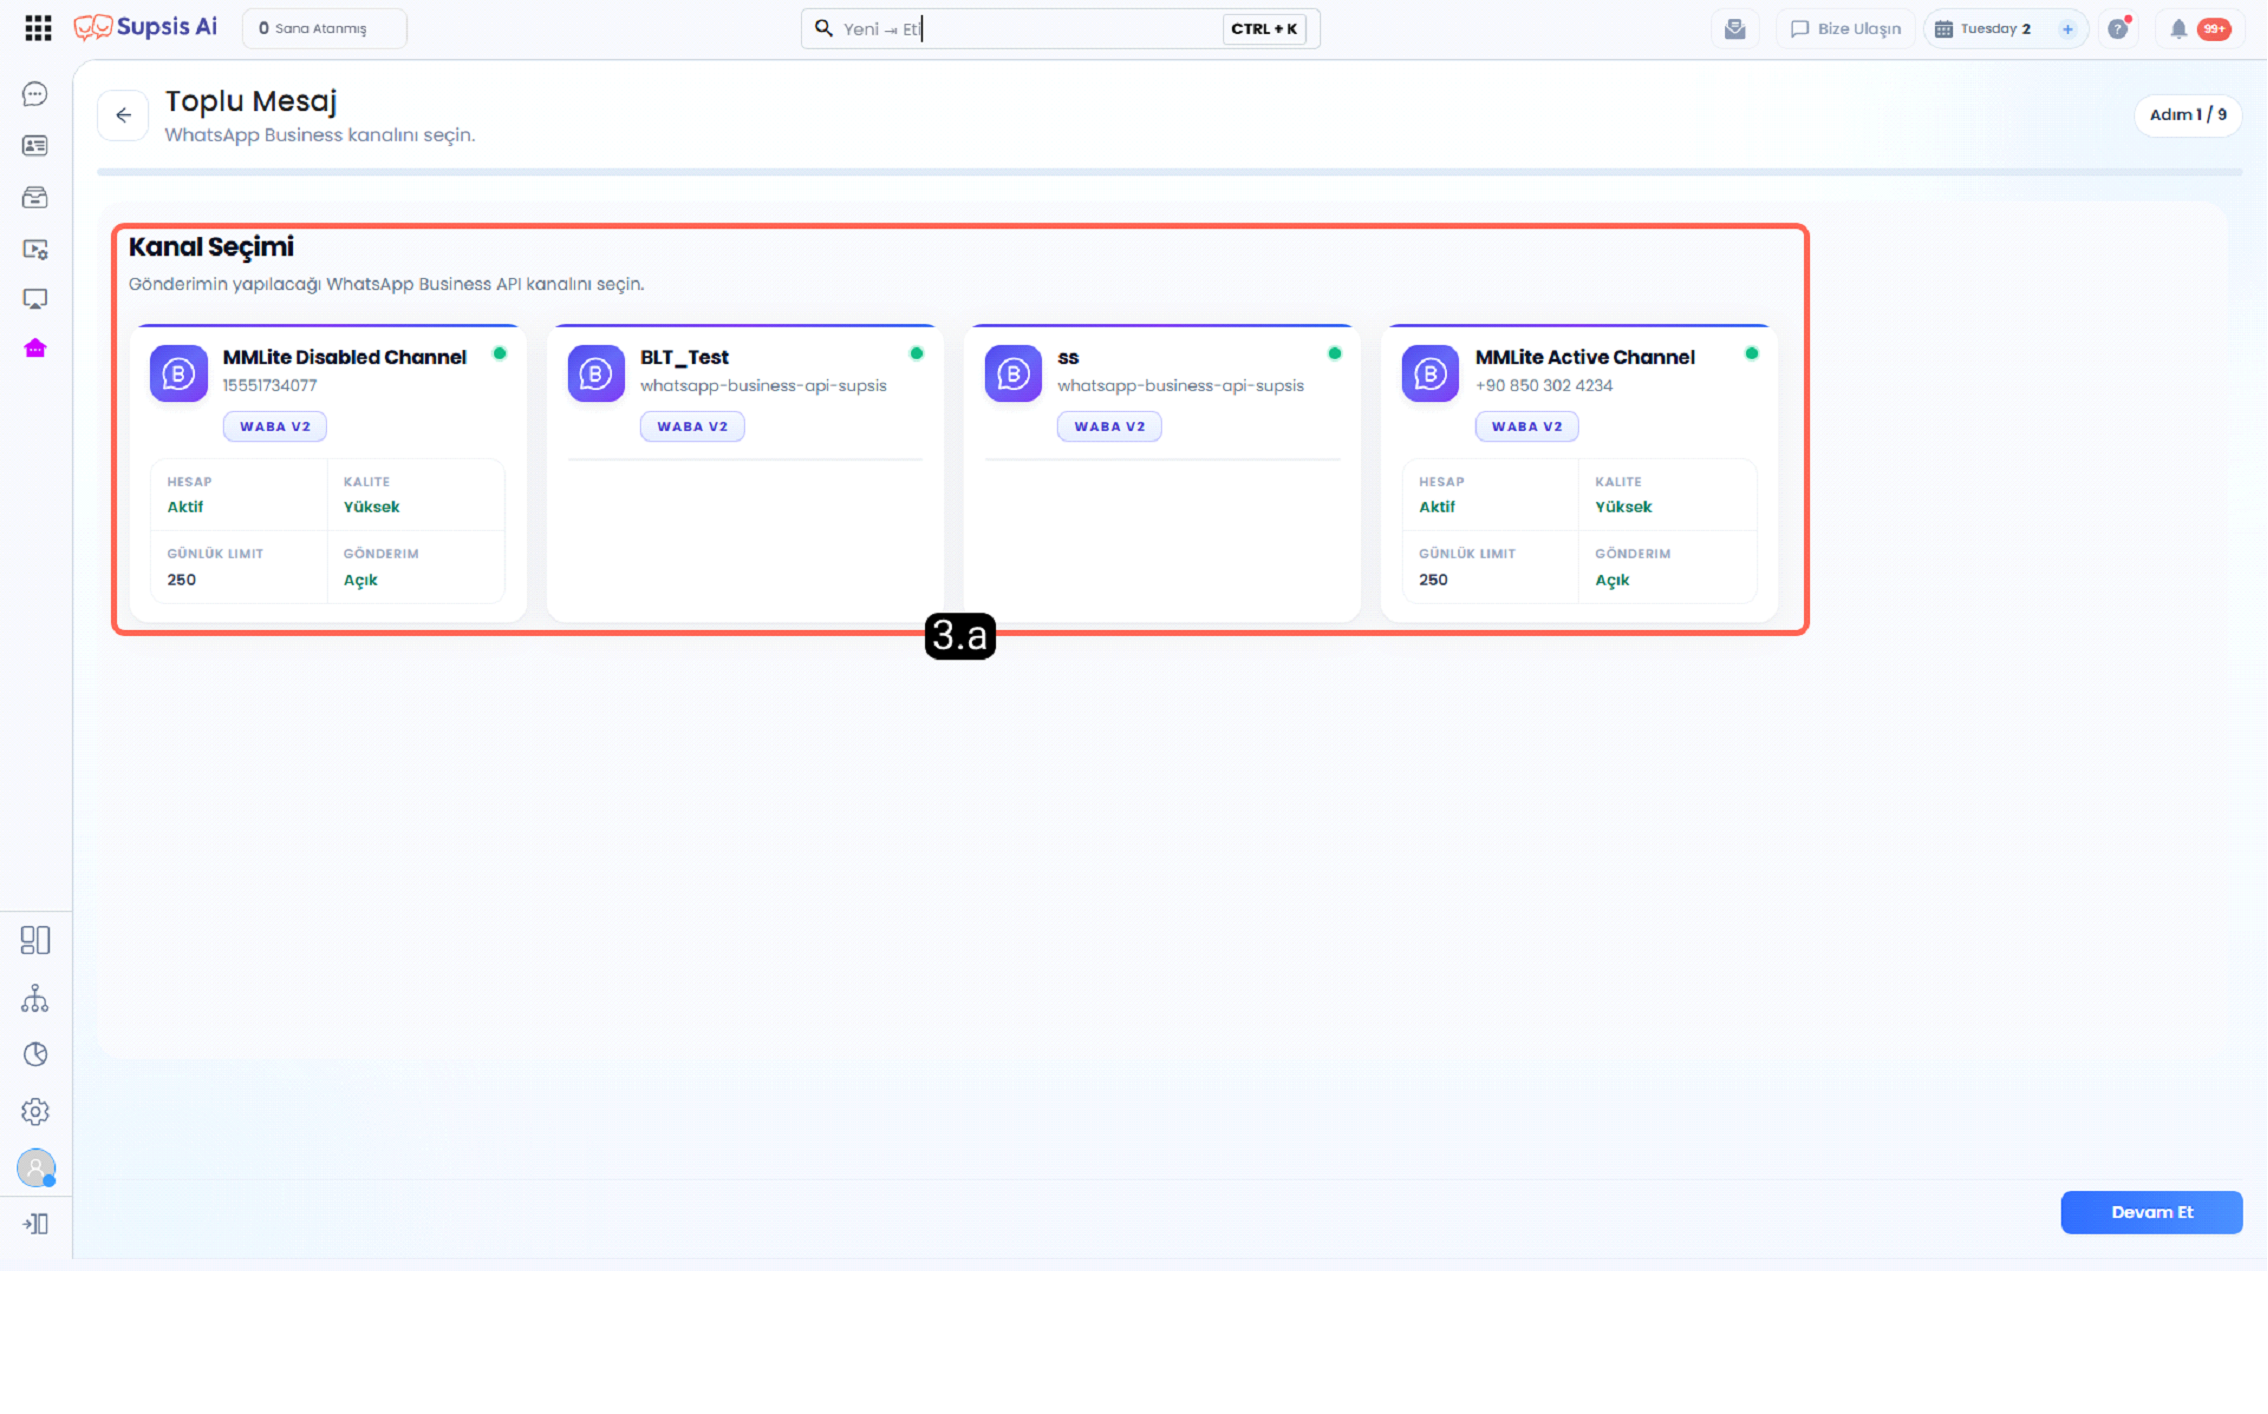
3.a - Channel Selection
In the Channel Selection section, the WhatsApp Business API channel where the bulk message will be sent is determined. The user can continue the bulk message process by selecting the channel they want to send from among the active channels defined in the system. Information such as account status, quality information, daily limit, and sending status can be viewed on the channel cards.
Note: Bulk message sending is only done via WhatsApp Business API and WhatsApp Business API V2 channels. Bulk message sending is not supported over other channel types.
4-) All
Through the All tab, all bulk messages created in the system can be viewed as a single list. In this section, access is provided to all bulk message records—ongoing, completed, scheduled, failed, or canceled—regardless of their current status.
5-) Ongoing
Contains bulk messages whose sending process has been started and is still ongoing. Messages in this status may be waiting in the system queue, being processed, or being delivered to recipients. When the sending is complete, the relevant record is automatically moved to the completed messages list.
6-) Scheduled
Contains bulk messages planned for a future date and time. These messages have not yet been included in the sending process. When the designated time arrives, they are automatically processed by the system and sending starts.
7-) Completed
Through the Completed tab, all bulk message records whose sending process has finished, whether successful or unsuccessful, can be viewed. In this section, the title, channel, sending status, and creation date information of the completed messages can be tracked.
8-) Paused
Through the Paused tab, bulk messages whose sending process has been temporarily stopped can be viewed. In this section, bulk message records that are not yet complete but are no longer sending can be tracked, and the sending process can be managed again if necessary.
9-) Failed
Through the Failed tab, bulk messages whose sending process could not be completed can be viewed. In this section, message records that could not be sent due to any error or systemic reason can be tracked and necessary checks can be made.
10-) Canceled
Through the Canceled tab, bulk message records whose sending process was stopped by the user or canceled by the system can be viewed. In this section, the title, channel, sending status, and creation date information of the canceled messages can be tracked.
11-) Filtering (Advanced Filters)
The Filter panel allows narrowing down bulk message records according to specific operational criteria, enabling users to locate desired broadcasts across large history sets rapidly.
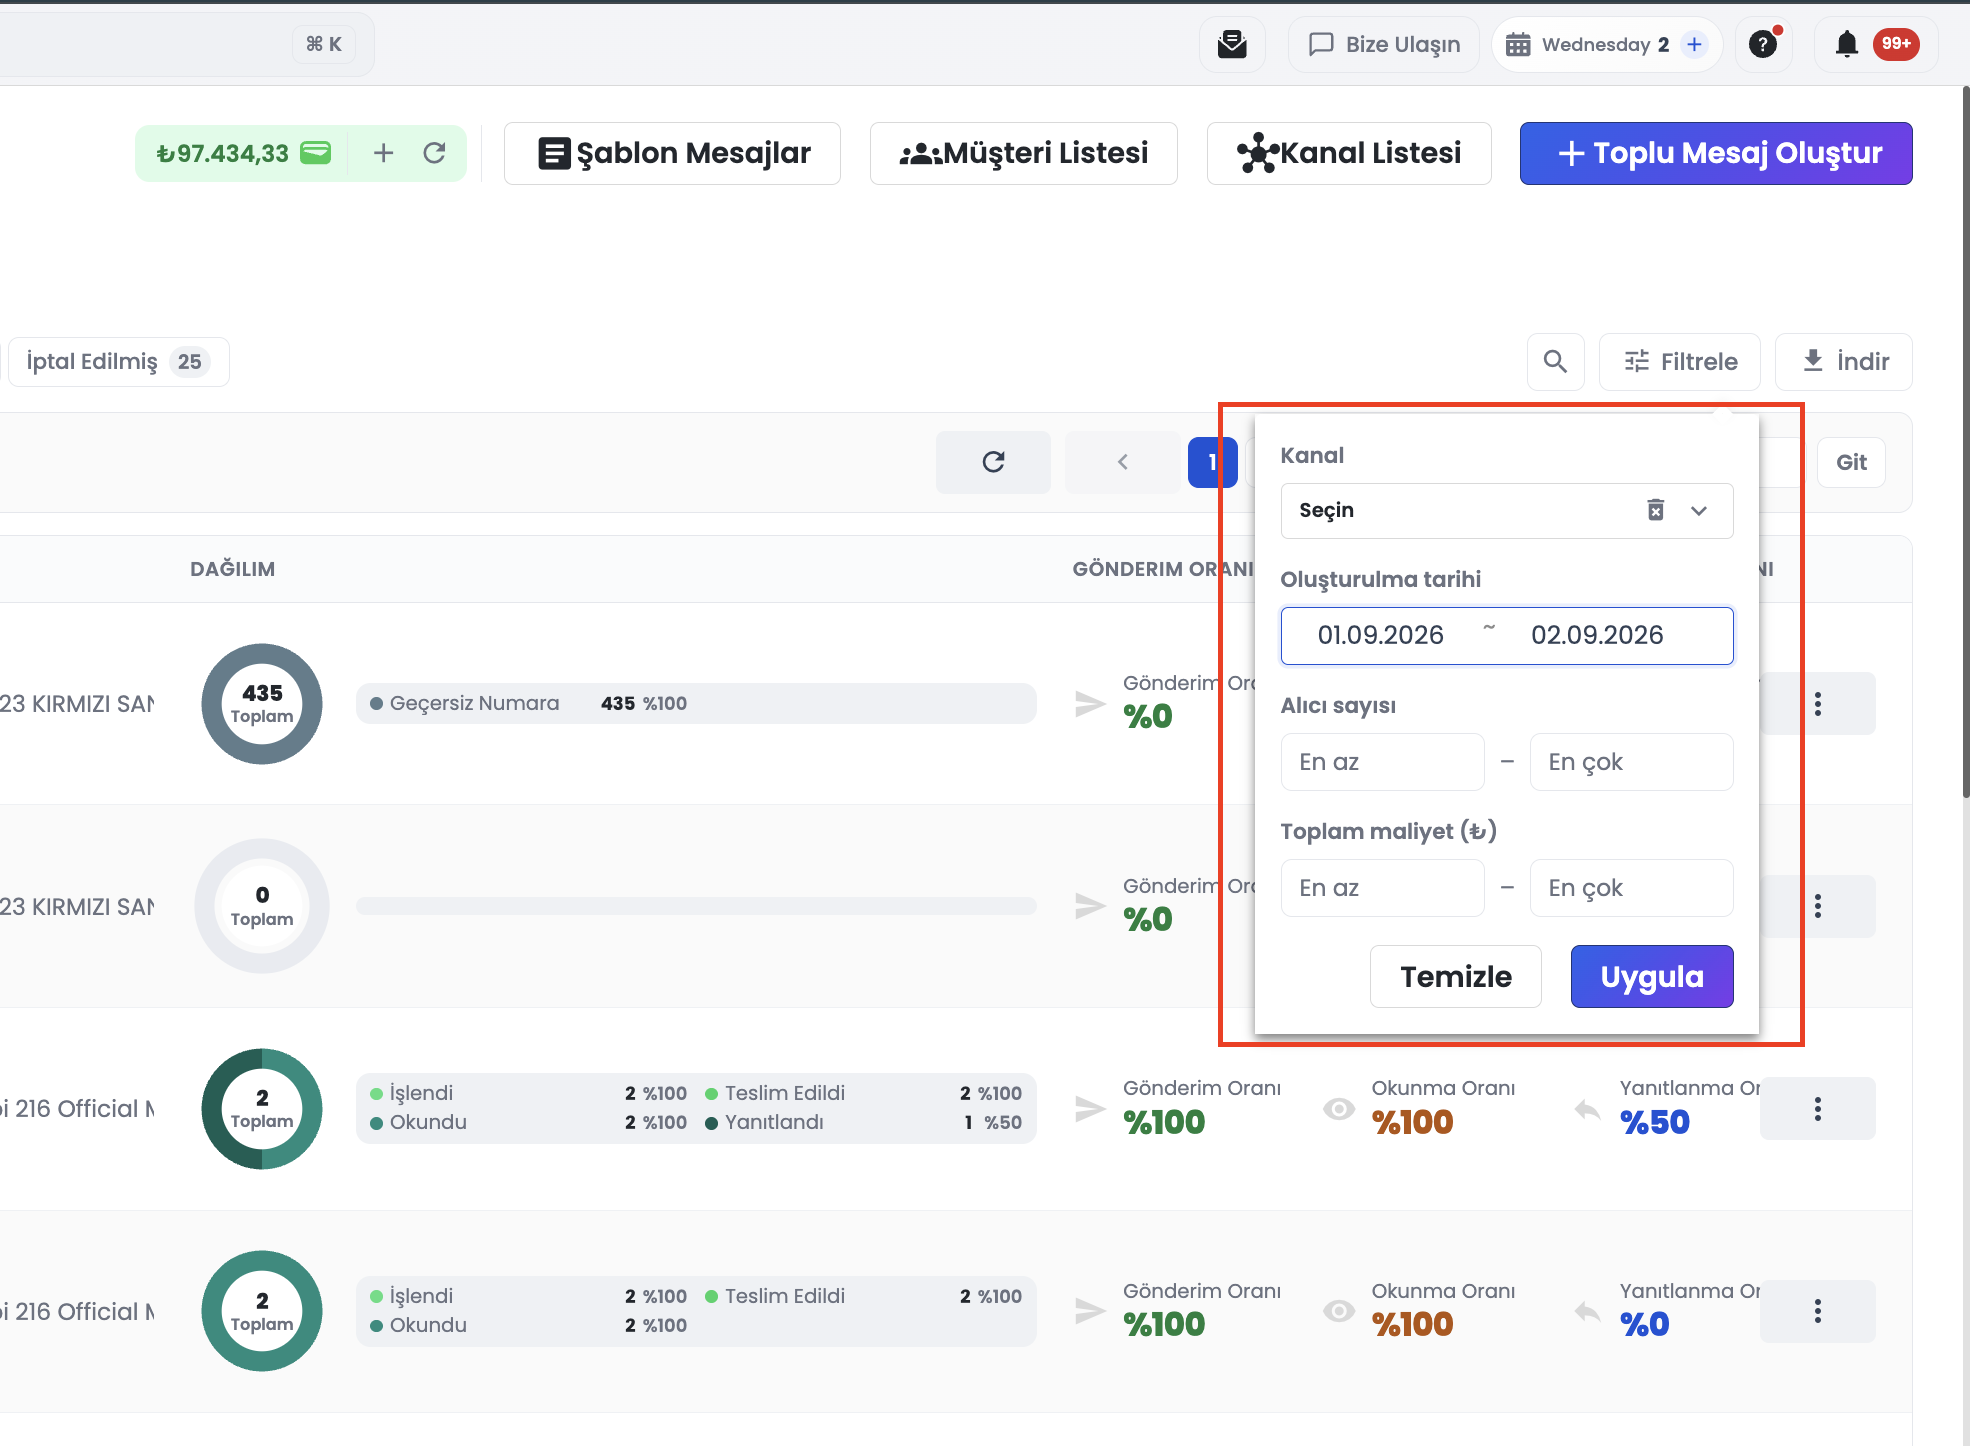
11.a - Channel
Filters broadcasts based on the specific WhatsApp communication channel used.
11.b - Number of Recipients
Restricts the list based on target audience size (minimum and maximum recipient counts).
11.c - Total Cost
Filters broadcasts by the total budget and charges incurred (minimum and maximum amounts).
11.d - Creation Date Range (Date Filter)
Filters records based on when broadcasts were initially generated in the system (createdAt):
- Start and End Dates: Select a customized date window using the date picker.
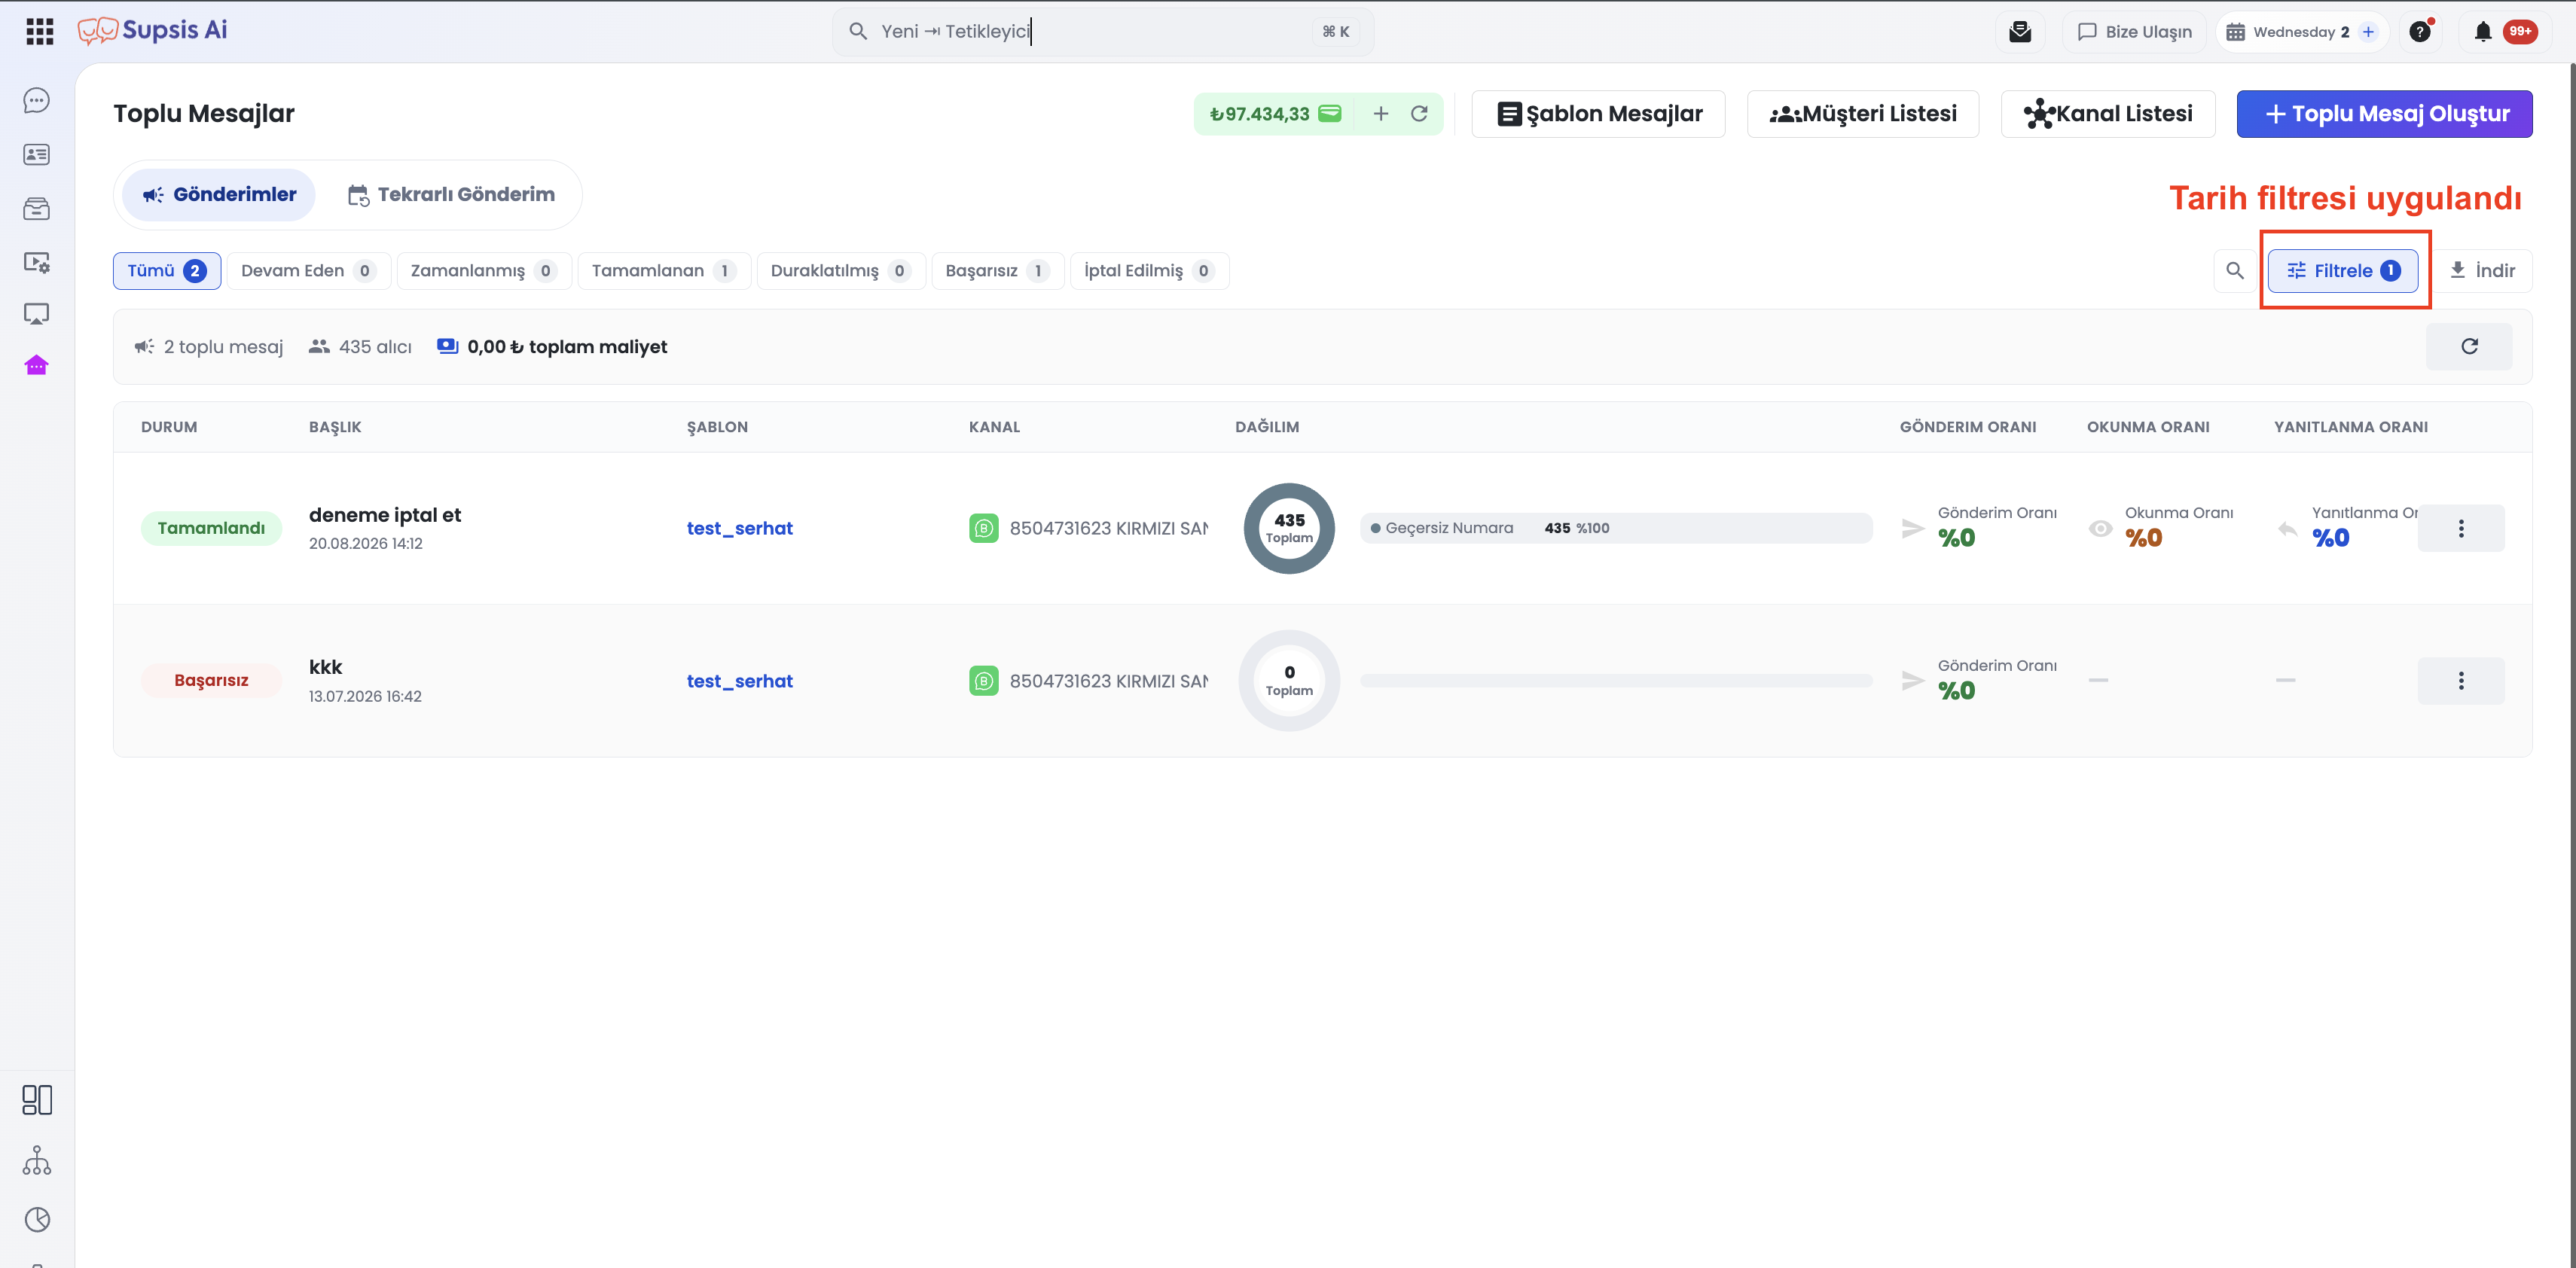
- Synchronized Updates: Clicking Apply immediately re-calculates the broadcast table, top summary bar metrics (filter badge count), and Excel export scope.
- Clear Filters: Applied date filters can be cleared in one click to restore the complete list.
12-) Download (Excel Export)
Allows exporting bulk message broadcast data in Excel (.xlsx) format.
Filter-Preserved Export
Excel downloads strictly adhere to active screen filters (date range, channel, cost, recipient counts). Only filtered records are included in the export.
13-) Bulk Message List & Pagination (Go to Page)
The Bulk Message List provides end-to-end tracking of broadcast status, title, channel, delivery rate, and creation timestamp. For extensive broadcast histories, an advanced Go to Page feature is available.
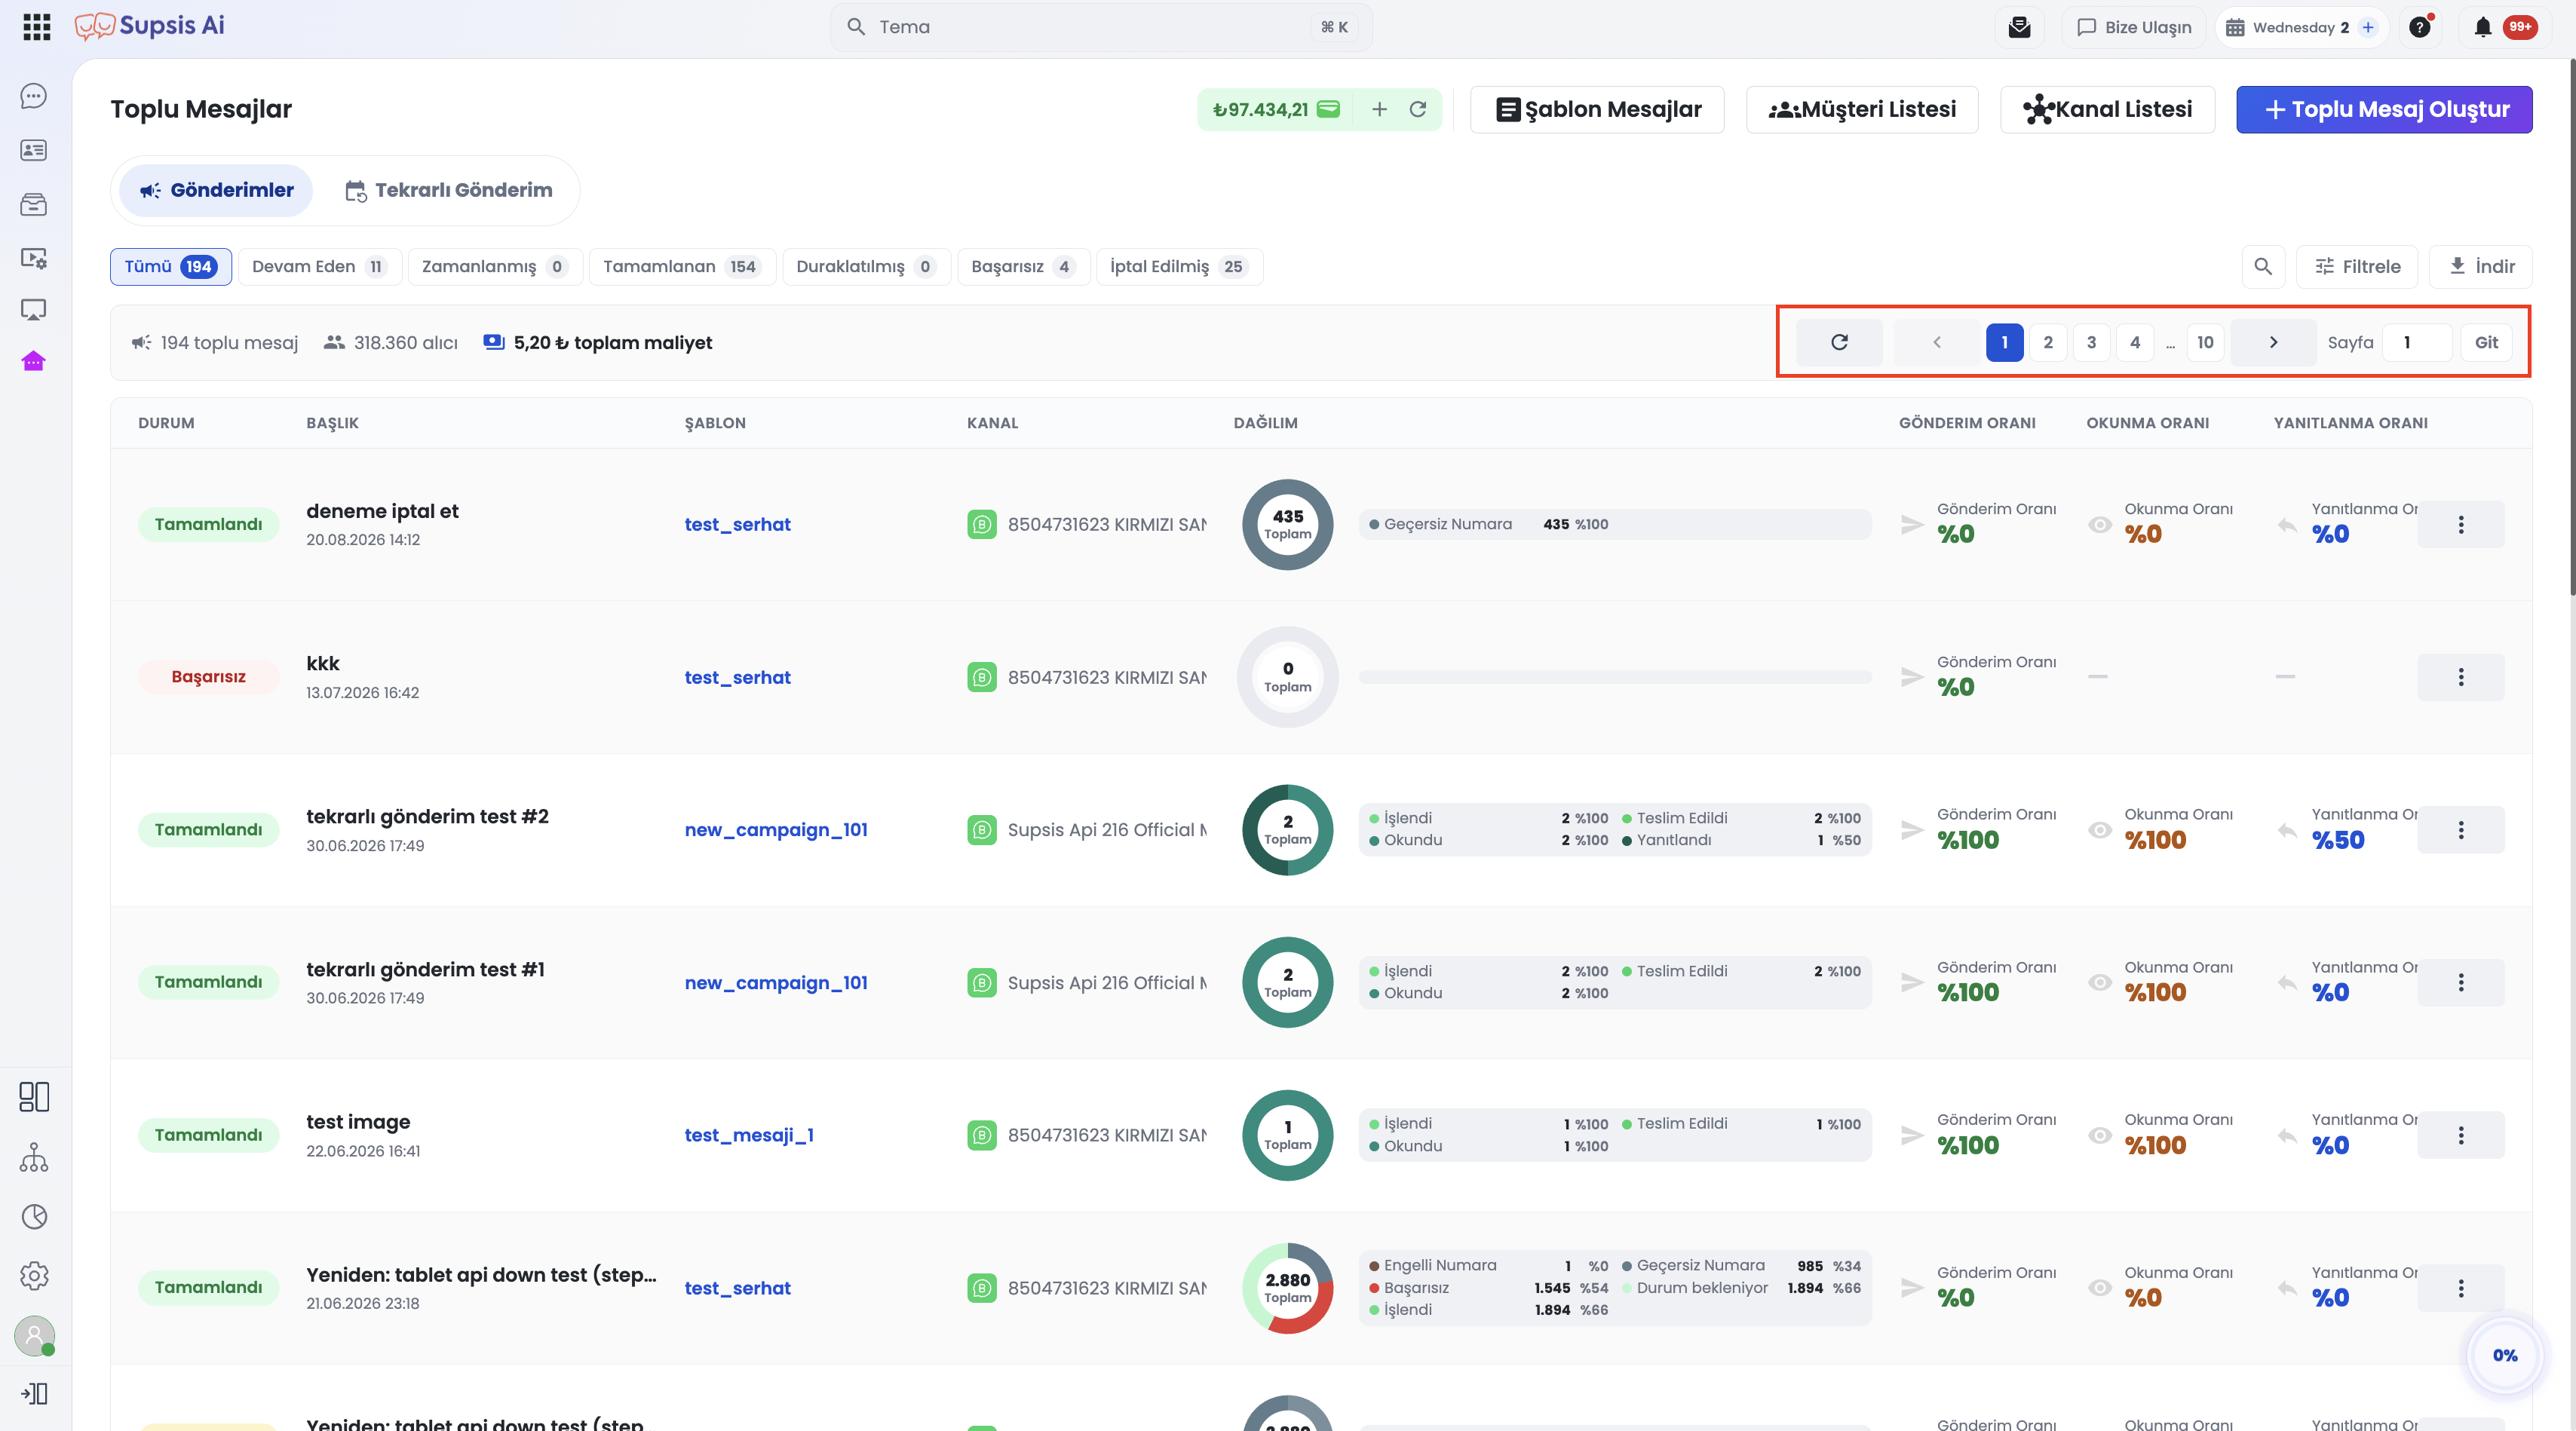
13.a - Direct Page Navigation
Quickly jump across multi-page lists without repetitive clicking: - Dual Placement: The page input and "Go" button are available on both the top summary bar and the bottom pagination bar. - Instant Jump: Enter the target page number and click Go or press Enter.
13.b - Page Validation & Error Handling
Entering a page number beyond total available pages or an invalid number triggers an immediate warning notification, preventing incorrect navigation.
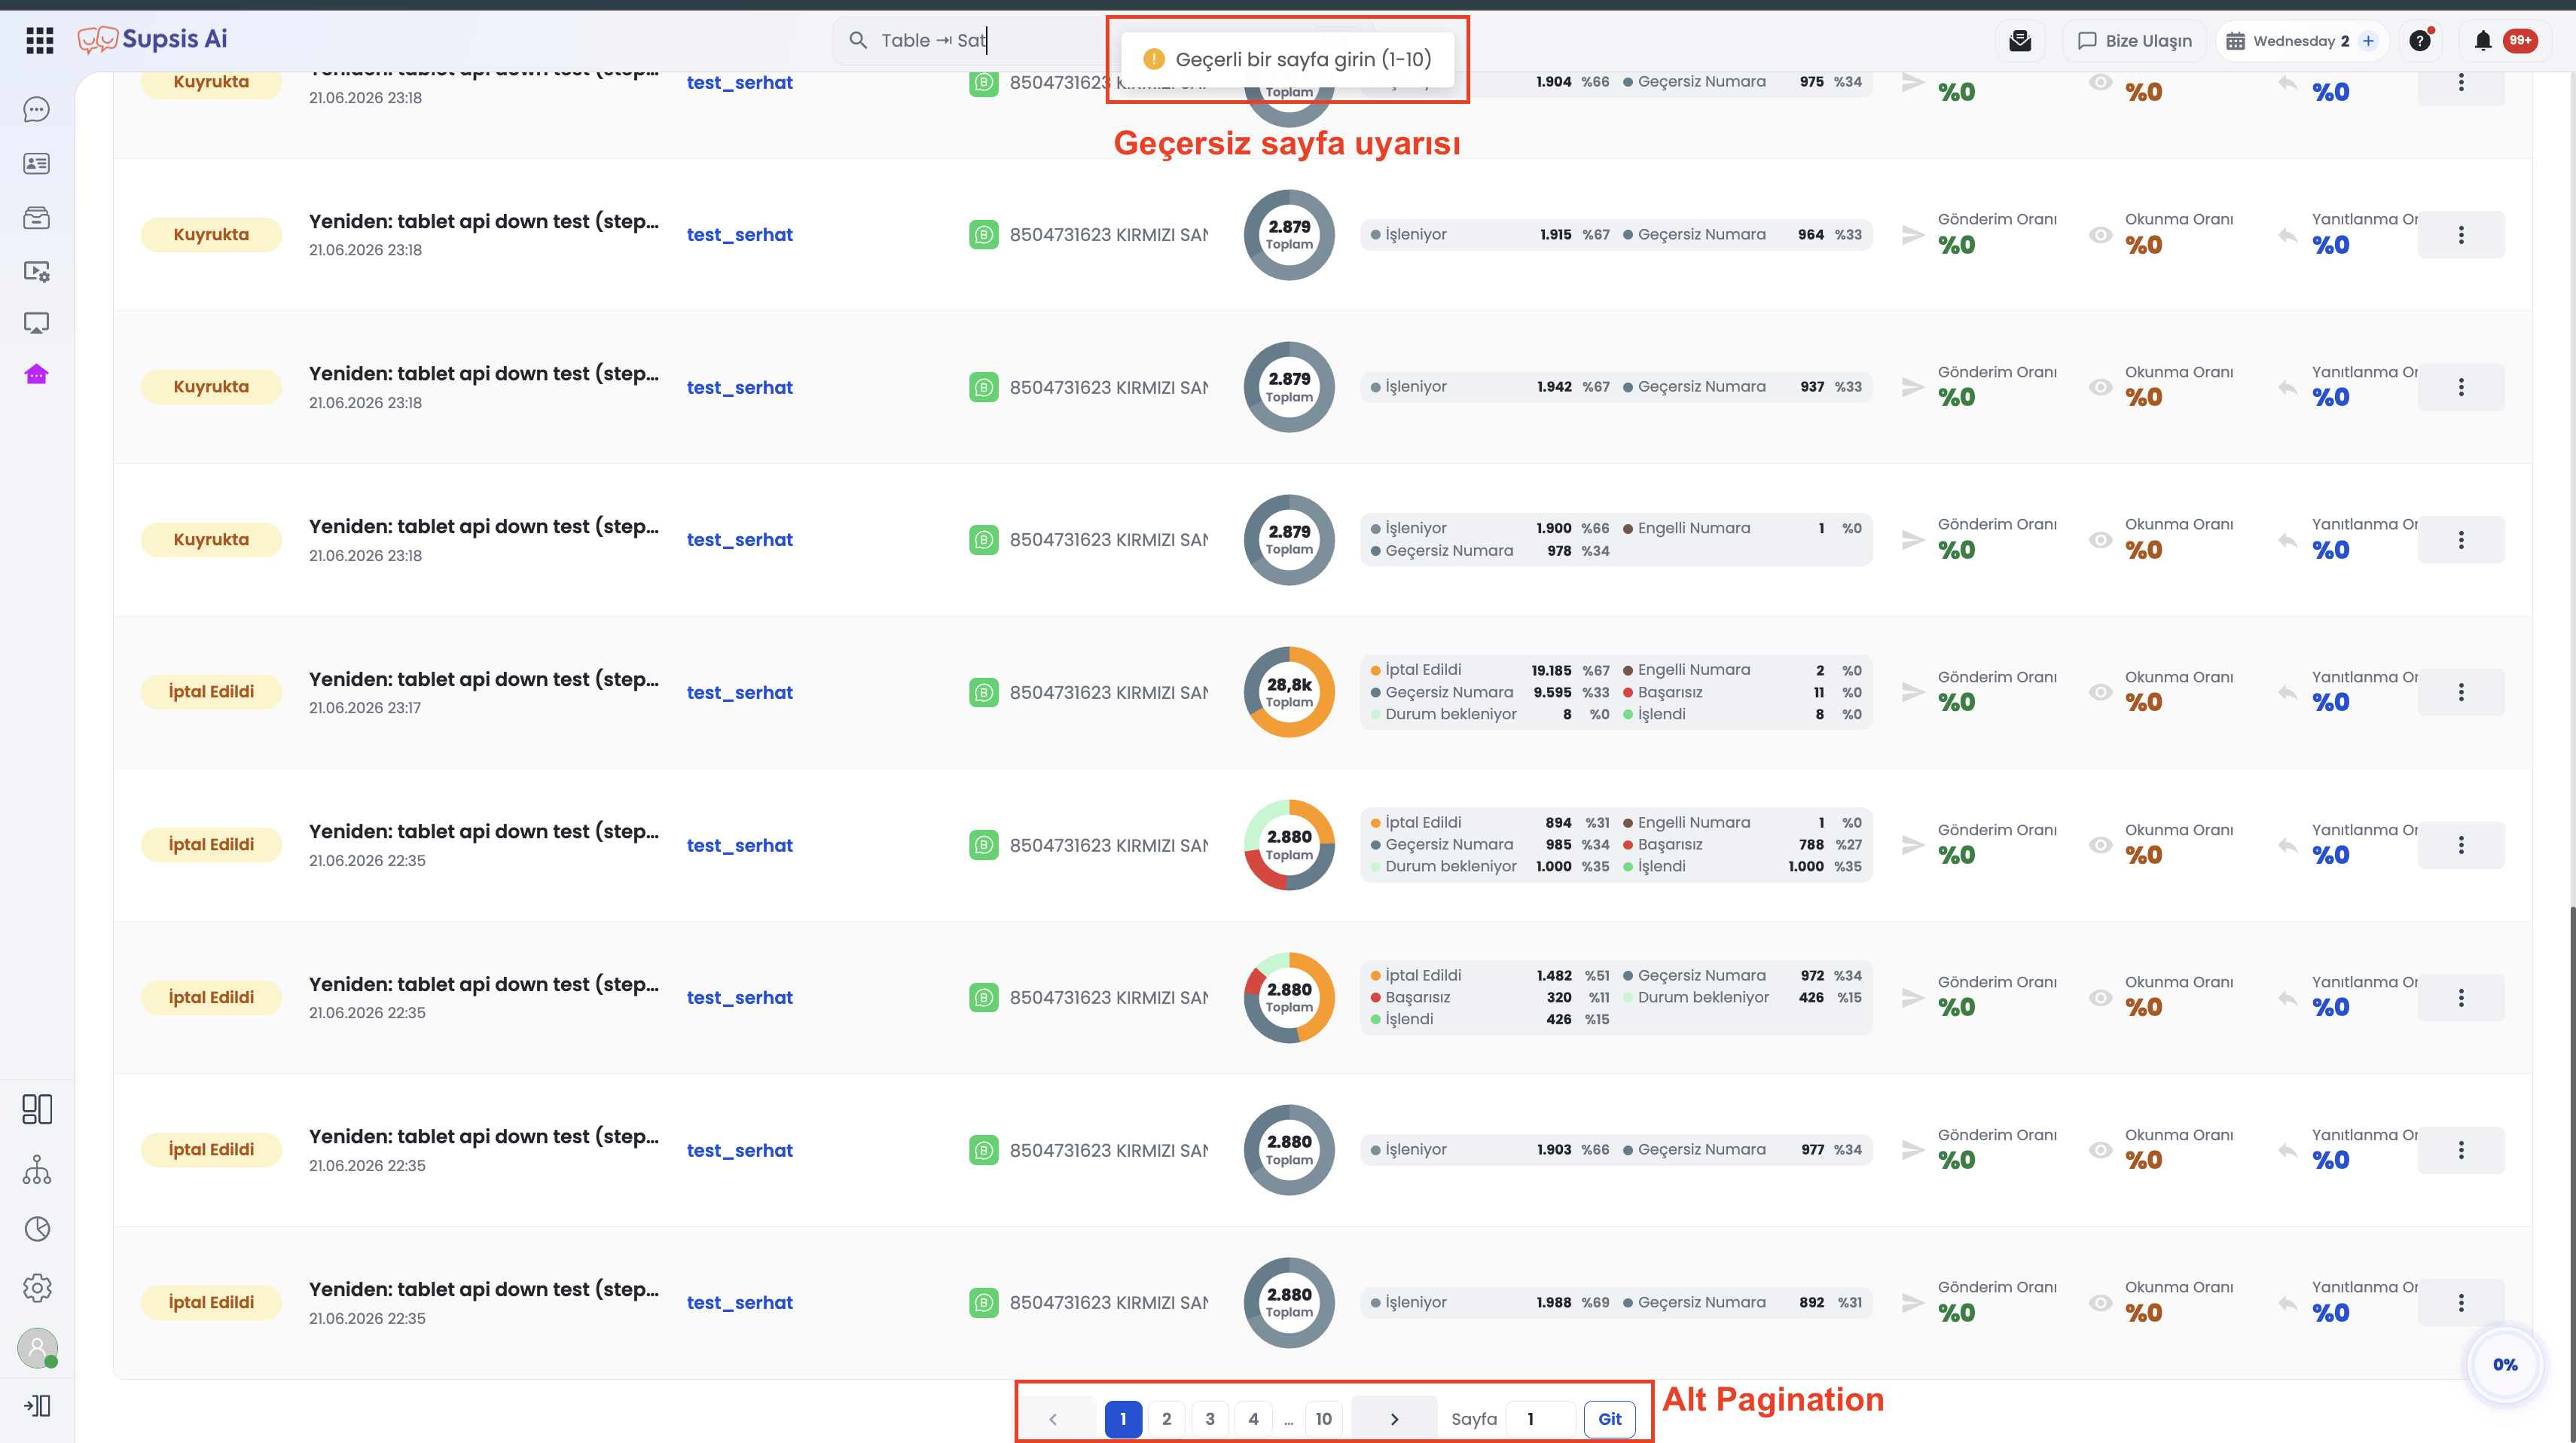
Step-by-Step Guide for Filtering and Page Navigation
- Applying Date Range Filter:
- 1.a- Navigate to Broadcast → Bulk Messages in Customer Panel.
- 1.b- Click the Filter button on the top toolbar.
- 1.c- Select start and end dates under Creation Date.
- 1.d- Click Apply to view filtered broadcasts and recalculated metrics.
- Jumping Directly to a Page:
- 2.a- Type the target page number into the Page input field (top or bottom bar).
- 2.b- Click Go or press Enter to load the records immediately.
Use Cases & Key Benefits
| Use Case | Benefit |
|---|---|
| Periodic Campaign Audit | Quickly isolate and inspect broadcasts sent within a specific week or month. |
| Custom Financial Reporting | Export filtered broadcast records for specified billing intervals to Excel. |
| Fast Archive Navigation | Skip directly to earlier campaigns in large broadcast histories in a single action. |
Important Control & Configuration Notes
Tab Scope
Date filtering and direct page jumps apply to the Bulk Messages (Broadcast List) tab. The Recurring tab is excluded from these features.
Date Criteria
The filter evaluates the initial creation timestamp (createdAt) of the broadcast.
Permissions
No special permissions or plan add-ons are required; available to all users with Broadcast module access.
14-) Options
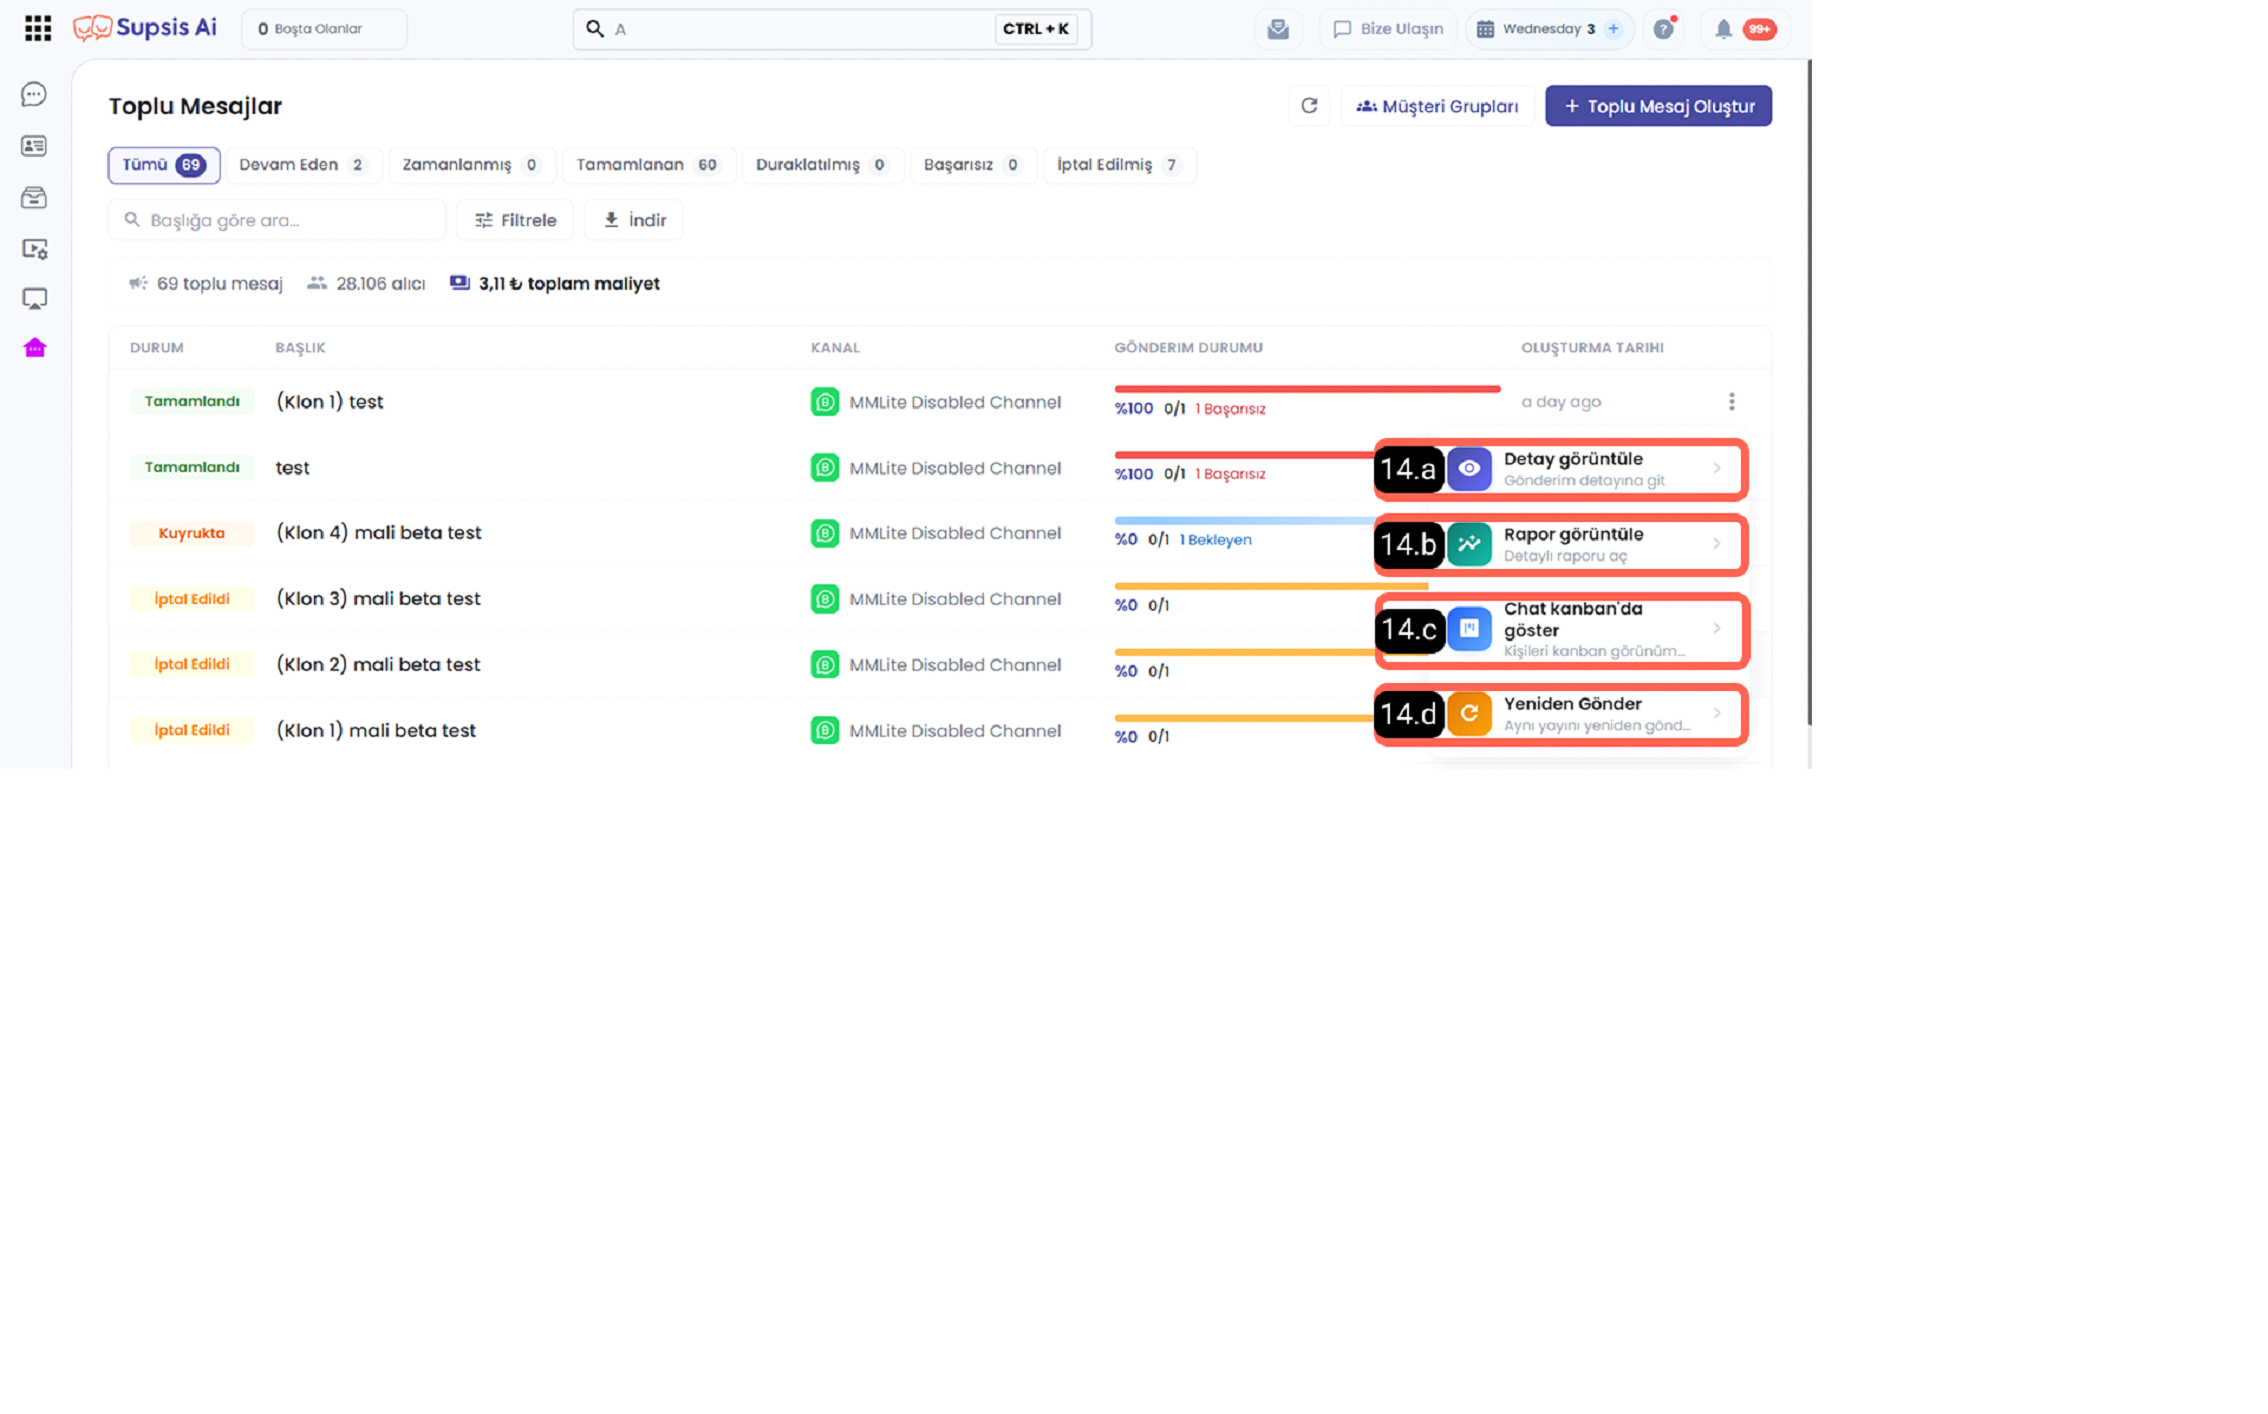
14.a - View Details
Through the View Details option, the sending details of the relevant bulk message can be accessed. In this section, the sending status of the message, recipient information, and the results generated in the process can be examined in more detail.
14.b - View Report
Through the View Report option, the sending report of the relevant bulk message can be accessed. In this section, how many people the message was sent to, successful and failed sending results, and overall performance information can be examined in detail.
14.c - Show in Chat Kanban
The Show in Chat Kanban option is used to display the relevant contacts in a kanban view. Through this section, contacts can be examined more neatly in a card structure according to their processes or statuses.
14.d - Resend
The Resend option is used to restart a previously created bulk message send. In this process, target audience selection can be made, and if desired, the sending settings can be edited to prepare the bulk message for resending.
15- ) View Details Content
In the View Details content, the sending results of the selected bulk message can be examined in detail. On this screen, successful and failed sending numbers, progress rate, queued messages, usage cost, customer information, error details, and message preview can be viewed.
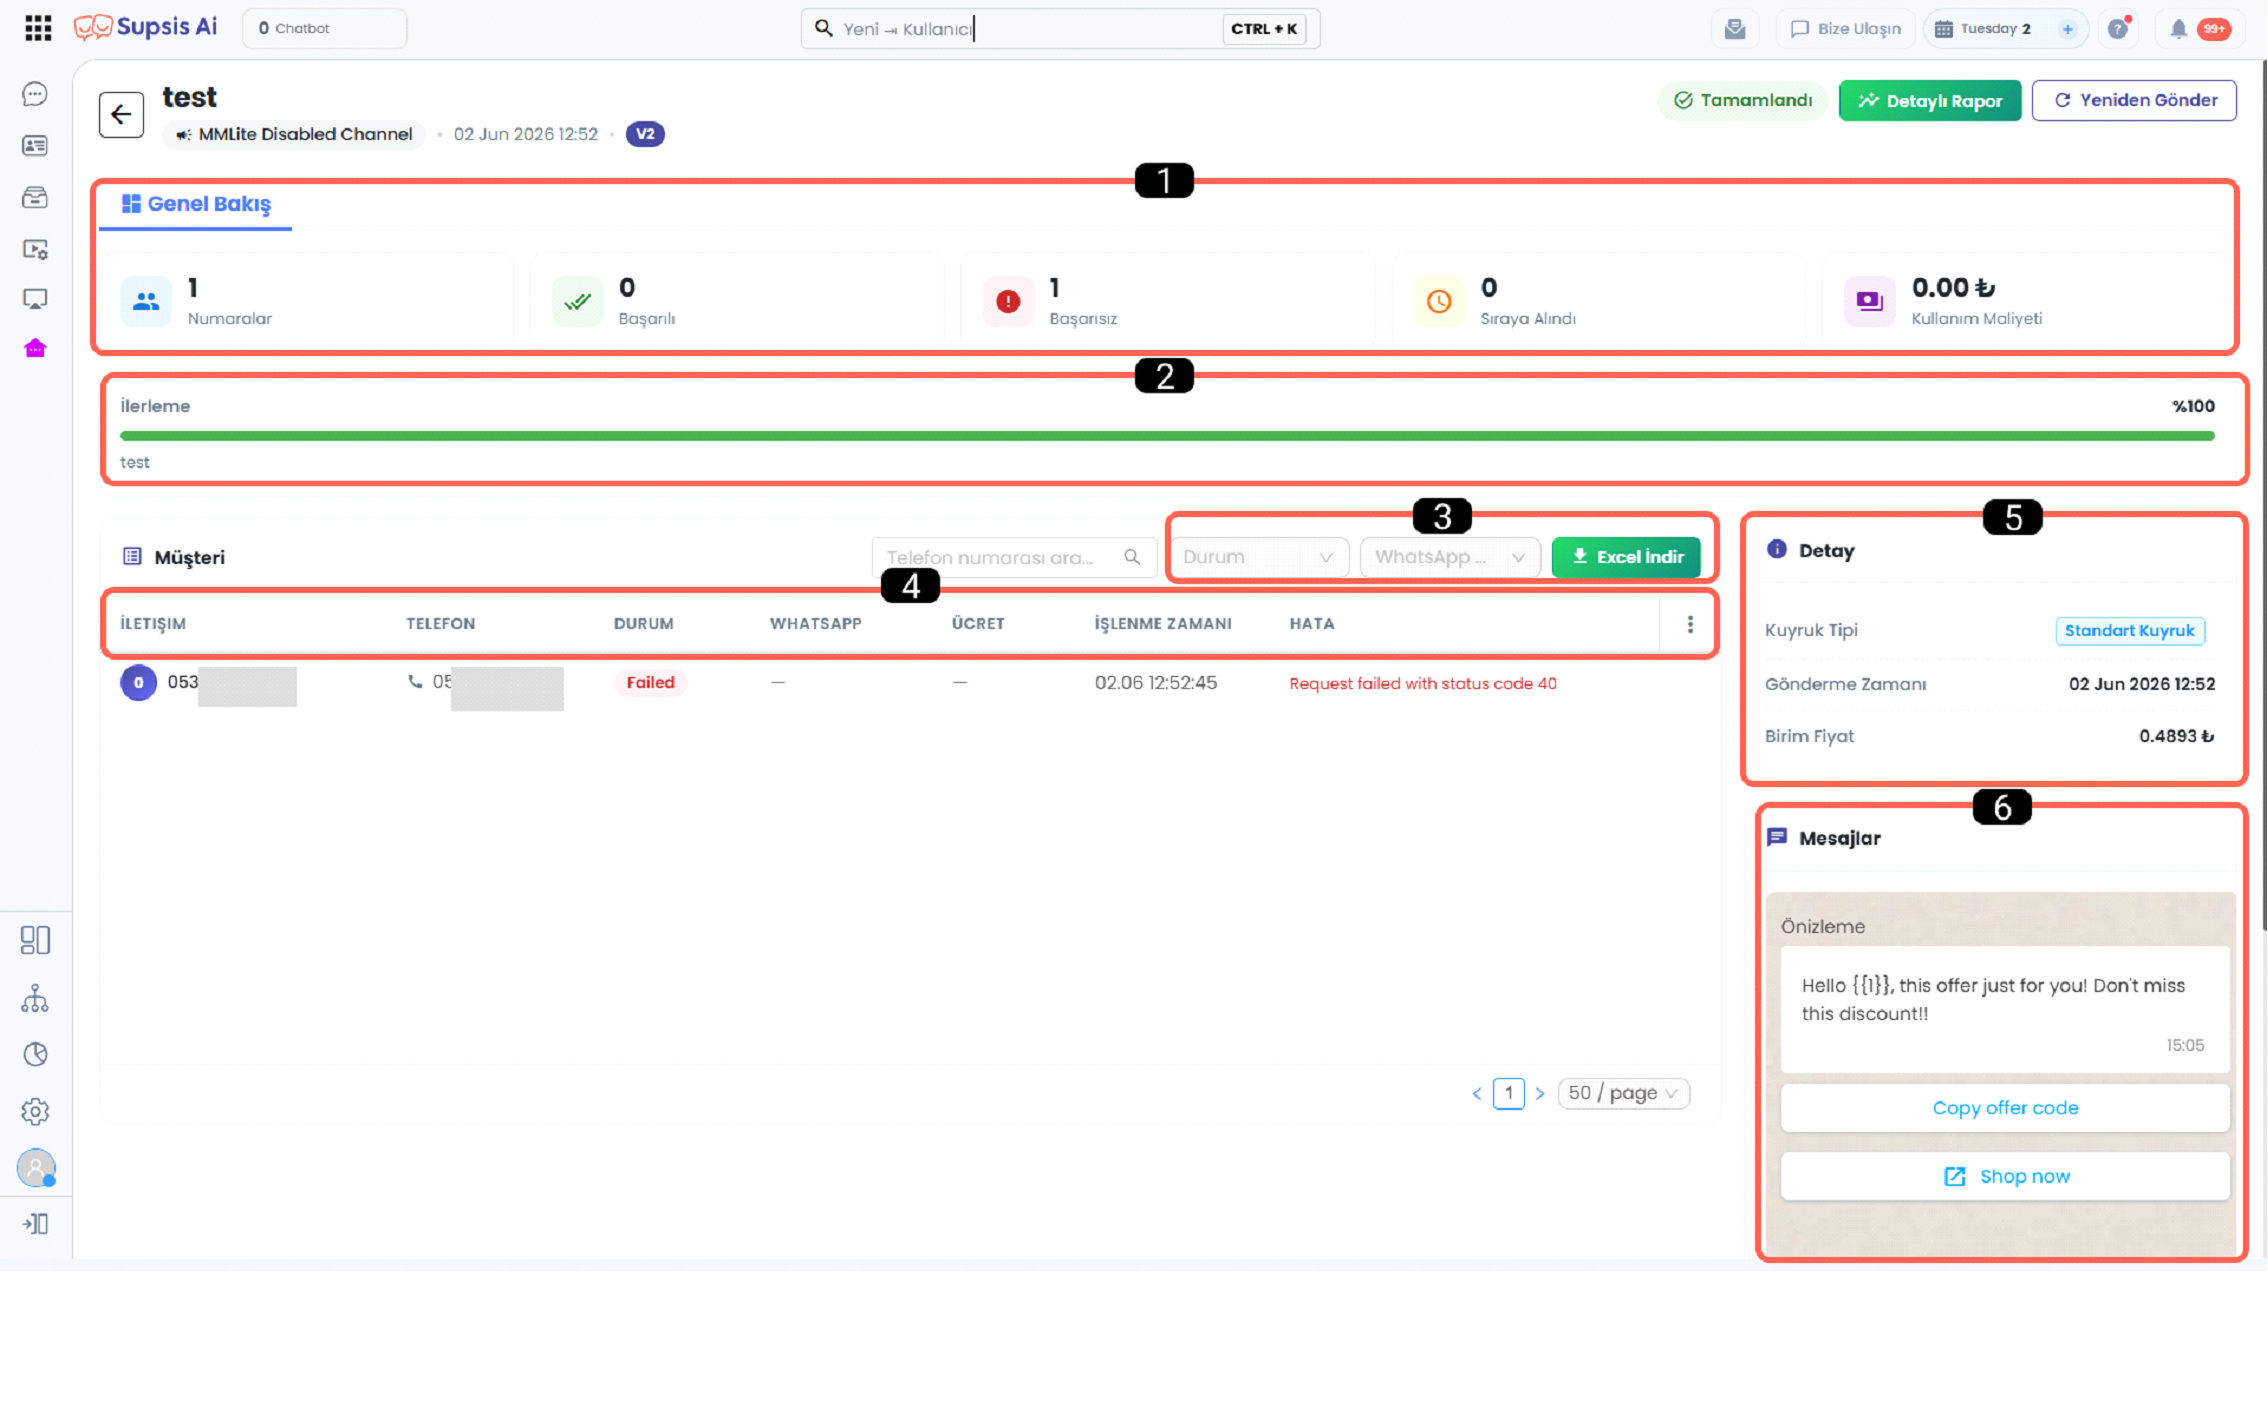
- General Sending Summary
- Sending Progress Status
- Customer Filtering and Excel Export Area
- Customer Sending List
- Sending Detail Information
- Message Preview Area
15.a – General Sending Summary
In the General Sending Summary section, basic information regarding the bulk message send is displayed. Data such as the total number of contacts, successful and failed sends, queued messages, and usage cost allow the sending process to be quickly tracked in this area.
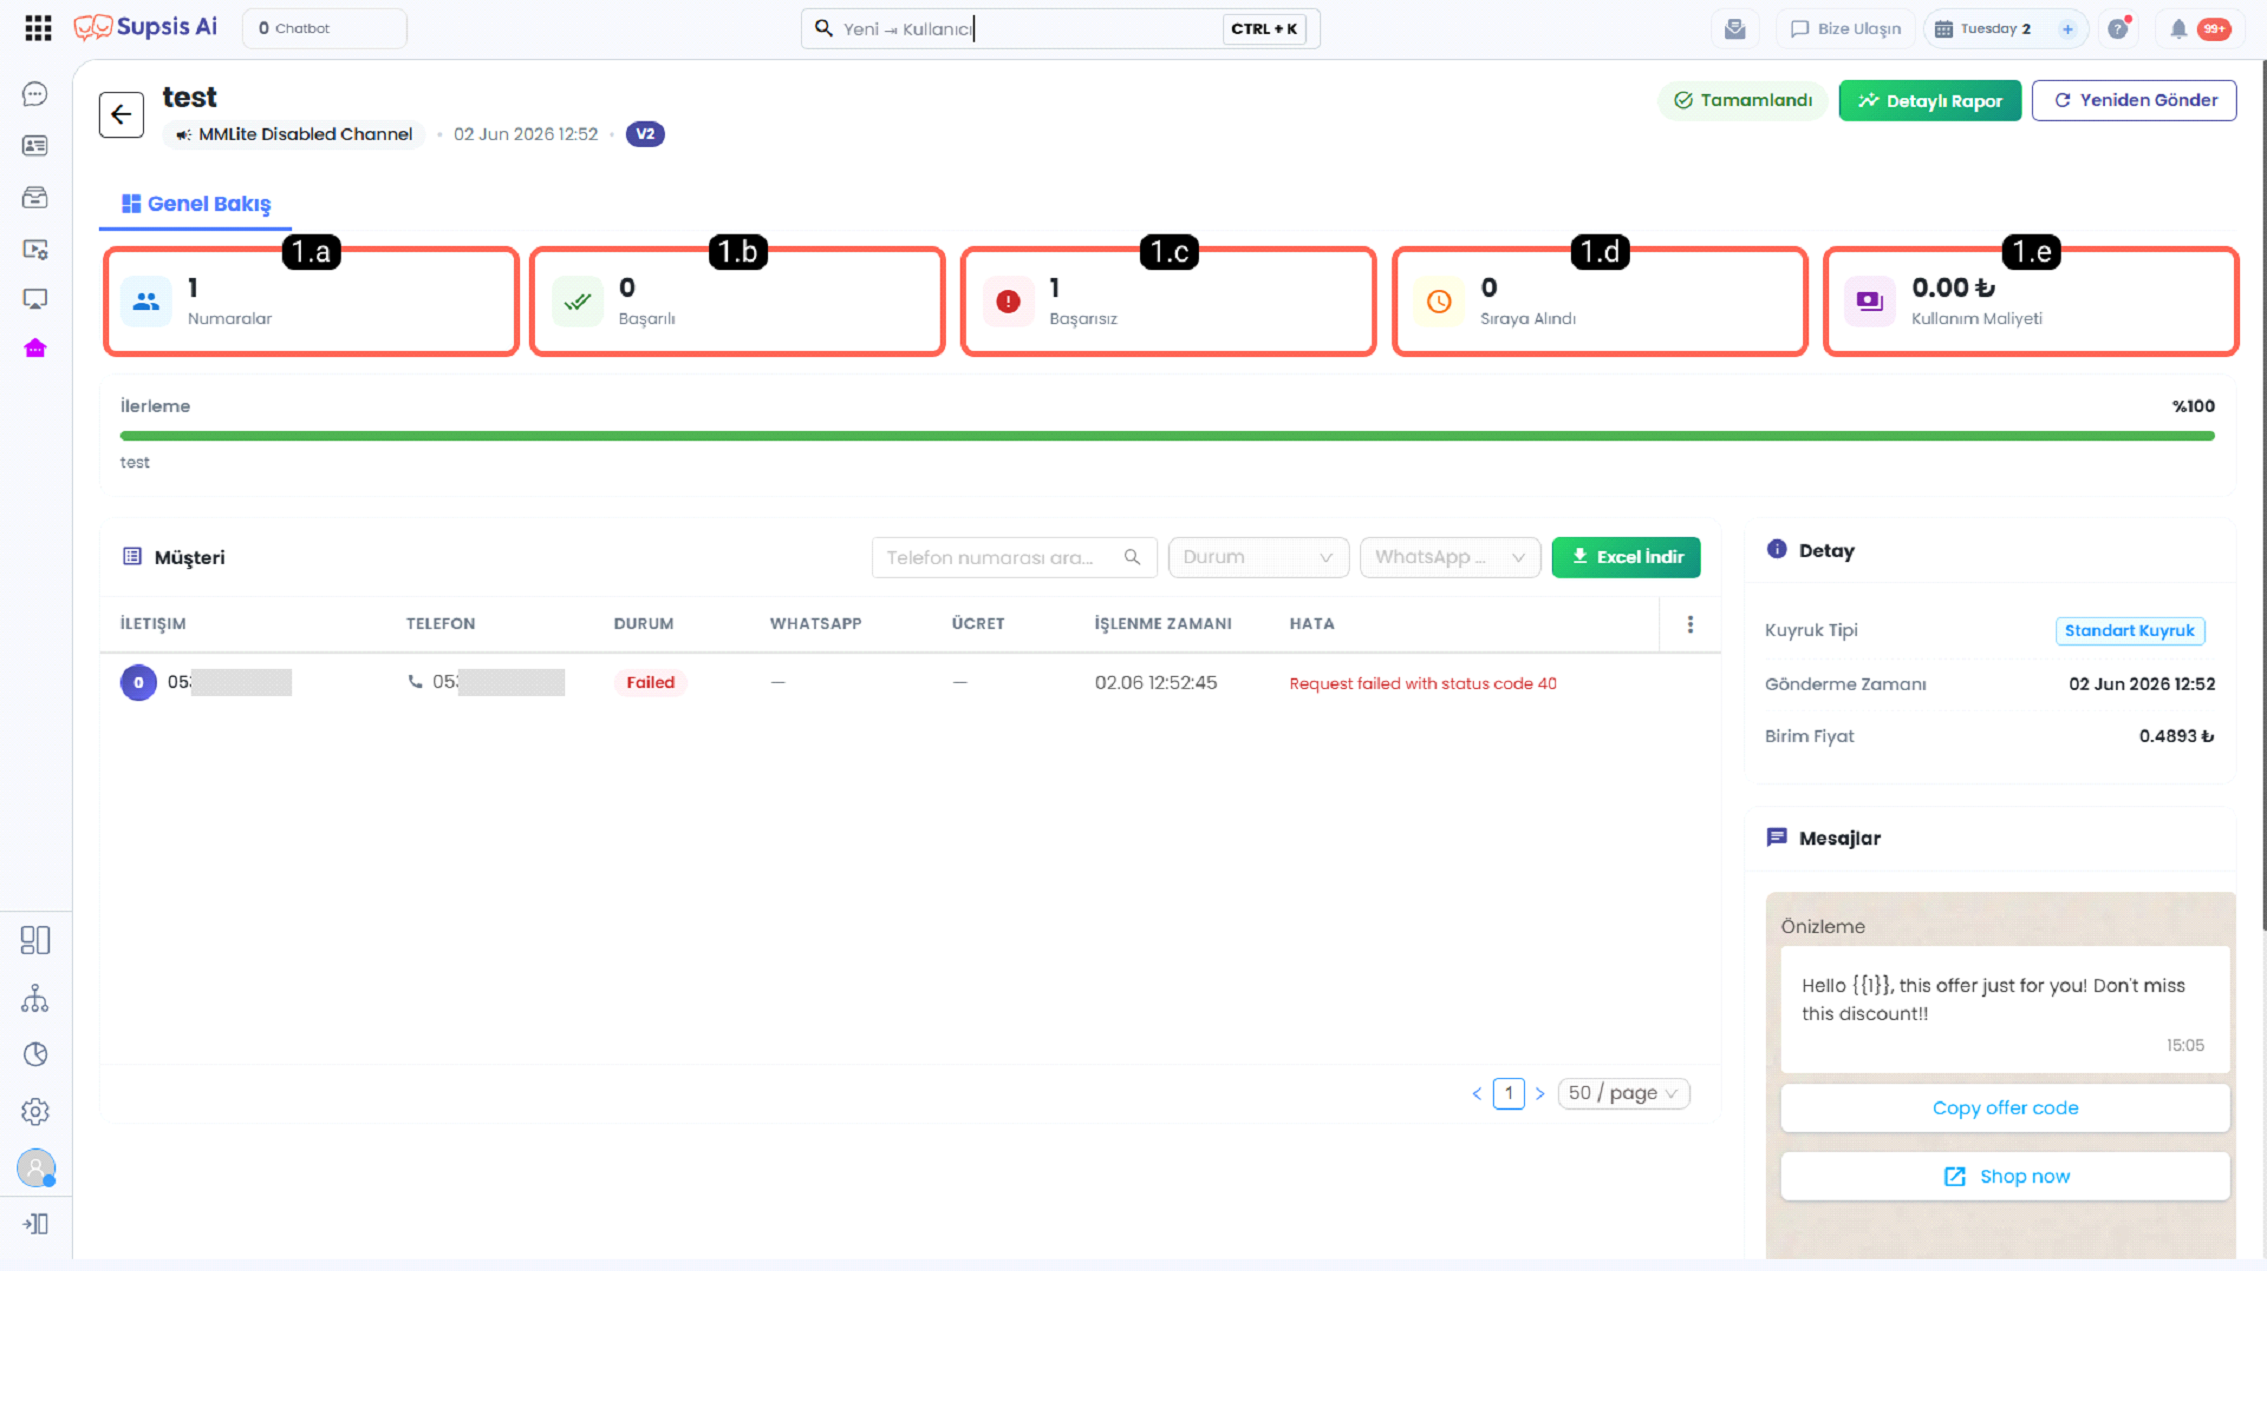
15.b – Numbers
In the Numbers field, the total number of recipients determined for the bulk message send is displayed. This number shows how many different phone numbers the message is prepared to be sent to.
15.c – Successful
In the Successful field, the number of messages smoothly delivered to the recipients as a result of the bulk message send is displayed. This number shows the messages successfully completed during the sending process.
15.d – Failed
In the Failed field, the number of messages that could not be delivered to the recipients during the bulk message send is displayed. This number is used to track messages that received an error or could not be completed during the sending process.
15.e – Queued
In the Queued field, the number of messages placed on hold for bulk message sending is displayed. This number is used to track recipients waiting in line or for whom the sending process has not yet started.
15.f – Usage Cost
In the Usage Cost field, the total fee information incurred as a result of the bulk message send is displayed. This amount is used to track the cost of sent messages and control usage expenses.
15.g – Sending Progress Status
In the Progress area, the percentage of completion for the bulk message sending process is displayed. Thanks to this section, the current status of the sending can be tracked instantly.
15.h – Customer Filtering and Excel Export Area
Through the Customer Filtering and Excel Export Area, recipient records can be filtered by phone number, sending status, and WhatsApp information. In addition, the listed customer data can be downloaded and exported in Excel format, making it easier to examine sending results.
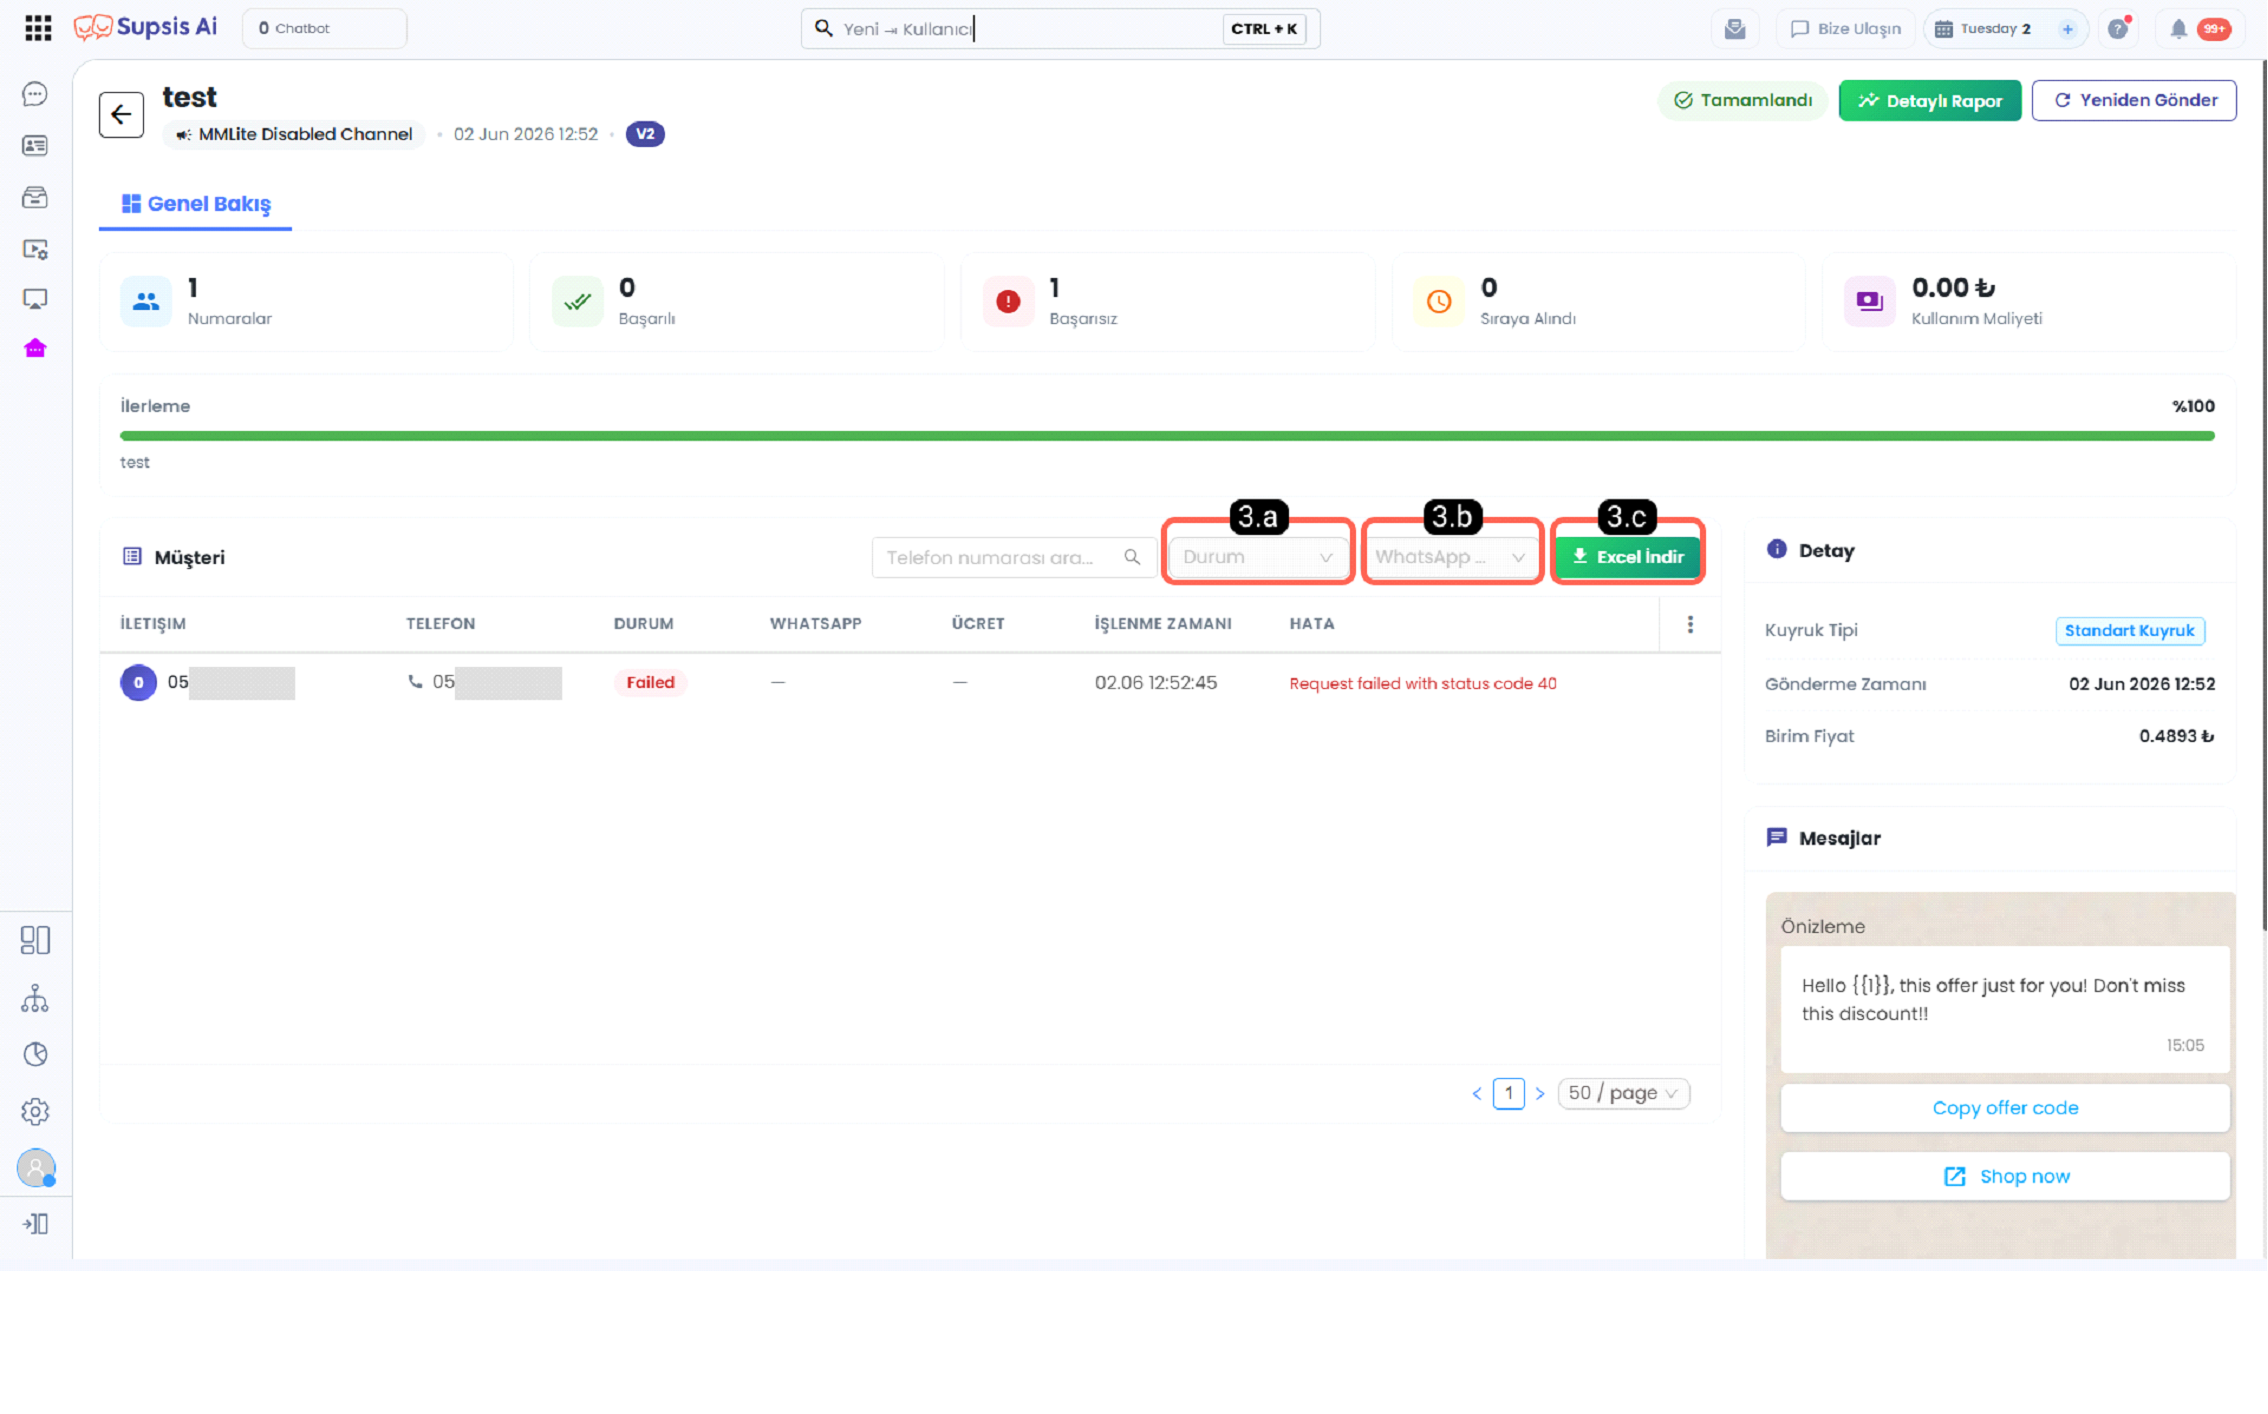
15.i – Status Filter
The Status filter is the filtering area that allows customer sending records to be separated according to their current transaction status. Thanks to this feature, the user can examine the records in the list more neatly and reach the desired sending results faster.
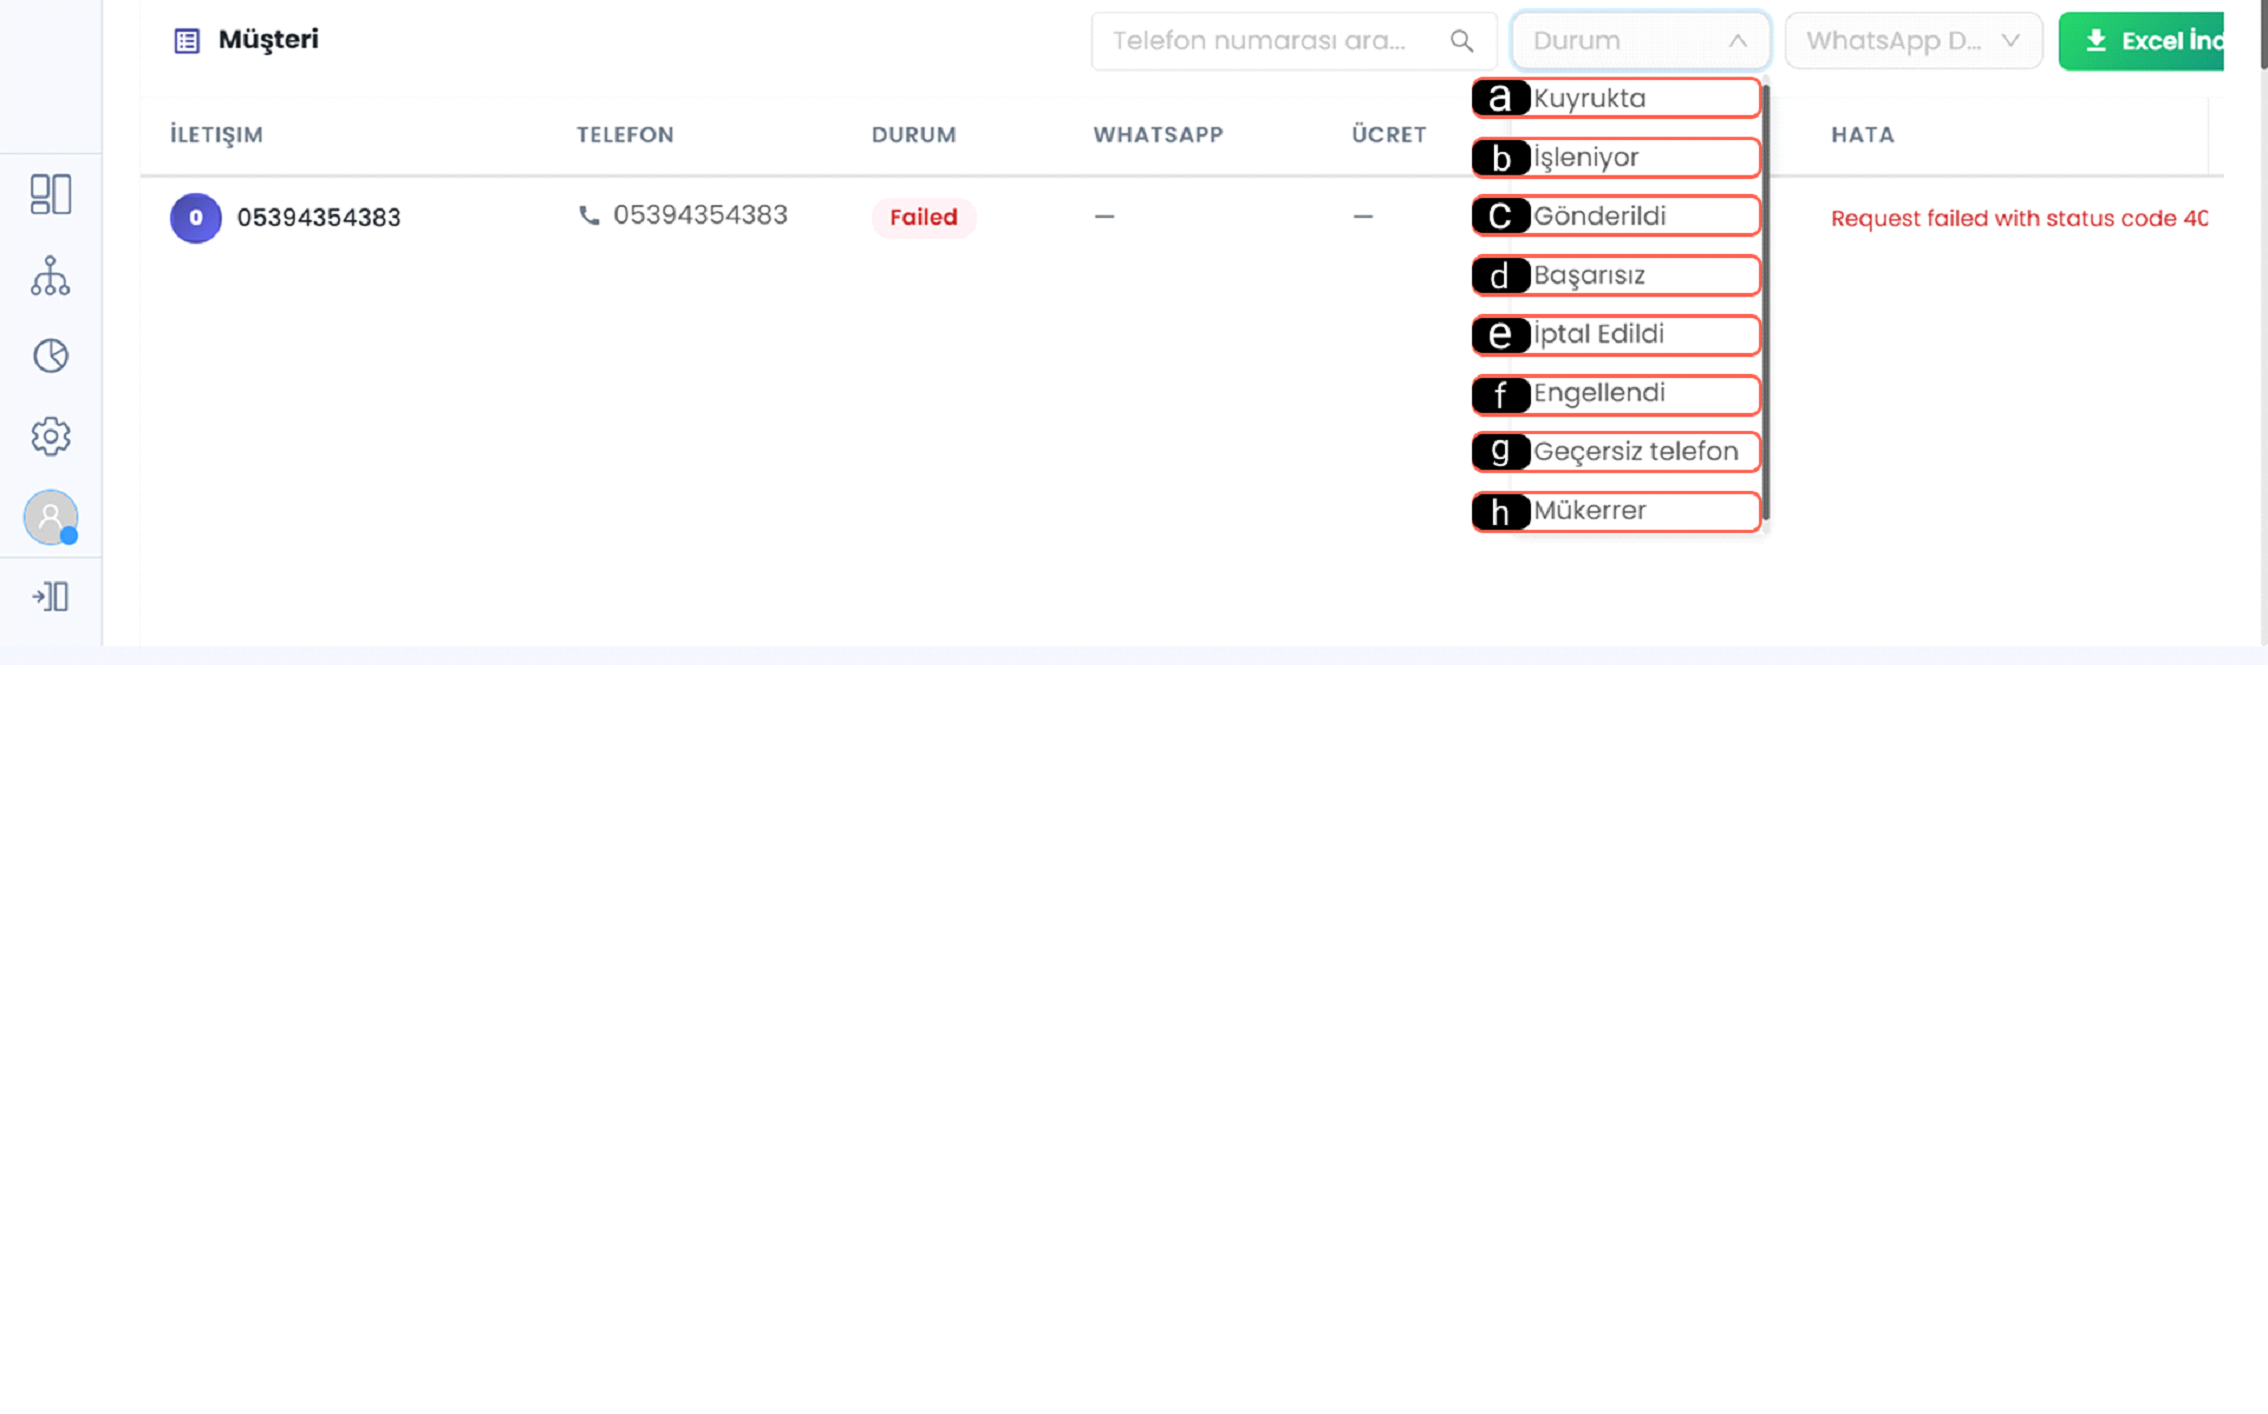
-
a - In Queue: Shows records queued for sending, processing not yet started.
-
b - Processing: Shows records whose sending process is ongoing.
-
c - Sent: Shows message records successfully sent to the recipient.
-
d - Failed: Shows records where an error occurred during sending.
-
e - Canceled: Shows records whose sending process was canceled.
-
f - Blocked: Shows records whose sending was blocked by the system or channel.
-
g - Invalid Phone: Shows records where the phone number is incorrect or not in the proper format.
-
h- Duplicate: Shows repeating records where the same number appears more than once.
15.j – WhatsApp Status Filter
Allows messages to be listed according to their sending status on WhatsApp. Thanks to this filter, the delivery and reading processes of messages can be tracked more easily.
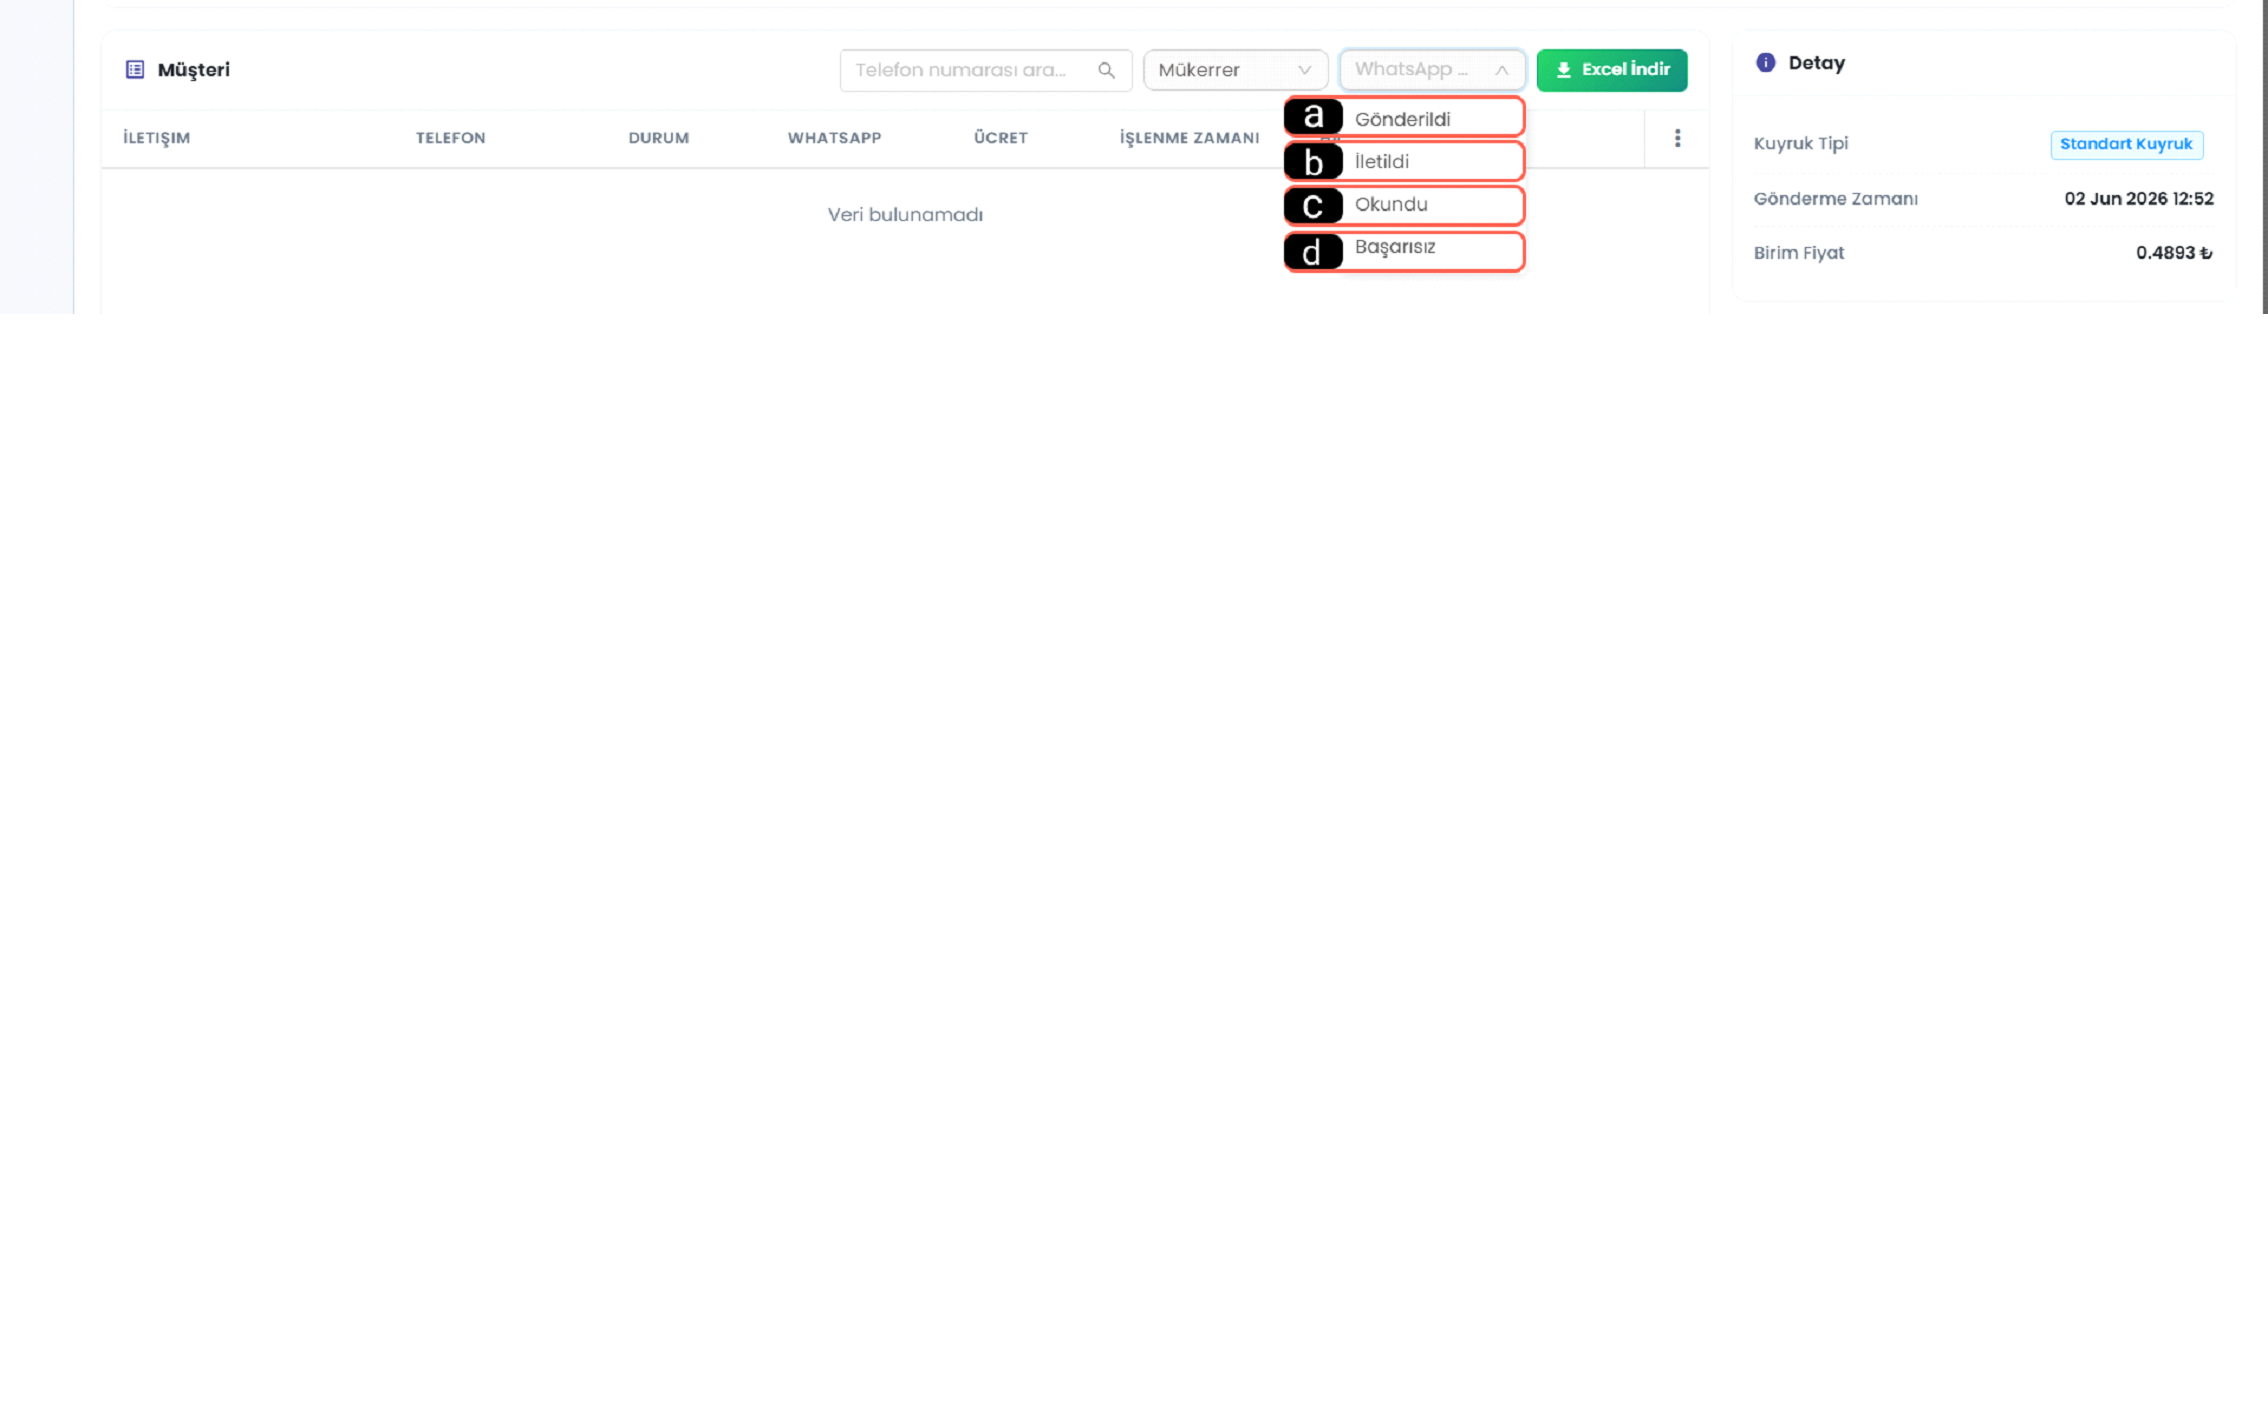
-
a - Sent: Shows that the message has been sent to the recipient by the system.
-
b - Delivered: Shows that the message has reached the recipient's device.
-
c - Read: Shows that the message has been viewed by the recipient.
-
d - Failed: Shows that the message received an error during the sending or delivery process.
15.k – Download Excel
The Download Excel button allows customer sending records to be exported in Excel format. This way, the data in the list can be downloaded as a file and examined later.
15.l – Customer Sending List
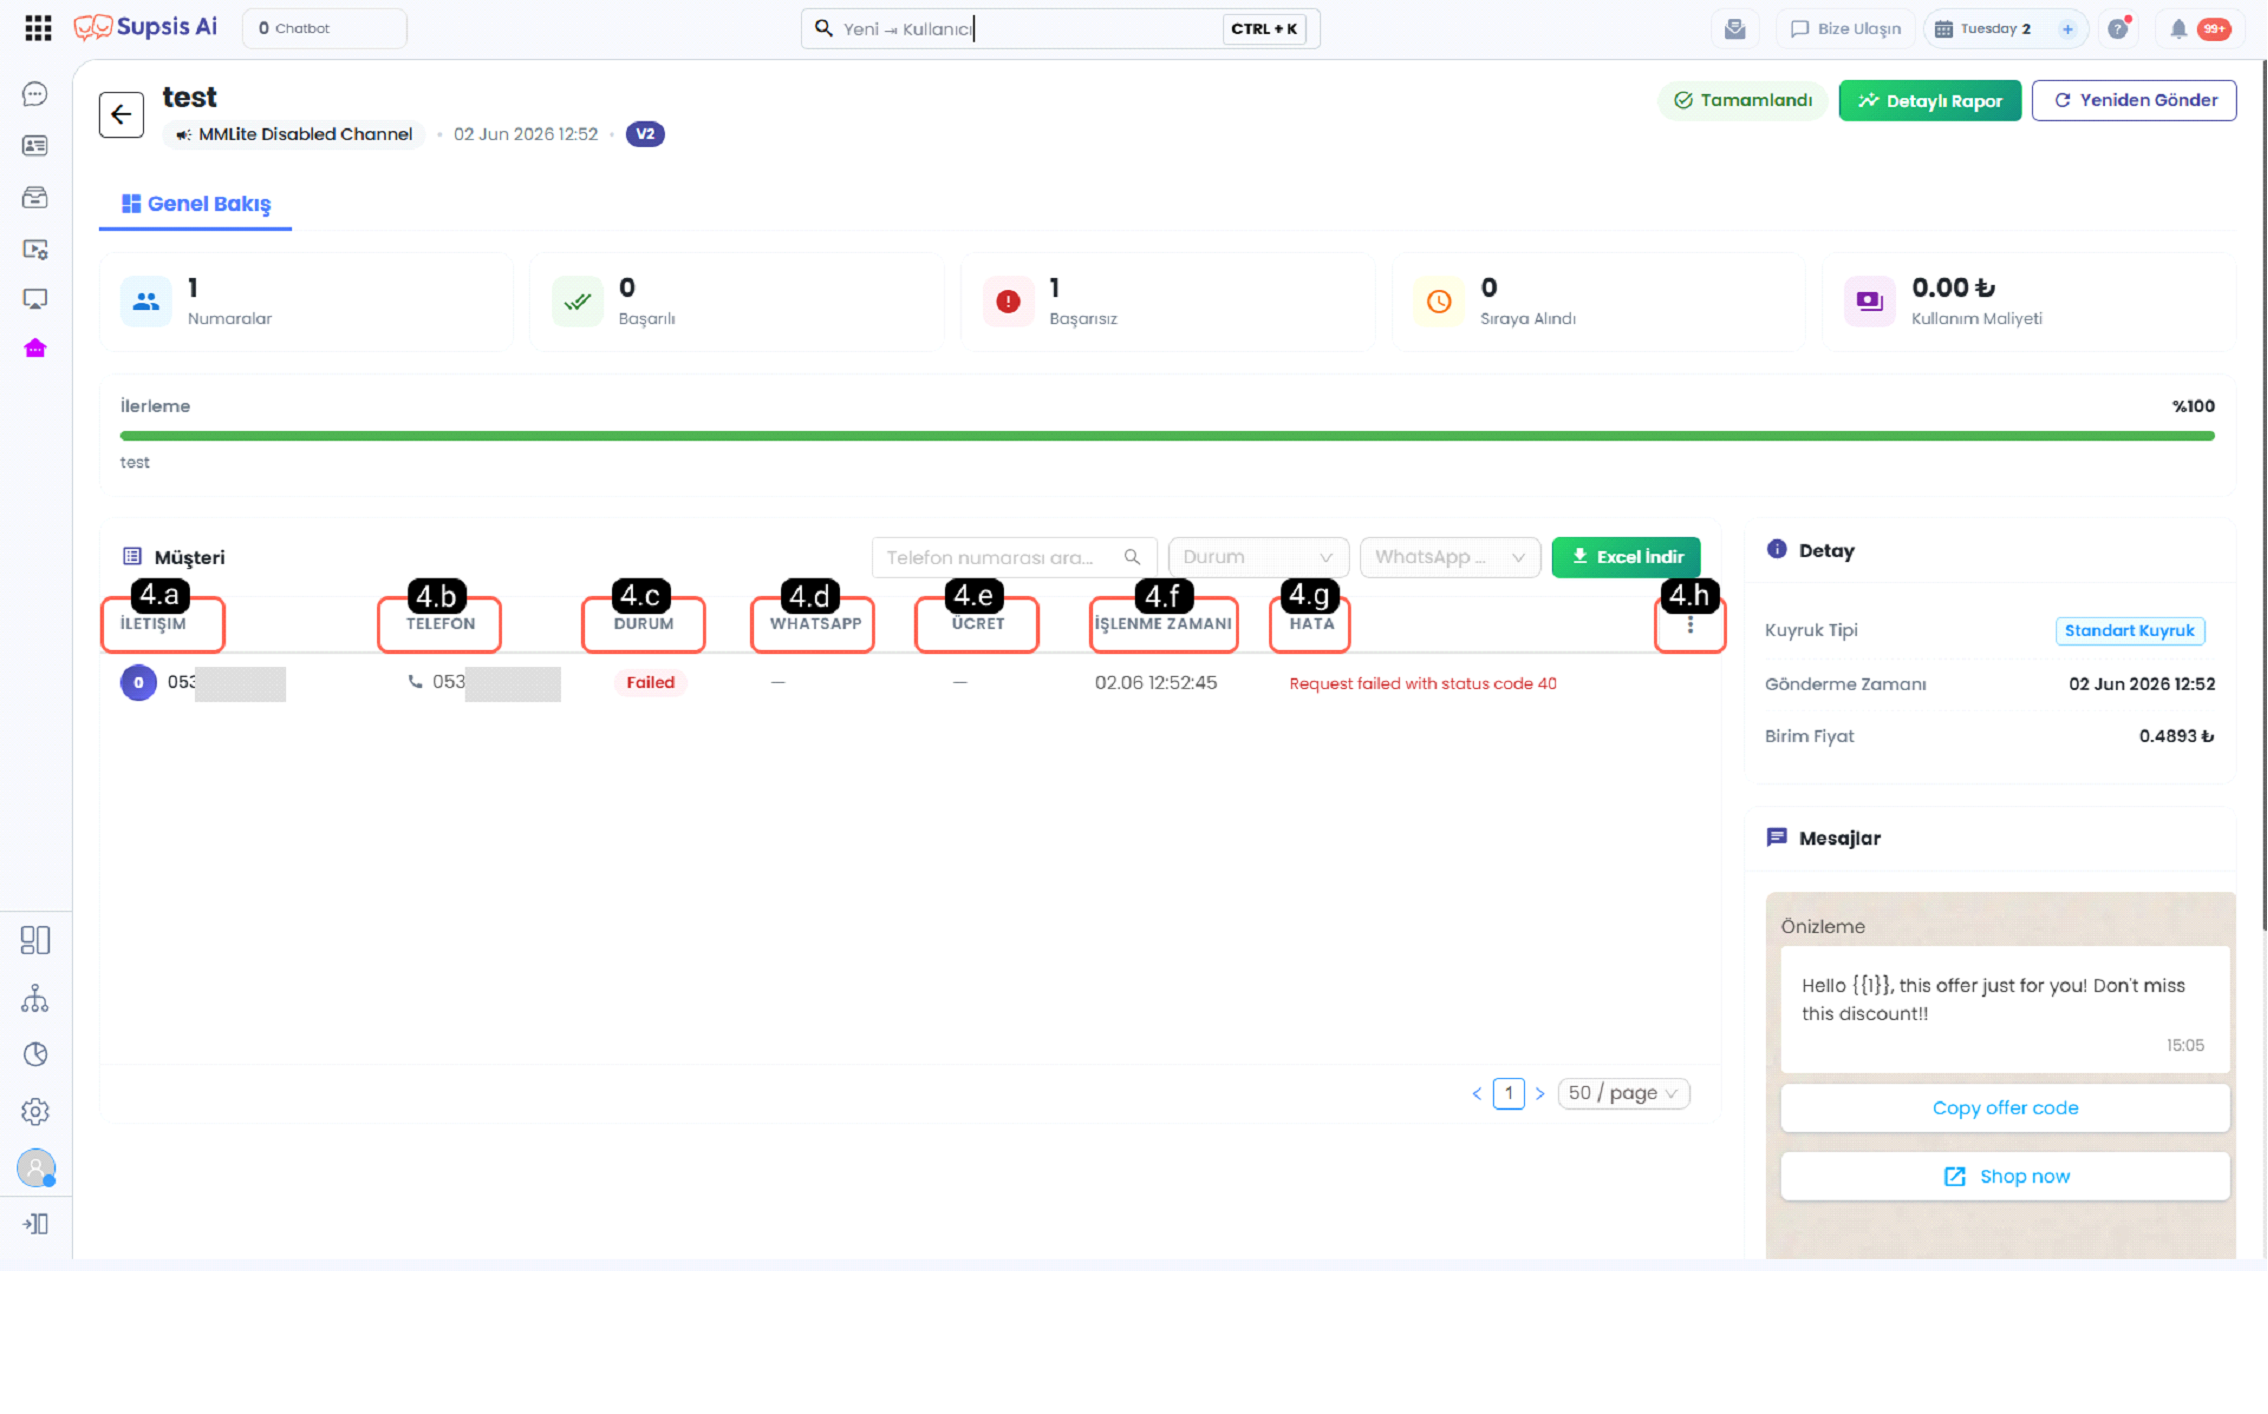
Information belonging to the recipients sent the bulk message is displayed in this area. Contact information, phone number, sending status, WhatsApp result, cost, processing time, and error details, if any, can be tracked from here.
-
4.a - Contact
This is the area where the contact information belonging to the recipient is displayed.
-
4.b - Phone
Shows the phone number to which the message was sent.
-
4.c - Status
Shows the current transaction status of the sending record in the system.
-
4.d - WhatsApp
Shows the sending, delivery, or read status of the message on WhatsApp.
-
4.e - Fee
Shows the cost information incurred for the relevant message send.
-
4.f - Processing Time
Shows the date and time information when the message was processed by the system.
-
4.g - Error
Shows the error or failure reason that occurred during sending.
-
4.h - Manage Columns
Allows selecting and editing the columns displayed in the list. The user can hide columns they do not need or make them visible again. In addition, the desired column can be found faster thanks to the column search area.
Note: To change the column order, you can drag and drop the column header you want to move to your desired position. This way, you can edit the list view according to your usage needs and view the columns in any order you want.
15.m – Sending Detail Information
Additional information regarding the bulk message send is displayed. In this section, queue type, sending time, and unit price information can be tracked to examine the sending process in more detail.
15.n – Message Preview Area
The message content used in the bulk message send is displayed as a preview. In this section, the message text, buttons, and links can be examined as they will appear to the recipient.
16-) View Report Content
Used to open the detailed report belonging to the relevant bulk message send. Through this section, sending results, successful and failed messages, recipient information, and general performance details can be examined.