Workflow Content
The Workflow Content area is the management section where you define according to which rules tasks will progress, who can view them, which rule automations will run, and which actions can be taken on the task by which Supsis AI users. Through this area, you can standardize your business processes, automate them, and strengthen coordination between teams.
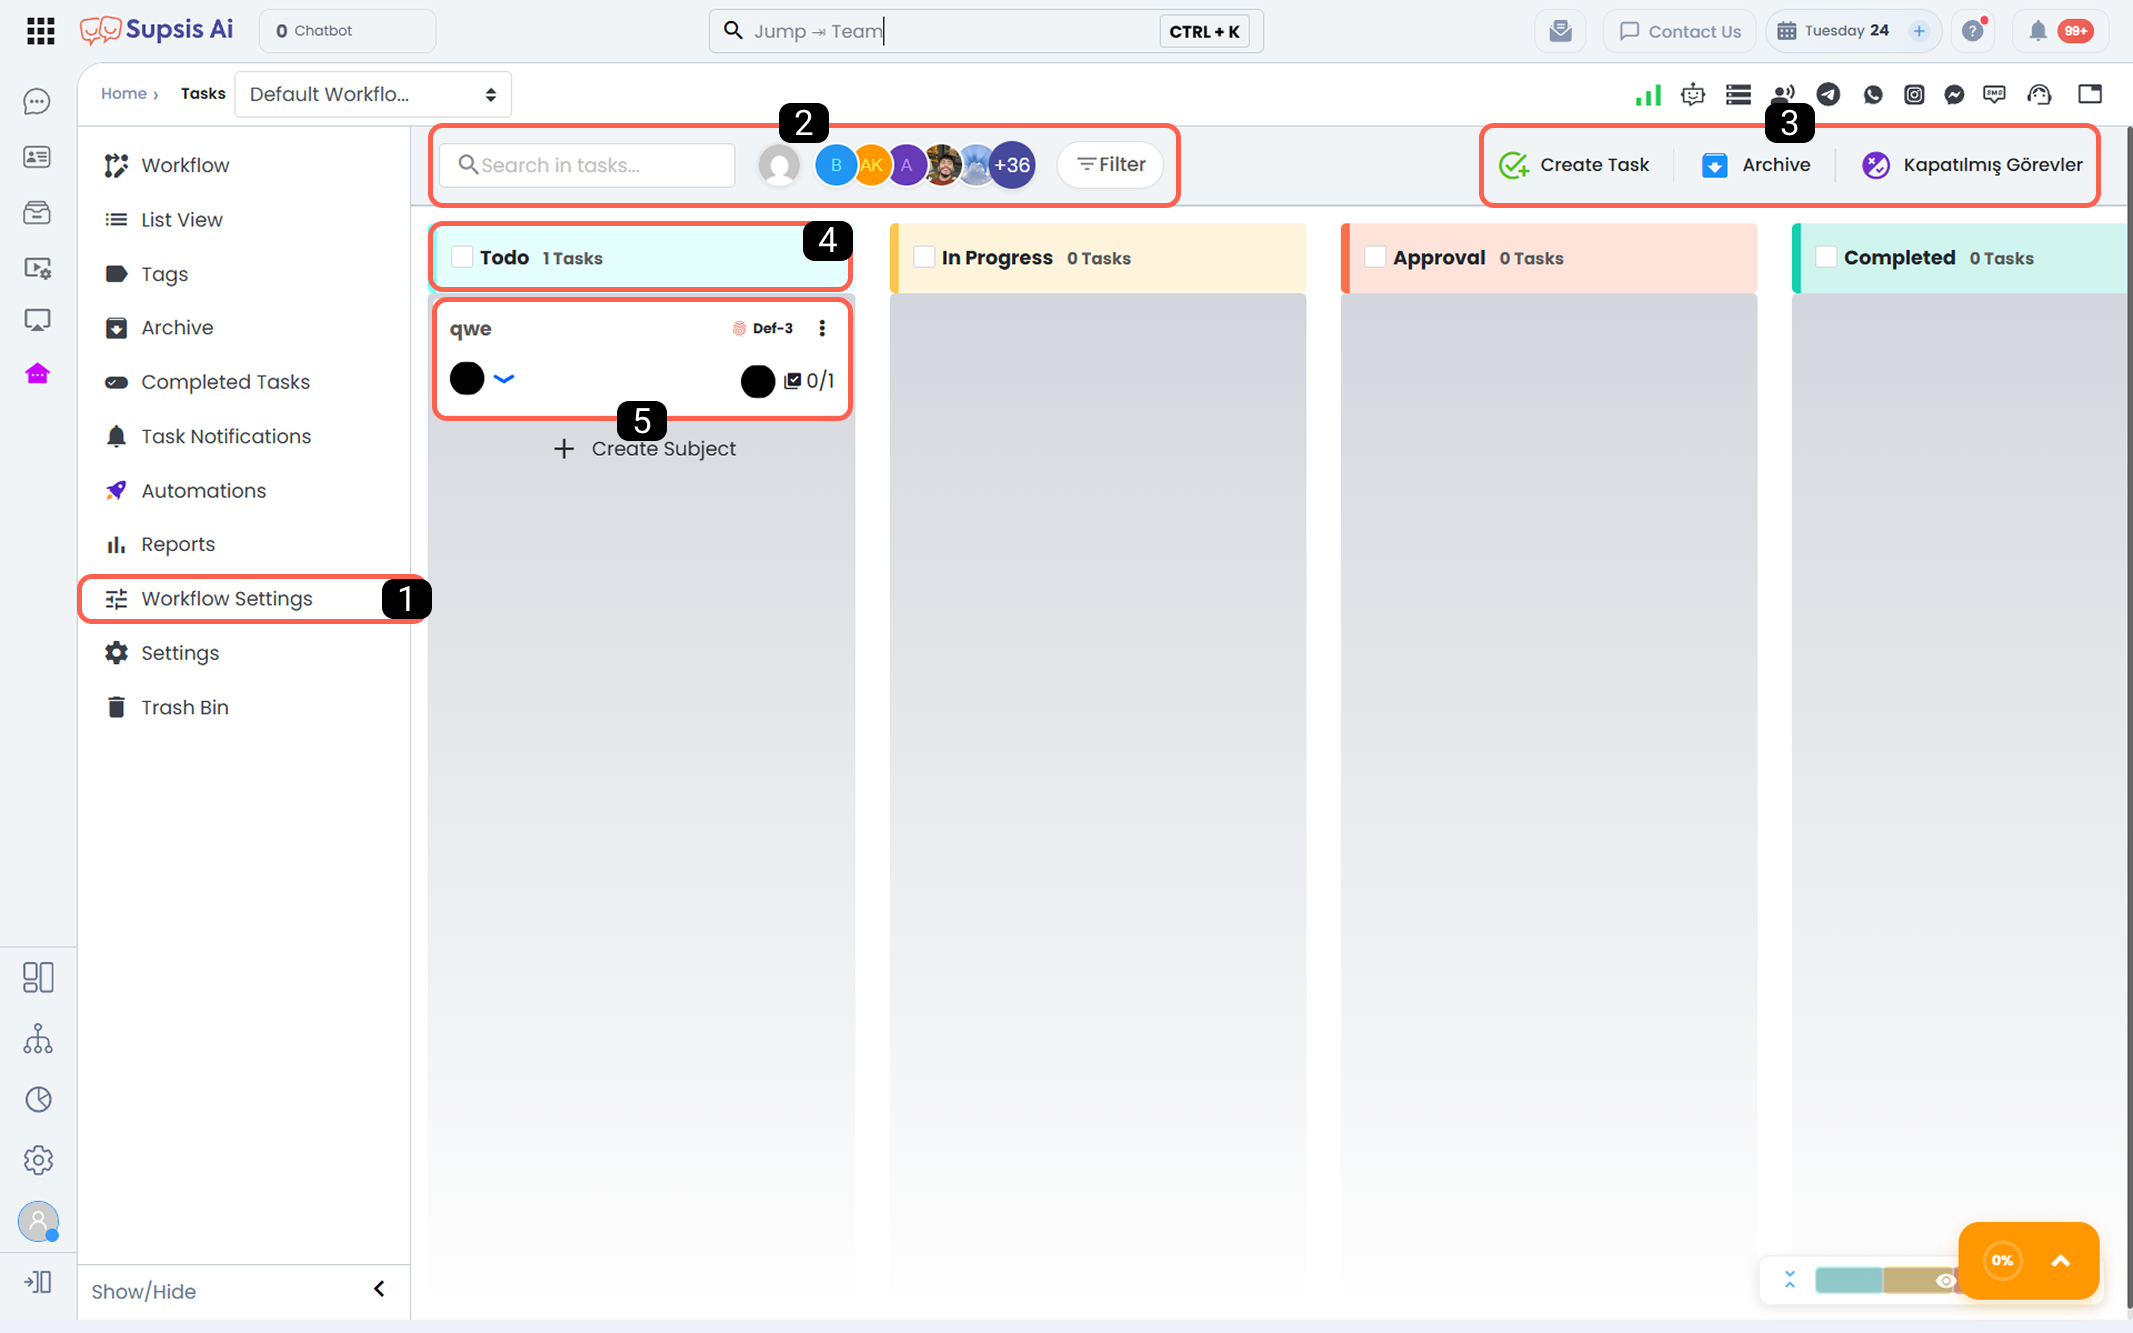
| No | Menu |
|---|---|
| 1 | Workflow Settings |
| 2 | Filter Elements |
| 3 | Shortcuts |
| 4 | Stage Actions |
| 5 | Task Actions |
1-) Workflow Settings
Workflow Settings is the area where the fundamental building blocks of the workflow are defined and managed. The workflow title, description, and stage structures are controlled from this section.
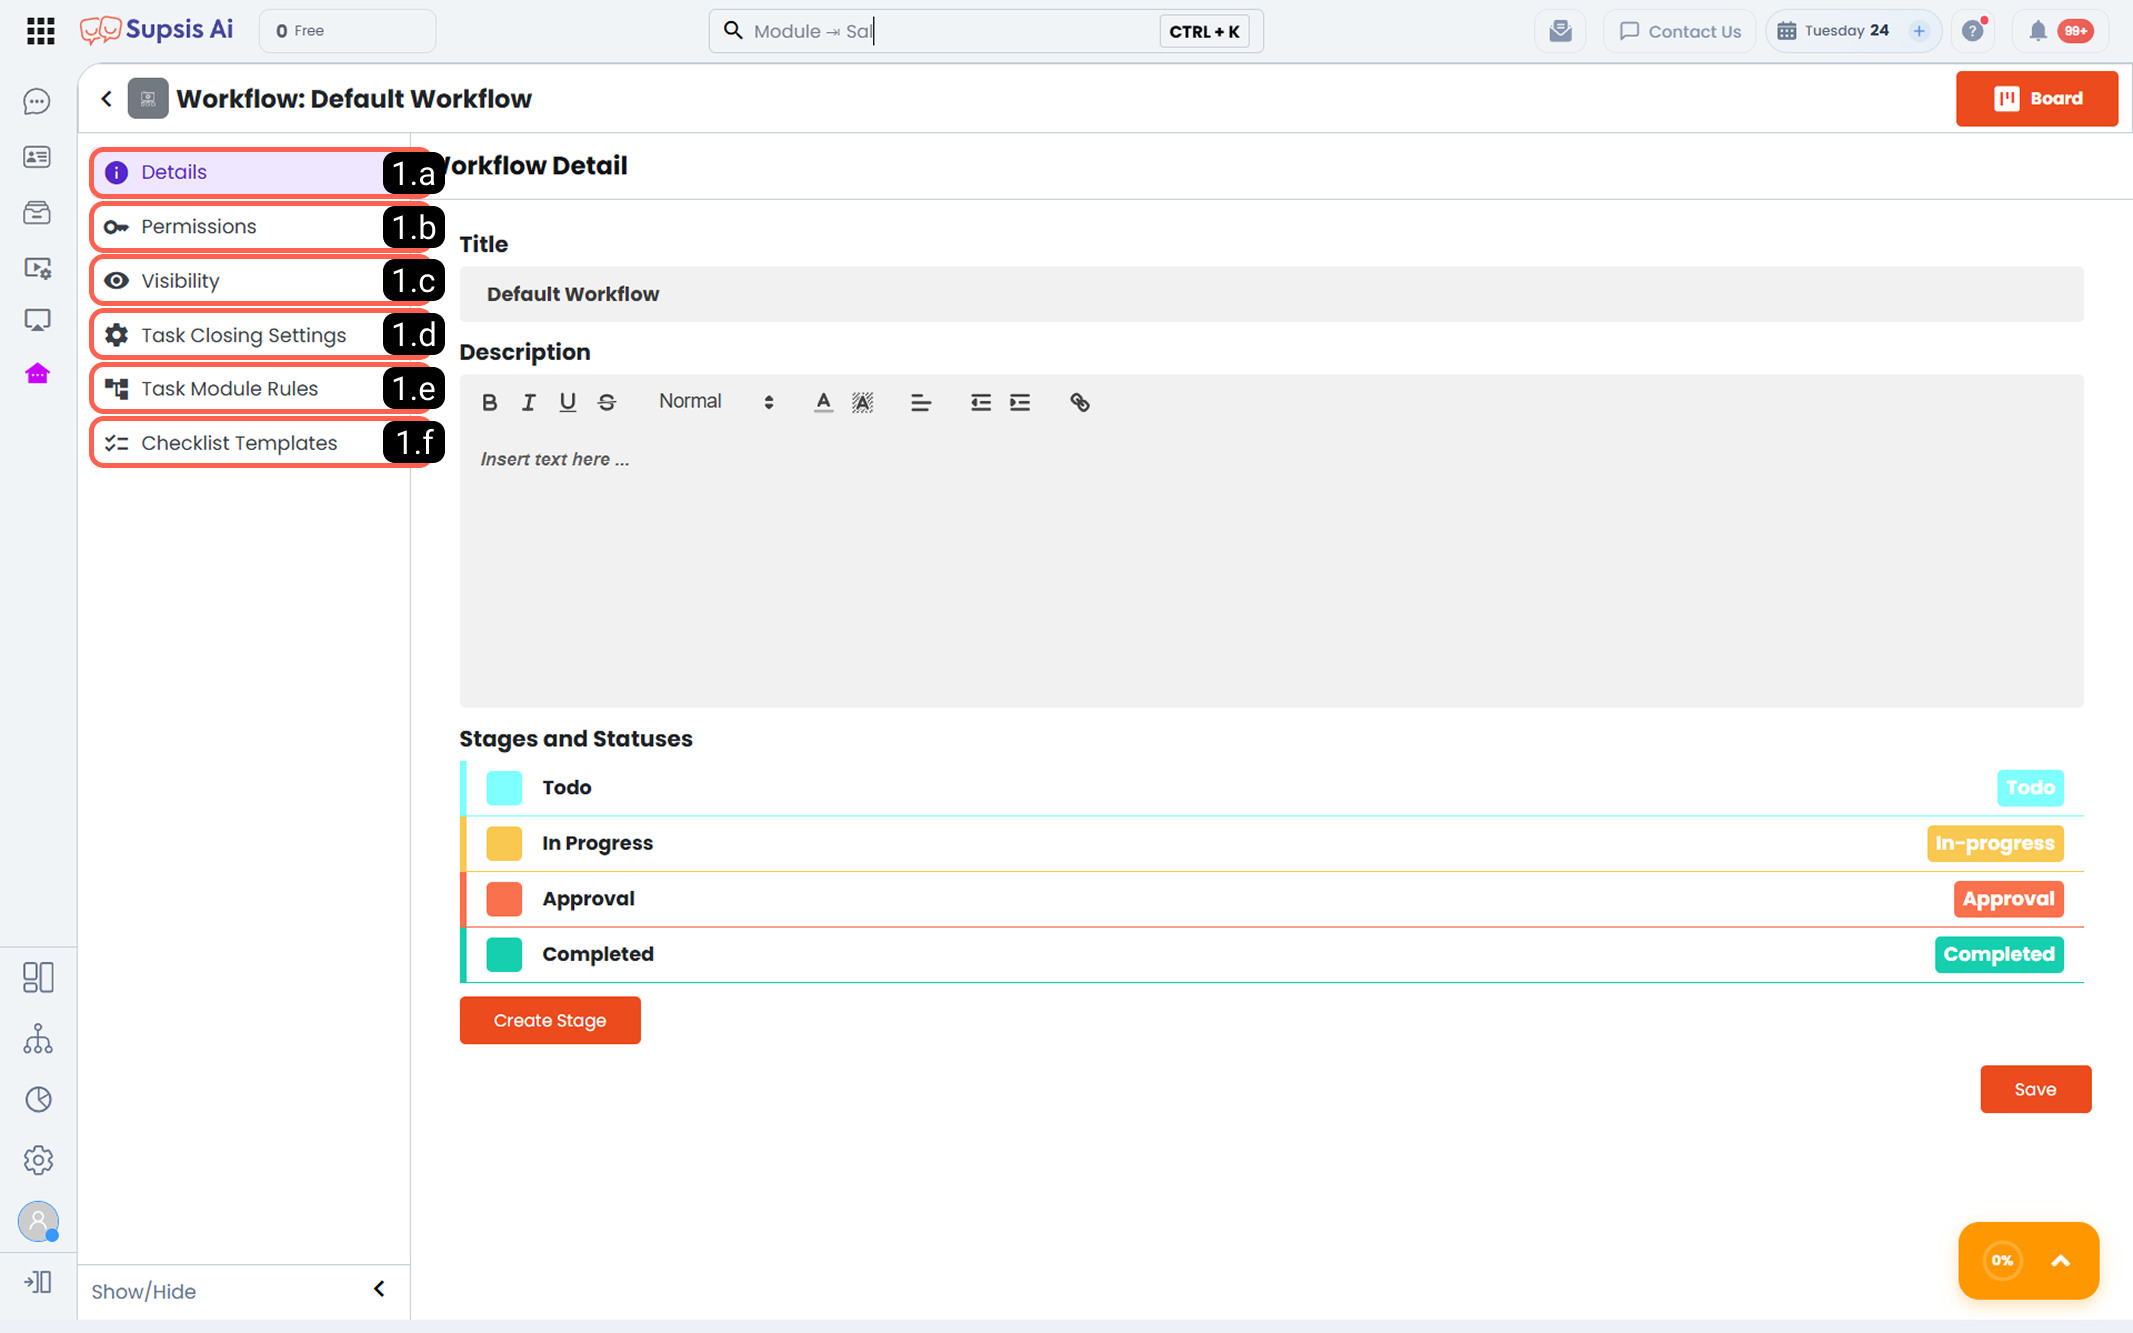
1.a – Details This is the main area where the content of the workflow is managed. All core editing operations related to the workflow can be performed through this area.
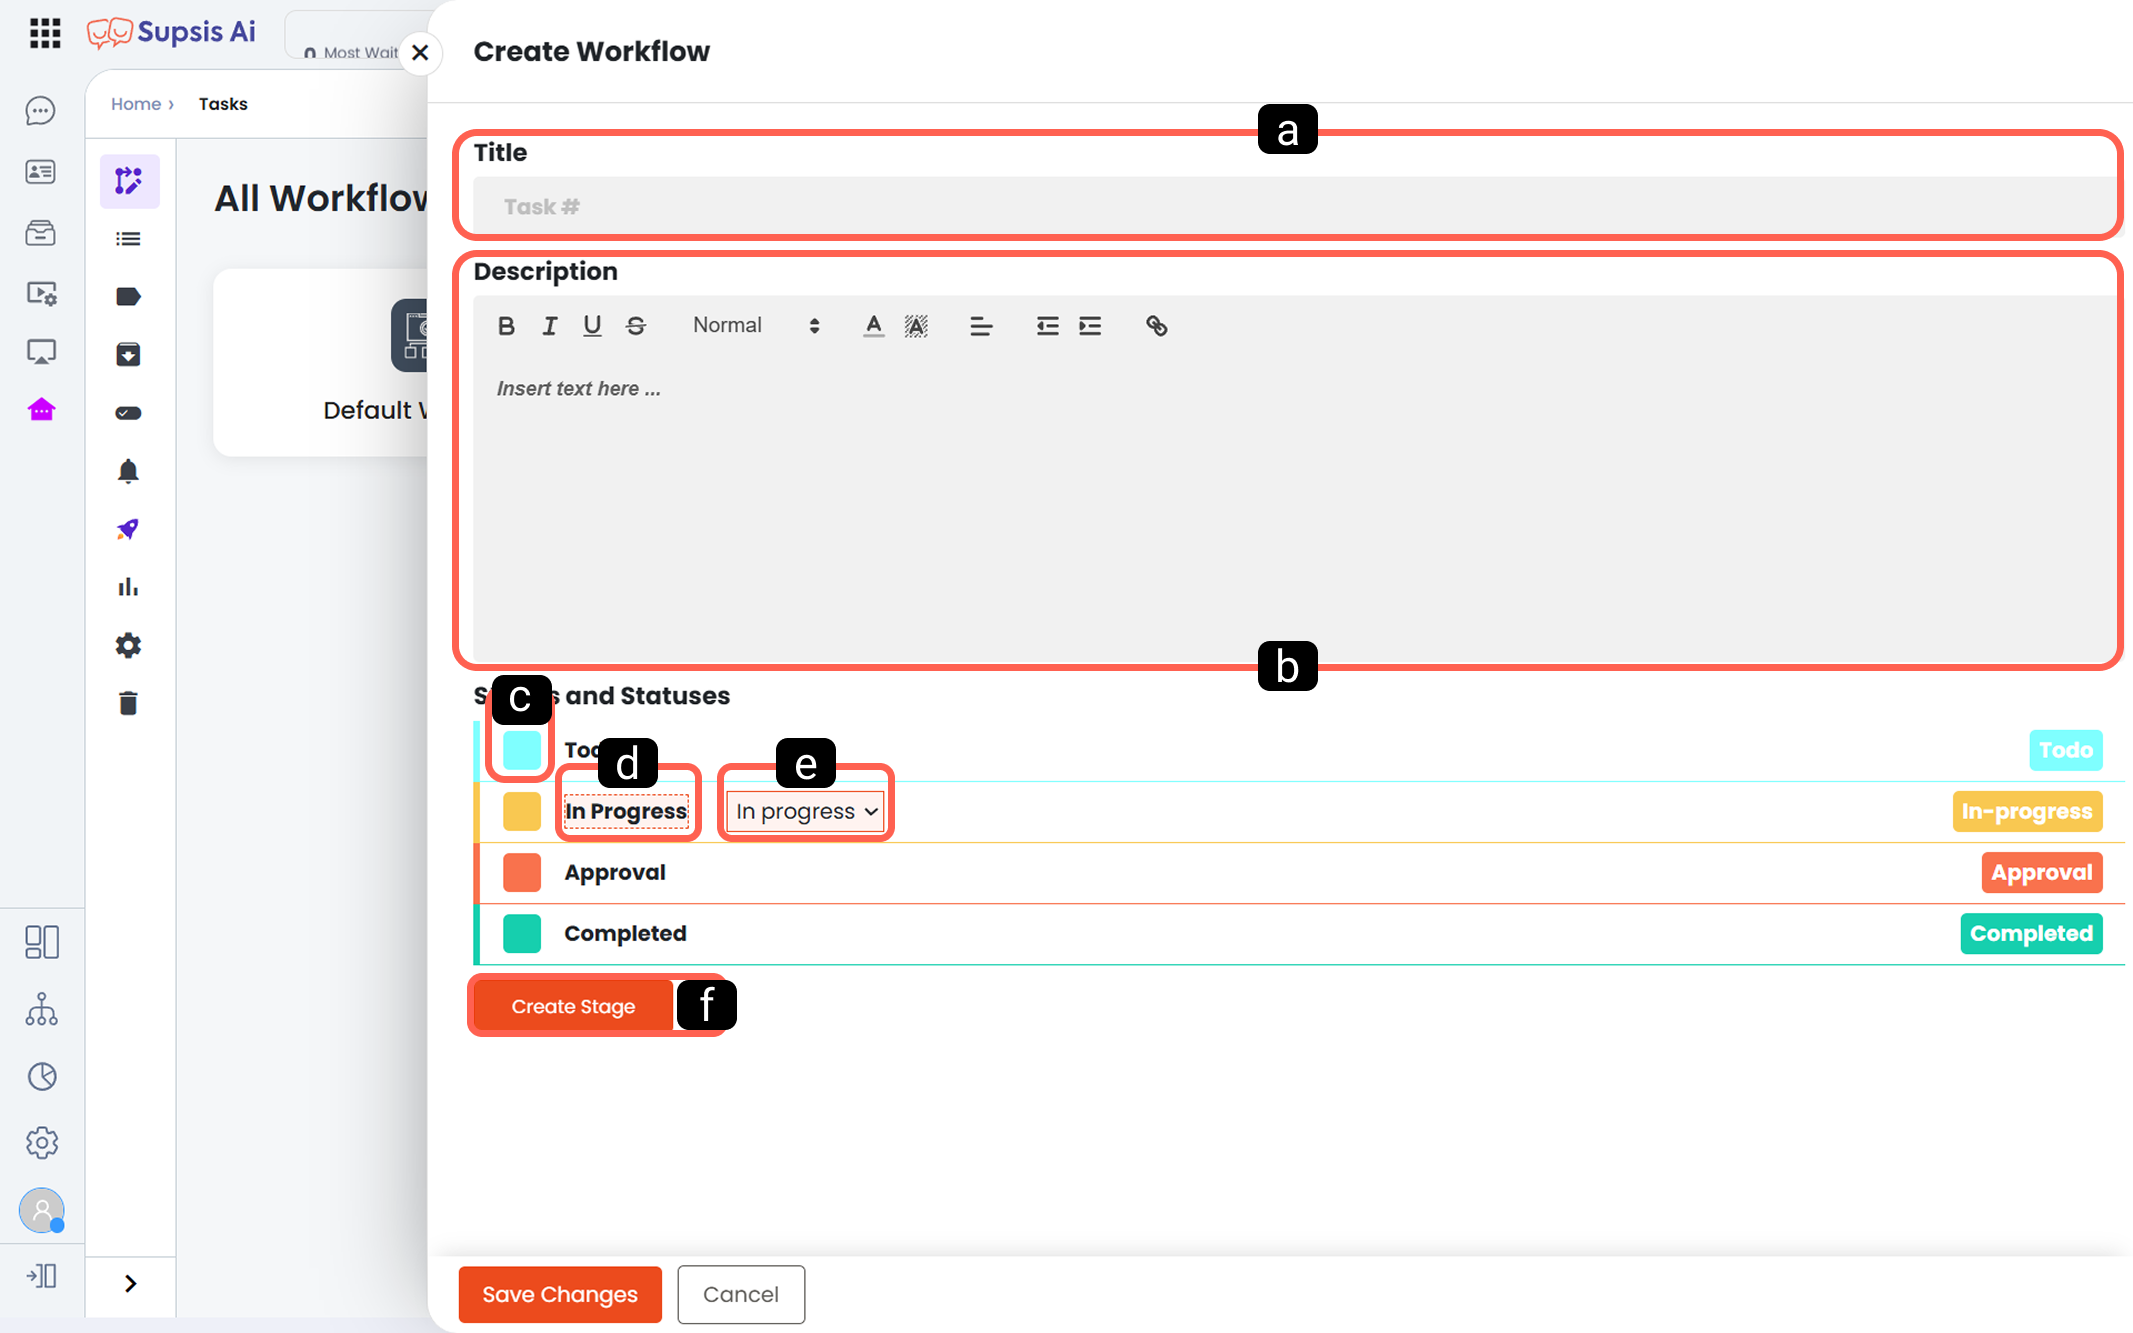
a - Workflow Title It is the name information that defines the workflow. This title is displayed in task lists, reports, and filtering areas. It is recommended that it clearly expresses the purpose of the workflow.
b - Workflow Description It is the area where you can explain in detail for what purpose the workflow is used and which scenarios it serves. This description makes it easier for team members to use the workflow correctly.
c - Stage Color It is the color definition used to visually distinguish the stages belonging to the workflow. By defining a different color for each stage, it becomes easy to understand which process the tasks are in.
d - Stage Name It is the stage name that expresses the process in which the task is located. Example: Refund Request Received, Under Review, Awaiting Approval.
e - Stage Status It indicates the system status information of the tasks in that stage. The stage statuses are: Todo, In-progress, Approval, Completed These statuses directly affect task closing, reporting, and automation behaviors.
f - Create New Stage It is the option used to add new stages to the workflow. Newly created stages are added to the workflow order and can be moved to the desired position using drag-and-drop.
1.b – Permissions The Permissions section is used to determine which users can perform which operations on tasks (cards) within the workflow.
Through this area, the distribution of authority within the team is clarified and task processes are managed in a controlled manner.
When a workflow is created, default settings are active in the permission settings. In default settings, all users have full authority.

a - User Search Bar
It is the search field used to quickly find the users to be authorized. By typing the username, the relevant user can be filtered in the list and permission settings can be easily accessed.
b - User
It is the area where the users who can be authorized on the workflow are listed. Each user is displayed in their own row and which actions that user is authorized for are controlled from that row.
c - User Permission
It refers to the operations that the user can perform on the cards within the workflow. These permissions include actions such as deleting a card, creating a card, editing a card, moving a card, archiving a card, and completing a card. By checking or removing permission areas, a specific access and operation authority can be defined for each user. Through this structure, workflows are managed in a secure and role-based manner.
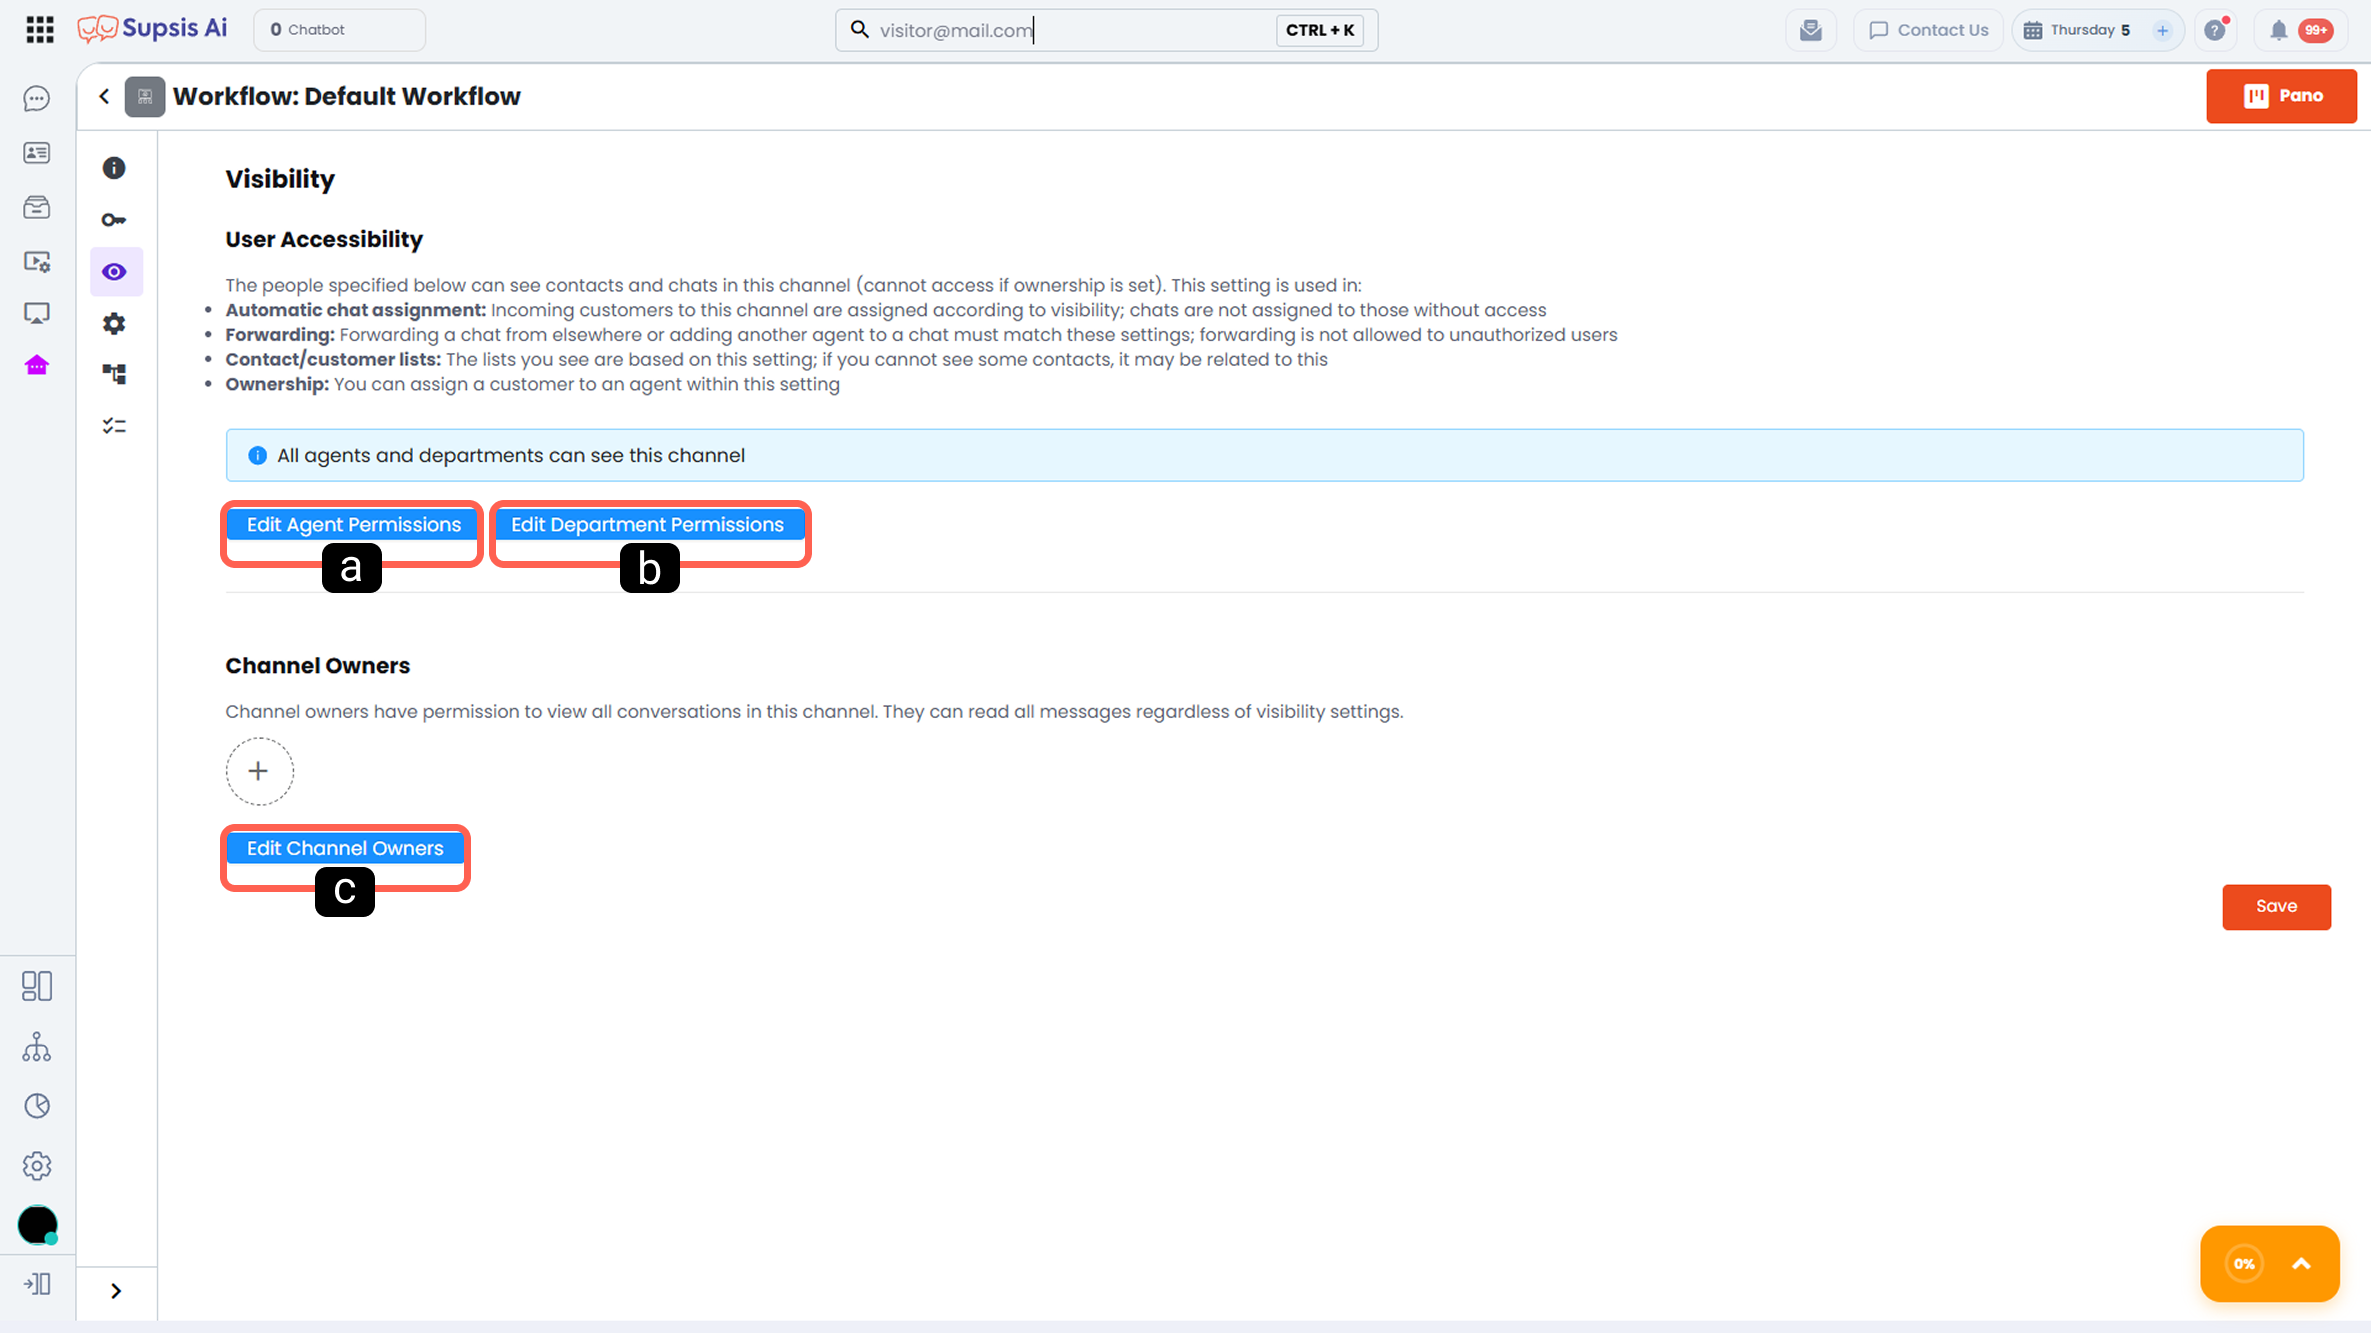
1.c – Visibility Permissions The Visibility Permissions section is used to determine which users and departments can view the workflow and who will have ownership authority on this workflow. Through this area, workflows can be restricted or expanded in accordance with the organizational structure.
-
a - Agent Visibility
It is the setting used to determine which agents can see the workflow. Through this option, access permission can be granted to specific agents or all agents can be allowed to view the workflow. Agent-based visibility supports that only authorized users can take action on the relevant workflow.
-
b - Department Visibility
It is used to determine which departments can view the workflow. All agents affiliated with the selected departments can view this workflow and perform actions in line with their permissions. This structure facilitates department-based task management and ensures that processes are followed by the correct teams.
-
c - Ownership Editing
It is the area used to determine and update the owners of the workflow. Channel owners have full authority over the workflow and can perform visibility, editing, and management operations. Through ownership editing, the responsibility of workflows is clarified and managerial control is ensured.
Note: If no visibility setting is made, all users can view this workflow.
1.d – Task Closure Settings
Task Closure Settings are used to determine whether additional information will be requested from the Supsis AI user closing the task during the task closing process. Through these settings, task closing operations become more controlled, traceable, and reportable.
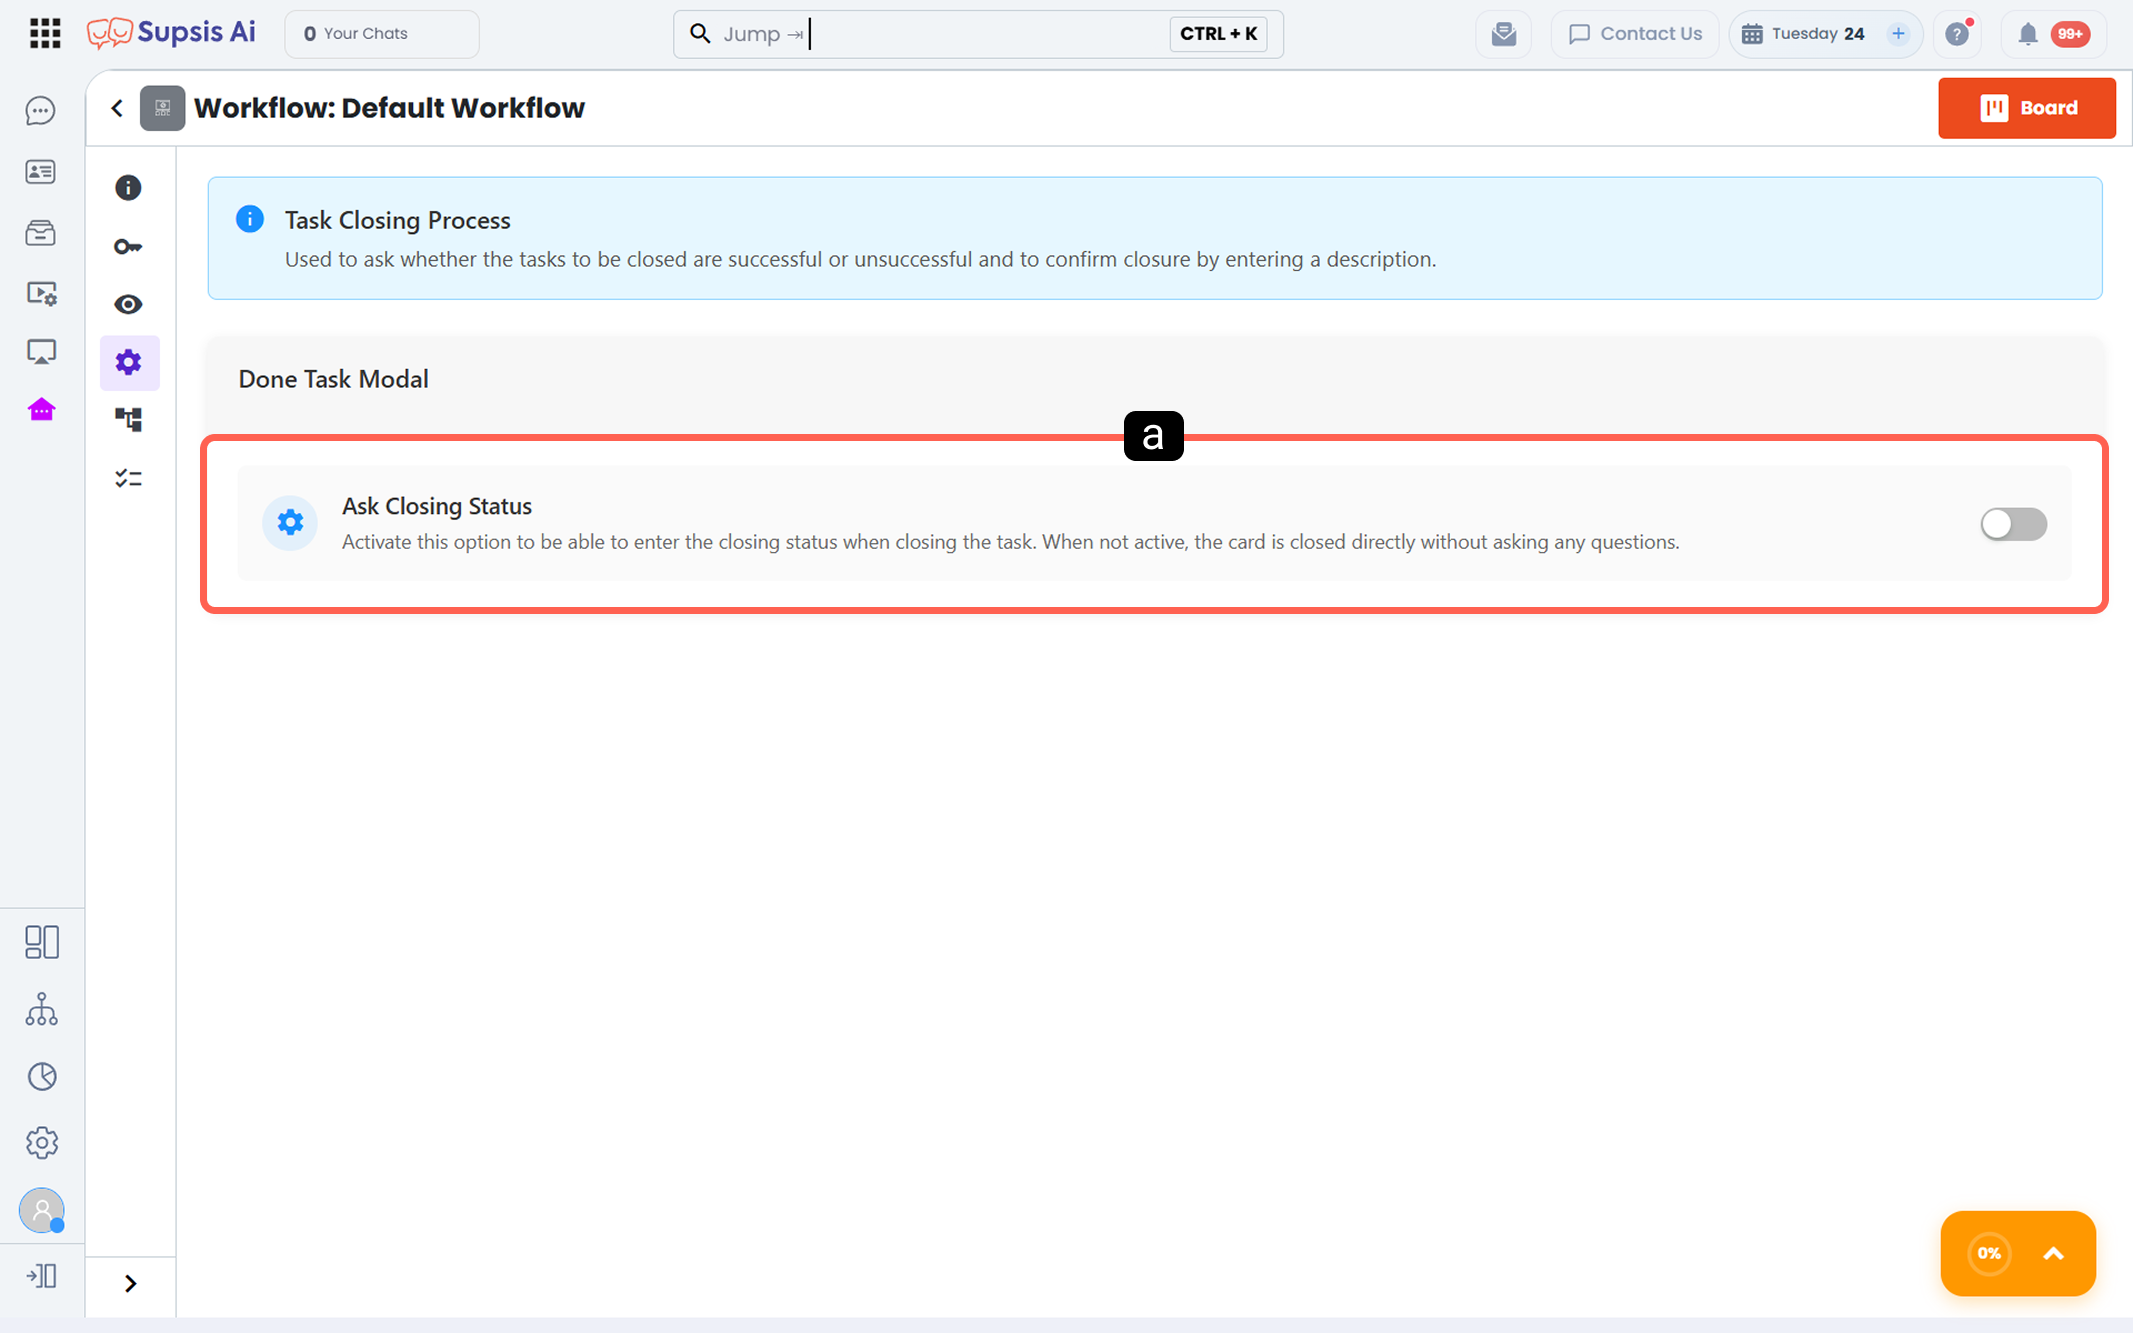
- a - Ask Closure Status
When this option is activated, the agent must specify the closure status related to the task while closing it. The user is asked whether the task was completed successfully or unsuccessfully and optionally allowed to enter an explanation.
When Active:
During task closing, a closure screen is shown to the user and the task cannot be completed without selecting a closure status. In this way, task results become more meaningful and process performance can be analyzed.
When Passive:
The task is closed directly without requesting any question or additional information. It can be preferred for workflows that require faster closing and do not require details.
1.e – Task Module Rules
Task Module Rules is the automation area that allows you to execute automatic actions when certain events occur on tasks.
Through these rules, you can reduce the need for manual operations, standardize task flows, and increase operational efficiency. Automations are triggered when a defined triggering task status occurs such as when a task is created, when a task is updated, when a comment is added to a task, when a task changes stage, etc.
The working logic is as follows:
- Condition Matched Situation:
The defined triggering event occurs → Conditions are checked → If conditions are met → Defined actions are executed automatically.
- Condition Not Matched Situation:
The defined triggering event occurs → Conditions are checked → If conditions are not met → Action does not run → It is directed to the No Rule Matched (Else) area.
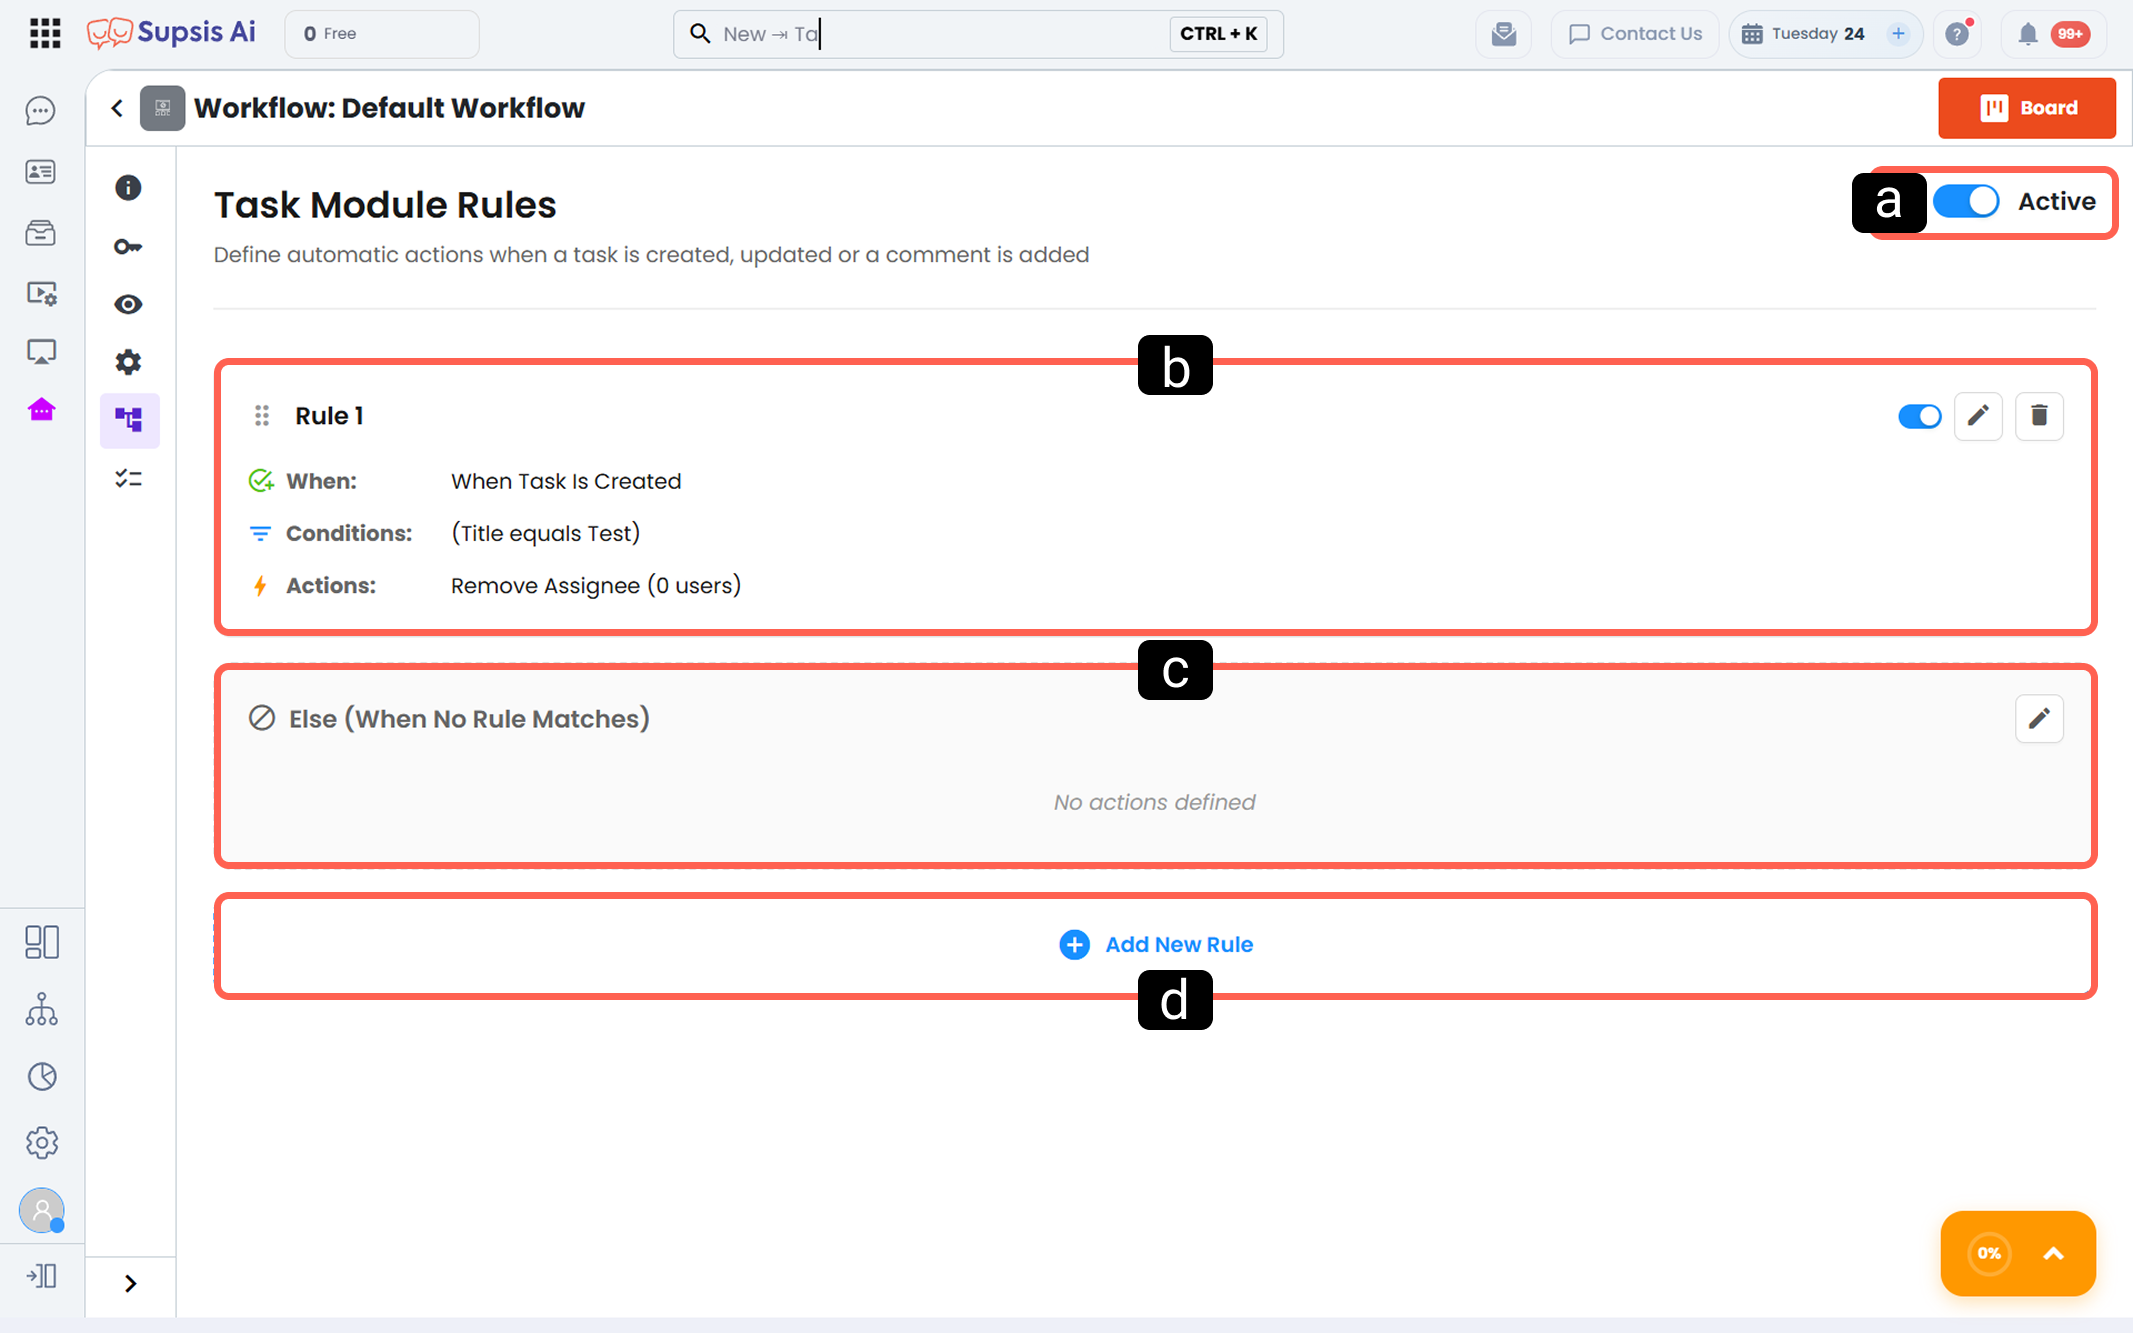
- a – Rule Activation: Through this area, you can set the task module rules to active or passive.
When Active: All defined rules run according to triggering events.
When Passive: Rules are disabled and no automation runs. This feature can be used to temporarily stop automations or to maintain control during testing processes.
- b – Content of Existing Rules: All rules you have created are listed in this area. Each rule contains the following components:
When (Trigger): Specifies under which condition the automation will run. (Example: When a task is created)
Conditions: Specifies the conditions to be checked when the trigger occurs. (Example: Title contains “refund”)
Actions: Specifies the operations to be executed when conditions are met. (Example: Assign the task to a specific user) Rules can be reordered using drag-and-drop and prioritized.
- c – If No Rule Matches: This area is activated if the triggering event occurs but none of the defined rules meet their conditions. In this type of automation, condition definition cannot be made. Only the actions to be executed are defined.
Thanks to the Else rule, it is clarified how the system should behave even in exceptional cases.
- d – Add New Rule:
You can create new task module rules through this button. When adding a new rule, the following steps are followed:
-
The triggering condition is determined
-
Conditions are defined
-
Actions are selected
-
The rule is activated
For details, example scenarios, and advanced usage options of Task Module Rules, you can review the Task Module Rules documentation.
1.f – Checklist Templates
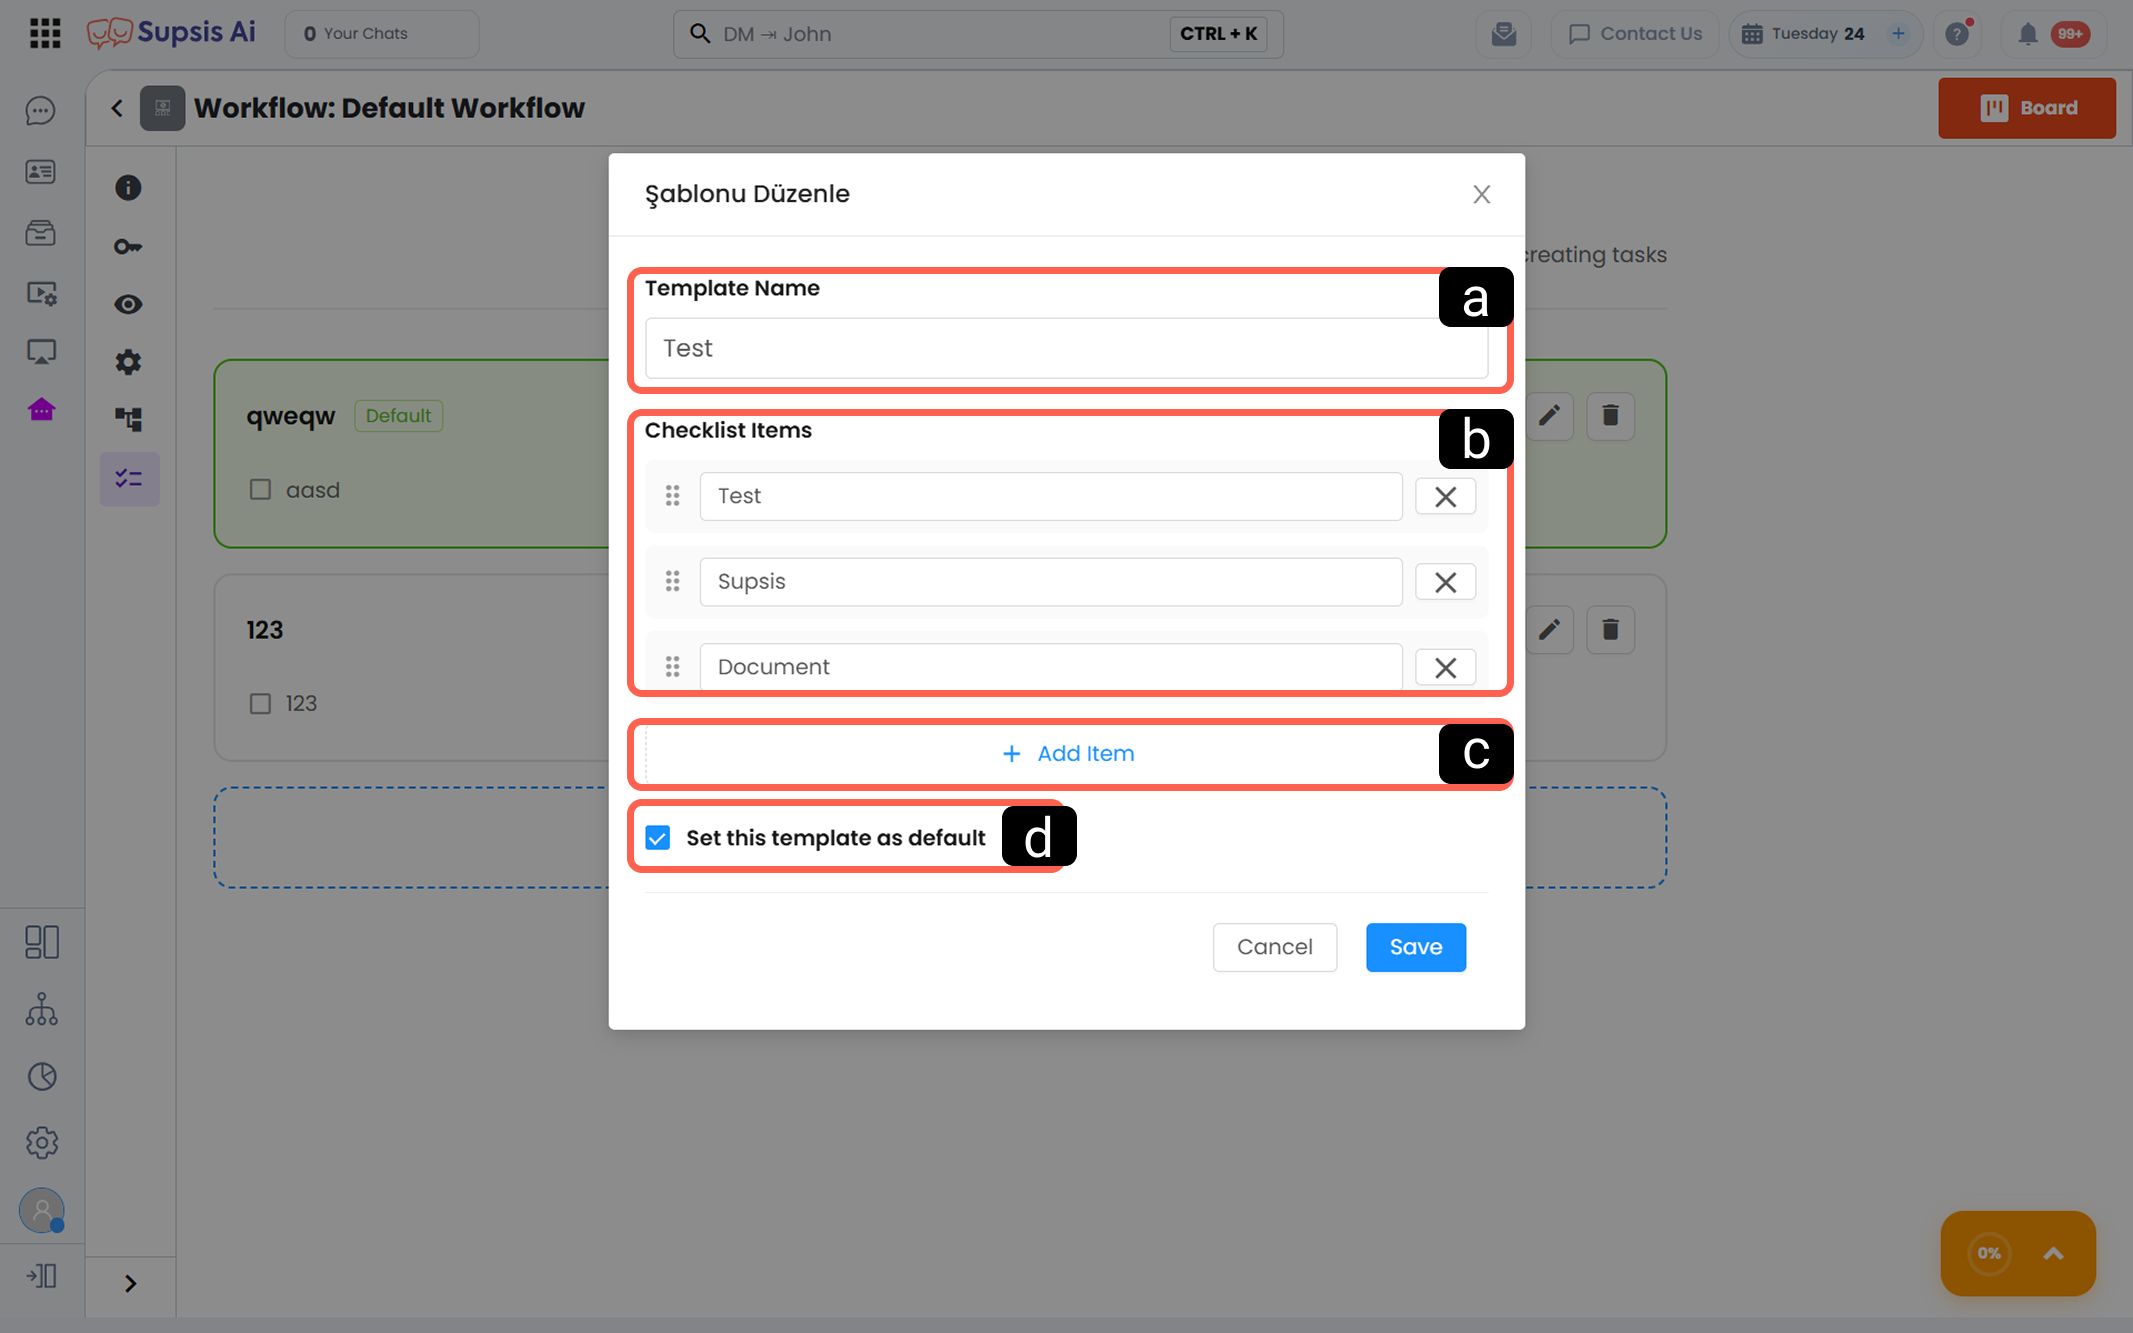
Checklist Templates allow you to define ready-made checklists that will be automatically added when creating a task. In this way, standard processes are secured.
-
a – Template Name: It is the name information that defines the checklist template.
-
b – Sample Checklist Items: It is the area where the checklist items included in the template are listed. Items can be reordered by drag-and-drop.
-
c – Add Item to Checklist: It is used to add a new item to the checklist.
-
d – Set as Default Template: When this option is activated, this checklist is automatically added to the task when creating a task in the relevant workflow. If the option is not activated, you must manually define which template you want to add to the task among the templates you created during task creation.
2-) Filter Elements
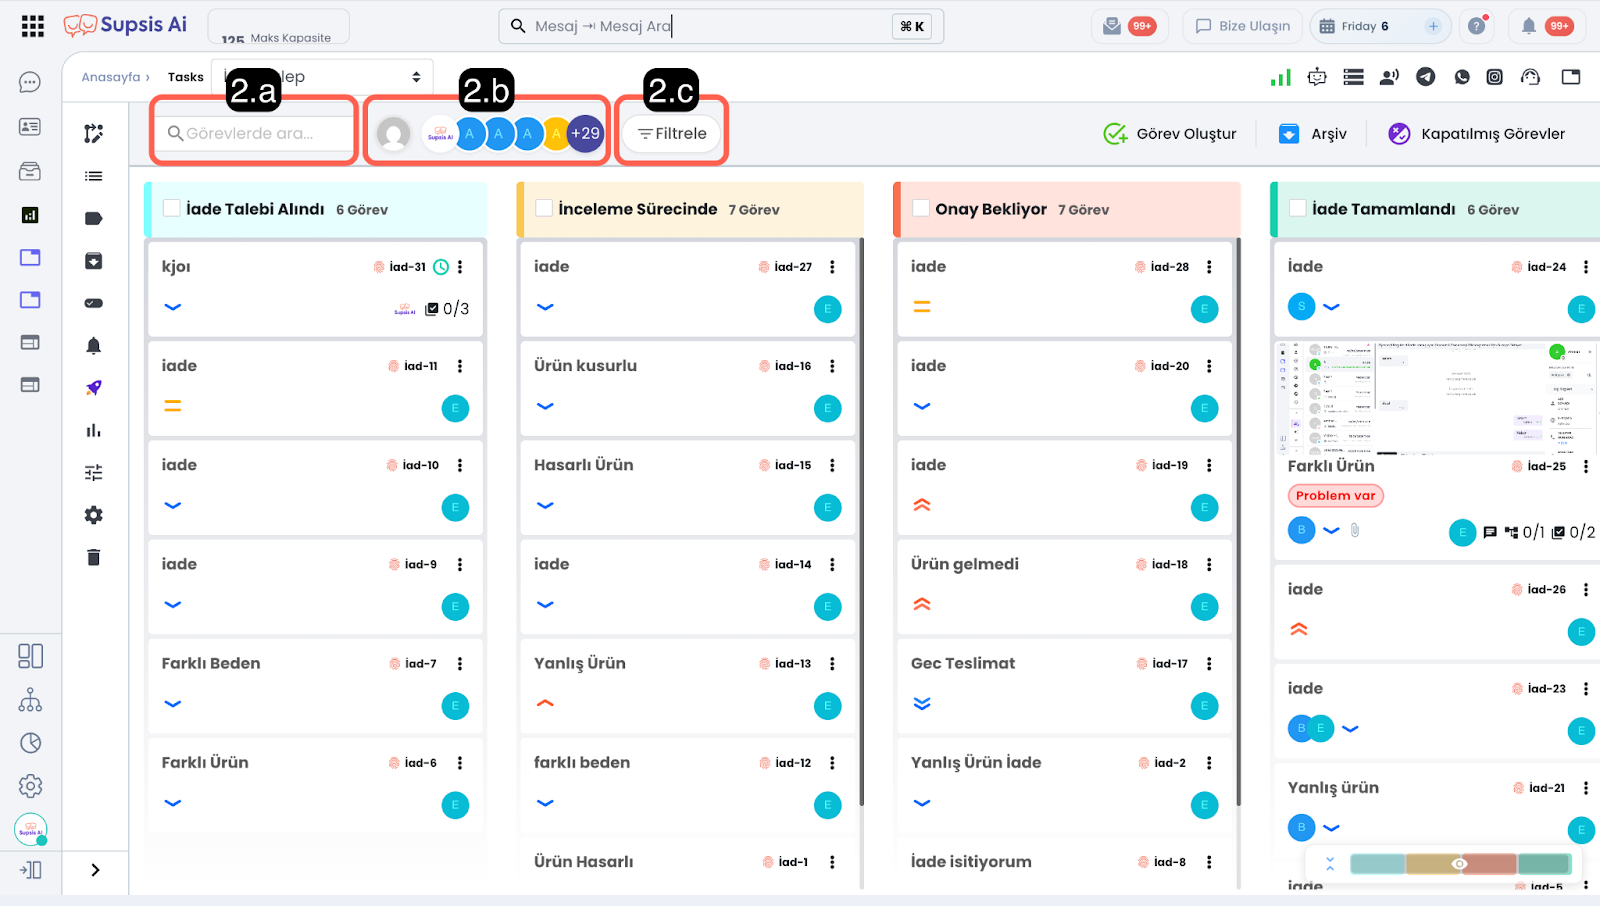
2.a – Search in Tasks
Allows you to search within the task list by keyword. You can quickly access results through task title, description, and related fields.
2.b – Filter by Assigned Person
Allows you to filter tasks based on the assigned person. Thus, tasks belonging to a specific Supsis AI user can be easily listed.
2.c – Filter
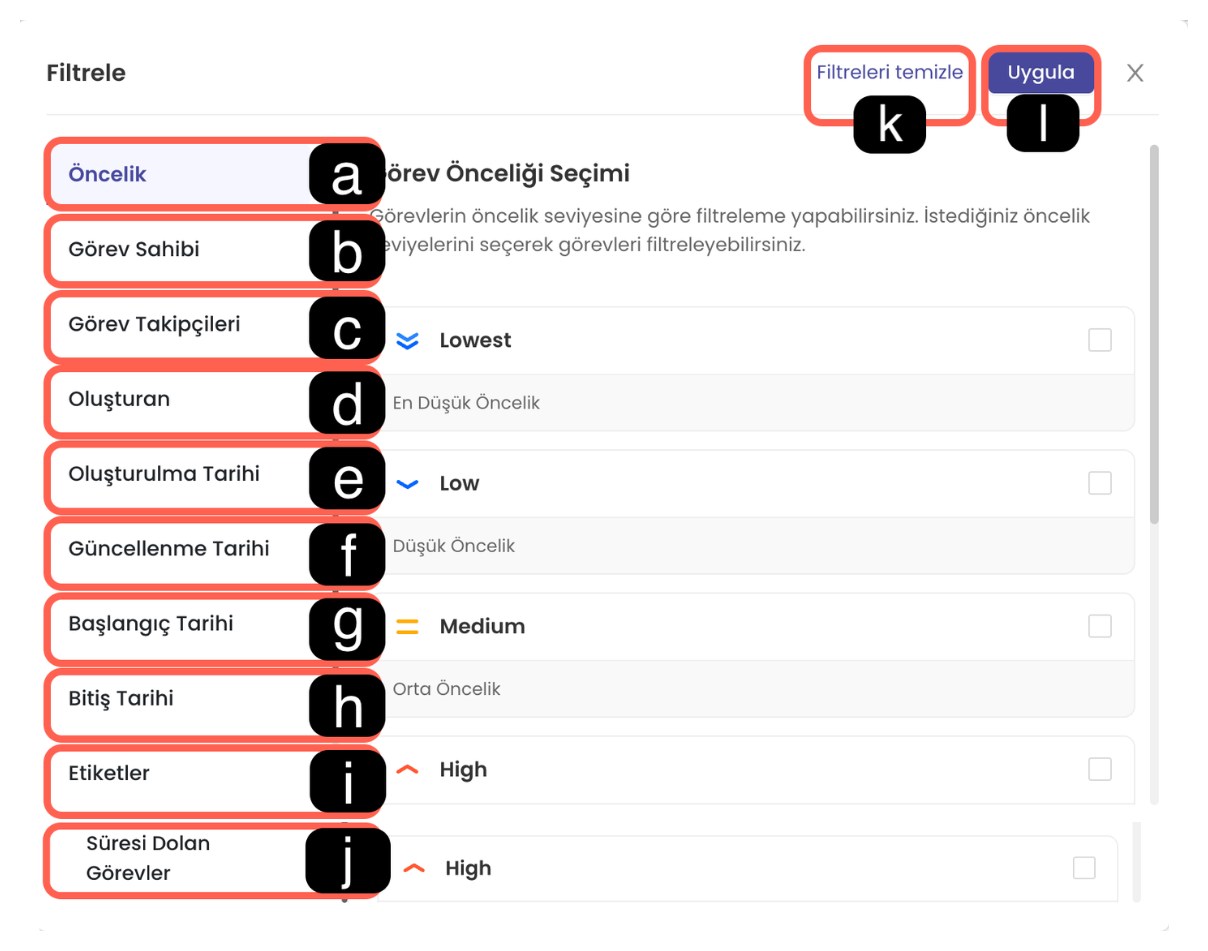
-
a - Priority Allows you to filter tasks according to priority levels. Tasks with different priority statuses can be viewed separately.
-
b - Task Owner Allows you to filter tasks according to ownership information. Tasks assigned to a specific user or owned by a specific user can be listed.
-
c - Task Followers Allows you to filter tasks according to users following the task. Tasks where selected users are assigned as followers are displayed.
-
d - Created By Allows you to filter tasks according to the user who created them. Tasks created by specific users are listed.
-
e - Creation Date Allows you to filter tasks according to their creation date range. Tasks created within a specific time period are filtered.
-
f - Update Date Allows you to filter tasks according to their last update date. Tasks updated within a specific time period can be easily found.
-
g - Start Date Allows you to filter tasks according to their start date. Tasks starting on a specific date are listed.
-
h - Due Date Allows you to filter tasks according to their due date. You can distinguish tasks according to their deadline.
-
i - Tags Allows you to filter tasks according to assigned tags. Tasks containing selected tags are displayed.
-
j - Overdue Tasks Allows you to list tasks whose due date has passed. It helps to quickly identify delayed tasks.
-
k - Clear Filter Resets all selected filters and restores the task list to its default state.
-
l - Apply Activates the determined filter criteria and updates the task list according to the selected filters.
3-) Shortcuts
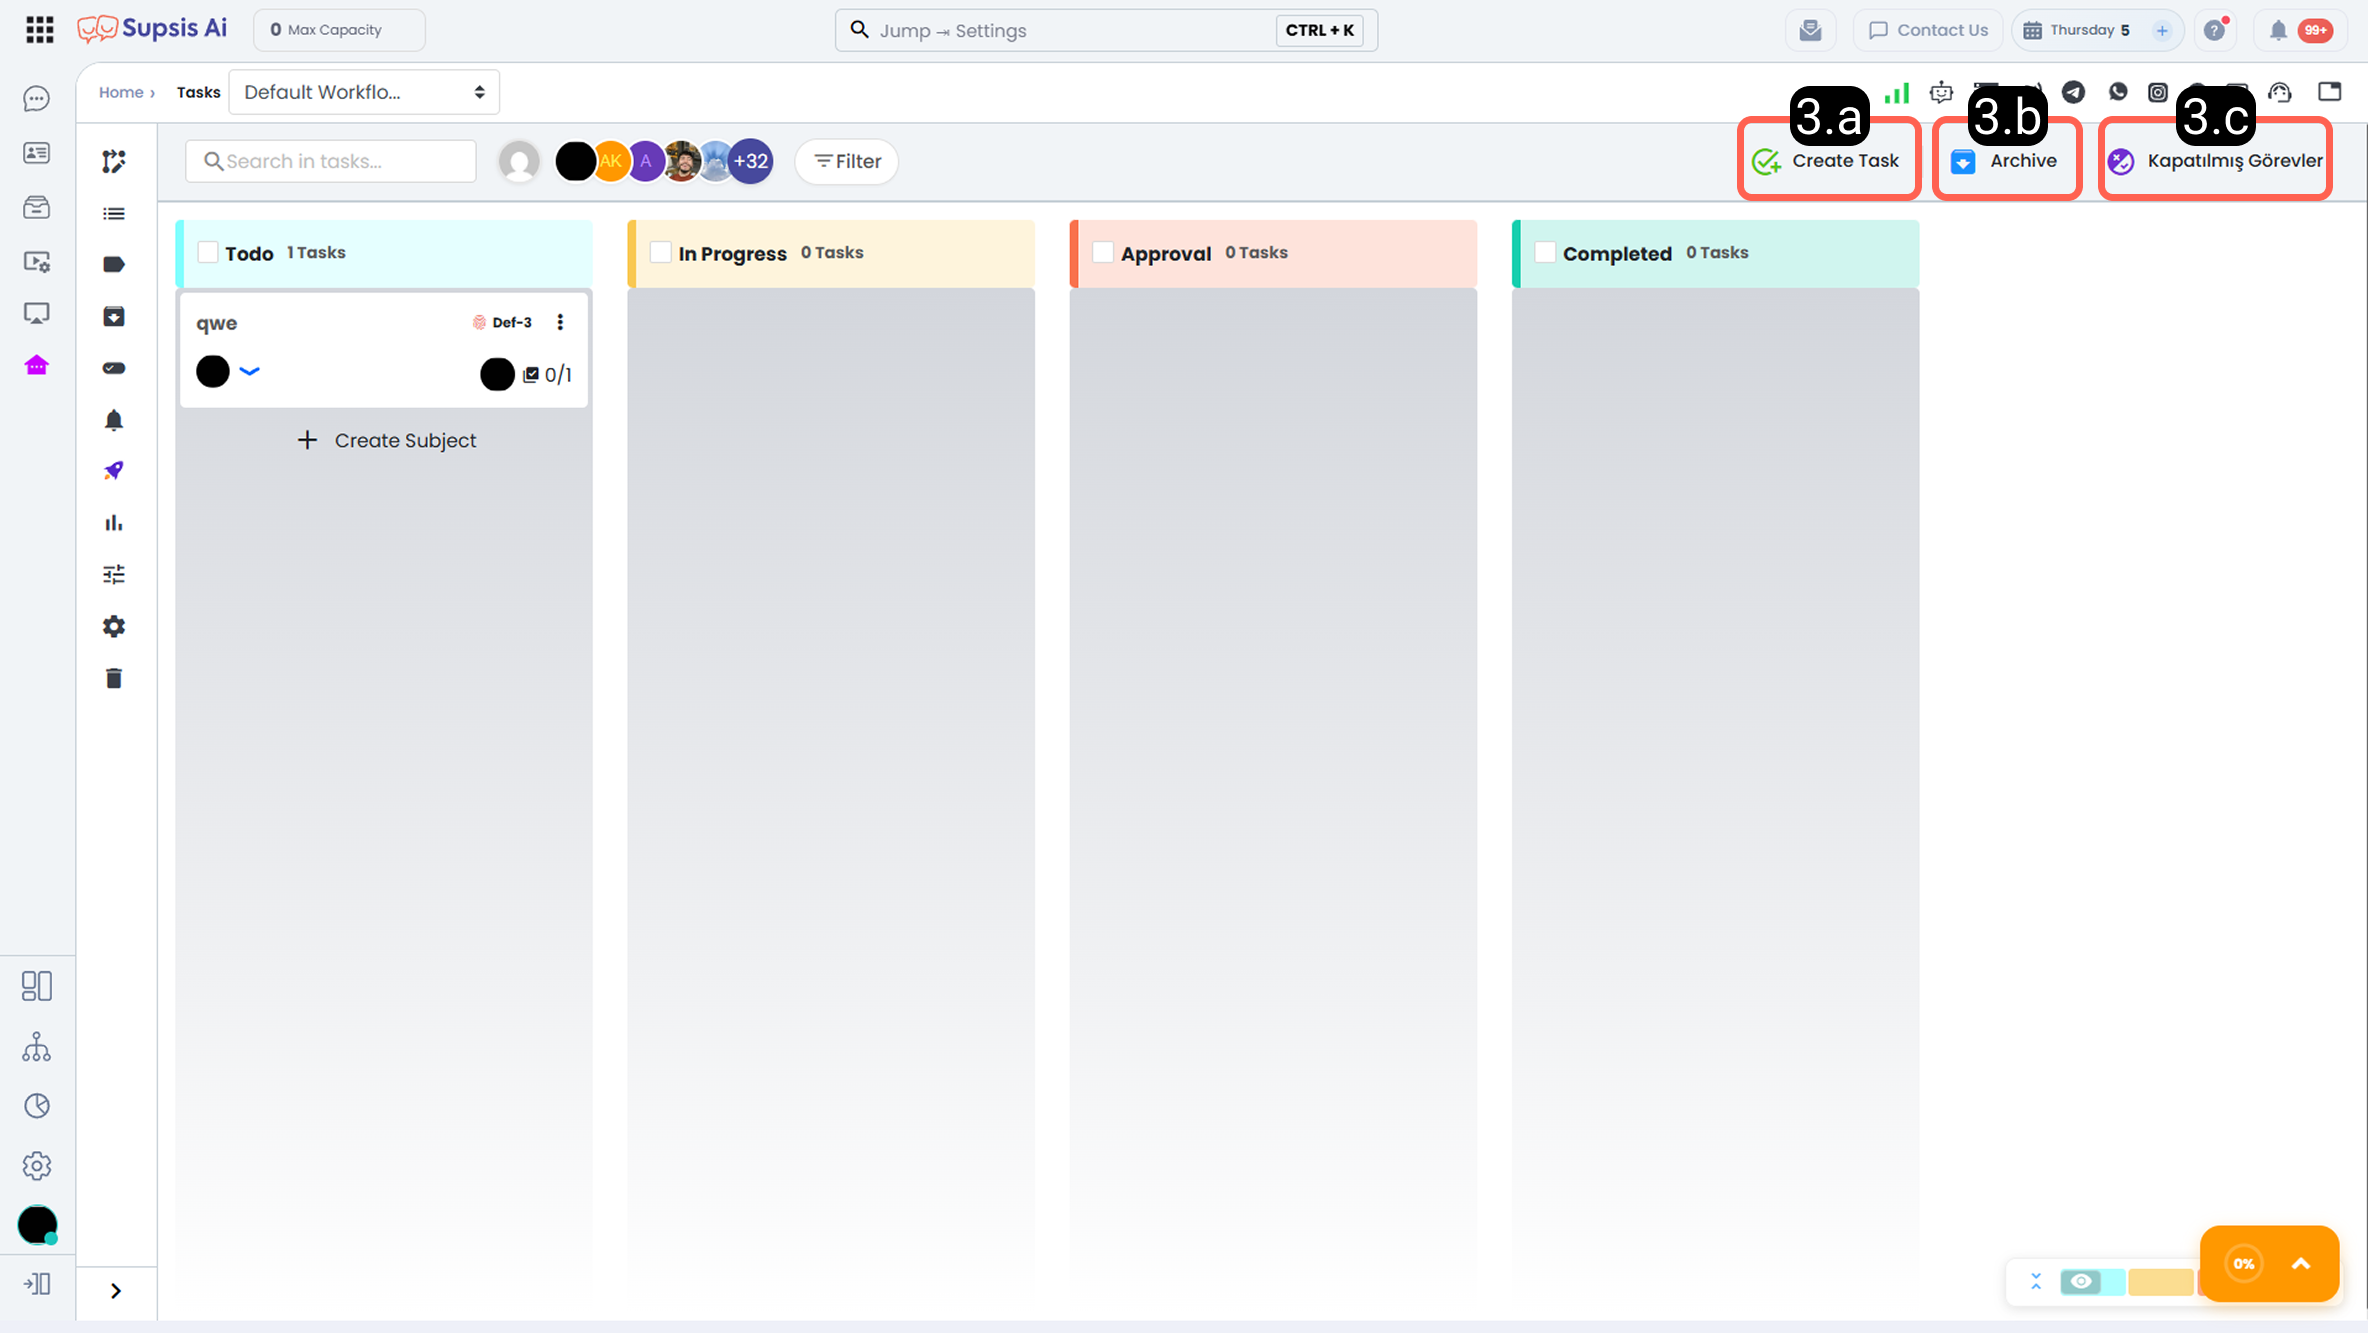
3.a – Create Task
Create Task allows defining a new task under the selected workflow and including it in the process. Through this area, all basic information, responsible users, date ranges, and additional details related to the task can be determined. The created task is automatically added to the first stage of the workflow and begins to be managed according to the defined rules.
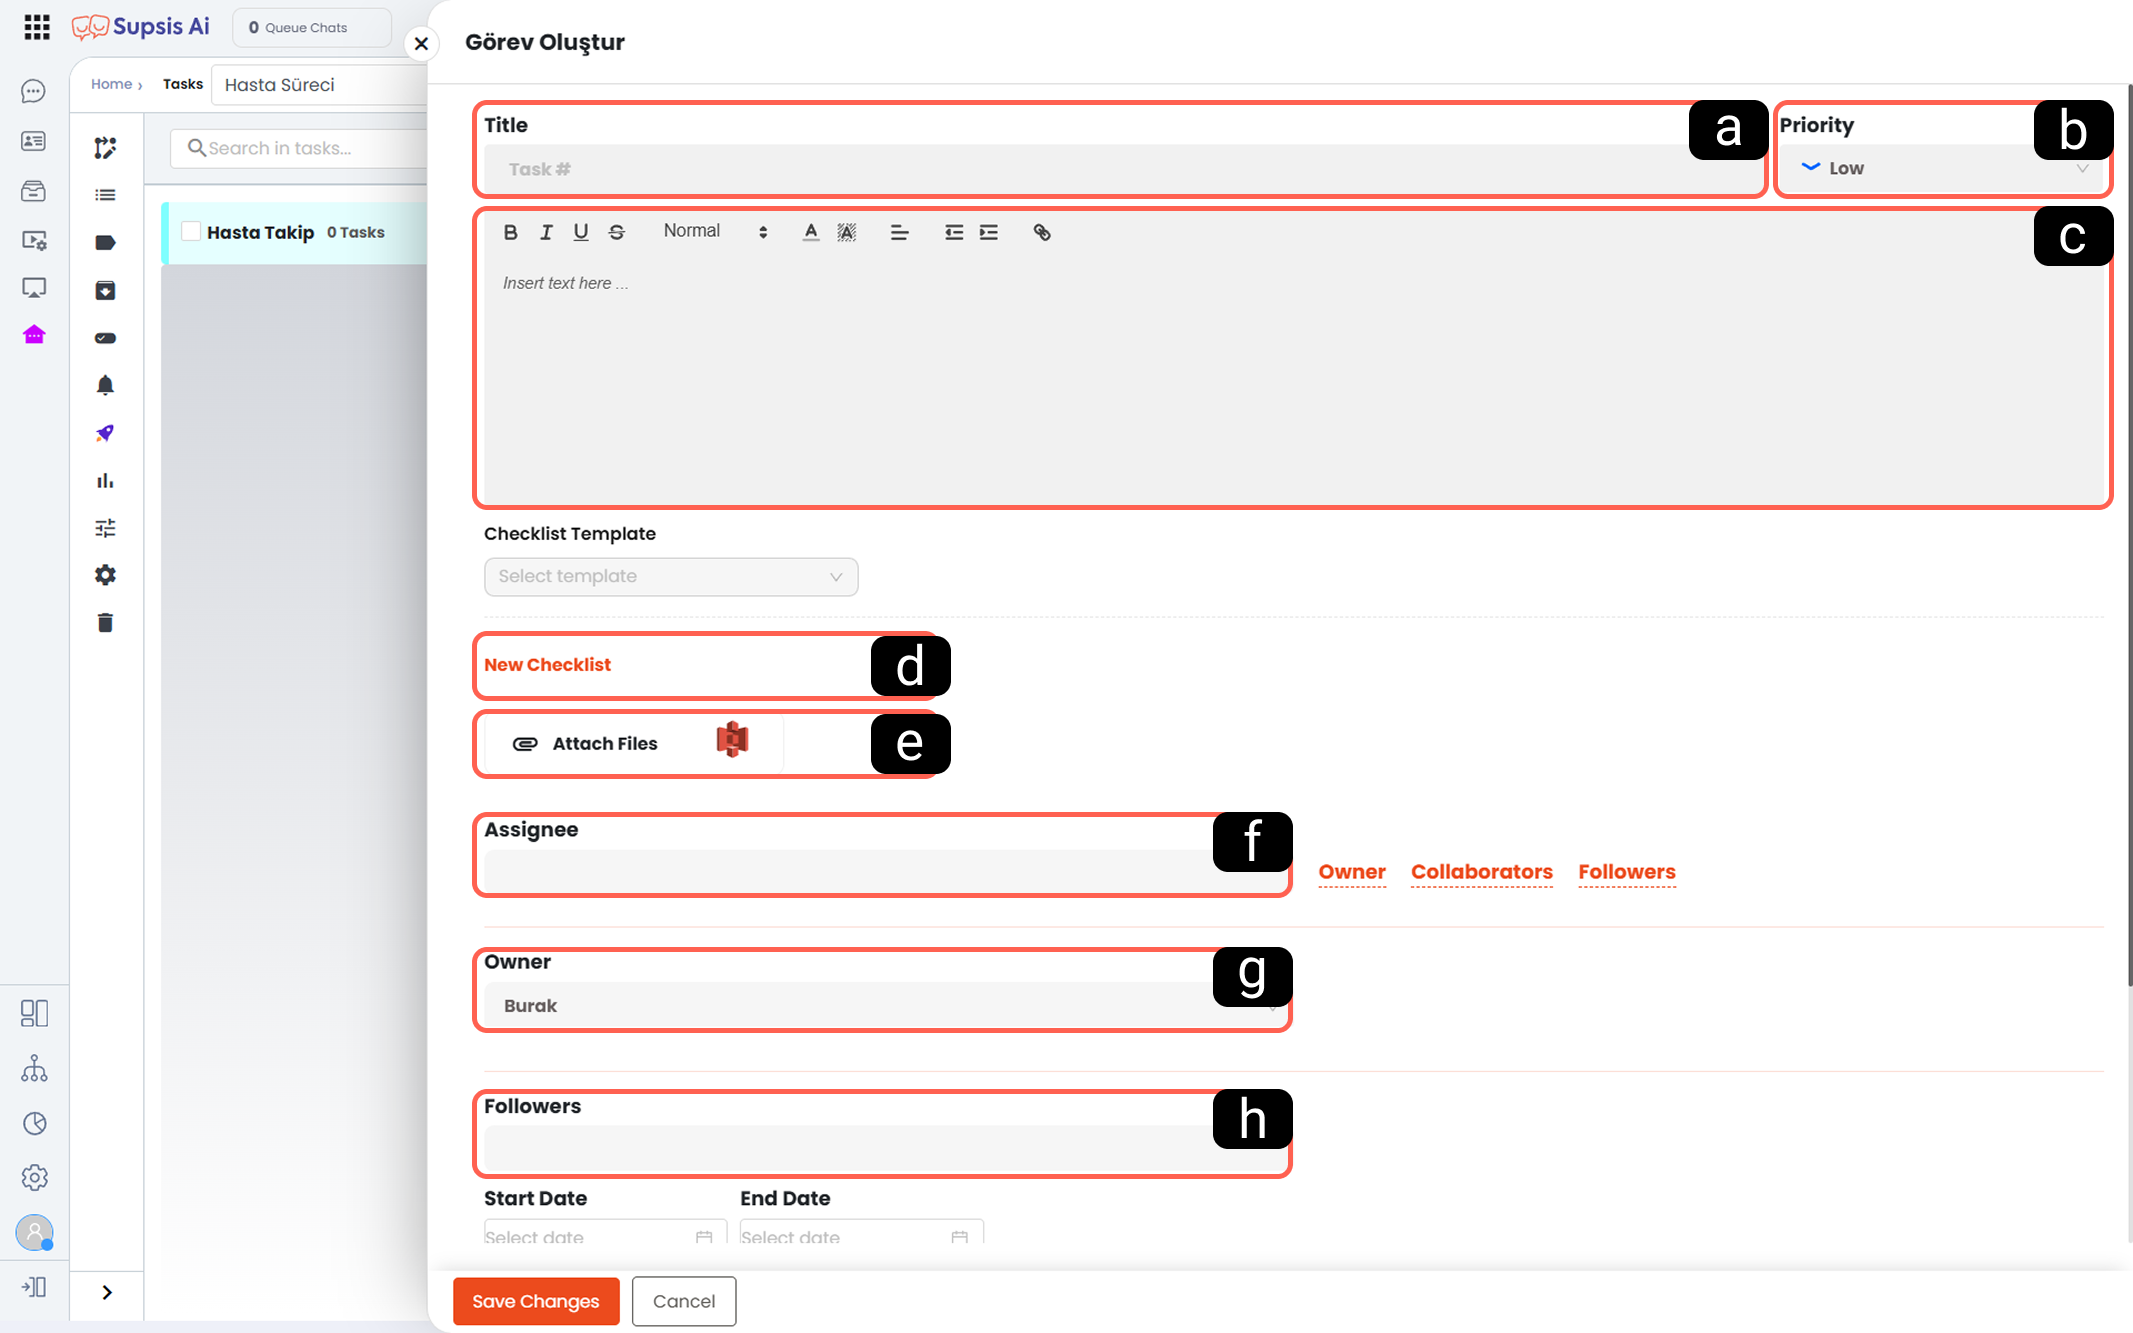
-
a - Title
It is the mandatory field that expresses the main definition of the task. The title entered here is displayed as the task name on the task card and in all lists. It is recommended that the title be short, clear, and descriptive.
-
b - Priority
It is used to determine the urgency level of the task. Priority information is actively used in sorting, filtering, and reporting tasks. System-wide levels include Lowest, Low, Medium, High, Highest.
- c - Description
It is the free text area where task details are entered. In this area, the scope of the task, required actions, notes, or additional explanations can be shared. Thanks to the rich text editor, formatting, adding links, and editing can be performed.
- d - New Checklist
It allows the steps required within the scope of the task to be added as a checklist. Through this area, the task can be divided into sub-steps and progress can be tracked more clearly. If there are predefined checklist templates defined for the relevant workflow, they can be automatically added with the task.
-
e - Add File
It allows adding documents, visuals, or other files related to the task. Added files can be viewed through the task card and accessed by all authorized users during the task lifecycle.
- f - Assigned
It is the area where the user(s) responsible for executing the task are determined. A task can be assigned to one or multiple users. Assigned users receive notifications related to the task.
- g - Owner
It refers to the user who assumes overall responsibility for the task. By default, the user who creates the task is assigned; however, it can be changed depending on authorization. The owner has high-level authority over the task.
-
h - Followers
It allows adding users who are not actively executing the task but need to be informed about the process. Followers receive notifications about updates and comments on the task.
-
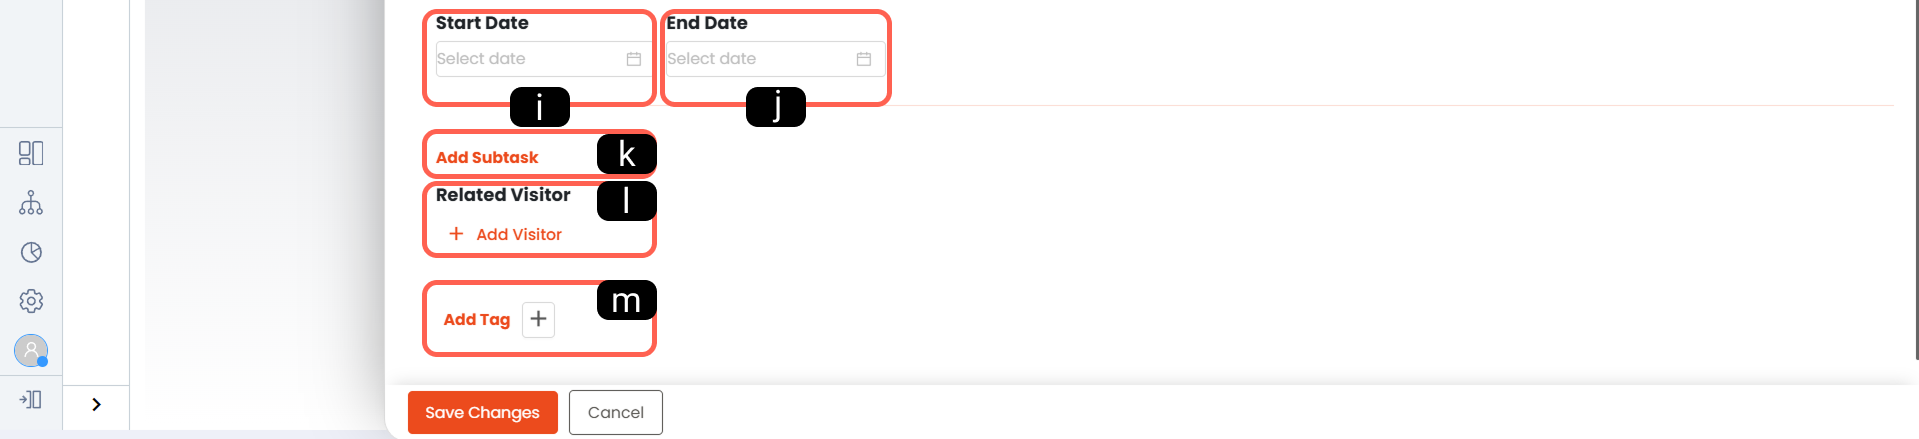
i - Start Date
It determines the planned start time of the task. It can be used in time-based filtering, reporting, and automations.
- j - Due Date
It represents the deadline by which the task must be completed. Tasks approaching or exceeding the due date can be reported separately in the system and reminders can be triggered.
-
k - Add Subtask
It allows creating dependent subtasks under the main task. Subtasks progress as part of the main task and can be tracked separately.
-
l - Add Visitor
It allows adding individuals who do not have a user account in the system but need to view the task. Visitors have view-only permission and cannot make changes to the task content.
- m - Add Tag
It allows adding tags for classification and easy retrieval of the task. Tags are actively used in filtering, reporting, and API / automation scenarios.
3.b – Archive
Archive is the area where tasks that do not need to be displayed on the active workflow board but may need to be accessed again in the future are stored.
This area allows maintaining board organization while managing task data without loss.
Archived tasks are removed from active stages, but all their contents (description, files, tags, history movements, etc.) are preserved.
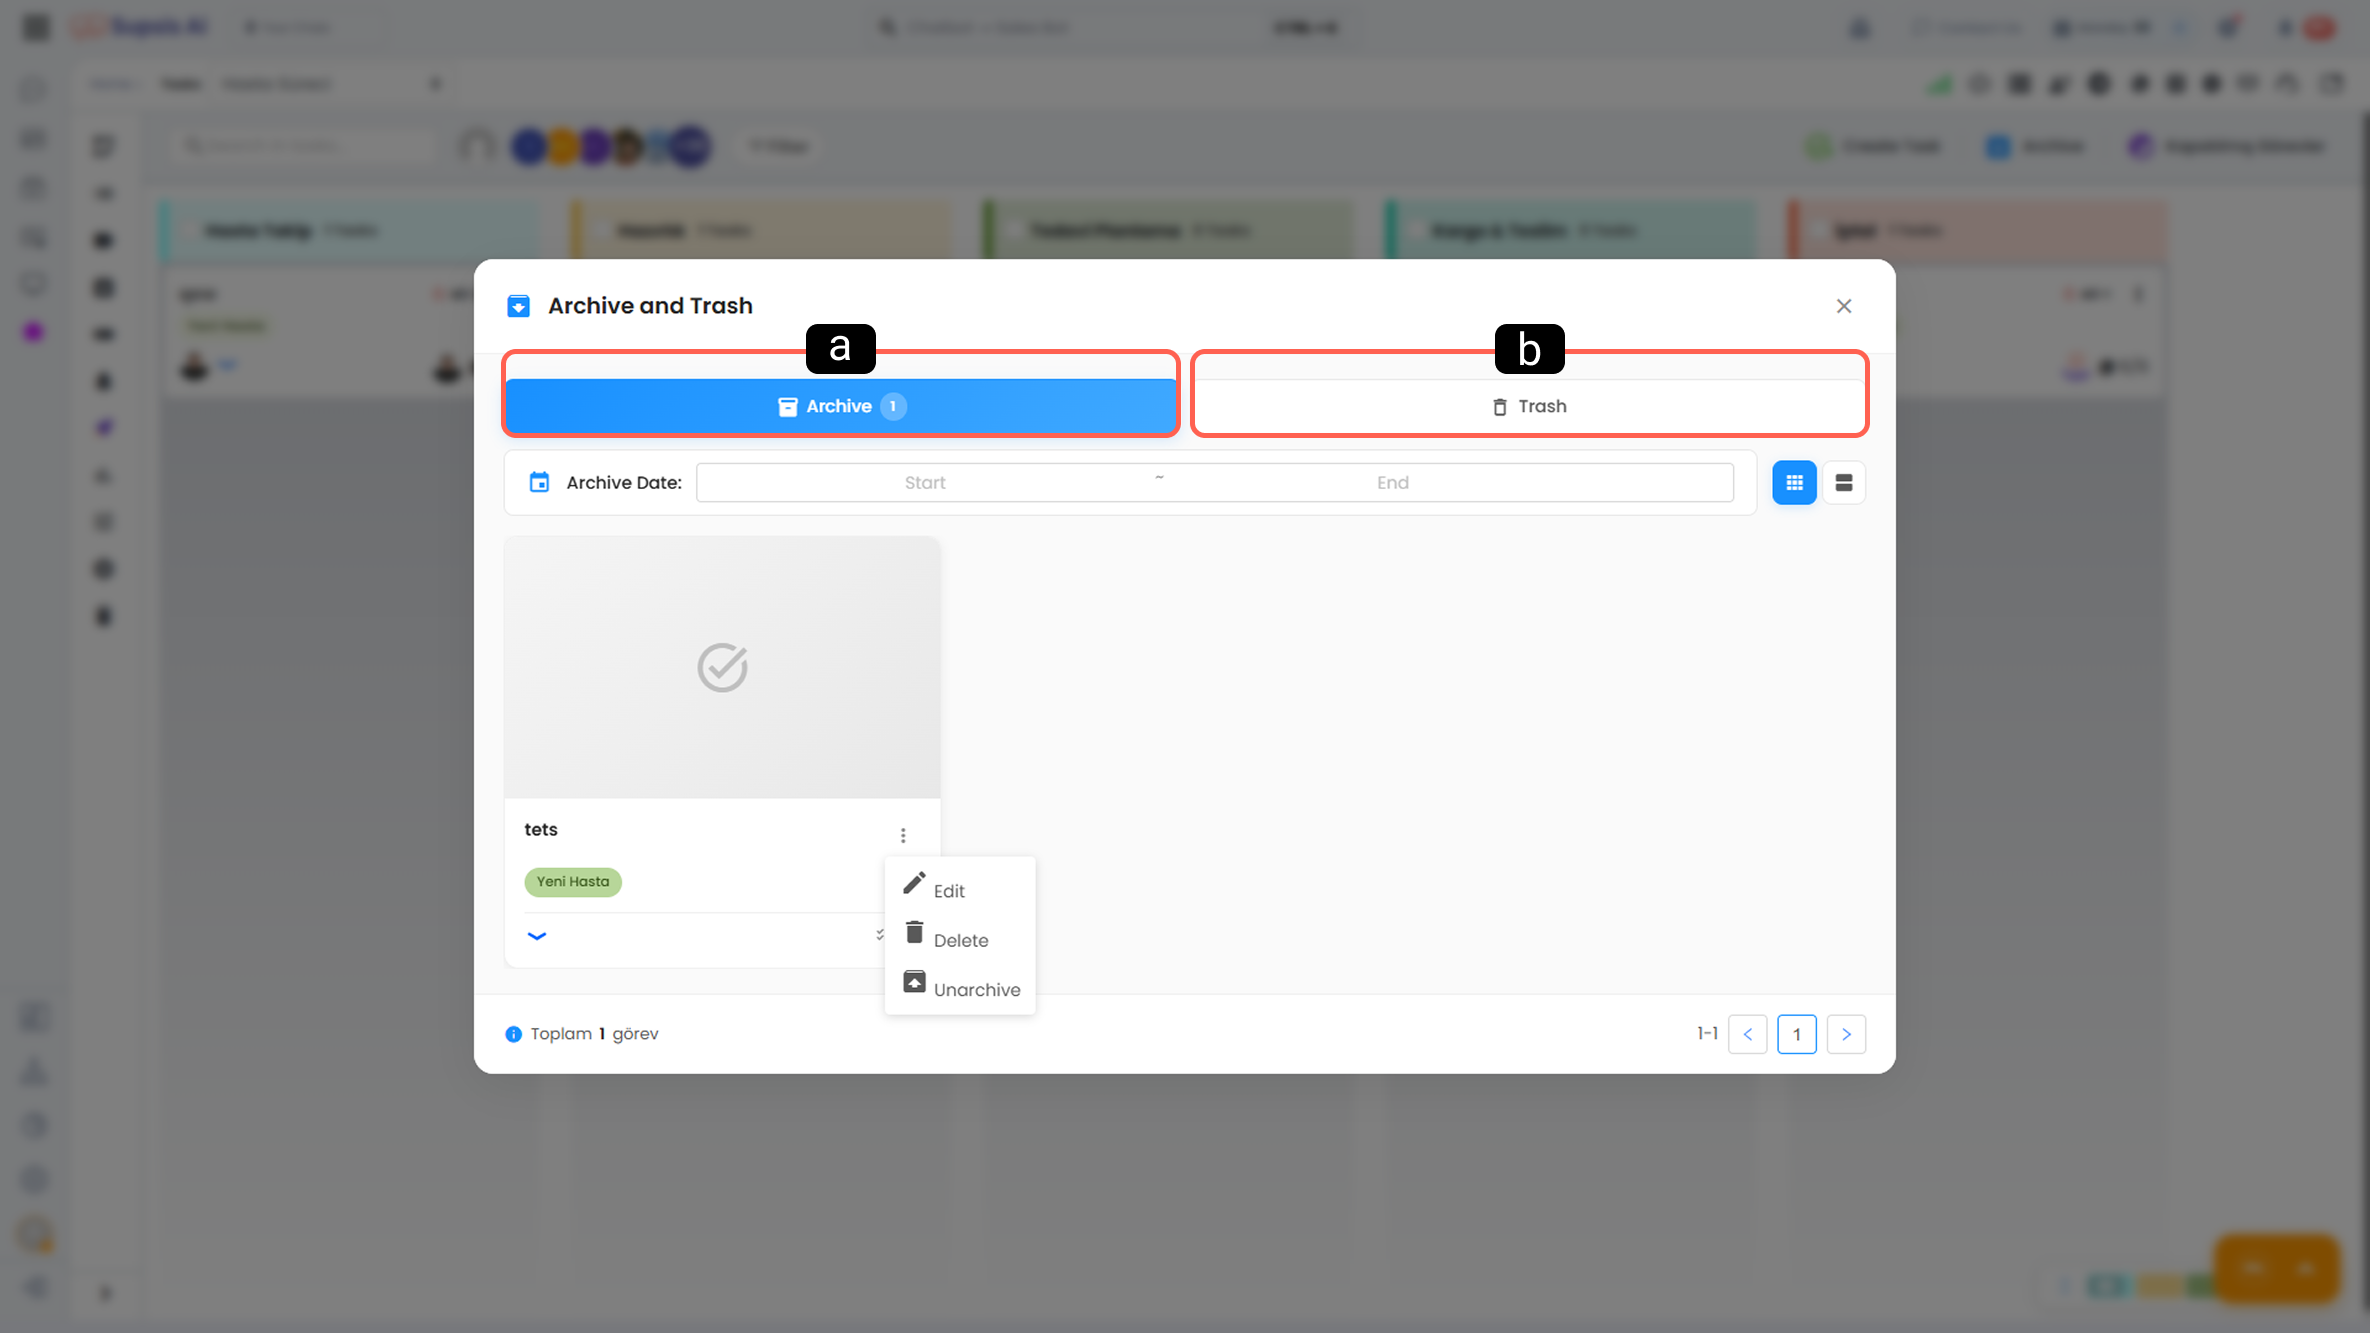
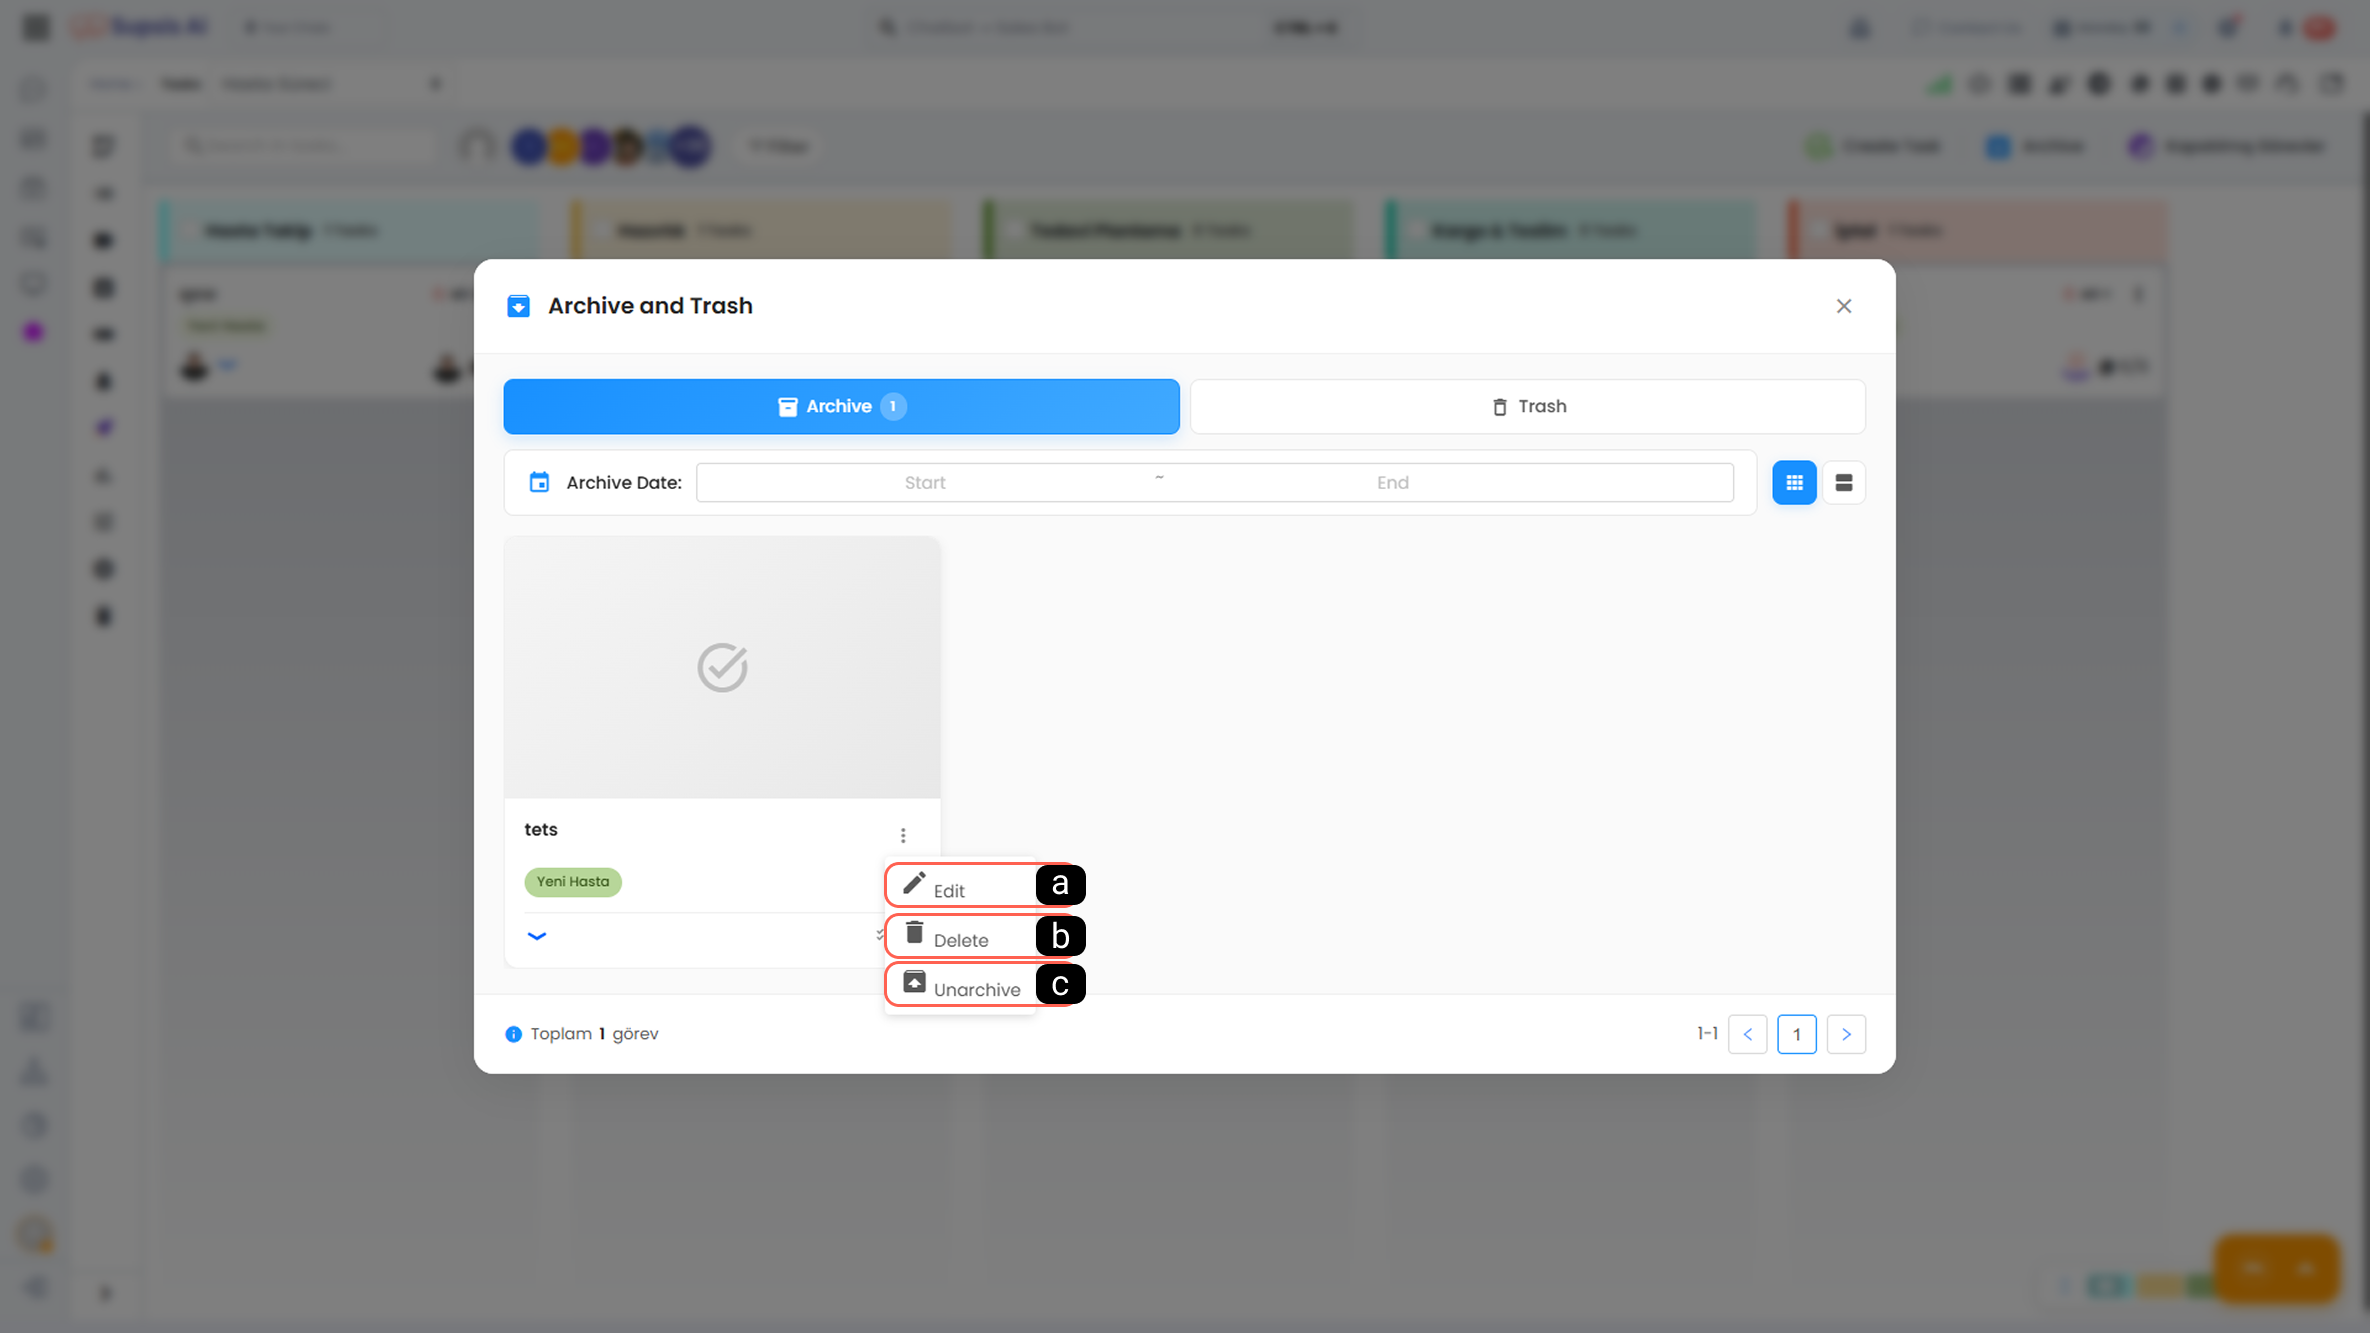
- a - Archive
This area lists tasks that have been manually archived. Archived tasks do not appear in the active workflow. Details of archived tasks can be read-only or editable depending on permissions. When needed, archived tasks can be moved back to the active workflow. The archive area can be used as a reference in reporting and historical review processes.
- b - Trash
Trash is the area where tasks that have been deleted are temporarily stored. Deleted tasks are not permanently destroyed immediately; they are first moved to Trash. Through the Trash; tasks can be restored, tasks can be permanently deleted. This structure ensures that accidentally deleted tasks can be recovered.
3.c – Closed Tasks
Closed Tasks are the section where tasks whose stage status is “Completed” within the workflow are automatically moved when closed.
This area ensures that successfully completed tasks are recorded and past processes are tracked.
Completed tasks are removed from active task lists, transferred to the closed tasks area while preserving their final workflow state; they remain accessible in the closed tasks area for reporting, performance analysis, and historical control.
4-) Stage Actions
Stage Actions include operations that can be performed on columns (stages) within the workflow. These actions allow controlling the structural order and visibility of the workflow. Operations related to the relevant stage are performed through the menu that appears when you hover the mouse over stage titles.
4.a – Task Creation Form This button activates the task creation form. The Task Creation Form is the form used to add a new task to the workflow.
Through this form, all basic and advanced information related to the task can be entered. For more information about the task creation form, you can review our Task Creation documentation.
4.b – Stage Operations
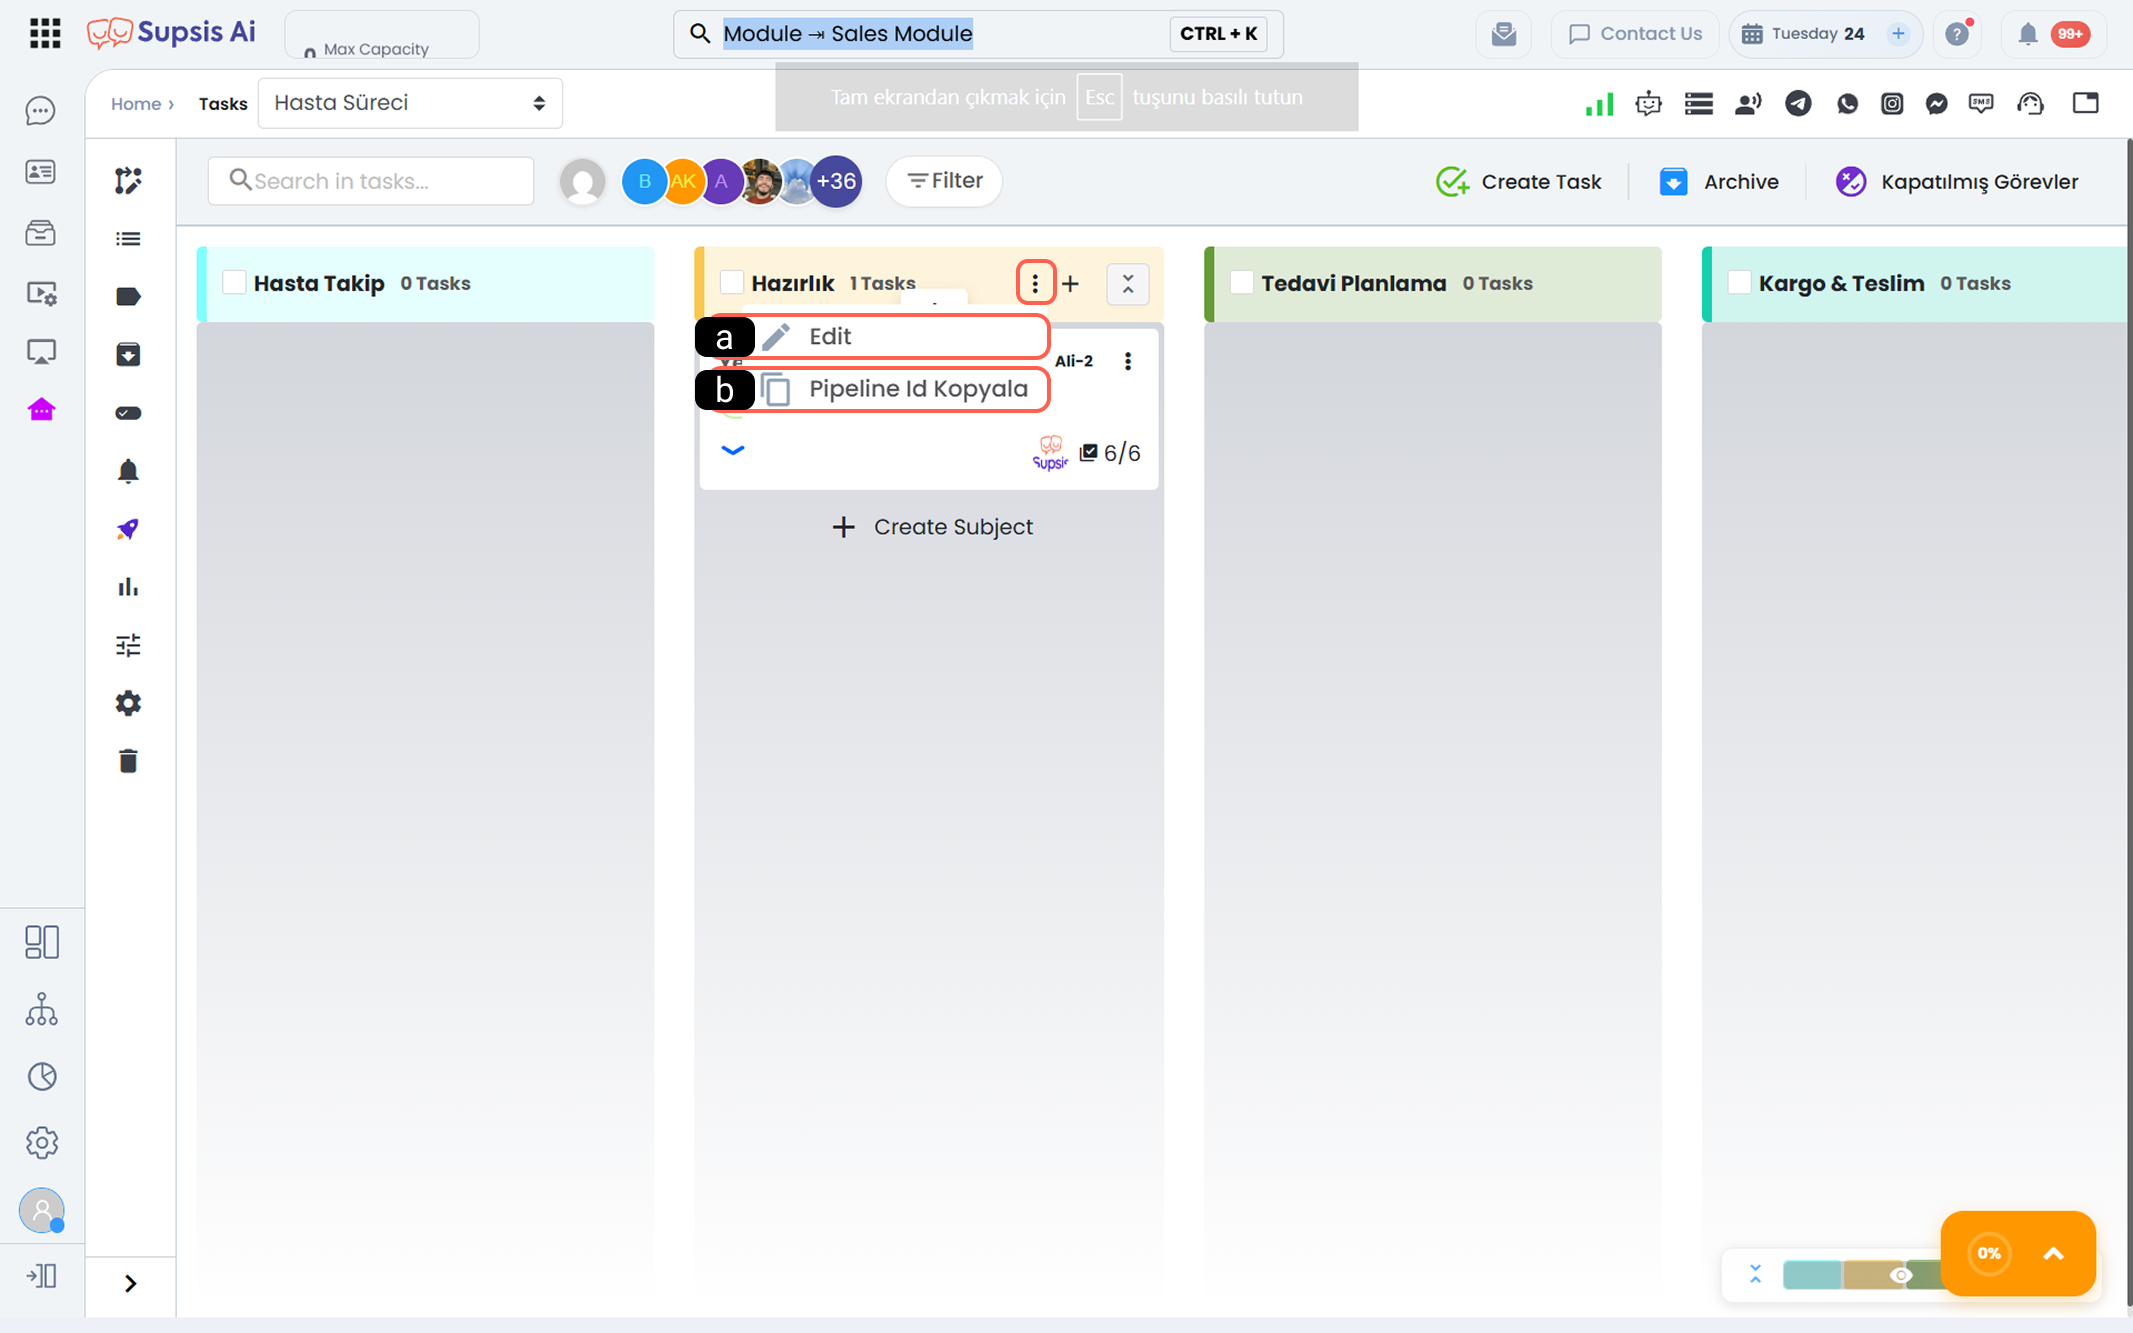
- a - Edit
Used to edit the name, color, or status of the selected stage.
- b - Copy Pipeline ID
Copies the unique ID information of the relevant stage (pipeline). This ID is used in API integrations and Supsis AI automations to perform actions on the relevant stage.
4.c – Duplicate Stage
Creates an exact copy of an existing stage (except completed).
This feature enables rapid creation of similar stages and reduces manual repetition.
4.d – Hide Stage
Hides the relevant stage and its content from the board view on the side.
The stage is not deleted; it is only temporarily hidden. It can be reactivated when needed.
5-) Task Actions
Task Actions are actions that allow quick and direct operations on tasks within the workflow. Through these actions, the status, location, and lifecycle of tasks can be easily managed.
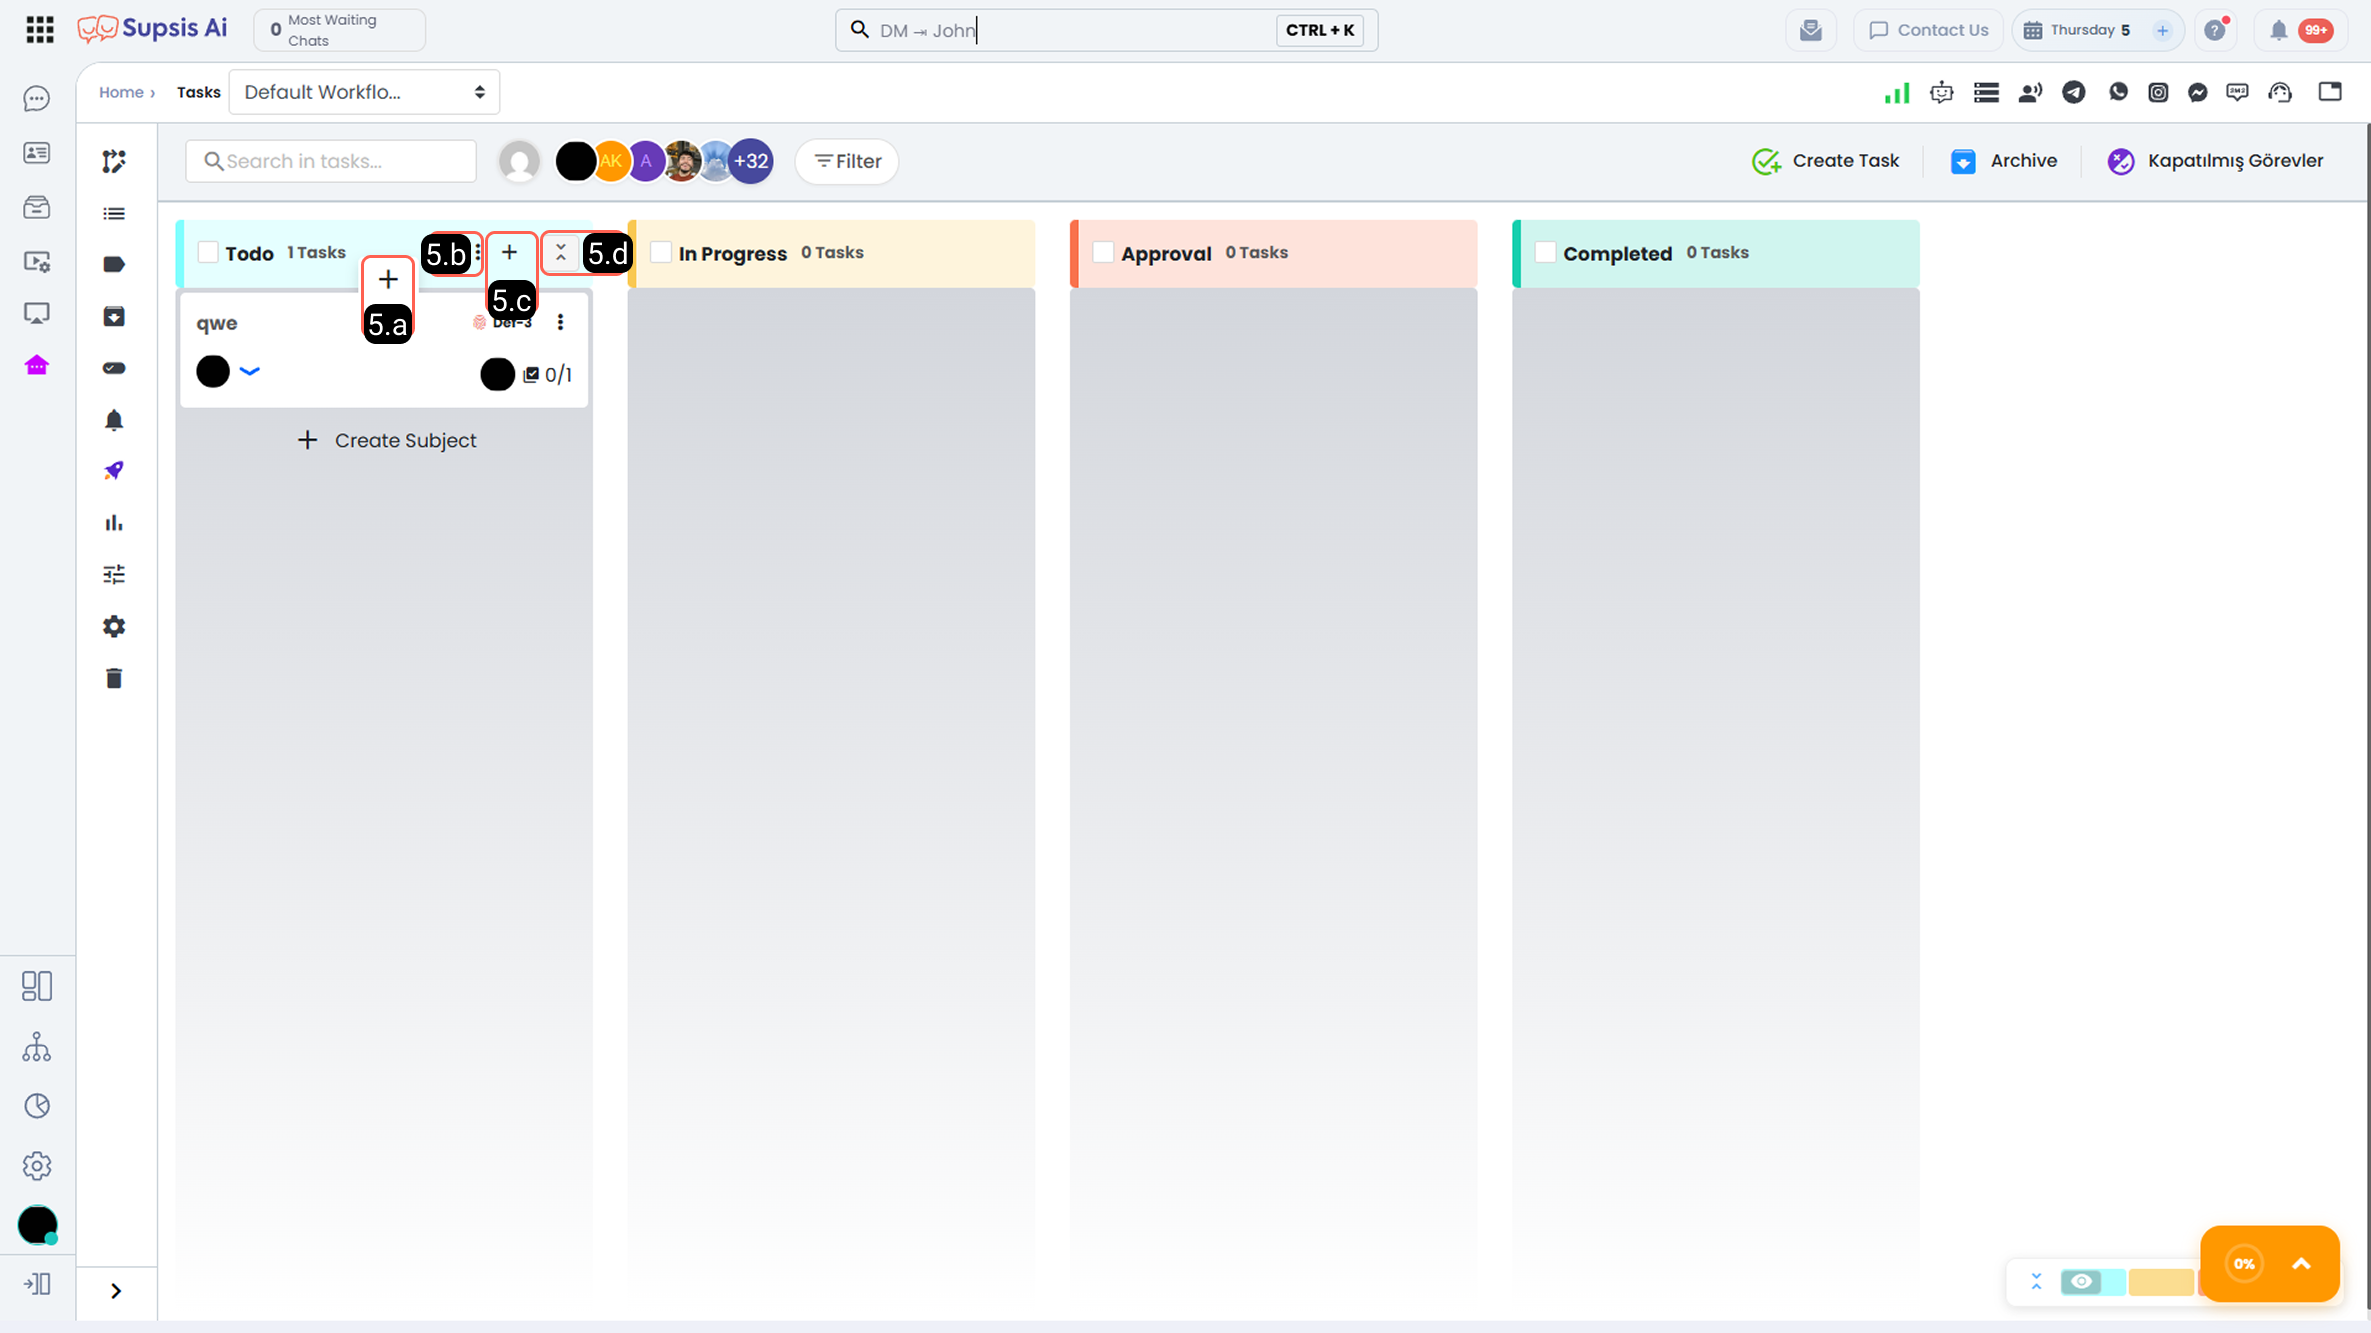
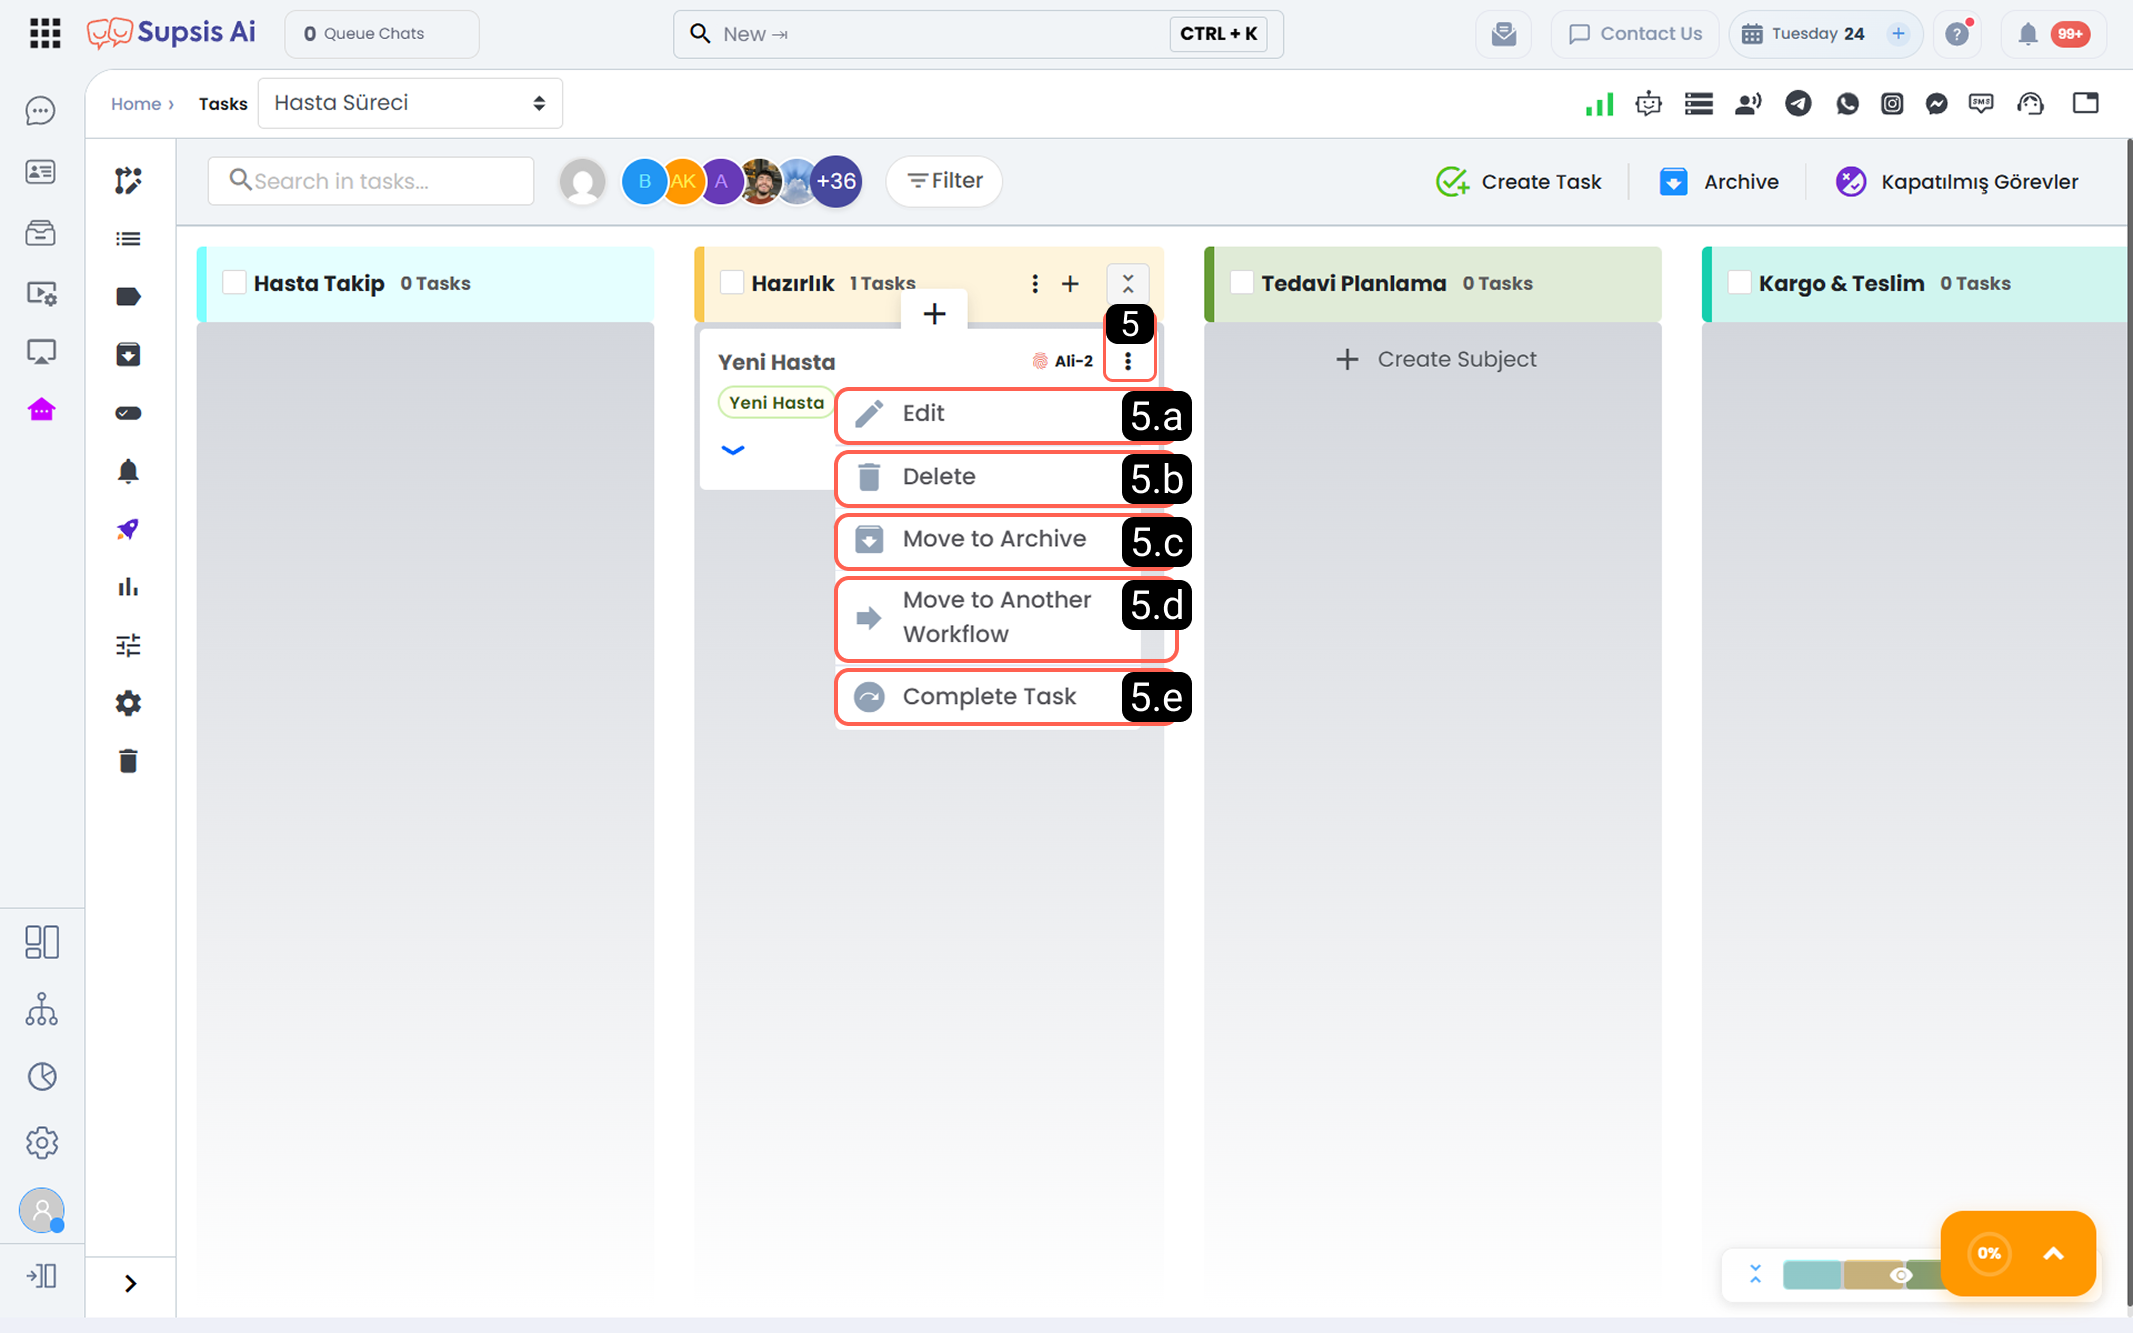
5.a - Edit
With this option, the edit screen of the selected task is opened.
Task title, description, priority, assigned users, date information, and other task details can be updated from this screen. When changes are saved, the task continues to exist in the workflow with its updated state.
5.b - Delete
Used to remove the task from the current workflow. Deleted tasks are not permanently destroyed; they are moved to Trash. If necessary, restoration can be performed from the Trash.
5.c - Move to Archive
Used for tasks that are not actively being worked on but are not intended to be deleted. Tasks moved to archive are removed from the workflow view but continue to be stored for historical record and reference purposes.
5.d - Move to Another Workflow
Allows transferring the task from the current workflow to another workflow. During this process, the target workflow is selected from the window that opens and once confirmed, the task is moved to the selected workflow.

5.e - Complete Task
Used to indicate that the task has been completed. With this action, the task is moved to the completed tasks list and removed from the active workflow. Depending on workflow settings, additional steps (such as entering closure information) may be triggered.
5.f - Move Done Task Back to Board
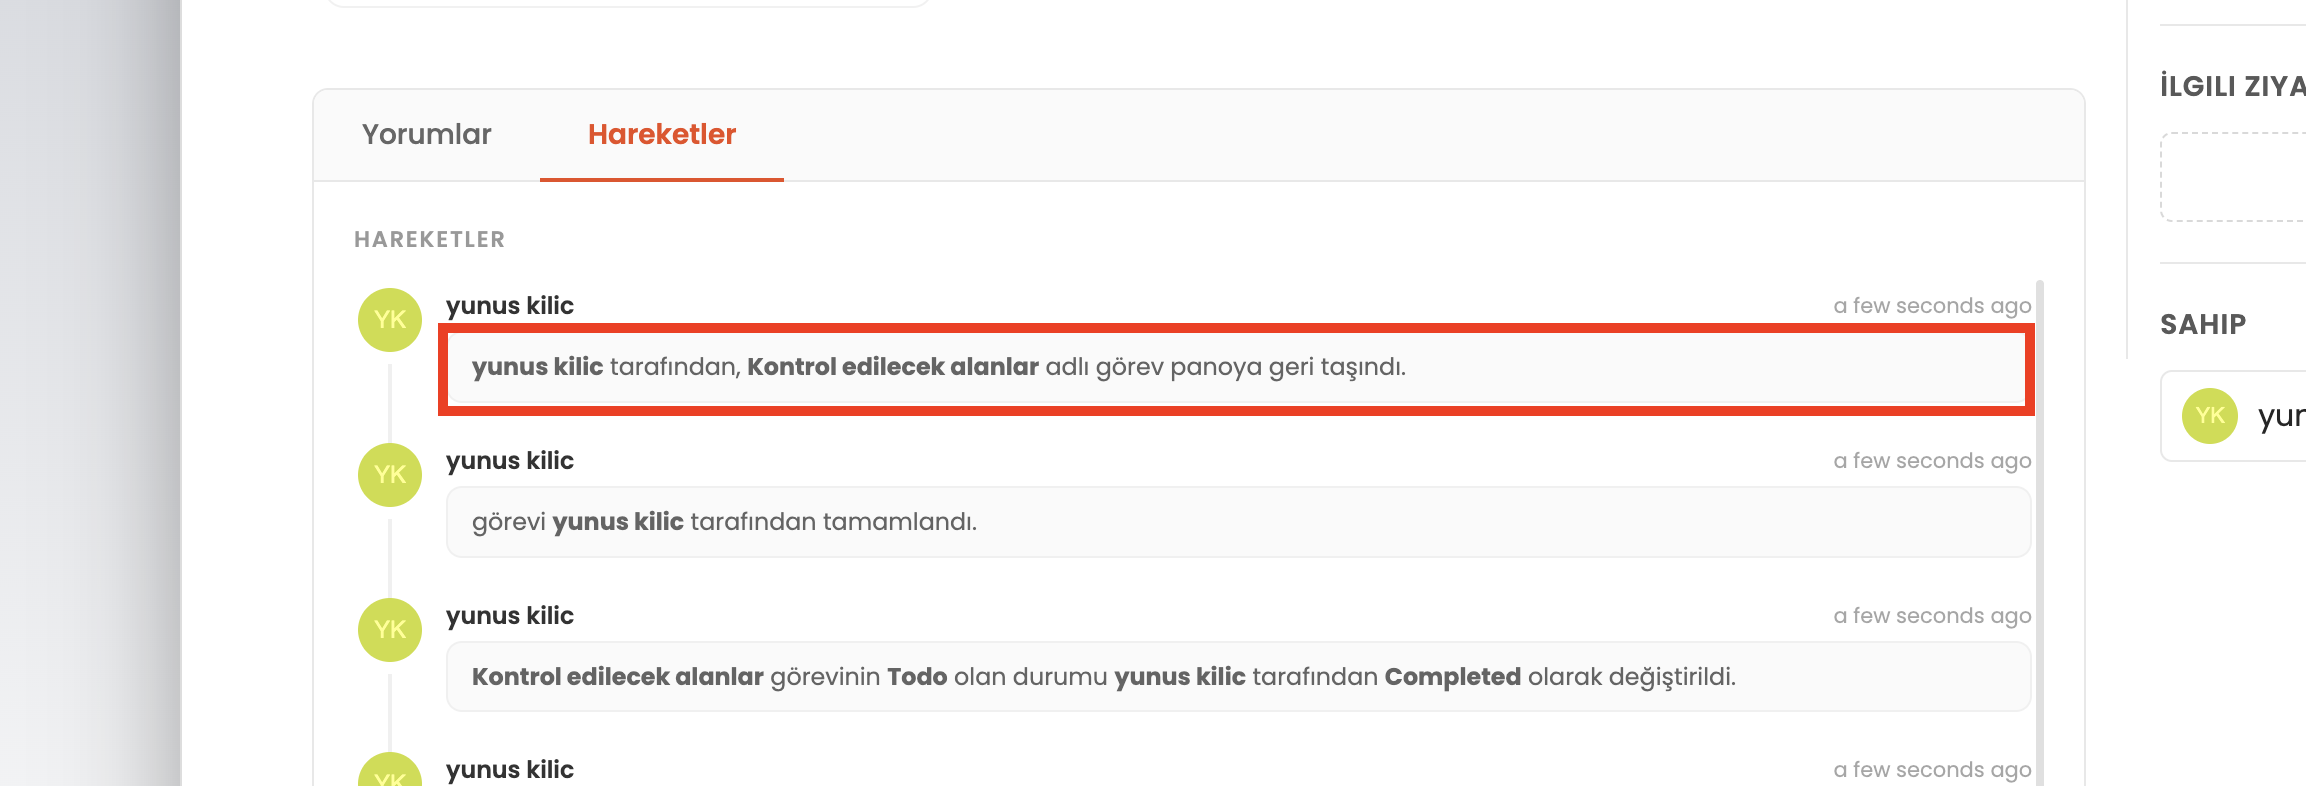
Used to restore a completed (Done) task back to active work status without data loss whenever additional work arises or a task was closed prematurely.
- Usage Steps & Execution Logic:
- Open the "Closed Tasks" modal from the top menu of your workflow board.
- Click the "..." (three dots) menu on the target task card and select "Move to Board".
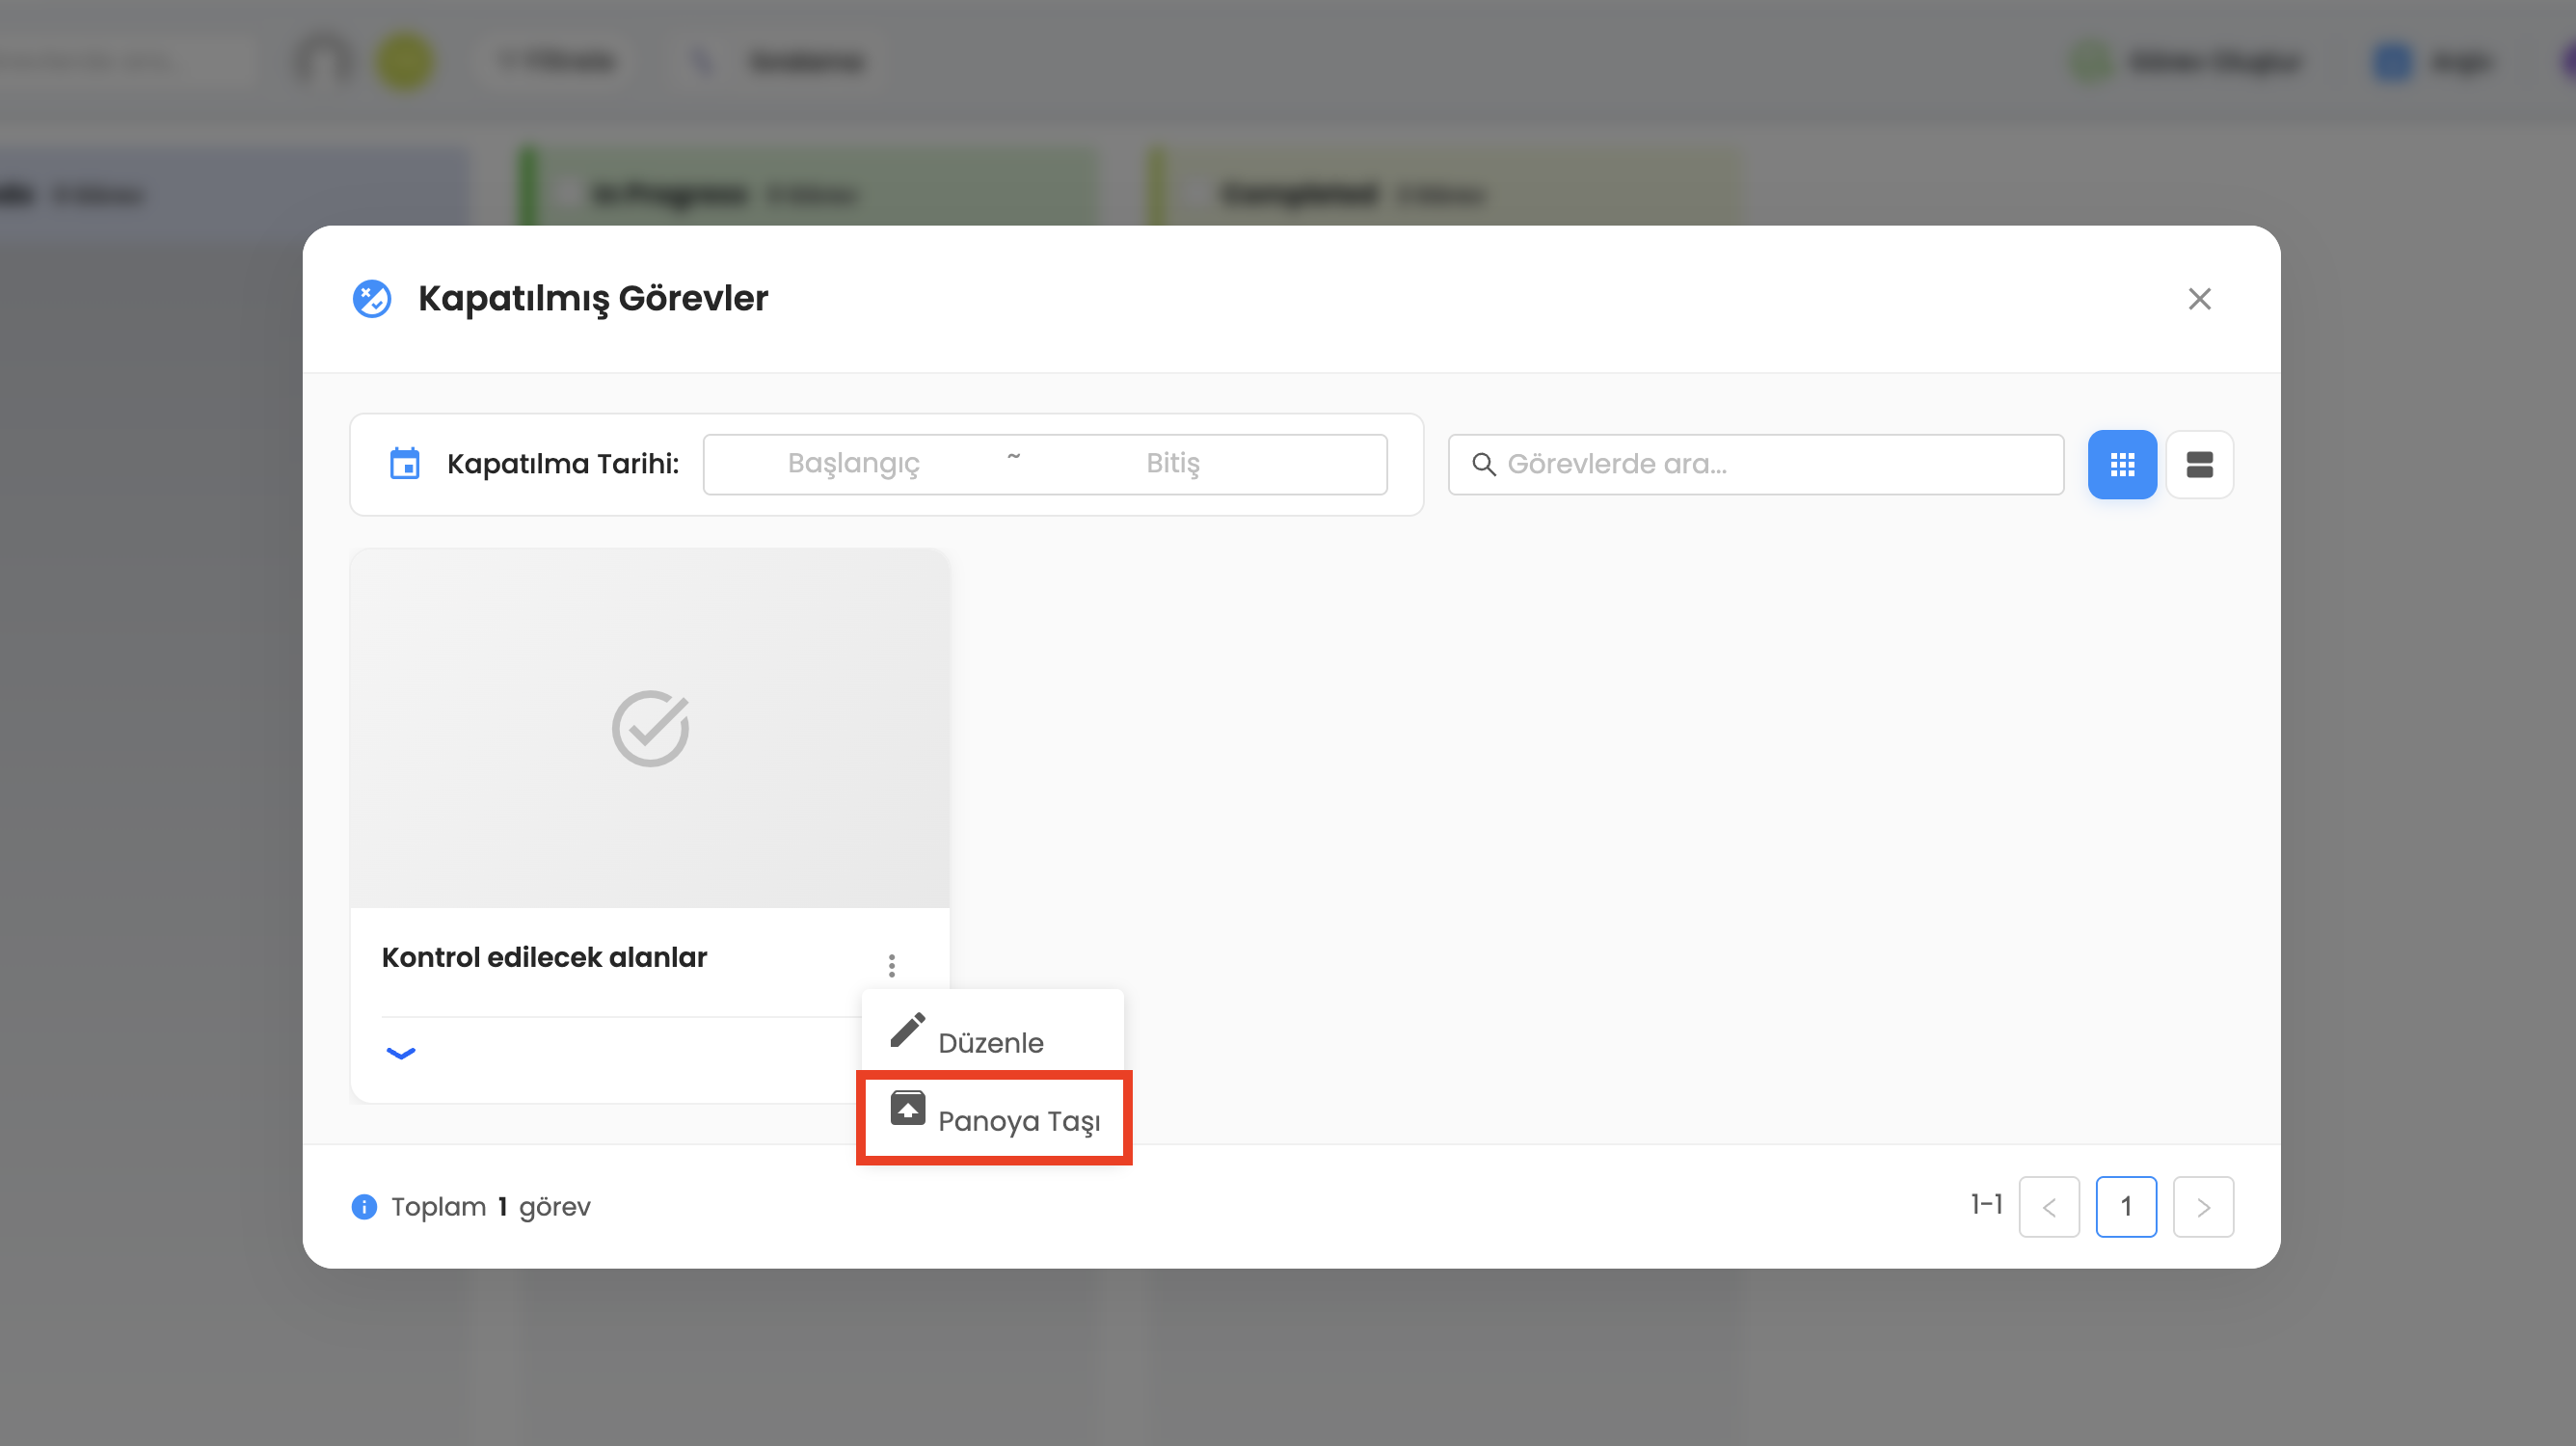
- The task is instantly removed from the closed tasks list and placed at the very top of the first "todo" column of its workflow board, clearing its Done status.
- A "Success - Task moved to board" toast notification appears in the panel.

- Real-time web and mobile notifications are dispatched to the task's assignees, owner, and followers. A "moved task back to board" entry is logged under the Activity tab in task details.