
Supsis is a comprehensive communication platform designed to efficiently, scalably, and seamlessly meet all communication needs of businesses — including pre-sales, post-sales, technical support, and marketing — through artificial intelligence and automation technologies.
You can experience all the features offered by the Supsis platform completely free of charge for 1 week with unlimited access through a demo account. During the demo period, you can explore all modules of the platform, observe how they integrate into your business processes, and evaluate how effectively they meet your needs.
1-) Creating a Demo Account
To create your Supsis demo account, follow the steps below:
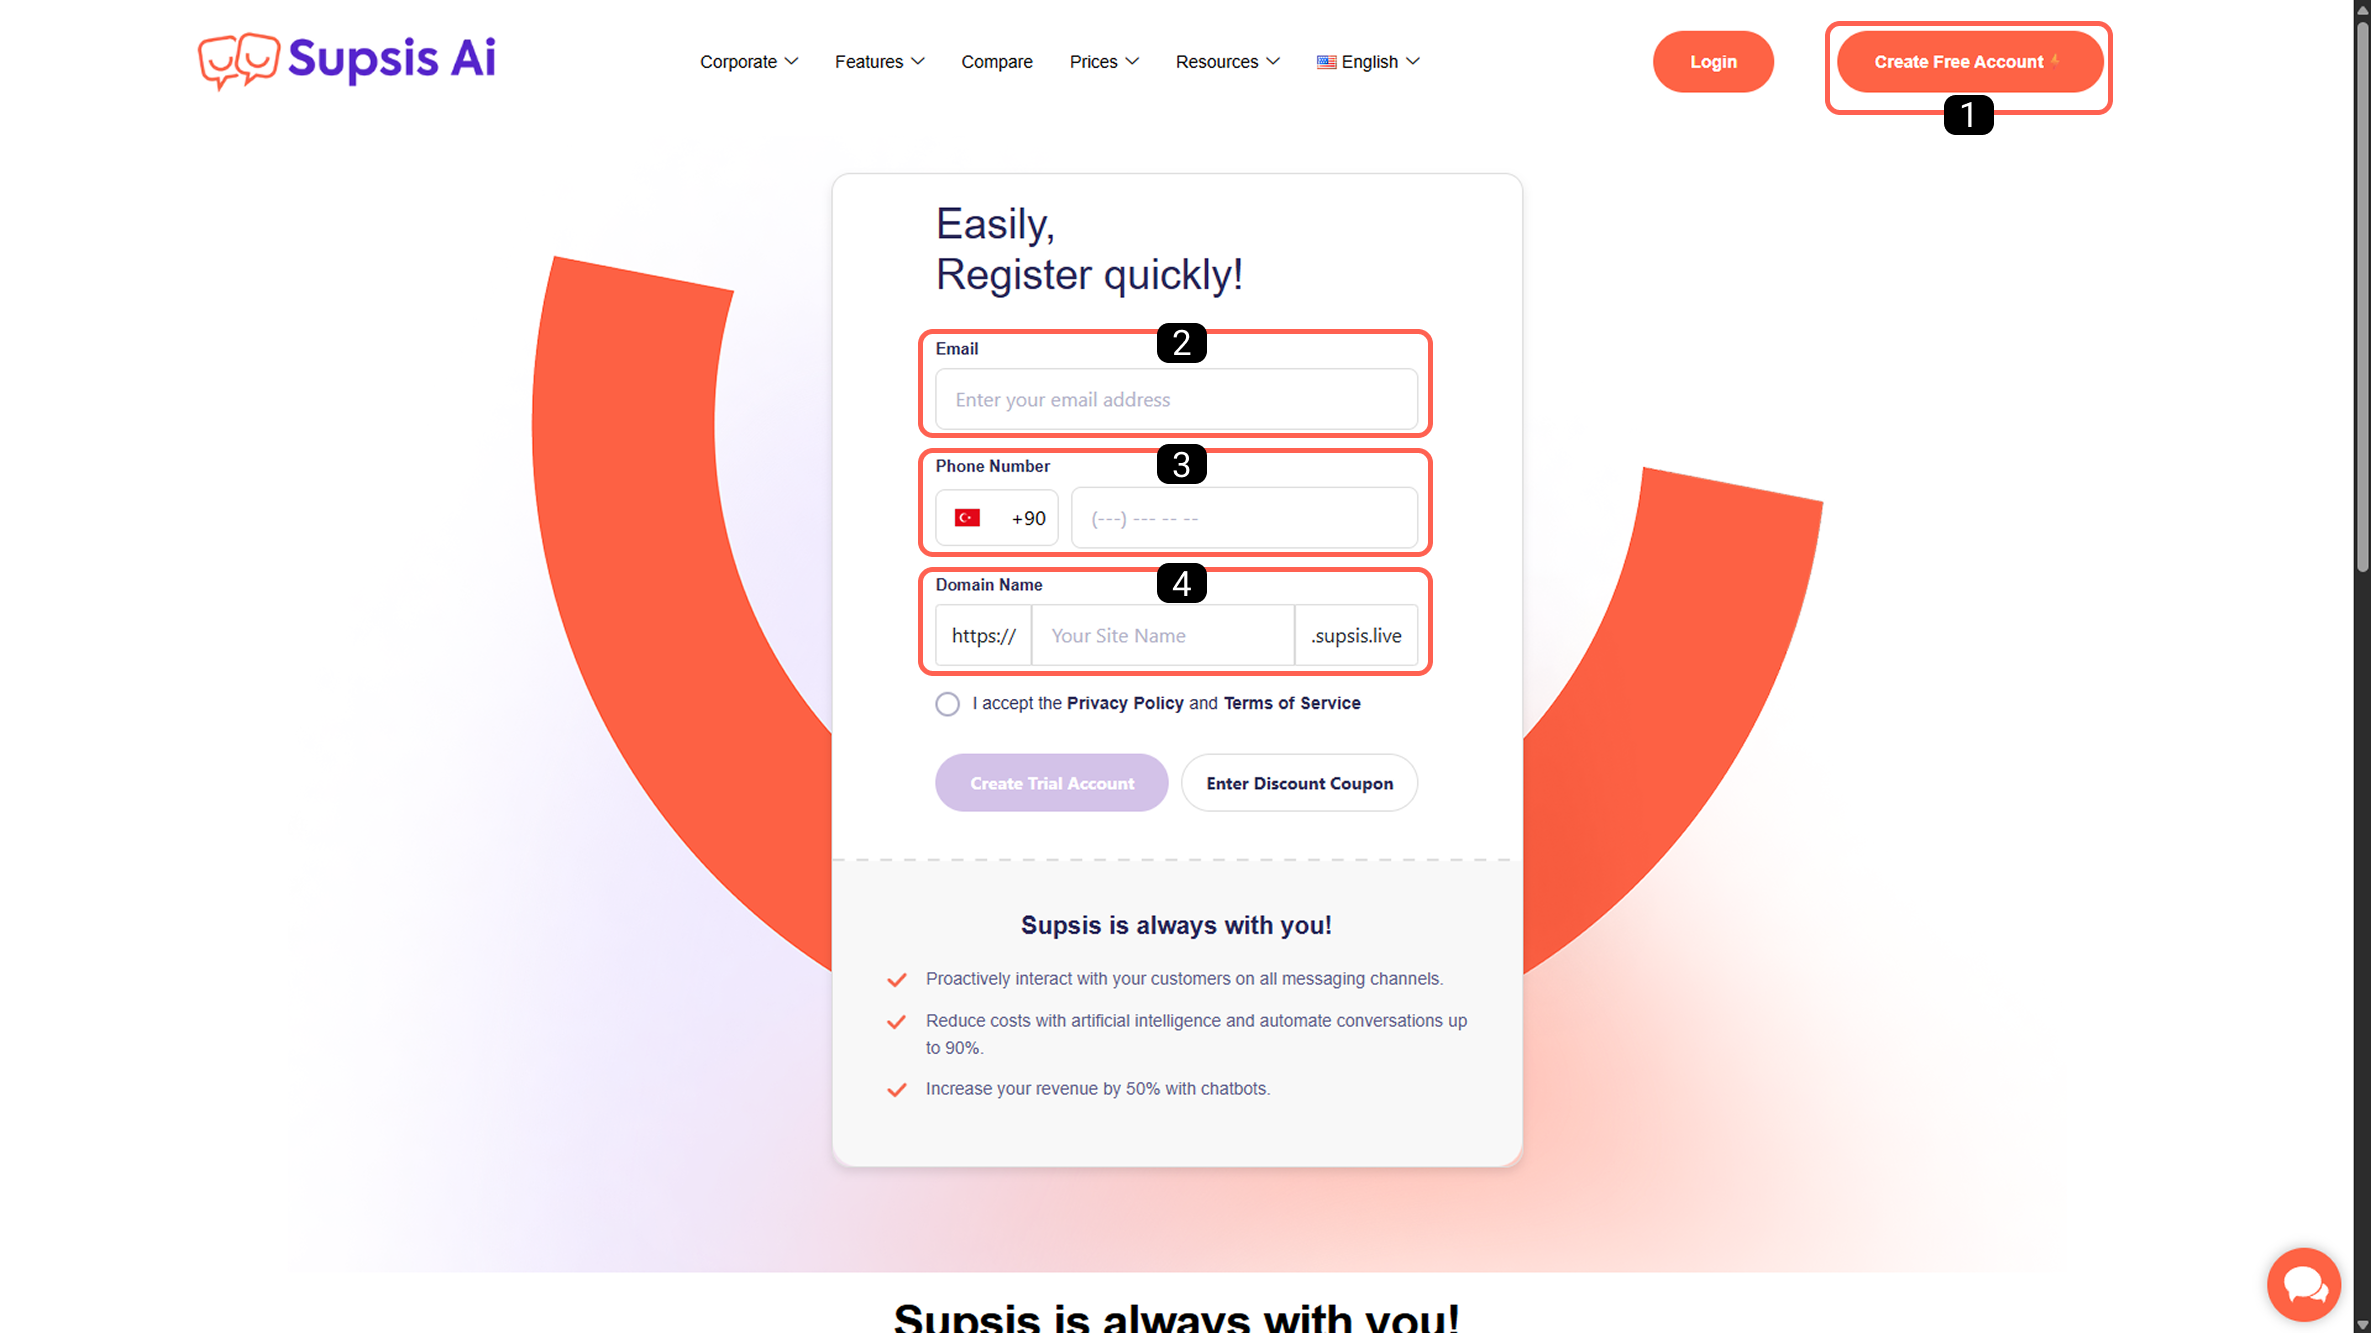
- Create Account Button
- Email Address
- Phone Number
- Domain Name
1-) Create Account Button
To start the demo account creation process, first go to https://supsis.com/. Click the Create Account button located in the top-right corner of the homepage to proceed to the registration screen.
2-) Email
Enter an active email address that you currently use and have access to. During the account creation process, Supsis will send a verification code to this email address. To complete account activation, the verification code must be entered into the relevant field accurately and completely.
3-) Phone Number
You can enter your personal phone number or a phone number belonging to a relevant department of your company so that our sales and technical support teams can contact you when necessary.
4-) Domain Name
This field refers to the domain name through which you will access your Supsis panel. The value you enter here will be part of your panel address. For example, if you enter example, your panel address will be example.supsis.com.
Note: The domain name must not contain Turkish characters, spaces, or punctuation marks. If you meet all requirements but still encounter an issue, the domain name may already be in use. Please proceed with a different domain name.
After filling in all fields, review and approve the Privacy Policy and User Agreement located at the bottom of the page.
If you have a discount code, you can enter it in the “Enter Discount Coupon” field. The discount rate associated with the entered coupon code will be reflected in the pricing of the modules you select after the demo period ends.
Finally, click the Create Demo Account button to proceed to the next step.
5-) Account Verification
After completing the previous steps, you will need to enter the verification code sent to your email address into the displayed field. Once entered correctly, you can continue the process.
6-) Login Information
After email verification, the Login Information screen will open. In this section:
-
First Name – Last Name:
This name will be displayed in reporting screens within the panel, to other representatives, and to customers who communicate with you via the web chat widget. -
Password:
This is the password you will use to log in to the Supsis panel. It is recommended to create a strong password for security purposes.
After entering the required information, complete the step and proceed.
7-) Purpose Selection
At this step, you will be asked to select the purpose for which you plan to use the Supsis platform. Your selection helps our teams provide more accurate guidance and support tailored to your usage scenario.
Choose the options that best match your intended use of Supsis.
8-) Add Platform
In this section, you can select the platforms through which you manage your communication processes and plan to actively use Supsis modules.
The selected platforms integrate with Supsis modules and allow communication processes on those channels to be managed through Supsis.
9-) Add Modules
Select the modules you wish to use in your Supsis panel. The selected modules help us better analyze your intended usage of the platform. Accordingly, our relevant teams may provide detailed information and guidance when needed.
For more detailed information about selectable modules, you can review the relevant documentation at https://doc.supsis.live.
Key modules include:
-
AI Voice Assistant
An AI-powered voice assistant that automatically calls your customers to handle appointments, orders, and requests quickly, increasing operational efficiency. -
Dynamic Tables
Manage your data through flexible and customizable tables with filtering, sorting, and grouping features. -
Re-Marketing Automations
Reach customers via bulk WhatsApp, email, and SMS campaigns, managing all communication from a single panel. -
Calendar & Reservation System
Create appointments across platforms, set automatic reminders, and organize bookings 24/7 with AI-powered chatbot support. -
Ad Analysis & Reporting
Analyze website visitors and social media ads, calculate performance metrics, and generate detailed reports. -
Form & Survey Module
Collect data through integrated forms and analyze customer behavior to develop tailored strategies. -
Process & Task Management Module
Define workflows, priorities, and rules to plan and manage tasks collaboratively. -
Video & Voice Call & Screen Sharing Module
Offers real-time messaging, video/voice calls, file sharing, and screen sharing through web chat infrastructure. -
Website Analysis & Segmentation
Analyze visitor sources and behavior to create detailed segments. -
Ticket Management System
Collect and manage requests from email, SMS, WhatsApp, and other platforms in a unified system. -
Web Push & Popup Module
Create behavior-based web push notifications and pop-up triggers to increase conversion rates.
10-) Let’s Get to Know You
By answering a few short questions, your demo account setup will be completed.
This information helps ensure that the most appropriate teams contact you and provide an effective experience tailored to your needs.
2-) Package Selection
During the demo period, you can experience all Supsis features free of charge and without entering any card details for 1 week. While your demo account is active, you can select the packages you wish to try by following the steps below.
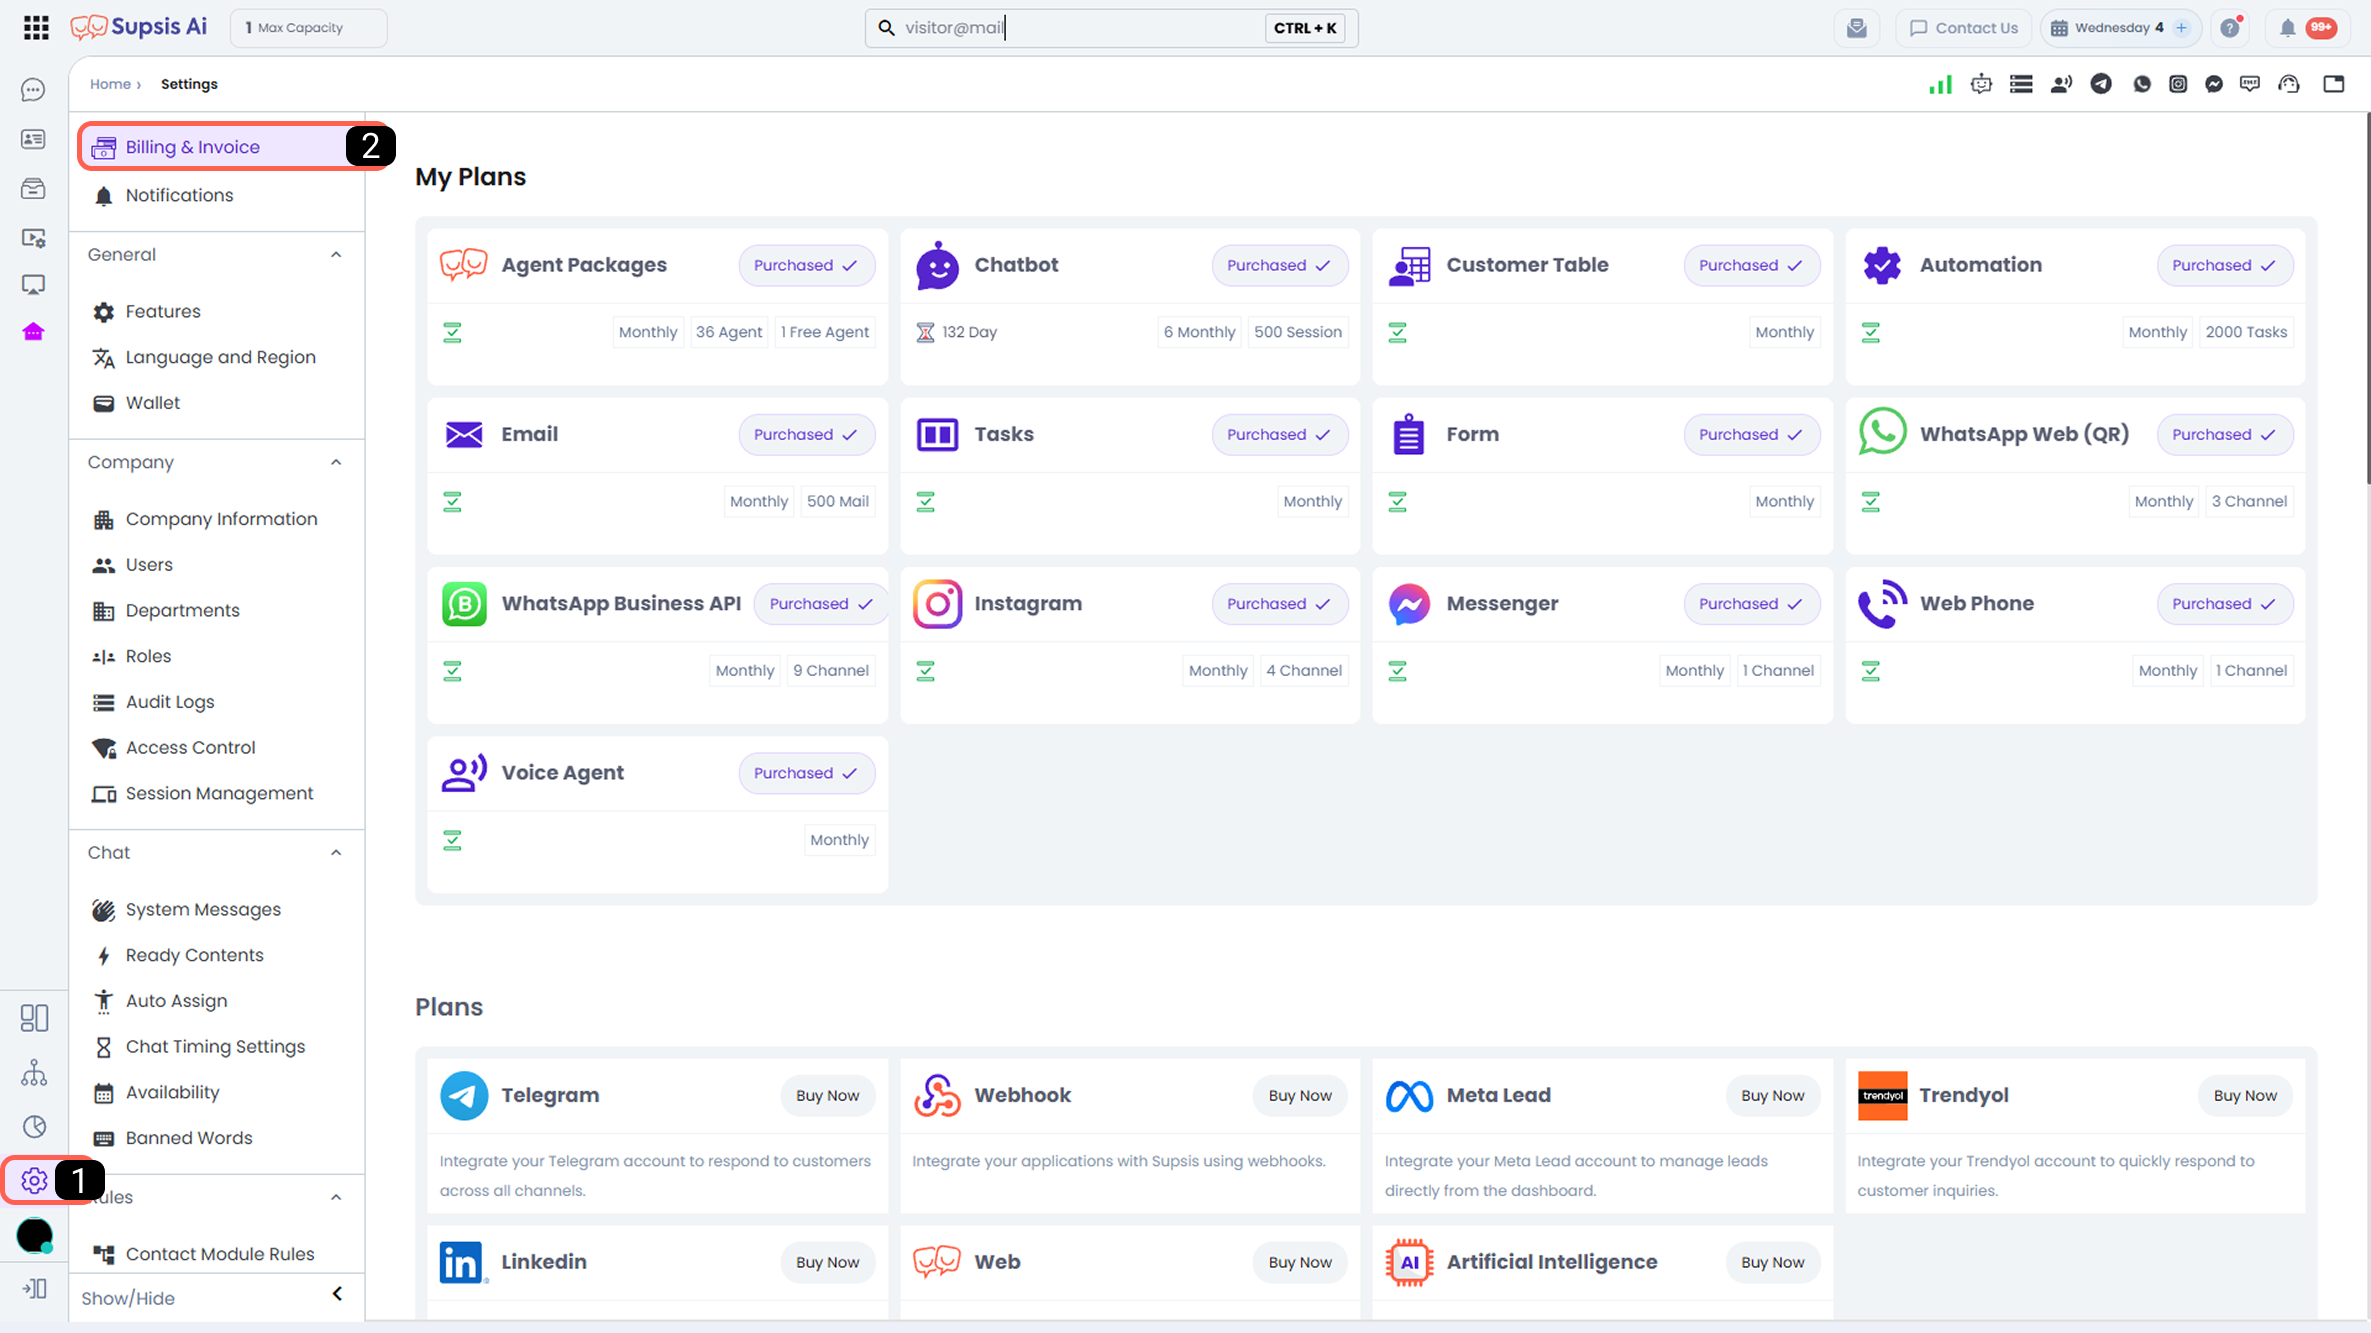
- Settings
- Billing & Payment
1-) Settings
To select a package, first navigate to the Settings menu in your Supsis panel.
2-) Billing & Payment
The Billing & Payment page allows you to view your current plans, available new plans, and additional package options.
From this page, you can: - Upgrade your current plan, - Select a new plan, - Review available packages.
Click on the relevant plan and choose the package that best suits your needs. The scope and features of the selected plan are detailed in the description area below the plan title.
No charges will be applied for package selections made during the demo period until the demo ends.
3-) Contacting Support & Requesting a Meeting
To receive detailed information about Supsis, contact live support, or request a meeting with our technical or sales teams, follow the steps below through your panel.
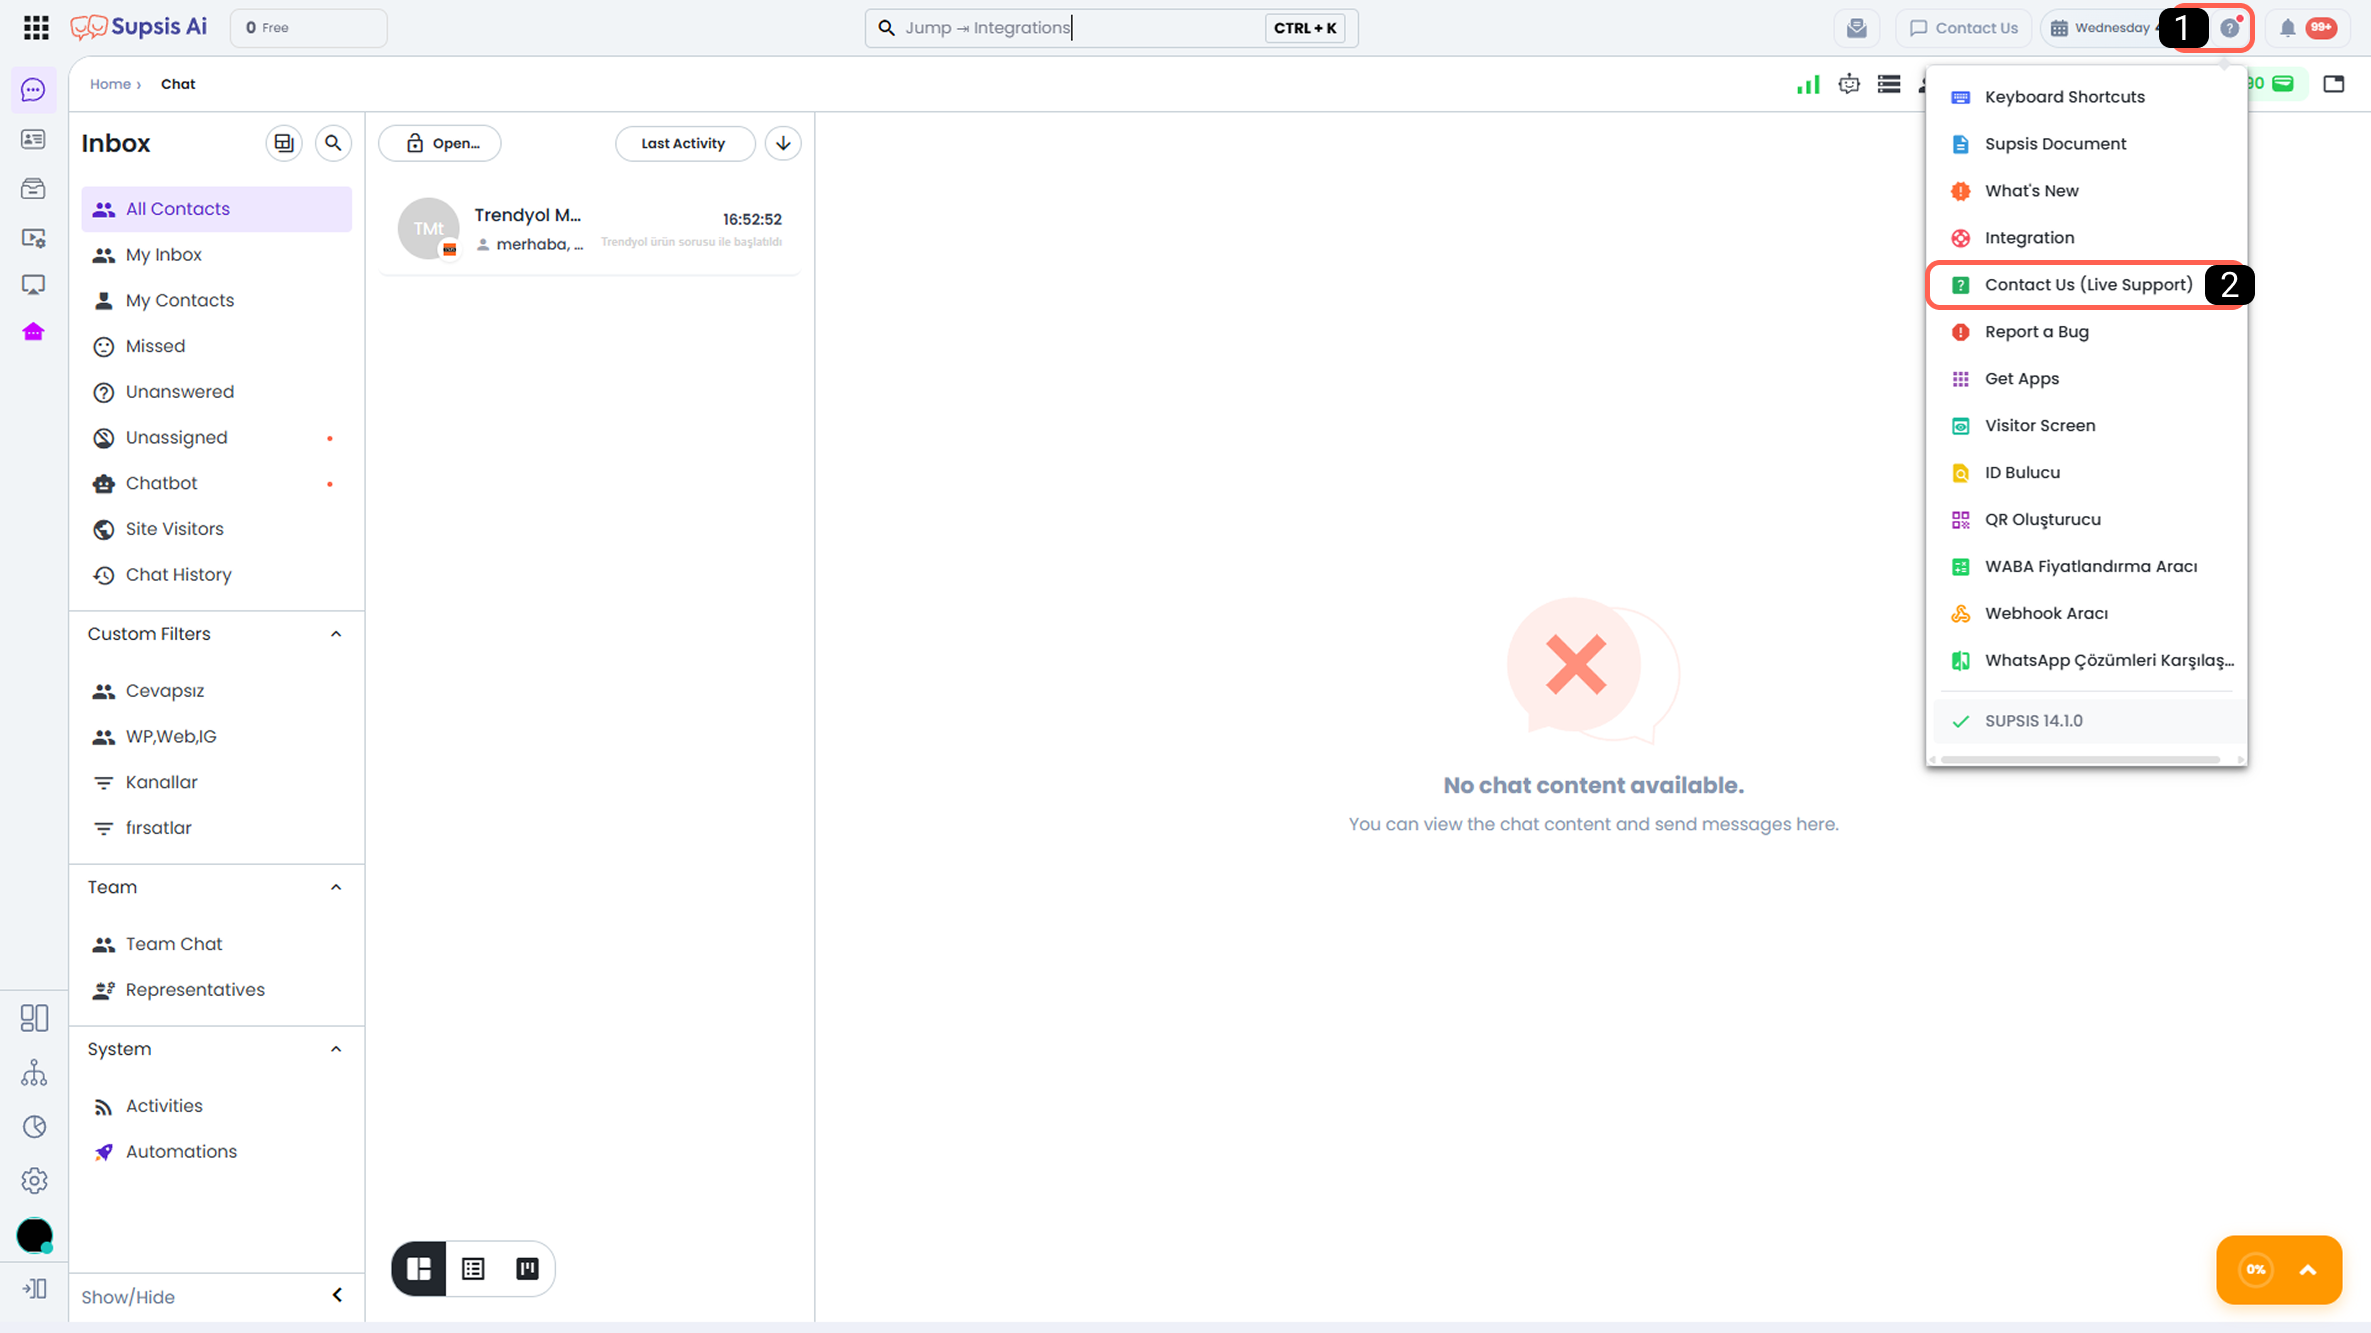
- “?” Shortcut
- Live Support
1-) “?” Shortcut
Click the “?” icon located in the top-right corner of your Supsis panel to access the shortcut menu.
2-) Live Support
From the opened shortcut menu, click “Contact Us (Live Support)”.
After this action, a chat widget will appear in the bottom-right corner of the screen, allowing you to send your request directly to our live support team.
Our support team will review your request and provide real-time assistance, including:
- Technical support appointments,
- Sales information or meeting requests,
- General meeting scheduling.
```