
2-) Ticket Management
The Ticket Management area lists customer requests from all communication channels connected to Supsis AI on a single screen. Through this area, tickets can be filtered, categorized, and easily managed. Support teams can quickly analyze requests and take action without delay.
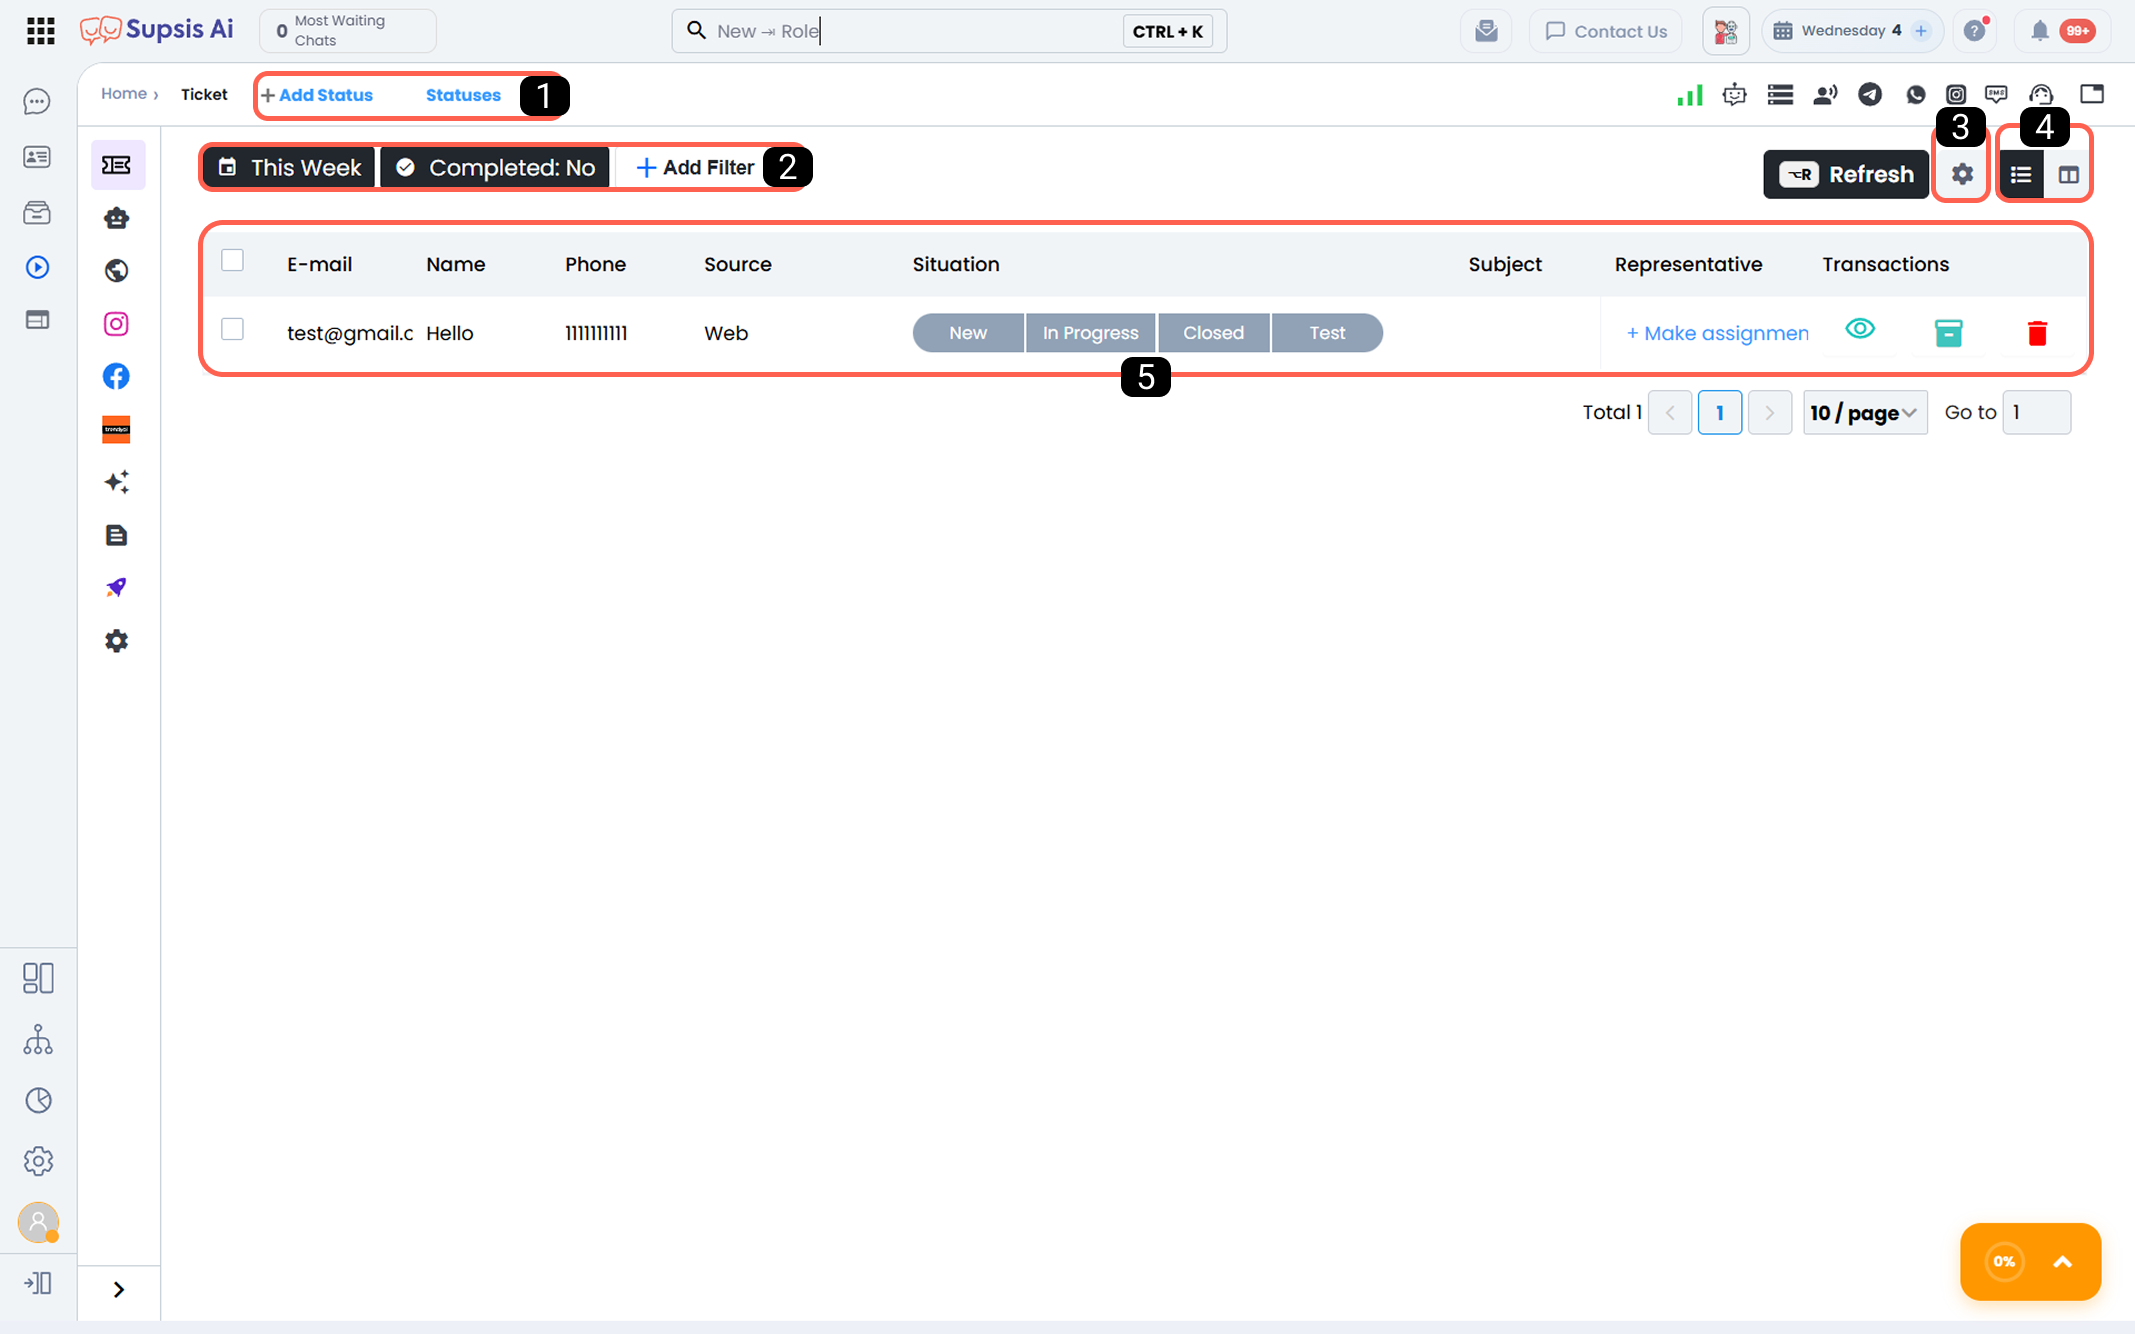
| No | Menu |
|---|---|
| 1 | Status Management |
| 2 | Filters |
| 3 | View Settings |
| 4 | Change View |
| 5 | Table |
1-) Status Management
Status Management allows tickets to be organized under steps that align with your workflow. By assigning statuses to tickets, you can clearly track which stage each process is in.
With this feature:
-
Tickets are grouped under statuses such as New, In Progress, To Be Called Later, Completed
-
Urgent and priority requests can be easily distinguished
-
Operational workload is reduced through status-based filtering
-
Faster access to relevant tickets is provided
Tickets are displayed in Kanban view, arranged in columns according to their statuses. This structure enables visual tracking of workflows and easy process management.
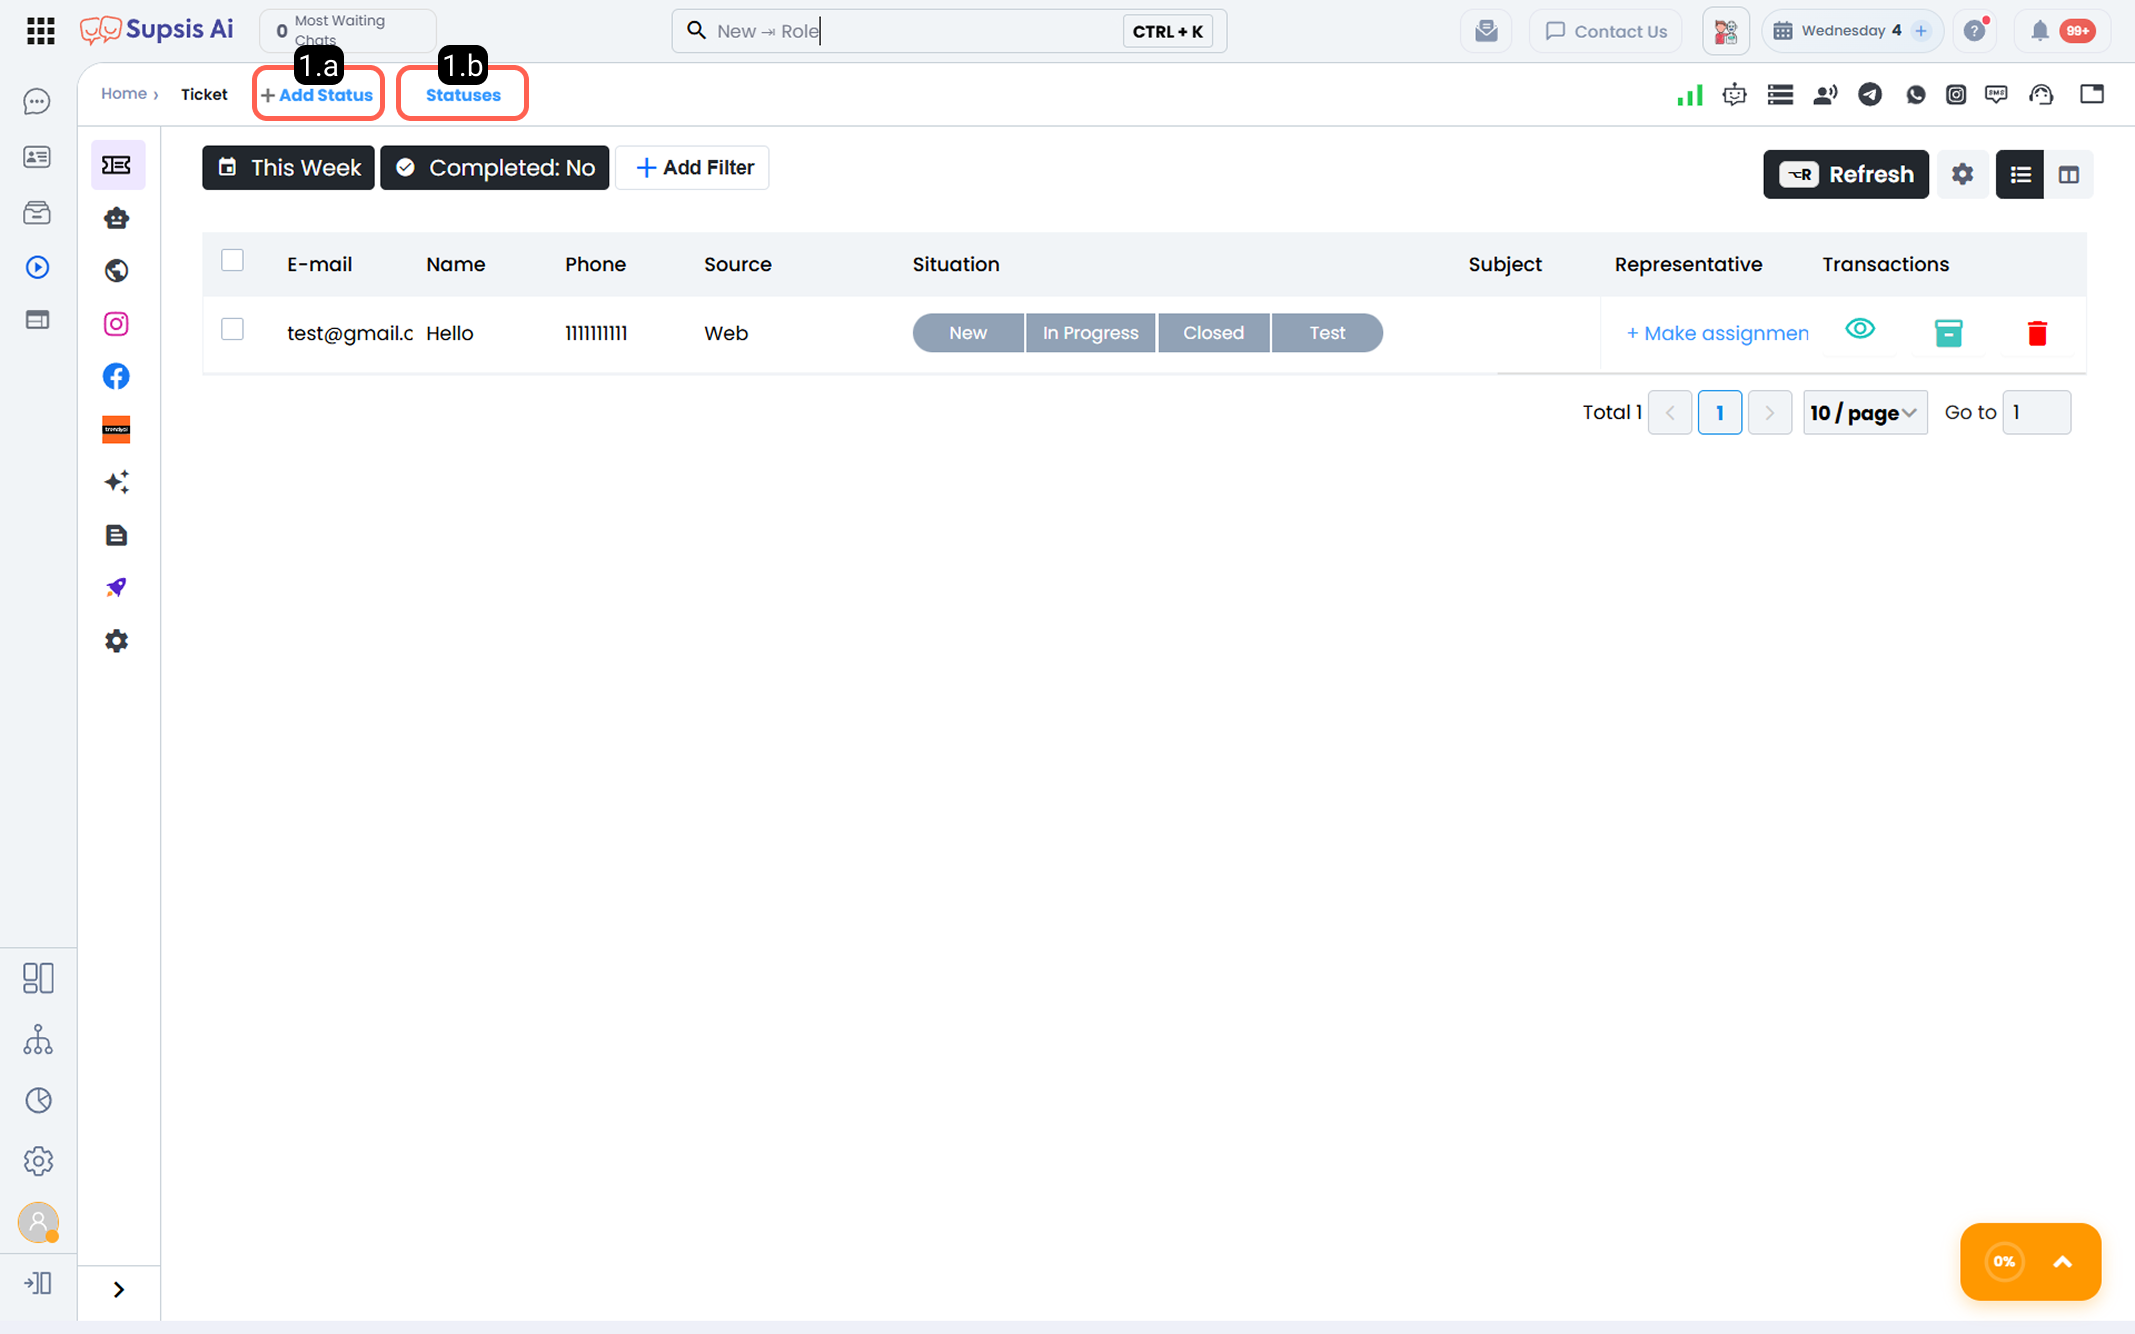
1.a - Add Status:
You can create new ticket statuses from this area; when creating a status, it is sufficient to define only the status name.
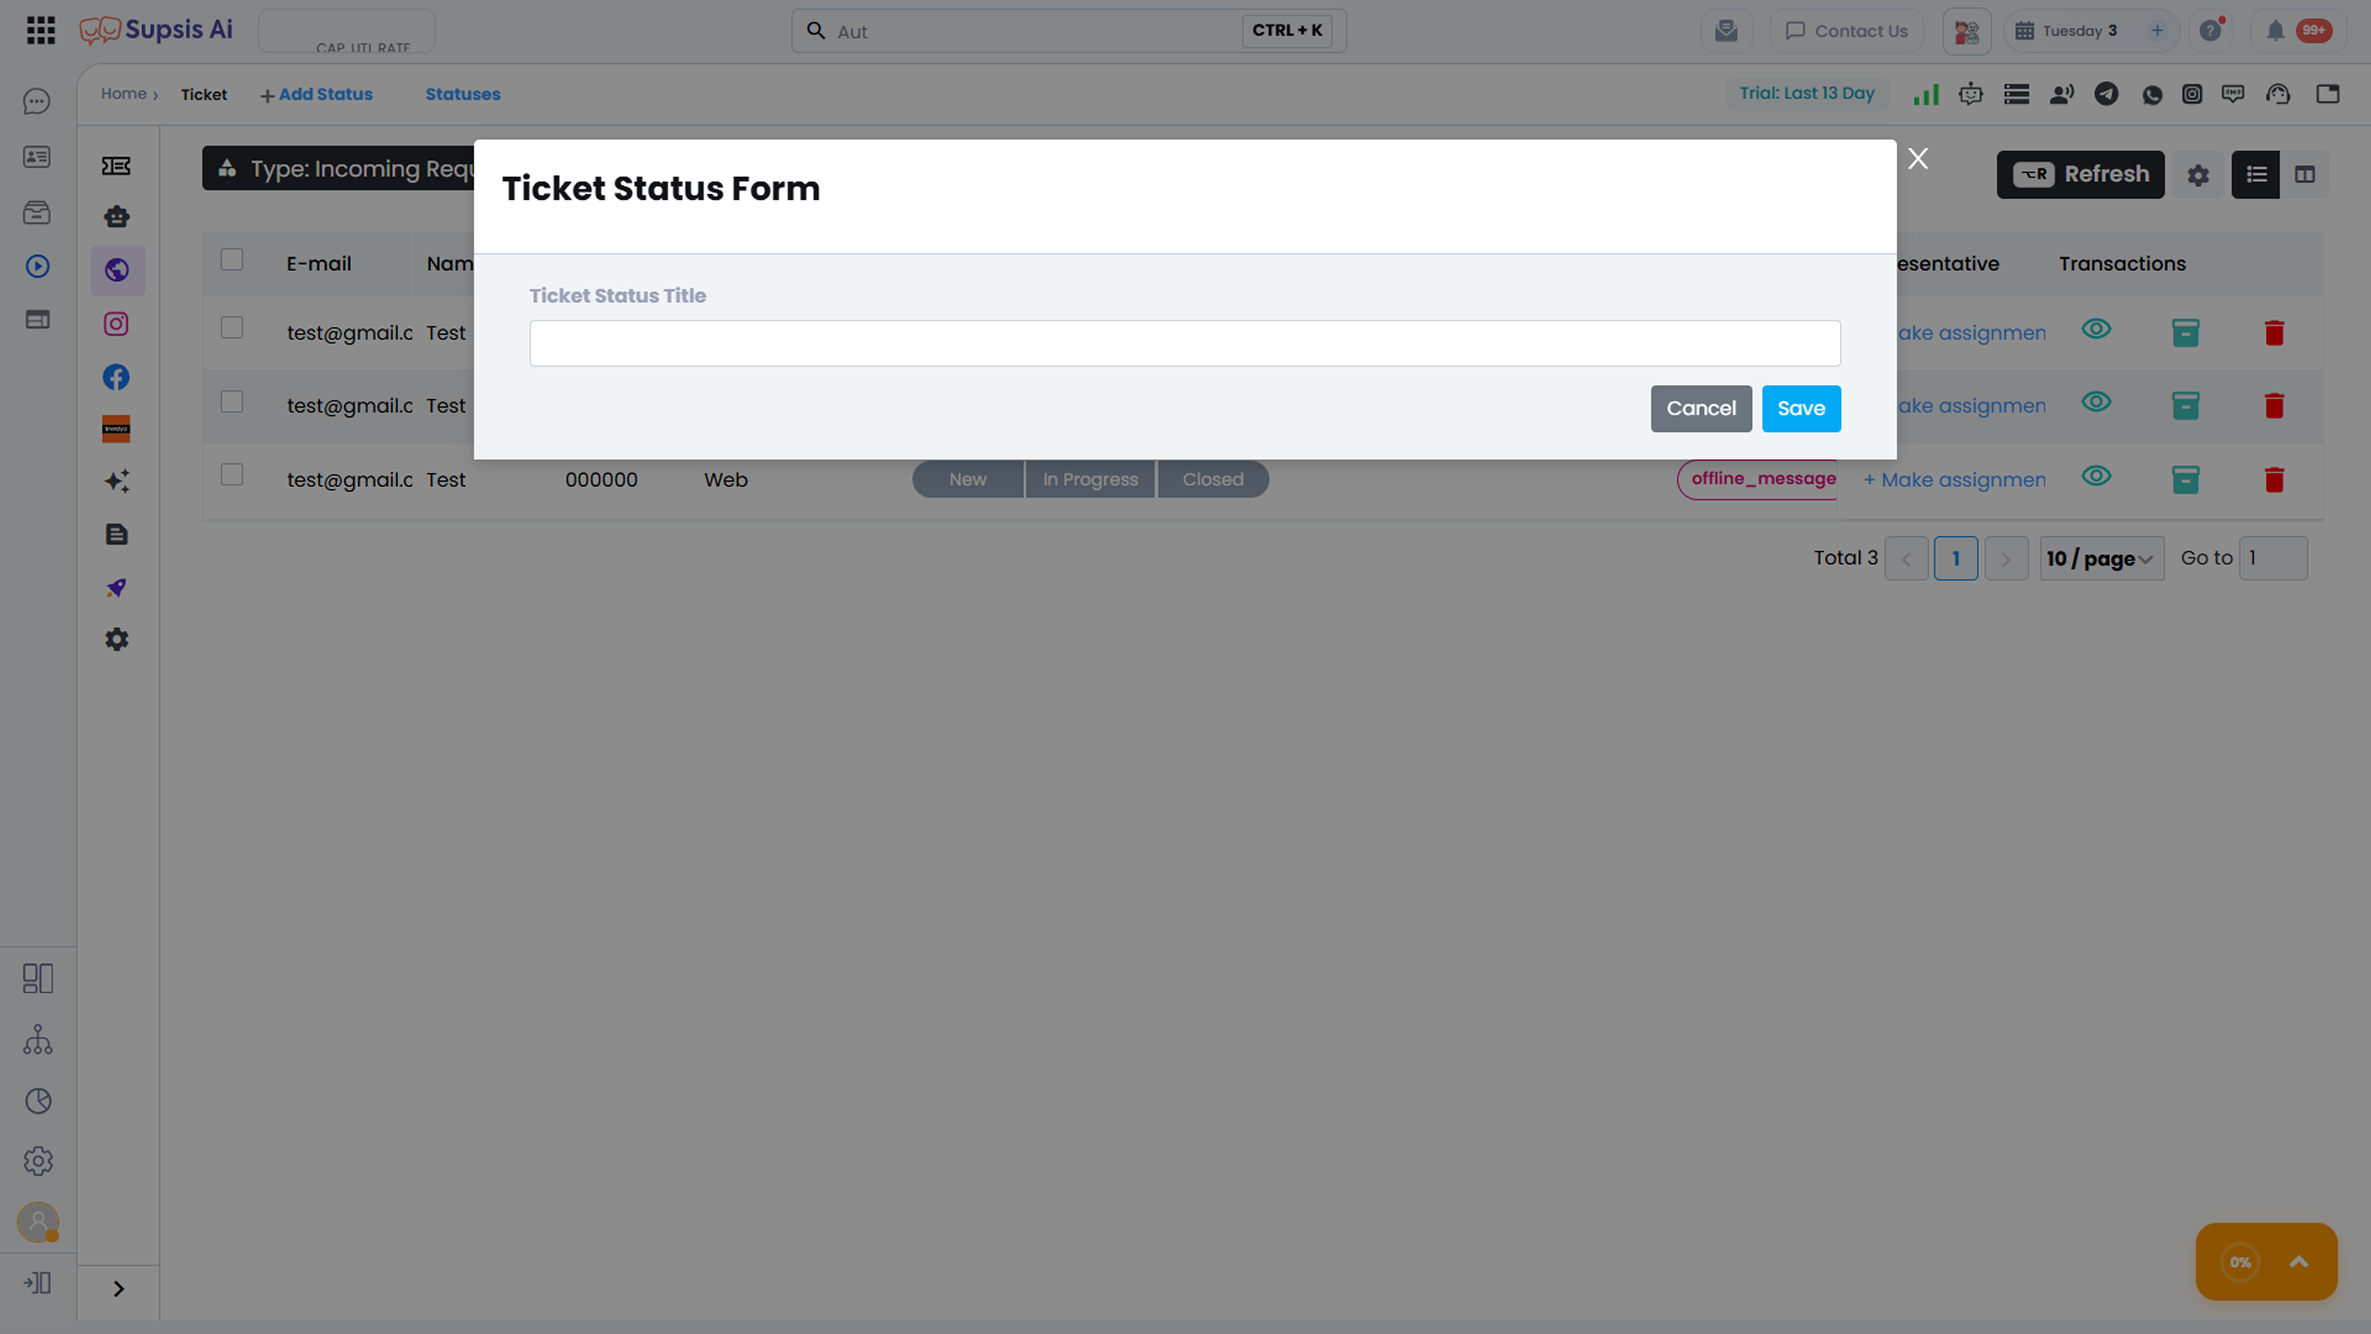
The created status:
- Appears as a new column in Kanban view
- Is automatically added to the Status field in list view
This allows you to define custom statuses aligned with your workflow.
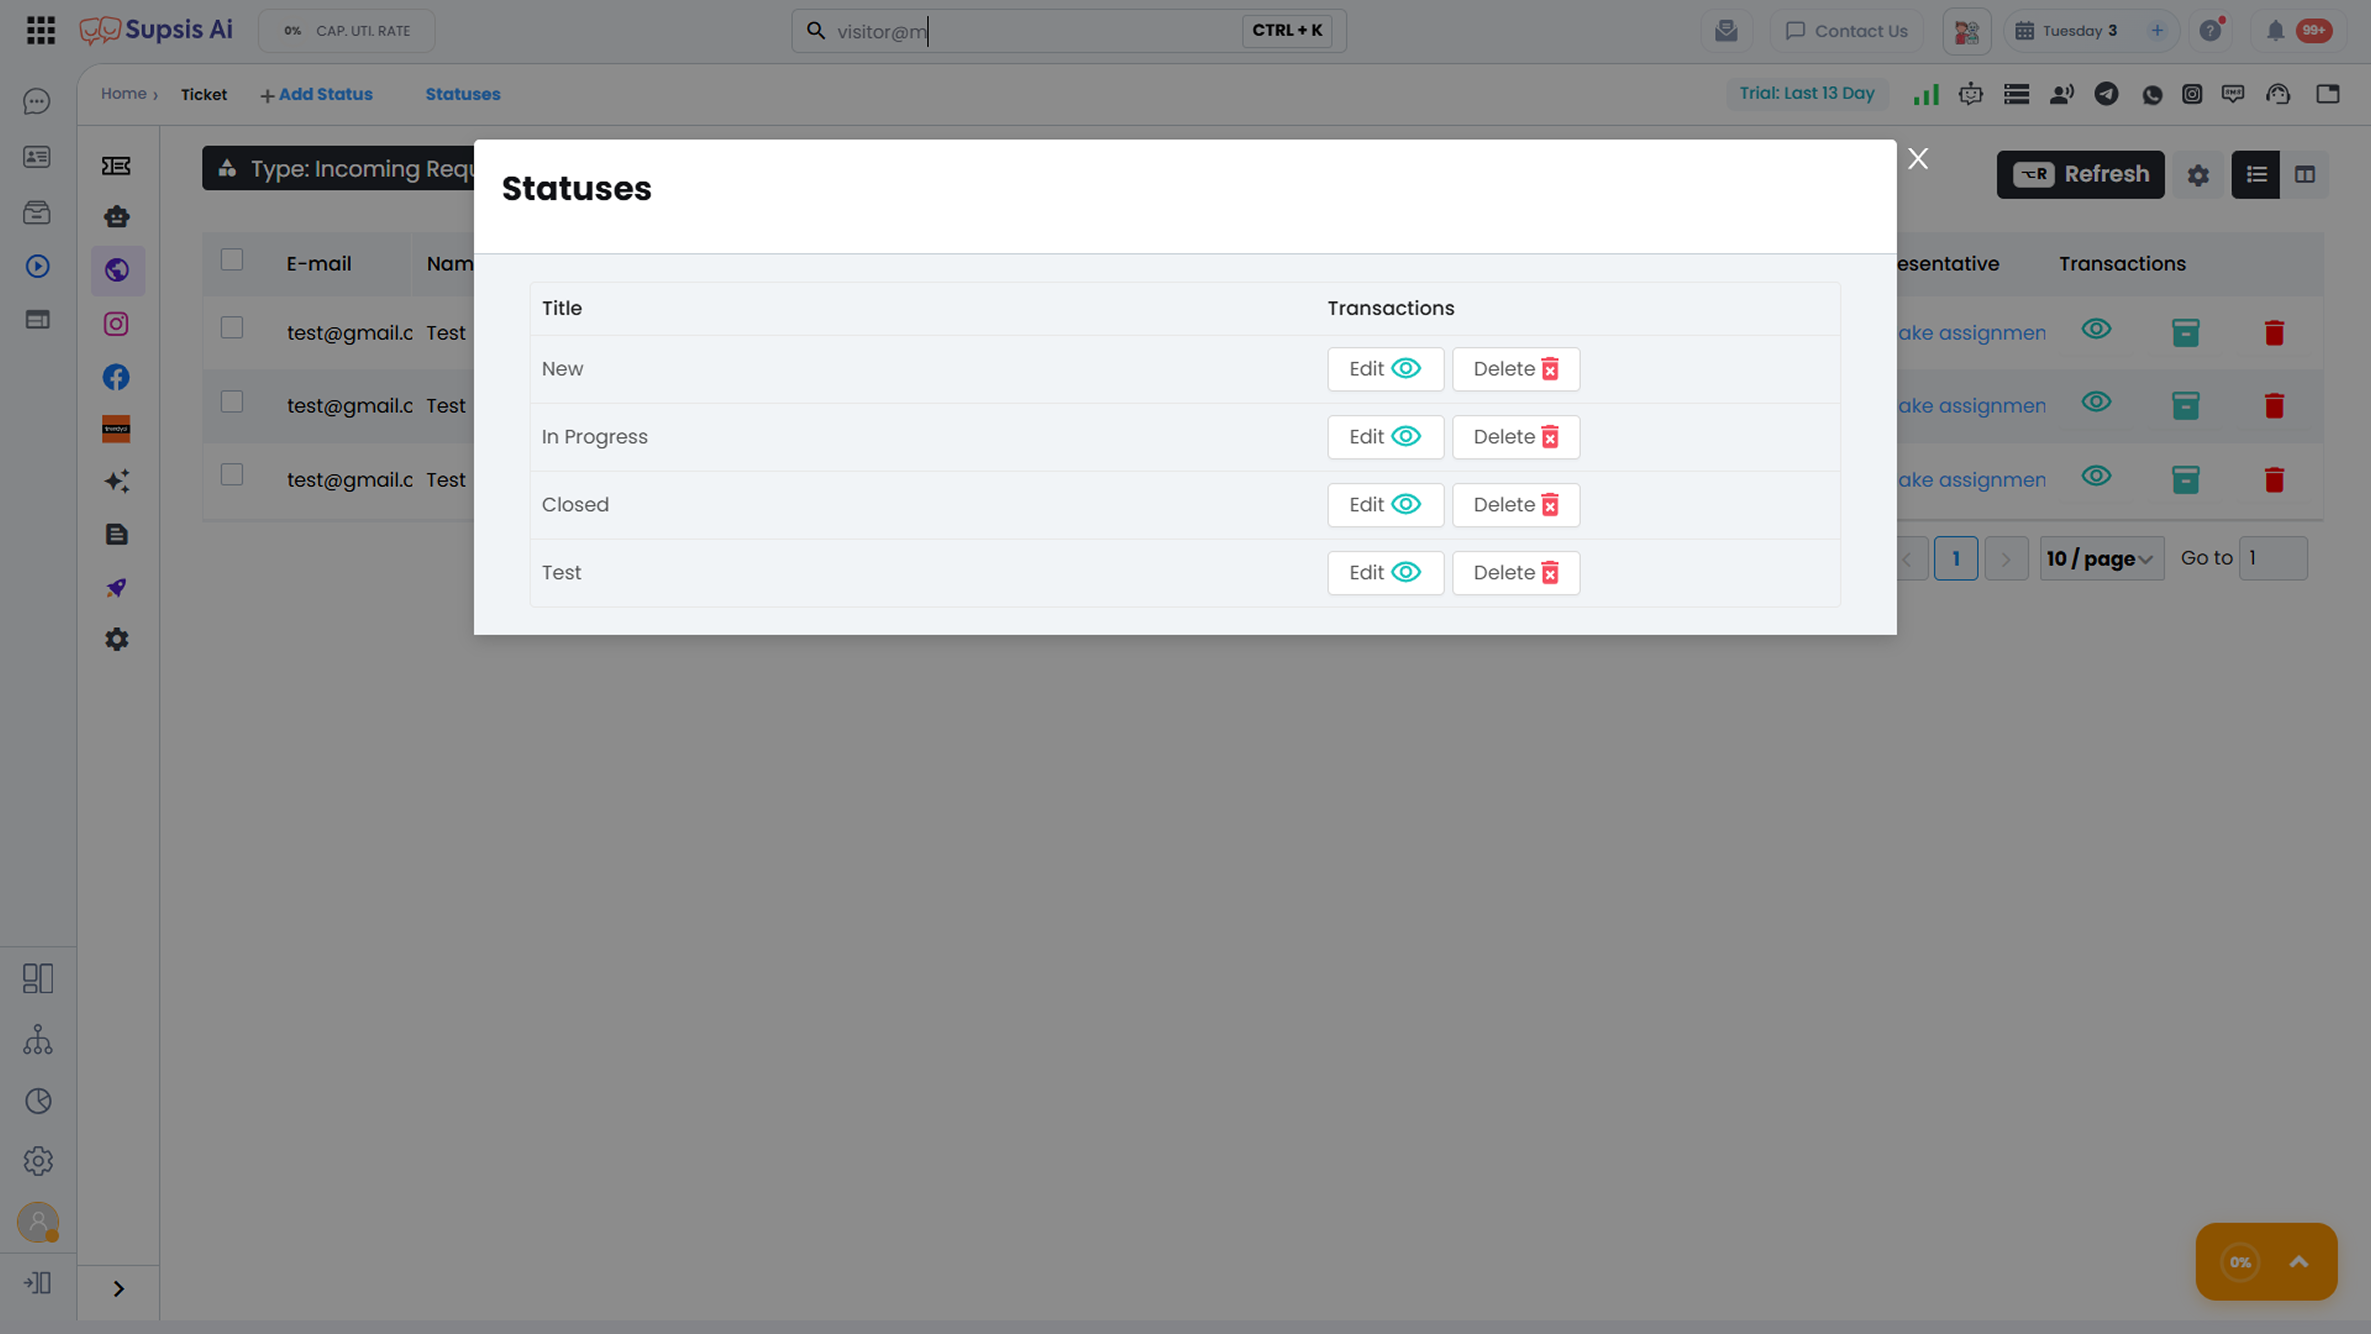
1.b – Statuses:
You can manage your existing ticket statuses from this area.
- You can edit status names,
- You can delete statuses that are no longer used.
Status Management ensures that ticket processes progress in a flexible, organized, and needs-based manner.
2-) Filters
The Filters area allows you to quickly access the requests you are looking for by filtering tickets according to different criteria. Without getting lost in busy ticket lists, you can focus only on the requests you need.
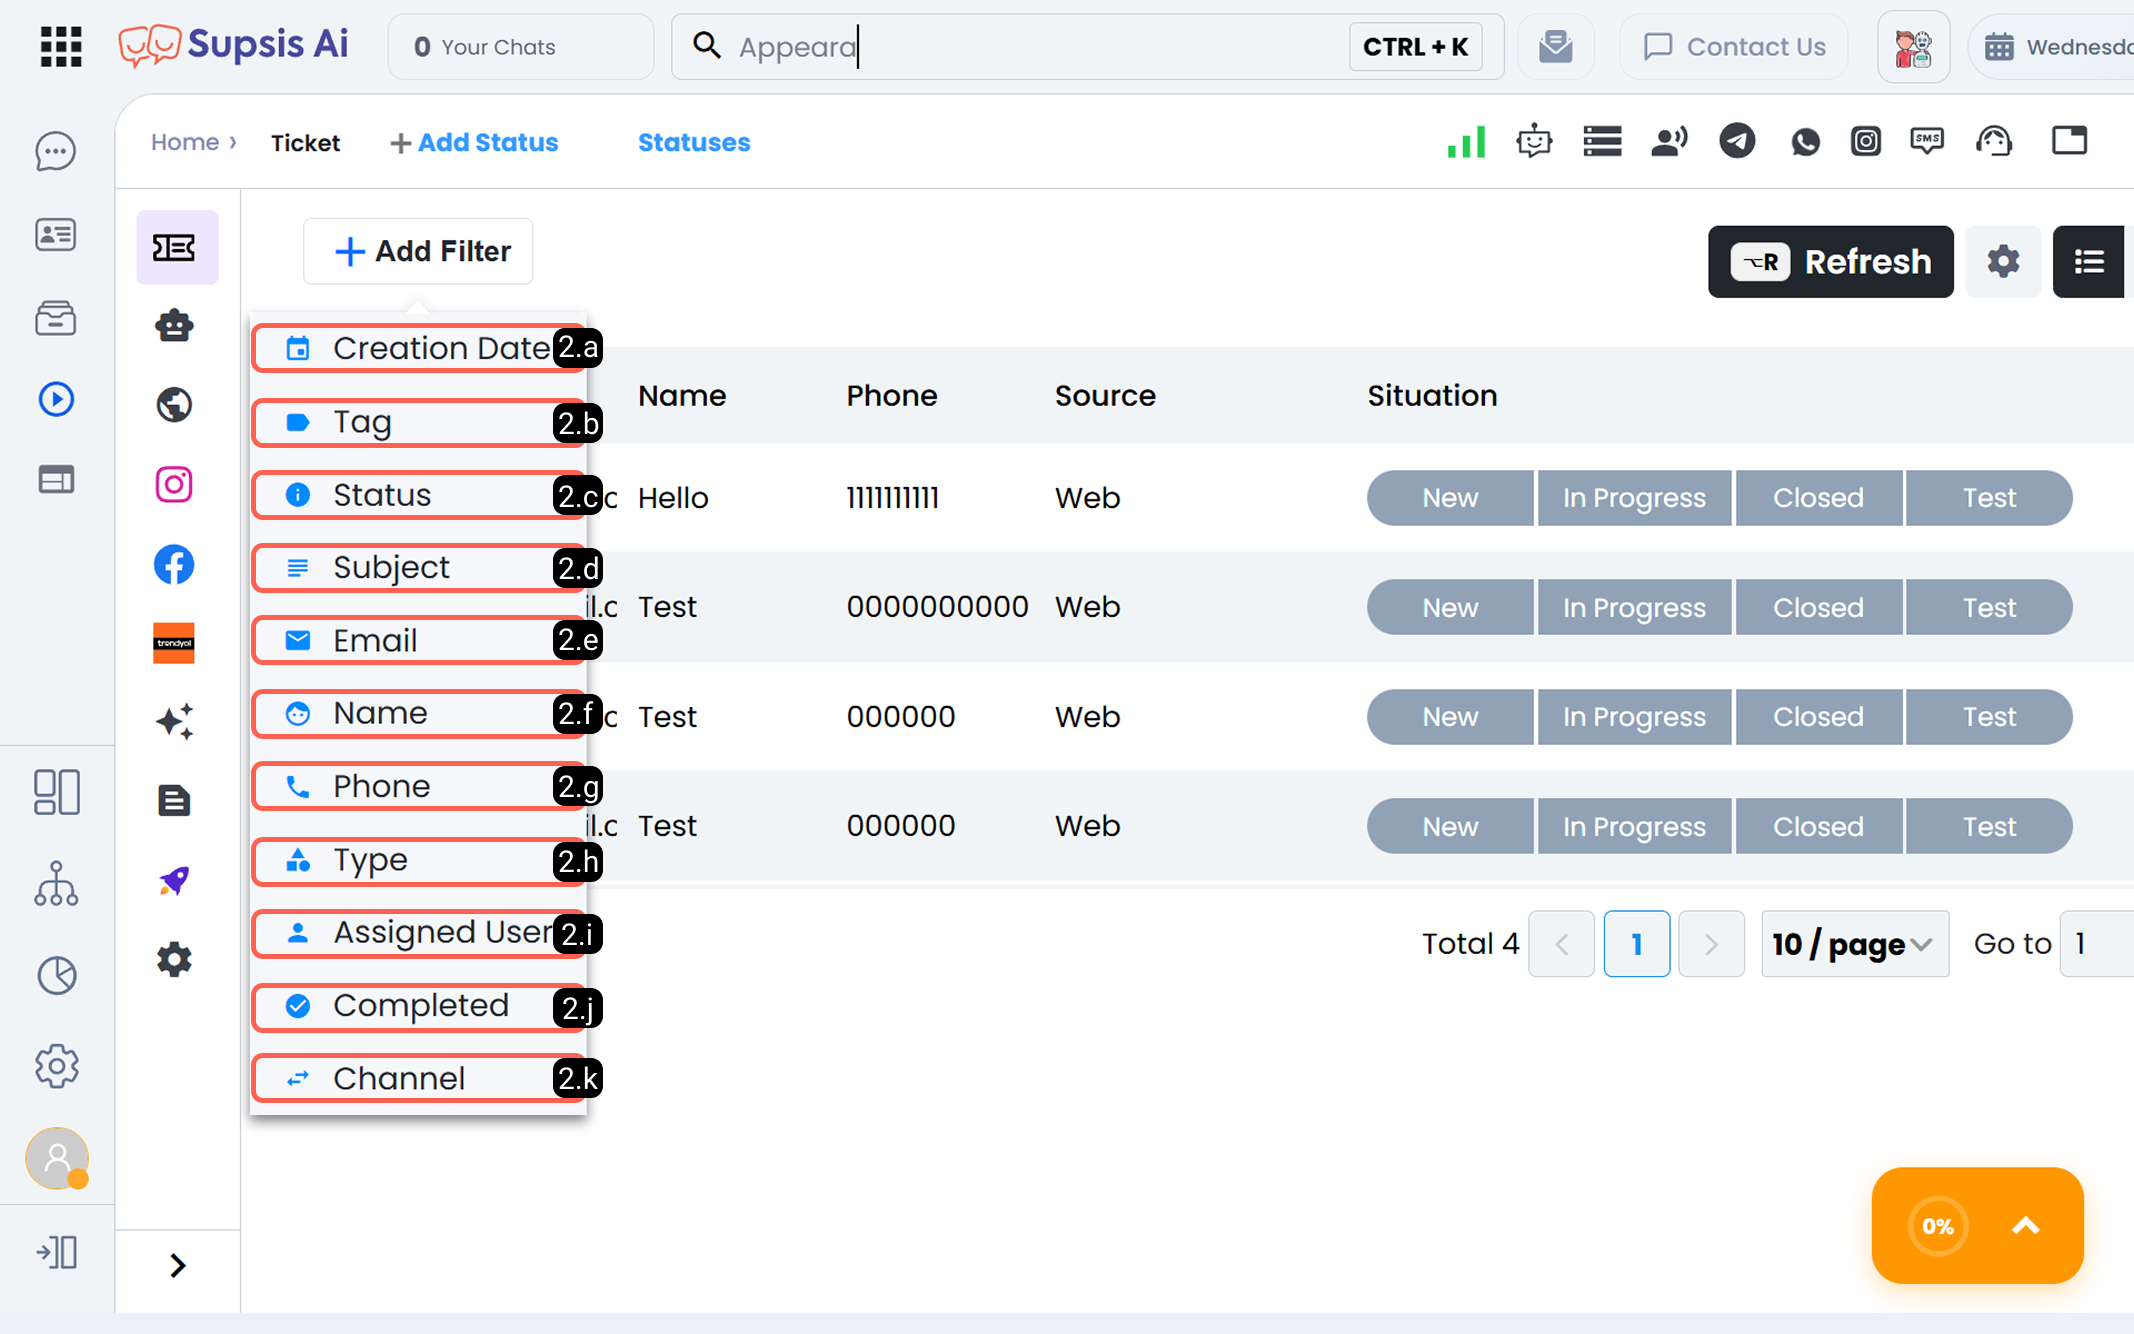
2.a – Creation Date:
Allows filtering based on the date range when the ticket was created.
2.b – Tag:
Grouping and filtering can be performed based on tags assigned to tickets.
2.c – Status:
Tickets can be listed according to their currently assigned status.
2.d – Subject:
Allows filtering based on the ticket subject.
2.e – Email:
You can search based on the email address of the user who created the request.
2.f – Name:
You can easily find tickets by the name of the request owner.
2.g – Phone:
Tickets can be filtered based on the phone number of the user who left the request.
2.h – Type:
Tickets can be separated by type (Instagram Comment, Offline Ticket, etc.).
2.i – Assigned User:
You can list tickets based on the assigned responsible support agent.
2.j – Completed:
Filtering can be performed based on the ticket’s completion status (completed / not completed).
2.k – Channel:
Filtering can be performed based on the communication channel from which the ticket originated (Web, Instagram, Facebook, Chatbot, Trendyol, etc.).
The filtering structure speeds up daily operations. Support teams find the right requests in less time and focus on priority tasks.
3-) View Settings
The View Settings area allows you to fully customize how the ticket list appears according to your needs. This way, you can create a clean and easy-to-read table view that aligns with your workflow.
Through this area:
- You can select which columns will be displayed in the ticket list,
- You can hide columns you do not need,
- You can create a more organized and focused screen.
View Settings allow different teams to personalize their screens according to their information priorities.
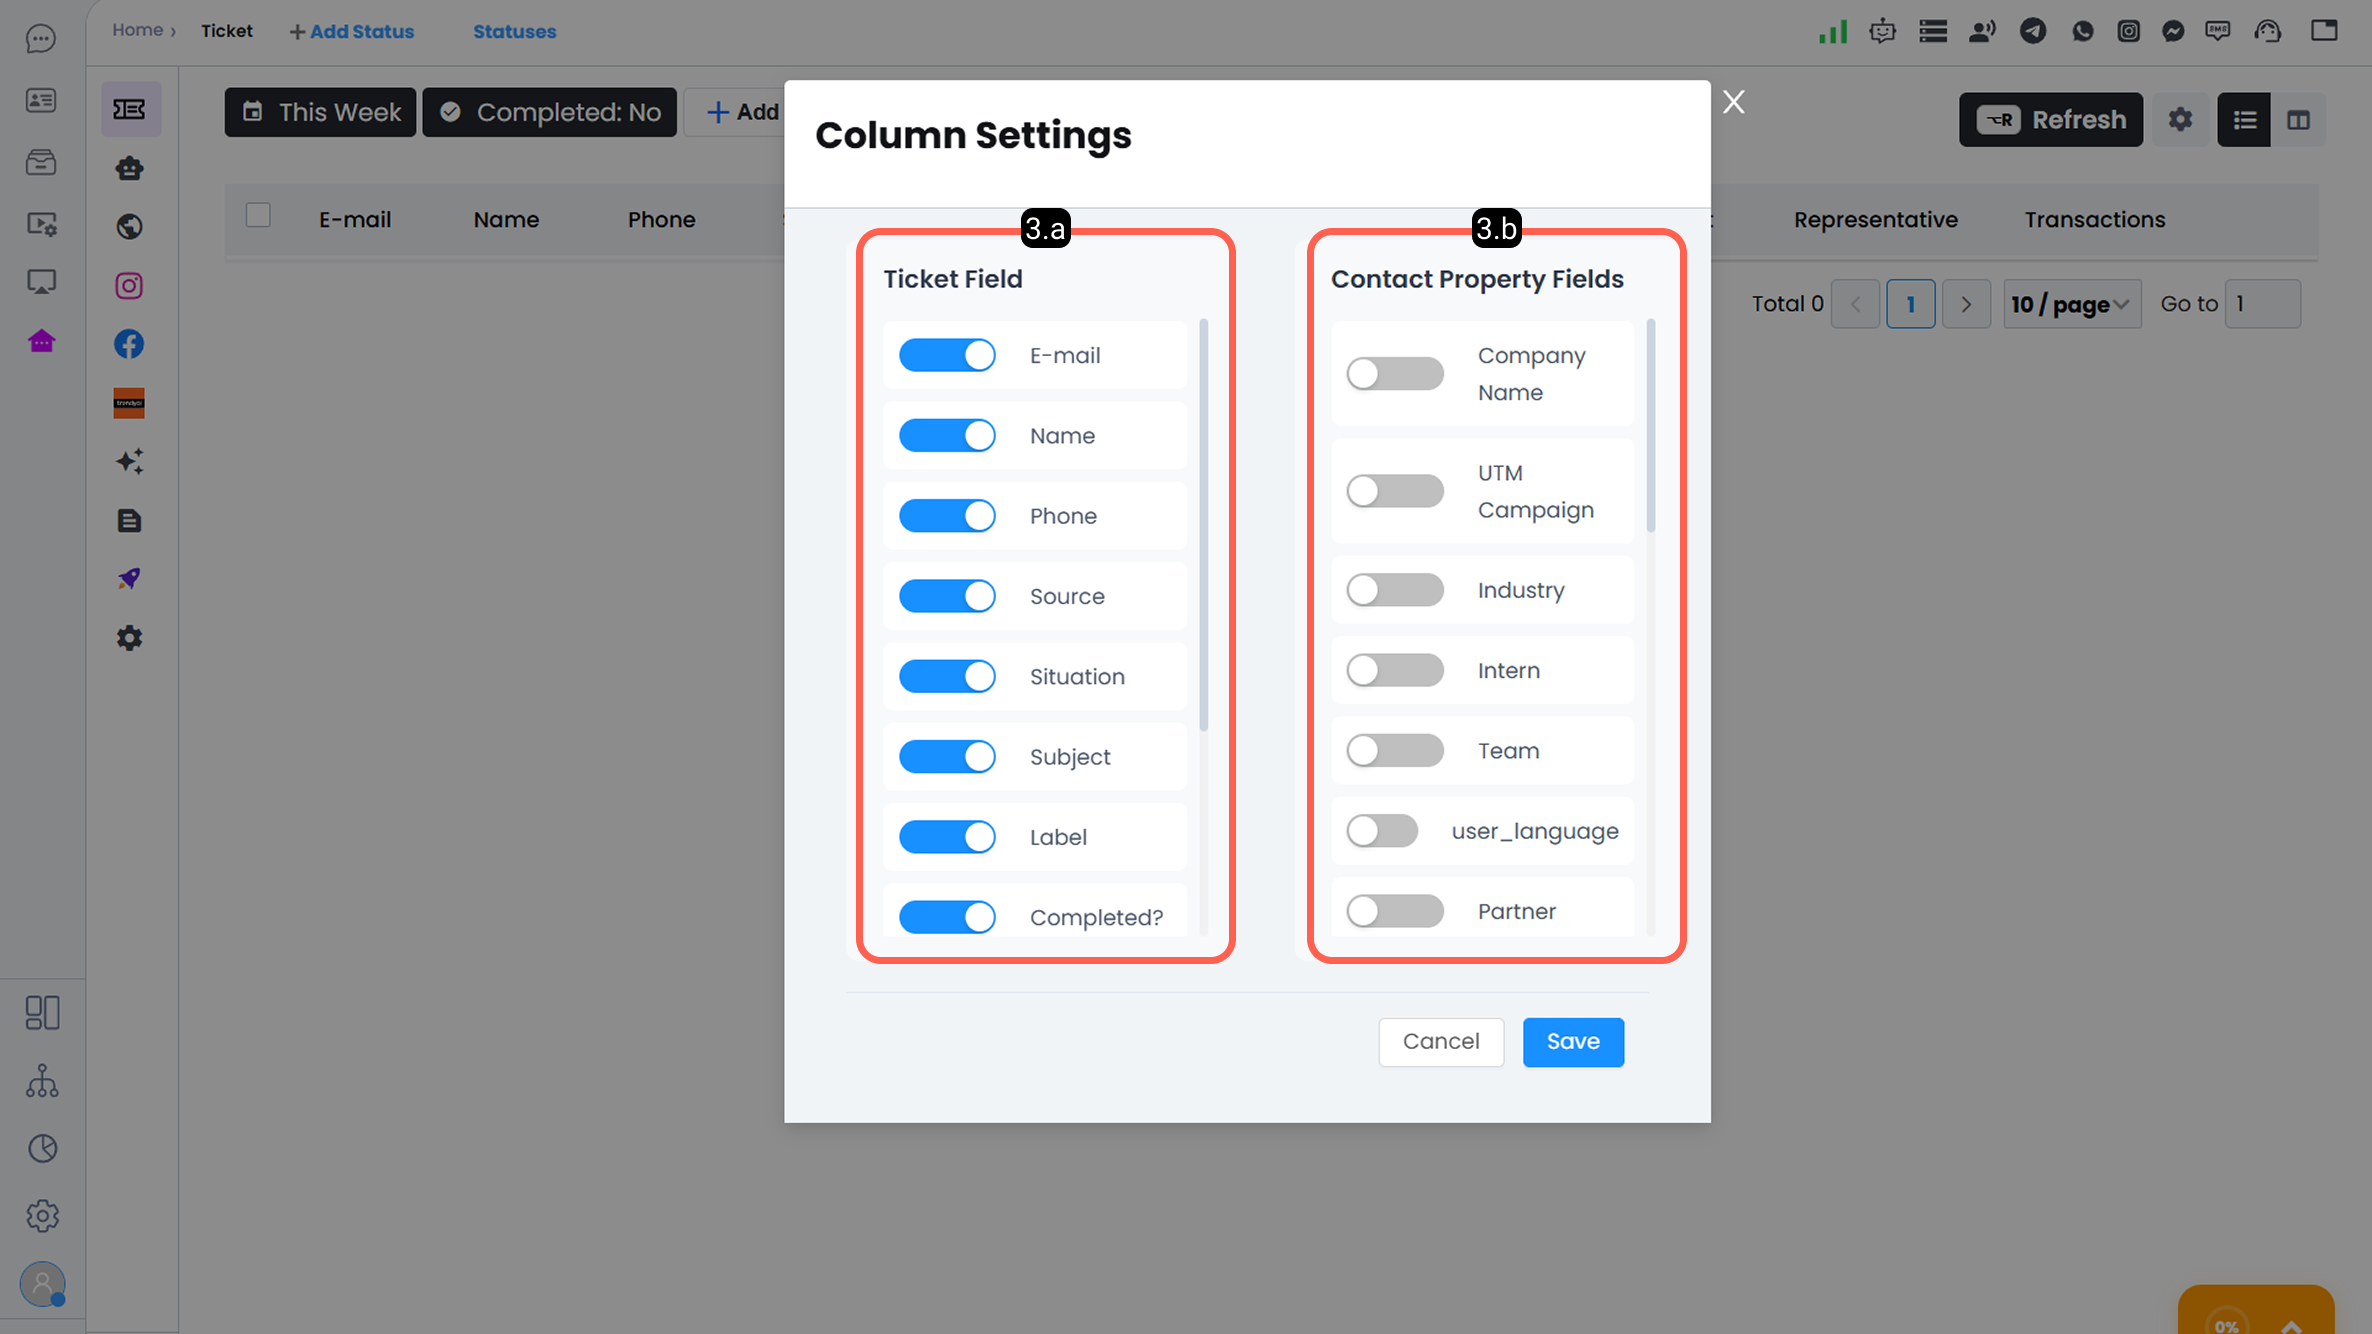
3.a – Ticket Field:
You can determine whether ticket-related fields (ticket attributes) will be displayed in table view. This ensures that only the ticket information you need appears on the screen.
3.b – User Values:
You can enable or disable the display of profile information (name, contact details, etc.) belonging to the Supsis contact who created the ticket request in table view.
4-) Change View
The Change View area allows you to determine in which format tickets will be displayed. You can easily select the view that best suits your way of working.
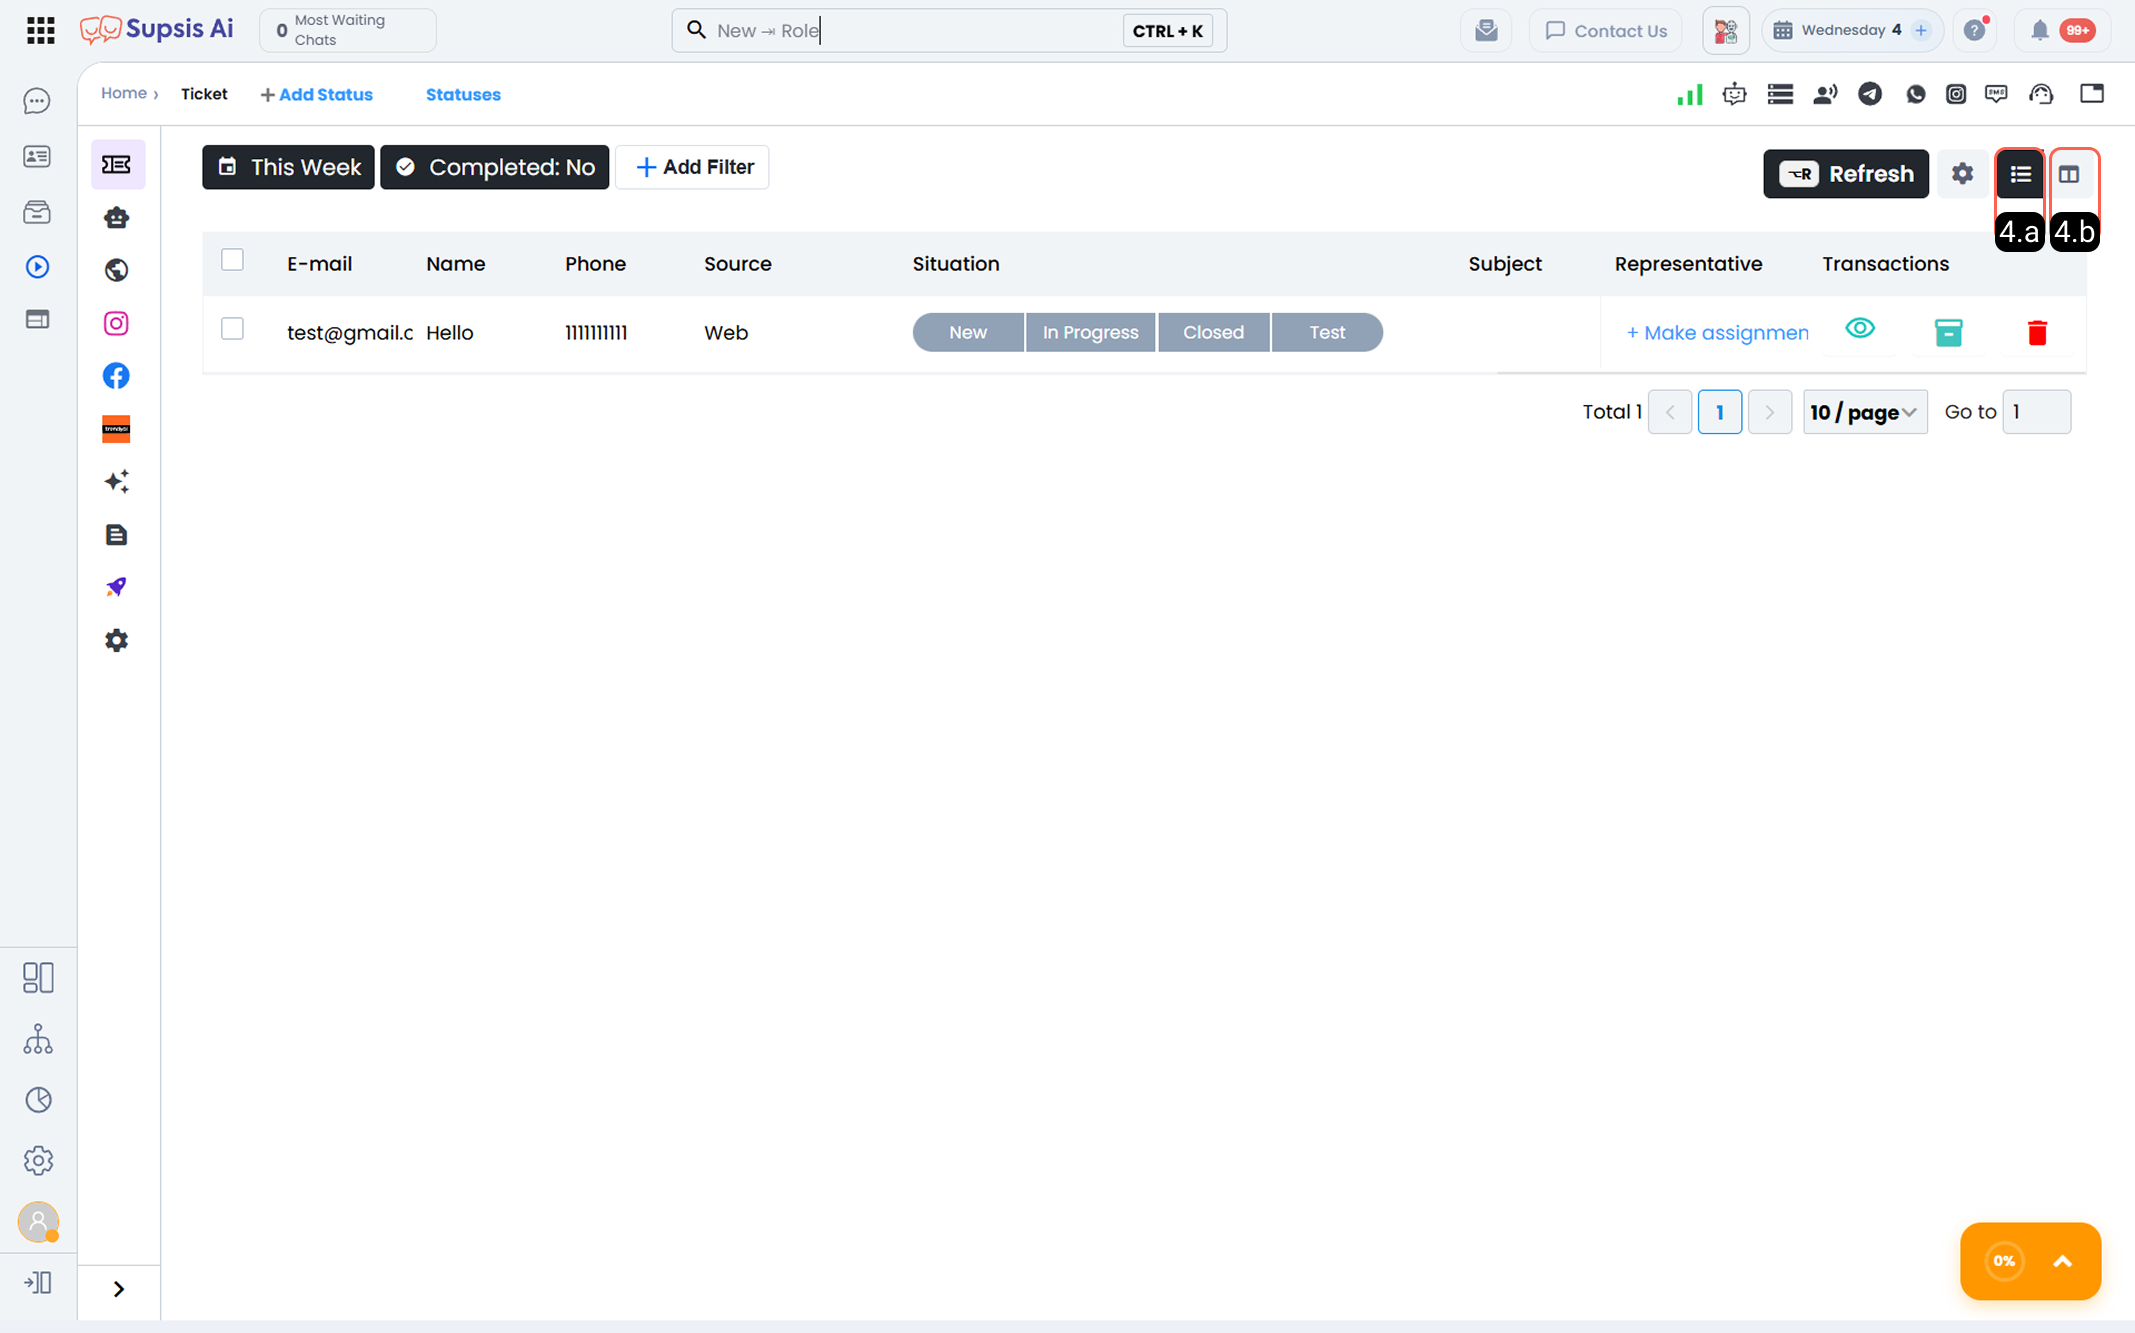
4.a - List View:
The main view where tickets are listed in detail in a table structure.
Many operations such as filtering and bulk editing are performed through this view.
4.b - Kanban View:
A drag-and-drop supported view where tickets are displayed in columns according to their statuses.
It is especially ideal for status-based tracking and workflow management.
5-) Table
The Ticket Table is the main working area of the Ticket Management screen. All tickets are listed here according to the columns and preferences defined in the view settings. Support teams can manage their daily operations quickly and practically directly through this table.
Through the Ticket Table:
- Basic information about tickets is displayed,
- Ticket fields can be quickly edited,
- Operational actions can be taken,
- Support processes can be tracked instantly.
Thanks to this structure, ticket management is carried out in a centralized, organized, and controllable manner. The Ticket Table is the main control point of support operations.
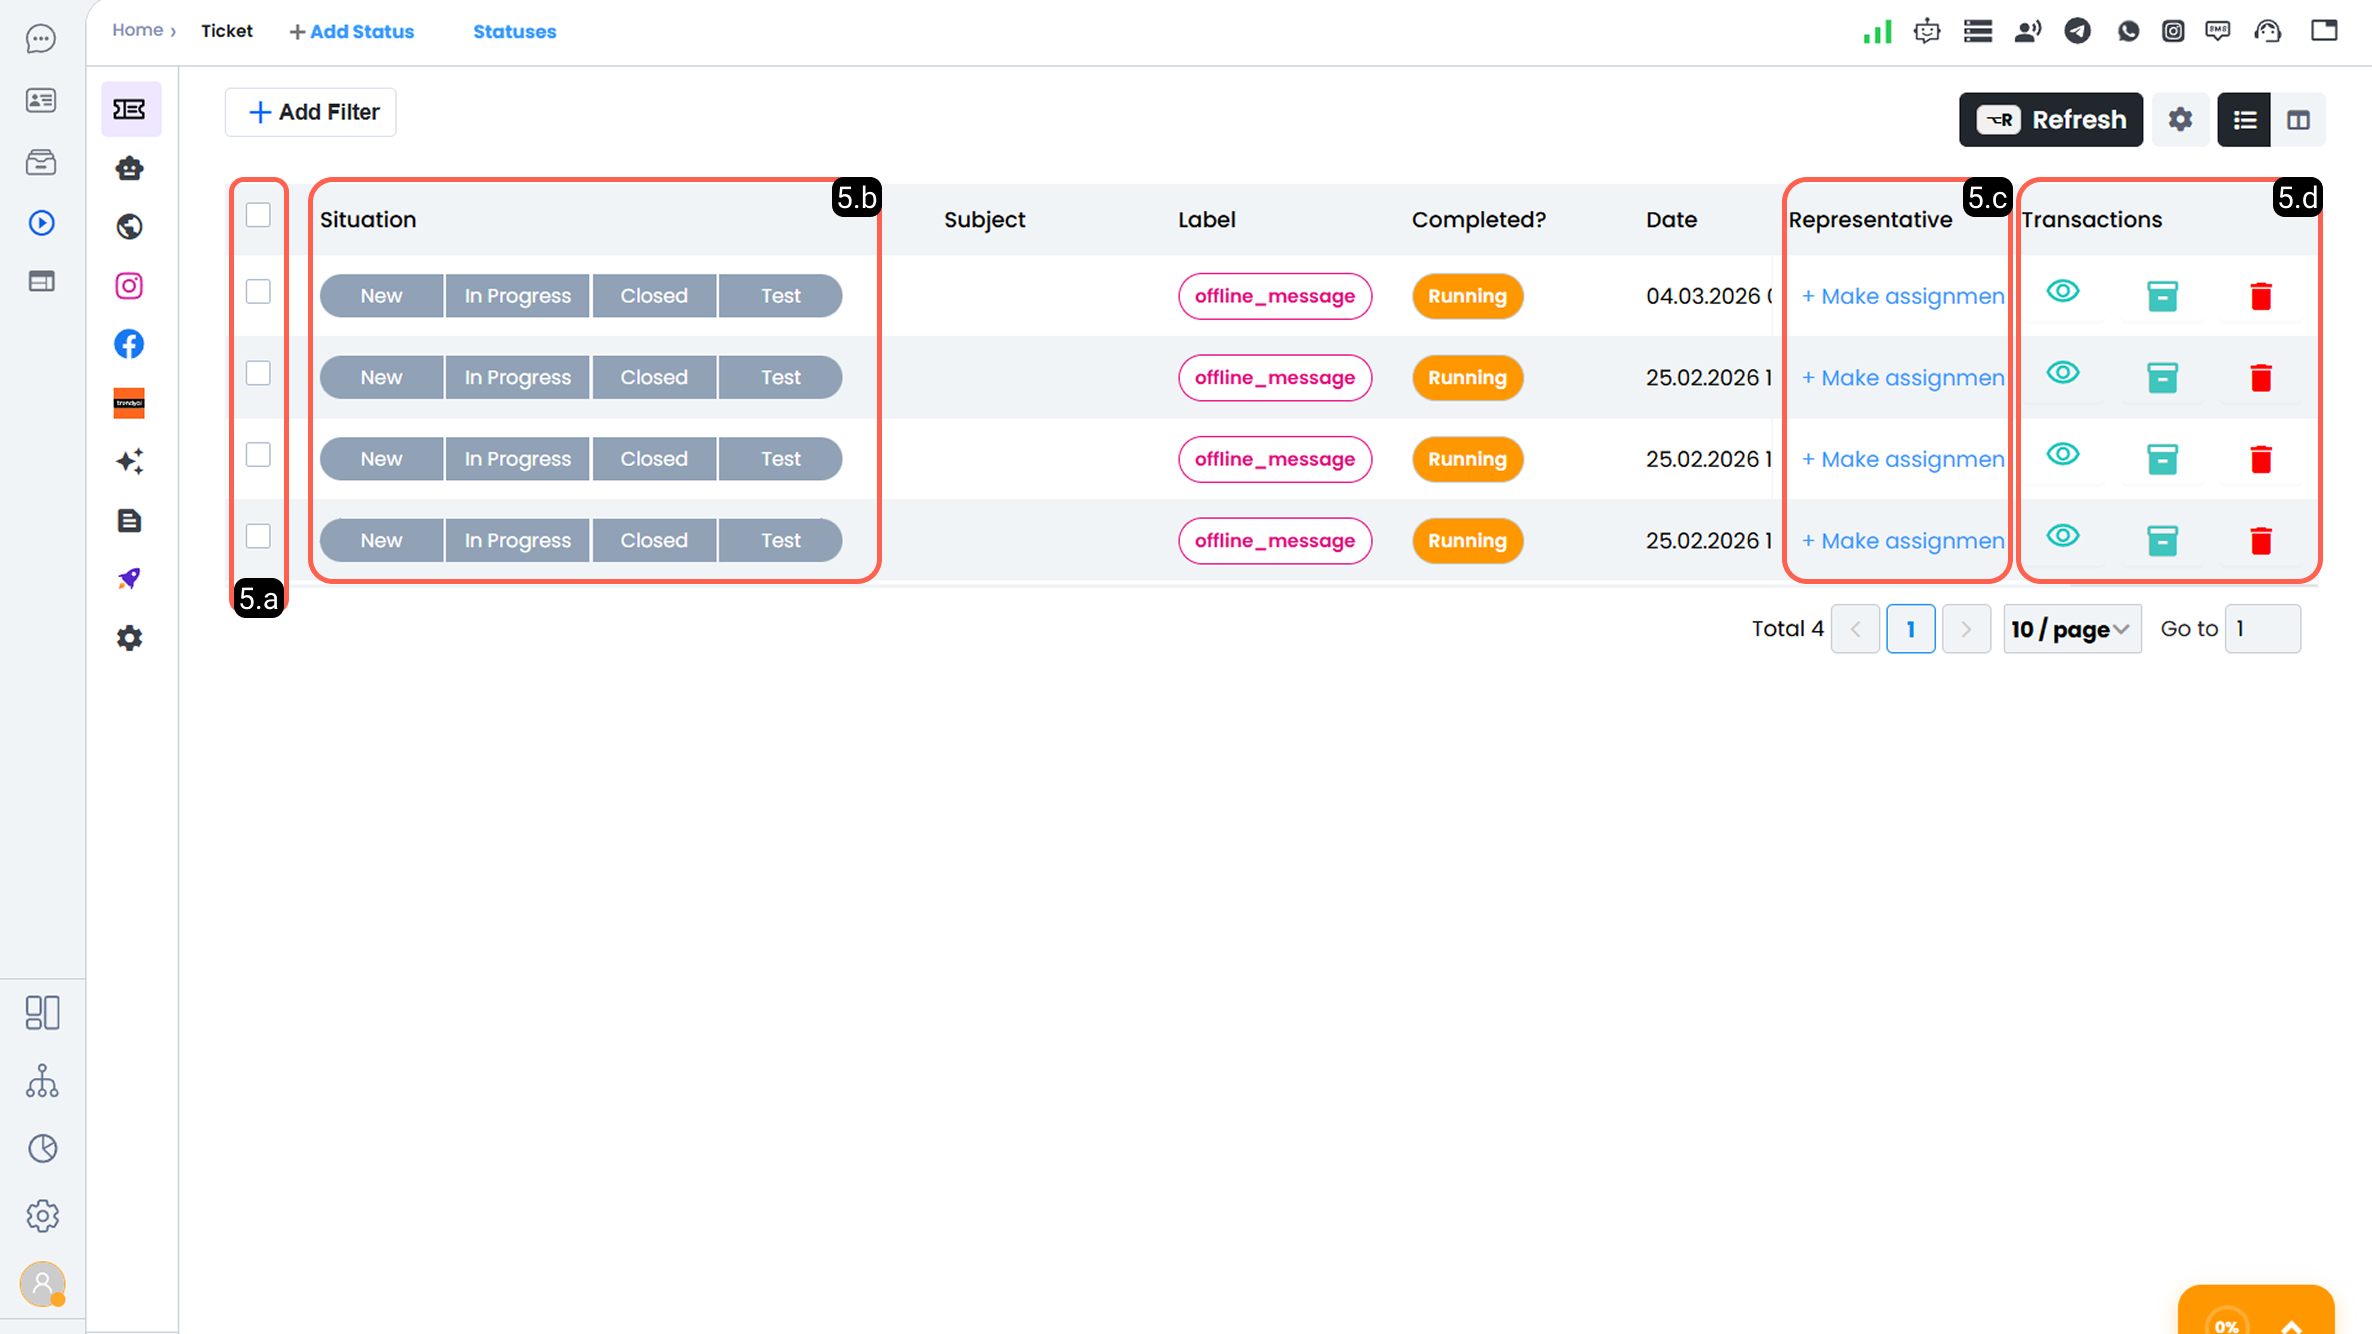
5.a - Bulk Action:
The Bulk Action area allows operations to be performed on multiple tickets at the same time. It provides significant time and efficiency advantages, especially for teams with high ticket volume.
Bulk actions can be performed in two ways:
Manual Selection
- You can select the tickets you want to process one by one from the table,
- You can apply actions to the selected tickets simultaneously.
Filter-Based Selection
- You can list tickets that meet specific criteria using filters,
- You can select all filtered tickets at once using the selection box in the table header.
To quickly select all tickets:
- Windows: CTRL + A
- Mac: Command + A
You can use these shortcuts.
5.b - Status:
The Status field allows you to update the statuses of selected tickets individually or in bulk.
5.c - Agent:
The Agent field allows tickets to be assigned to support representatives.
With this feature:
- Tickets are directed to the right people,
- Bulk assignment simplifies the assignment process,
- Workload is balanced on an agent basis,
- Responsibilities are clarified.
Agent assignments can be made individually or in bulk.
5.d - Actions:
The Actions field contains the actions that can be taken regarding the related ticket.
-
Eye: Through the eye icon:
The progress stages of the ticket,
Past actions performed on the ticket,
Detailed information about the ticket and the person who created the request
can be viewed.
-
Archive: Moves the ticket to the archive. When the archiving process is completed:
The ticket automatically switches to closed status
It is no longer displayed in the active ticket list
This operation ensures that completed or non-actionable requests are separated in an organized manner.
-
Trash:
Permanently deletes the ticket request from the system.
Used for incorrect, invalid, or duplicate requests.