
OpenAI Integration
OpenAI integration enables the OpenAI infrastructure to be connected to the system so that AI-based response generation, AI assistants, knowledge base operations, and modules such as Voice Agent can function within Supsis AI.
Through this integration, Supsis AI uses OpenAI models to generate text, produce voice responses, and create intelligent decision-making mechanisms within automation scenarios.
In order to actively use the OpenAI integration, you must create a valid account on the OpenAI platform, define billing information, and generate an API key to be used in the Supsis AI panel.
| No | Menu |
|---|---|
| 1 | Login to OpenAI |
| 2 | Access the Billing Page |
| 3 | Billing Address & Payment Method – Add Balance |
| 4 | Create Key |
| 5 | Steps to Connect the OpenAI Key to Supsis AI |
1-) Login to OpenAI
Before starting the OpenAI integration, you must have an OpenAI account. If you do not have an account, you can create one at https://platform.openai.com/. If you already have an account, simply log in through the same address to access the panel.
2-) Access the Billing Page
To ensure uninterrupted operation of AI services within the Supsis AI platform, an active billing method must be defined in your OpenAI account. There are two different methods to access the billing page: via the search bar or via the settings menu.
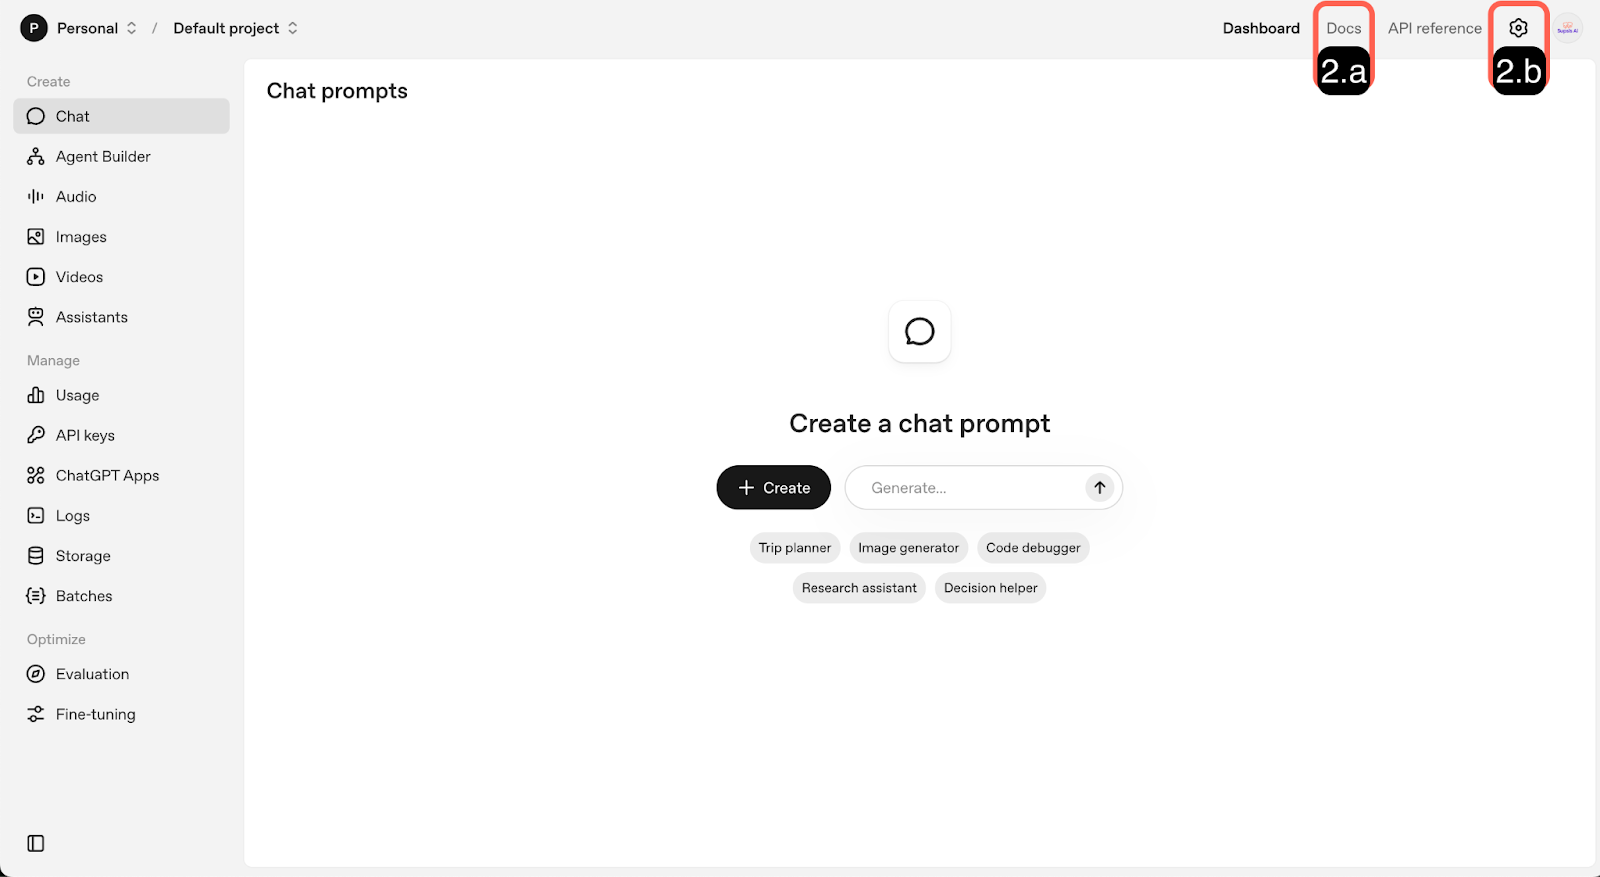
2.a – Access via Search Bar:
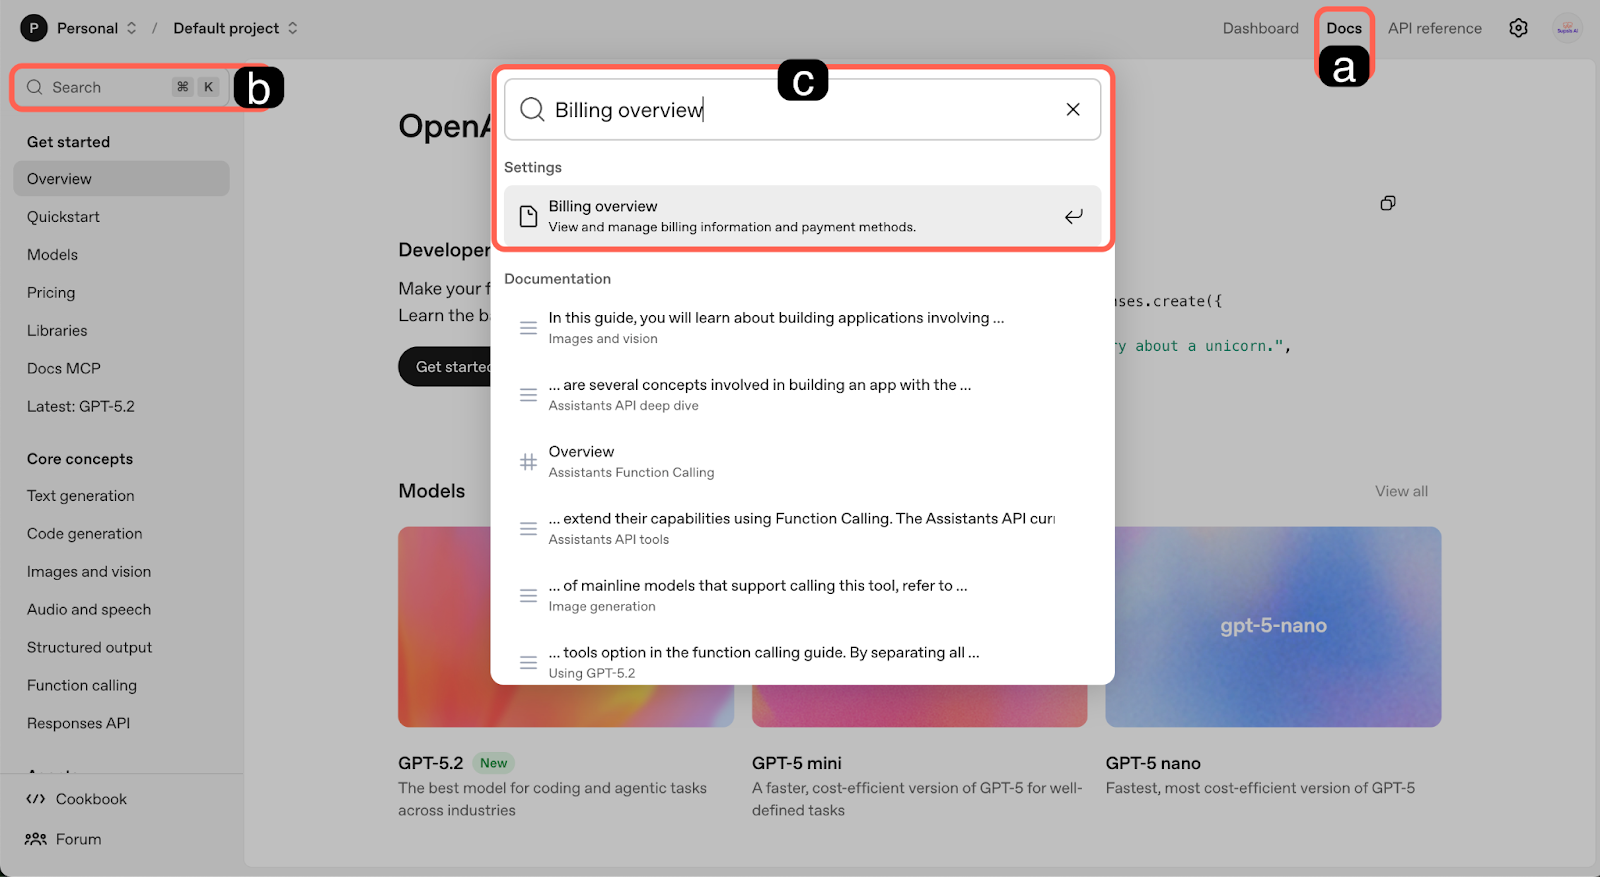
-
a – Docs
After logging into the OpenAI platform, click on the Docs section located in the top menu.
-
b – Search Bar
Once the Docs page opens, use the search bar located in the upper left section.
-
c – Access Billing Page
Type “Billing overview” into the search field to quickly access the billing page. From this screen, you can add a payment method, view credit status, and check usage information.
2.b – Access via Settings Menu:
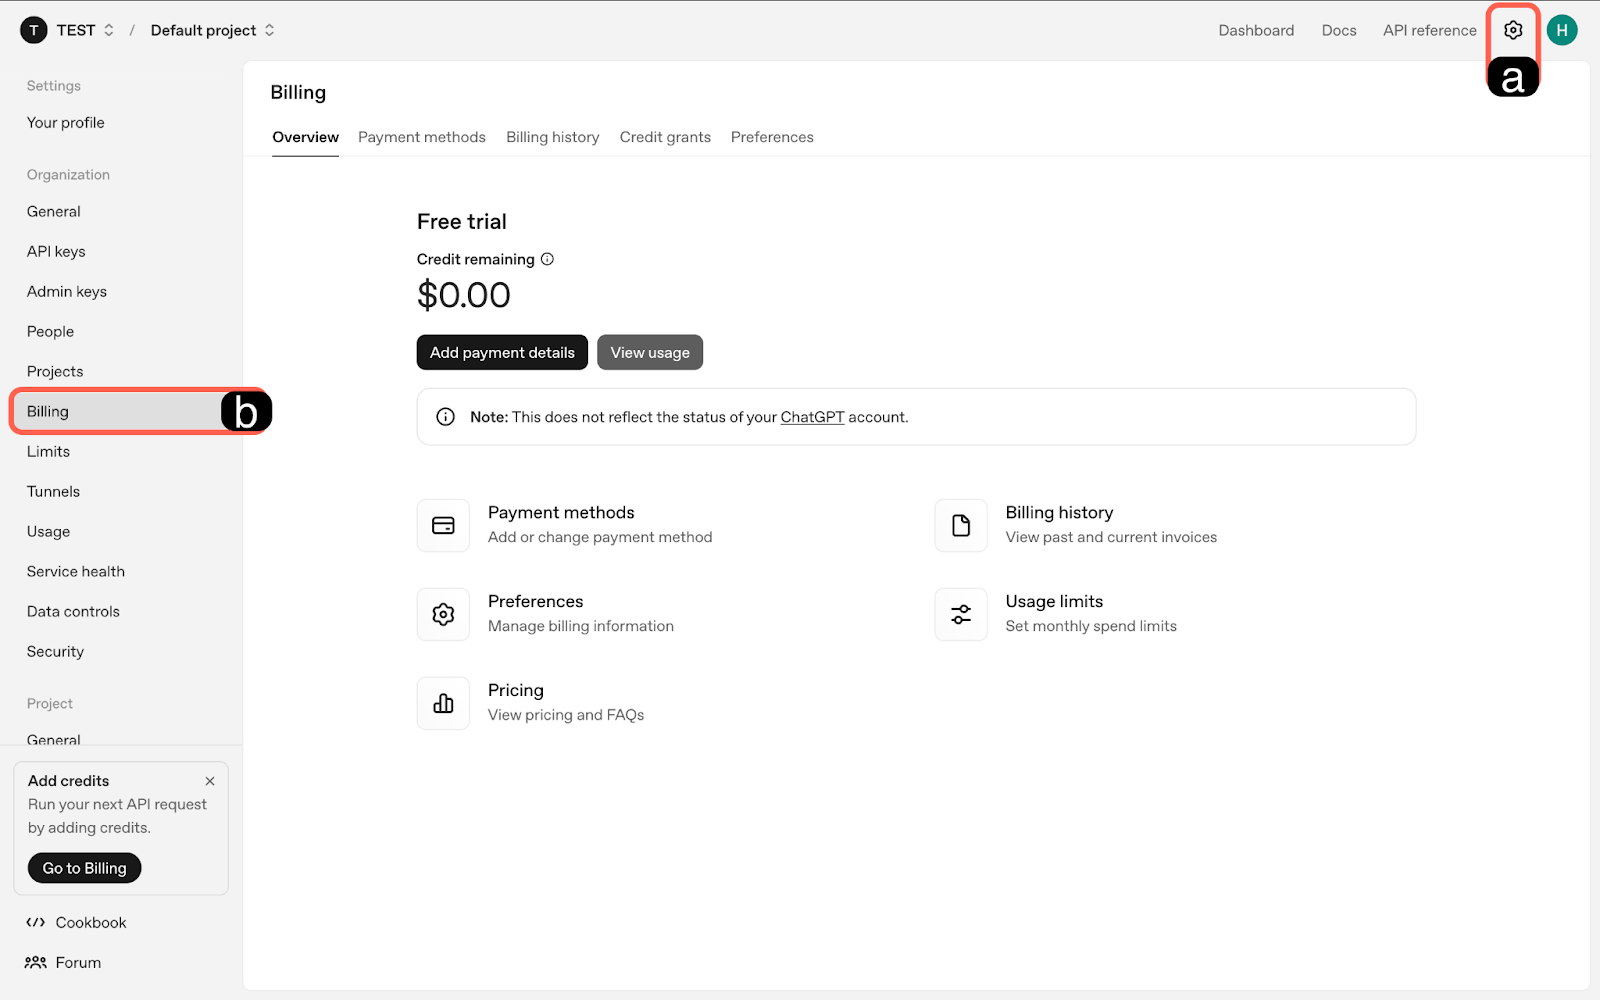
-
a – Access Settings
Click the settings (gear) icon located in the upper right corner of the OpenAI panel.
-
b – Access Billing Page
From the left menu that opens, select Billing to access the billing and payment settings screen. From this section, you can add a payment method and review current usage and limits.
3-) Billing Address & Payment Method & Add Balance
To use OpenAI services, payment information must be defined and sufficient balance must be available in your wallet. If you have already added your payment information, you can load balance using the payment method button.
If you have not yet defined a payment method, navigate to the section explained above and follow the steps below.
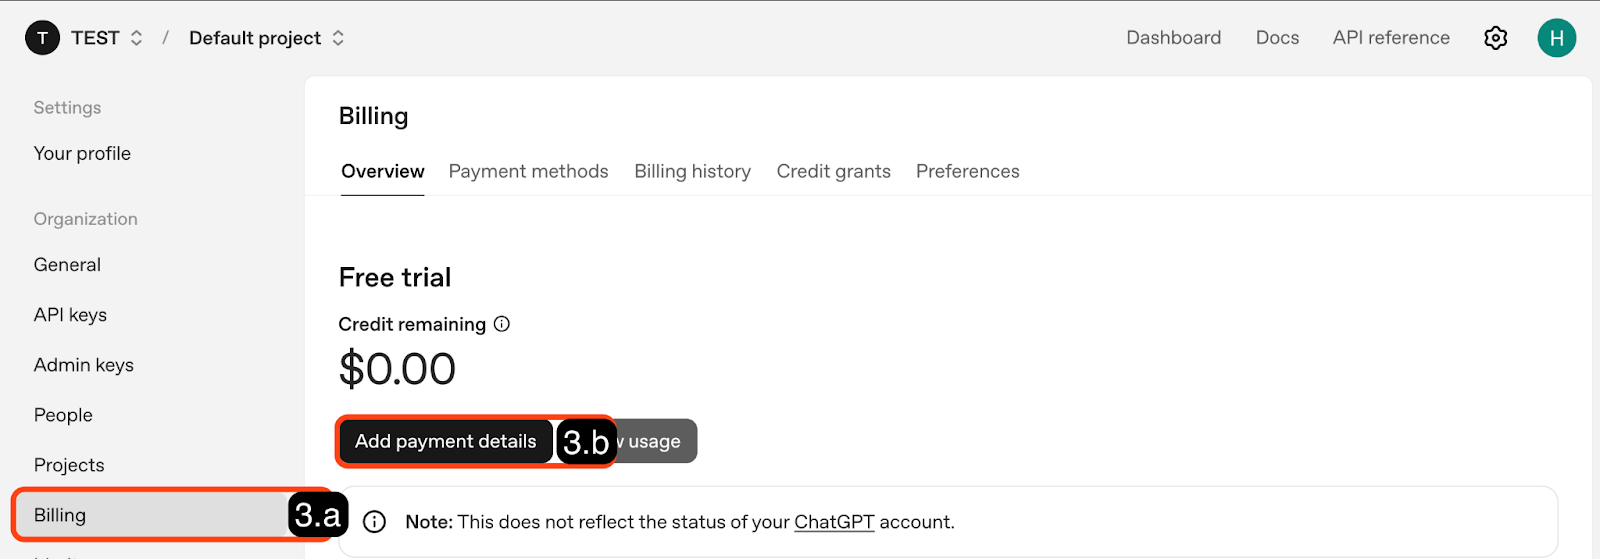
3.a – Access Billing Page
Enter the Billing menu. In this area, you can view your current credit balance, usage details, and payment settings associated with your OpenAI account.
3.b – Payment Details & Add Balance
If you have not saved your payment details in the system, you can register your billing information through this button. If your payment details are already saved, you can directly add balance using this button.
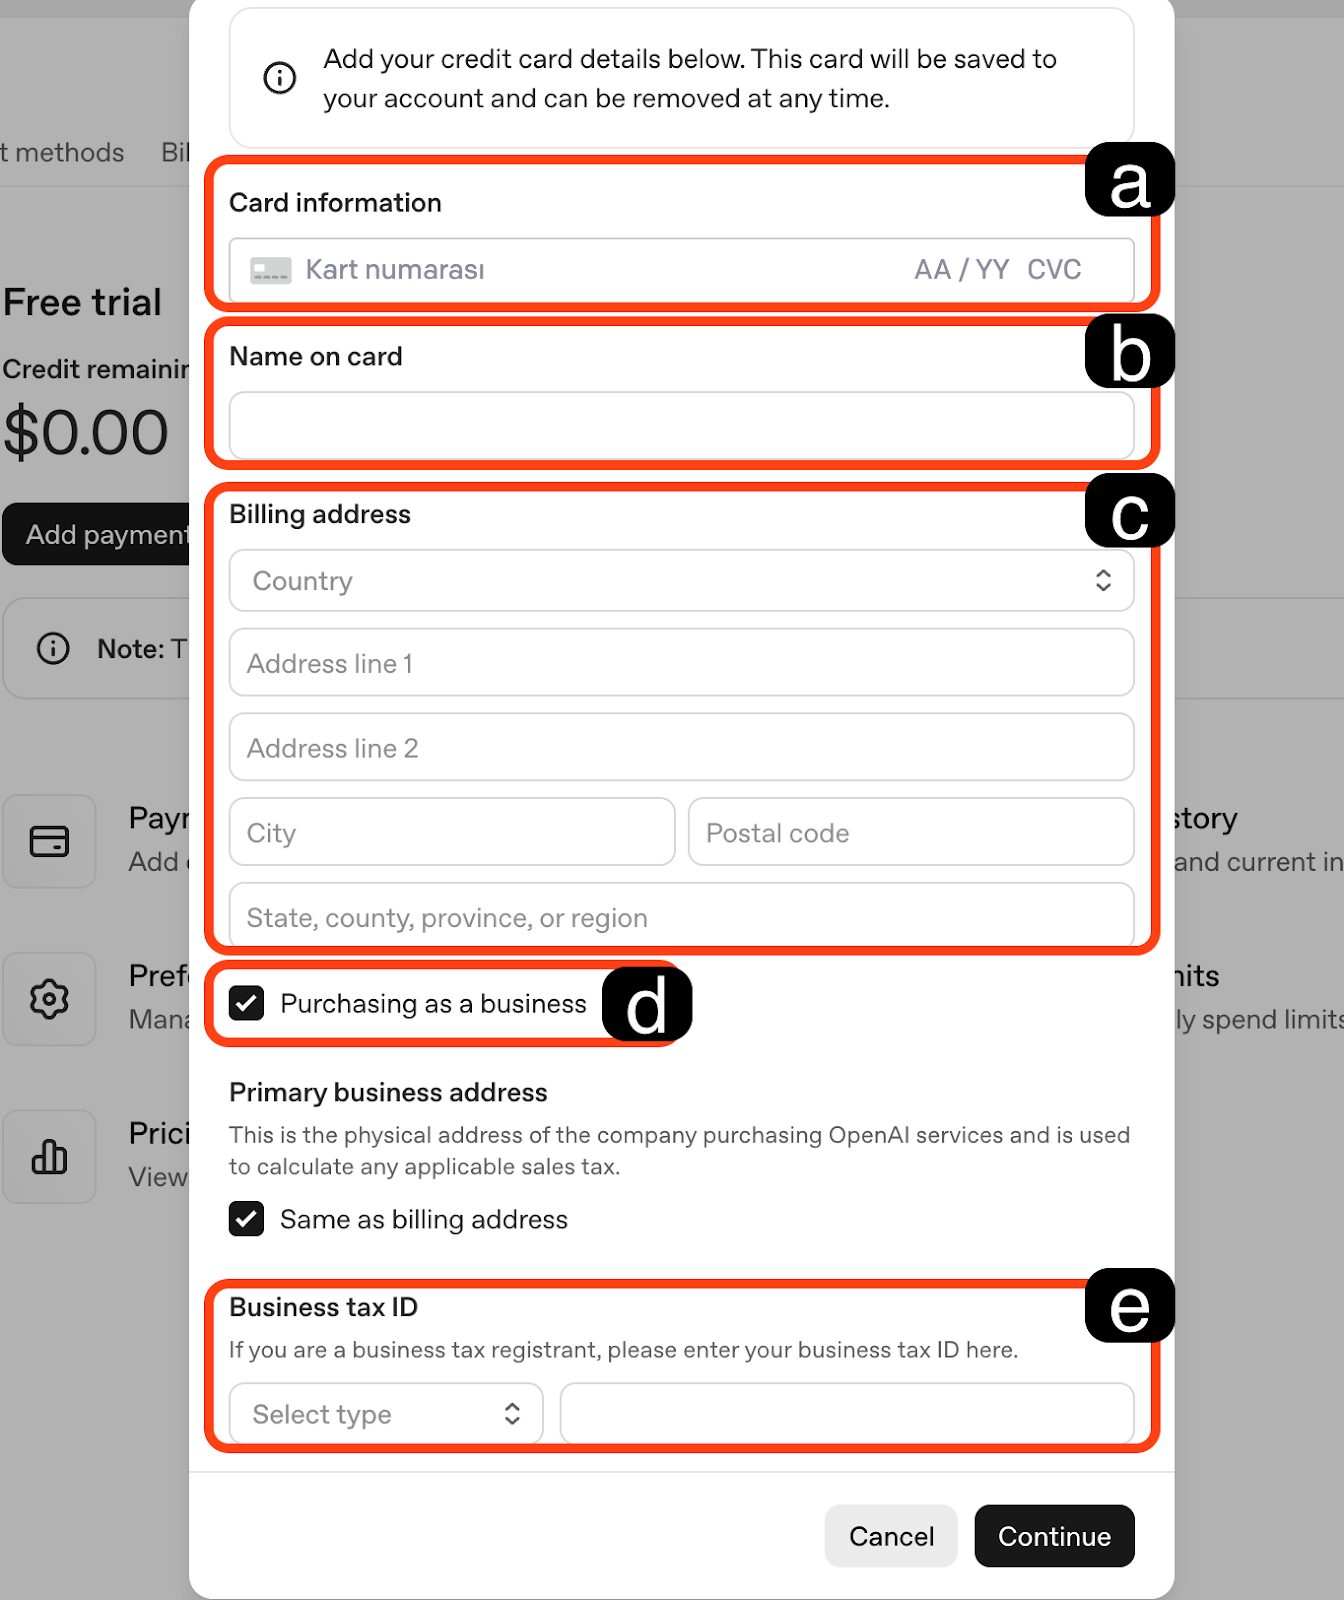
-
a – Card Number
Enter the credit card number to be used for payment transactions.
-
b – Name on Card
Enter the cardholder's name as it appears on the credit card.
-
c – Billing Address
Enter the country, address, city, and postal code information of the cardholder. This address is used for individual billing.
-
d – For Businesses
If the account is used on behalf of a business, this option must be selected.
-
e – Business Tax Number
If billing will be issued under a business name, the tax number information must be added.
4-) Create Key
An API key must be created for Supsis AI to access OpenAI services.
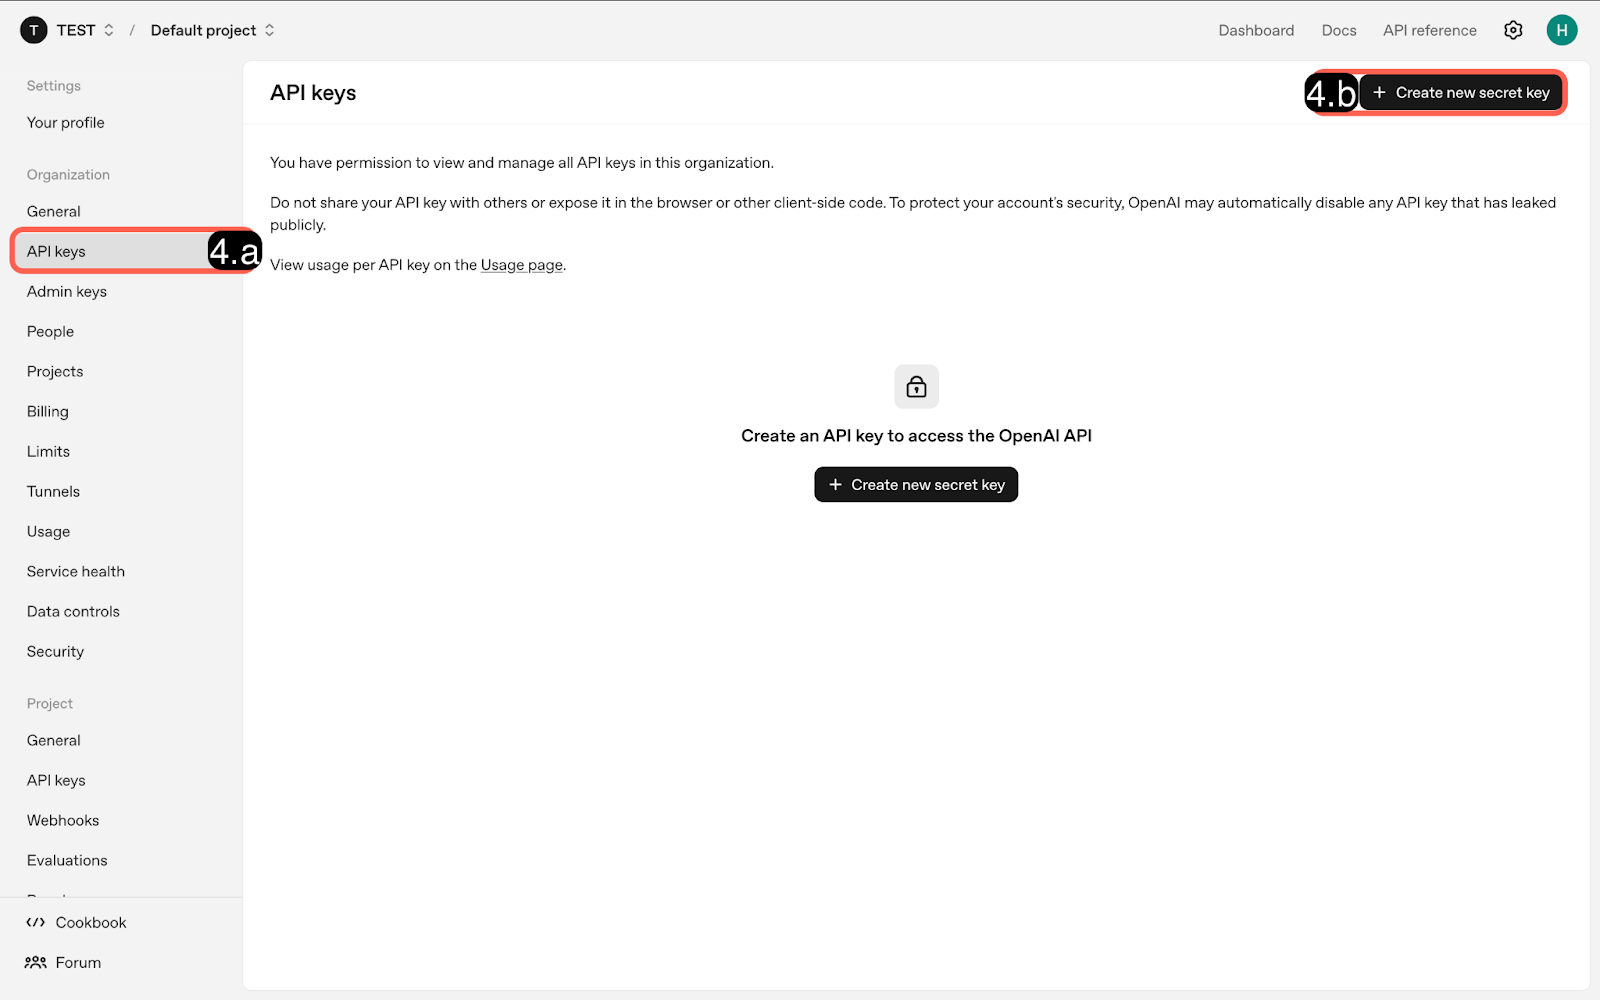
4.a – API Keys
From the Settings menu, enter the API Keys section.
4.b – Create New Secret Key
Click the “Create new secret key” button. This button opens the new key creation screen.
4.c – Key Details
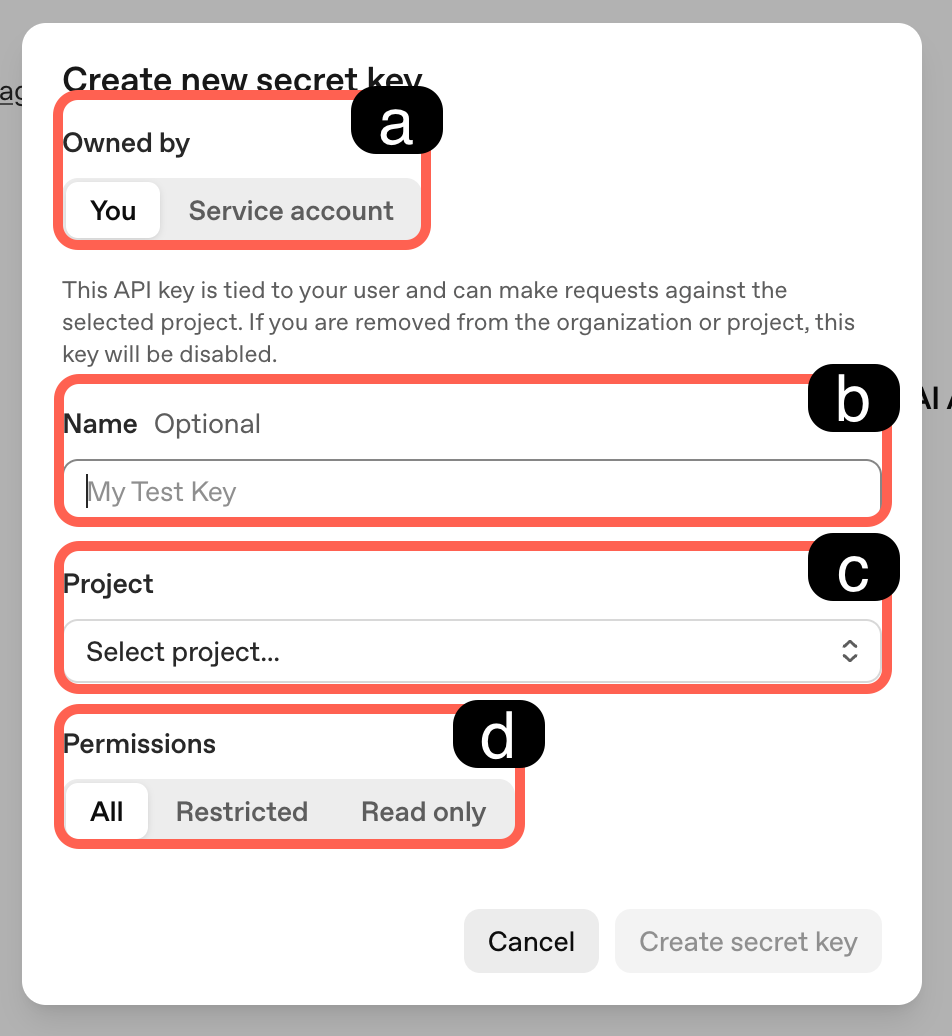
-
a – Key Ownership Determine whether the key belongs to a user or a service account.
-
b – Key Name Assign an optional name to easily distinguish the key.
-
c – Project Associated with the Key Select which project the key will be used under.
-
d – Permissions Define the authorization level of the key for API operations (full access, restricted, or read-only).
After completing these steps, you can create the API key. Once created, the key is accessible only once and cannot be viewed again. To avoid issues, it must be stored securely and defined in the Supsis AI panel to complete the integration.
5-) Steps to Connect the OpenAI Key to Supsis AI
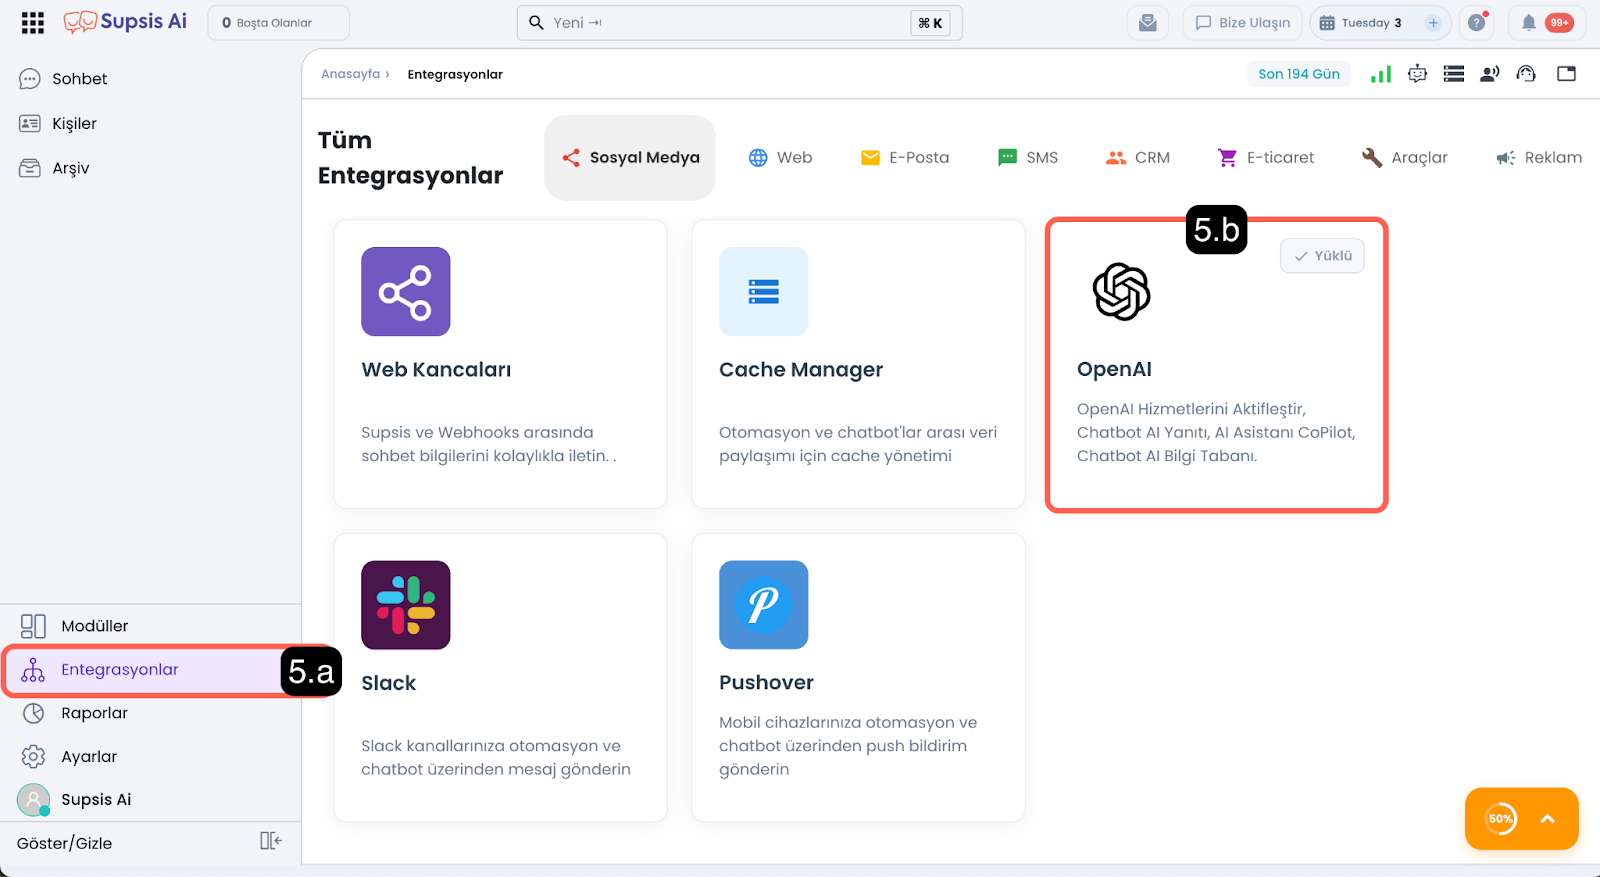
5.a – Integrations
In the Supsis AI panel, navigate to the Integrations section located in the left menu.
5.b – OpenAI Integration
Select OpenAI integration from the list of integrations.
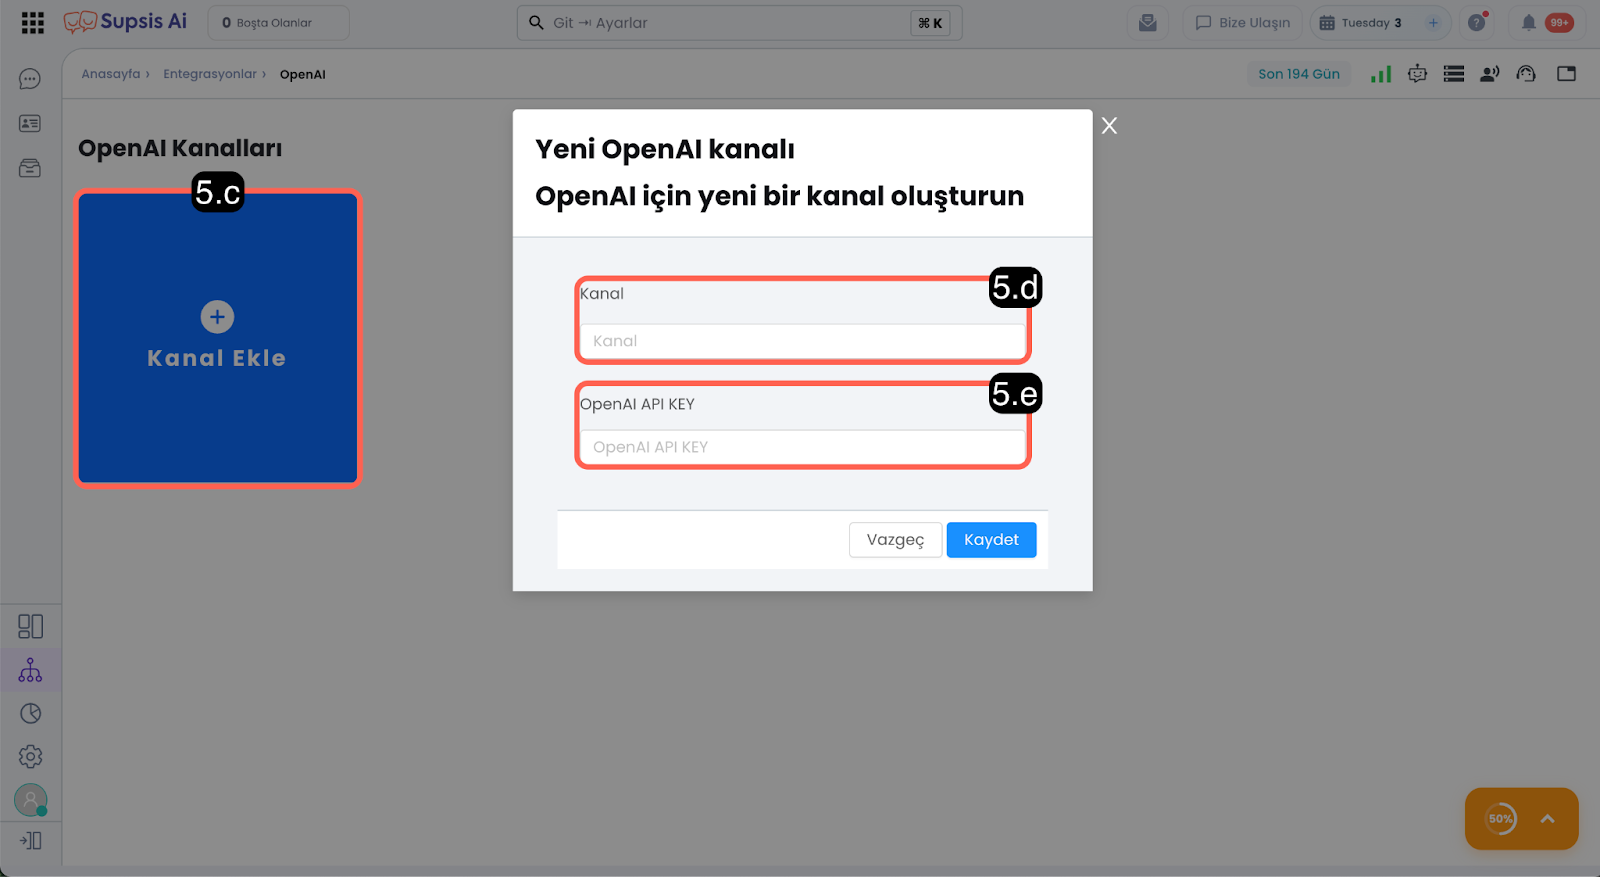
5.c – Add OpenAI Channel
Click the Add Channel button to create a new OpenAI connection.
5.d – Channel Name
Enter a descriptive name for the OpenAI channel to be created. This name is only used to differentiate keys within your Supsis AI panel.
5.e – OpenAI API Key
Paste the API key created in the OpenAI panel into this field and save the integration.