
1. Integration Setup
To add the Supsis Chat Widget to your website, insert the following script snippet inside the <head> section of every page.
- The Supsis SDK loads asynchronously without affecting your site's page load performance.
- Include it only on pages where you want the chat widget to be visible.
- Once the SDK loads and becomes ready, the widget appears automatically.
Integration Code
<script>
  window.supsis = window.supsis || function () {
    (supsis.q = supsis.q || []).push(arguments);
  };
  supsis.l = +new Date;
</script>

<script
  src="https://SITE_DOMAIN_NAME.visitor.supsis.live/static/js/loader.js"
  type="text/javascript"
  async
  defer>
</script>
SITE_DOMAIN_NAME with your unique domain name registered with Supsis.If you are using IdeaSoft, your IdeaSoft domain name will serve as your Supsis domain name. (e.g.
SITE_DOMAIN_NAME=market71 if logging in via market71.supsis.live).
2. SYNC API & Method Comparison
The SYNC API uses the supsis. syntax, whereas the ASYNC API uses the supsis() syntax. Both synchronous and asynchronous calls are fully supported.
| METHOD | SYNC API Usage |
|---|---|
| Open Chat Window | supsis("open") / supsis.open() |
| Minimize Chat Window | supsis("minimize") / supsis.minimize() |
| Hide Chat Widget | supsis("hide") / supsis.hide() |
| End Conversation | supsis("closechat") / supsis.closeChat() |
| Set User Data | supsis("setUserData",{fullname:'Ali',email:'a@a.com',phone:'5396829048'}) |
| Set Contact Properties | supsis("setContactProperty",{badget:'gold-member'}) |
| Mark Visitor as VIP | supsis("setVisitorVip", false) |
supsis("ready", (supsis) => {
    // You can use supsis synchronously within this scope
    supsis.open();
    supsis.setUserData({ fullname: "Ali", email: "a@a.com", phone: "5396829048" });
});
Alternatively, you can load the SDK synchronously and run your custom scripts immediately afterwards:
3. ASYNC API Methods
Since the Supsis SDK loads asynchronously, your API calls will execute sequentially after initialization.
Configuration Syntax:
"API_FUNCTION_NAME"is a string representing the target method (e.g.supsis("open")).payloadis passed whenever the method requires parameters.
Visitor Management Methods
// Mark Visitor as VIP (false = Not VIP, true = VIP)
supsis("setVisitorVip", false);

// Minimize Chat Window
supsis("minimize");

// Hide Chat Widget
supsis("hide");

// Open Chat Window
supsis("open");

// End Conversation
supsis("closeChat");

// Switch Department
supsis("department", "$DEPARTMENT_TITLE");
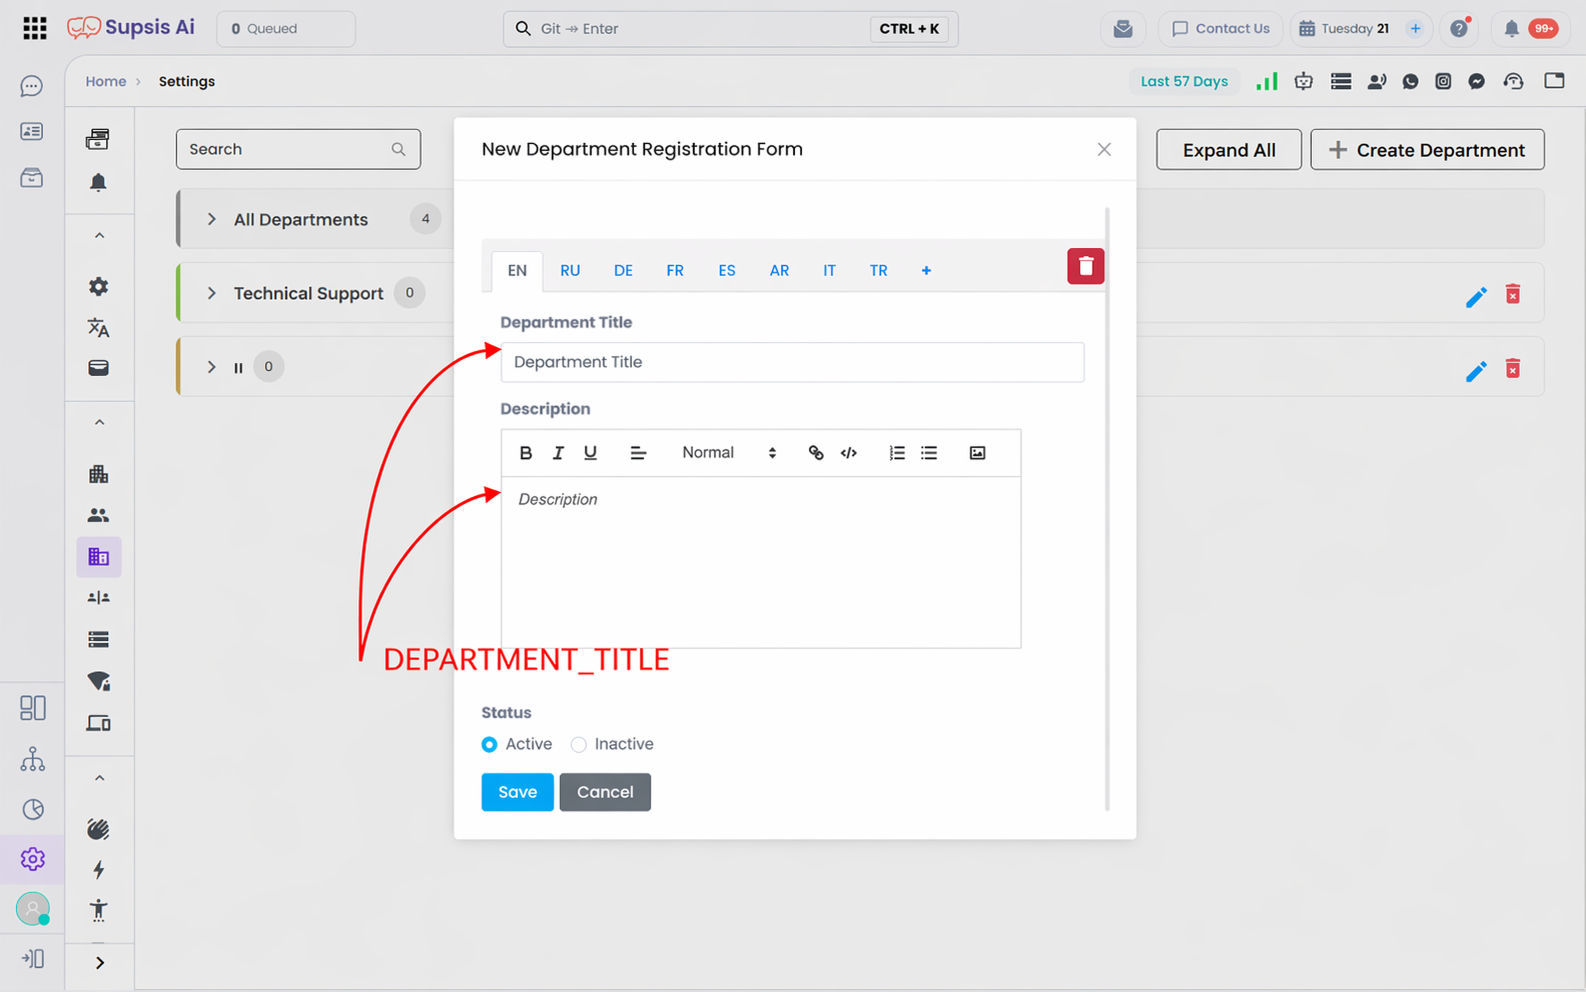
* Department title values must match across all languages.
4. Updating Visitor Information and Login Form Data
If you supply your visitors' personal information to the Supsis SDK before they click on the chat bubble, their details will be configured automatically. Customers can start chatting directly using their logged-in name, email address, and phone number.
Updating Visitor Info for Default Login Form
supsis("setUserData", {
    fullname: "Logged-in user's full name",
    email: "Logged-in user's email address",
    phone: "Logged-in user's phone number",
});
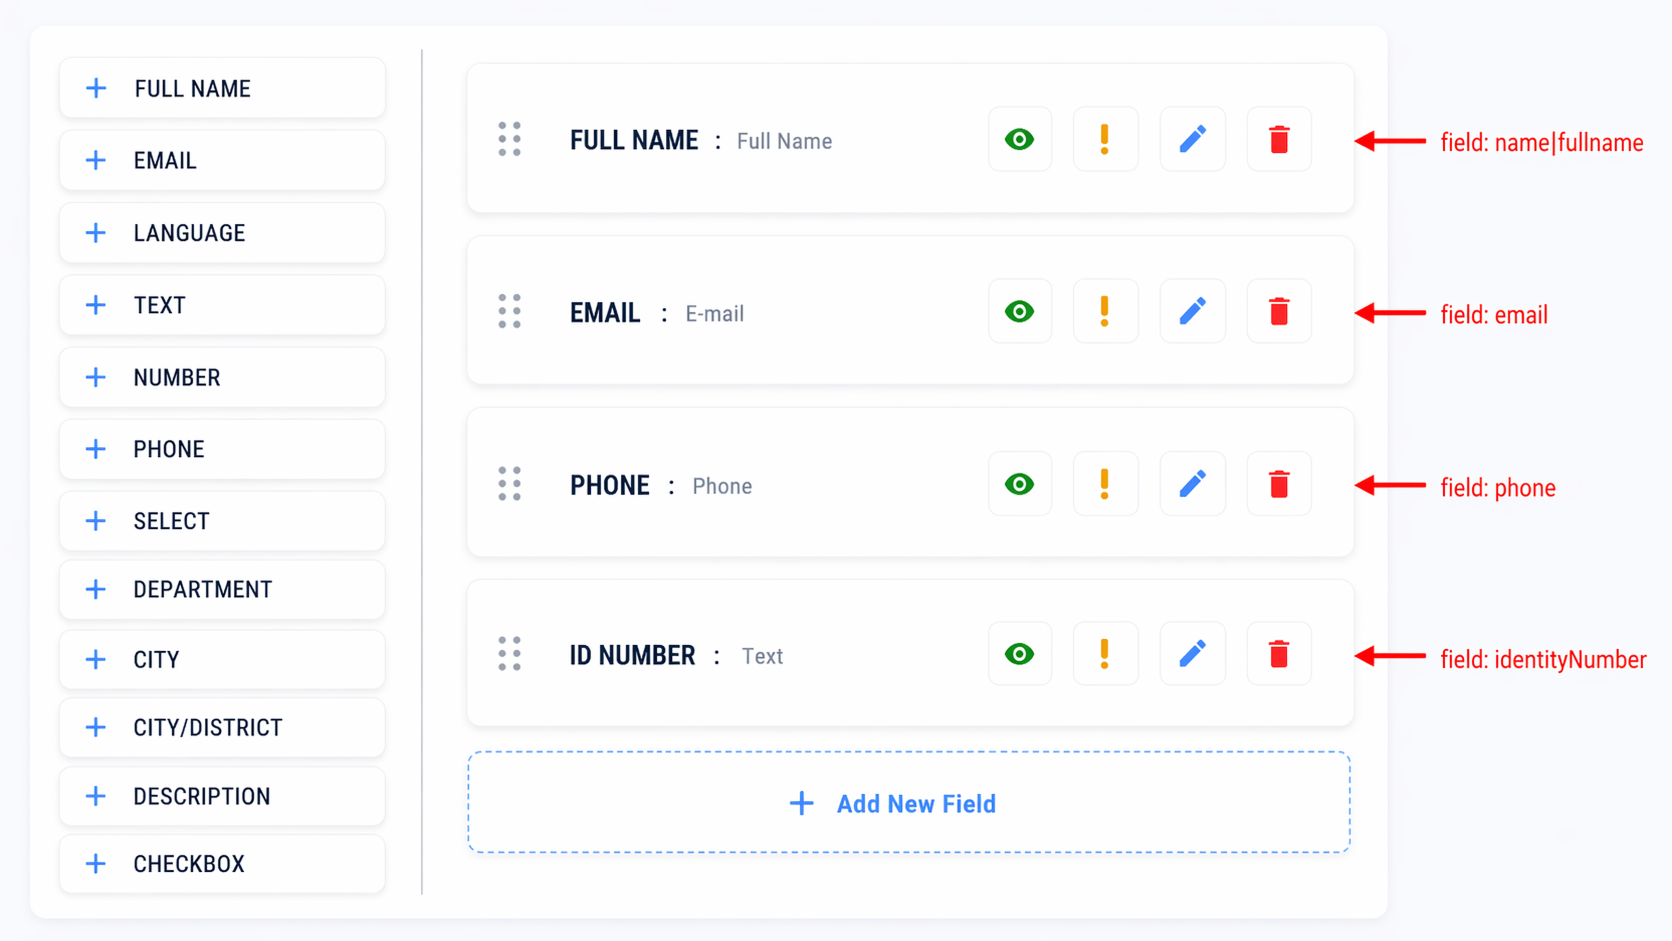
Updating Visitor Info for Custom Login Form
- Mandatory fields in custom login forms:
fullname,email,phone - Additional fields can be added as needed. Each field must have a designated identifier.
Sample custom login fields: (fullname, email, phone, identityNumber)
5. Updating Custom User Contact Properties
You can dynamically update custom contact properties configured via the Supsis dashboard through the SDK. This is ideal for identifying customer tier levels or segment tags when connecting to live chat support.
Example Scenario: Defining User Membership Rank
To pass customer membership rank, create a custom label named User Rank in the admin panel:
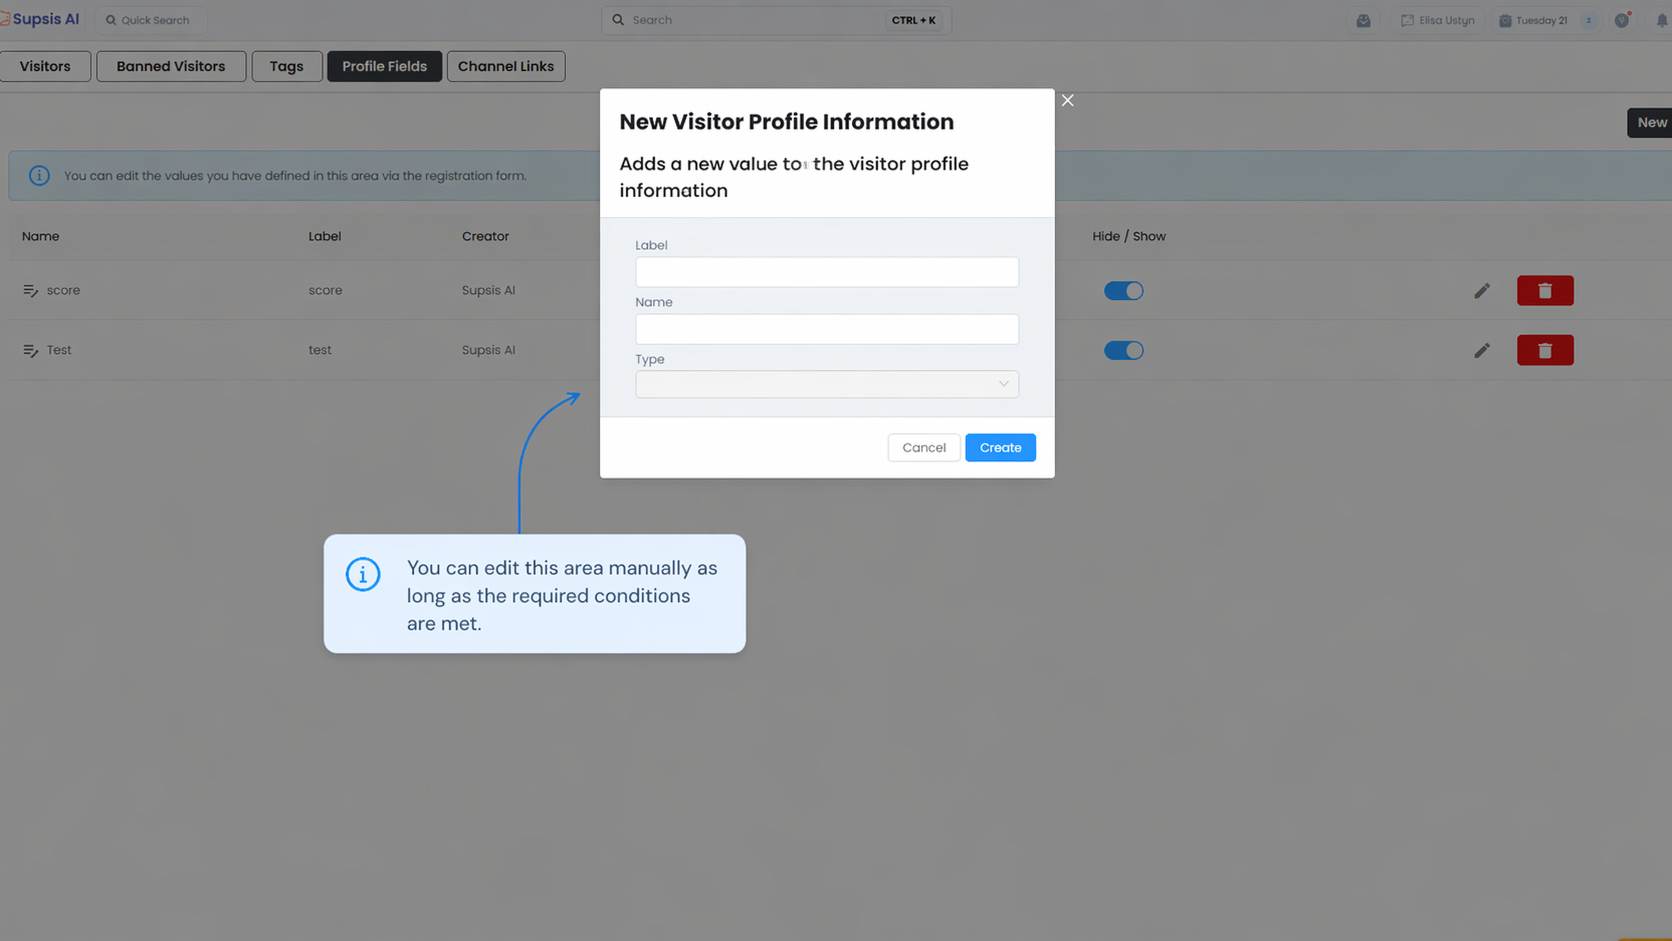
Then execute the setContactProperty method to assign the label:
5.1 Webchat Event Listeners & GTM Integration
The Supsis Web Widget triggers clientside JavaScript events upon critical visitor interactions, such as clicking the chat bubble or establishing a live connection with an agent. By listening to these events, you can dispatch real-time conversion events into Google Tag Manager (GTM), Google Analytics 4 (GA4), or Meta Pixel.
GTM dataLayer Integration Code
// 1. Chat Bubble Click Event (Widget Opening)
supsis("ready", (supsis) => {
    if (supsis.i && supsis.i.openButton) {
        supsis.i.openButton.addEventListener("click", () => {
            window.dataLayer = window.dataLayer || [];
            window.dataLayer.push({
                event: "supsis_chat_opened",
                event_category: "Supsis Webchat",
                event_action: "Chat Bubble Opened"
            });
        });
    }
});

// 2. Visitor Connected to Live Support Event
window.addEventListener("message", function (e) {
    if (e.data && e.data.command === "visitor-connected") {
        window.dataLayer = window.dataLayer || [];
        window.dataLayer.push({
            event: "supsis_visitor_connected",
            event_category: "Supsis Webchat",
            event_action: "Live Support Connected",
            chat_id: e.data.id || null
        });
    }
});
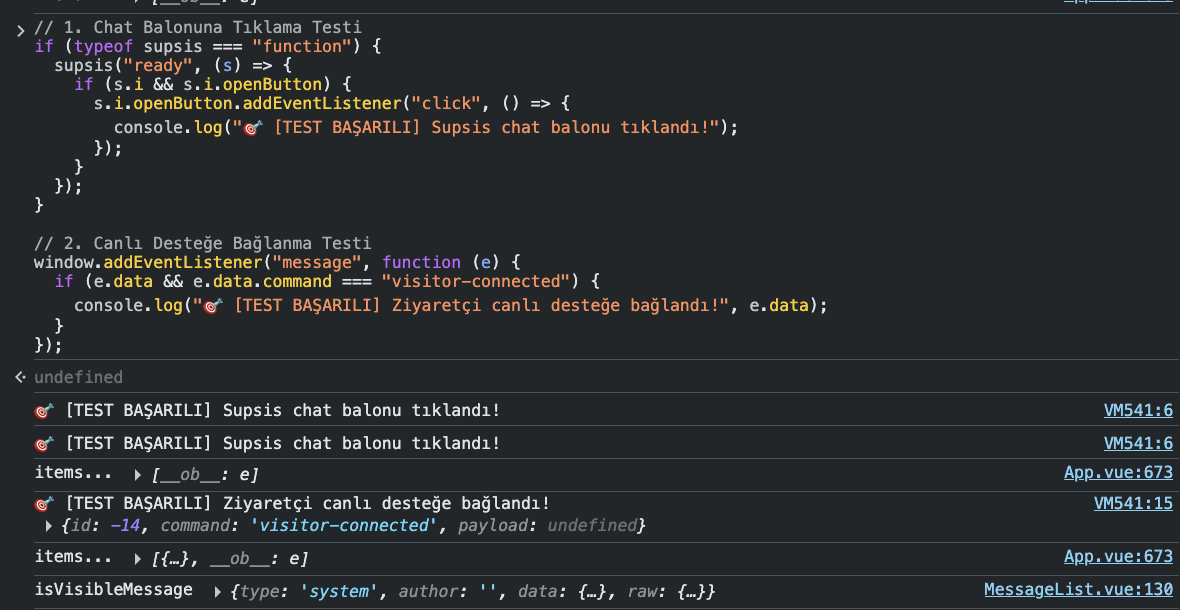
Live Console Verification
You can verify that event listeners trigger properly in your browser console (F12) as shown below:
6. Programmatic WhatsApp Bulk Messaging & Queue Management via Automation SDK
Within Supsis Automation Code Blocks (Automation SDK / JS Scripting), you can utilize supsis.whatsapp and supsis.queue methods to execute bulk WhatsApp template campaigns safely within background queue architectures.
Key SDK Methods & Implementation Workflow
- Channel & Template Validation: Validate active channels and templates via
supsis.channel.get(channelId)andsupsis.whatsapp.getTemplate({ channelId, templateId }). - Audience Segmentation: Filter contacts using
supsis.contact.searchV2({ filters, cursor })by platform, tags, and phone number. - Background Fire-and-Forget Queue: Enqueue
supsis.whatsapp.sendTemplateMessagecalls viasupsis.queue.add(fn, "queue_name")to preserve provider rate limits. - Queue Status Monitoring: Inspect active, pending, and completed queue jobs via
supsis.queue.status("queue_name").
7. Omnichannel Contact Search, Auto-Creation & Messaging via Automation SDK
In Supsis Automation Code Blocks (Automation SDK), you can resolve contacts using WhatsApp, Instagram, Telegram, or Messenger IDs, auto-create missing contact cards, and send messages via contact.sendTextMessage, contact.sendImageMessage, and contact.sendAssetMessage.
Key Methods
- Omnichannel Contact Resolution:
supsis.contact.get(contactId),supsis.contact.searchV2({ filters })(WhatsApp/Phone), orsupsis.contact.search({ groups })(InstagraminstagramUserId, TelegramtelegramUserId, MessengermessengerUserId). - Automatic Contact Creation: Create new contact records for unlisted recipients via
supsis.contact.create({ platform, fullname, phone, channelIds }). - Multi-Channel Message Dispatch:
contact.sendTextMessage({ from, text }),contact.sendImageMessage({ from, url, caption }), andcontact.sendAssetMessage({ from, url, assetType, filename }).
8. Supsis Core & Automation SDK API Reference (All Methods)
All categorized API methods available within Supsis Automation Scripting, Workflow, and Server-Side SDK environments are listed below.
👥 User Management (Users)
| Method Signature | Description |
|---|---|
supsis.users.get(id) | Fetches a user record by ID. |
supsis.users.list() | Lists all users associated with the site. |
supsis.users.showWidget(options) | Displays a widget on the specified agent's dashboard. |
supsis.users.playSound(options) | Plays an audio alert on the specified agent's dashboard. |
supsis.users.playSpeechToText(options) | Converts text to speech and plays it on the specified agent's dashboard. |
🎫 Ticket Management (Ticket)
| Method Signature | Description |
|---|---|
supsis.ticket.get(id) | Fetches a ticket record by ID. |
supsis.ticket.create({contactId, tag, subject, email, phone, message}) | Creates a new support ticket. |
supsis.ticket.update(ticketId, fields) | Updates specific ticket fields. |
📎 Media & Asset Management (Asset)
| Method Signature | Description |
|---|---|
supsis.asset.create(urlOrBase64, fieldType, options) | Creates a new asset from a URL or base64 string. |
supsis.asset.get(id) | Fetches an asset record by ID. |
✅ Task Management (Task)
| Method Signature | Description |
|---|---|
supsis.task.get(id) | Fetches a task record by ID. |
supsis.task.create(data) | Creates a new task. |
supsis.task.update(taskId, fields) | Updates task fields. |
supsis.task.move(taskId, pipelineName) | Moves a task to a new stage column in a pipeline. |
supsis.task.search(workflowId, filters, cursor) | Searches and filters tasks within a workflow. |
💬 Chat Management (Chat)
| Method Signature | Description |
|---|---|
supsis.chat.get(chatId) | Fetches a chat conversation by ID. |
supsis.chat.getMessages(chatId) | Retrieves all messages for a specific conversation. |
supsis.chat.close(chatId) | Closes an active chat conversation. |
supsis.chat.open(options) | Opens a new chat for a contact; returns existing active chat via alreadyExists if present. |
supsis.chat.isActiveChatExistsByContactId(contactId) | Checks if an active, new, chatbot, or lost conversation exists for the contact. |
supsis.chat.transferToQueue(chatId) | Transfers a chat conversation back to the unassigned queue. |
supsis.chat.transferToChatbot(chatId, options) | Transfers a chat conversation to a chatbot scenario flow. |
supsis.chat.transferToDepartment(chatId, departmentId) | Routes a conversation to a specific department. |
supsis.chat.transferToDepartmentAndAgent(chatId, departmentId, agentId) | Routes a conversation to a specific department and agent concurrently. |
✉️ Message Object Methods (Message)
| Method Signature | Description |
|---|---|
supsis.message.get(messageId) | Fetches a message by ID. |
supsis.message.findByExternalProviderId(externalProviderId) | Finds a message using an external provider ID. |
supsis.message.findByGupshupMessageId(gupshupMessageId) | Finds a message using a Gupshup message ID. |
supsis.message.findByMetaMessageId(metaMessageId) | Finds a message using a Meta message ID. |
supsis.message.findByUniqMessageId(uniqMessageId) | Finds a message using a unique message ID. |
supsis.message.toLite(message) | Converts a message object to a lite format. |
supsis.message.toLLM(messageOrMessages) | Formats message(s) into an LLM-compatible structure. |
📋 Form Submissions (Form)
| Method Signature | Description |
|---|---|
supsis.form.getSubmission(submissionId) | Returns form submission data formatted cleanly by field slugs. |
👤 Contact Management (Contact)
| Method Signature | Description |
|---|---|
supsis.contact.get(id) | Fetches a contact record by ID. |
supsis.contact.create({platform, fullname, email, phone, channelIds, contactProperties}) | Creates a new contact record. |
supsis.contact.update(contactId, fields, isListenEvent) | Updates contact fields. |
supsis.contact.addTag(contactId, tagId) | Adds a tag to a contact. |
supsis.contact.removeTag(contactId, tagId) | Removes a tag from a contact. |
supsis.contact.updateContactProperty(contactId, contactPropertyName, value) | Updates a custom contact property value. |
supsis.contact.changeOwnerAuto(contactId, options) | Changes contact ownership using automatic assignment rules. |
supsis.contact.changeOwner(contactId, ownerId) | Assigns contact ownership to a specific user. |
supsis.contact.addDepartment(contactId, departmentId, isListenEvent) | Appends a department to the contact's relatedDepartments list. |
supsis.contact.updatePreferredLanguage(contactId, lang, isListenEvent) | Updates the contact's preferred language attribute. |
supsis.contact.search(filterGroups, cursor, projectionFields, withCount) | Searches contact records using structured filter groups. |
supsis.contact.getMessages(contactId, options) | Fetches all messages belonging to a contact. |
supsis.contact.getChats(contactId, options) | Fetches all chat conversations belonging to a contact. |
📲 SMS Dispatch & Status
| Method Signature | Description |
|---|---|
supsis.sms.send({channelId, senderId, number, message}) | Dispatches an SMS and returns provider-specific execution results. |
supsis.sms.getStatus(params) | Queries SMS status directly from the underlying provider. |
📱 WhatsApp Operations (WhatsApp)
| Method Signature | Description |
|---|---|
supsis.whatsapp.sendTemplateMessage({channelId, template, phoneNumber, params, asset}) | Dispatches a WhatsApp template message (Meta or Gupshup). |
supsis.whatsapp.getTemplate({channelId, templateId}) | Fetches WhatsApp template metadata. |
supsis.whatsapp.qr.send(options) | Sends a text message or asset via a WhatsApp QR channel. |
supsis.whatsapp.qr.sendLocation(options) | Sends location data via a WhatsApp QR channel. |
📧 Email Dispatch (Email)
| Method Signature | Description |
|---|---|
supsis.email.send({from, to, subject, content, senderName, templateId, type}) | Dispatches an email. Returns messageId/emailId on success, success:false on failure. |
supsis.email.getByMailId(mailId) | Fetches an email record by mail ID. |
📡 Channel Management (Channel)
| Method Signature | Description |
|---|---|
supsis.channel.list() | Lists all configured communication channels. |
supsis.channel.get(channelId) | Fetches a channel record by ID. |
supsis.channel.getByType(type) | Lists channel records filtered by channel type. |
🔔 Activity & Notifications (Activity)
| Method Signature | Description |
|---|---|
supsis.activity.create({message, notification, actions}) | Creates a custom activity record and dispatches notifications to target users. |
💰 Balance & Wallet (Balance)
| Method Signature | Description |
|---|---|
supsis.balance.addActivity(options) | Deducts or credits balance activity in a wallet (amount must be positive). |
supsis.balance.get(walletType) | Retrieves wallet balance (currently supports WhatsApp wallet). |
📞 Voice AI Agent (VoiceAgent)
| Method Signature | Description |
|---|---|
supsis.voiceagent.makeCall({agentId, fromNumber, toNumber, variables, metadata}) | Initiates an outbound call using a Voice AI Agent. |
supsis.voiceagent.getCall(callId) | Retrieves status and metadata for a Voice AI Agent call. |
⏳ Queue Management (Queue)
| Method Signature | Description |
|---|---|
supsis.queue.add(operation, type) | Enqueues an operation to the in-memory queue. |
supsis.queue.clean(type) | Clears specified queue entries by type. |
supsis.queue.status(type) | Returns current queue status and pending items. |
💾 Cache Management (Cache)
| Method Signature | Description |
|---|---|
supsis.cache.write(key, value, options) | Writes a key/value pair to cache. |
supsis.cache.read(key, defaultValue) | Reads a value from cache; returns defaultValue if not found. |
supsis.cache.extend(key, expiresIn) | Extends the expiration TTL of a cache key. |
supsis.cache.delete(key) | Deletes a key from cache. |
supsis.cache.list(pattern) | Lists cache keys matching a pattern. |
🤖 AI Services (AI)
| Method Signature | Description |
|---|---|
supsis.ai.createResponse(options) | Generates AI responses via OpenRouter API. Returns parsed JSON if jsonOutput is true. |
🛠️ Utility Methods (Util)
| Method Signature | Description |
|---|---|
supsis.util.html2md(html) | Converts HTML string content into Markdown format. |
supsis.util.url2md(url, timeout, proxy) | Fetches content from a URL and converts it into Markdown. |
supsis.util.encodeUri(str) | Encodes a string into a URI-safe format. |
supsis.util.decodeUri(str) | Decodes a URI-encoded string back to raw format. |
🔔 Pushover Integration (Pushover)
| Method Signature | Description |
|---|---|
supsis.pushover.send({channelId, message, title, priority, sound, url, urlTitle, device}) | Dispatches a Pushover push notification. |
💼 Slack Integration (Slack)
| Method Signature | Description |
|---|---|
supsis.slack.sendMessage({channelId, message, channel, username, iconEmoji}) | Dispatches a plain text message to a Slack channel. |
supsis.slack.sendWithBlocks({channelId, blocks, channel, text}) | Dispatches a message with Slack Blocks payload. |
supsis.slack.sendWithAttachment({channelId, attachment, channel, text}) | Dispatches a message with Slack Attachment payload. |
📦 Dynamic Custom Modules (Module)
| Method Signature | Description |
|---|---|
supsis.module.list() | Lists all custom modules configured in the workspace. |
supsis.module.{moduleName}.get(id) | Fetches a record by ID from a custom module. |
supsis.module.{moduleName}.create(data) | Creates a new record in a custom module. |
supsis.module.{moduleName}.update(id, data) | Updates a record in a custom module. |
supsis.module.{moduleName}.delete(id) | Deletes a record from a custom module. |
supsis.module.{moduleName}.search(query) | Searches records in a custom module using a query. |
📊 Metrics & Reporting (Report)
| Method Signature | Description |
|---|---|
supsis.report.sessionOverall({startDate, endDate, users, channels, timezone}) | Returns overall session metrics for the period. |
supsis.report.ratingOverall(params) | Returns customer rating summary metrics. |
supsis.report.chatDistributionsAll(params) | Returns chat distribution report data. |
supsis.report.contactDistributionsAll(params) | Returns contact distribution report data. |
supsis.report.calculateStats(params) | Returns general operational statistics. |
supsis.report.resolveTimeByUser(params) | Returns resolution time reports by agent. |
supsis.report.firstInteractionTimeByUser(params) | Returns initial response time reports by agent. |
supsis.report.agentPerformanceAll(params) | Returns comprehensive agent performance report. |
supsis.report.teamWorkCalendar(params) | Returns team working schedule report. |
supsis.report.websiteTraffic(params) | Returns website traffic metrics. |
supsis.report.channelOverall(params) | Returns channel performance summary metrics. |
supsis.report.wabaMessageTraffic(params) | Returns WhatsApp Business message volume metrics. |
supsis.report.walletStatus(params) | Returns wallet status and spending report. |
supsis.report.calendarEvents(params) | Returns calendar event metrics. |
supsis.report.reservationEvents(params) | Returns appointment reservation event metrics. |
supsis.report.mailInboxCounts(params) | Returns inbox email volume count metrics. |
supsis.report.mailSendCounts(params) | Returns sent email volume count metrics. |
supsis.report.ticketDistributionsAll(params) | Returns ticket distribution report data. |
supsis.report.taskOverall(params) | Returns task management summary metrics. |
🔗 Zoho CRM Integration (Zoho)
| Method Signature | Description |
|---|---|
supsis.zoho.getDealsByPhone(phone) | Fetches Zoho deal records matching a phone number. |
supsis.zoho.getUserById(userId) | Fetches a Zoho user by ID. |
supsis.zoho.getAllUsers() | Lists all users in Zoho CRM. |
supsis.zoho.getOrganizationDetails() | Retrieves Zoho organization metadata. |
supsis.zoho.getContactById(contactId) | Fetches a Zoho Contact by ID. |
supsis.zoho.createContact(fullname, phone) | Creates a new Contact in Zoho CRM. |
supsis.zoho.createLead(fullname, phone, extraData) | Creates a new Lead in Zoho CRM. |
supsis.zoho.getLeadById(leadId) | Fetches a Zoho Lead by ID. |
supsis.zoho.getContactByMobile(phone) | Fetches a Zoho Contact by mobile number. |
supsis.zoho.getContactByPhone(phone) | Fetches a Zoho Contact by phone number. |
supsis.zoho.listRecordsByPhone(module, phone) | Lists records in a target Zoho module by phone. |
supsis.zoho.uploadAttachmentToRecord(moduleApiName, recordId, fileUrl, filename) | Uploads a file attachment to a Zoho record. |
supsis.zoho.uploadFileToZFS(fileUrl, filename) | Uploads a file to Zoho File System (ZFS). |
supsis.zoho.uploadImageToField(moduleApiName, recordId, fieldId, fileUrl, filename) | Uploads an image file to a Zoho custom image field. |
supsis.zoho.getLeadByPhone(phone) | Fetches a Zoho Lead matching a phone number. |
supsis.zoho.changeOwnerByRecordId(module, recordId, ownerId) | Changes ownership for a specified Zoho record. |
supsis.zoho.getRecordsByMobile(module, phone) | Fetches Zoho records by mobile number. |
supsis.zoho.getRecordsByPhone(module, phone) | Fetches Zoho records by phone number. |
supsis.zoho.getRecordsByContactId(module, contactId) | Fetches Zoho records related to a Contact ID. |
supsis.zoho.getRecordById(module, id) | Fetches a single record by ID from a Zoho module. |
supsis.zoho.getModuleFields(module) | Retrieves field schema definitions for a Zoho module. |
supsis.zoho.isNewLeadByPhone(phone) | Checks if a phone number corresponds to a new lead. |
supsis.zoho.createRecord(module, data) | Creates a new record in a target Zoho module. |
supsis.zoho.getModuleRelatedLists(module) | Retrieves related list metadata for a Zoho module. |
supsis.zoho.getModules() | Lists all available modules in Zoho CRM. |
supsis.zoho.updateRecord(module, recordId, data) | Updates a record in a target Zoho module. |
supsis.zoho.upsertRecord(module, data) | Upserts a record in a target Zoho module. |
supsis.zoho.deleteRecords(module, recordIds) | Deletes multiple records from a target Zoho module. |
supsis.zoho.getRelatedRecordData(module, recordId, relatedModule, fields) | Fetches related module record data for a Zoho record. |
🛒 ikas E-commerce Integration (Ikas)
| Method Signature | Description |
|---|---|
supsis.ikas.product.list(channelId, options) | Lists products in an ikas store. |
supsis.ikas.product.search(channelId, searchOptions) | Searches products in an ikas store. |
supsis.ikas.product.get(channelId, productId) | Fetches an ikas product by ID. |
supsis.ikas.customer.get(channelId, identifier) | Fetches ikas customer details by email, phone, or ID. |
supsis.ikas.order.getOrderStatus(channelId, orderNumber) | Retrieves ikas order status by order number. |
supsis.ikas.order.getCustomerOrders(channelId, identifier) | Fetches orders belonging to an ikas customer. |
supsis.ikas.order.list(channelId, options) | Lists ikas orders. |
supsis.ikas.abandonedCart.list(channelId, options) | Lists ikas abandoned shopping carts. |
🏪 Ticimax E-commerce Integration (Ticimax)
| Method Signature | Description |
|---|---|
supsis.ticimax.member.list(channelId, filter, pagination) | Lists Ticimax members with filtering and pagination. |
supsis.ticimax.member.getByPhone(channelId, phone) | Fetches a Ticimax member by phone number. |
supsis.ticimax.member.getByEmail(channelId, email) | Fetches a Ticimax member by email address. |
supsis.ticimax.member.getNew(channelId, options) | Fetches newly registered Ticimax members. |
supsis.ticimax.member.getNonBuying(channelId, options) | Fetches Ticimax members without purchases. |
supsis.ticimax.order.getByPhone(channelId, phoneNumber) | Fetches Ticimax orders by phone number. |
supsis.ticimax.order.getStatus(channelId, orderId) | Retrieves Ticimax order status. |
supsis.ticimax.order.getAbandoned(channelId, options) | Fetches abandoned cart/order records from Ticimax. |
supsis.ticimax.order.getCompleted(channelId, options) | Fetches completed Ticimax orders. |
▶️ YouTube Integration (YouTube)
| Method Signature | Description |
|---|---|
supsis.youtube.video.list(channelId, options) | Lists YouTube videos. |
supsis.youtube.video.get(videoId) | Fetches a YouTube video by ID. |
supsis.youtube.comment.list(options) | Lists YouTube video comments. |
supsis.youtube.comment.get(commentId) | Fetches a YouTube comment by ID. |
supsis.youtube.comment.reply(channelId, commentId, text) | Replies to a YouTube comment. |
supsis.youtube.comment.updateStatus(commentId, status) | Updates internal status attribute of a YouTube comment. |
supsis.youtube.comment.setModerationStatus(channelId, commentId, moderationStatus, banAuthor) | Updates moderation status of a YouTube comment. |
📍 Google Business Integration (Google Business)
| Method Signature | Description |
|---|---|
supsis.googlebusiness.location.list(channelId, options) | Lists Google Business locations. |
supsis.googlebusiness.location.get(locationId) | Fetches a Google Business location by ID. |
supsis.googlebusiness.review.list(options) | Lists customer reviews. |
supsis.googlebusiness.review.get(reviewId) | Fetches a customer review by ID. |
supsis.googlebusiness.review.reply(channelId, reviewId, text) | Replies to a Google Business review. |
supsis.googlebusiness.review.updateStatus(reviewId, status) | Updates status attribute of a Google Business review. |
🤖 Google Play Integration (Google Play)
| Method Signature | Description |
|---|---|
supsis.googleplay.app.list(channelId, options) | Lists Google Play applications. |
supsis.googleplay.app.get(appId) | Fetches a Google Play application by ID. |
supsis.googleplay.review.list(options) | Lists Google Play app reviews. |
supsis.googleplay.review.get(reviewId) | Fetches a Google Play review by ID. |
supsis.googleplay.review.reply(channelId, reviewId, text) | Replies to a Google Play review. |
supsis.googleplay.review.updateStatus(reviewId, status) | Updates status attribute of a Google Play review. |
🍎 App Store Integration (App Store)
| Method Signature | Description |
|---|---|
supsis.appstore.app.list(channelId, options) | Lists App Store applications. |
supsis.appstore.app.get(appId) | Fetches an App Store application by ID. |
supsis.appstore.review.list(options) | Lists App Store app reviews. |
supsis.appstore.review.get(reviewId) | Fetches an App Store review by ID. |
supsis.appstore.review.reply(channelId, reviewId, text) | Replies to an App Store review. |
supsis.appstore.review.updateResponse(channelId, reviewId, text) | Updates sent response text for an App Store review. |
supsis.appstore.review.deleteResponse(channelId, reviewId) | Deletes a sent response for an App Store review. |
supsis.appstore.review.updateStatus(reviewId, status) | Updates status attribute of an App Store review. |
📁 Google Drive Integration (Google Drive)
| Method Signature | Description |
|---|---|
supsis.googledrive.search(channelId, query, options) | Searches for files in Google Drive. |
supsis.googledrive.list(channelId, options) | Lists files in Google Drive. |
supsis.googledrive.get(channelId, fileId) | Fetches a single file from Google Drive. |
supsis.googledrive.uploadByAsset(channelId, assetId, options) | Uploads a Supsis Asset to Google Drive. |
supsis.googledrive.downloadAsAsset(channelId, fileId) | Downloads a Google Drive file and creates a new Supsis Asset. |
supsis.googledrive.deleteFile(channelId, fileId) | Deletes a file from Google Drive. |