
Supsis AI Web Chat Triggers is a proactive customer acquisition and engagement engine that analyzes visitor behavior and properties in real time, delivering personalized interactions at the optimal moment.
Instead of waiting for visitors to initiate a conversation, triggers evaluate session duration, traffic source (UTM), visit frequency, geographical location, or device type to render customizable engagement cards or directly launch live chat sessions.
1- What is a Trigger and How Does It Work?
A trigger is an automated action deployed when a website visitor satisfies specific criteria (e.g., remaining on the pricing page for 30 seconds, arriving from a Google Ads campaign, or browsing from a mobile device).
Triggers operate under two distinct behavioral modes:
- 1.a – Show Card (Default): Displays an elegant, customizable card comprising a title, message, visual assets, action buttons, or an embedded code block. Visitors can click buttons to connect with live support, navigate to campaign landing pages, or dismiss the card.
- 1.b – Open Chat Directly: Bypasses card rendering and automatically launches the live chat widget as soon as conditions are met, initiating an immediate greeting conversation.
2- Triggers List Screen & Global Configuration
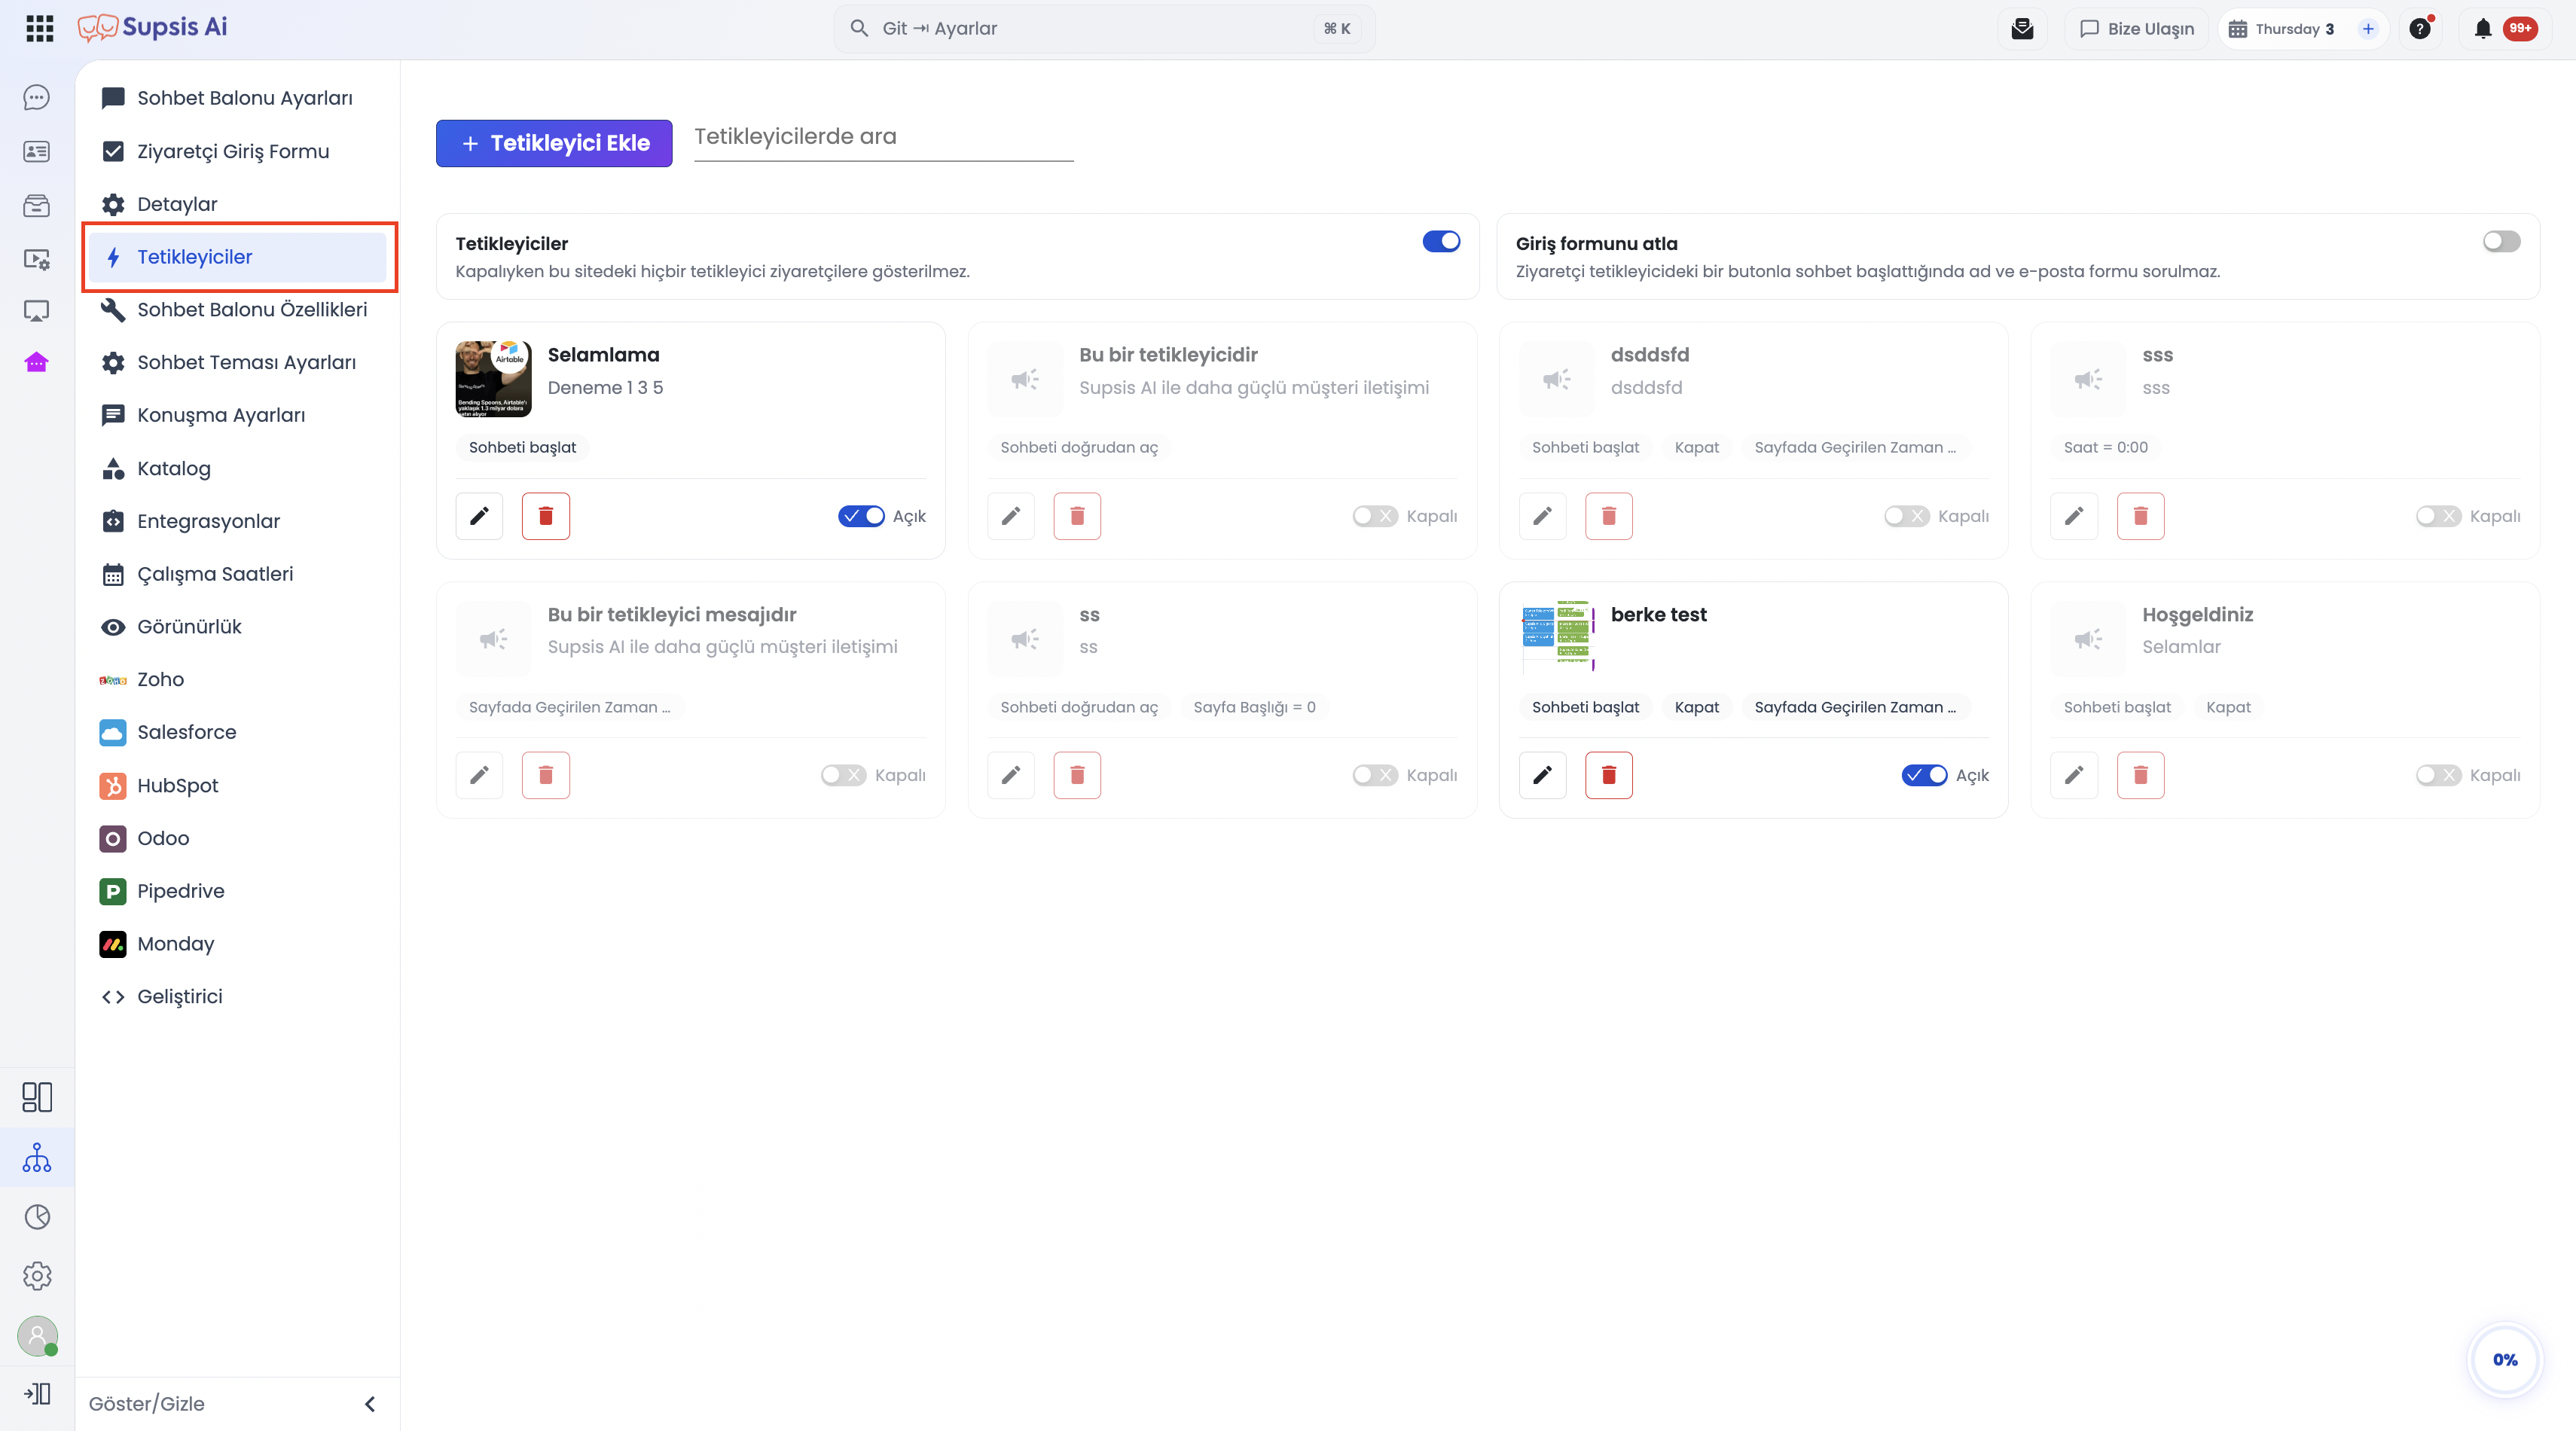
In the Customer Panel, navigating to Integrations › Web Chat › Triggers displays all configured triggers in a comprehensive card view.
2.a – Global Page Controls
The toolbar at the top provides two system-level switches: - Triggers Master Toggle: When toggled off, all triggers across the website are immediately silenced. - Skip Entry Form: When visitors start a chat via a trigger button, this bypasses the standard pre-chat form (name, email, etc.) and connects them directly to an agent.
2.b – Instant Search & Priority Ordering
- Omni-Search Bar: Rapidly filters trigger cards across all configured languages by title or message content.
- Drag-and-Drop Priority Sorting: If a visitor meets the conditions of multiple triggers simultaneously, only the highest-ranked trigger in the list is executed. Triggers must be prioritized using drag-and-drop reordering (reordering is locked while search filtering is active).
2.c – Trigger Card Actions
Each card displays operational badges (behavior mode, condition count, active/passive status toggle), along with Edit and Delete buttons.
3- Trigger Design Modal: Localization and Content
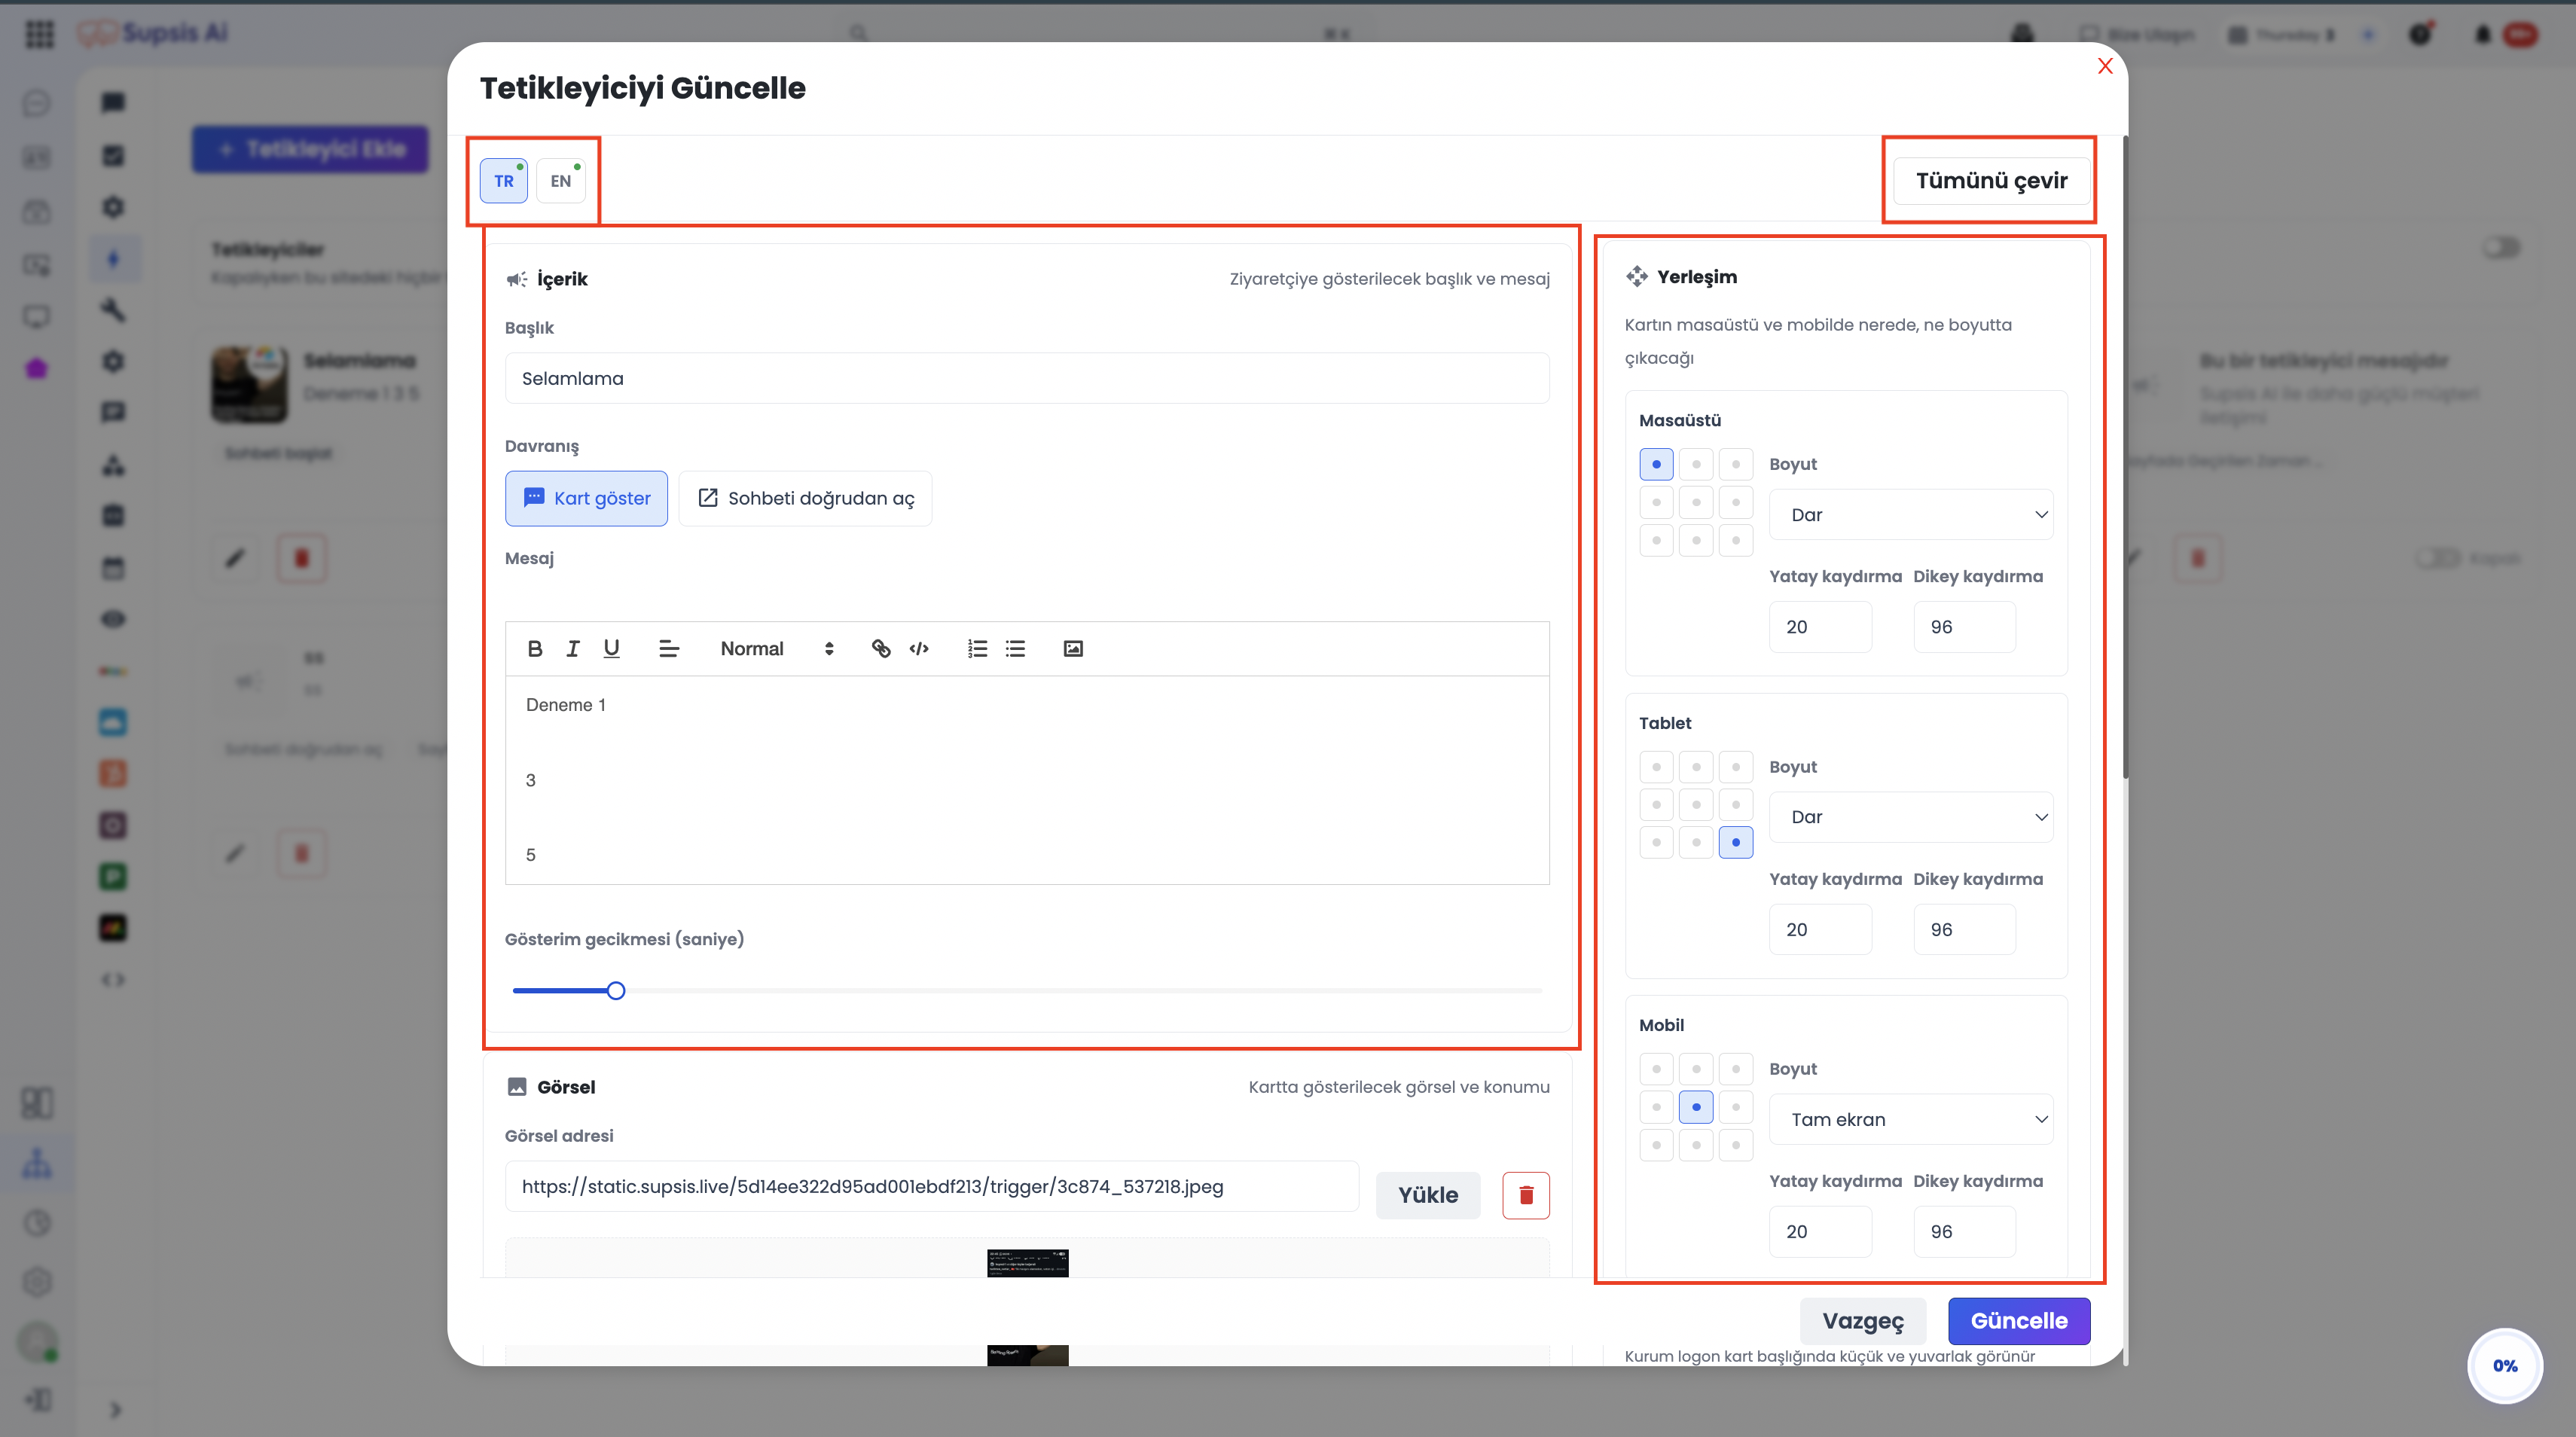
Creating or modifying a trigger opens a responsive modal with configuration fields on the left and a live interactive preview on the right.
3.a – Multilingual Support & Language Bar
The language navigation bar at the top of the modal allows defining titles and messages for every language enabled in your panel. Languages with saved content are marked with a green indicator. The widget automatically serves content matching the visitor’s browser locale.
3.b – "Translate All" Feature
Compose your copy in a single primary language and click Translate All to automatically localize content across all active panel languages via AI within seconds.
3.c – Display Delay and Avatar Display
- Display Delay (Seconds): Defines the exact delay before displaying the card once all conditions are satisfied.
- Show Avatar: Displays the company logo as a circular avatar in the trigger header (requires an uploaded logo in Settings › Business).
4- Interactive Buttons & Action Types
Up to 3 action buttons can be added to the bottom of the trigger card.
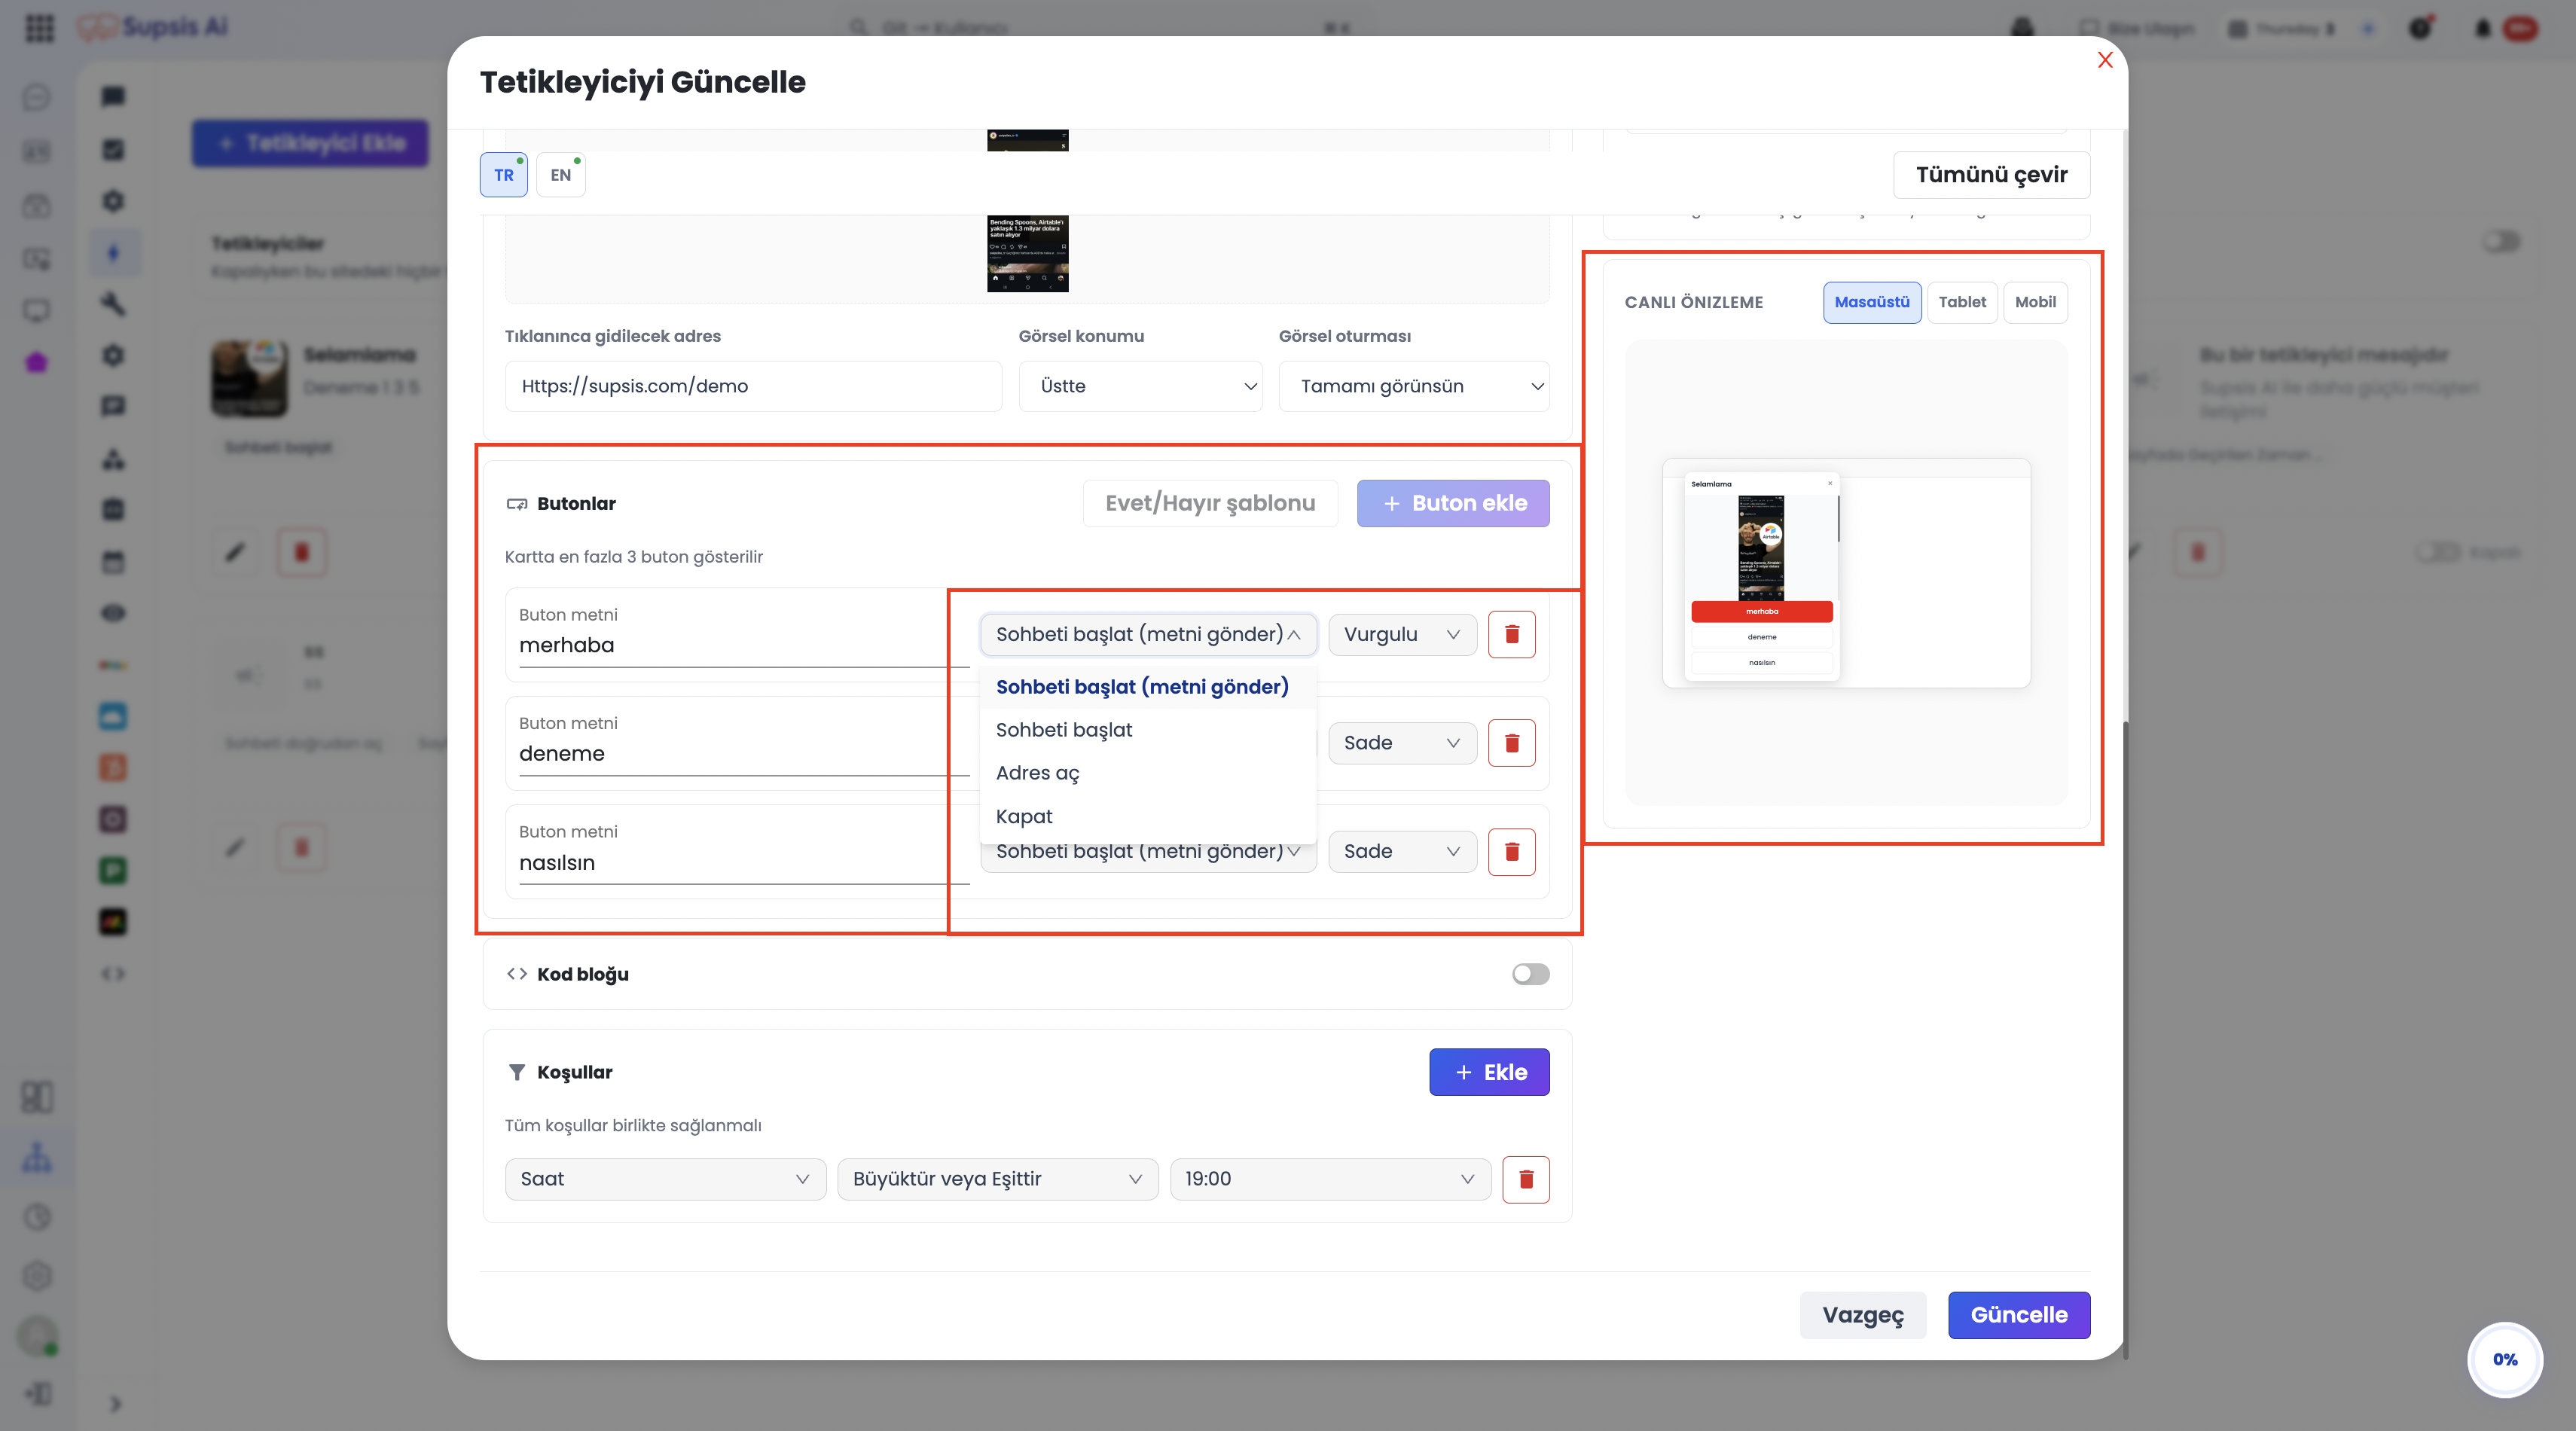
Each button can be assigned one of the following action types:
| Button Action | Functional Behavior |
|---|---|
| Start Chat (Send Text) | Opens the chat widget and automatically submits the predefined text as the visitor's first message to the agent/chatbot. |
| Start Chat | Launches the live chat conversation window directly without submitting pre-filled text. |
| Open URL | Redirects the visitor to the specified URL. Can be configured to open in the Same Tab (_self) or a New Tab (_blank). |
| Close | Dismisses the trigger card. Optionally displays a brief farewell message before disappearing. |
5- Visual Media Assets & Positioning
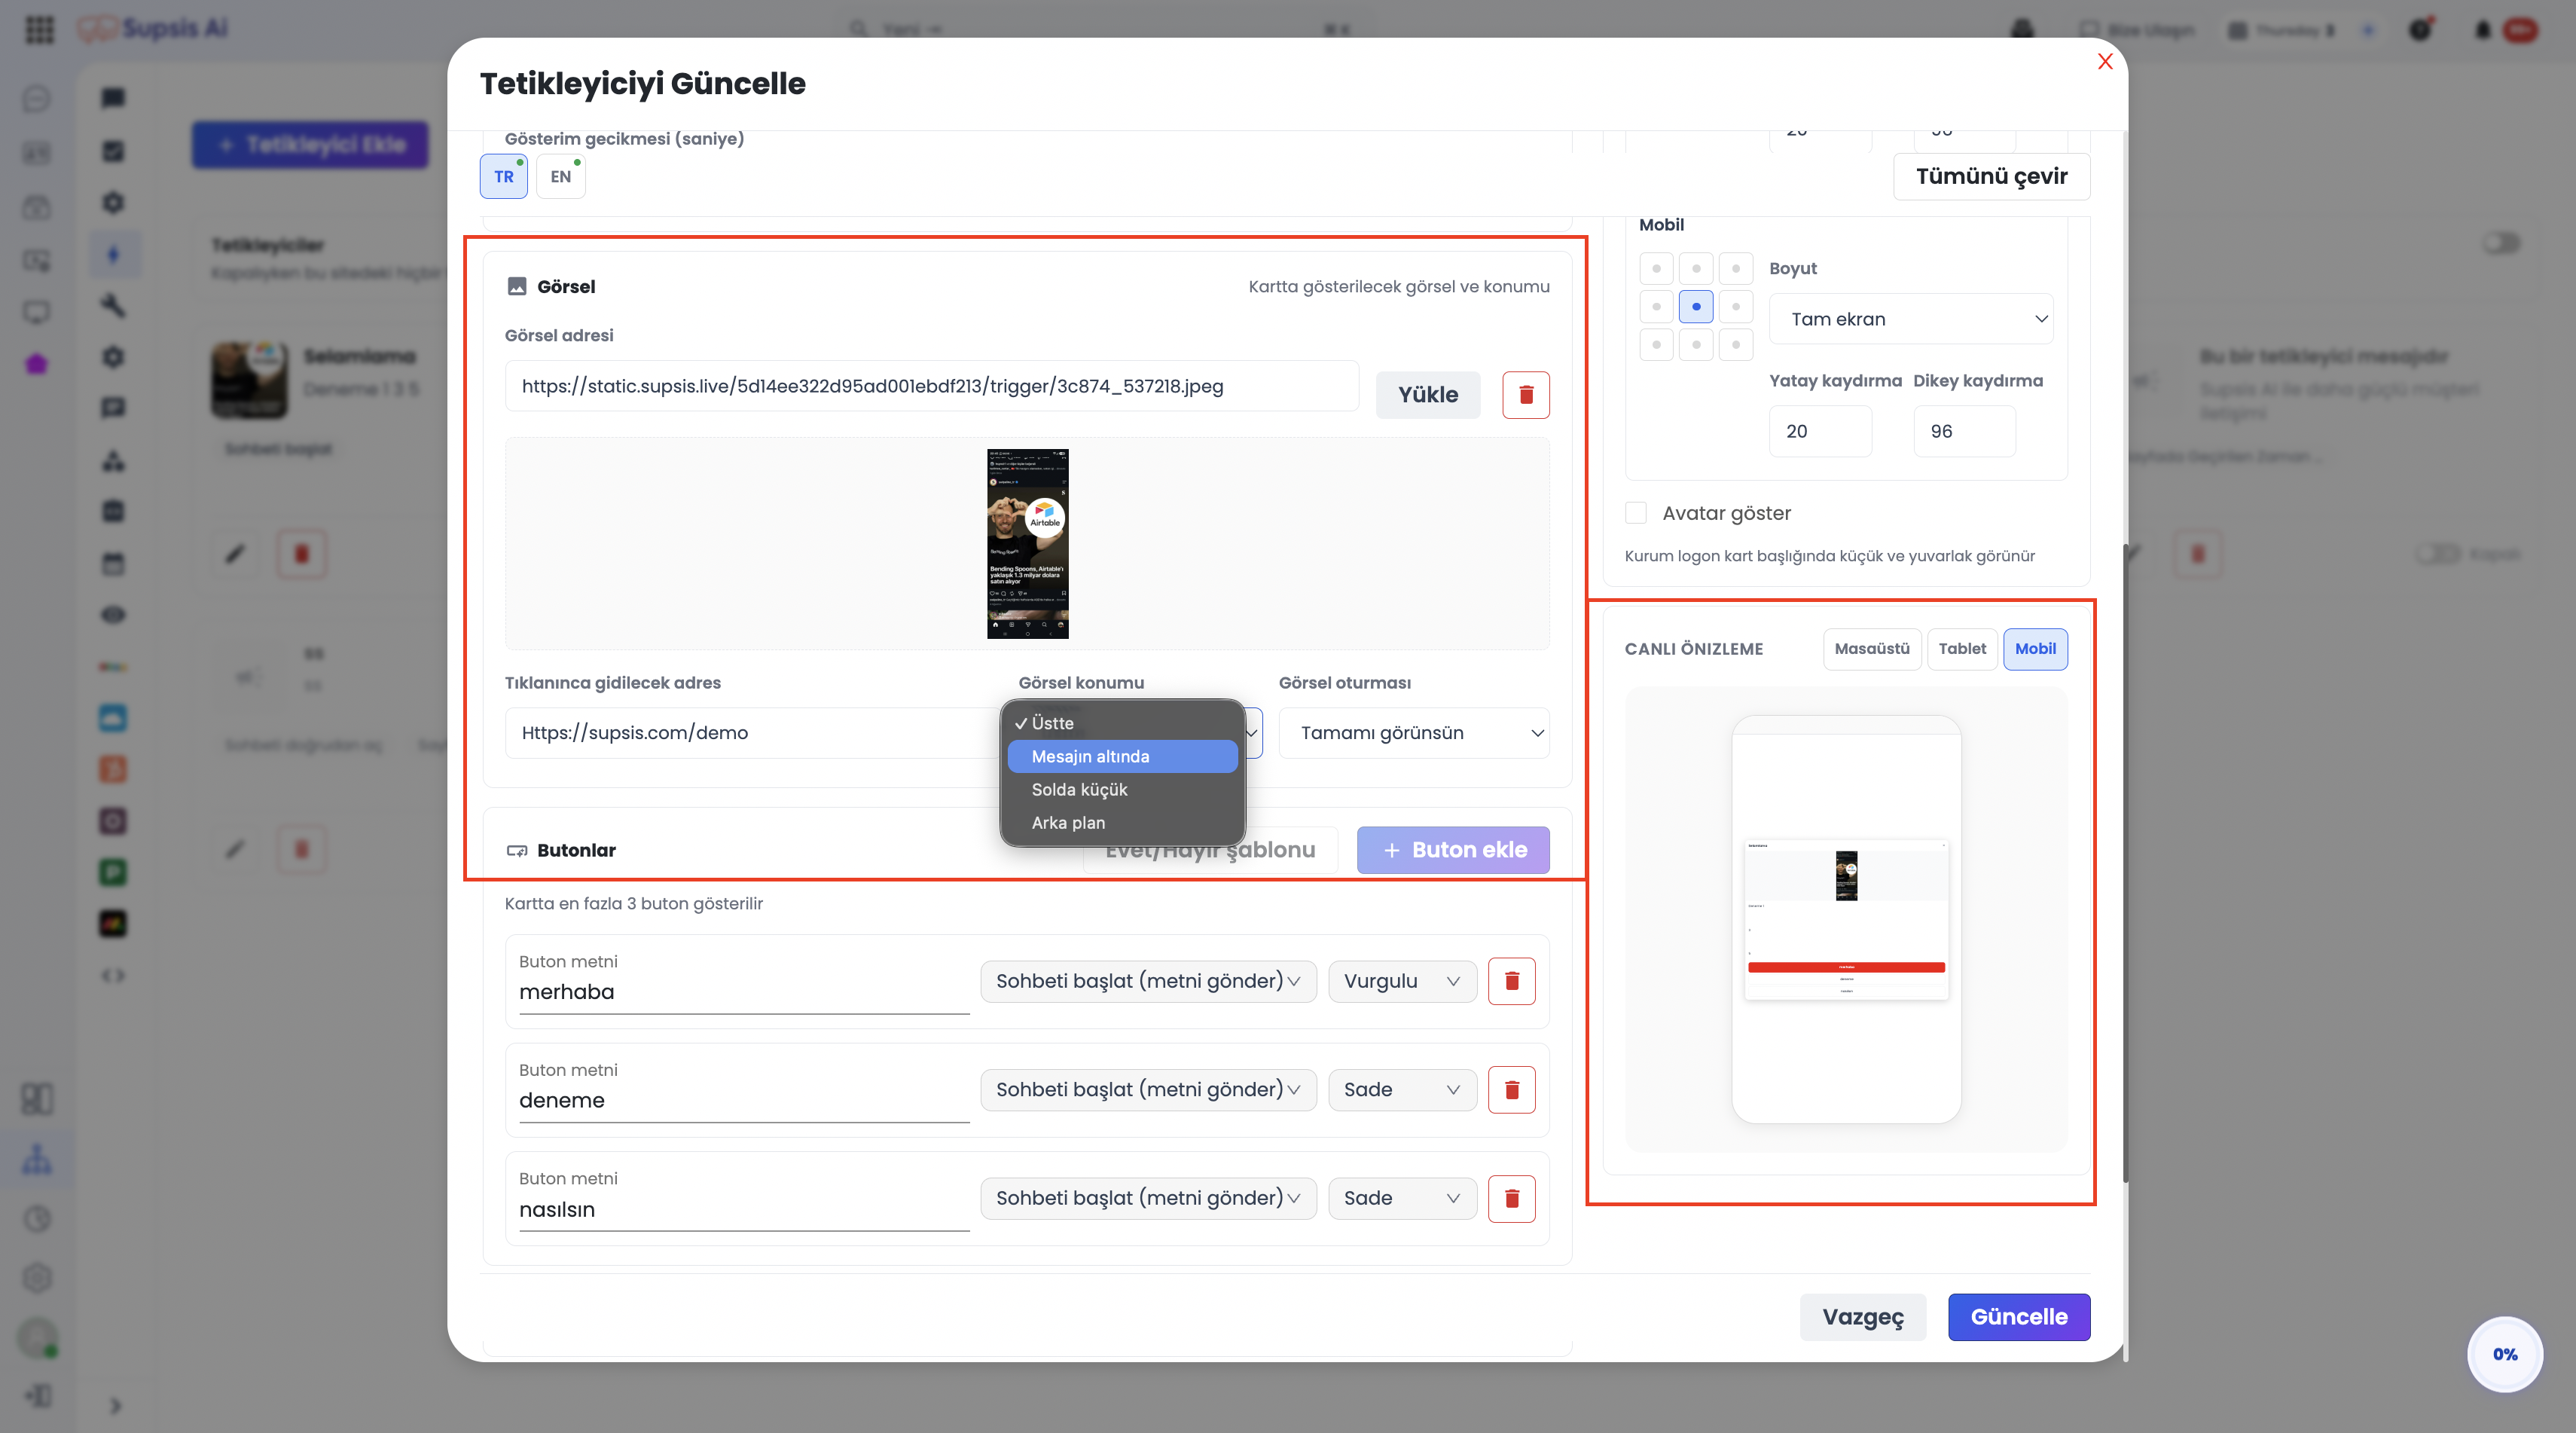
Trigger cards support promotional banners, product images, and icons to capture user attention.
5.a – Uploading & Link Redirection
- Upload local image files directly or input external CDN URLs.
- Make the image interactive by attaching a target destination URL upon click.
5.b – Image Layout Positions
- Top: Renders as a full-width header banner above the card title.
- Below Message: Positioned between the message body and the action buttons.
- Left Thumbnail: Displays as a compact square thumbnail on the left side of the content.
- Background: Covers the entire card background with text overlaid.
5.c – Image Object Fit
- Contain (Full Image Visible): Scales the image proportionally without cropping.
- Cover (Fill Area): Fills the entire visual container, cropping edges if necessary.
6- Responsive Device Layouts (Desktop, Tablet, Mobile)
The screen position, dimensions, and spacing of the trigger card can be configured independently across three distinct device profiles:
- Desktop Profile: Screen widths greater than 1024 px.
- Tablet Profile: Screen widths between 769 px and 1024 px.
- Mobile Profile: Screen widths 768 px and below.
6.a – 9-Point Positioning Grid
Select an exact screen anchor point from a 9-point alignment grid (Top-Left, Top-Center, Top-Right, Center-Left, Center, Center-Right, Bottom-Left, Bottom-Center, Bottom-Right).
6.b – Sizing and Offset Precision
- Card Size: Choose from Narrow, Medium, Wide, or Full Screen.
- Horizontal & Vertical Offsets (px): Fine-tune X and Y margins relative to the chosen anchor.
- Live Preview: Toggle between desktop and mobile preview modes on the right panel to validate responsive aesthetics instantly.
7- Embedded Code Block (Custom HTML/JS Sandbox)
Embed custom interactive components (mini-forms, countdown timers, product selectors, survey widgets) directly into the trigger card.
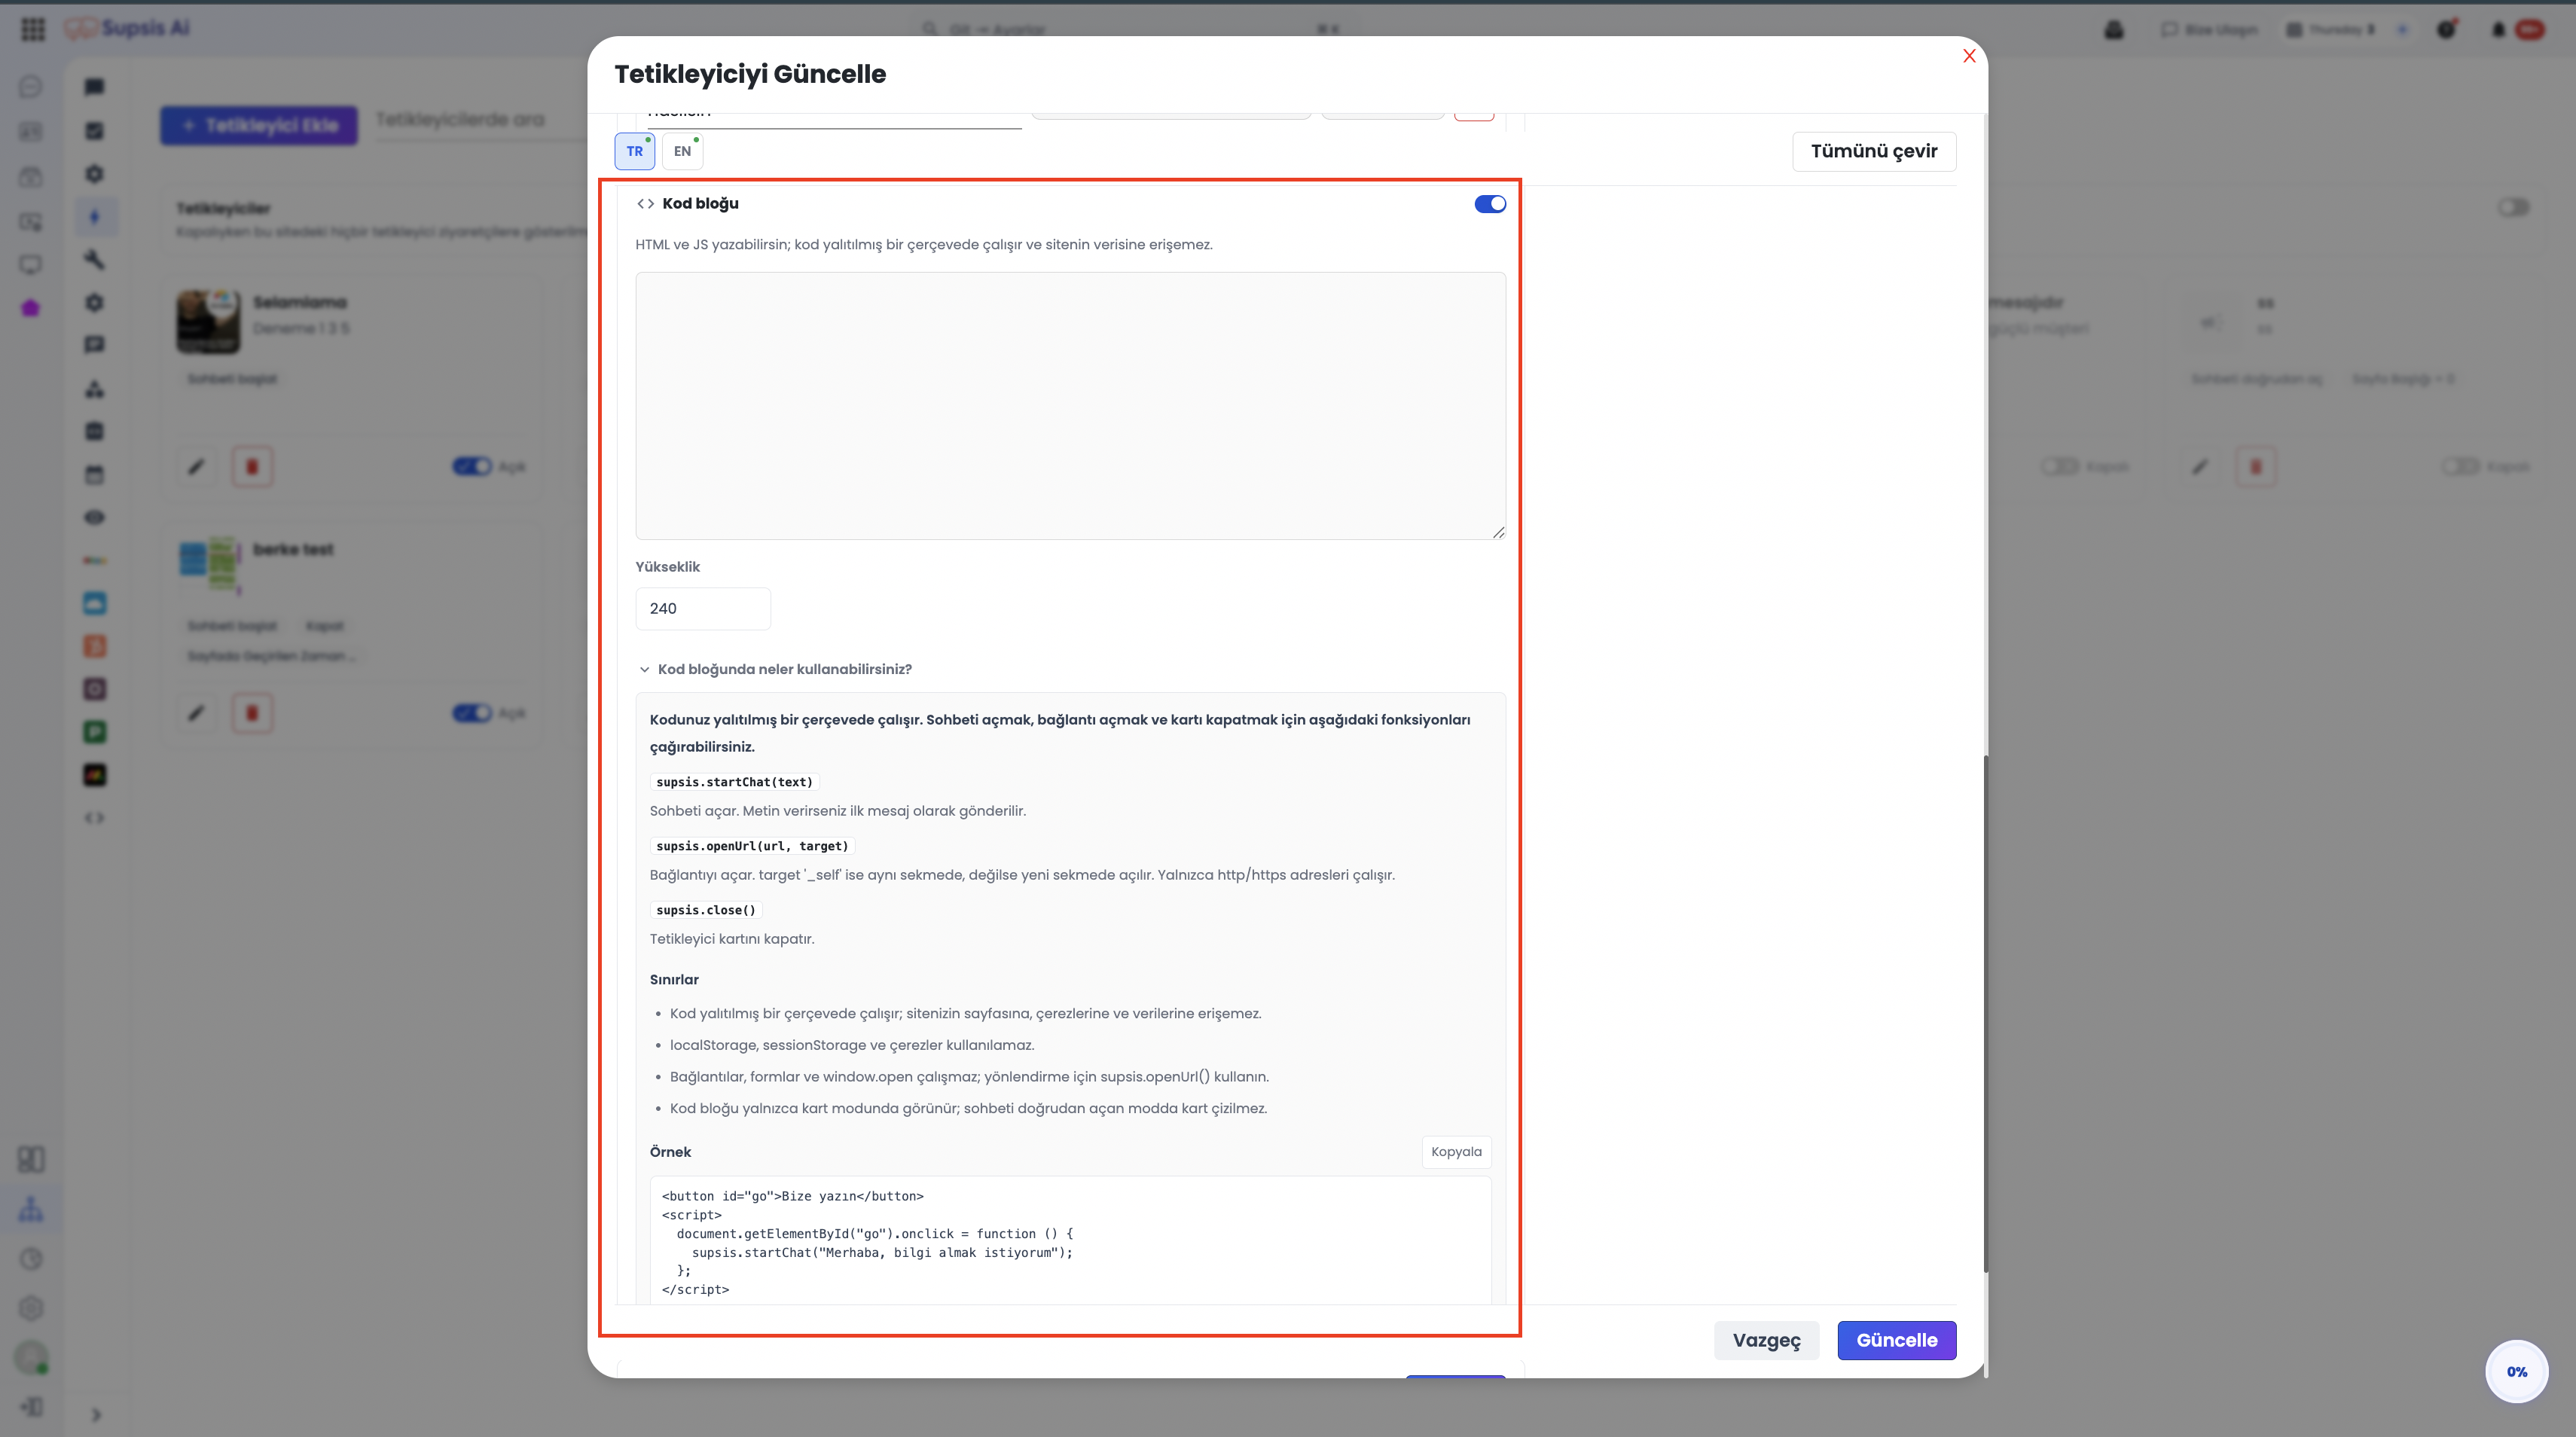
To protect host site security and performance, code runs inside an isolated sandboxed iframe. It cannot access host cookies, parent DOM elements, or host local storage.
7.a – Supported Supsis Client API
| Method | Parameters | Description |
|---|---|---|
supsis.startChat(text) |
text (optional) |
Opens the chat widget. If text is provided, it is sent as the initial user message. |
supsis.openUrl(url, target) |
url, target (_self / _blank) |
Opens an HTTP/HTTPS link safely. |
supsis.close() |
- | Closes the trigger card. |
7.b – Sandbox Security Constraints
localStorage,sessionStorage, and cookies are disabled.- Standard
<form>submissions, anchor links (<a href>), andwindow.openare restricted; navigate usingsupsis.openUrl(). - Active solely in Show Card mode.
- Custom container height can be adjusted in pixels (
px).
<!-- Example Embedded Campaign Button -->
<div style="text-align:center; padding:10px;">
  <button onclick="supsis.startChat('I would like to claim my discount voucher.')"
          style="background:#2563eb; color:#fff; border:none; padding:8px 16px; border-radius:6px; cursor:pointer;">
    Claim Voucher & Start Chat
  </button>
</div>
8- Target Conditions (Up to 8 Rules)
A trigger can contain up to 8 conditions. All conditions are evaluated concurrently (AND operator); all rules must evaluate to true for the card to trigger.
| Condition Type | Supported Values / Format | Operational Purpose |
|---|---|---|
| Time | HH:MM (30-minute intervals) |
Targets specific working hours or after-hours windows (e.g., 09:00 - 18:30). |
| Day of the Week | Monday - Sunday | Schedules weekday vs. weekend campaigns. |
| Time on Current Page | Seconds (Default: ≥) |
Triggers after a visitor spends designated dwell time on a specific URL. |
| Total Time on Site | Seconds (Default: ≥) |
Targets engaged visitors based on cumulative session duration. |
| URL | Contains / Equals / Starts with | Targets pricing, /checkout, or landing pages. |
| Page Title | Text String | Matches keywords in the HTML <title> tag. |
| System Status | Online / Offline | Displays distinct fallback cards when live agents are offline. |
| Device Type | Mobile / Desktop | Delivers device-optimized engagement cards. |
| Visit Count | Integer (Default: ≥) |
Distinguishes first-time visitors from returning users (2+ visits). |
| Traffic Source | referrer, utm_source, utm_medium, utm_campaign |
Targets visitors originating from Google Ads, newsletters, or social campaigns. |
| Country / Language | country, language |
Delivers localized messaging based on geolocation or browser language. |
| SDK Custom Data | Key + Value Pair | Evaluates custom business parameters passed through the JavaScript SDK. |
Deprecated Conditions
"Visitor Name" and "Department" rules have been removed from the trigger builder as they do not apply to pre-chat anonymous visitors. Historical records remain fully intact.
9- Step-by-Step Guide to Creating a Trigger
- Open Module and Verify Settings:
- 1.a- Navigate to Integrations › Web Chat › Triggers in Customer Panel.
- 1.b- Ensure the global Triggers switch is enabled on the top toolbar.
- Define Trigger Core Properties:
- 2.a- Click Add Trigger.
- 2.b- Provide a descriptive title and select the execution behavior (Show Card or Open Chat Directly).
- Configure Content & Buttons:
- 3.a- Compose your message copy and utilize Translate All for other locales.
- 3.b- Upload an image asset and configure its position and fit.
- 3.c- Create up to 3 action buttons and assign designated interaction behaviors.
- Fine-tune Layout & Conditions:
- 4.a- Configure position grids and dimensions for Desktop, Tablet, and Mobile profiles with the live preview.
- 4.b- Set up target audience conditions under the Conditions tab (up to 8 rules).
- 4.c- Click Save and adjust the priority position in the list via drag-and-drop.
10- Use Cases & Strategic Benefits
| Business Use Case | Configuration Rules | Expected Impact |
|---|---|---|
| Cart Abandonment Rescue | URL: /checkout & Time on Page: ≥ 45 sec |
Delivers timely discount codes to rescue drop-offs. |
| Paid Ad Campaign Conversion | Traffic Source: utm_source = google_ads |
Tailored greetings matching ad copy increase PPC ROI. |
| VIP Returning Customer Offer | Visit Count: ≥ 3 |
Offers prioritized support queues for high-intent visitors. |
| Mobile-First Engagement | Device Type: Mobile (Bottom-Center, Full Screen) |
Eliminates intrusive banners on small screens. |
| After-Hours Lead Capture | System Status: Offline |
Invites offline visitors to leave contact information. |
11- Important Operational Notes
Priority Rule
When multiple triggers match a visitor's session criteria, the highest-positioned trigger in the list is served. Prioritize critical campaigns at the top using drag-and-drop.
Evaluation Engine Timing
The trigger evaluation engine initiates approximately 3 seconds after page load and re-evaluates rules every 10 seconds. Cached changes from the dashboard synchronize with client widgets within 1 minute.
Display Frequency
A trigger displays only once per browser tab session. Once dismissed, it will not re-appear in the same tab until refreshed.
Permissions & Plan Limits
Adding and editing triggers require designated administrative permissions. Maximum concurrent trigger limits depend on your Supsis subscription tier.