
2. Templates
Templates are the design center where you can create corporate email designs to send to your customers and manage your existing designs. Through this section, you can search your registered email designs in the system using detailed filters, edit your existing templates at any time, or delete them. At the same time, you can build brand new email templates with the rich tools provided by the system without needing any coding knowledge. You can access the code infrastructure behind these visual contents and manage your page designs in detail.
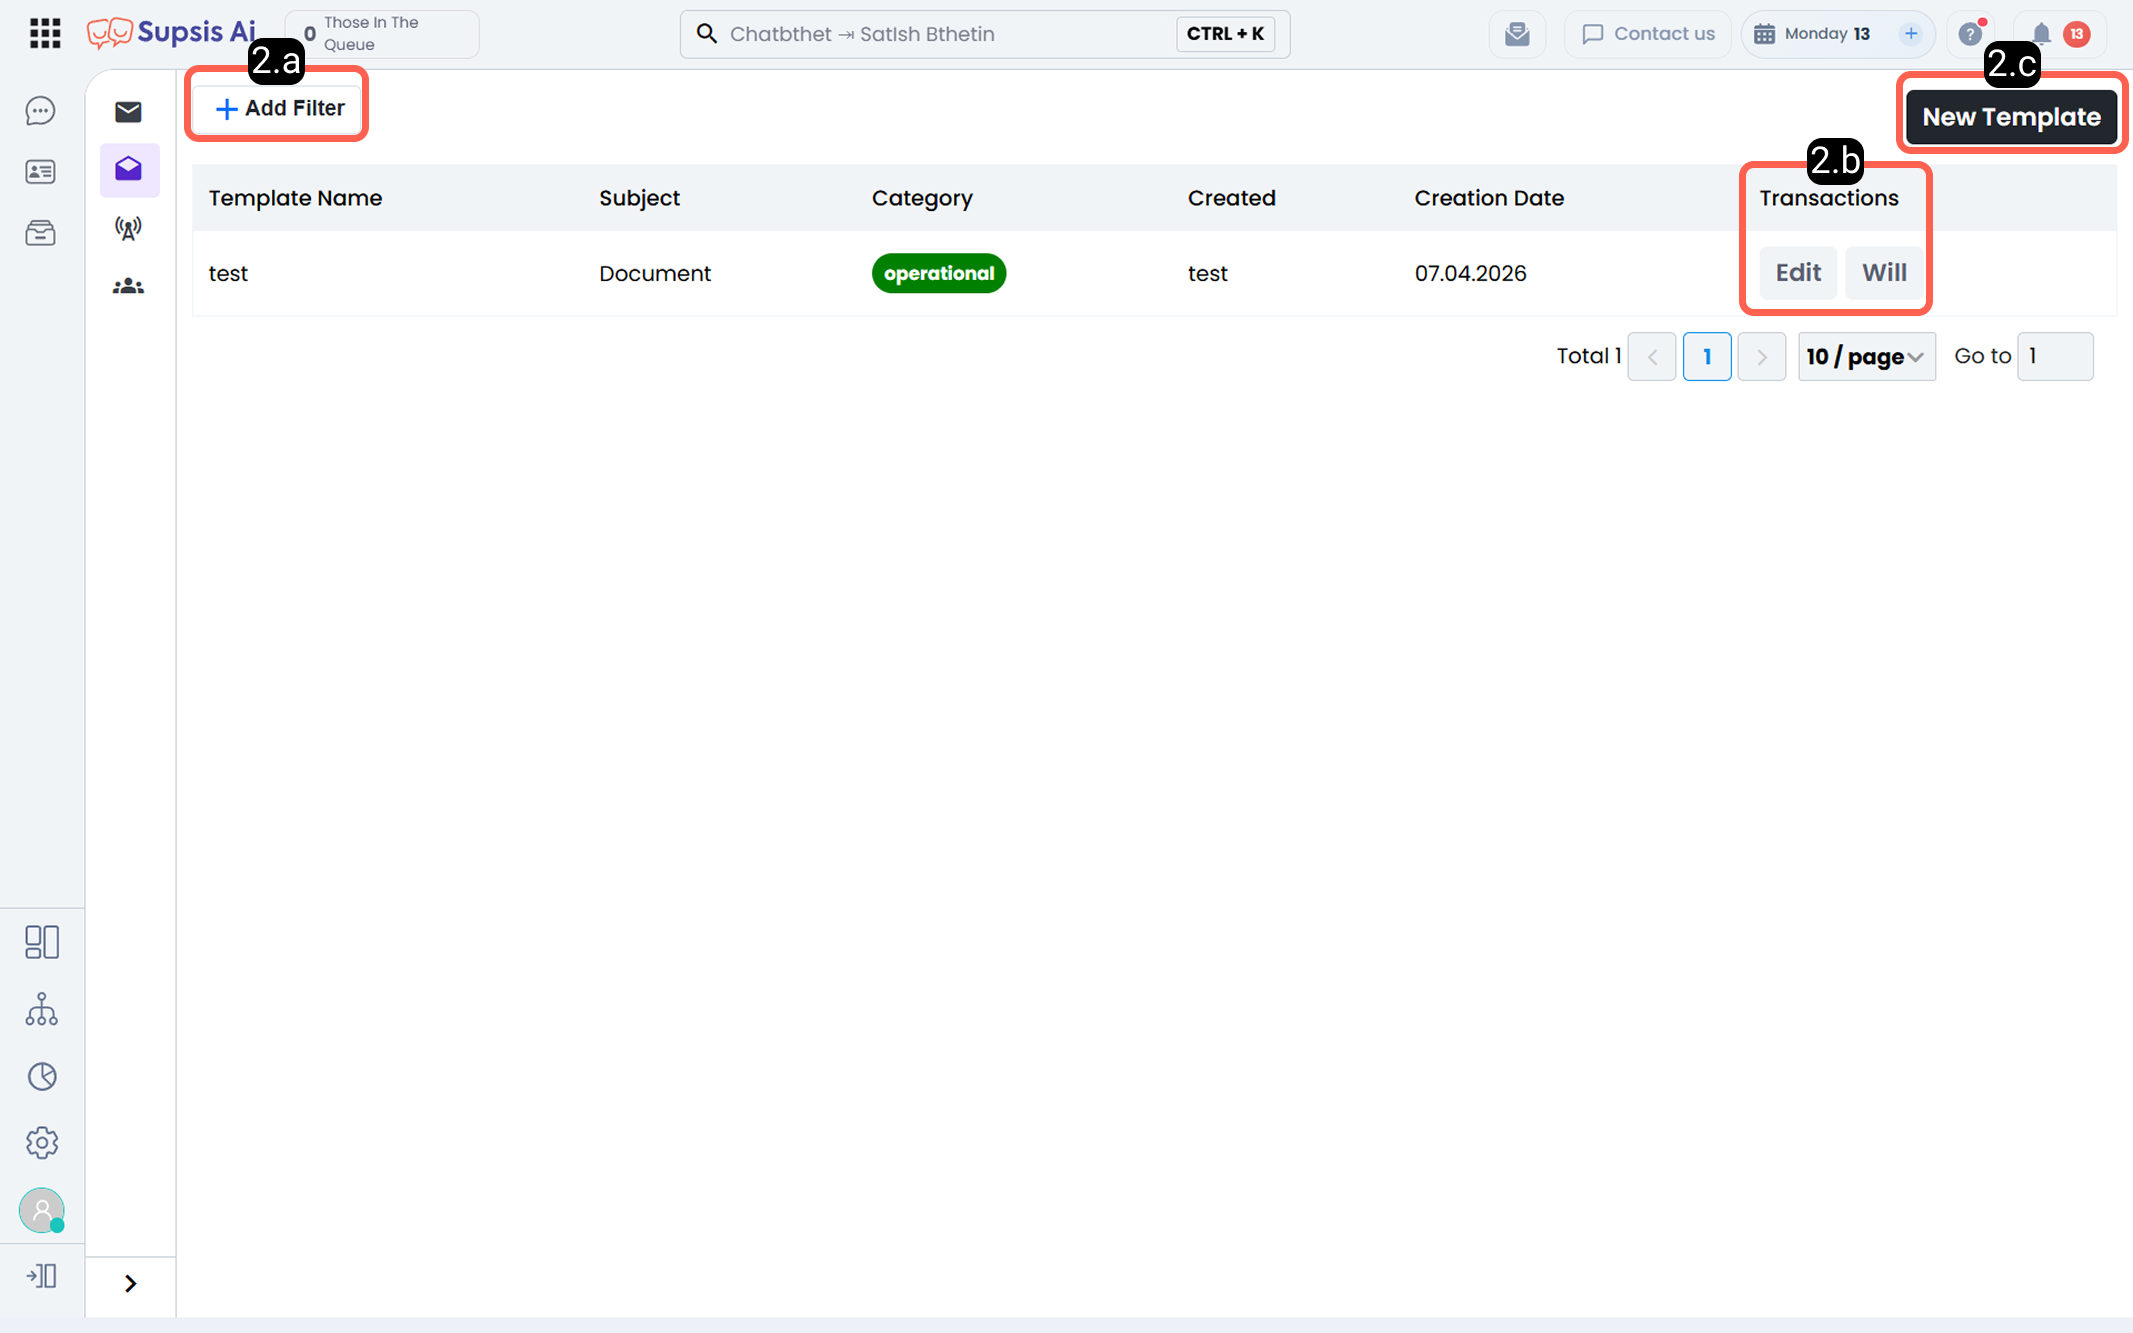
2.a – Filters
This is the detailed filtering section you can use while searching for your existing email designs within the system.
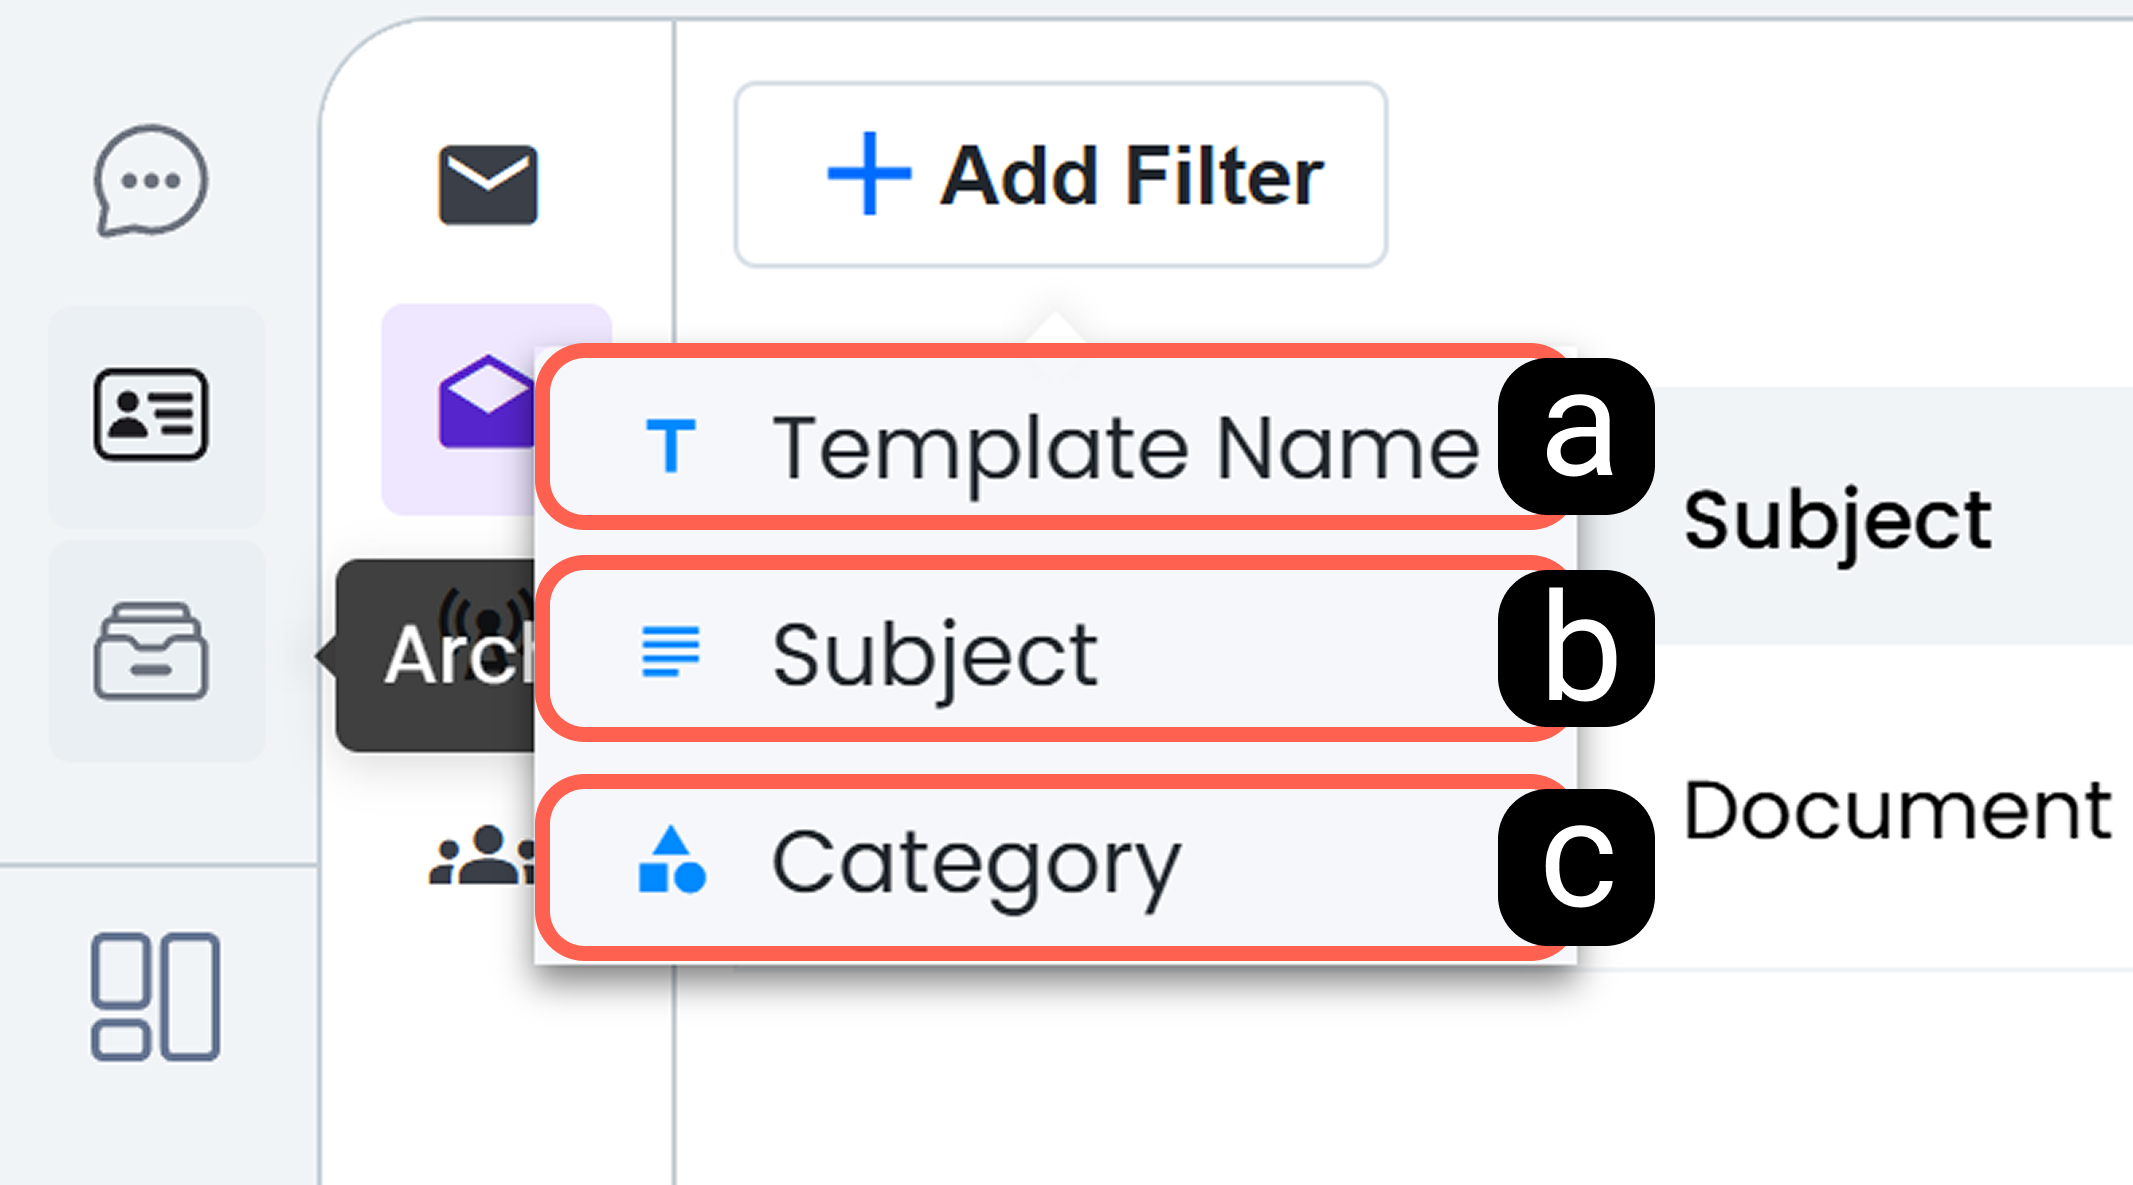
a. Template Name
Provides filtering based on the name of the template you created.
b. Subject
Allows filtering based on the subject field of the templates.
c. Category
Enables filtering according to the category in which the template is located.
2.b – Template Actions
A menu that contains the actions you can perform on your saved template designs.
a. Edit
Opens the content of the template. From this area, you can edit the template either באמצעות code or via drag-and-drop management.
b. Delete
Permanently deletes the template from your panel.
Note: Deleted templates cannot be restored.
2.c – New Template
This is the creation screen used to add a brand-new email design to the system. While starting the design process, you need to complete the basic configurations in this menu step by step.
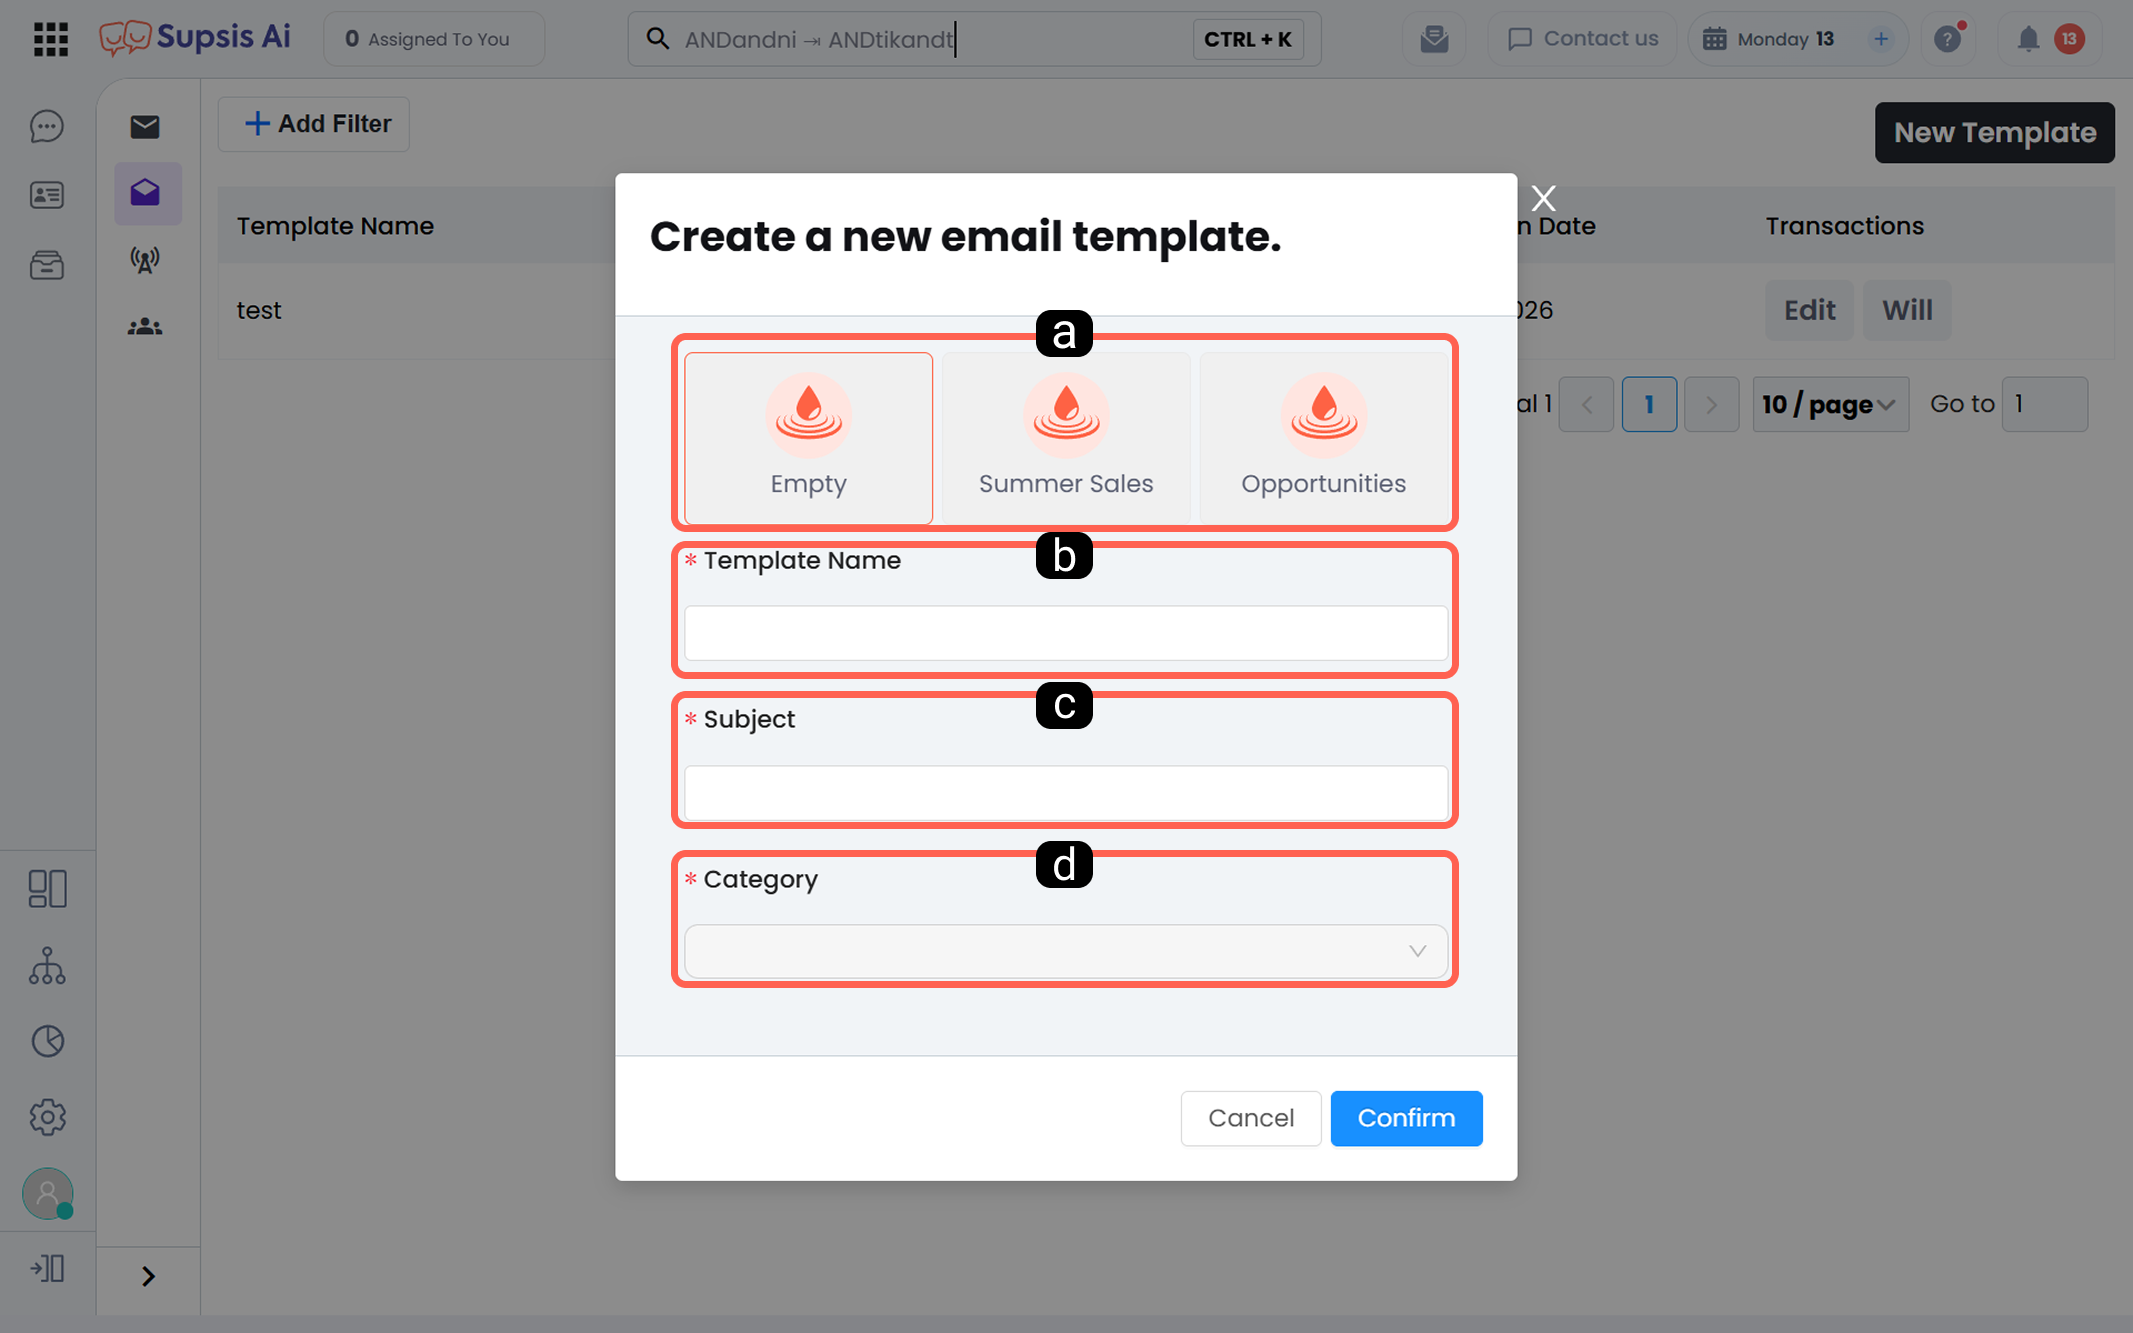
a. Content Template
This is the area where you define the main structure of your new email. Depending on your needs, you can start by selecting one of the ready-made starter designs offered by the system.
Blank: A clean workspace with no visual or text elements, allowing you to build your corporate design completely from scratch.
Summer Discounts: A visually rich and eye-catching ready-made template structure specially designed for seasonal campaigns, discount announcements, and marketing-focused emails.
Deals: A boxed layout template option optimized to highlight special offers, product showcases, or periodic promotions for your customers.
b. Template Name
An internal identifier name you assign so you can easily find your design within the system and distinguish it from other templates.
c. Template Subject
The default and attention-grabbing subject line that will appear on the recipient's side (inbox) when emails are sent using this template.
d. Template Category
A classification field where you assign your design under an operational or campaign-based group to easily find it using the system’s filtering tools.
2.d – Template Content
This is the main workspace where you can manage the visual elements, page layout, and background coding of your email design in detail. This screen includes many professional tools that simplify the design process without requiring coding knowledge.
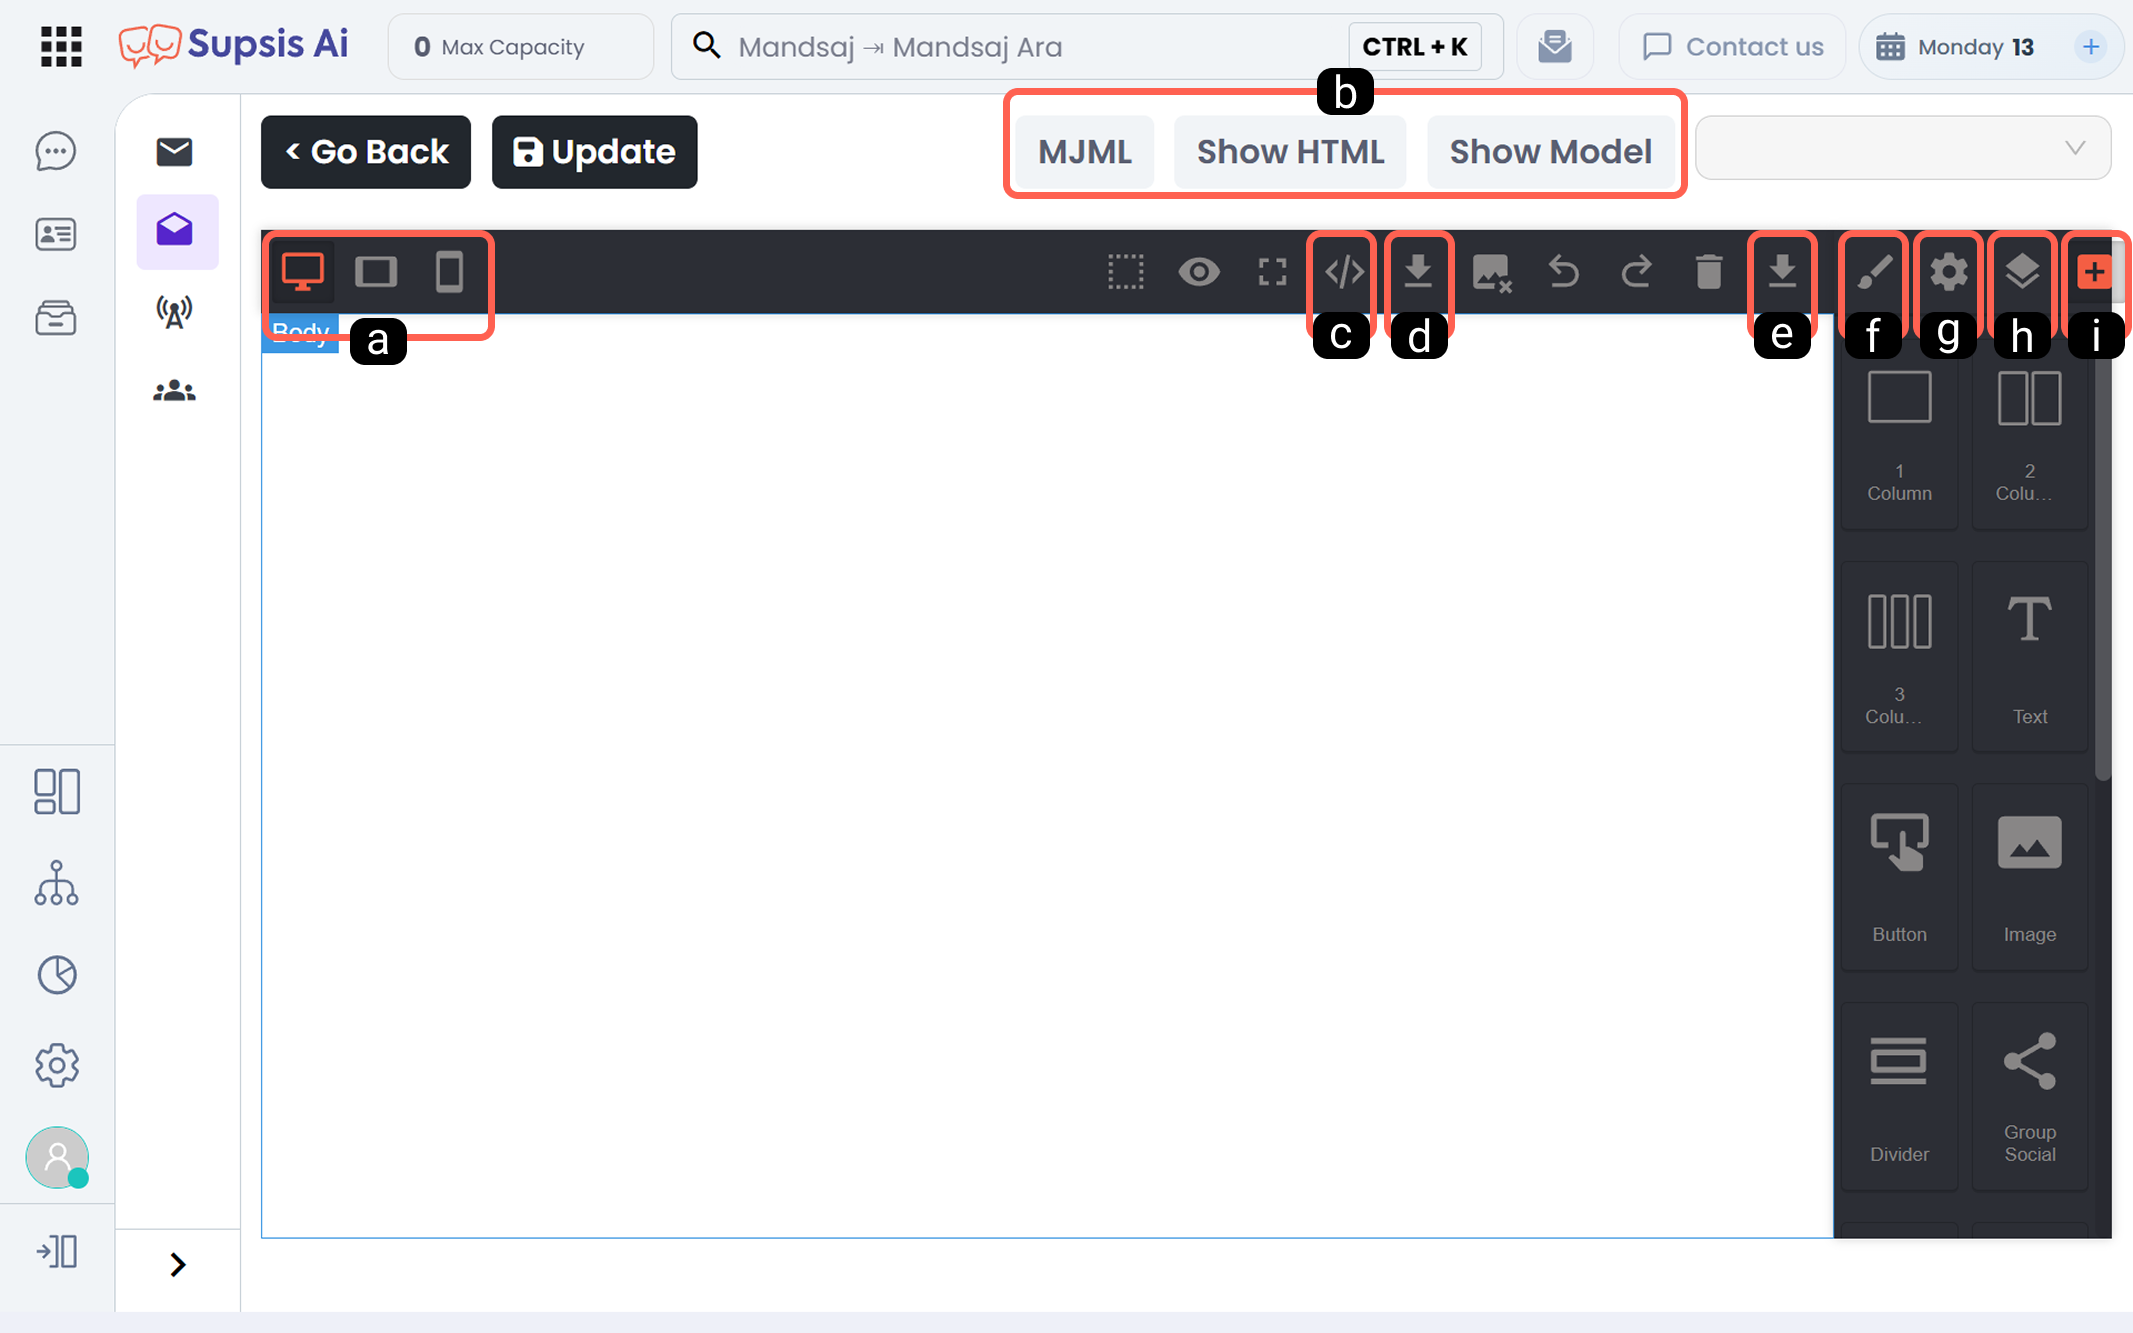
a. Switch Between Device Views
A preview tool that allows you to instantly test how your email design appears on different screen sizes (responsive).
Desktop: The main view where you check how the design looks on wide desktop or laptop screens, including column structures and alignments.
Tablet: A view that allows you to test the layout width and readability of visuals on medium-sized tablet screens.
Mobile: A critical preview area where you examine how content stacks vertically on narrow mobile screens—where emails are most commonly read—without breaking user experience.
b. Template Code Content
A technical inspection section where you can directly access and, if necessary, modify the underlying software architecture of your design.
MJML: The source code screen of the responsive markup language that ensures your email design works smoothly across all email clients (Gmail, Outlook, etc.).
HTML: The area where the pure text-based source code of your design, following web standards, is displayed.
Model (JSON): The code section that reflects the data structure of design elements in a programmable format.
c. Unified Code View
A tool that allows you to view all underlying codes of your email template in a single, integrated editor window instead of separate tabs.
d. Import MJML Template
A button that enables you to import designs created in external systems in ".mjml" format for use in the Supsis AI email template editor.
e. Import HTML Template
An import feature that allows you to upload and use a fully functional HTML file created in external systems (CRM or other mailing platforms) directly in your Supsis panel.
f. Component Style Management
The section where you can adjust the visual appearance of any element (images, buttons, etc.) added to the design area. You can configure background colors, margins/padding, alignments, border radius, and borders with CSS-based styling options.
g. Component Typography Management
The area where you manage typographic settings of text elements in your email. You can control fonts, sizes, weights, line spacing, and text colors directly from this panel.
h. JSON Folders
An advanced data management section that allows you to organize template data structures and element hierarchy (which element belongs to which block) in a folder-like structure.
i. Drag & Drop Contents
A rich toolbox containing all the building blocks needed to design your email. You can easily create your template by dragging and dropping elements such as text blocks, images, buttons, social media icons, dividers, and multi-column layouts onto the design canvas.
2.e – Unsubscribe and Email Preference Management
To prevent sent emails from being marked as spam by recipients, protect domain reputation with email providers, and comply with email marketing standards (GDPR/KVKK), every email template should include a functional "Unsubscribe" link in the footer section.
-
a. Automatic Unsubscribe Link:
In the template editor, you can add the{{unsubscribe_url}}parameter or the ready-made "Unsubscribe" component to the footer of your email. This link is generated dynamically and uniquely for each recipient. -
b. Email Preference Management:
When users click the unsubscribe link in the email, they are directed to a secure preference page where they can easily manage their email notification preferences (opt out of specific categories or cancel all email subscriptions). -
c. Spam Prevention and Deliverability:
Including a working unsubscribe link at the bottom of your emails increases sender reputation with major email providers (Gmail, Outlook, etc.) and prevents your messages from going straight to the spam folder or continuing unwanted delivery loops.
2.f – User-Friendly Attribute (Dynamic Parameter) Insertion
A user-friendly Attribute (Parameter) Selector has been added to the email template editor.
Instead of manually typing code for dynamic parameters such as customer name, order number, or unsubscribe URL into text blocks, you can select them with a single click from the Add Attribute menu in the editor. The selected dynamic parameter is automatically inserted into the text at the exact position of your cursor in a clean format.