
Instagram V2 Integration
Instagram V2, developed to manage Instagram activities within the Supsis AI platform, allows you to quickly connect directly using your Instagram login credentials without needing a Facebook account. In this guide, you will find the steps to switch your account to professional status and connect it to the Supsis AI panel.
| No | Menu |
|---|---|
| 1 | Integration Process |
| 2 | Instagram Channel Content |
1-) Integration Process
In order for your Instagram account to be managed via Meta and integrated through Supsis AI, it is mandatory to switch the account to one of the Professional Account types (Business or Creator).
1.a – Converting Instagram Account to Professional Account
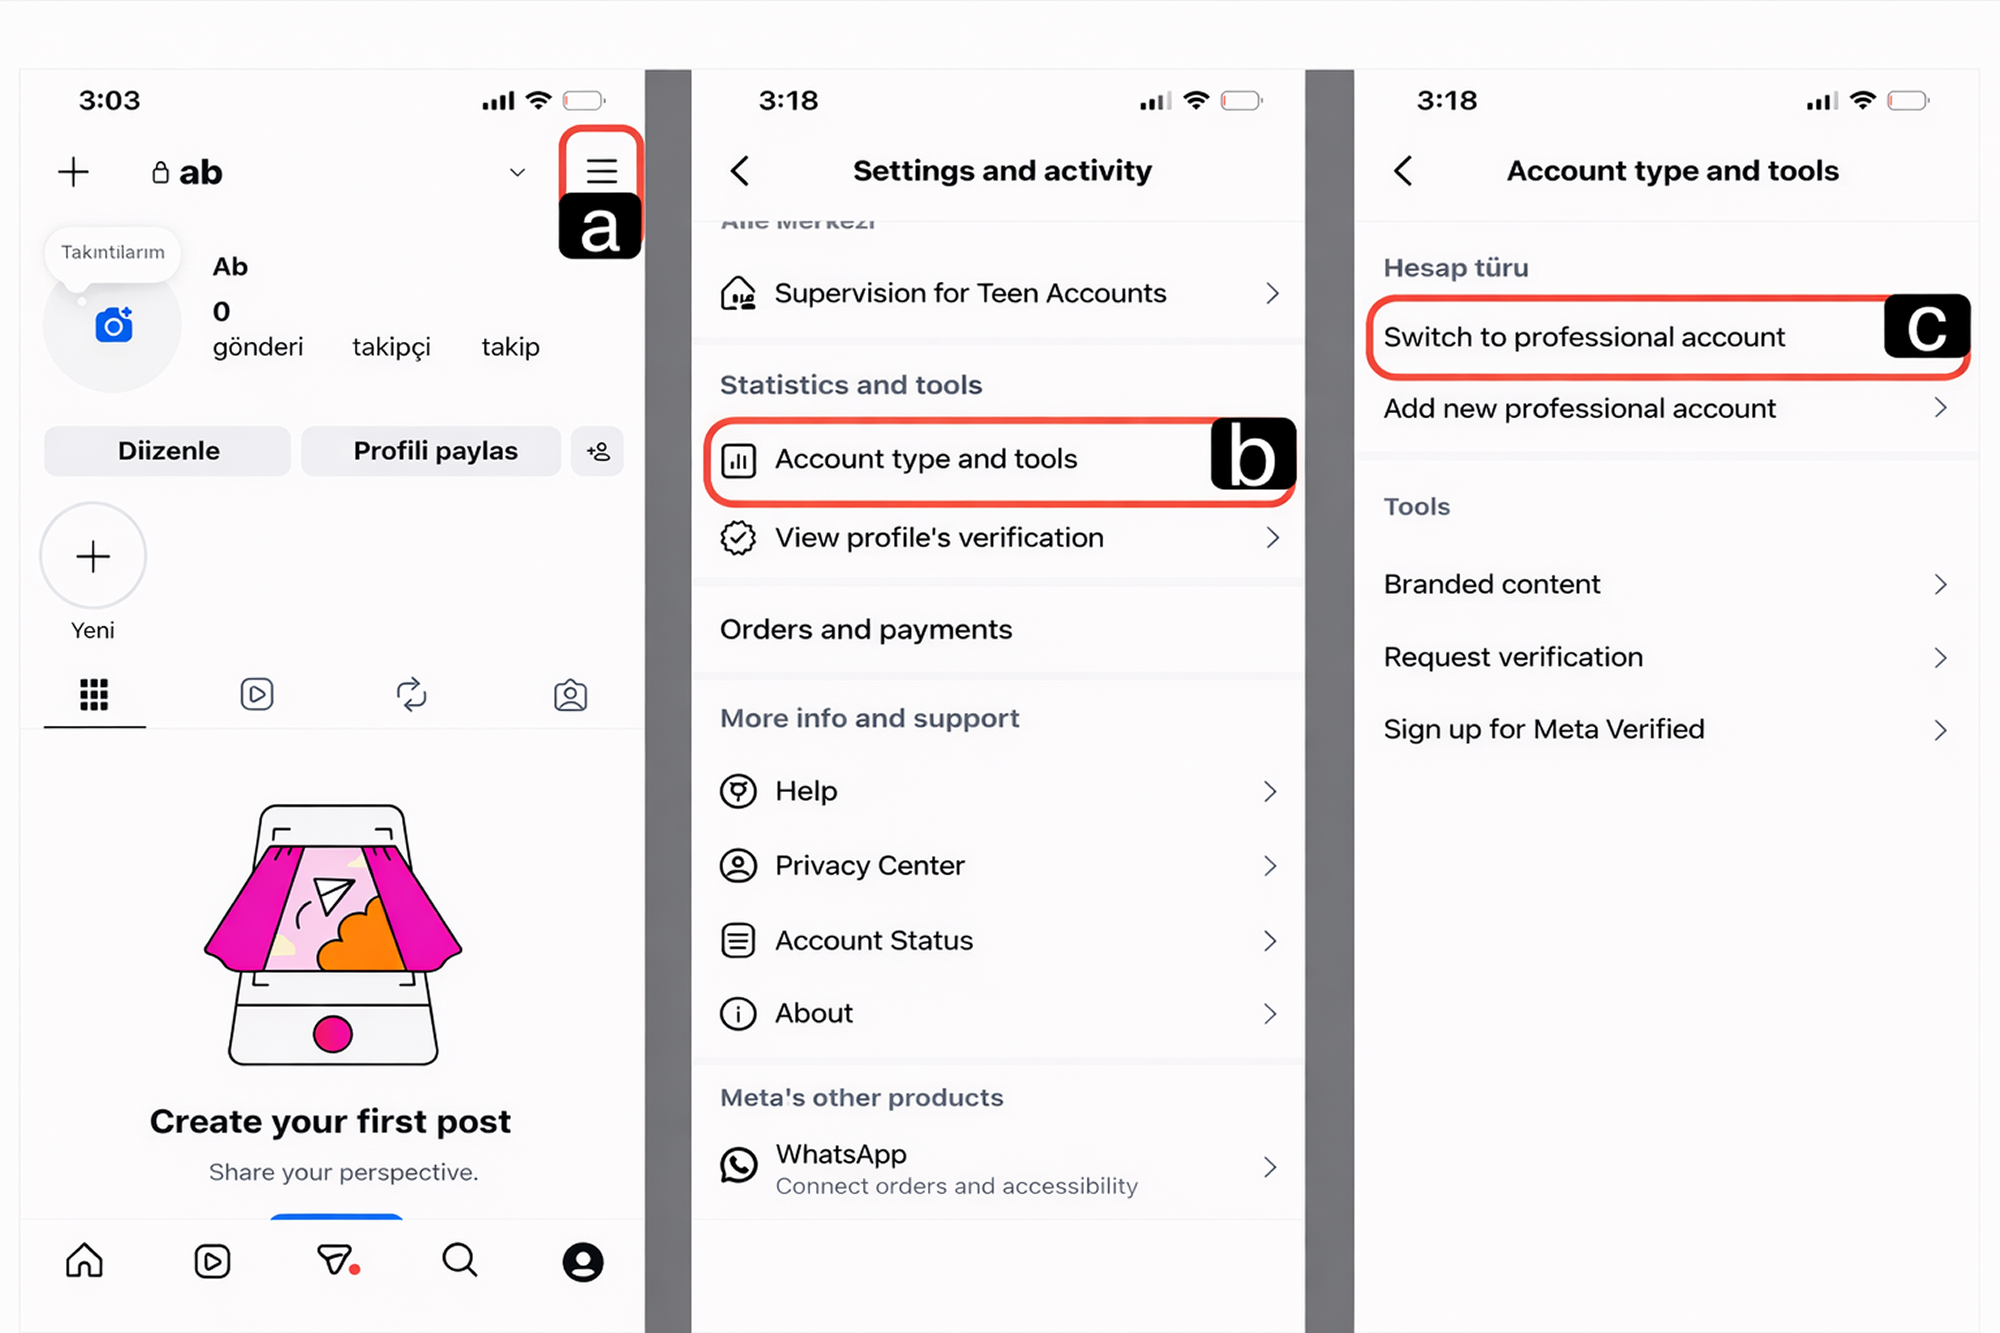
-
a – Settings
Open your profile in the Instagram mobile application. Tap the menu (hamburger) icon in the top right corner and go to the "Settings and activity" section. -
b – Account Type and Tools
Find and enter the "Account type and tools" option in the menu. This section is used to set up professional management tools. -
c – Switch to Professional Account
Tap the "Switch to professional account" option. Follow the steps directed by Instagram, choose the category most suitable for your business (Business, Creator, etc.), and complete the setup.
1.b – Completing the Integration
After your account has been switched to professional status, follow these steps in the Supsis AI panel to complete the integration:
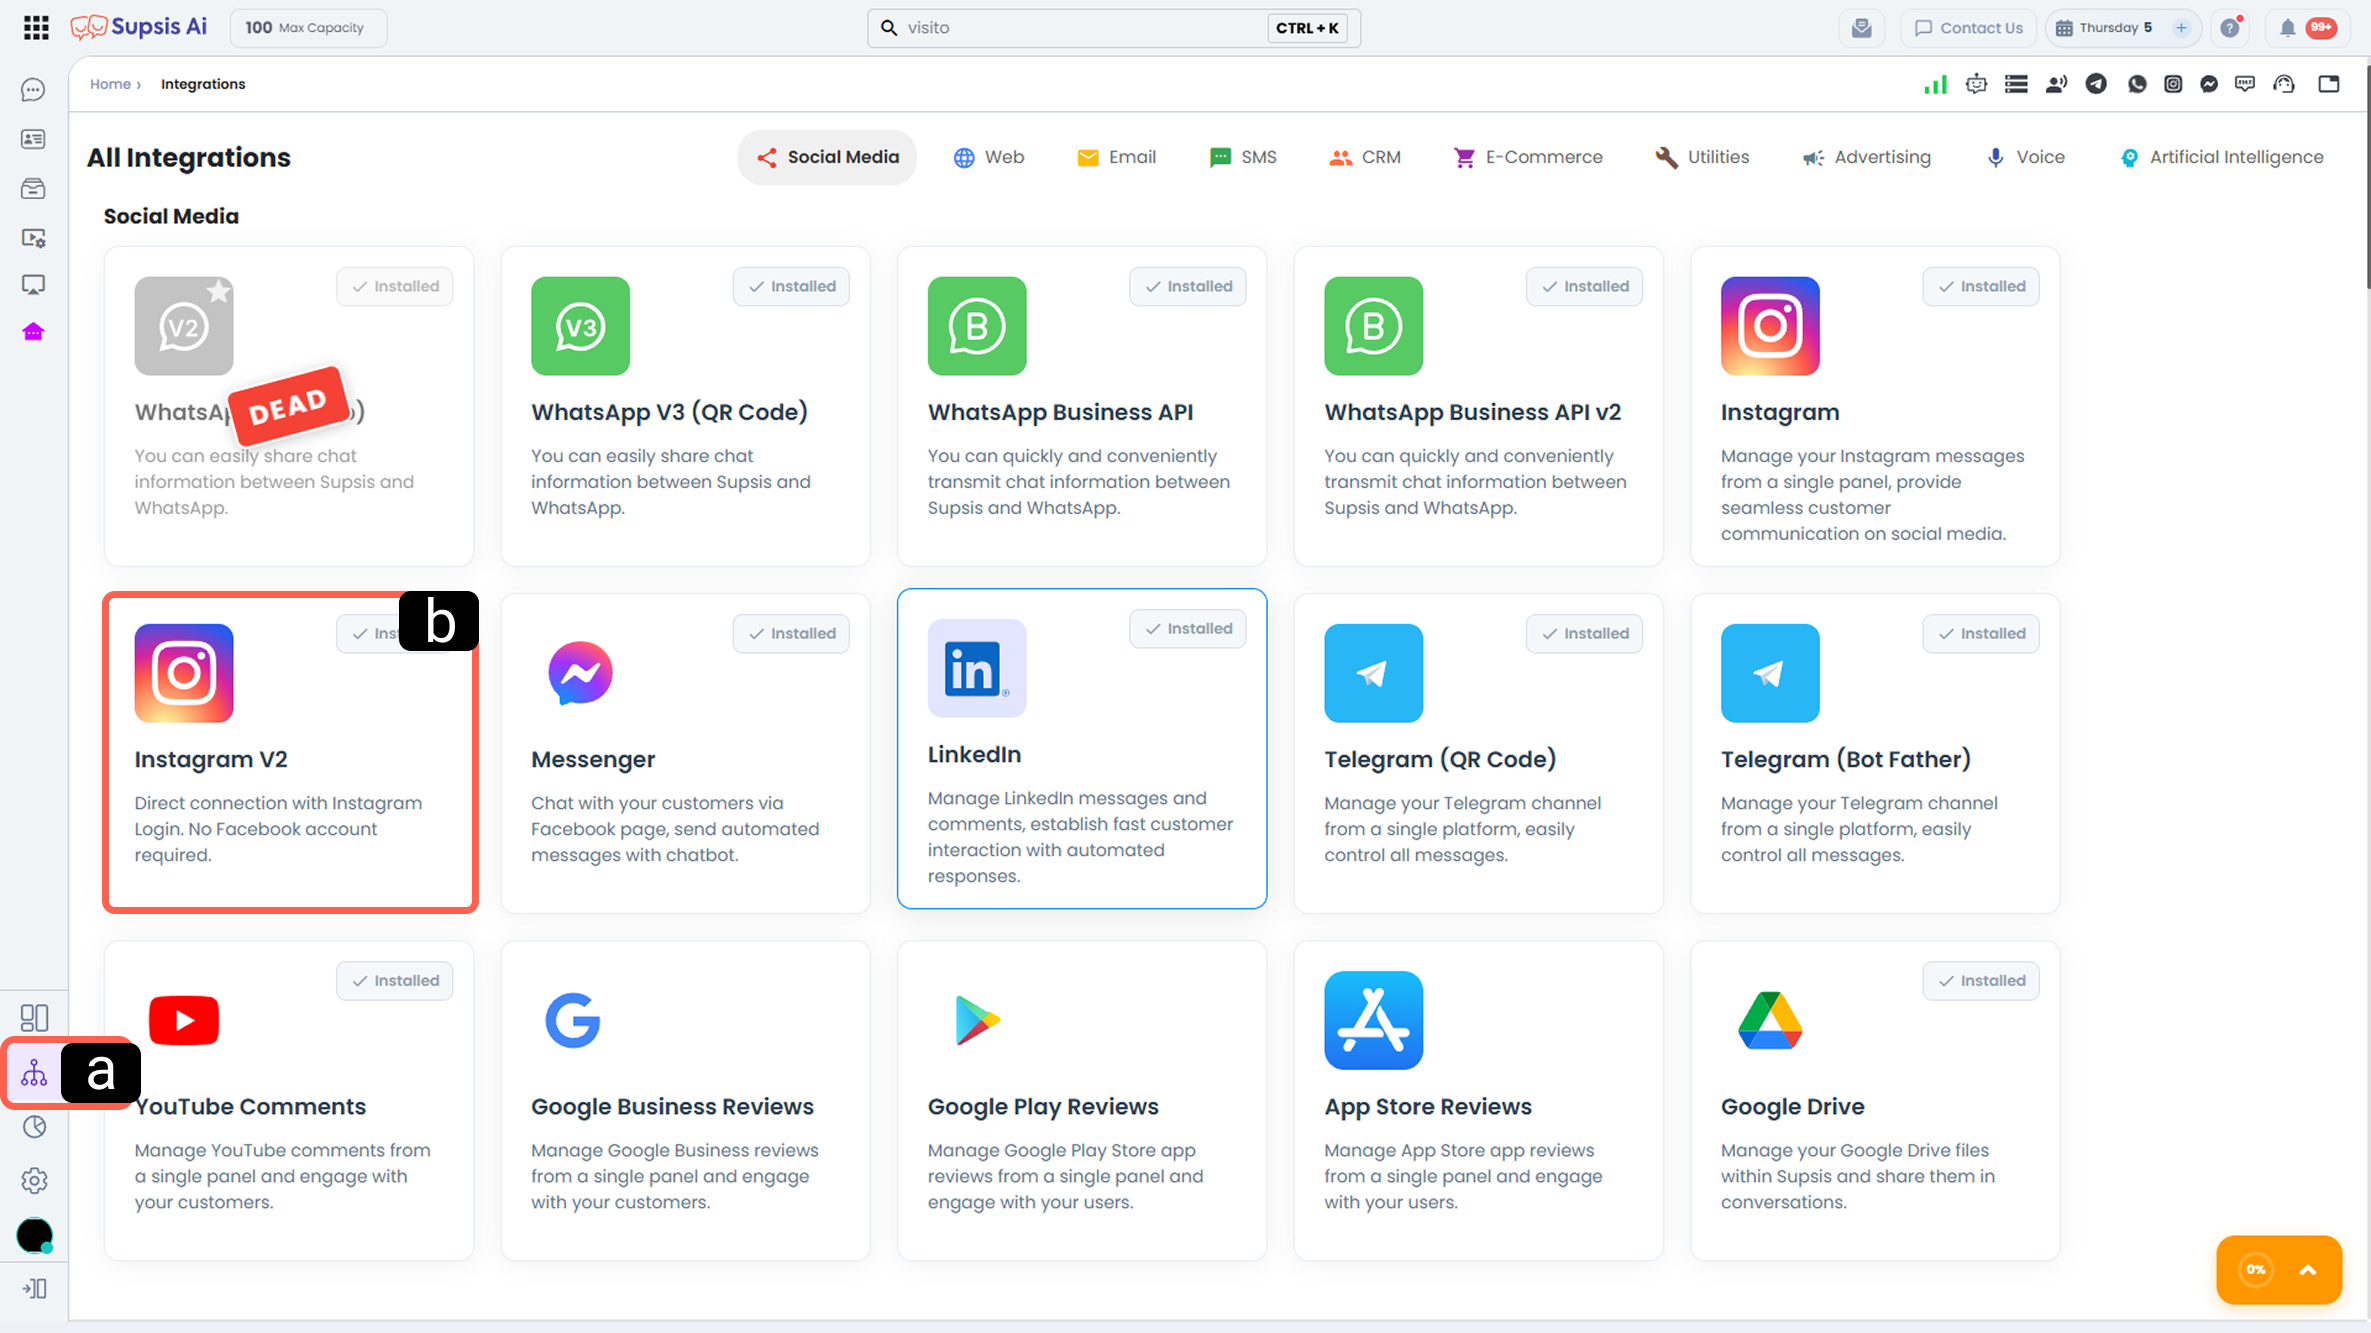
-
a – Integrations
Click the Integrations icon located in the left menu of your Supsis AI panel to access the menu. -
b – Instagram V2
Find the Instagram V2 card in the list of social media channels and enter it.
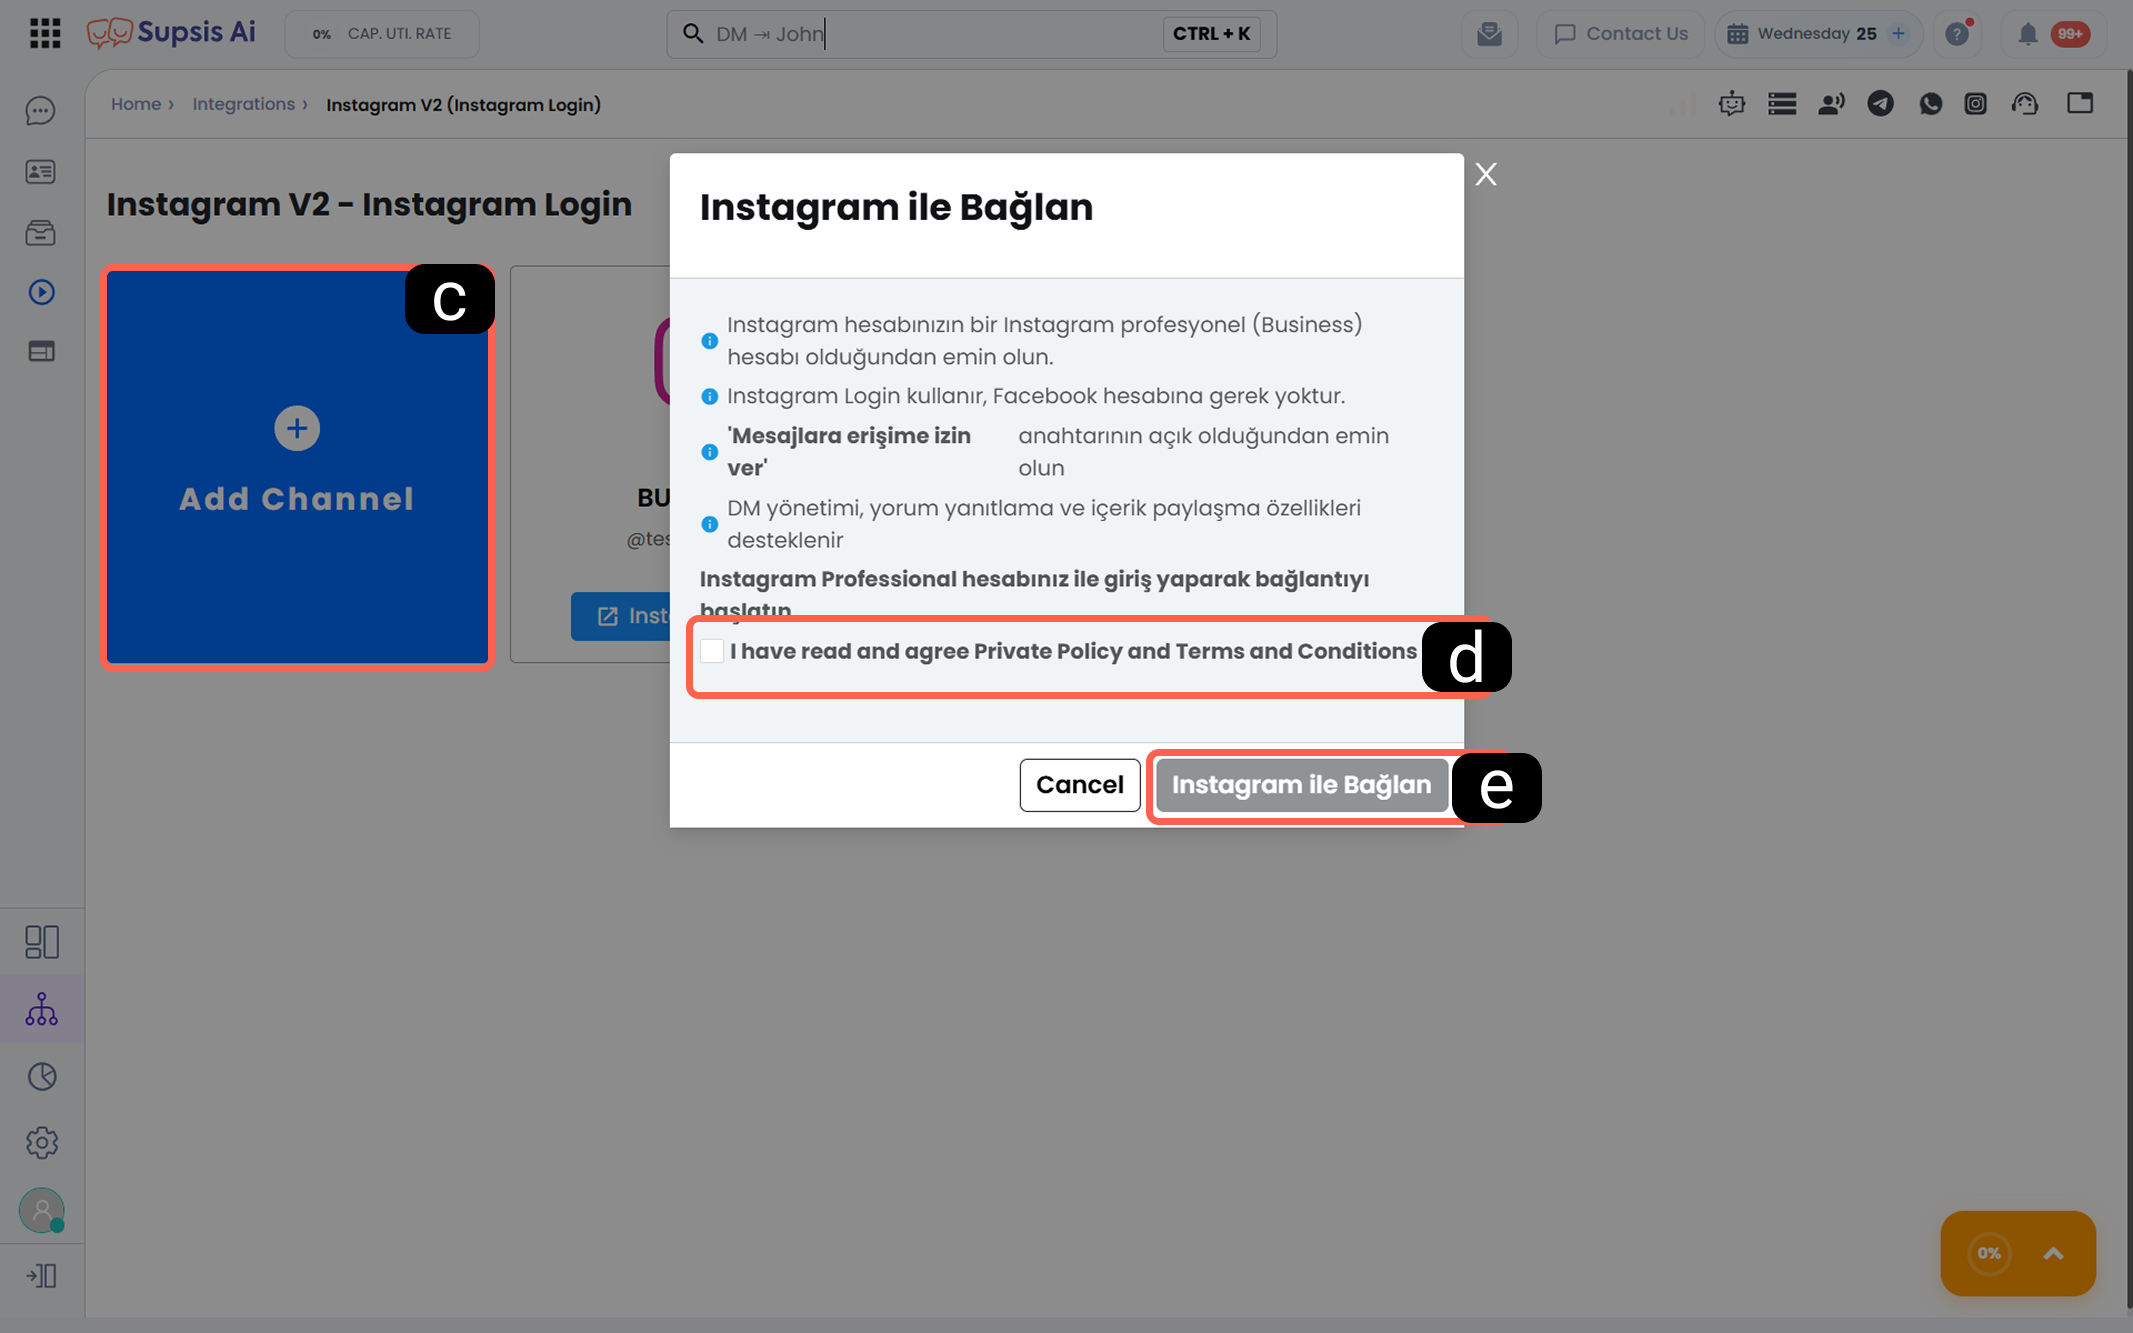
-
c – Add Channel
Click the Add Channel button (blue area with plus icon) on the Instagram integration screen. This action will redirect you to the Instagram authorization window to securely connect your account. -
d – Terms and Conditions
In the pop-up window, check the box that says "I have read and accept the Privacy Policy and Terms and Conditions." This confirmation represents the legal permission required for the system to access and manage your messages. -
e – Connect to Instagram
Finally, click the Connect to Instagram button. This will redirect you to the Instagram interface where you must log in and grant authorization.
1.c – Instagram Login and Permissions
This stage allows Supsis AI to gain management authority over your Instagram account and transfer messaging traffic to the panel. For a smooth connection, it is mandatory to grant the necessary approvals through the Meta infrastructure.
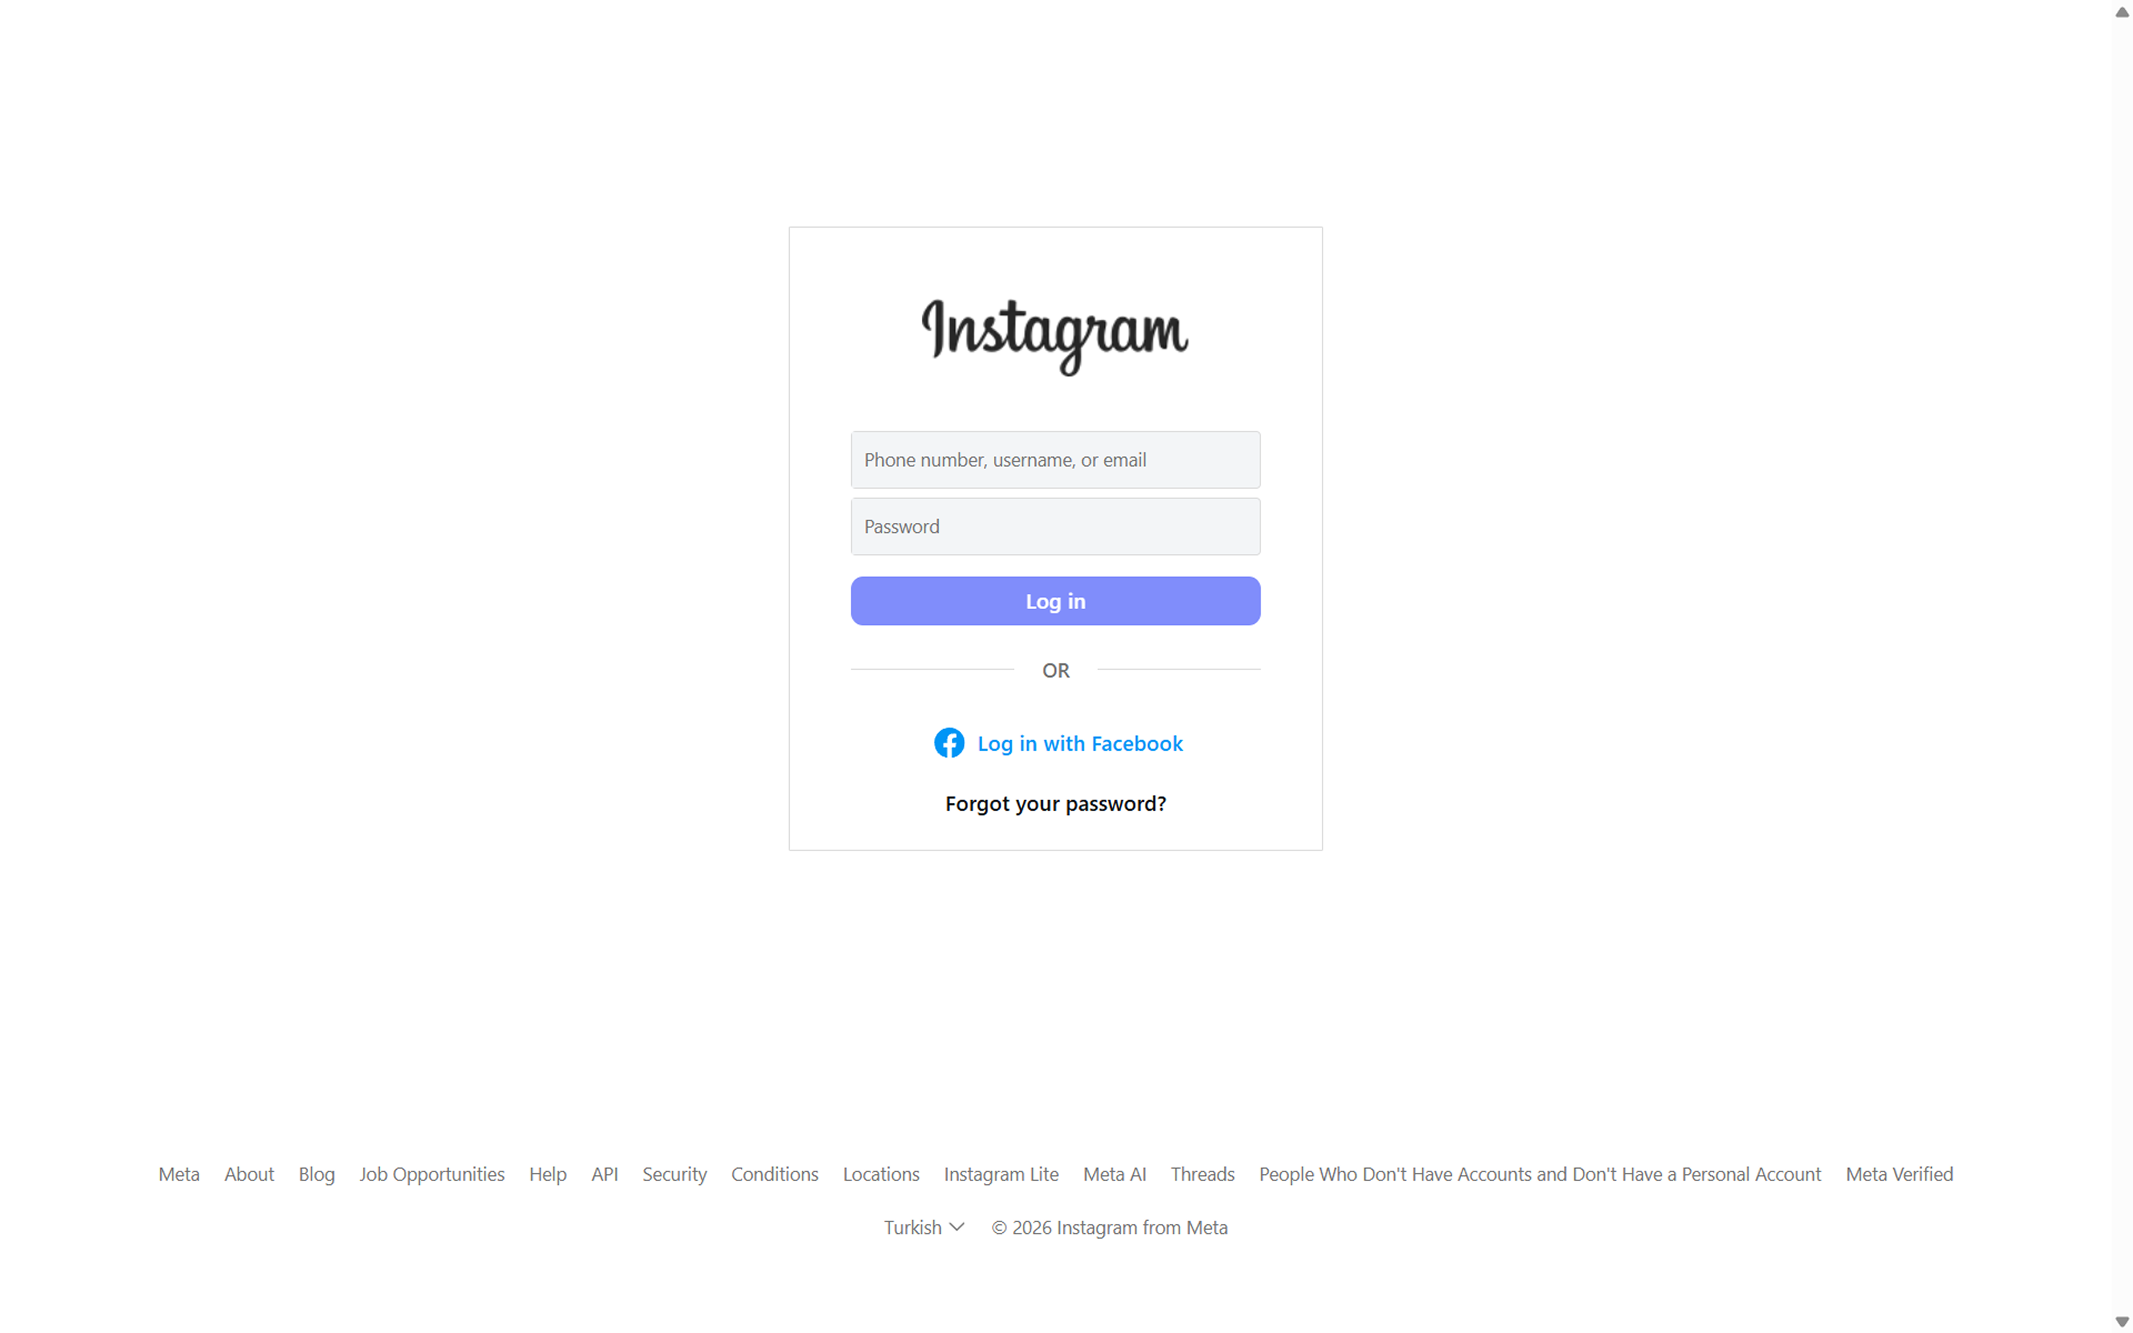
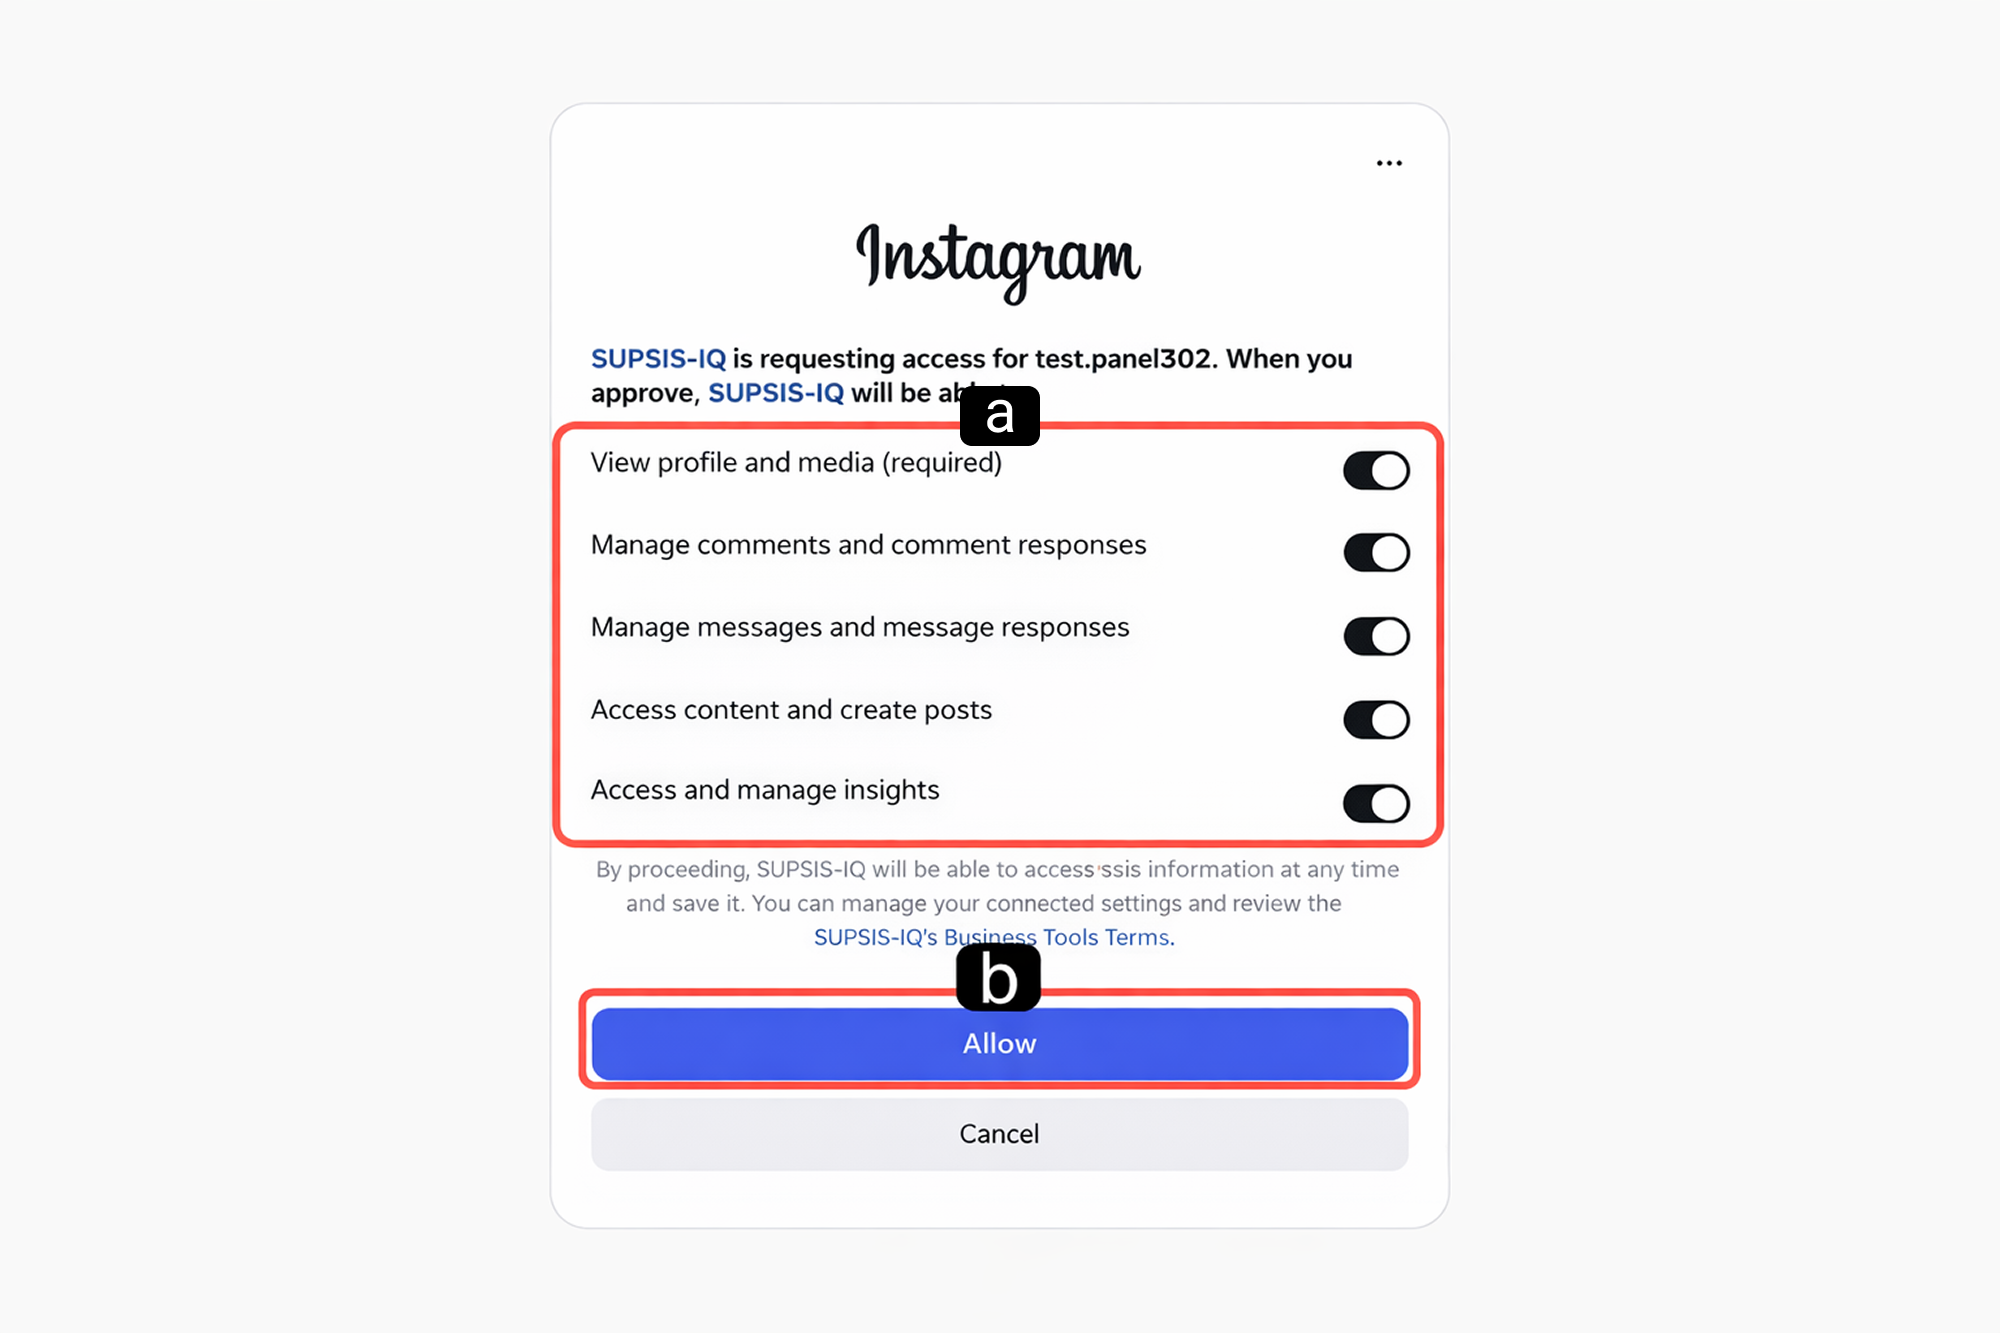
-
a – Permissions
After logging in, a permission management menu opens, defining which data Supsis AI can access.
This menu includes mandatory authorizations such as profile viewing, comment management, message access, and analytics tracking. The scope of permissions may vary in the background according to Instagram’s current API policies; therefore, to ensure smooth integration, all options provided by Instagram must be enabled. -
b – Permission Approval
After reviewing and setting the required permissions using the toggles, click the blue Allow button at the bottom of the screen to complete the authorization process.
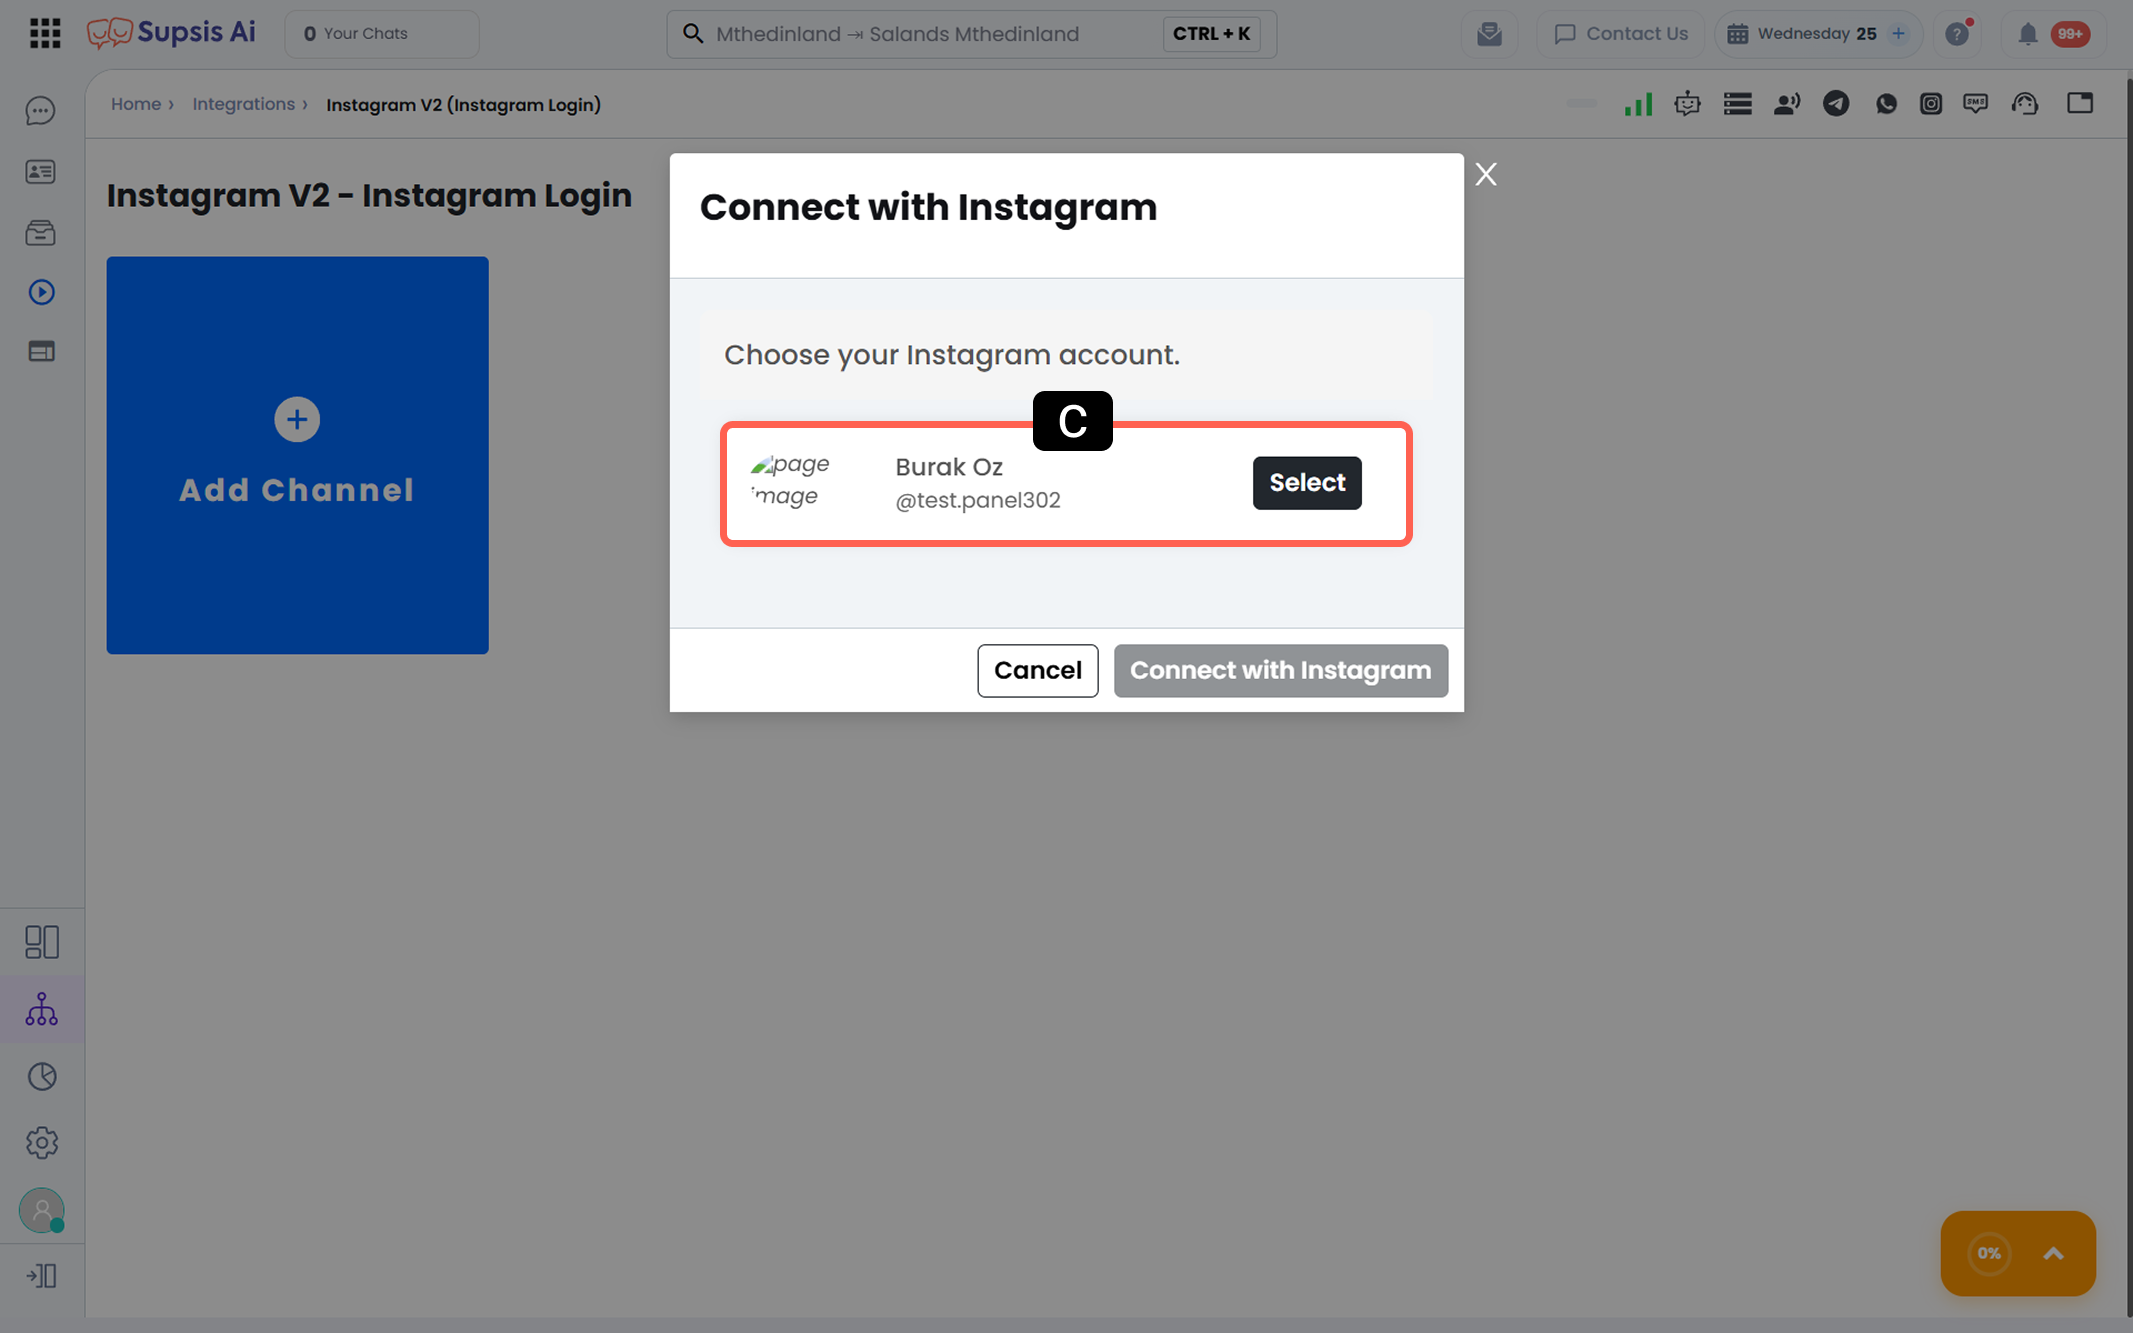
- c – Instagram Account Selection
After authorization approval, Supsis AI redirects you back to the panel interface and lists the available accounts that can be connected. All professional Instagram accounts linked to the Meta account you logged in with will appear in this window. Click the Select button next to the account you want to integrate to complete the process.
Note: If no account appears in the list, recheck whether your Instagram account is in "Professional Account" status and correctly associated with the Meta account you logged in with.
2-) Channel Details
You can view and edit the operational features and settings of your integrated Instagram channel within the Supsis AI panel from this section.
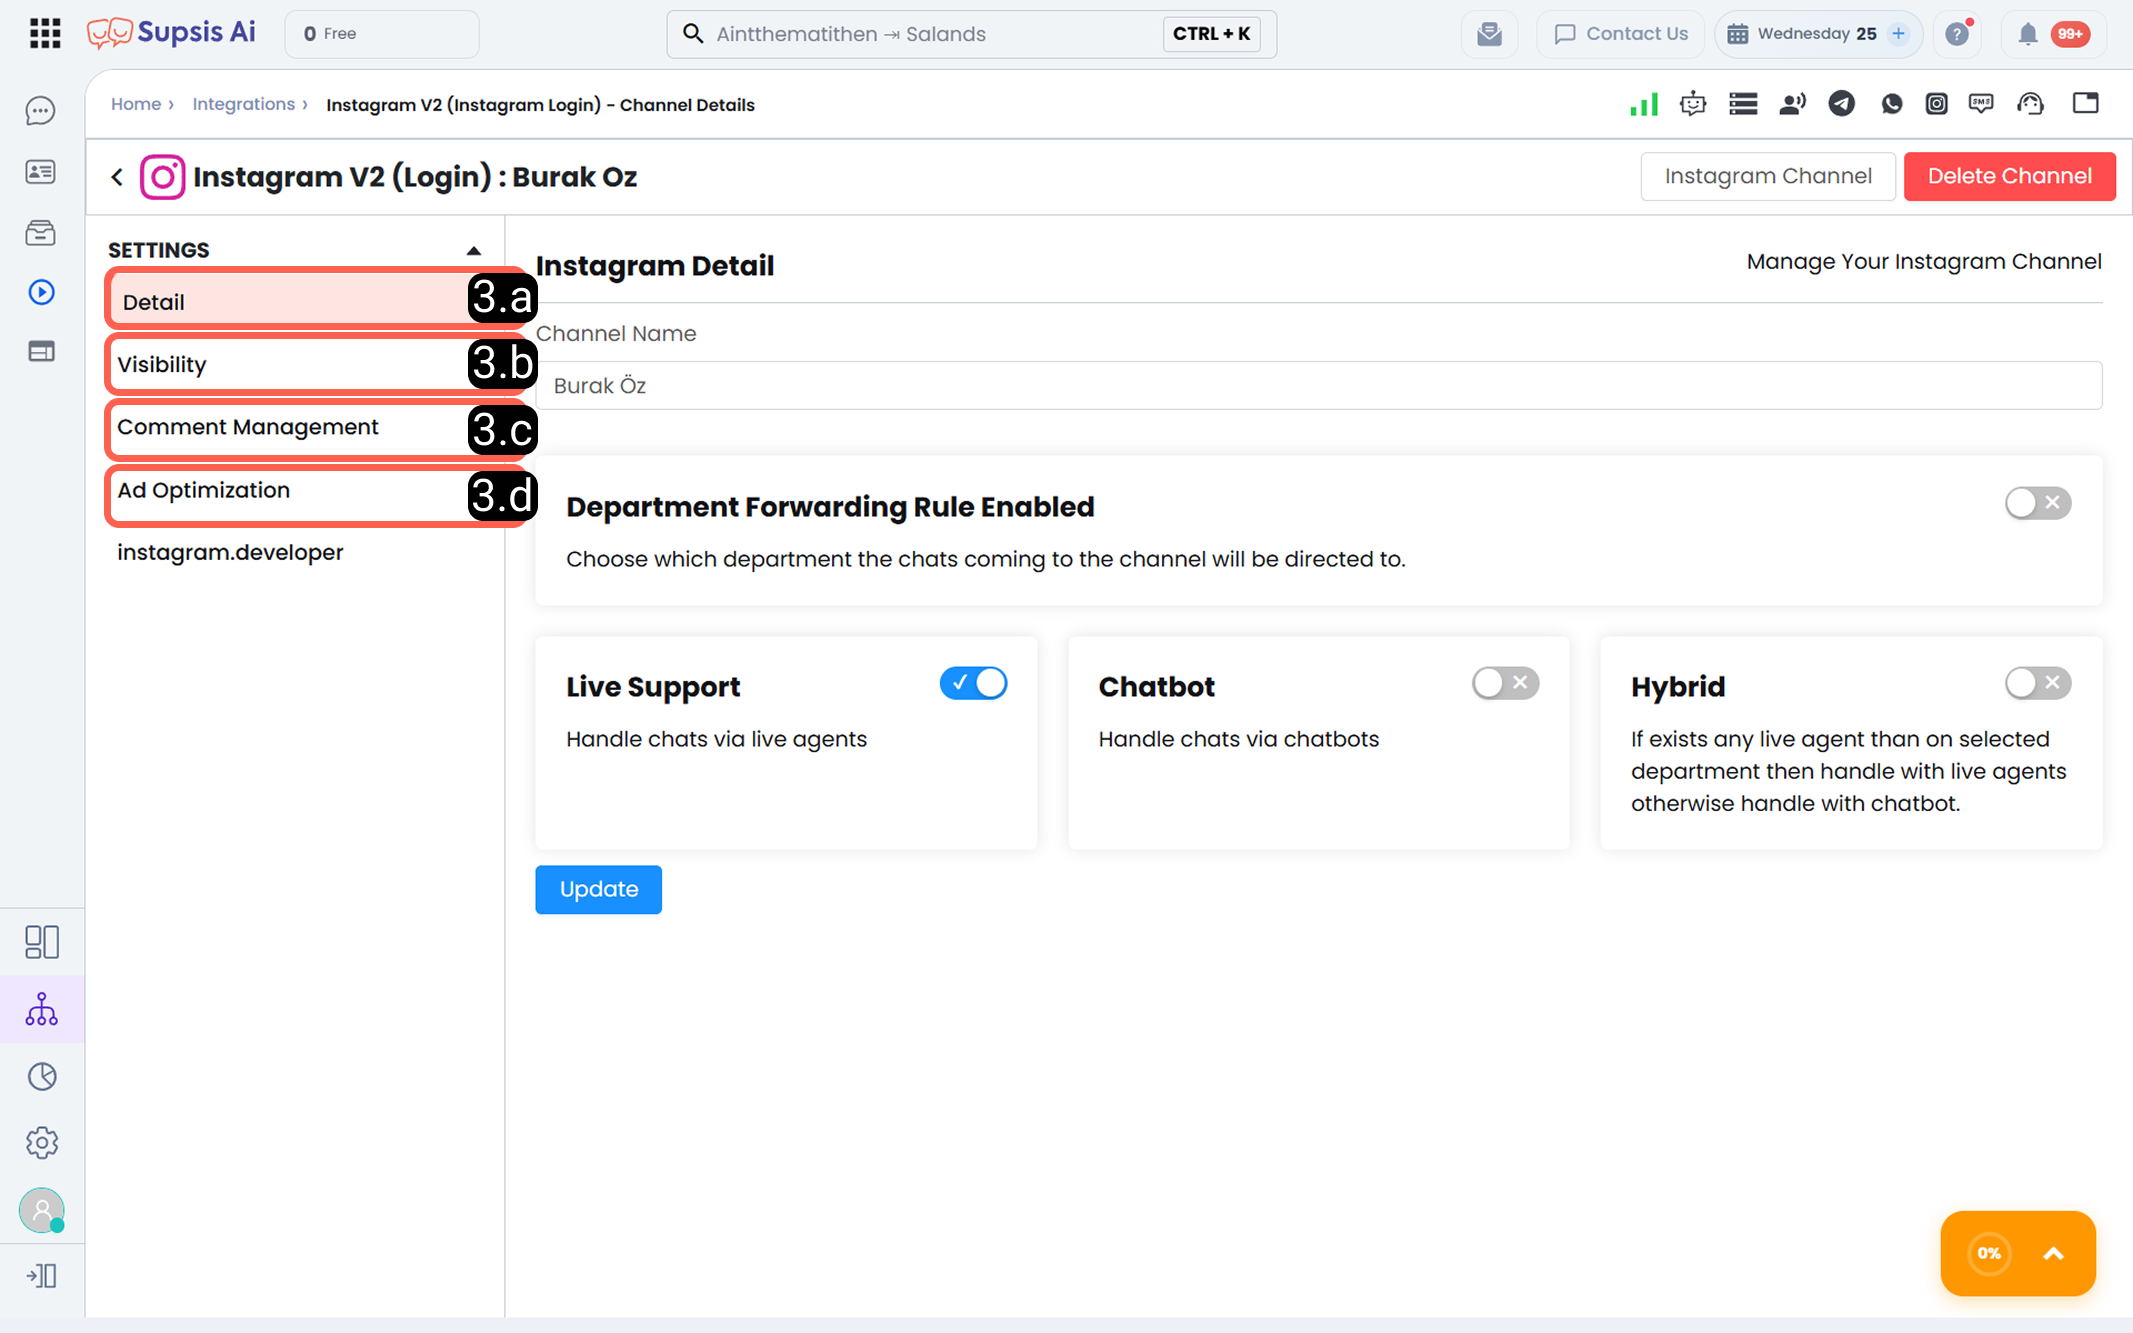
2.a – Details
Details is the management area where you configure which team/flow will handle incoming conversations and how assignment behavior will function.
-
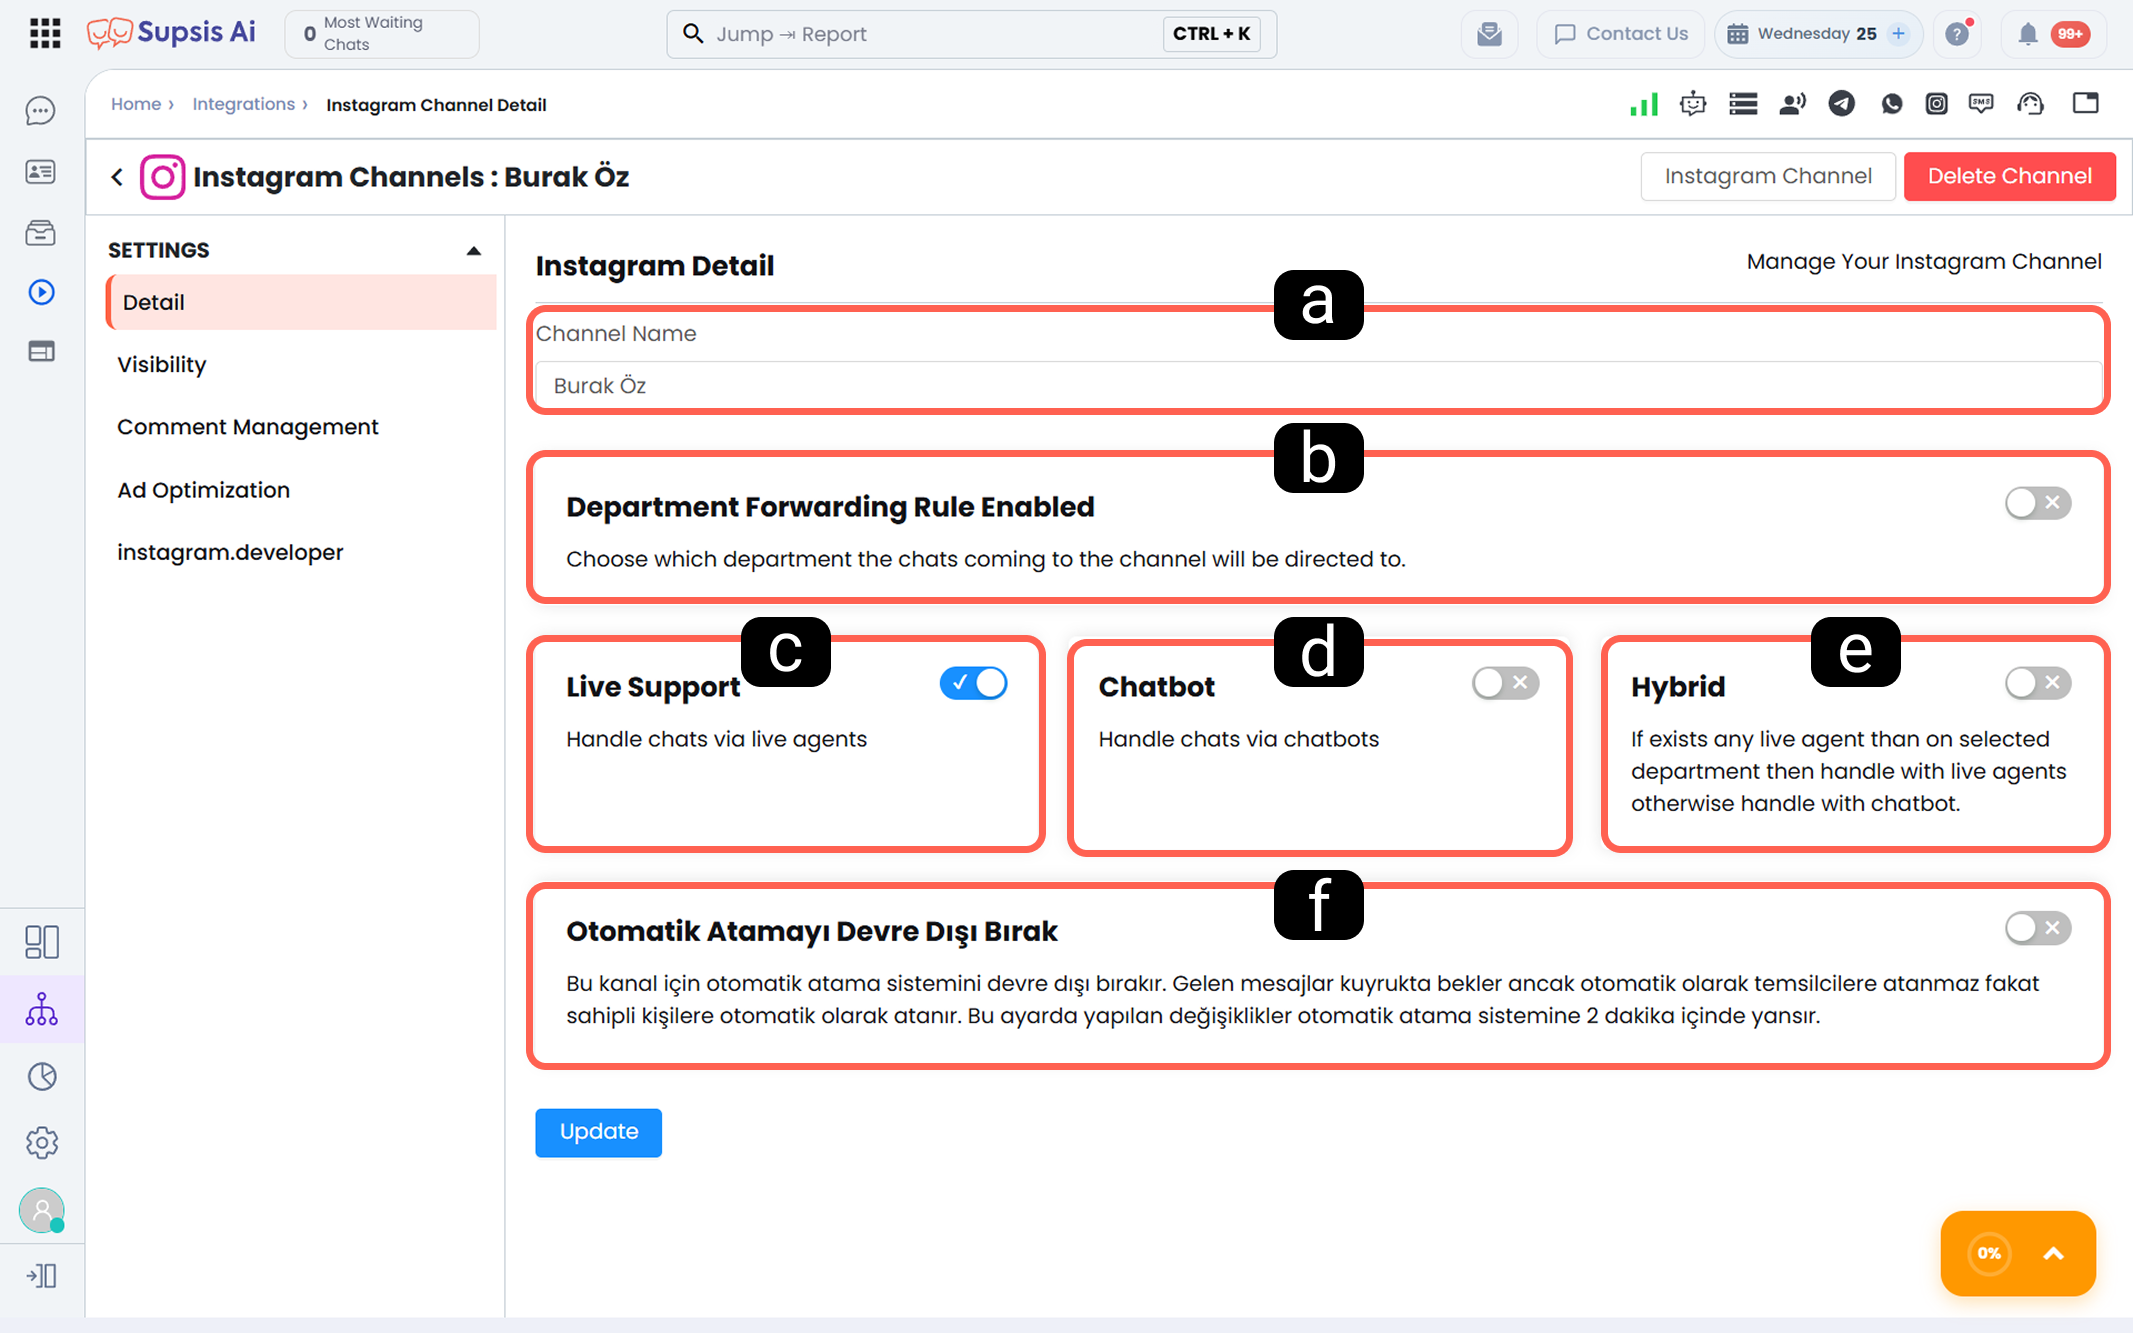
a – Channel Name
Channel Name allows you to define the name under which your Instagram account will appear in the Supsis AI panel. This name represents how the Instagram account is displayed in the panel; customers cannot see this name. -
b – Department Routing Rule Active
When this toggle is enabled, conversations coming from the Instagram channel are automatically routed to departments separately. Requests are handled by the relevant team.
This rule works together with other routing rules within Supsis AI.
Example: When the chatbot is active, conversations exiting chatbot records may be transferred to the relevant department according to the defined routing rule.
Note: If there is no available user in the selected department to receive chats when a conversation arrives, the chat waits in the queue until an eligible user from the selected department becomes online.
-
c – Live Support
When this mode is active, all incoming messages to the channel are directed to agents via live support assignments. If automatic assignment is active, assignments are made to active agents according to the chat assignment algorithm. If automatic assignment is not used, chats remain in the queue for agents to manually claim. -
d – Chatbot
When this mode is active, the chatbot handles conversations coming to the Instagram channel. Communication proceeds according to the chatbot scenario flow selected from the dropdown menu.
Note: After selecting the scenario, enter the relevant chatbot scenario and publish it to activate it.
- e – Hybrid
In Hybrid mode, routing works conditionally between the selected Department and the Chatbot.
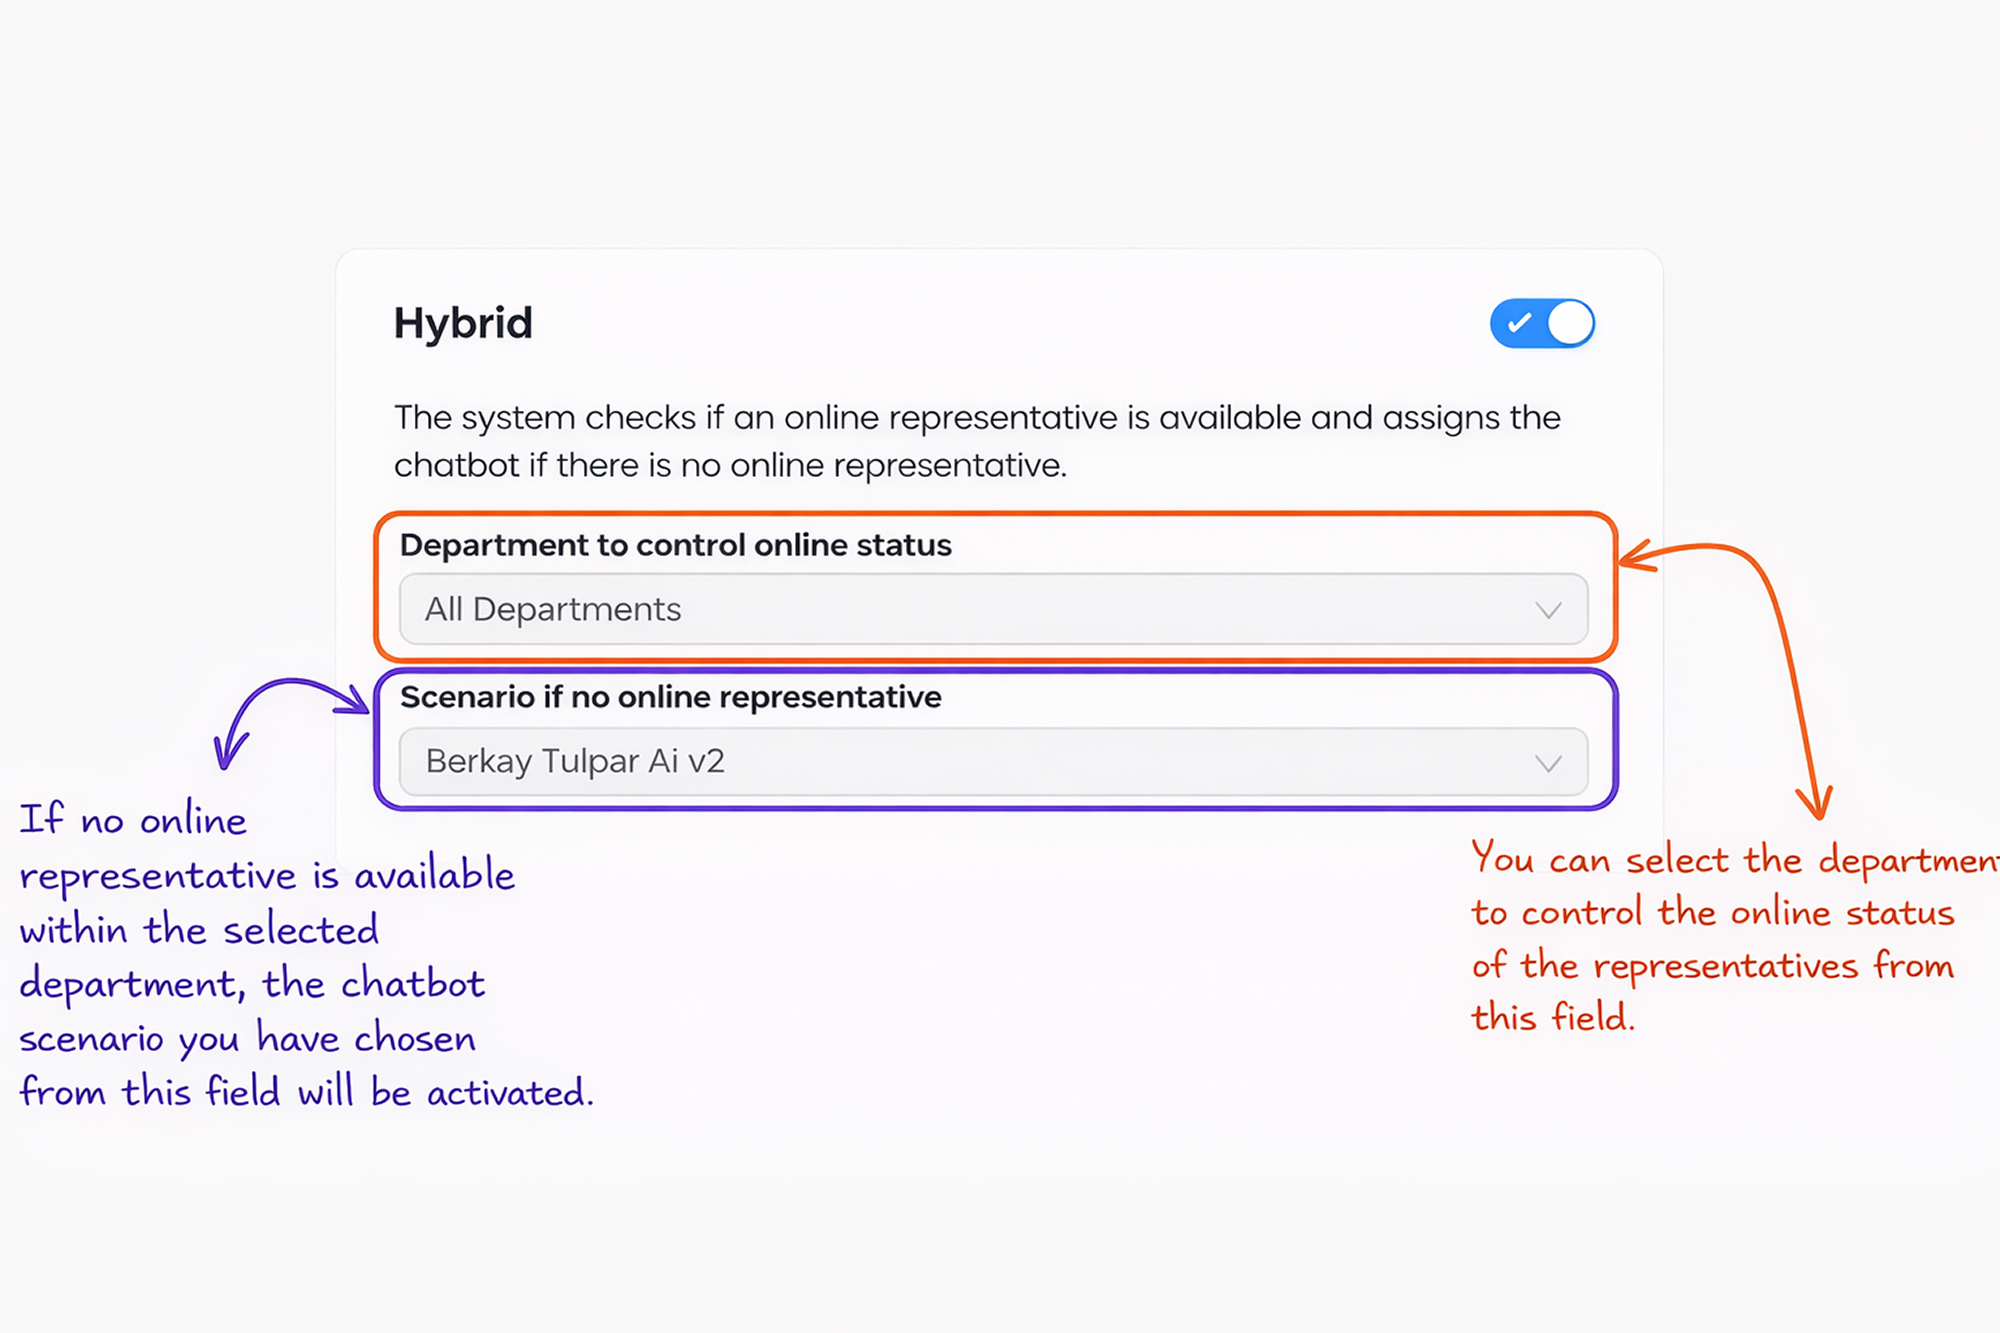
Example Flow: The system checks whether there is an online agent in the selected department. If there is an online agent, the conversation is routed to the department. If there is no online agent, conversations are transferred to the chatbot scenario.
-
f – Disable Automatic Assignment
When this option is enabled, automatic assignment is disabled for the relevant channel:- Newly incoming conversations are not automatically assigned to agents and remain in the queue.
- However, owned conversations (previously assigned to or associated with a specific user) are automatically assigned to the relevant Supsis AI user.
- Changes made in this setting are reflected in the automatic system assignment within approximately 2 minutes.
Owned Conversation: A conversation previously associated with a specific agent (has an owner).
2.b – Visibility
Visibility settings allow you to control which agents or departments within the Supsis AI platform can view the integrated Instagram channel. The main purpose of this configuration is to improve operational efficiency and data privacy by ensuring teams only access channels within their area of responsibility.
User Accessibility Rules: The defined visibility settings directly affect the following system functions:
- Automatic Chat Assignment: Conversations are assigned only to agents who have access permission to the channel; agents without permission are not given workload.
- Routing Operations: In order to route a conversation to another agent, the target agent must have viewing permission for this channel.
- Customer and Contact Lists: Agents can only view customer records coming from channels they have access to.
- Ownership Assignment: Assigning a customer to a specific agent (ownership) can only be performed within these access limits.
Important Note: Users with the "Full Admin" or "Root" role have permission to view all channels regardless of these settings.
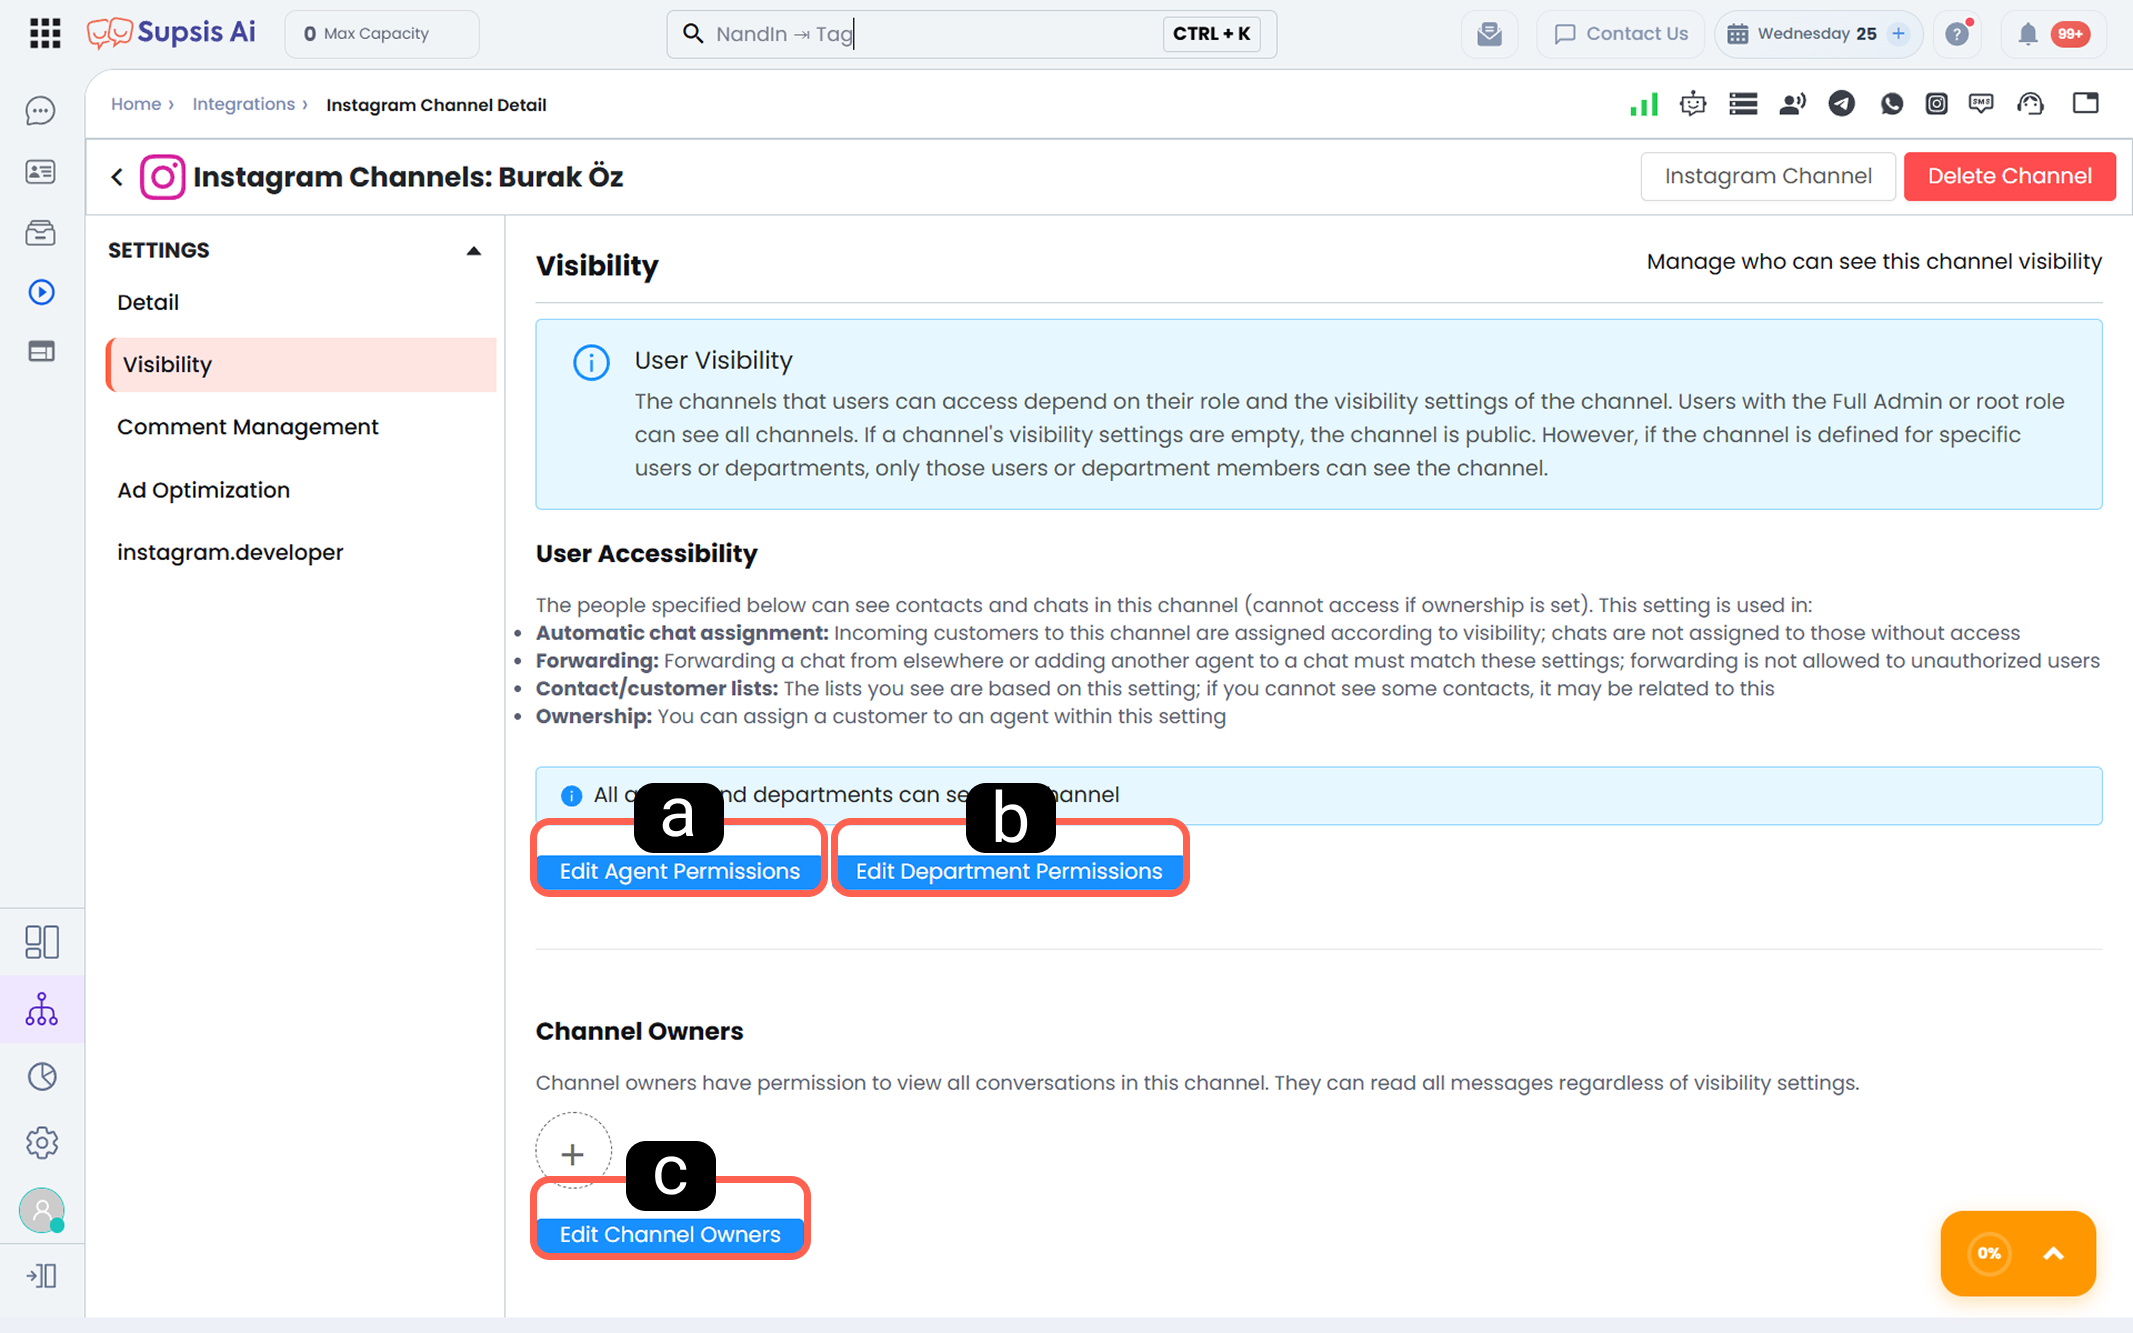
- a – Agent Permissions Agent permissions allow you to define on an individual basis which users can view and manage channel activities. Users with channel visibility enabled can operate within the channel according to their role permissions.
By selecting specific users from this section, you can ensure that channel activities are visible only in the panels of designated users.
-
b – Department Permissions
Through department permissions, you can make the relevant channel accessible to all users within the selected departments. -
c – Channel Owners
Channel owners are special users with supervisory and management authority. These users can monitor all conversations in the channel regardless of other visibility restrictions. You can add new owners or remove existing ones via the “Edit Channel Owners” button.
2.c – Comment Management
Through the Comment Management menu, you can determine how comments received under your Instagram posts will be transferred to the Supsis AI panel and how they will be processed.
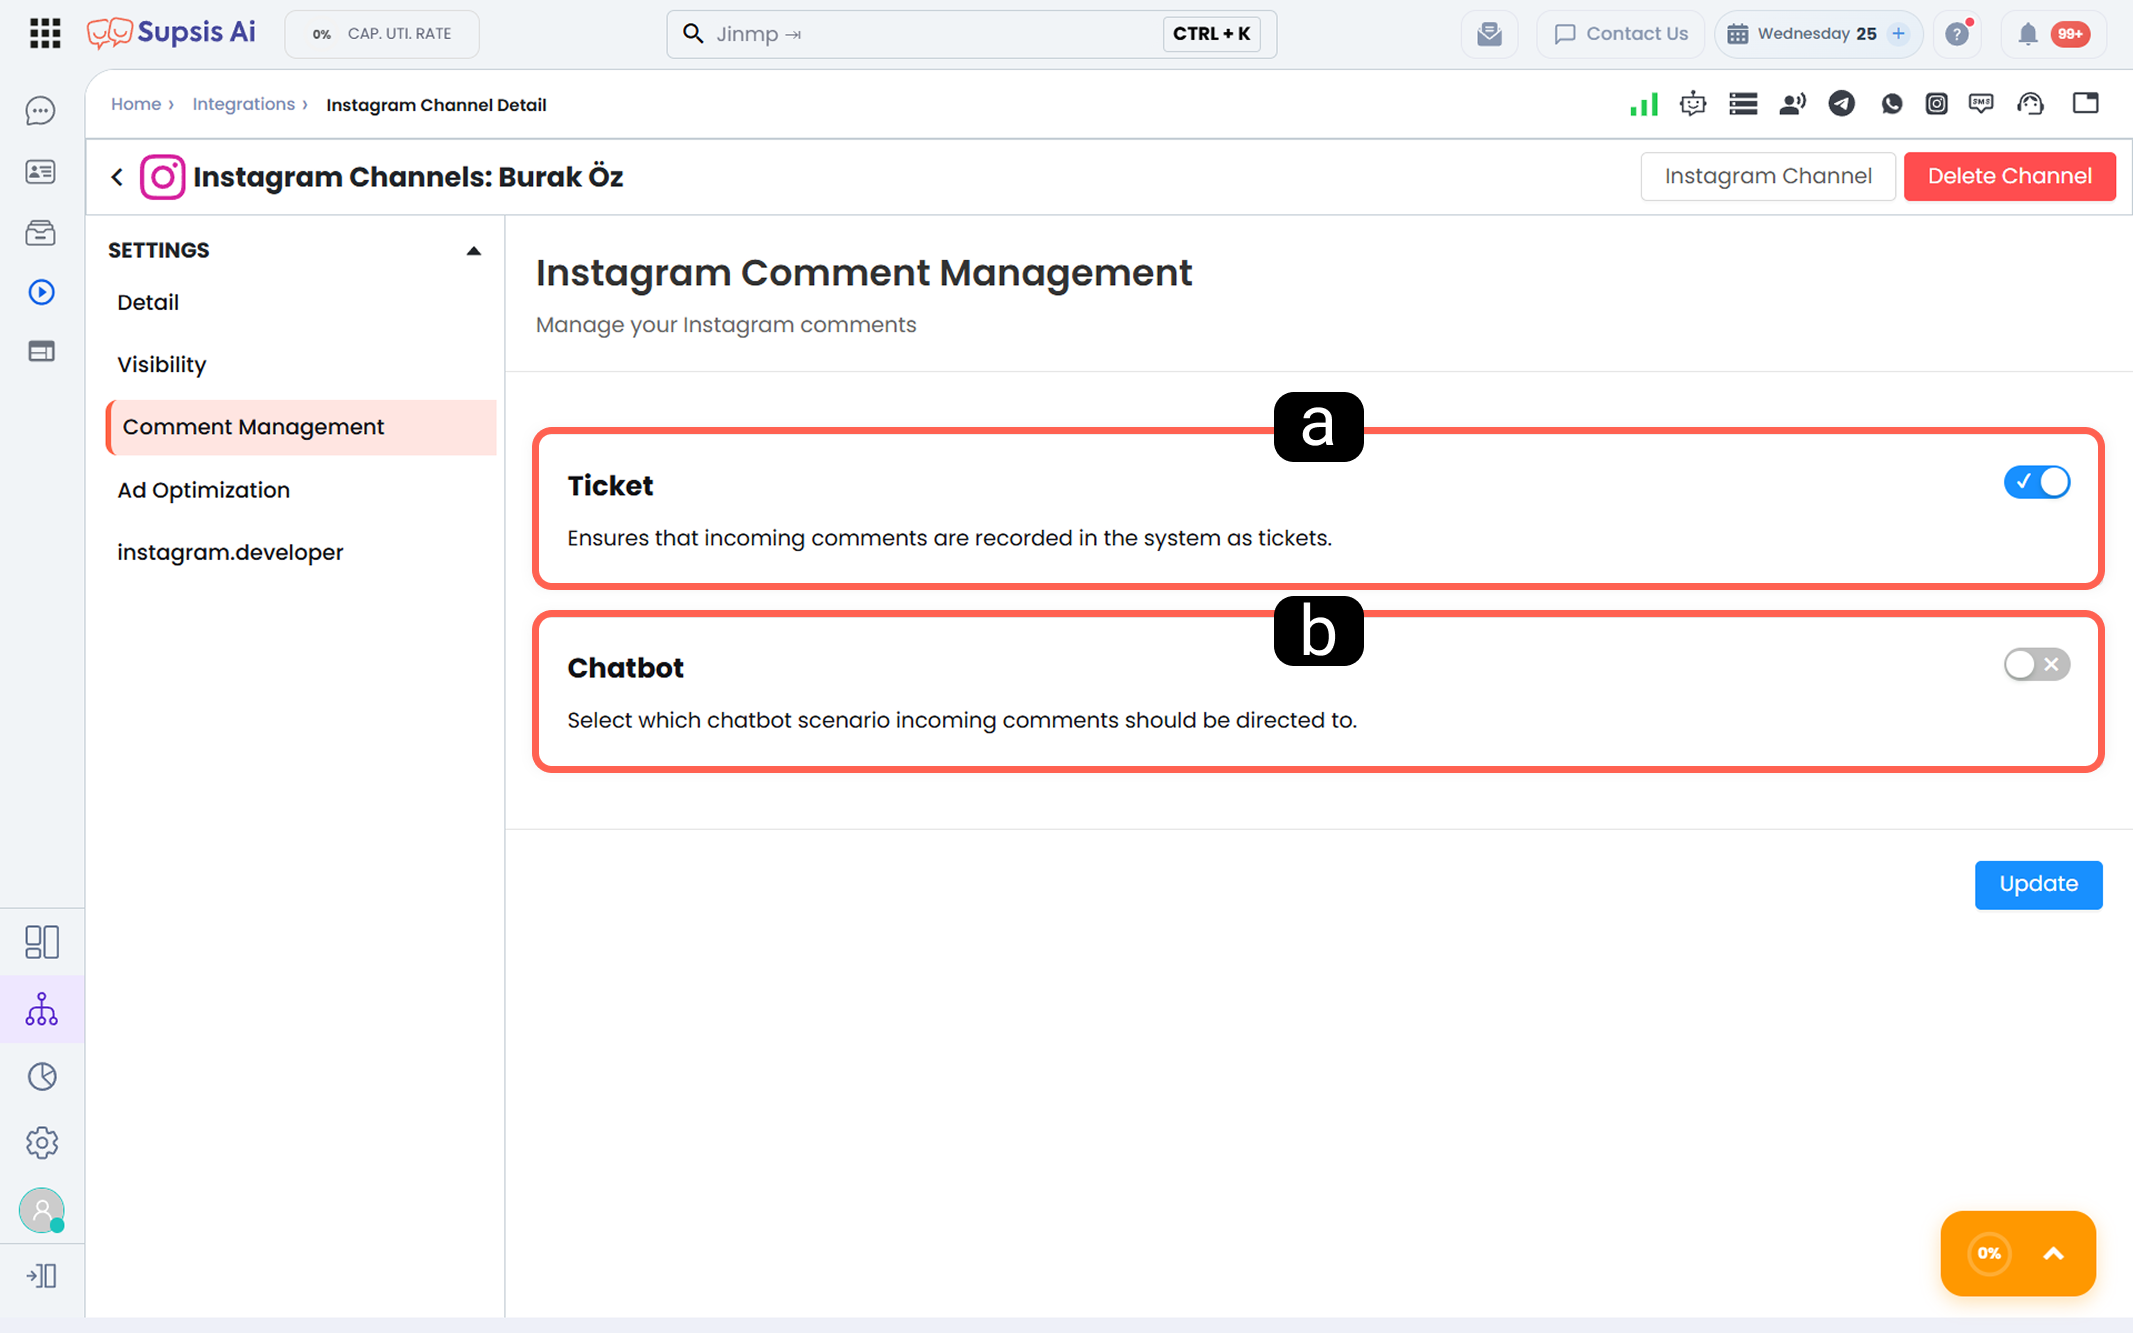
-
a – Ticket When this option is enabled, every comment under your Instagram posts is recorded as a Ticket within Supsis AI. This allows comments to be queued, responded to, and tracked end-to-end by your agents.
-
b – Chatbot
If you want comments to be automatically responded to without human intervention through a defined chatbot flow, you can use this option.
From the dropdown menu, select the chatbot scenario that will handle incoming comments.
To complete the settings, click the "Update" button at the bottom right.
To activate chatbot routing, make sure to publish the selected chatbot scenario from within the chatbot configuration.