
In this section, you can learn how to manage your agent profile information, notification preferences, personalized Customer Panel theme settings, and passwordless biometric Passkey (WebAuthn) session management. Profile, notification, theme, and passkey records are user-specific (stored per-account); therefore, adjustments must be made by each agent through their own panel.
1- Profile Settings
On the profile settings screen, you can customize the agent profile picture and username. These settings will be displayed during interactions with your customers.
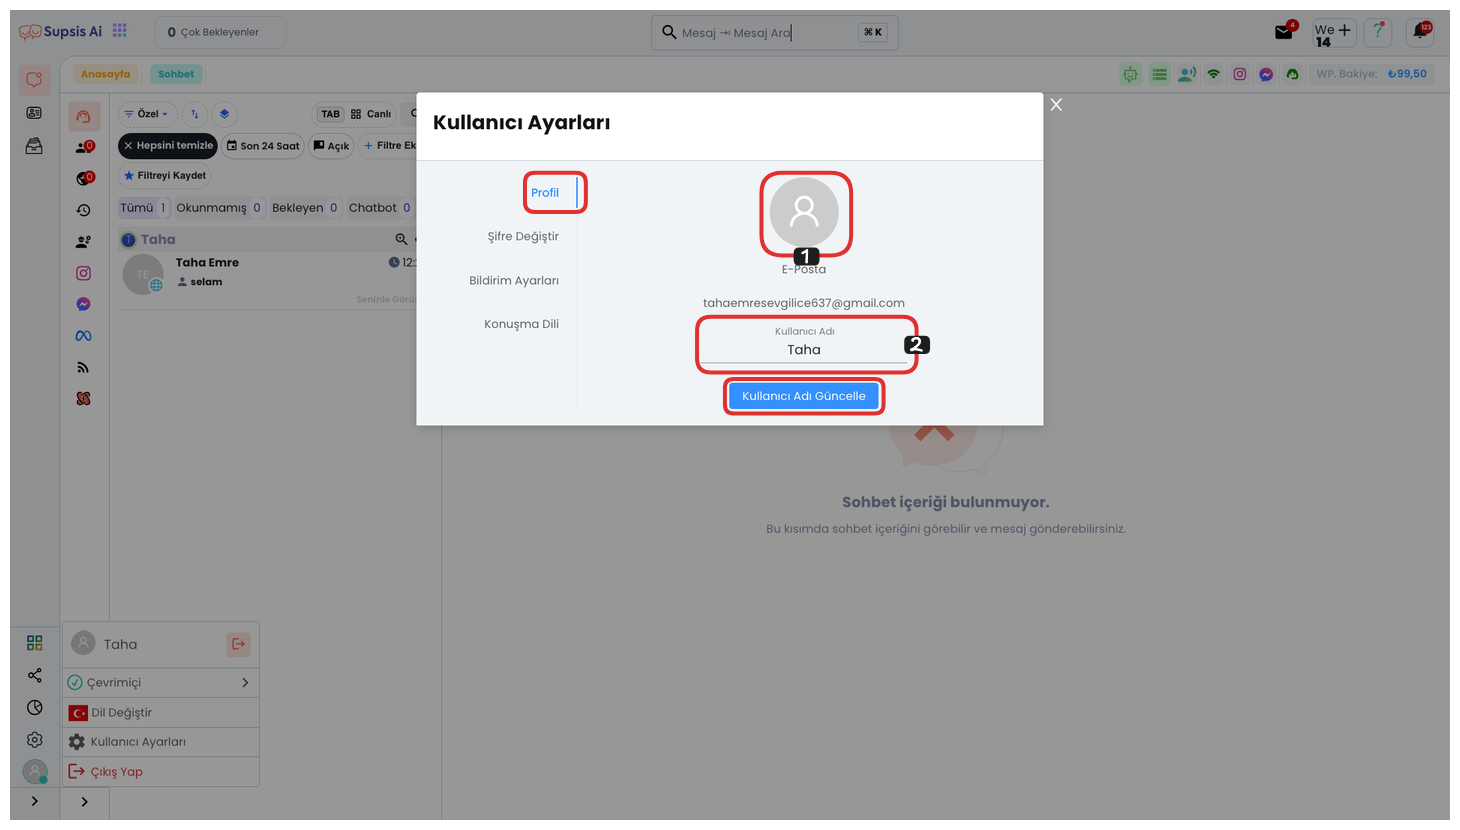
1.a- Customize Profile Picture
Use this section to change your profile picture. Your profile picture will be visible in conversations with your customers and provides a professional brand identity.
1.b- Customize Username
You can customize your username and then save it by clicking the Update Username button. This name will be visible to customers during interactions.
2- Customize Notification Settings
With notification settings, you can follow incoming notifications with sound, assign different sounds based on notification types, and adjust sound volume.
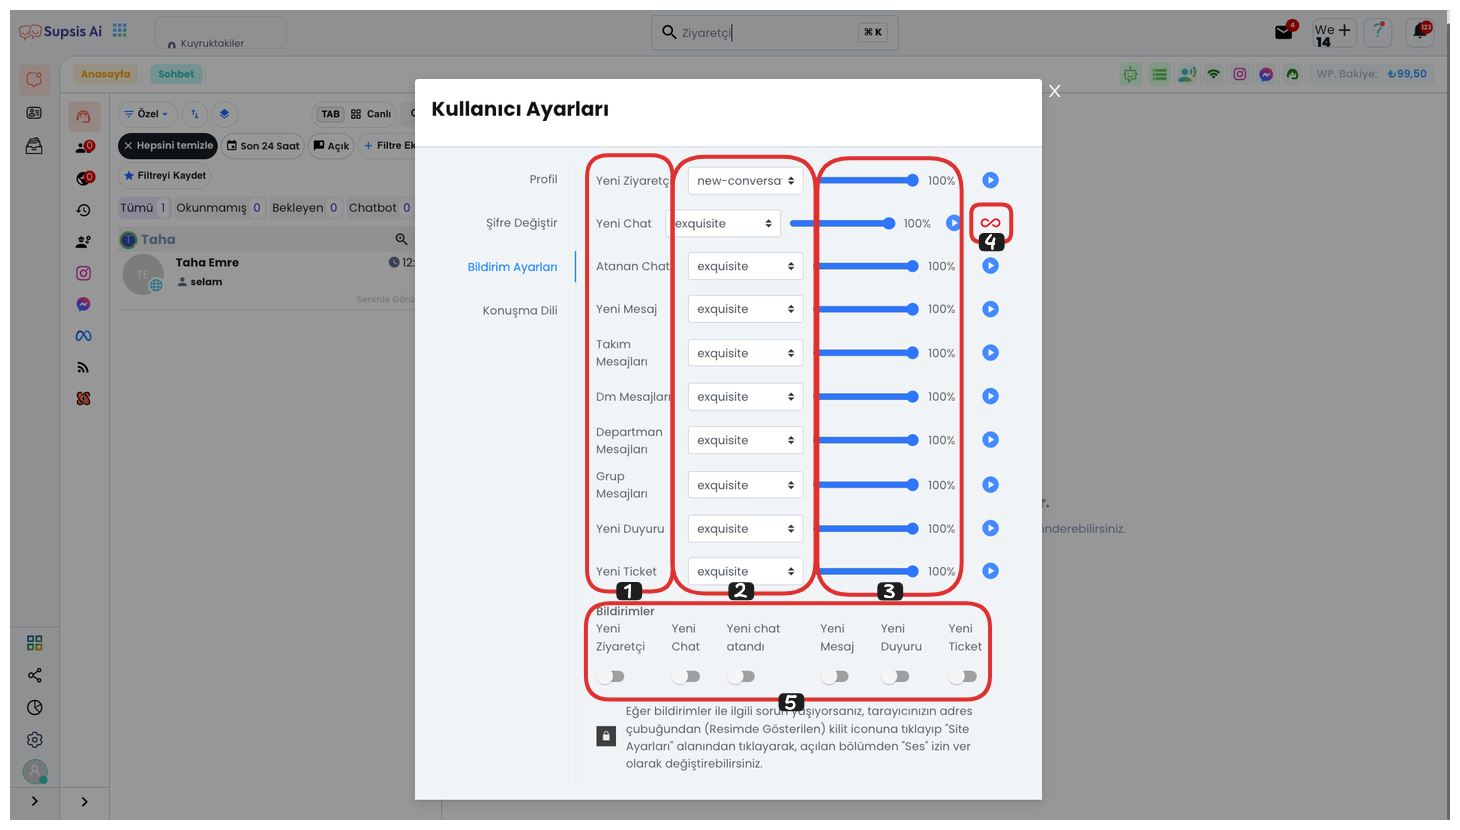
2.a- Sound Selection by Notification Type
Assign different notification sounds for different situations. For example, distinct tones can be assigned when a new visitor arrives, a message is received, or a session is opened.
2.b- Volume Level & Loop
- Volume Level: Adjust notification volumes to make critical alerts more noticeable.
- Loop Notification Sound When Assigned a Message: When enabled, the notification sound repeats in a loop when a new chat session is assigned until the agent takes action in the Supsis panel.
2.c- Enable / Disable Notifications
Manage your notifications by toggling each notification type on or off independently, keeping only necessary notifications active.
2.d- Temporarily Muting Notifications (Do Not Disturb)
Agents can temporarily silence all notifications during breaks, meetings, deep-work sessions, or off-hours without modifying individual notification toggle settings.
While Mute mode is active:
* Web Push Notifications are suppressed.
* Mobile Push Notifications are not dispatched.
* In-Panel Live Toast Alerts (new_notification) and notification sounds are disabled.
* Unread Message Notification Emails are paused (suppressed emails do not flood the inbox in bulk once mute ends).
* The notification bell dropdown in the top bar continues to log historical alerts; only disruptive real-time interruptions are paused.
1- Access Points for Muting Notifications
Mute preferences can be managed from three distinct interface locations:
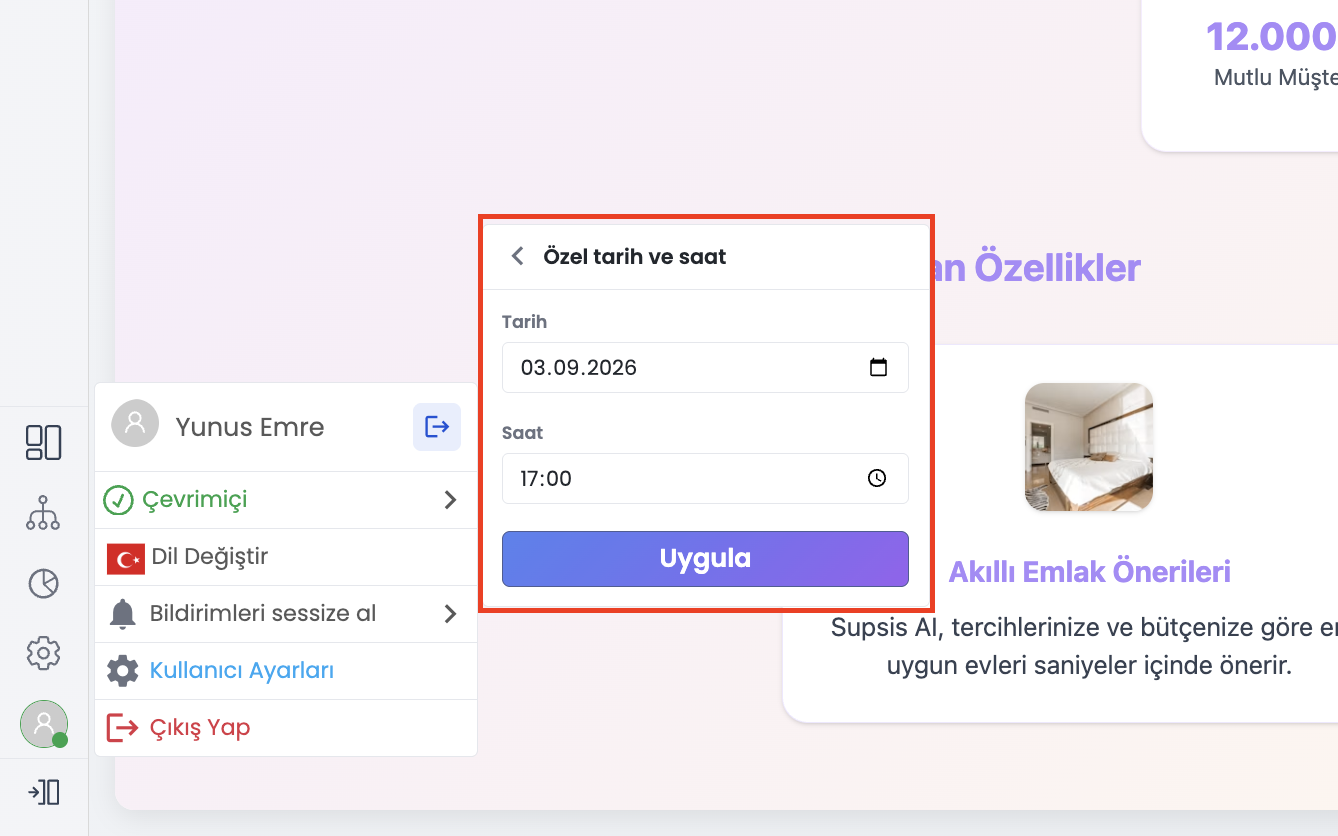
- 1.a – Bottom-Left User Popover: Click your profile avatar at the bottom-left of the navigation sidebar and select Mute notifications.
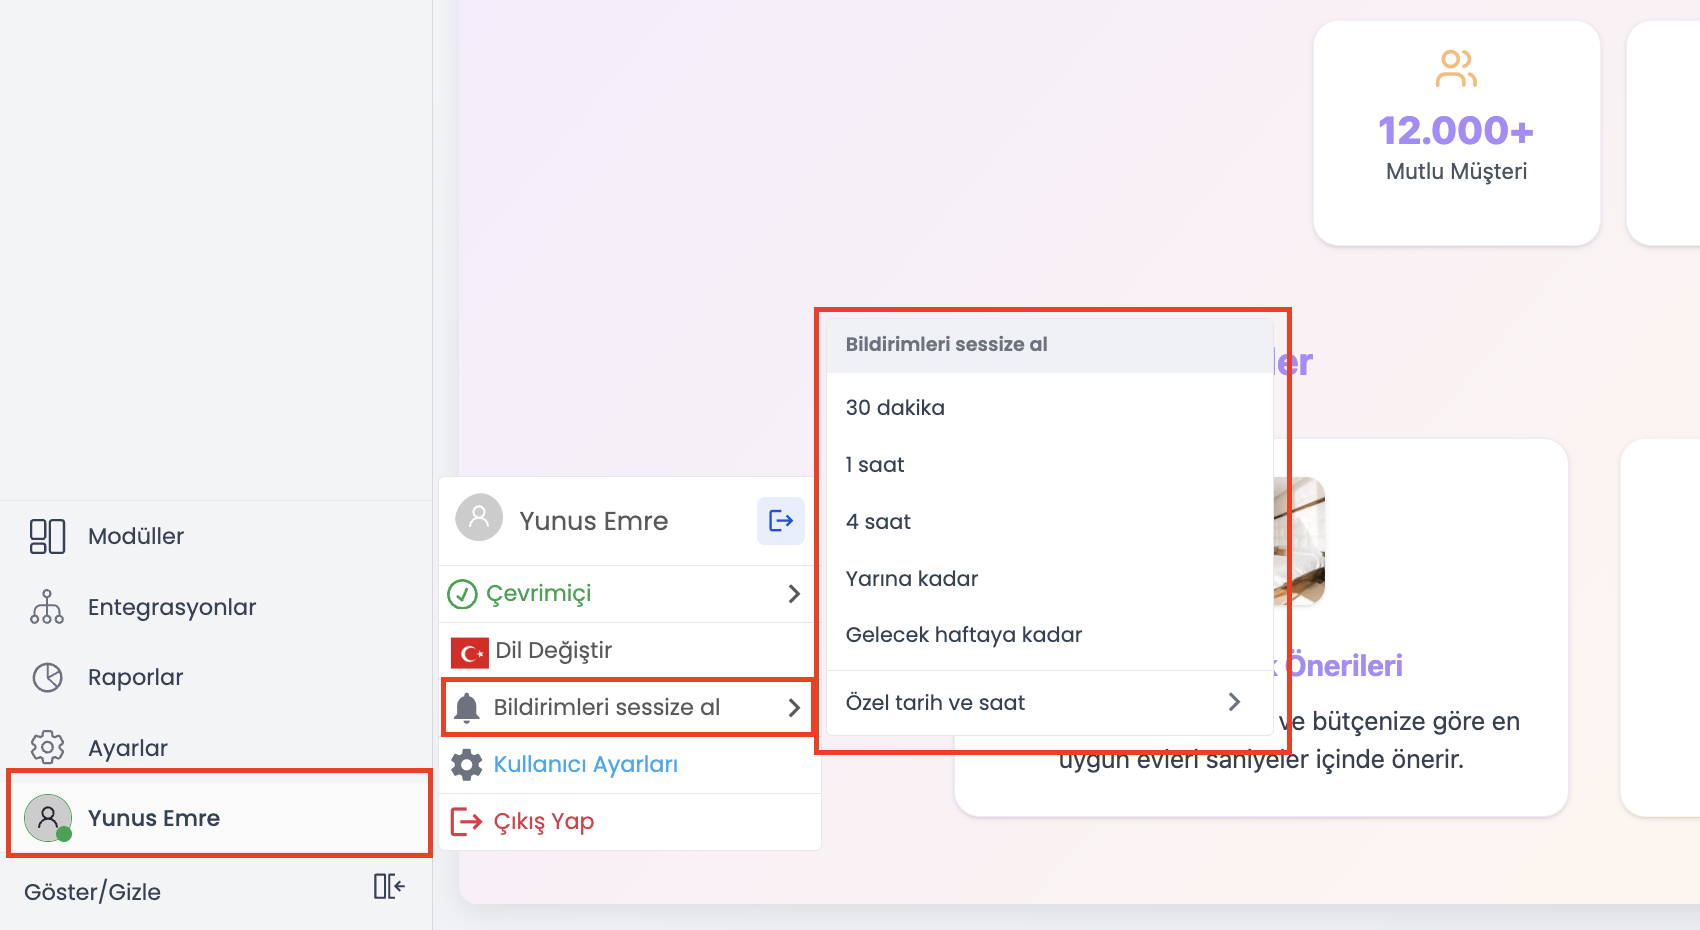
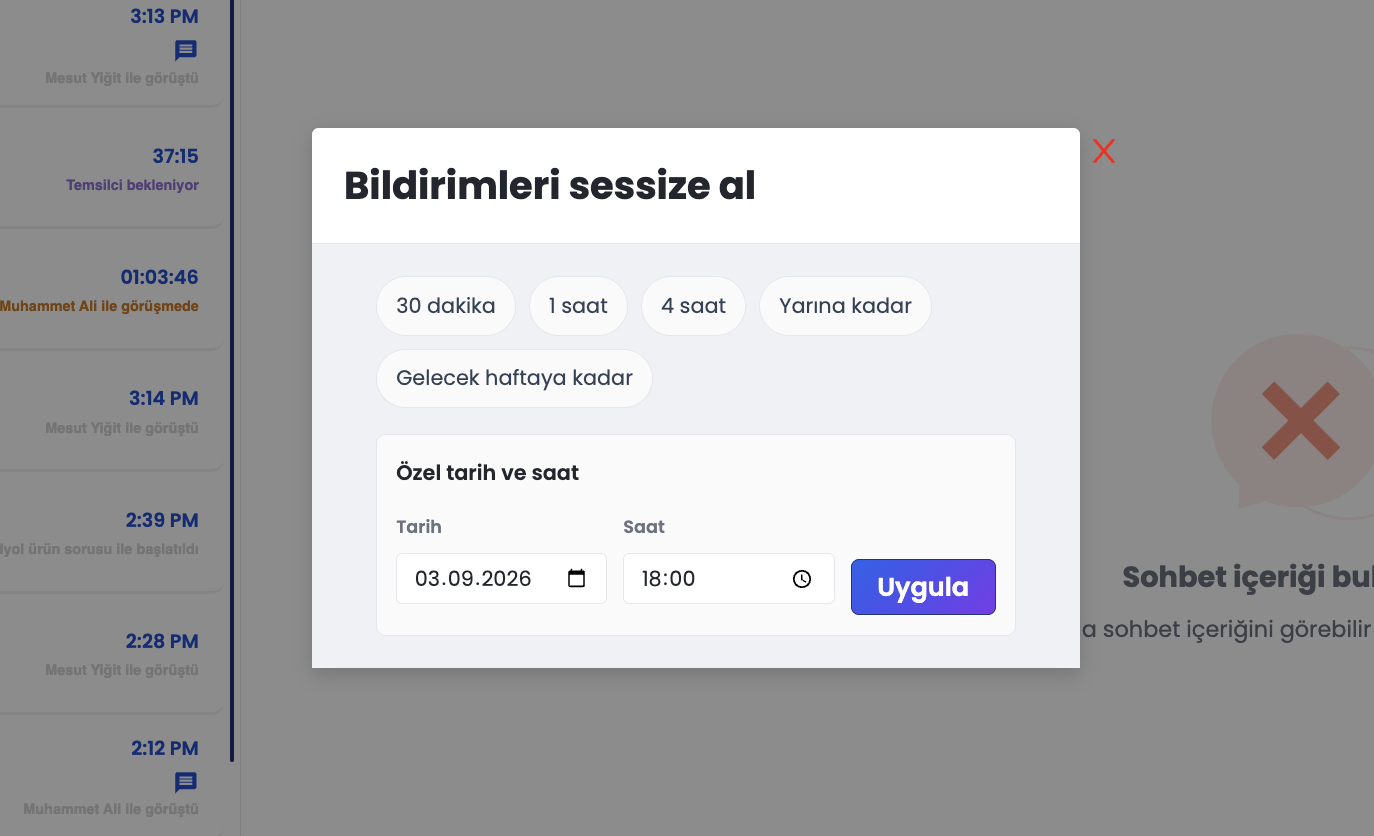
- 1.b – Profile › Notifications Tab: Configured via preset chips or the custom date-time card in the Notifications tab under Profile.
- 1.c – Top Bar Notification Bell: Click the bell icon in the top-right header, then click the mute icon (bell with slash) in the dropdown footer to open the modal directly.
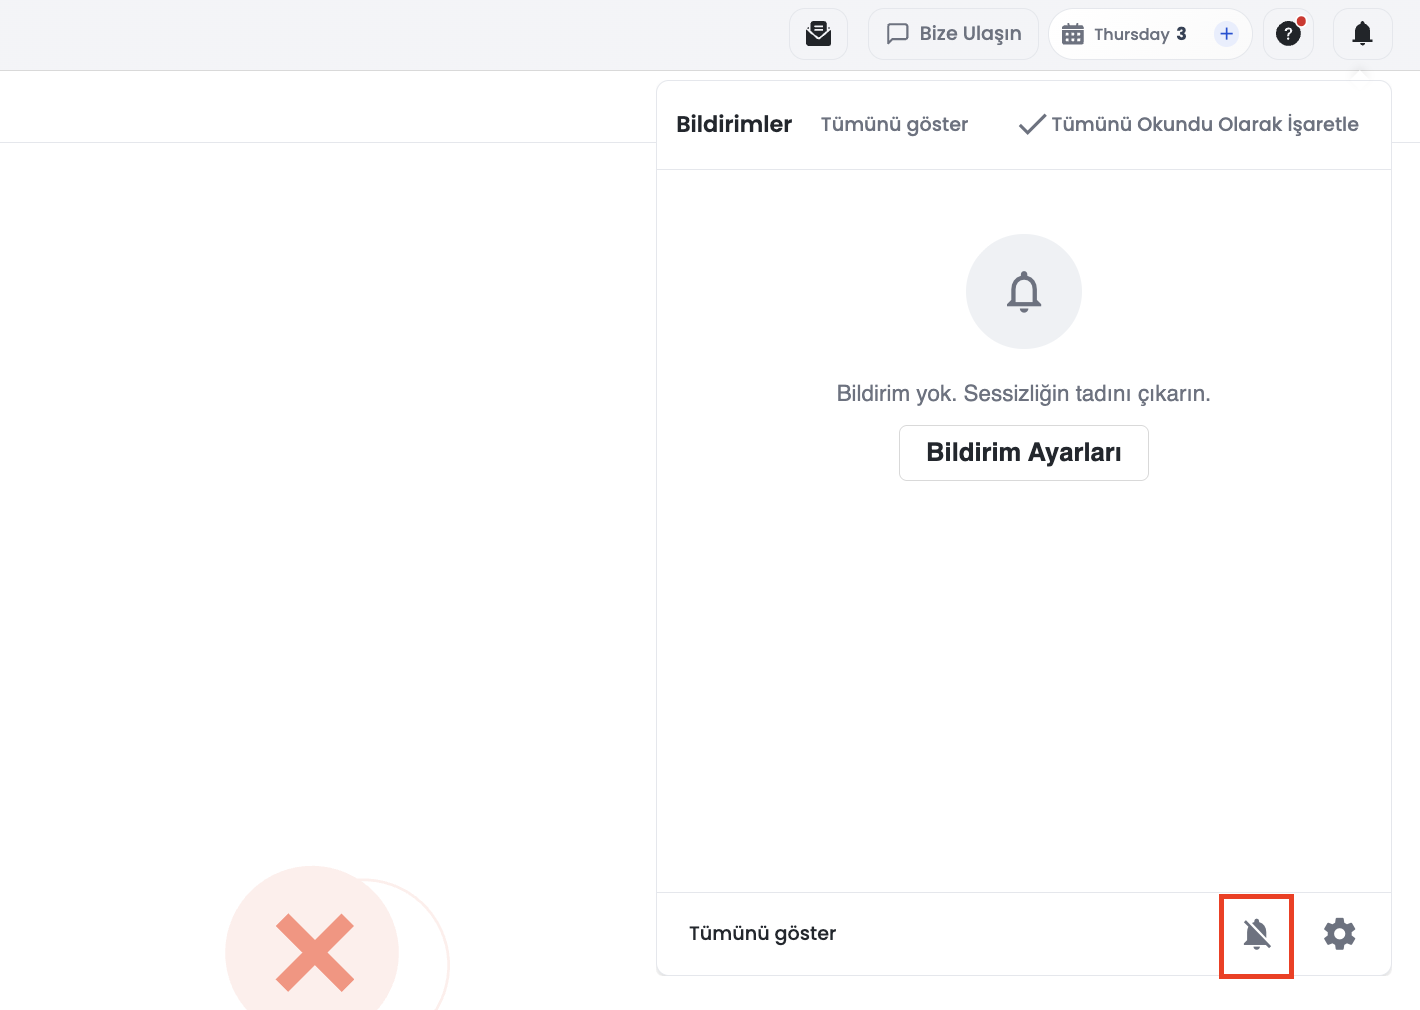
2- Preset Durations and Custom Date-Time Scheduling
Select from multiple quick presets or schedule an exact expiration timestamp:
| Duration Option | Scope and Operational Use Case |
|---|---|
| 30 Minutes | Ideal for coffee breaks, rapid standups, or urgent 1-on-1 calls. |
| 1 Hour | Standard team meetings, client presentations, or focused reviews. |
| 4 Hours | Extended deep-work blocks or half-day leaves. |
| Until Tomorrow | Selected at shift conclusion; silences alerts until the next workday begins. |
| Until Next Week | Useful for weekend respites or weekly leave periods. |
| Custom Date & Time | Calendar and clock picker to silence notifications until a specific calendar deadline. |
3- Step-by-Step Guide to Muting and Early Resumption
- Activating Mute Mode:
- 1.a- Open the user popover from the sidebar avatar or click the mute icon in the top notification bell dropdown.
- 1.b- Select a preset duration or pick a custom date and time, then click Apply.
- 1.c- An active indicator displaying "Muted until [Date/Time]" appears, instantly halting real-time alerts.
- Expiry & Early Unmute:
- 2.a- Once the scheduled period elapses, the system automatically disables mute mode during background profile refreshes, resuming normal notification routing.
- 2.b- If your meeting concludes early, click the Unmute Notifications button at any time to resume instant notifications ahead of schedule.
4- Control and Security Notes
Individual User Scope
Muting notifications is strictly personal to the respective agent and does not impact team routing or other agents' notification flows.
Lightweight Timestamp Architecture
The system does not run background timer daemons; it simply stores the expiration timestamp. When user state refreshes past the target time, mute mode gracefully deactivates.
Universal Availability
This feature is available across all subscription tiers and user roles without extra permissions.
3- Theme Settings
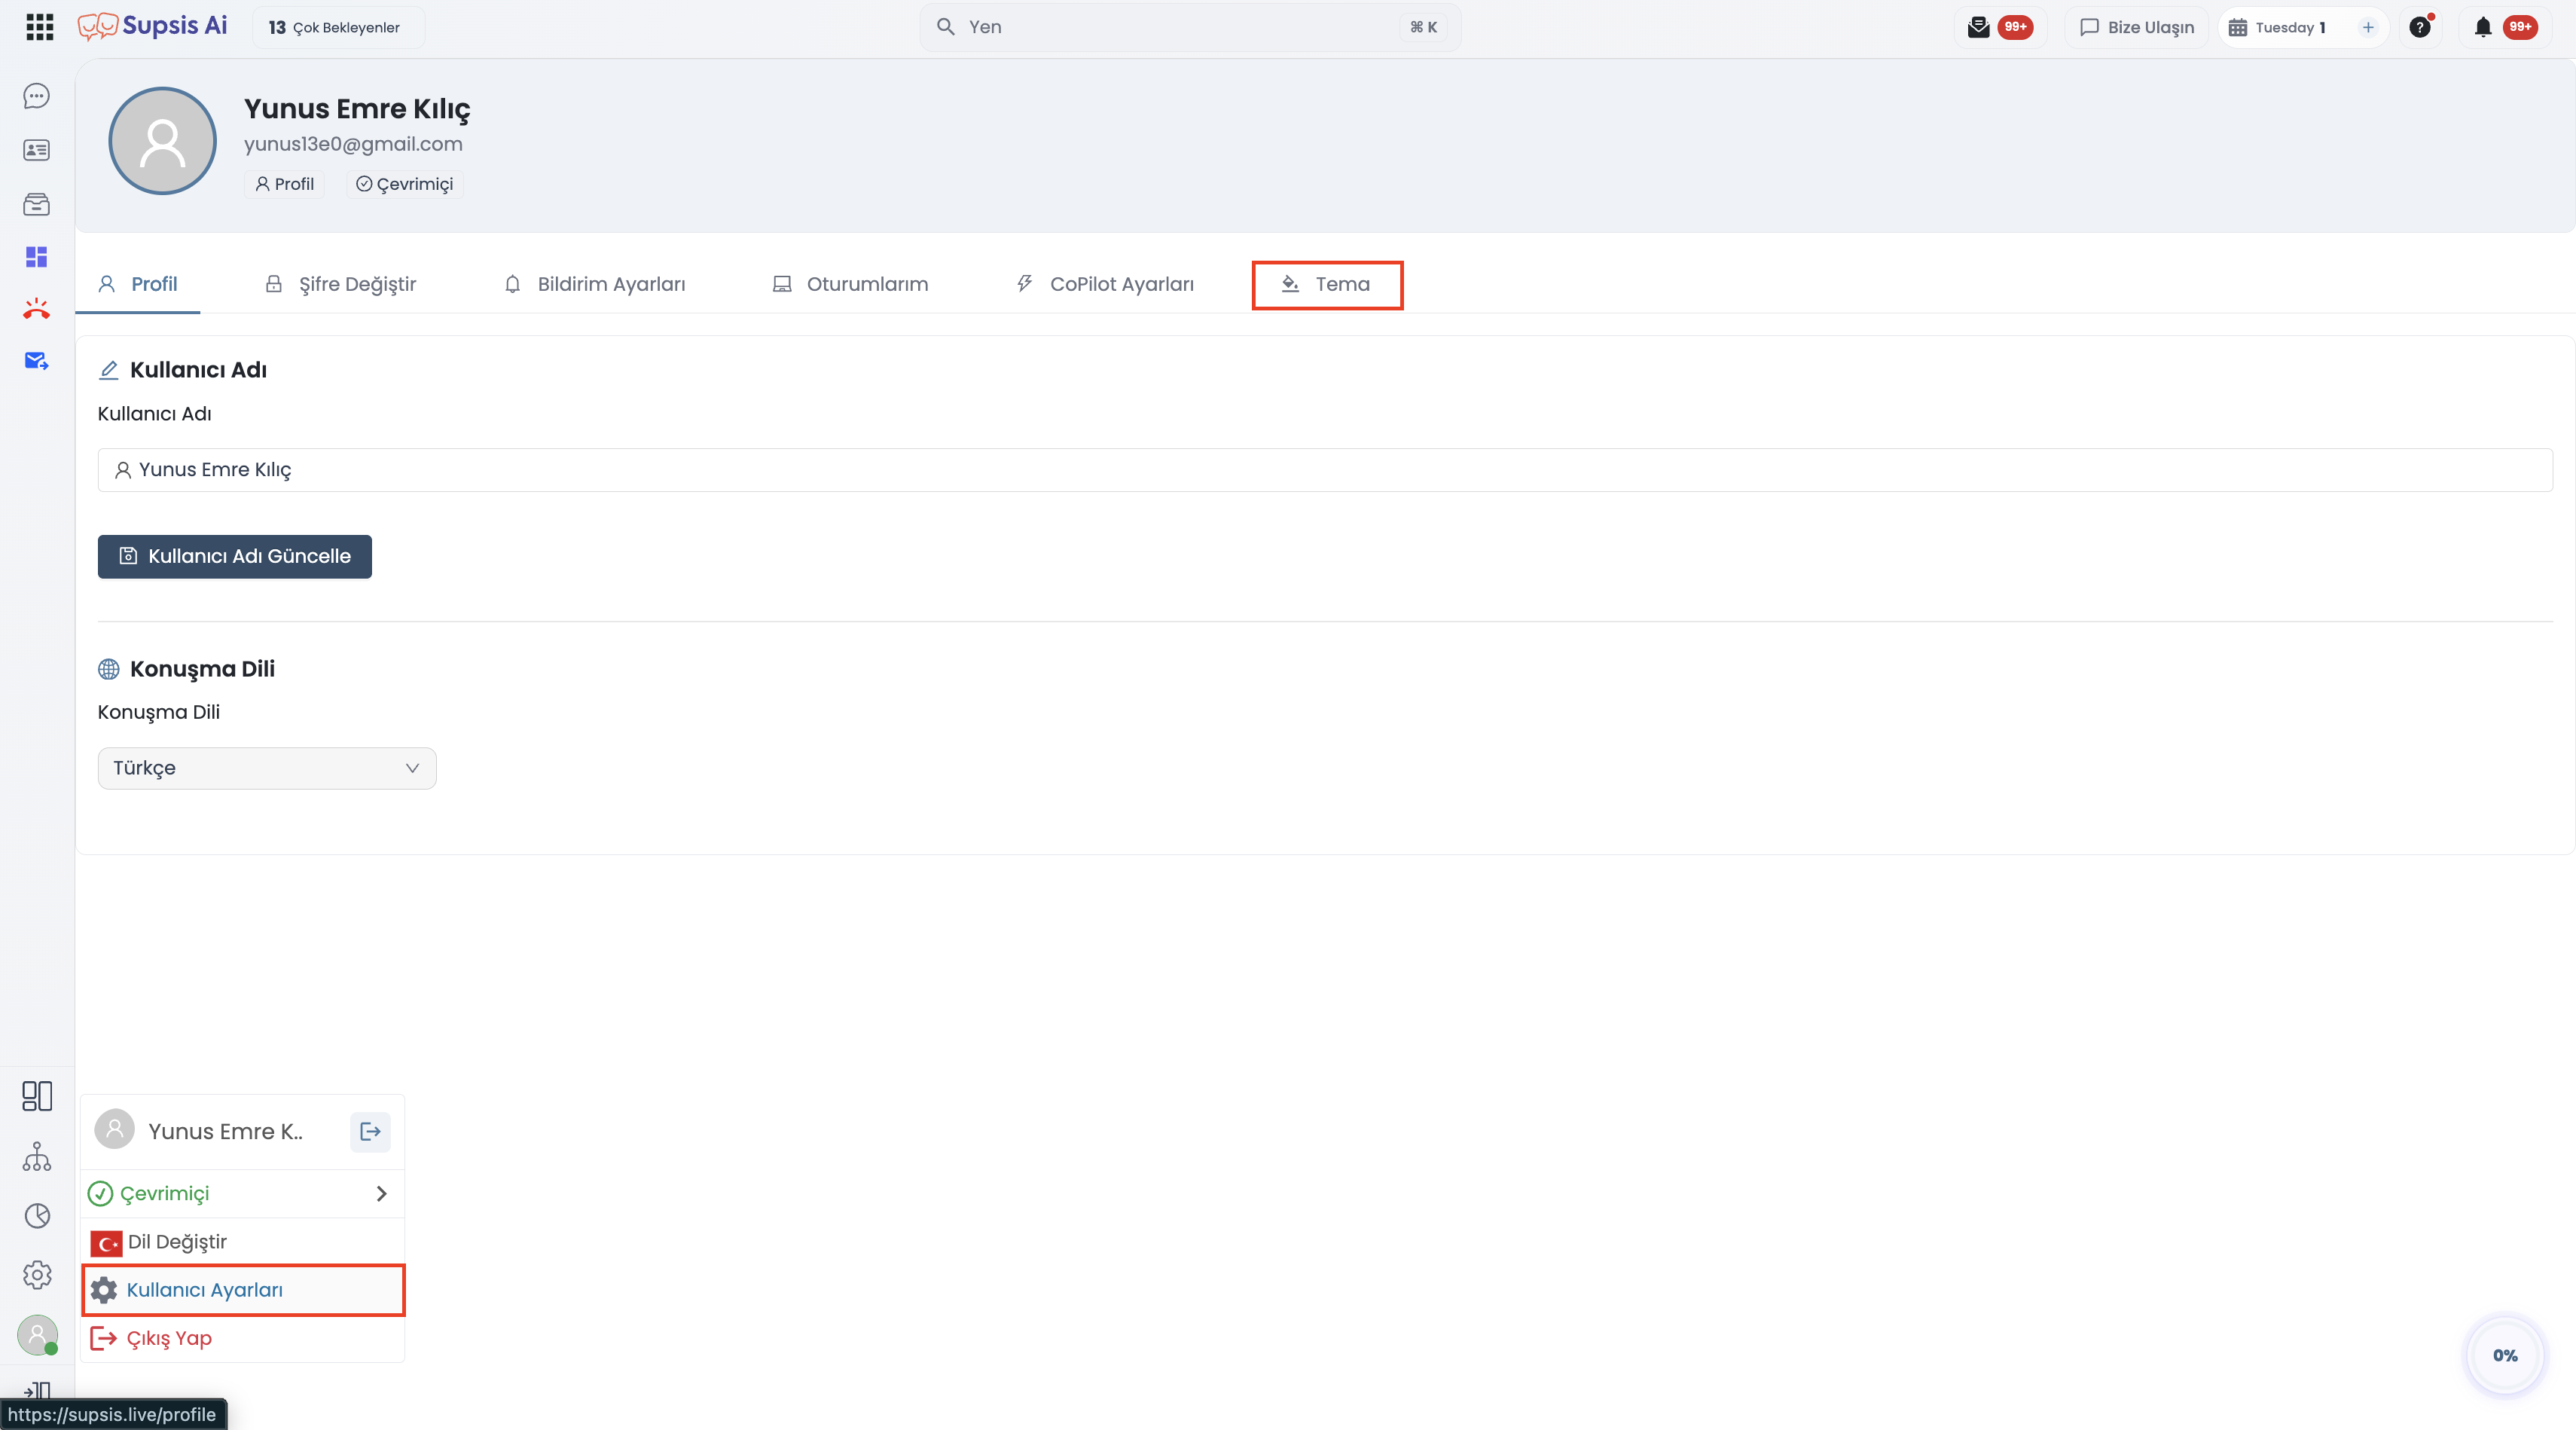
With the user-based theme system in Supsis Customer Panel, each agent can customize their workspace appearance. Theme preferences are saved directly to the user account (User.themeSettings), ensuring preferences persist across different devices and browsers.
Customer Panel Theme vs. Visitor Widget Theme
Theme settings configured here only apply to the Customer Panel (agent dashboard). The chat bubble/widget seen by website visitors is independent and managed under Settings → Chat Bubble.
3.a- Theme Structure and Components
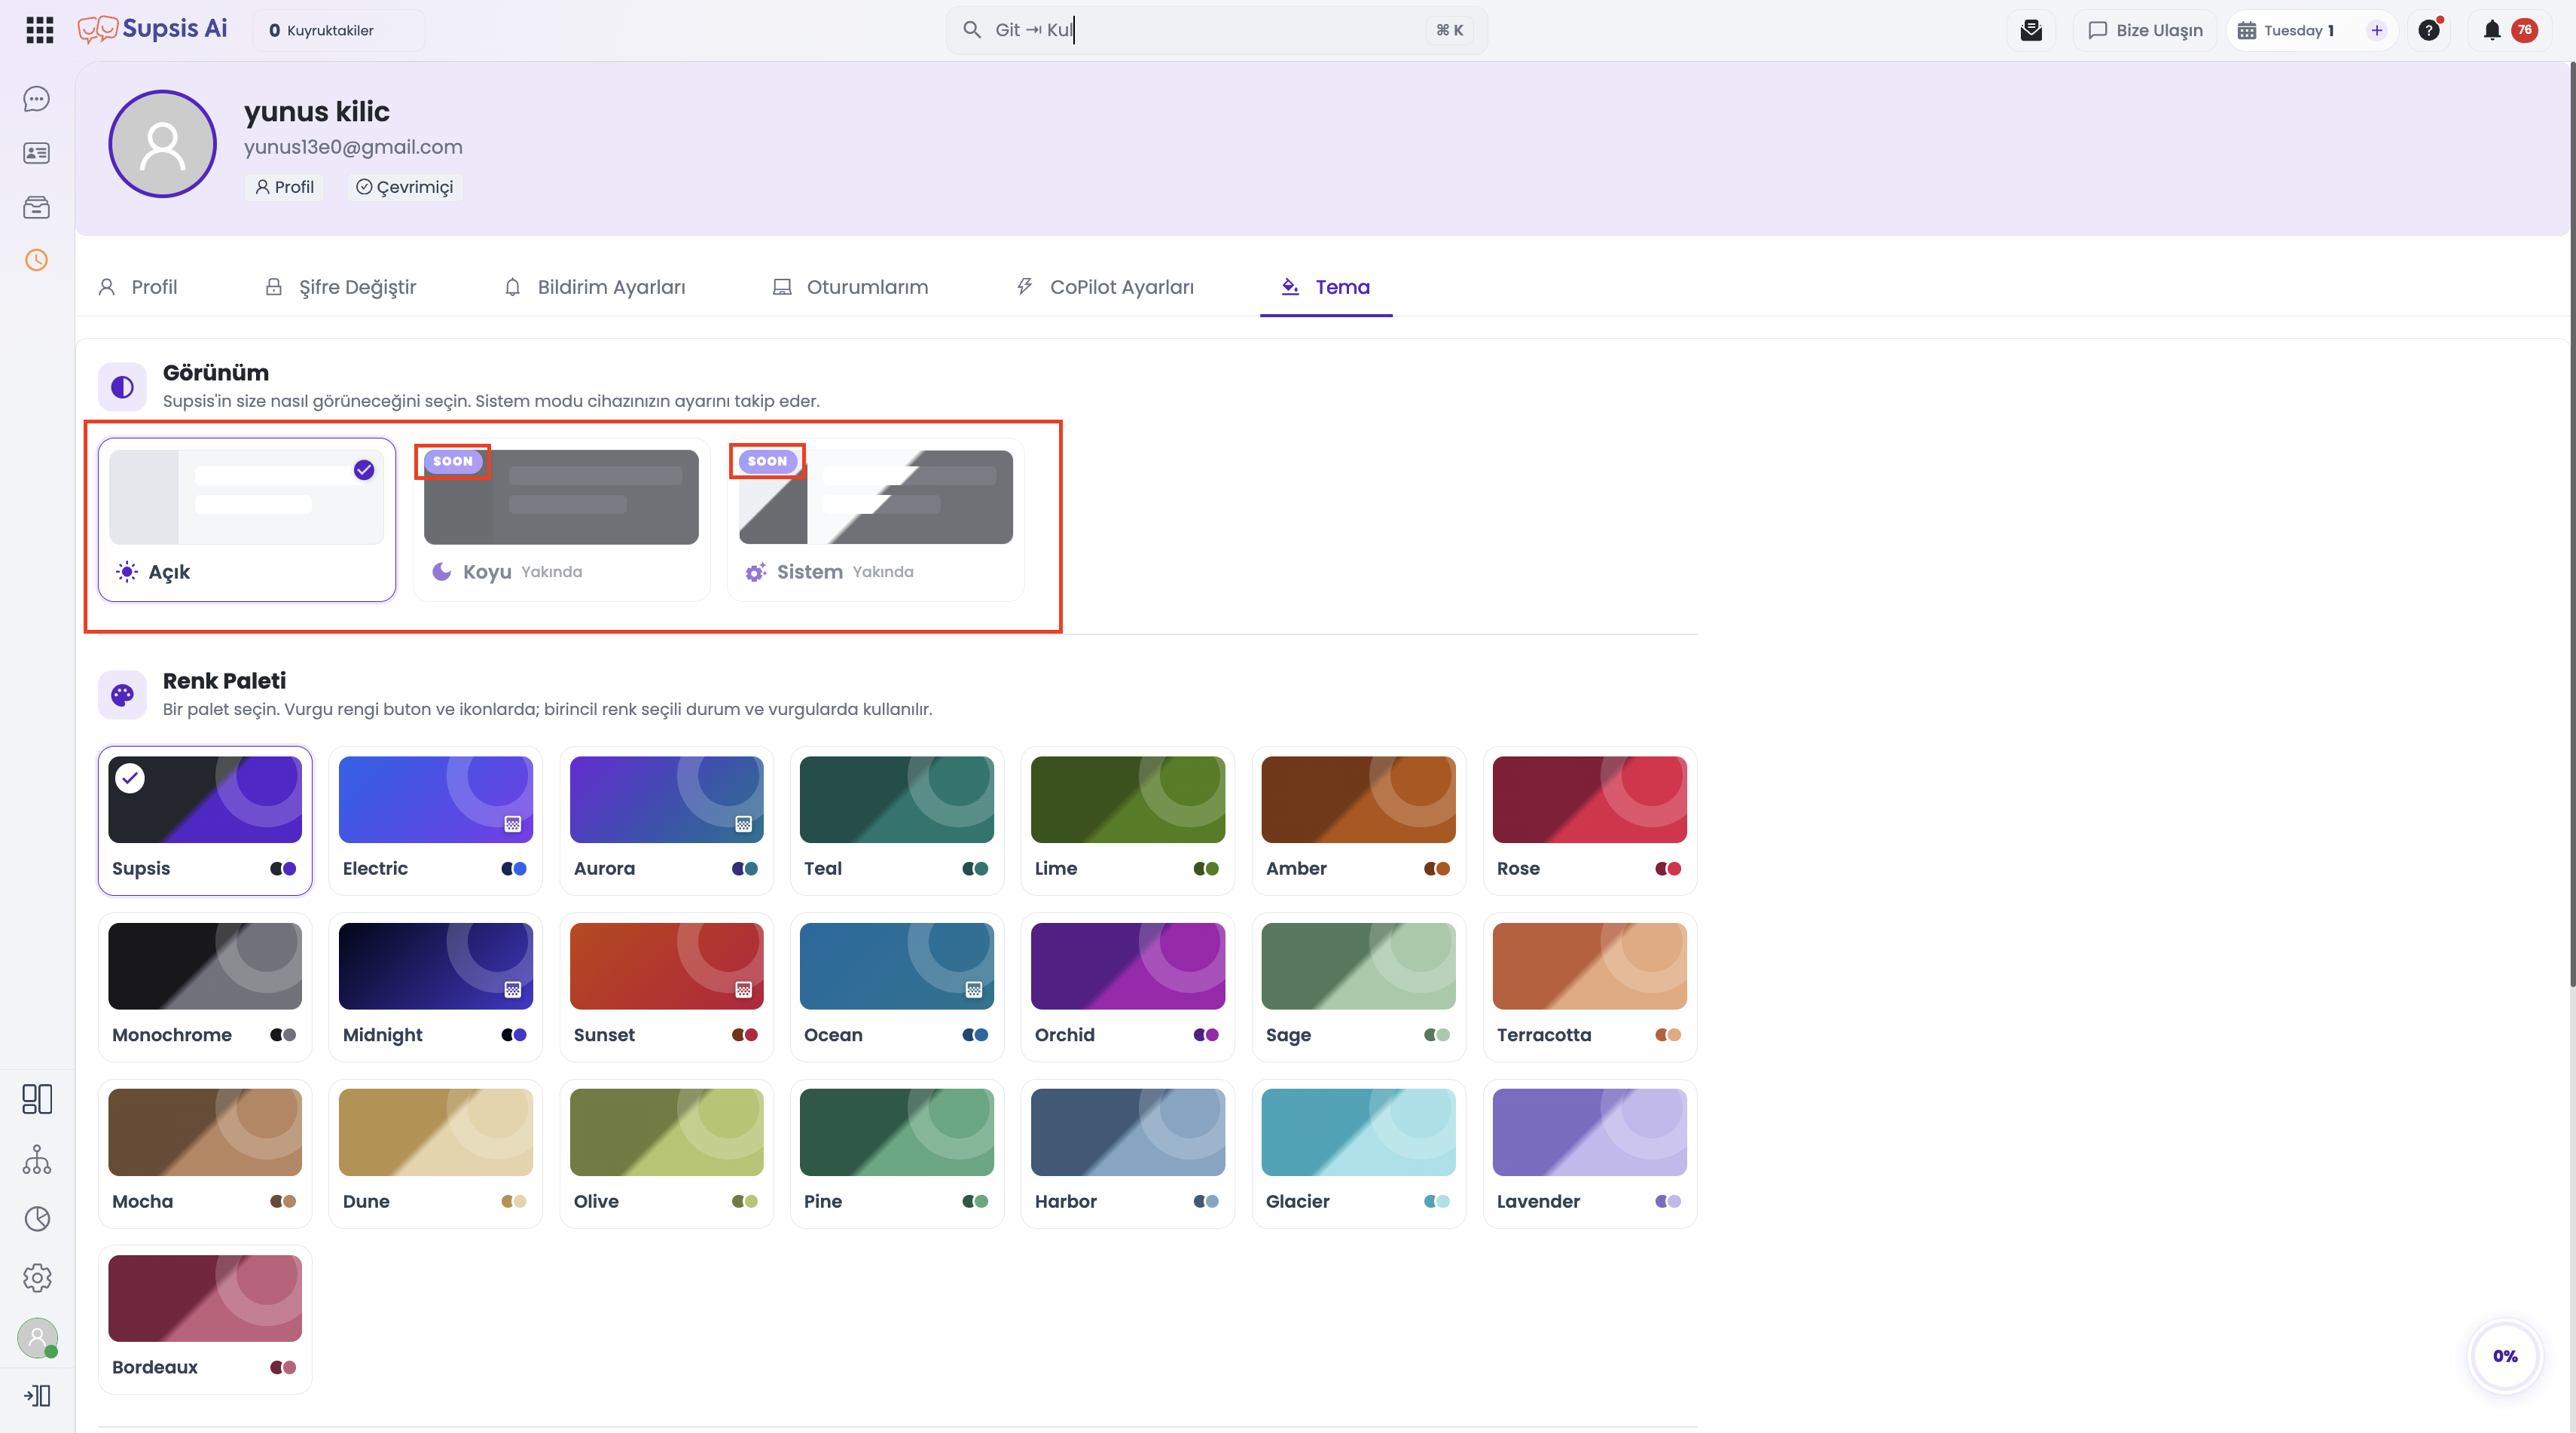
The theme system consists of two main components:
| Component | Options | Description |
|---|---|---|
| Appearance Mode | Light, Dark, System |
Configures interface brightness or syncs automatically with the operating system theme. |
| Color Palette | 22 Ready-to-Use Palettes | Defines button, selection, tab, and accent highlight colors across the panel. |
Appearance Modes
- Light: Standard bright panel theme.
- Dark: Night mode reducing eye strain during extended work hours.
- System: Syncs with your device’s operating system mode (light during the day, dark at night).
Ready-to-Use Color Palettes
Accent colors are applied to buttons and icons, while primary colors define selected rows and focus states:
| Palette Name | Characteristics and Aesthetics |
|---|---|
| Supsis (Default) | Corporate Supsis blue and purple tones |
| Electric | Vibrant, high-contrast dynamic colors |
| Aurora | Northern lights inspired emerald and cyan |
| Teal | Calming teal and turquoise tones |
| Lime | High-visibility vivid green accents |
| Amber | Warm amber and golden yellow highlights |
| Rose | Elegant rose and subtle pink hues |
| Monochrome | Minimalist grayscale and neutral balance |
| Midnight | Deep nocturnal midnight blues |
| Sunset | Warm evening sunset orange and red tones |
| Ocean | Deep oceanic marine blues |
| Orchid | Vivid orchid purple accents |
| Sage | Tranquil sage and soft herbal greens |
| Terracotta | Earthy clay and terracotta hues |
| Mocha | Warm roasted coffee tones |
| Dune | Desert sand and neutral beige accents |
| Olive | Natural olive green palette |
| Pine | Deep forest pine greens |
| Harbor | Maritime harbor blues and deep nautical tones |
| Glacier | Crisp glacial cyan and icy highlights |
| Lavender | Soothing lavender and soft violet |
| Bordeaux | Rich burgundy and wine-red accents |
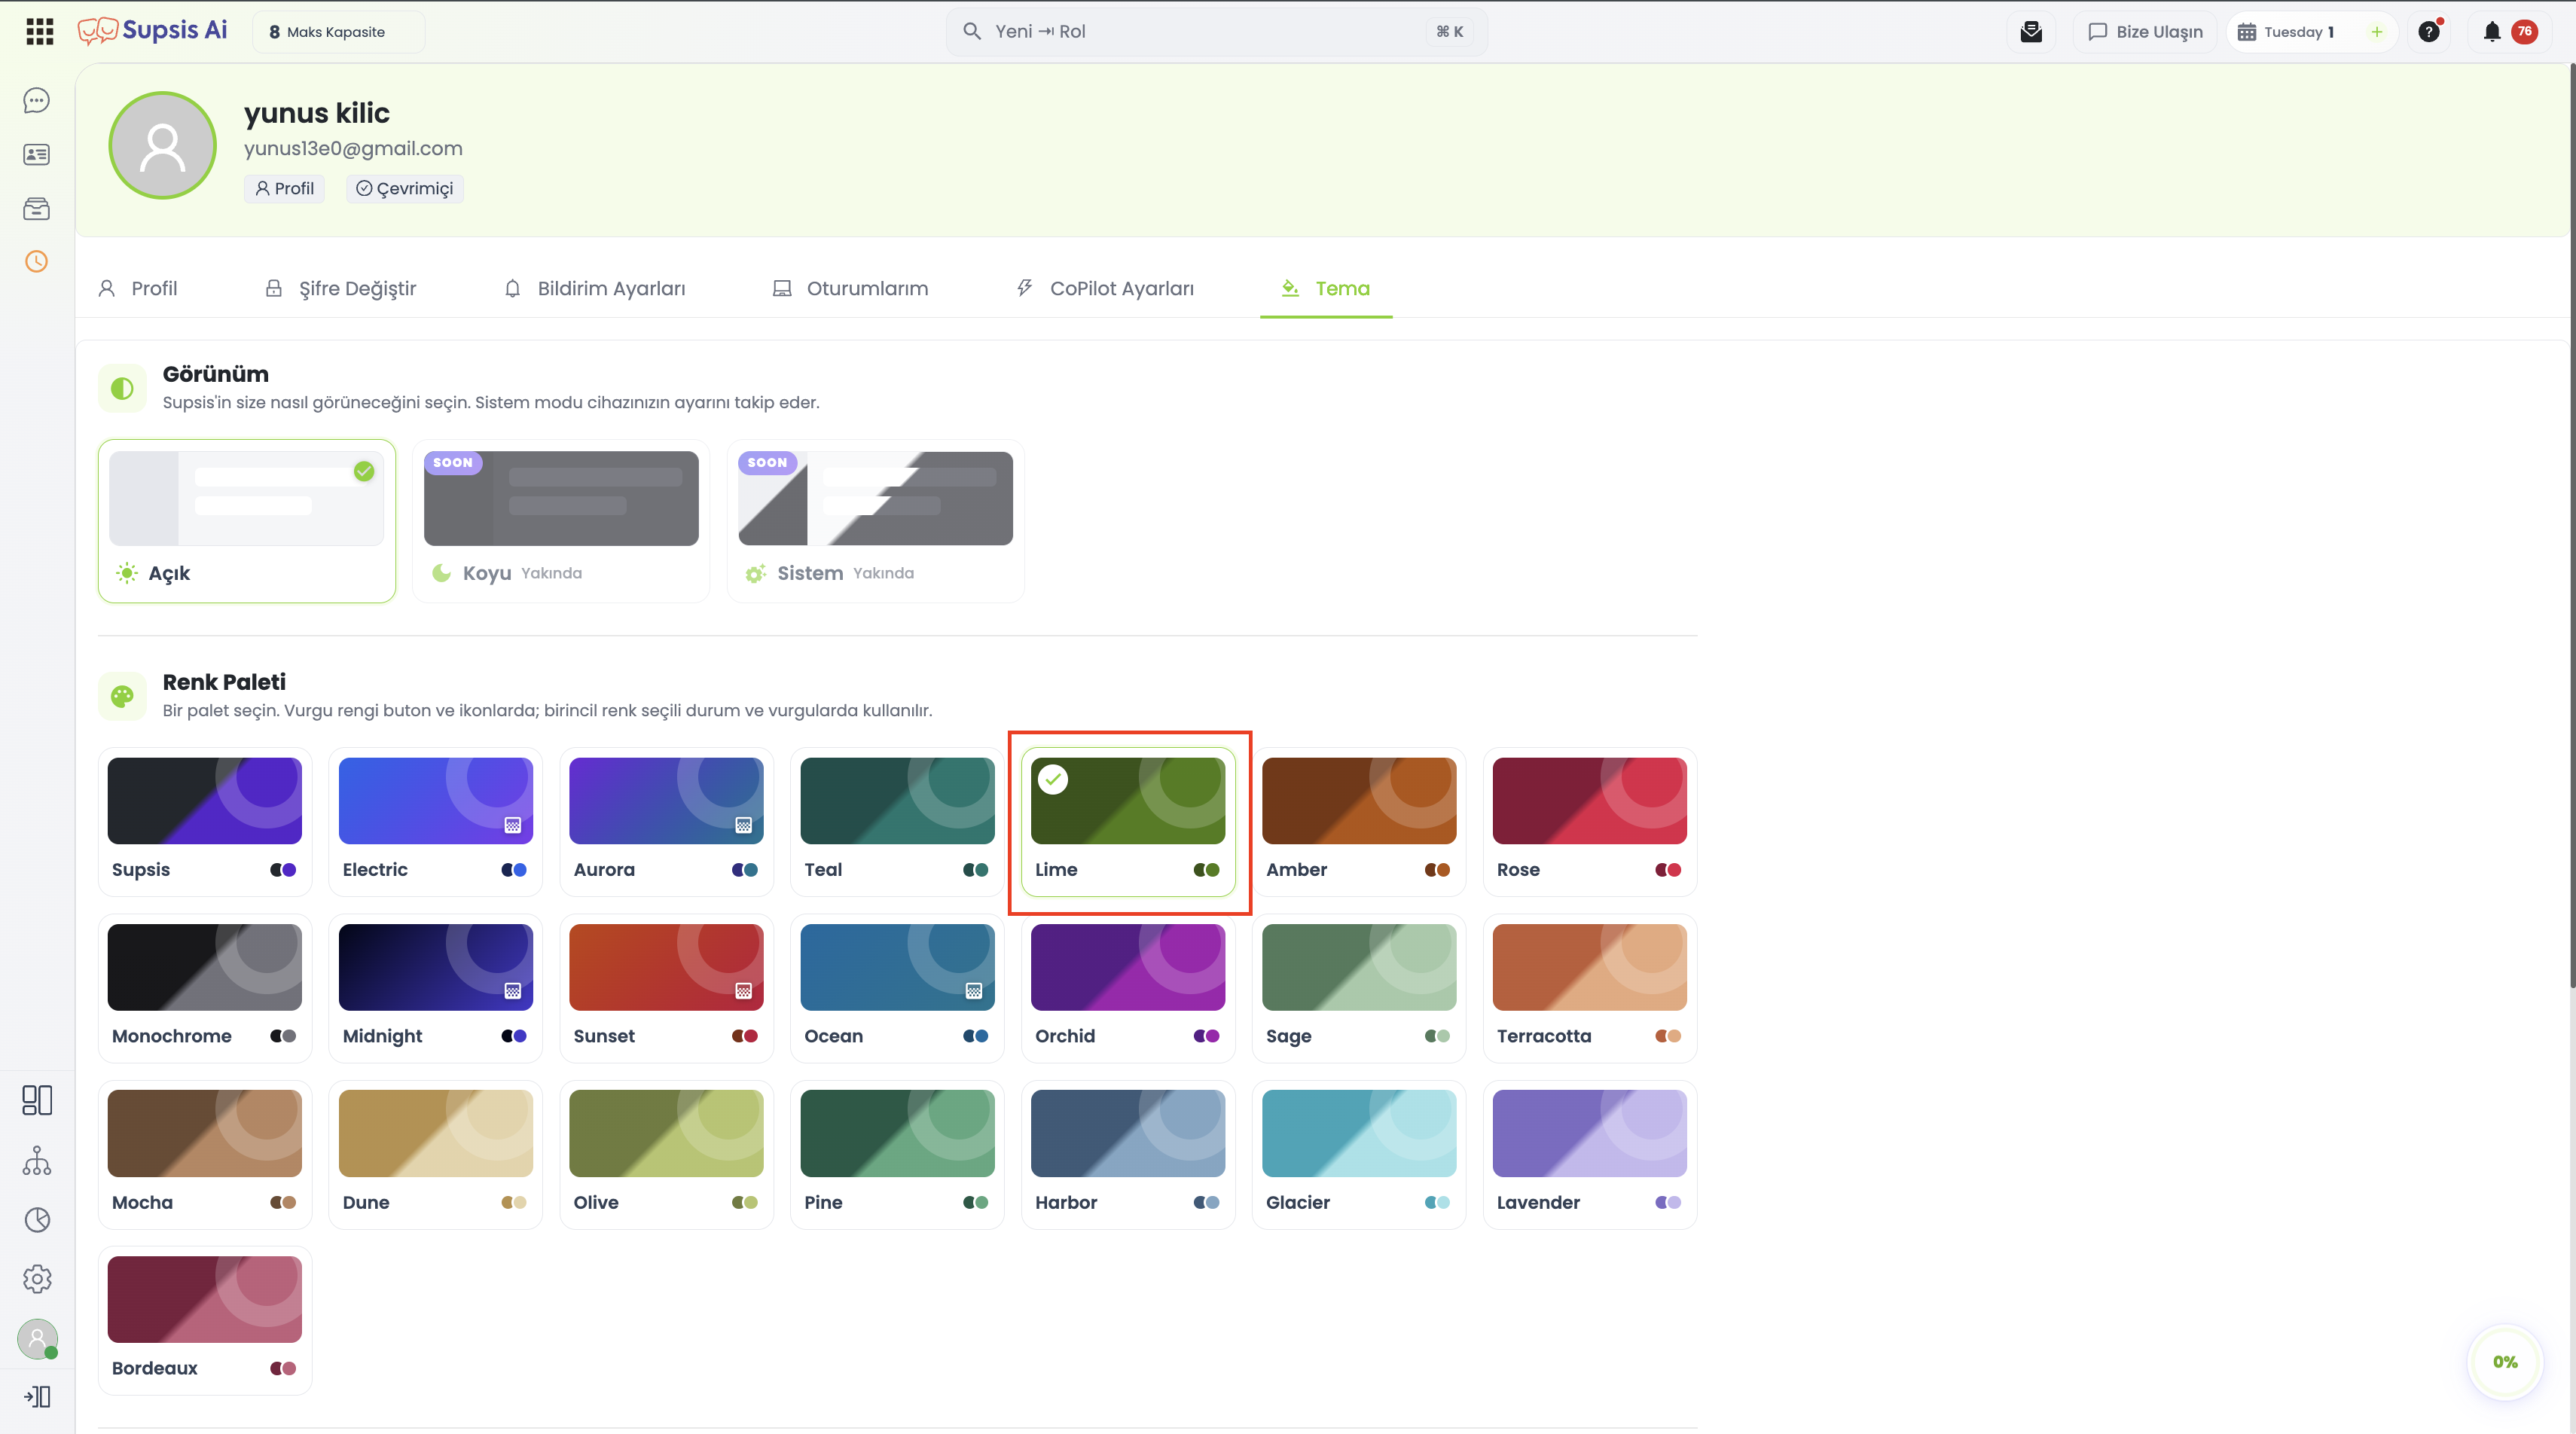
3.b- Steps to Change Theme
- Log In: Access Supsis Customer Panel (
/profile). - Open Profile Navigation: Click your avatar at the bottom-left corner, then click Profile.
- Switch to Theme Tab: Select the Theme tab (palette icon).
- Choose Mode: Select Light, Dark, or System.
- Select Palette: Pick any of the 22 curated color palettes.
4- Passkey Authentication and Session Management
A Passkey is a passwordless authentication standard built on FIDO2 and WebAuthn specifications. On supported browsers, you can sign in to the Customer Panel instantly using fingerprint recognition (Touch ID / Windows Hello), facial recognition (Face ID), or a hardware security key.
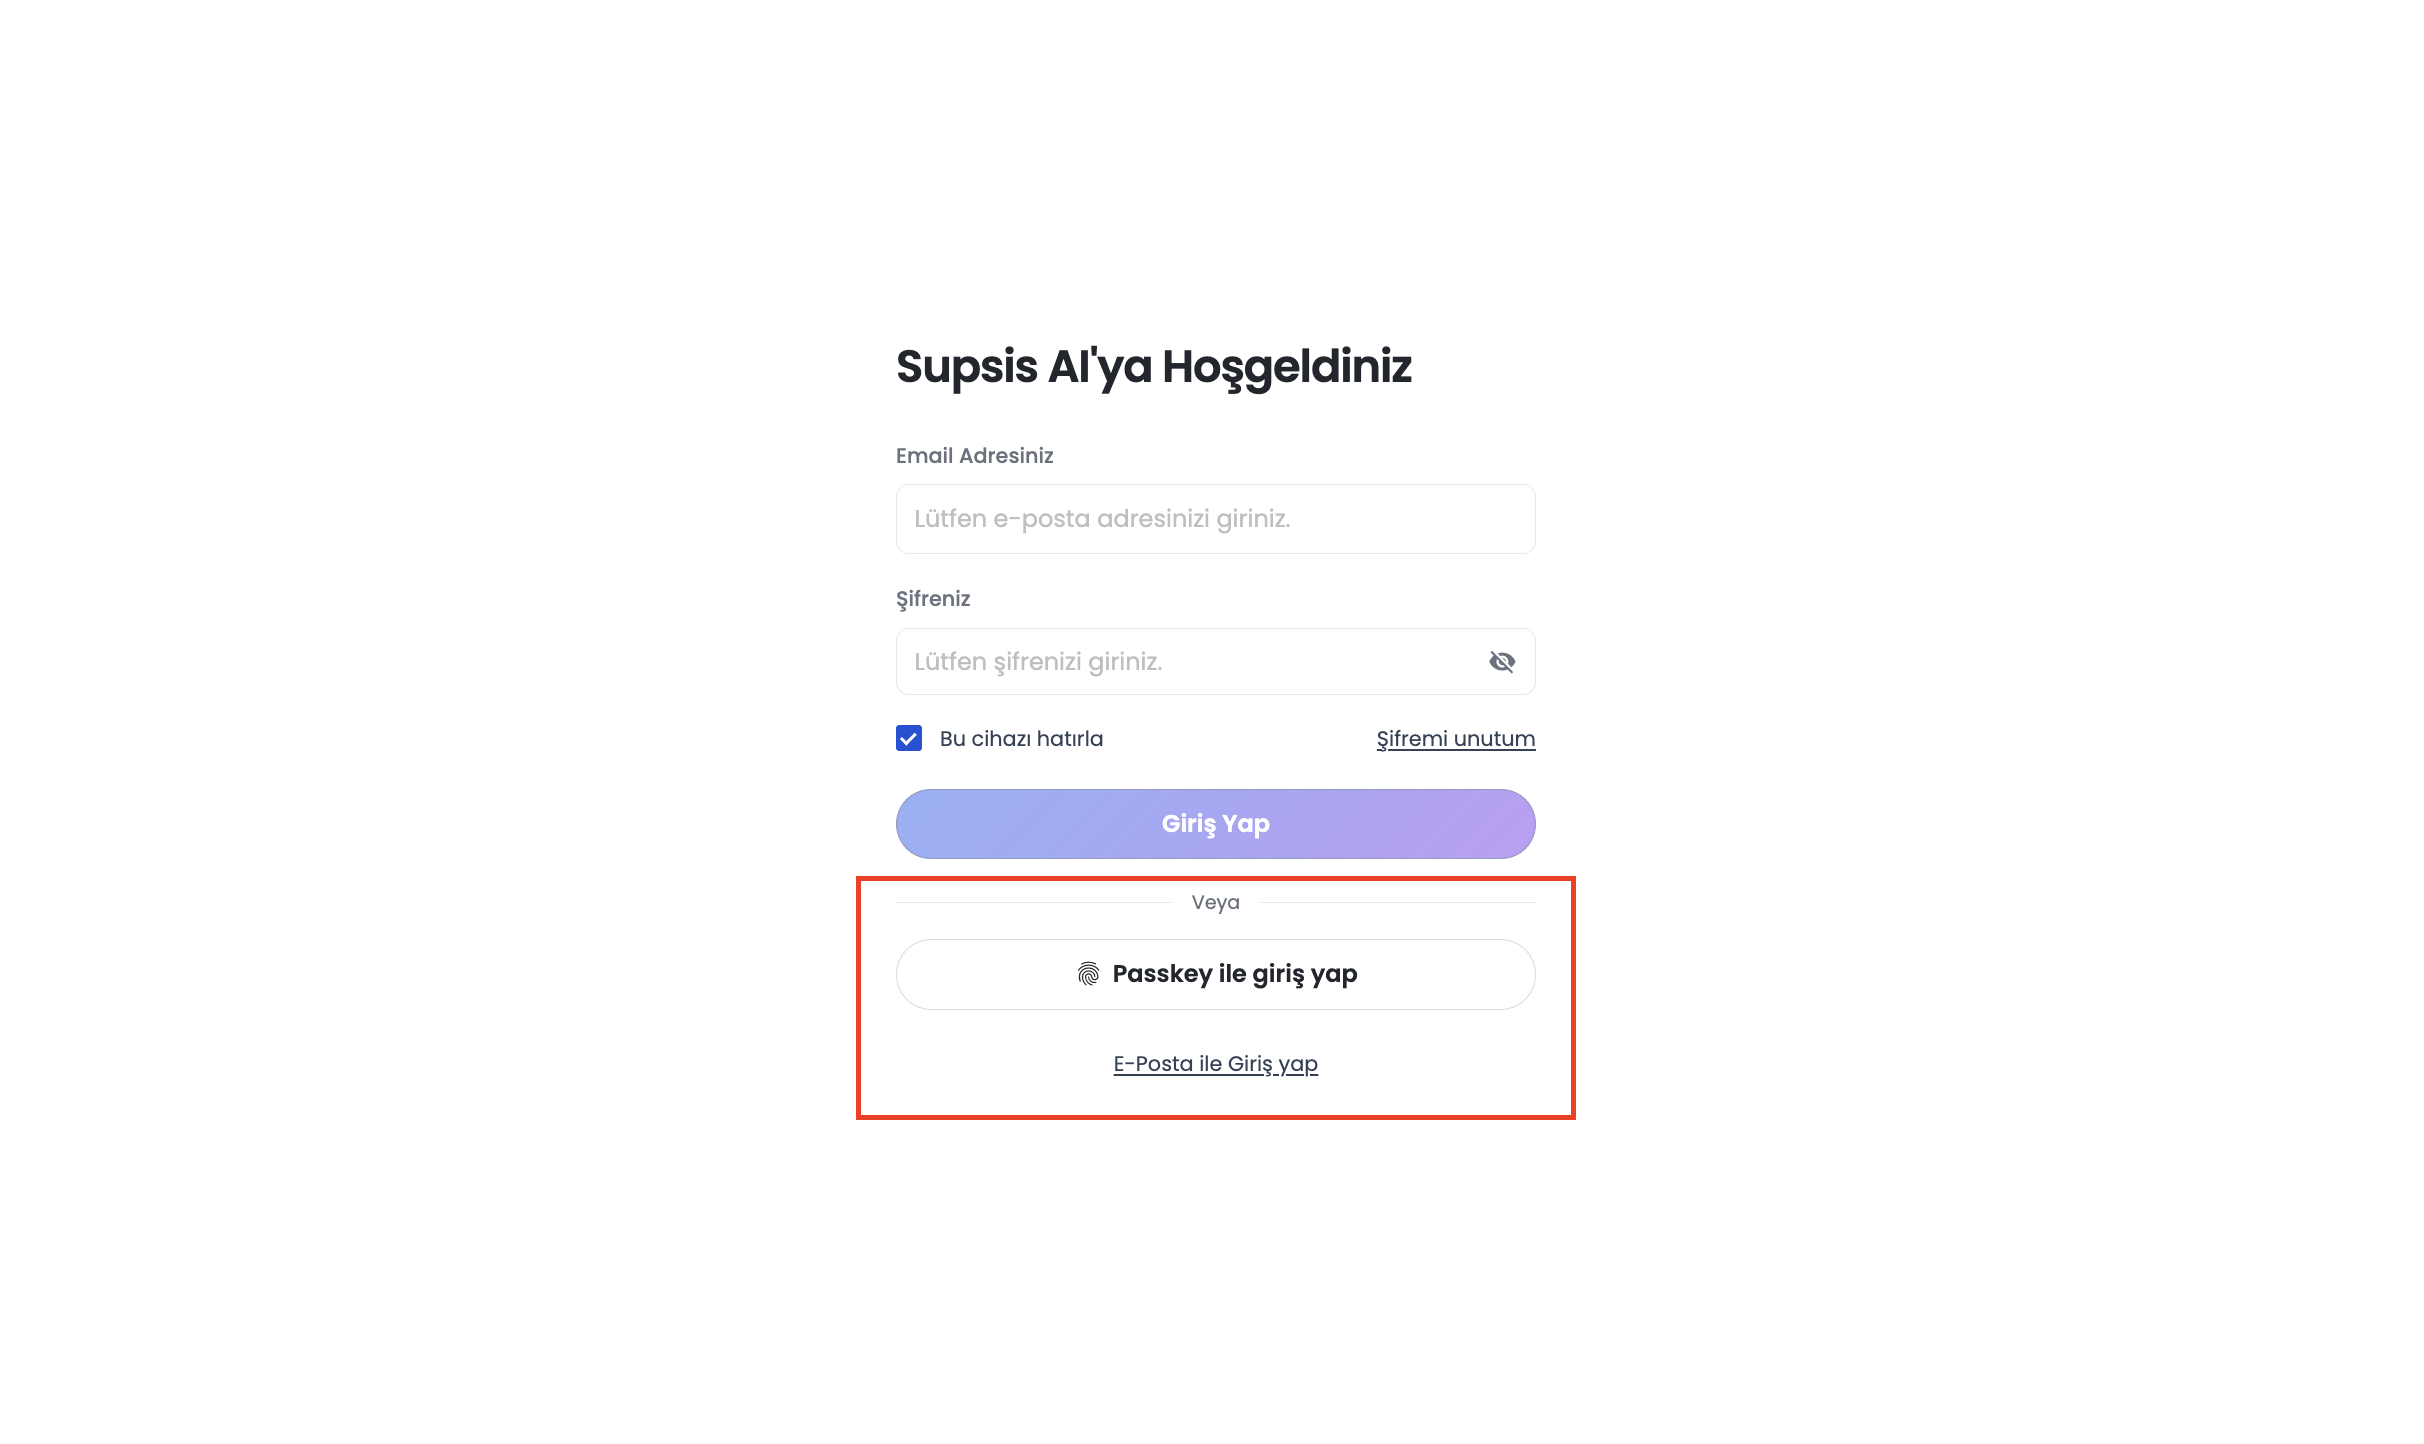
4.a- Sign-In Workflow & Smart Automatic Prompt
- Sign-In Button: On the login page, a Sign in with Passkey button (fingerprint icon) is placed directly beneath the email/password form. This button is hidden automatically if the browser lacks WebAuthn support.
- Smart Auto-Prompt: If a user previously enrolled a Passkey on the current device and their last successful login used a Passkey, opening the login page in a fresh browser session triggers the biometric verification prompt automatically.
- Cancellation Safeguard: If a user cancels the automatic prompt, the system will not aggressively re-trigger it during the same session; the user can manually click the button anytime. Auto-prompt is suppressed after explicit logout within the same browser tab.
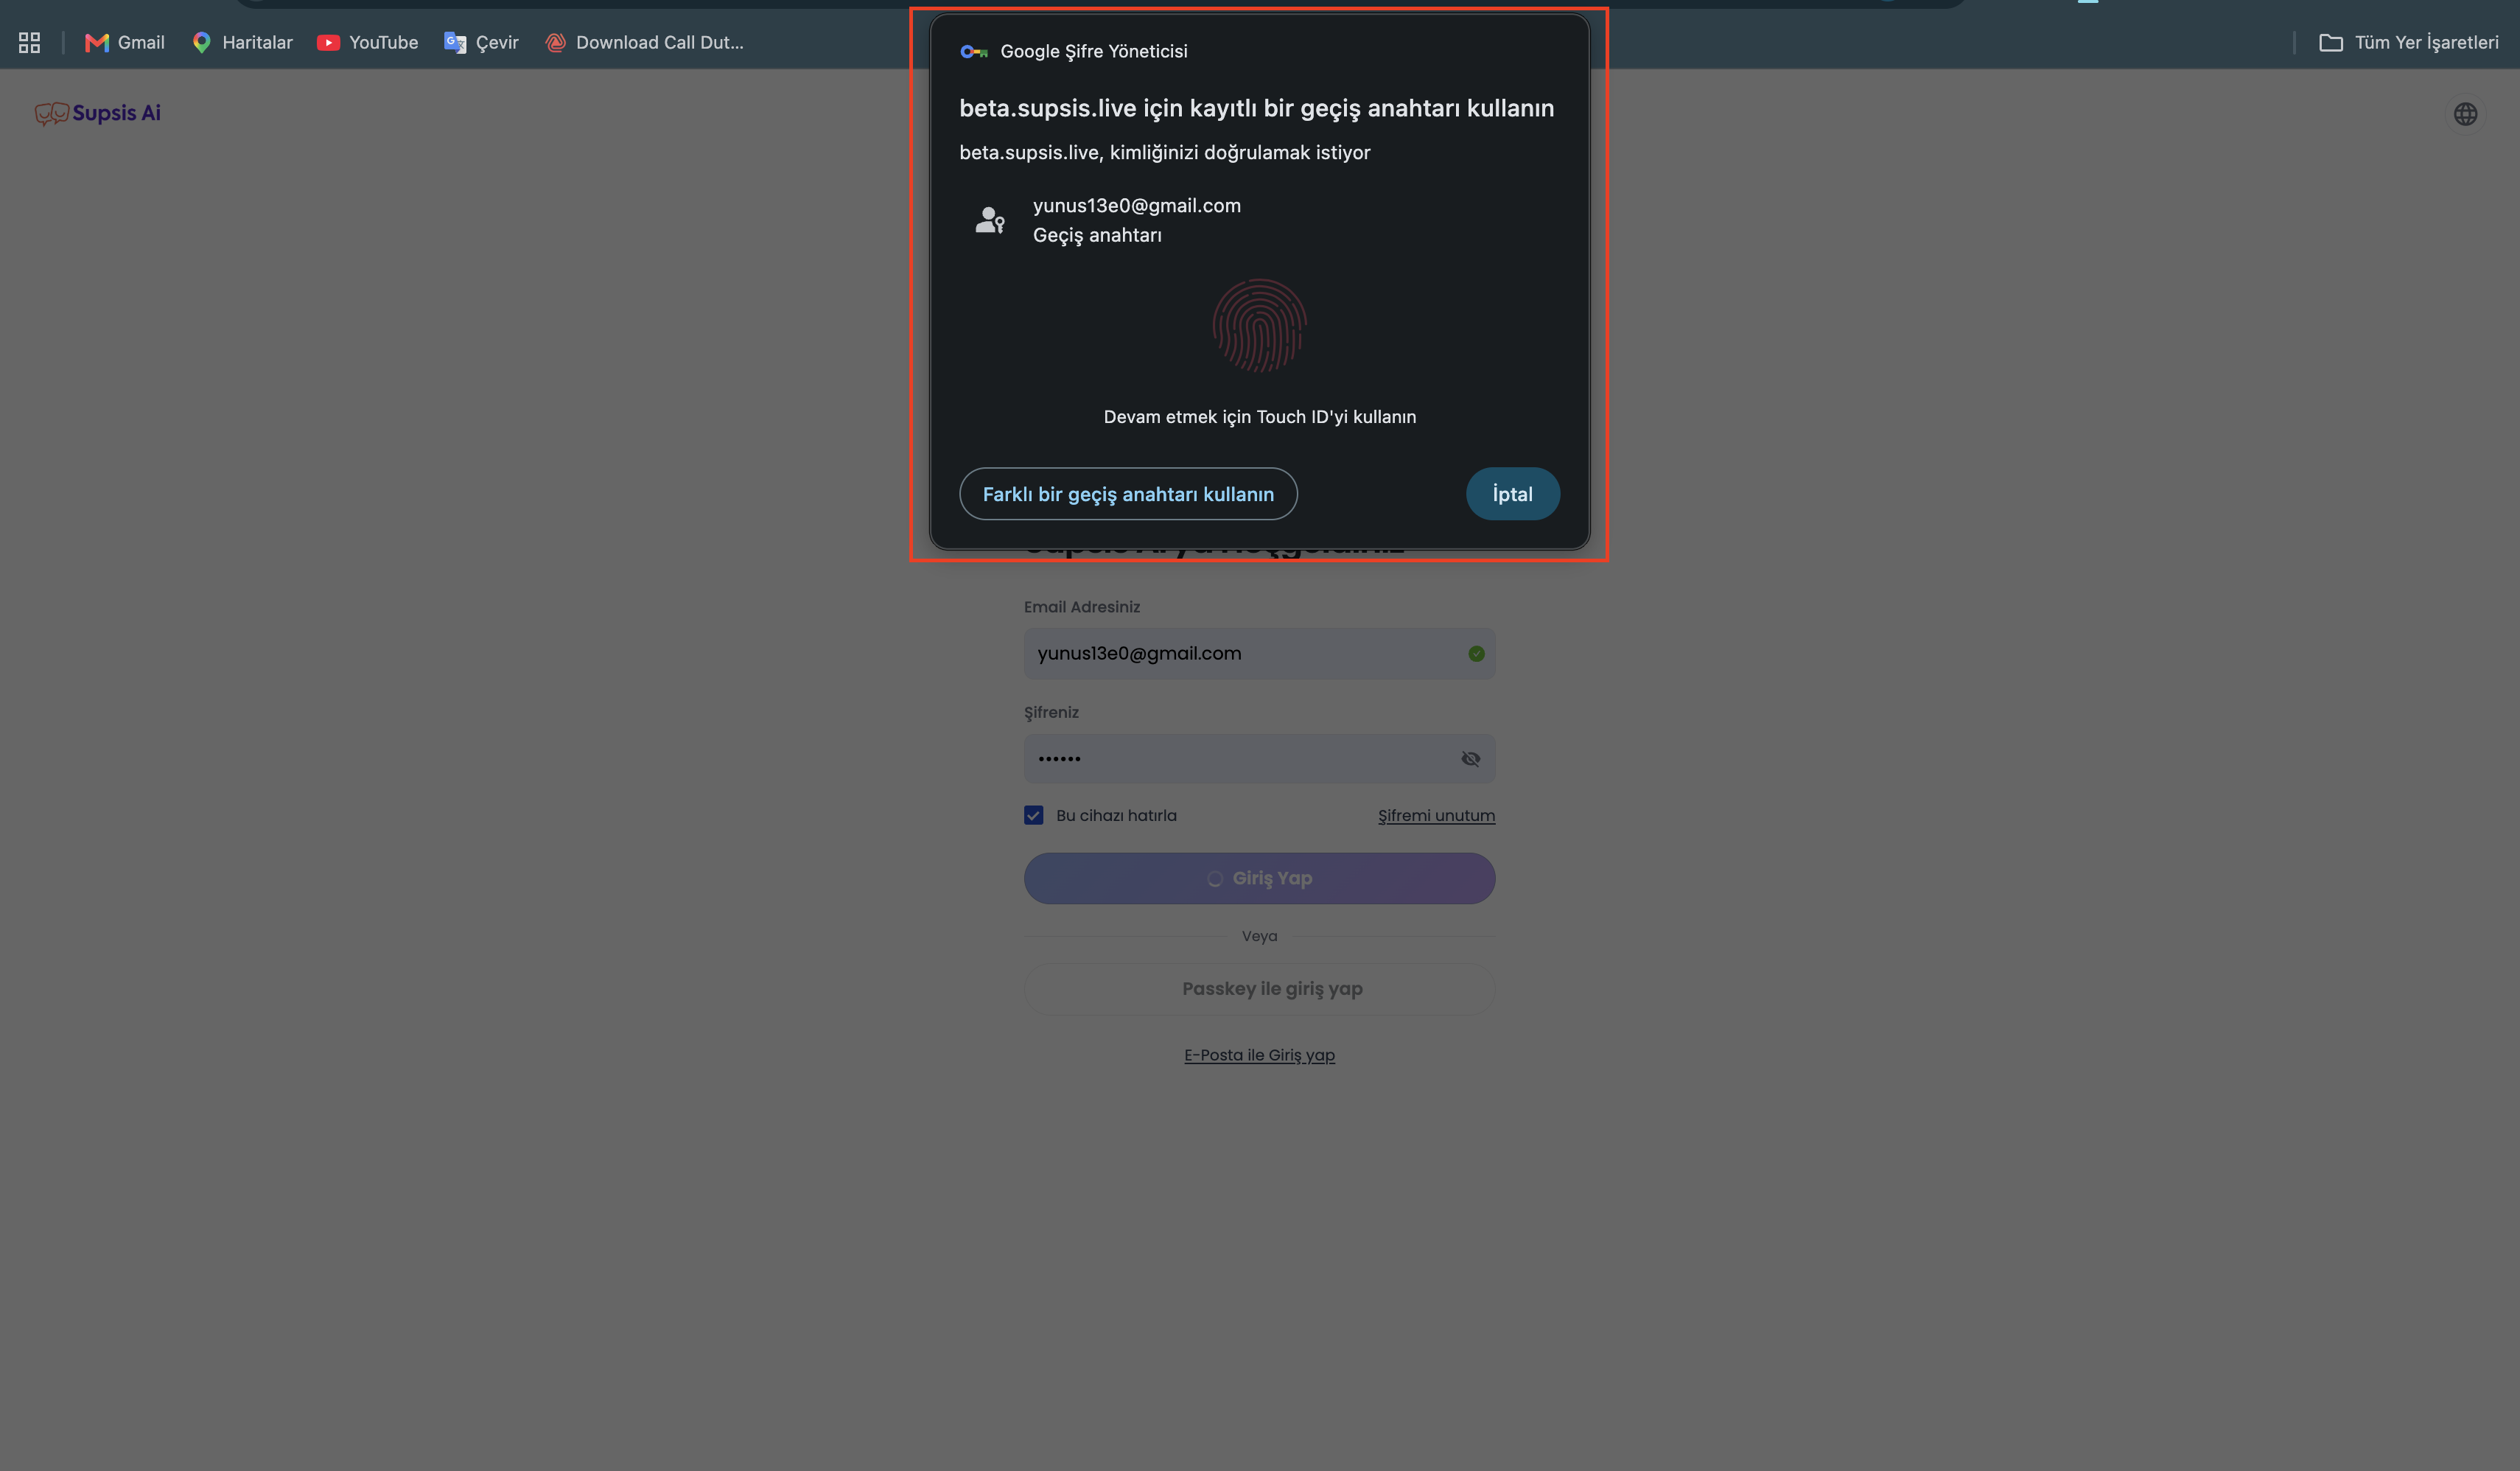
4.b- Initial Enrollment & Device Pairing
Signing in with email and password for the first time on an unenrolled device displays the "Set Up a Passkey" onboarding modal:
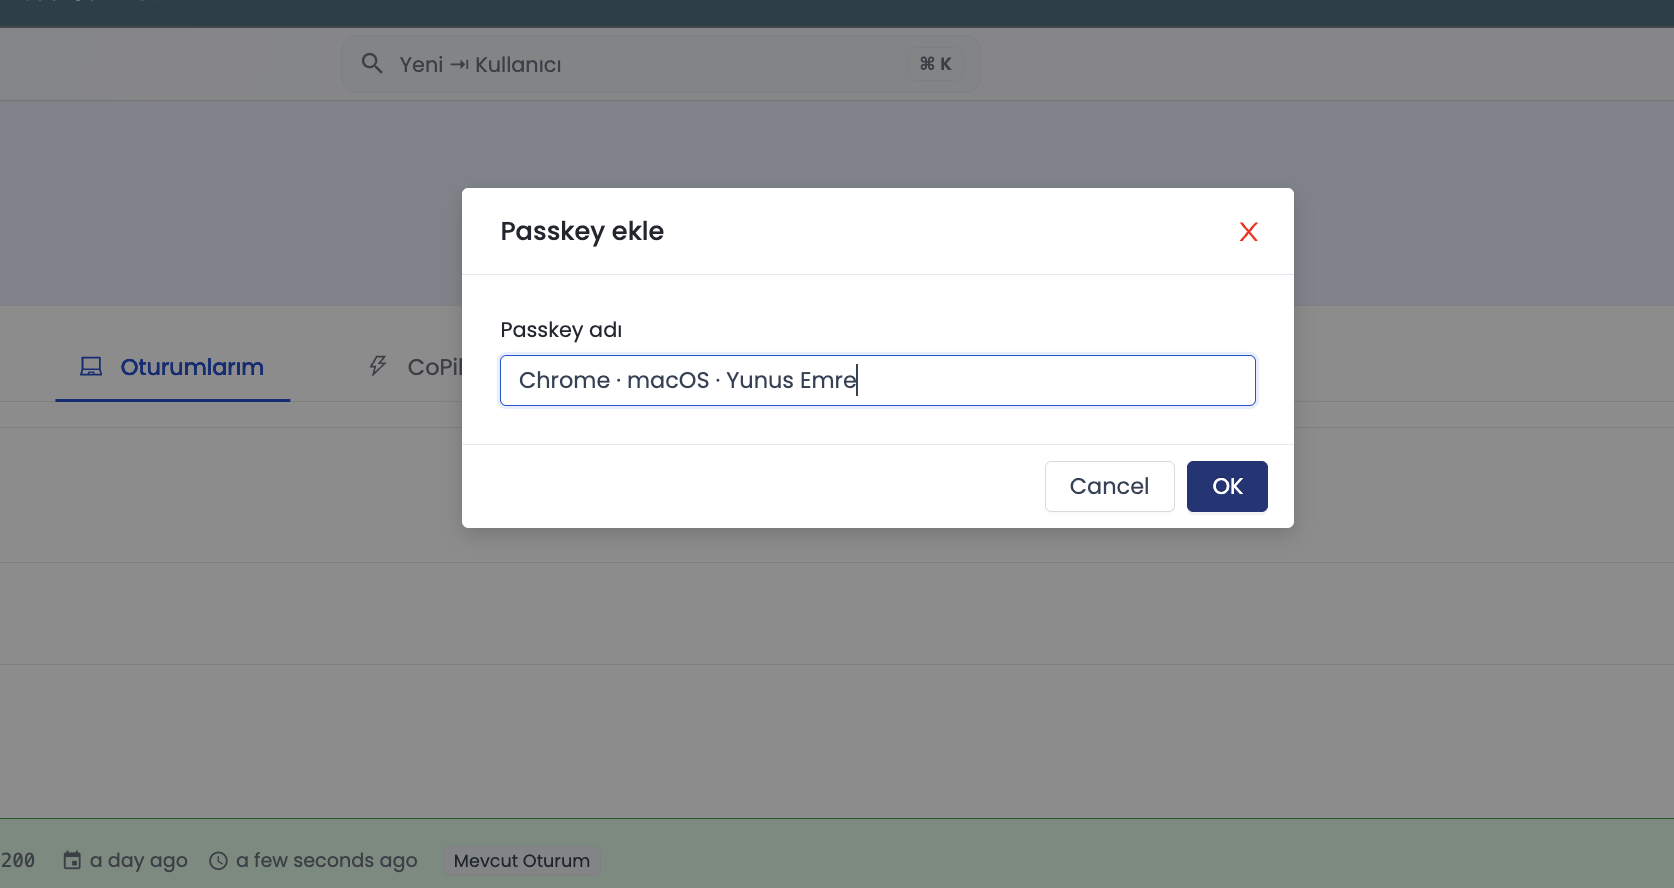
- Default Device Naming: Formatted as Browser · Operating System · User Name (e.g., Chrome · macOS · Jane Doe).
- Customizable Name: The label can be customized to identify the physical device easily.
- Actions: Click Set up Passkey to register biometric credentials, or select Not Now to skip.
4.c- Managing Passkeys under Profile > Sessions
Access your registered credentials from the Sessions tab on the Profile page:
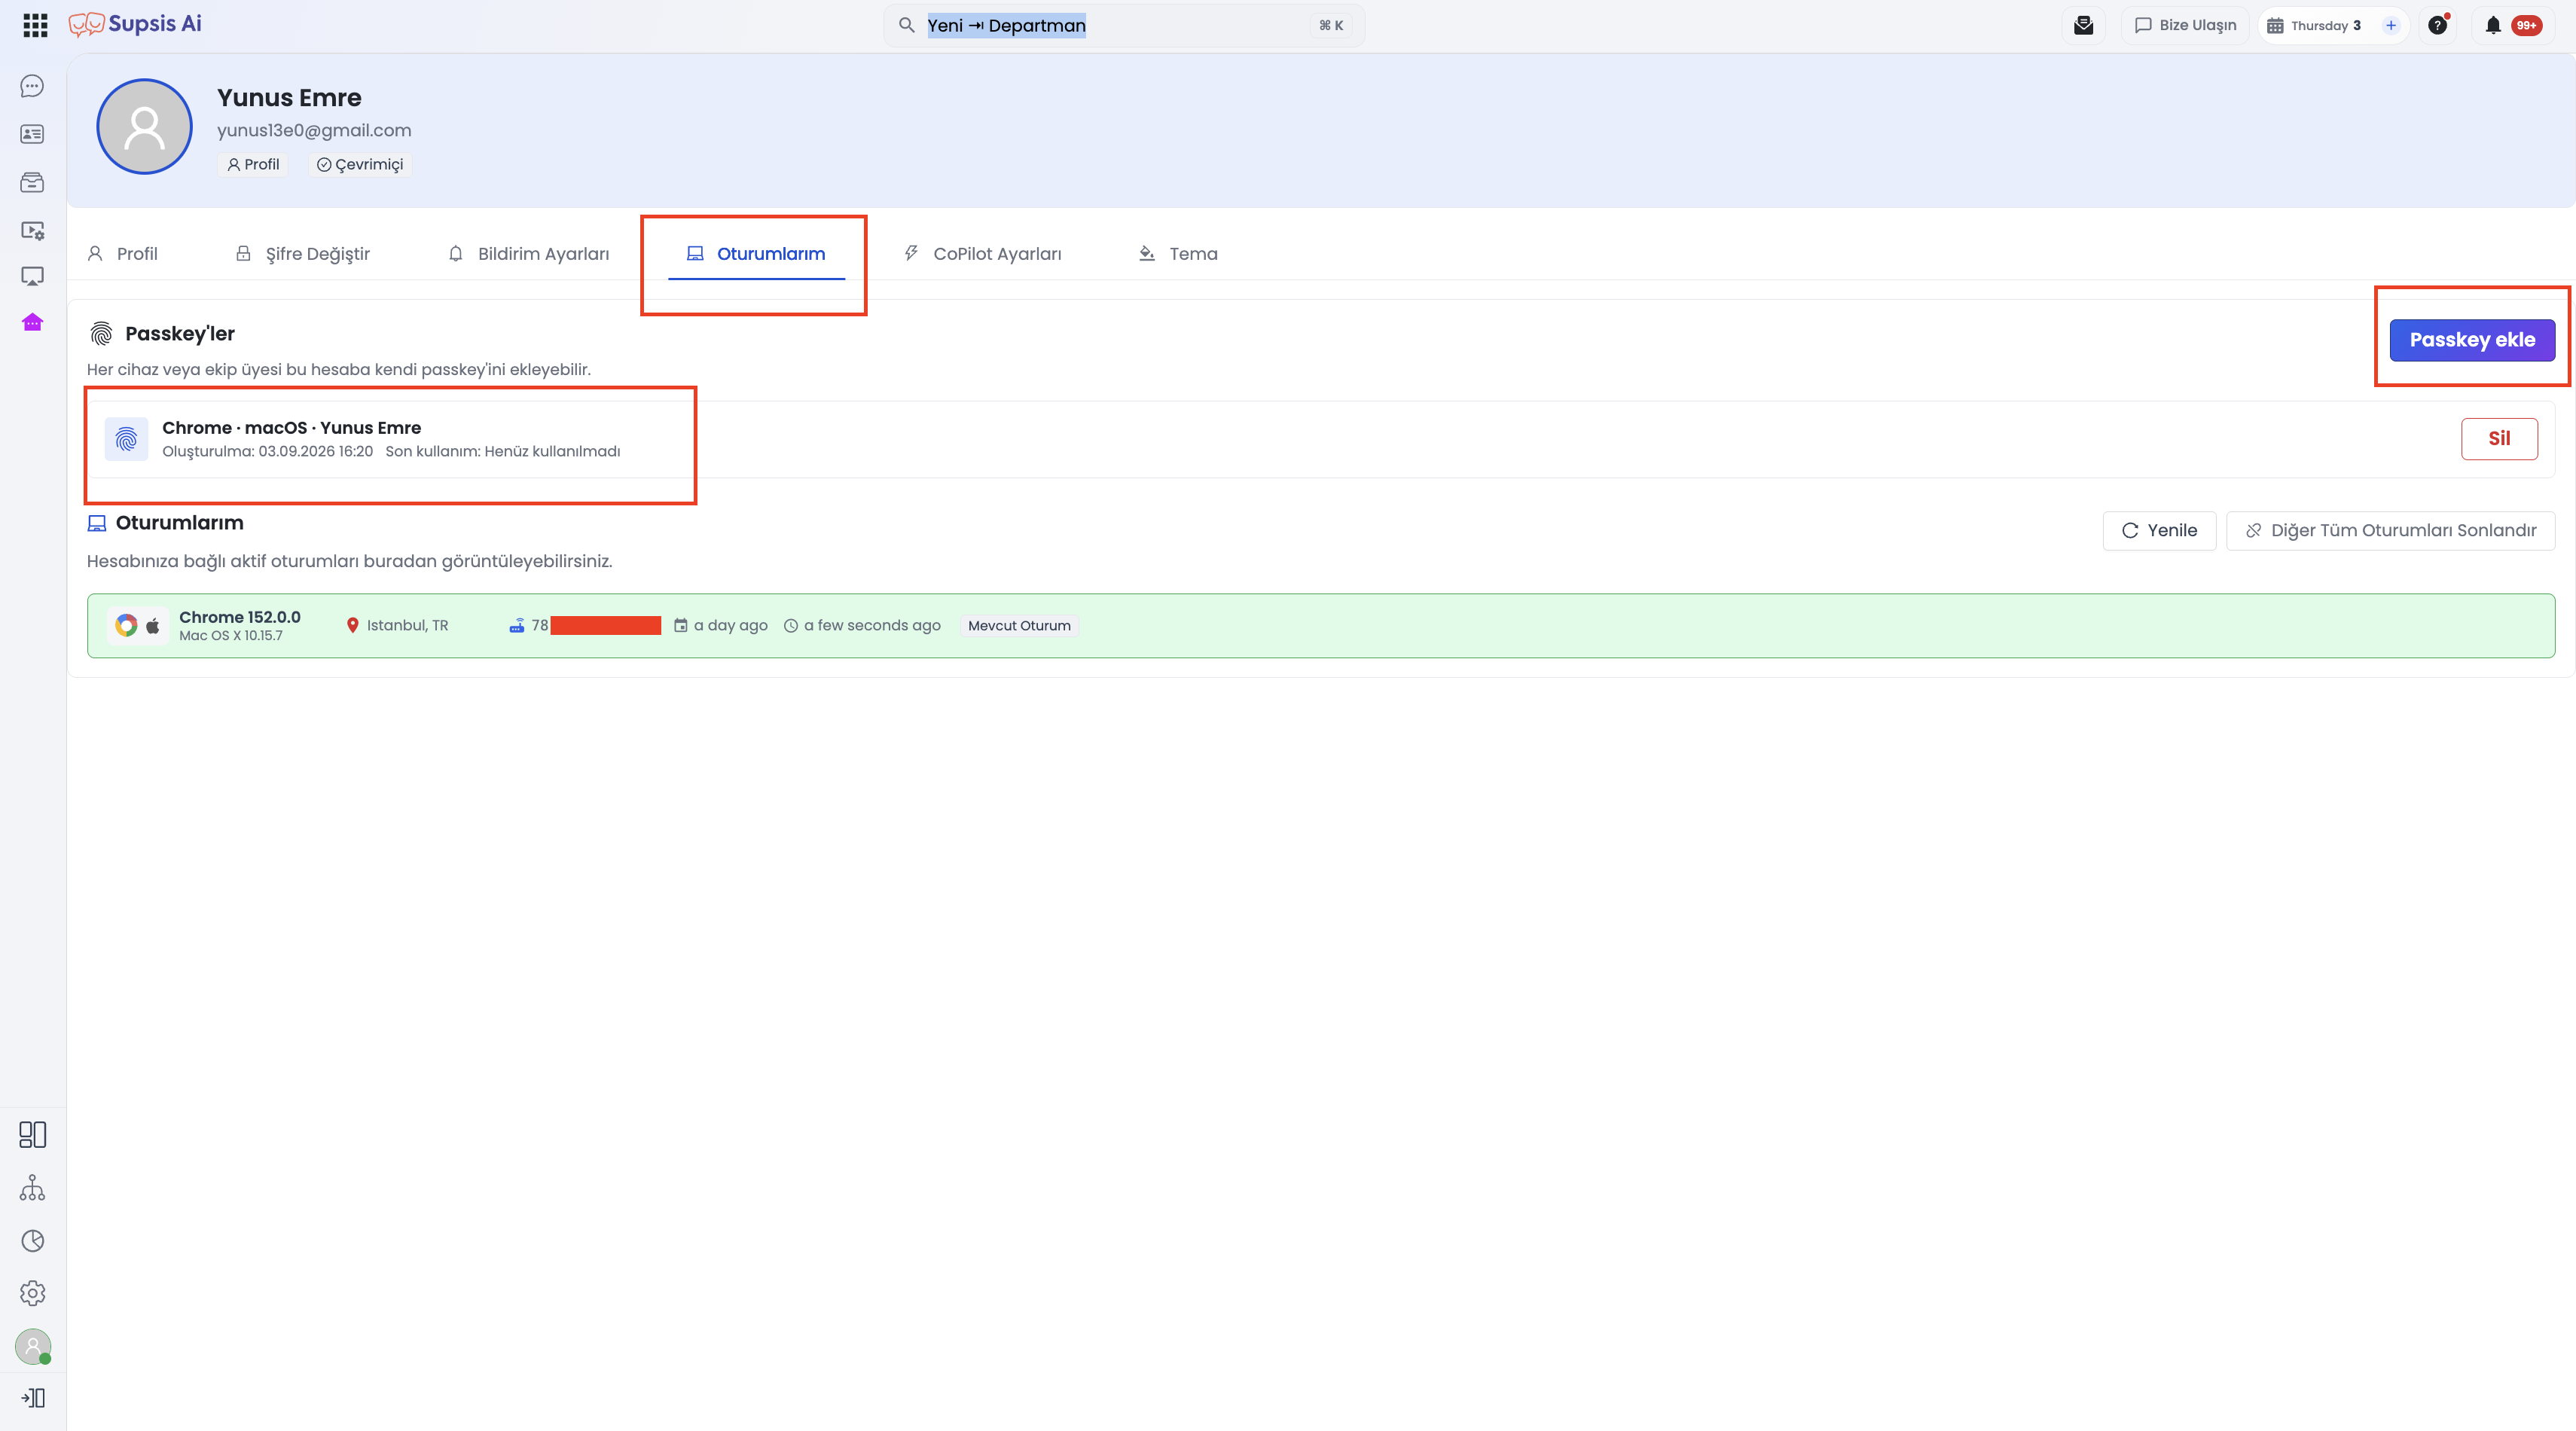
- Registered Credentials Table: Displays credential label, creation date, and last usage timestamp.
- Multi-Device Support: Enroll separate credentials for your work laptop, tablet, and mobile device under the same account.
- Revocation: Instantly remove lost, obsolete, or decommissioned devices by clicking Delete.
4.d- Biometric Confirmation for Critical Channel Deletion
To prevent accidental deletion or unauthorized tampering with vital customer touchpoints, deleting critical channels prompts an identity challenge:
- Passkey Confirmation: If a Passkey is enrolled, the system requests biometric verification by default.
- Password Fallback: Users can switch to standard password verification via the Use Password option.
- Protected Channels:
- WhatsApp Business API (and Cloud API)
- Instagram & Instagram V2
- Messenger
- Telegram & Telegram Unipile
- LinkedIn Unipile
- TikTok & TikTok Leads
- Meta Leads
- NetGSM WebPhone
- Supsis Voice Agent
4.e- Step-by-Step Passkey Guide
- First-Time Enrollment:
- 1.a- Navigate to the Customer Panel login screen (
/login). - 1.b- Log in with your email and password, then click Set up Passkey and confirm your device biometric sensor.
- 1.a- Navigate to the Customer Panel login screen (
- Subsequent Sign-Ins:
- 2.a- Click Sign in with Passkey on the login page (or accept the automated prompt).
- 2.b- Touch your biometric sensor or security key to log in instantly.
- Adding Additional Devices or Deleting Keys:
- 3.a- Navigate to Profile → Sessions.
- 3.b- Click Add Passkey to pair a new device, or click Delete to revoke existing credentials.
4.f- Use Cases and Security Advantages
| Scenario | Legacy Password Method | Biometric Passkey Method |
|---|---|---|
| Daily Agent Login | Typing lengthy passwords manually multiple times a day. | One-touch fingerprint/face verification in 1 second. |
| Critical Channel Deletion | Unattended browser tabs risk unauthorized channel removal. | Physical biometric challenge prevents unauthorized channel deletion. |
| Forgotten Passwords | Tedious password recovery email flows. | Log in securely using enrolled device Passkeys without resetting passwords. |
4.g- Important Security & Compatibility Notes
Browser & Protocol Prerequisites
Passkey technology requires a modern WebAuthn-compliant browser (Chrome, Safari, Edge, Firefox) served exclusively over secure HTTPS connections.
Password Independence
Updating or resetting your account password does not invalidate active Passkeys. Cryptographic key pairs function independently of passwords.
Deactivated & Deleted Users
Users flagged as deleted or inactive (enable=false) are strictly blocked from logging in via Passkeys. Re-activating the account restores existing Passkey functionality.