
3-) Business
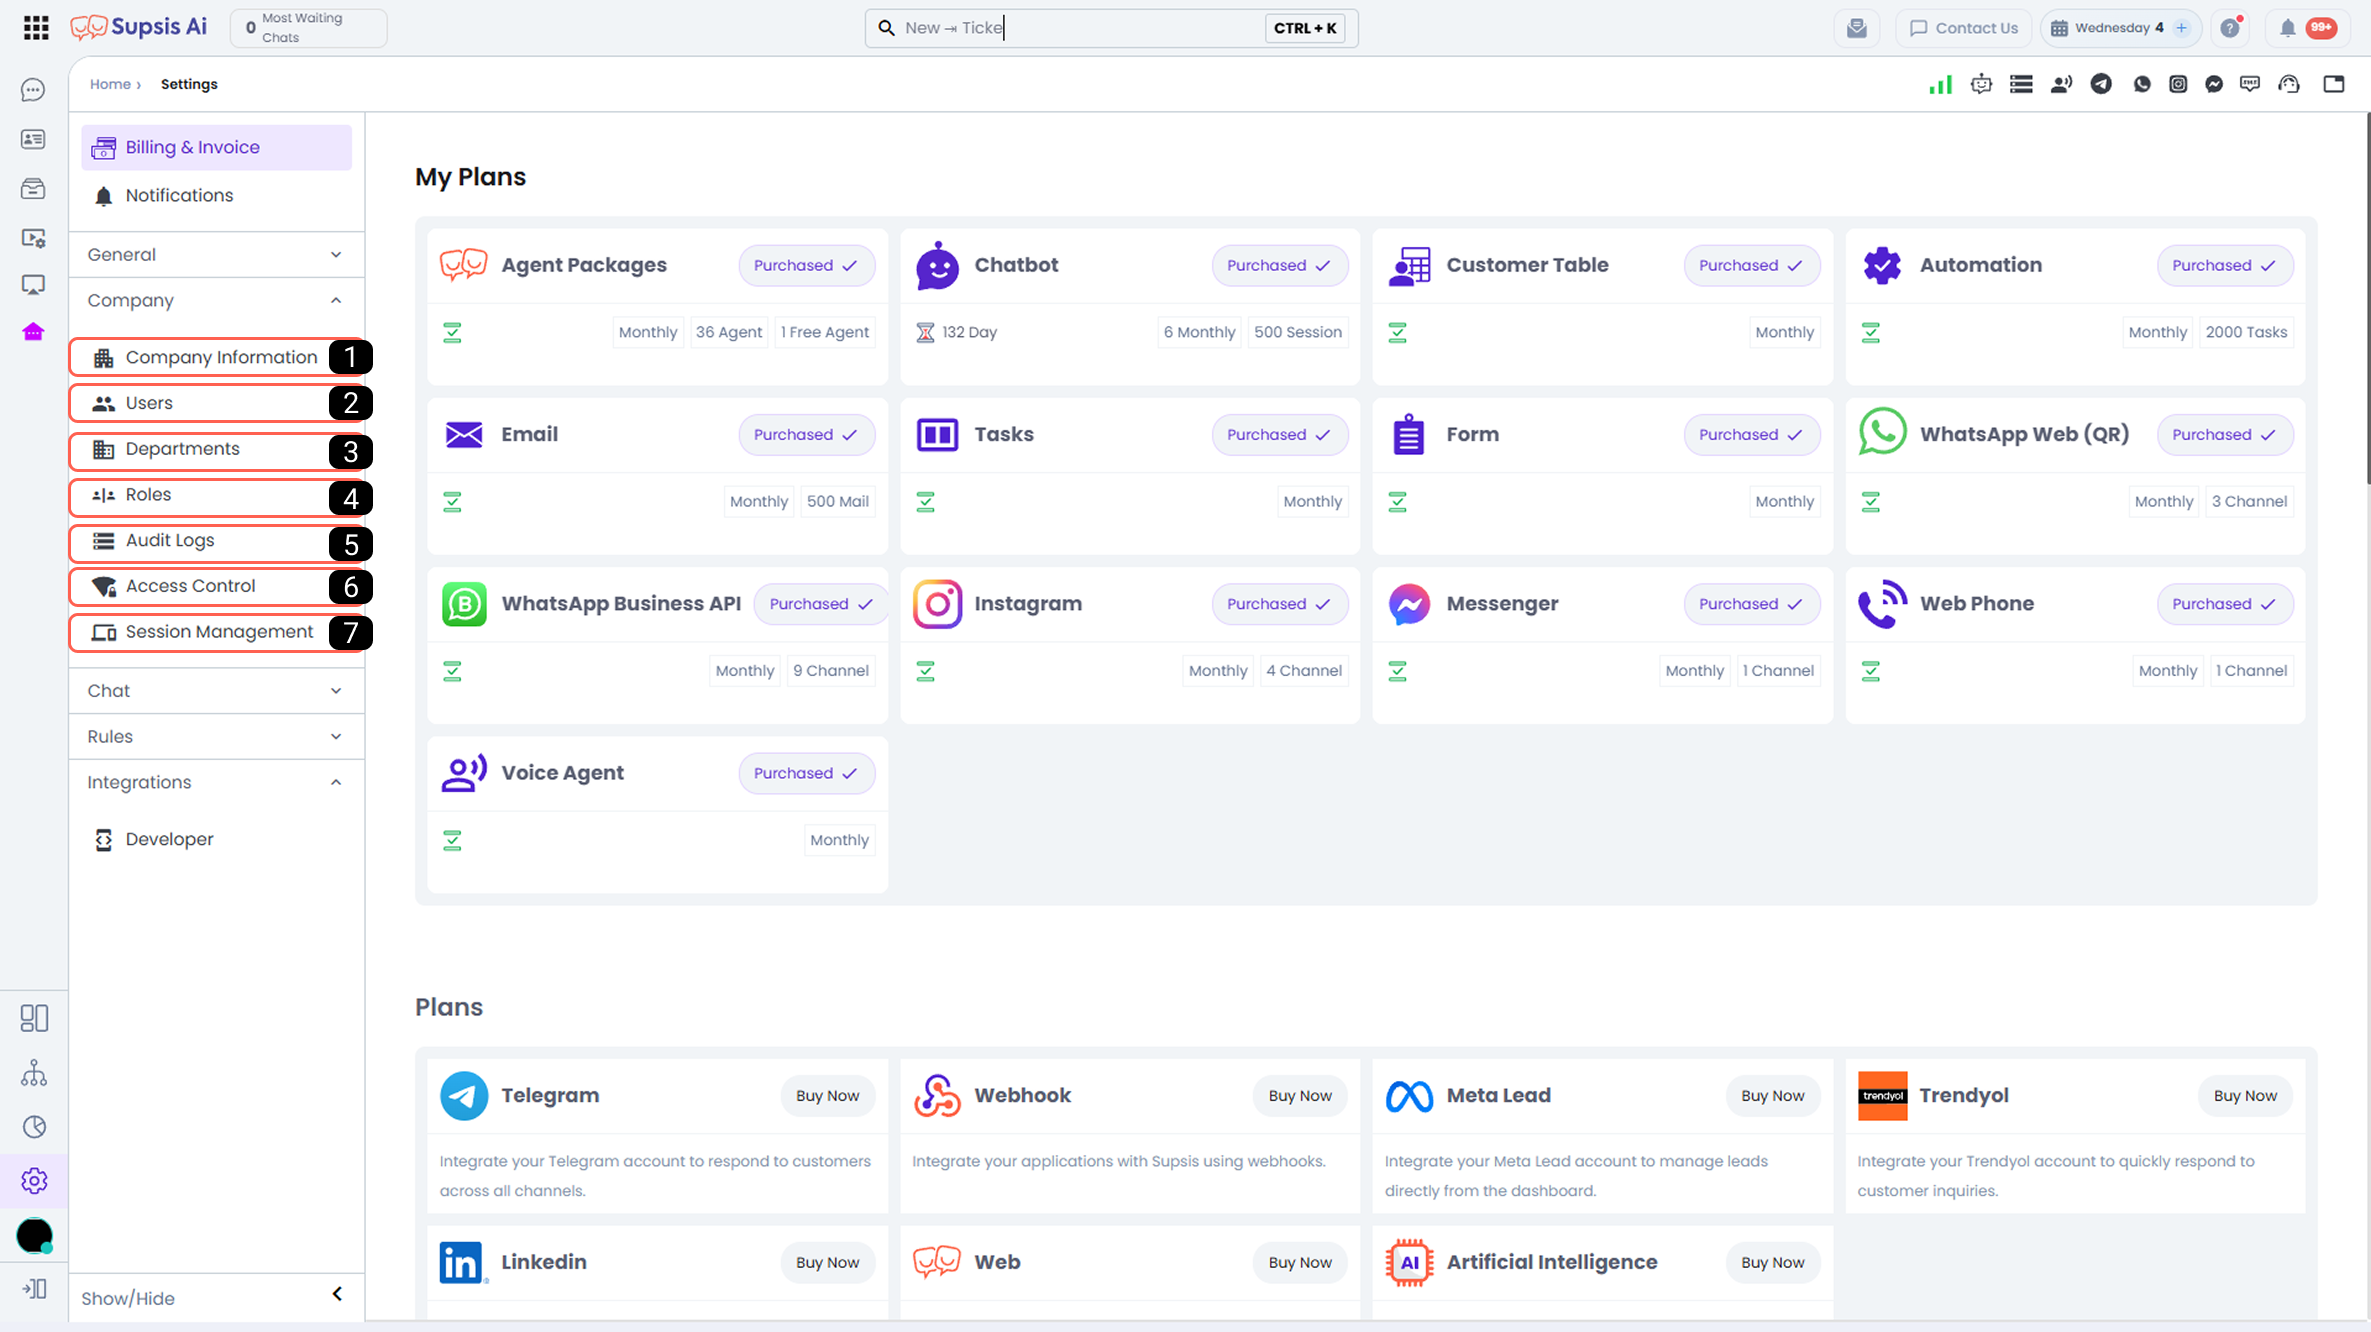
| No | Menu |
|---|---|
| 1 | Business Information |
| 2 | Users |
| 3 | Departments |
| 4 | Roles |
| 5 | Audit Logs |
| 6 | Access Control |
| 7 | Session Management |
1-) Business Information
The Business Information section is where the core details representing your company within Supsis Ai are managed. The information defined here is displayed in customer interactions, chatbot appearances, and certain areas within the platform, reflecting your corporate identity.
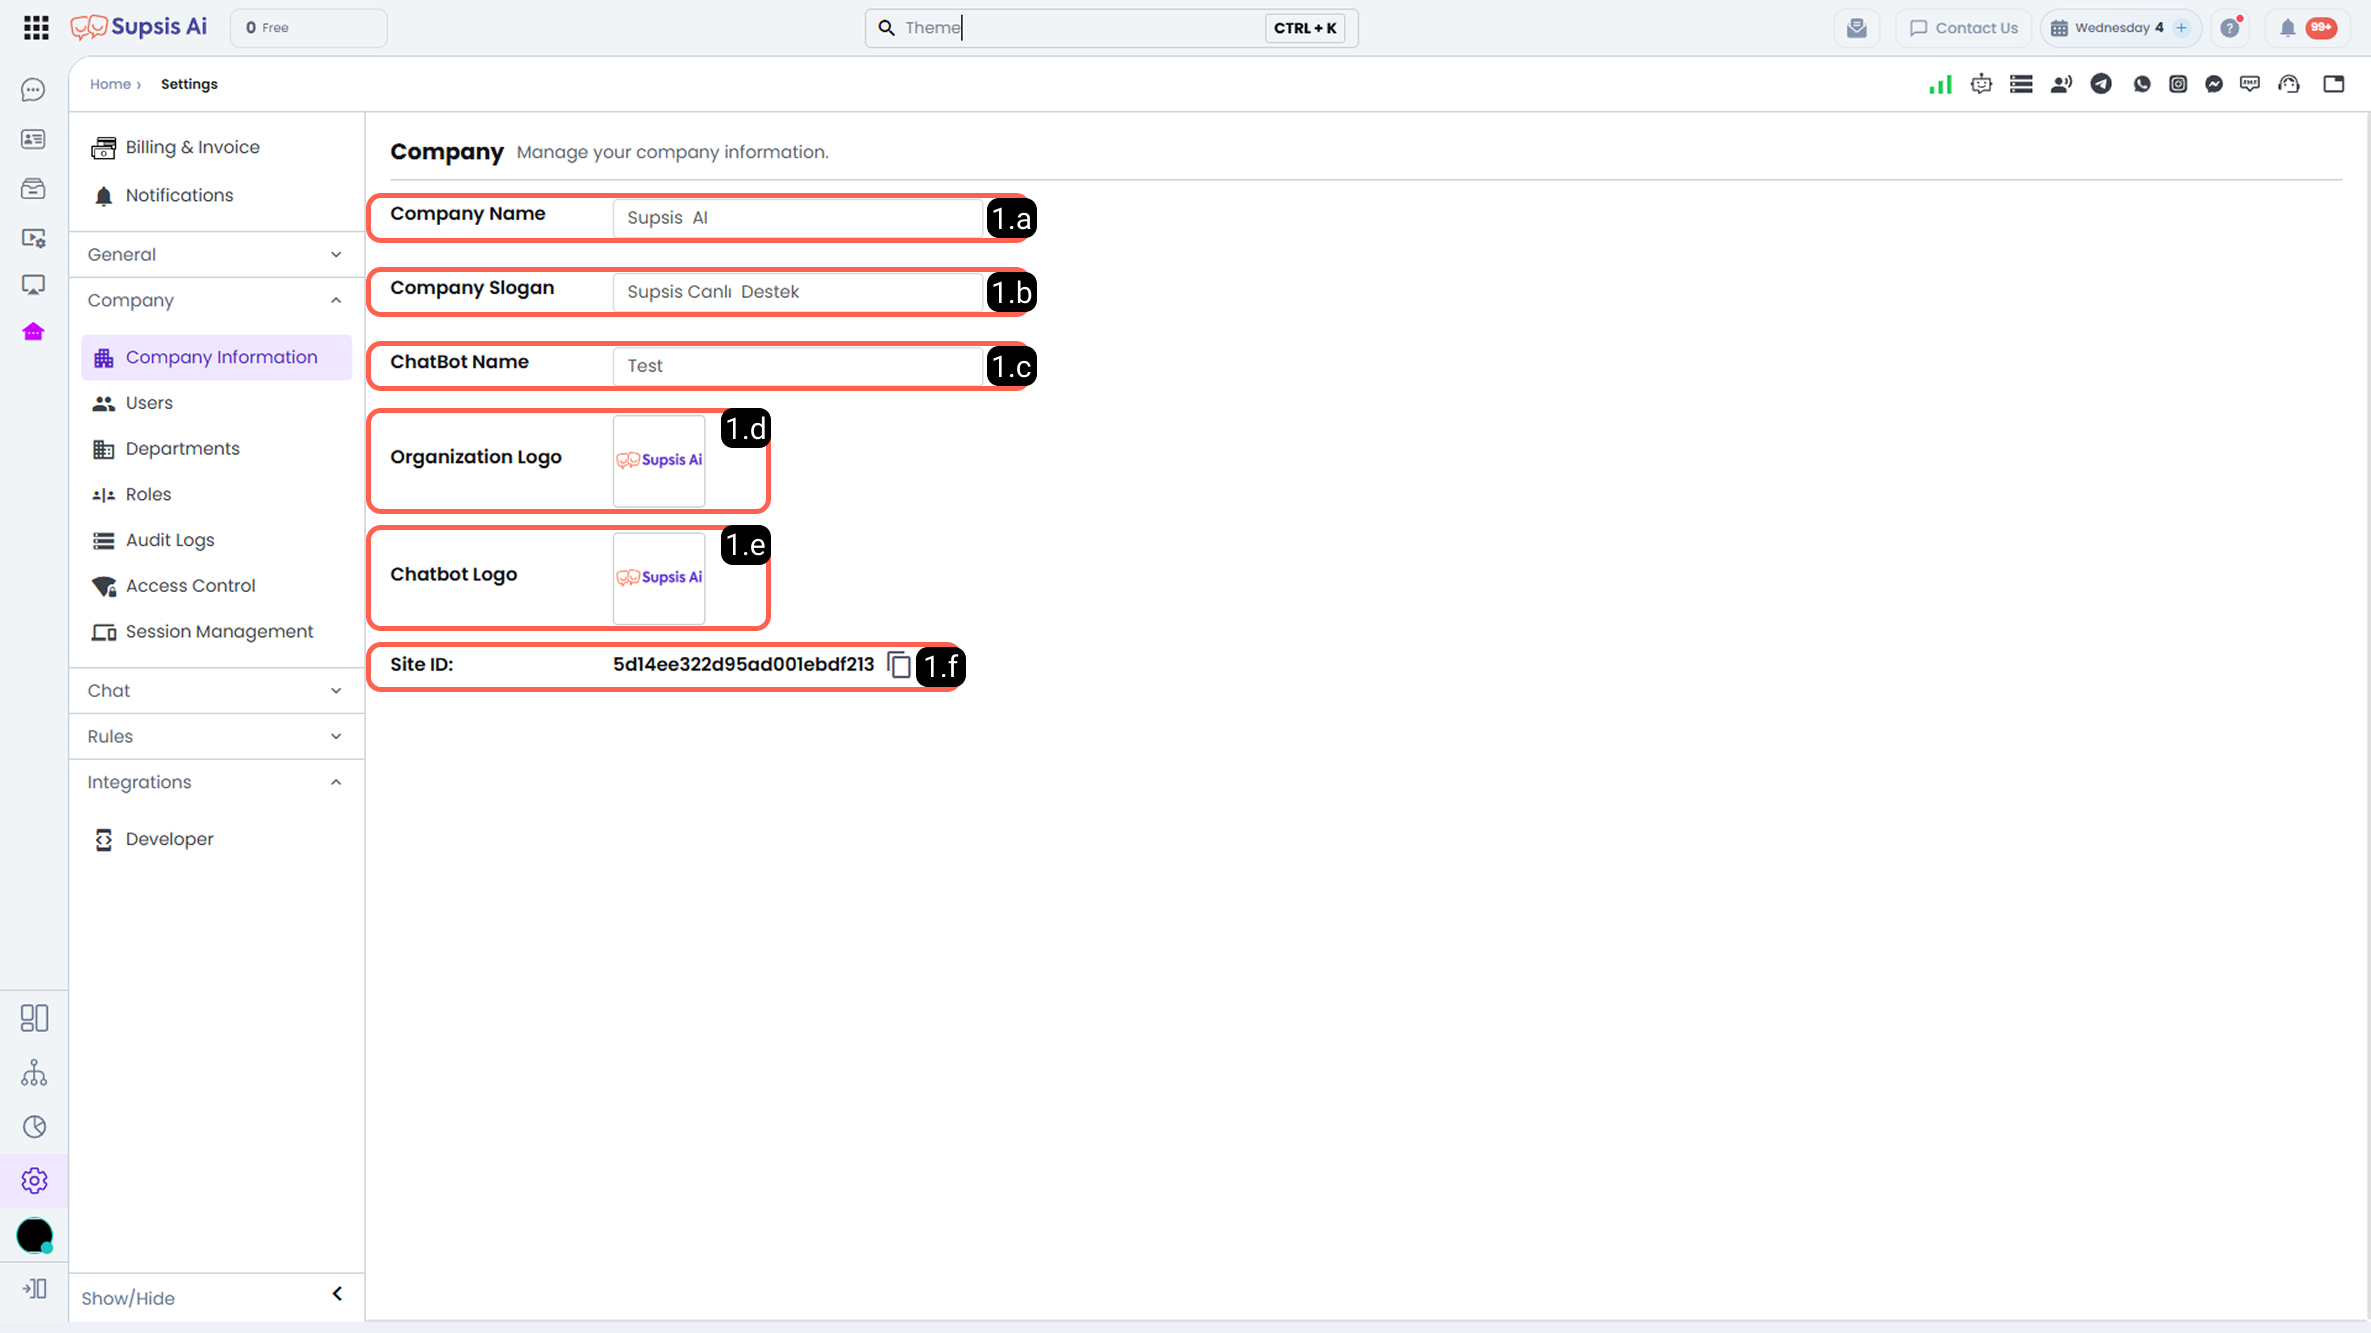
1.a – Business Name:
In this field, you can enter the name you want your customers to see. The defined business name is displayed in areas where customer interactions occur via the chat bubble.
1.b – Business Slogan:
You can add a slogan in this field that reflects your company’s mission or communication tone. The defined slogan is displayed during certain customer interactions to support brand perception.
1.c – Chatbot Name:
The name defined in this field is the chatbot name displayed when users interact with the chatbot via the chat bubble. The chatbot name is used to personalize the user experience and maintain brand consistency.
1.d – Business Logo:
You can upload your company logo in this field. The logo represents your brand and ensures recognition during customer interactions. Using a high-resolution logo with appropriate dimensions provides a more professional appearance.
1.e – Chatbot Logo:
The image added in this field is displayed as the chatbot logo when users interact with the chatbot via the chat bubble. The chatbot logo strengthens brand consistency during the chat experience.
1.f – Site ID:
The Site ID is a unique identification number that ensures your Supsis Ai panel is uniquely defined within the system. This ID is actively used, especially in API integrations and other external connections.
2-) Users (Add User, Create User & Agent Management)
The Users menu is where all management operations for users and support agents who have access to the Supsis AI panel are performed. From this screen, you can add user, create new user, add agent, and update user permissions, roles, and other configurations.
- Site Owner Icon (👑): To easily distinguish who the site owner is in the user list, a crown (👑) emoji is displayed next to the name of the user who is the site owner.
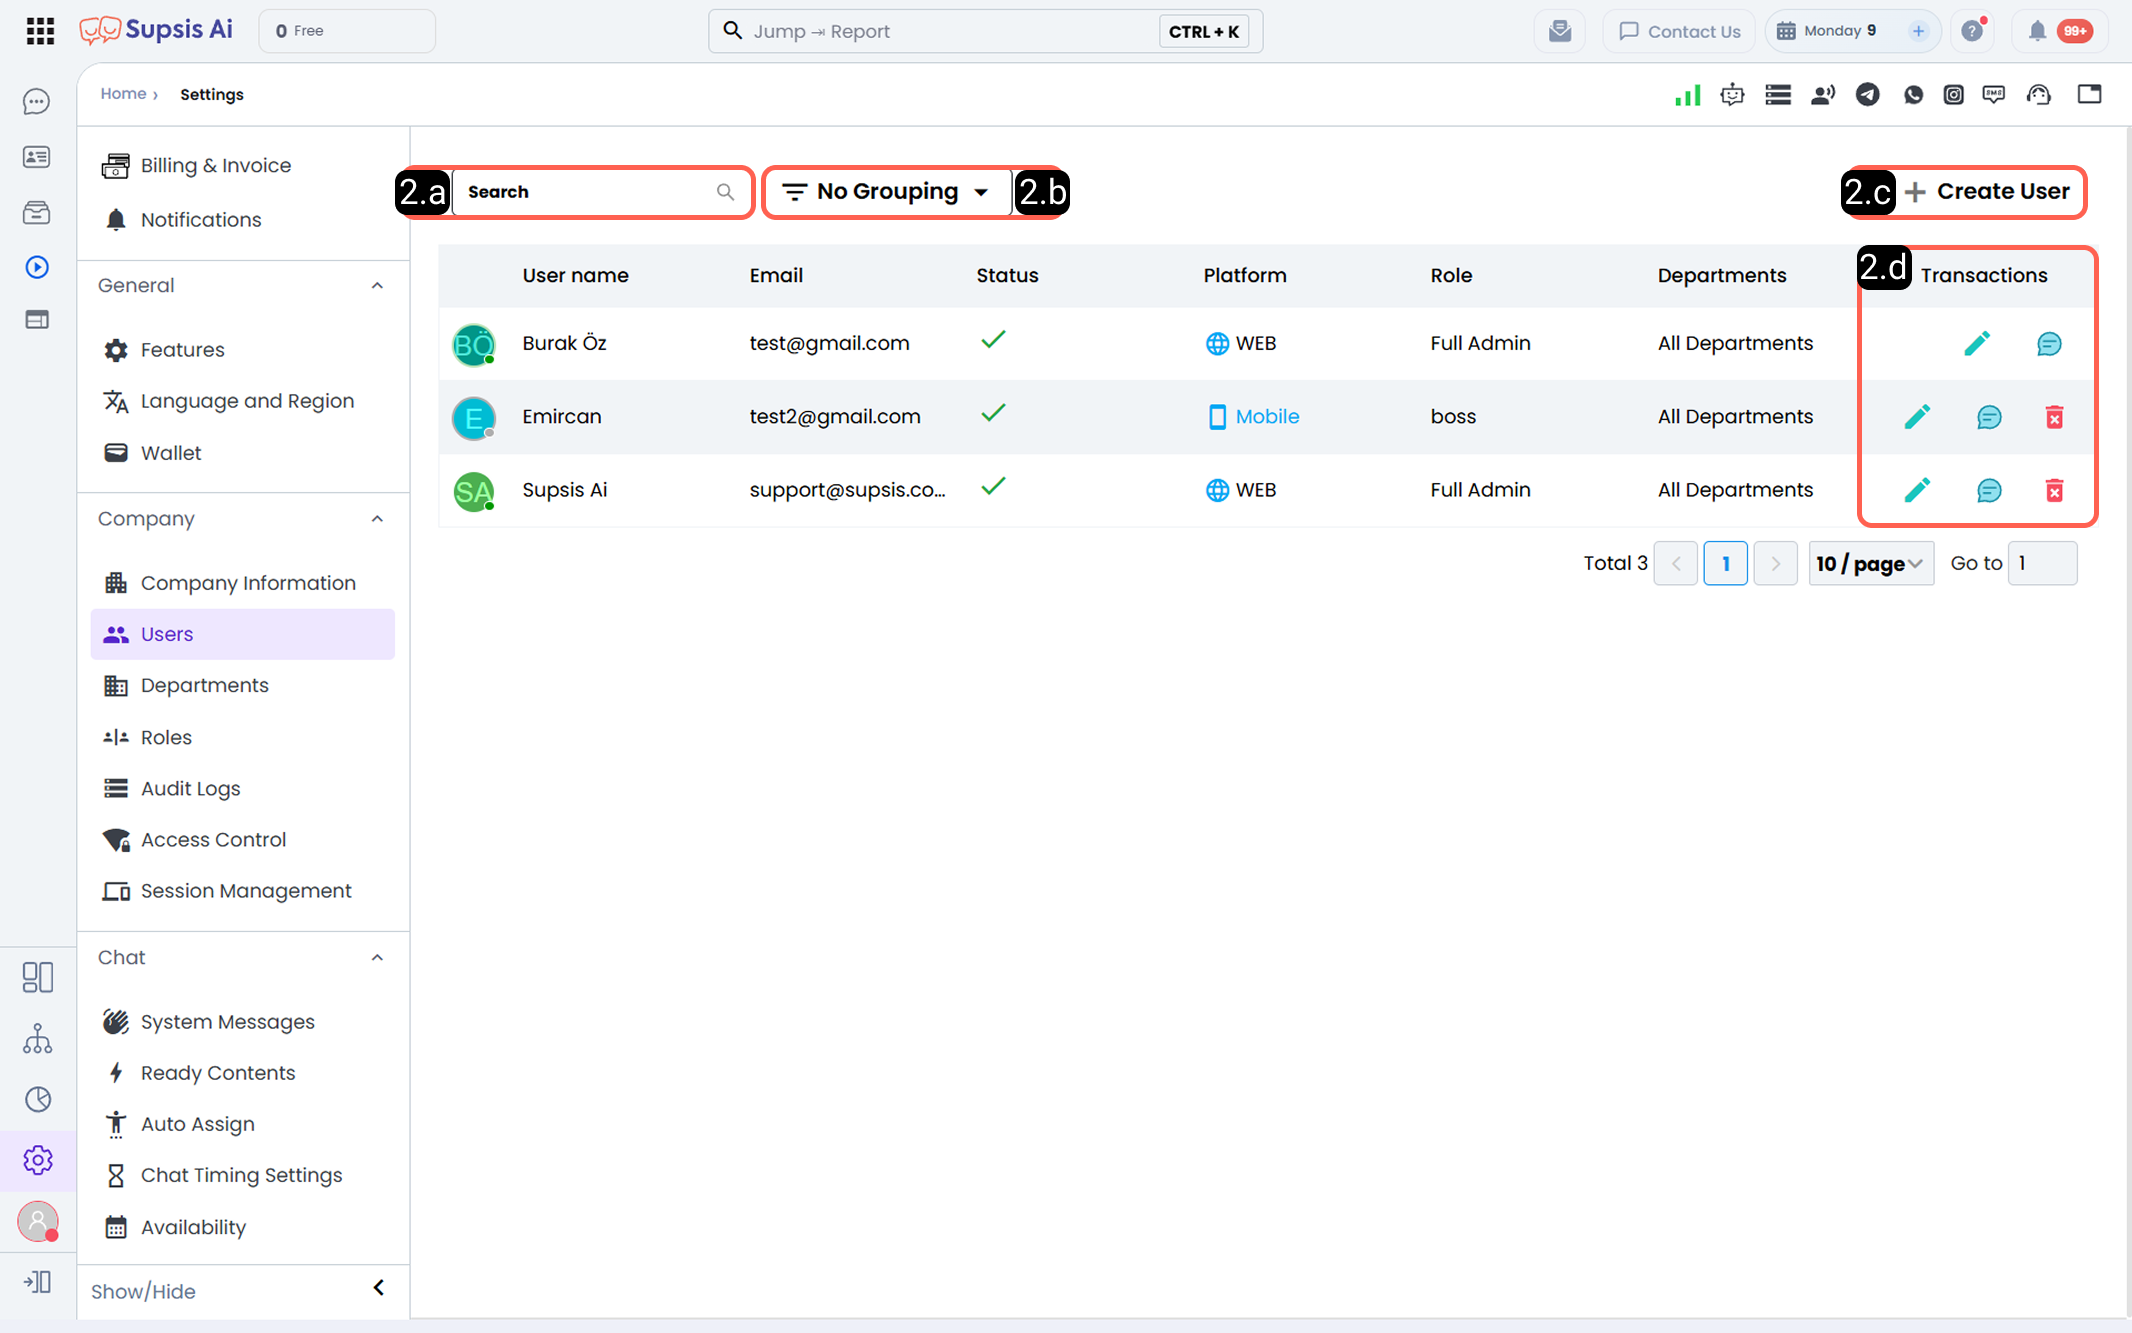
2.a – Search Bar:
The search bar allows you to quickly search among users defined in the panel. You can filter agents and other users by name or email address.
2.b – User Groups:
The User Groups feature allows users in the panel to be grouped and displayed based on specific criteria. This makes the user list more organized and simplifies management operations.
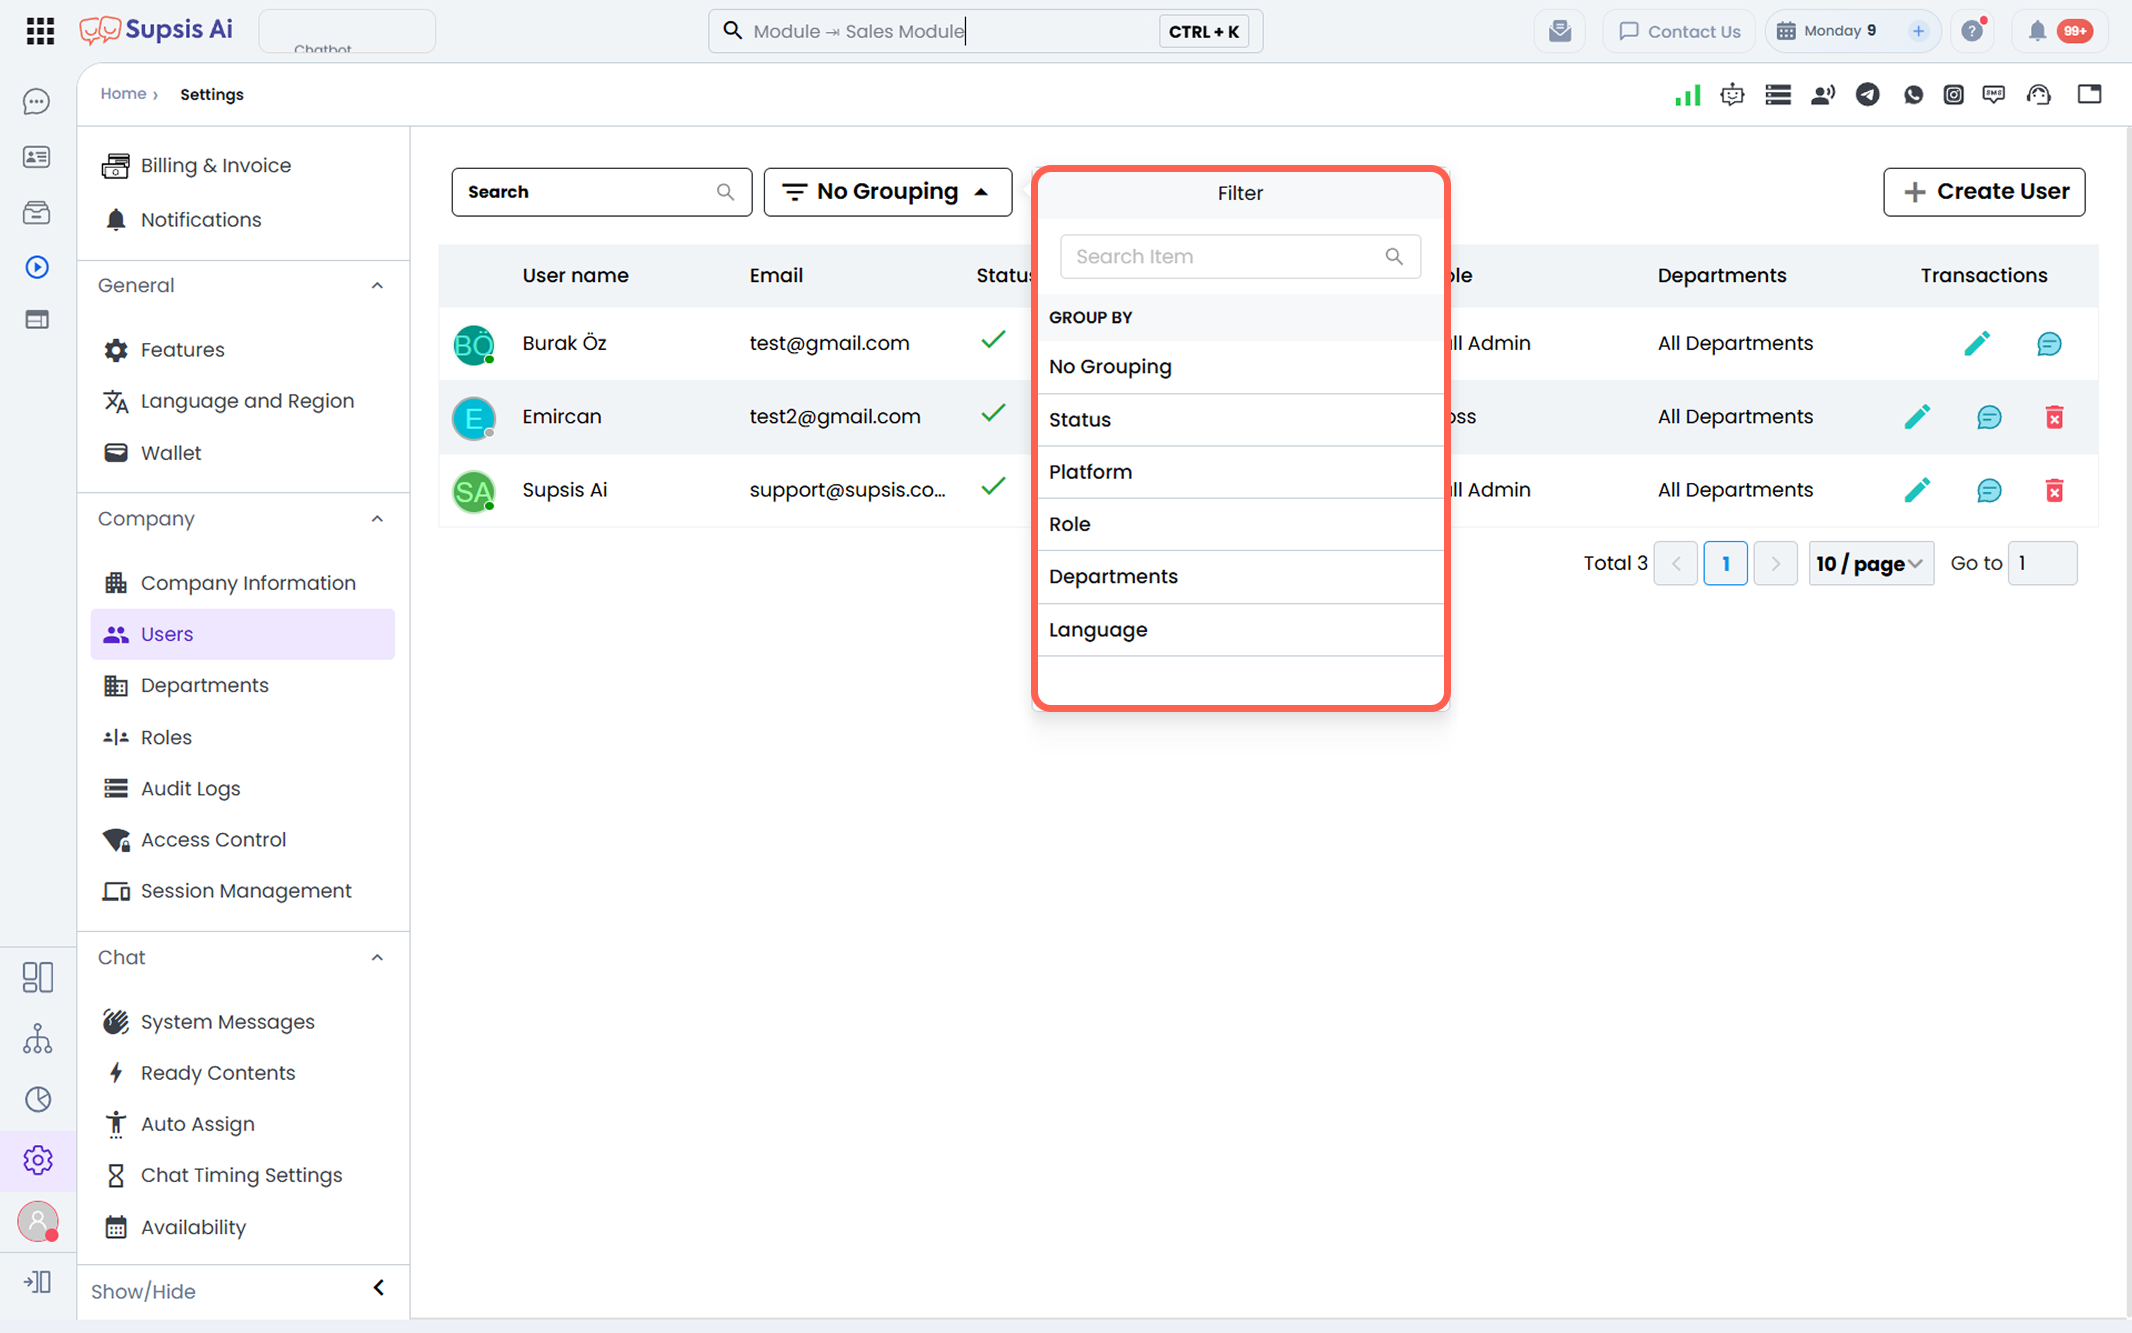
Supported grouping options are listed below:
- No Grouping: Users are displayed in a flat list without separation by any criteria.
- Status: Users are grouped based on their active or inactive status.
- Platform: Users are grouped based on the platform they last connected from (Web, Mobile).
- Role: Users are grouped according to their assigned roles (Admin, Agent, etc.).
- Departments: Users are grouped according to their assigned departments.
- Language: Users are grouped based on their preferred system language.
2.c – Add User (Create New User & Add Agent)
The Add User (Create User) section is used to add user, create new user, or add support agents to the Supsis AI panel. A new user is defined in the panel based on the information entered in the user registration form.

a – Username
In this field, a name is assigned to the user. The defined username represents the user in WebChat interactions, system activities, and reports.
b – Email
The user’s email address is entered in this field. The defined email address is used for panel login, email notifications, and internal communication processes.
c – Phone
In this field, you can define the phone number to be used for operations such as sending messages to the user via automations or two-factor verification.
d – Password & Confirm Password
The password defined in this field (minimum 6 characters) is used by the user when logging into the Supsis AI panel. The same password must be entered into the Confirm Password field for verification.
e – Role
In this field, you determine the role assigned to the user. The assigned role directly affects the user’s permissions, accessible areas, and available actions within the panel.
For detailed information about roles, please review the Roles documentation.
f – Language
This field determines the language in which the user will use the Supsis AI panel.
This feature can later be edited by the user via the Language & Region settings menu.
g – Automatic Conversation Assignment Limit
In this field, you can define the maximum concurrent active live conversation assignment limit for the user. The redesigned interface offers 4 distinct assignment options:
| Option | Value | Operational Logic |
|---|---|---|
| System Default | -1 |
The global default conversation limit configured under Chat Settings applies. |
| Do Not Assign | 0 |
No automated conversations will be routed to the user. Chats can only be picked manually from the queue or transferred. |
| Unlimited | ∞ |
No upper numeric limit is enforced; all new incoming chats can be assigned automatically without quota constraints. |
| Manual Value | >0 |
A custom concurrent chat quota is specified for the agent (e.g., 3, 5). When active chats reach this threshold, automatic routing pauses. |
Assignment Limit Rule
-1 = System default, 0 = No automated assignment, >0 = Assigned up to the specified value.
For more information about the automatic conversation assignment mechanism, please review the Chat Assignment documentation.
h – Assigned Departments
In this field, you select the departments the user will be assigned to. The defined departments determine the user’s scope of authority, working area, and accessible ticket types.
For detailed information about department management, please review the Departments documentation.
i – Status
This field determines the user’s activity status within the system:
- Active: Users can log in to the panel and handle live customer support.
- Inactive: Users cannot log in to the panel and their access is disabled.
In cases where historical reports, transaction records, and private data must be preserved, you can restrict access by setting the user’s status to inactive instead of deleting the user.
2.d – User Actions:
The User Actions section allows you to perform quick and practical management operations on users defined in the panel. Through the icons in this section, you can edit user information, communicate with the user, or remove the user from the system.
-
Pencil
The pencil icon is used to edit an existing user’s information. The following information can be updated: Username, Email, Phone, Password, Role, Language, Automatic Conversation Assignment Limit, Assigned Departments, and Status.
Any changes made directly affect the user’s platform access, report data, and user experience. -
Chat Bubble
The chat bubble icon allows you to send a direct message (DM) to the relevant user via Team Chat. This feature is used for quick communication and instant notifications. -
Trash Bin
The trash bin icon is used to remove an existing user from the system. When this action is performed, the user’s access to the Supsis Ai panel is completely revoked.
3-) Departments
Departments are routing and organizational structures that ensure incoming chats and customer requests in Supsis AI are handled by the appropriate teams. By matching customer requests and communication channels with relevant teams, you can ensure that only authorized department members have access to specific conversations.
Through the department structure, different teams such as Sales, Technical Support, Billing, and Customer Service can operate within the same panel while independently managing their assigned queues. This structure ensures that support processes run faster, more systematically, and with greater efficiency.

3.a – Department Search and View Controls: * Search Bar: Quickly filter through the department list to locate a specific team or agent instantly. * Collapse All / Expand All: Toggle all department cards open or closed in bulk to keep your workspace organized.
3.b – Create Department (+ Create Department): Use the + Create Department button in the top-right corner to define a new team. In the modal, enter the department title, description message, and language translations for multilingual environments.
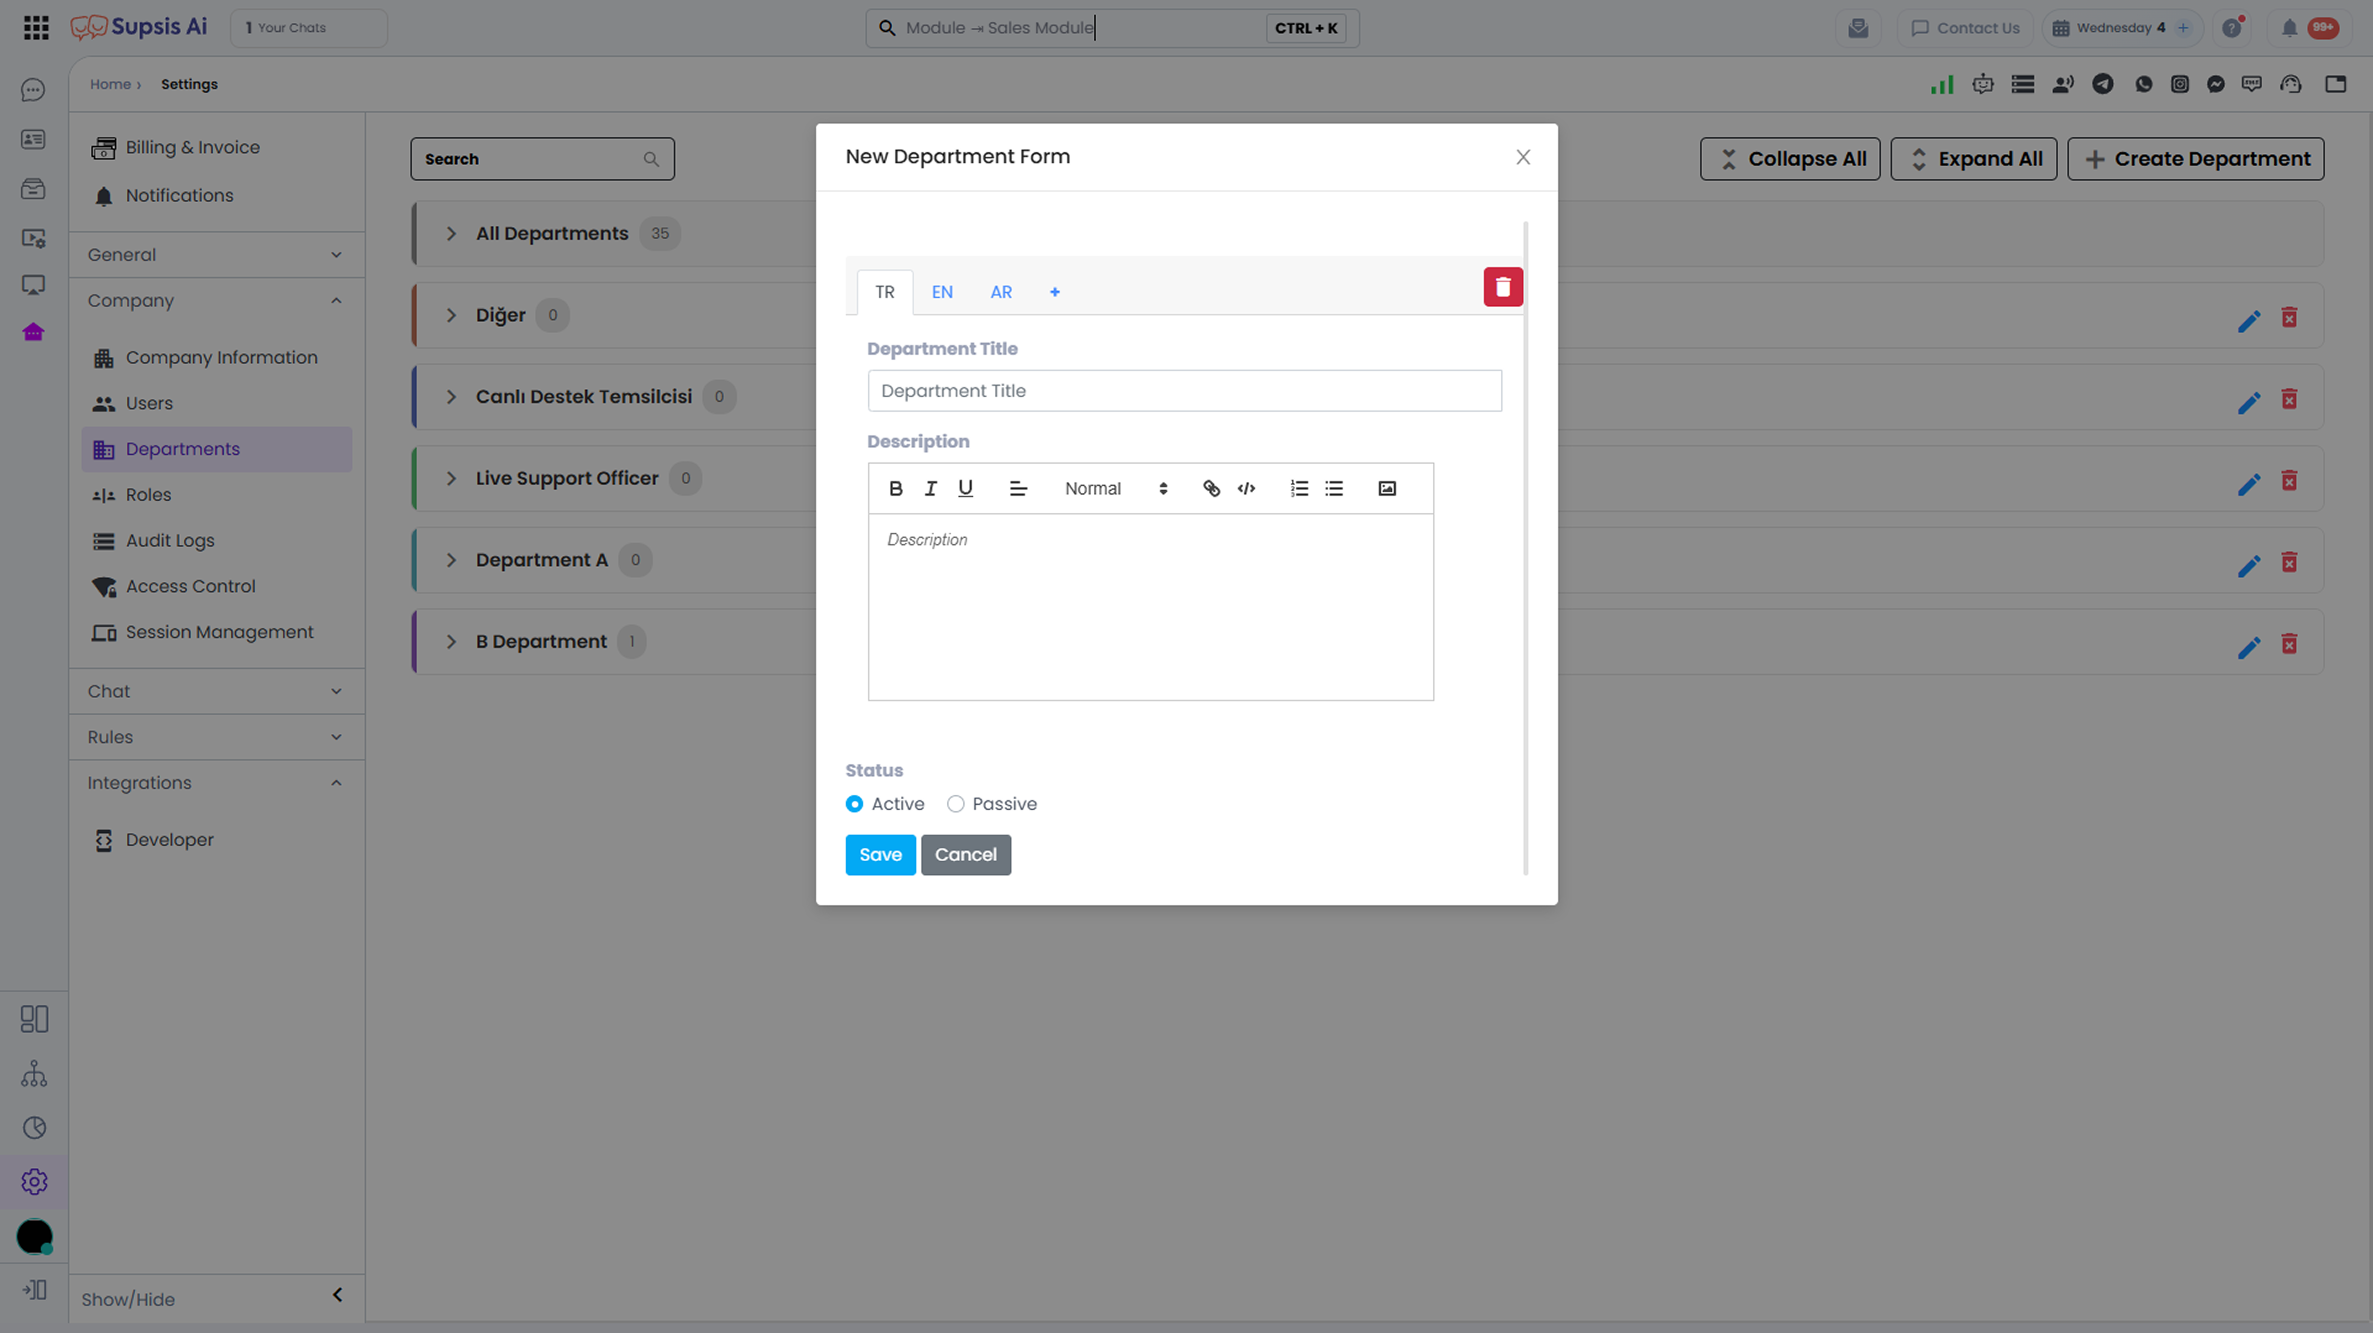
- Language Information: Define secondary languages for the department title and description so visitors see department names in their preferred language.
- Title: The display name of the department used in routing rules, webchat selection menus, and reports.
- Message: Informational description detailing what types of inquiries this department resolves.
3.c – Member Management Inside Departments: * Add User to Department: Click + Add user to department beneath each department card to assign registered agents directly. * Select All / Bulk Actions: Select all users within a department to perform batch operations. * Remove User: Use the three-dot menu on any user row to unassign the agent from the department.
3.d – Department Actions (Three-Dot Menu): From the action menu on the top-right of each department card: * Edit (Pencil): Update the department name, description, and multi-language translations. * Delete (Trash Bin): Remove the department from the system. Associated routing rules and user bindings are automatically updated.
4-) Roles
Roles are granular authorization structures that define which modules users can access and which actions they can perform within the Supsis AI management panel. Every user operates strictly within the permissions defined by their assigned role.
Properly configured roles enhance security, clarify team responsibilities, and maintain strict control over administrative workflows.

4.a – Role Search and Overview:
* Search Bar: Search through custom and system roles quickly.
* Collapse All / Expand All: Expand or collapse role cards to review user distributions conveniently.
* Role Member Count (Badge): Displays the active number of users assigned to each role (e.g., Test (1), Root (1), Unassigned (0)).
4.b – Create Role (+ Create Role): Click the + Create Role button in the top-right corner to establish a new authorization role.
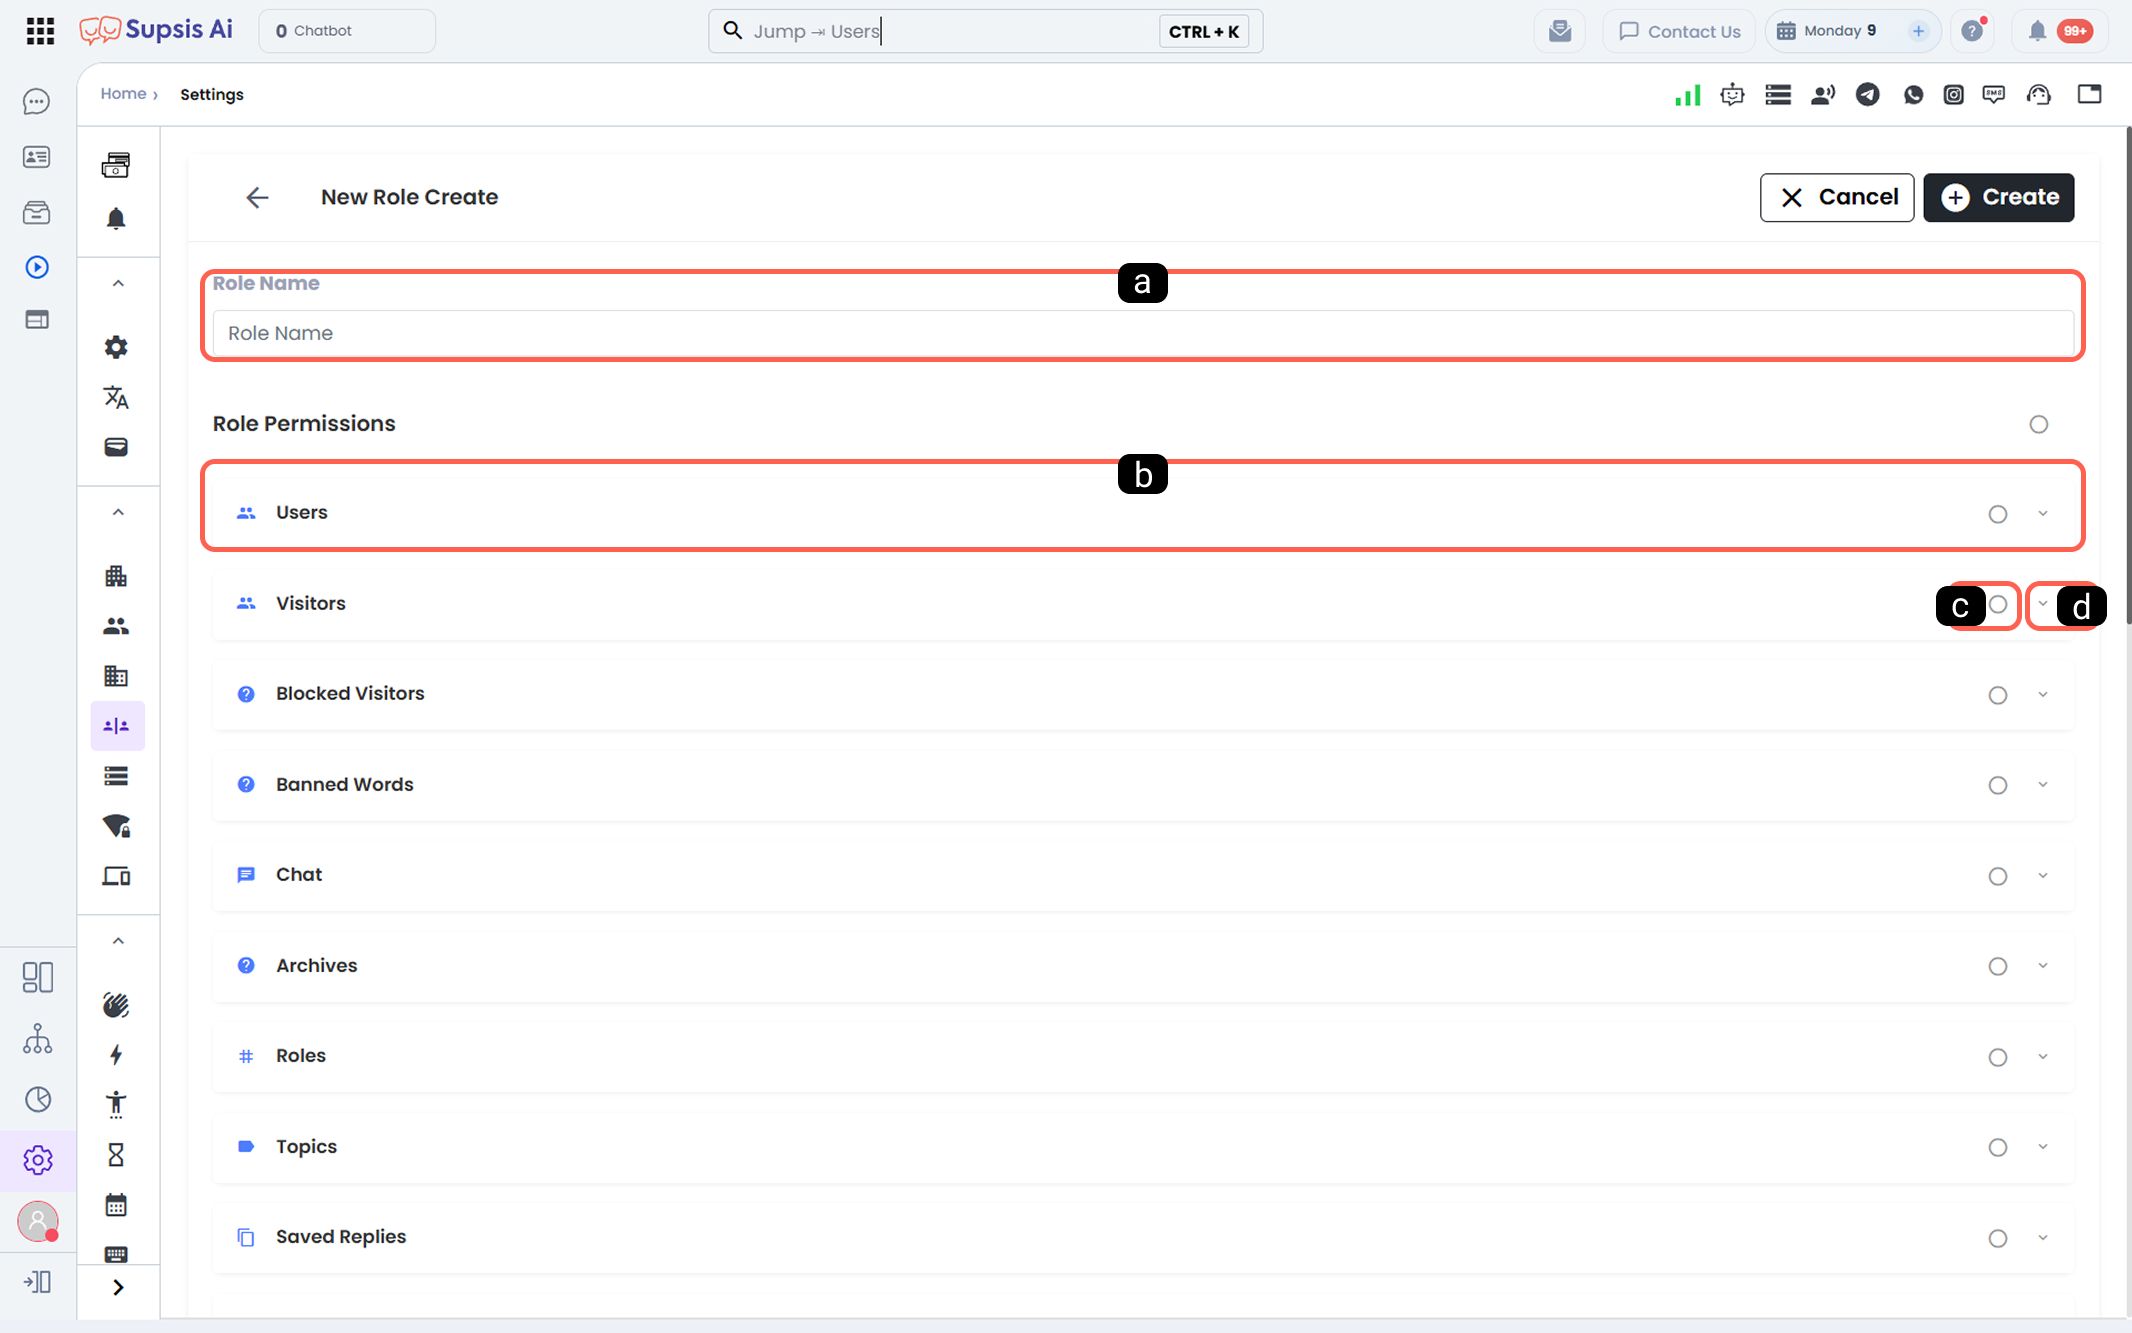
- Role Name: Assign a clear role title (e.g., Admin, Live Support Agent, Reporting Specialist).
- Role Permissions: Toggle granular read, write, delete, and edit permissions across modules (Chats, Settings, Reports, CRM, Contacts, etc.).
- Select All: Check all permissions across a module with a single click.
- Permission Details: Expand module-specific sub-permissions (e.g., export data, view only assigned chats).
4.c – Assigning Users to Roles: * Add User to Role: Click + Add user to role within any card to assign agents directly. * Select All: Check all members within a role for bulk reassignment.
4.d – Role Actions (Three-Dot Menu): * Edit (Pencil): Modify the role name and adjust permission toggles. Changes take effect across all assigned agents immediately. * Delete (Trash Bin): Remove the role from the system. Assigned users transition to the "Unassigned" role state.
4.e – Permission Catalog Security and Privilege Isolation:
Over 120 granular system permissions defined across the Supsis platform (archives, live conversations, user management, integrations, admin features, etc.) establish your organization's operational security hierarchy. Supsis implements a rigorous authentication architecture to protect the permission model and system catalog.
| Security Scope | Protection Mechanism & Policy | Standard Applied |
|---|---|---|
| Mandatory Session Authentication | All authorization endpoints, including permission catalog enumeration (GET /api/permissions), require a valid session token (getAuthorize / Bearer Token). |
Anonymous, unauthenticated, or invalid external requests are immediately rejected (401 Unauthorized / 403 Forbidden). |
| Privilege Model Confidentiality | Internal administrative permission keys, entity descriptors, and high-privilege function names are shielded from the public internet. | External clients cannot inspect your permission hierarchy or system capabilities, preventing targeted privilege escalation attempts. |
| Role-Based Access Control (RBAC) | Granular permission scoping across modules. | Under the principle of least privilege, agents are restricted solely to the capabilities necessary for their designated duties. |
- Catalog Isolation: The permission catalog is not a public service. It can only be queried by authenticated administrators from within the Customer Panel role configuration interface.
- Audit & Least Privilege: It is recommended not to grant sensitive high-privilege permissions (e.g., export data, delete users) to standard operational roles.
Permission Catalog Security Guarantee
Supsis enforces strict authentication boundaries across all authorization and permission catalog services. Unauthenticated external requests attempting to inspect the internal permission catalog or administrative function names are strictly blocked.
5-) Audit Logs
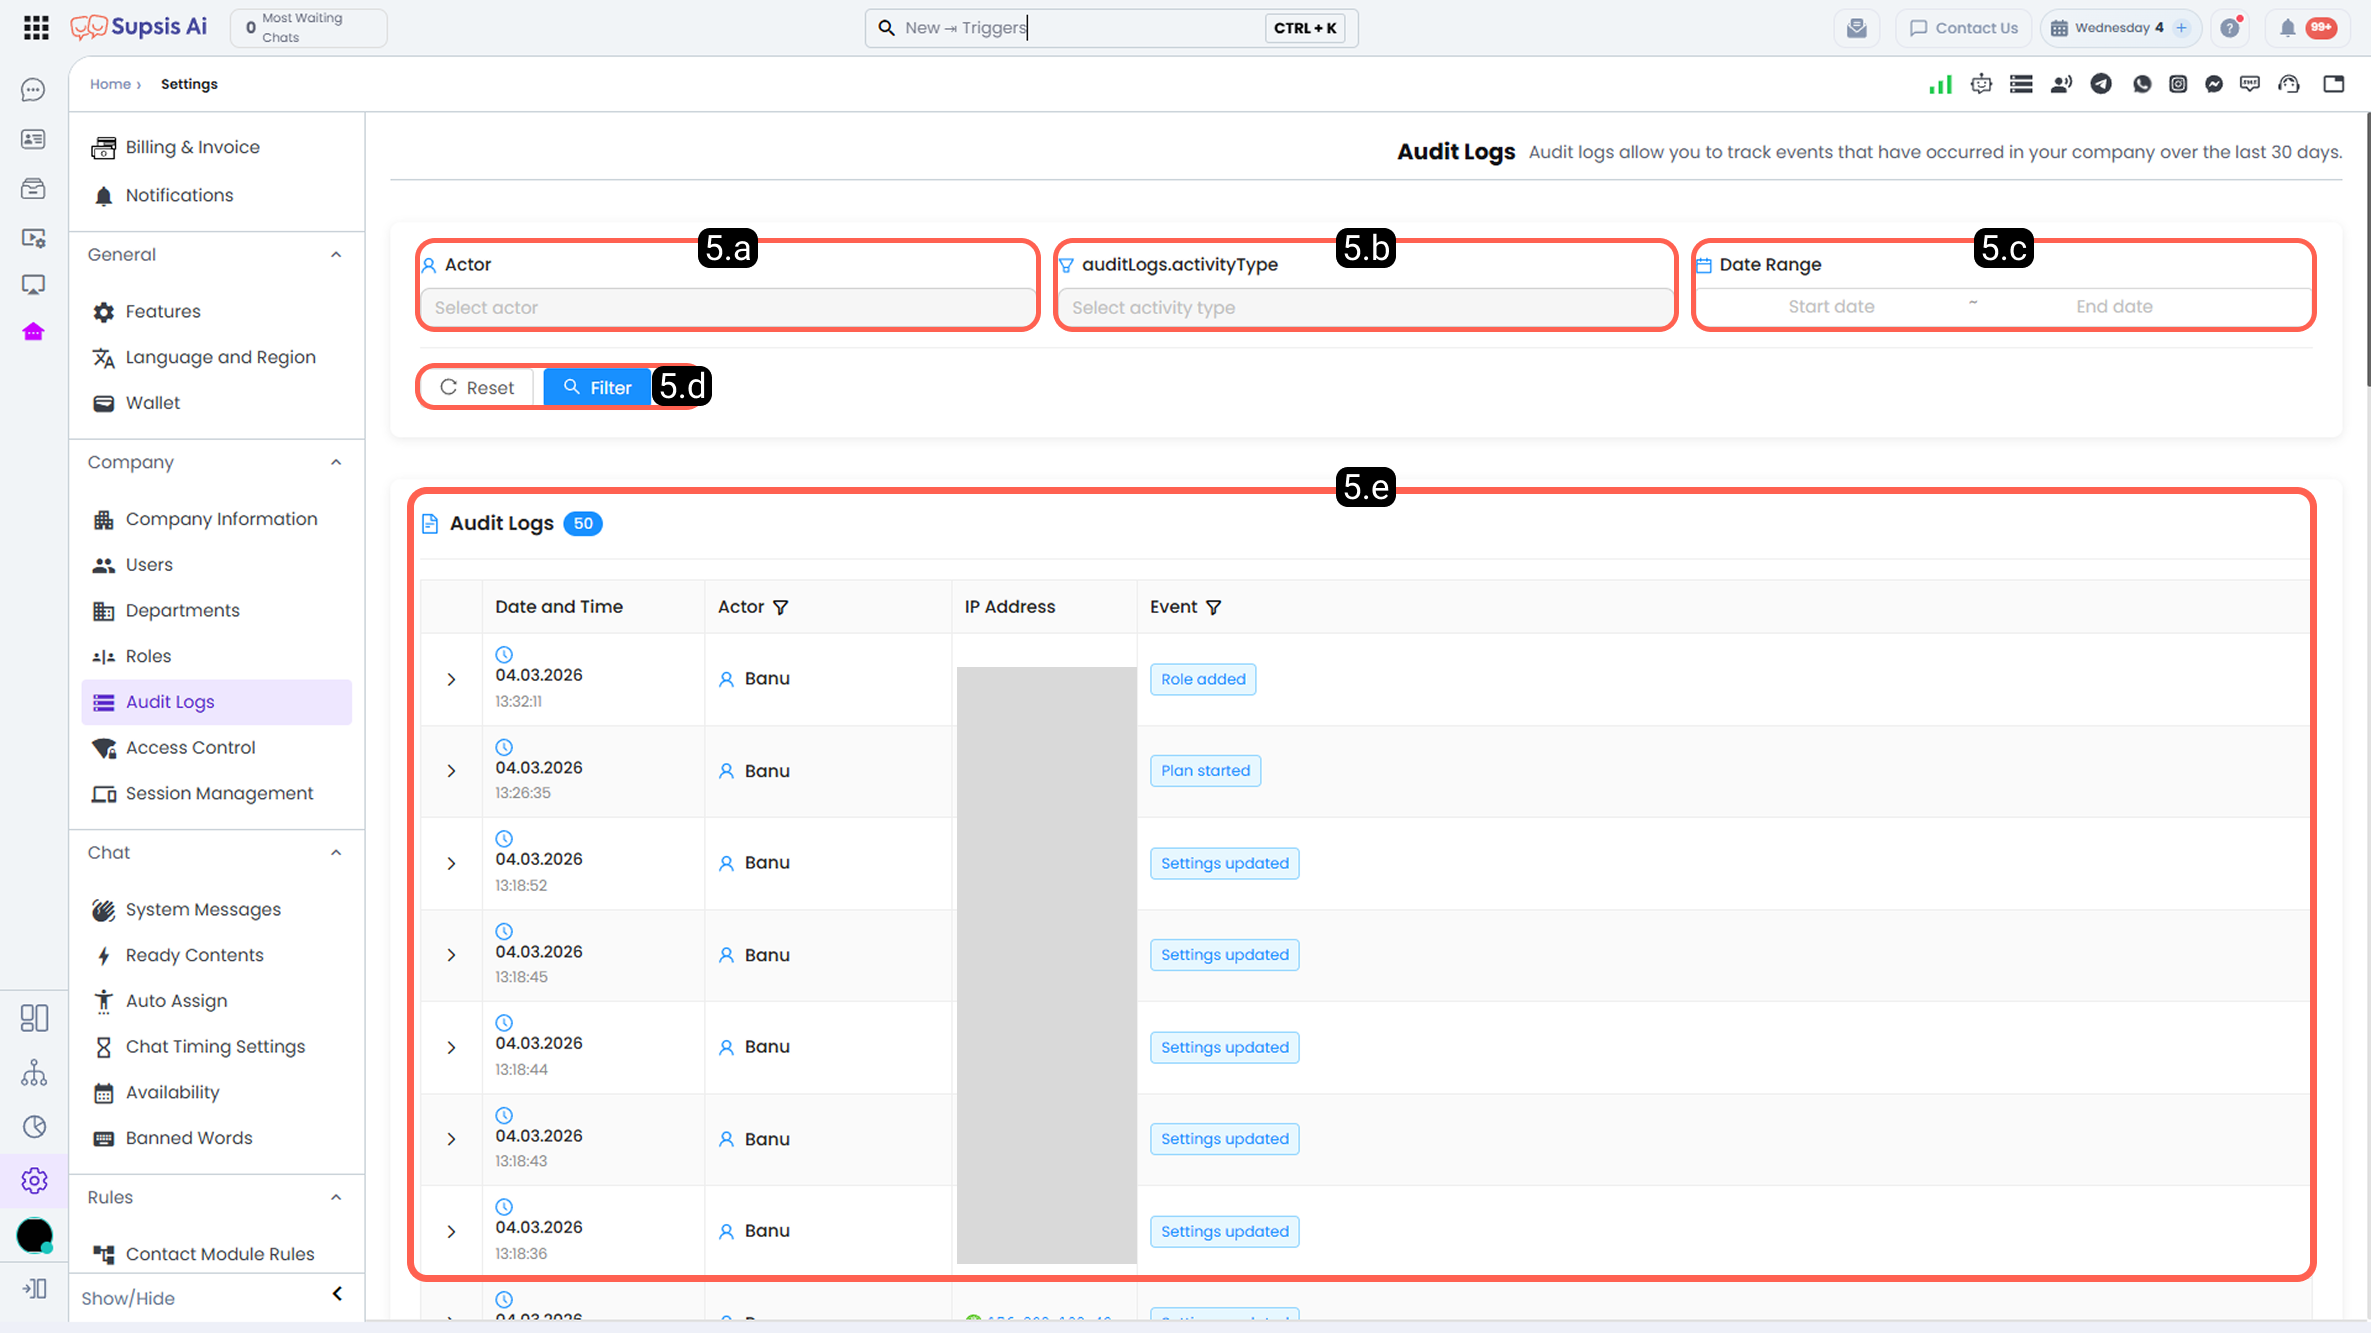
Audit Logs serve as a central security and compliance tracking module where all system events (conversations, users, channels, billing, tasks, automations, etc.) across the Supsis AI platform are logged.
Underneath, backend queries run via a MongoDB Atlas Search index (activitys.default) with token-based cursor pagination (afterToken / beforeToken), delivering significantly faster loading and search performance.
- Access Routes:
- Customer Panel Audit Logs:
Settings → Company → Audit Logs - Activities Menu:
Notifications / Activities - Visitor Activities:
Visitor Details Panel → Activitiestab - Admin Site Audit Log:
Admin → Site Details → Audit Logtab (Prev/Next token pagination)
5.a – Actor Filter:
Filters activity logs by the entity that initiated the event. Select System, Chatbot, Agent, or specific panel users to isolate relevant actions.
5.b – 18-Category Activity Type Filter & Live Search:
Hundreds of activity types are logically grouped under 18 main categories:
- 1. Chat: Messaging, chat transfers, closing, and assignment events.
- 2. Visitor & Contact: Contact profile creation, editing, and tag updates.
- 3. User & Team: Agent creation, role/permission edits, and session events.
- 4. Settings: Company, general panel, and notification setting changes.
- 5. Channels: Channel connection, deletion, and status updates.
- 6. WhatsApp: Template approvals, message deductions, and API calls.
- 7. Chatbot: Flow triggers, node edits, and model training actions.
- 8. Email: SMTP connections, email template edits, and bulk mail events.
- 9. Billing: Wallet top-ups, plan renewals, and cost deductions.
- 10. Tasks: Task creation, status shifts, and agent assignments.
- 11. Automations: Triggered automation workflows and webhook executions.
- 12. Forms: Custom form creation, submissions, and field updates.
- 13. Tables: Custom table schema and row data modifications.
- 14. Calendar: Appointment scheduling and event planner actions.
- 15. Drive: File uploads, deletions, and folder management.
- 16. Voice Agent: Voice call dispatches, versioning, and call logs.
- 17. Modules: System module activation and configuration changes.
-
18. Site & System: System maintenance, security, and infrastructure logs.
-
Live Search Box: Includes an integrated search bar within the filter dropdown to quickly find activity types by name.
- Multi-Select & Active Filter Chips: Select multiple event types simultaneously. Active choices appear as removable tags/chips above the list.
5.c – Date Range Filter:
Filters log entries between custom start and end timestamps.
5.d – Infinite Flow Loading (Load More):
Uses stream-based cursor pagination instead of standard page numbers. Clicking the "Load More" button at the bottom of the list seamlessly appends the next batch of log records.
5.e – Detailed Log Records & JSON Expansion:
Displays timestamp, actor name, IP address, and event type. Clicking the arrow (>) icon on the left of any row expands the raw JSON payload for in-depth technical inspection.
Step-by-Step Usage Guide
- In the Customer Panel, navigate to
Settings → Company → Audit Logs. - Actor Filter: Select System, Chatbot, Agent, or specific users.
- Activity Type Filter: Open the dropdown to select event types across 18 categories or type into the search bar.
- Set an optional Date Range.
- The log table updates automatically; click Load More at the bottom to fetch older historical entries.
- Click the arrow (
>) icon on the left of a row to inspect full JSON payload details.
Use Cases
- Auditing Permission & Setting Changes: Trace which agent modified company settings or user permissions, including timestamp and source IP.
- Isolating Channel & Chatbot Events: Filter events related strictly to WhatsApp or chatbot workflows using category filters.
- Financial & Billing Audits: Audit wallet deductions, top-ups, and subscription changes across specific time windows.
- Compliance & Security Audits: Retrieve definitive proof for support or security audits regarding who performed what action from which IP address.
Customer Benefits
- Drastically reduces page load and filtering latency for high-activity accounts.
- Simplifies log navigation by categorizing hundreds of event types into 18 logical groups.
- Empowers security and compliance teams to conduct audits efficiently.
Control & Technical Notes
- Permissions: Access depends on company role permissions.
- Hidden Activities Filter: Internal sales analysis events marked as hidden (
isHidden: true) are excluded from customer views. - Admin Actions Masking: Actions executed by system administrators (
admin-user) appear as "System" unless an active admin session exists. - Backend Index: Powered by MongoDB Atlas Search index (
activitys.default). - Multi-Language Support: Fully localized across 8 languages (TR, EN, DE, FR, ES, IT, AR, RU).
6-) Access Control
Access Control allows you to restrict panel access based on IP addresses.
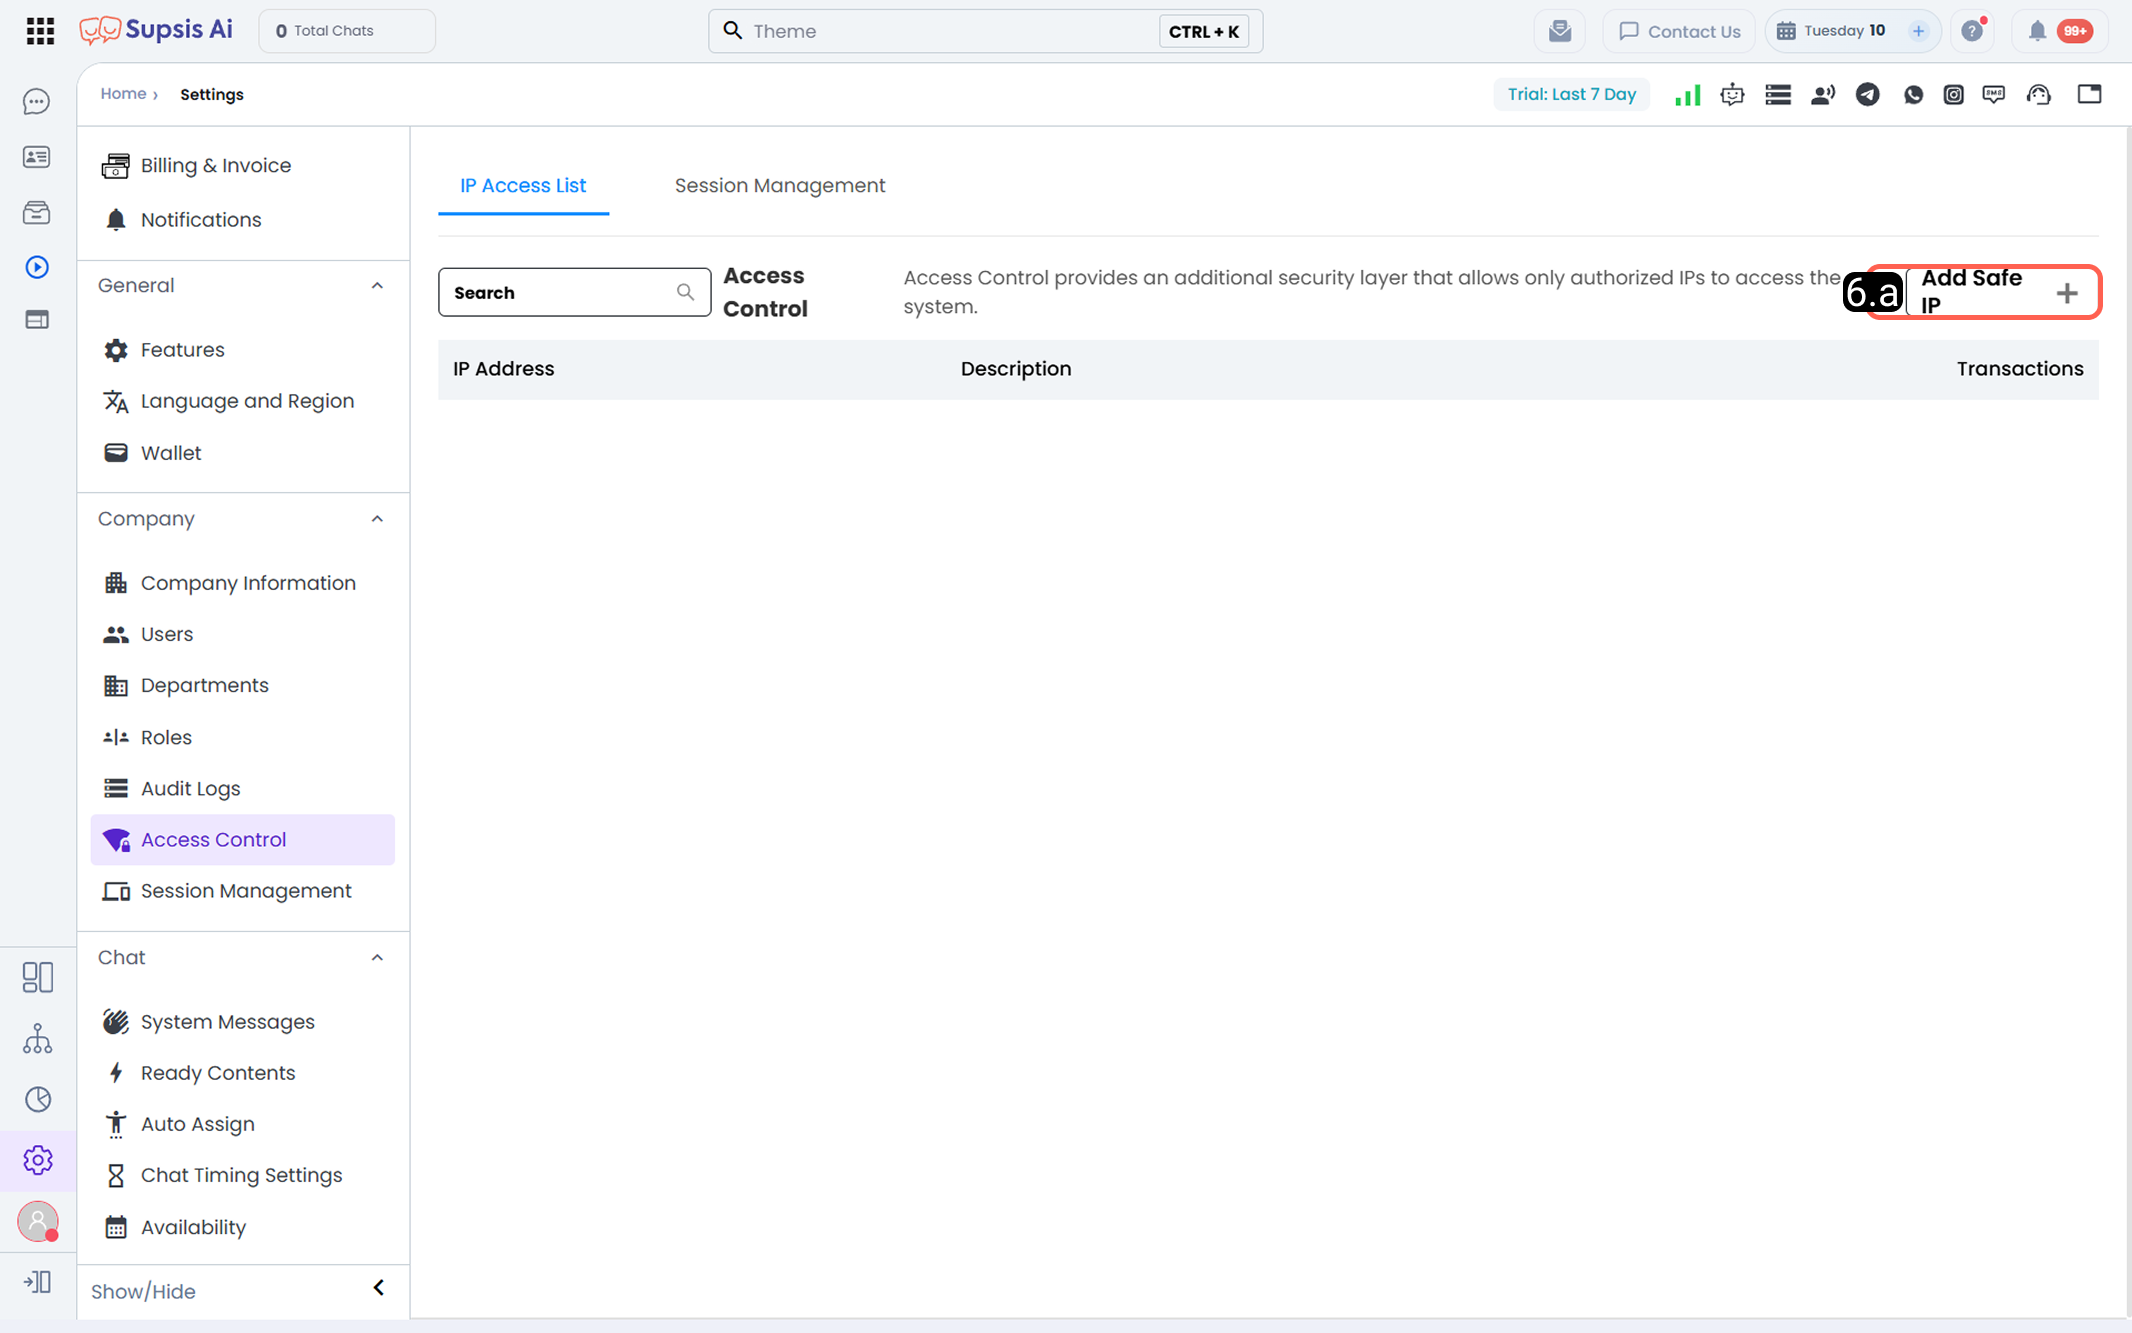
6.a – Add Secure IP:
Add IP addresses authorized to access the panel.
7-) Session Management
Session Management allows viewing, filtering, and terminating active user sessions.
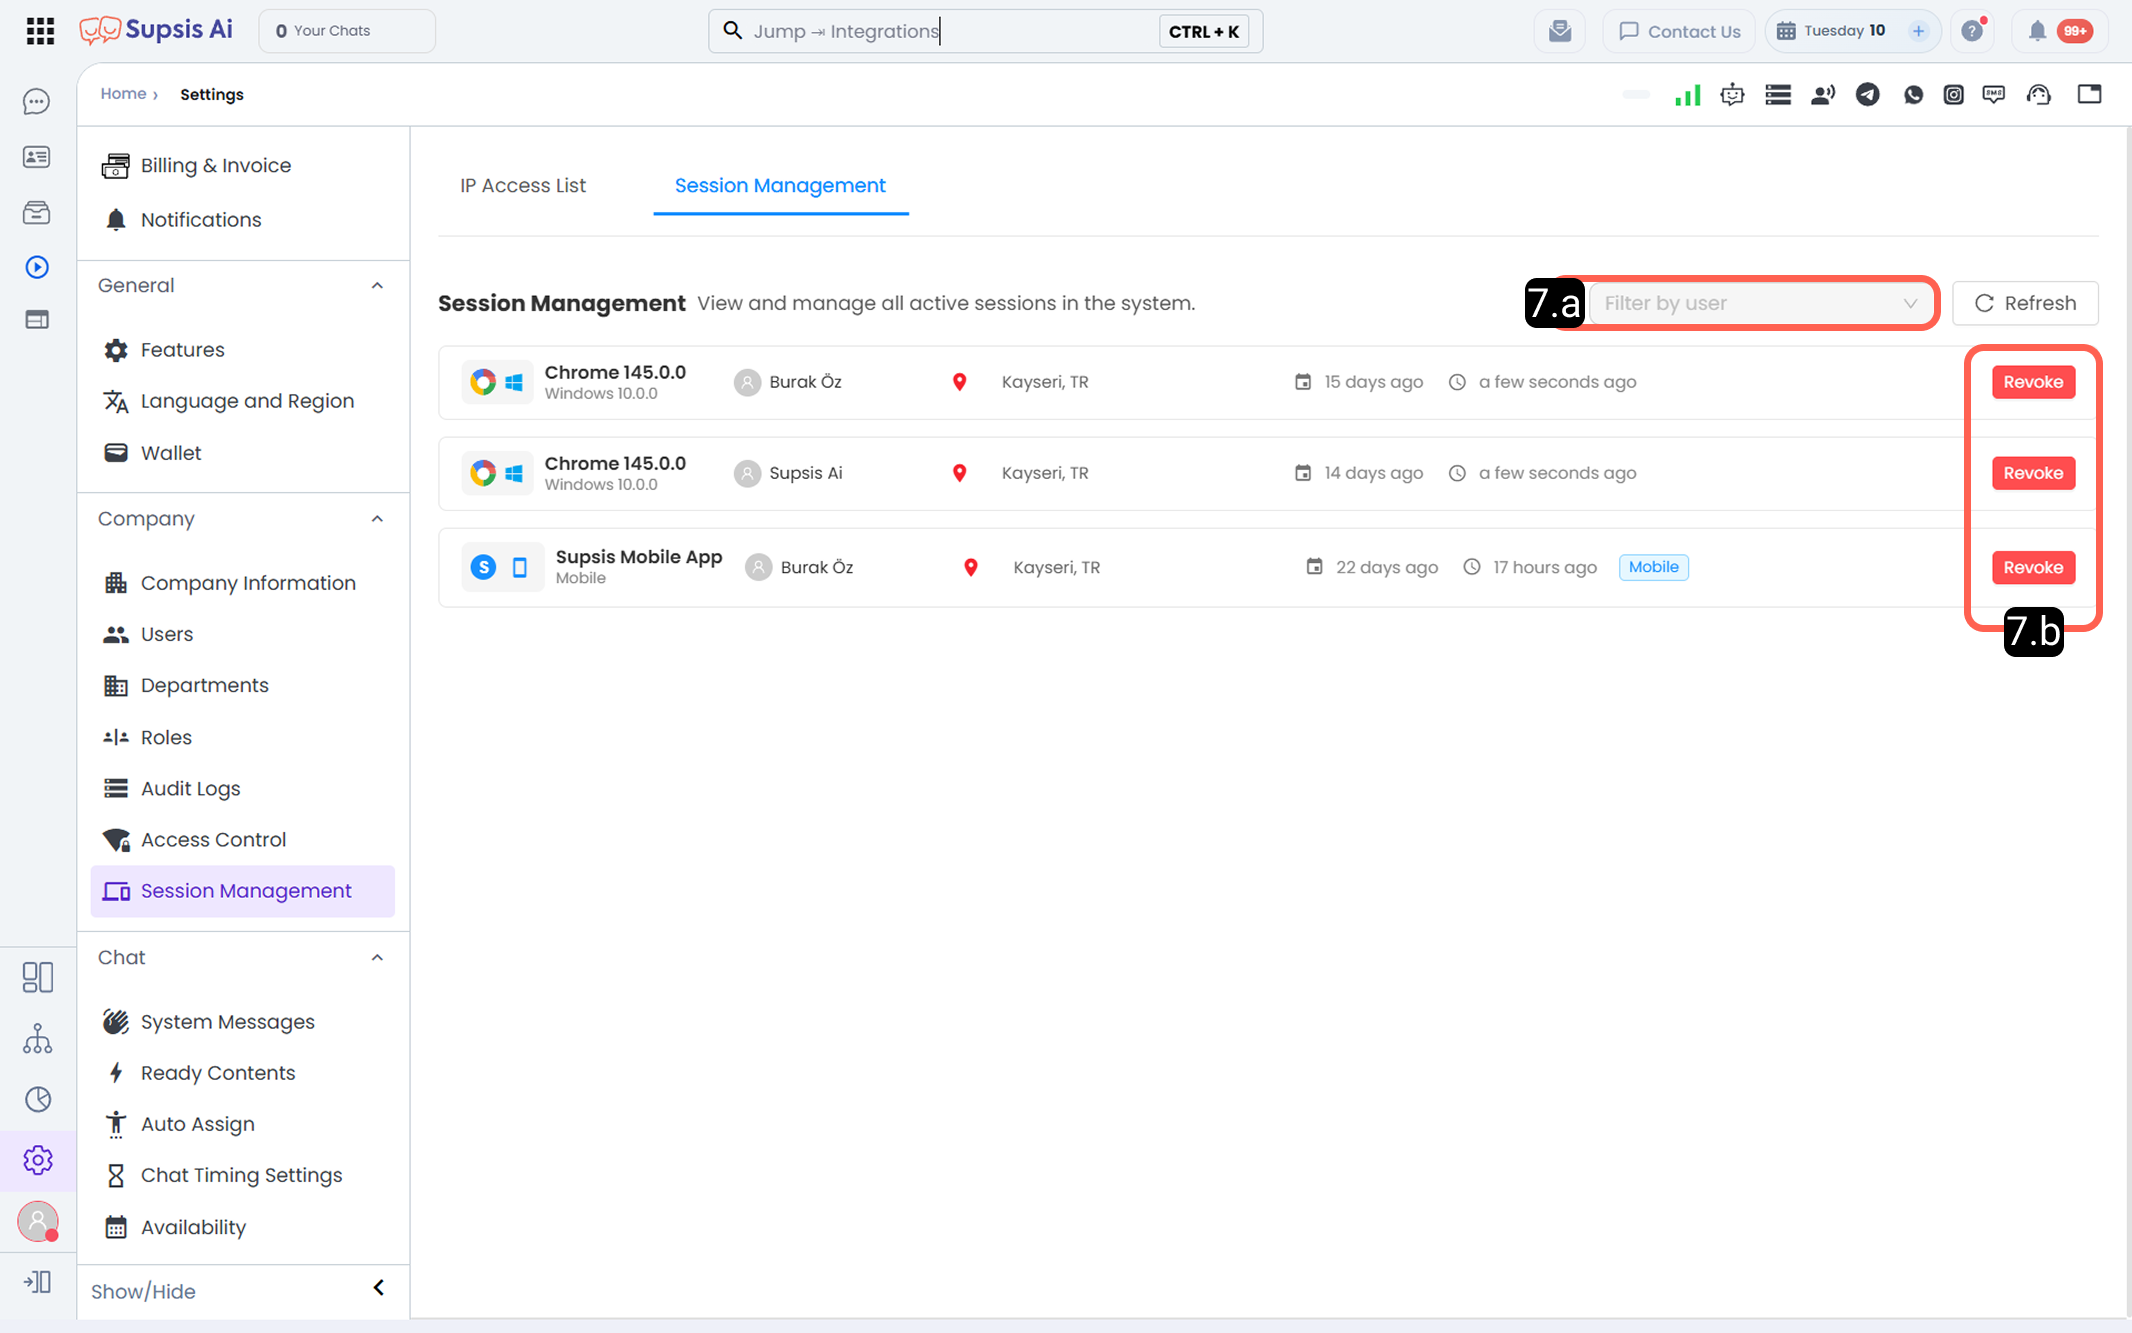
7.a – Filter by User:
Filters sessions by selected user.
7.b – Terminate Session:
Ends only the selected session.
```