
Custom filters allow you to create additional filtering methods tailored to your needs in cases where the default filters provided by the system are insufficient. By defining specific criteria or operational requirements, you can create customized new filters. With this feature, relevant conversations can be displayed quickly.
Steps to Create a Custom Filter
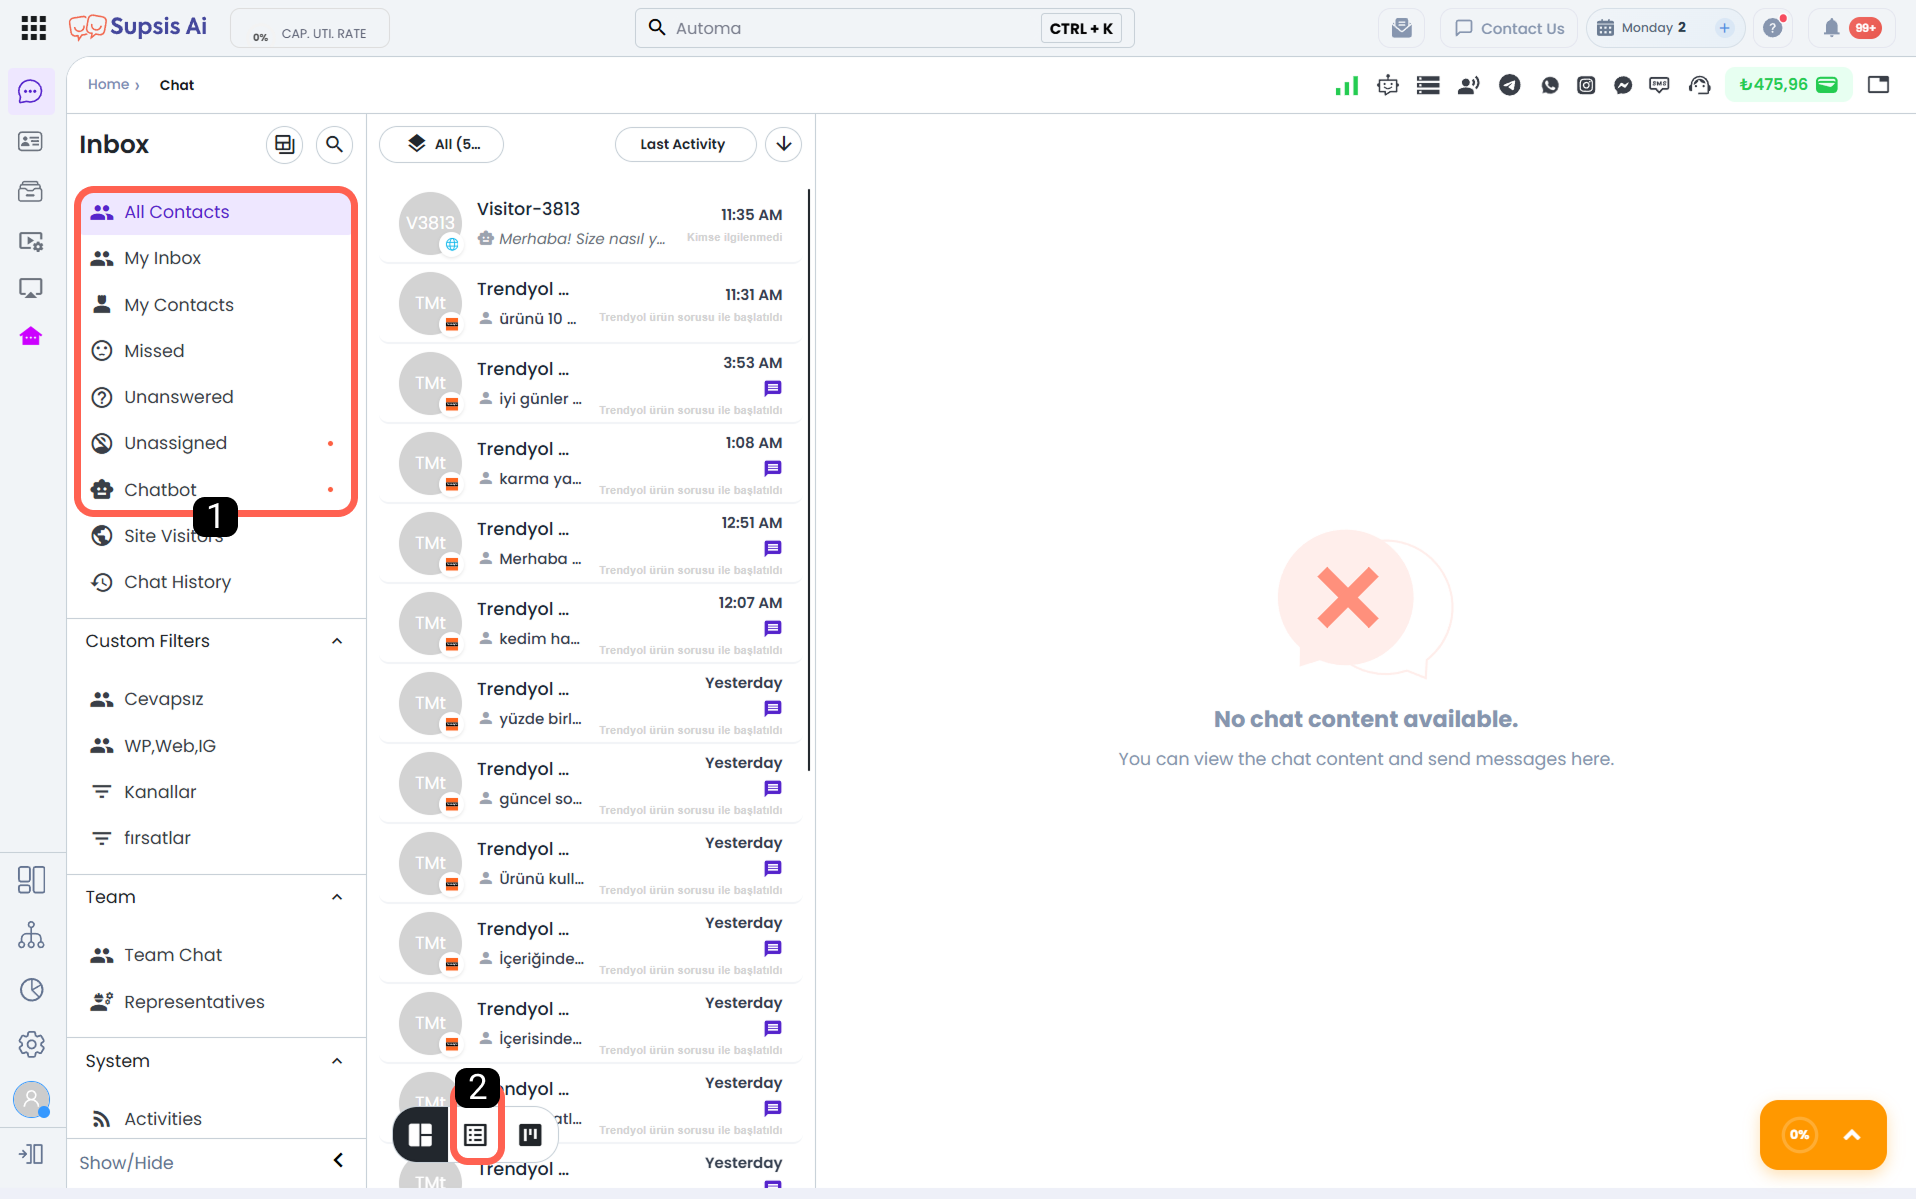
- 1. Default Filter Selection
- 2. Access Table View
1-) Default Filter Selection
To create a custom filter, first select the filter you want to modify from the default filters or existing filters in this area. The attributes of the filter you select at this stage will determine the attributes of the new filter you create.
The default filters available in the system are:
All Contacts, My Inbox, My Contacts, Missed, Unanswered, Unassigned, Chatbot.
2-) Access Table View
After selecting the filter, click this button. This action ensures that all conversations matching the attributes of the selected filter are listed in table view.
In the opened conversation table, you can view the listed conversations holistically and preview only the conversations that match the criteria you want to include in your custom filter, and adjust the settings accordingly.
Defining Filter Content
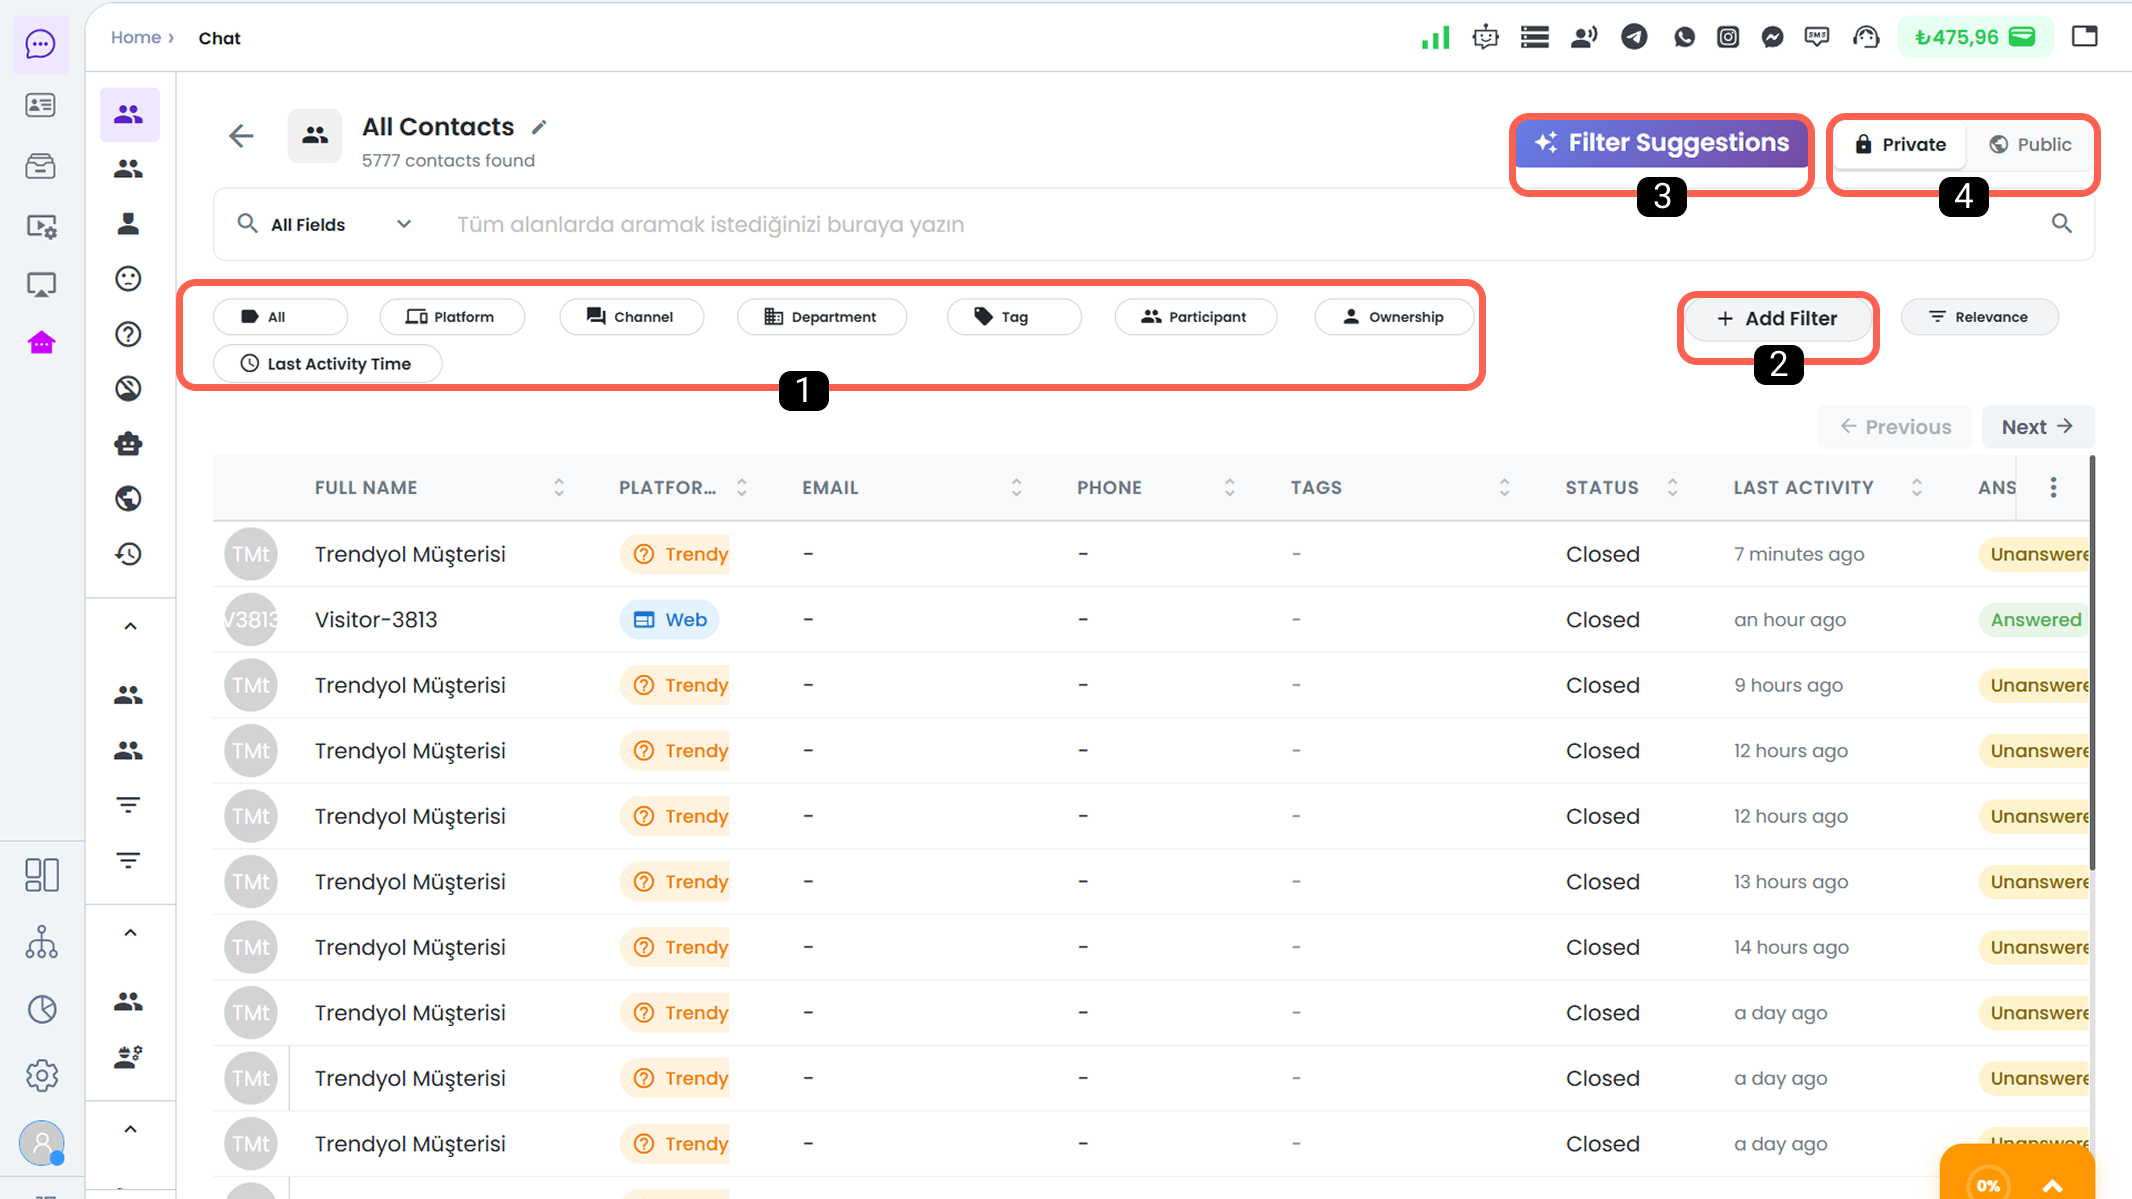
1-) Basic Filters
This area includes the fundamental criteria that must be defined when creating a filter. If no selection is made in this section, the filter content inherits the properties of the default filter selected in the previous step.
Through this section, you can combine multiple filter criteria and define multiple parameters simultaneously within applicable filters.
-
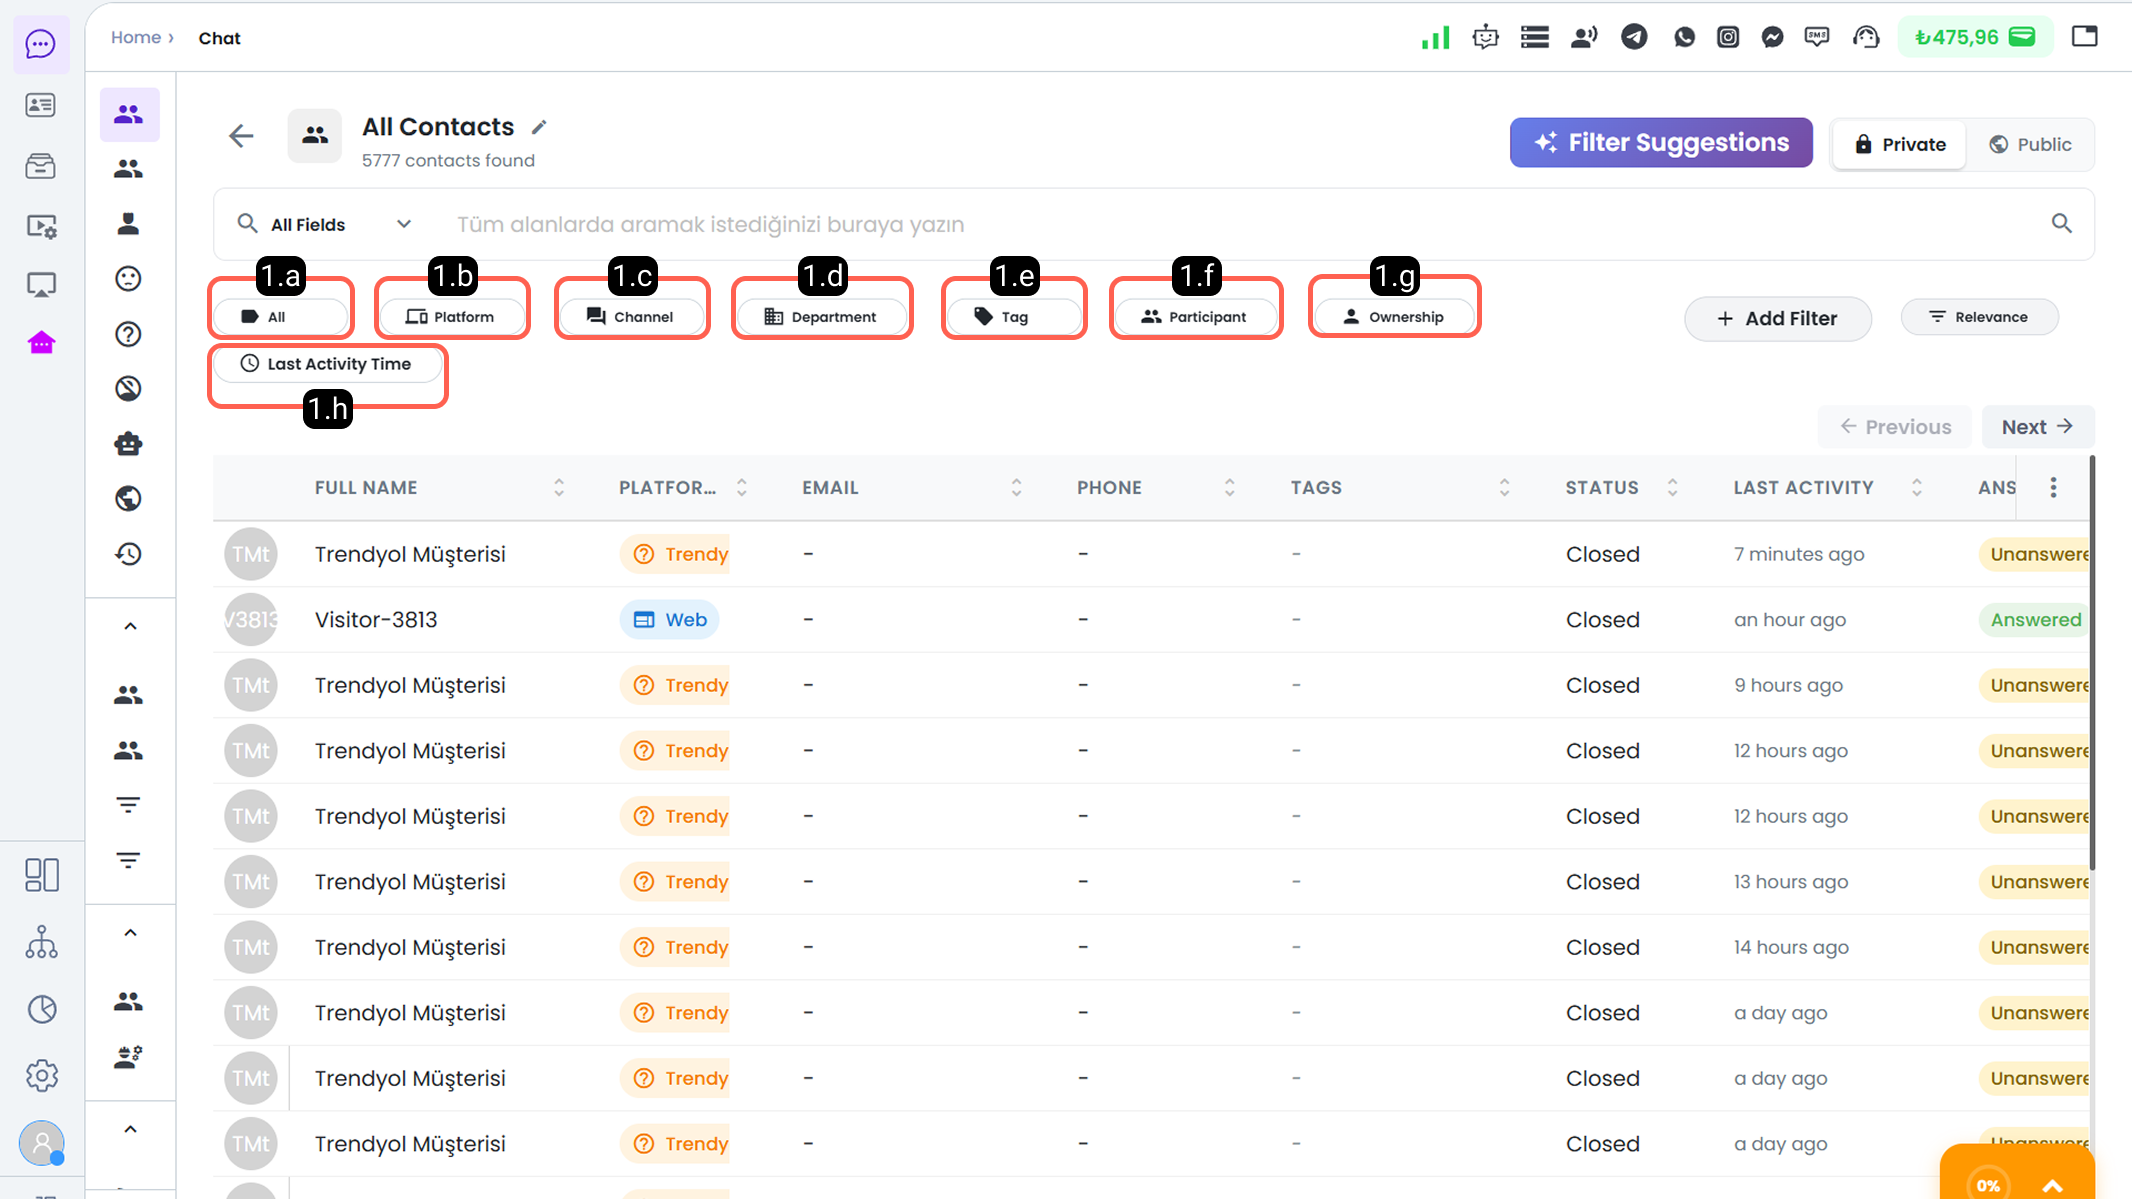
1.a – Session Status
The area where you can define the status of the chat sessions to be filtered.
You can retrieve only open sessions, only closed sessions, or both. -
1.b – Platform
The section where you can select the platform on which the conversation took place among the platforms integrated into Supsis. -
1.c – Communication Channel
The area where you can filter the communication channels connected to your Supsis panel.
Selections made in this field must be compatible with the platform selection.
For example, if Instagram is selected in the Platform section and WhatsApp is selected in the Communication Channel section, no results will be returned because these two selections are inconsistent. -
1.d – Department
Used to filter conversations conducted by a specific department. -
1.e – Tag
Filters conversations that contain specific tags among tagged chats. -
1.f – Participant
Allows filtering based on the agent who participated in the conversation. -
1.g – Ownership
Allows filtering based on the user or users to whom the chat session ownership is assigned. -
1.h – Last Activity Time
Filters and lists chat sessions that occurred up to the date specified in this section.
2-) Advanced Filters
This section provides access to advanced filtering methods that can be applied in addition to basic filters.
Advanced Filters allow you to create more detailed and scenario-based conversation queries.
-
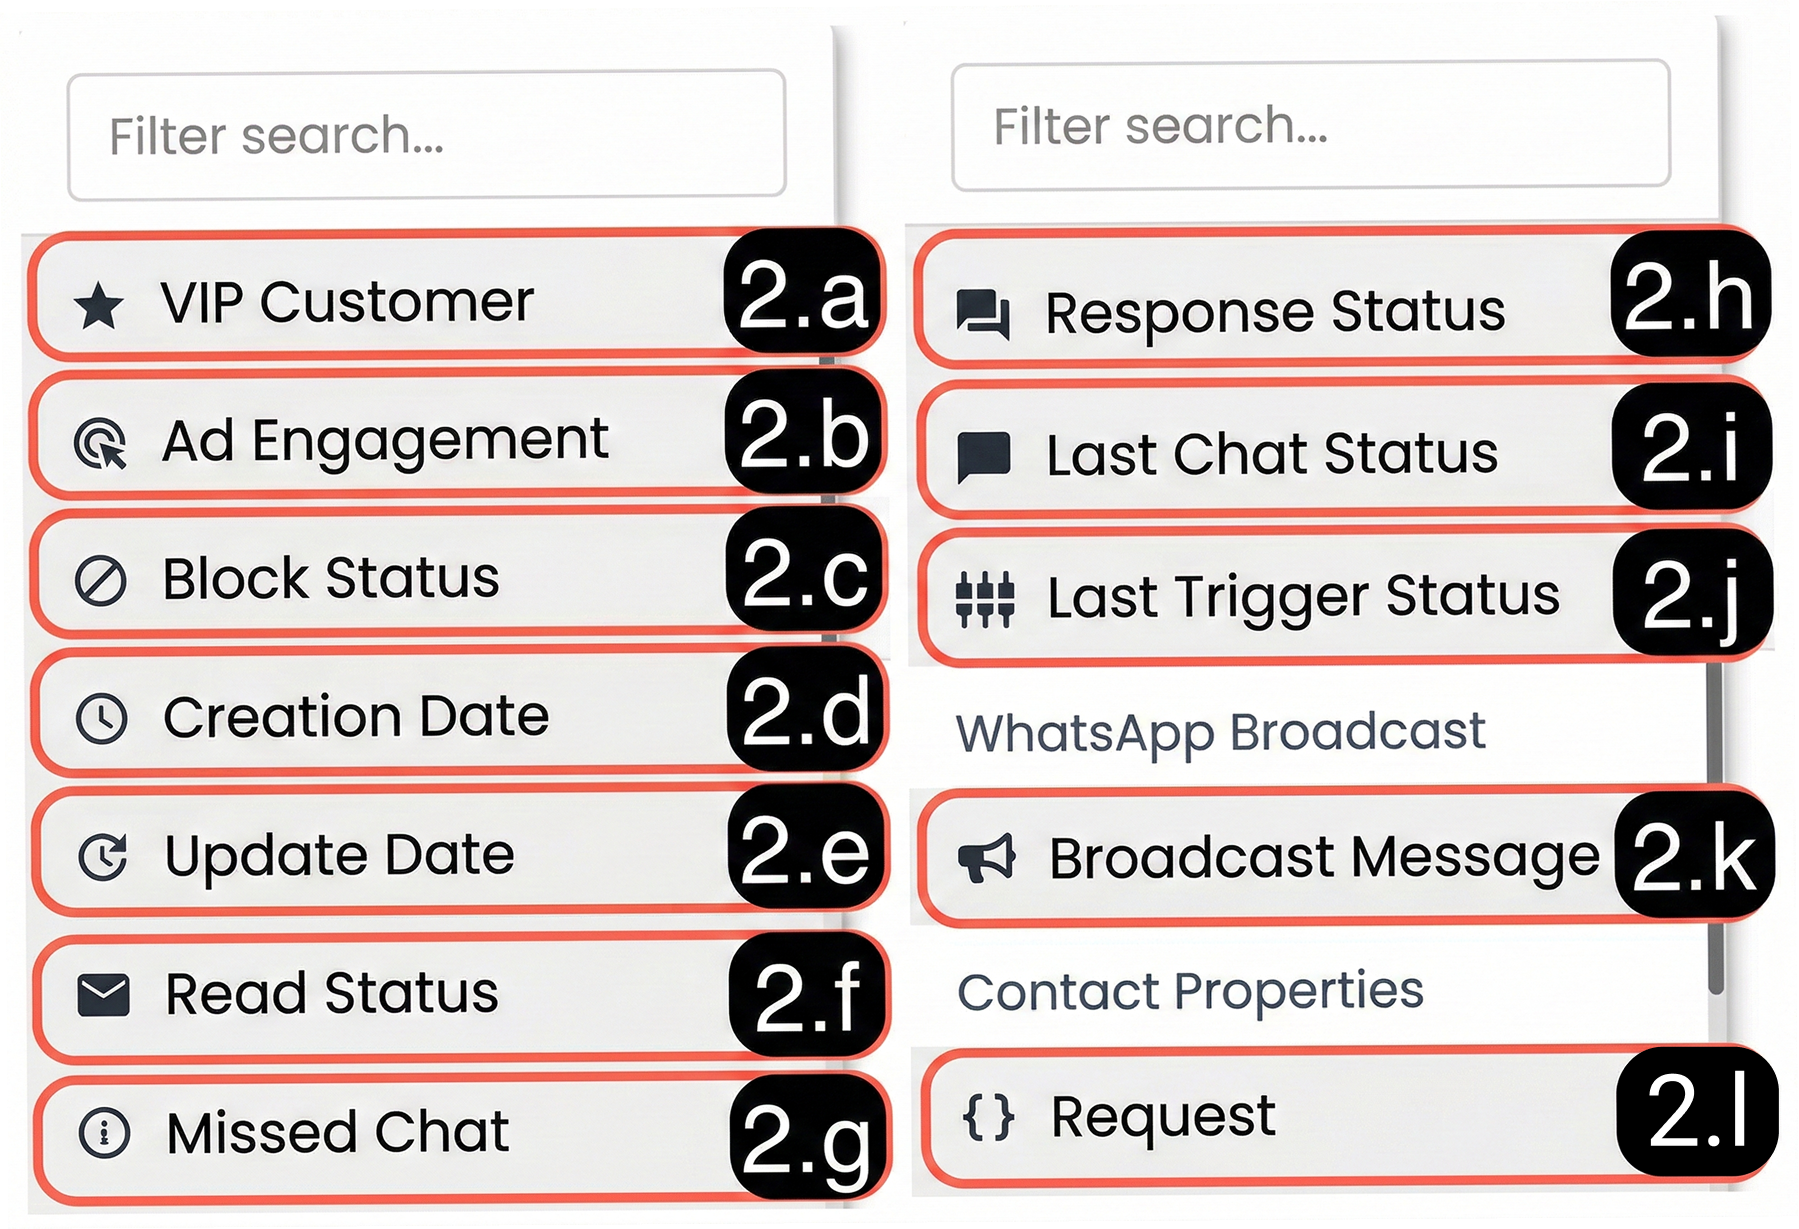
2.a – VIP Customer
Checks whether the person in the conversation is marked as a VIP Customer.
This filter is used to distinguish priority customer conversations. -
2.b – Ad Interaction
Filters whether the conversation was initiated as a result of an advertisement interaction.
Enables analysis of ad-driven conversations. -
2.c – Block Status
Allows filtering based on whether the person in the conversation is blocked in the system. -
2.d – Creation Date
Allows filtering based on the date the contact in the conversation record was first created in the system. -
2.e – Update Date
Allows filtering based on the date the conversation was last updated. -
2.f – Read Status
Allows filtering conversations based on whether they are read or unread. -
2.g – Missed Chat
Filters conversations that were closed or left unanswered without agent interaction. -
2.h – Response Status
Allows filtering based on whether the conversation was responded to by an agent. -
2.i – Last Chat Status
Allows filtering based on the final status of the conversation (active, missed, closed, etc.). -
2.j – Last Trigger Status
Allows filtering based on the last action that triggered the conversation (API, Automation, bulk message, etc.). -
2.k – WhatsApp Bulk Message
Filters whether the conversation was initiated through a WhatsApp bulk message. -
2.l – User Attributes (Contact Properties)
Allows filtering based on custom fields defined in the contact card (profile fields, dynamic properties, etc.).
For more detailed information about creating and using custom fields, please review the Profile Fields documentation.
3-) Filter Suggestions
This area allows you to quickly and easily create filter content through AI-powered filter suggestions and ready-made template filters.
You can define the conversation criteria you want to display to the AI and receive automatic filter suggestions, or select the most suitable one among ready-made templates to perform the filtering process.
This enables complex filtering scenarios to be created quickly without dealing with technical details, allowing access to the desired conversation content in a short time.
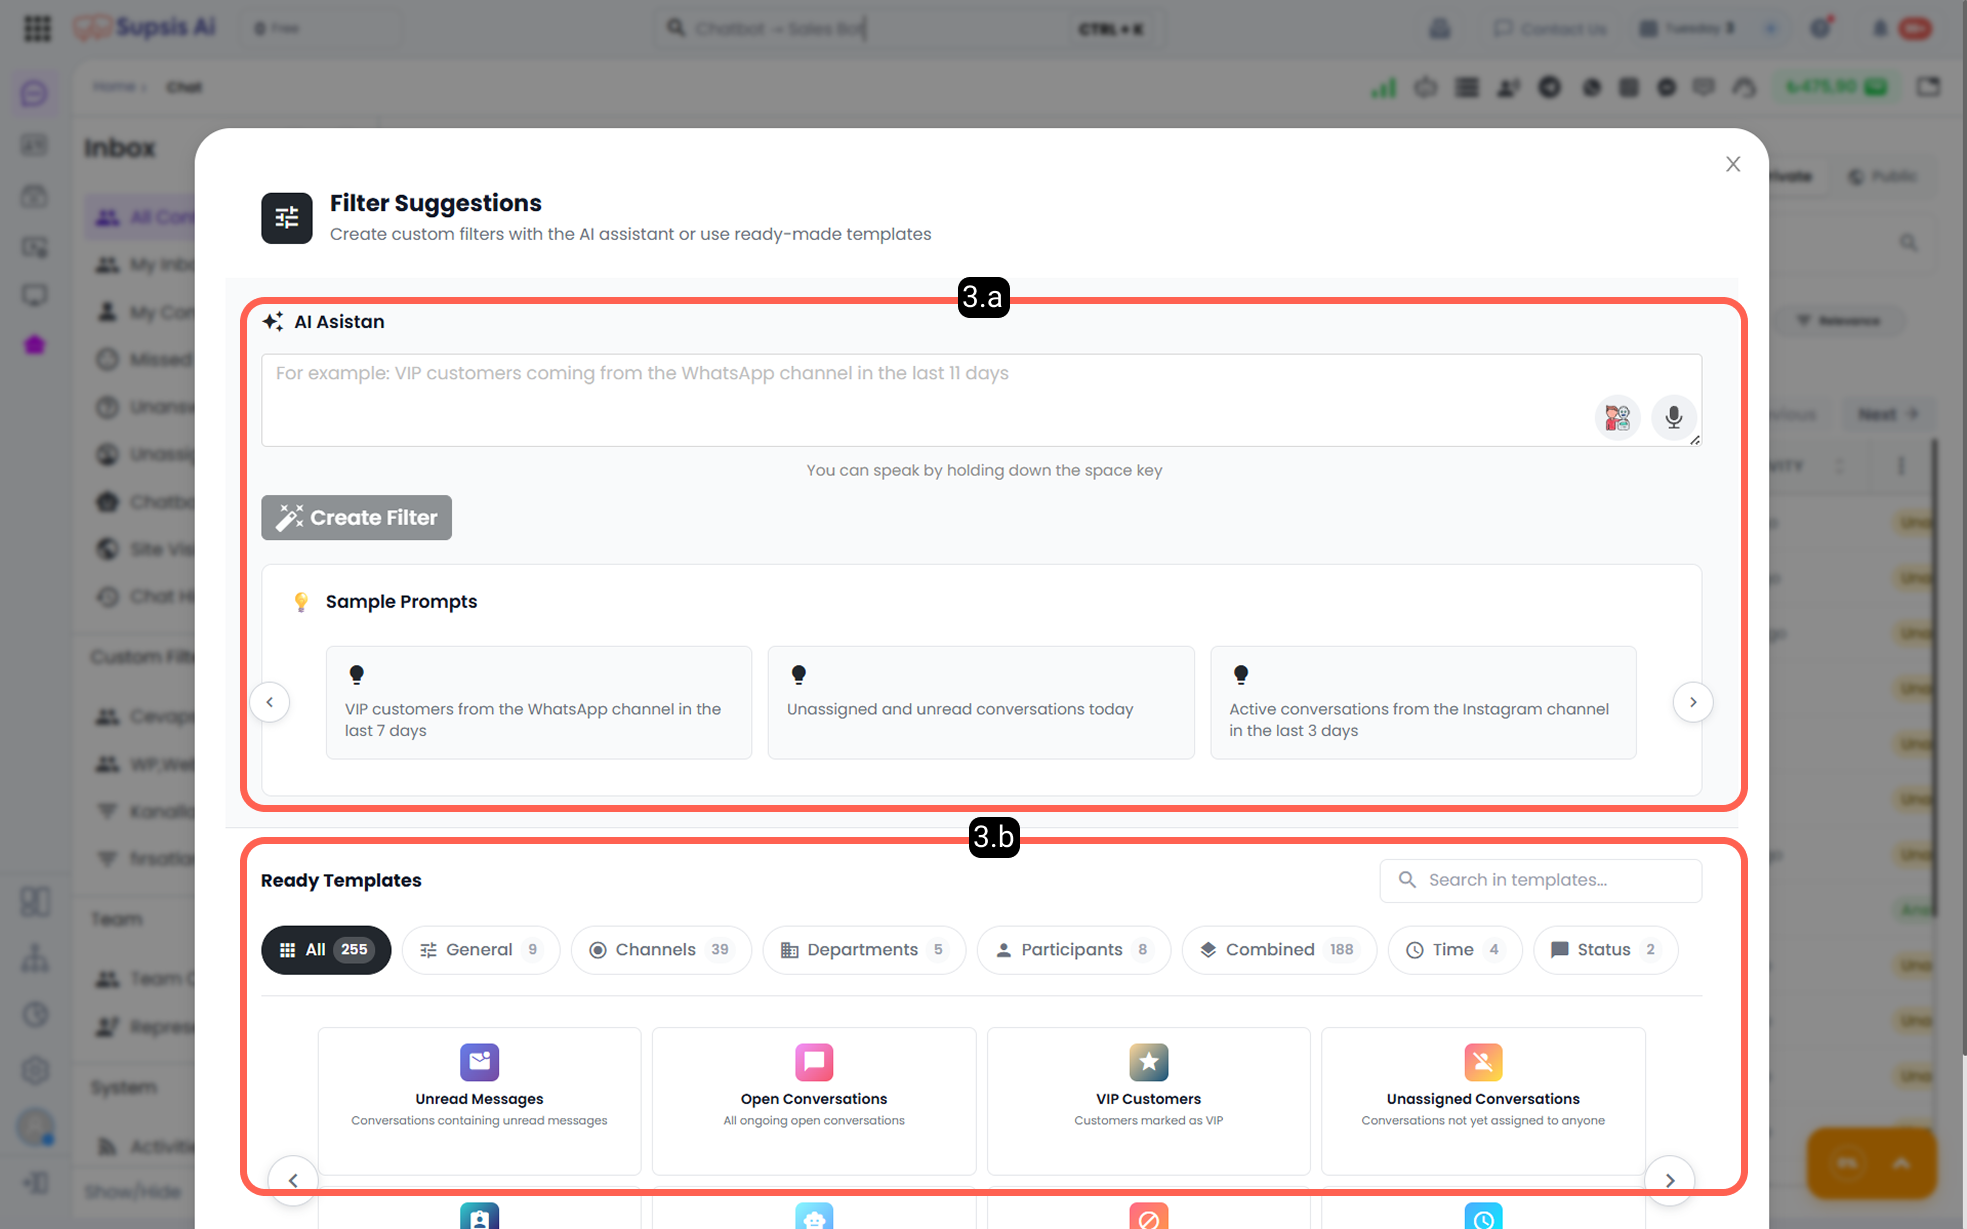
- 3.a – AI Assistant
The AI Assistant allows you to define the filter you want to create in natural language and have the filter content automatically generated by artificial intelligence. You can submit your filtering request in writing or press the “Space” key to provide a voice command to the assistant.
During the filter creation process, you can use the example prompts located below the field to obtain more accurate and faster results.
This makes it possible to easily create complex filtering scenarios without dealing with technical configurations.
To activate this feature, OpenAI integration must be defined in your panel. For the setup process, please review our OpenAI Integration documentation.
- 3.b – Ready-Made Templates
This area allows you to access ready-made template filter contents automatically defined by the system specifically for your panel.
The provided templates can be evaluated according to the descriptions under each one, and by selecting the most suitable template filter for your needs, the filter content can be populated accordingly.
4-) Filter Visibility
This is the area where you can determine whether the created filter can be viewed by other users in the system.
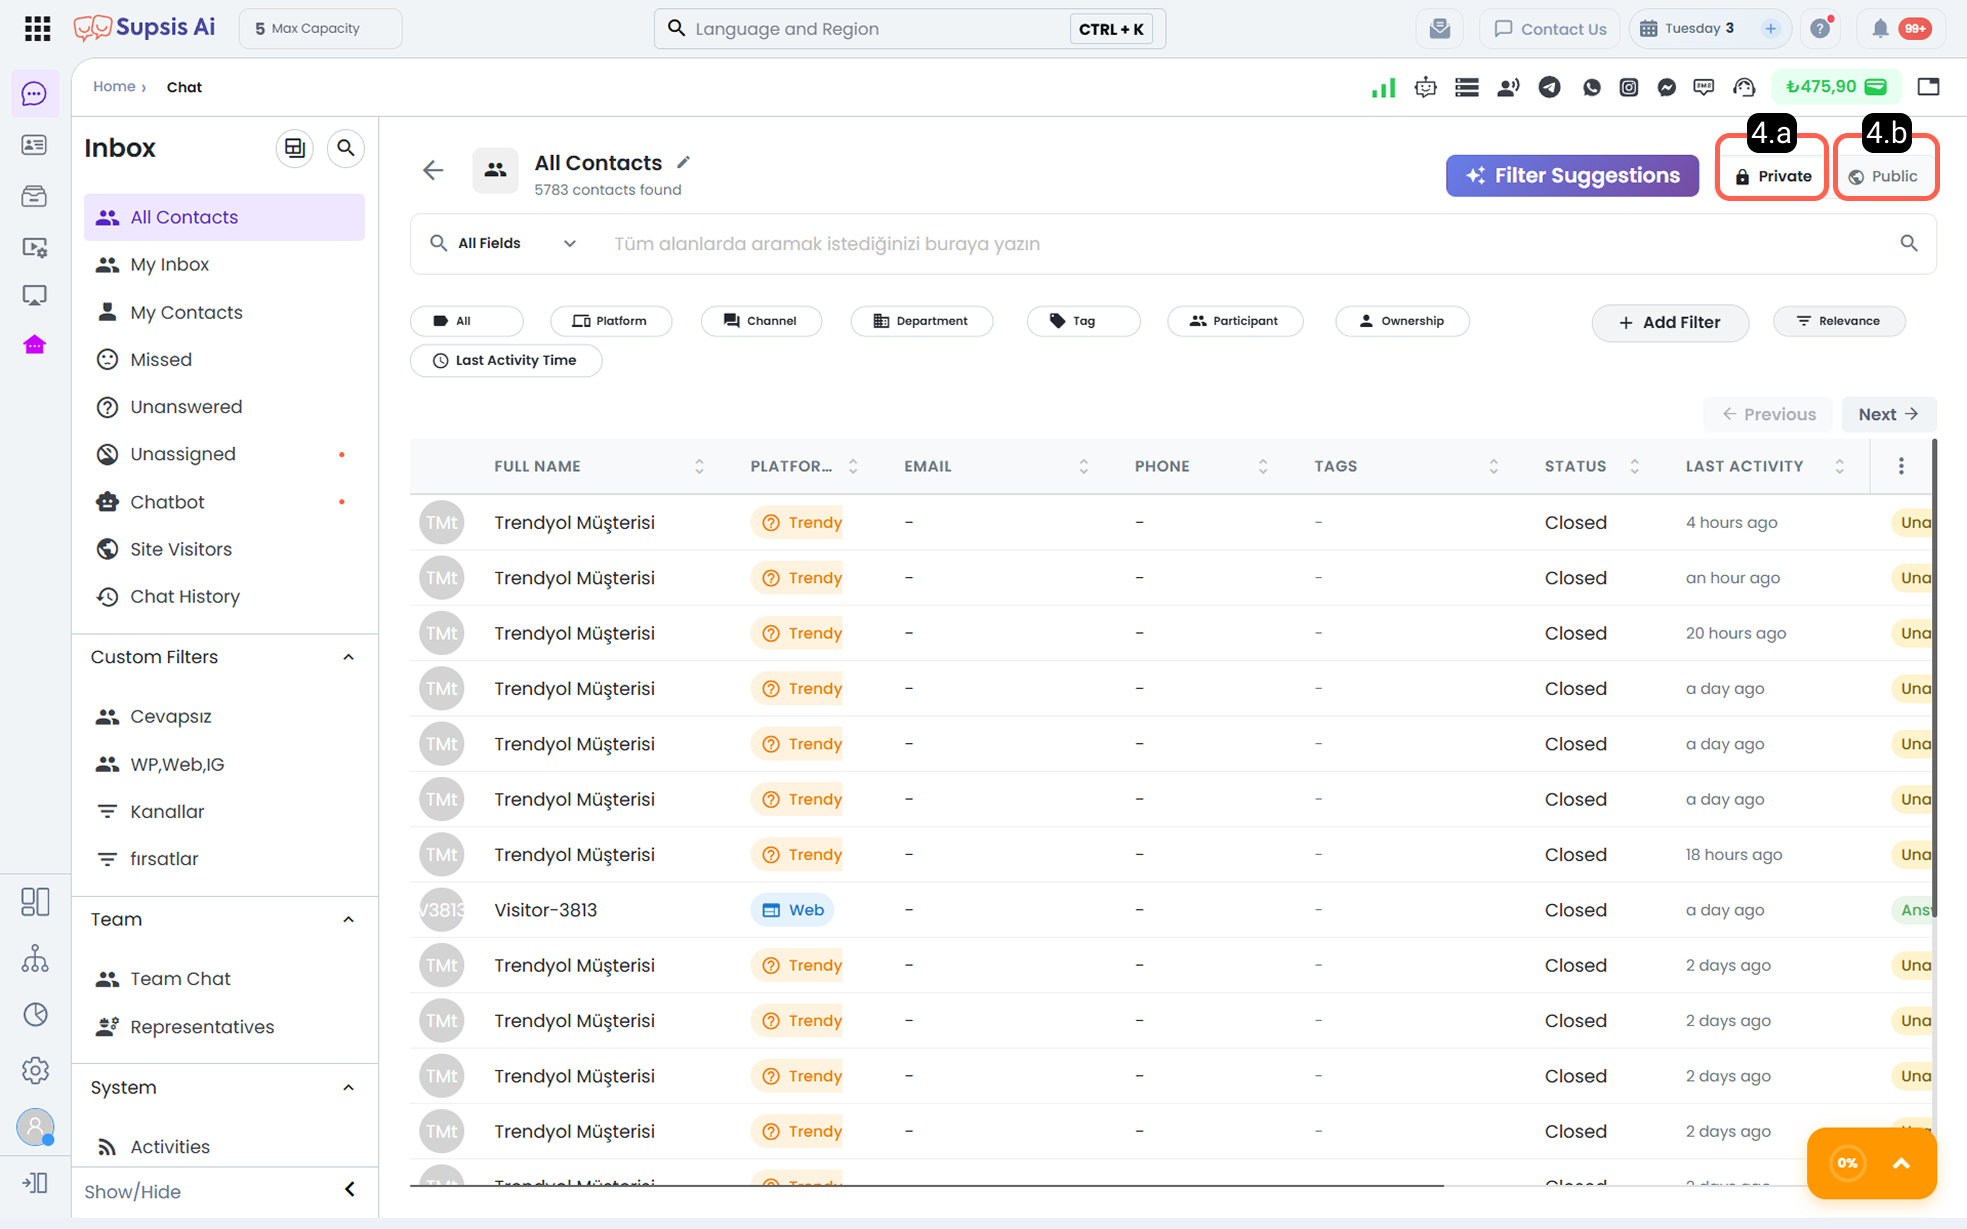
- 4.a – Private
The filter can only be viewed and used by the user who created it. Other users do not have access to this filter.
- 4.b – Public
The filter can be viewed and used by all appropriate users within the scope of authorization and role settings. This option is preferred for creating filters shared across the team. test