
Tables Menu
Through this section, you can access your existing tables, categorize and update them. You can also create new tables, establish relationships between tables, and convert your tables into modules.
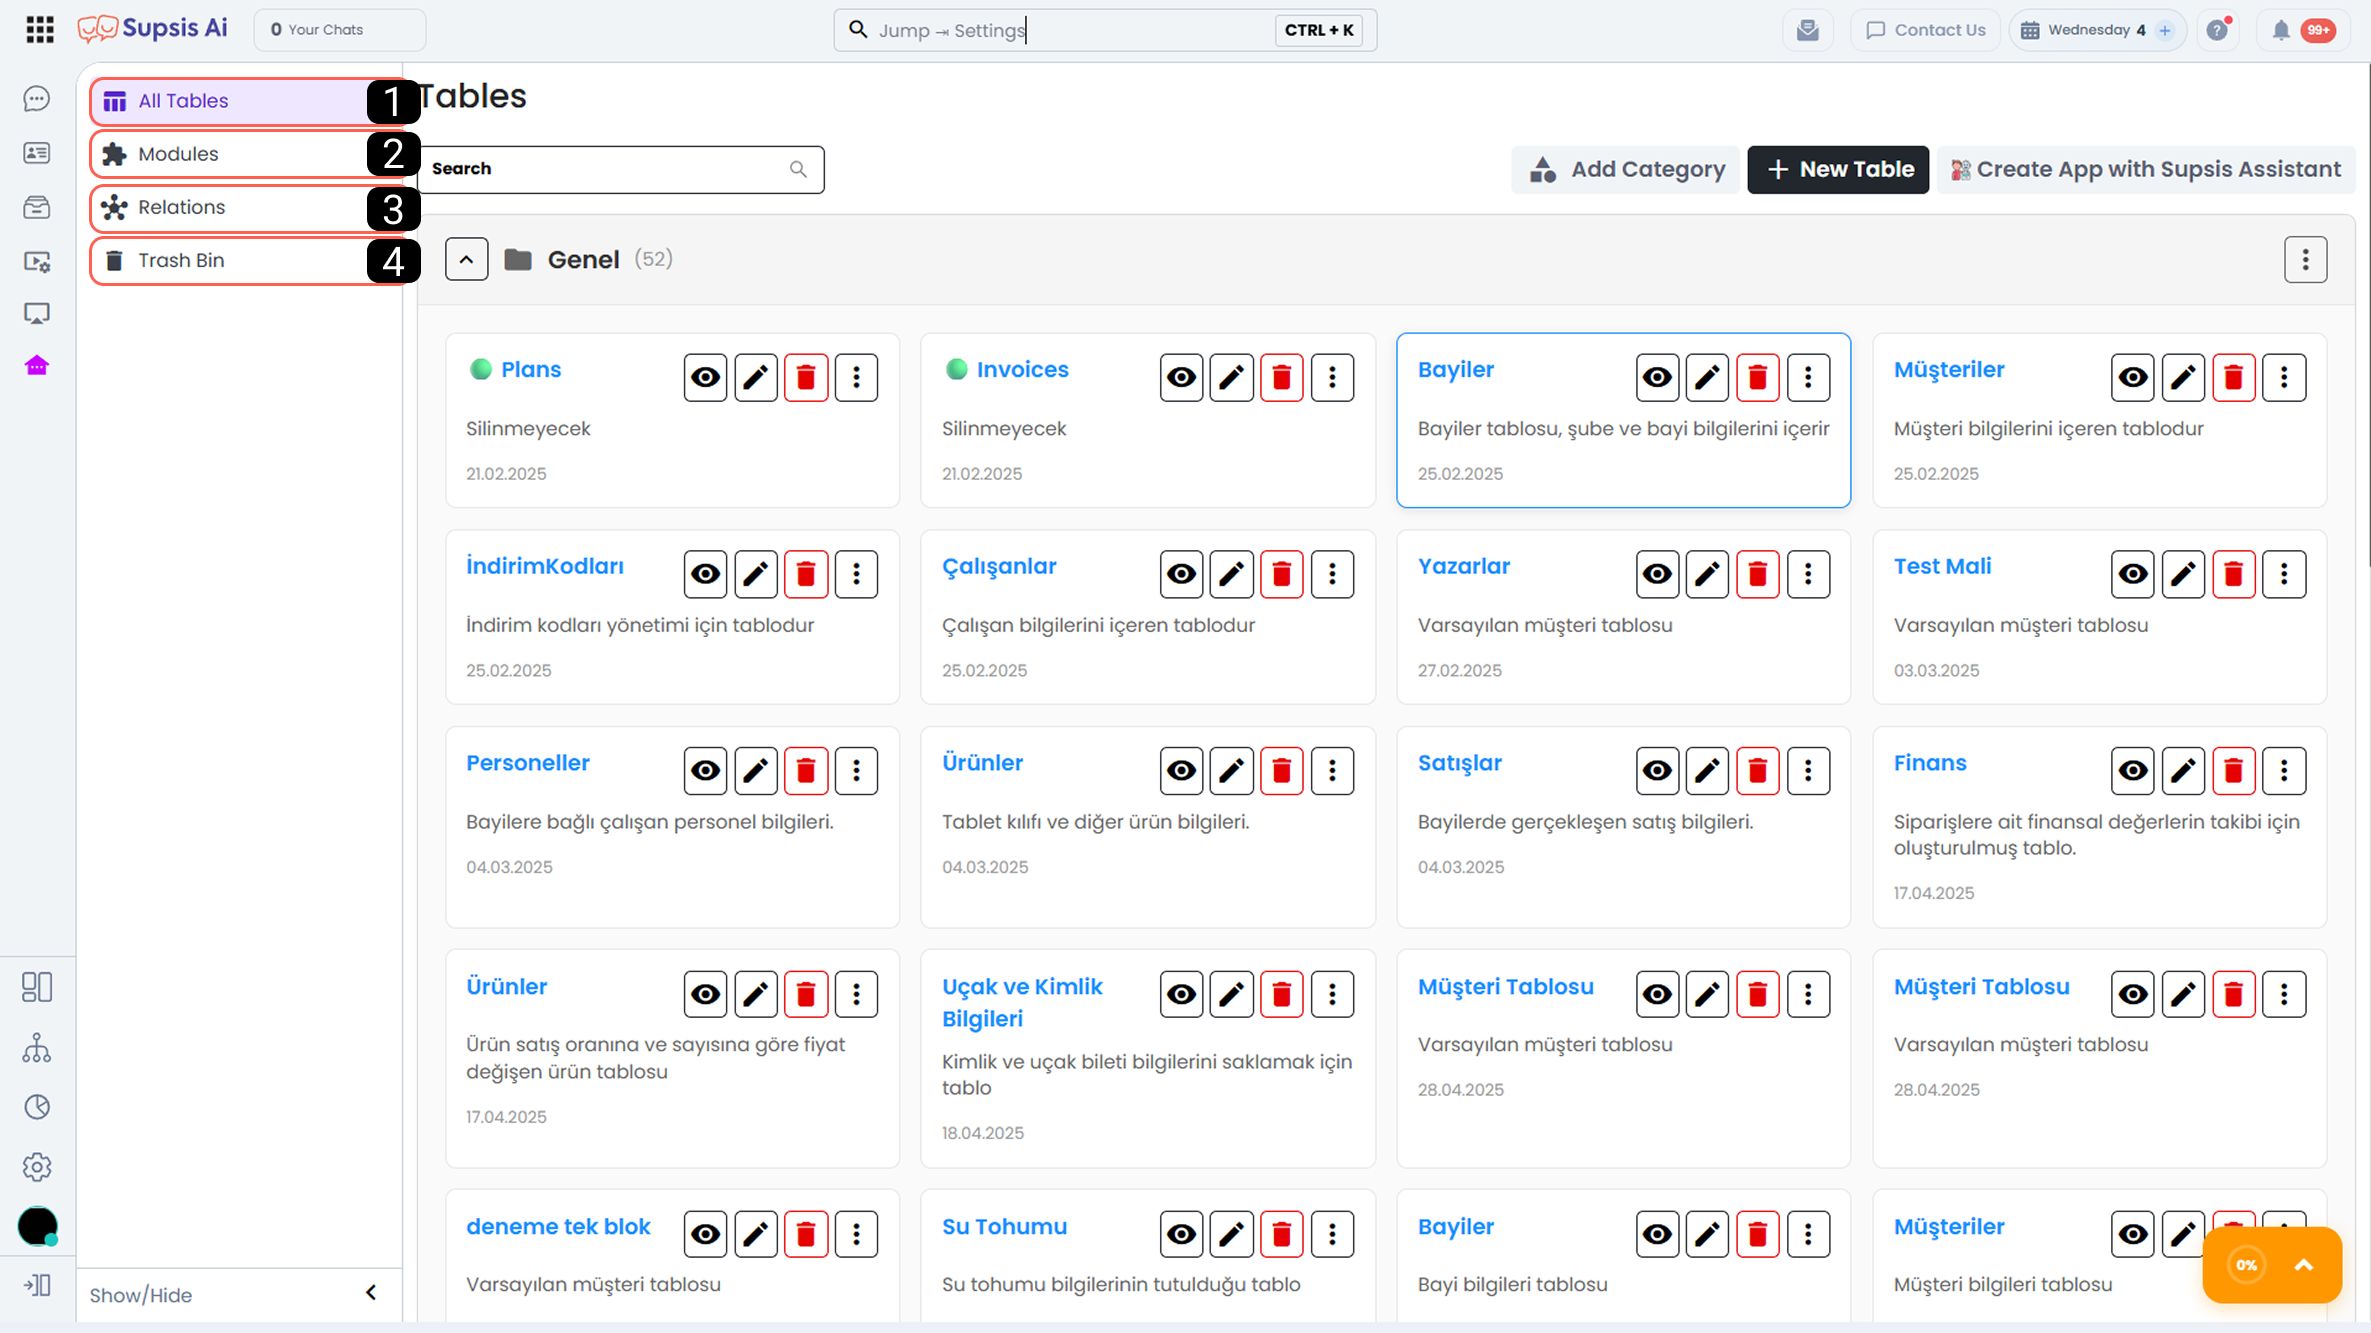
| No | Menu |
|---|---|
| 1 | All Tables |
| 2 | Modules |
| 3 | Relationships |
| 4 | Trash |
1-) All Tables
From this section, you can create new tables, instruct Supsis’ AI assistant to design advanced table applications, add new categories to organize and classify your tables, view the content of your existing tables, and perform editing and update operations on them.
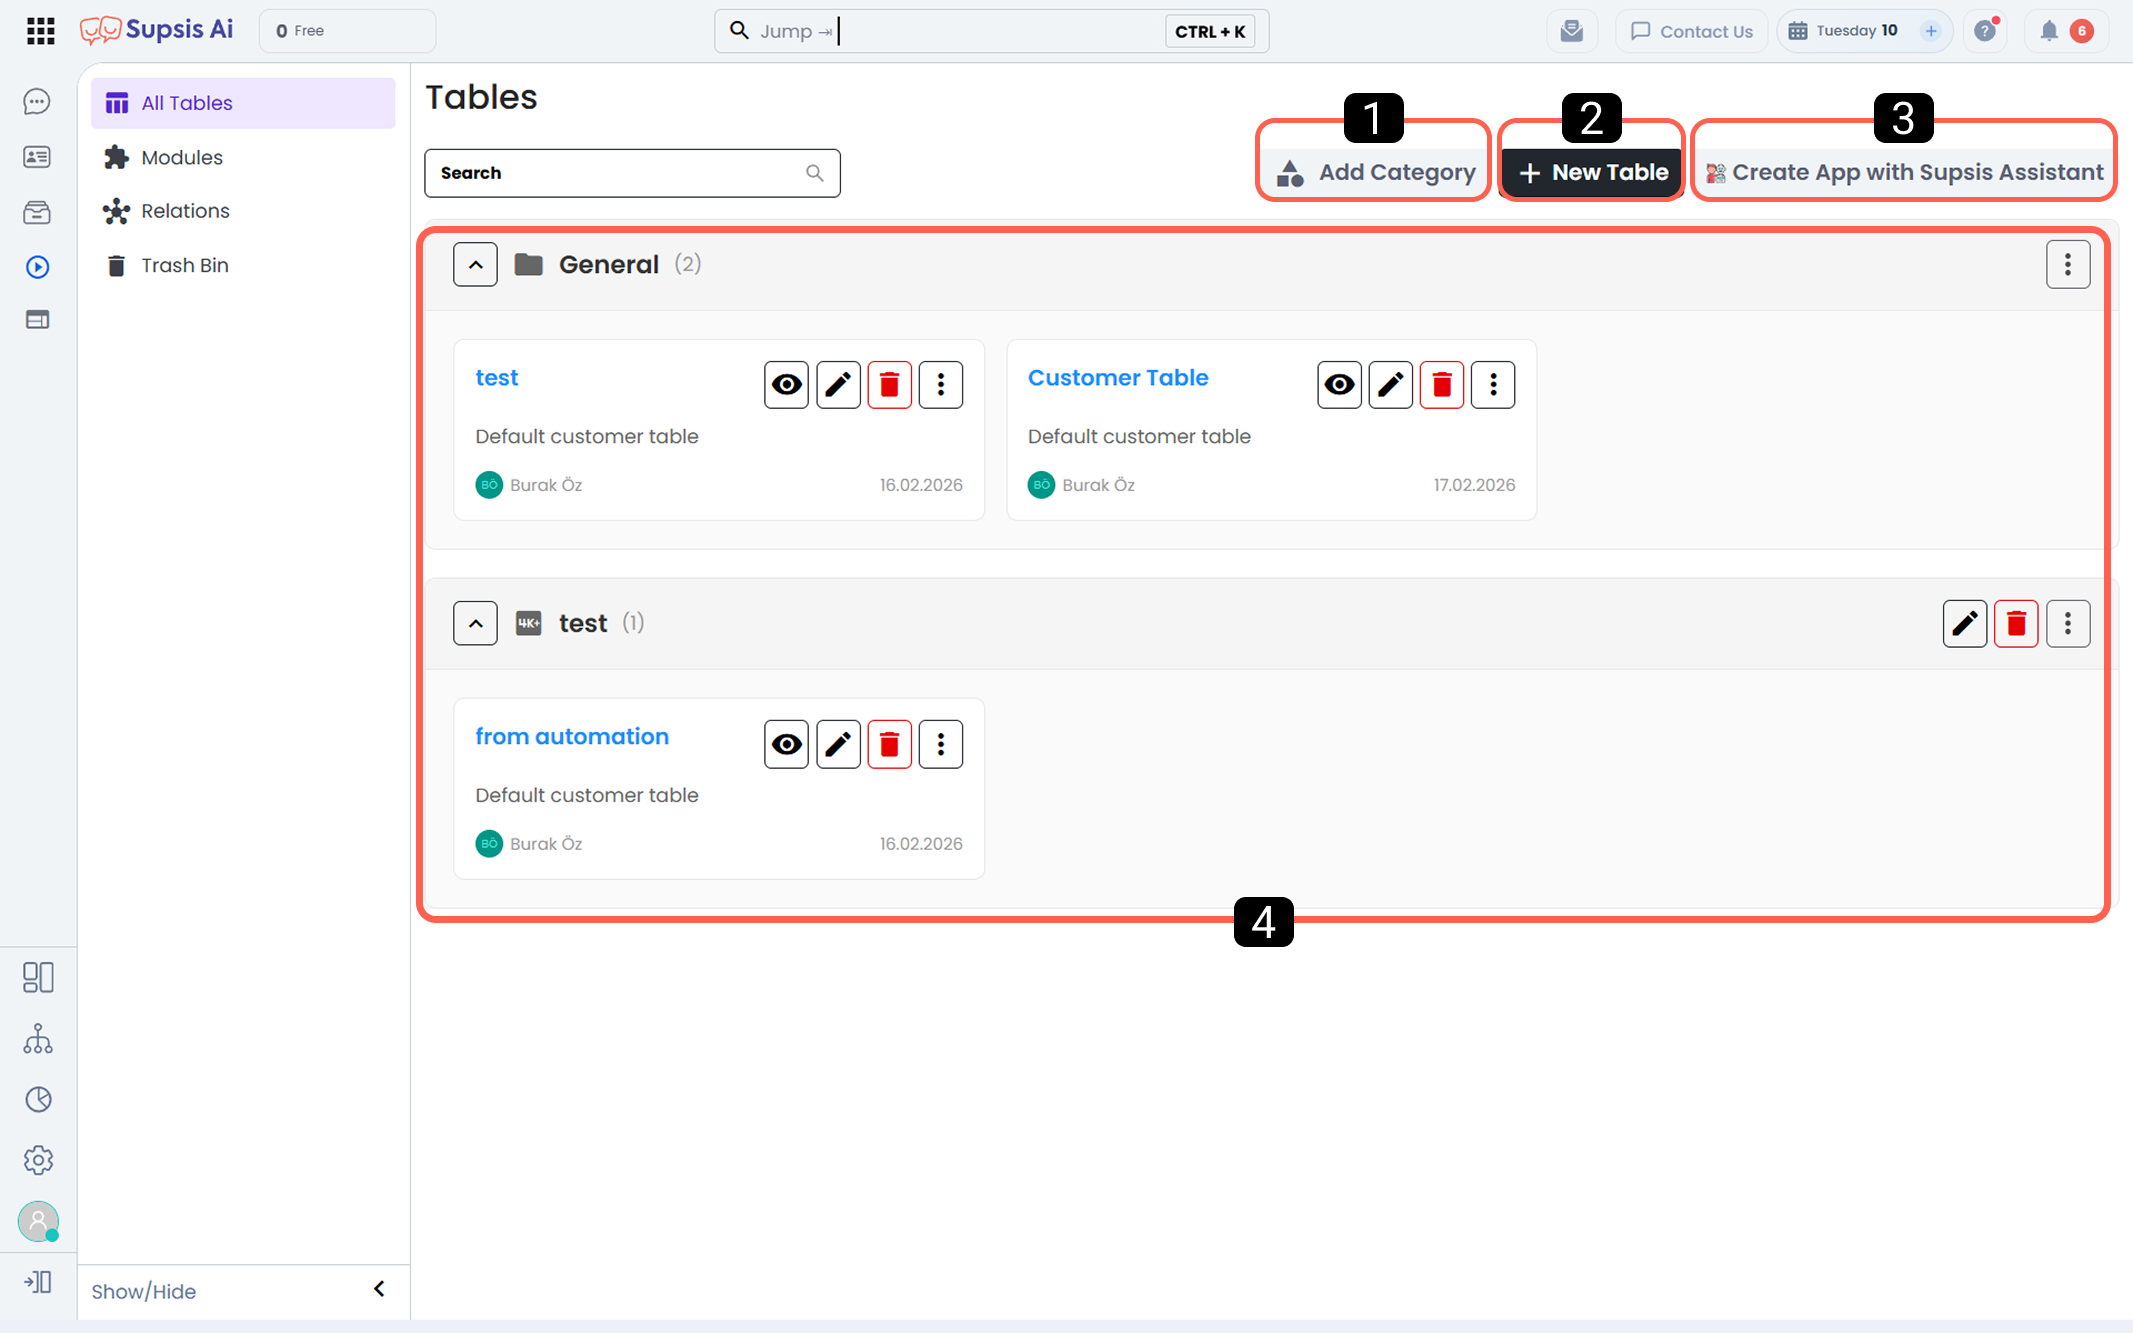
1-) Add Category
From this area, you can create a new category and group your tables under categories.
While creating a category, you can assign a name and add a custom icon. This allows you to distinguish your tables more easily and keep them organized, clear, and manageable.
1.a – New Table
You can create a new table using this option. The table you create can be fully customized according to your business processes and needs, and you can define data structures suitable for those processes.
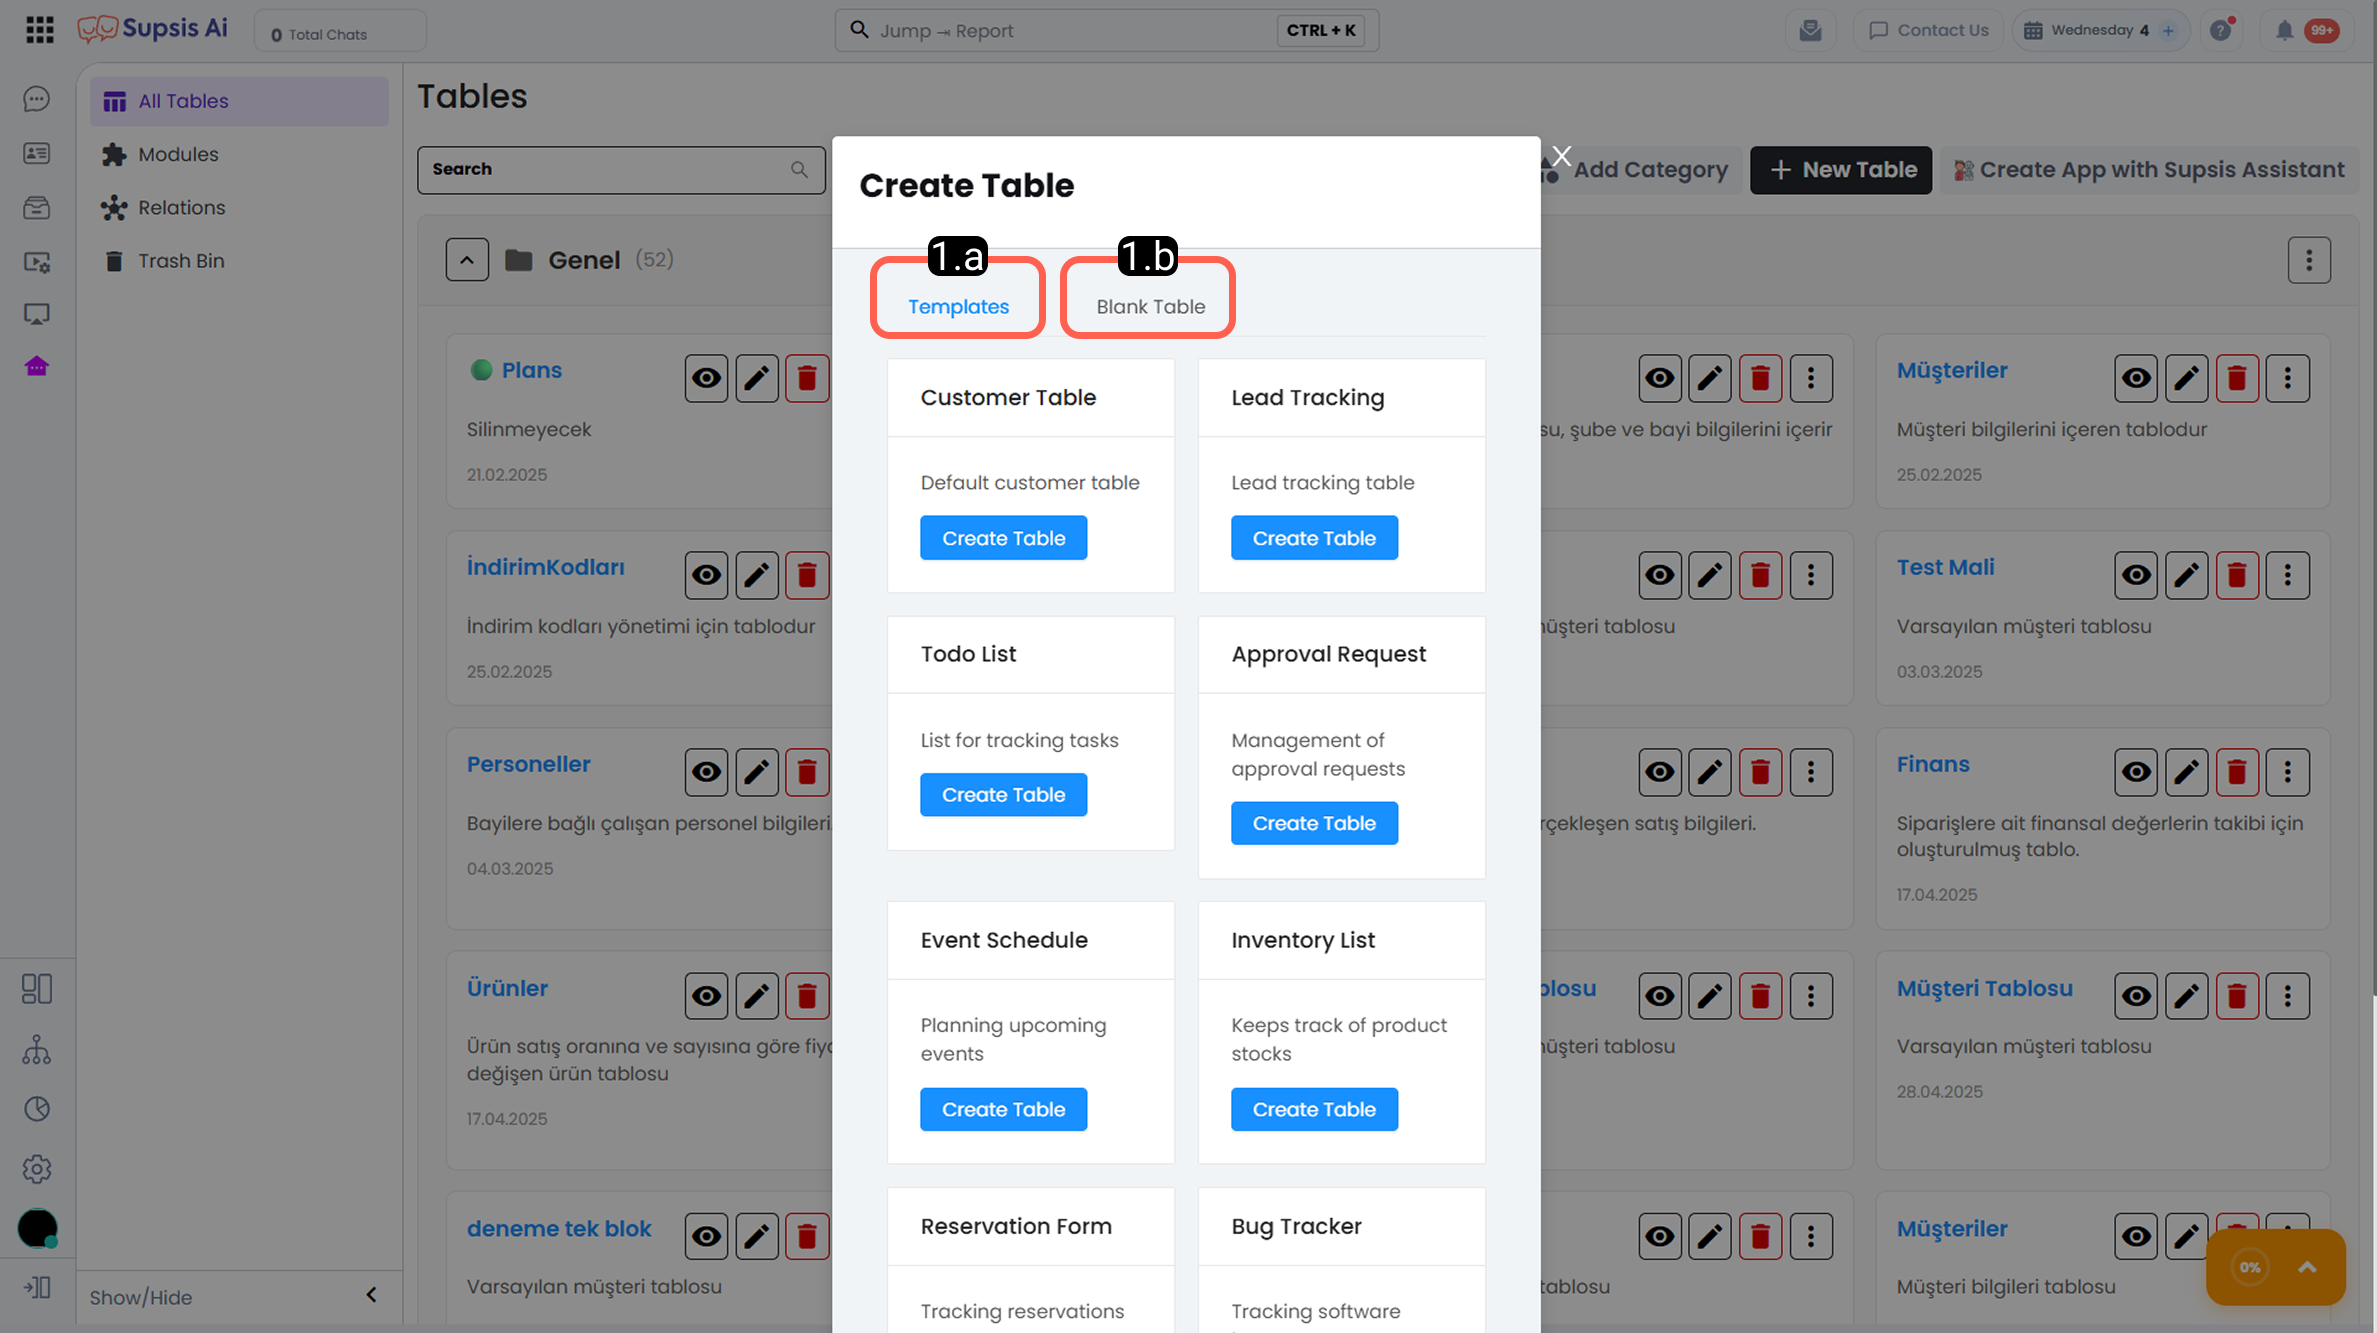
- 2.a – Template Tables:
When creating a table, you can choose from ready-made template tables. Template tables are pre-defined tables with predefined columns and data structures.
You can select the most suitable template from the options below and use the ready-made content directly, or modify it according to your needs. This method allows you to prepare your table for use much faster.
- 2.b – Blank Table:
This option allows you to create a completely empty table with no columns. You can manually define all columns and data structures from scratch according to your needs.
After creating your table, you can review the Table Content documentation for more information about creating and managing table data.
1.b – Create Application with Supsis Assistant
This option allows you to use Supsis’ AI assistant to create tables tailored to your needs and build advanced applications based on those tables.
Based on the information you provide to the AI assistant, table fields, field structures, inter-table relationships, and table modules are automatically created. This enables you to build advanced applications and tables much faster and more practically without dealing with technical details.
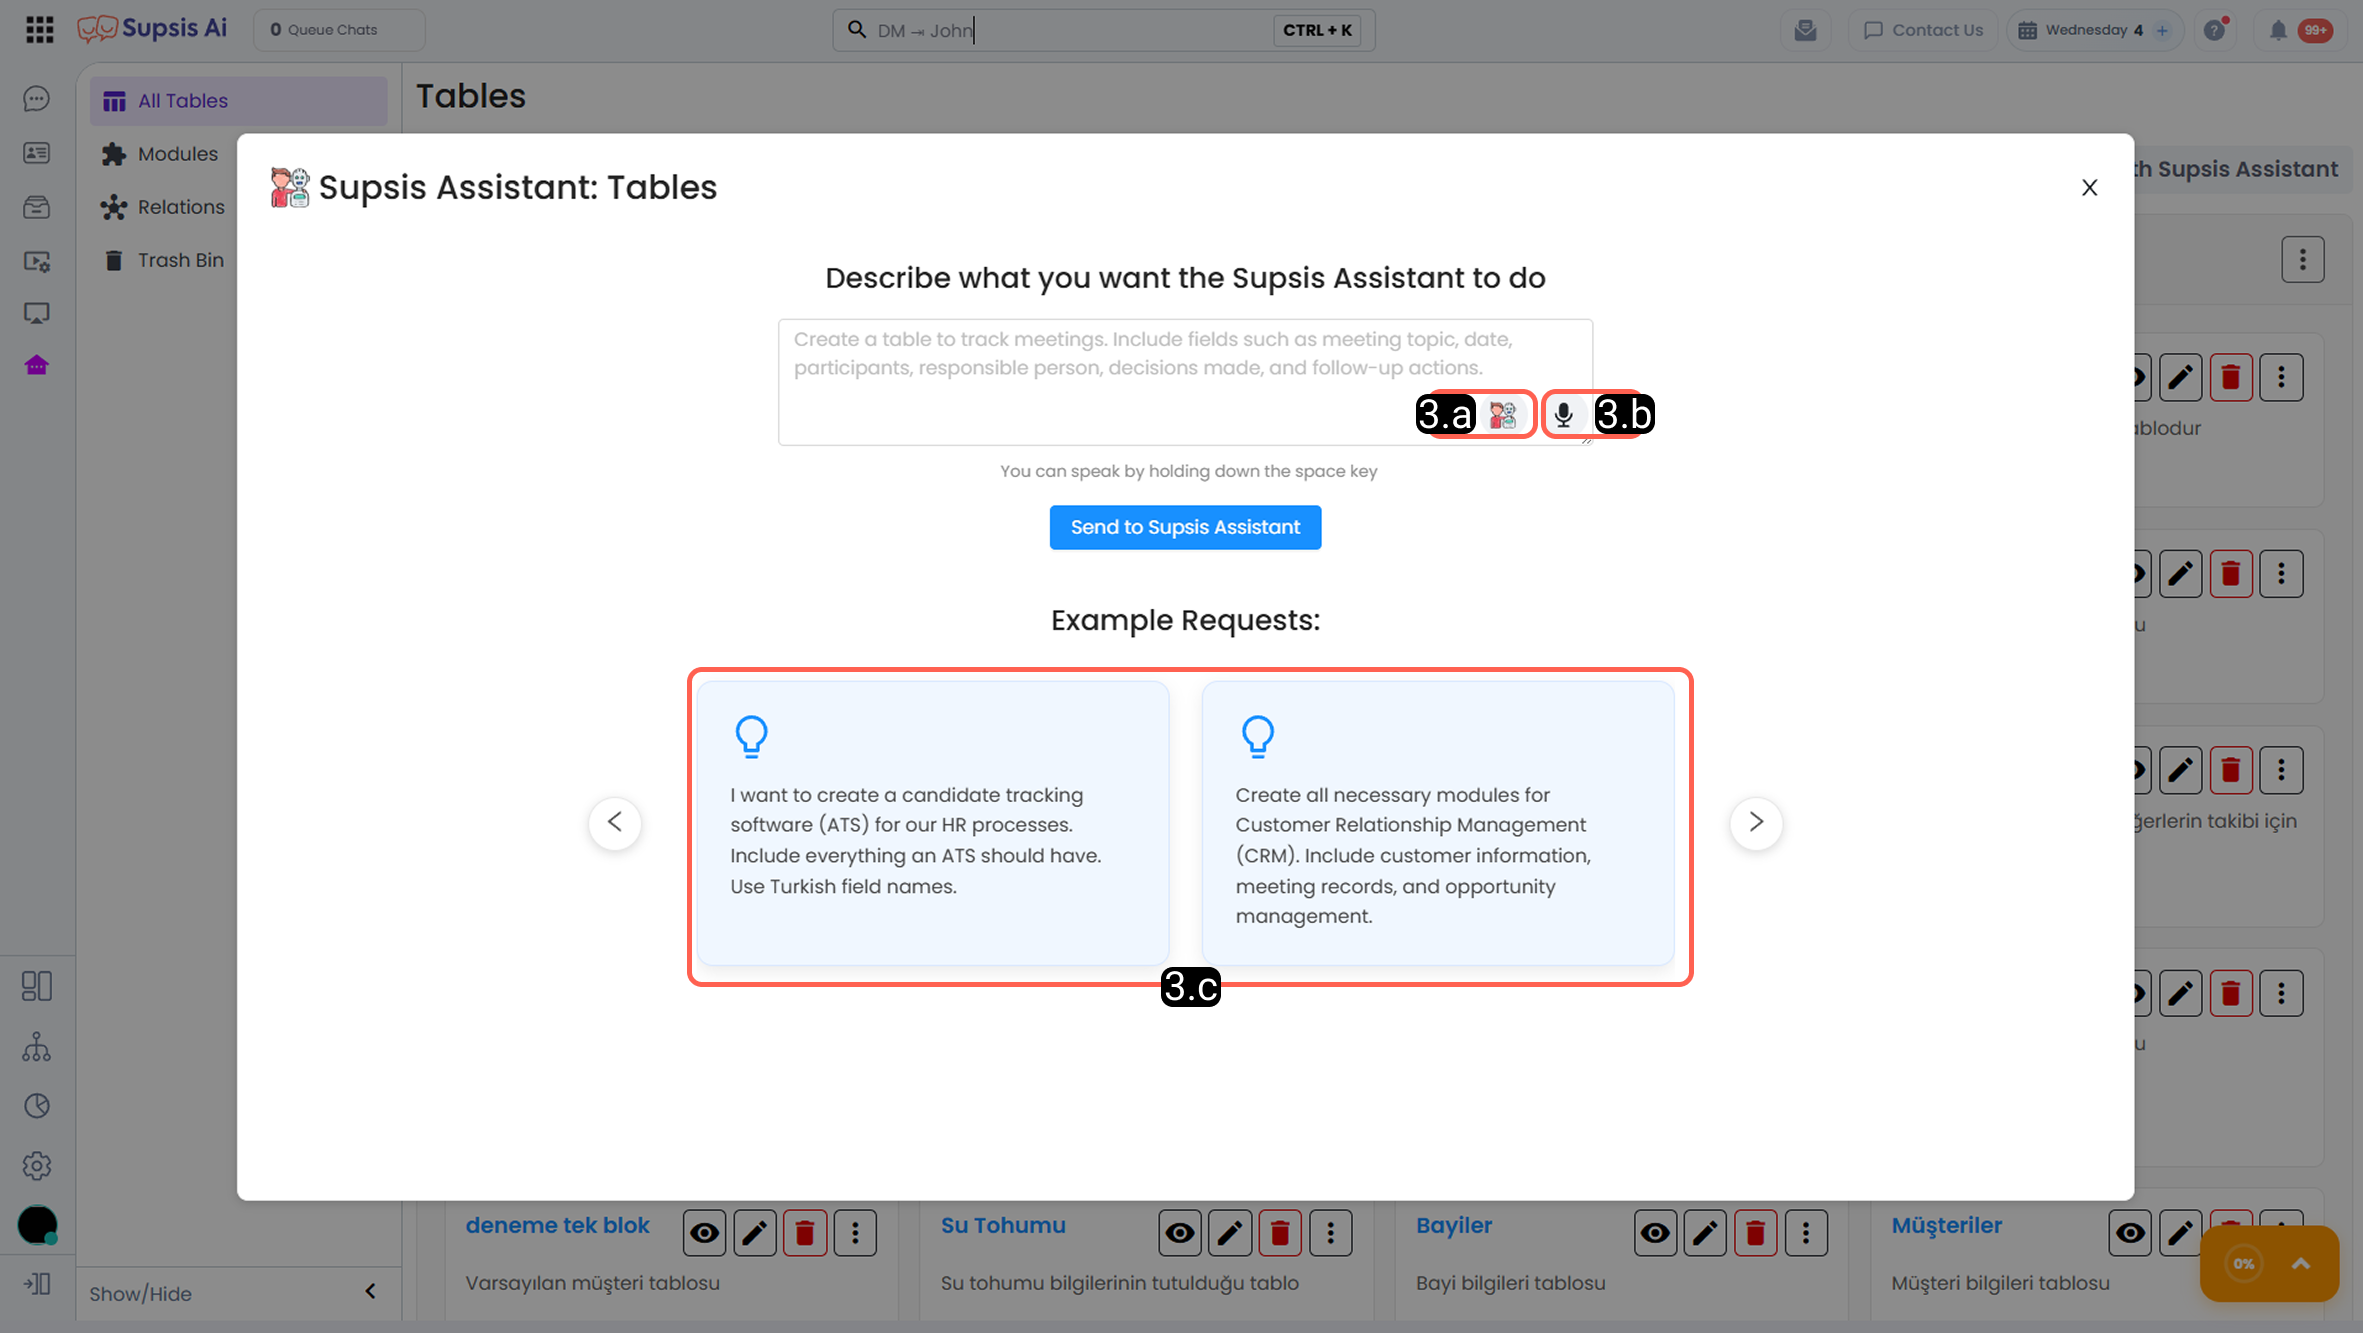
- 3.a – AI Co-Pilot:
With this button, you can activate the AI Co-Pilot feature. Thanks to Co-Pilot, you can refine, improve, or regenerate the messages you send to the AI during the table creation process.
Co-Pilot makes your content clearer, more consistent, and more goal-oriented, helping you achieve more accurate and efficient results.
To use Co-Pilot features, OpenAI integration must be active in your panel. For detailed information, please review the OpenAI Integration documentation.
AI Co-Pilot text editing functions include:
Make Longer: Expands short and superficial content into more detailed and comprehensive text.
Change Tone: Allows you to modify the tone and style of the content. The text can be rewritten in professional, friendly, simple, assertive, or casual tones.
Run Prompt: Automatically generates table details or restructures existing content based on the commands (prompts) you provide.
Fix Grammar: Automatically corrects spelling and punctuation errors, making the text clearer and more structured.
- 3.b – Speech to Text:
This feature allows you to create table content by speaking through a microphone instead of typing. Your speech is automatically converted into text and used during the table creation process.
Note: If this feature does not work, ensure that microphone permission is enabled in your browser’s Site Settings.
- 3.c – Example Requests:
In this section, you can view example requests that you can send to Supsis Assistant. You can review them for inspiration or use them directly to quickly create your tables and applications.
This feature automatically determines your table structure, from column names to column icons, according to your instructions. If your request requires multiple tables, those tables are automatically created; when necessary, they are also linked together and converted into modules.
Example: Creating an Application with the Assistant
1. Example Request:
I want to track the products my customers purchase on a customer basis. I have API integration with Supsis tables. When a new product is added to my system, when a new customer record is created, and when a new sale occurs, these are automatically sent to Supsis tables via API.
When a new customer record is created, my customers’ full name, address, phone number, and email data are transmitted via API.
When a sale occurs, the buyer’s full name, address, and phone number are transmitted via API.
When a new product is added, the product’s name, description, and price are sent via API.
2. The Assistant Creates the Tables:
Based on your request, Supsis Assistant automatically creates the following tables:
Customers Table Content:
- Full Name (Data Type ⇒ Text)
- Address (Data Type ⇒ Long Text)
- Phone Number (Data Type ⇒ Phone)
- Email (Data Type ⇒ Email)
Products Table:
- Product Name (Data Type ⇒ Text)
- Product Description (Data Type ⇒ Long Text)
- Product Price (Data Type ⇒ Currency)
Sales Table:
- Full Name (Data Type ⇒ Text)
- Address (Data Type ⇒ Long Text)
- Phone Number (Data Type ⇒ Phone)
- Sold Product (Data Type ⇒ Related List)
The Sold Product column in the Sales table is created with the Related List data type. This allows product details to be viewed directly from the sales record without navigating to the product table.
3. Establishing Table Relationships:
The assistant creates a relationship between the Customers and Sales tables using the common and unique Phone Number field.
As a result:
- All sales records related to a customer are automatically listed from the Customers table.
- Sales records are correctly matched with the relevant customer based on the unique value.
4. Converting the Table into a Module:
The assistant converts the Customers table into a module. This allows direct access to the Customers module from the Modules menu.
Thanks to this structure, three tables can be managed in an integrated and organized way through a single module.
Since the Customers table is linked to the Sales table:
- All sales related to a customer can be accessed from the customer record.
- Because the Sold Product column is defined as a related list, product details can also be viewed on the same screen.
5. Automating the Module:
Thanks to API integration, external data can be written directly into tables.
When a new sale occurs, when a new product is added, or when a new customer record is created, the related data can be automatically transferred to the appropriate tables via API.
To enable API access, your table must be converted into a module from the Modules section.
1.c – Category and Table Operations
From this section, you can manage the tables within the categories you have created. You can move your existing tables to any category, edit tables, and update category configurations.
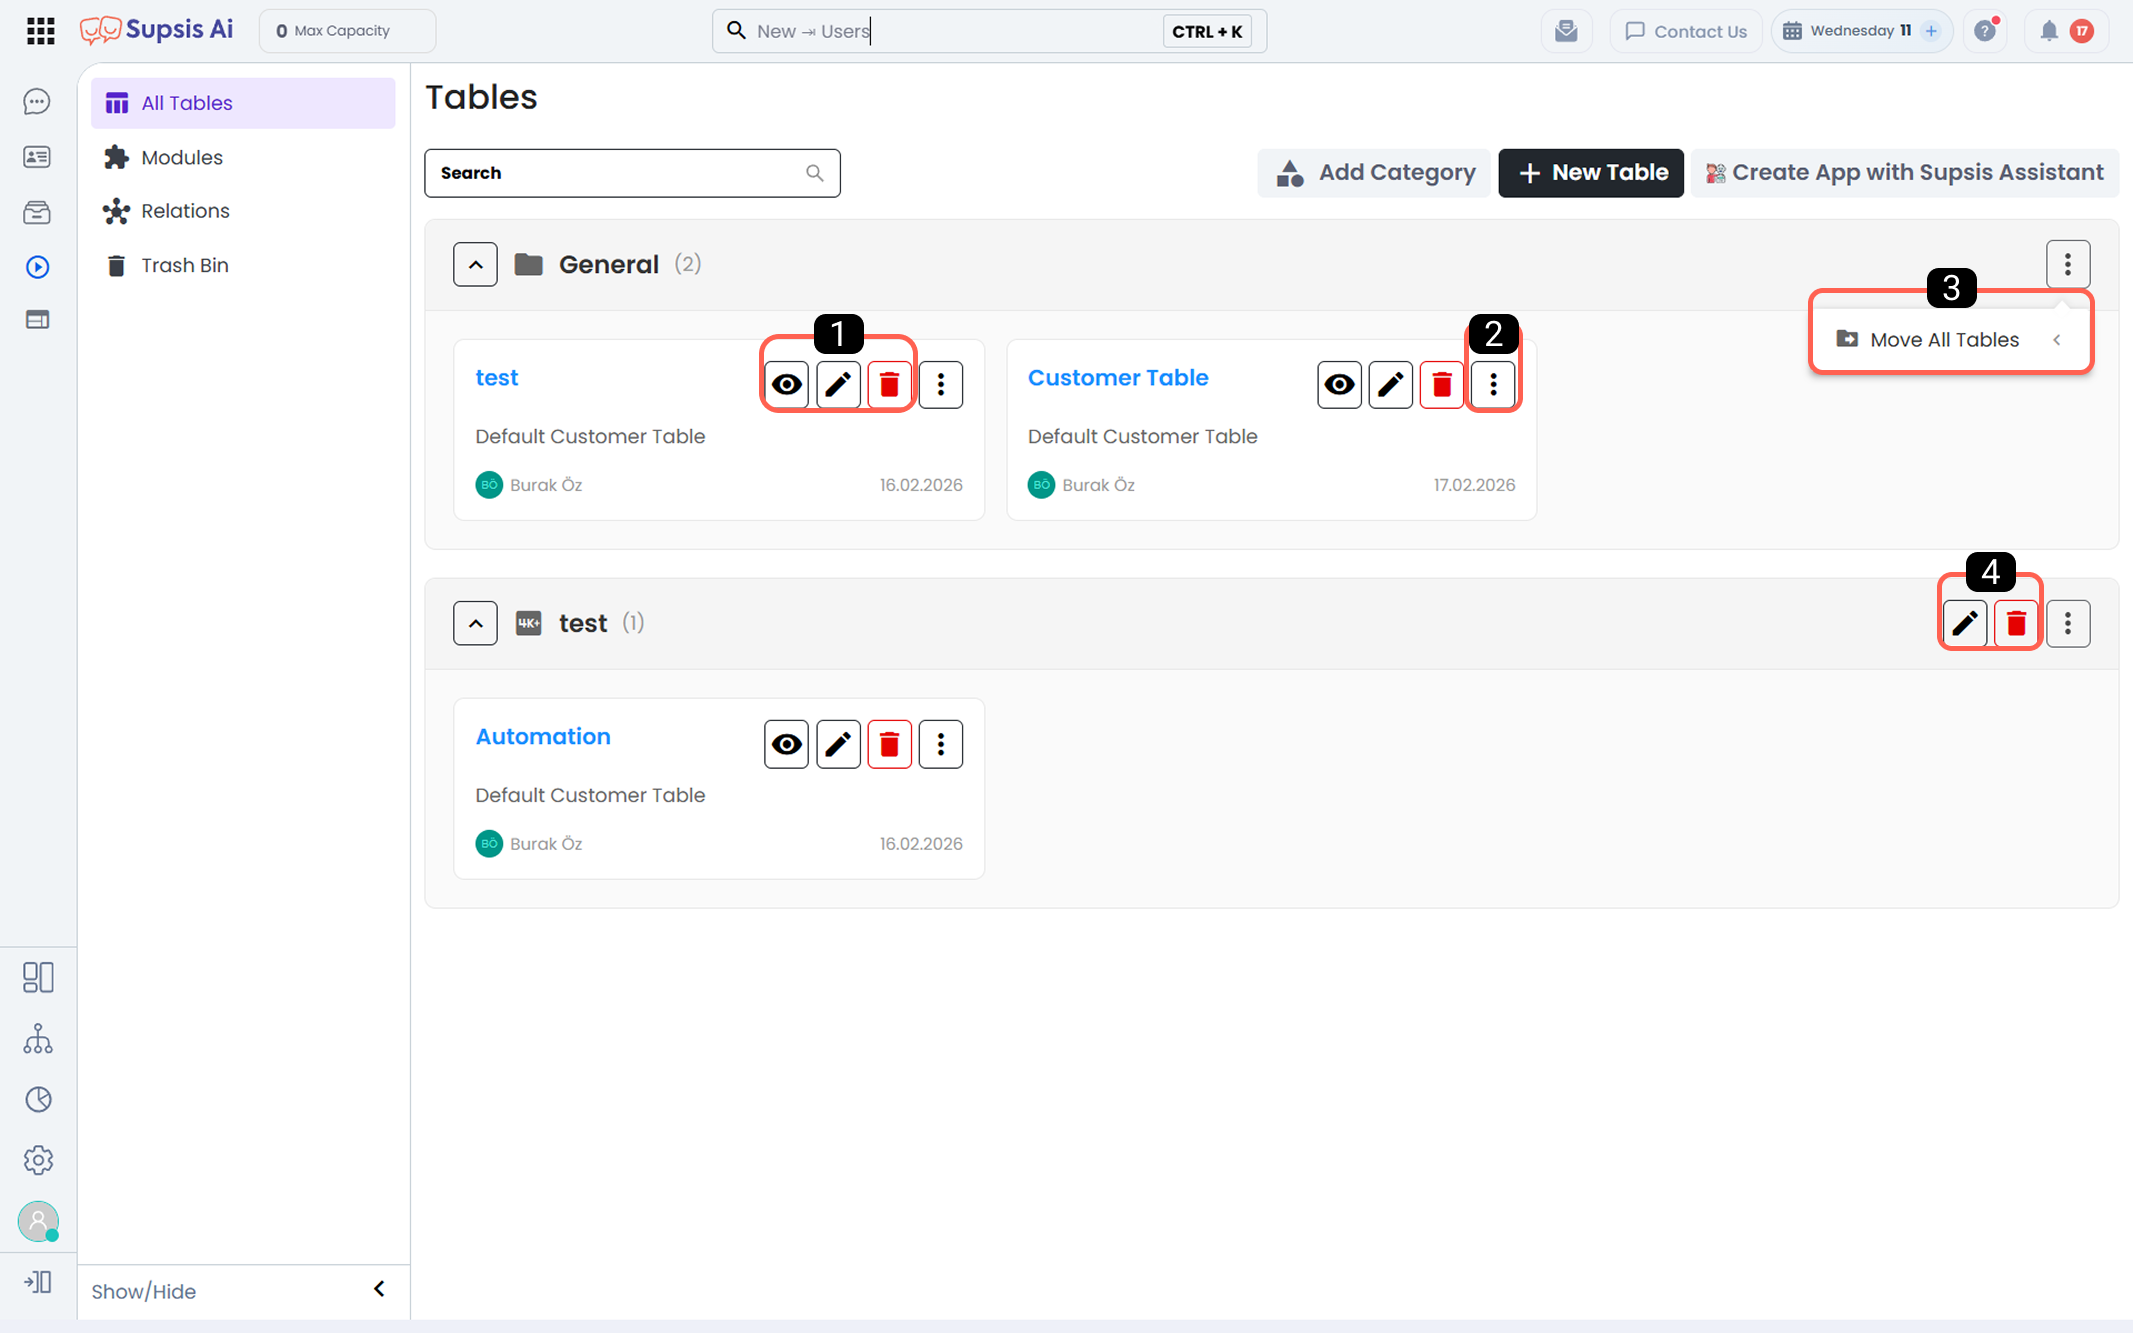
1-) View/Edit/Delete Table
This section allows you to perform basic operations for a table via the action icons located in its row.
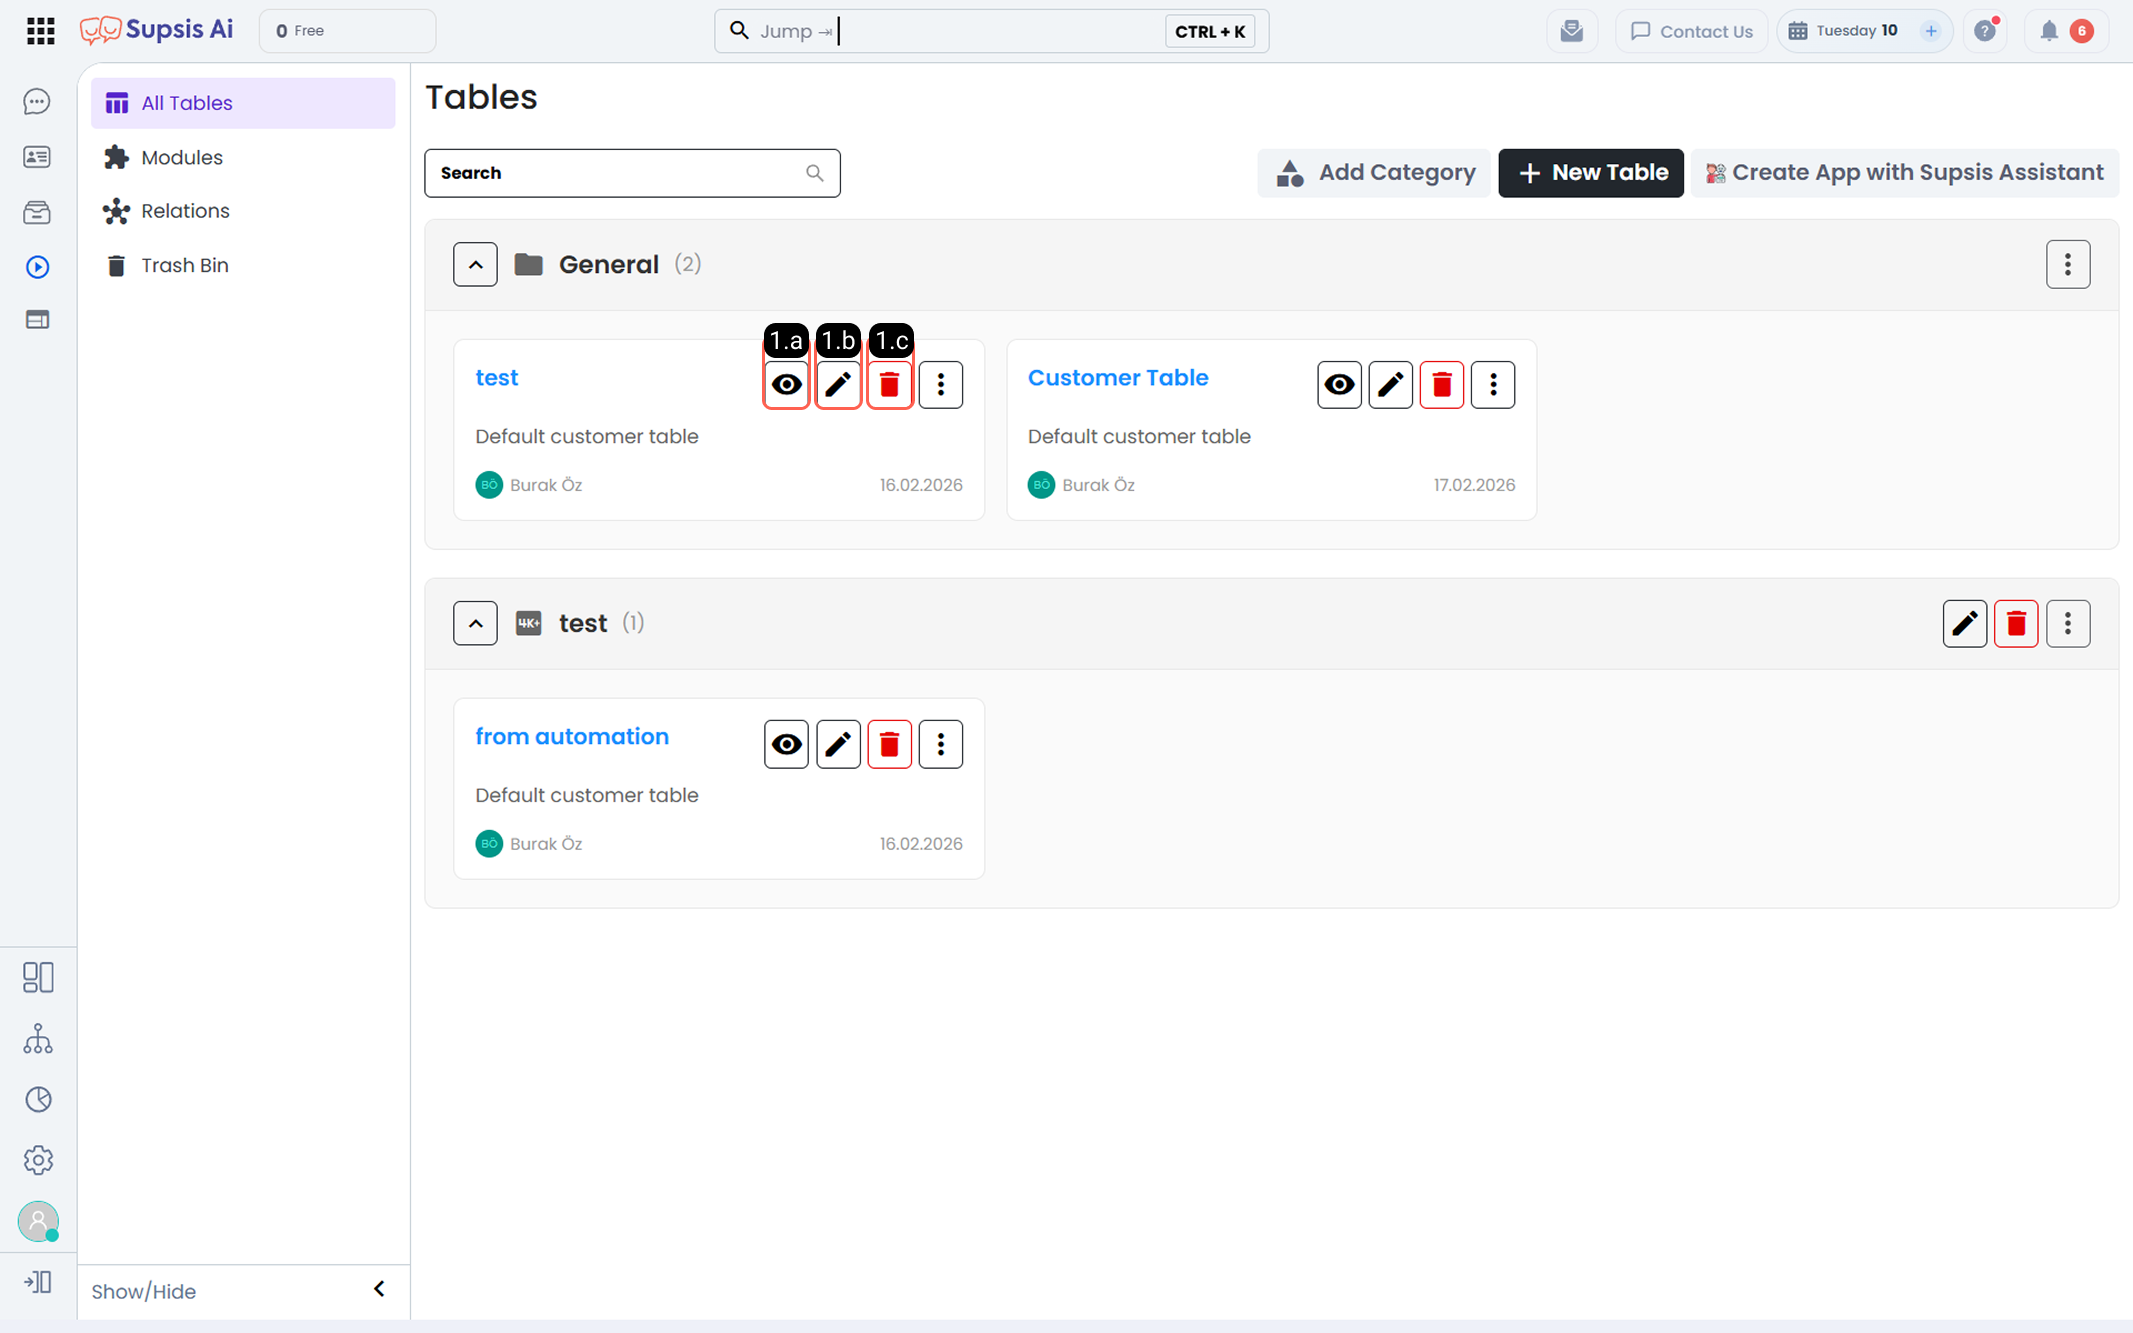
1.a – View Table:
Allows you to view the table’s existing records, column structures, data types, and relationships.
1.b – Edit Table Name & Description:
Allows you to update the table name and description content.
1.c – Delete Table:
Allows you to delete the table from the panel and move it to the Trash section.
Tables moved to the Trash can be restored within 30 days before being permanently deleted. Tables with deletion protection enabled cannot be deleted.
2-) Table Settings
From this section, you can manage the table’s general settings and advanced configurations.
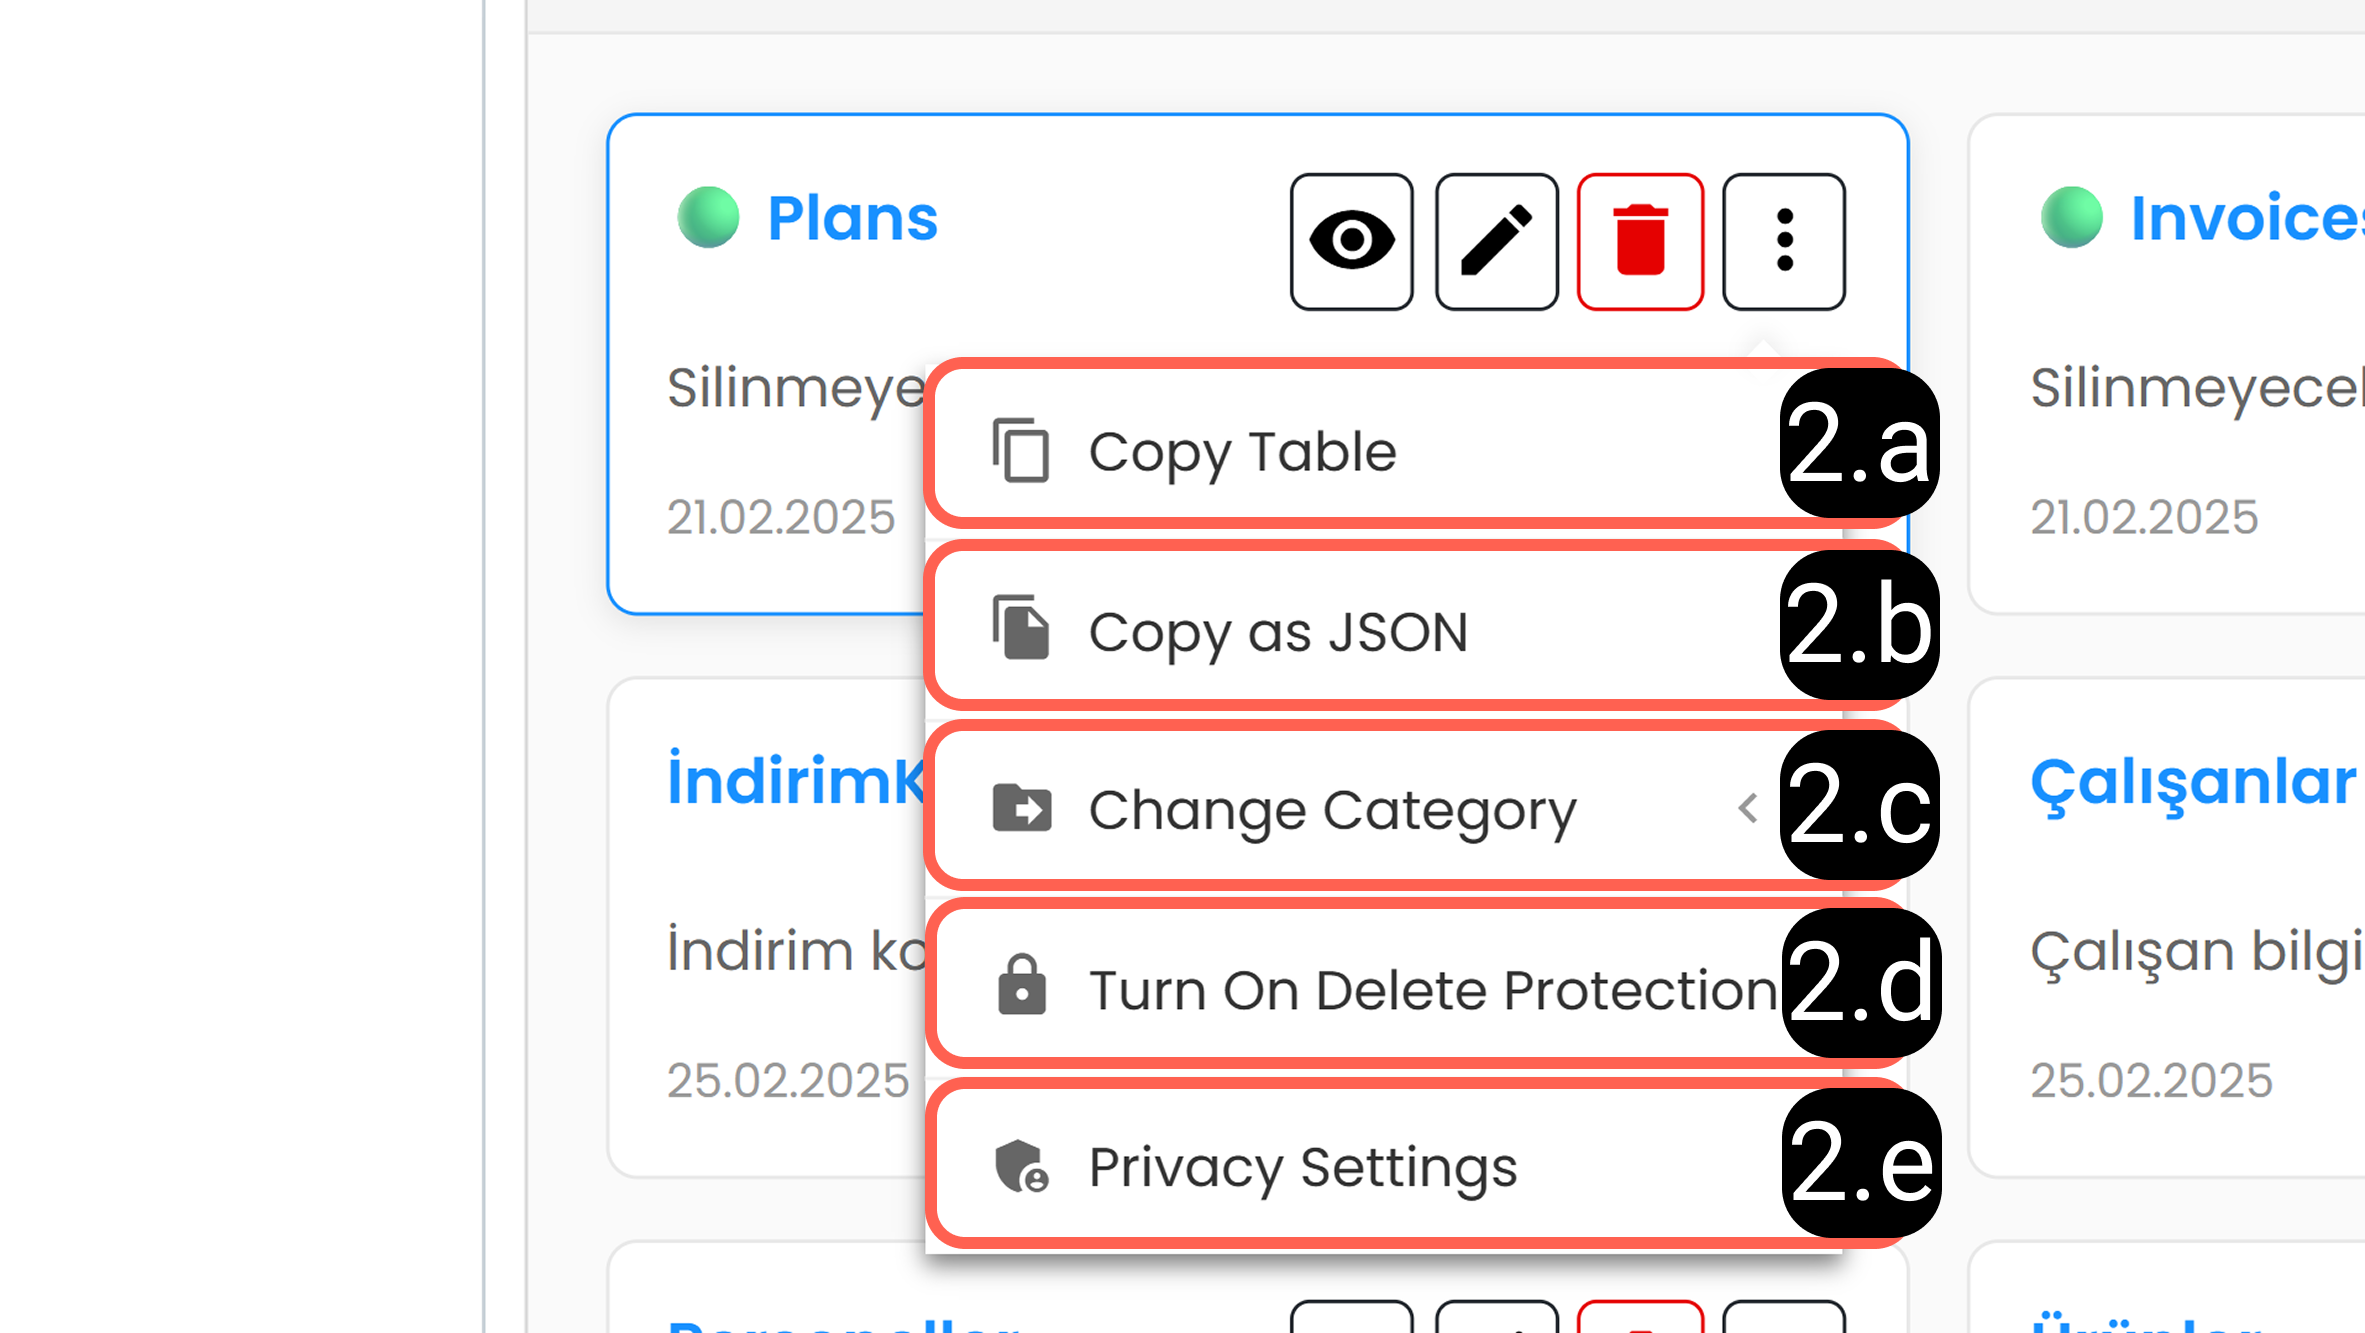
2.a – Duplicate Table:
Creates an exact structural copy of the table within the same category.
The duplicated table does not include the original data; only fields, data types, and table attributes are copied.
2.b – Copy Table as JSON:
Copies the table structure in JSON format.
After copying, you can paste the table into the same panel or another Supsis panel using:
- CTRL + V (Windows)
- Command + V (Mac)
Note: When copied as JSON, only the table structure is copied — not the data.
2.c – Change Category:
Allows you to move the table to a different category.
2.d – Enable Deletion Protection:
When activated, the table cannot be deleted unless protection is removed.
2.e – Privacy Settings:
Allows you to define which users or departments can view or operate on the table. This enables access control management.
2-) Modules
From the Modules section, you can access your existing modules, edit module content, review API documentation, and create new modules.
Converting a table into a module:
- Makes it accessible from the main menu
- Enables API access for external systems
- Allows visibility control in the menu
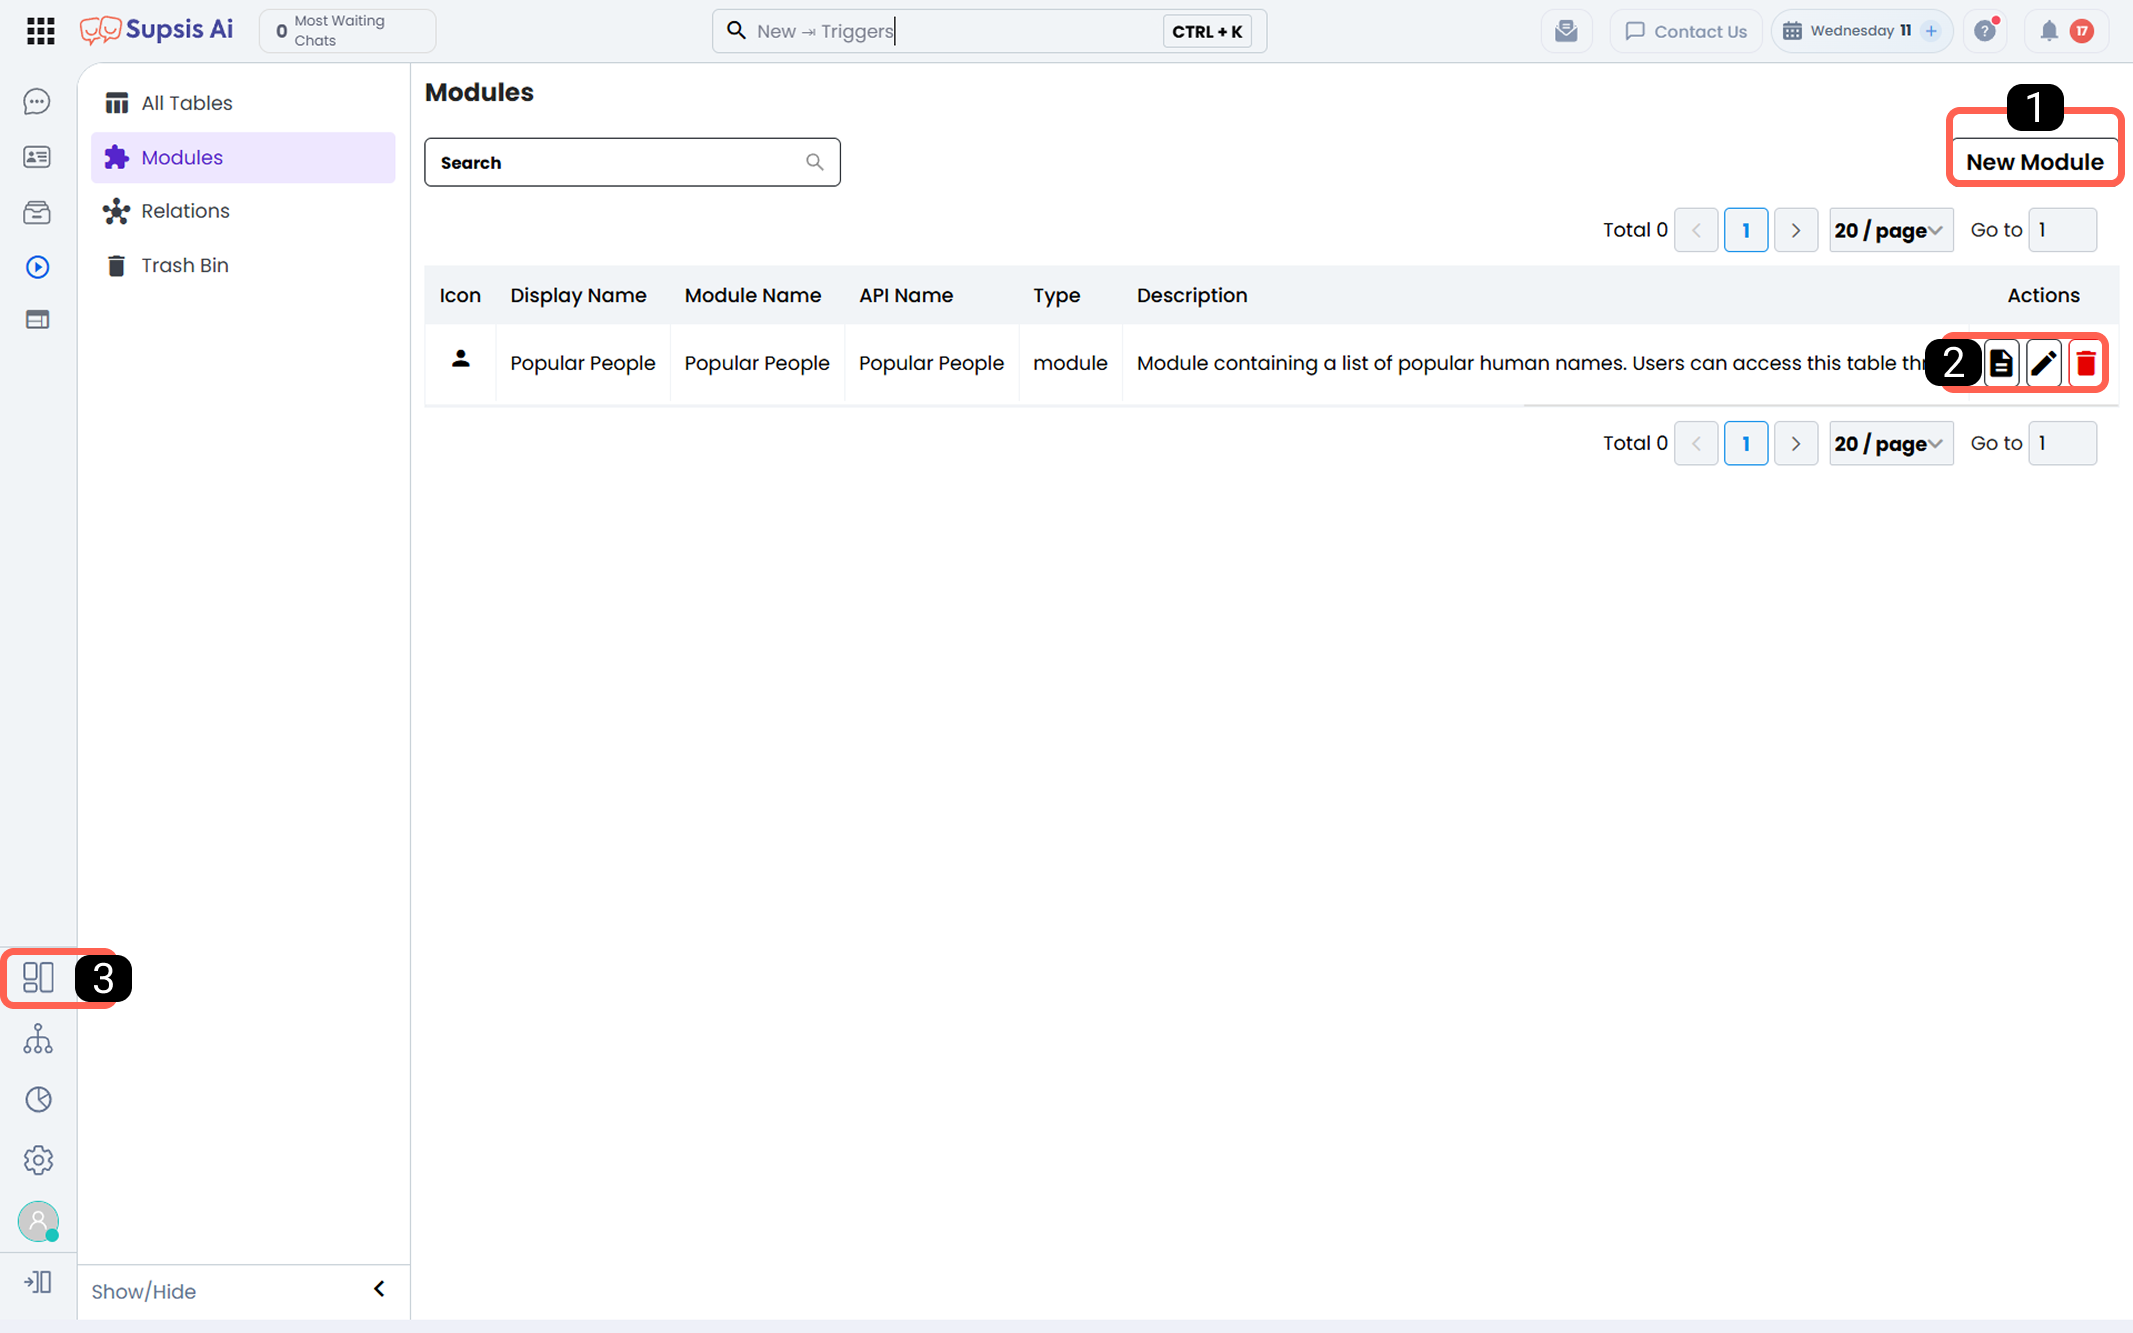
1-) Create New Module
From this section, you can convert your tables into modules.
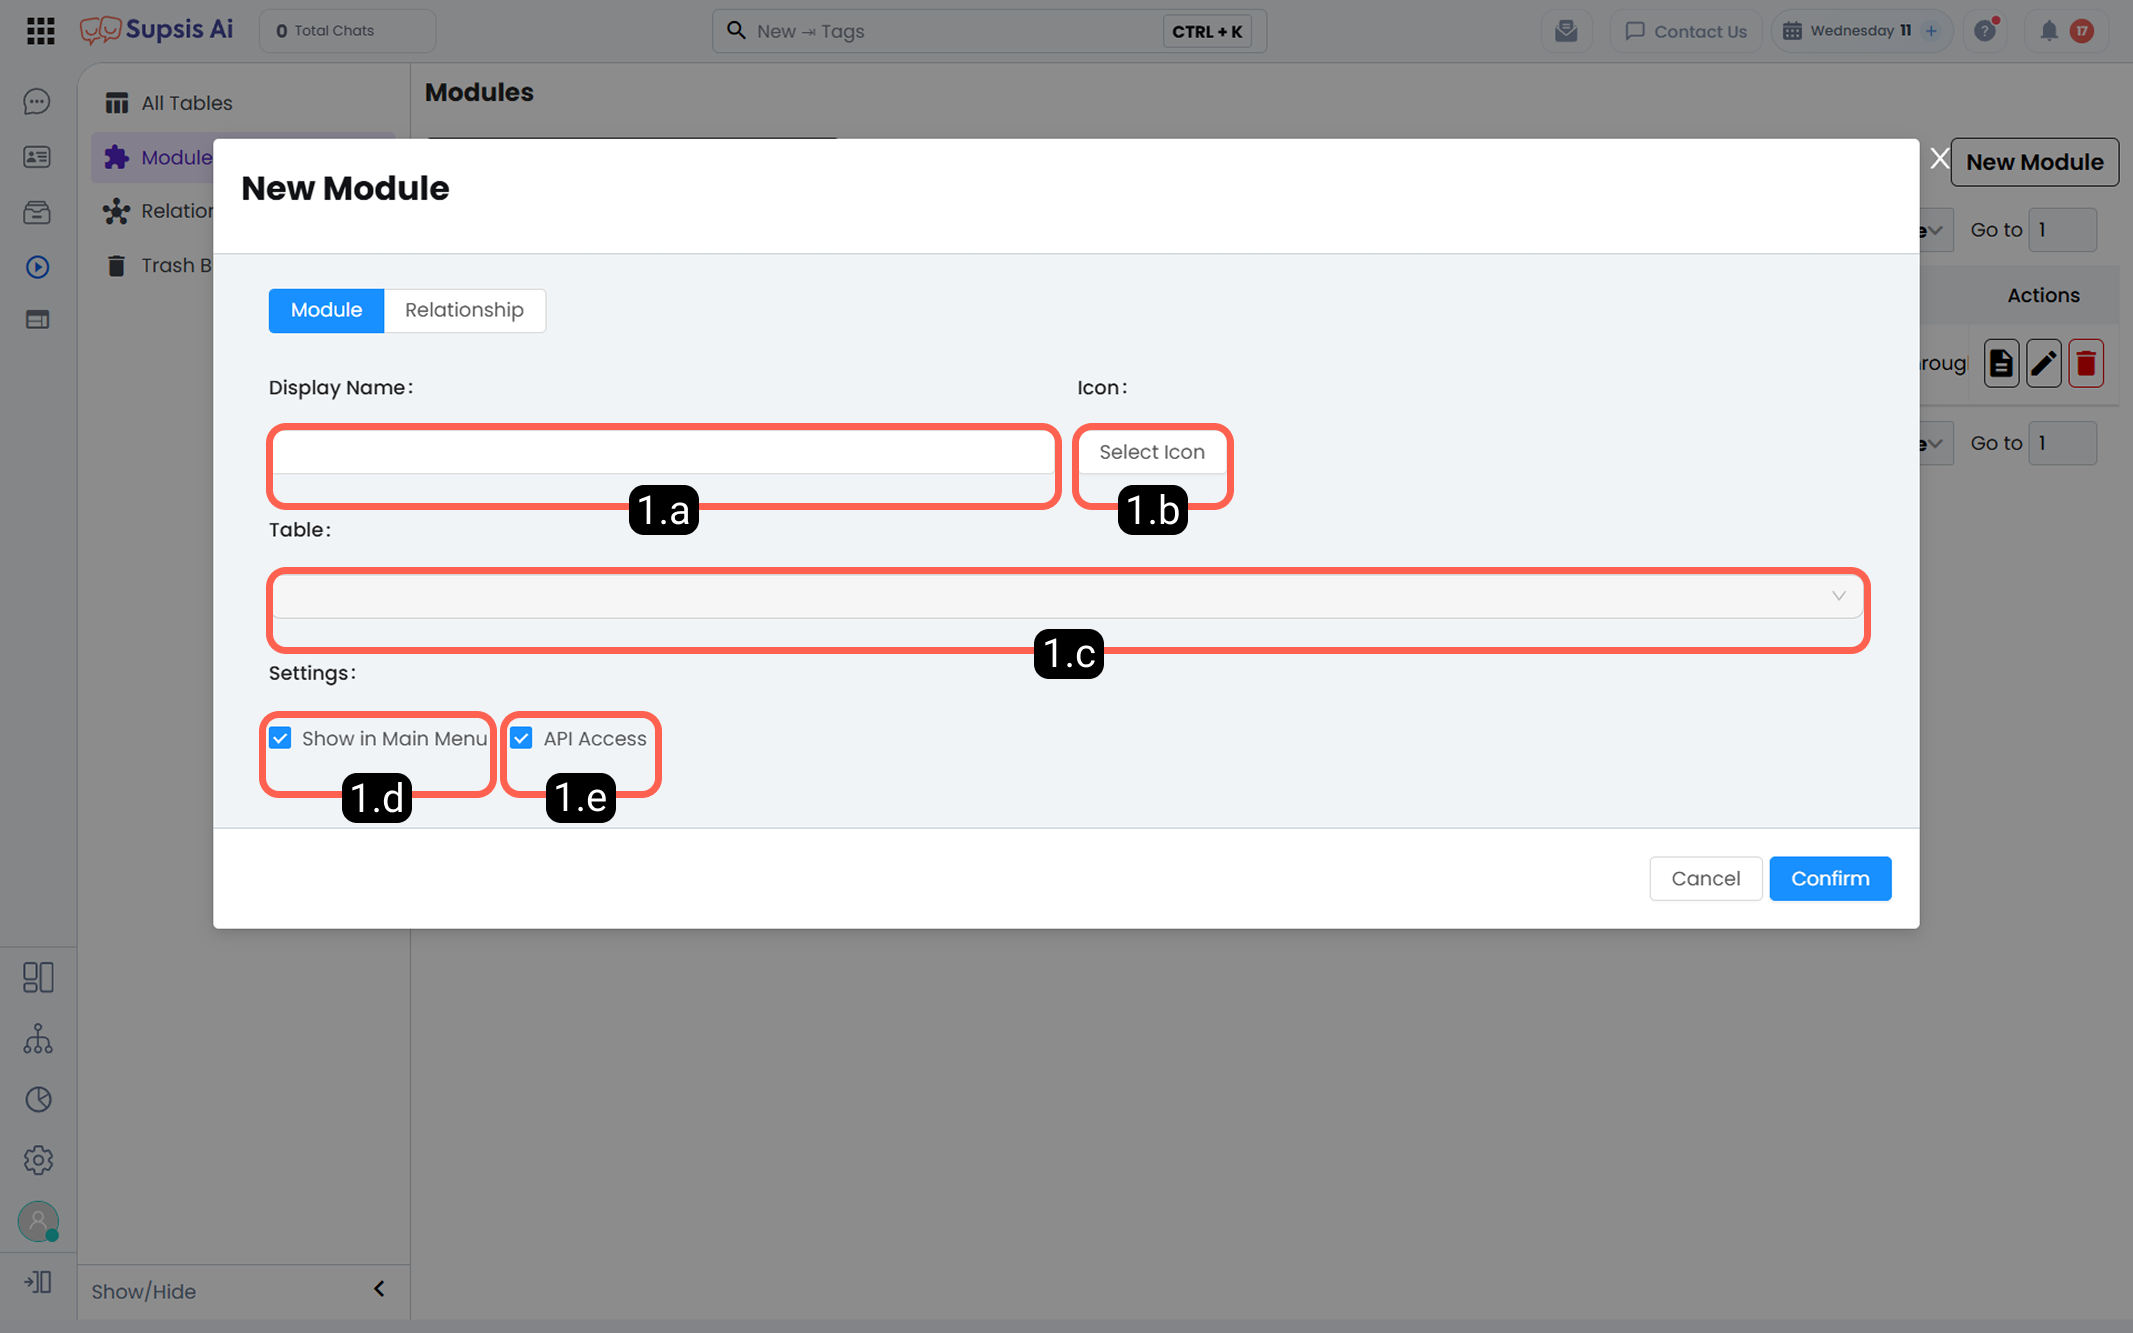
1.a – Module Name:
The module name you define will appear in:
- Supsis main menu
- API endpoints
- Module lists
1.b – Module Icon:
Defines the visual representation of the module in the Supsis main menu.
1.c – Table Selection:
The selected table is converted into a module. All related content, relationships, and data structures become accessible through the module menu.
1.d – Show in Main Menu:
If enabled, the module appears in the Supsis main menu under Modules.
If disabled, the module is hidden from the menu and accessible only via API.
1.e – API Access:
Allows API access to the table when enabled.
Note: To enable API access, the table must first be converted into a module and this option must be activated.
2-) Module Information and Editing
From this section, you can review the module’s table structure, access API documentation, and modify module settings.
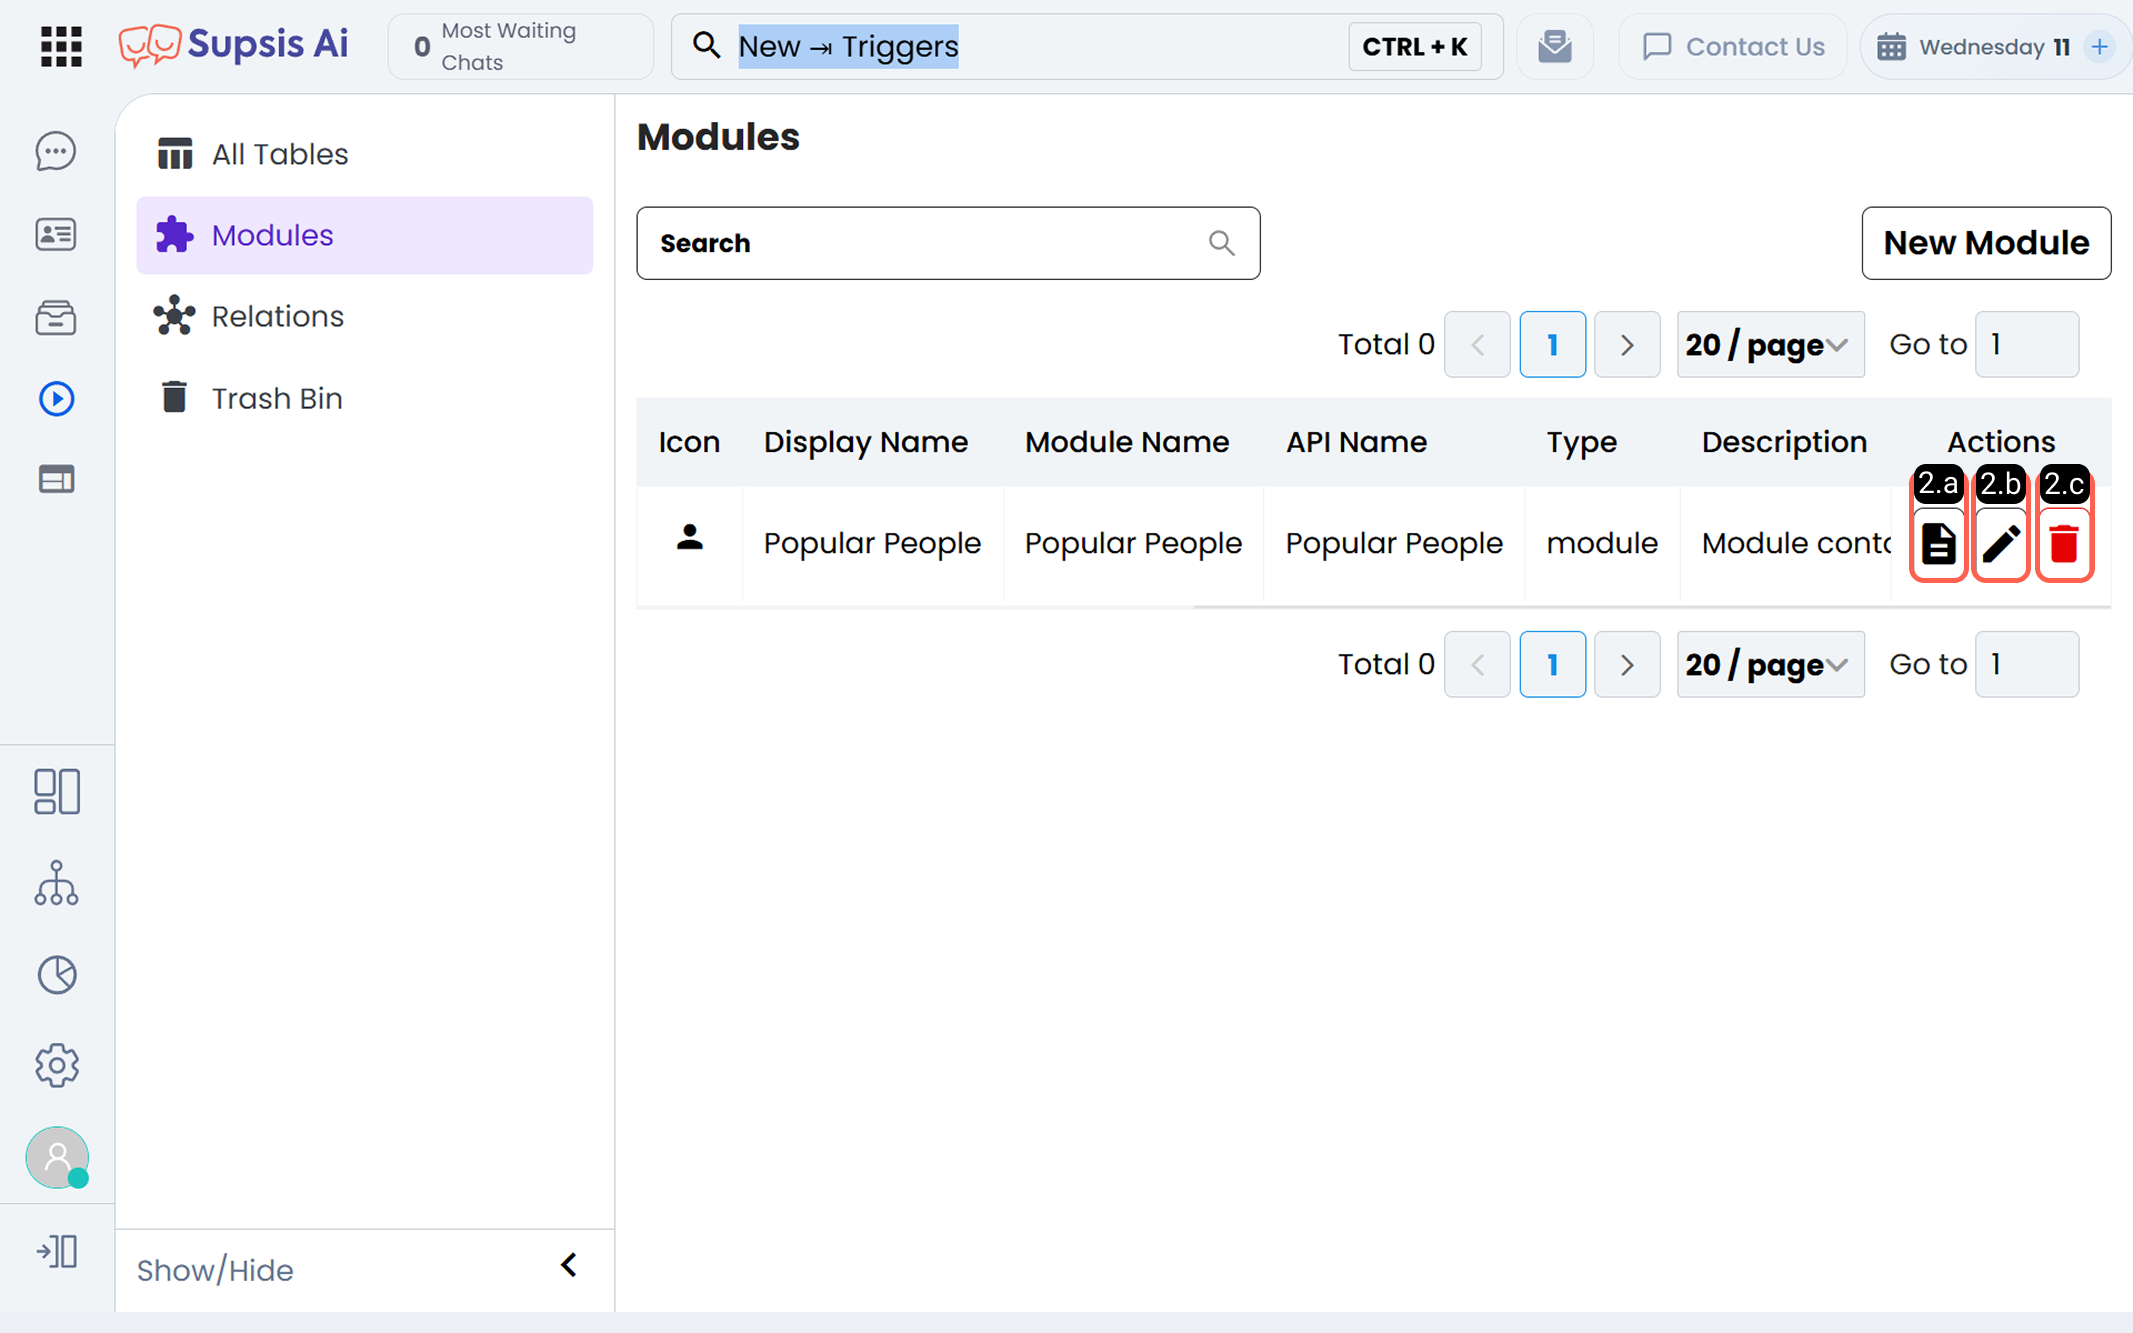
2.a – API Documentation:
From this section, you can access:
- Module API endpoints
- API parameters
- Sample request and response scenarios
This documentation contains all technical details required for integration with external systems.
2.b – Edit Module Settings:
You can update:
- Module name
- Module icon
- Main menu visibility
- API access permission
Changes take effect immediately in both the user interface and API layer.
2.c – Delete Module:
Permanently deletes the module.
Note: Module deletion cannot be undone. Deleted modules are not moved to Trash, and API access is immediately disabled.
3-) Access Modules
From this section, you can access tables that were converted into modules with the “Show in Main Menu” option enabled.
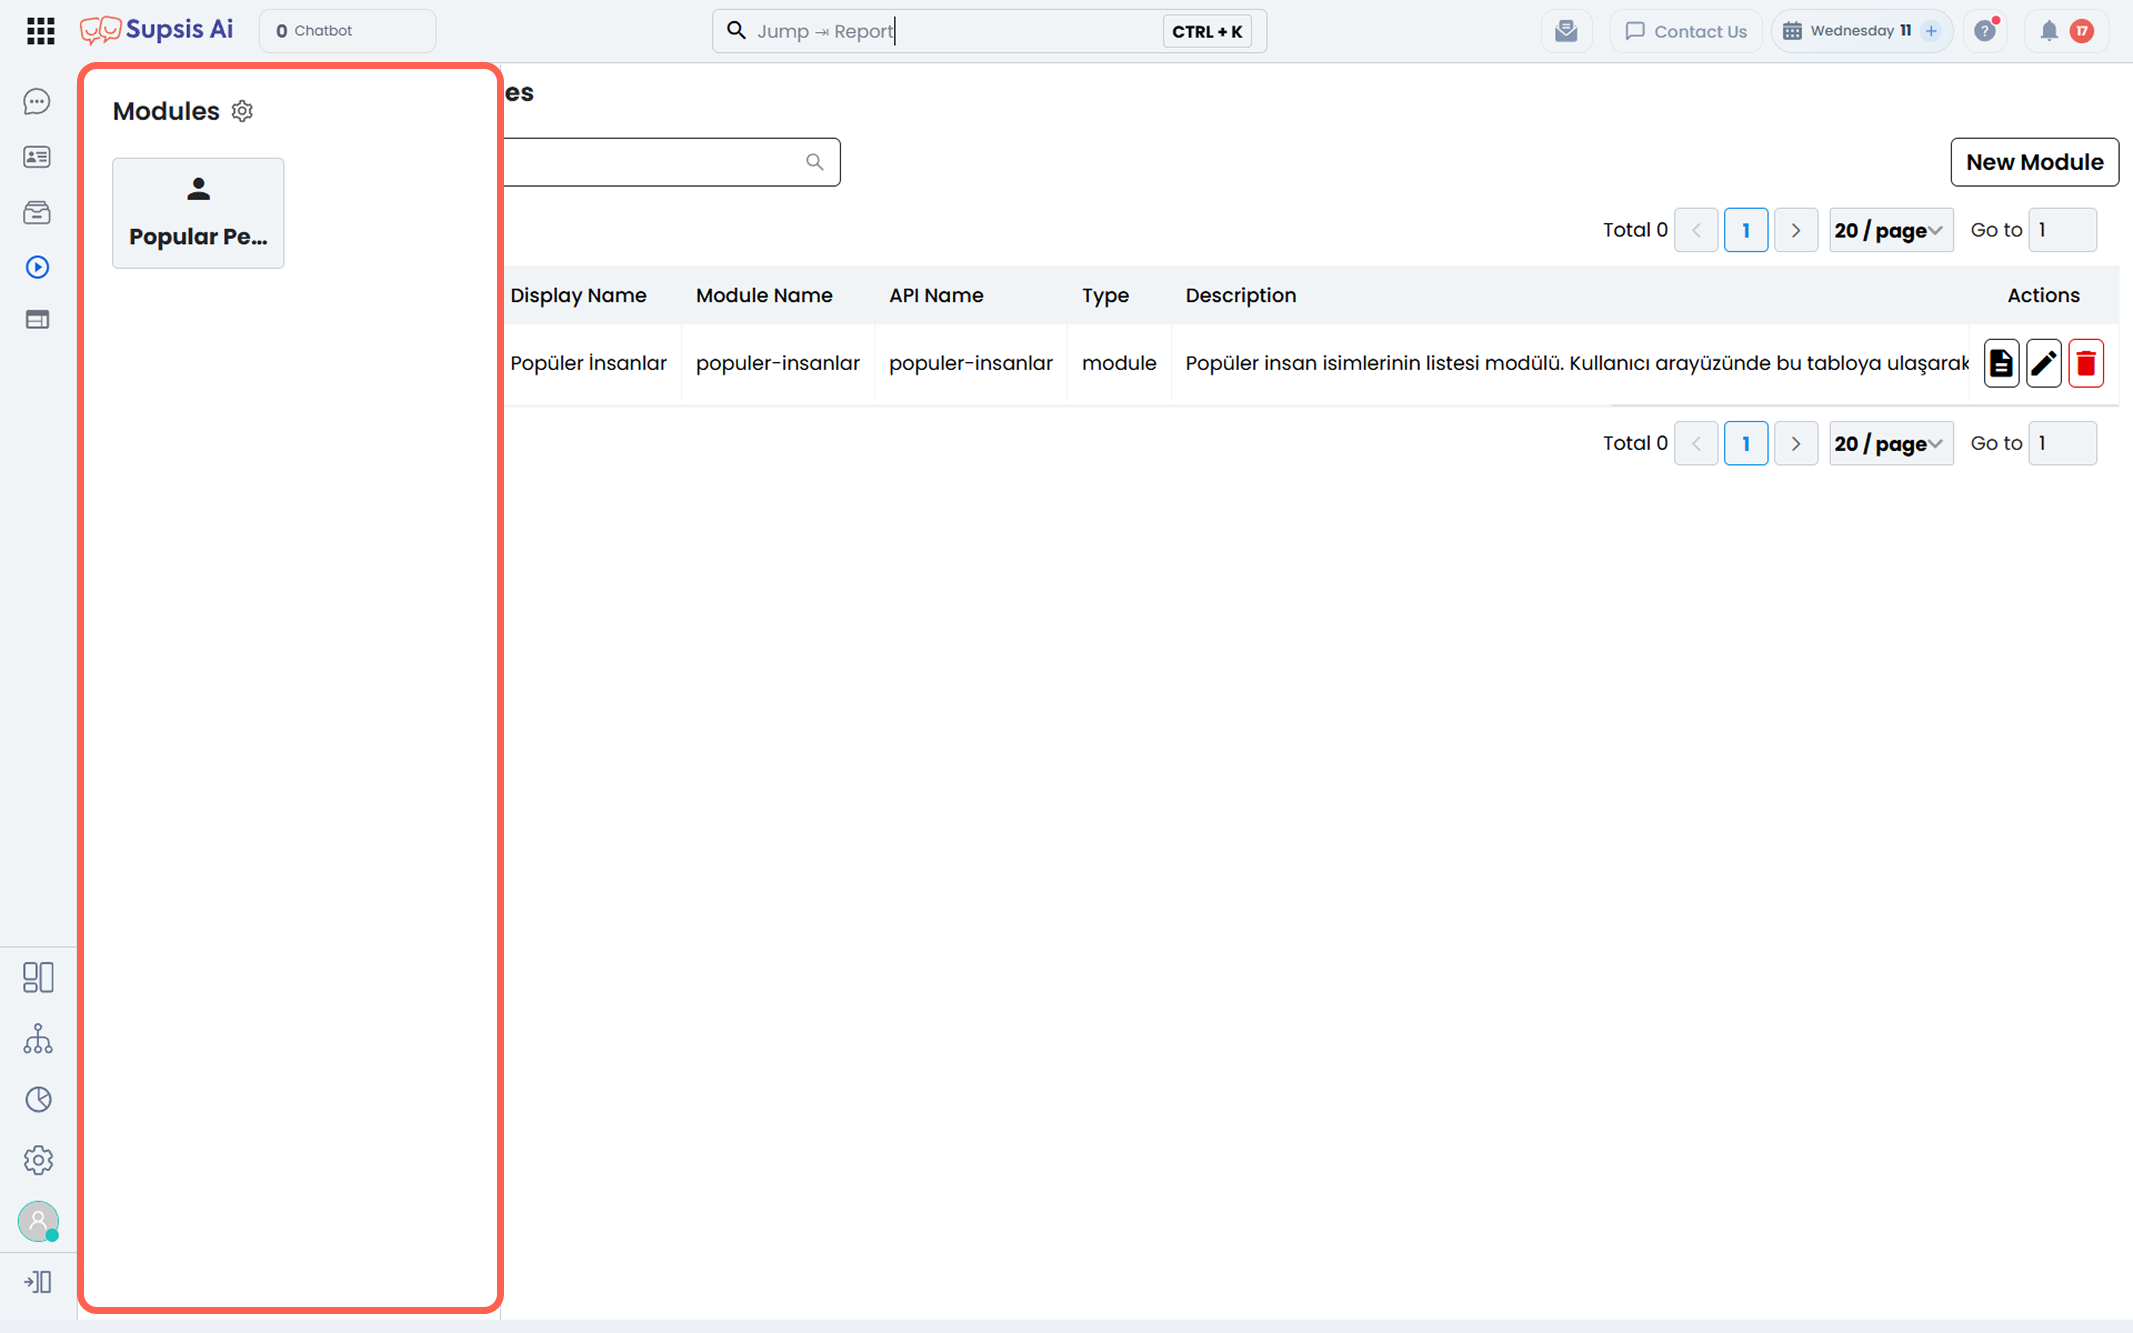
Modules listed in the main menu allow quick shortcut access to your converted tables.
Modules with main menu visibility disabled are accessible only via API and are not listed in the menu.
3-) Relationships
The Relationships section allows you to link your tables with each other or with Supsis Standard Modules.
This structure prevents data duplication, strengthens record connections, and enables more meaningful relational data models.
1-) Relationships Menu
From this section, you can view existing relationships, manage them, and create new ones.
Depending on the selected relationship direction, data flow changes accordingly. When matching is established between defined connection fields in source and target, related data is retrieved.
For example, if both Customers and Sales tables share a Phone Number field and the relationship is based on that field, you can access sales details related to a specific phone number directly from the Customers table.
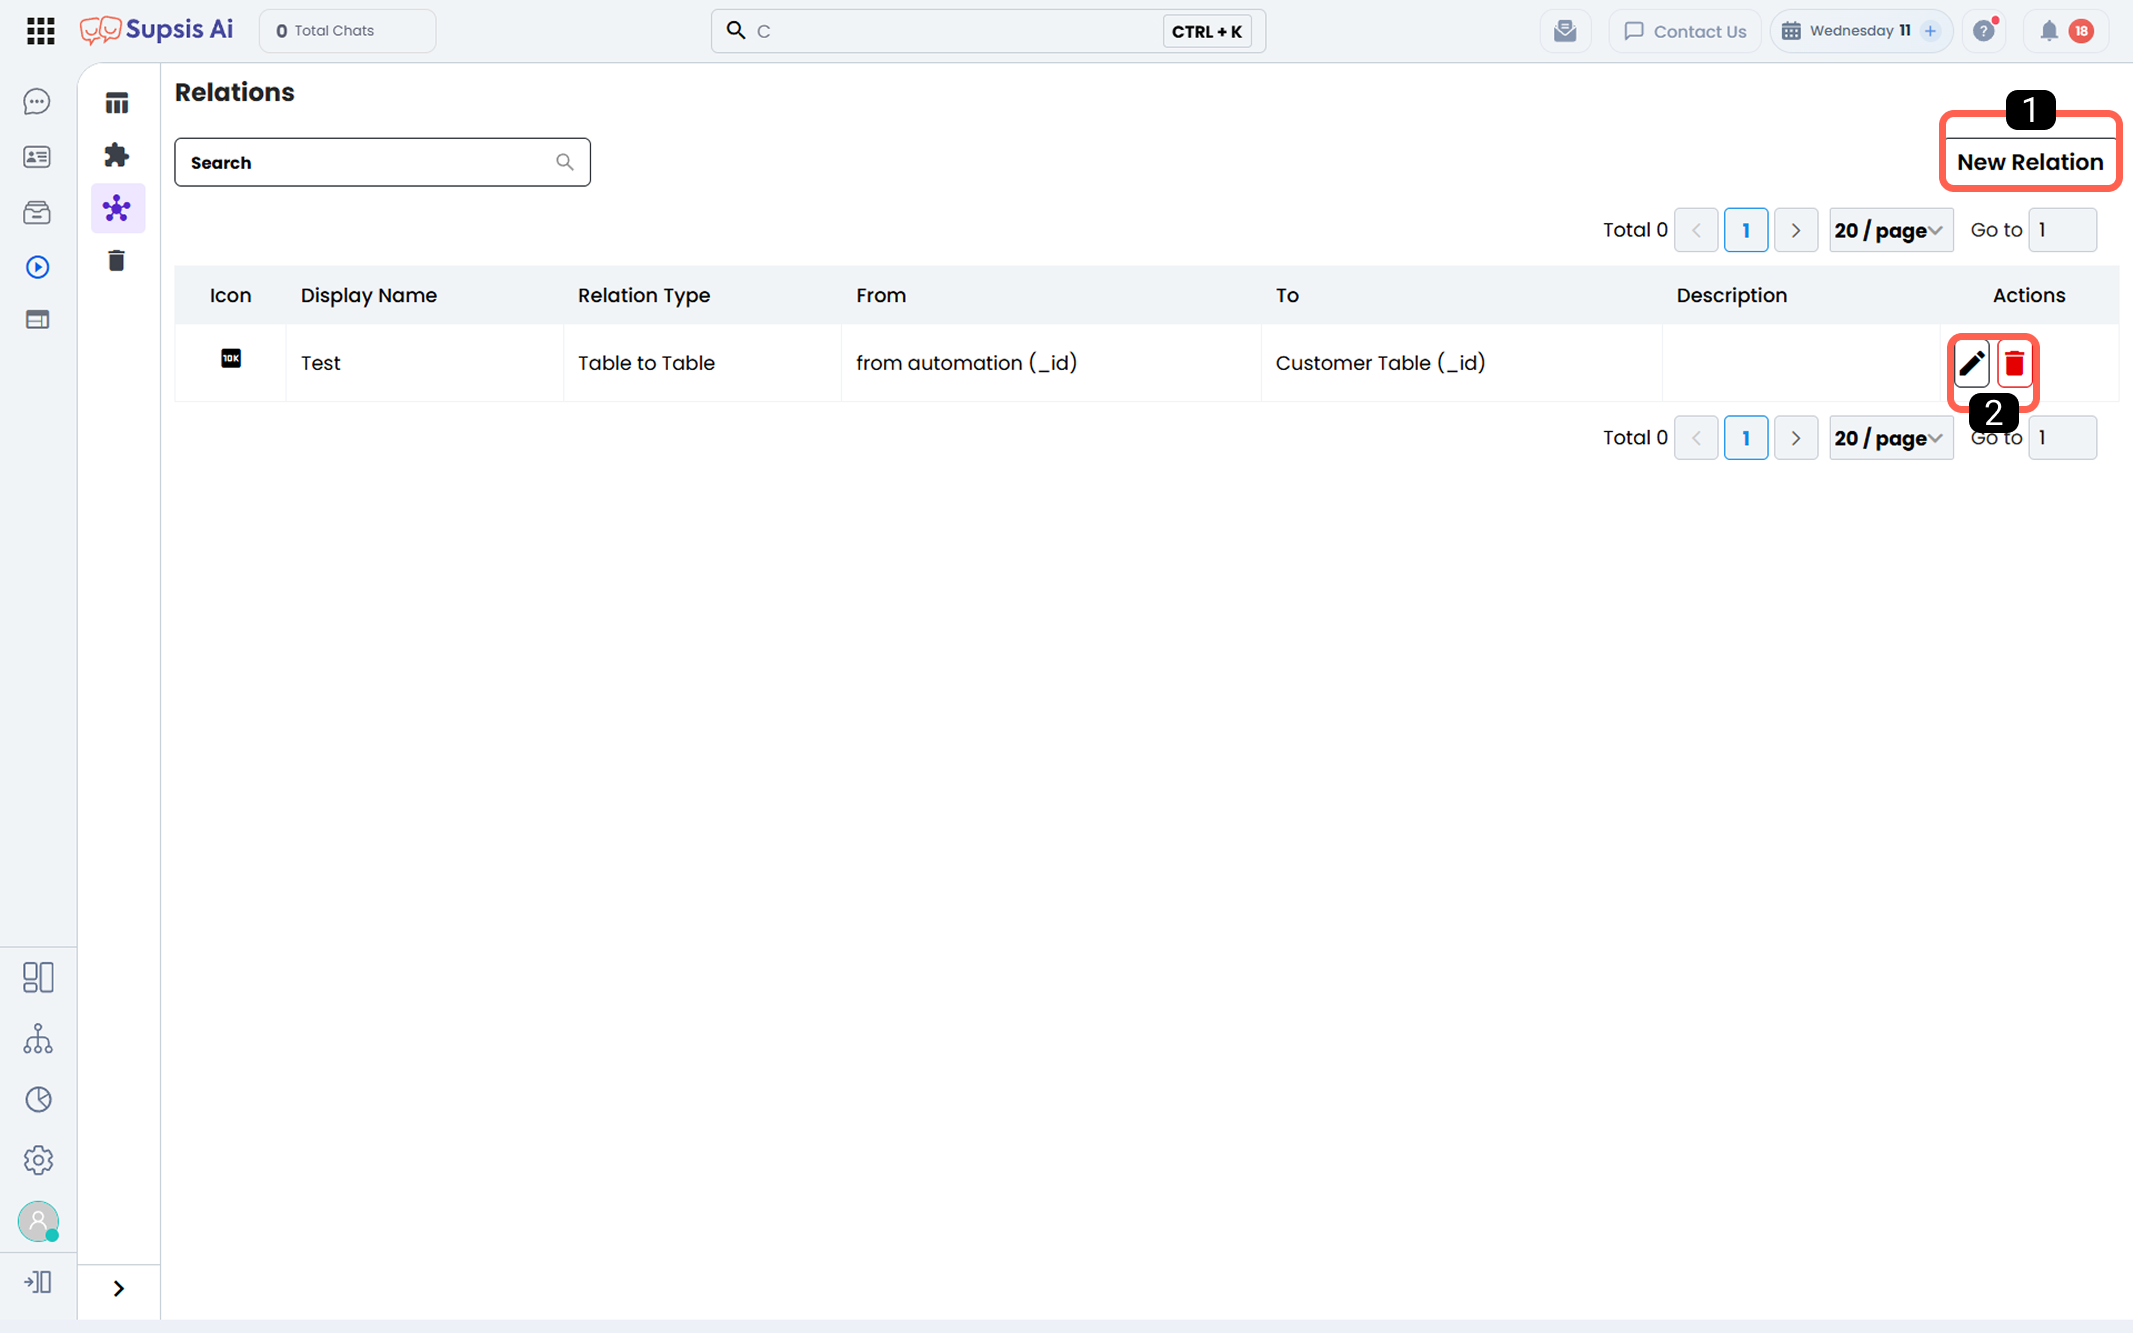
1-) Create New Relationship
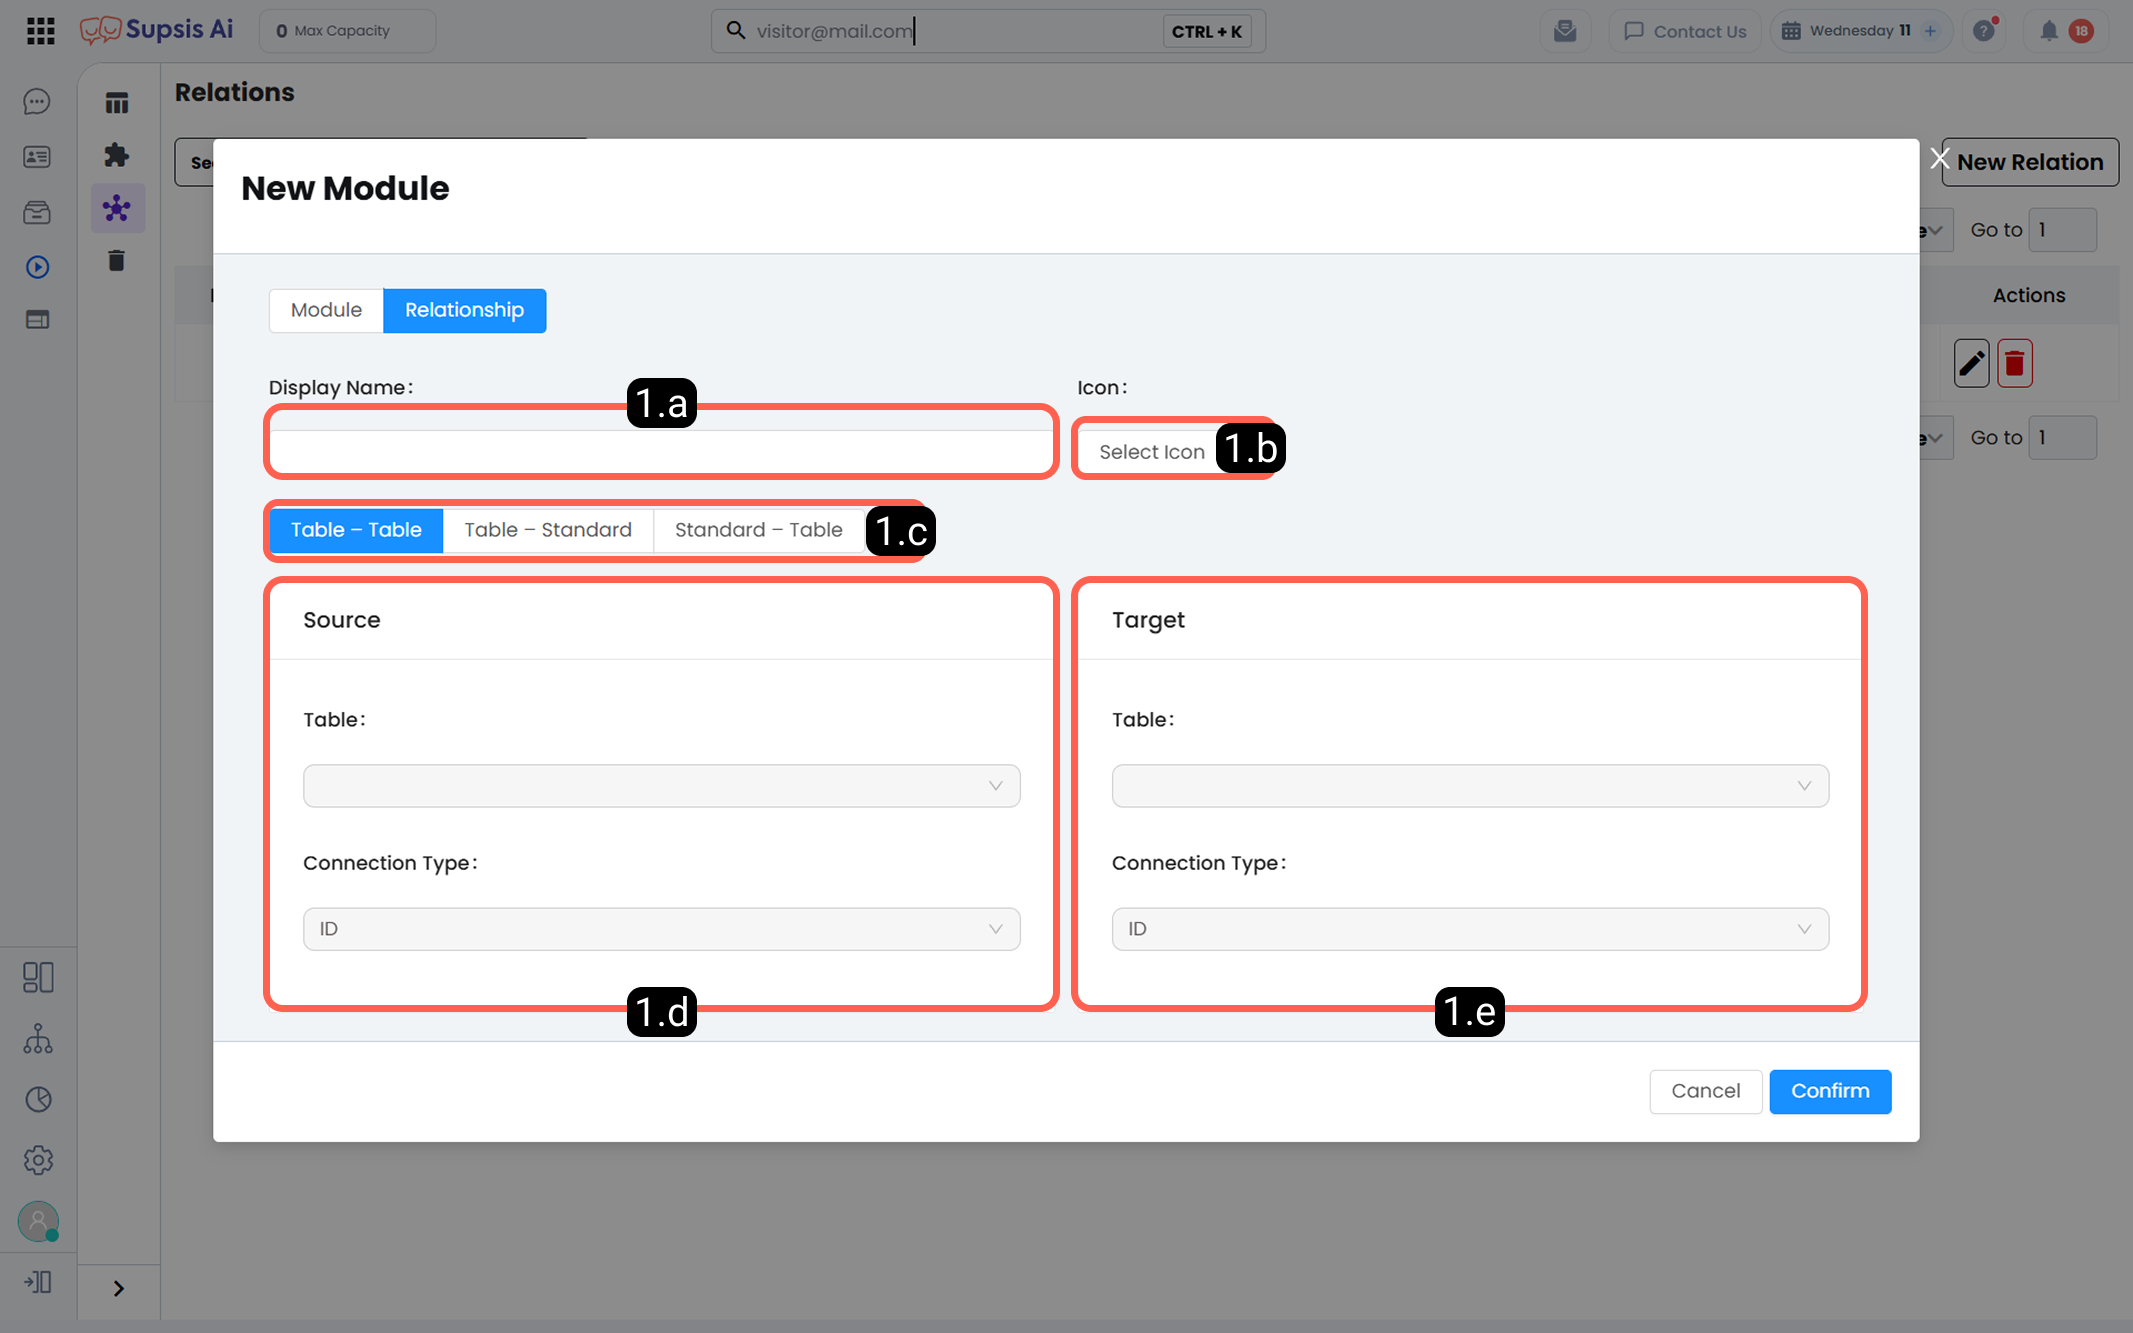
1.a – Relationship Name:
Define a name that describes the purpose of the relationship.
1.b – Relationship Icon:
Assign an icon for better visual clarity.
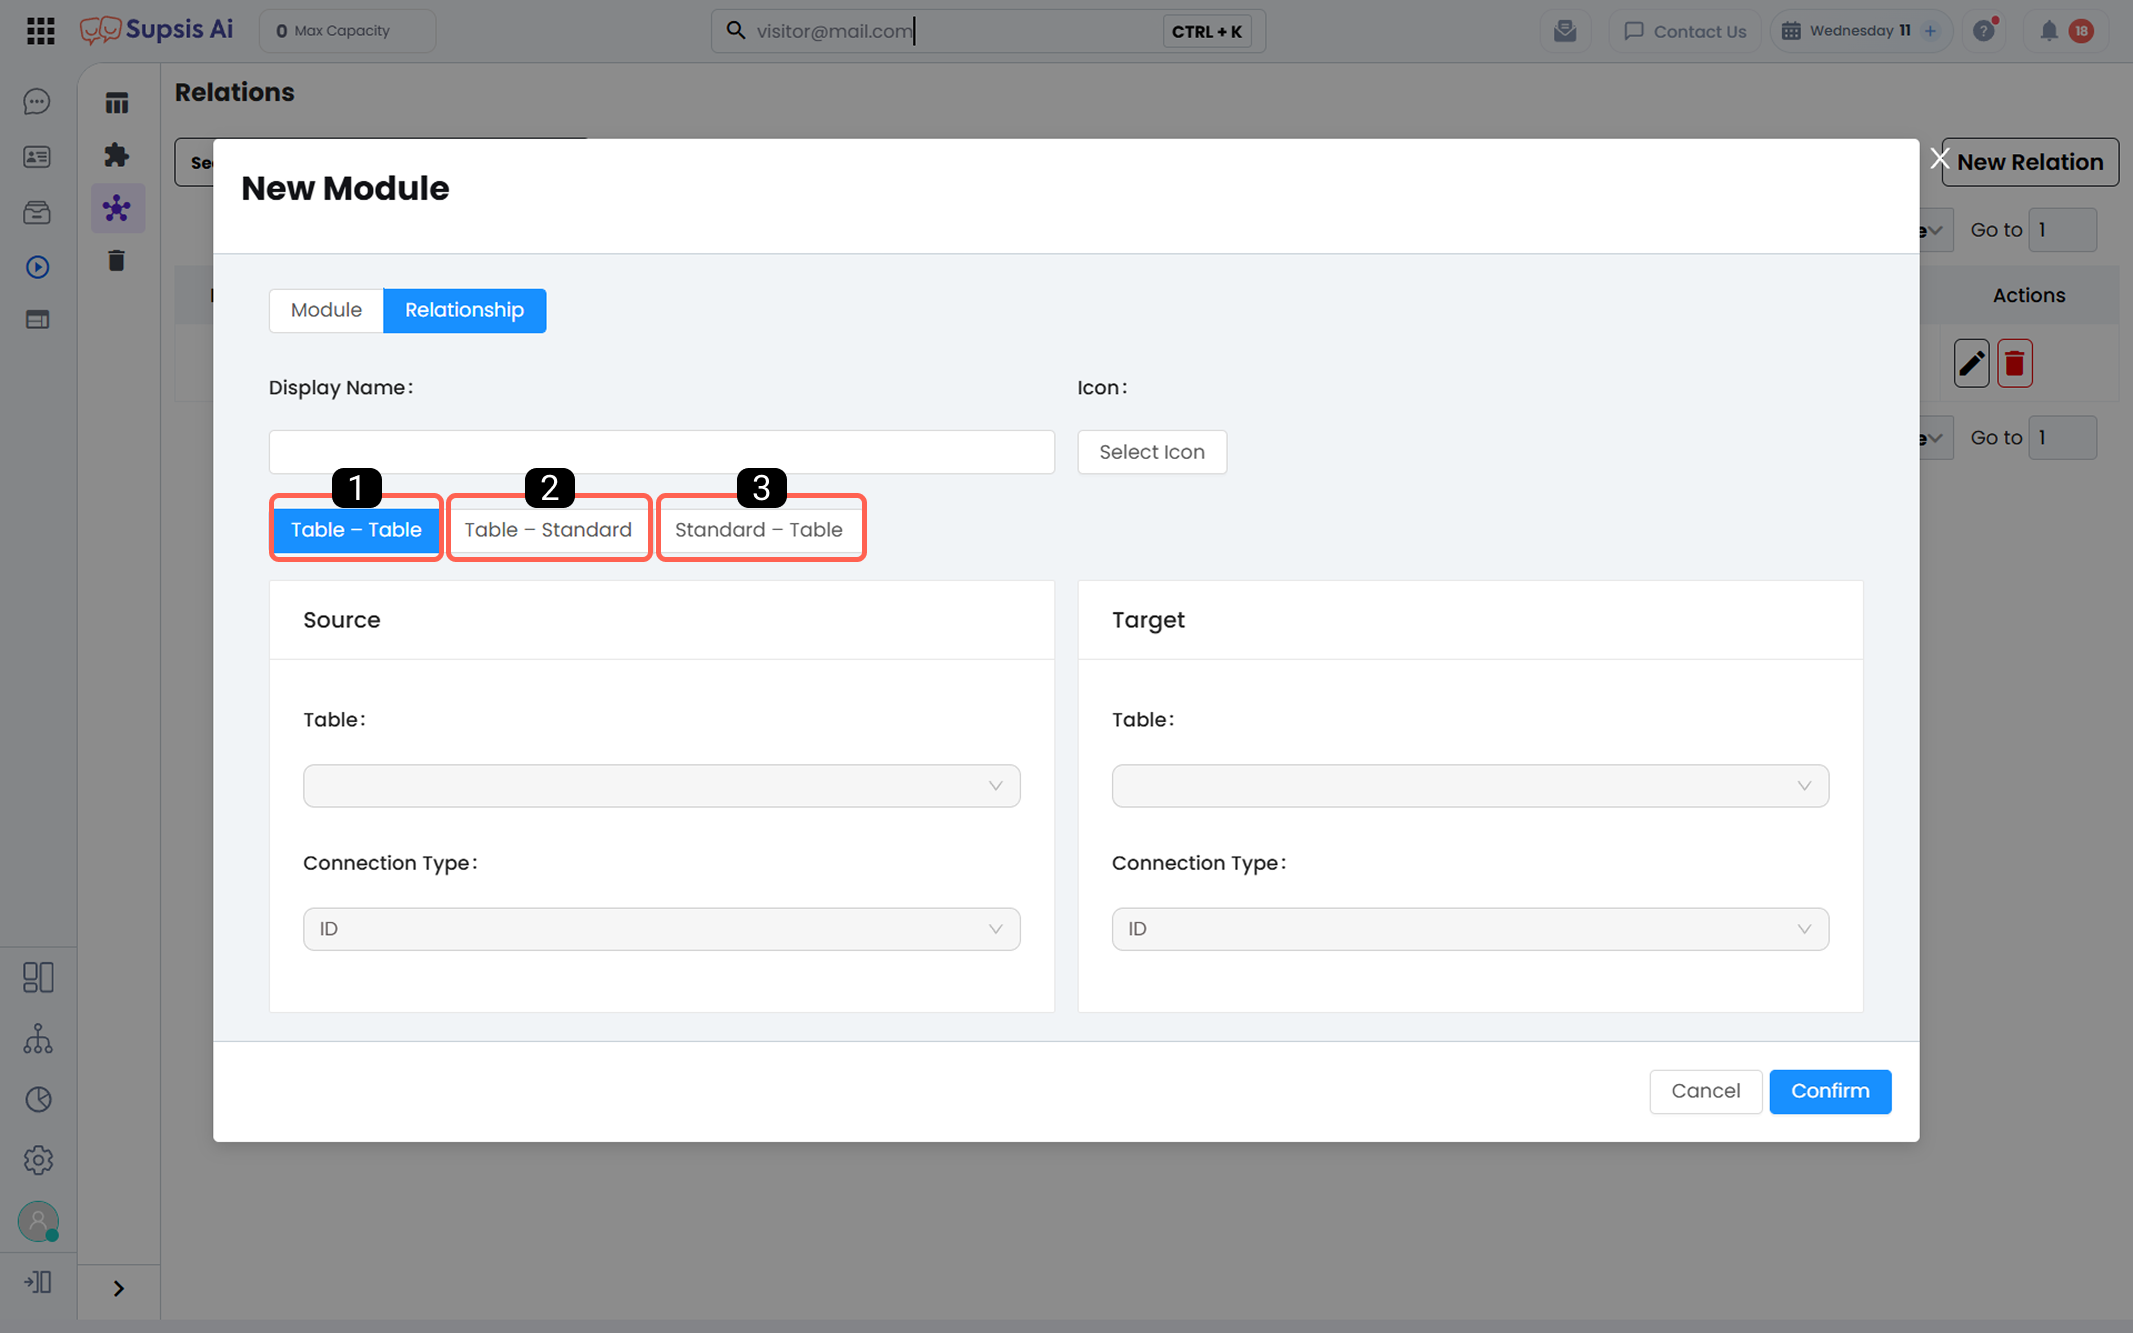
1.c – Relationship Direction:
There are three types:
Table → Table:
Creates a relationship between two custom tables.
Standard Module → Table:
Creates a relationship from a Supsis standard module to a custom table.
Table → Standard Module:
Creates a relationship from a custom table to a Supsis standard module.
1.d – Source:
Defines the data source that will be displayed in the target.
1.e – Target:
Defines where the source data will be shown.
2-) Edit/Delete Relationship
From this section, you can edit or delete existing relationships.
Note: Relationship deletion cannot be undone and is not moved to Trash.
Example Relationship Scenarios
In this section, we review example scenarios for all relationship directions.
1-) Table to Table
Goal: Track customers’ product purchases.
Customers Table: Full Name, Address, Phone Number, Email
Sales Table: Full Name, Address, Phone Number, Sold Product
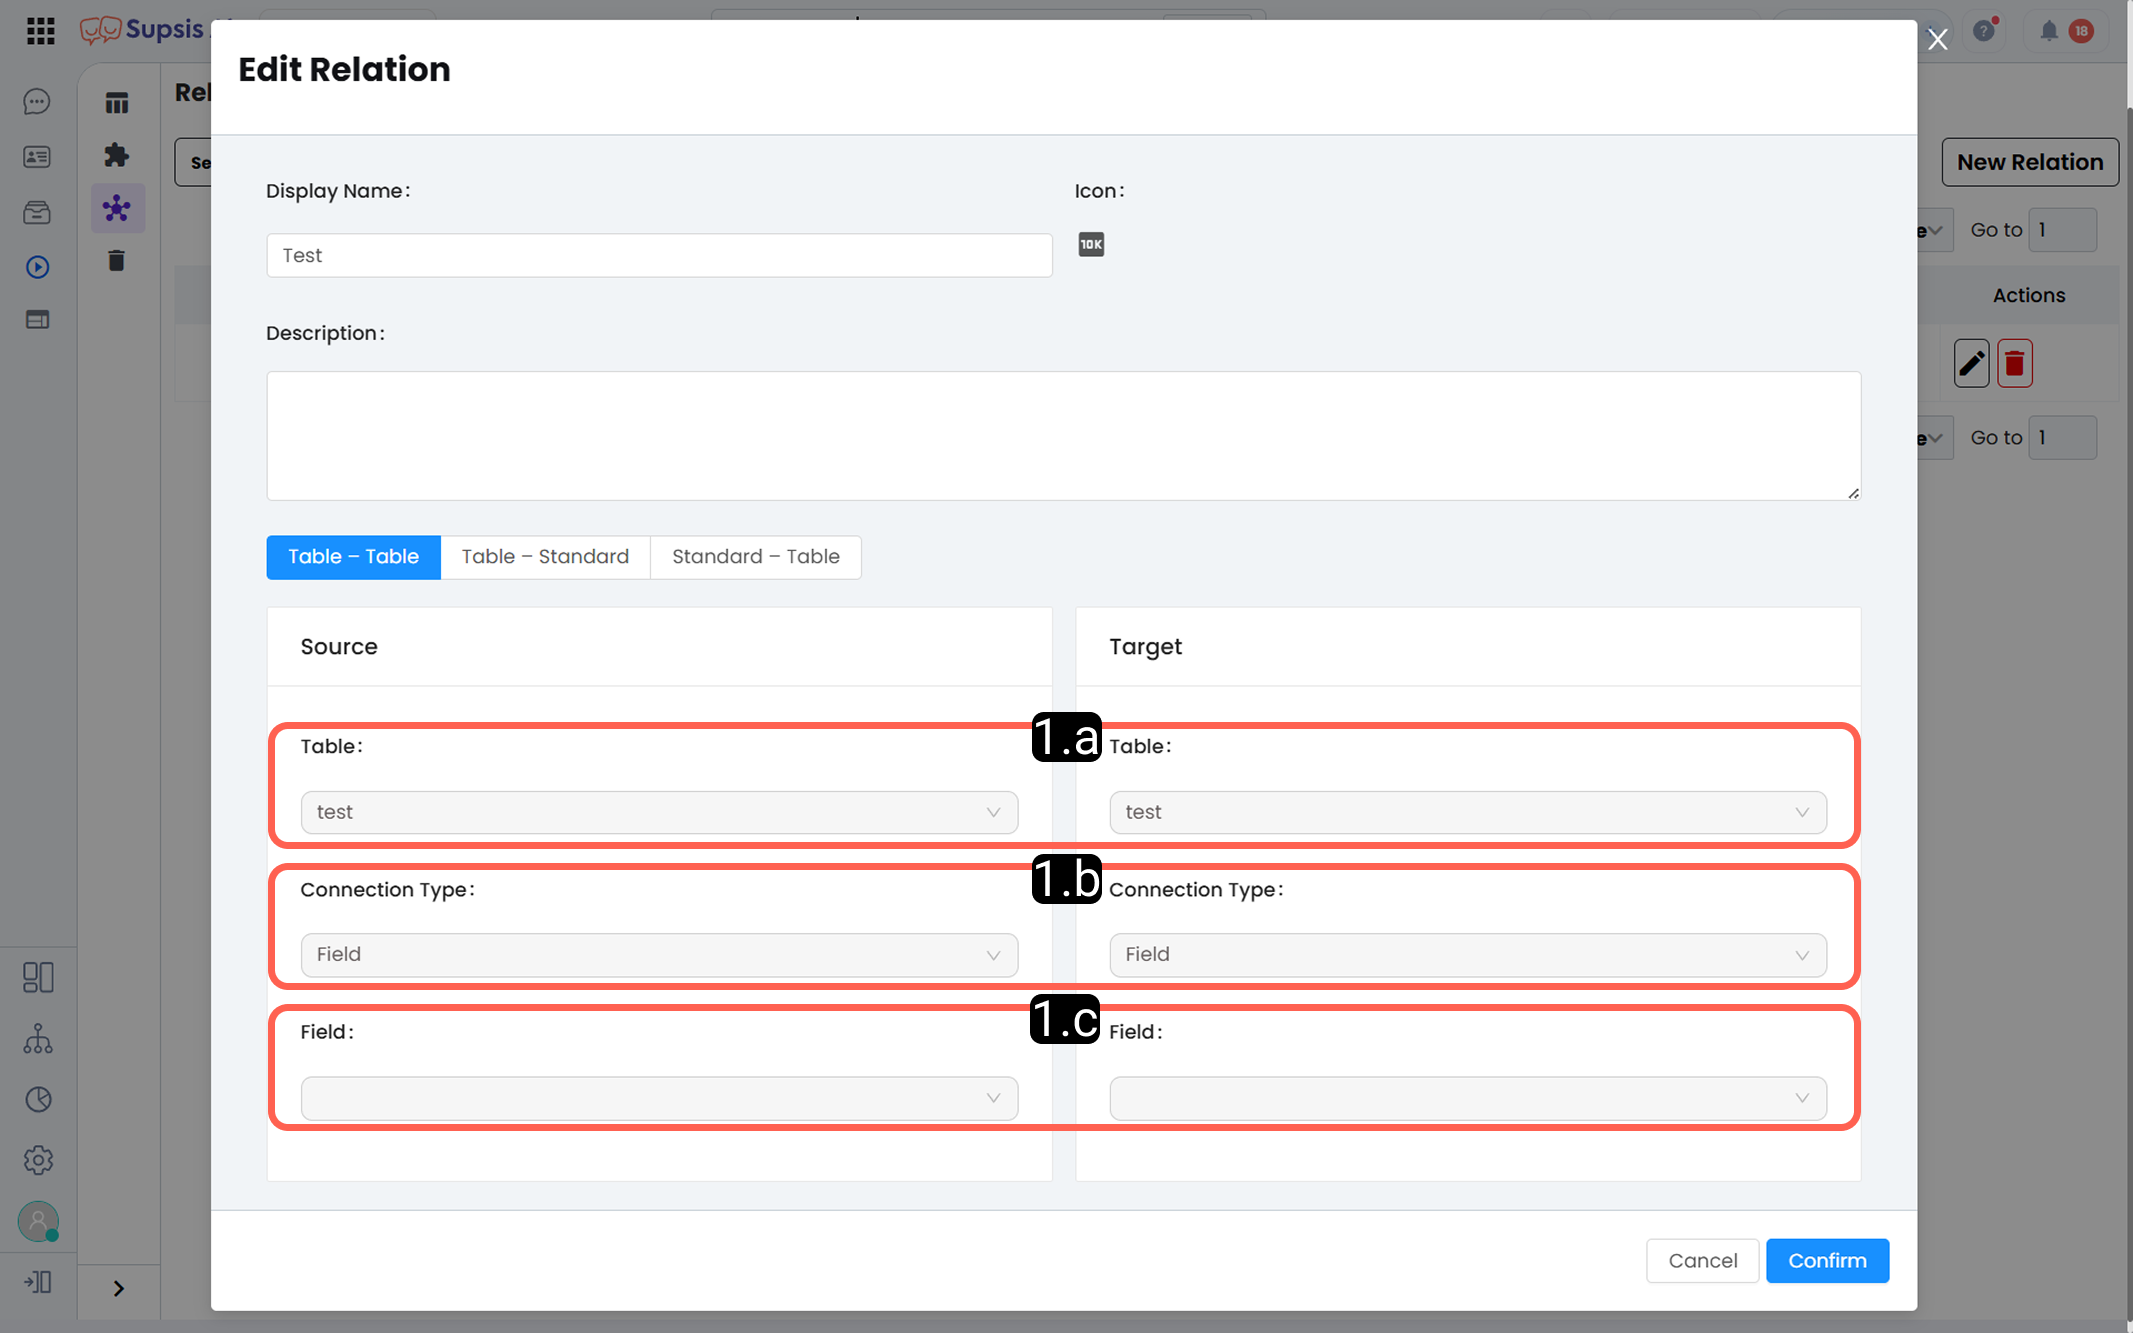
Connection Type: Field-based matching.
Matching Field: Phone Number (chosen due to uniqueness and reliability).
Result:
Sales records are matched with Customers via phone number. All related sales automatically appear under the relevant customer.
2-) Standard to Table
Goal: Retrieve past purchases of customers who send messages.
Sales Table: Full Name, Address, Phone Number, Sold Product
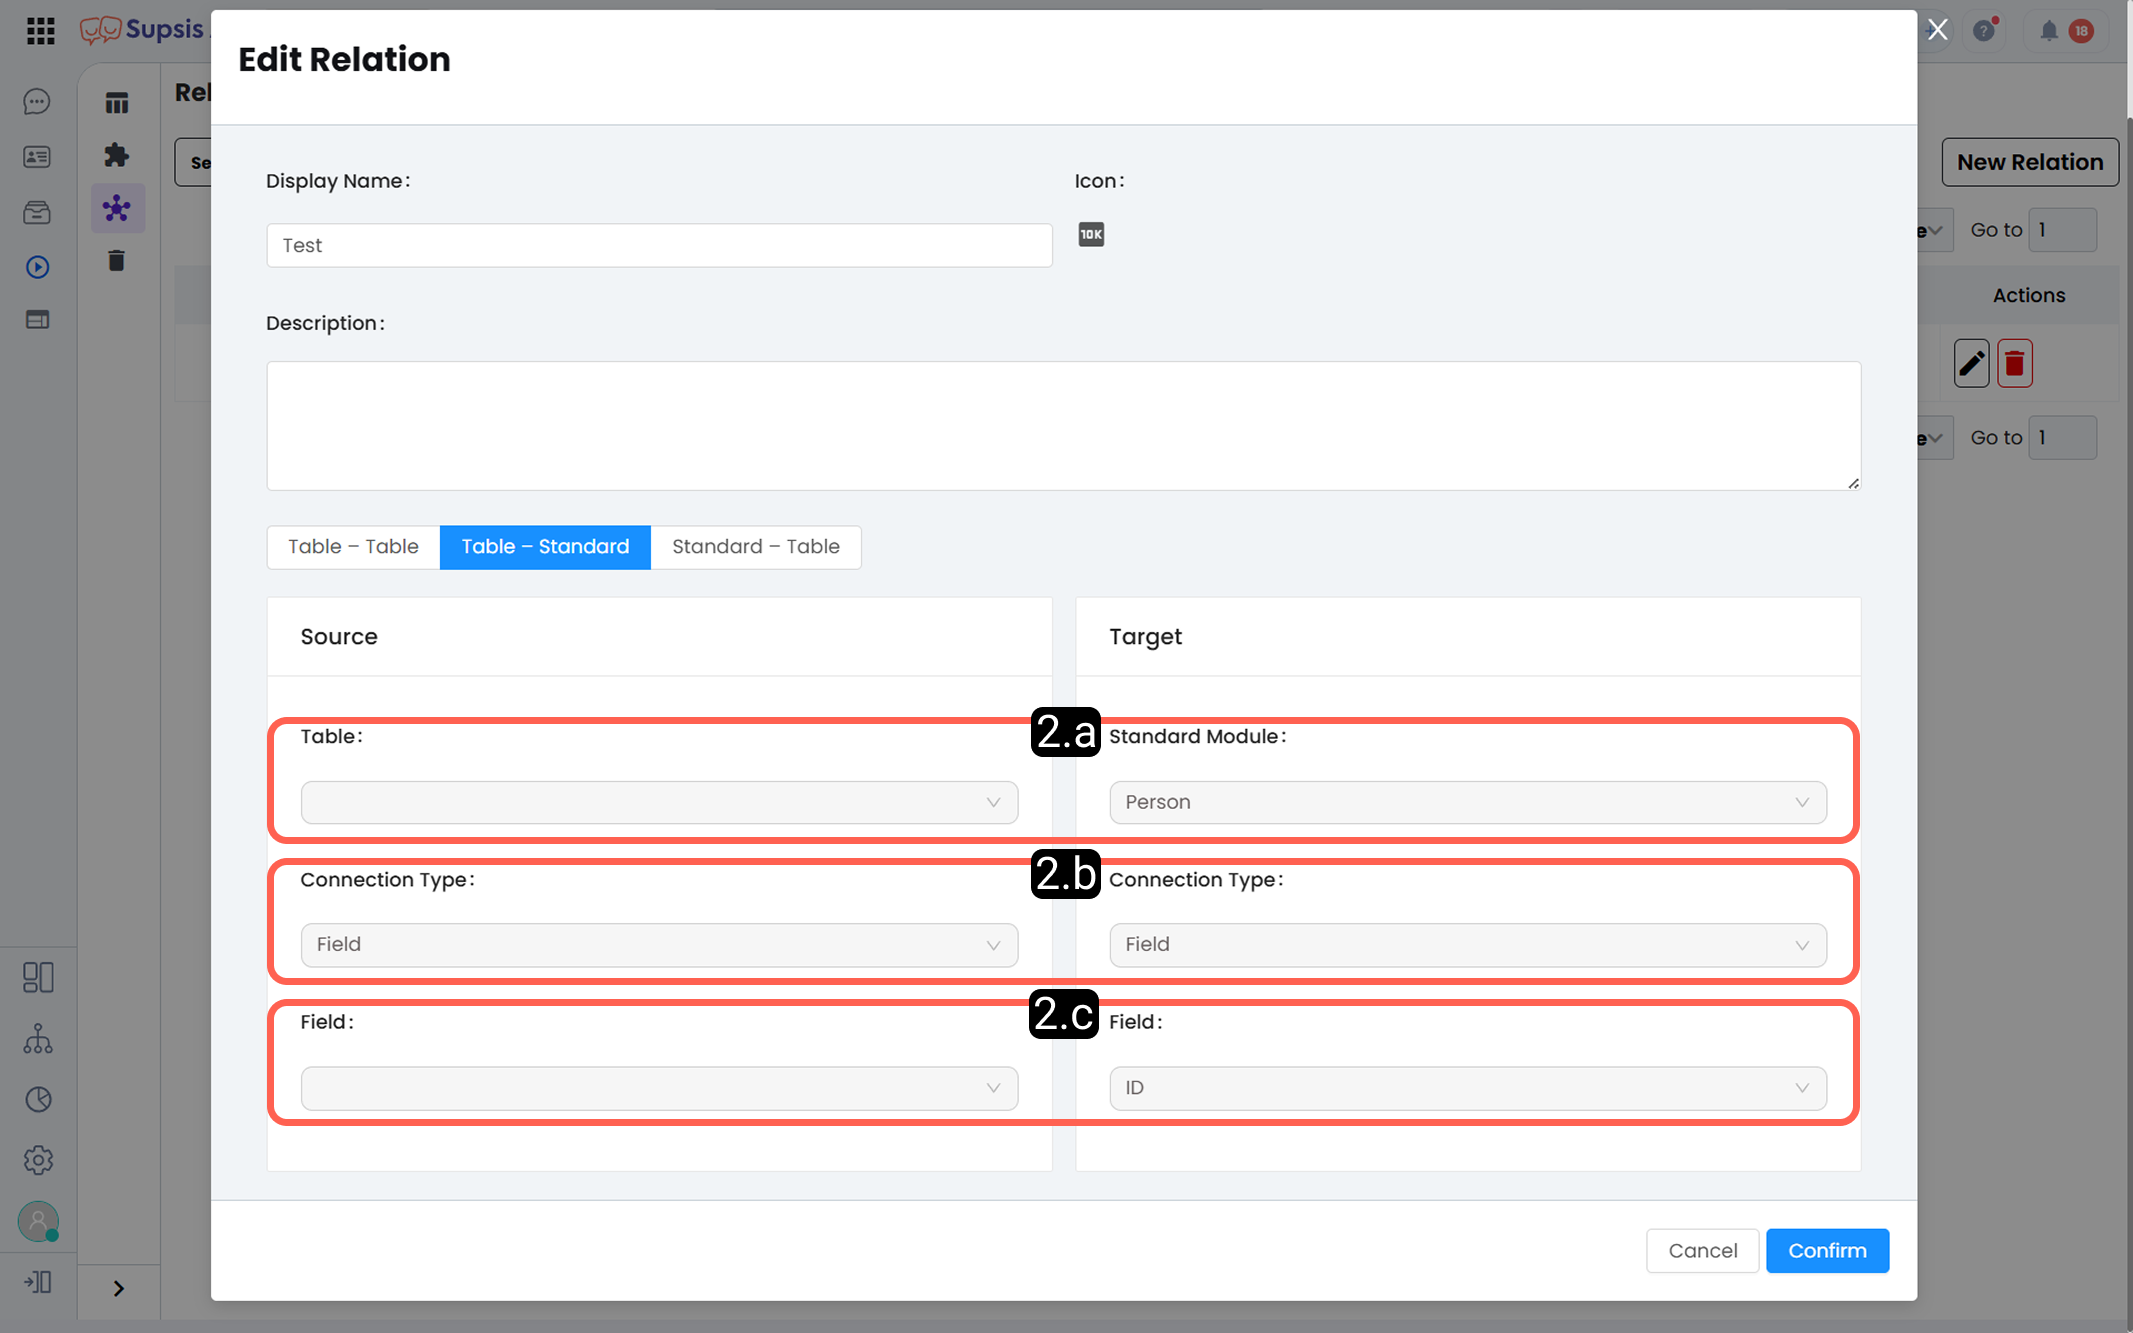
Source: Standard Person module
Target: Sales table
Matching Field: Phone Number
Result:
When the phone number in the Person module matches a phone number in the Sales table, related sales data becomes accessible.
4-) Trash
Deleted tables are moved to the Trash section. You can restore or permanently delete them from here. If not manually deleted, tables are permanently removed after 30 days.
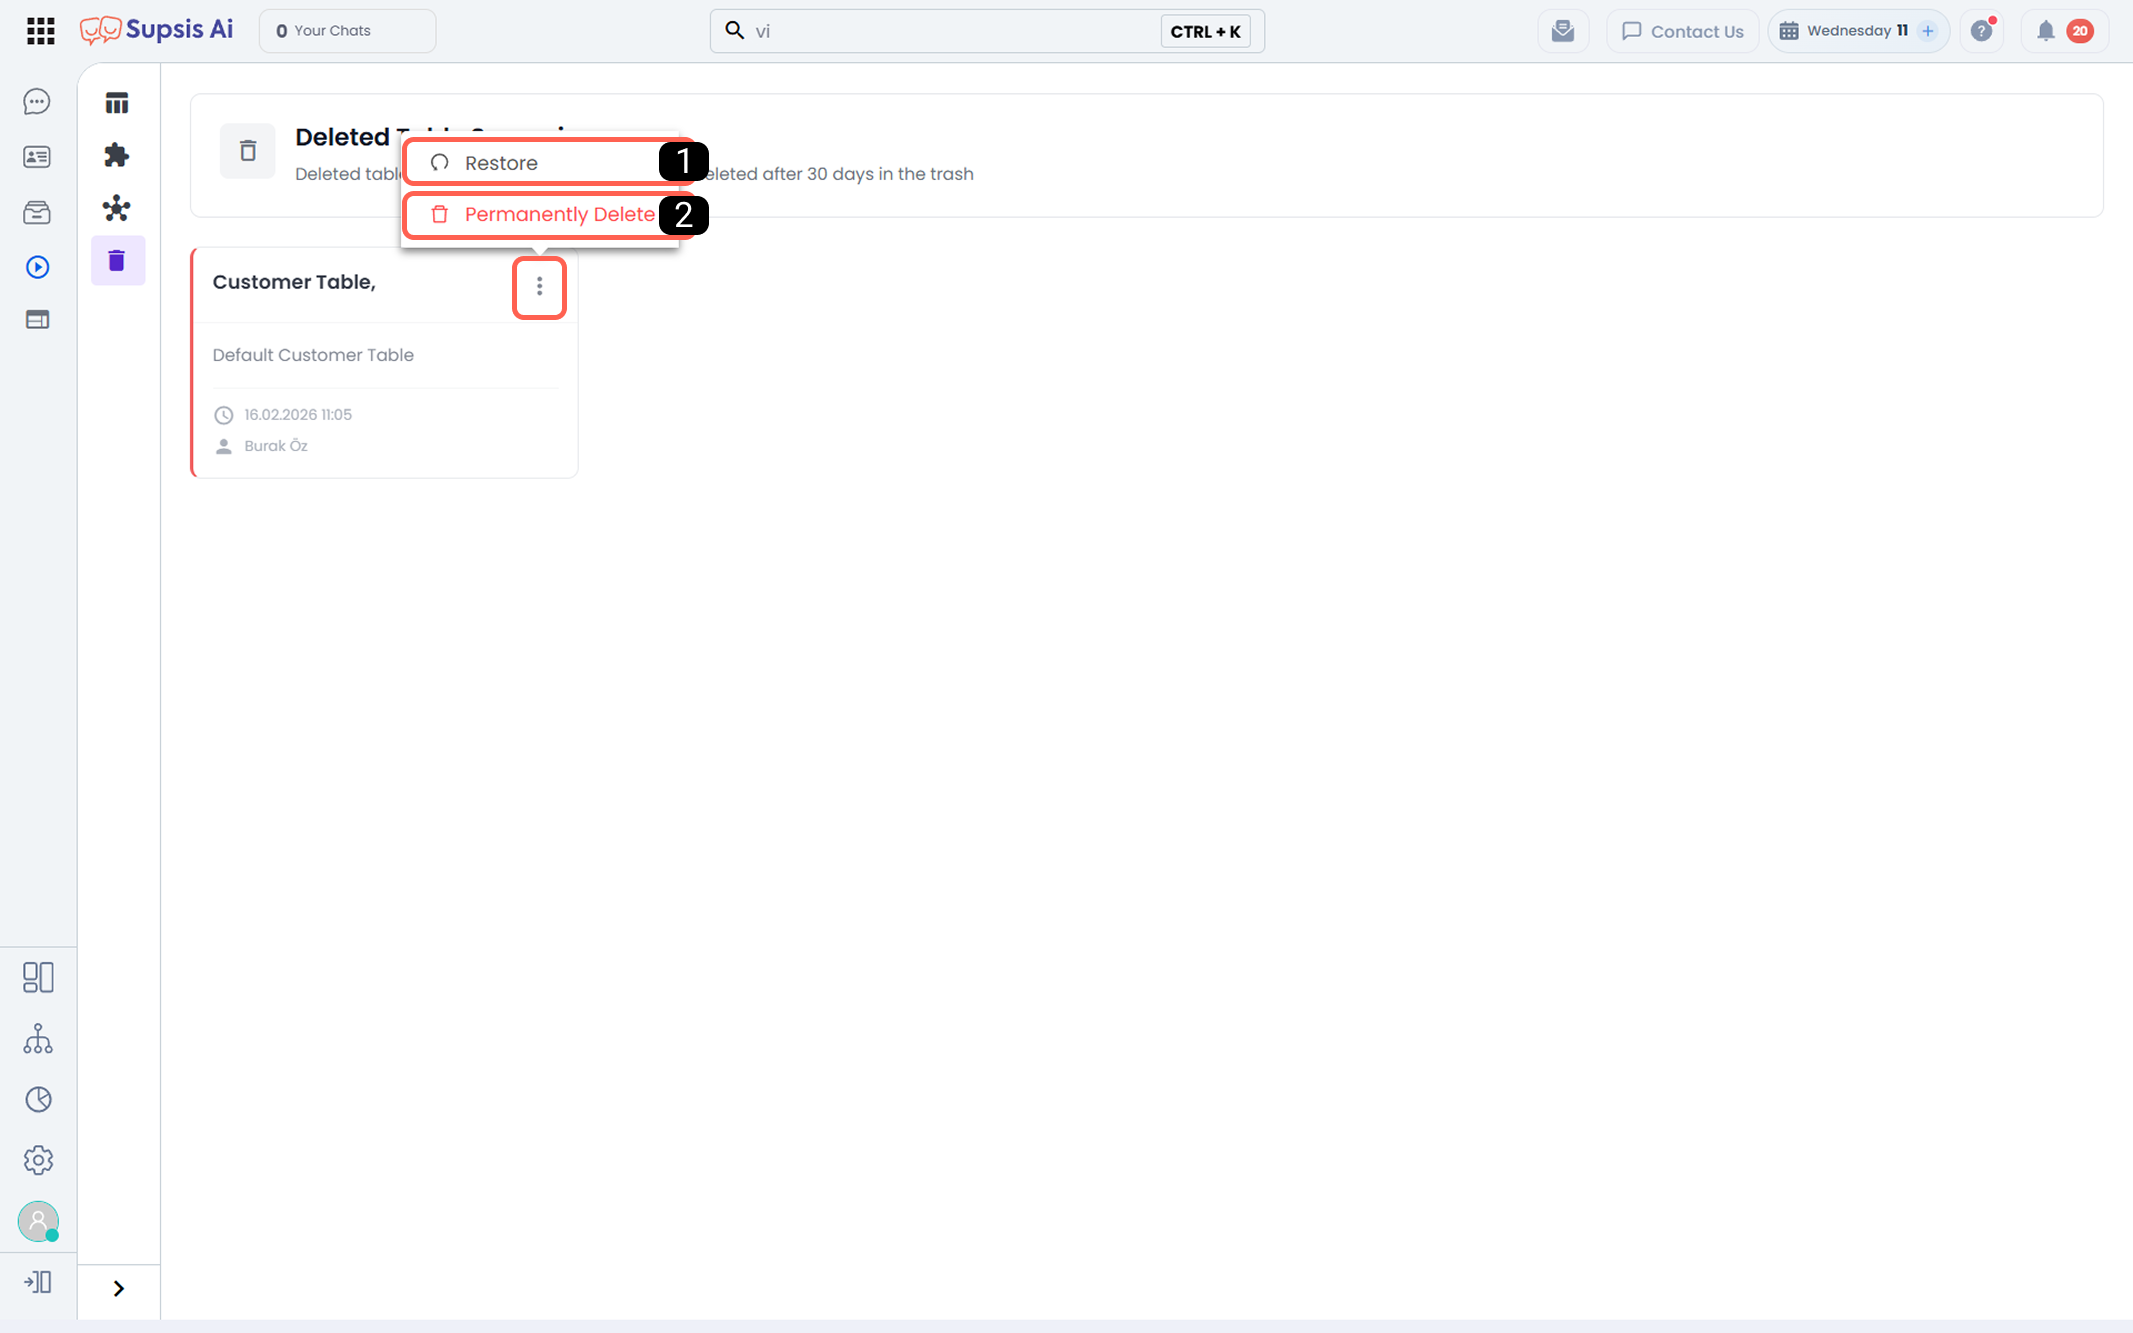
1-) Restore
Restores deleted tables. If not restored within 30 days, they are permanently deleted automatically.
2-) Permanently Delete
Permanently deletes the table. This action cannot be undone.