
The Chatbot Menu is a centralized workspace used to create chatbot scenarios, utilize ready-made templates, manage integrations, and monitor performance reports. Through this structure, you can carry out all essential operations—from chatbot setup to channel connections, operational tracking, and reporting—via a single panel.
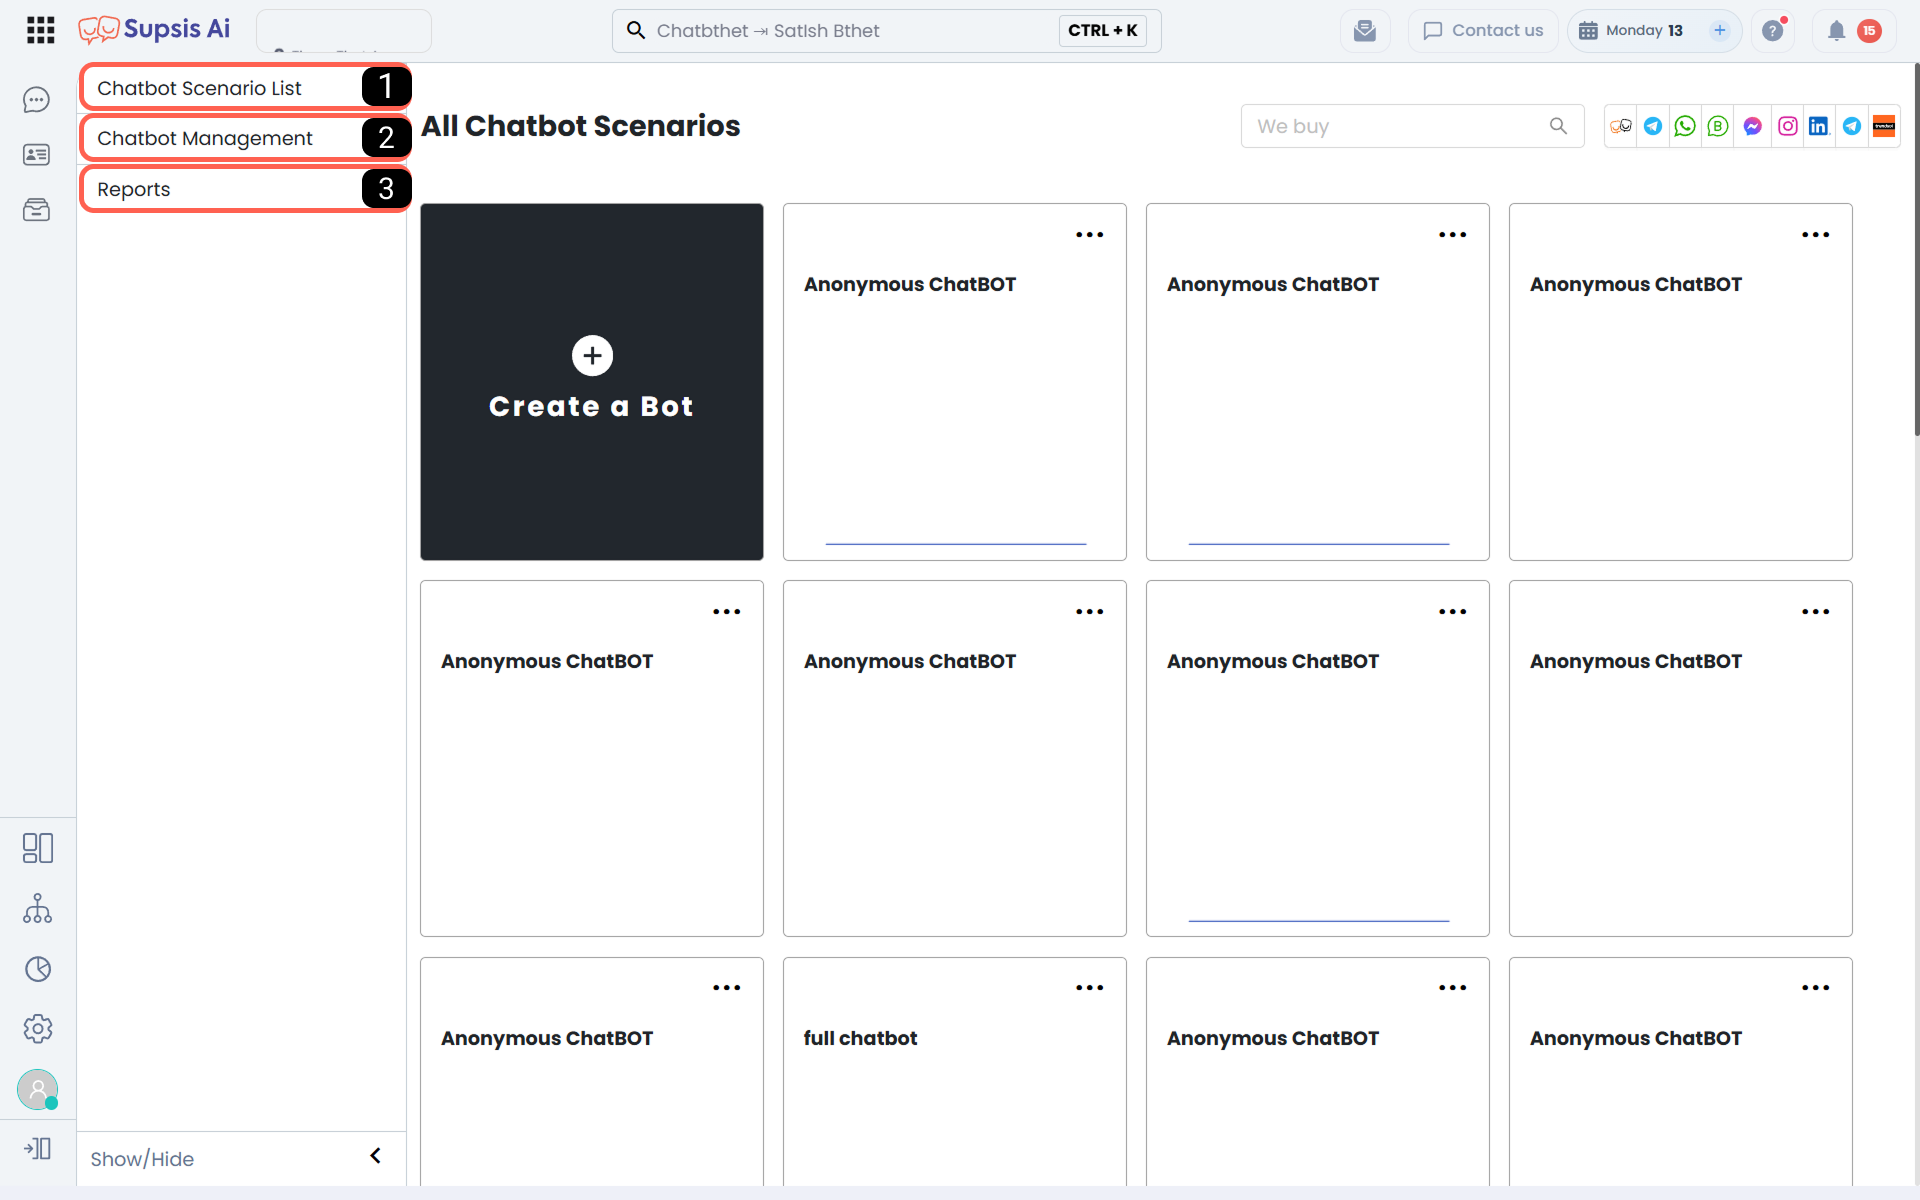
| # | Section |
|---|---|
| 1 | Chatbot Scenario List |
| 2 | Chatbot Management |
| 3 | Reports |
1. Chatbot Scenario List
The Chatbot Scenario List is the main section where you can view and manage all your chatbot flows collectively. From this area, you can create new scenarios, manage existing ones, access ready-made templates, and control integration connections.
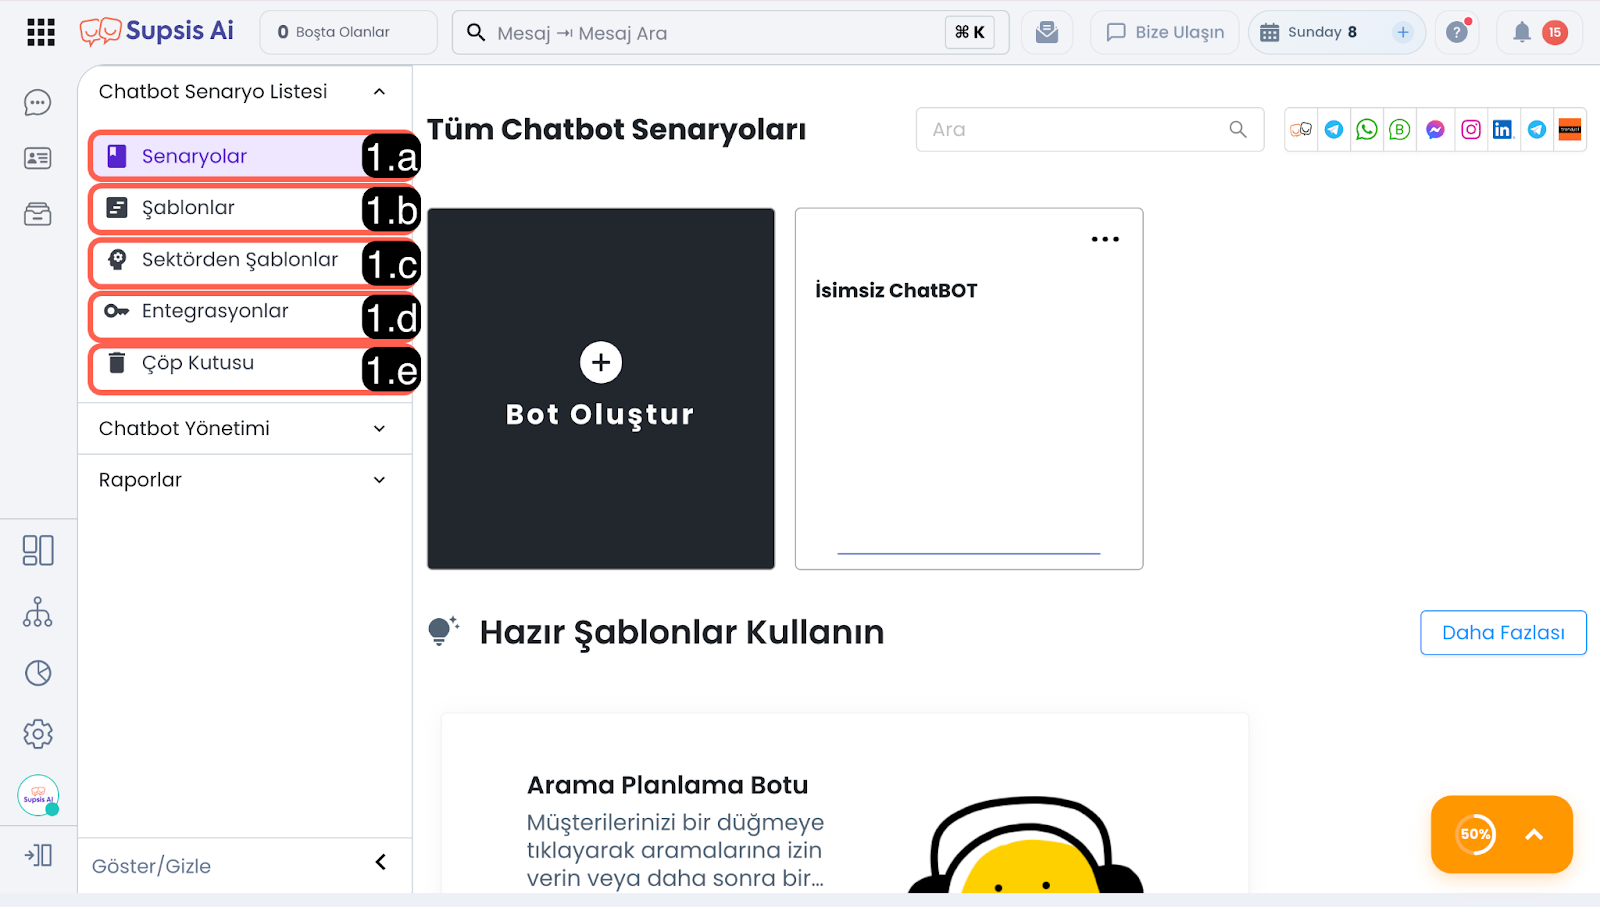
1.a – Scenarios (All Chatbot Scenarios - Story List)
The Scenarios screen is the primary workspace where all your business's chatbot flows are listed, filtered, and managed. With the redesigned interface, users can filter scenarios based on messaging and comment automation platforms, highlight active scenarios using flexible sorting criteria, and easily inspect integration statuses directly on scenario cards.
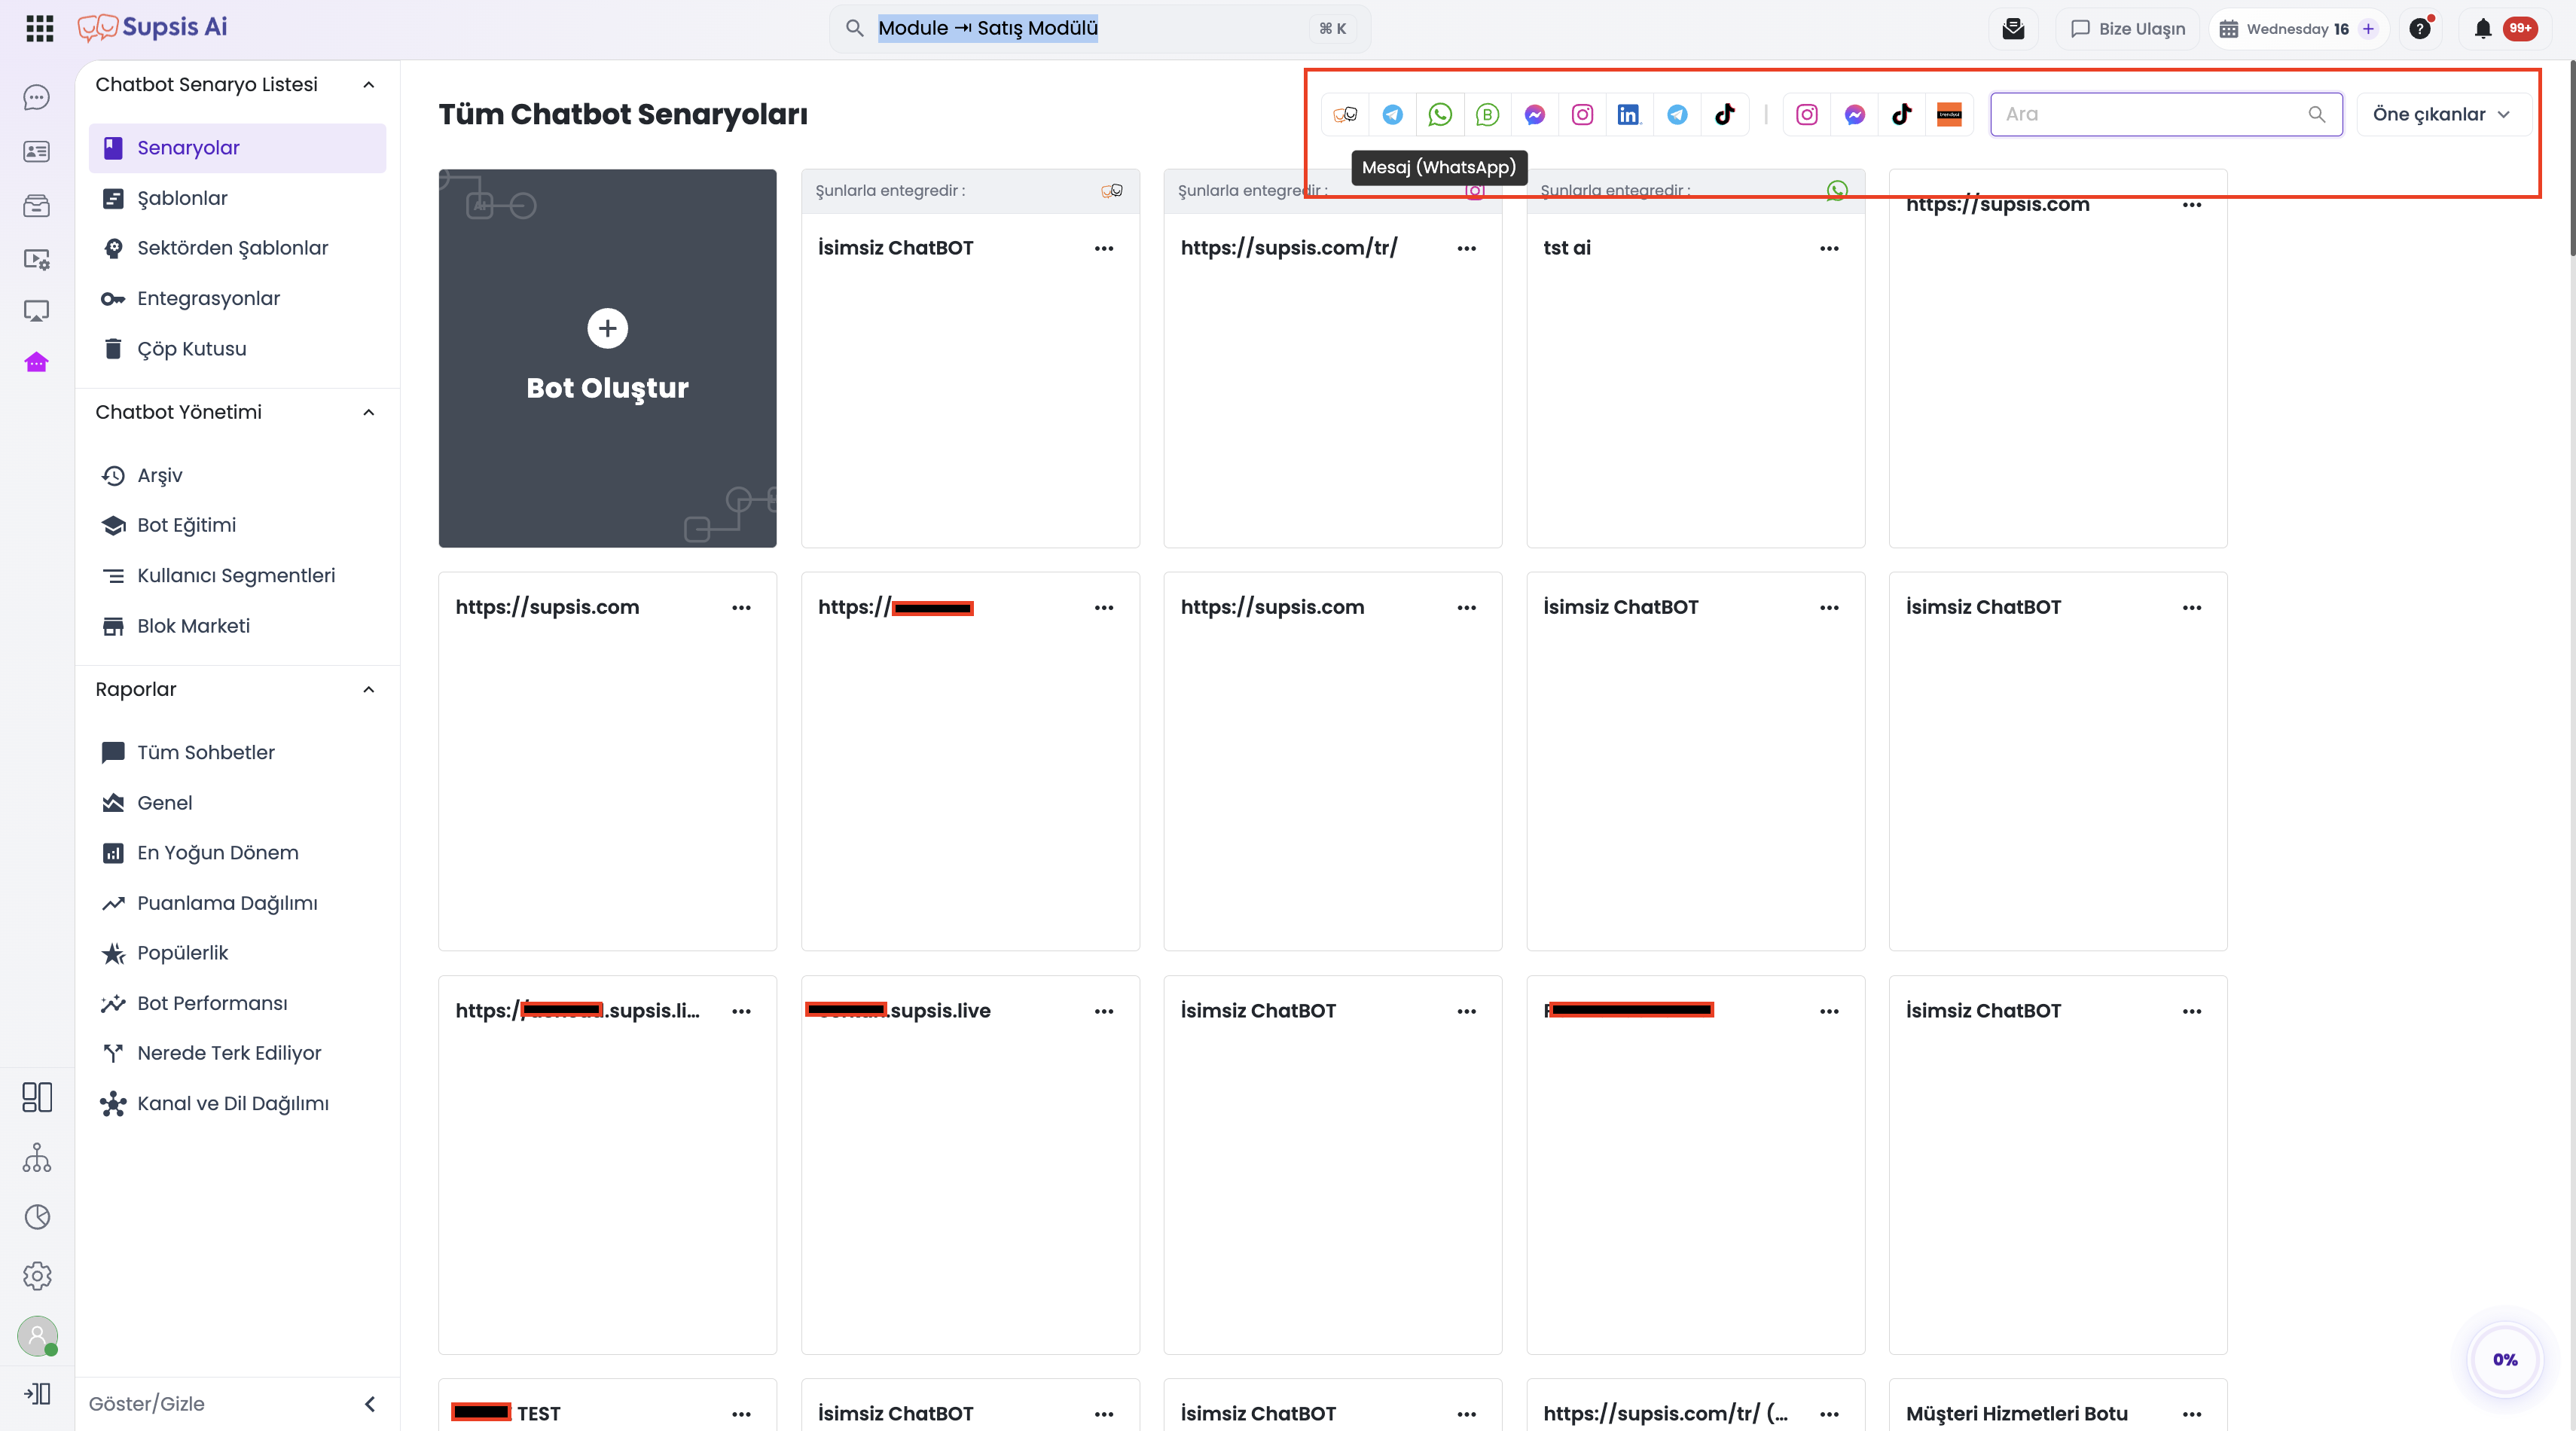
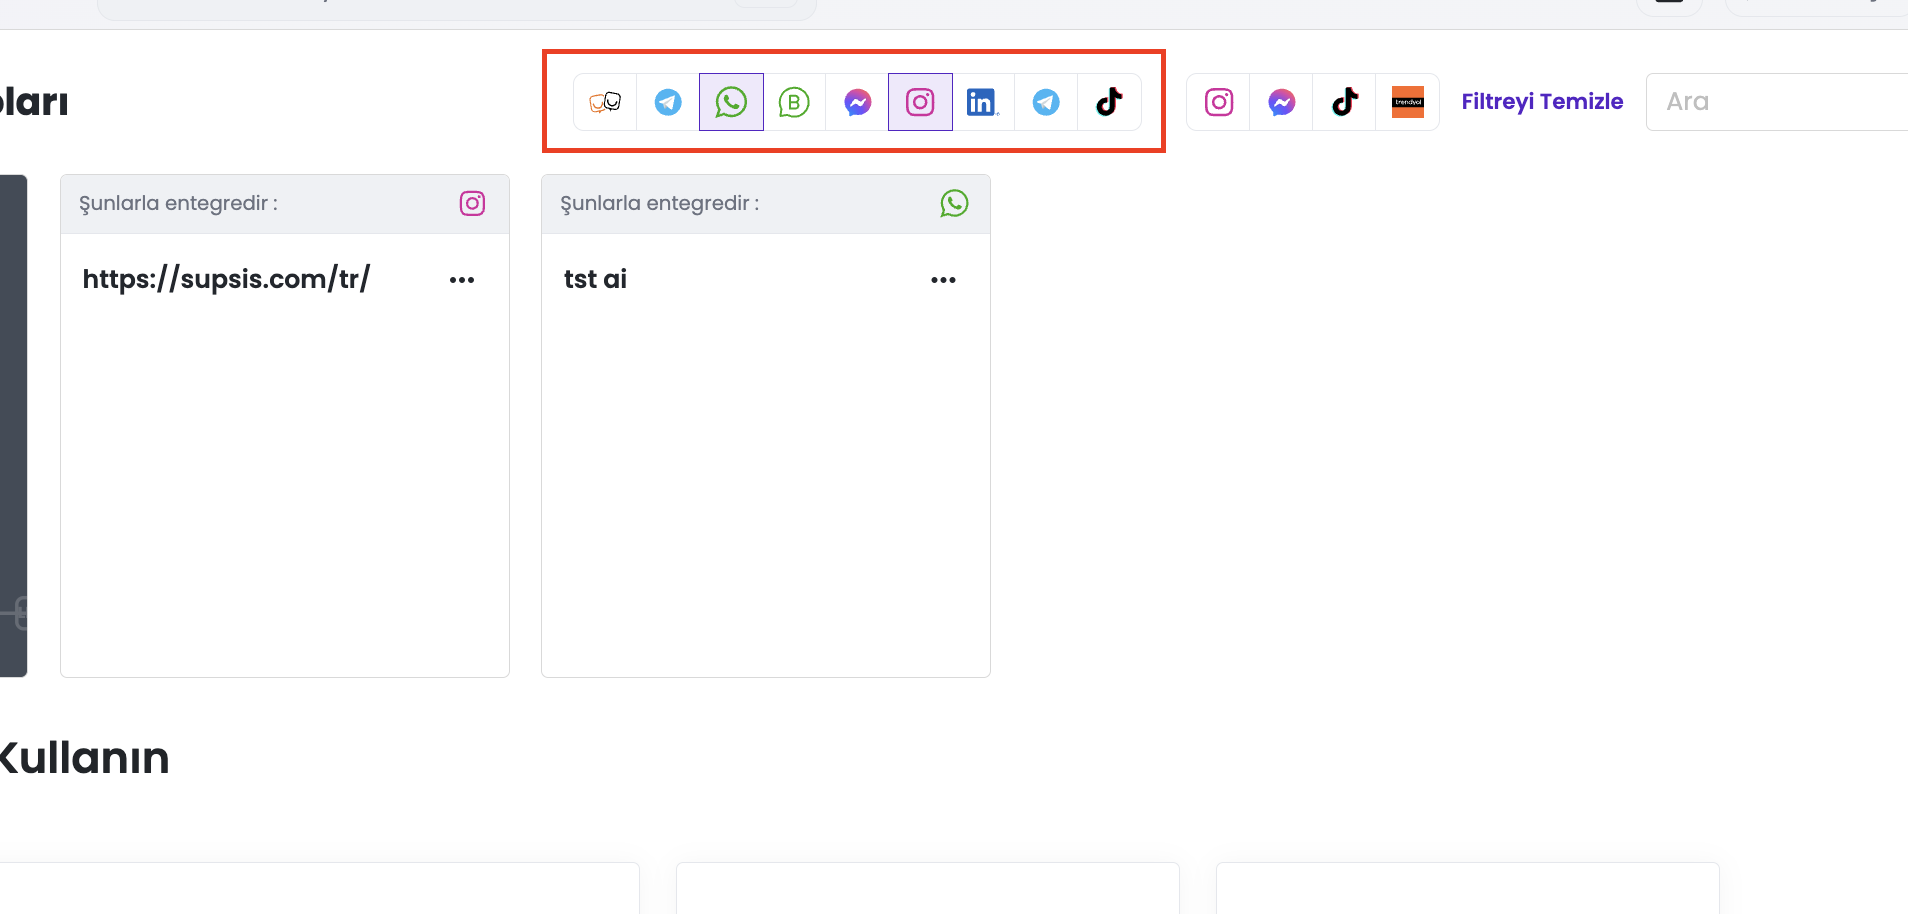
1- Platform Filters and Search Tools
At the top bar of the page, advanced filtering and search tools allow you to quickly navigate through dozens of scenarios:
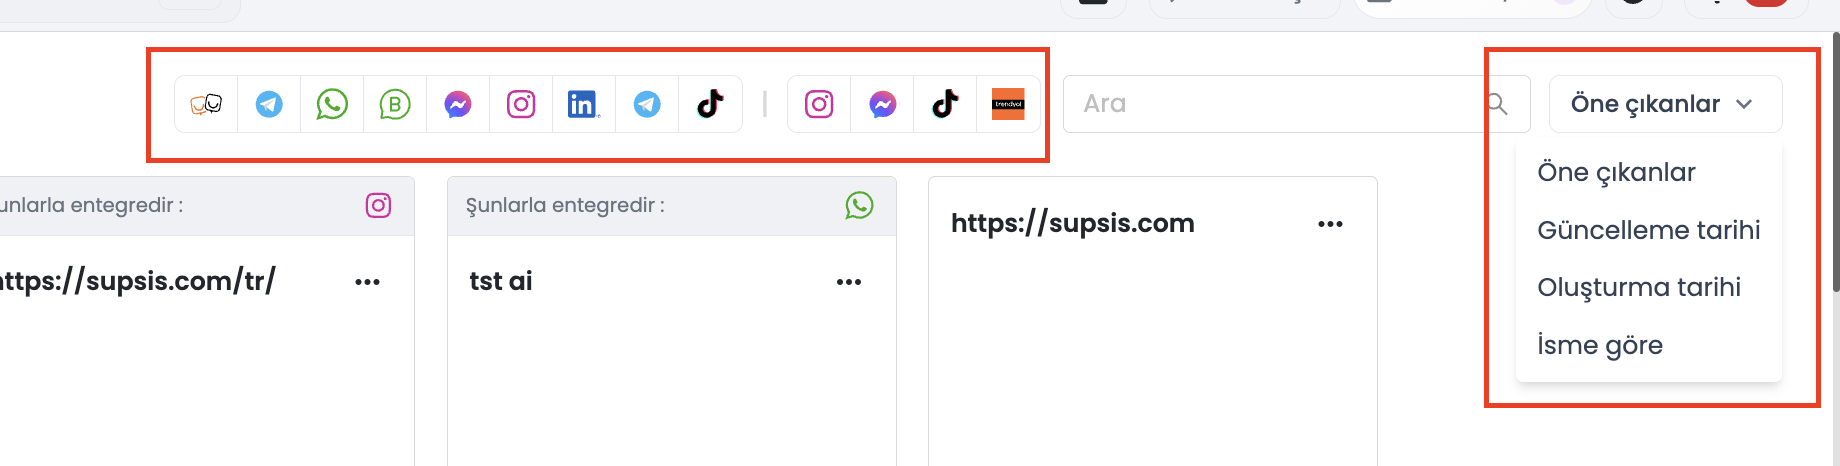
- Message Integration Platforms (Left Group):
Filters scenarios integrated directly into messaging channels. Supported platforms: Web, Telegram, WhatsApp (QR & WABA), Messenger, Instagram, LinkedIn, TikTok, etc. - Comment Chatbot Platforms (Right Group):
Filters scenarios configured to auto-reply to post and video comments (commentForward.mode = chatbot). Supported platforms: Instagram, Messenger, TikTok, Trendyol. - Vertical Divider (
|):
Visually separates message integration filters from comment chatbot filters. - Multi-Select and Highlighting:
You can select a single platform or click multiple platform icons to filter scenarios (OR logic: displays scenarios connected to at least one of the selected platforms). Active selected filters are highlighted with a purple border. - Informative Tooltips:
Hovering over an icon displays an informative tooltip formatted asMessage (Platform)orComment (Platform)(e.g., Message (WhatsApp), Comment (Instagram)).
- Clear Filter:
When one or more filters are selected, a Clear Filter link appears next to the platform icons. Clicking it instantly resets all filters and restores the complete list. - Instant Search:
Typing in the search input performs real-time filtering across scenario titles, descriptions, and names.
2- Advanced Sorting Options
Using the dropdown menu located at the top right corner of the page, the list can be reordered according to your operational needs:
| Sorting Criterion | Sorting Logic & Operation |
|---|---|
| Featured (Default) | Pushes active scenarios integrated with live communication channels to the top, followed by last updated date. |
| Update date | Displays recently modified or published scenarios first. |
| Creation date | Orders scenarios chronologically by their initial creation timestamp (newest to oldest). |
| By name | Sorts scenario titles alphabetically from A to Z. |
3- Redesigned Scenario Card Layout
Scenario cards have been modernized to present integration details and administrative actions clearly:
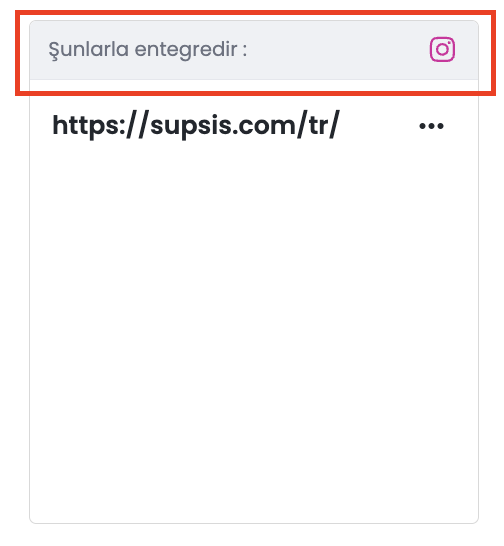
- a – Integration Strip ("Integrated with"):
Integrated scenarios feature an "Integrated with" bar across the top of the card. Platform icons are aligned to the right. If a scenario is linked to both messaging and comment automation on the same platform, a single platform icon is shown to keep the interface clean and concise. - b – Card Title and Action Menu:
The scenario title and the three-dot (...) action menu are horizontally aligned on the same row. Through this menu, you can quickly Edit, Duplicate, or Delete the scenario. - c – Create Bot Card:
The card at the beginning of the list for launching a new bot features modern AI/LLM diagram illustrations in the background corners while retaining the central plus (+) icon. - d – Quick Access to Templates:
Ready-made sample scenarios and industry templates can be accessed directly alongside the scenario card list.
4- Step-by-Step User Guide
- Navigate to Story List: From the Customer Panel left menu, click Chatbot to open the scenario list.
- Filter by Channel: Click any message or comment platform icon in the top bar to display scenarios tied to that specific channel (e.g., WhatsApp or Instagram Comment).
- Apply Multi-Selection: Select multiple platform icons to filter scenarios matching any of the chosen channels.
- Change Sorting: Open the top-right sorting menu and select Featured, Update date, Creation date, or By name.
- Search Instantly: Enter a scenario name or keyword into the search bar to locate your flow within seconds.
- Manage from the Card: Check integration statuses from the top strip of the card; click the three-dot menu to enter the scenario editor or duplicate the bot.
5- Use Cases and Customer Benefits
- Channel Segmentation: Instantly differentiate WhatsApp customer service bots from Instagram or TikTok comment auto-reply bots.
- Identify Idle Scenarios: Quickly detect and clean up draft or unlinked scenarios that are not connected to any active channel.
- Efficiency in Large Teams: For organizations managing dozens of chatbots, sorting by updated date or searching by name enables instant access to the right scenario.
Filtering and Integration Notes
- Comment Chatbot Filter Scope: Comment filters only return scenarios that have
commentForward.mode = chatbotconfigured for the respective platform (Instagram, Messenger, TikTok, Trendyol). - Message Filter Scope: Returns scenarios assigned directly to inbound inbox/chat channels.
- Permissions: All filtering and scenario actions adhere to existing chatbot user roles and permissions (view, create, edit, delete).
- Multi-Language Support: Filter tags, sorting options, and interface elements are localized across 8 supported languages (tr, en, ar, de, es, fr, it, ru).
1.b – Template Scenarios
The Template Scenarios section is an area where you can review ready-to-use chatbot flows. Through these templates, you can understand the system logic more quickly and adapt a ready-made structure to your own processes so that it becomes directly usable.
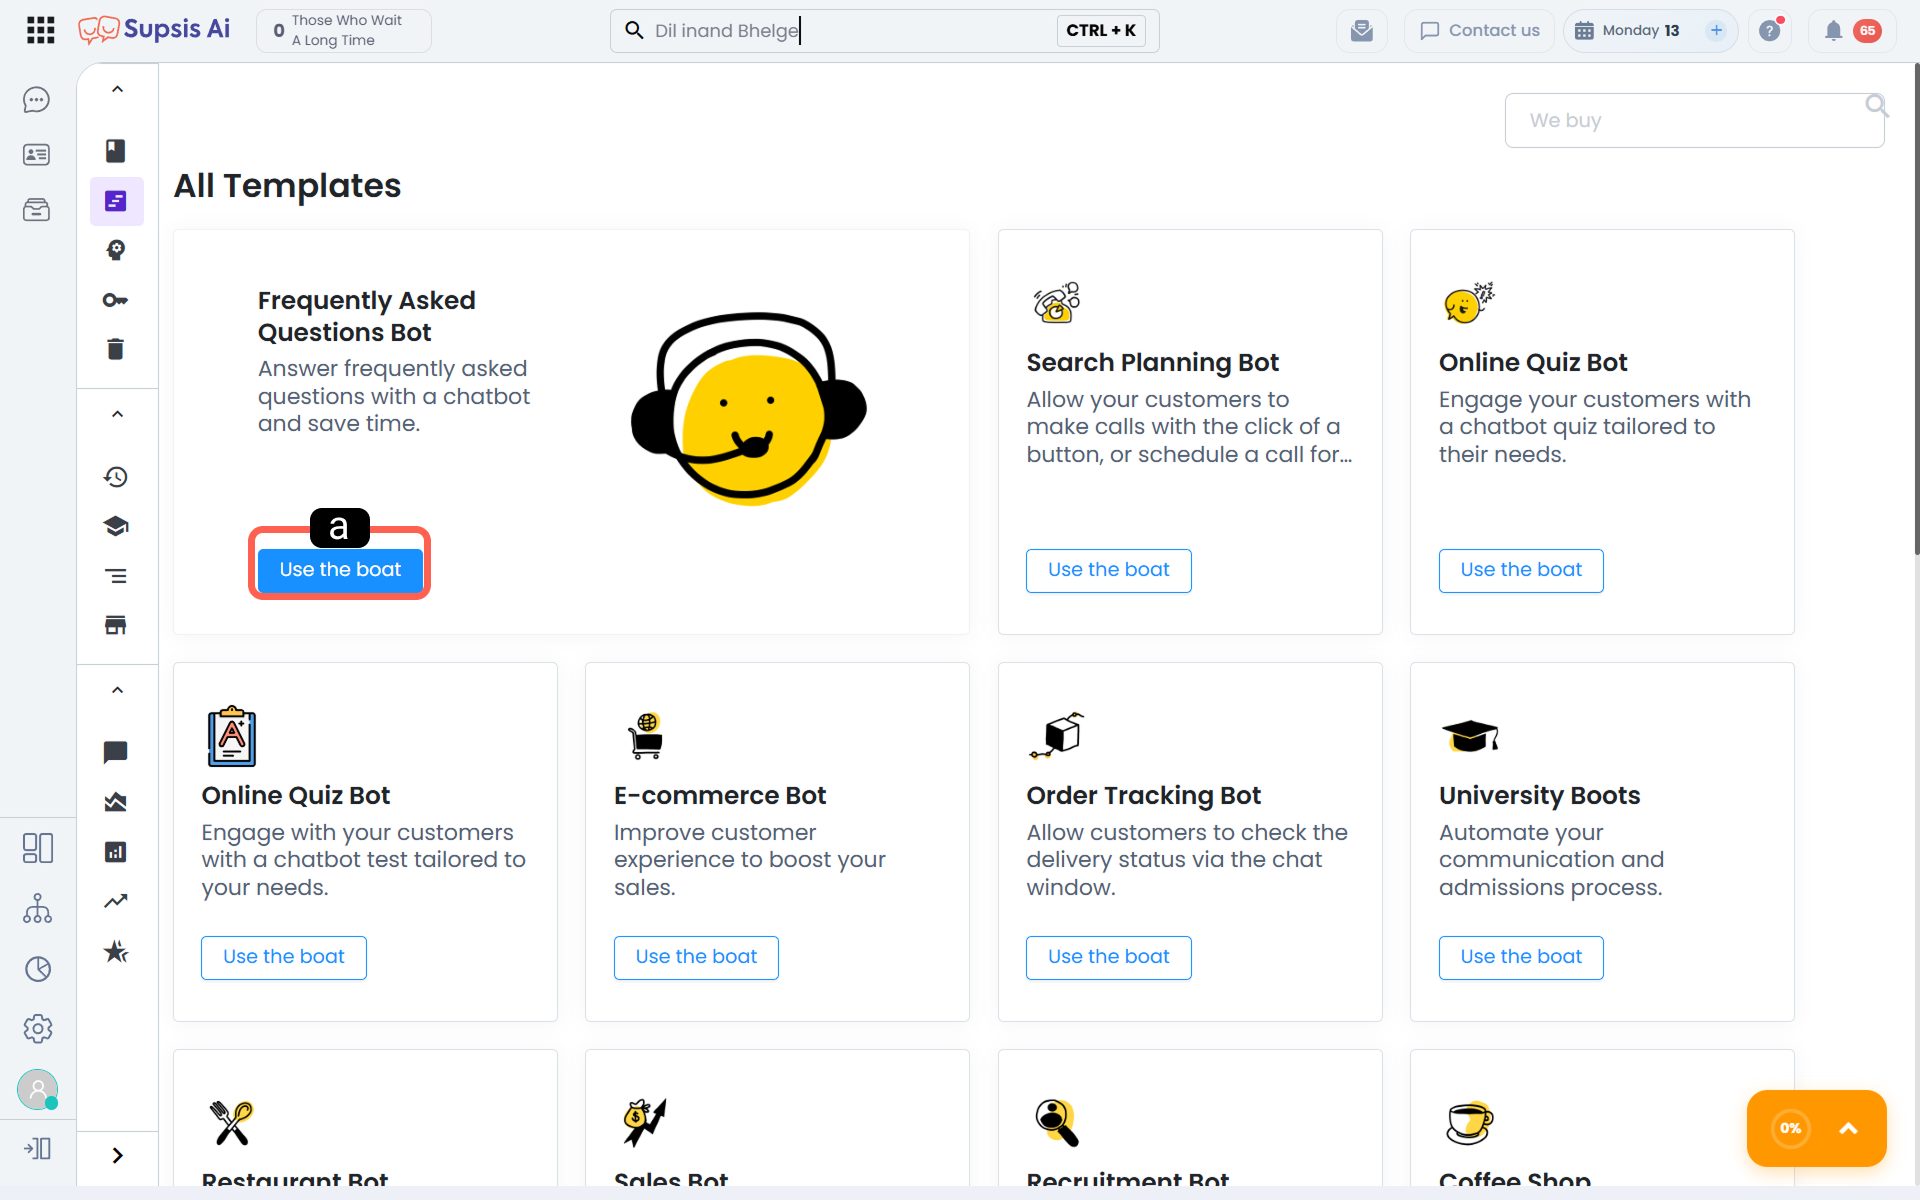
- Use Bot
This button opens the screen containing details about the selected ready-made template and the confirmation button that will allow you to add the bot to your workspace and begin using it.
After reviewing the template details, you can confirm and transfer the bot content to your scenarios; then you can inspect and edit the flow. After making the necessary adjustments to the template scenario that best suits your use case, you can continue with it as your own scenario and save time.
1.c – Industry Templates
The Industry Templates section contains ready-made chatbot examples prepared by the Supsis Ai team by considering the needs of specific industries. Since these templates are designed to be used with minimal modification in their relevant area, they significantly speed up the setup process.
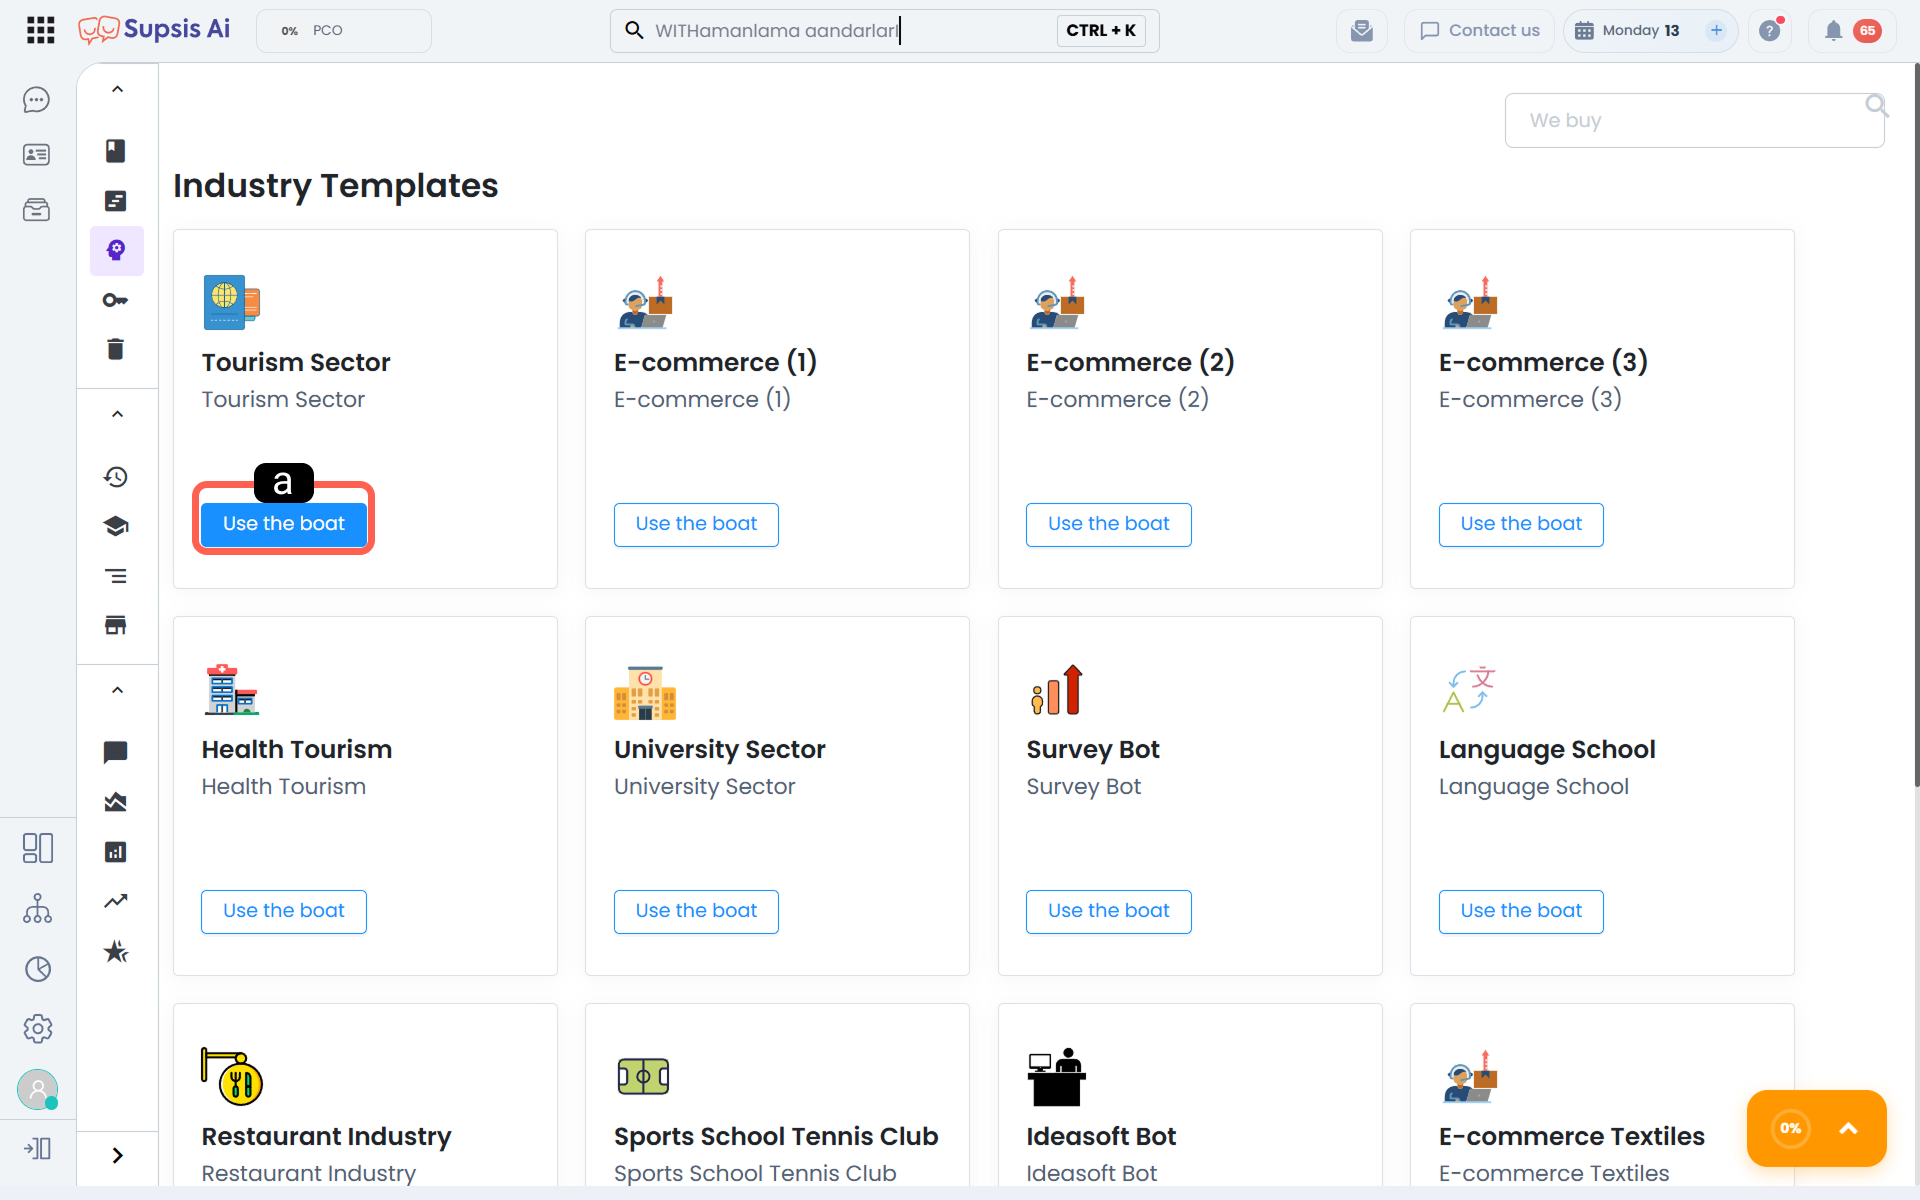
- Use Bot
This button opens the screen containing details about the selected industry template and the confirmation button that will allow you to add the bot to your workspace and begin using it.
After reviewing the template details, you can confirm and transfer the bot content to your scenarios; then you can inspect and edit the flow. After making the necessary adjustments to the template scenario that best suits your use case, you can continue with it as your own scenario and save time. Especially for businesses with service structures similar to the scenario in the template, this method provides a quick way to move forward without designing a scenario from scratch.
1.d – Integrations
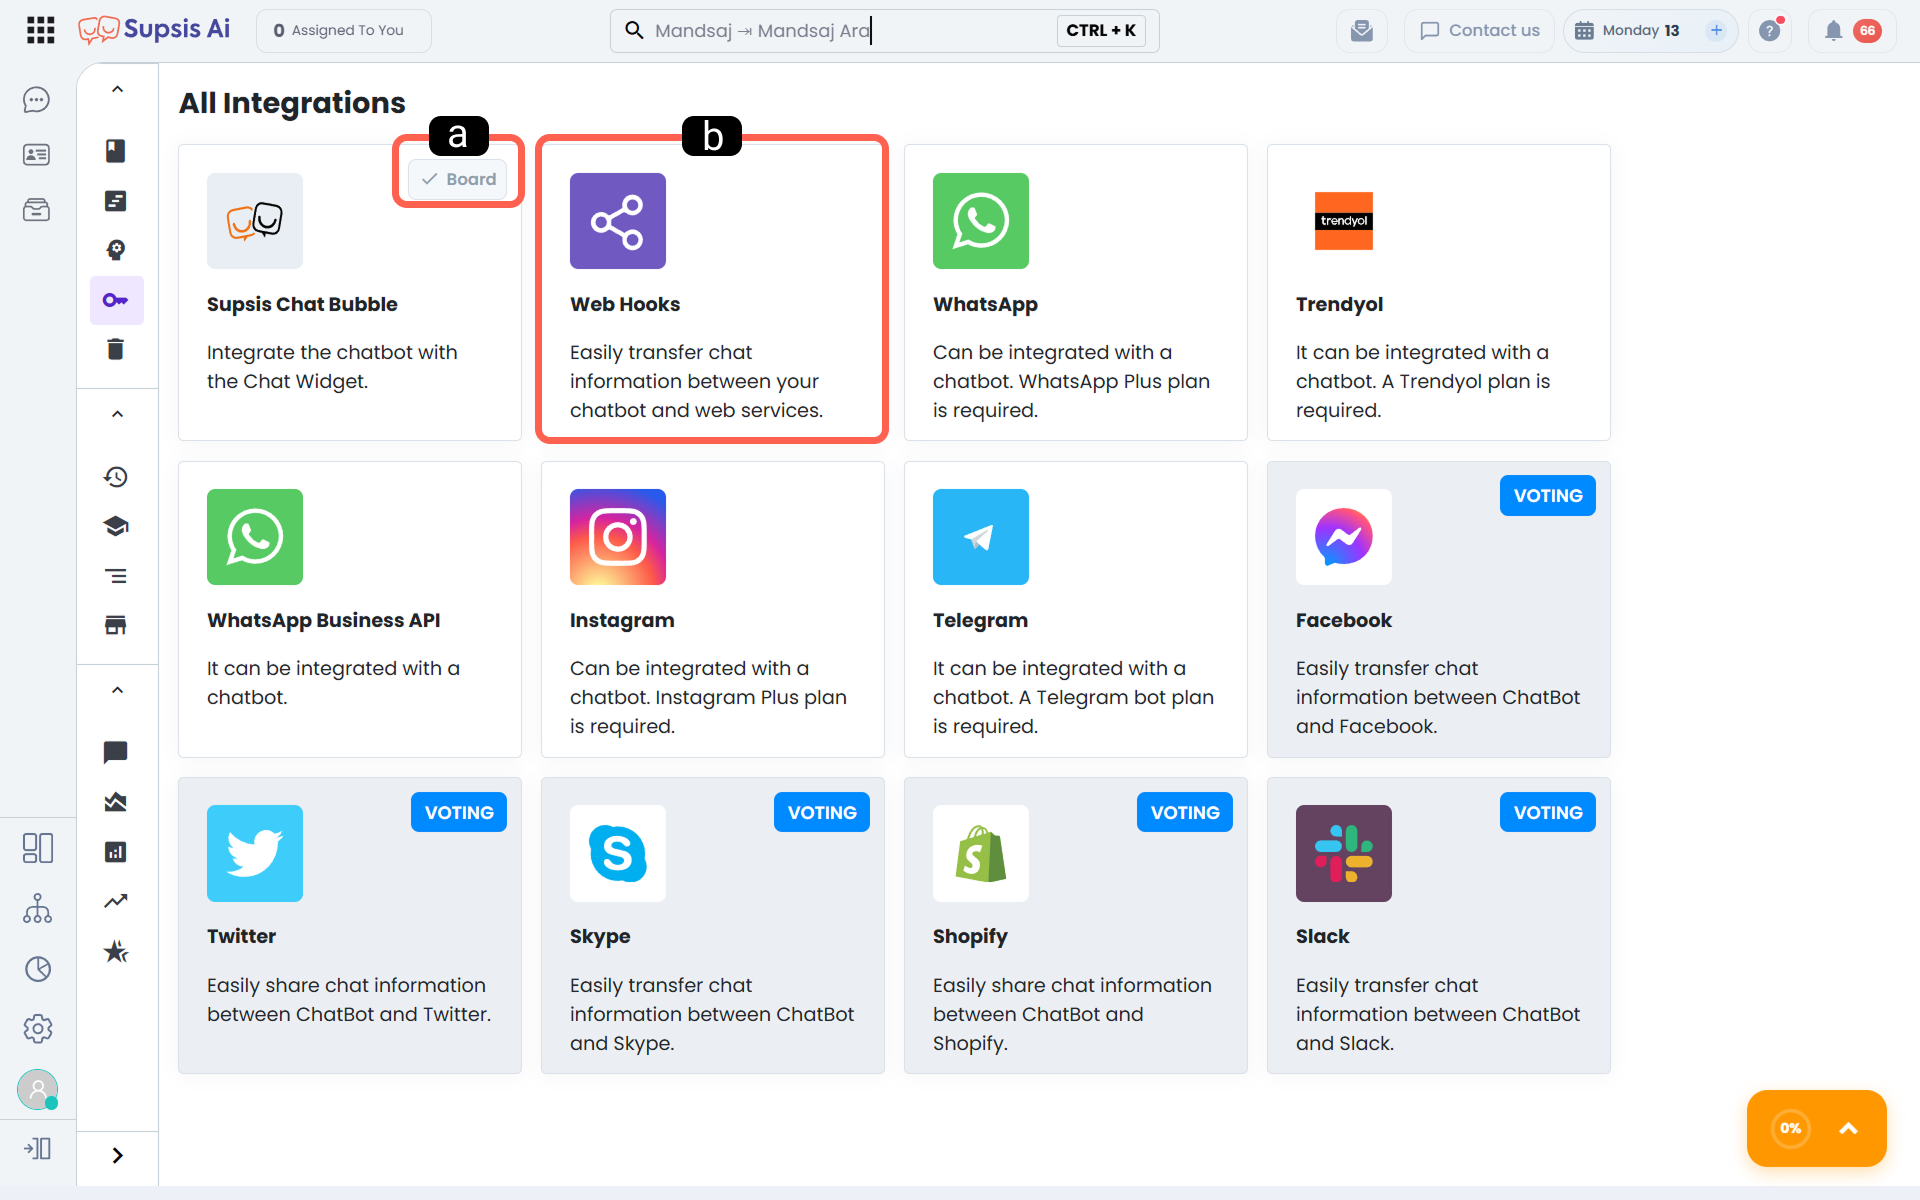
The Integrations section is used to connect your chatbot scenarios with different communication channels. From this area, you can see which channel is connected and manage which chatbot scenario will run in the relevant channel.
-
Integration Status:
The status information shown on the channel cards lets you quickly see whether the relevant integration is defined in the system. This way, you can check from a single screen which channels are ready for active use. -
Integration Channel Content
When a channel card is opened, the management screen appears where you can define which chatbot scenario will be associated with that channel. Through this screen, you can review the current connection, update the scenario selection, or completely remove the connection.

-
Remove Integration
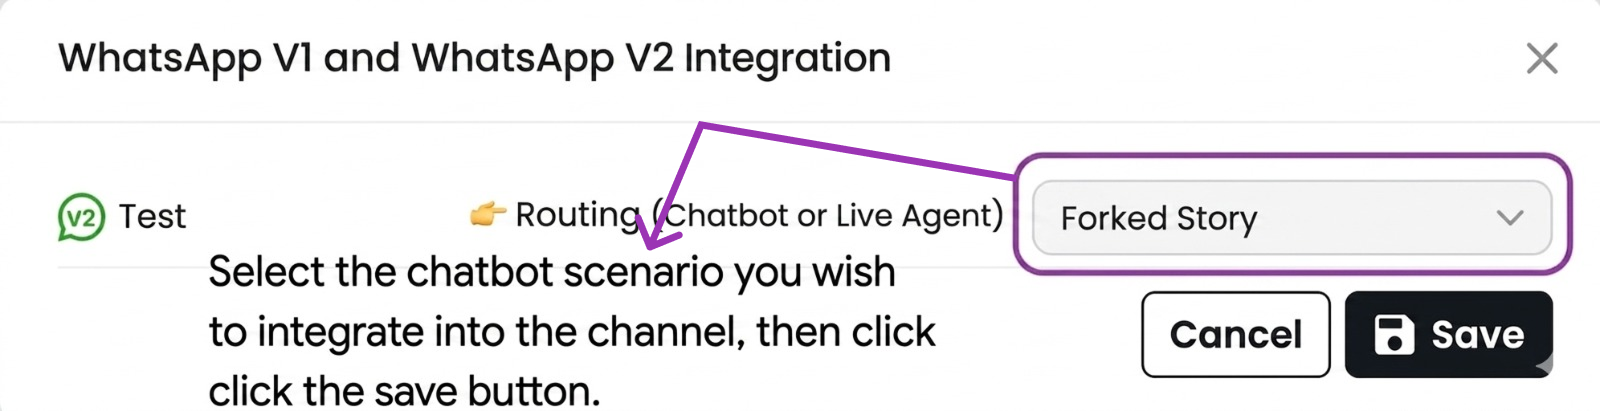
The Remove option is used to end the existing connection between the relevant channel and the chatbot scenario. You can use this when you want to connect the channel to a different scenario or when you want to clean up an integration that is no longer used. - Select the Scenario to Integrate with the Channel
Through the dropdown selection field, you can choose the chatbot story you want to run in the relevant channel. After the selection is completed, the integration record is created and the channel is matched with the scenario. This structure helps ensure that the correct flow is assigned for each channel, supporting more controlled channel-based usage.
1.e – Trash Bin
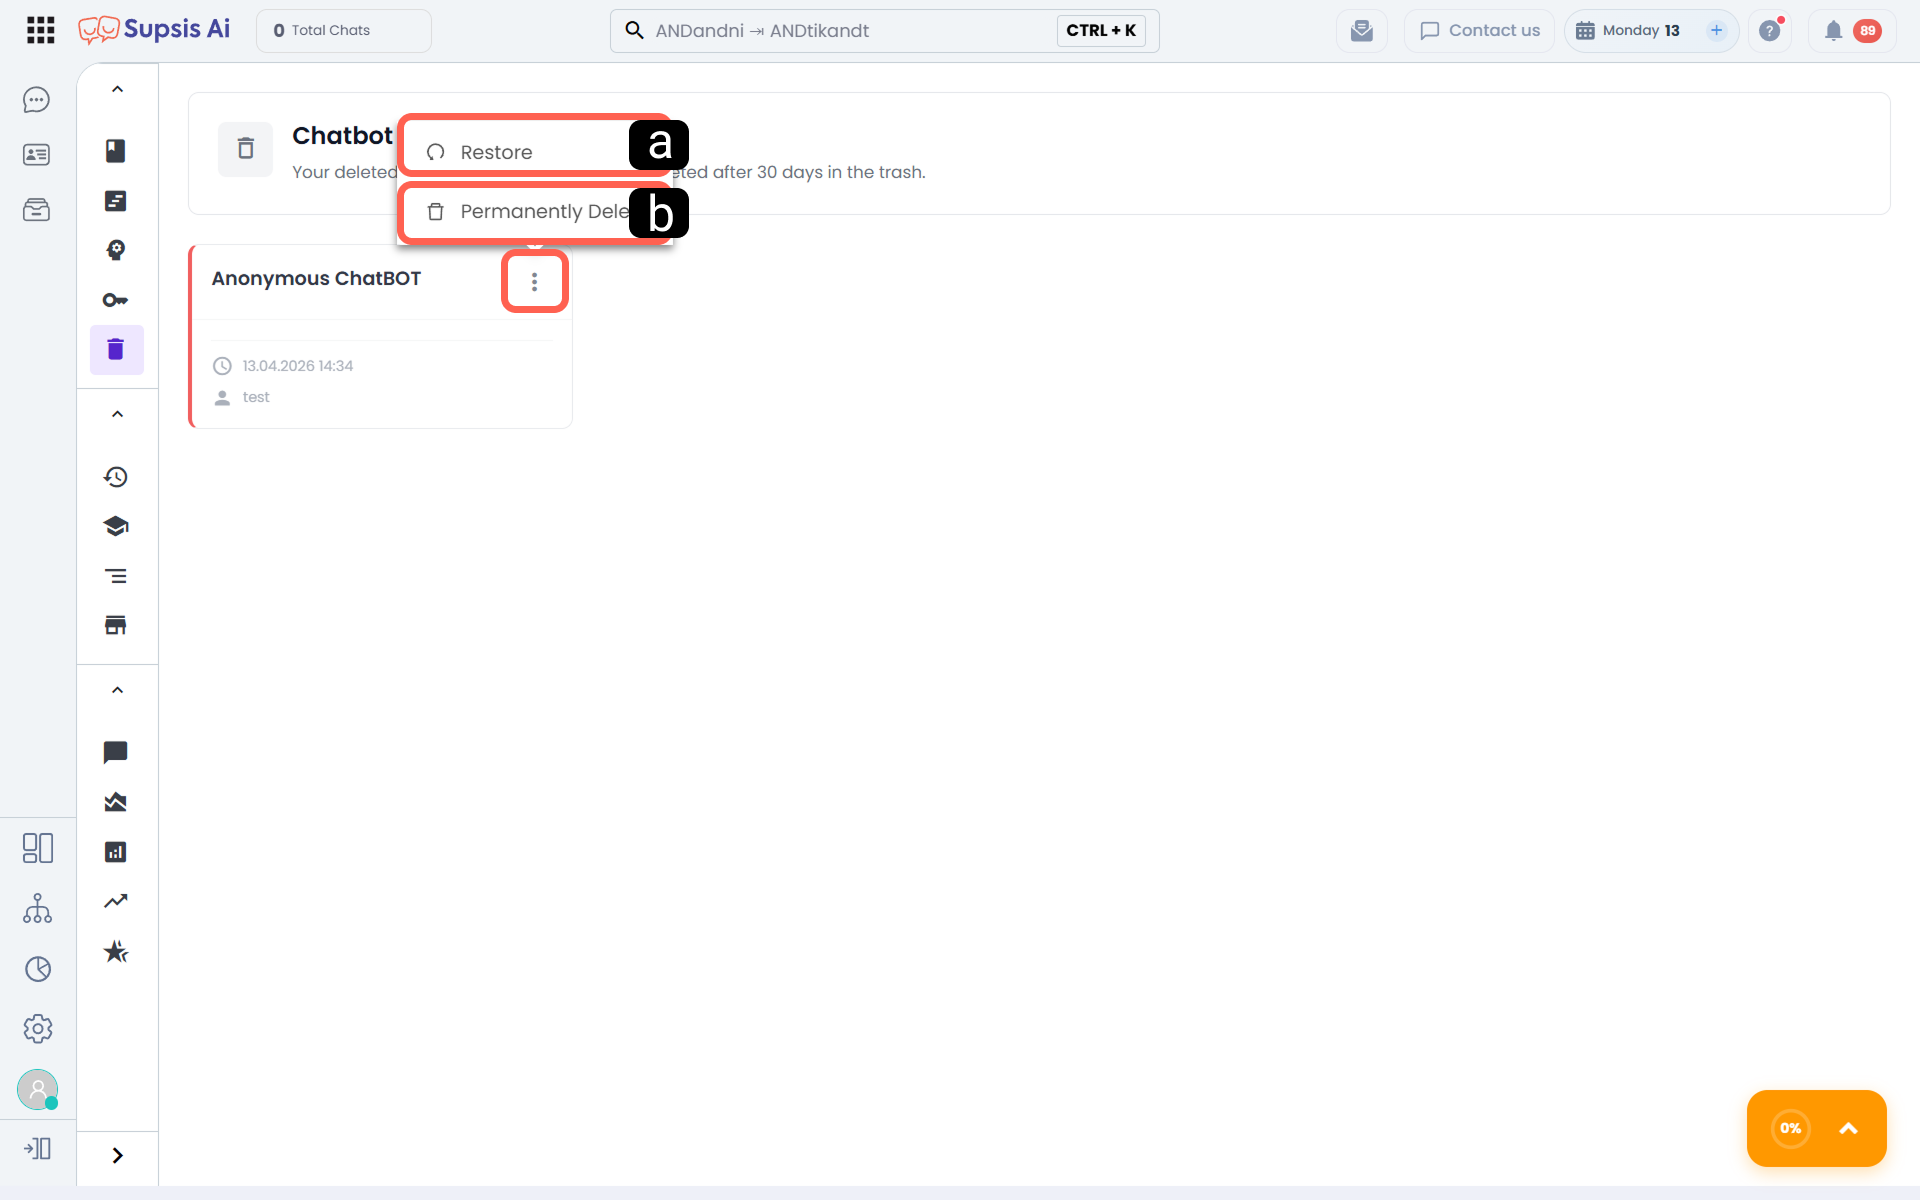
The Trash Bin section is where deleted scenarios are displayed and can be recovered when needed. This screen allows you to make a final check on removed scenarios, restore those you want to use again, or delete them permanently.
-
Restore
This option returns the scenario moved to the trash bin back to the active scenario list. It can be used to quickly recover scenarios that were deleted by mistake or decided to be used again. -
Delete Permanently
This option removes the relevant scenario completely from the trash bin. It is used to permanently clean up scenarios that are no longer needed from the system.
2. Chatbot Management
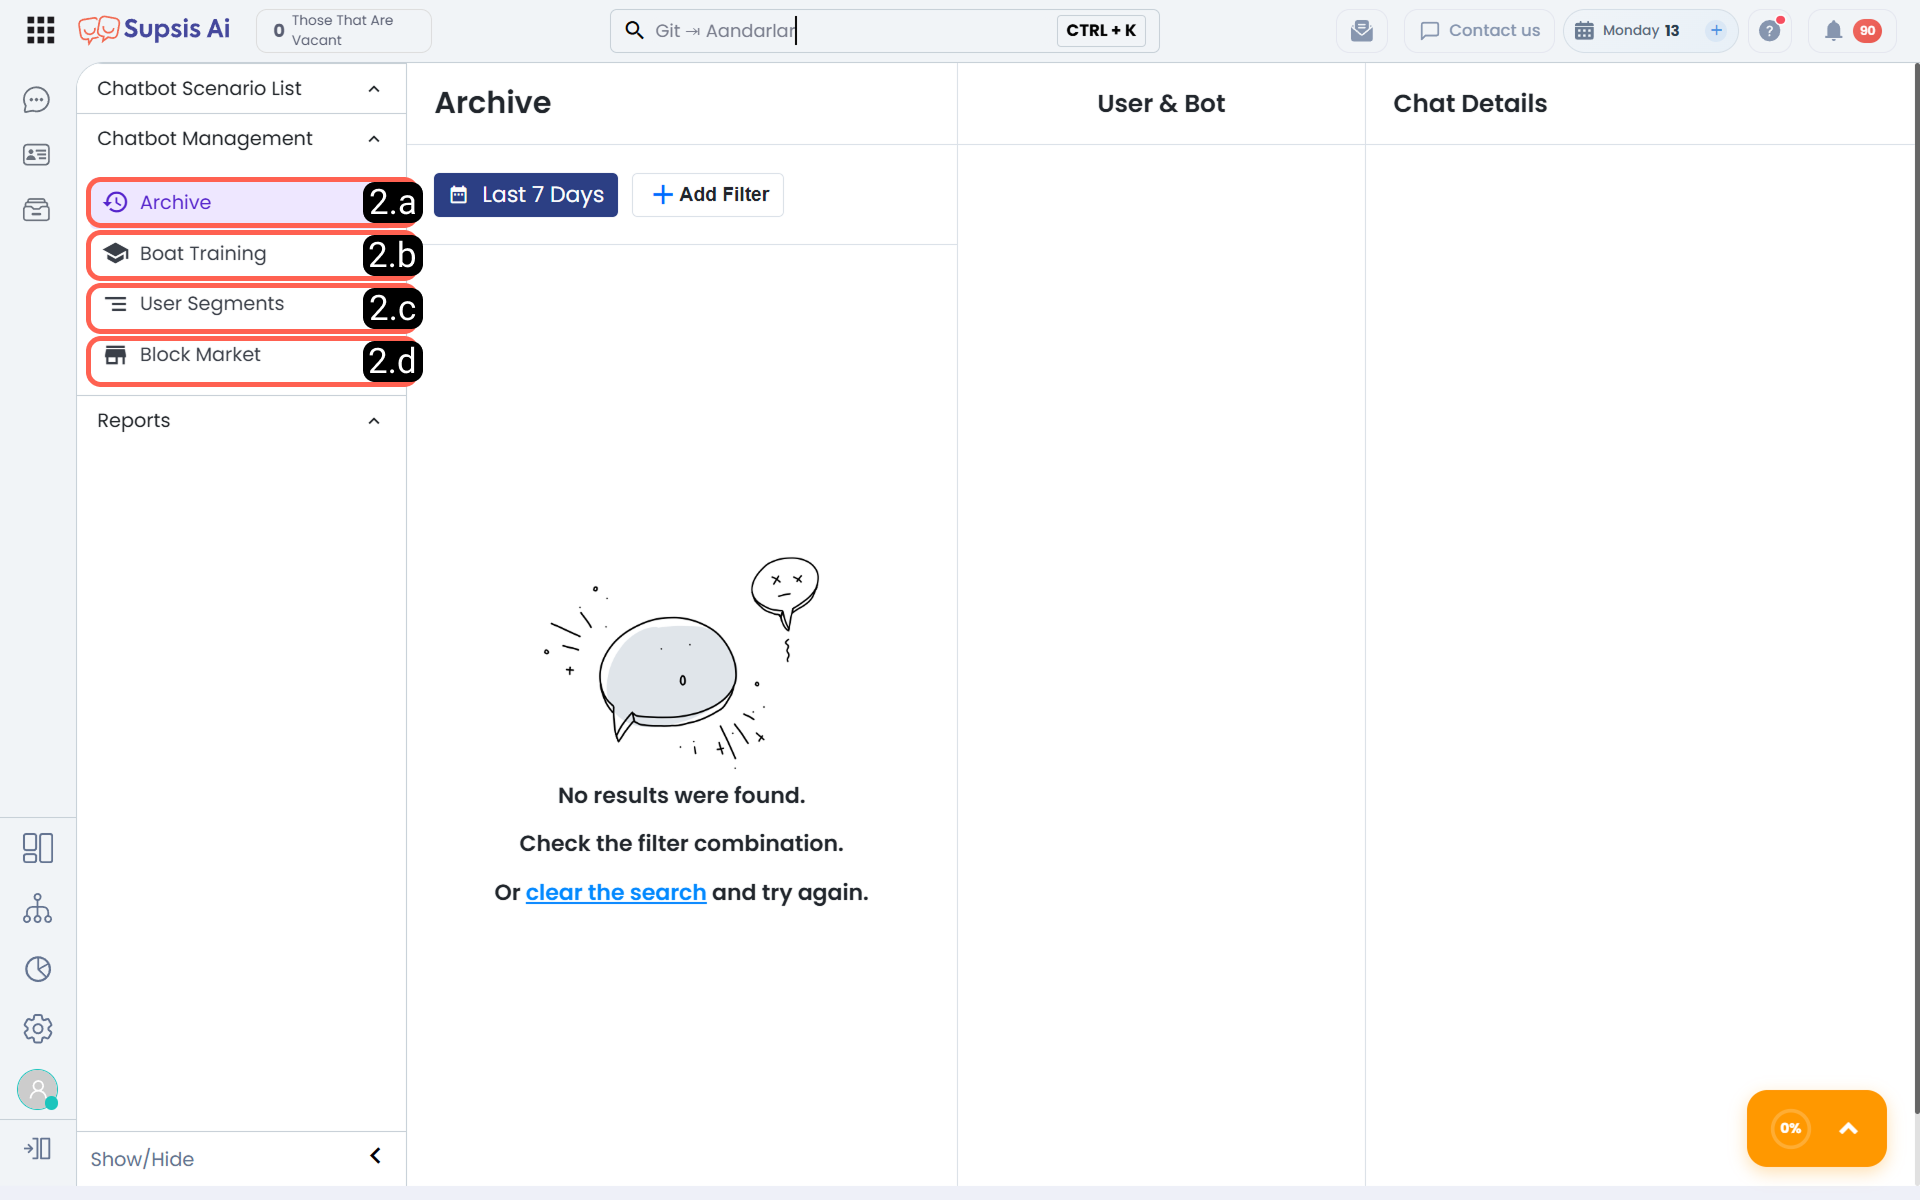
The Chatbot Management section allows you to analyze user interactions, track chatbot development, and manage data generated within the system more systematically. The segmentation and block management screens in this area enable you to group users into specific categories and centrally manage the block structures used in chatbot flows. The logic for user segmentation and reporting is defined under the “User Sections” heading in the documentation; this structure supports grouping users based on specific criteria and analyzing their behavior.
2.a – Archive
The Archive section is where all conversations made with the chatbot are recorded and can be viewed again when needed. Through this screen, you can access past chats, filter conversations using different criteria, and examine user interactions in more detail. The archive provides an important control area both for operational tracking and for analyzing past conversations.
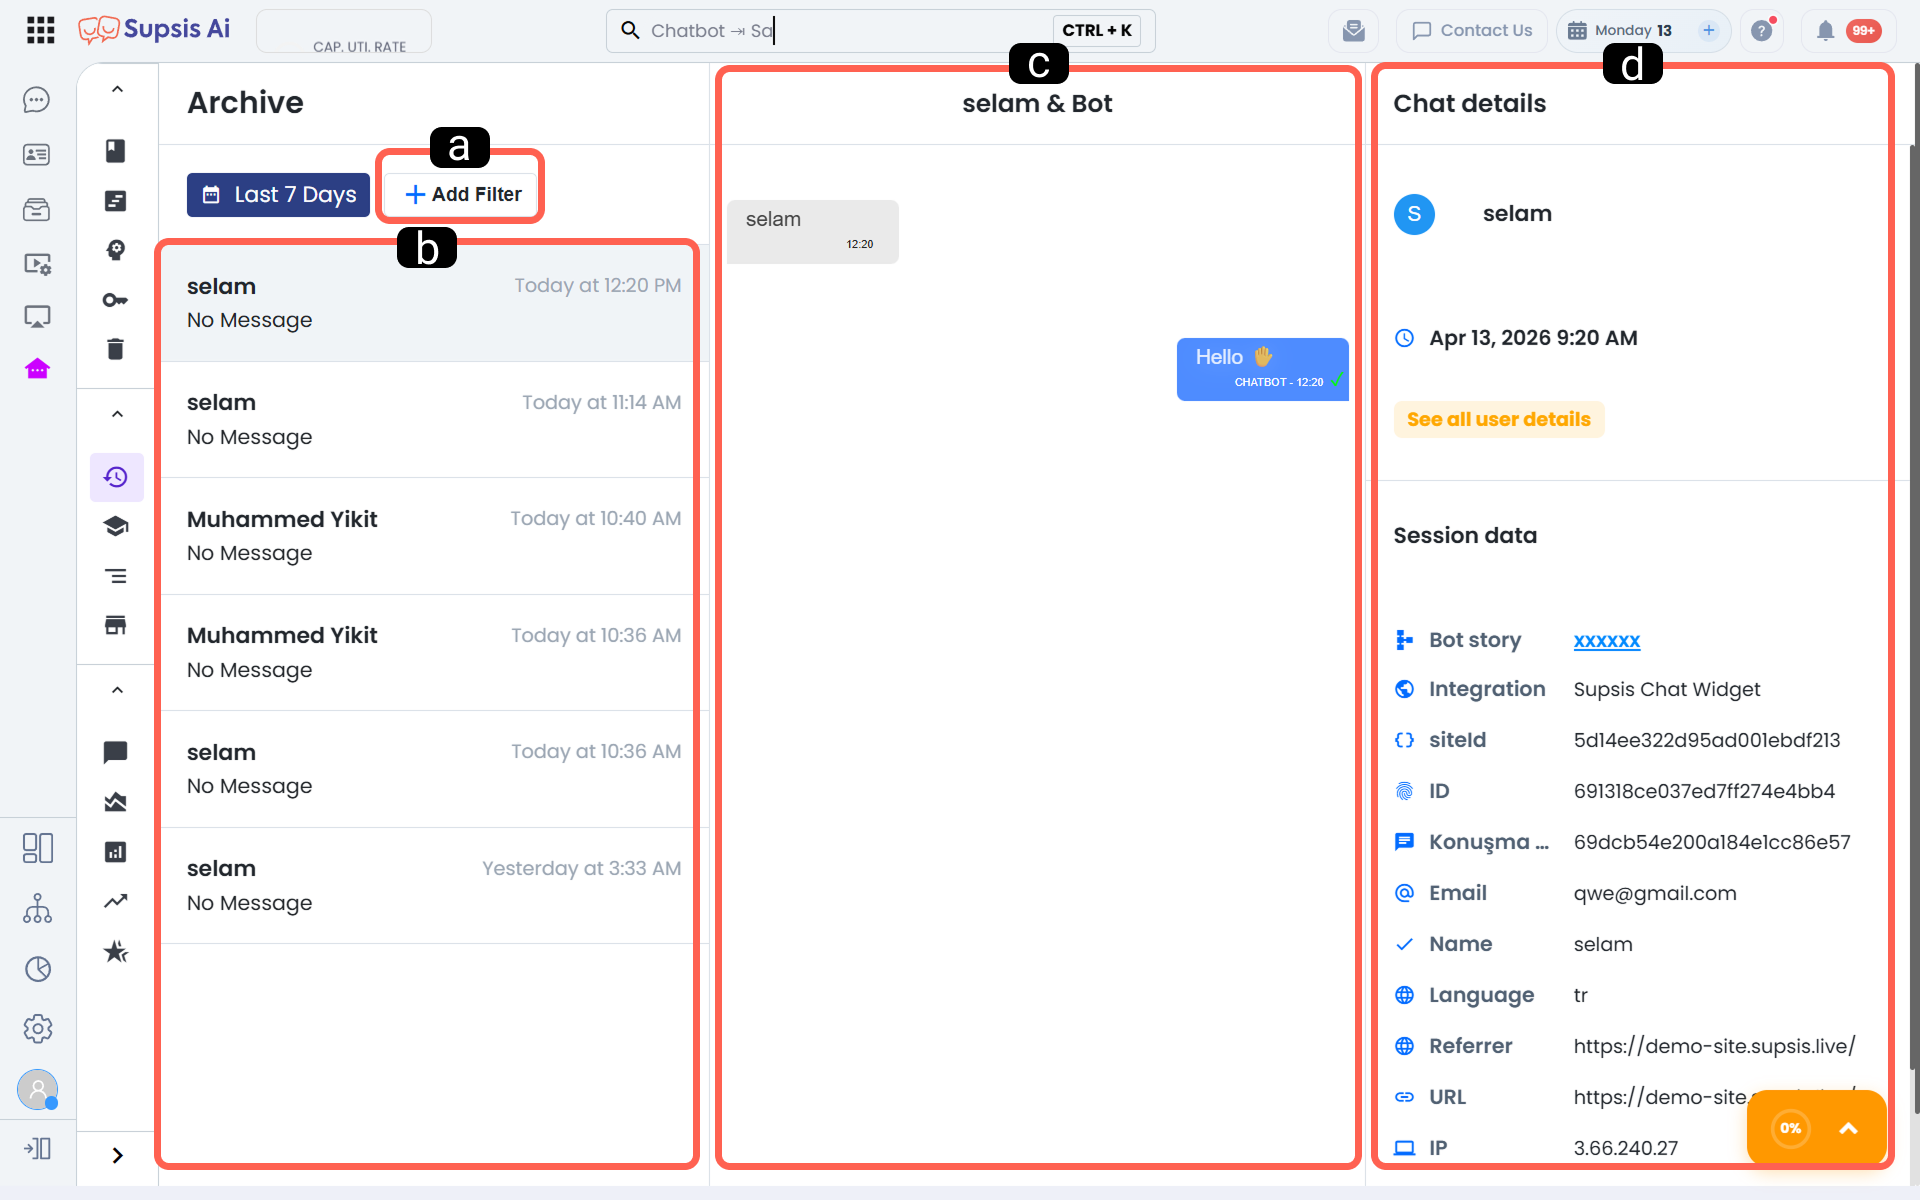
a. Add Filter
The Add Filter area helps you find conversations in the archive more quickly and in a more targeted way. By selecting specific criteria from the filter menu, only the records you need can be displayed. The system allows filtering by date, user ID, conversation ID, integration channel, and story/scenario.
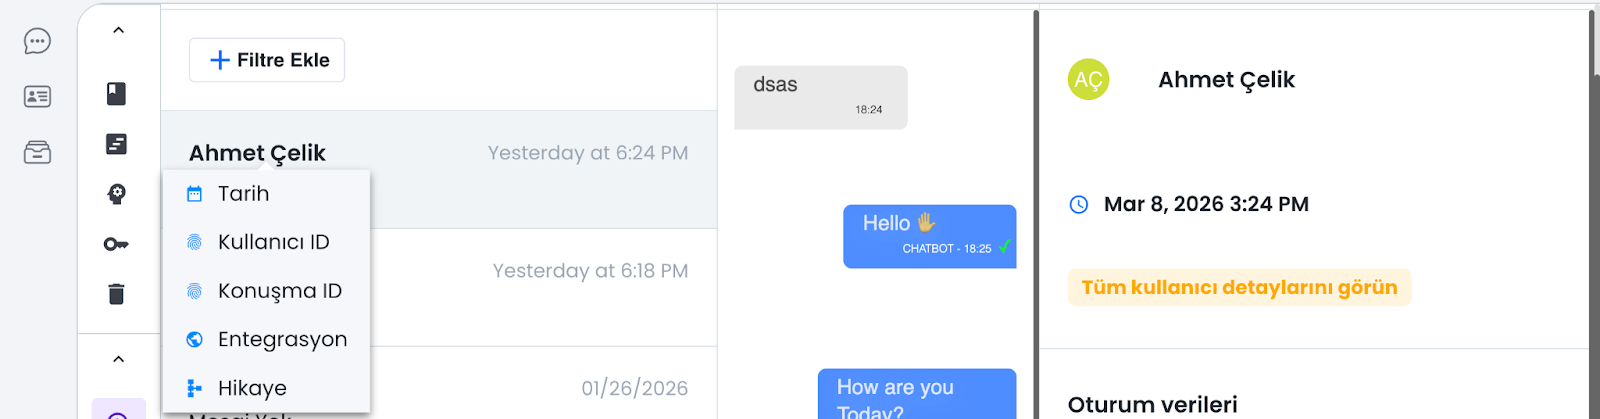
-
Date Filter: Used to display chats that took place on a specific day, week, or within a custom date range. With this filter, you can review user interactions that occurred during certain periods separately and analyze past conversations by time.
-
User ID Filter: Allows direct access to all conversation records belonging to a specific user. It provides quick access especially when you want to review the interaction history of a single user.
-
Conversation ID Filter: Used to find a specific chat session directly. It provides a practical way to inspect, verify, or technically track a single conversation record.
-
Integration Channel Filter: Allows you to filter chats according to the communication channel they came from. In this way, you can view conversations received through the website, WhatsApp, or other integrated channels separately and perform channel-based analysis.
-
Chatbot Scenario Filter: This story-based filter in the interface lets you list conversations belonging to a specific chatbot scenario. This allows you to analyze the performance of a certain flow, see how users progress in different scenarios, and better evaluate how efficiently the relevant structure works.
b. Chat Sessions
This area displays the chats found as a result of filtering in a list. Each session row contains basic data such as user name and time information. This makes it easy to move quickly among past conversations and select the one you want to inspect. In structures with many records, this section makes archive management more organized and practical.
c. Chat Content
The entire message flow of the selected chat session is displayed in this section. By reviewing the conversation chronologically between the user and the bot, you can analyze how the conversation progressed, how responses were given to each message, and at which point an issue occurred in detail. This area is especially used to evaluate the user experience and review the bot’s responses.
d. Chat Details
The Chat Details area presents the user and session information related to the selected conversation in a single panel. Through this section, you can view the user name, conversation time, and technical details related to the session. This way, you can evaluate the conversation not only in terms of message content but also from a contextual and operational perspective. This structure makes it easier to analyze past records more comprehensively.
2.b – Bot Training
The bot training section is the area where queries that the chatbot cannot match with the blocks found in the chatbot diagram are recorded in the system as unmatched expressions.
Through this screen, you can evaluate the relevant expressions, associate them with the correct scenario blocks, increase the chatbot’s understanding capacity, and ensure it gives more accurate responses to similar questions in the future. Regular training is one of the core areas that directly improves chatbot performance.
Note: Only your bots with static chatbot flows can be trained from this area. If you want to train your AI-based bots, you can refer to our Artificial Intelligence Knowledge Base document.
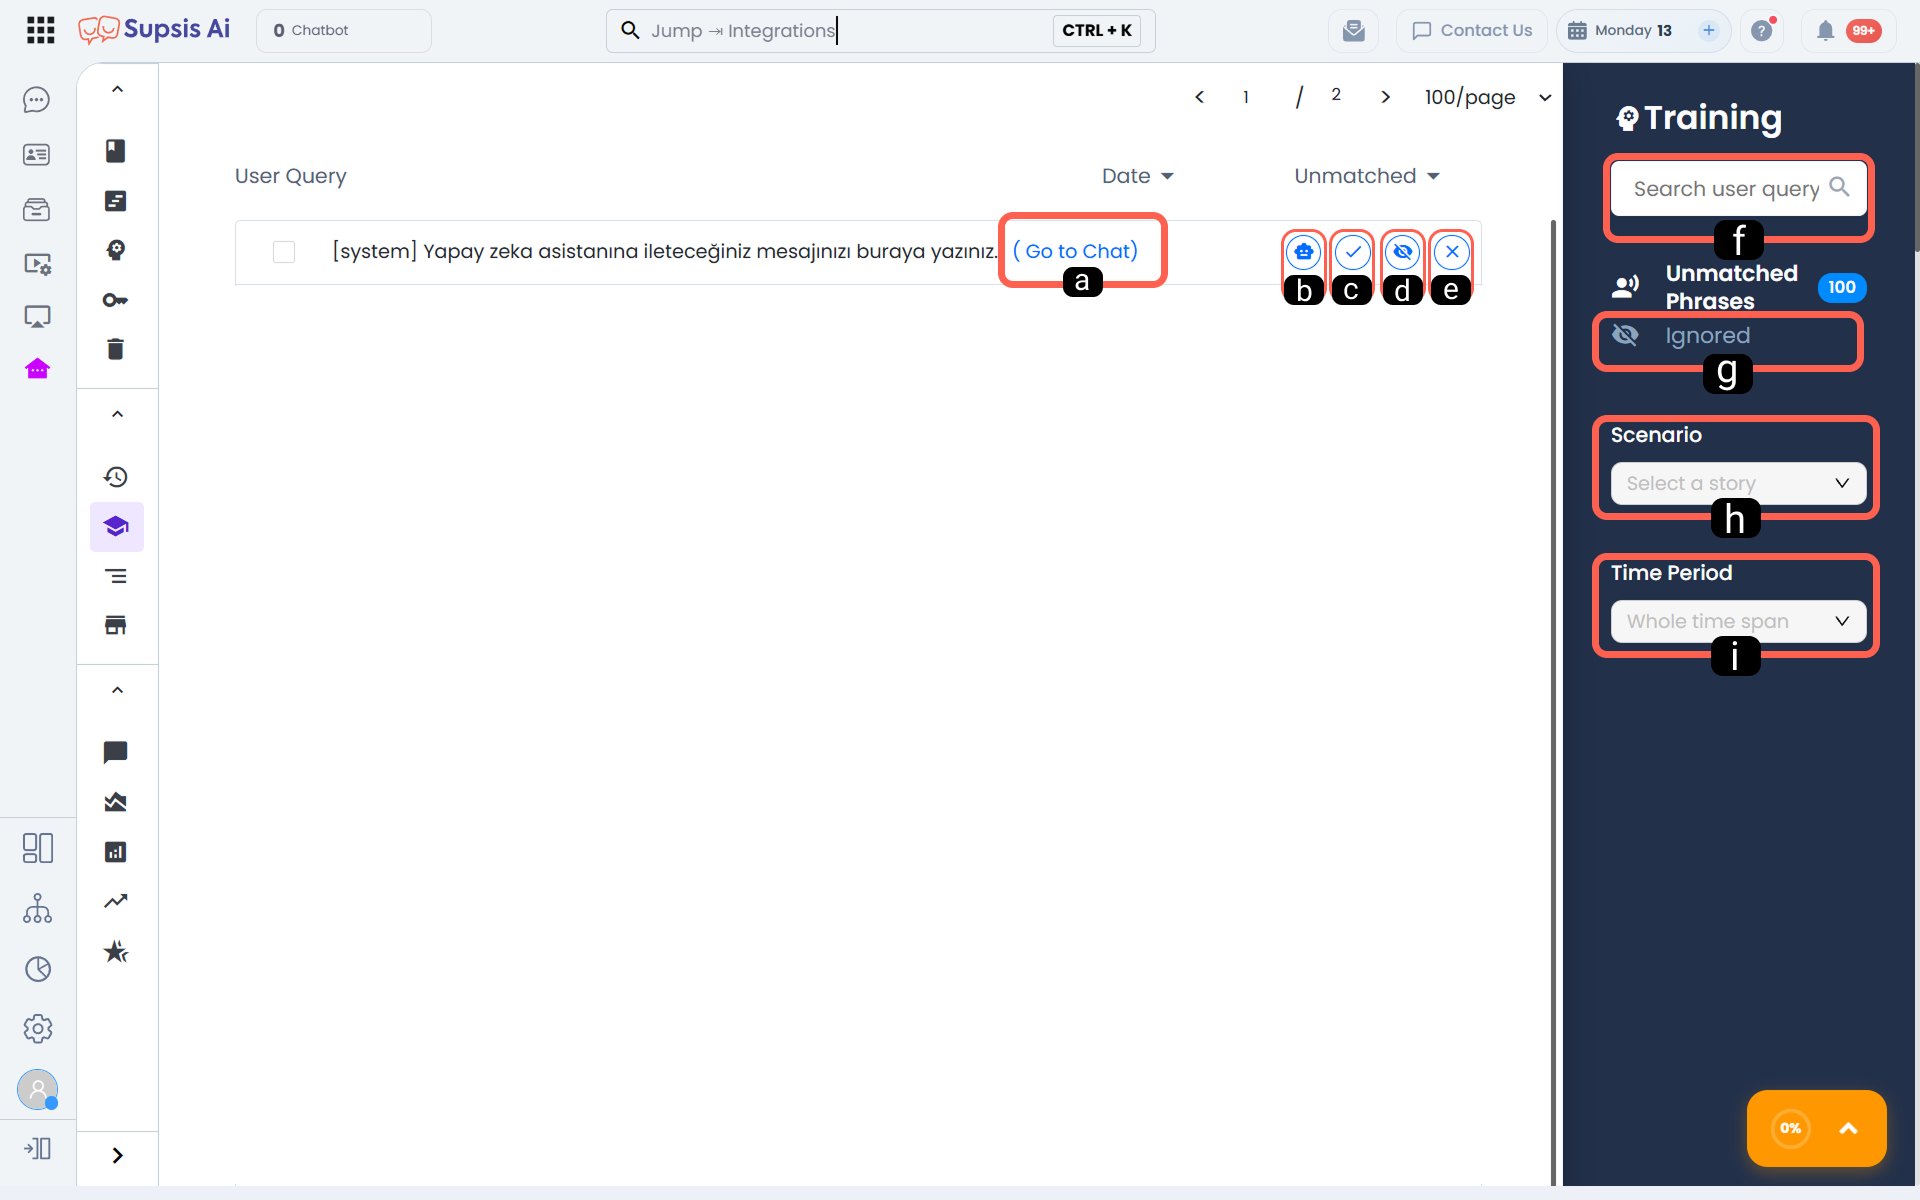
a. Go to Chat
This link gives you direct access to the conversation where the unmatched expression appears. In this way, you can see not only the query itself but also the context in which the user wrote this message and make a more accurate training decision. Seeing the message context during training is important for proper guidance.
b. AI Bot Training
This area, presented with a robot icon in the interface, is used to include the response desired to be given by the AI bot when the relevant user expression is received.
c. Chatbot Training
This action allows you to associate the unmatched expression with the appropriate chatbot scenario or relevant block. In this way, the system can recognize similar user messages in the future and direct them to the correct flow. The basic logic of chatbot training is to connect unclear expressions from the user to the correct scenario step so that the bot can provide the intended responses.
d. Add to Irrelevant List
This area allows you to move expressions that do not require action from a training perspective or do not need to be reviewed again into a separate list. This way, you can focus only on queries that truly need to be processed in the main training screen and manage your workspace more efficiently. Separating unmatched expressions in a manageable way makes the training process more efficient.
e. Delete Unmatched Expression
This option is used to remove records that no longer need to be reviewed or that were created by mistake. This way, you can keep the bot training screen cleaner and work only on the expressions that need to be processed. The ability to edit unmatched expressions allows the training screen to be used more carefully.
f. Unmatched Expression Query
The user query field on the right allows you to narrow down the list by searching for a specific expression. With this feature, you can quickly search through many unmatched expressions and directly reach the query you want to review.
g. Added to Irrelevant
This tab lets you view expressions that were previously marked as irrelevant in a separate area. In this way, you can separate the records excluded from the main training screen and review them again later if needed.
h. Scenario Filter
The scenario filter allows you to display unmatched expressions belonging to a specific chatbot story. This way, you can review only the user queries related to the scenario you selected and see more clearly where a particular flow falls short.
i. Time Filter
The time filter allows you to list unmatched expressions according to a specific date or date range. This makes it possible to identify periods with increasing mismatches, examine performance changes over time, and conduct training work in a more targeted way.
2.c – User Segments
The User Segments section allows you to track users with similar behaviors, flows, or criteria as separate groups. With this structure, you can gather users under specific categories, see the density of users in each segment, and manage your segment-based reporting processes more efficiently.
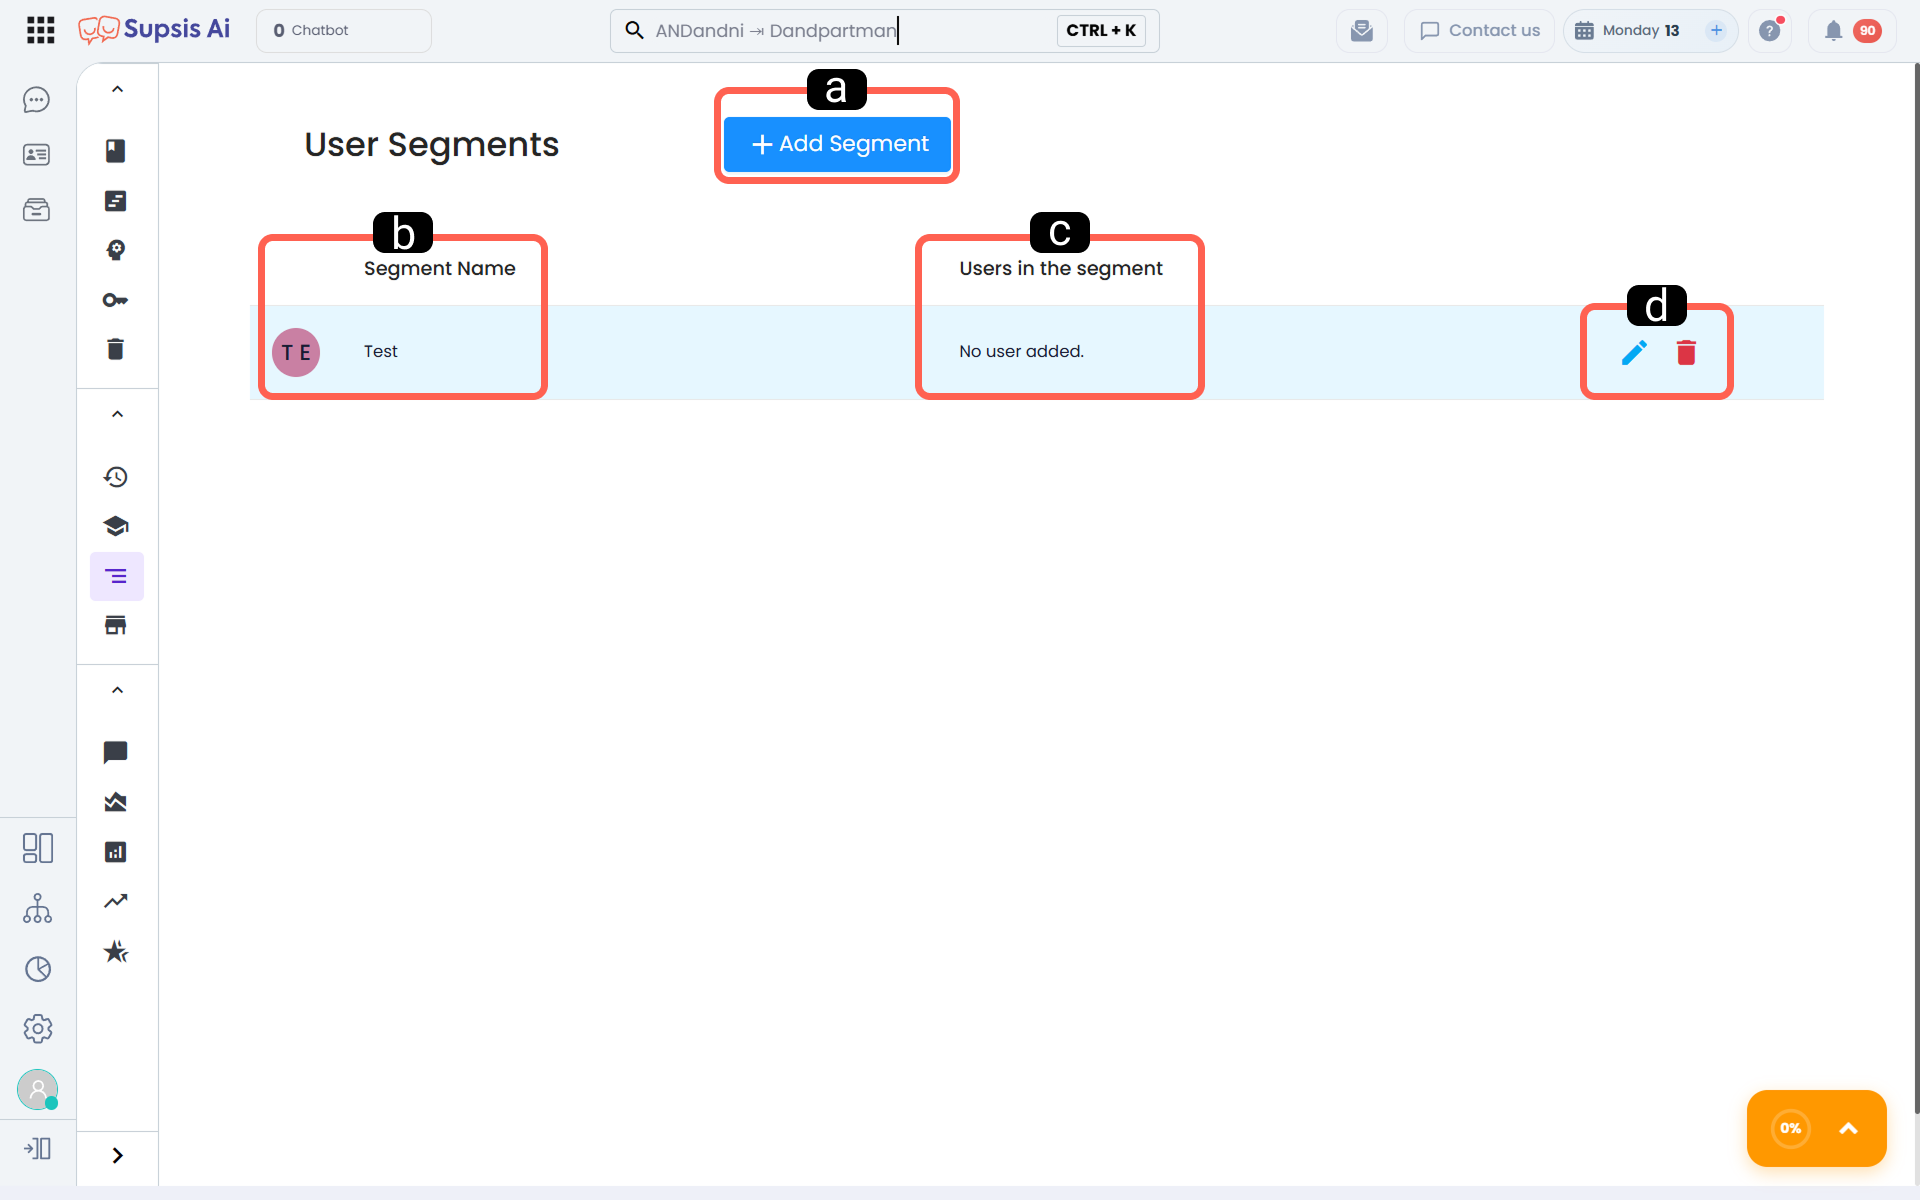
a. Add Segment
You can create a new user segment through this button. In the opened window, a segment name is defined and a new group is created. This structure is used to track specific user groups separately, obtain special reports, and carry out segment-based operations in chatbot flows.

b. Segment Name
This field shows the name under which the current segment is defined in the system. The segment name makes it easier to understand which category users belong to and makes management more understandable, especially in structures with many segments.
c. Number of Users in the Segment
This field shows how many users are in the relevant segment. This helps you see which segments are used more heavily, analyze user distribution, and perform segment-based performance evaluations. To export the data of users belonging to a specific segment stored in the system, please refer to the People document.
d. Segment Actions
The action icons at the end of each segment row allow you to perform management operations on the segment. This area is used to keep the current segment structure up to date and to reorganize segments as needs change.
- Edit Segment Name:
With the edit option, you can update the current segment name. This is used when you want to make the segment structure clearer or rename it according to its purpose. - Delete Segment:
The delete option allows you to remove segments that are no longer used from the system. This way, you can simplify your segment list and display only the groups you actively use.
2.d – Block Marketplace
The Block Marketplace is the management area where chatbot blocks uploaded to the marketplace by the Supsis Ai team and users can be viewed, edited, and used. Through this screen, you can review ready-made blocks, add them to your system, manage blocks you uploaded to the marketplace, and track blocks previously imported.
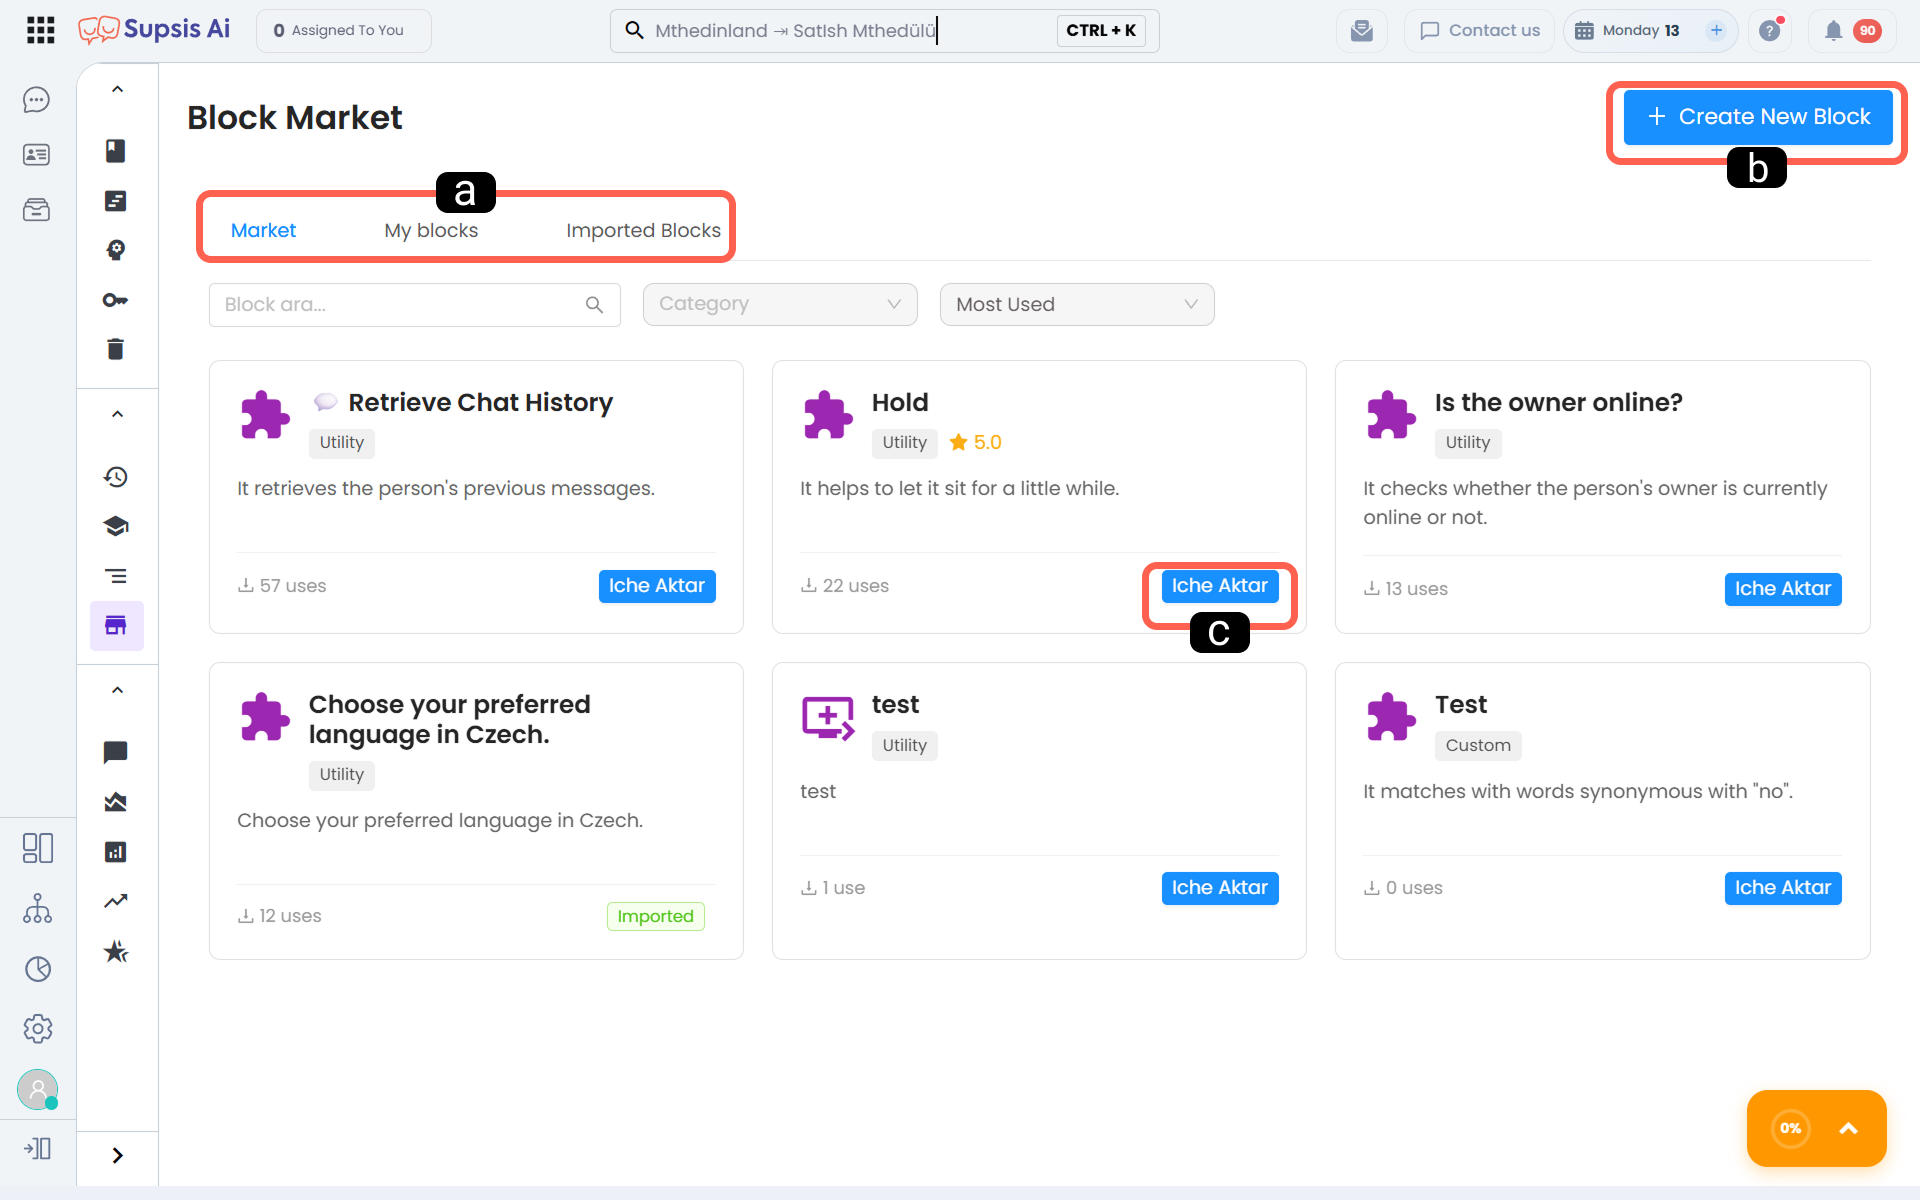
a. Marketplace Menus
This tab group allows you to view blocks under separate headings according to their source and usage status. In this way, you can switch between marketplace blocks, your own blocks, and blocks imported previously.
-
Marketplace:
The Marketplace tab is the area where ready-to-use blocks are listed. In this section, you can review blocks suitable for different purposes and add the ones you need to your own workspace. Each marketplace block card is presented with a name, a short description, and usage information. -
My Blocks:

The My Blocks tab is the section where the blocks you created and uploaded to the marketplace are listed. In this area, blocks are listed together with their status information; you can also perform management operations such as editing, publishing, and deleting from this area.
- Imported Blocks

The Imported Blocks tab is used to view and manage blocks imported from the marketplace. In this area, a list of imported blocks can be displayed and actions such as viewing details and removing the relevant block can be performed.
b. Create New Block
Through this button, you can start creating a completely custom new block in the block marketplace. With this method, you can prepare structures tailored to your needs and turn them into reusable blocks, creating standardized components that can be used in flows.
Note: Blocks you publish will start appearing in the marketplace only after approval by the Supsis Ai team. Blocks that are not approved by the Supsis Ai team for marketplace publishing can only be used within your own panel.
c. Import Block
This action allows you to add a ready-made block from the marketplace to your own panel. In this way, you can include a ready-made block structure in the system without creating it from scratch and use it in the flows you need.
3. Reports
The Reports section allows you to analyze chatbot performance with both real-time and historical data. Through this area, you can follow user interactions, chat density, satisfaction levels, and behavioral trends inside the bot, improving your processes in a data-driven way. Critical insights such as which questions come up more often, which responses satisfy users, and where improvements are needed become visible in this section.
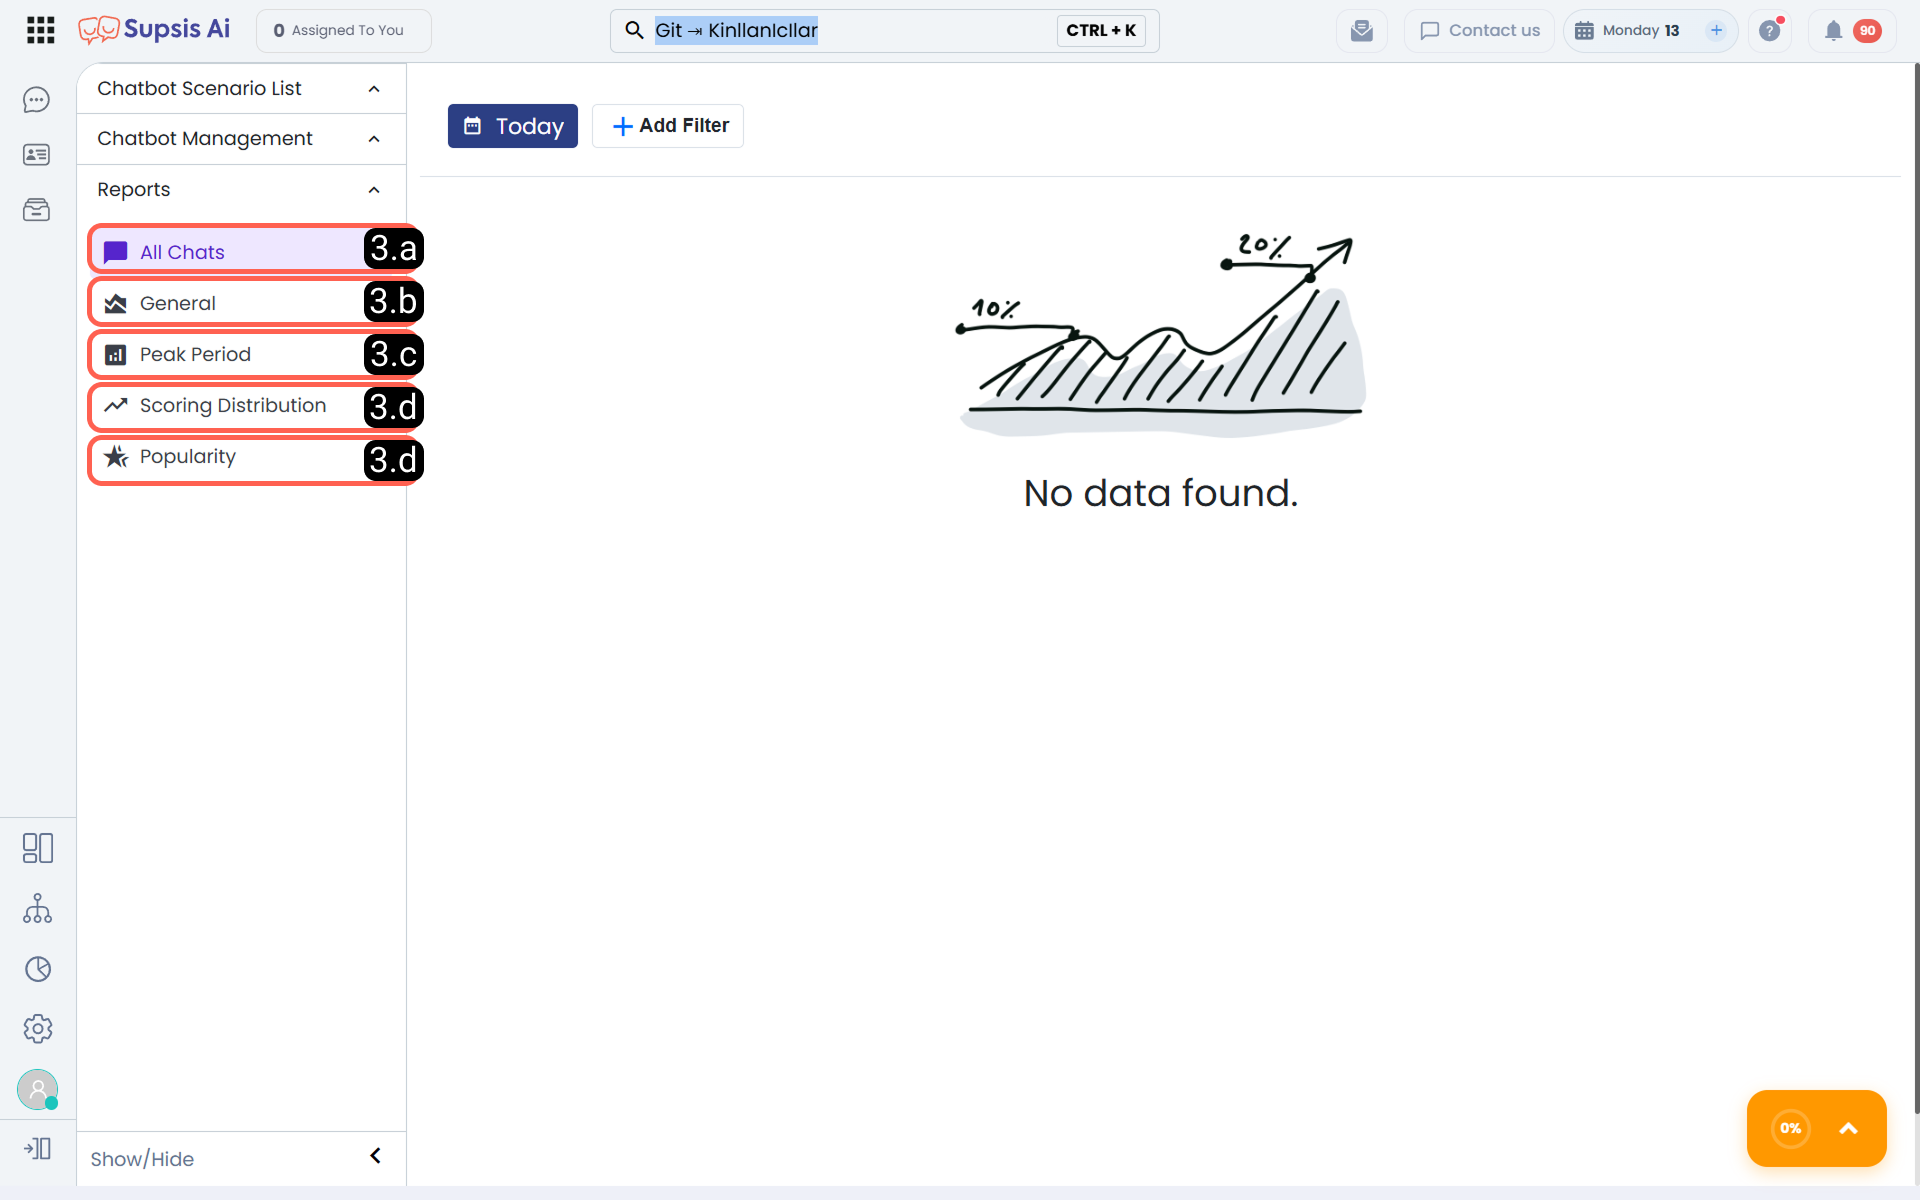
3.a All Chats
The All Chats report presents detailed records and analyses of all conversations with the chatbot on a single screen. With this report, you can examine the number of chats within specific date and time ranges, see when users are most active, and evaluate interaction depth through the average chat length. In addition, by comparing successfully completed conversations with those that were incomplete or required redirection, you can identify areas that need improvement more clearly. This screen also helps you perform more targeted analysis with date, integration, and story-based filters; if needed, you can export the data and use it in internal reporting.
3.b General
The general report section is the main analysis screen that allows you to evaluate chatbot performance holistically. In this area, you can measure the overall efficiency of the chatbot using core metrics such as total interaction count, average response time, and resolution rate. This way, you can clearly see how quickly the system responds, to what extent it resolves user requests, and at which points performance should be strengthened. The general report screen also offers tools such as graph and table views, export options, filtering by unique users or all users, and saving graphs, allowing you to examine data more flexibly.
3.c – Peak Period
The Peak Period report visually shows on which days and hours the chatbot receives the most interaction. This area helps you quickly identify time periods with high traffic, read user traffic more accurately, and plan operations accordingly. It is an important decision-support tool especially for support team shift planning, chatbot capacity management, and improving response times during busy hours. With filtering and export options, you can perform more detailed analysis for specific date ranges, integrations, or scenarios.
3.d – Score Distribution
The Score Distribution report allows you to analyze the feedback scores users give after the chatbot experience. Through this report, you can measure user satisfaction, compare positive and negative evaluations, and see more clearly how the chatbot is generally perceived. Thanks to the graphical structure, you can track how many users gave each score and the average satisfaction level over time; you can also identify which scenarios or integrations produce better results. This data can be used directly to improve user experience and define improvement priorities.
3.e – Popularity
The Popularity report allows you to analyze the most used blocks inside the chatbot, the most frequently preferred flows, and the topic headings with which users interact the most. In this way, you can easily see which content stands out, which steps are used most intensively, and which services users need more often. Through the graph and table area on the report screen, you can compare data such as total usage count, unique user count, and ratio to the overall user base; you can strengthen frequently used interactions and simplify low-interest areas. This approach helps make the chatbot flow more effective and user-oriented.