
Automation Blocks
| # | Title |
|---|---|
| 1 | Interactions |
| 2 | Person Actions |
| 3 | Loop Actions |
| 4 | Data Formatters |
| 5 | File Actions |
| 6 | Cache Actions |
| 7 | Artificial Intelligence |
| 8 | Table Actions |
| 9 | Zoho Actions |
| 10 | Youtube Actions |
| 11 | Google Business Actions |
| 12 | Google Play Actions |
| 13 | App Store Actions |
| 14 | Google Drive Actions |
| 15 | Actions |
| 16 | Ticket Actions |
| 17 | Task Actions |
| 18 | Messaging Actions |
| 19 | Find Record with Supsis ID |
1. Interactions
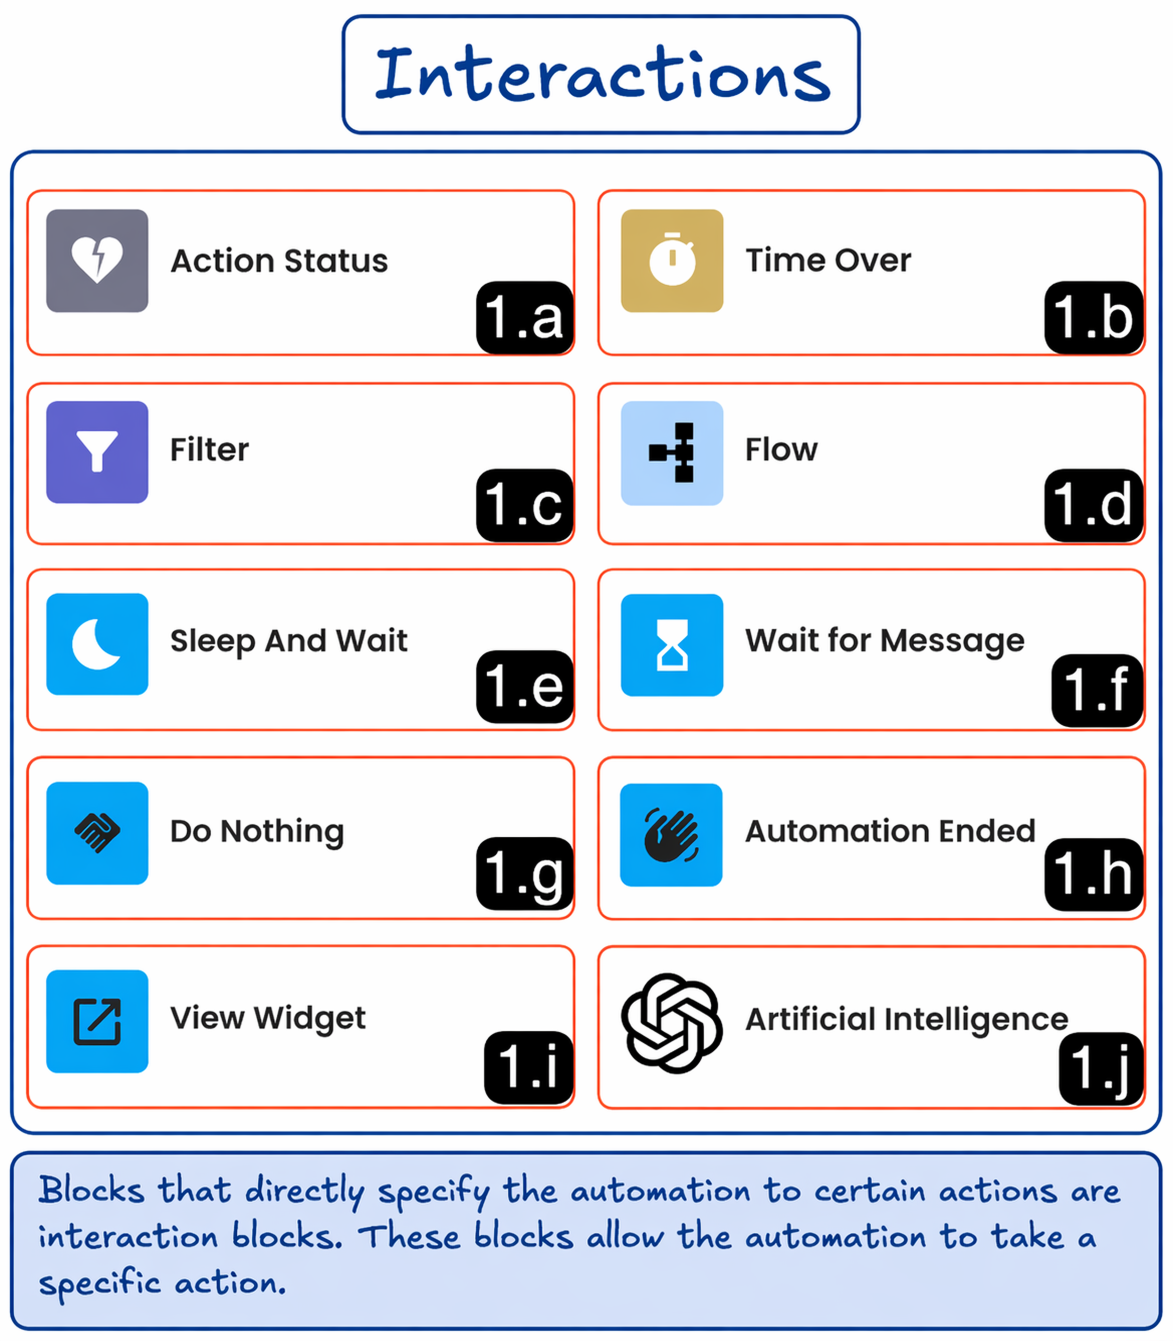
1.a – Otherwise
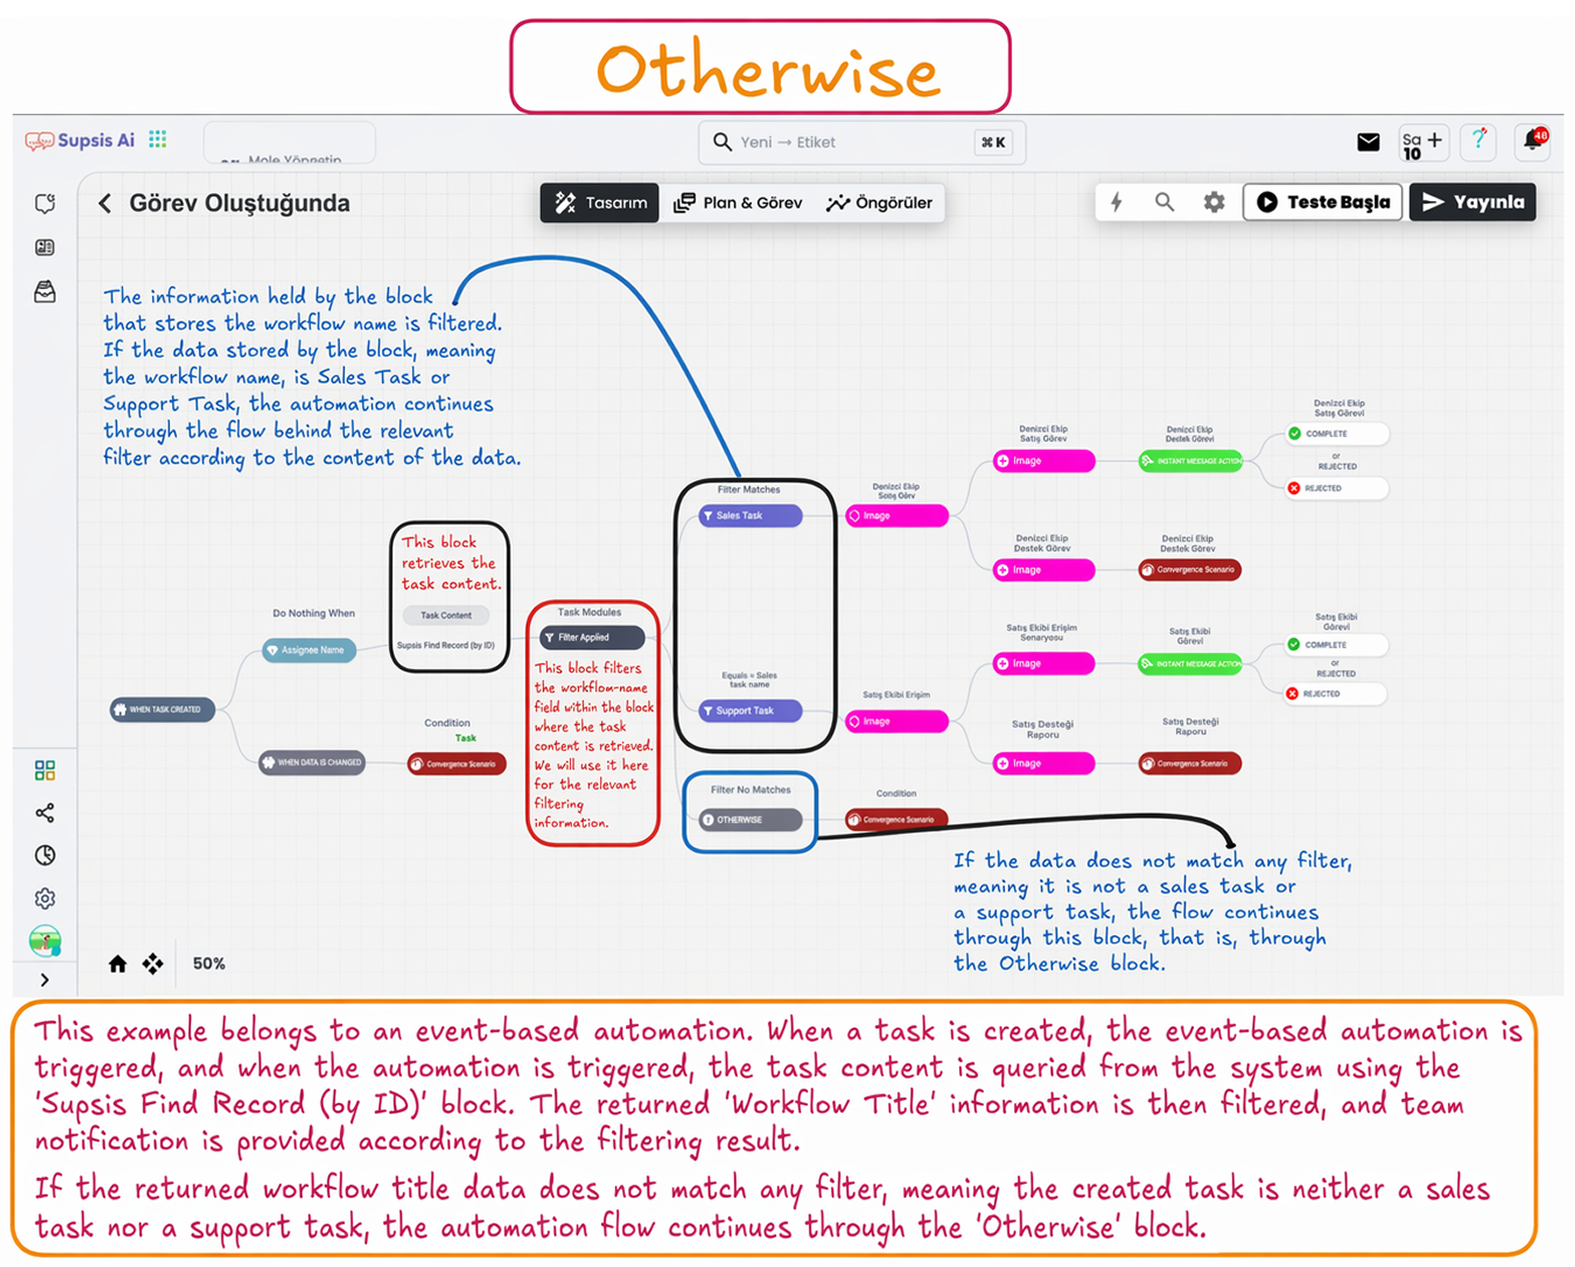
Otherwise refers to the alternative scenario steps that are triggered when the data returned in the automation during filtering and processing steps has an unexpected, undefined, or unmatched input or filter condition within the scenario. With this block, the scenario flow can be directed to an alternative routing step.
Note: If a local otherwise is defined for the relevant step in the automation scenario, the user is first directed to the local otherwise flow. If there is no local otherwise, the system will route the user to the Default Otherwise flow.
Example Otherwise Usage:
In the visual below, compliance with the filters is checked; if the data returned in the automation cannot pass through the filters, it is directed to the otherwise flow.
1.b – Timeout
This block allows you to create an alternative scenario that is triggered when no response is received from the user for a certain period of time.
The Timeout block can only be used in the relevant flow step of scenarios designed with the "Wait For Message" block that expects message input from the user. The block is used to direct users who do not interact within the specified time to the alternative scenario designed behind the timeout block.
Determining the Timeout Waiting Duration
To determine the triggering parameters of the timeout block, you can enter the “Wait For Message” block to which the timeout block is connected and make the necessary configurations from the screen that opens.
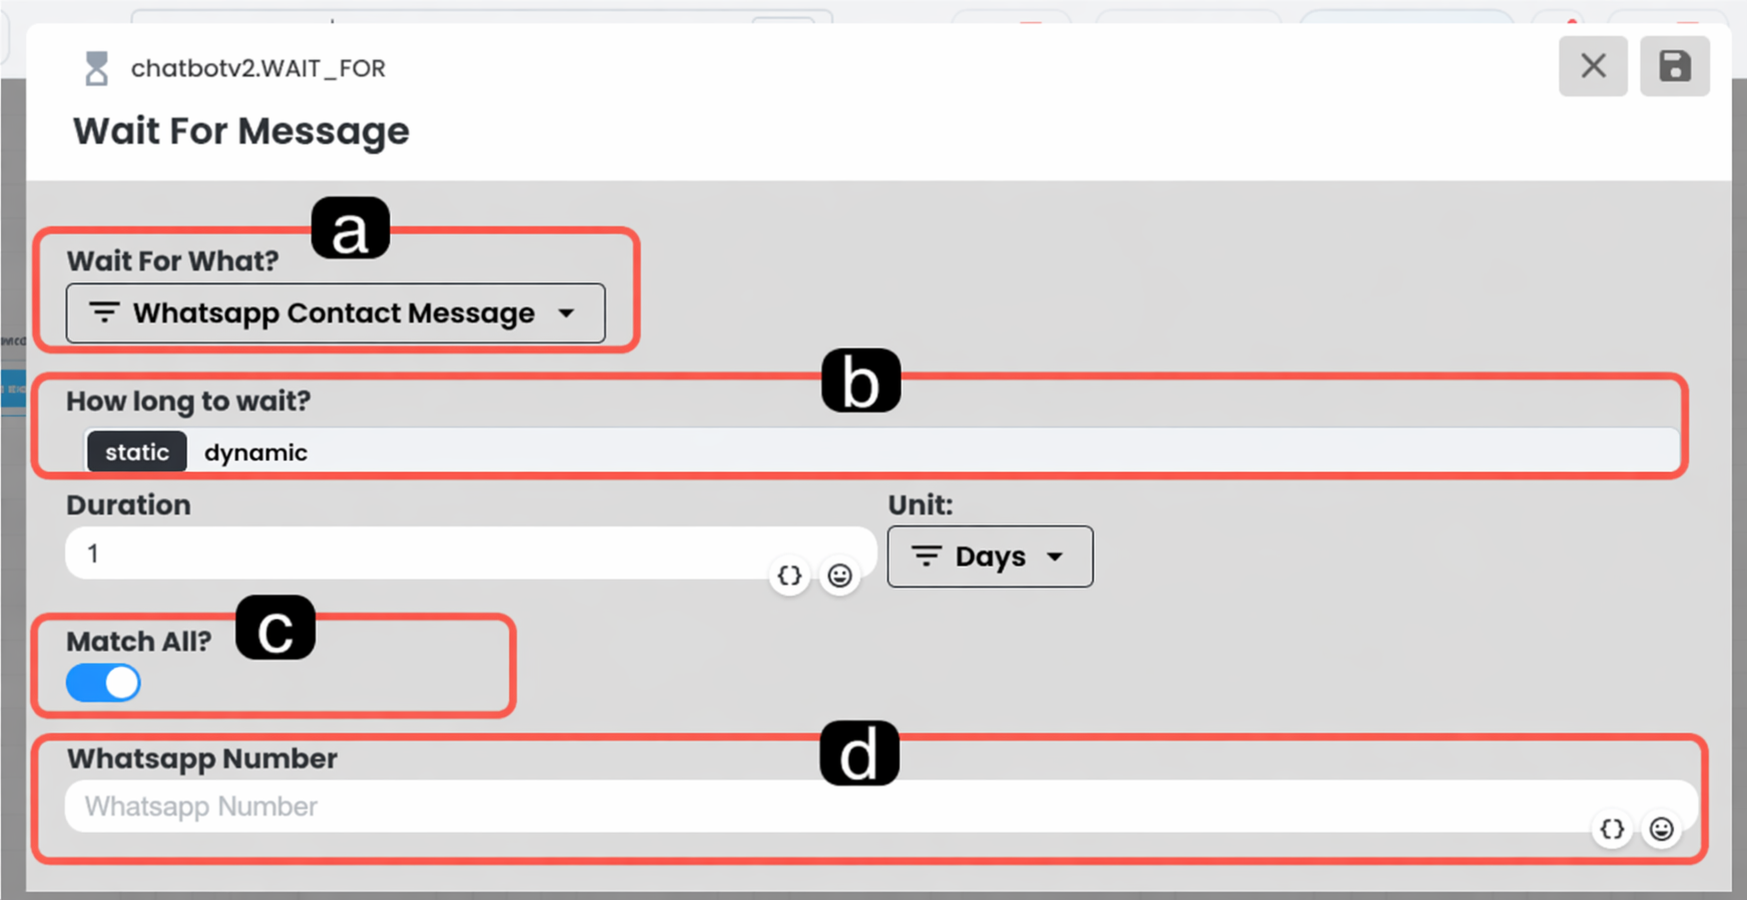
a. What is Being Waited For
This is the field where you select which action the automation will wait for before pausing. For example; by selecting "WhatsApp Contact Message" from the dropdown menu, the system can wait for the user to send a message via the WhatsApp channel as the triggering input.
b. Until When to Wait
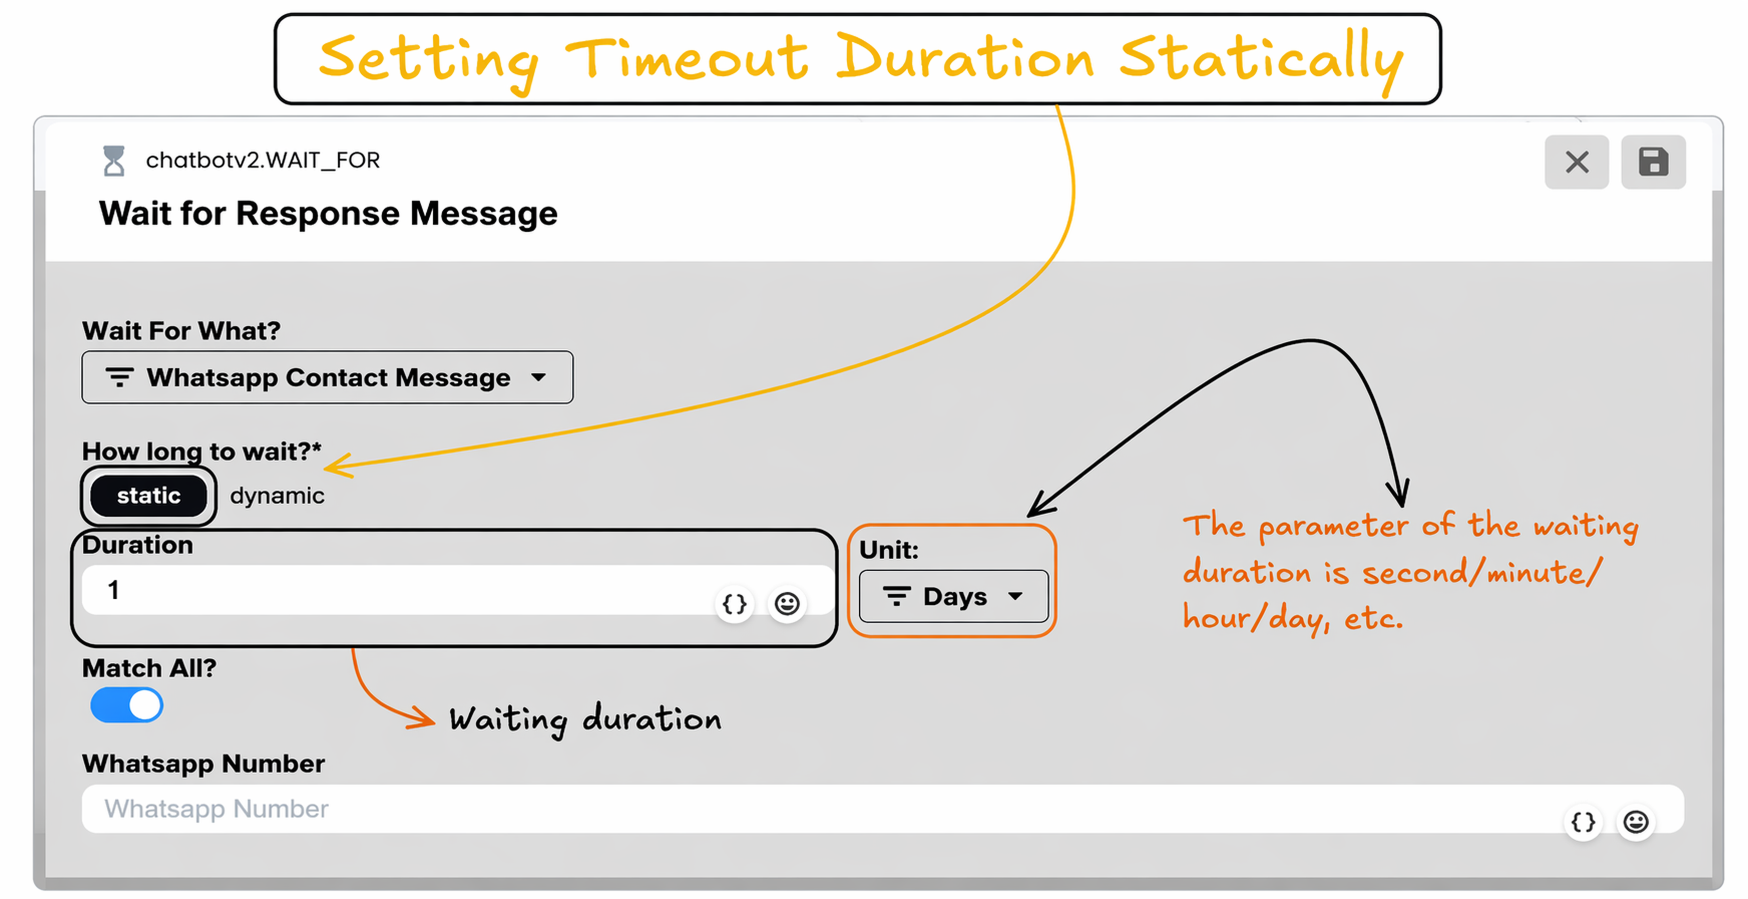
This is the field where you determine how long the message wait block will remain without receiving input before switching to the "Timeout" state. It can be set statically or dynamically according to the need.
Static Data:
It allows you to define the waiting time as a fixed value. By entering a duration based on Seconds, Minutes, Hours, or Days (e.g.: 1 Day), it becomes clear how long the flow will pause.
Dynamic Data:
It allows you to define the waiting time as a specific future moment (date and time). The date data to be entered must be in ISO String (e.g.: 2025-05-11T14:30:00Z) or Timestamp (e.g.: 1715437800) format.
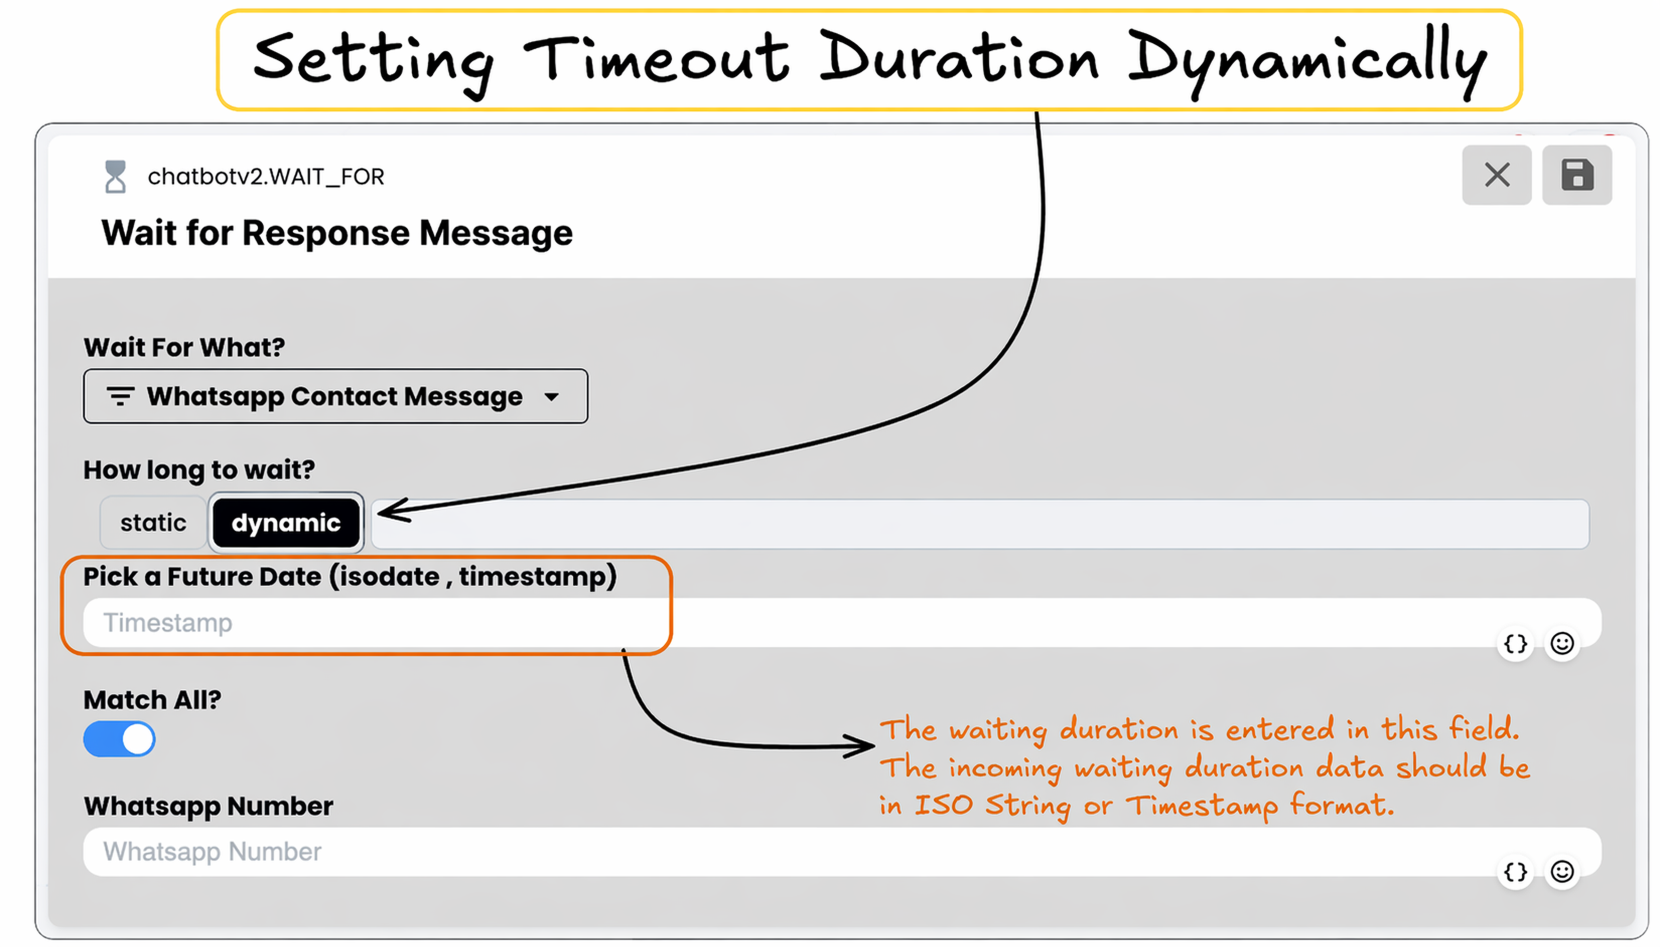
c. Input Matching Method
Determines how the system will evaluate the incoming response.
Match All (when Match All is Active): Accepts any message received from the user (regardless of its content) as a valid response and successfully completes the wait block.
Match According to Specific Criteria (when Match All is Inactive): When this option is disabled, detailed matching settings are accessed.
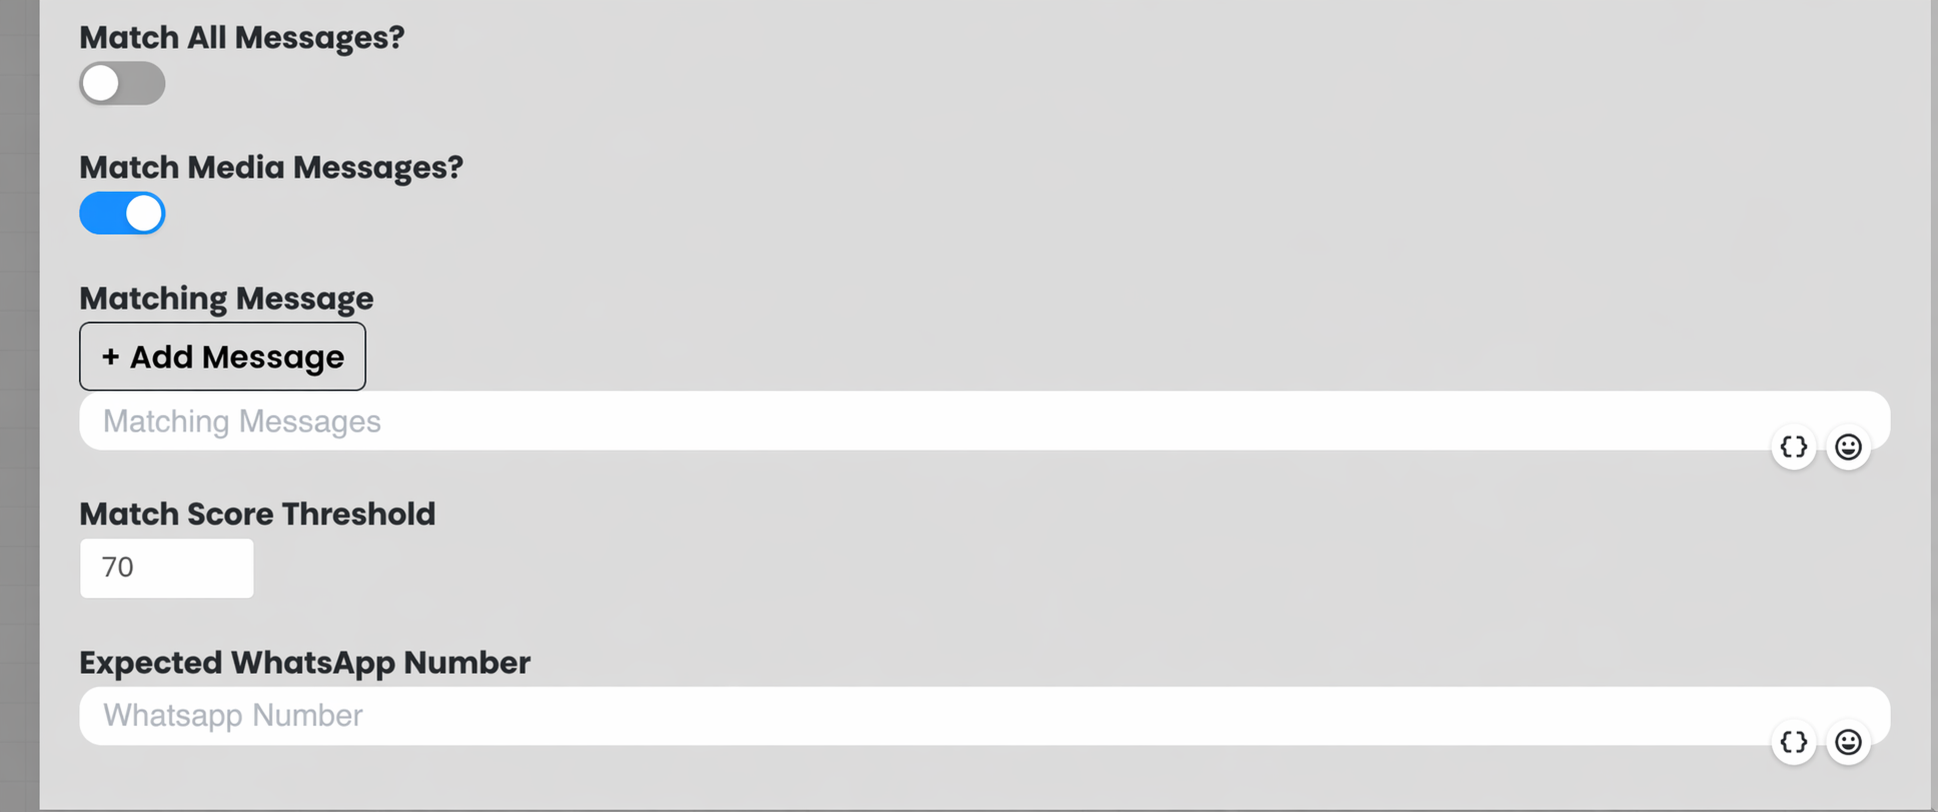
Specific conditions can be defined such as the incoming message containing a certain word ("Message to Match"), being only a media message, or exceeding the "Match Score Threshold" (e.g.: 70) that measures word similarity.
d. Source of the Expected Message
This is the field where it is defined from which user or number the response is expected. Generally, variables such as "WhatsApp Number" obtained from previous steps of the flow (for example, from a table record) are defined in this field to ensure that the system listens to the correct person.
Example Timeout Flow
The "Marketing Scenario" in the visual belongs to an event-based automation scenario:
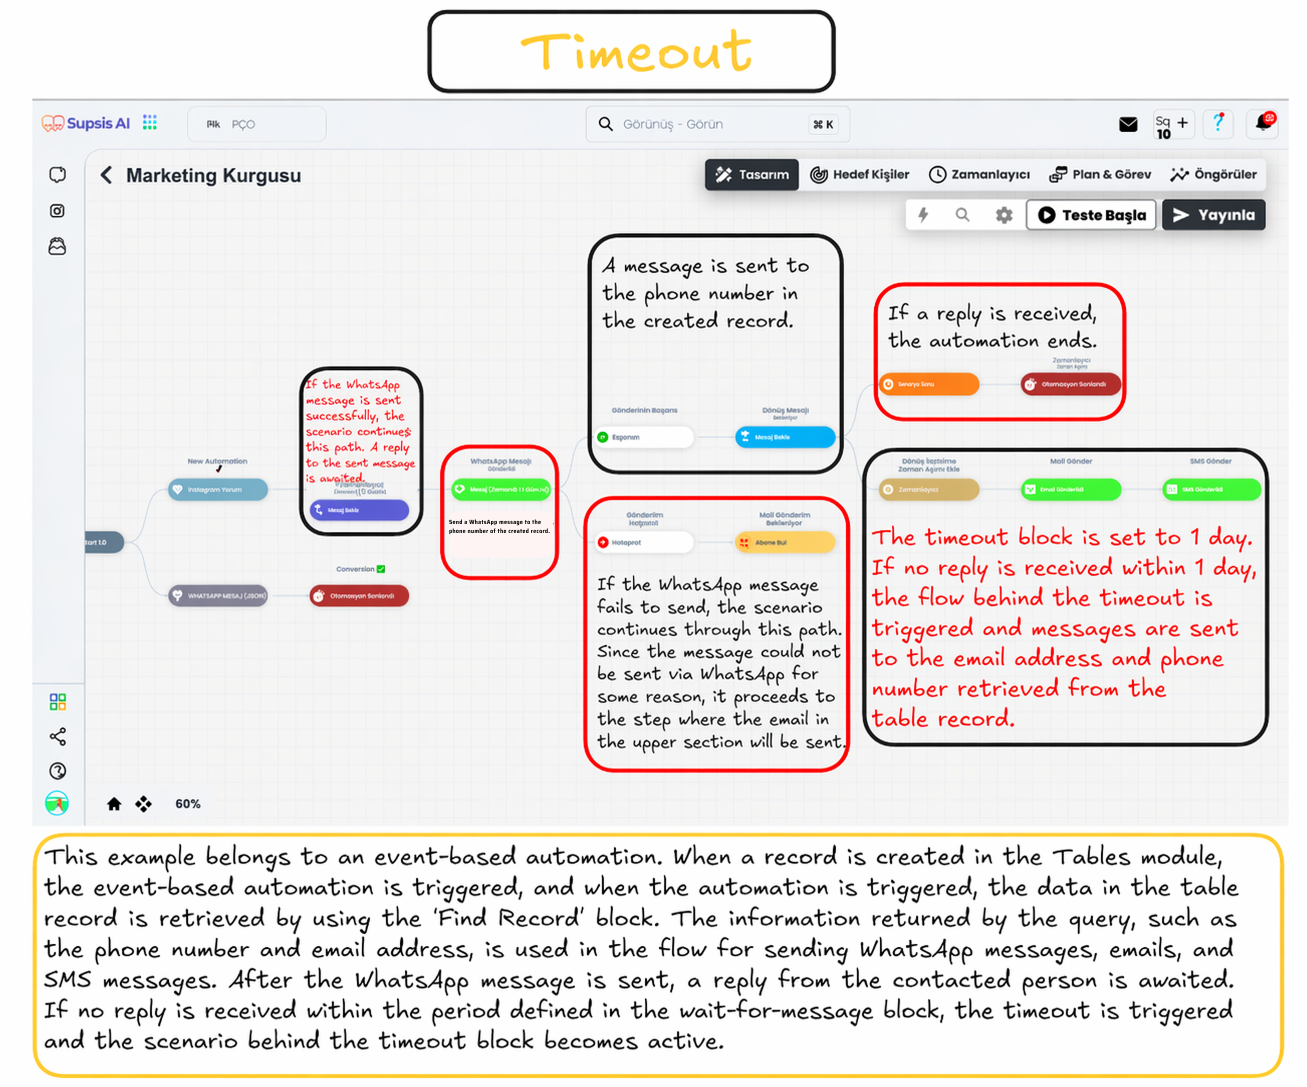
1. Triggering and Data Retrieval: When a new record is created in the Tables module, the automation is triggered. Using the "Find Record" block, data such as the Phone Number and Email Address of the relevant person in the table are included in the flow.
2. Message Sending and Waiting: A "WhatsApp Message" is first sent to the person whose contact information is obtained. If the sending is successful, the system immediately proceeds to the "Wait for Response Message" (Wait For) step.
3. Successful Response: If the user responds via WhatsApp within the expected time, the system follows the "Message Received" path and the automation ends successfully.
4. Timeout Activation: The time limit in the message waiting block is set as 1 Day. If the user does not respond within 1 day, the Timeout is triggered. The system leaves the waiting step and executes the alternative scenario connected behind the timeout block, and since the user cannot be reached, it performs Email Sending and SMS Sending operations respectively.
1.c – Filter
The Filter block is a decision block used to direct the automation process to the appropriate flow according to the nature of the returned data. Filtering is performed based on static values and dynamic values returned within the automation. By checking dynamic information, automation data that meets the conditions you define is directed to the relevant filter branch.
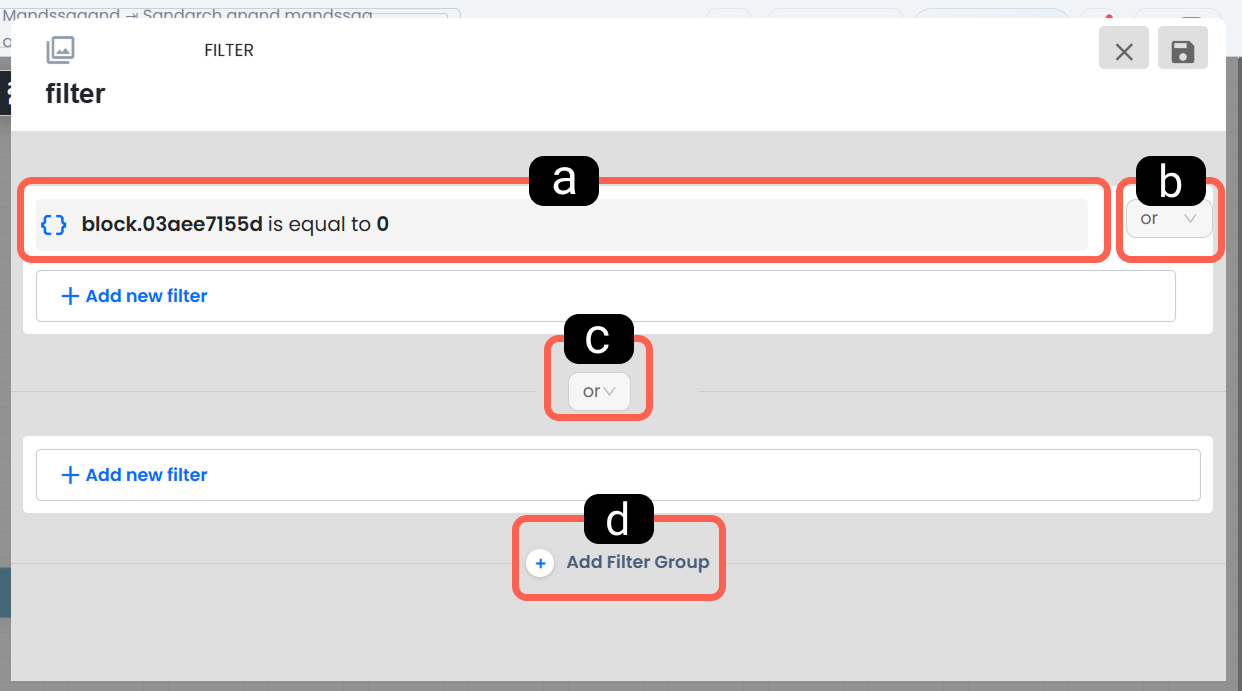
a. Filter Content
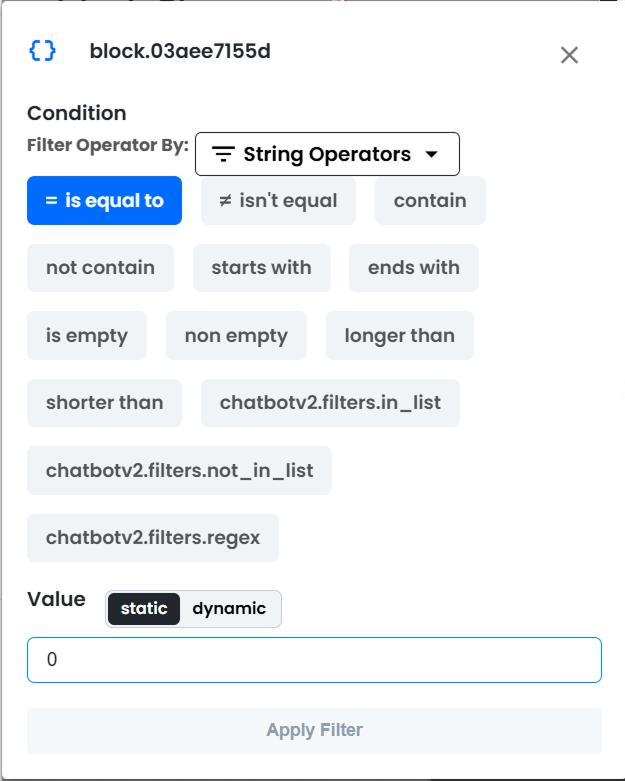
This area is where you can configure the existing conditions defined within that filter block and determine according to which rule a variable in the system will be checked.
-
Condition (Filter Operator Type): This is the field where you select the appropriate operation category according to the type of data the filter will check. In the example in the visual, "String Operators" is selected. The appropriate type must be selected for the filter to read the data correctly.
-
Condition Operators: Logical evaluation rules specific to the selected filter operator type.
- Value: The target data against which the incoming data to be filtered will be compared. This value can be entered manually by selecting "static" or matched with a dynamic value returned within the automation by selecting "dynamic".
b. Filter Condition
The filter condition determines how the rules within the same group will be evaluated together.
- and: In order for the automation task to pass through the filter, all conditions in the filter group must be met at the same time.
- or: In order for the automation task to pass through the filter, it is sufficient for any one of the conditions in the filter group to be met.
With this structure, you can create narrower or more flexible filtering setups
c. Filter Group Operator
The filter group condition determines how multiple filter groups will be related to each other. Thus, you can connect not only individual conditions but also sets of conditions together. This structure is very important in complex scenarios; because a task can be evaluated not only according to a single criterion but also according to multiple condition sets.
- and: In order for the automation task to pass through the filter, all conditions belonging to the filter groups must be met at the same time.
- or: In order for the automation task to pass through the filter, it is sufficient for only one of the conditions of the filter groups to be met.
d. Add Filter Group
This area allows you to add a new group to the existing filter structure. Thus, more powerful and system-readable multi-layered decision structures can be created within a single filter block.
1.d – Flow
The Flow block is used to group a specific part of the automation scenario under a single structure. Especially in growing and branching scenarios, it simplifies the diagram, increases readability, and makes editing easier. This block does not create any interaction within the flow; it is a structural organization tool used to manage certain parts of your scenario more neatly. By entering the Flow block, you can view and edit the sub-steps in that section collectively.
1.e – Sleep and Wait
This block allows the automation to wait without doing anything for the specified duration within the block, and when the time expires, to continue through the flow located after the sleep and wait block.
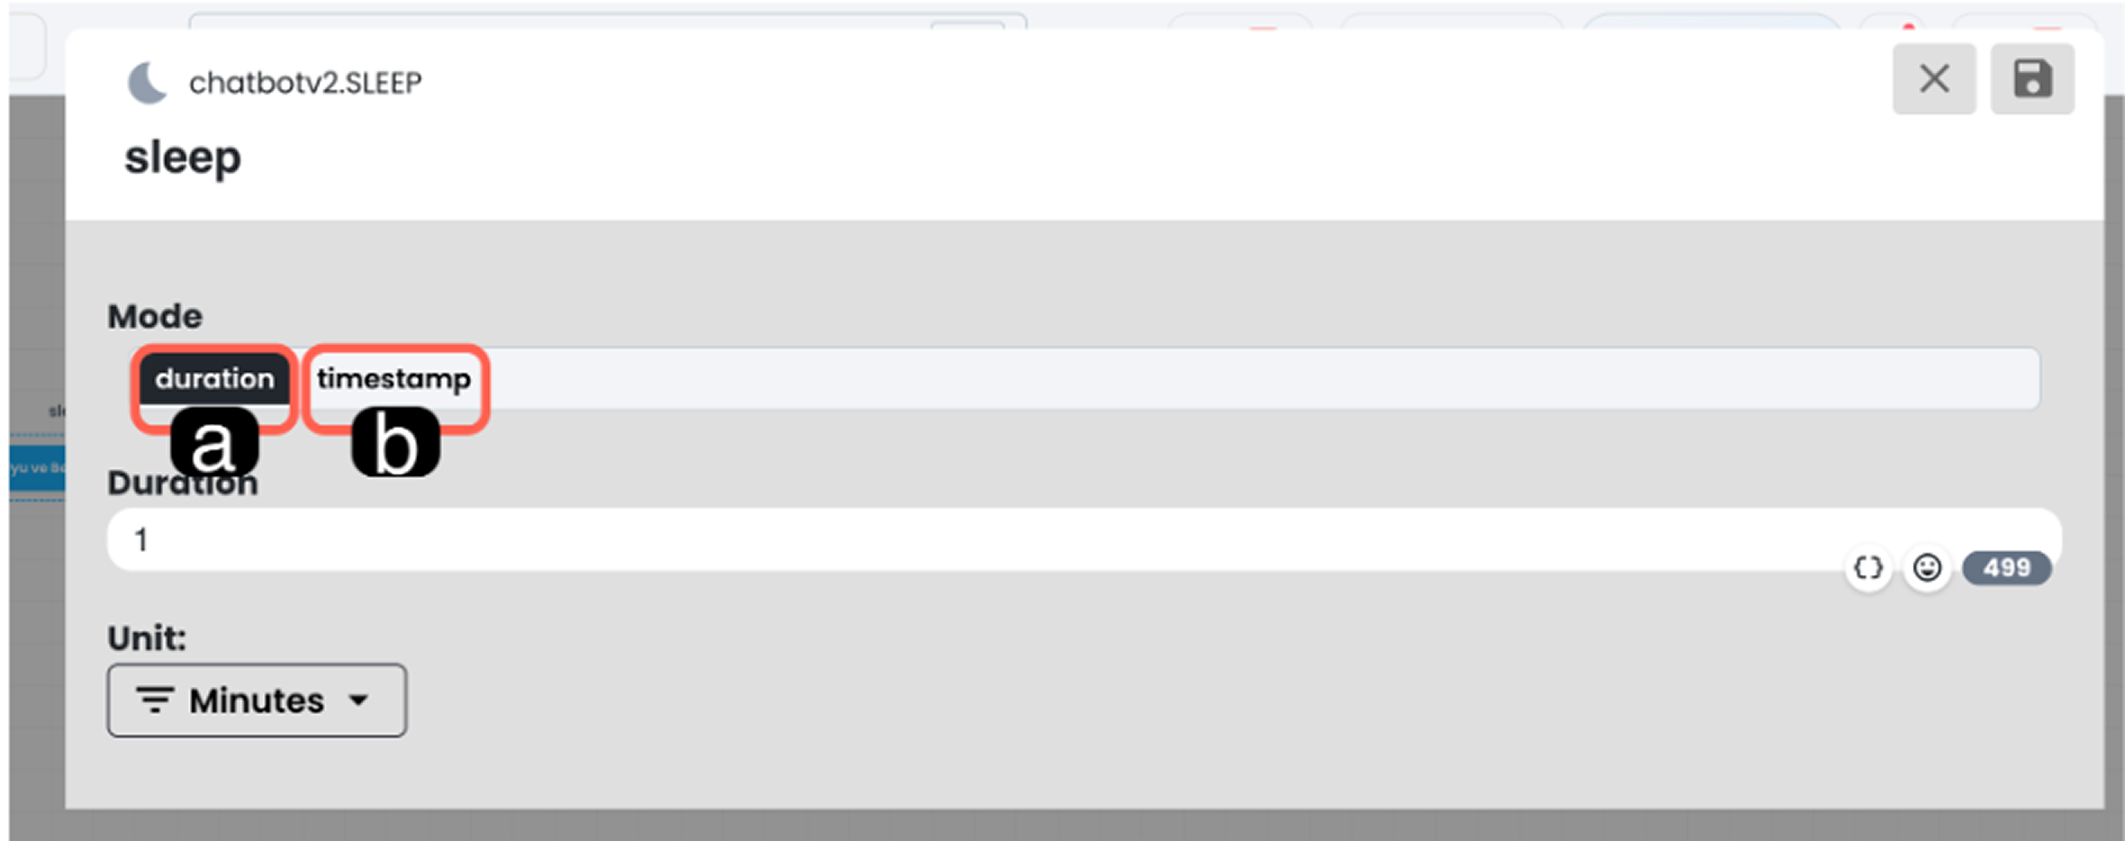
a. Determining the Waiting Duration Statistically:
It allows you to define the waiting duration as a fixed value. By entering a duration based on Seconds, Minutes, Hours, or Days (e.g.: 1 Day), it becomes clear how long the flow will pause.
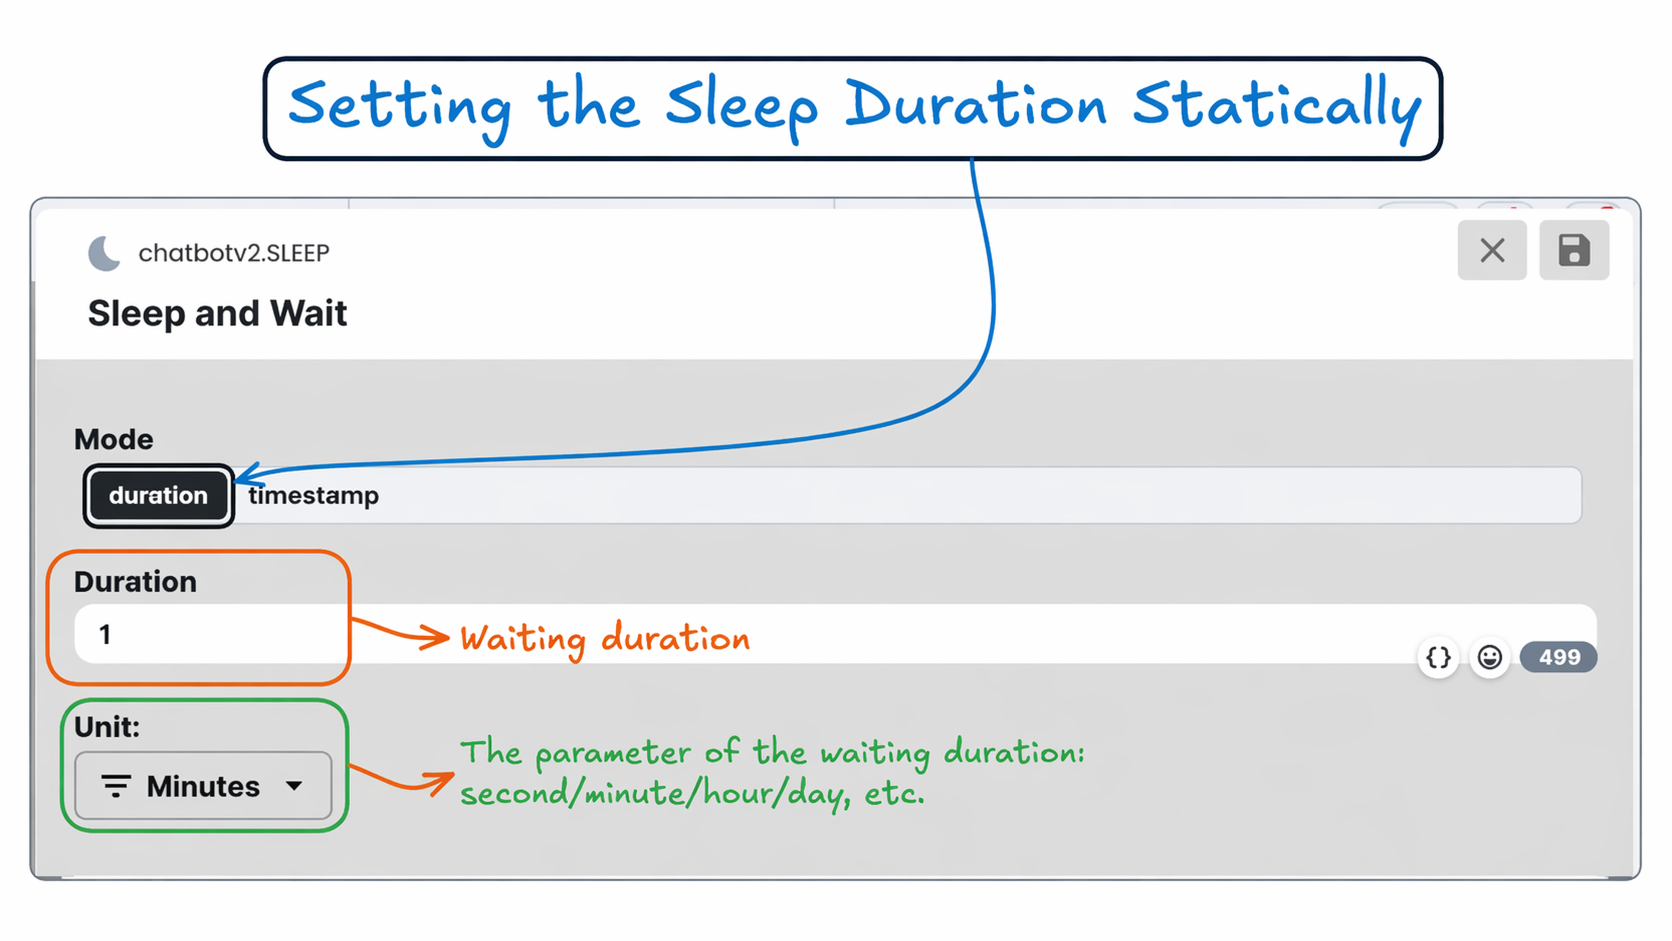
b. Determining the Waiting Duration Dynamically:
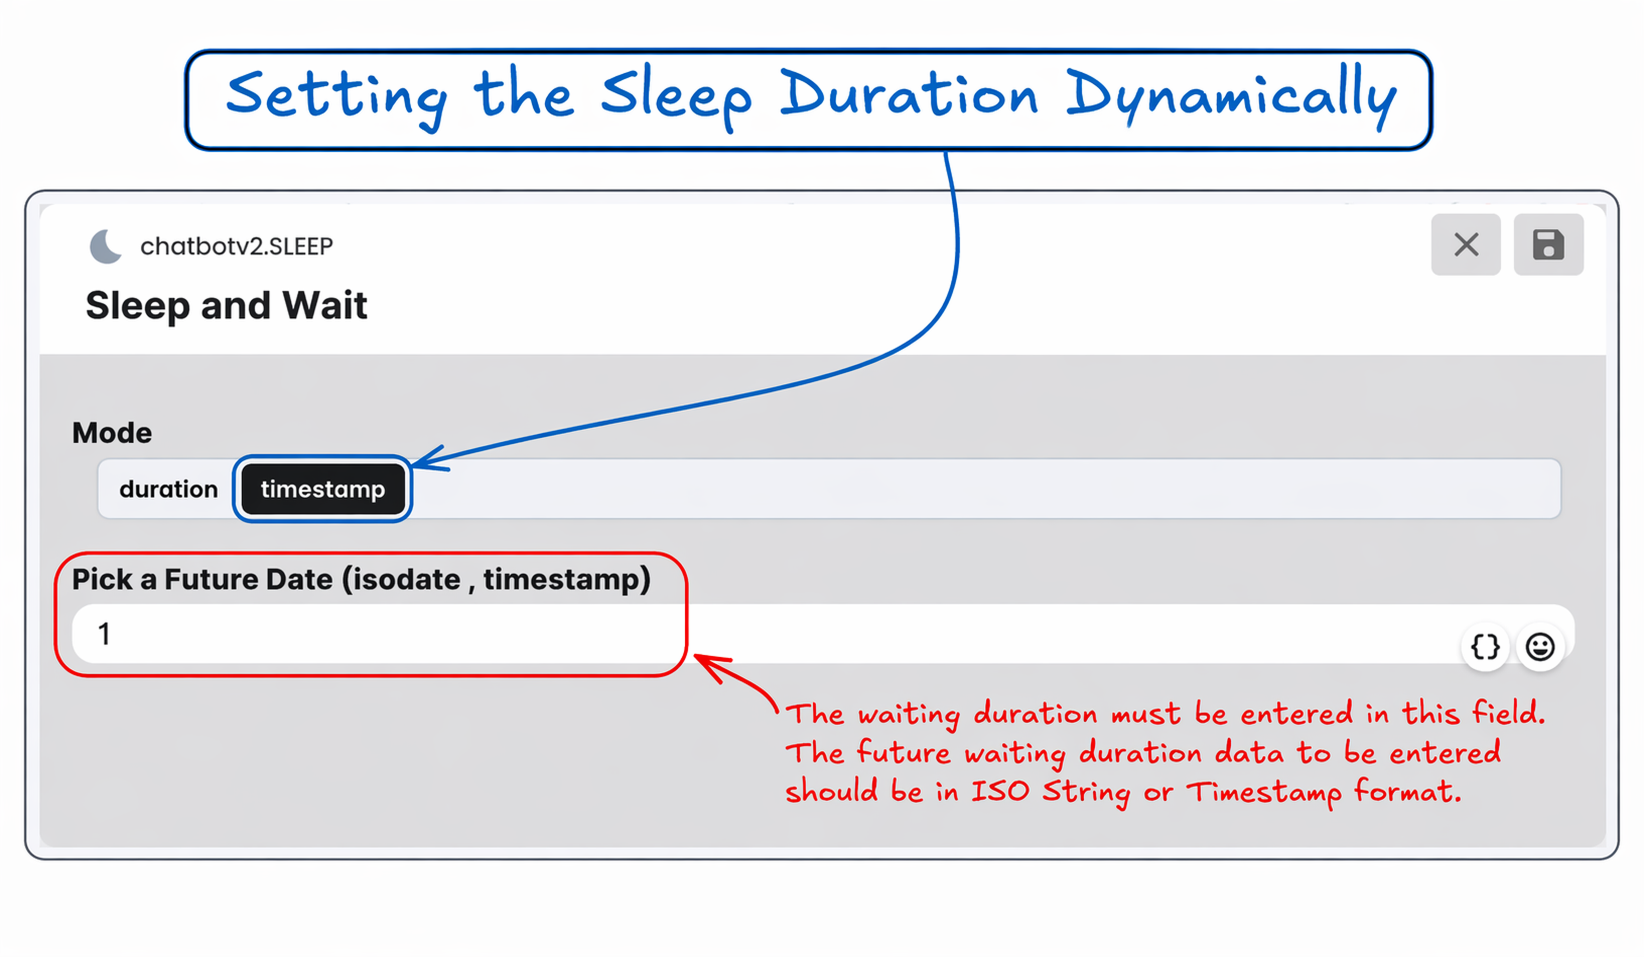
It allows you to define the waiting duration as a specific future moment (date and time). The date data to be entered must be in Timestamp (e.g.: 1715437800) format.
1.f – Wait for Message
This block allows you to create an alternative scenario that is triggered when no response is received from a specific communication platform for a certain period of time.
The block is used to direct users who do not interact within the specified time to the alternative scenario designed behind the timeout block.
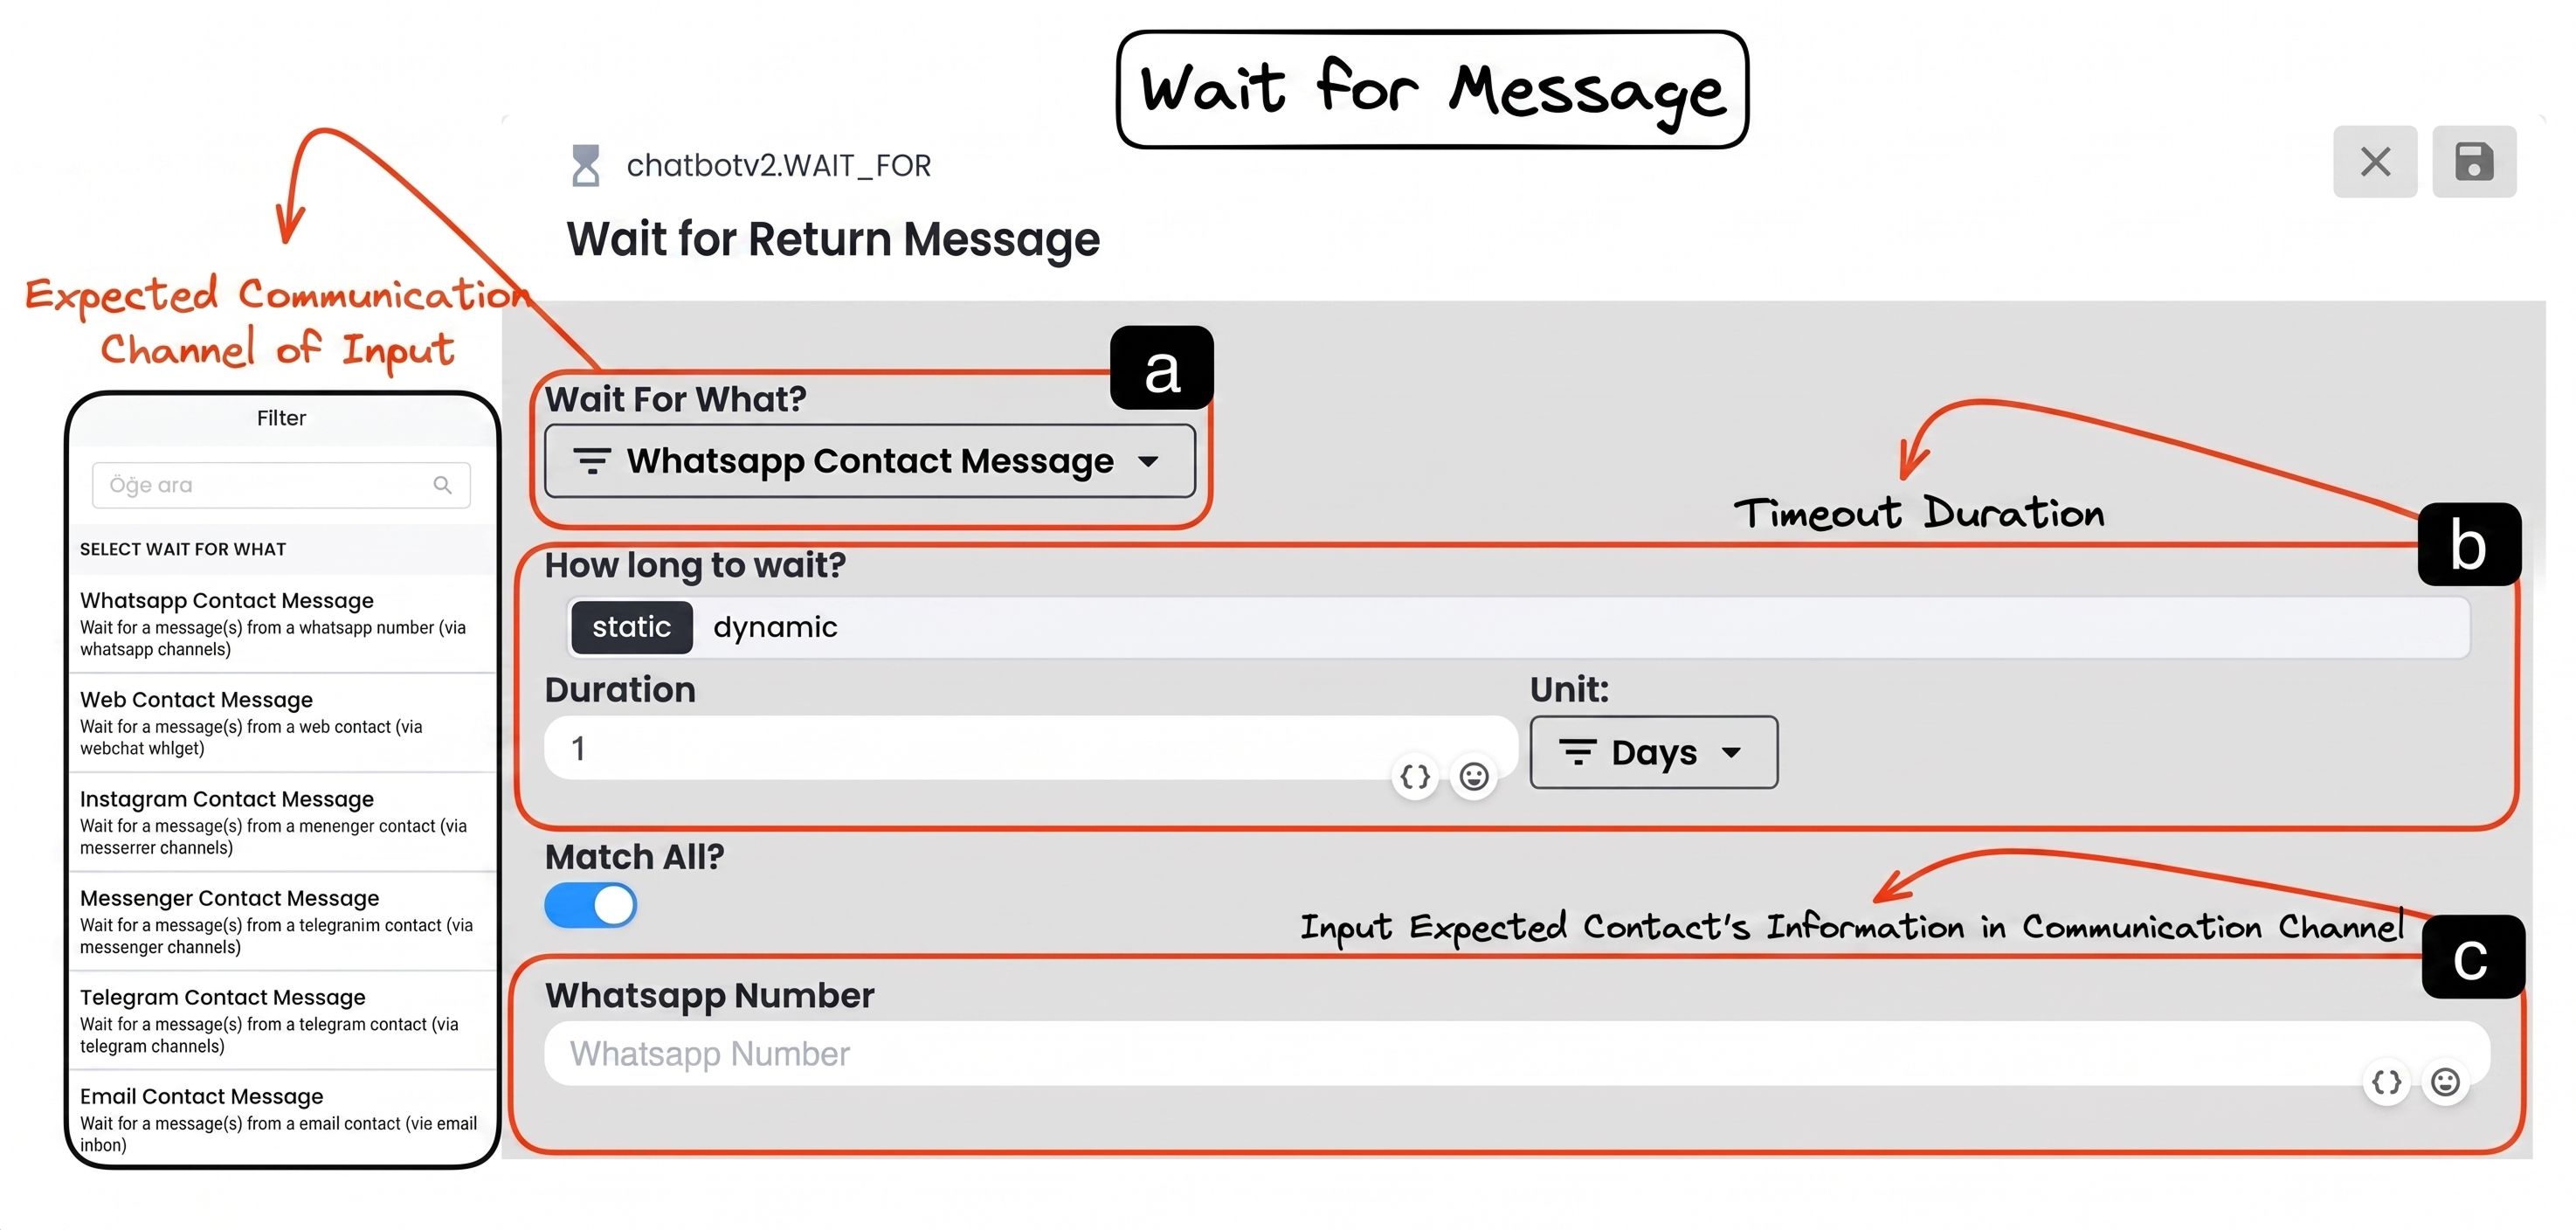
a. What is Being Waited For
This is the field where you select which action the automation will wait for before pausing. For example; by selecting "WhatsApp Contact Message" from the dropdown menu, the system can wait for the user to send a message via the WhatsApp channel as the triggering input.
b. Until When to Wait
This is the field where you determine how long the message wait block will remain without receiving input before switching to the "Timeout" state. It can be set statically or dynamically according to the need.
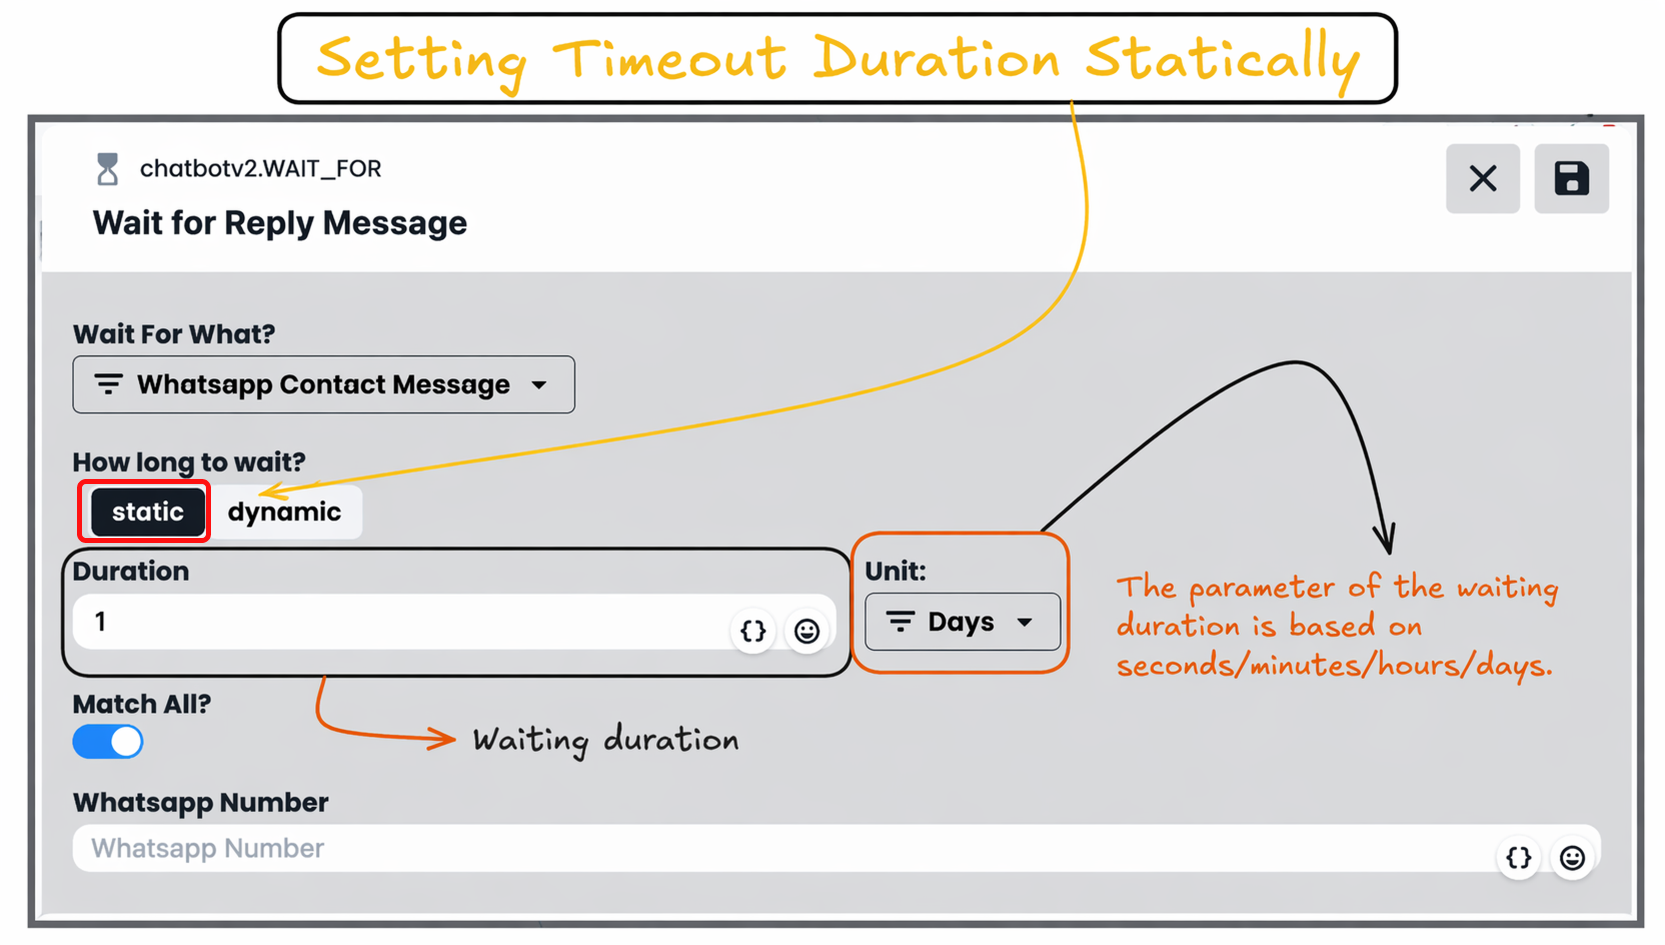
Static Data:
It allows you to define the waiting time as a fixed value. By entering a duration based on Seconds, Minutes, Hours, or Days (e.g.: 1 Day), it becomes clear how long the flow will pause.
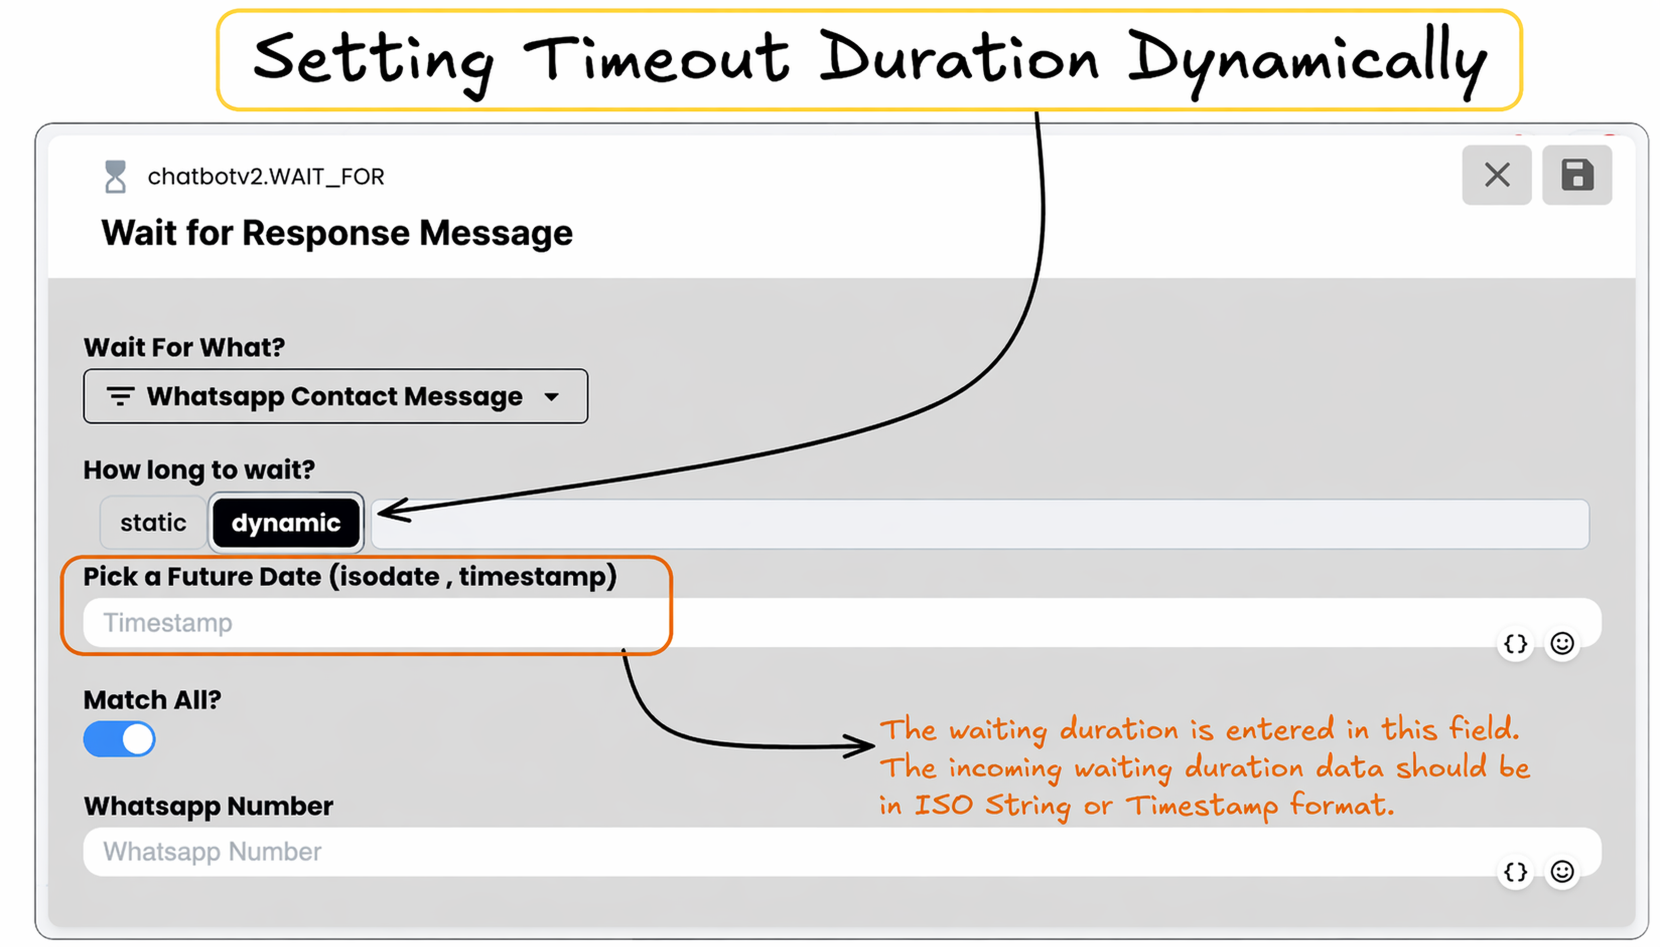
Dynamic Data:
It allows you to define the waiting time as a specific future moment (date and time). The date data to be entered must be in ISO String (e.g.: 2025-05-11T14:30:00Z) or Timestamp (e.g.: 1715437800) format.
c. Input Matching Method
Determines how the system will evaluate the incoming response.
Match All (when Match All is Active): Accepts any message received from the user (regardless of its content) as a valid response and successfully completes the wait block.
Match According to Specific Criteria (when Match All is Inactive): When this option is disabled, detailed matching settings are accessed.
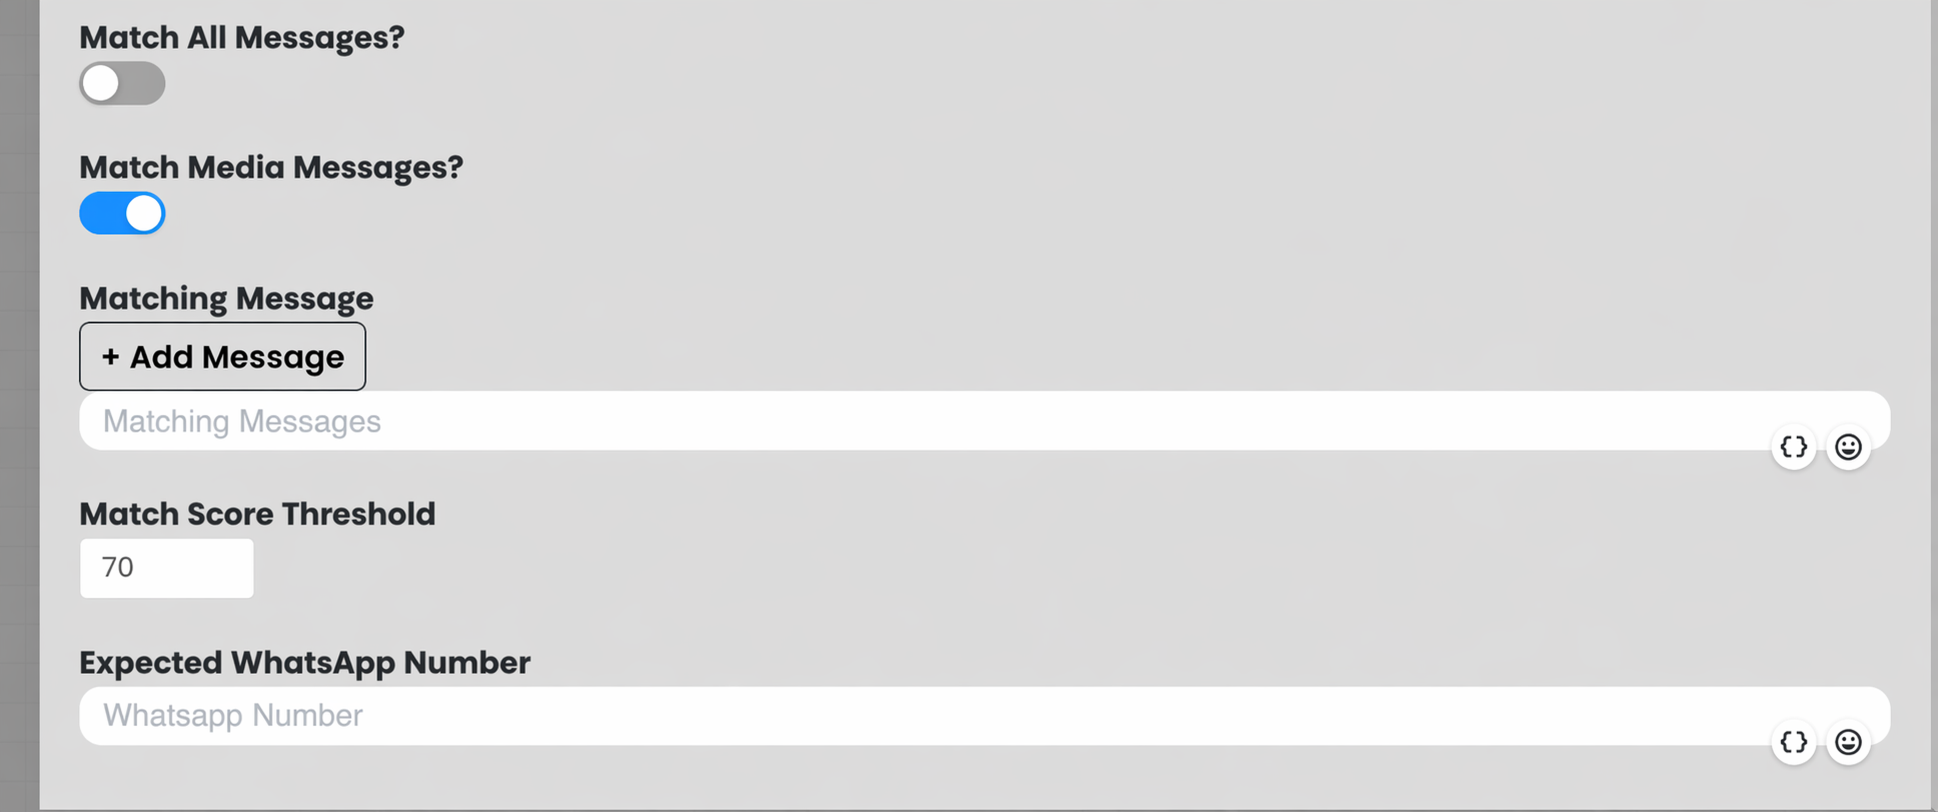
Specific conditions can be defined such as the incoming message containing a certain word ("Message to Match"), being only a media message, or exceeding the "Match Score Threshold" (e.g.: 70) that measures word similarity.
d. Source of the Expected Message
This is the field where it is defined from which user or number the response is expected. Generally, variables such as "WhatsApp Number" obtained from previous steps of the flow (for example, from a table record) are defined in this field to ensure that the system listens to the correct person.
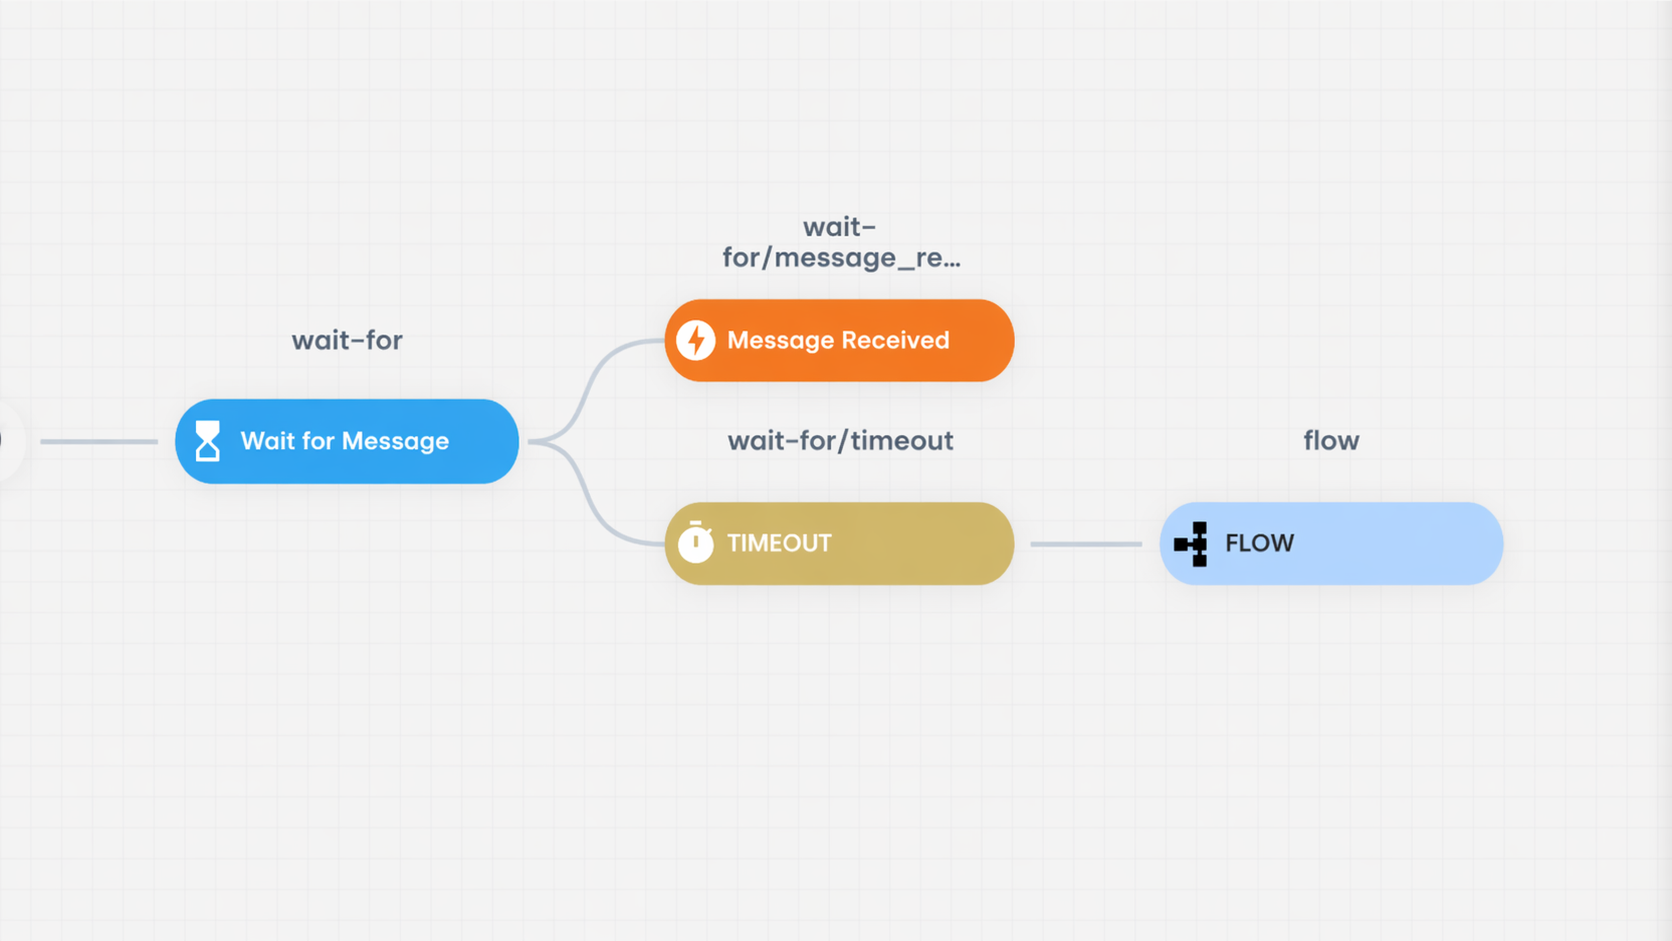
Example Wait for Message Flow
The "Marketing Scenario" in the visual belongs to an event-based automation scenario:
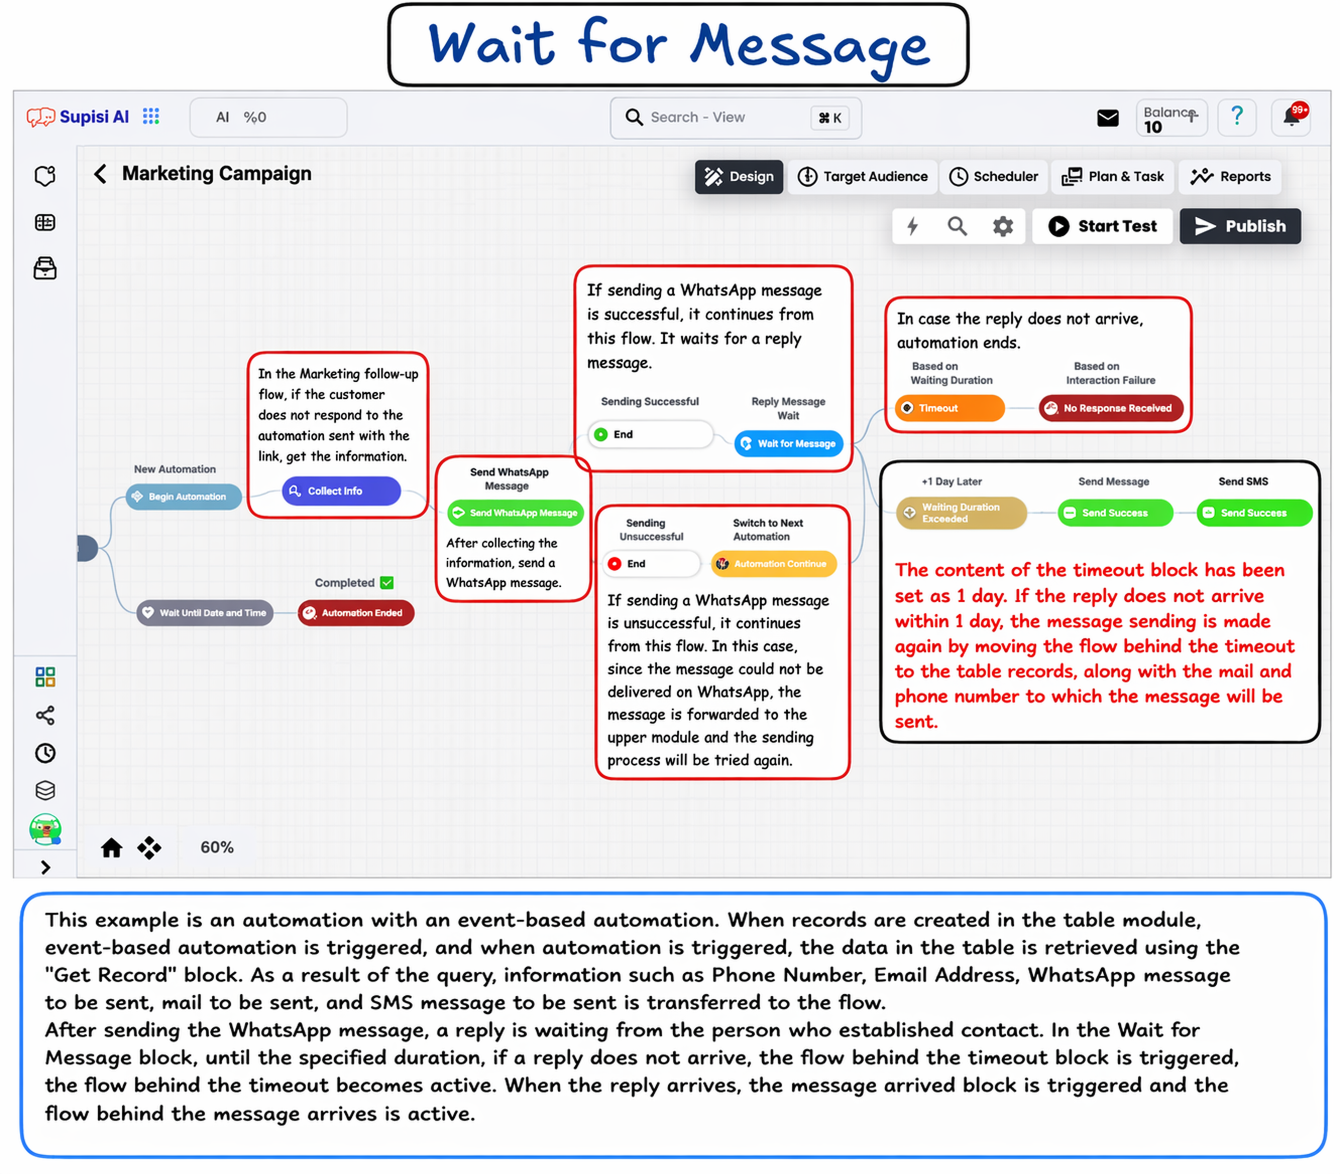
1. Triggering and Data Retrieval: When a new record is created in the Tables module, the automation is triggered. By using the "Find Record" block, data such as the Phone Number and Email Address of the relevant person in the table are included in the flow.
2. Message Sending and Waiting: A "WhatsApp Message" is first sent to the person whose contact information is obtained. If the sending is successful, the system immediately proceeds to the "Wait for Response Message" (Wait For) step.
3. Successful Response: If the user responds via WhatsApp within the expected time, the system follows the "Message Received" path and the automation ends successfully.
4. Activation of Timeout: The time limit in the message waiting block is set as 1 Day. If the user does not respond within 1 day, the Timeout is triggered. The system leaves the waiting step, executes the alternative scenario connected behind the timeout block, and since the user cannot be reached, it performs Email Sending and SMS Sending operations respectively.
1.g – Do Nothing
Do Nothing is a tool used entirely for structural and visual arrangement purposes that does not perform any operational action within your automation flow. Especially in complex and multi-step scenarios, it increases the readability of the diagram by being placed between blocks. When the flow reaches this block, the system does not trigger any action and proceeds to the next step without interruption. This feature helps you keep your automation processes in a cleaner, more understandable, and more manageable structure by preventing clutter in your workspace.
1.h – Automation Ended
This block allows you to intentionally terminate the automation flow when certain conditions are met or when the scenario reaches its purpose. It is configured to accurately reflect how the flow is completed in system reports and in the work plan table according to the result of the operation.
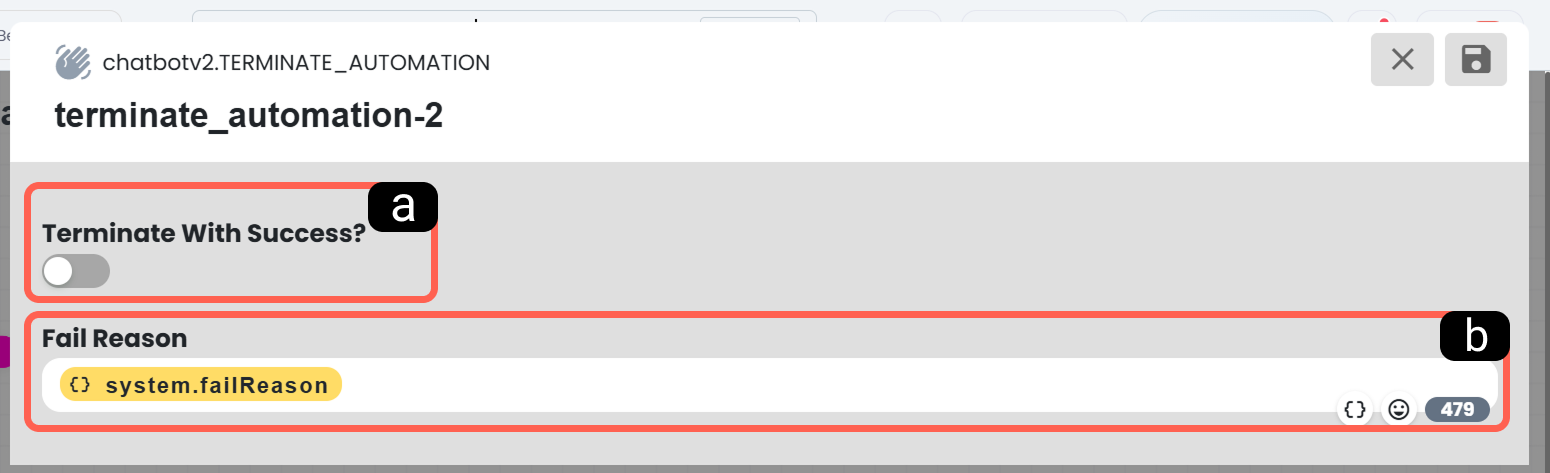
a. End Successfully
It is used to indicate that the automation has been completed as intended and without any issues. When this option is activated, the system records this flow as a "successful" operation.
b. Failure Reason
If the scenario is terminated before reaching the intended result (that is, if the "End Successfully" option is disabled), an explanation of why the operation was terminated is entered in this field. The data entered here is reflected in the work plan area of the automation.
1.i – Display Widget
The Display Widget block triggers the opening of a custom interface window (widget) on the user’s screen during the automation flow. It is used to display an external web page instantly to users or to present custom HTML content.
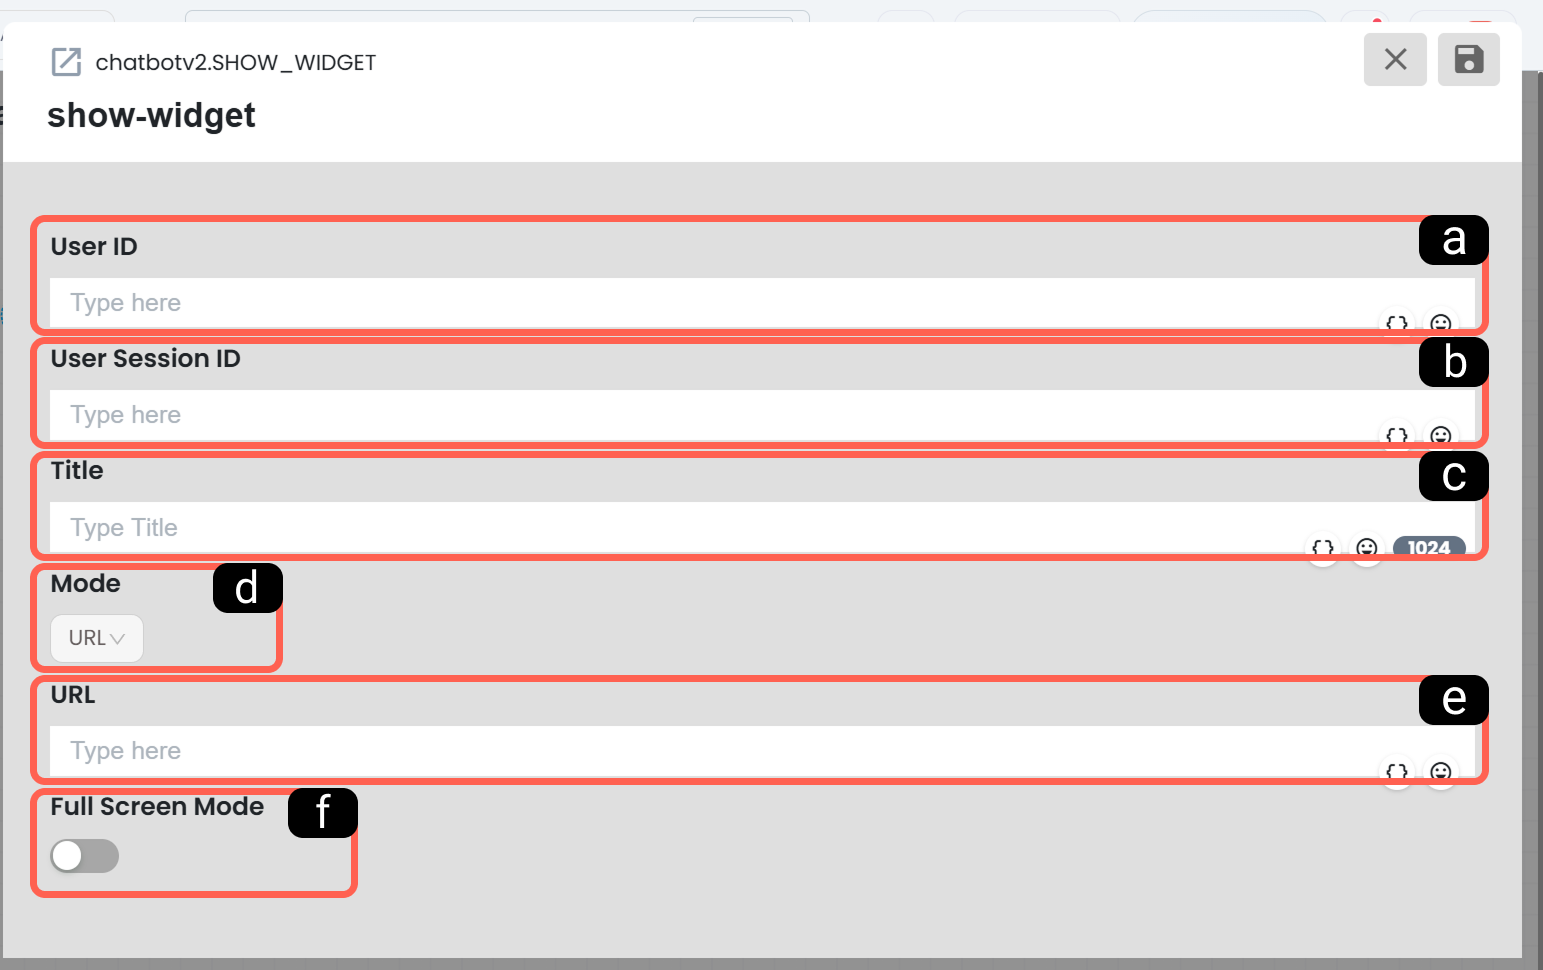
a. User ID
This is the unique identity information of the targeted Supsis AI user in the system to whom the widget will be displayed. It ensures that the display operation is reflected to the correct person.
b. User Session ID
This is the identity information of the current active session of the target user on which the widget will be activated.
c. Widget Title
This is the text that will appear at the top of the window that will open on the user’s screen. It provides the user with preliminary information about what the content is related to.
d. Widget Type
This is the field where you determine the format of the content to be displayed on the screen. It offers two different configuration types.
- URL: It is used to display a specific web page inside the widget by calling its link.
- HTML: It is preferred to render (process) and display your own custom HTML and CSS codes directly on the widget.
e. URL/HTML Code
Depending on the structure of the Widget Type you selected; it is the data input field where you will enter either the target website link (URL) or the HTML code blocks you want to run directly.
f. Full Screen Mode
When activated, it ensures that the called widget opens in a way that completely covers the user’s current device screen (full screen). It is used in situations where the user’s attention is expected to fully focus on this content.
1.j – Artificial Intelligence
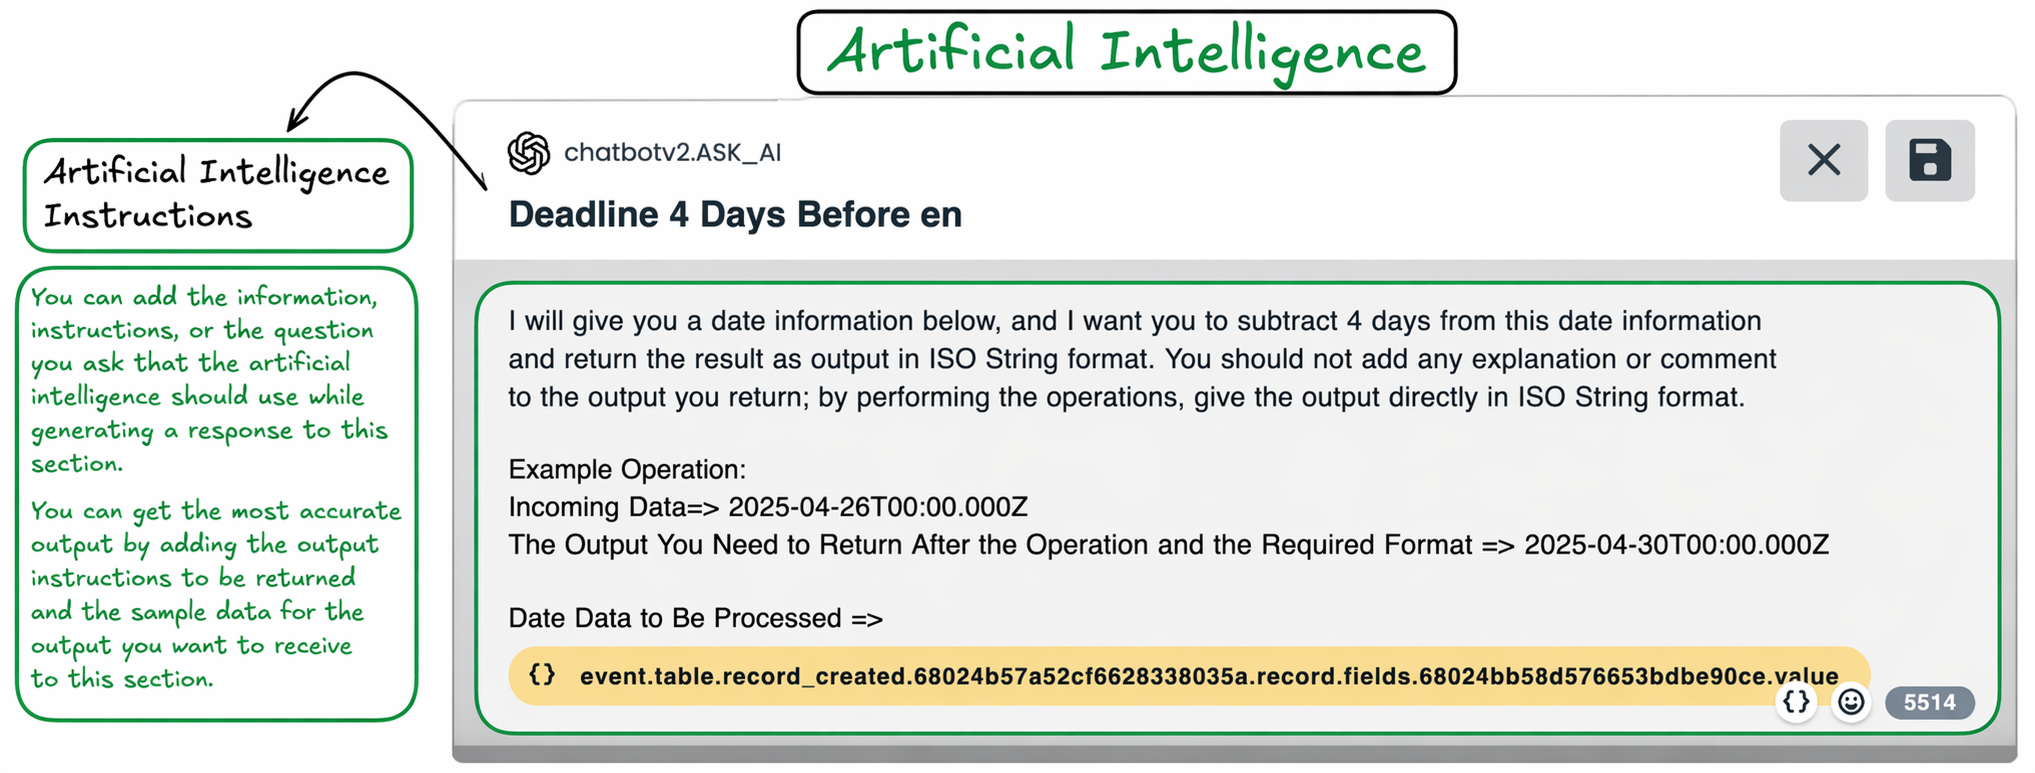
This block allows artificial intelligence to generate responses according to the instructions and data content you provide. The automation uses AI integration to generate the most appropriate responses according to the inputs received, the questions asked, and the instructions given over the data. The AI response returned from this block can be used within the flow behind the block.
2. Person Actions
Person Actions is a block set that allows you to process customer and user data within your automation scenarios and perform fully integrated operations with the Supsis CRM (Contacts) module.
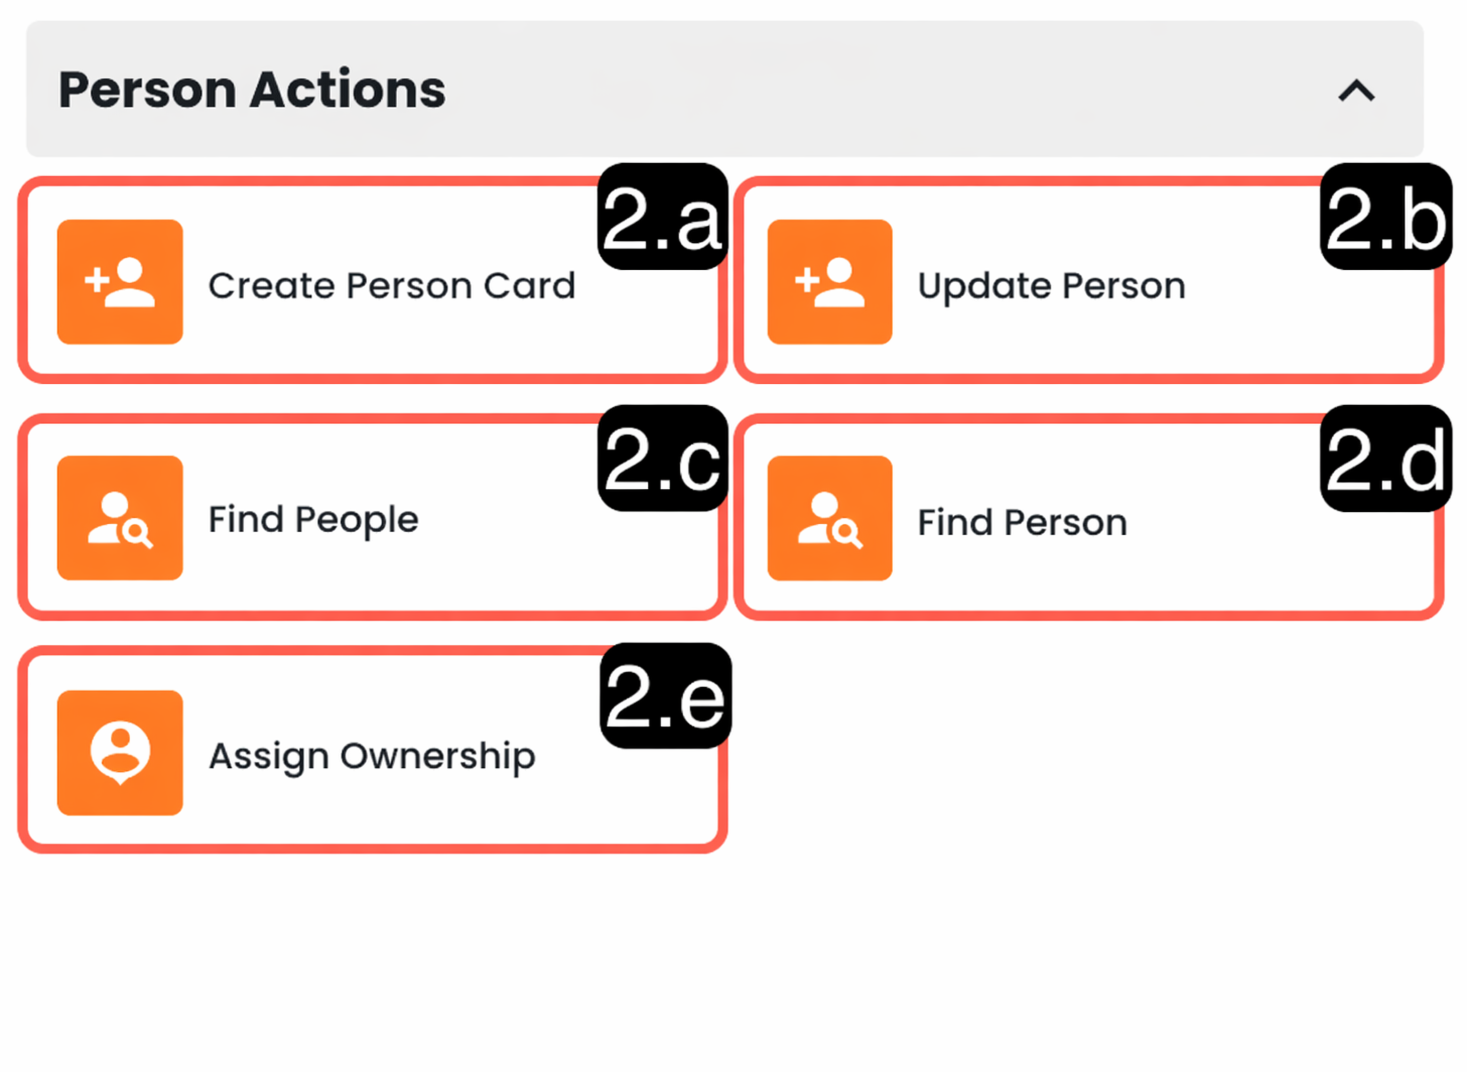
2.a – Create Contact Card
The Create Contact Card block allows you to automatically create new contact records in the Contacts (CRM) module by using the data obtained within the automation flow. It is very important for storing customer information coming from forms, your website, or other automation triggers in an organized way and making it quickly accessible and processable from the Supsis AI panel in subsequent processes. see: Contacts
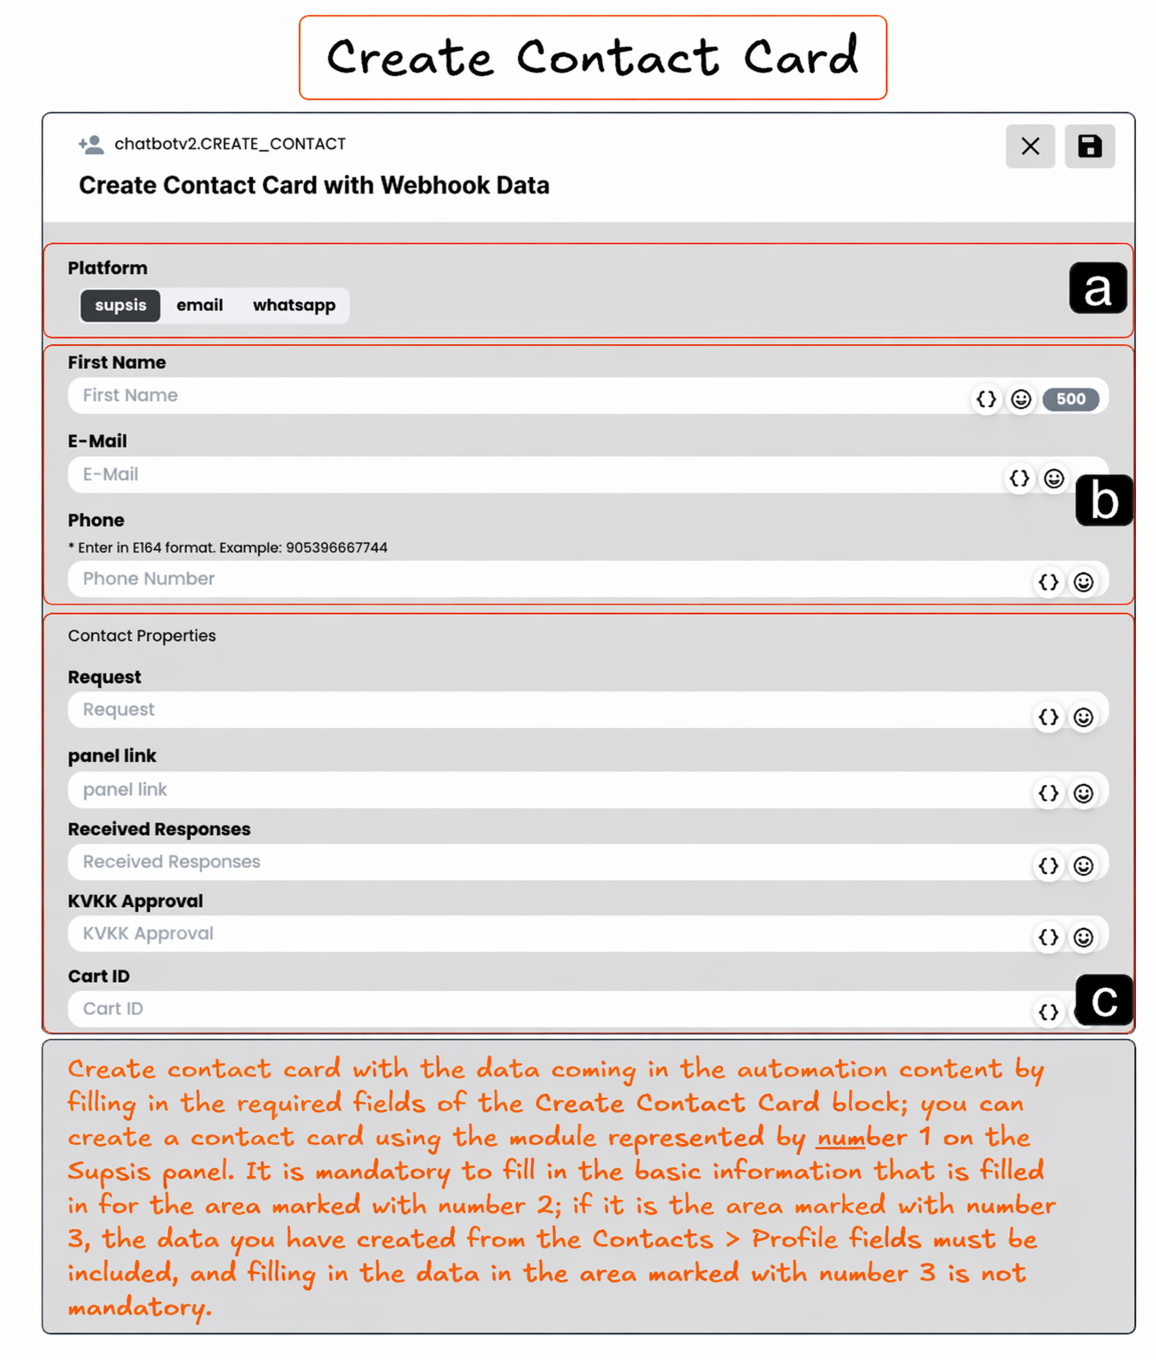
a. Platform
This is the field where you can specify through which channel or platform source the contact record is created.
b. Basic Values
These are the standard fields where the main contact data such as name, surname, email address, and phone number of the contact card to be created are entered.
c. Profile Fields
These are dynamic fields where you can add specific details about your business or the person other than basic contact information. In order to use custom data fields specific to your system, you must first create the desired custom fields from the Contacts > Profile Fields menu and then map them on this block.
2.b – Update Contact
The Update Contact block is used to change or enrich the existing information of a person already registered in the Supsis AI Contacts (CRM) module with new data returned within the automation.
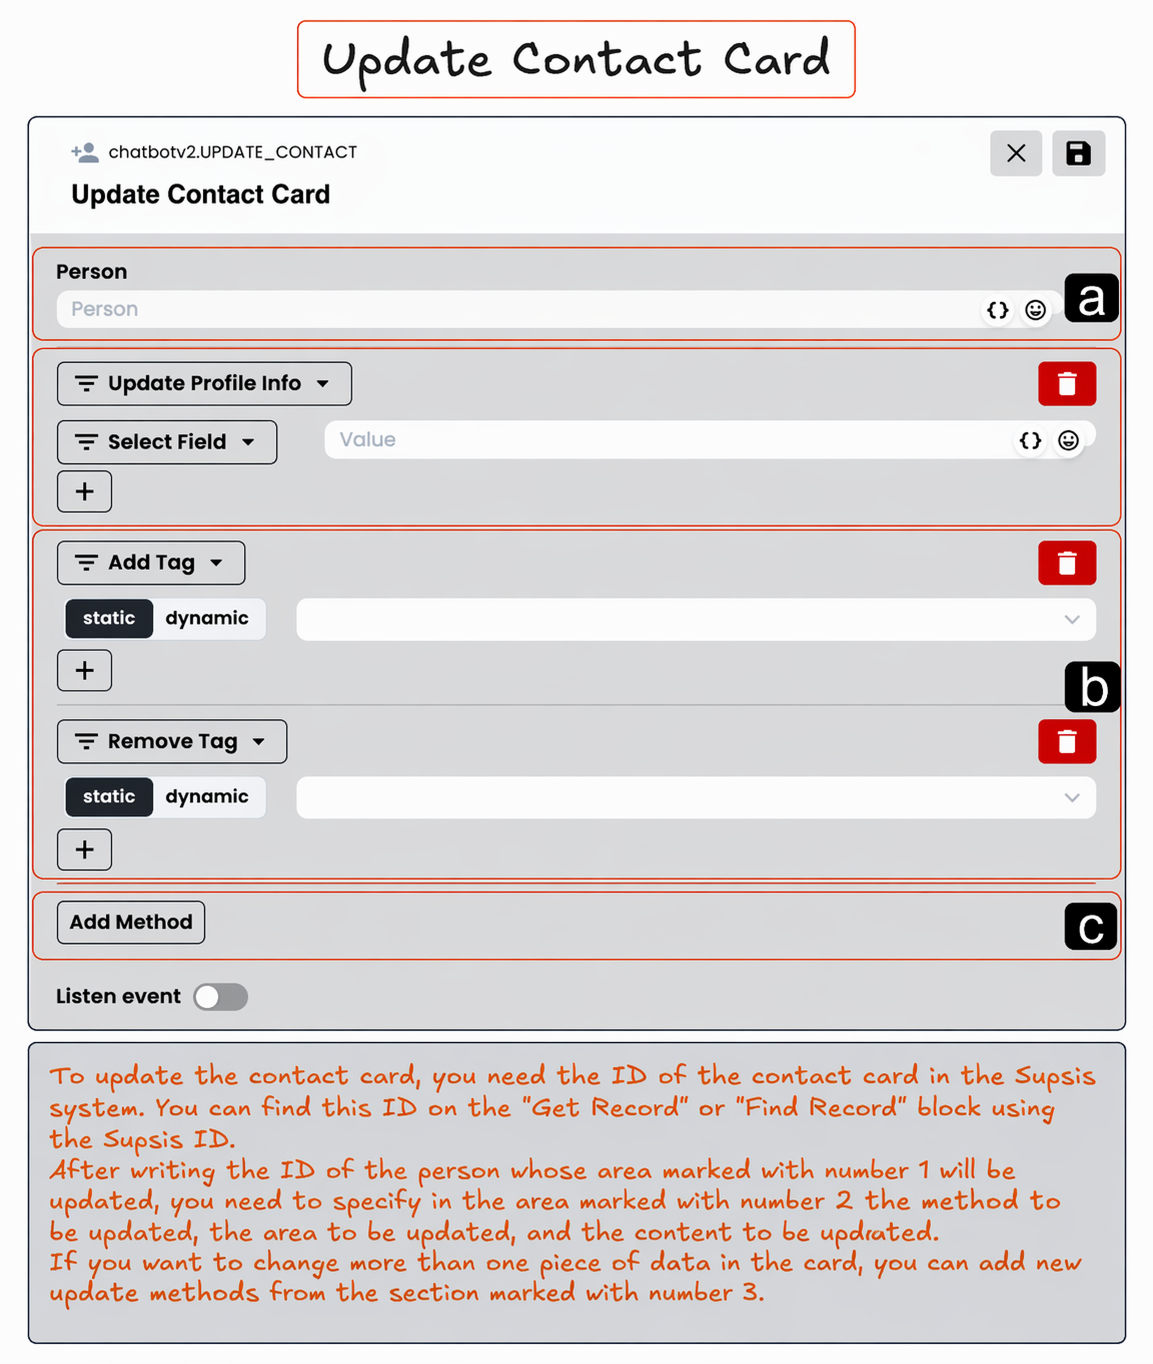
a. Contact to Be Updated (Contact ID)
This is the identity information required to identify the specific contact card to be processed in the system. You can assign this ID dynamically by directing the data you obtain from blocks such as "Find Contact" or "Find Contacts".
b. Value to Be Updated and New Value
This is the section where you determine which information field (for example; phone number, company name, or a tag) in the contact card will be changed and what the new value to be written will be. You can enter the new value manually (static) or fill it with variable data (dynamic) coming from the automation.
c. Add Method
It is used when you want to update multiple data of a person at the same time with a single operation step. By clicking this button, you can add new update rows that will simultaneously change both the profile fields and tags of the person.
2.c – Find Contacts
The Find Contacts block allows you to perform multiple searches in your database in the Contacts module by using the data in the automation flow as filtering criteria. All contact records that match the specific attributes you define are identified as a list and included in the automation process.
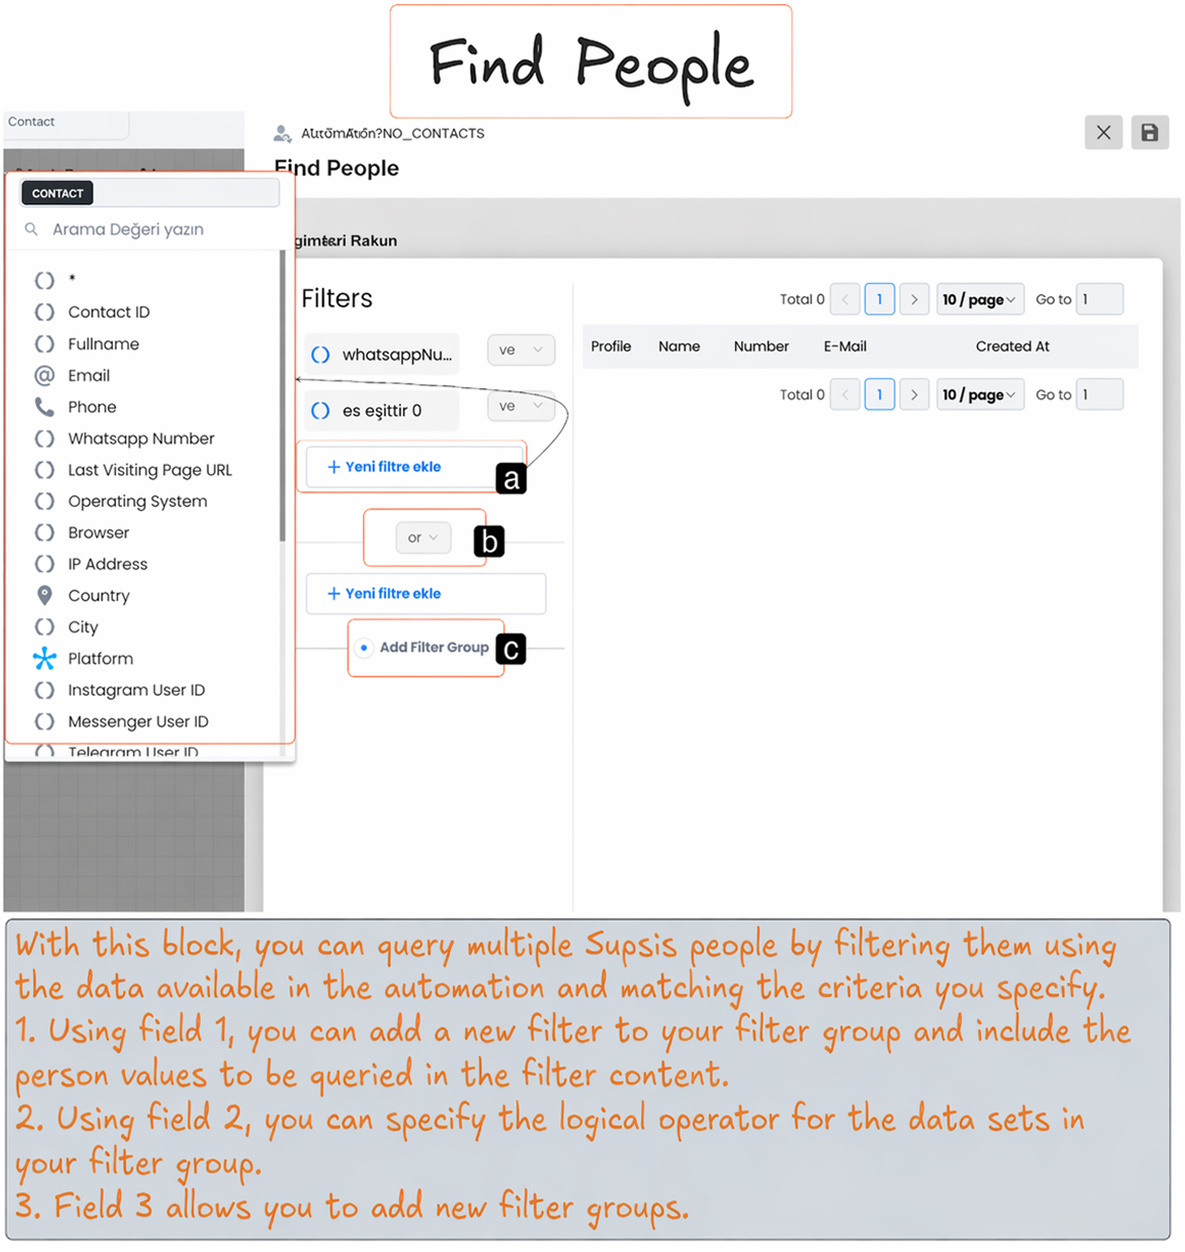
a. Filter Content
This is the area where you define the criteria of the target audience you want to search for. By clicking the button, you can add new filters and define the attributes that the contacts you are searching for must have (e.g.: "Those whose city is Istanbul") from the left panel.
b. Filter Condition
When multiple filter parameters are added, this is the setting where you determine the logical relationship between these rules (with And / Or operators).
c. Add Filter Group
It allows you to create new filter sets in addition to existing filters to perform complex queries. It is used to run accurate queries by defining "and/or" rules between groups in detailed search scenarios where simple operators are insufficient.
2.d – Find Contact
The Find Contact block is used to identify only a single contact record that exactly matches the filter criteria you define and bring it into the automation.
Note: If more than one record matching the filter conditions you define is detected, the system will return only the most recently (latest) added contact record to prevent confusion.
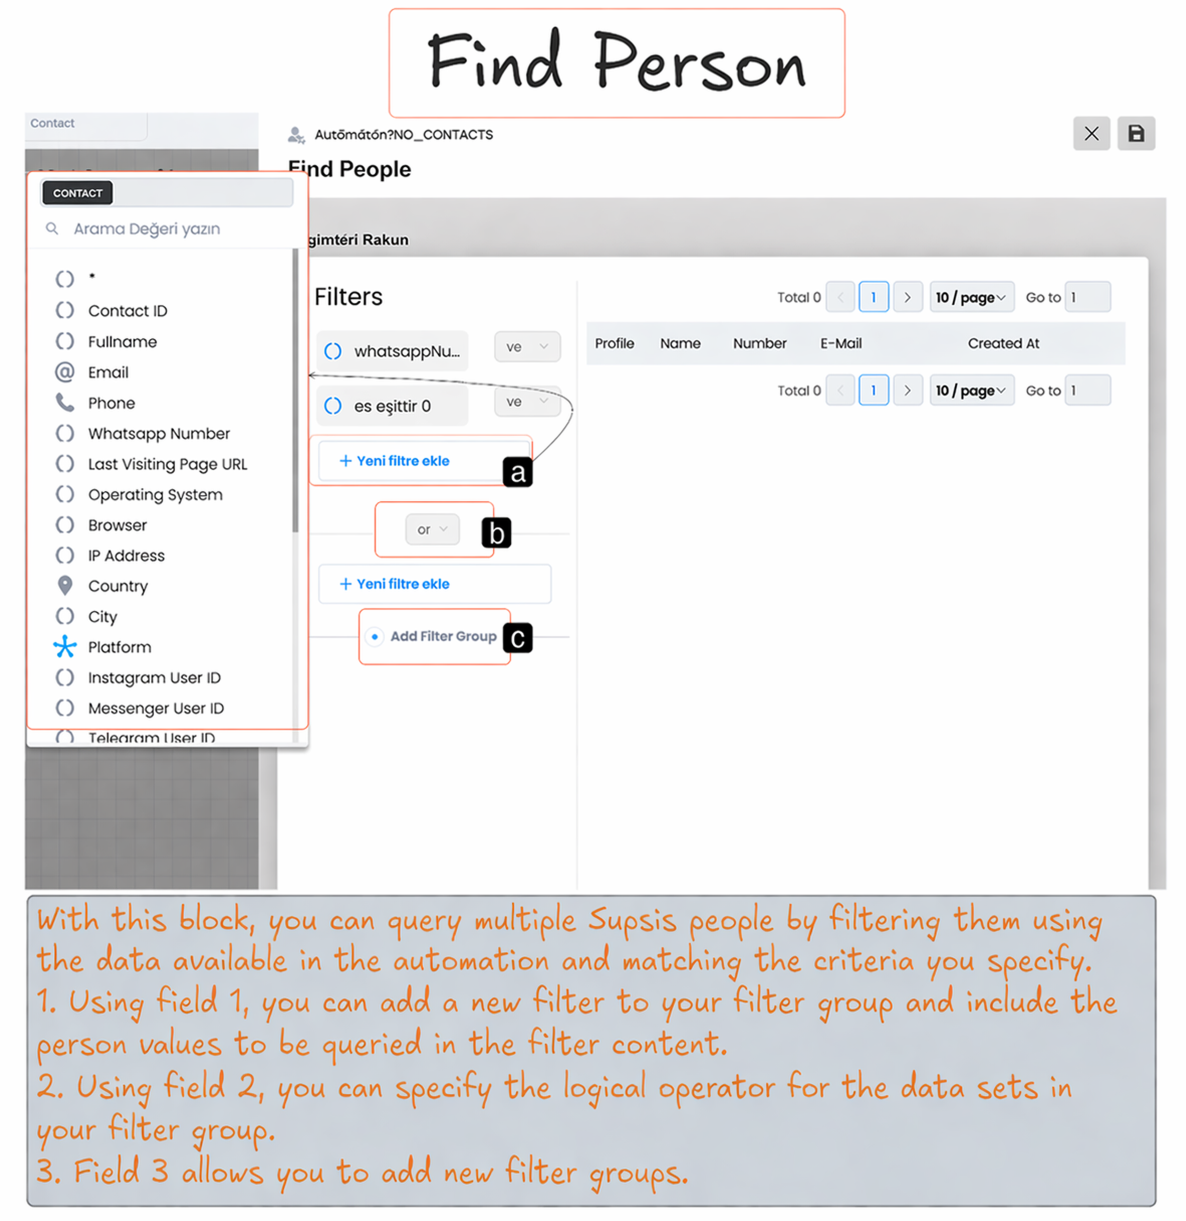
a. Filter
This is the area where the attributes required to identify the specific person you want to search for (e.g.: ID Number, Order Number) are defined.
b. Filter Condition
This is the area where you can make the filter rules precise by connecting them with "And" or create alternatives with "Or".
c. Add Filter Group
This is the feature that allows you to connect different filter groups in detailed query scenarios to find the most accurate person precisely.
2.e – Assign Ownership
The Assign Ownership block automatically assigns the conversations and management of a specific person to an appropriate customer representative according to the criteria you define. This process ensures that the customer's processes are managed in a more organized, personalized, and systematic way by the correct department or representative.
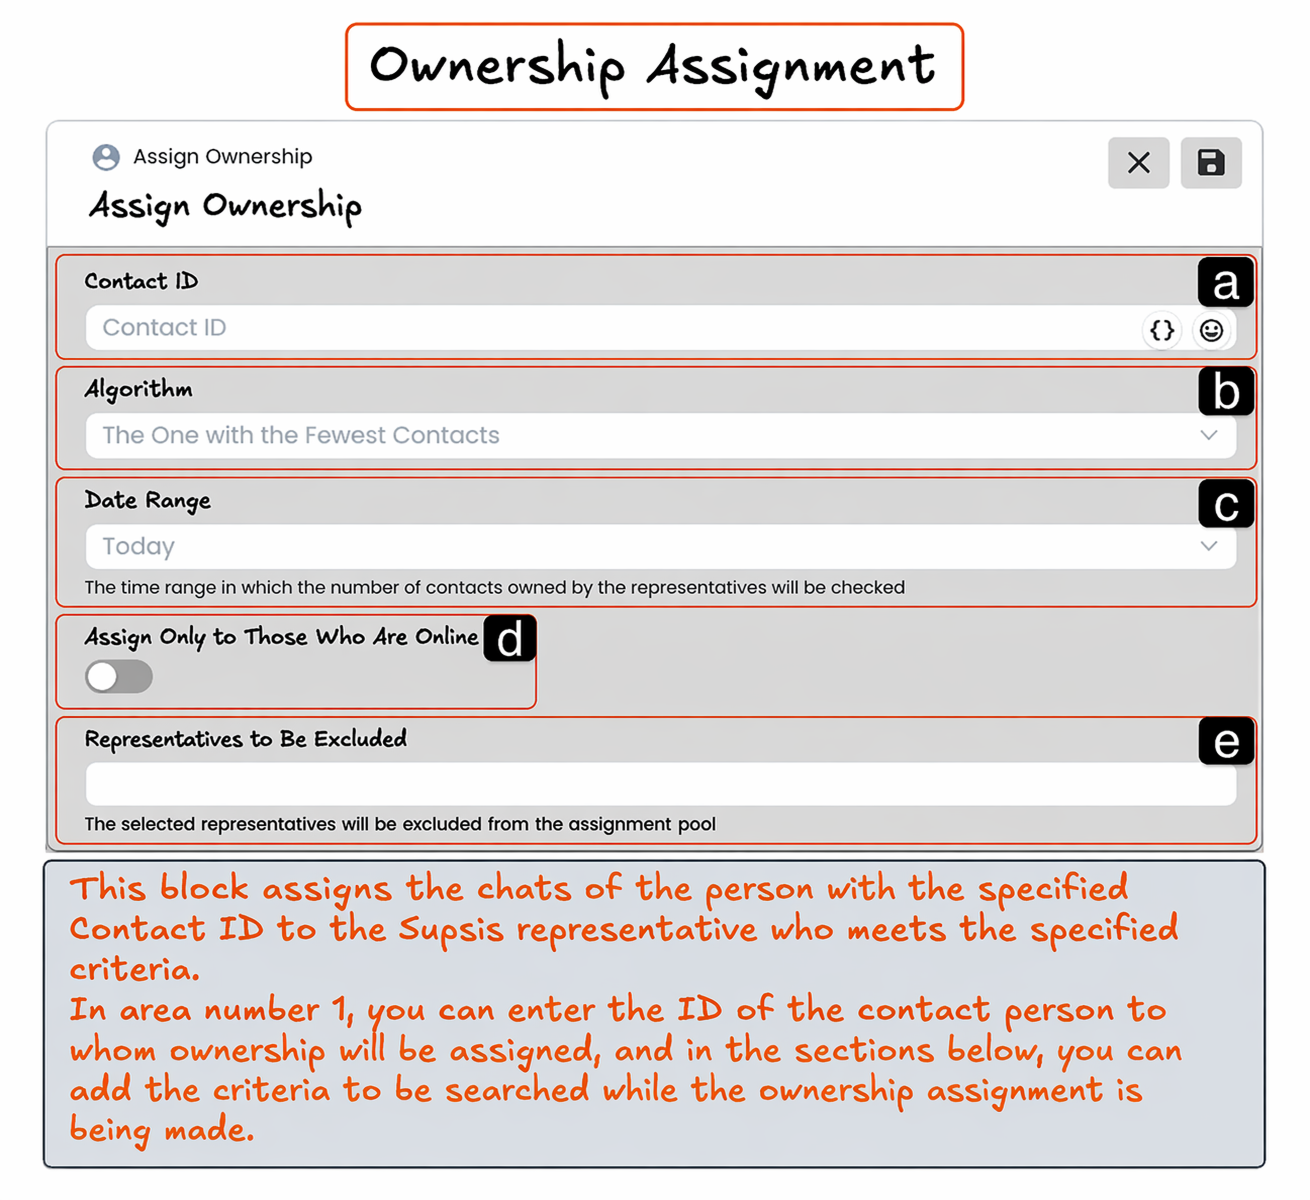
a. Contact ID to Assign Ownership
This is the "Contact ID" information of the customer/user to whom the ownership will be assigned. This value must be entered into the system (usually with dynamic ID data coming from previous blocks) to ensure that the operation is performed on the correct person.
b. Assignment Algorithm
This is the logical structure where you determine according to which distribution rule (e.g.: round robin, random, etc.) the selected user will be assigned to representatives.
c. Date Range
This is the time range setting based on past conversations and interaction durations that the algorithm will check while making the distribution.
d. Distribute Only to Online Users
When activated, the system limits the assignment algorithm and distributes the operation only among representatives who are currently "Online" and available to serve.
e. Representatives to Exclude
This is the area where you exclude specific representatives (e.g.: managers, interns, or employees from different departments) from the assignment pool during ownership distribution.
3. Loop Actions
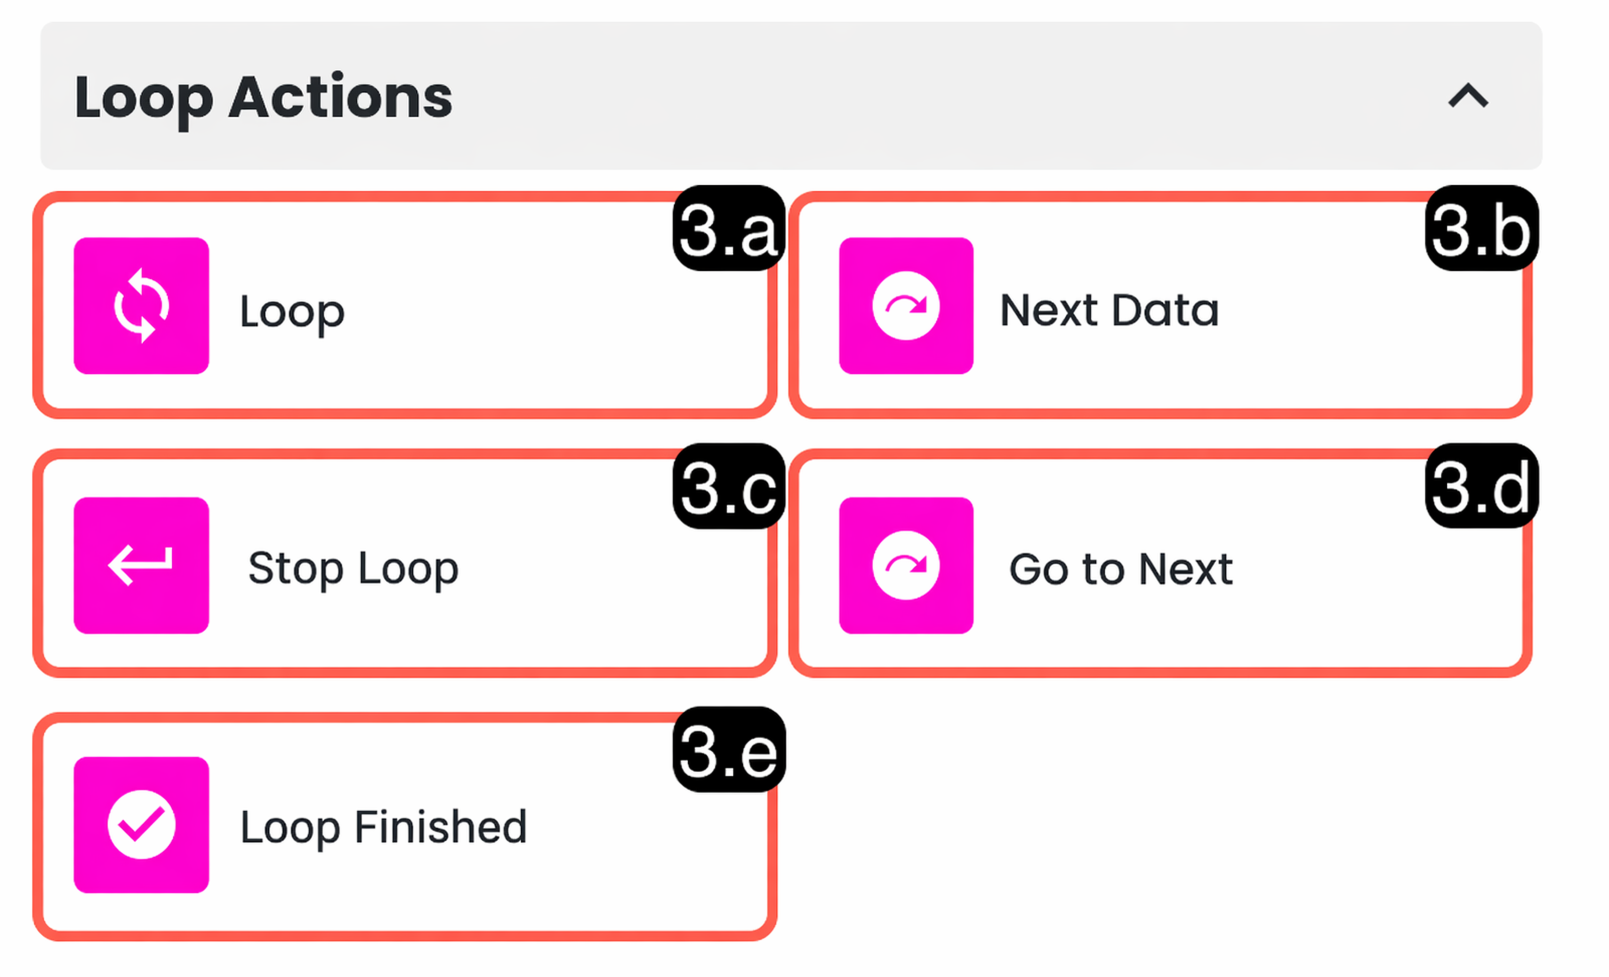
3.a – Loop
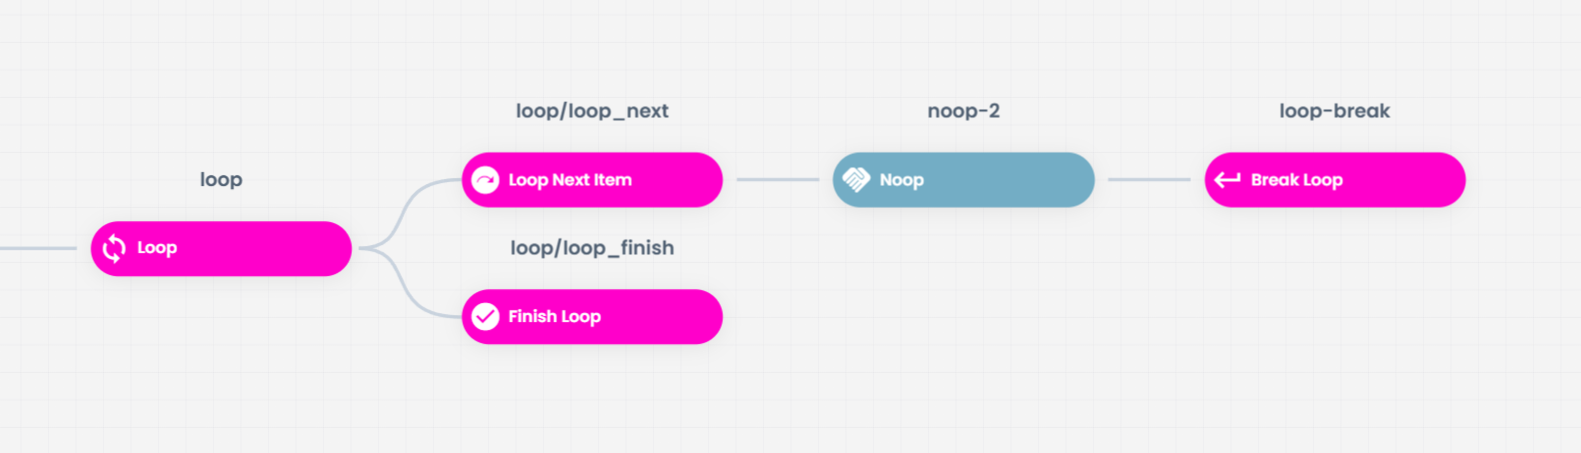
The Loop block is a powerful automation tool that automatically parses data sets with a specific format and repetitive structure and processes each item (data piece) within them individually by passing them through the same automation stages. When this block is added to your scenario, it comes together with three core components that work integrated with each other so that you can manage your processes.
Block Working Logic
The loop structure basically works through three main components while automating your operational processes: Loop, Next Data, and Loop End blocks.
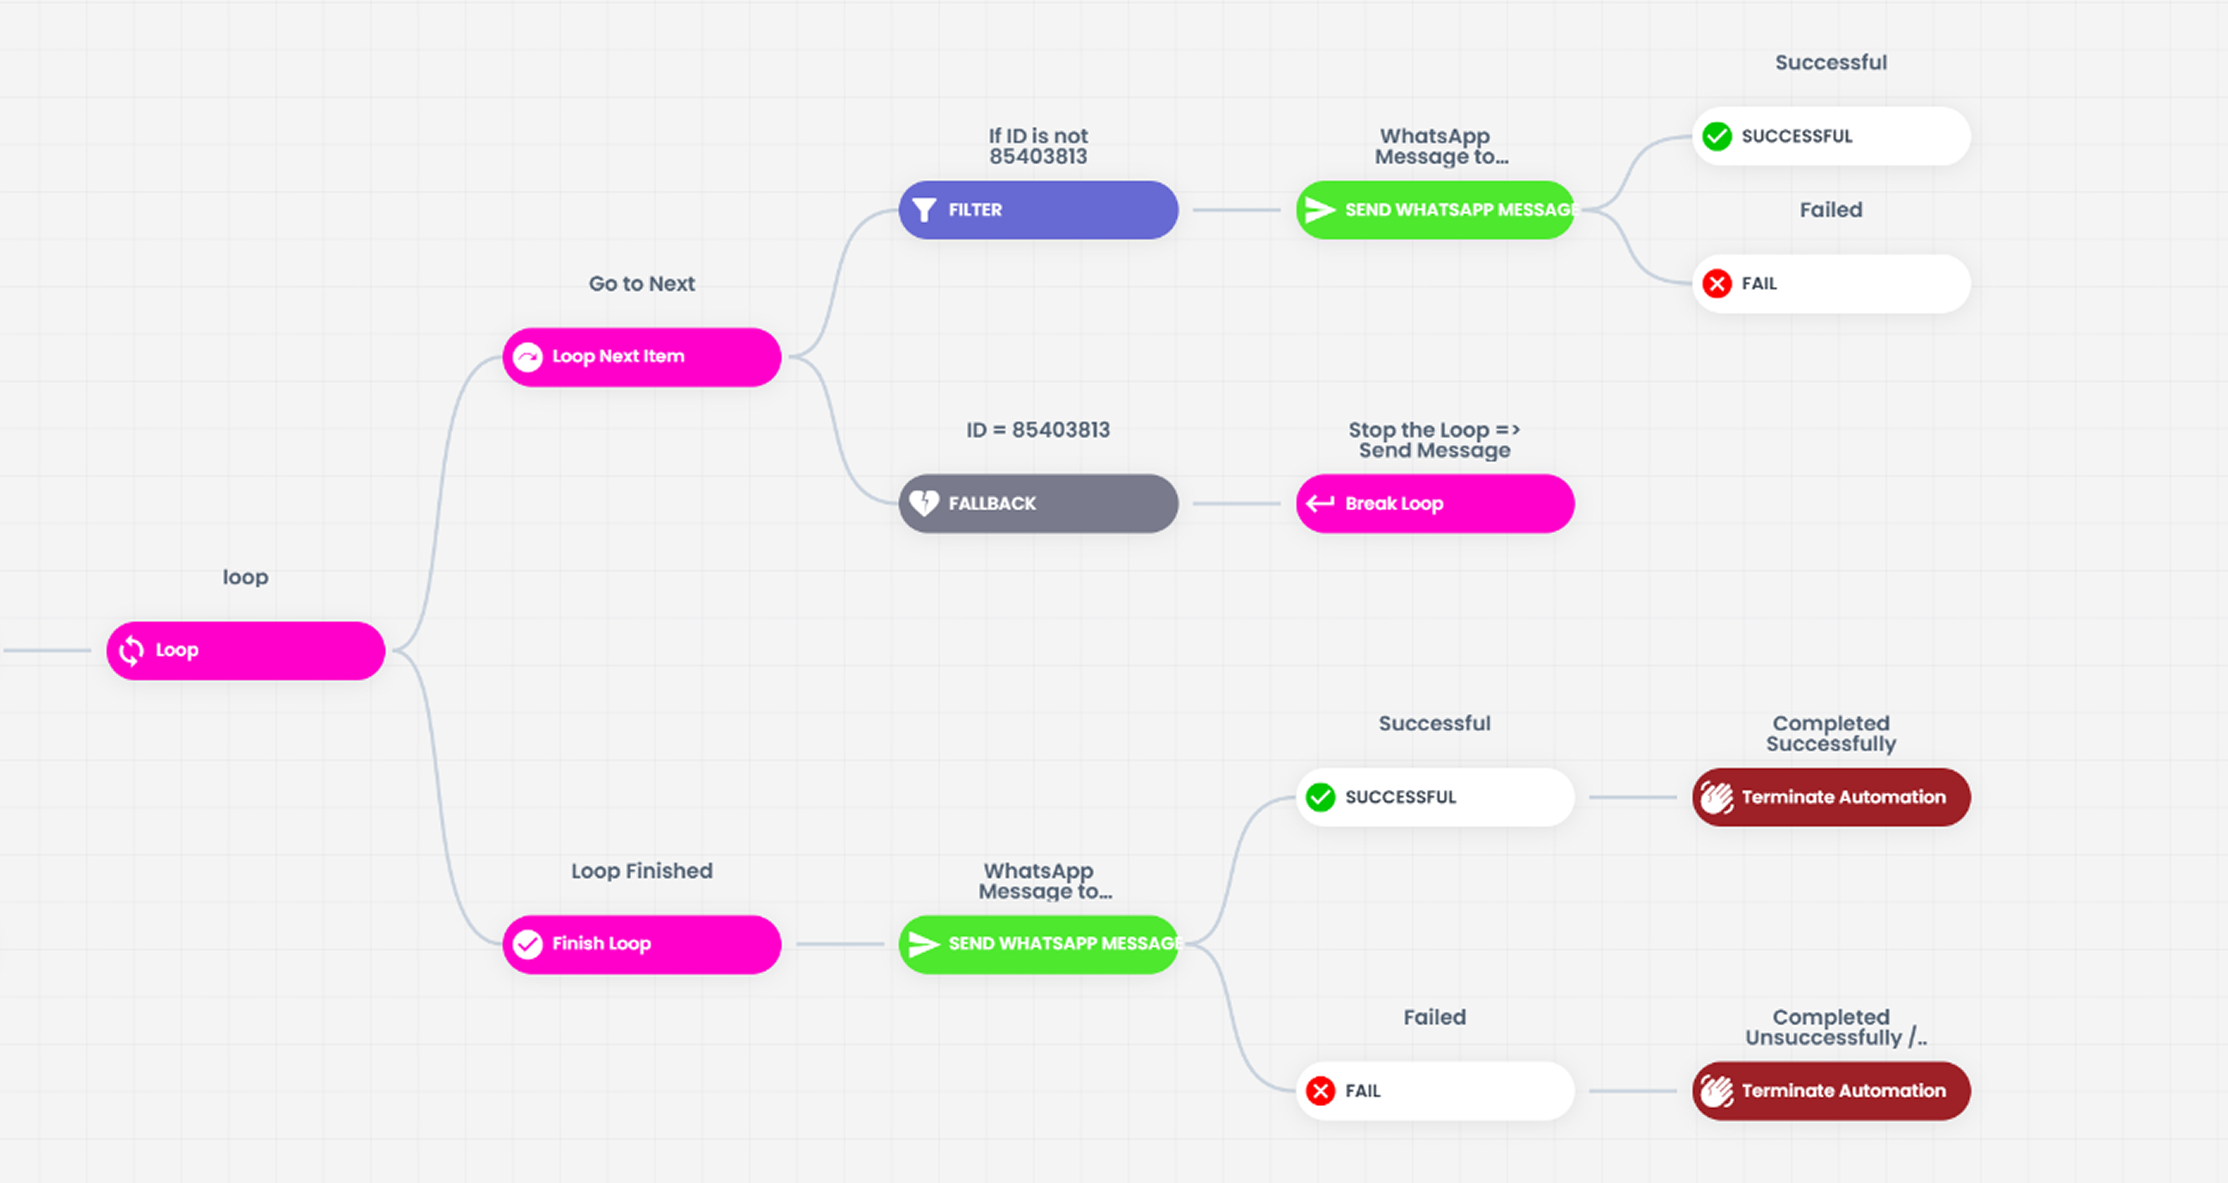
Loop: It is the main configuration block where how the relevant data set will be processed within the automation and according to which rules it will be parsed is defined. You can determine the basic parameters of your loop through this block.
Next Data: Each item in the processed data set is transferred to this block sequentially after being parsed by the Loop block. Each transferred data item is read through the "Next Data" block, and the operations you add after this block are executed specifically for each item. When the flow connected after the next data is completed, the system returns to the beginning and restarts the flow for the next new item until the data in the loop is finished. This process is repeated until all items in the data set are exhausted.
Loop End: This block is activated when the processing of all items in the data set is successfully completed according to your configuration settings. Your automation flow continues seamlessly through the operations you add after the "Loop End" block.
Block Content
The Loop block content is the main configuration step where you define the data to be included in the loop and how the data content will be processed.
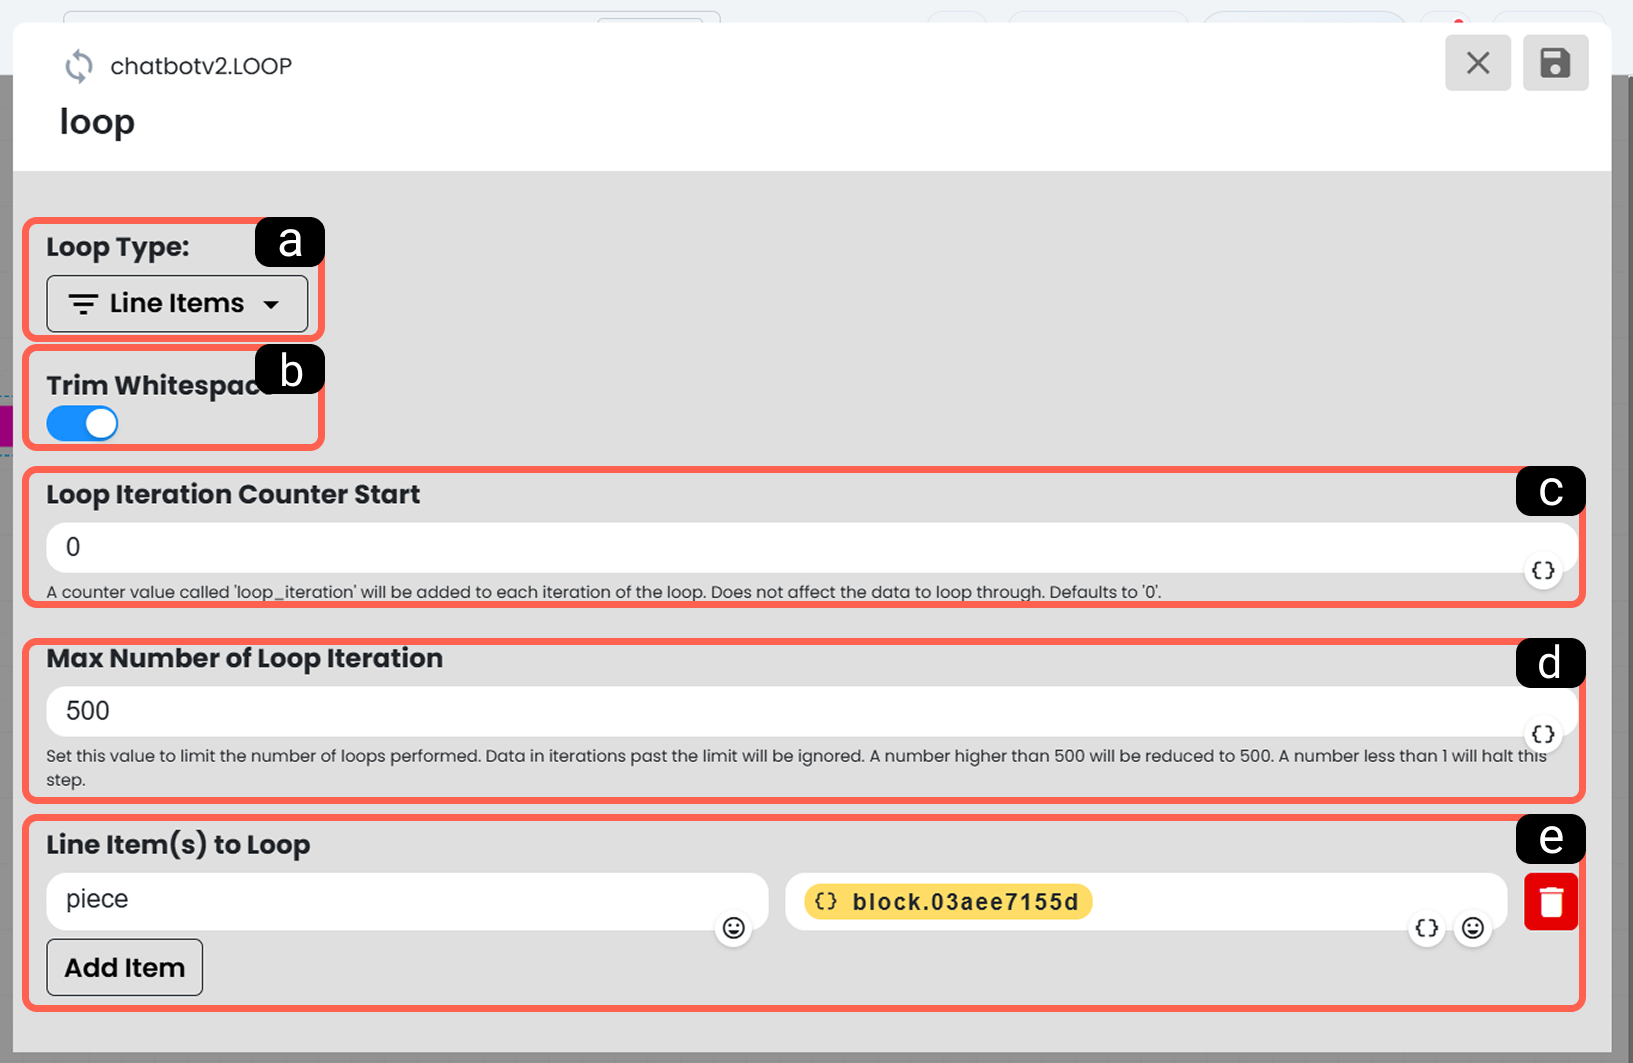
a. Data Type Entered into the Loop
This is the main configuration step where you determine the format of the data to be included in the loop. According to the data type you select, the configuration options offered by the automation and the data parsing rules dynamically change. You can operate through three different data types according to your needs:
- Line Items: It is used to process bulk data coming in table or list (array) format. Each row in the data set is parsed one by one by the system and included in the loop as independent items.
- Numbers: It allows you to perform operations within a numeric range (start and end values) that you define. It ensures that the system counts rhythmically according to the defined rule sequence and automatically repeats the operation you want at each counting step.
- Text: It is used to split a unified text into parts based on a specific character (delimiter) you define. For example, if you define the delimiter character as a comma (","), the system detects each comma in the text and transfers the text segments between two commas to the loop as independent data items.
b. Trim Whitespace
This is the setting that ensures the automatic removal of unnecessary spaces at the beginning and end of texts during the data processing process. When activated, it helps you obtain a cleaner and more standardized data output.
c. Loop Iteration Counter Start
This is the field where you determine from which value the system counter that tracks loop steps will start. For example, if you enter the value "0" here, the loop counting starts from zero. The counter value is automatically updated and incremented at each processing step. You can always access this value via the "Next Data" block in your automation and read the current iteration information.
d. Max Number of Loop Iteration
This is the area where you ensure system security by limiting how many times the loop can run at most. If the amount of data entering the loop exceeds this limit, no operation is performed for the data exceeding the limit and the loop is safely stopped.
e. Data Set
This is the critical section where you define and configure the main data you want to include in the loop. The data set added here is parsed by the system according to the data type you selected and each part is transferred sequentially to the "Next Data" block. The requirements of this field vary according to the loop type you selected as follows:
For Line Items Loops:
You need to add the table or list (array) data that you want to be parsed and processed from the data within the loop to this field.

Each part in the loop can be read from within the next data block.
For Numbers Loops:
This is the configuration where you determine by how much the number will increase at each step while progressing from the starting value of the counter to the maximum value.

For example; if you set the starting value to 0, the maximum value to 10, and the increment value to 1, the system progresses as 0, 1, 2... 10 and repeats the operation you define for each number step. This data content can be read from within the next data block.
For Text Loops:
It is used to split a unified text into parts based on a specific character (delimiter) you define.
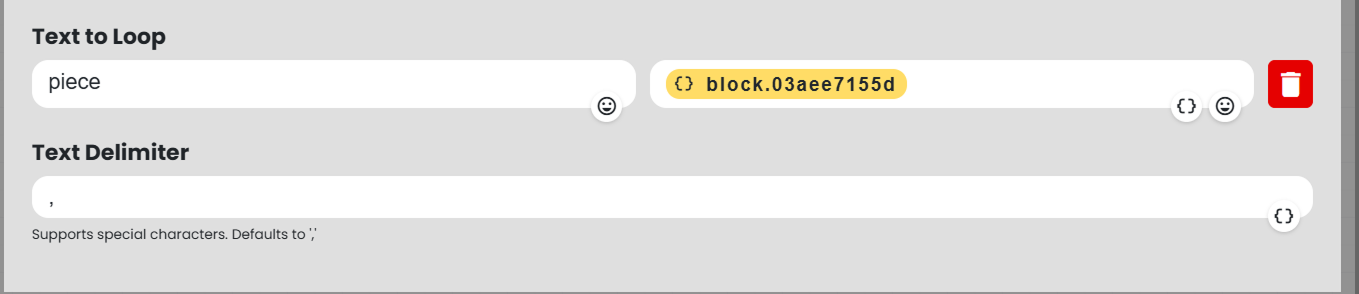
In this data type, two sub-settings appear:
“Text to Loop” is the data field where you enter the main text block or text variable you want to split.
“Text Delimiter” is the reference point where you determine from which character (delimiter) the text will be split. (e.g.: when a comma (,) is entered, the system splits the text by commas).
3.b – Next Data
The Next Data block is a bridge component that works integrated with the main Loop block and allows each item parsed from the data set to be read sequentially one by one.
Each item in the processed data set is transferred to this block sequentially after being parsed by the Loop block. Each transferred data item is read through the "Next Data" block, and the operations you add after this block are executed only for the specific data item (data piece) being read at that moment.
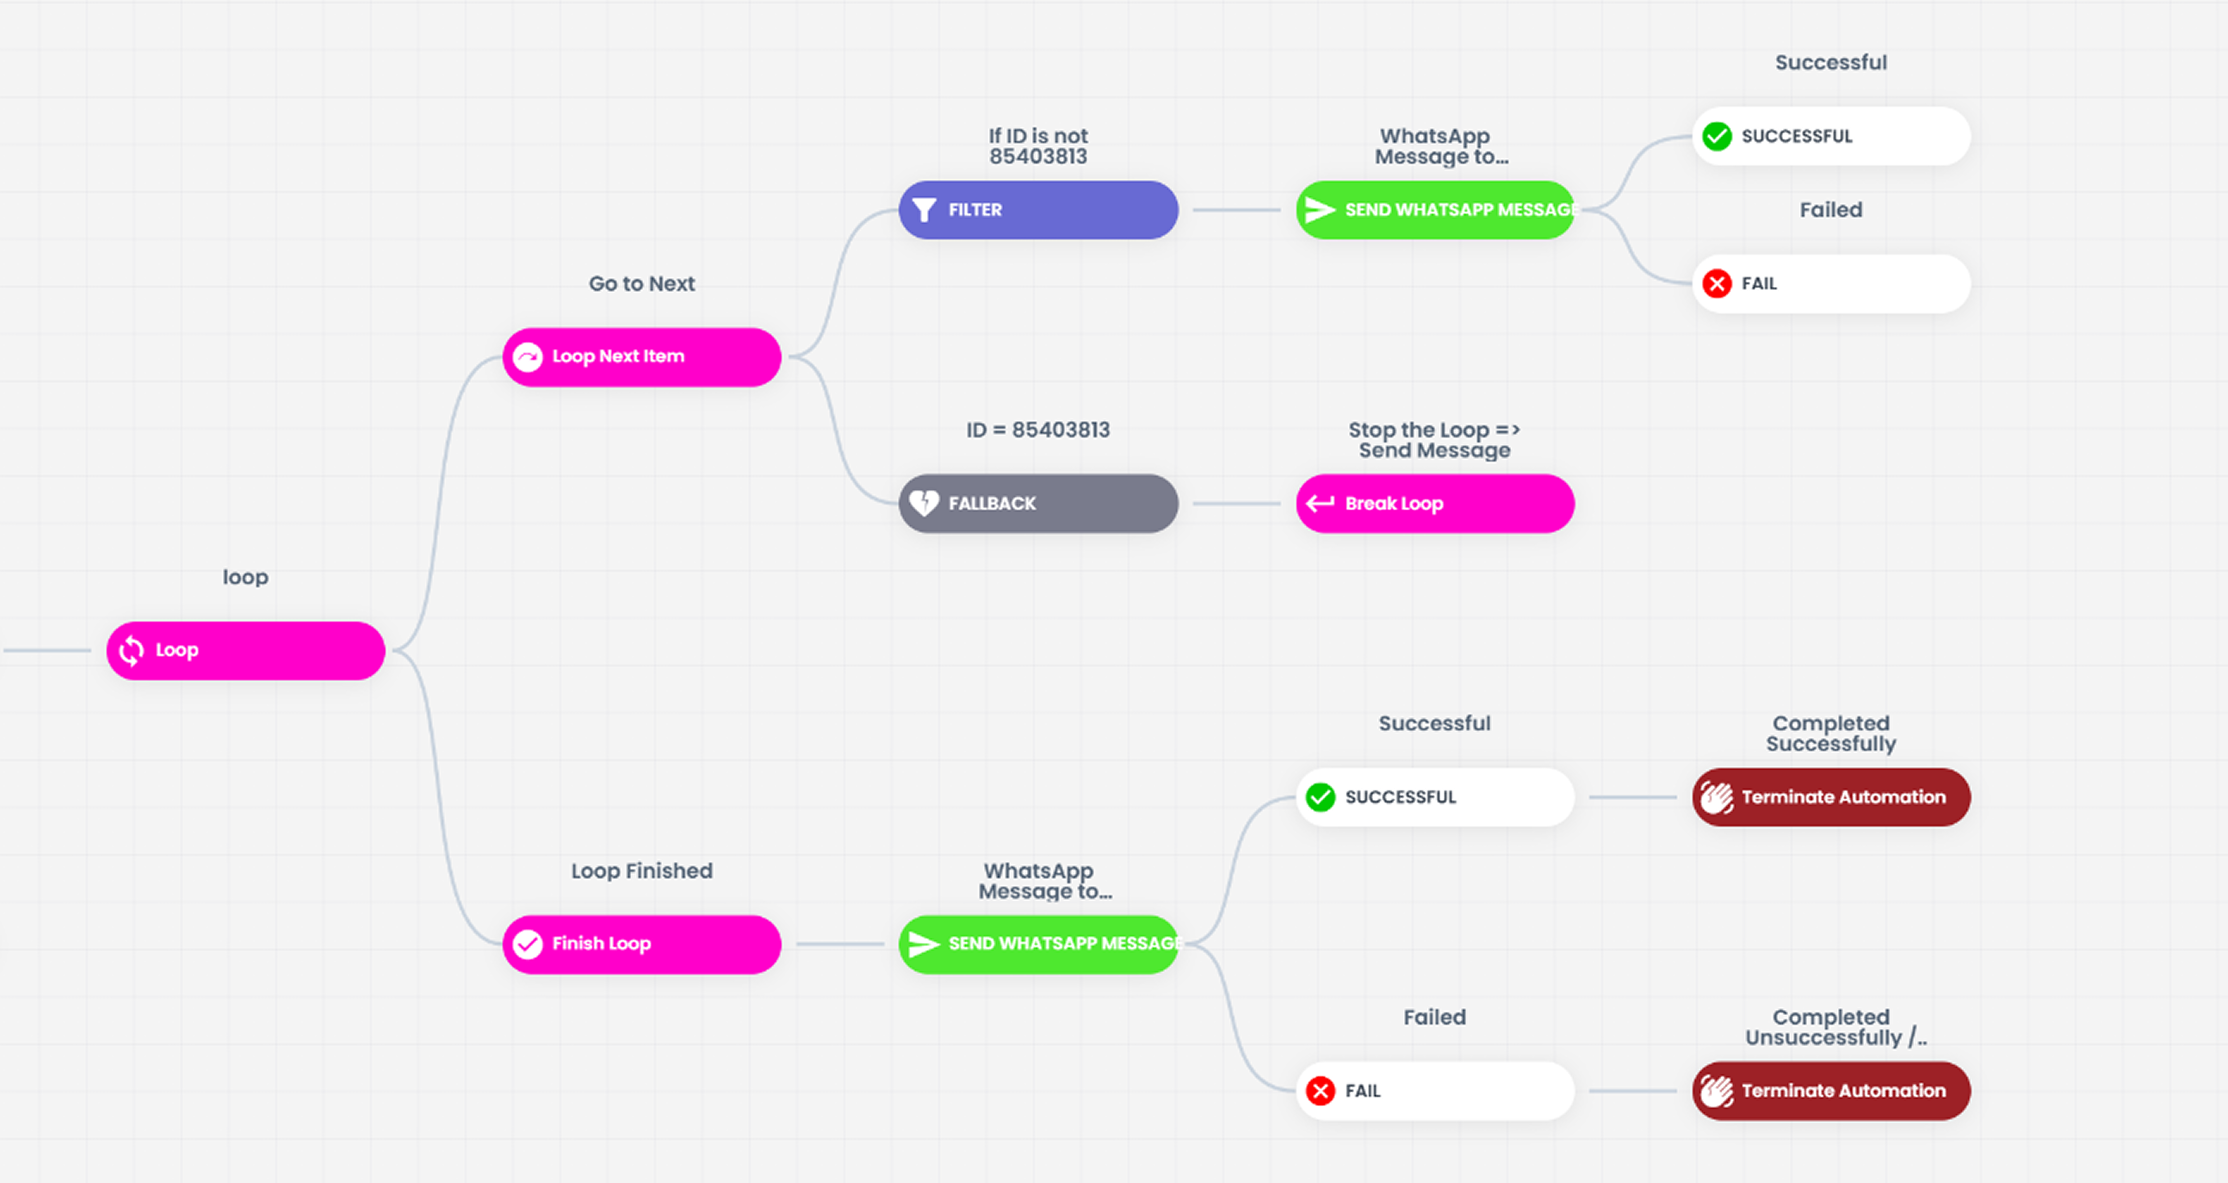
When the automation flow connected after the Next Data block is completed, the system returns to the beginning again. Until all the data set included in the loop is exhausted, the "Loop ➔ Next Data ➔ Defined Operations ➔ Loop" routine is repeated continuously.
How to Read the Data Item in the Loop
In the blocks you add after the Next Data flow, you can follow the steps below to read the specific data item currently in the loop and use it within the automation.
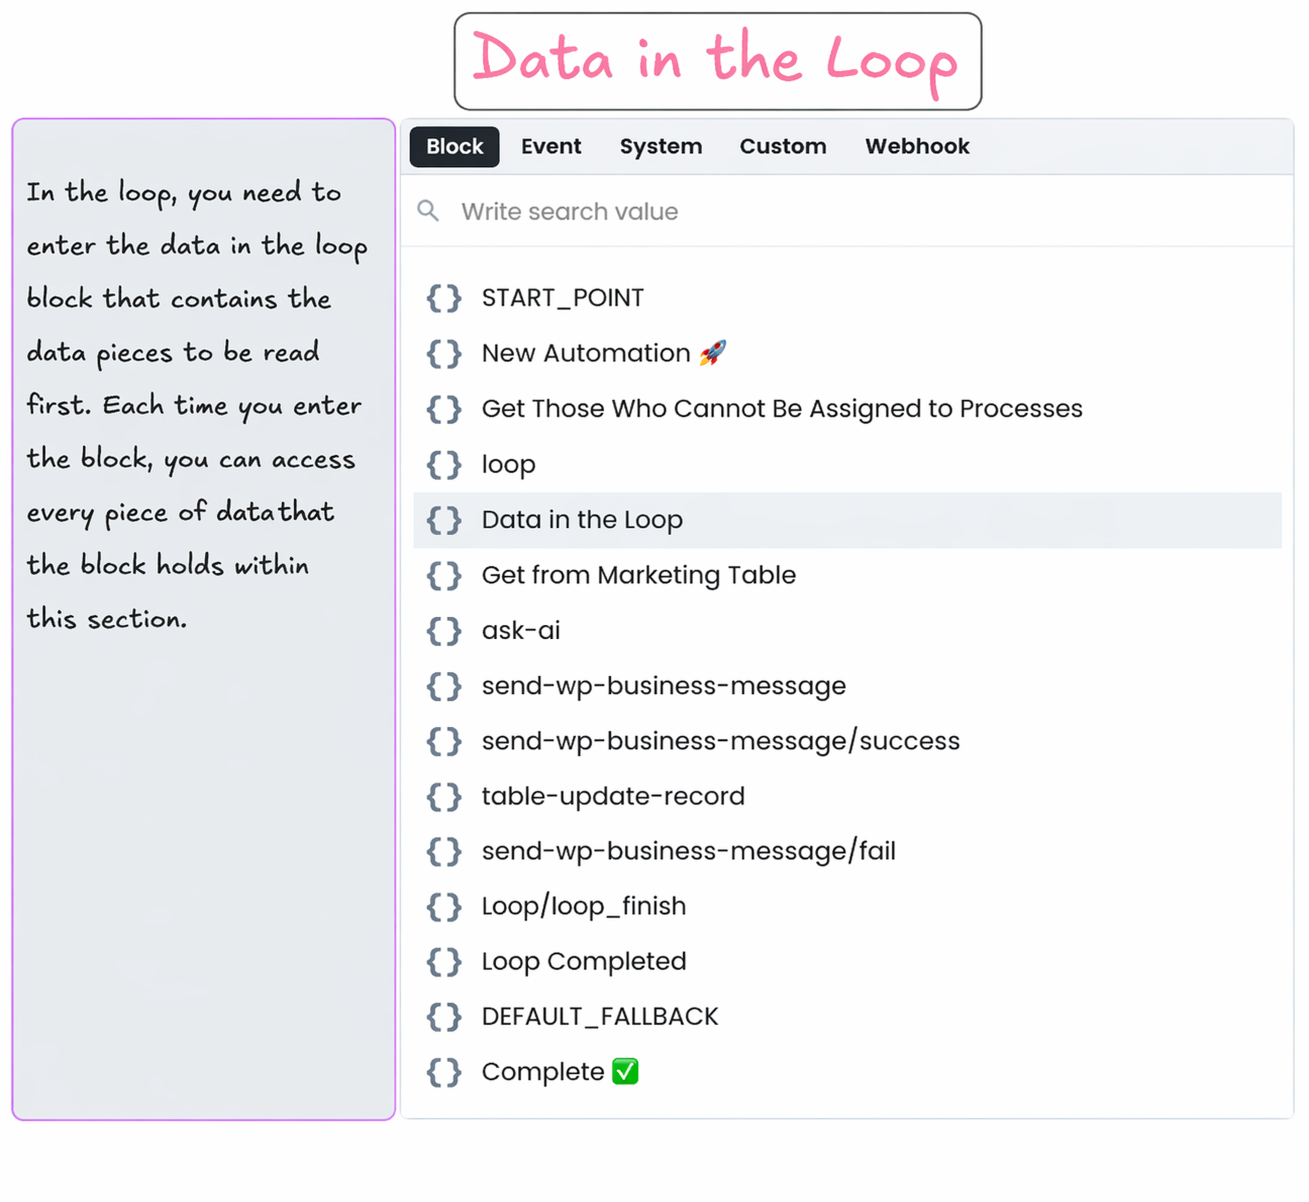
1. Determining the Data Source: Enter the block content that will process the data item in the loop and select the "Block" option among the data reading methods (Data Source).
2. Selecting the Relevant Block: From the "Blocks" list that opens, find and select the "Next Data" block as the source from which you will retrieve the data.
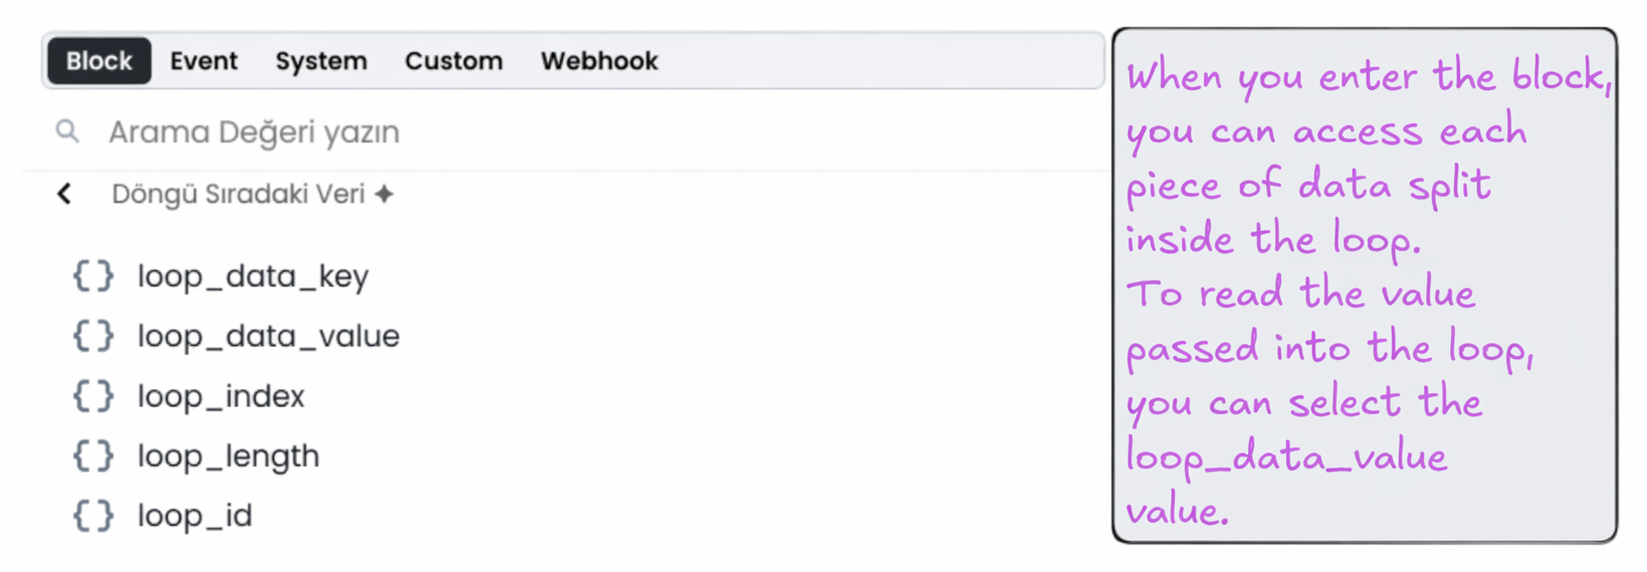
3. Retrieving the Data Value: To access each data item parsed and queued by the loop, select the loop_data_value parameter from the variables. This value will reflect the current data being processed in that iteration of the loop.
3.c – Stop Loop
This control block is used when the loop needs to be completely stopped when a certain condition is met or when the targeted stage is reached in your automation scenario.
For example; when a specific word you are searching for is found within the processed data set or when a rule you define is matched, you can stop the loop instantly by applying filtering.
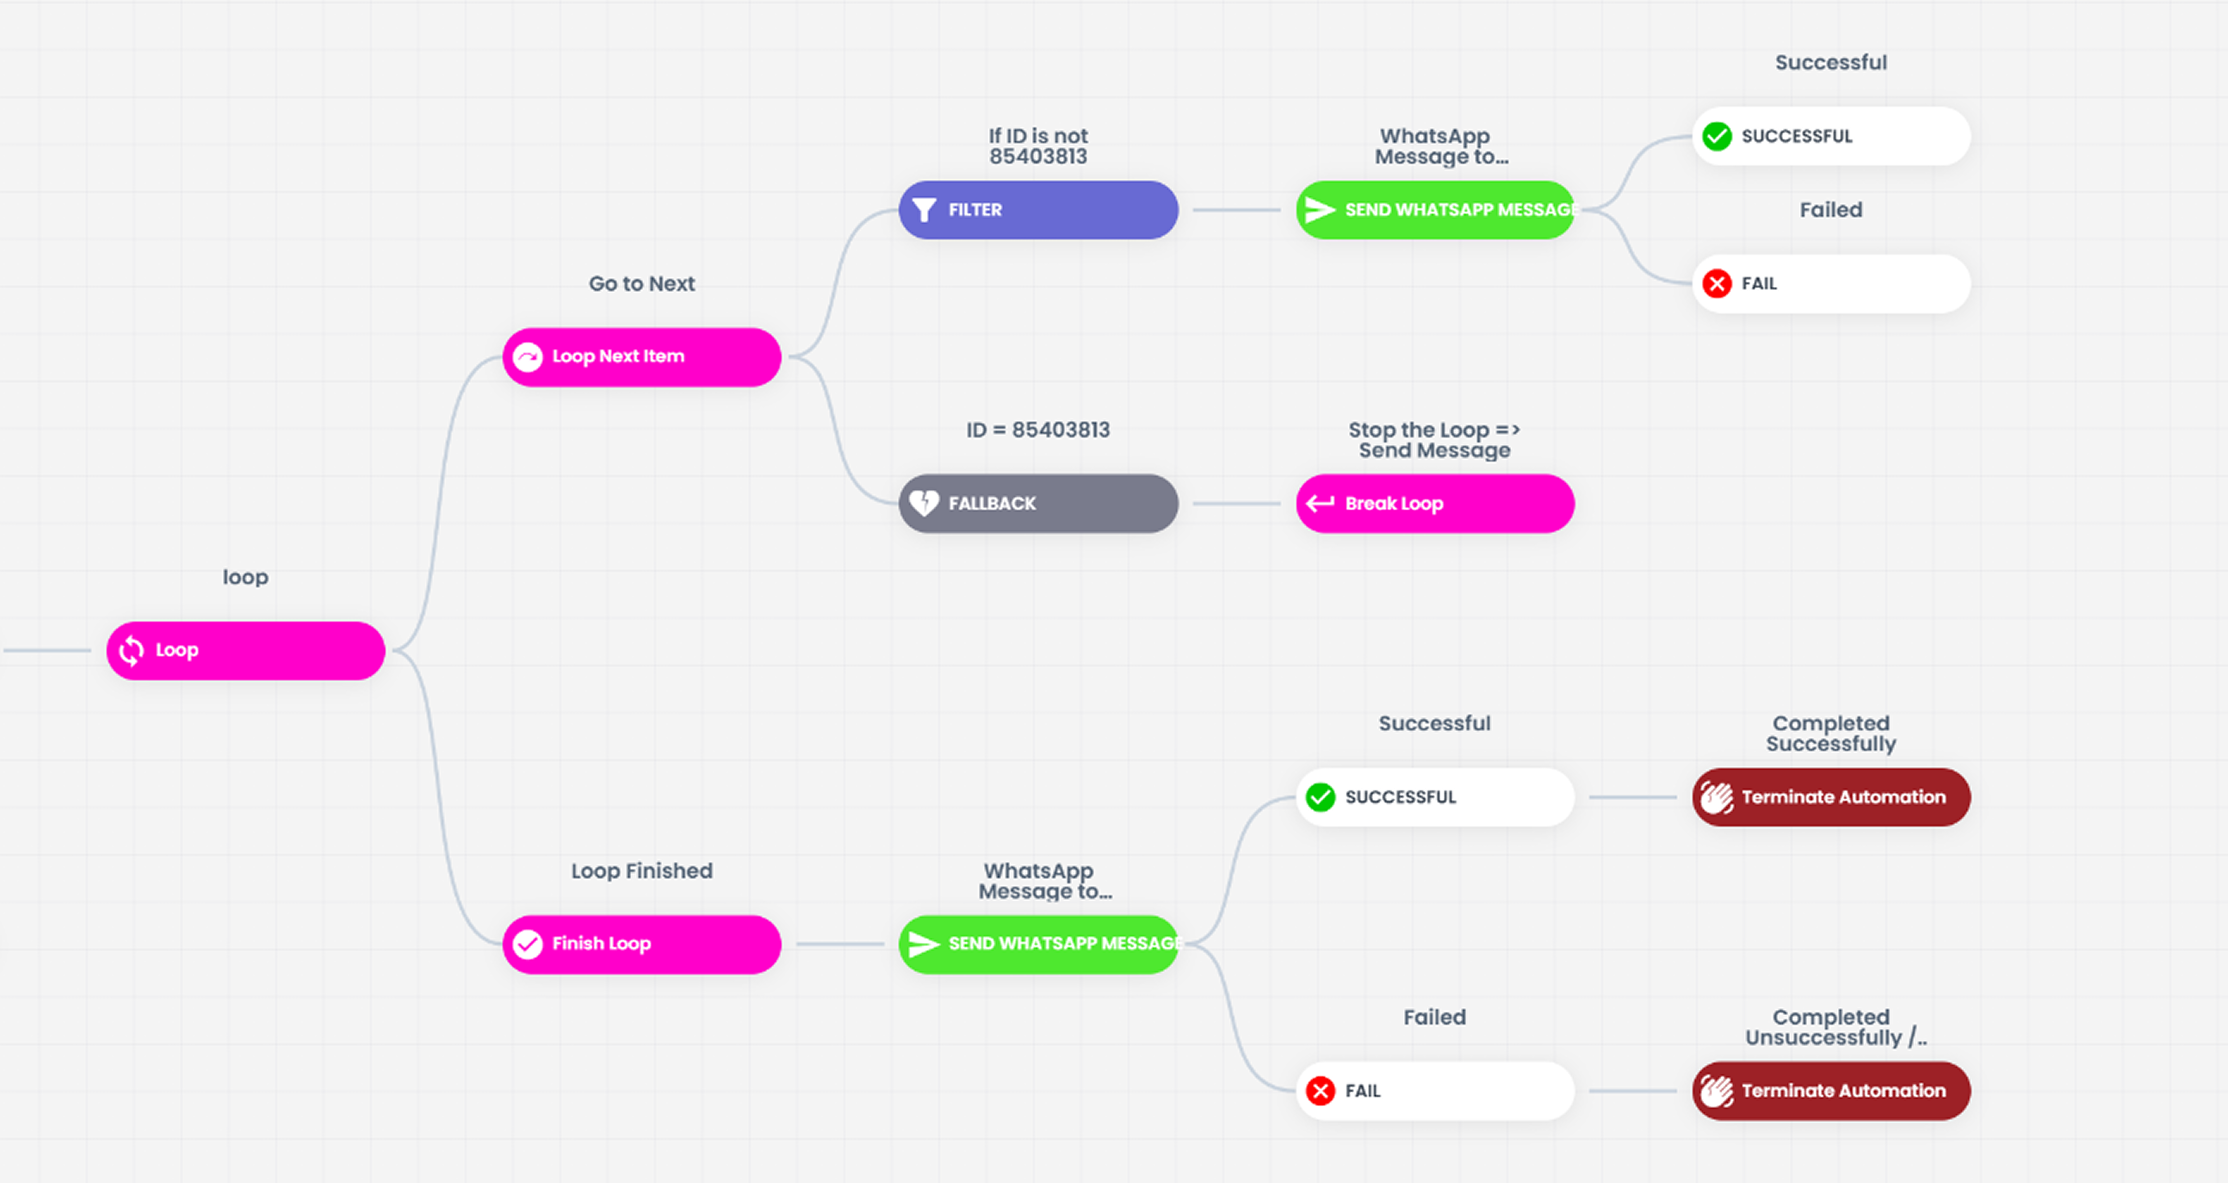
As soon as the scenario flow interacts with this block, the current loop process is terminated and the system directly proceeds to the operations you defined after the "Loop End" block.
3.d – Skip to Next
It is a skip (pass) block used to jump directly to the next data item without performing any operation on the current data item when a certain condition is met within the processed data set in the loop process. For example; if a specific word or value that you do not want to process among the data entering the loop is encountered, the system filters that data, skips it without processing, and continues the loop from where it left off to read the next data.
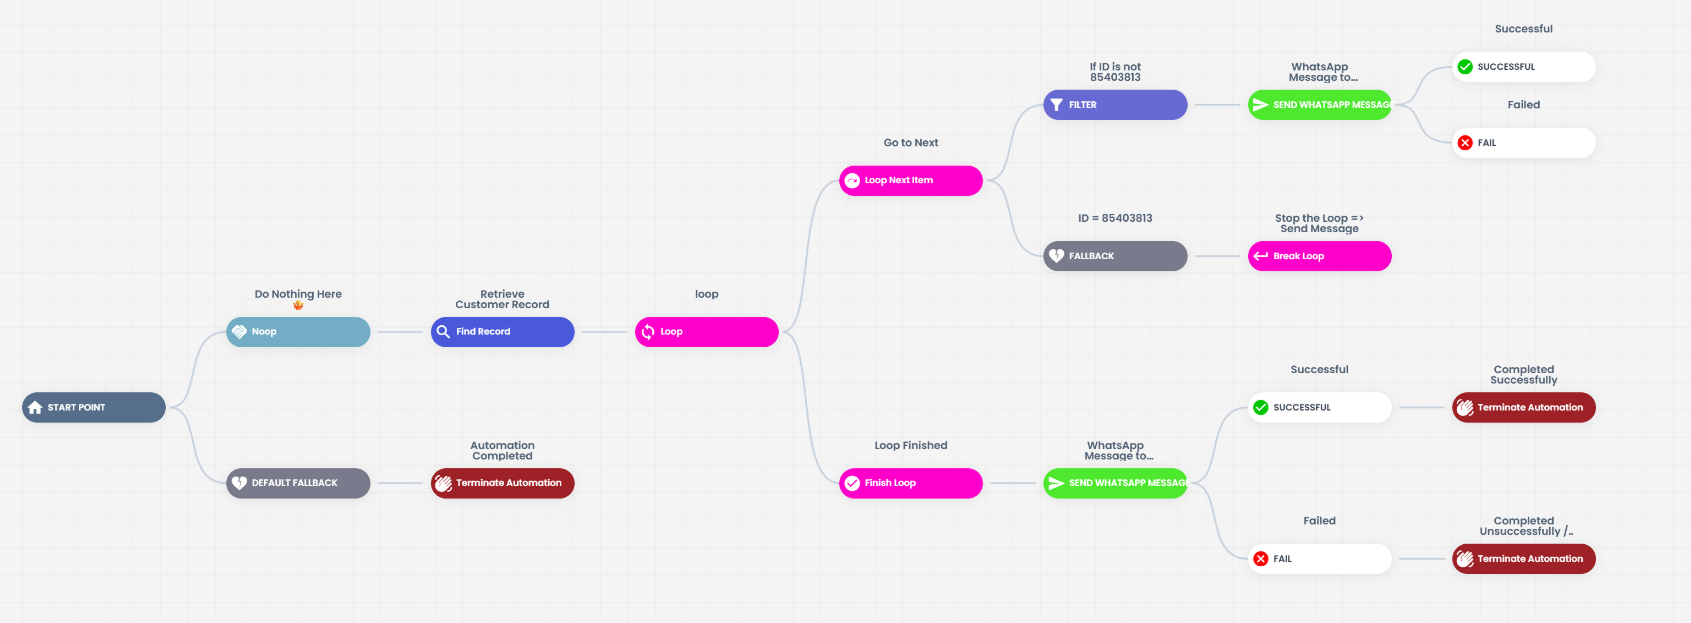
This block is ideal for preventing unnecessary processing load and conditionally filtering data.
3.e – Loop End
It is the main termination block that is activated when the processing of all items in the data set included in the automation is successfully completed or when the flow is interrupted with the "Stop Loop" block. When the loop processes end, the system is automatically directed to this block.
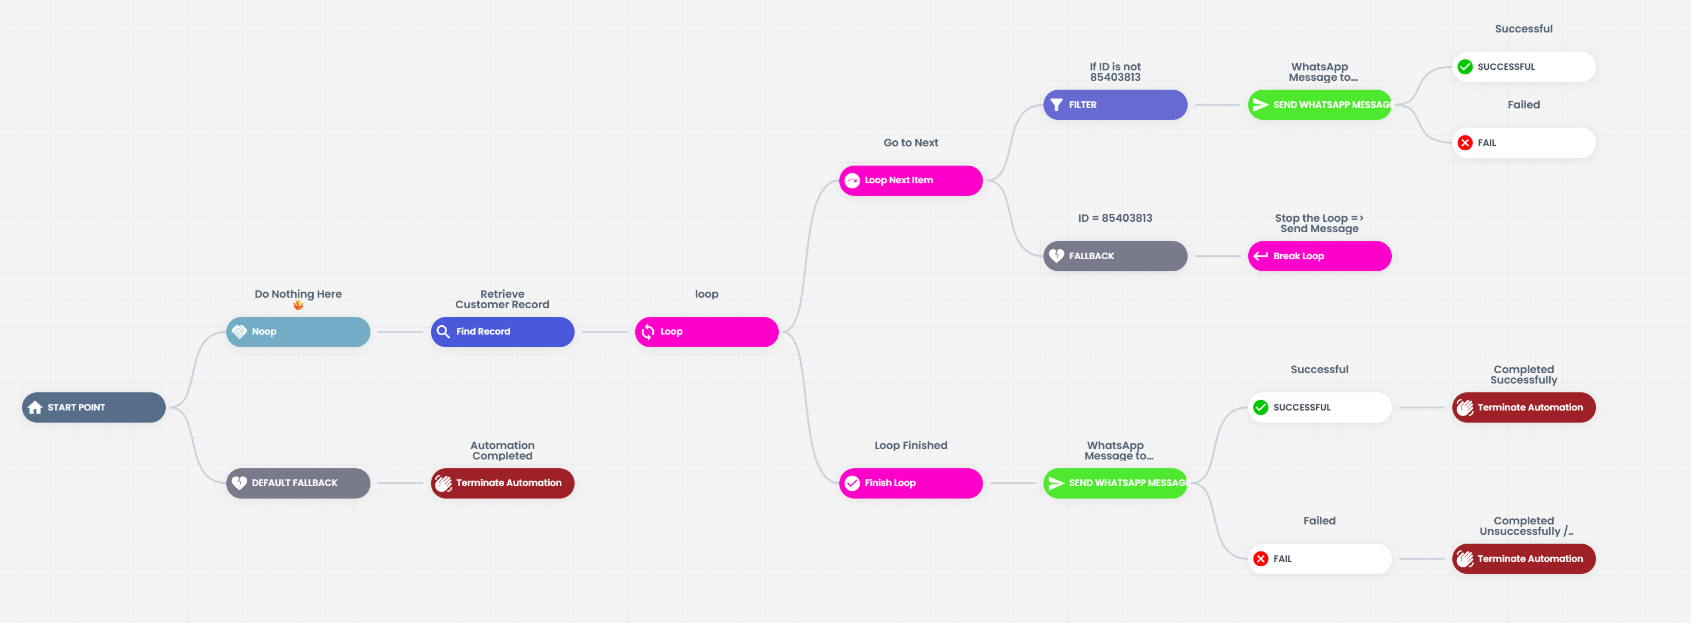
In order for your automation scenario to continue seamlessly with post-loop operations, you can configure all your remaining flow by connecting it after this block.
4. Data Formatters
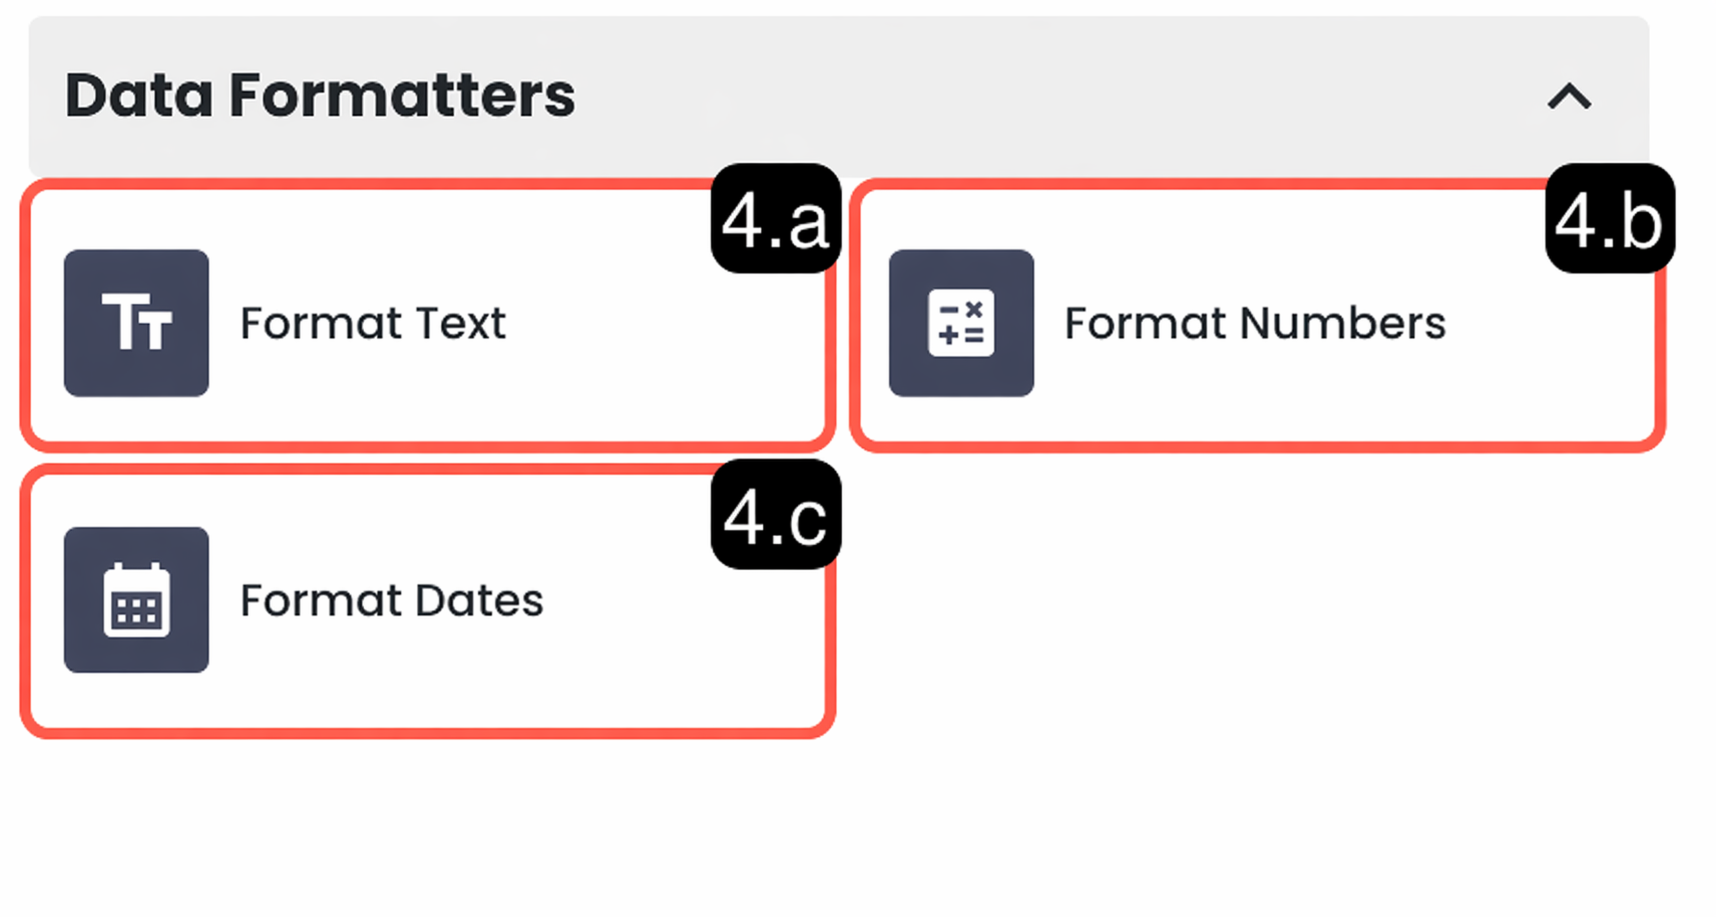
4.a – Format Text
The Format Text block is a comprehensive data processing tool used to standardize, transform, and organize text data in your automation flow according to your needs. With this block, you can convert raw texts in the system into different formats, clean unnecessary data, or extract specific information from the text.
In addition, you can easily read and use the output you format here in other automation steps connected after the block with the block data reading method.
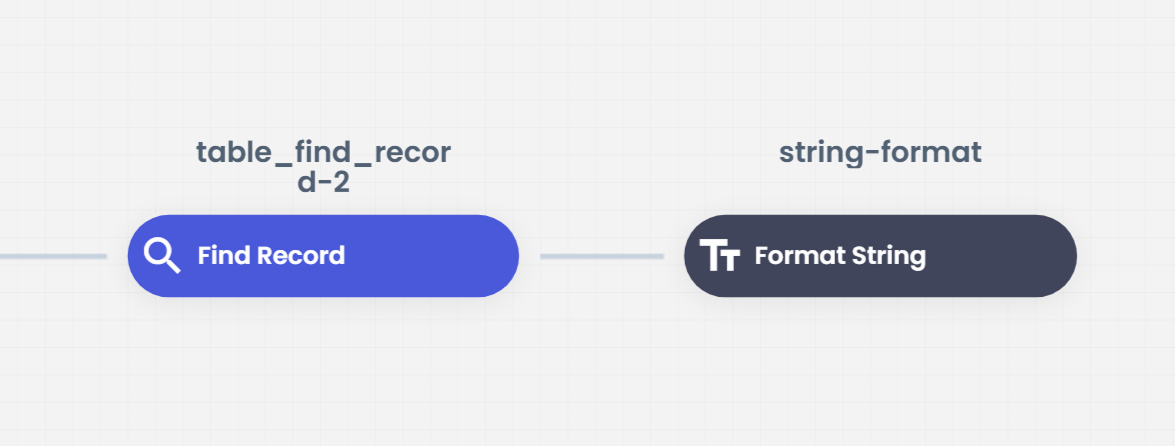
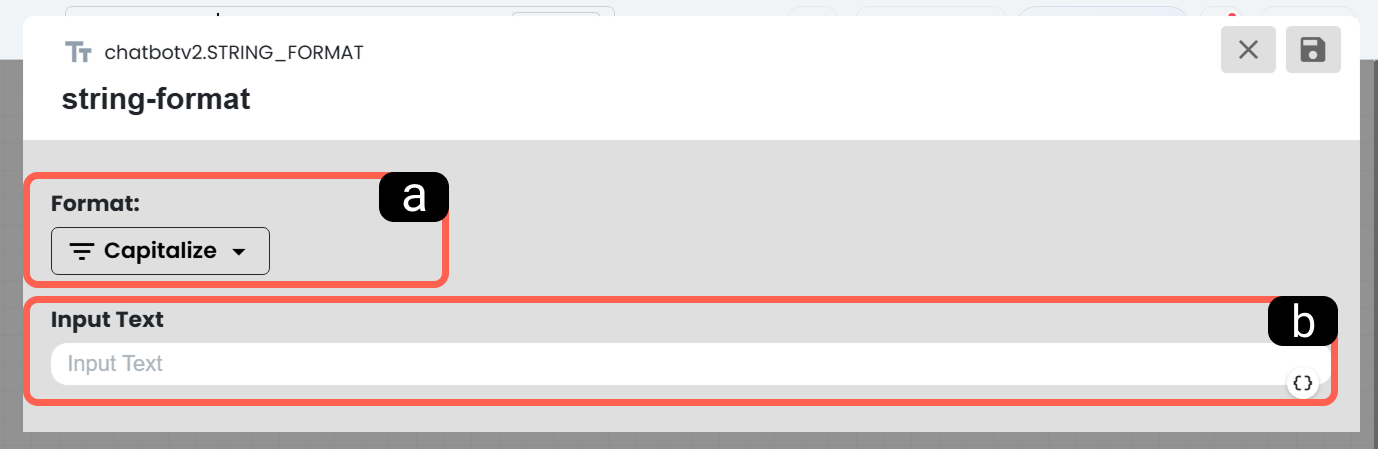
a. Format Selection
Through this dropdown menu, you can select the formatting or transformation operation you want to apply to the input text. Each format type serves a specific data processing purpose. The formatting operations offered by the block are as follows:
- Capitalize: Converts the first letter of each word in the text to uppercase.
- Lowercase: Converts all characters in the text to lowercase.
- Uppercase: Converts all characters in the text to uppercase.
- Titlecase: Converts the first letter of each word to uppercase in accordance with the title format.
- Regex: Allows you to format the text according to advanced rules using Regular Expressions.
- Find: Finds a specific pattern or word you define within the text.
- Split: Splits the text into parts based on a delimiter (dot, comma, etc.) you define.
- Replace: Replaces a specific word or character sequence in the text with another value you define.
- Truncate: Shortens long texts by trimming them according to the character limit you specify.
- Default: Allows you to assign a default value to be used by the system when the input text is empty.
- Trim Whitespace: Cleans unnecessary whitespace characters at the beginning and end of the text.
- HTML to Markdown: Converts text in HTML format into Markdown format.
- Markdown to HTML: Converts text in Markdown format into web-compatible HTML format.
- XML to JSON: Converts data in XML format into a JSON data structure that is easier to process.
- Read JSON Path: Reads only the targeted specific value from data in JSON format by specifying a JSONPath.
- Remove HTML Tags: Removes all HTML tags in the text and leaves only plain text.
- Encode ASCII: Encodes the text in accordance with ASCII standards.
- Extract Phone Number: Detects and extracts phone numbers within a complex text.
- Extract Email: Finds email addresses in the text and makes them accessible for the system.
- Extract URL: Detects and extracts website links (URLs) in the text.
- Extract Number: Finds numerical values in the text and separates them from the text.
- Extract Hashtag: Extracts tagged (#hashtag) words in the text.
- Extract Mention: Finds and extracts mention (@mention) values in the text.
- Word Count: Counts how many words the text block consists of.
- Encode URL: Encodes the text into a valid URL format that web browsers can read.
- Decode URL: Decodes previously URL-encoded complex text into readable plain text.
- Shuffle: Randomly shuffles the order of items in a list (array).
- Sort: Sorts items in a list (array) according to a specific order (alphabetical/numerical).
- Reverse: Reverses the order of items in a list (array) completely (from end to beginning).
- Sample: Randomly selects an item from a list (array) based on sampling logic.
- Take First: Takes the first item in a list (array).
b. Input Text
This is the section where you define the main data to which the formatting operation you selected (e.g.: Uppercase, Split, Word Count, etc.) will be applied. You can either write a fixed text directly into the input field or perform a dynamic formatting process by adding variables coming from previous stages of your automation (e.g.: a message from a customer or a name received from a form).
4.b – Format Numbers
The Format Numbers block is a processing block that allows you to perform various mathematical operations on numerical data in your automation flow and format these data according to your needs.
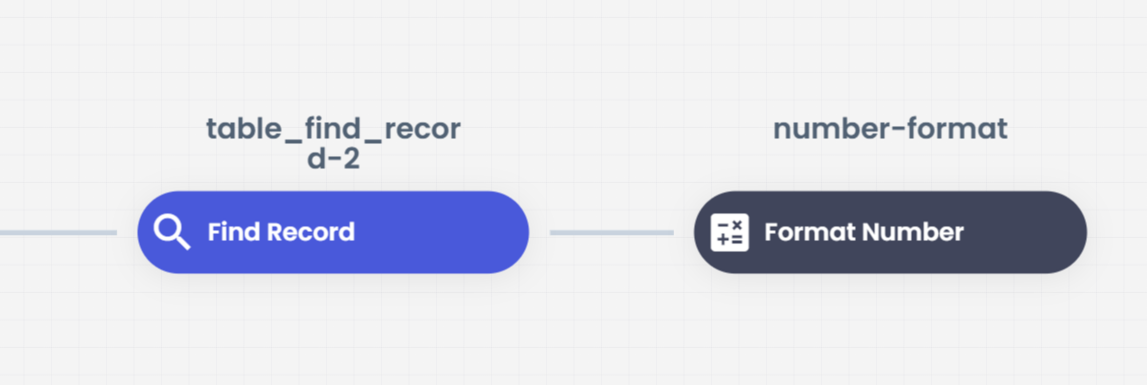
With this block, you can calculate, transform, and convert complex numerical data in the system into an end-user-friendly (or system-processable) output to be used in your processes.
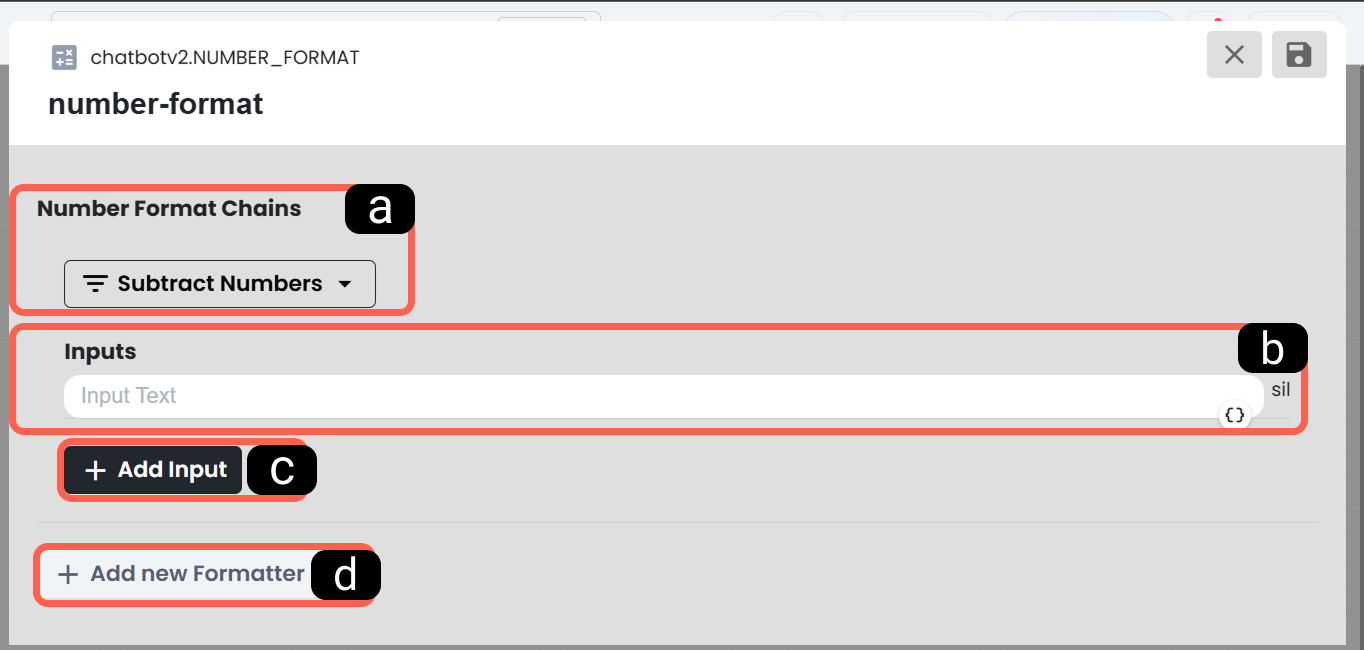
a. Formatting Type
Through this menu, you determine the mathematical formula or transformation operation you want to apply to your numerical inputs. The formatting operations you can choose according to your needs are as follows:
- Sum Numbers: Adds all numerical values entered into the input field together.
- Subtract Numbers: Subtracts numerical values entered into the input field from each other.
- Multiply Numbers: Multiplies all numerical values entered into the input field.
- Divide Numbers: Divides numerical values entered into the input field.
- Absolute Value: Returns the absolute (positive) value of the processed number.
- Ceil: Rounds a decimal number up to the nearest integer.
- Floor: Rounds a decimal number down to the nearest integer.
- Round: Rounds a decimal number to the nearest integer according to mathematical rules.
- Max: Finds the largest value among multiple numbers entered.
- Min: Finds the smallest value among multiple numbers entered.
- Average / Mean: Calculates the arithmetic average of all entered numbers.
- Increment +1: Automatically increases the processed numerical value by 1.
- Decrement -1: Automatically decreases the processed numerical value by 1.
b. Content to Be Formatted
This is the section where you enter the numerical values (Value 1, etc.) to which the mathematical operation you selected will be applied. You can either write a fixed number manually here or automate the operations by adding dynamic numerical variables (e.g.: price from a form, calculated amount, etc.) obtained from previous steps of your automation using the {x} icon.
c. Add Content
It is used for operations that require more than one numerical value such as addition, subtraction, or averaging. By clicking the "Add" button, you can create new input fields (Value 2, Value 3) and calculate multiple data sets in a single operation.
d. Add New Formatter
This button allows you to perform sequential (chained) operations on the numerical data you obtain. By adding a new formatter, you can create a multi-step mathematical structure within a single block, for example; first summing multiple numbers, then taking the average of the result, and finally rounding the decimal part up.
4.c – Format Dates
The Format Dates block is a data processing tool that allows you to structure, transform, and calculate date and time data in your automation flow according to your needs.
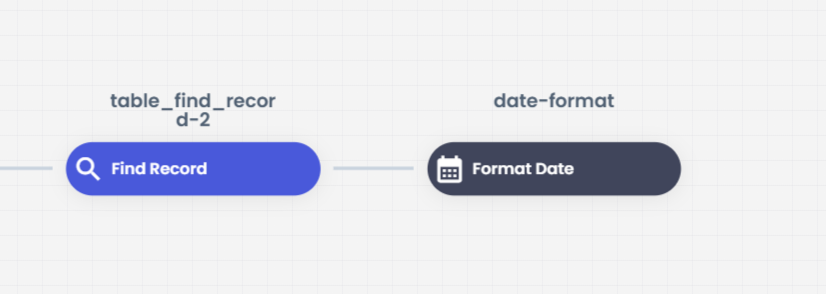
With this block, you can display raw date data in the system in correct, error-free, and user-friendly formats (for example; DAY/MONTH/YEAR, MONTH/DAY/YEAR, or the universal ISO 8601 standard YEAR-MONTH-DAY), and manage your calendar processes dynamically.
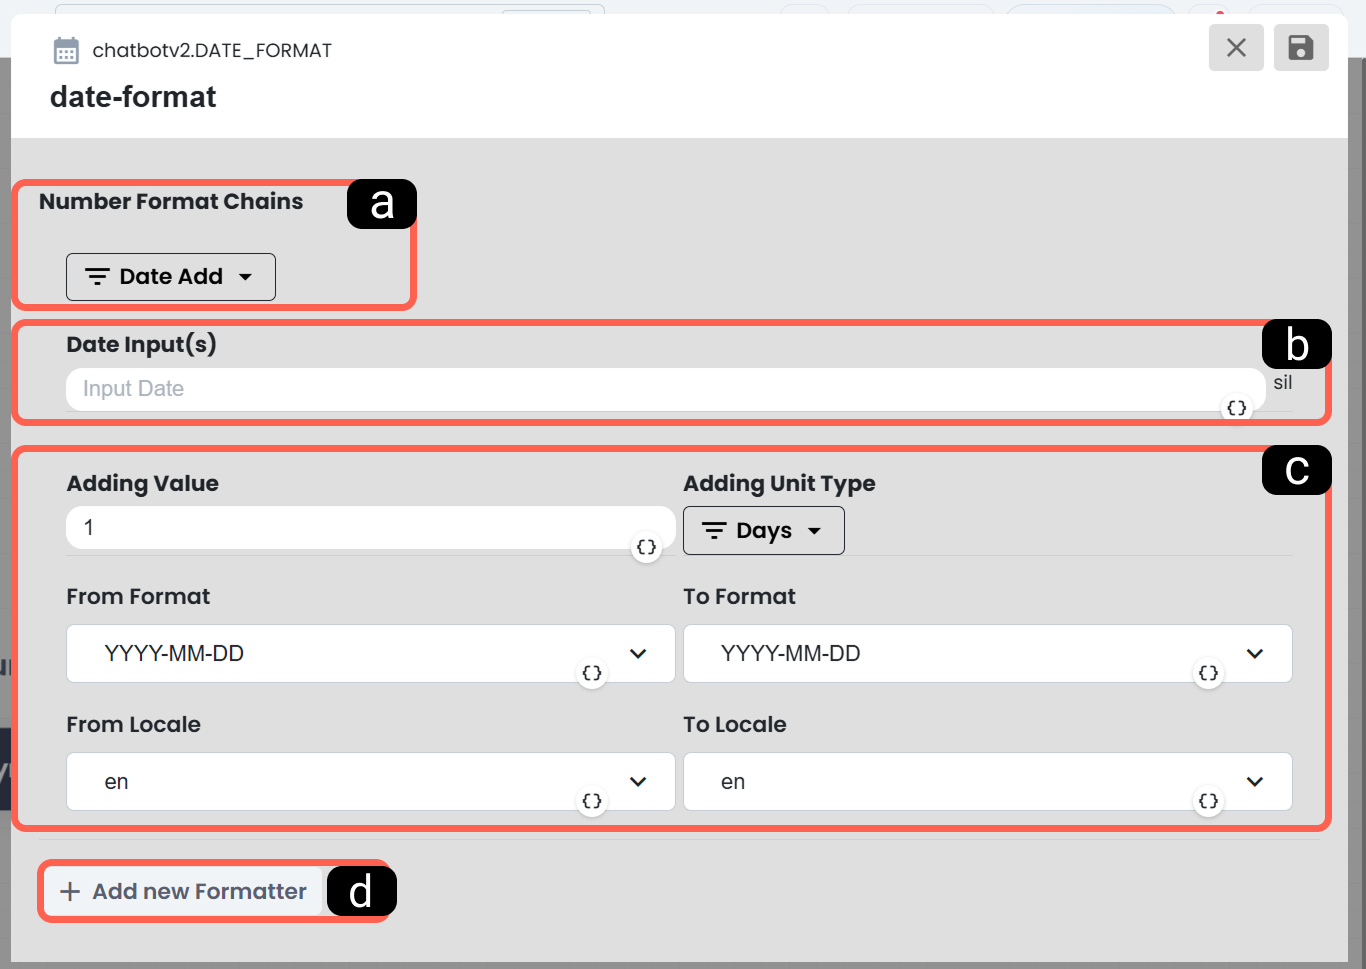
a. Formatting Type
Through this menu, you determine the transformation, calculation, or validation operation you want to apply to your date data. The formatting operations you can choose according to your needs are as follows:
- Date Add: Calculates a future date by adding a specific time period (day, month, year, hour, etc.) to an existing date.
- Date Sub: Calculates a past date by subtracting a specific time period from an existing date.
- Date Diff: Calculates the time difference (how many days, months, or years) between two different dates.
- Date Format: Converts date data into a specific visual format you define (e.g.: 15.03.2026 or 15 March 2026).
- Compare Dates: Compares two different dates with each other.
- Start Of: Returns the start date/time of the period (week, month, year) to which the given date belongs.
- End Of: Returns the end date/time of the period to which the given date belongs.
- Is Before: Checks whether a date is before another reference date (logically).
- Is After: Checks whether a date is after another reference date.
- Is Between: Checks whether a date falls between two specified dates.
- Is Leap Year: Checks whether the year in the processed date is a leap year.
- Is Weekend: Checks whether the relevant date falls on a weekend (Saturday/Sunday).
- Is Weekday: Checks whether the relevant date falls on a weekday.
- Is Today / Tomorrow / Yesterday: Verifies whether the processed date belongs to today, tomorrow, or yesterday according to the system time.
b. Content to Be Formatted
This is the section where you define the base date data to which the transformation or calculation operation you selected will be applied. You can either write a fixed date into the input field or automate the operations by adding dynamic date variables (e.g.: reservation date, form submission time, etc.) coming from previous steps of your automation.
c. Formatting Parameters
This is the section where you configure the details according to the formatting type you selected (step a). For example; when you select the "Date Add" operation, you define how much time will be added (e.g.: 1) and the time unit to be added (e.g.: days) through these parameter fields.
d. Add New Formatter
This button allows you to perform sequential (chained) operations on date data. With this feature, you can combine multiple operations in a single block. For example; in the first step, you can add 3 days to the current date (Date Add), and immediately after, convert this result into DAY/MONTH/YEAR format (Date Format) to obtain a perfect output.
5. File Actions
5.a – Collect CSV Records
The Collect CSV Records block is a data aggregation tool that allows you to create an organized table structure by bringing together data obtained from different sources during your automation flow in a standard CSV (Comma Separated Values) format. It is used to combine multiple data returned from Loop blocks, form submissions, or database queries into a single file format, export them, store them in a table, or send them in bulk to integrated systems (CRM, email, etc.).
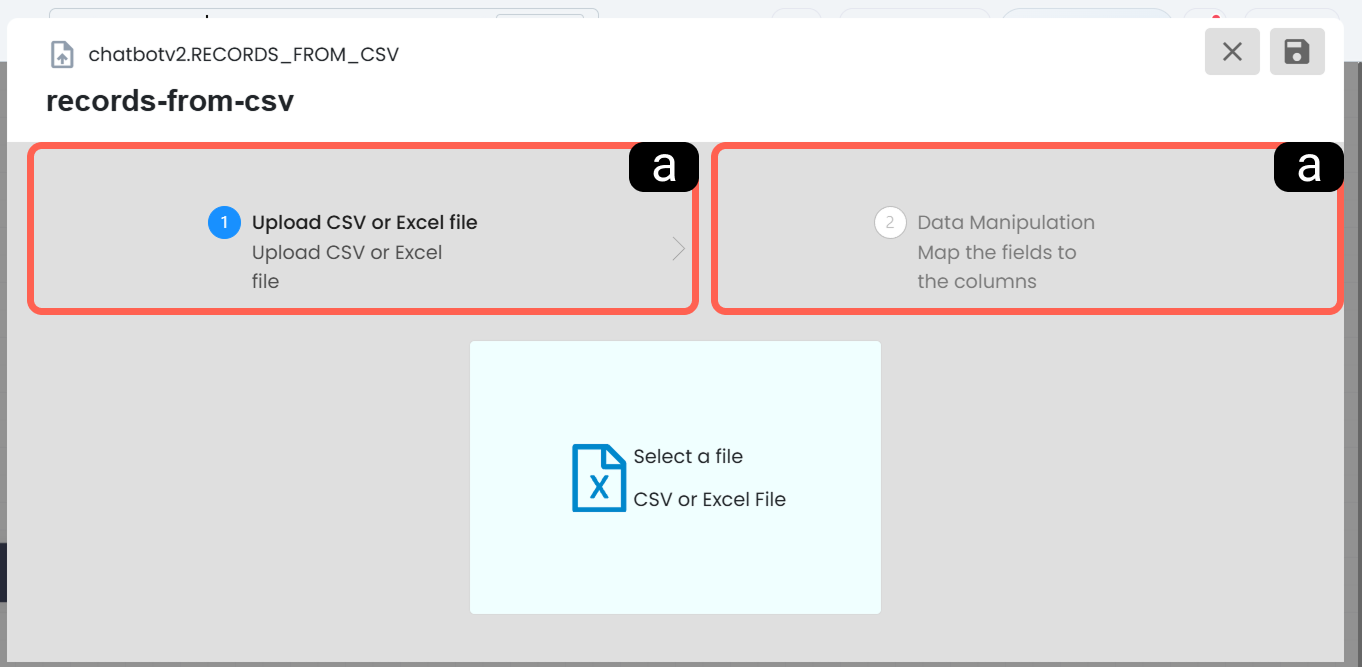
a. Document Upload
The CSV or Excel document where the records will be written must be uploaded through this field.
b. CSV Record Configuration
You can configure the automation data to be processed into the uploaded document through this field. While configuring this field, the following parameters are used:
Data Mapping (Row/Column Configuration): This is the area where you map which columns in the CSV file the data returned within the automation will correspond to. The system adds each incoming new data as a new row to the CSV records according to this mapping.
Column Headers (Headers): This is the section where you define the headers (e.g.: "Name", "Surname", "Contact") that will appear in the top row of the CSV table so that your data is organized and understandable.
Delimiter Selection: This is the setting where you determine which character will separate the data. Although the system uses a comma (,) by default, you can also define different delimiters such as semicolon (;) according to your needs to ensure full compatibility with Excel or different table readers.
6. Cache Actions
Cache actions allow you to manage temporary data within your automation flows using a key-value logic. Thanks to this structure, data that you will need again in the later steps of the scenario can be stored securely. While Supsis AI action blocks are used to manage automated processes, the Cache Manager structure also facilitates data sharing between automations and different scenarios.
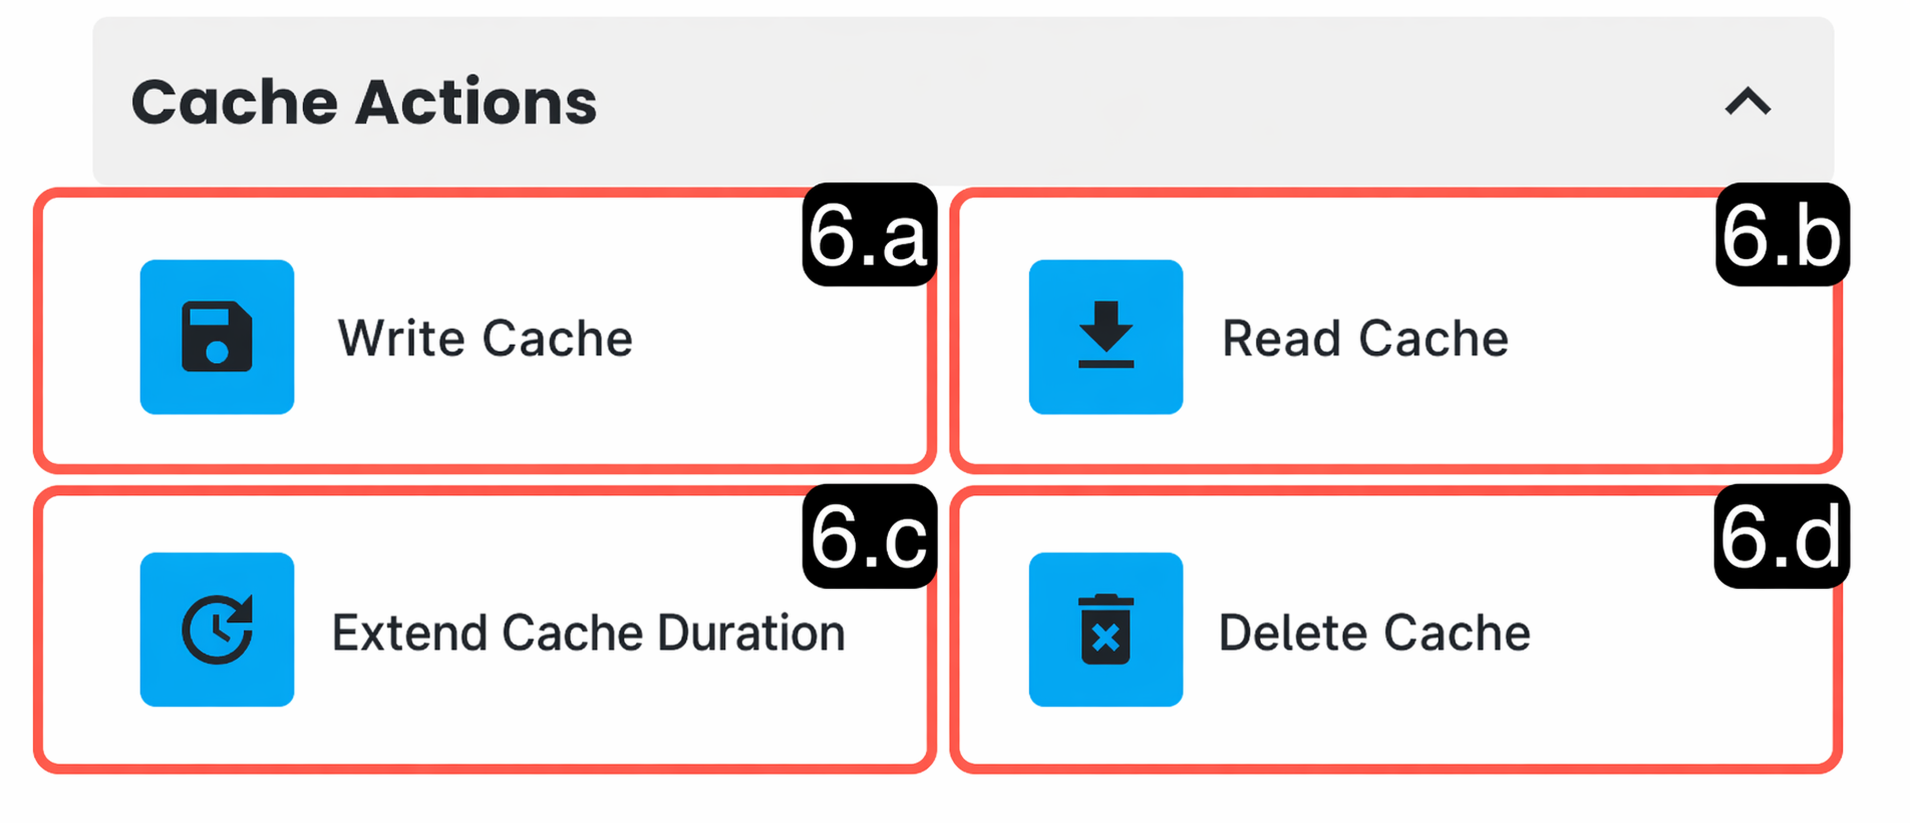
6.a – Write Cache
This block is used to store a data obtained or generated during the automation flow into temporary memory (cache). It is especially effective for storing temporary process results, loop data, or short-term information that needs to be remembered throughout the scenario. The Cache Manager structure enables such temporary data to be stored securely. When rewritten with the same key, the existing record is updated and the new value becomes active.
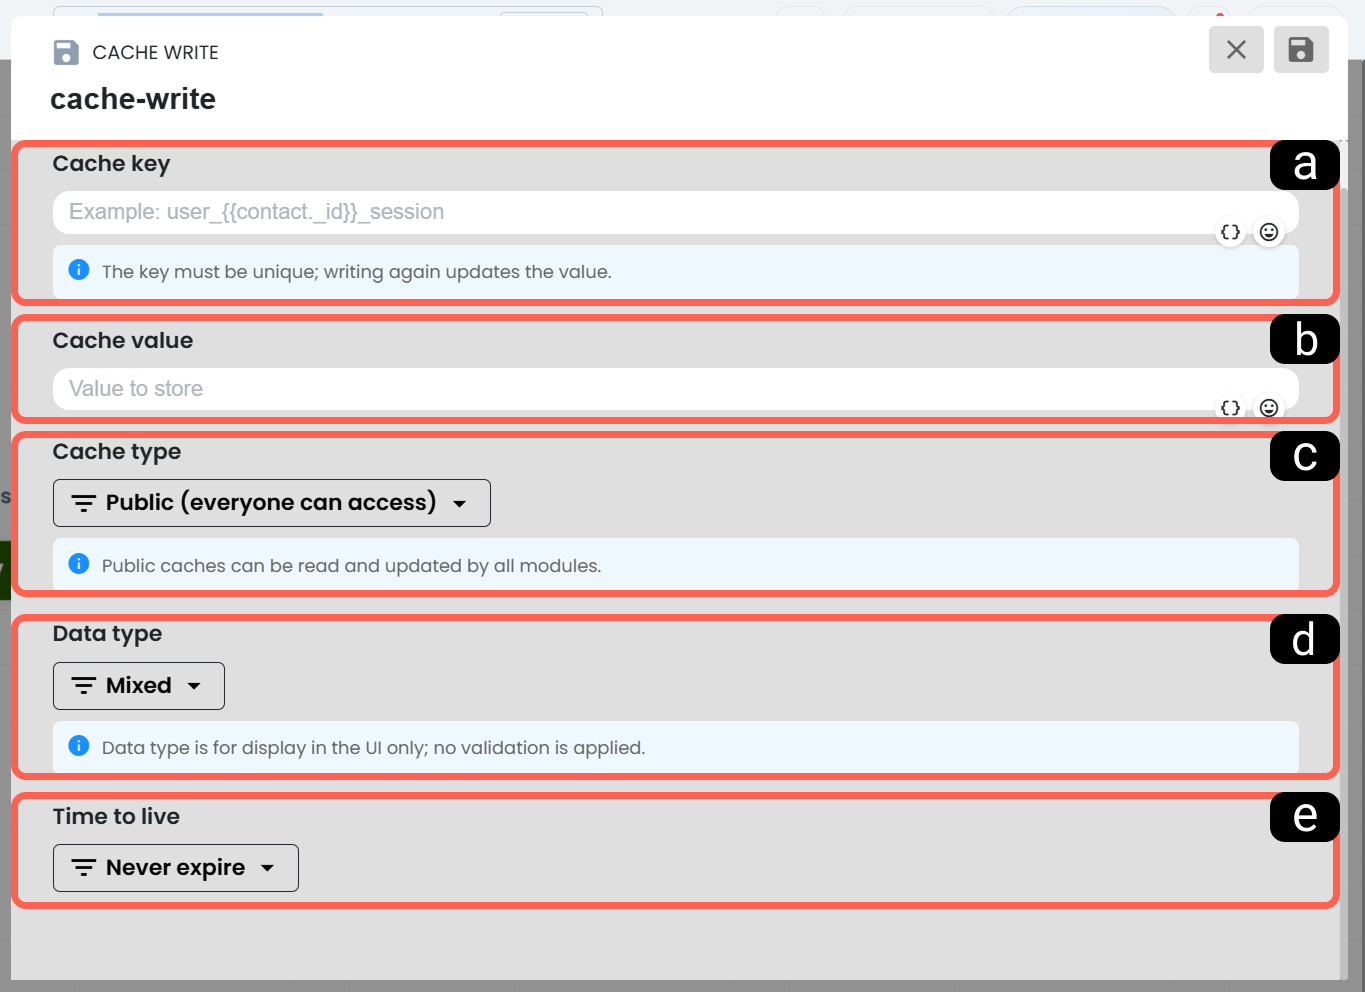
a. Cache Key (Key)
This field is the unique key name that will be used to access the data again within the automation later. In the Cache Manager documentation, this field is also defined as the unique key used to access the data again. It is recommended that the key structure be designed clearly, consistently, and in alignment with automation variables. Thus, cache conflicts that may occur for different operations can be prevented.
b. Cache Value (Value)
In this section, the actual data to be stored under the cache is entered. The saved value can be read again in the subsequent steps of the automation flow and can be easily used in different blocks. Temporary process results or auxiliary data that needs to be kept throughout the scenario can be stored in this field. Cache Manager is designed exactly for managing such temporary data.
c. Cache Type
The access scope of the cache is determined from this field. Cache records of Public type can be accessed by system users within scenarios. Records of Private type can only be used within scenarios by the user who defined the cache. You can determine the scope of access according to the needs of your automation scenario.
d. Data Type
It allows you to classify the type of the data to be written to the cache on the interface. On the system side, there are various data type options such as String, Number, Boolean, Date, JSON, Array, Mixed, and User ID. This selection does not directly apply validation to the data; it is mostly used to display the data correctly on the interface and to make the scenario more readable.
e. Expiration Time
This section defines how long the cache data will be kept in the automation system. You can store the data indefinitely, assign a specific time duration, or end its validity on a specific date. The “Never expire” option ensures that the data remains in the cache until you manually delete it.
6.b – Read Cache
This block allows you to reuse a data that has previously been written to the cache in later stages of the automation flow or at a completely different point in the flow. Since Cache Manager enables temporary data sharing between automations, this action is extremely important for recalling the information saved in previous steps.
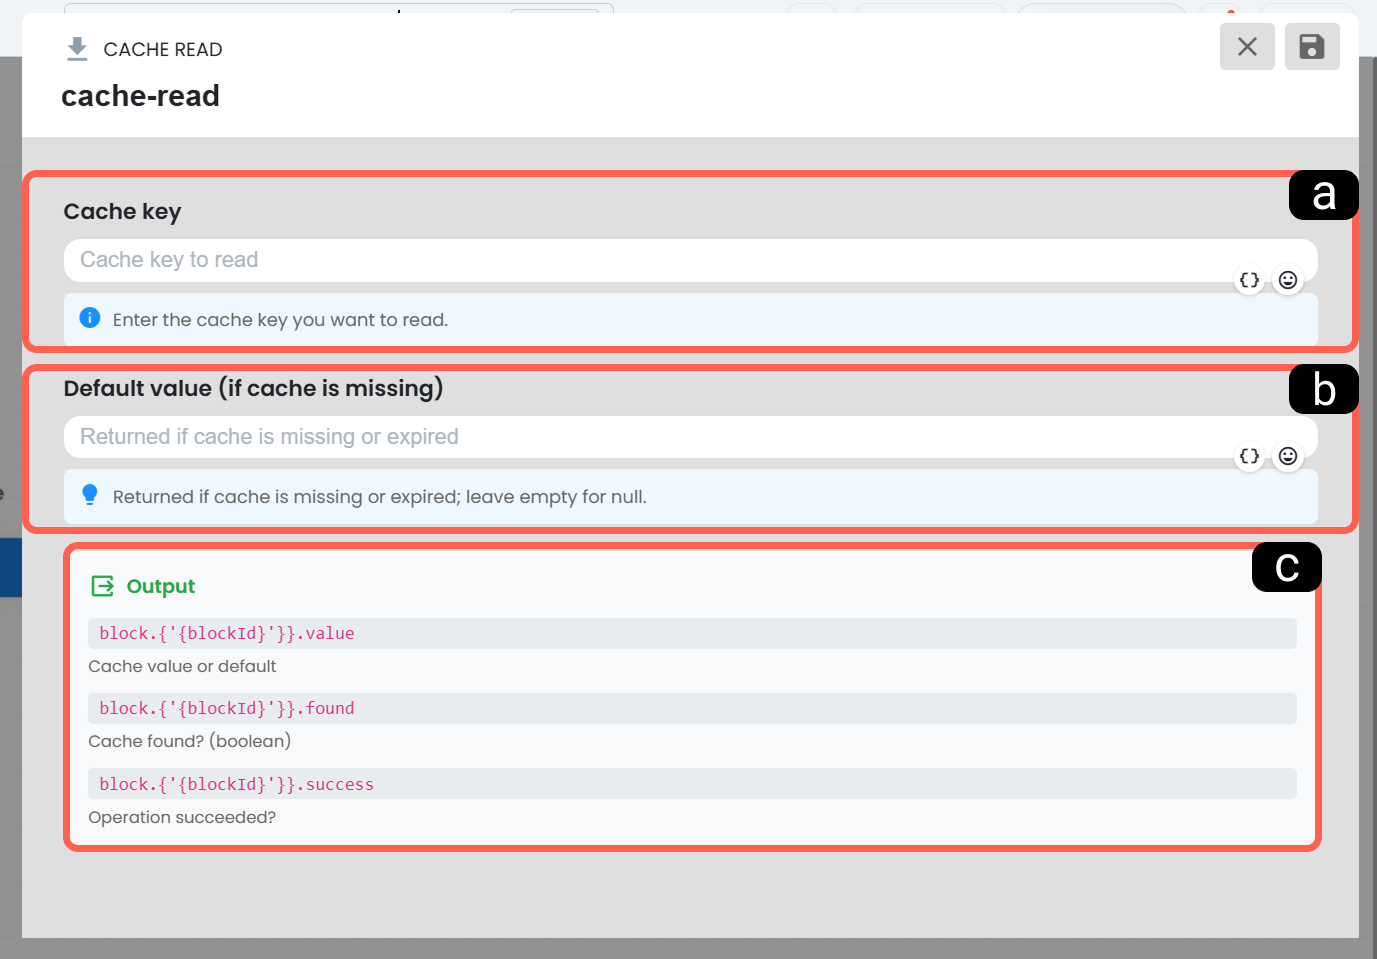
a. Cache Key
The key of the cache record to be read is entered in this field. The key to be used must be exactly the same as the key used when writing the data to the cache. If you are using a dynamic key structure, you must maintain the same variable logic during the reading process; otherwise, the system cannot find the relevant record.
b. Default Value
This determines which value the system will return if the relevant cache record cannot be found or if the cache has expired. If this section is left empty, the result will return as "null". In this way, even when the cache data is not available, the flow can continue in a controlled manner without errors.
c. Block Output Information
After the operation, the Read Cache block produces the following output variables and these can be used as references in subsequent blocks:
- block.{{'{blockId}'}}.value: The found cache value or the default value if the cache does not exist.
- block.{{'{blockId}'}}.found: Boolean information indicating whether the cache record is found (true/false).
- block.{{'{blockId}'}}.success: Status information indicating whether the read operation is successful.
Thanks to this structure, you can create conditional flows such as "if cache is found, go to this step; if not found, switch to an alternative scenario".
6.c – Extend Cache Duration
This block is used to update only the expiration time (lifetime) of an existing cache record without changing its value. The manageability of the expiration time ensures that temporary data is used in a controlled manner. It is useful in cases where you want to reconfigure the retention duration of an existing data in the system while the automation process continues.
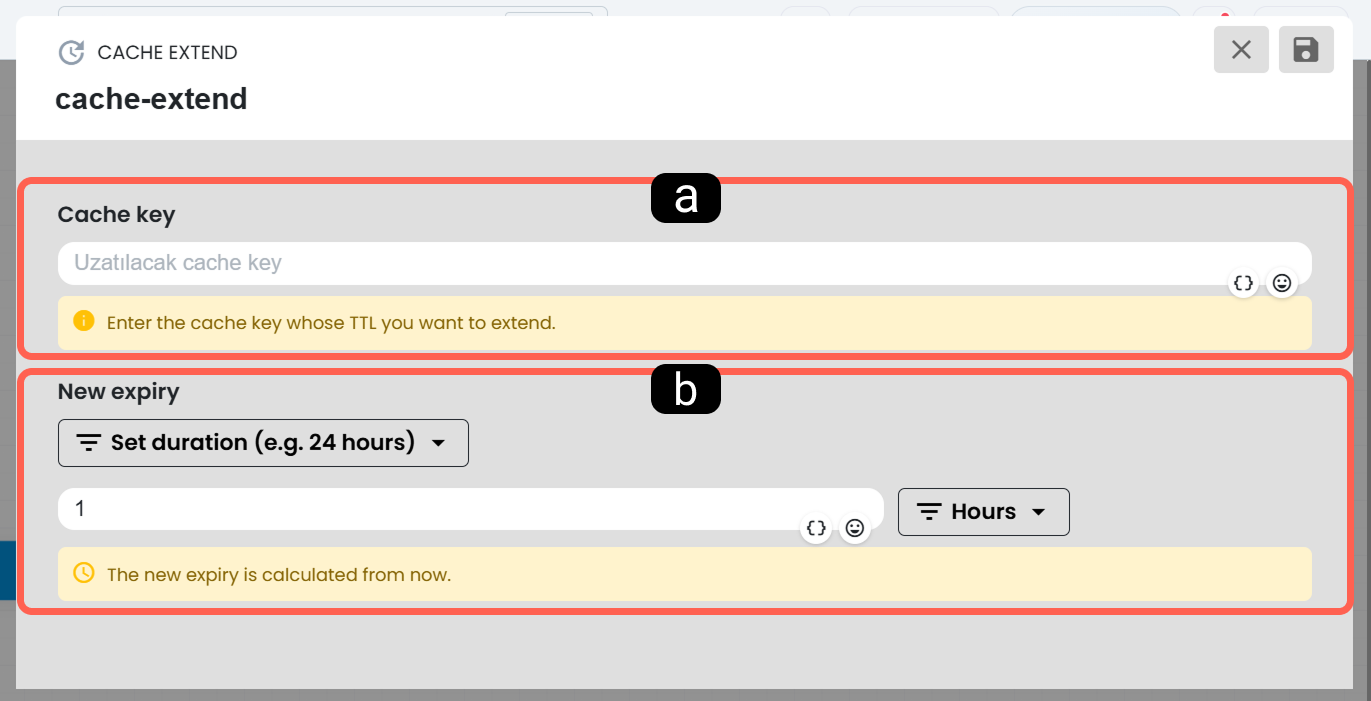
a. Cache Key
The cache record whose duration will be updated is targeted with the key information in this field. The entered key must exactly match the record previously written to the cache; correct key usage is critical for ensuring that the update is applied to the correct data.
b. New Expiration Time
The new duration information of the cache is defined in this section. The duration value is entered numerically and the time unit (hour, day, etc.) is selected from the side. The new expiration time is calculated based on the moment this block is executed, rather than being added to the remaining part of the current duration. Thus, the lifetime of the cache record is refreshed according to the current need.
6.d – Delete Cache
This block is used to clean up cache records that are no longer needed or have completed their task within the automation flow. Since some records can be stored until manually deleted, this action becomes especially important for cleaning data that is kept indefinitely or is no longer functional within the scenario.
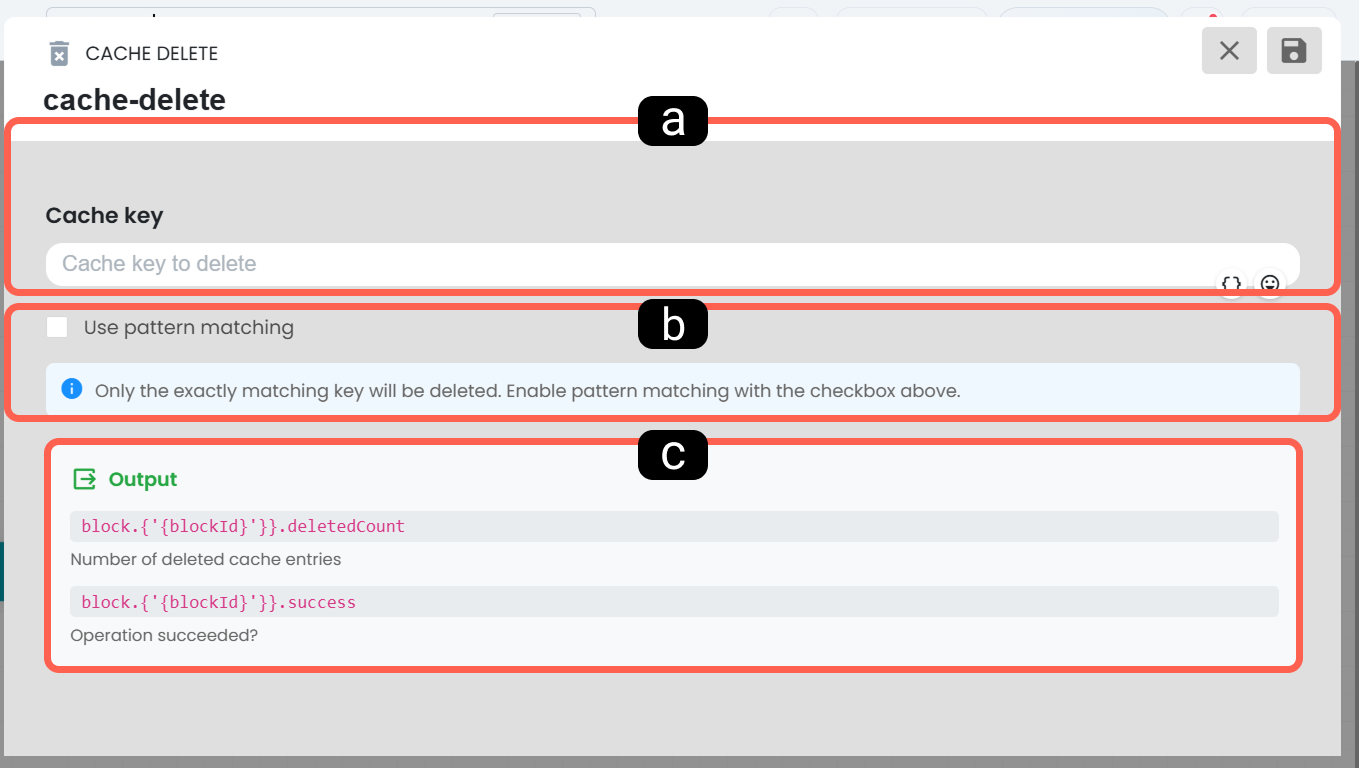
a. Cache Key
The cache record to be deleted is identified by the key information in this field. If you want to delete a single specific record, it is sufficient to enter the exact key of the relevant cache; thus, only the targeted data is removed from the system.
b. Use Pattern Matching
When this option is disabled, the system deletes only the exact matching key value. If you want to perform pattern-based deletion, you need to activate this option. This structure is useful in scenarios where you want to clean multiple cache records created with a similar key format in a more flexible way.
c. Block Output Information
After the operation, the Delete Cache block produces the following output information in the system:
- block.{{'{blockId}'}}.deletedCount: Total number of caches deleted from the system.
- block.{{'{blockId}'}}.success: Status information indicating whether the deletion operation is successful.
These outputs are useful especially for checking how many data have been affected after multiple (pattern matching) deletion operations and for planning the continuation of the automation accordingly.
7. Artificial Intelligence
The Artificial Intelligence category of automation blocks allows you to equip your automation scenarios with the power of world-renowned artificial intelligence language models.
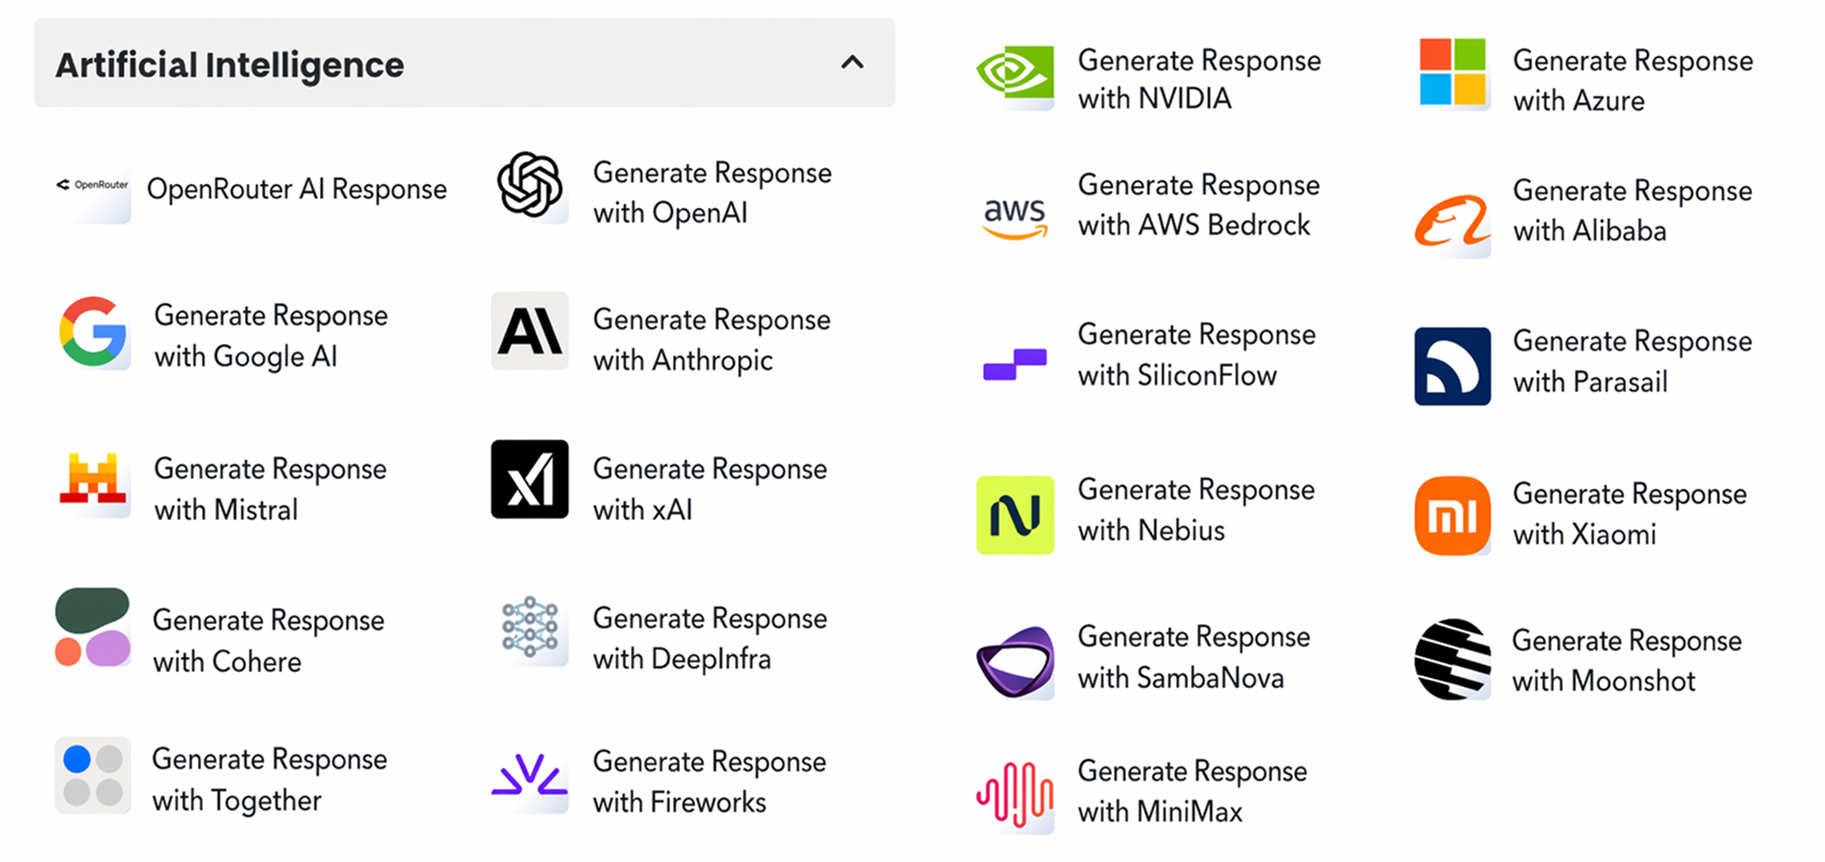
Thanks to these blocks, you can have the data you obtain within the automation flow analyzed by the artificial intelligence language model in the system, generate text, classify incoming messages, or interpret complex data and transfer it to the next step of the scenario.
7.a. Block Content
Regardless of your language model selection, our automation system provides you with a standard and easy-to-use configuration interface. Through this common interface, you can determine the behavior of the model, the output it will generate, and the tools it will use.
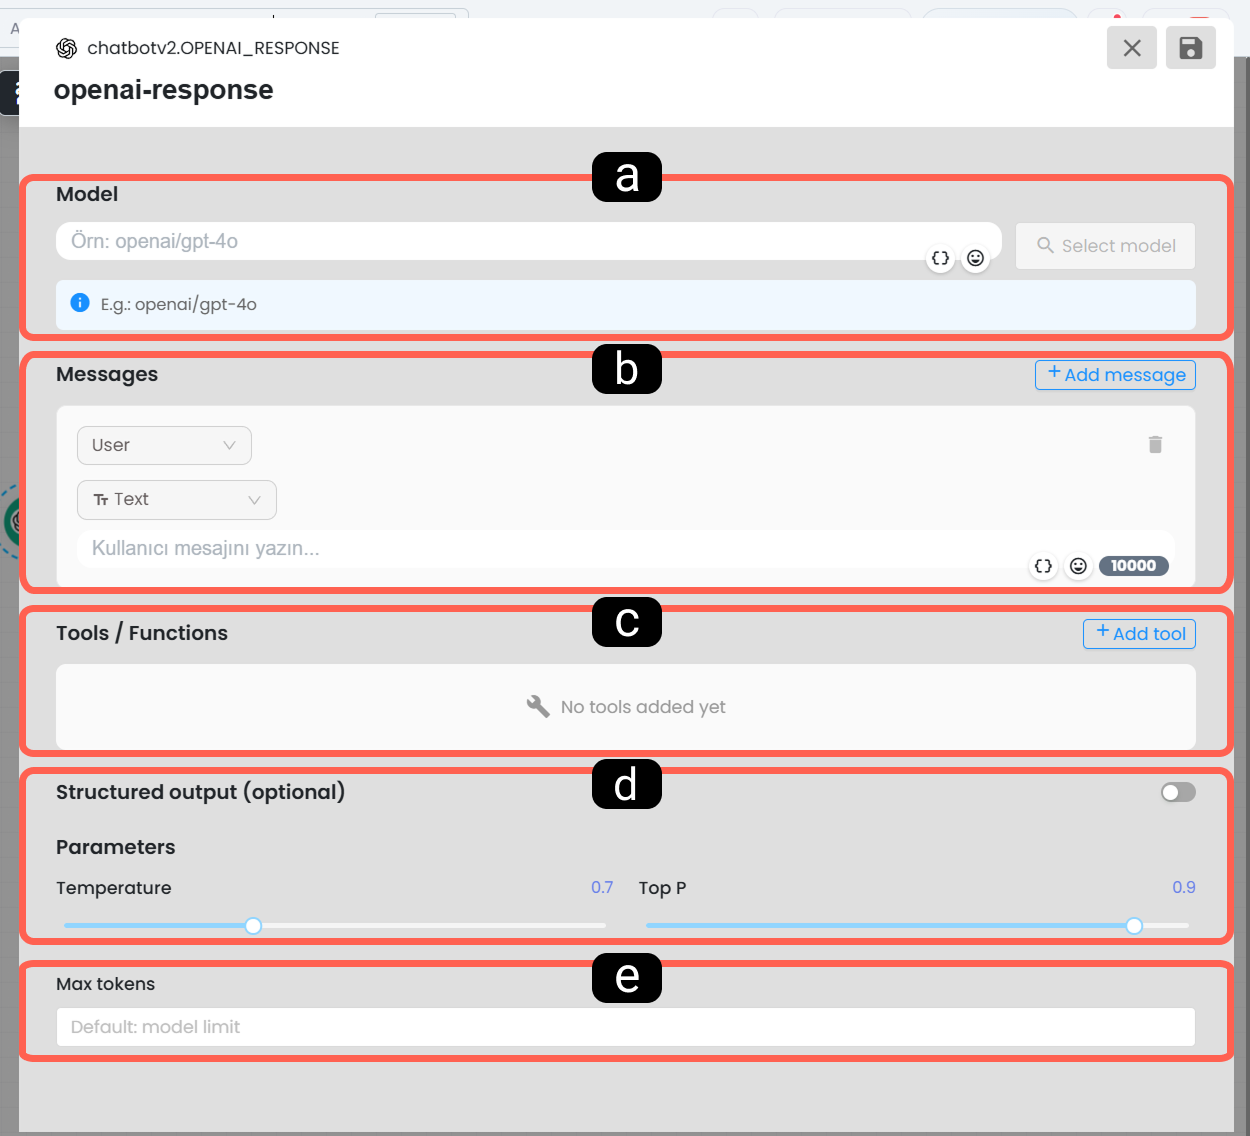
a. Model Selection
This is the section where you can choose the most suitable model for your operation, speed, and cost budget among the sub artificial intelligence models (e.g.: gpt-4o-mini, gpt-4-turbo) offered by the provider (e.g.: OpenAI) whose block you are using.
b. Message (Prompt)
This is the field where you enter the main content that you want the artificial intelligence to analyze, respond to, or process. You can write manual texts here, or you can add dynamic variables (e.g.: the email text sent by the customer) returned within the automation so that the artificial intelligence can directly process this data.
c. Tools
This is the most advanced feature that allows the artificial intelligence not only to generate text but also to perform an active action within the automation. All artificial intelligence infrastructures commonly support the "Function" tool in this field. By using this setting, you can give the artificial intelligence the authority to call predefined custom functions. For example; after analyzing an incoming message, instead of only giving a text response, the artificial intelligence can automatically trigger a "Create Record" function in the background.
d. Structured Output
The AI Parameter Settings section is used to more precisely shape the response generation behavior of the artificial intelligence. These settings applied to the selected model affect how creative, how consistent, and how controlled the responses will be.
- Temperature: The temperature value determines how creative or how controlled the model will generate responses. Higher values tend to produce more diverse and freer responses. Lower values produce more focused, more consistent, and more deterministic answers.
If you want to configure the artificial intelligence for a more formal, clearer, and more controlled usage, lower temperature values can be preferred. For more flexible, more natural, and freer expressions, higher values can be used.
- Top-P
The Top-P setting determines which probability range of words and response alternatives the model will evaluate. This structure is an alternative sampling method to temperature. Lower Top-P values direct the model to a narrower and more controlled answer space; higher values allow it to evaluate a wider range of response alternatives.
In general use, instead of aggressively changing both temperature and Top-P values at the same time in most scenarios, it is healthier to primarily adjust one of these two settings when needed.
e. Max Tokens
This is the security setting where you limit the word/syllable capacity of the response that the artificial intelligence will generate. It is used to obtain responses of appropriate length and to prevent unnecessary credit (token) consumption.
8. Table Actions
Table actions establish a seamless bridge between your automation scenarios and your panel, which acts as a database through the tables module. Thanks to these blocks, you can save the data within the flow to your tables, update existing data, or read the data in the table and use it in other steps of your automation.
8.a – Create Record
The Create Record block allows you to add dynamic data (for example; customer information coming from a form) returned within your automation task or static information you define as a new row (record) to your target table.
The system creates new records at automation speed by simulating manual data entry according to the content you define for the fields.
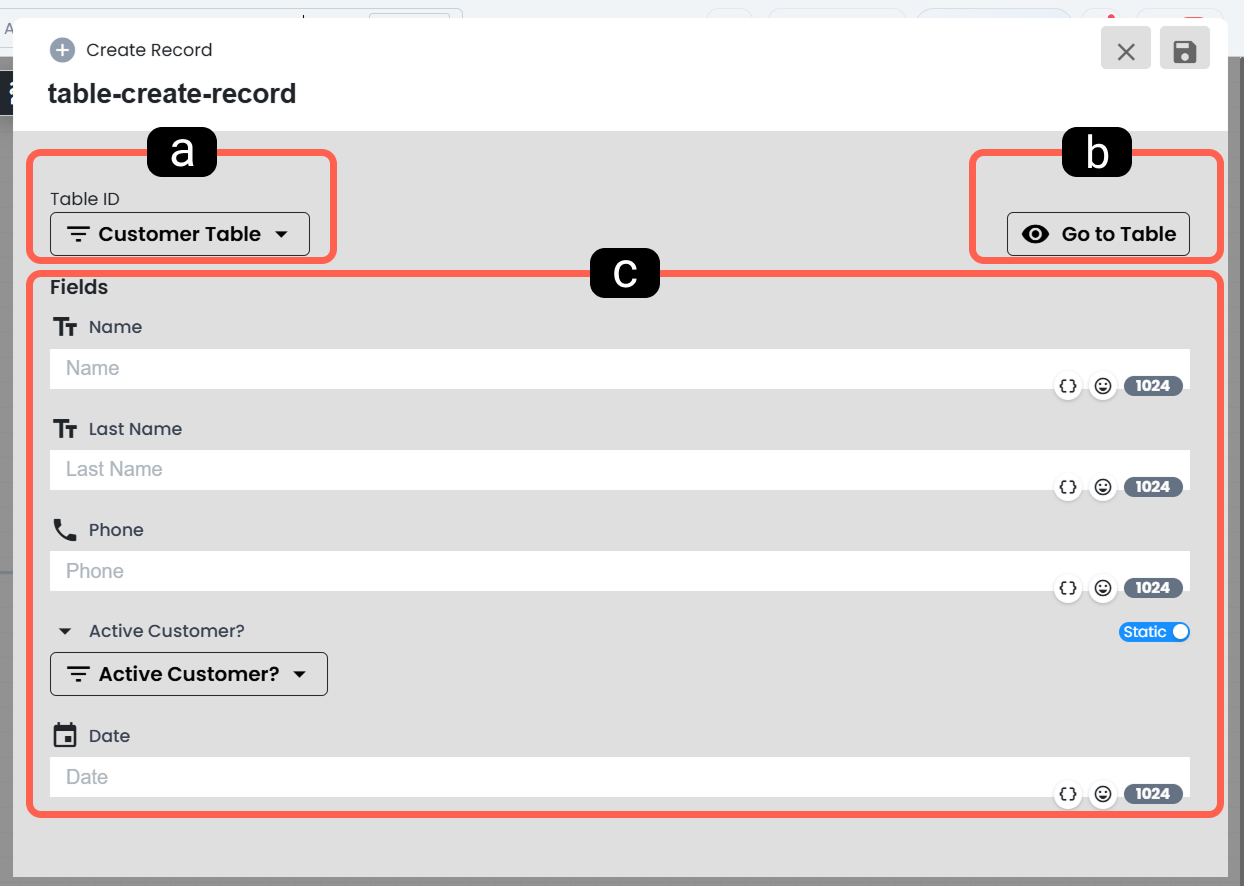
a. Table Selection
This is the main setting where you determine which table the new record will be added to. According to the table you select, the data input fields (table columns) below are automatically generated.
b. Go to Table
It allows you to open the selected table and quickly review column structures and existing data. It is very useful for referencing during mapping.
c. Table Fields
This is the section where the columns (name, email, phone, etc.) of the selected table are listed. You map which data from the automation flow will be written to which column of the table through this field.
8.b – Delete Record
The Delete Record block is used to permanently delete a specific record within the table you specify from the system. Since this operation is performed through a completely unique identity called "Record ID", it eliminates the risk of deleting incorrect data within the automation flow.
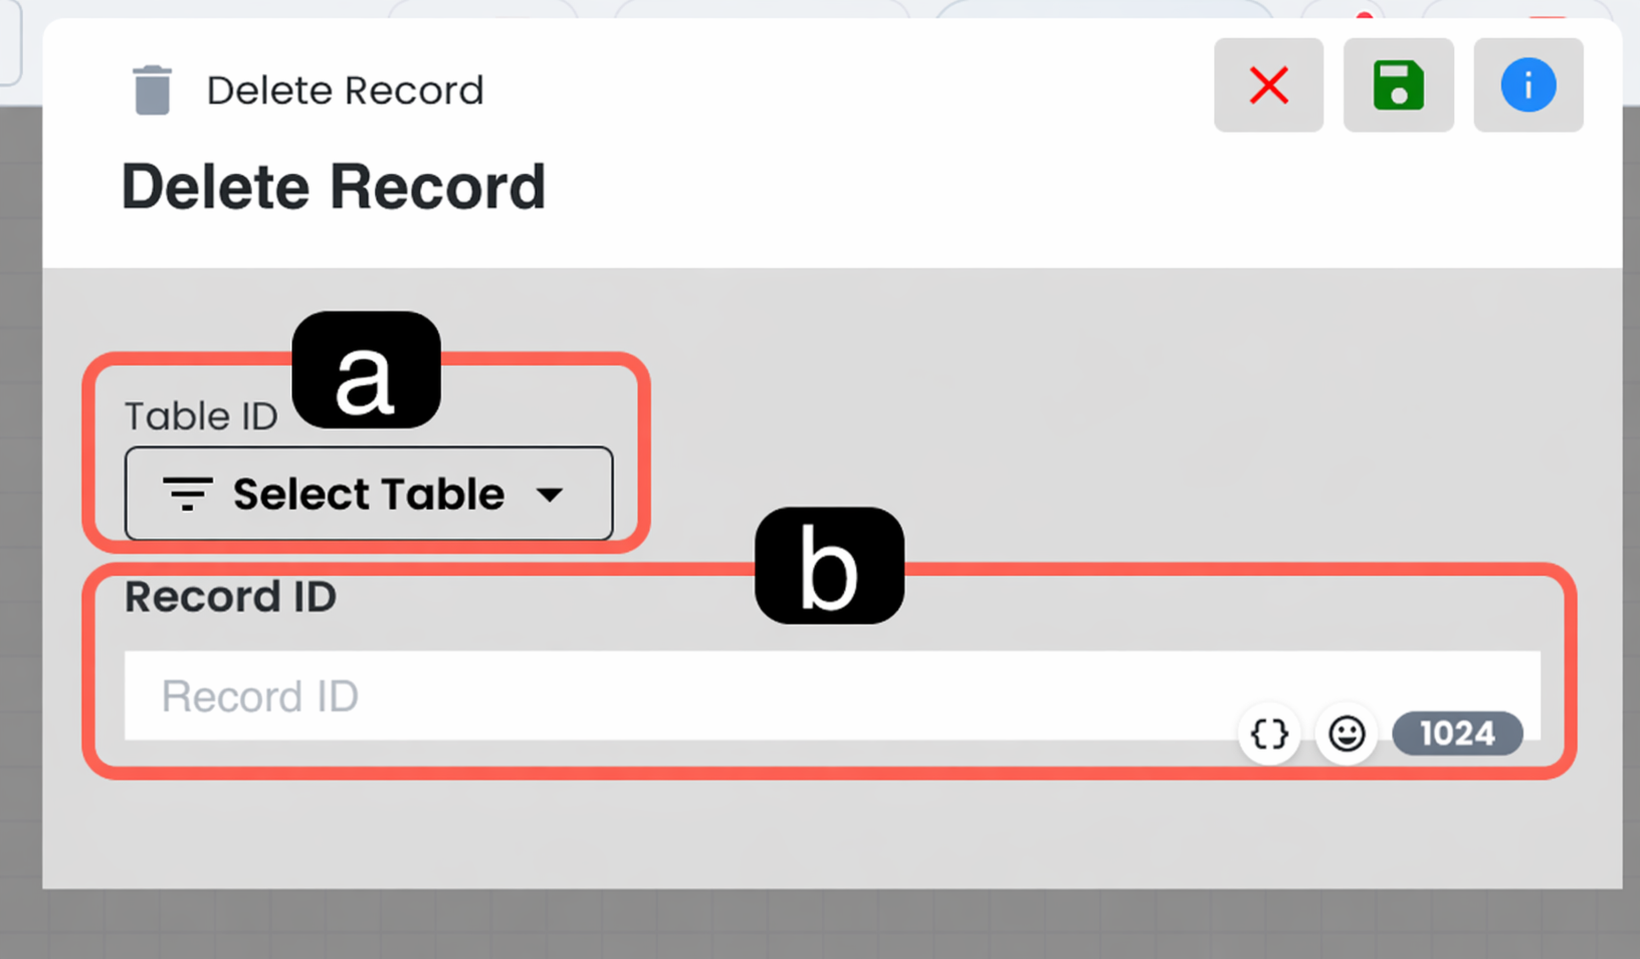
a. Table Selection
This is the field where you select the relevant table on which the deletion operation will be applied.
b. Record ID
This is the system identity number of the record to be deleted. By defining the Record ID variable of the relevant table record in this field, you can ensure that the correct record is automatically deleted.
8.c – Update Record
The Update Record block is used to update specific fields of an existing record in the selected table. Thus, new information obtained during the automation flow can be written onto the existing record and the data can be kept up to date.
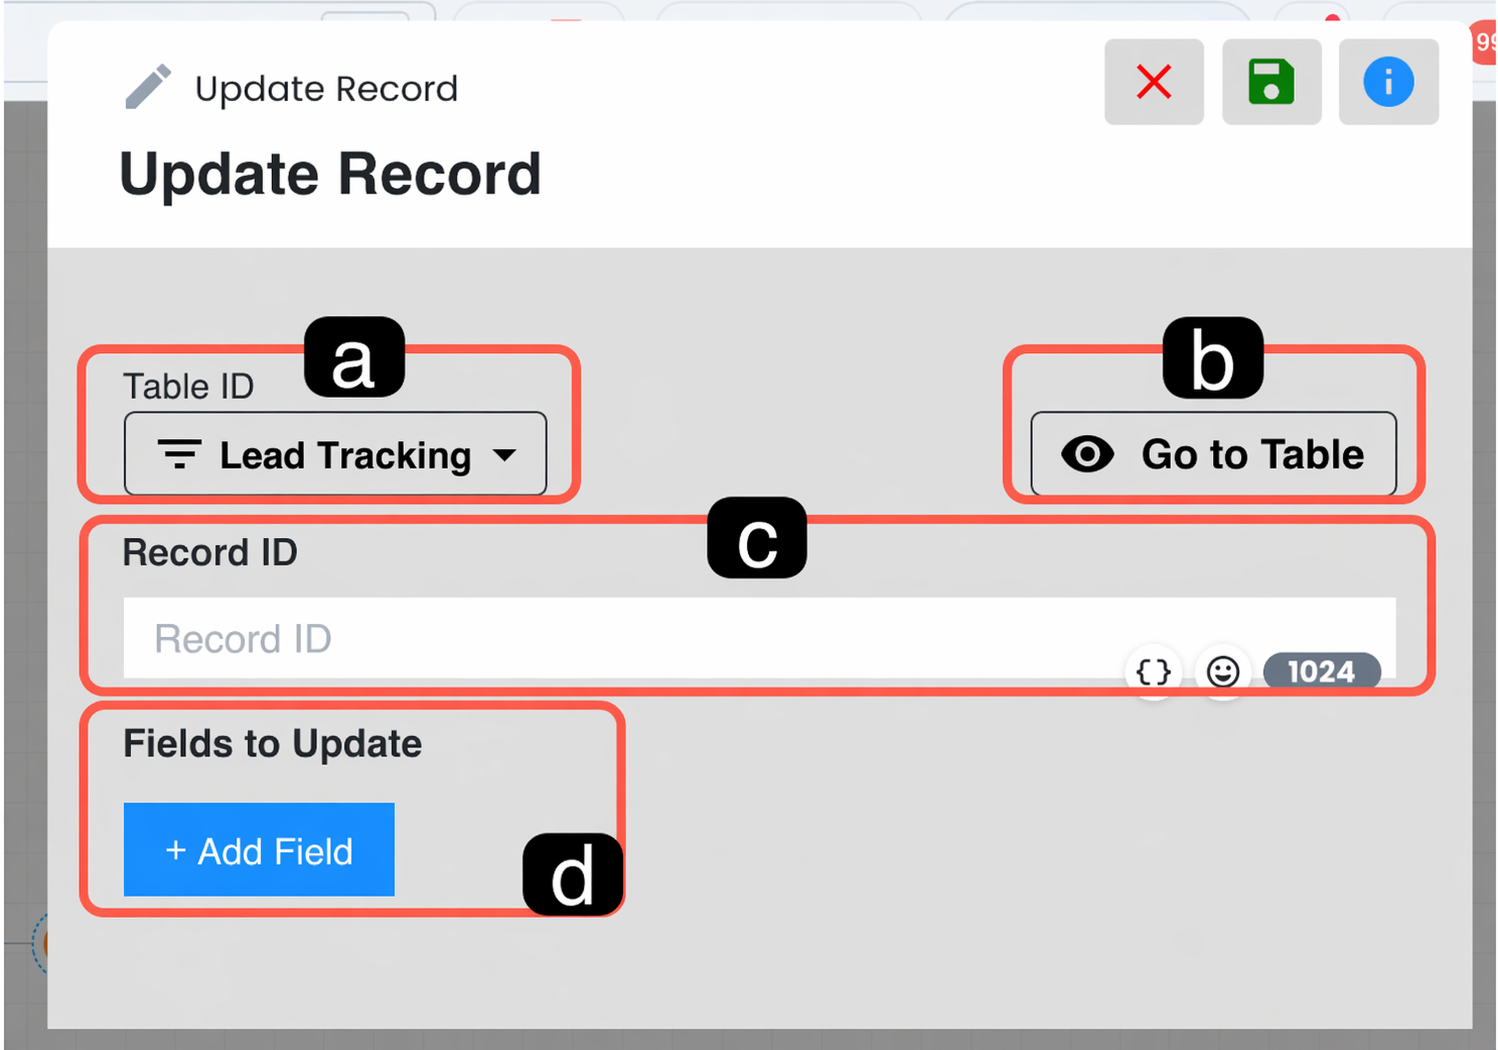
a. Table Selection
From this field, the table containing the record to be updated is selected. According to the table you choose, the fields to be updated (table columns) below will appear.
b. Go to Table
Through this button, you can directly navigate to the selected table and review records and field structures. Checking the table before determining which fields will be updated helps prevent incorrect mappings.
c. Record ID
In this field, the unique Record ID value of the record to be updated is entered. By defining the Record ID variable of the relevant table record in this field, you can ensure that the correct record is automatically updated with the content you specify
d. Fields to Be Updated
This is the section where you determine which columns of the existing record will be changed. By using the "+ Add Field" button, you can update multiple columns. After selecting the column to be updated, you can define the new value (dynamic or static) to be written into that column
8.d – Find Record
It allows you to find a specific record that matches the custom conditions (filters) you define among all the data content in your table and call it into the automation scenario. The found data is directly converted into a readable variable through the block itself. Thus, you can easily use the information you obtain in the subsequent steps of your automation.
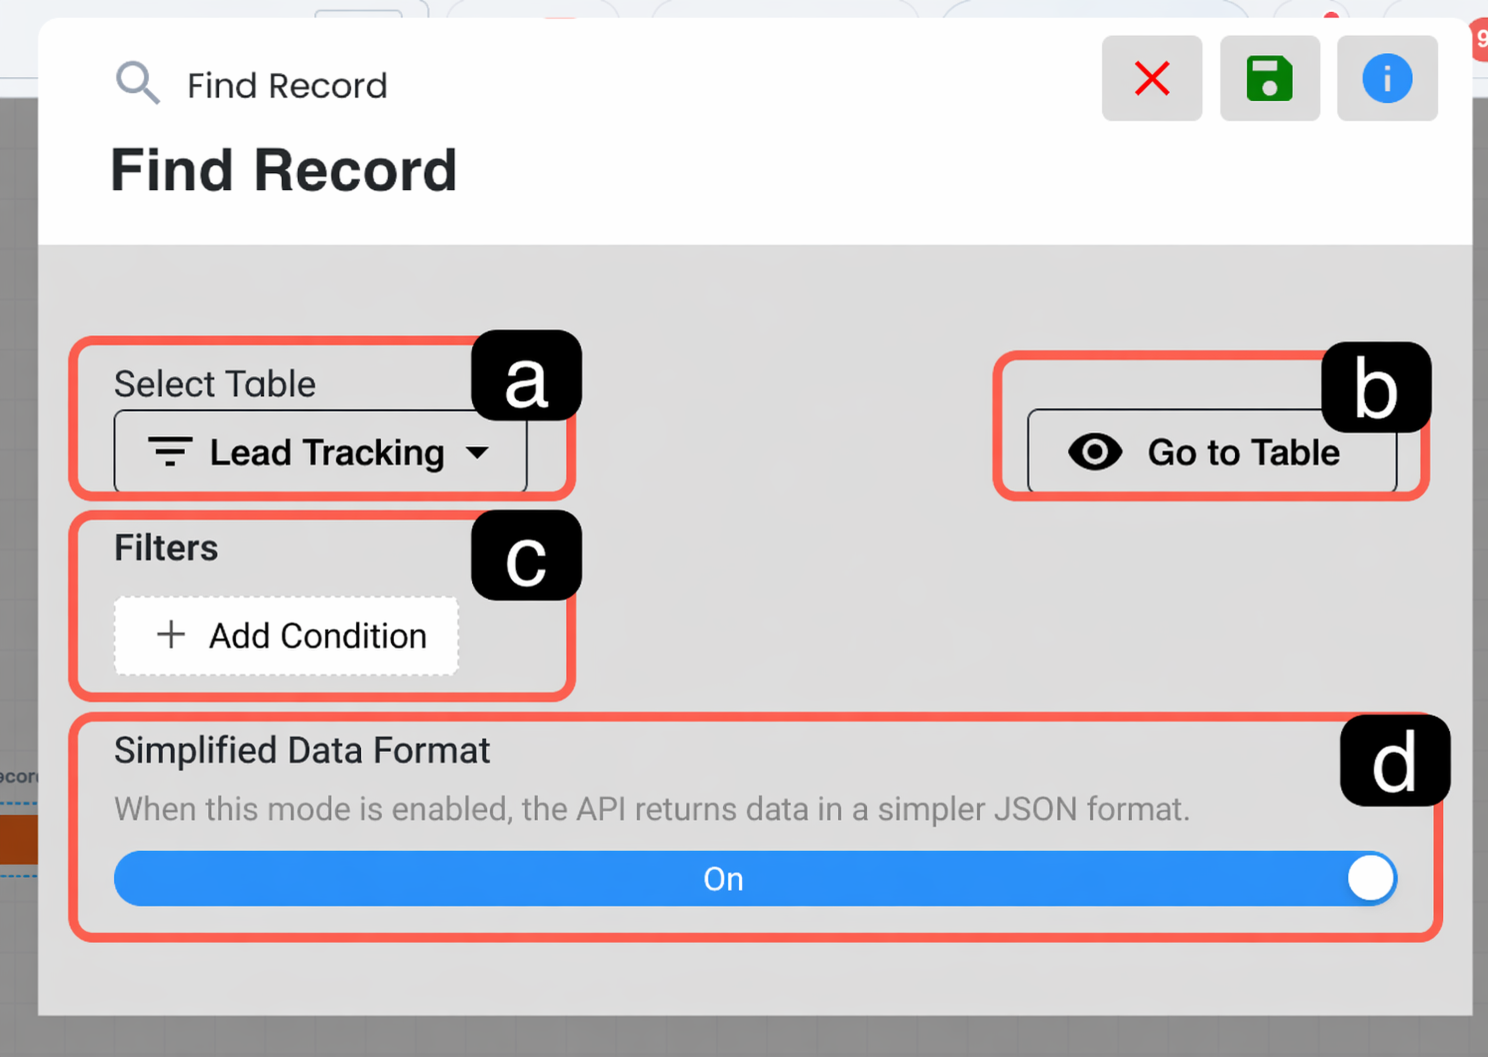
a. Table Selection
This is the field where you determine the source table in which the search operation will be performed.
b. Go to Table
Allows you to directly open the table to verify column names before filtering.
c. Filters
Filters are the field where you define which data in which column of the table will be queried and matching records will be returned as a list content.
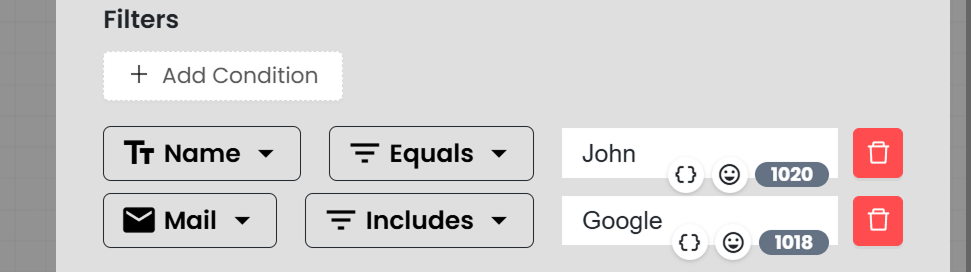
With the "Add Condition" button; you define the table field to be searched, the logical operator (e.g.: Equals, Contains), and the value to be searched.
d. Simplified Data Format
When this option is enabled, the API output is returned in a more simplified JSON format. It can be preferred especially in integration and data processing scenarios where a more readable output structure is needed.
Note: If there are multiple table items matching the searched record parameters, Find Record returns the most recently added record.
8.e – List Records
The List Records block allows you to fetch multiple records that match the criteria you define in bulk and include them in your automation flow as a list (array/data set). This block enables processing each record sequentially by transferring the returned multiple data set into Loop blocks for single usage.
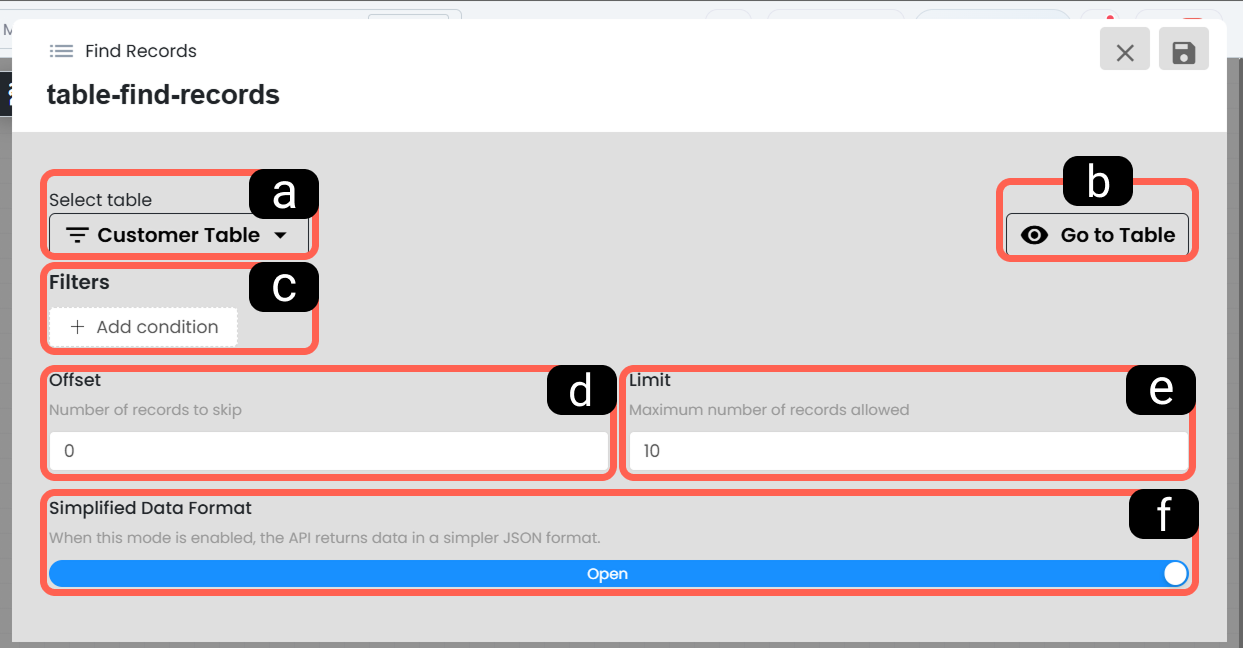
a. Table Selection
From this field, the table to be listed is determined.
b. Go to Table
This button allows you to directly open the selected table and check the table content and field structure. Thus, you can quickly verify which fields will be used while creating filters.
c. Filters
Filters are the field where you define which data in which column of the table will be queried and matching records will be returned as a list content.
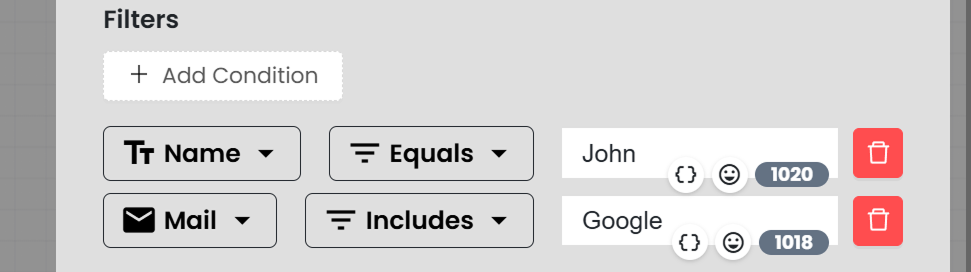
With the "Add Condition" button; you define the table field to be searched, the logical operator (e.g.: Equals, Contains), and the value to be searched.
d. Offset
It is used for pagination in multiple data. For example, if you write "10" here, the system skips the first 10 records and starts listing from the 11th record. It should be left as "0" to read from the beginning of the table.
e. Limit
This is the field where you limit how many records the system will fetch at once. It is used to prevent large data sets from slowing down the automation.
f. Simplified Data Format
It converts the listed multiple data set into a simplified JSON format that can be more easily read and parsed by other blocks (especially loops).
9. Zoho Actions
Zoho Actions enable your automation scenarios to establish a seamless data flow with your Zoho CRM channel integrated into your Supsis AI panel. Thanks to these blocks, you can transfer the data processed in your automation to Zoho, query existing records in Zoho, or fully automate operations such as adding files/images to records.
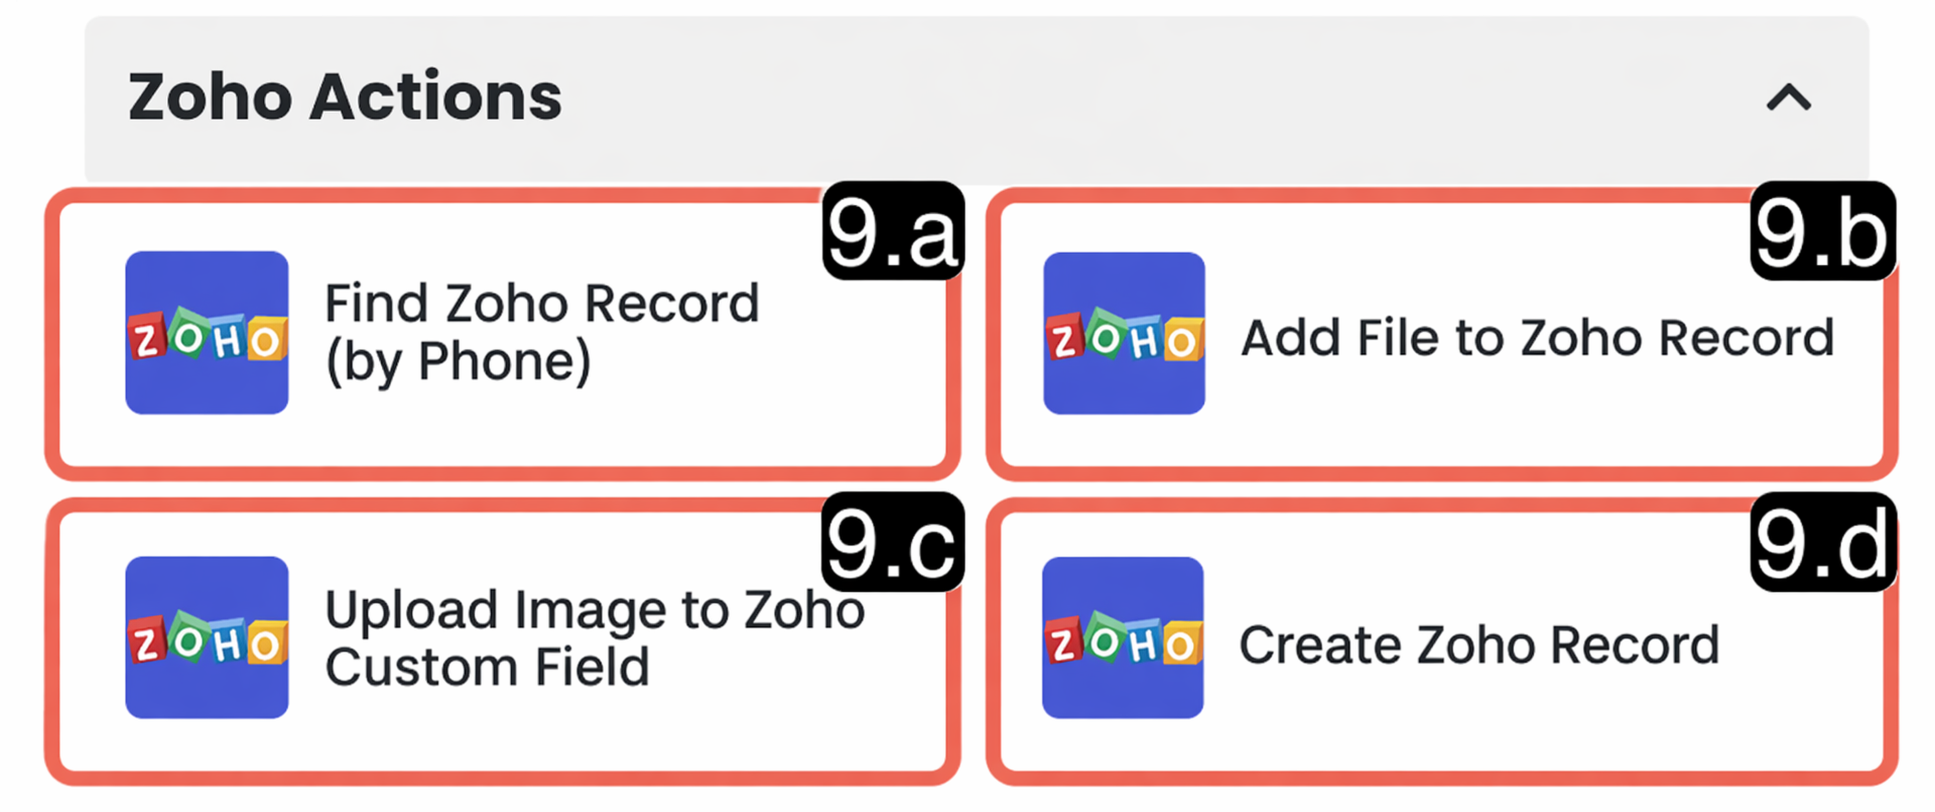
9.a – Find Record by Zoho Phone Number
It allows you to query whether there is a record associated with this phone number in your Zoho database by using the phone number within the data returned in the automation. The details of the found record (name, email, etc.) can be retrieved into the automation and used in subsequent blocks
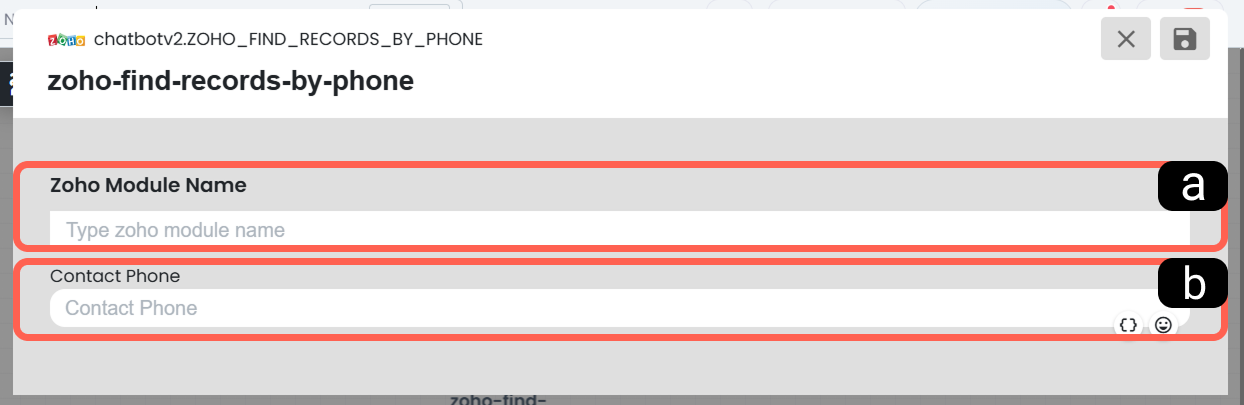
a. Zoho Module Name
This is the field where you enter the name of the target Zoho module in which the search operation will be performed.
b. Phone Number
This is the phone number to be searched within the relevant Zoho module. You can add a static phone number to this field or automate the query by adding a dynamic phone number variable obtained from previous steps of the automation.
9.b – Add File to Zoho Record
It allows you to upload a file returned within the automation as an "attachment" to an existing record in Zoho.
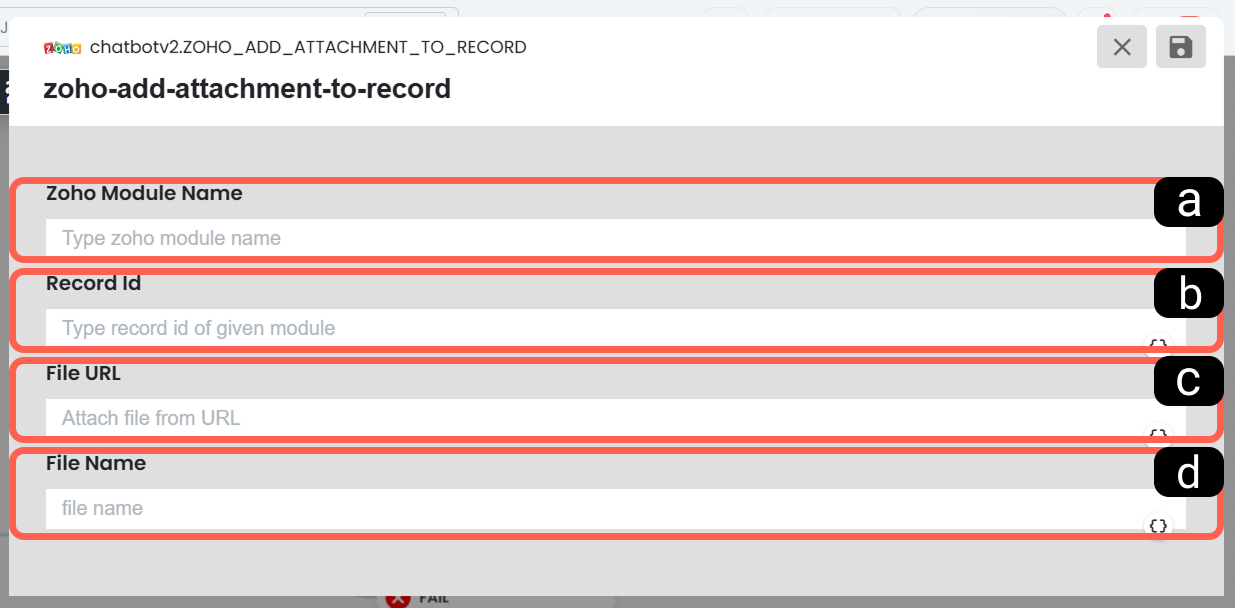
a. Zoho Module Name
This is the field where you enter the name of the Zoho module where the record to which the file will be added is located.
b. Zoho Record ID
This is the unique identity (Record ID) number that determines to which specific Zoho record the file will be added.
c. File URL
This is the web link (URL) where the file to be uploaded is hosted. The link of the file variable coming from the automation is defined here.
d. File Name
This is the field where you determine the name under which the file will be saved in the Zoho system.
9.c – Add Image to Zoho Custom Field
Unlike the file attachment block, this block is used to upload an image directly into a custom "Image Field" that you created on the Zoho side.
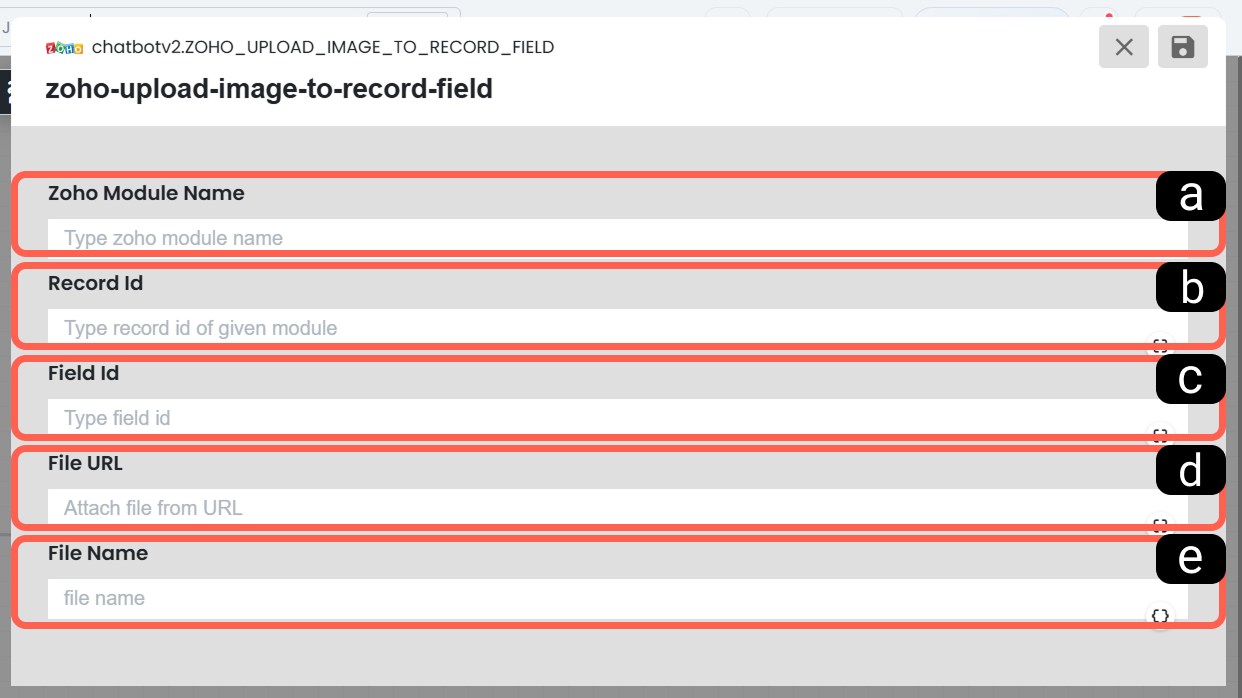
a. Zoho Module Name
This is the field where you enter the name of the Zoho module where the record to which the image will be added is located.
b. Zoho Record ID
This is the unique identity (Record ID) number that determines to which specific Zoho record the image will be added.
c. Zoho Field ID
This is the field identity that determines to which specific custom field (Field) within the record the image will be uploaded.
d. File URL
This is the web link (URL) where the image to be uploaded is hosted. The image URL variable coming from the automation is defined here.
e. File Name
This is the name that the image will take when it is saved in the system
9.d – Create Zoho Record
This is the record creation block that allows you to create a brand new record (for example; a new lead or support request) in the Zoho module you selected by using the data returned within the automation.
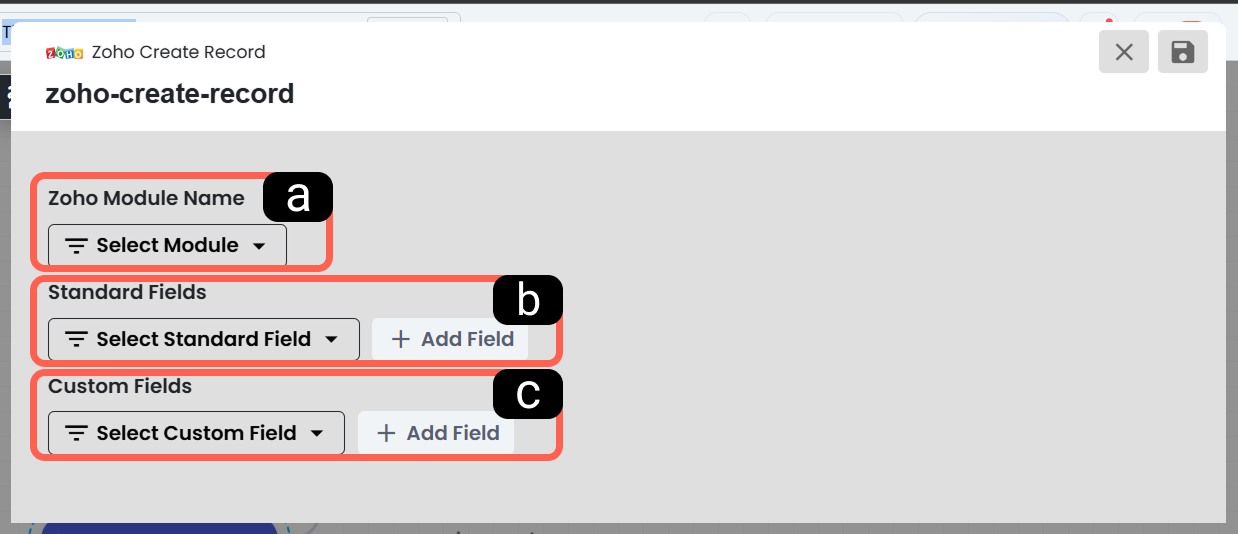
a. Zoho Module Name
This is the section where you select the target Zoho module in which the new record will be created. Which module the data will be written to is determined here.
b. Standard Fields
This is the section where the default fields (name, surname, email, etc.) of the Zoho module you selected are listed. You map which data from your automation scenario will be written to which standard column in Zoho here. You can add and fill multiple standard fields via the "Add Field" button.
c. Custom Fields
This is the section where you select the custom fields (Custom Fields) that you manually created on the Zoho side according to your business needs and match them with the automation data. Thus, not only standard fields but also detailed data specific to your company are fully included in the new record creation process.
10. Youtube Actions
YouTube Actions allow you to automate viewer interactions (comments, moderation processes) by directly integrating your automation scenarios with your YouTube channel. Thanks to these blocks, you can instantly respond to comments on your channel with artificial intelligence or templates, filter unwanted comments, and automatically assign customer representatives.
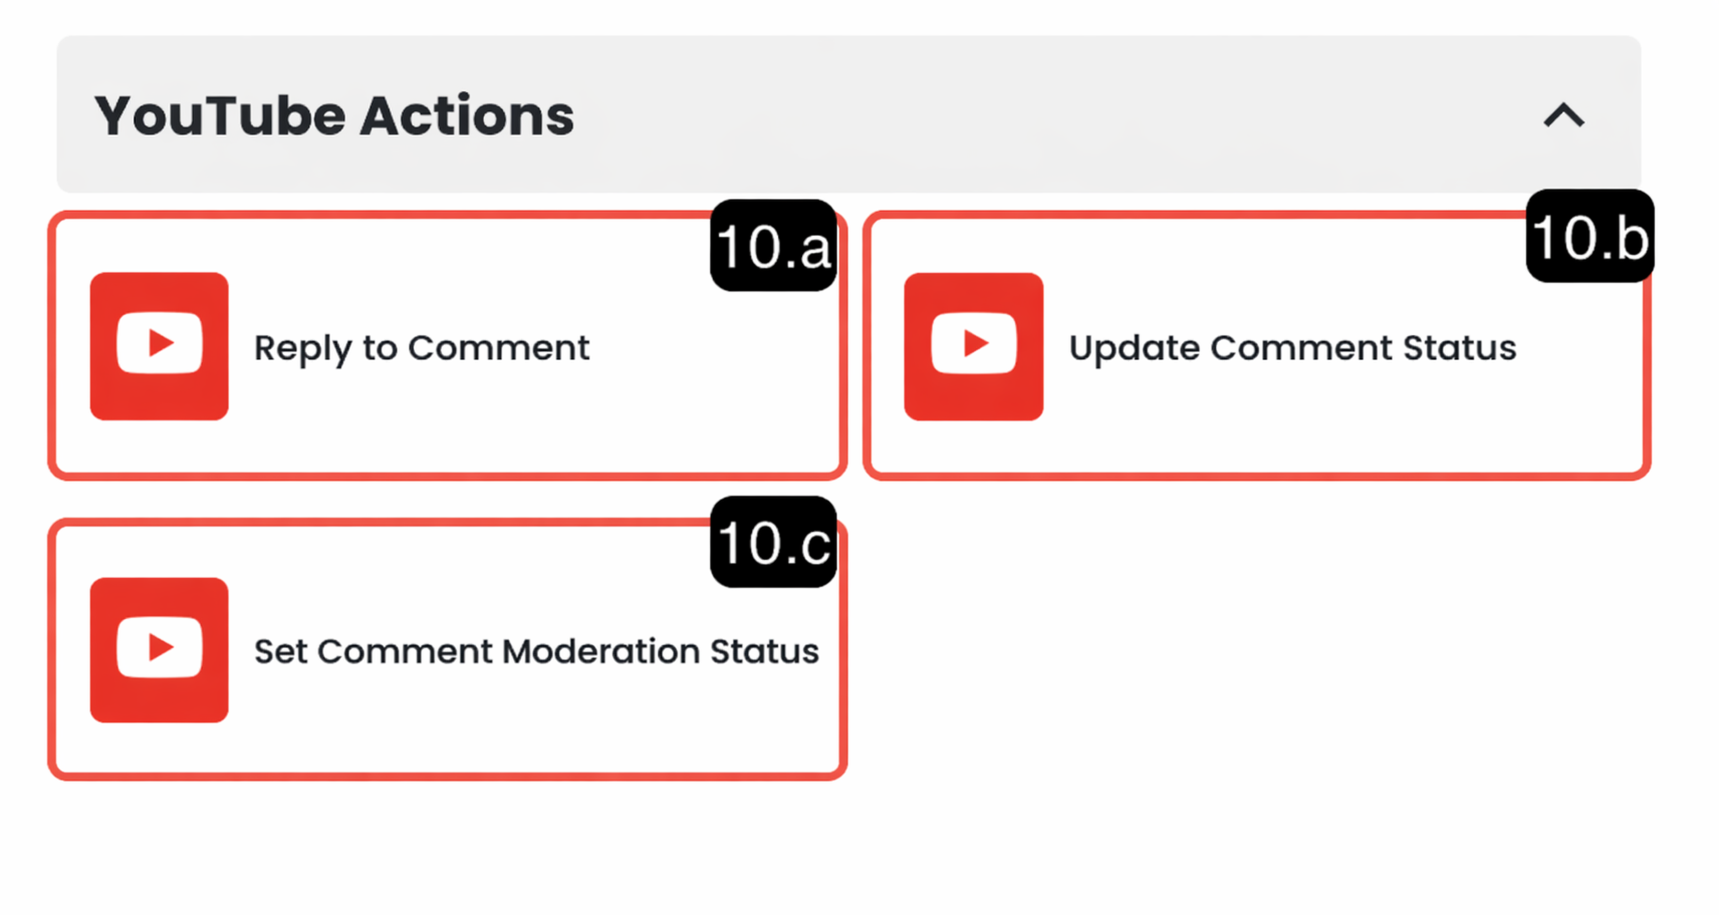
10.a – Reply to Comment
This block is used to automatically send a reply to a specific comment on your YouTube channel through the automation flow.
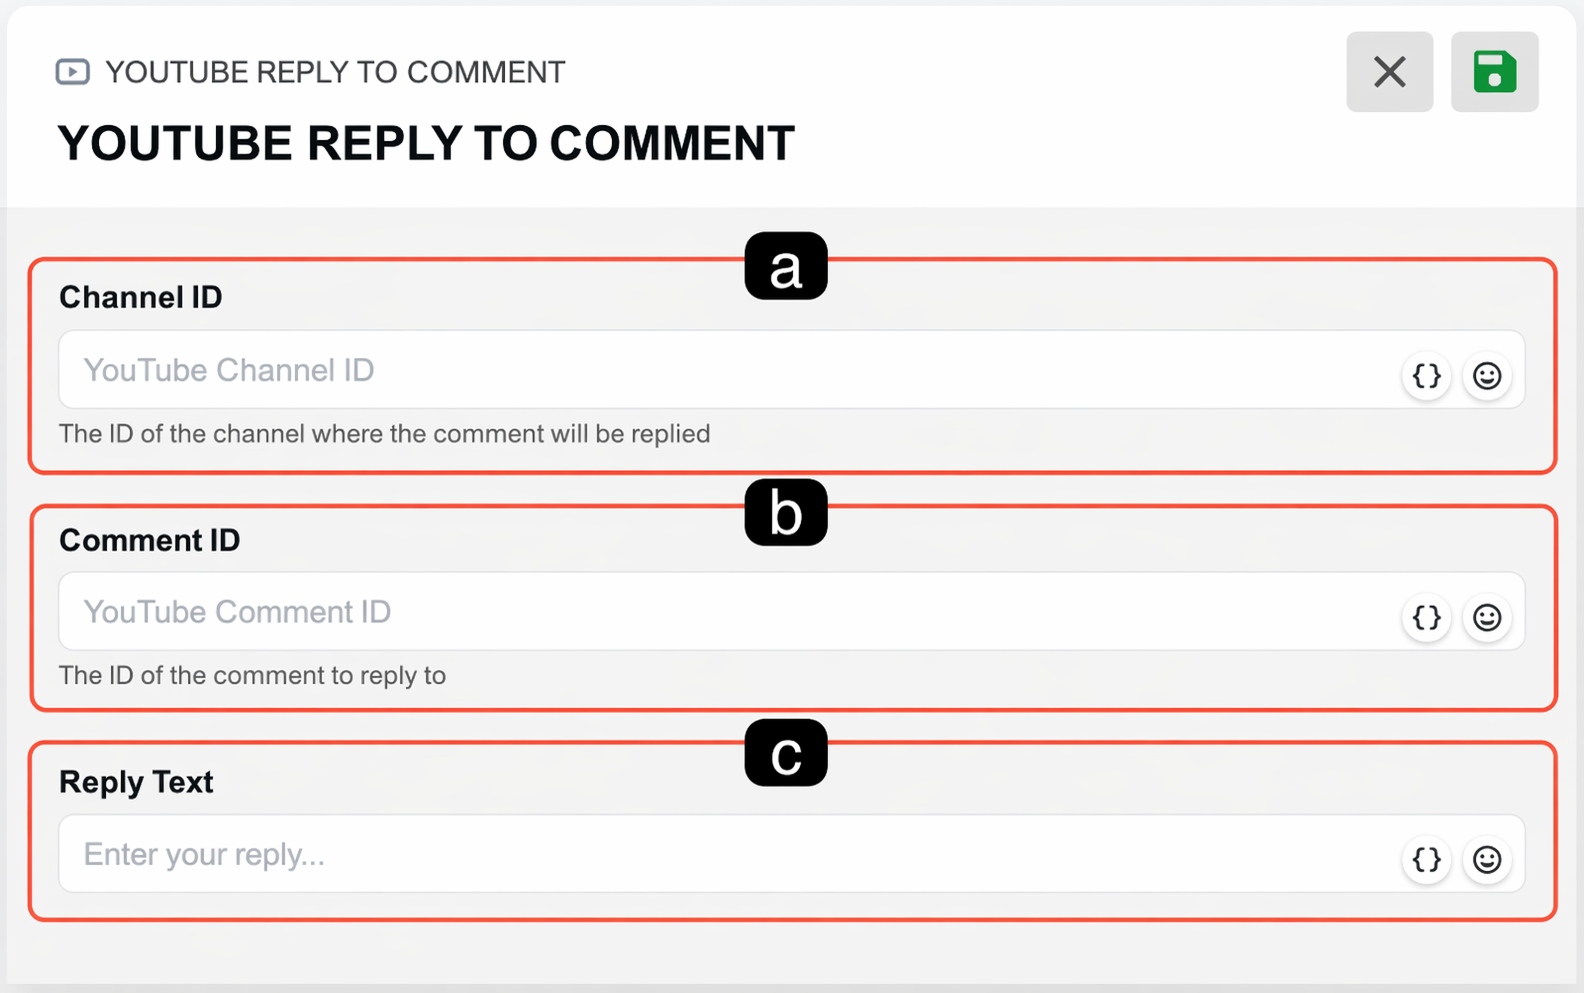
a. Channel ID
This is the unique identity number of the YouTube channel where the comment to be replied to is located.
b. Comment ID
This is the unique identity of the target comment required for the system to determine which comment will be replied to (the dynamic ID value coming from the automation flow can be defined here).
c. Reply Text
This is the text to be sent to the user. You can write a static message here or add a dynamic response text obtained from the artificial intelligence block or previous steps.
10.b – Update Comment Status
This block is used to update the processing status (open, closed, pending, etc.) of a comment received from YouTube within the Supsis AI panel and to automate operational tracking.
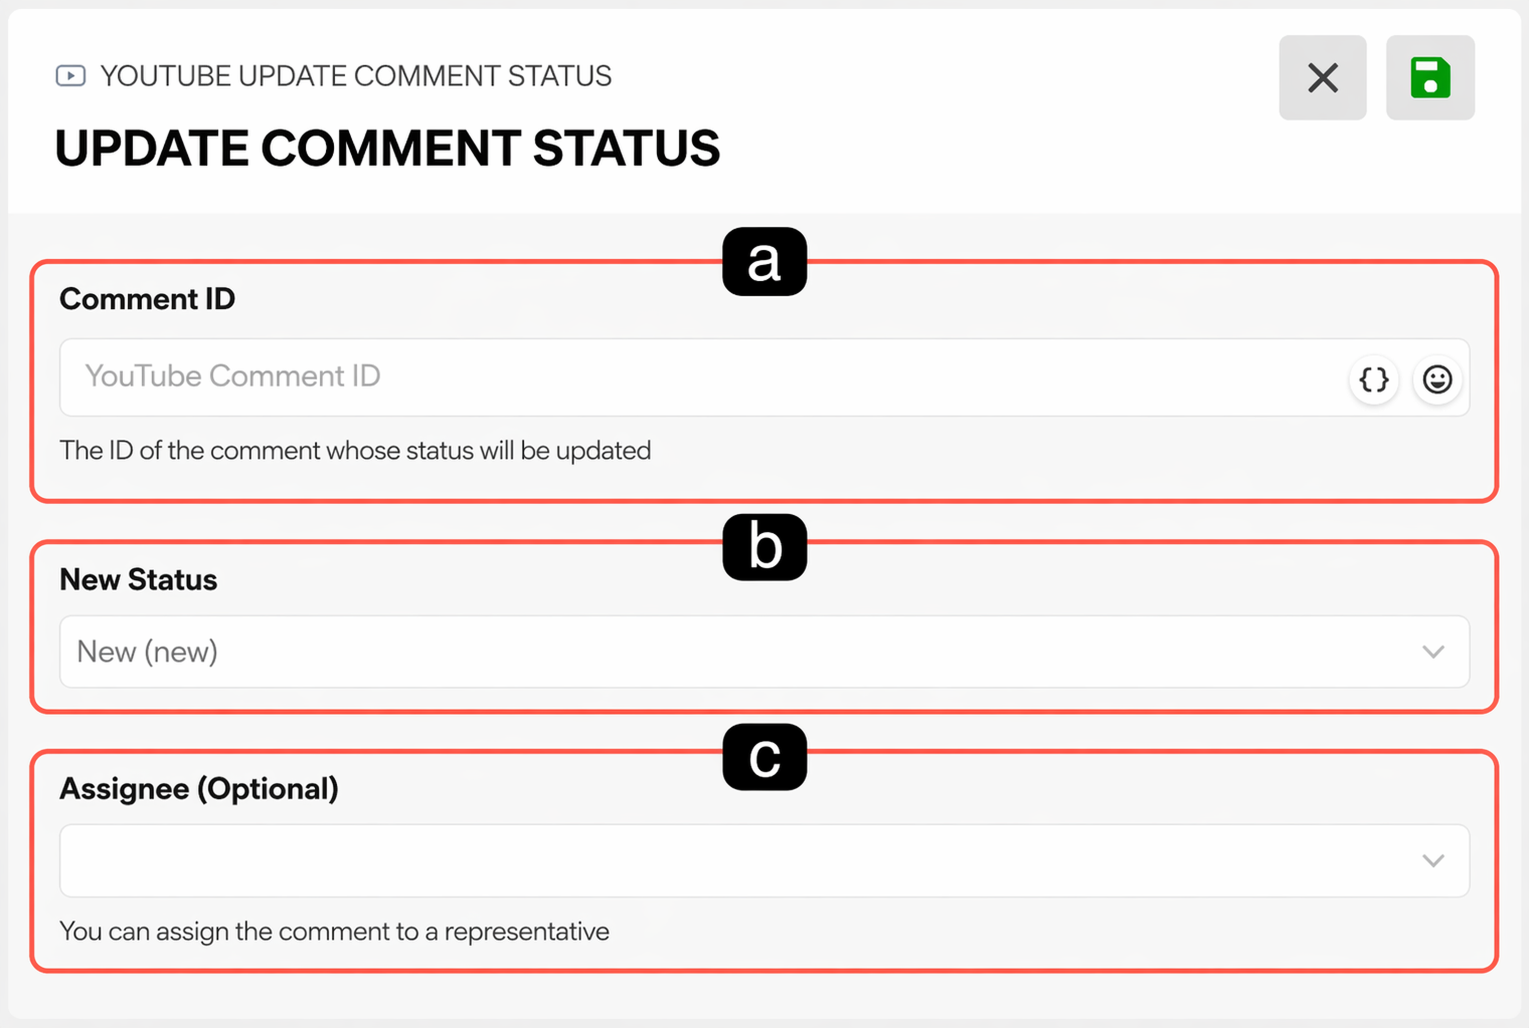
a. Comment ID: This is the unique identity number of the comment on which the operation will be performed.
b. Comment Status: This is the field where you determine how the new status of the comment will be recorded in the Supsis AI panel. (e.g.: "Replied" or "Pending Action")
c. Representative to Assign the Comment (Optional): If the comment requires manual intervention, this is the setting that allows you to automatically assign the relevant comment to a specific customer representative (agent) via the automation.
10.c – Set Comment Moderation Status
This block is used to manage the visibility of comments on your YouTube channel and to filter unwanted content. It allows you to fully automate the moderation of comments that are flagged by profanity filters or artificial intelligence sentiment analysis without manual intervention.
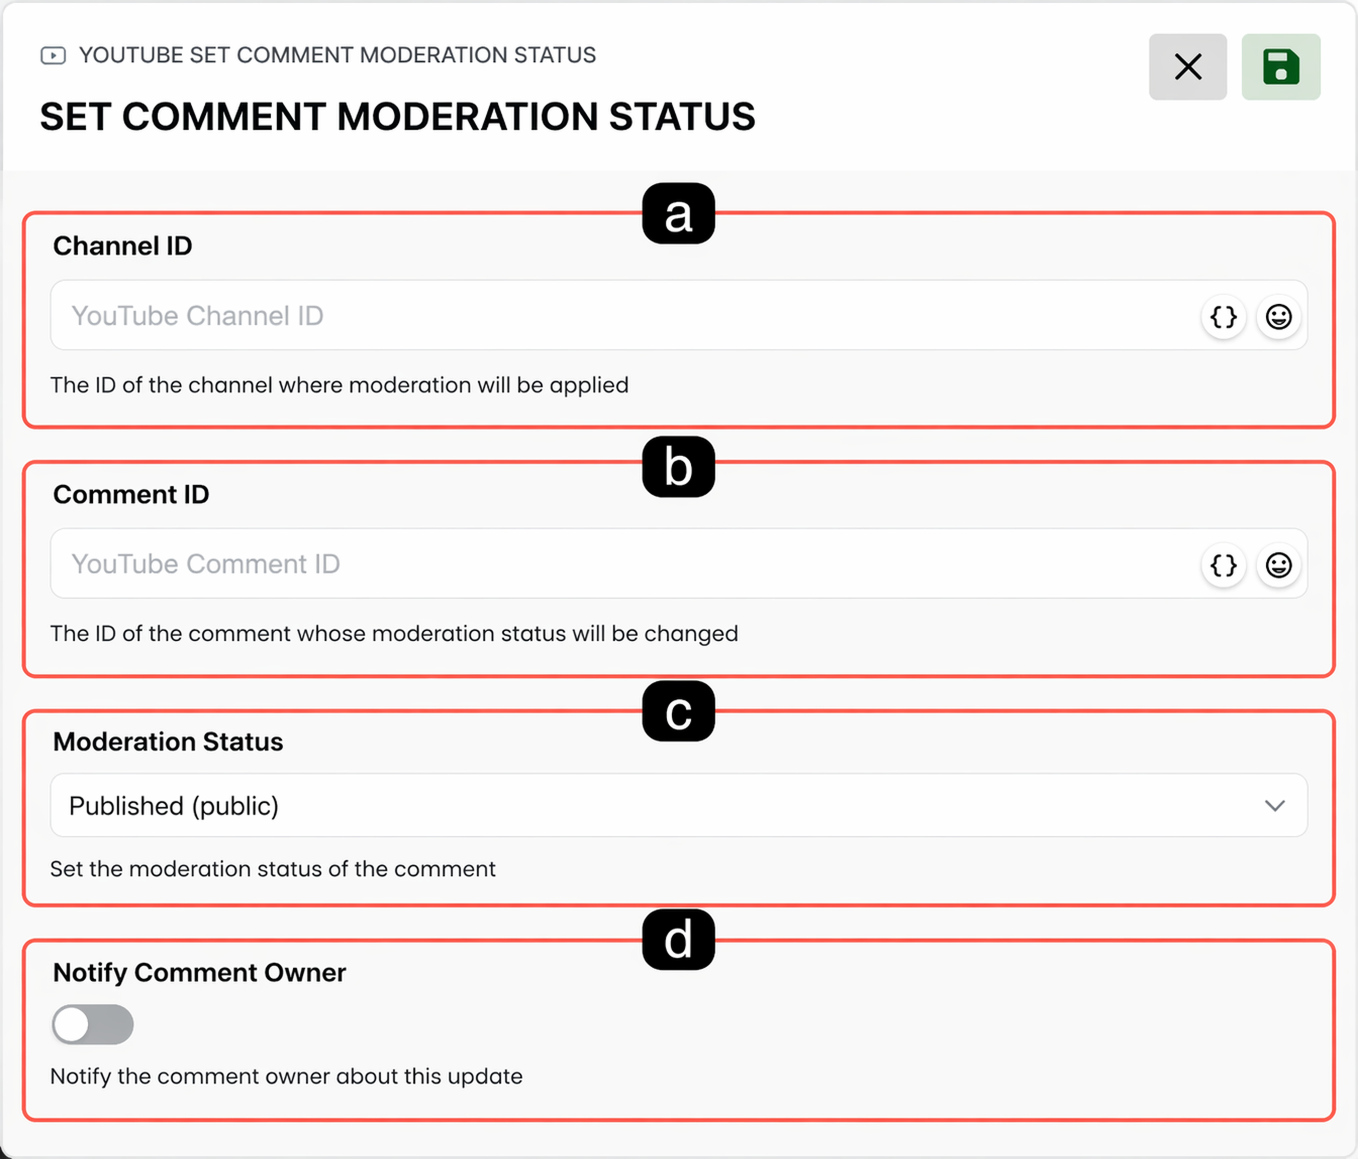
a. Comment ID
This is the unique identity of the comment to which the moderation operation will be applied.
b. Comment Status
This is the operational status of the comment within the system.
c. New Moderation Status
This is the field where you determine the action to be taken regarding the visibility of the comment on YouTube. You can apply one of the following options according to your needs:
- Publish: Approves the comment and makes it visible to everyone.
- Hold for Review: Does not publish the comment directly and sends it to manual approval (pending) by the channel administrator.
- Reject: Does not approve the comment and completely removes/deletes it from the YouTube channel.
d. Ban Comment Owner
If the comment contains spam or violates rules, you can automatically block the user (from the channel) who made the comment by using this option
11. Google Business Actions
Google Business Actions allow you to integrate customer reviews coming to your business profile (Google My Business) on Google Maps and Google Search into your automation scenarios. Thanks to these blocks, you can instantly send automatic responses to the reviews your customers leave for your business and easily manage your customer relations operations from a single center.
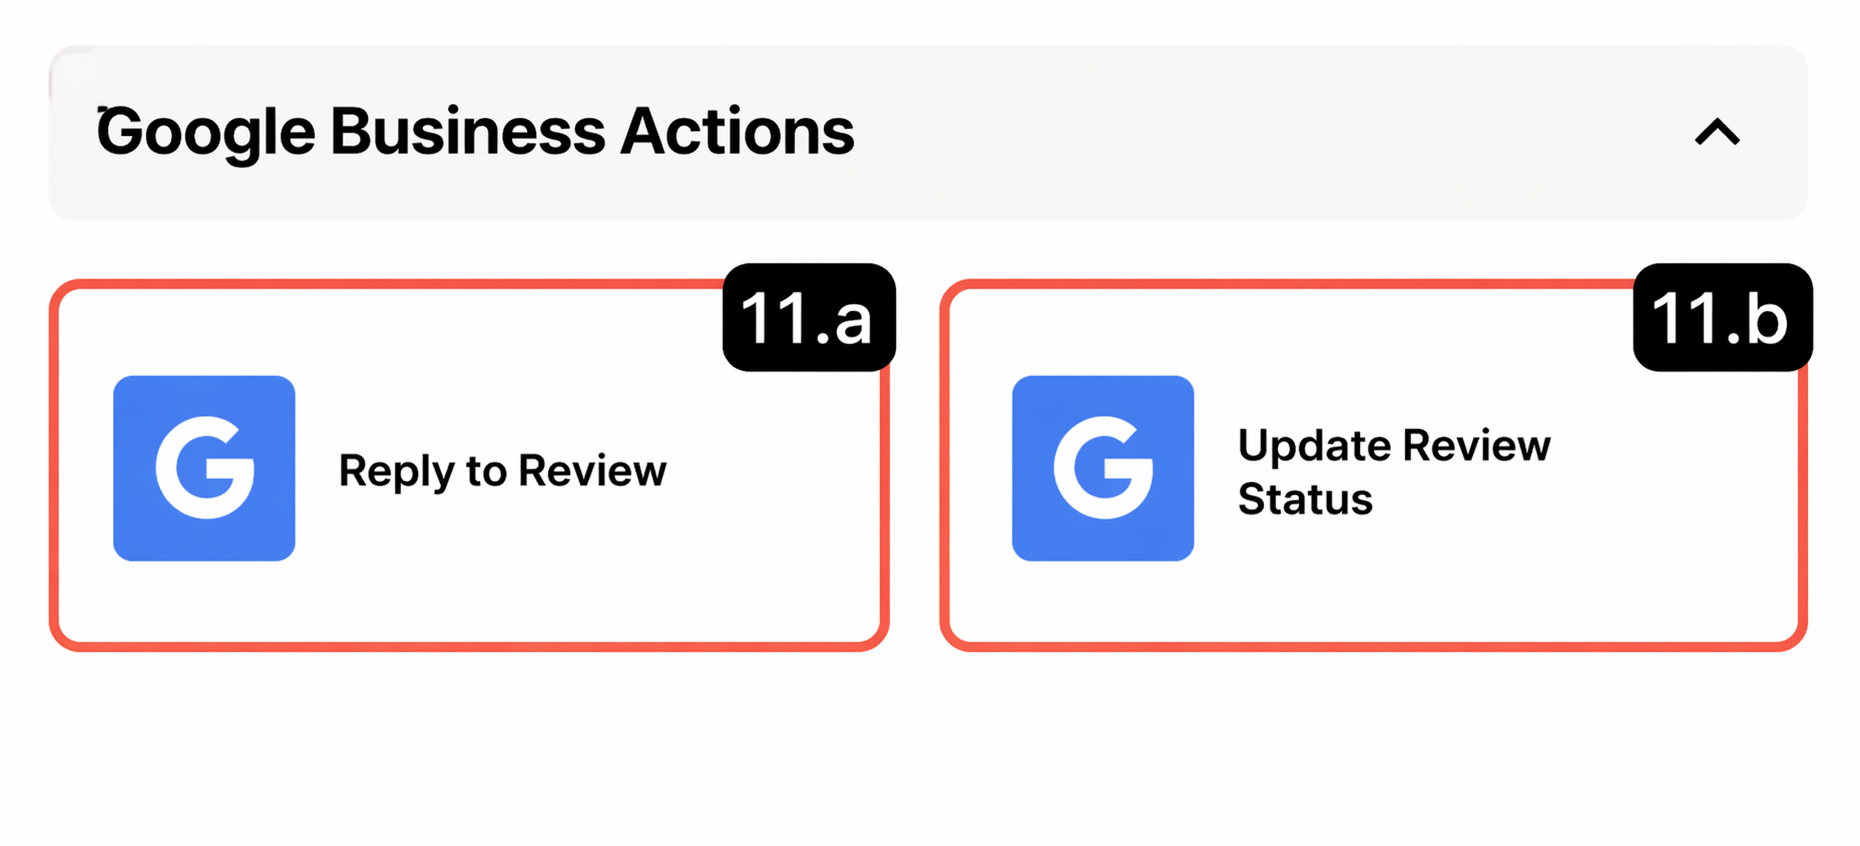
11.a – Reply to Comment
This block is used to automatically send a response to a specific Google Business review left for your business through the automation flow. It is ideal for instantly thanking incoming reviews or responding with predefined templates (or AI-supported texts) in negative situations.
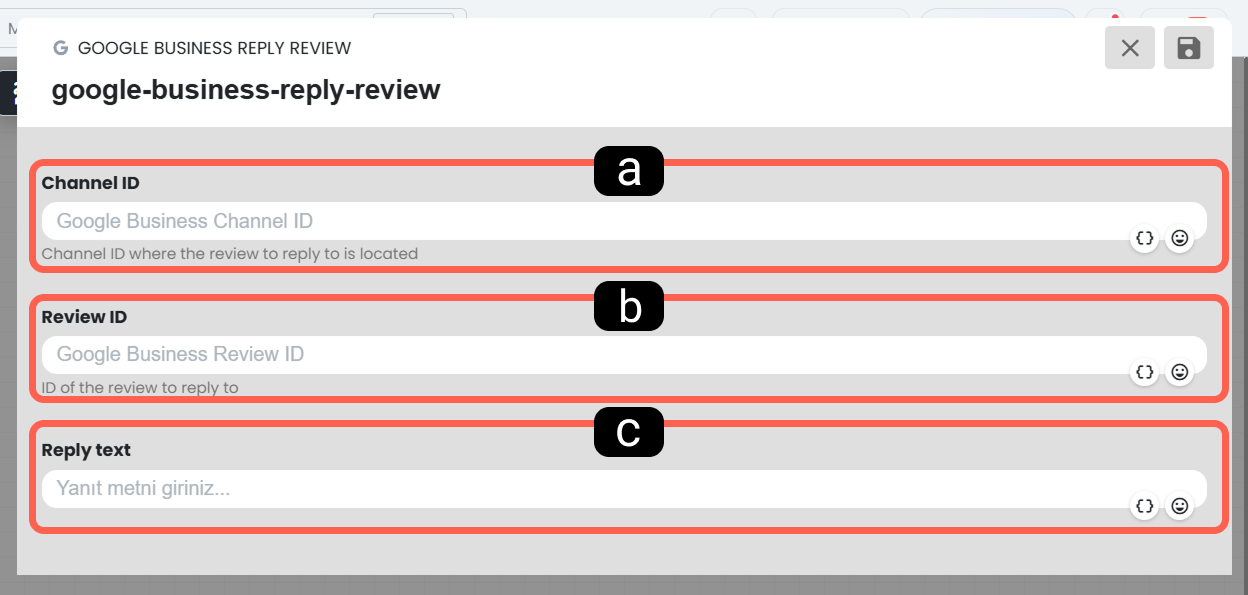
a. Channel ID
This is the unique identity number of your Google Business channel where the comment to be replied to is located.
b. Comment ID
This is the unique identity (Record ID) of the relevant comment required for the system to find which comment will be replied to. The dynamic ID obtained from the automation flow can be defined here.
c. Reply Text
This is the response that will be sent to the customer. You can write a manual text here or add a dynamic response variable coming from previous blocks of the automation (e.g.: Artificial Intelligence block).
11.b – Update Comment Status
This block is used to update the processing status of a comment coming from Google Business within the Supsis panel and to automate operational tracking.
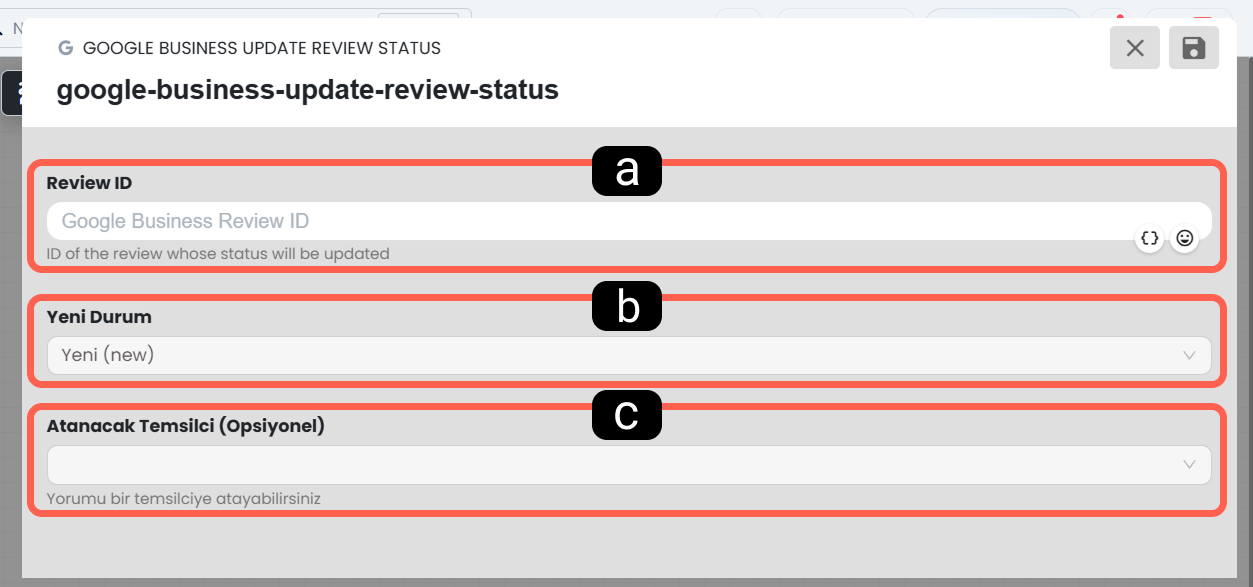
a. Comment ID
This is the unique identity number of the comment on which the operation will be performed.
b. Comment Status
This is the field where you determine what the operational stage of the comment will be in the Supsis AI panel. According to your needs, you can choose one of the New, Replied, or Resolved options.
c. Representative to Assign the Comment (Optional)
If the incoming comment requires manual review or intervention, this is the assignment setting that allows you to automatically route the relevant comment to a specific customer representative (agent) via the automation.
12. Google Play Actions
Google Play Actions allow you to include user reviews coming to your mobile application on the Google Play Store into your automation scenarios. In this way, you can automatically respond to app reviews and increase your app rating and store engagement by processing user feedback quickly.
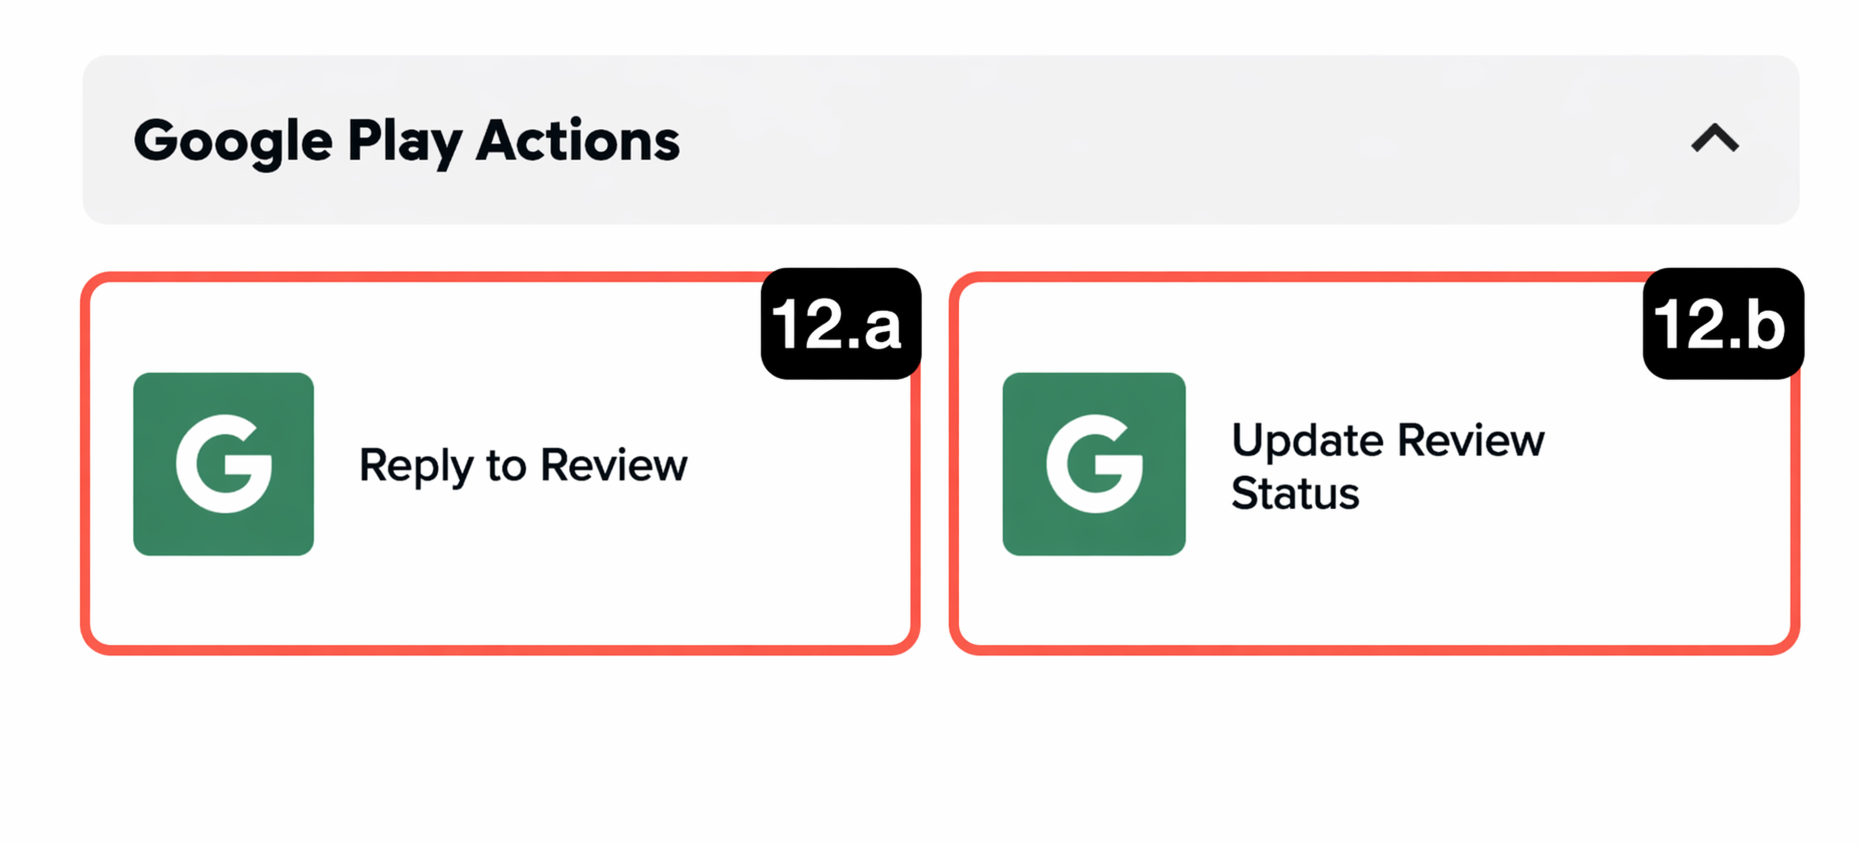
12.a – Reply to Comment
This block is used to automatically send a response to a review (comment) left for your application through the automation flow.
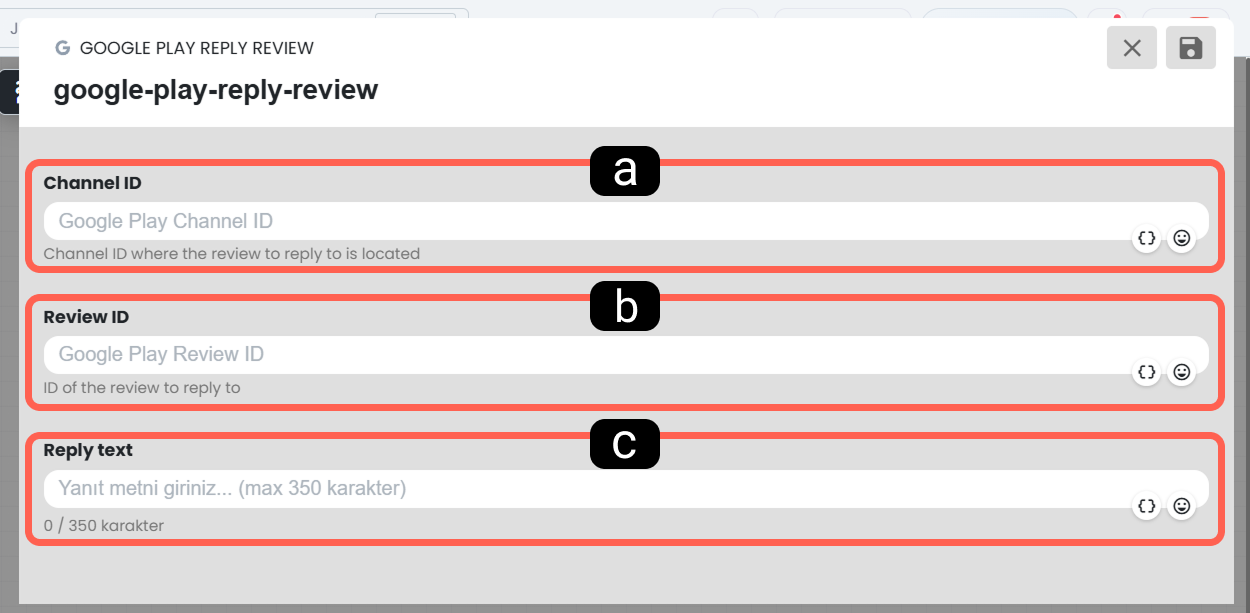
a. Channel ID
This is the unique identity number of the Google Play channel to which your application is connected in the system.
b. Comment ID
This is the unique identity of the target comment that determines which comment will be replied to.
c. Reply Text
This is the response text that will be sent to the user on behalf of your application. A standard template or a personalized text generated with artificial intelligence can be used.
12.b – Update Comment Status
This block is used to automate the resolution and tracking process of comments coming from Google Play within the Supsis support panel.
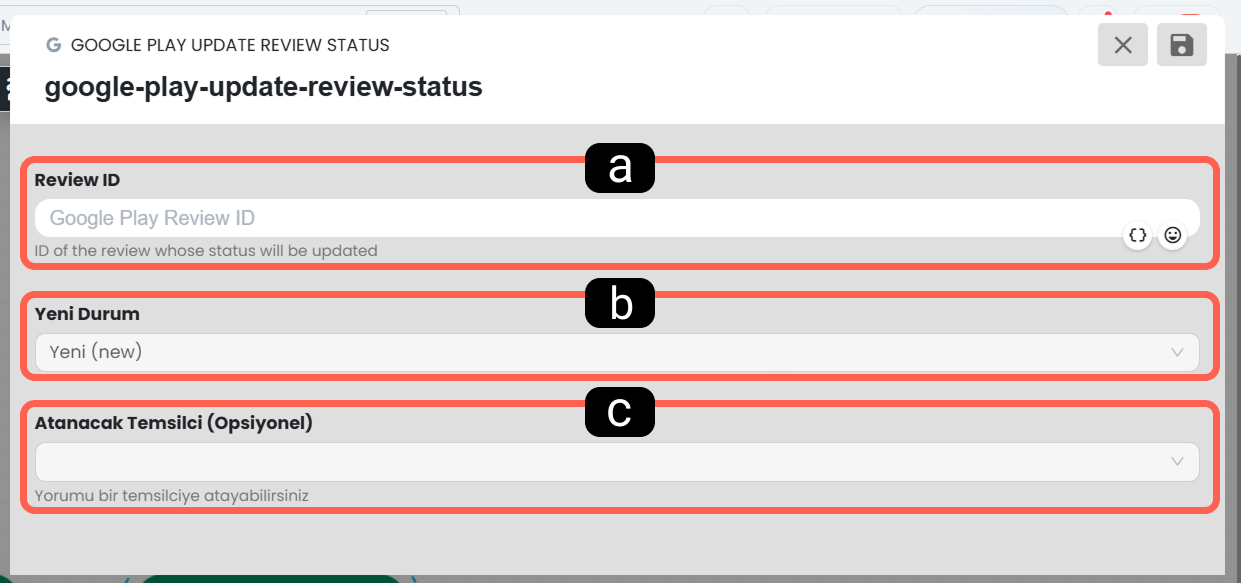
a. Comment ID
This is the unique identity of the application comment whose status will be updated.
b. Comment Status
This is the field where you determine the new stage of the comment in the support process. You can assign one of the New, Replied, or Resolved statuses from the options.
c. Representative to Assign the Comment (Optional)
If a technical issue related to your application has been reported or a manual review is required, this ensures that the automation automatically assigns this comment to a specific technical support specialist or representative.
13.App Store Actions
App Store Actions allow you to include user reviews (comments) coming to your iOS application on the Apple App Store into your automation scenarios. Thanks to these blocks, you can instantly respond to user feedback automatically, update the operational status of your support processes, or automatically remove previously given responses from the system
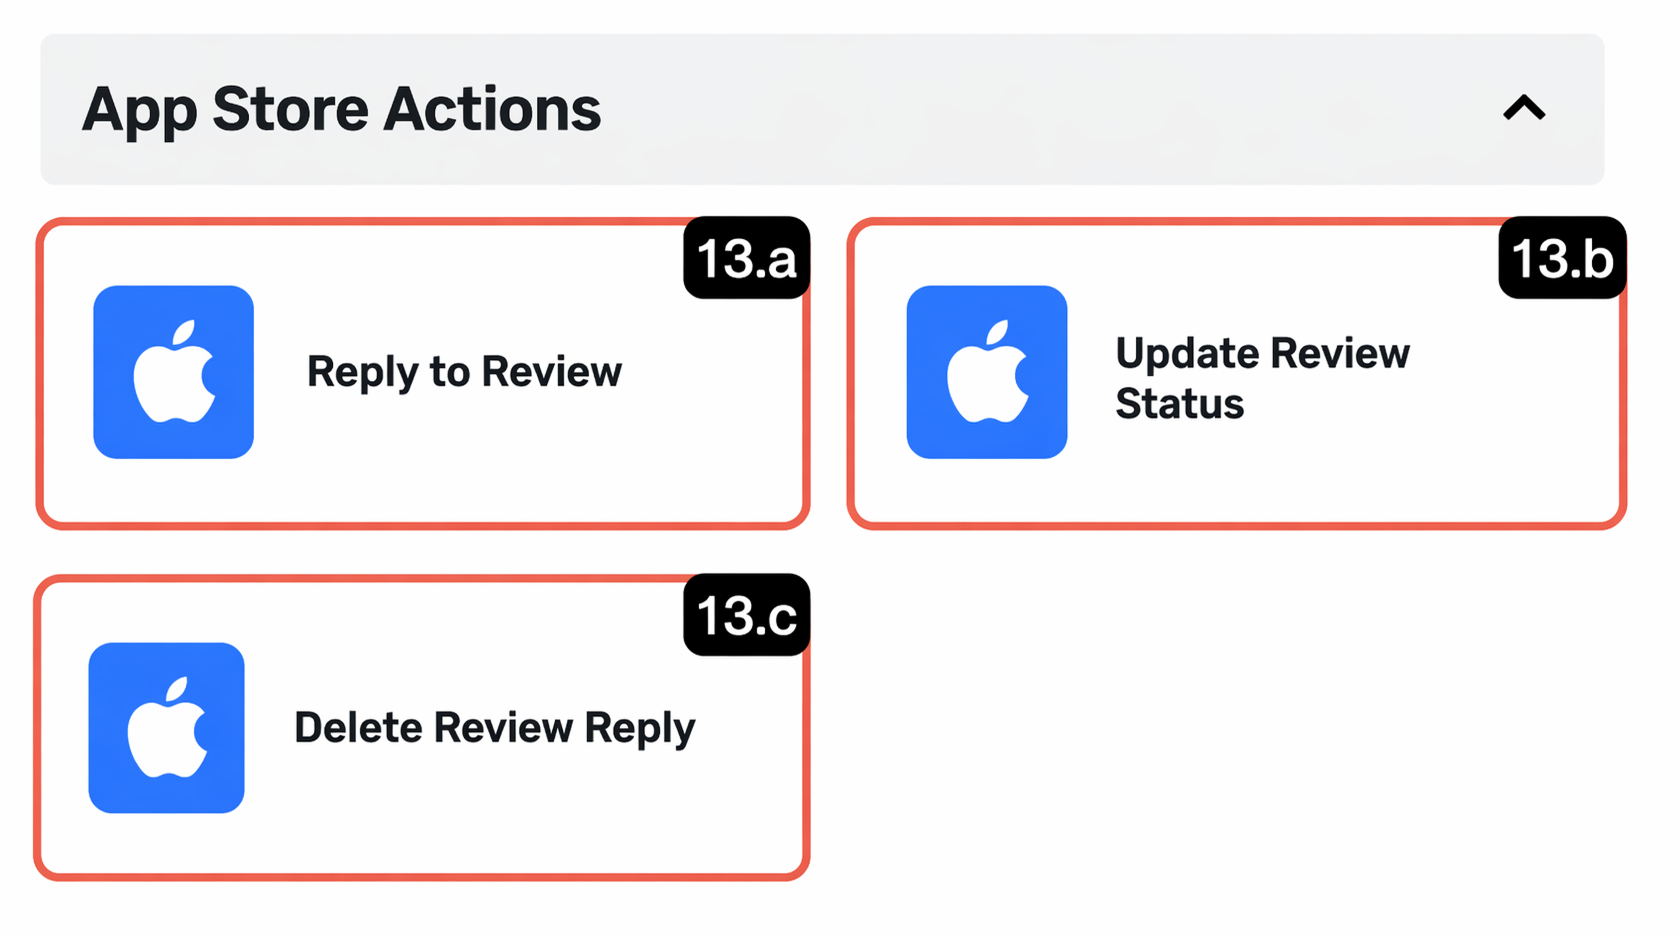
13.a – Reply to Comment
This block is used to automatically send a response to a user comment left for your application through the automation flow. It is very effective for thanking positive reviews or responding to encountered problems with a standard template.
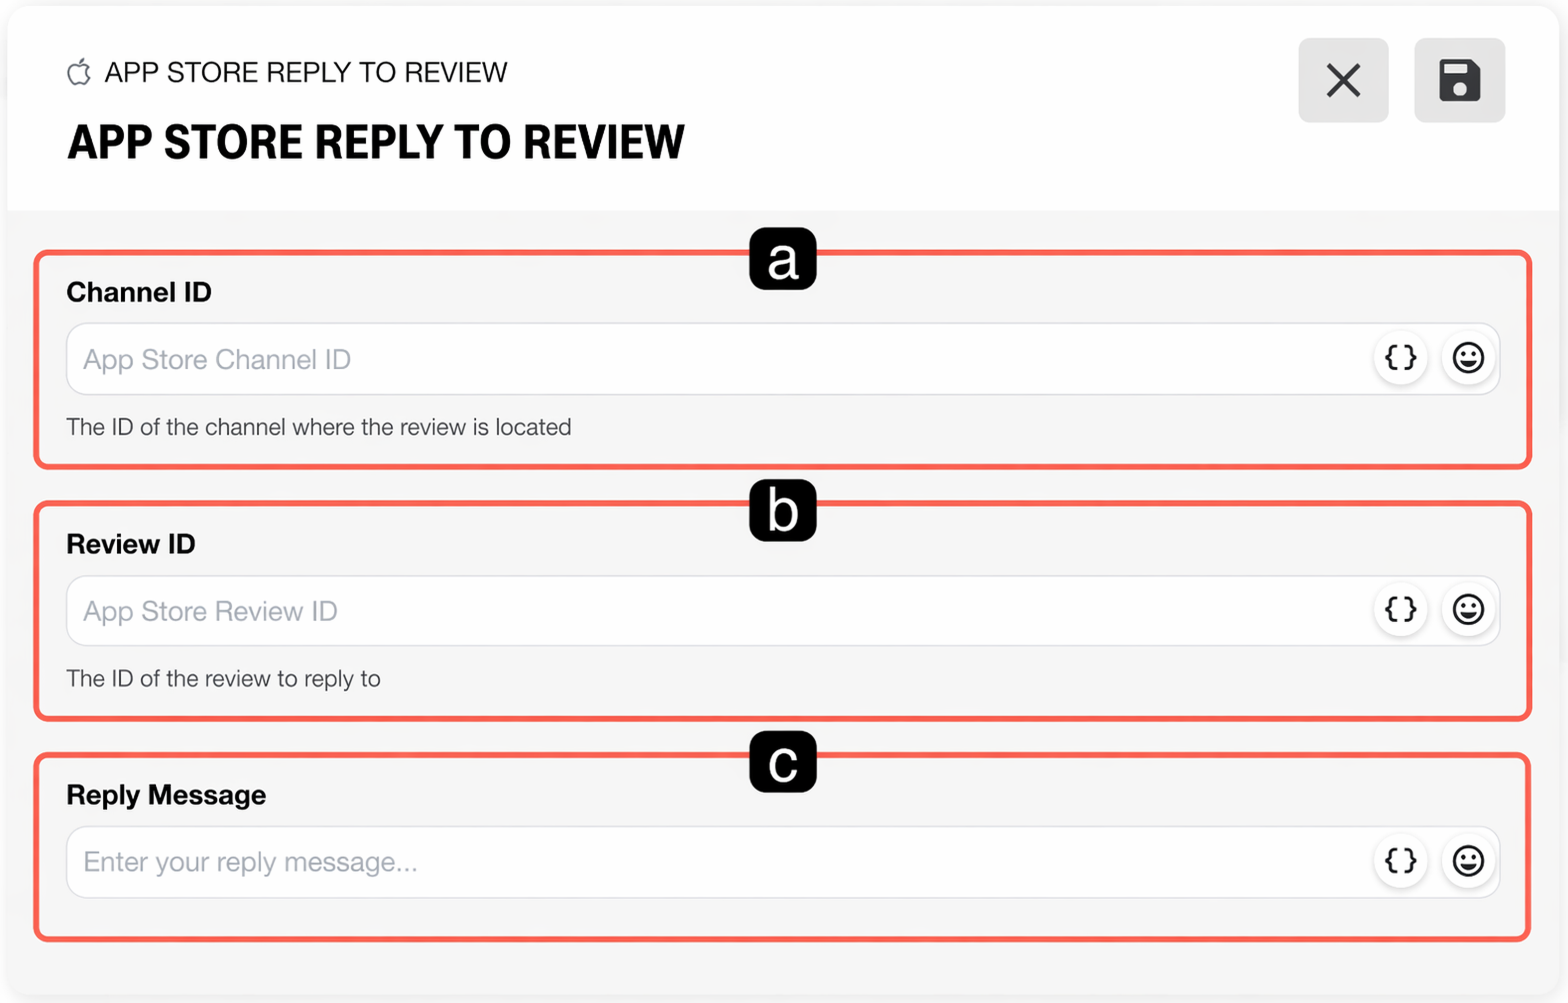
a. Channel ID
This is the unique identity number in the Supsis system of the App Store channel to which your iOS application is connected.
b. Comment ID
This is the unique identity of the target comment that determines which review will be replied to. The dynamic ID obtained from the automation flow can be defined here.
c. Reply Text
This is the response that will be delivered to the user. You can enter a fixed text or add a dynamic text variable generated by artificial intelligence.
13.b – Update Comment Status
It is used to automate the resolution and tracking process (operational tracking) of comments coming from the App Store within the Supsis support panel.
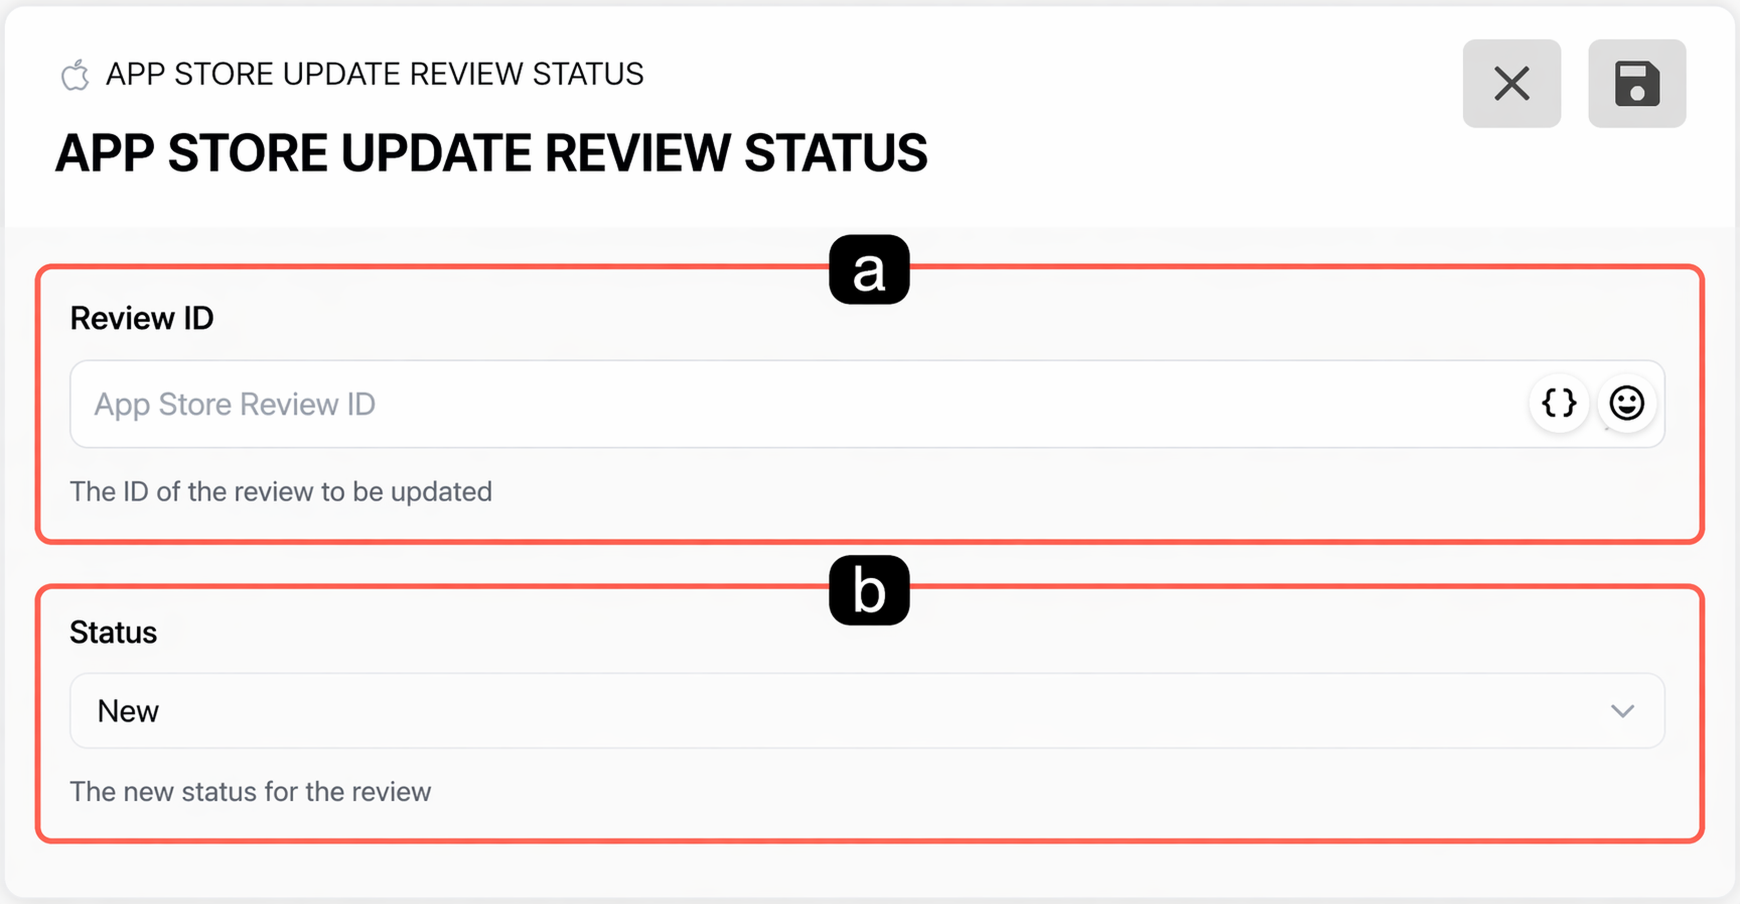
a. Comment ID
This is the unique identity of the comment whose status will be updated.
b. Status
This is the field where you determine the new stage of the comment in the support process. According to the flow of your scenario, you can automatically move comments to New, Replied, or Resolved statuses.
13.c – Delete Comment Reply
This block is used to permanently delete (remove) a developer response previously given to a specific comment on the App Store through the automation flow. It can be preferred to remove an incorrect automatic response or to clean up the old response after resolving the customer’s issue through a different channel.
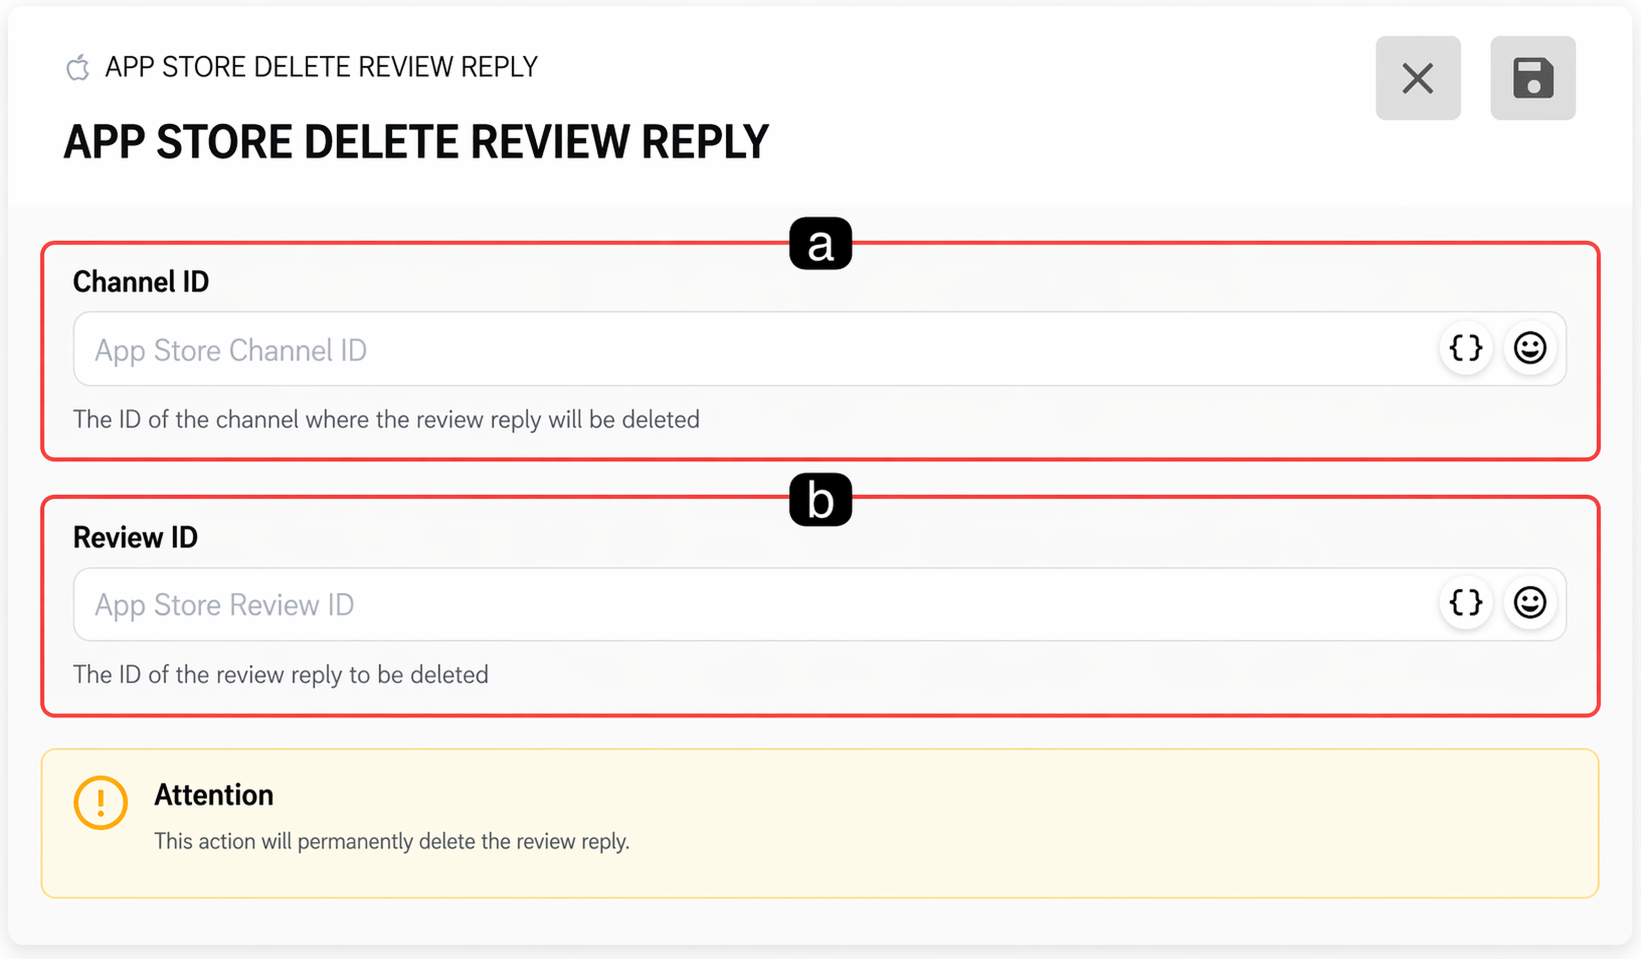
a. Channel ID
This is the unique identity number of the App Store channel where the operation will be performed.
b. Comment ID
This is the identity of the target application/comment whose previously given response will be deleted. When this operation is performed, only your response is deleted; the user’s original comment remains on the store.
14. Google Drive Actions
Google Drive Actions allow you to establish a direct and secure data bridge between your automation scenarios and your Google Drive cloud storage. Thanks to these blocks, you can automatically upload files obtained during the automation process (for example; customer invoices, form attachments, or generated reports) to Drive, download existing files, query file metadata, or delete unnecessary files from the system
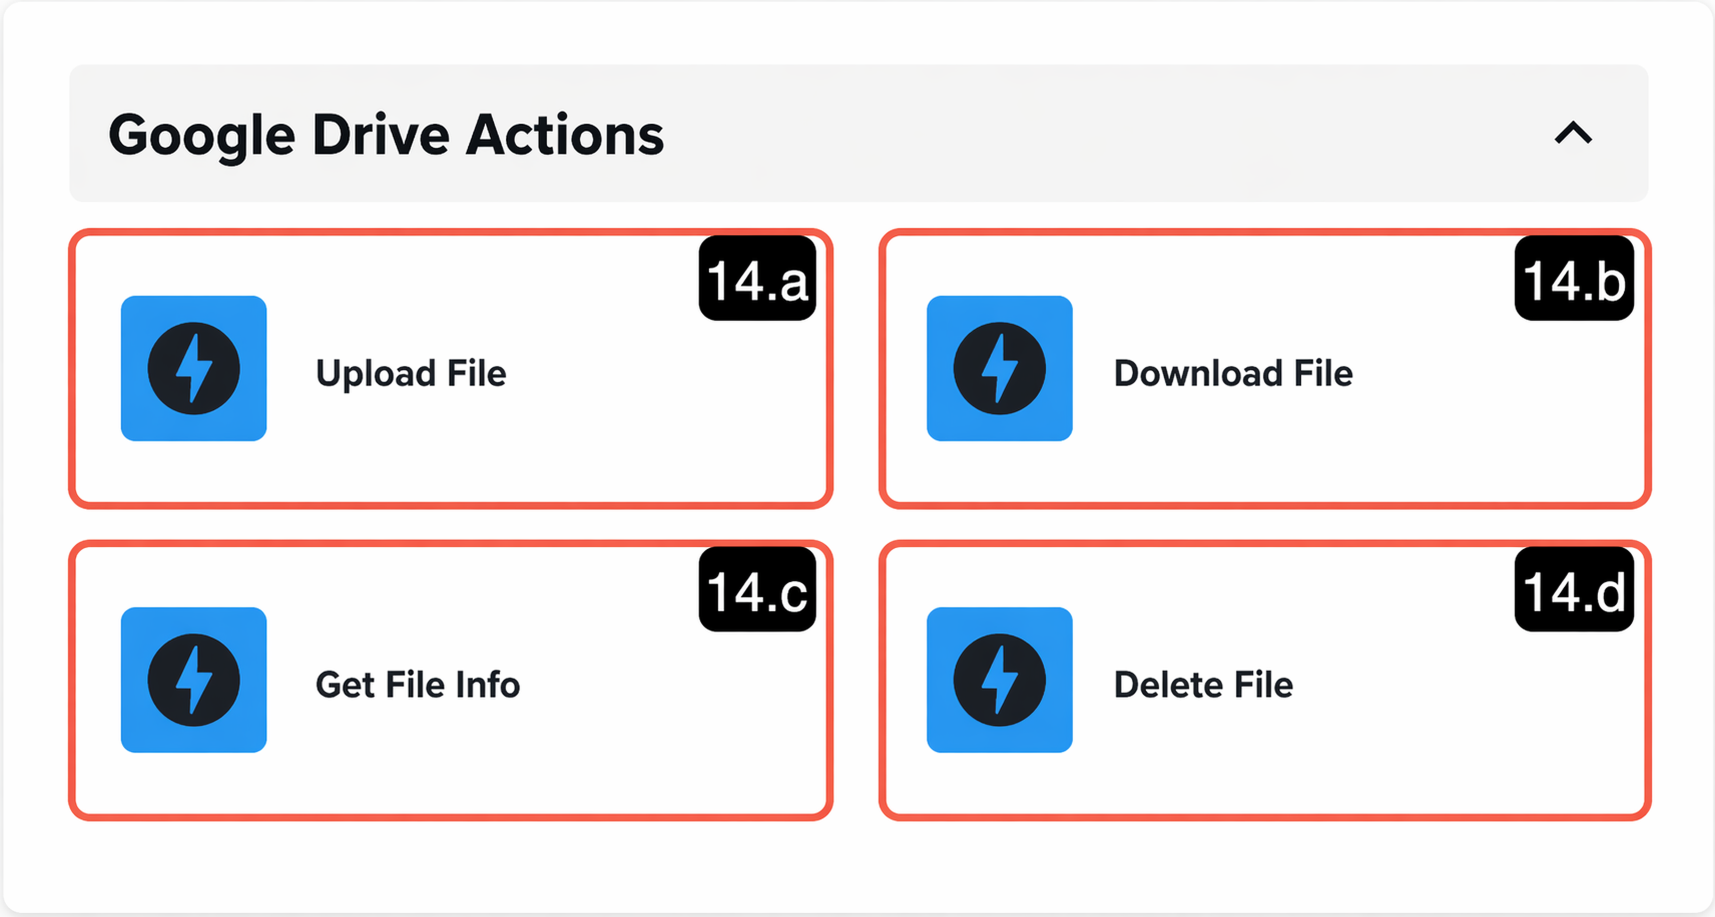
14.a – Upload File
This block is used to upload a file (Asset) obtained during the automation flow directly to your Google Drive account and archive it in the cloud.
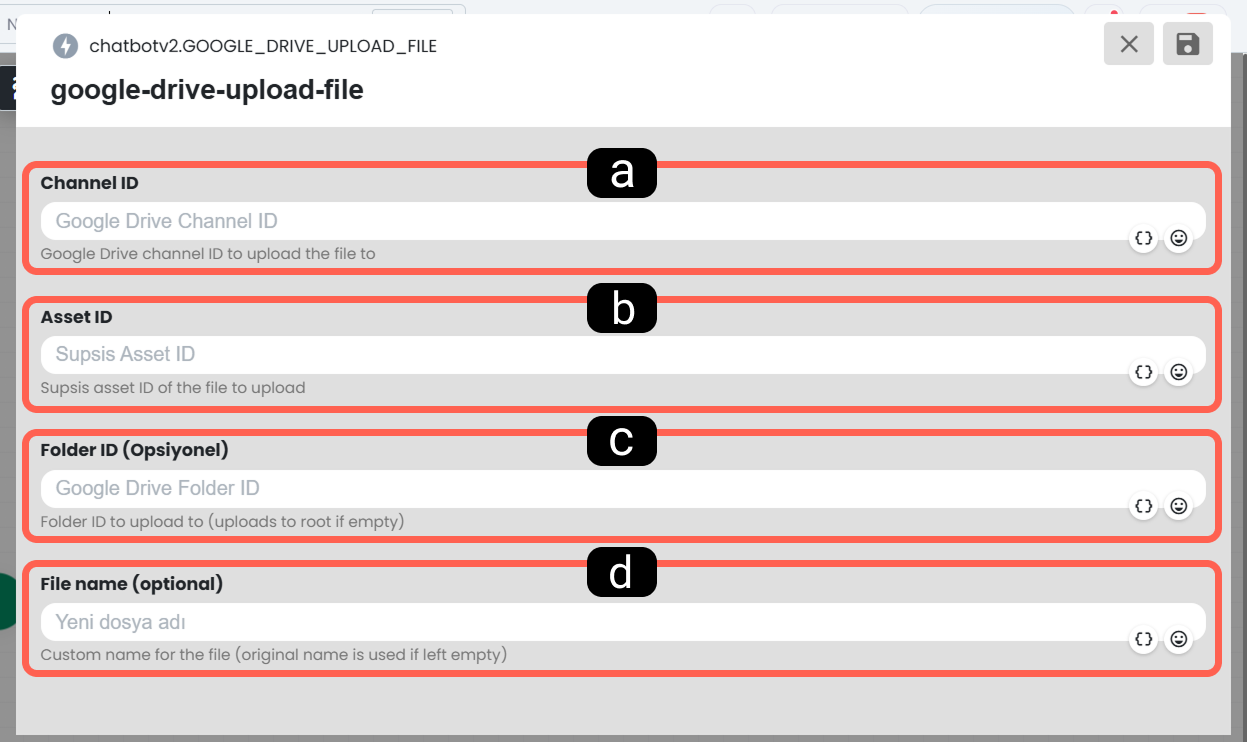
a. Channel ID
This is the unique identity number in the system of the integrated Google Drive channel (account) where the operation will be performed.
b. Asset ID
This is the unique identity of the file within the Supsis system that will be uploaded to Drive. The file variable obtained from previous steps of the automation (for example; a document uploaded from a form) is defined here.
c. File ID (Optional)
If you want to overwrite (update the existing file) on a specific file that already exists on Drive, you can enter the identity of that file here. If a completely new file will be uploaded, this field can be left empty.
d. File Name (Optional)
This is the field where you determine under which name the uploaded file will be saved on Google Drive. Automation variables can be used for dynamic naming (e.g.: "CustomerName_Invoice.pdf")
14.b – Download File
It is used to download (retrieve) a specific file located on Google Drive into the automation flow. This file pulled into the system can be easily used in the subsequent steps of the automation (for example; to be sent to a customer as an email attachment or a WhatsApp message).
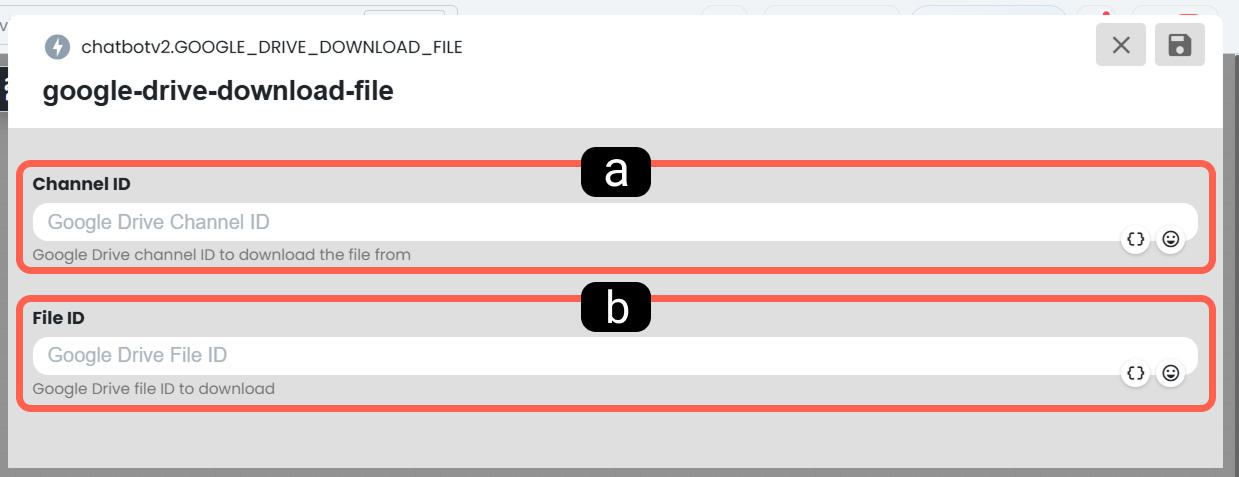
a. Channel ID
This is the identity number of the connected Google Drive channel where the file is located.
b. File ID
This is the unique identity number (Drive file ID) of the target file to be downloaded from Drive.
14.c – Get File Information
It is used to query only the metadata (file size, creation date, file type, name, etc.) of a file located on Drive without fully downloading its content and to bring it into the automation as a variable. It is an ideal validation step to check the existence or size of a file.
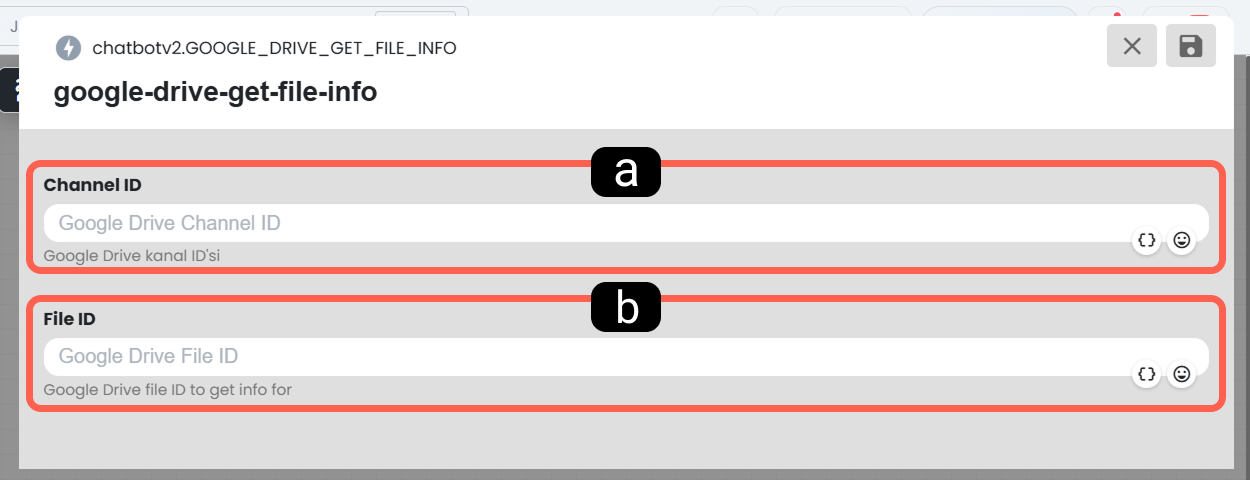
a. Channel ID
This is the identity number of the Google Drive channel where the operation will be performed.
b. File ID
This is the unique identity of the file whose information will be queried and pulled into the automation
14.d – Delete File
It is used to automatically delete a file on Google Drive at a specific stage of your automation scenario or when a condition is met. It is preferred to clean temporary documents and prevent unnecessary space usage (quota overflow) in cloud storage.
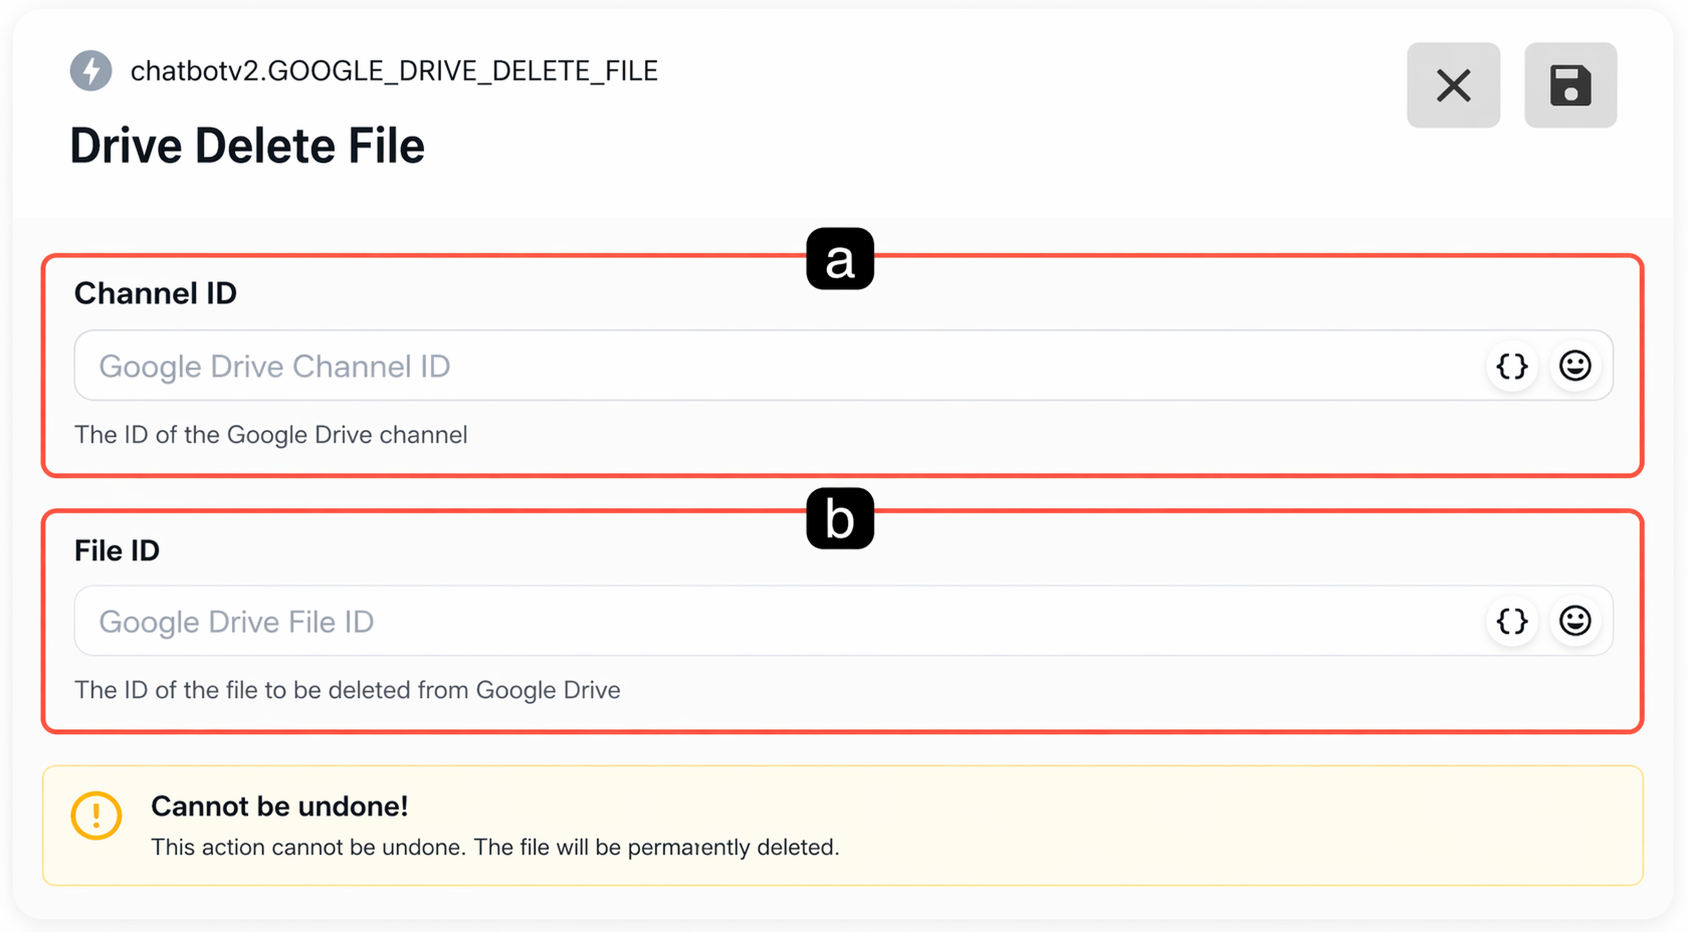
a. Channel ID
This is the identity number of the Google Drive channel where the deletion operation will be performed.
b. File ID
This is the target identity number of the file that will be permanently removed (deleted) from the Google Drive system
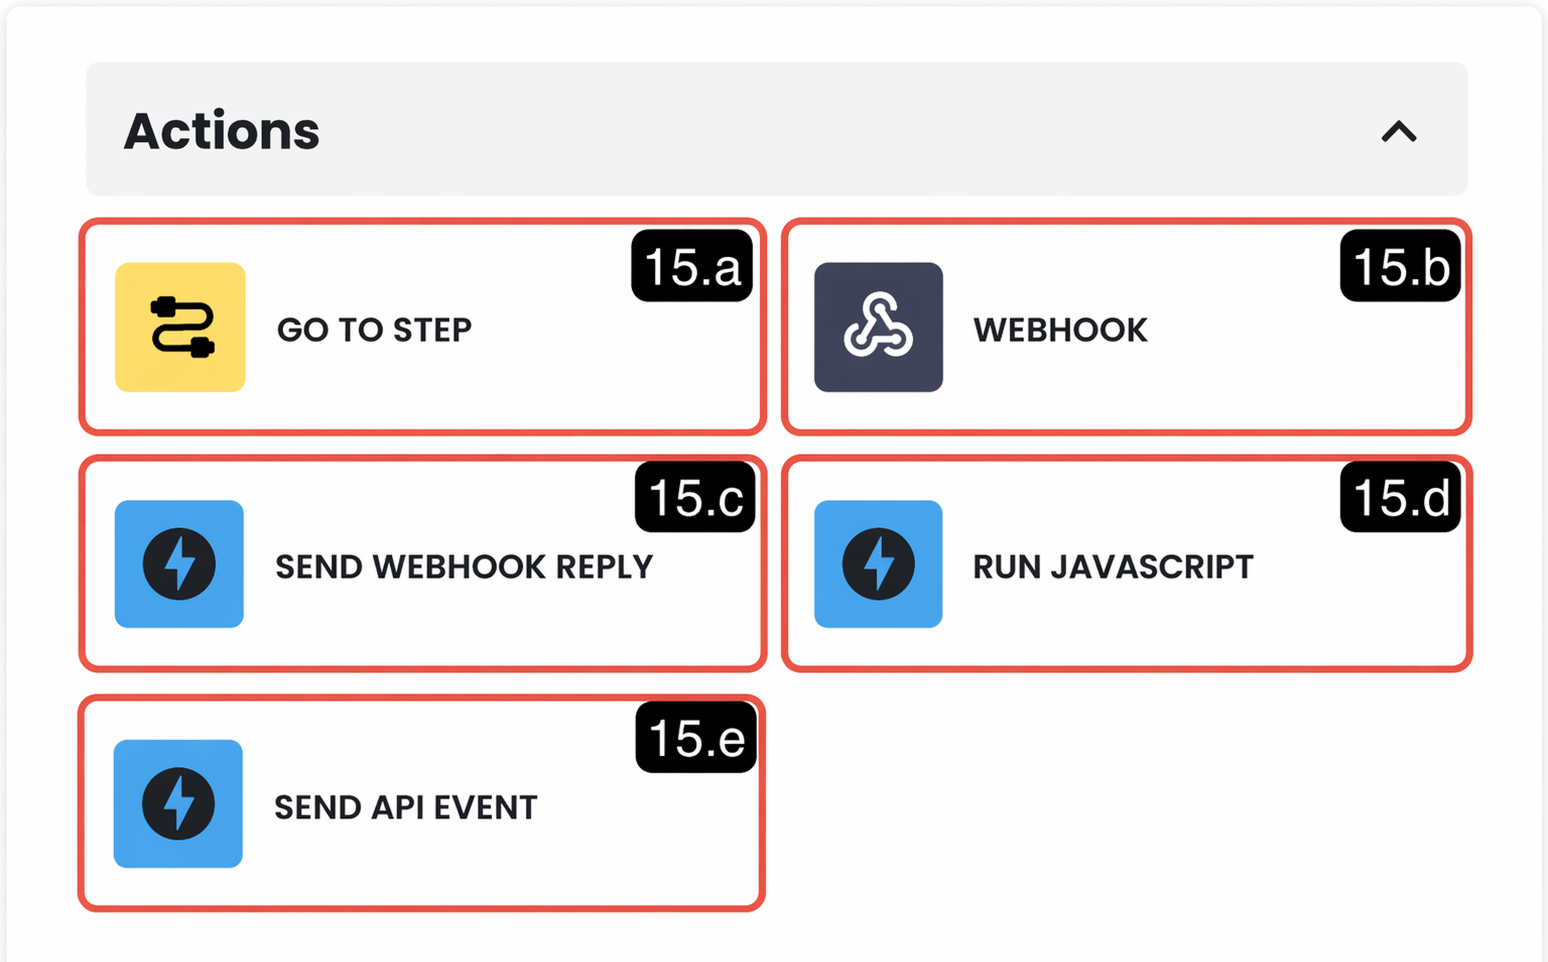
15. Actions
Action blocks are core tools that enable your automation scenario to communicate with external resources, send and receive data to/from different applications, and dynamically control the progress within the scenario
15.a – Go to Step
The Go to Step block is used to quickly navigate to a specific stage or skip certain steps, especially in long and complex automation scenarios.
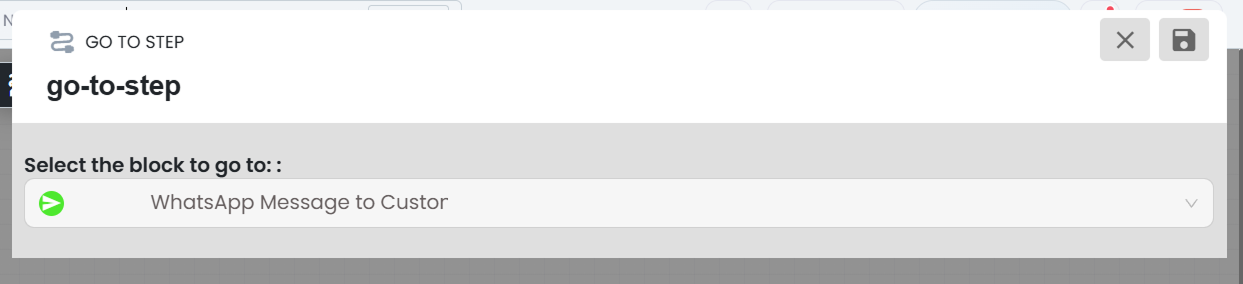
When the flow reaches this block, the system directly jumps to the target block you defined and the automation continues seamlessly from that point.
15.b – Webhook
It allows you to perform real-time data exchange via HTTP calls between your Supsis AI automation and external resources (CRM, accounting software, ERP systems, etc.). It is used to send data to the target system or retrieve data from that system when a specific event is triggered
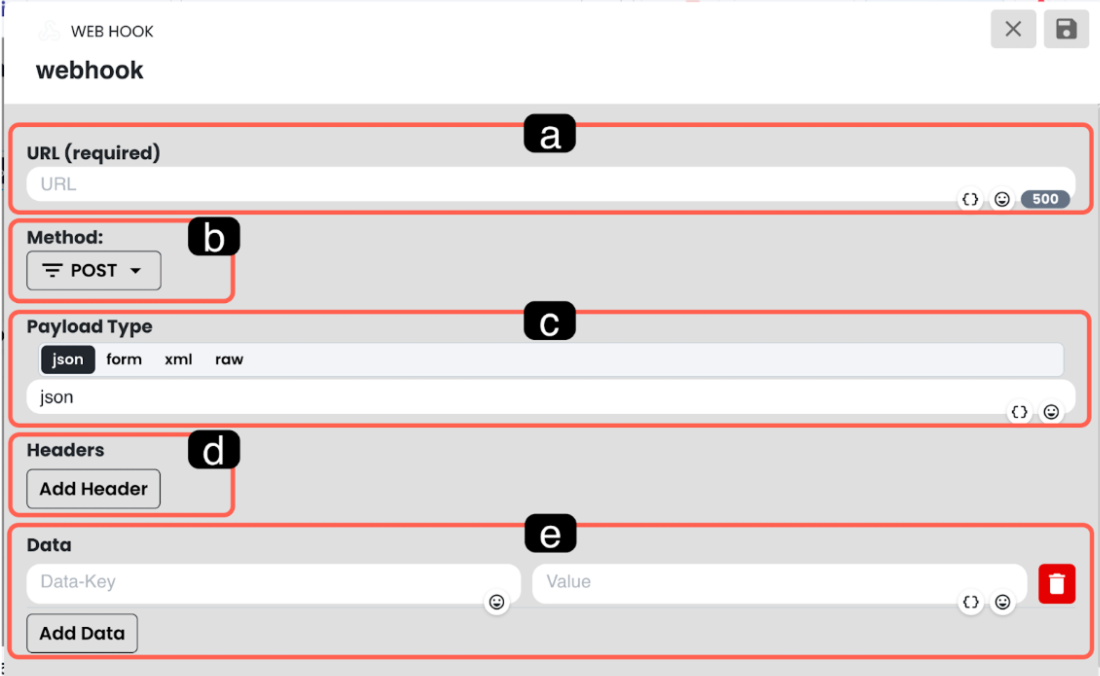
a. URL
This is the connection address of the target system where the data will be sent or received. Whichever system you are integrating with, you must enter the Webhook URL provided by that system into this field.
b. Method (Request Method)
This is the field where you determine which function the HTTP request to be sent will perform.
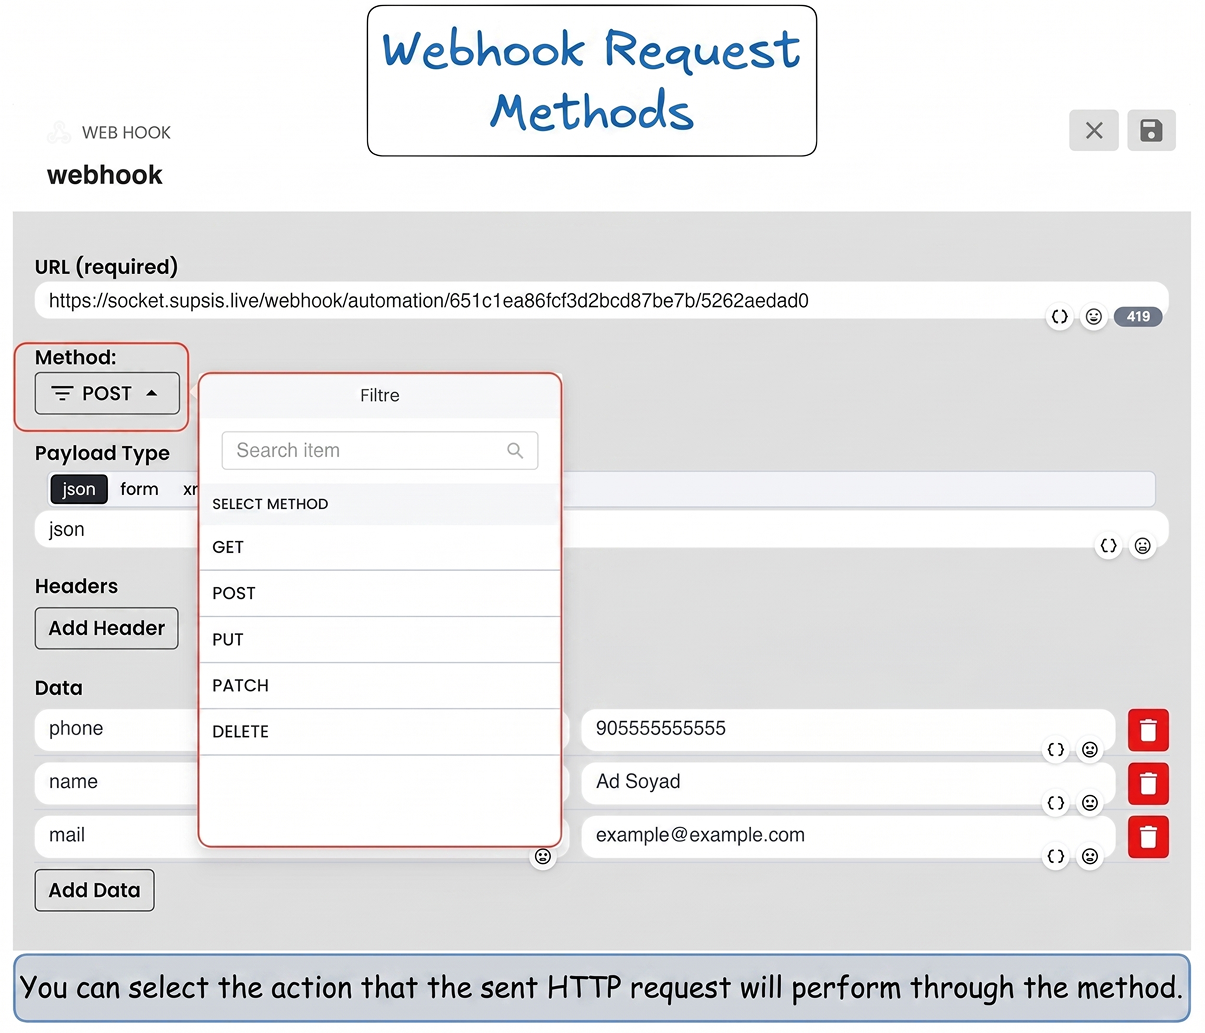
- GET: Used to retrieve or read data from the target server (system).
- POST: Used to send new data to the target server or create a new record.
- PUT: Used to completely replace or update an existing record in the target system.
- PATCH: Similar to PUT, but it is a more efficient method used to update only specific (partial) fields of a record rather than the entire record.
- DELETE: Used to permanently delete a specific record from the target server.
c. Payload Type (Data Format)
This is the format in which the data to be sent is packaged. The selection should be made according to the format accepted by the target system. The most commonly used JSON format transmits data as key-value pairs. In addition, Form, XML (tag-based structure), and Raw (line-based data) formats are also supported.
d. Add Headers
This is the field where you enter the header information required to ensure authentication (Authorization) and to specify the accepted data format in API integrations.
e. Data to be Sent (Data)
This is the section where you define the actual dataset to be sent to the target URL. You can enter static data here, or you can include dynamic variables from the automation using the {data} format.
15.c – Send Webhook Response
If your automation is triggered by an incoming Webhook request, you can automatically return a response to the source that sent the request using this block.
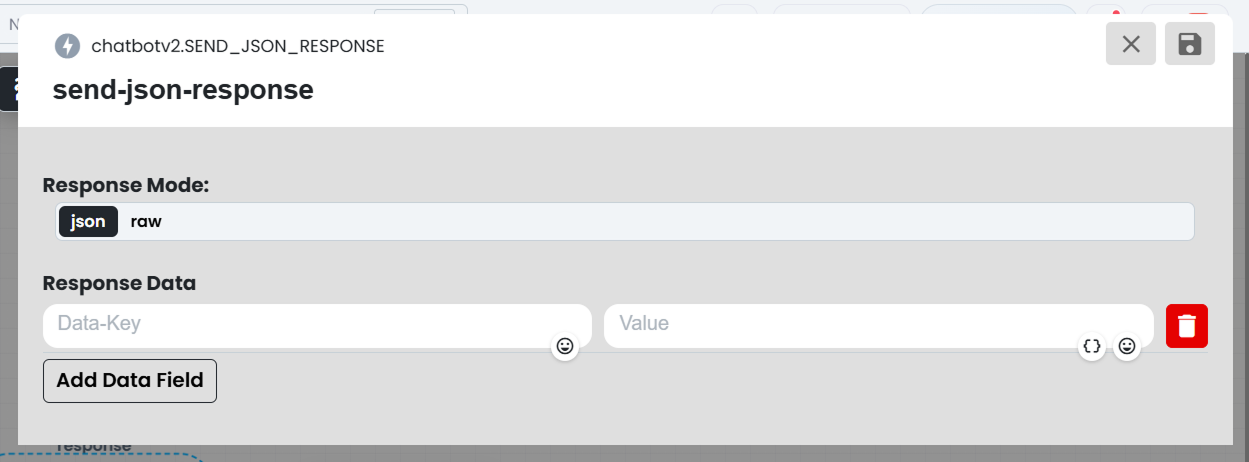
a. JSON
The response to the Webhook is sent within a JSON schema.
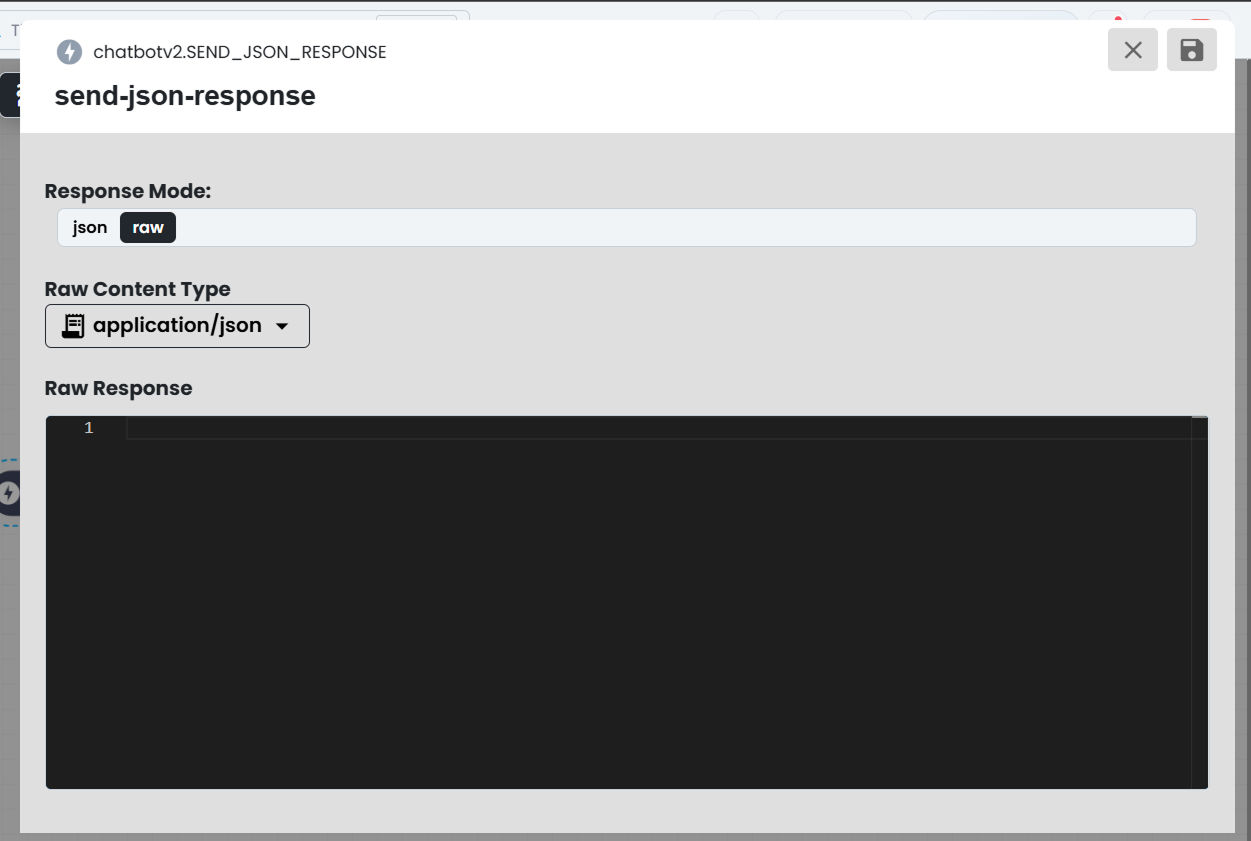
b. Raw
This response format is selected when sending unprocessed, raw data to the Webhook.
15.d – Run Javascript
15.e – Send CAPI Event
This block, which provides integration with Meta (Facebook/Instagram) Conversions API (CAPI), allows you to report important user actions (purchase, form submission, etc.) that occur in your automation directly to Meta systems as events.
Note: In order for CAPI events to be sent successfully, Meta CAPI settings must be pre-configured in the relevant communication channel.
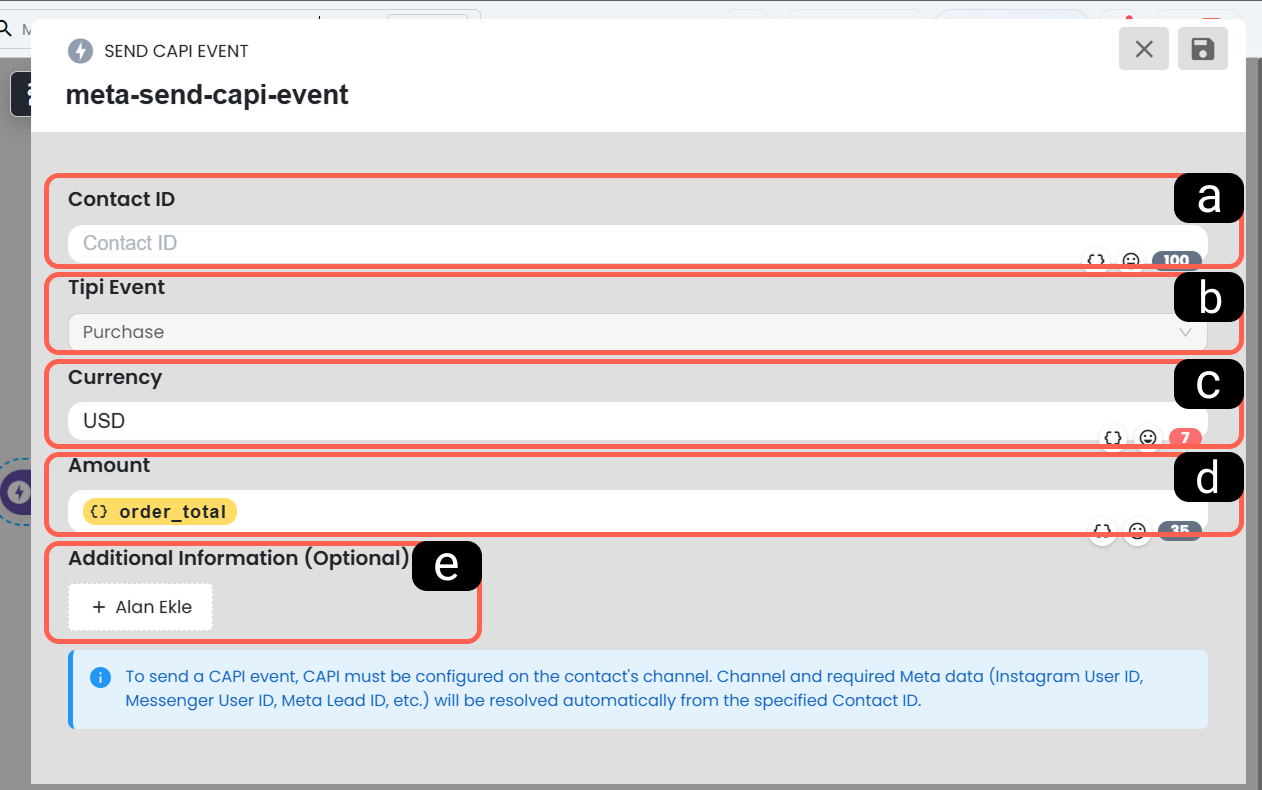
a. Contact ID:
This is the unique identifier of the customer who performed the action. The system automatically retrieves the user's Meta (Instagram/Messenger) data using this ID.
b. Event Type
This is the type of action to be reported to Meta (e.g., Purchase). Event parameters vary depending on the selected event type.
c. Currency (Event Parameter)
This is the currency of the transaction provided based on the event type (e.g., USD, TRY).
d. Amount (Event Parameter)
This is the monetary value of the transaction. The dynamic order total variable ({order_total}) from the automation can be added here.
e. Additional Information
This is an optional field where extra data to be sent along with the event to Meta is added as key-value pairs.
16. Ticket Actions
Ticket Actions allow you to automate your customer service operations by integrating your automation scenarios with the Supsis AI ticket system. With these blocks, a new ticket request can be automatically created within the scenario using data flowing through the automation, or the status of an existing request can be updated via the system.
16.a – Create Ticket
This block is used to automatically create a new support request (ticket) in the system based on user data and interaction details obtained during the automation flow.
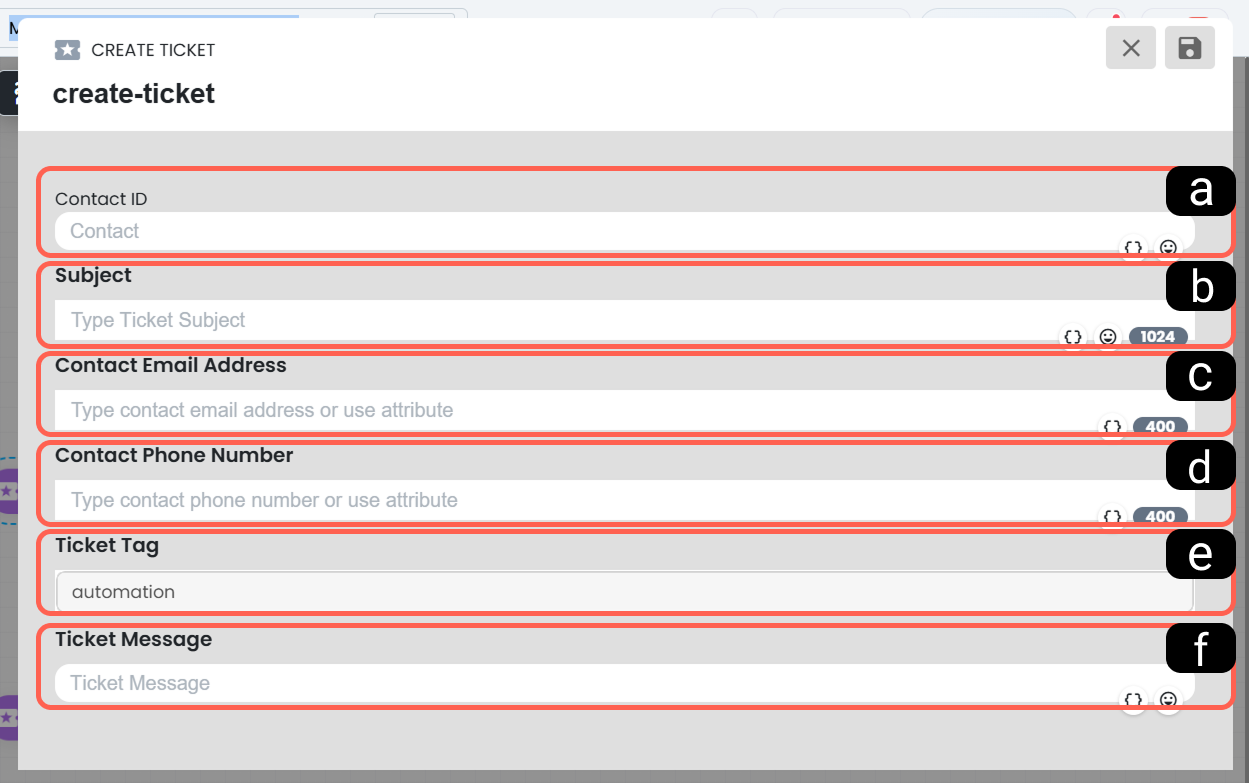
a. Contact ID
This is the unique identifier of the customer (contact) who created the request in the Supsis system. The user ID from the automation is defined here.
b. Title
This is the subject/title of the support request to be created. (e.g., "Shipping Delay" or "Order Cancellation Request")
c. Contact Email Address
This is the email address of the customer who opened the support request. Updates and responses are associated with this address.
d. Contact Phone Number
This is the contact number of the customer.
e. Ticket Tag
These are descriptive labels used to categorize, filter, or route the request to the correct department (e.g., "Accounting", "Urgent", "Technical Support", etc.).
f. Ticket Message
This is the detailed text of the issue experienced by the customer or the request submitted. The text variable from the previous step in the automation (e.g., AI analysis or the user's last message) can be directly transferred to this field.
16.b – Update Ticket
This block is used to update the status or details of an existing support request that is currently active in the system through automation (without manual intervention). It is a perfect tool for automatically closing the ticket when the customer issue is resolved within the automation.
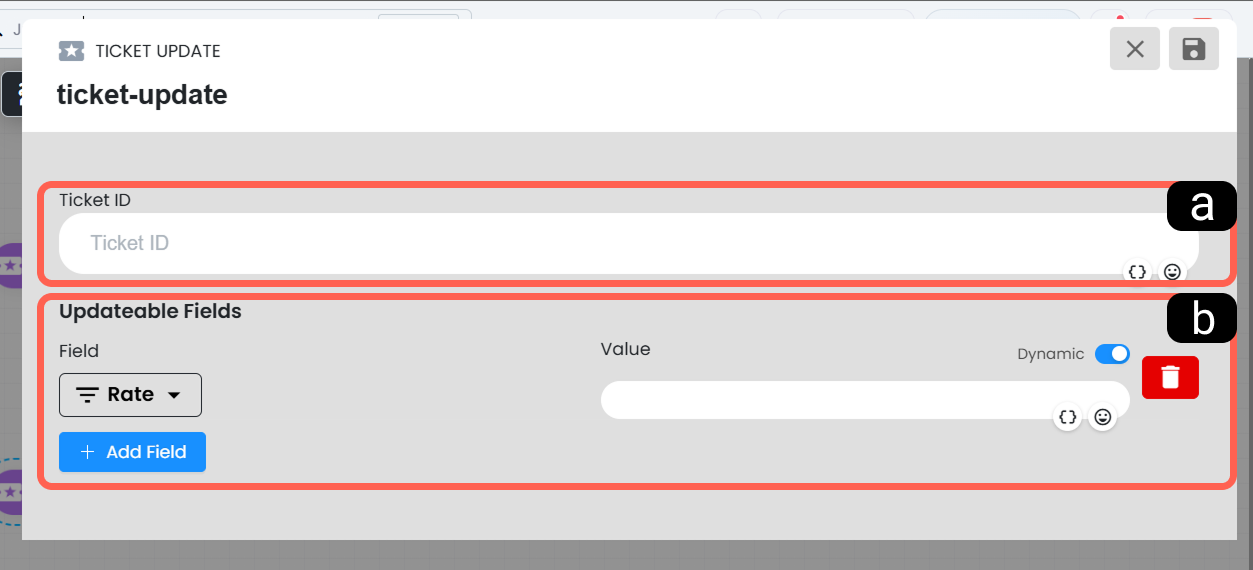
a. Ticket ID
This is the unique identifier of the support request to be processed (updated) in the system. This value must be entered to ensure the change is applied to the correct record.
b. Fields to be Updated
This is the section where you define which information within the target ticket will be changed. Depending on your needs, the request status or ticket fields can be updated.
17. Task Actions
Task Actions allow you to automate your internal operations by integrating your automation scenarios with the Task Management Module. With these blocks, new tasks can be automatically created in the relevant workflow based on the nature of the data flowing through the automation, or the statuses of existing tasks can be automatically updated.
17.a – Create Task
This block is used to automatically create a new task card in the system based on the data obtained during the automation flow. It eliminates manual task assignment workload in operational processes and enables teams to take action quickly.
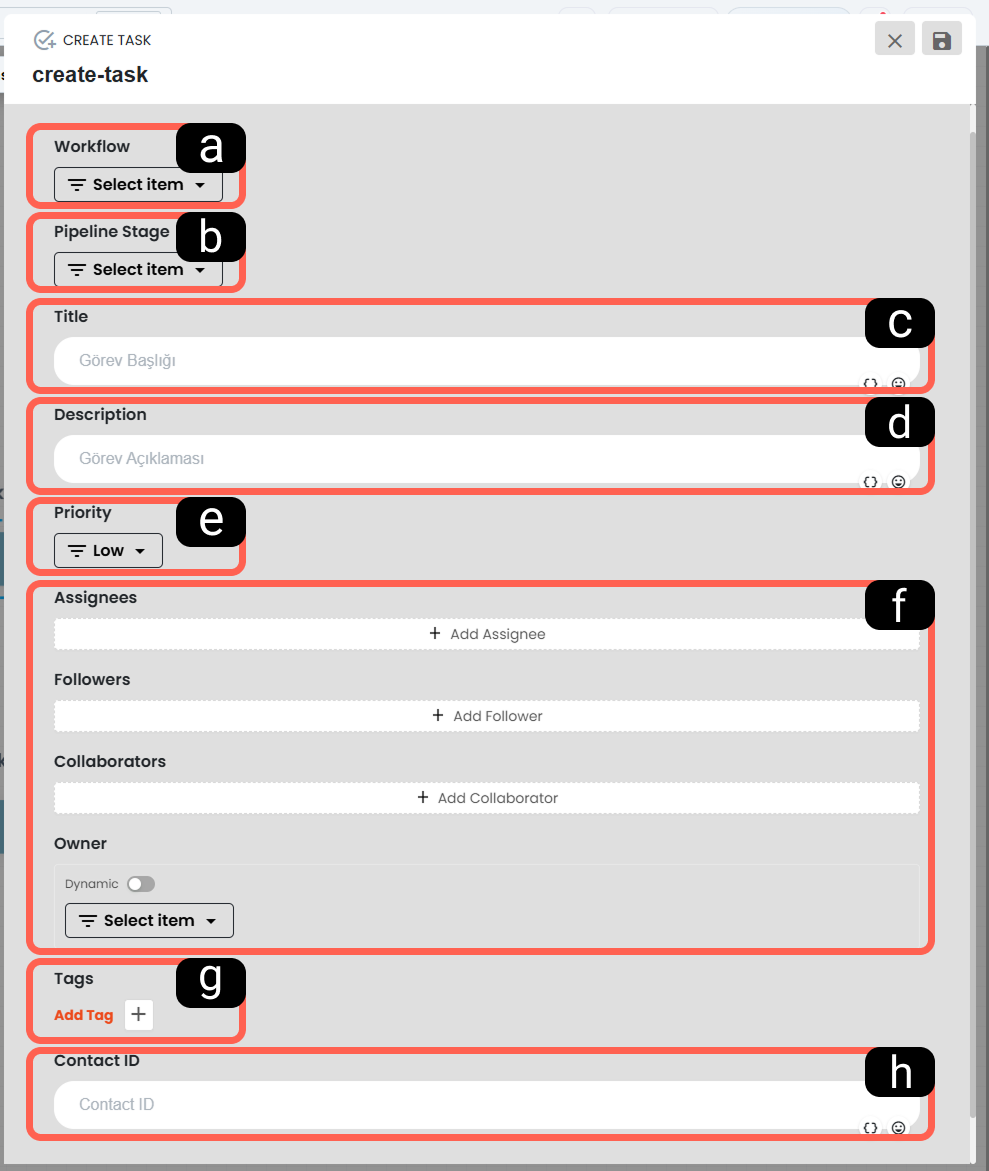
a. Pipeline
This is the field where you define which main project board or departmental workflow the task will be added to.
b. Pipeline Stage
This determines at which stage (which column) within the selected pipeline the task will start. (e.g., "To Do", "Pending")
c. Task Title
This is the short and clear name of the task to be created. It can be named using dynamic variables from the automation (e.g., "VIP Customer Scan - {Customer_Name}").
d. Task Description
This is the detailed text describing exactly what the assigned person or team needs to do.
e. Task Priority
This is the field where you define the urgency and importance level of the task within the system (e.g., Low, Medium, High).
f. Assigned Agents
This is the assignment setting where you define the responsible persons for the task. The task can be assigned to specific customer representatives based on different responsibility categories.
g. Tags
These are descriptive keywords used to easily filter, report, and categorize tasks later. You can create tags via the Task Management Module.
h. Task Contact ID
This is the unique Contact ID that informs the system which Supsis AI person the task is related to. This allows the assigned representative to directly access the customer's profile and past interactions.
17.b – Update Task
This block is used to update the stage or content details of an existing task in the system workflows via automation. For example, when a customer payment is successfully received within the automation scenario, it is a perfect tool to automatically move the relevant accounting task to the "Completed" column.
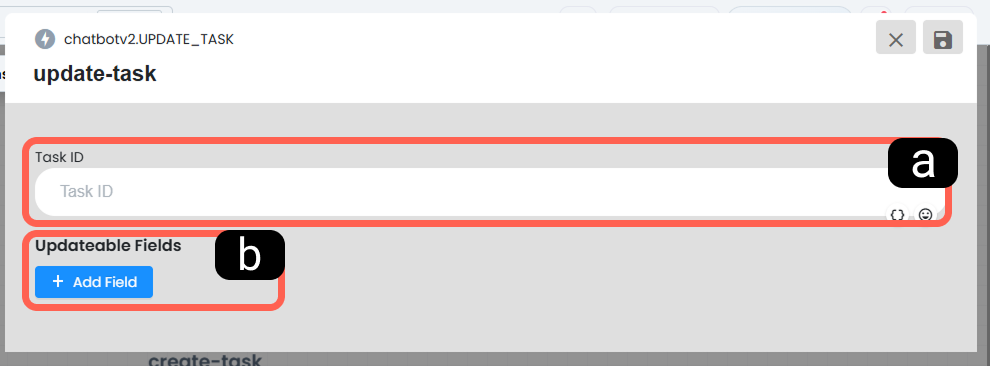
a. Task ID
This is the unique identifier of the task to be updated in the system. This value must be entered for the automation to find the correct task card.
b. Fields to be Updated
This is the section where you define which details within the target task will be changed. Depending on your needs, you can change the workflow stage of the task, update the assigned representative, increase its priority, or add new descriptions.
18. Messaging Actions
18.a – Send SMS
The Send SMS action is used to automatically send an SMS to the user or another specified number. In order to use this feature, an SMS provider integration must be configured in the panel. Personalized SMS scenarios can also be created through the use of attributes in the message content.
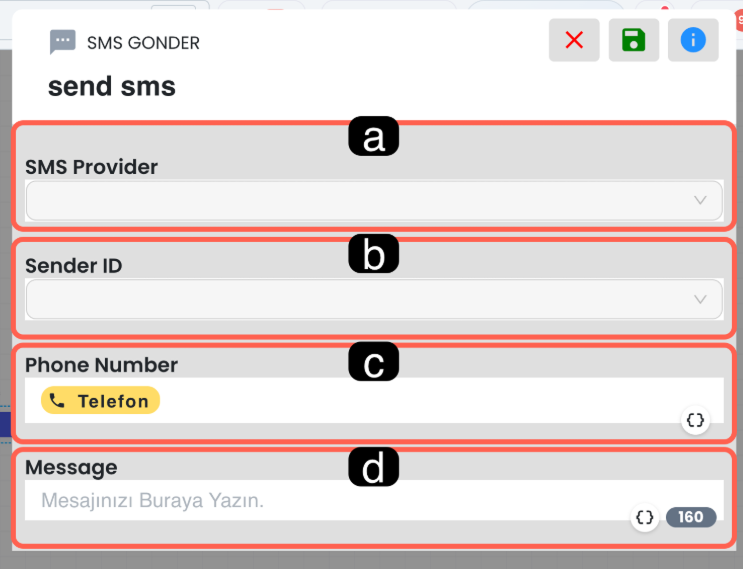
a. SMS Provider
This field determines which integrated provider will be used for sending SMS. If multiple integrations are available, the appropriate provider for the scenario should be selected.
b. Sending SMS Line
This section is used to determine which sender name or line the SMS will be sent from. This selection is especially important in structures where messages are sent under different brand or campaign names.
c – Phone Number
This field determines the target number to which the message will be sent. To fill this field, dynamic values from the user's profile (such as the stored phone number) can be used, or a fixed phone number can be entered.
d – Message Content
This section is where the SMS text to be sent is defined. By adding attributes such as user name, order status, or other profile data, more personalized and context-appropriate messages can be created.
18.b – Send Mail
The Send Mail block allows you to automatically send emails using the information collected via the chatbot. This block can be used to send notifications to the user, forward support requests to relevant teams, or create dynamic content confirmation emails.
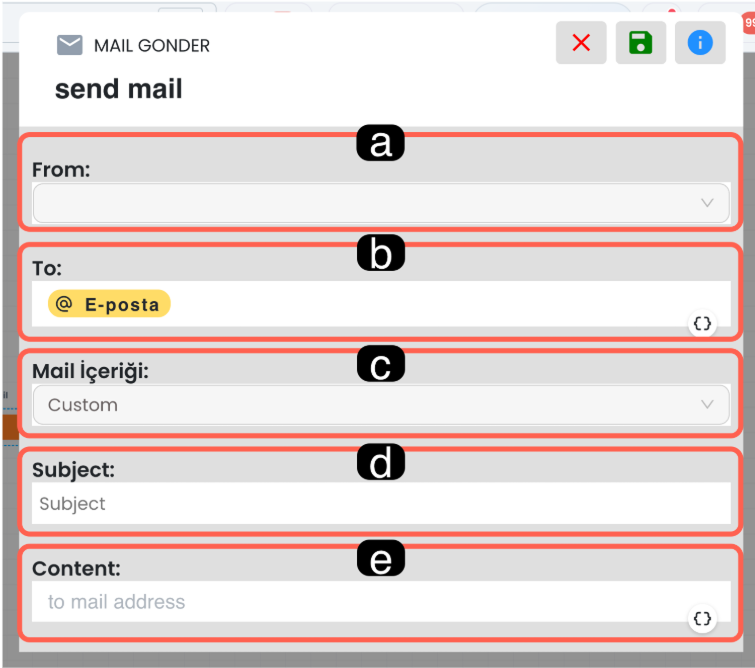
a. Sender Address
This field determines which integrated corporate address the email will be sent from. Usually, one of the sender accounts defined in the system is selected.
b. Recipient Address
This section is used to determine the target address to which the email will be sent. The email information registered in the user profile can be used, or a manual address can also be defined.
c. Mail Content Type
This field determines the content structure in which the email to be sent will be prepared. The field selection structure offers a convenient usage for choosing between setups that have special data content.
d – Mail Subject
This field is used to determine the subject line of the email. The subject section can be customized with dynamic attributes; thus, information such as request number, username, or transaction type can be automatically added to the subject.
e – Mail Content and Template Parameters (Params Visibility)
This section is where you configure the main body text or the selected email template.
- Dynamic Parameters (Params): In the Send Mail action block, dynamic parameters (
params) belonging to the selected template or message scenario are now clearly listed and visible in the block settings panel. This allows user variables or profile data to be directly mapped to email parameters from the UI without manual coding.
18.c – Send WhatsApp Message
The Send WhatsApp Message action is used to send a message via WhatsApp to the user or another specified number. This structure generally works together with the integrated WhatsApp channel, the selected message template, and template variables; the preview of the selected template and filled content is shown on the right side.
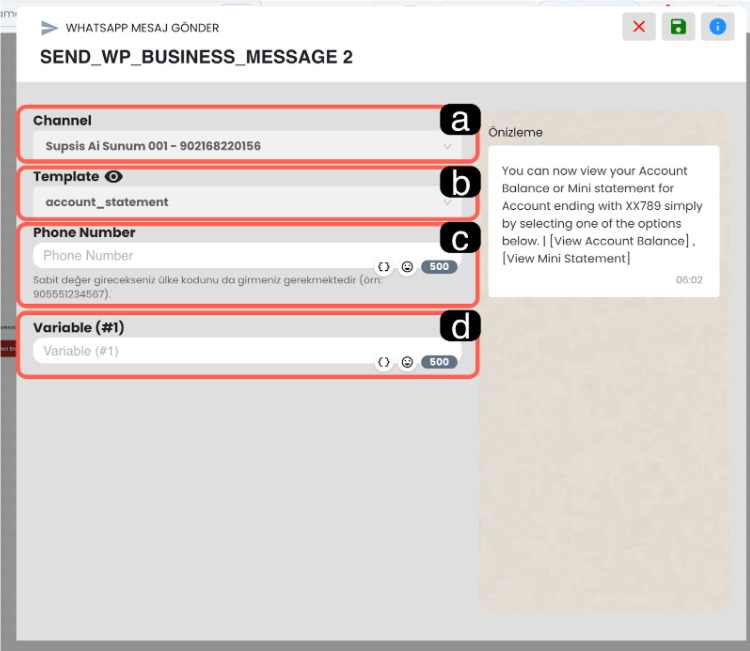
a. WhatsApp Channel
This field determines through which integrated WhatsApp line the message will be sent. In structures where multiple channels are used, selecting the correct channel is important for the template and number matching to work correctly.
b. Message Template
In this section, the approved WhatsApp message template to be sent is selected. According to the selected template, the structure of the message becomes clear and the preview area is automatically updated.
c. Phone Number
This field defines the target number to which the message will be sent. If a fixed number is to be entered, the number must be written together with the country code; additionally, this field can also be dynamically fed with attributes.
d – Template Variables
This section is used to fill the dynamic fields in the selected WhatsApp template. Personalized WhatsApp messages can be sent by adding dynamic values to this field. (see: Dynamic Values)
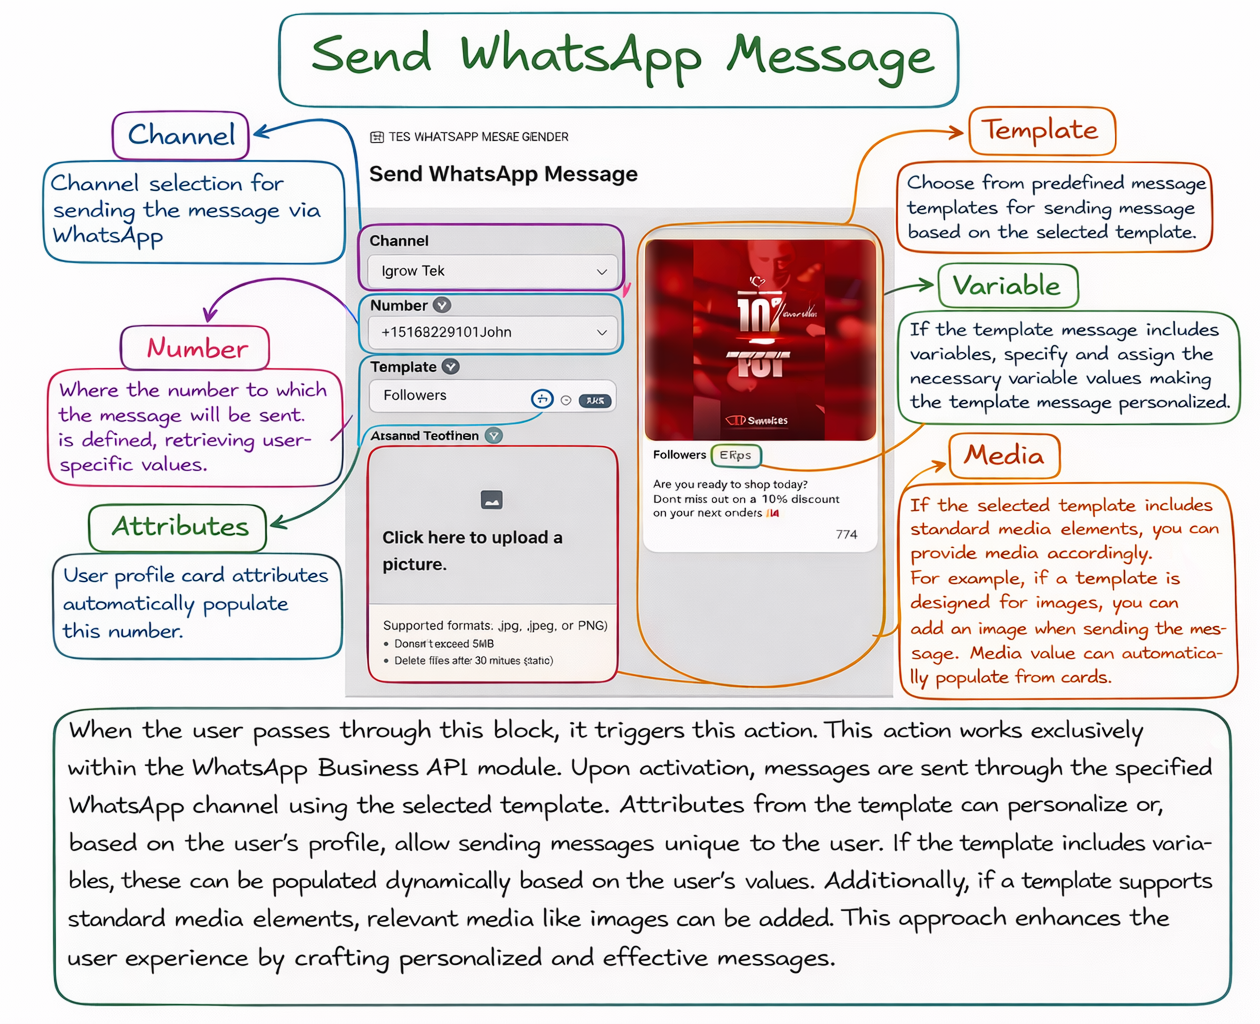
18.d – Reply to Trendyol Question
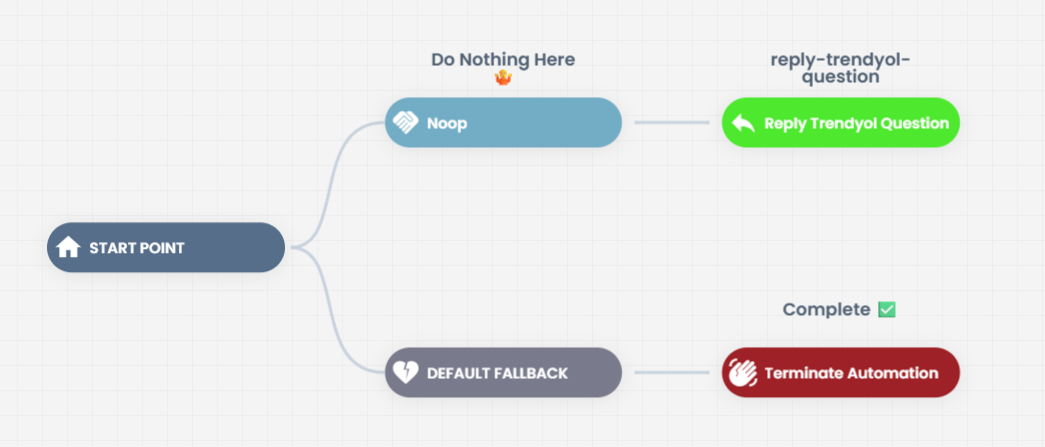
The "Reply to Trendyol Question" block allows you to send questions or answers to your customers via Trendyol when this block is reached. In order to use this feature, the Trendyol integration must be completed. This block helps you manage customer requests coming from Trendyol and enables you to respond quickly. Once the integration is completed, you can increase customer satisfaction by instantly responding to questions or messages coming from Trendyol.
18.e – AI Call
This block allows you to automatically initiate phone calls to the target user via a voice artificial intelligence assistant that you created in your Supsis AI panel. It is a highly advanced tool that combines the data processing capability of automation and the voice communication capability of artificial intelligence in operations such as automatic appointment reminders, order confirmations, or survey calls.
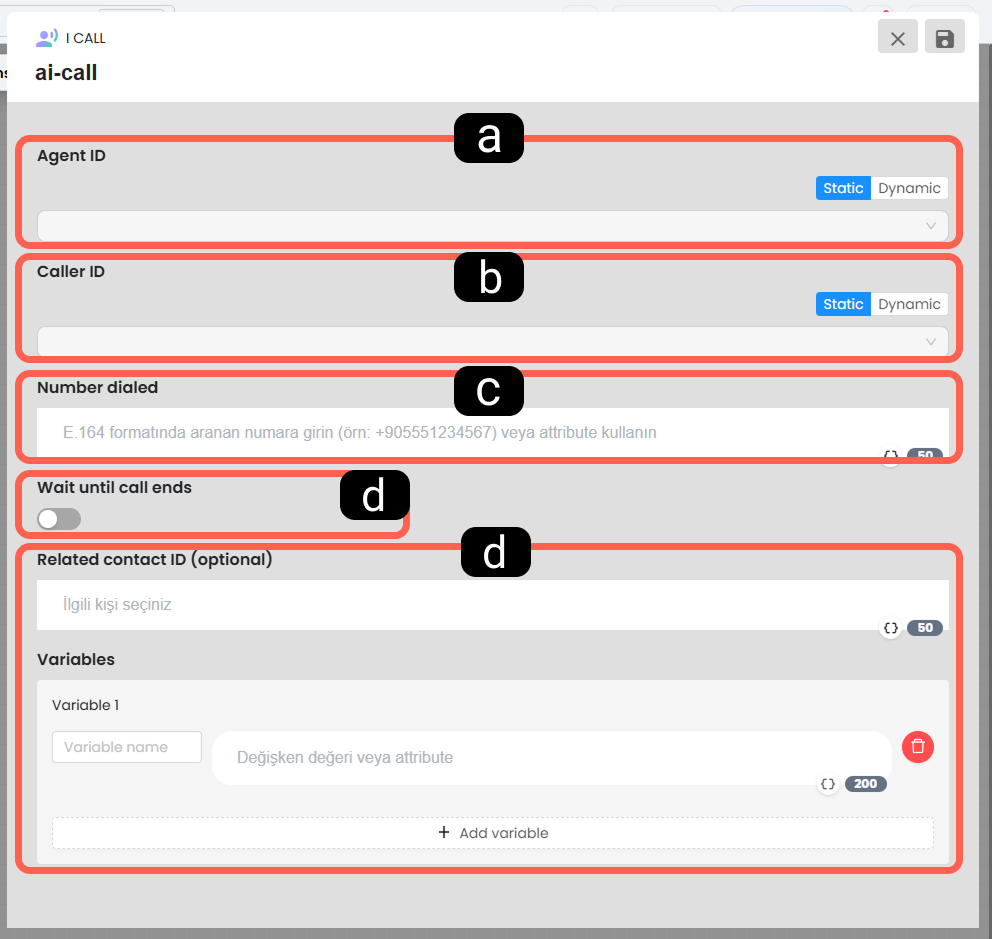
a. Agent ID
This is the identity of the artificial intelligence assistant that will perform the call. If you will use the same assistant for all calls, you can make a fixed selection from the list; if you will use different assistants according to the flow of the scenario (for example; an English assistant or a Turkish assistant), you can define a dynamic ID variable.
b. Outgoing Number for the Call
This is the outgoing line integrated into Supsis AI that your system will use when initiating the call. Especially if multiple PBX numbers are defined in your panel, you determine here from which number the call will reach the customer.
c. Number to Be Called
This is the phone number of the target customer with whom the voice assistant will have the conversation. According to system standards, the number must be entered in international E.164 format (e.g.: +90555...). You can seamlessly operate the process by defining the dynamic customer phone variable obtained from previous steps of the automation here.
d. Wait Until Call Ends
This is the operational setting where you control the execution order of your automation scenario (synchronous or asynchronous progression).
- If Enabled: The automation flow is paused until the phone call between the artificial intelligence assistant and the customer is completely finished. After the call ends, the scenario continues from the next block.
- If Disabled: As soon as the system triggers the call, it immediately proceeds to the next operation in the flow (for example; sending a notification email at the same time) without waiting for the conversation to end.
e. Variables to Be Passed to the Agent
This is a critical field used to provide the voice artificial intelligence assistant with "context and information" before the call. Thanks to the Key and Value pairs you add to this section, you can transfer dynamic data within the automation to the agent. For example; by transmitting information such as the customer’s name, last order status, or unpaid invoice amount to the agent, you can enable the assistant to establish a highly personalized and intelligent communication directly such as "Hello Mr. Ahmet, I am calling regarding your invoice amounting to 1500 TL..."
19. Find Record with Supsis ID
The Find Record with Supsis ID block is a universal data retrieval tool that allows you to fetch all details of a specific record in all modules within the Supsis AI platform into your automation scenario using its unique identity number (ID). Thanks to this block, you can instantly access all kinds of data sets stored in your Supsis AI panel and create highly personalized, dynamic workflows by using this retrieved data in the subsequent steps of the scenario.
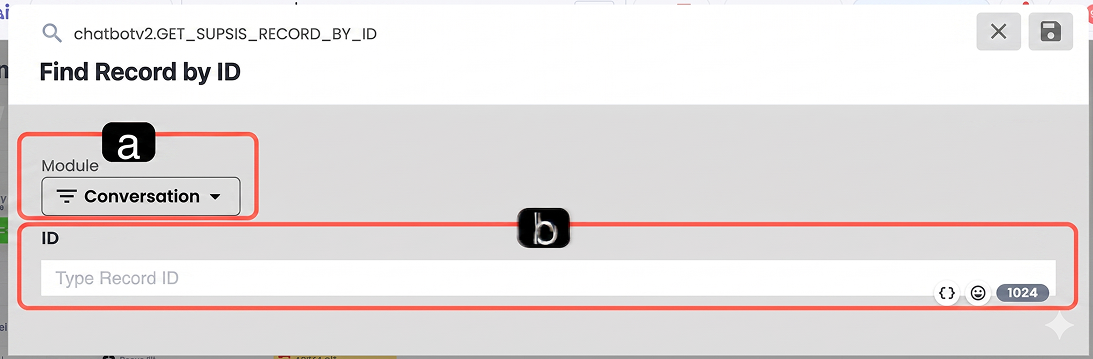
a. Module Selection This is the dropdown menu where you select the target Supsis AI module in which the record whose data you want to include in the automation is located. The system performs the search only within the data pool you specify here.
b. ID Value This is the unique identity (ID) field where you inform the system which specific record in the selected module will be retrieved. In order for the automation to work flexibly and dynamically, it is recommended to fill this field not with a fixed number but with variable parameters obtained from previous steps of the scenario (e.g.: {Contact_ID}, {Record_ID}, or {Ticket_ID}).
How to Use?
When the search operation is completed, all data details retrieved from the relevant module (for example; a customer’s email address or the current status of a task) are directly converted into a readable variable through this block itself.
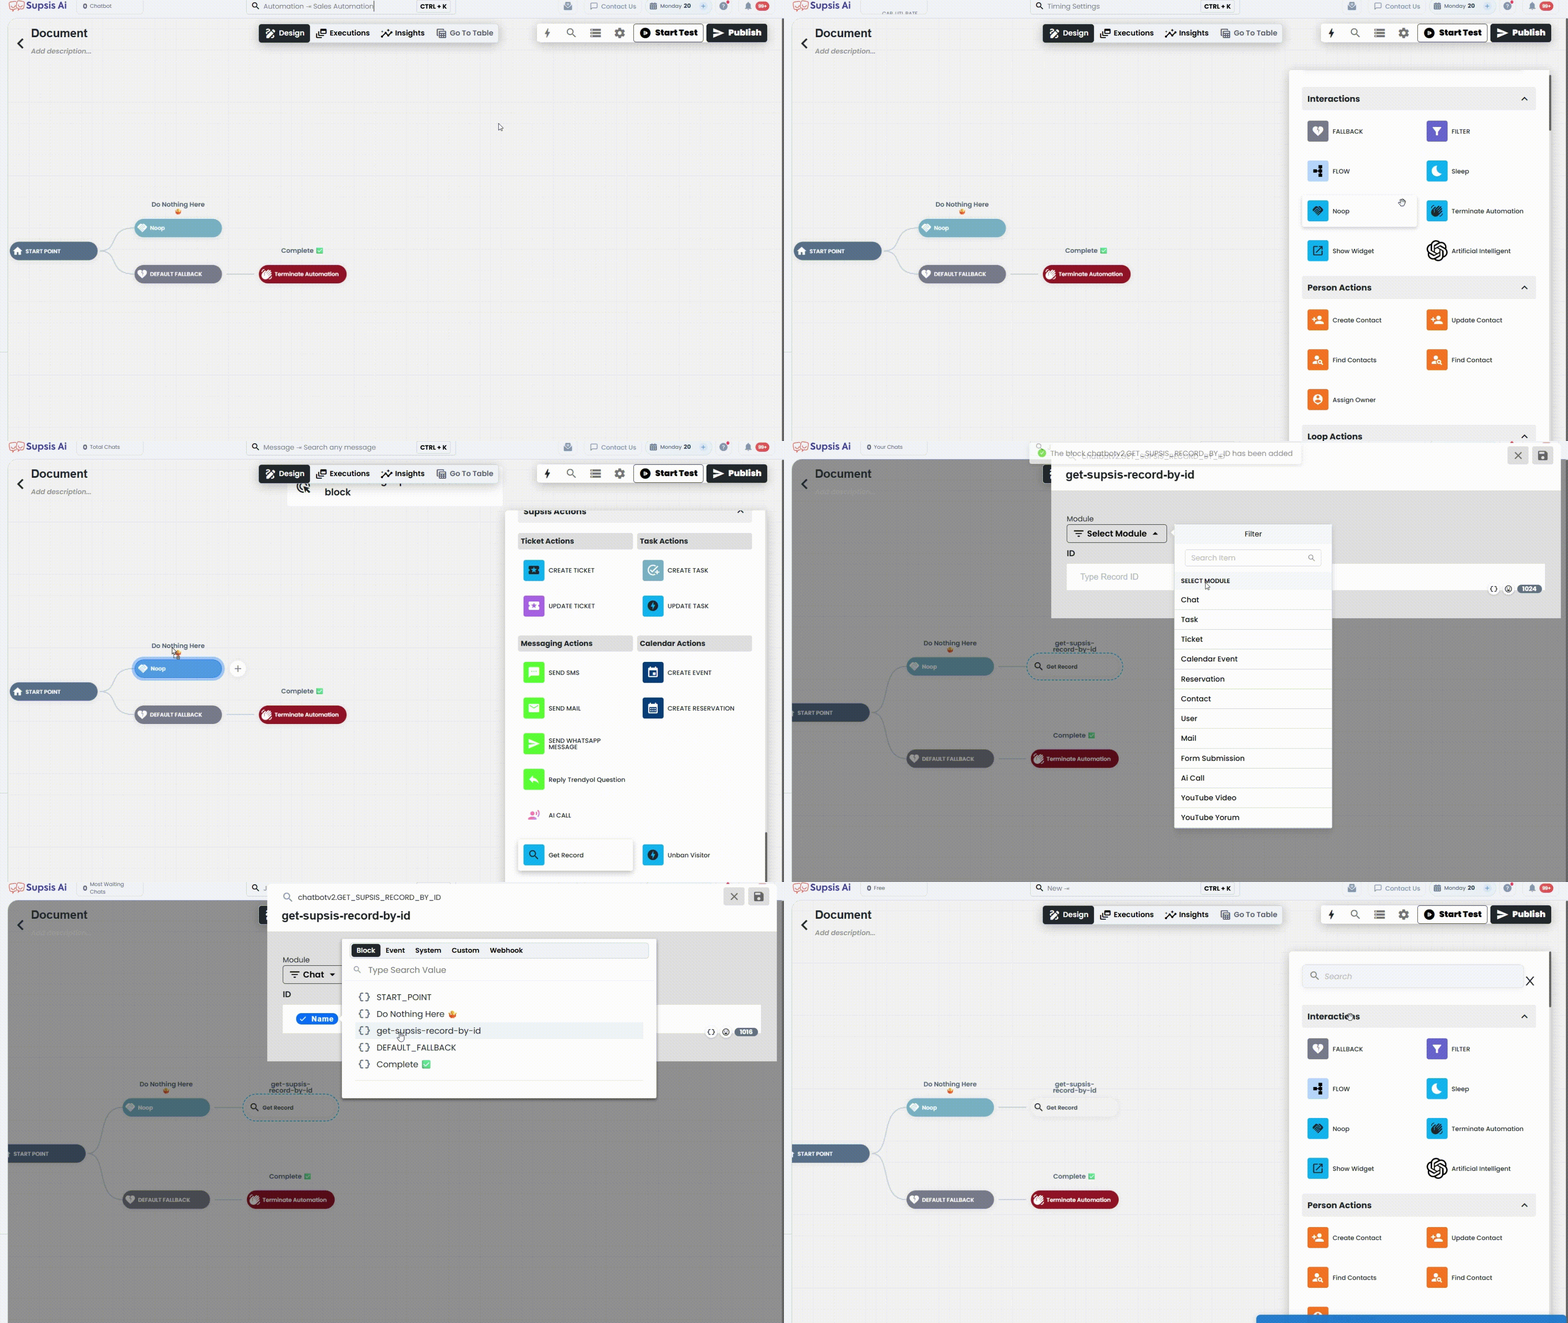
You can easily transfer this rich data you obtained to the next step of your automation (for example, to a message sending or table writing block).
20. Programmatic Bulk Template Messaging & Queue Management via Automation SDK
Thanks to Code Blocks (Automation SDK / JS Scripting) in Supsis AI Automations, complex promotional and notification workflows can be written directly in JavaScript code with secure queue processing for bulk WhatsApp template broadcasts.
Key Configuration Steps & Core Principles
- Channel and Template Validation (
supsis.channel.get&supsis.whatsapp.getTemplate) -
Before initiating broadcasts, the script verifies active WhatsApp Business API channel status (
supsis.channel.get) and template validity (supsis.whatsapp.getTemplate) to prevent invalid requests. -
Advanced Recipient Segmentation (
supsis.contact.searchV2) -
Target audiences are queried via
supsis.contact.searchV2by filtering platform (whatsapp), assigned tags, and validwhatsappNumberfields. -
Background Queue Management (
supsis.queue.add) - High-volume broadcasts use a fire-and-forget architecture with
supsis.queue.add()to avoid API rate limits and ensure smooth queue execution. -
Template messages are sent sequentially using
supsis.whatsapp.sendTemplateMessagewith dynamic parameters (params: [fullname]). -
Queue Status & Progress Tracking (
supsis.queue.status) - Monitor execution progress and queue stats (
queueLength,hasItems,stats) in real time viasupsis.queue.status("queue_name").
21. WhatsApp 24-Hour Customer Window (Last 24h / Opt-In) Validation via Automation SDK
According to WhatsApp Business API guidelines, a 24-hour customer service window starts whenever a customer sends a message to your business. In Supsis AI Automations (JS Code Blocks), you can programmatically verify whether a recipient is currently within the active 24-hour communication window before sending messages.
Core Logic & Decision Rules
- Fetching Customer Message History (
supsis.contact.getMessages) - Retrieve contact message history via
supsis.contact.getMessages(contactId, { limit: 200 }). -
Filter message types to identify the timestamp (
createdDate) of the most recent incoming message from the customer (visitororwhatsapp-user). -
Time Difference Calculation (
isWithin24HourWindow) - Calculate the elapsed time in hours between the customer's last incoming message and the current time.
- If less than 24 hours (
diffHours < 24): The 24-hour window is active (true). -
If 24 hours or more, or if no message history exists: The 24-hour window is closed (
false). -
Message Type Dispatch Logic
isWithin24HourWindow === true(Active Window): Free-form text, image, or asset messages (supsis.contact.sendTextMessage,sendImageMessage, etc.) can be sent freely without requiring an approved template. Communication is classified under Meta's Service Conversation category.isWithin24HourWindow === false(Closed Window): Free-form text messages cannot be delivered; you must send a Meta-approved WhatsApp Template Message (supsis.whatsapp.sendTemplateMessage) to reopen the conversation window.
22. Omnichannel Contact Search, Auto-Creation & Multi-Channel Messaging via Automation SDK
In Supsis AI Automations (JS Code Blocks), contacts can be dynamically searched across various channels (WhatsApp, Instagram, Telegram, Messenger), auto-created if missing, and delivered text, image, or document messages directly to their active communication channel.
Key Configuration & SDK Methods
- Omnichannel Identity Resolution & Search (
supsis.contact.get&supsis.contact.searchV2/search) - Direct ID: Fetch contact card immediately using
supsis.contact.get(contactId). - Phone / WhatsApp: Search via
supsis.contact.searchV2usingwhatsappNumberorphone. -
Social Media ID (Instagram, Telegram, Messenger): Search using
supsis.contact.searchwithinstagramUserId,telegramUserId, ormessengerUserIdfilters. -
Dynamic Contact Creation (
supsis.contact.create) -
If a target contact does not exist and
createIfNotExists: trueis provided, automatically register the recipient viasupsis.contact.create({ platform, fullname, phone, channelIds }). -
Multi-Channel Message Dispatch (
contact.sendTextMessage,sendImageMessage,sendAssetMessage) - Text Message: Dispatch plain text messages using
contact.sendTextMessage({ from, text }). - Image Message: Send images with custom captions using
contact.sendImageMessage({ from, url, caption }). - Document / Media: Send PDF documents or catalogs via
contact.sendAssetMessage({ from, url, assetType: "document", filename }).
23. sups.is Link Shortener Integration via Automation SDK (supsis.util.shortLink & isShortLinkAvailable)
Inside Automation and Chatbot JavaScript code blocks, you can dynamically shorten long campaign, tracking, survey, or proposal links using supsis.util.shortLink and include them directly in your message text:
// Shorten link with custom alias, expiration, and description
const shortLink = await supsis.util.shortLink("https://mycompany.com/campaigns/2026-spring?ref=automation", {
  customUrl: "spring2026",
  expireIn: "2 days",
  description: "Automation Discount Link"
});

// Check custom alias availability
const isAvailable = await supsis.util.isShortLinkAvailable("spring2026");

// Dispatch generated short link in WhatsApp / SMS message
await contact.sendTextMessage({
  from: "whatsapp_channel_id",
  text: `Hello! Here is your exclusive discount link: ${shortLink}`
});
- Parameters:
customUrl(custom alias, max 64 chars, unique),expireIn("2 minutes","1 hour","2 days", etc.),password(password protection),description(internal note),domain(custom domain). - Rules: The system throws an error on custom alias conflicts; calling without options reuses existing short links for identical target URLs.
For a detailed guide, please review our sups.is Link Shortener Service documentation.