
MCP Server - AI Agent Integration, Configuration & Live Execution Guide
The Supsis Model Context Protocol (MCP) Server allows you to connect database tables, customer records, and workflows in your Supsis account to modern artificial intelligence assistants (AI Agents) such as Cursor, Antigravity IDE, Claude Desktop, and ChatGPT with a secure, scope-restricted authorization layer.
With this architecture, you can perform read, query, update, and record creation operations directly on your Supsis data using natural language prompts without writing custom code or building separate integrations for each AI tool.
🚀 Supsis MCP Server Core Features & Advantages
| Feature / Capability | Description & Security Standards |
|---|---|
| Model Context Protocol Compliant | 100% compliant with Anthropic's open-standard MCP protocol. |
| Restricted Scope Authorization | Restricts AI assistant access strictly to authorized product modules or custom tables. |
| Time-Limited Access (Expiration) | Create temporary security tokens with auto-expiration between 1 day and 365 days. |
| Live Bi-Directional Synchronization | AI agents read panel data in real-time and execute live write operations to the database. |
| Extensive Tool Library (Tools) | Pre-built tools for table listing, data fetching, batch record insertion, and field updates. |
1. Supsis Panel MCP Server Setup & Configuration
You can create and manage your MCP Server connections within the Supsis AI panel in minutes.
1.a – Accessing the MCP Server Page
You can navigate to MCP Server management via two different paths:
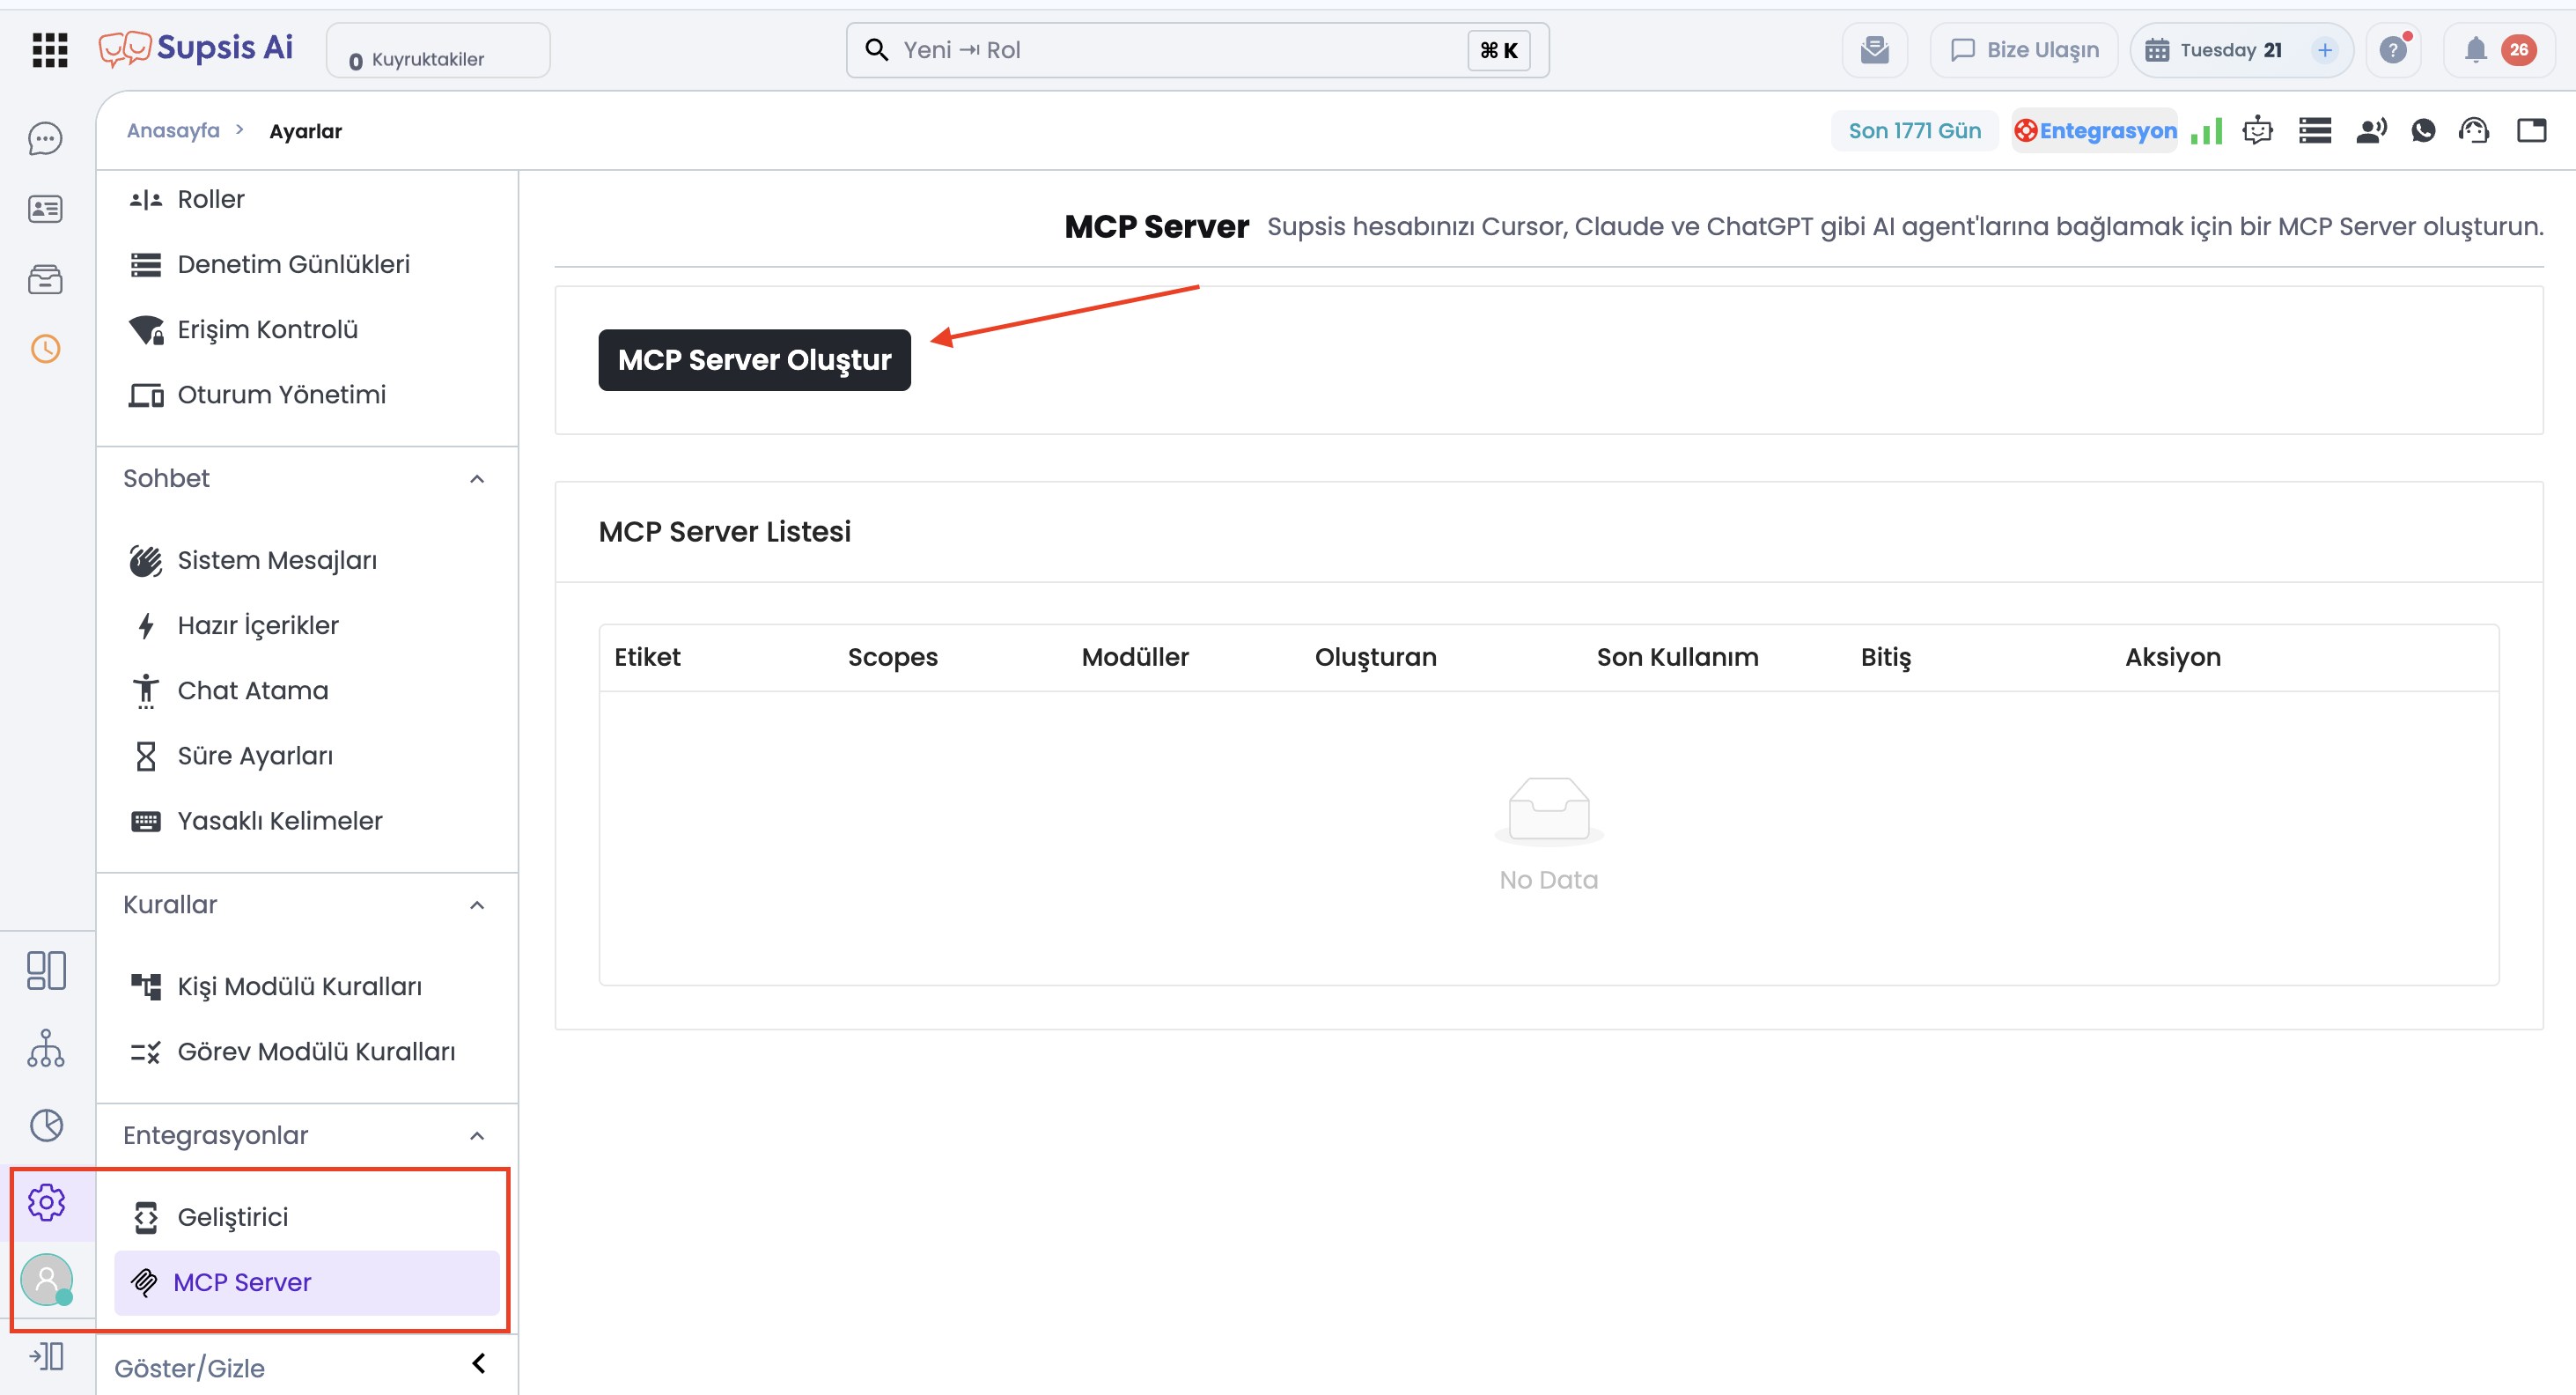
- Settings > Integrations > Utilities > MCP Server (General management area for Root / Admin users)
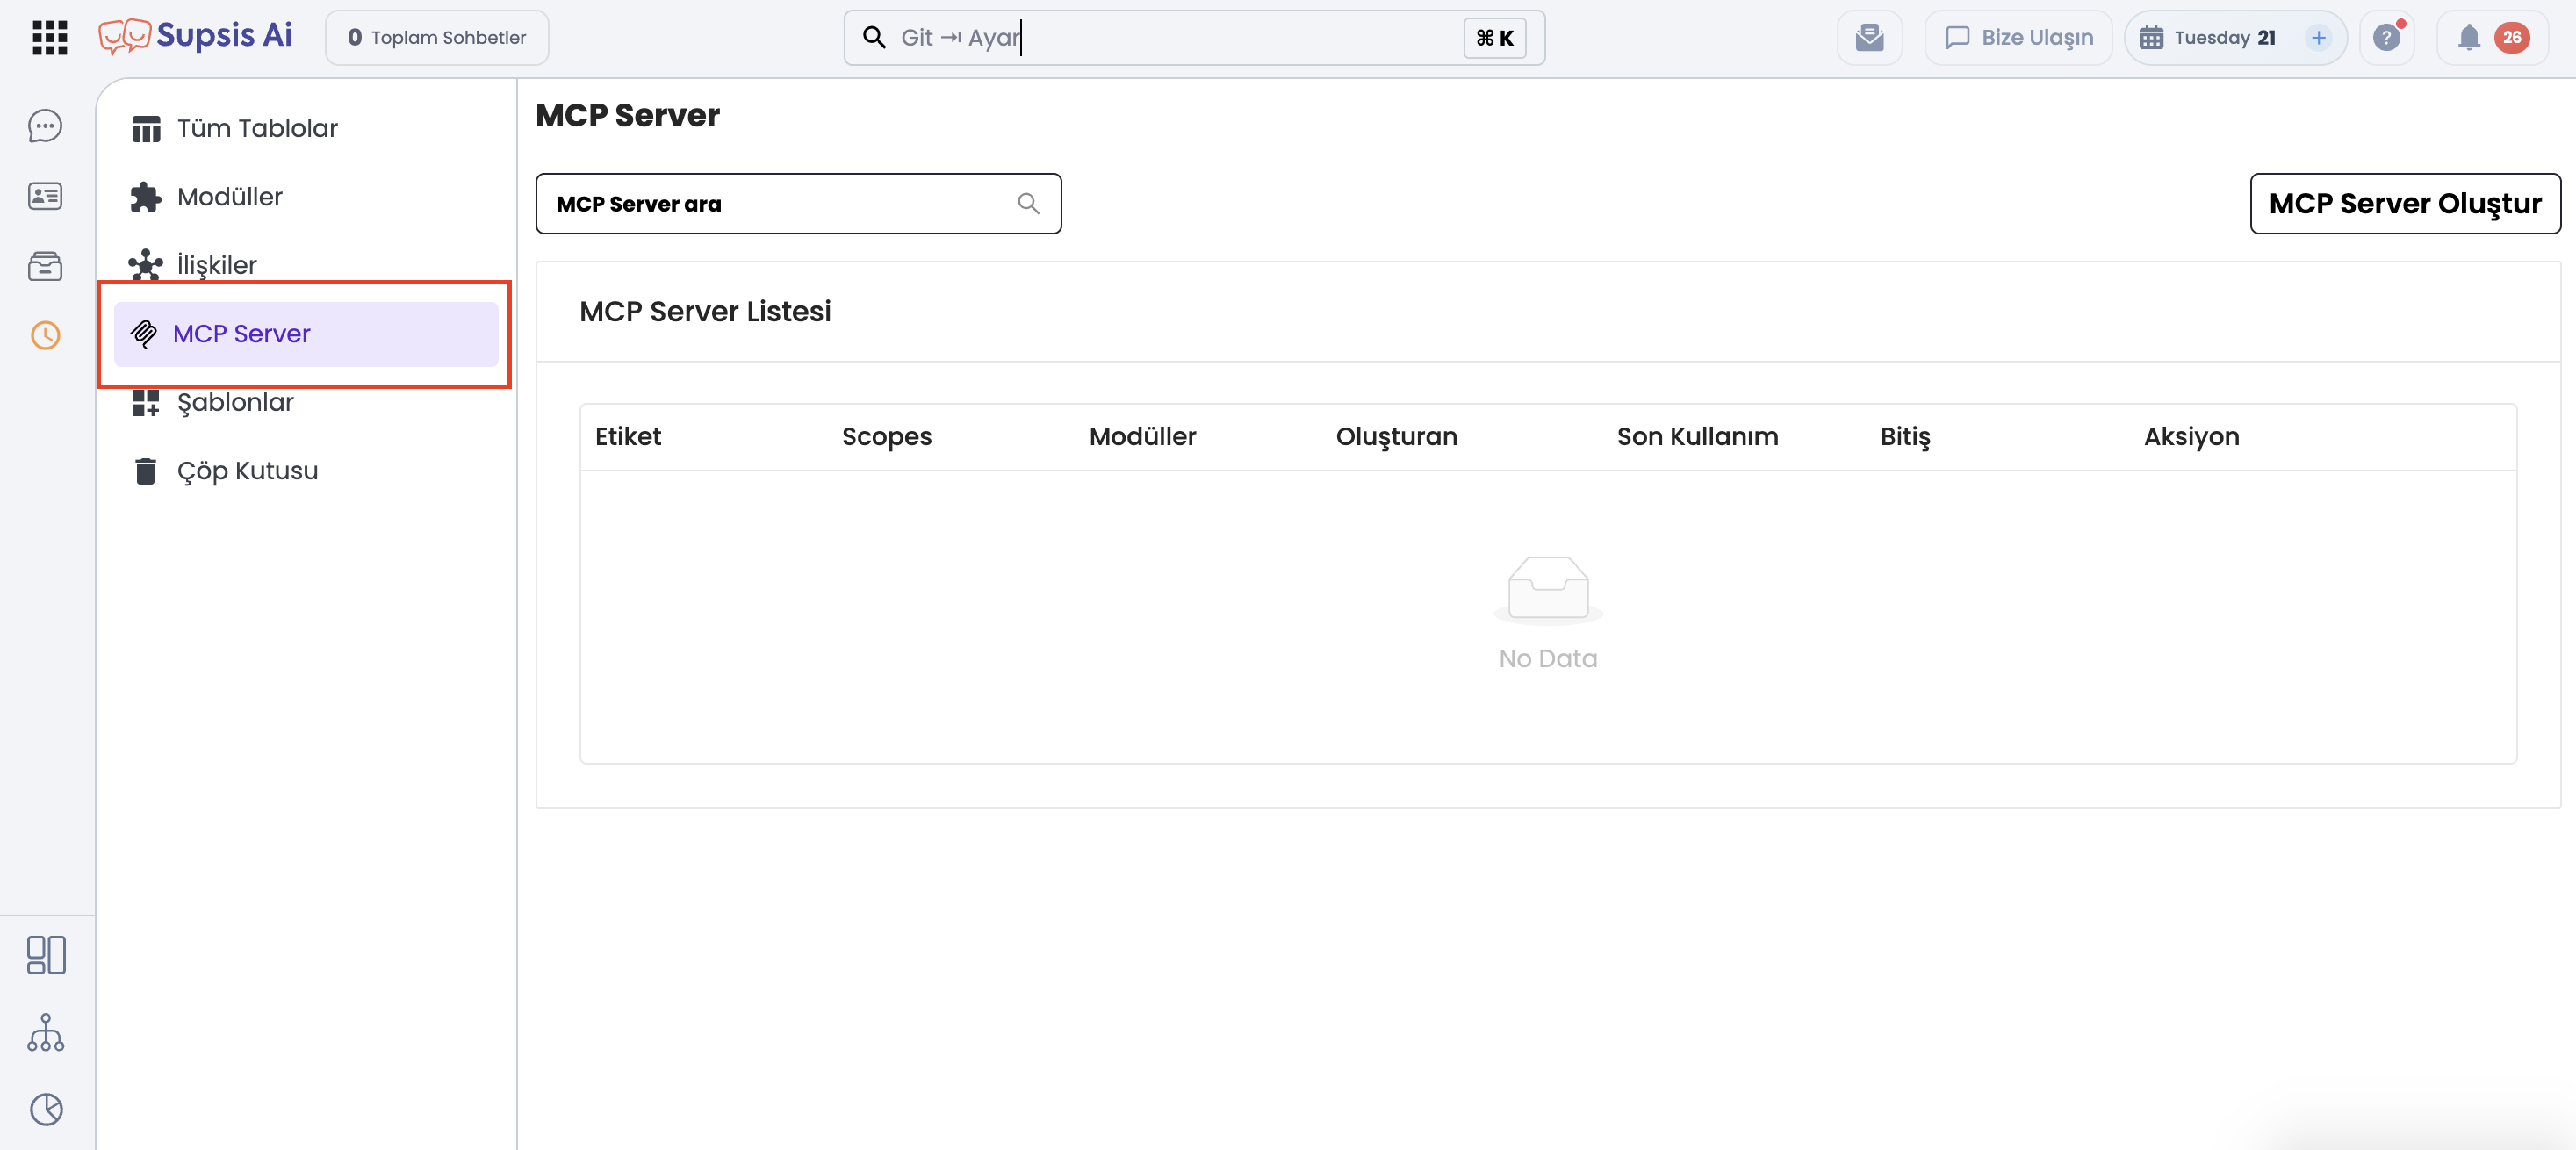
- Tables > MCP Server (User-level management screen for personal active connections)
- a – MCP Server Discovery Card: The card located under the Utilities section on the Integrations page that directs to settings.
- b – Create MCP Server Button: The button used to initiate a new secure MCP connection.
1.b – Scope and Duration Selection
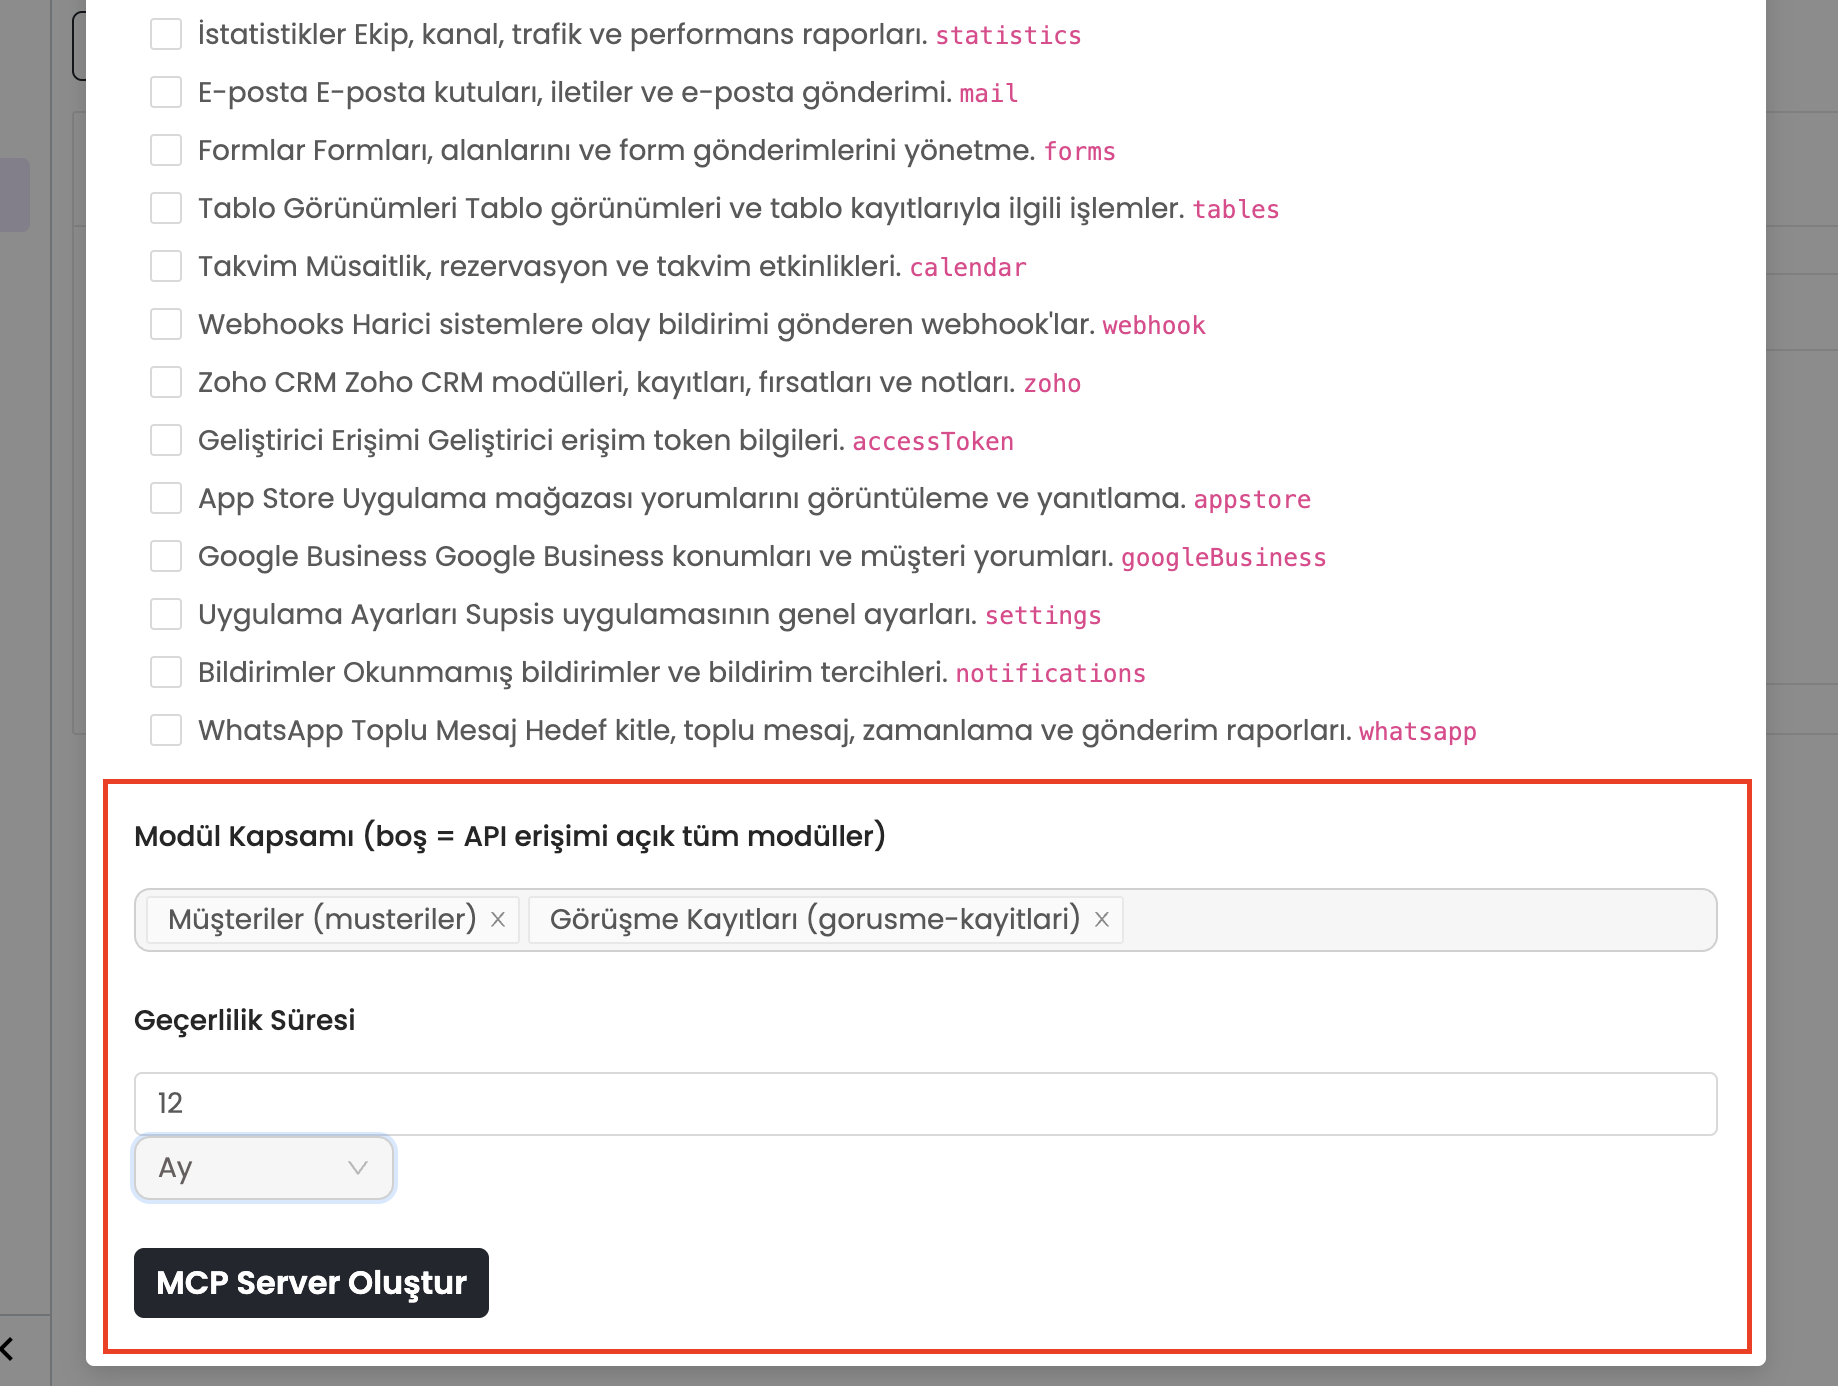
In the first step, define which data scopes the AI agent can access and how long the token remains valid.
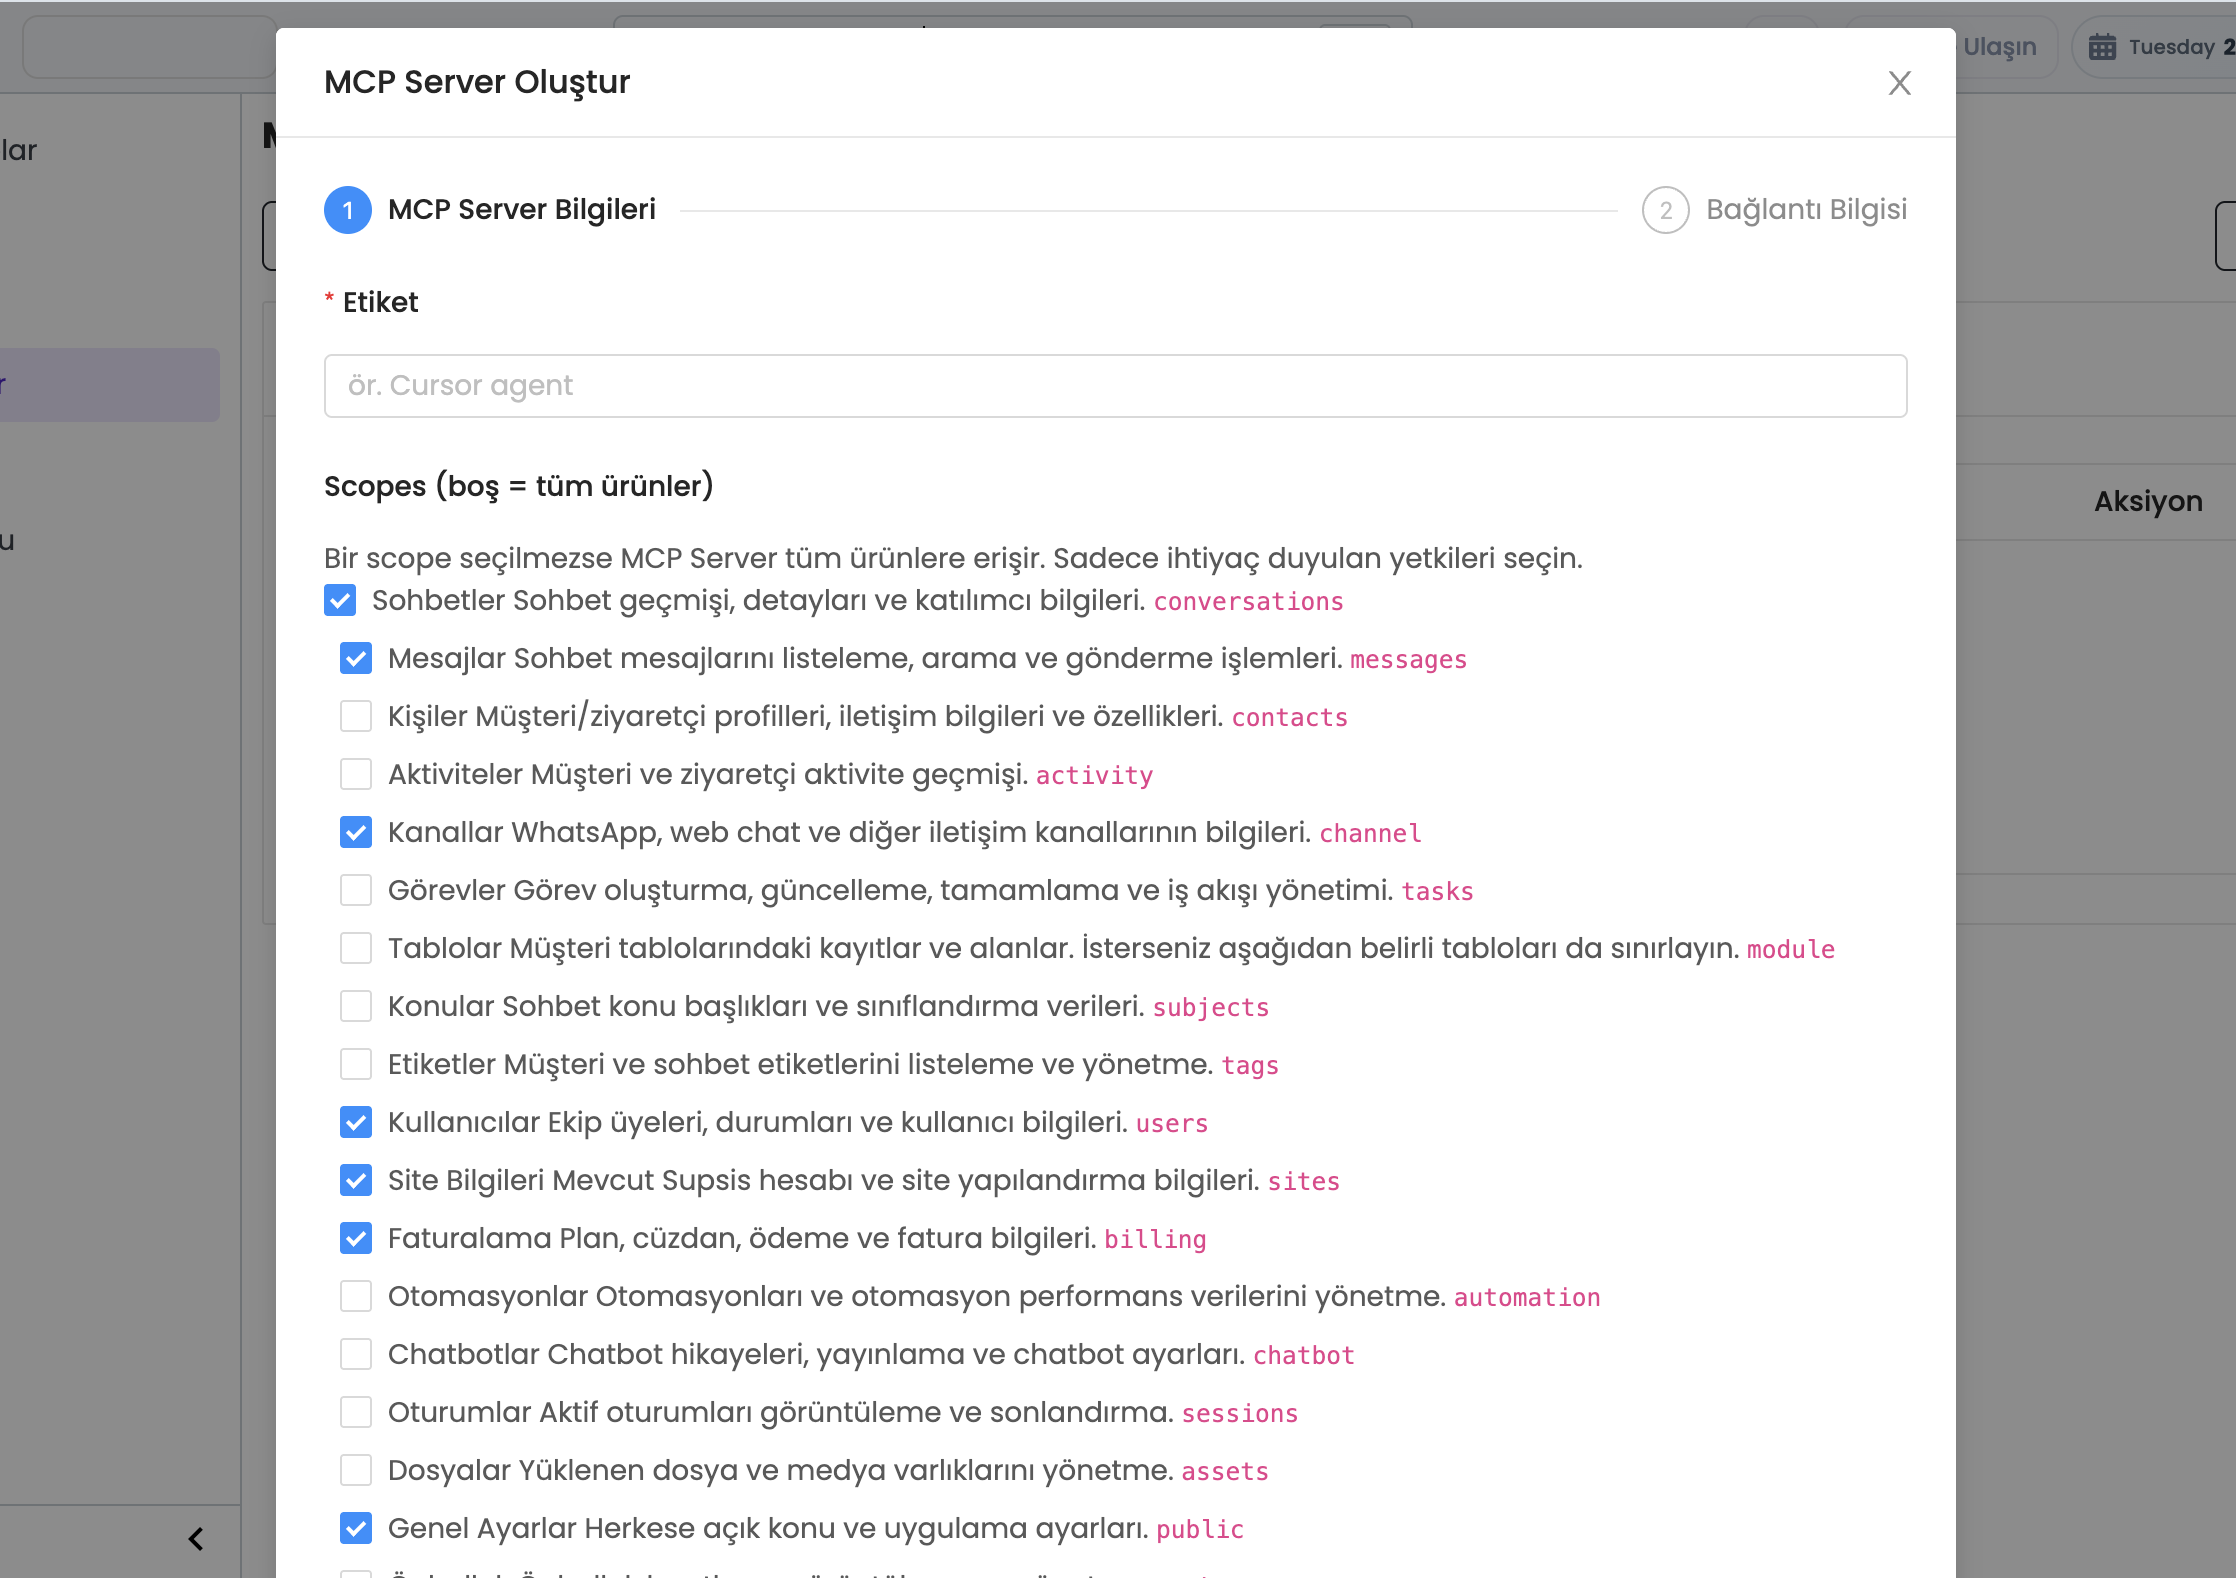
- c – Label and Scope Selection: Enter a descriptive connection label and select the Supsis product modules accessible by the AI agent.
- d – Validity Period: Choose the duration for which access remains active (ranging from 1 day to 365 days).
1.c – Connection Configuration, Secret Token & Client Setup Tabs
Once approved, system-generated connection snippets and security credentials are created for 3 client options:
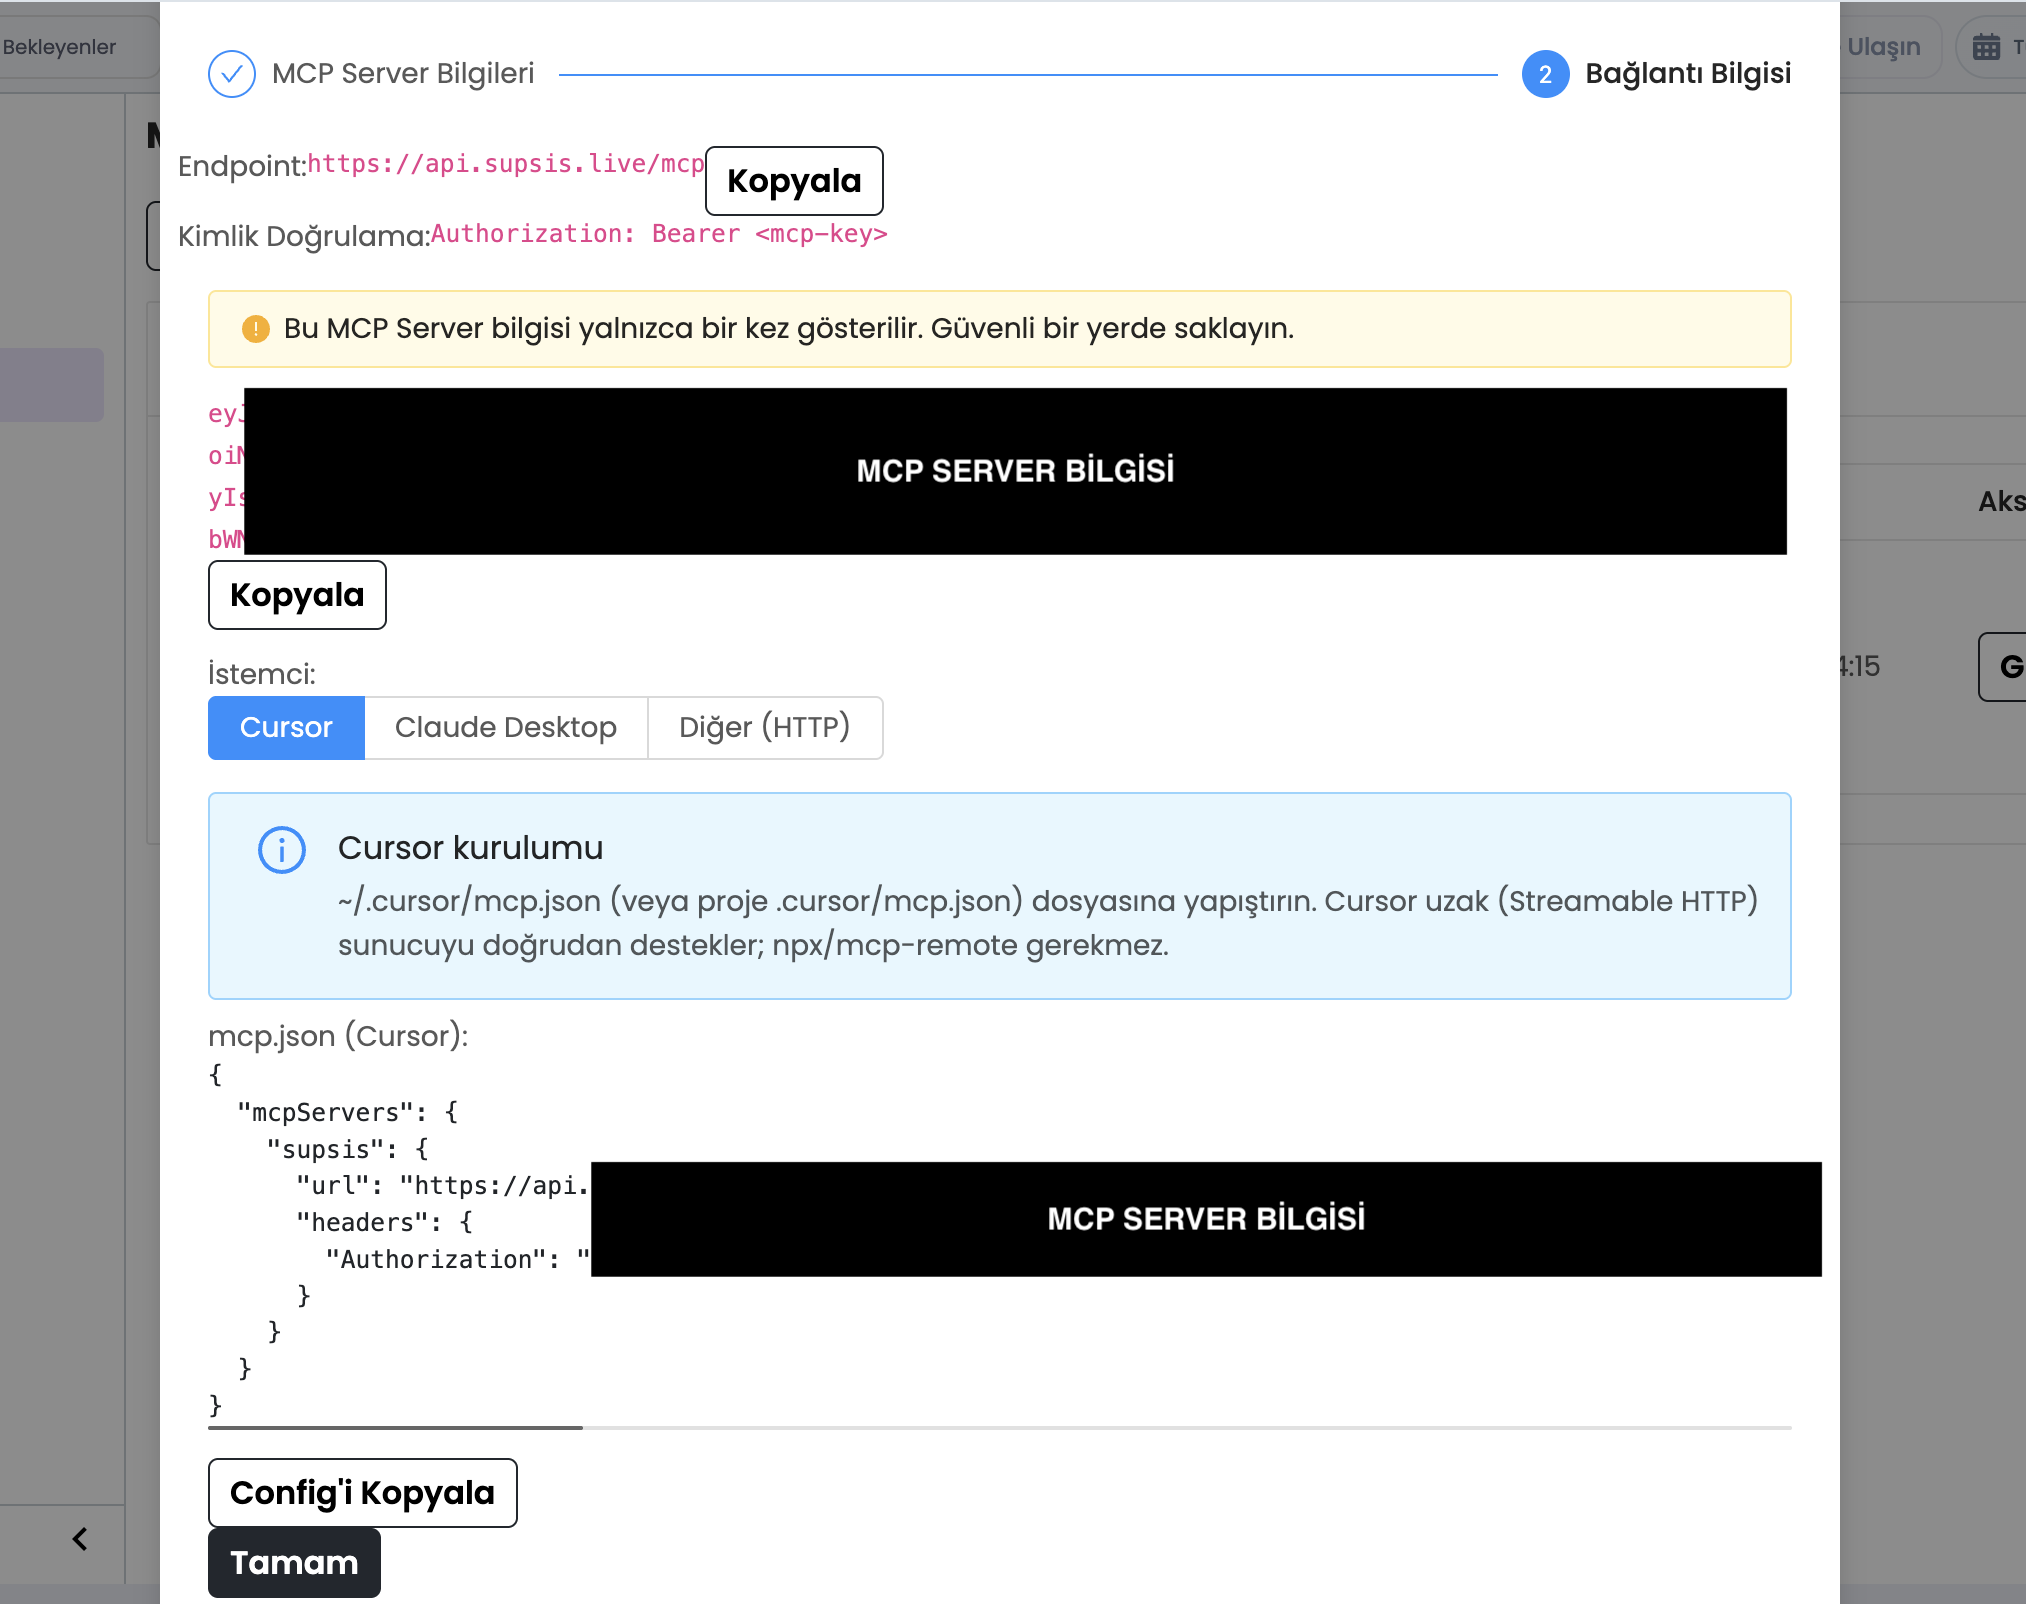
- e – Access Token / Secret: A secure key generated by the system, displayed only once for security reasons.
- f – Client Setup Options: The panel provides one-click copyable config tabs tailored to your AI tool:
Setup Options by AI Client:
-
Cursor / Antigravity IDE Setup: Directly added to
~/.cursor/mcp.json(or project.cursor/mcp.json/.vscode/mcp.json). Cursor supports the server natively, so runningnpxormcp-remoteis not required. -
Claude Desktop Setup: Added to
claude_desktop_config.jsonusing anmcp-remoteproxy bridge to connect securely to the Supsis endpoint (https://api.supsis.live/mcp). -
Other HTTP Clients (Custom Agent / LangChain / ChatGPT): For custom AI agents supporting HTTP / SSE protocols, use the endpoint URL
https://api.supsis.live/mcpwith anAuthorization: Bearer <TOKEN>header.
1.d – MCP Server List & Revocation Management
All active and expired connections can be monitored and managed from the MCP Server page.
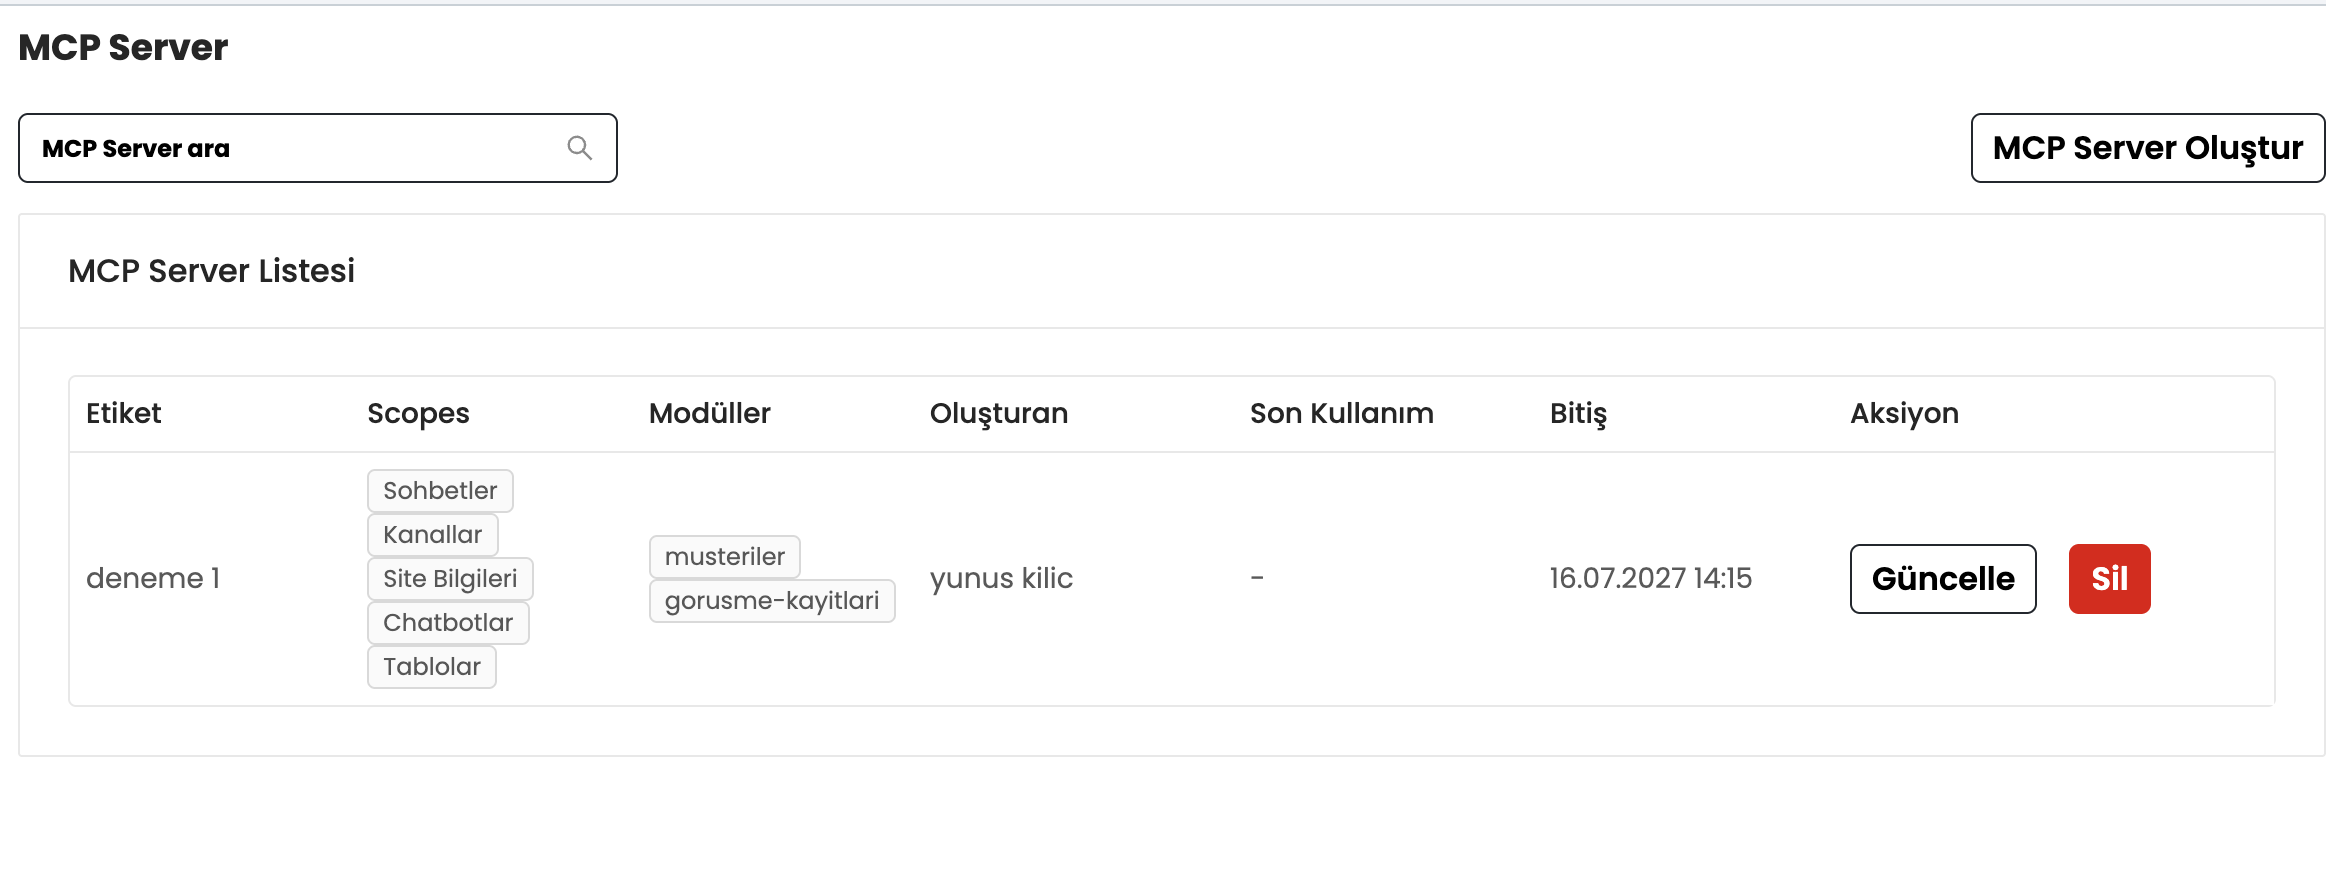
- g – Connection List & Expiration Status: Displays active connections, remaining validity periods, and assigned scopes.
- h – Delete & Revoke Access: Revoke connection access immediately at any time with a single click.
2. Antigravity / Cursor IDE Live MCP Connection & Testing Workflow
This section demonstrates how a generated Supsis MCP Server connection is activated in an AI development environment (Cursor / Antigravity IDE) and verified against live database records step by step.
Step 1: IDE Connection & Automated Tool Discovery
When the Supsis MCP Server endpoint (https://api.supsis.live/mcp) is added to .vscode/mcp.json or .cursor/mcp.json with a valid Bearer Token, the AI assistant automatically discovers and registers all active tools.
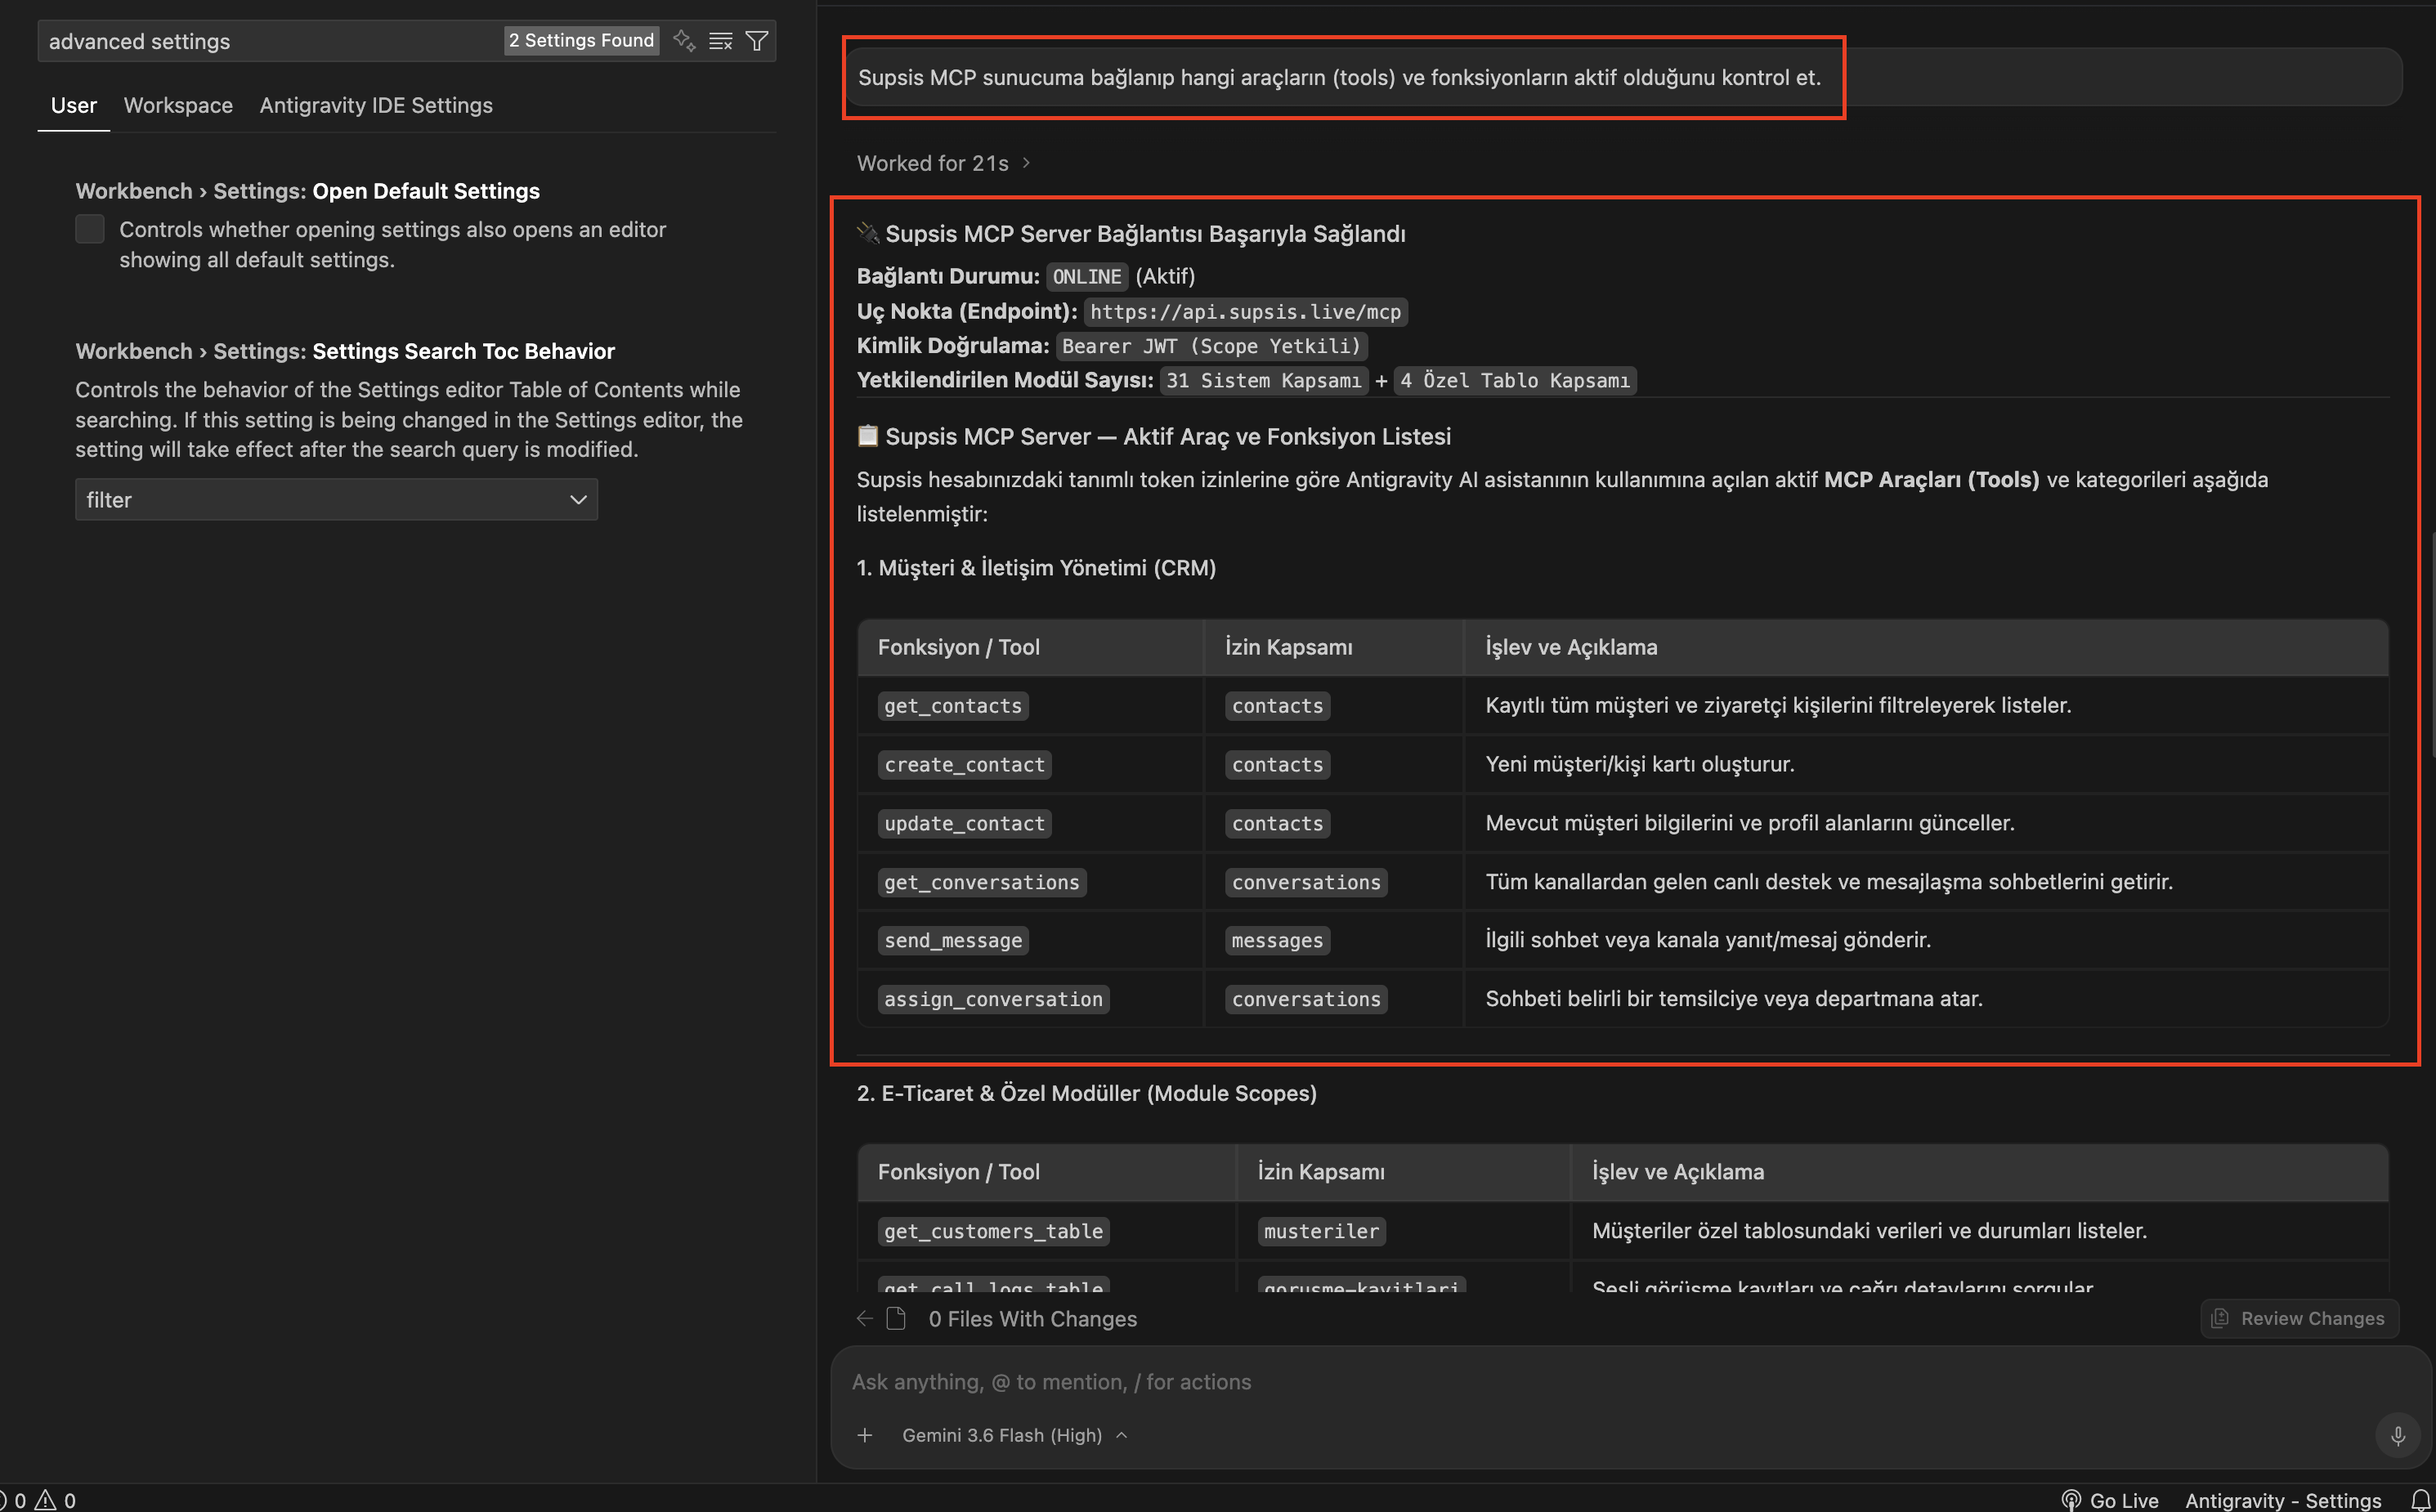
Figure 1: Initial chat interface confirming AI assistant connection to Supsis MCP Server and listing available tools.
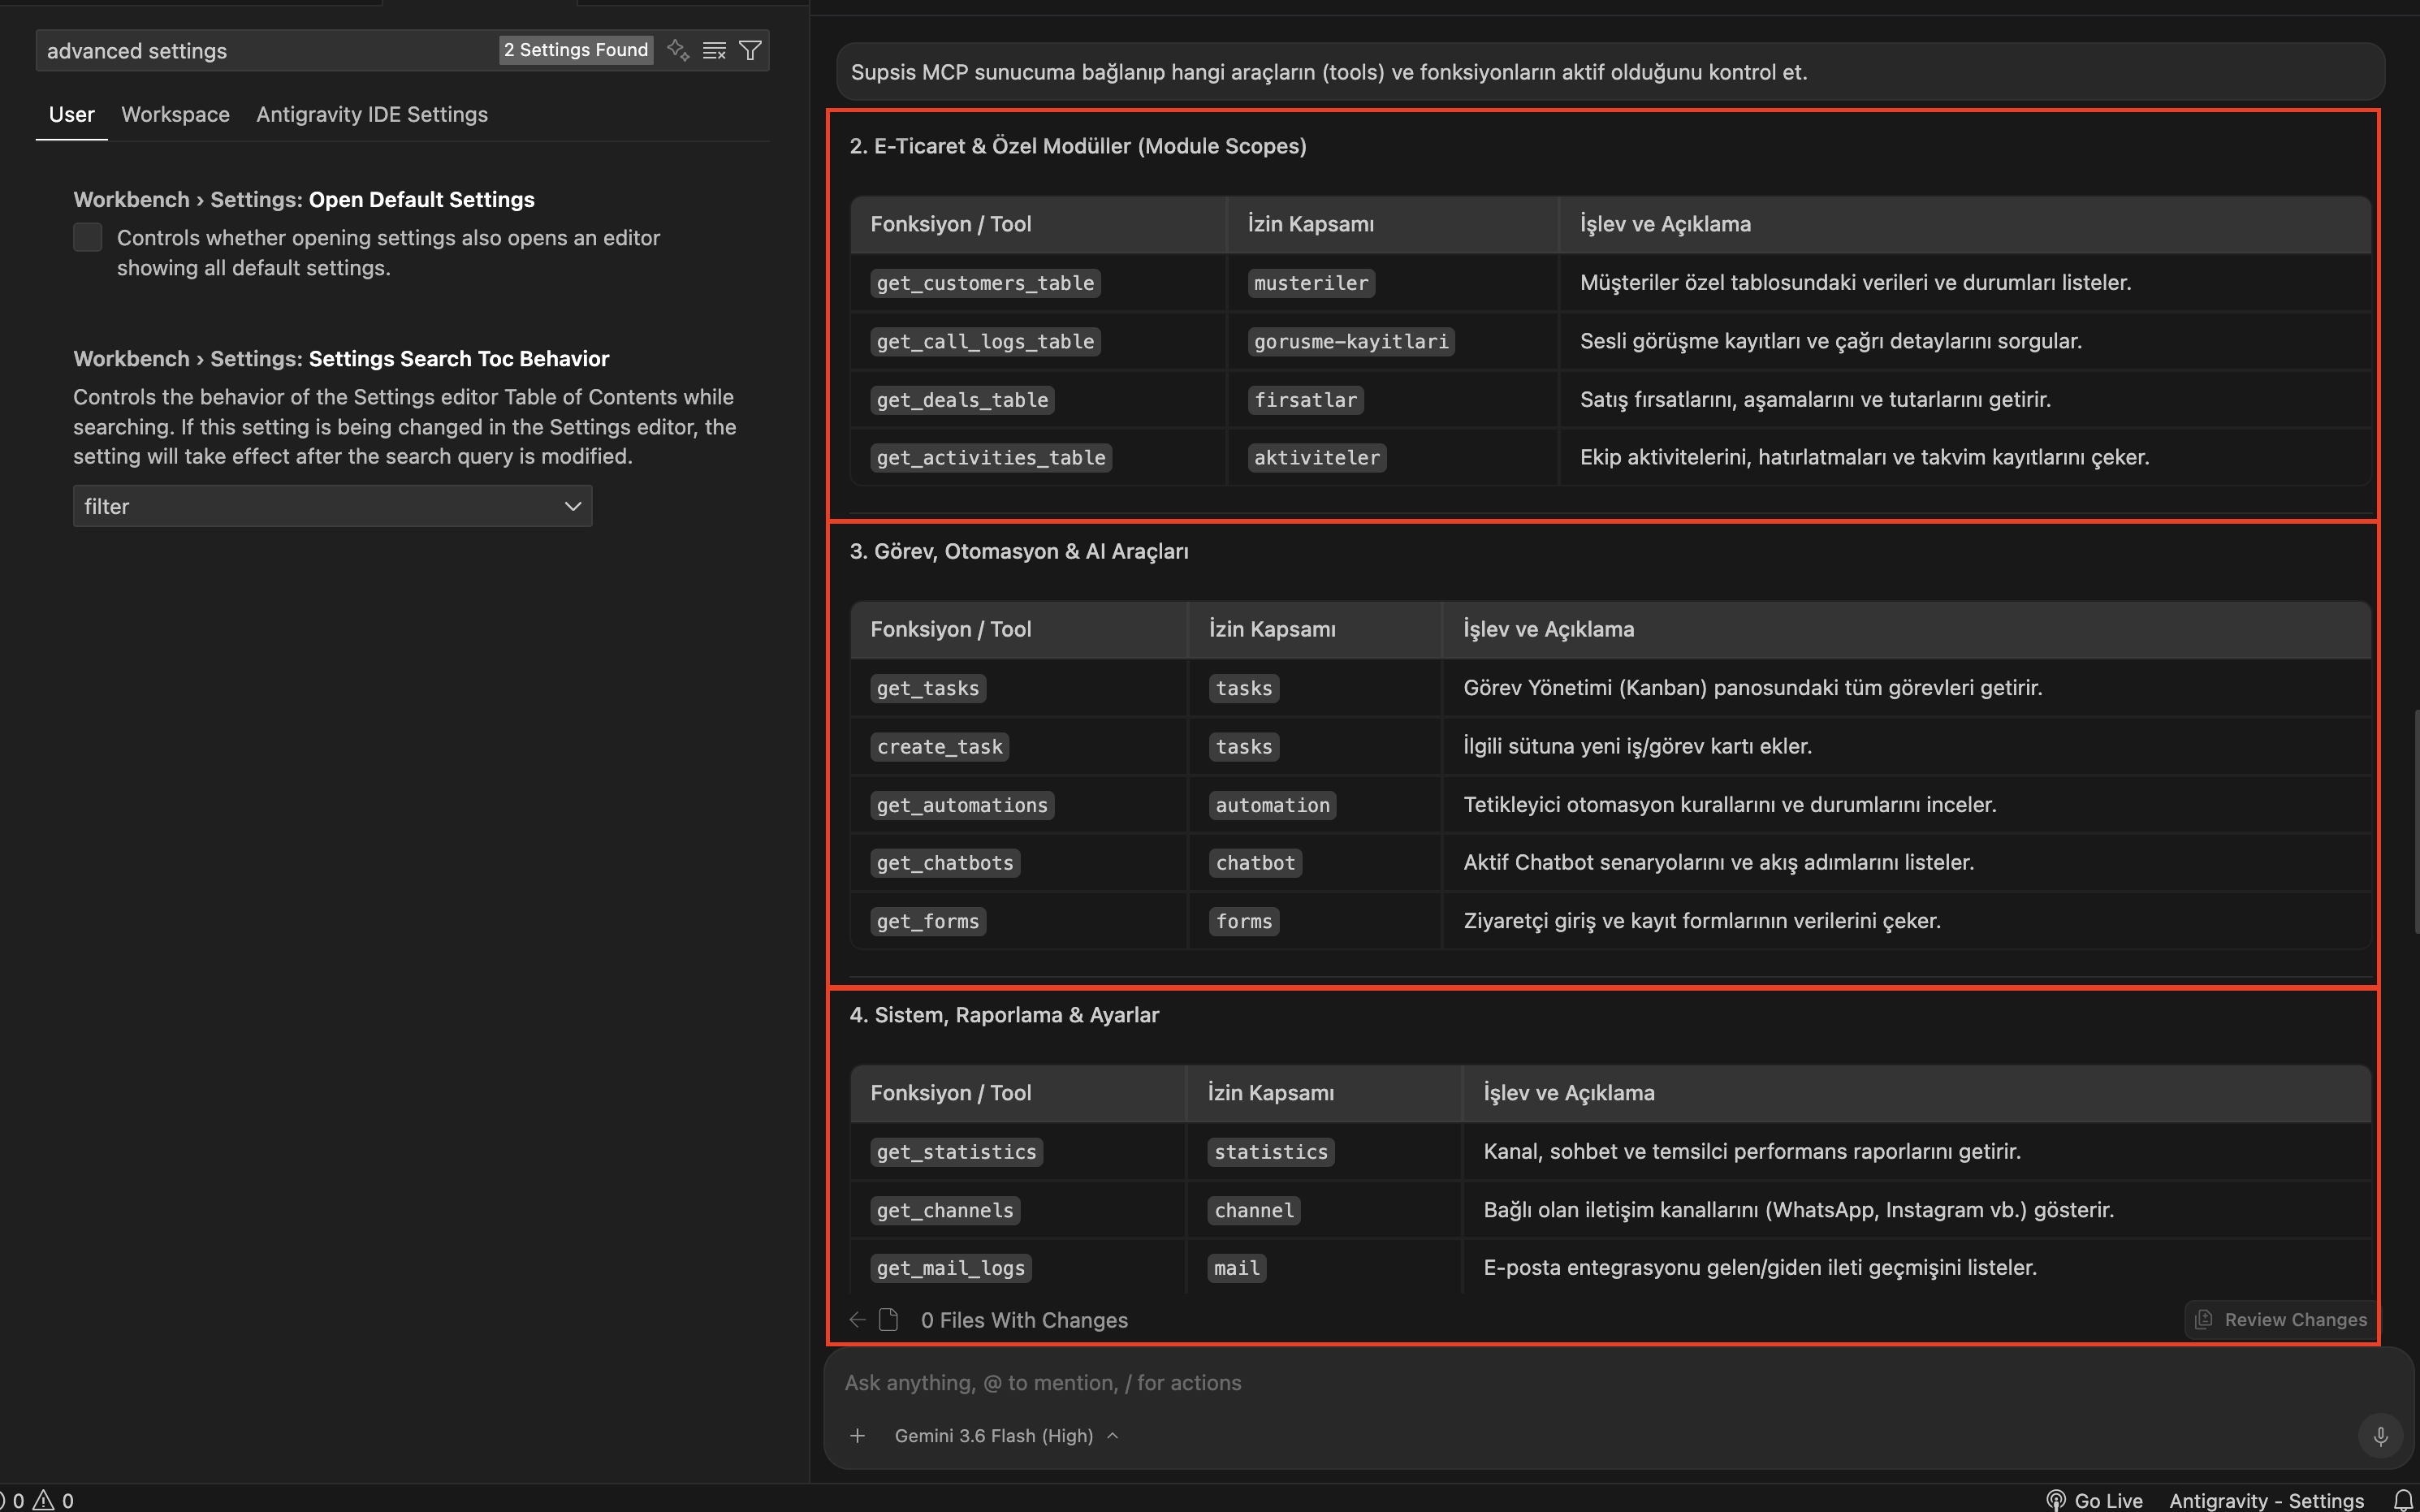
Figure 2: Continued list of granular tools provided by Supsis MCP Server including tables_list, tables_record_create, and tables_fields_list.
Step 2: Querying Supsis Database Tables via AI Prompt
When prompted "List my modules and tables in Supsis", the AI agent executes the tables_list MCP tool and fetches all active database tables.
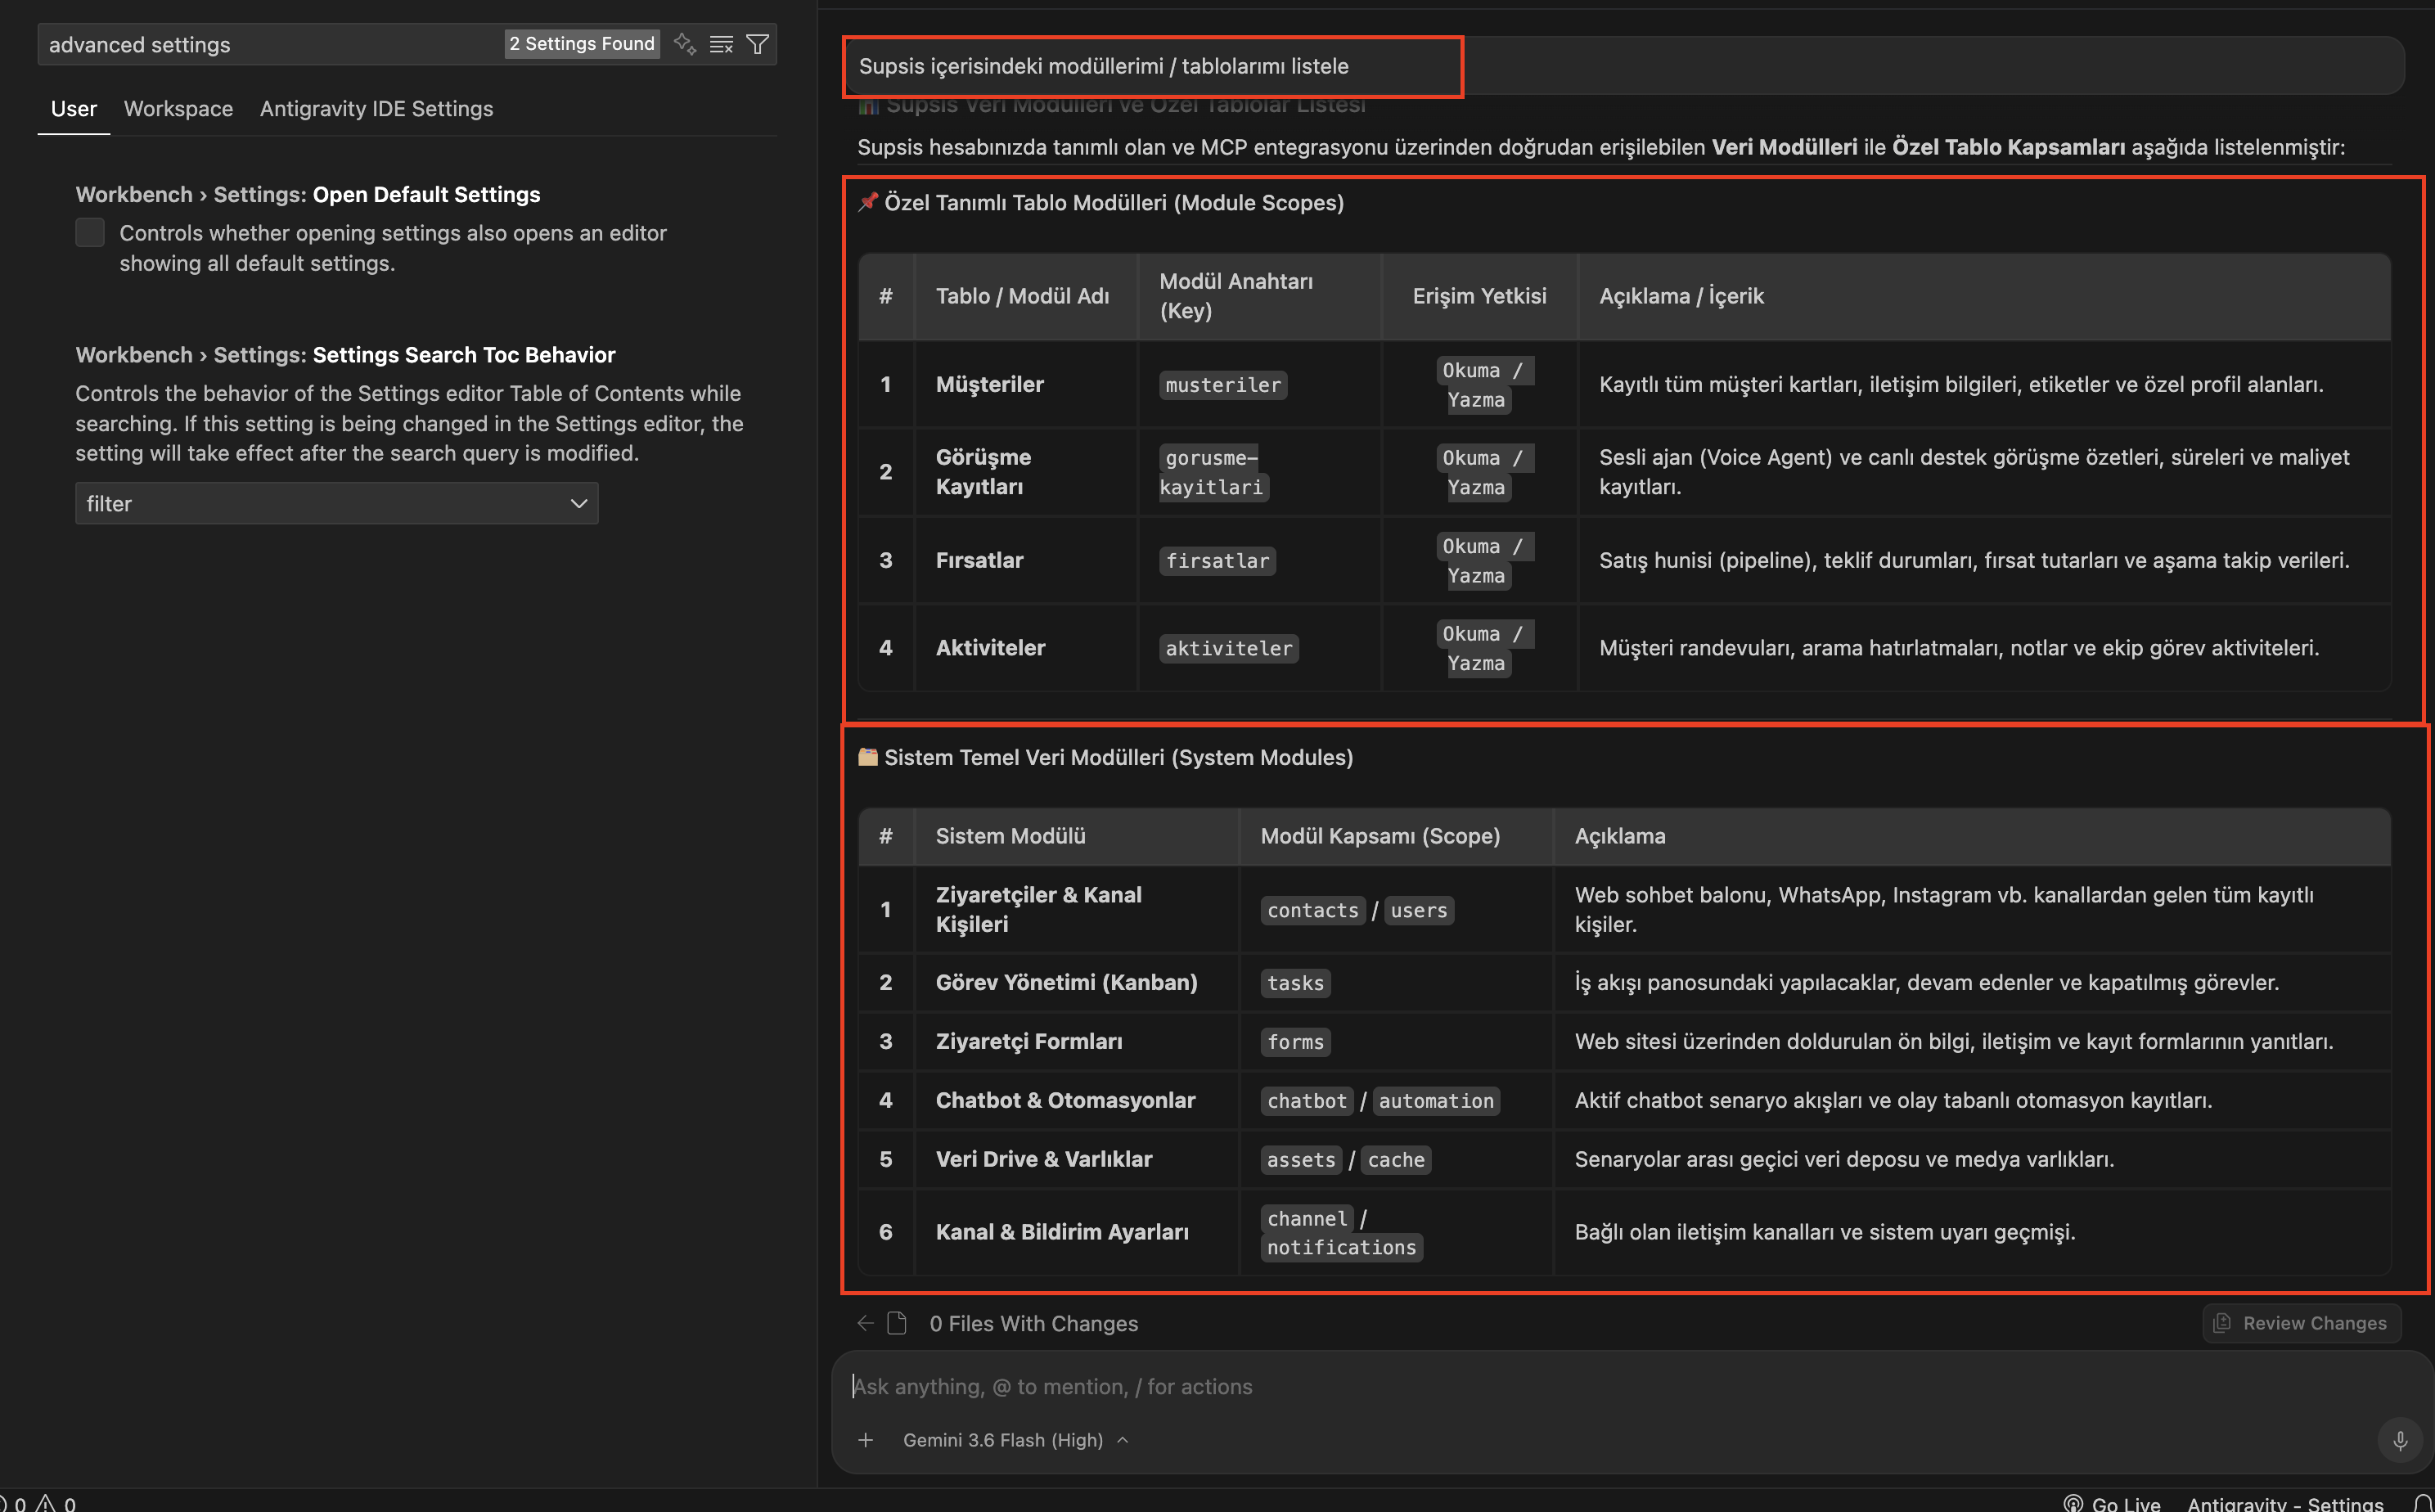
Figure 3: AI assistant retrieving and displaying active Supsis database tables in the chat using the tables_list tool.
The accuracy of the fetched tables is cross-verified in the Supsis Table Management panel:
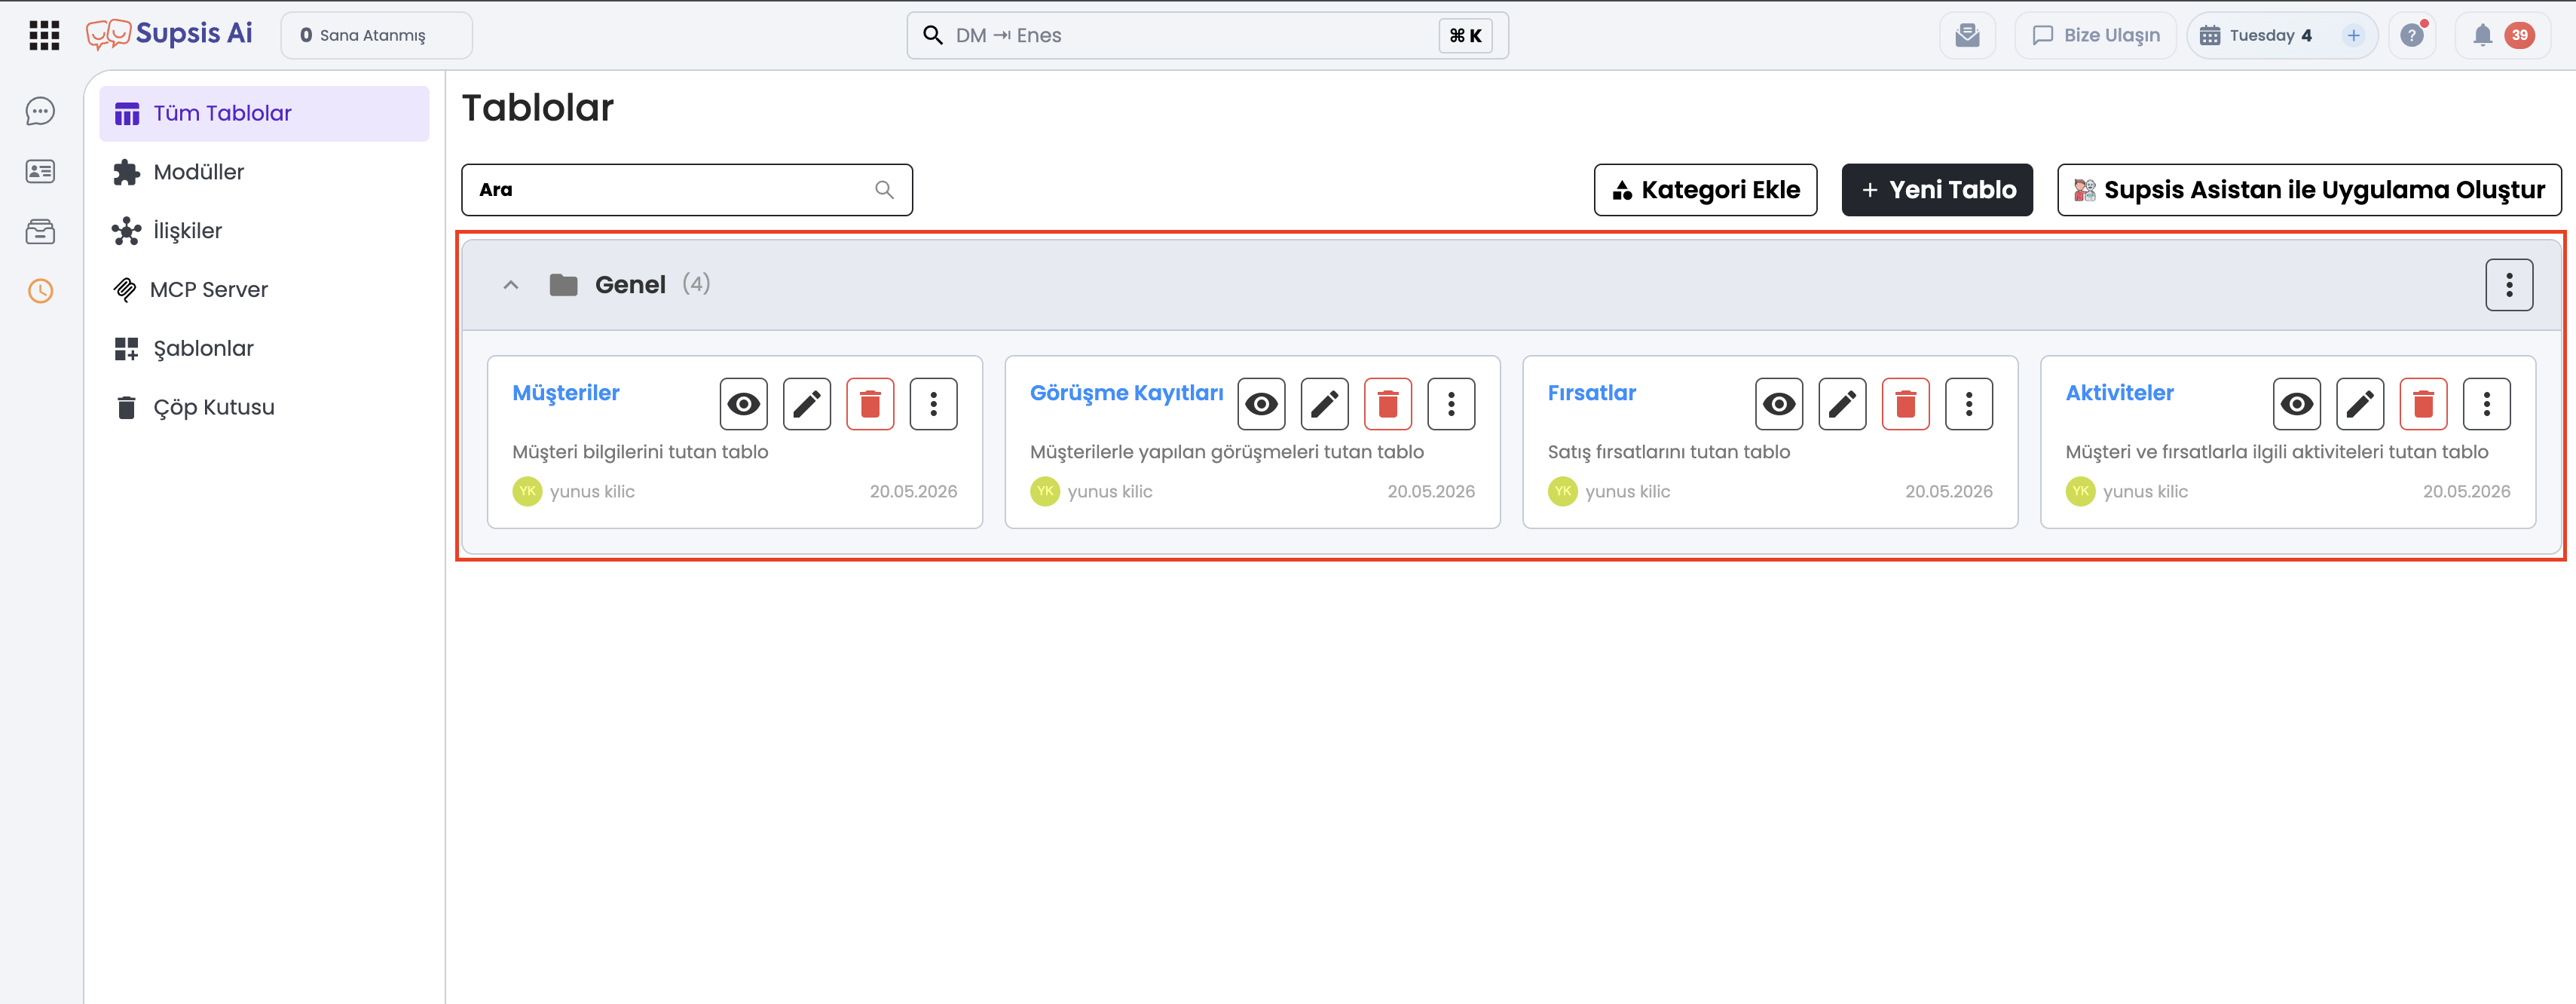
Figure 4: Live verification of database tables inside the Supsis AI panel matching the chat list 1:1.
Step 3: Live Data Insertion & Panel Verification
When instructed "Add 1 test record to the Customers table", the AI agent uses the tables_record_create MCP tool to write new customer fields (Name, Phone, Email, etc.) to the database.
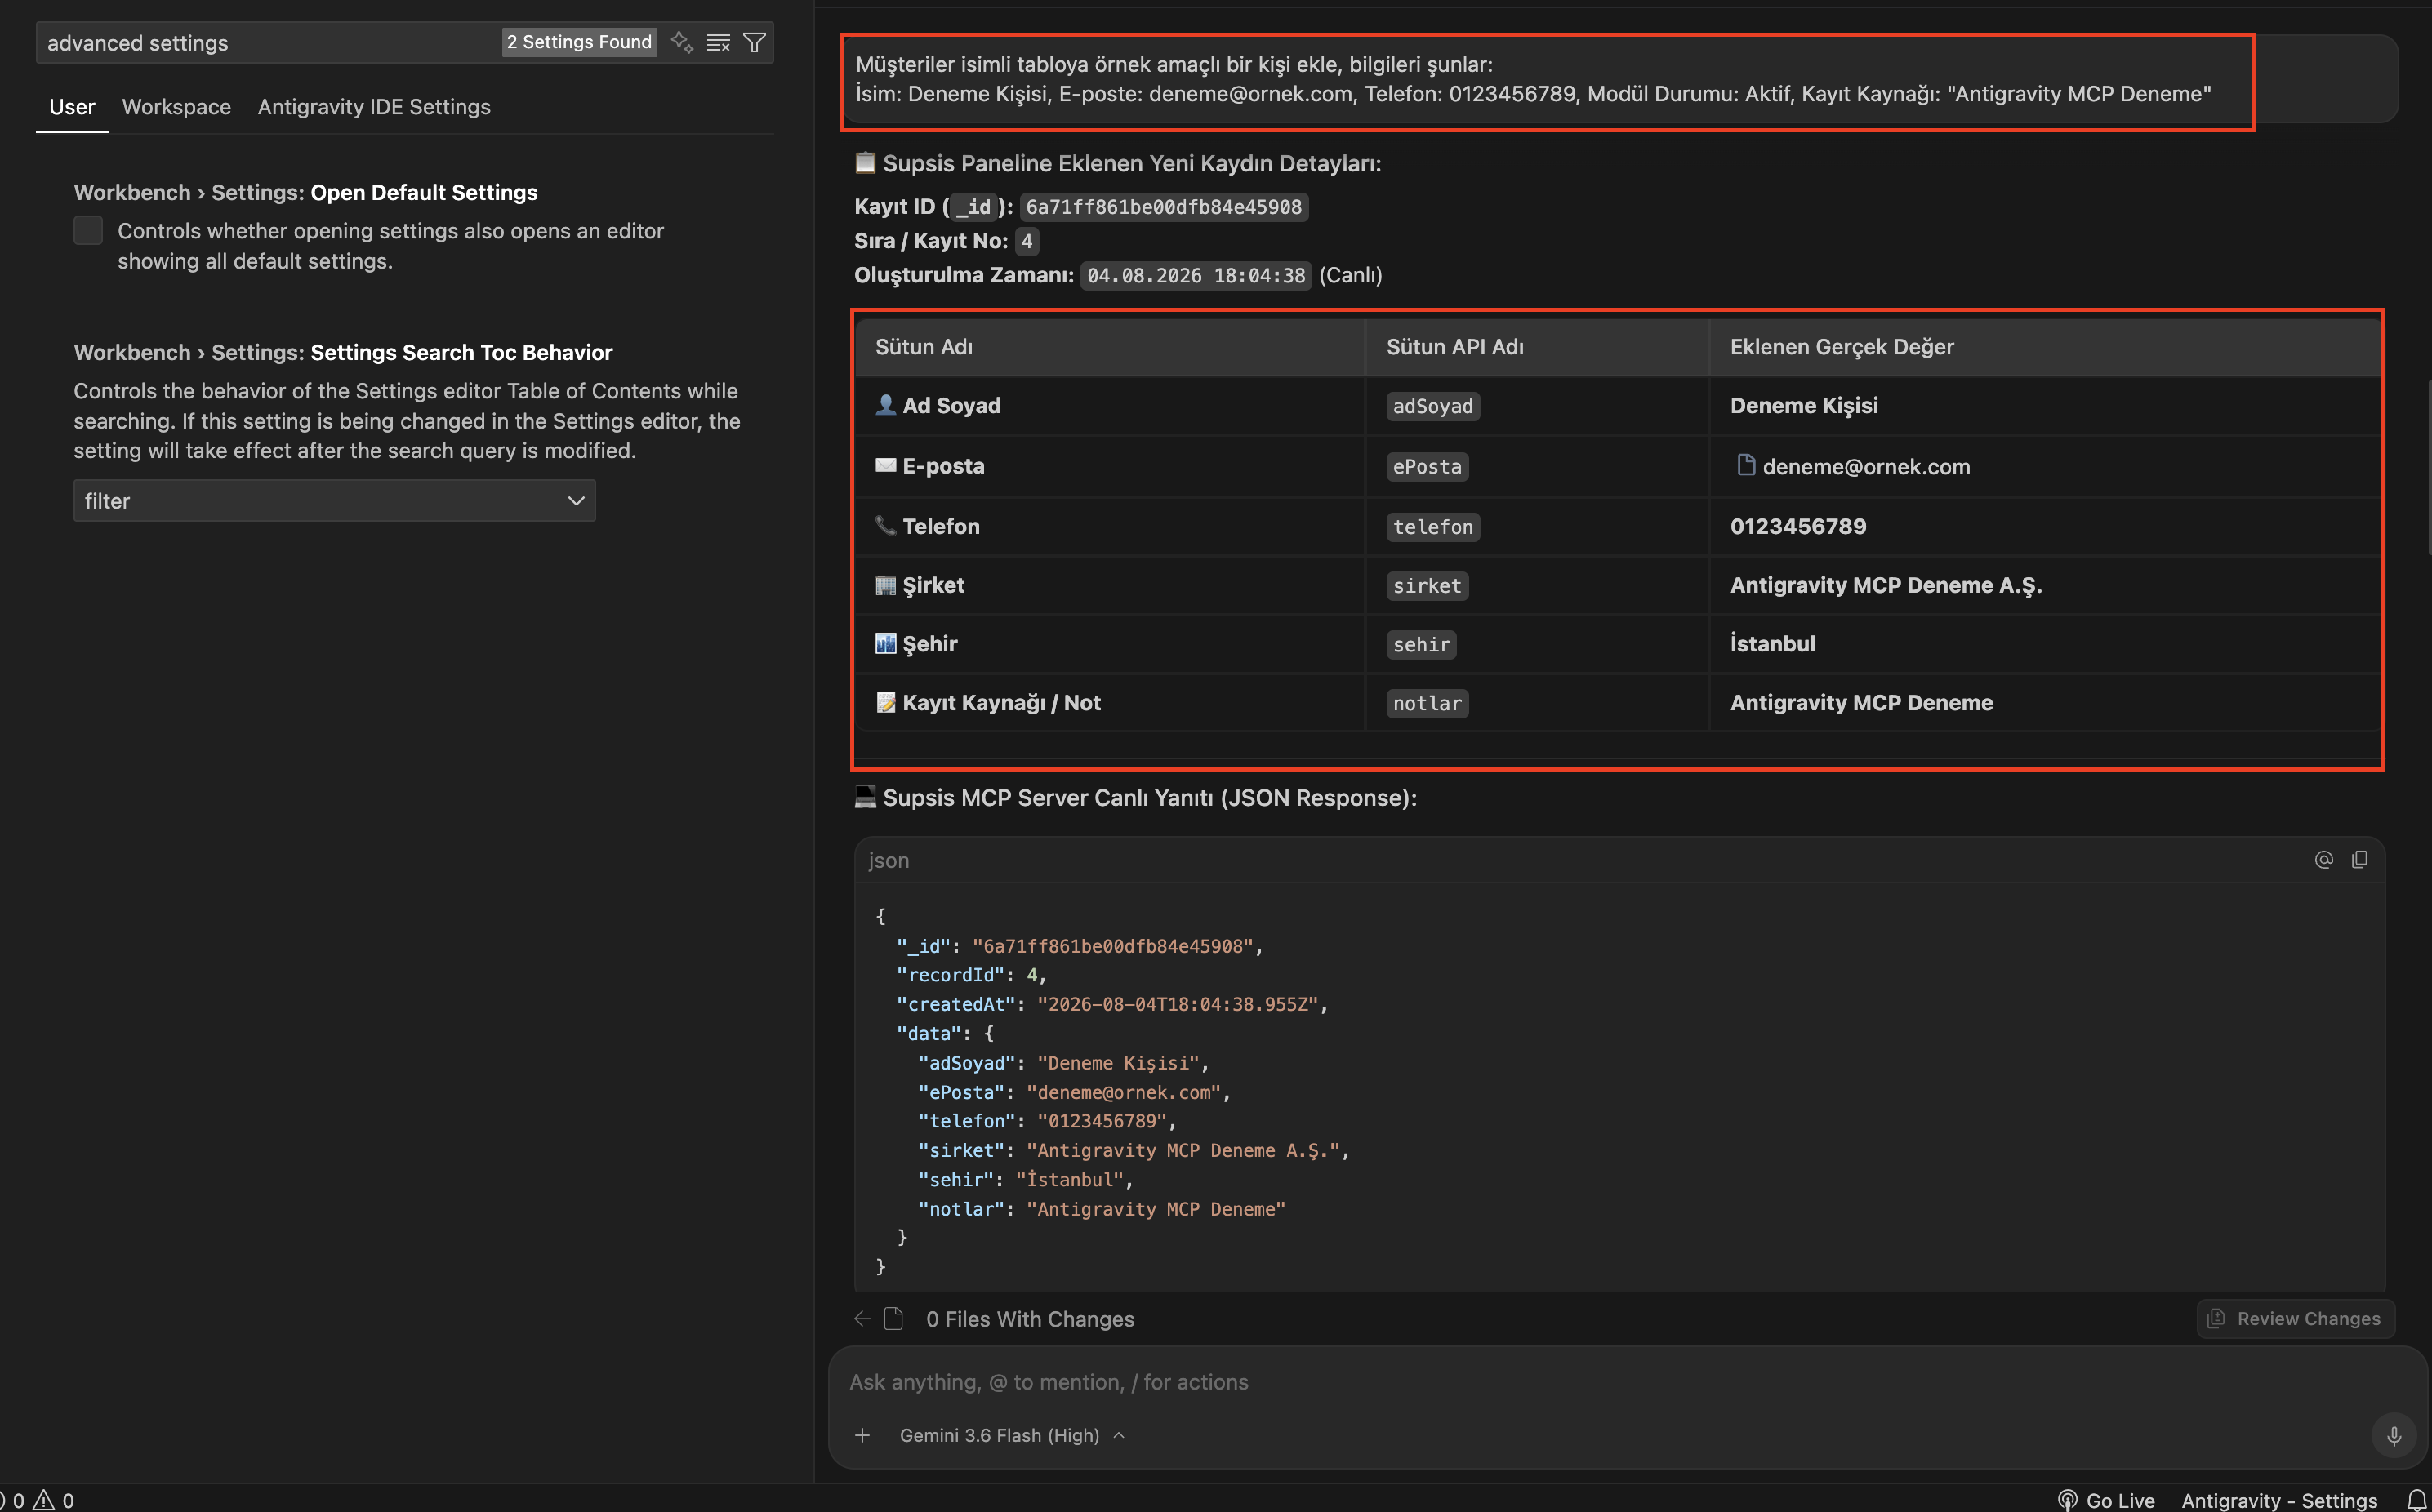
Figure 5: Chat interface showing the AI agent inserting a live test record into the "Customers" table via MCP.
The newly inserted record is instantly verified in the Supsis Customers table:
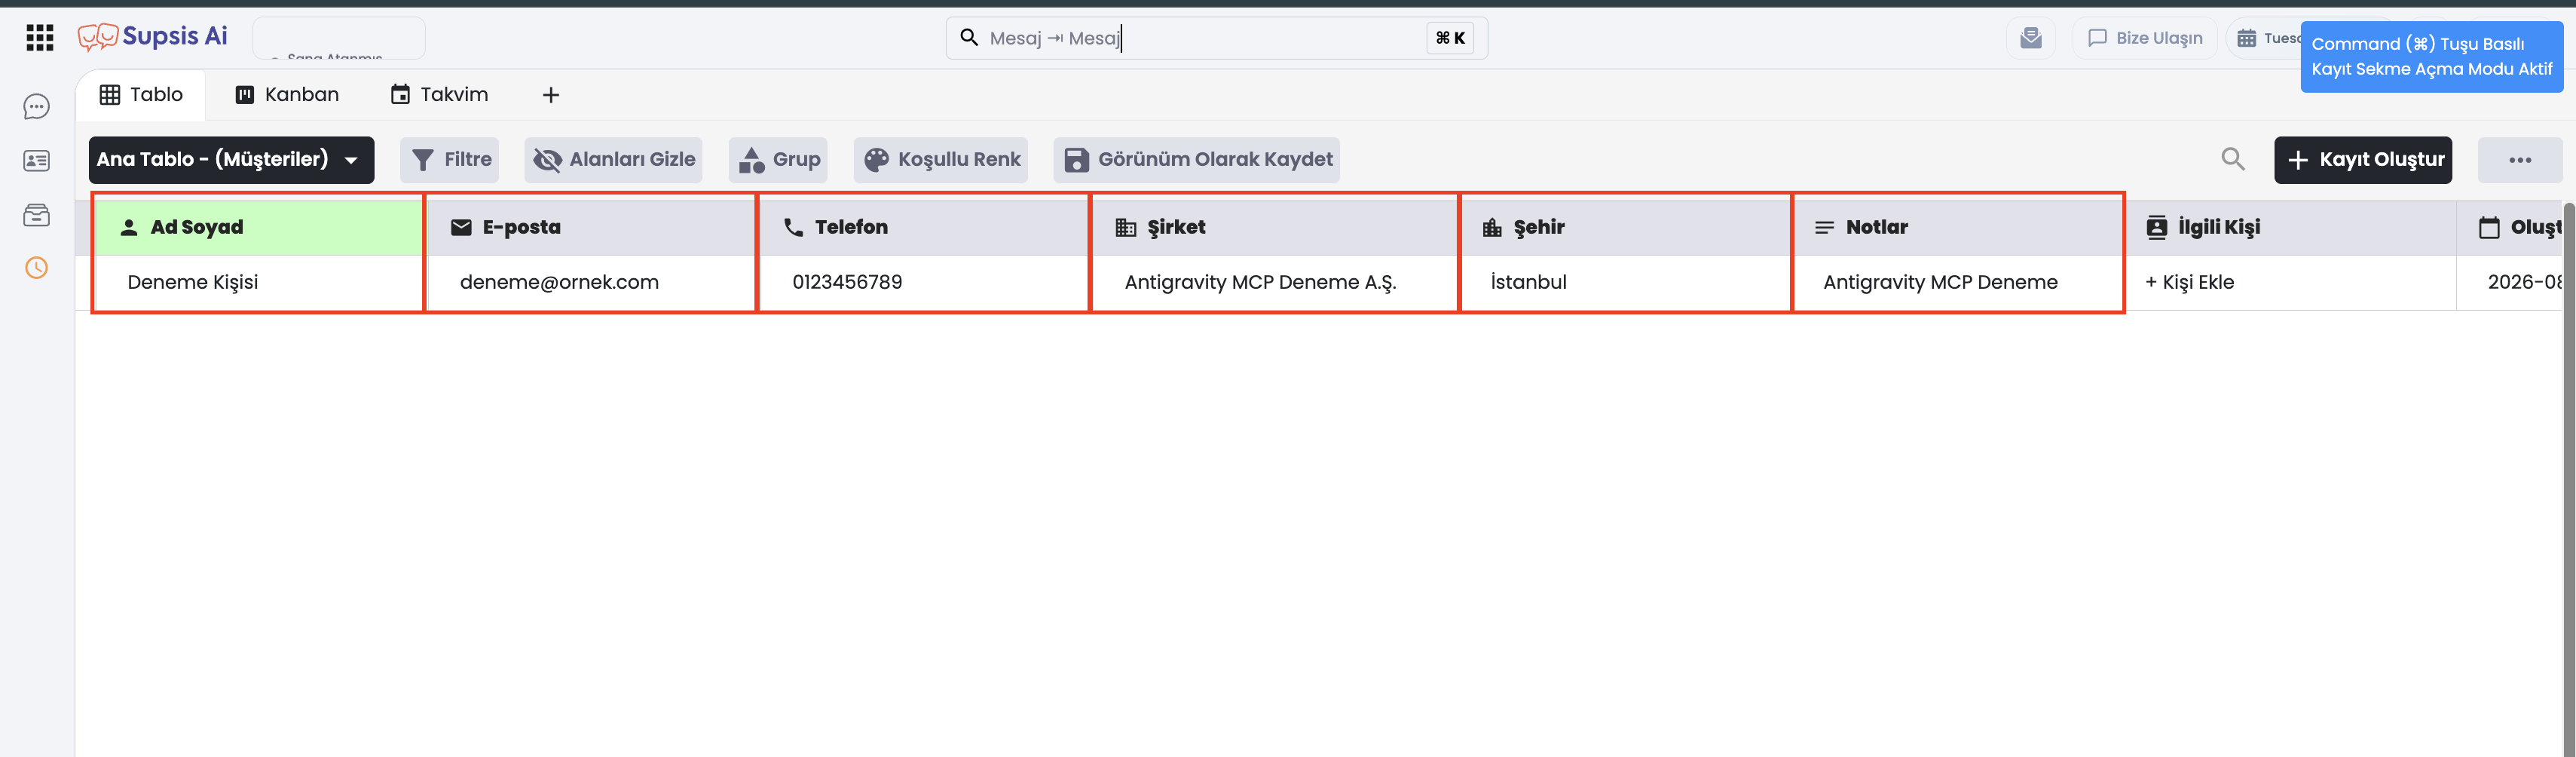
Figure 6: Real-time confirmation of the new customer record displayed inside the Supsis AI panel Customers table.
3. Supported AI Clients & Setup Methods
Supsis MCP Server is 100% compatible with all major AI tools supporting the Model Context Protocol standard:
| AI Client / Platform | Connection Protocol | Configuration Details |
|---|---|---|
| Cursor / Antigravity IDE | Direct HTTP / SSE | mcp.json (Native server support, no npx/mcp-remote required) |
| Claude Desktop | MCP Remote Proxy | claude_desktop_config.json (npx -y mcp-remote bridge) |
| Other (HTTP) / Custom GPTs | HTTP REST & SSE | https://api.supsis.live/mcp + Authorization: Bearer <TOKEN> |
| LangChain / AutoGen / Python | Client SDK / HTTP POST | Endpoint URL & Auth Header configuration |
4. Frequently Asked Questions (FAQ)
1. What should I do if I lose my MCP Server Access Token?
For security reasons, MCP Tokens are displayed only once upon creation. If lost, delete the existing connection and create a new MCP Server connection.
2. Do I need to run mcp-remote when using Cursor?
No. Cursor natively supports the Supsis MCP server, so you can connect directly by adding the endpoint to mcp.json without running npx or mcp-remote.
3. What happens when an MCP Server connection expires?
Once the specified validity period (e.g., 30 days) elapses, the token automatically becomes invalid, and AI assistant access to Supsis data is revoked immediately.
4. Can I restrict AI agent access to specific tables only?
Yes. During setup, use the Scope selection to restrict AI assistant access exclusively to specified product modules or database tables.
5. Can I revoke an active MCP connection before it expires?
Yes. Navigate to Settings > MCP Server or Tables > MCP Server and click Delete on the connection row to revoke access instantly.