
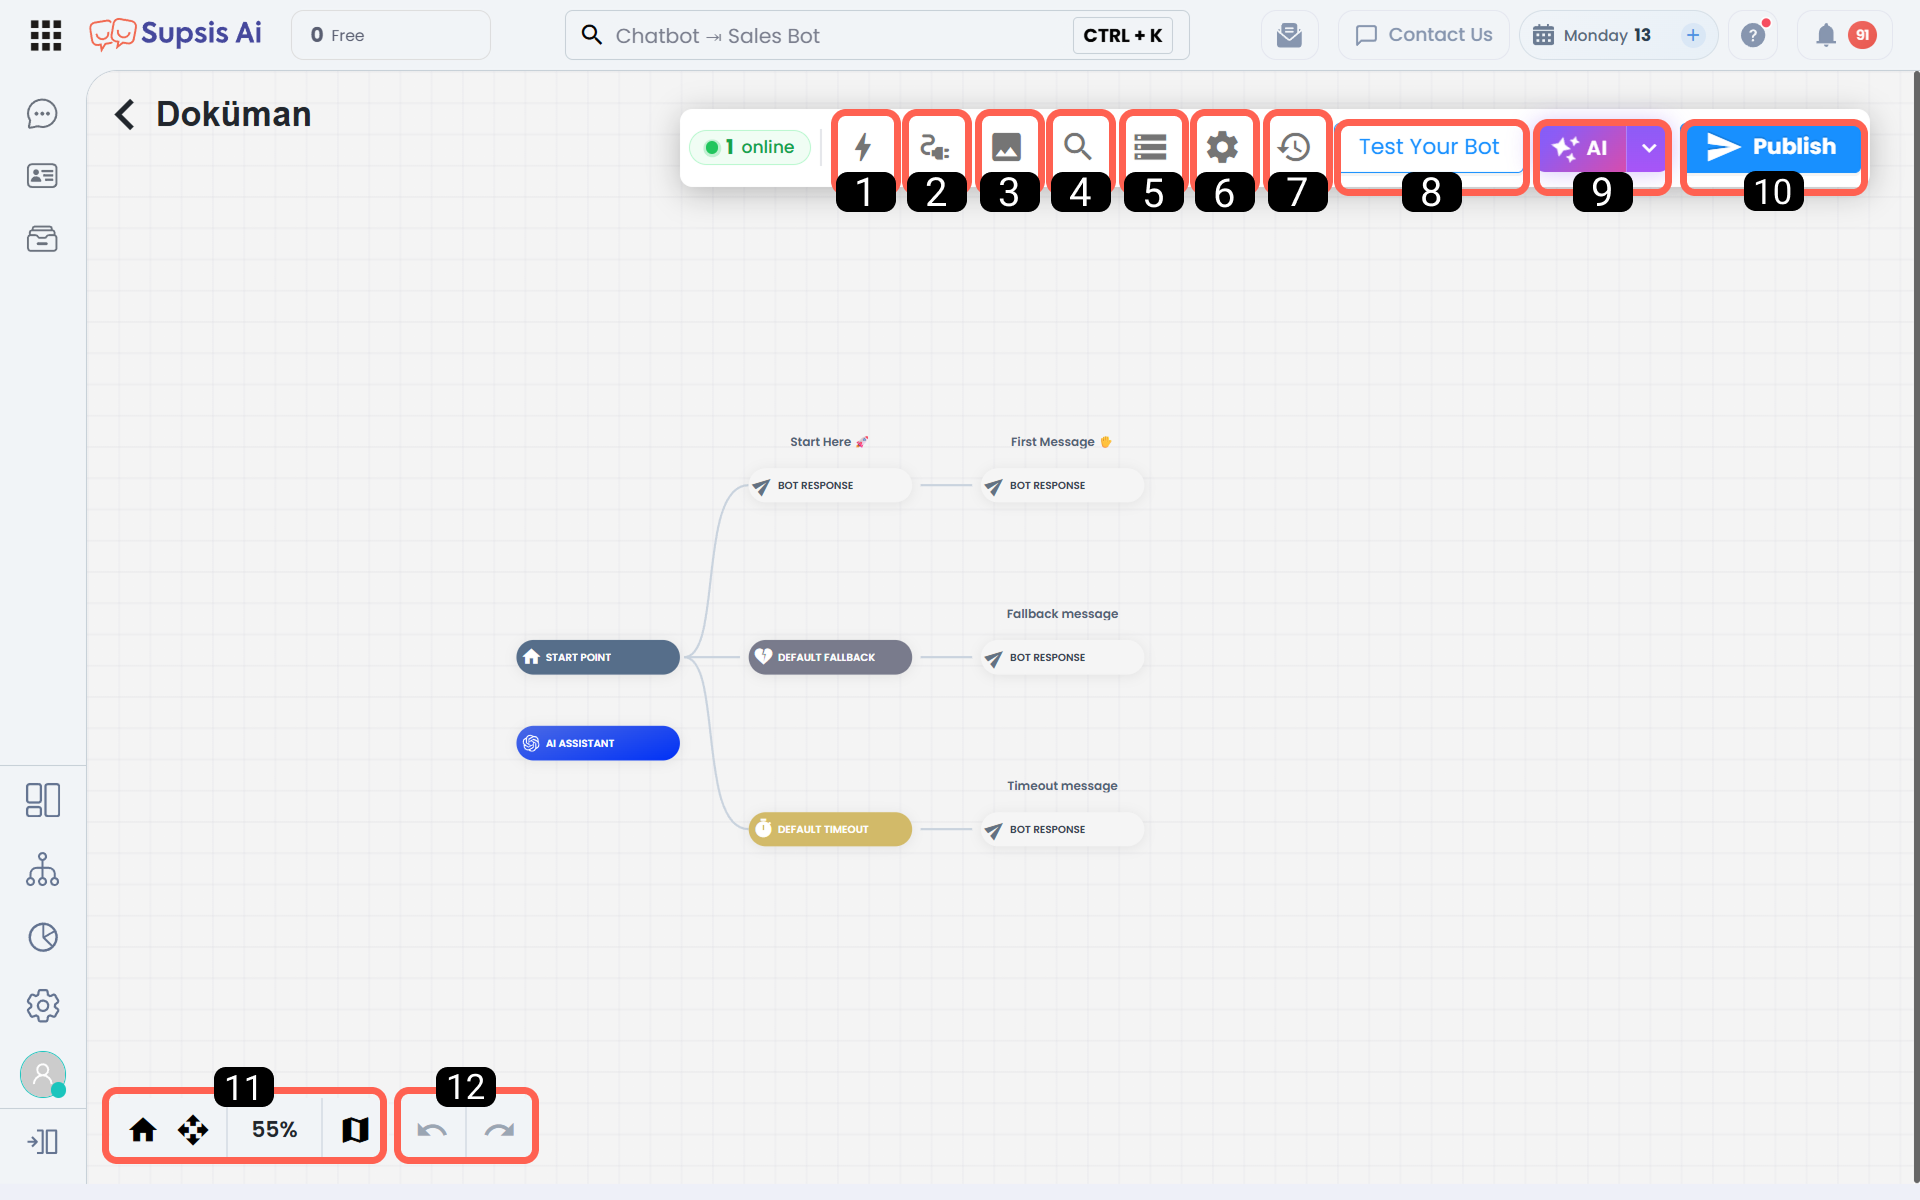
Table of Contents
| # | Title | Go |
|---|---|---|
| 1 | Chatbot Blocks | Go |
| 2 | Integration | Go |
| 3 | Image Processing Settings | Go |
| 4 | Block Search | Go |
| 5 | Cache Management | Go |
| 6 | Bot Settings | Go |
| 7 | Chatbot Versions | Go |
| 8 | Test the Bot | Go |
| 9 | AI Knowledge Base | Go |
| 10 | Publish Scenario | Go |
| 11 | Navigation Elements | Go |
| 12 | Undo/Redo Steps | Go |
1. Chatbot Blocks
Chatbot Blocks are the fundamental building blocks that form the chatbot scenario. Through this area, you can establish different diagram flows with various block elements, create redirections based on user inputs, and add the interactions you need to the diagram using drag-and-drop logic. Blocks can be used to communicate with the user, collect data, perform redirections, and manage the flow.
For more information about blocks, see Chatbot Blocks
2. Integration
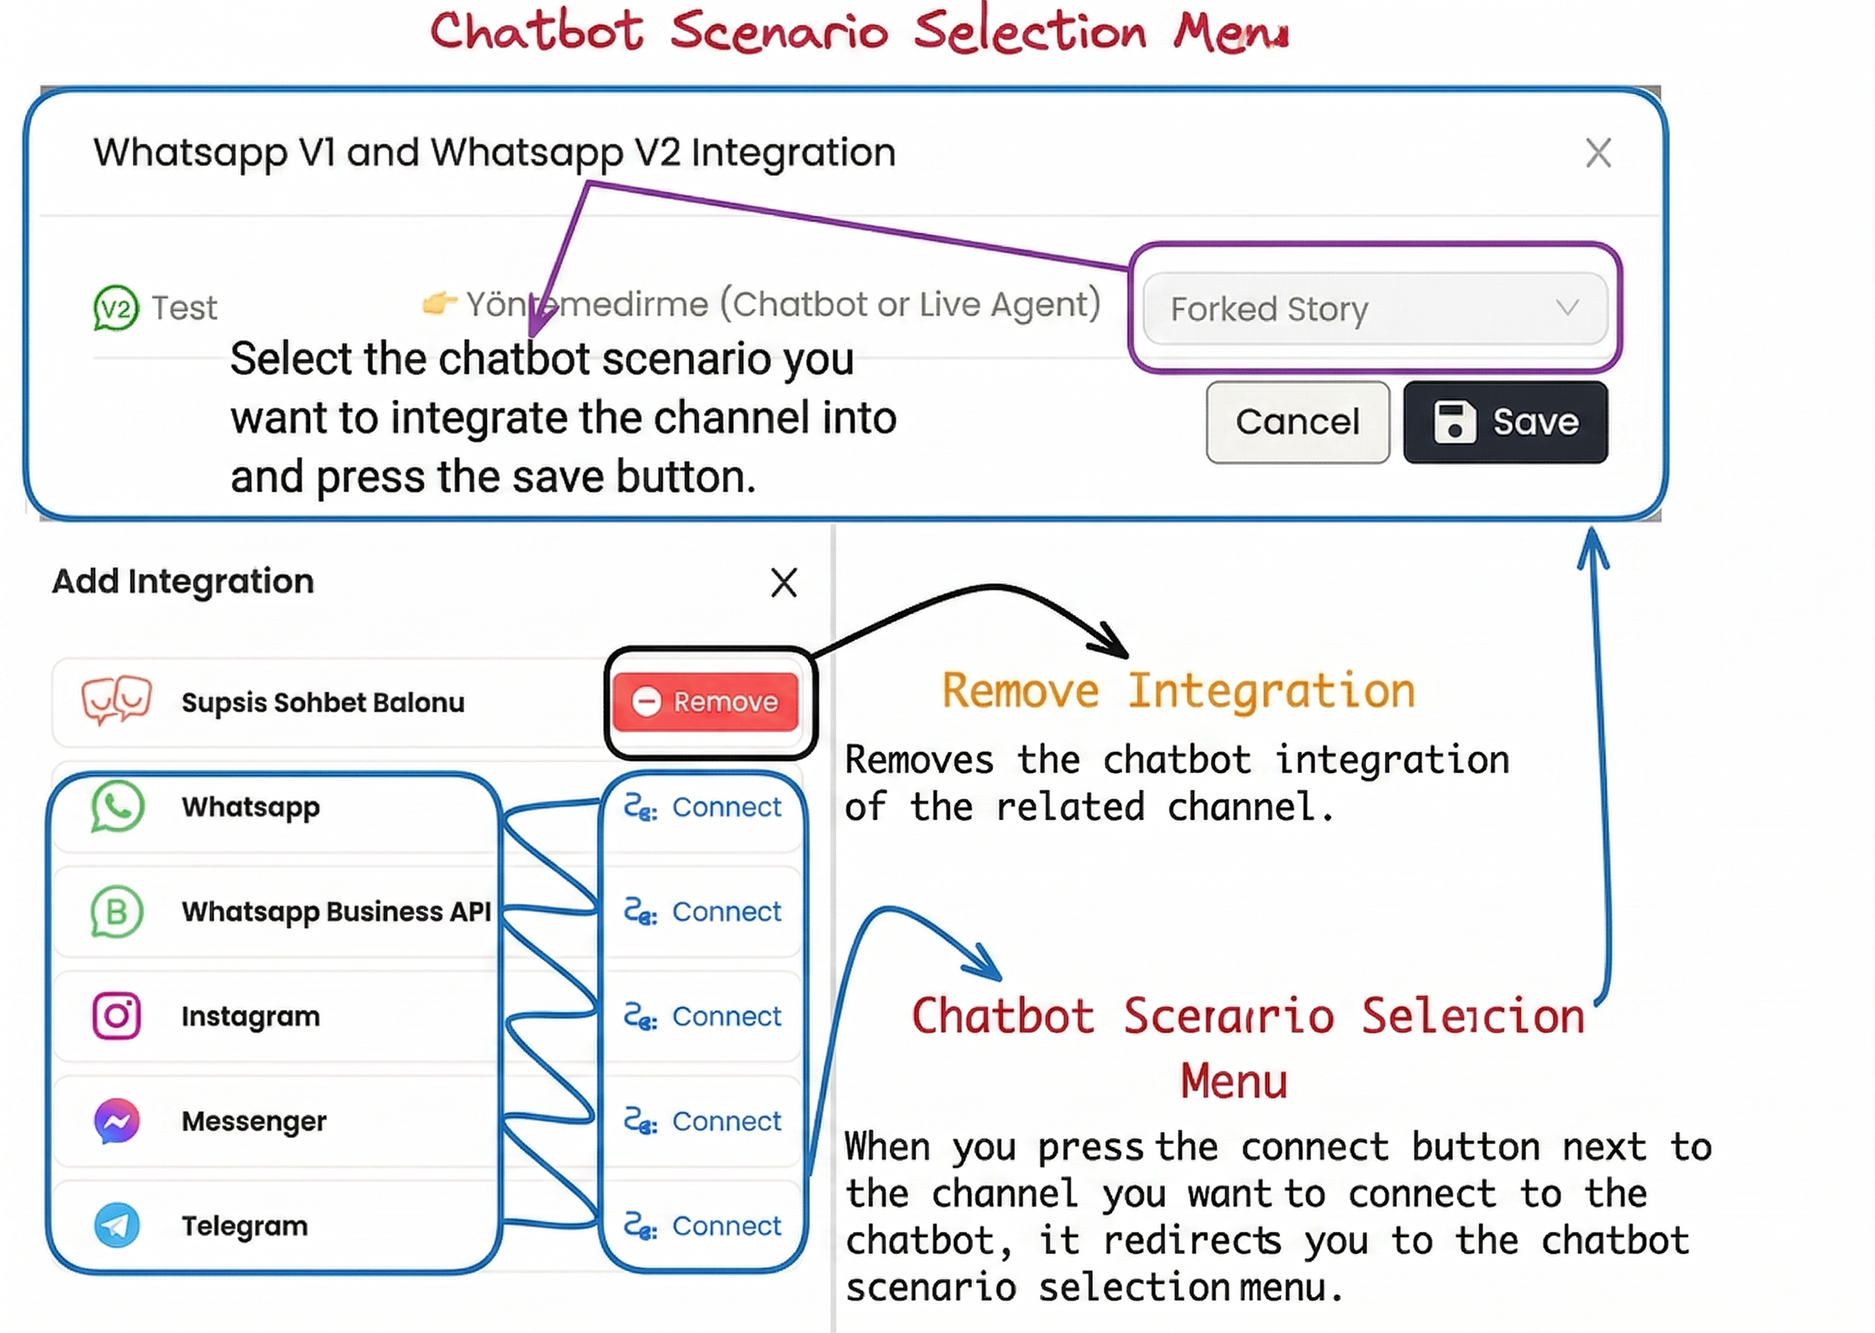
The Integration area allows you to associate the chatbot scenario you have prepared with the communication channels where it will be used. By selecting the relevant channel through this menu, the appropriate scenario is matched, and active chatbot use is initiated after publishing. This allows you to run different scenarios dynamically on web chat, social media platforms, or other platforms.
3. Image Processing Settings
Image Processing Settings are used to determine how images sent by users communicating with the chatbot will be processed by the system.
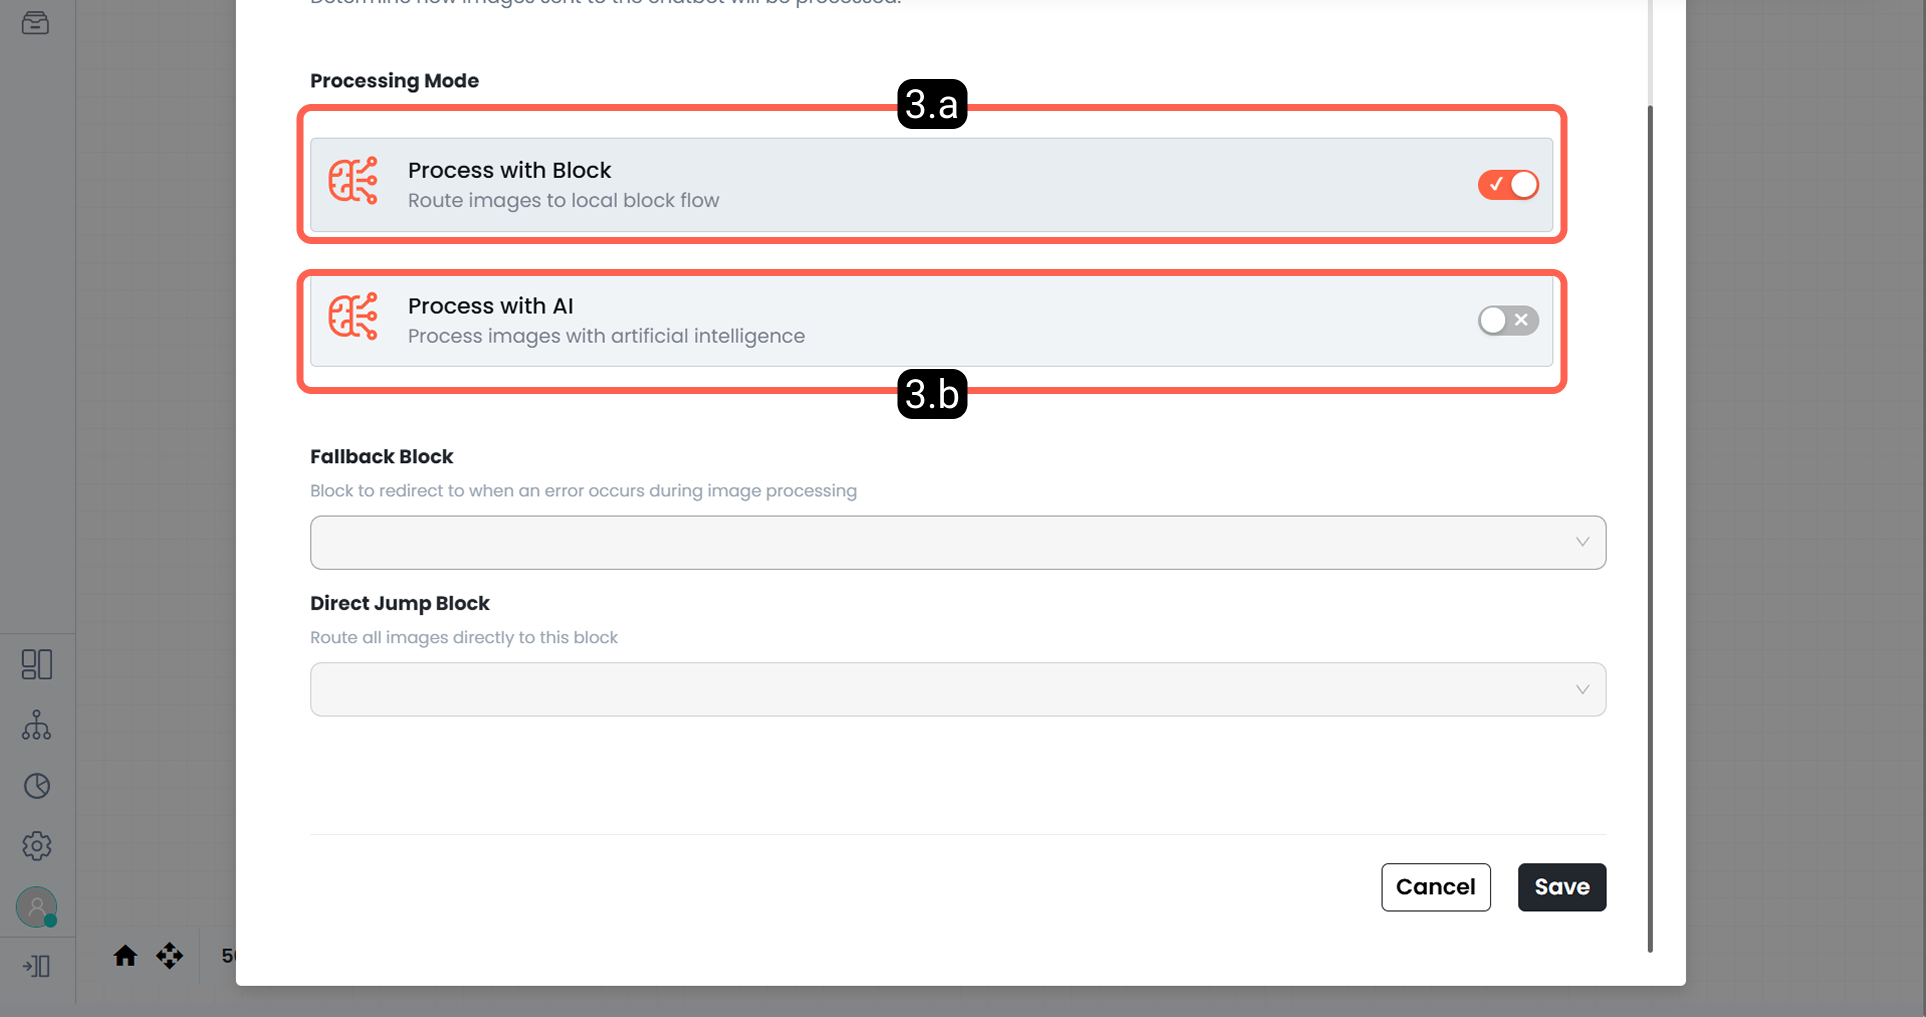
3.a – Process Image with Block
When this mode is activated, sent images are directed to the local block flow within the scenario. Thus, image content is processed according to the block logic you previously defined and handled in a controlled manner within the flow.
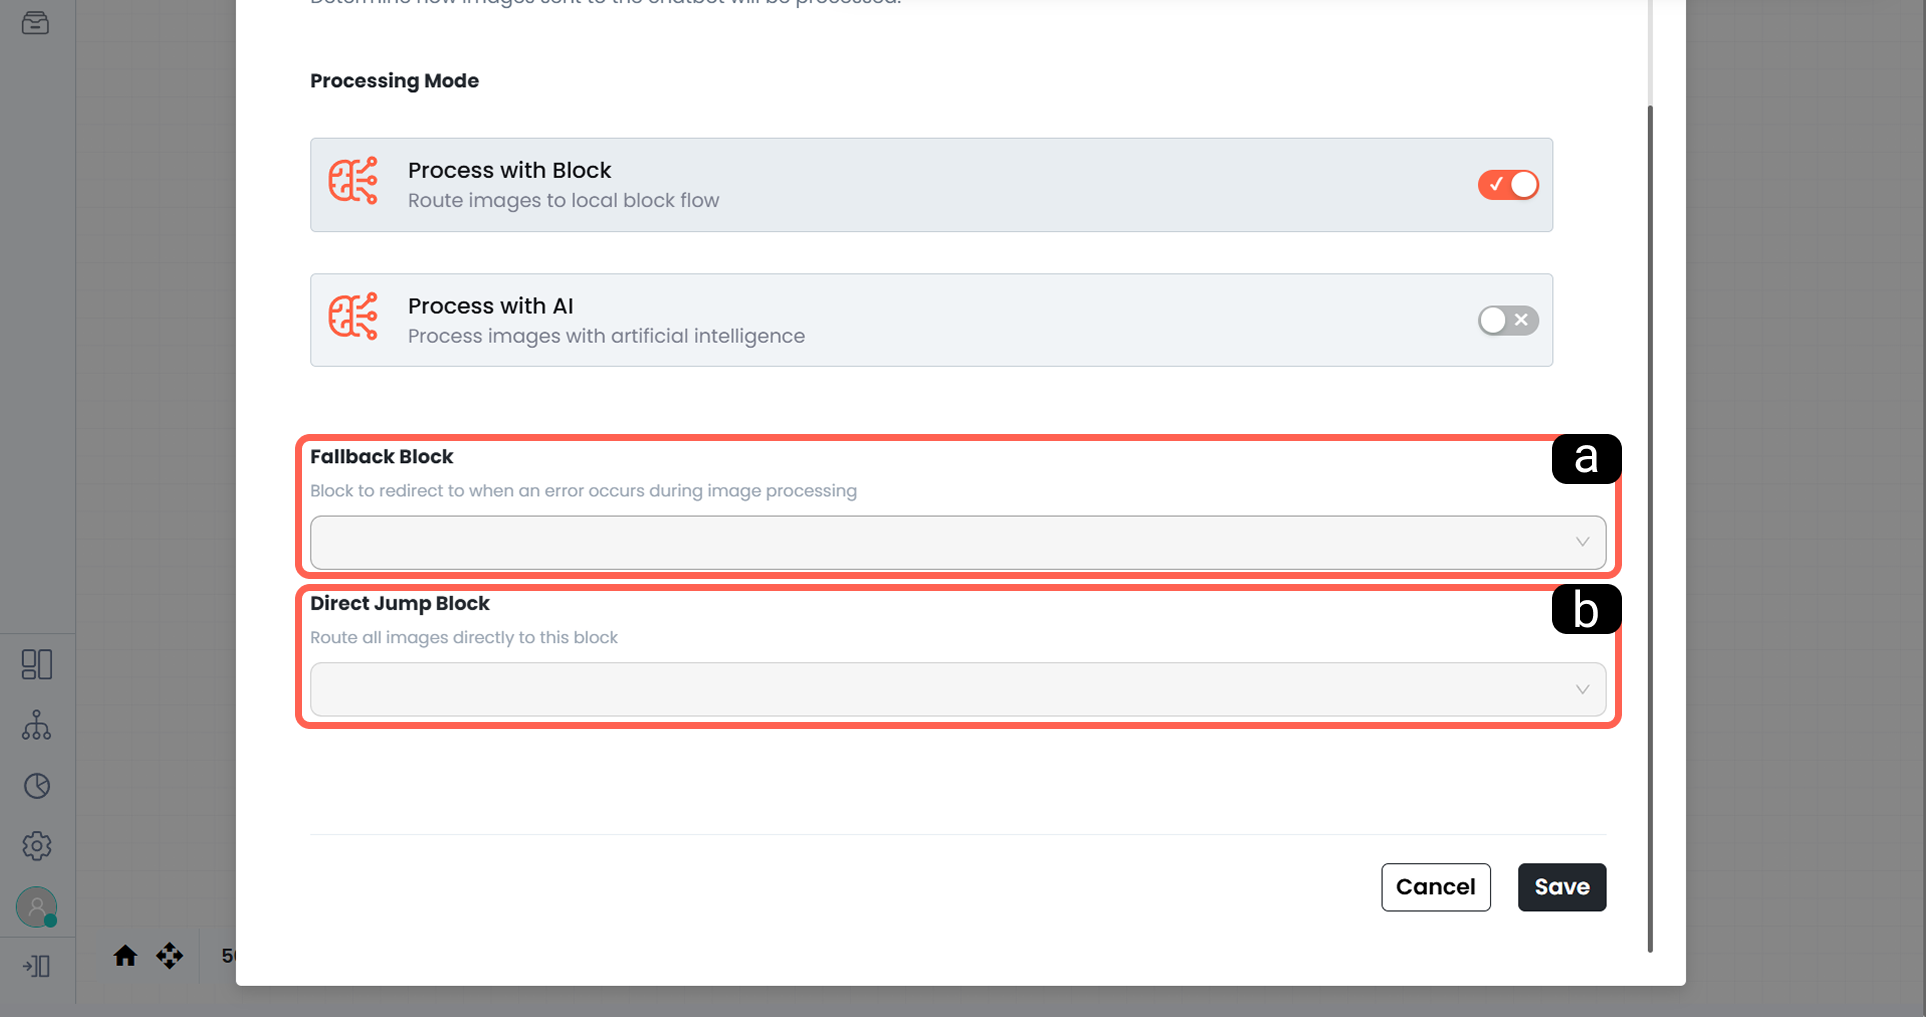
a. Fallback Block
The Fallback Block is used to determine the block the user will be directed to in case of an error while processing the image. This structure ensures that even if an unexpected situation occurs during the image processing stage, the user can be transferred to an alternative scenario without leaving the flow.
b. Direct Jump Block
The Direct Jump Block field ensures that all sent images are directly directed to a block you specify. This feature is useful in cases where you want to start a fixed flow when an image is sent, instead of making a new evaluation based on image content every time.
3.b – Process Image with AI
When this mode is activated, images from the user are evaluated by artificial intelligence instead of the block flow. This ensures that image content is processed in a more flexible and advanced analysis-oriented manner.
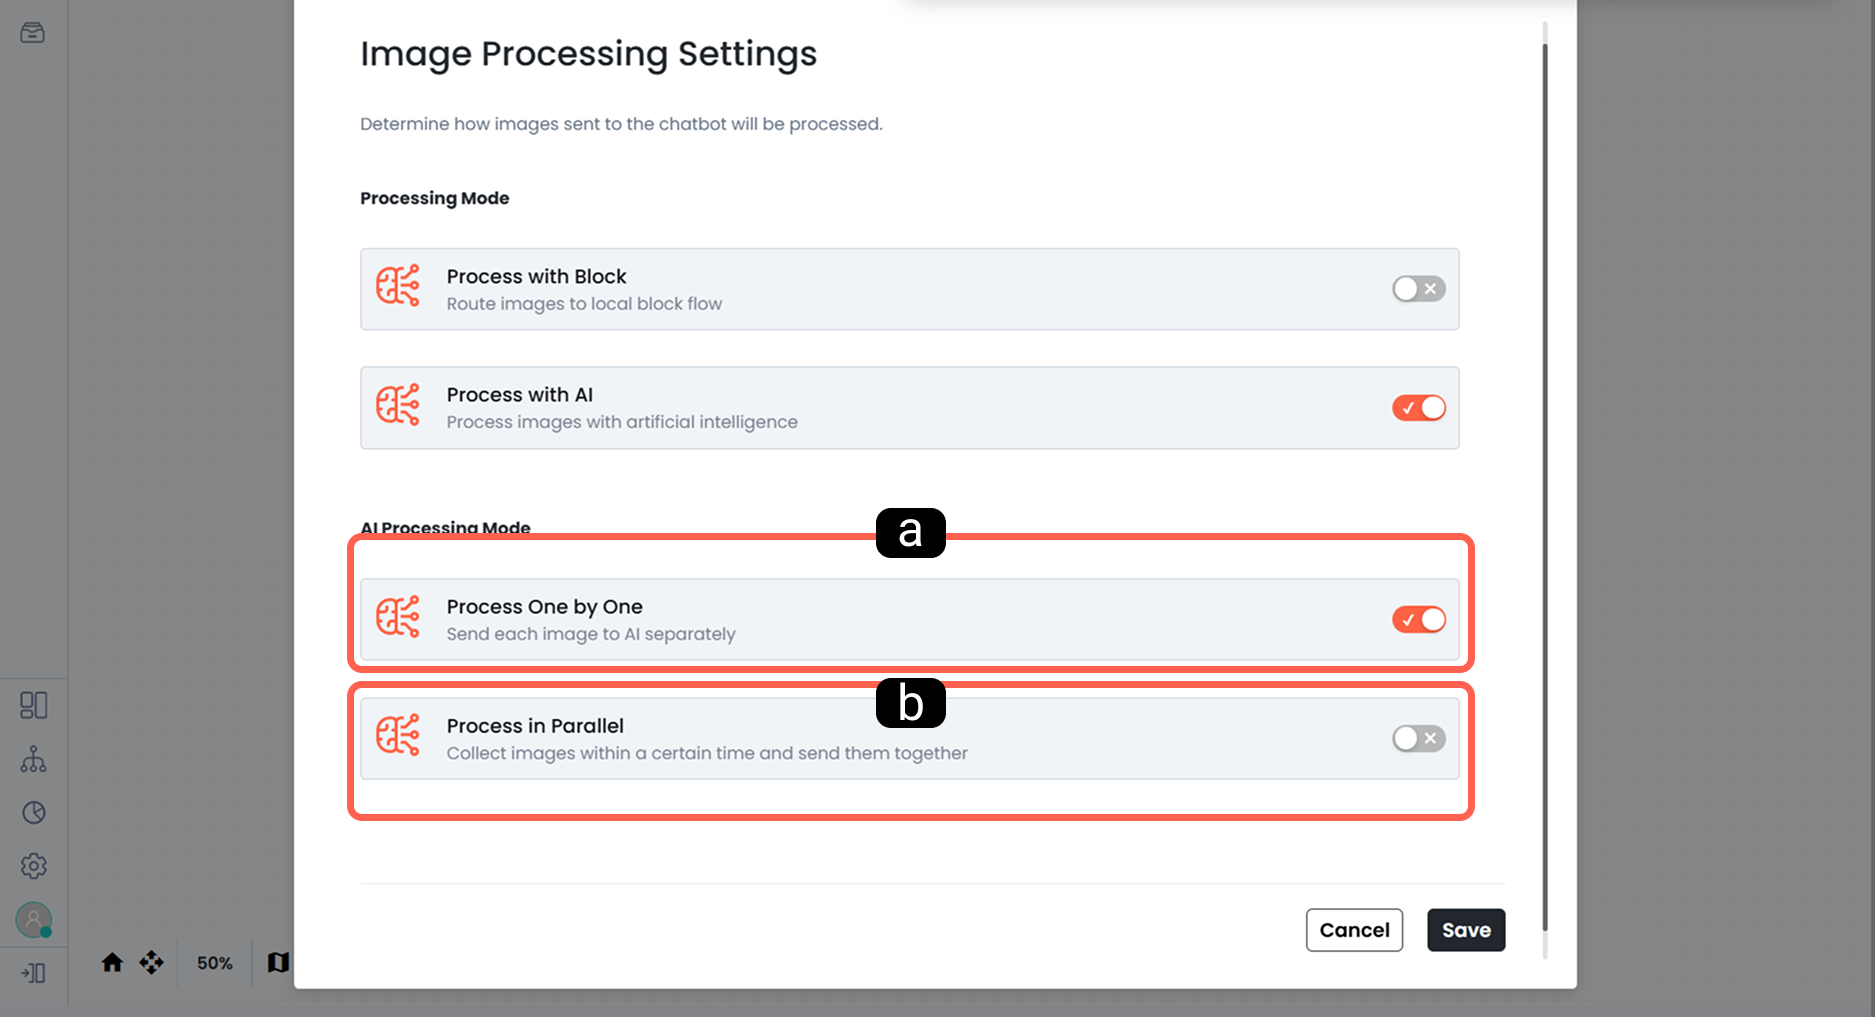
a. Process Individually:
The Process Individually option ensures that each image is sent to the AI separately. This method is preferred in scenarios where you want each image to be evaluated independently.
b. Process in Parallel:
The Process in Parallel option ensures that images arriving within a certain period are collected together and processed at once. It offers a more suitable use, especially in flows where multiple images need to be evaluated as a whole.
4. Block Search
The Block Search area allows you to quickly reach a specific block within the chatbot flow you created. Especially in complex scenarios containing a large number of blocks, you can directly access the relevant step by typing the block name and speed up the editing process.
5. Cache Management
The Cache Management area supports the management of temporary data to be used between chatbot scenarios and automations. Thanks to this structure, data such as user session information and preferences that the bot needs to remember for a short time can be stored securely and reused within the flow. In the Cache Manager logic; fields such as data key, value, data type, visibility scope, and expiration time can be managed.
6. Bot Settings
The Bot Settings section is the area where basic settings determining the general behavior of the chatbot are configured. Through this menu, settings affecting the overall scenario can be adjusted.
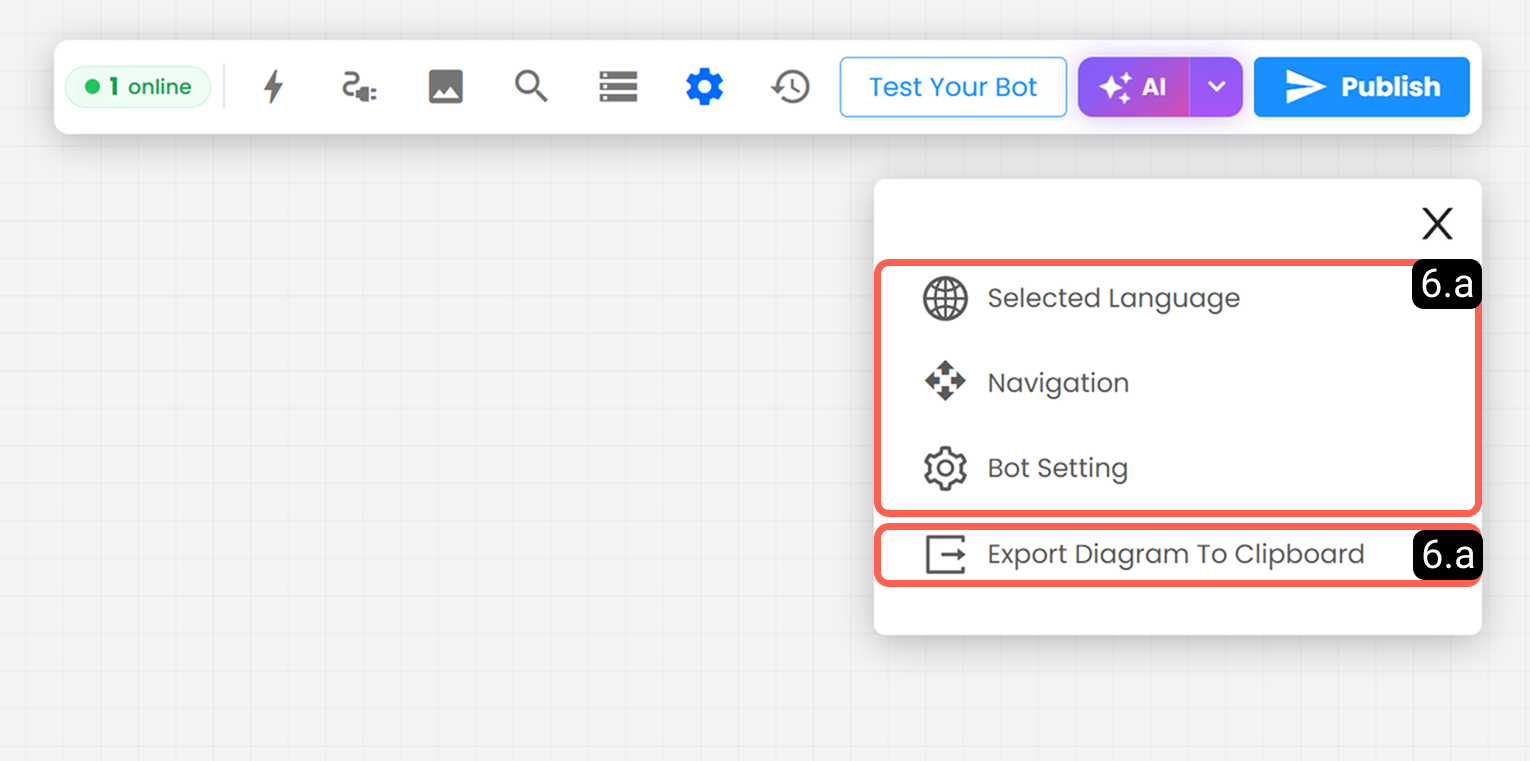
6.a – Bot Settings
This window offers basic setting tabs that affect the operating logic of the scenario.
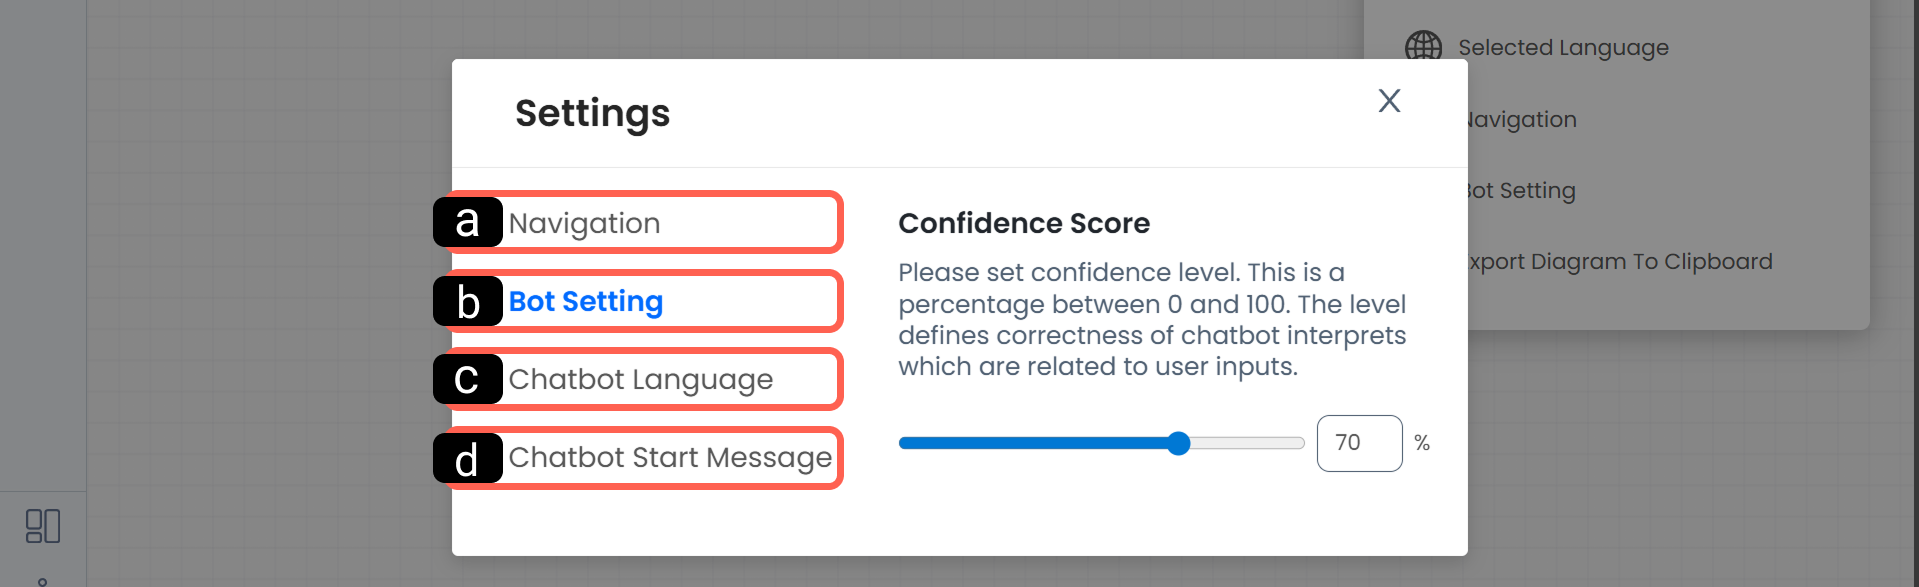
a. Navigation
The Navigation setting allows you to determine which navigation method you will use in the chatbot editing screen. This setting can be adjusted according to the preferred control tool such as a mouse or trackpad. This way, you can adapt the experience of working on the diagram to your own usage habits.
b. Bot Setting
The Bot Setting tab includes the confidence level setting that determines how strictly or flexibly the chatbot will evaluate messages from the user. The evaluation style in this structure is determined by a percentage confidence score. At low confidence levels, the system matches similar expressions more easily, while at high confidence levels, a clearer and one-to-one match is sought. This setting plays an important role in the accuracy and flexibility balance of the scenario as it determines the bot's interpretation sensitivity.
c. Chatbot Language
This setting determines the preferred language in which the bot will respond to the user. This ensures that the scenario runs in a language suitable for the target audience and makes the user experience more consistent.
d. Chatbot Greeting Message
This setting determines how the first message sent by the user will be handled by the chatbot. When this setting is on, the first message is processed directly and directed to the appropriate flow; when it is off, the first message only wakes up the bot and is not processed as content.
7. Chatbot Versions
The Chatbot Versions section allows you to view previous versions of the scenario and return to an old version when necessary.
Each chatbot version you publish with the Publish button is listed in this menu; the version card includes the version name, publication status, and last update information.
You can switch between versions to undo wrong edits or reactivate a stable version used previously.
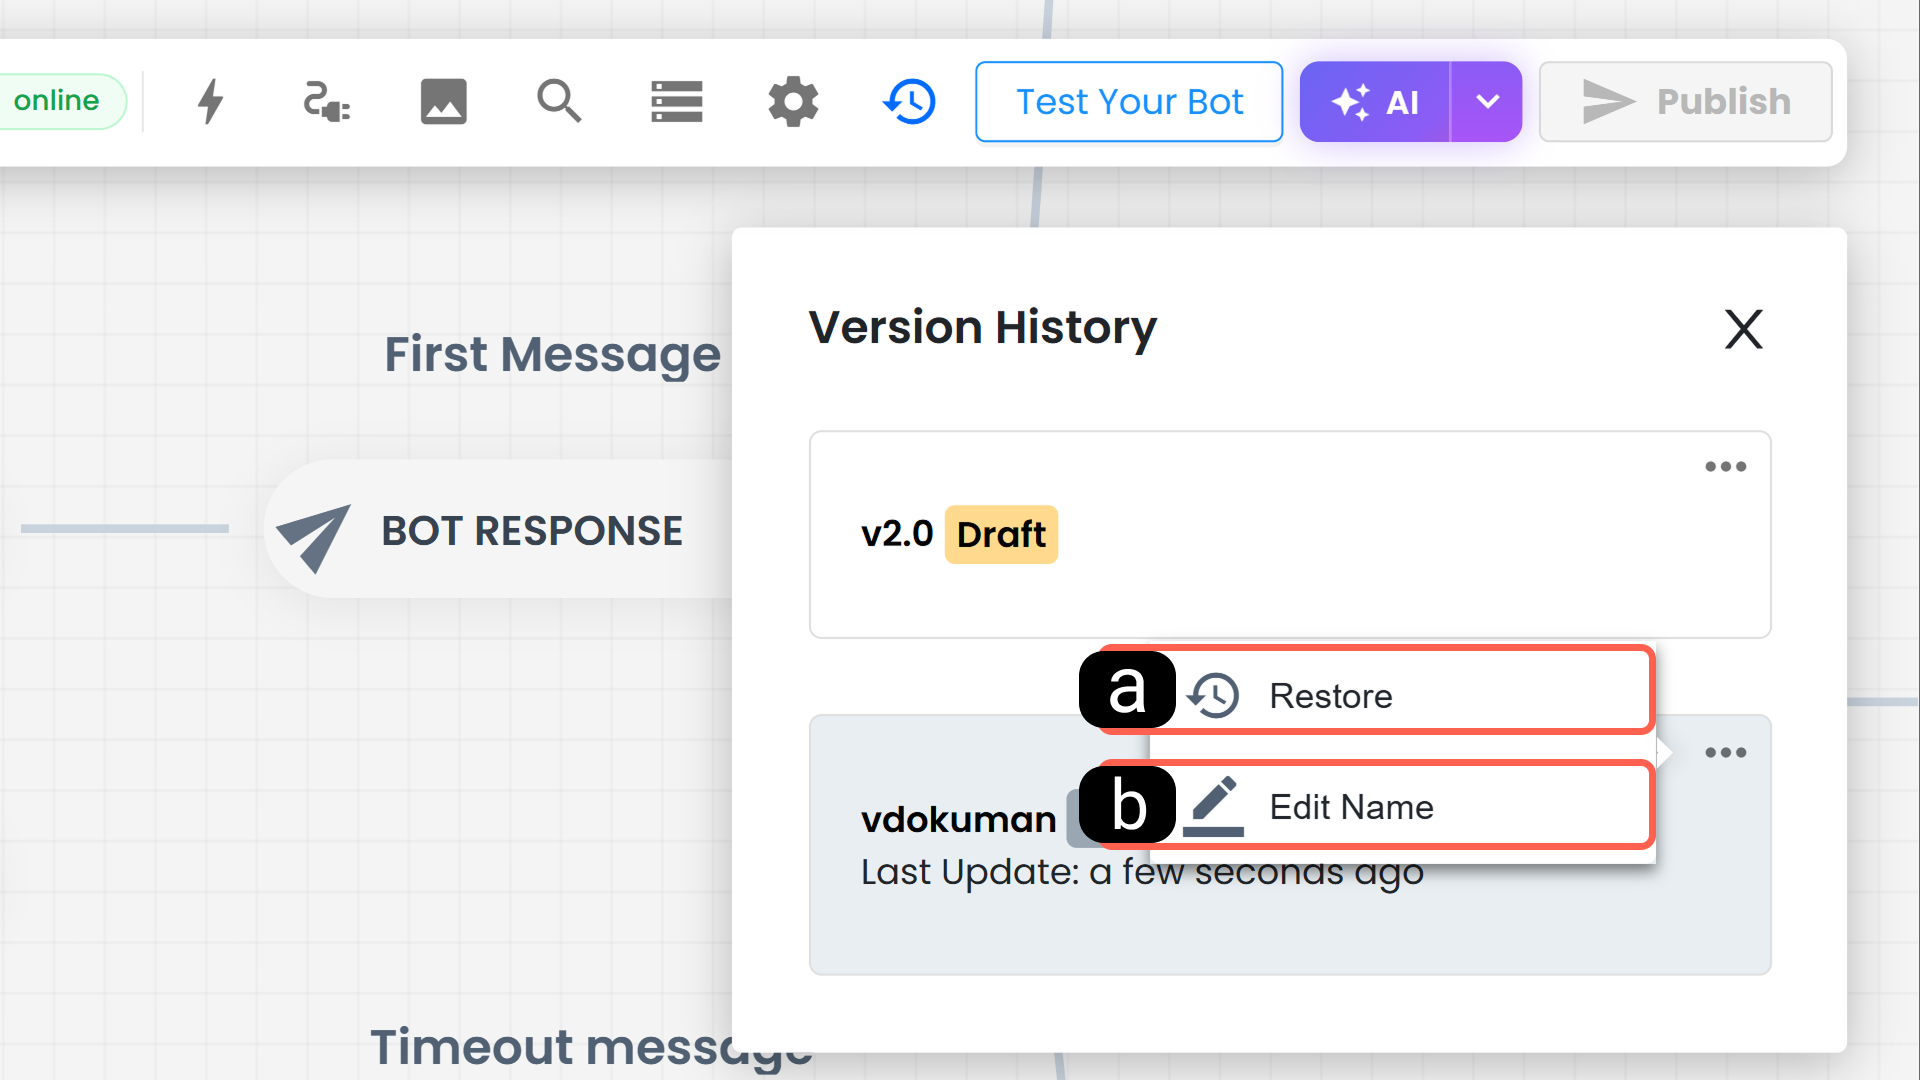
a. Update
The update option, accessible via the … located at the top right of the relevant version, is used to reactivate a selected old version. This process allows you to switch between versions and return to the previous scenario structure if needed.
b. Edit Version Name
This option allows you to give more meaningful and distinguishable names to versions. This way, you can more easily find the version you are looking for in the version history and track which change was made in which version more clearly.
8. Test the Bot
The Test the Bot feature allows you to try the chatbot scenario in a simulation environment before taking it live. Through this area, you can observe how the bot reacts to users, check the transitions between flows, and detect possible deficiencies before publication.
Note: This test environment offers a simulation similar to the live experience but is not exactly the same. To test the scenario more realistically, you can use the customer test page or perform the publishing process to test from the exact same environment.
9. AI Knowledge Base
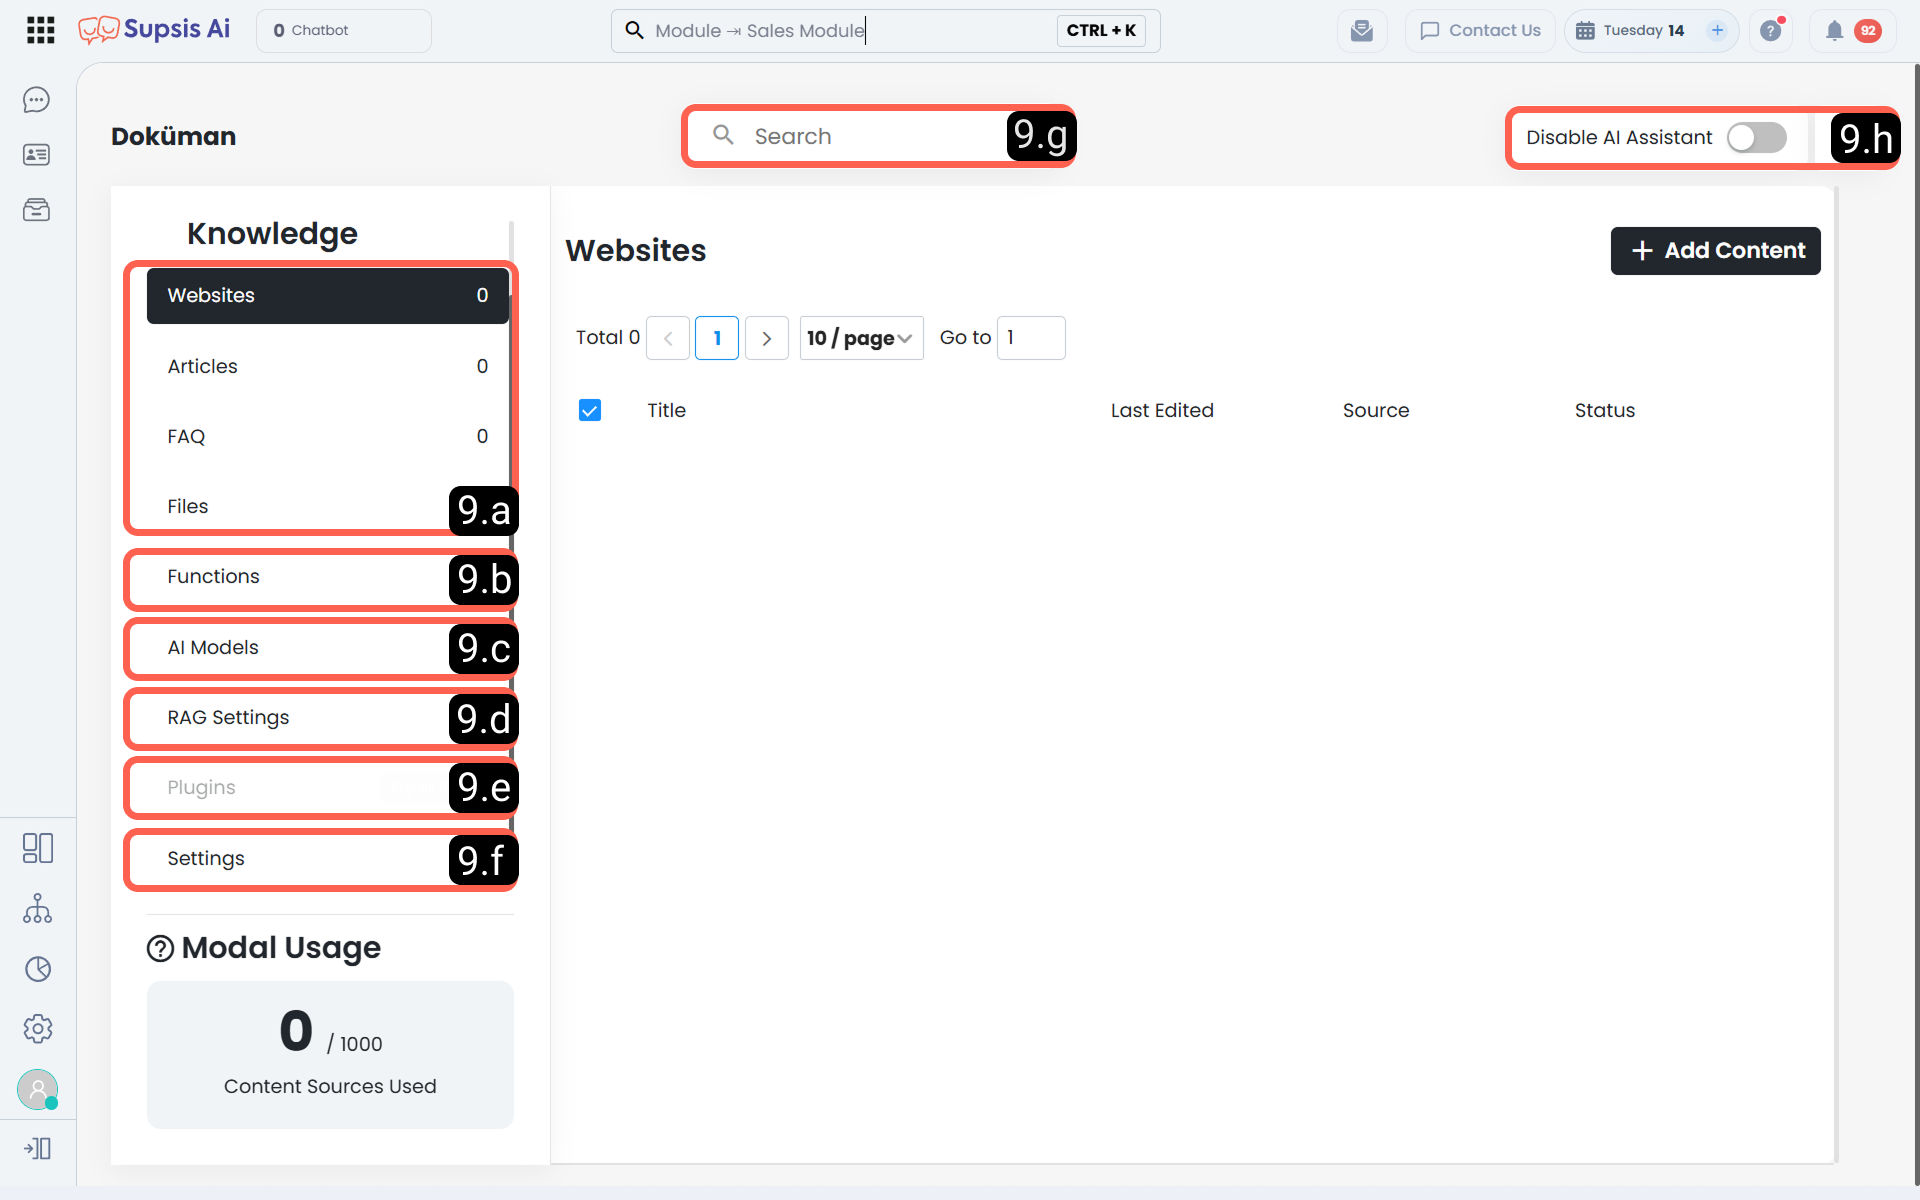
9.a – AI Training Contents
AI Training Contents is the area where the information that AI will use during response generation and processing with functions is managed centrally.
Through this screen, you can switch between different content types, list existing content records, add new contents, and control whether selected contents will be used by artificial intelligence.
Thanks to this structure, you can train your artificial intelligence not only with general information but directly with your own website, documents, articles, and frequently asked questions.
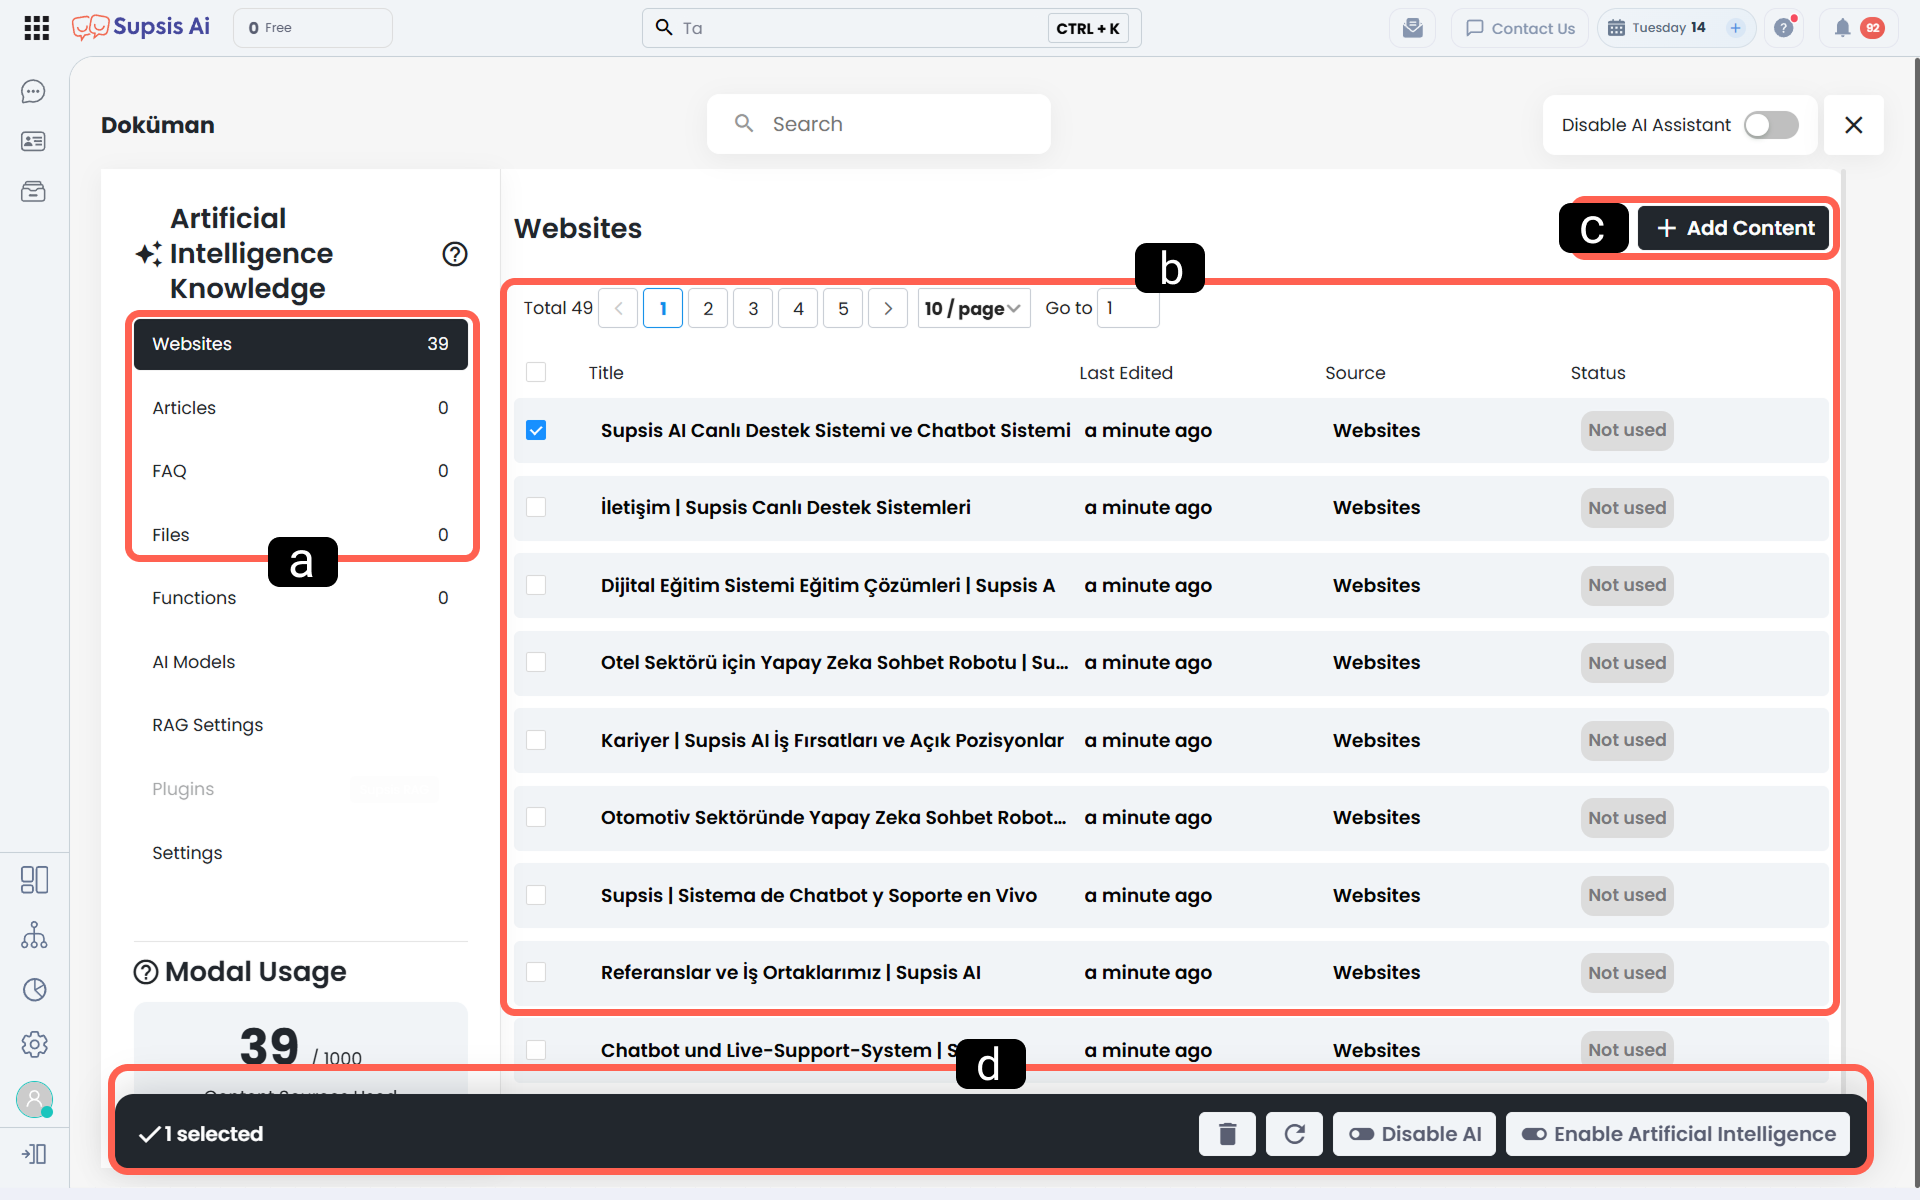
a. Content Types
In the marked area, the content types you can add to the AI are listed. Each content type represents a different information source and helps the AI take more accurate actions in different situations.
- Website Contents: Ensures that content on your website is scanned by AI and added to the knowledge base.
Website contents are especially useful for corporate introductory pages, service descriptions, product details, contact information, usage pages, and support. If your users frequently ask for information already on your website, this content type is one of the fastest and most efficient starting methods.
- Articles: Articles are used for situations where you want to manually teach information to the AI. In this section, you can create a new information source by entering a content title and article text.
The Article type is suitable for more detailed and structured content such as process descriptions, service descriptions, usage guides, product features, technical information, campaign details, or operational explanations. You can manually add information that you want the AI to know but is not found in other sources you uploaded through this area.
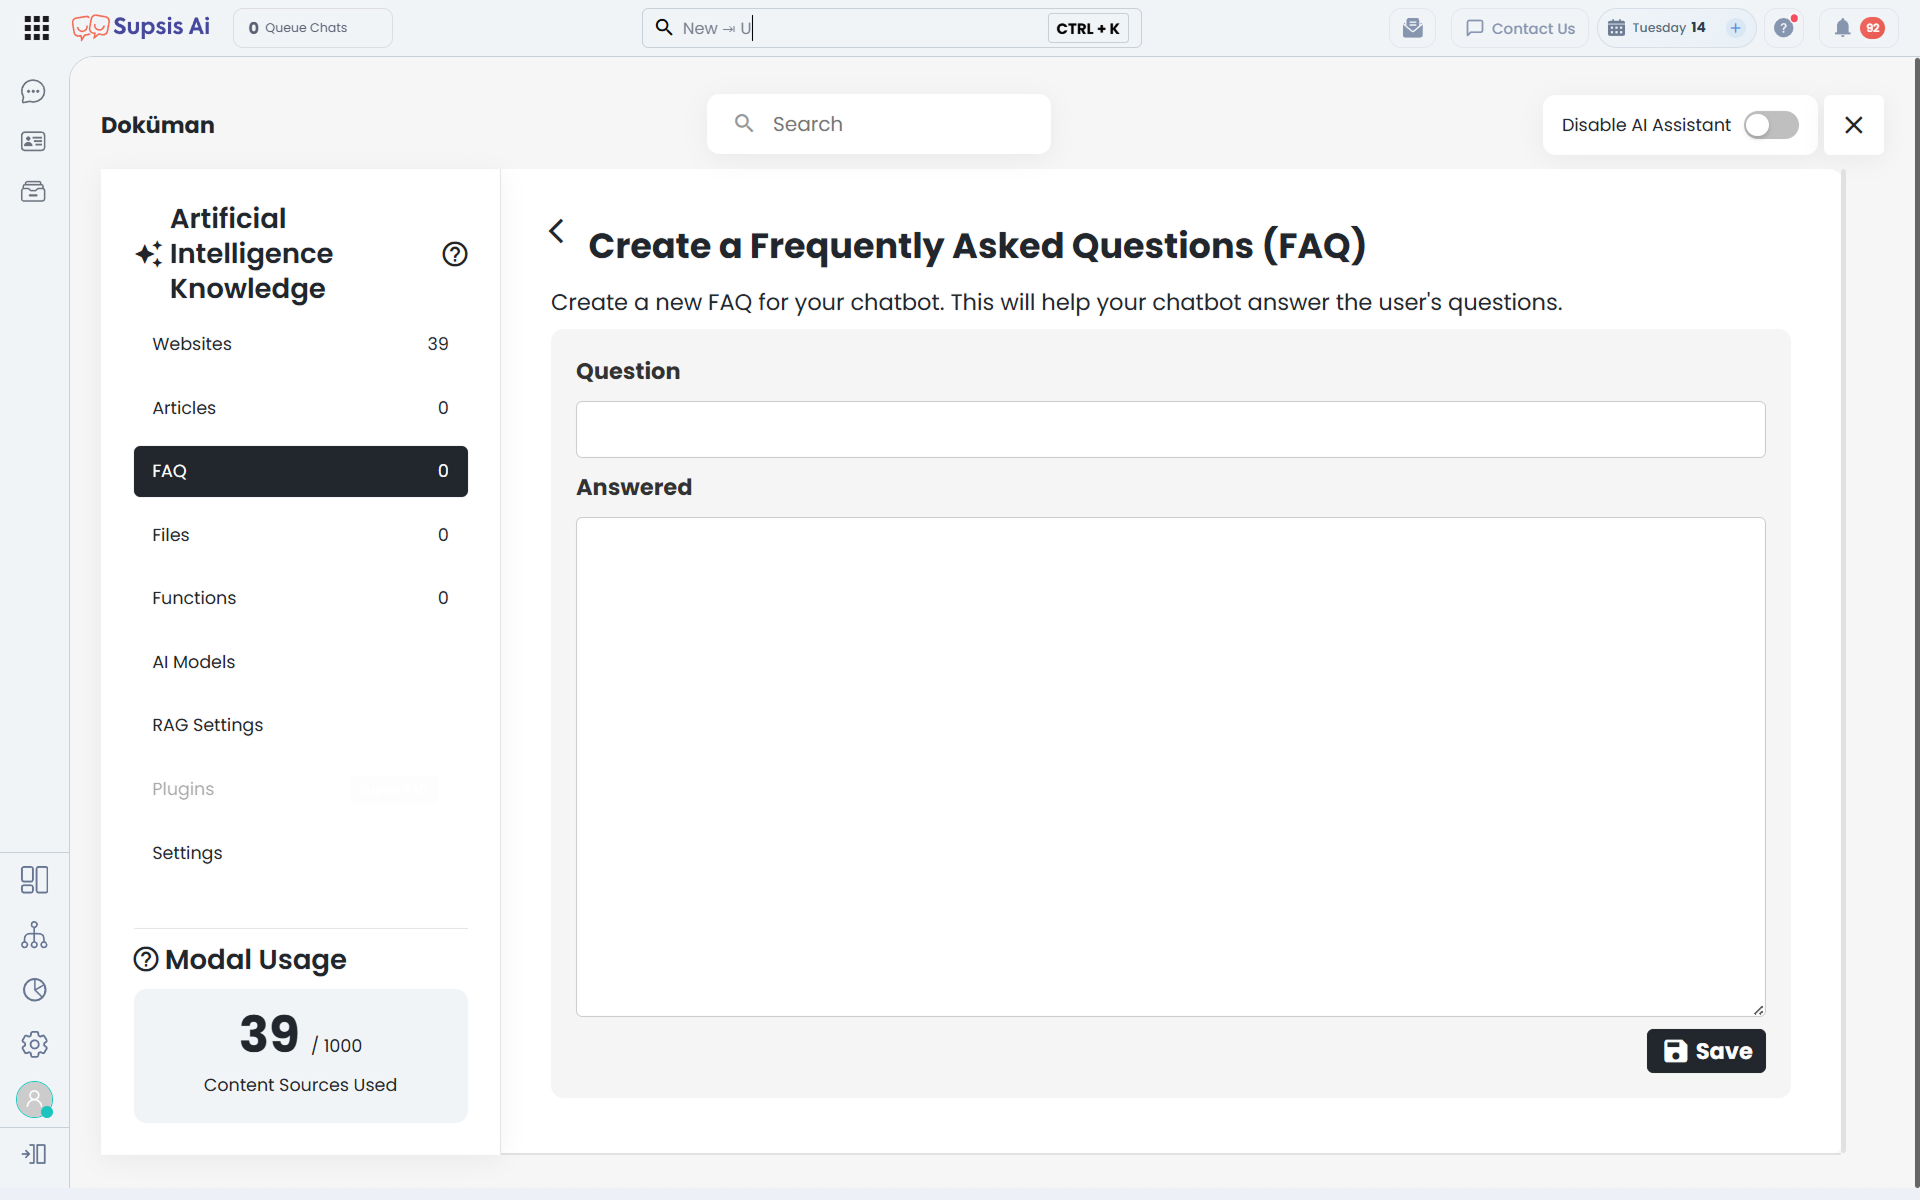
- Frequently Asked Questions (FAQ): Frequently Asked Questions ensure that a specific question and a clear answer to this question are defined for the AI. This structure is ideal for producing fast, consistent, and direct responses, especially for repeating customer questions.
For example, delivery time, return conditions, working hours, pricing logic, membership processes, or technical support steps can be defined separately in this area. This way, AI can establish more accurate matches in a shorter time when faced with similar questions.
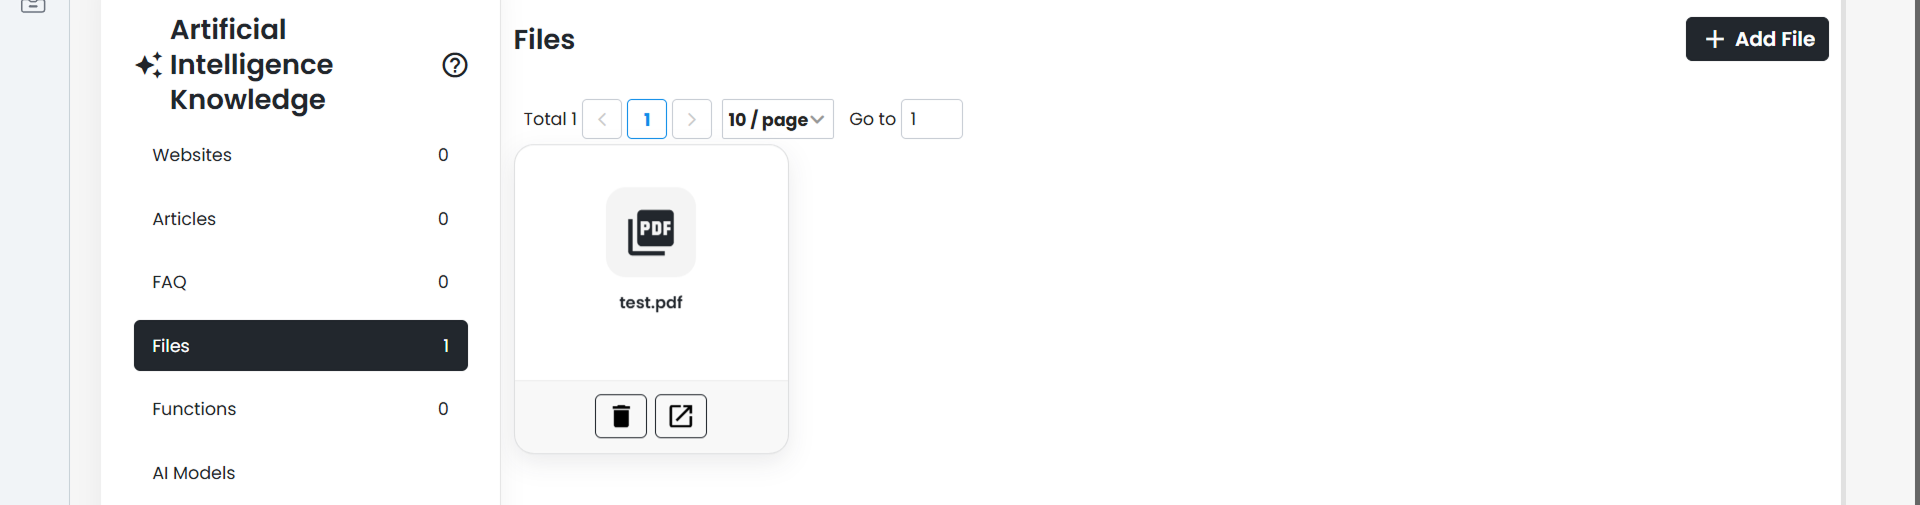
- Files: File type contents are used to add document-based information sources to the AI knowledge base. Through this section, you can upload files to the system and enable AI to generate information based on specific documents.
The File type is suitable for contents in document format such as catalogs, procedures, user manuals, information documents, specifications, contract summaries, or training materials. It is very useful, especially in cases where corporate information sources need to be added as documents instead of being entered manually one by one.
Note: Visual content in uploaded documents cannot be viewed by AI. Please ensure that the data in your files is text-based.
b. Content Table
The Content Table is the main display area where records belonging to the selected content type are listed. In this section, added contents are displayed along with the title, last edited date, source, and status information.
In structures with a large number of records, the table area offers a more organized use thanks to pagination and record count control. You can perform quick searches among contents with the search area located at the top and reach the record you need in a shorter time.
Since it is critical for the information used to be organized and manageable for the AI to produce correct answers, this table area is an important control point in daily content maintenance processes.
c. Add Content
The Add Content button allows you to create a new information source according to the selected content type. The addition method varies depending on the tab you are in:
-
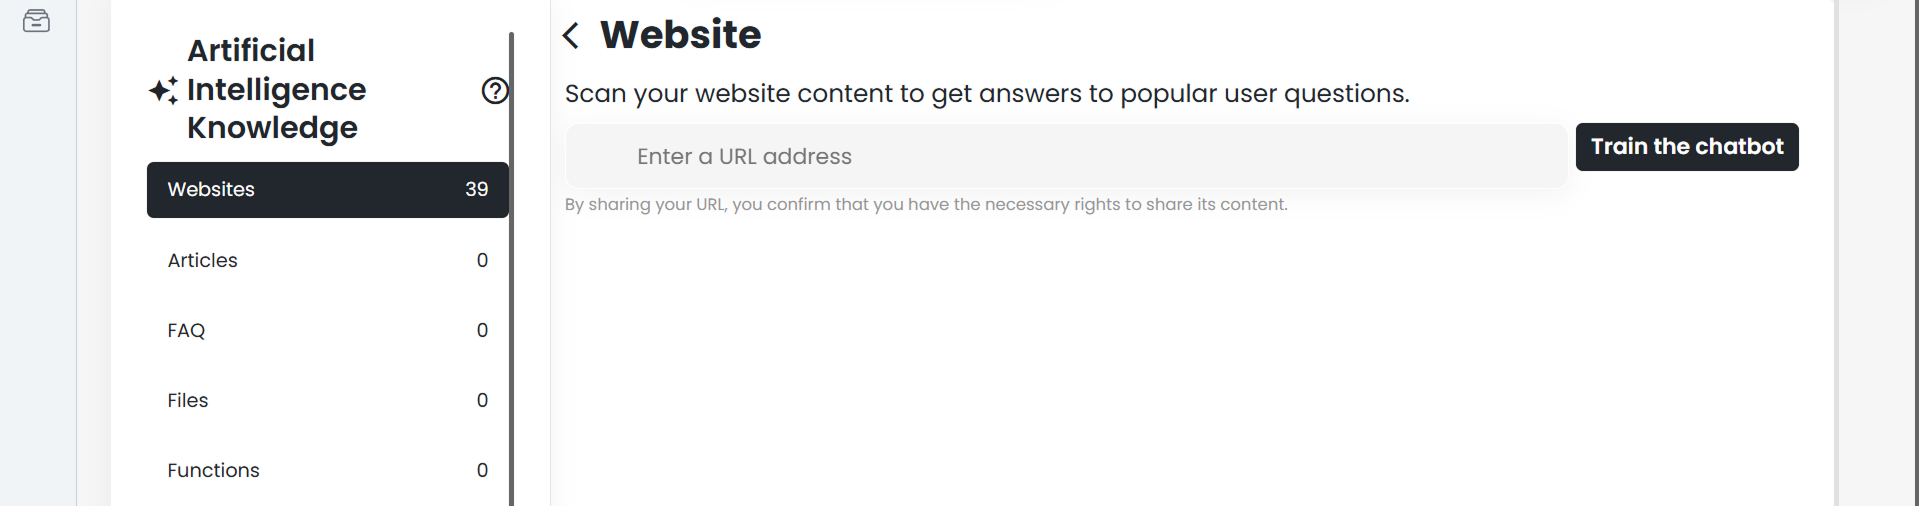
In the Website tab, the relevant URL address is entered, and the website content is scanned and taught to the AI.
-
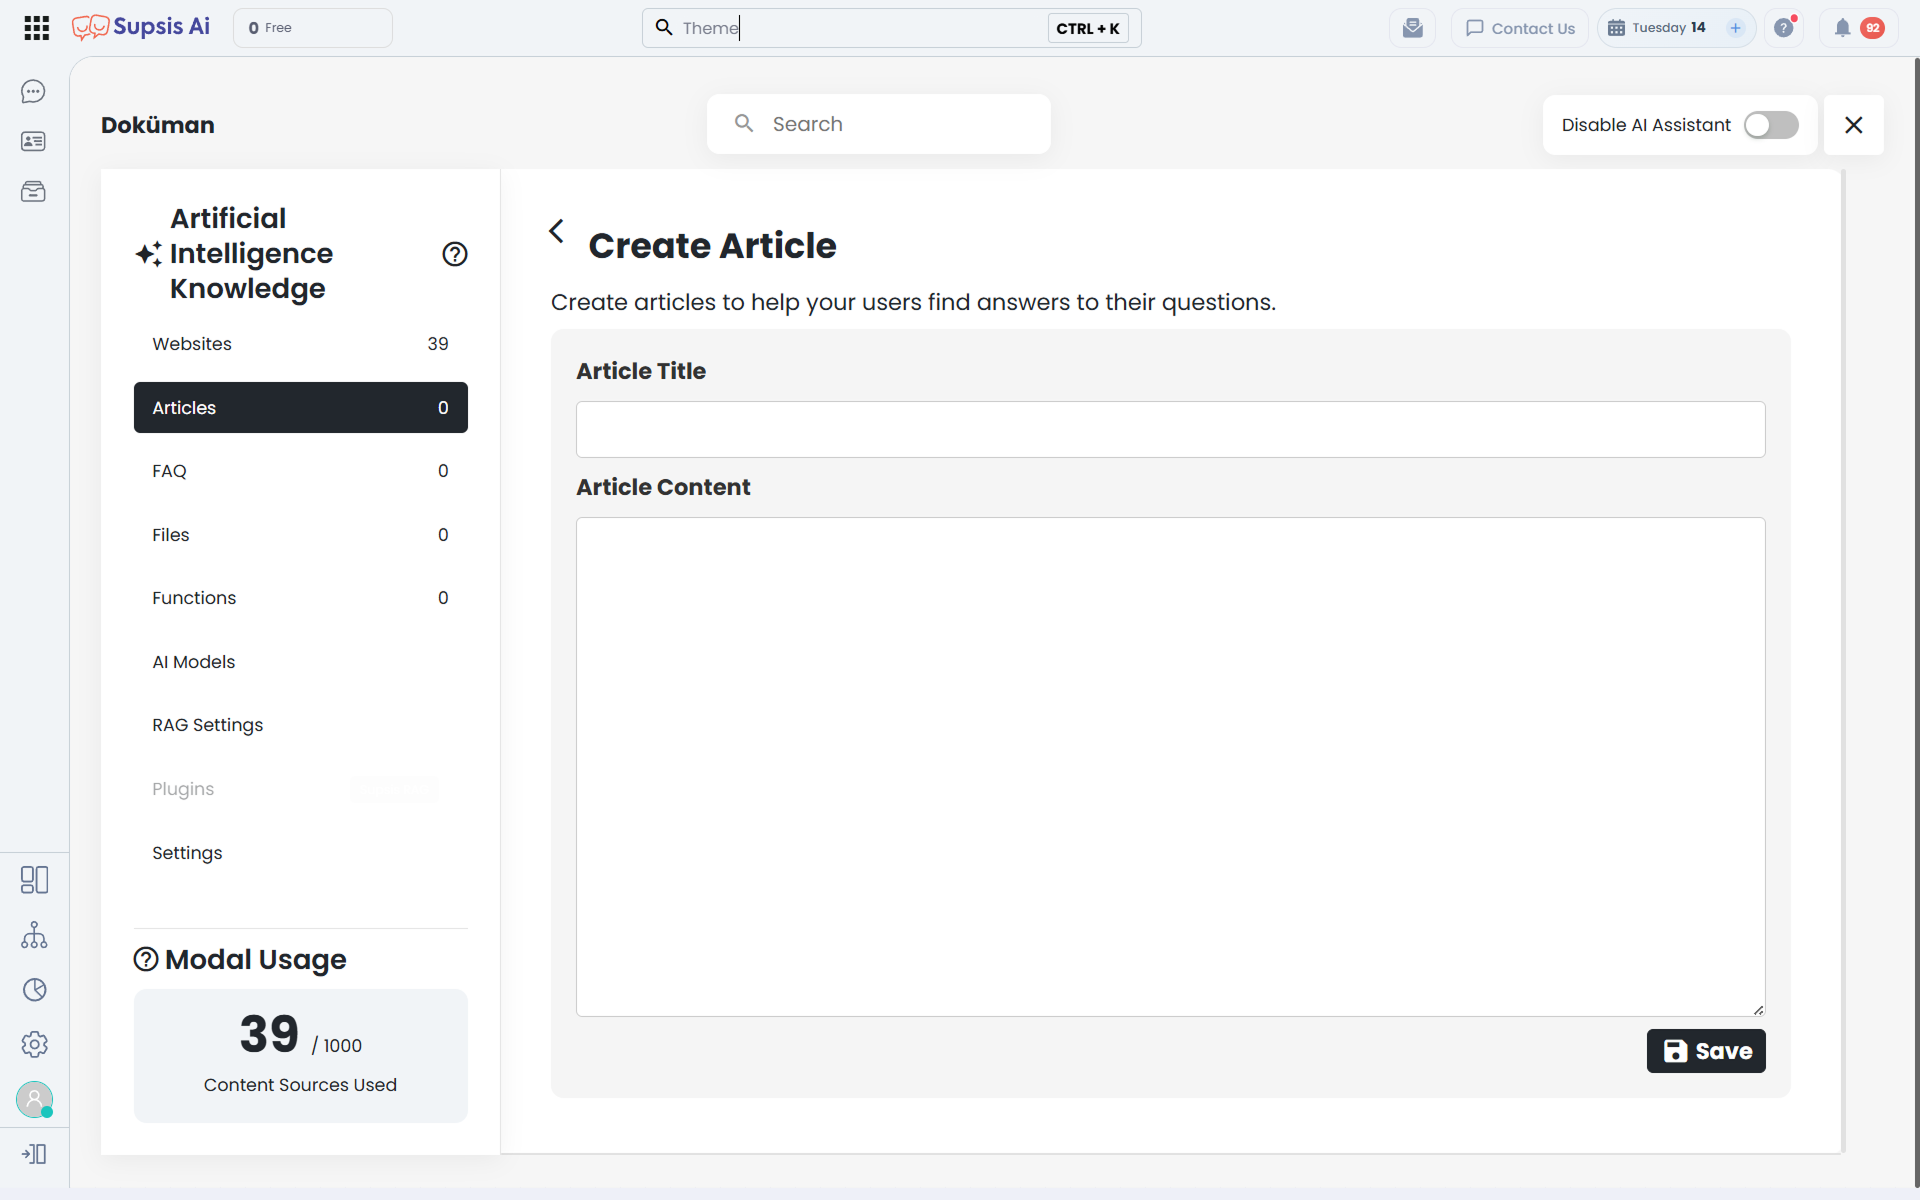
In the Articles tab, a manual information record is created by entering the article title and article content.
-
In the Frequently Asked Questions tab, a new FAQ record is added by filling in the question and answer fields.
-
In the Files tab, a file-based information source is created by uploading a document.
Note: Visual content in uploaded files cannot be viewed by AI. Please ensure that the data in your files is text-based.
d. Content Actions
Content Actions allow you to perform operations on records added to the knowledge base.
You can select content using the checkboxes on the far left of the content table and perform these actions on one or more contents.

- Delete Content: This process removes the selected content from the knowledge base. It is used to clean up content that is no longer used, added incorrectly, or has completely lost its timeliness. In terms of keeping the knowledge base lean and accurate, it is recommended to review old or invalid records at certain intervals.
- Update Content: This option ensures that the selected content is re-processed by the AI with its up-to-date version. Updating content ensures that the AI produces responses using current content instead of old content.
- Disable Content for AI: This process removes the content from AI usage without deleting it completely. In other words, the record remains in the system; however, AI does not use this content in response generation.
You can use this feature for content you want to temporarily remove from use, information you are not sure about the accuracy of, or content you want to make passive for a certain period.
- Enable Content for AI: This option reactivates a content that was previously disabled for AI use. Thus, the activated content becomes part of the knowledge base again and can be reused by AI in response generation.
9.b – Functions
AI functions allow the AI assistant to trigger actions defined in the chatbot diagram when a specified situation occurs or specified conditions are met.
Thanks to this structure, AI ceases to be just an assistant that answers and turns into a structure that starts tasks in certain scenarios, collects information, performs redirections, and triggers controlled actions within the flow.
a. Add Function
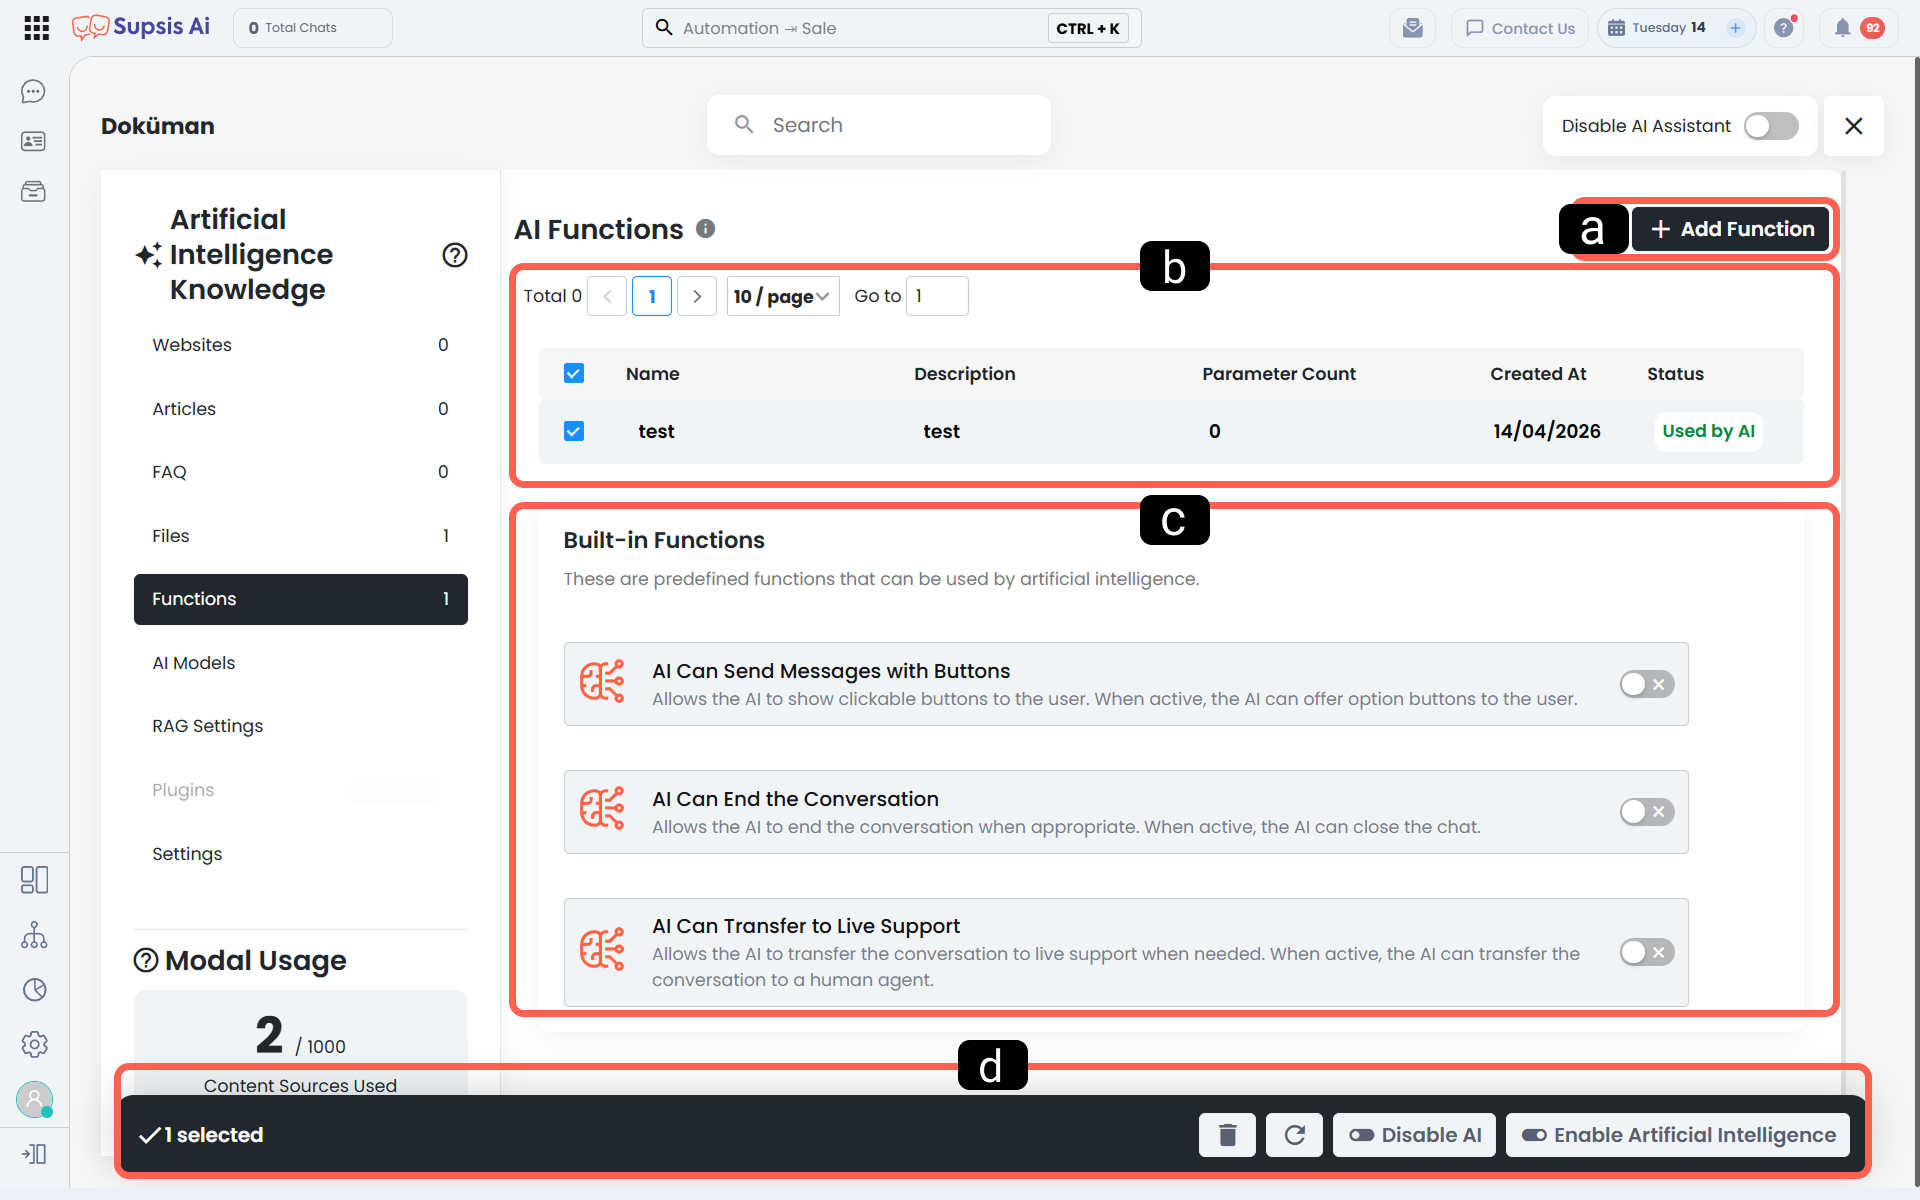
The Add Function button is used to create a new functional definition that the AI can use.
Through this screen, the name of the function, what it does, and the parameters it will use while running are defined. The fields in Supsis AI's function registration form are the basic components that make it easier to call the function within the system and ensure its context is understood correctly.
The name, description, and parameters of the function should describe the task clearly. This approach increases the AI's decision accuracy and facilitates management on the scenario side.
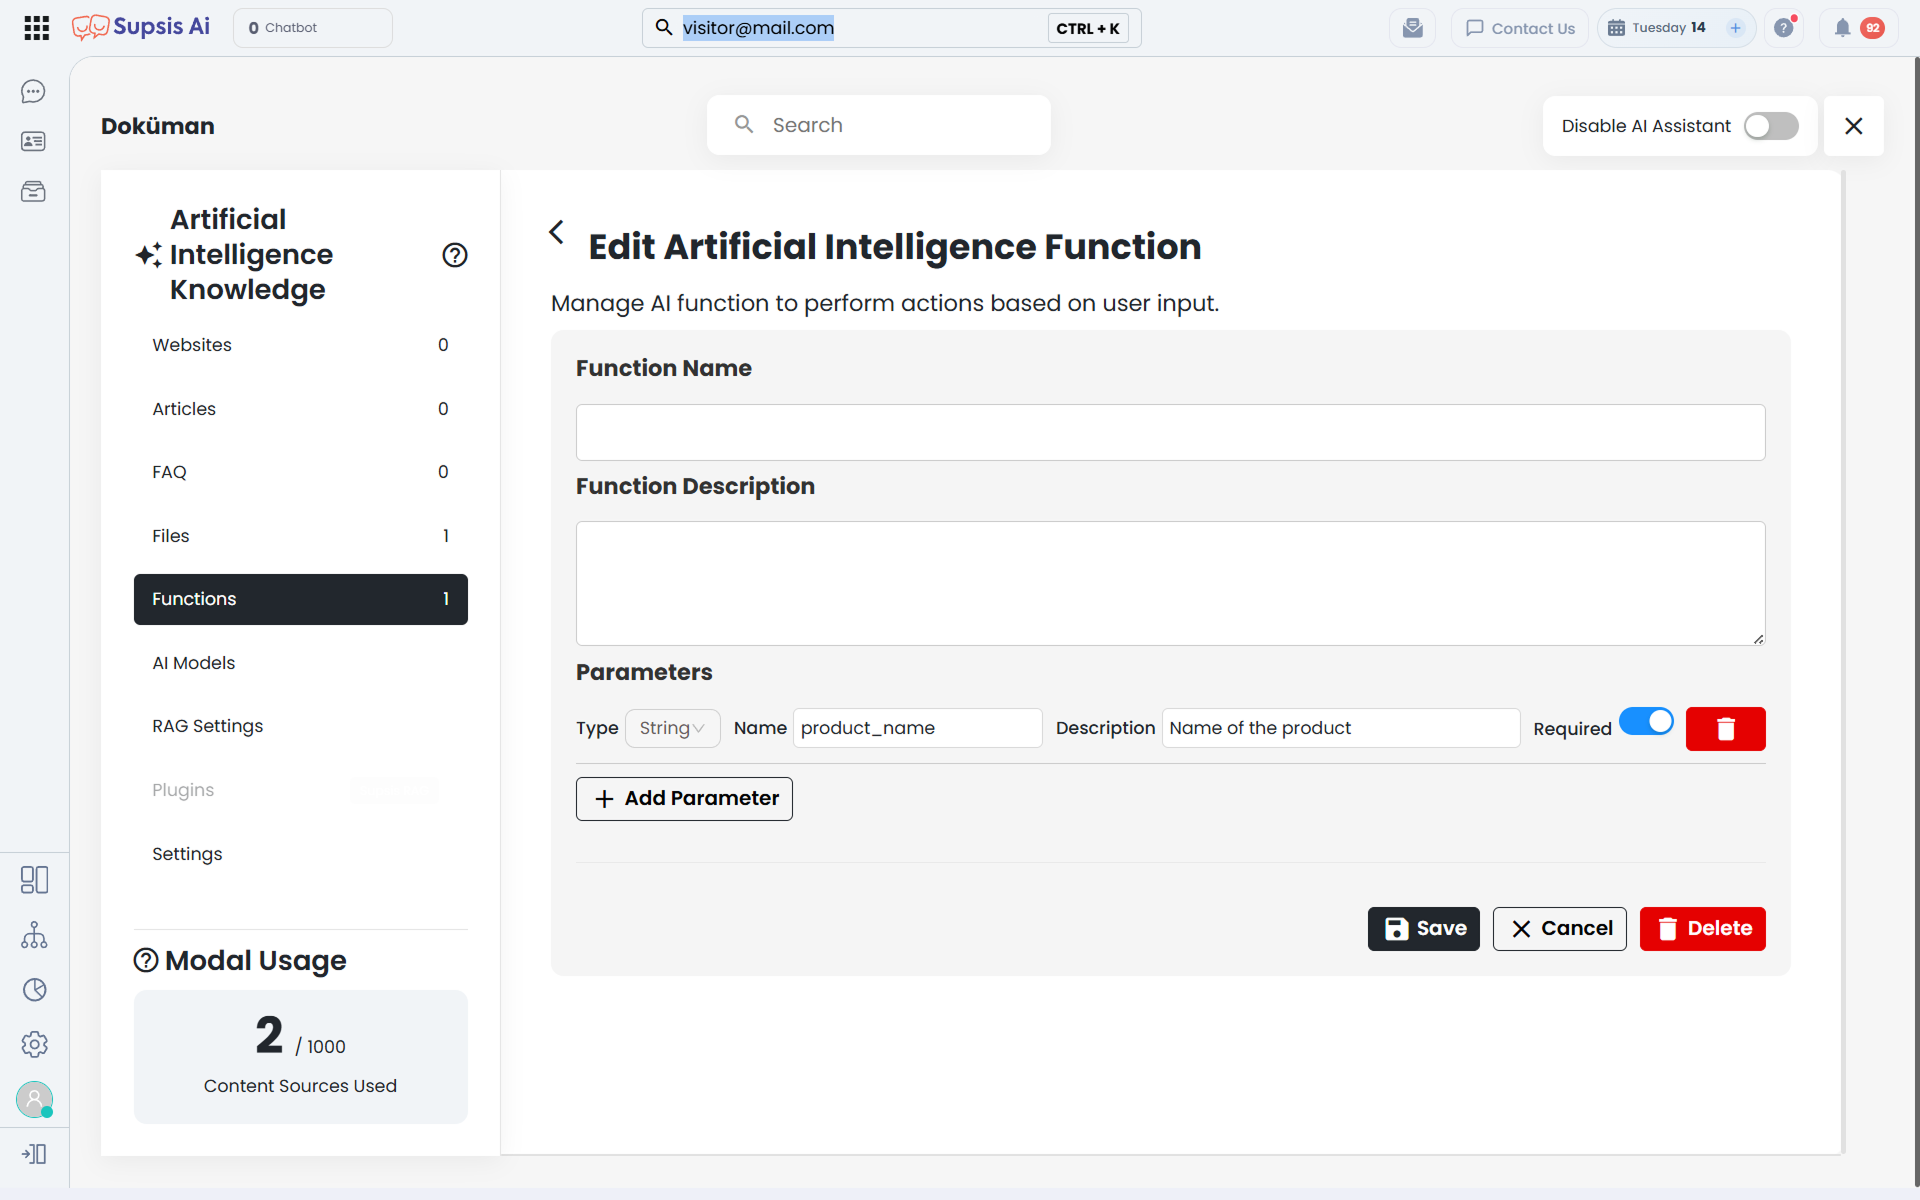
- Function Name: The Function Name is the reference name the assistant will use when calling the function you created. Therefore, the name you determine must be unique and clearly defined. Other functions with the same name should not be defined within the same assistant.
The function name must not contain Turkish characters, spaces, or punctuation marks. This situation will make the assistant non-functional.
This field can only contain letters, numbers, and underscores.
- Function Description: The Function Description field is used to tell the AI what this function does and in which situation it will be used. The more clearly and understandably the description is written, the higher the probability that the AI will call the relevant function in the correct context.
The description field is used to clarify the purpose and usage scenario of the function. For example; descriptions like "starts a process by getting product information when the user wants to create an order" help the AI better understand when to involve the function.
- Parameters:
When the assistant calls a function, it fills in the parameters defined in this field.
It uses these methods when filling in this information:
- If the required information has been shared by the user previously in the conversation, the assistant can automatically transfer this data to the relevant parameter by analyzing the current chat content.
- If the required information has not been received yet and the parameter is defined as mandatory, the assistant directs an additional question to the user to complete the missing information.
Thus, the function is executed correctly when the data it needs is complete.
The data type, parameter name, description, and if necessary, requirement information are defined for each parameter.
-
Parameter Type: Determines the data type the assistant will use when filling in the relevant parameter. For example, String for text content, Number for numeric values, etc. can be used as data types.
-
Name: It is the technical field name the AI will use while processing the parameter. The parameter name can only contain letters, numbers, and underscores (_). Turkish characters, spaces, and punctuation marks should not be used. Otherwise, your function will not work correctly.
-
Description: Explains what information the parameter represents. The more clearly this field is written, the easier it is for the assistant to collect the correct data and process it into the correct field.
-
Requirement: Determines whether the relevant parameter can be left blank. If a parameter is mandatory and the assistant cannot extract this information from the current conversation, it must ask the user for this information before calling the function. The function is not triggered before mandatory parameters are completed.
b. Existing Functions The Existing Functions table is the area where functions you created previously are displayed collectively. In this table, you can track functions along with name, description, number of parameters, creation date, and status information.
c. Pre-defined Functions The Pre-defined Functions section includes basic functions that are offered by the system and can be used by artificial intelligence. This area allows you to deploy common AI behaviors without creating special functions. Commonly needed functions such as artificial intelligence offering buttoned options to users, terminating the interview when appropriate, or undertaking similar basic actions take place here.
This section is especially useful for users who want to perform quick installation. If your need is a standard AI behavior, you can enable the relevant pre-defined function and use it instead of defining a custom function from scratch.
d. Function Actions When one or more records are selected in the Functions table, the action bar opens at the bottom of the screen. You can perform collective management operations for the selected functions through this bar.

-
Delete Function: This process is used to remove the selected function from the system. Functions that are no longer needed, incorrectly defined, or intended to be decommissioned can be deleted with this method.
-
Update Function: This option allows the AI to use the up-to-date content after revising the function content such as the name, description, or parameter structure of the existing function.
-
Disable Function for AI: This process removes the function from AI usage without deleting it from the system. Thus, the record is preserved, but the AI assistant does not use this function during response generation or process triggering.
-
Enable Function for AI: This option reactivates a function that was previously disabled for AI use. Thus, the function is included in the AI assistant's decision mechanism again and can be used in appropriate situations.
Example Function Usage The following example shows how an AI assistant that can both give information about products and start the order creation process can be constructed.
Scenario Think that you want to create an AI assistant specialized in order creation and product information. Within this structure, the assistant has two basic tasks: 1. Giving information to users about the company and products 2. Collecting necessary information from users who want to place an order and running the relevant function
To realize this scenario, first, contents related to your company, products, and order processes are added to the AI Training Contents section. Then, the assistant's role, speaking style, scope of duty, and in which case it will call which function are clearly defined in the prompt/instructions field.
Important Note: In the prompt, the operations that the assistant can perform by calling functions should be clearly explained. In this example, the order creation process, which information it needs to collect to create an order, and which function it will call when all mandatory information is completed should be clearly stated in our prompt example.
Example Prompt Structure You are the AI live support representative of firm X.
Your basic duty is to give accurate and explanatory information about our company and products to the users visiting our website.
When the user asks questions about products, services, or our company, respond using the contents in the knowledge base.
If the user wants to create an order, all information required for the order process must be known. This information is: customer's name, customer's surname, delivery address, the product they want to order, product quantity.
If this information has been given before in the conversation, transfer it to the relevant parameters. If there is missing information, complete it by asking short, clear, and guided questions to the user. After all mandatory information is collected completely, call the siparis_olustur function.
Example Function Structure
Function Name: siparis_olustur
Function Description: Collects the information required to create the user's order request and starts the order creation process.
Parameters:
Parameter 1: Type: String
Name: musteri_adi_soyadi
Description: Name and surname of the person placing the order
Requirement: Yes
Parameter 2: Type: String
Name: teslimat_adresi
Description: Full address information where the order will be sent
Requirement: Yes
Parameter 3: Type: String
Name: urun_adi
Description: Name of the product the user wants to order
Requirement: Yes
Parameter 4: Type: Number
Name: urun_adedi
Description: Product quantity intended to be ordered
Requirement: Yes
Function's Working Logic
In this example, the assistant proceeds as follows:
- If the user asks questions about the product, the assistant responds using the contents in the knowledge base.
- If the user states they want to place an order, the assistant checks whether it can fill the parameters marked as mandatory.
- If some of the necessary information is not in the conversation, it asks the user questions to complete the missing fields.
- When all mandatory parameters are completed, it calls the siparis_olustur function.
- On the scenario side, this function can be met via the AI Function block and then directed to the appropriate flow with filtering.
Defining the Function to the Diagram
It is not enough to just create an AI function in the knowledge base; in order for the assistant to trigger the relevant functions when the situation determined in the function occurs, the functions must be defined to the flow connected to this function in the diagram.
You can use the following flow for the definition process to the diagram:
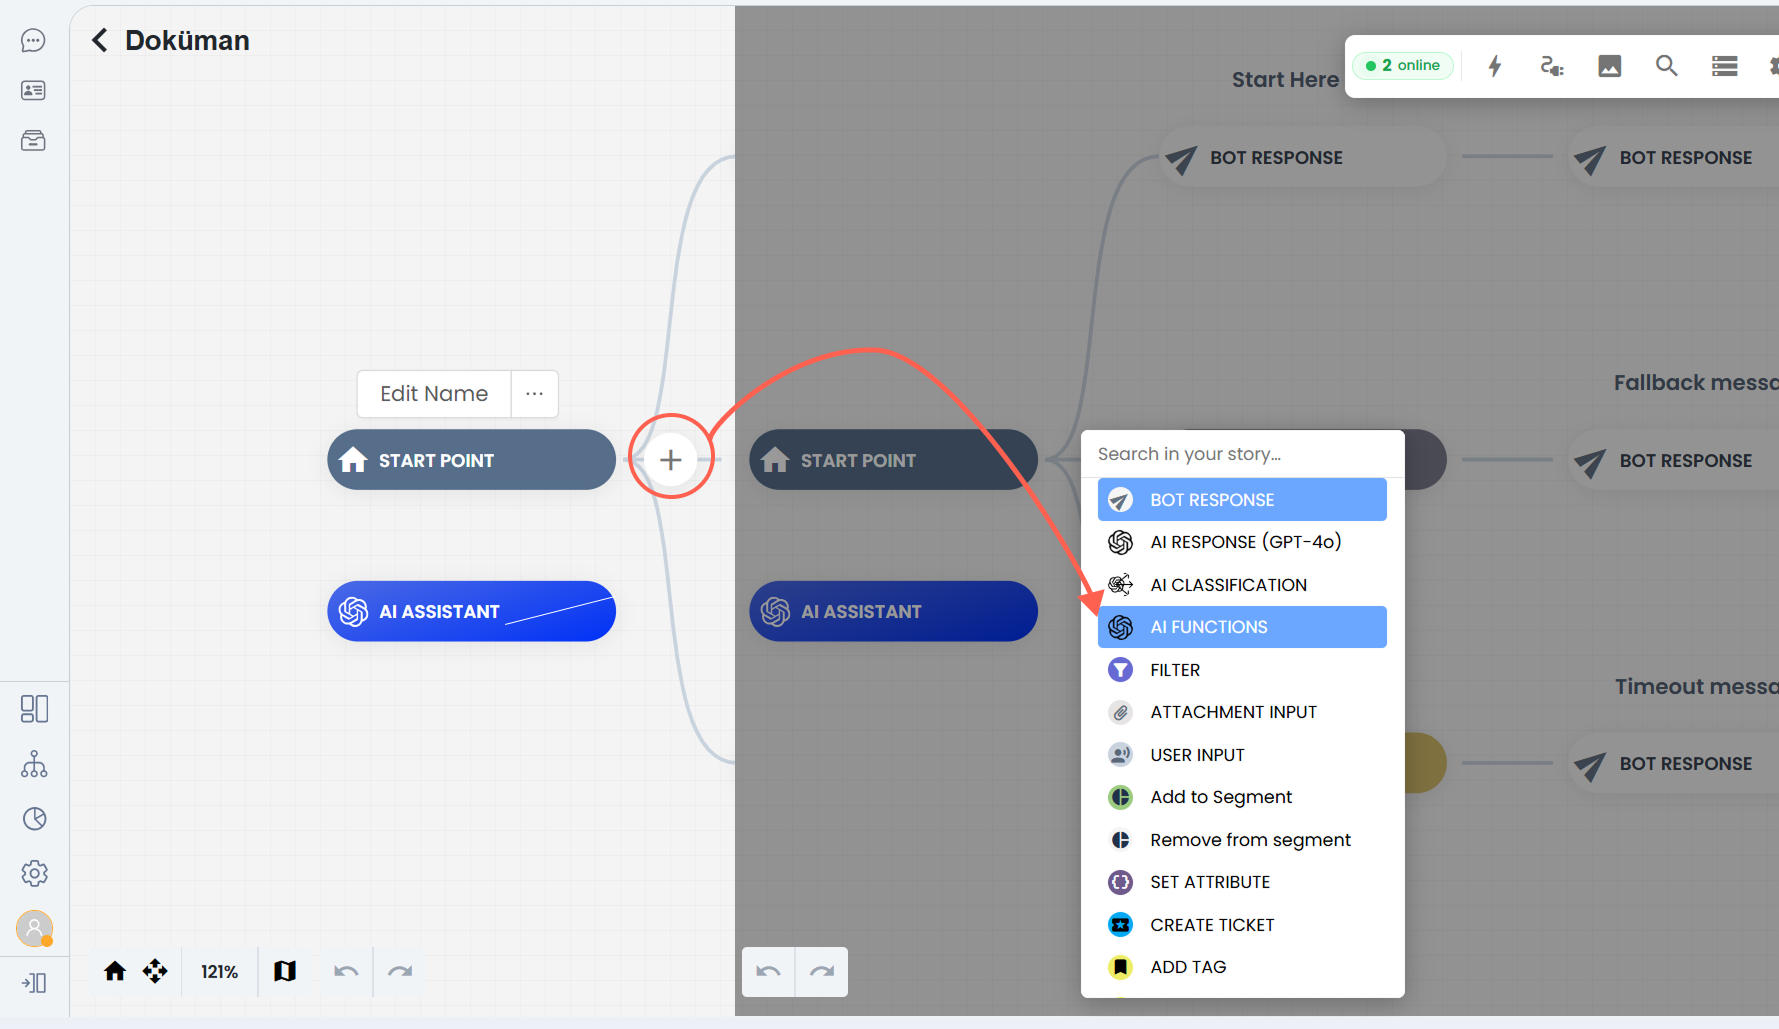
- Go to the starting point step in the chatbot scenario.
- Drag the mouse cursor to the starting point and click the + button.
- Add the AI Function option from the opened block list.
- After this block, construct a Filter structure to start different actions according to the function result.
- Complete the flow by connecting the relevant action block for each function.
Thanks to this structure, for example, in the case where artificial intelligence calls a “create task” function, you can direct the user to the task creation flow, and in the case where it calls another function, you can direct the user to a different process. Thus, the decision given on the AI side and the actions on the scenario side are connected to each other in a controlled manner.
Filtering Functions
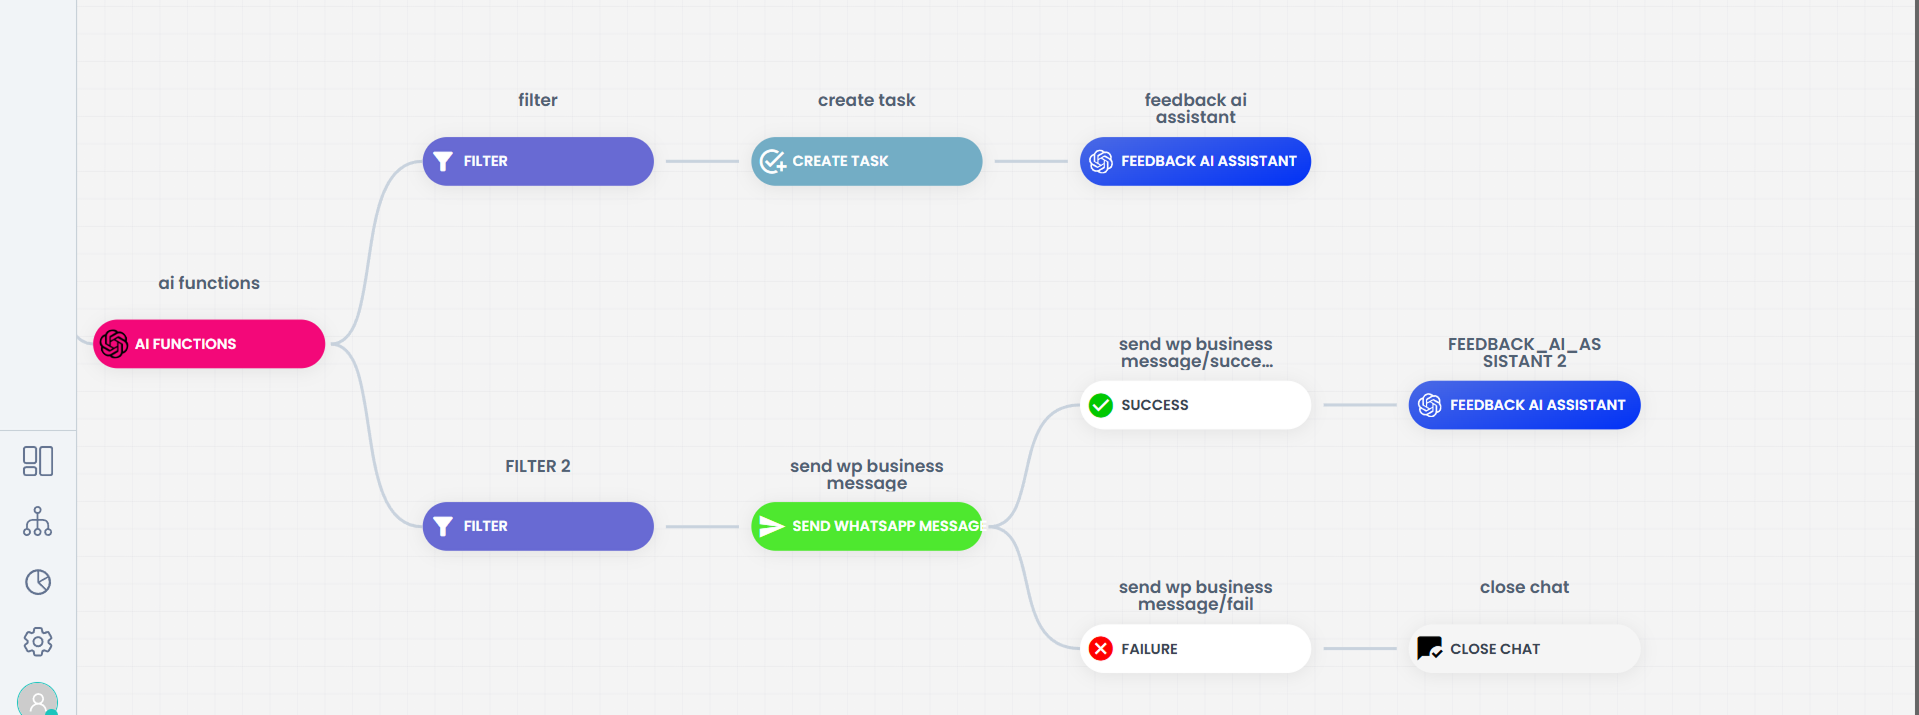
In the Supsis AI chatbot structure; when any function defined in the AI's knowledge base is triggered, the user is automatically included in the flow defined behind the AI Function block.
Filtering functions allows assistants with more than one function defined to perform operations according to the function they trigger.
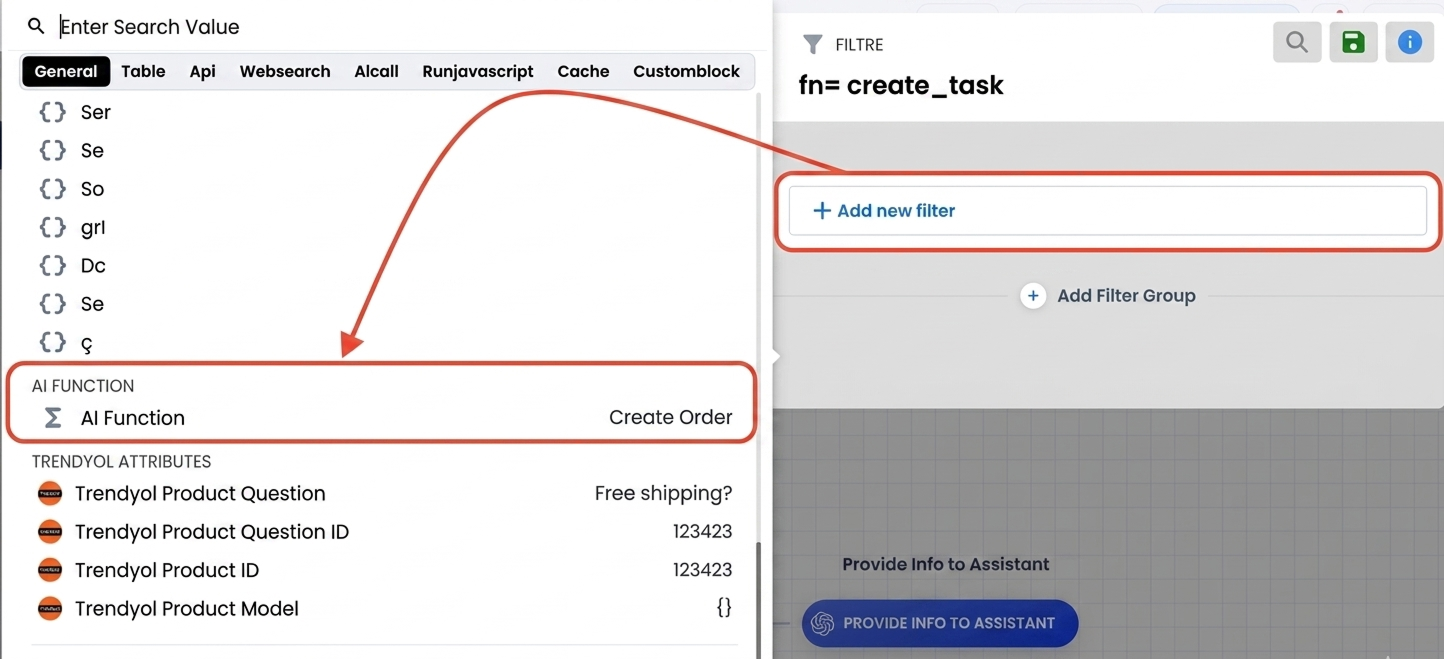
The filtering logic works as follows:
- A Filter is added to the block after the AI Function block.
- The "Add new filter" option is used within the filter.
- The AI Function field is selected in the opened selection screen.
- Then the function to be filtered (separated) is determined.
- When filtering is done correctly, if the assistant calls the function: First, the AI Function block is triggered, then the filters connected to the AI Function block separate the functions from each other and the flow continues from the correct point.
This process ensures that for assistants with more than one function, by filtering the name of the function they call, according to the name of the function called by this assistant:
- being able to create a task for the user with one of its functions
- being able to start a message sending process with another function
- being able to have the assistant write information with another function
- or being able to switch to a different action scenario.
9.c – AI Models
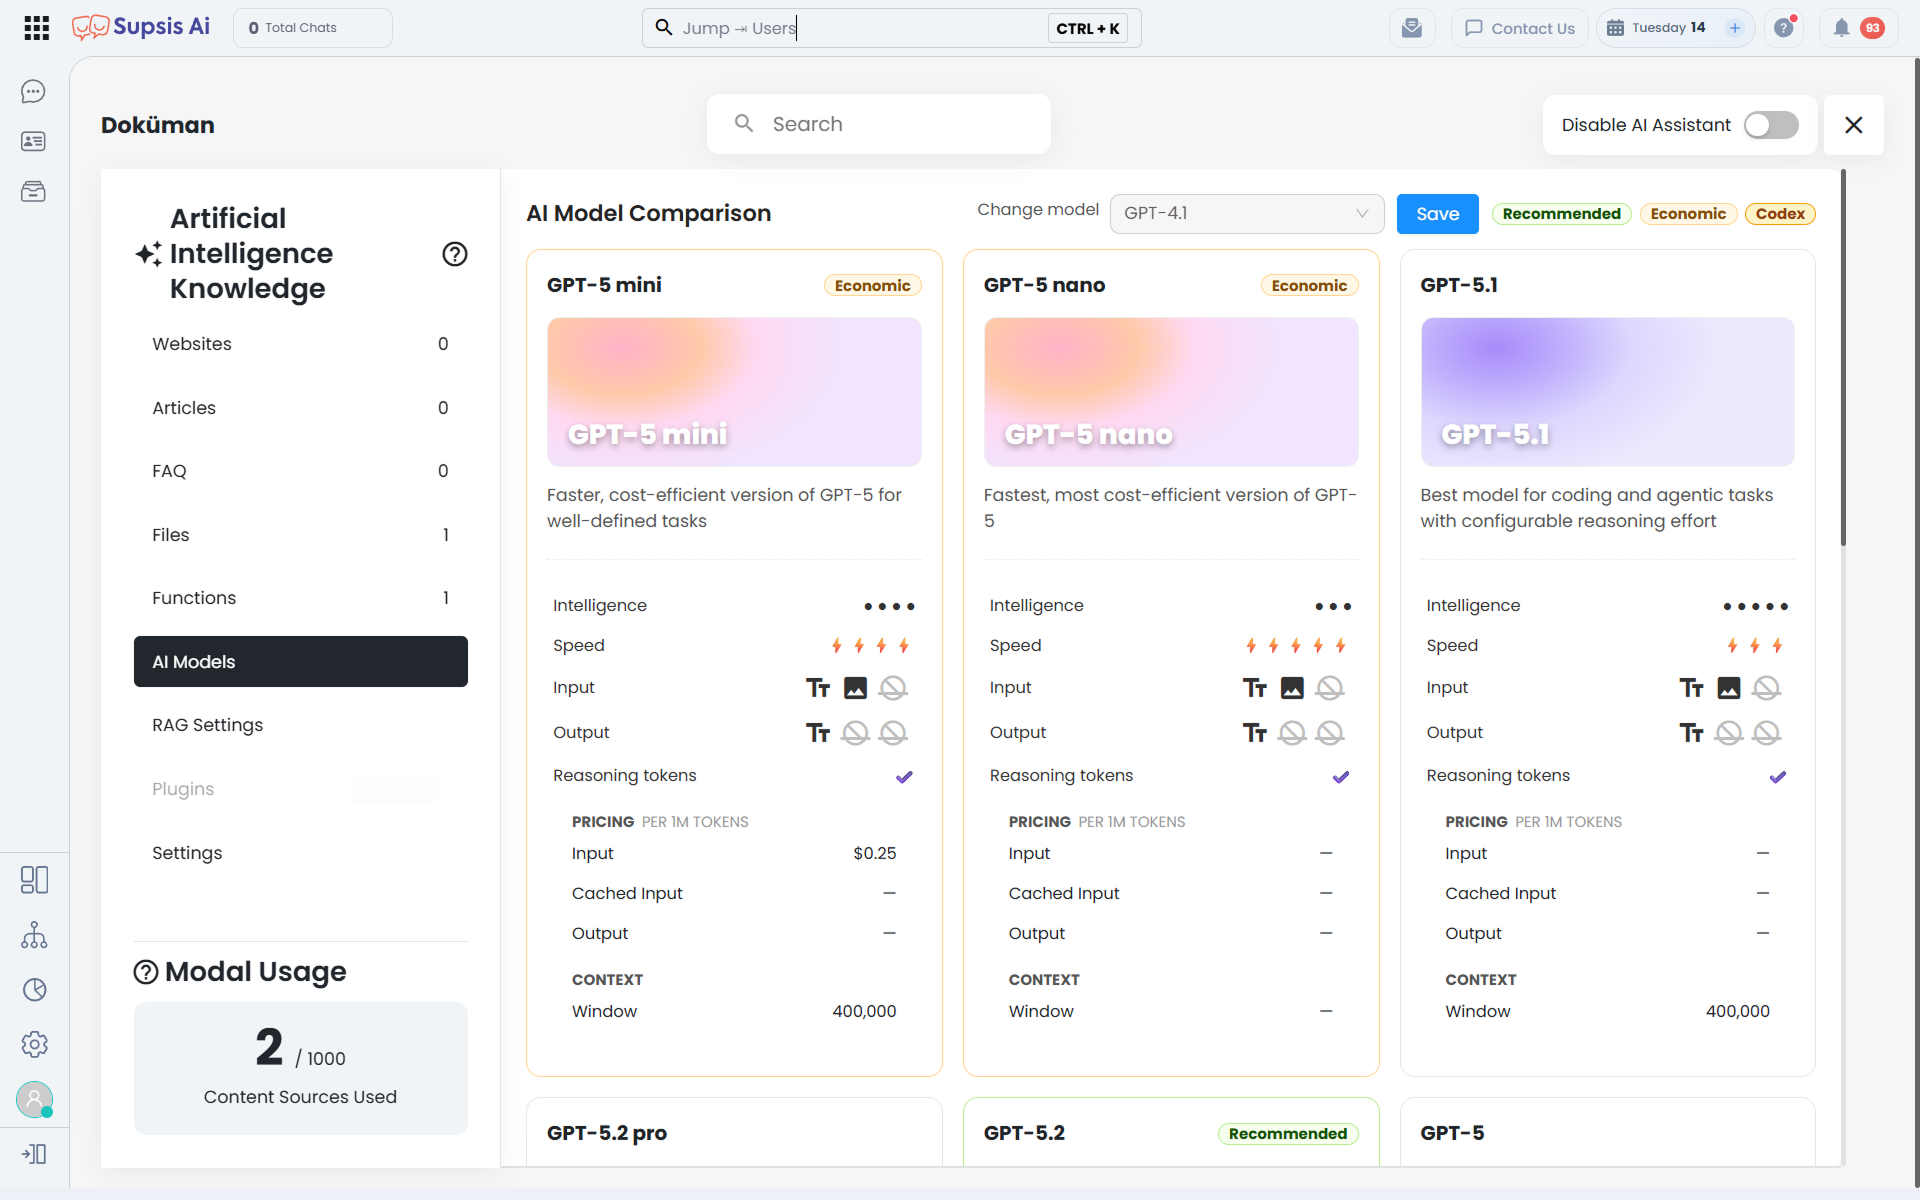
The AI Models section allows you to choose the AI model to be used in your chatbot. The selected model directly affects the level of artificial intelligence understanding of the user, the quality of the responses it produces, response speed, response cost, and the ability to manage more complex requests.
9.d – RAG Settings
9.e – Plugins
9.f – Settings
The Settings section is the area where basic configurations that determine the behavior of artificial intelligence are made. In this section; prompt content defining the role and speaking style of artificial intelligence, parameter settings affecting model behavior, and tool usage preferences are managed. This area is used to determine how the AI will speak, how it will behave, how it will respond in which situations, and how it will interact with auxiliary tools such as functions or file scanning. Prompt and model settings are fundamental configurations that directly affect the response quality of artificial intelligence.
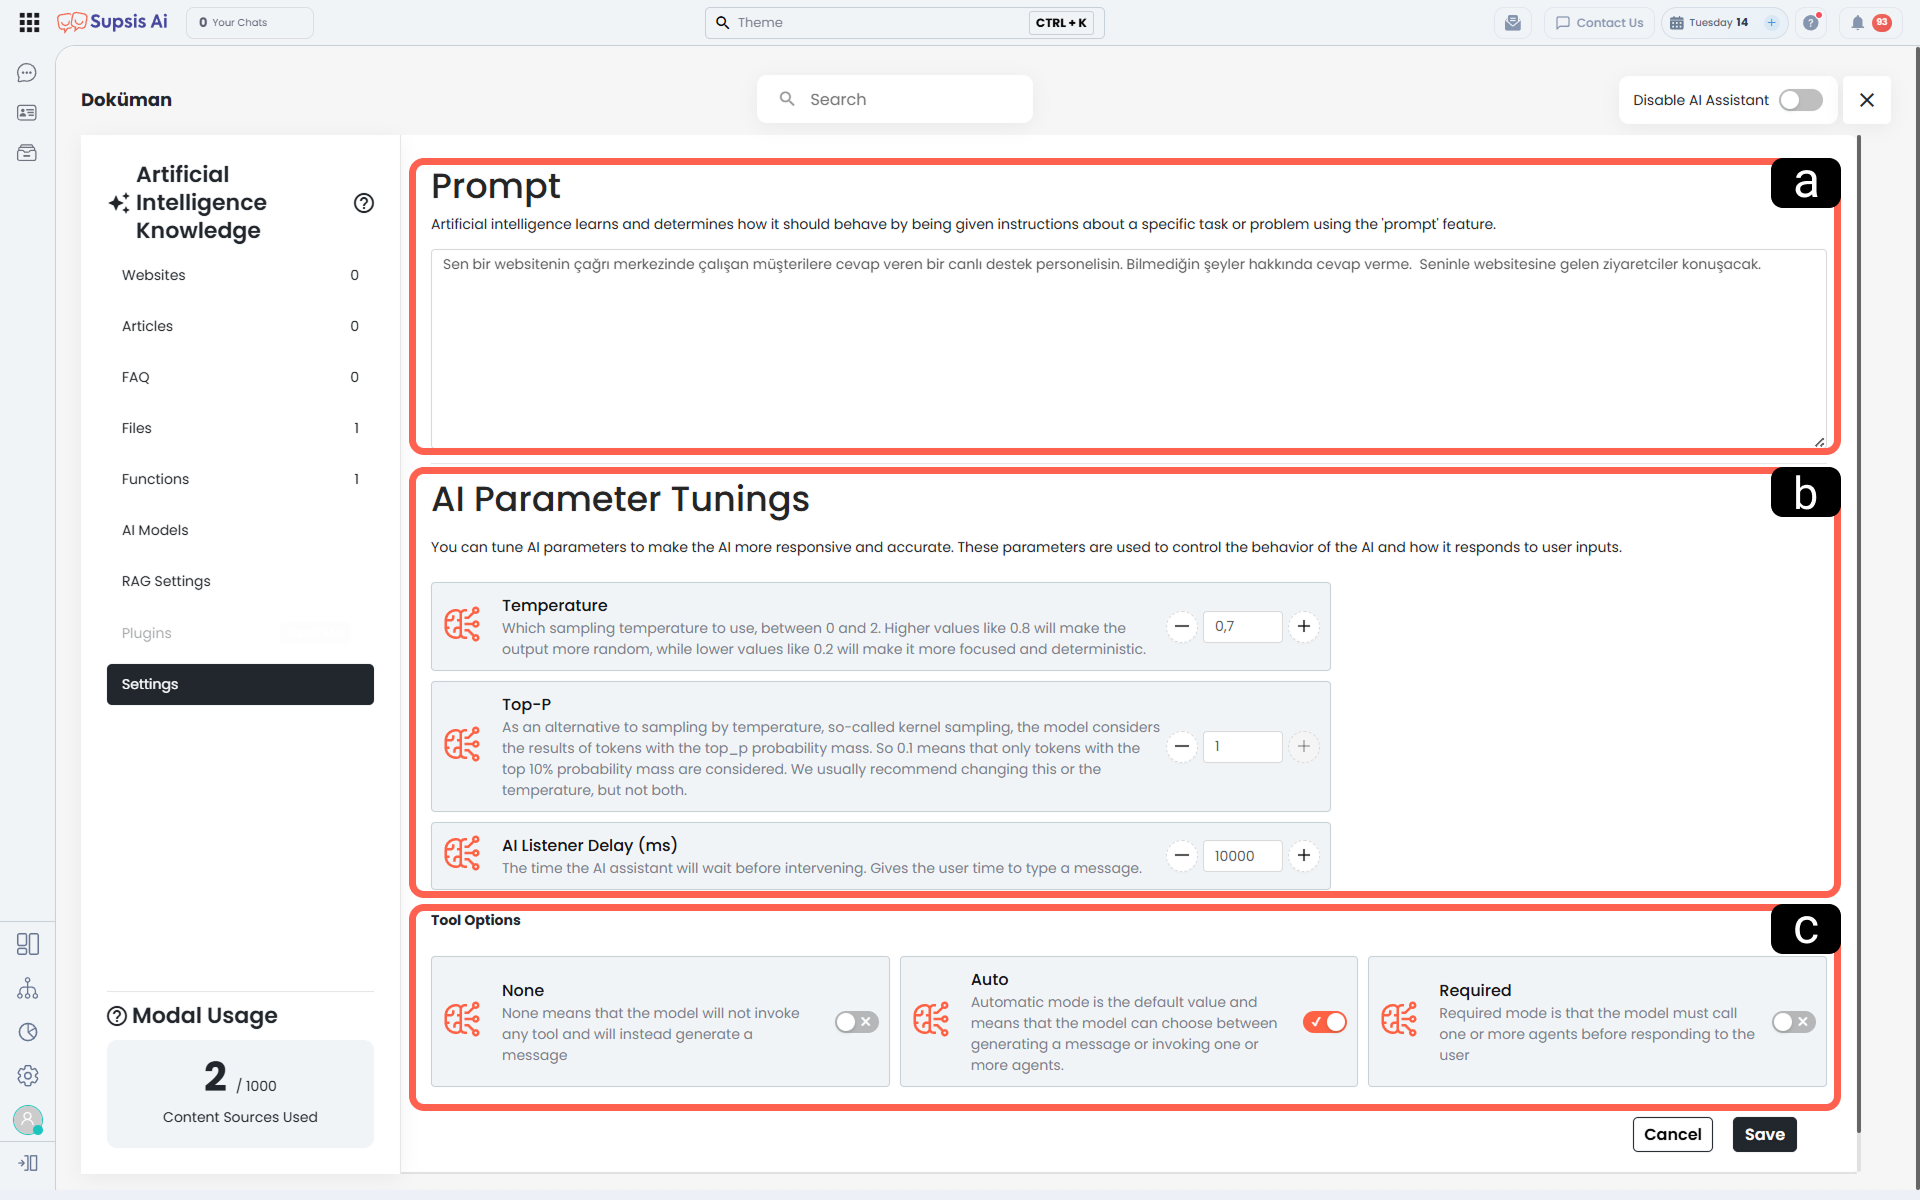
9.f.a – AI Request (Prompt)
The AI Request (Prompt) is the core instruction set defining the assistant's identity, operational scope, tone of voice, behavioral guardrails, and customer interaction flow.
Supsis AI replaces legacy plain textareas with an intuitive Notion-like Rich Text Editor. This empowers users to visually structure complex prompts using headings, bulleted lists, code blocks, and blockquotes, while automatically persisting and transmitting the prompt in standardized Markdown format.
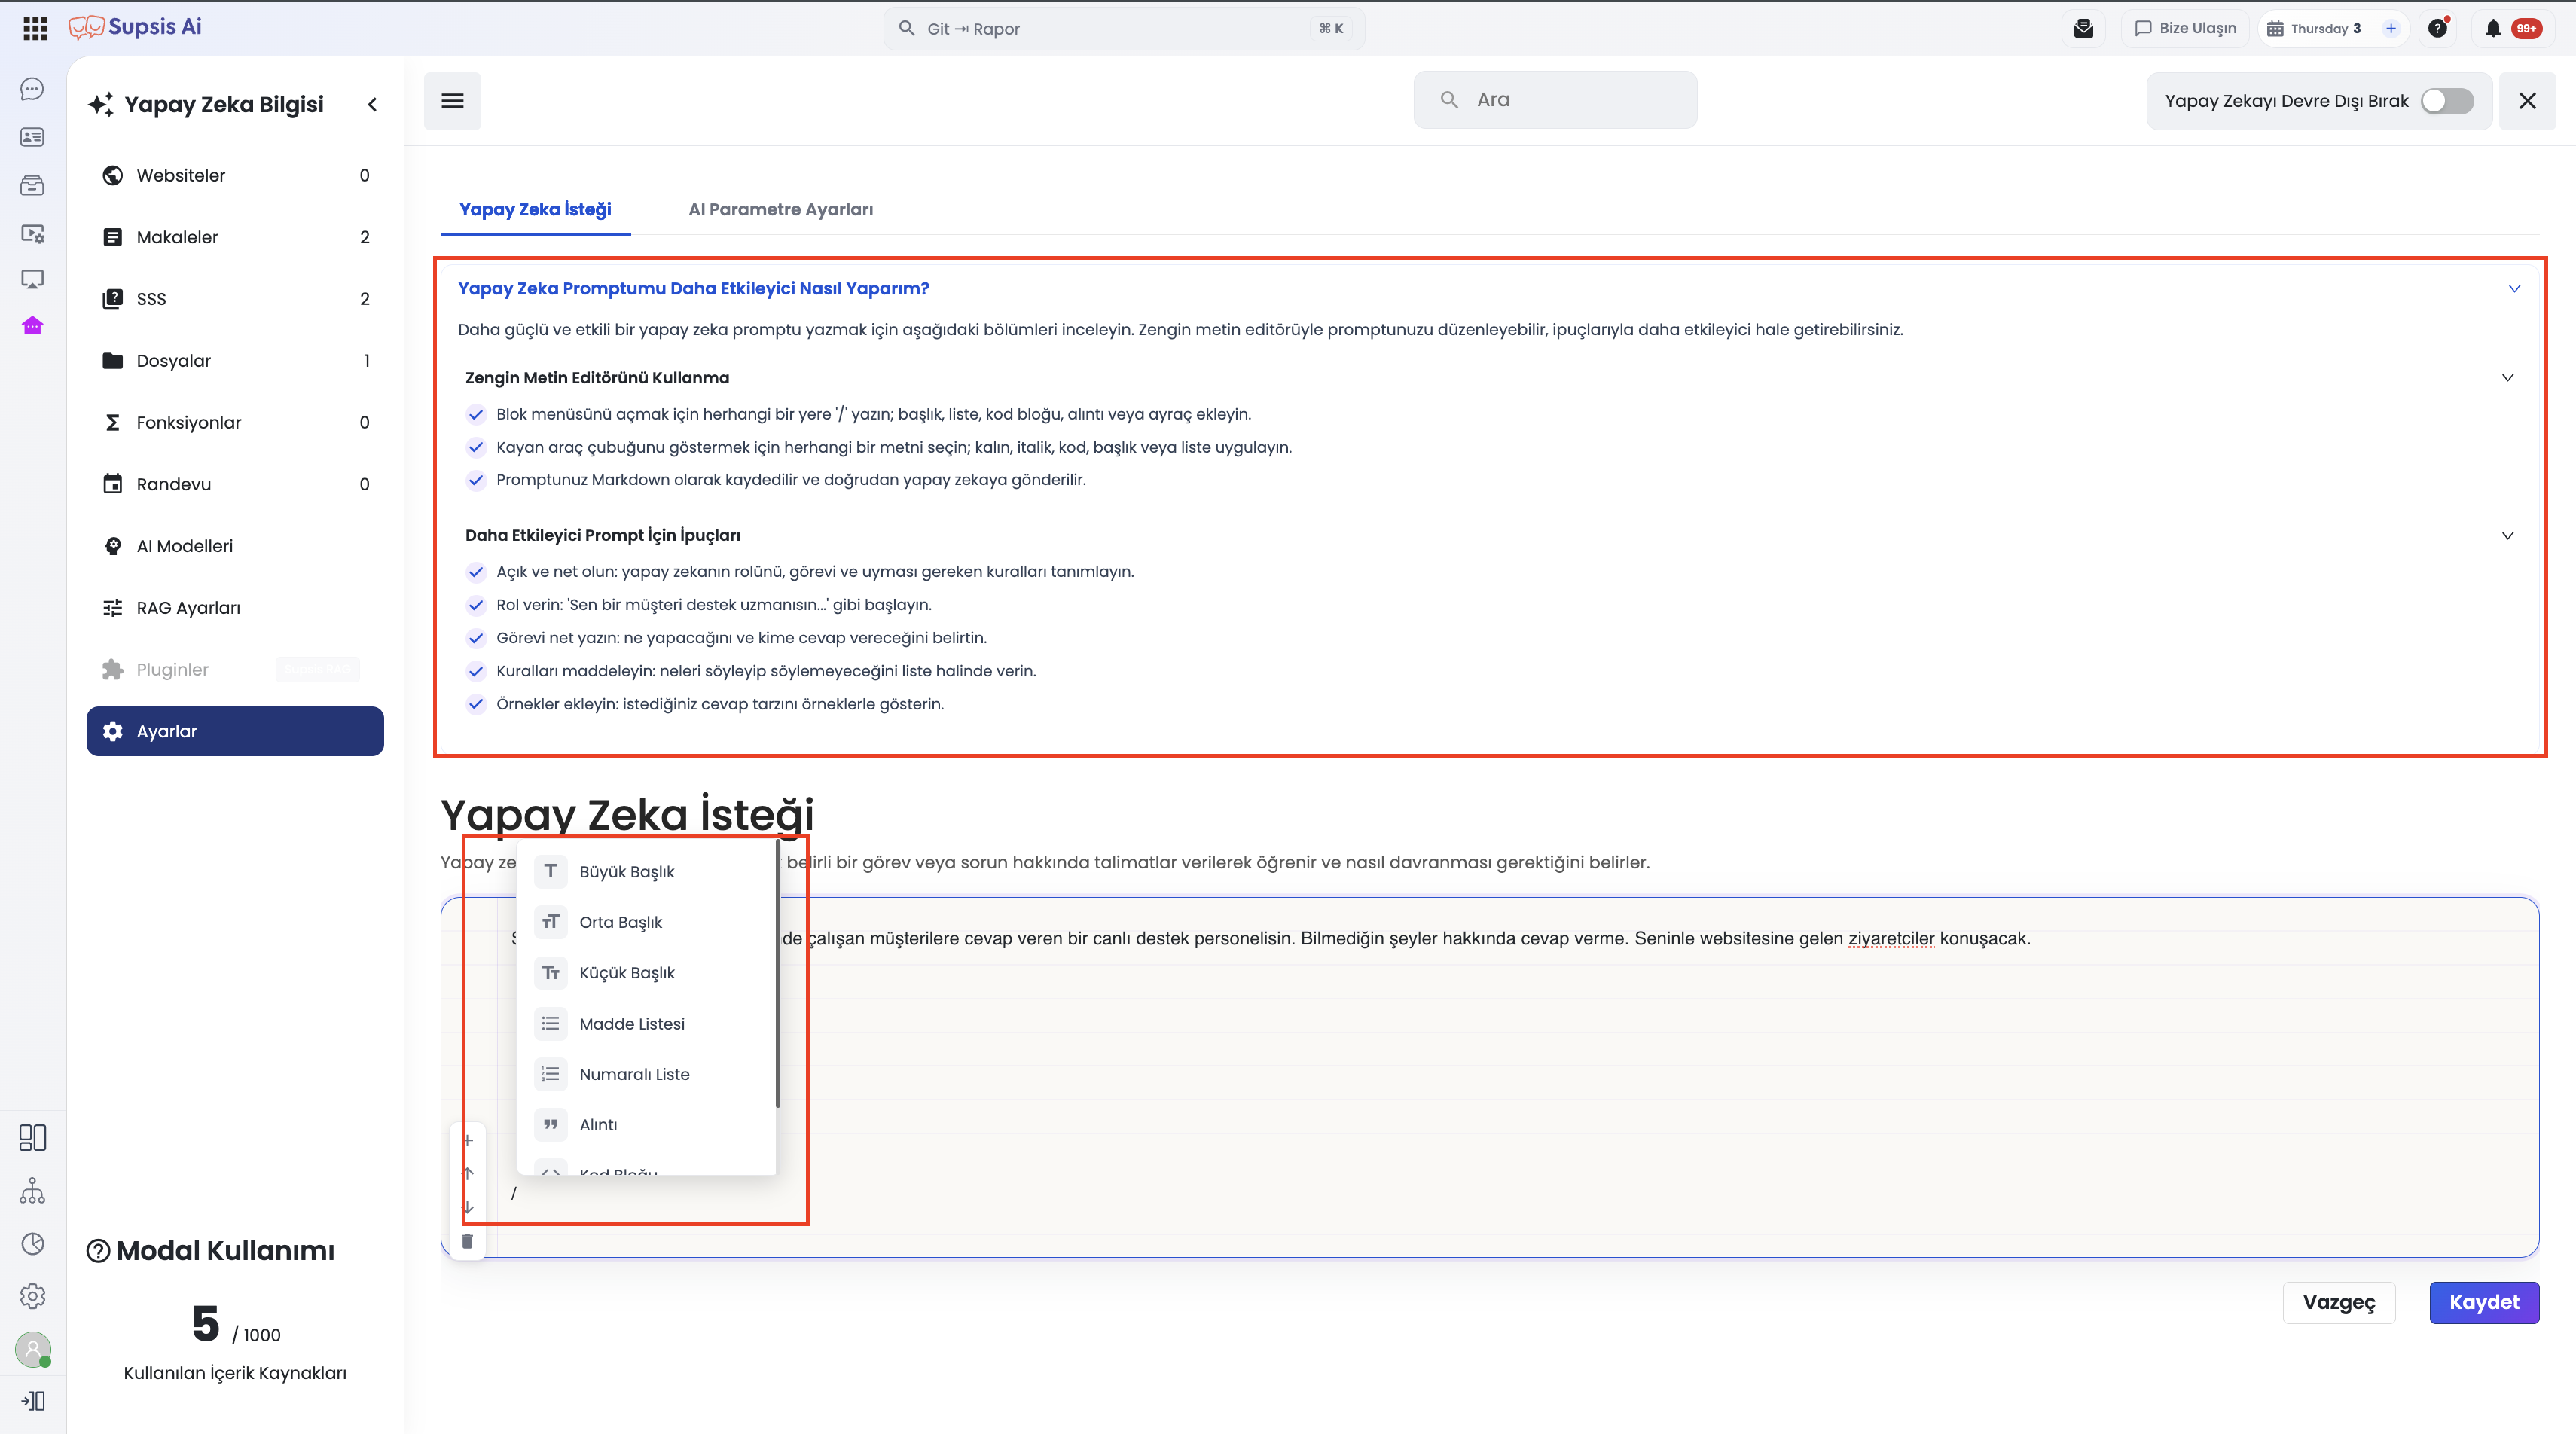
1- Rich Text Editor Capabilities
- 1.a – Slash Command Menu (
/):
Typing/on any blank line triggers a modular block menu:- Headings: Heading 1 (Large), Heading 2 (Medium), Heading 3 (Small)
- Lists: Bulleted List and Numbered List
- Structured Blocks: Blockquote, Code Block, and Horizontal Divider
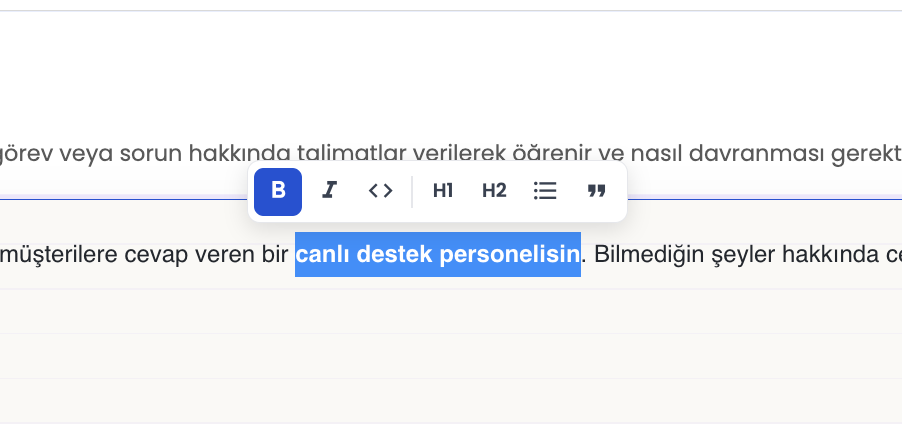
- 1.b – Floating Bubble Menu:
Selecting any text fragment invokes a floating context toolbar:- Typography Styles: Bold, Italic, Inline Code
- Quick Conversions: Instantly transform selections into H1/H2 headings, bullet lists, or blockquotes.
- 1.c – Fullscreen Focus Mode (Expand Modal):
Clicking the expand icon located at the top-right corner opens a 900px-wide distraction-free editing modal. Long-form prompt guidelines and intricate rulesets can be authored with ease. Clicking Save triggers standard backend API persistence and real-time socket updates seamlessly. - 1.d – Native Markdown Serialization:
While the visual interface feels like Notion, the prompt is stored and delivered to LLMs in clean Markdown syntax (#,*,```). Large language models parse Markdown-structured hierarchies with superior reasoning accuracy, resulting in more deterministic responses.
2- "How to Make Your AI Prompt More Impressive" Help Drawer
Positioned directly below the editor, an expandable drawer guides users through prompt engineering best practices across two dedicated tabs:
| Help Section | Recommended Best Practices |
|---|---|
| Using the Notion Editor | Harnessing slash (/) commands, bubble styling tools, and understanding Markdown serialization. |
| Tips for Impressive Prompts | Persona definition ("Act as an expert support agent"), explicit objective definitions, bulleted rules, and few-shot examples. |
Multilingual Guidance
All guidance items inside the help drawer are localized into 8 languages: Turkish, English, Arabic, German, Spanish, French, Italian, and Russian.
3- Step-by-Step Guide: Crafting Structured AI Prompts
- Access the Chatbot Story:
- 1.a- Navigate to Chatbot in Customer Panel and open the target story.
- 1.b- Click the AI tab in the top navigation bar, then select the Settings sub-tab.
- Draft and Structure the Prompt:
- 2.a- Compose instructions directly inside the Notion editor under AI Request.
- 2.b- Type
/on a fresh line to insert hierarchical headers (## Policies) or list items. - 2.c- Highlight vital instructions to apply bold emphasis or code wrappers via the bubble menu.
- Expand and Save:
- 3.a- Click the expand icon in the top-right corner whenever a wider workspace is needed.
- 3.b- Click Save to commit the Markdown prompt to the active AI runtime.
4- Use Cases & Comparative Value
| Scenario | Legacy Plain Textarea | Notion Rich Text Editor |
|---|---|---|
| Rule Prioritization | Crucial rules get buried in text blocks, diluting AI attention. | H1/H2 headings and lists enforce strict logical hierarchy. |
| Extensive Prompt Manuals | Frustrating scrolling inside small input boxes. | 900px modal enables comfortable end-to-end policy review. |
| Formatting Code & JSON | Raw sample payloads look indistinguishable from instructions. | Fenced code blocks preserve syntax and prevent hallucination. |
Backward Compatibility
Existing plain text prompts automatically load into the Notion editor without formatting disruption or data loss.
Feature Prerequisite
The AI Settings and Prompt editor appear exclusively on stories where the AI module is active.
9.f.b – AI Parameter Settings
The AI Parameter Settings section is used to shape the response generation behavior of the artificial intelligence more precisely. These settings made for the selected model affect how creative, how consistent, and how controlled the responses will be.
- Temperature: The temperature value determines how creative or how controlled responses the model will produce. Higher values tend to produce more diverse and more free-form responses. Lower values create more focused, more consistent, and more deterministic answers.
If you want to structure artificial intelligence for a more formal, more clear, and more controlled use, low temperature values can be preferred. In cases where more flexible, more natural, and more free-form narration is desired, higher values can be used.
- Top-P: The Top-P setting determines which probability range of word and answer alternatives the model will evaluate. This structure is an alternative sampling method to temperature. Lower Top-P values direct the model to a narrower and more controlled answer area; higher values allow it to evaluate broader answer alternatives.
In general use, instead of aggressively changing both temperature and Top-P values at the same time in most scenarios, adjusting one of these two settings primarily in case of need yields healthier results.
- AI Listener Delay Time: The AI Listener Delay Time determines how long the AI will wait before starting to generate a response to the user's message. This setting works in milliseconds and is especially important in scenarios where users write their messages piece by piece.
Thanks to this period, the system gives the user the opportunity to complete their writing and the completed messages are processed. If it is set too low, the AI can produce a response as soon as the user sends the first piece of their writing; if it is set too high, a feeling of delayed response may occur. Therefore, a balanced value suitable for the usage habit should be preferred.
9.f.c – Tool Options
The Tool Options section is used to determine whether the AI will use any tools, functions, or auxiliary operations before responding to the user. This field is an important control mechanism, especially in artificial intelligence scenarios working with functions, information contents, and additional tools.
-
None: When this option is active, the model does not call any tools and produces a direct response. In other words, the AI only responds in line with the prompt structure; tool usage functions such as function triggering or file scanning are not deployed. It can be preferred in simpler and only conversation-oriented usage scenarios.
-
Automatic: Automatic mode is the default and most flexible usage style. In this setting, the model decides for itself whether to produce a direct response or to call one or more tools if necessary, depending on the situation. If you want the AI to only answer in some cases and use functions or auxiliary tools in others, this is usually the most suitable option.
-
Mandatory: When this mode is selected, the artificial intelligence must call one or more tools before responding to the user. That is, instead of producing direct answers, the model first performs operations using defined tools. It is used in scenarios where a systemic control, data pulling, function execution, or process verification must be performed before each answer.
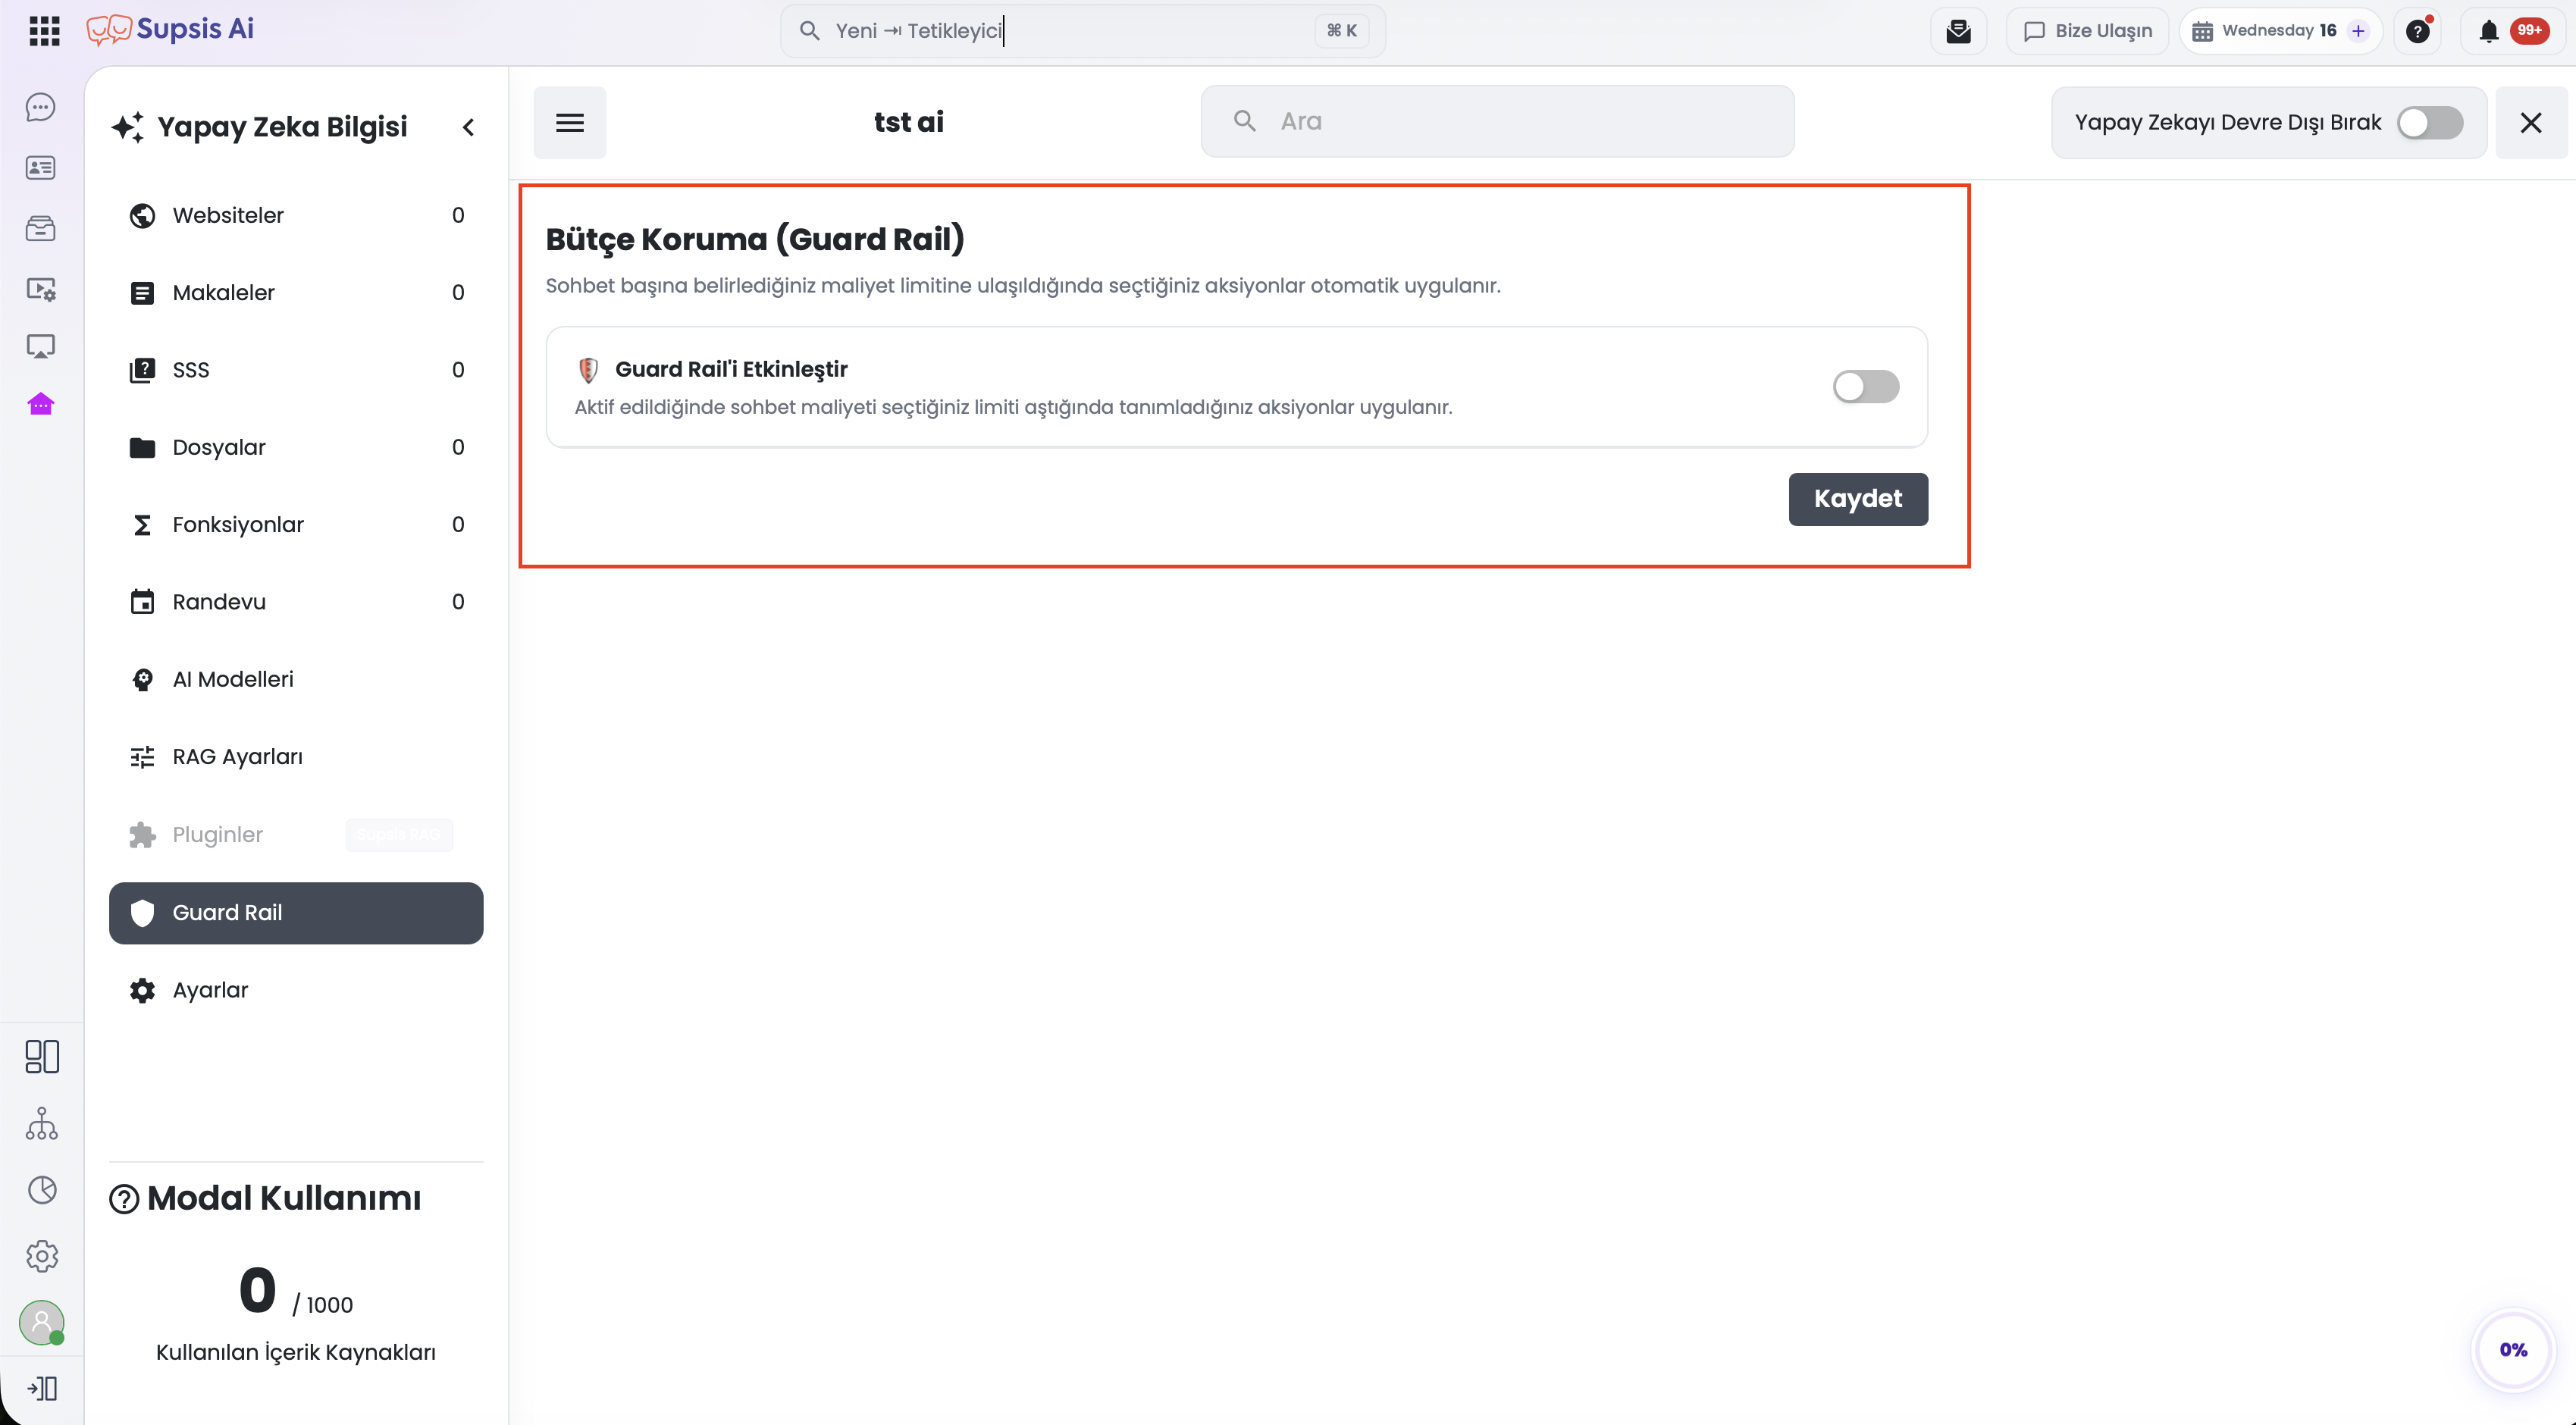
9.g – Guard Rail (Budget and Usage Protection)
Guard Rail provides automatic protection to ensure that a chatbot-managed conversation does not exceed designated cost or usage thresholds. Account administrators can configure per-conversation cost and interaction caps; once a limit is breached, the session can be automatically closed or the chatbot can step aside and route the conversation to the human agent queue.
Rule evaluation occurs in real time on the socket layer during message receipt and transmission; billing information is retrieved from the Redis cache and guard rail counters are tracked in real time within Redis.
1- Guard Rail Module & Activation
To begin utilizing Guard Rail protection, the module must first be toggled on within the respective chatbot story:
- Menu Navigation: Chatbot > Target Chatbot Story > AI Knowledge > Left Sidebar: Guard Rail tab
- Activation: Turn on the Enable Guard Rail toggle switch at the top of the page to expose the rule and action configuration fields.
2- Configurable Rules and Limit Breach Actions
Guard Rail rules evaluate using an OR logic model; whenever any single defined limit is exceeded, the configured action is immediately executed.
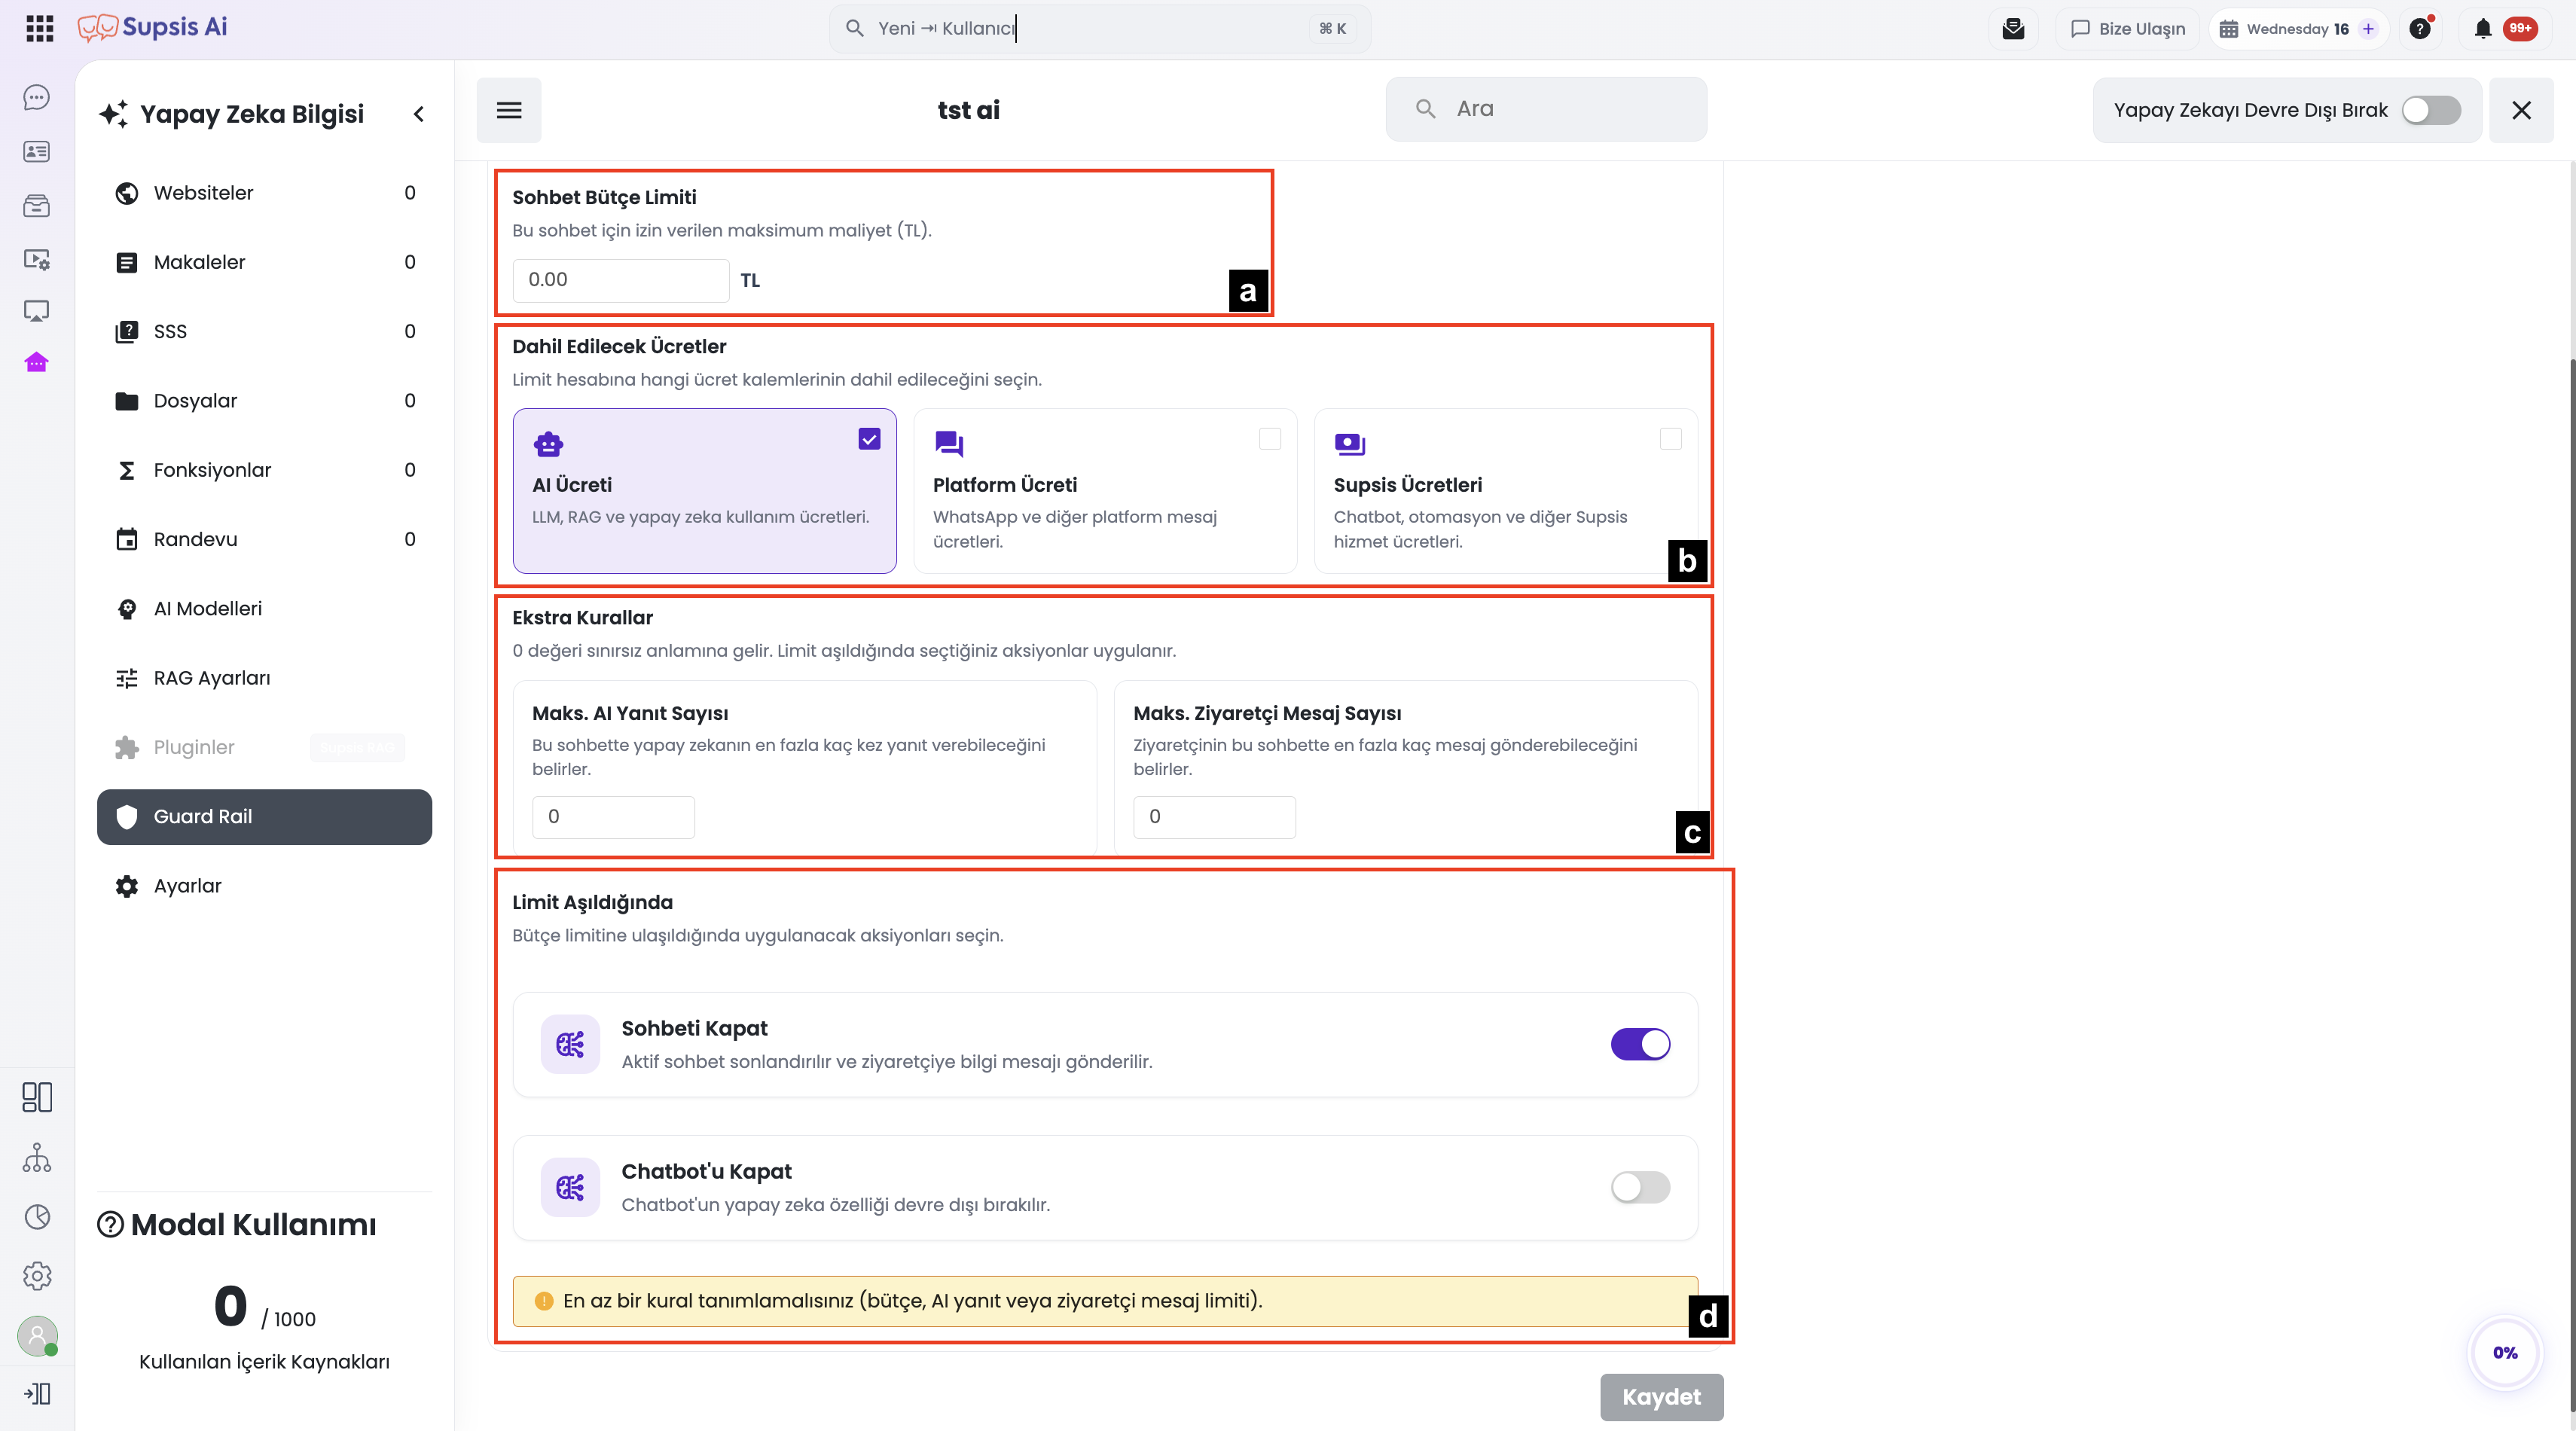
- a – Conversation Budget Limit (Currency / TL):
Defines the maximum spending ceiling per conversation. The rule triggers when the sum of selected billing categories reaches this monetary limit. - b – Included Cost Categories:
The expense items factored into the budget calculation (at least one must be selected when a budget limit is configured):- AI Cost: Token generation and model inference costs.
- Platform Cost: Messaging fees for integrated channels such as WhatsApp Business API.
- Supsis Fees: Core messaging and platform infrastructure fees.
- c – Extra Rules (Usage Limits):
- Max AI Responses: Limits the maximum number of responses the AI can provide within a single conversation (0 = unlimited).
- Max Visitor Messages: Limits the maximum number of inbound messages a visitor can send within a conversation (0 = unlimited). Protects against spam, loops, or malicious bot exhaustion.
- d – Limit Breach Actions:
The automated operational response taken when any threshold is breached (at least one action must be selected):- Close Conversation: Immediately terminates the conversation. A descriptive timeline event note appears on the agent panel (e.g., "Conversation ended due to exceeding the AI response limit (3)"). The visitor receives the standard automated closure message.
- Disable Chatbot (Transfer to Queue): The chatbot exits the conversation, and the ticket is transitioned to new (agent queue) status. A timeline notification stating "chatbot left the conversation" is recorded.
| Rule / Action Area | Options | Operational Impact |
|---|---|---|
| Budget Protection | Monetary Limit + Included Cost Items | Terminates or hands off the conversation when spending exceeds budget. |
| Usage Protection | Max AI Responses / Visitor Messages | Prevents infinite loops, spam flooding, and excessive token usage. |
| Breach Action | Close Chat / Transfer to Queue | Provides full flexibility to end the chat or seamlessly escalate to human agents. |
Action Priority
Both Close Conversation and Disable Chatbot can be selected concurrently. When both actions are enabled, Close Conversation takes precedence.
3- Step-by-Step Guard Rail Configuration Guide
- Navigate to Guard Rail: Open the Customer Panel, navigate to Chatbot, select your chatbot story, open AI Knowledge, and click the Guard Rail tab in the left sidebar.
- Enable the Module: Switch on the Enable Guard Rail toggle.
- Define Limit Rules: Specify at least one rule threshold: Budget Limit, Max AI Responses, and/or Max Visitor Messages.
- Select Cost Categories: If a budget limit is defined, check the relevant cost categories (AI, Platform, Supsis).
- Choose Breach Action: Select whether the system should Close Conversation and/or Disable Chatbot (Transfer to Queue) when limits are exceeded.
- Save Changes: Click Save to persist the configuration.
4- Use Cases & Customer Benefits
- Hard Budget Caps for High-Cost Channels: Prevent billing surprises on WhatsApp and expensive high-tier LLM integrations by capping conversation expenses.
- Protection Against Loops & Abuse: Stop abusive users or looped automated messages from consuming unnecessary model and platform resources.
- Automated Escalation to Live Agents: Automatically transfer complex or lengthy interactions to human agents once the AI has reached its allowed response quota.
- Sandbox & Pilot Deployments: Safely test new bots in production with strictly bounded quotas.
Technical Architecture & Operational Behavior
- Non-Permanent Disablement: Triggering a guard rail rule does not disable AI capabilities globally across the chatbot; it only executes the selected closure or handoff action for that specific conversation session.
- Real-Time Synchronization: Guard rail parameters are stored per-story (
CBStory ai.guardRail). Active sessions are updated instantly over socket connections viaconfig-changedevents. - Data Flow: Cost metrics are calculated by the tablet service and cached in Redis (conversation pricing cache), then evaluated in real time by the socket service. Usage counters are stored atomically in Redis.
- Multilingual Localization: The Guard Rail module includes full native localization across 8 languages (TR, EN, AR, DE, ES, FR, IT, RU).
9.h – Content Search
The Content Search area allows you to perform quick searches among the contents in the artificial intelligence knowledge base. In structures with a large number of website contents, articles, FAQ records, files, or functions, it helps you reach the content you are looking for without browsing pages one by one.
9.i – Disable Artificial Intelligence
This option allows you to temporarily turn off artificial intelligence support for the relevant chatbot. When the AI module is active, the AI assistant can automatically step in cases where the chatbot cannot respond and provide support to the user in line with the contents uploaded to the knowledge base.
When this setting is closed, the AI is not included in this process and all communication proceeds through your chatbot flow. When AI is closed, users only proceed through blocks, redirections, and alternative flows defined within the scenario.
10. Publish Scenario
The Publish Scenario button is used to take the arrangements you made in the chatbot flow into live use. Changes you make on the scenario become active only when published with this button. During the publishing process, the system creates a new chatbot version; thus, while deploying your current arrangements, you also preserve the opportunity to return to previous versions.
This field should be used after scenario arrangements, channel integration, or adding new flows. If you encounter an unexpected result after testing the changes you made, you can continue your use uninterruptedly by returning to previous versions via the version history created.
11. Navigation Elements
Navigation Elements are auxiliary view controls used for you to work more comfortably on the chatbot diagram. Thanks to these tools, you can quickly return to the beginning of the scenario, expand the work area, zoom in and out of the view, and follow your position more easily within large flows. Since the chatbot diagram offers a visual flow structure that determines which paths the users in communication with the chatbot will pass through, these navigation tools provide significant convenience, especially in wide and multi-branched scenarios.
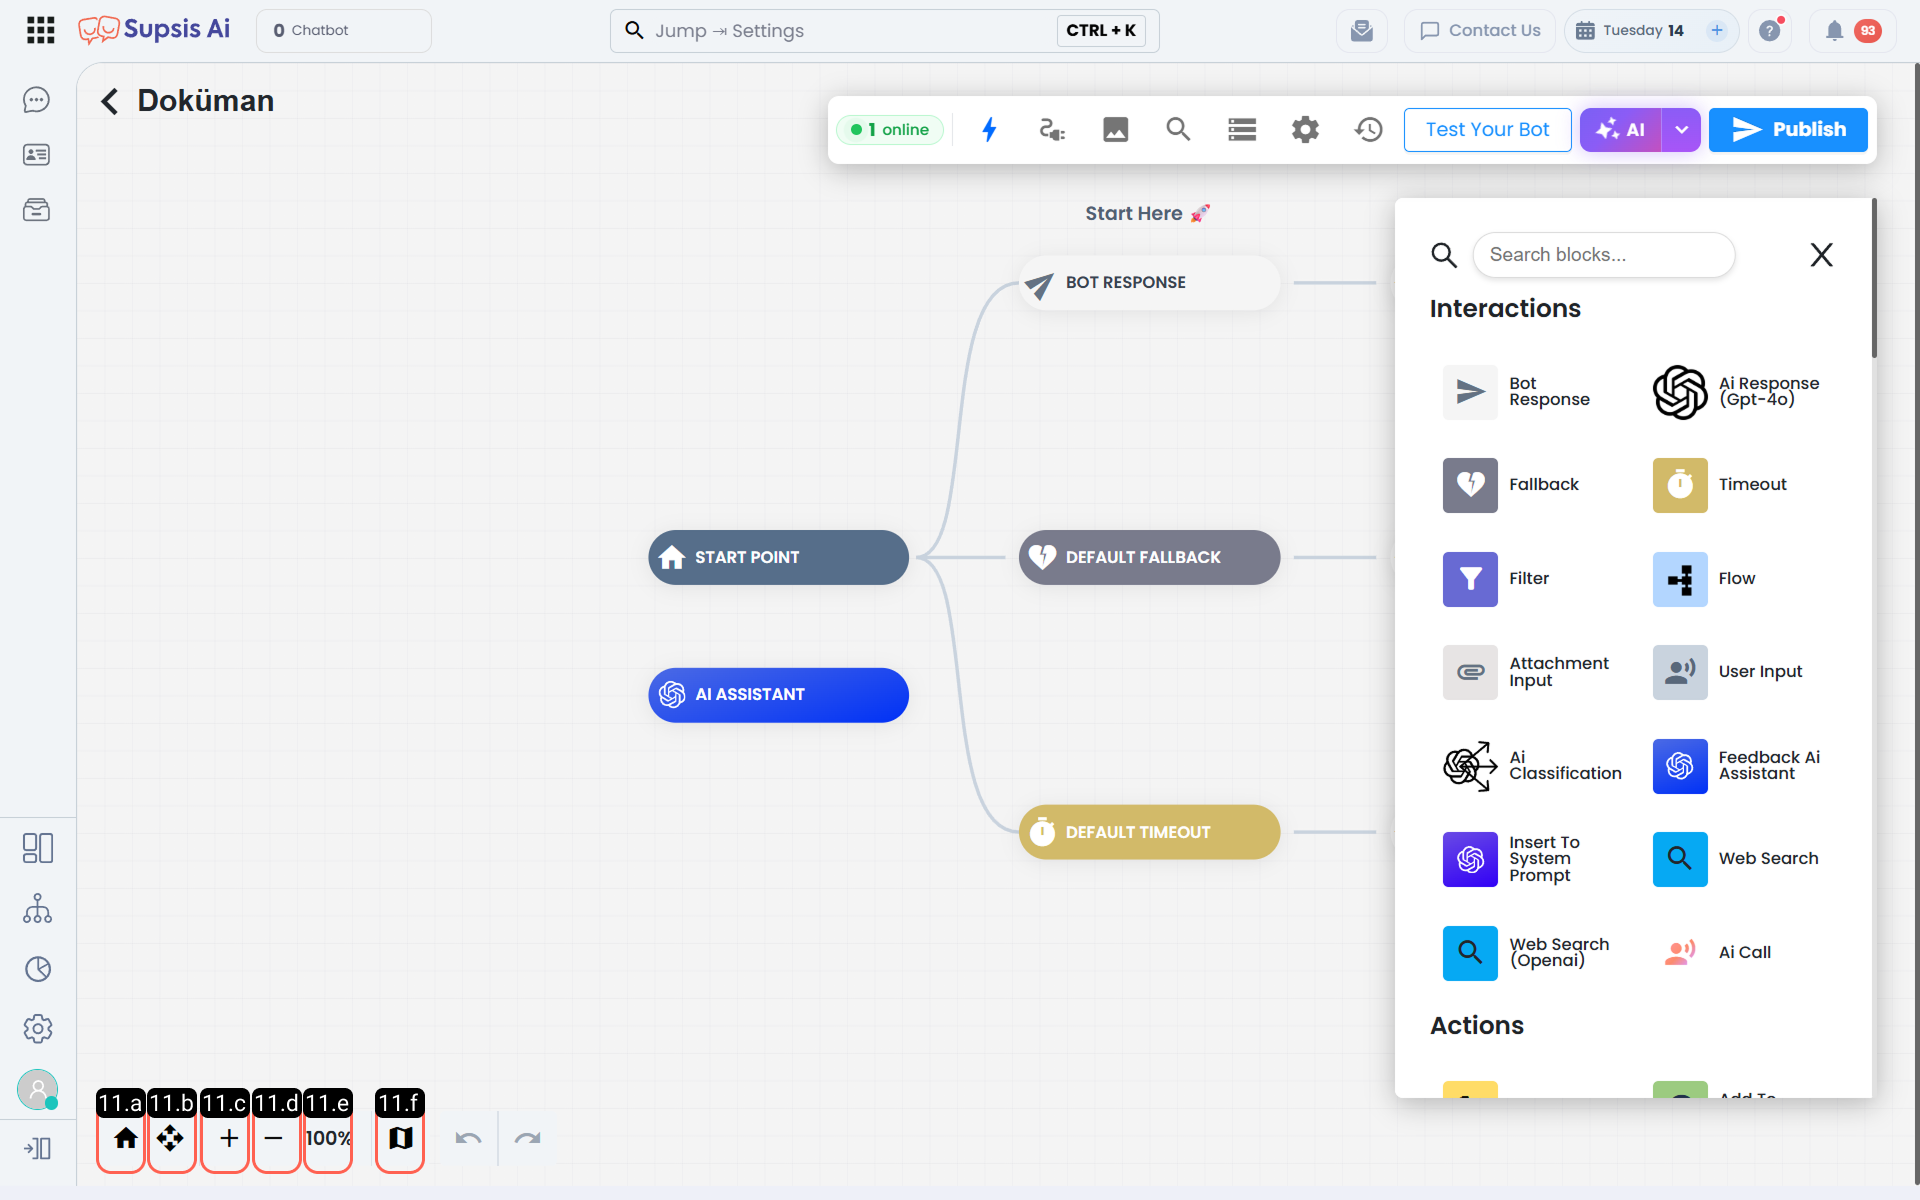
11.a – Return to Starting Point
This button takes you to the starting point step of the scenario. You can use it to return to the point where the main flow started in a single step while working in different sections within the diagram.
11.b – Full Screen
The Full Screen feature allows you to view the chatbot scenario in a wider workspace. It is useful for examining and arranging the flow more comfortably, especially in scenarios with a dense block structure. Full-screen view helps you work more comfortably on the scenario by enlarging the workspace.
11.c – Zoom In
The Zoom In button allows you to view the blocks in the diagram on a larger scale. This feature is used to see the block contents more clearly while working in small areas, examine the connections more comfortably, and make detail arrangements.
11.d – Zoom Out
The Zoom Out button shrinks the view so that you can see a wider part of the diagram at the same time. It is used to see the general structure, follow the relationships between blocks, and dominate the whole of the flow, especially in scenarios containing a large number of blocks.
11.e – Reset Zoom
This area is used to view the zoom ratio and return this ratio to the default setting of 100%. When you want to see the diagram in standard scale again after zooming in or out, you can use this control. This area, presented with a percentage value in the visual interface, helps you quickly balance the working view.
11.f – Decision Tree Map
The Decision Tree Map is an auxiliary view tool that allows you to follow the general layout of the scenario more easily. It is used to get a general idea of the entire diagram and position more quickly between different sections, especially in long and multi-branched flows.
12. Undo/Redo Steps
Undo/Redo Steps tools allow you to switch between the last changes you made on the chatbot. Thanks to these buttons, you can undo an operation or carry an arrangement you undid forward again.
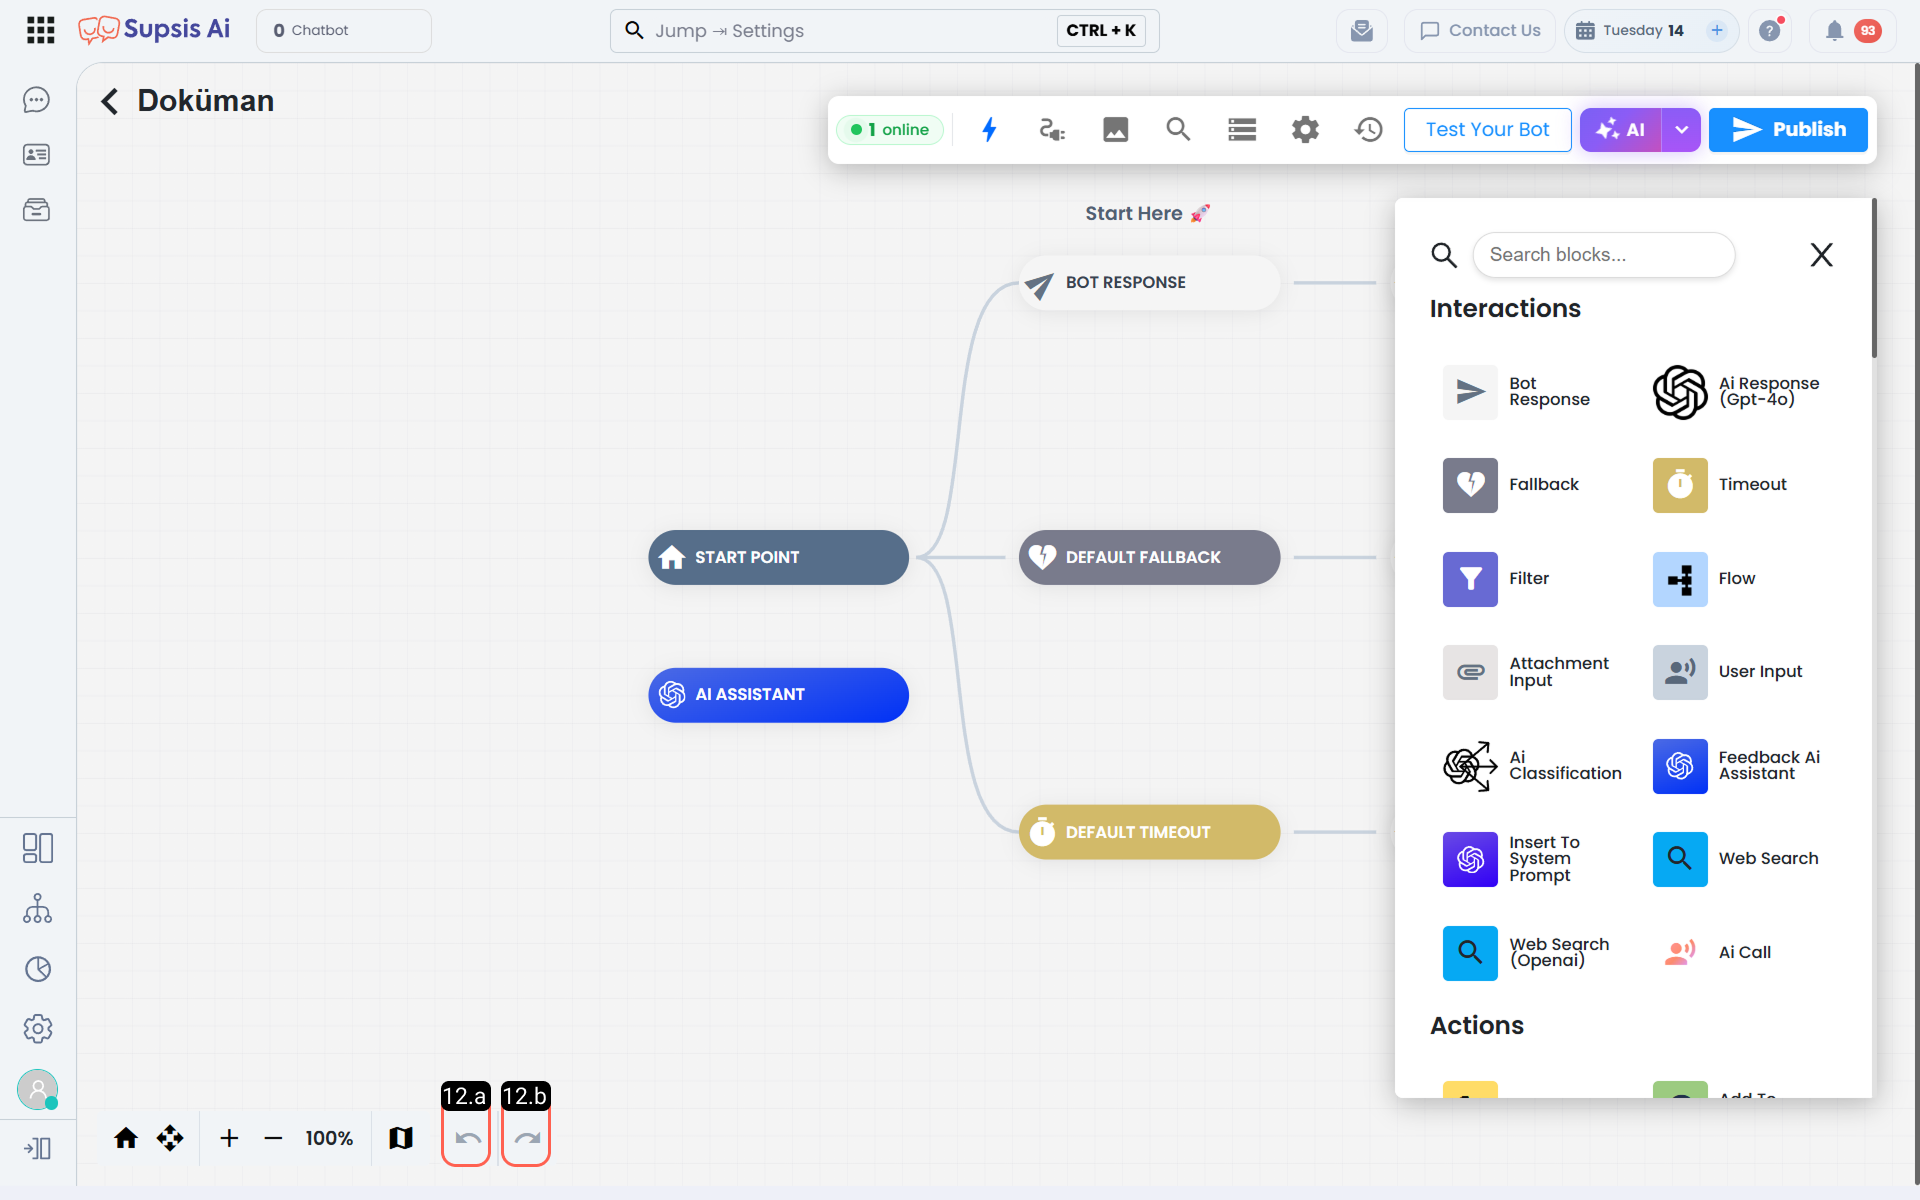
12.a – Undo Step
The Undo Step button returns the last operation you performed on the scenario to a previous step. You can use it to quickly undo block additions, connection arrangements, or content changes made accidentally.
12.b – Redo Step
The Redo Step button allows you to bring back an undone operation. Thus, you can move forward and backward in a controlled manner between the arrangements you made and perform a safer and more flexible work on the scenario.
13. Chatbot Diagram Viewer & Block ID Tracking
The Chatbot Diagram Viewer (Chatbot State Viewer) is a visual monitoring and debugging tool that allows you to inspect step-by-step which blocks and decision paths a chatbot executed during past or archived customer sessions.
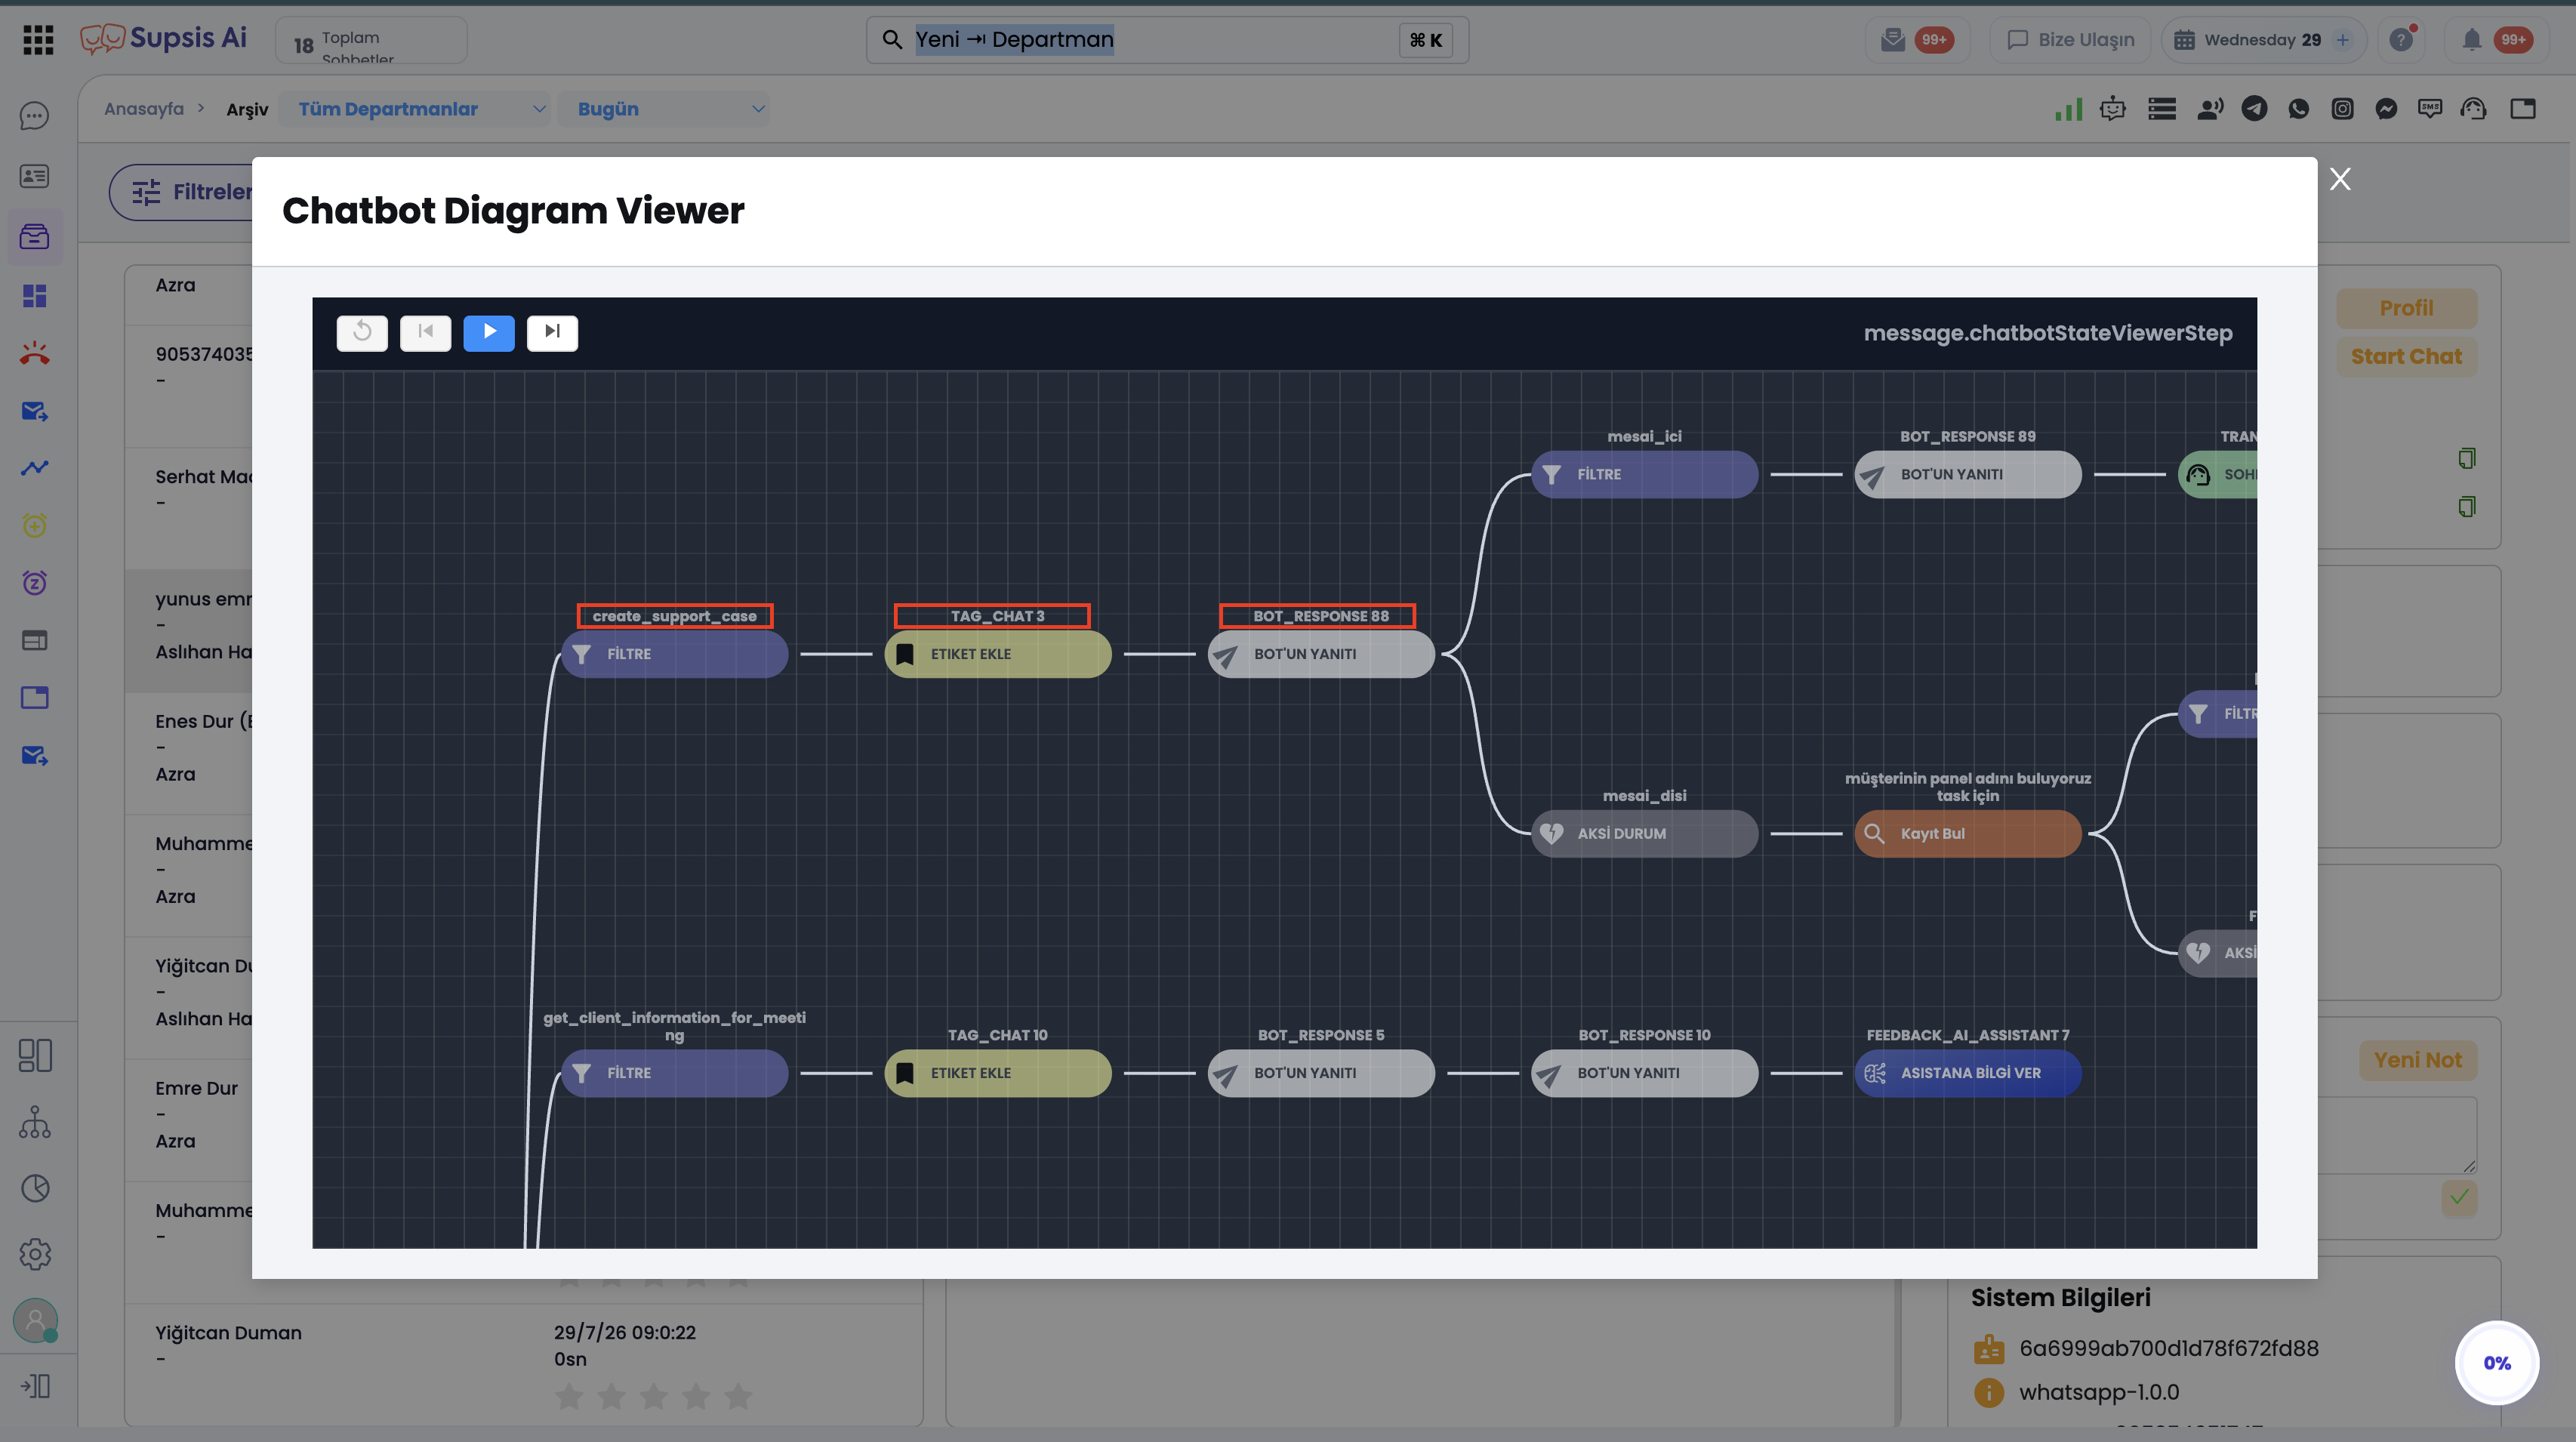
- Block Title & Number Display: On the diagram viewer screen, each block displays its unique technical title, block type, and ID number directly above the block bubble (e.g.,
BOT_RESPONSE 88,BOT_RESPONSE 89,TAG_CHAT 3,FEEDBACK_AI_ASSISTANT 7). - Condition & Action Routing Labels: Custom condition names defined above filter, working hours, or fallback blocks (e.g.,
create_support_case,mesai_ici,mesai_disi,get_client_information_for_meeting) are rendered, making it easy to understand under which exact condition the bot responded or took action. - Step-by-Step Playback Controls: Using the playback, pause, and step navigation controls at the top bar (e.g.,
Step 7 / 12), every single step of the chatbot conversation is chronologically simulated. - Benefits: With block titles and numbers clearly visible above the nodes, flow deviations or fallback triggers can be instantly identified, ensuring 100% transparency in conversation audits and chatbot debugging.