
2-) Contact Information
From this section, you can access detailed information about the person in the conversation and make edits to specific data fields.
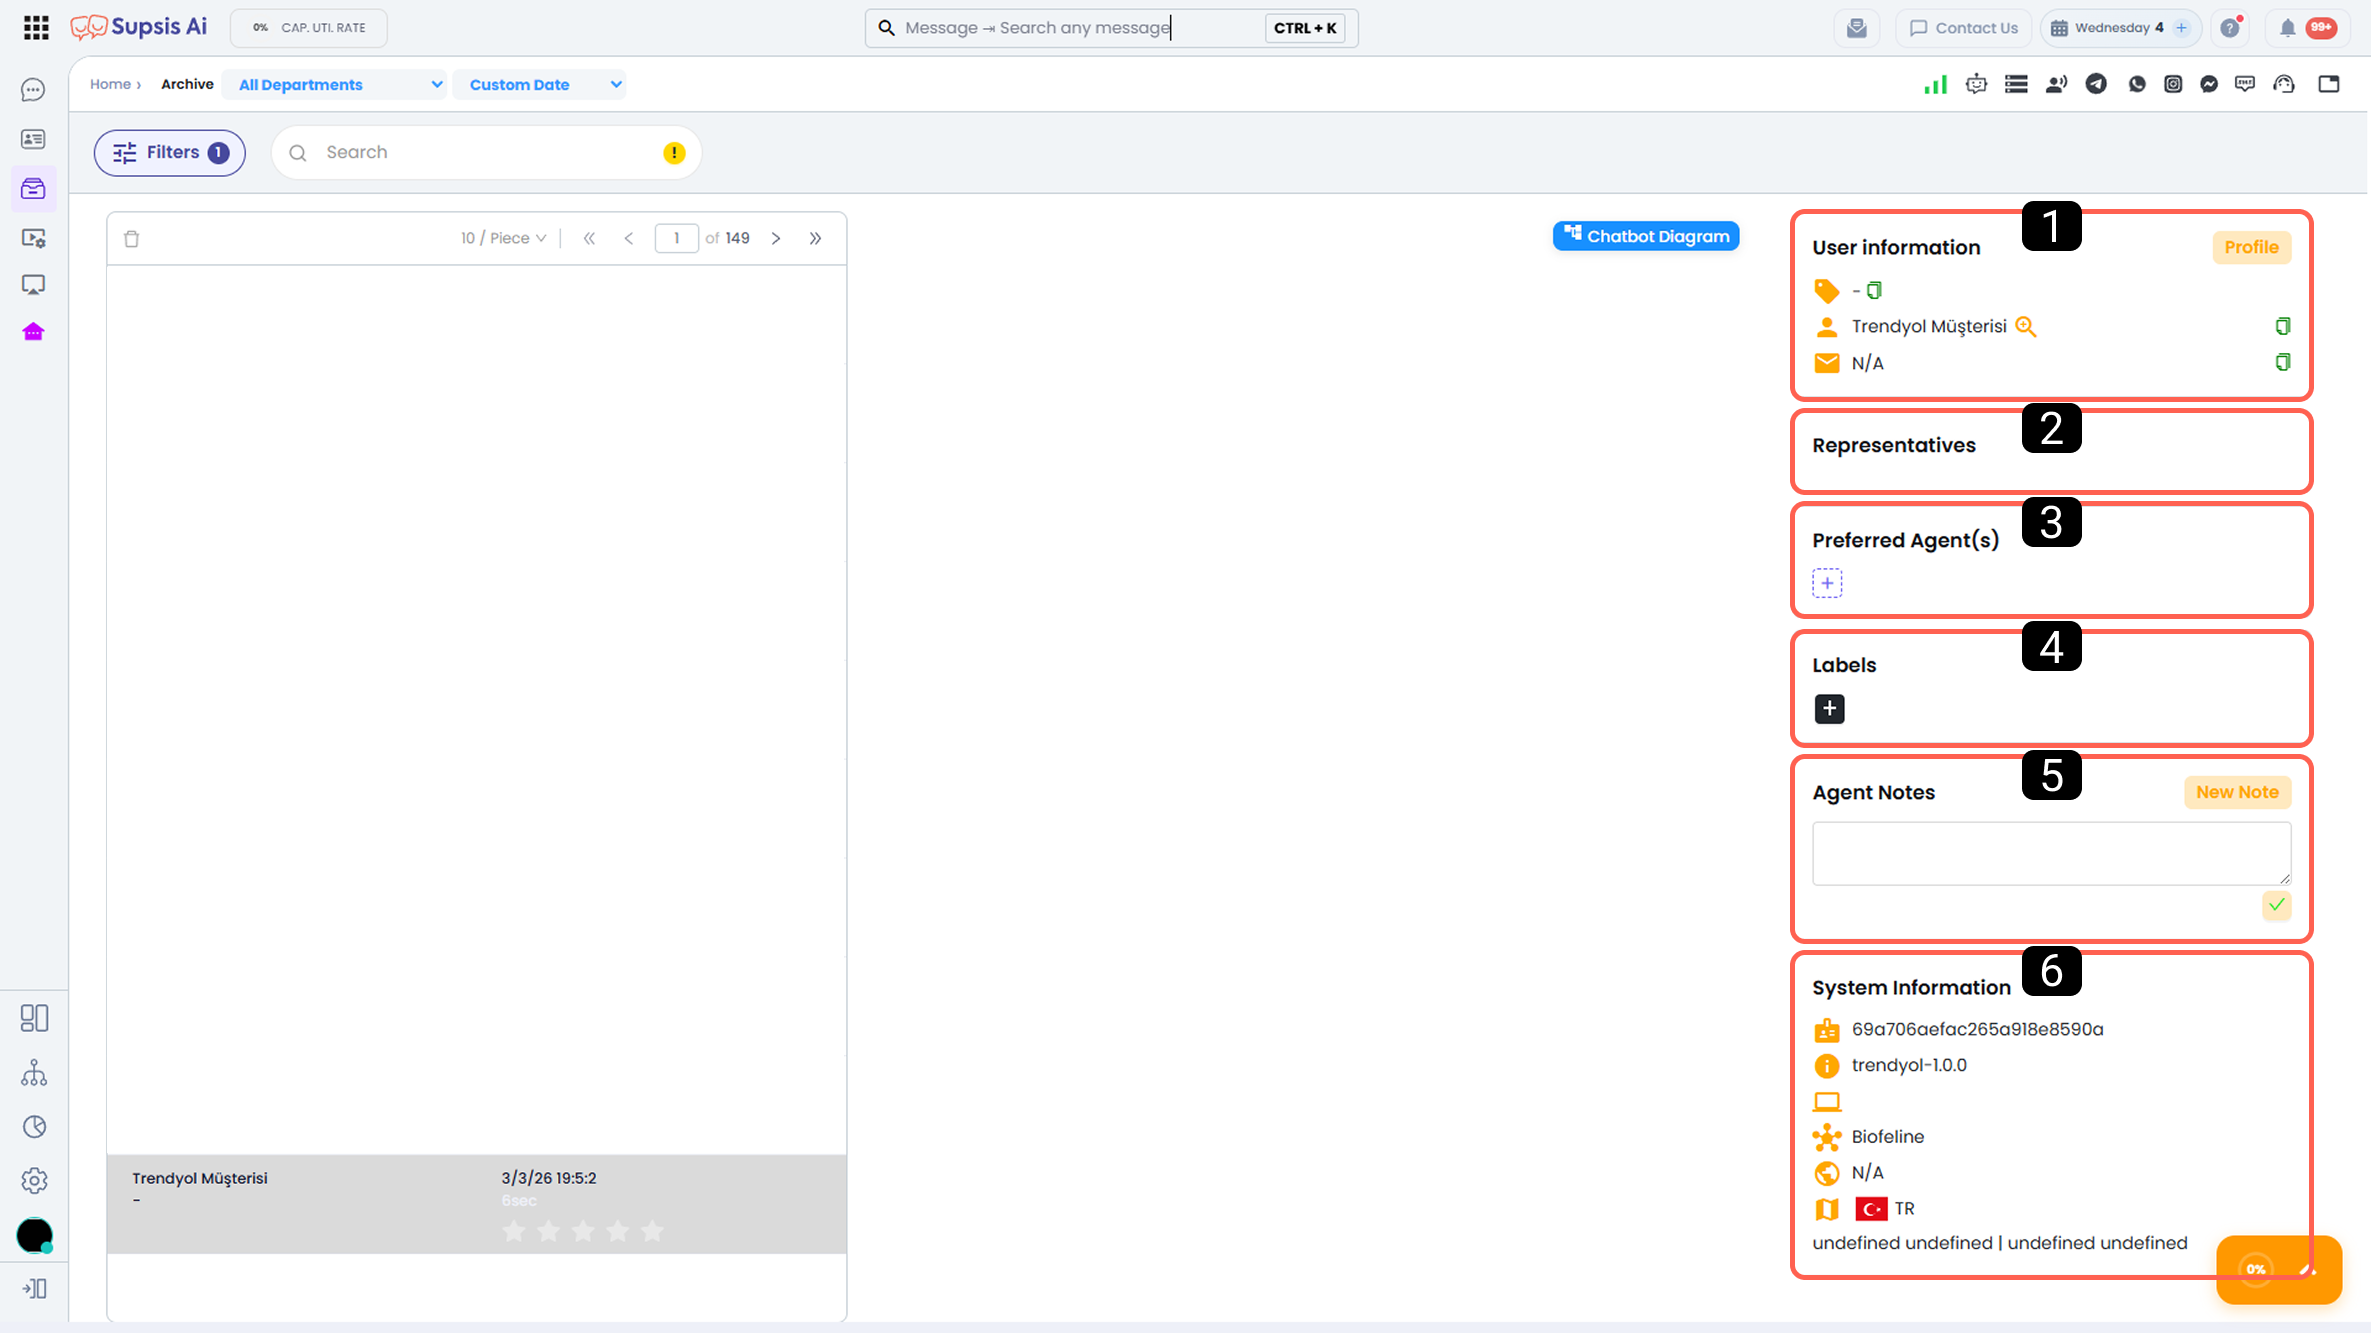
| No | Menu |
|---|---|
| 1 | Information & Access to Contact Card |
| 2 | Agents |
| 3 | Preferred Agents |
| 4 | Tags |
| 5 | Agent Notes |
| 6 | System Information |
1-) Access to User Information
From this section, you can access the person’s Name–Surname, email address, and Contact Card.
The Contact Card is the central management area where you can view all system-registered information about the customer and perform various operations related to them.
Through this area, the customer’s communication history, profile details, tasks, notes, and system interactions can be managed in detail.
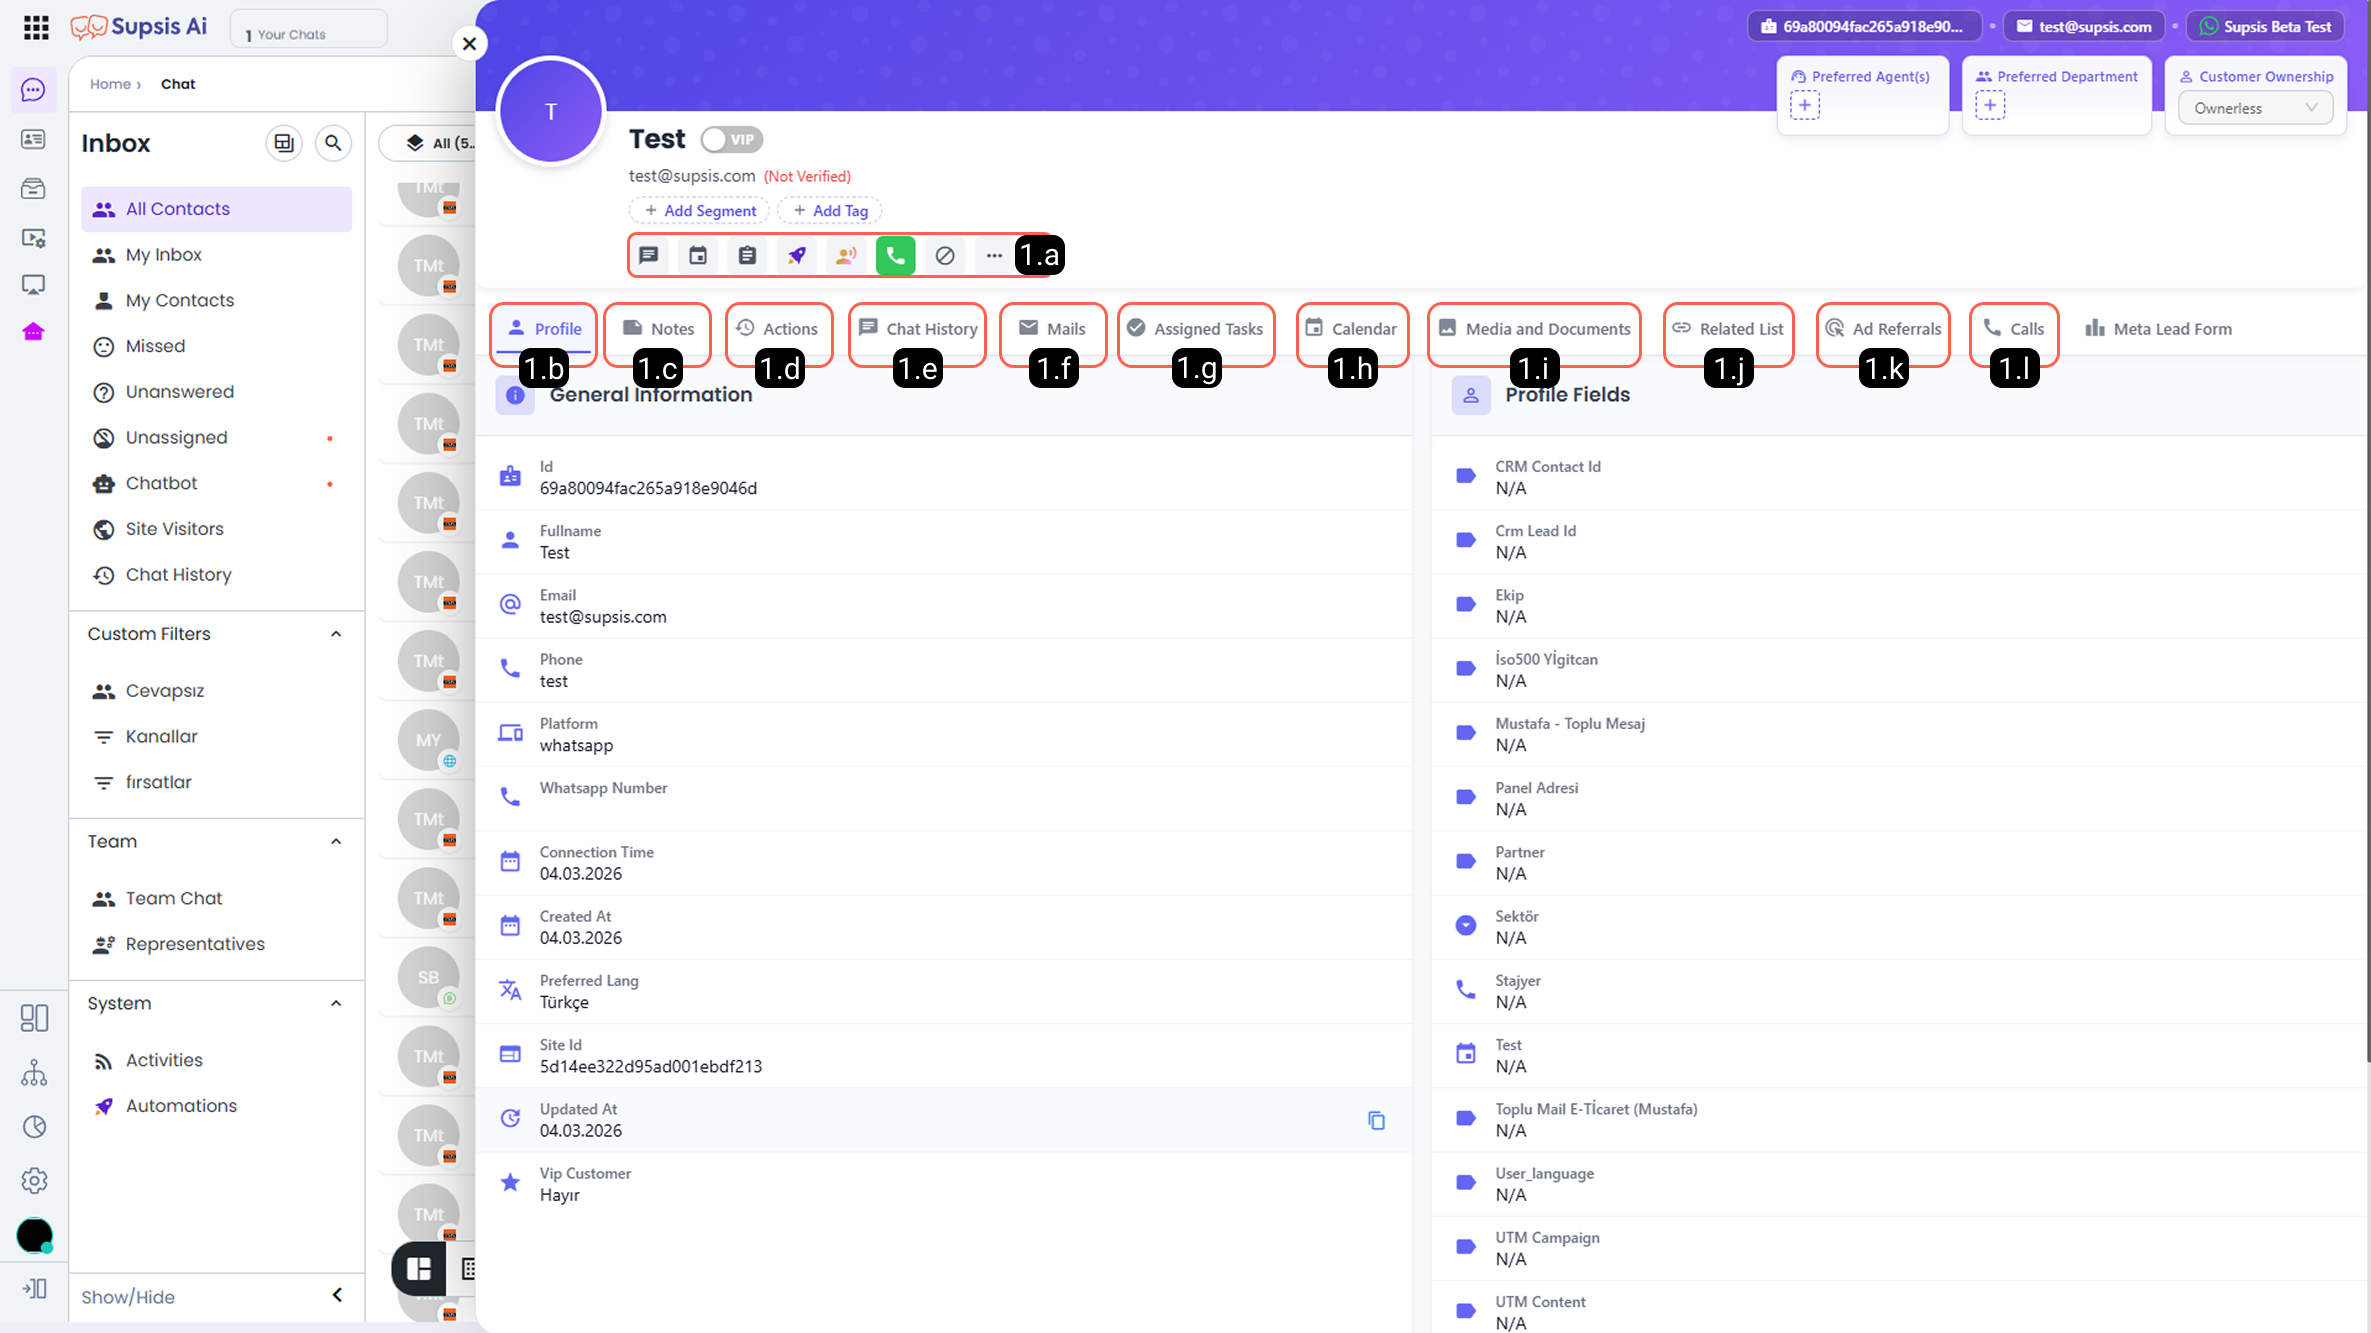
- 1.a – Contact Actions:
From this area, you can perform system-related actions for the contact.
Within Contact Actions, you can:
- Create tasks and calendar events
- Run automations using profile data
- Have the AI Agent call the contact
- Block the user
- Delete the user along with all system data
- 1.b – Profile Fields:
This section lists the person’s registered system information and profile fields.
While fixed system information such as IP address and ID cannot be edited, variable profile data such as contact information and custom fields can be updated.
- 1.c – Notes:
In this area, you can view previously added agent notes about the contact, edit existing notes, and add new ones.
Notes are for internal team use only. They are visible only to Supsis users and cannot be seen by customers.
- 1.d – Activities:
All historical system activities related to the contact whose card is open are displayed here.
The communication channel used by the person, the date and time of connection, and all related activities are listed with detailed timestamps and content.
- 1.e – Conversation History:
All chat sessions initiated with the contact are listed in this section.
By clicking on a specific session, you can review the full message content and conversation details.
- 1.f – Emails:
In this area, you can view all emails sent to and received from the contact via email addresses connected to your Supsis panel, and you can also send new emails.
For more details regarding usage and integration, please refer to the E-Mail documentation.
- 1.g – Assigned Tasks:
All tasks created during conversations with the contact or linked to the contact within the Task Management module are listed here.
For detailed information on task creation methods, please review the Task Creation Methods documentation.
- 1.h – Calendar:
In this section, you can view all calendar events associated with the contact.
Events may have been created during a conversation or assigned via the Calendar module.
For more information, please review the Event Creation Methods documentation.
- 1.i – Media and Documents:
All media files and documents shared during conversations between the contact and agents are listed in this section.
- 1.j – Related List:
All tables within the Table module that are associated with this contact card’s ID are displayed here.
- 1.k – Ad Interactions:
If the contact reached you via Meta advertisements (Instagram, Facebook), the related advertisement(s) are listed in this section.
- 1.l – Calls:
If the contact has previously been called via the Supsis Call Center module by an agent or AI Agent, the call date, call history, and any available voice recordings are displayed here.
2-) Agents
In this section, you can view all agents involved in the current chat session.
Agents who participated actively or passively in the conversation are listed here.
3-) Preferred Agents
From this section, you can view the preferred agents defined for the customer in the related chat session.
If you have the required permissions, you can edit preferred agent assignments.
Thanks to the Preferred Agent feature, when the customer contacts you again, the system automatically assigns the conversation to the most suitable online preferred agent based on the assignment algorithm.
If none of the preferred agents are online, the conversation is transferred to the most appropriate agent according to the system’s general assignment algorithm.
4-) Tags
In this section, you can view the tags assigned to the person in the related chat session.
You can add new tags or edit existing ones to better classify and track the contact.
Tags are used in filtering, segmentation, and automation processes to ensure more organized and efficient customer management.
For more details, please review the Tags documentation.
5-) Notes
This section allows you to add notes about the person you are communicating with, as well as view and manage previously created notes.
These notes are not visible to customers.
6-) System Information
In this section, you can view the user’s:
- Conversation ID
- IP address
- Operating system
- Browser or connected platform
- Country information
The Conversation ID represents the unique identifier assigned to the relevant chat session.
With this ID, you can access the related conversation content across different Supsis modules and quickly perform search and filtering operations.