
Chat views are the content area that allows chat records matching your selected filter criteria to be listed in different layouts. Through this area, you can display chats in a way that best suits your needs and working style.
Chat views enable core conversation information to be presented through different methods and visual layouts. Each view contains unique features in terms of how chats are handled, the information presented, and interaction options. This allows you to quickly analyze and manage chats by displaying them using the listing method that best suits your current usage style.
You can apply filtering to customize the conversations you see and display only chats with specific attributes. For more information about filtering, please review the Custom Filters documentation.
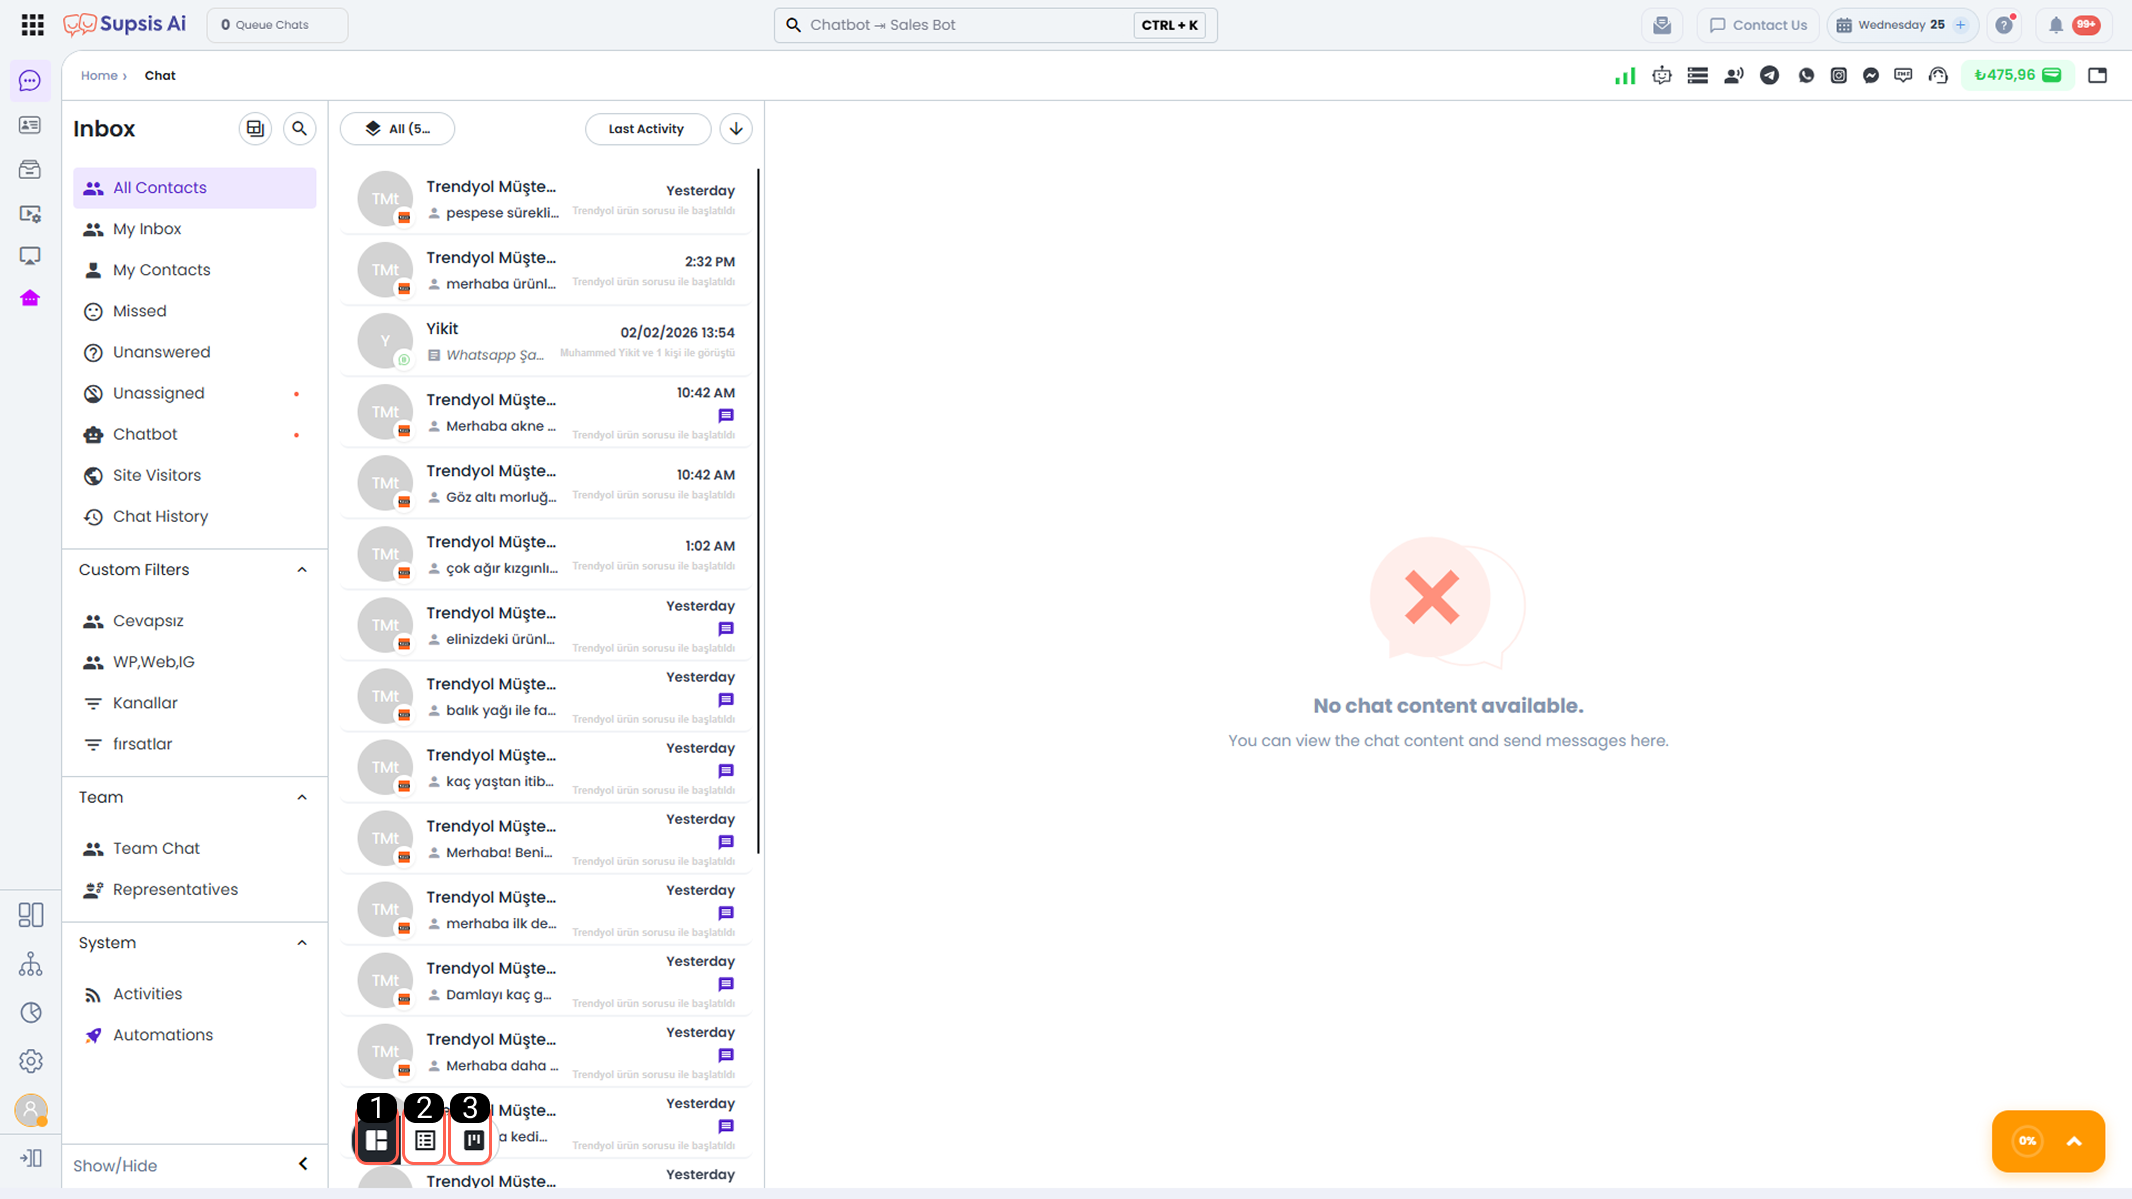
Through the chat log area; you can access core information about conversations, sort the listed chats according to your needs, and examine the data generated as a result of filtering in a more organized and understandable way.
For more information about filtering, please review the Custom Filters documentation.
Chat (List) View
The Chat (List) view allows you to display chat records in chronological order and in a list format according to the attributes of the selected sorting tools. In this view, each chat is presented row-based with its core information and allows you to quickly switch between chats. Especially in scenarios with a large number of conversations, when used together with filtering and sorting tools, it makes chat management practical and efficient.
From this section; you can view which communication channel the customer used to connect with you, the name of the customer currently in communication, if the conversation is closed when it took place, if it is open how long it has been active, which agent or agents are handling the conversation, and a short preview of the last chat message.
You can use sorting tools to organize the listing format of chats in the chat view according to their attributes.
With the sorting tools:
You can sort chats by date, update time, or priority status; display the newest or oldest chats first, and adapt the chat list view according to your workflow.
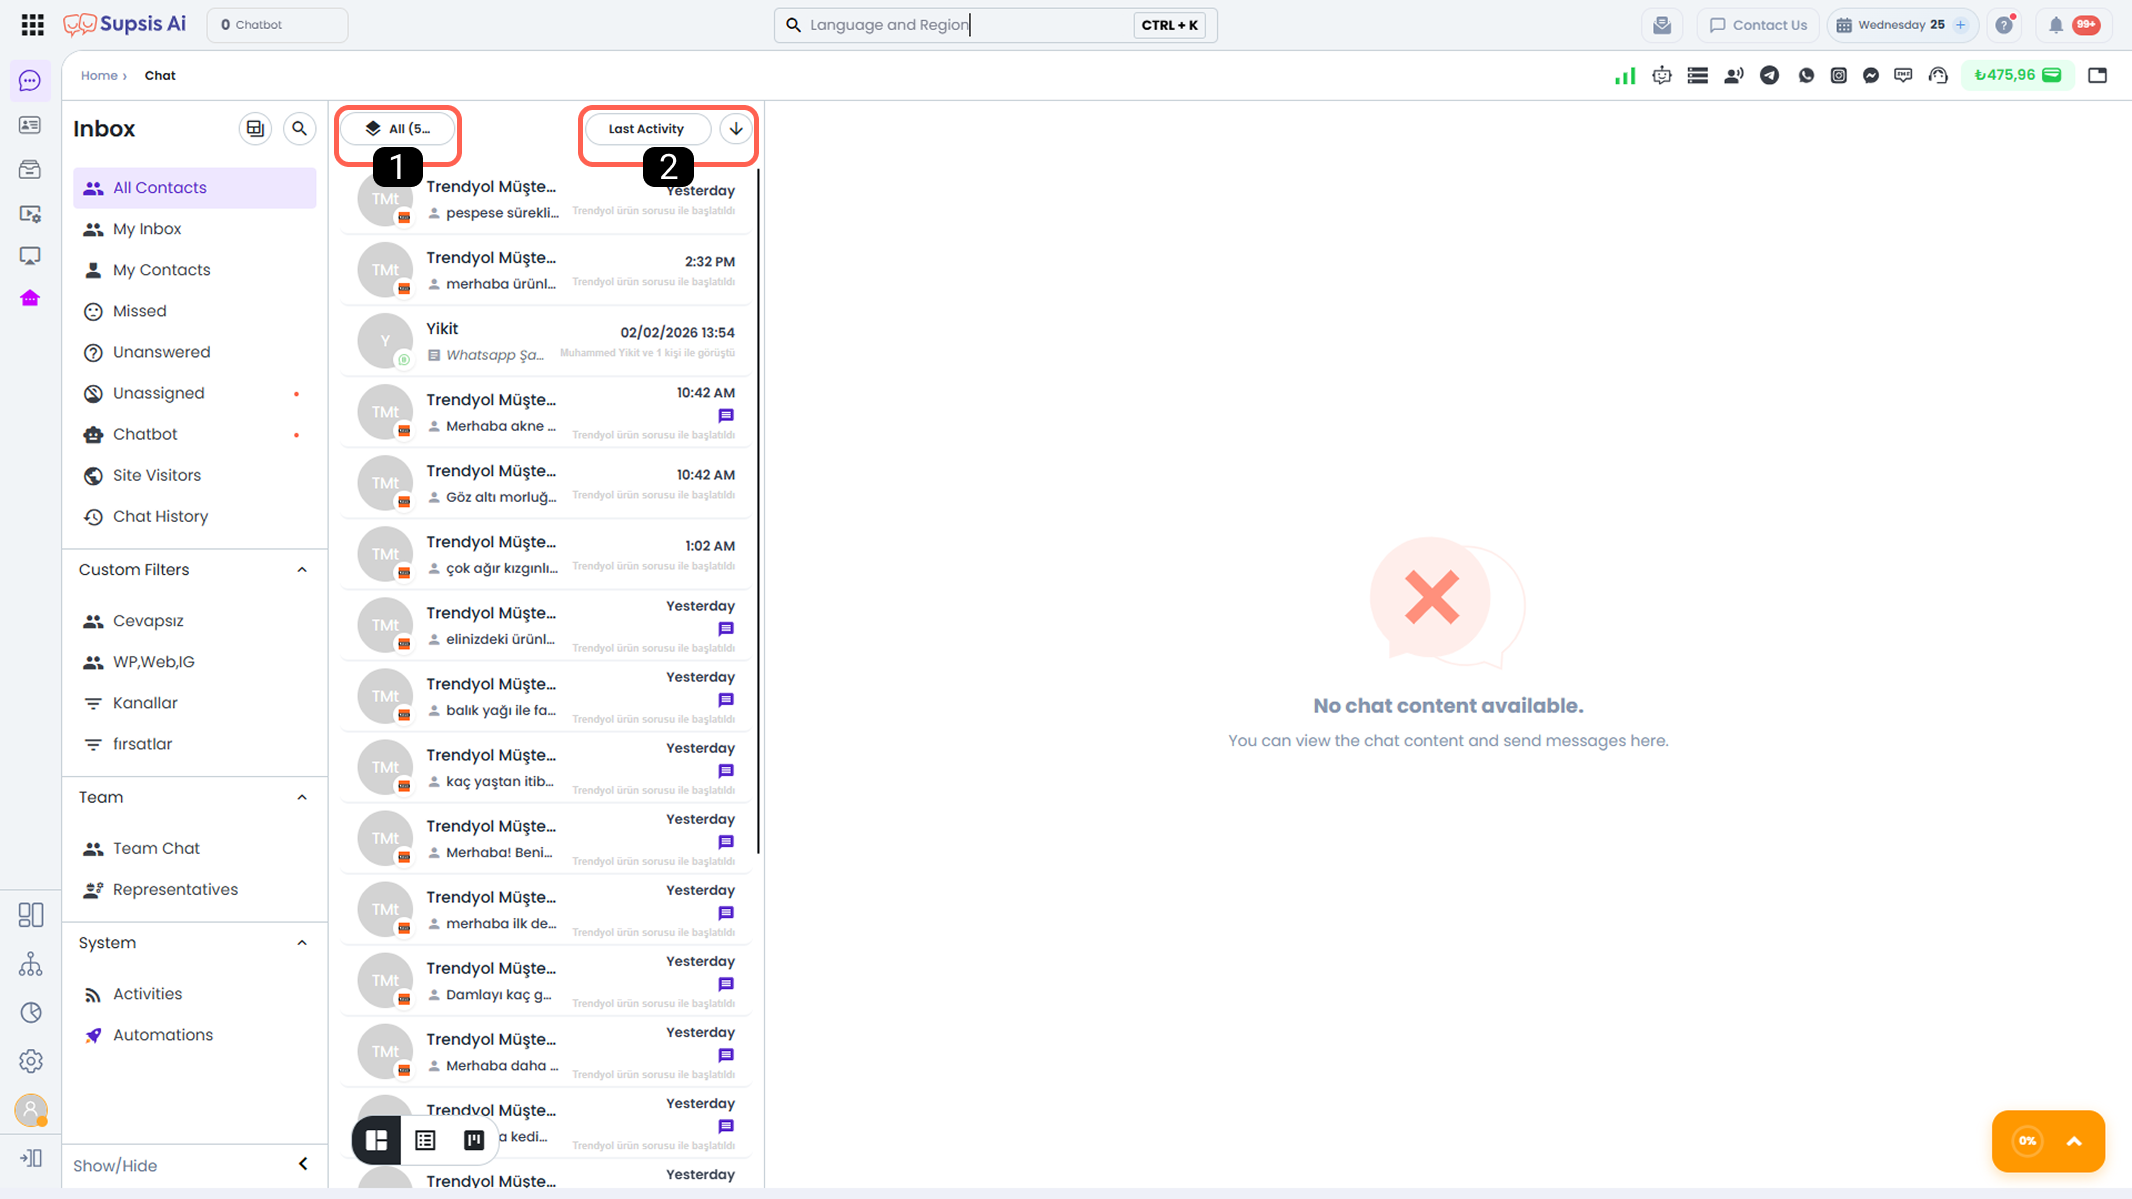
1-) Status Filter
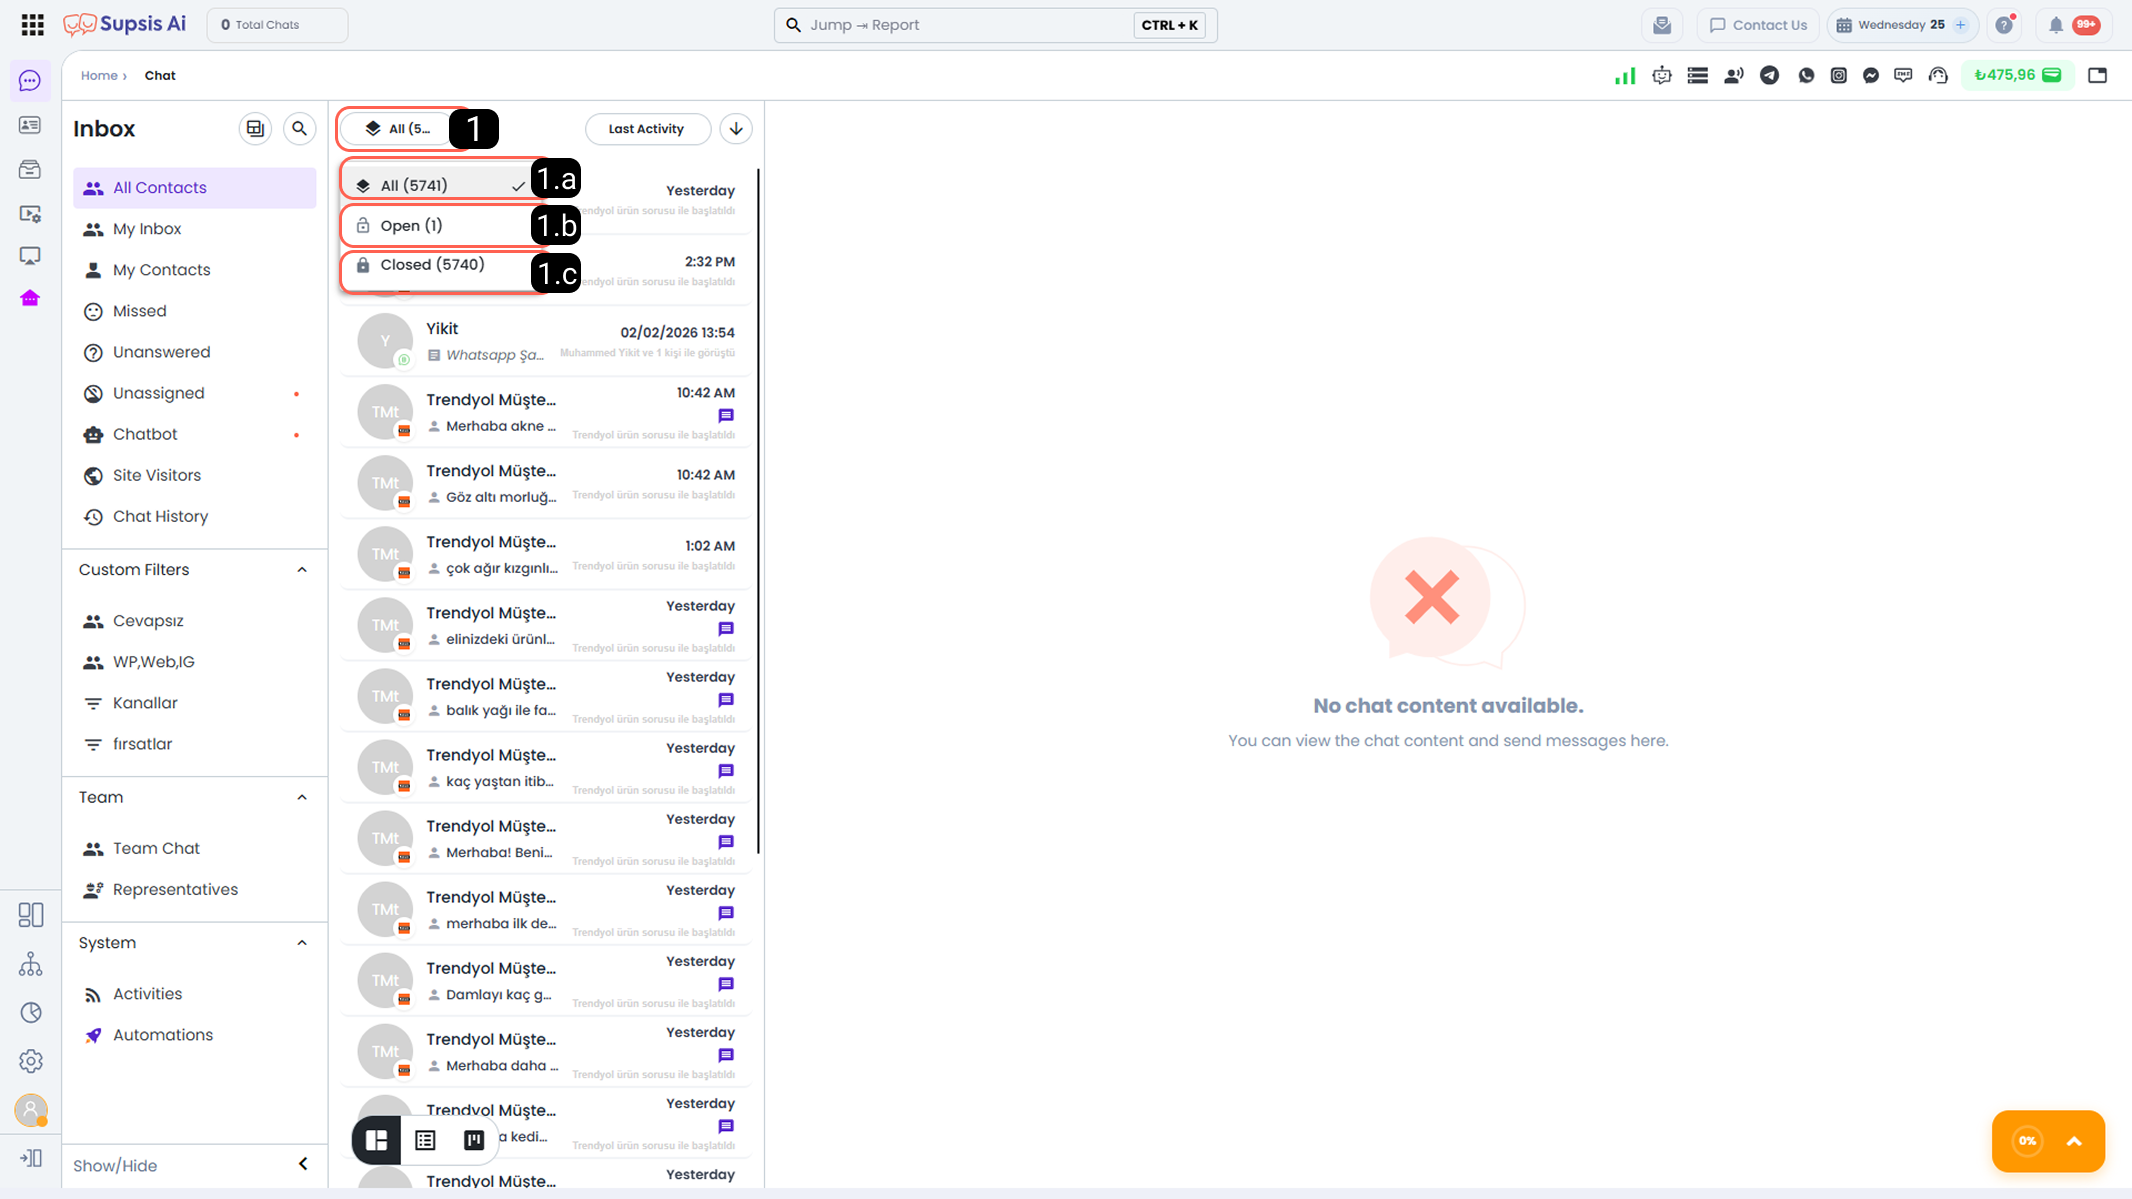
This tool allows you to quickly and systematically display conversations in the chat log according to their status. Through this tool, you can separate open, closed, or all chats with a single click; focus on active conversations or easily review past chats. Thus, you can manage chat operations in a more efficient and controlled manner.
-
1.a – All: Lists all chats in open and closed status that match the filter criteria on the chat log page. By displaying both active and past conversations on the same screen, it provides the most comprehensive chat view.
-
1.b – Open: Displays chats that are still ongoing, whose session duration has not expired or have not been terminated by agents, and that match your filter criteria. It is used to track and respond to active customer interactions. For more detailed information about session durations that enable automatic chat closing, please review the Chat Duration Settings documentation.
-
1.c – Closed: Lists chats that have been closed or whose session duration has expired. This area can be used to review past conversations as an archive, conduct analysis, or re-initiate communication with contacts.
2-) Sort by Interaction
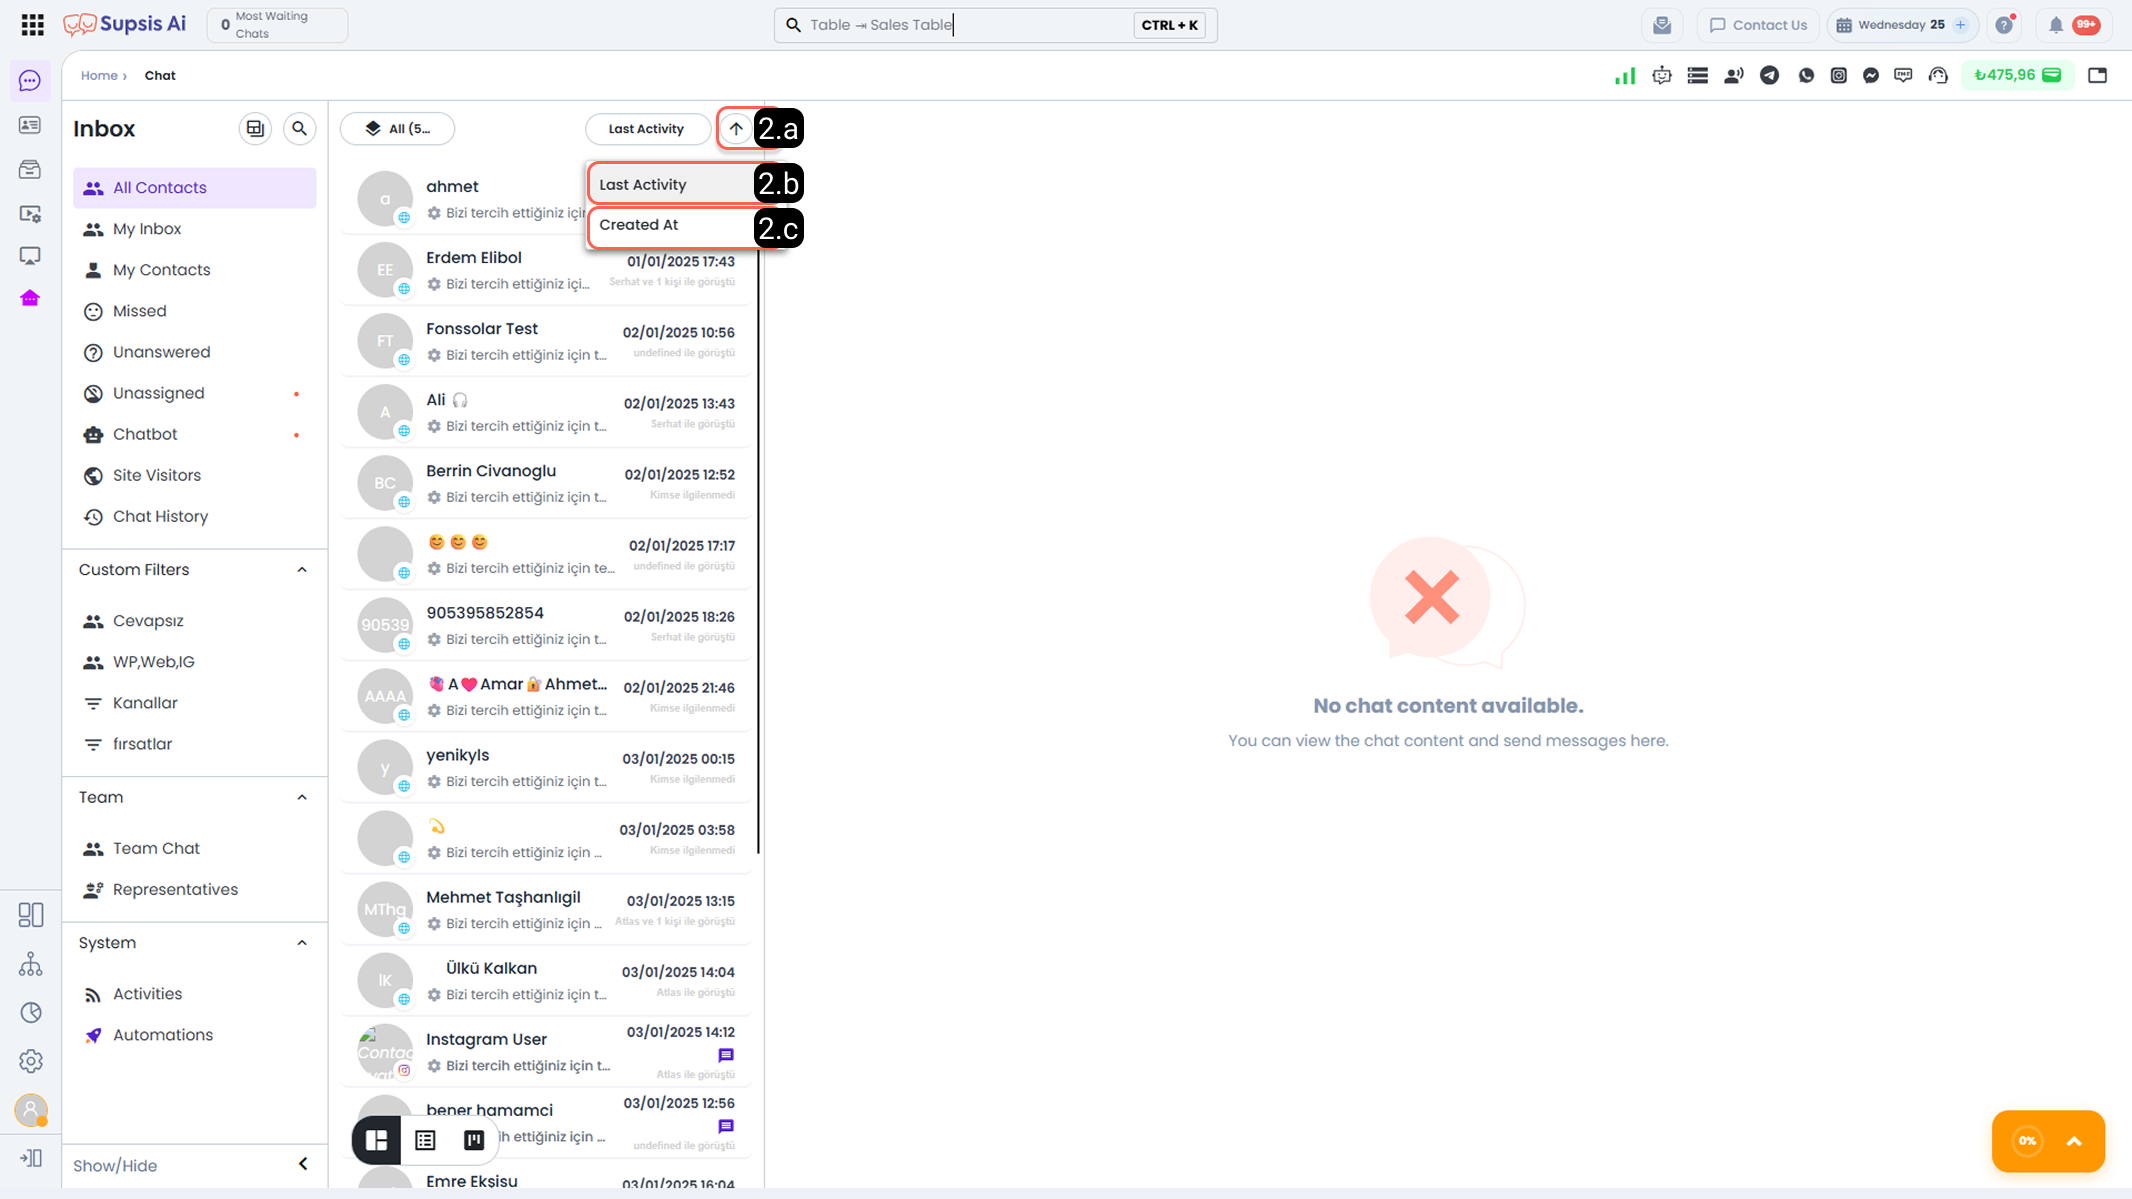
This area allows you to sort conversations in the chat log according to interaction type. Based on your selected sorting criterion, you can list chats in ascending or descending order; manage your conversations according to recency, age, or creation time.
-
2.a – Ascending/Descending by Interaction: Sorts chats in ascending or descending order according to the selected sorting attribute. This allows you to display chats as newest or oldest based on your chosen criterion.
-
2.b – Last Activity: Sorts based on the most recent action performed within the chat. This tool enables you to focus on chats with the most recent or oldest interaction by sorting in ascending/descending order.
-
2.c – Created: Sorts chat sessions according to their initial creation date. It allows you to obtain chronological ordering based on when conversations were started.
Each view type offers different sorting options depending on its intended use. By selecting the view that best suits your needs, you can manage your chats more efficiently. To review other views and sorting tools, please examine the Table View and Kanban View documentation.
Table View
The Table view allows you to display the people you have chatted with in table format according to their chat statuses and applied grouping criteria, in line with selected attributes. In this view, each person is presented within a table structure together with the selected contact card information.
In cases where contacts matching specific criteria need to be found quickly and processed, filtering and sorting operations can be performed practically through the Table view. Additionally, this view allows you to perform bulk or individual operations on contacts, significantly simplifying operational processes.
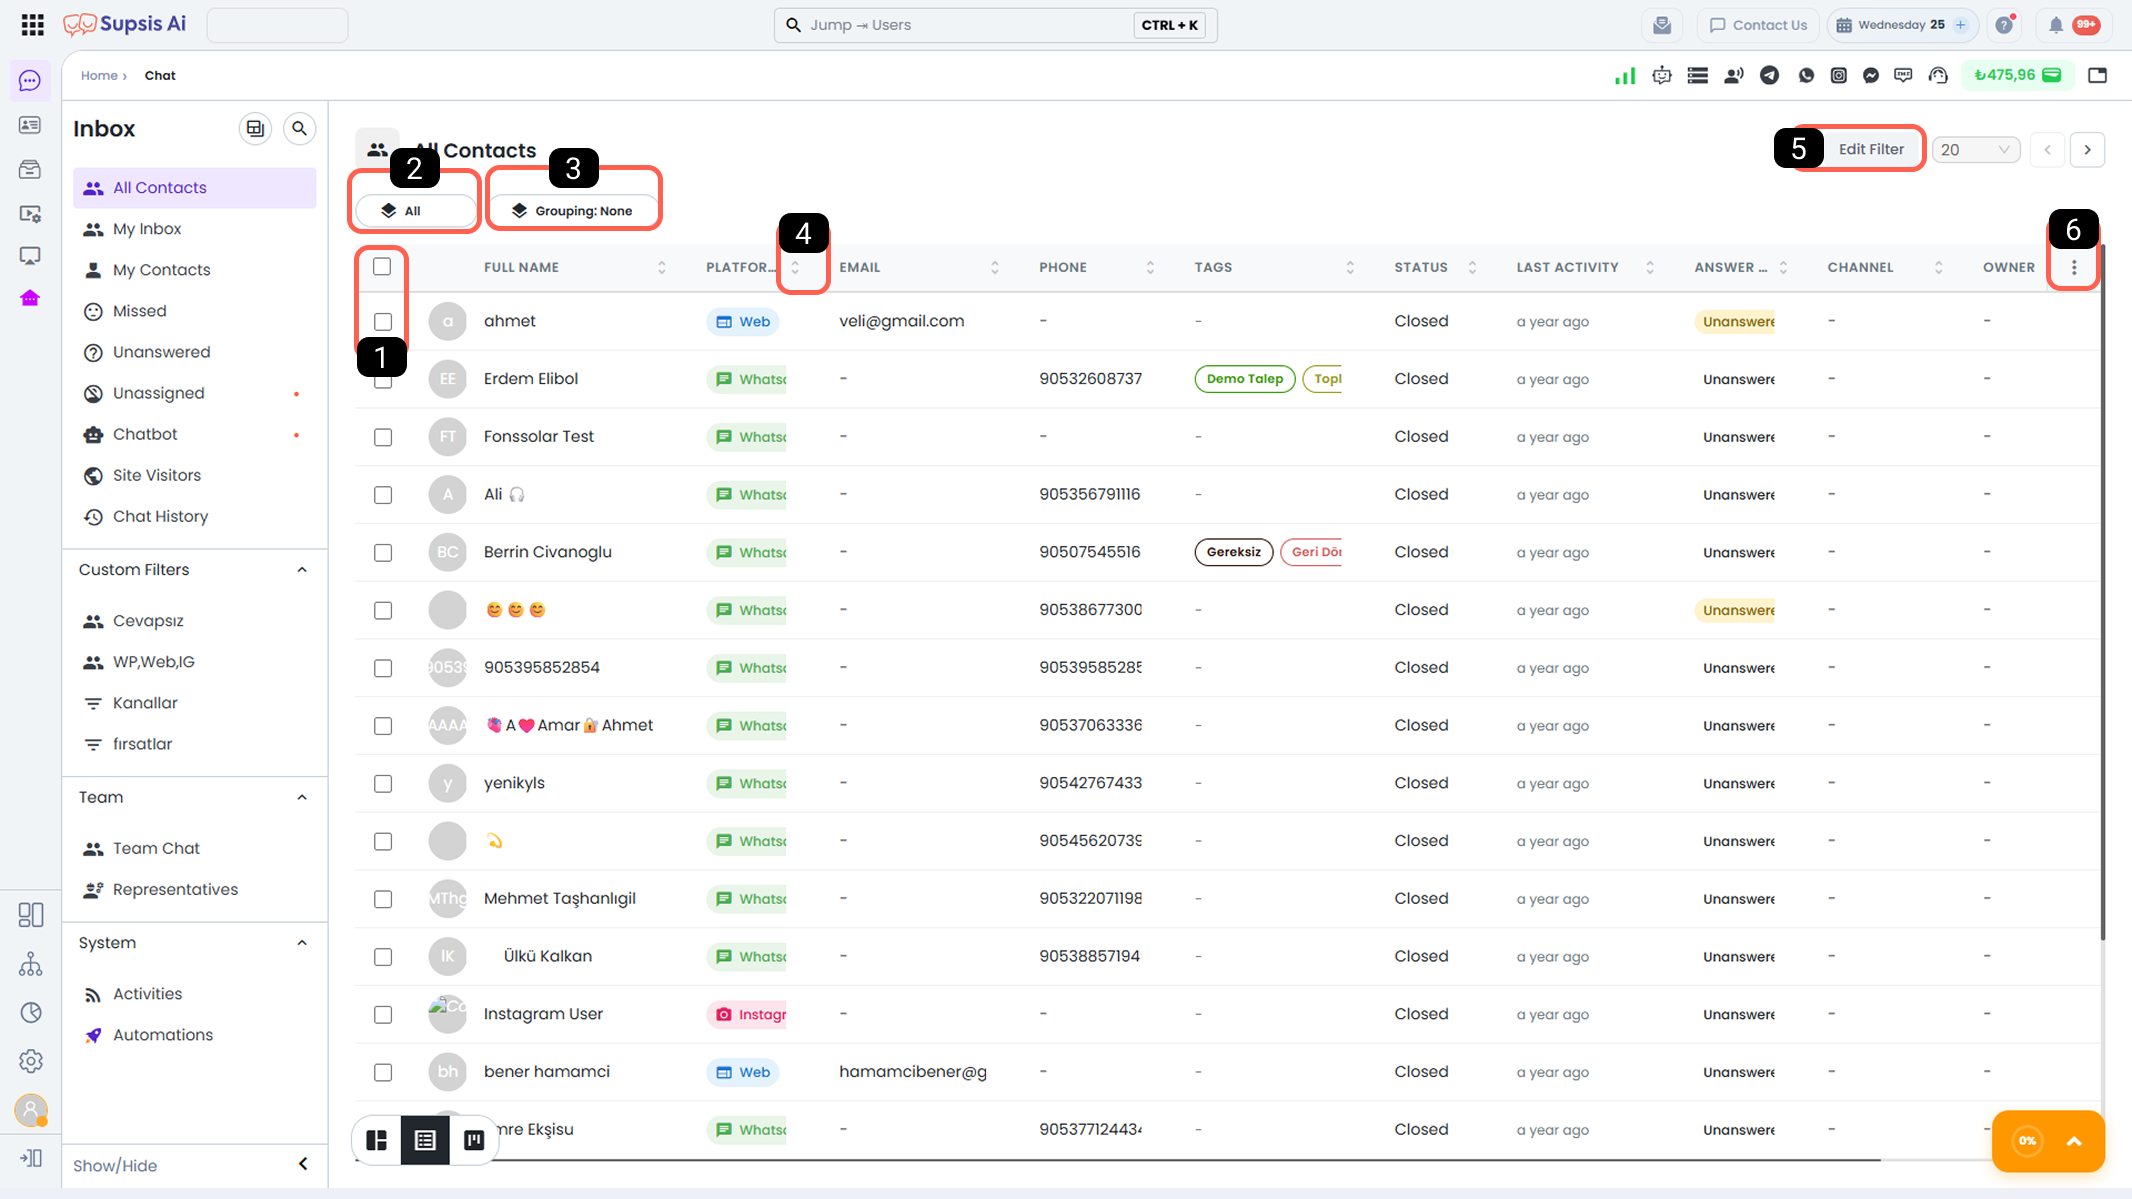
- Bulk/Single Contact Selection
- Status Filter
- Grouping
- Sort by Column Data
- Edit Filter
- Customize Table View
1-) Bulk/Single Contact Selection
You can select a single contact using the checkbox located on the far left of the row where the contact is listed. The checkbox located at the top left of the attribute row allows you to select all contacts listed in the table at once.
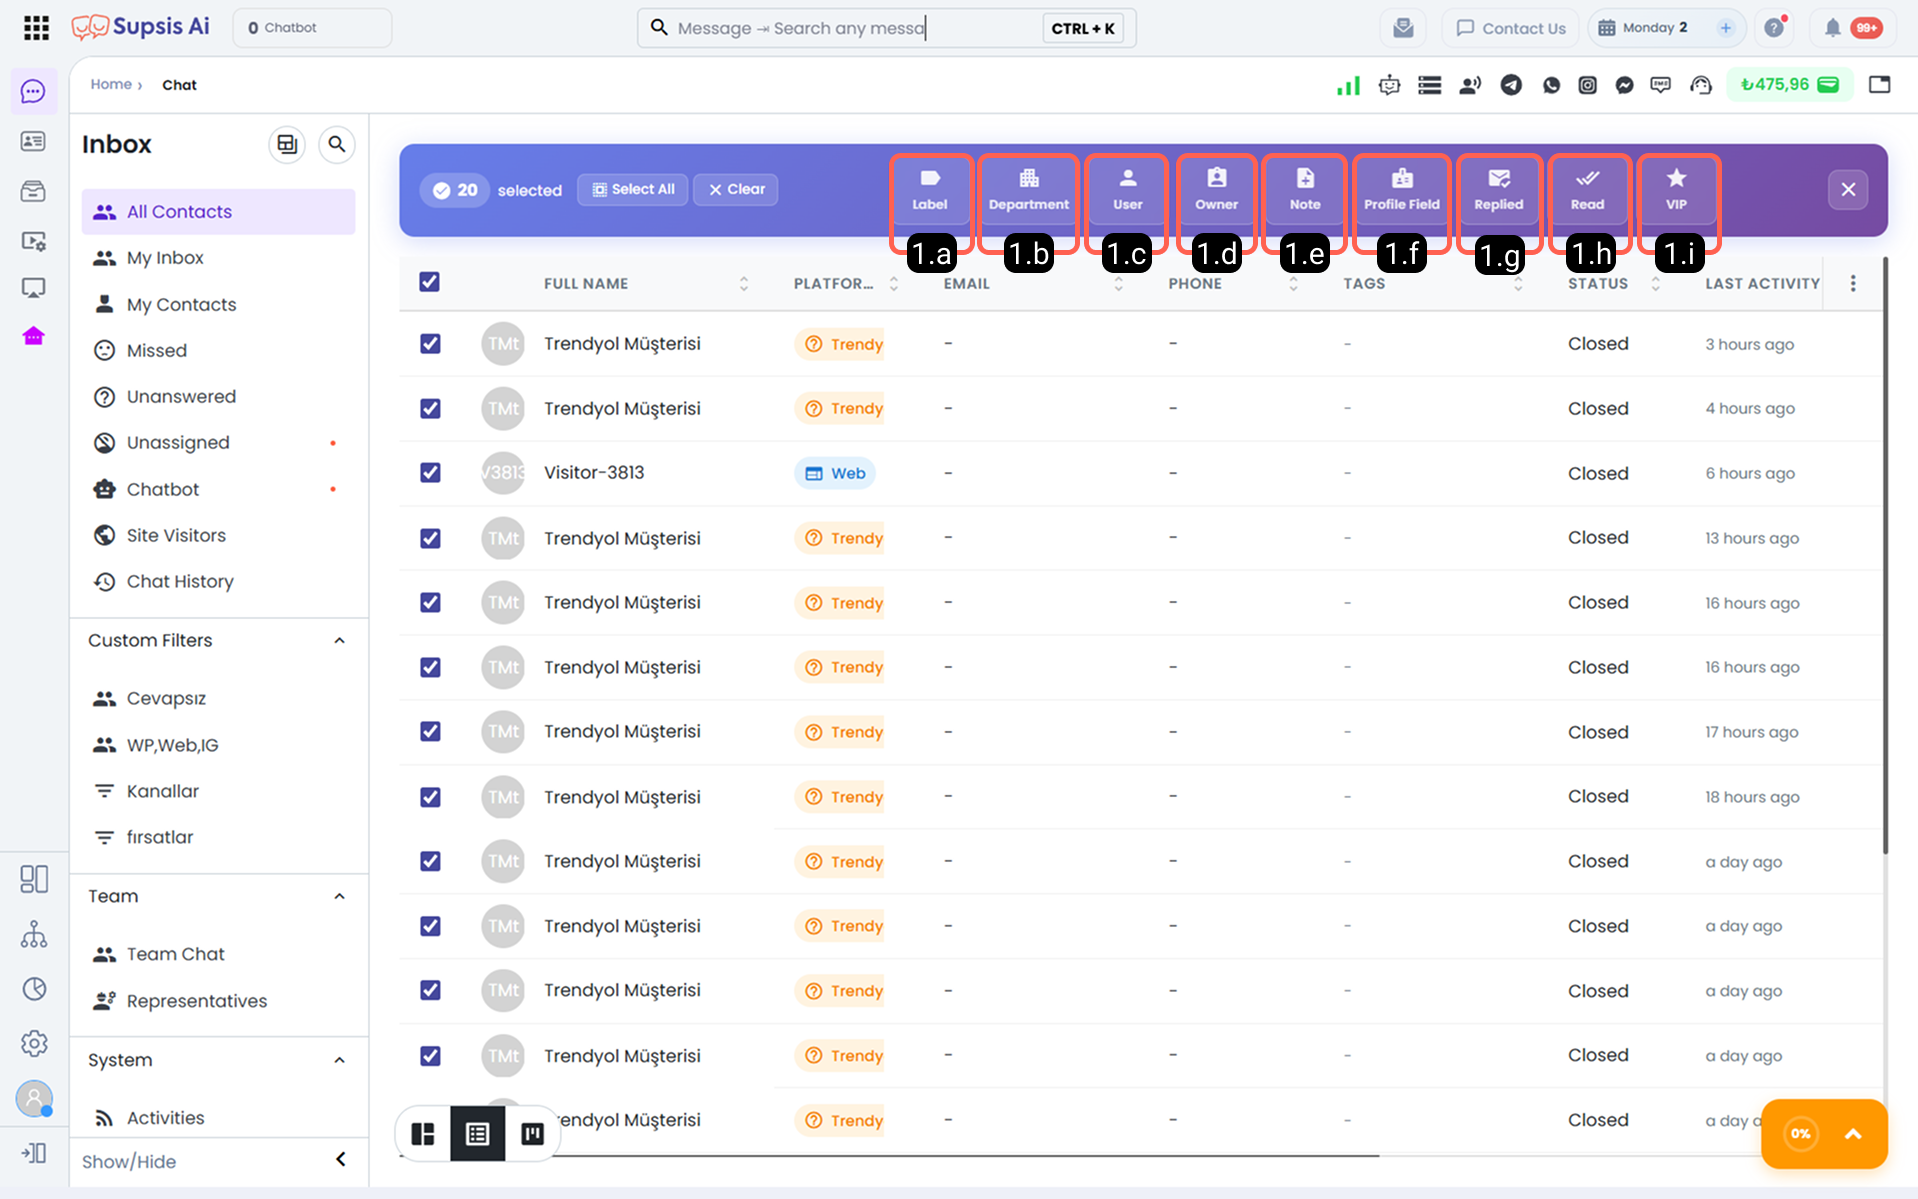
After making a selection, the attributes in the contact card of the selected contact(s) can be edited individually or in bulk.
-
1.a – Tagging: You can add one or multiple tags to the selected contact(s) from this area. Tagging is used to classify contacts, facilitate filtering processes, and create more meaningful groups in reporting. For more information about tagging, please review the Tags documentation.
-
1.b – Assign to Department: Allows you to assign the selected contacts’ conversations to a designated department. As a result, new chats of the relevant contacts are managed on a department basis and routed to suitable agents within that department. To manage your agents’ departments, please review the User Editing documentation.
-
1.c – Assign to Users: Allows you to assign selected contacts’ conversations to specific agents. When a new chat is initiated with the relevant contact, conversations are routed to the most suitable agent among the selected users according to the existing chat assignment algorithm.
-
1.d – Grant Ownership to User: Allows you to define general chat ownership of the selected contacts to a specific user. The user granted ownership becomes the primary responsible person for future conversations with these contacts. Even if the user is offline, chats are automatically assigned to the designated owner.
-
1.e – Add Note to Contact Card: You can add internal notes to the selected contact(s)’ cards. These notes are for internal or private use only and are not visible to the customer. Notes can be used to provide quick references regarding past interactions, special requests, or important information.
-
1.f – Edit Profile Field: You can update the profile fields in the contact card individually or in bulk. This feature allows you to edit contact information quickly and consistently. Specifically when updating
preferredLanguage, agents do not need to memorize or enter ISO codes manually; a Language Selection Modal pops up allowing language selection from a visual list and automatically assigning the ISO 3166-1 / 639-1 code (en,tr,zh-TW, etc.). For more information about Profile Fields, please review the Profile Fields documentation. -
1.g – Mark as Answered: You can manually set selected chats to “Answered” status. This ensures chats are displayed in the correct status in response reporting and filtering processes.
-
1.h – Mark as Read: You can mark selected chats as read to clear notifications and control the number of unread messages in the chat list.
-
1.i – Change VIP Customer Status: You can mark selected contacts as VIP customers or remove their existing VIP status. Contacts marked as VIP may be subject to special rules in chat assignment, filtering, automation, and prioritization processes.
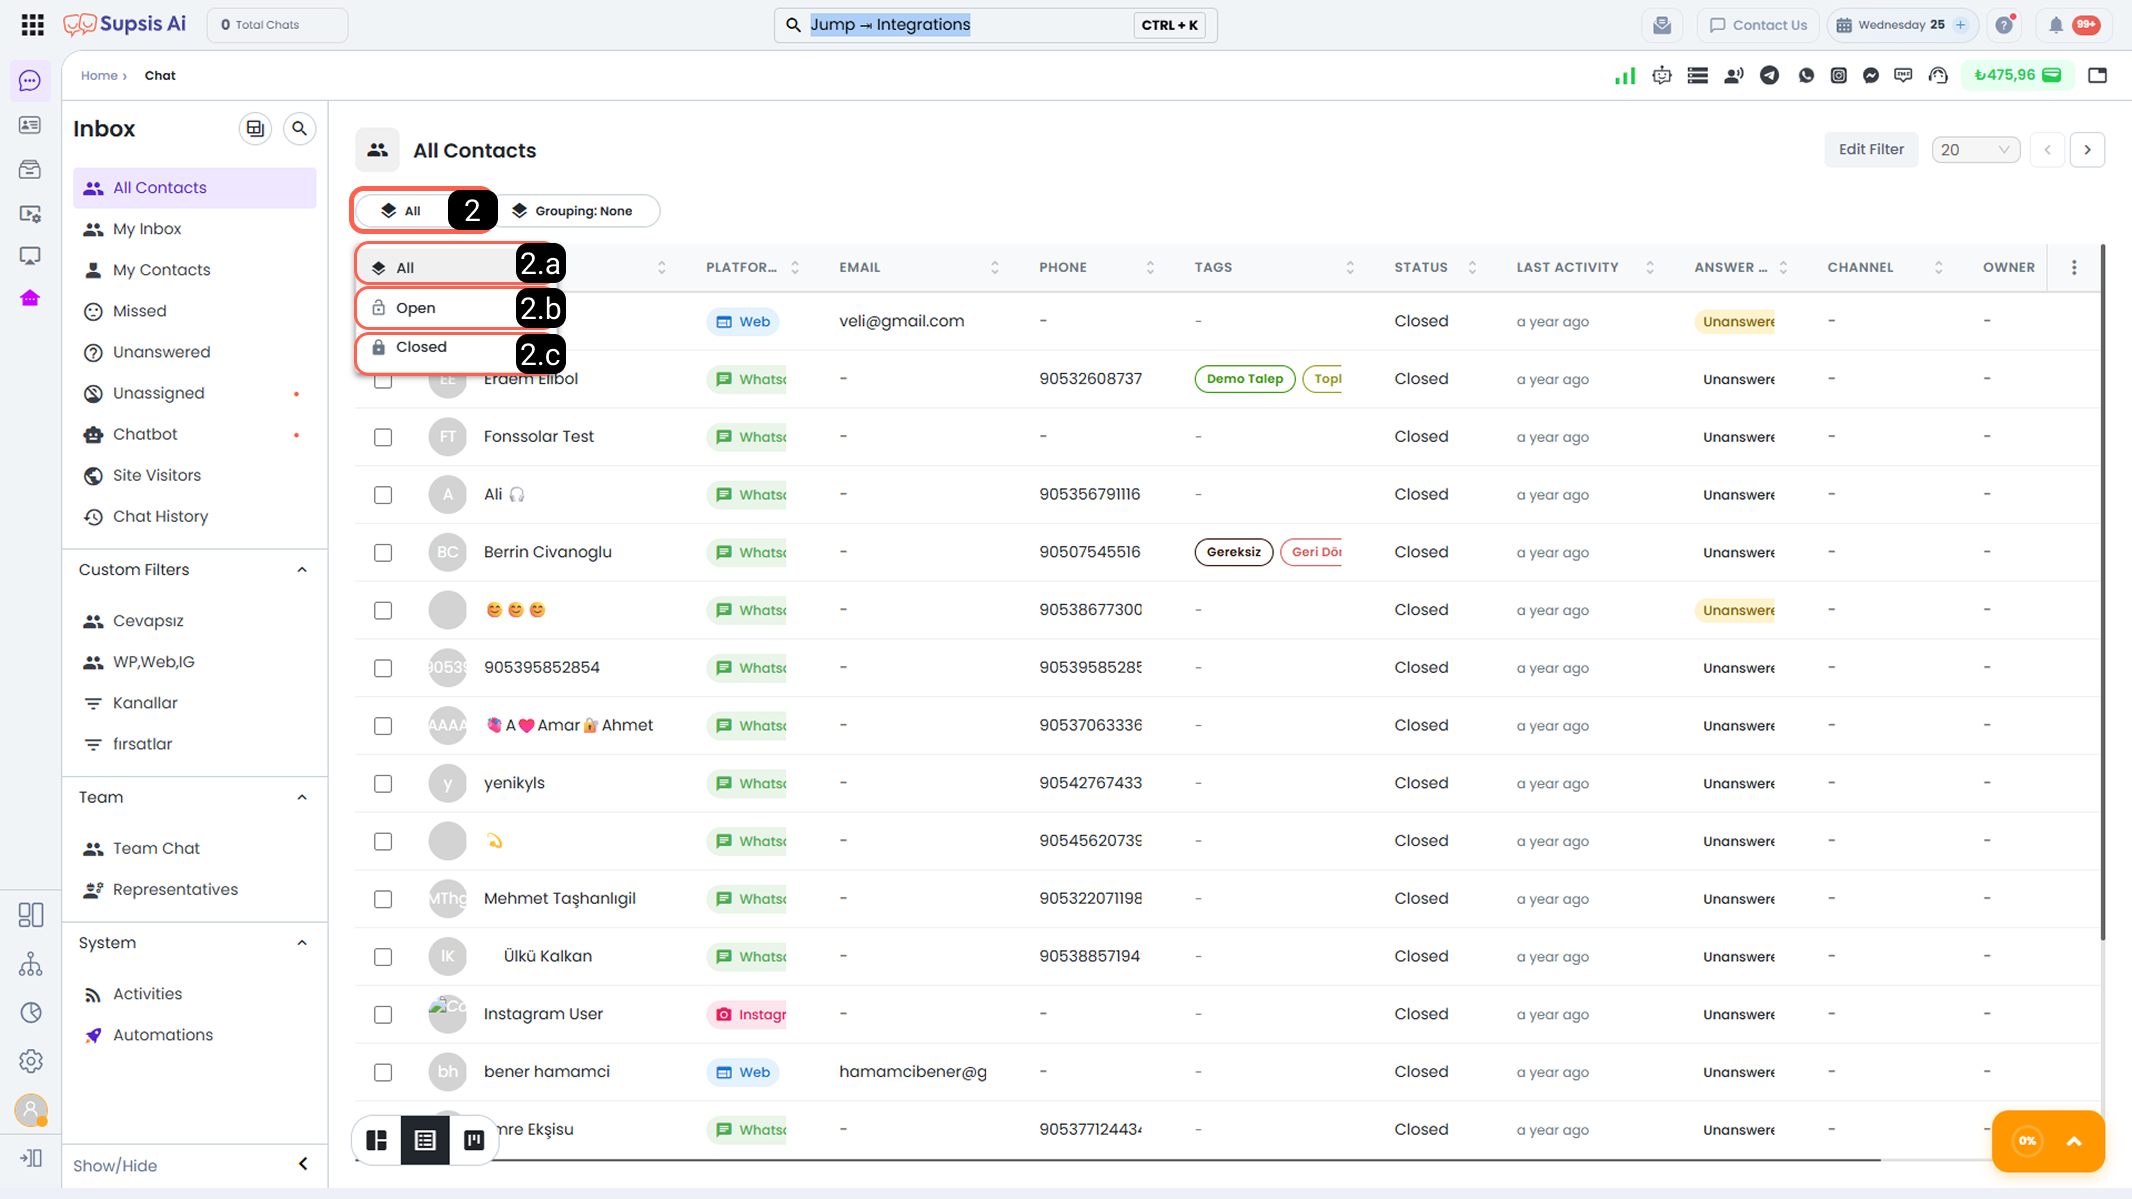
This tool allows you to quickly and systematically display contacts in the table view according to their chat status. Through this tool, you can separate open, closed, or all chats with a single click; focus on contacts with active conversations or easily review closed chats. Thus, you can manage chat operations in a more efficient and controlled manner.
-
2.a – All: Lists all chats in open and closed status that match the filter criteria on the table page. By displaying both active and past conversations on the same screen, it provides the most comprehensive table view.
-
2.b – Open: Displays contacts who have ongoing chats whose session duration has not expired or have not been terminated by agents and match your current filter criteria. It is used to track and respond to active customer interactions. For more detailed information about session durations that enable automatic chat closing, please review the Chat Duration Settings documentation.
-
2.c – Closed: Lists contacts who have chats that have been closed or whose session duration has expired.
3-) Grouping
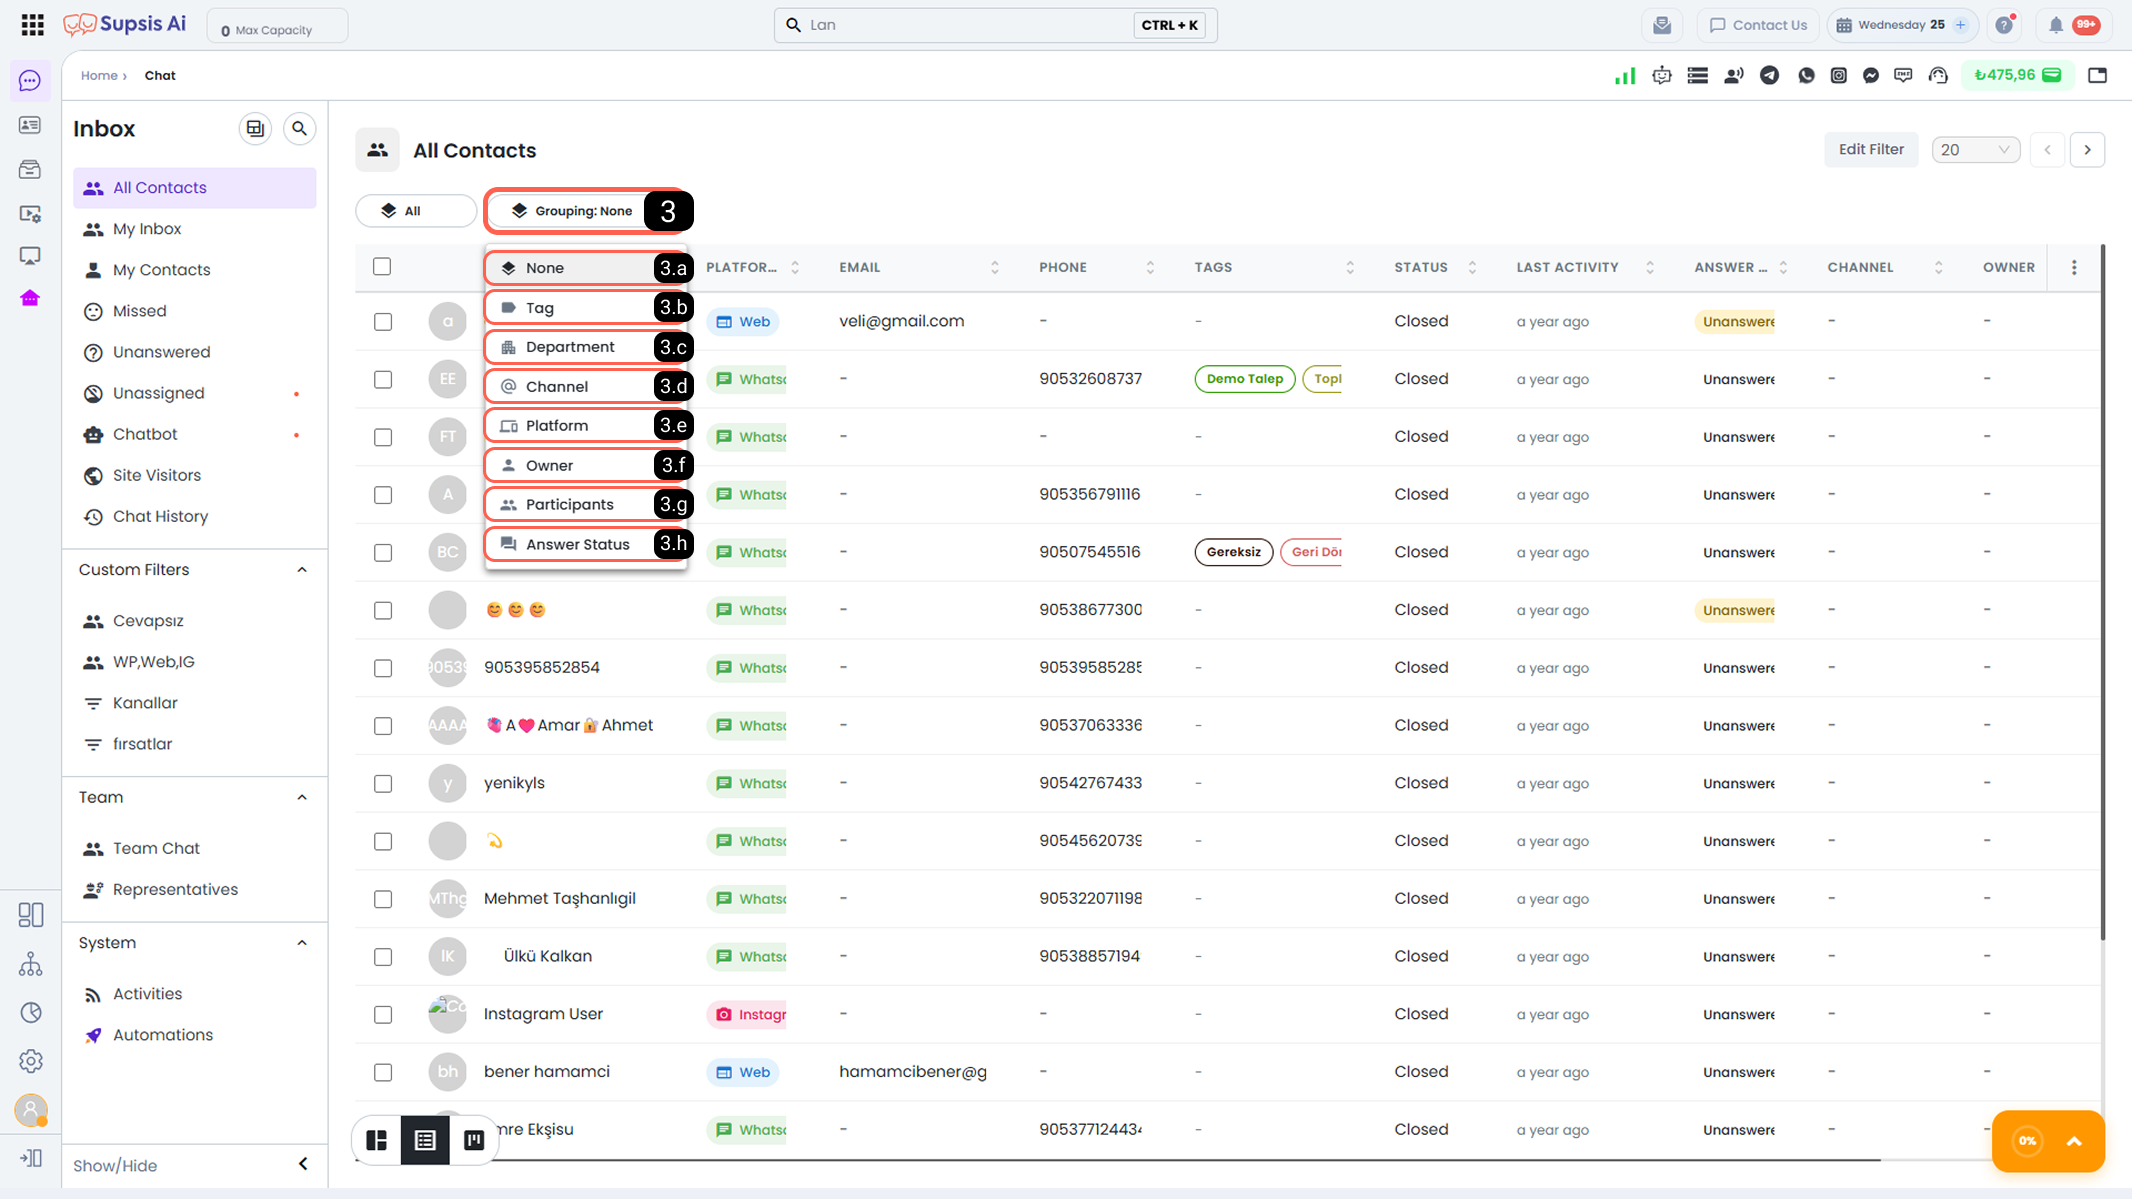
The grouping feature brings chats displayed in the table together according to specific attributes and presents a more organized and meaningful view. Through this feature, you can gather contacts with the same characteristics within a single table and perform actions more quickly.
When grouping is activated, chats are automatically grouped according to the selected criterion and each group is listed under its own title.
-
3.a – None: No grouping is applied. All chats in the table are displayed in a single list according to the selected filter criteria. This is used as the default table view.
-
3.b – Tag: Groups contacts in your table according to the tags assigned to their contact cards. Contacts with the same tag are listed together in the table. Tag-based grouping is ideal for customer segmentation or quickly viewing specific scenarios.
-
3.c – Department: Groups contacts according to the department associated with the conversation. This allows chats managed by each department to be displayed in separate groups and enables easy department-based workload analysis.
-
3.d – Channel: Groups chats according to the communication channel connected to the platform where the conversation took place.
-
3.e – Platform: Groups chats according to the platform through which communication was established. For example, chats coming from different platforms such as Meta, Web, or WhatsApp Business API are displayed under separate headings.
-
3.f – Owner: Groups contacts according to agent ownership. Each group contains chats assigned to a specific user. This grouping type is used for agent-based task tracking and ownership control.
-
3.g – Participants: Groups contacts according to the agents involved in the conversation. Chats involving multiple agents can be displayed under separate groups based on the relevant agents.
-
3.h – Response Status: Groups chats according to their response status. For example, Awaiting Response, Answered, or Unanswered statuses are listed in separate groups. This grouping allows quick identification of chats that require priority action.
4-) Sort by Column Data
By clicking on the relevant column header, you can sort the data in that column alphabetically or numerically according to its data type.
The sorting process occurs in the following order with each click:
-
First click: Sort in ascending order
-
Second click: Sort in descending order
-
Third click: Return to the default sorting order
Through this feature, you can quickly analyze table data and access the information you need more easily.
5-) Edit Filter
The filter editing area allows you to customize the chat and contact records displayed in the table view according to your defined criteria. Through this area, you can modify existing filters and update them according to your needs to display only the data that is meaningful to you.
For more information about filtering options and advanced usage details, please review the Custom Filters documentation.
6-) Customize Table View
This area allows you to define which columns and data content will be displayed in the table. The information here corresponds to the fields available in contact cards, and the selected fields are displayed as columns in the table.
This allows you to customize the table structure according to your needs and obtain a more organized and efficient view by highlighting only the information you want to track.
Kanban View
The Kanban view allows you to display chats divided into Kanban boards according to additional filters applied on top of your existing filters and the selected grouping attribute.
Within Kanban boards; core user information, chat status, and essential contact card details are displayed.
Thanks to the extensive segmentation criteria offered by this view, you can track chats across different boards and manage them efficiently.
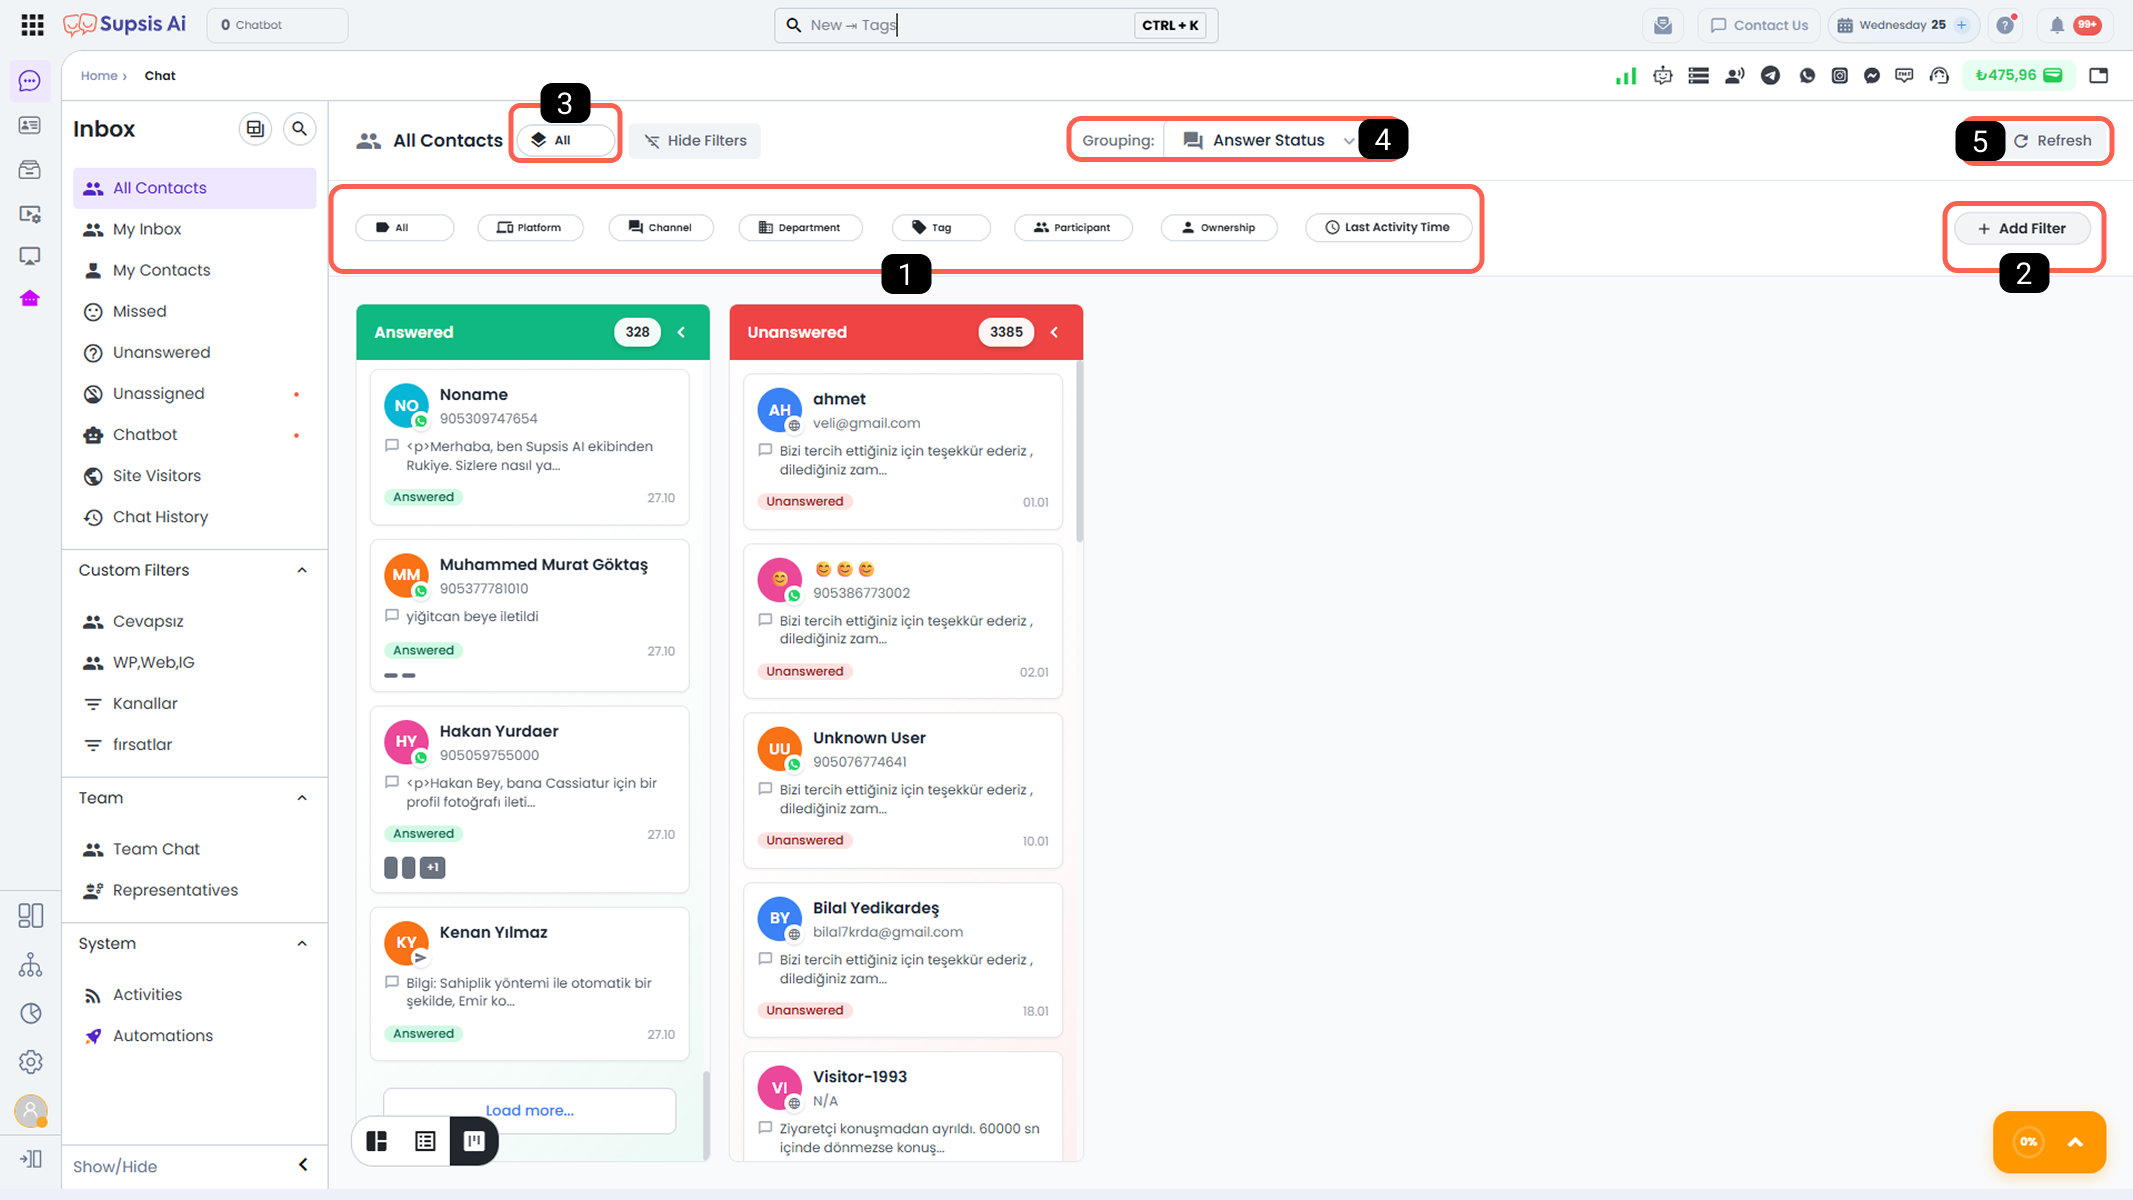
1-) Basic Filters
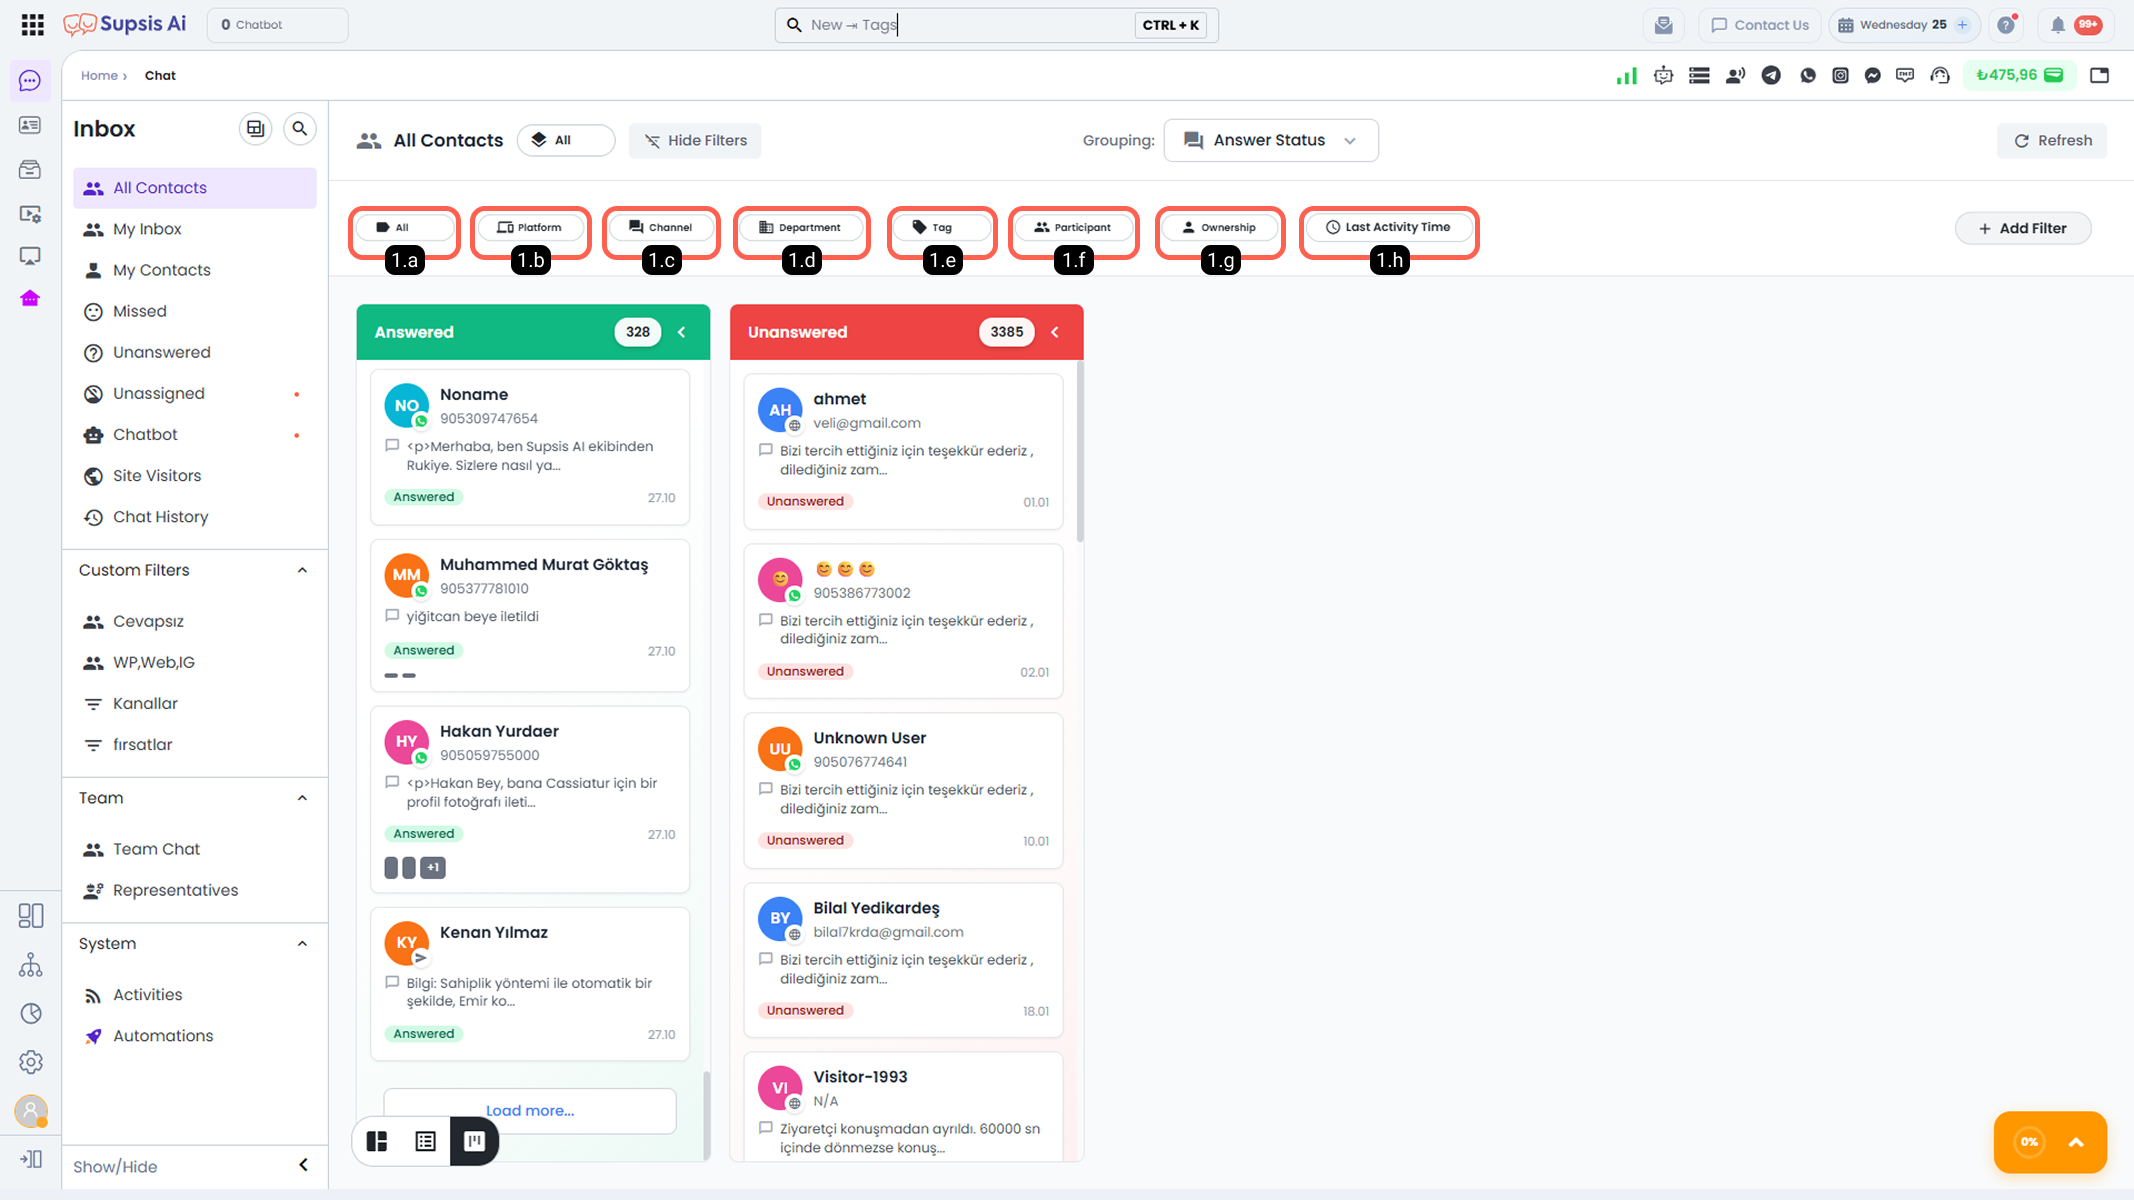
This area allows you to apply additional filters to chats displayed on the Kanban board without altering the content of the current filter. Through Basic Filters, you can narrow down chats on the Kanban board according to specific criteria and display them according to your needs.
-
1.a – Session Status: This field allows you to define the status of chat sessions brought by the filter. You may display only open sessions, only closed sessions, or both together. Thus, only chats that match your selected session status are displayed on the Kanban board.
-
1.b – Platform: Allows you to filter chats on the Kanban board according to the platforms integrated with Supsis.
-
1.c – Communication Channel: This field allows filtering based on the communication channels connected to your Supsis panel. The selections made in this field must be compatible with the Platform filter.
For example; if Instagram is selected in the Platform field and WhatsApp is selected in the Communication Channel field, no results will be listed because these two options are not compatible. -
1.d – Department: Used to filter conversations handled by a specific department. Thus, only chats belonging to the selected department are displayed on the Kanban board.
-
1.e – Tag: Allows you to display only conversations that contain the selected tags among chats on the Kanban board.
-
1.f – Participant: Enables filtering based on the agent participating in the conversation. With this filter, you can easily access chats involving a specific agent.
-
1.g – Ownership: Allows filtering based on the user or users assigned as the owner of the chat session. Thus, chats belonging to a specific user can be listed on the Kanban board.
-
1.h – Last Activity Date: According to the selected date filter, only chat sessions that have had activity after the specified date are displayed on the Kanban board.
2-) Advanced Filters
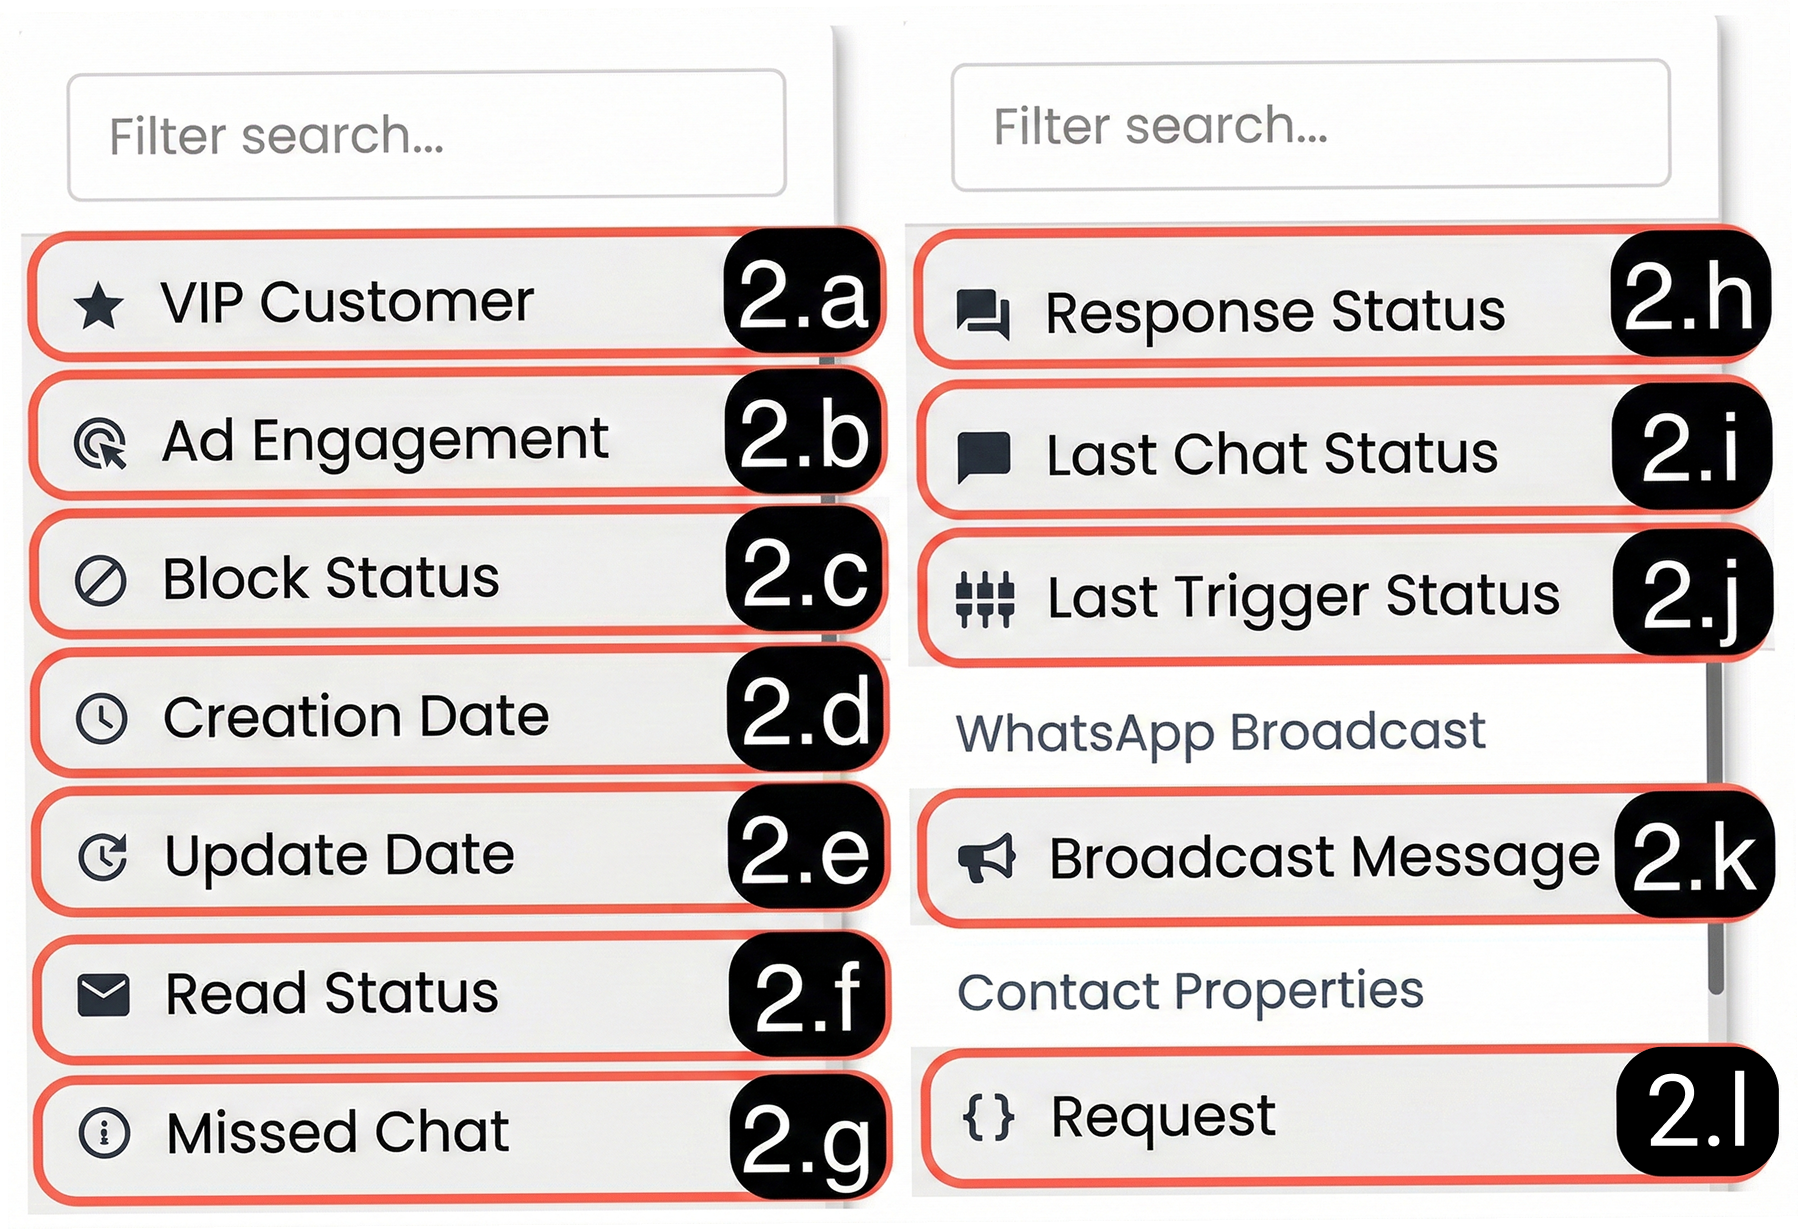
This section provides access to advanced filtering methods that can be applied in addition to basic filters. Advanced Filters allow you to create more detailed and scenario-based Kanban boards.
-
2.a – VIP Customer: Allows differentiation in Kanban chats based on whether the person in conversation is marked as a VIP Customer.
-
2.b – Ad Interaction: Allows you to customize the Kanban board based on whether the chat was initiated as a result of an advertisement interaction.
-
2.c – Block Status: Enables filtering based on whether the person in conversation is blocked in the system.
-
2.d – Creation Date: Allows filtering based on the date when the contact person in the chat record was first created in the system.
-
2.e – Last Updated Date: Enables filtering based on the date when the chat was last updated.
-
2.f – Read Status: Allows filtering chats based on whether they are marked as read or unread.
-
2.g – Missed Chat: Filters chats that were closed or left unanswered without agent interaction.
-
2.h – Response Status: Enables filtering based on whether chats have been responded to by an agent.
-
2.i – Last Chat Status: Allows filtering based on the final status of the chat (active, missed, closed, etc.).
-
2.j – Last Trigger Status: Enables filtering based on the last action that triggered the chat (API, Automation, bulk message, etc.).
-
2.k – WhatsApp Bulk Message: Filters whether the chat was initiated through a bulk message sent via WhatsApp.
-
2.l – Contact Properties: Enables filtering based on custom fields defined in the contact card (Profile Fields, Dynamic properties, etc.).
For more detailed information about creating and using attributes, please review the Profile Fields documentation.
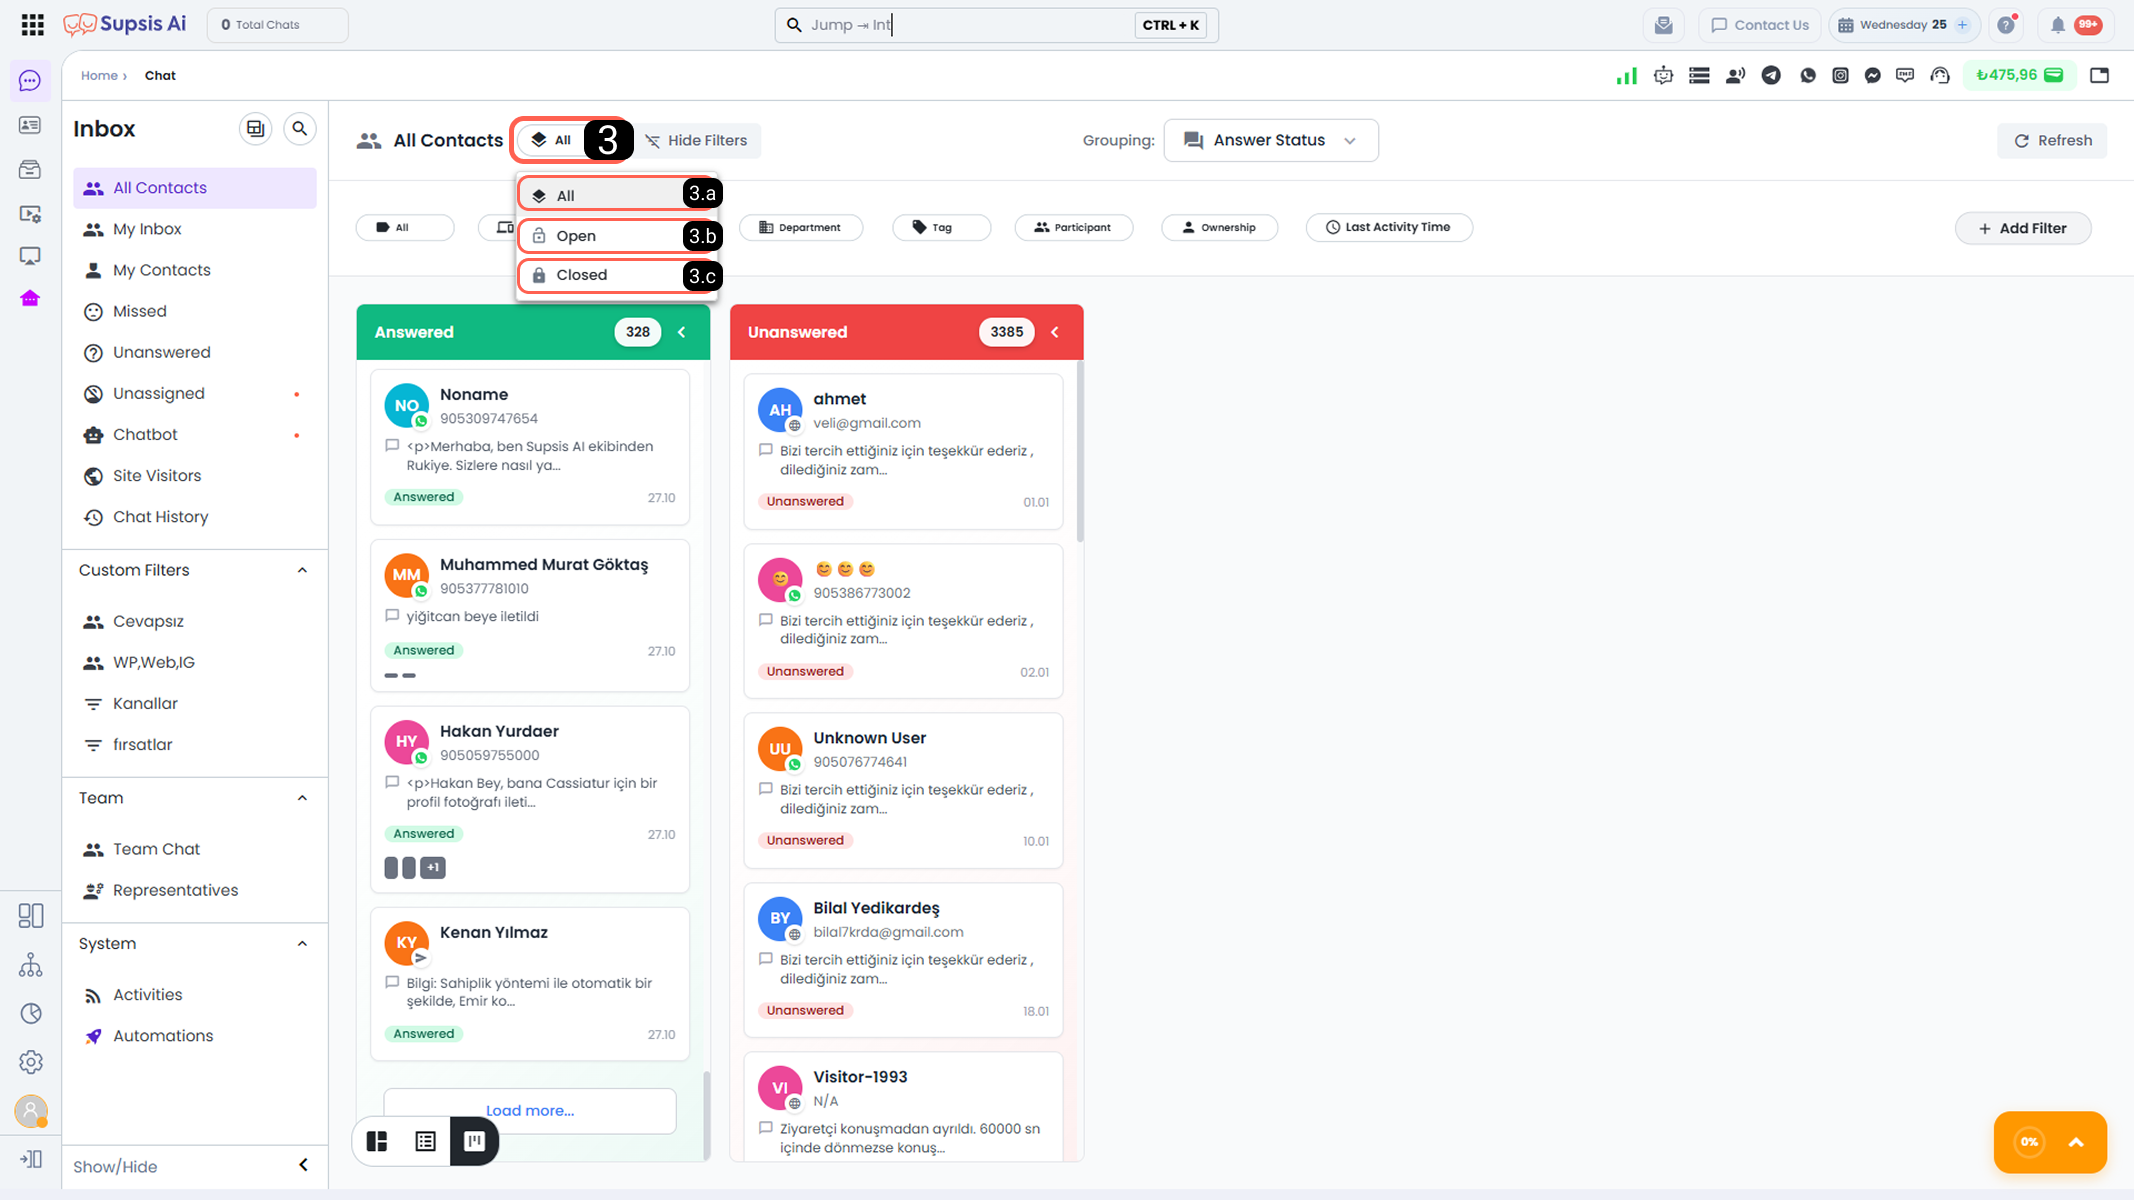
This tool allows you to display chats on the Kanban board according to their status. By filtering open, closed, or both types of chats, you can list only the conversations that match your needs on the Kanban board and analyze your processes more efficiently.
-
3.a – All: Lists all chats in open and closed status that match the current and additional filter criteria on the Kanban boards. By displaying both active and past conversations on the same screen, it provides the most comprehensive Kanban view.
-
3.b – Open: Displays ongoing chats whose session duration has not expired or have not been terminated by agents and that match your filter and additional filter criteria on the Kanban board. For more detailed information about session durations that enable automatic chat closing, please review the Chat Duration Settings documentation.
-
3.c – Closed: Lists chats that have been closed or whose session duration has expired on the Kanban boards.
4-) Grouping
Using this button, you can display chats on the Kanban board brought by your current filter as separate Kanban boards according to the selected grouping attribute.
The grouping feature presents chats in a more organized, understandable, and manageable structure by separating them according to specific criteria.
For example; when the All Contacts filter is active and Country grouping is selected in the Kanban view, all contacts you have communicated with are listed in different Kanban boards according to their countries. This allows teams to prioritize chats and access the conversations they need more quickly.
Grouping Tools:

4.a - Basic: The basic grouping option groups chats according to core attributes related to conversations. This grouping type includes the most frequently used criteria in daily operations and allows you to quickly analyze the overall status of chats.
-
Response Status: Groups chats according to answered and unanswered statuses. This allows you to quickly identify chats awaiting a response and take action.
-
Chat Status: Enables you to display conversations in separate boards such as open, closed, in chatbot session, in queue, agent dropped, and custom statuses.
-
Owner: Groups chats according to the agent assigned as the owner of the conversation. This grouping is useful for agent-based workload tracking and performance evaluation.
-
Participants: Groups chats according to the agents involved in the conversation. By opening a board for each agent, it allows easy identification of conversations in which agents are involved.
-
Channel: Groups conversations according to the integrated platform channels from which they originated. For teams using multiple channel integrations on a single platform, this makes it possible to clearly distinguish the source of chats.
-
Platform: Separates chats according to communication platforms such as WhatsApp, Web Chat, Instagram, and Facebook. It helps you perform channel-based workload and intensity analysis. 4.b - Demographic: The demographic grouping option allows you to group chats according to demographic and technical information found in the contact card. Some of this information is automatically collected by the system initially, while certain fields can later be modified by agents.
This grouping type helps analyze visitors based on their location, language, and device information and supports operational planning accordingly.
-
Country: Groups chats according to the country information of the person in conversation. By displaying requests from different countries in separate boards, it facilitates regional workload analysis.
-
City: Groups conversations according to the city information of contacts. Especially for teams providing regional services, it enables location-based tracking and prioritization.
-
Browser: Groups chats according to the browser used by visitors during communication (e.g., Chrome, Safari, Firefox). It helps quickly identify browser-related issues in technical support processes.
-
Language: Groups chats according to the person’s preferred language or the language detected by the system. For teams providing multilingual support, it simplifies routing conversations to the appropriate agents and managing language-based workload.
4.c - Tag & Category:
The Tag & Category grouping option allows you to divide chats into Kanban boards based on tags assigned to contact cards or conversations, as well as department information.
This grouping type supports more organized operational management, clarifies inter-team task distribution, and helps focus on specific topics.
-
Tag: Groups chats according to tags assigned to the contact card or chat session. Chats with the same tags are collected under a single Kanban board.
-
Department: Groups chats according to the department to which the conversation belongs or is assigned. A separate Kanban board is created for each department, allowing teams to view and manage only the chats within their area of responsibility.
This grouping provides significant convenience in department-based workload tracking, performance analysis, and operational organization.
4.d - Meta Leads: The Meta Leads grouping option allows you to divide conversations coming from Meta (Facebook and Instagram) advertisements into Kanban boards according to advertisement, campaign, and lead information.
This grouping type helps marketing and sales teams track advertisement performance on a chat basis, clearly identify the source of incoming requests, and manage leads more efficiently.
-
Lead Status: Groups conversations according to the current status of records received via the Meta lead form.
For example; leads at different stages such as new lead, first contact, negotiation, or closing can be displayed in separate Kanban boards. This allows the lead management process to be tracked more systematically. -
Ad Name: Groups chats according to the advertisement name through which the person initiated communication. It allows you to analyze which advertisement generates more interaction and conversations.
-
Ad Set: Groups conversations based on advertisement sets. This enables you to evaluate the performance of advertisement sets targeting different audiences or budgets through chats.
-
Campaign: Divides chats into Kanban boards according to the associated Meta campaign. It allows you to view campaign-based lead distribution and interaction intensity on a single screen.
-
Form Name: Groups conversations according to the Meta lead forms used. You can track which chats were generated from different forms and compare form performance.
-
Meta Platform: Groups conversations according to the Meta platform where the interaction occurred.
For example; leads coming from Facebook or Instagram are listed in separate Kanban boards. This allows clear analysis of platform-based interaction and request intensity.
4.e - Broadcast: The Broadcast grouping option allows you to group chats related to bulk message (broadcast) deliveries according to delivery status and possible error reasons. This section simplifies tracking bulk sending processes and helps you quickly identify issues that occur during message delivery.
-
Broadcast Status: Groups chats according to the current status of the broadcast delivery process related to the contact or conversation.
For example; statuses such as sent, queued, delivery failed, or deleted can be listed in separate Kanban boards. This allows you to easily track the real-time status and progress of bulk message campaigns. -
Broadcast Reason: Groups broadcast messages according to the primary reasons why the message could not be delivered.
4.f - Other: Other grouping options allow you to divide chats into Kanban boards based on system-related statuses, triggering methods, and data coming from external CRM integrations.
-
Block Status: Groups chats or contacts according to their blocked status.
-
Trigger Type: Groups contacts based on the triggering method through which they entered the chat system.
-
Zoho Lead Status: In panels with Zoho CRM integration, allows grouping based on the lead (potential customer) status of contacts in Zoho.
-
Zoho Lead Source: Groups chats according to lead sources defined in Zoho CRM.