
Mail Integration
The Mail Integration of Supsis AI allows you to centrally collect all your email addresses within the Supsis AI panel and manage your customer correspondence from a single point. Through this integration, you can create dedicated email addresses under the Supsis AI domain for both individual agents and departments, and use these addresses as a routing hub for your existing email traffic.
| No | Menu |
|---|---|
| 1 | Create Supsis AI Domain Email |
| 2 | Forwarding Process |
Mail Module - Setup and Onboarding Screen
This guide covers the process of creating Supsis domain-based email addresses and integration operations via the Supsis AI panel.
The newly added features: Previously, manual selection from menus was required for email integration. Now, an automatic setup (onboarding) screen has been added that provides step-by-step guidance for customers who enter the Mail screen but have not completed the integration. The integration is considered complete if the domain name is bound and at least one email address is created. If either condition is missing, the customer sees this routing screen showing what they need to do instead of the normal interface (Inbox, Templates, etc.).
1.a – Domain Binding Step
When the Mail tab is clicked from the left menu, if the integration process has not started yet, the system opens the setup onboarding screen.
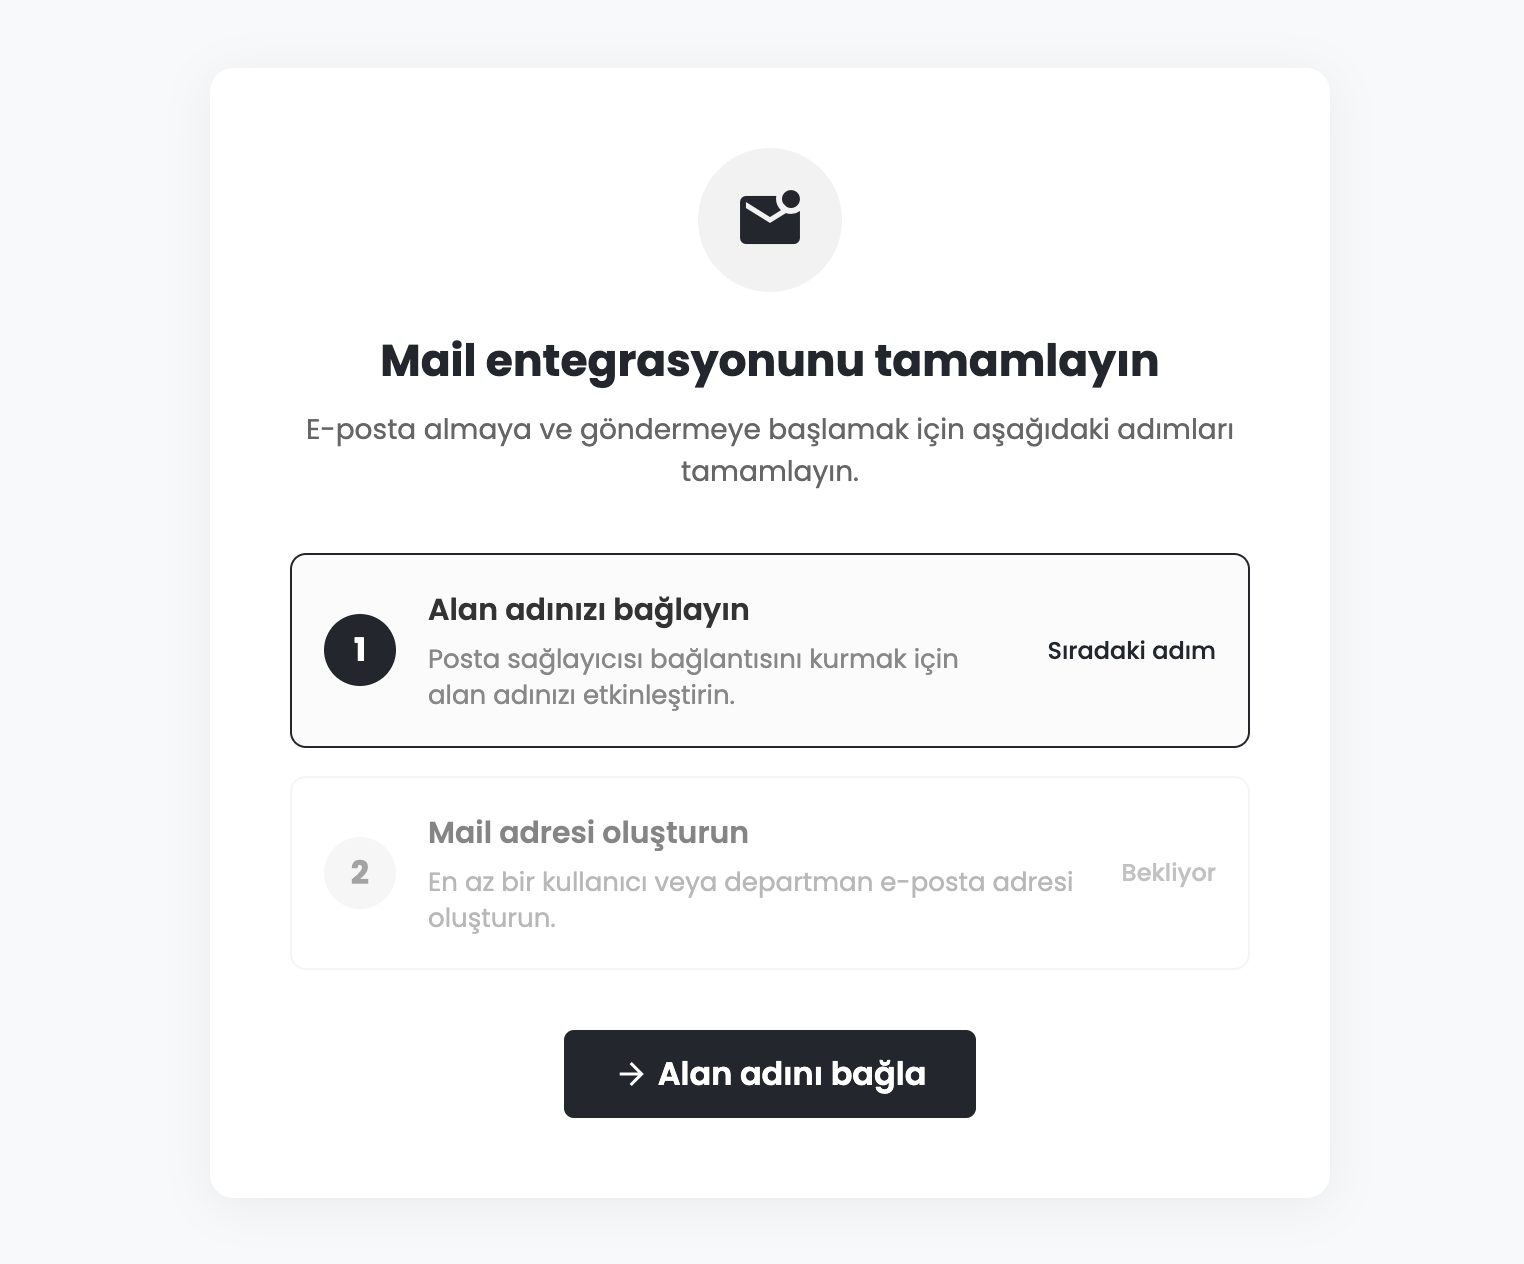
- a – First Step Status (Bind Domain): It is the stage showing that the first thing to do on the screen is to bind a domain name. It is stated that the setup is in the "Next step" status.
- b – Action Button ("Bind domain name"): When this button is clicked, the system directs the user directly to the Mail Integration (
/integrations/mail) page and ensures the domain name activation process is performed.
(Alternatively, it is also possible to access via the old method from the Integrations menu:)
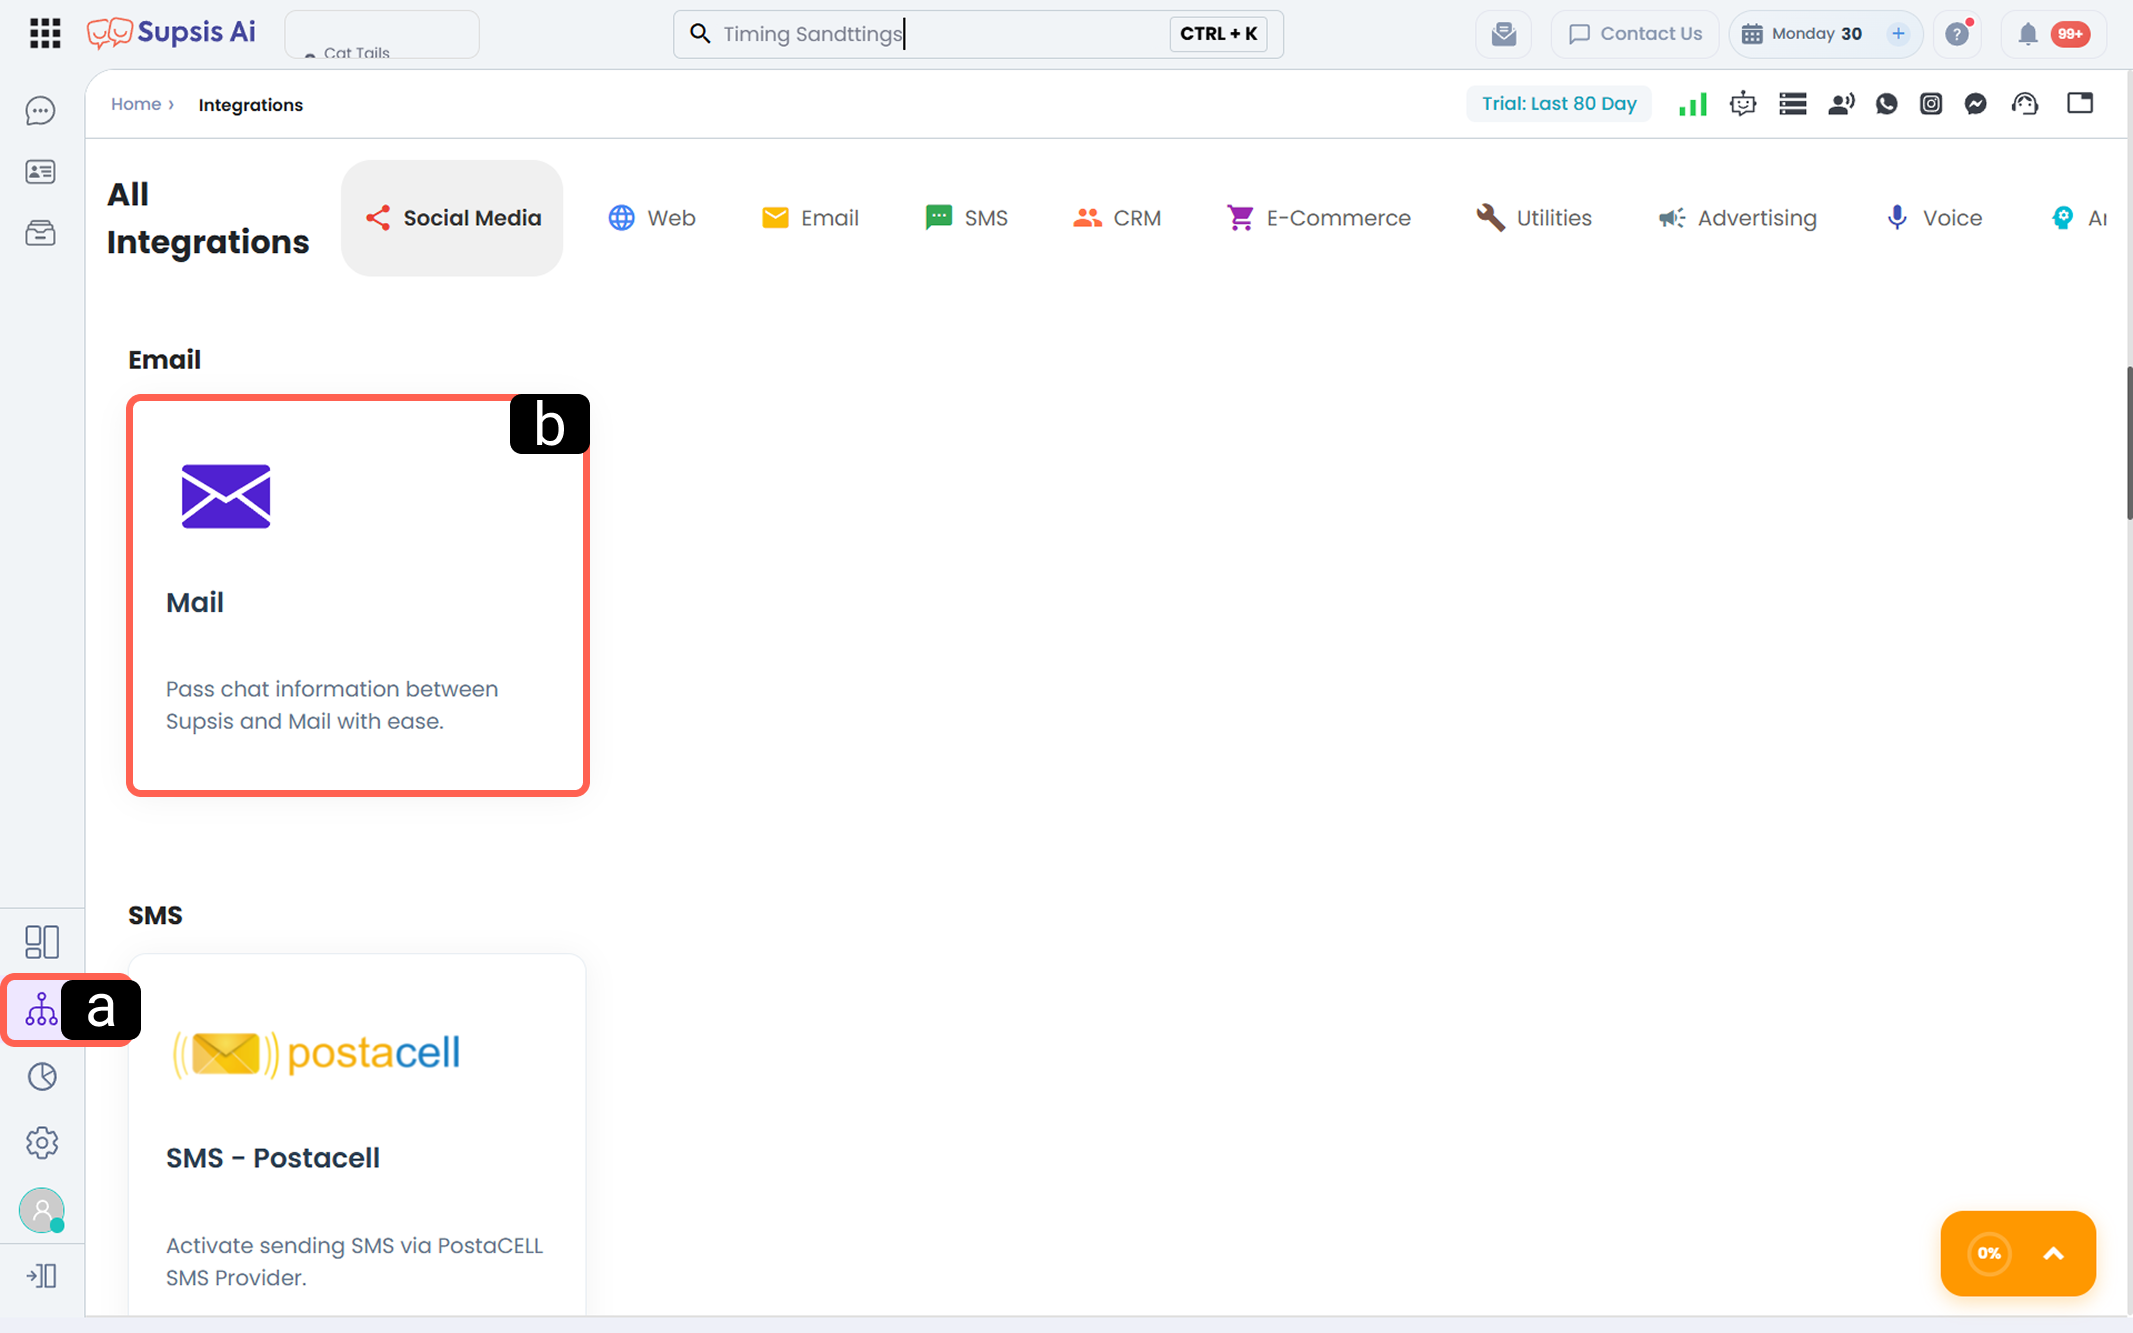 * a – Access Integrations: Click on the Integrations icon located in the left menu of your Supsis AI panel.
b – Mail:* Select the Mail card under the "Email" category.
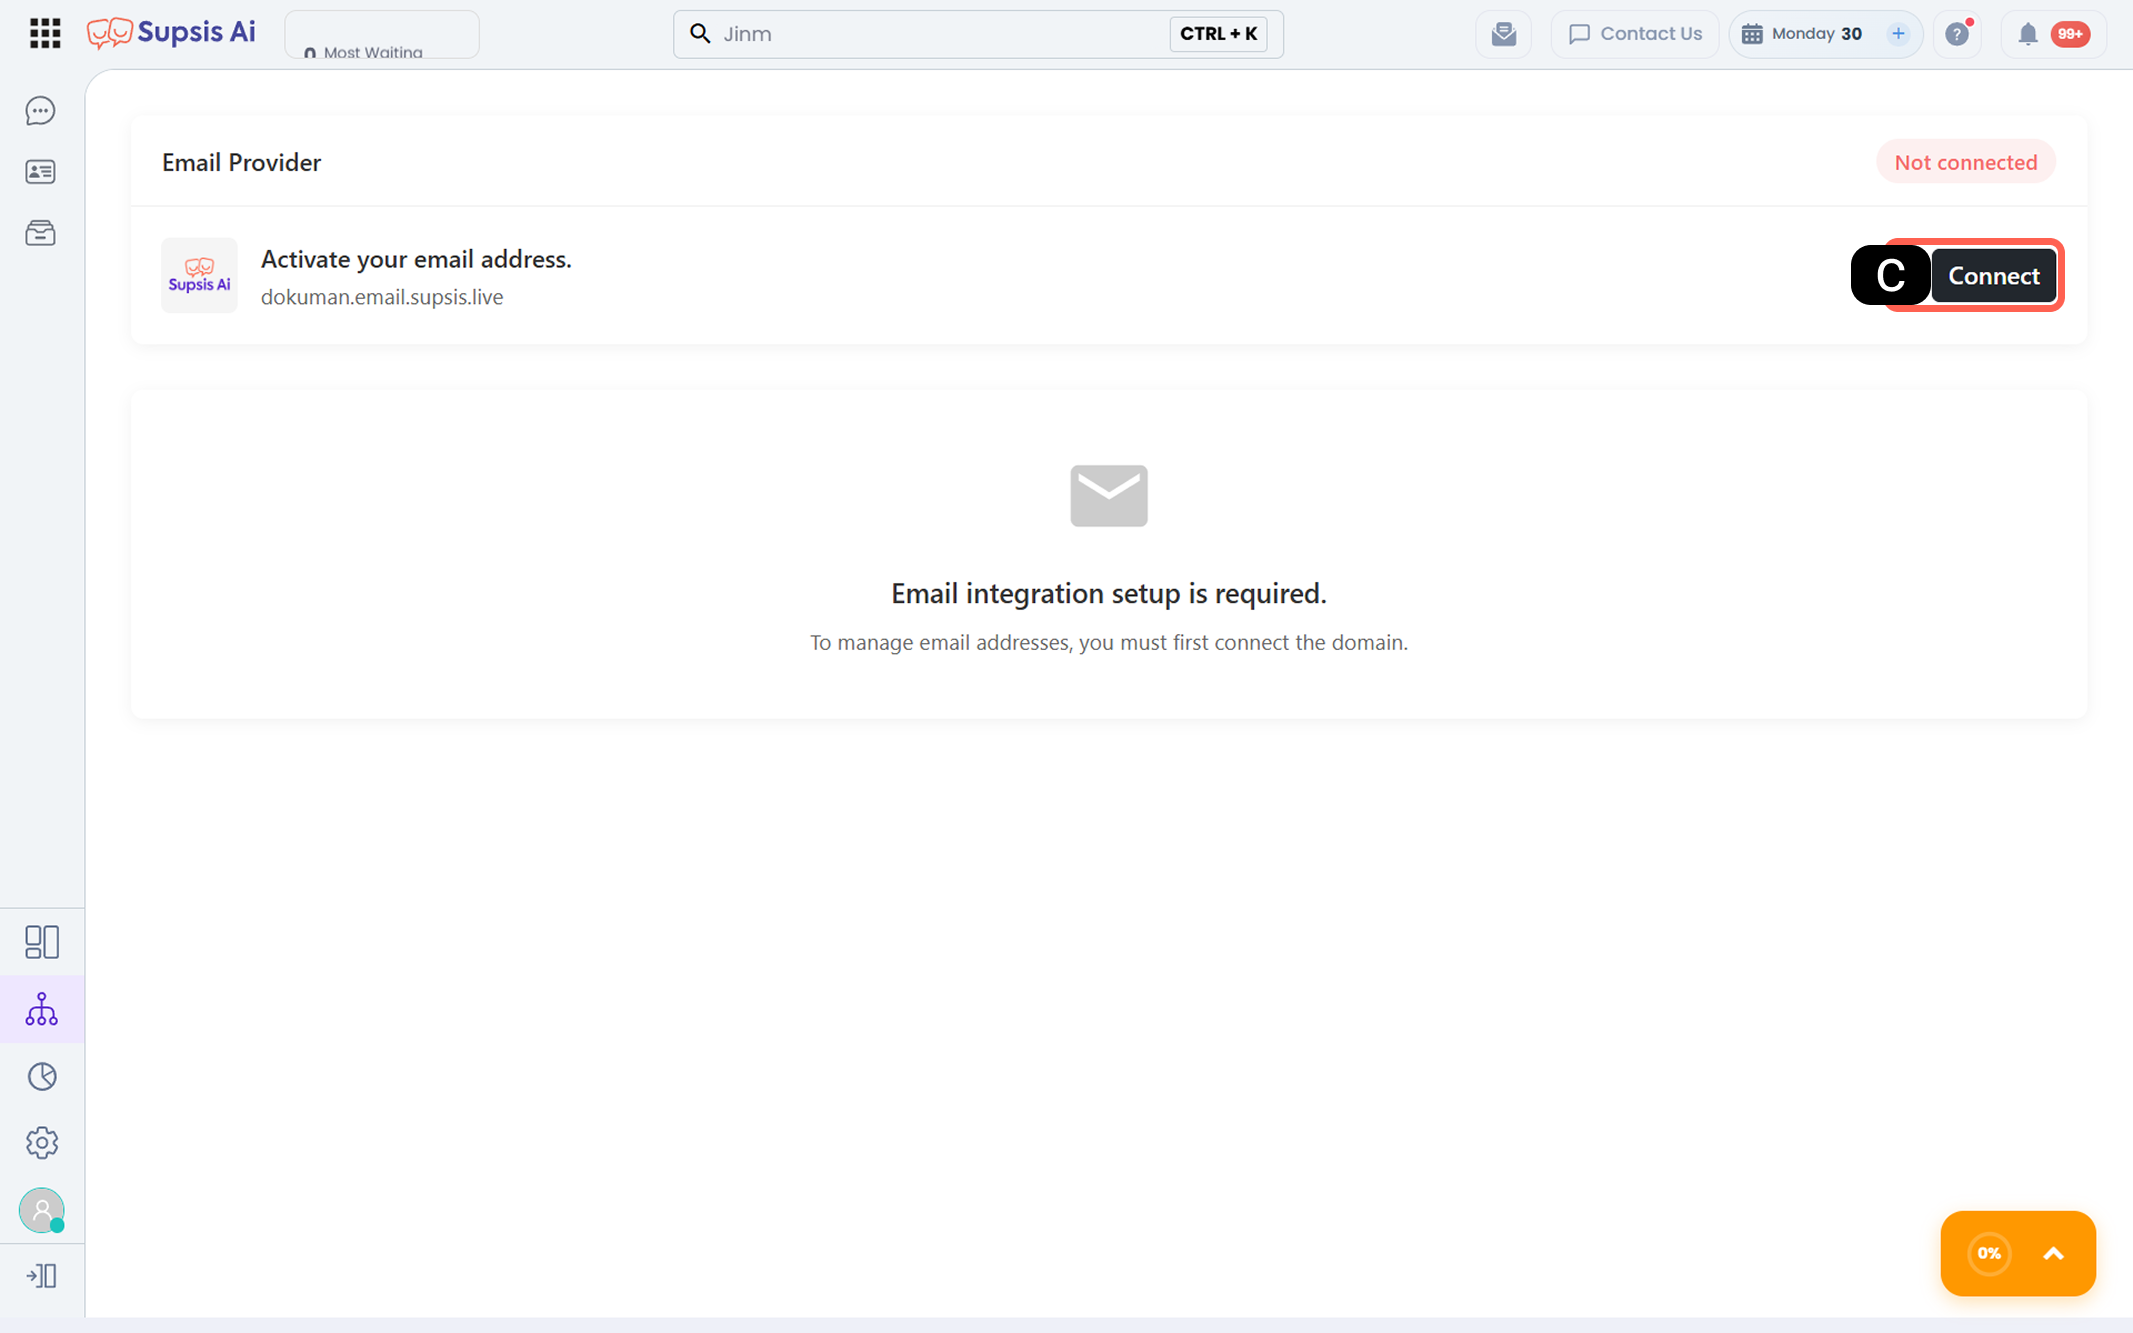 * c – Create Supsis Domain Email: On the email screen, click the "Connect" button next to your domain name to activate your Supsis domain email connection.
1.b – Email Address Creation Step
After completing domain activation, when returning to the Mail screen, the system actively displays the second and final step of the integration. You must create User-based and Department-based addresses to determine which email addresses incoming messages will be routed to.
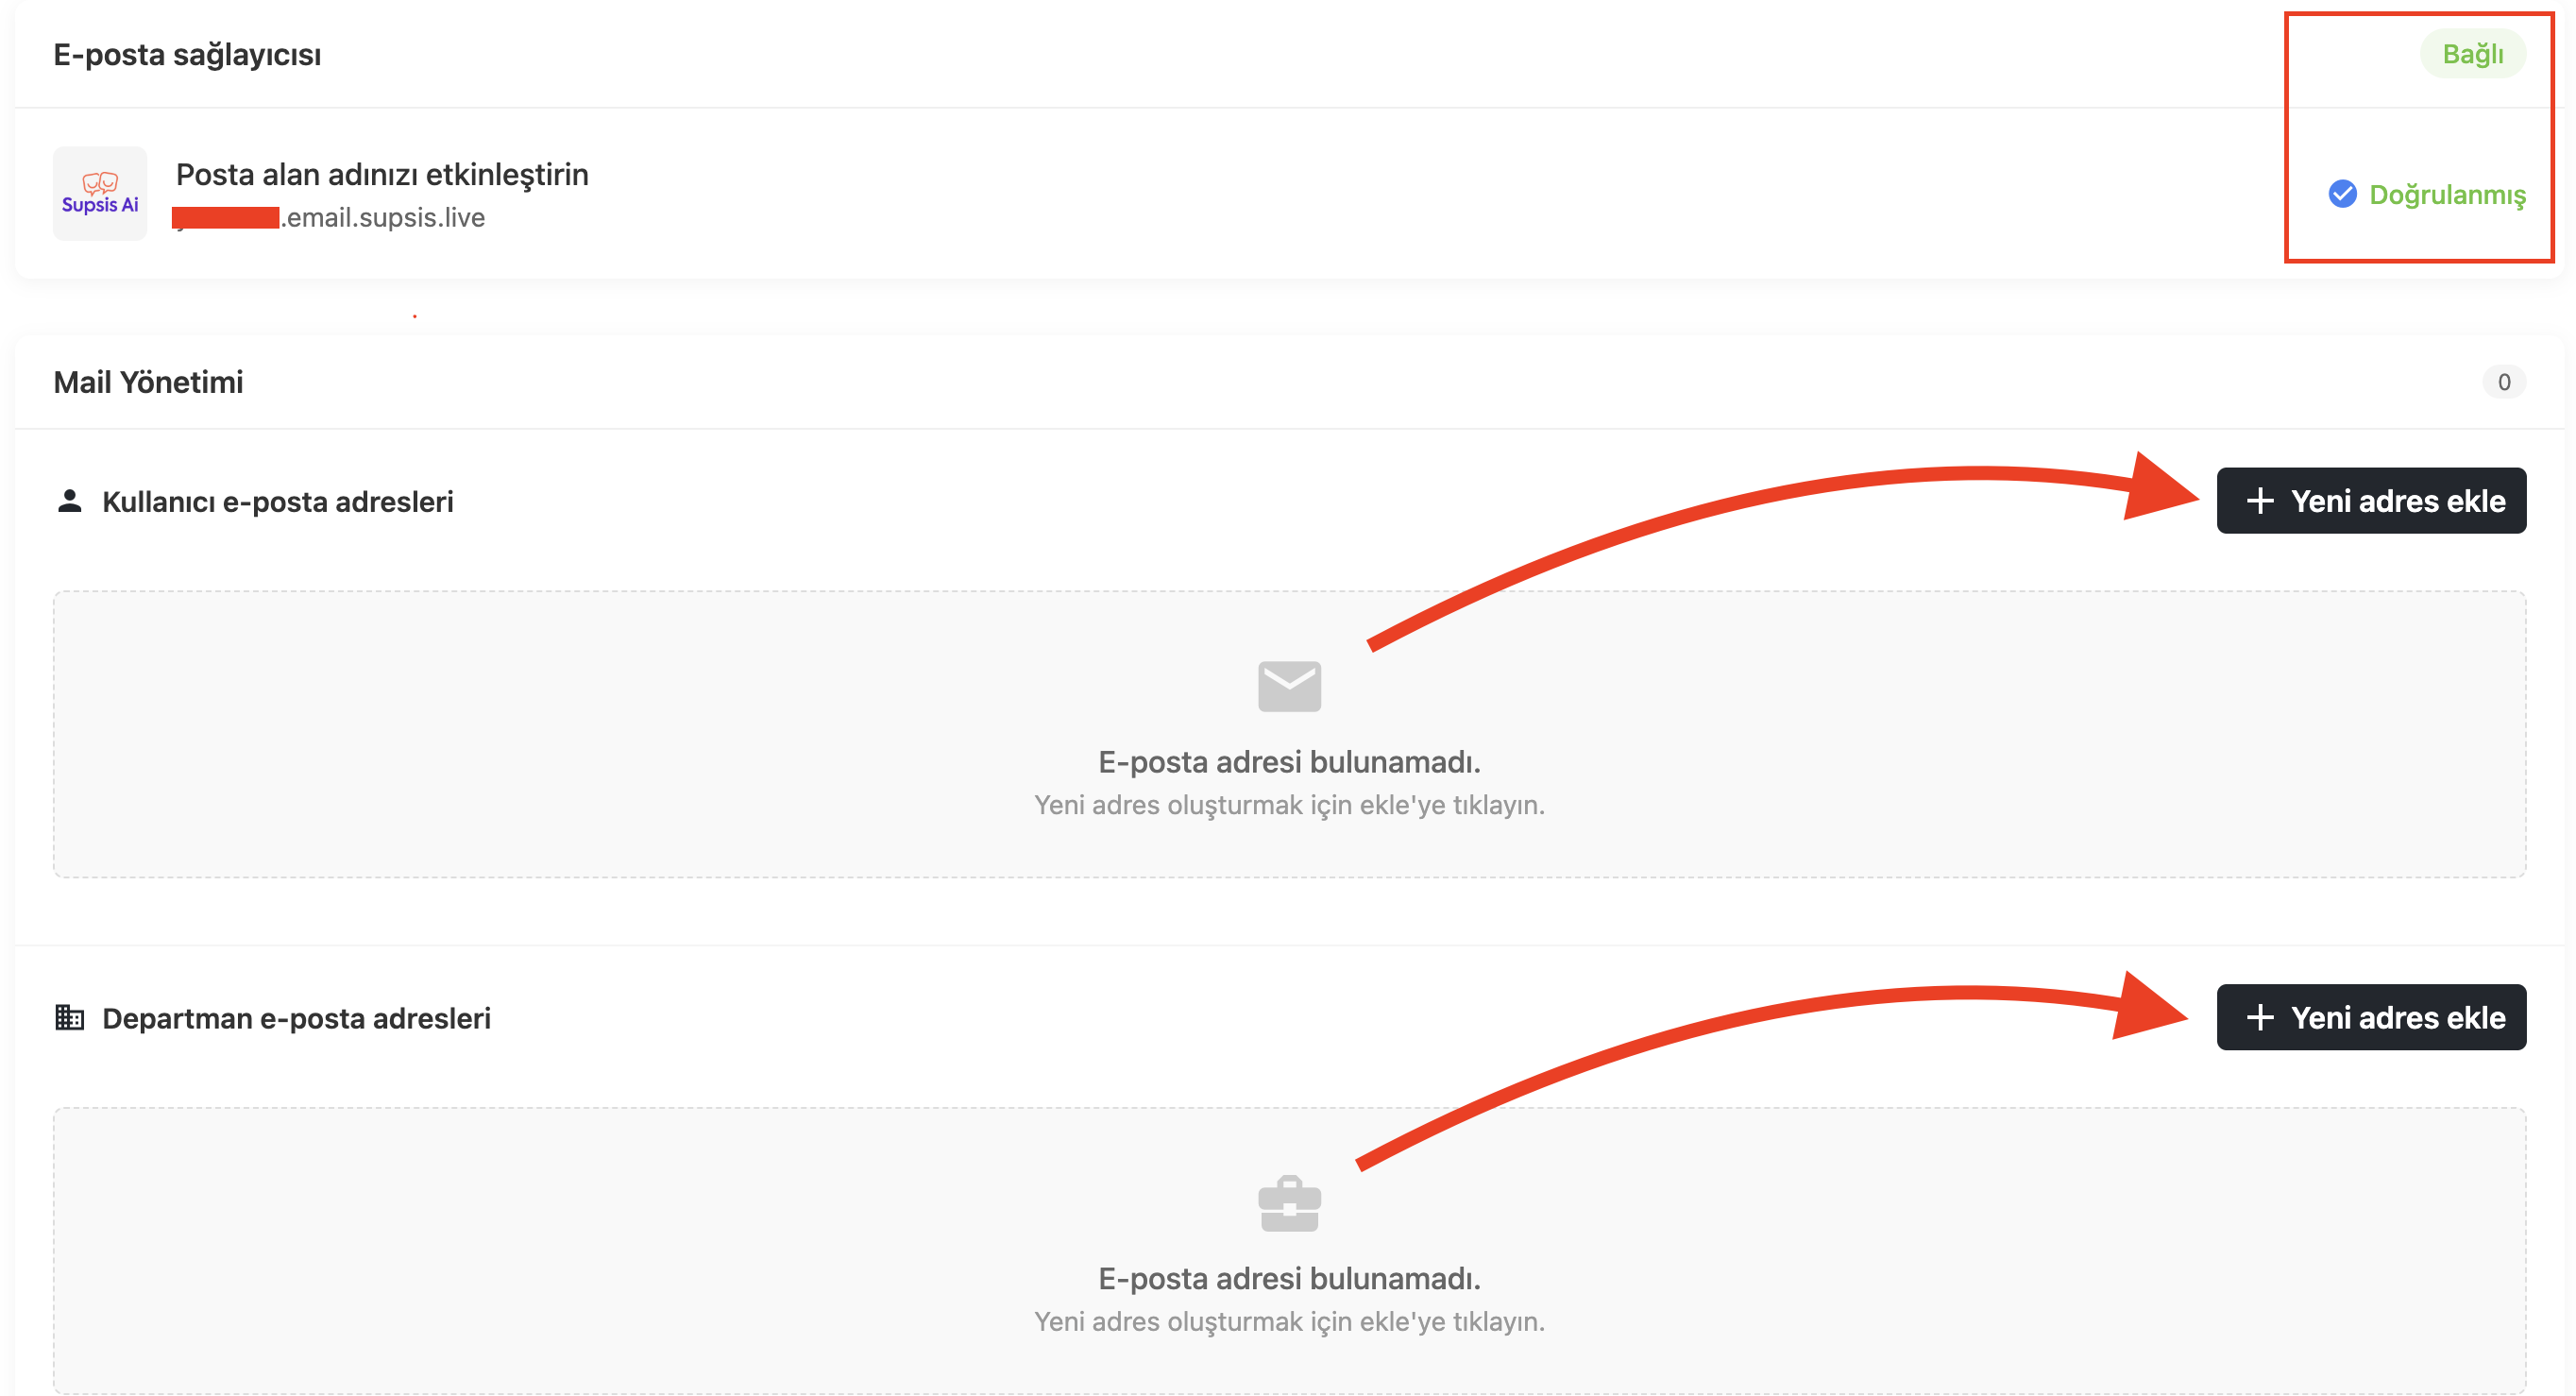
- c – Second Step Status (Create Email Address): It is the screen showing that the domain name is bound (Completed) and the next operation is to create an email address.
- d – Action Button ("Create email address"): By clicking this button, a redirection is made to the relevant page to open a new user or department email account over the domain name integrated into the panel.
You can create two different types of email addresses on this page:
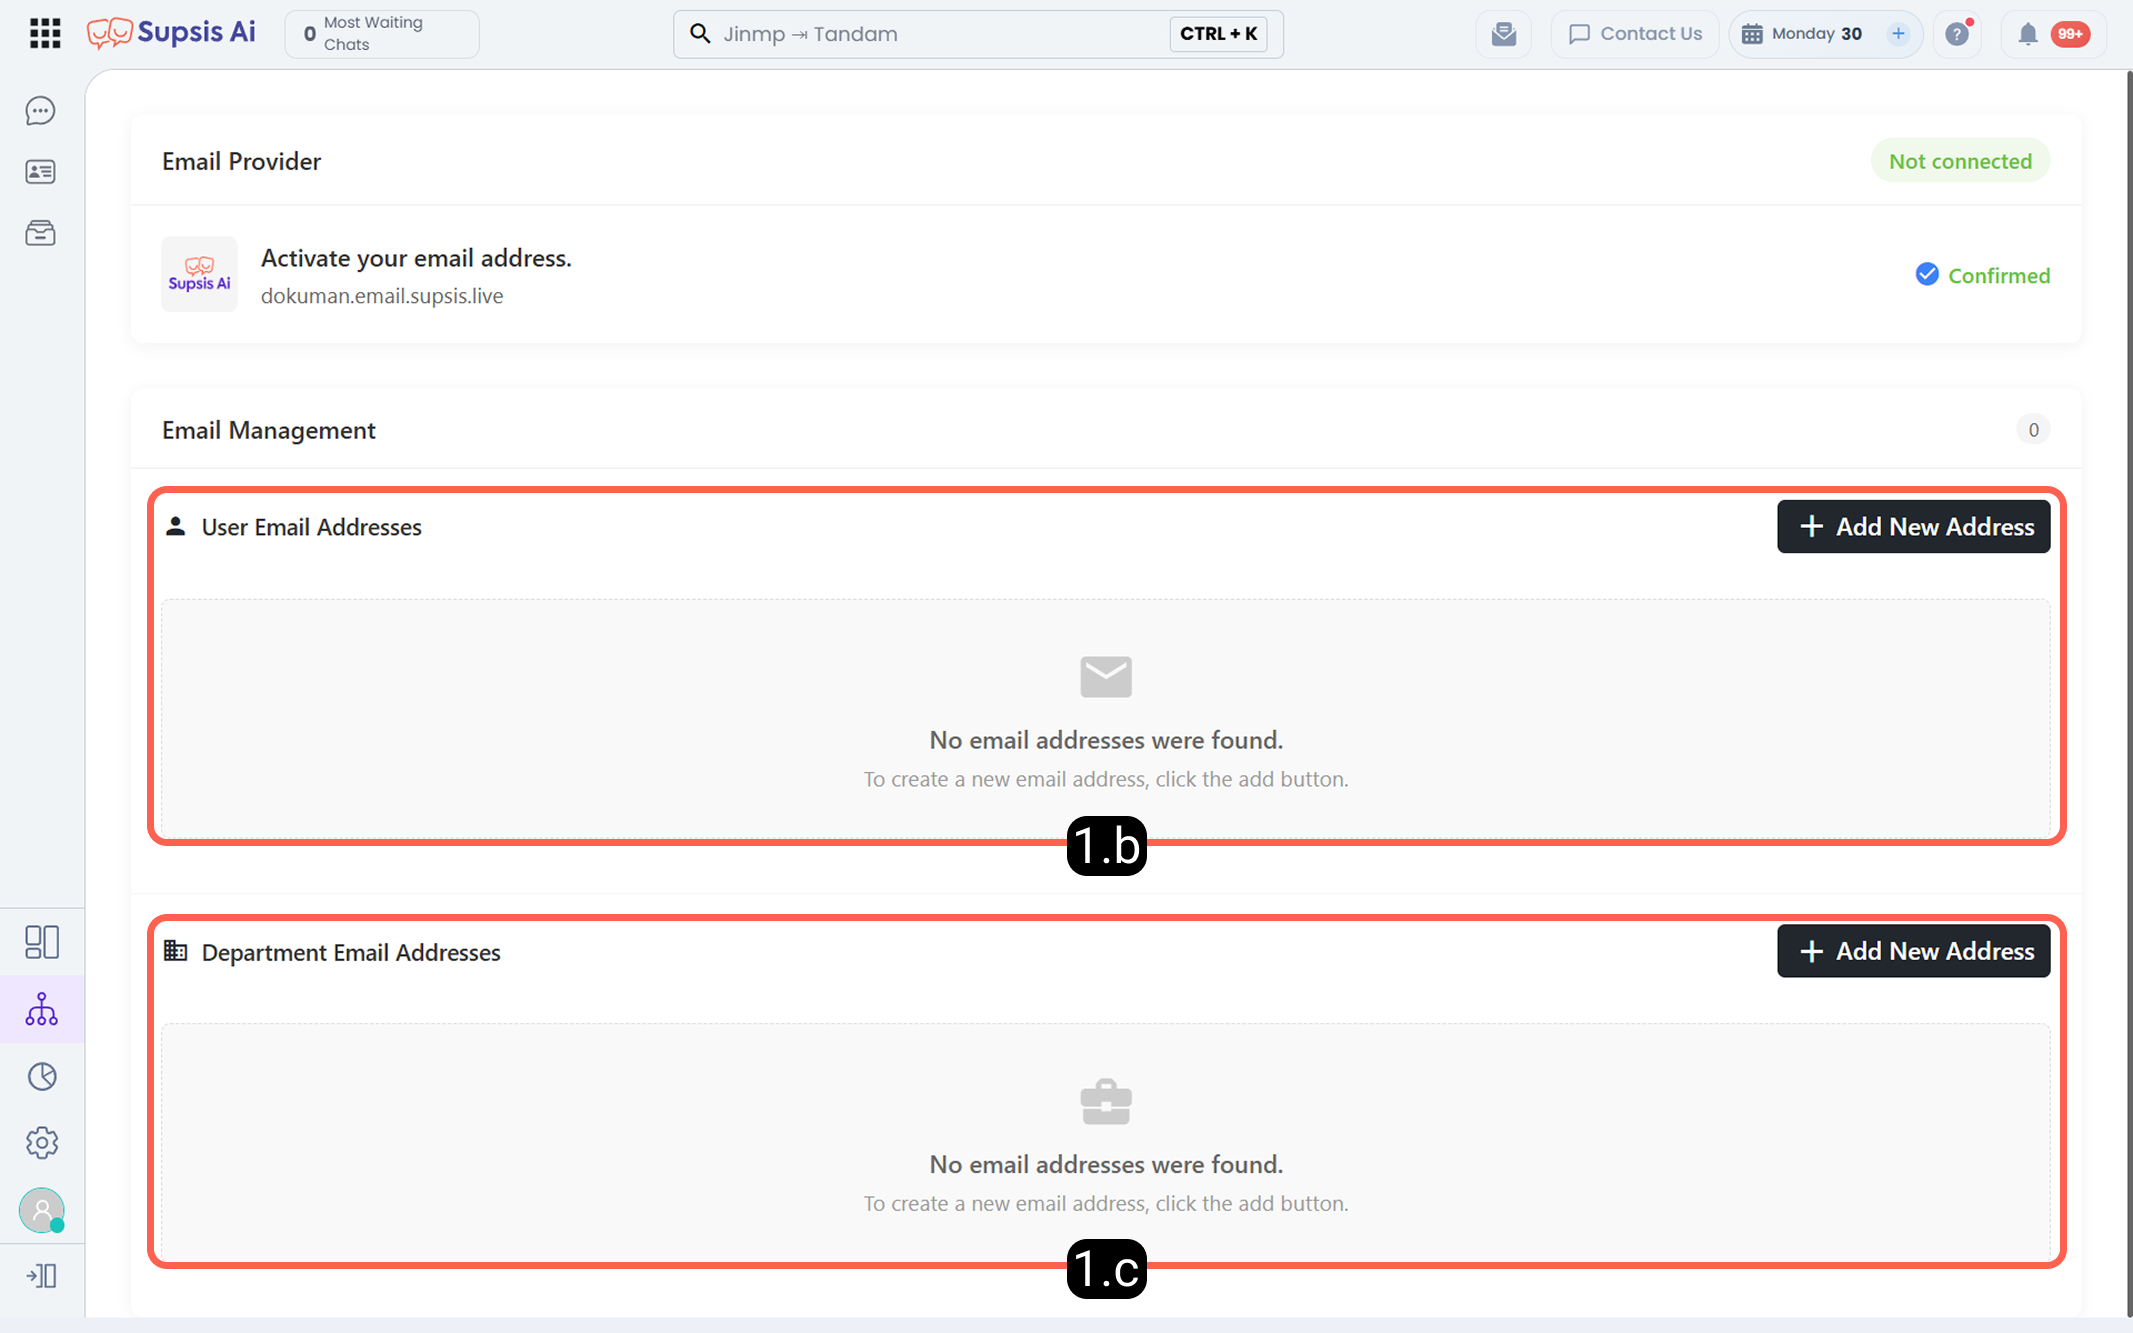
1. Create User Email: You can define user-specific email addresses for individual users. To do this, click the "+ Add New Address" button in the "User Email Addresses" section.
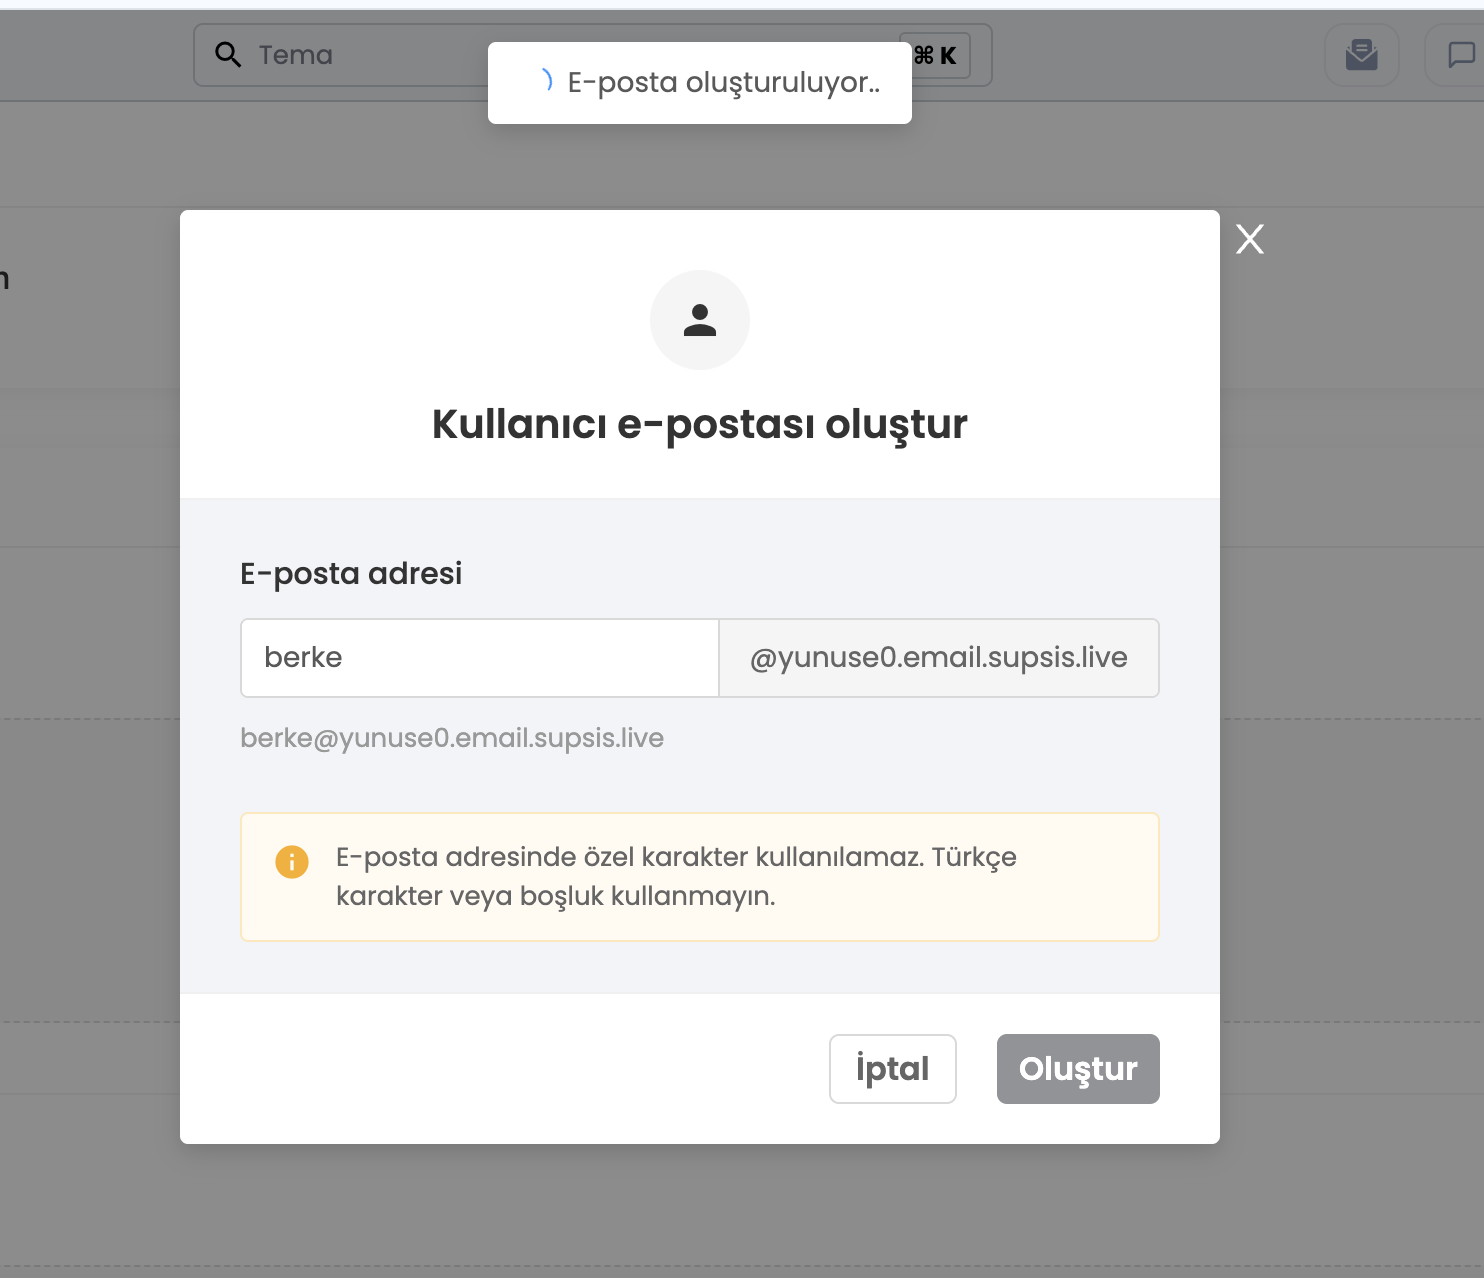
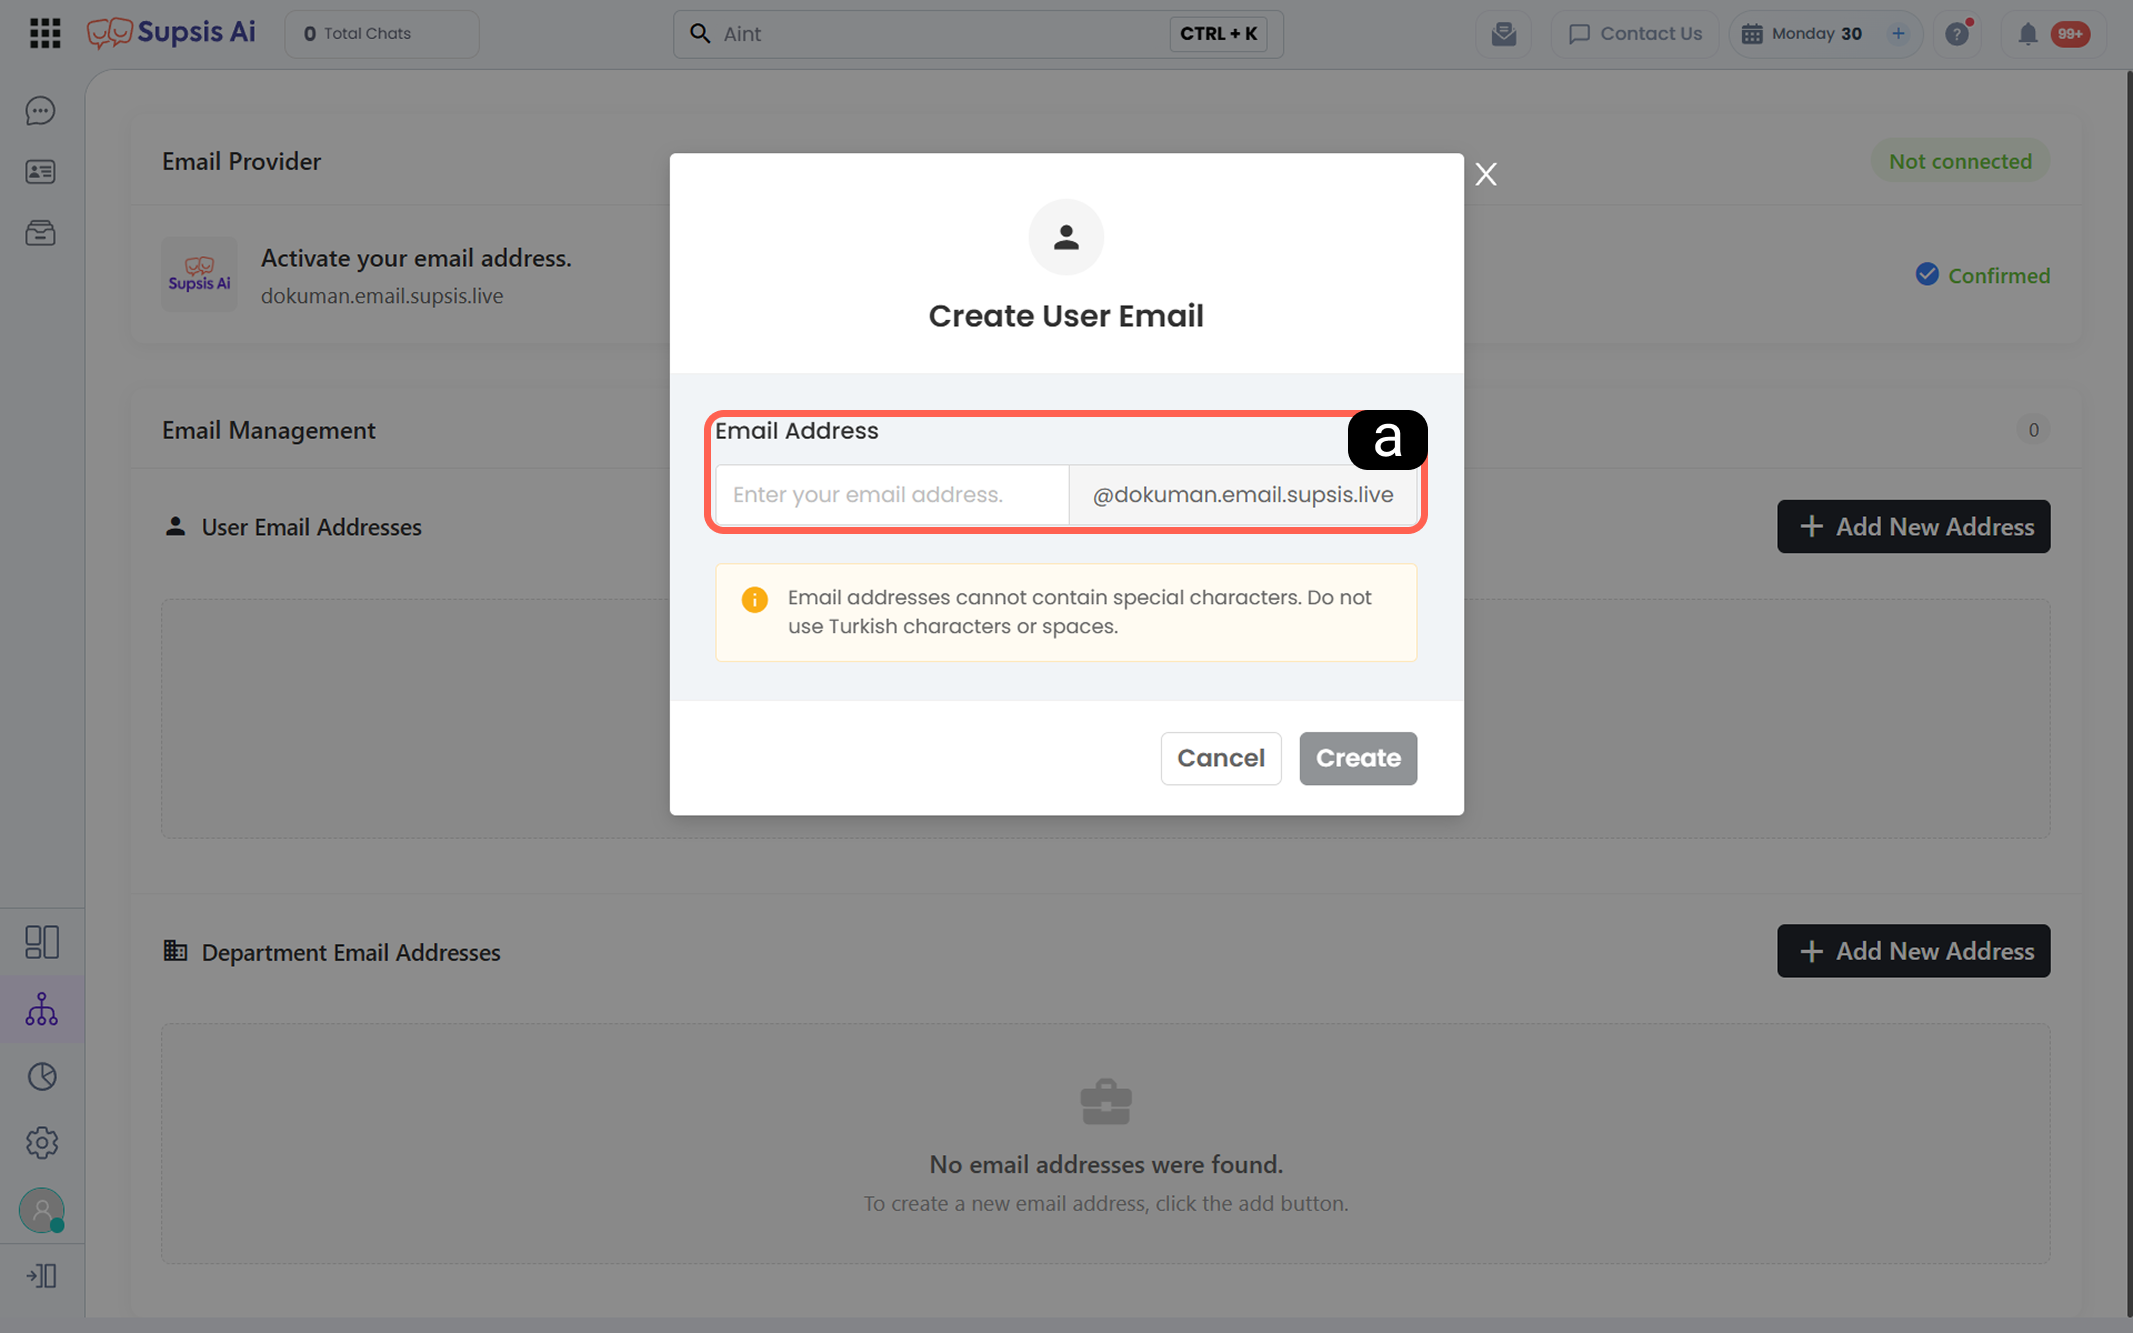 * a – Email Address: In the modal that opens, enter the email prefix that will be created specifically for your user.
2. Create Department Email: Department emails are shared email addresses used by teams such as Sales, Support, or Accounting. Incoming emails are automatically routed to the relevant department, allowing all Supsis AI users within that department to manage the emails.
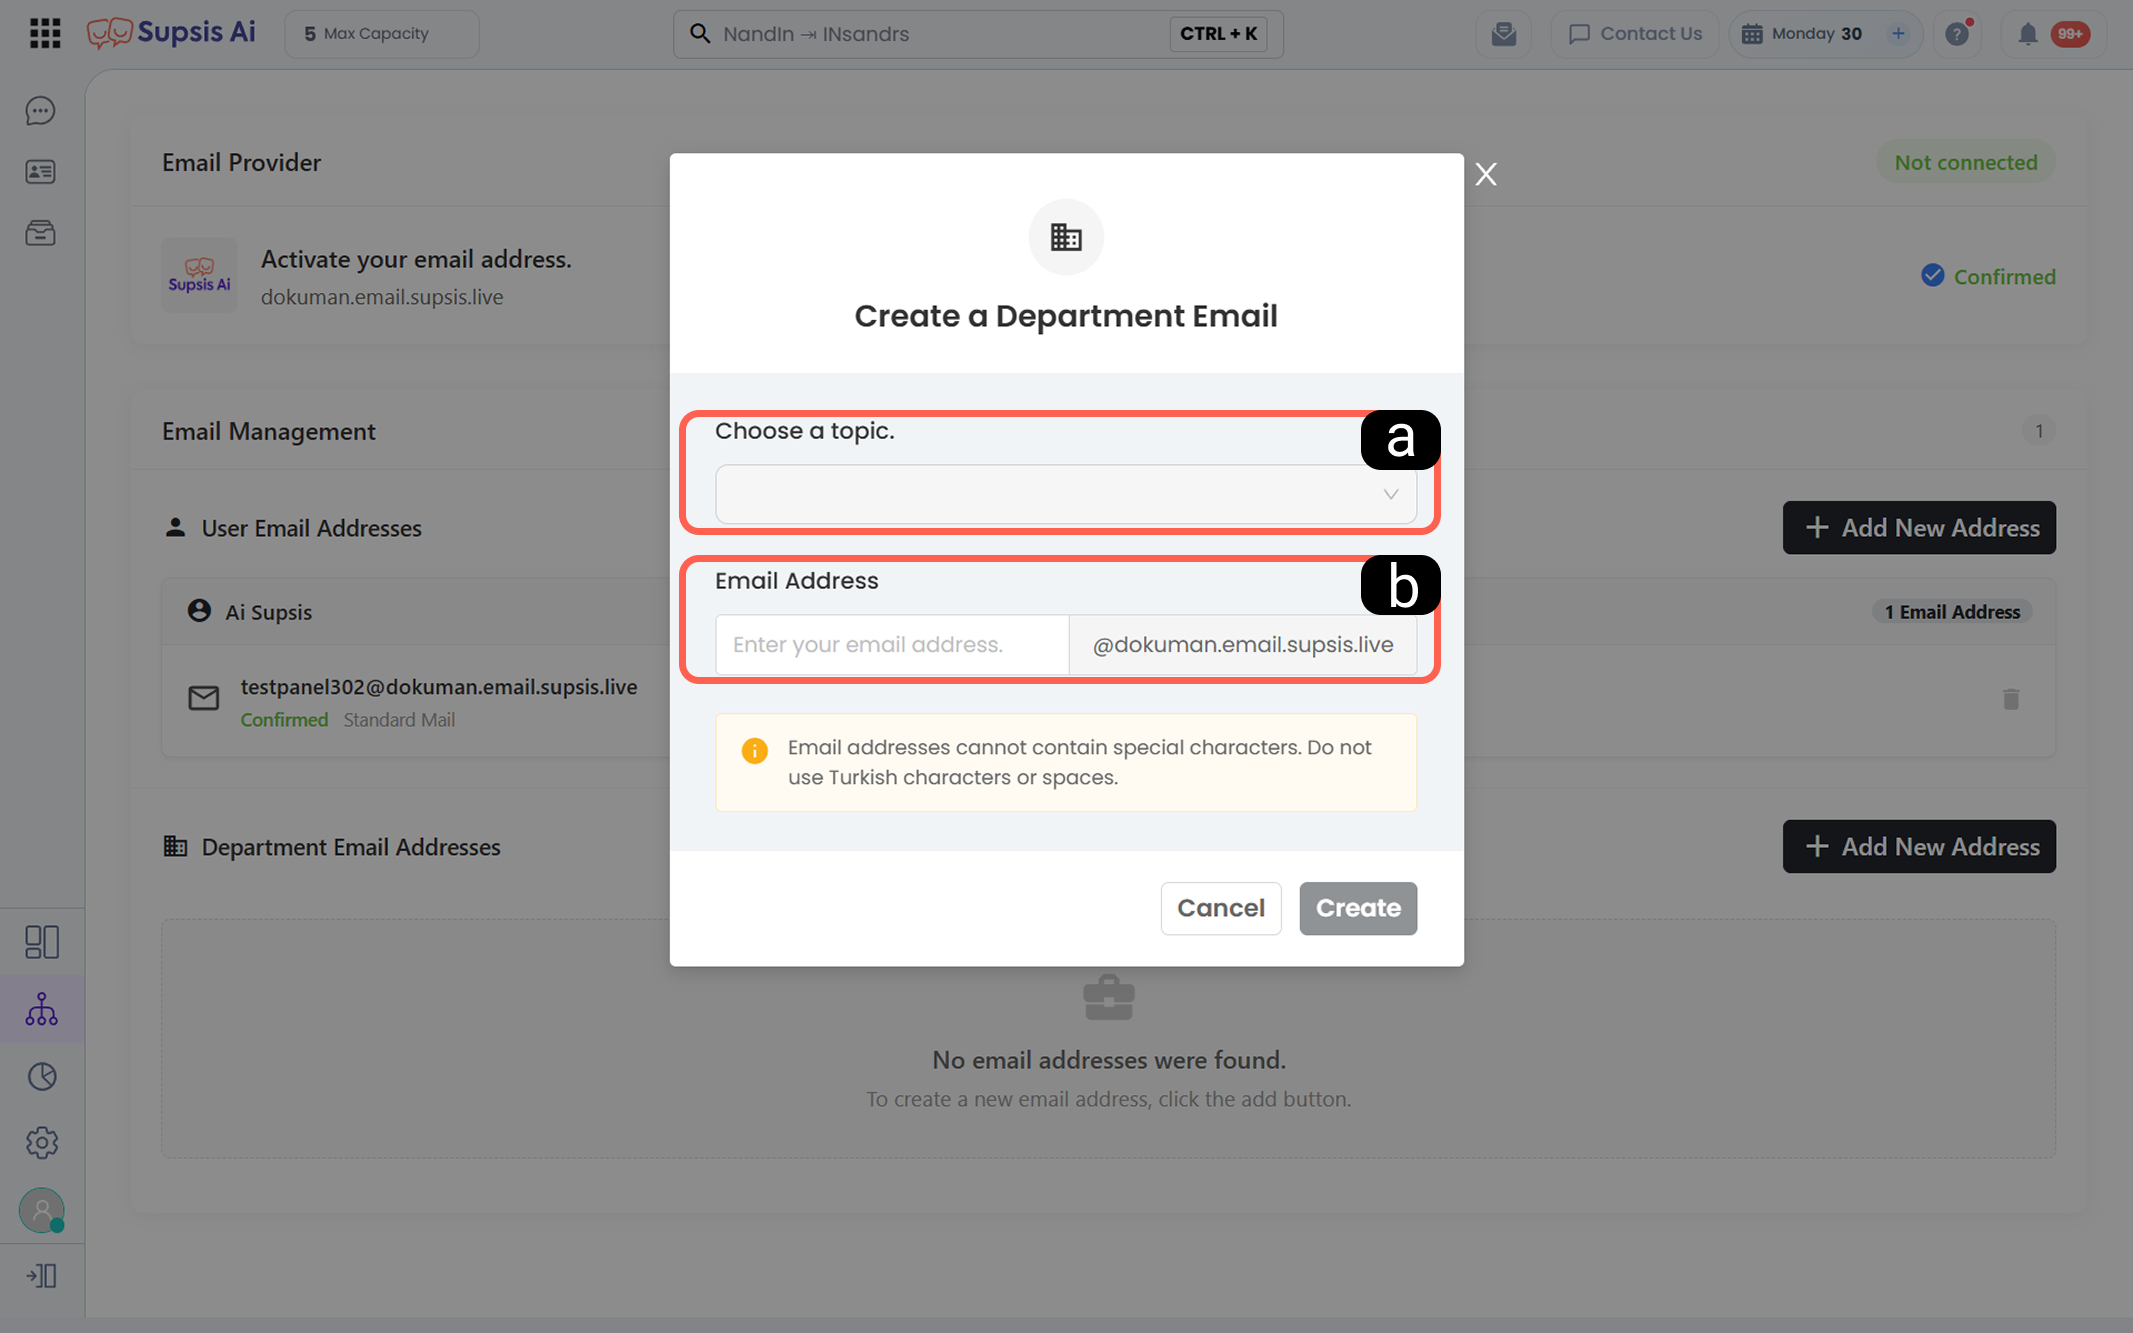 * a – Department Selection: Select from the dropdown list which team incoming emails to this address will be assigned to.
* b – Email Address: Enter the email prefix that will be created specifically for the department.
* a – Department Selection: Select from the dropdown list which team incoming emails to this address will be assigned to.
* b – Email Address: Enter the email prefix that will be created specifically for the department.
Important Note: When creating email addresses, pay attention to the following rules to ensure the system functions properly:
* Character Usage: Email addresses cannot contain special characters.
Language Support: Turkish characters (ç, ğ, ı, ö, ş, ü) and spaces must not be used in email prefixes.
Verification Status: When you see the "Verified" label next to created addresses, the address is ready for use. When both steps (domain name and email address) are completed, the routing screen automatically disappears and the normal Mail interface opens.
1.c – Authorization and Information Screen
The action buttons on the mail onboarding screens are only shown to users with the mail.update permission.
- e – Permission Information: When a user without setup permission enters the Mail module, they see a note stating "Contact your administrator" specifying what to do instead of an action button. In this way, unauthorized transactions are prevented and correct orientation is provided.
1.d – Example Usage Scenarios
The mail onboarding screen ensures that the processes are completed entirely in the following scenarios:
- Installation from Scratch: For a customer who opens the Mail module for the first time and has not made any setup, instead of showing an empty screen, the operations they need to do are listed in order.
- Incomplete Operations: A customer who has bound the domain name but forgot to create an email address yet, sees that they are directly on the 2nd step when they enter the Mail module and completes the process.
- Unauthorized Access Management: When unauthorized personnel opens the system, instead of seeing a faulty or broken screen, they are informed that they need to contact their administrator.
Thanks to this development, instead of encountering an empty and non-working screen, customers easily complete the setup process by clearly seeing their missing steps. Thus, possible technical support requests are reduced and full efficient use of Mail integration is guaranteed.
2-) Forwarding Process
You can manage the process of forwarding your Supsis AI domain-created emails to Supsis AI through this section.
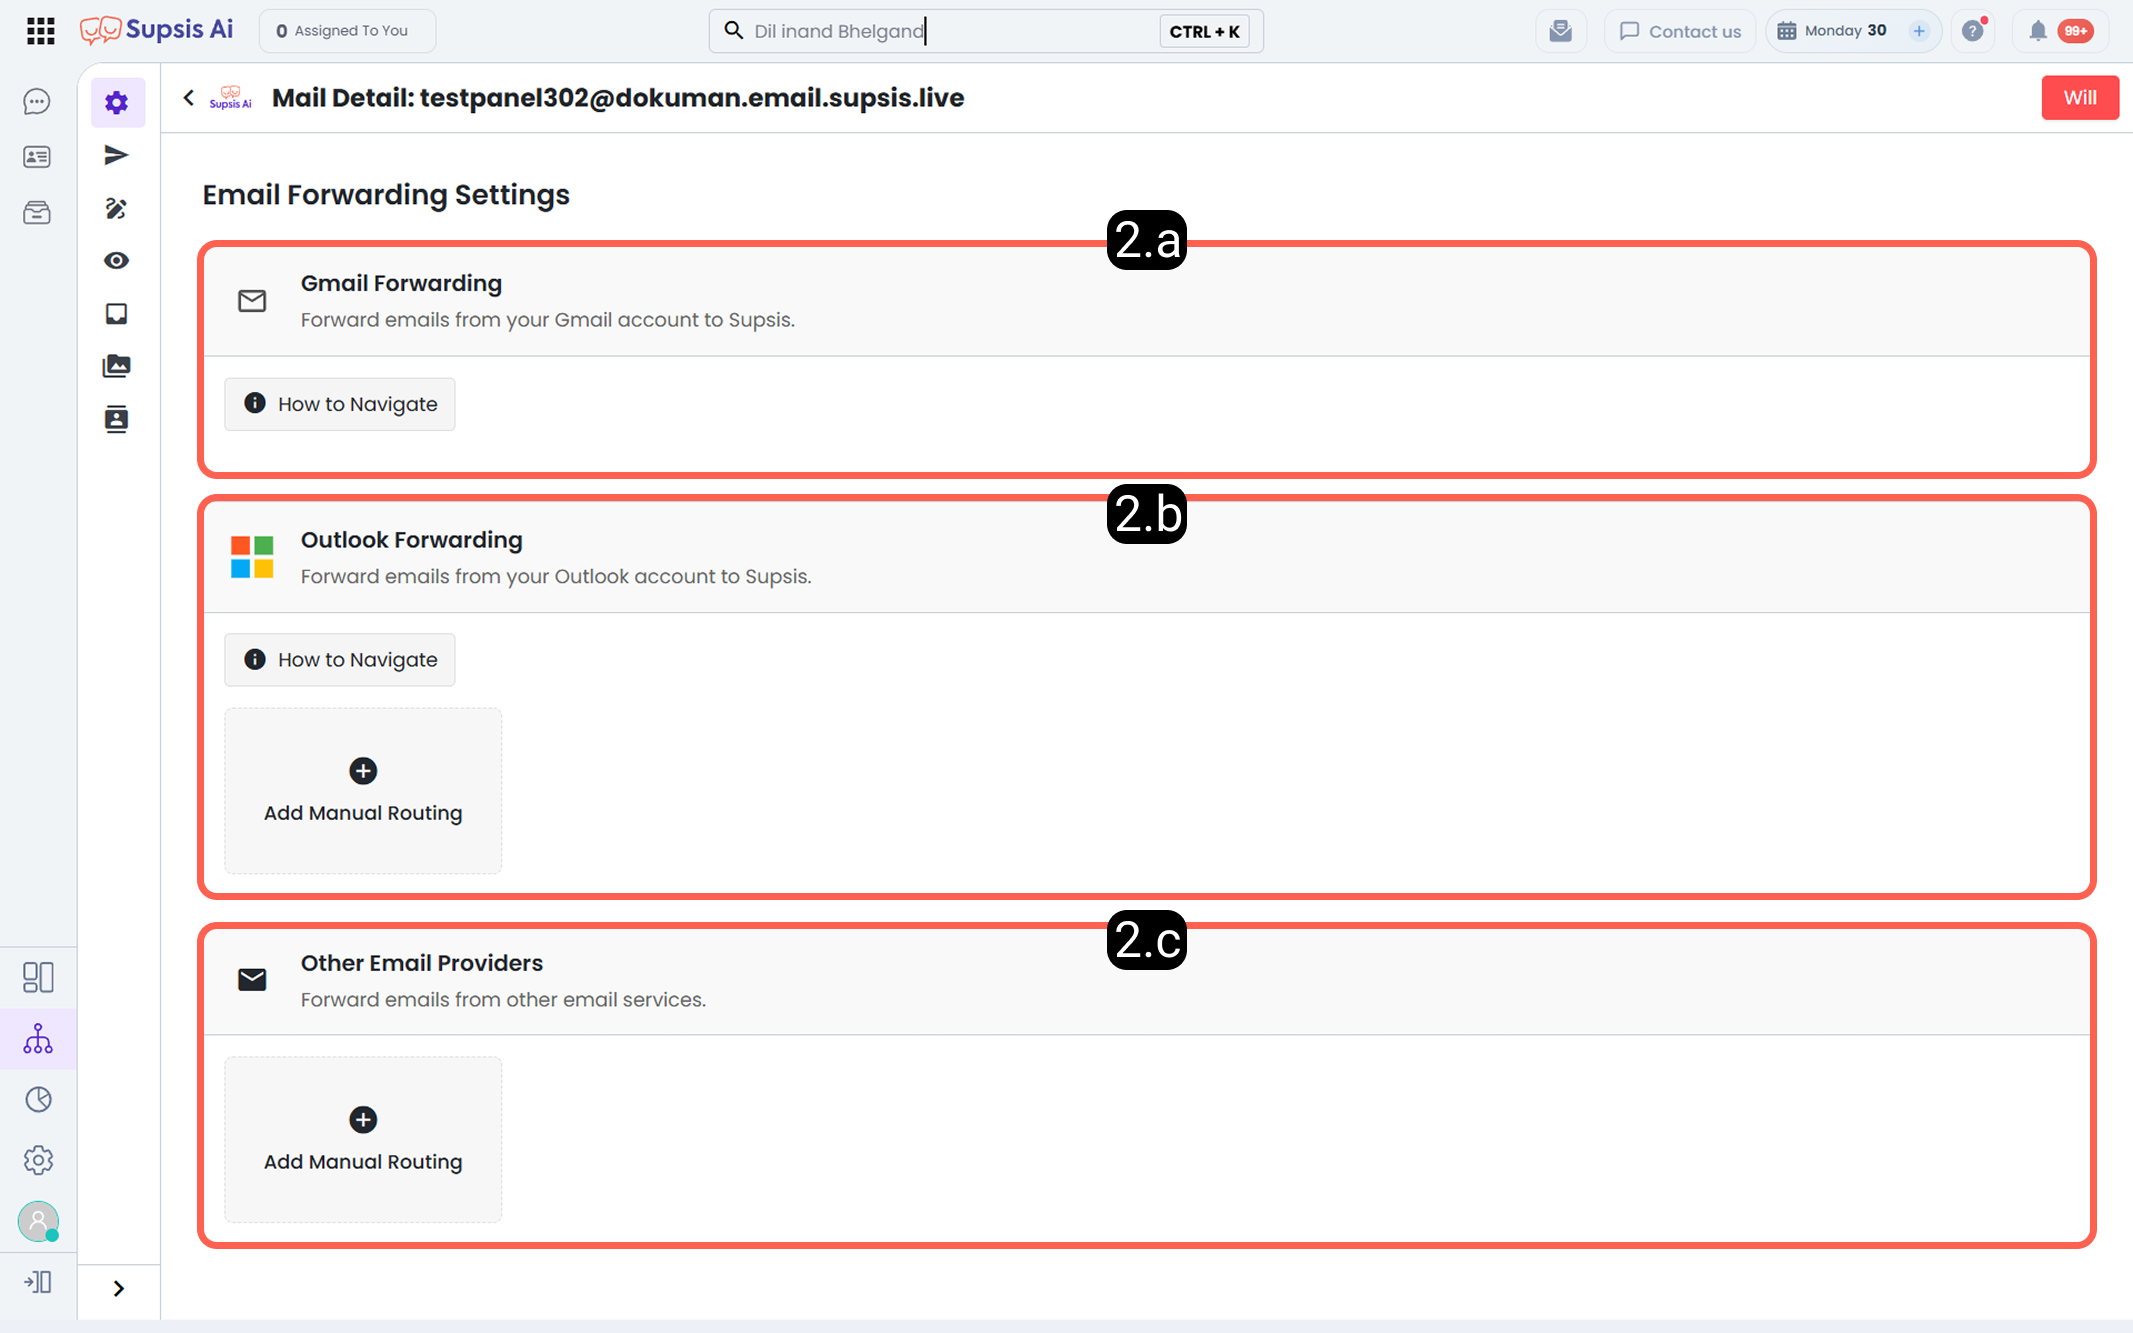
2.b – Gmail Forwarding
The forwarding process is completed directly through your Gmail settings.
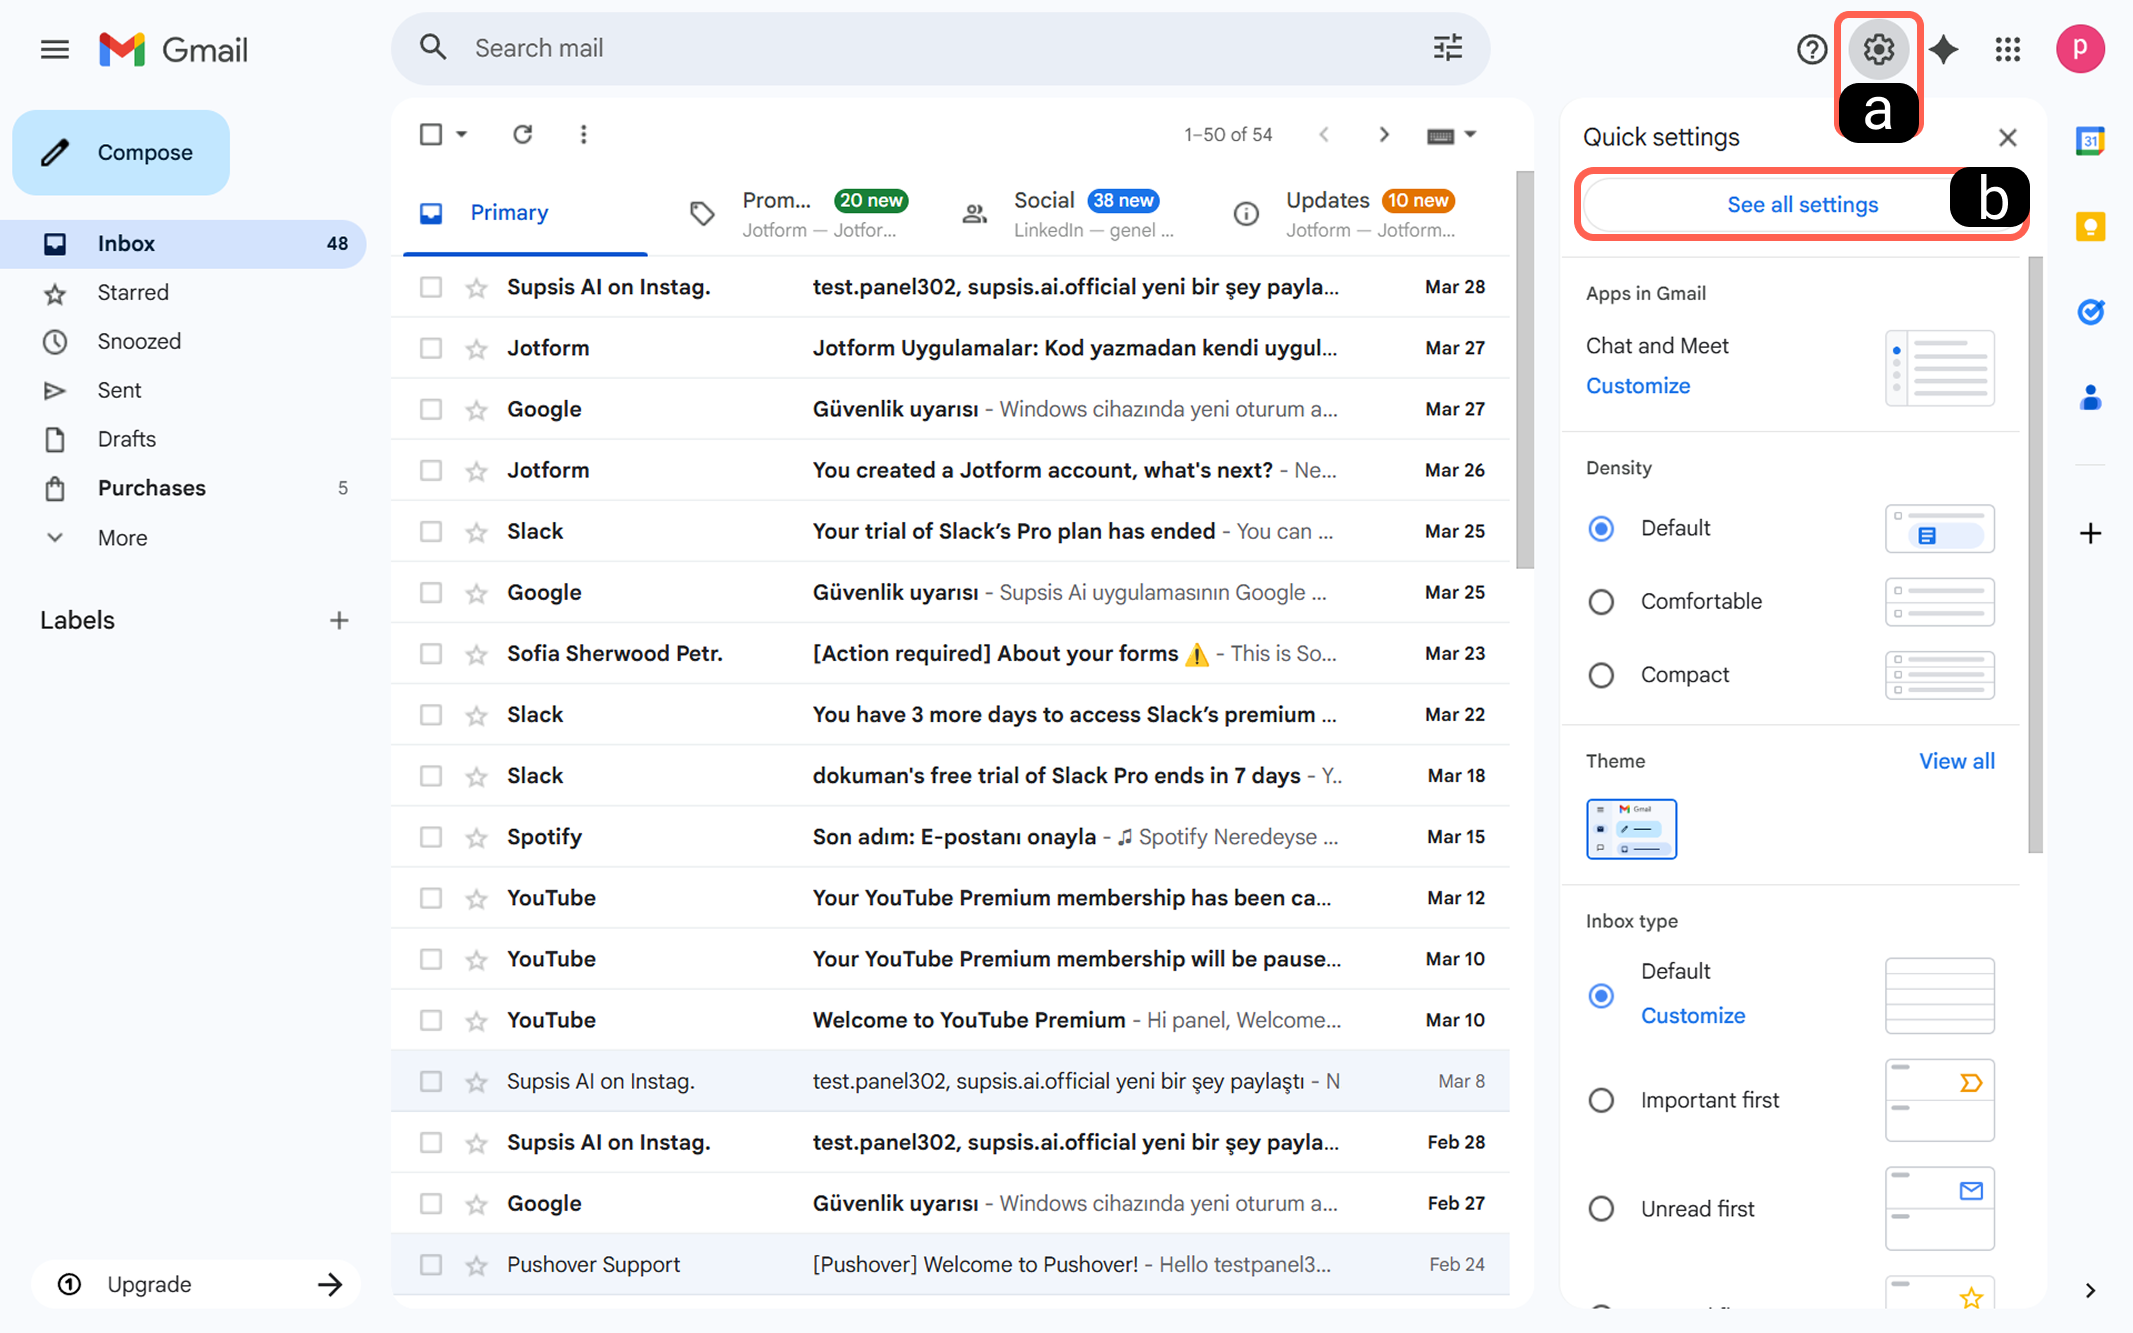
-
a – Settings
Click the Settings (gear icon) located in the top right corner of your Gmail interface. -
b – See All Settings
From the side panel that opens, click the "See all settings" button.
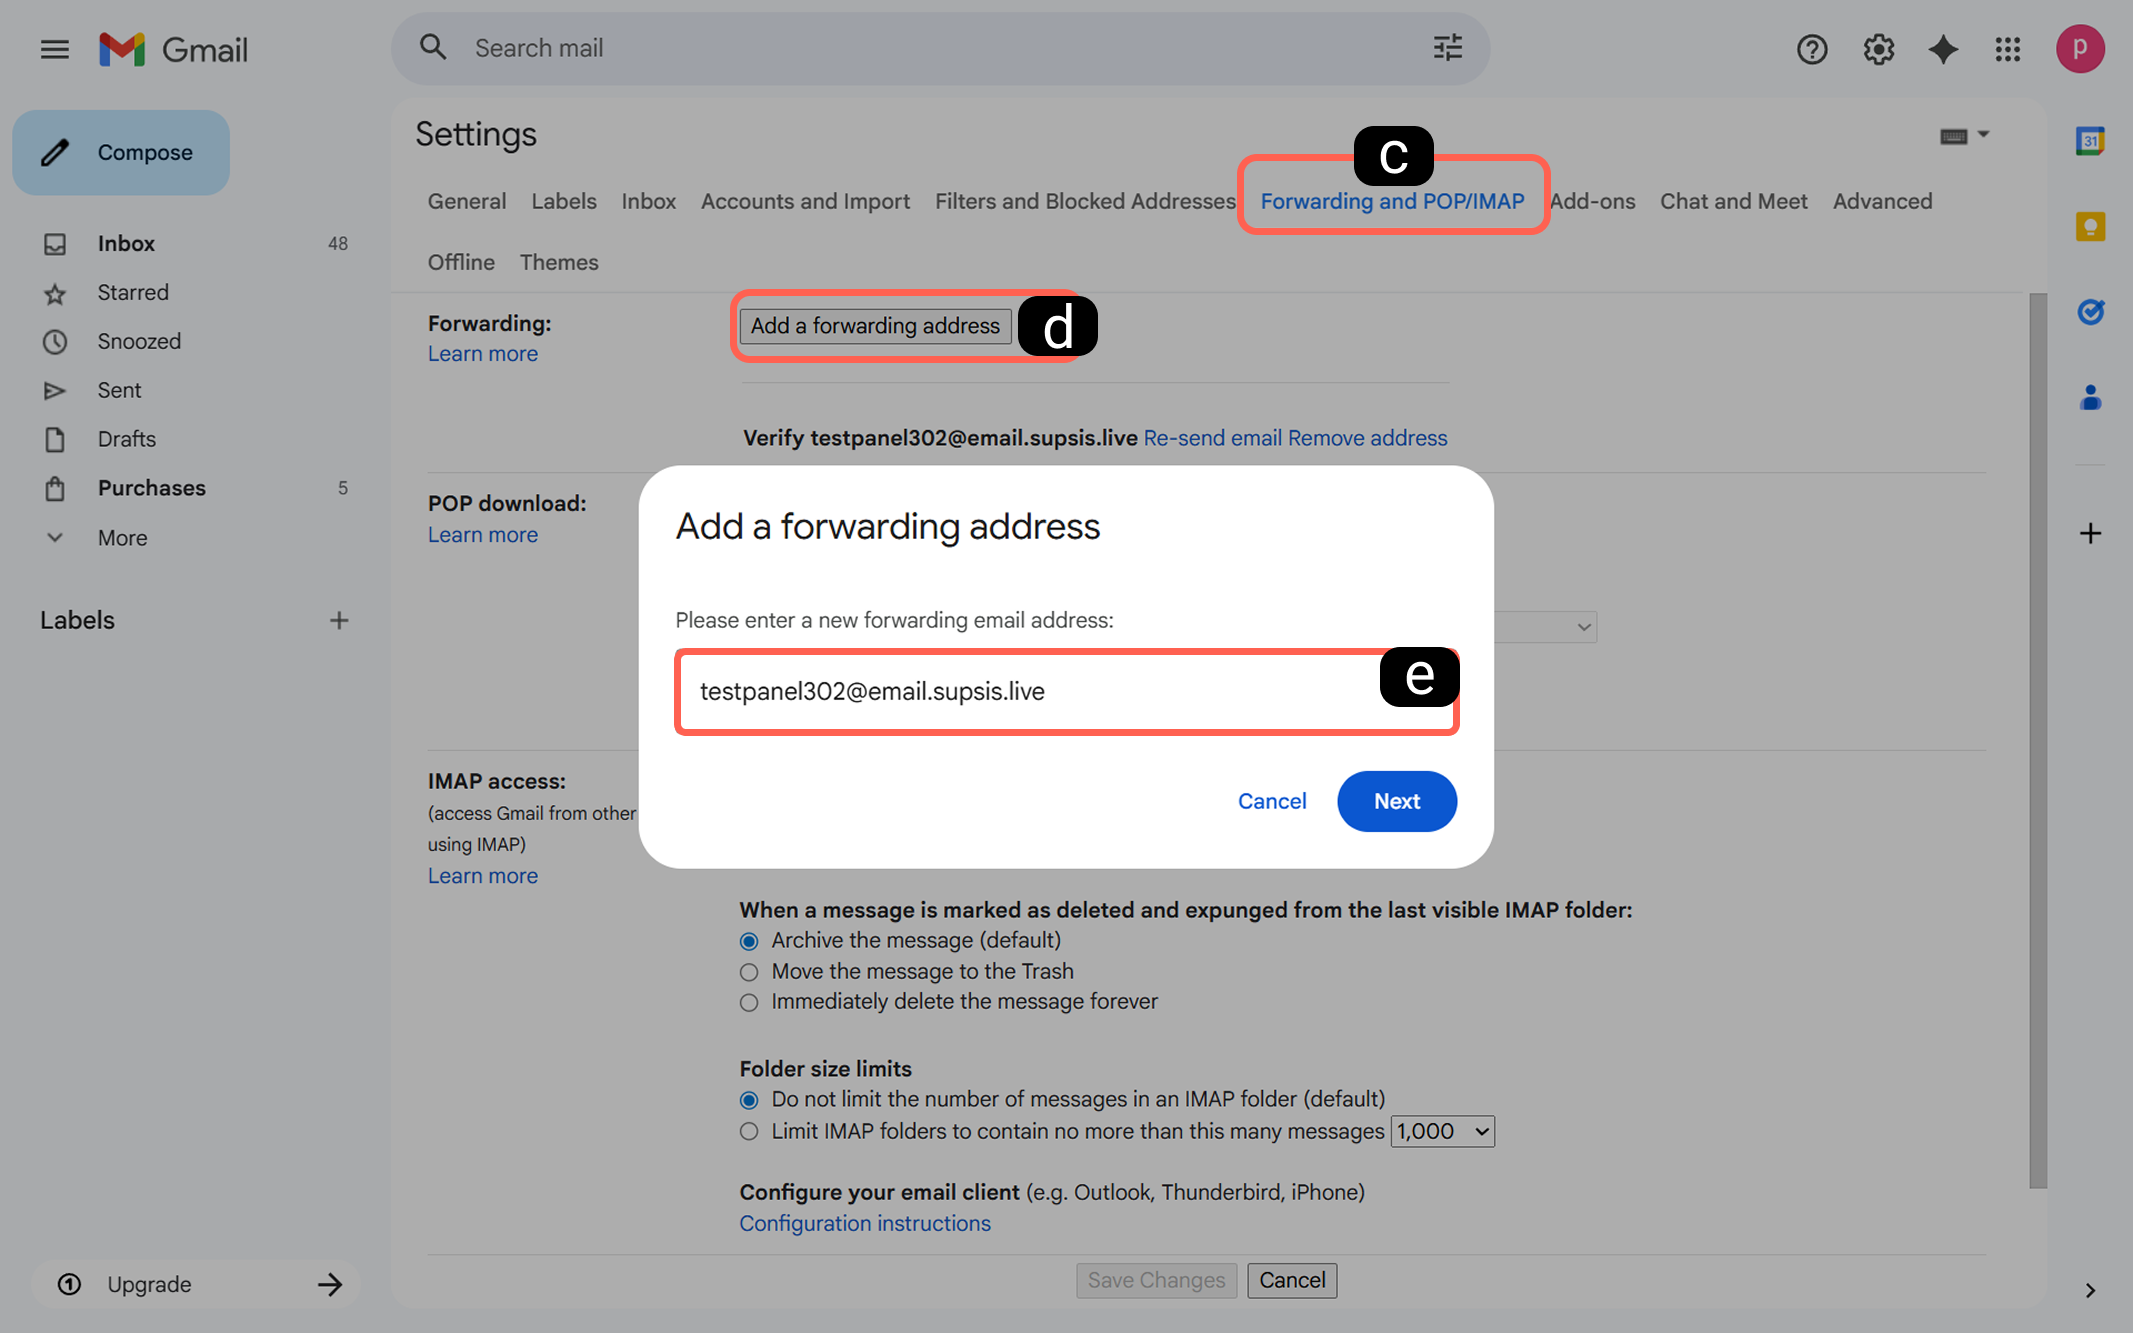
-
c – Forwarding and POP/IMAP
Navigate to the "Forwarding and POP/IMAP" tab in the top menu bar. -
d – Add a Forwarding Address
Click the "Add a forwarding address" button at the top of the screen. -
e – Enter Supsis AI Email
In the pop-up window, enter the email address you created in the Supsis AI panel exactly and click "Next".
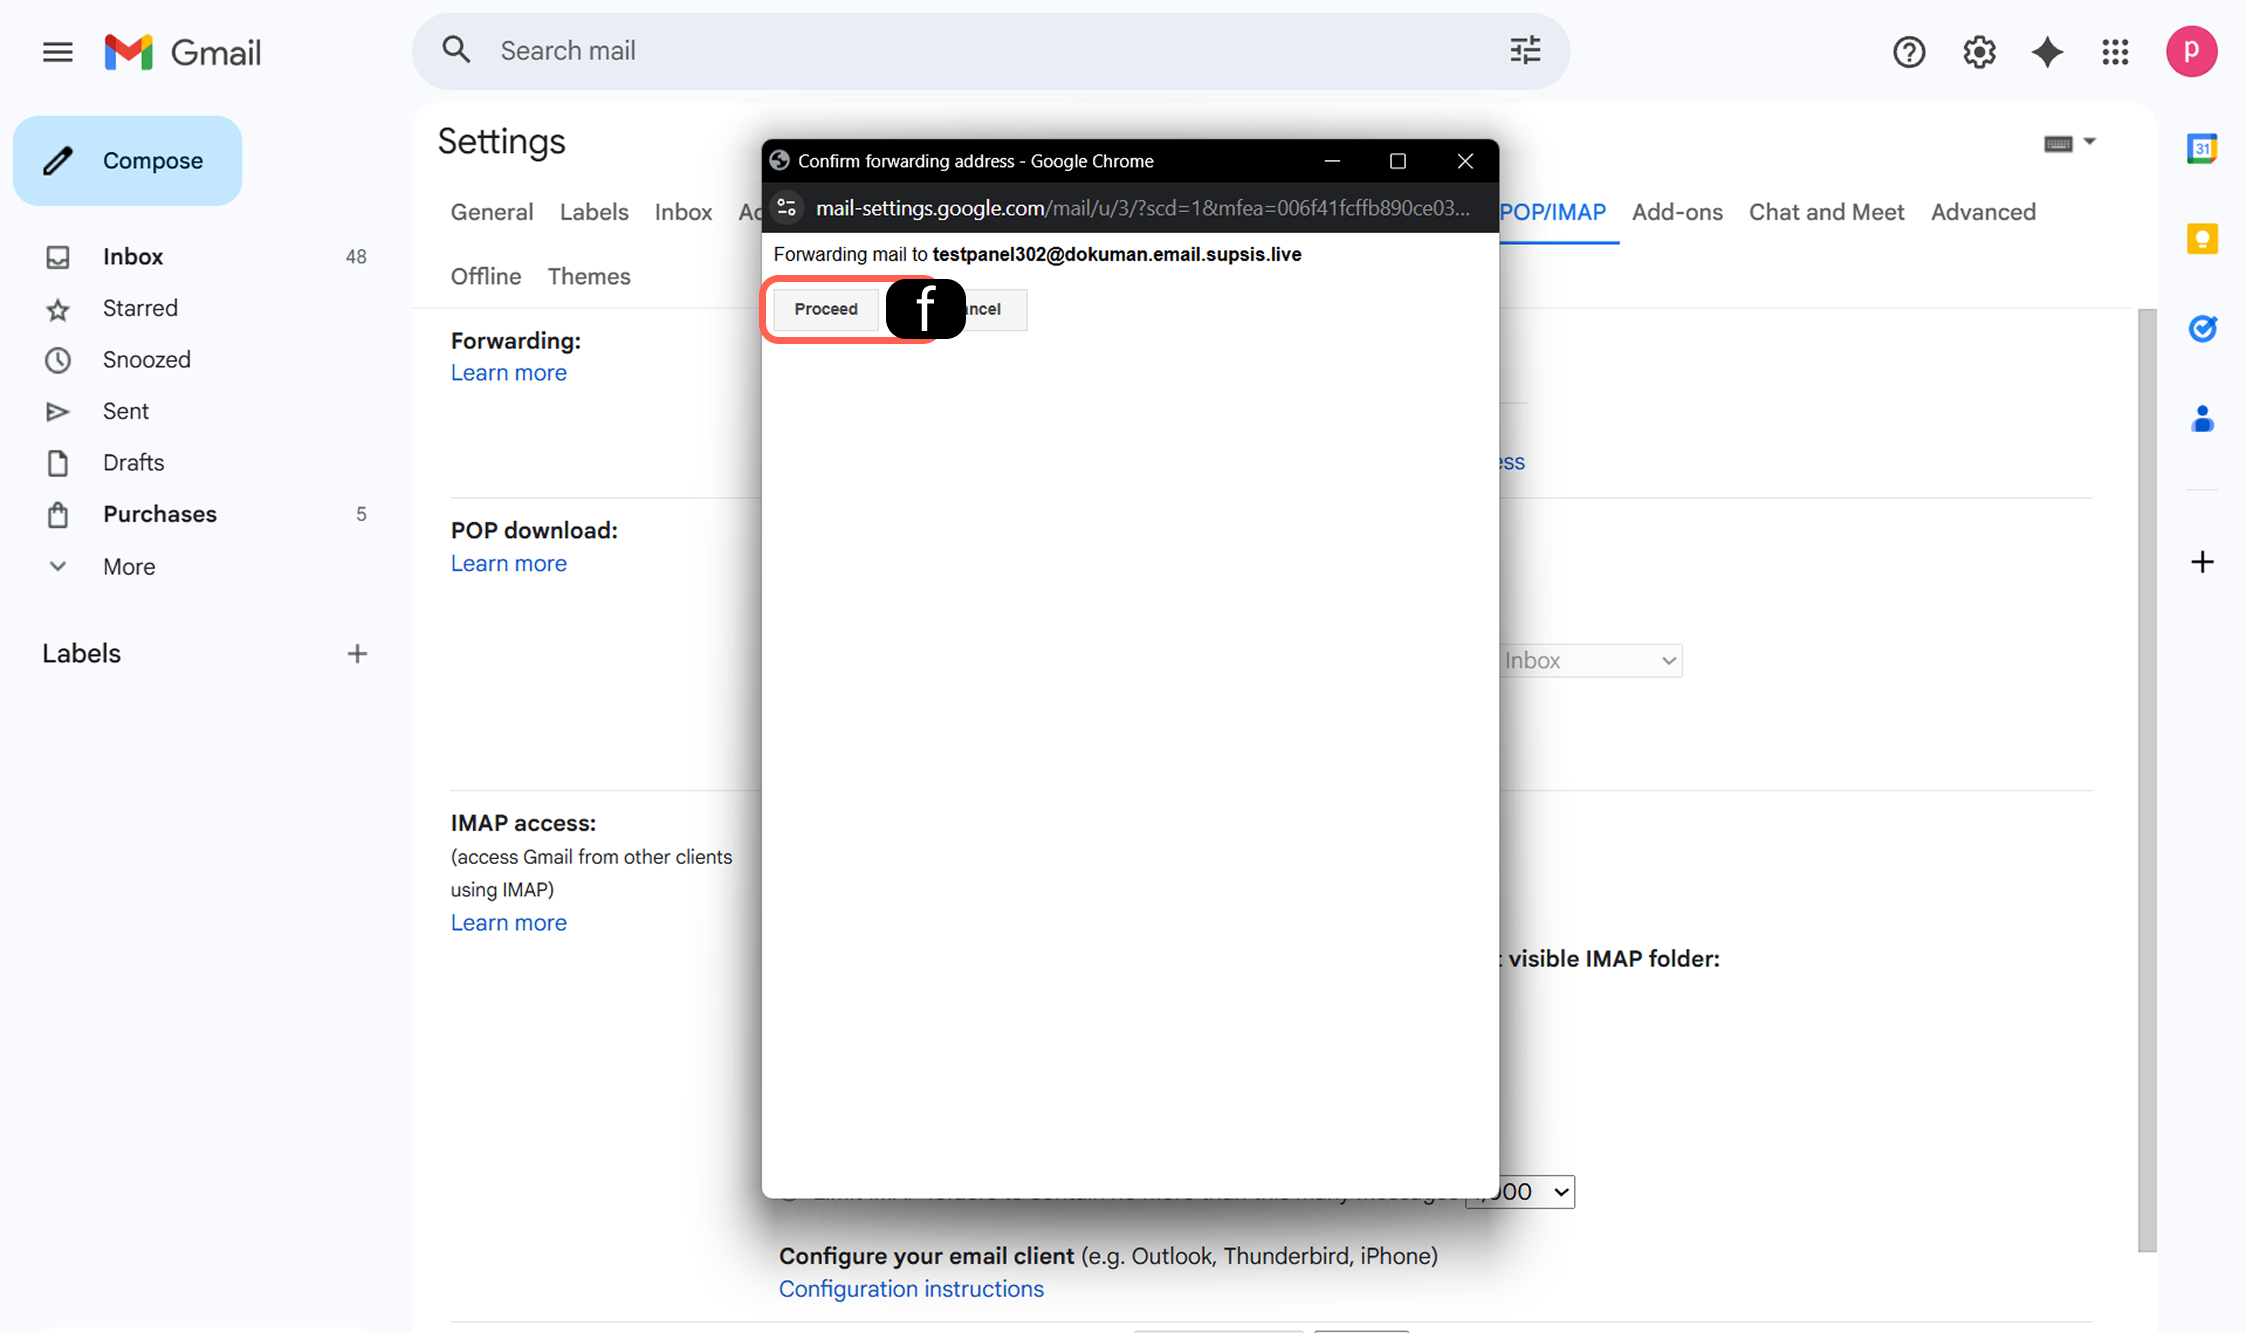
- f – Confirm Forwarding
In the confirmation dialog shown by Gmail, click "Proceed" to initiate the forwarding request.
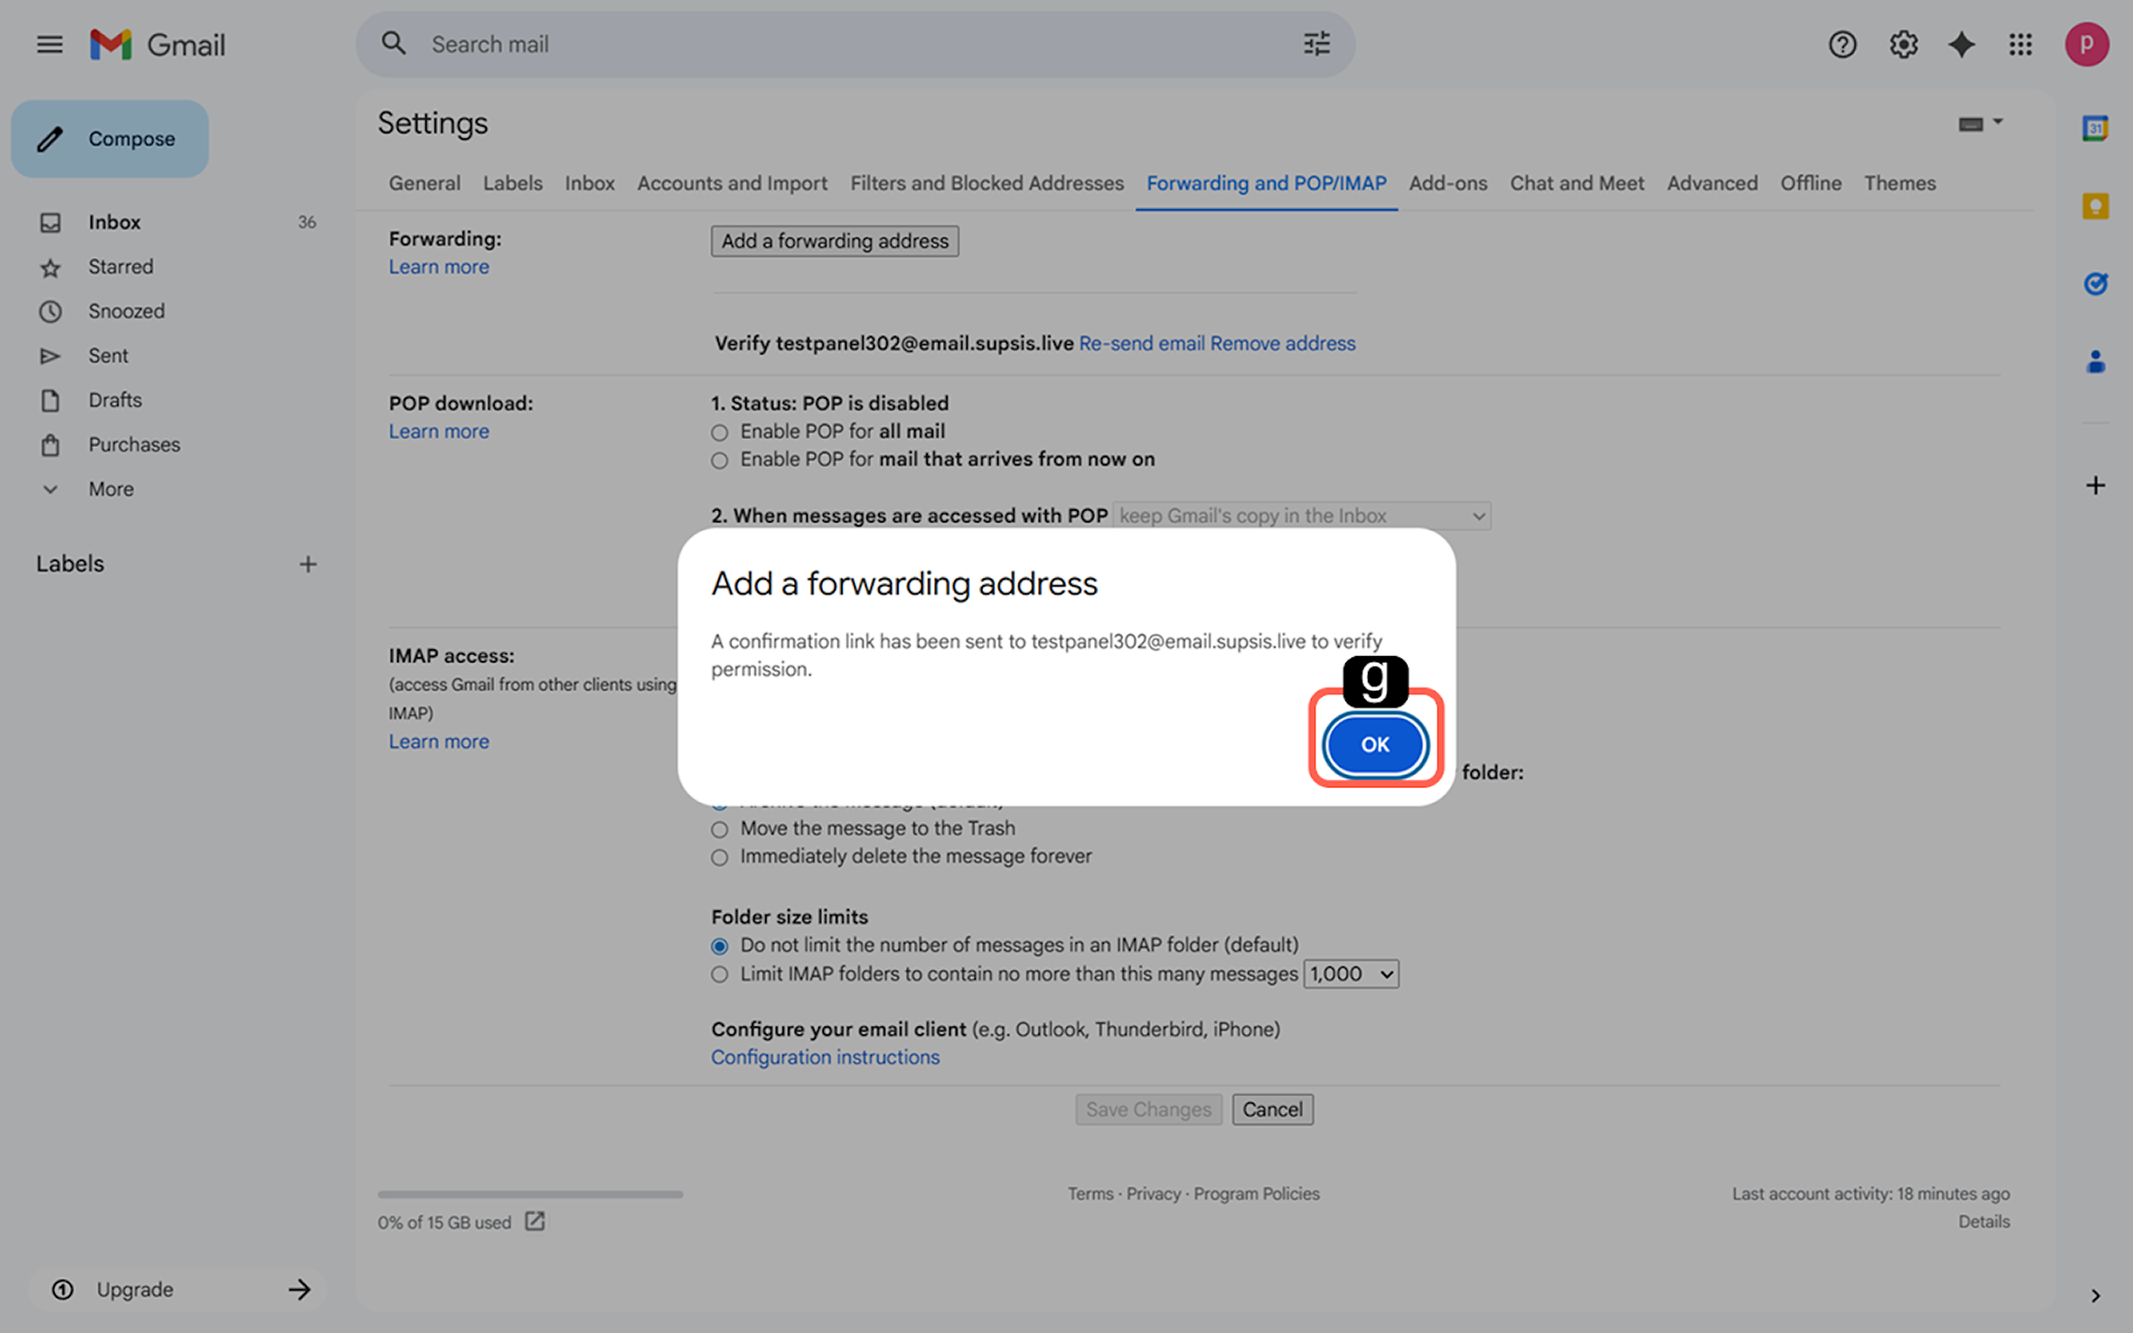
- g – Email Verification Notification
A verification link will be sent to the Mail you created in the Supsis AI panel. At this stage, click "OK" on Gmail to close the notification box. Then, log in to the email via the Modules section on the left side of your Supsis AI panel and confirm the verification link.
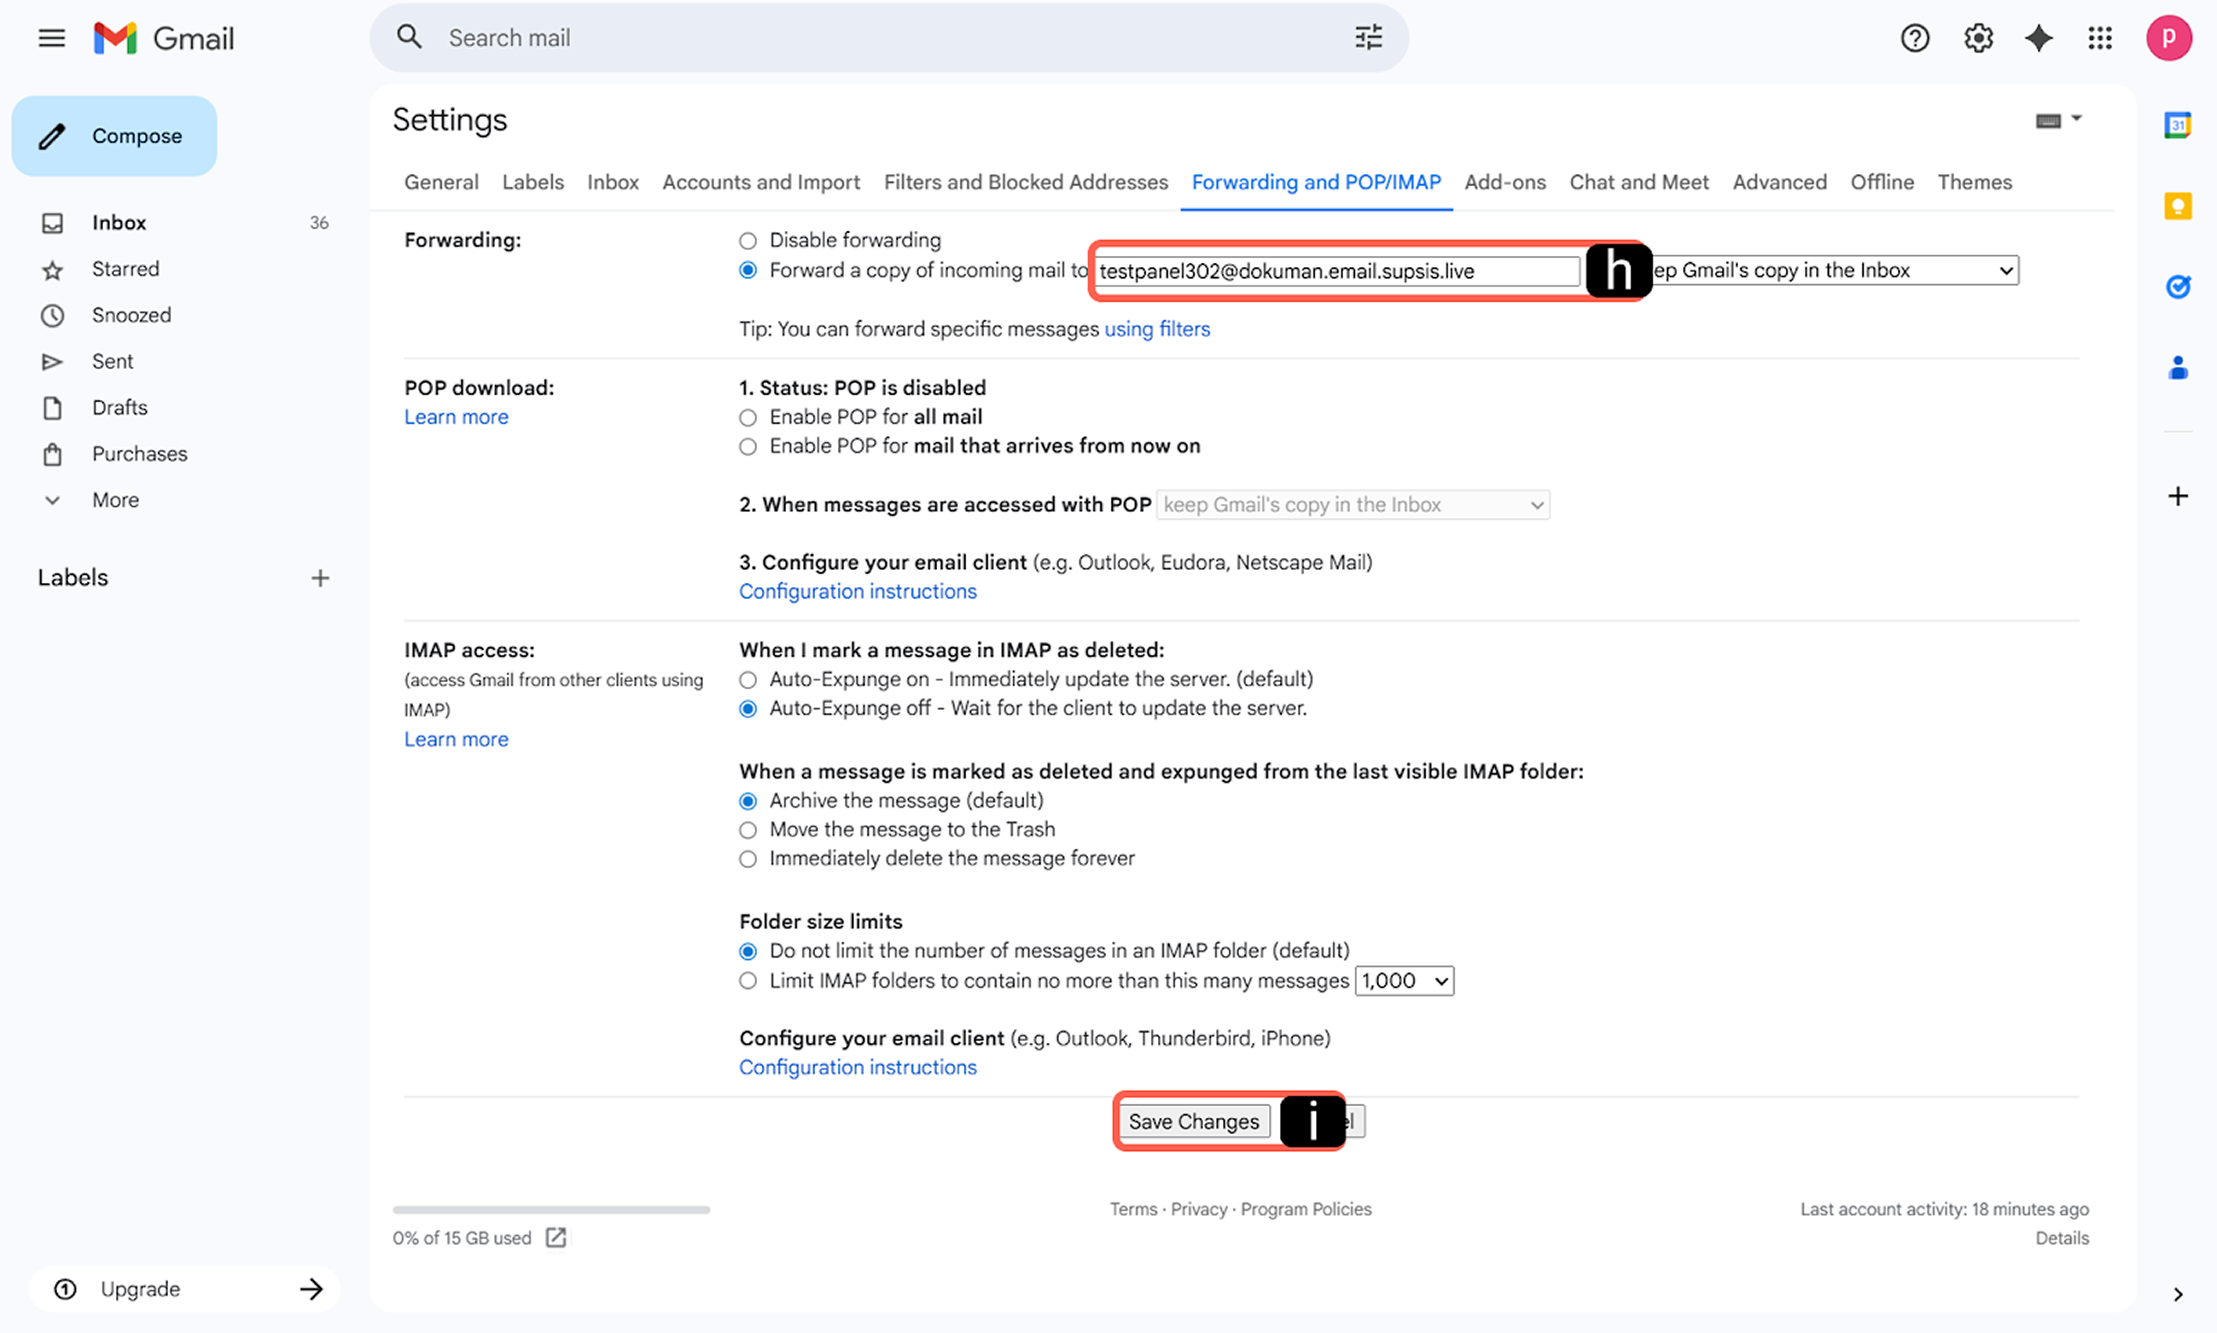
-
h – Forwarding Type
After completing email verification in the Supsis AI panel, return to the Gmail screen. Activate the option "Forward a copy of incoming mail to". -
i – Save Forwarding Type
Scroll to the bottom of the page and click the "Save Changes" button.
Post-Installation Checklist
- Verification: Make sure to check the "Verified" label next to the connected email address in the "Mail" integration section of the Supsis AI panel.
- Test Submission: Send a test email to your Gmail address from a personal account and confirm that the message is received in the Supsis AI Mail module.
- Spam Filter: If emails are not appearing in the panel, ensure that the "Forwarding enabled" notification is visible at the top of your Gmail forwarding settings.
2.b – Outlook Forwarding
This process ensures that emails received in your Outlook account are automatically transferred to the Supsis AI panel. Please follow the steps below in order to complete the setup.
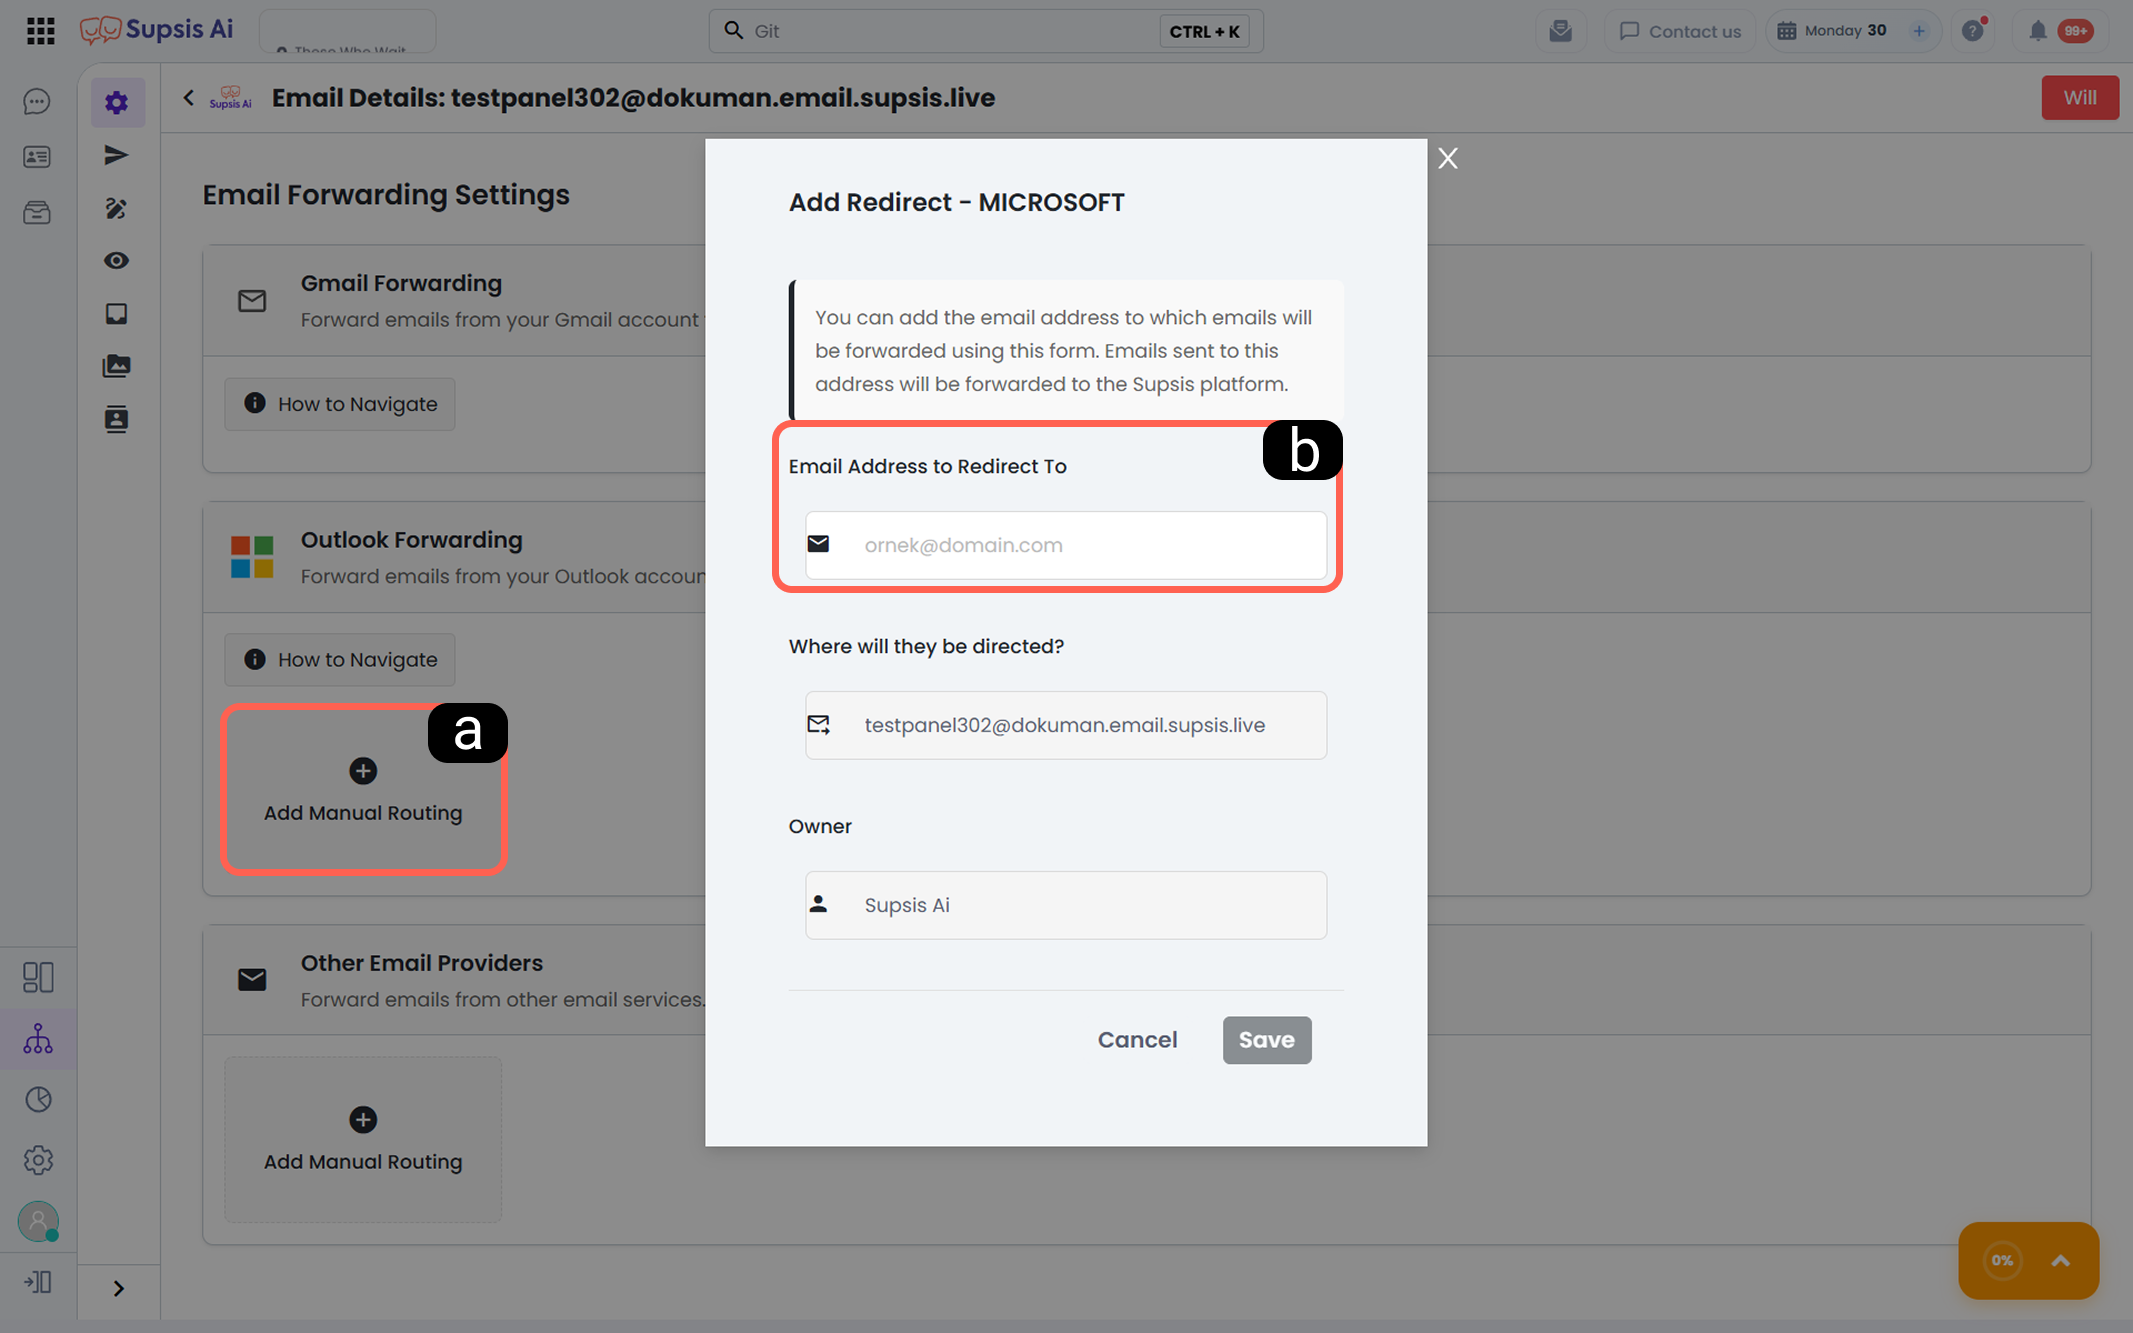
To ensure proper forwarding functionality, you must first define which address will be forwarded to the Supsis AI system.
-
a – Add Manual Forwarding
Click the "Add Manual Forwarding" button in the Outlook section on the mail forwarding screen. -
b – Email Address to be Forwarded
In the form that opens, enter your existing Outlook email address that you want to transfer to Supsis AI in the "Email Address to be Forwarded" field and click "Save".
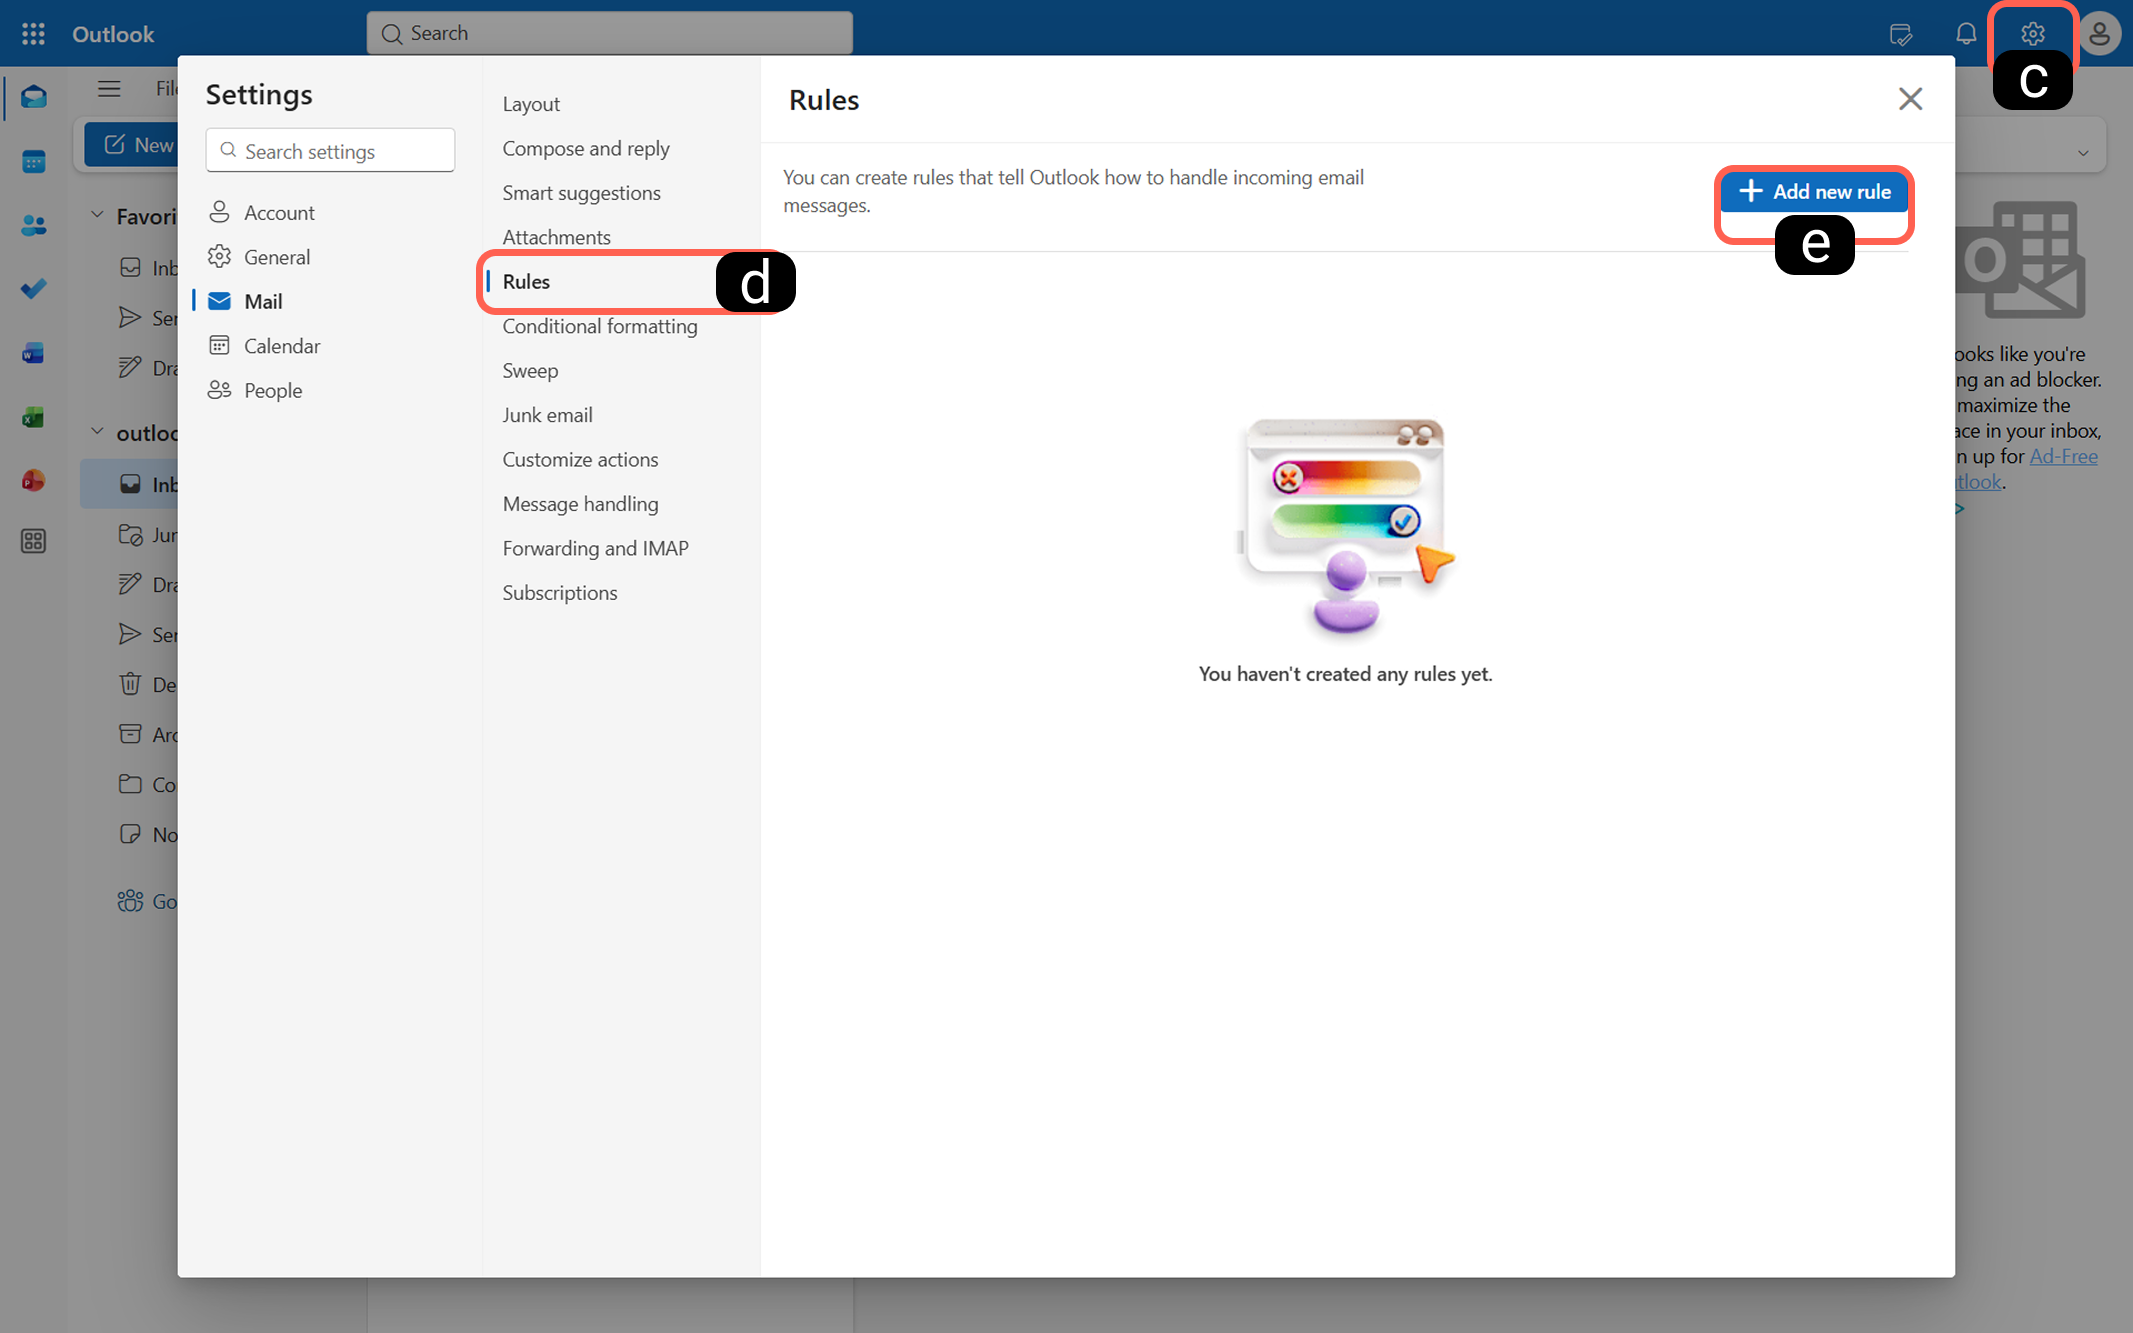
After completing preparation in the Supsis AI panel, go to the Outlook web interface to define the actual forwarding rule:
-
c – Settings
Click the "Settings" (gear icon) in the top right corner of the Outlook screen. -
d – Rules
From the left menu, follow the steps Mail > Rules. -
e – Add New Rule
Click the "+ Add new rule" button.
-
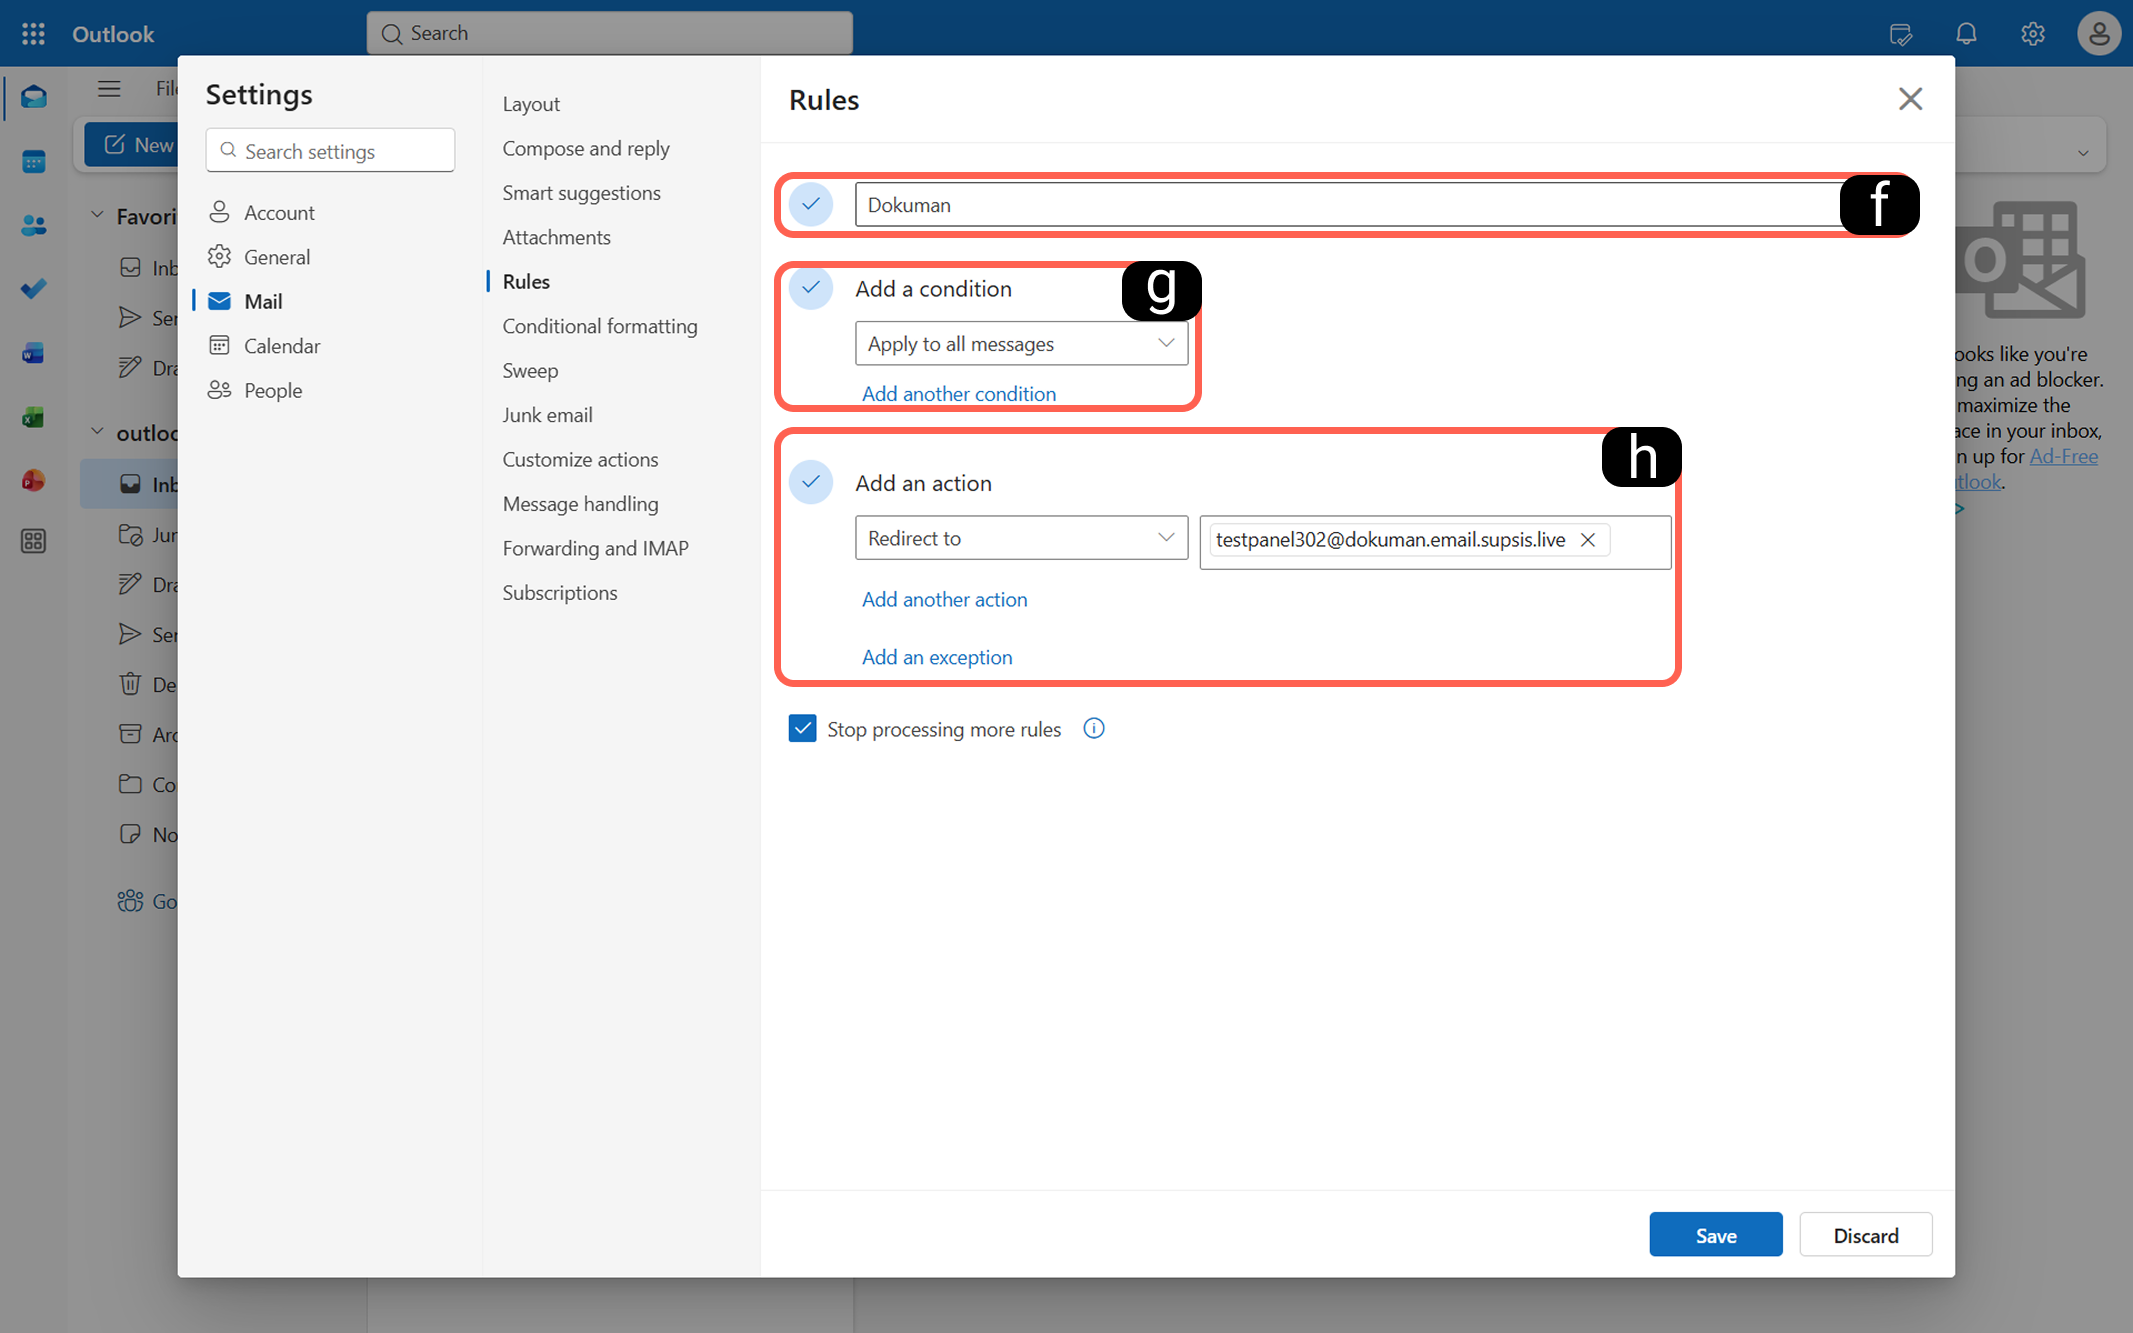
f – Rule Name
Give the rule a clear name that defines it. -
g – Rule Condition
Select the option "Apply to all messages" to include all traffic in the forwarding scope. -
h – Action When Condition is Met
From the "Add an action" section, select "Redirect to". Then paste the forwarding address with the...email.supsis.liveextension that you created in your Supsis AI panel into the recipient field. Click "Save" to complete the process.
Post-Installation Checklist
- Verification: Make sure to check the "Verified" label next to the connected email address in the "Mail" integration section of the Supsis AI panel.
- Test Submission: Send a test email to the Outlook address you integrated with Supsis AI from a personal account and confirm that the message is received in the Supsis AI Mail module.
2.c – Other Email Providers
The "Other Email Providers" option allows you to integrate all local and global services that support SMTP/IMAP into the Supsis AI ecosystem. If you are using a provider with this support, you can complete the forwarding process according to your provider’s documentation or by contacting their technical support team.
To ensure proper forwarding functionality and system recognition of incoming traffic, first complete the following steps:
-
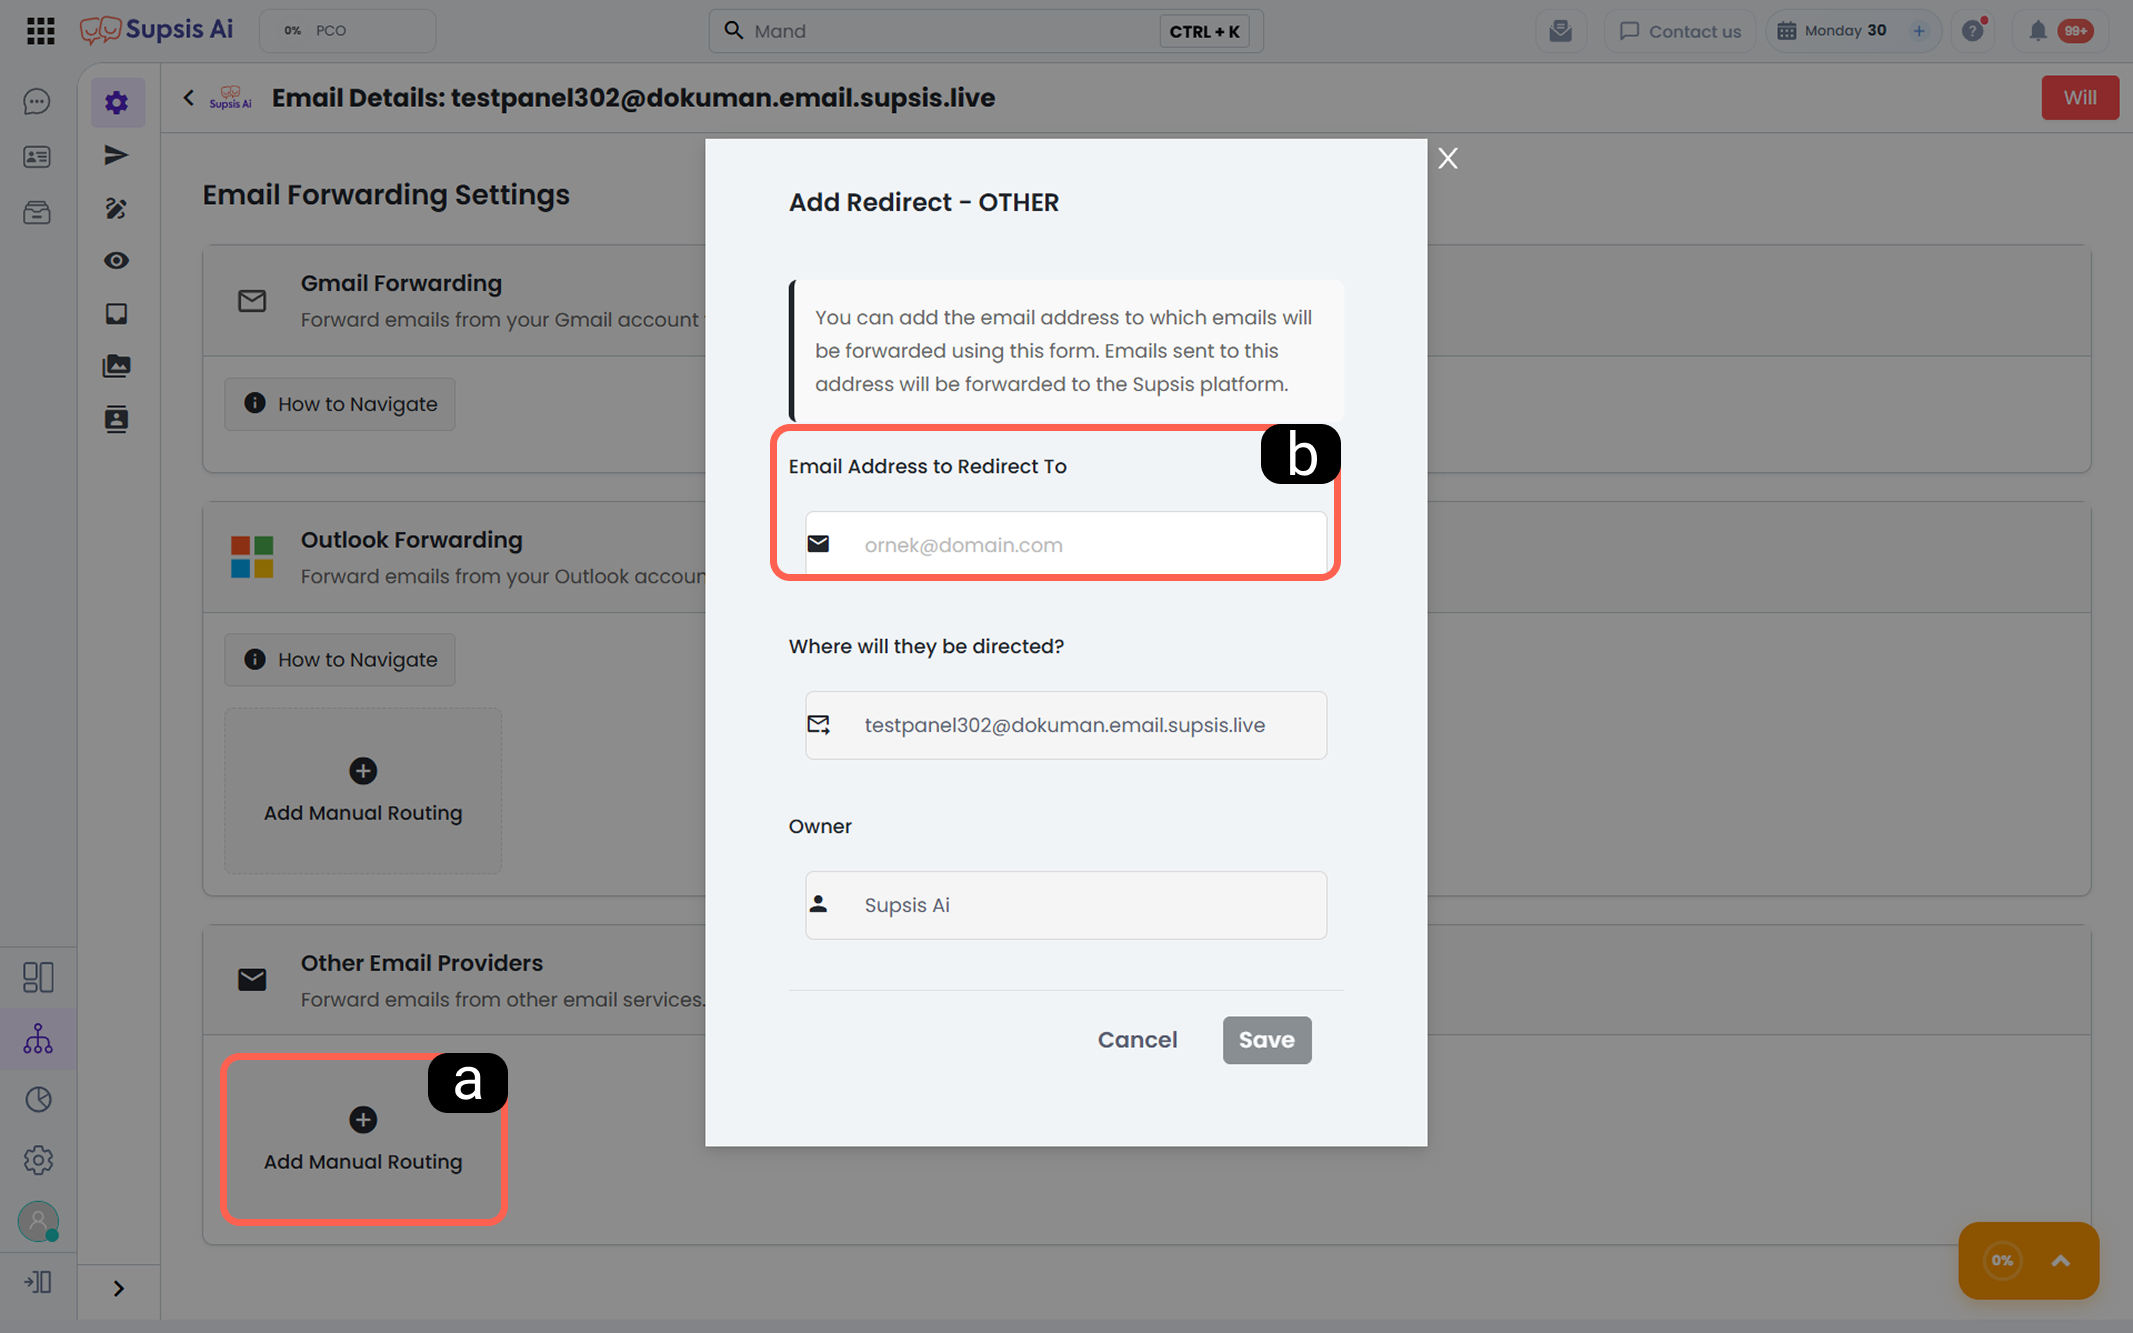
a – Add Manual Forwarding
Click the "Add Manual Forwarding" button in the Other Email Providers section on the mail forwarding screen. -
b – Email Address to be Forwarded
In the form that opens, enter your existing email address that you want to transfer to Supsis AI into the "Email Address to be Forwarded" field and click "Save".
After completing this definition on the Supsis AI side, go to your email provider’s management panel and complete the steps to forward messages to the dedicated email address generated for you by Supsis AI.
Post-Installation Checklist
- Verification: Make sure to check the "Verified" label next to the connected email address in the "Mail" integration section of the Supsis AI panel.
- Test Submission: Send a test email to the email address you integrated into the panel from a personal account and confirm that the message is received in the Supsis AI Mail module.