
The Inbox is the central area where all conversations are managed.
From this section, you can access the content of active and past conversations, filter conversations, and perform related actions.
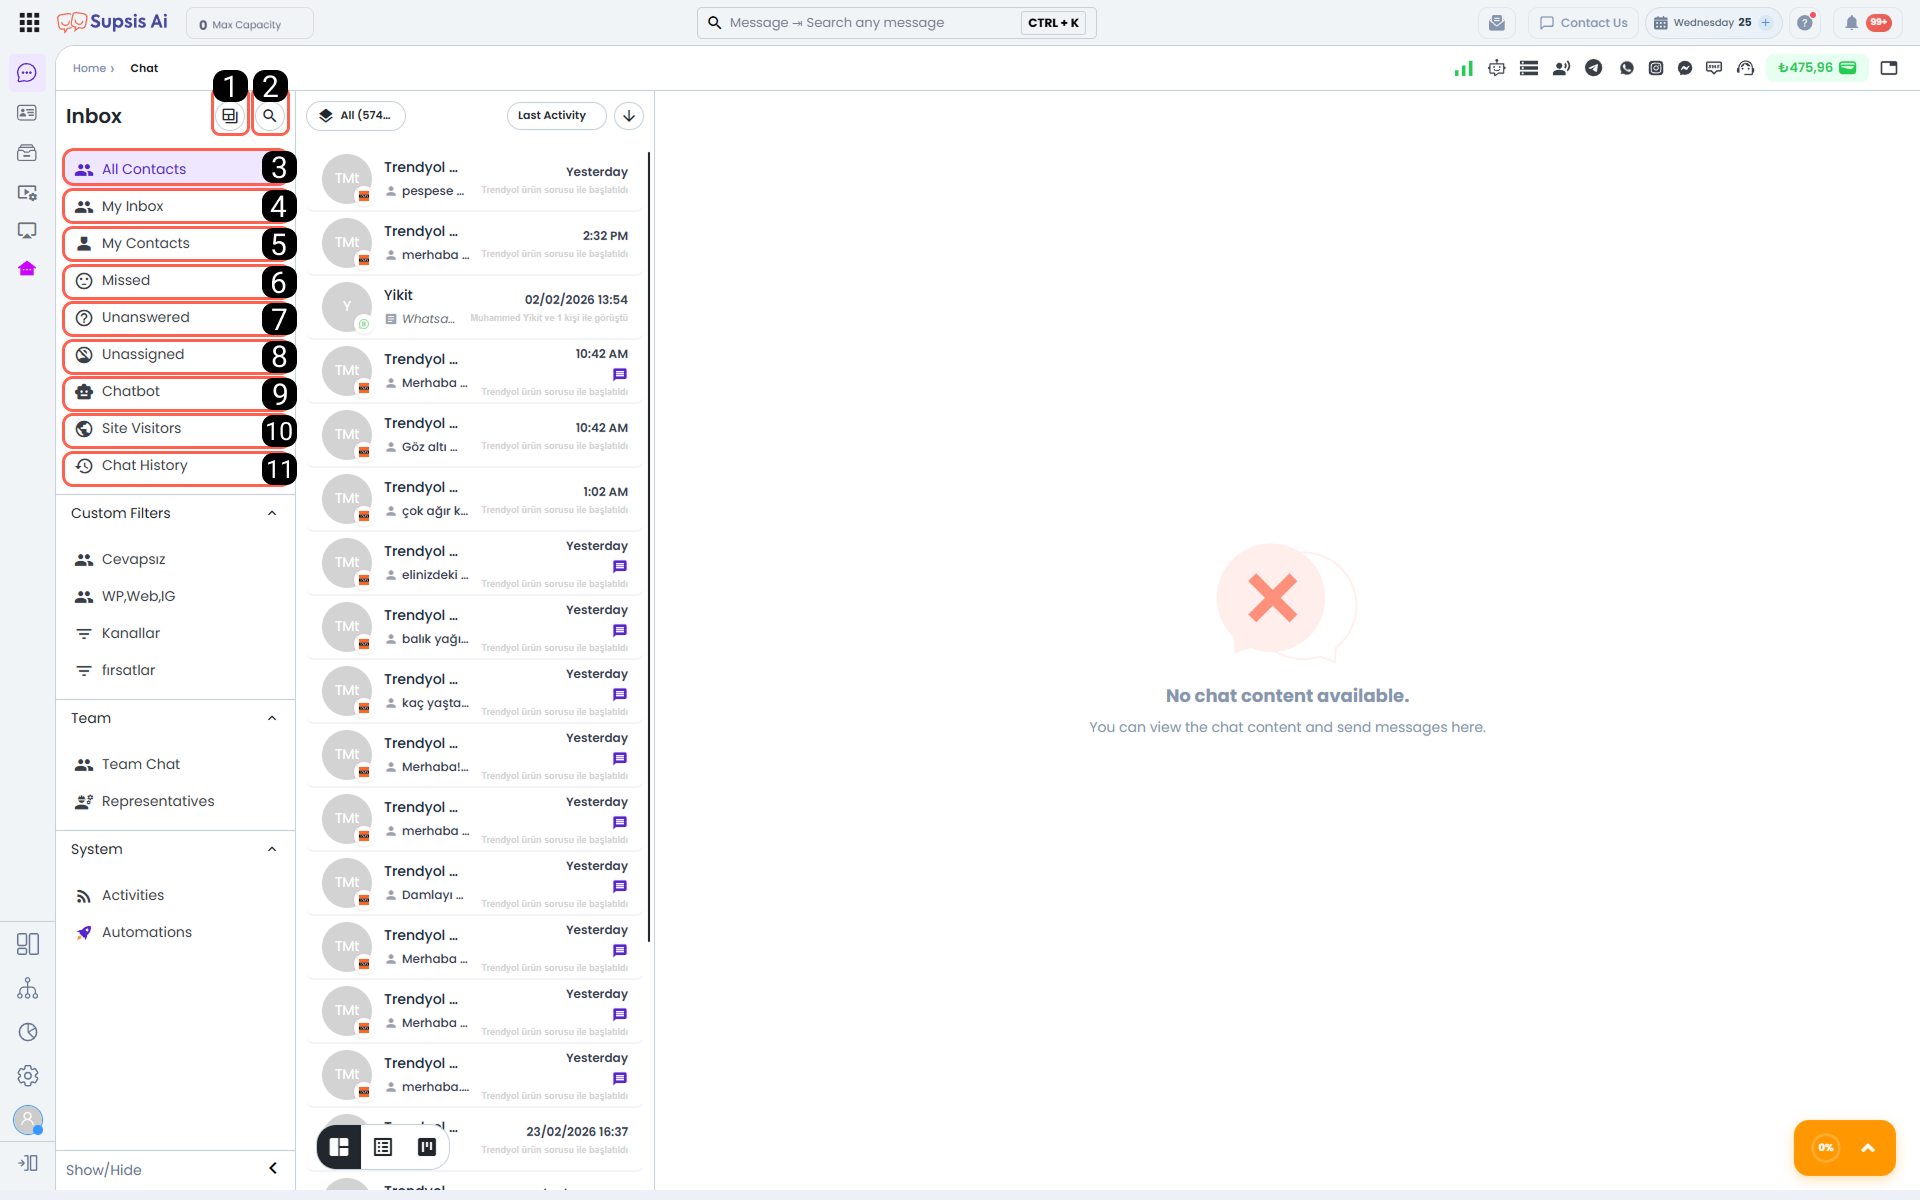
Sections
| No | Menu |
|---|---|
| 1 | TAB Screen |
| 2 | Search |
| 3 | All Contacts |
| 4 | My Inbox |
| 5 | My Contacts |
| 6 | Missed |
| 7 | Unanswered |
| 8 | Unassigned |
| 9 | Chatbot |
| 10 | Website Visitors |
| 11 | Conversation History |
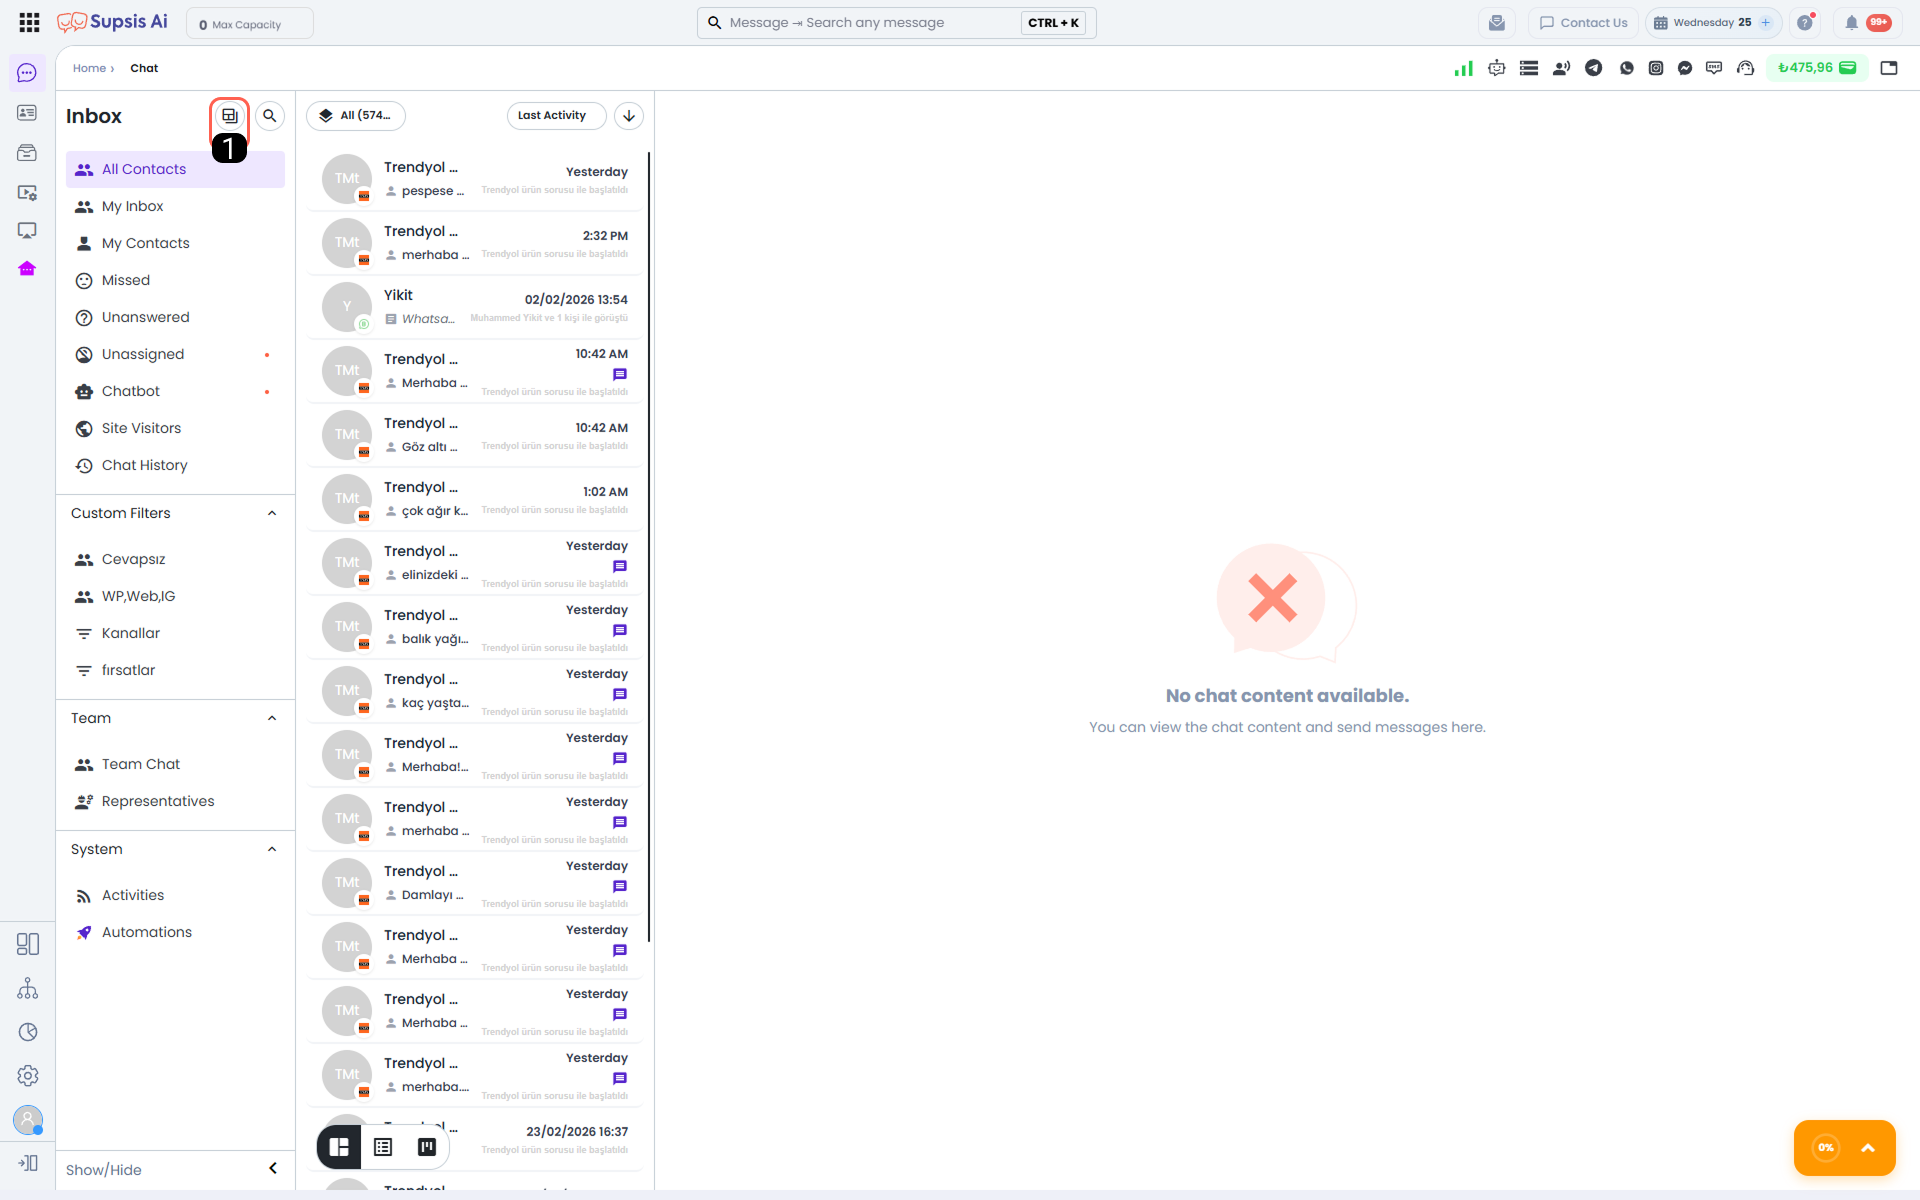
1- TAB Screen
You can access this menu by pressing the Tab key or by clicking the highlighted TAB Screen button.
This menu is used to monitor the status of active chat sessions.
You can view the overall or agent-based status of active conversations from this screen.
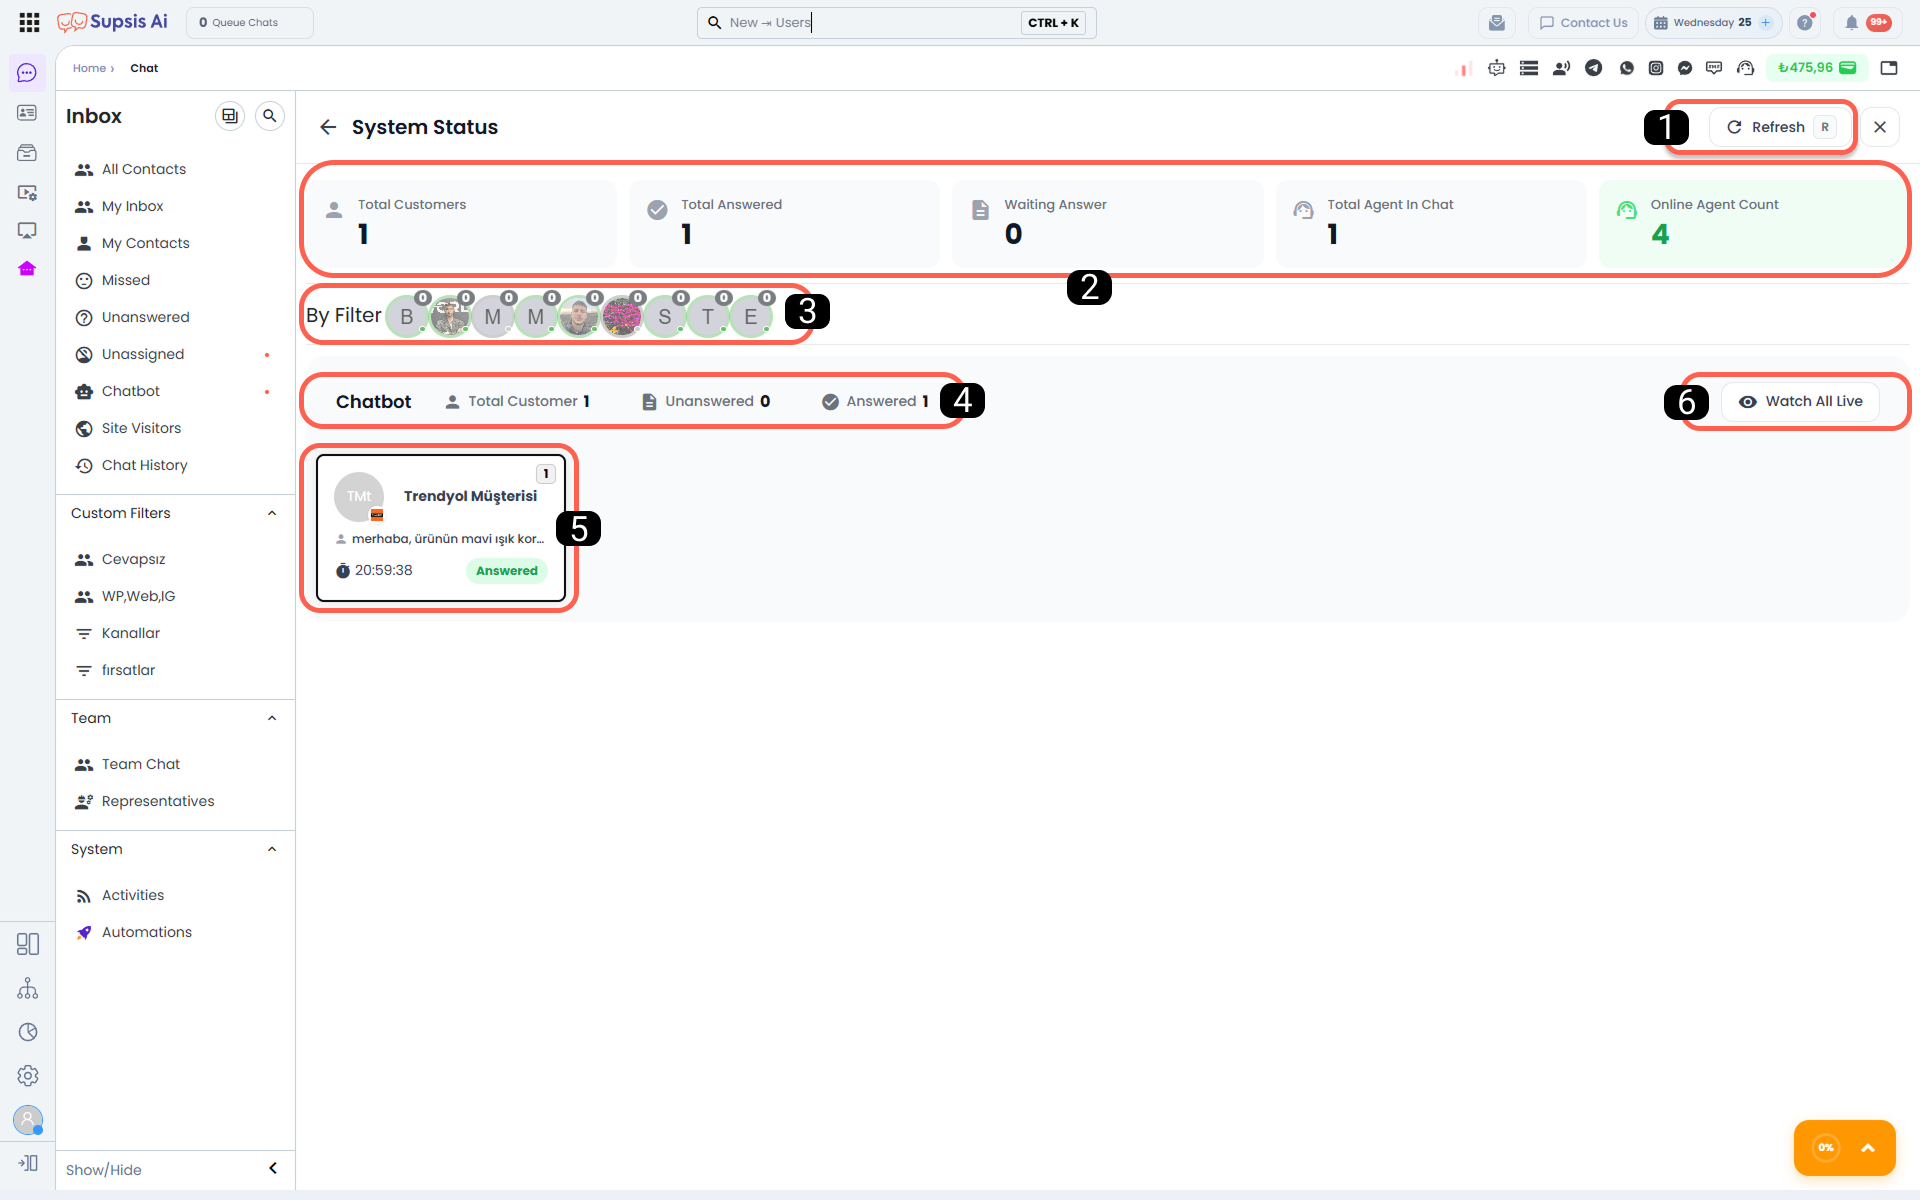
- Refresh
- System Status of Active Chats
- Filter Agent Chats
- Agent Chat Status
- Access Chat & Chat Status
- Live Monitor Agent Chats
1-) Refresh
The data in the menu does not update automatically. To view the most up-to-date status of conversations, you must manually refresh the page by clicking the relevant button or pressing the “R” key on your keyboard.
This ensures that newly opened or closed sessions and updated chat statuses are instantly displayed.
2-) System Status of Active Chats
This section summarizes the overall status of all ongoing active conversations in the system. Through the dashboard indicators, the system’s real-time condition can be quickly analyzed and interventions can be made when necessary.
The numerical data presented regarding active chats is as follows:
- Total Customers: Total number of customers with an active chat session in the system.
- Total Answered: Total number of conversations responded to by agents.
- Waiting for Response: Number of active conversations waiting for an agent response.
- Total Agents in Chat: Number of agents currently engaged in active conversations.
- Online Agents: Number of agents currently online and available in the system.
3-) Filter Agent Chats
Online agents and the chats assigned to them are displayed numerically in this area. Additionally, by clicking on the agent’s profile picture, you can filter the chats assigned to that agent and view only the selected agent’s active chat sessions.
4-) Agent Chat Status
This section displays the status of active conversations managed by the selected agent.
You can track how many active chats each agent has and monitor their current chat statuses.
This structure provides an important advantage for analyzing workload per agent and monitoring operational efficiency.
5-) Access Chat & Chat Status
To access the chat content, simply click on the relevant chat bubble.
The real-time status of each conversation is displayed in this section.
Chat statuses are indicated with labels such as “waiting for reply” or “answered” located at the bottom right of the chat bubble.
This allows agents to quickly and easily track the stage of the conversations under their responsibility.
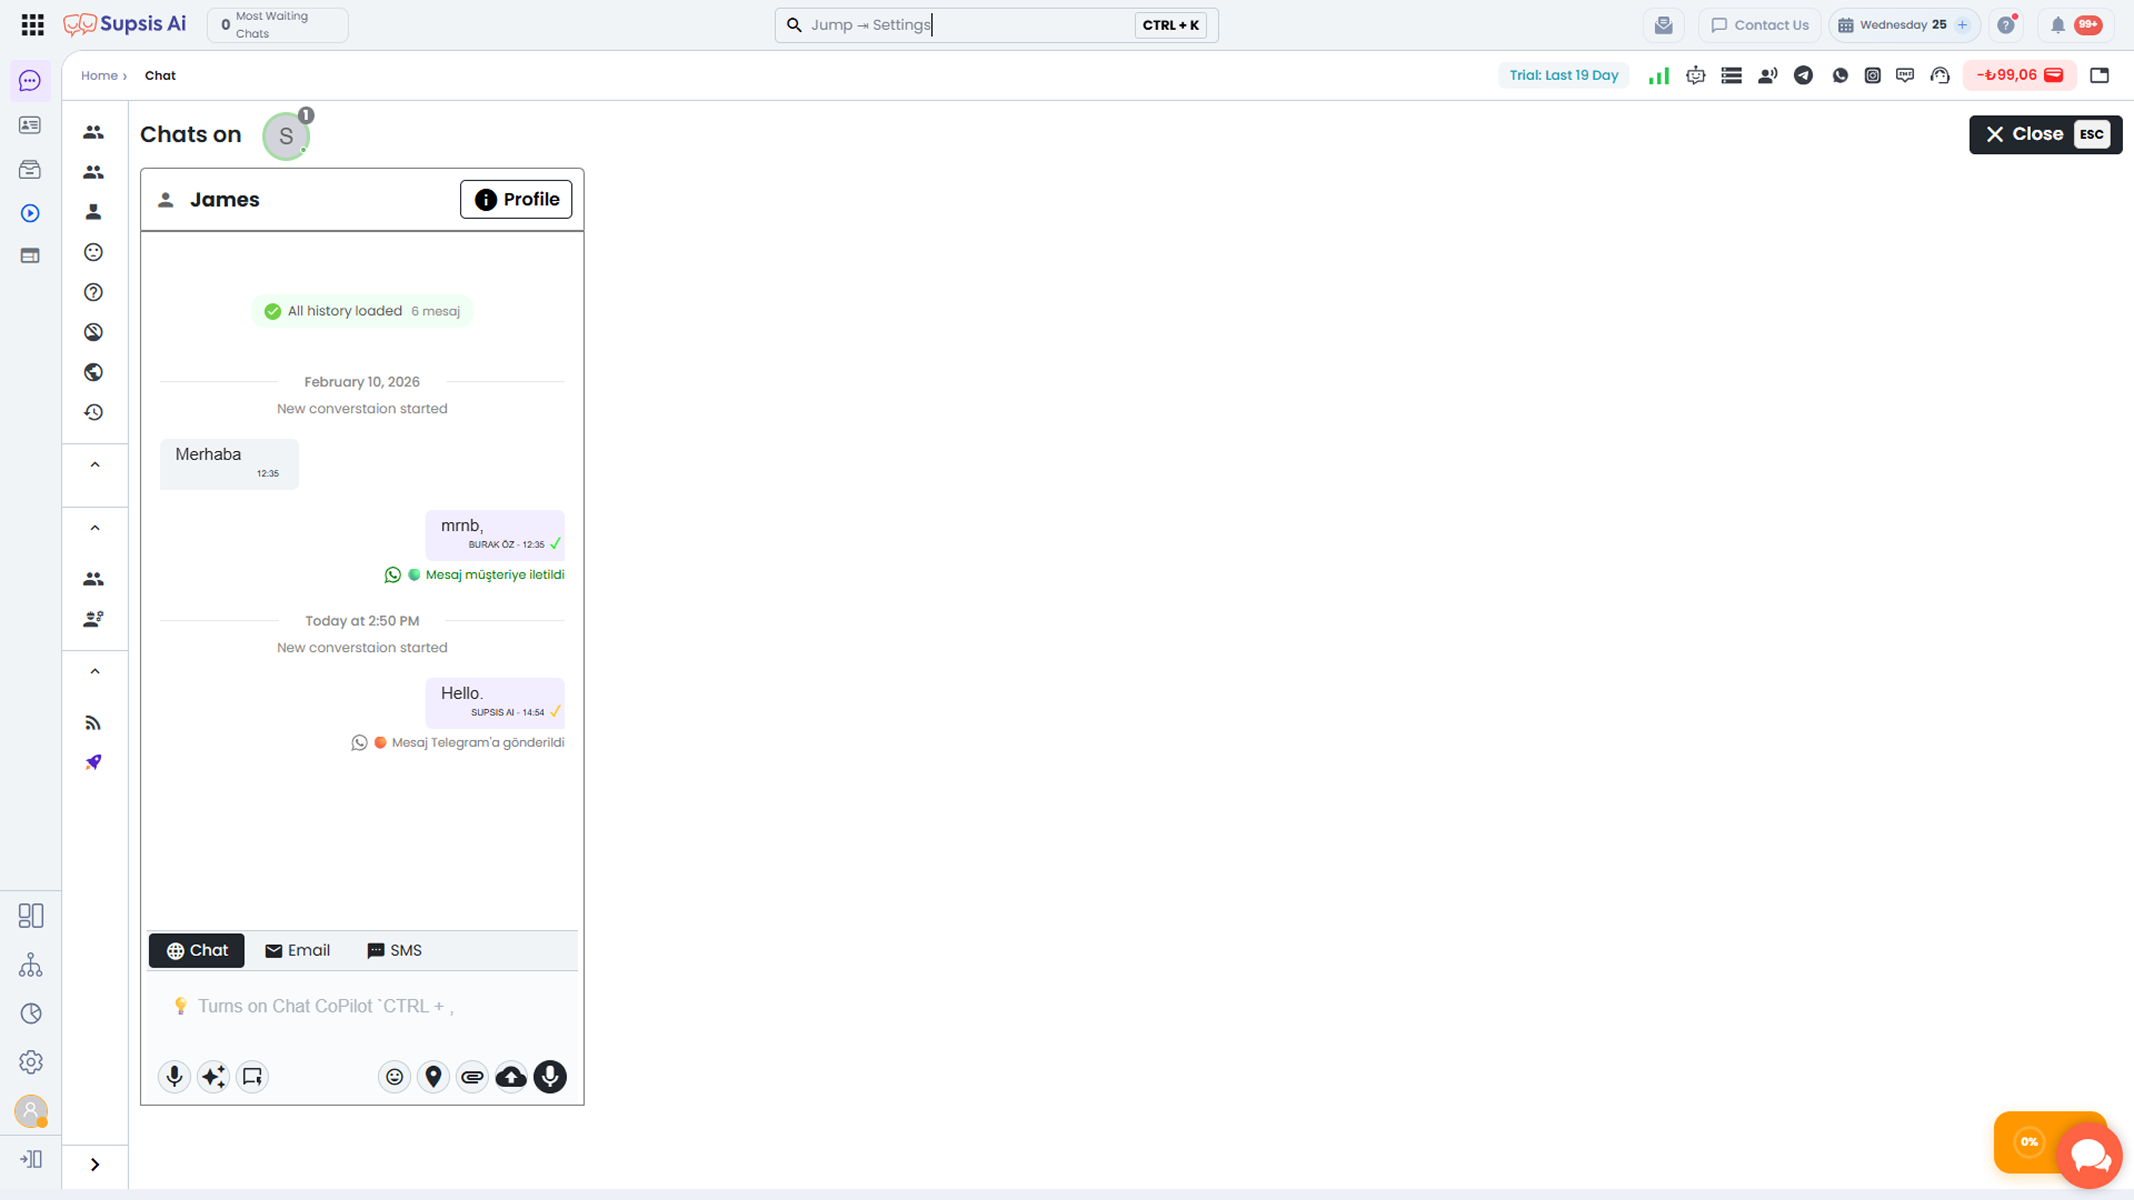
6-) Live Monitor All Chats
This area allows all chats assigned to the agent to be monitored in real time and enables necessary actions to be taken.
All chat content related to the customers served by the agent can be followed live from this section and chat operations can be performed.
7-) Automation Delivery Info and Direct Link
In the chat window, directly below messages automatically sent to customers via automation scenarios (WhatsApp, Chatbot, etc.), a dedicated info and traceability tag is displayed:
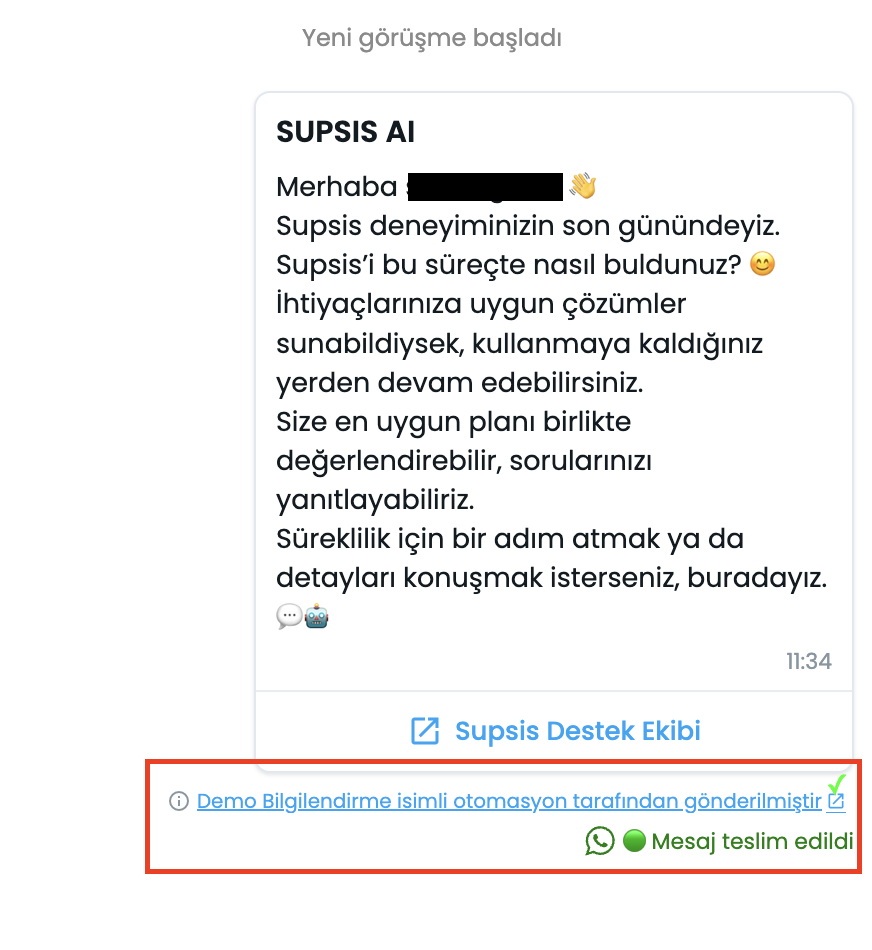
- Automation Name Info: Displayed directly under the message bubble as "ℹ️ Sent by automation named [Automation Name]", clarifying which automation sent the message.
- Clickable Live Link: The notification text includes a clickable link. Clicking this link directs agents or administrators straight to the edit and details page of the relevant automation scenario without leaving the chat window.
8-) Representative Info & Timestamp on Media / Asset Messages
In the chat window, image, file, and media (asset) messages include detailed sender representative information, timestamps, and message read statuses, just like standard text messages:
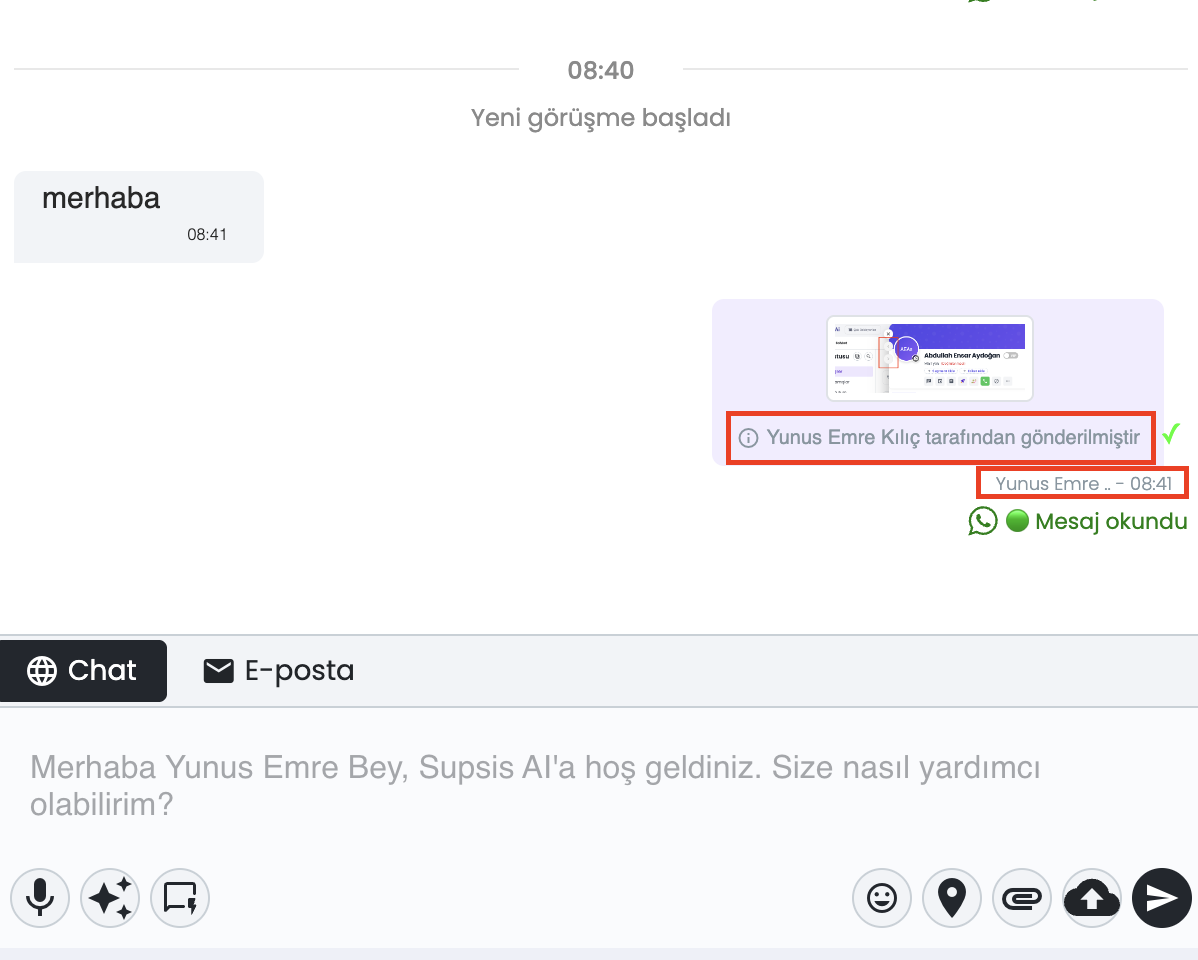
- Sender Representative Info: Below the image or media message bubble, a notice is displayed stating "ⓘ Sent by [Representative Full Name]". This allows teams to instantly identify which agent uploaded the file or image in the conversation history.
- Representative Name & Timestamp: Along with the representative's name, the exact sending time (e.g.,
Yunus Emre Kılıç - 08:41) is displayed beneath the media bubble. - Delivery & Read Status: Real-time delivery and read statuses (e.g.,
🟢 Message reador✓✓) are tracked alongside the active communication channel icon (such as WhatsApp).
2-) Search
Through the search menu accessed via the highlighted button, you can search among the records in the contact cards listed under the Contacts menu according to specified criteria. This area helps you filter results based on the existing information in contact cards and quickly reach the person you are looking for.
For more information about the structure of the Contacts menu and how contact cards used during searches are created, you can review the Contacts document.
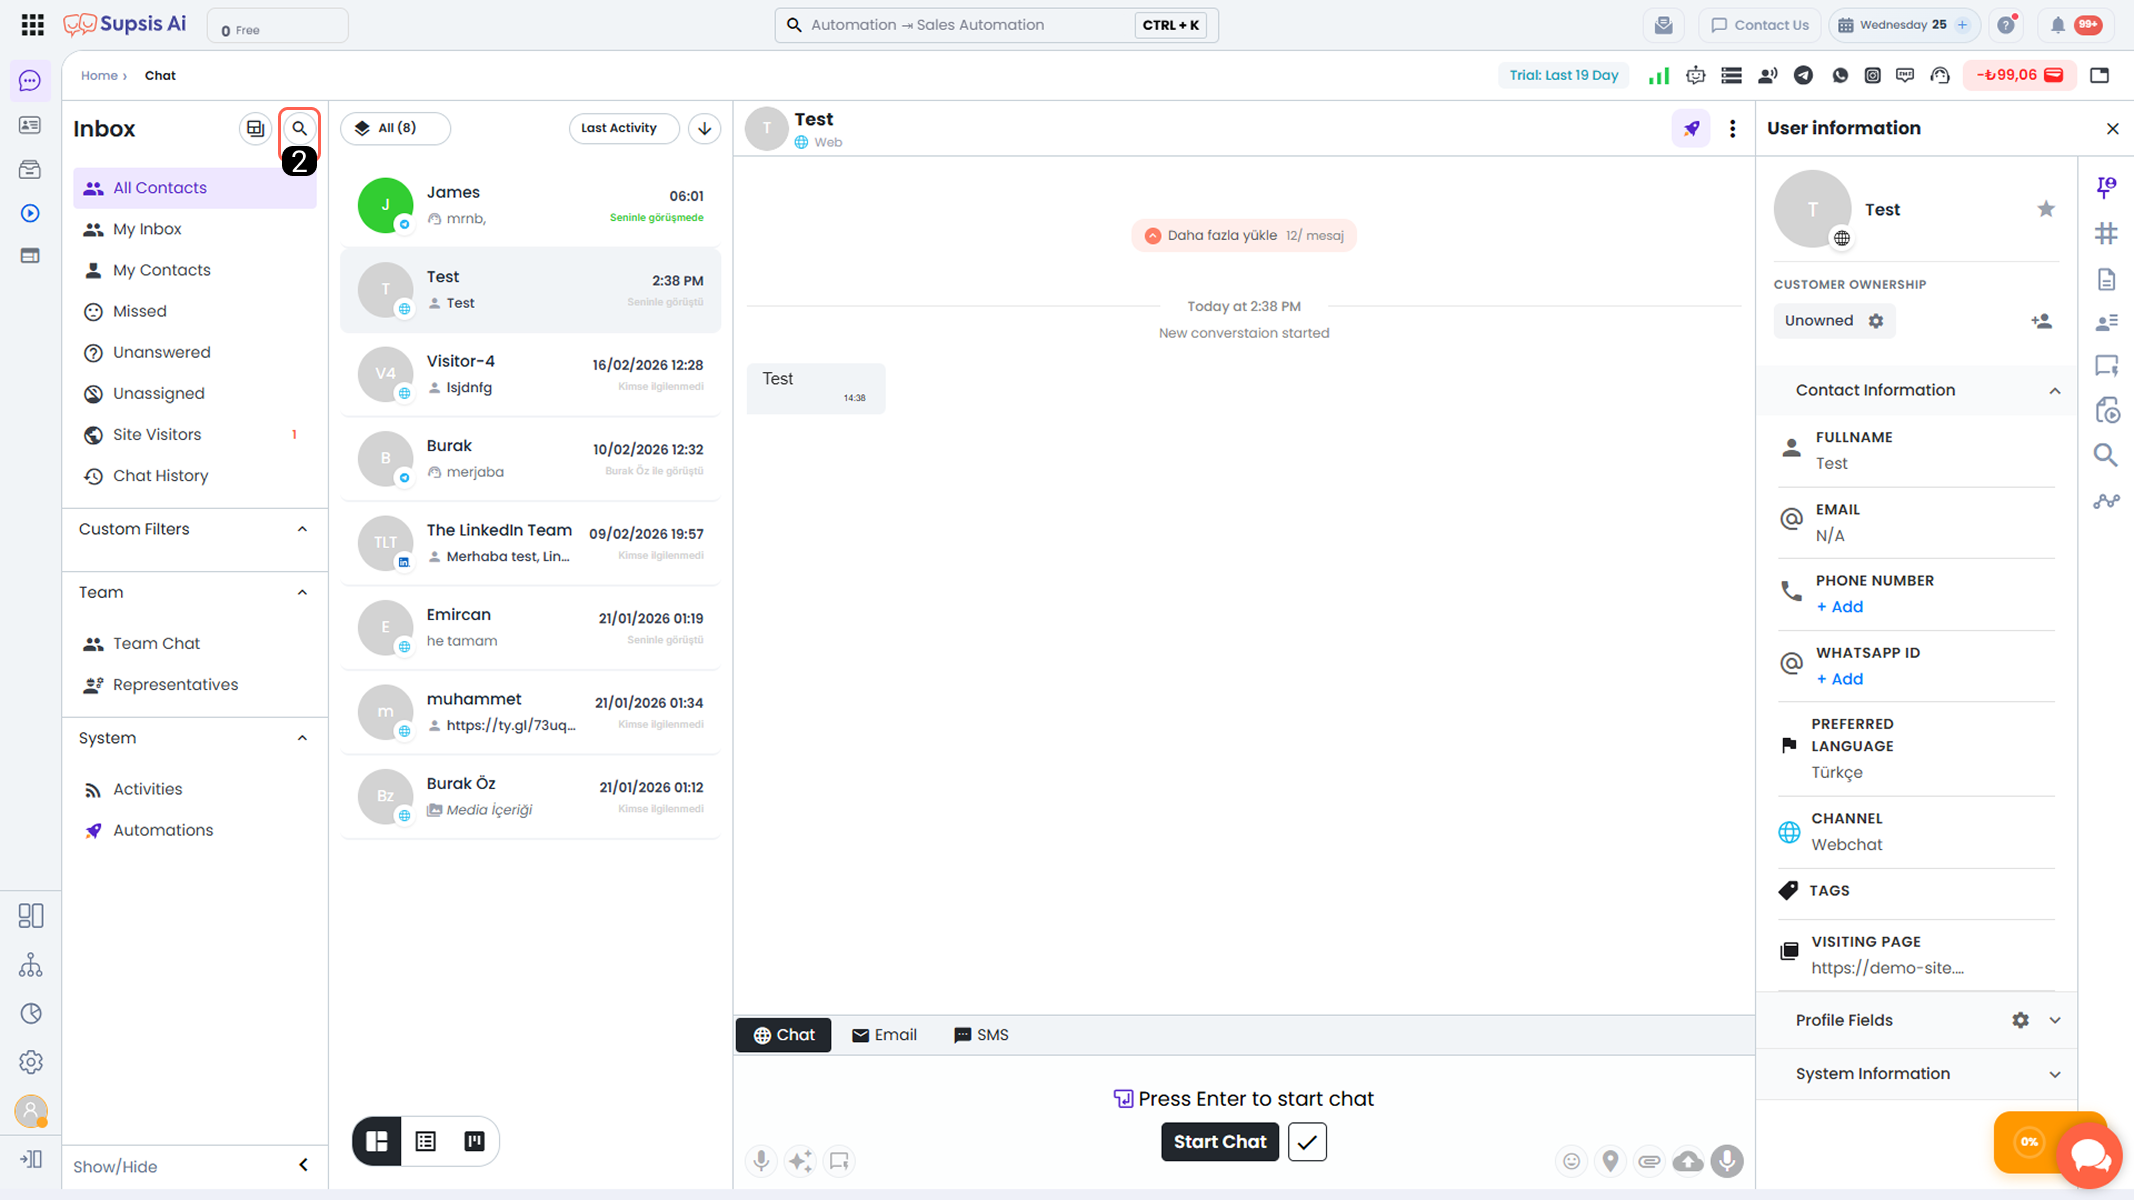
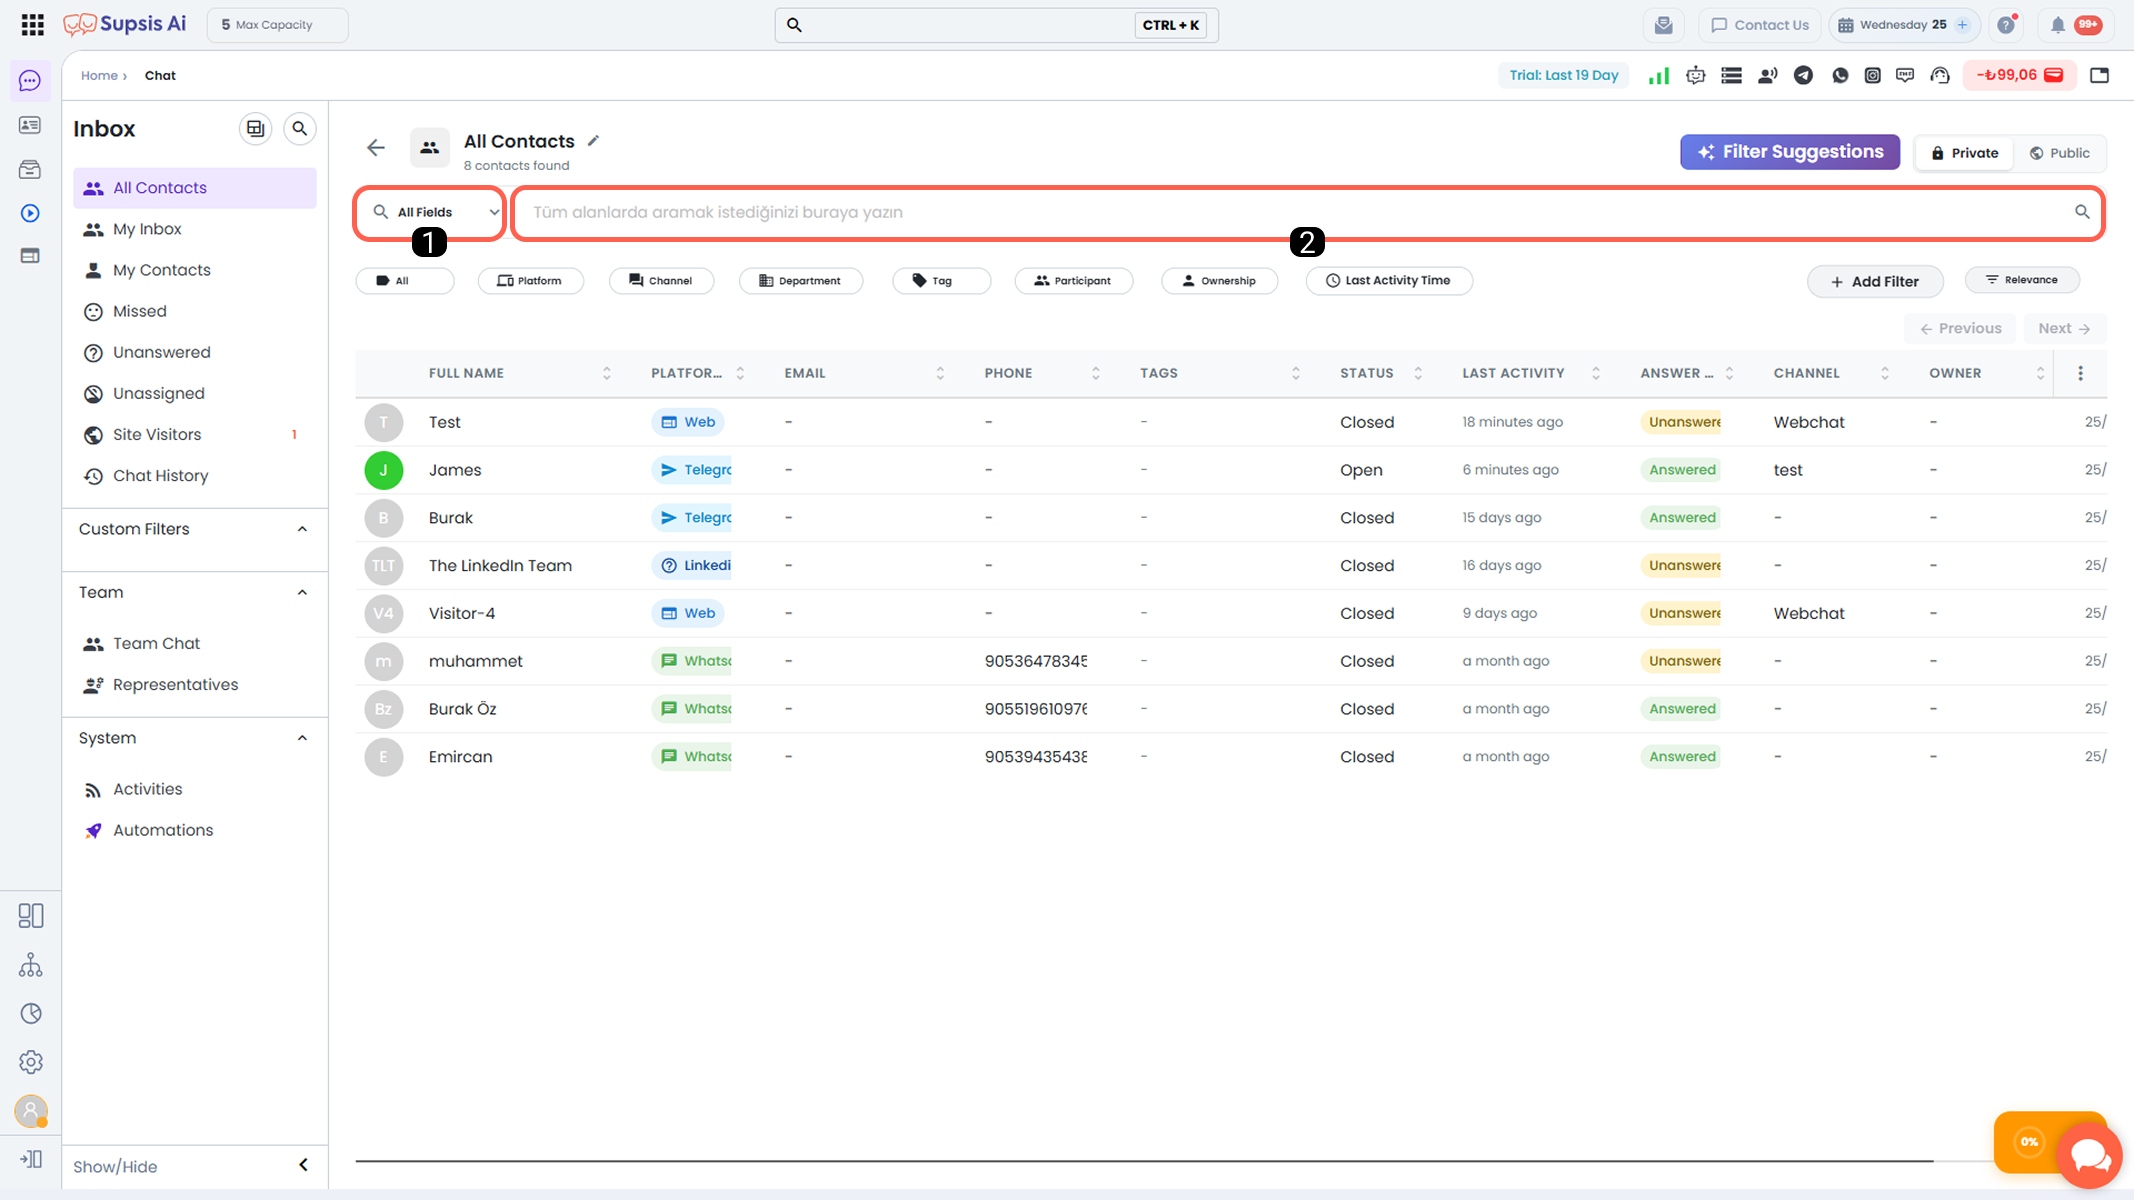
- Search Criteria
- Search Bar
1-) Search Criteria
Through the search menu, you can perform detailed filtering among registered contacts in the system based on different fields.
This allows you to quickly and accurately reach the person or specific conversation record you are searching for.
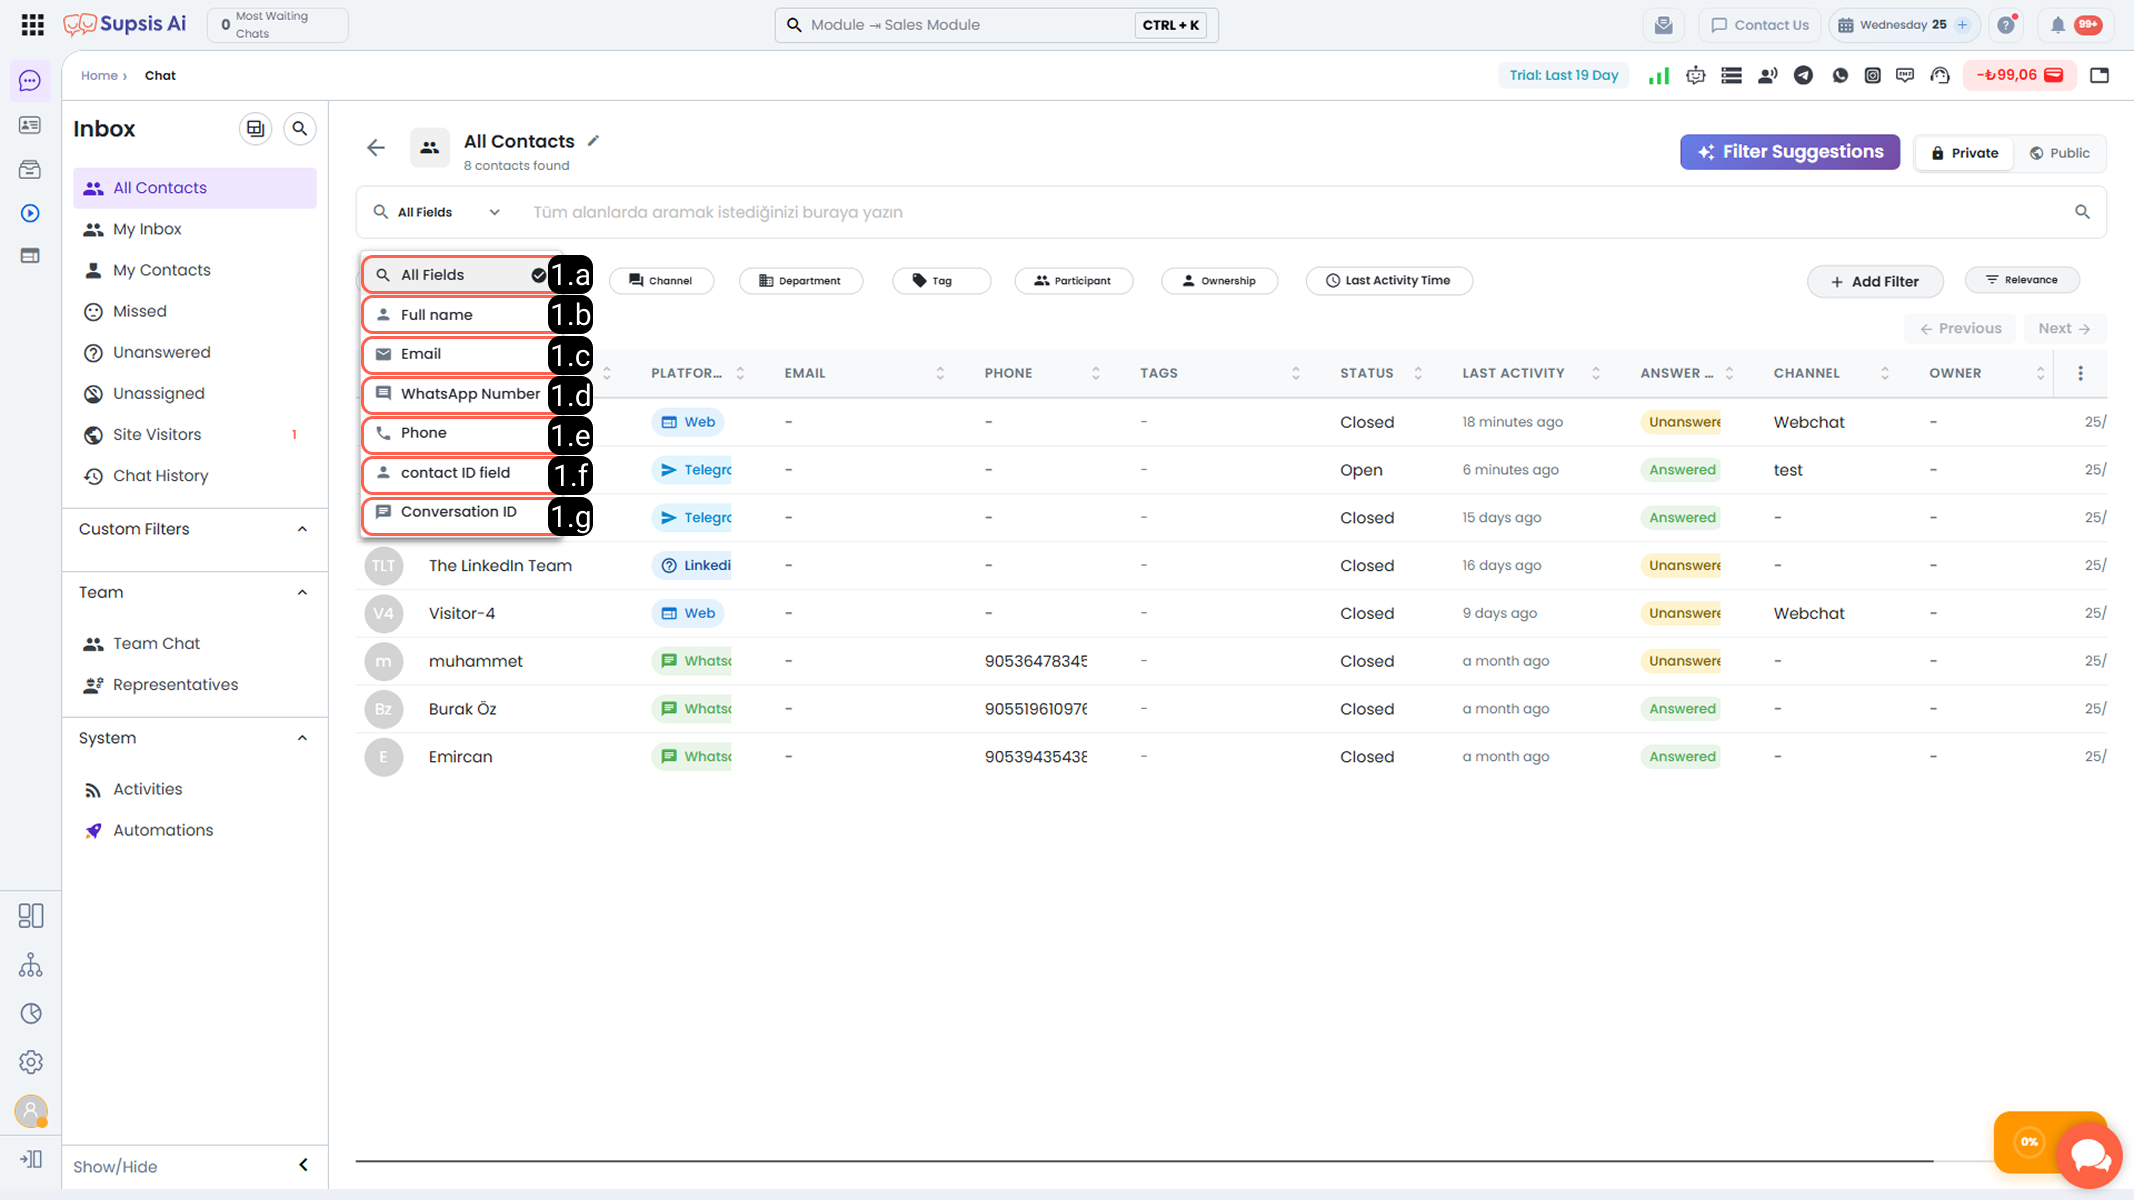
The available search criteria are as follows:
-
1.a – All Fields:
Allows a general search across all data fields. The entered keyword is scanned in all fields, including name, contact information, IDs, and other search criteria. -
1.b – Full Name:
Allows searching by the person’s first and/or last name information. -
1.c – Email:
Enables filtering through registered email addresses in the system. -
1.d – WhatsApp Number:
Allows searching by the phone numbers of individuals contacted via WhatsApp or WhatsApp group numbers. -
1.e – Phone:
Allows searching using the phone number recorded in the contact card. -
1.f – Supsis Contact ID:
Enables targeted searches using the unique Supsis Contact ID automatically assigned to each contact by the system. -
1.g – Conversation ID:
Allows direct searches through the Conversation ID defined for a specific chat session belonging to the contact.
2-) Search Bar
To filter according to the selected search criteria, the information you want to search for must be entered into this search bar.
The expression entered into the search bar is scanned among the relevant records based on the selected criteria and the results are listed.
3-) All Contacts
The All Contacts section is the area where conversation records of all contacts who have opened a chat session in the system are listed. Depending on the department, role, and filter permissions of the user logged into the Supsis system, access to all conversation history permitted by authorization can be provided from this section.
The conversations displayed in this area may vary depending on the role, department, and visibility settings of the logged-in user. Changes in user settings may restrict the conversations that are visible.

Filters applied through the All Contacts section narrow down the conversation list displayed when entering this area according to specific criteria. Accordingly, only conversations that comply with the defined rules are displayed. For more detailed information, please review the Custom Filters section of our documentation.
Customizing the chat view allows different display features to be used. For more detailed information about these options, please review our Chat View documentation.
4-) My Inbox
The My Inbox section is the area where only the conversations conducted or assigned to the logged-in user are listed. This section allows the user to quickly access their personal conversation history, manage active chats, and track past communications.
The conversations displayed in this area may vary depending on the role, department, and visibility settings of the logged-in user. Changes in user settings may restrict the conversations that are visible.

Filters applied through the My Inbox section narrow down the conversation list displayed when entering this area according to specific criteria. Accordingly, only conversations that comply with the defined rules are displayed. For more detailed information, please review the Custom Filters section of our documentation.
Customizing the chat view allows different display features to be used. For more detailed information about these options, please review our Chat View documentation.
5-) My Contacts
The My Contacts section is the area where contacts whose ownership is assigned to the user among the contacts communicated within the Supsis system are listed. In this section, only the contacts transferred to the user’s responsibility or owned by the user are displayed.
Through this area, the user can easily track their own contacts, quickly access past and active conversations with these contacts, and perform necessary actions directly. The list is shaped according to user authorization, role, and department settings and includes only the contacts owned by the user.
Adding a Contact to the My Contacts Filter
In order for a contact you have communicated with to appear in the My Contacts filter, you must take ownership of the relevant conversation. Likewise, to add a contact to another agent’s My Contacts filter, the conversation ownership must be transferred to the relevant agent.
To take ownership of a conversation or assign it to another agent, you can use the Customer Ownership field. Follow the steps below to complete this process.
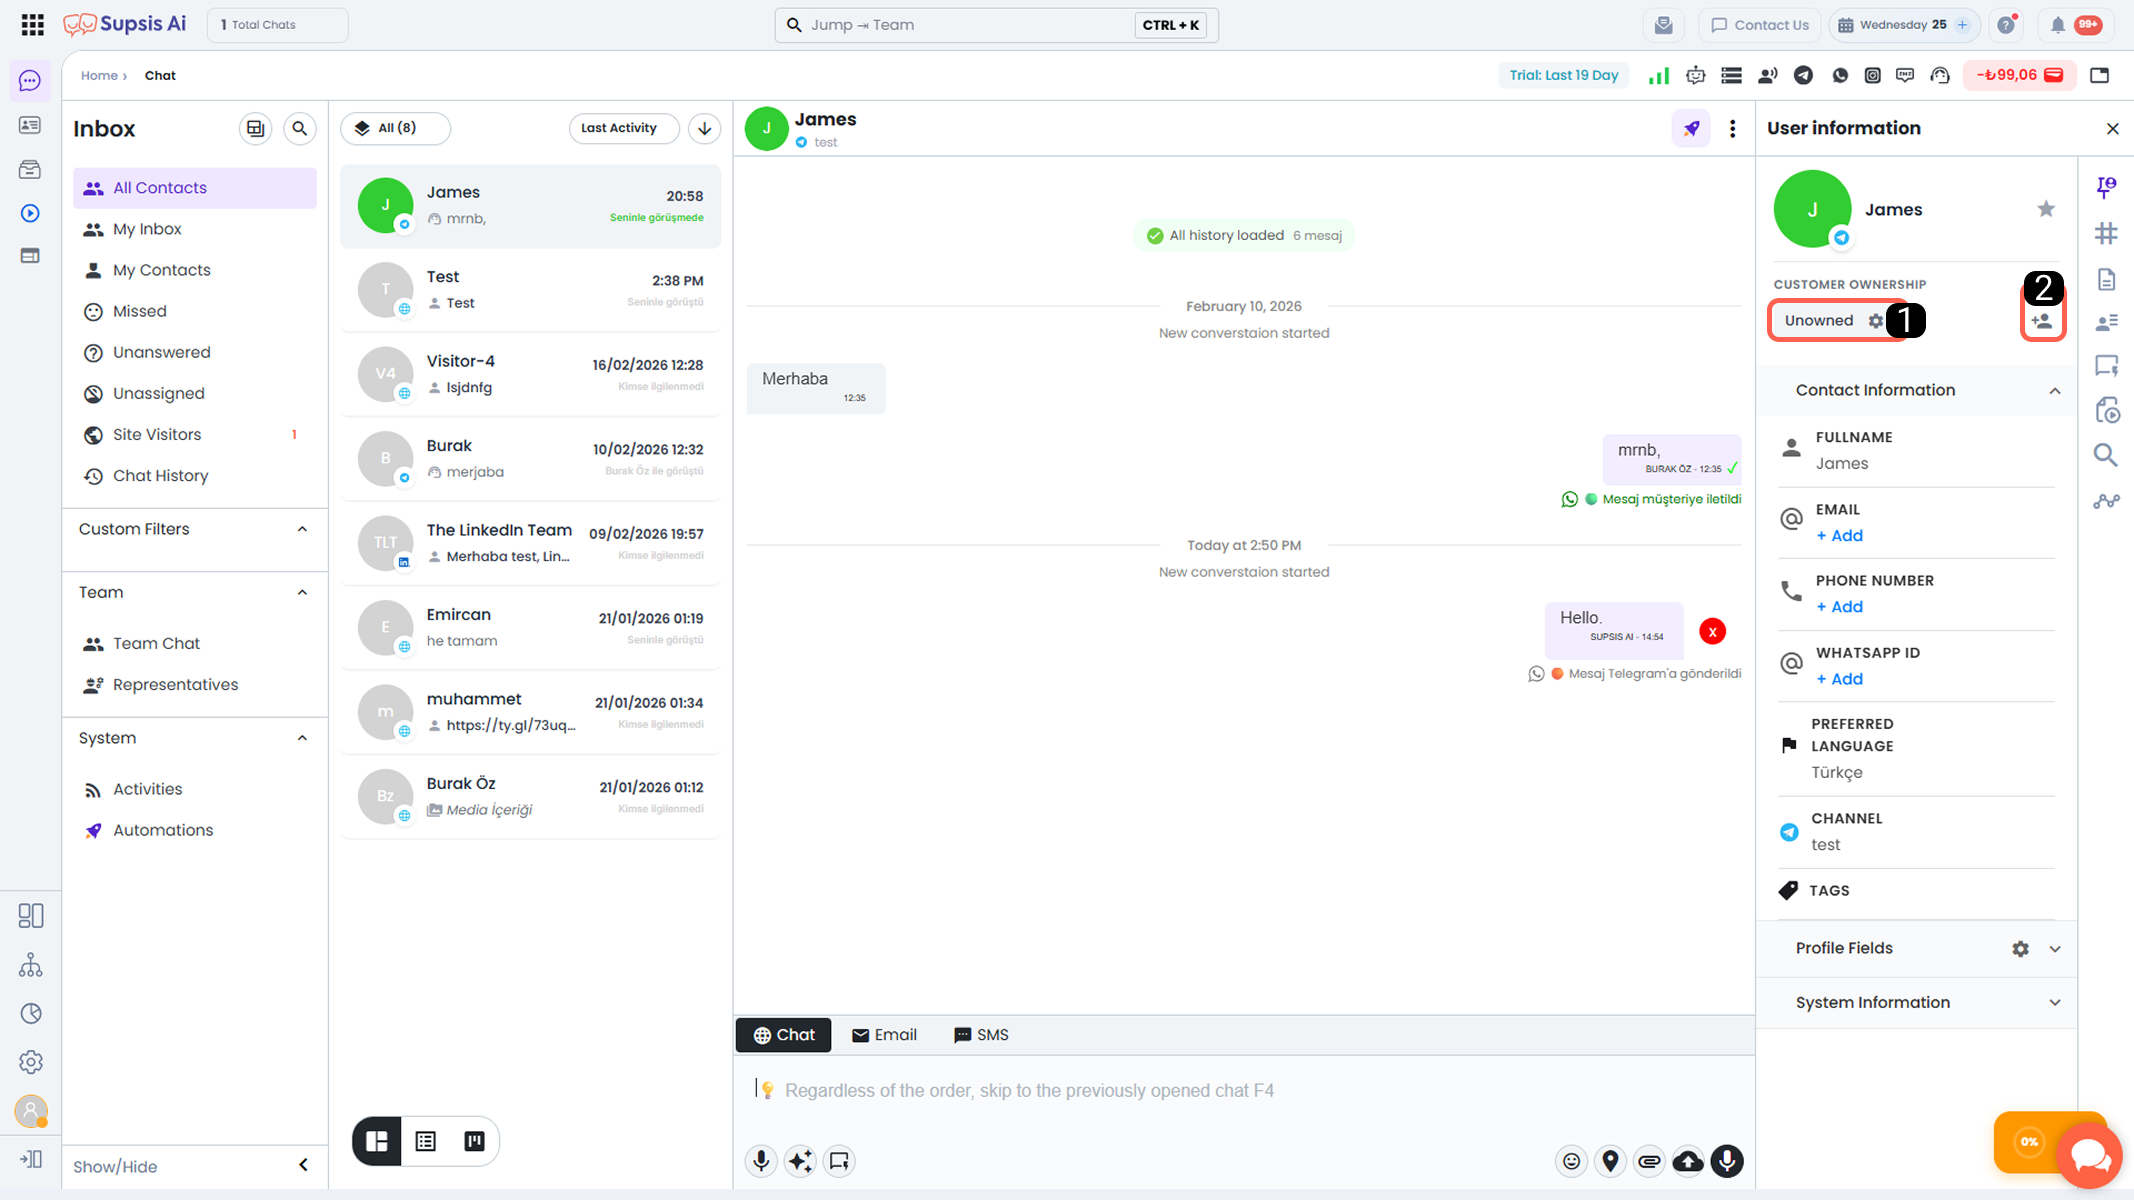
-
Assign Ownership & Route
-
Assign to Me
5.a – Assign Ownership & Route
Through this section, you can determine the ownership of the current and future conversations of the contacted customer; you can assign the conversation to a specific user, department, or route it to the queue.
- What is Routing?
The routing process transfers an active chat session to the designated user. The routed conversation remains assigned to the designated user until the session is manually closed or naturally ends.
When the chat session is closed, conversations continue in their normal flow according to the current routing algorithm defined in the system. The routing process does not permanently change the ownership of the conversation.
- What is Assignment (Ownership)?
The assignment process permanently links the conversation to a specific user or department. All current and future conversations with the assigned customer are routed according to the designated owner user or department.
After assignment, routing processes are carried out only within the scope of the assigned user or department.
-
Assignment to User:
If the conversation is assigned to a specific user, when a new chat session is initiated with the customer, the system automatically routes the conversation to the assigned user. -
Assignment to Department:
If the conversation is assigned to a department, chat sessions re-initiated with the customer are automatically routed to one of the available users within that department.
Note:
For assignment processes to take effect, it is not mandatory for the designated user or the users within the department to be online. Even if the relevant user or department is offline, the assignment rule is automatically applied by the system.
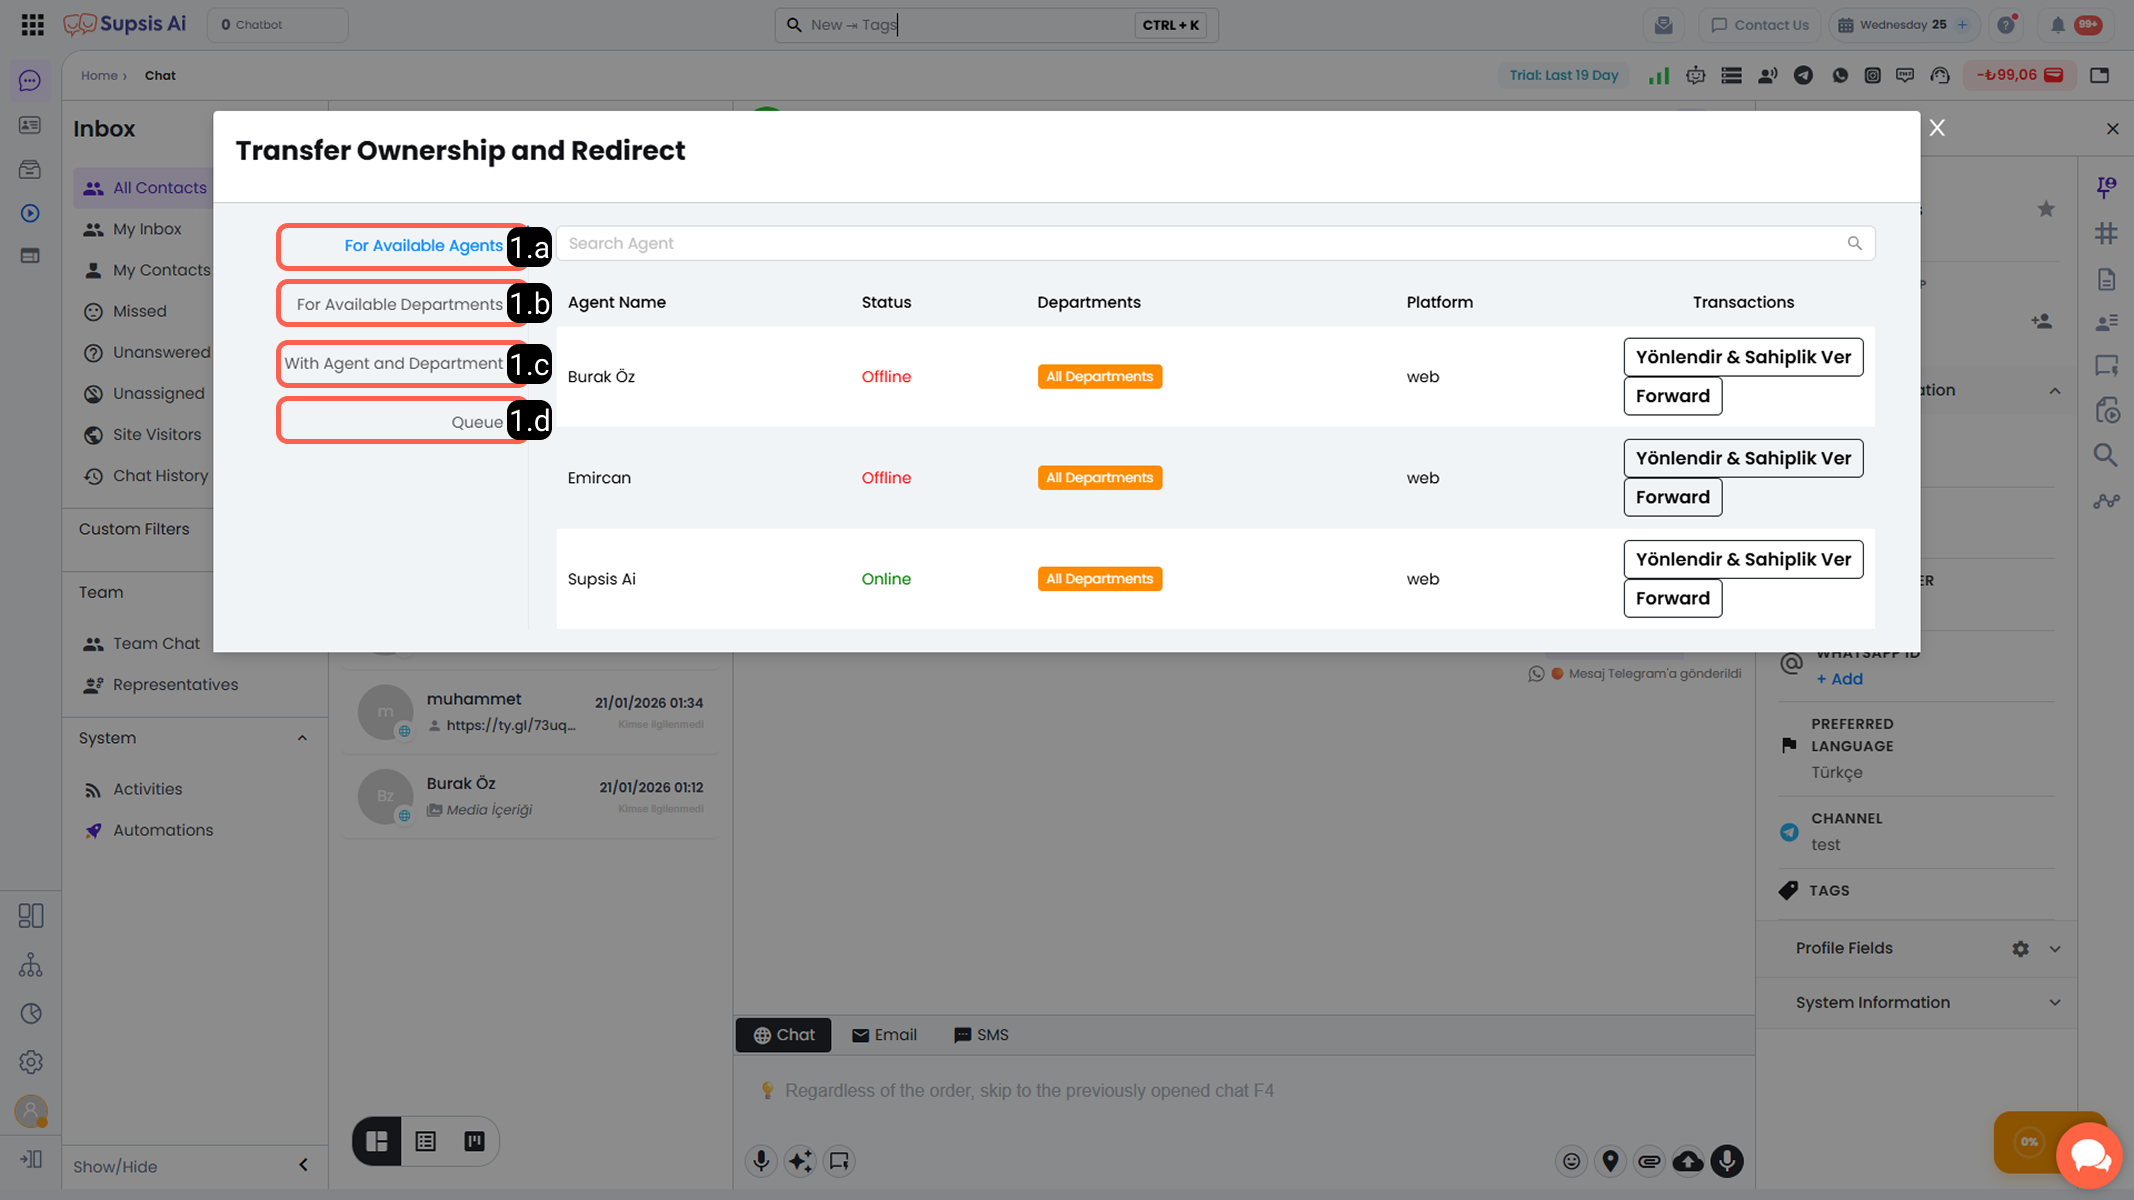
-
1.a – For Existing Agents
- With this option, you can route or assign the conversation to all users defined in the system.
-
1.b – For Existing Departments
- Transfers the general ownership of the conversation to the designated department.
- This process assigns the conversation not to a single user but directly to the relevant department.
- If some departments are not displayed in the list, you need to check the visibility settings of the communication channel through which the conversation was conducted.
-
1.c – With Agent and Department
- Routes the conversation to the designated agent.
- However, it assigns the general ownership of the conversation to the designated department.
- This method allows active agent changes while maintaining department-based ownership.
-
1.d – To Queue
- Adds the conversation to the queue.
- When this action is performed, the agent involved in the chat is removed from the conversation and the conversation is placed in the queue.
- If automatic chat assignment is enabled, the conversation is automatically assigned to an appropriate agent according to the system’s defined assignment algorithm.
- If automatic chat assignment is disabled, the conversation remains in the queue and must be picked up manually.
5.b – Assign to Me
- The Assign to Me option allows you to directly assign the ownership of the conversation to yourself.
- After this action, when a new chat session is initiated with the same contact, the conversation is automatically routed to you again.
- Once the assignment process is completed, you can also easily access the relevant contact through the My Contacts chat filter located on the left side.
6-) Missed
The Missed filter lists conversations that were directly connected to live support or transferred to live support via chatbot or AI but were not joined by the live support team, based on the selected Chat Status attribute.
Through this filter, you can:
- Easily identify overlooked conversations
- Quickly intervene to prevent negative impacts on customer experience
7-) Unanswered
The Unanswered filter lists conversations in which agents joined the chat session, but the last interaction was performed by the customer and the session was closed without an agent response.
Additionally, conversations not manually marked as “answered” by agents are also displayed in this area.
When any action is taken by agents in conversations listed under the Unanswered section, the relevant conversation is automatically removed from this filter.
If contact has been re-established later through a different channel or if you want to remove non-actionable conversations that create clutter, you can manually mark the conversation as answered.
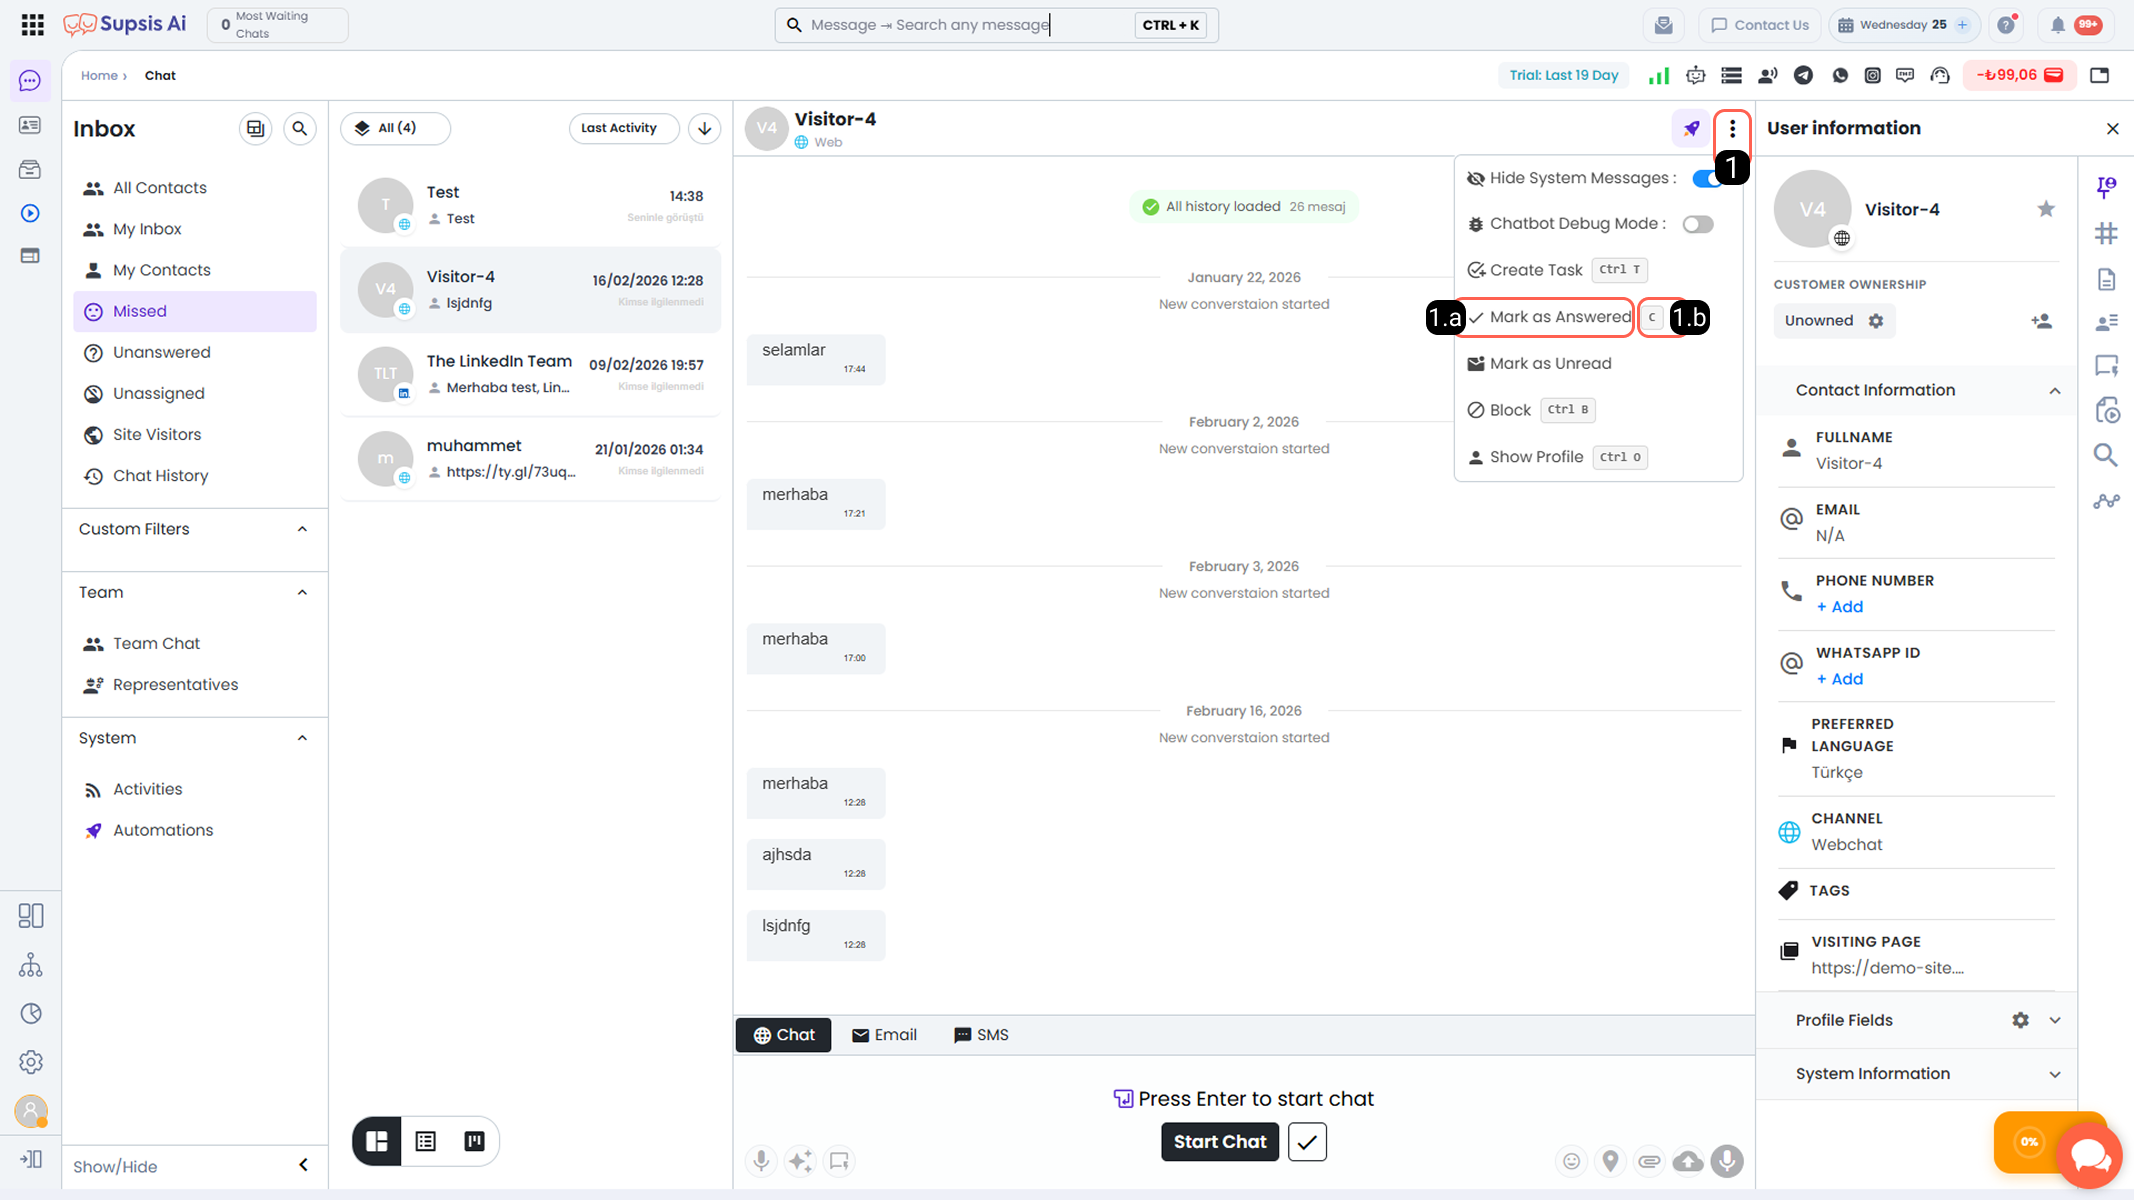
7.a – Accessing the Answered Field
Through the relevant button, you can access the area where you can manually mark the open conversation as answered.
- 1.a – Mark as Answered
With this button, you can set the current conversation to answered status.
Once the process is completed, the conversation is automatically removed from the Unanswered filter.
- 1.b – Shortcut (C)
While in the conversation, you can quickly mark the chat as answered by using the “C” shortcut key.
8-) Unassigned
The Unassigned section is the area where conversations that have not been claimed by agents are listed.
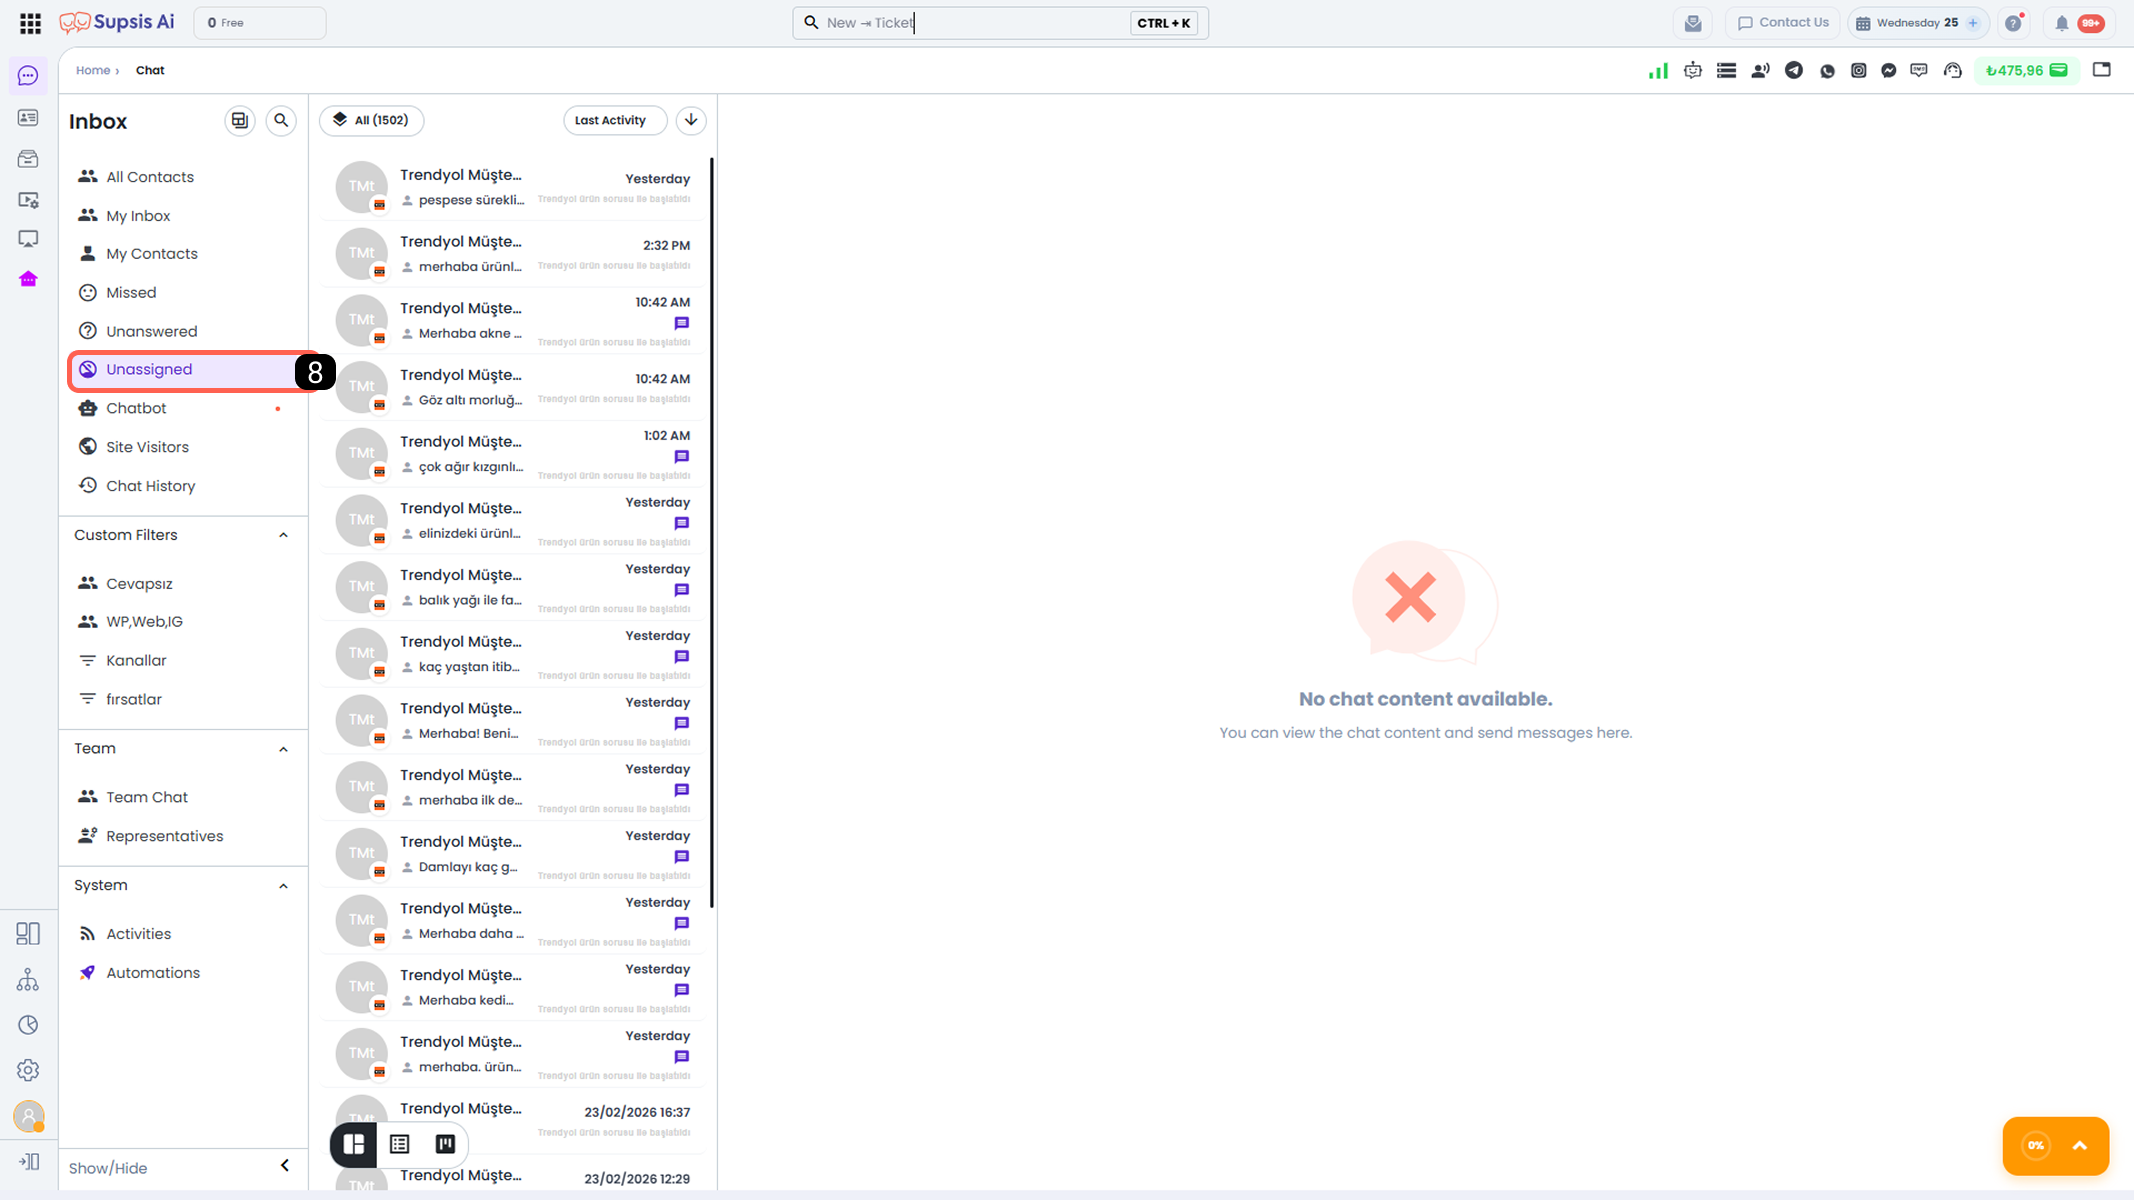
This section includes conversations that meet the following conditions:
- Conversations that have not been taken over by any agent
- Conversations that were routed to an agent by a chatbot or AI but where no agent interaction occurred
Filters applied through the Unassigned section narrow down the conversation list displayed when entering this area according to specific criteria. Accordingly, only conversations that comply with the defined rules are displayed. For more detailed information, please review the Custom Filters section of our documentation.
Customizing the chat view allows different display features to be used. For more detailed information about these options, please review our Chat View documentation.
9-) Chatbot
The Chatbot section is the area where all conversations between customers and the chatbot are listed. From this section, you can access all conversations that were answered, routed, or processed by the chatbot.
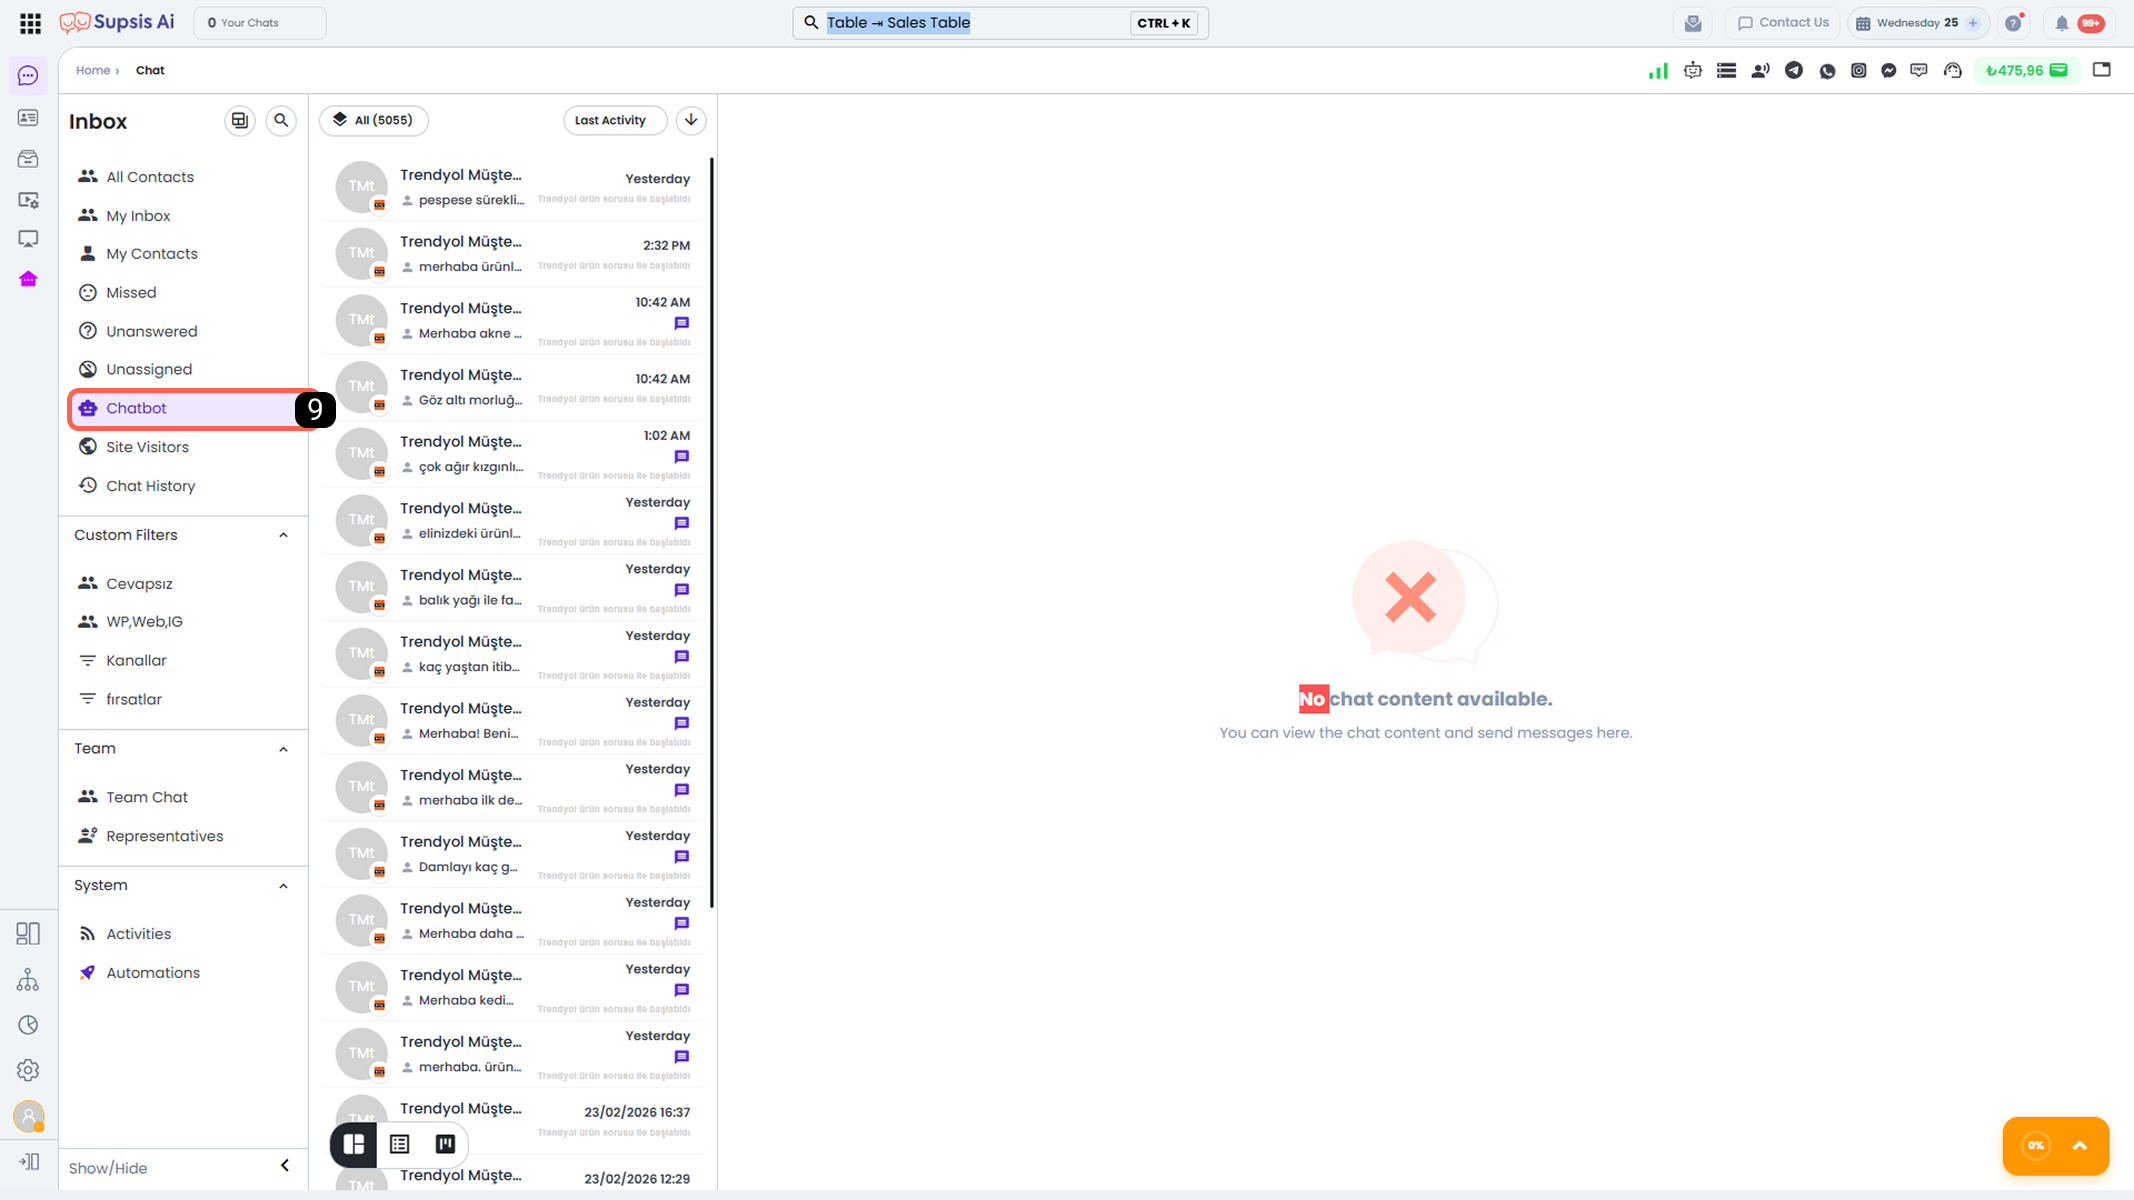
Filters applied through the Chatbot section narrow down the conversation list displayed when entering this area according to specific criteria. Accordingly, only conversations that comply with the defined rules are displayed. For more detailed information, please review the Custom Filters section of our documentation.
Customizing the chat view allows different display features to be used. For more detailed information about these options, please review our Chat View documentation.
10-) Website Visitors
The Website Visitors section is the area where users who visit your website are listed when the Supsis chat widget is integrated into your website.
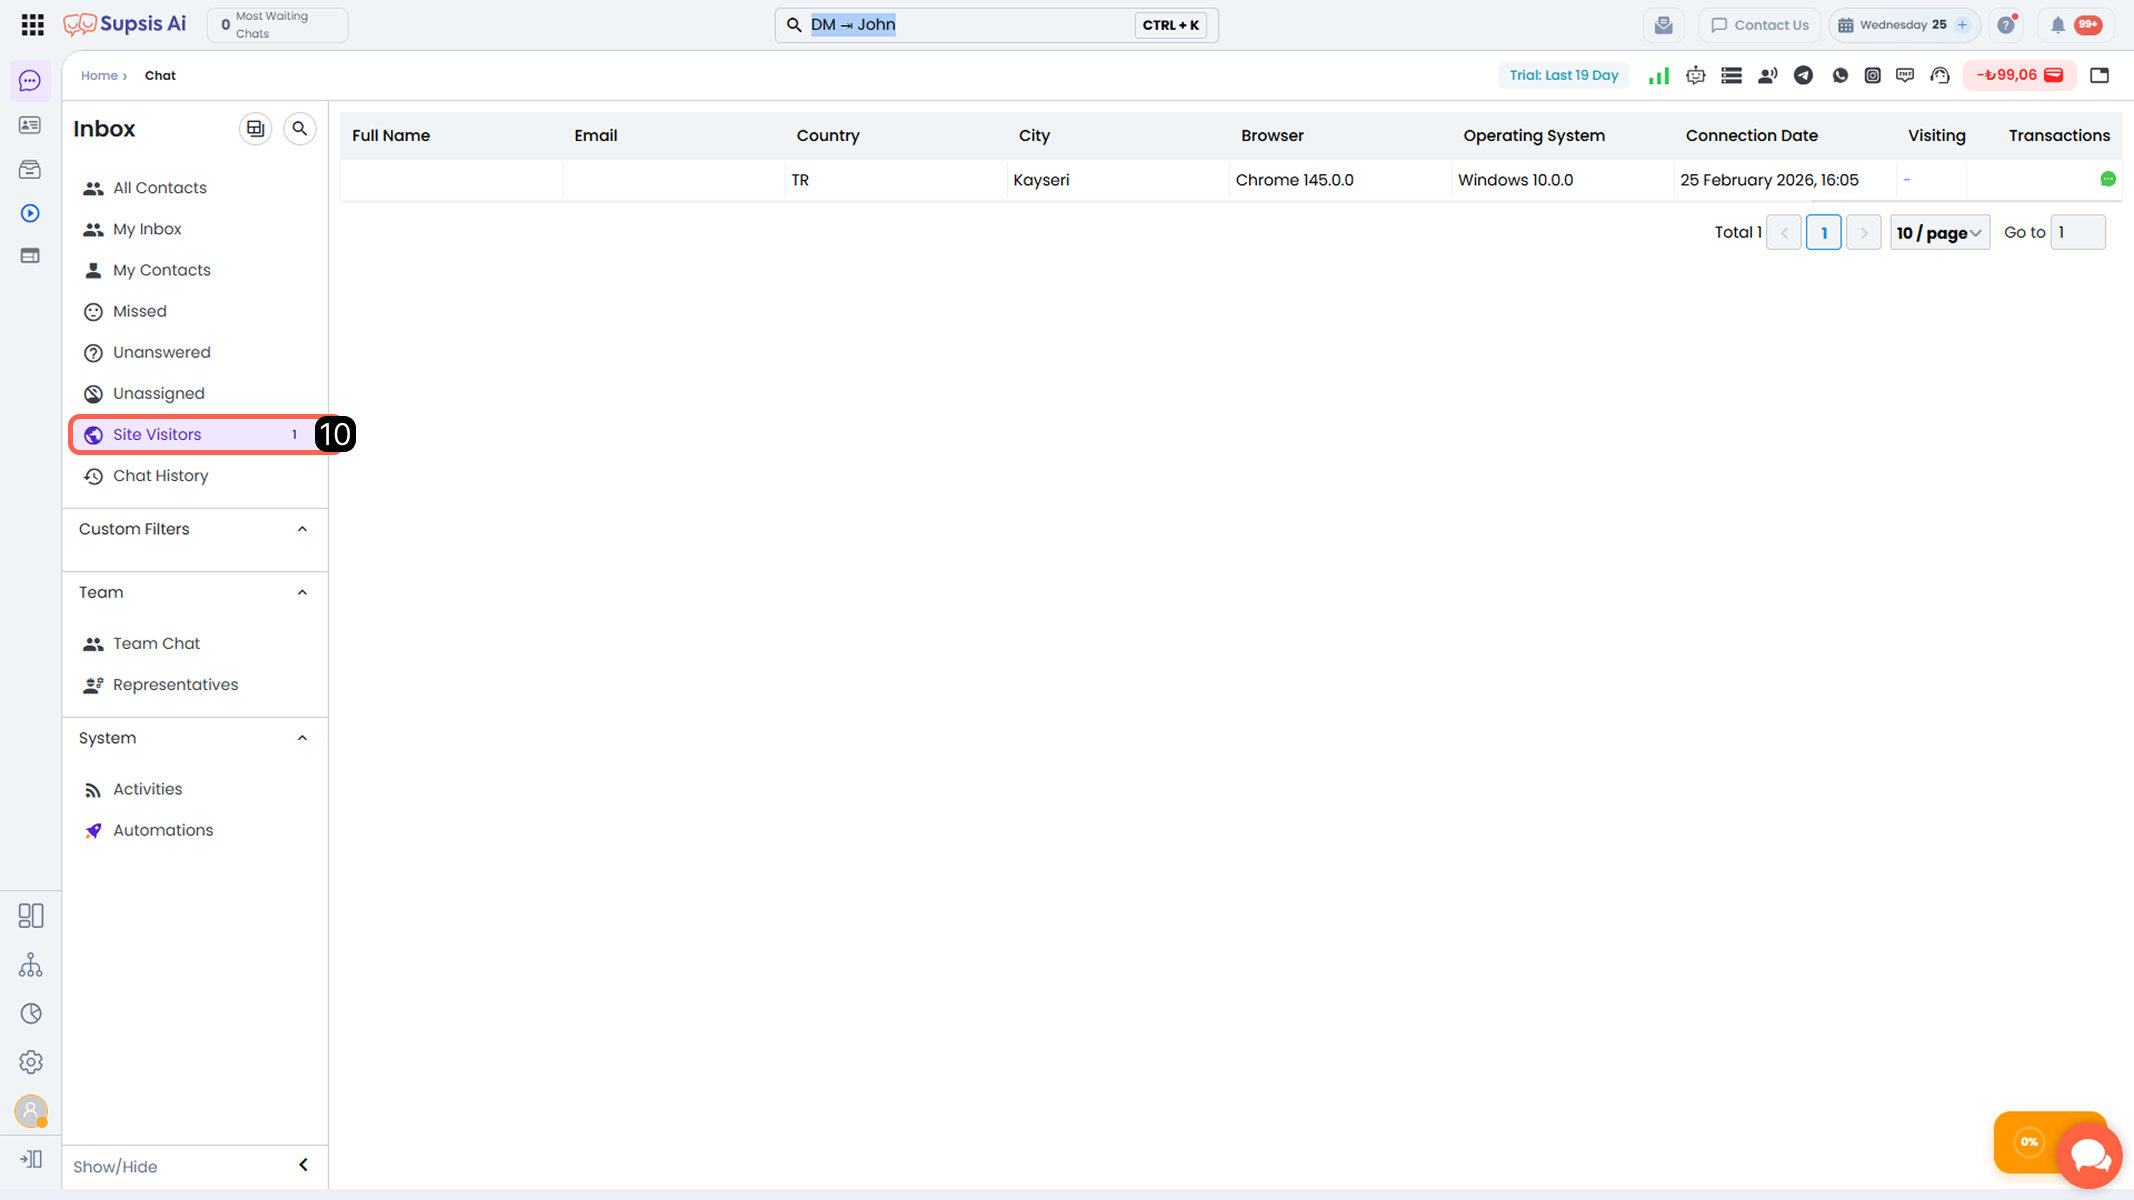
From this section, you can view the visitor’s city, connected browser, operating system, the date they accessed your website, the web page they browsed, and past chat interactions.
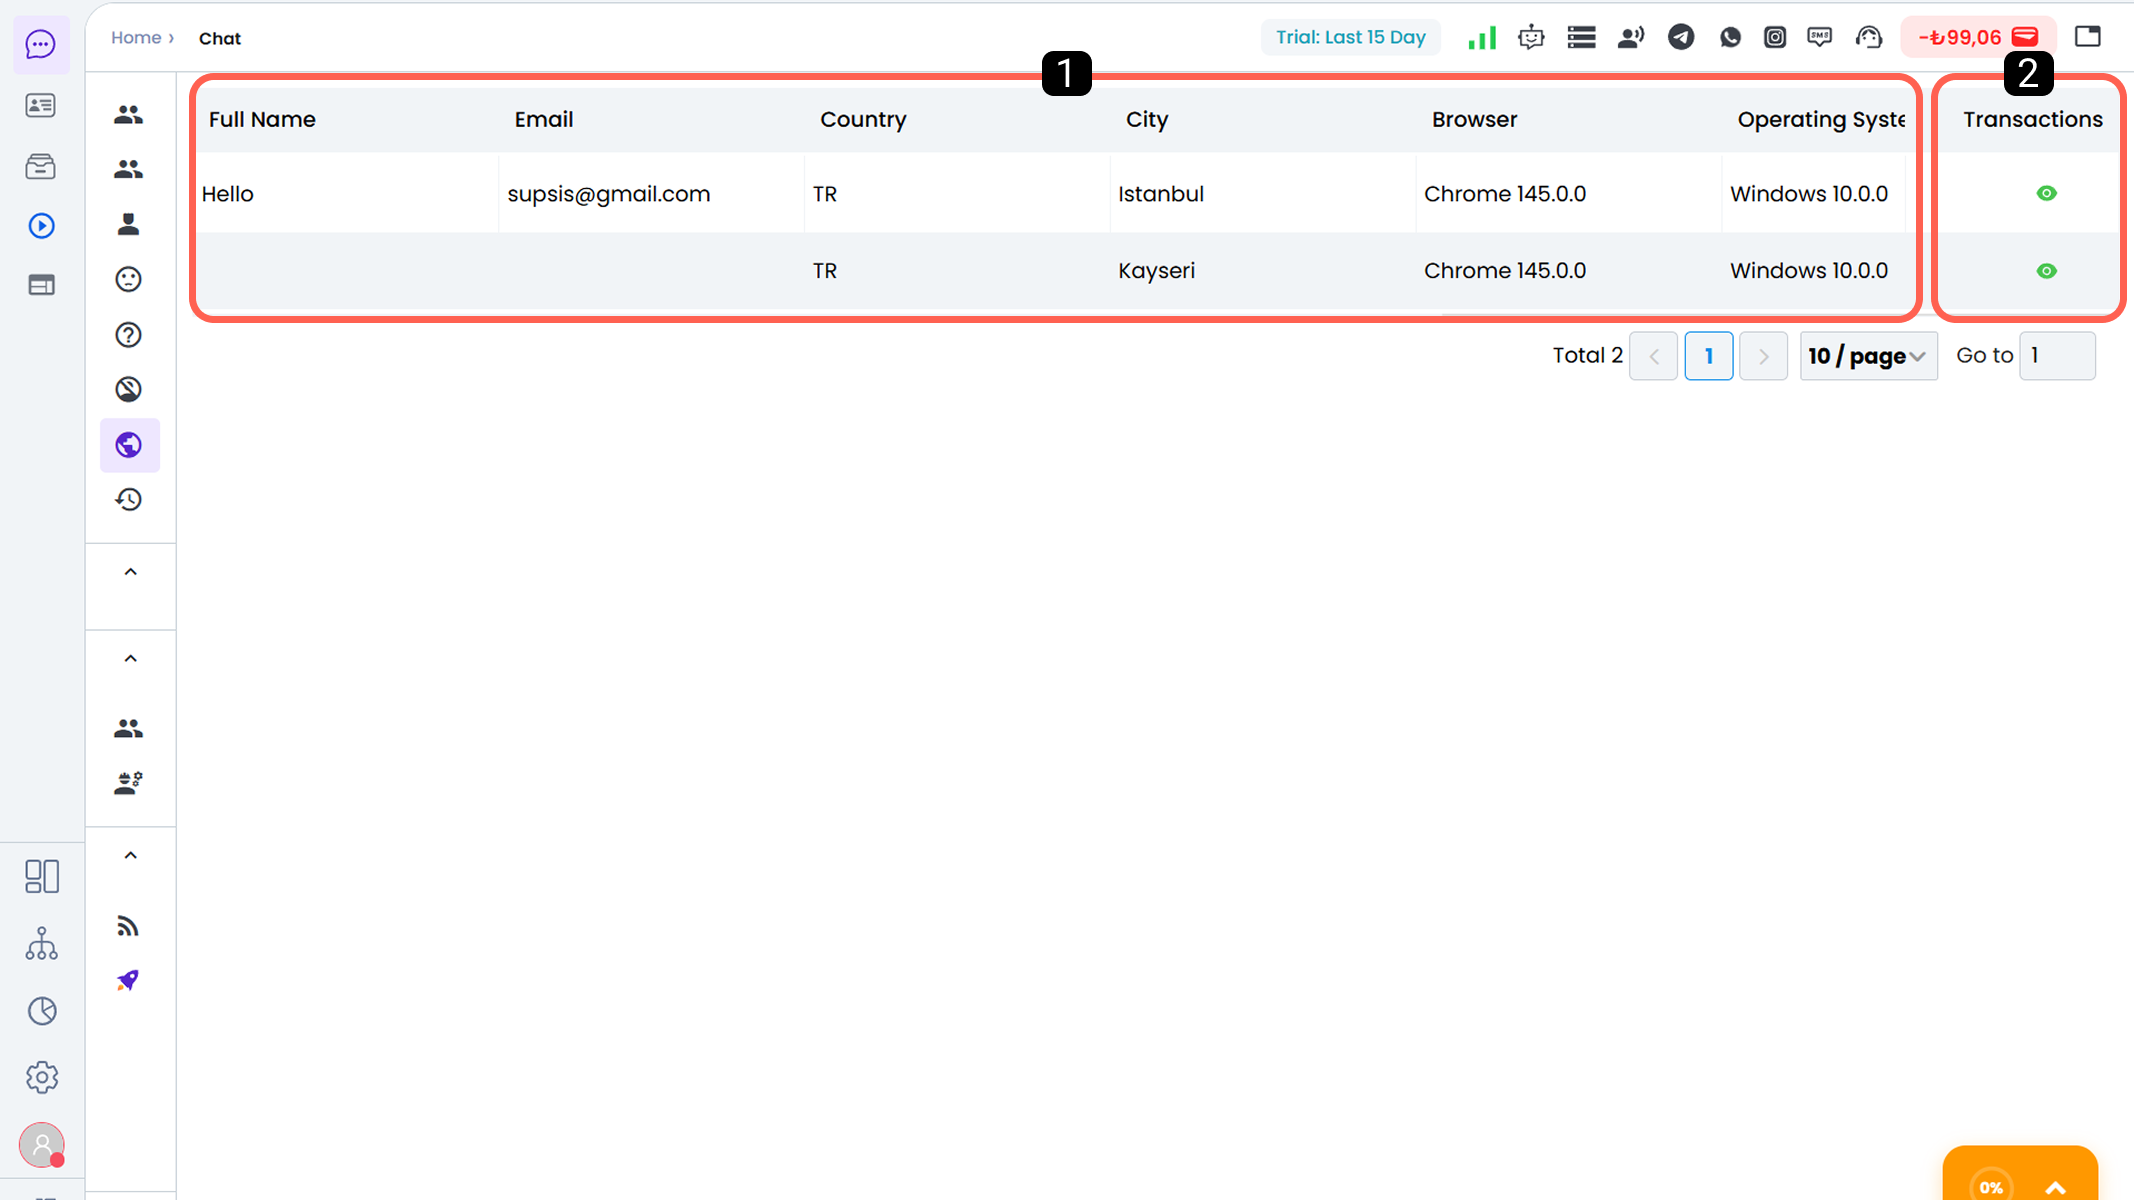
- 1. Visitor Table
- 2. Start Conversation / Monitor Conversation
10.a – Visitor Table
This area is the data table where the current information of users visiting your website is displayed. Some of the information in the table consists of data automatically retrieved from the visitor’s browser. Personal information such as name, surname, and email is displayed in the table only if the visitor fills out the visitor entry form available in the chat widget.
Through this structure, visitors’ basic information, behaviors, and potential interaction data can be monitored in a single area.
If additional features are not purchased, only visitors who have previously connected via the Supsis chat widget are listed in this section. If the additional feature is purchased, the available information of all visitors browsing your website can be displayed in this area.
For more detailed information and to activate the feature, please review the Web section in the billing documentation.
10.b – Start Conversation / Monitor Conversation
This section is the control area that allows you to interact with users visiting your website or monitor existing interactions.
Start Conversation:
If additional features are active, you can manually initiate a conversation with any visitor listed. This feature is especially used in sales, support, or proactive communication strategies to directly reach the visitor. When a conversation is initiated, the chat automatically appears on the agent’s screen and can be responded to by the visitor via the chat widget.
Monitor Conversation:
When the visitor interacts with the chat widget or when a flow is initiated by the chatbot, the visitor’s current chat status can be viewed from this section. The agent can monitor the chat live, intervene when necessary, or take over the conversation.
The Start Conversation / Monitor Conversation feature described above is not directly active. An additional feature is required to activate this process.
For more detailed information and to activate the feature, please review the Visitor Chat Initiation section in the billing documentation.
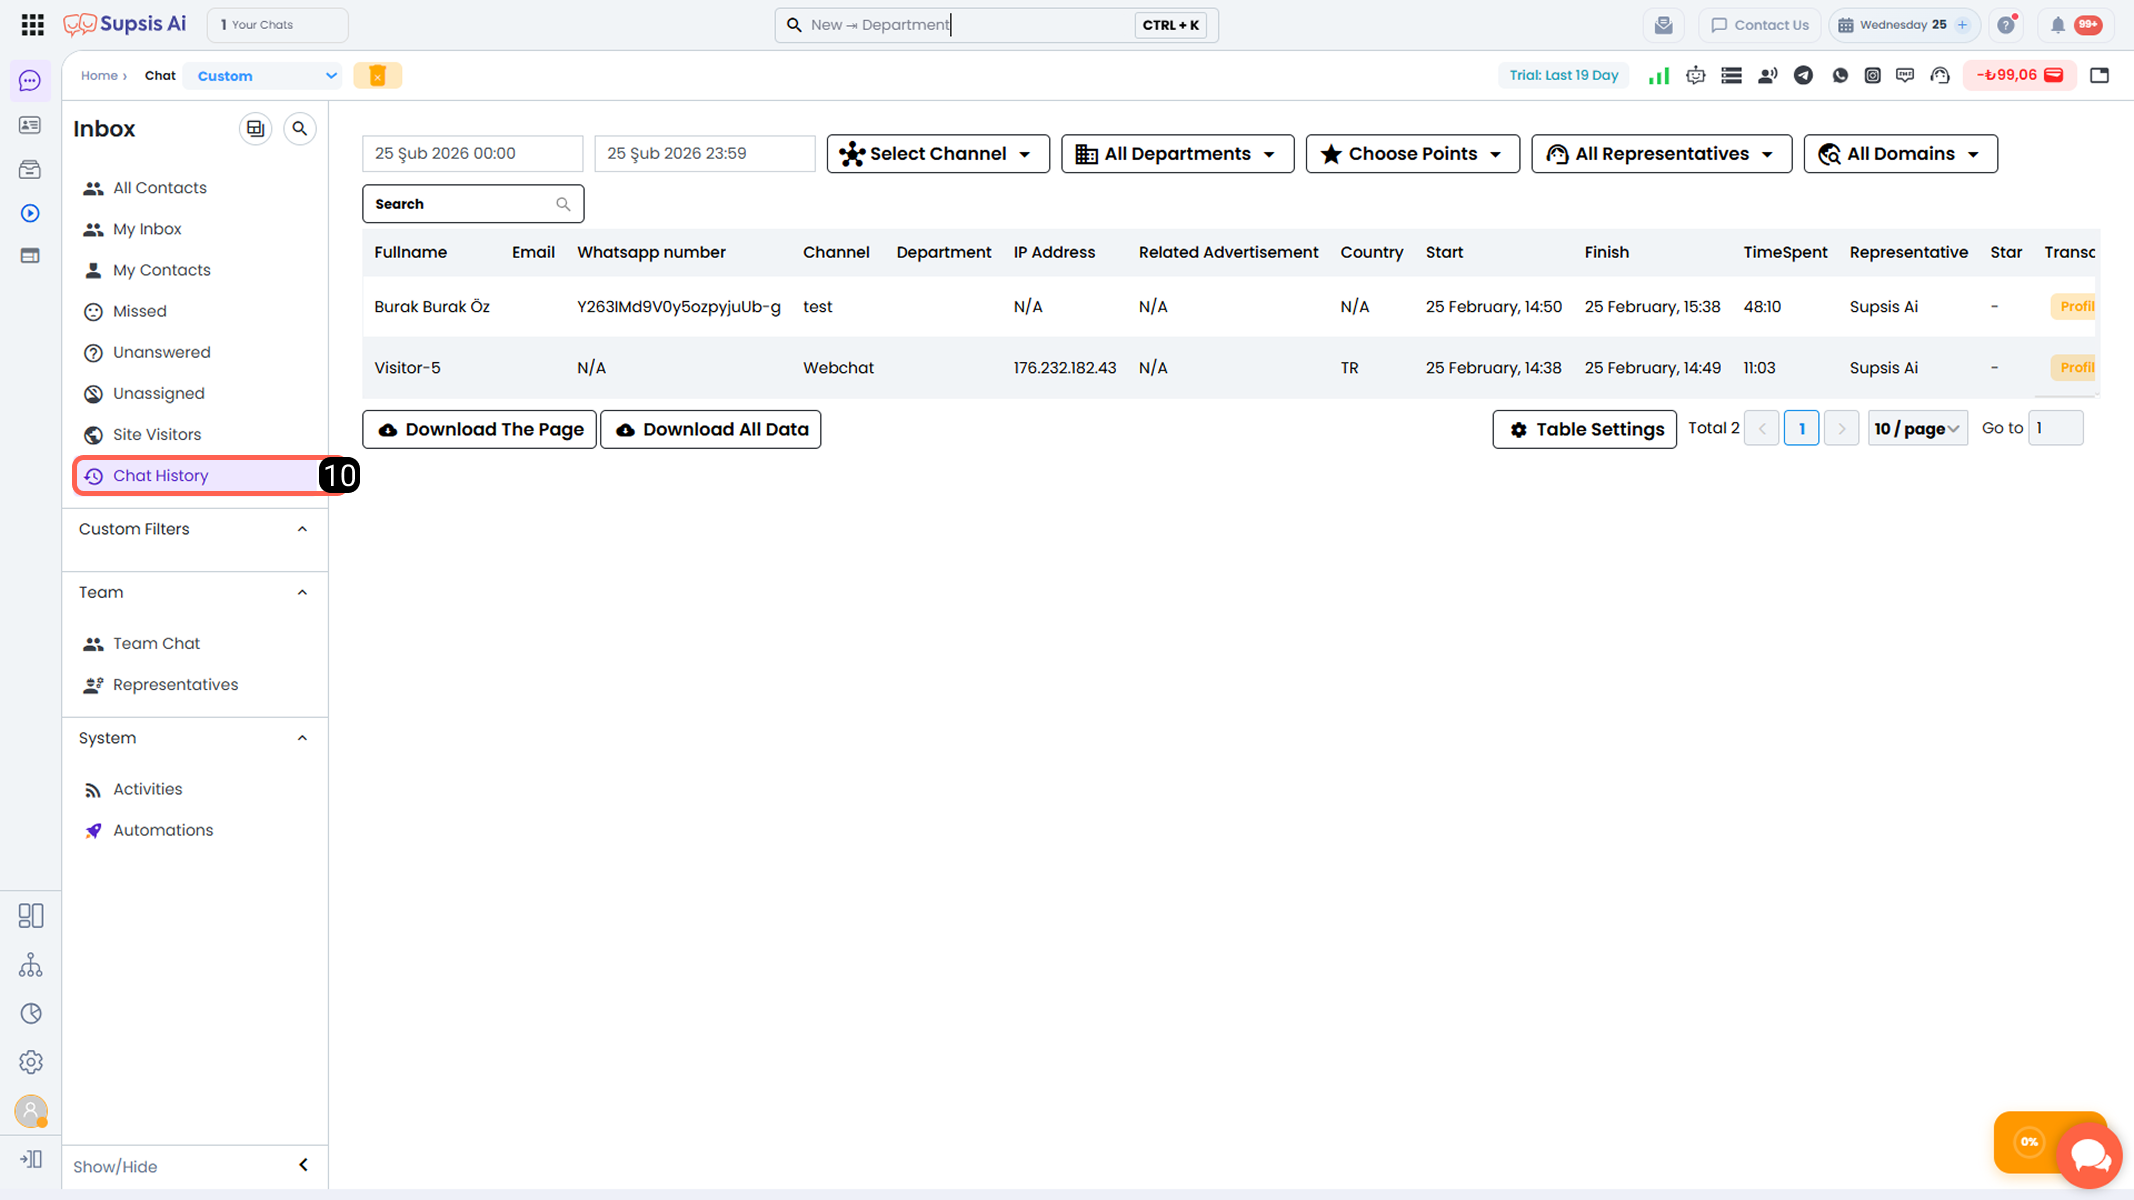
11-) Conversation History
The Conversation History section is the area where you can view all previous conversations and the information contained in the contact cards involved in those conversations in a detailed table format, and export the table. In this area, past conversations can be filtered according to specific attributes and statuses, and filtered results or all data in the table can be exported.
Exported data is provided in Excel format, and all information contained in the contact card for each conversation is included in the file. This allows you to analyze your past interactions in detail and securely store your records.
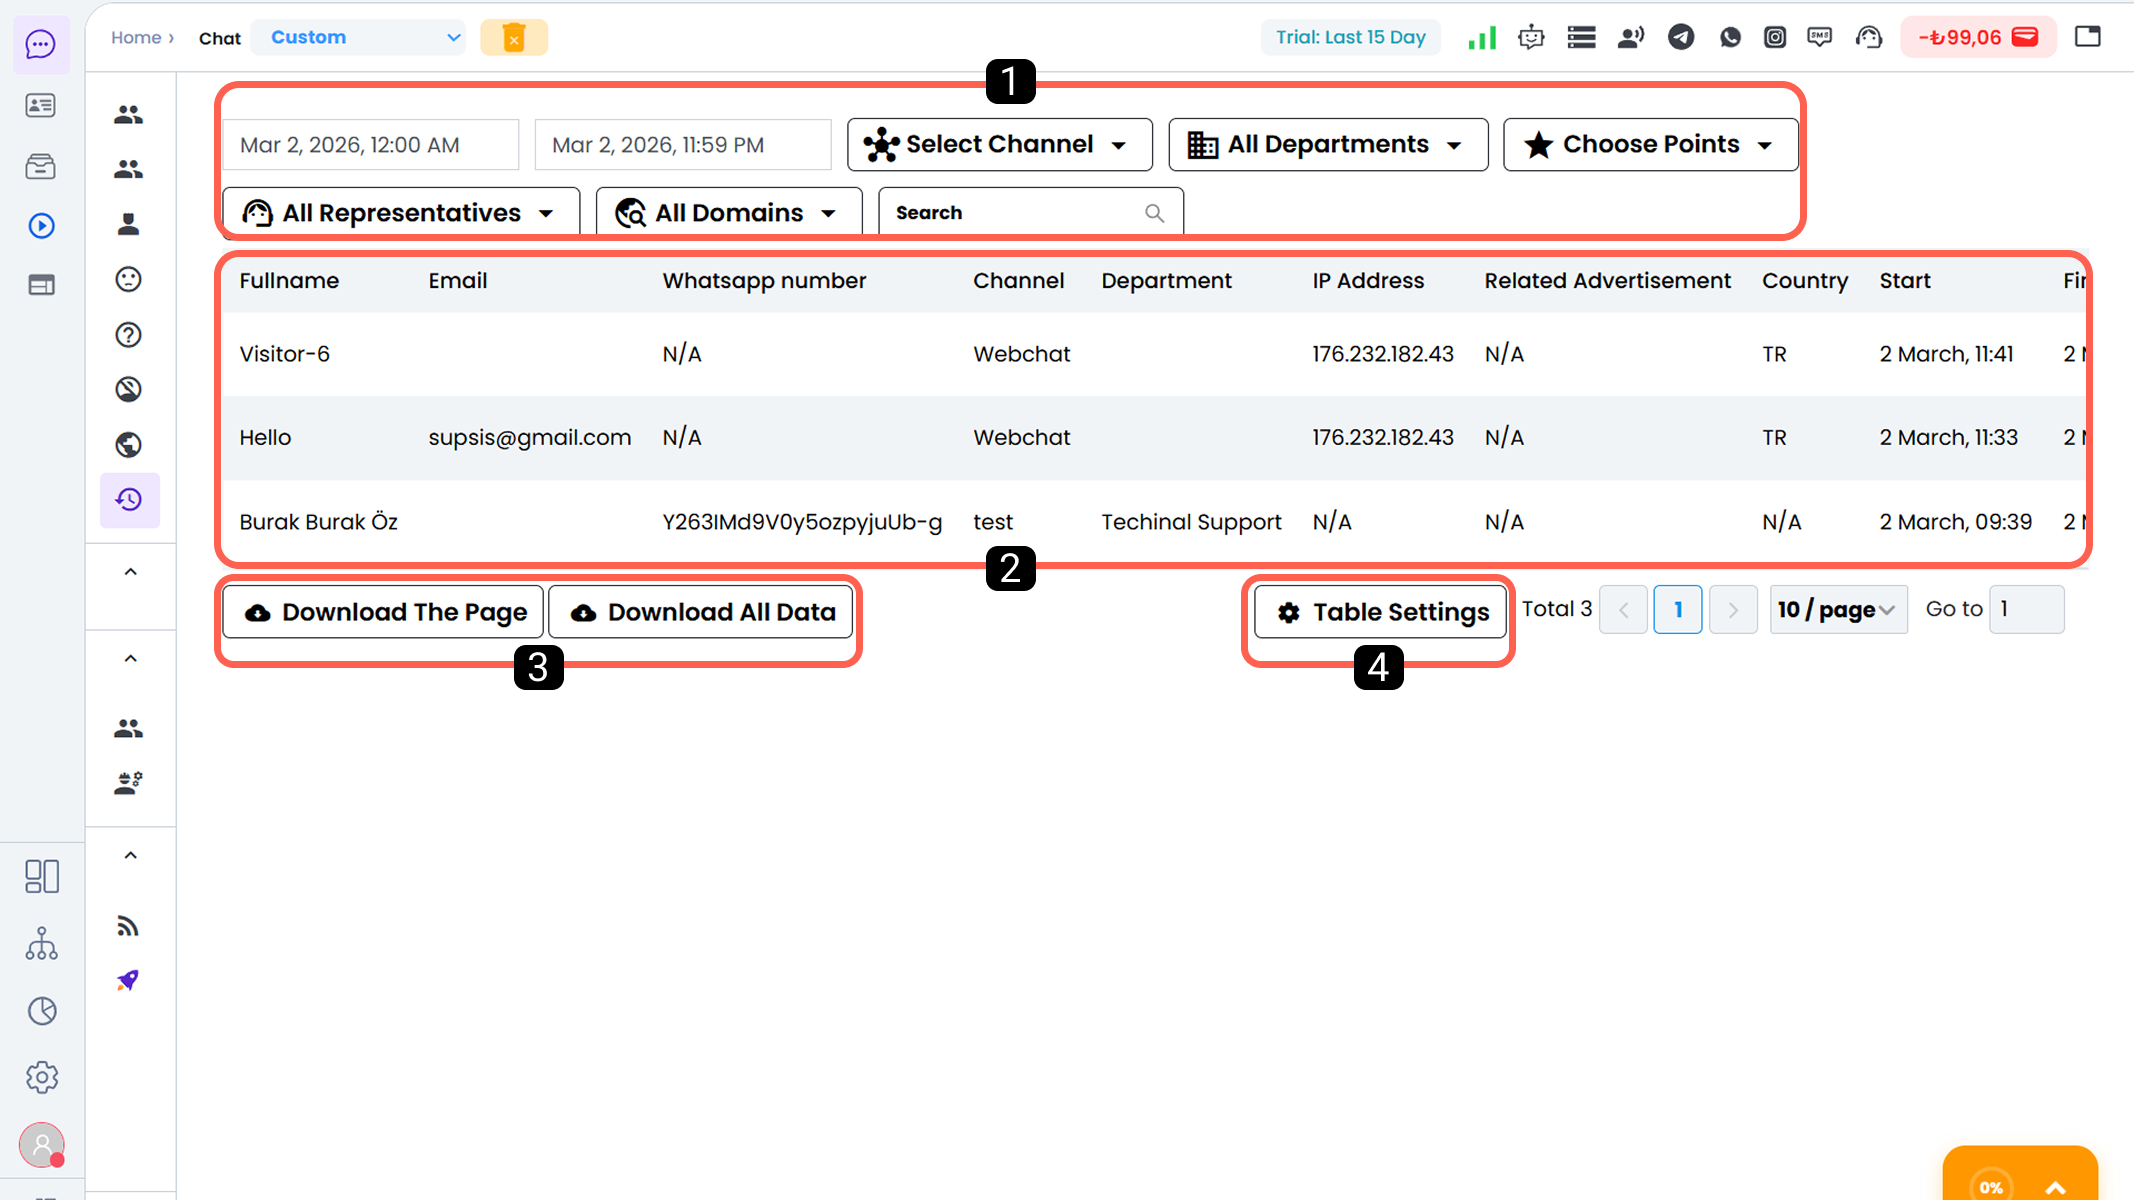
11.a – Filters
11.b – Table
11.c – Data Export
11.d – Table Settings
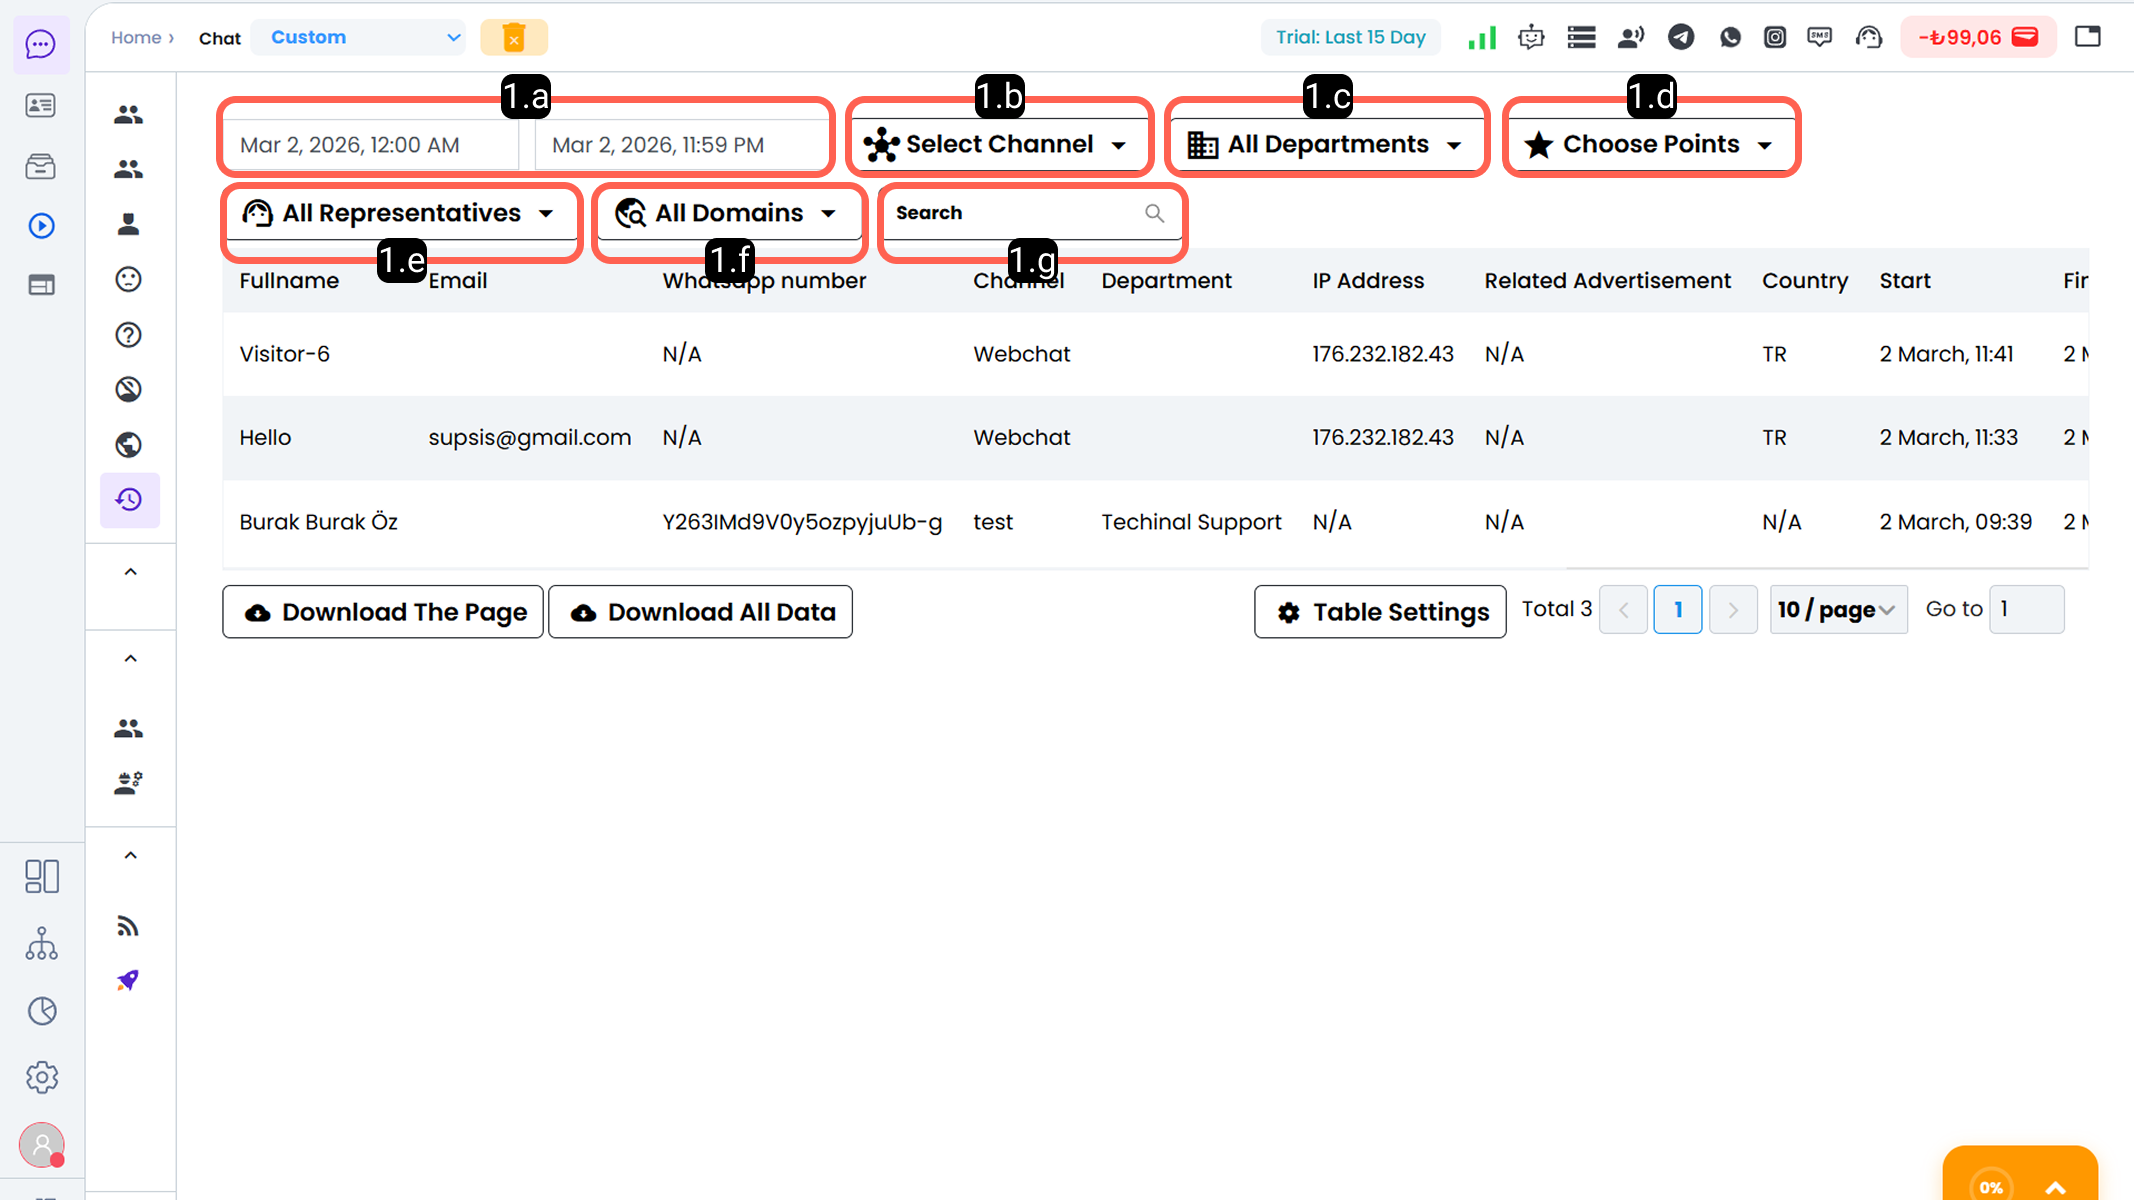
1-) Filters
These are the criteria that allow you to narrow down the data you want to display or export in the table. The filtering process can be performed by combining multiple criteria or without specifying certain criteria. Through these parameters, you can access only the data you need and perform your analyses more effectively.
-
1.a – Date Filter The area where you can filter conversation history by a specific date range.
This allows only the conversations within the selected time period to be displayed and downloaded. -
1.b – Channel Filter Allows you to filter according to the communication channels you have integrated.
With this filter, only conversations coming from the selected channel are listed. -
1.c – Department Filter The area where you can filter conversations that took place within a specific department.
This allows you to easily review past conversations on a department basis. -
1.d – Rating Filter The area where you can filter based on the 1–5 rating score given by the user to the agent after the conversation via the chat widget.
-
1.e – Agent Filter The area where you can filter based on the agent who conducted the conversation with the customer.
This filter is especially useful for agent performance analysis. -
1.f – Website Filter The filter area where you can select among different websites where you have integrated the Supsis script in the panel where you opened the conversation history, and display only the conversations belonging to a specific website.
-
1.g – Search Bar The area where you can perform a text search across all data in the table and list only the records containing the information you are searching for.
2-) Table
This is the area that provides a preview of the filtered data and the data display preferences you have determined in the Table Settings section.
In this table, you can view the results generated according to the filters you applied and the data fields you selected, and preview the final version of the data before downloading.
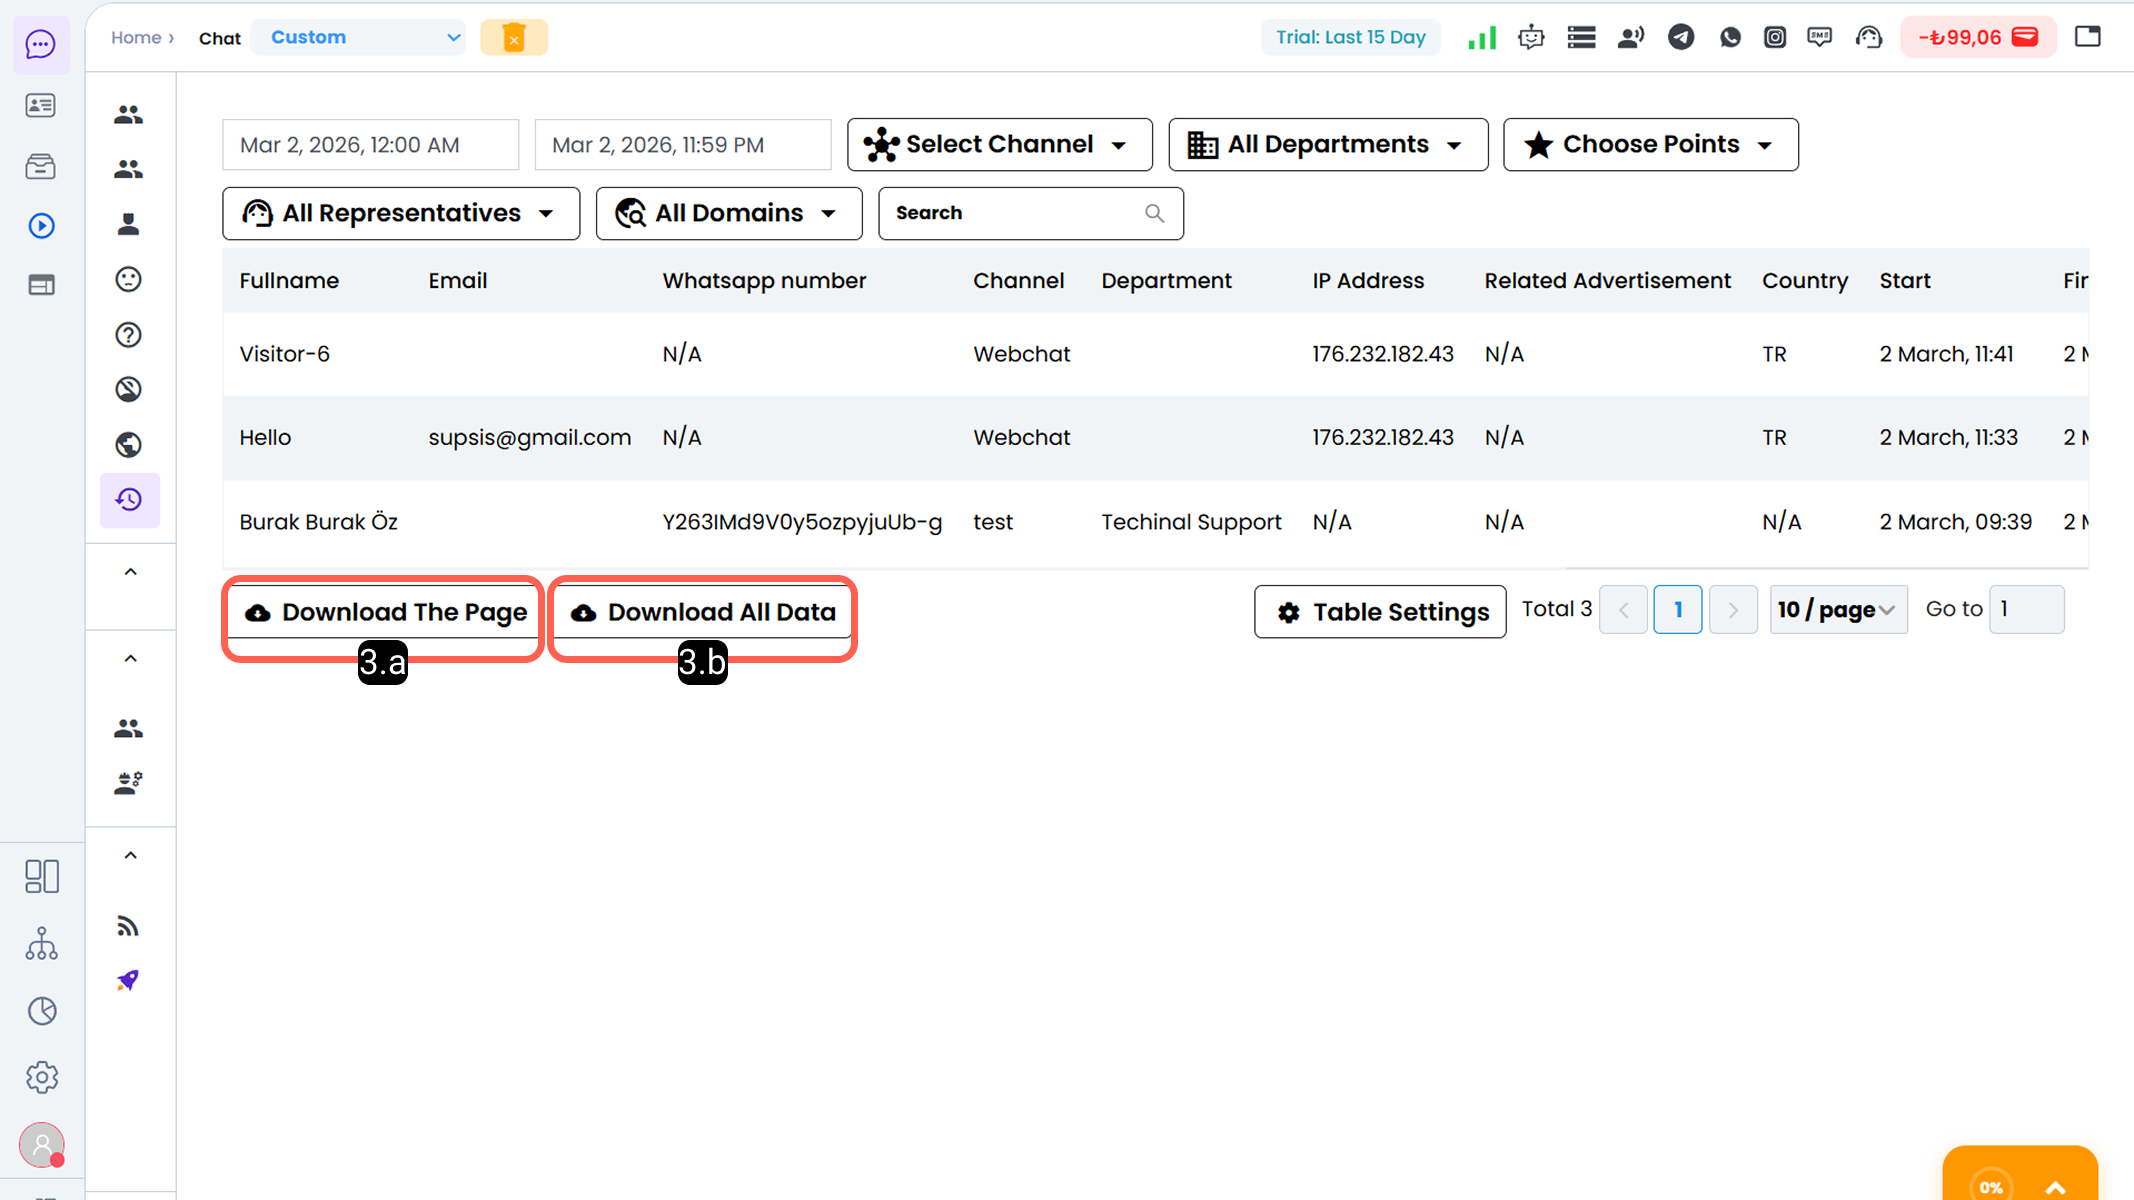
3-) Data Export
These are the options that can be used to export the data in Excel format. The differences between these options are as follows:
-
3.a – Download Page Downloads only the data currently displayed in the table. According to the Data Count/Page setting located at the bottom right, the number of records displayed on the screen is the number of records exported to Excel.
To modify the content of the data displayed in the table, you can edit it from the Table Settings section. If you want more data to be listed in your Excel table, you can increase the number of records to be displayed from the Data Count/Page option. -
3.b – Download All Data Downloads all records that comply with the filtering criteria you have applied.
In this process, the visibility restrictions set in the table settings are not taken into account; all relevant data fields defined in the system based on your filtering criteria are fully included as columns in the Excel file.
4-) Table Settings
This is the area where you can determine the columns that present the data content displayed in the table. The information included in this section consists of the core information in the Supsis system, basic data obtained from the communication channels through which you interact with the user, details related to the chat session, and information obtained from the visitor entry form.
Through this structure, you can customize the table layout according to your needs and display or download only the fields you want to see.