
2-) Visitor Entry Form
The Visitor Entry Form is a configurable form area that allows visitors to enter required information before starting a live chat. Through this form, the information that needs to be collected prior to the conversation can be defined; various components such as text fields, selection fields, informational content, and checkboxes can be added.
The data collected through the form is automatically saved to the fields matched in the contact/profile card. This allows customer representatives to access essential visitor information before the chat begins and conduct a faster, more personalized, and more efficient support process.
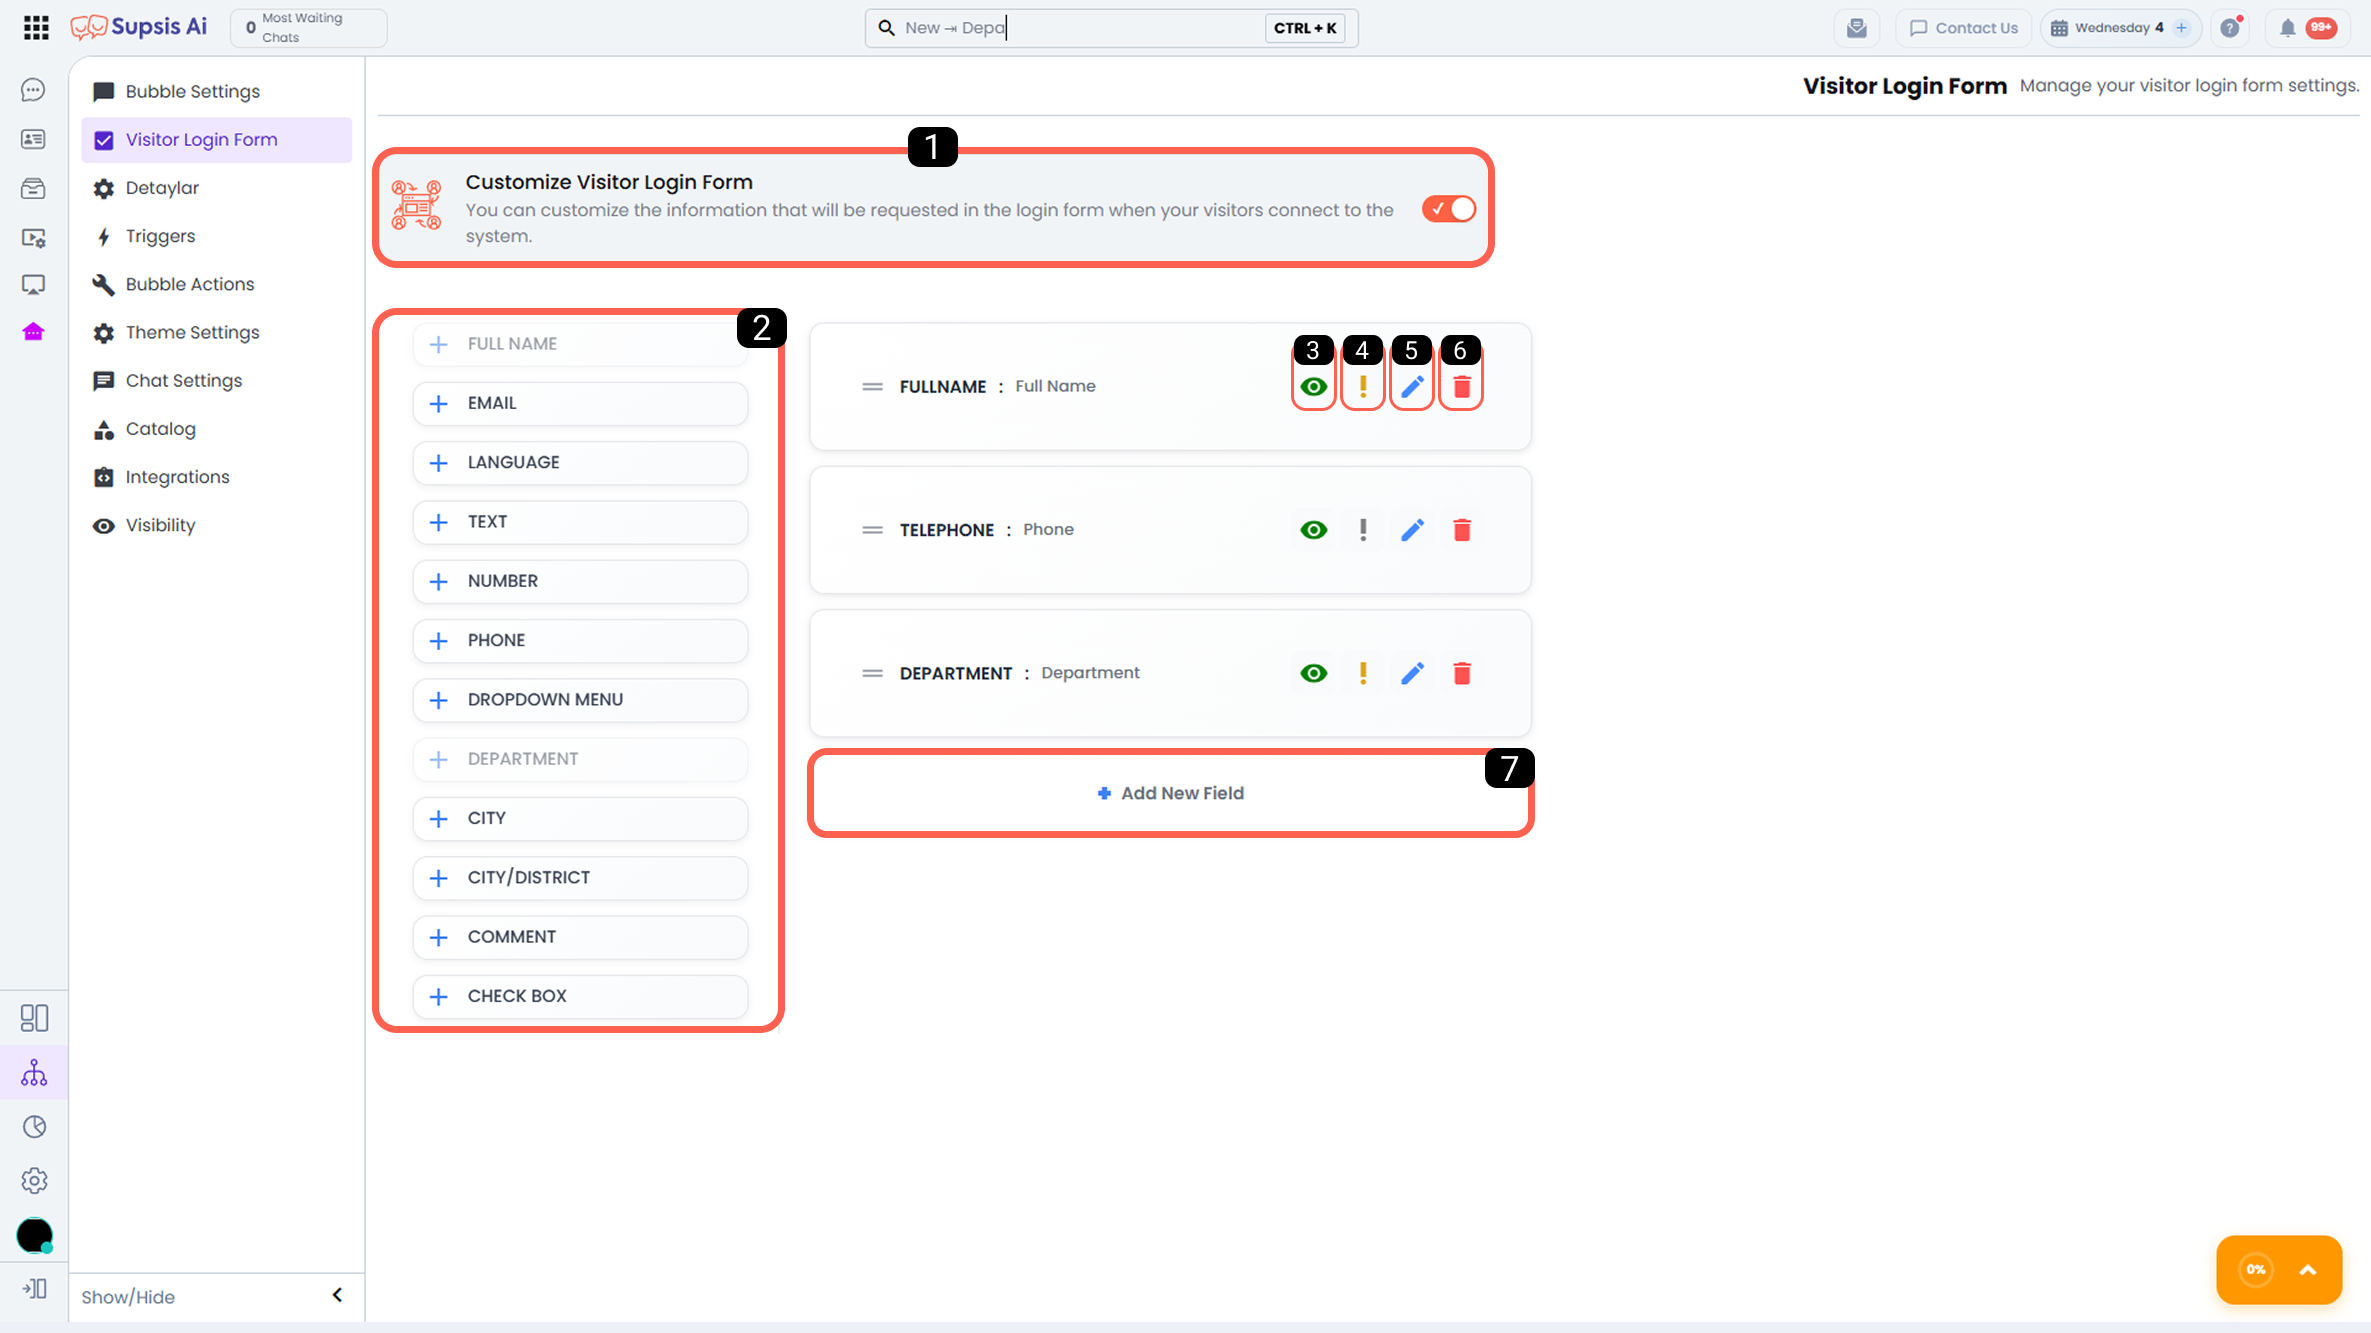
1- Customize Visitor Entry Form
When this option is enabled, the visitor entry form becomes active. The fields included in the form can be defined and edited according to your needs. Predefining the information to be collected enables representatives to make accurate routing decisions and manage the process more effectively during the chat.
2- Add New Field
Allows you to add new data entry fields to the form. This makes it possible to expand the information collected from visitors and fully customize the form according to your needs.
Available field types:
- Full Name: Used for the visitor to enter their first and last name.
- Email: Allows the visitor to enter their email address.
- Language: Enables the visitor to select their preferred language.
- Text: Allows the visitor to enter free text.
- Numeric: Creates a field that accepts only numeric input.
- Phone: Allows the visitor to enter their phone number.
- Select: A dropdown menu that enables selection from predefined options.
- Department: Allows the visitor to choose the department they wish to contact.
- City: Allows the visitor to select their city information.
- City / District: Used for entering city or district information.
- Description: Used to add informational text, social media links, images, or GIFs. This field is display-only and cannot be filled by the visitor.
- Checkbox: Allows visitors to approve texts such as data protection notices, privacy policies, or terms of use.
3- Visibility
This option determines whether the field is visible in the visitor entry form.
- On: The field is displayed to the visitor and can be filled in.
- Off: The field is not visible in the form; however, data collected via Supsis AI website scripts can be processed through API, SDK, or automations.
Fields with visibility turned off are especially used for background data collection and processing information from third-party systems into the visitor profile.
4 - Required
Determines whether the field is mandatory. If marked as required, visitors must fill in this field before submitting the form. If not marked as required, visitors can start the chat without filling in the field.
5 - Edit Field
This feature activates the field creation form for the existing form field. Through the opened form, you can edit the field name, type, and cosmetic details. This option allows you to customize the field’s appearance and functionality according to your needs.
6 - Delete Field
Removes the field from the form. This option is used to delete unwanted or unnecessary fields.
7 - Create New Field
The Create New Field feature allows you to create fully customized fields within the visitor entry form. With these fields, you can collect only the data required for your business processes and customize the form structure without negatively affecting user experience.
Created fields can be filled by visitors and can also work in integration with profile cards, automations, and API processes in the background.
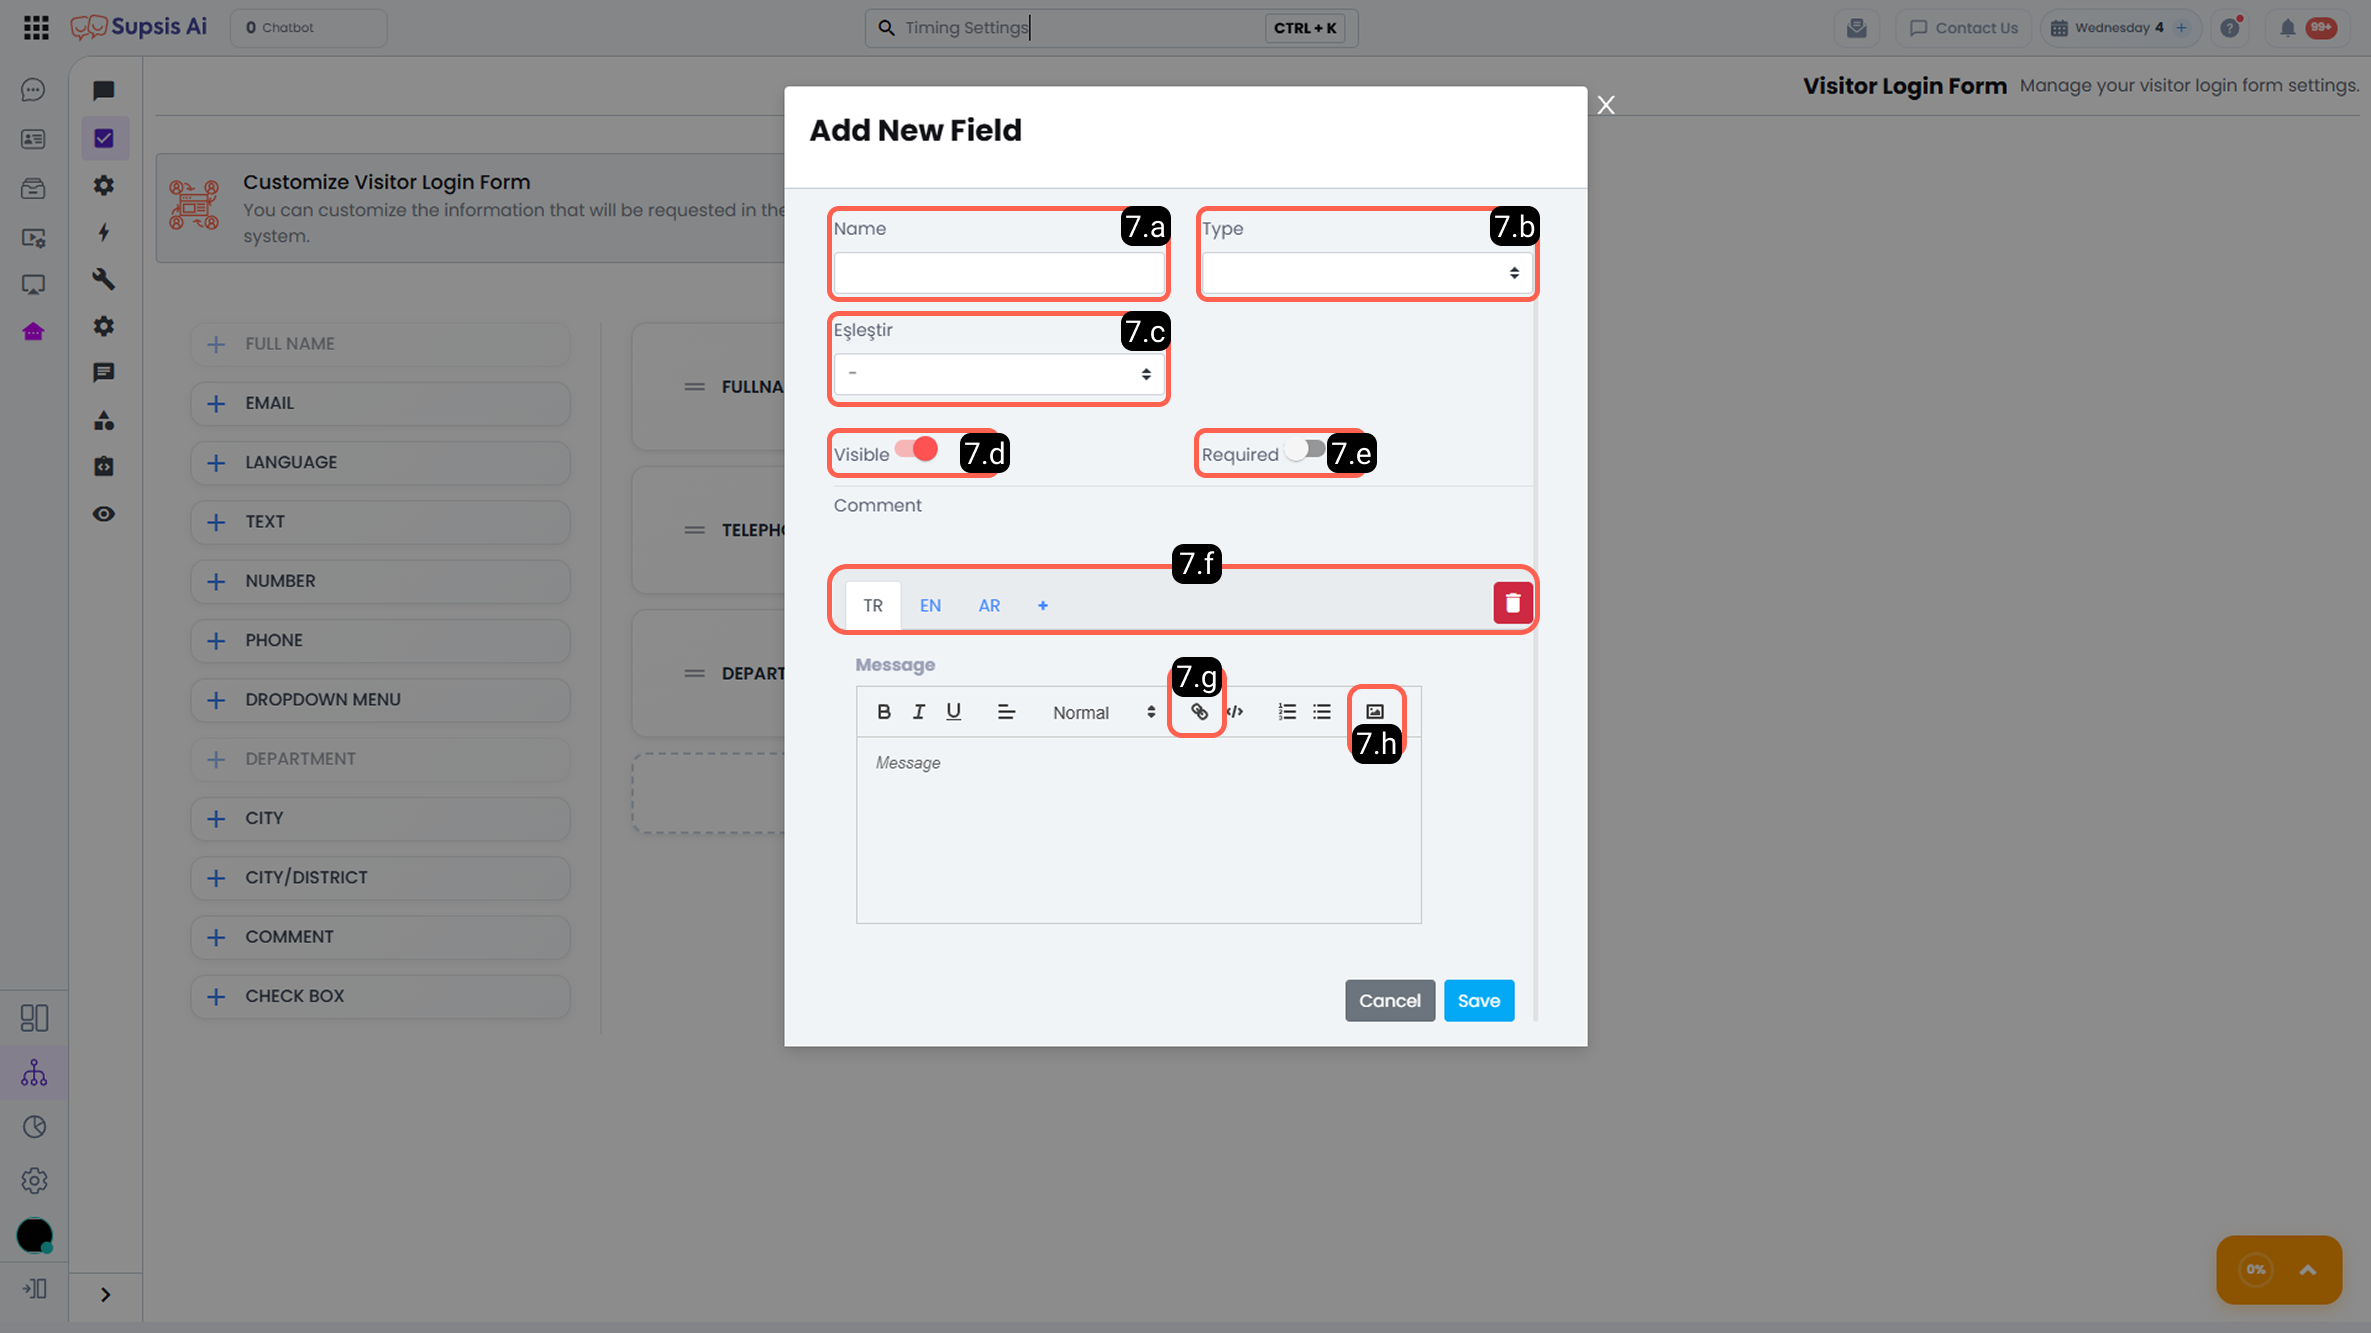
7.a – Field Name:
Defines a name for the form element. The defined field name is not displayed to visitors and is used only for panel management and matching processes.
7.b – Field Type:
Allows you to determine the field type. The selected field type defines the type of data collected from the visitor and how it will be displayed in the form.
7.c – Match:
This feature allows the information entered by the visitor in the form to be matched with a field in the visitor profile card.
For example:
- If you need to collect a username from the visitor,
- The field type is selected as Text,
- The visible field label is defined as Username,
- Then this field is matched with the relevant Profile Field.
In this way, the entered information:
Is displayed on the visitor profile card, stored for future interactions, and can be used by representatives, automations, and reporting processes.
For more information about profile fields, you can review the Profile Fields documentation.
7.d – Visibility:
This option determines whether the field is visible in the visitor entry form.
- On: The field is displayed and can be filled by the visitor.
- Off: The field is not visible, but data collected via Supsis AI website scripts can be processed through API, SDK, or automations.
Fields with visibility turned off are mainly used for background data collection and processing information from third-party systems into the visitor profile.
7.e – Required:
Determines whether the field is mandatory. Fields marked as required must be filled before starting the chat, while non-required fields can be left empty.
This setting ensures that critical information is collected completely.
7.f – Language Settings:
Supsis AI automatically detects the visitor’s browser language and dynamically displays form elements accordingly.
From this section, you can add multiple languages to the form field, edit existing language definitions, or remove them.
This allows you to provide a localized form experience for multilingual websites.
7.g – Add Link:
With this option, you can add external links within the form field.
For example: data protection notice, privacy policy, or terms of use.
7.h – Add Image:
This feature allows you to add an image within the form field.
Added images can be used for informational, guiding, or brand-supporting purposes and help enrich the visitor experience.