
The Table Content section allows you to view and manage the data within the tables you have created. Through this area, you can edit table datasets, analyze and report data with AI assistant support, import your existing data into the table, or export the data from the table.
Table Content functions as the central hub for data management and analysis processes.
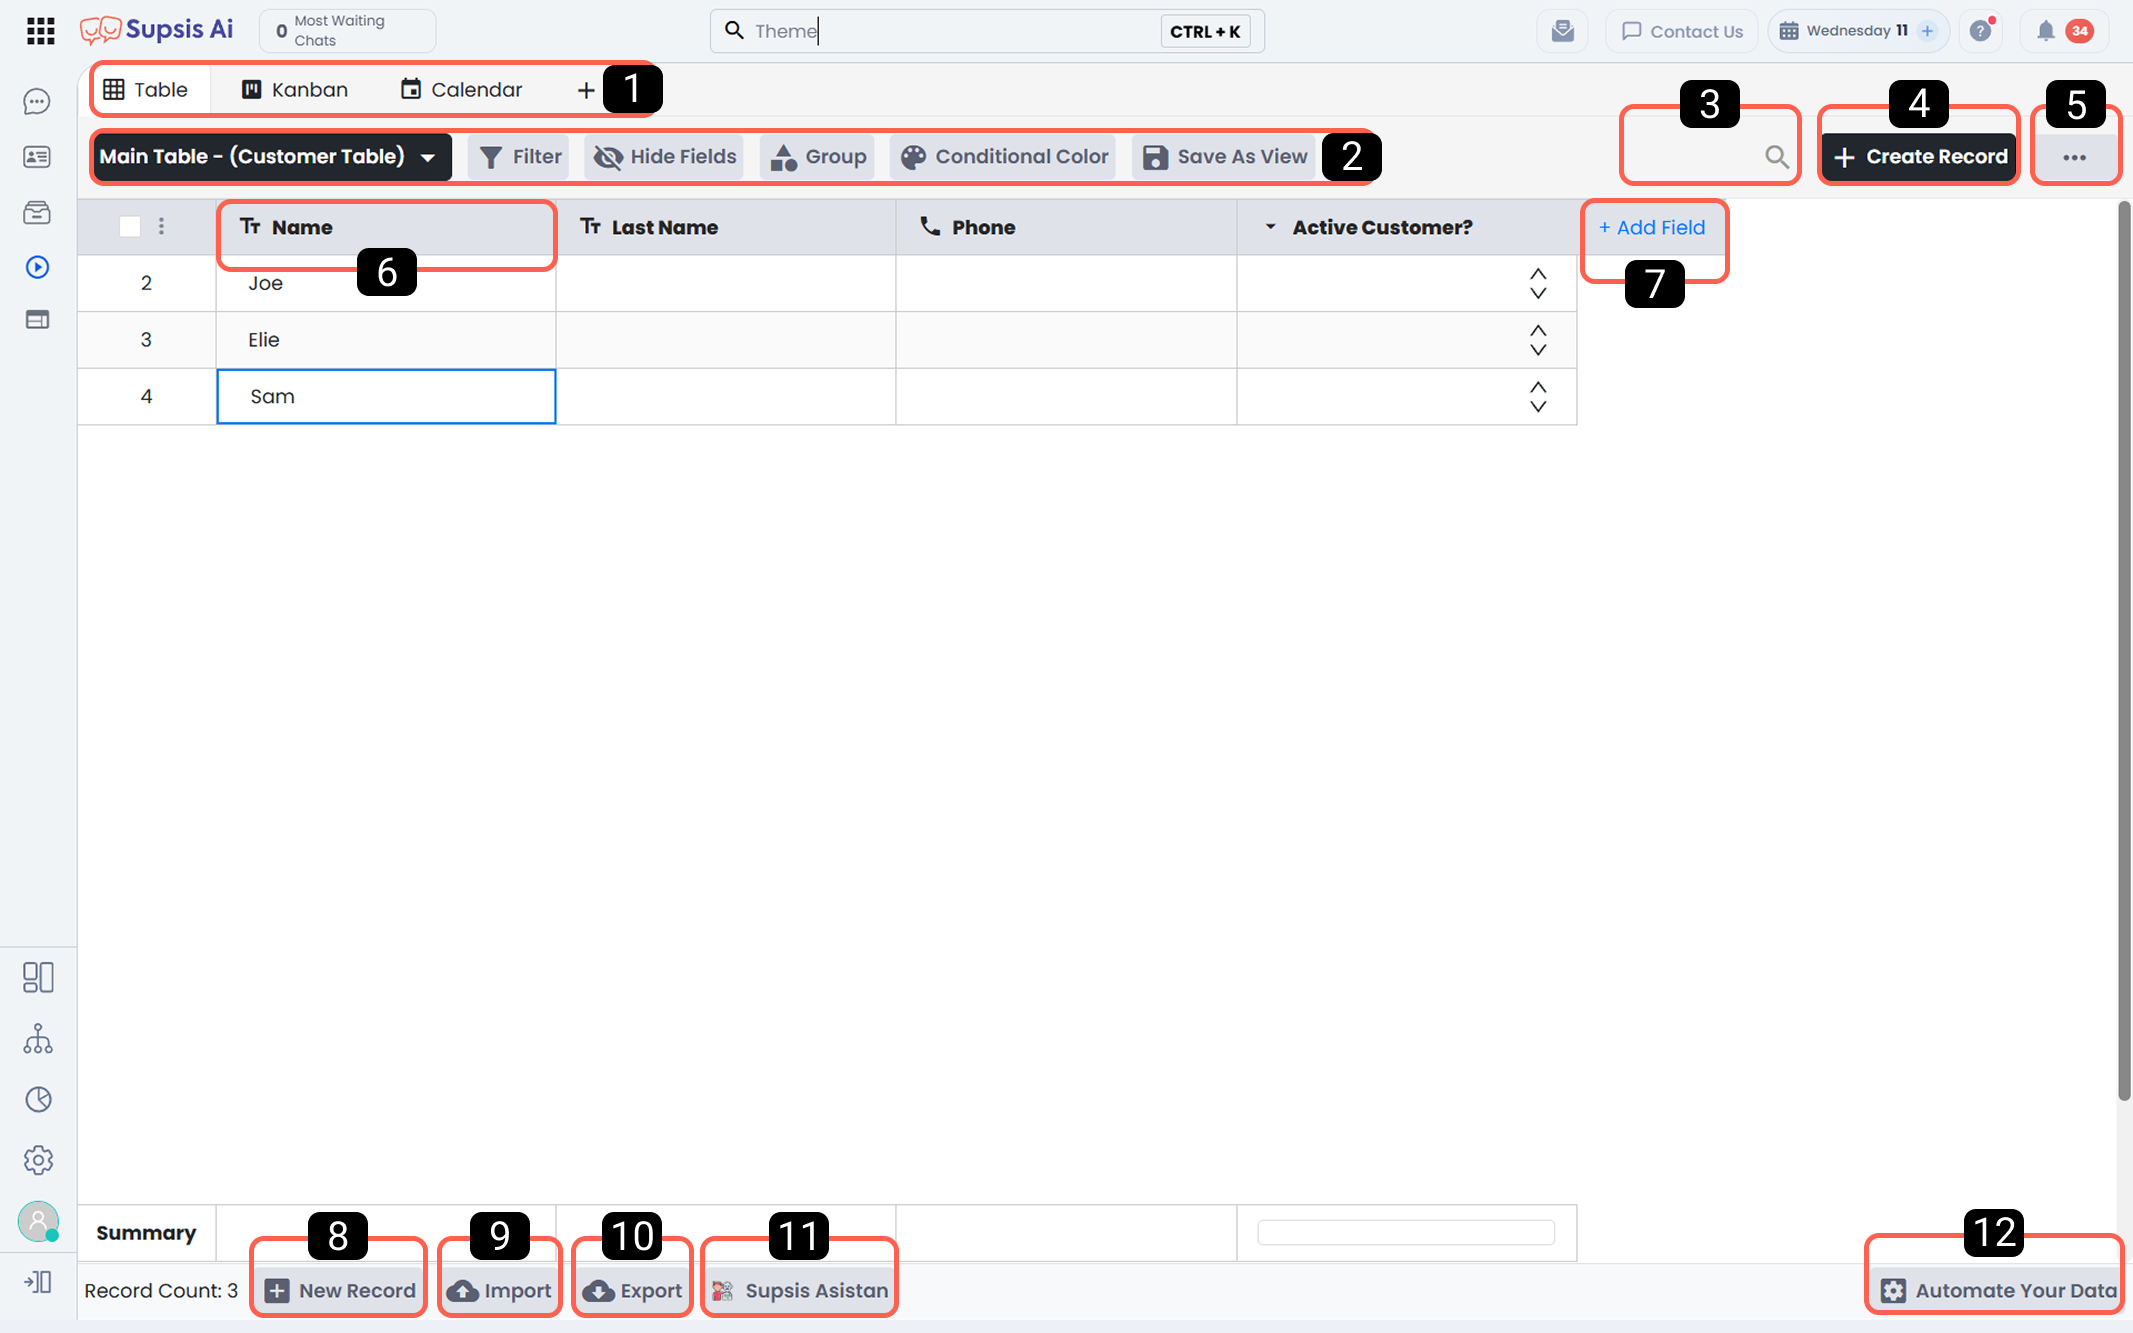
| No | Menu |
|---|---|
| 1 | View of Table Data |
| 2 | Edit View |
| 3 | Search Bar |
| 4 | Create Record |
| 5 | Additional Tools |
| 6 | Edit Field |
| 7 | Add Field |
| 8 | New Record |
| 9 | Import |
| 10 | Export |
| 11 | Supsis Assistant |
| 12 | Automate Data |
1-) Data View
The Data View section allows you to determine how table content will be displayed and managed. Through this section, you can switch between different view types for your data and easily select which table view you want to work on.
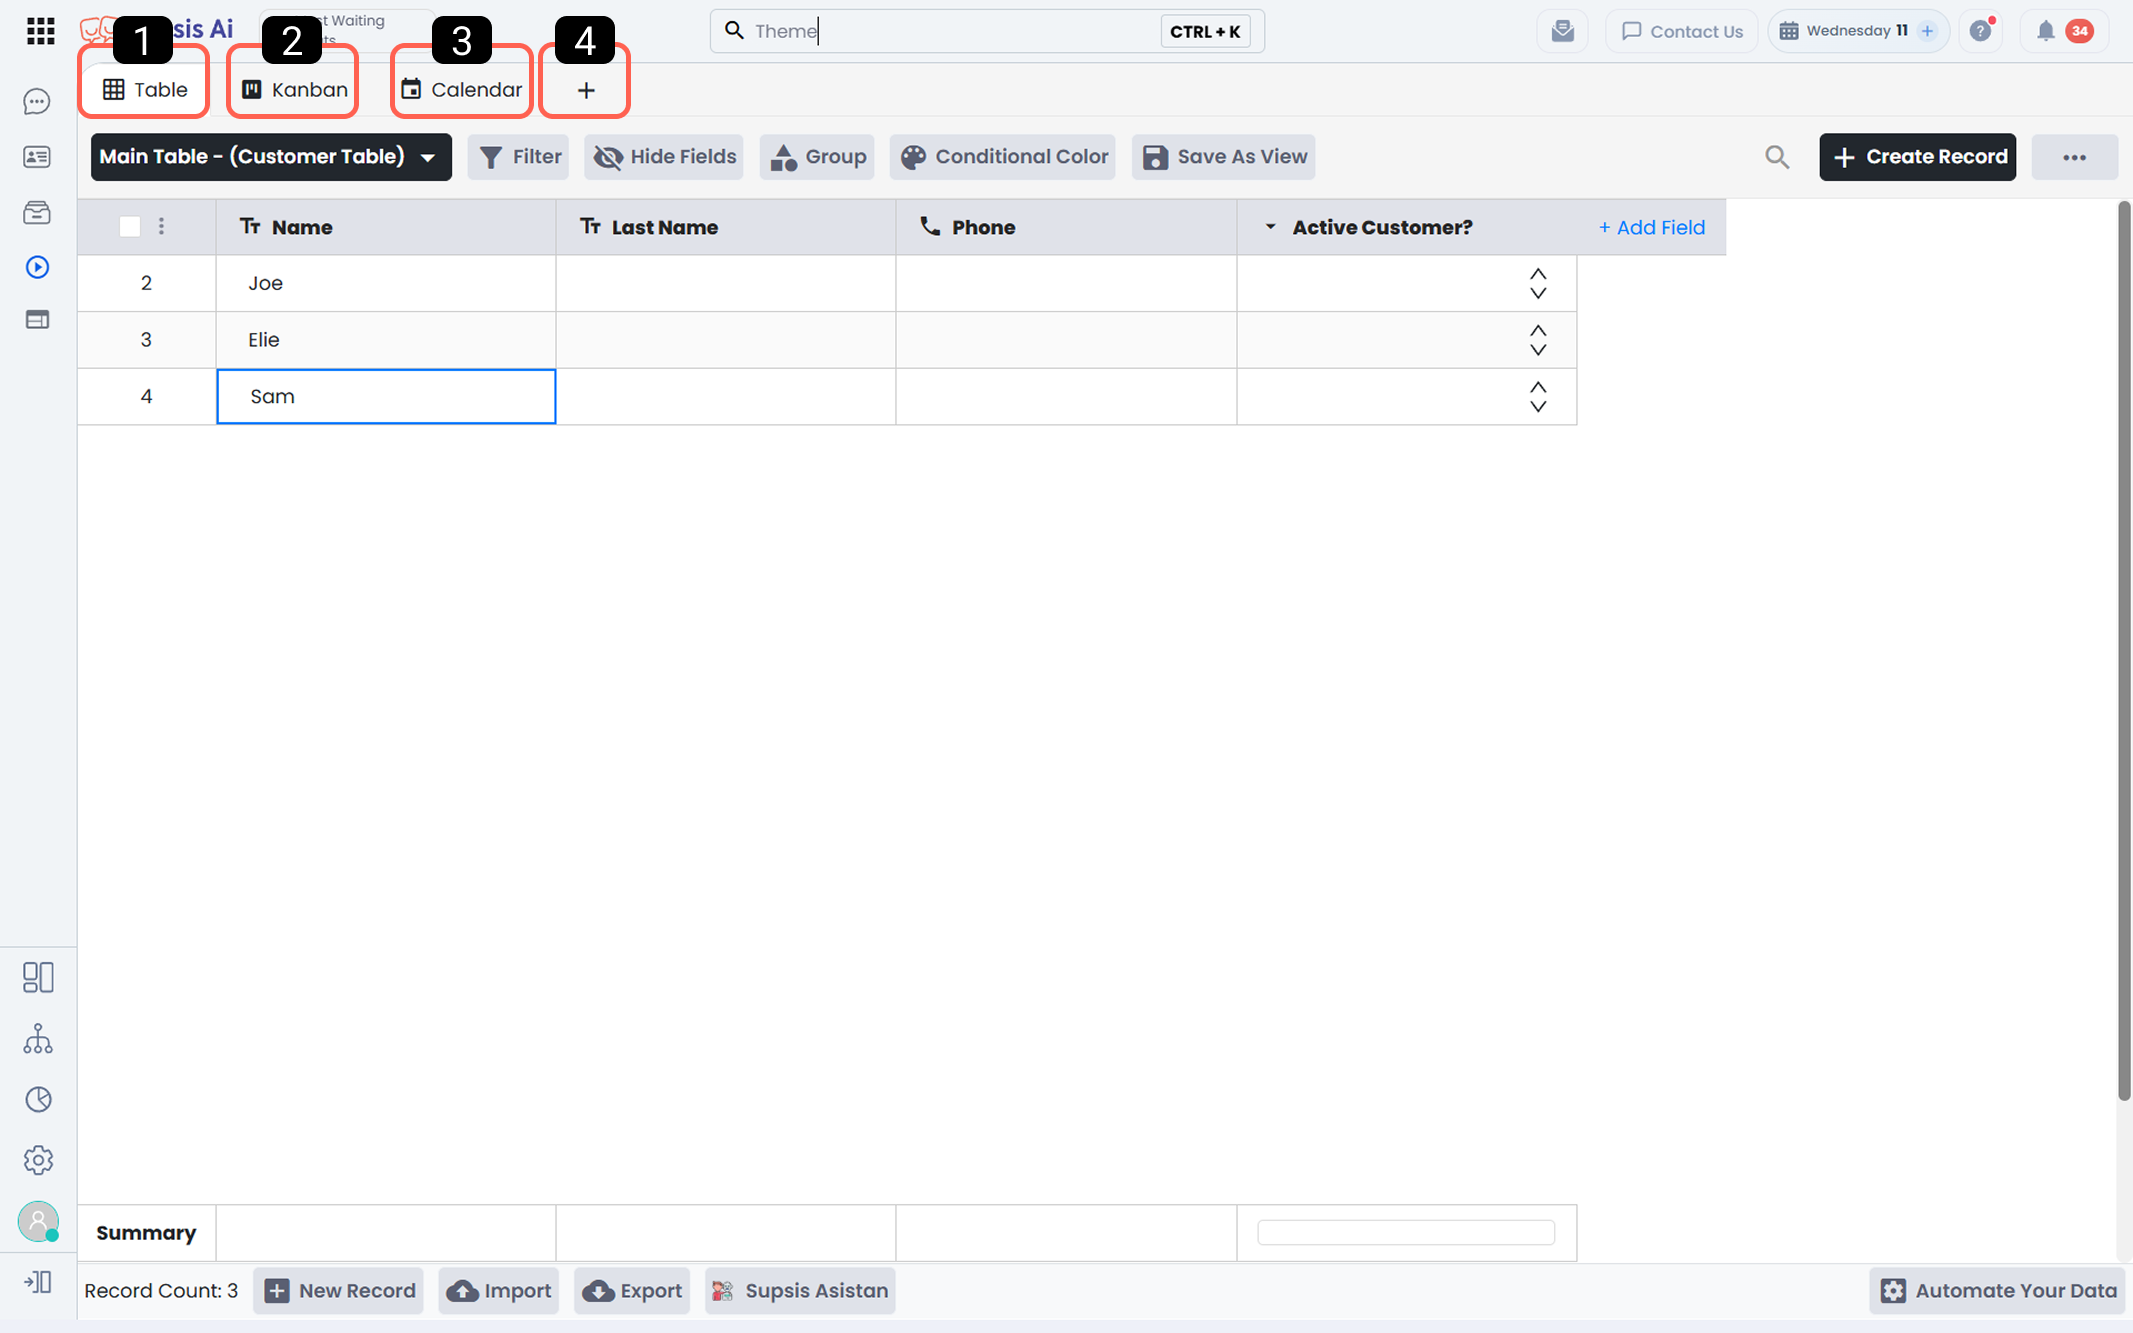
1-) Table View
Table View is the main view type where all table operations are performed. In this view:
- All records in the table are listed
- All operations related to data can be performed
- All functionalities permitted by the table can be actively used
Table View is the primary workspace where all table functions are active.
2-) Kanban View
Kanban View can be used for tables that contain a dropdown list (selection field) column. If the table does not include a dropdown-type column, Kanban view cannot be activated.
In Kanban view:
- Each selectable value in the dropdown list is displayed as a separate board column
- Records are automatically placed in the corresponding column according to their selected value
- Records can be moved between board columns using drag-and-drop or scrolling
This structure makes status- or stage-based workflow tracking visual and practical.
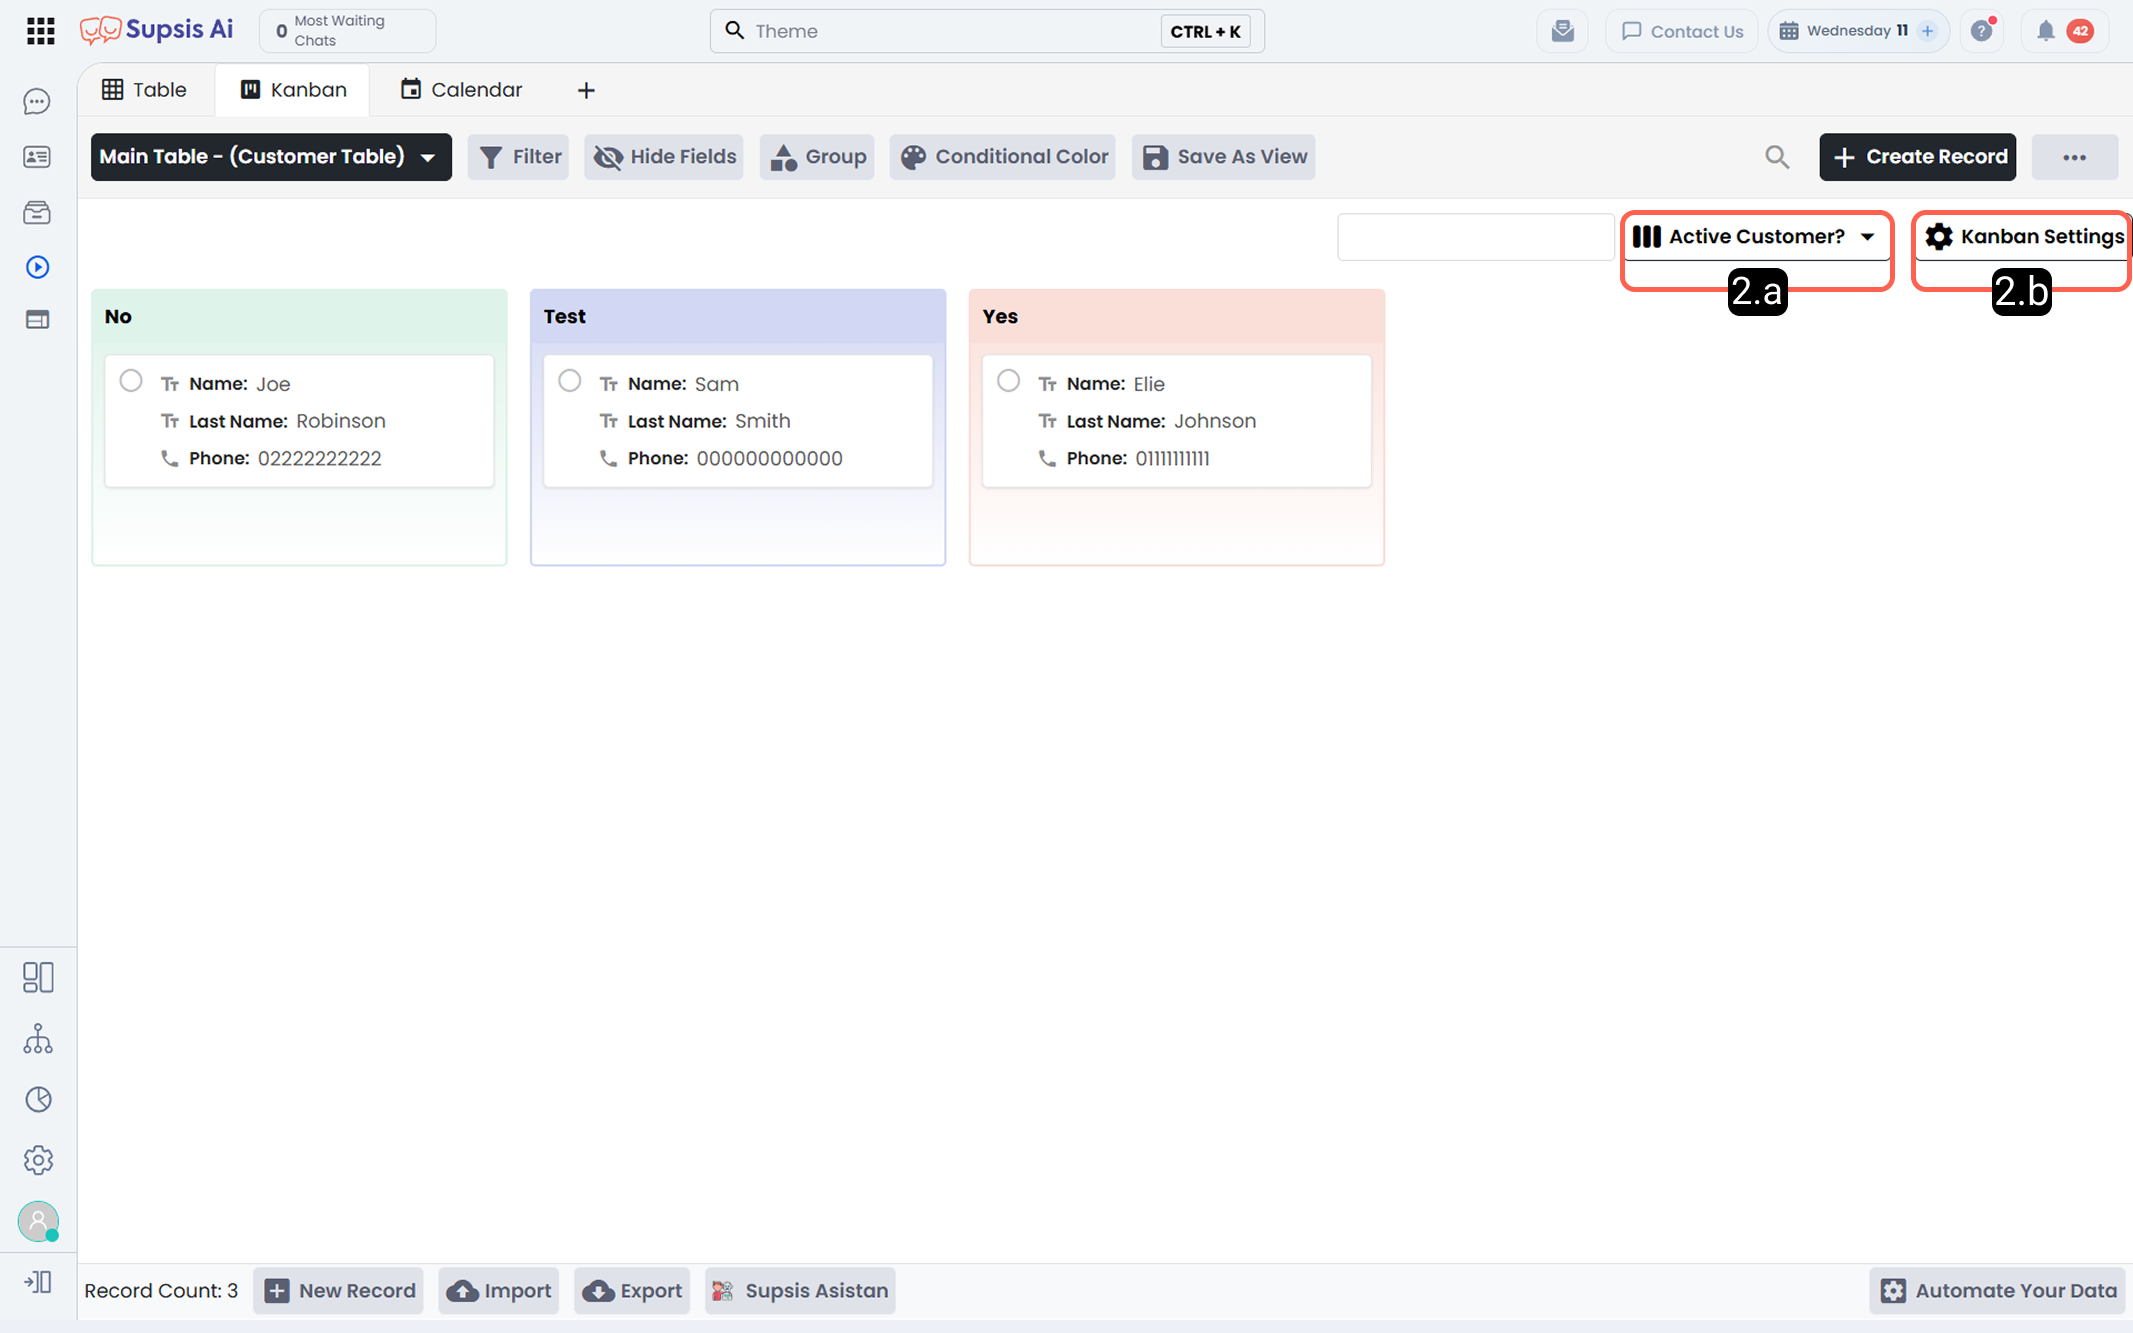
2.a – Column Selection:
Determines which table column will be used to generate board columns in Kanban view. A dropdown-type column is selected, and its values become the Kanban board headers.
2.b – Kanban Settings:
Allows configuration of the data content displayed on Kanban cards.
From this section:
- You can select which table columns will appear on Kanban cards
- You can hide unwanted data fields
- You can simplify card content
Activated data content is retrieved from table records and displayed on Kanban cards.
3-) Calendar View
To use Calendar View, the table must contain at least one date field (column). When switching to Calendar view in tables with a date field, records are displayed on the calendar based on date.
In Calendar view:
- Records are placed on days according to the date field
- You can switch between monthly, weekly, and daily views
- Data is displayed based on configured table settings
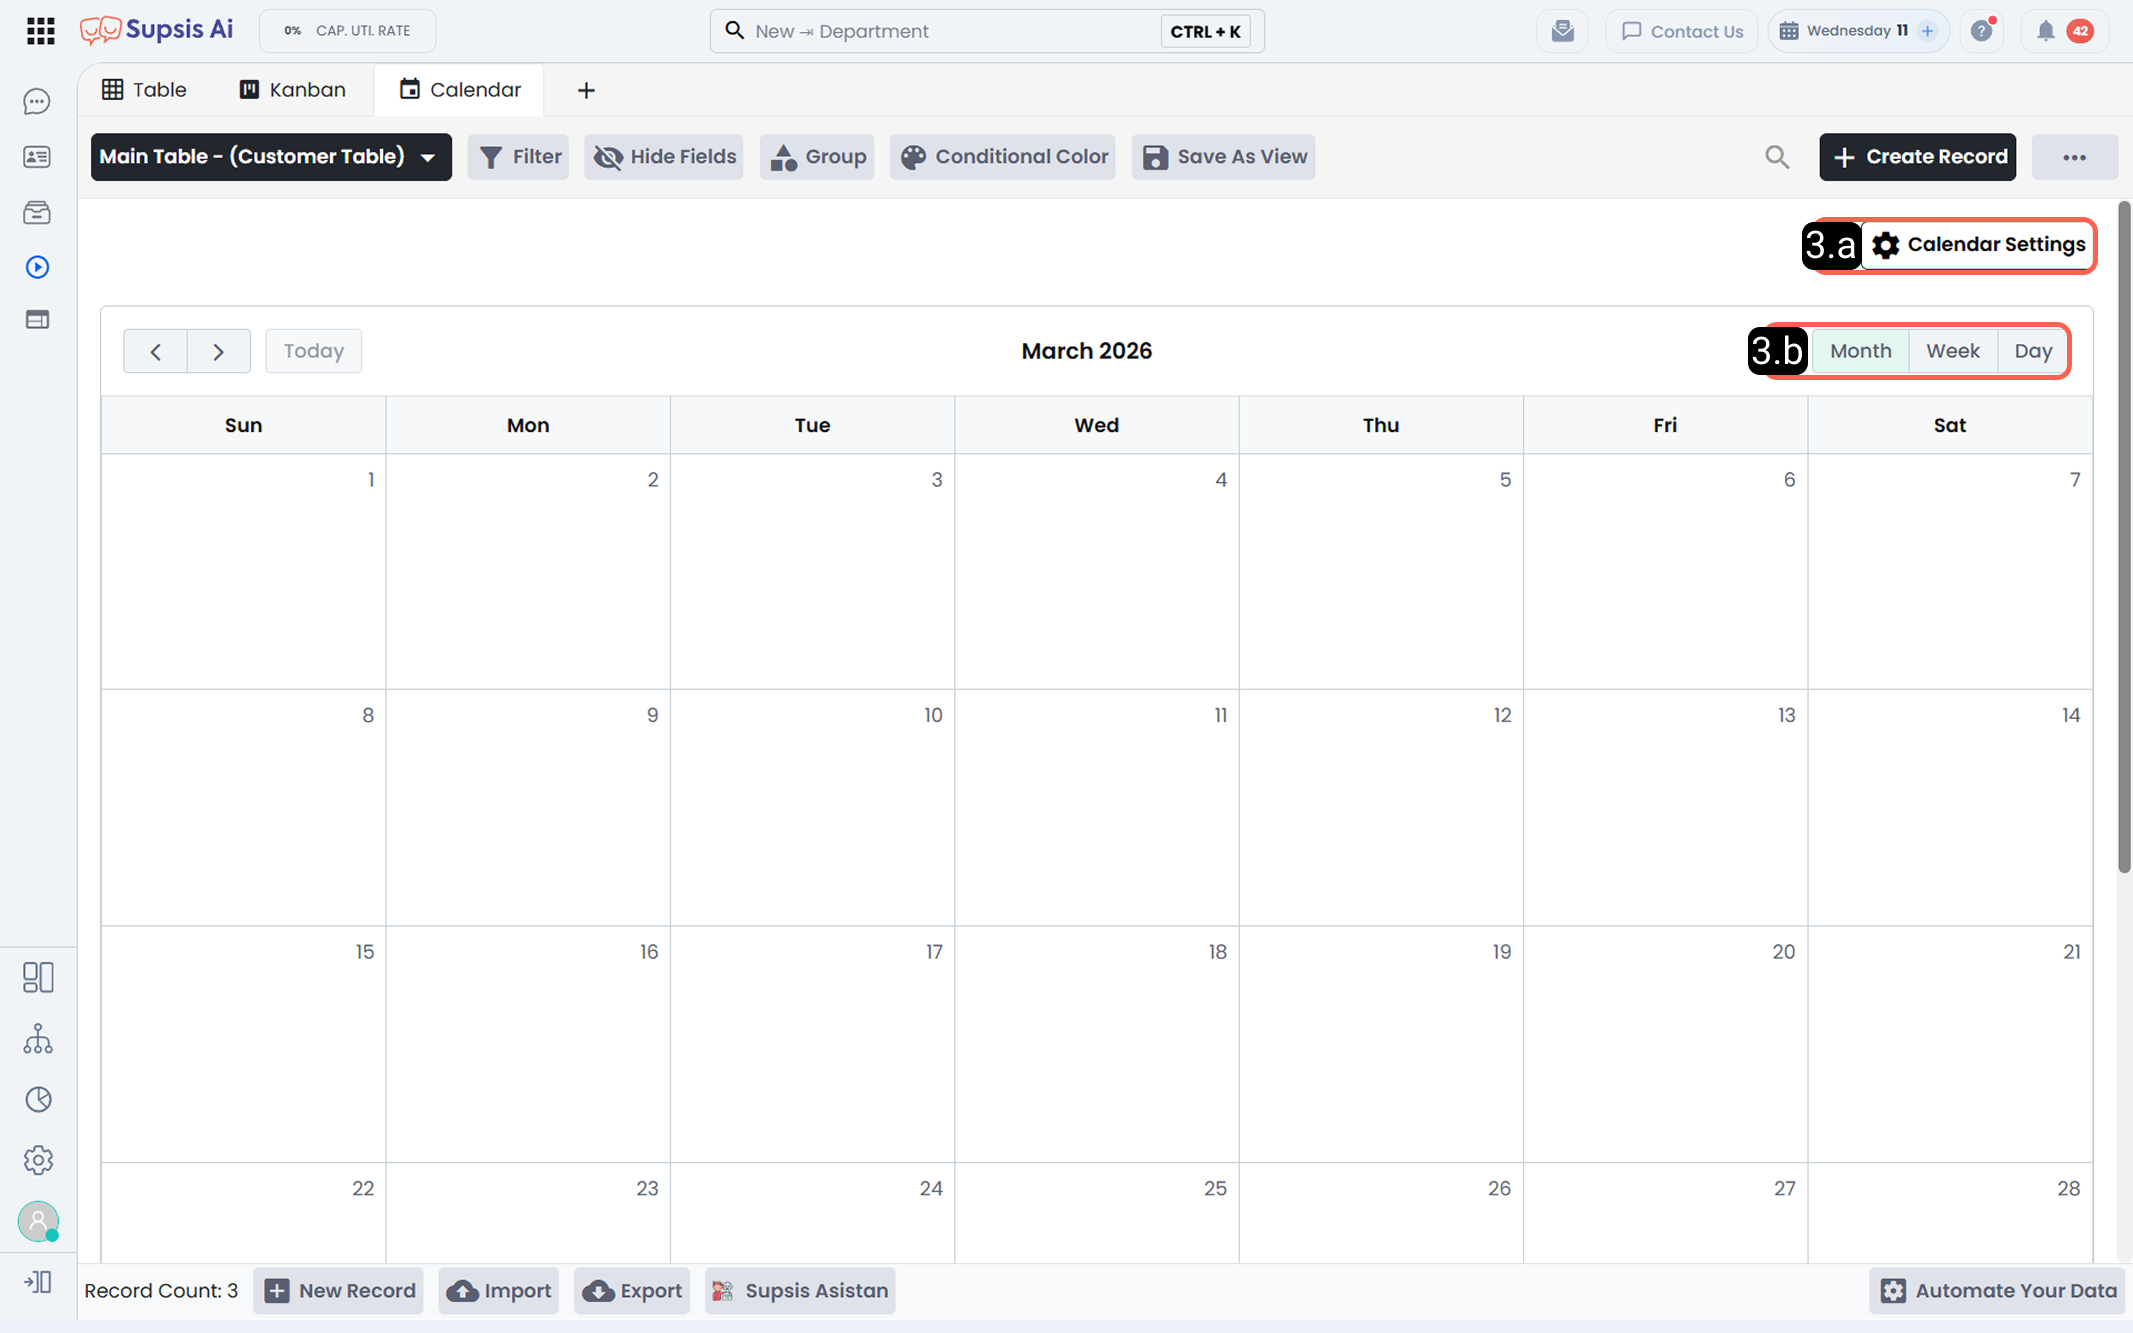
3.a – Table Settings:
Determines which table data will be displayed in Calendar view.
From this section:
- You select which table columns will appear on calendar cards
- Selected content is displayed on the relevant date
3.b – Date-Based View Selection:
Determines the time range shown in the calendar.
You can switch between Daily, Weekly, and Monthly views.
4-) Customized View
The Customized View feature allows you to create charts and reports using widgets fed by your table data. Using the available customized view options, you can generate reports and charts from your table data.
When creating a widget:
- You can manually define which data will be displayed
- Or you can describe the chart/report you want to AI and let it generate it automatically
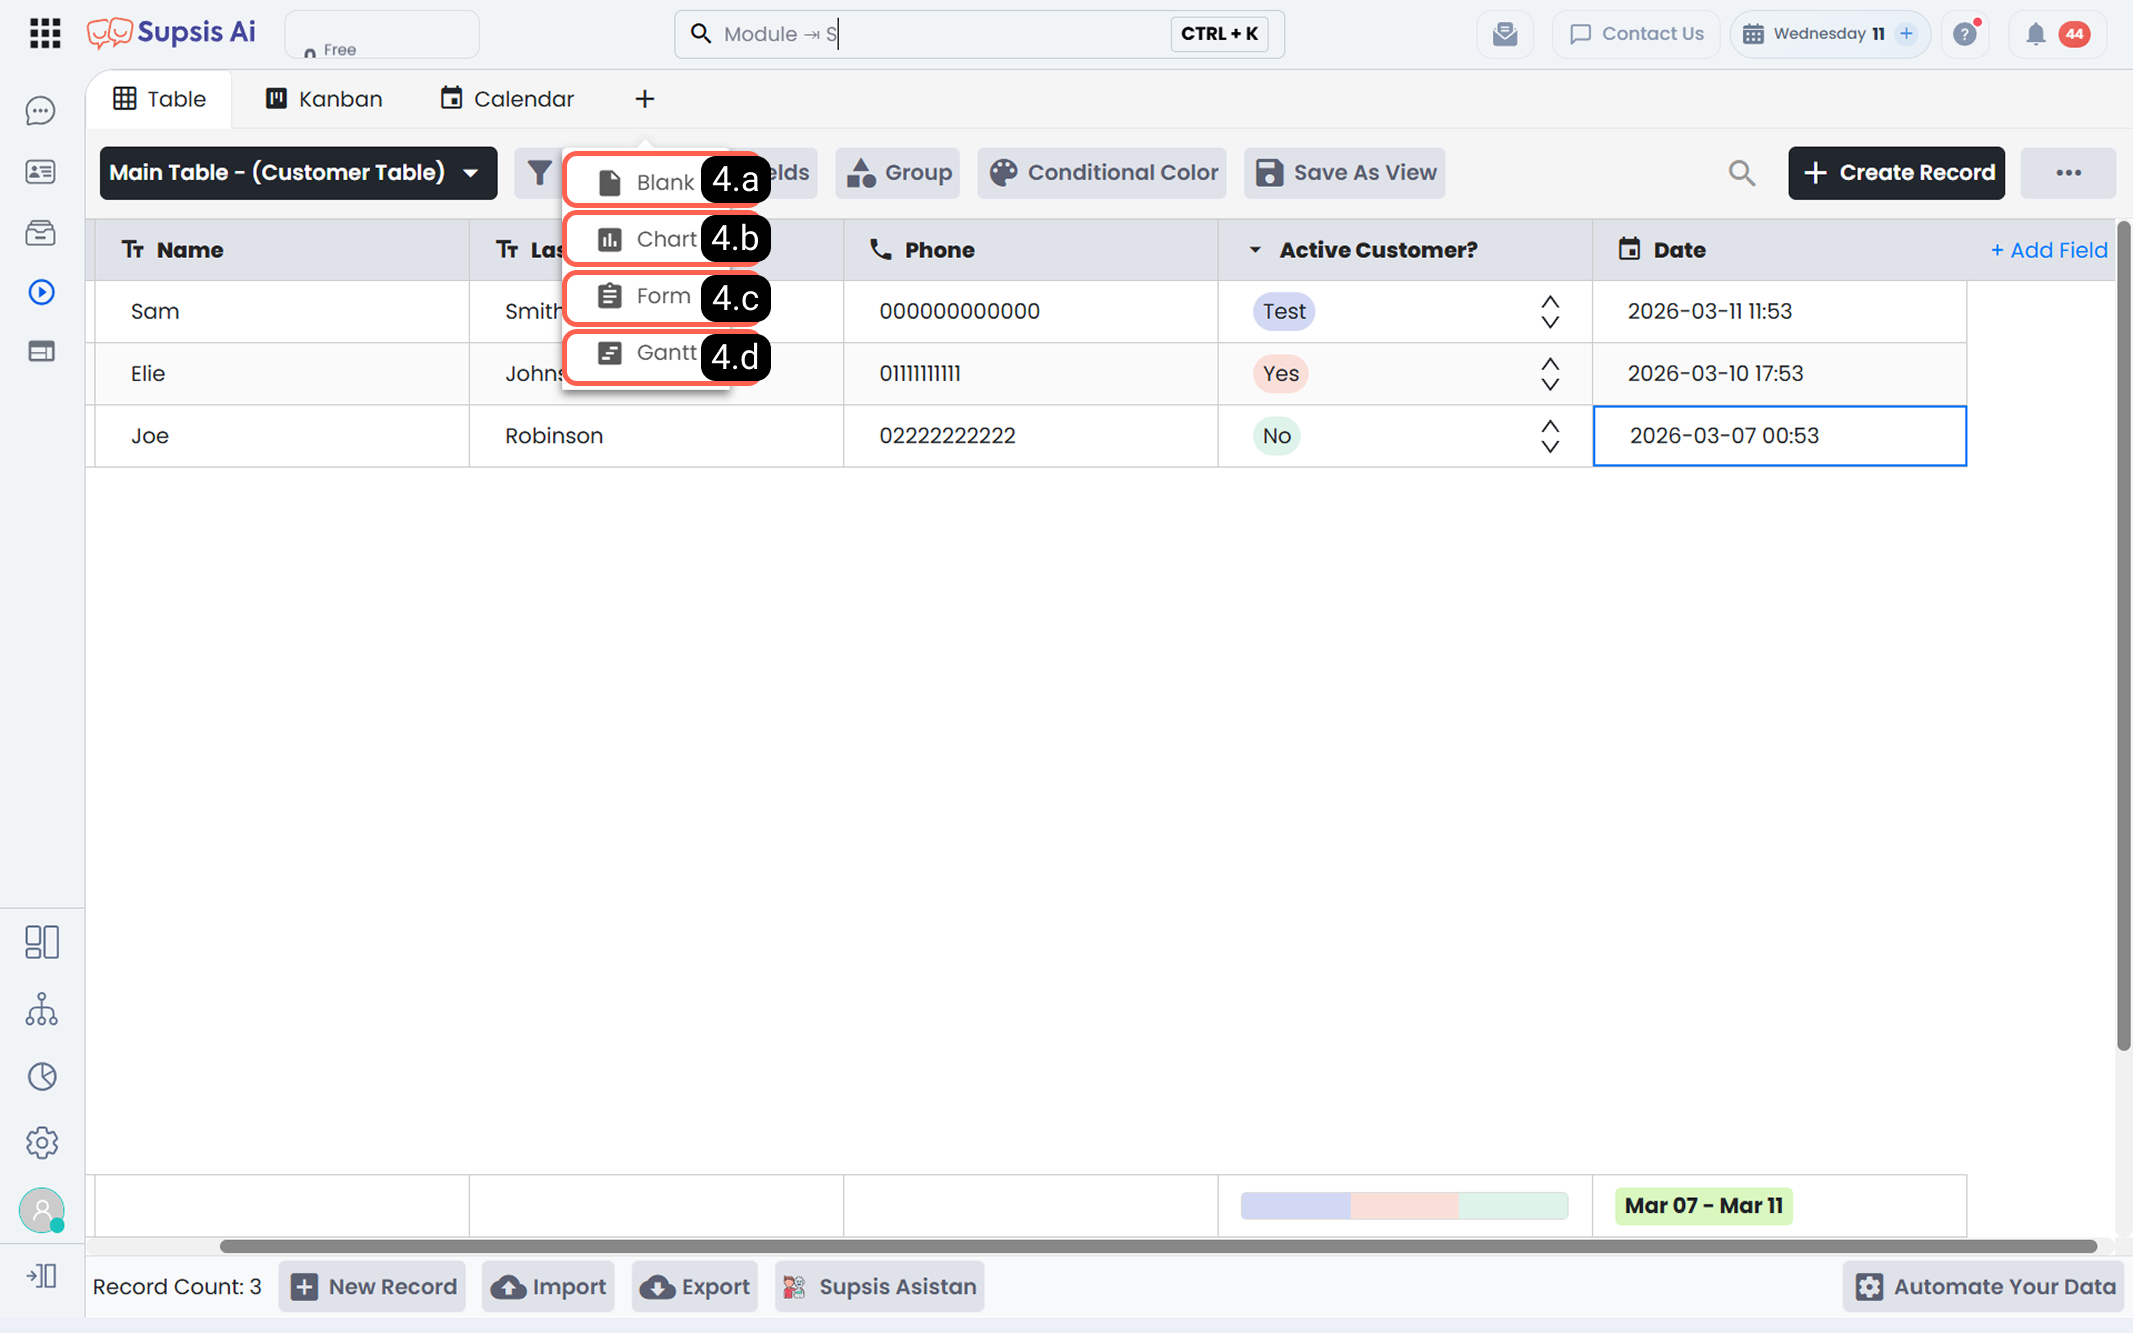
4.a – Blank
4.b – Chart
4.c – Form
4.d – Gantt
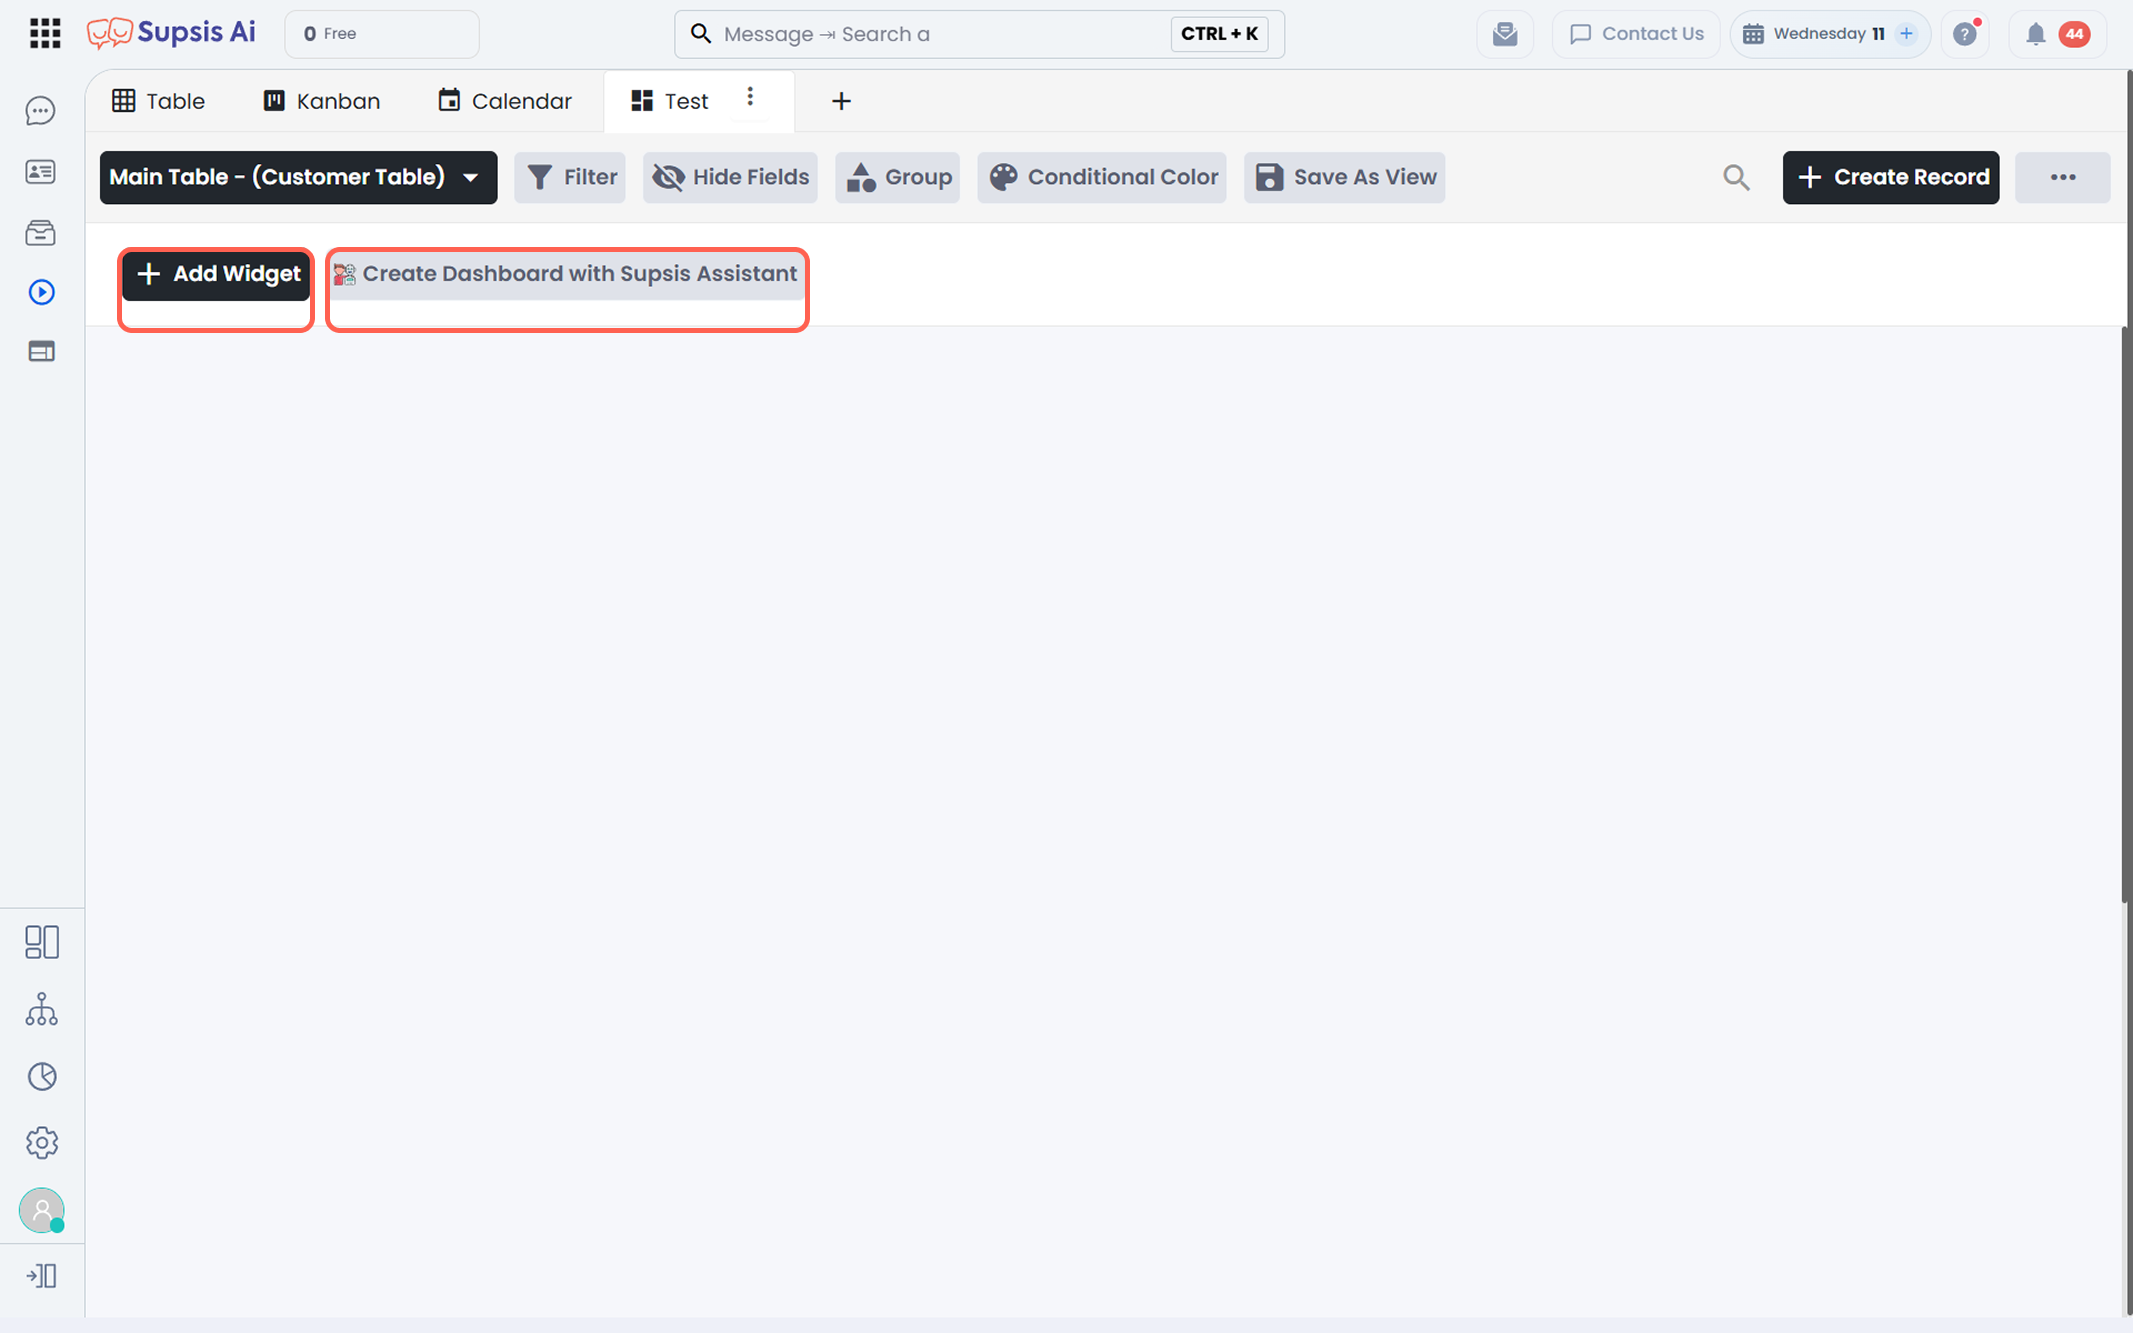
Add Widget:
Allows you to manually add a widget and define its data source and columns.
Create Dashboard with Supsis Assistant:
You can describe the reports you want to Supsis Assistant and automate the widget creation process. The assistant analyzes your request, determines a strategy, selects the most suitable widget, defines the data source, and manages the entire setup end-to-end.
2-) Edit View
From this section, you can filter, group, and apply color formatting to table data.
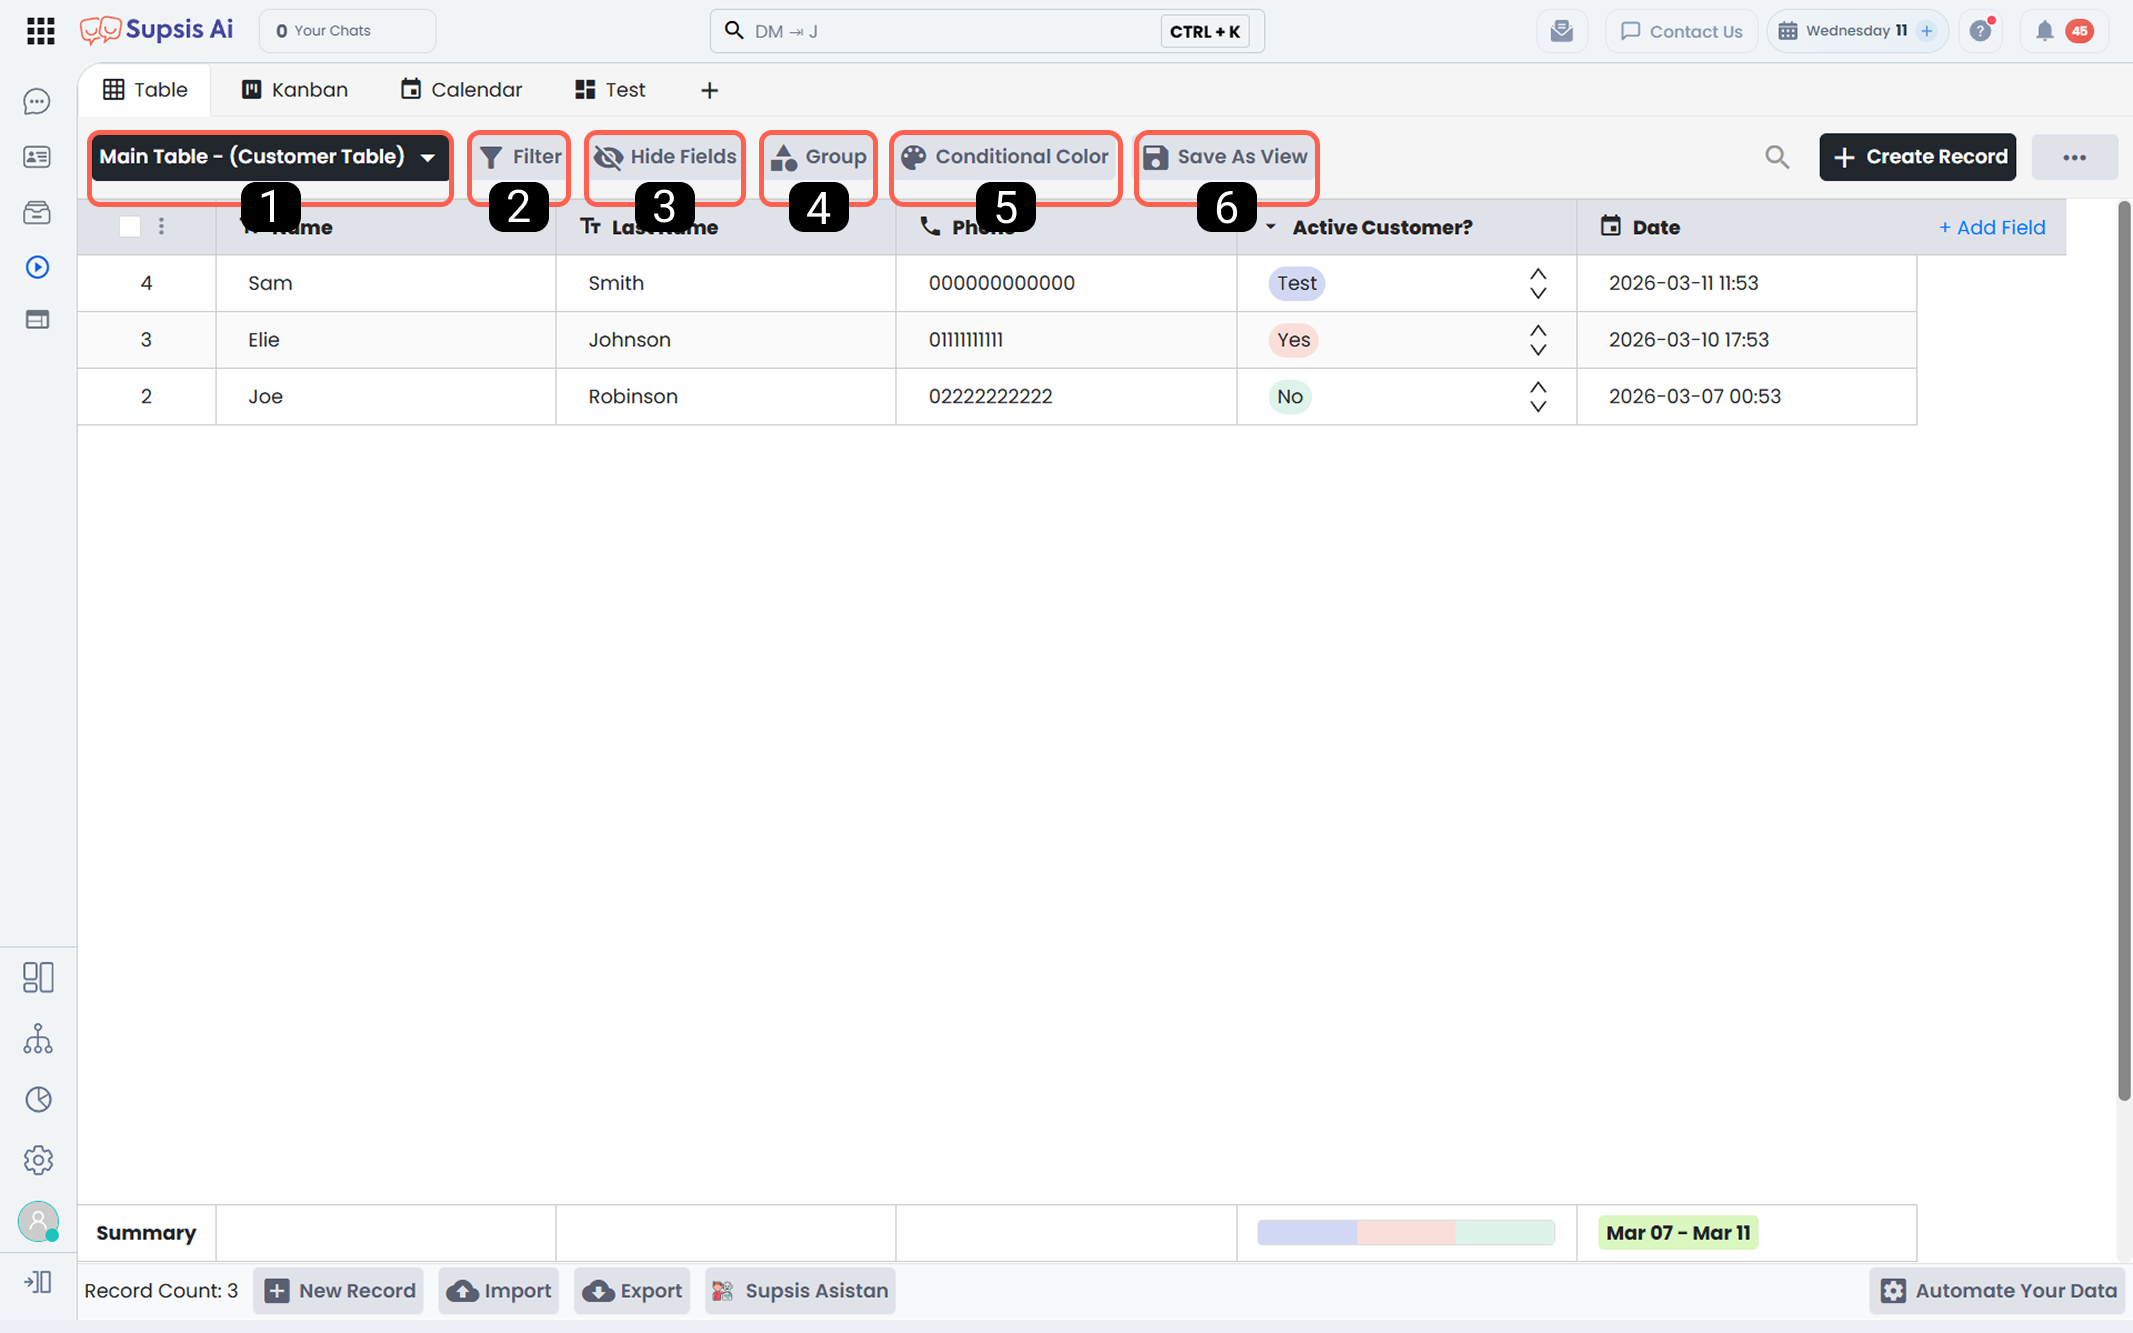
1-) Saved Views
Allows switching between previously saved views.
2-) Filter
The Filter feature allows you to refine table data according to defined rules.
Filtering consists of:
- Field selection
- Operator selection
- Value input
You can use single or multiple conditions.
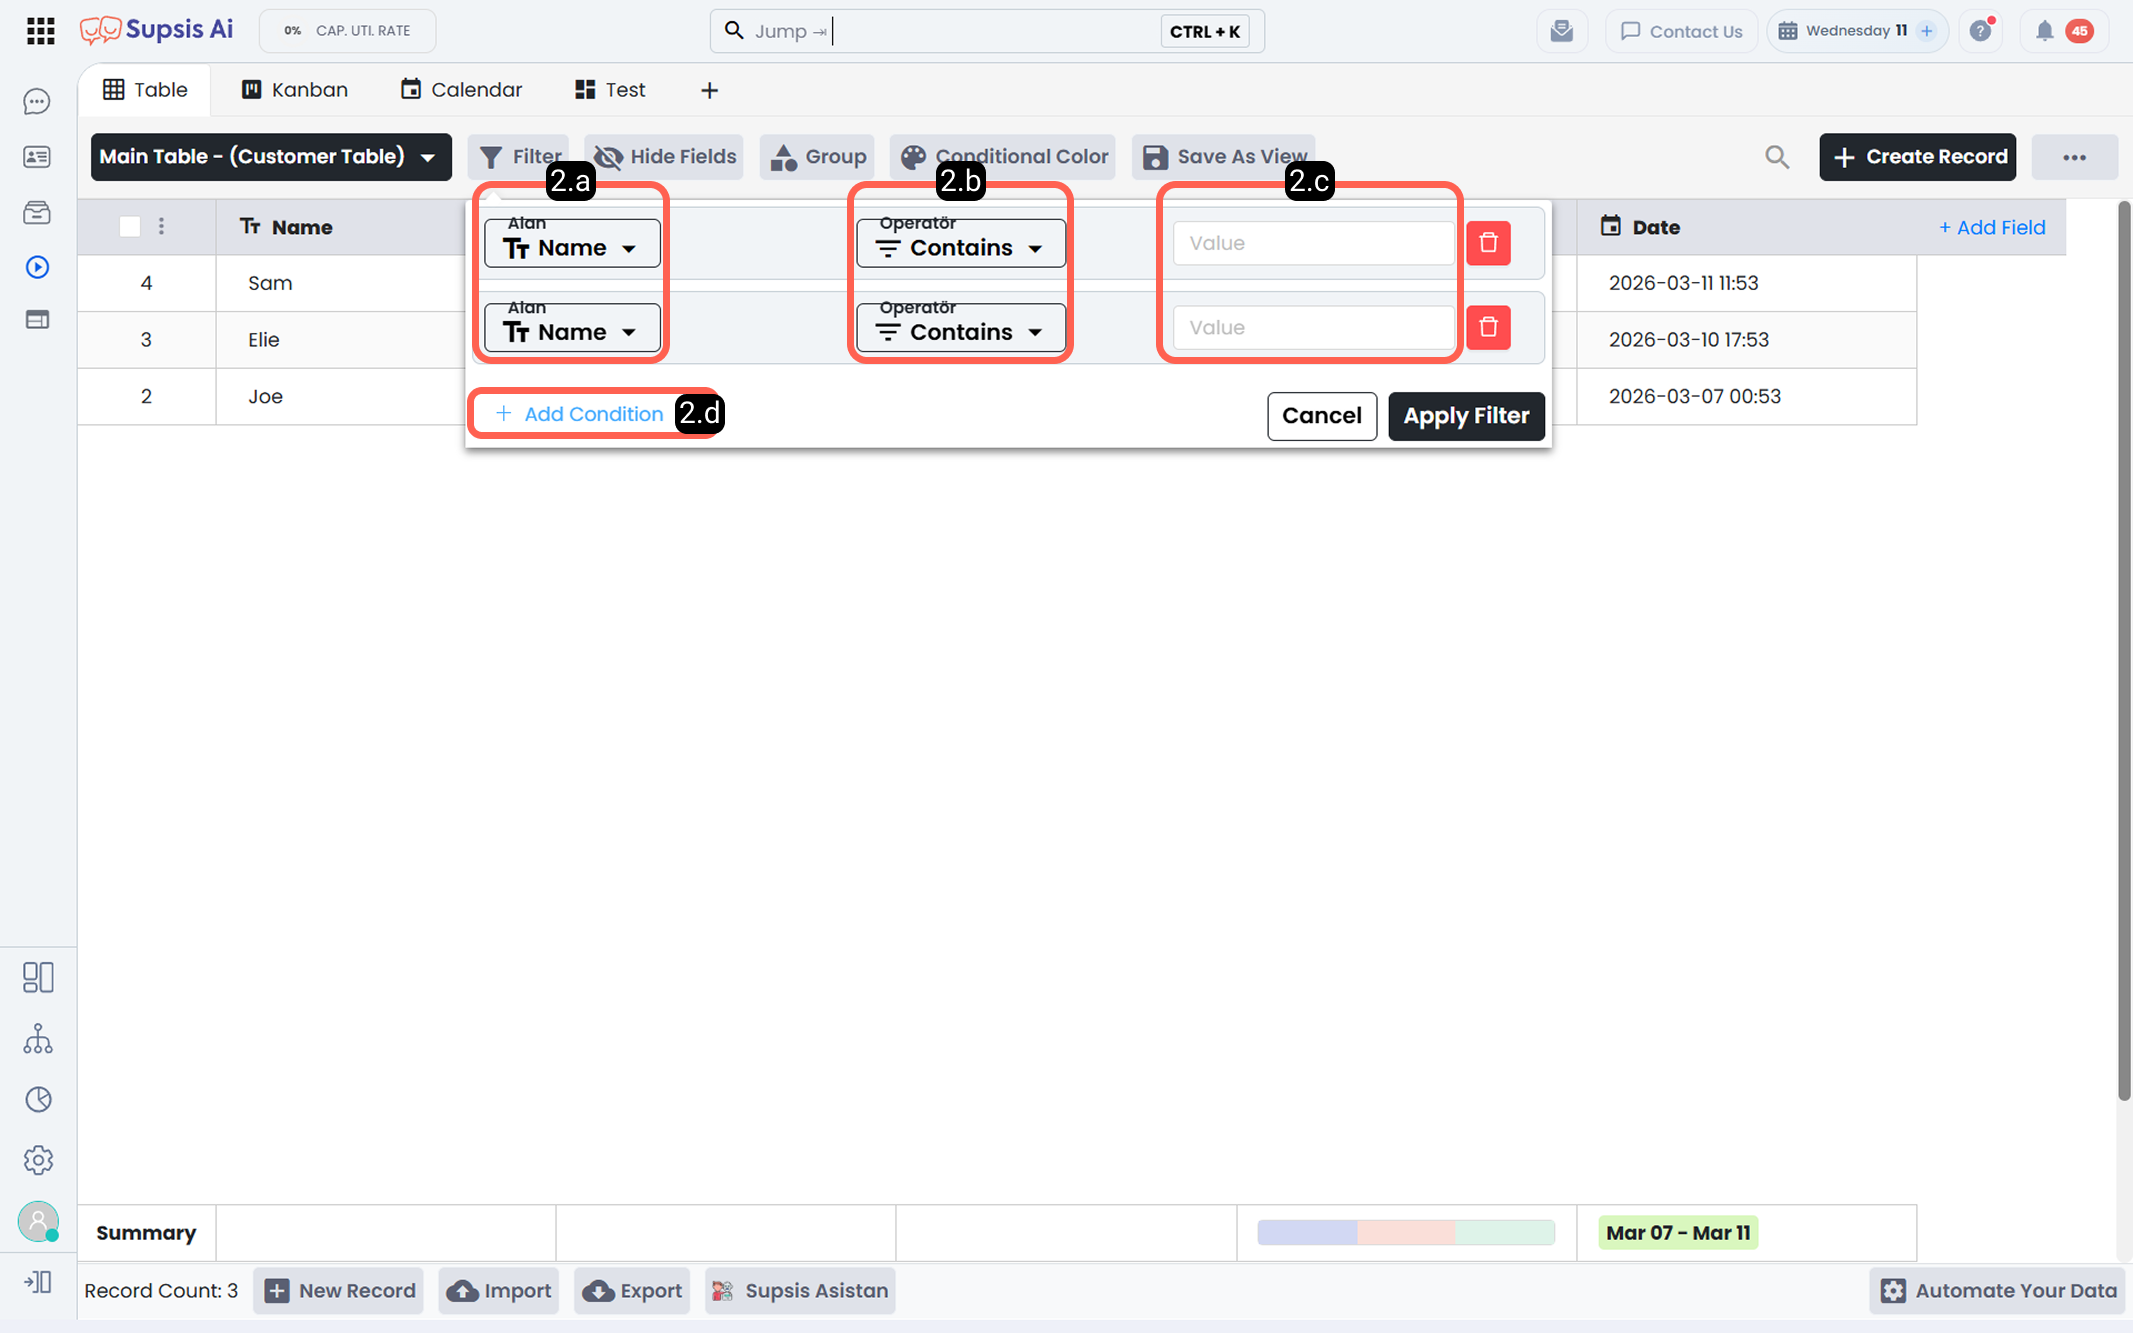
2.a – Field Selection:
Select the column to filter.
2.b – Operator:
Determines the rule for filtering.
Available operators:
- Contains
- Equals
- Not Equal
- Starts With
- Ends With
- One Of
- Does Not Contain
- Is Empty
- Is Not Empty
2.c – Entered Value:
Value used for filtering.
Example:
Field: Name
Operator: Contains
Value: Ahmet
All records containing “Ahmet” are listed.
2.d – Add Condition:
Allows adding multiple filter rules.
2.e – Field-Type Right-Click Context Menu Filtering
When you right-click on any cell in a table, a dynamic quick filter popup menu (context menu) specific to that cell's field type opens. This allows you to apply field-appropriate filters with a single click without opening the manual filter menu.
- a – Date / DateTime Fields Right-Click Menu:
Right-clicking a date cell opens pre-configured time period and comparison options:
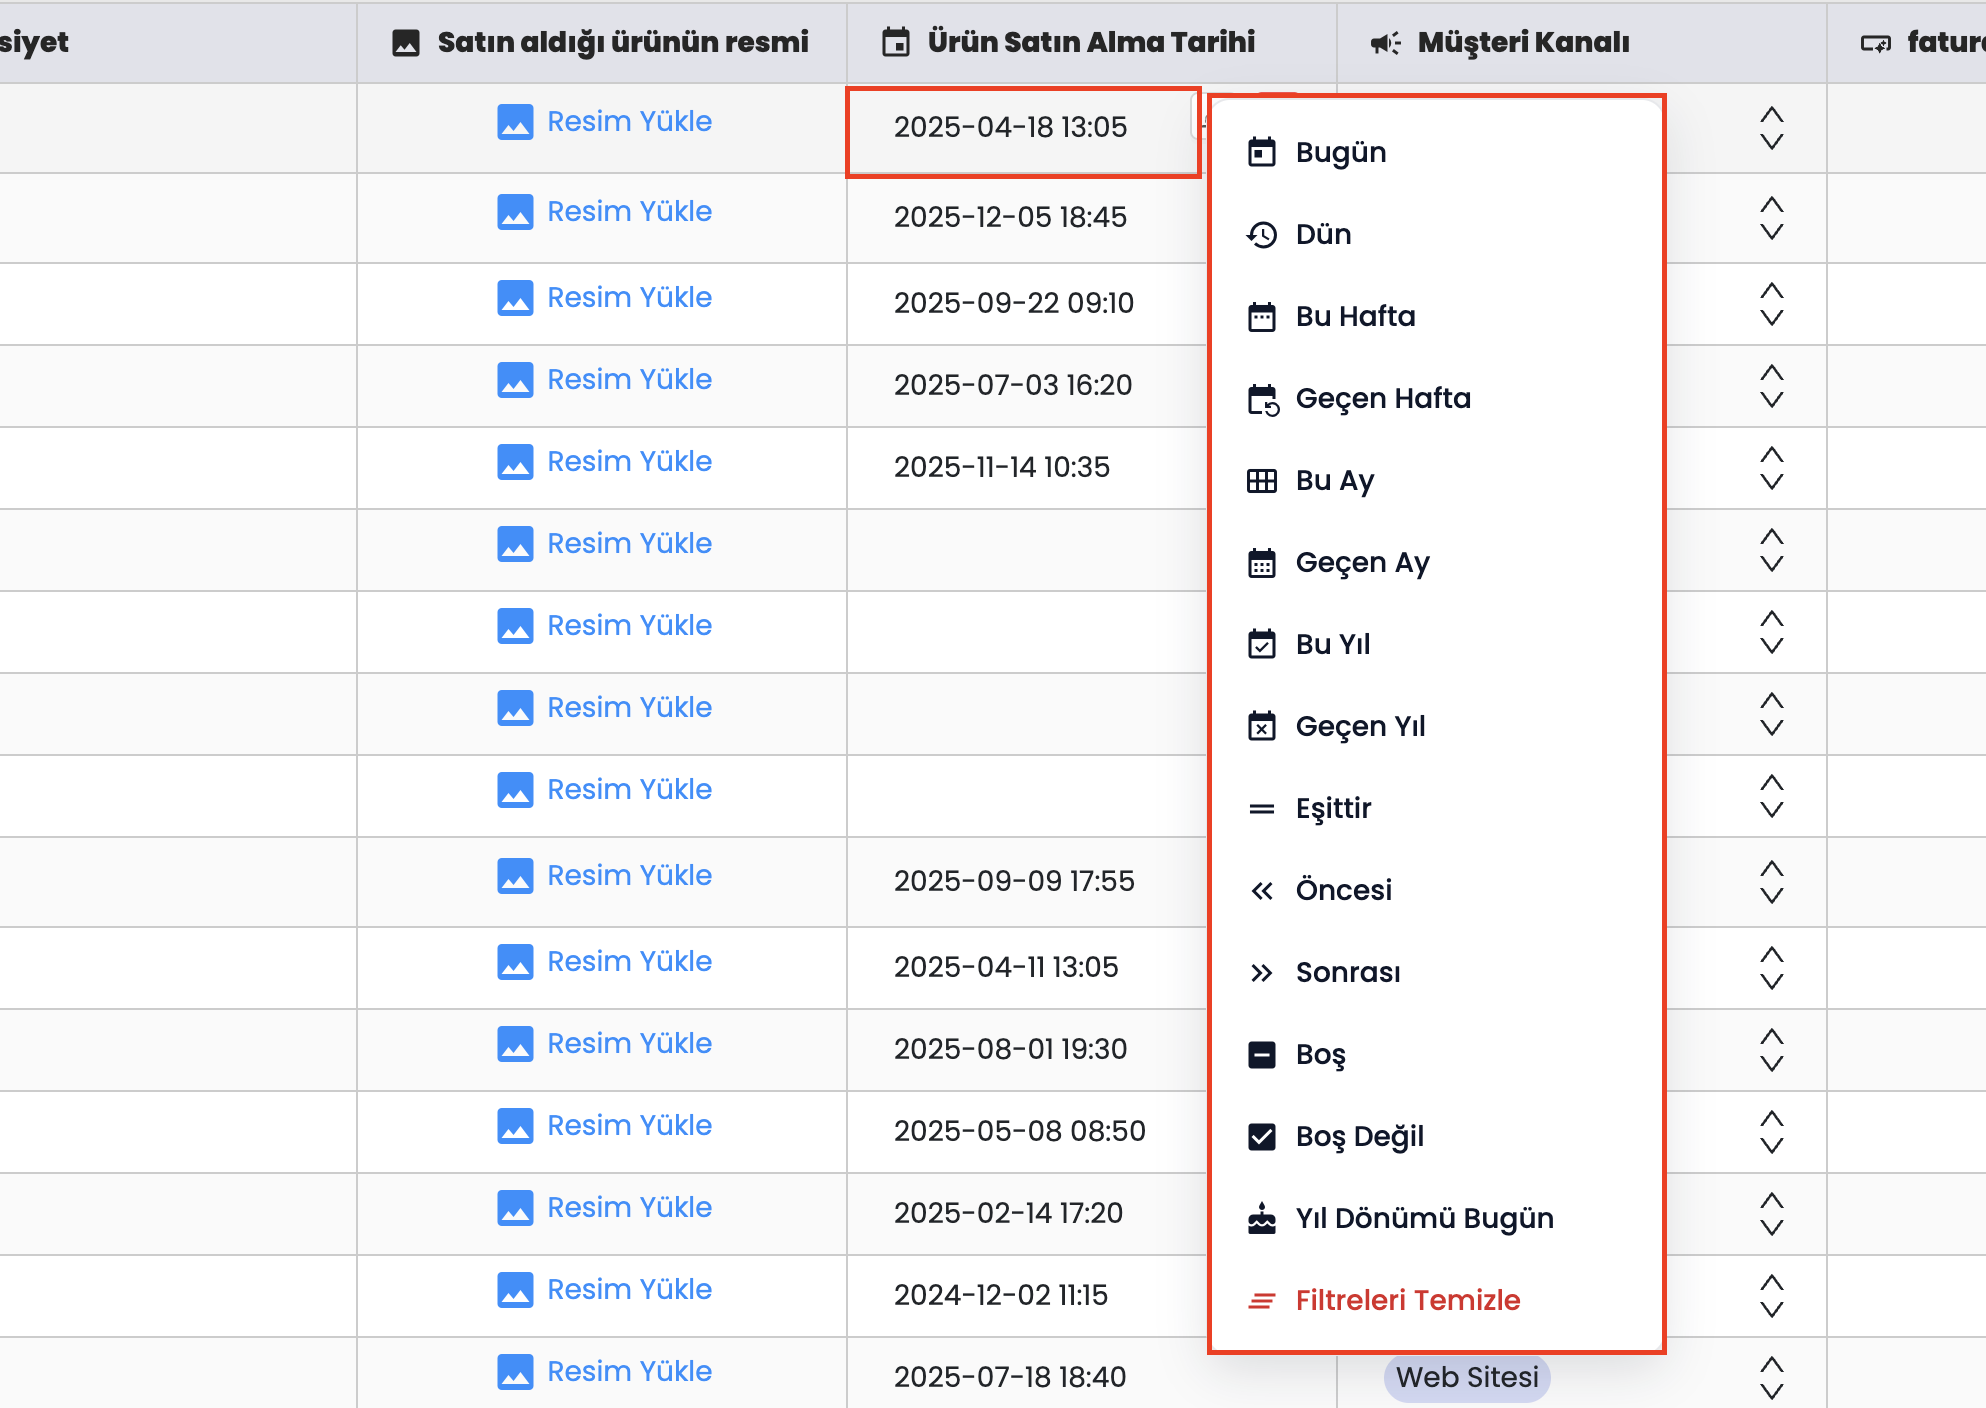
- Time Periods: Today, Yesterday, This Week, Last Week, This Month, Last Month, This Year, Last Year
- Comparison Operators: Equals, Before, After
- Status Check: Is Empty, Is Not Empty
- Special Recurring Filter: Anniversary Today (For birthday, policy, or subscription renewal tracking)
-
Reset: Clear Filters
-
b – Text, Dropdown, Select & Permission Fields Right-Click Menu:
Options opened when right-clicking text, gender, KVKK permission, or dropdown select cells:
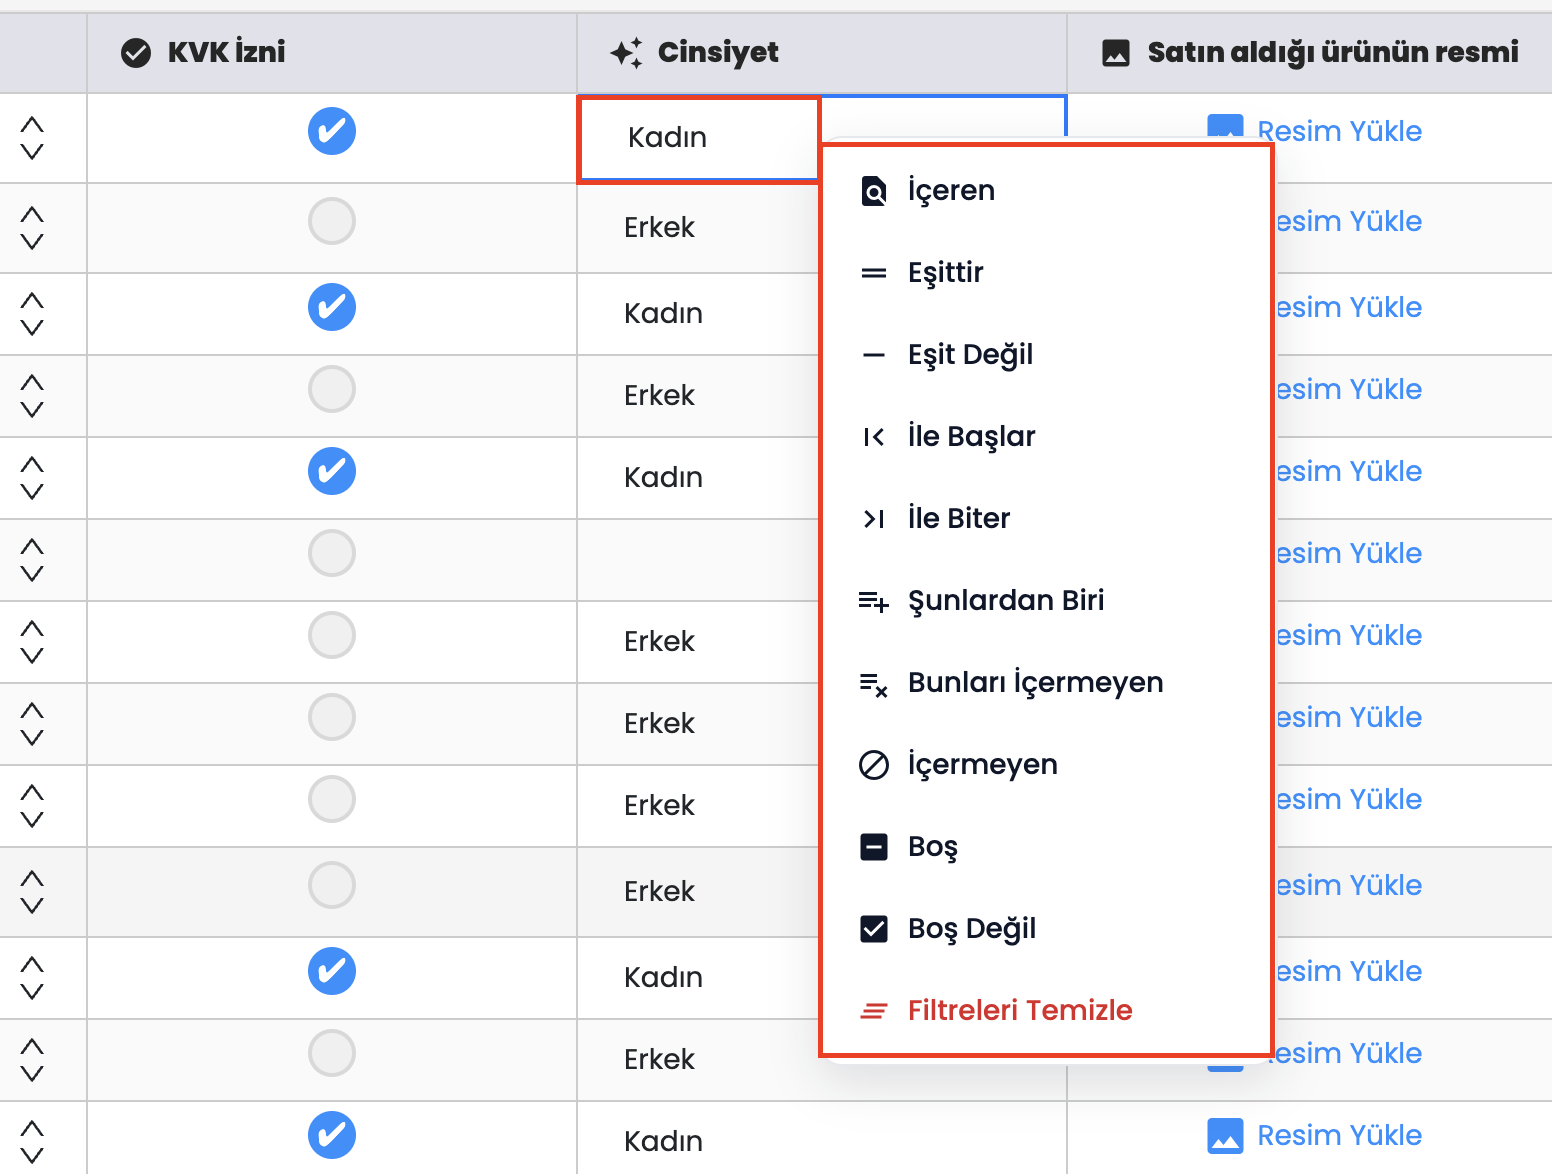
- Text Comparison: Contains, Equals, Not Equal, Starts With, Ends With
- Multi / Exclusion Filters: One Of, Does Not Contain Any Of, Does Not Contain
- Status Check: Is Empty, Is Not Empty
-
Reset: Clear Filters
-
c – Numeric Fields Right-Click Menu:
Options opened when right-clicking cells containing numbers, amounts, or quantities: - Numeric Comparison: Filter Greater Than (
>), Filter Less Than (<), Equals (=) - Status Check: Is Empty, Is Not Empty
- Reset: Clear Filters
3-) Hide Fields
Allows temporarily hiding columns in the table.
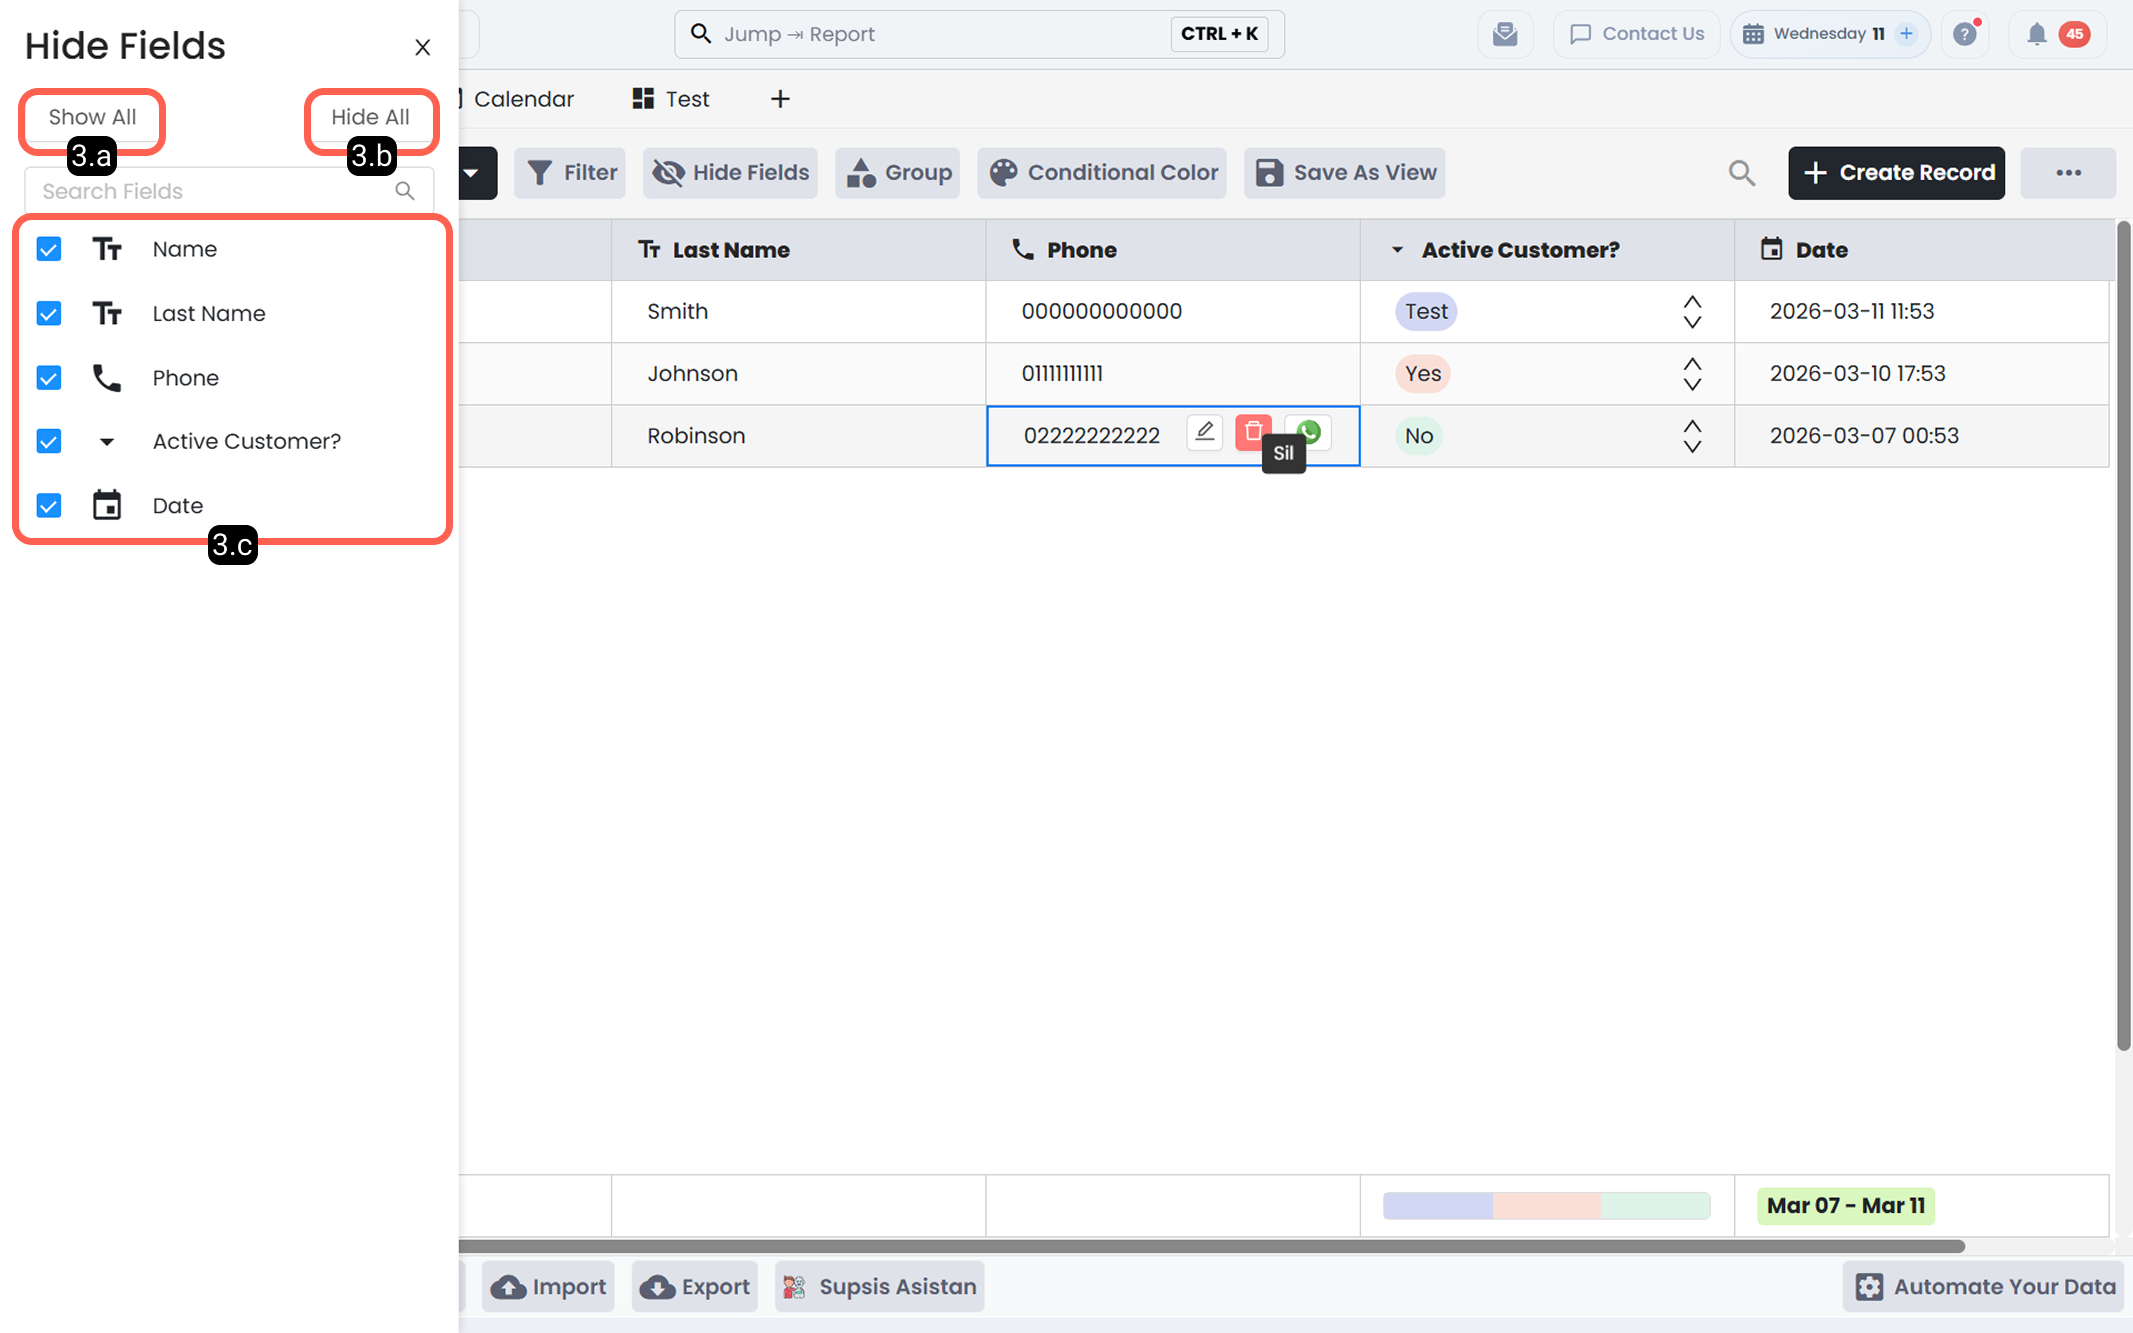
3.a – Show All
3.b – Hide All
3.c – Single Selection
4-) Group
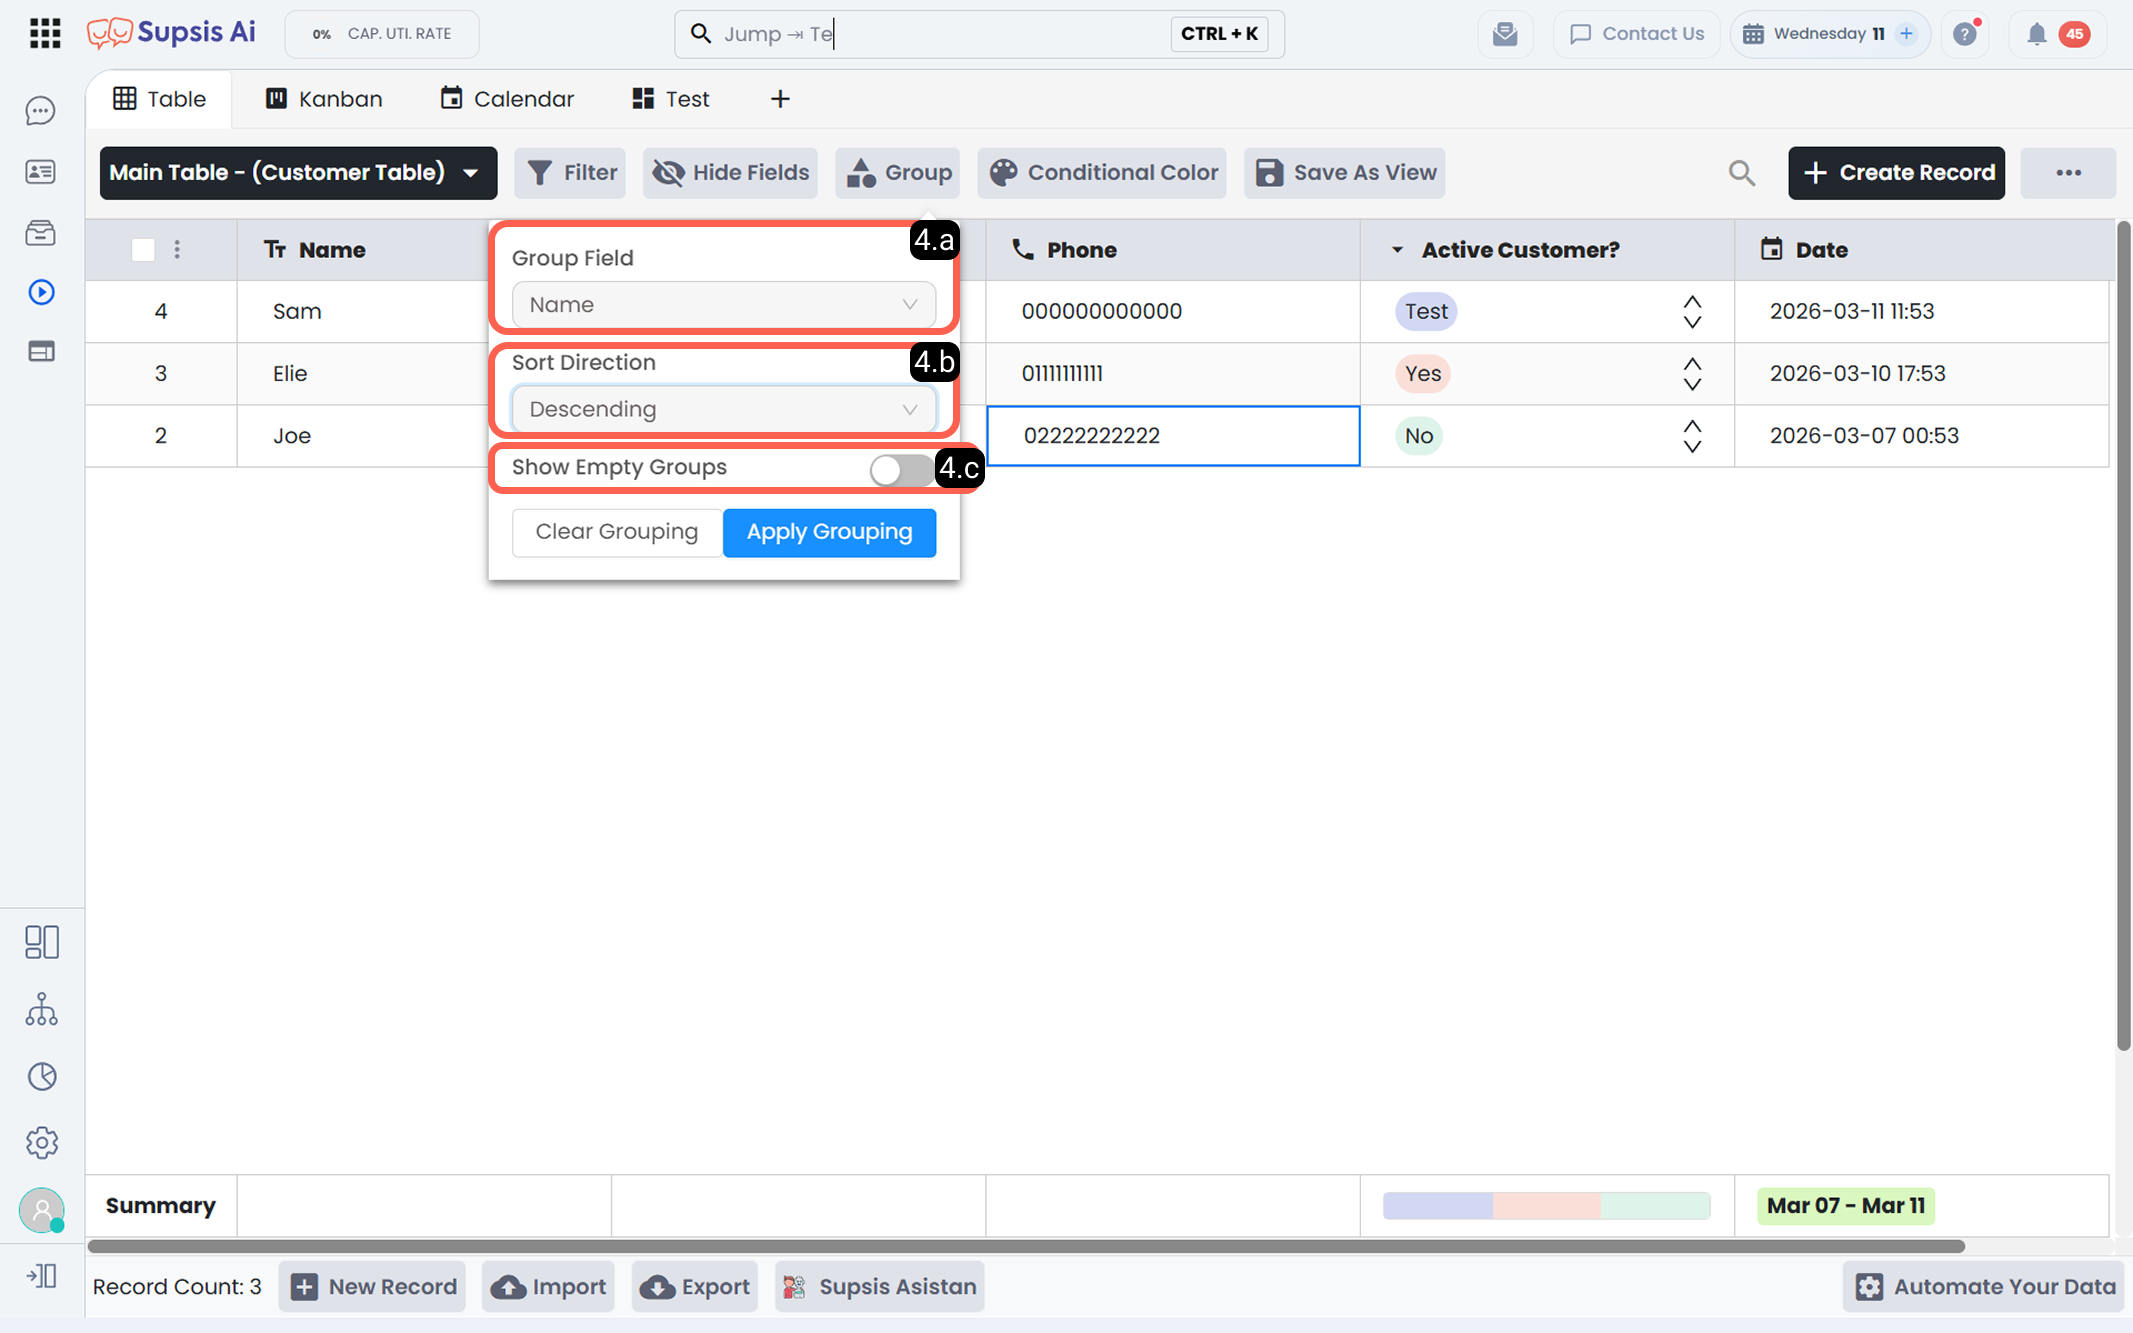
4.a – Group Field
4.b – Sort Direction
4.c – Show Empty Groups
5-) Conditional Color
Allows automatic color formatting based on defined rules.
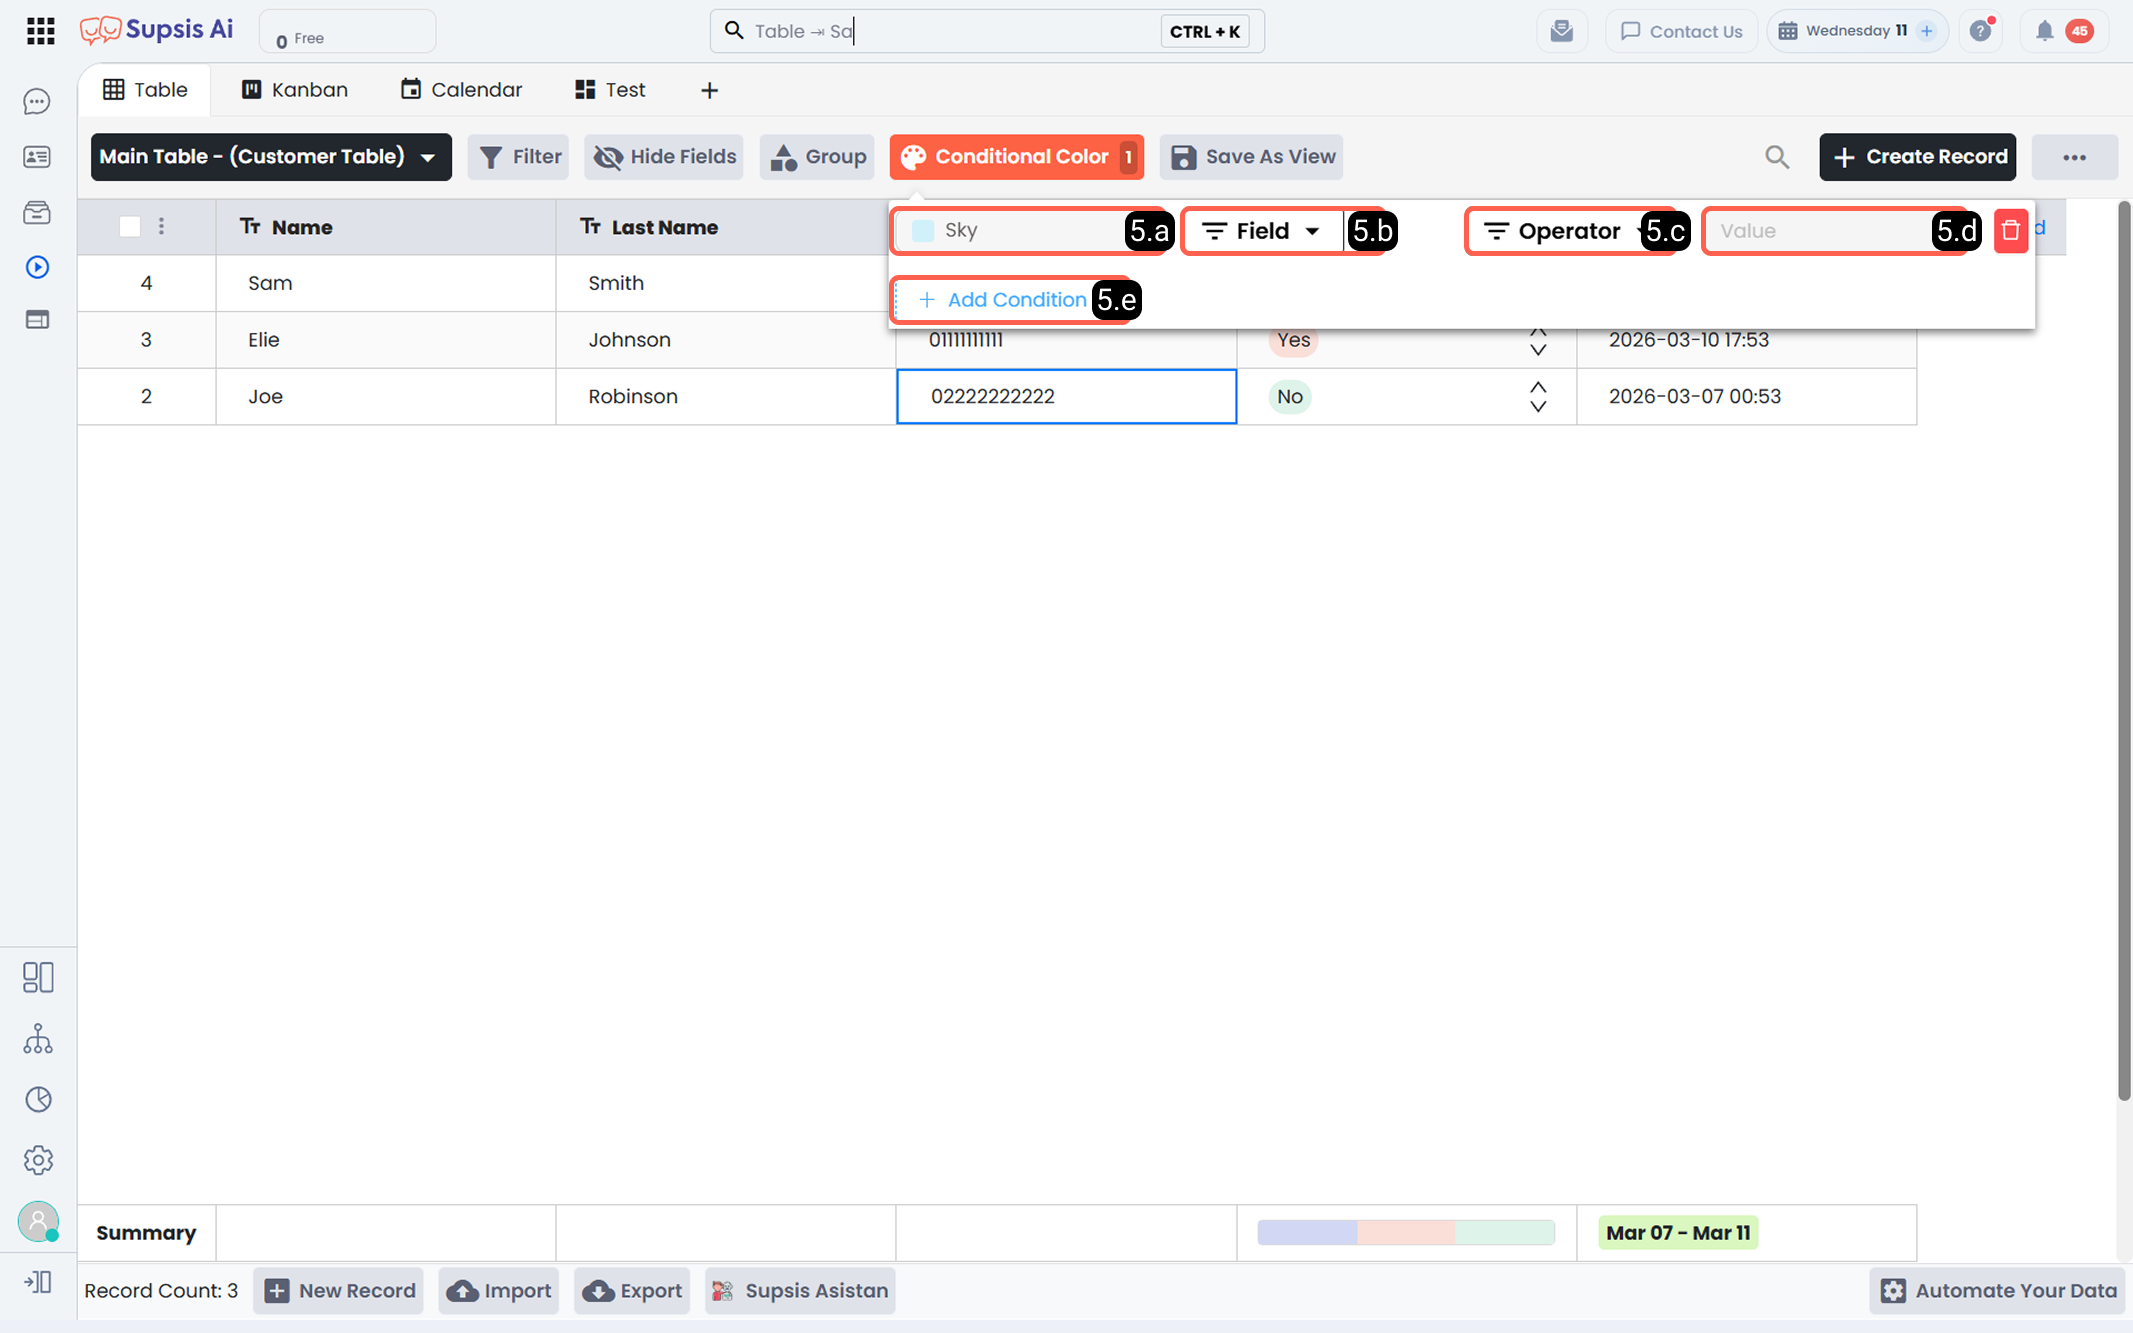
Operators are identical to filter operators.
5.a – Condition Color
5.b – Field Selection
5.c – Operator
5.d – Entered Value
5.e – Add Condition
6-) Save View
Saves all display settings including:
- Hidden/shown fields
- Filters
- Conditional colors
- View types
Saved views can be accessed from Saved Views.
3-) Search Bar
The Search Bar allows you to quickly search among records within the table. The entered search term is checked across all fields in the table, and all matching records are listed.
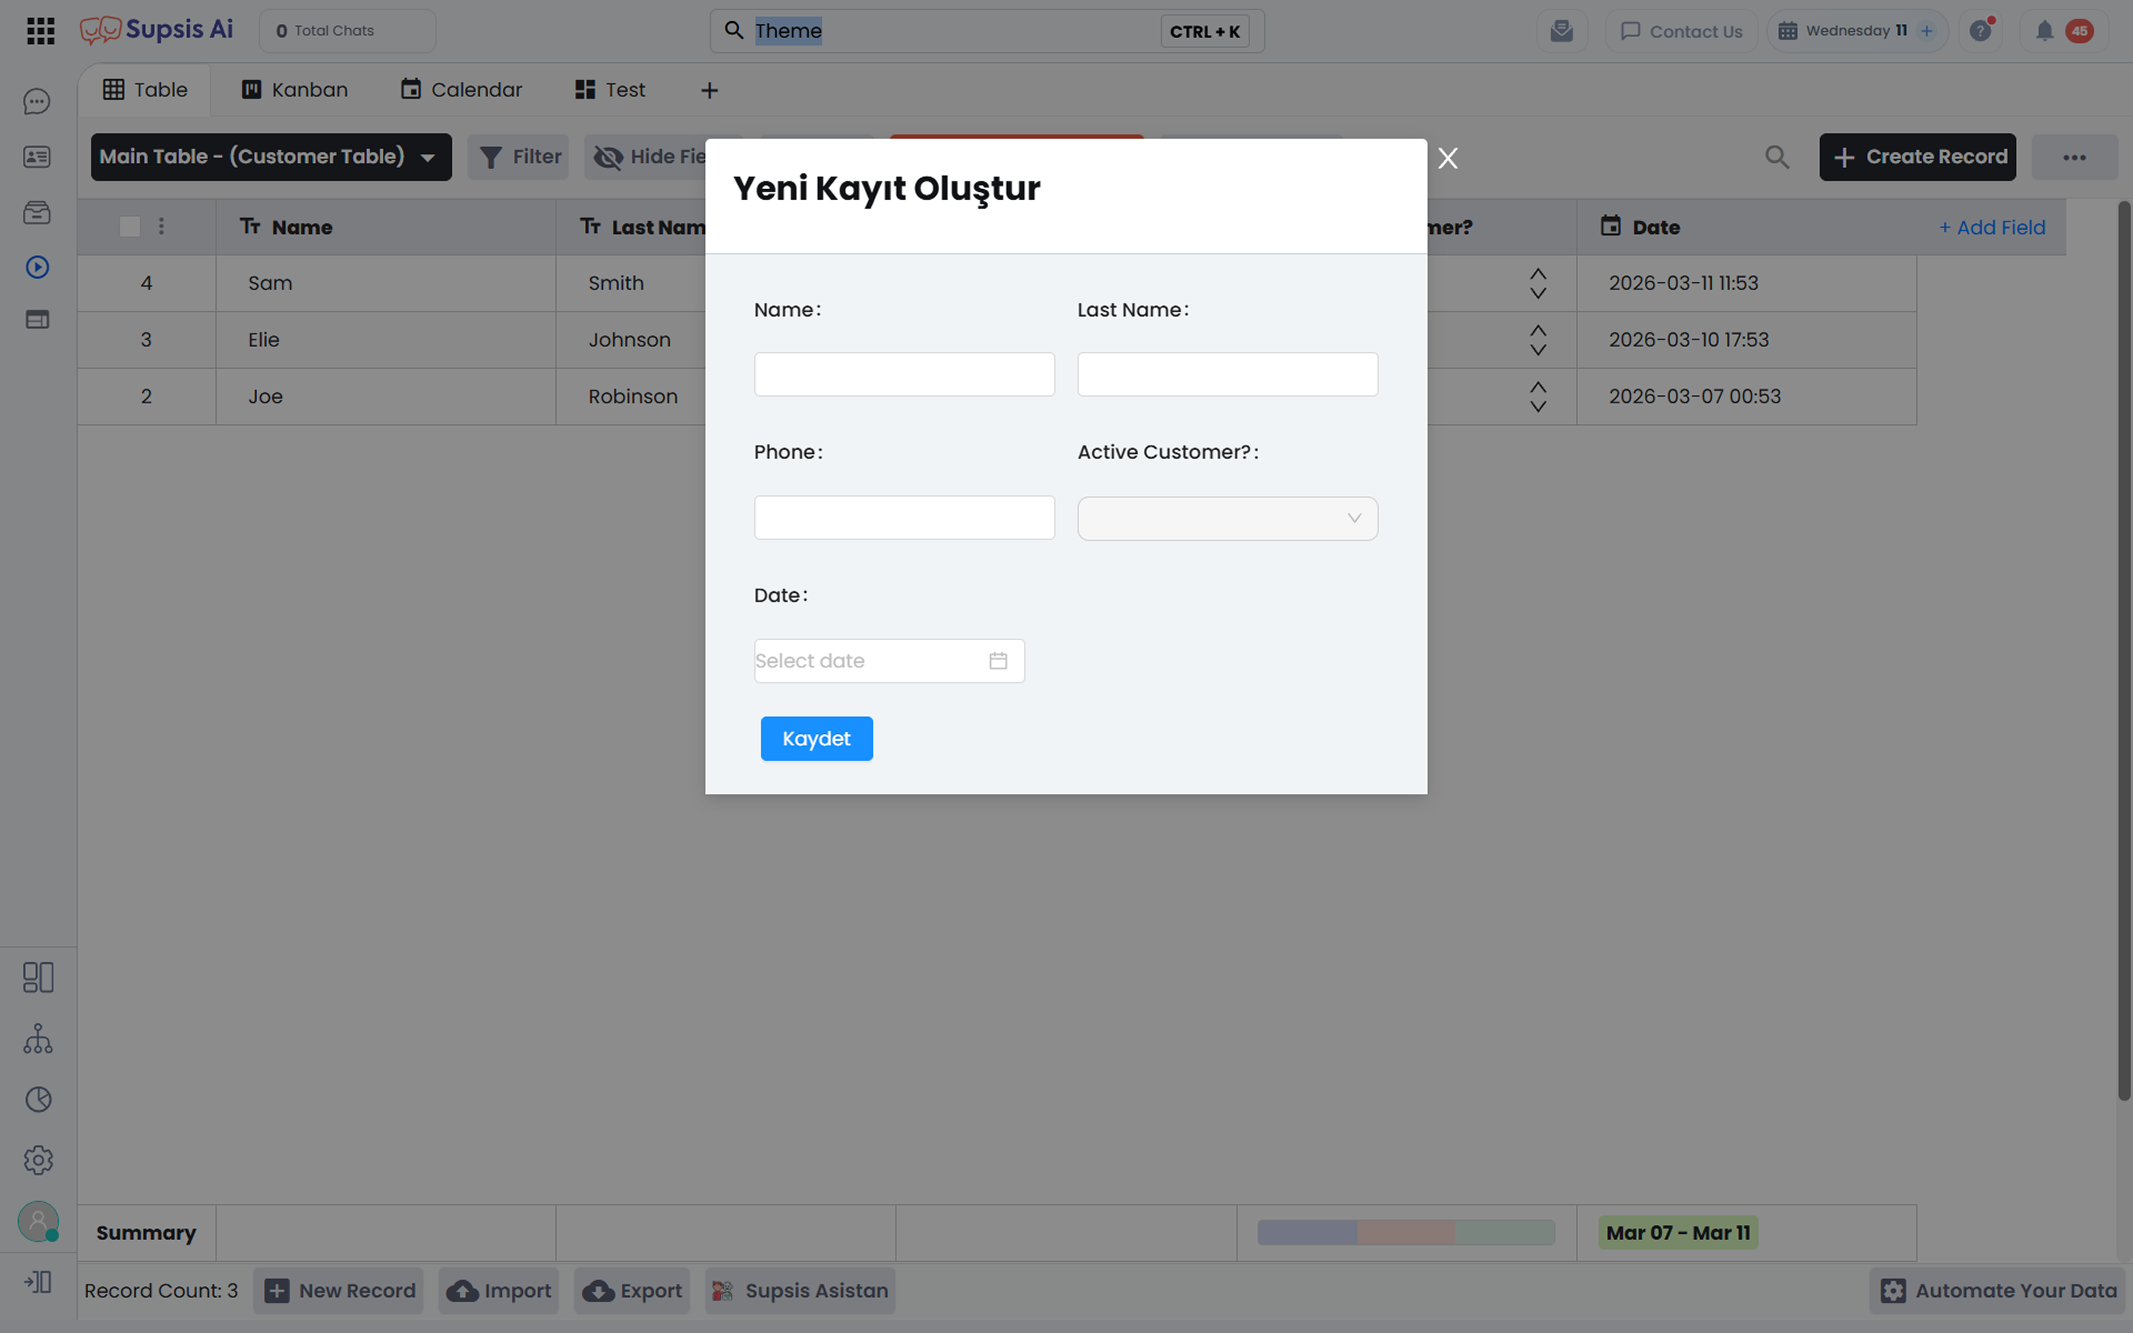
4-) Create Record
The Create Record section allows you to add a new manual record to the table. With this feature, users can directly enter the data they need into the table.
When this section is used:
- All columns in the table open as empty
- Each field is filled manually by the user
- Once saved, a new table record is created
The Create Record feature is used to quickly add individual or custom records without importing data from external sources.
5-) Additional Tools
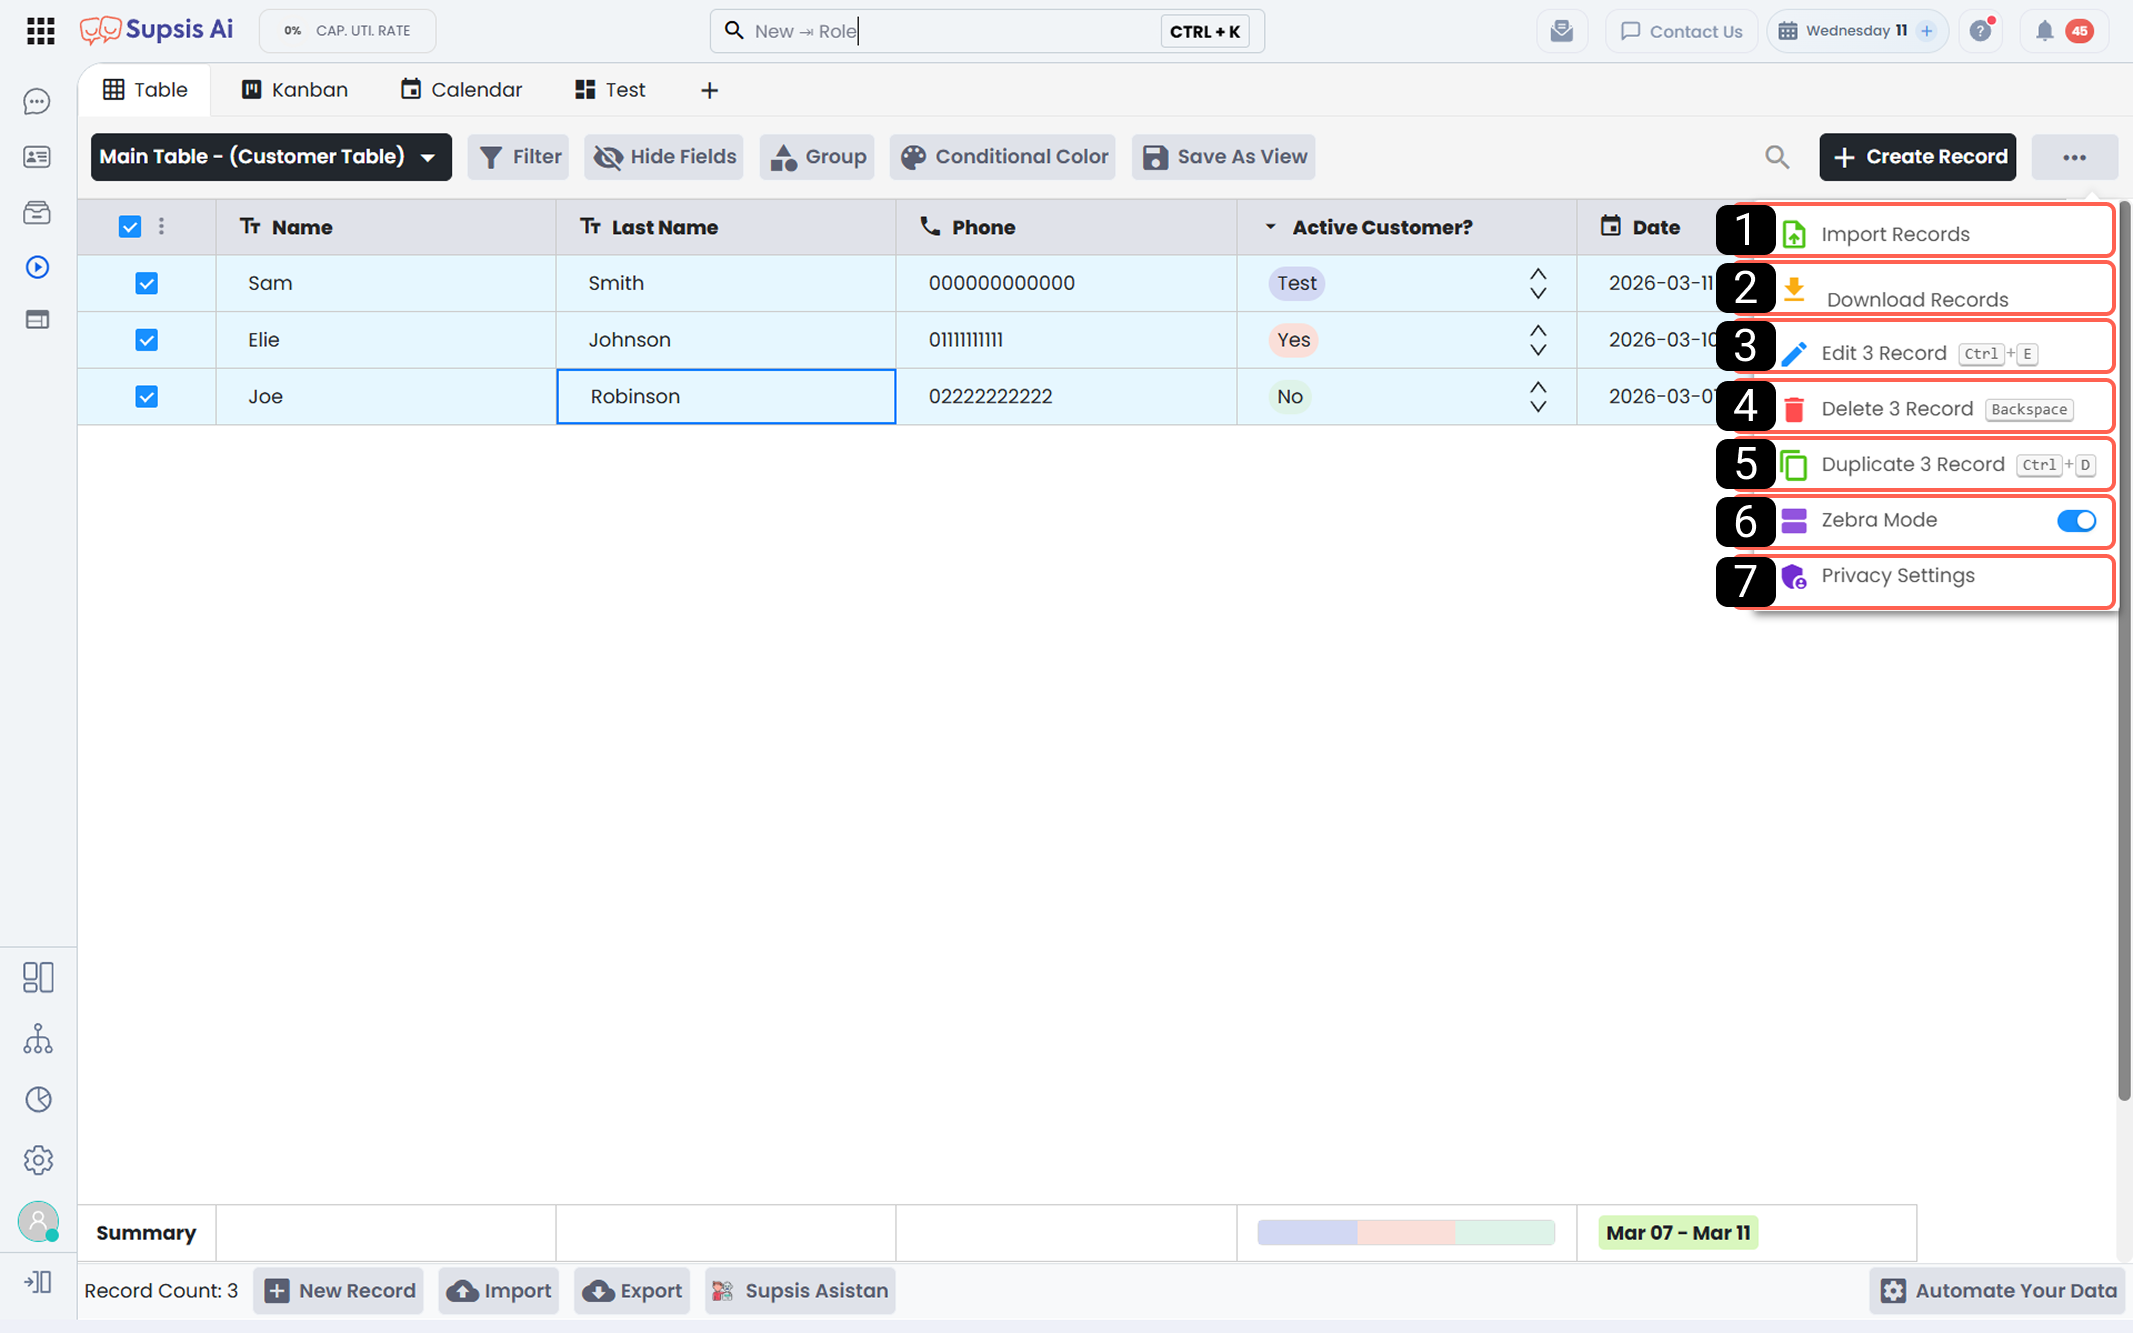
- Import Records
- Download Records
- Edit Selected Records
- Delete Selected Records
- Copy Selected Records
- Zebra Mode
- Privacy Settings
1-) Import Records
Allows you to add new data into the table from your existing documents. For more information, please refer to the Import documentation.
2-) Download Records
Allows you to download records. The download process can be performed through different options. For more information, please refer to the Export documentation.
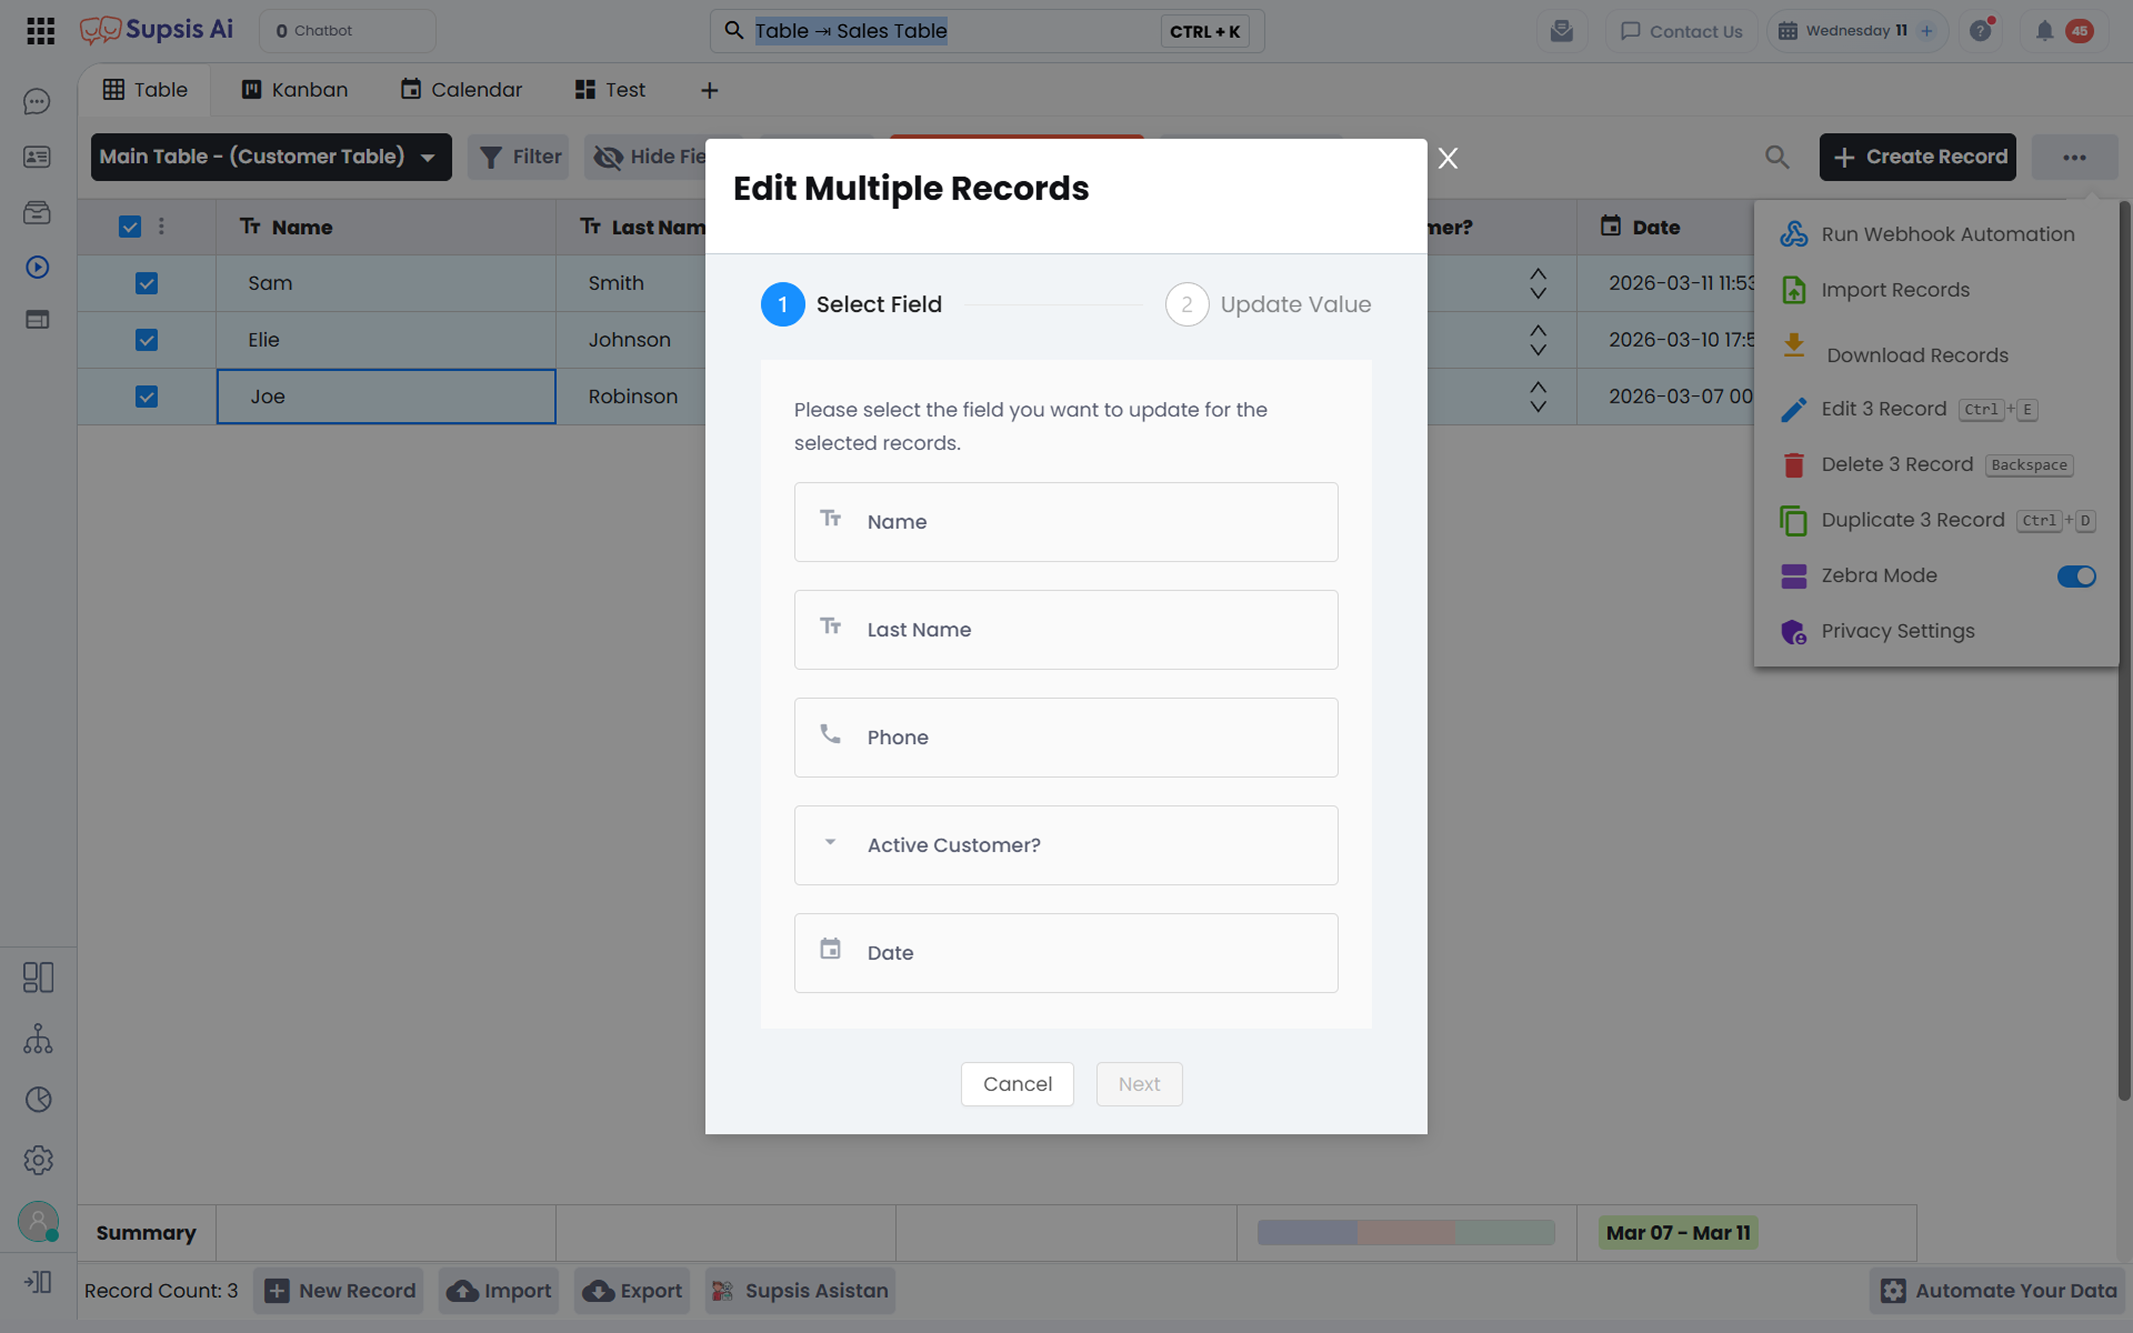
3-) Edit Selected Records
Allows bulk editing of selected records. The editing process is performed in two stages:
- Select the table field (column) to be edited
- Define the new value for that field
The change is then applied to all selected records at once.
4-) Delete Selected Records
Allows bulk deletion of selected records.
5-) Copy Selected Records
Creates exact duplicate copies of the selected records within the table.
6-) Zebra Mode
Allows you to enable Zebra Mode for the table view. When activated, each row is displayed alternately in darker and lighter shades to improve readability.
7-) Privacy Settings
This section allows you to configure the visibility and user-based permissions of the table content.
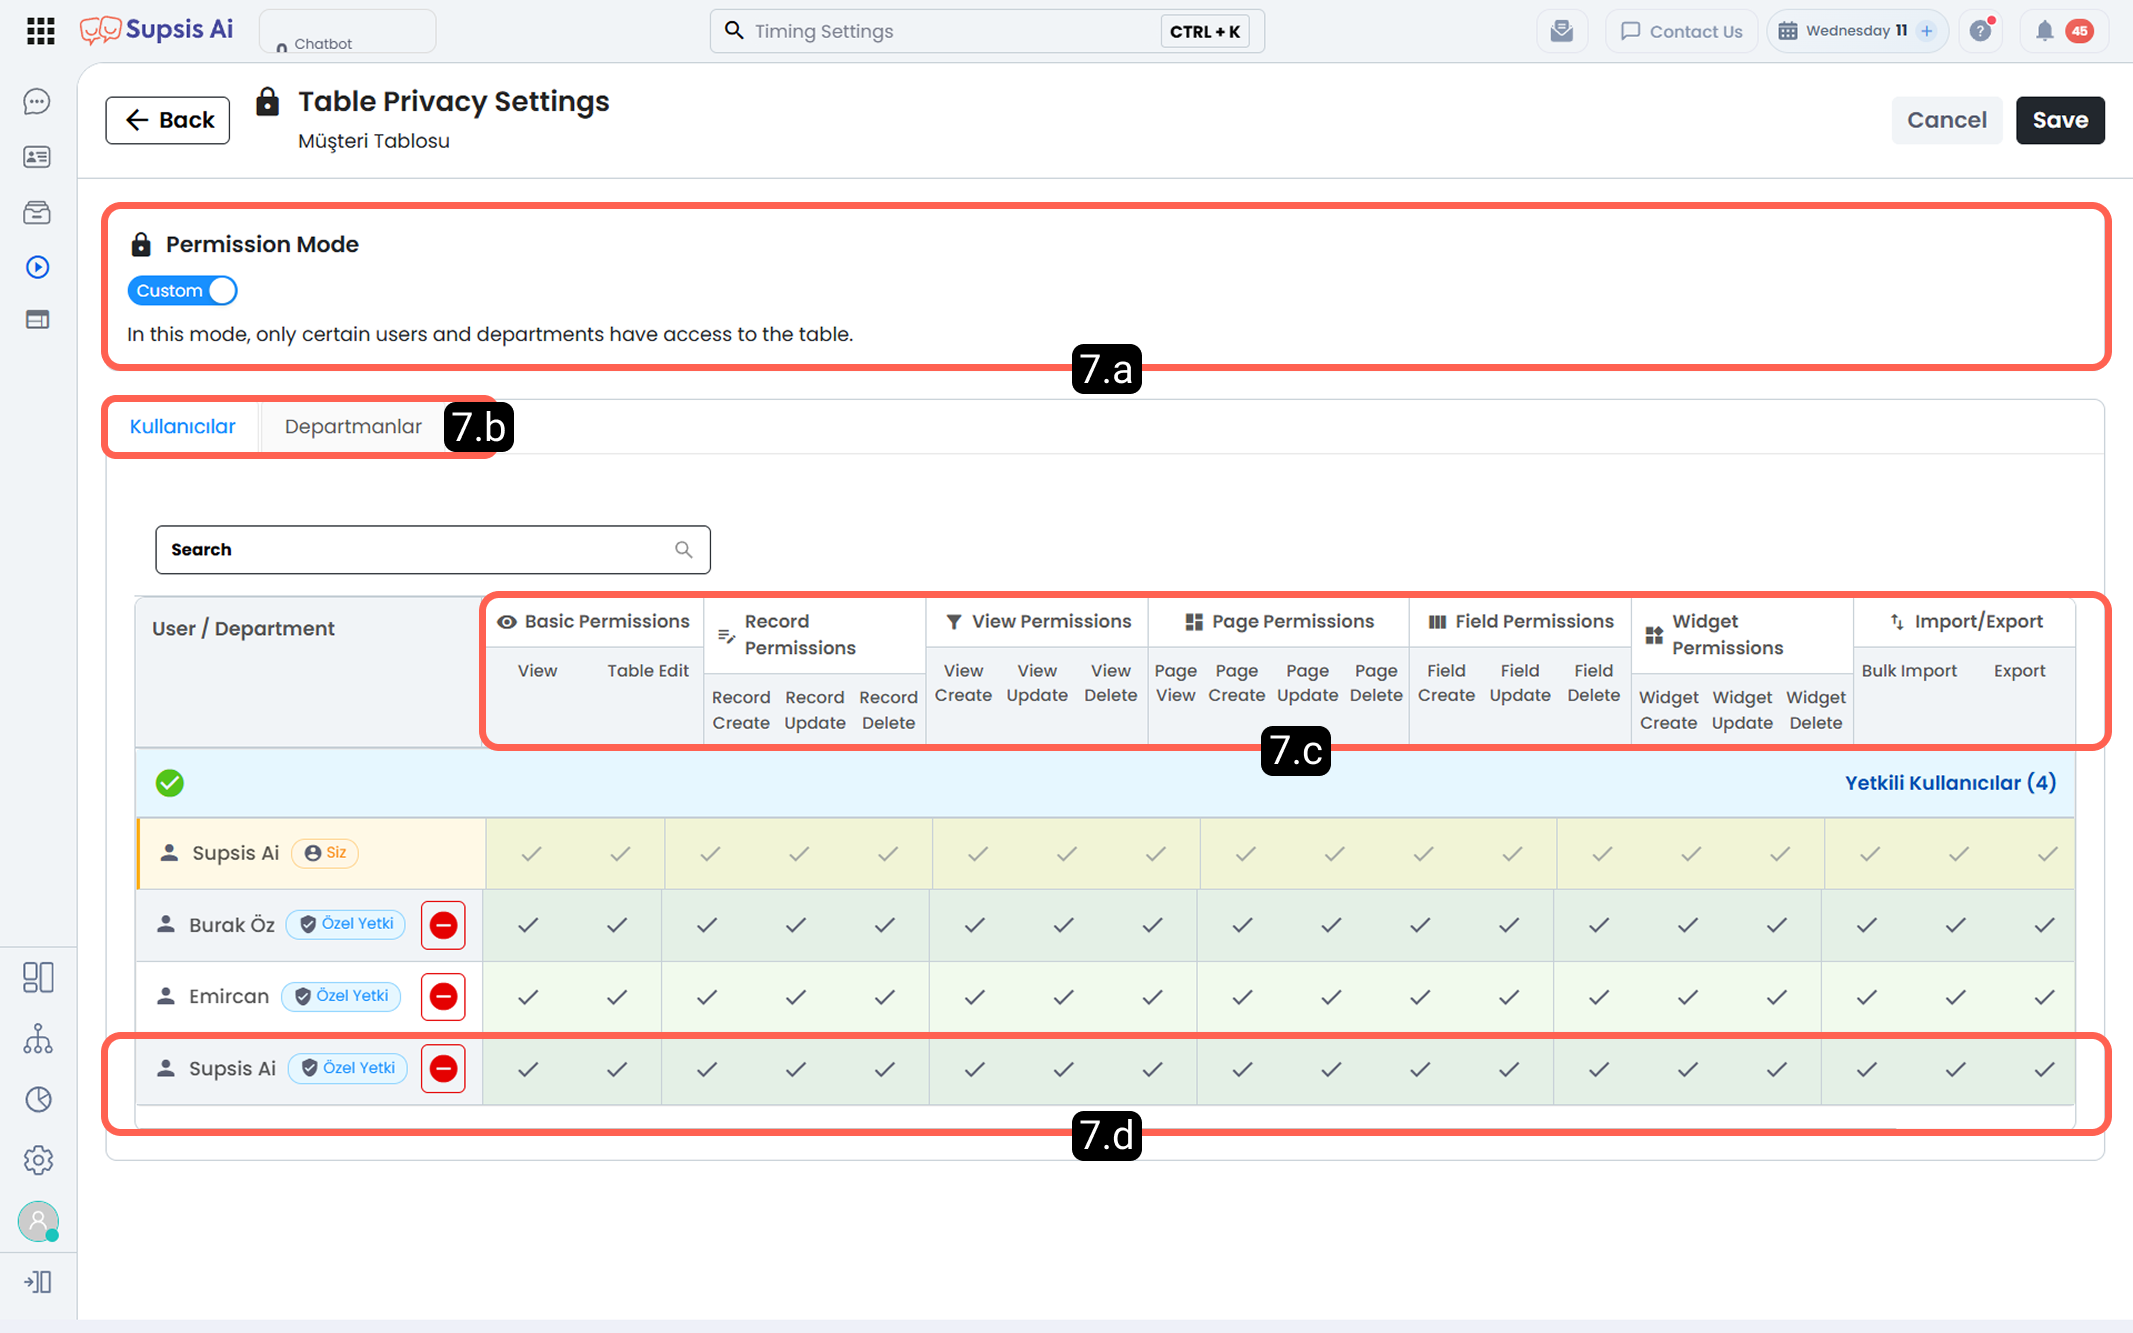
7.a – Authorization Mode:
You can set the authorization mode to Public or Private.
- If set to Public, all users have unlimited access to the table view and permissions.
- If set to Private, visibility and permissions are fully active for everyone by default, and specific permissions must be manually disabled per user or department.
7.b – Department/User-Based Configuration:
You can configure permissions on a department basis or user basis. Customizations are made from this section.
7.c – Permission Details:
By hovering over permission icons in the column header, you can view a preview of the permission details. This section displays detailed information about the relevant permission.
7.d – Permission Editing:
Permissions must be configured using the checkboxes in this section. Activating or deactivating a checkbox adjusts the selected user’s permissions accordingly.
6-) Field Tools
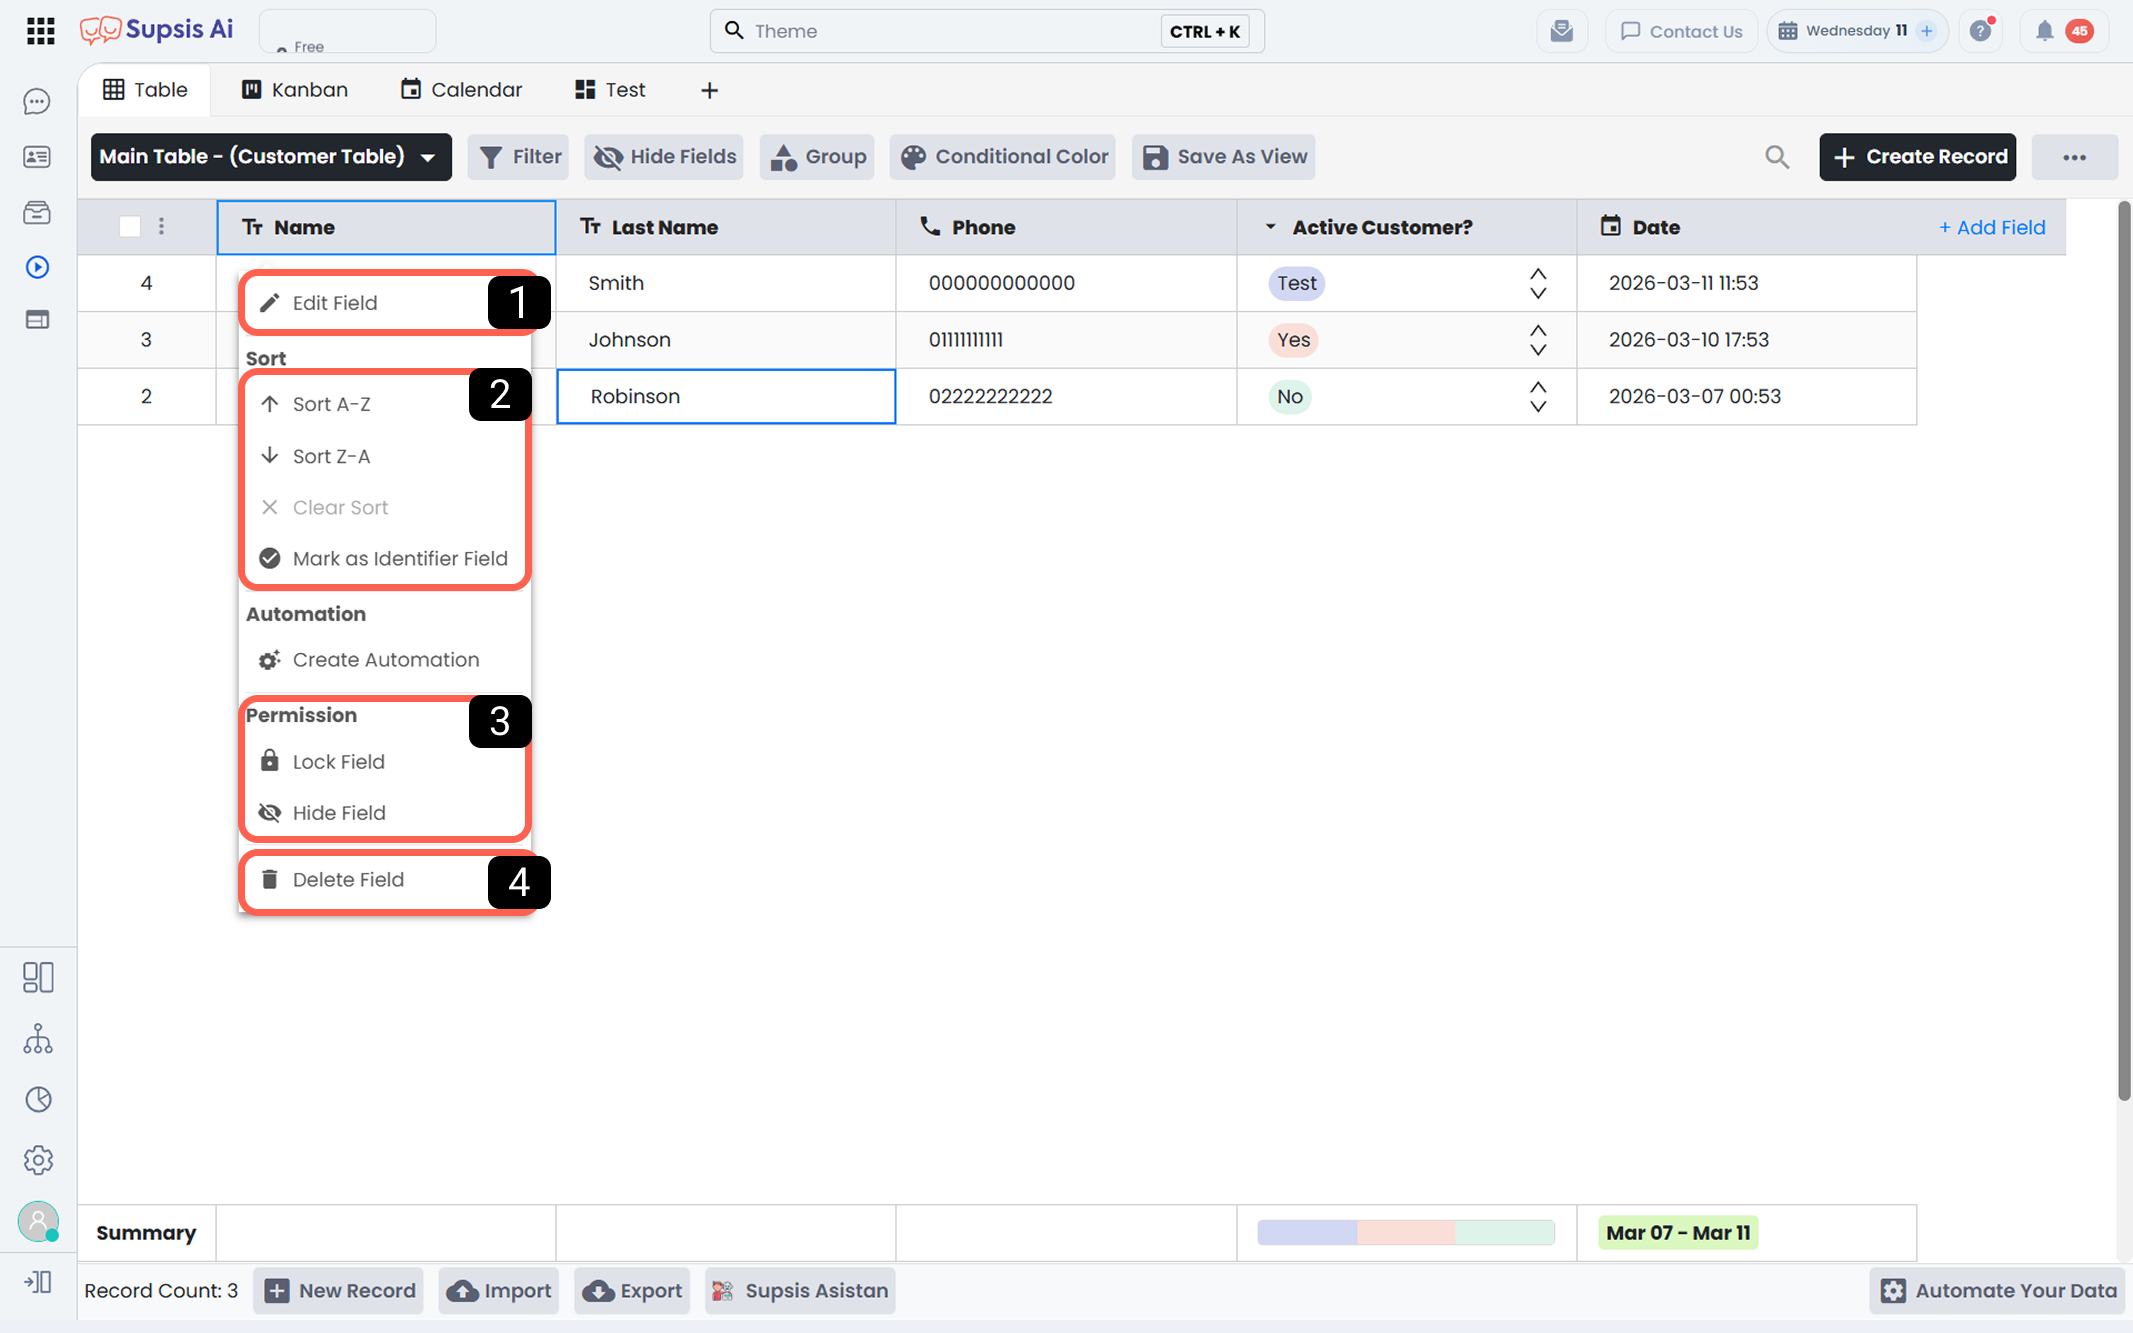
1-) Edit Field
Allows editing the field content. Using this tool, you can modify:
- Field icon
- Field name
- Field type
- Alignment
- Default value
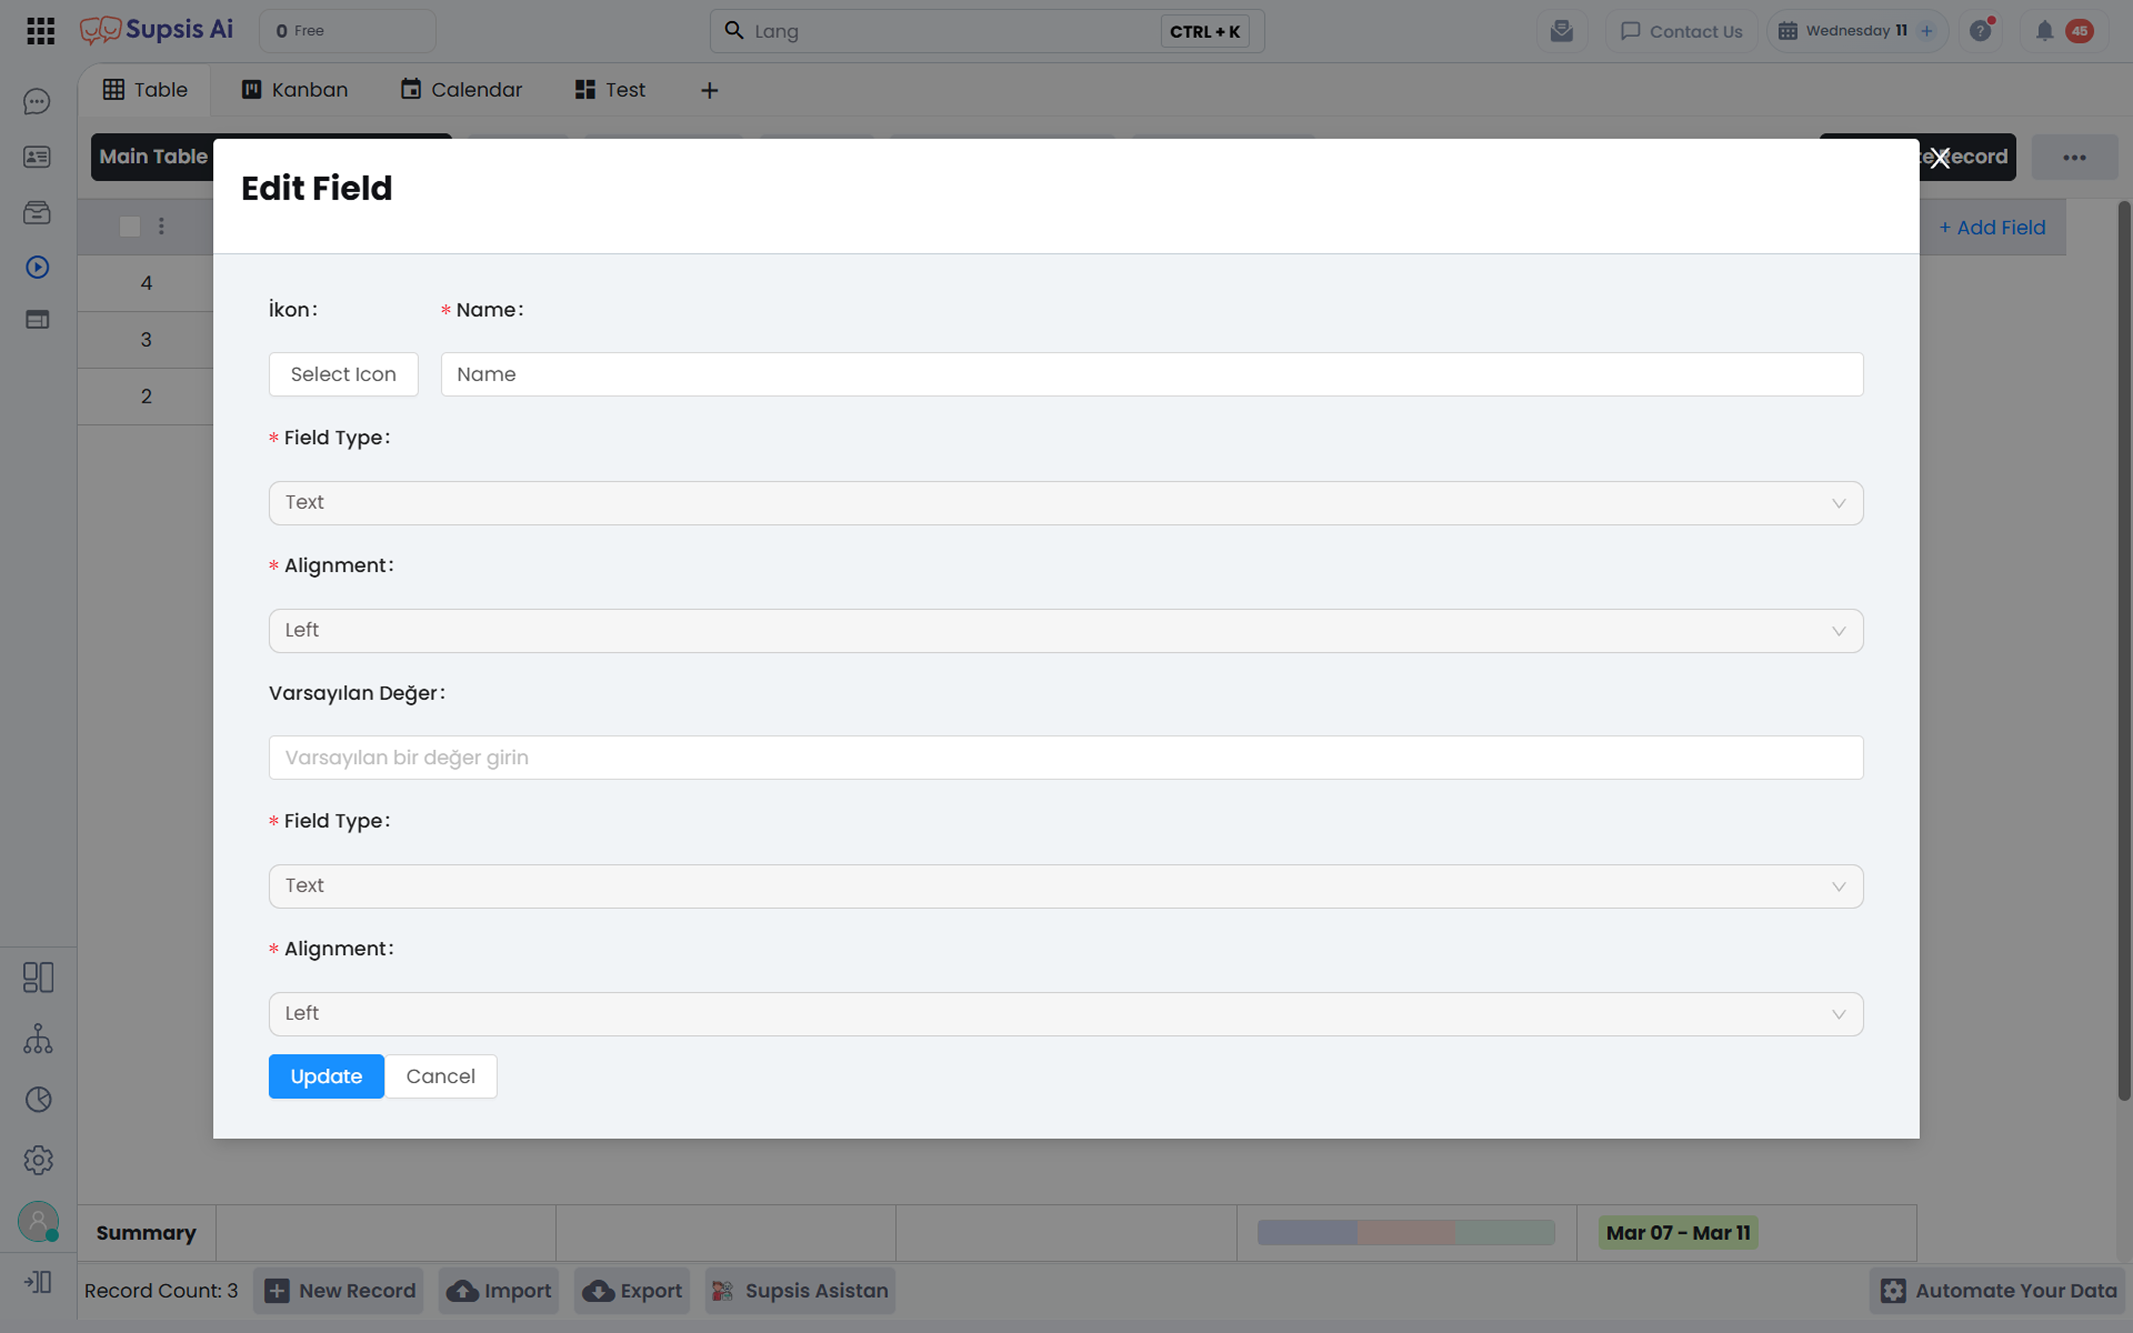
2-) Sorting Tools
This section allows sorting table data based on the content of the selected field.
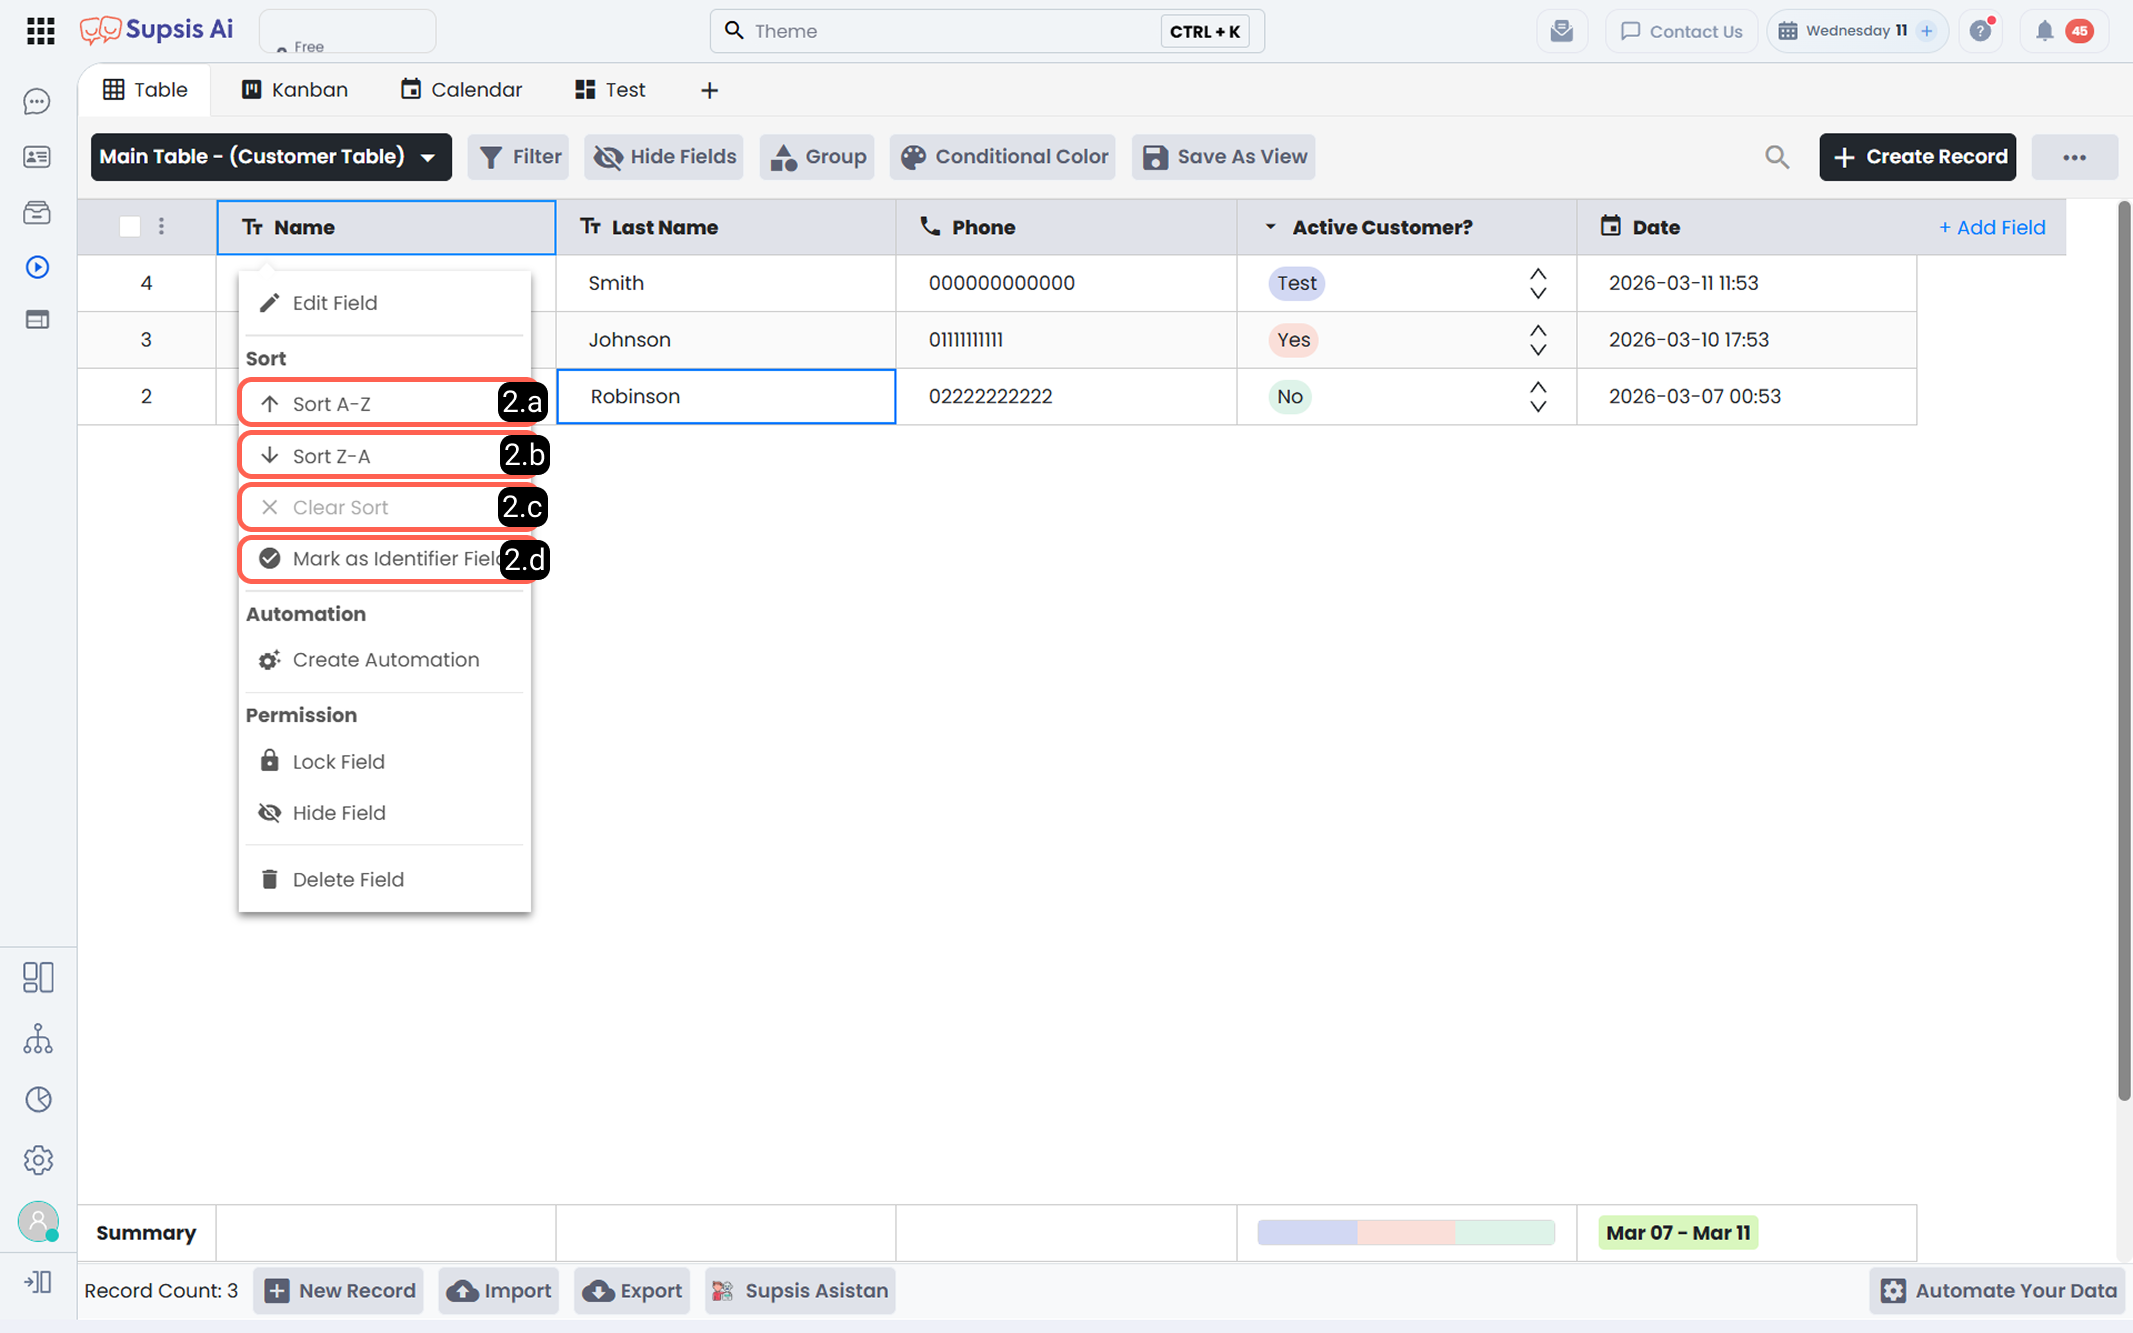
2.a – Sort A-Z:
Sorts data alphabetically from smallest to largest (A-Z).
2.b – Sort Z-A:
Sorts data alphabetically from largest to smallest (Z-A).
2.c – Remove Sorting:
Cancels any active sorting.
2.d – Mark as Identifier Field:
Marks the selected field as an identifier field. This ensures records are uniquely identified.
3-) Permissions
Field-level permission settings can be configured here.
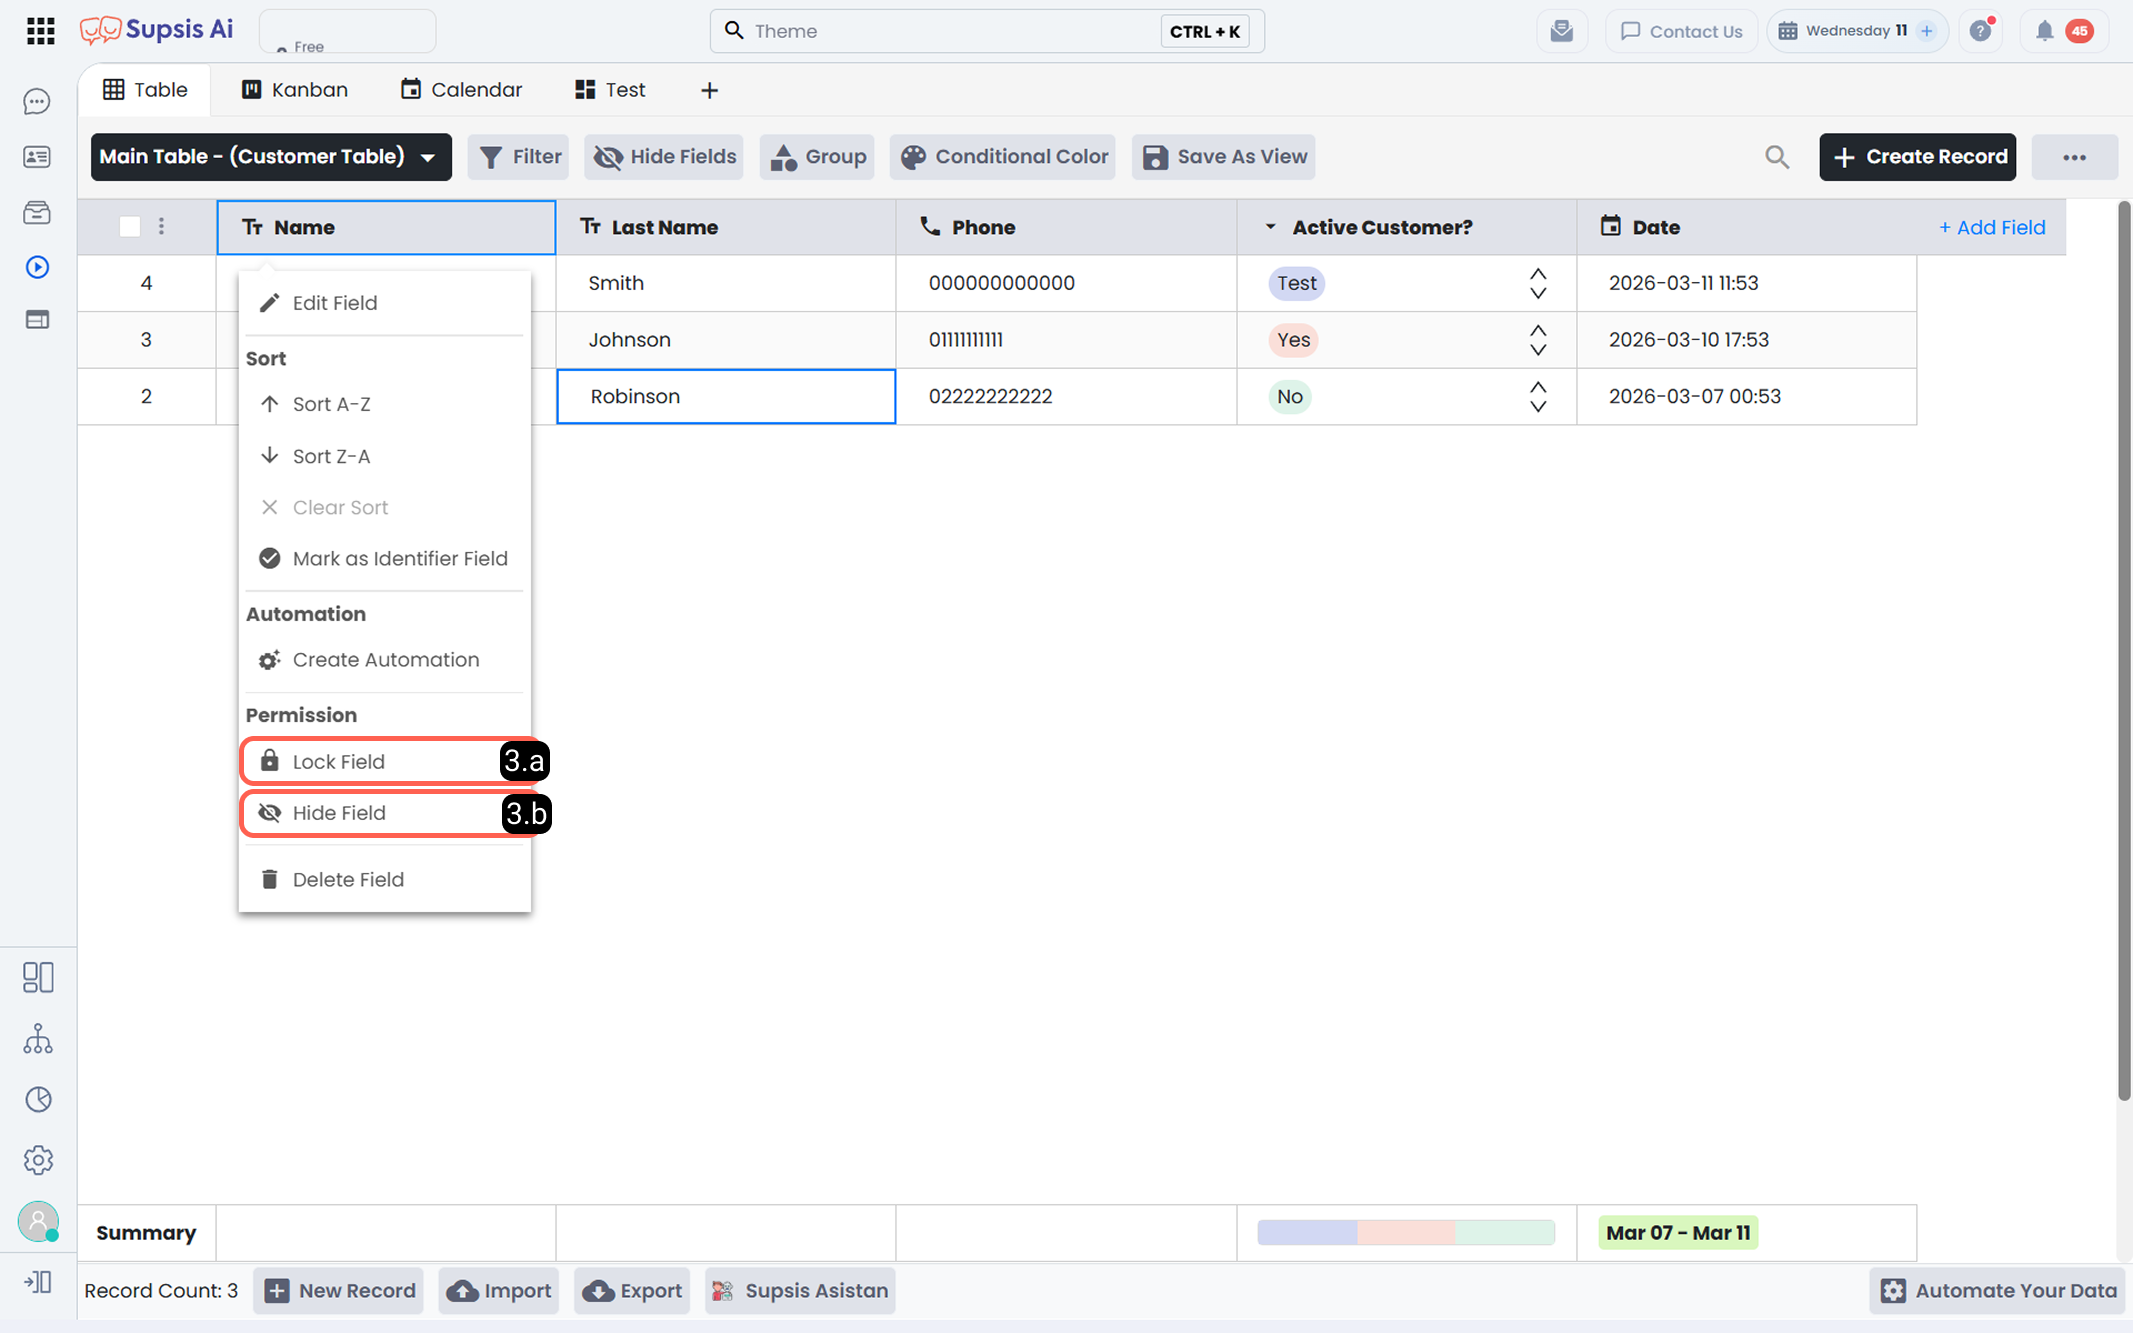
3.a – Lock Field:
Adds a lock to prevent modifications. Once locked, none of the field’s cells can be edited.
3.b – Hide Field:
Hides the field from the table until visibility is restored.
4-) Delete Field
Deletes the field and all data within that field.
7-) Add Field
Adding a field allows you to add a new column to the table. By adding fields, you can customize your table according to your data needs.
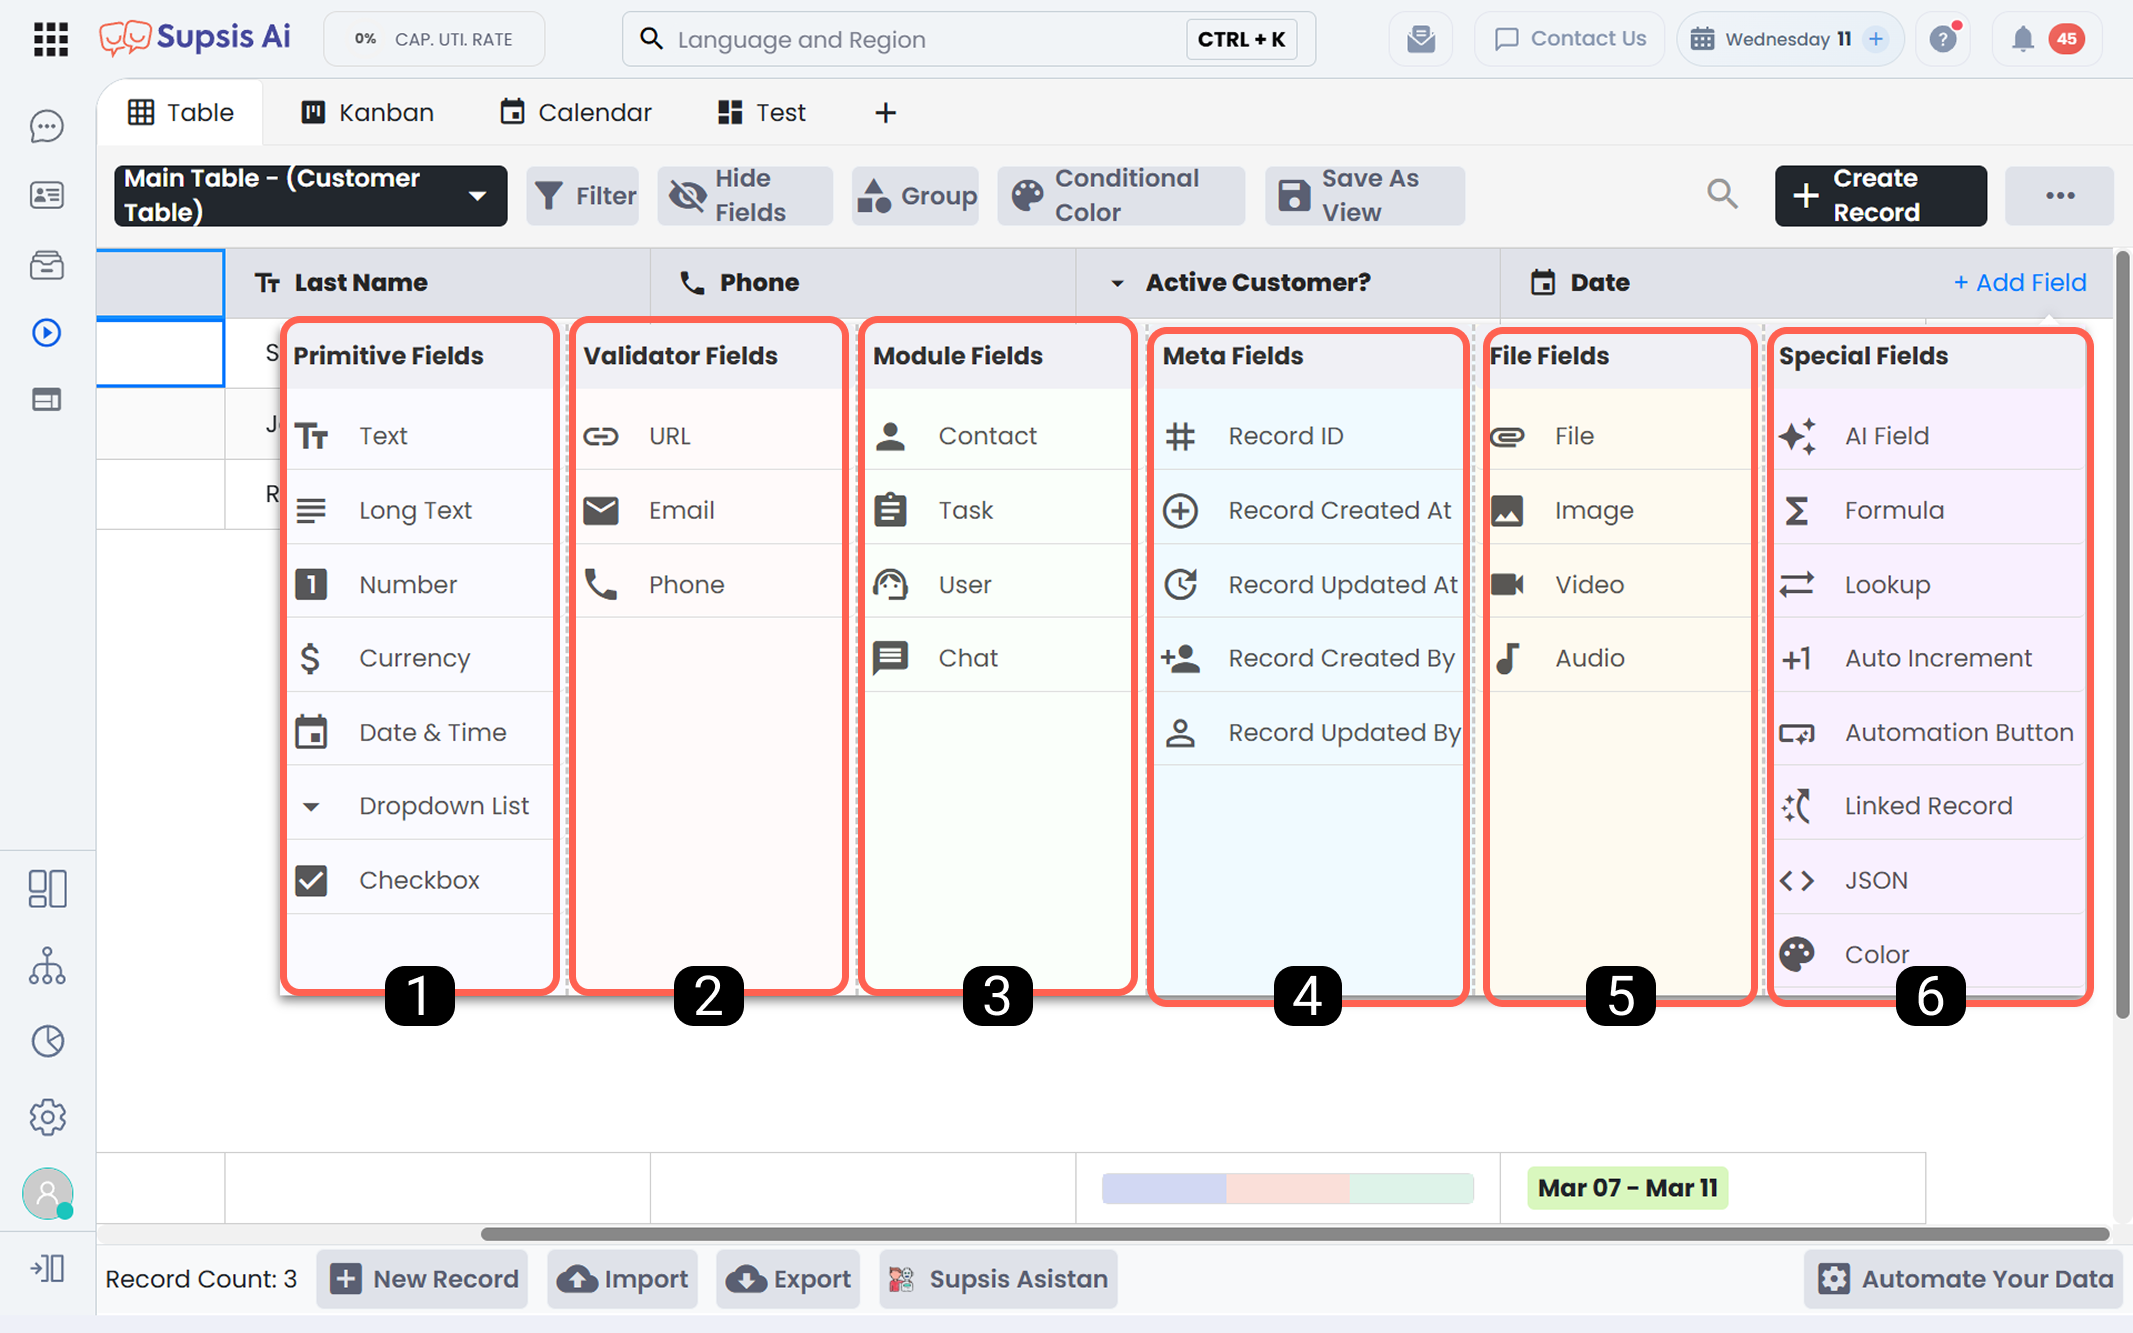
- Basic Fields
- Authentication Fields
- Module-Integrated Fields
- Meta Fields
- File Fields
- Custom Fields
1-) Basic Fields
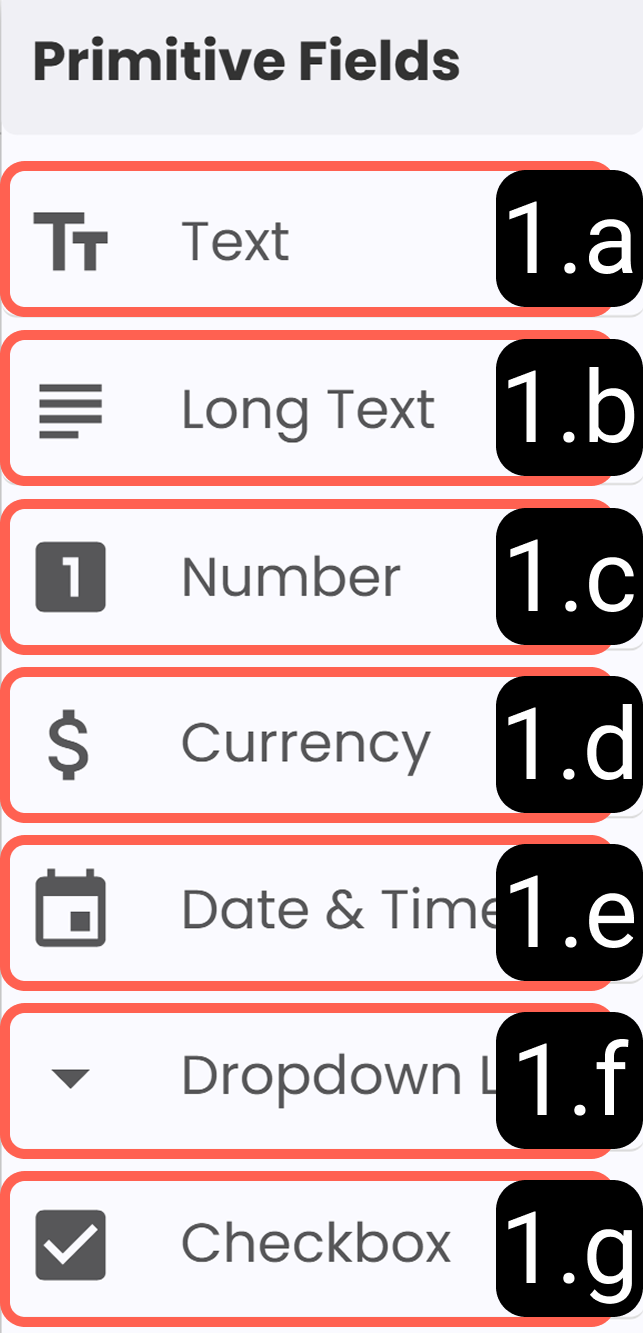
1.a – Text: Used for short text input (e.g., name, title).
1.b – Long Text: Used for long text, descriptions, and notes. Multiple paragraphs allowed.
1.c – Number: Used for numeric values. Can be used in filters and calculations.
1.d – Currency: Used for monetary values. Automatically formatted as currency.
1.e – Date & Time: Used to store date and time. Selection via calendar.
1.f – Dropdown: Used to select from predefined options. Suitable for categories or status.
1.g – Checkbox: Used for Yes/No information.
2-) Authentication Fields
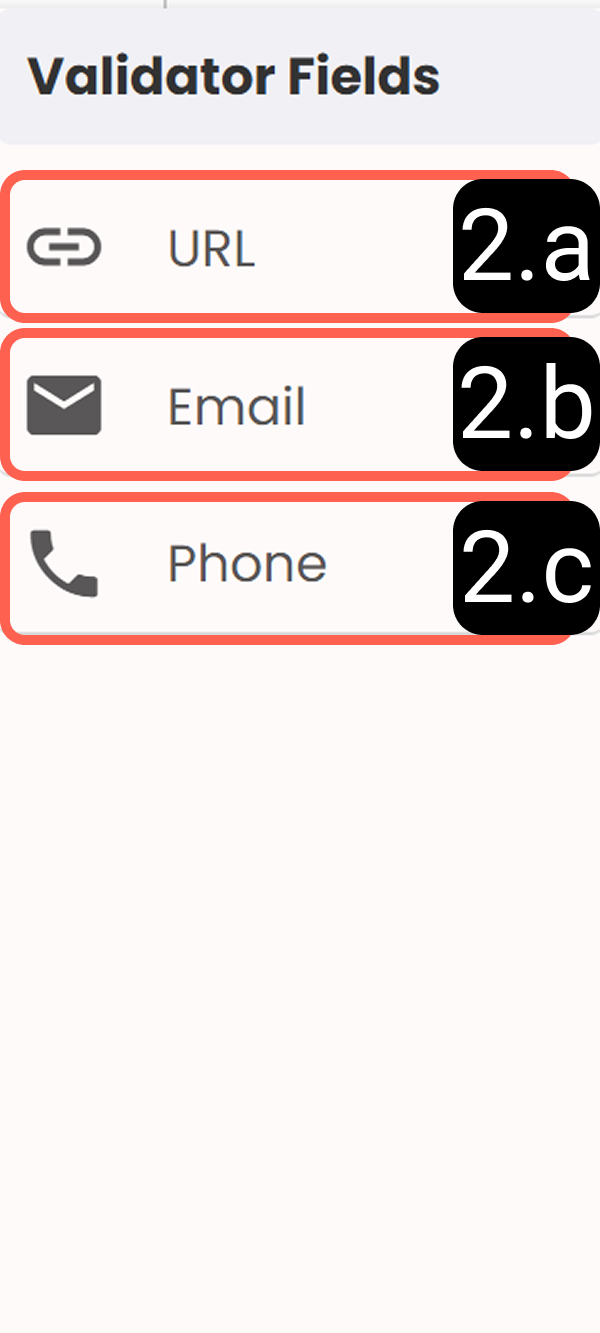
2.a – URL: Used for web addresses. Automatically validates valid URLs.
2.b – Email: Used to store email addresses. Automatically validates format.
2.c – Phone: Used for phone numbers. Validates and formats automatically.
3-) Module-Integrated Fields
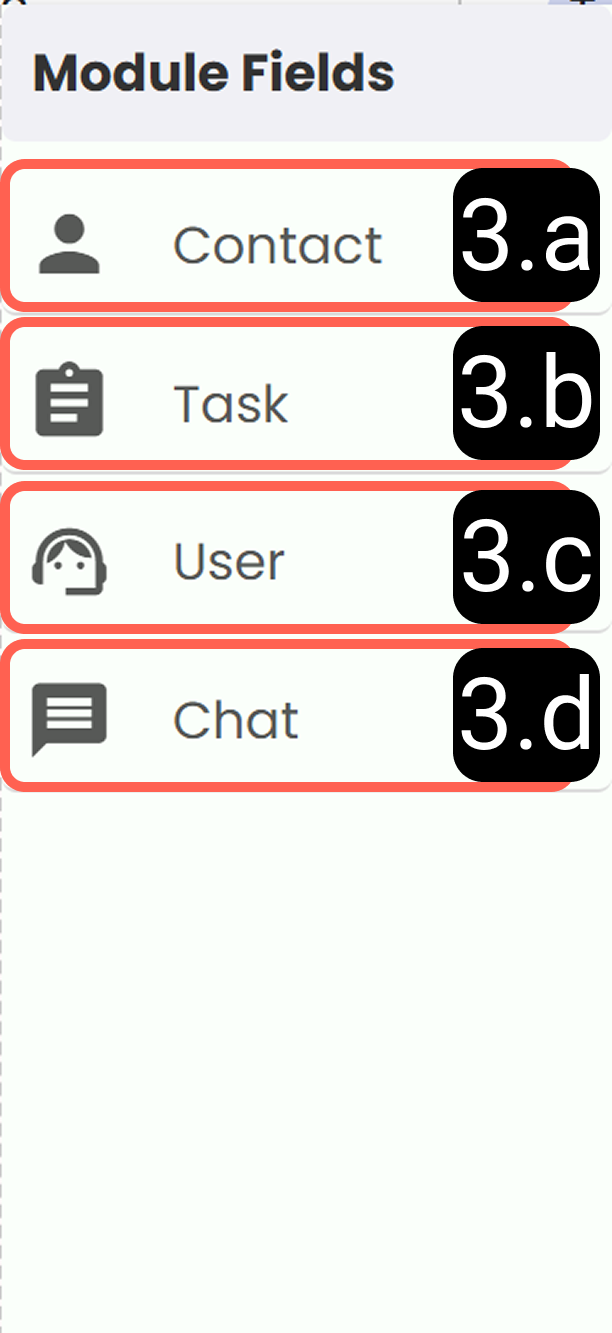
3.a – Person:
Used to associate with the "Person" module. You can select one of the existing persons in the system.
3.b – Task:
Used to associate with the "Task" module. You can select one of the existing tasks in the system.
3.c – User:
Used to associate with the "User" module. You can select one of the existing users in the system.
3.d – Chat (Conversation):
Used to associate with the "Chat/Conversation" module. You can select one of the existing conversations in the system.
4-) Meta Fields
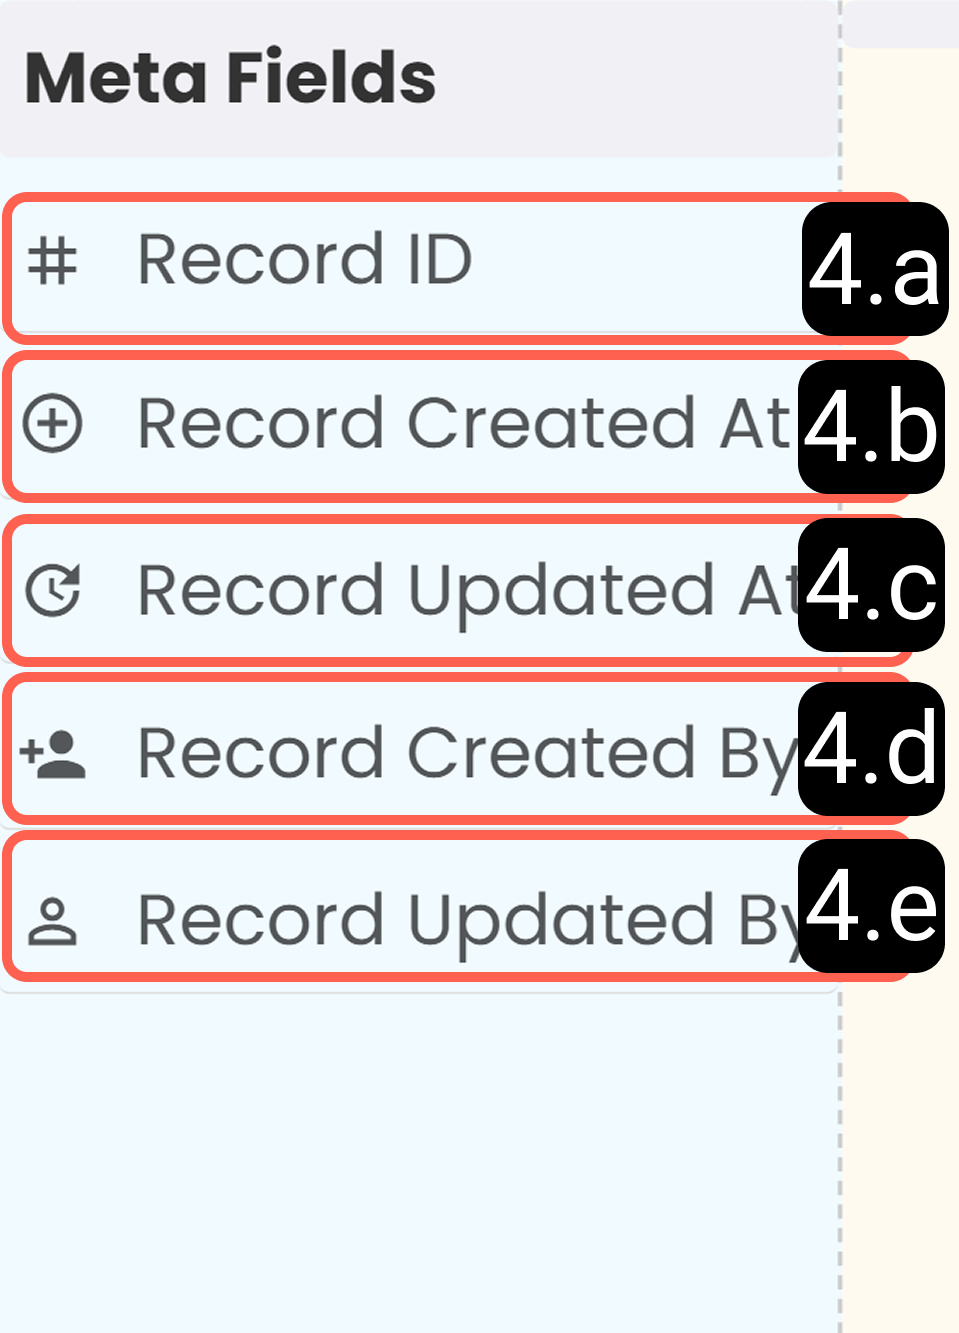
4.a – Record ID:
Assigns a unique identification number to each record. This number is automatically generated by the system and cannot be manually modified.
4.b – Record Created At:
Automatically records the date and time when the record was created.
4.c – Record Updated At:
Automatically records the date and time of the last update. Updated each time the record is modified.
4.d – Record Created By:
Displays the user who created the record. Automatically assigned and cannot be manually changed.
4.e – Record Updated By:
Displays the user who last updated the record. Automatically updated with each modification.
5-) File Fields
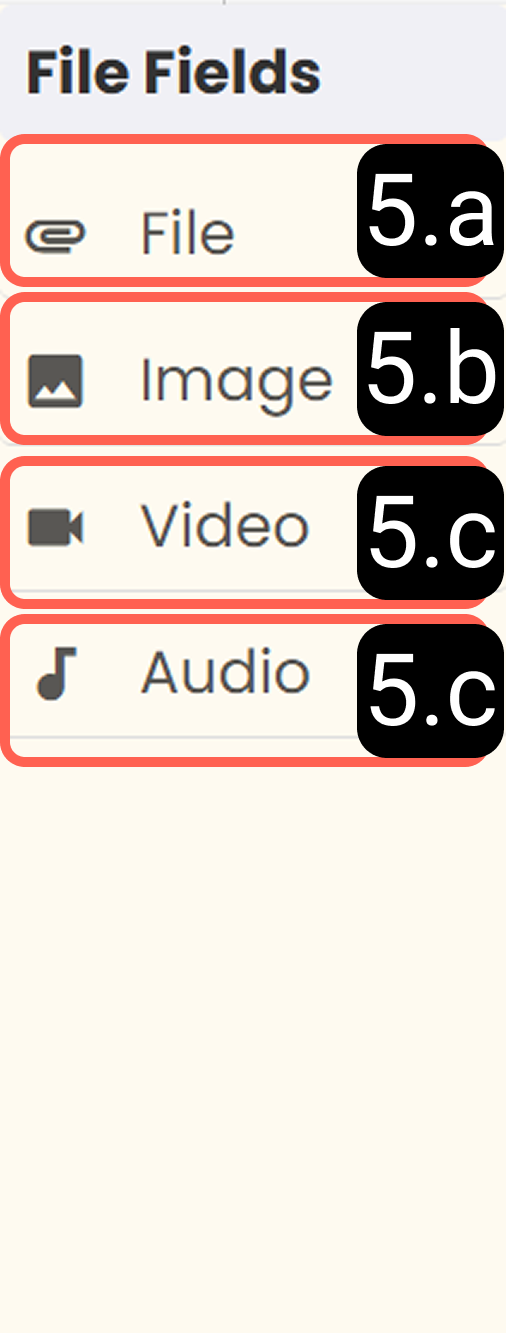
5.a – File:
Used to upload and store any file type. Suitable for documents and archives.
5.b – Image:
Used to upload and display image files. Images are automatically shown as thumbnails.
5.c – Video:
Used to upload and play video files. Works with supported video formats.
5.d – Audio:
Used to upload and play audio files. Works with supported audio formats.
6-) Custom Fields
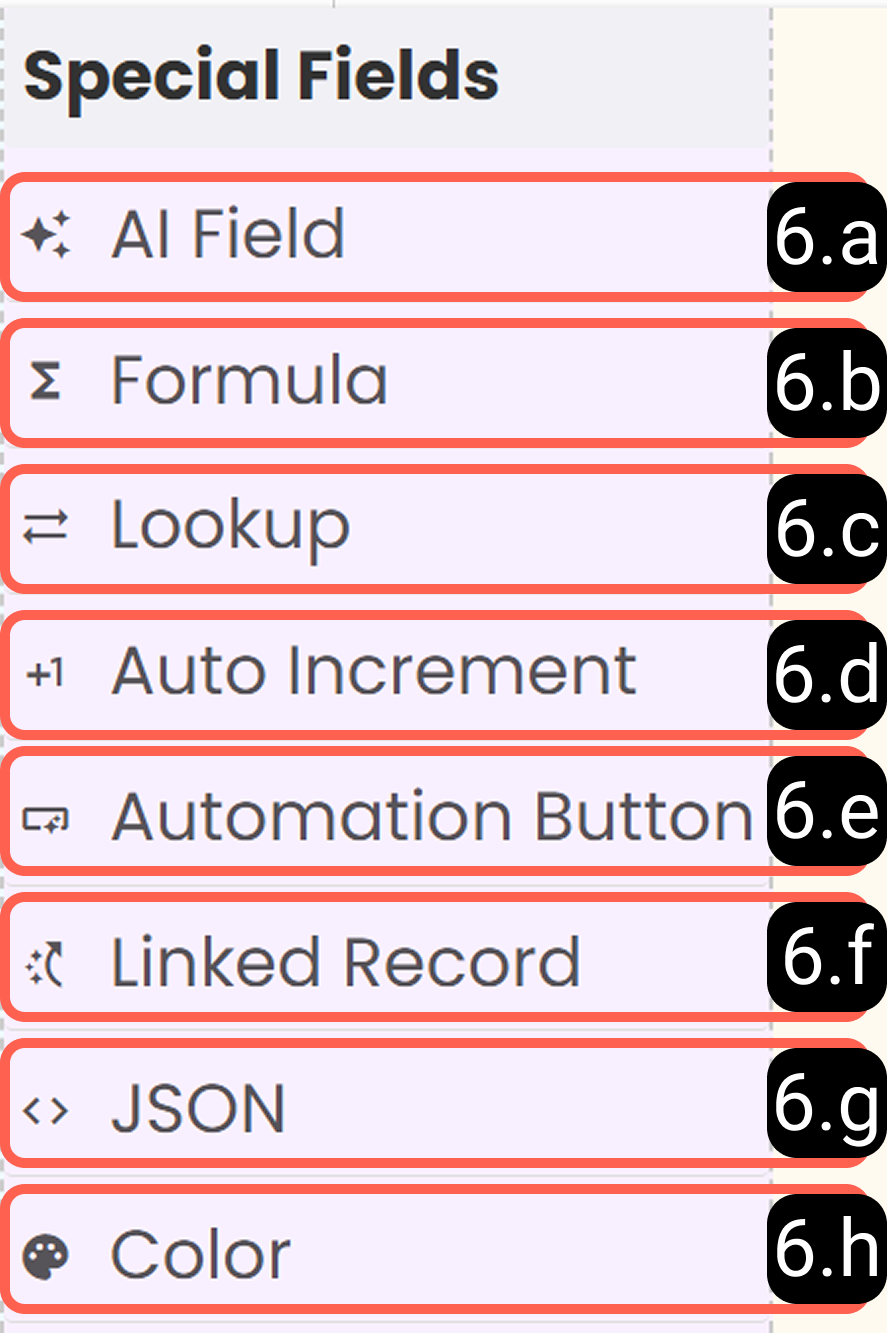
6.a – AI Field:
Used for AI-powered text analysis, summarization, and classification. Allows analyzing, summarizing, or classifying text content.
6.b – Formula:
Used as a calculated field. Enables automatic calculations using data from other fields.
6.c – Lookup:
Displays data from another table. Allows easy access to related information across tables.
6.d – Auto Increment:
Automatically generates a sequential unique number or text value for each new record.
6.e – Automation Button:
Added as a field in your table. Users can click this button to trigger automated processes.
6.f – Linked Record:
Used to connect to another table record. Establishes relationships between records.
6.g – JSON:
Used to store data in JSON format. Suitable for structured and complex data.
6.h – Color:
Used for selecting and storing color values. Colors can be used to visually organize data.
8-) New Record
This option creates a new data row within the table. The created row is completely empty and must be filled manually.
9-) Import
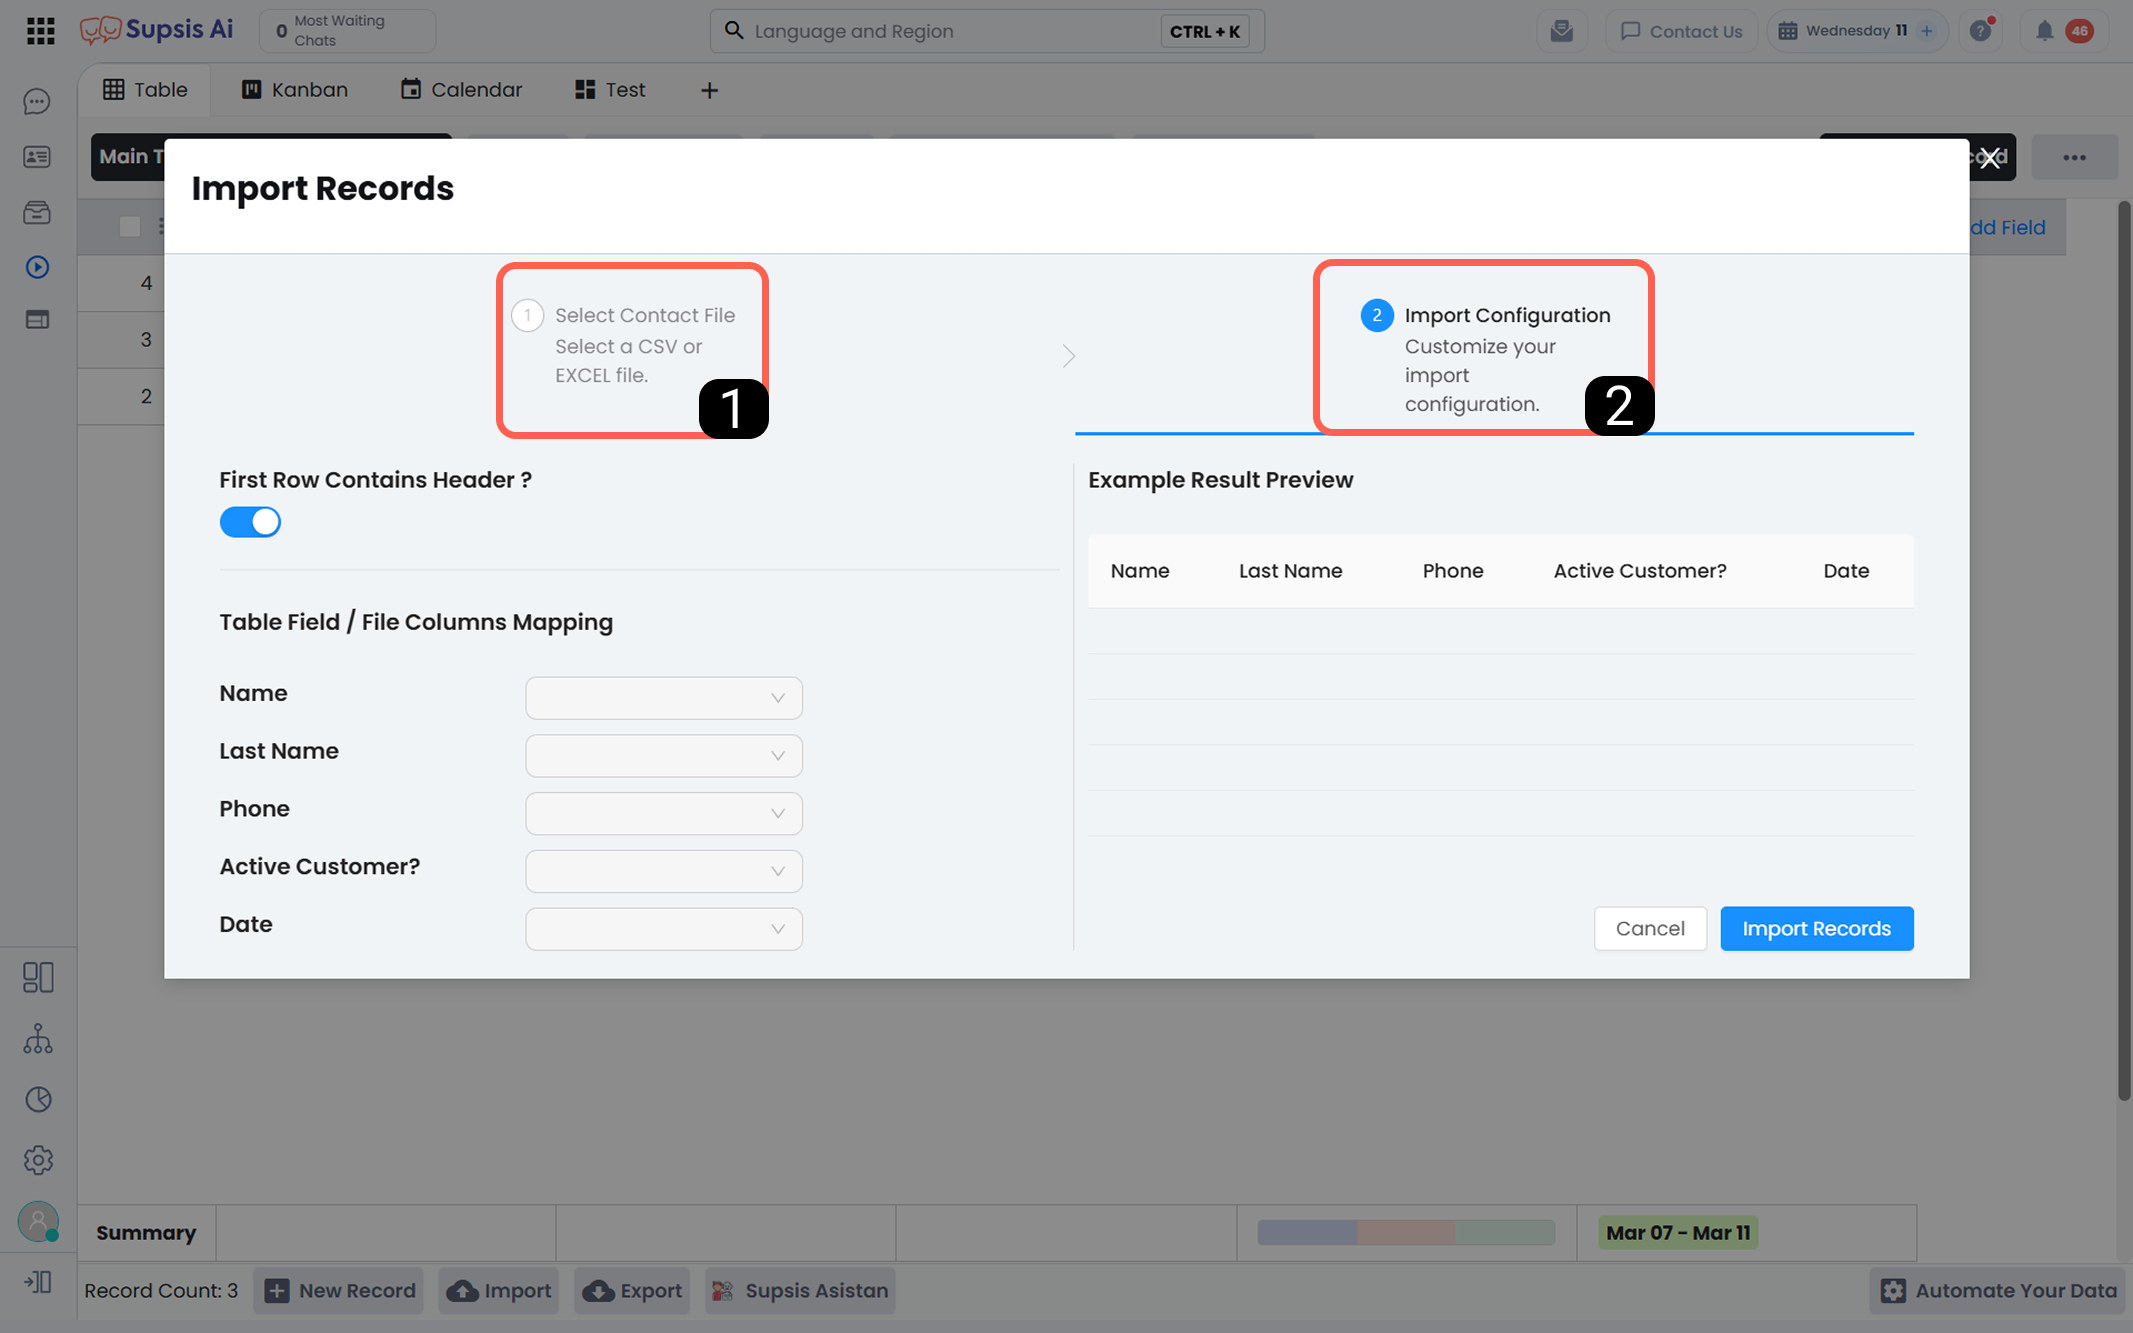
- Select Document
- Import
1-) Select Document
This is the step where you select the document to upload. Only CSV and Excel formats are supported.
2-) Import Process
This step requires matching the content of your document with the table fields.
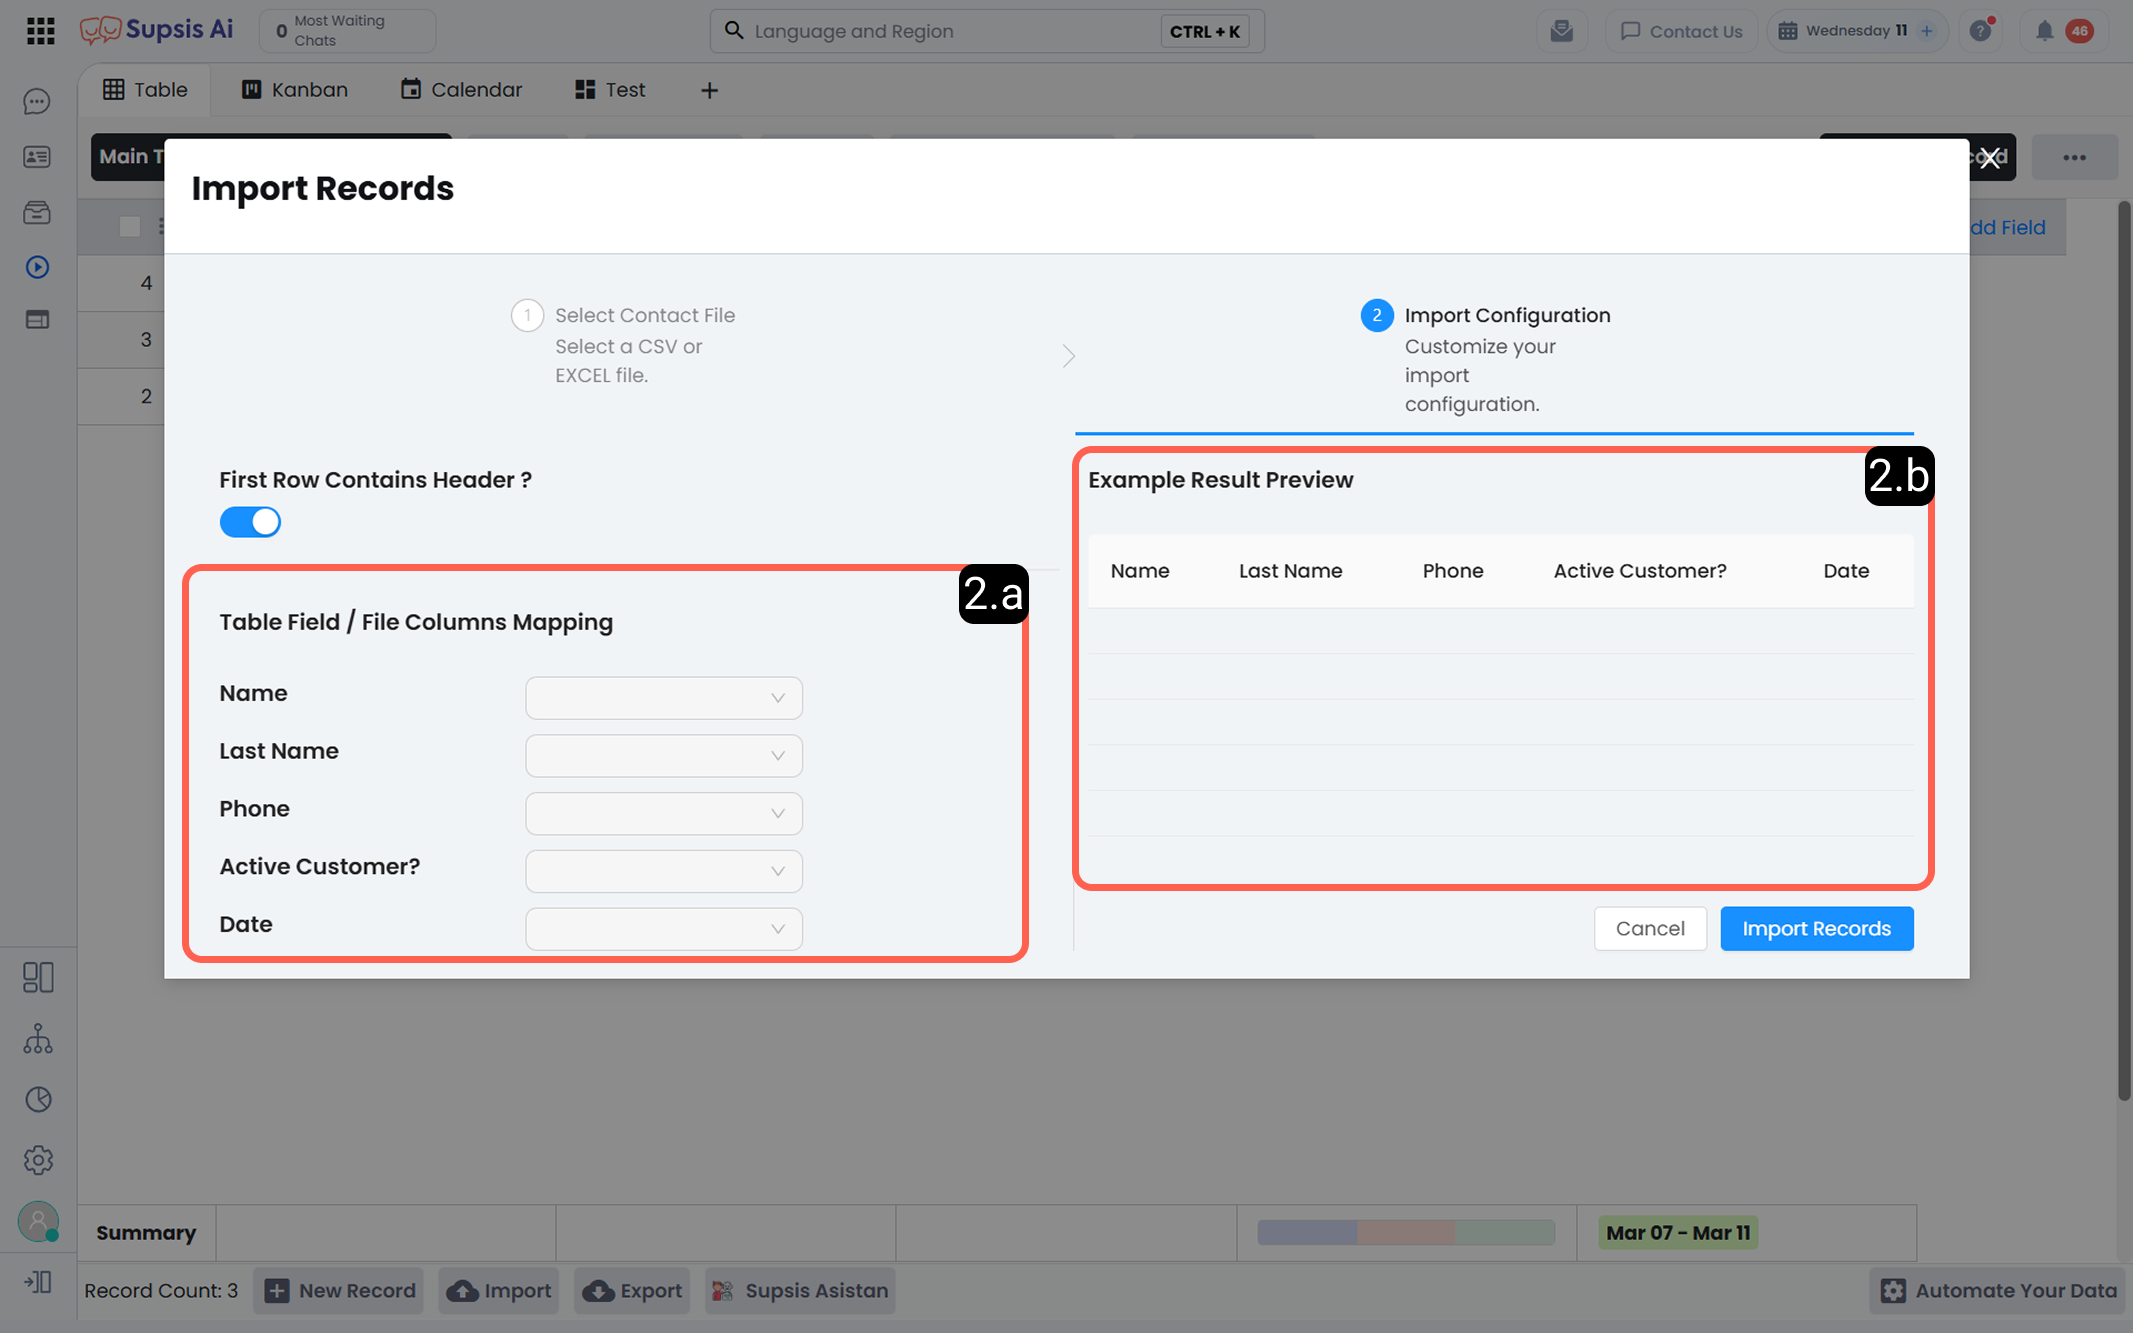
2.a – Table/File Matching:
You must match table fields with document columns.
2.b – Preview:
Allows previewing the matched content before completing the import.
10-) Export
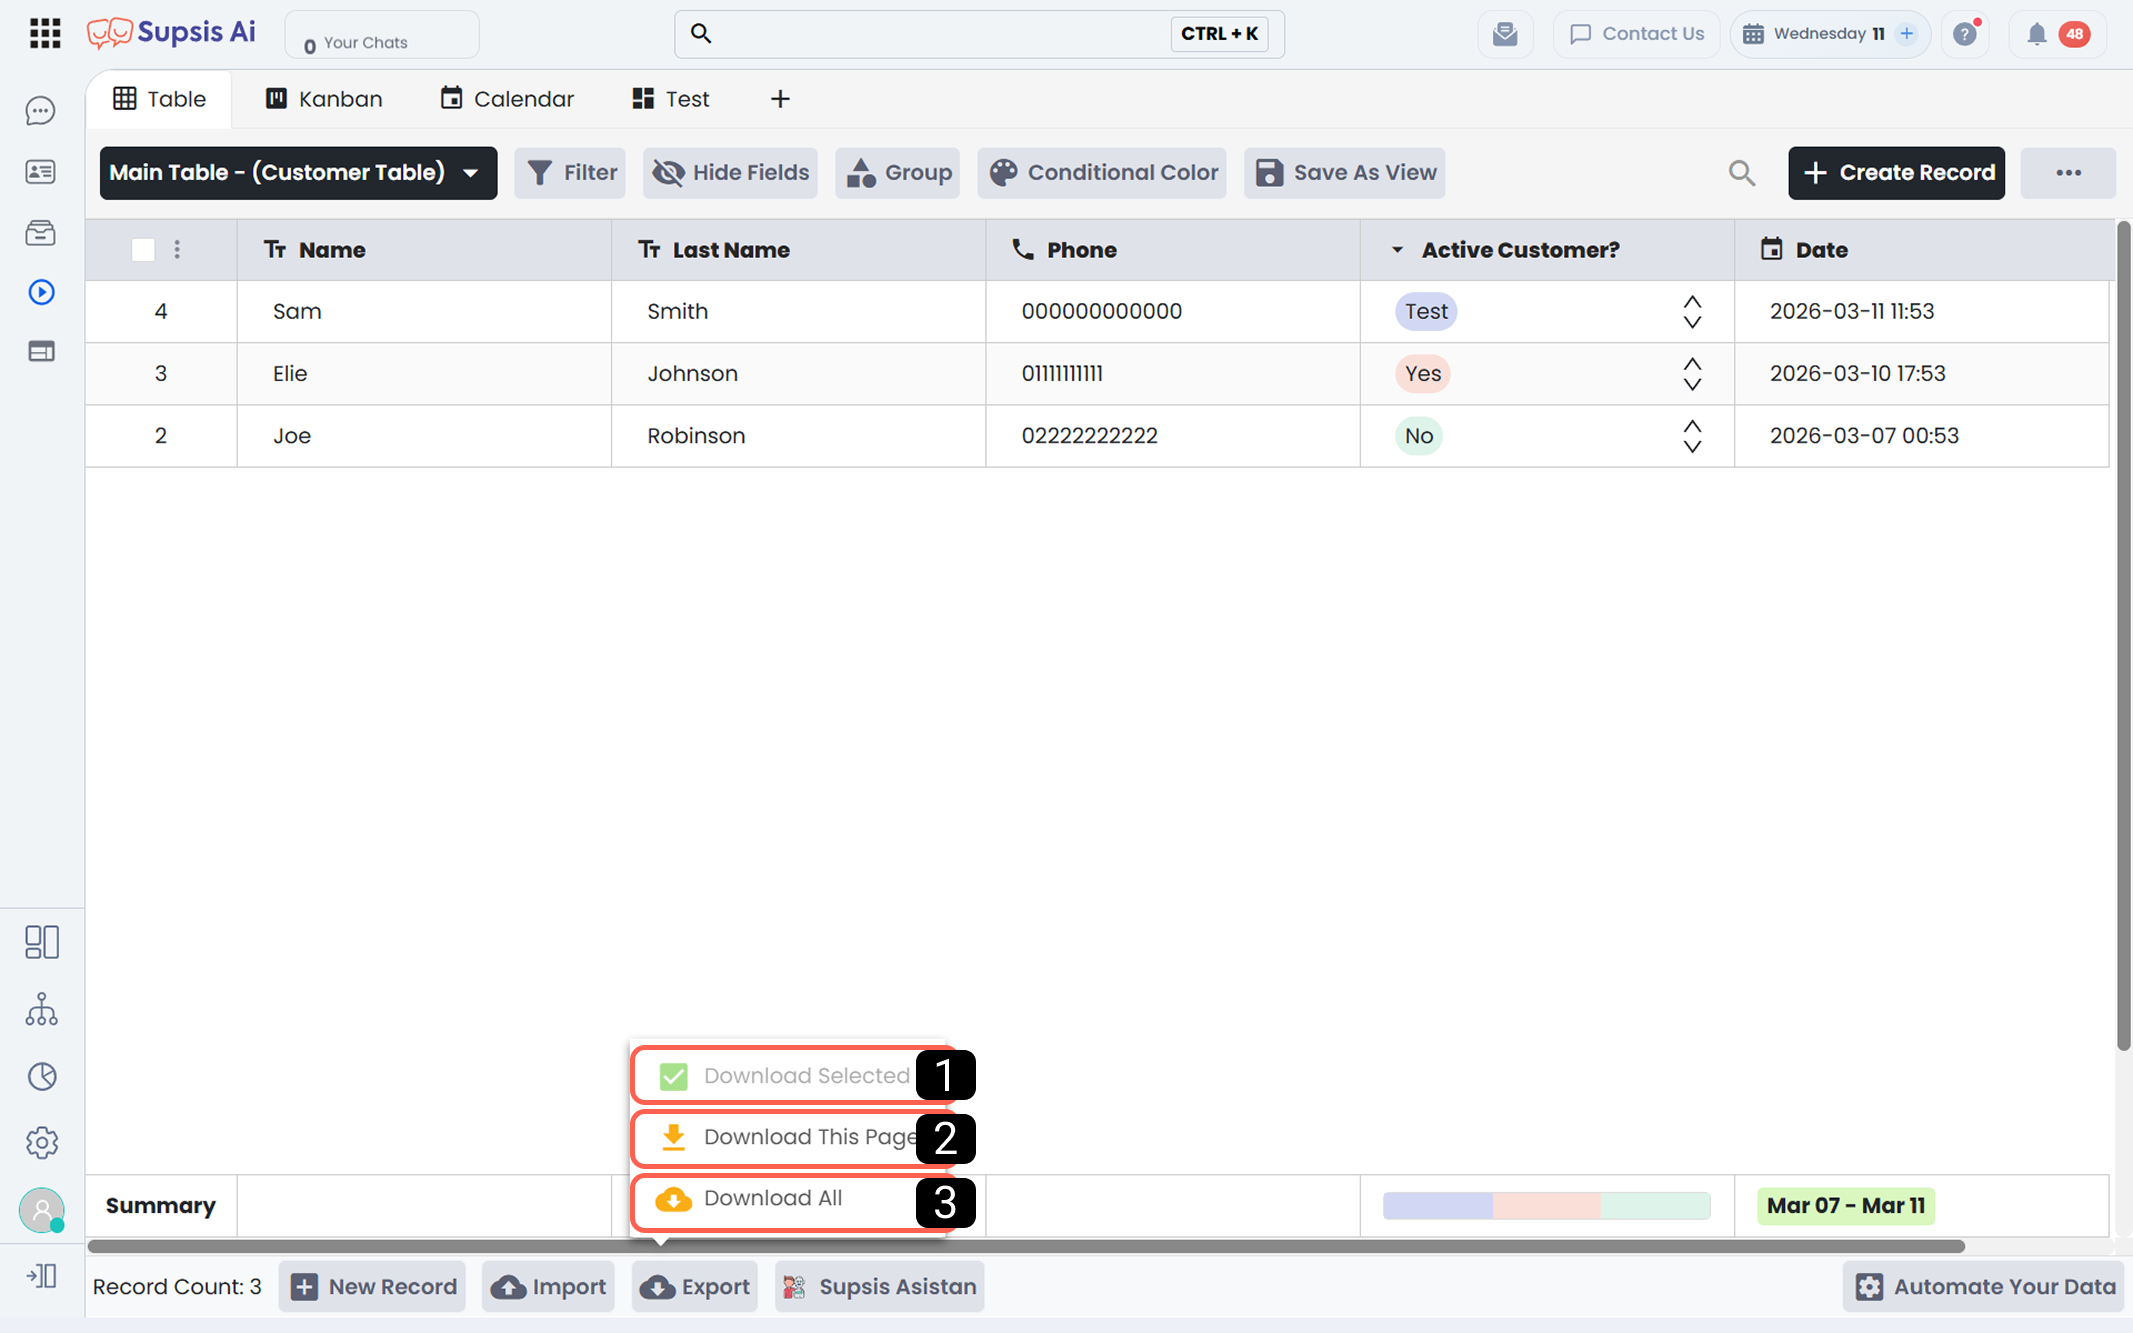
- Download Selected
- Download This Page
- Download All
1-) Download Selected
Downloads only the selected table rows.
2-) Download This Page
Downloads the records listed on the current page. The number of records per page can be adjusted.
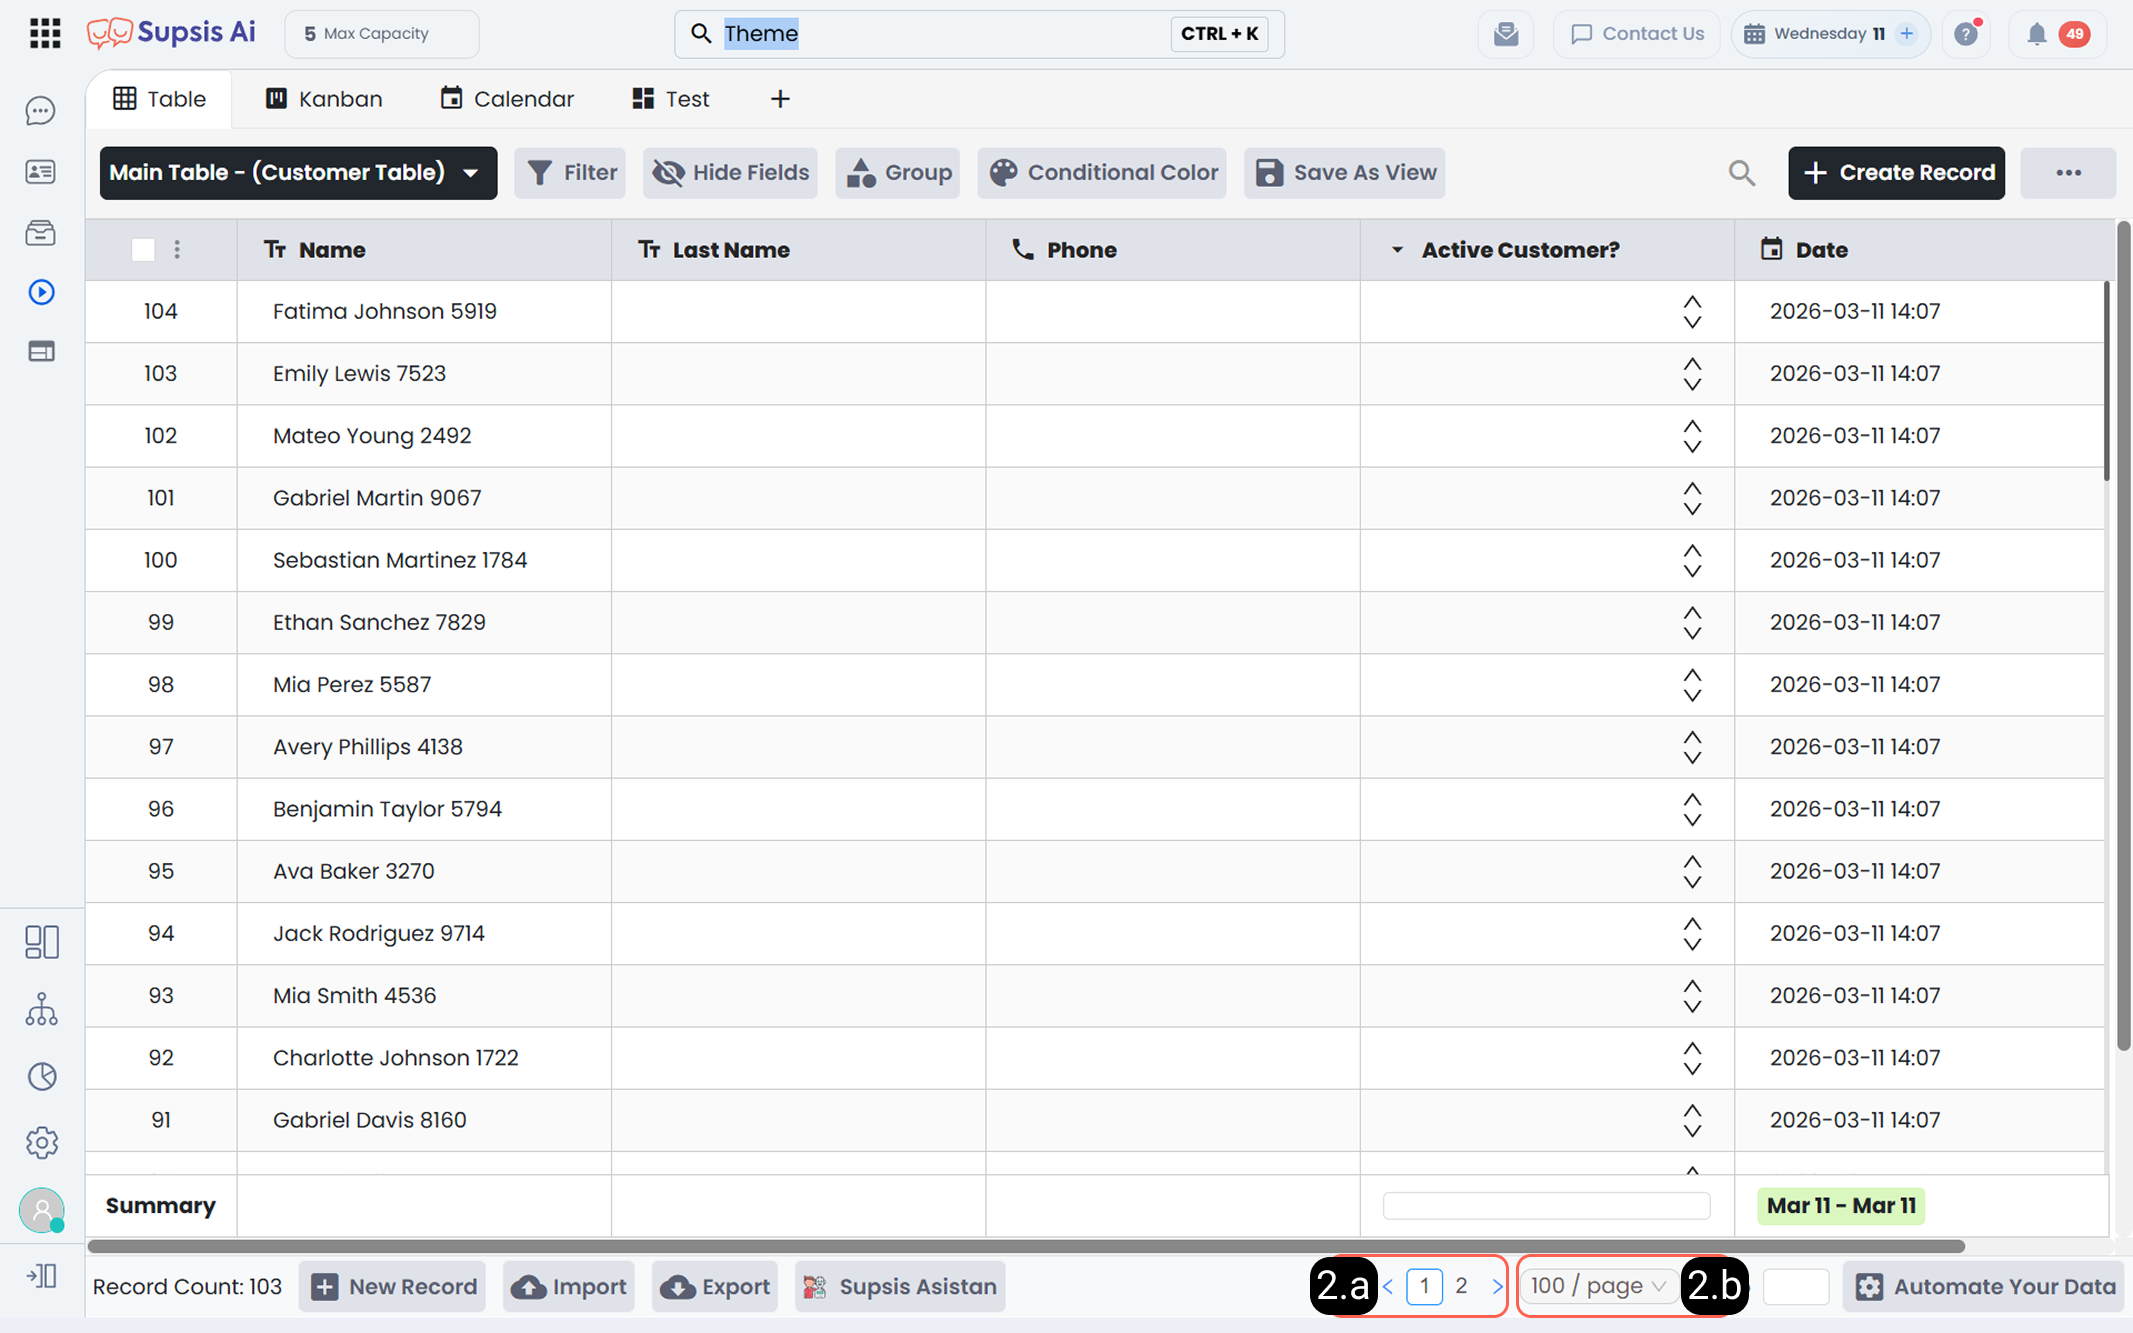
2.a – Page Navigation:
Allows switching between pages.
2.b – Records Per Page:
Allows selecting how many records are displayed per page.
3-) Download All
Downloads all records in the table as an Excel file.
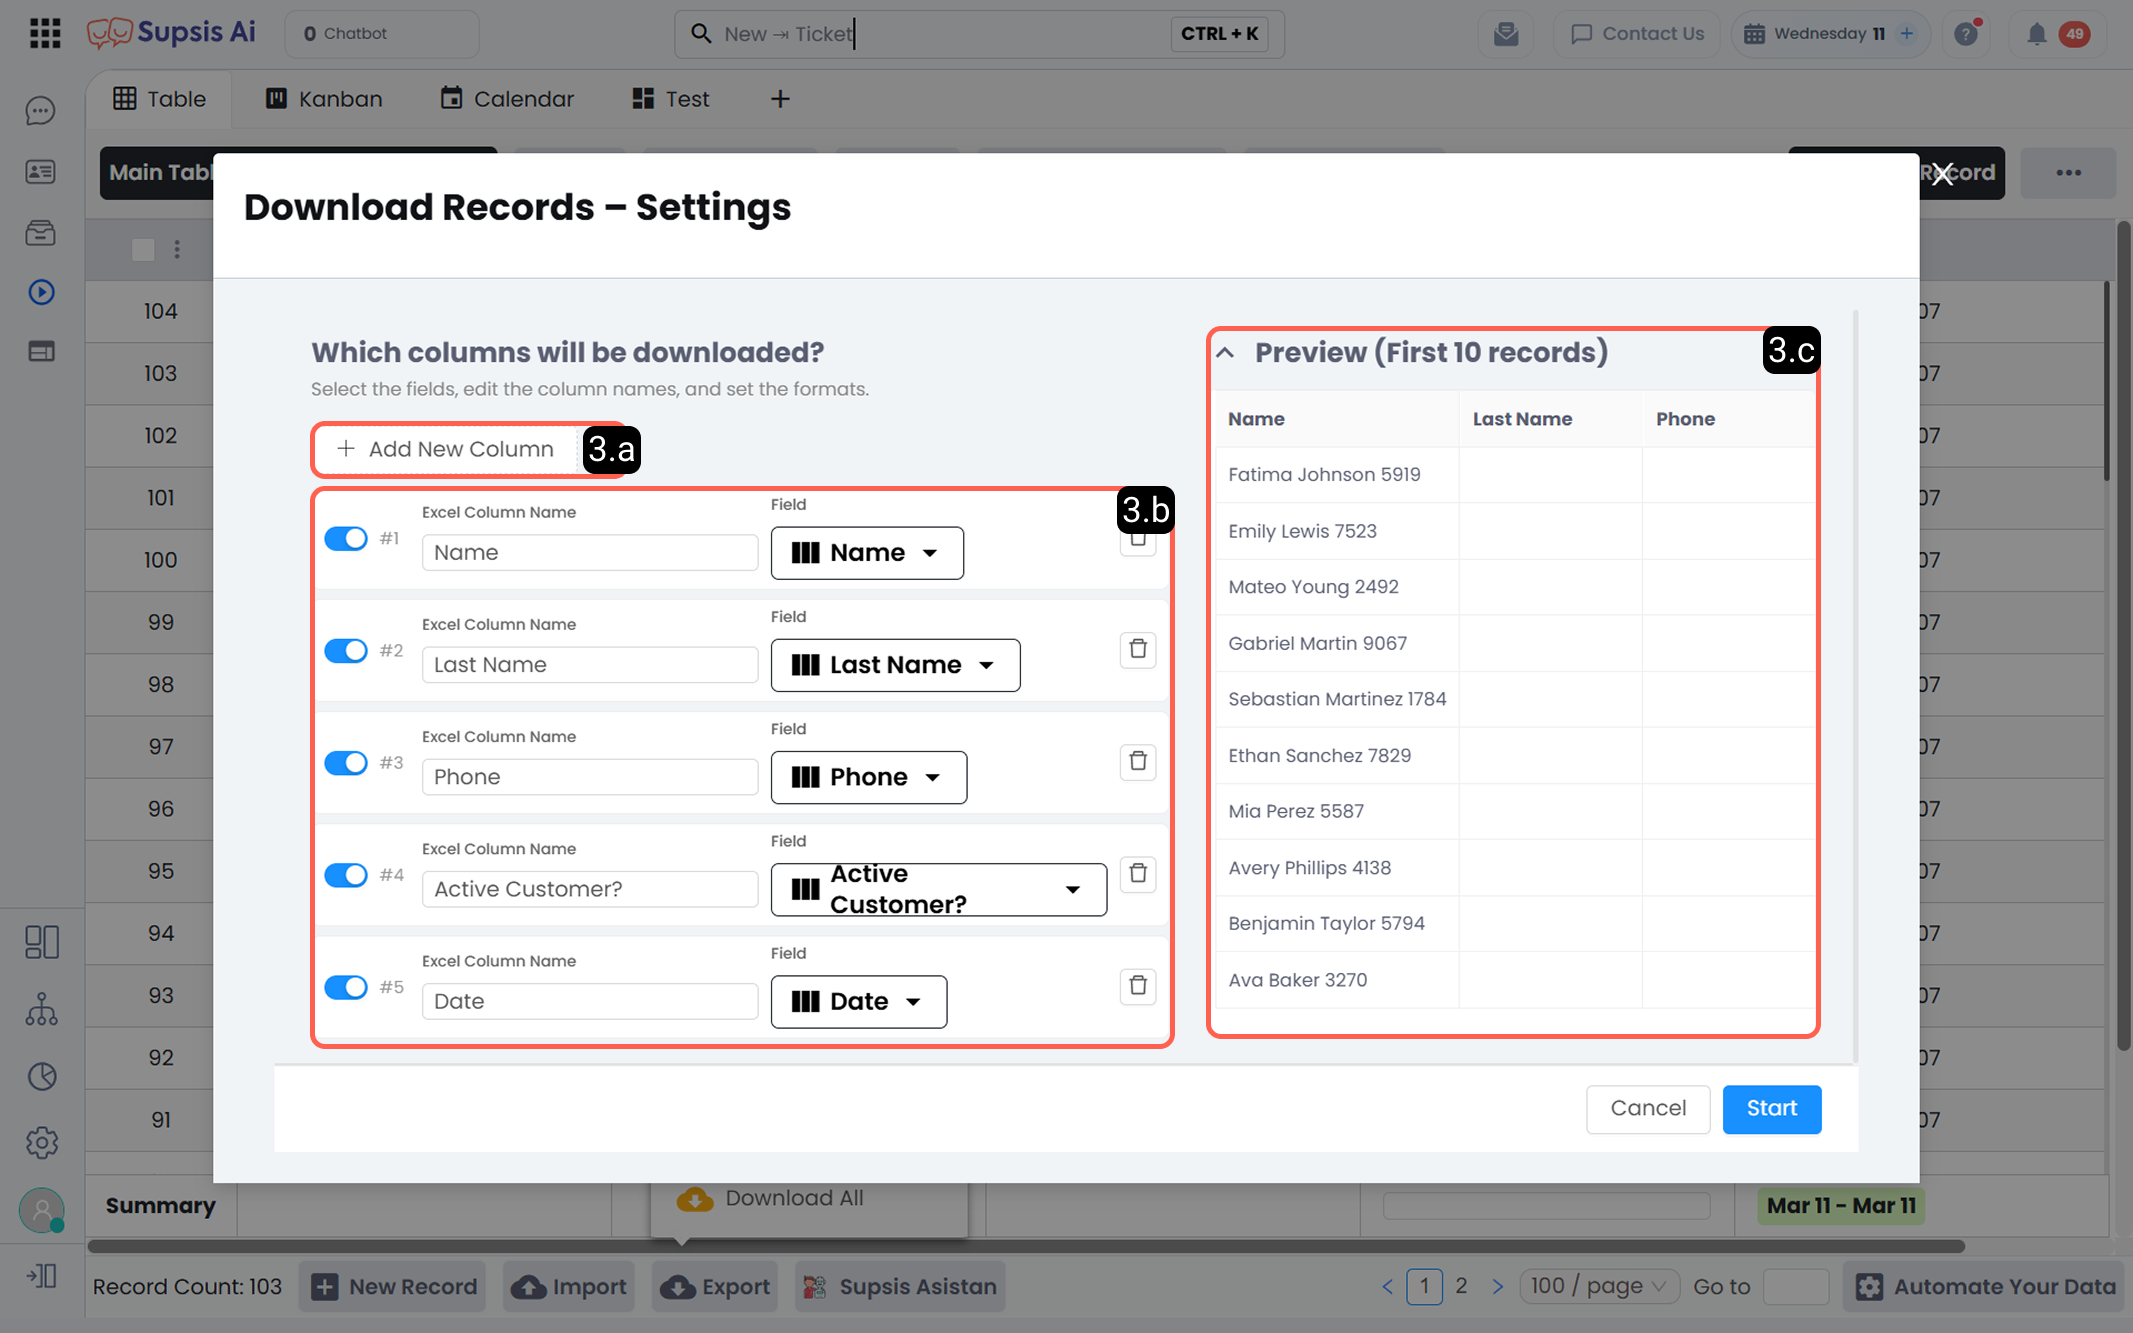
3.a – Add New Column:
Adds a new column to the Excel file to be downloaded. You can define the column name and match it with existing table fields.
3.b – Data-Column Matching:
You must match Excel column names with table fields. Define the Excel column name and select the corresponding table field.
3.c – Preview:
Displays a preview of the Excel file before downloading.
11-) Supsis Assistant
This feature allows you to make adjustments to your existing table based on the instructions you provide to the assistant.
The assistant can:
- Add new fields
- Edit existing fields
- Delete unnecessary fields
- Filter records
- Group records
- Hide fields
- Create conditional coloring
- Create calculation formulas
- Generate sample records
12-) Automate Data
Through this button, you can create new automations integrated with the table or view existing automations linked to the table.
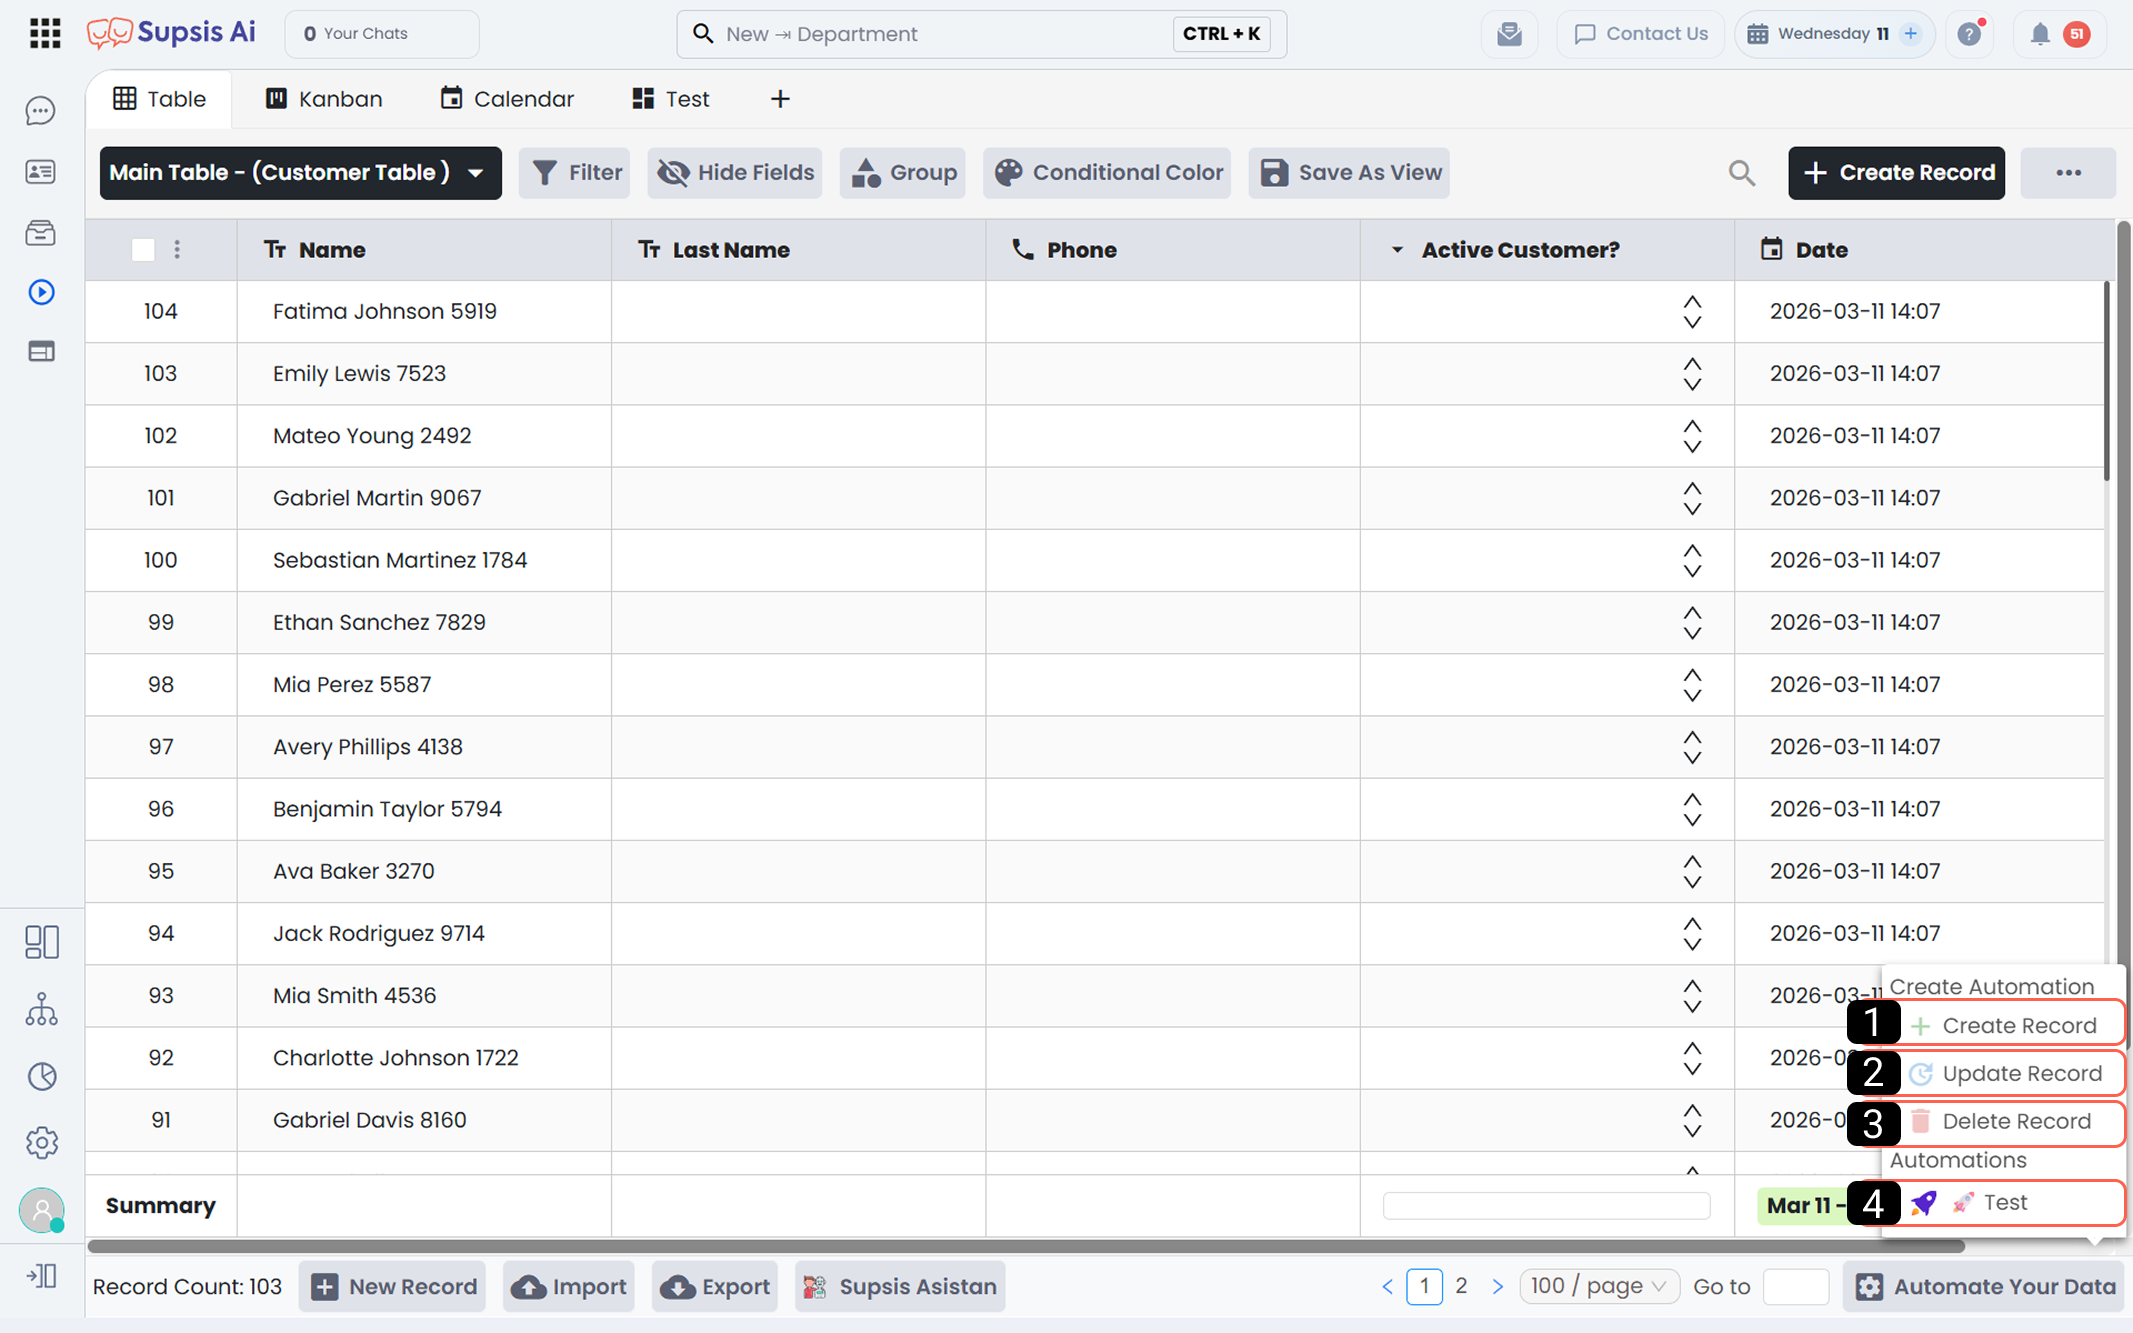
- Create Record Automation
- Update Record Automation
- Delete Record Automation
- Existing Automations
1-) Create Record Automation
Creates an automation that runs when a new record is created in the current table. The automation processes the new data and automatically performs predefined actions.
2-) Update Record Automation
Creates an automation that runs when a record is updated in the current table. Any update to table fields triggers the automation and executes predefined actions.
3-) Delete Record Automation
Creates an automation that runs when a record is deleted from the current table. When any row is deleted, the automation is triggered and performs predefined actions.
4-) Existing Automations
Lists the automations currently linked to the table.