
1-) Task Management Module Menu
The Task Management Module menu provides the main navigation structure that enables quick access to all task-related areas.
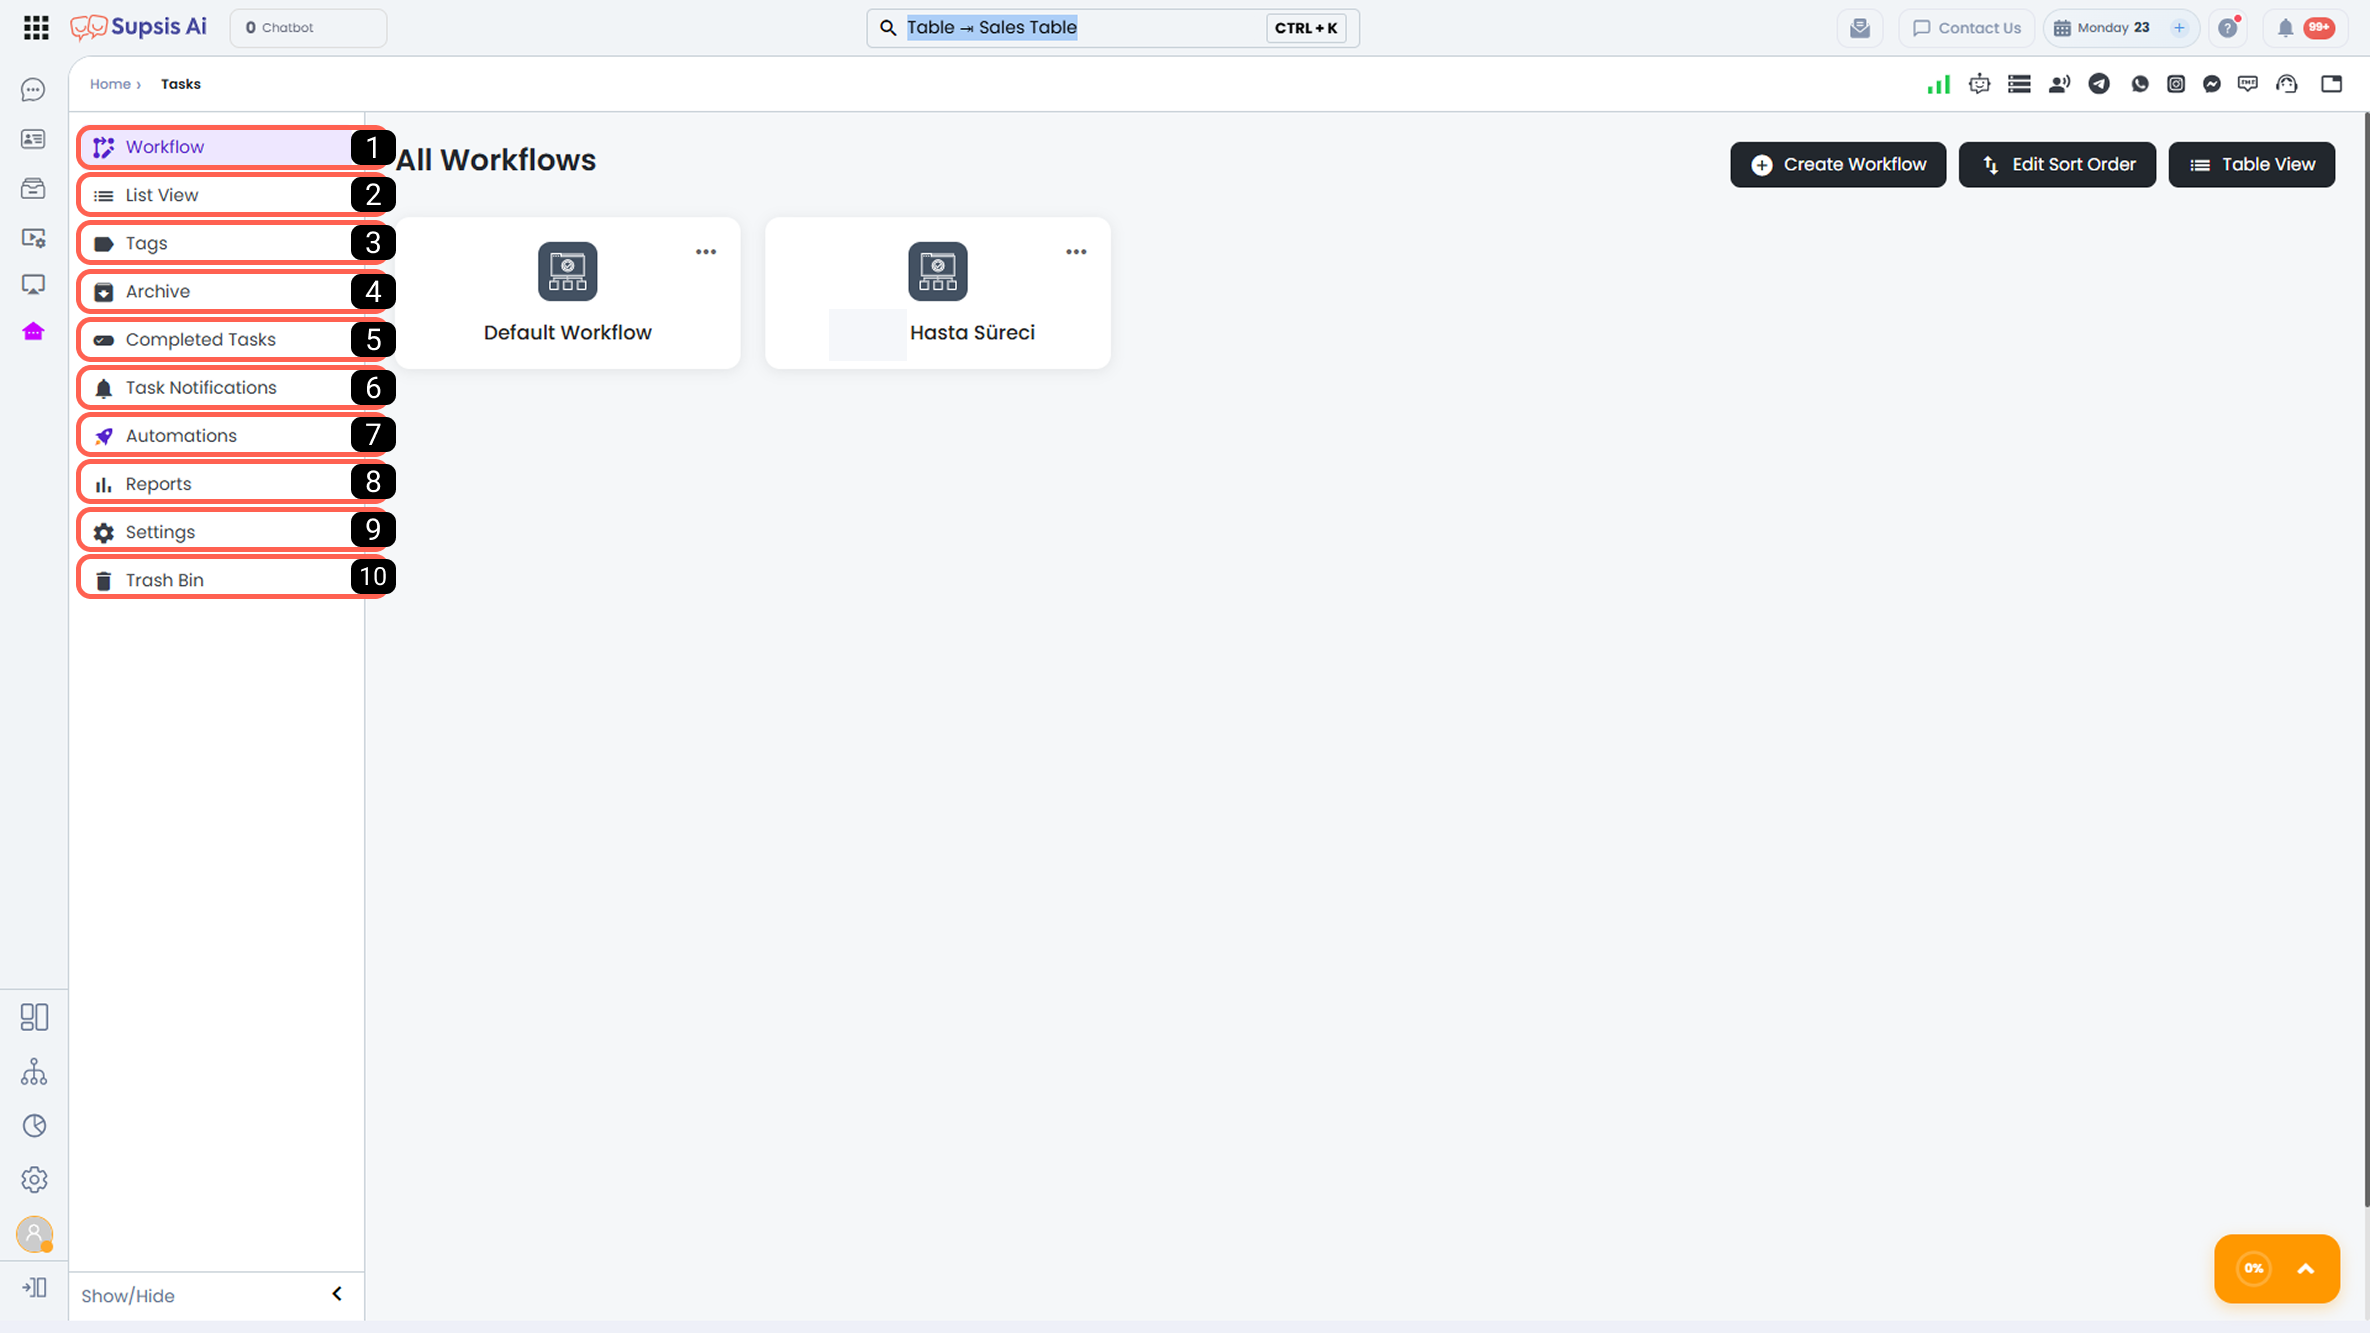
| No | Menu |
|---|---|
| 1 | Workflow |
| 2 | List View |
| 3 | Tags |
| 4 | Archive |
| 5 | Completed Tasks |
| 6 | Task Notifications |
| 7 | Automations |
| 8 | Reports |
| 9 | Settings |
| 10 | Trash |
1-) Workflow
This is the area where workflows that determine the stages tasks go through are created and managed.
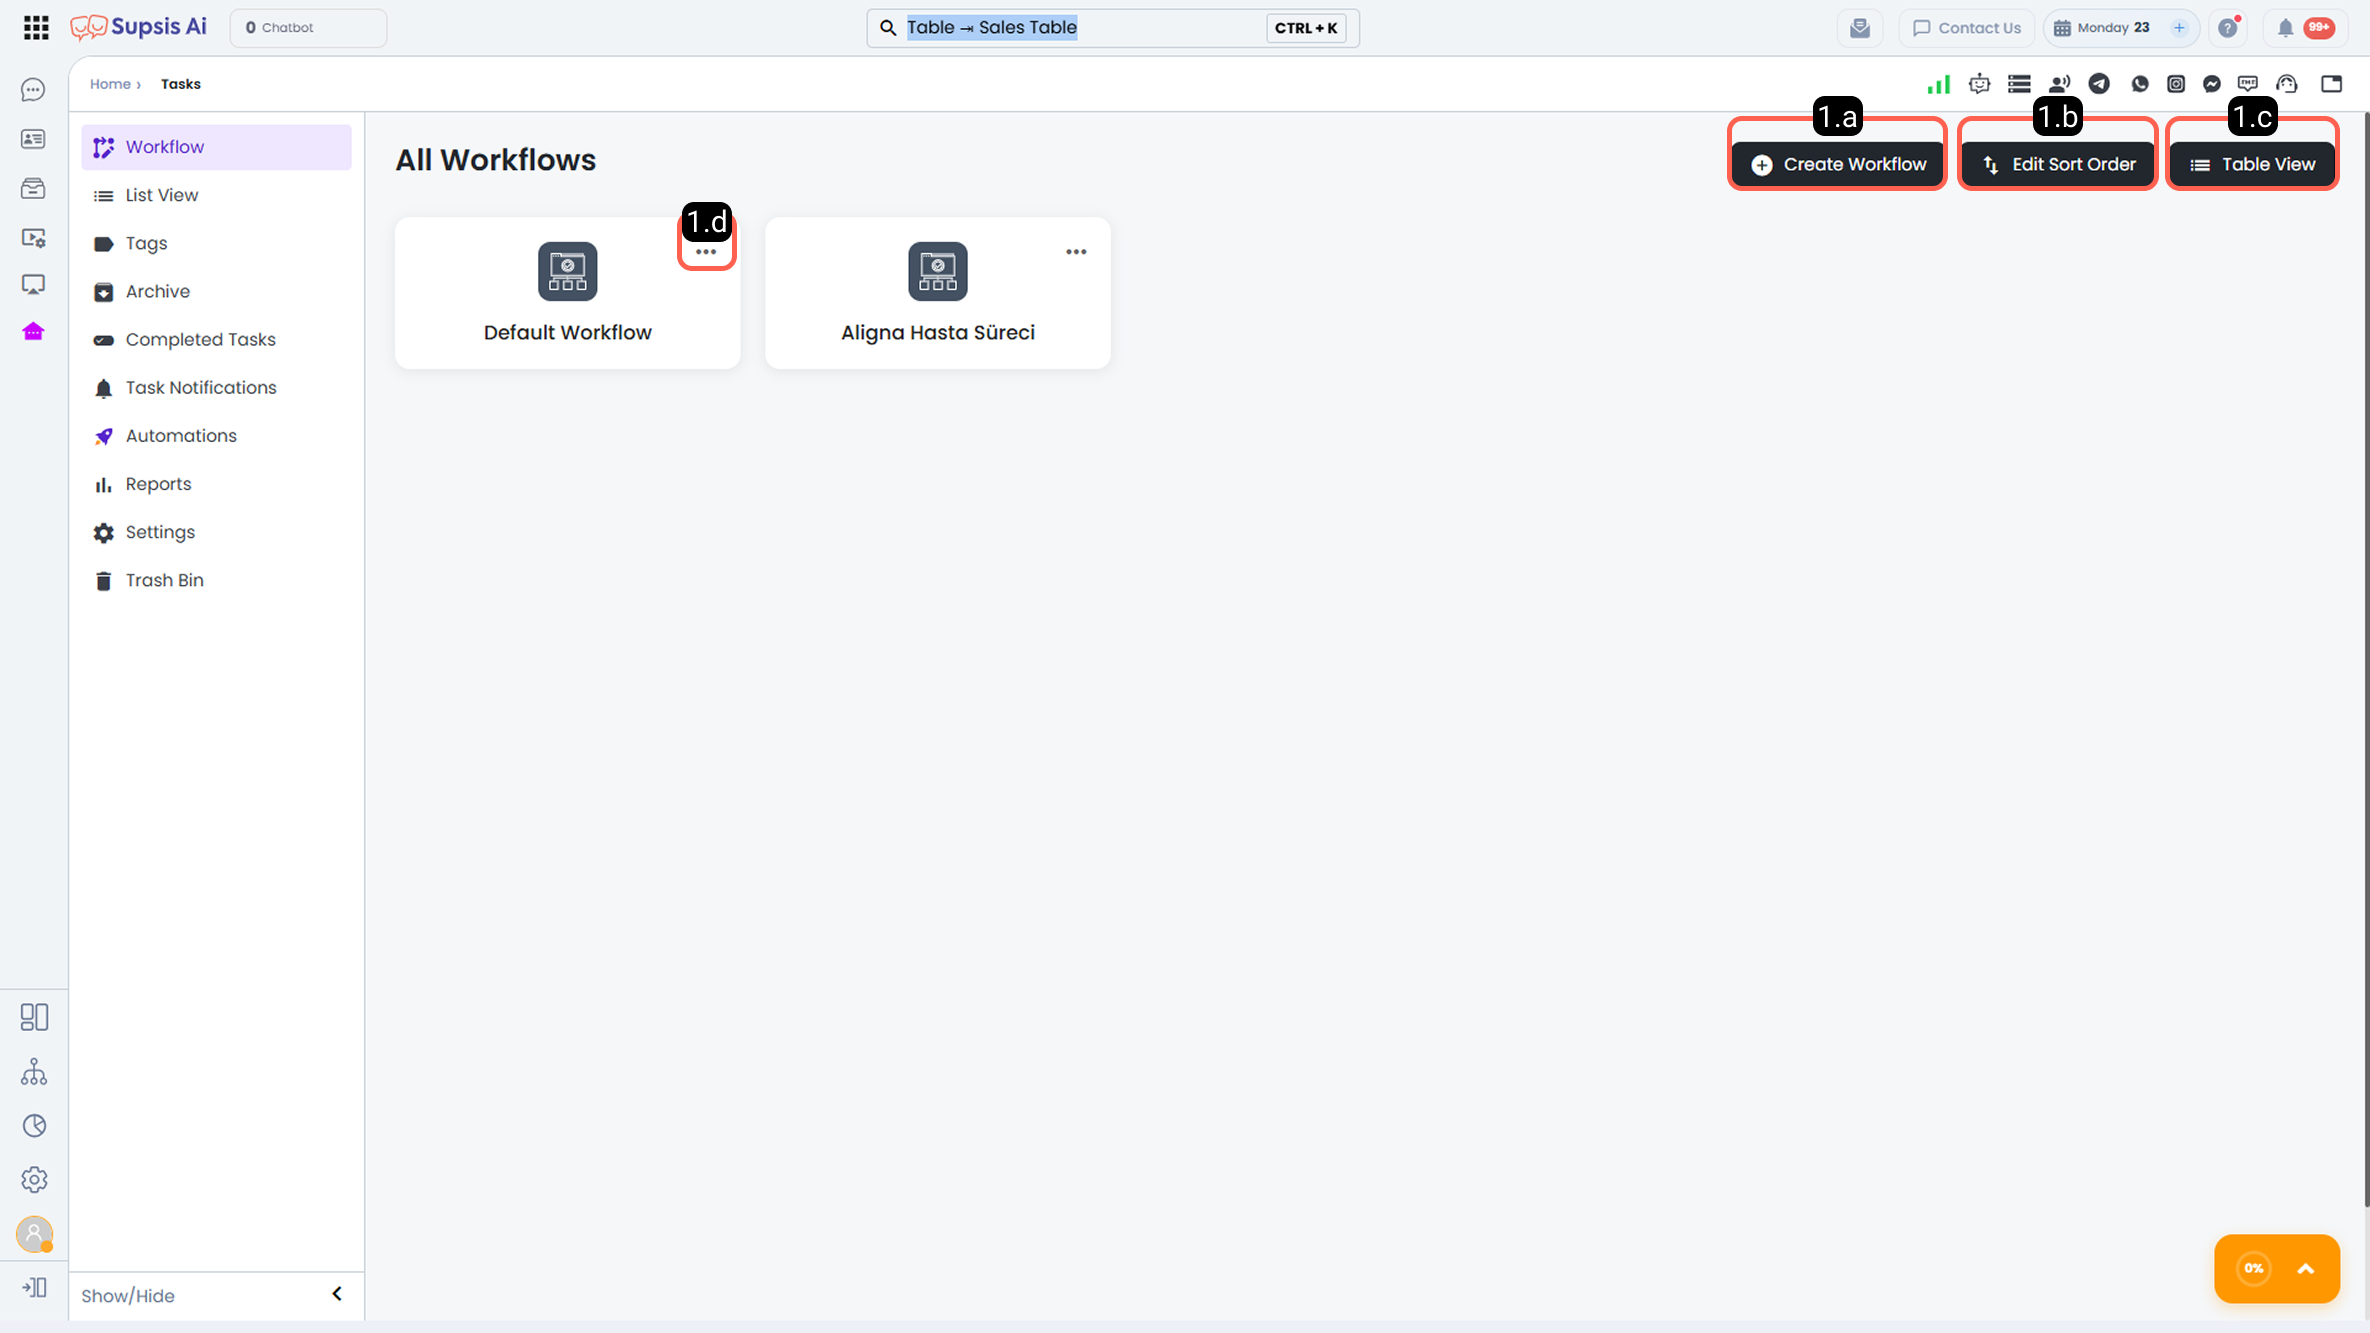
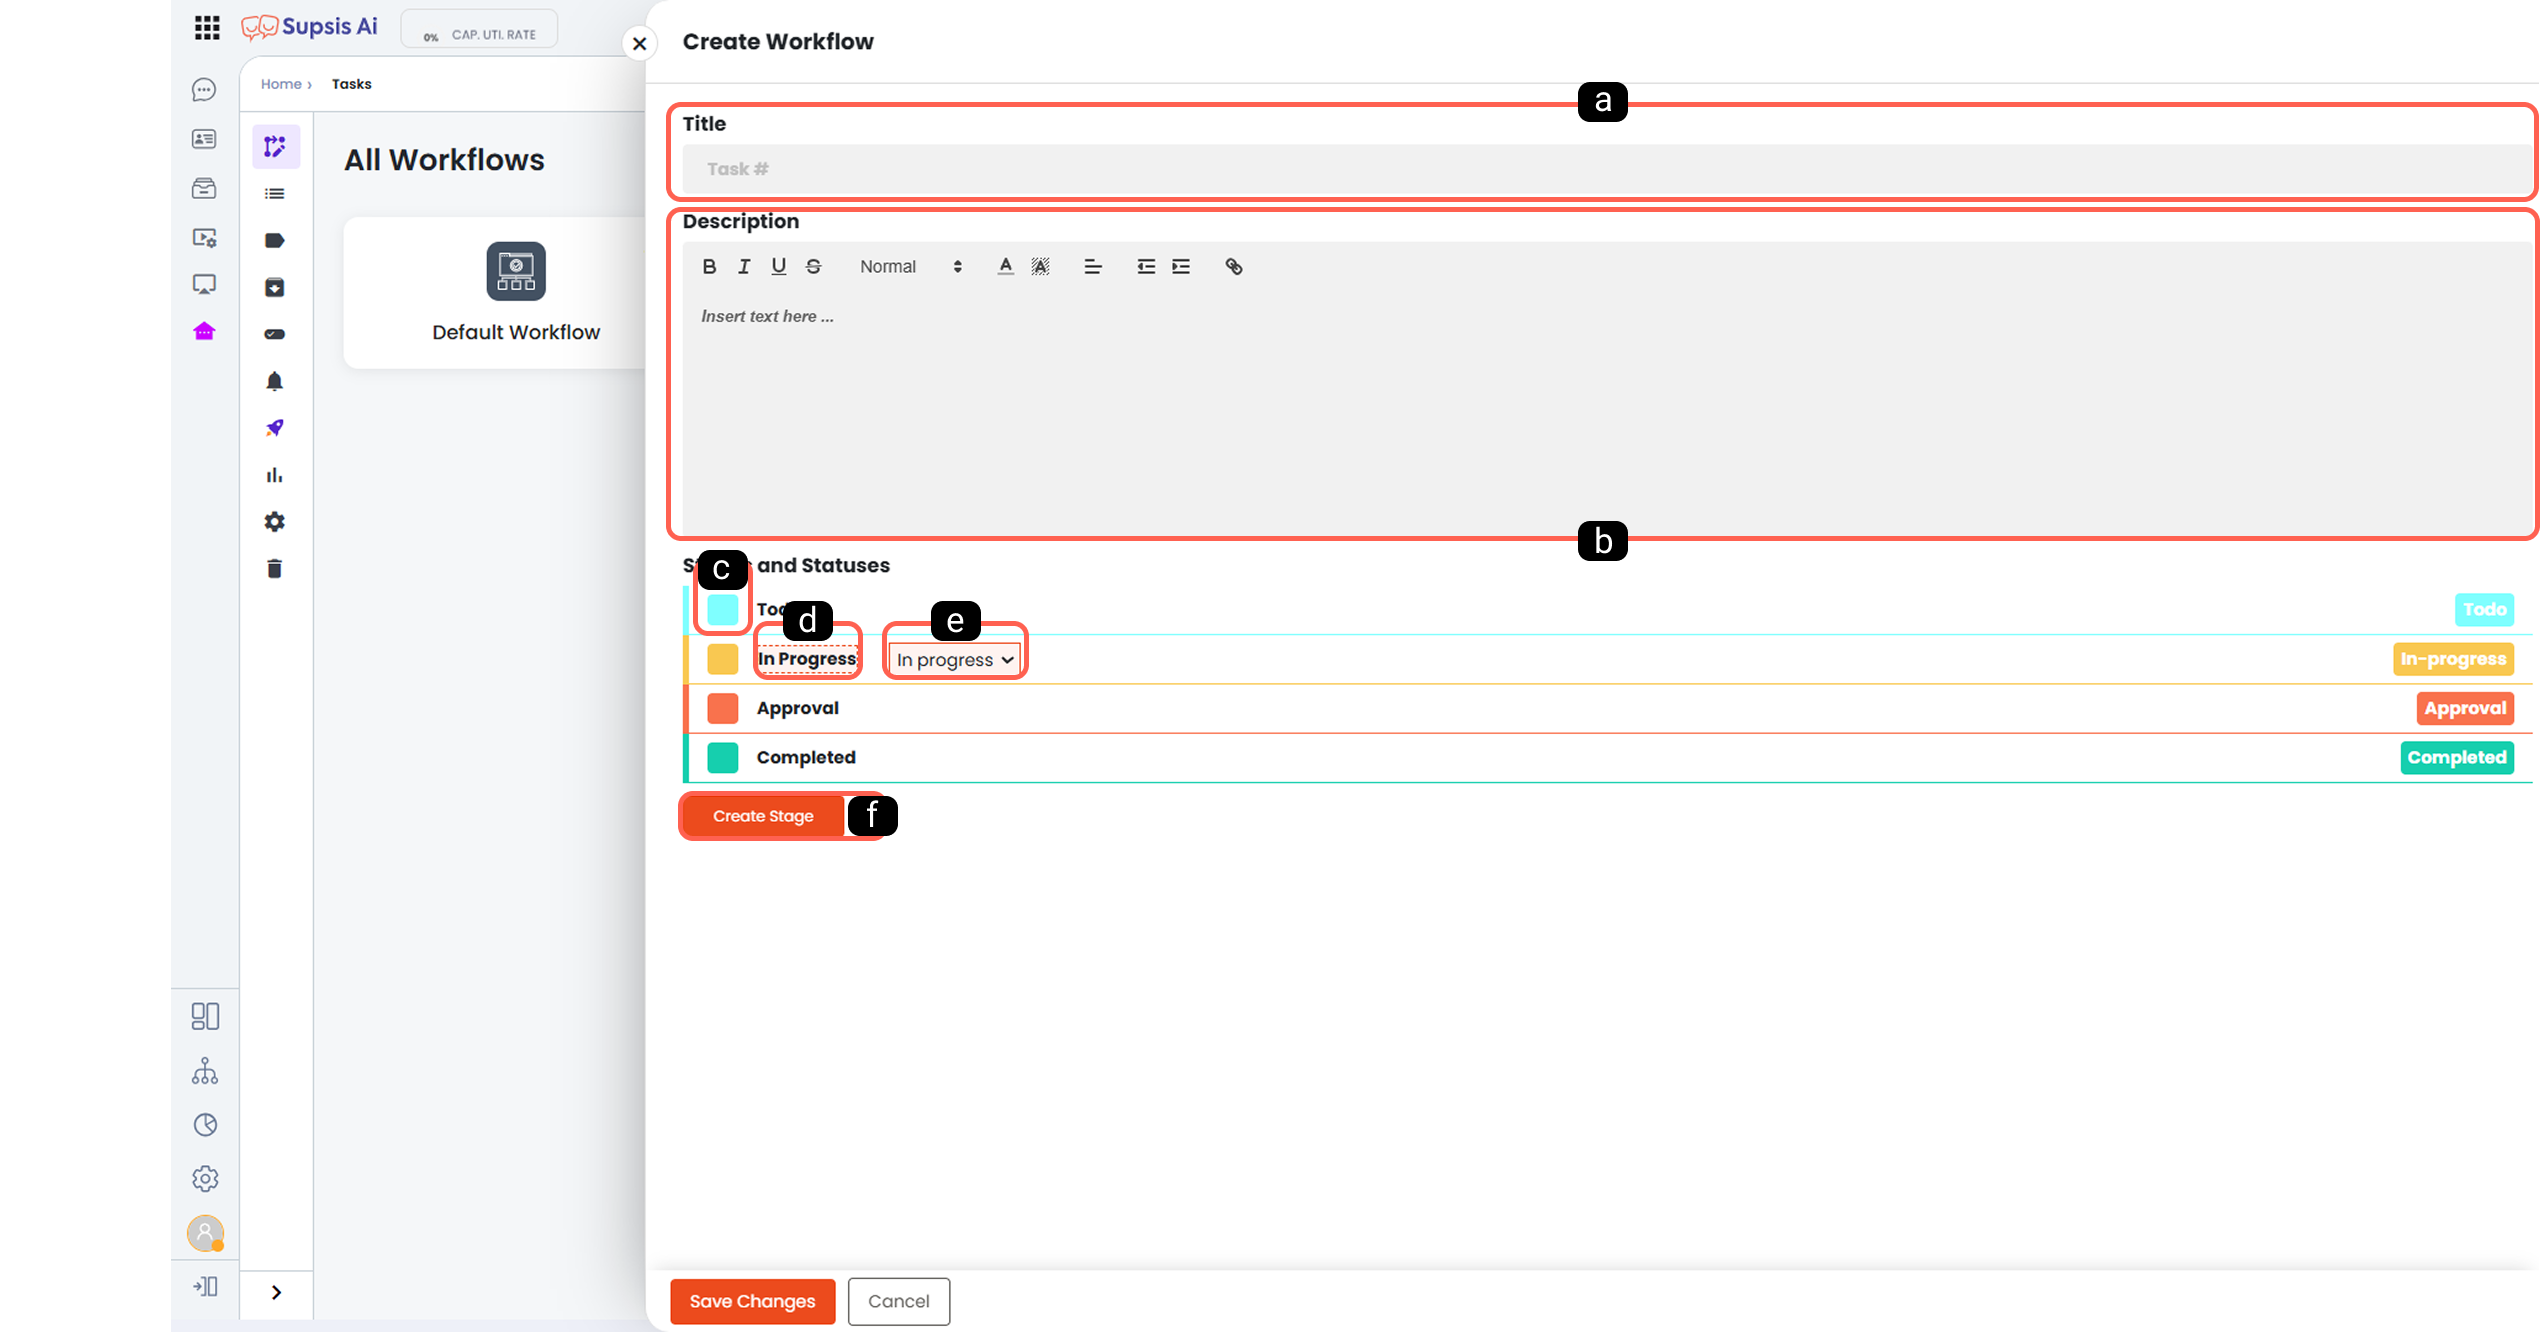
1.a – Create Workflow
This button is used to define a new task process.
-
a - Workflow Title
The name that defines the workflow. -
b - Workflow Description
The area where you can explain the purpose and usage scenario of the workflow in detail. -
c - Stage Color
The color assigned to visually distinguish workflow stages. -
d - Stage Name
The name of the stage that represents the process the task is currently in. -
e - Stage Status
Indicates the status of the task within the stage: To Do, In Progress, In Approval, or Completed. -
f - Add New Stage
Used to add new stages to the workflow.
1.b – Edit Order
The Edit Order feature allows you to determine the display order of workflows on the screen.
You can reorder workflows using the drag-and-drop method and move prioritized workflows to the top of the list. Changes are saved instantly and apply to all users.
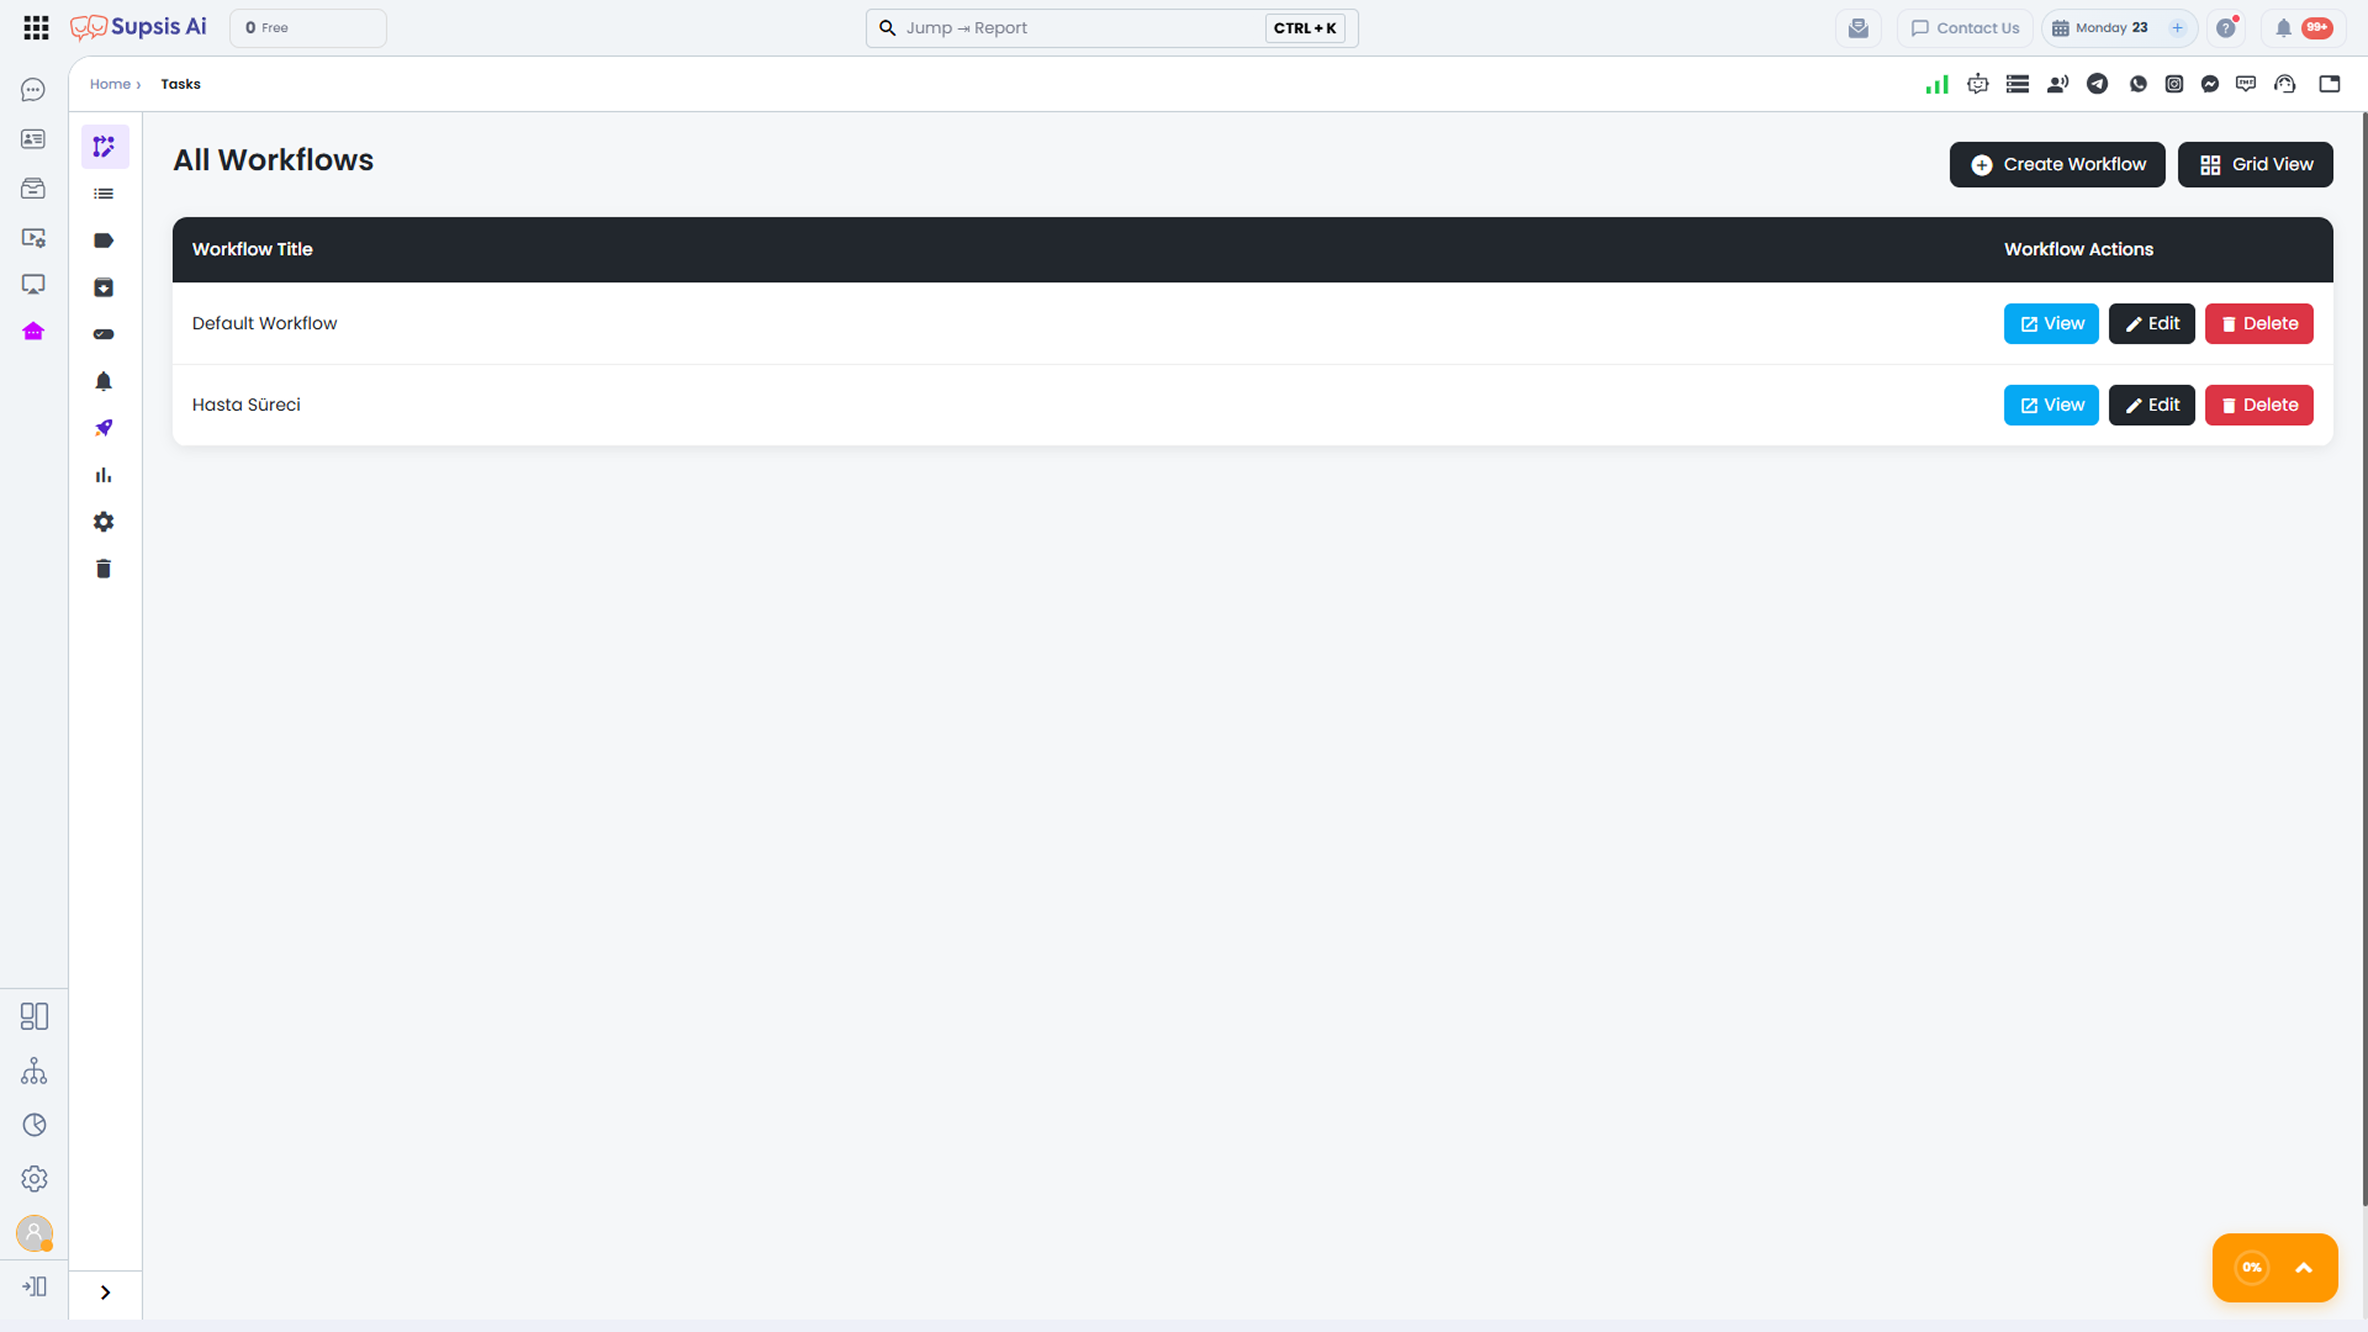
1.c – Table & Board View
The Table View and Board View options allow you to customize how workflows are displayed on the screen.
-
Board View displays workflows in a card layout and provides quick visual access.
-
Table View presents workflows in a list format, enabling more detailed and comparative analysis.
Users can switch between these two views at any time according to their needs.
1.d – Workflow Actions
Workflow Actions provide quick access to management and operation options for each workflow. Through these actions, workflows can be edited, integrated, or deleted.

-
a - Edit
Opens the edit form of the selected workflow.
The title, description, stages, and stage settings of the workflow can be updated. When changes are saved, the workflow is updated instantly. -
b - Copy Workflow ID
Allows you to copy the unique Workflow ID of the selected workflow.
This ID is used in API integrations and Supsis AI automation scenarios to perform actions on the relevant workflow. The Workflow ID ensures that the workflow is correctly identified during integration processes. -
c - Delete Workflow
Removes the selected workflow from the system.
The deleted workflow, along with all tasks inside it, is moved to the Trash. The workflow can be restored or permanently deleted from the Trash.
If not permanently deleted manually, the system automatically deletes it permanently after 30 days. During this period, restoration is possible.
2-) List View
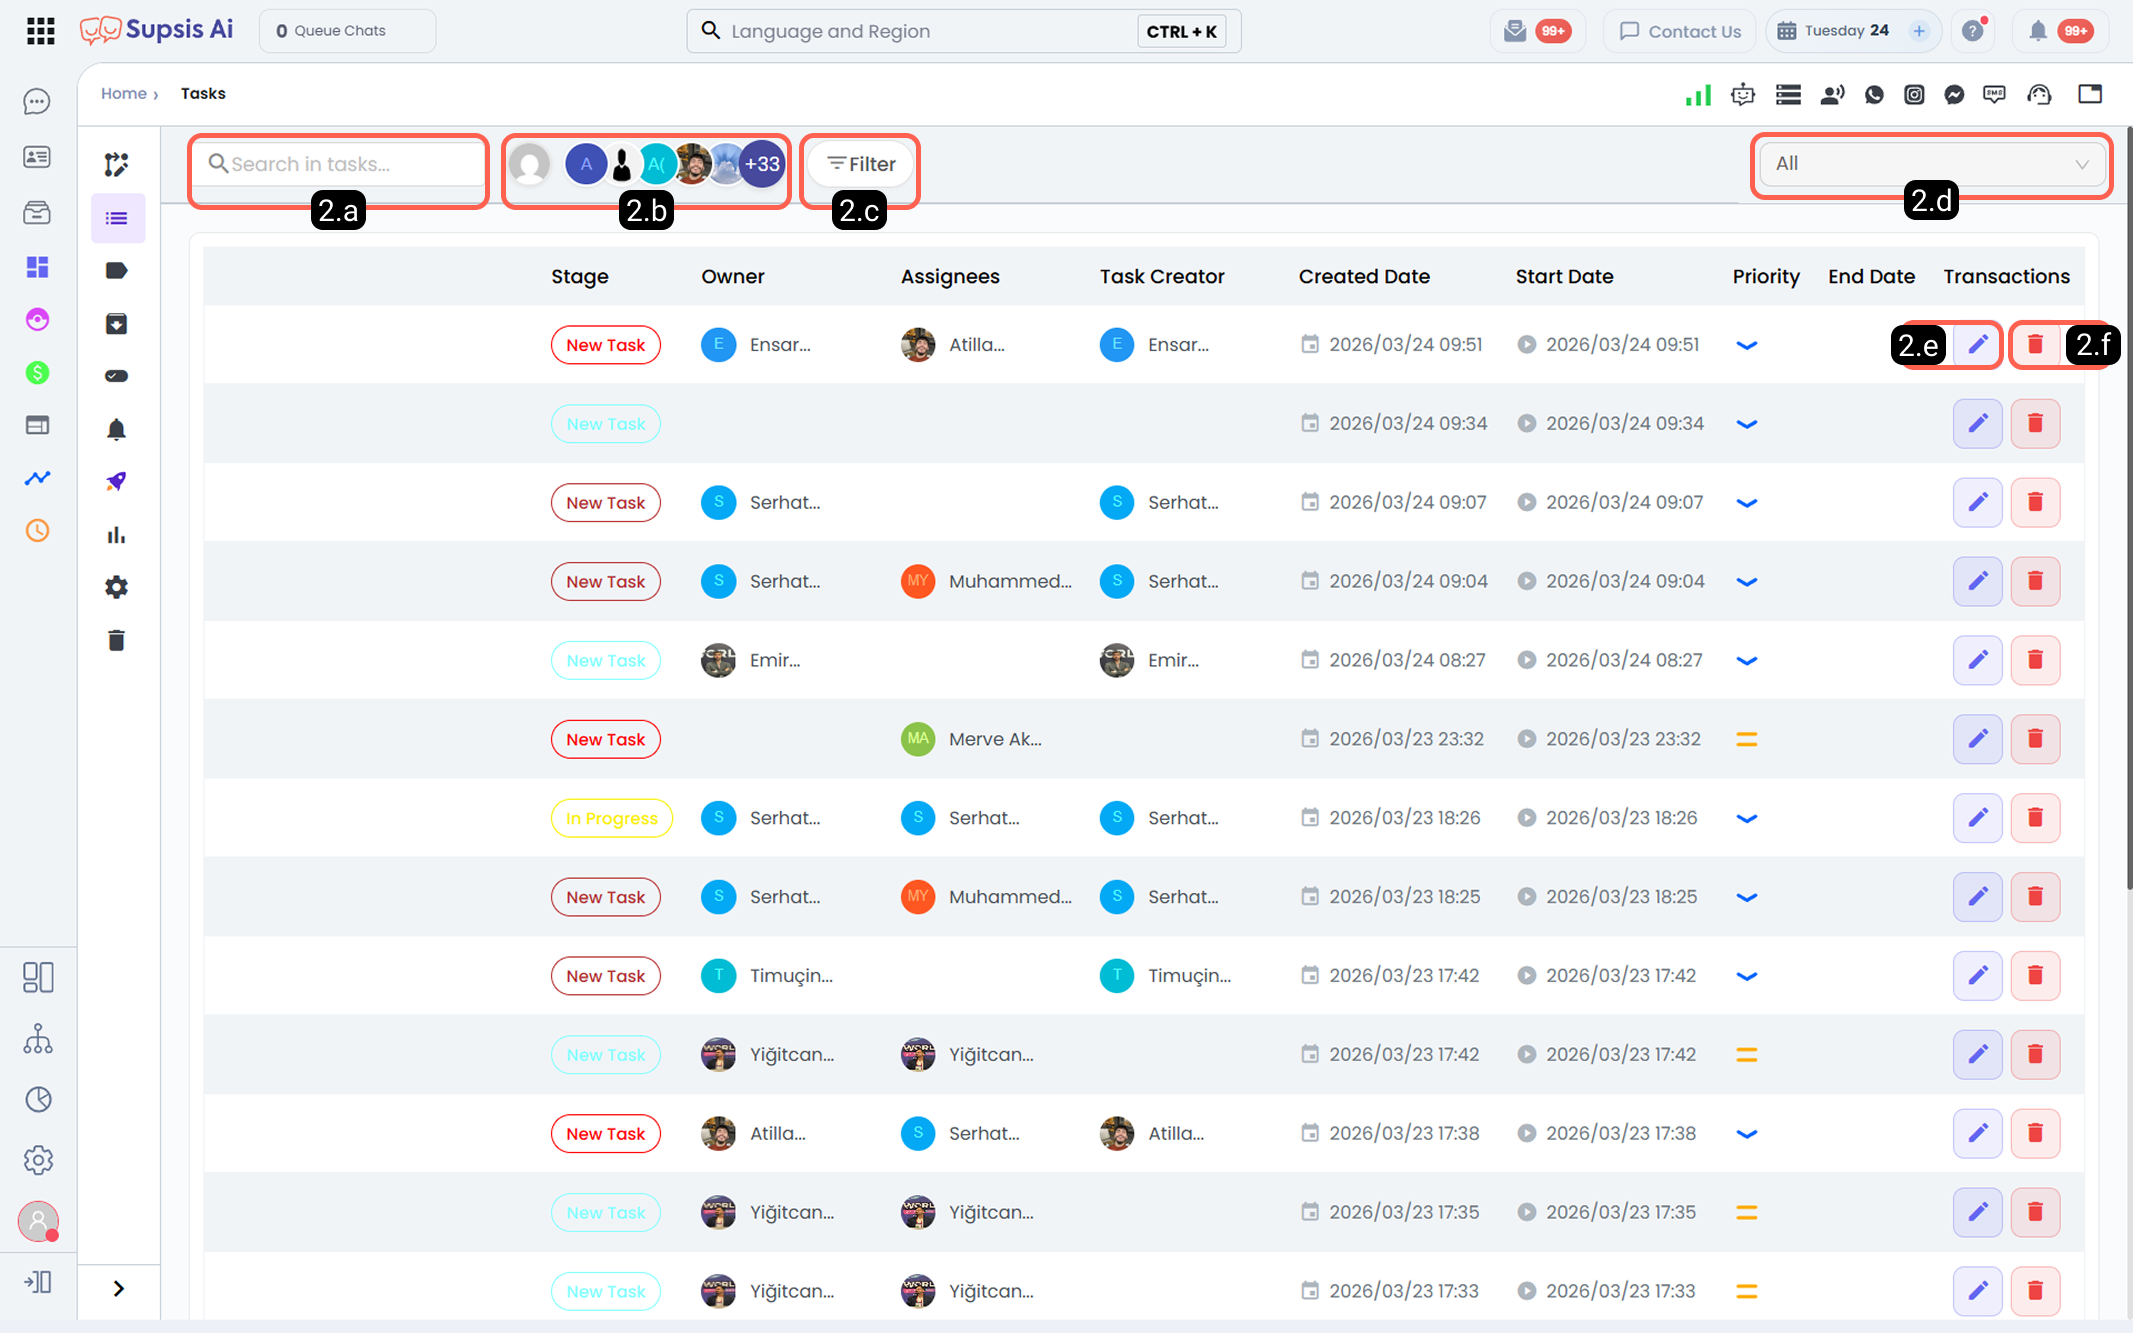
2.a – Search Tasks
Allows you to search within the task list by keyword. You can quickly access results based on task name, description, and related fields.
2.b – Filter by Assignee (Kanban & List View)
Allows you to filter tasks based on the assigned person. This filter is available on both Kanban (Workflow Board View) and List View screens. Selecting a specific Supsis AI user/agent from the filter instantly filters and displays only the tasks assigned to that individual across both views.
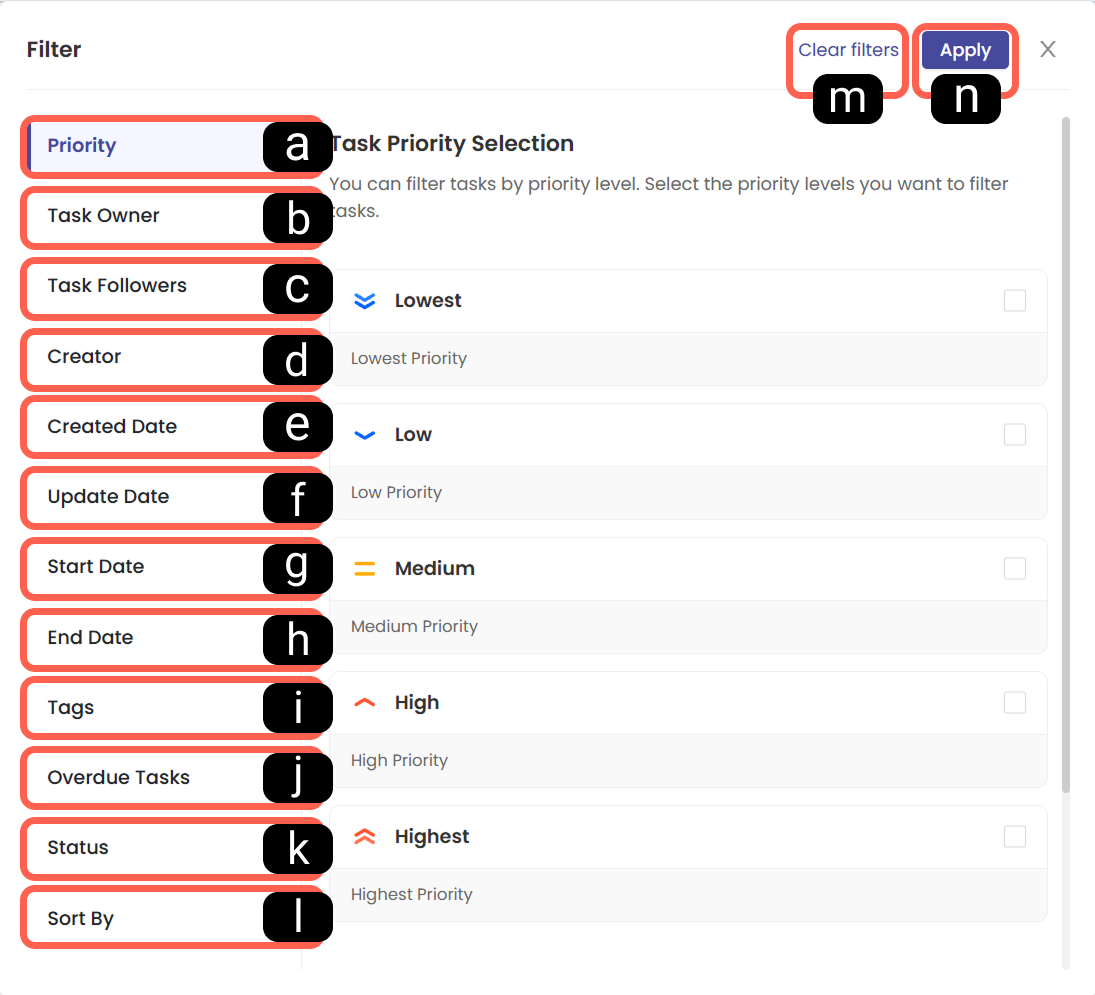
2.c – Filter
-
a - Priority
Allows you to filter tasks by priority levels. Tasks with different priority statuses can be viewed separately. -
b - Task Owner
Allows you to filter tasks based on ownership information. Tasks assigned to a specific user can be listed. -
c - Task Followers
Allows you to filter tasks according to followers. Tasks where selected users are assigned as followers are displayed. -
d - Created By
Allows you to filter tasks based on the user who created them. -
e - Created Date
Allows filtering tasks by their creation date range. -
f - Updated Date
Allows filtering tasks based on their last update date. -
g - Start Date
Allows filtering tasks according to their start date. -
h - Due Date
Allows filtering tasks based on their due date. -
i - Tags
Allows filtering tasks based on assigned tags. -
j - Overdue Tasks
Lists tasks whose due date has passed. -
k - Status
The "Status" filter allows you to filter tasks based on different stages in the workflow. This way, only tasks in specific stages are displayed. If multiple stages are selected, tasks in all selected stages will be shown. -
l - Sorting
The "Sorting" filter lets you choose the order in which tasks are listed. Tasks are sorted based on the selected date criteria, with the most recent tasks always displayed at the top. -
m - Clear Filter
Resets all selected filters and returns the task list to its default state. -
n - Apply
Activates the selected filter criteria and updates the task list accordingly.
2.d – Filter by Workflow
Allows filtering tasks based on the workflows they are connected to. Tasks are displayed according to the selected workflow and defined filters.
2.e – Edit Task Content
Allows editing of task name, description, date, priority, Supsis AI contact source, tags, subtasks, checklist, assignments, and adding comments.
2.f – Delete Task
Removes the selected task from the system. Deleted tasks cannot be recovered.
3-) Tags
Tags are auxiliary task identifiers that enable classification and filtering of tasks.
Tags created within the Task Management Module allow tasks to be distinguished based on priority, topic, team routing, or special business processes.
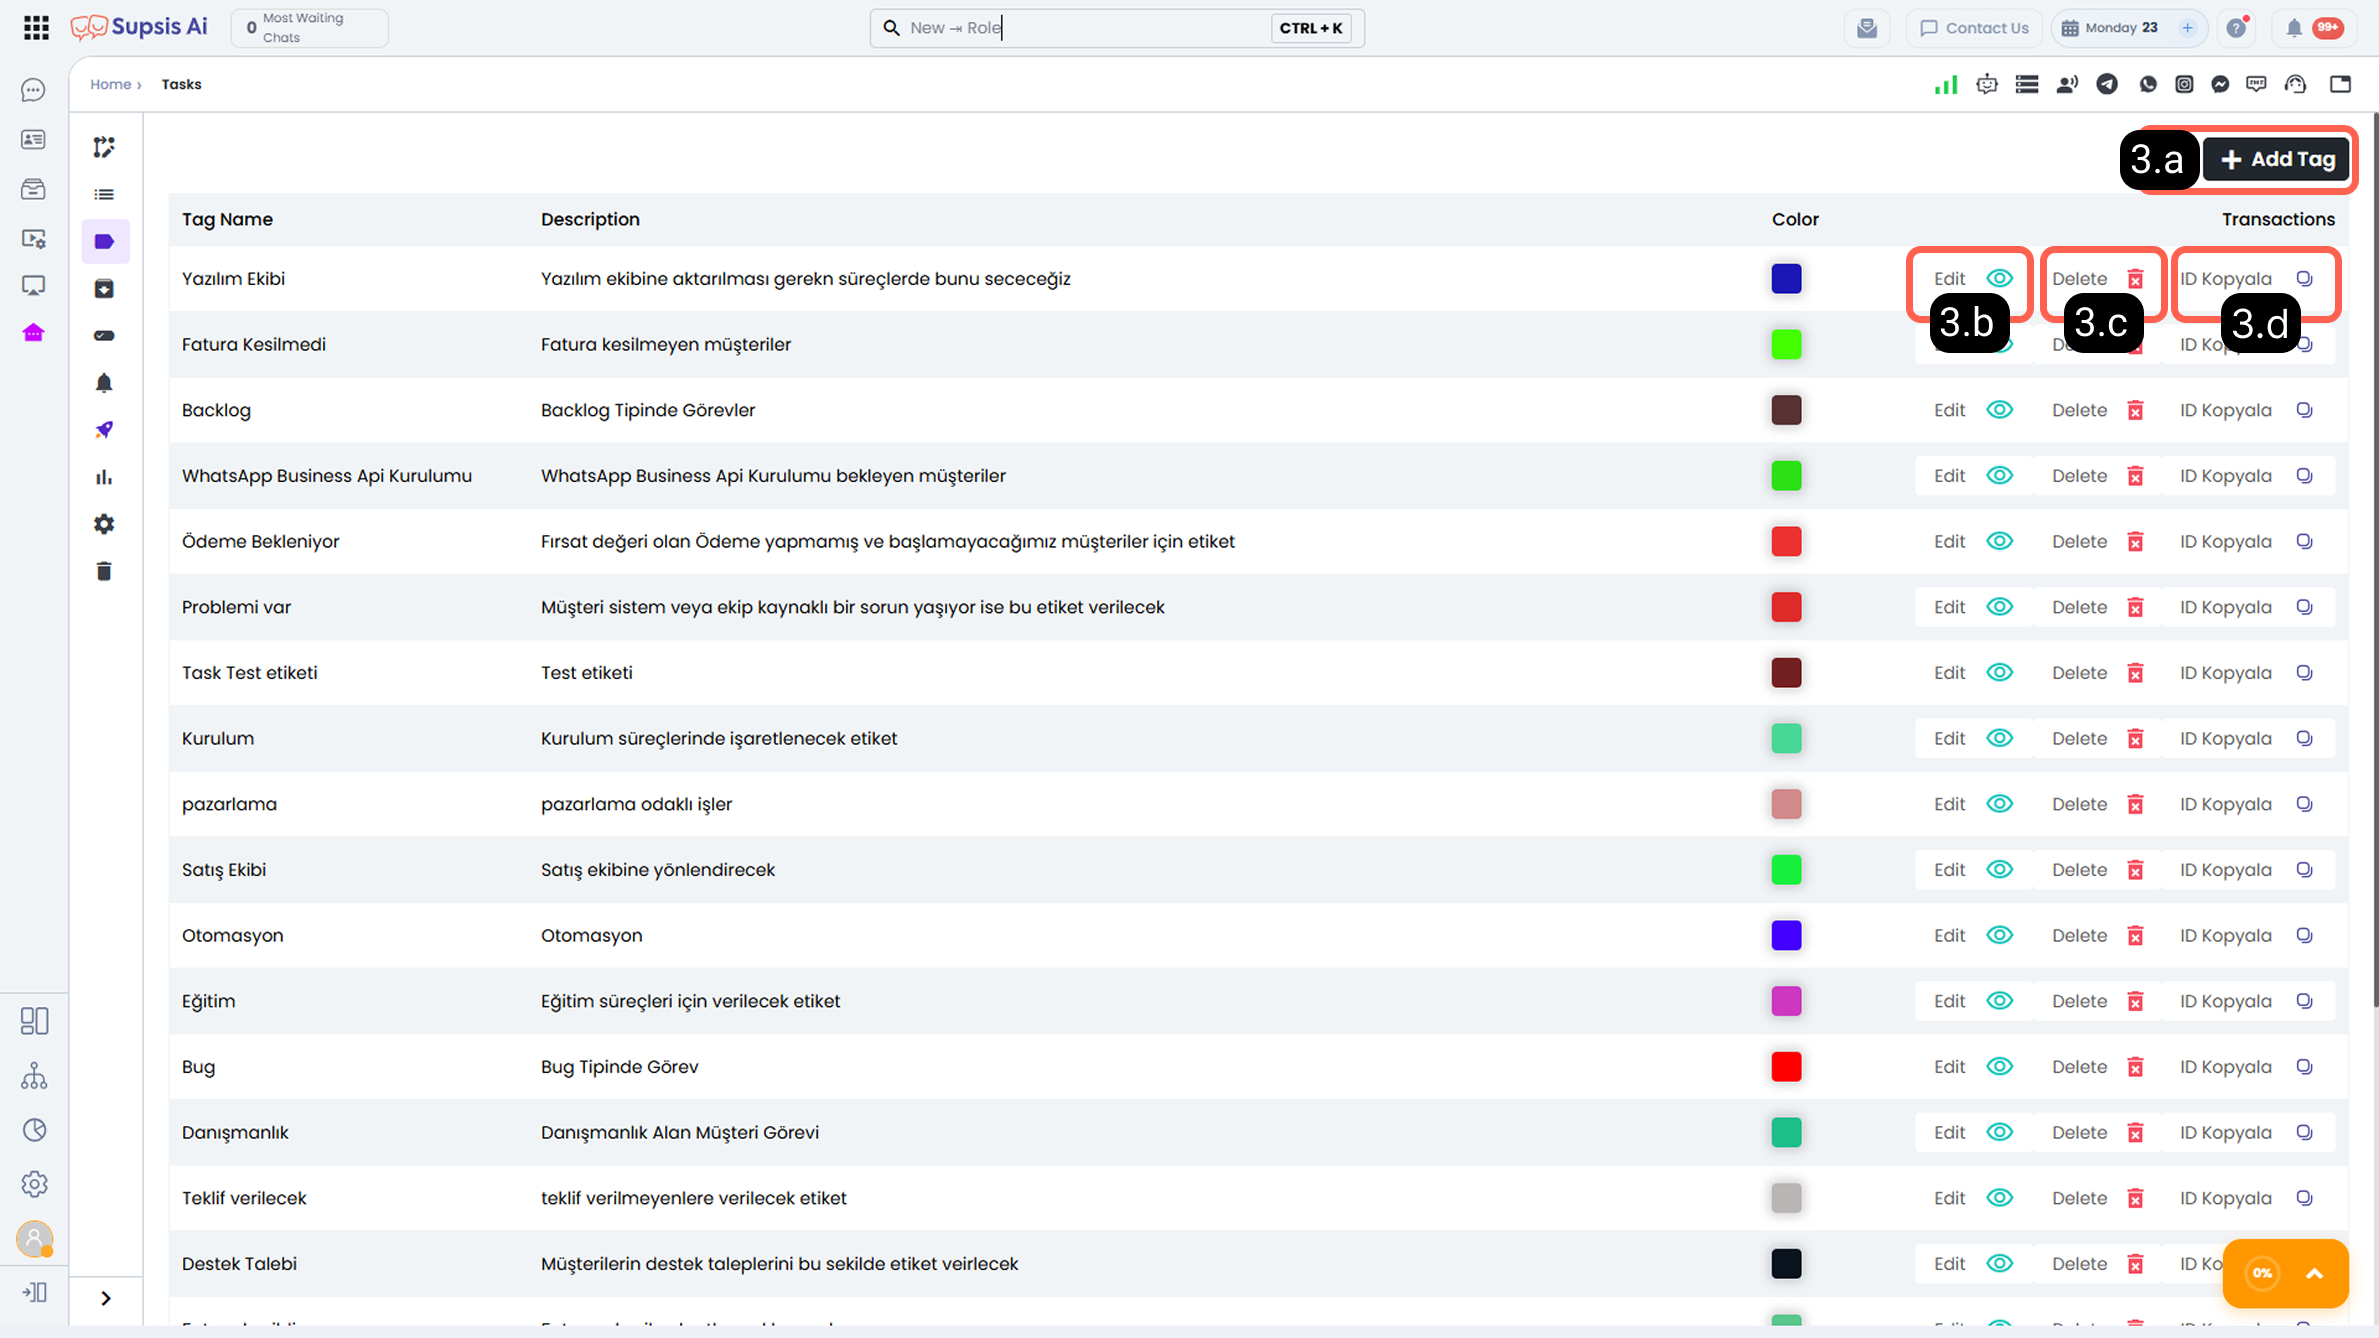
3.a – Add Tag
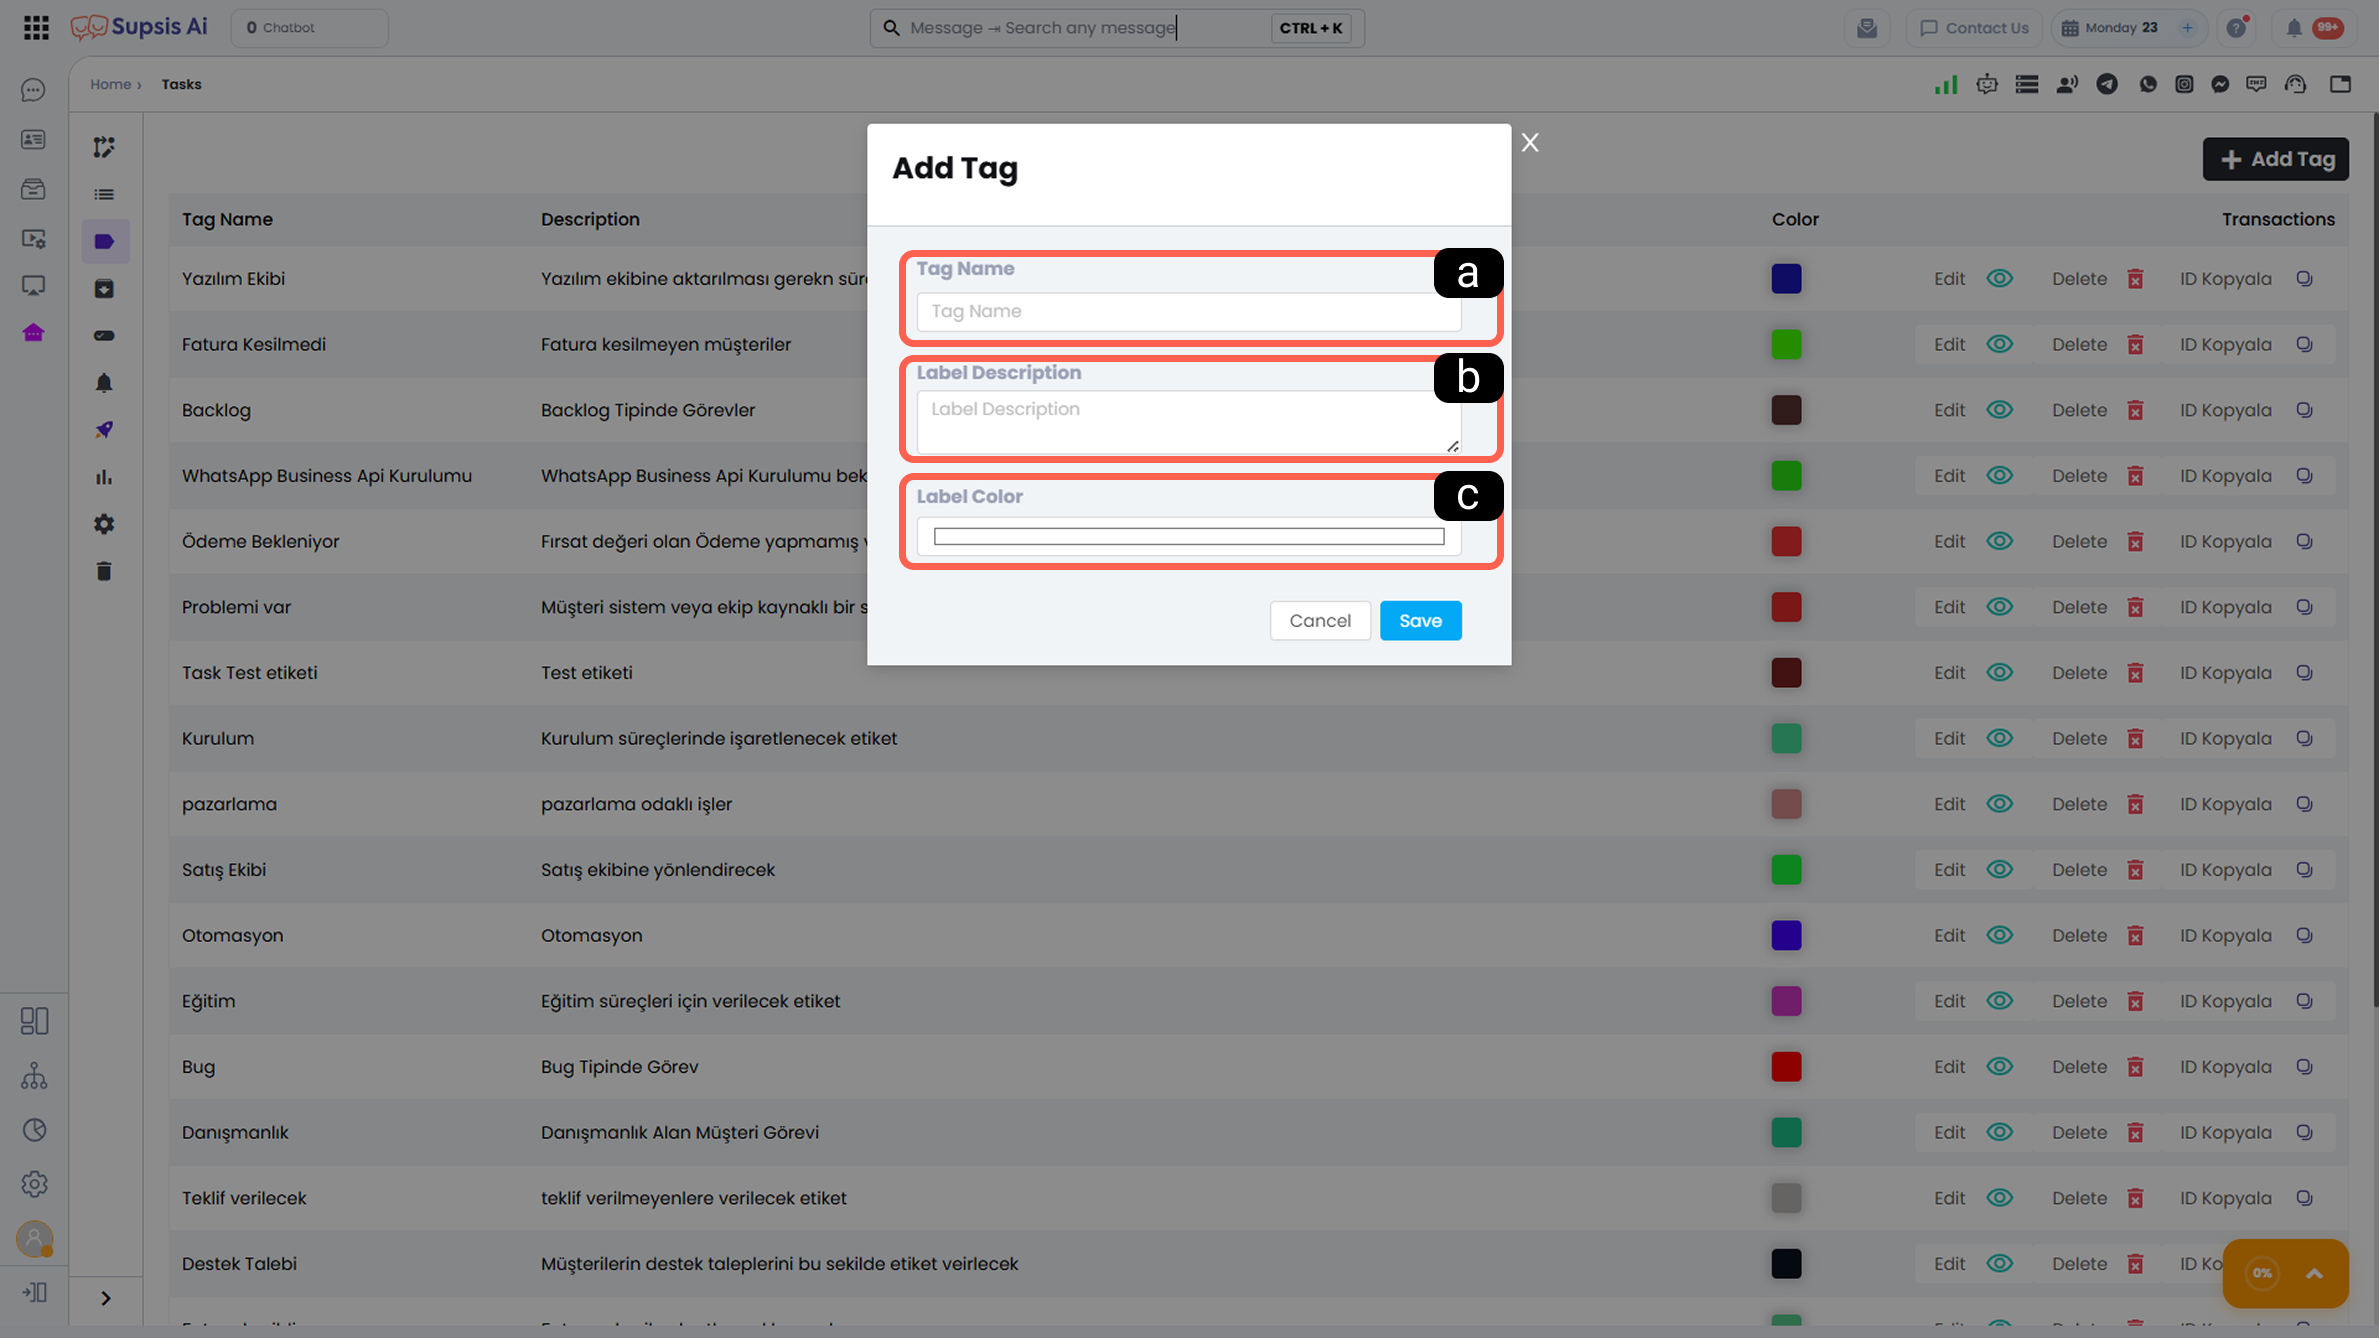
-
a - Tag Name
The name displayed on tasks. -
b - Tag Description
Informational text explaining the purpose of the tag. -
c - Tag Color
The color displayed in task lists and detail screens for visual distinction.
3.b – Edit Tag
Allows updating the name, description, or color of an existing tag.
Changes automatically apply to all tasks using that tag.
3.c – Delete Tag
Unused tags can be removed from the system.
The deleted tag is removed from all tasks it was assigned to.
3.d – Copy Tag ID
Each tag has a unique Tag ID that allows it to be recognized by software systems.
This ID can be copied and used in API integrations and Supsis AI automation scenarios.
4-) Archived Tasks
Archived Tasks store tasks that have been completed or temporarily removed from view.
This section ensures tasks are archived without being deleted, historical records are preserved, and the active task list remains clean.
Archived tasks are not visible in active workflows but are kept for reporting and review purposes.

4.a – Search Tasks
Allows you to search within the archived task list by keyword.
4.b – Filter by Assignee
Allows filtering archived tasks by assigned user.
4.c – Filter
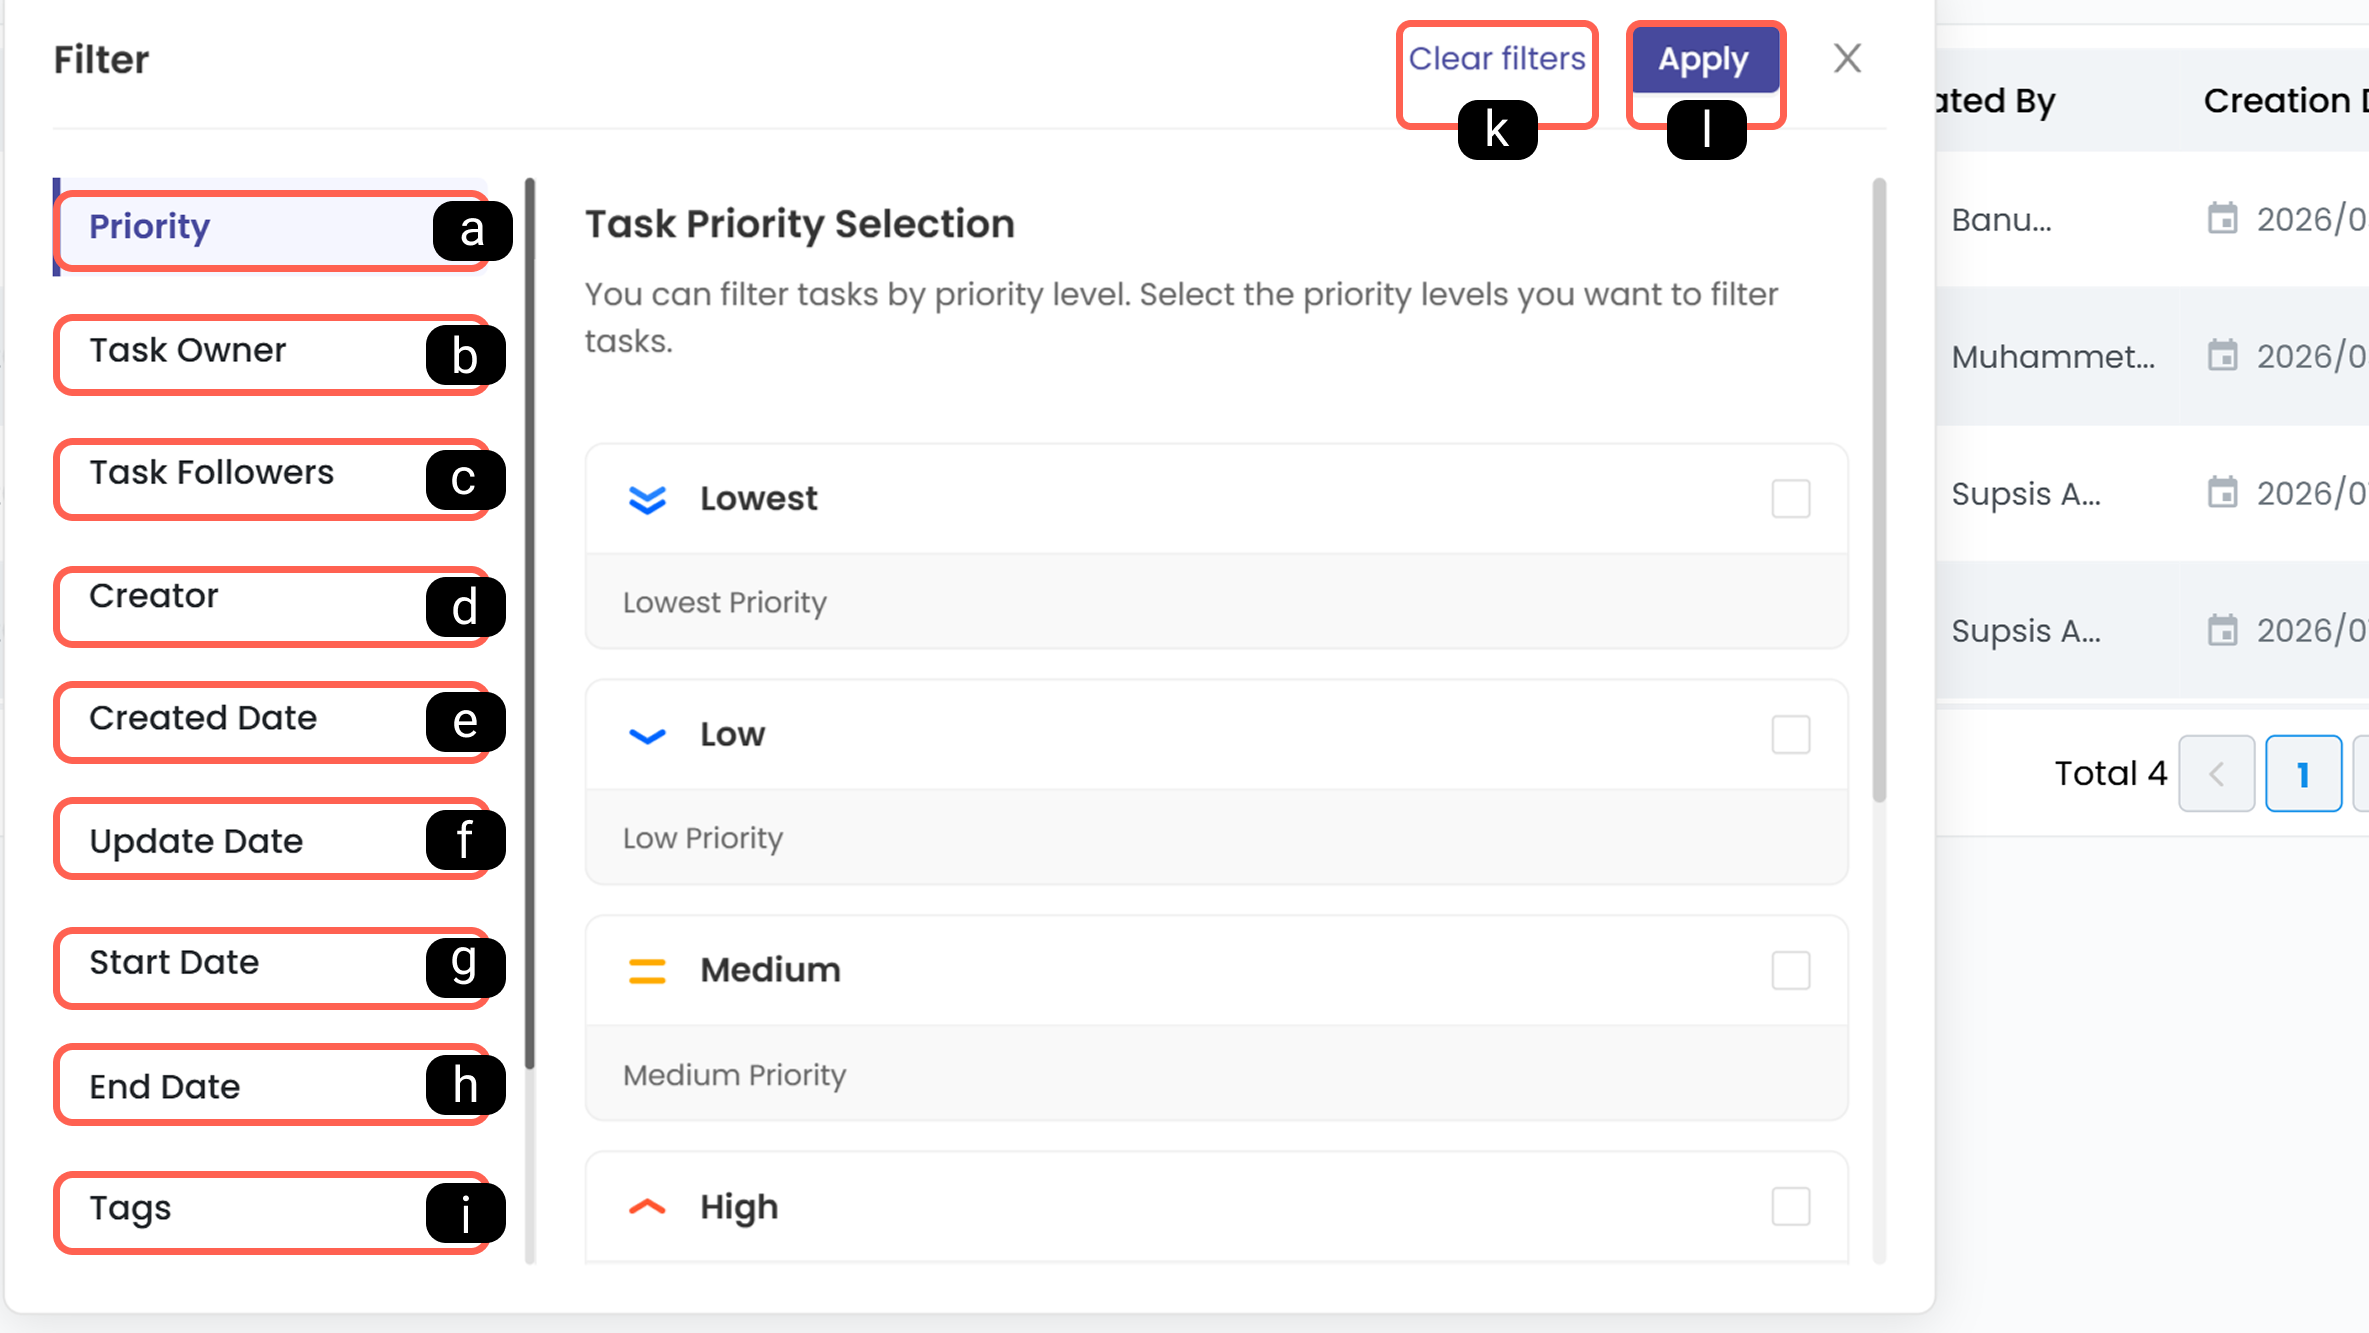
- Priority
- Task Owner
- Task Followers
- Created By
- Created Date
- Updated Date
- Start Date
- Due Date
- Tags
- Overdue Tasks
- Clear Filter
- Apply
4.d – Filter by Workflow
Allows filtering archived tasks according to their related workflow.
4.e – Edit Task
Allows editing archived task details including name, description, date, priority, source contact, tags, subtasks, checklist, assignments, and comments.
4.f – Delete Task
Removes the selected task from the system permanently. Deleted tasks cannot be recovered.
5-) Completed Tasks
Completed Tasks are automatically moved here when their stage status becomes “Completed”.
This section ensures that successfully completed tasks are recorded and past processes can be tracked.
Completed tasks are removed from active task lists, archived with their final workflow status preserved, and remain accessible for reporting, performance analysis, and historical review.
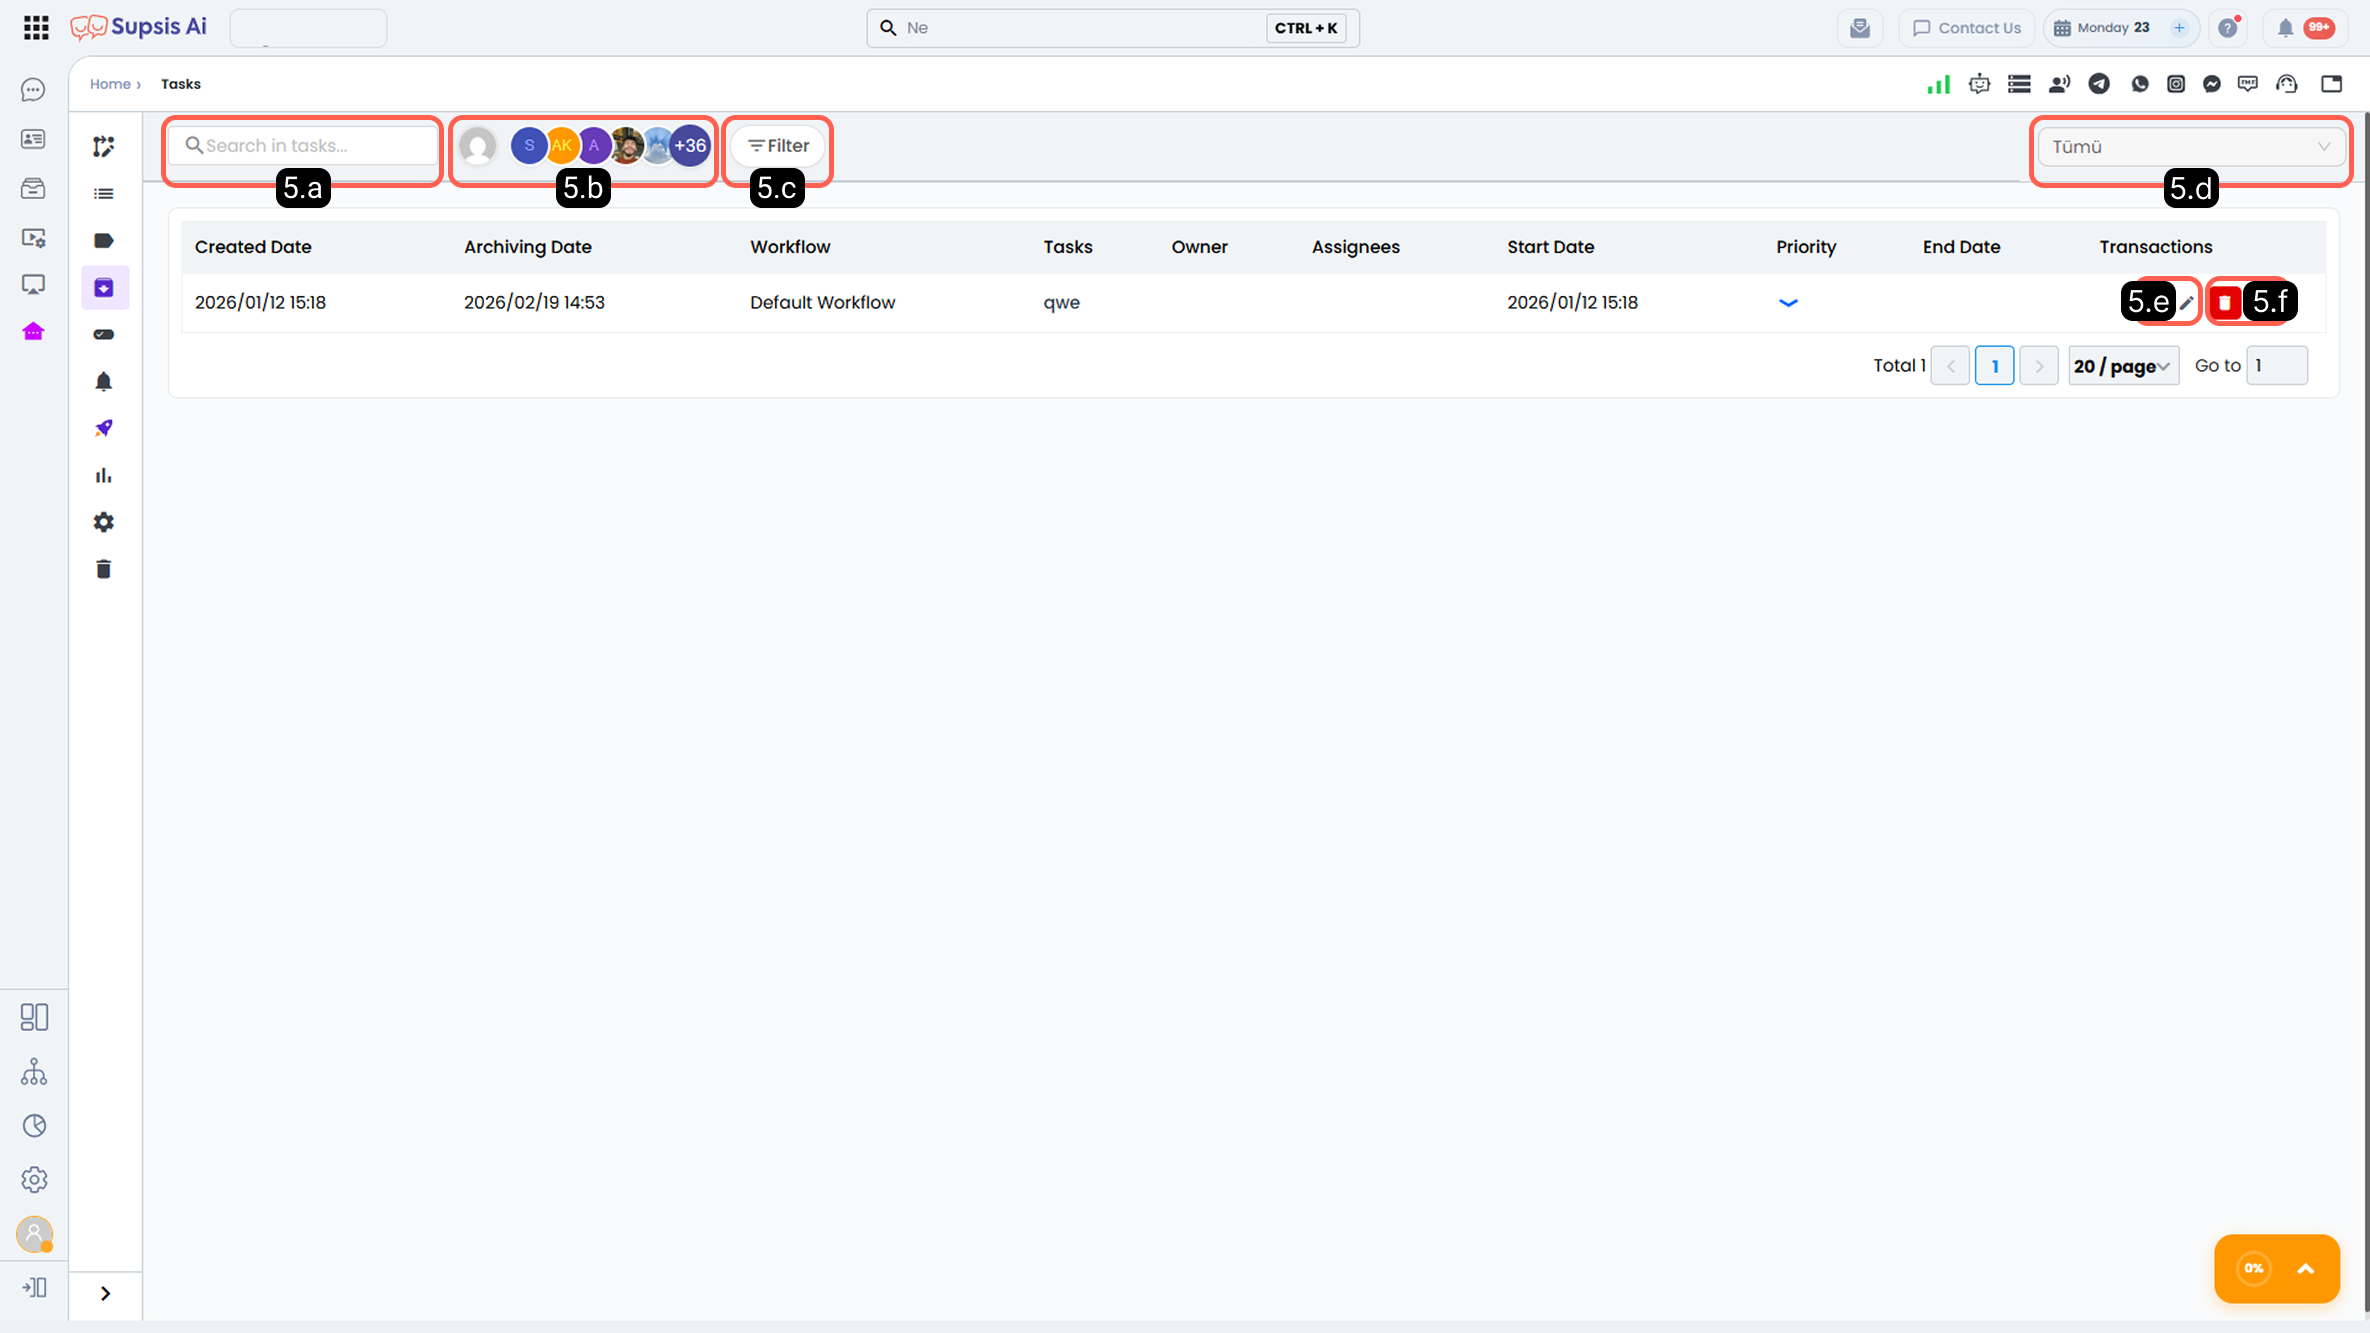
5.a – Search Tasks
Allows keyword search within completed tasks.
5.b – Filter by Assignee
Allows filtering completed tasks by assigned user.
5.c – Filter

- Priority
- Task Owner
- Task Followers
- Created By
- Created Date
- Updated Date
- Start Date
- Due Date
- Tags
- Overdue Tasks
- Clear Filter
- Apply
5.d – Filter by Workflow
Allows filtering completed tasks according to their related workflow.
5.e – Edit Task
Allows editing task details.
5.f – Delete Task
Removes the selected task permanently. Deleted tasks cannot be recovered.
5.g – Move Done Task Back to Board (Panoya Taşı)
Feature used to restore a closed/completed (Done) task back to active status on the Kanban board:
* Menu Navigation: Tasks → Workflow Board → "Completed Tasks" Modal → Task Card → "..." Menu → "Move to Board (Panoya Taşı)".
* Automatic Relocation Logic: When selected, the task is automatically placed at the top of the first "todo" (to-do) column of its associated workflow and removed from Done status.
* Notifications & Activity Log: A "Task moved to board" toast notification appears. Assigned users (assignees), task owner, and followers receive instant web and mobile notifications, and a "moved task back to board" entry is logged in the task activity history.
6-) Task Notifications
Task notifications allow you to configure which channels you want to receive notifications from for specific events within the task management module.
Notifications can be delivered via:
- Web panel
- Mobile application
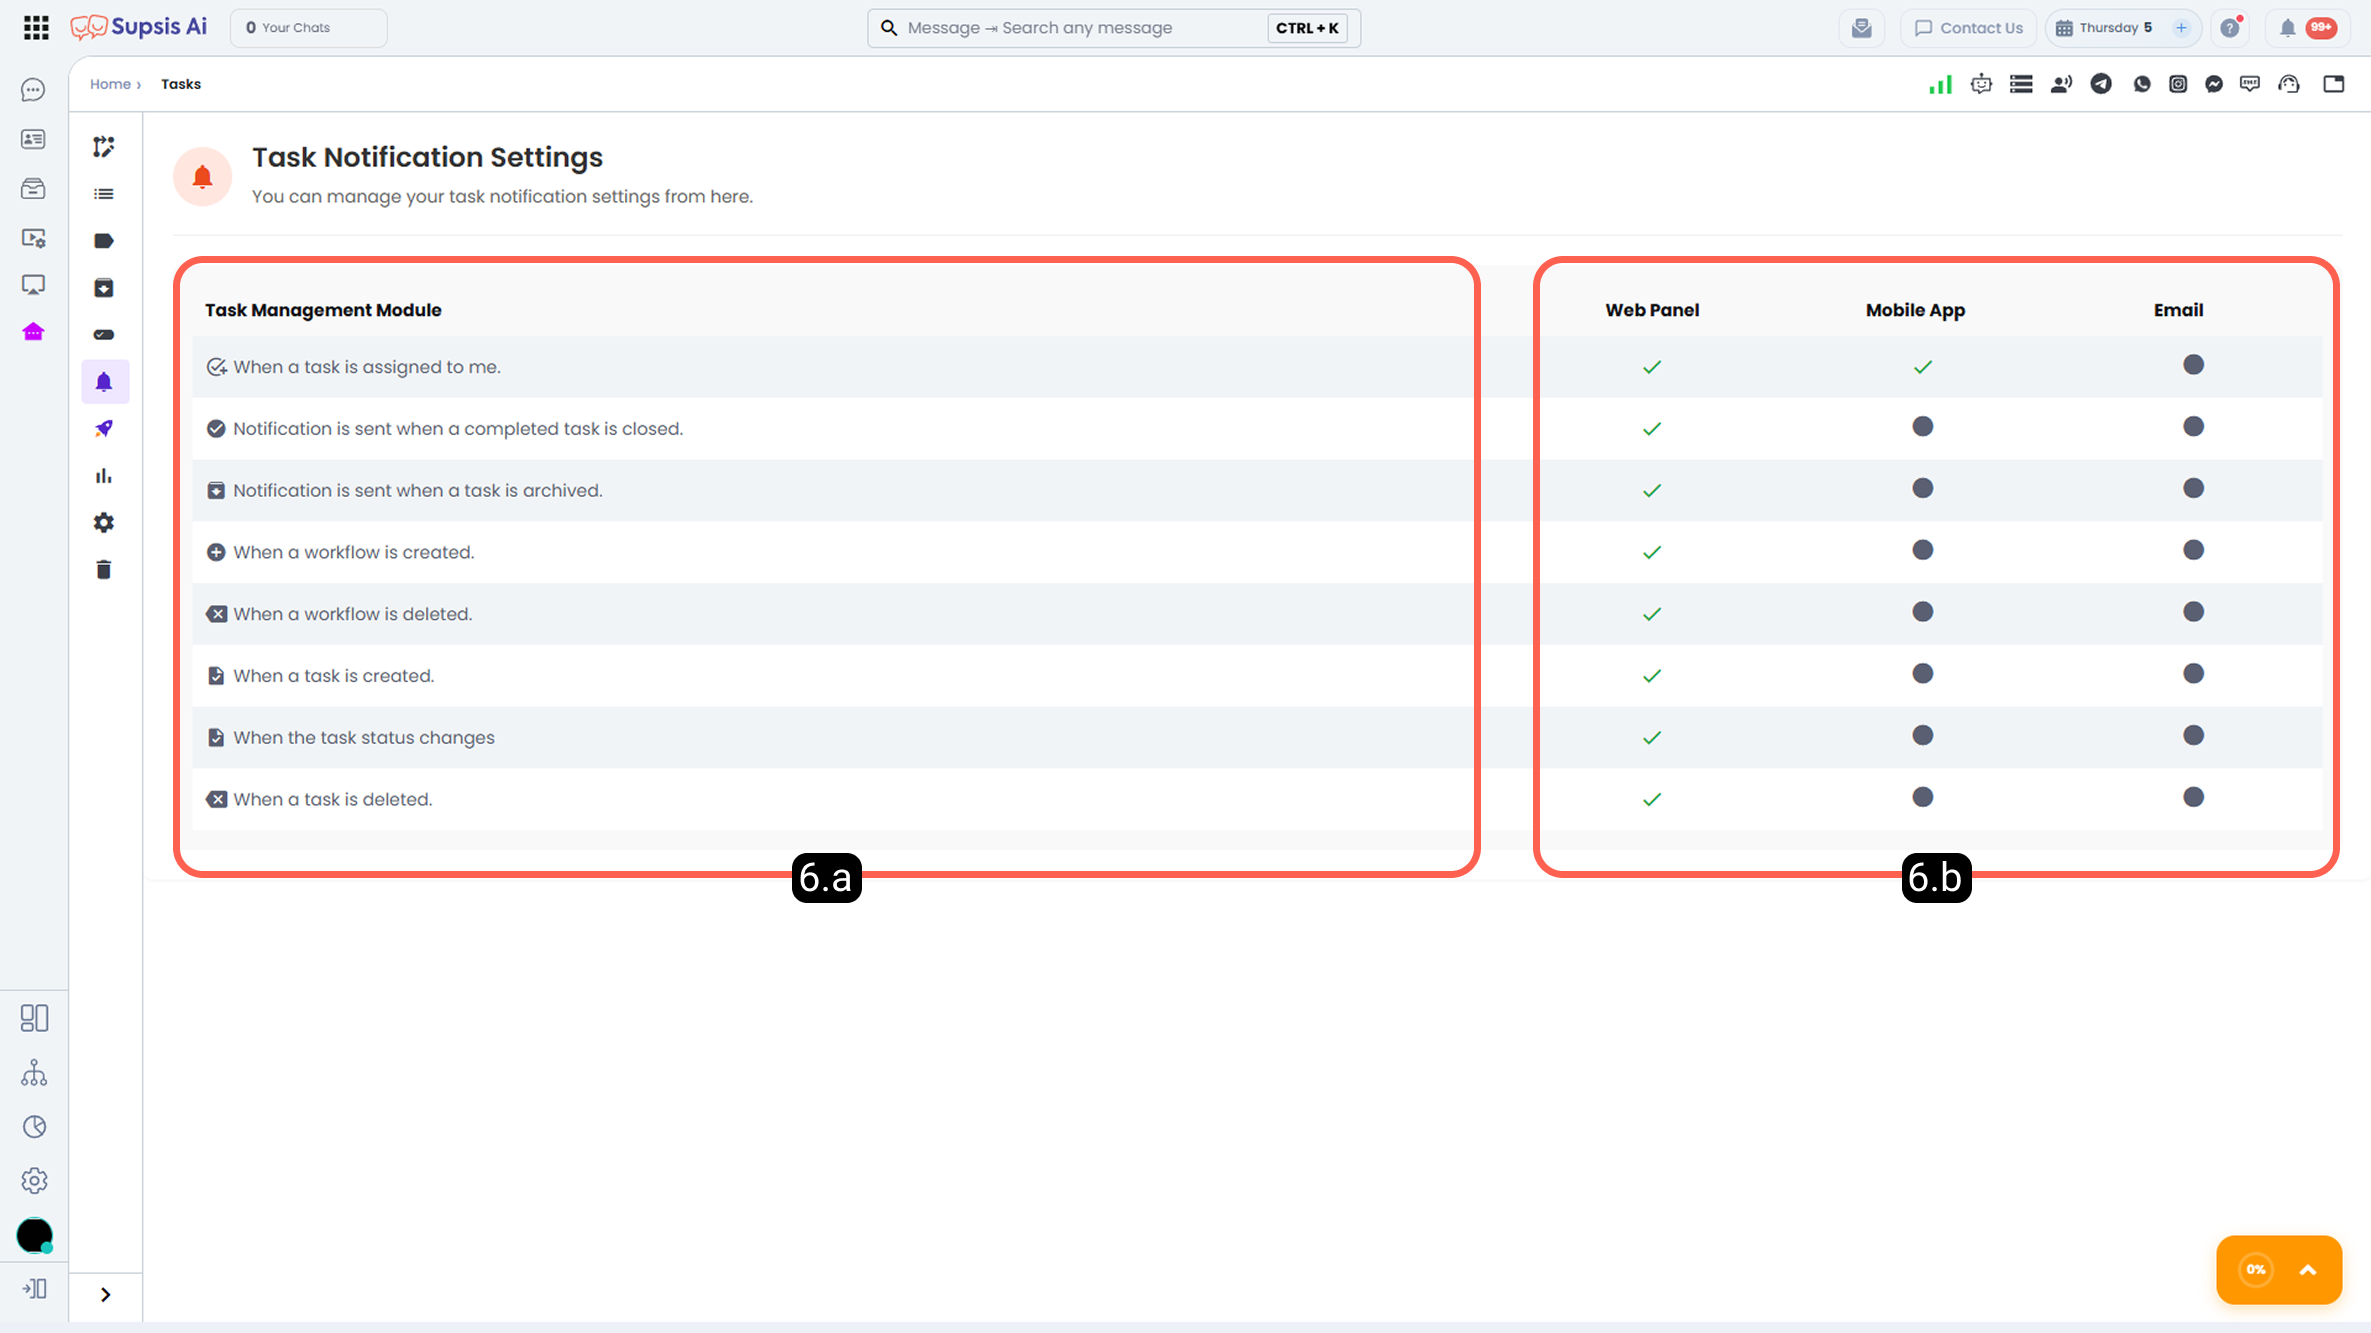

6.a – Actions
Defines which events trigger notifications. When a channel is selected, a notification is sent instantly when the related event occurs.
6.b – Notification Channel
Allows selecting which channels will receive notifications for specific actions. Channels can be activated or deactivated as needed.
7-) Automations
All automation rules that run based on events within the Task Management Module (such as task creation, stage changes, etc.) are managed through this section.
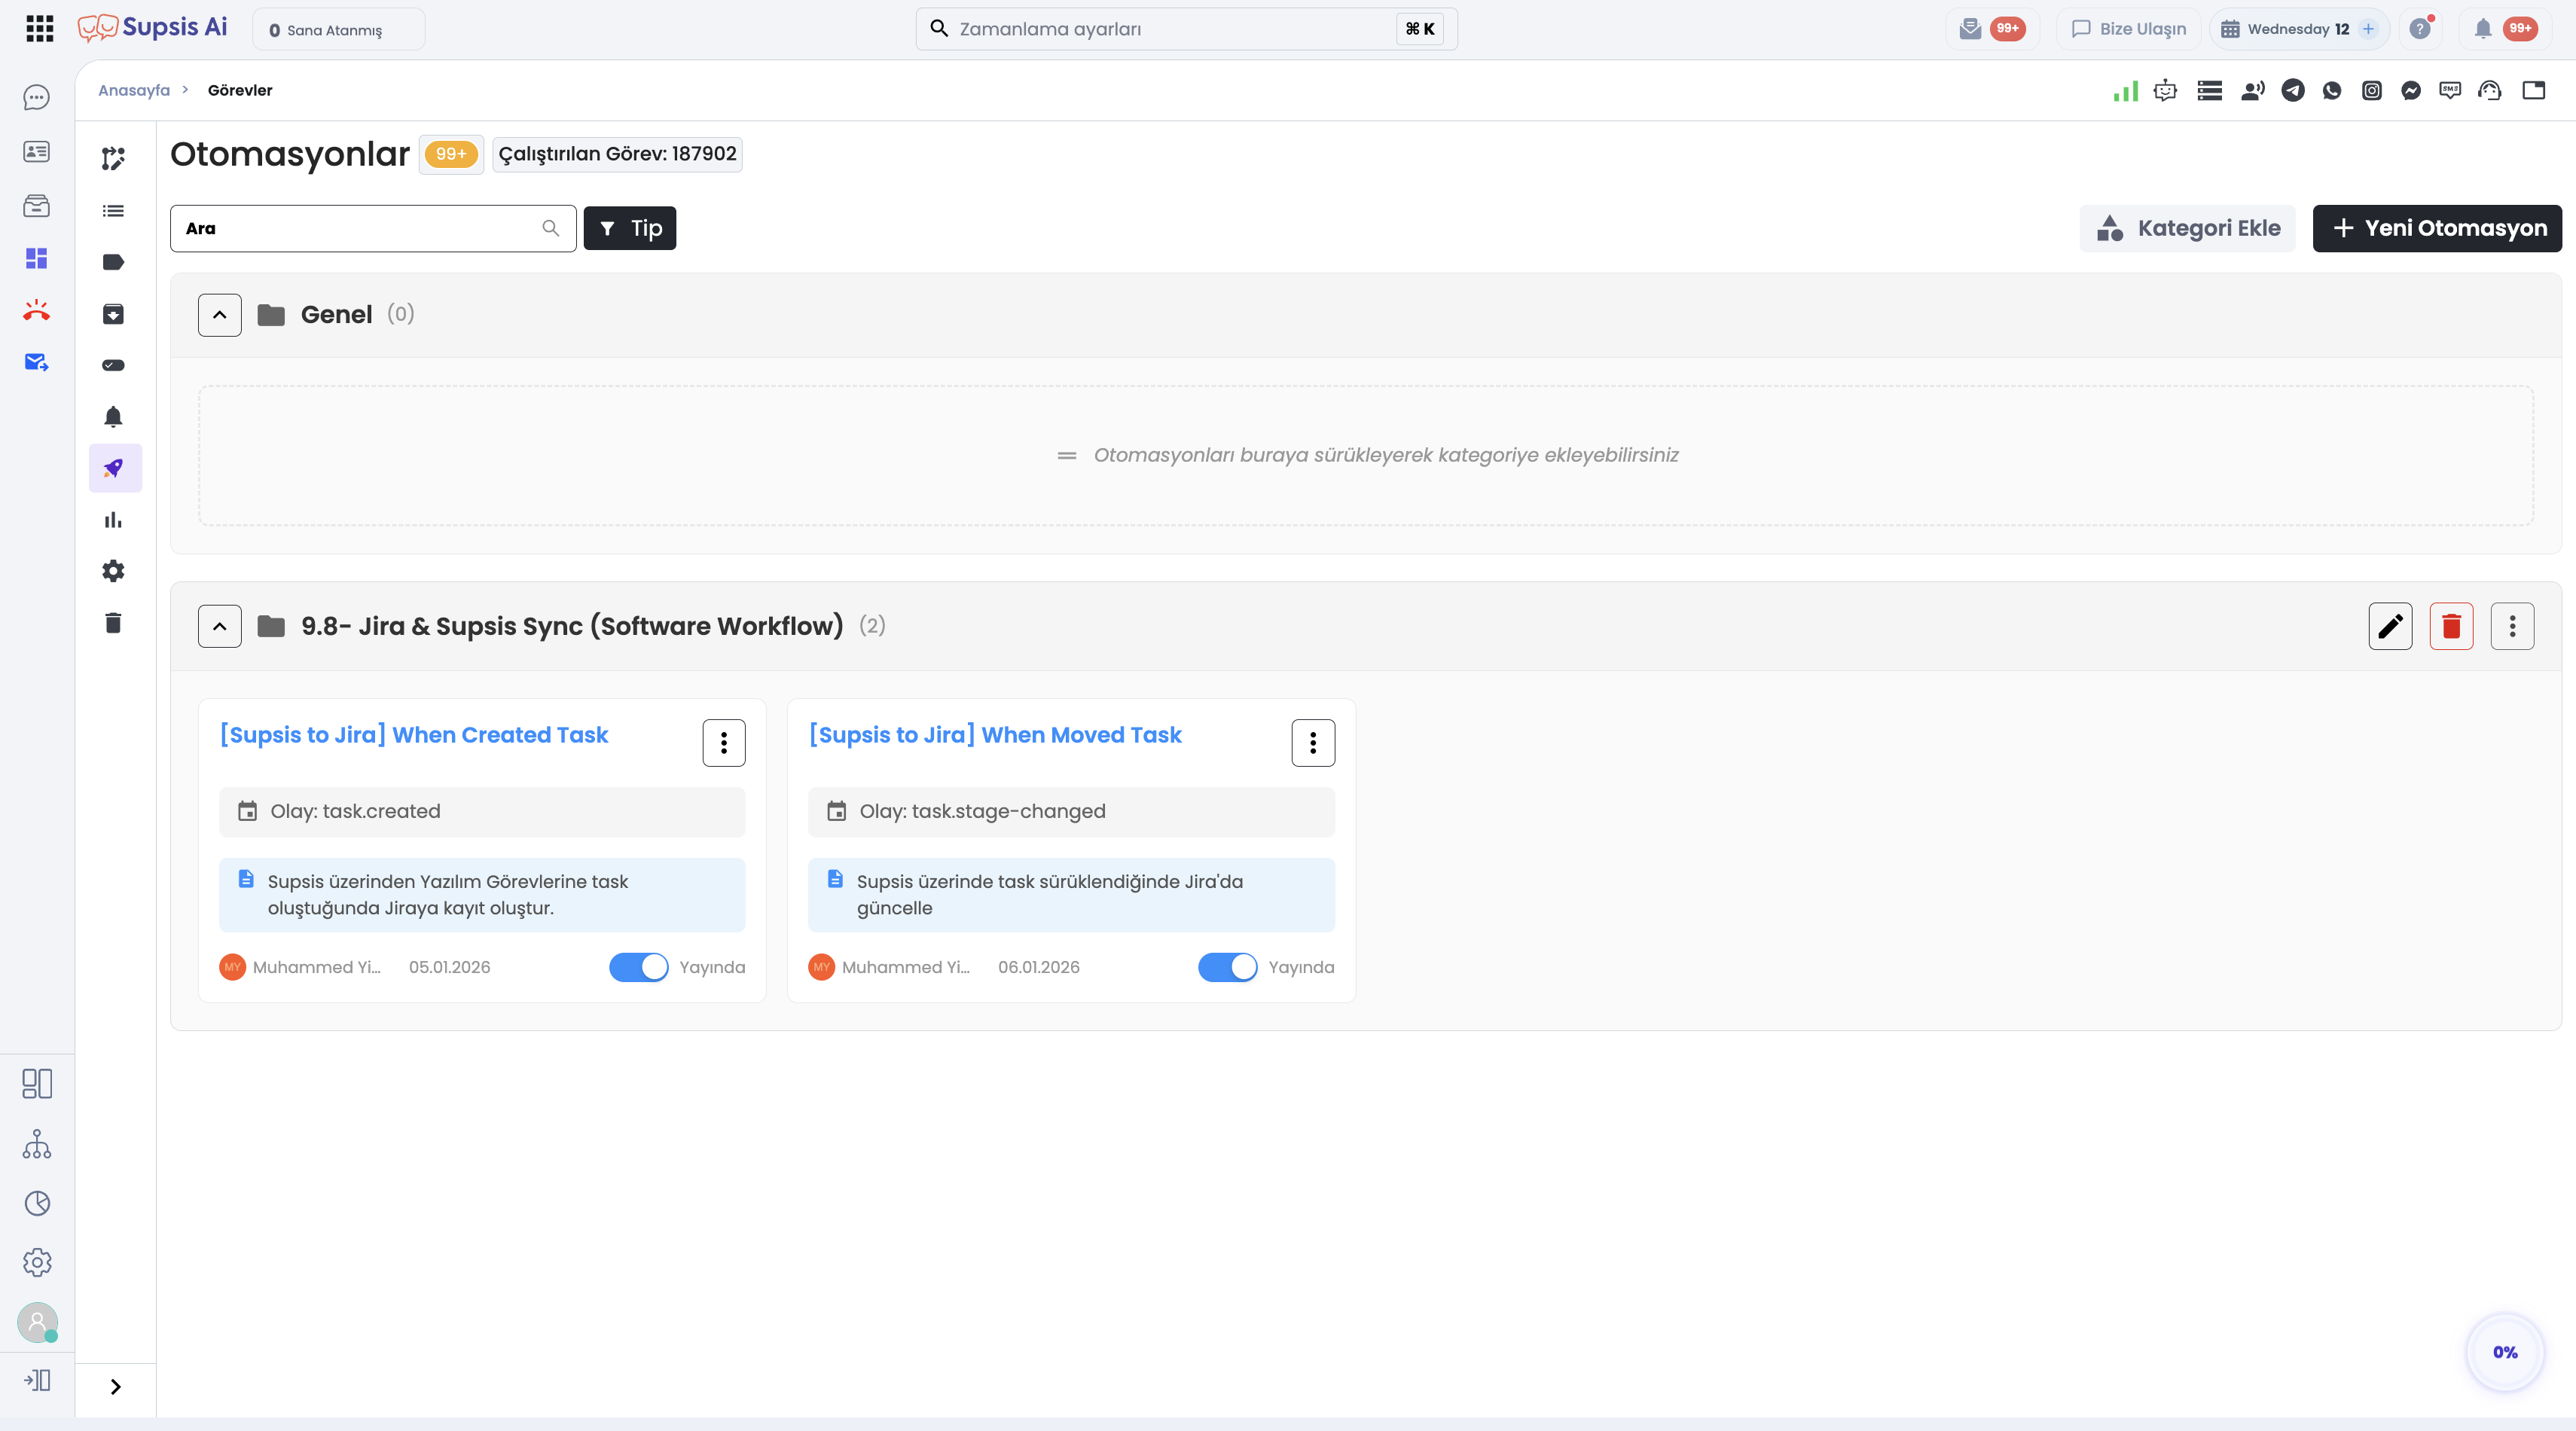
- Categories & Drag-and-Drop Organization: You can group your automations under folders/categories and easily move them between categories using drag-and-drop.
- Creating New Automations: Use the
+ New Automationbutton to define new rules and integration actions triggered by task movements. - Publish Status Control: Track the trigger event (
task.created,task.stage-changed, etc.) directly on the automation cards and toggle automations between Published / Inactive states instantly. - Execution Statistics: Monitor the total number of tasks processed by automations across the module from the top badge stats.
8-) Reports
The Reports section allows detailed analysis of workflow and task data. This area provides real-time reporting on the number of created and updated tasks within a specific date range, task distribution among assignees, and their current statuses across workflow stages. It also allows time-based tracking of agent performance via the timeline.
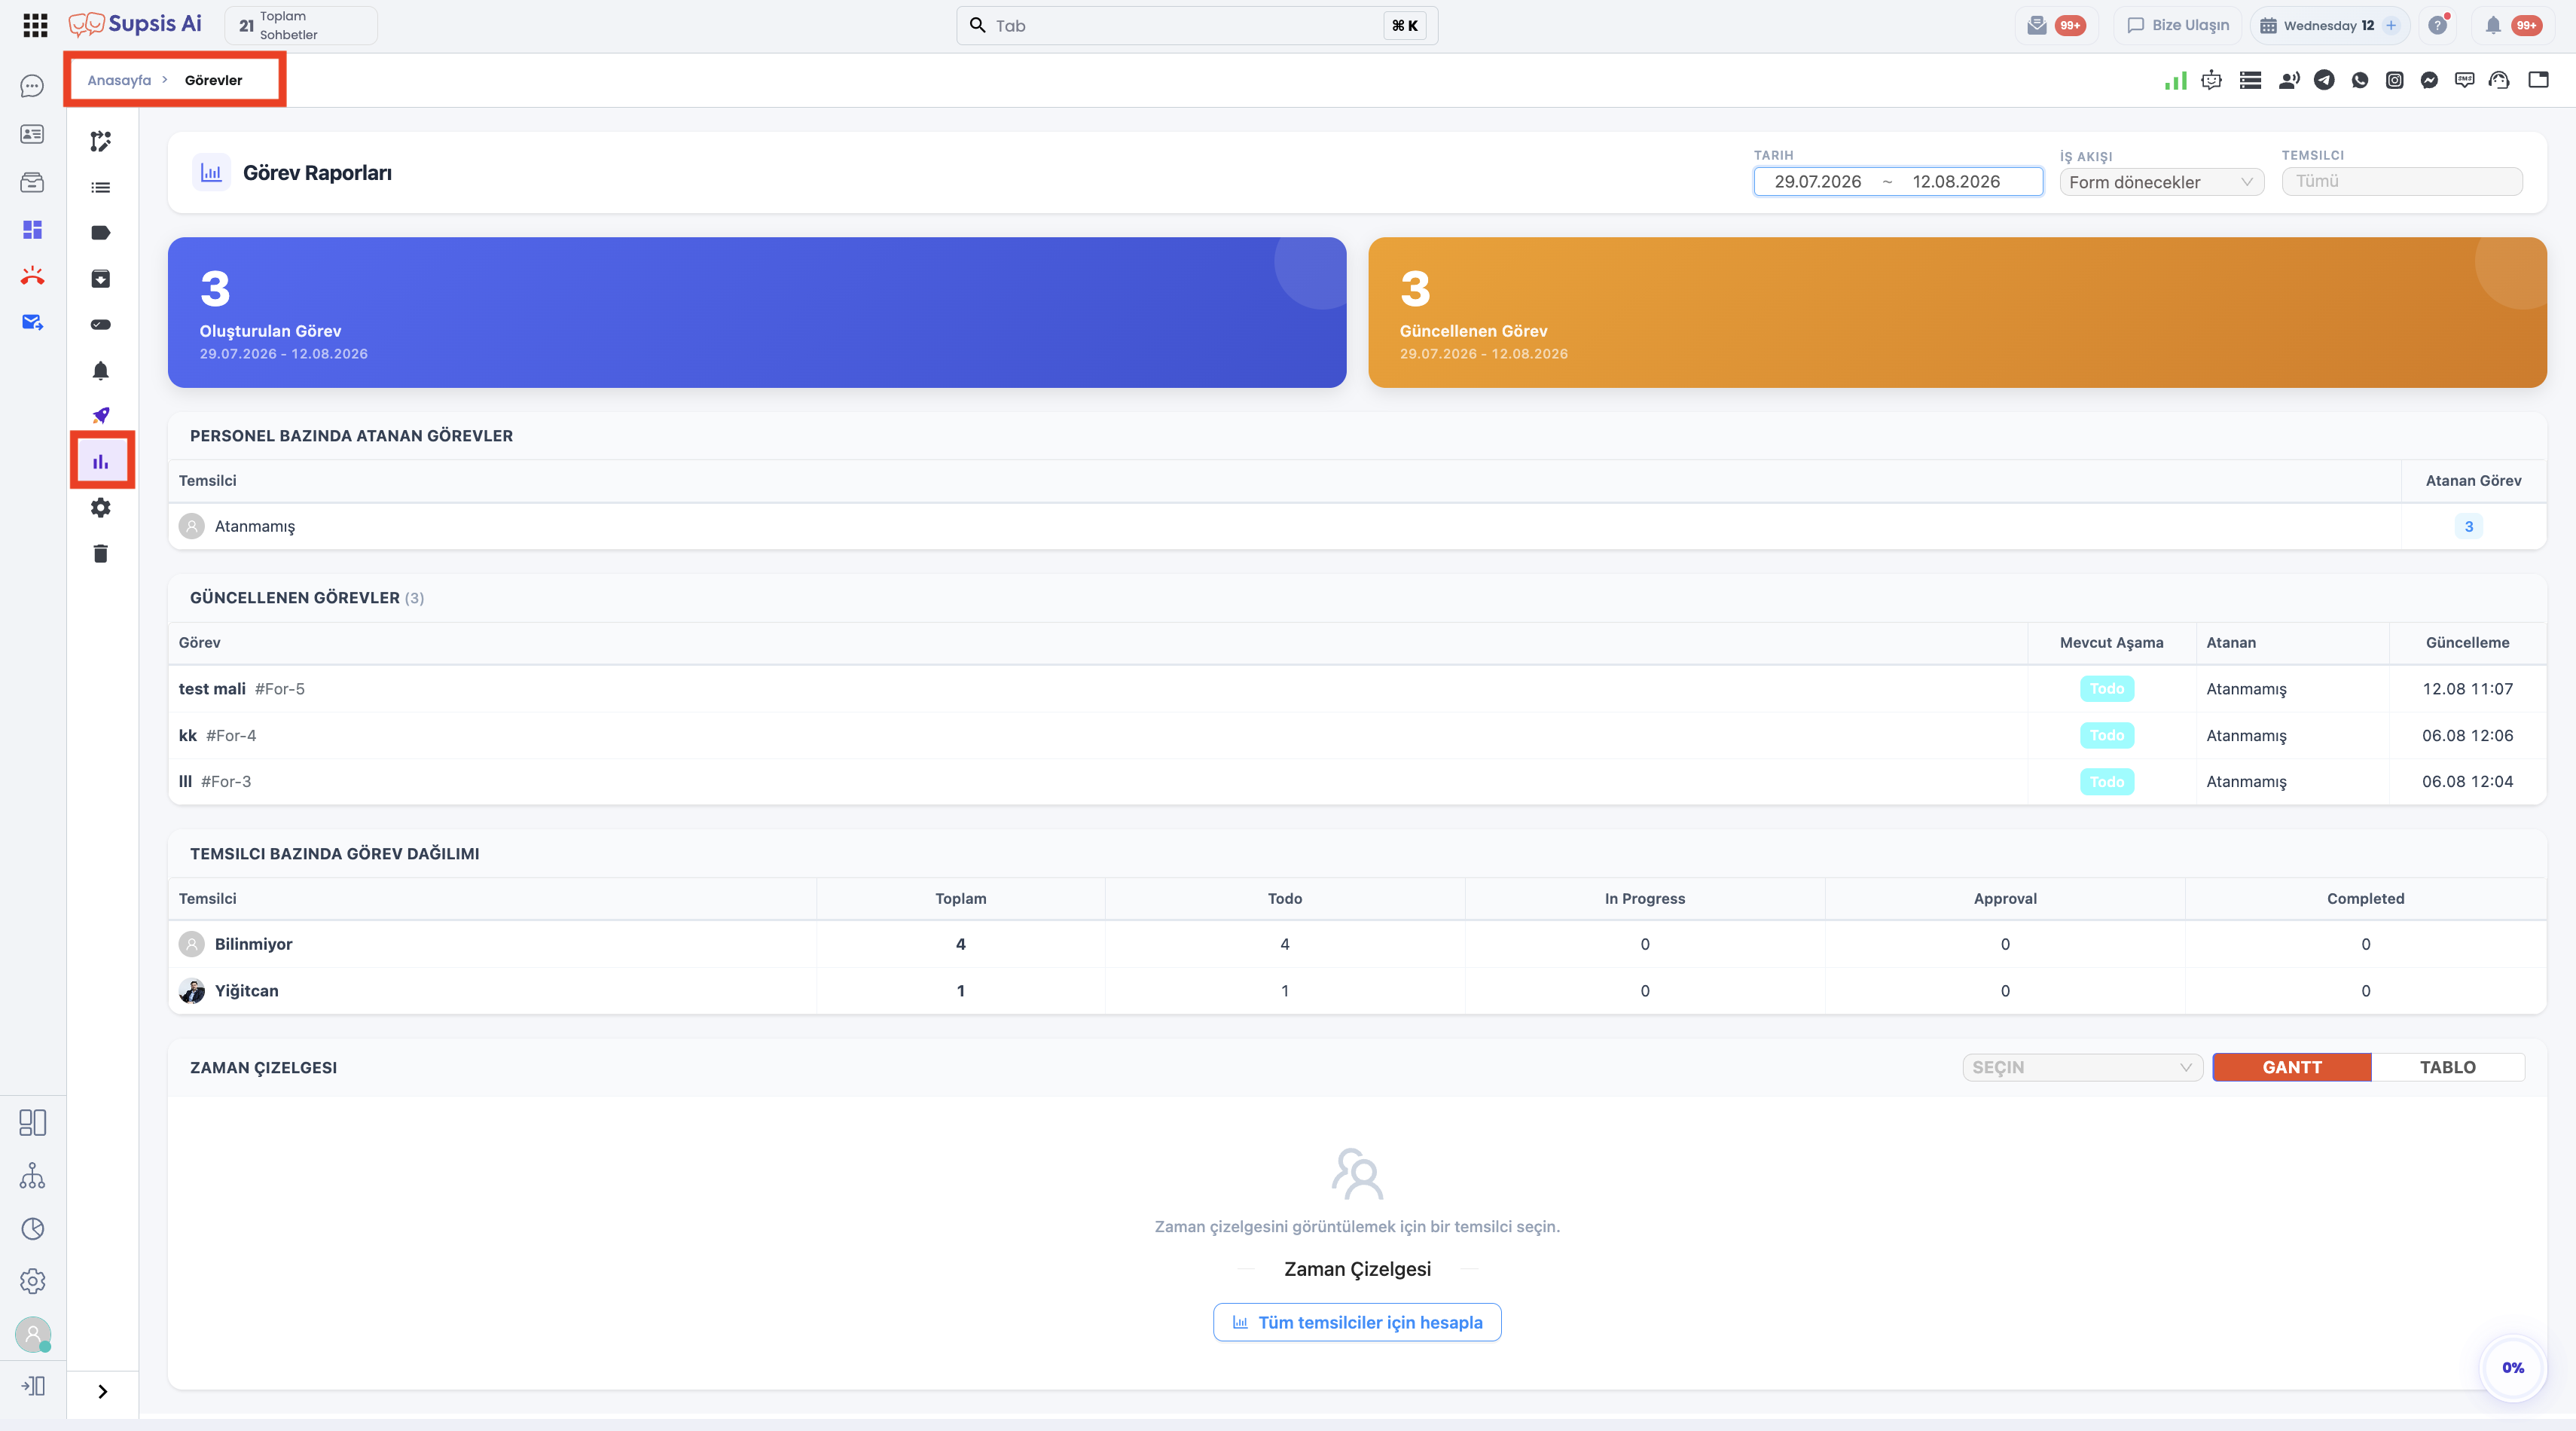
8.a – Filtering Options (Date, Workflow, Assignee)
You can narrow down report data using the filters located in the top right corner: * Date Range: Lists tasks based on their creation or update dates. * Workflow (e.g., Default Workflow): Displays tasks connected to the selected workflow. * Assignee Filter (All): Allows you to analyze the workload of a specific agent or the entire team.
8.b – Summary Cards (Created and Updated Tasks)
- Created Task (Blue Card): Shows the total number of tasks opened within the relevant period based on the applied filters.
- Updated Task (Orange Card): Shows the number of tasks that had their statuses changed or were updated, based on the applied filters.
8.c – Tasks Assigned by Personnel
Provides a summary list showing which agent is currently responsible for the tasks assigned within the specified time range and filters.
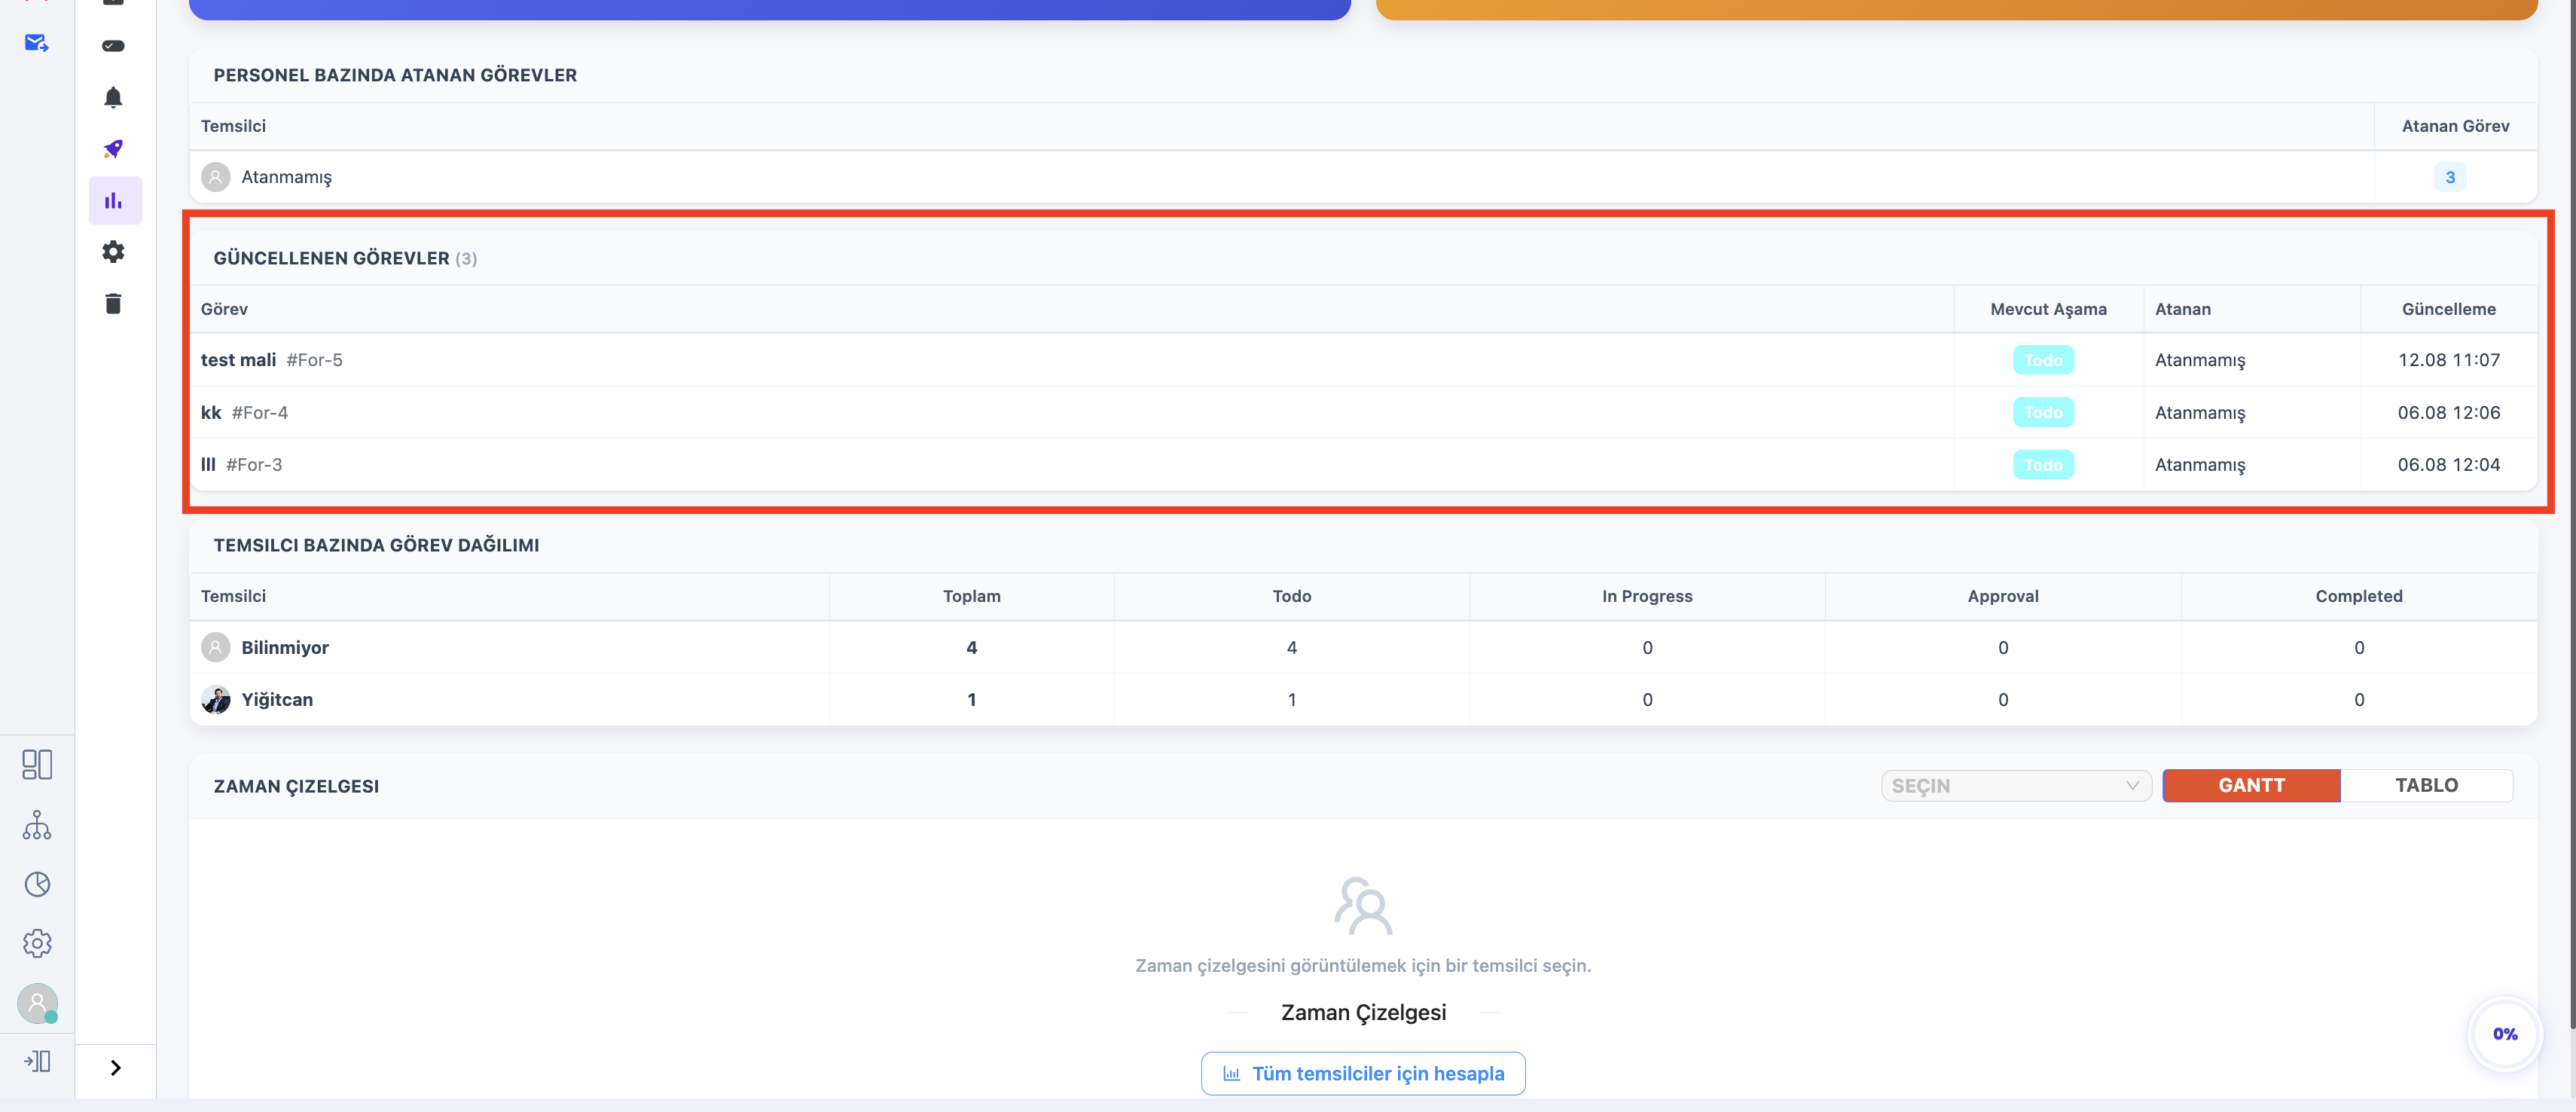
8.d – Updated Tasks List
A detailed list showing which tasks were updated during the reported period, who made the update, and the current stage of the task.
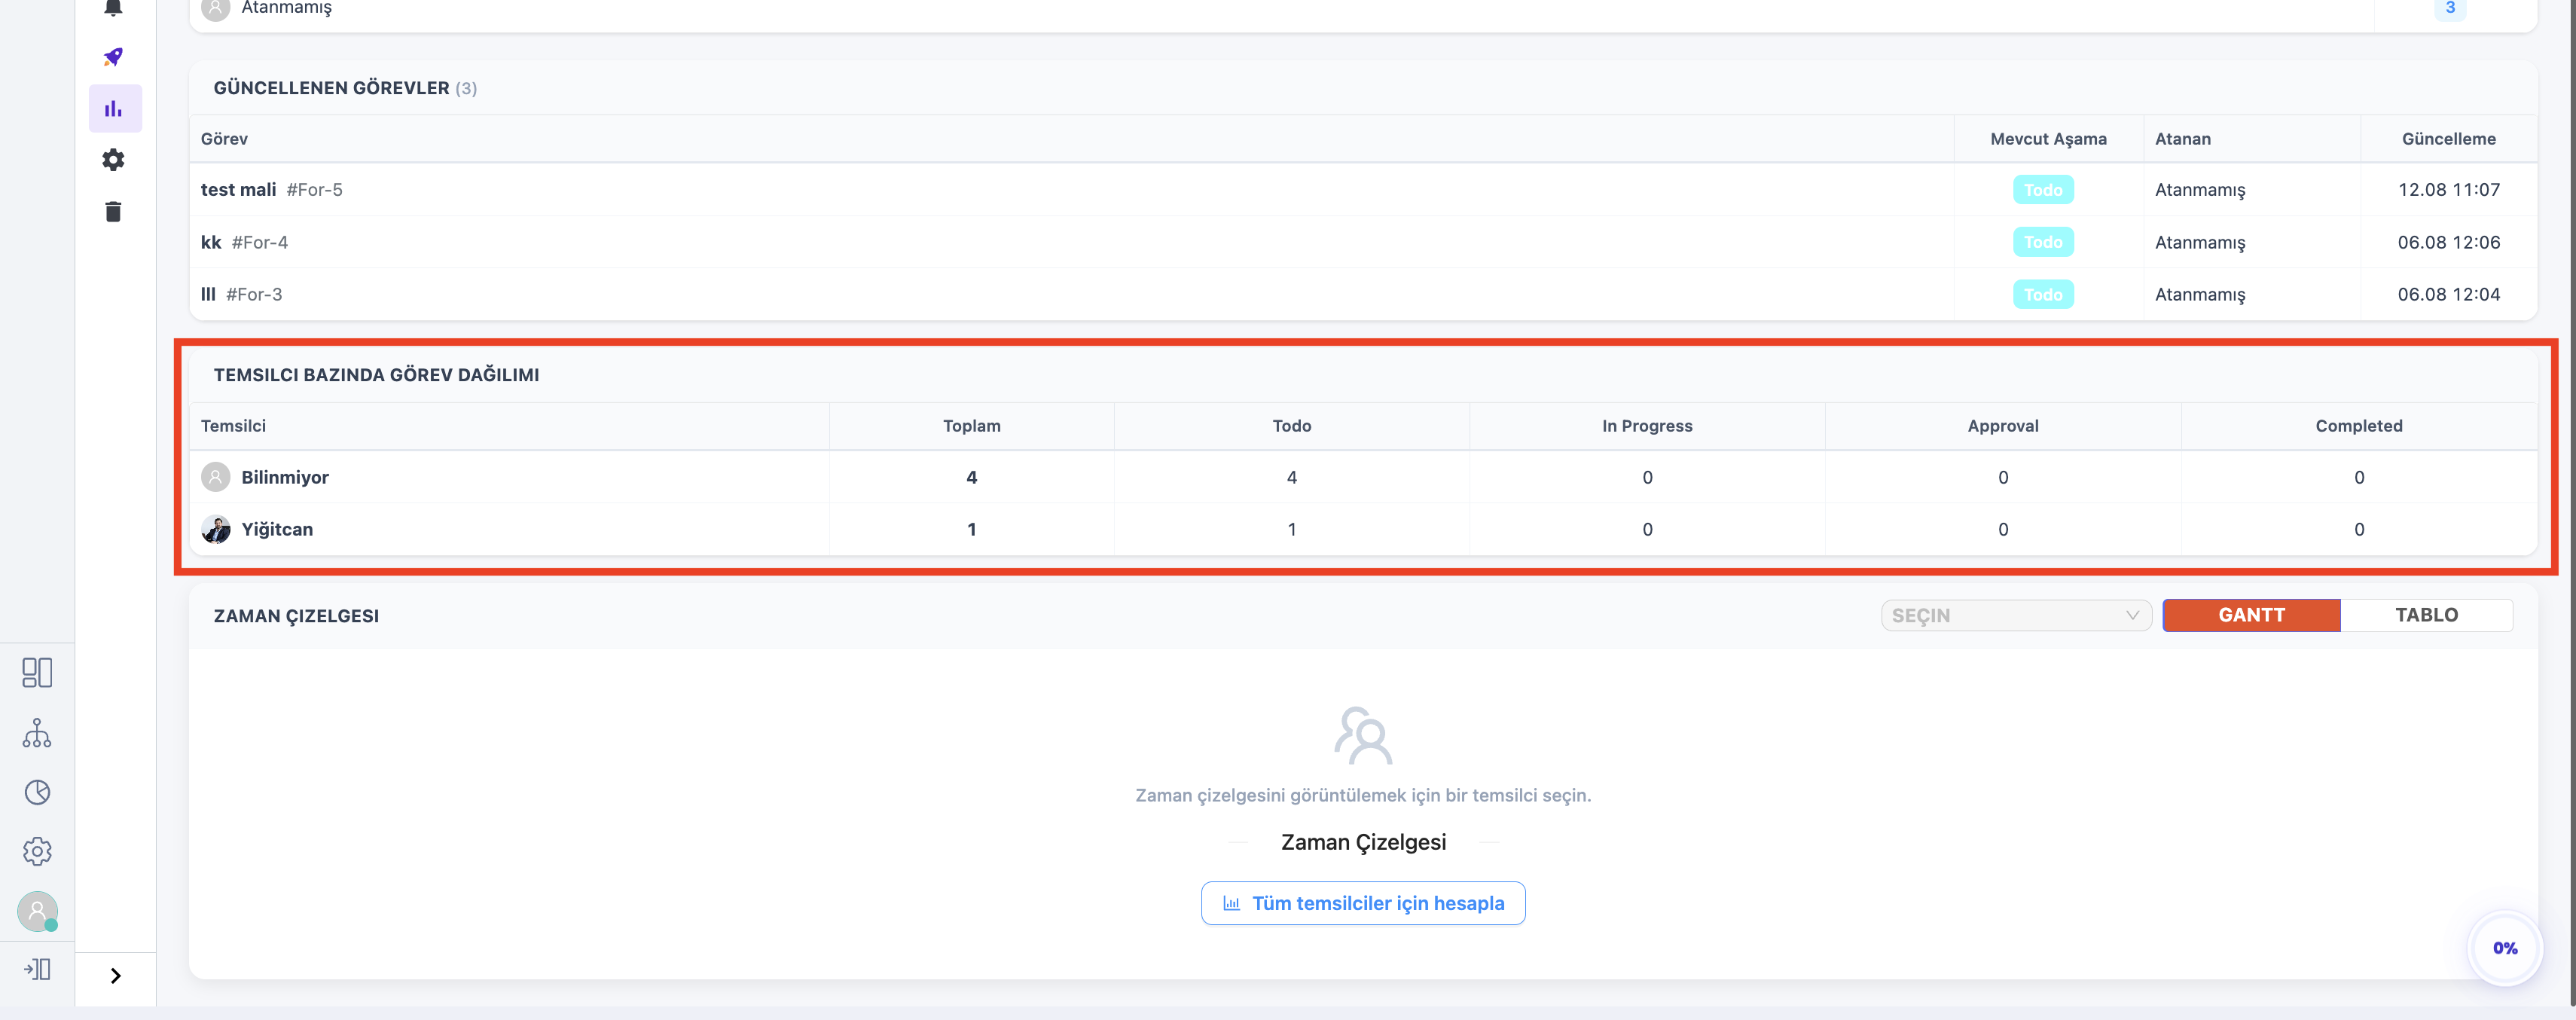
8.e – Task Distribution by Agent (Stage Breakdown)
Allows you to see the workload distribution among team members in detail. The stages of the selected workflow (e.g., Todo, In Progress, Approval, Completed) are reflected as columns in the table. This allows you to see not only the total number of tasks per agent but also exactly which stage each task is currently waiting in.
8.f – Timeline (Gantt & Table Views)
Allows you to analyze the time-based progress of tasks within the process either visually or in a list format. * Assignee Selection: Select the agent whose timeline you want to view from the dropdown menu. * Calculate for All Agents: Instead of selecting agents individually, you can calculate and generate the timeline for the entire team with a single click. * View Modes: * GANTT: Displays the task distribution across dates as timeline bars (Gantt chart). * TABLE: Allows you to review tasks in a standard list format instead of a chart.
9-) Settings
The Settings section enables centralized management of workflows.
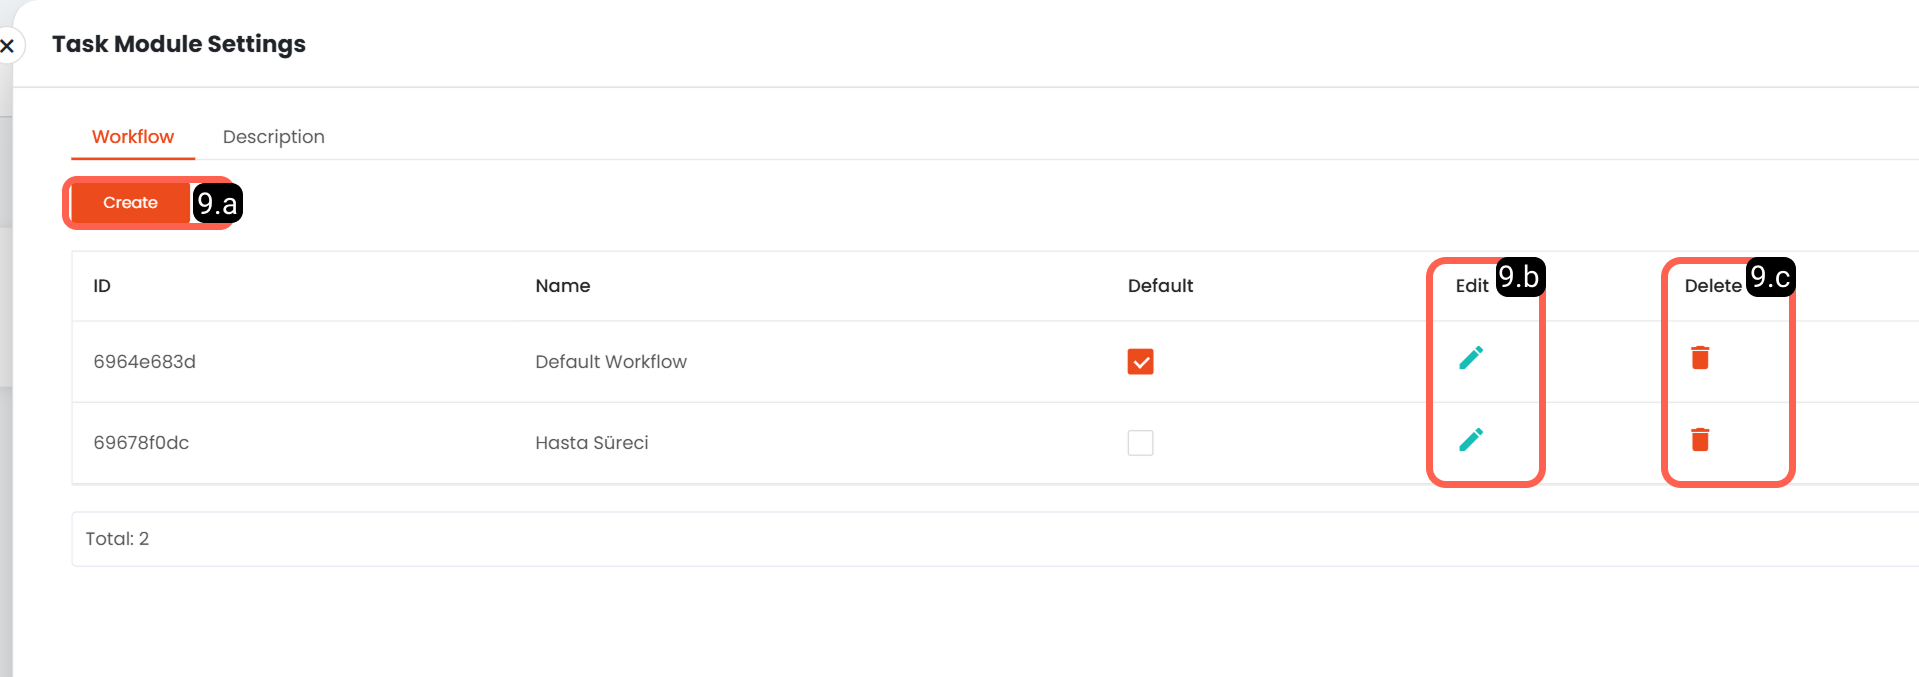
9.a – Create Workflow
Allows defining new workflow processes.
9.b – Edit
Allows modifying workflow name, stages, order, statuses, and colors.
9.c – Delete
Moves the workflow and its tasks to Trash.
If not permanently deleted manually, it is automatically permanently deleted after 30 days.
10-) Trash
Deleted workflows and their tasks are moved to the Trash.
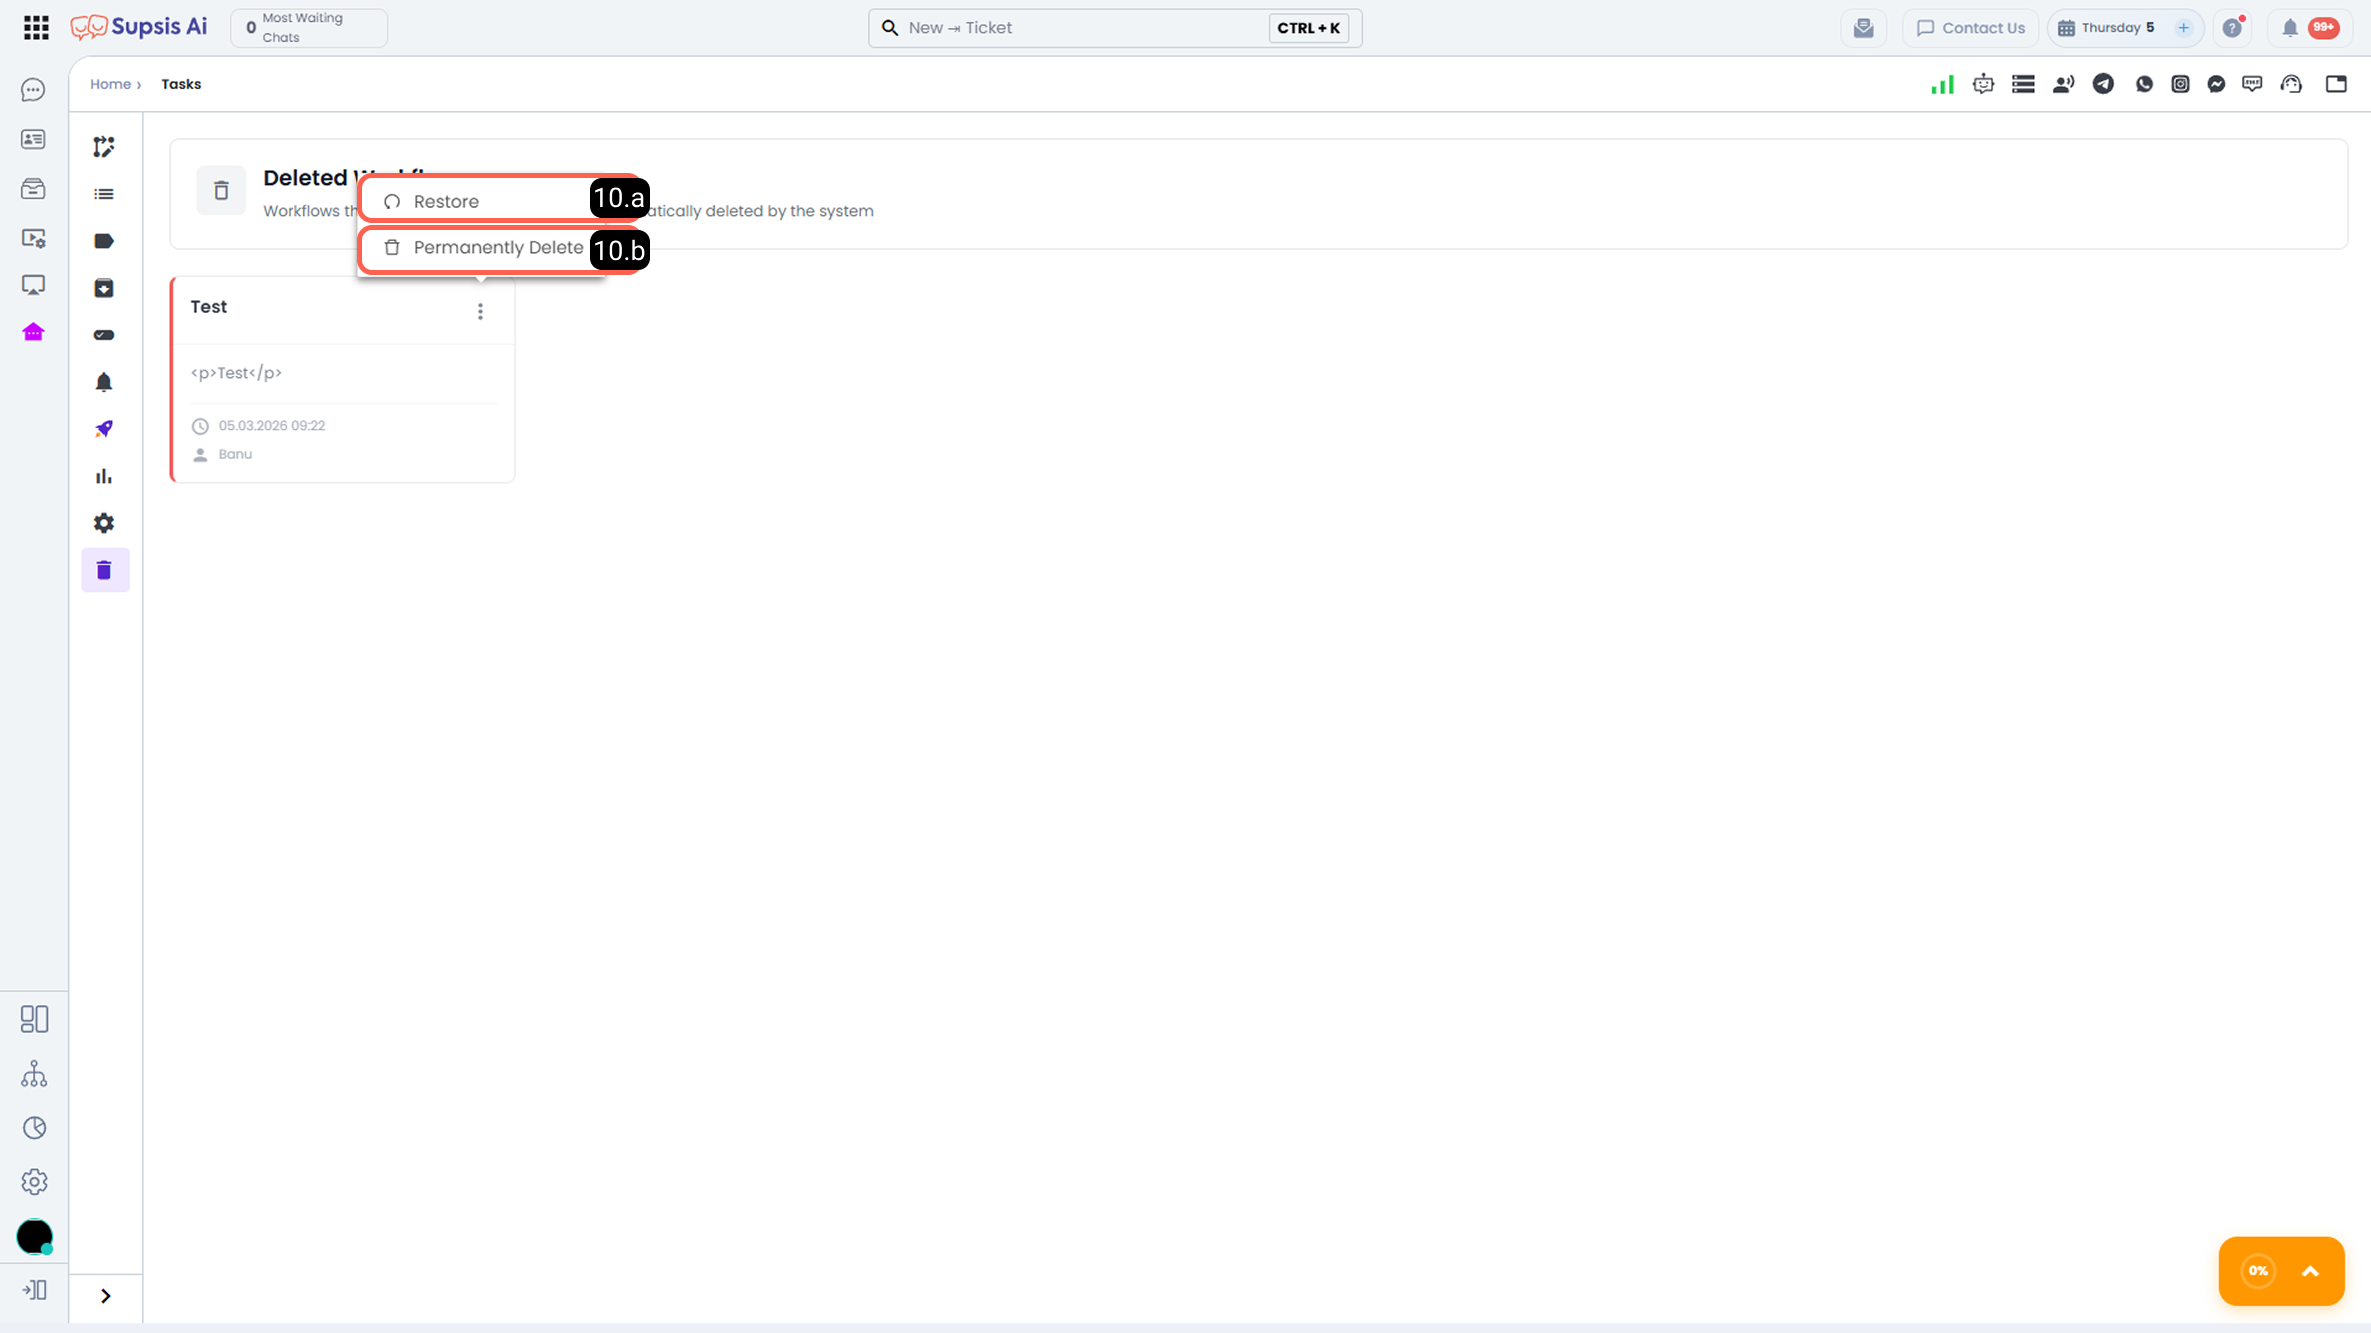
10.a – Restore
Restores deleted workflows. If not restored within 30 days, they are permanently deleted automatically.
10.b – Delete Permanently
Permanently deletes the selected workflow. Permanently deleted data cannot be recovered.