
Chatbot Blocks
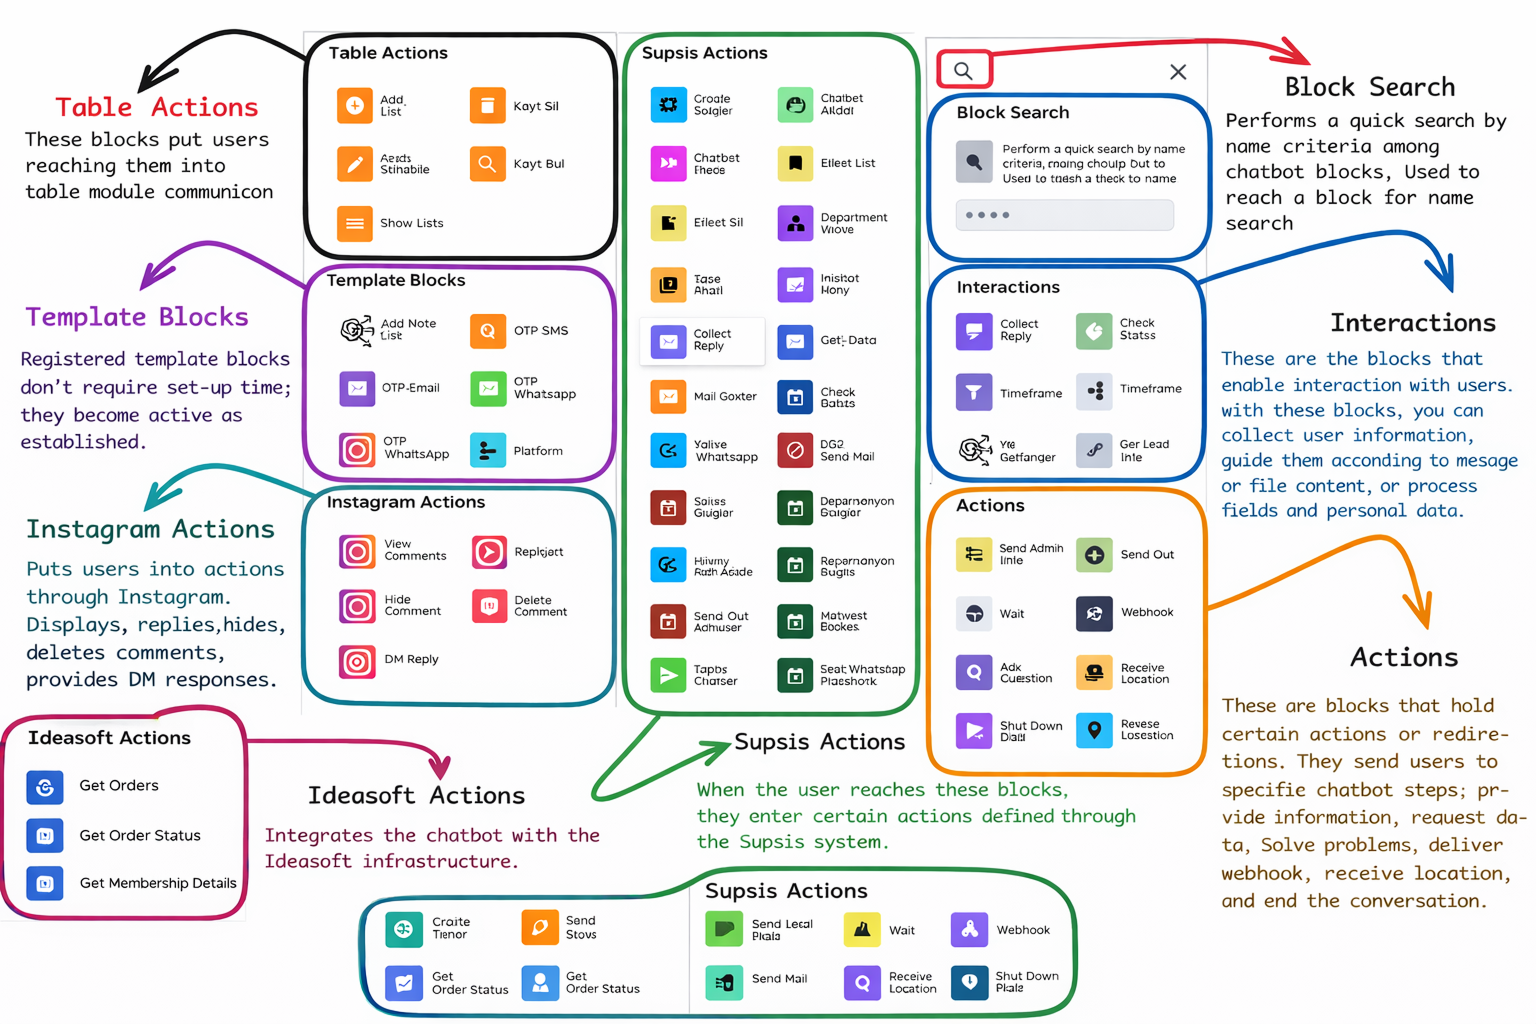
| Title |
|---|
| Interactions |
| Actions |
| Supsis Actions |
| Table Actions |
| Cache Actions |
| Template Blocks |
| Meta Actions |
| Ideasoft Actions |
| T-Soft Actions |
| Ticimax Actions |
| Ikas Actions |
| Zoho Actions |
| Custom Blocks |
| Block Market |
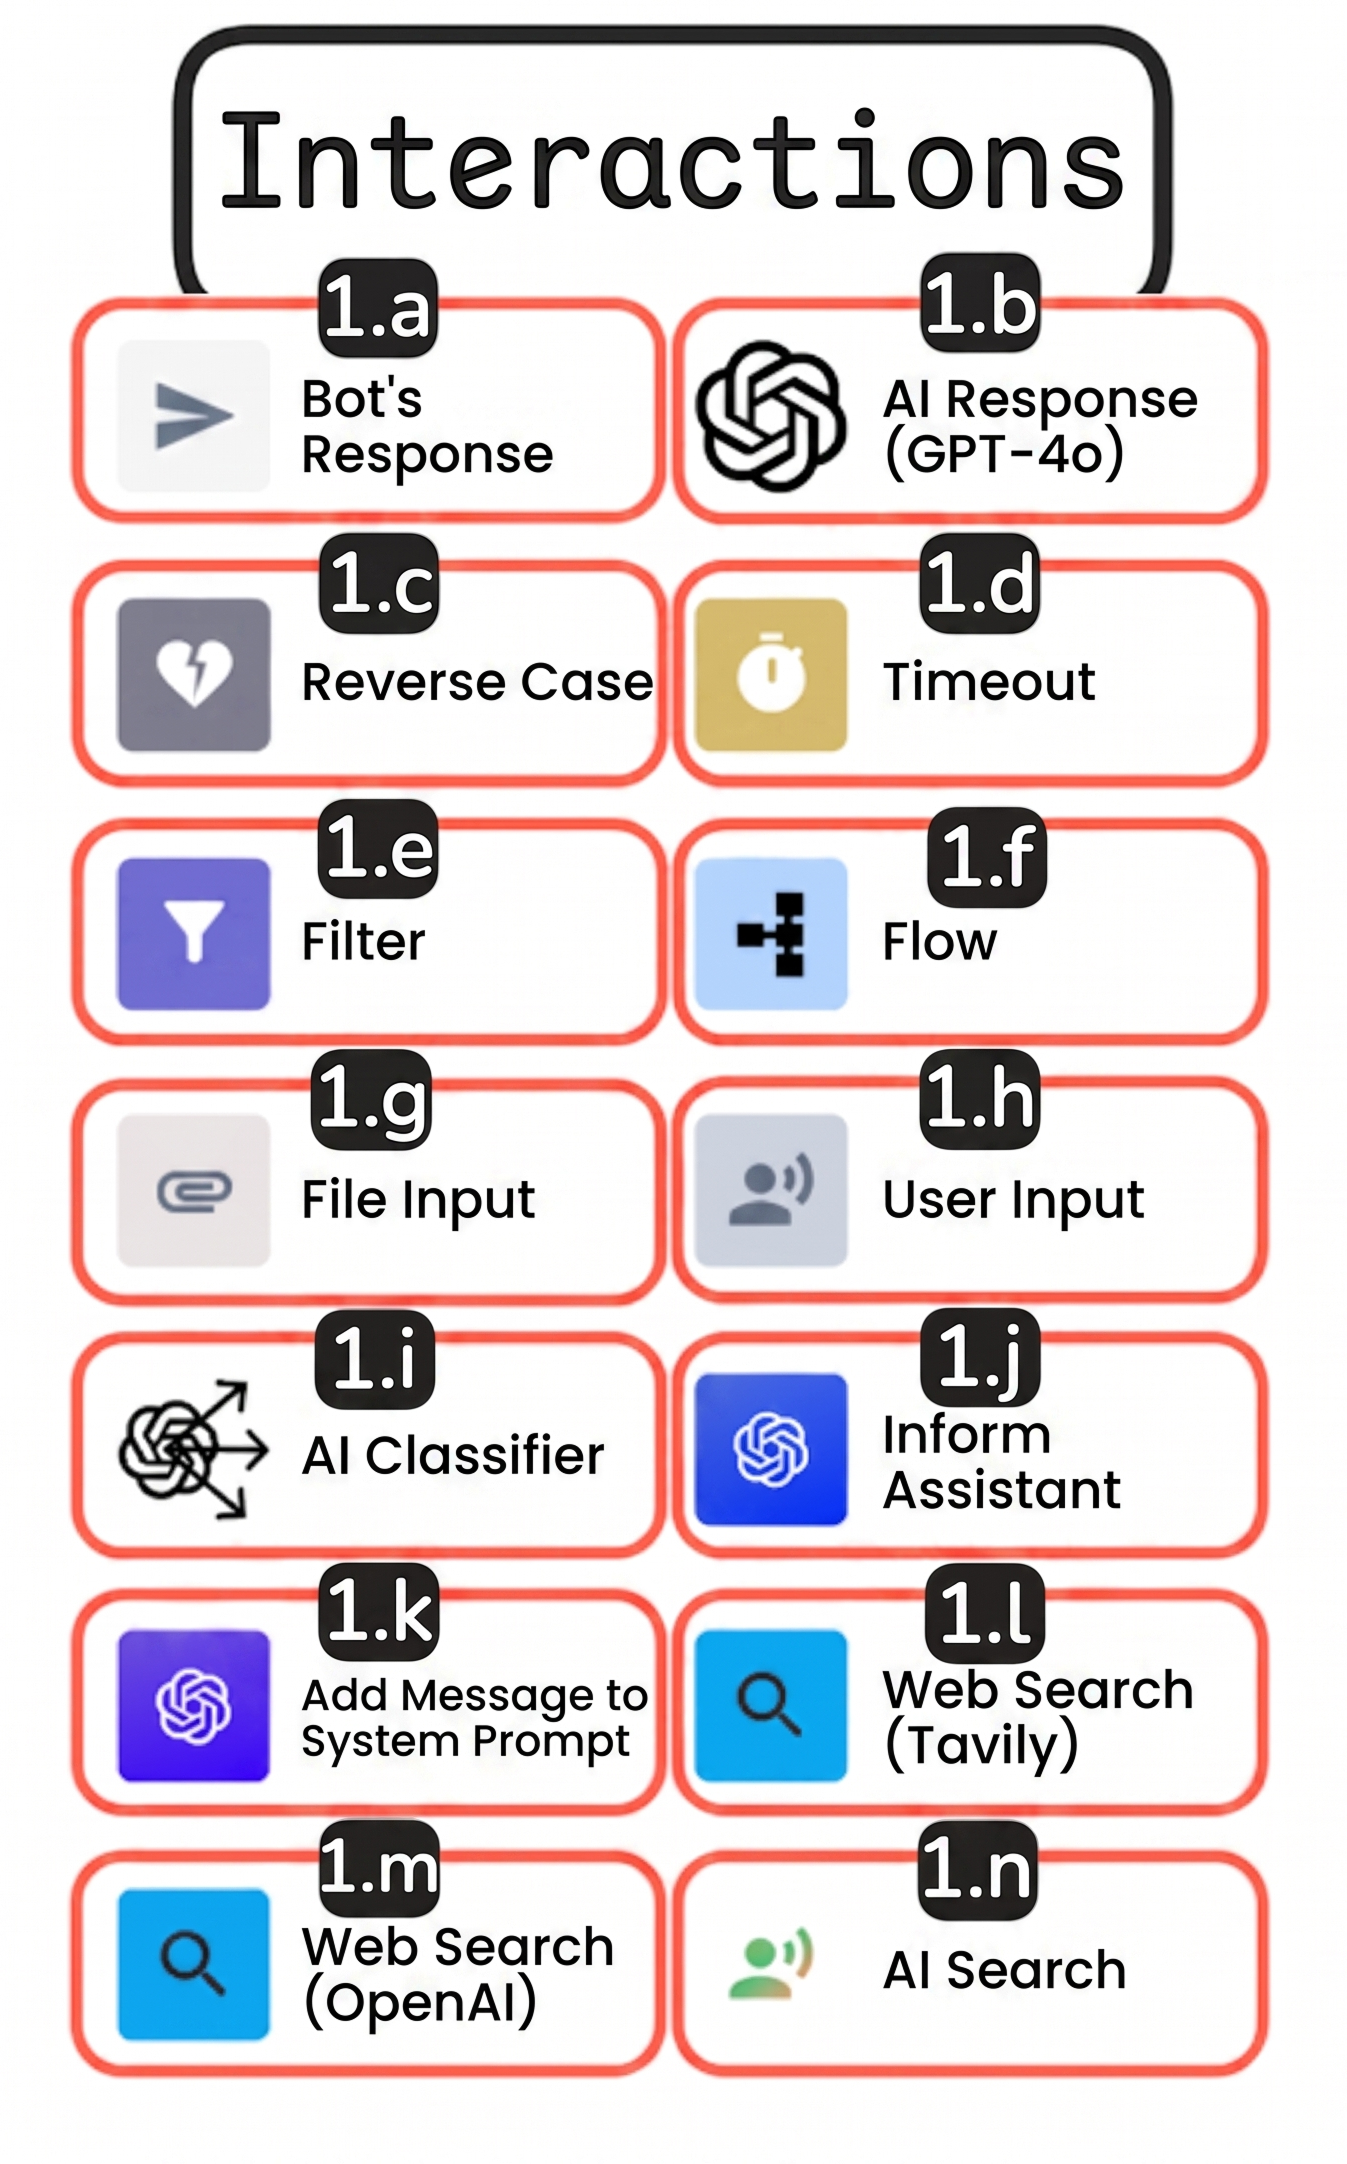
1. Interactions
Interaction blocks are the components that provide the chatbot with the ability to understand the user and communicate correctly with them. These blocks form the foundation of a chatbot scenario.
1.a – Bot Response
The Bot Response block is used to send content directly to the user. Through this block, you can prepare plain text messages, images, files, buttons, or quick replies to make interaction clearer and more guided. It serves as the main messaging area, especially in scenarios where you want to inform the user, present options, or direct them to the next step.
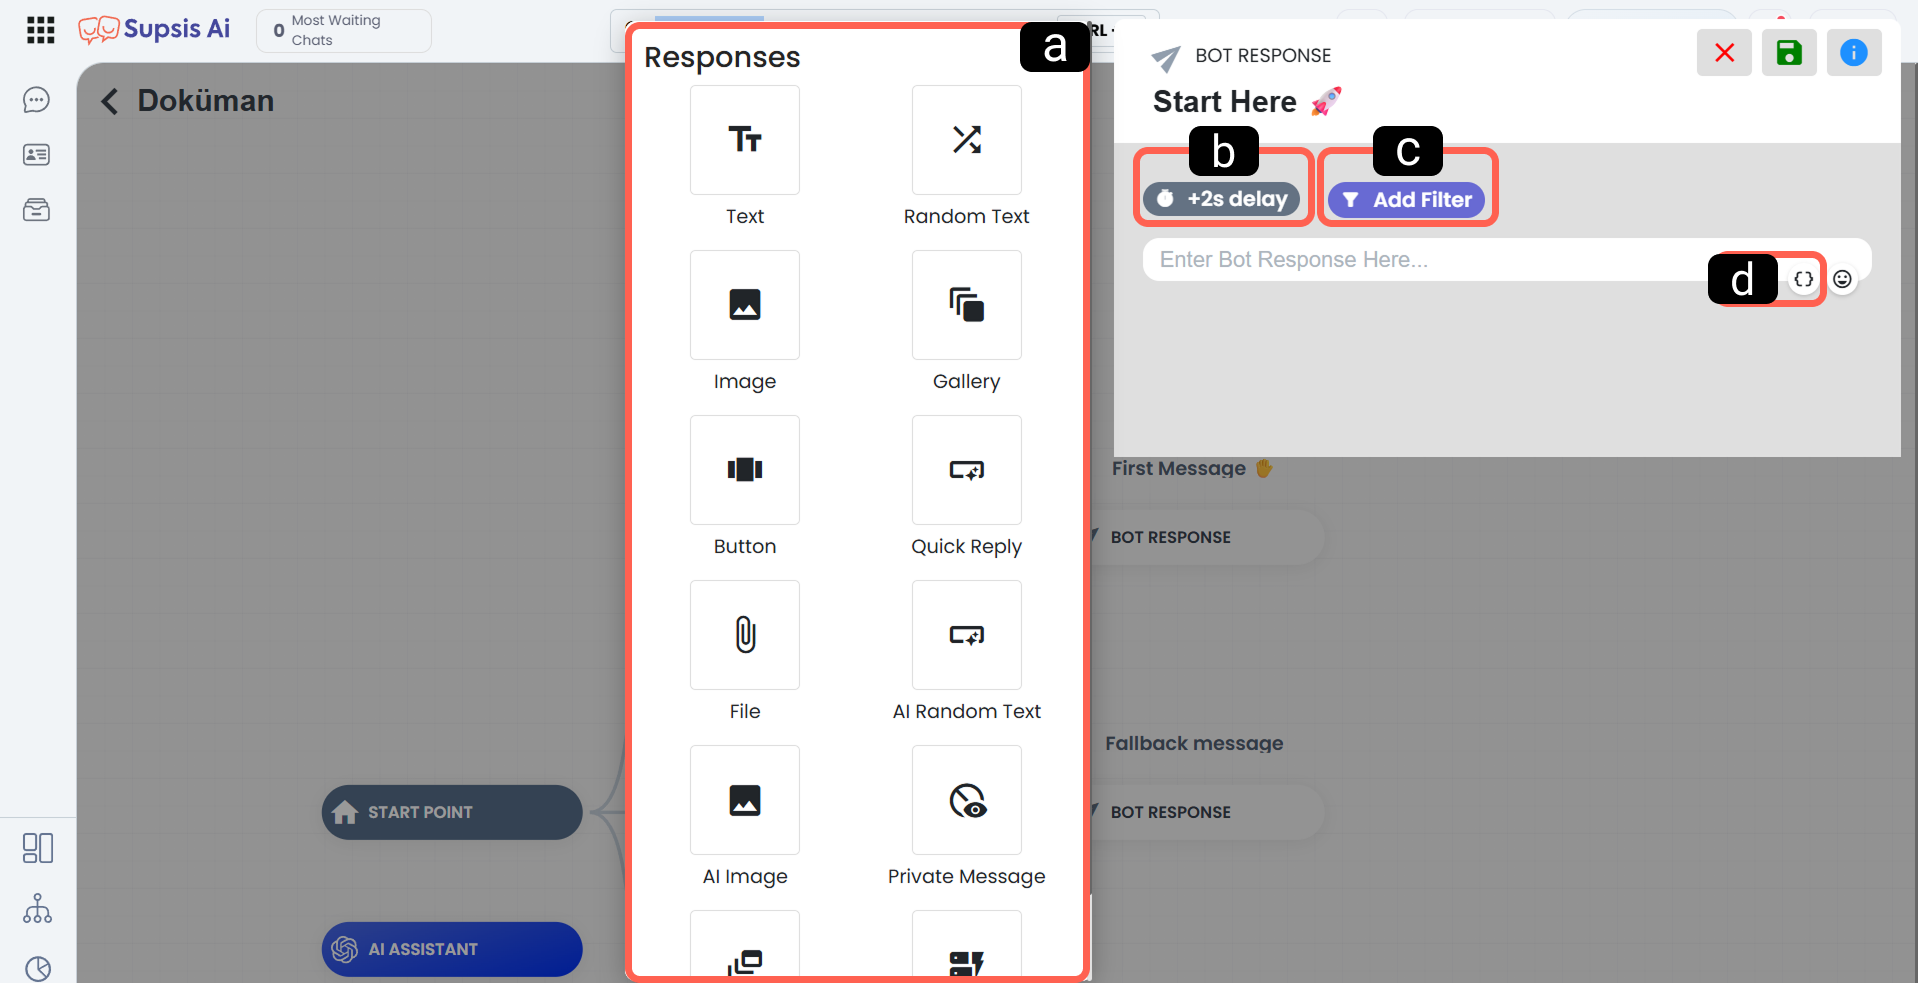
a. Responses
This section allows you to choose the format in which the response will be delivered to the user. You can use different response types depending on your needs.
- Text: Used to send a direct text message to the user.
- Random Text: Allows you to prepare multiple variations of the same message and display one randomly.
- Image: Used for visual-supported explanations.
- Gallery: Enables richer presentations with images, descriptions, and buttons.
- Button: Provides fixed options to the user.
- Quick Reply: Allows the user to make a selection with a single click; on some platforms, it disappears after selection.
- File: Used to send documents, media, or other file types to the user.
- AI Random Text: Allows AI to generate a random text during the conversation based on the content description and examples you provide.
- AI Image: Allows AI to generate and send an image based on your description at the relevant step.
- Hidden Message: Enables the chatbot to send messages visible only through the Supsis AI panel.
b. Response Delay Time
This field determines how long after the response is prepared it will be shown to the user. Delay is useful for making messages appear more natural, allowing users time to read previous content, or controlling the flow in step-by-step scenarios. In short, it helps you adjust the bot’s response speed according to the tone of your scenario.
c. Response Filter
This field allows you to attach conditions to when a response is sent. This way, only appropriate users or scenarios will see specific content within the same bot response.
d. Adding Dynamic Values to Content
You can add dynamic values via the curly brace icon next to the message field. Dynamic values include personal data such as user profile information, user responses, or results from external sources (see: Dynamic Values).
This allows you to create personalized content instead of sending the same static message to every user.
1.b – AI Response (Gpt-4o)
The AI Response block is used to answer user questions with AI support. Based on your instructions and included dynamic values, it generates more flexible, dynamic, and context-aware responses. It is especially useful when you want a more natural conversation instead of fixed messages.
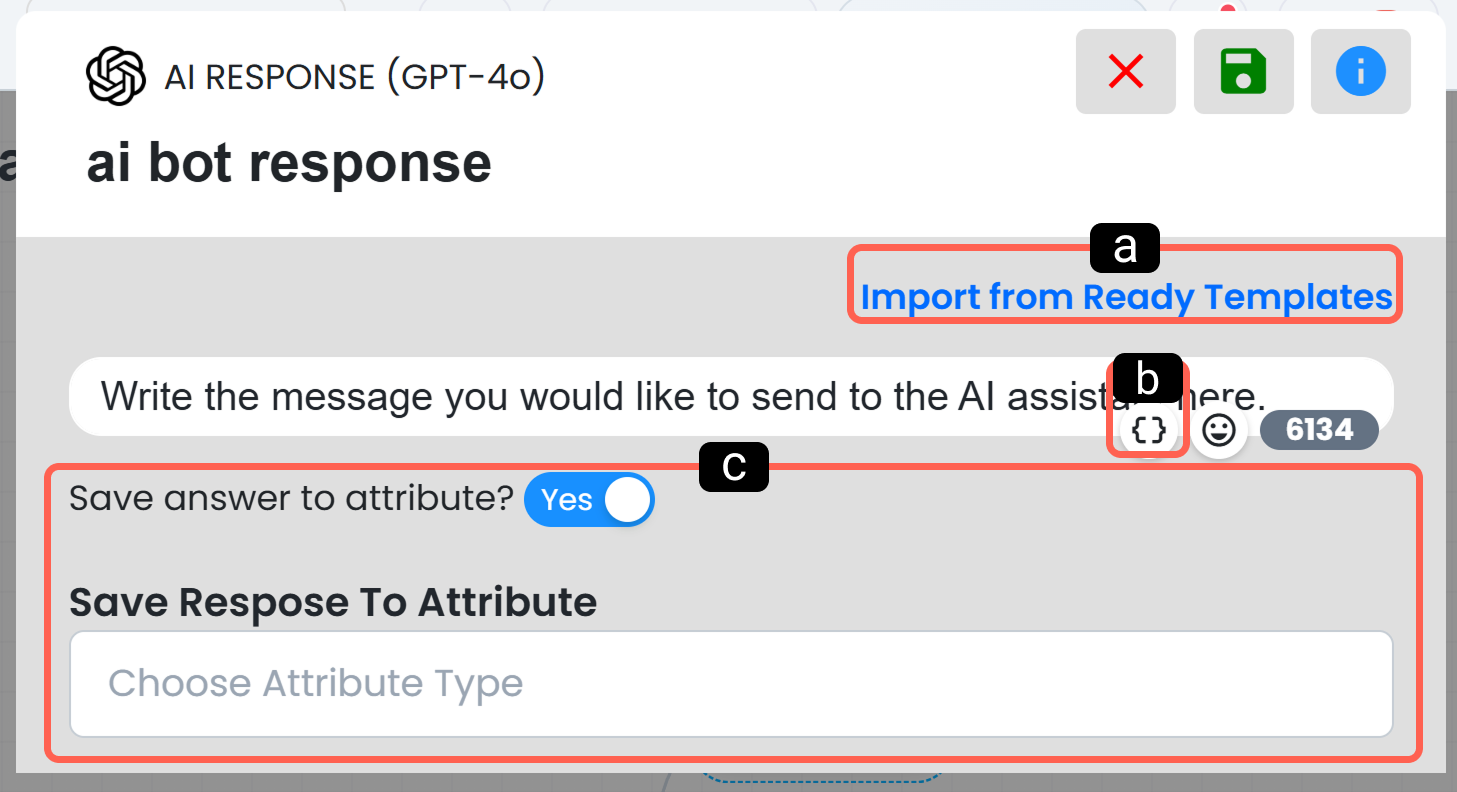
a. Ready Prompt Templates
This section allows you to use ready-made templates to speed up prompt writing. If you don’t want to start from scratch, you can import templates and customize them.
b. Adding Dynamic Values to Content
By adding dynamic values to the prompt, you can enable AI to generate user-specific responses. These values include user data, responses, and external results (see: Dynamic Values).
AI uses these to generate more meaningful responses based on the current session and user context.
c. Save Response as Attribute (Temporary Value)
When enabled, the AI-generated response can be stored as an attribute. Attributes are temporary values assigned during a session and are deleted when the session ends.
If you need persistence, you should save them as permanent profile data instead (see: Profile Fields, Set Attribute).
This allows reuse, filtering, and transferring of AI outputs within the session.
1.c – Fallback
Fallback represents alternative scenario steps triggered when the user provides unexpected, undefined, or unmatched input during filtering or input steps.
With this block, the flow can redirect to another message, warning, or different guidance.
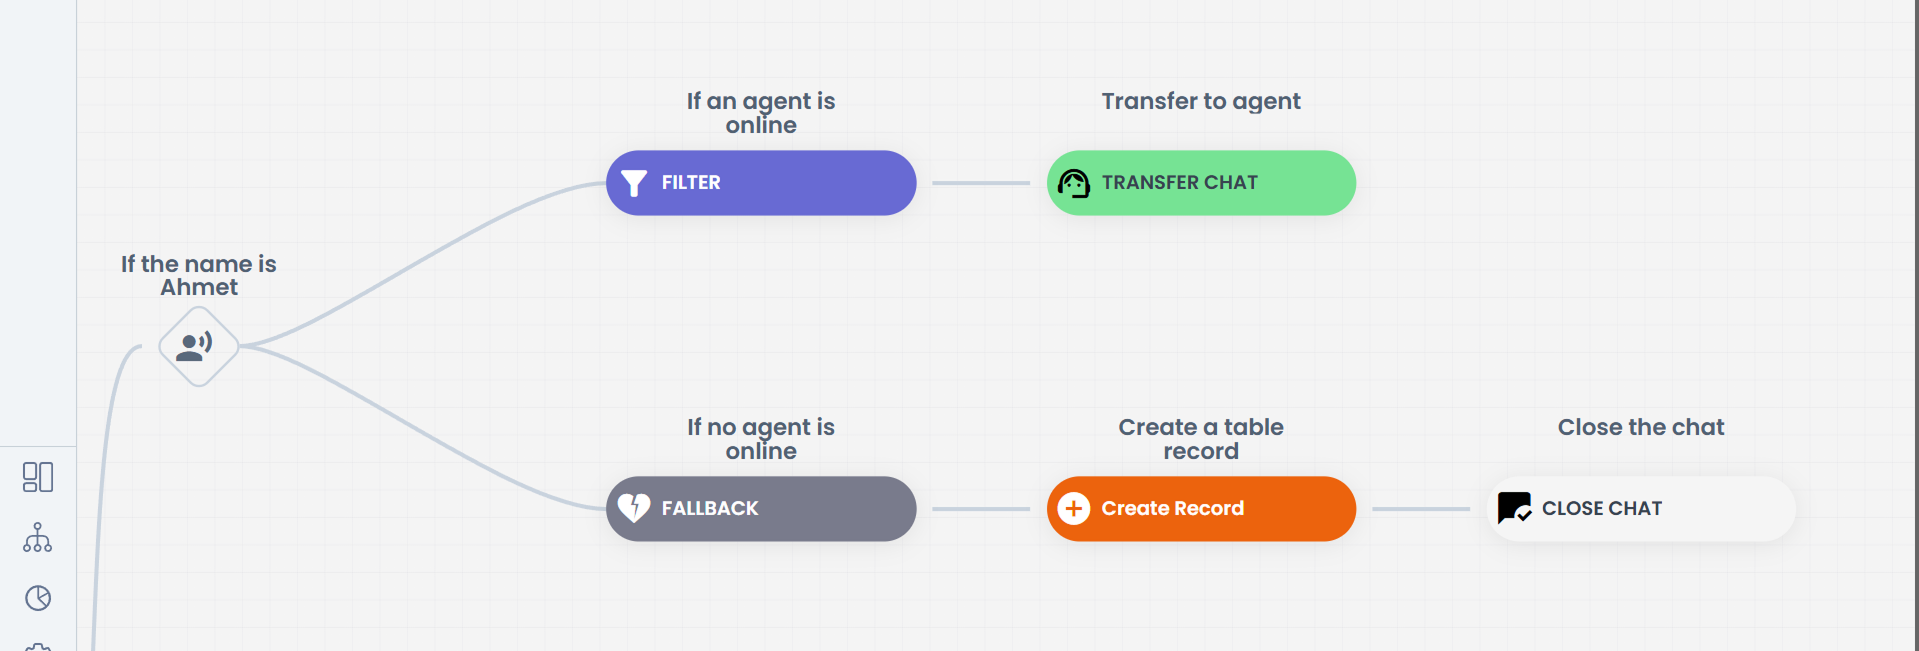
Note: If a local fallback is defined for the step, the user is directed there first. If not, the system uses the Default Fallback flow.
In chatbot scenarios with an AI assistant, if no local fallback exists, the AI assistant is triggered instead of the default fallback.
1.d – Timeout
The Timeout block defines an alternative flow when the user does not respond within a certain time. It is used to redirect inactive users to another scenario path. Timeout can only be used in user input blocks.
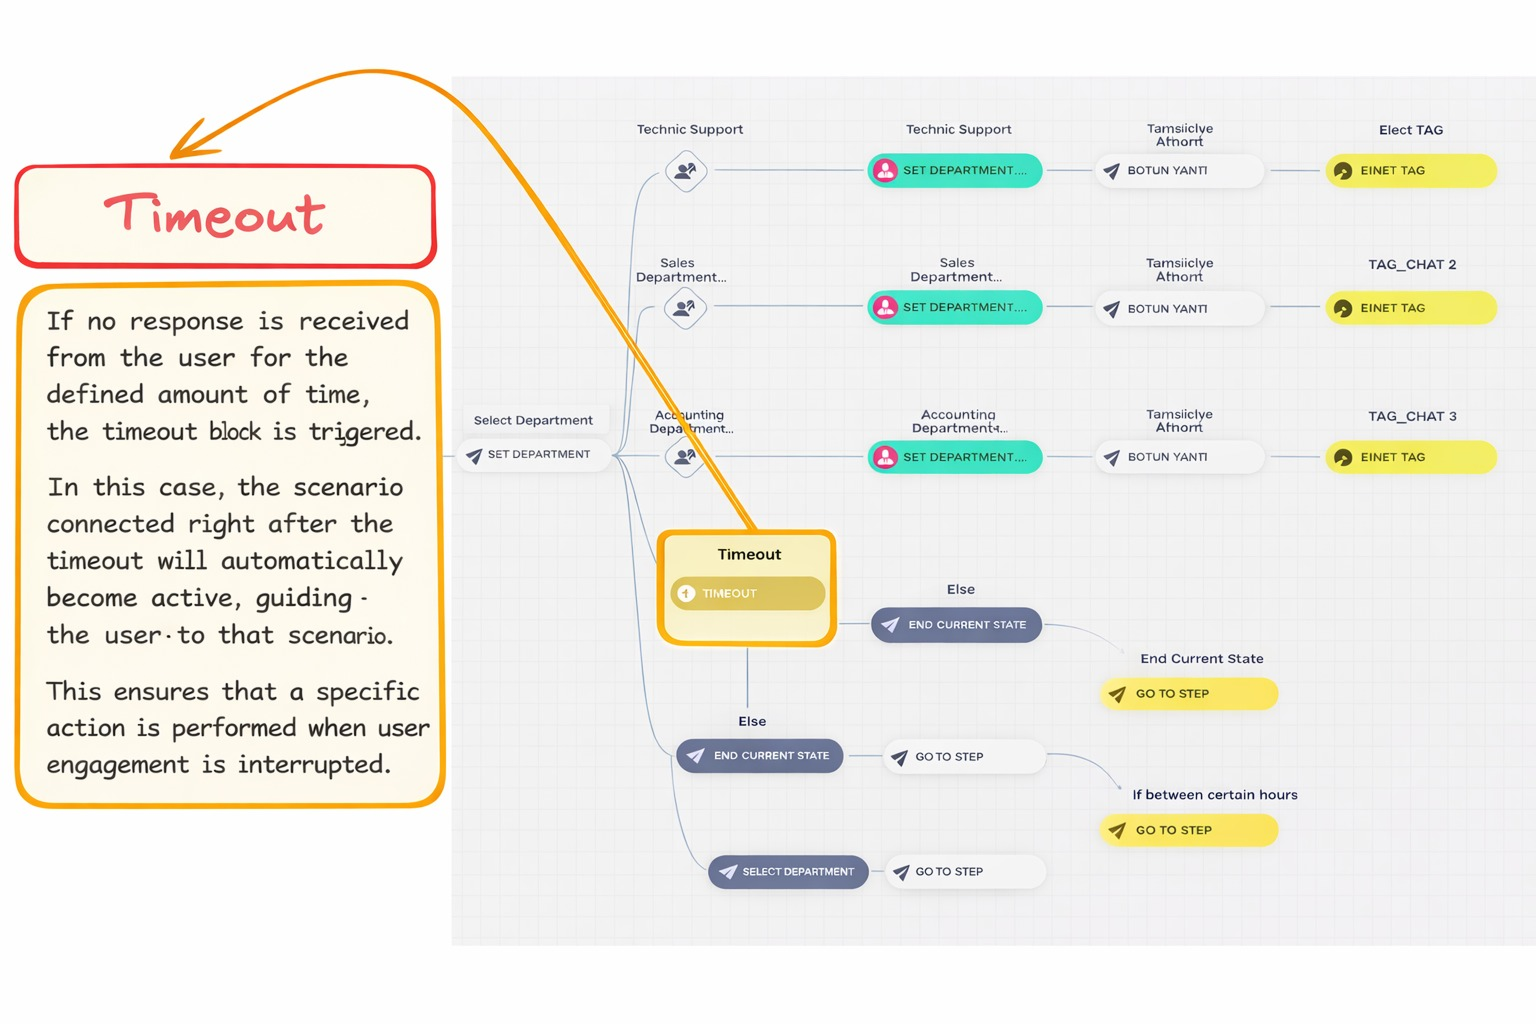
If no input is received within the specified time, the block triggers and executes the connected scenario.
This allows sending reminders, redirecting users, or ending conversations in a controlled way.
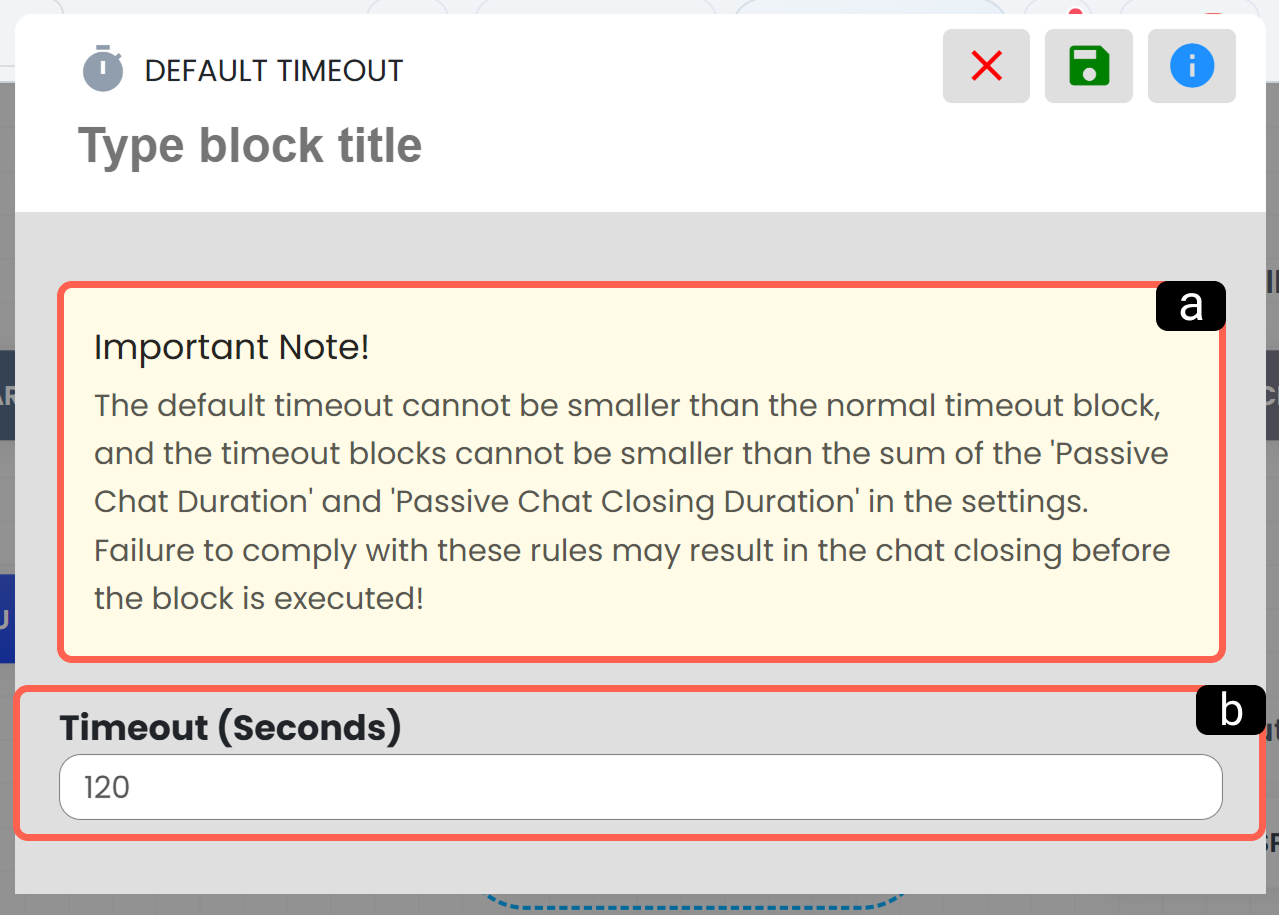
a. Important Considerations
- Default Timeout: Every scenario has a system-wide default timeout. Local timeout settings must align with it. Otherwise, the default timeout may trigger before the local one.
- Session Duration: Timeout cannot exceed the session duration. Otherwise, the session may end before timeout triggers (see: Time Settings).
b. Timeout (in Seconds)
Defines how many seconds of inactivity will trigger the timeout.
1.e – Filter
The Filter block is a decision block used to route users to the correct flow. Filtering is based on dynamic values such as user messages, profile data, system data, or external data.
Users matching the defined conditions are directed to the corresponding branch.
Examples include user profile info, date-time data, agent availability, social media data, manually entered values, or CRM data (see: Dynamic Values).
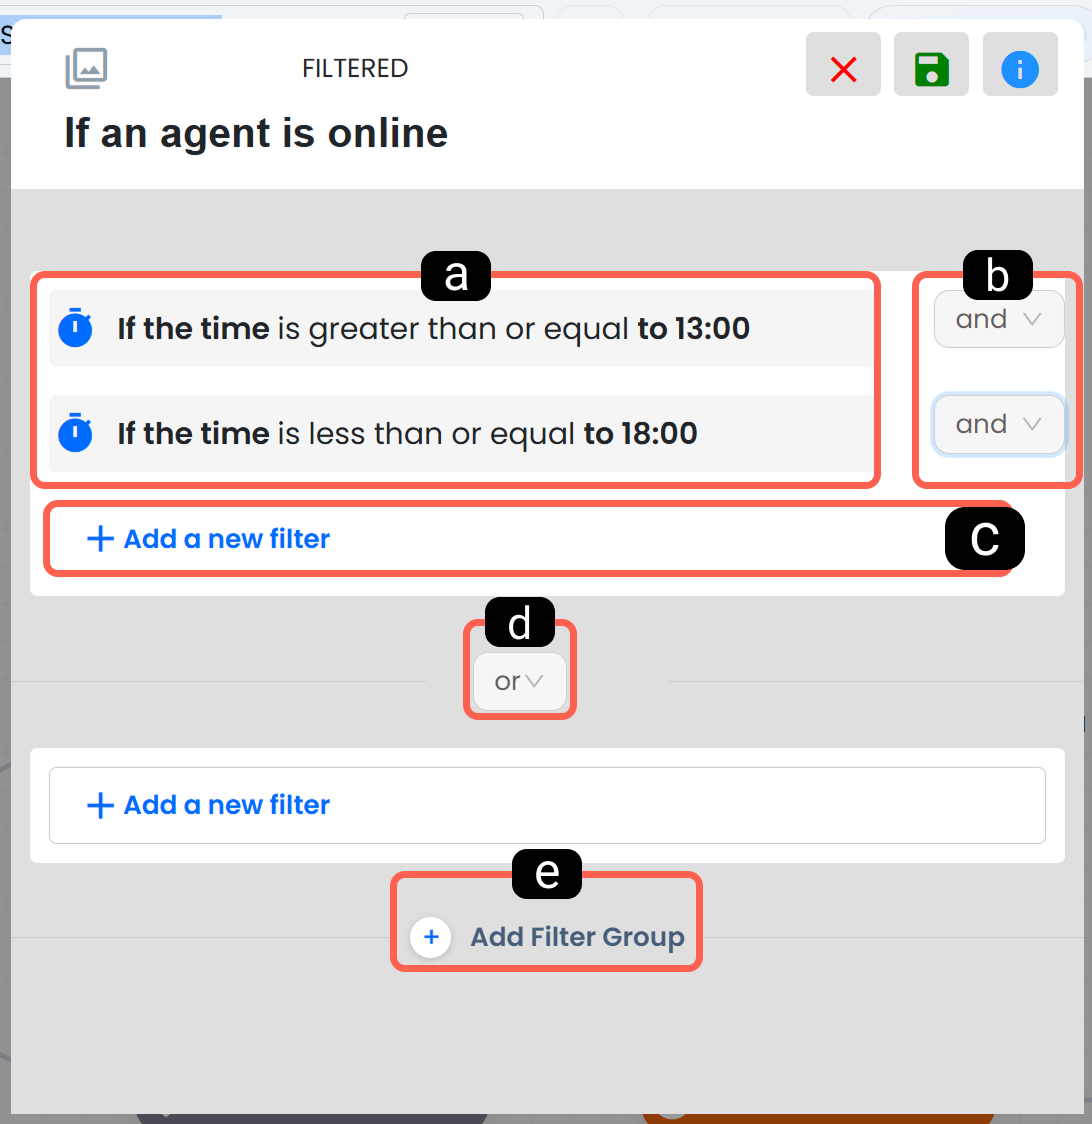
a. Existing Filter Content and Editing
This section displays the currently defined conditions within that filter block. Each row includes the selected data, comparison type, and target value. From here, you can review, edit, and update existing filters as needed. For example, rules such as “Time is greater than or equal to 13:00” or “Time is less than or equal to 18:00” are listed in this section.
b. Filter Condition
The filter condition determines how rules within the same group are evaluated.
- and: All conditions in the group must be met simultaneously.
- or: It is sufficient for any one of the conditions in the group to be met.
This structure allows you to create more strict or more flexible filtering logic.
c. Adding a New Filter to the Filter Group
This section is used to add a new condition to the existing filter group. In other words, you can define multiple checks within the same logical group. For example, you can create a clearer decision structure by checking both time and day within the same group.
d. Filter Group Condition
The filter group condition determines how multiple filter groups are related to each other. This allows you to connect not only individual conditions but also groups of conditions. This structure is especially important in complex scenarios, as it enables routing users based on multiple condition sets instead of a single criterion.
e. Add Filter Group
This section allows you to add a new group to the existing filter structure. It is especially useful when creating alternative scenarios. For example, one group can be created for “working hours,” another for “online agent status,” and a third for “user segment.” Thus, more powerful and readable decision structures can be built within a single filter block. Within the scenario, the user passes through the relevant filters; if no condition is met, you can direct the user to an alternative flow such as Fallback.
1.f – Flow
The Flow block is used to group a specific part of the chatbot scenario under a single structure. It simplifies the diagram, improves readability, and makes editing easier, especially in growing and branching scenarios. This block does not create any interaction within the flow; it is a structural organization block used to manage certain parts of your scenario in a more organized way. By entering the Flow block, you can collectively view and edit the sub-steps within that section.
1.g – File Input
The File Input block is used to capture files sent by the user during the conversation and proceed with the scenario based on these files. When the user sends a file of the defined type, this block is triggered, processes the file, stores it securely, and generates a downloadable URL. This URL can later be reused in different action blocks.
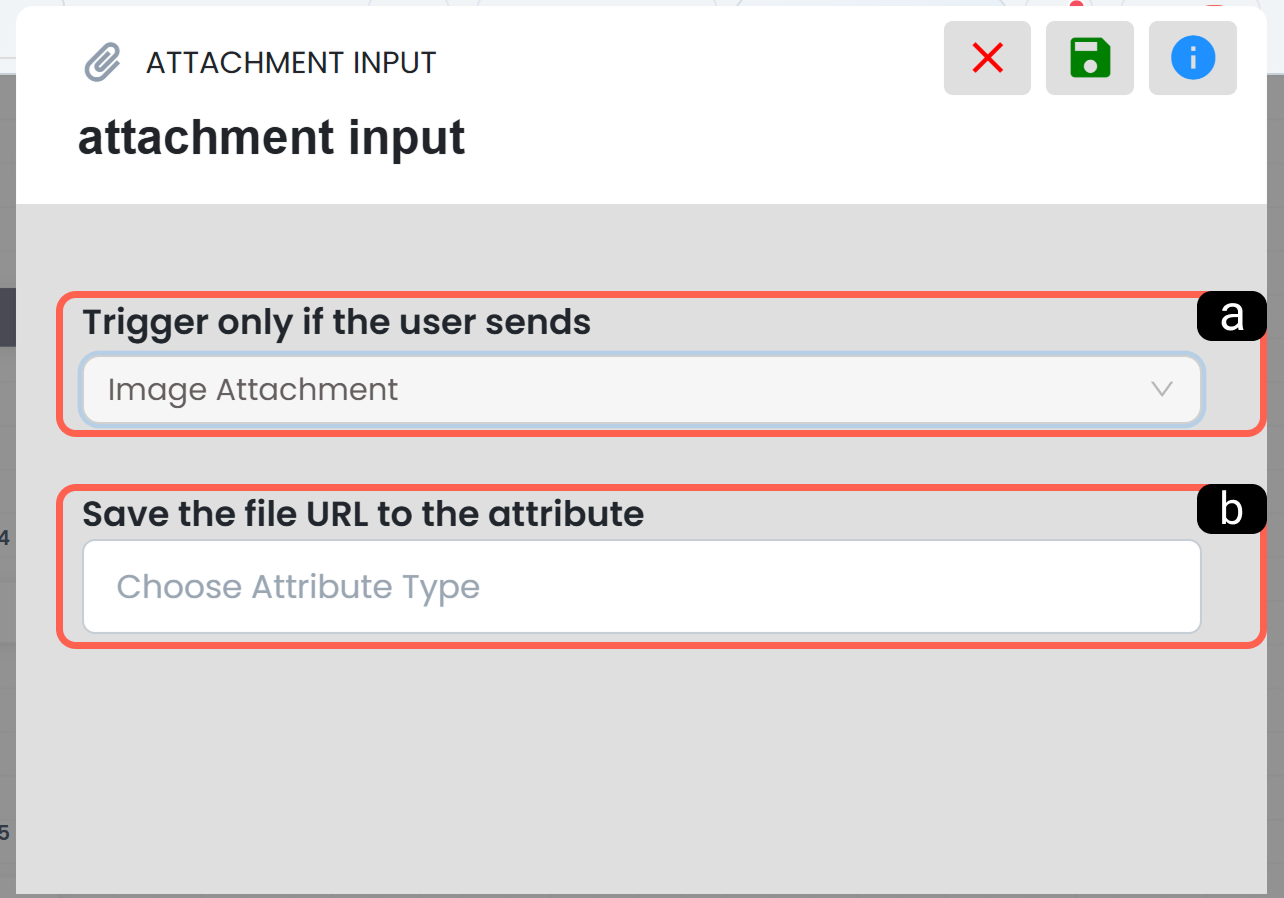
a. Trigger File Type
In this field, you determine which file type will trigger the block. Depending on the scenario, image, audio, video, document, or other attachment types can be selected. Thus, the flow continues only when the user sends the expected file type.
b. Save File URL (Optional)
When the uploaded file is received by the system, a link is generated. Using this field, you can save the generated file URL into a selected value and reuse it in later steps. This is especially useful in scenarios where you want to send the file via email, transfer it to an agent, or use it as a reference in another process.
1.h – User Input
The User Input block is used to capture, validate, store, and trigger the correct flow based on the messages written by the user. This structure, where free-text inputs are processed, plays a fundamental role in scenarios such as collecting data from the user, detecting specific keywords, and directing the user to the appropriate branch.
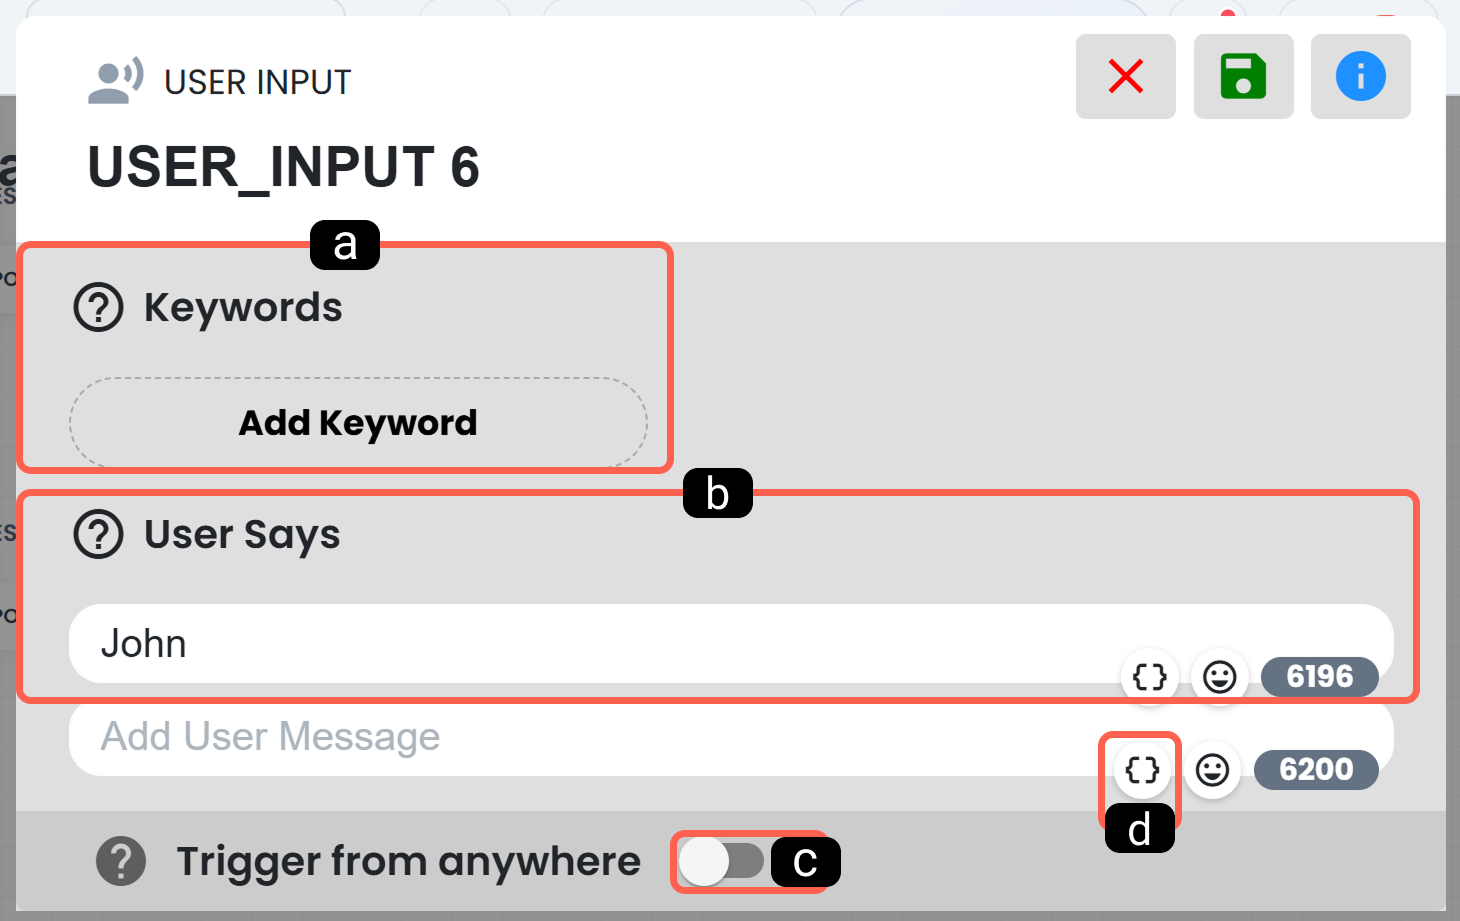
a. Keyword
This field defines the trigger word or phrase groups used to capture the user's message. Keywords can operate with two different logics:
- Global keywords are valid throughout the entire chatbot. When the user writes one of these expressions, the relevant user input can be triggered regardless of the current step.
- Local keywords are only valid within the step where they are defined and help you create a more controlled flow.
b. Step Expression
This field defines example expressions that the user is expected to write to trigger this step. The system evaluates the user's message together with these expressions and keywords to match the correct user input. It is especially useful for capturing texts sent via buttons or short expected responses.
c. Step Expressions Can Be Triggered Anywhere
When this feature is enabled, locally defined expressions can be triggered throughout the entire chatbot. In other words, a user input that normally works only in its defined step becomes globally active when this setting is enabled. This structure is used in scenarios where you want to create shortcuts accessible from any point.
d. Adding Dynamic Values
You can add dynamic values to text fields in the User Input block using the curly brace icon. Thus, user profile information, previously collected data, or other values generated within the scenario can be included in the input structure. This feature is especially useful when building personalized flows or defining a new user input based on data from a previous step.
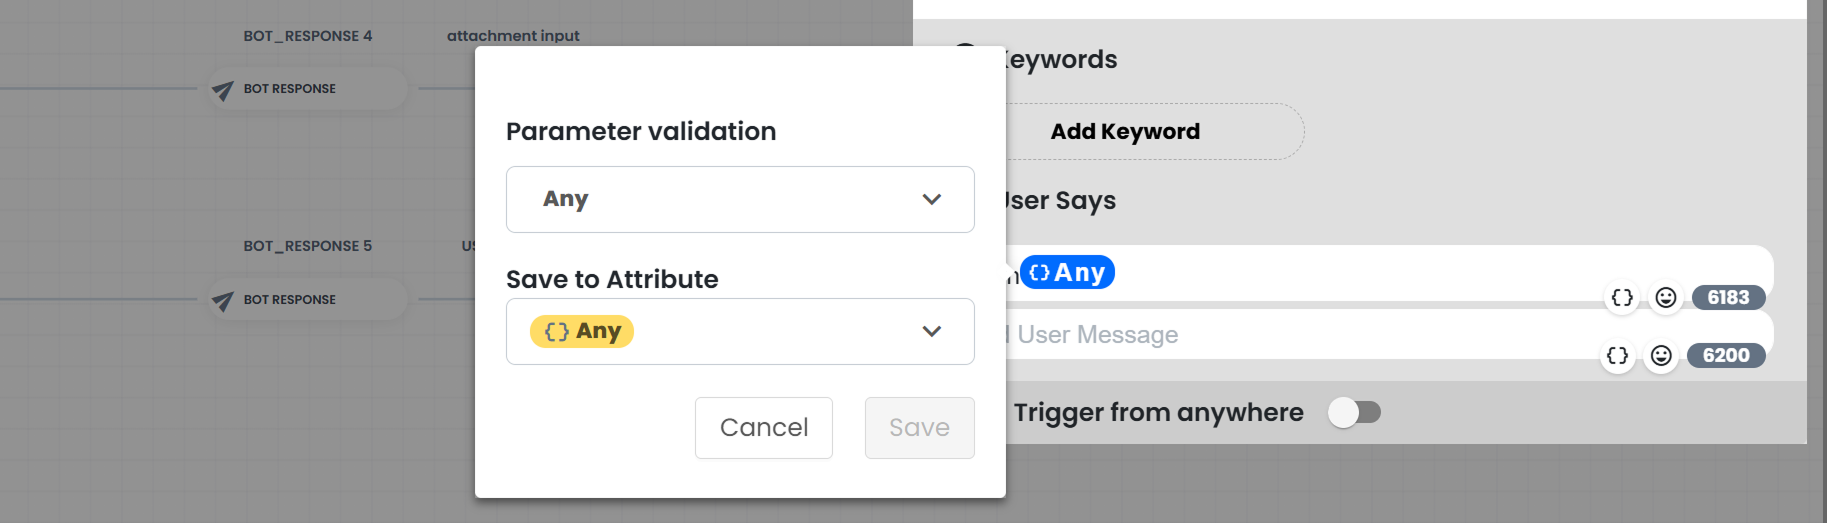
-
Validation with Parameter:
This field allows validating the data received from the user according to a specific rule. For example, it can check whether the incoming data matches an email, phone number, or a specific format. For more advanced validation needs, you can create your own validation using regex. -
Save Attribute:
This field allows the data received from the user to be saved to a selected attribute. For example, the user's email address, phone number, or other information can be stored in the profile card or a related record field. The saved data can later be reused for filtering, segmentation, and generating personalized responses.
1.i – AI Classification
The AI Classification block analyzes incoming user content with the help of artificial intelligence and categorizes it into predefined categories. In this way, you can automatically classify user requests based on their intent, define different actions for each class, and build a more organized scenario structure. Based on the classification result, users can be directed to different flows using filter blocks.
Note: For this feature to work, you must have completed the OpenAI integration via your Supsis AI panel (see: OpenAI Integration).
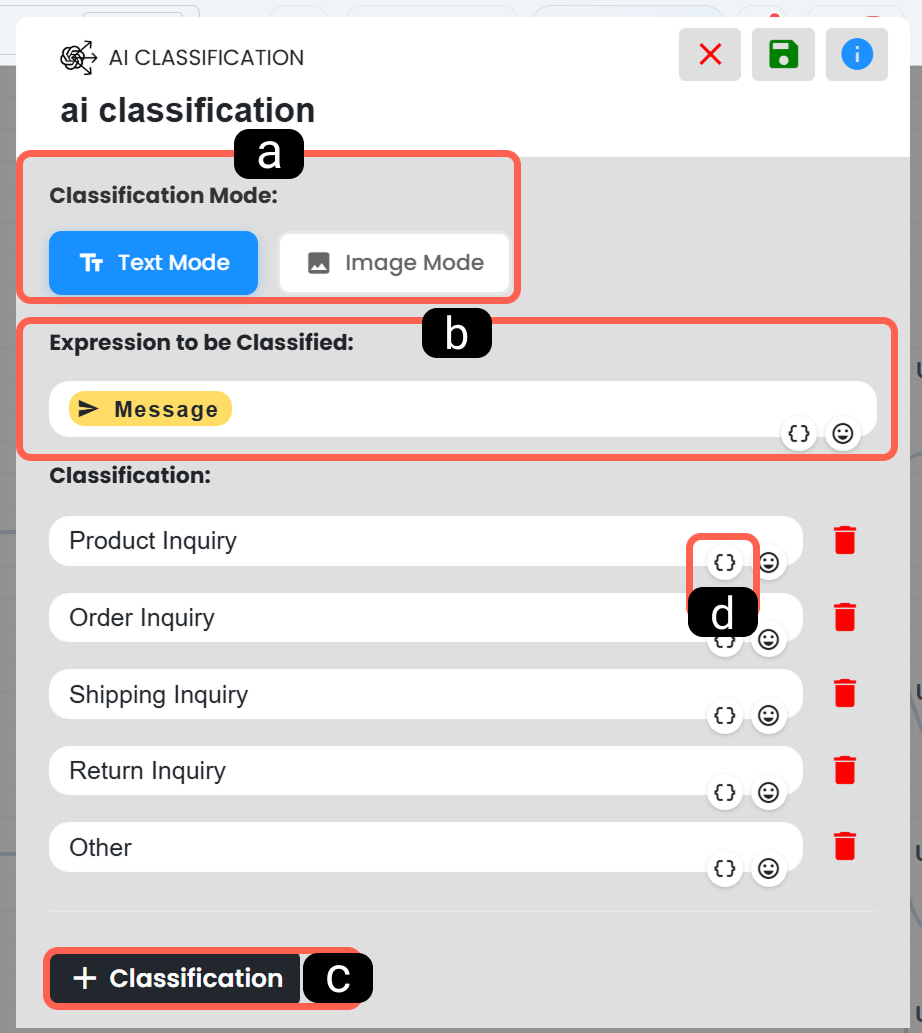
a. Classification Mode
In this field, you determine which type of content the classification will be based on. The system provides two different modes:
- Text Mode: Used to classify text-based inputs such as user messages, comments, or textual entries. Intent-based classifications like product inquiries, order tracking, or shipping requests are handled in this mode.
- Image Mode: This classification type is used in scenarios where both visual and textual content need to be evaluated together. It is especially preferred when you want to create different flows based on the type or content of the image sent by the user.
In cases where image input needs to be obtained from the user, you can capture the image using the File Input block, save it to a specific attribute, and use it for classification.
b. Expression to Classify
This field defines the data that the AI will analyze. The user’s message, a selected dynamic value, or a specific static value can be used here as classification input. The system analyzes this expression and assigns it to the most appropriate category, enabling the next action to be taken accordingly.
c. Add Classification Category
This field is where you create the category list to be used in classification results. You can add new classes, edit existing ones, or remove them as needed. This makes the classification structure flexible and adaptable to your workflow.
d. Adding Dynamic Values
You can add dynamic values to expression and category fields using the curly brace icon. Thus, AI can use not only static text but also dynamic data generated during the scenario in the classification process.
Note: Based on the classification result, users who are intended to be directed to different scenarios should be filtered and routed to different scenario branches. For this, the filter condition must be set as AI Classification Result (see: Filter).
1.j – Provide Information to Assistant
Provide Information to Assistant ensures that the current conversation session with the user is transferred to the AI assistant connected to the scenario.
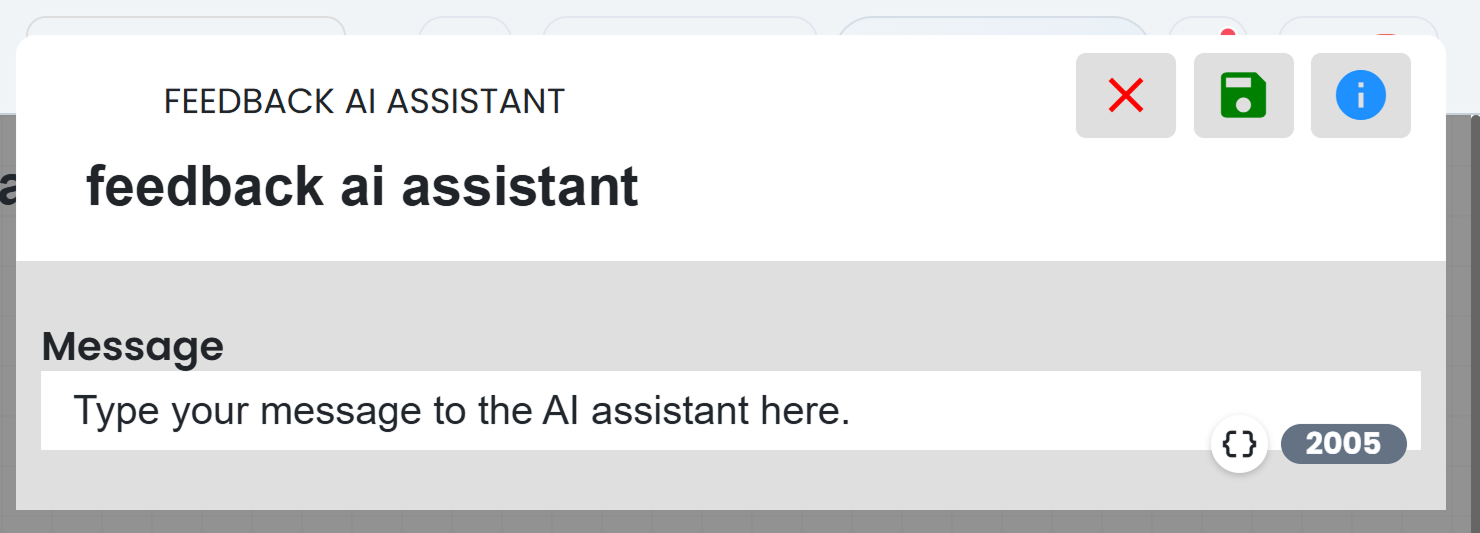
When this block is active, your AI assistant connected to the scenario starts processing using the message written here, the conversation content, and the user data.
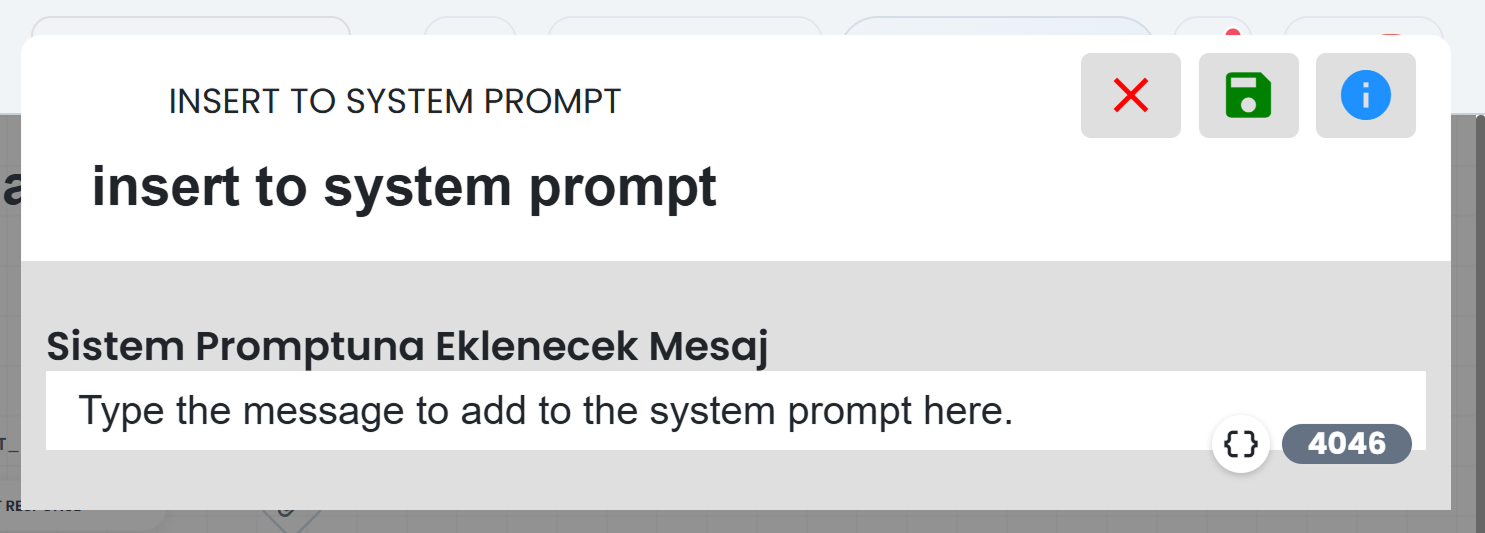
1.k – Add Message to System Prompt
When entering this block within the flow, it is used to define an additional instruction at the prompt level that the AI assistant connected to the scenario will consider throughout this conversation session.
Adding a message to the system prompt can be used to define a new rule, priority, or tone for the AI’s behavior specifically for the relevant user based on analysis.
1.l – Web Search (Tavily)
This block allows you to perform a web search based on your defined query and use the results within the scenario. It is preferred in scenarios where you want to fetch up-to-date information, collect data from external sources, or provide additional context to AI.
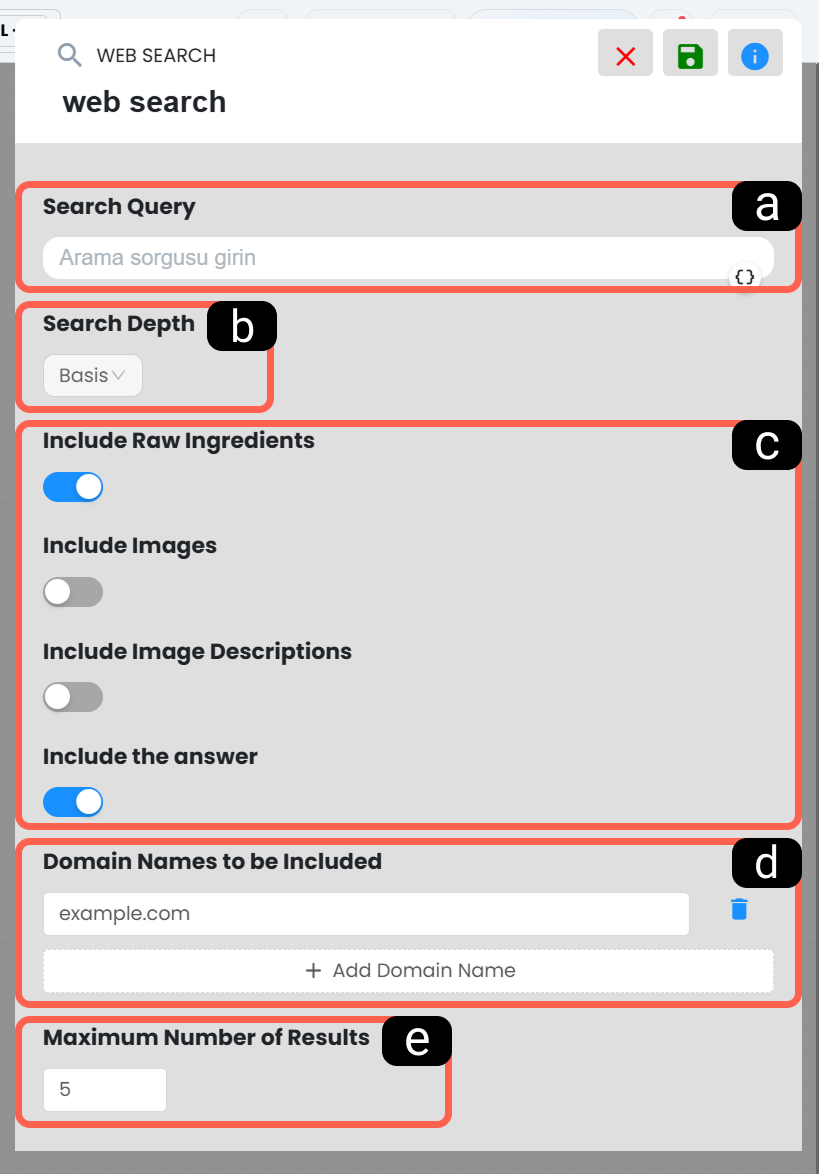
a. Search Query
This field is where the query to be searched on the web is written. The clearer and more focused the query, the more relevant the returned results will be.
b. Search Depth
This setting determines how shallow or deep the search will be. For faster and more general searches, a lower level can be used; for more detailed and comprehensive results, a deeper search can be preferred.
c. Returned Data Type
In this section, you determine which types of data will be retrieved as a result of the search. By selecting options, you can control whether components such as raw content, images, image descriptions, and summary answers are included in the results.
d. Domains to Query
This field allows the search to be limited to specific websites or domains. If you want to search only trusted or organization-specific sources, you can add the relevant domains here.
e. Maximum Number of Results
This setting determines how many results will be returned to the system. Limiting the number of results is useful for reducing unnecessary data clutter and obtaining more controlled outputs.
1.m – Web Search (OpenAI)
This block is used to perform web searches supported by OpenAI and retrieve information from external sources. Its basic logic is similar to Tavily search; however, the search context and source scope are managed differently through this block.
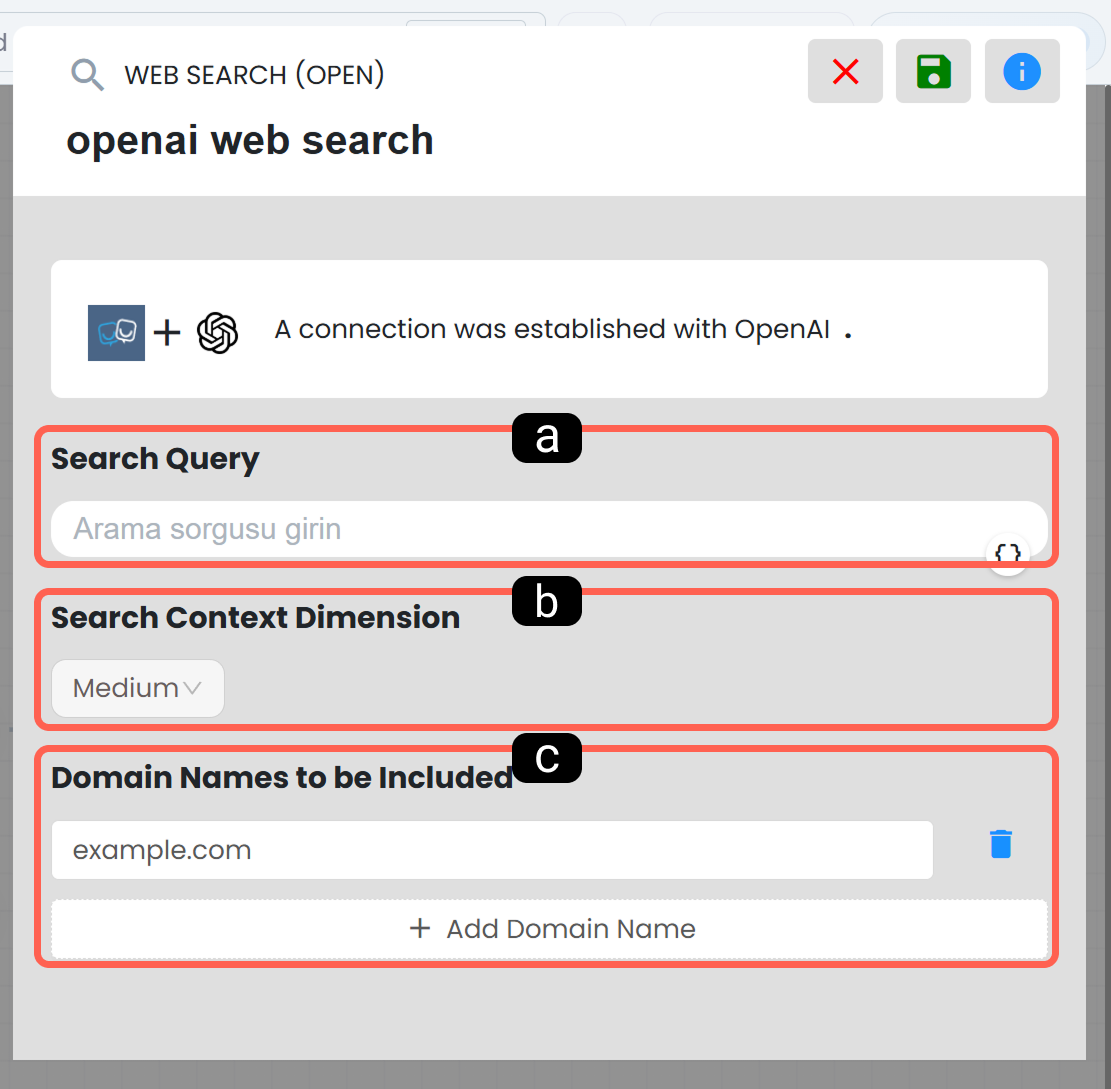
a. Search Query
This field defines the query that will be sent to the OpenAI web search.
b. Search Context Size (Search Depth)
This setting determines how broad a context will be considered during the search. Narrow contexts provide faster and shorter results, while broader contexts provide more comprehensive results.
c. Included Domains
This field is used to limit the search to specific websites. If you want to retrieve data only from certain domains, you can add them here. This ensures that the search becomes more controlled and aligned with your purpose.
1.n – AI Call (Voice AI)
This block allows you to automatically initiate phone calls to the target user through a voice AI assistant created in your Supsis AI panel. It is a highly advanced tool that combines the chatbot’s decision-making and data processing capabilities with the AI’s voice communication abilities.
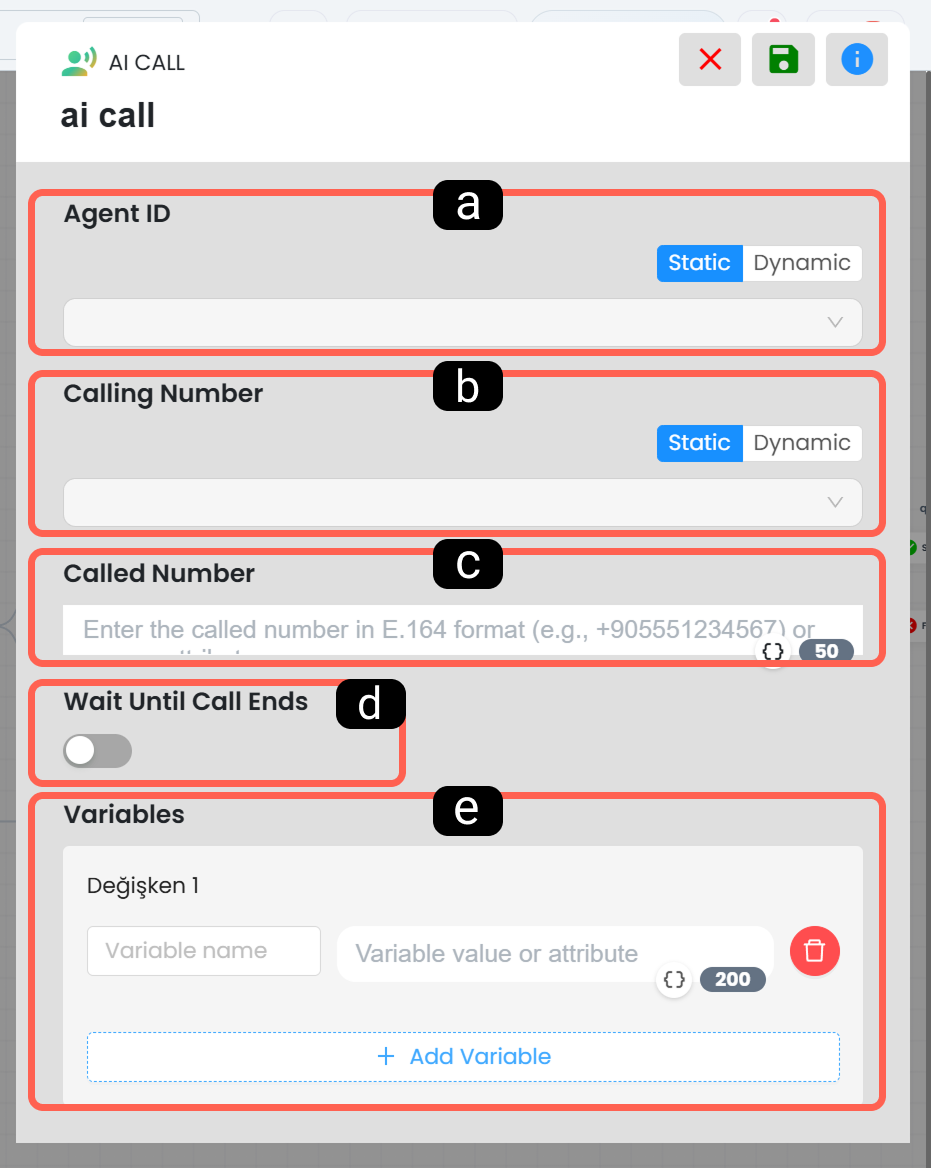
a. Agent ID
This is the identity of the AI assistant that will perform the call. If you will use the same assistant for all calls, you can select a fixed one from the list. If you plan to use different assistants depending on the scenario flow (e.g., English assistant or Turkish assistant), you can define a dynamic ID variable.
b. Caller Number
This is the outbound line integrated with Supsis AI that the system will use when initiating the call. Especially if multiple PBX numbers are defined in your panel, you can determine from which number the call will be made to the customer.
c. Target Number
This is the phone number of the target customer that the voice assistant will call. According to system standards, the number must be entered in international E.164 format (e.g., +90555...).
d. Wait Until Call Ends
This is an operational setting where you control the execution order of your chatbot scenario (synchronous or asynchronous flow).
- If Enabled: The chatbot flow waits until the phone call between the AI assistant and the customer is completely finished. After the call ends, the scenario continues from the next block.
- If Disabled: The system proceeds immediately to the next step in the flow as soon as the call is triggered, without waiting for the conversation to end.
e. Variables Sent to the Agent
This is a critical field used to provide context and information to the voice AI assistant before the call. By adding Key–Value pairs here, you can pass dynamic data from the chatbot to the agent.
For example, you can send the customer’s name, last order status, or outstanding invoice amount so that the assistant can start the conversation with a highly personalized message such as:
“Hello Mr. Ahmet, I’m calling regarding your invoice of 1500 TL...”
2. Actions
2.a – Go to Step
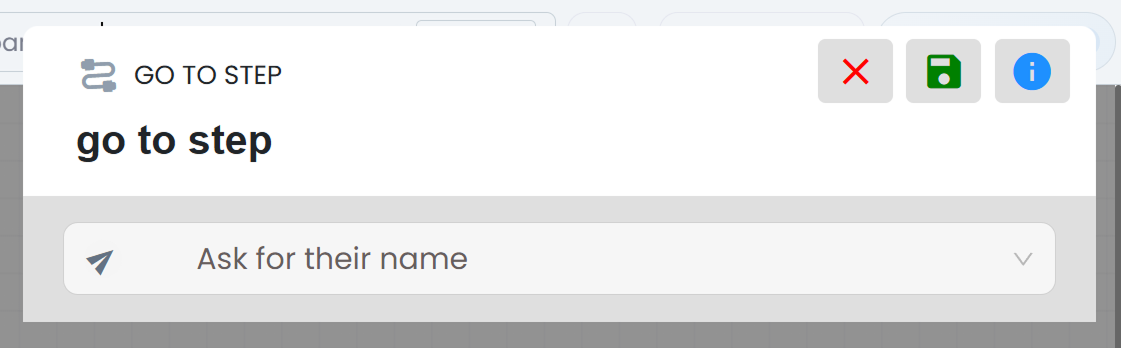
The Go to Step action is used to redirect the user to another step defined in the scenario. By selecting the target block from the dropdown list, you can directly move the user to a specific point in the flow.
It simplifies the flow, especially in scenarios where you want to provide access to the same menu, shared information area, or a specific process step from different paths. Since targets are selected by block names, clearly naming steps makes navigation management easier.
2.b – Add Segment
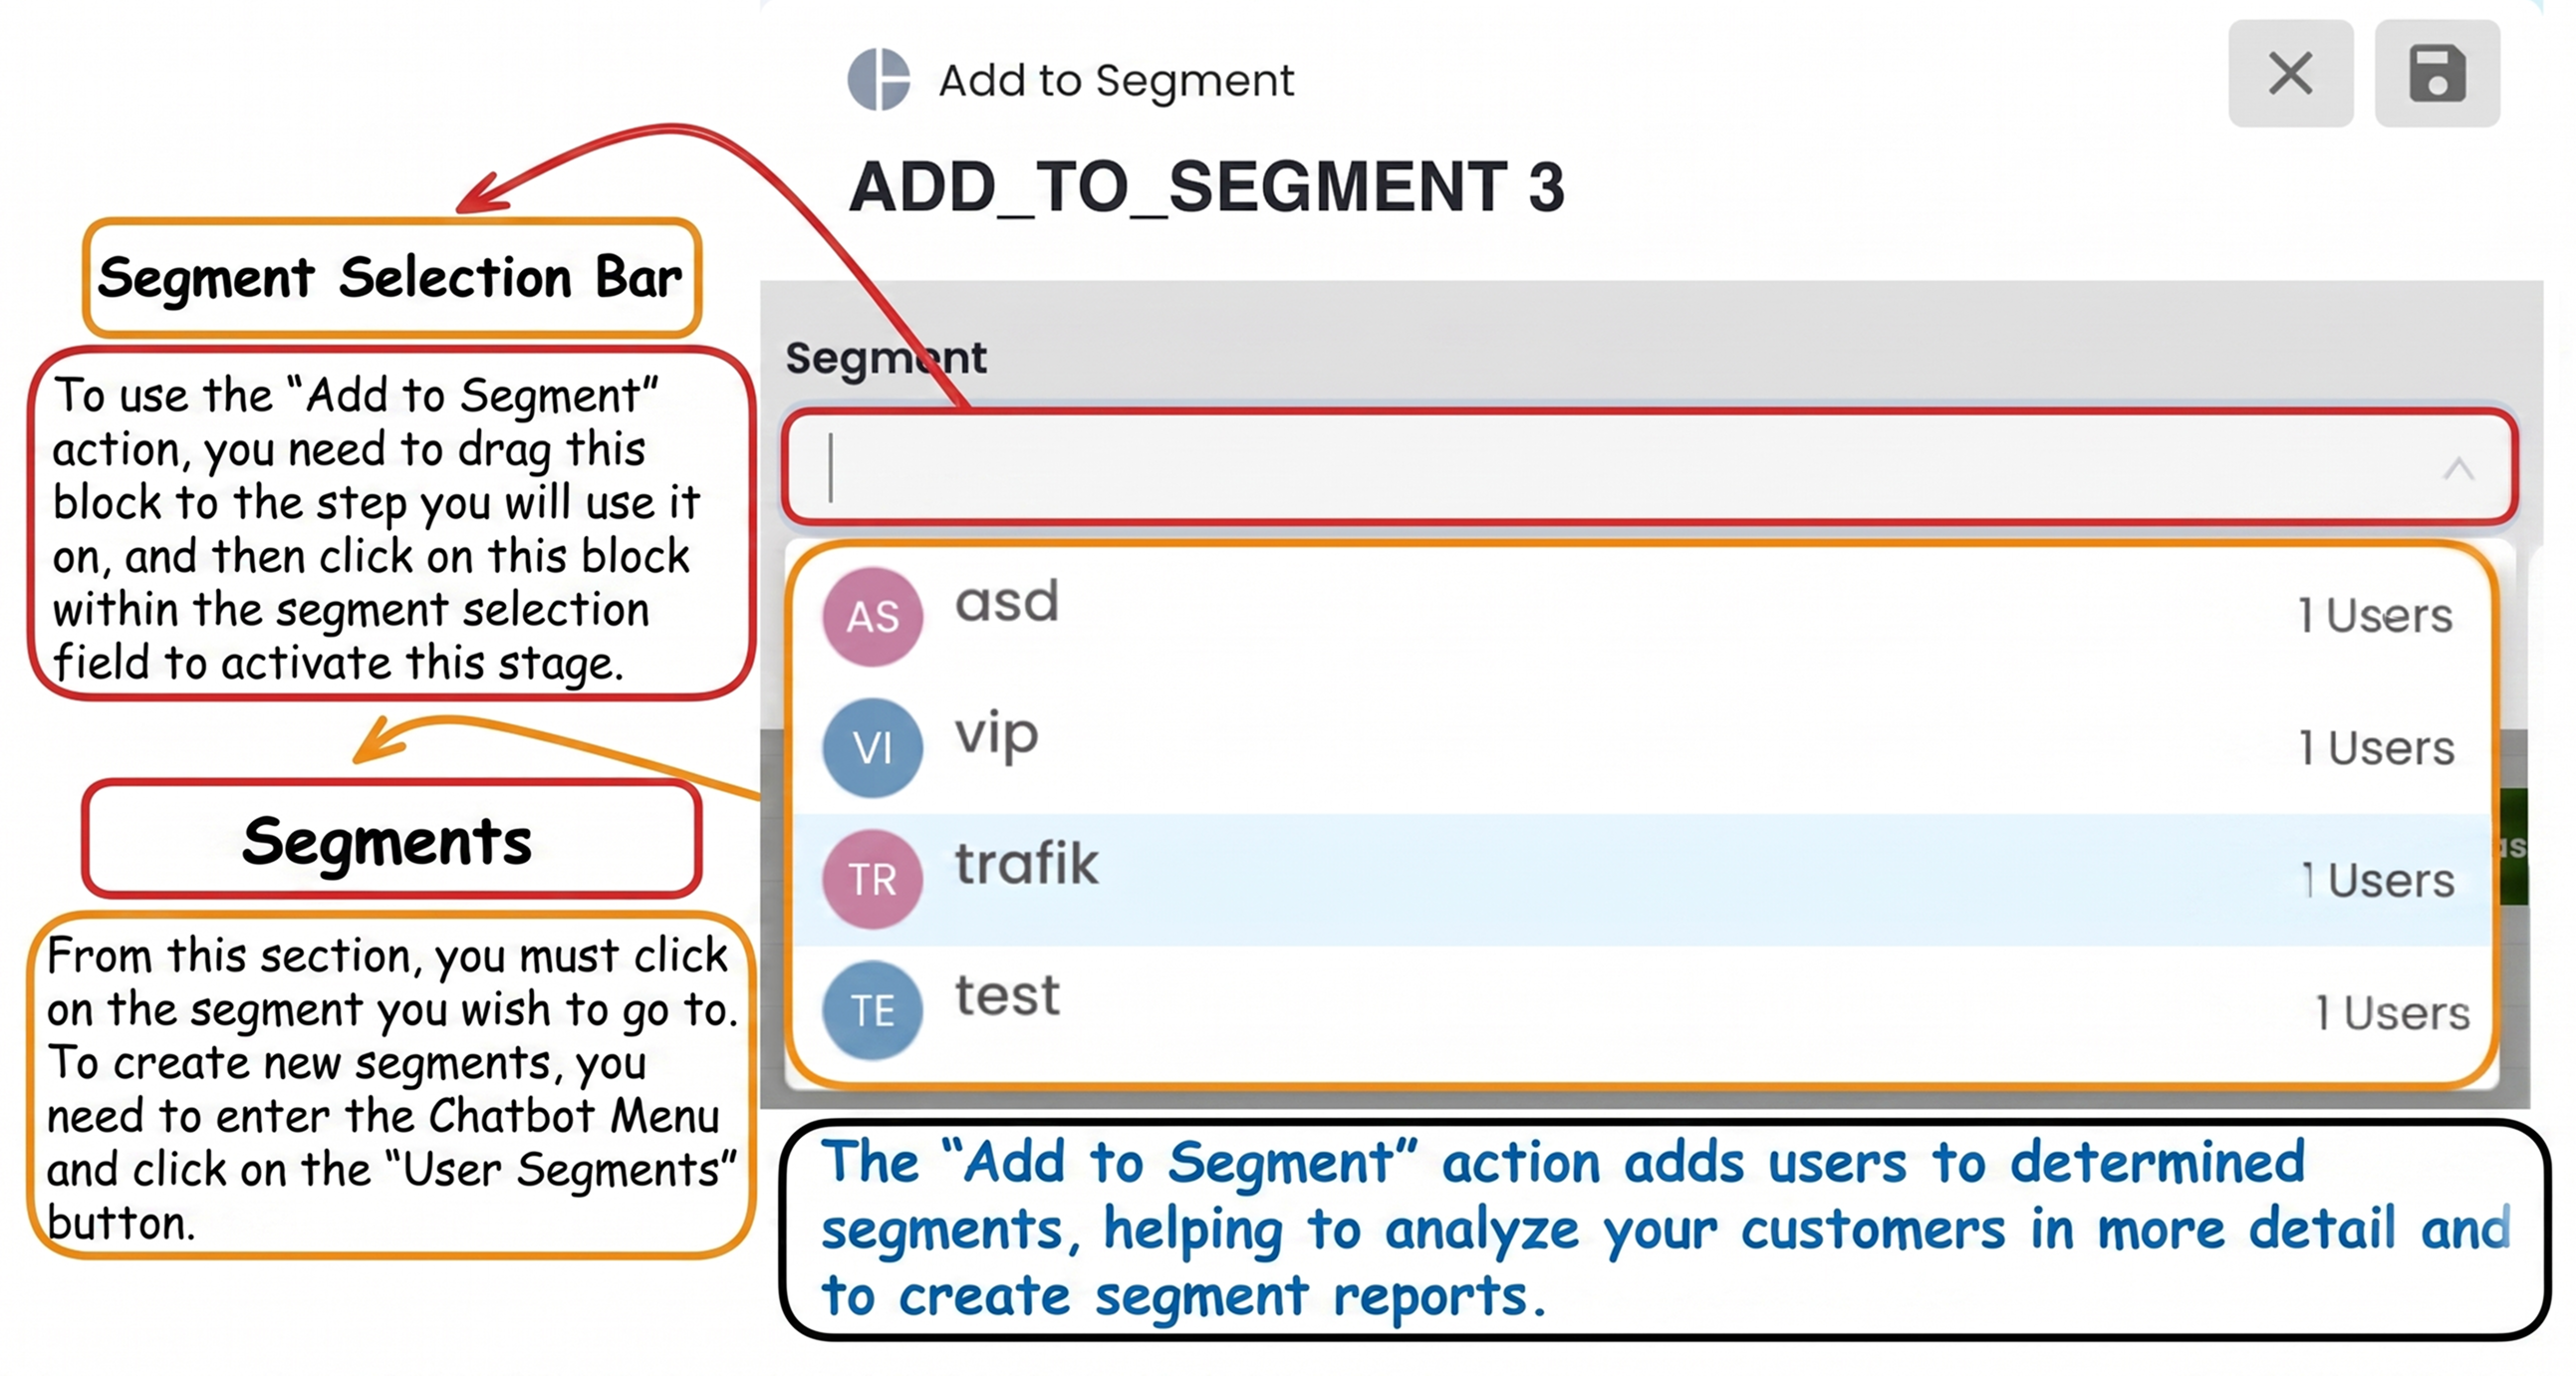
This action is used to include the user in a selected segment. When you define the target group in the segment field, the user is added to that category. This information can later be used for filtering, targeting, and reporting processes.
Segment structures significantly simplify flow management, especially in campaign interest, customer type, or behavior-based segmentation scenarios.
New segments can be created from the User Segments section in the Chatbot menu (see: User Segments).
2.c – Remove from Segment
This action is used to remove the user from a selected segment. When the segment to be removed is selected, the user is automatically removed from that group.
This structure is ideal for keeping campaigns, targeting, and user segmentation up to date, cleaning outdated matches, and making reporting more accurate.
You can track segment changes from the General section of chatbot reports.

2.d – Webhook
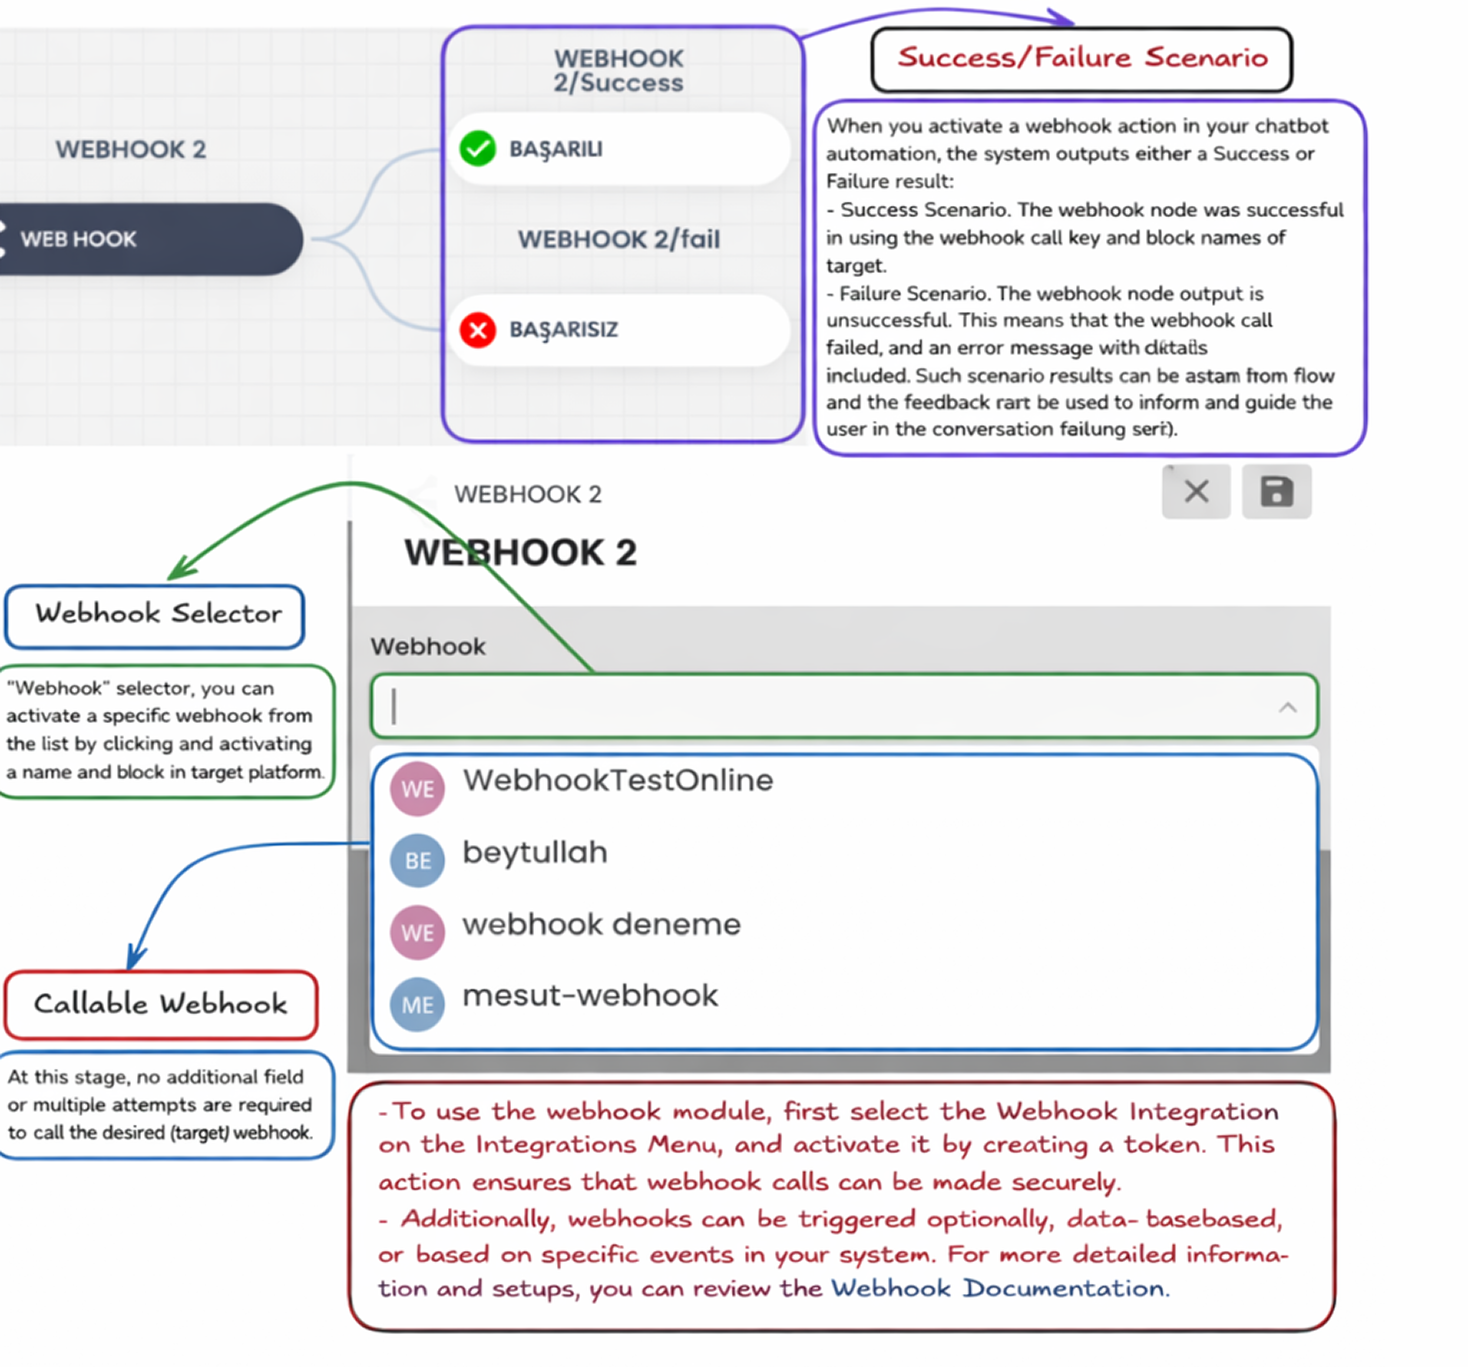
The Webhook action is used to share data from the chatbot flow with external systems such as CRM, ERP, or custom databases, and to receive responses from these systems.
In this section, you can select a webhook channel previously defined in the Integrations menu and connect it to the flow.
When the webhook block is activated, the system creates two separate scenarios: success and failure. This allows you to design different flows depending on the result of the request.
Before use, the webhook channel must be created and, if necessary, activated with a token (see: Chatbot Integrations).
xxx 2.e – API Request: xxxx Skip
2.f – Set Attribute
The Set Attribute block is used to store data obtained in the chatbot flow into the user profile card and to update existing profile information.
With this block, static values, dynamic data from the user, or system-generated values can be written to the profile. This allows you to create a more personalized and measurable user experience.
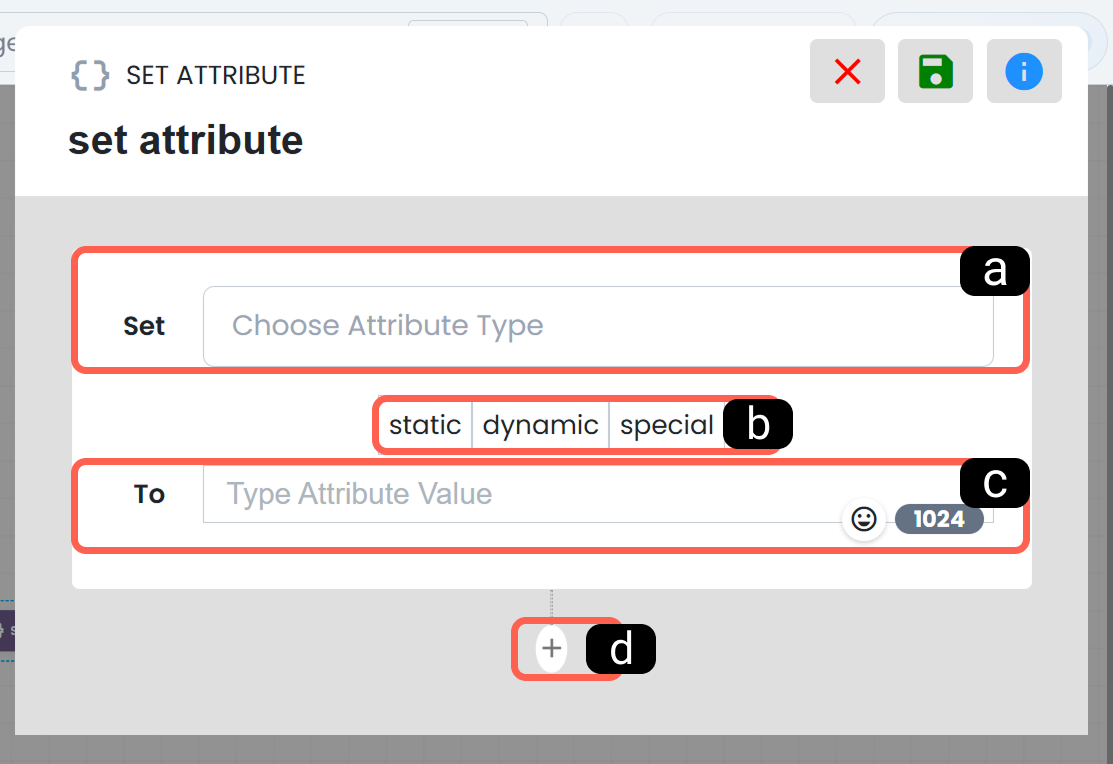
a. Attribute to Set
In this field, you select the profile attribute to be updated. The selected attribute is matched with the value defined below and saved to the user’s profile card. This structure ensures that collected data is written to the correct profile field.
b. Data Type of the New Value
This section determines the type of data that will be written to the selected profile.
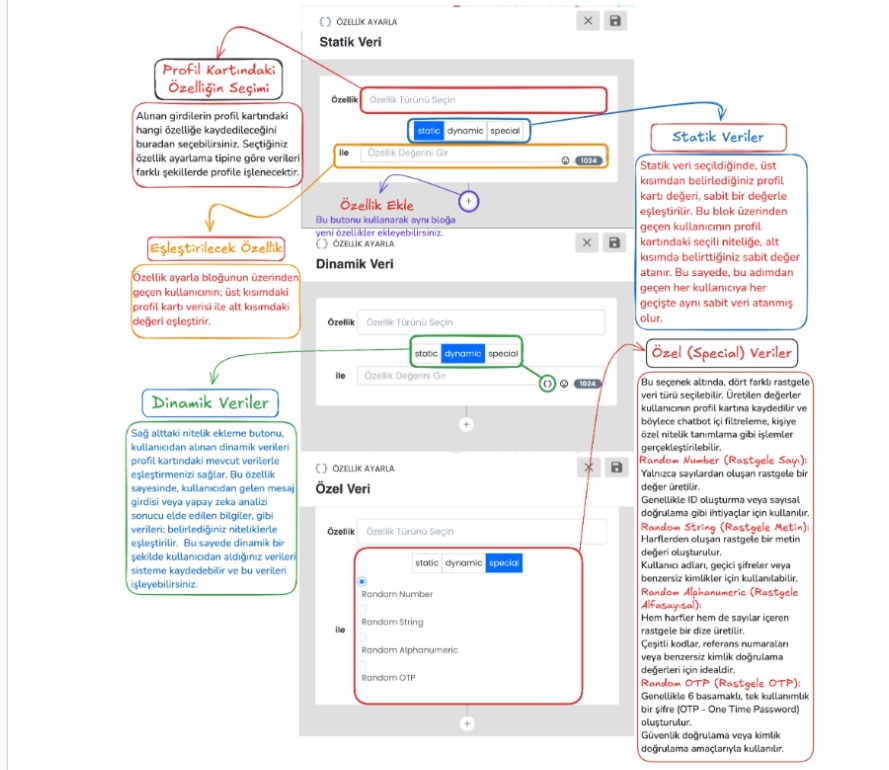
Static is used to assign a fixed value that will always be written to the attribute.
Dynamic is preferred for writing variable data such as user messages, preferences, or values generated during the flow.
Special allows you to store system-generated values such as random numbers, random text, alphanumeric values, or OTP codes in the profile.
c. New Value of the Attribute
In this field, you define the value corresponding to the selected attribute type.
d. Add New Attribute
Using the “+” button in the lower section, you can define an additional attribute within the same Set Attribute block. This is useful when you want to update multiple profile fields within a single structure.
2.g – Question
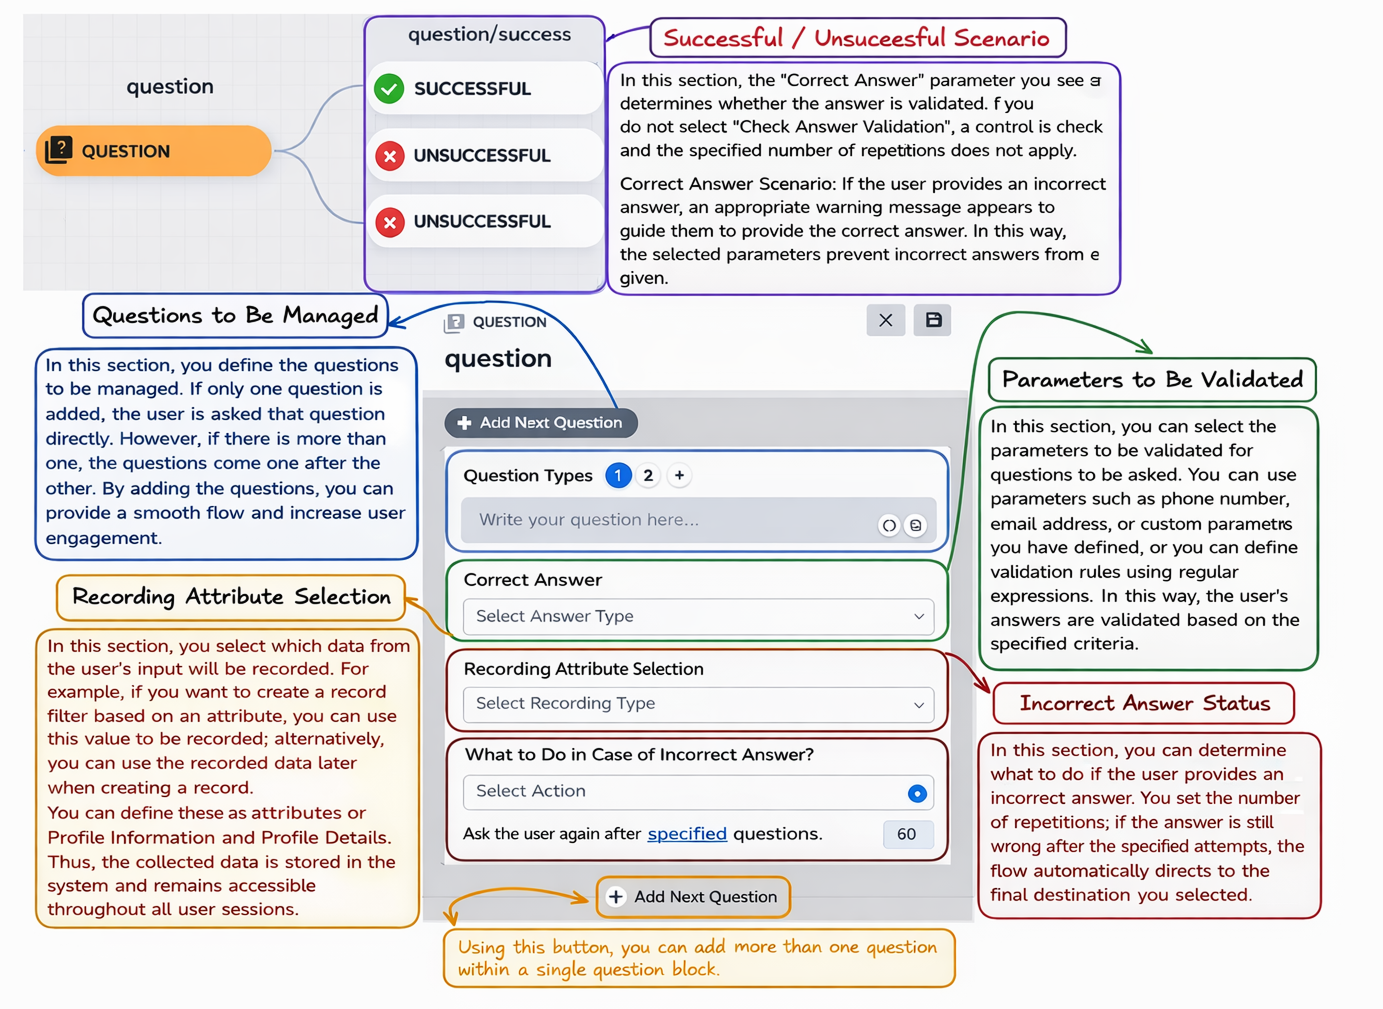
The Question block is used to collect information from the user, validate the response according to specific rules, and optionally store it in the profile card.
When the user provides a valid response, the flow continues successfully; in case of invalid responses, a failure scenario or retry structure can be triggered.
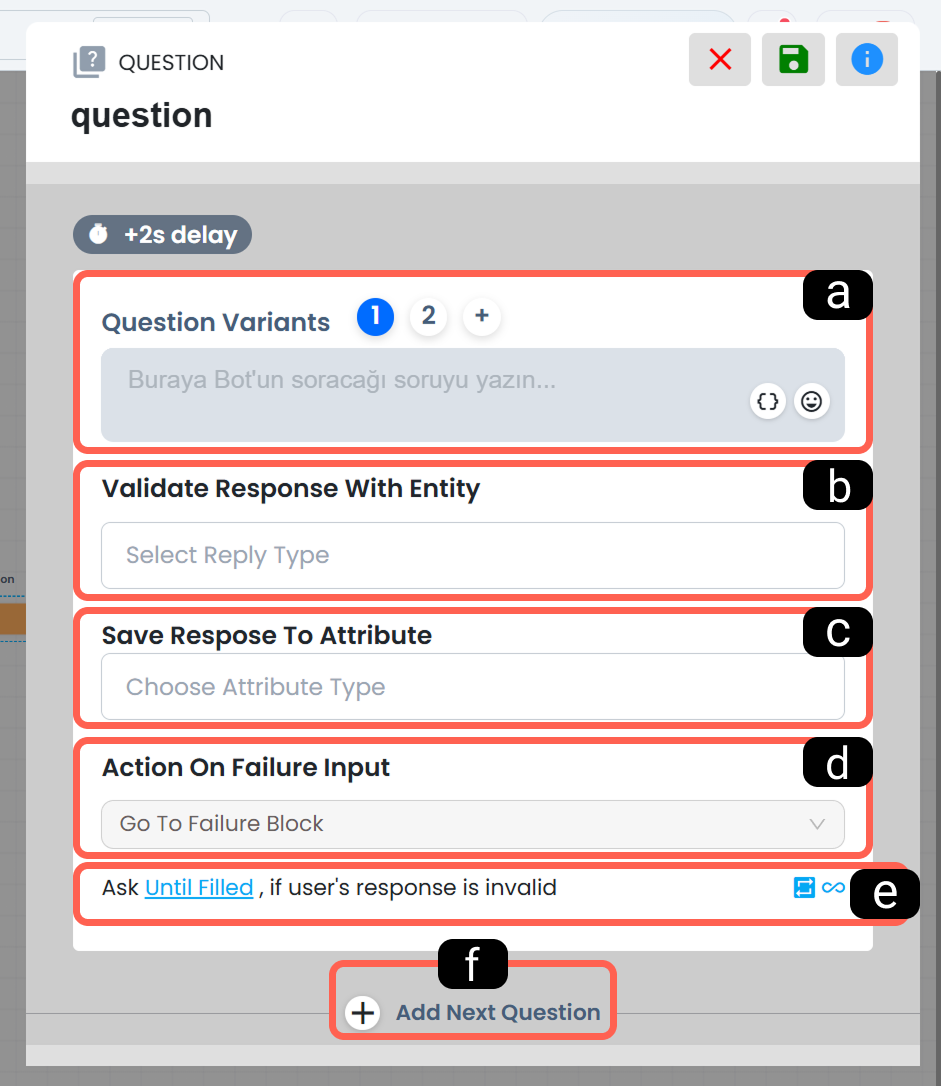
a. Question Variants
In this field, you define the question text that will be asked to the user. By using the “+” option, you can add multiple variations of the same question, allowing the system to provide a more natural and fluent experience by using different phrasings.
The added question variants are presented to the user randomly.
b. Validation Parameter for the Response
This section determines which rule will be used to validate the user’s response.
For example, you can select data types such as email, phone number, or a custom regex to ensure that only valid data proceeds in the flow.
This helps maintain data quality and filters out incorrect inputs at an early stage.
c. Value Where the Response Will Be Saved
This field is used to determine which attribute in the profile card the validated user response will be saved to. For example, after verifying the email address received from the user, it can be automatically processed into the relevant profile field. Thus, the information collected through the chatbot is stored in the user profile in an organized manner and can be reused in subsequent flows.
d. What Should Be Done in Case of Invalid Response?
In this section, you define how the system should behave if the user provides an invalid response or one that does not match the expected format. You can choose to direct the user to a failure block, or you can create an alternative scenario to initiate additional guidance or a retry process. This setting strengthens flow control, especially in steps where you collect mandatory data.
e. How Many Times Should the Question Be Asked in Case of Invalid Response?
This setting determines how many times the question will be repeated when an invalid response is received. The system will re-ask the same question until it receives a response that matches the type defined in the validation parameter, up to the specified number of attempts.
f. Add New Question
With this button, you can define a new question step within the same flow. Thus, instead of being limited to collecting a single piece of information, you can build a multi-step structure that collects different data from the user consecutively.
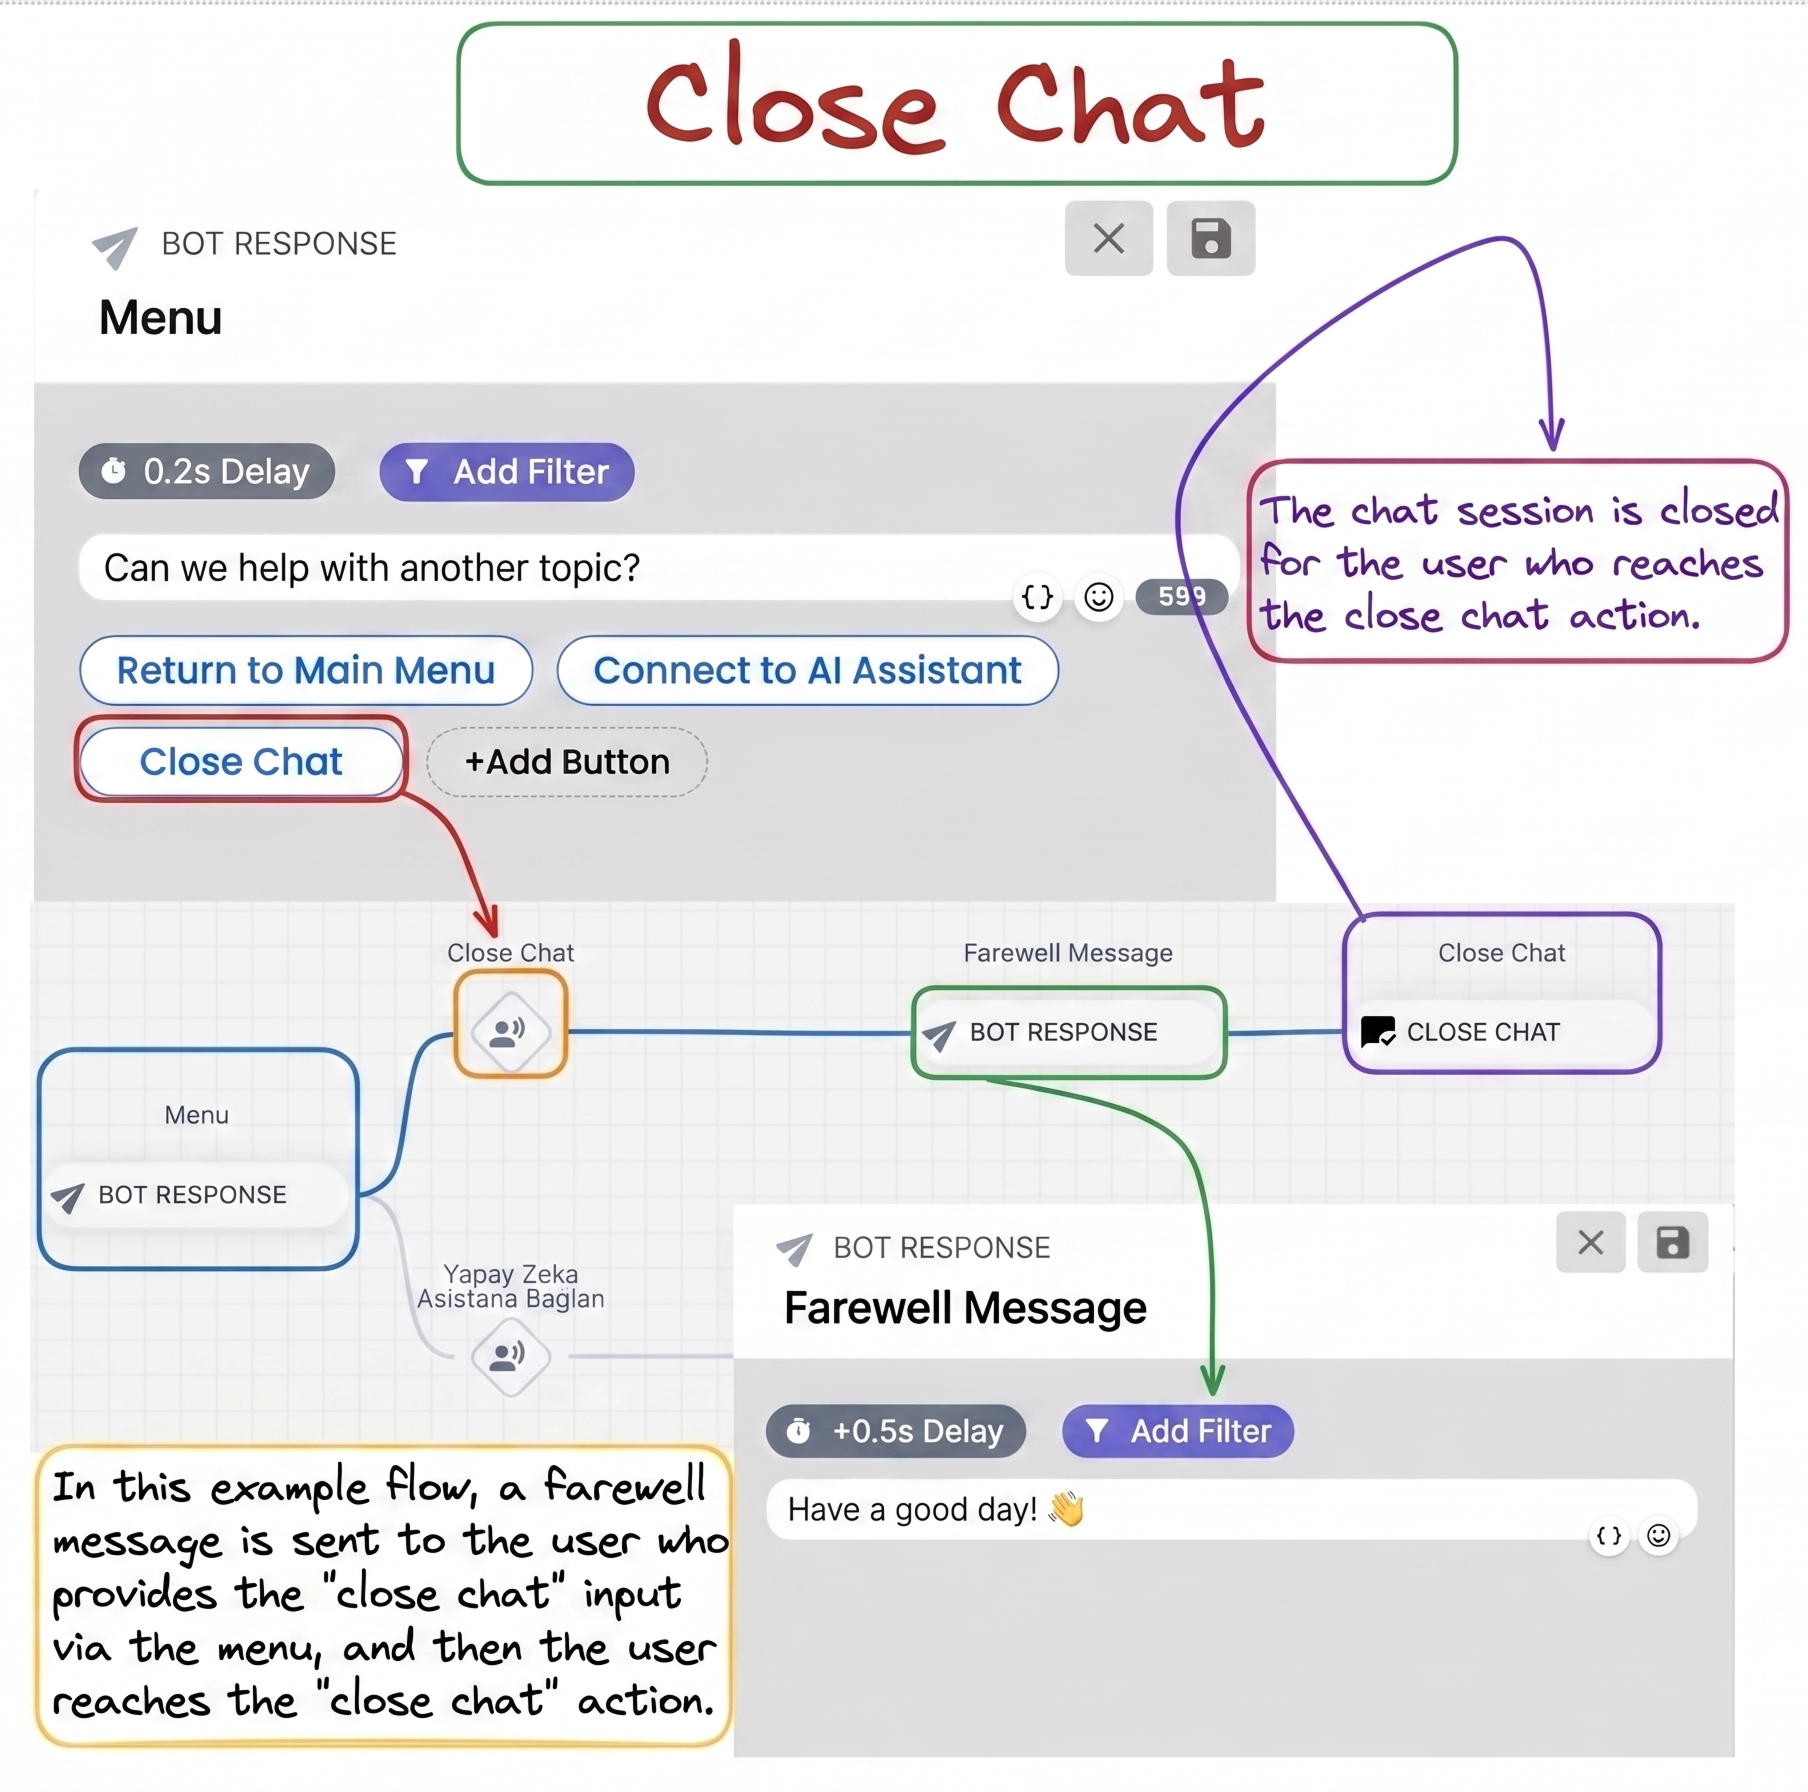
2.h – Close Chat
Close Chat is used to terminate the chat session conducted with the chatbot. When the user reaches this block within the diagram, the chat session is closed. It is important to design the flow before this action knowing that the session will be terminated. For example, you can send a farewell message or a notification related to the situation.
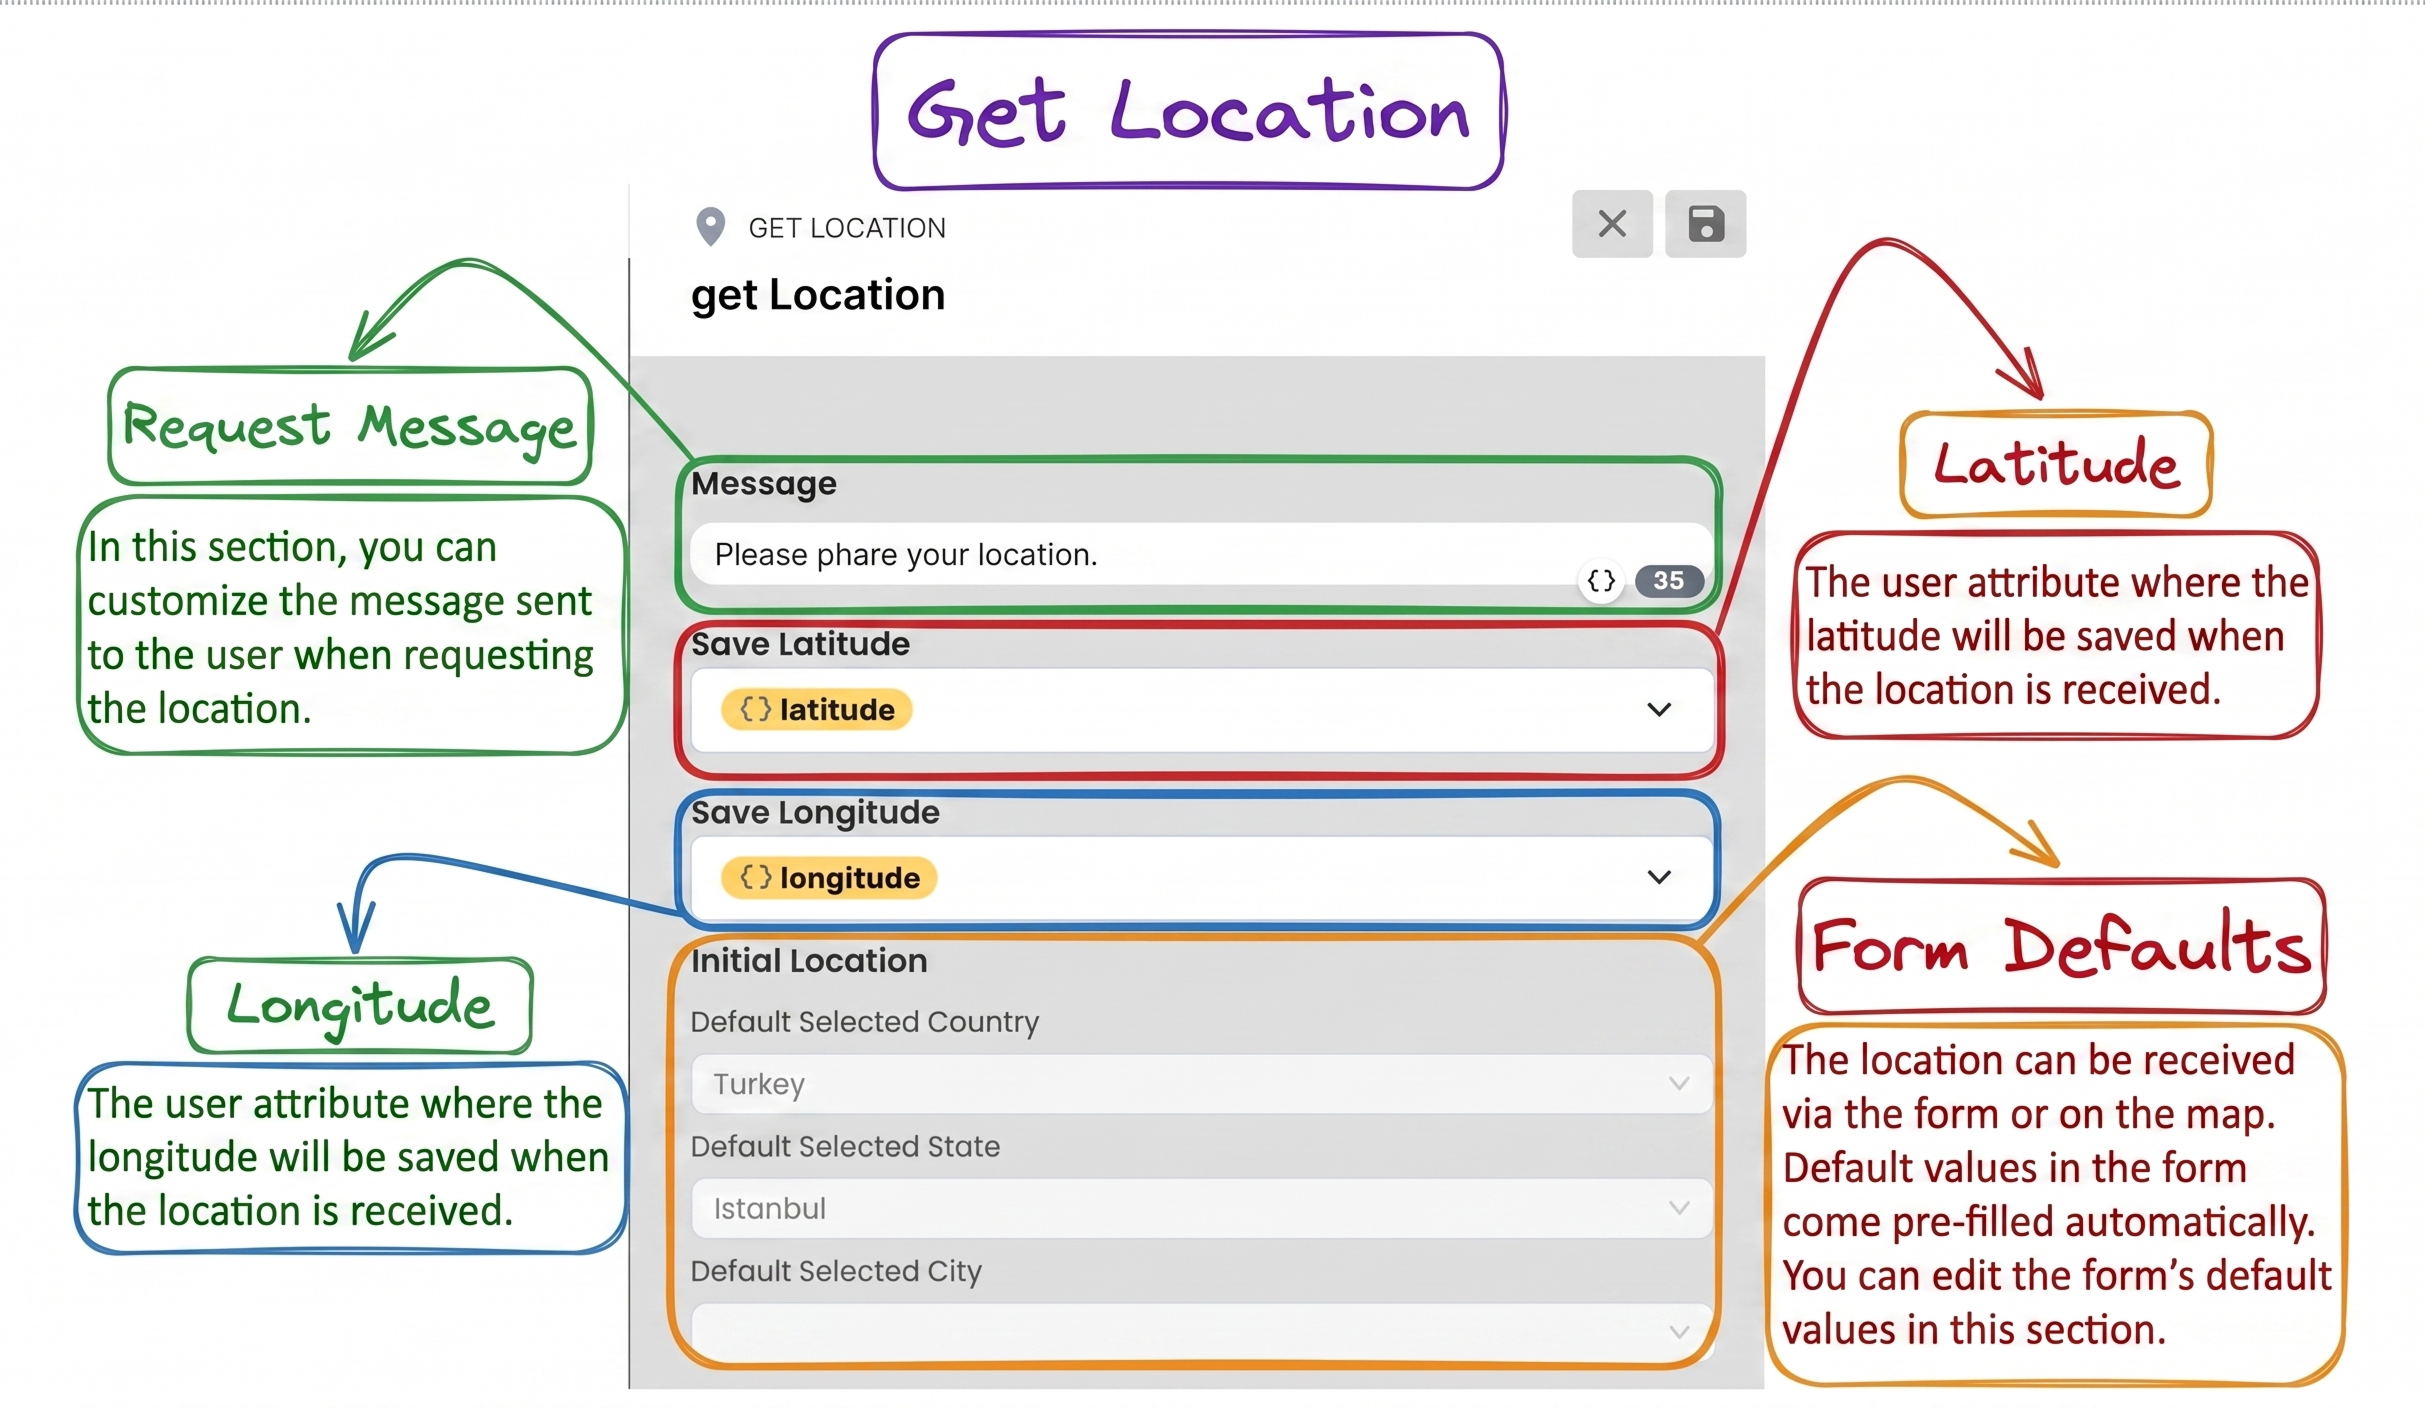
2.i – Get Location
This block allows the chatbot to collect geographic location information from users. This feature requests the user to share their location and stores this information in the system.
xxx 2.j – Run Javascript xxx to be done skip
3. Supsis Actions
3.a – Assign Owner
The Assign Owner action is used to assign the ownership of the conversation or the user to a specific representative or a defined assignment structure. Thanks to this structure, follow-up responsibility is clarified, customer communication is managed in a more controlled manner, and ownership can be maintained through specific users or teams in appropriate scenarios.
a – Algorithmic Assignment
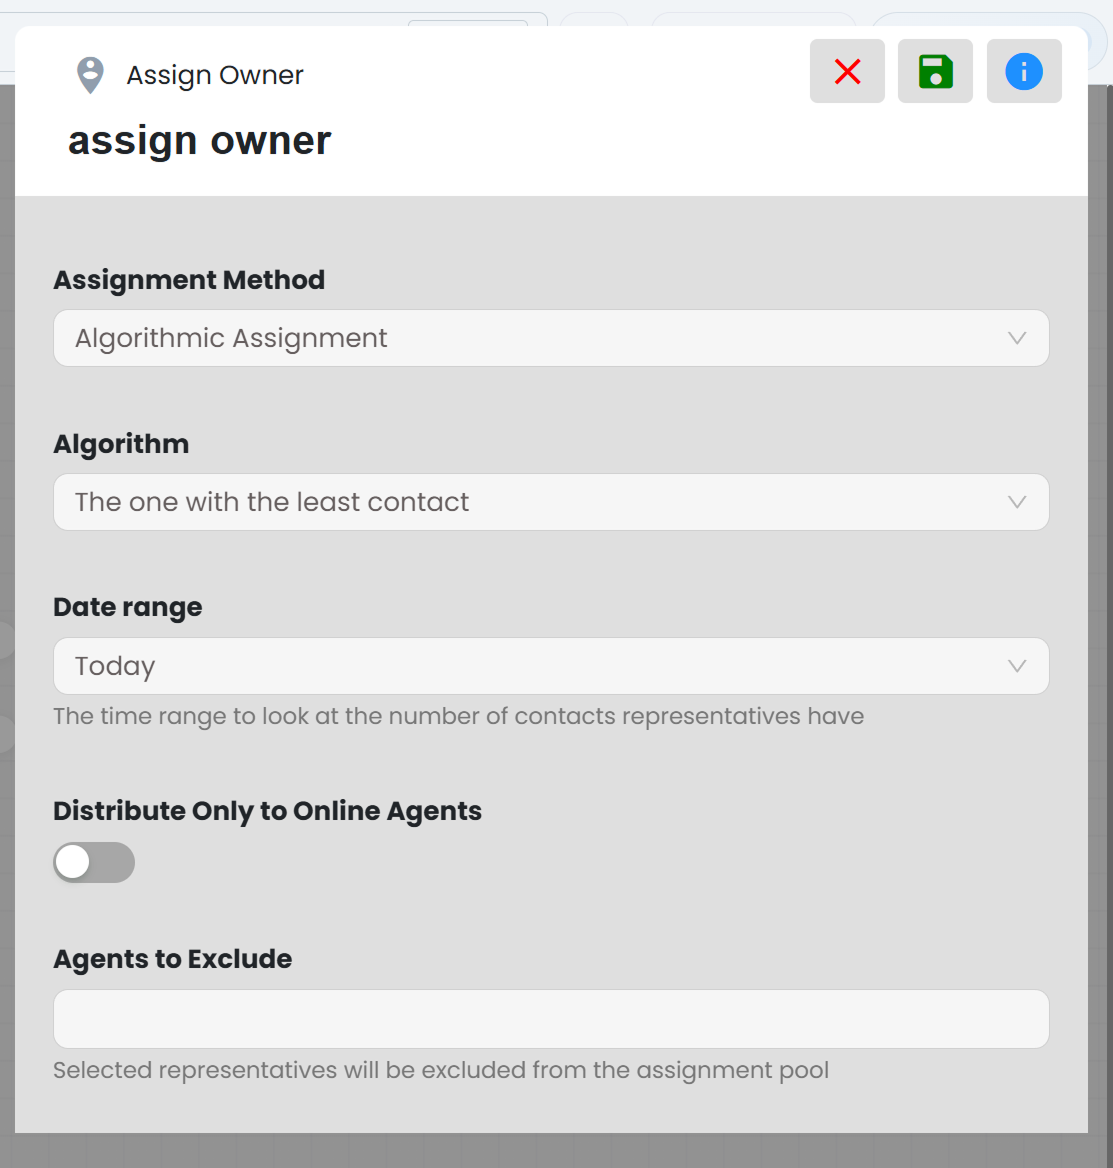
In this method, the representative selection is not made manually; the system automatically selects the most appropriate person according to the assignment logic you define. Through the assign owner block structure, the algorithm to be used can be determined, you can choose which time range data will be taken into account, configure whether distribution will be limited only to online representatives, and exclude specific representatives from the assignment pool.
b – Static Assignment
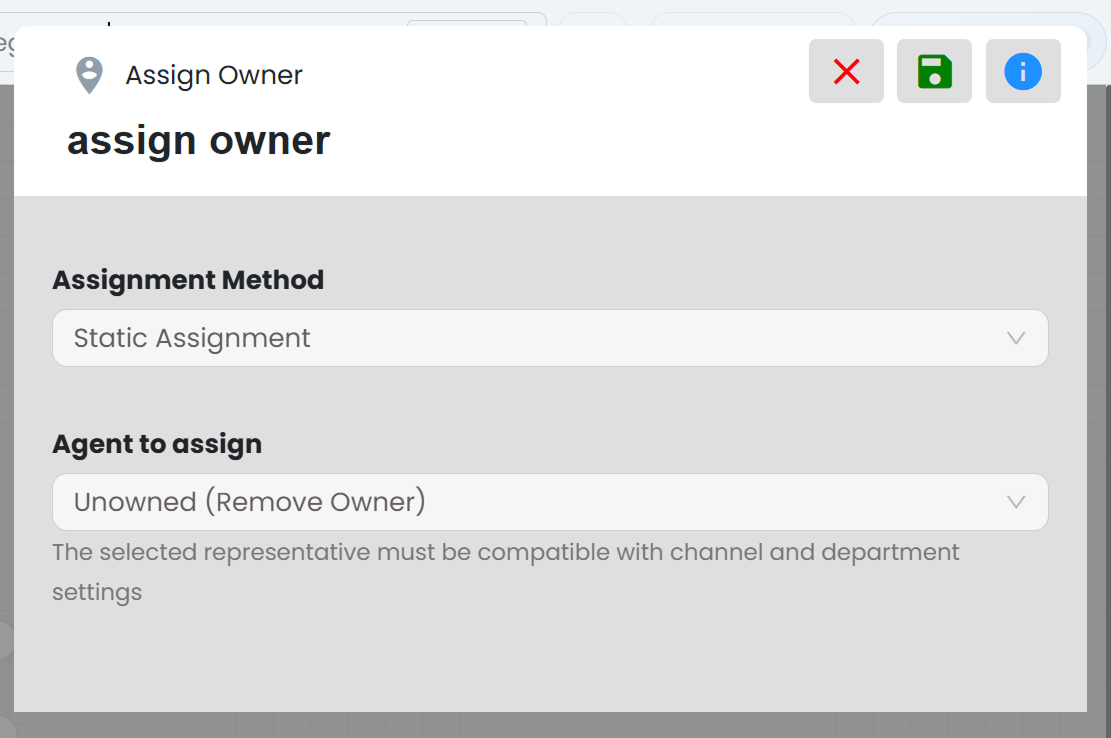
Static Assignment allows you to directly assign the conversation to a specific representative you choose. The representative selected from the dropdown list must be compatible with the relevant channel and department settings. This method provides more controlled usage, especially for VIP customers, requests requiring expertise, or processes where you want to gather certain customer groups under the same representative.
3.b – Create Ticket
The Create Ticket action processes the contact information and request details received from the user into the system as a ticket record. Thus, a support request initiated through the chatbot becomes trackable, filterable, and reportable by support teams.
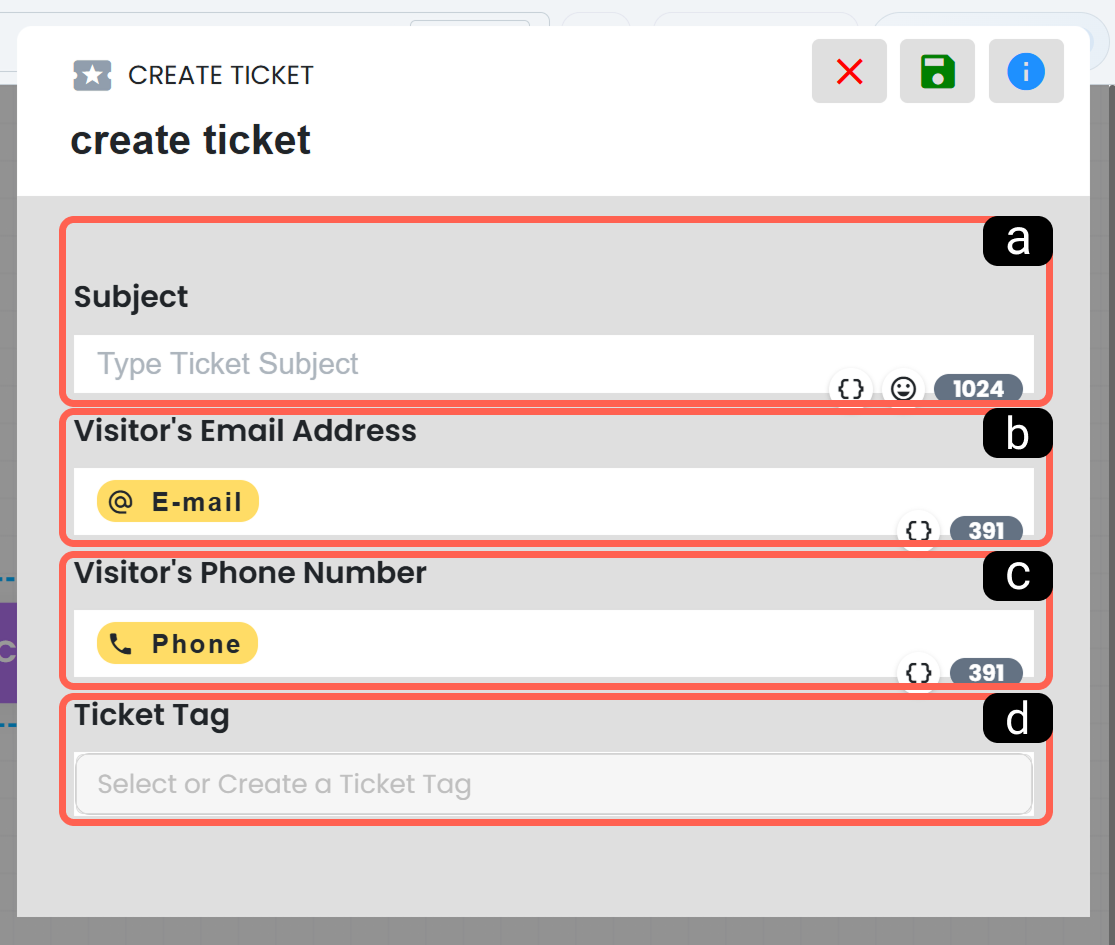
a – Request Subject
This field is used to determine the subject/title of the ticket to be created. Entering a clear and understandable title ensures that ticket records can be found more easily, categorized, and managed operationally faster.
b – Visitor Email Address
In this section, the email address to be associated with the ticket is defined. The system can automatically use the email information stored in the user profile; if the information is not available, it can also be entered manually. The email field must be filled in order for the ticket creation process to take place. If you cannot populate this field with dynamic values, you can enter a static placeholder email content inside it.
c – Visitor Phone Number
This field ensures that the user's phone information is added to the ticket record. The number can be retrieved from the user's profile attributes or defined manually when necessary. This information provides convenience to the support team when an alternative communication channel is needed.
d – Ticket Tag
This field is used to add category- or process-based tags to the created ticket. The added tags enable ticket records to be filtered, grouped, and support processes to be managed more systematically.
3.c – Transfer Chat
The Transfer Chat action is used to move the user from the chatbot flow to the live support process. If the user has previously been assigned to a department, the transfer is made to the relevant department; if there is no department definition, the system directs the user to the appropriate representative according to the automatic assignment logic. In this way, communication that starts with the chatbot continues seamlessly with representative support when necessary.
3.d – Redirect to Chatbot
The Redirect to Chatbot action is used to move the user from the current flow to another chatbot scenario. This structure is ideal for managing different service topics in separate stories, creating simpler flows, and directing the user to the correct scenario. In channel-based usage, the selected chatbot scenario must be published.
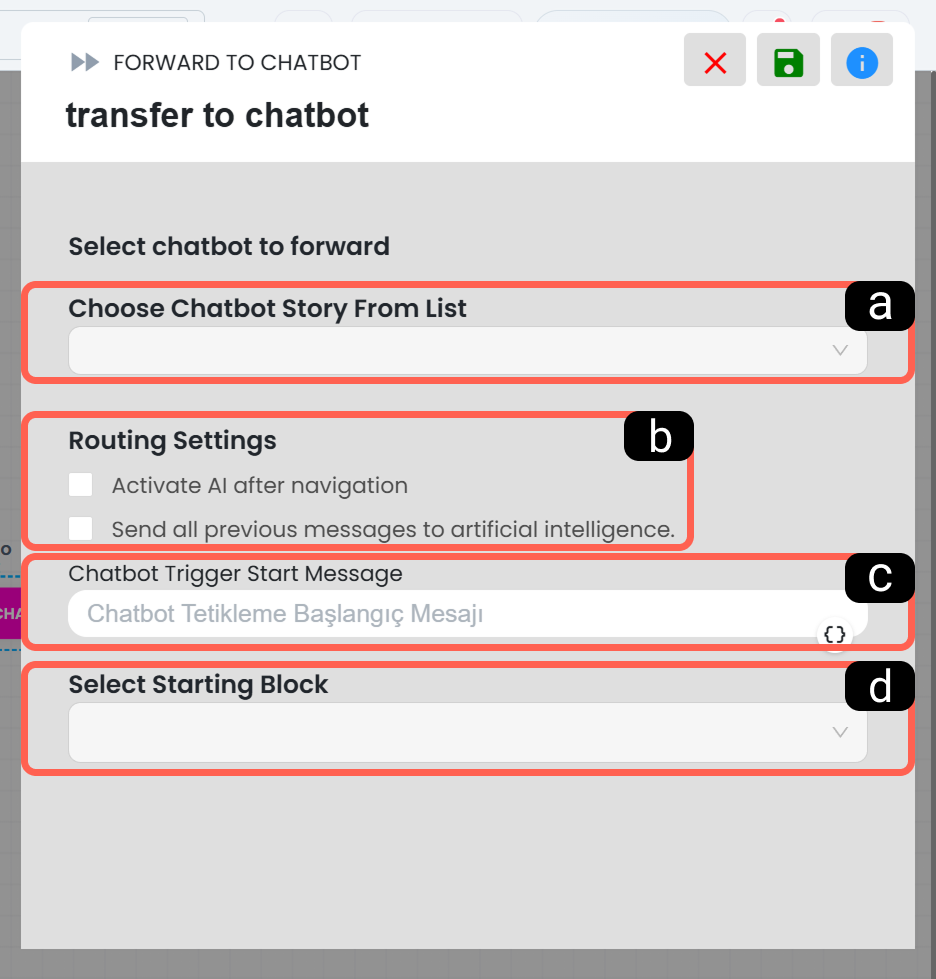
a. Select Target Chatbot (Required)
Chatbot Story: Used to select the target chatbot scenario to which the user will be redirected. By selecting the correct story from the list, you can provide controlled transitions between product, support, campaign, or different service flows.
* Start Block (Optional):* Allows you to determine from which specific block the user will start within the target chatbot, facilitating flow control when creating multiple entry points.
b. Artificial Intelligence Settings
AI Priority Execution: Ensures that artificial intelligence responds first right after redirection occurs, before executing scenario steps.
* Forward All Message History:* When enabled, all previous chat history (messages) in the conversation is passed as context to the redirected AI model. This allows the AI to analyze past conversation details thoroughly and produce seamless, accurate responses.
c. General Redirection Settings
Boomerang Mode: Automatically redirects the session back to the original chatbot or agent once the chatbot interaction is completed.
* Chatbot Trigger Start Message:* The default start message automatically sent to the target chatbot when redirection occurs.
3.e – Add Tag
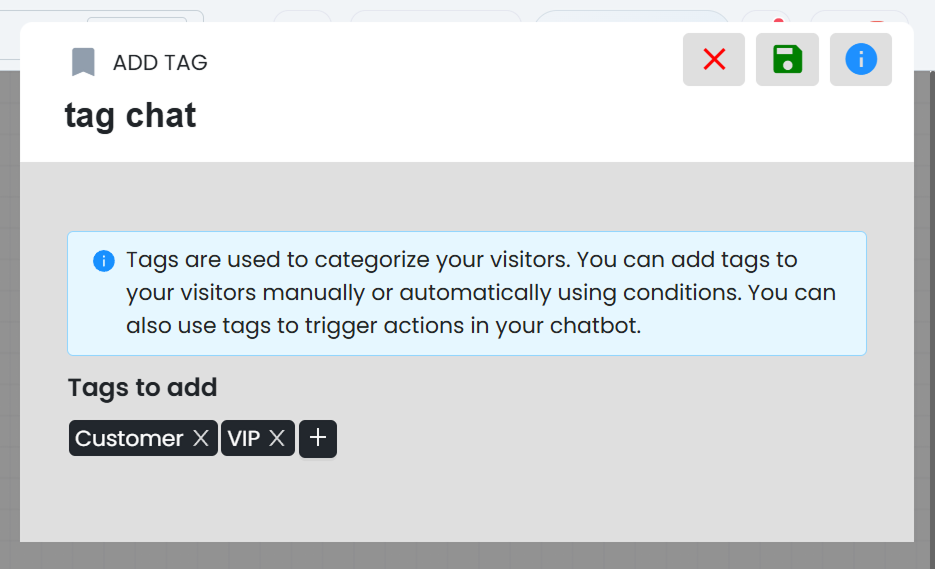
The Add Tag action is used to add one or more tags to the user's profile card. The added tags are stored in the system; they can be used as references for user segmentation, filtering, and triggering specific actions. The ability to add multiple tags to the same user in the visual structure shows that this action can be used flexibly in multi-classification scenarios.
3.f – Remove Tag
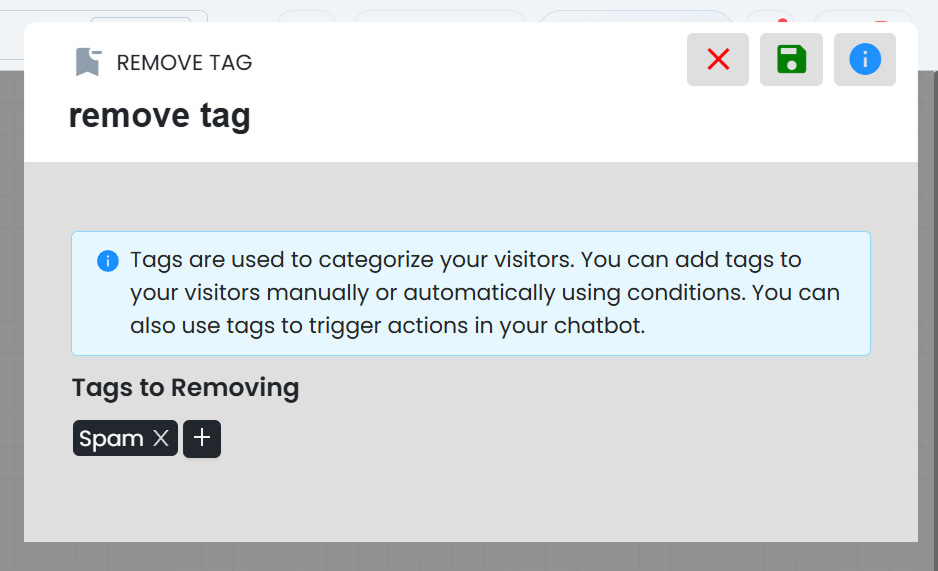
The Remove Tag action is used to remove specific tags found in the user's profile card. This operation is useful for cleaning outdated segments, simplifying filtering structures, and disabling automation triggers that are no longer valid.
3.g – Set Department
The Set Department action is used to direct the user passing through the block to a specific department. In this way, the user's messages are viewed by the relevant team and live support processes are managed through the correct department.
a – Static
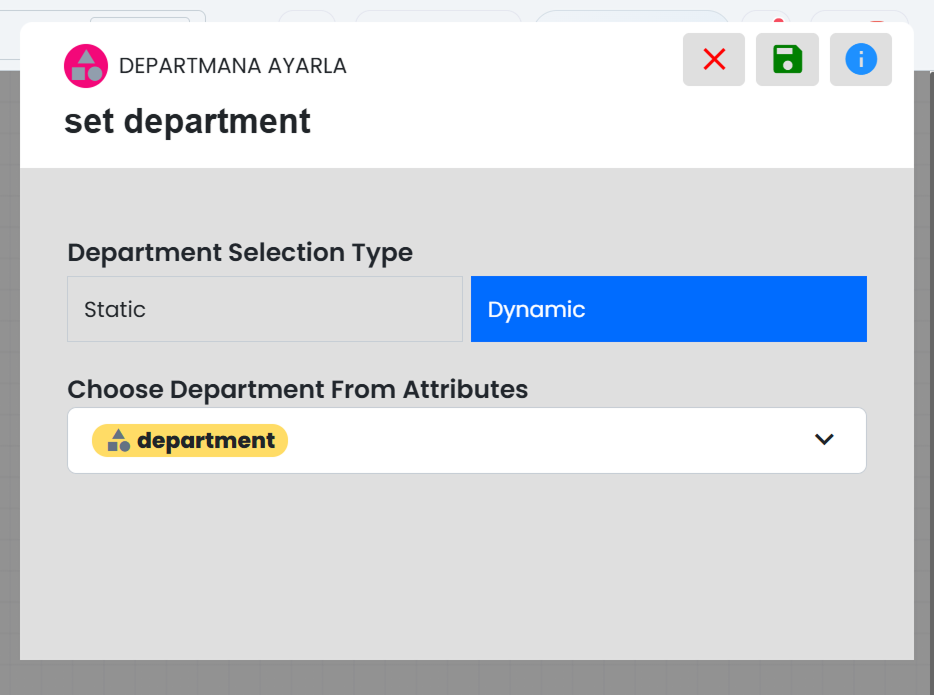
In static usage, the department is selected manually from the list and the user is directly directed to the specified team. It provides fast and clear routing in fixed department structures such as sales, support, operations, or technical teams.
b – Dynamic
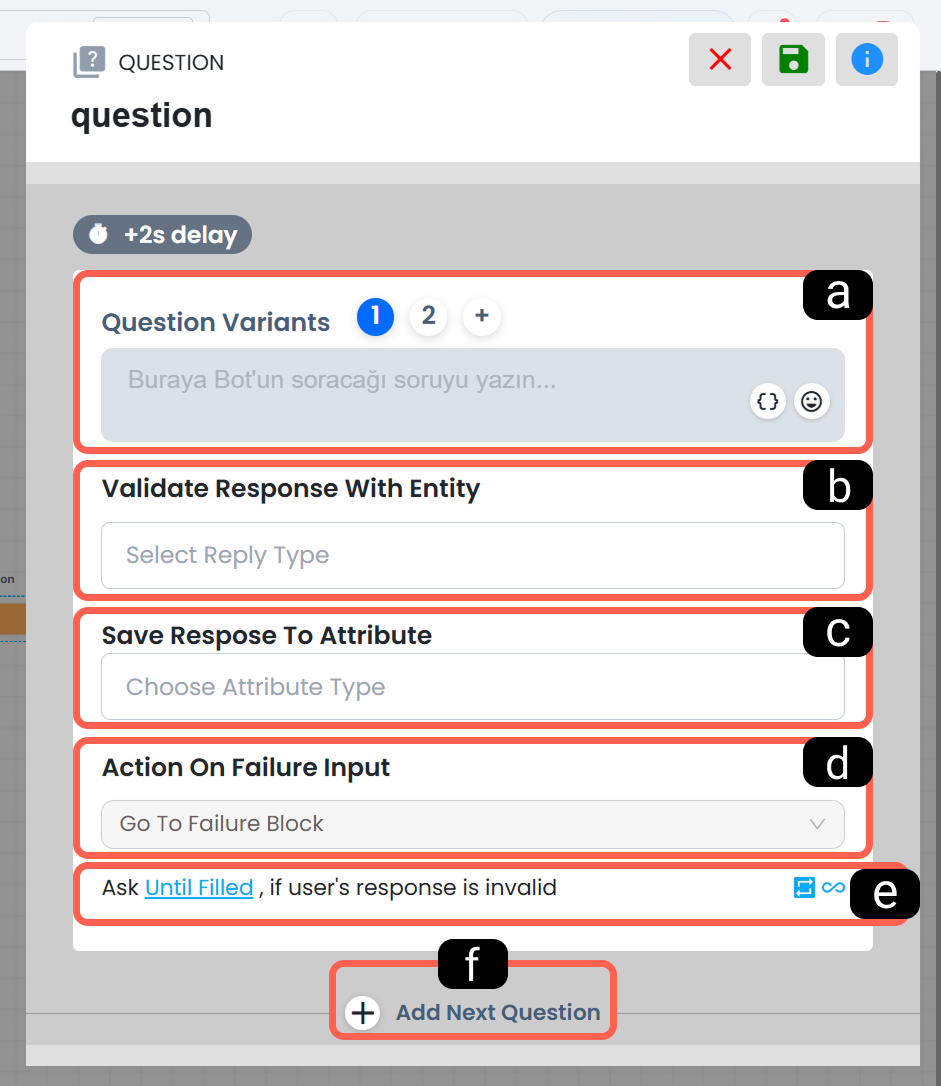 In dynamic usage, department information is obtained from user attributes or data collected in previous steps. Thus, the department can be automatically determined according to the user's profile, selection, or response given within the chatbot. This usage is suitable for building more personalized and flexible routing scenarios.
3.h – Question
The Question block is used to collect information from the user, validate the given response according to specific rules, and optionally save this information to the profile card. When the user provides a valid response, the flow continues successfully; in invalid responses, a failure scenario or retry structure can be triggered.
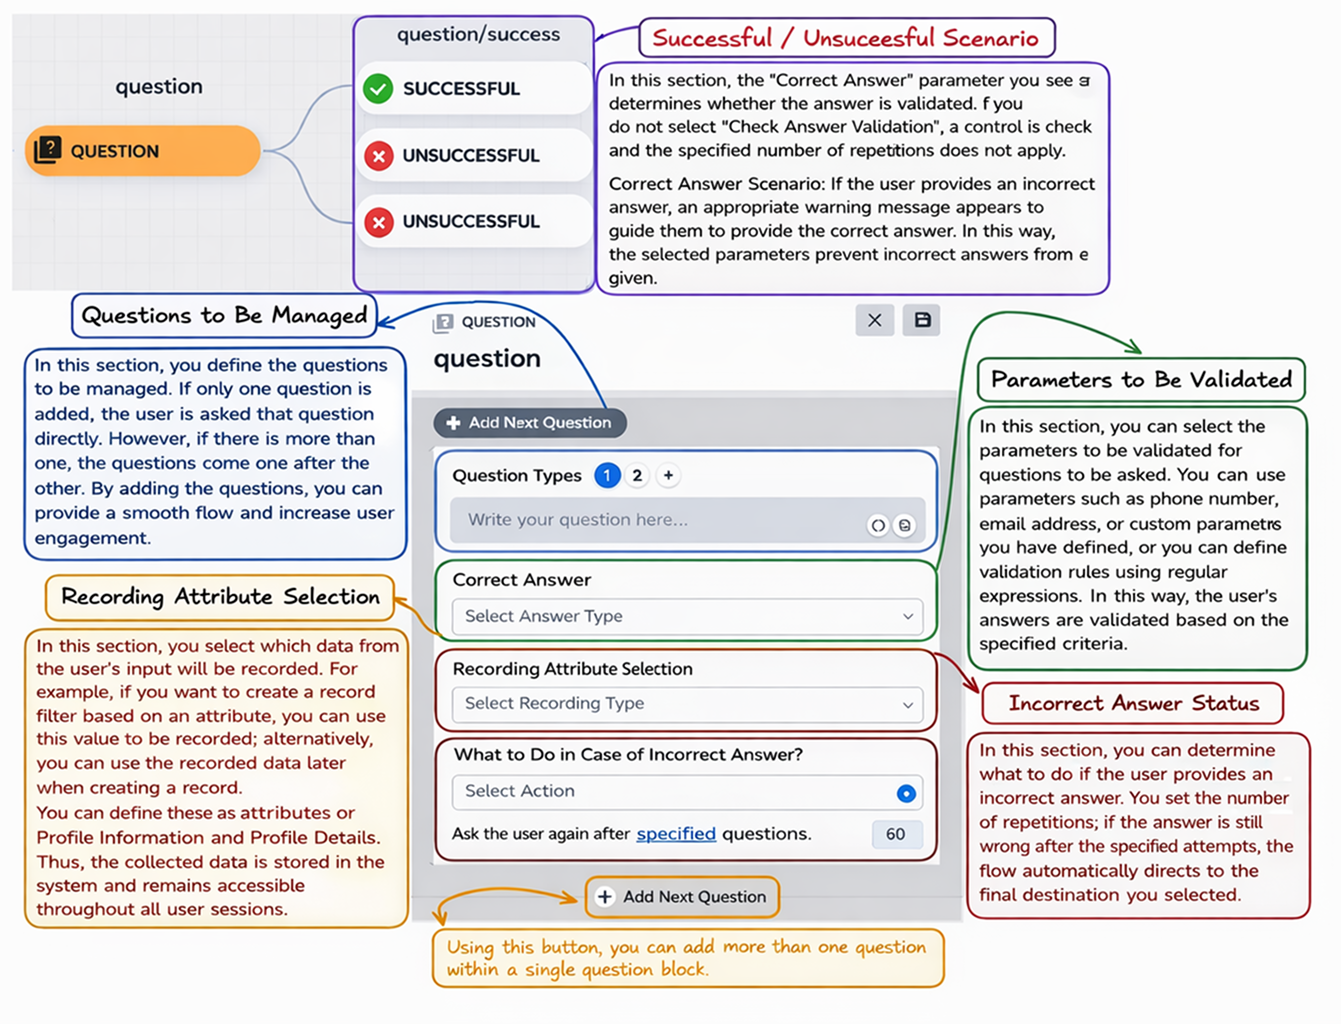
a. Question Variants
In this field, you can define the question text to be directed to the user. By using the “+” option, you can add multiple question variations for the same purpose, allowing the system to provide a more natural and fluent experience by using different expressions. The added question variants are presented to the user randomly.
b. Parameter to Validate the Response
This section determines according to which rule the user’s response will be checked. For example, by selecting data types such as email address, phone number, or a regex defined according to your needs, you can ensure that only valid data proceeds in the flow. In this way, data quality is preserved and incorrect entries are filtered out at an earlier stage.
c. Value Where the Response Will Be Saved
This field is used to determine which attribute in the profile card the validated user response will be saved to. For example, after verifying the email address received from the user, it can be automatically processed into the relevant profile field. Thus, the information collected through the chatbot is stored in the user profile in an organized manner and can be reused in subsequent flows
d. What Should Be Done in Case of Invalid Response?
In this section, you define how the system should behave if the user provides an invalid response or one that does not match the expected format. You can choose to direct the user to a failure block, or create an alternative scenario to initiate additional guidance or a retry process. This setting strengthens flow control, especially in steps where you collect mandatory data
e. How Many Times Should the Question Be Asked in Case of Invalid Response?
This setting determines how many times the question will be repeated when an invalid response is received. The system will re-ask the same question until it receives a response that matches the type defined in the validation parameter, up to the specified number of attempts.
f. Add New Question
With this button, you can define a new question step within the same flow. Thus, instead of being limited to collecting a single piece of information, you can build a multi-step structure that collects different data from the user consecutively.
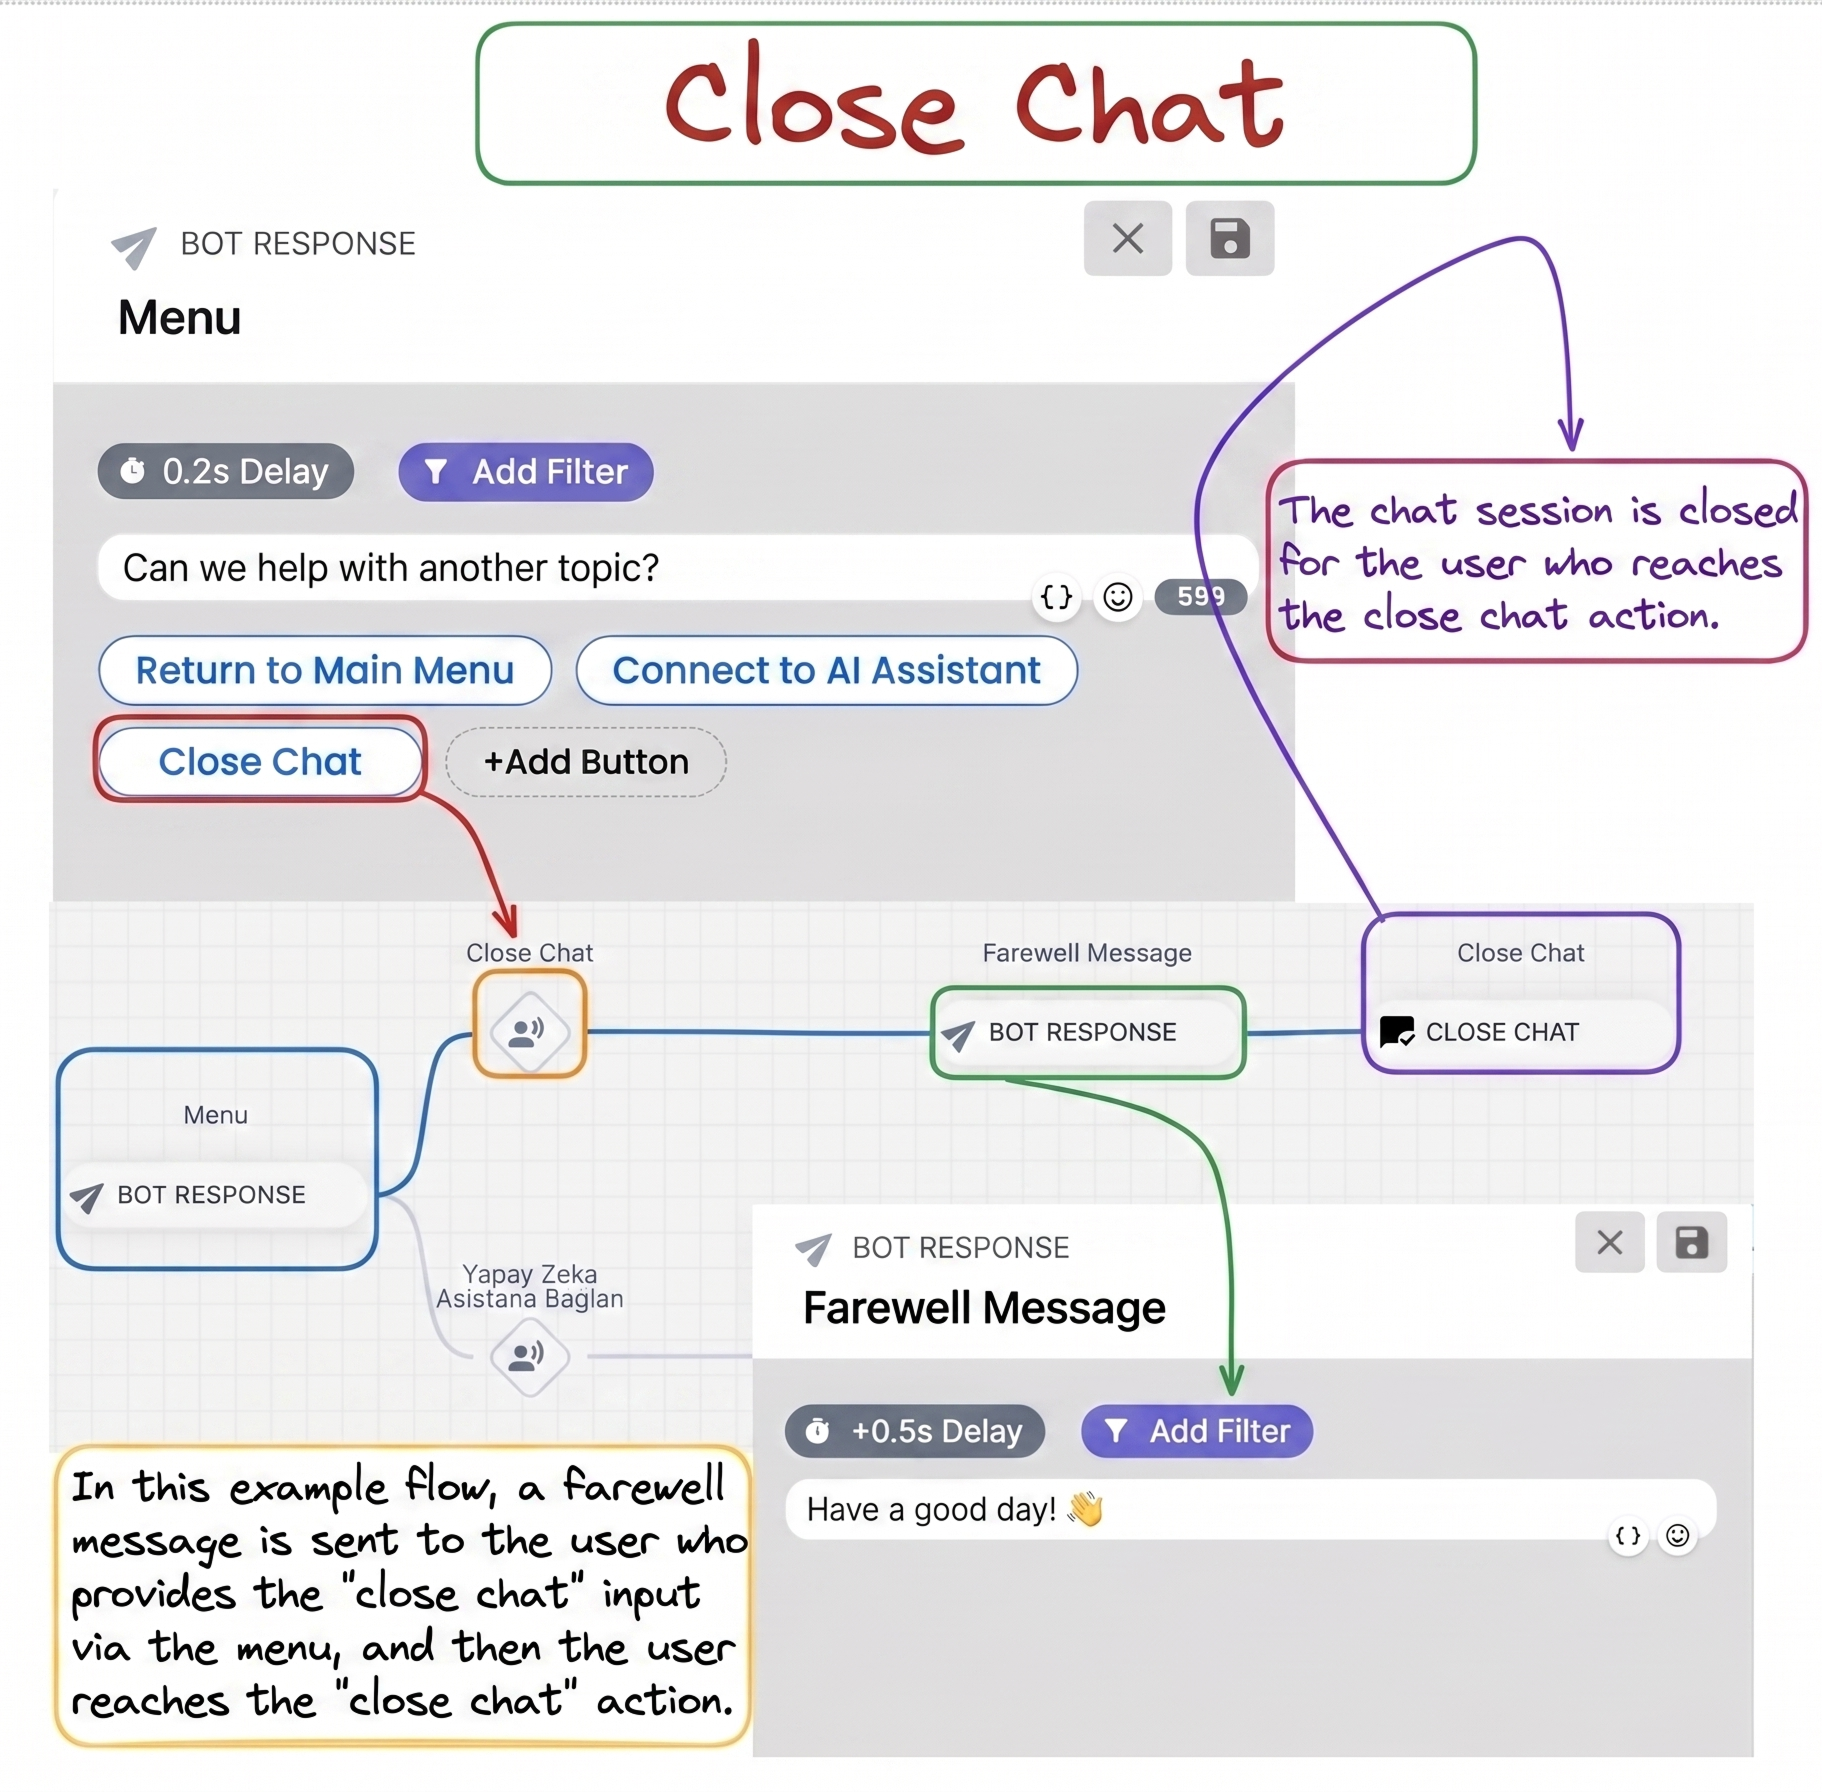
3.i – Close Chat
This action is used to terminate the chat session conducted with the chatbot. When the user reaches this block within the diagram, the chat session is closed, and it is important to design the flow before this action knowing that the session will be terminated. For example, you can send a farewell message or a notification related to the situation.
3.j – Send Transcript
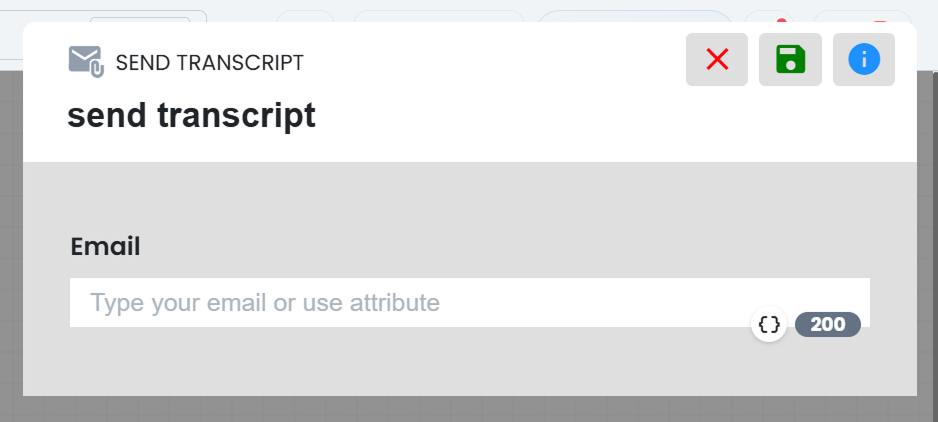
The Send Transcript action is used to automatically send the chat history to the email address you specify.
This structure is quite useful in scenarios where you want to share the conversation summary with the user, send records to teams, or create an operational archive. The recipient email address can be entered manually in this field or called as a dynamic value. (see: Dynamic Values)
3.k – Send SMS
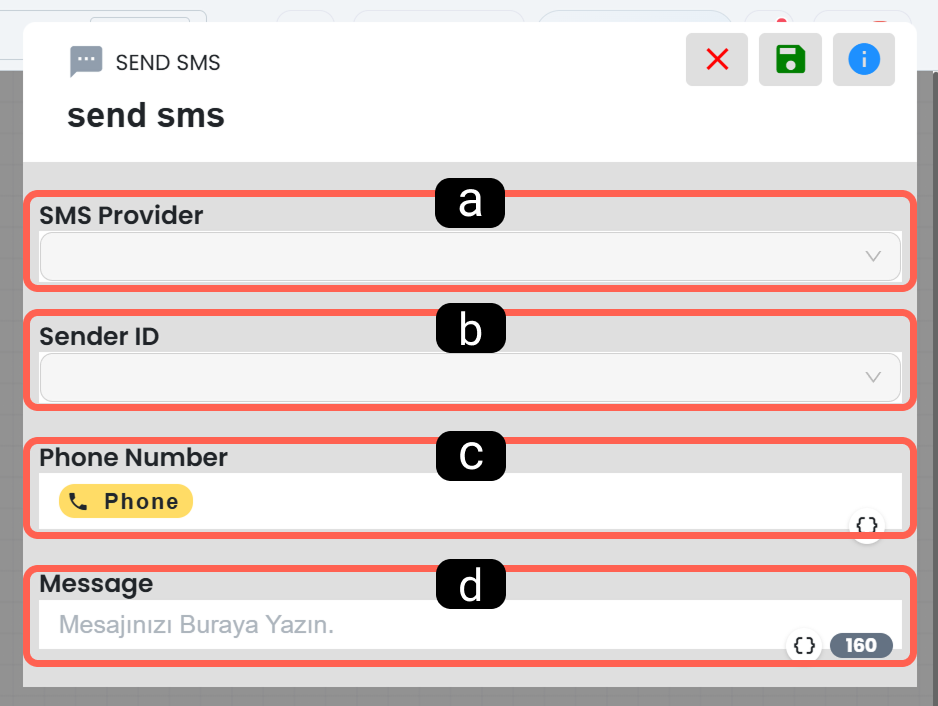
The Send SMS action is used to automatically send an SMS to the user or to another specified number. In order to use this feature, an SMS provider integration must be defined in the panel. Thanks to attribute usage in the message content, personalized SMS scenarios can also be created.
a. SMS Provider
This field determines through which integrated provider the SMS will be sent. If multiple integrations exist, the appropriate provider for the scenario should be selected.
b. SMS Line to Be Used for Sending
This section is used to determine through which sender name or line the SMS will be sent. This selection is especially important in structures where messages are sent under different brand or campaign names.
c – Phone Number
This field determines the target number to which the message will be sent. To fill this field, the phone information stored in the user’s profile card can be used via dynamic values, or a specific fixed phone number can also be used.
d – Message Content
This section is where the SMS text to be sent is defined. By adding attributes such as username, order status, or different profile data, more personalized and context-appropriate messages can be created.
3.l – Send Email
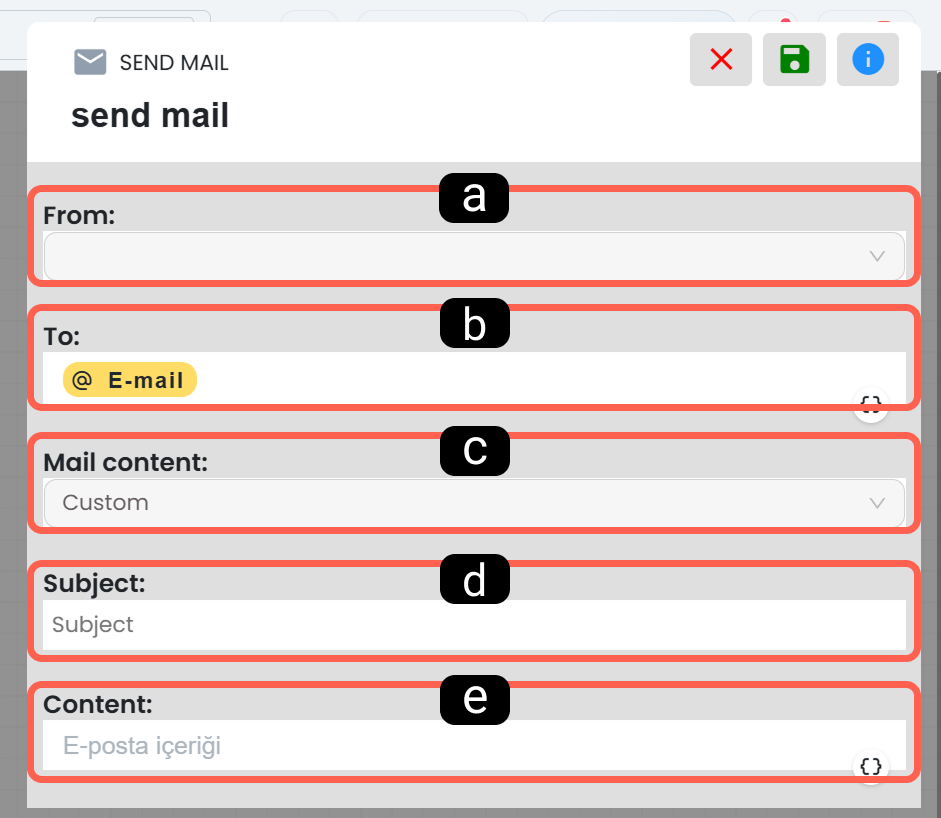
The Send Email block allows you to automatically send emails using the information collected through the chatbot. This block can be used to send notifications to the user, forward support requests to relevant teams, or create confirmation emails with dynamic content.
a. Sender Address
This field determines through which integrated corporate address the email will be sent. Usually, one of the sender accounts defined in the system is selected.
b. Recipient Address
This section is used to determine the target address to which the email will be sent. The email information stored in the user profile can be used, or a manual address can also be defined.
c. Email Content Type
This field determines the content structure of the email to be sent. The selection structure of the field provides a suitable usage for choosing between configurations with specific data content.
d – Email Subject
This field is used to determine the subject line of the email. The subject section can be customized with dynamic attributes; thus, information such as request number, username, or transaction type can be automatically added to the subject.
e – Email Content and Template Parameters (Params Visibility)
This section is where you configure the main body text or the selected email template.
- Dynamic Parameters (Params): In the Chatbot Send Email action block, dynamic parameters (
params) belonging to the selected email template are now clearly listed and visible in the block settings screen. Variables collected from user responses or profile data can be directly mapped to parameters from the UI.
3.m – Create Event
The Create Event block is used to automatically schedule events for representatives through the calendar module. The event start date, duration, title, description, owner, and additional participants can be configured manually or dynamically using data from the user profile. Thus, meetings, reminders, and follow-up processes can be automatically planned within the chatbot flow.
3.n – Create Task
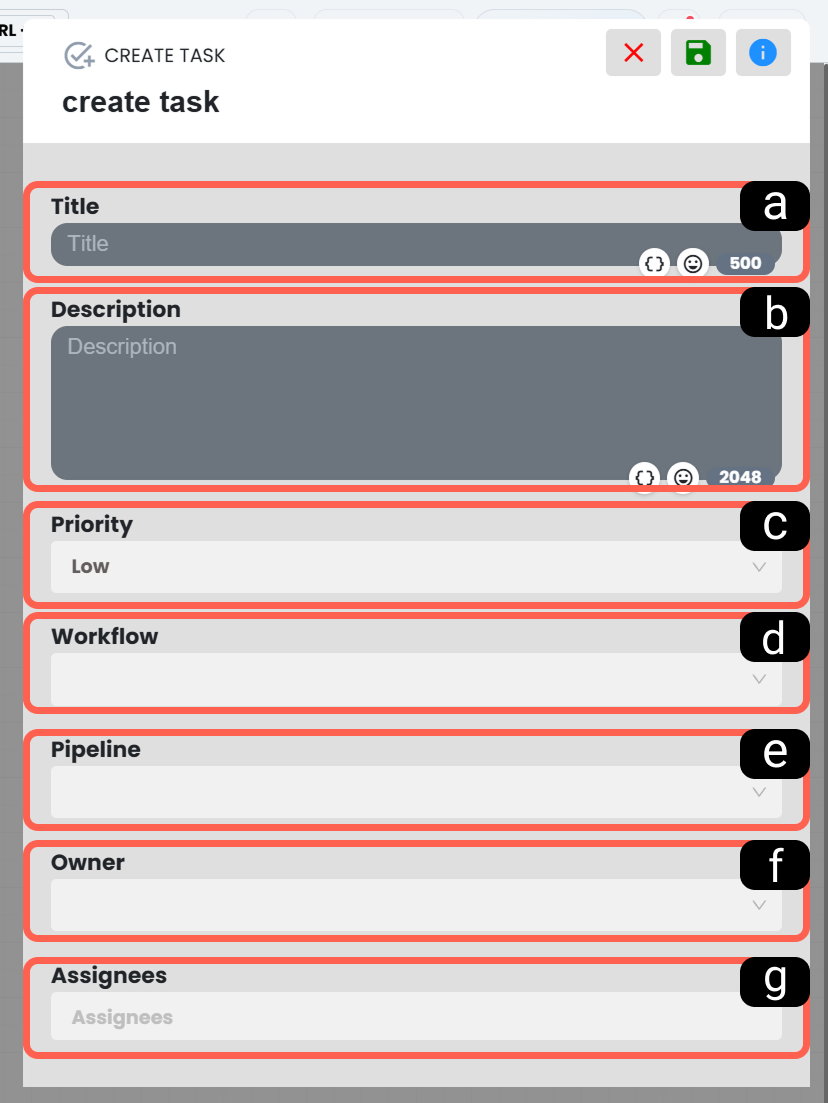
The Create Task action automatically creates a task record within the Task Management Module for the user passing through the block. The created task enables teams to carry out operational tracking within the system together with the selected workflow, pipeline, owner, and assigned users.
a. Task Title
This field determines the main title of the task card. It is recommended that the title be short, clear, and structured in a way that explicitly defines the task.
b. Task Description
This section is used to detail the scope of the task, the work to be done, and related notes. The description field provides all the information needed by the person who will take over the task in a single place.
c. Priority
This field determines the urgency level of the task. Priority information is important for proper task ordering, filtering, and team planning.
d. Workflow
This section determines under which workflow the task will be managed. Selecting the correct workflow ensures that the task is properly connected to the relevant operational process.
e. Pipeline
This field is used to determine the column or stage within the selected workflow. Thus, the task is created at the correct step of the process and teams can track progress through the pipeline structure.
f. Task Owner
The task owner is the main responsible person for the record. Coordination and overall management of the task are carried out through this user.
g. Assigned Users
This section is used to define additional users who will work on the task. By including multiple people in the task, you can create team-based task tracking.
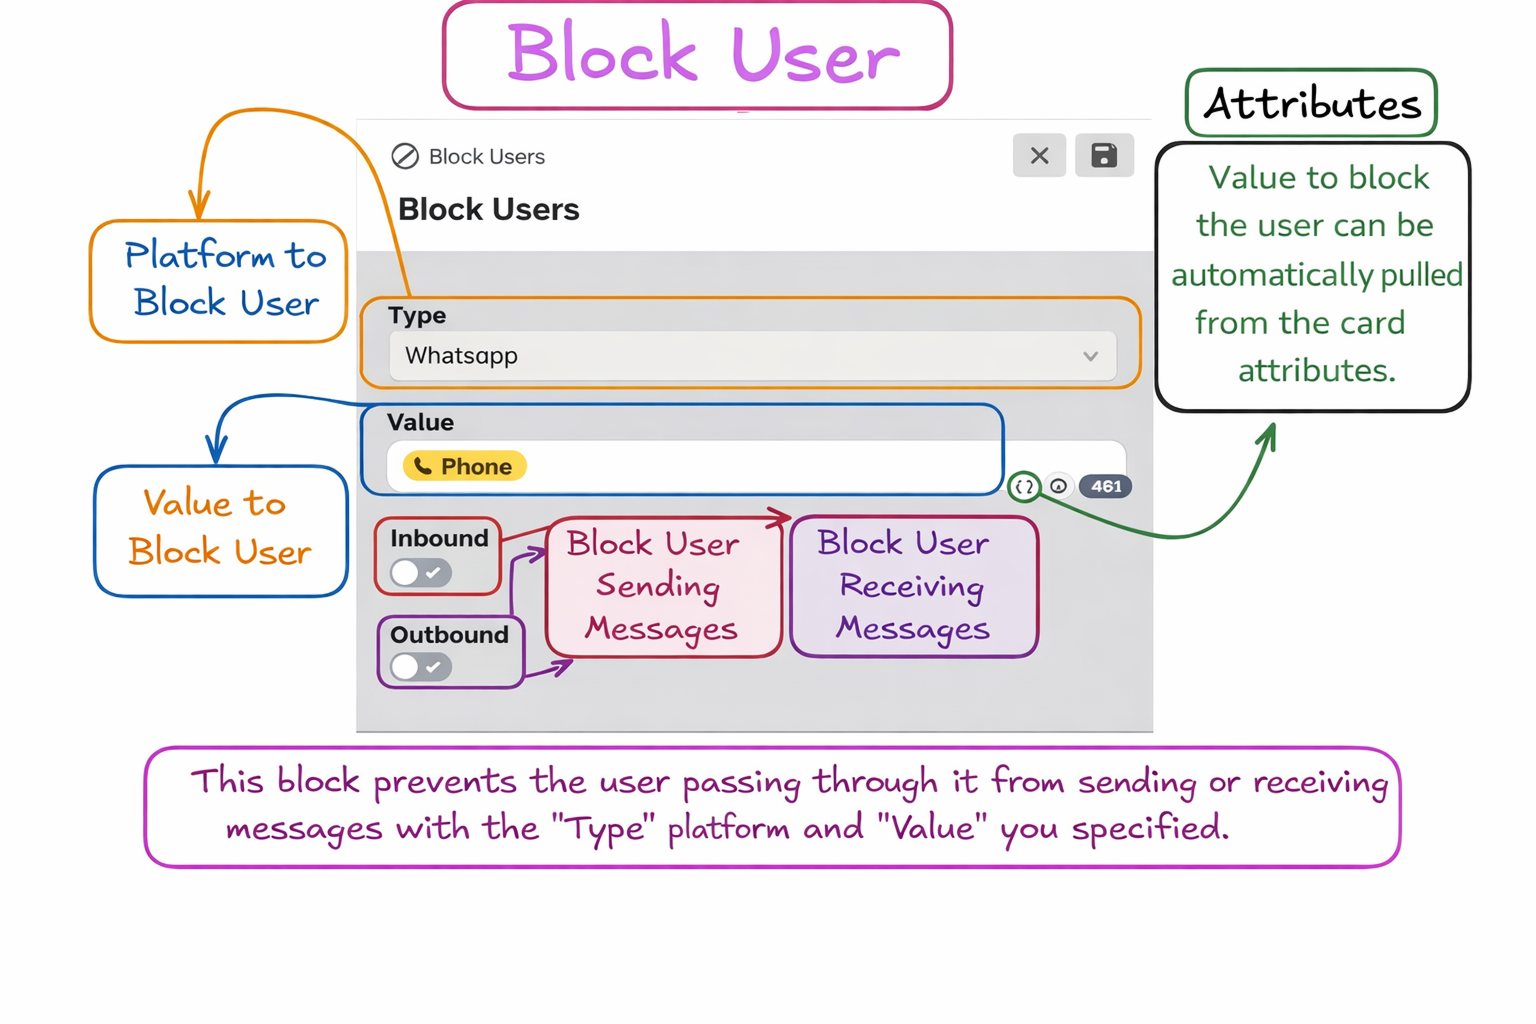
3.o – Block User
This action is used to restrict the user’s access on the communication channel you specify. It provides an effective control point especially in cases such as spam behavior, unwanted repetitions, or situations where communication must be stopped operationally.
Note: For each platform determined through the Type field, the value field must be filled with different content.
- WhatsApp: The user is blocked via phone number.
- Web Visitor: Blocking is performed using the visitor ID.
- Web Visitor IP: Blocking is performed via IP address.
- Mail: Blocking is performed via email address.
Among the blocking options, there are inbound and outbound options. Activating inbound blocks the user from receiving messages; activating outbound blocks the user from sending messages.
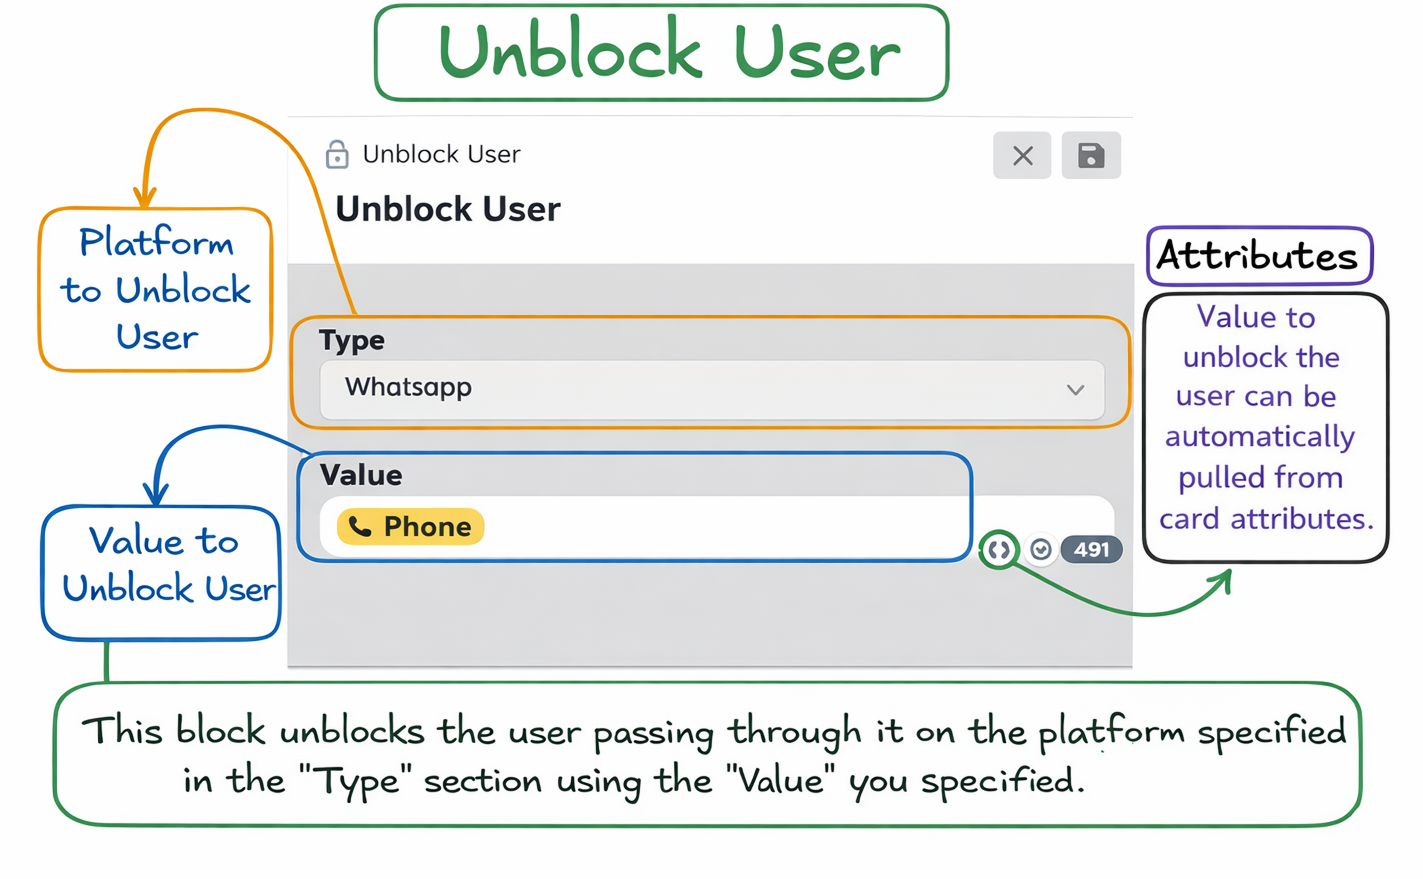
3.p – Unblock User
This action allows a previously restricted user to communicate again. Thus, the user can be included again in chatbot or live support processes through the relevant channel.
Note: For each platform determined through the Type field, the value field must be filled with different content.
- WhatsApp: The user is blocked via phone number.
- Web Visitor: Blocking is performed using the visitor ID.
- Web Visitor IP: Blocking is performed via IP address.
- Mail: Blocking is performed via email address.
Among the unblocking options, there are inbound and outbound options. Activating inbound blocks the user from receiving messages; activating outbound blocks the user from sending messages.
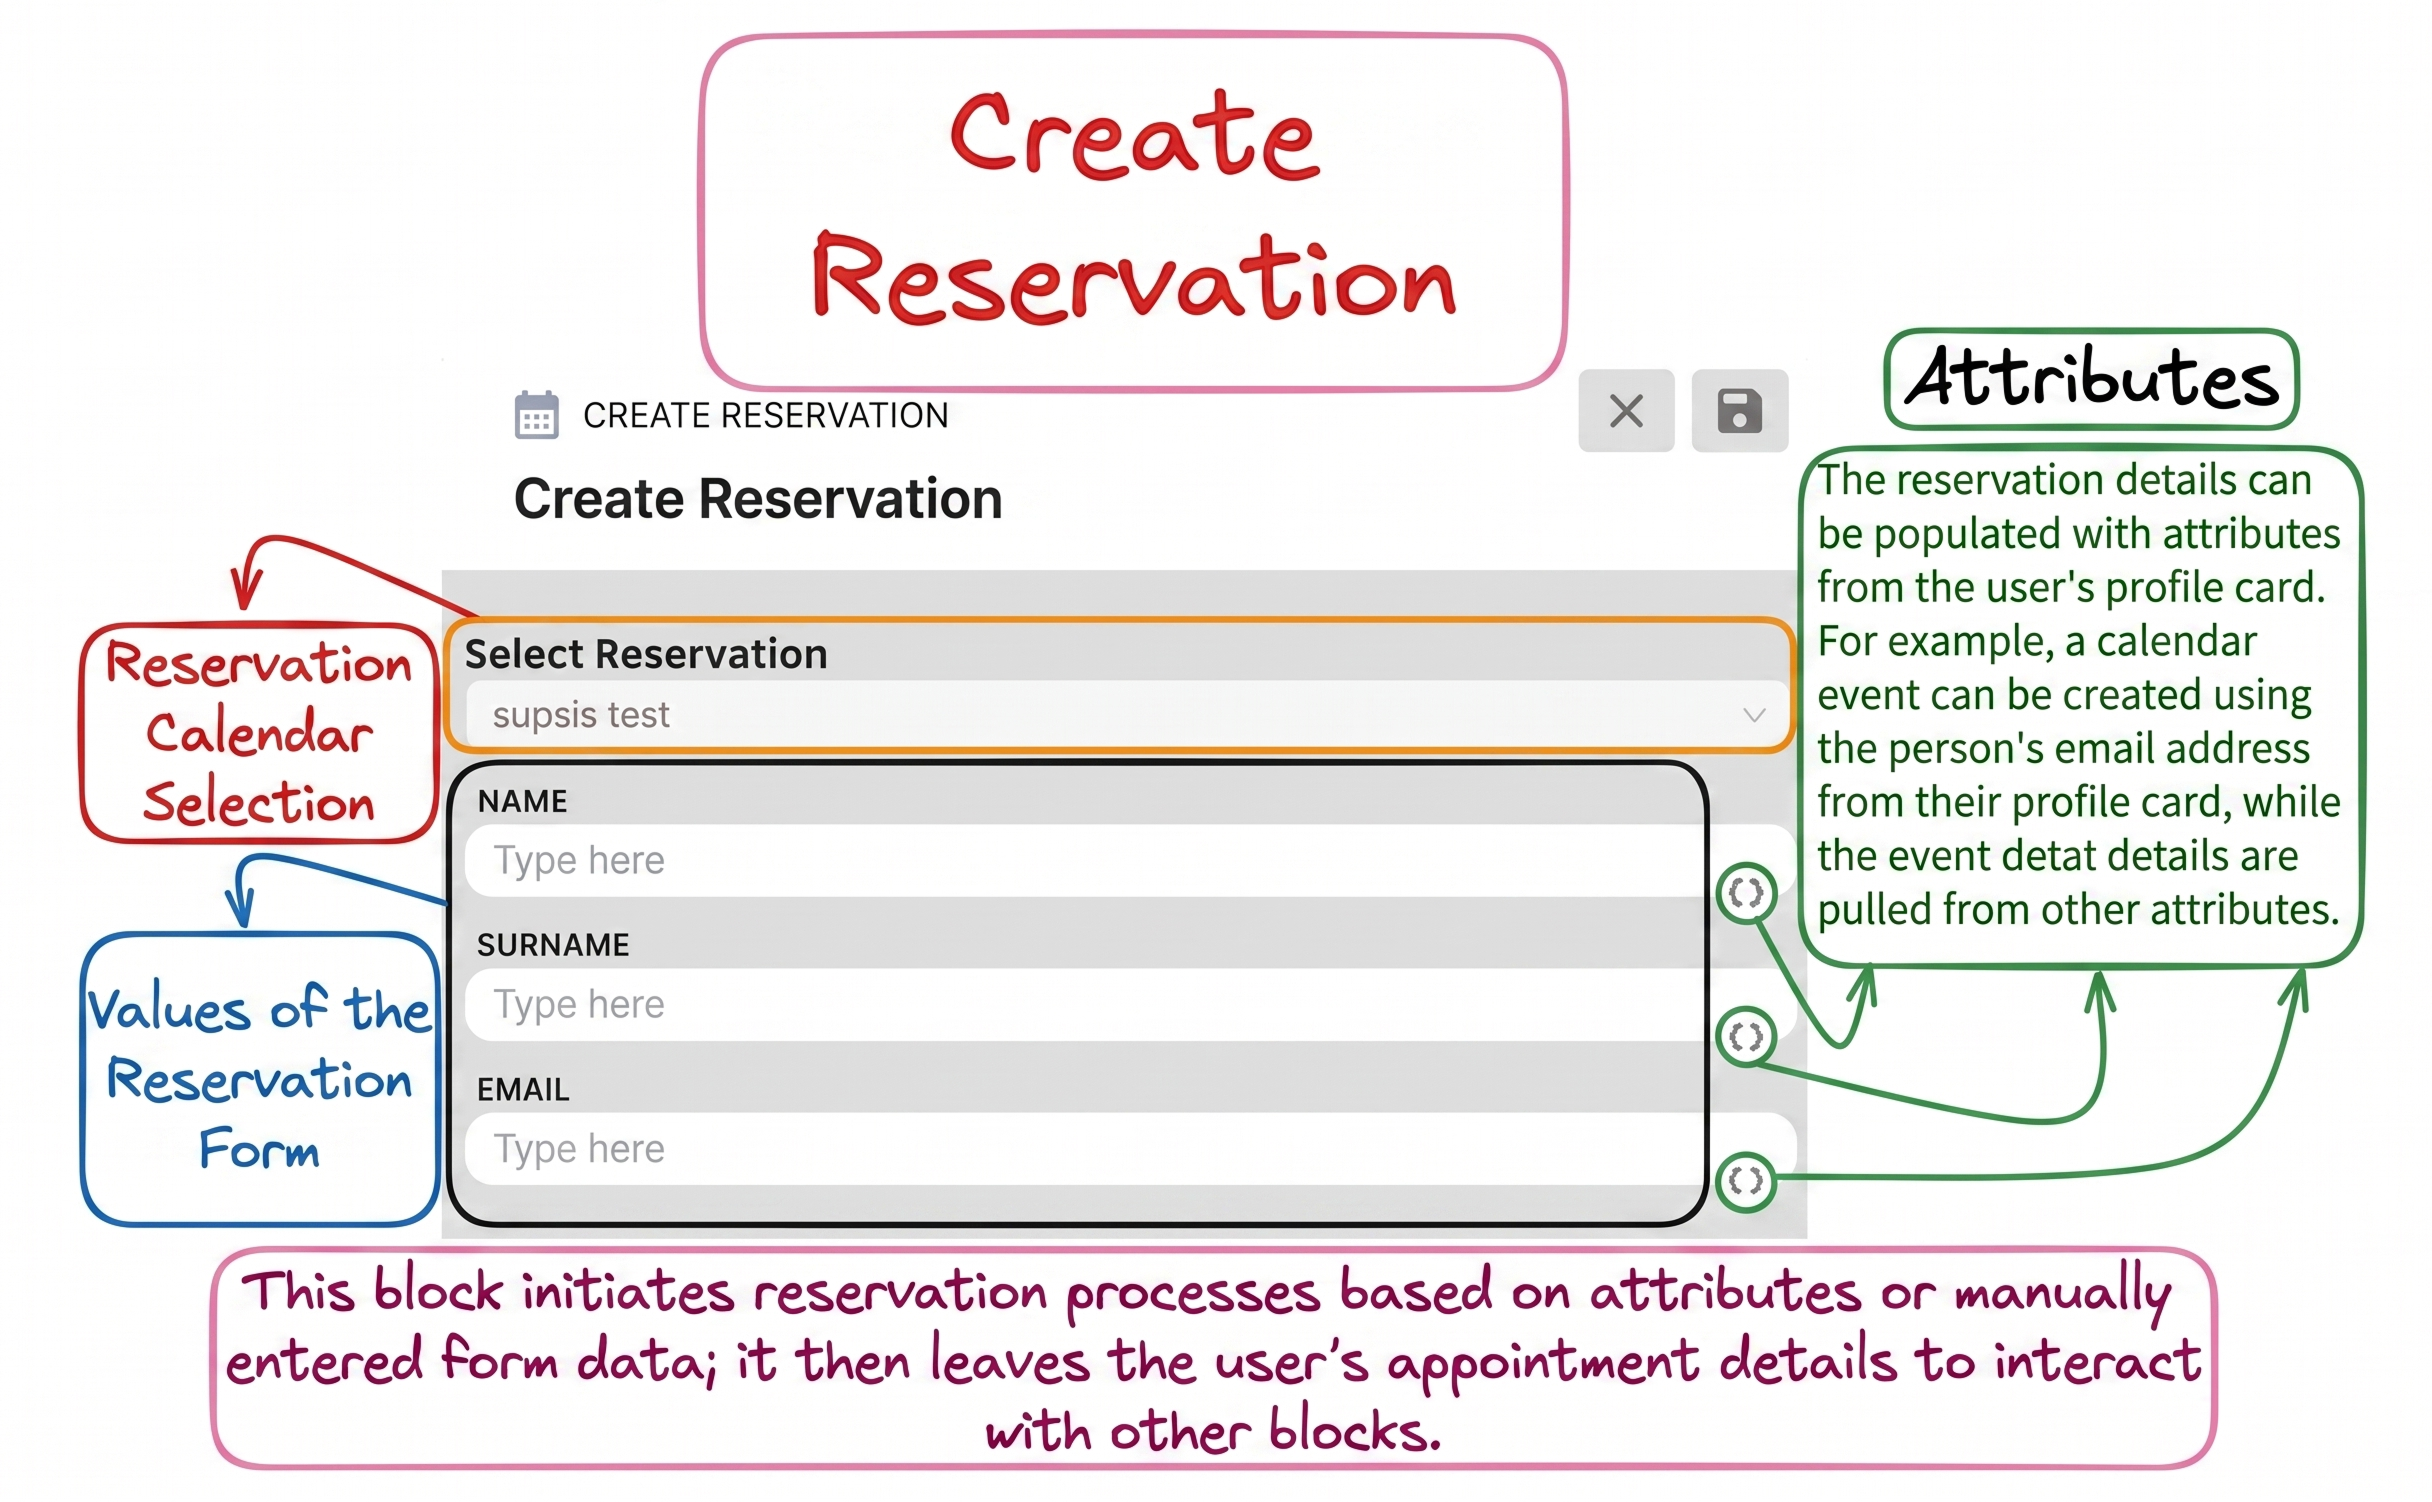
3.r – Create Reservation
The Create Reservation action is used to initiate a new reservation record for the user. It allows the reservation process to be started directly within the chatbot.
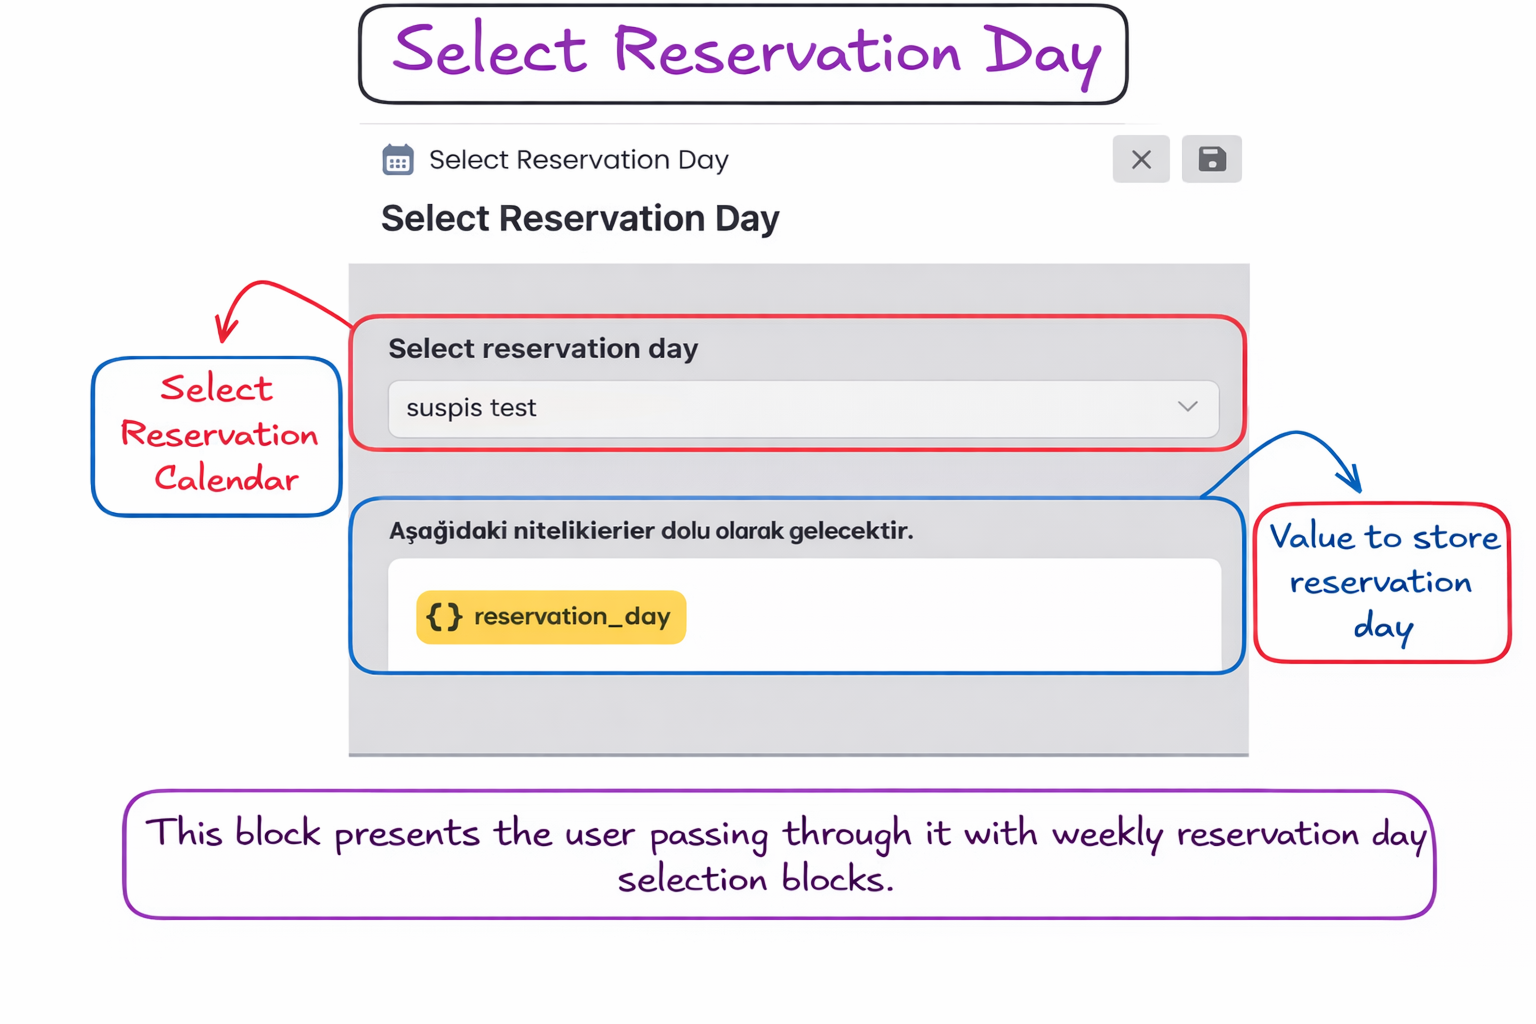
3.s – Select Reservation Day
This step is used to determine the day the user prefers for the reservation. It enables the reservation flow to proceed based on date.
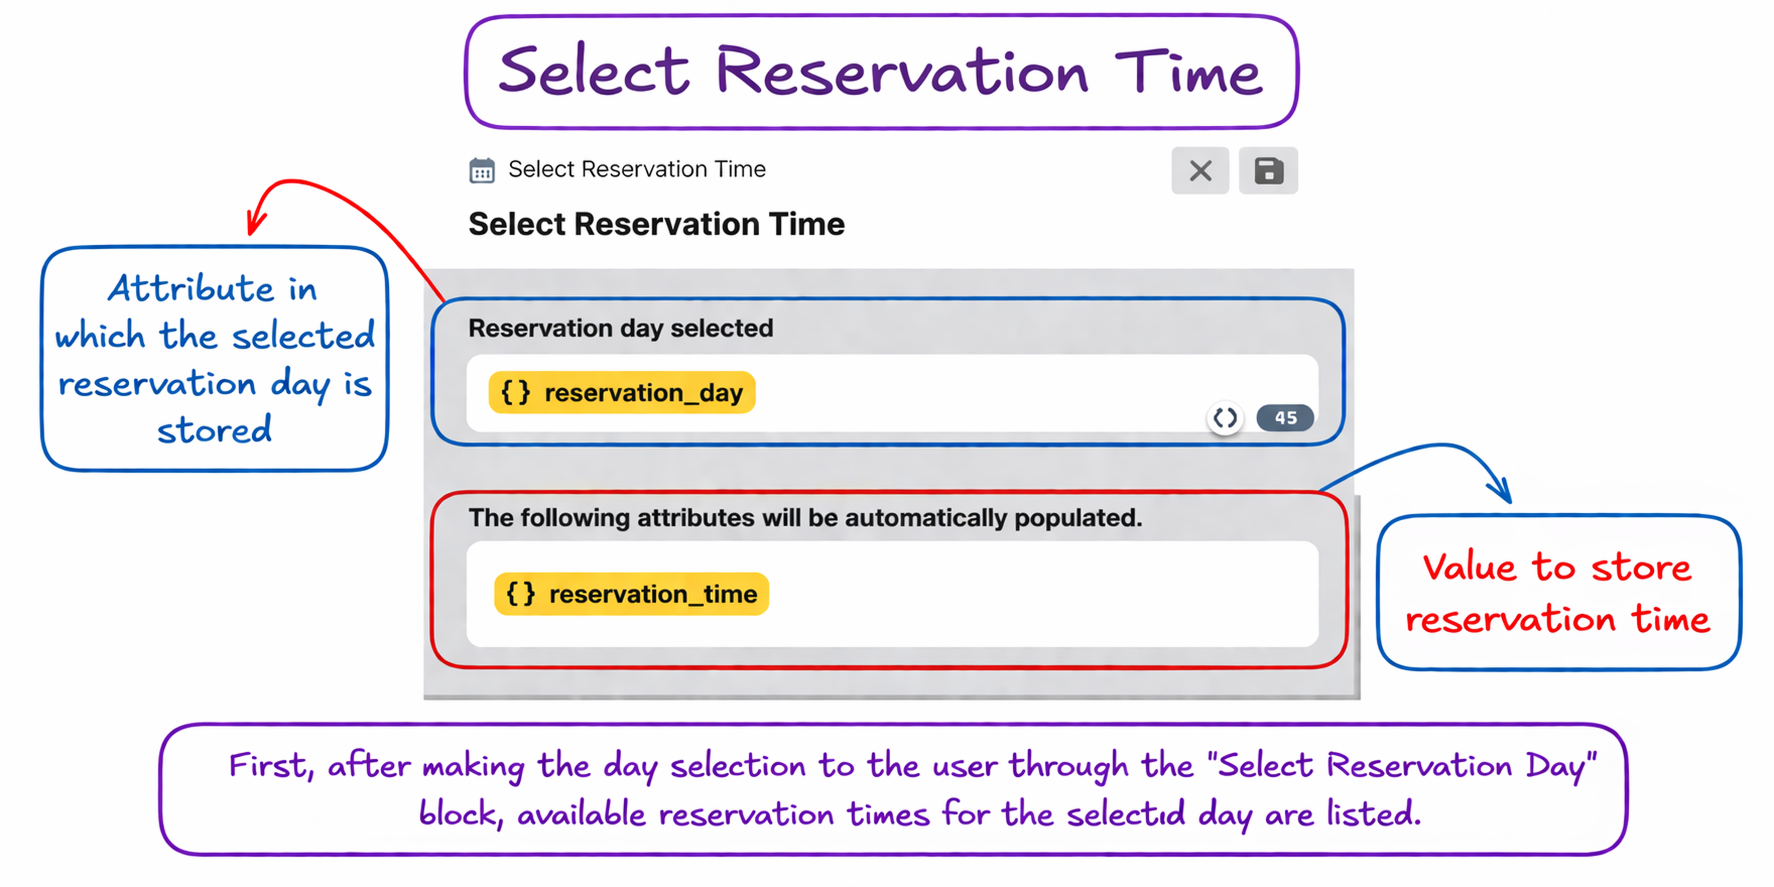
3.t – Select Reservation Time
This action allows determining the appropriate time preference within the selected day. Thus, the reservation record becomes clearer and more complete.
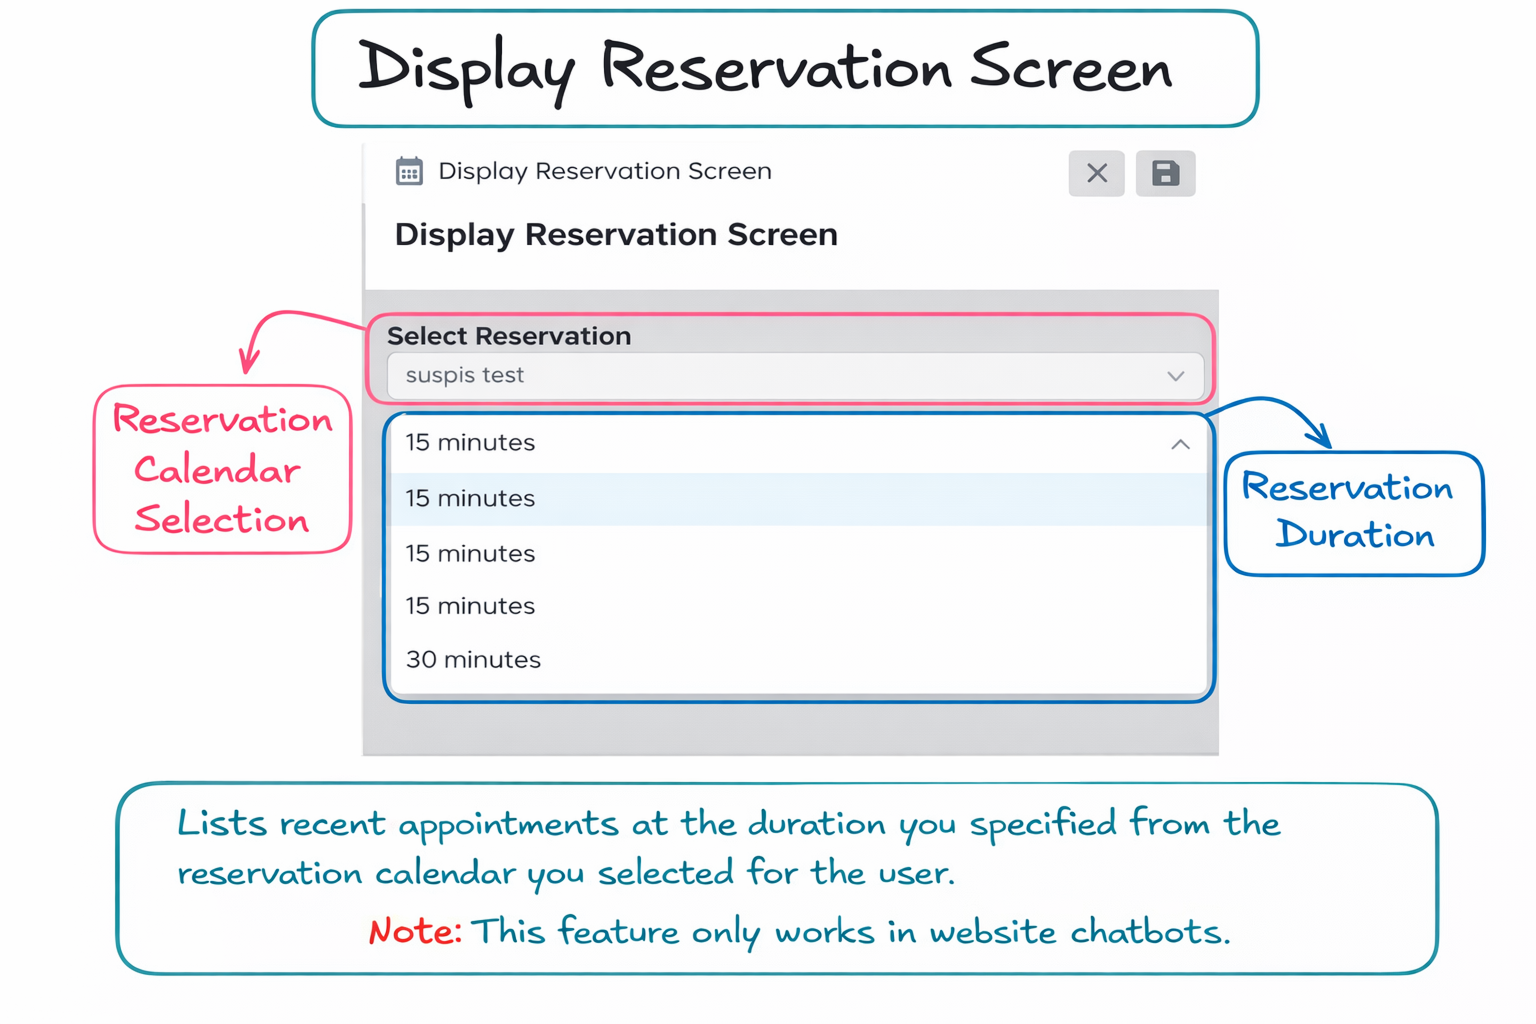
3.u – Display Reservation Screen
This action is used to display available reservation dates and times to the user through a form structure. It is stated in the documentation that this feature works only on certain platforms; therefore, it is recommended to check channel compatibility before use.
3.v – Customer Reservation List
This block is used to list all reservation records of the user in the system. It is useful for viewing existing reservations, checking them, and creating new flows based on them.
3.y – Send WhatsApp Message
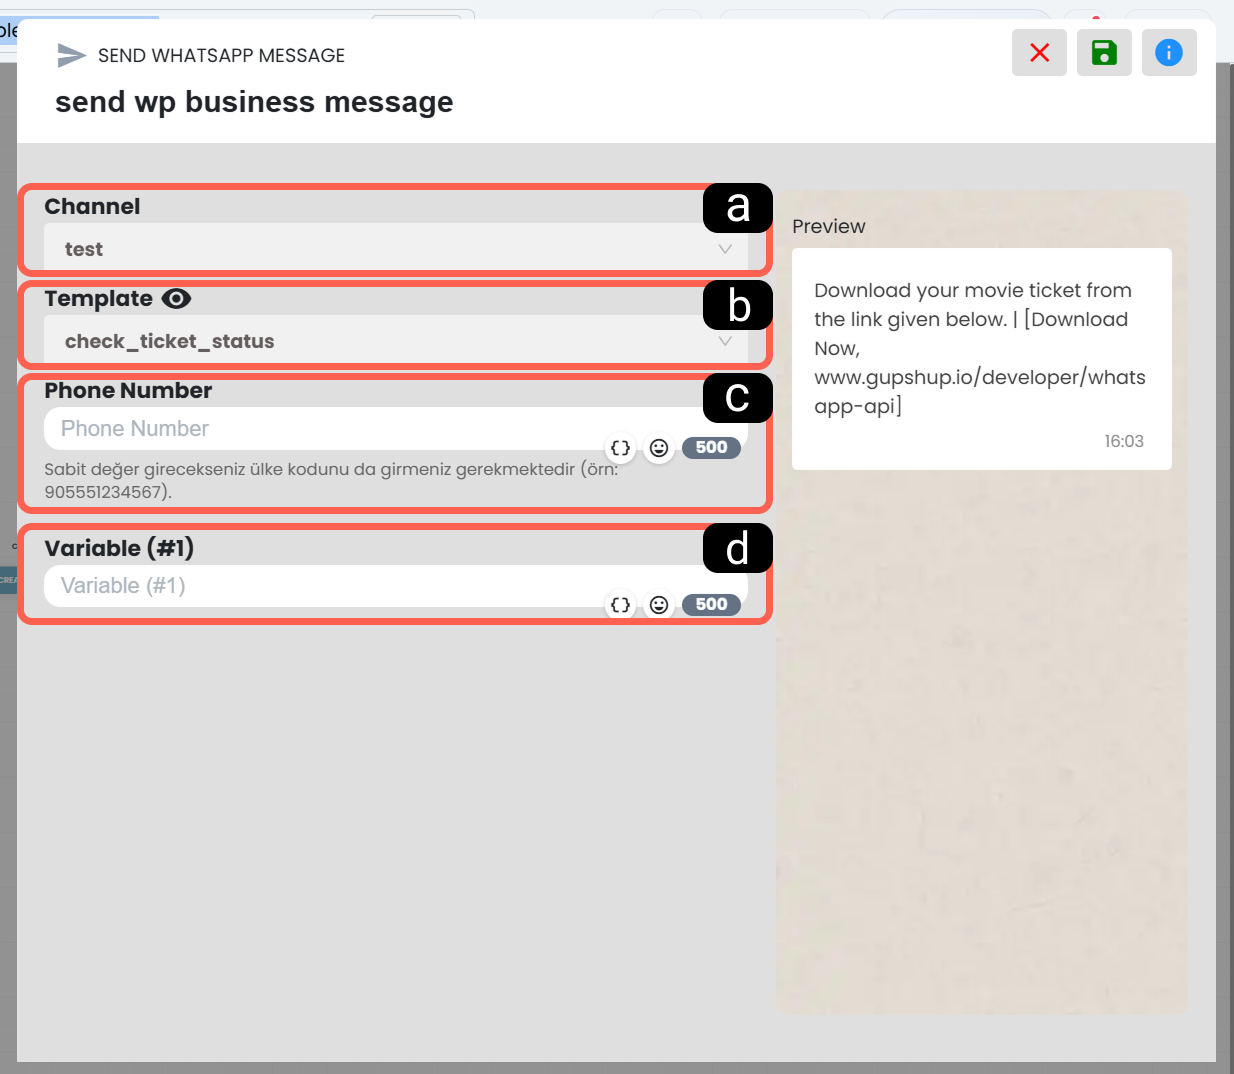
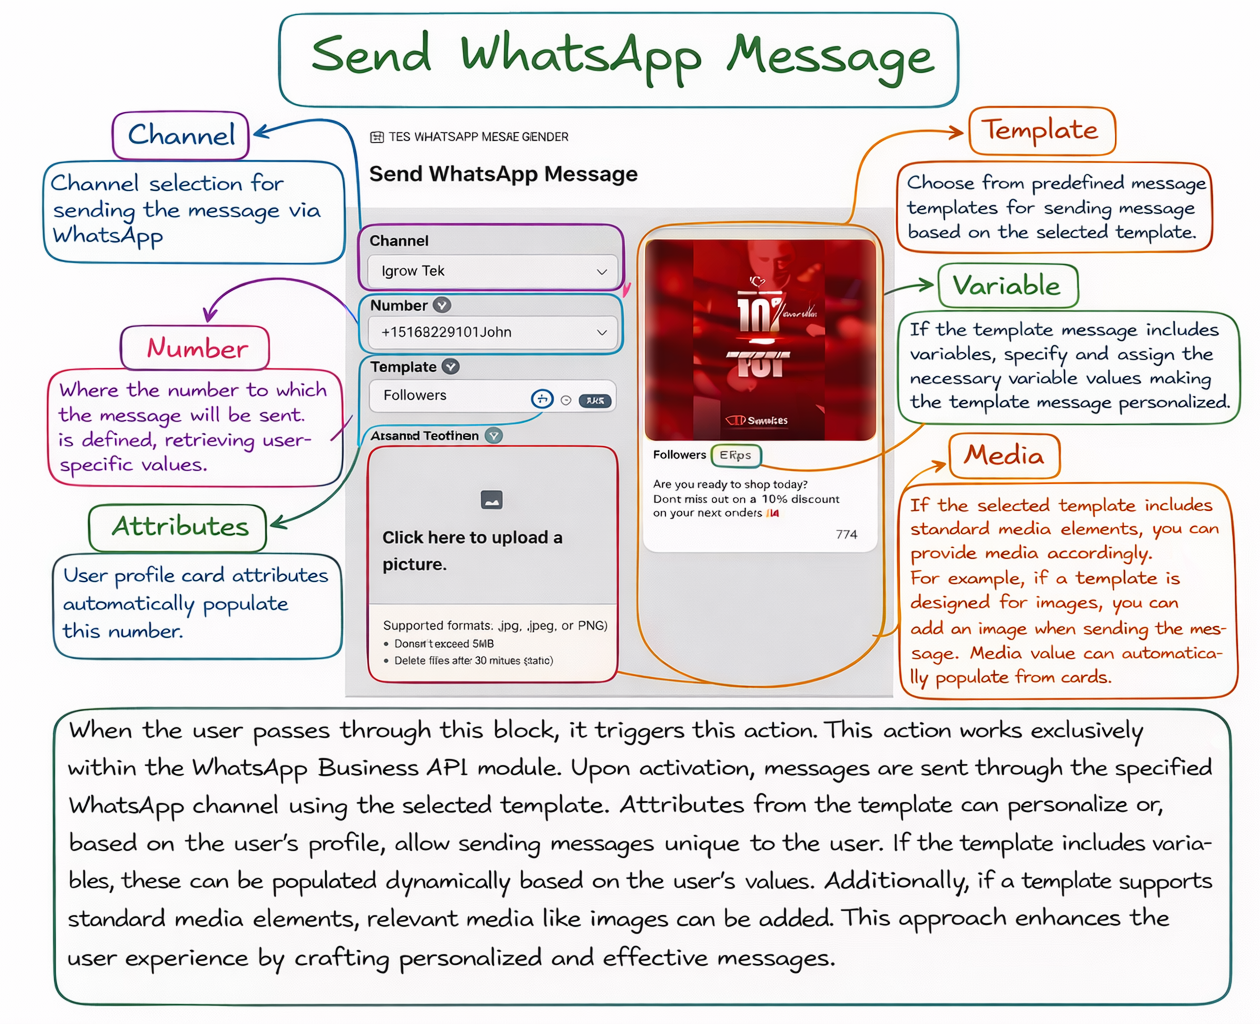
The Send WhatsApp Message action is used to send a message to the user or another specified number via WhatsApp. This structure generally works together with the integrated WhatsApp channel, the selected message template, and template variables; the preview of the selected template and filled content is displayed on the right side.
a. WhatsApp Channel
This field determines through which integrated WhatsApp line the message will be sent. In structures where multiple channels are used, selecting the correct channel is important for proper template and number matching.
b. Message Template
In this section, the approved WhatsApp message template to be sent is selected. According to the selected template, the structure of the message becomes clear and the preview area is automatically updated.
c. Phone Number
This field defines the target number to which the message will be sent. If a static number is to be entered in this field, it must be written together with the country code; additionally, this field can also be dynamically populated with attributes.
d – Template Variables
This section is used to fill dynamic fields in the selected WhatsApp template. By adding dynamic values to this field, personalized WhatsApp messages can be sent. (see: Dynamic Values)
4. Table Actions
Table actions establish a seamless bridge between your chatbot scenarios and your panel, which acts as a database through the table module. Thanks to these blocks, you can save data within the flow to your tables, update existing data, or read data from the table to shape your chatbot behavior accordingly.
4.a – Create Record
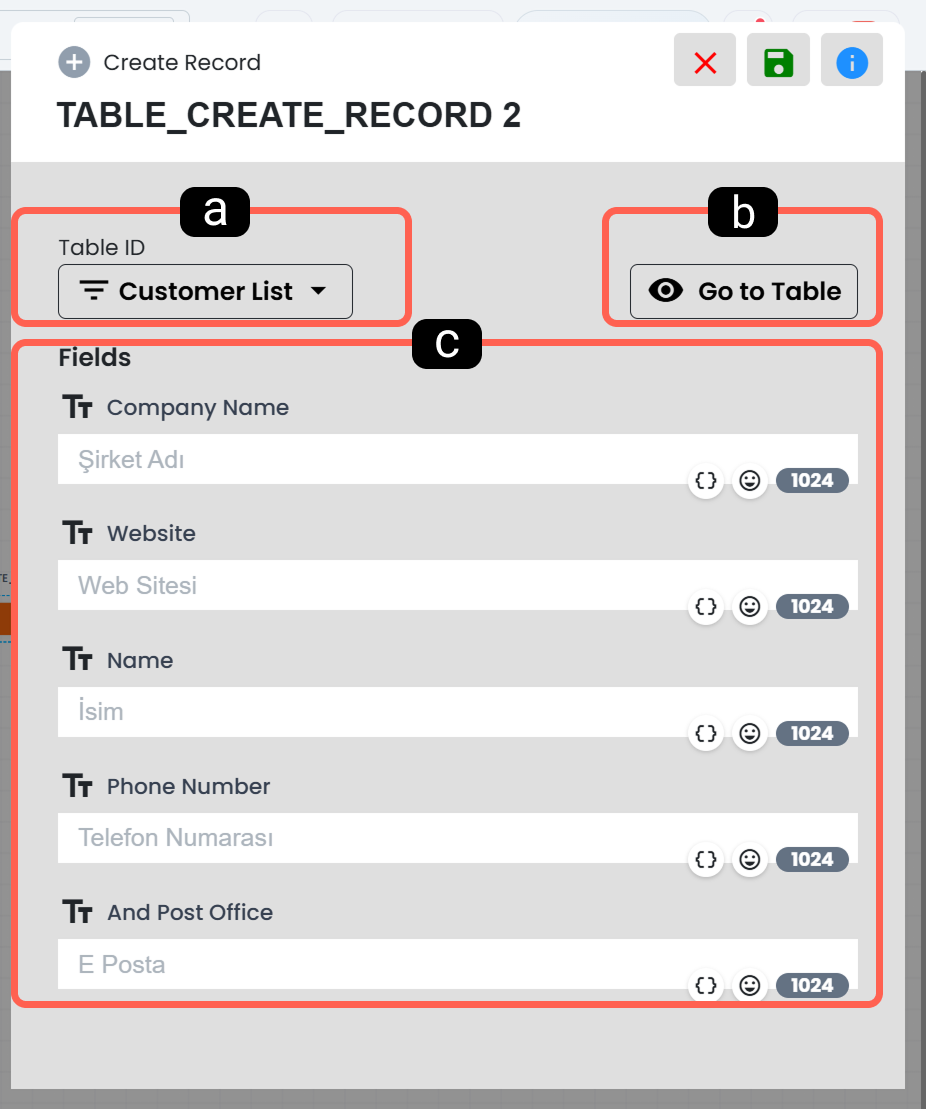
The Create Record block allows you to add dynamic data available in your chatbot session or static information you define as a new row (record) to your target table.
The system creates new records at automation speed by simulating manual data entry according to the content you define for the fields.
a. Table Selection
This is the main setting where you determine which table the new record will be added to. According to the table you select, the data input fields (table columns) below are automatically generated.
b. Go to Table
Allows you to open the selected table and quickly review column structures and existing data. It is very useful for referencing during mapping.
c. Table Fields
This is the section where the columns (name, email, phone, etc.) of the selected table are listed. You map which data from the chatbot flow will be written to which column of the table through this field.
4.b – Delete Record
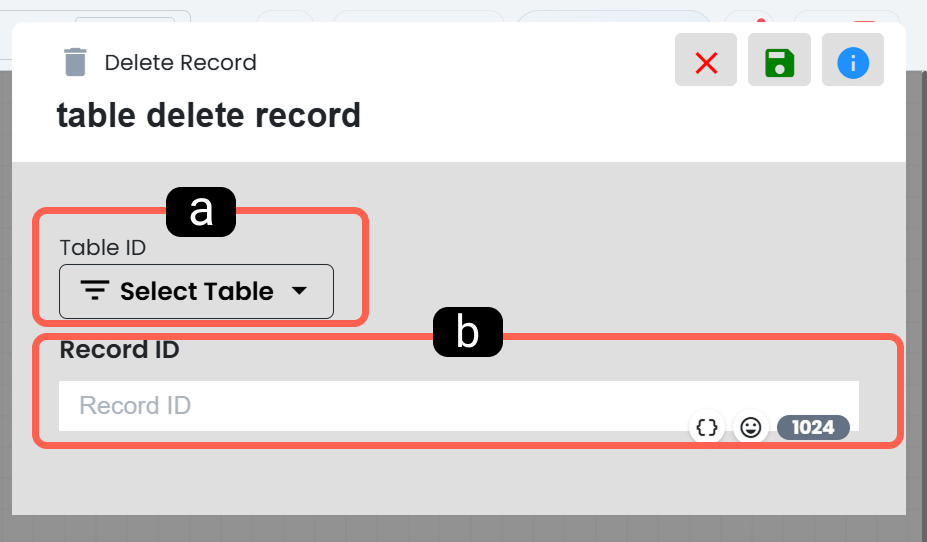
The Delete Record block is used to permanently delete a specific record within the table you specify from the system. Since this operation is performed through a completely unique identity called "Record ID", it eliminates the risk of deleting incorrect data within the chatbot flow.
a. Table Selection
This is the field where you select the relevant table on which the deletion operation will be applied.
b. Record ID
This is the system identity number of the record to be deleted. By defining the Record ID variable of the relevant table record in this field, you can ensure that the correct record is automatically deleted.
4.c – Update Record
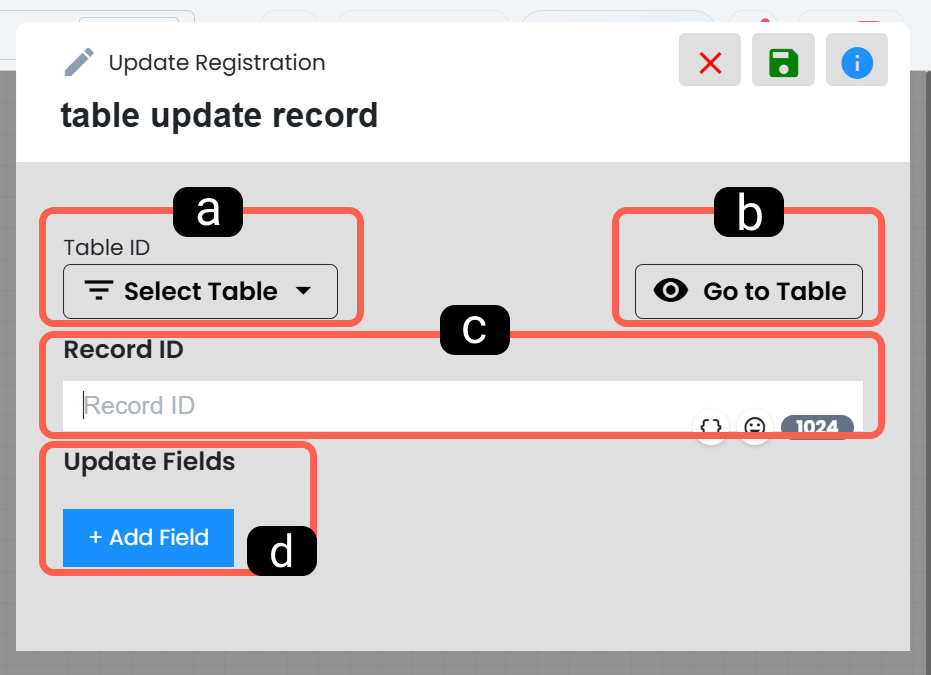
The Update Record block is used to update specific fields of an existing record in the selected table. Thus, new information obtained during the chatbot flow can be written onto the existing record and the data can be kept up to date.
a. Table Selection
From this field, the table containing the record to be updated is selected. According to the table you choose, the fields to be updated (table columns) below will appear.
b. Go to Table
Through this button, you can directly navigate to the selected table and review records and field structures. Checking the table before determining which fields will be updated helps prevent incorrect mappings.
c. Record ID
In this field, the unique Record ID value of the record to be updated is entered. By defining the Record ID variable of the relevant table record in this field, you can ensure that the correct record is automatically updated with the content you specify
d. Fields to Be Updated
This is the section where you determine which columns of the existing record will be changed. By using the "+ Add Field" button, you can update multiple columns. After selecting the column to be updated, you can define the new value (dynamic or static) to be written into that column
4.d – Find Record
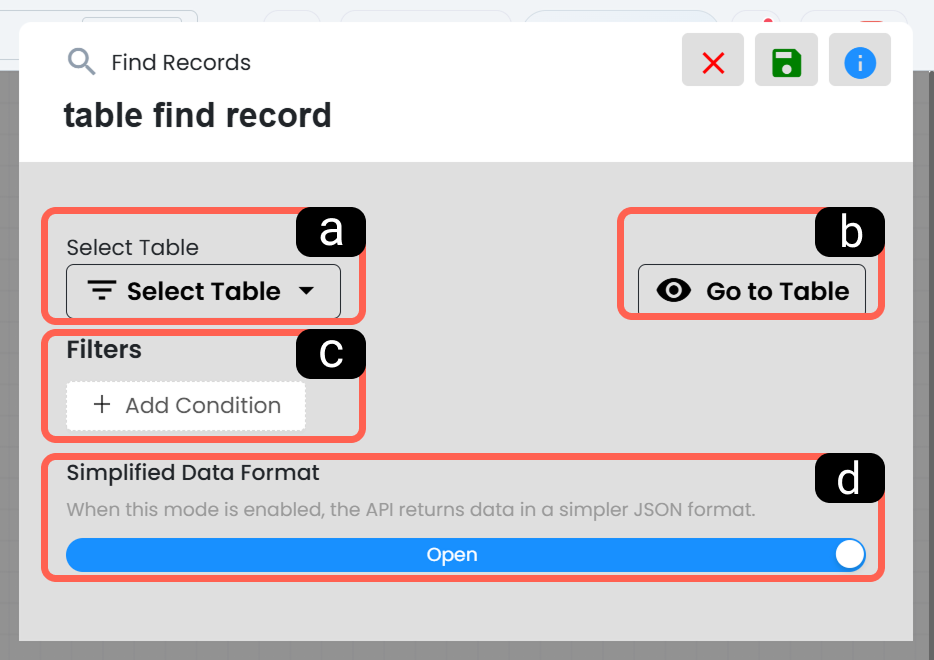
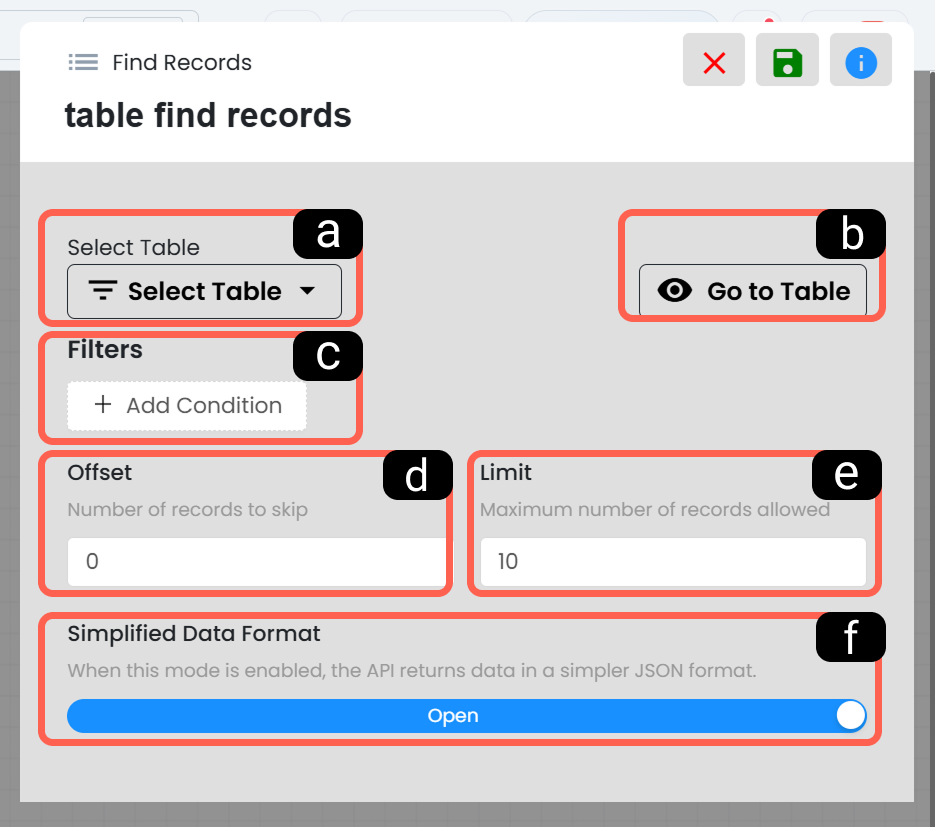
It allows you to find a specific record that matches the custom conditions (filters) you define among all the data content in your table and call it into the chatbot scenario. This found data is directly converted into a readable variable through the block itself. Thus, you can easily use the information you obtain in the subsequent steps of your chatbot scenario.
a. Table Selection
This is the field where you determine the source table in which the search operation will be performed.
b. Go to Table
Allows you to directly open the table to verify column names before filtering.
c. Filters
Filters are the field where you define which data in which column of the table will be queried and matching records will be returned as a list content.
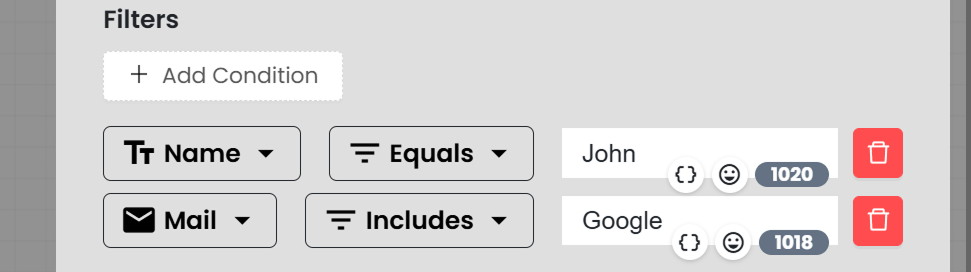
With the "Add Condition" button; you define the table field to be searched, the logical operator (e.g.: Equals, Contains), and the value to be searched.
d. Simplified Data Format
When this option is enabled, the API output is returned in a more simplified JSON format. It can be preferred especially in integration and data processing scenarios where a more readable output structure is needed.
Note: If there are multiple table items matching the searched record parameters, Find Record returns the most recently added record.
4.e – List Records
The List Records block allows you to fetch multiple records that match the criteria you define in bulk and include them in your chatbot flow as a list (array/data set).
a. Table Selection
From this field, the table to be listed is determined.
b. Go to Table
This button allows you to directly open the selected table and check the table content and field structure. Thus, you can quickly verify which fields will be used while creating filters.
c. Filters
Filters are the field where you define which data in which column of the table will be queried and matching records will be returned as a list content.
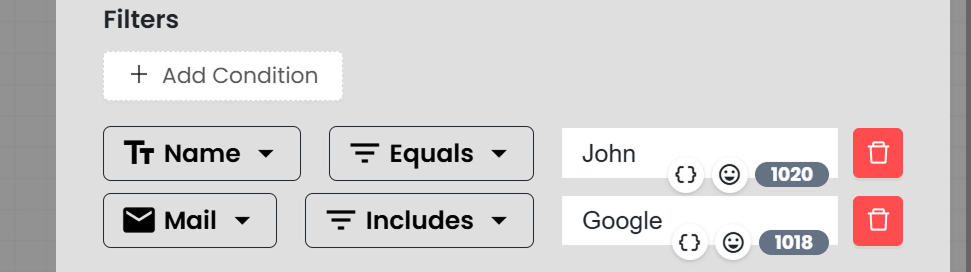
With the "Add Condition" button; you define the table field to be searched, the logical operator (e.g.: Equals, Contains), and the value to be searched.
d. Offset
It is used for pagination in multiple data. For example, if you write "10" here, the system skips the first 10 records and starts listing from the 11th record. It should be left as "0" to read from the beginning of the table.
e. Limit
This is the field where you limit how many records the system will fetch at once.
f. Simplified Data Format
It converts the listed multiple data set into a simplified JSON format that can be read more easily.
5. Cache Actions
Cache actions allow you to manage temporary data within the chatbot flow using a key-value logic. Thanks to this structure, user session information, preferences, or data that you will need again in the later steps of the scenario can be stored securely. While Supsis AI action blocks are used to manage automated processes, Cache Manager also facilitates data sharing between chatbot scenarios and automations.
5.a – Write Cache
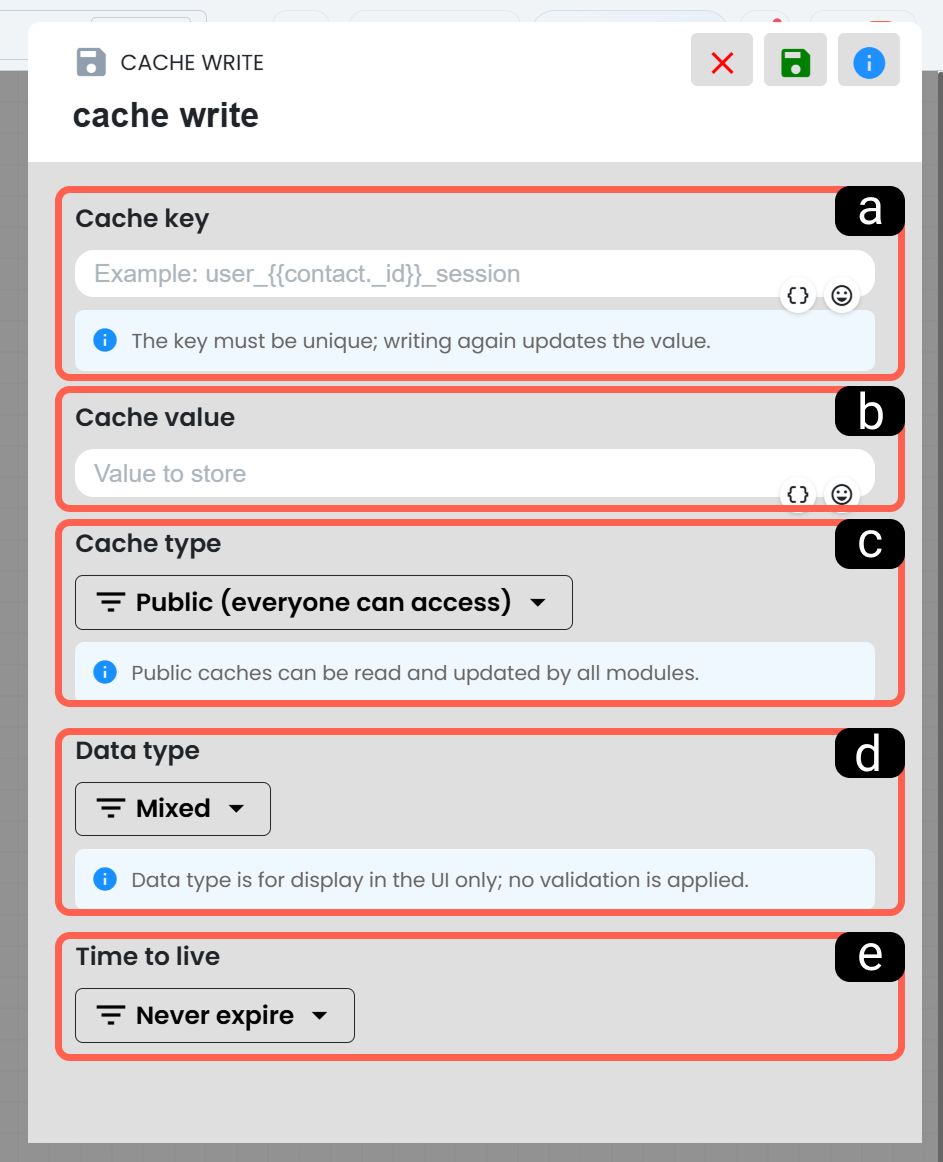
This block is used to store a piece of data generated during the flow in the cache. It is especially effective for storing temporary data such as session information, user preferences, or data that the bot needs to remember for a short time. The Cache Manager structure allows such temporary data to be stored securely; when rewritten with the same key, the existing record is updated and the new value becomes active.
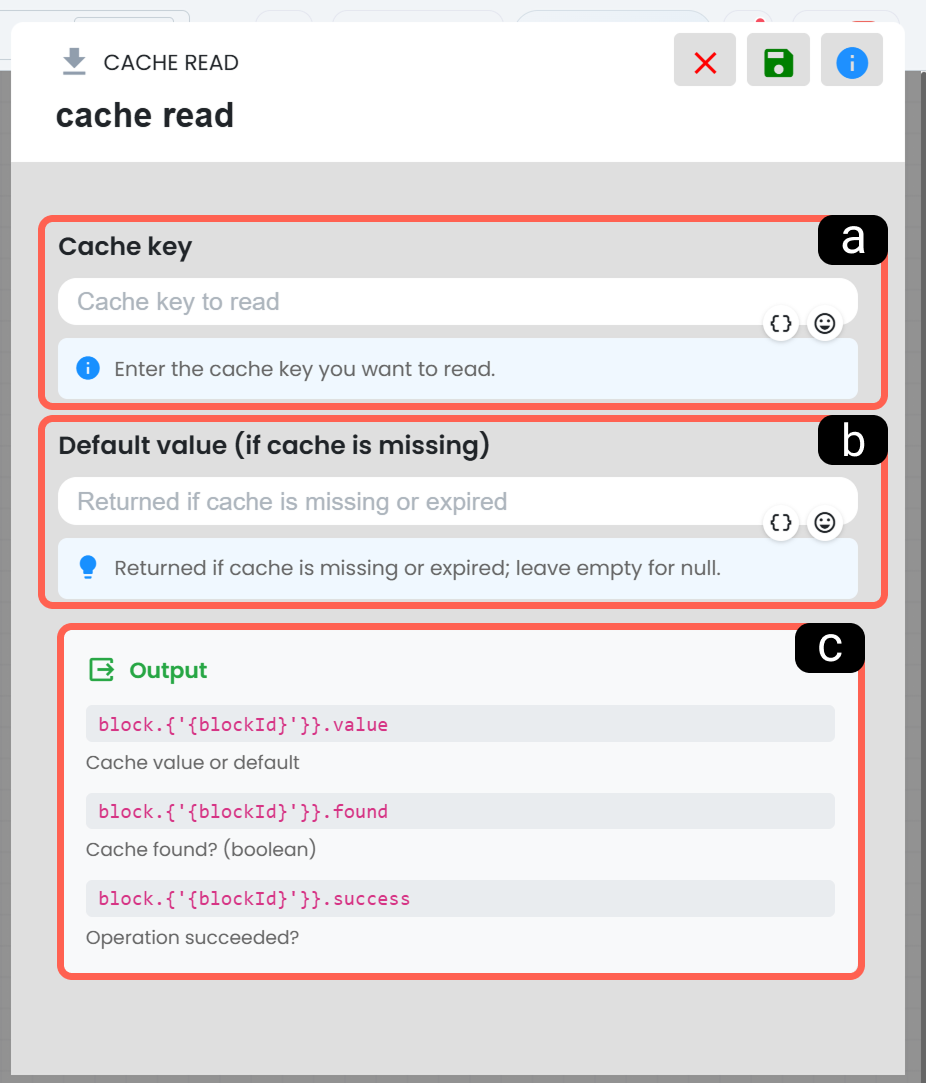
a. Cache Key
This field is the unique key name that will be used to access the data later. It is recommended that the key structure be clear, consistent, and preferably designed with user-specific variables. Thus, cache conflicts that may occur for different users or different operations can be prevented. In the Cache Manager documentation, this field is also defined as the unique key used to access the data again
b. Cache Value
In this section, the actual data to be stored under the cache is entered. The saved value can be read again in the later steps of the flow and used in different blocks. User preference, temporary operation result, routing information, or auxiliary data that needs to be kept during the session can be stored in this field; Cache Manager is also designed for managing such temporary data
c. Cache Type
The access scope of the cache is determined from this field. According to the Cache Manager documentation, cache records of the Public type can be accessed by system users within scenarios; records of the Private type can only be used within scenarios by the user who defined the cache. Therefore, you can determine here whether the access should be broad or more limited according to the needs of the scenario
d. Data Type
This field allows you to classify the type of data to be written to the cache on the interface. On the system side, there are data type options such as String, Number, Boolean, Date, JSON, Array, Mixed, and User ID. According to the information on the screen, this selection does not directly apply validation; it is mostly used to display the data correctly on the interface and to manage the scenario more readably
e. Expiration Time
This section defines how long the cache data will be kept in the system. According to the Cache Manager documentation, you can store the data indefinitely, define a specific duration, or end its validity on a specific date. The “Never expire” option on the screen ensures that the data remains in the cache until you delete it manually
5.b – Read Cache
This block allows you to reuse a previously stored cache data at a different point in the flow. Since Cache Manager enables temporary data sharing between scenarios and automations, this action is especially important for recalling information saved in previous steps.
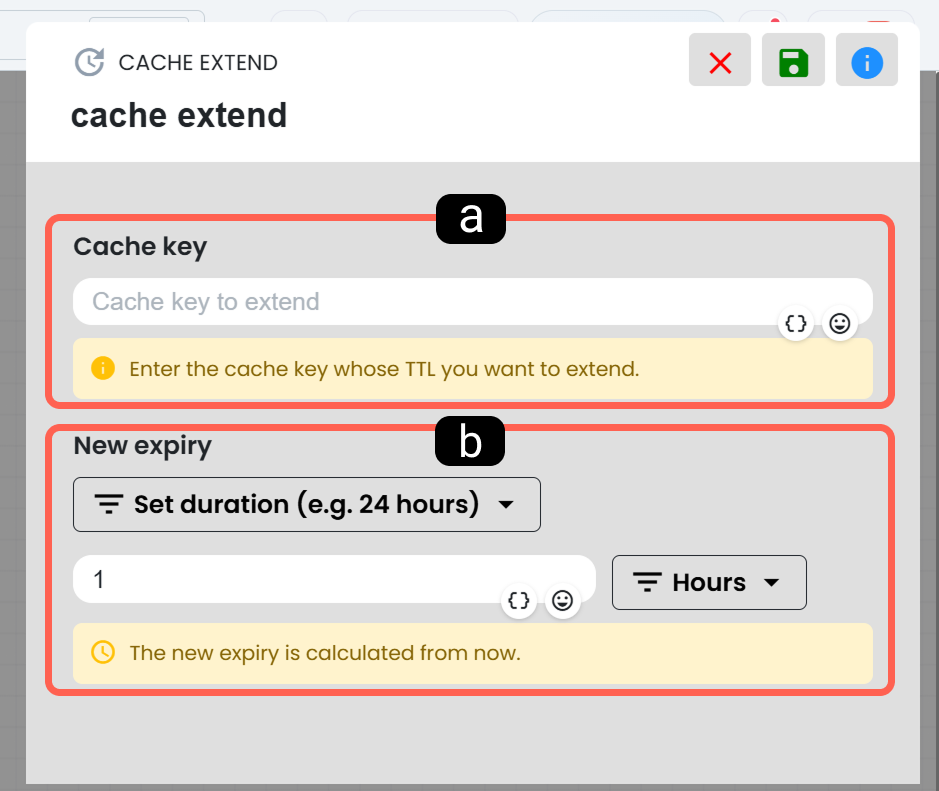
a. Cache Key
The key of the cache record to be read is entered in this field. The key used here must be exactly the same as the key used during cache writing. If you are using a dynamic key structure, you must maintain the same variable logic in the reading process; otherwise, the system cannot find the relevant record.
b. Default Value
This field determines which value the system will return if the relevant cache record cannot be found or if the cache has expired. According to the on-screen description, if this section is left empty, the result will be null. Thus, even when the cache data is not available, the flow can continue in a controlled manner.
c. Block Output Information
After the operation, the Read Cache block produces the following output information and these can be used as references in subsequent blocks:
- block.{{'{blockId}'}}.value: The found cache value or the default value if the cache does not exist,
- block.{{'{blockId}'}}.found: Boolean information indicating whether the cache record is found,
- block.{{'{blockId}'}}.success: Status information indicating whether the read operation is successful.
Thanks to this output structure, you can create conditional flows such as “if cache is found, continue; if not found, switch to an alternative scenario”.
5.c – Extend Cache Duration
This block is used to update only the expiration time of an existing cache record without changing its value. In the Cache Manager structure, having manageable expiration time ensures that temporary data is used in a controlled way. This action is especially useful in cases where you want to redefine the retention duration of the existing cache record in the system while the interaction with the user continues
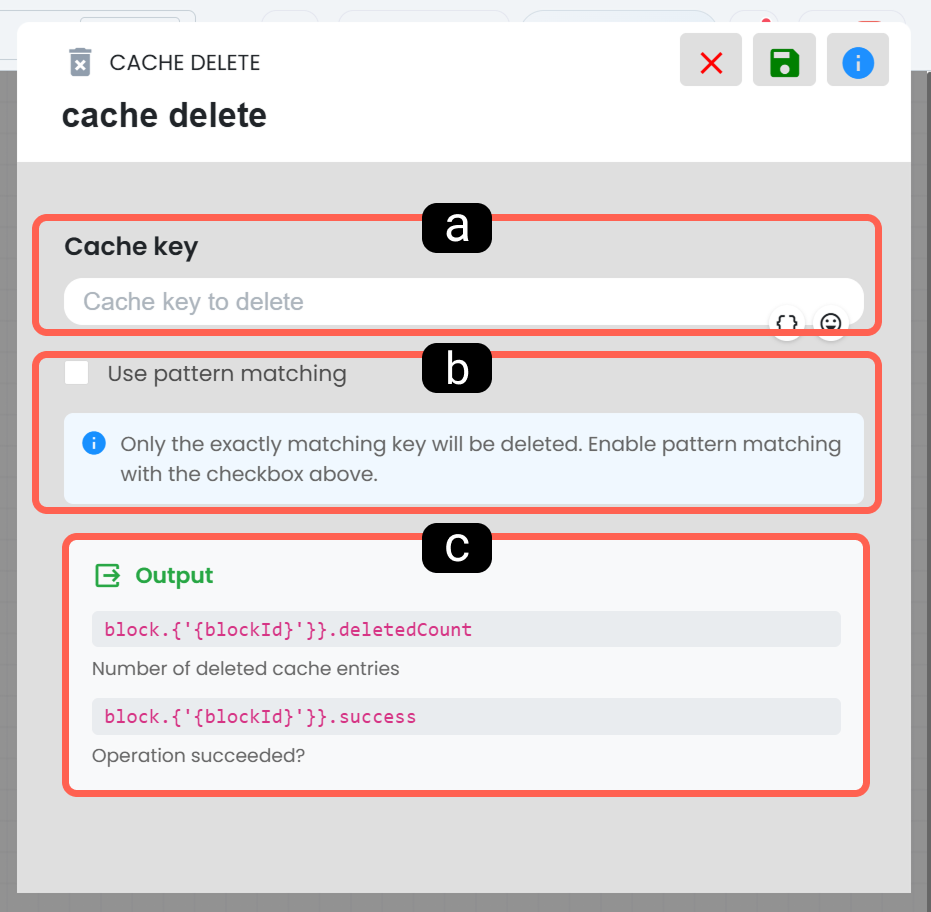
a. Cache Key
The cache record whose duration will be updated is determined by the key information in this field. The key entered here must match the record previously written to the cache. Using the correct key is critical to ensure that the update is applied to the intended data.
b. New Expiration Time
In this section, the new duration information of the cache is defined. In the usage structure on the screen, the duration value is entered numerically and the time unit is selected separately. As stated in the information area, the new expiration time is recalculated based on the moment of the operation rather than being added to the remaining part of the current duration. Thus, the lifetime of the cache record is refreshed according to the current need
5.d – Delete Cache
This block is used to clean up cache records that are no longer needed from the system. Since it is stated in the Cache Manager documentation that some records can be stored until manually deleted, this action becomes especially important for cleaning data that is kept indefinitely or will no longer be used in the scenario.
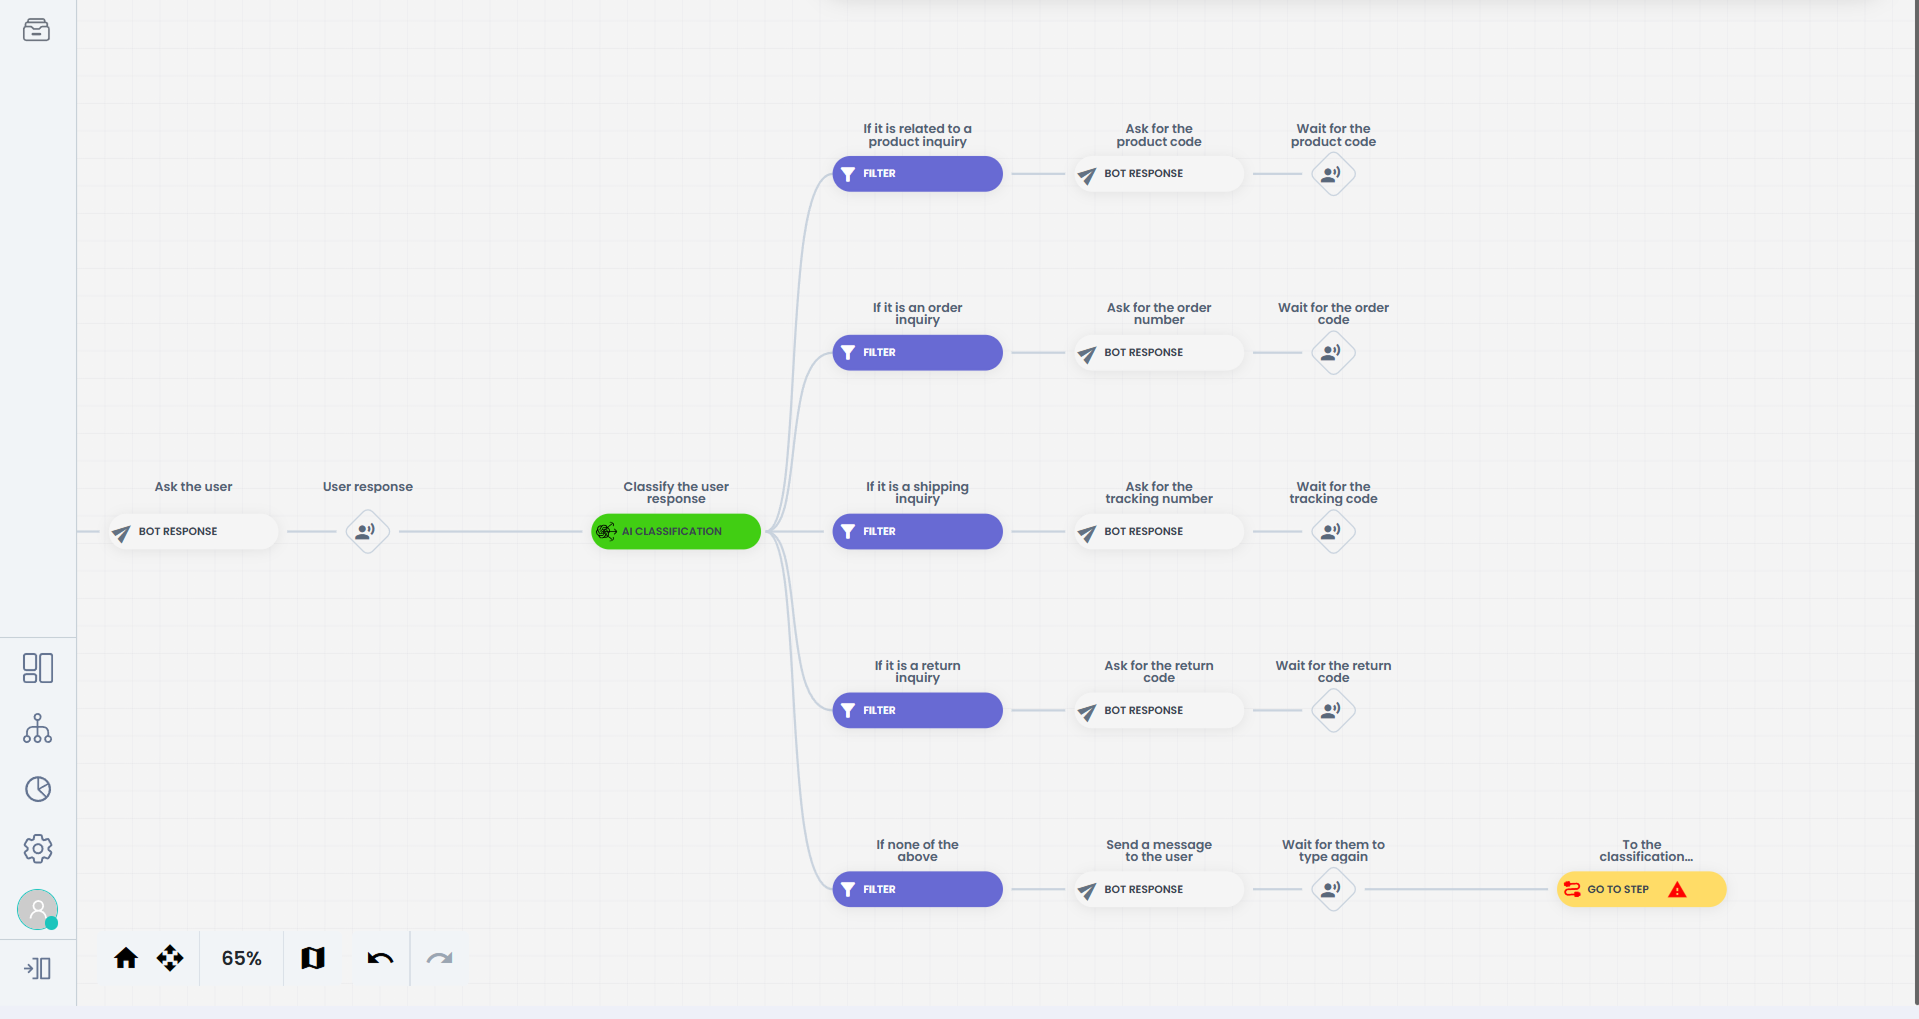
a. Cache Key
The cache record to be deleted is determined by the key information in this field. If you want to delete a single record, it is sufficient to enter the exact key of the relevant cache. Thus, only the targeted data is removed from the system.
b. Use Pattern Matching
When this option is not selected, the system deletes only the exact matching key. According to the on-screen information, if you want to perform pattern-based deletion, you need to activate this checkbox. This structure is useful in scenarios where you want to clean multiple cache records created with a similar key format in a more flexible way.
c. Block Output Information
After the operation, the Delete Cache block produces the following output information:
- block.{{'{blockId}'}}.deletedCount: Number of deleted caches
- block.{{'{blockId}'}}.success: Status information indicating whether the deletion operation is successful.
These outputs can be used especially to check the result after deletion operations affecting multiple records and to plan the continuation of the flow accordingly.
6. Template Blocks
Template blocks allow you to quickly activate frequently used chatbot scenarios without having to build them from scratch. These ready-made flows located in the Templates section in the chatbot menu can be tested, edited, and adapted according to your needs
6.a – Ready Menu Flow
The Ready Menu Flow is a ready-made menu structure that classifies free-text responses from the user with artificial intelligence and directs them to the relevant flow according to the classification result.![][image58]
This template comes with a predefined artificial intelligence classification and a filter setup based on it. Thus, user requests can be separated into categories such as product, order, shipment, return and directed to the correct step. Categories can be edited in the classification block; on the filter side, a specific action can be defined for each result using the AI Class Result field
6.b – OTP Mail
The OTP Mail template is a ready-made flow prepared to send one-time codes via email in user verification processes. Within this structure, first the email address is obtained from the user and format validation is performed. Then, together with the generated OTP code, the email information is saved to the profile card and the verification code is sent to the user via email. In the next step, the code received from the user is checked; in correct entry, the flow continues to the next step, and in incorrect entries, the user is redirected again. The template works with a three-attempt logic to increase security
6.c – OTP SMS
The OTP SMS template is provided ready for scenarios that require phone number verification. In order to use this flow, the relevant SMS infrastructure must be activated with Postacell integration as specified in the documentation. In the flow, the phone number is obtained from the user, saved to the profile card together with the generated OTP code, and then sent to the user via SMS. The system directs the flow by verifying the code entered by the user; in incorrect entries, it offers a retry opportunity, and when the defined attempt limit is exceeded, the session is terminated
6.d – OTP WhatsApp
The OTP WhatsApp template is used to send a one-time verification code via WhatsApp to the phone number received from the user. For this template to work, WhatsApp Business API integration must be active. In the flow, the phone number is obtained and verified, the OTP code generated with the number is saved to the profile card, and then the code is sent to the user via a WhatsApp template message. If the sending is successful, the user is expected to submit the code to the system; in case of failed sending, the user is informed and the flow is terminated. In the verification stage, there is a retry setup for incorrect entries, and in correct entry, the user is directed to the next process
6.e – AI Instagram Comment
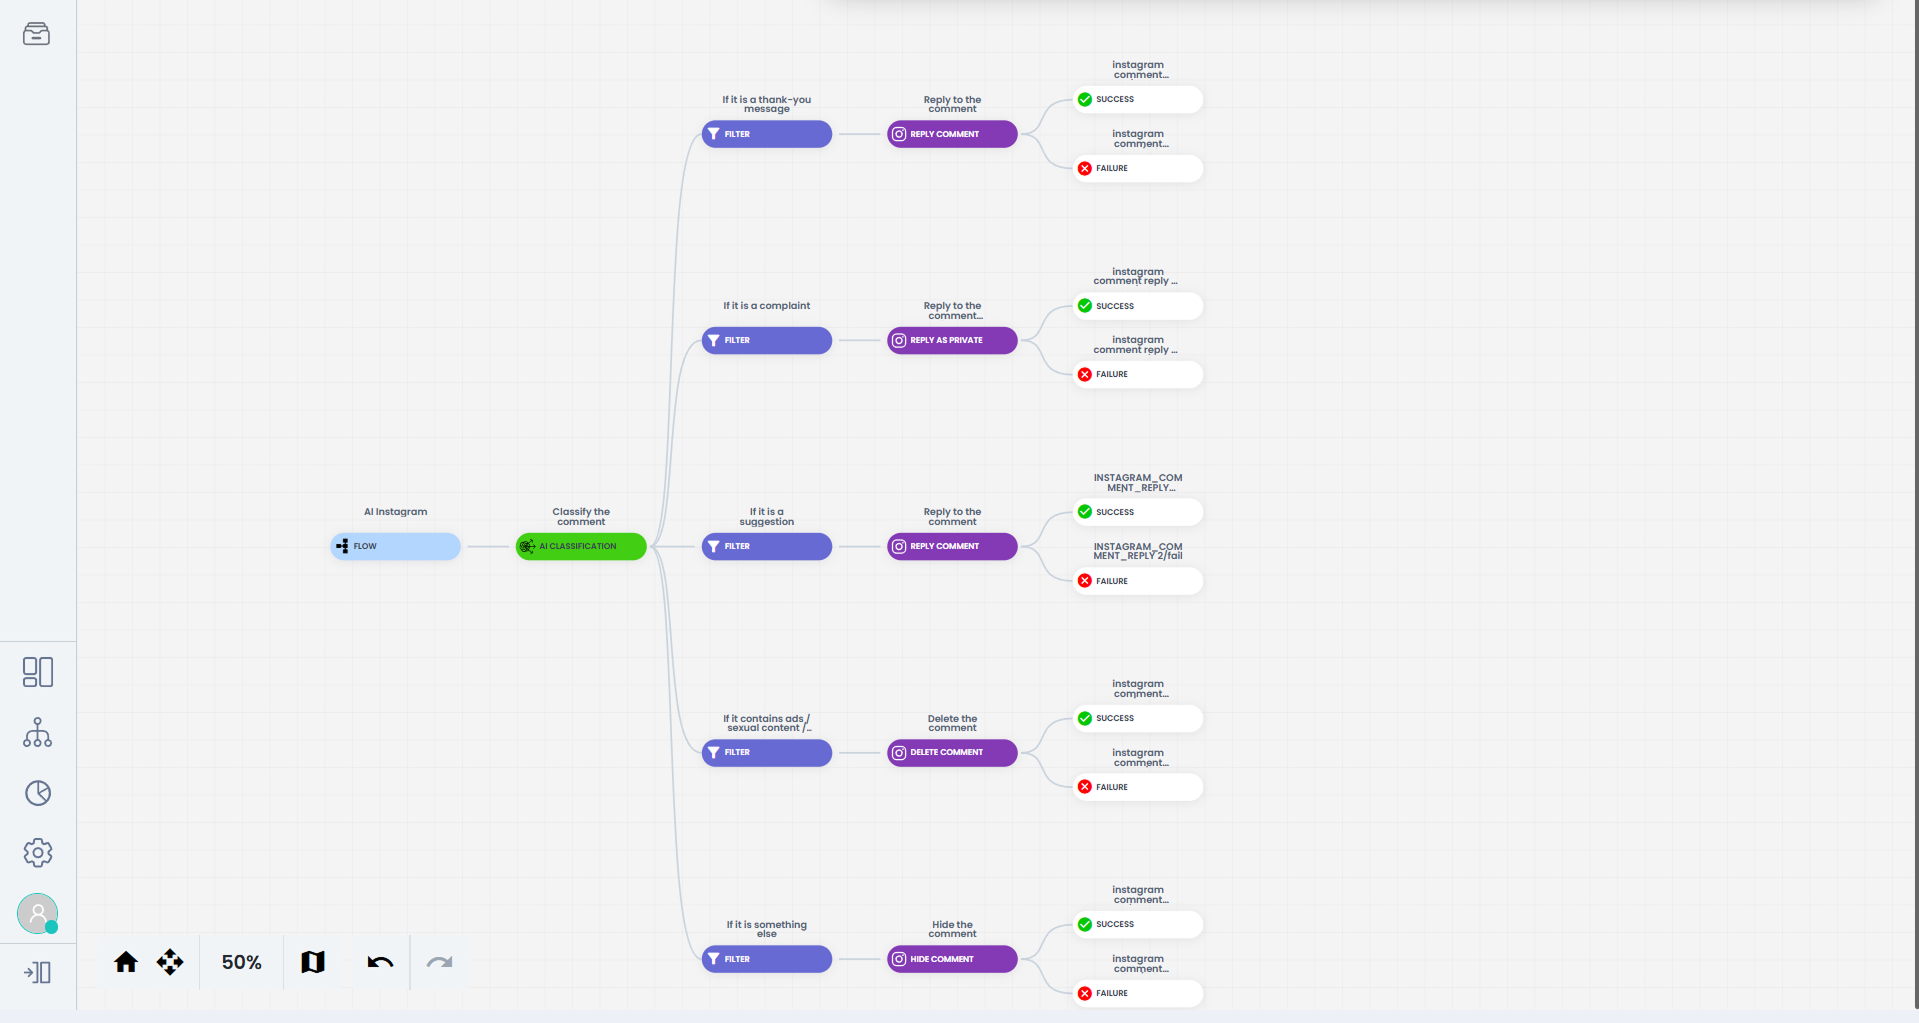
The AI Instagram Comment template is a ready-made flow that analyzes comments on Instagram posts with artificial intelligence, categorizes them into predefined categories, and triggers the appropriate moderation action according to the result. The Artificial Intelligence Classification block classifies the incoming comment according to its meaning; for Instagram comments, the Meta Comment attribute must be used in the data field to be classified. As a result of the classification, the comment can be categorized as thanks, complaint, suggestion, inappropriate content, or others, and accordingly actions such as replying to the comment, giving a private response via DM, hiding the comment, or deleting it can be applied. Thus, Instagram comment management becomes faster, more consistent, and automated
6.f – Platform
The Platform template is a ready-made flow used to filter users who contact the chatbot according to the channel they come from.
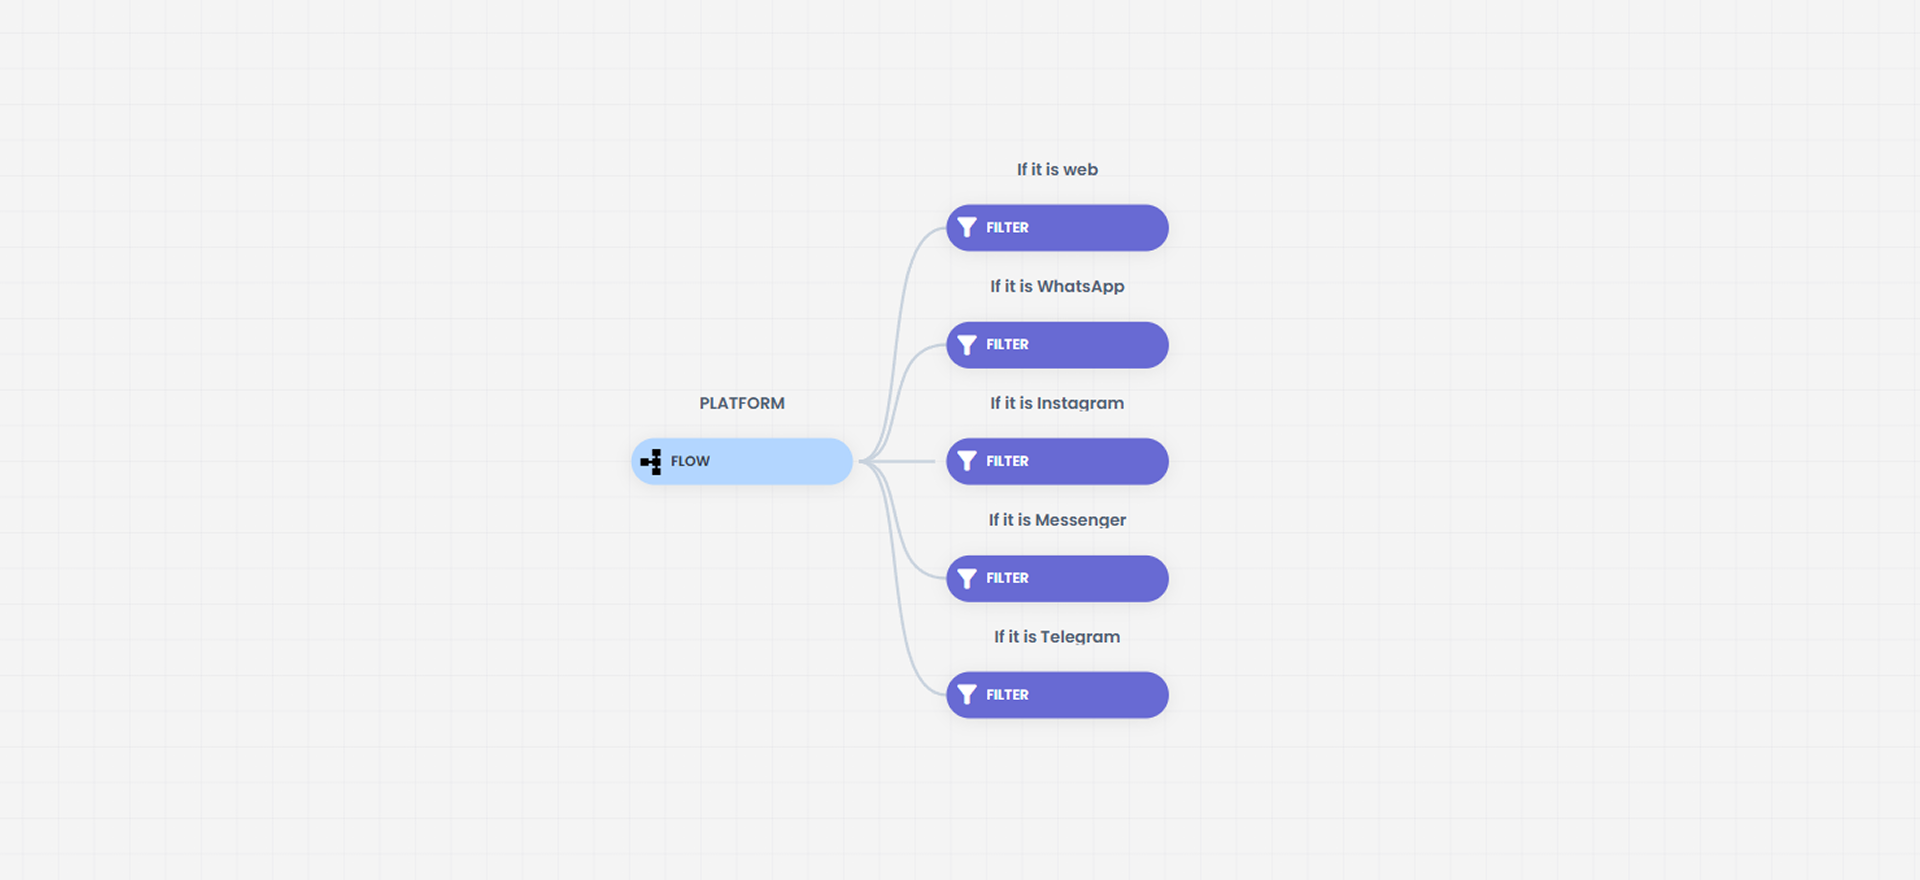
Within the template, there are ready-made filters specific to platforms such as Web, WhatsApp, Instagram, Messenger, and Telegram. Thanks to this structure, users can be directed to the relevant scenario according to the channel they connect from, and a separate experience can be designed for each platform. It provides a fast and organized starting point especially for teams that want to design different message structures, routing, or process steps on a channel basis.
7. Meta Actions
These actions allow managing Meta platforms within the chatbot flow.
7.a – Reply to Comment
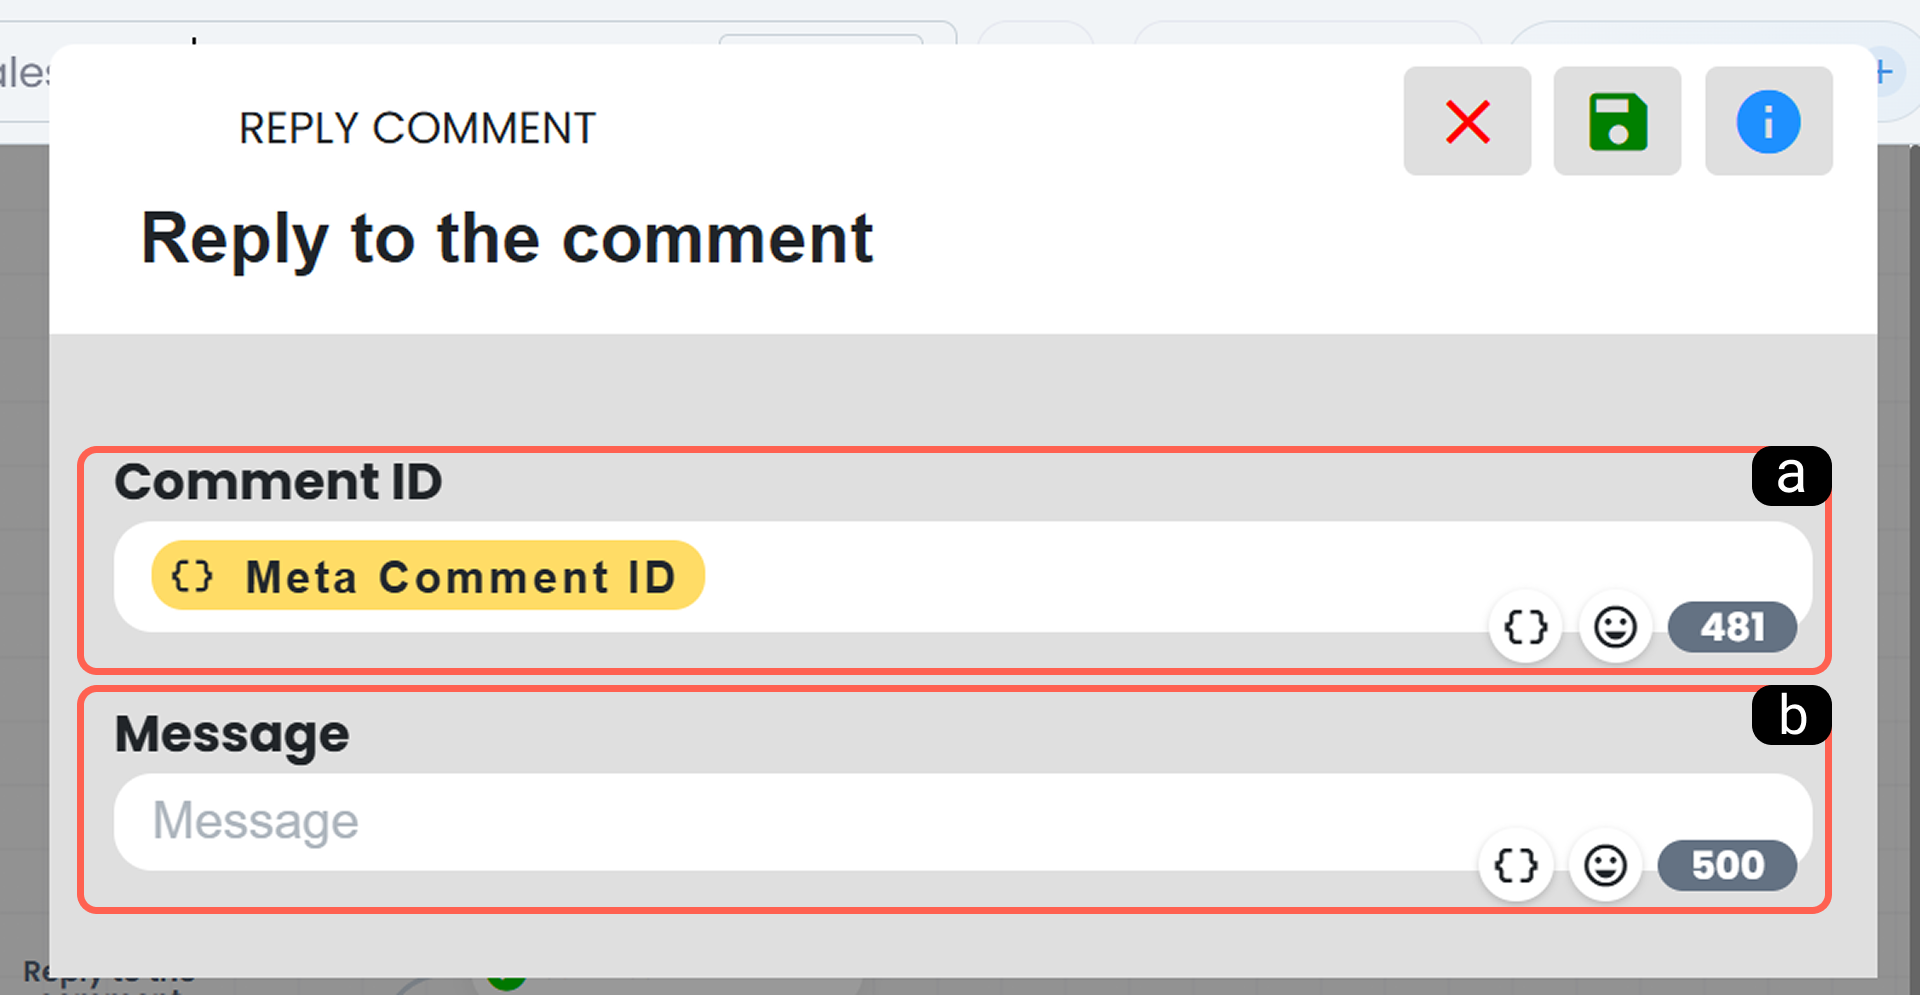
This block is used to reply directly under the post to the selected Instagram comment.
a. Comment ID
This field defines the identity of the comment to be replied to. By default in the block content, the comment id field will be filled with the Meta Comment ID value as shown in the visual.
In order for the chatbot to perform an operation related to a comment, it must have access to the Meta Comment ID of the relevant comment. If the chatbot flow is triggered via a Meta comment, the Meta Comment ID value of the comment that triggered the scenario will be the same as the dynamic Meta comment ID value here, and the chatbot will perform the operation directly on the relevant comment.
b. Message
In this section, the reply text to be sent under the comment is defined. You can create the message content to be delivered to the user through this field and prepare an informative or guiding response according to the tone of the scenario
7.b – Delete Comment
This block is used to remove unwanted or inappropriate content comments. It can be used especially in Instagram comment management scenarios for automatic cleaning of advertisements, slang, or content that violates the rules.
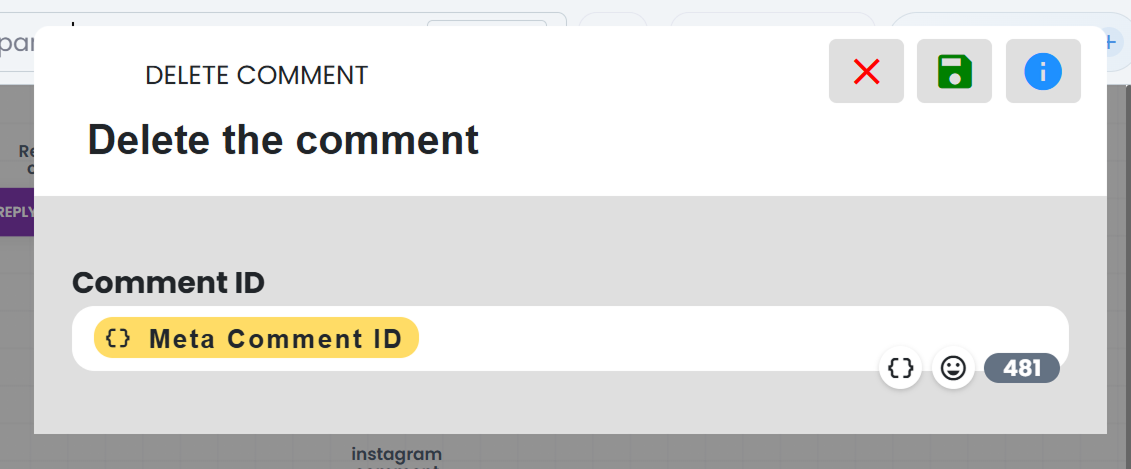
In order for the chatbot to automatically delete a comment, it must have access to the Meta Comment ID of the relevant comment. If the chatbot flow is triggered via a Meta comment, the Meta Comment ID value of the comment that triggered the scenario will be the same as the dynamic Meta comment ID value here, and the chatbot will perform the operation directly on the relevant comment.
7.c – Show Comment
This block is used to make a previously hidden comment visible again.
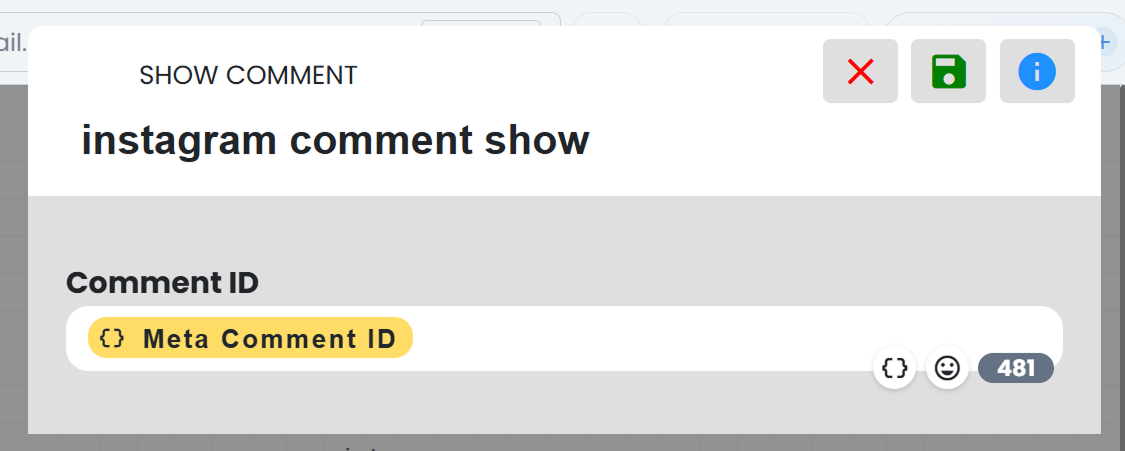
Comment ID
The value in this field defines the identity of the comment that will be made visible again. The Meta Comment ID value used in the visual determines on which comment the operation will be applied.
7.d – Hide Comment
This block allows the comment to be made invisible under the post without the need to completely delete it. It is especially preferred in managing suspicious, disturbing, or temporarily removed comments.
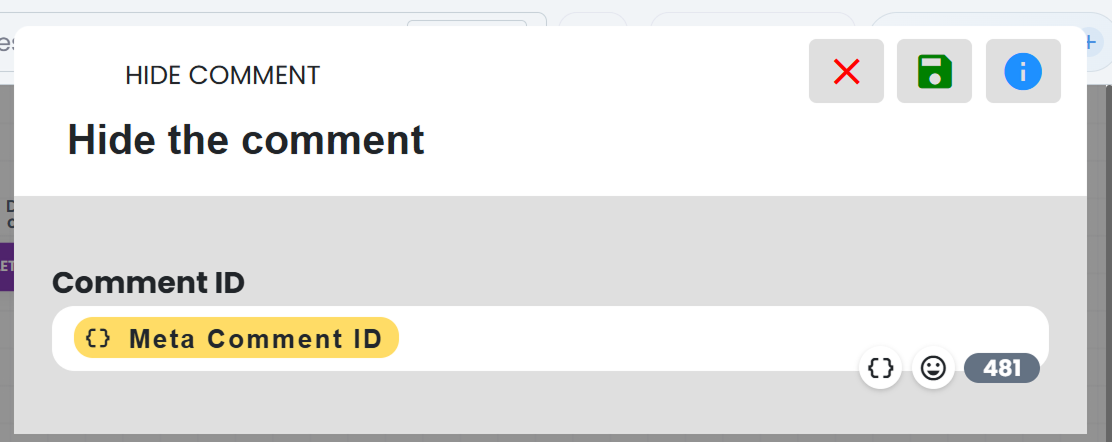
Comment ID
This field determines the identity of the comment to be hidden. In order to target the correct comment, the relevant Meta Comment ID information must be linked to this section.
7.e – Reply to Comment via DM
This block is used to respond to the user via private message instead of giving a public reply under the comment. It provides more controlled communication especially in cases such as complaints, sharing private information, or situations requiring one-to-one communication.
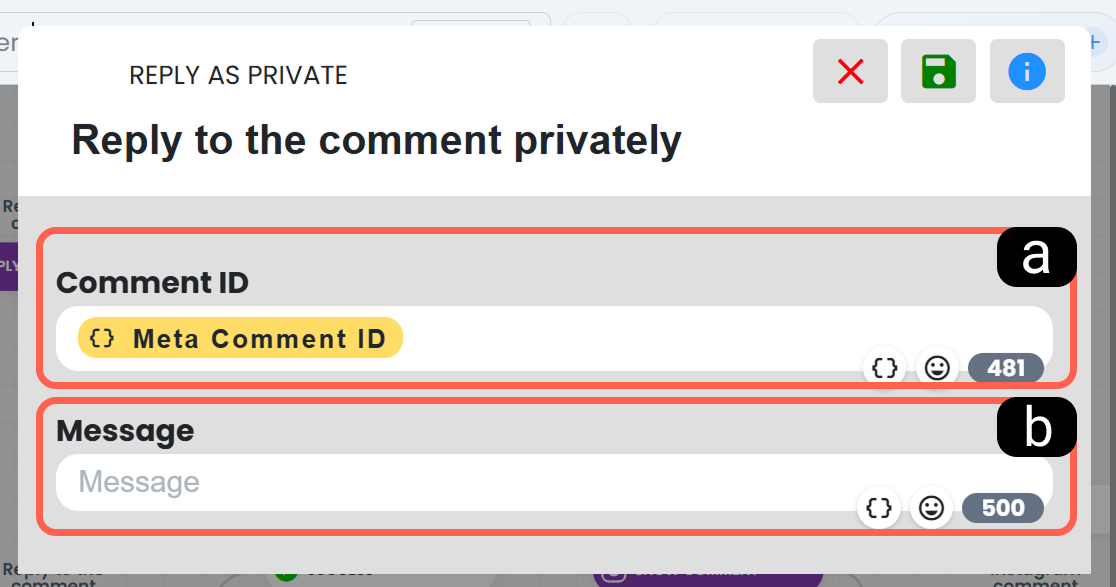
a. Comment ID
This field determines the comment to which the DM response will be sent. In cases where the chatbot scenario trigger is a Meta comment, using the Meta Comment ID value as shown in the visual ensures that the chatbot operation is performed for the correct comment.
b. Message
In this section, the message content to be sent to the user as a DM is defined. You can prepare content such as comment-specific explanations, information, or support guidance in this field.
7.f – Send Messenger Message
When this block is triggered; the specified message is sent directly to the specified Messenger user via direct message (DM).
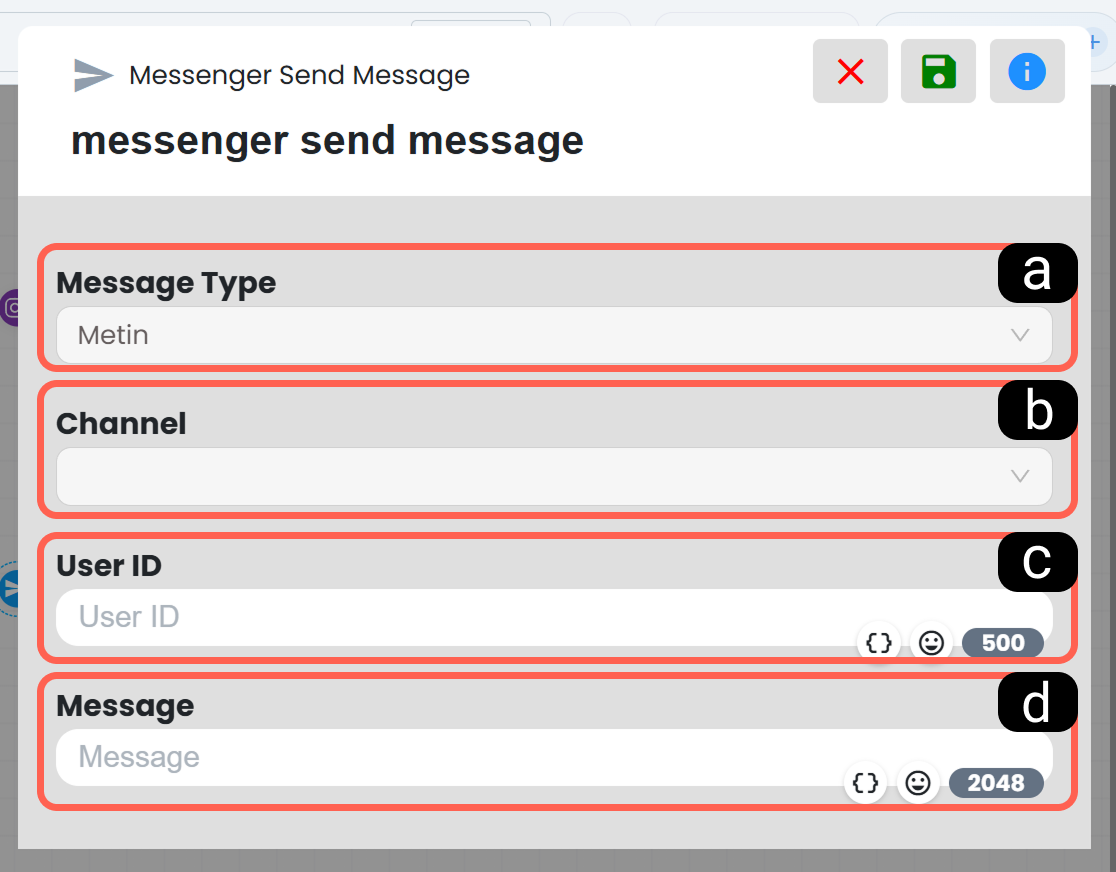
a. Message Type to Be Sent
This field is used to determine the type of the content to be sent. By determining the sending format from this field, you can prepare the message content in the appropriate structure. Text and image message types are supported.
b. Channel
From this field, you can determine through which channel the message will be sent among the Messenger channels you have integrated into your Supsis AI panel. Especially in structures with multiple channel connections, selecting the correct channel is important for sending the message through the correct account.
c. User ID
The user ID that identifies the user to whom the message will be sent on the Messenger platform must be entered in this field.
d. Message Content
The message text or image to be sent to the user is defined in this section.
7.g – Send Instagram Message
When this block is triggered; the specified message is sent directly to the specified Instagram user via direct message (DM).
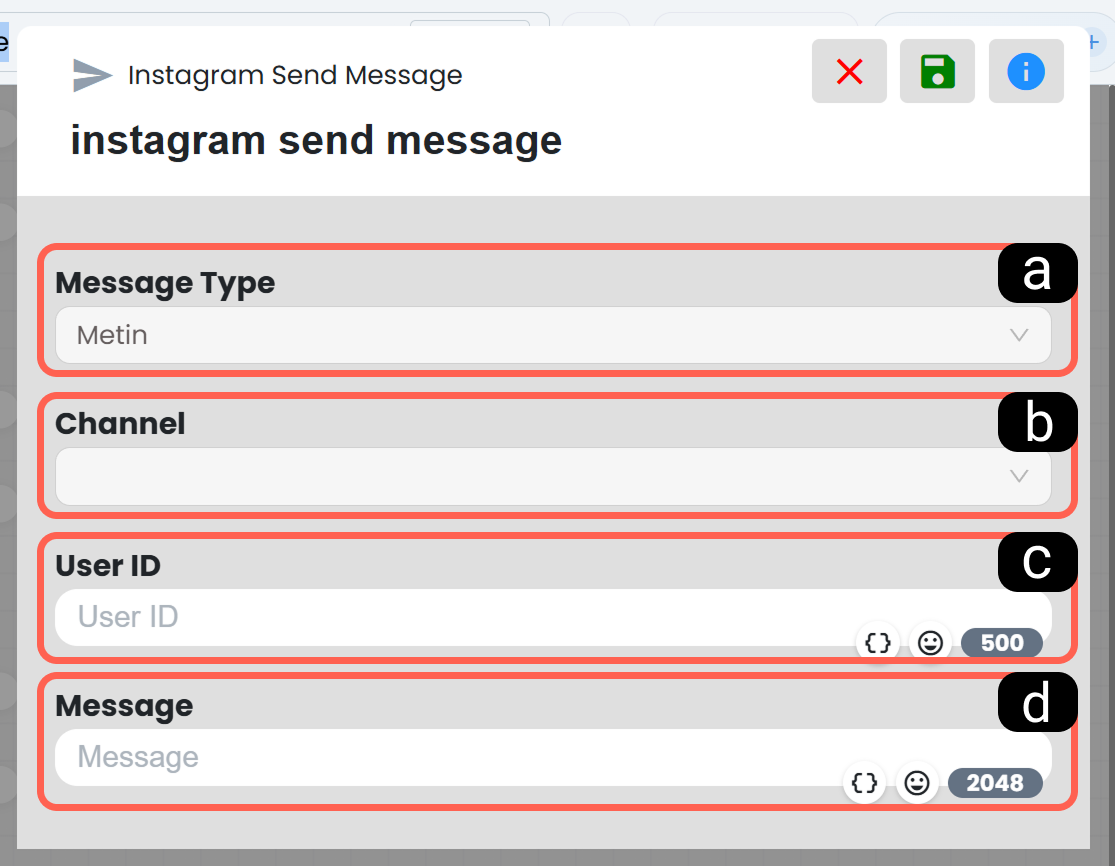
a. Message Type to Be Sent
This field is used to determine the type of the content to be sent. By determining the sending format from this field, you can prepare the message content in the appropriate structure. Text and image message types are supported.
b. Channel
From this field, you can determine through which channel the message will be sent among the Instagram channels you have integrated into your Supsis AI panel. Especially in structures with multiple channel connections, selecting the correct channel is important for sending the message through the correct account.
c. User ID
The user ID that identifies the user to whom the message will be sent on the Instagram platform must be entered in this field.
d. Message Content
In this section, the message text to be sent to the user is defined.
8. Ideasoft Actions
Ideasoft actions allow you to include member information, order lists, and order details in the flow by using store data within the chatbot scenario. The Supsis AI Chatbot infrastructure works integrated with e-commerce infrastructures, enabling data to be processed within the scenario and used dynamically.
8.a – Select Order
This block is used to allow the user to make a selection by bringing past orders belonging to the relevant member from Ideasoft. It is activated after the member information is successfully retrieved during the order query process and allows you to determine which order the user wants to perform an action for.
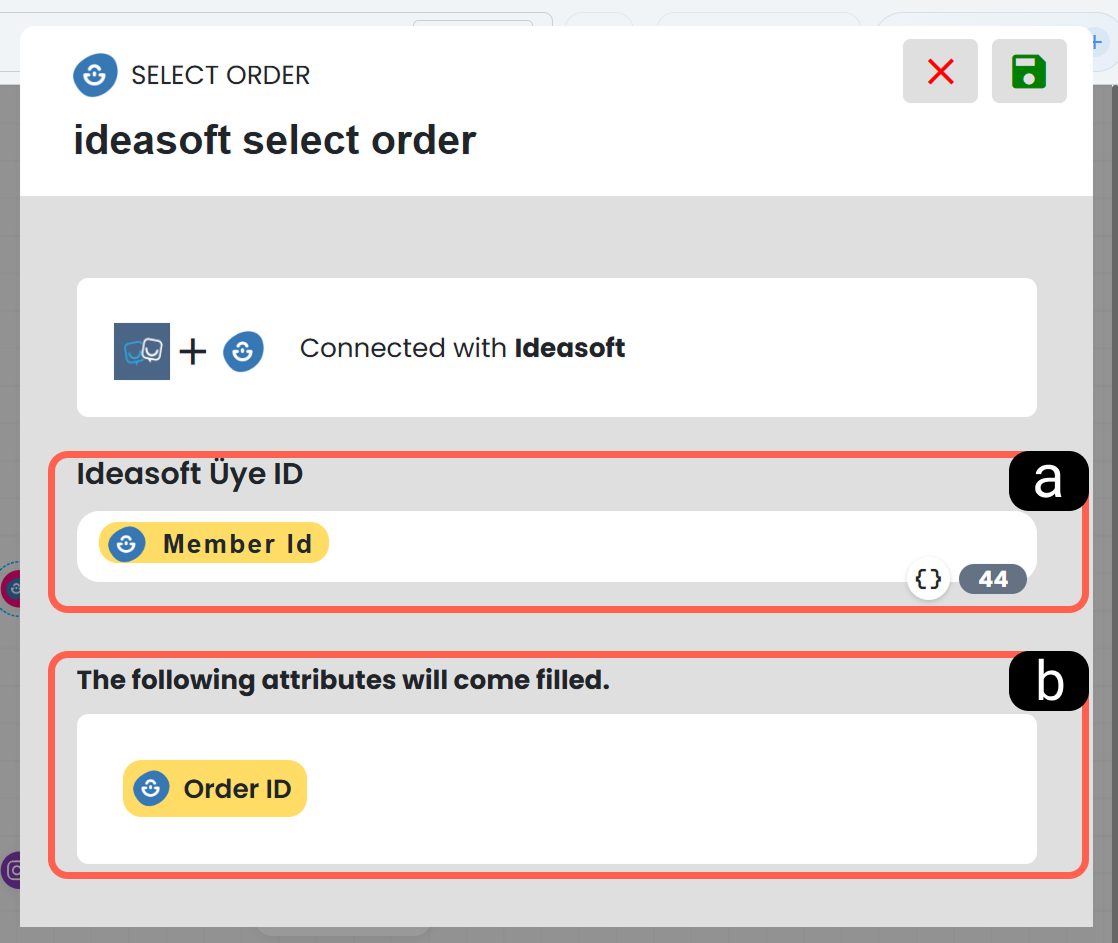
a. Ideasoft Member ID
In this field, the Ideasoft member identity information returned from the Get Member Details block is entered. The system queries the order list based on this member ID.
b. Attributes to Be Filled
In this field, the order information that can be used in the scenario after the user’s selection is listed. In the visual, for example, it is seen that the Order Number information is returned filled. These values can be used as dynamic fields in the following steps.
8.b – Fetch Order Status
This block fetches the details of the order selected by the user from Ideasoft and brings them into the chatbot flow. It is used especially in scenarios where you want to display information such as order status, shipping information, or tracking links to the user.
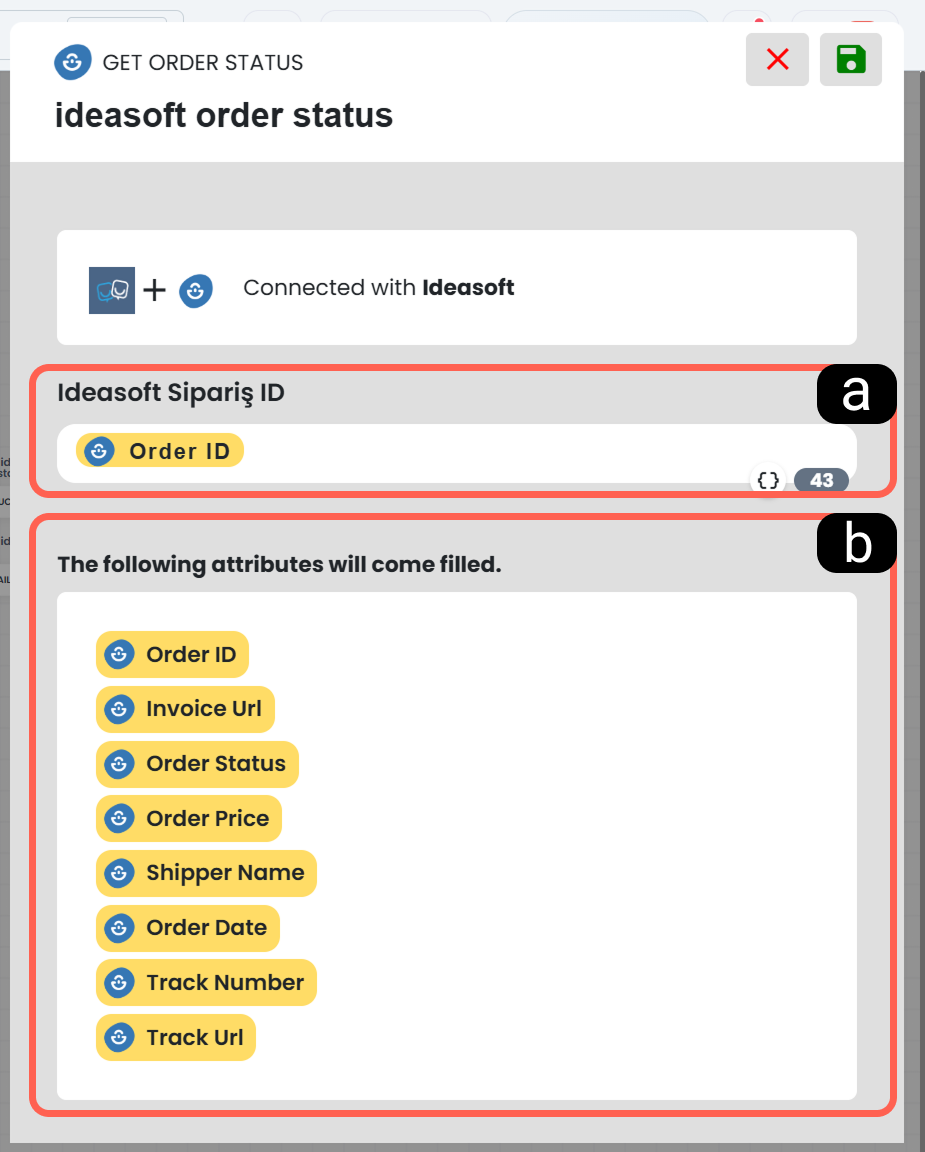
a. Ideasoft Order Number
In this field, the number of the order selected via the Select Order block is connected as a dynamic value. The system performs the detail query based on this order number.
b. Attributes to Be Filled
The details specified here for the selected order come filled. These data become usable in message contents, filters, or other action blocks within the chatbot scenario. You can use these fields via dynamic values. (see: Dynamic Values)
8.c – Get Member Details
This block is used to query member information registered in the Ideasoft store via the user’s email address. It is the first step in the order query flow. Saving the email information received from the user into the profile field and using it in subsequent blocks is suitable for the chatbot structure that can operate with user data.
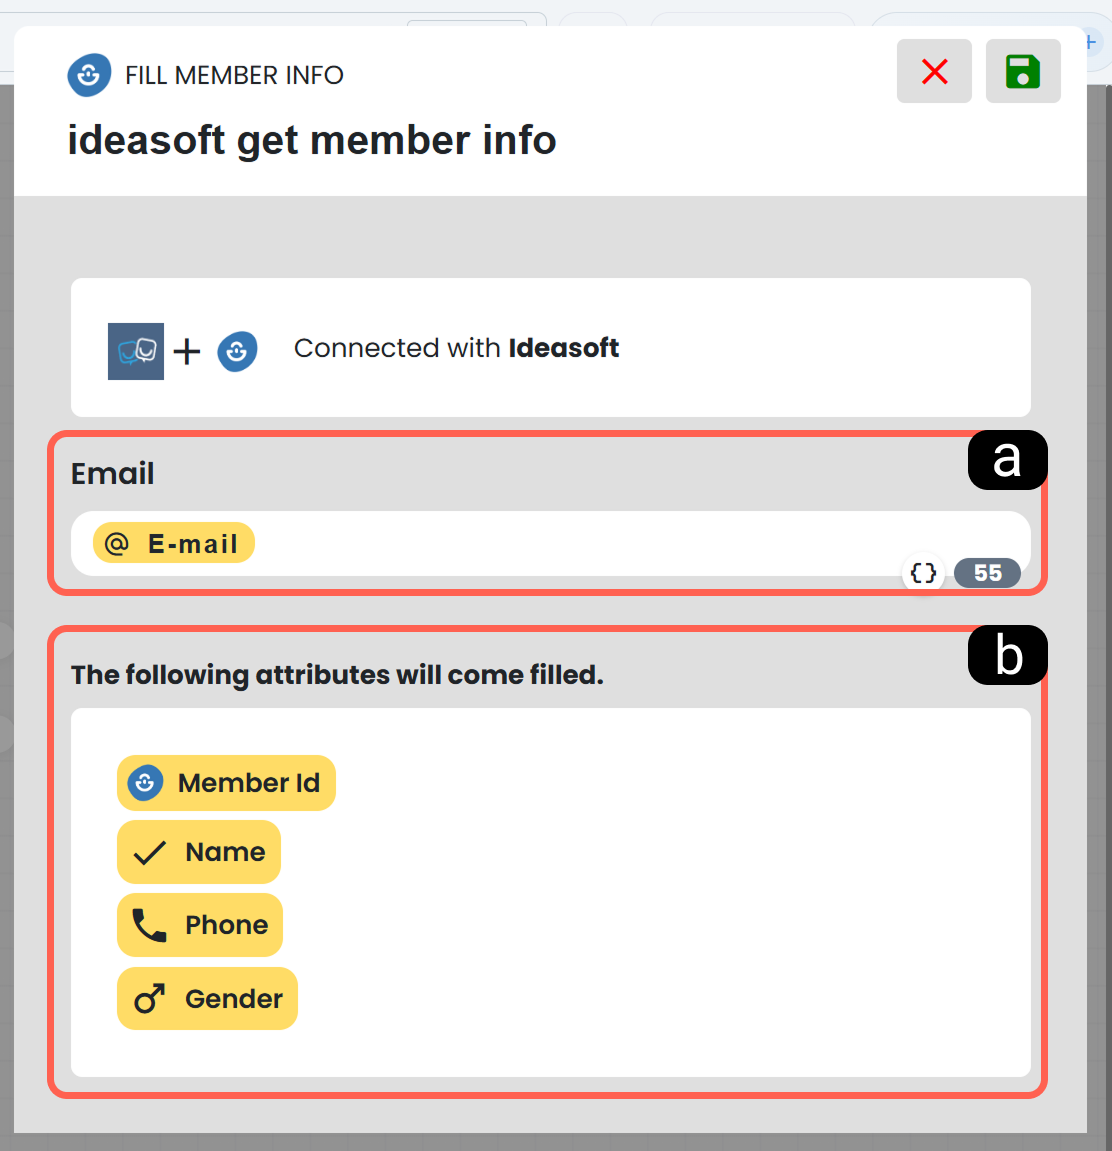
a. Email
In this field, the email address used by the user in the Ideasoft store is entered. The query is performed based on this information.
b. Attributes to Be Filled
The member data retrieved as a result of the query via the email information are listed in this field. The listed information becomes usable in the chatbot scenario after the Get Member Details block is successfully completed. This block is the first step for the order query to proceed correctly.
8.d – Product Search
This block is used to search for products in your Ideasoft store. It enables product queries based on a specified dynamic value or stock code.
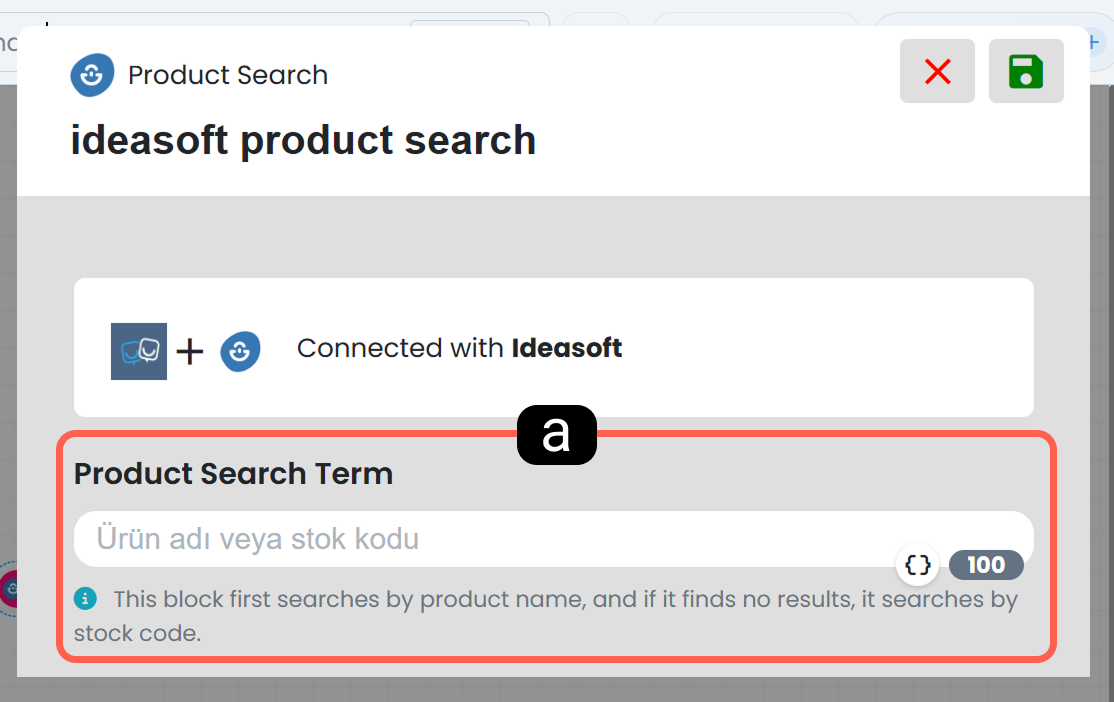
a. Search Term
In this field, the product name or stock code information received from the user is entered. According to the on-screen information, the system first searches by product name; if no result is found, it tries searching by stock code. This structure makes the product search process more flexible for the user.
How to Perform Order Query with Ideasoft Blocks
In order to perform an order query via Ideasoft, the blocks must be configured in the correct order.

1. Get Member Details
First, the email address used by the user when creating an order in the Ideasoft store is obtained. With this email, basic information such as the person’s Ideasoft Member ID, name, phone, and similar data are retrieved.
2. Select Order
Using the member ID information obtained in the previous step, the orders belonging to the relevant user are listed. The user selects among these orders, and it is determined for which order the query will be made.
3. Fetch Order Status
Detailed information about the order is fetched based on the order number selected by the user. The returned data can be used in the chatbot scenario via the dynamic values field. (see: Dynamic Values)
9. T-Soft Actions
T-Soft actions are designed to fetch order data belonging to the user from the T-Soft store and make it usable within the chatbot flow. In the general usage logic, the system retrieves the user’s orders via the email address; presents these orders to the user as selectable options; and prepares the details of the selected order for use in the continuation of the flow. The ability of the Supsis AI Chatbot to work integrated with e-commerce infrastructures makes it possible to evaluate such order data within the scenario.
9.a – Fetch Order Status
This block is used to fetch the details of the order selected by the user from the T-Soft infrastructure. The returned data become usable from the dynamic values field within the chatbot.
9.b – Select Order
This block retrieves the relevant orders via the user’s email address and allows the user to make a selection. After the user’s selection, the ID information of the selected order is used in the next step to fetch the order status. This structure, which progresses with user selection, is compatible with the chatbot flow logic
10. Ticimax Actions
Ticimax actions are similarly used to transfer the user’s order information into the chatbot flow. The system retrieves the relevant orders via the user’s email address, presents these orders as selectable options, and includes the order details in the scenario according to the user’s selection. These data received via integrations can be dynamically used in different message and action steps within the chatbot
10.a – Fetch Order Status
This block is used to get the detailed information of the selected order. The returned fields become usable from the dynamic values field within the chatbot scenario.
10.b – Select Order
This block retrieves the user’s orders via the email address and allows the user to make a selection. The order ID generated after the selection is used in the step of fetching the order status.
11. Ikas Actions
Ikas actions allow the chatbot to query orders in your Ikas store. In this structure; first, the email address used by the customer when creating an order in your Ikas store is obtained. With this email address information, the orders created by the person via the store are listed. When the user selects the order they want to get information about from the list, the details of the selected order are fetched. The retrieved order data become usable within the chatbot scenario.
11.a – Get Member Details
This block is used to retrieve other information via the customer email address registered in the Ikas store.
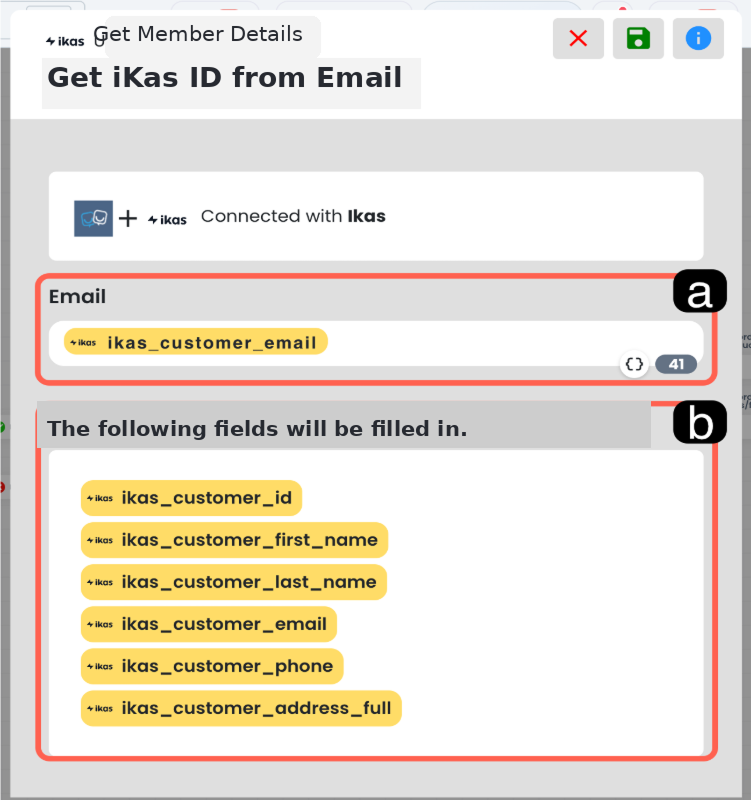
a. Email
In this field, the email address used by the user in the Ikas store is entered.
b. Attributes to Be Filled
The information returned as a result of the query is listed in this field. These data can be used in subsequent actions within the chatbot flow.
11.b – Select Order
This block retrieves the orders belonging to the relevant Ikas customer using the ikas_customer_id value received via the email address and allows the user to make a selection in a button-based structure.
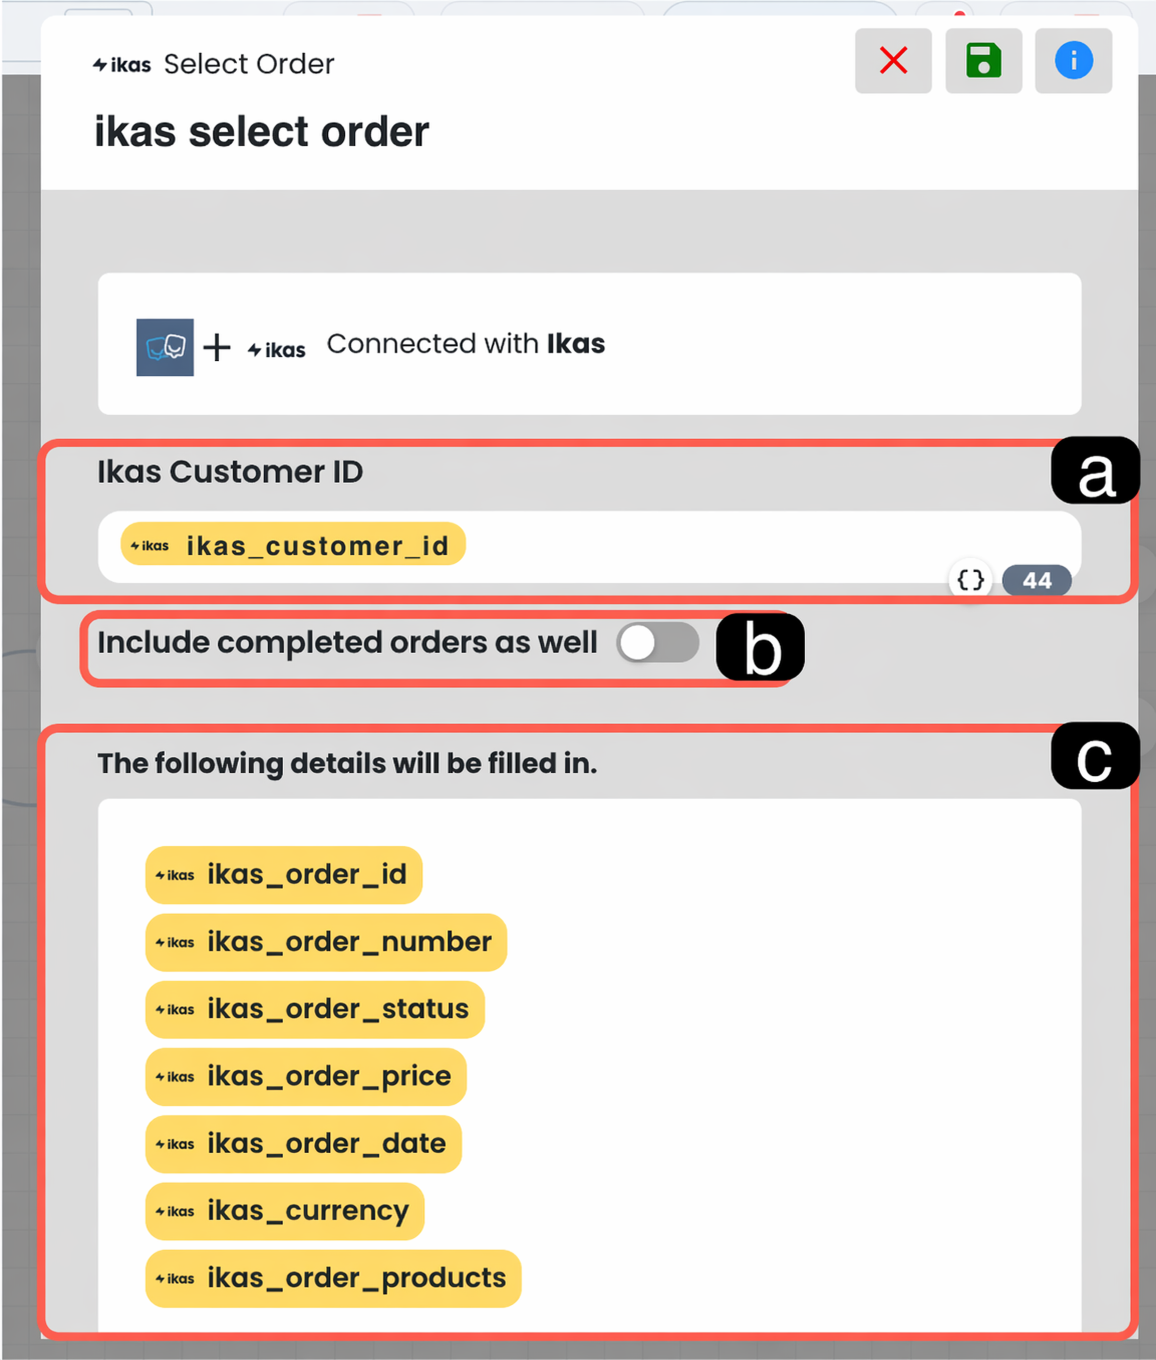
a. Ikas Customer ID
In this field, the ikas_customer_id information returned from the Get Member Details block is entered. The order list is retrieved based on this customer ID.
b. Include Completed Orders
When this option is enabled, completed orders are also included in the list. Thus, not only open orders but also previously completed orders can be presented to the user.
c. Attributes to Be Filled
The data returned as a result of the order selection are listed in this field. These information can be used in subsequent blocks within the chatbot scenario.
11.c – Fetch Order Status
This block retrieves detailed information about the order selected by the user.
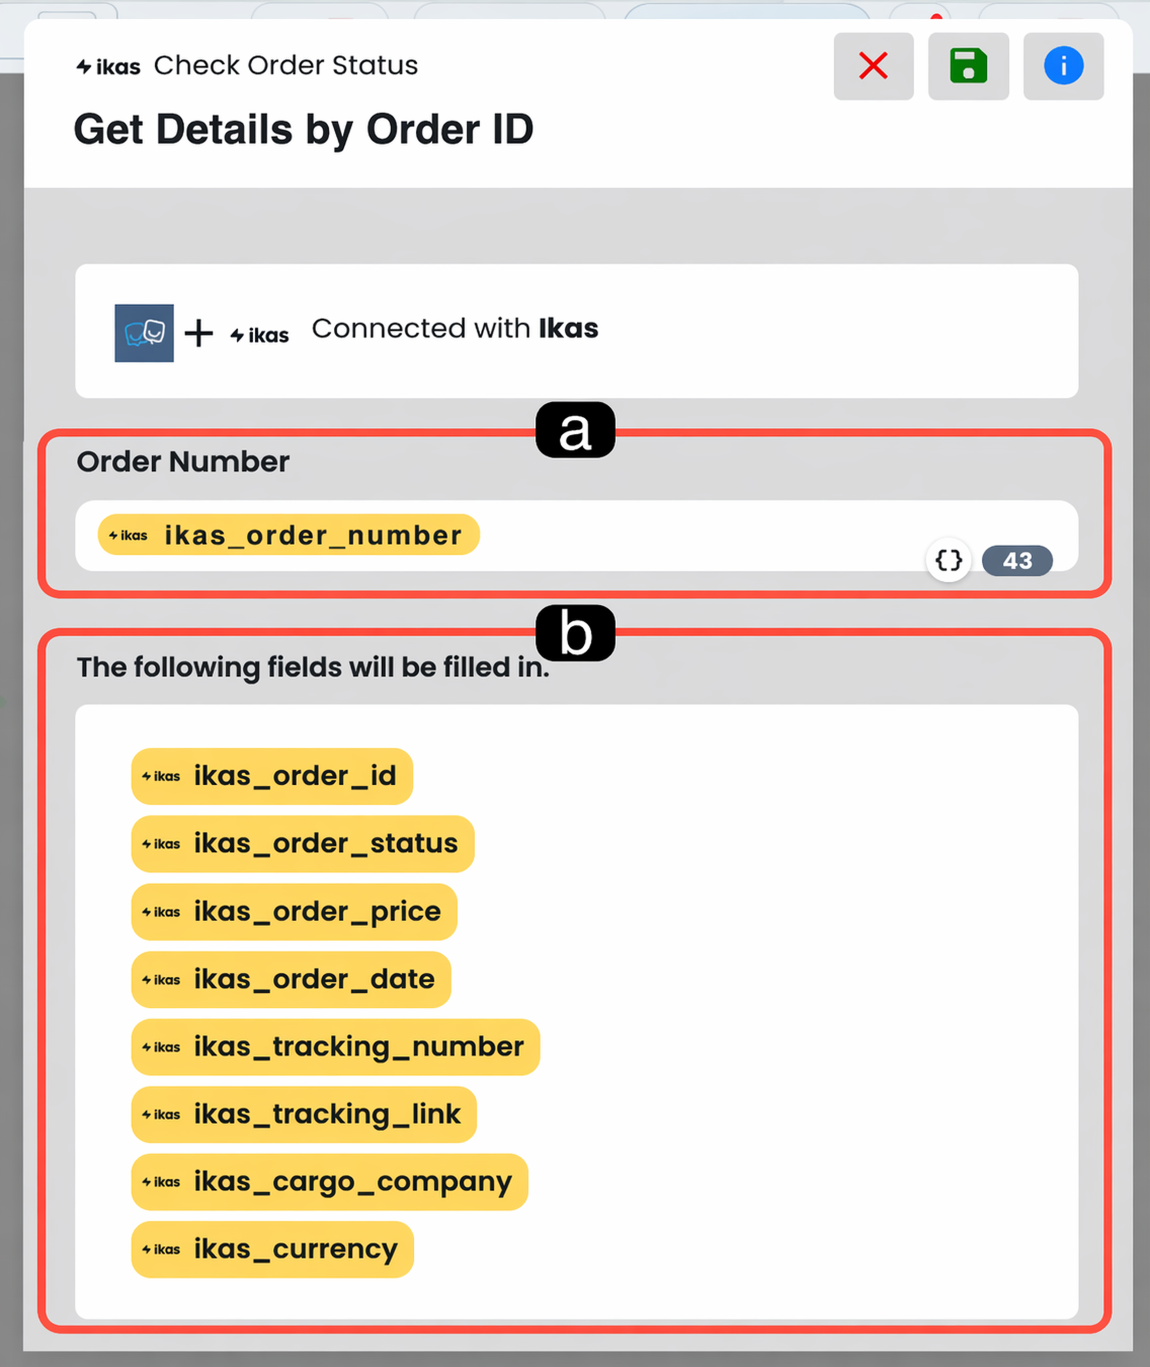
a. Order Number
In this field, the number of the order selected in the previous step is entered as a dynamic value.
b. Attributes to Be Filled
The details of the selected order are listed in this field. These data can be used within the chatbot scenario via the dynamic values field. (see: Dynamic Values)
How to Perform Order Query with Ikas Blocks
The order query setup on the Ikas side progresses with a simple logic.
The Ikas customer email of the user is obtained, and when the blocks are placed in the correct order, the information received from the user becomes the input of the next action and the flow progresses consistently step by step.
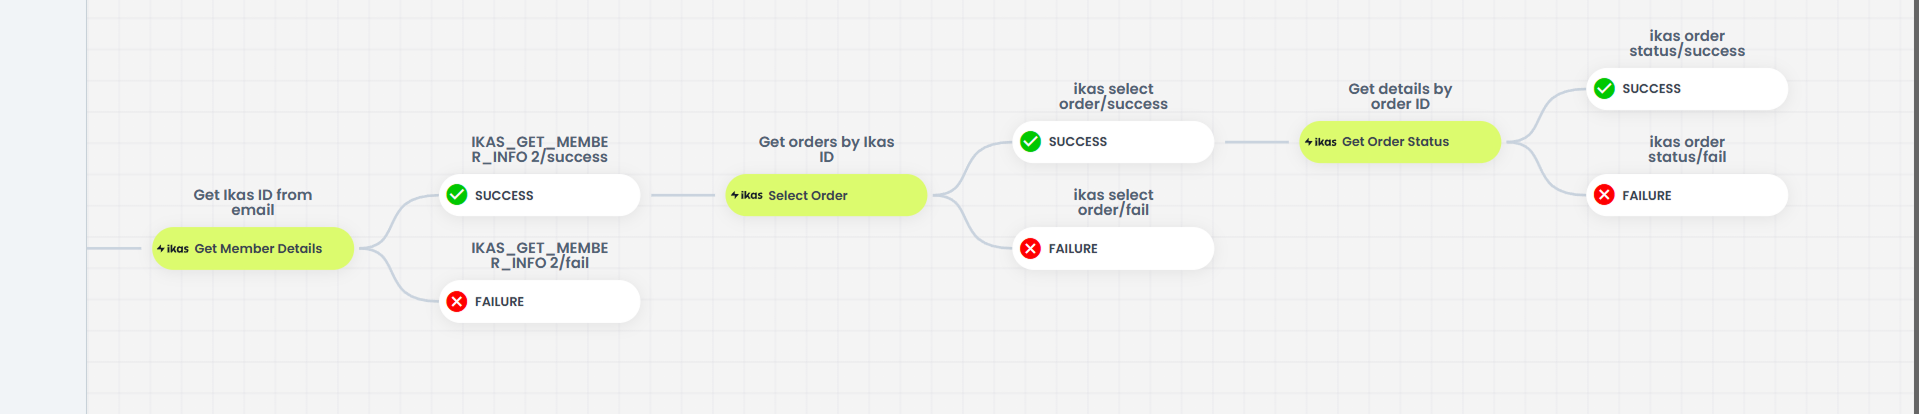
1. Get Member Details
Ikas customer information is retrieved via the user’s email address.
2. Select Order
With the retrieved customer ID information, the orders belonging to the user are listed and a selection is made.
3. Fetch Order Status
The details of the order are fetched based on the selected order number and these information become usable within the scenario.
12. Zoho Actions
Zoho actions allow you to create new records on the Zoho side from within the chatbot scenario. Supsis AI Chatbot can work integrated with CRM systems. This enables the data received from the user not only to remain within the chat and panel but also to be transferred to business systems
12.a – Create Zoho Record
This block is used to create a new record in the Zoho module you select.
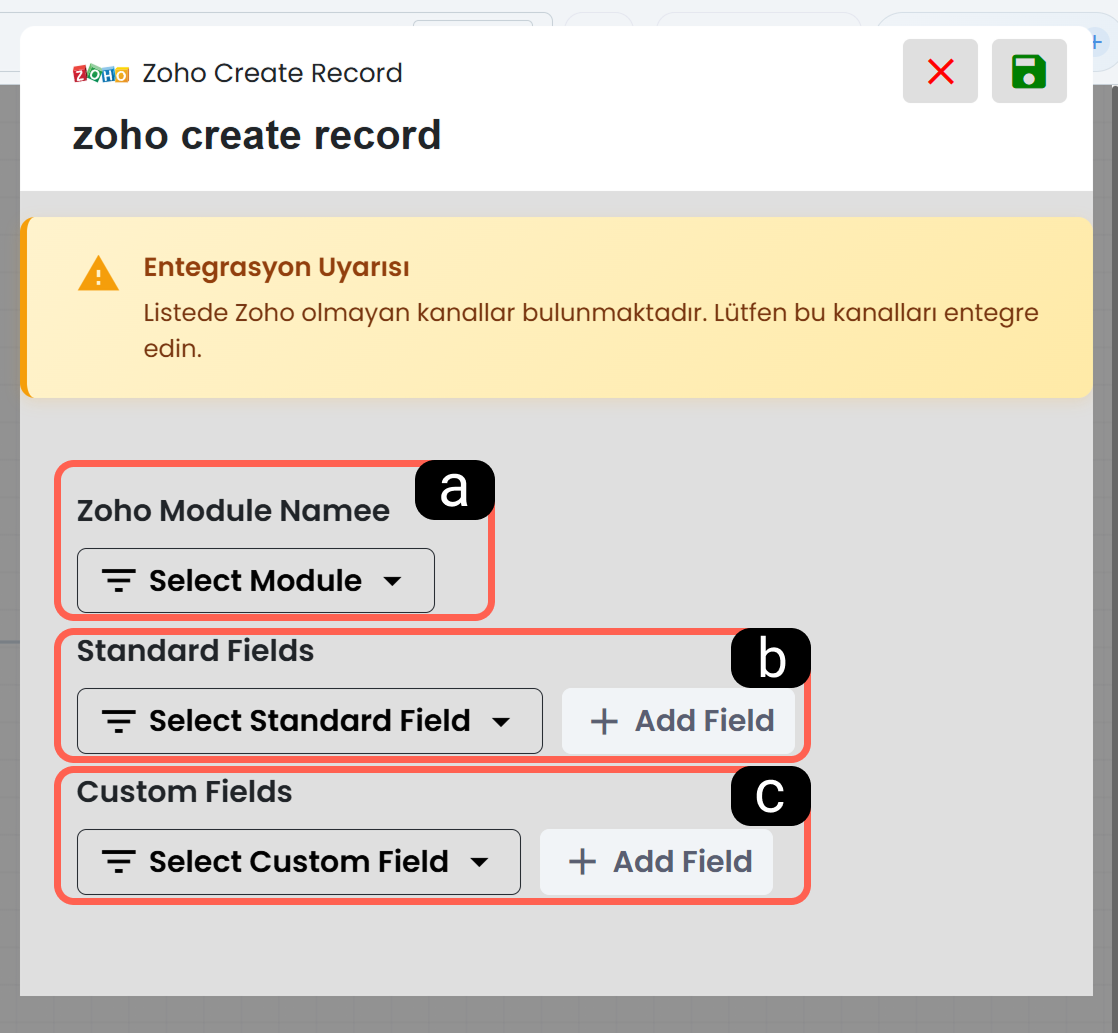
a. Zoho Module Name
From this field, the Zoho module in which the record will be created is selected. Which module the data will be written to is determined here.
b. Standard Fields
In this section, the standard fields of the selected Zoho module are determined and mappings are made with the chatbot data that will fill the relevant standard field. Mappings can be made for multiple standard fields via the Add Field button.
c. Custom Fields
In this field, custom fields defined on the Zoho side are selected and matched with the data coming from the chatbot scenario. Thus, not only standard fields but also fields specific to your business can be included in the record creation process.
13. Custom Blocks
The Custom Blocks section allows you to reuse chatbot blocks that you have created or imported via the block market in your scenarios. Thus, you can include previously prepared flow parts into your diagram without rebuilding them every time. Since Supsis AI blocks can be added to the diagram with drag-and-drop logic, custom blocks also support the same ease of use.
14. Block Market
The Block Market is a sharing area where chatbot blocks shared by the Supsis AI team and users can be viewed, examined, and added to the system. Through this area, you can review ready-made blocks, transfer structures suitable for your needs into your scenarios, manage the blocks you have uploaded to the market, and track the blocks you have previously imported. Supsis’s ready-made templates and reusable block logic accelerate the chatbot setup process and help create similar scenarios in a shorter time.