
The Inbox is the central area where all conversations are managed. Through this section, you can access the content of active and past conversations, filter chats, and perform relevant actions.
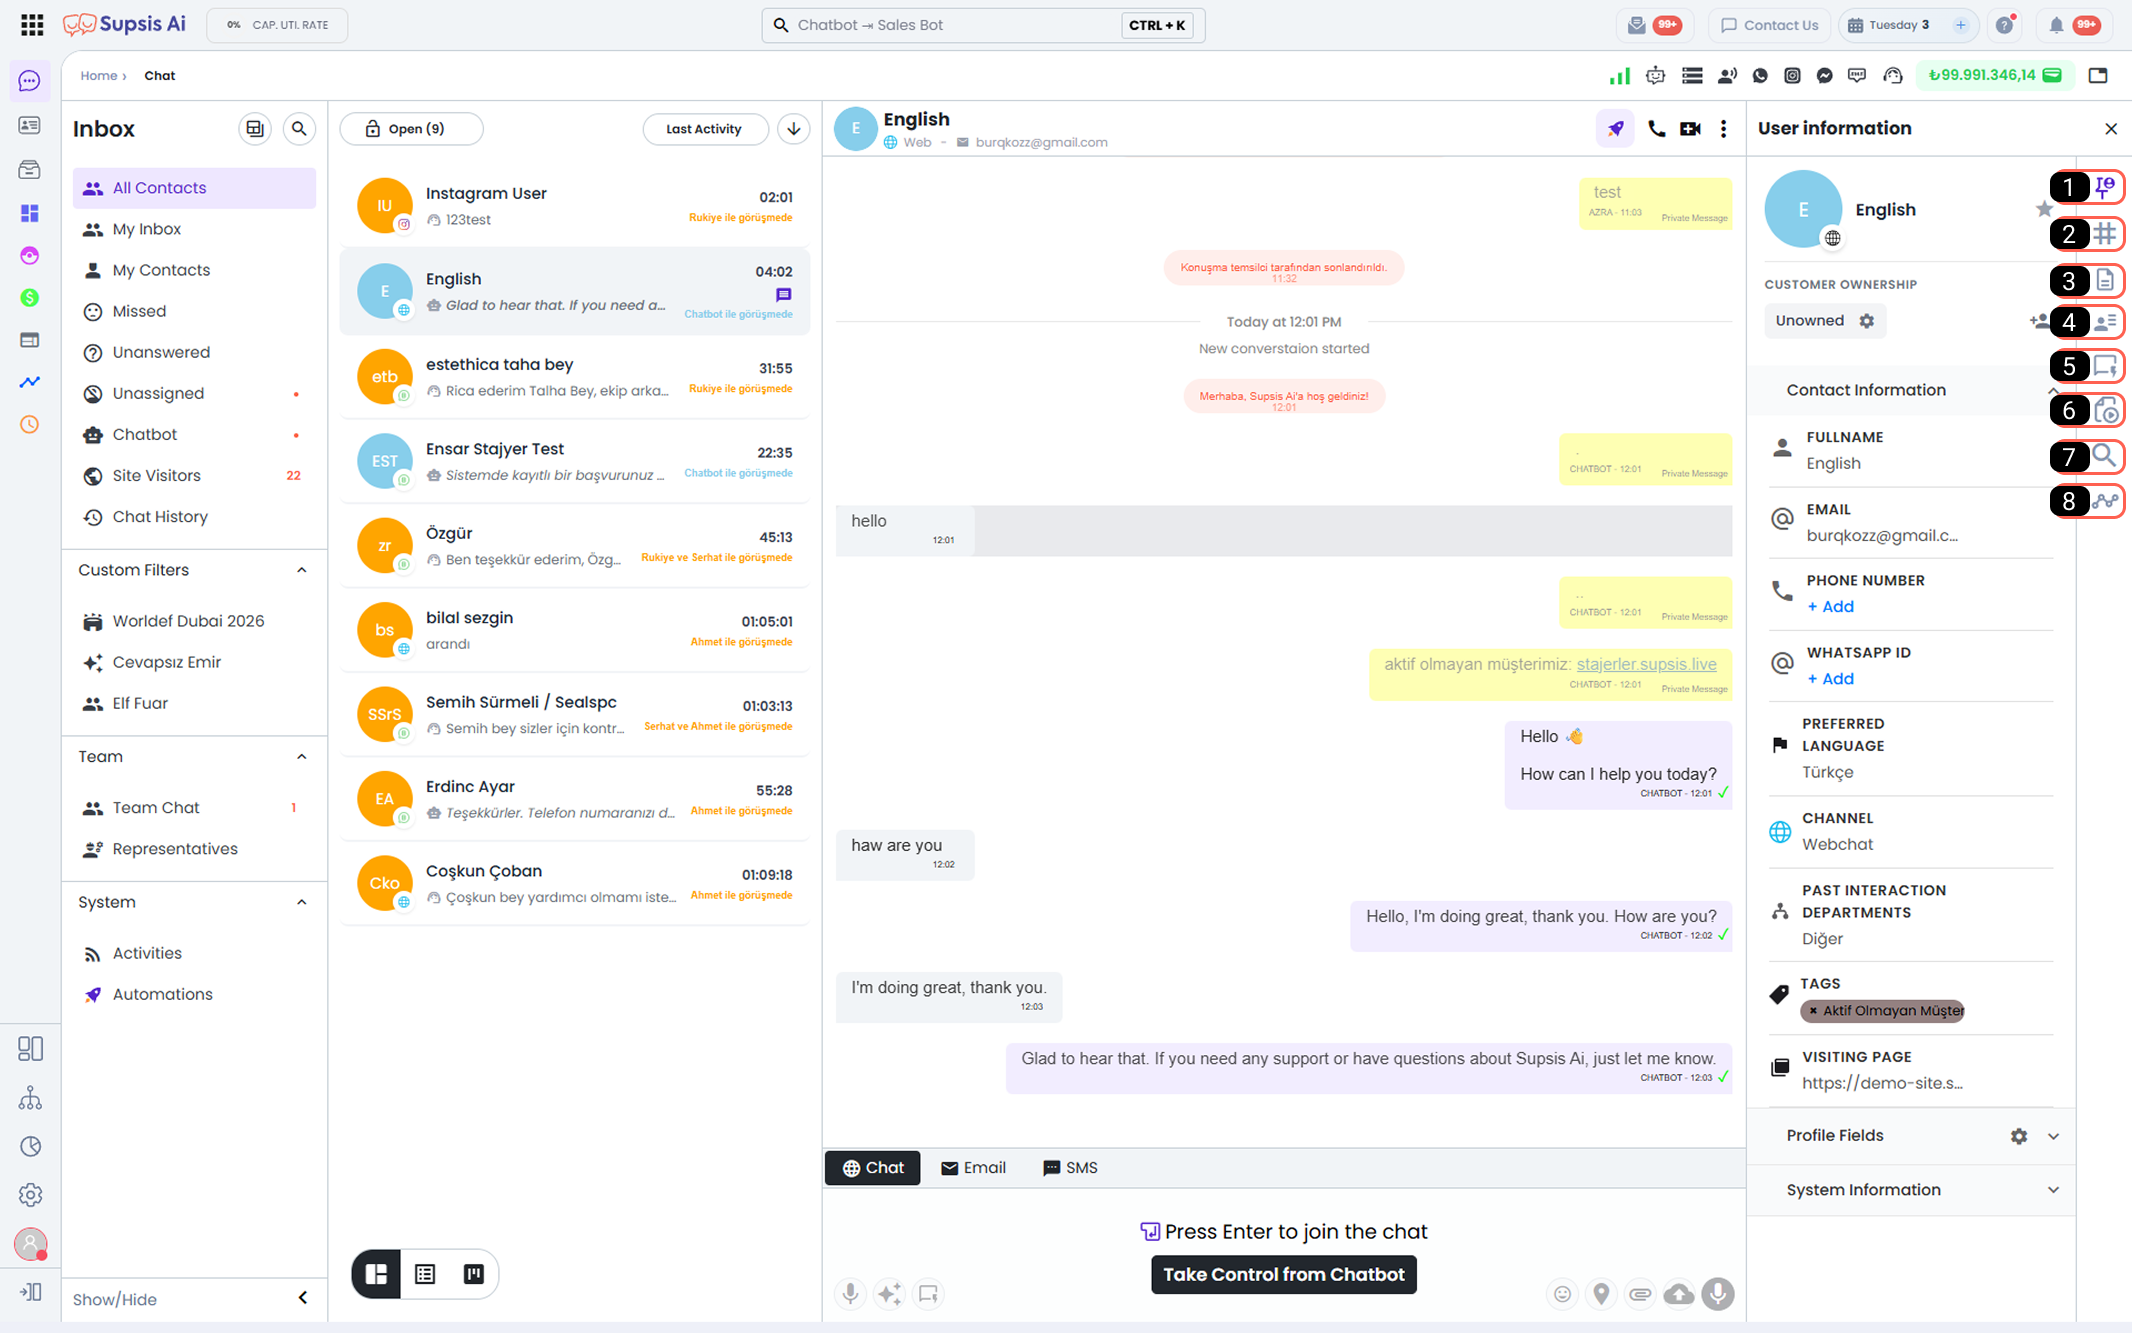
| No | Menu |
|---|---|
| 1 | Visitor Details |
| 2 | User Values |
| 3 | Notes |
| 4 | Agent Details |
| 5 | Predefined Content |
| 6 | Media and Documents |
| 7 | Search Message |
| 8 | Meta References |
1-) Visitor Details
From here, you can access and edit the details and basic information of the person you are chatting with.
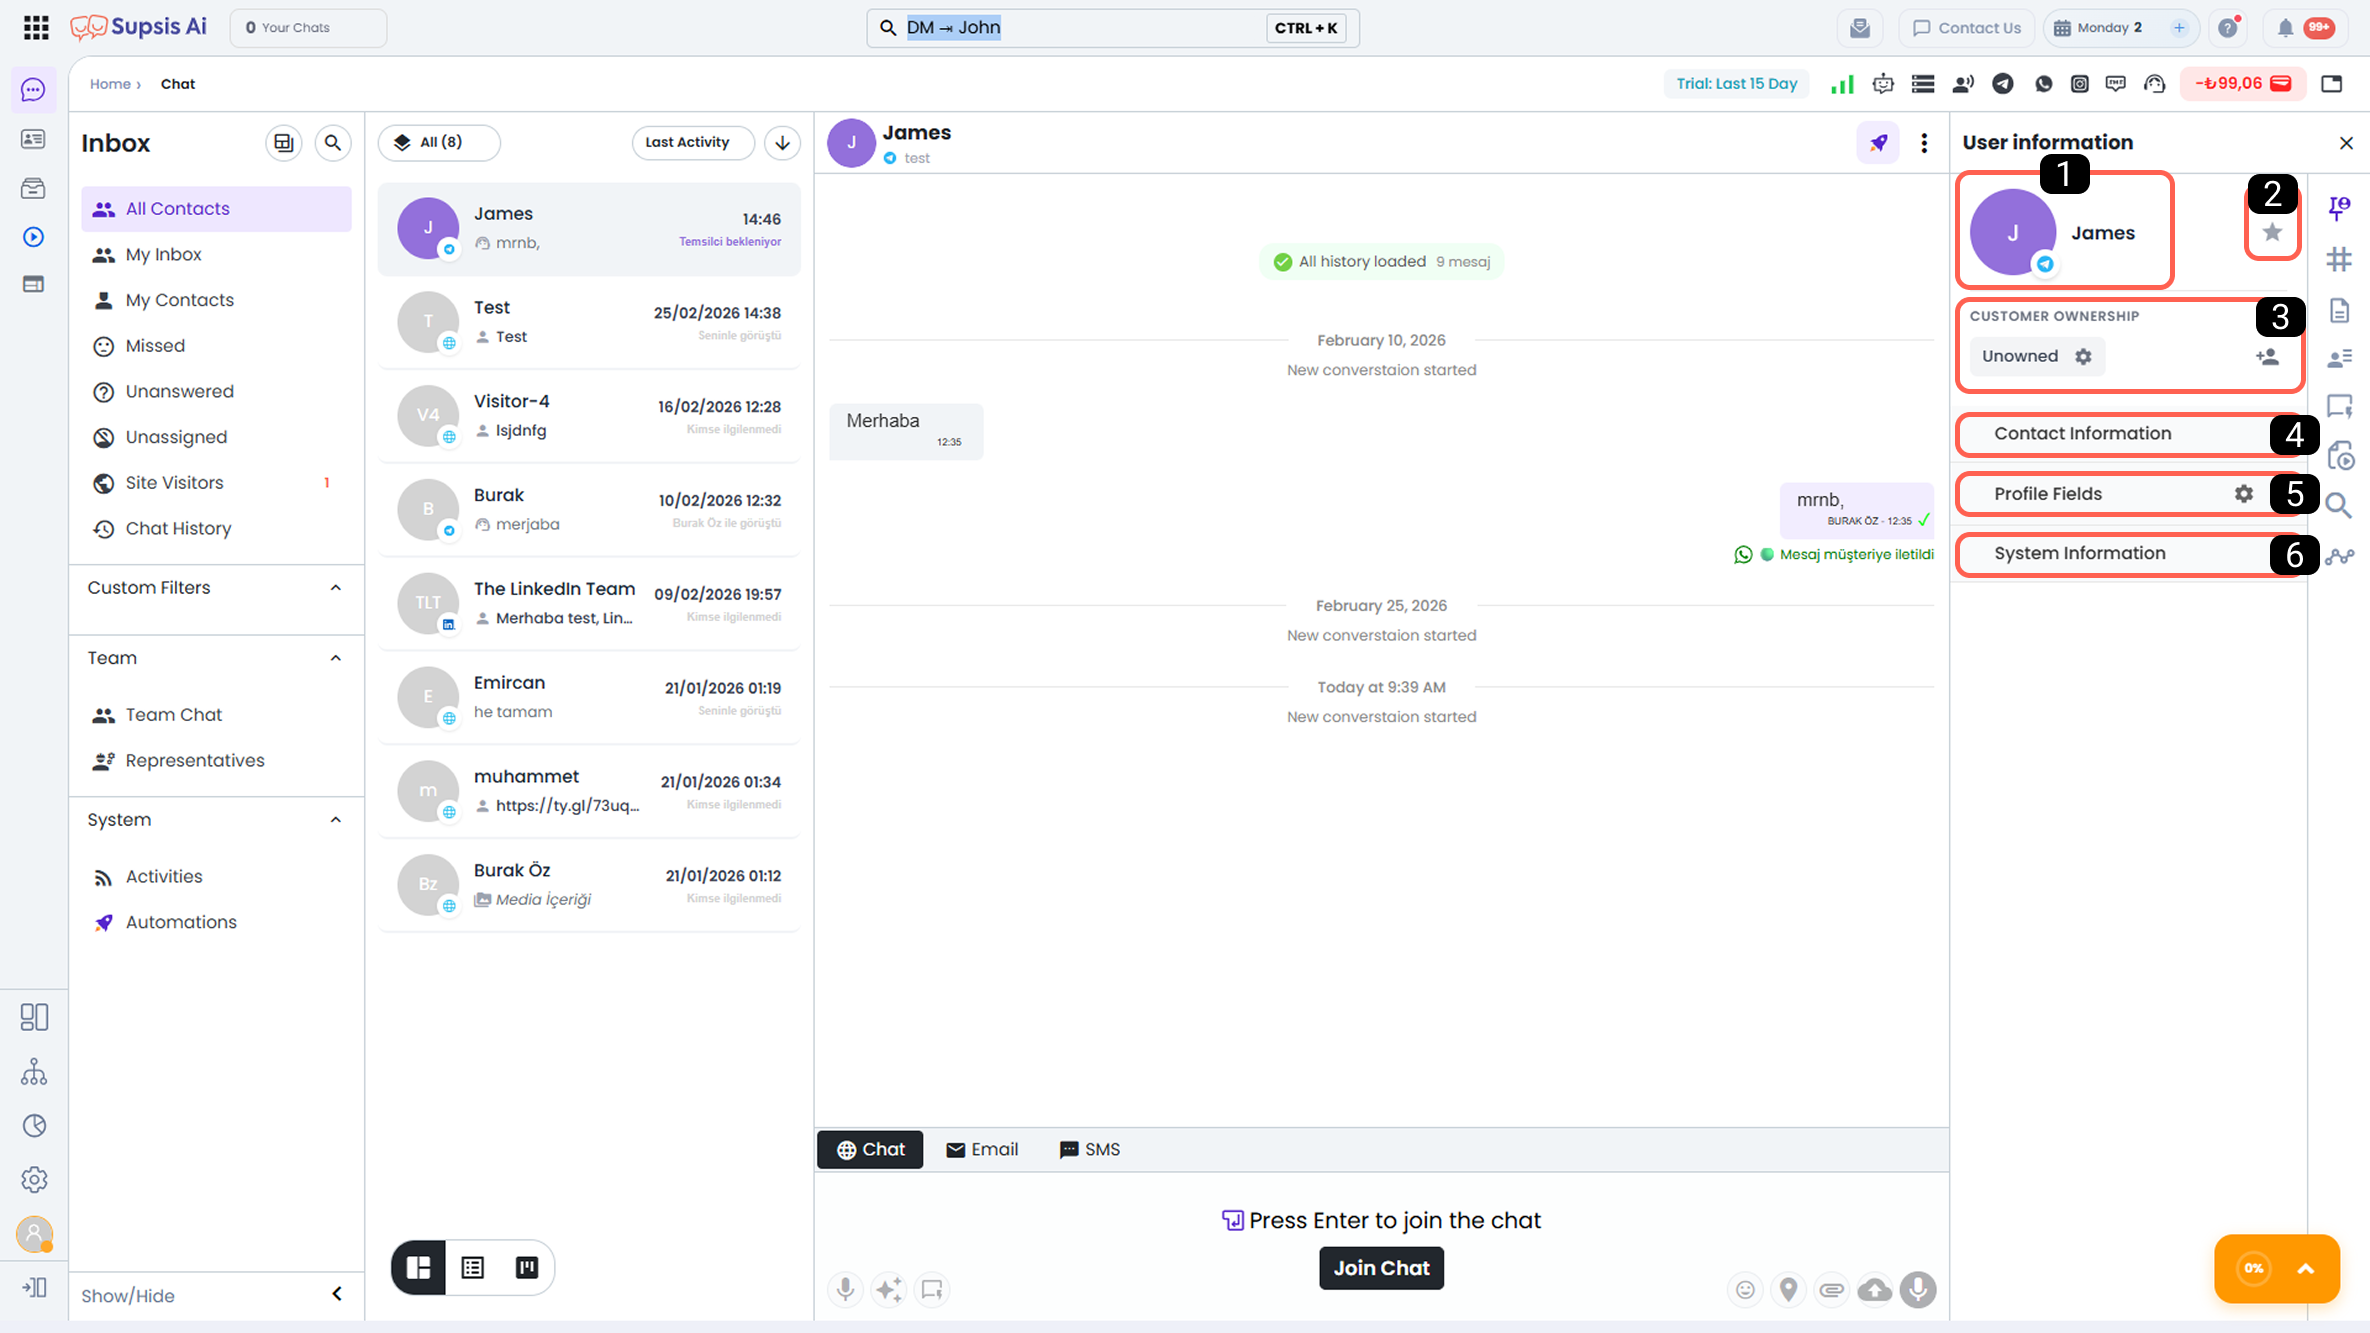
| No | Menu |
|---|---|
| 1 | Access Contact Card |
| 2 | VIP Customer |
| 3 | Ownership Assignment and Routing |
| 4 | Contact Information |
| 5 | Profile Fields |
| 6 | System Information |
1-) Access Contact Card
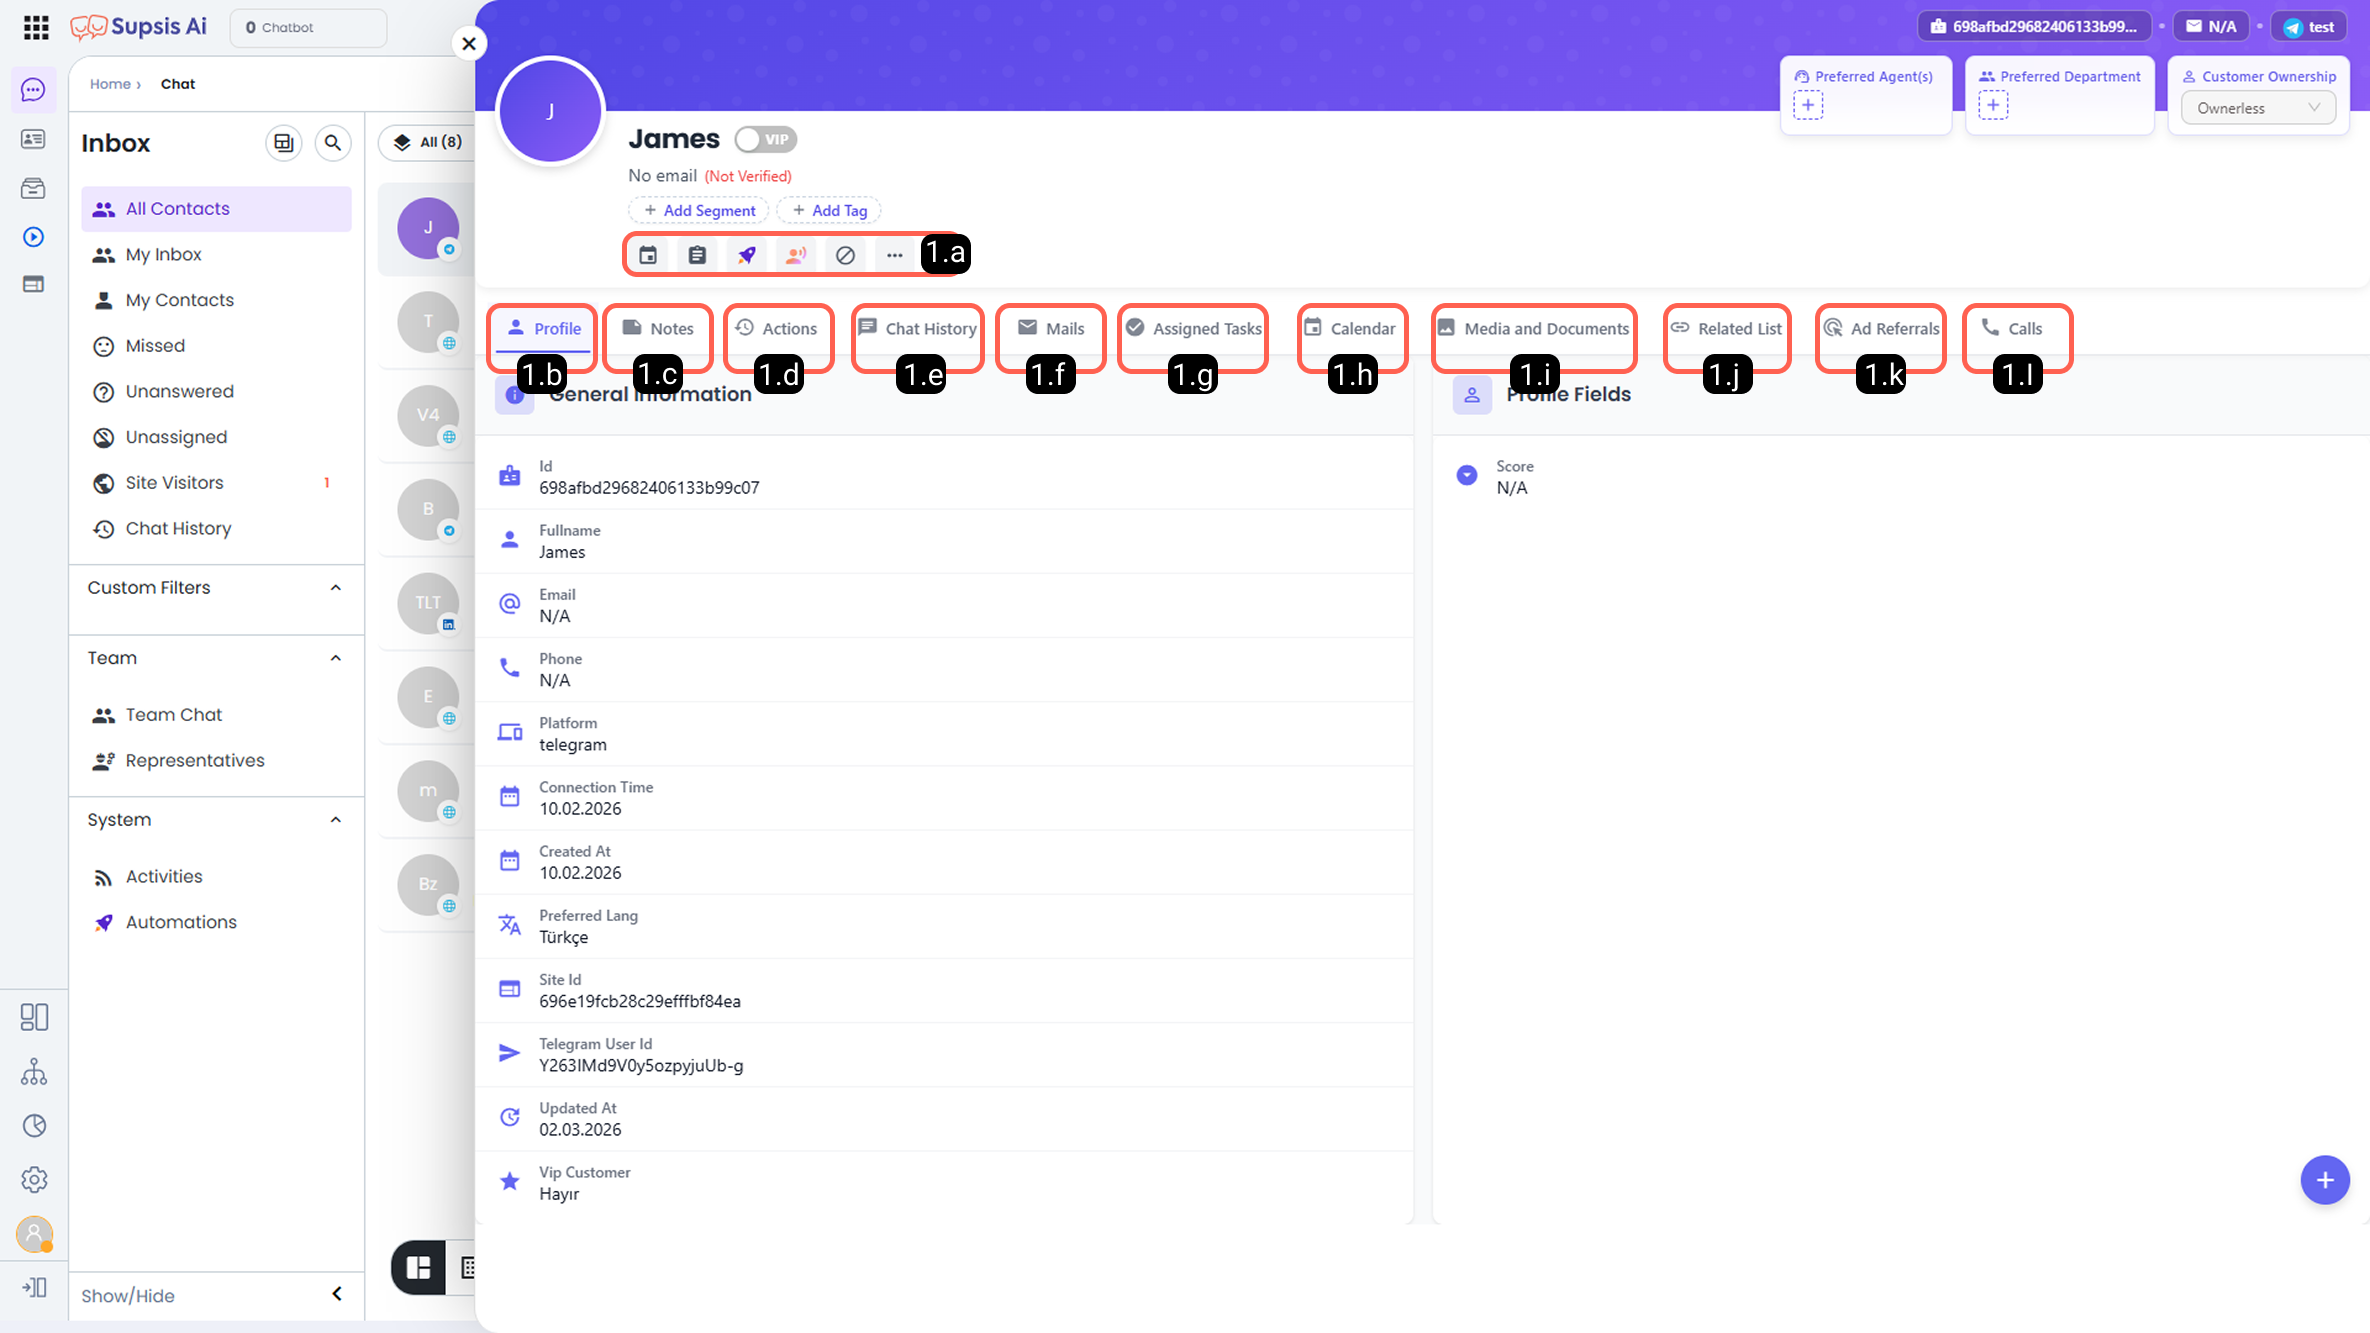
The Contact Card is the central action area where you can view all system-recorded information about the customer and perform various operations related to them. Through this section, you can manage the customer’s communication history, profile information, tasks, notes, and system interactions in detail.
-
1.a – Contact Actions:
Through this area, you can perform system-related actions for the contact. Within Contact Actions; you can create tasks and calendar events, trigger automations using profile information, initiate calls to the contact via AI Agent, block the user, or delete the user along with all their system data.
-
1.b – Profile Field:
This section lists the contact’s existing system-recorded information and profile fields. Fixed system data such as IP address and ID cannot be edited, whereas variable profile data such as contact details and custom fields can be updated.
-
1.c – Notes:
In this area, you can view previously added agent notes about the contact, edit existing notes, and add new ones. Notes are intended for internal team use only and can only be viewed by Supsis users, not customers.
-
1.d – Activities:
All past system activities related to the customer whose contact card is open are displayed in this area. The communication channel used, connection times, and all activities related to the contact are listed with date, time, and content details.
-
1.e – Conversation History:
All chat sessions initiated with the contact are listed in this section. By clicking on a specific session, you can review the full message content and details of the conversation.
-
1.f – Emails:
In this area, you can view all sent and received emails exchanged with the contact through the email accounts connected to your Supsis panel and send new emails. For more details about usage and integration, please review the Email documentation.
-
1.g – Assigned Tasks:
All tasks created during conversations with the contact or linked to the contact through the task management module are listed in this area. For detailed information about task creation methods, please review the Task Creation Methods documentation.
-
1.h – Calendar:
In this section, you can view all calendar events associated with the contact. Events may have been created during the conversation or assigned via the calendar module. For more information, please review the Event Creation Methods documentation.
-
1.i – Media and Documents:
All media files and documents shared by both the contact and agents during conversations are listed in this area.
-
1.j – Related List:
In the table module, all tables associated with this contact card’s ID are displayed in this area.
-
1.k – Ad Interactions:
If the contact reached you through Meta advertisements (Instagram, Facebook), the ad or ads they connected through are listed in this section.
-
1.l – Calls:
If the contact was previously called via the Supsis Call Center module by an agent or AI Agent, the call date, call history, and any available call recordings are displayed in this area.
2-) VIP Customer
The VIP Customer section allows you to manage the VIP status of the visitor you are communicating with. From this area, you can mark the visitor as VIP or remove their existing VIP status.
This feature ensures that critical customers receive support without waiting and is used for special scenarios aimed at increasing customer satisfaction.
Customers defined as VIP are subject to special prioritization rules in the system. Even when no active agent is available or all agents have reached their maximum chat capacity, VIP customers are connected directly to the live support line without waiting in the queue and are assigned to an available agent with priority.
3-) Ownership Assignment and Routing
Through this section, you can define the ownership of the current and future conversations of the customer; assign the conversation to a specific user or department, or route it to the queue.
What is Routing?
Routing transfers an active chat session to the specified user. The routed conversation remains with the assigned user until the session is manually closed or ends naturally.
When the chat session is closed, conversations continue according to the system’s existing routing algorithm. Routing does not permanently change the ownership of the conversation.
What is Assignment (Ownership)?
Assignment permanently links the conversation to a specific user or department. All current and future conversations with the assigned customer are directed according to the designated owner (user or department).
After assignment, routing actions can only be performed within the scope of the assigned user or department.
-
Assign to User: If the conversation is assigned to a specific user, when a new chat session is started with the customer, the system automatically routes the chat to the assigned user.
-
Assign to Department: If the conversation is assigned to a department, newly started chat sessions with the customer are automatically routed to one of the appropriate users within that department.
Note (Notification Behavior for Owned Chats): When a conversation is assigned to a specific user (Owned Chat), notification sounds and cards triggered by new incoming messages are sent only to the assigned representative (owner). Representatives who are not the owner of the chat will not receive notification sounds for that assigned chat.
Note: For assignment to take effect, it is not mandatory for the assigned user or users in the department to be online. Even if the relevant user or department is offline, the assignment rule is automatically applied by the system.
-
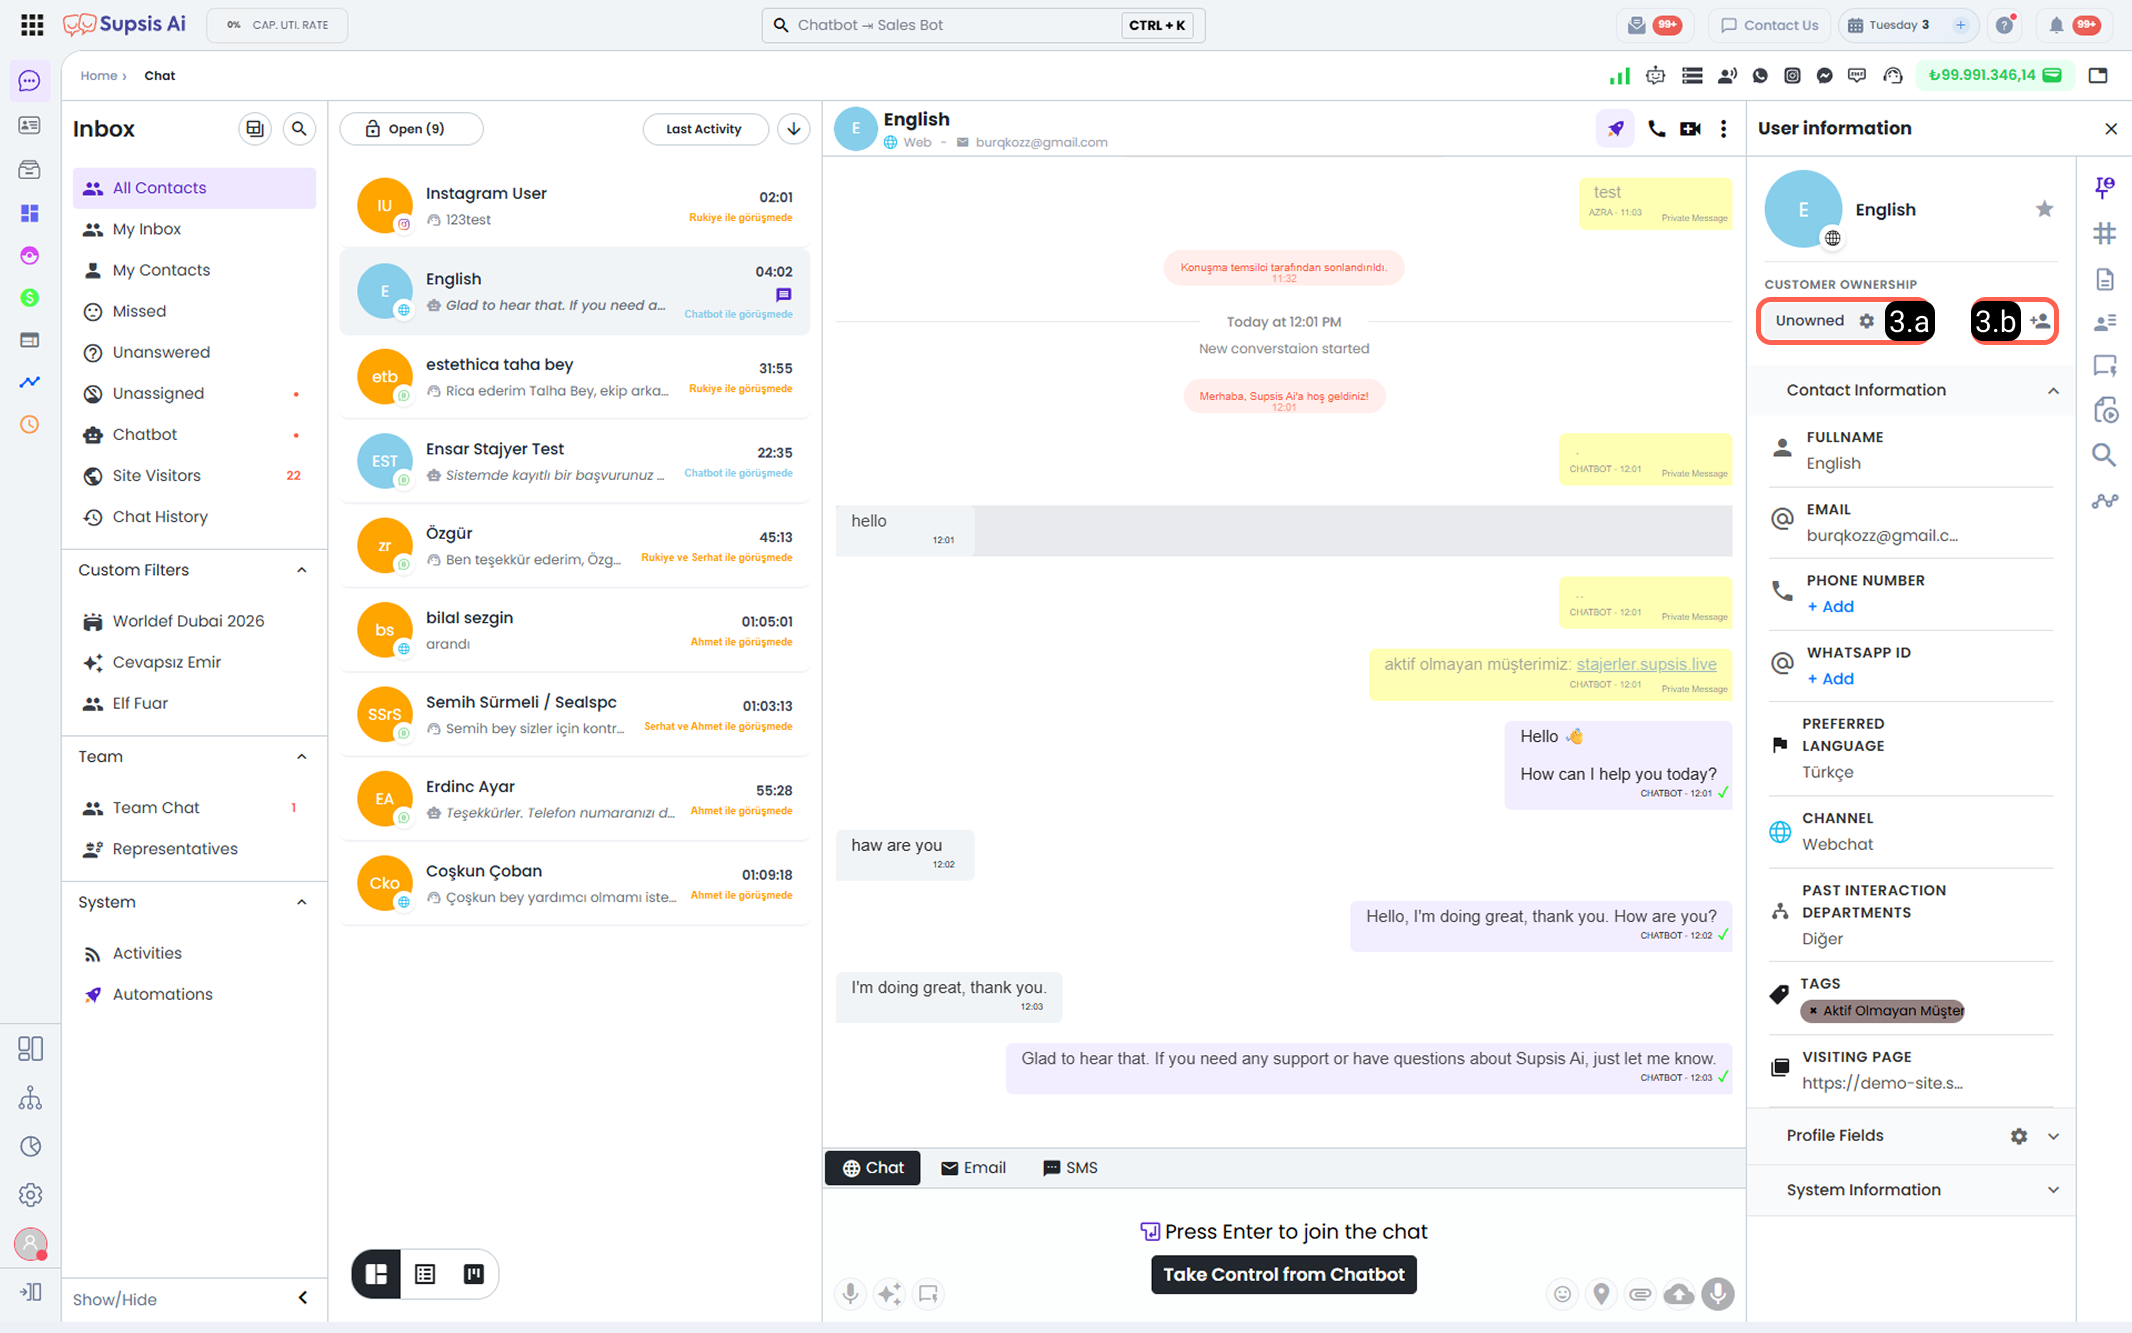
3.a – Ownership Assignment and Routing:
Through this area, you can perform assignment (ownership) and routing operations for conversations. Depending on the selected action, the current and future ownership of the conversation is defined. Supported options are detailed below:
For Existing Agents: With this option, you can route or assign the conversation to any user defined in the system.
For Existing Departments: Transfers the general ownership of the conversation to the selected department. This action assigns the conversation directly to the department rather than a single user. If some departments are not visible in the list, you should check the visibility settings of the communication channel used for the conversation.
With Agent and Department: Routes the conversation to the selected agent while assigning the overall ownership to the selected department. This method allows changing the active agent while maintaining department-based ownership.
To Queue: Adds the conversation to the queue. When this action is performed, the current agent is removed from the chat and the conversation is placed in the queue. If automatic chat assignment is enabled, the conversation is automatically assigned to an appropriate agent according to the system’s assignment algorithm. If automatic assignment is disabled, the conversation remains in the queue until manually picked up.
-
3.b – Assign to Me: The Assign to Me option allows you to directly assign the ownership of the conversation to yourself. After this action, when a new chat session is initiated with the same contact, the conversation will automatically be routed back to you.
After completing the assignment, you can also easily access the relevant contact via the My Contacts chat filter located on the left side.
4-) Contact Information
In this area, you can view and edit the contact’s basic information such as Full Name, Email, Phone Number, Preferred Language, Communication Channel, and Tags.
The displayed information may vary depending on the communication channel through which the conversation was conducted. The basic contact data shown here is automatically populated based on the information transferred to the system from the relevant communication channel and can be updated.
5-) Profile Fields
The Profile Fields section allows you to view, edit, and add new information to the profile fields defined for the visitor. All information entered here is saved to the contact card in the system and is used collectively by relevant modules for specific operations.
The values defined here can be actively used in many system processes such as filtering, automations, reports, and chat routing. All updates take effect instantly and are referenced in operations related to the visitor.
For more detailed information about profile fields and their functions, please review the Contacts documentation. To create new profile fields and manage existing ones, please review the Profile Fields documentation.
6-) System Information
In this area, you can view the user’s communication system and browser or connected platform, Conversation ID, Visitor ID, the creation date of the contact card, and the last updated date of the person’s chat.
The Conversation ID represents the unique identifier assigned to the related chat session.
The Visitor ID indicates the system identity of the person with whom the conversation was conducted.
Thanks to these IDs, you can directly access the relevant chat session or contact via ID across different modules within Supsis and quickly perform search/filter operations.
2-) User Values
The User Values section is an area where you can view, edit, and add new information to the profile fields defined for the visitor. All information entered here is saved to the contact card in the system and is jointly used by related modules for specific processes.
The values defined here can be actively used in many system processes such as filtering, automations, reports, and chat routing. All updates made become effective instantly and are referenced in operations related to the visitor.
For more detailed information about profile fields and their functions, please review the Contacts documentation. To create new profile fields and manage existing ones, please review the Profile Fields documentation.
3-) Notes
This area allows you to add private or general notes about the person you are speaking with, as well as view and manage previously created notes. Depending on the selected visibility, these notes can be viewed only by you or by all agents. Notes cannot be viewed by customers.
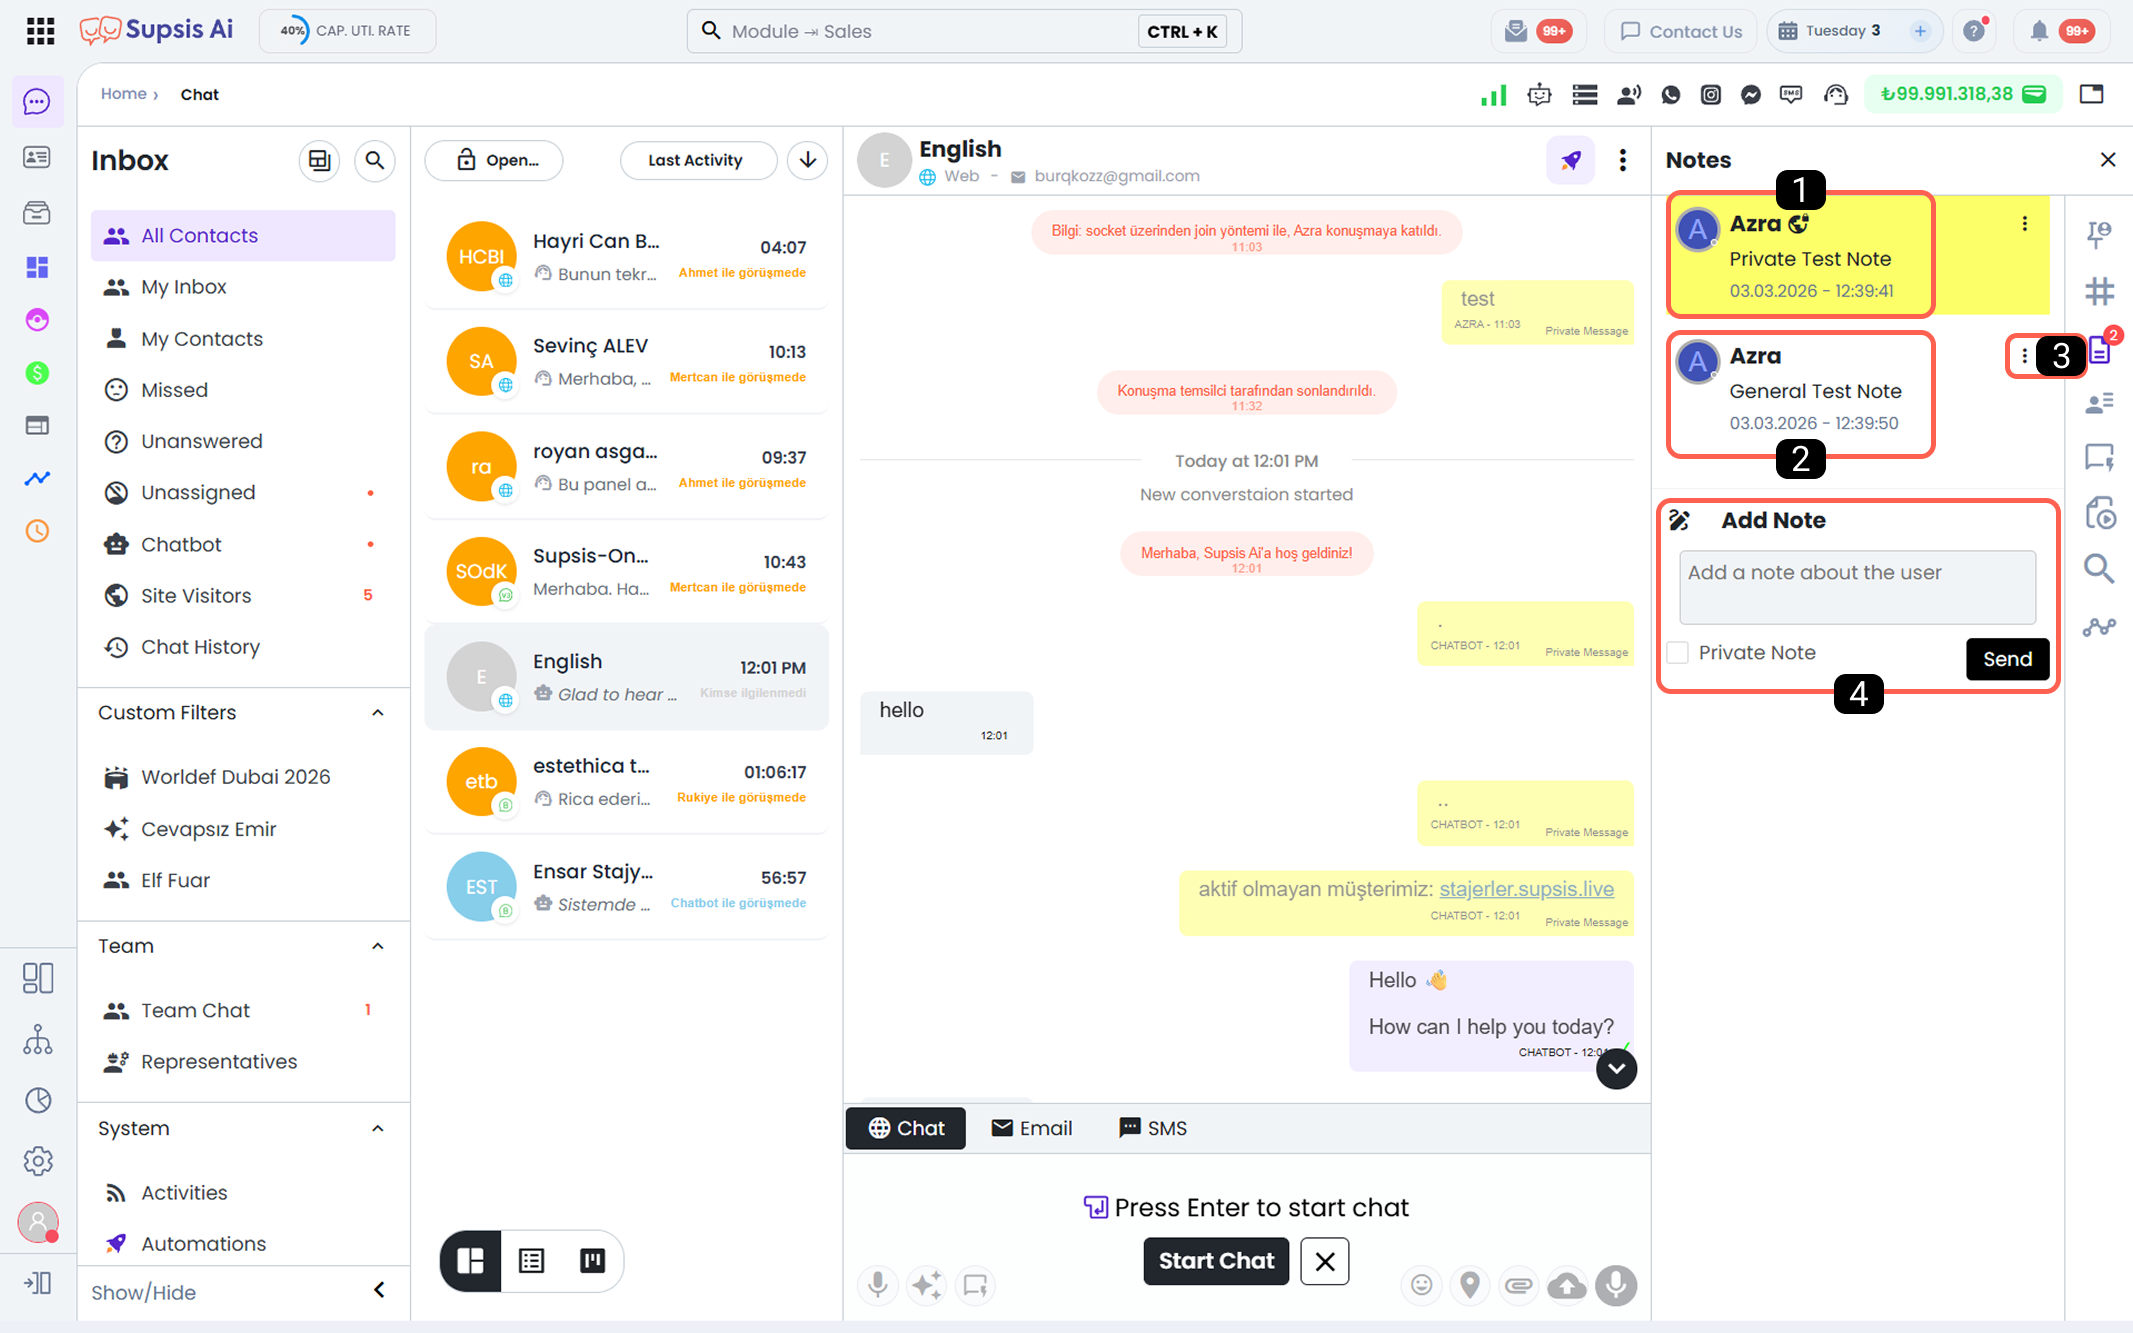
- Private Note
- General Note
- Edit Note
- Add Note
1-) Private Note
Private notes are marked in yellow as shown in the visual, and the details of the note are displayed.
These notes can only be viewed by the agent who created the note and cannot be seen by other agents.
2-) General Note
General notes can be viewed by all agents.
Next to the note, the name of the agent who created it and the creation date are displayed.
3-) Edit Note
Through this button, you can only edit the notes you have created.
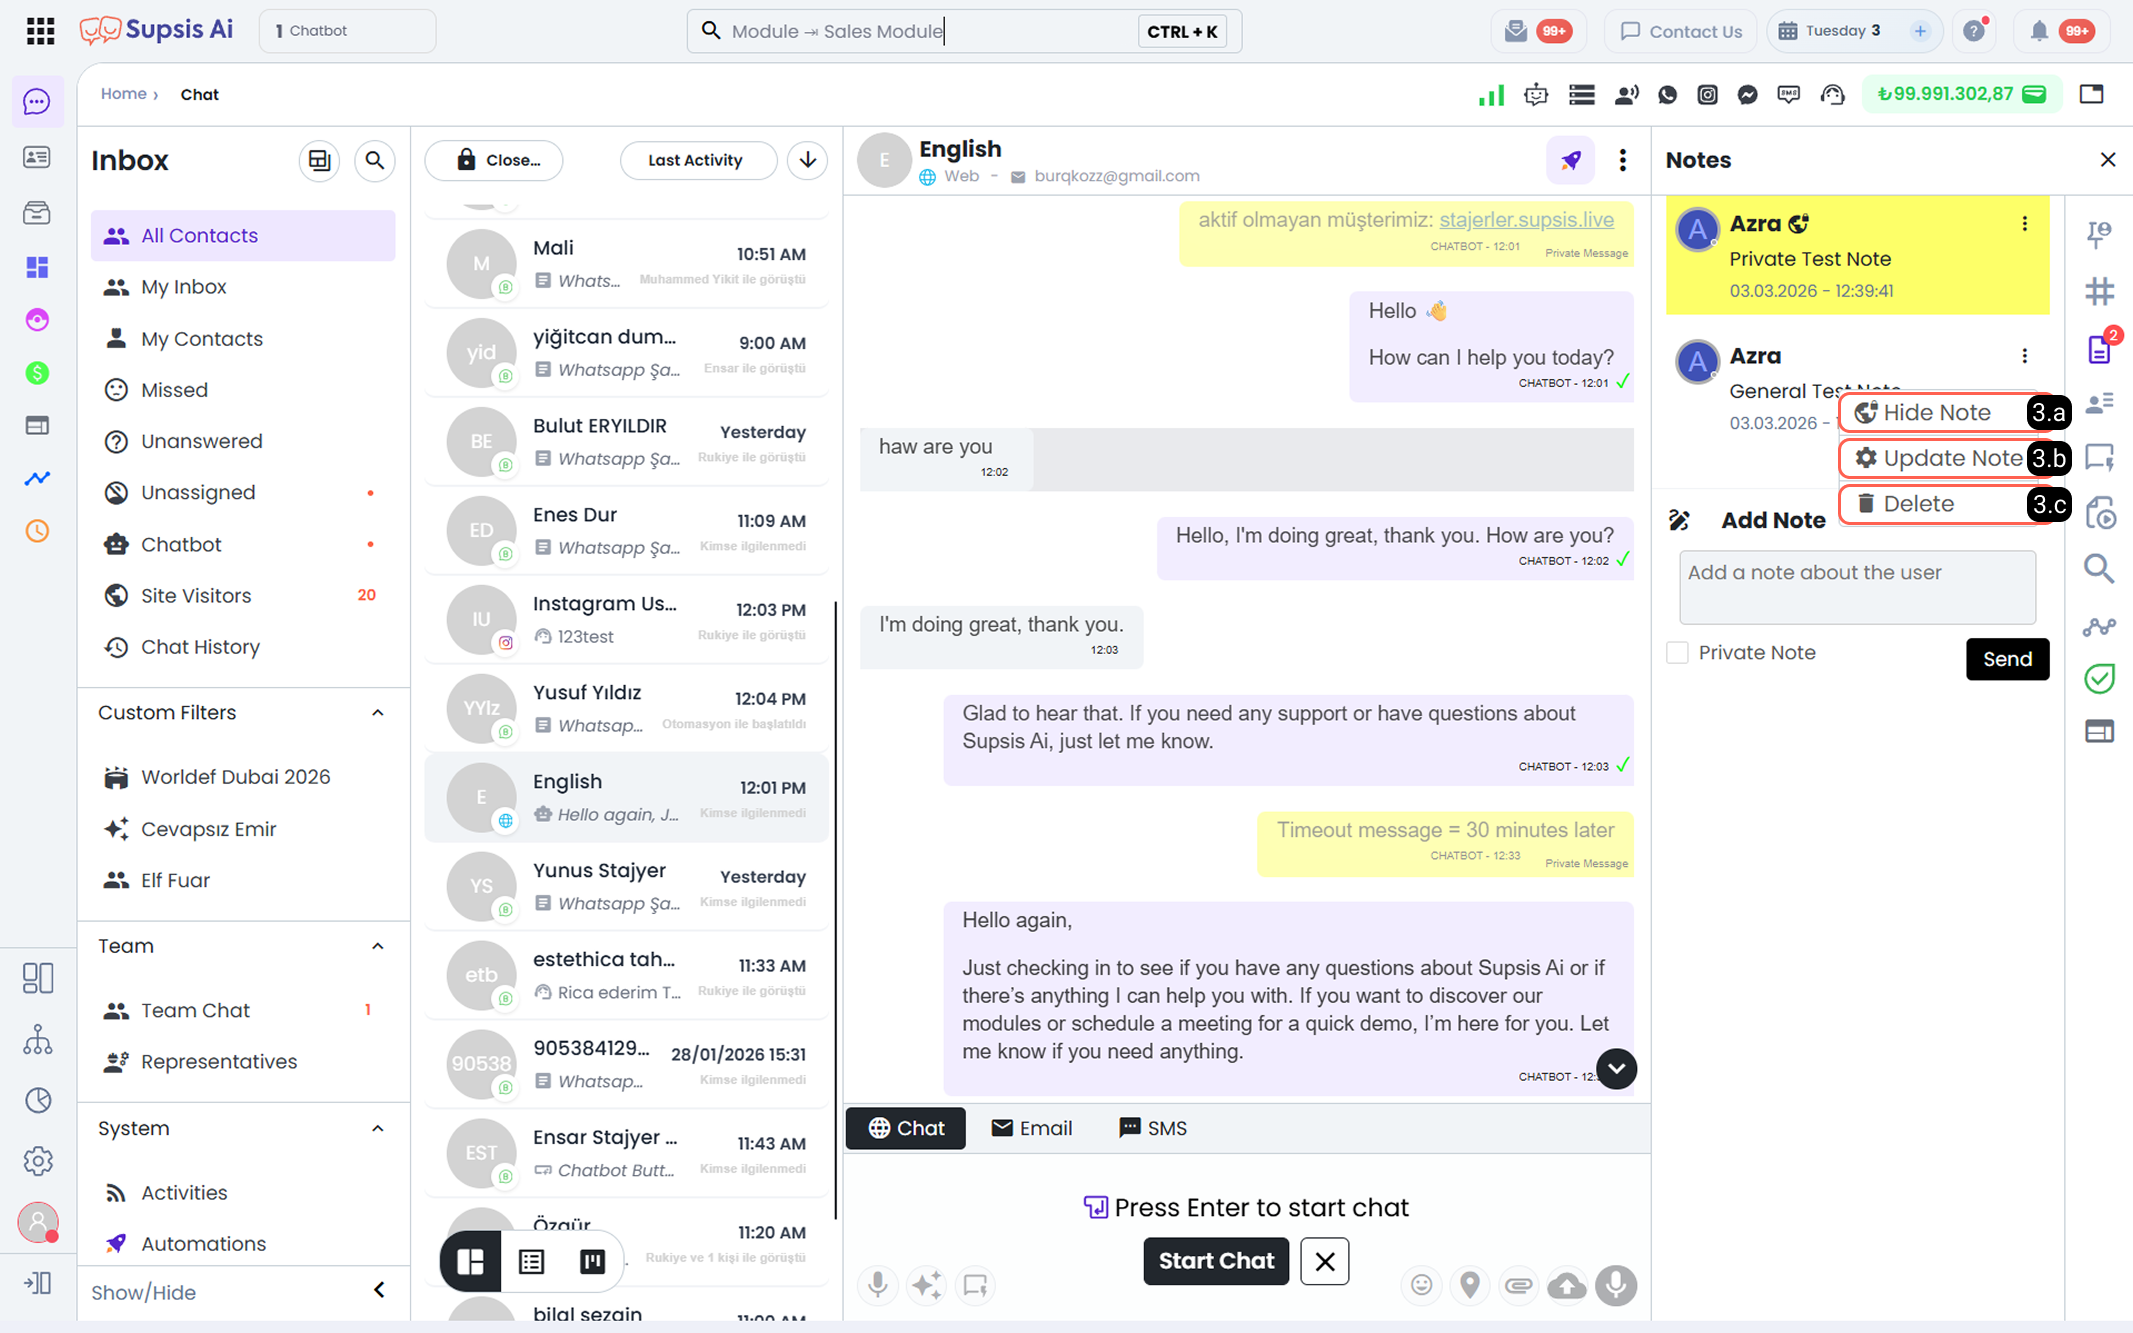
-
3.a – Hide Note/Show to Everyone: With this option, you can convert a general note into a private note or make a private note visible to all agents.
-
3.b – Update Note: Allows you to edit and update the existing note content.
-
3.c – Delete Note: Allows you to permanently delete the selected note.
4-) Add Note
You can create new notes from this area.
If the Private Note option is not selected, the created note will be visible to all agents.
If the Private Note option is selected, the note will only be visible to you.
4-) Agent Details
Here you can view the details of the agents involved in the chat. You can route the chat to other agents, assign it, or add new agents to the session.
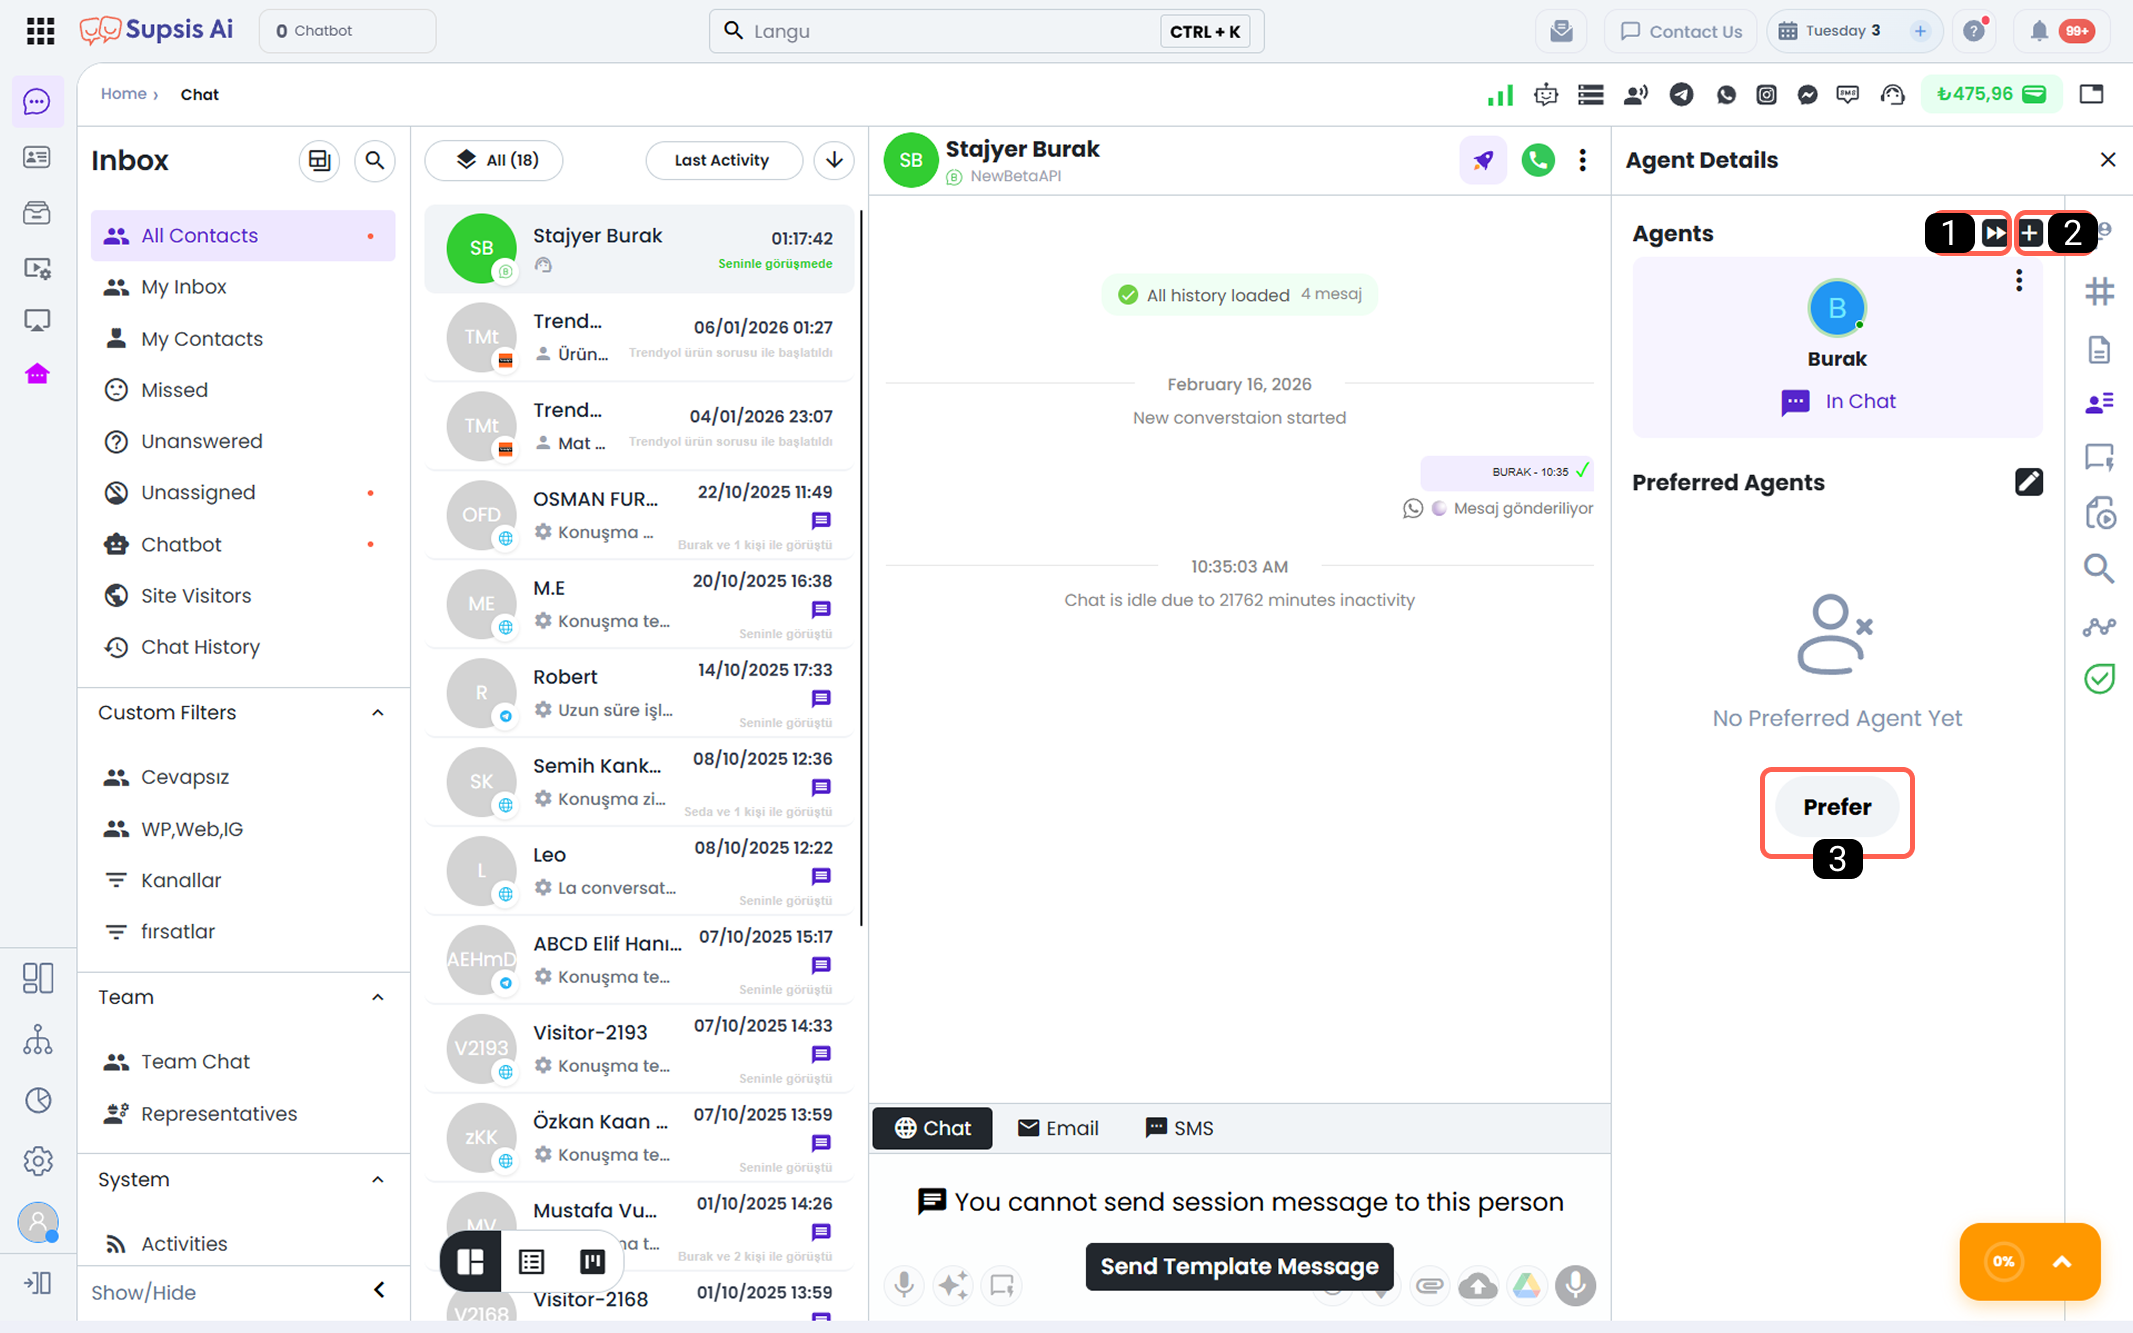
1-) Assign Ownership and Route
Through this section, you can define the ownership of the customer’s current and future chats; assign the conversation to a specific user or department, or send it to the queue.
What is Routing?
Routing transfers an active chat session to a specified user. The routed chat remains under the assigned user until the session is manually closed or naturally ends.
When the chat session is closed, conversations continue according to the routing algorithm defined in the system. Routing does not change the permanent ownership of the chat.
What is Assignment (Ownership)?
Assignment permanently binds the conversation to a specific user or department. All current and future chats with the assigned customer will be routed according to the defined owner (user or department).
After assignment, routing operations are performed only within the assigned user or department scope.
-
Assign to User: If the conversation is assigned to a specific user, when the customer starts a new chat session, the system automatically routes the chat to the assigned user.
-
Assign to Department: If the conversation is assigned to a department, when the customer starts a new chat session, it is automatically routed to one of the available users within that department.
Note:
For assignment to take effect, the assigned user or department users do not need to be online. Even if they are offline, the assignment rule is automatically applied by the system.
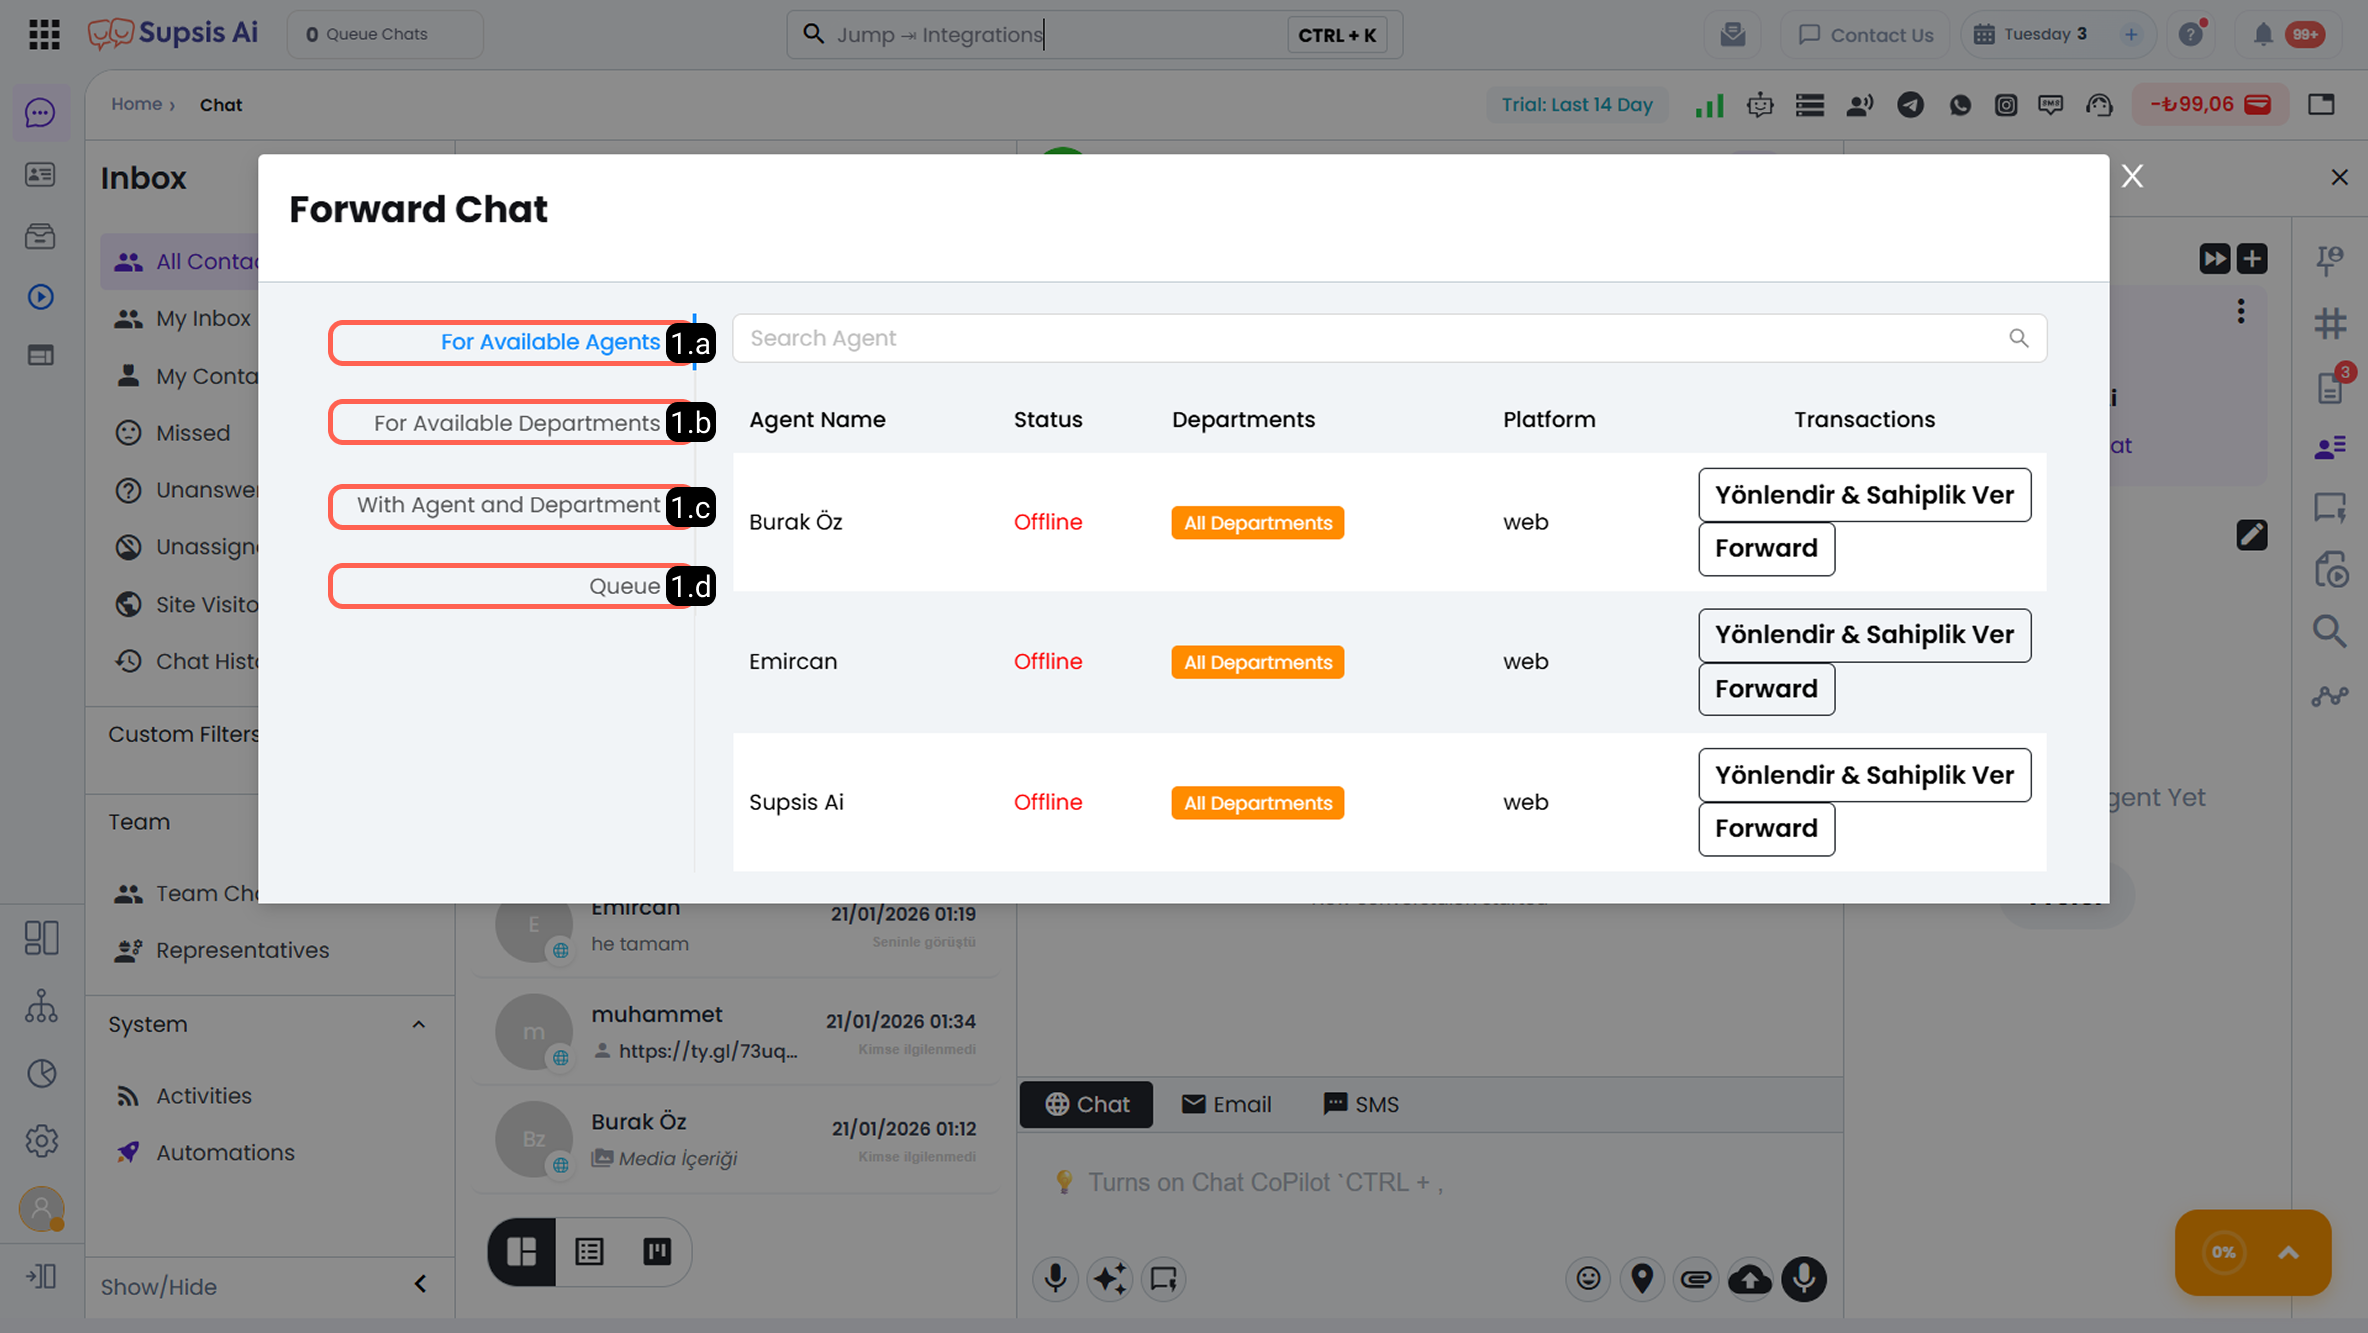
-
1.a – For Existing Agents: With this option, you can perform routing or assignment to all users defined in the system.
-
1.b – For Existing Departments: Transfers the general ownership of the conversation to the selected department. This operation assigns the conversation directly to the department rather than a single user. If some departments are not visible in the list, you should check the visibility settings of the communication channel through which the conversation was conducted.
-
1.c – With Agent and Department: Routes the conversation to the specified agent, while assigning the general ownership to the specified department. This method allows active agent changes while maintaining department-based ownership.
-
1.d – To Queue: Adds the conversation to the queue. When this action is performed, the agent currently in the chat is removed, and the conversation is placed in the queue. If automatic chat assignment is enabled, the conversation is automatically assigned to an appropriate agent according to the defined assignment algorithm. If automatic assignment is disabled, the conversation waits in the queue and must be manually picked up.
2-) Add Agent
From this section, you can select one or more active agents and add them to the chat. The added agent can follow the conversation simultaneously and join the process when necessary.
3-) Preferred Agents
With this VIP feature, when the person contacts again, the chat is automatically routed to one of the preferred agents who is online, according to the existing assignment algorithm.
If none of the preferred agents are online, the conversation is transferred to the most suitable agent based on the system’s current assignment algorithm.
5-) Canned Responses
Canned responses allow you to quickly reply to frequently asked questions or recurring customer requests using predefined message templates in the Supsis panel.
You can easily insert canned responses into the chat area by clicking on the relevant template message or using the keyboard shortcuts defined in the canned responses menu. This helps shorten response time and ensures consistent messaging across the team.
For creating canned responses and more detailed information, please review the Canned Responses documentation.
6-) Media and Documents
All media files and documents shared by the customer and agents during chats are listed in this section.
7-) Search Message
(The legacy right-panel search tab has been deprecated.)
In-chat message search now operates directly within the conversation window via a modern blurred overlay using ⌘ + F (Mac) / Ctrl + F (Windows) or the magnifying glass icon on the top header. Clicking a search result automatically fetches older message blocks and navigates smoothly to the target message bubble with a temporary focus border.
For comprehensive details, review our In-Chat and Global Message Search guide.
8-) Meta References
If the person contacted you via Meta advertisements (Instagram, Facebook), the advertisement or advertisements they connected through are listed in this section.