
Bulk Message Creation Content
1-) Bulk Message Creation
The Bulk Message Creation area allows you to prepare and manage bulk message sending to a defined target audience. Through this section, the sending channel can be selected, customer groups or recipient lists can be defined, message content can be edited, and the sending process can be initiated. Additionally, the status of created bulk messages can later be tracked from the listing screen and reported when necessary.
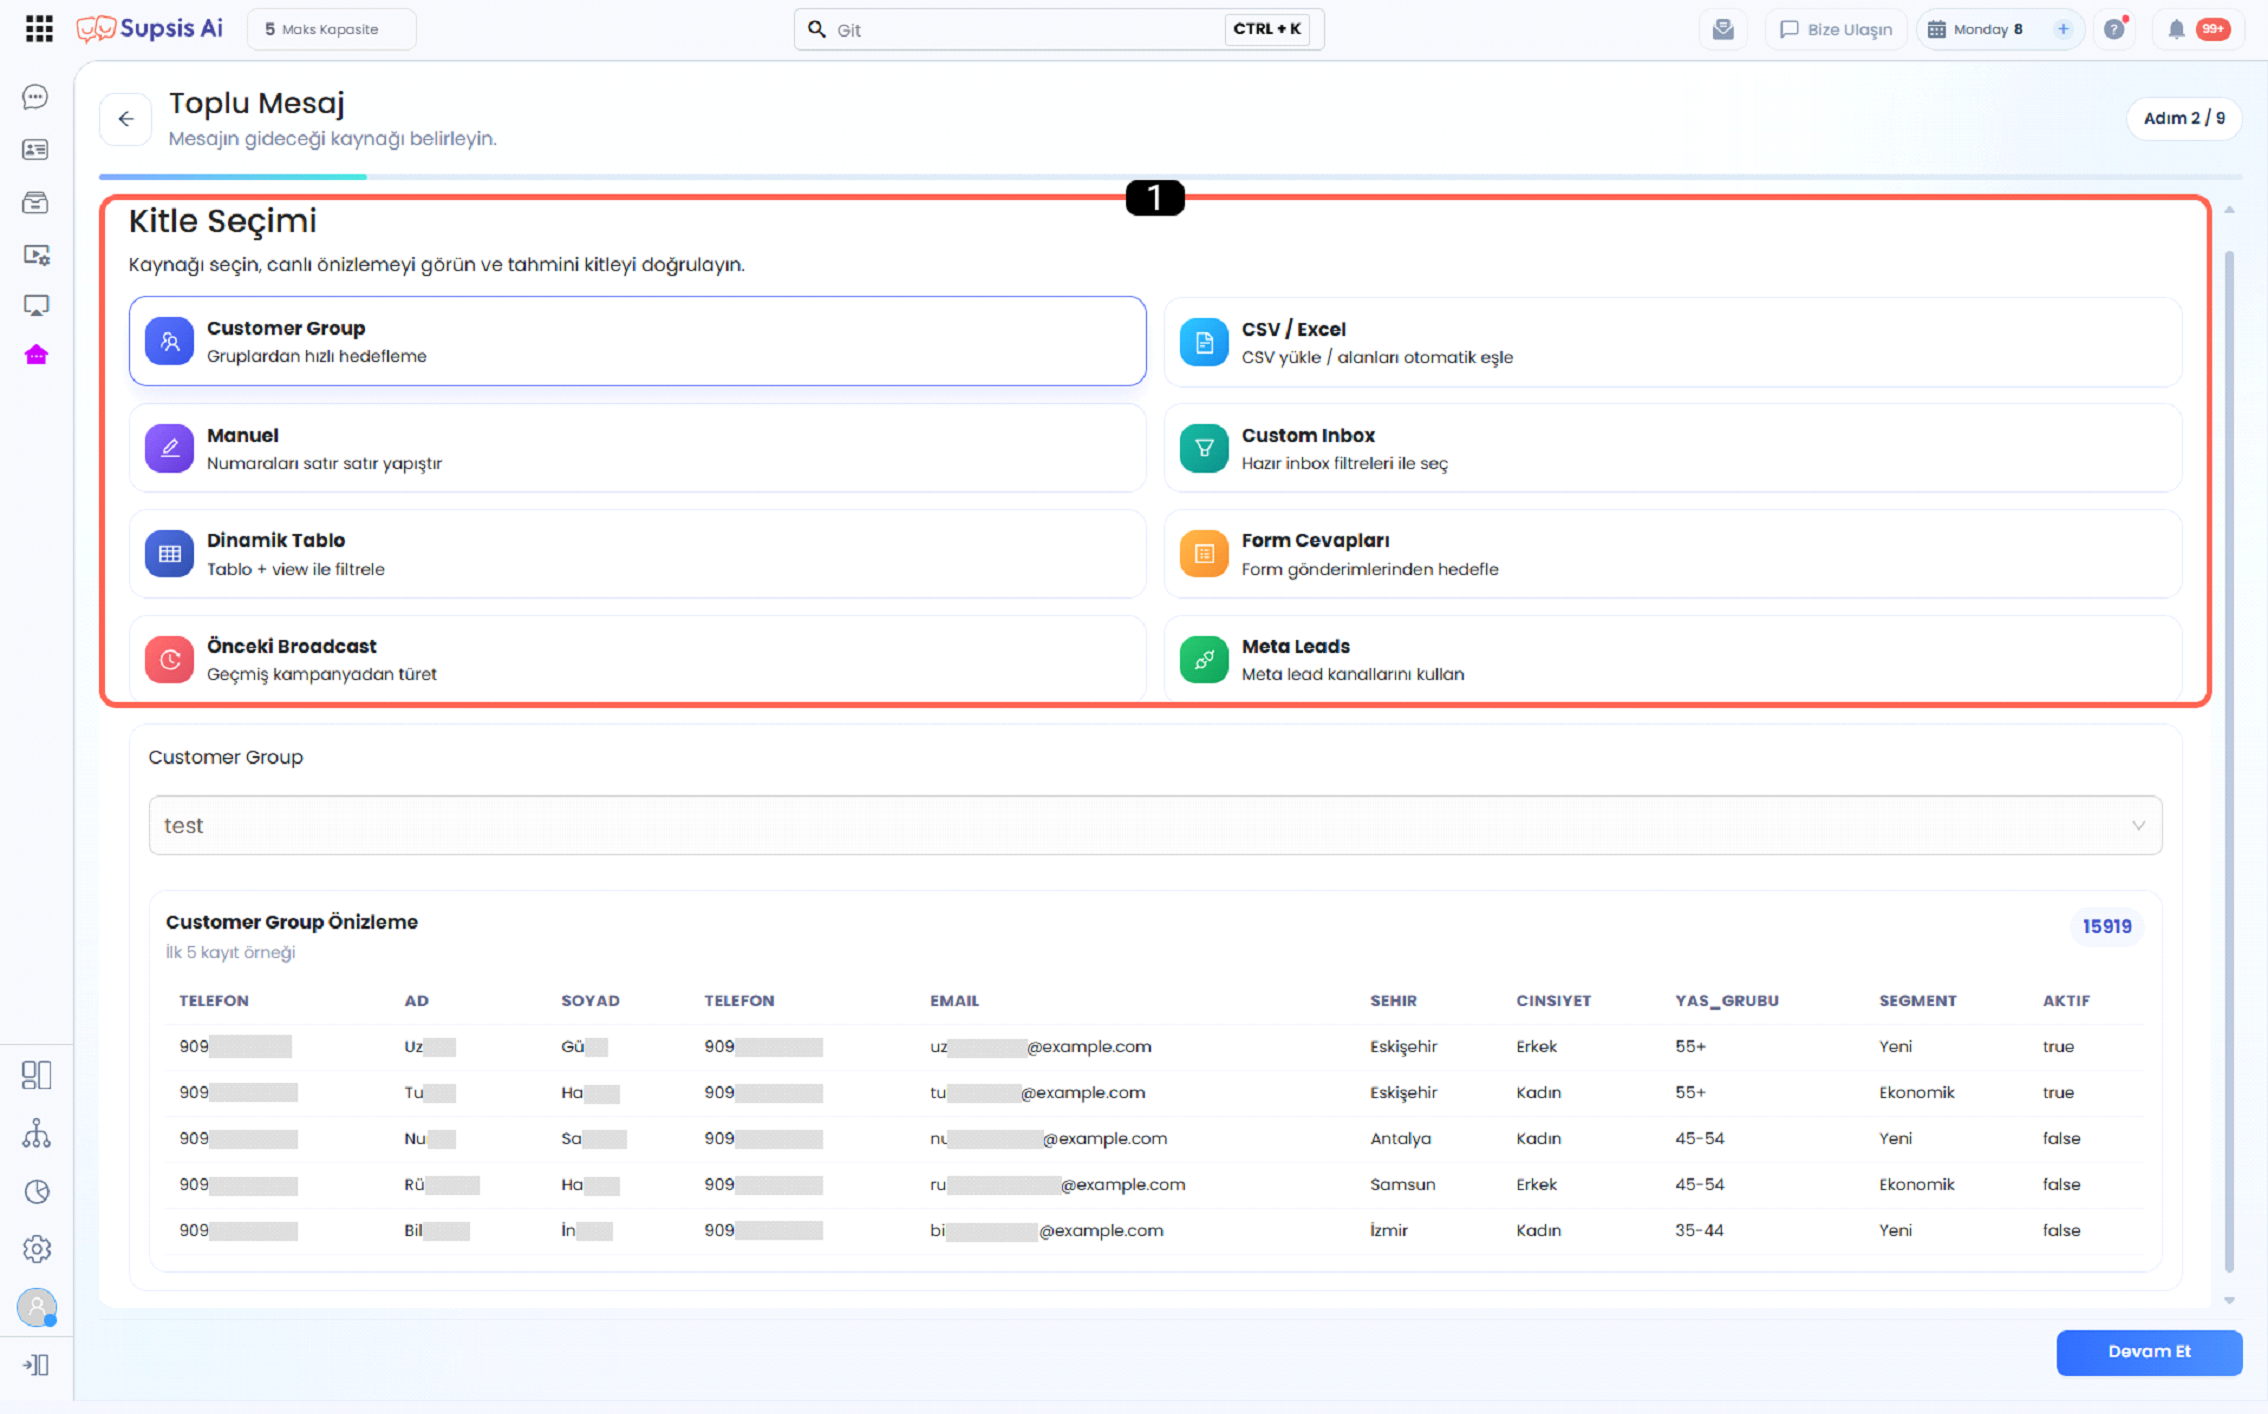
- Audience Source Selection
1-) Audience Source Selection
The Audience Source Selection area is used to define which user group or data source the bulk message will be sent to. Through this section, customer groups, manual number entry, CSV/Excel files, dynamic tables, form responses, or other sources can be selected to create the target audience.
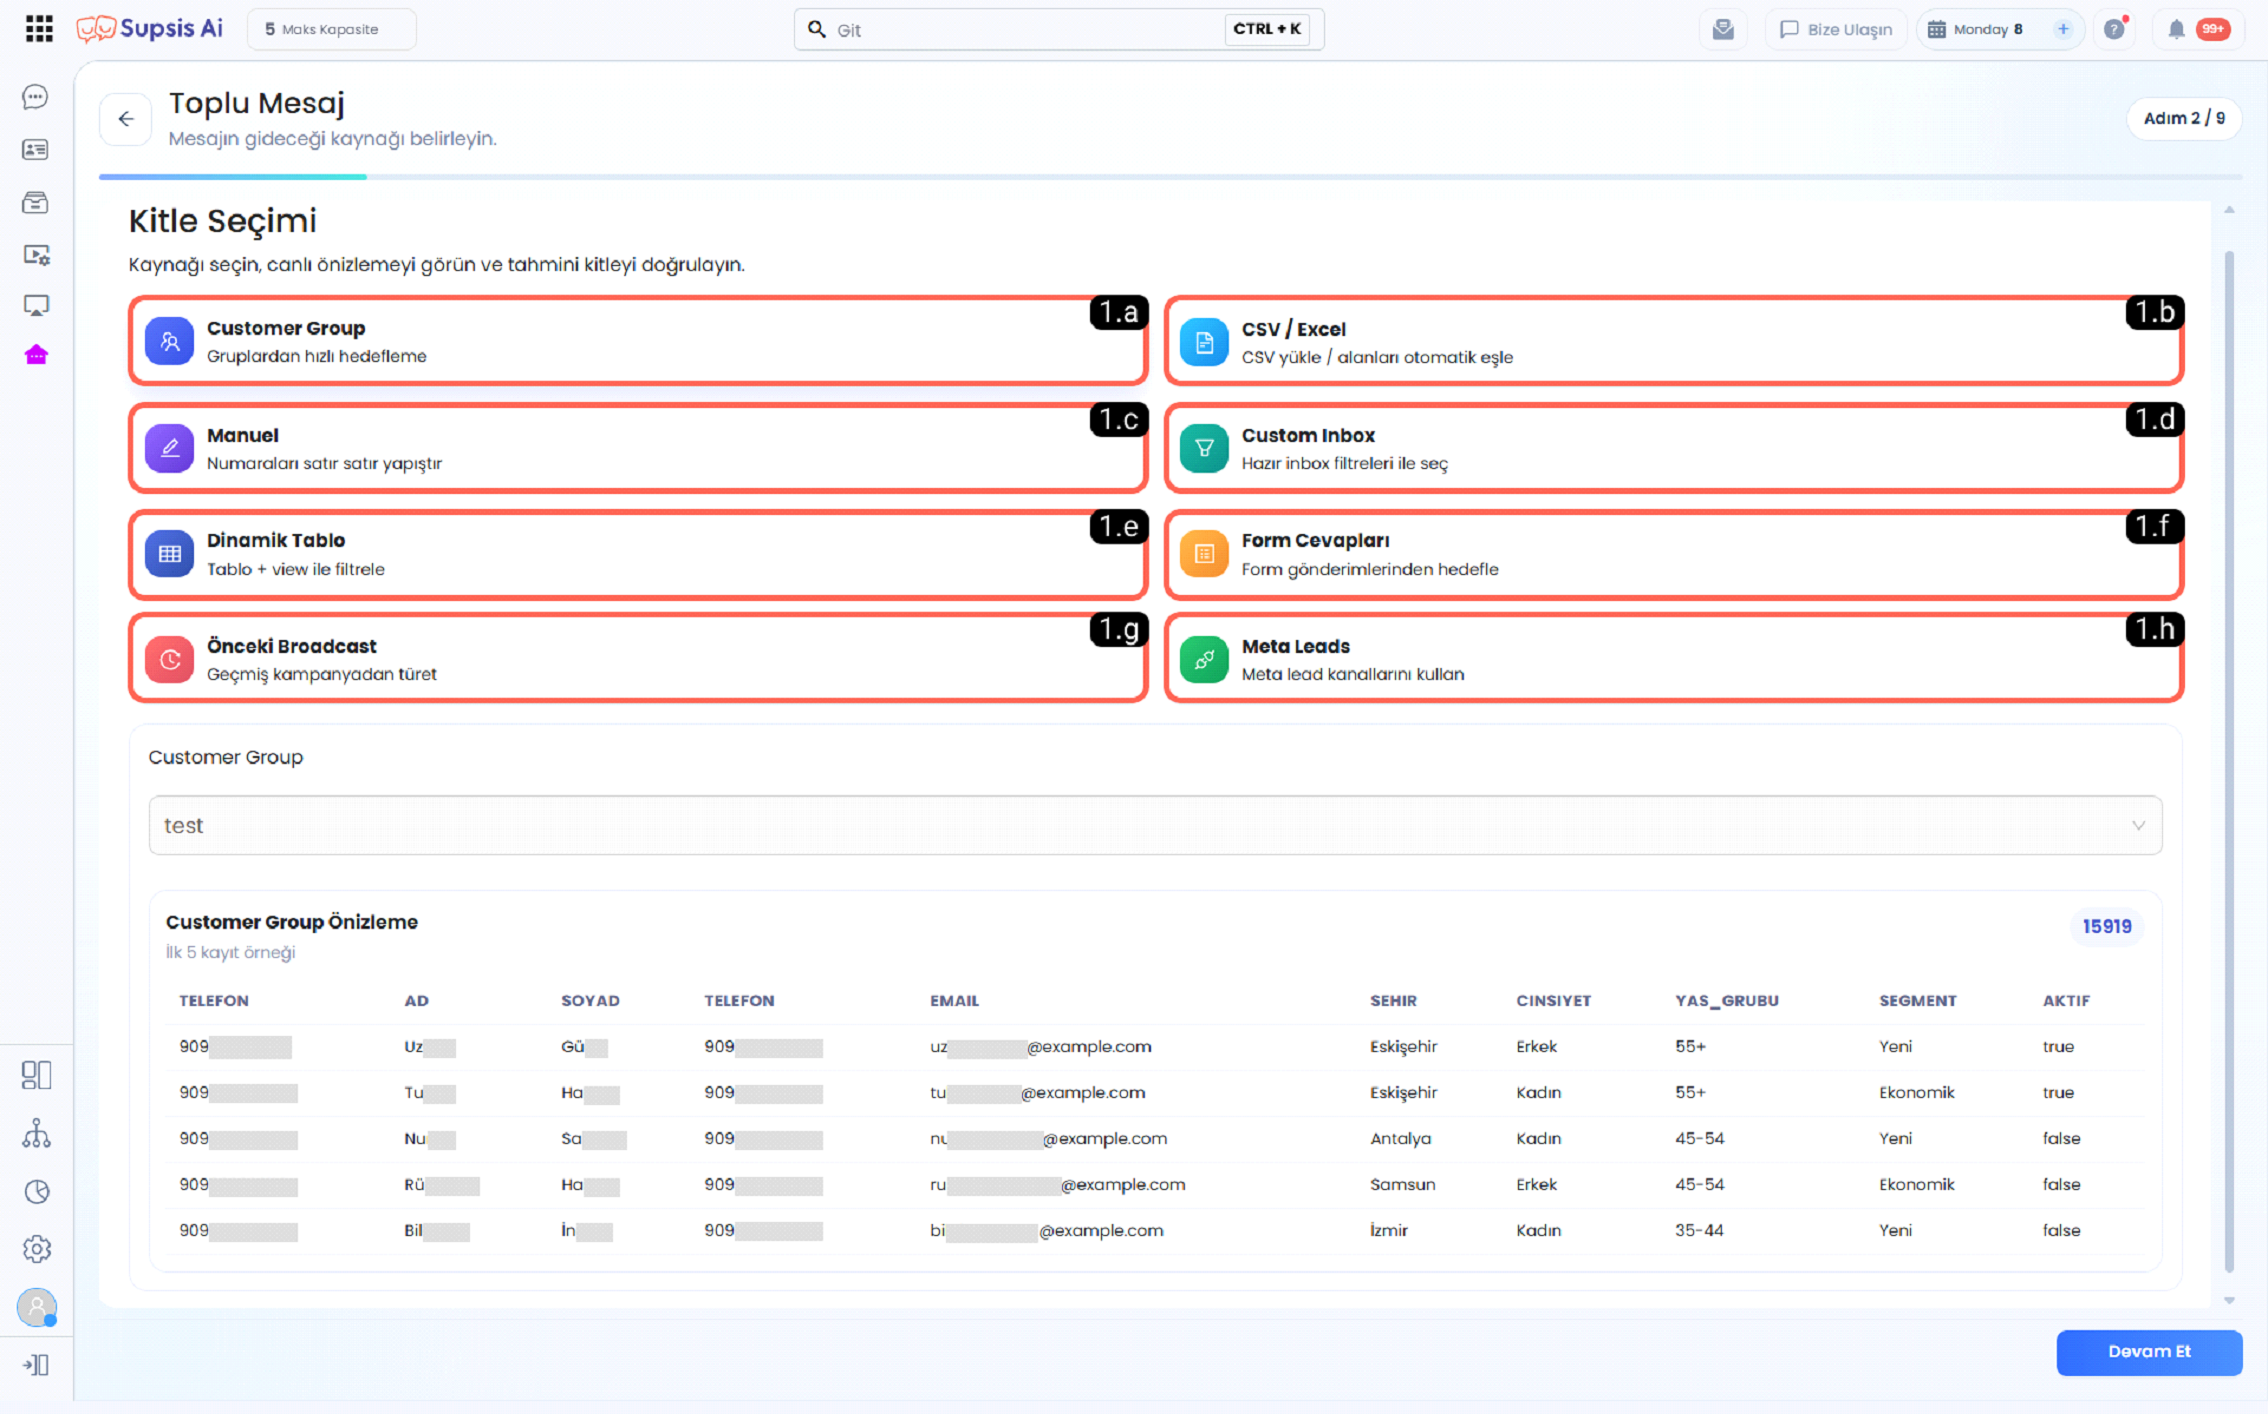
1.a - Customer Group
It allows selecting from existing customer groups to define the target audience for bulk messaging.
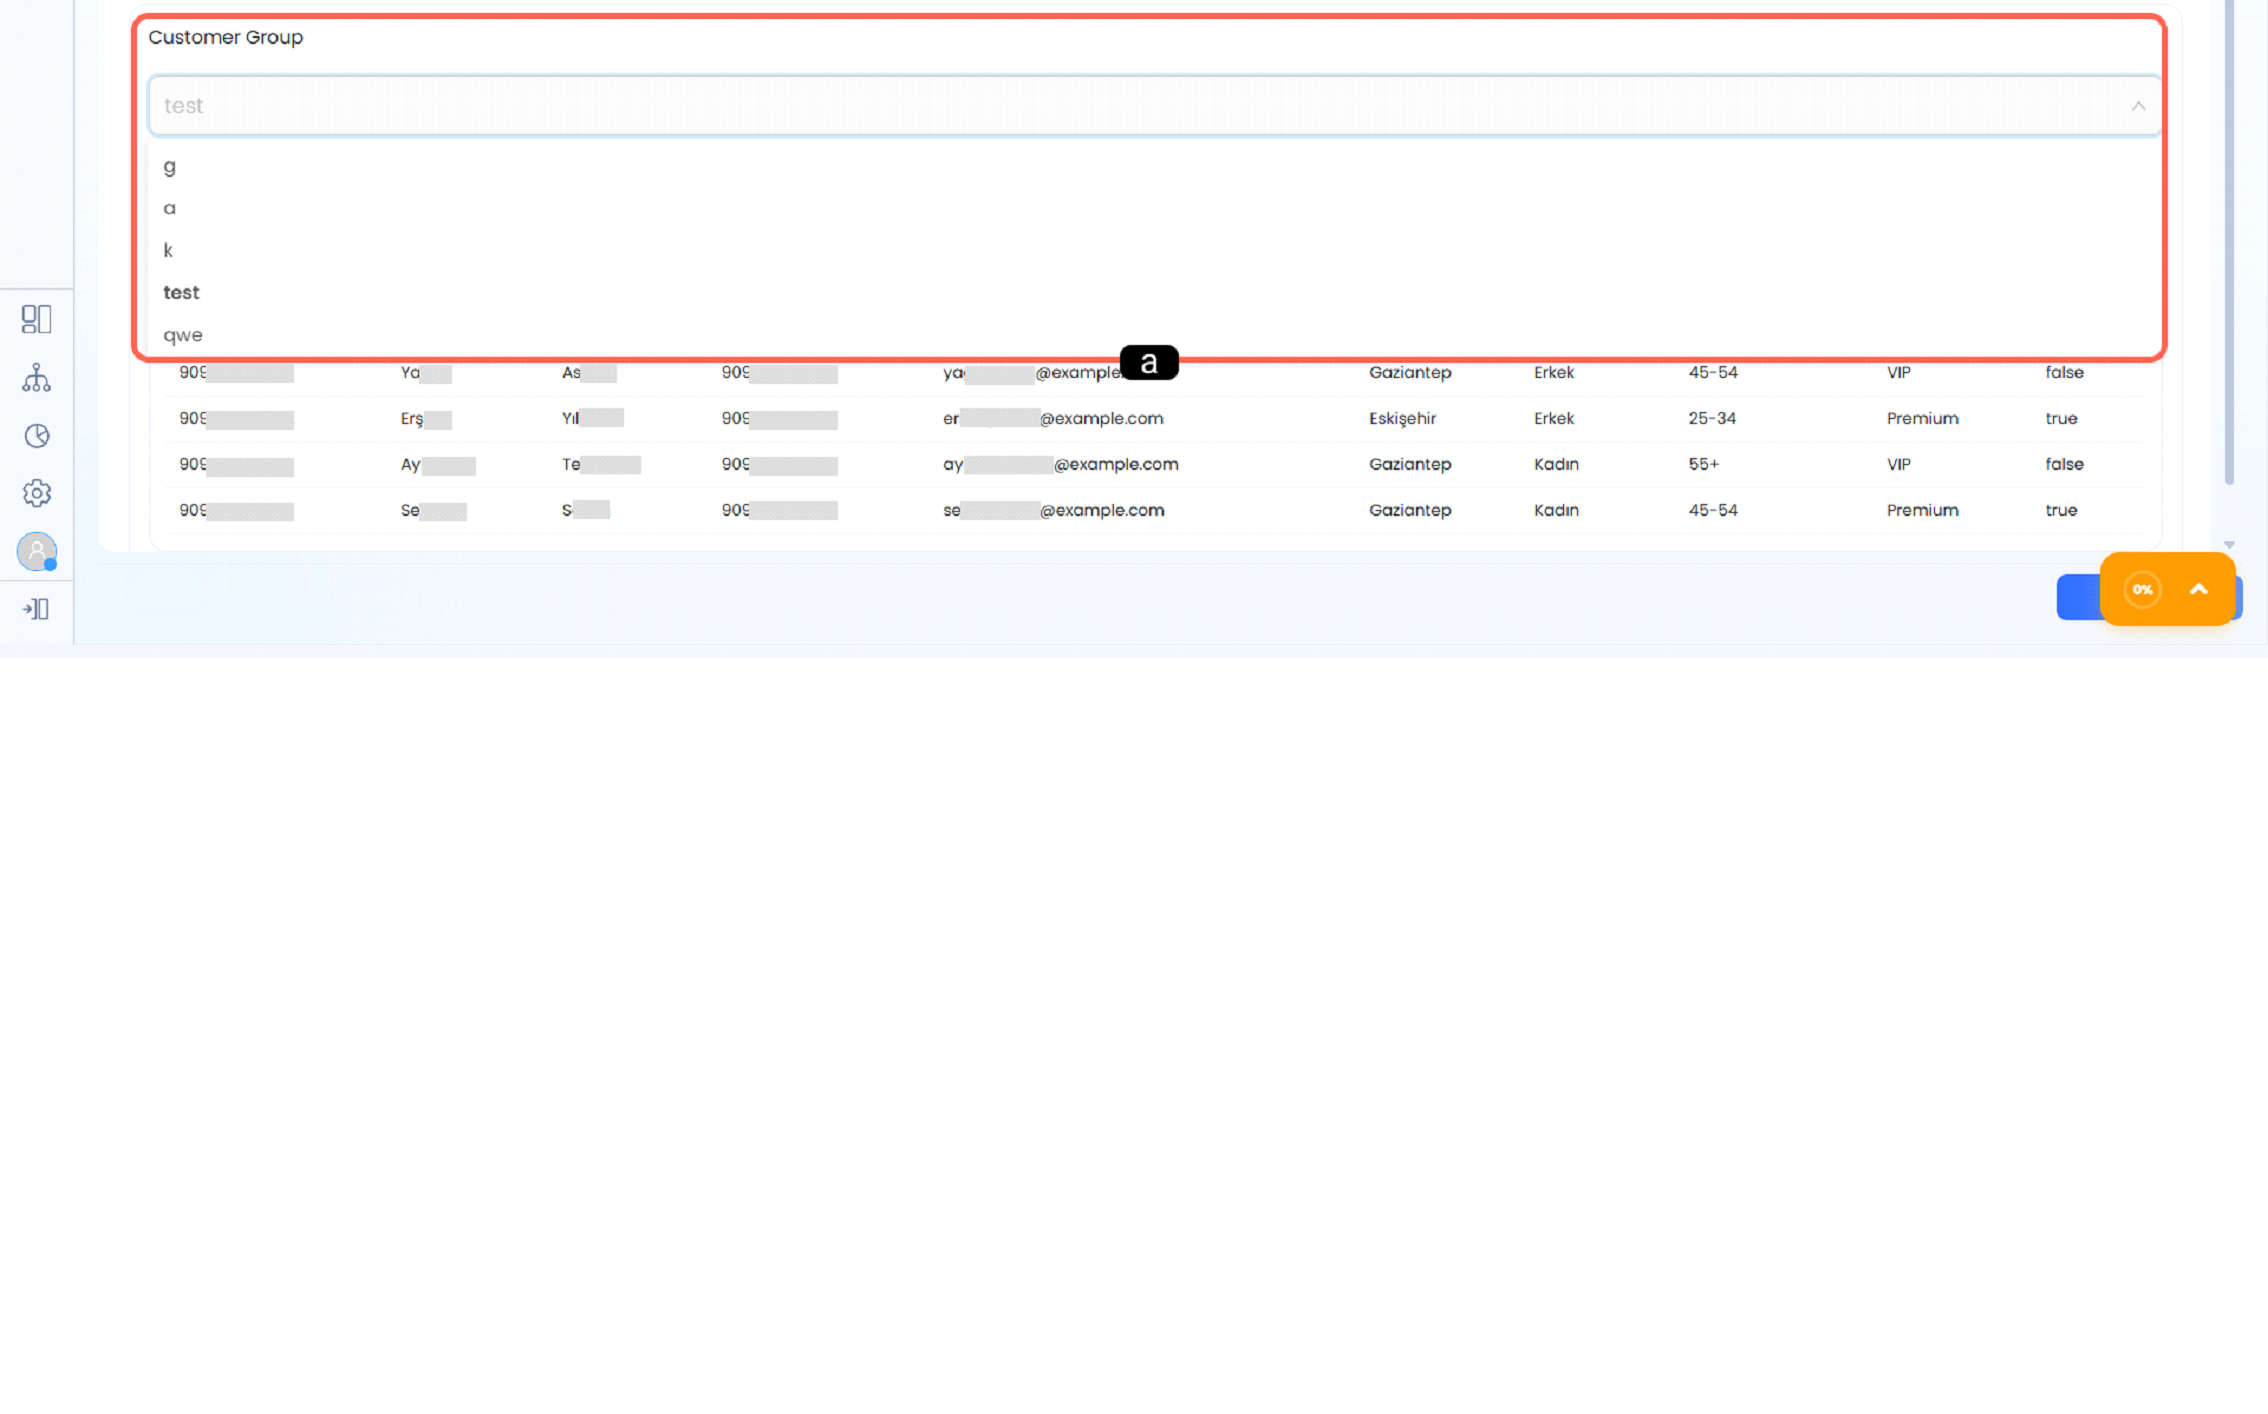
a . Customer Group
When the Customer Group option is selected, existing customer groups are listed in the section below. The user selects the desired group to define the target audience. Contacts belonging to the selected group are shown in a preview table and can be reviewed before sending.
1.b - CSV / Excel
Allows importing recipient lists into the system by uploading a prepared CSV or Excel file.
1.c - Manual
Allows creating a target audience by manually entering phone numbers line by line.
1.d - Custom Inbox
Allows adding users that match specific criteria using predefined inbox filters.
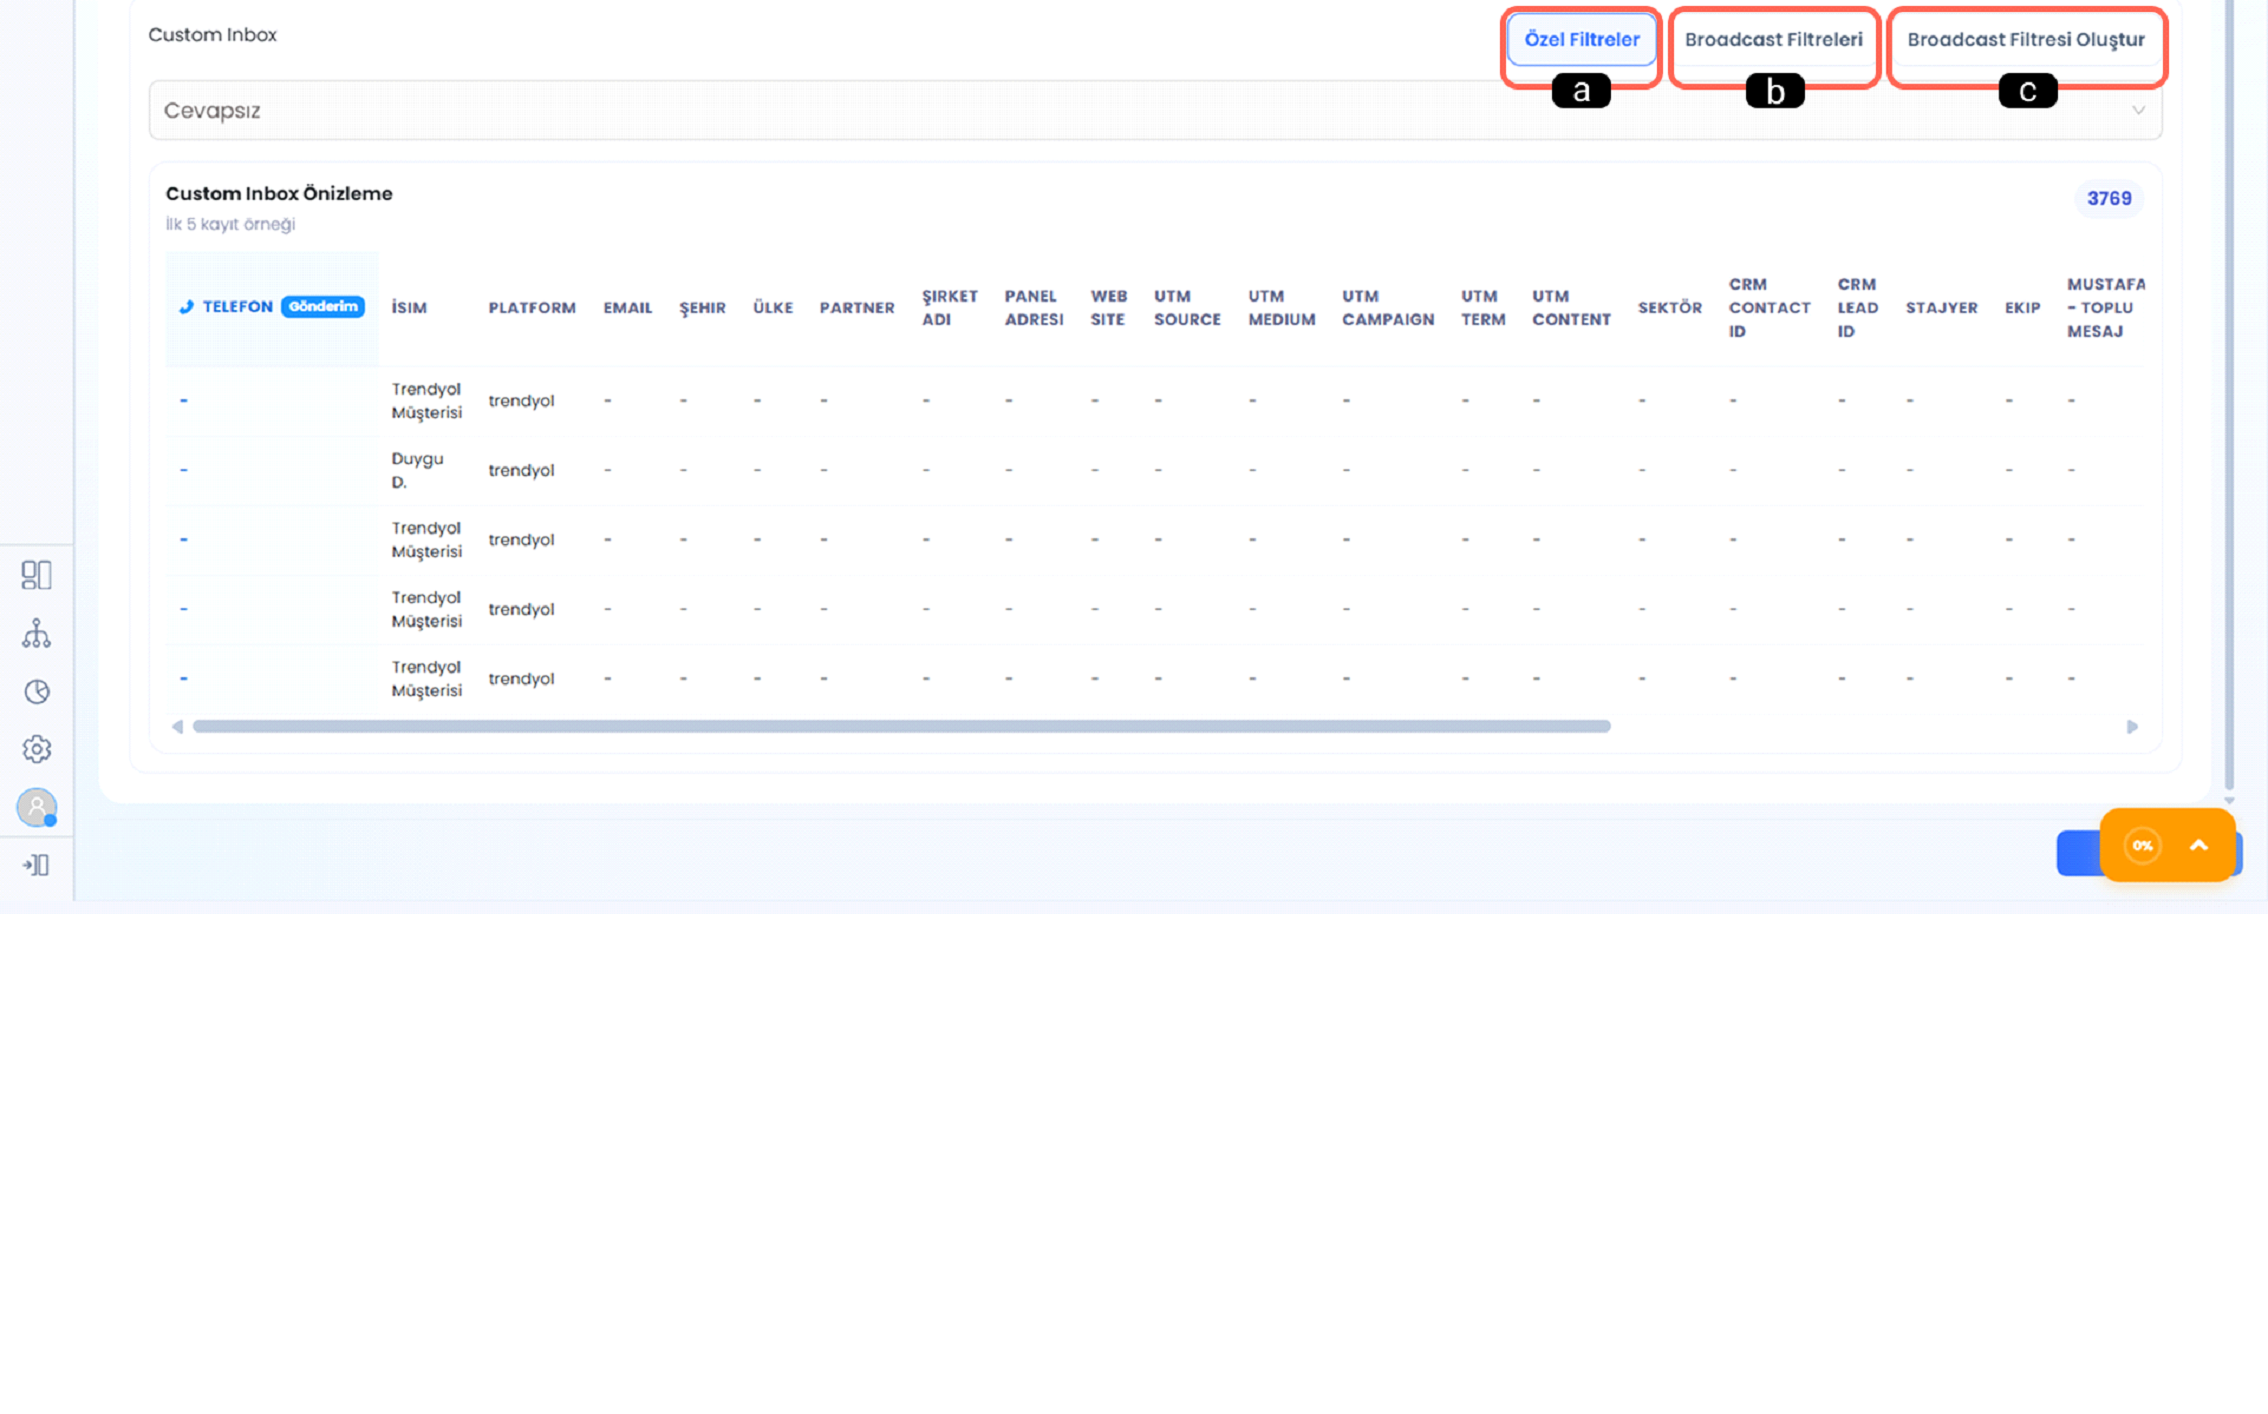
a - Custom Filter
Allows selecting previously created custom filters within Custom Inbox to define the target audience. Contacts matching the selected filter are shown in the preview area.
b - Broadcast Filters
This area lists broadcast filters prepared for bulk messaging. The user can select one of the available filters to define recipients.
c - Create Broadcast Filter
Used to create a new broadcast filter. Through this section, a recipient list can be built based on specific criteria and saved for future bulk messaging.
1.e - Dynamic Table
Allows selecting recipients using table views and filtering options.
1.f - Form Responses
Allows creating a target audience based on user data collected from form submissions.
1.g - Previous Broadcast
Allows creating a new target audience from a previously created bulk messaging campaign.
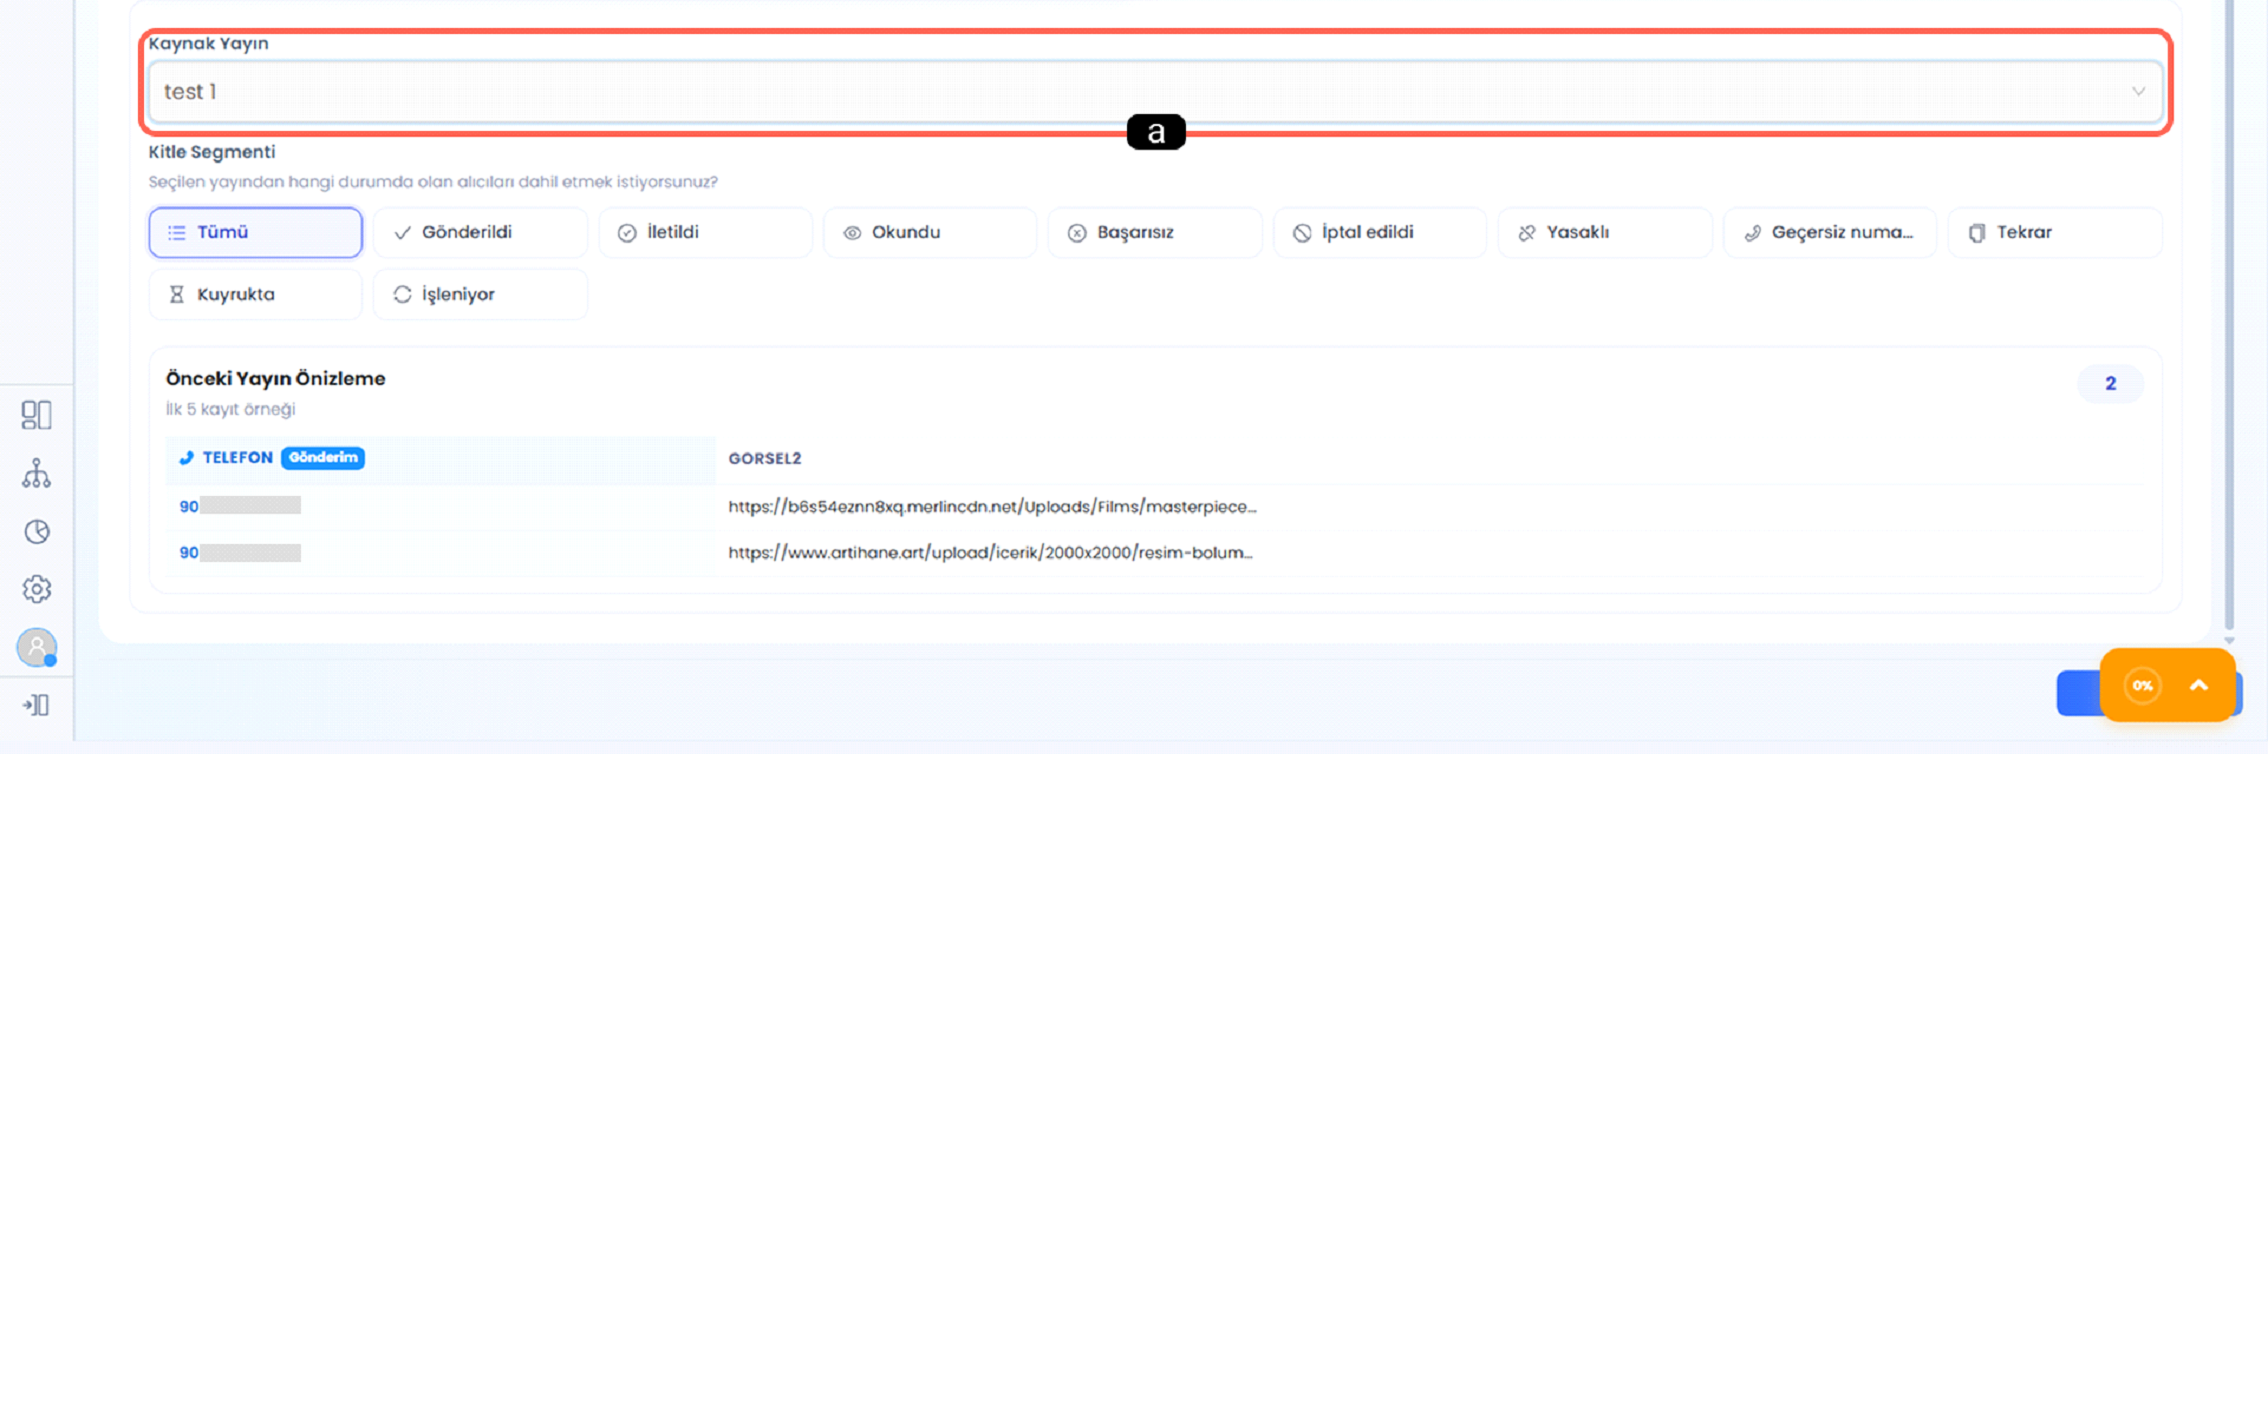
a - Source Broadcast
When Previous Broadcast is selected as the audience source, new target audiences can be created from previously sent bulk messages. The user selects a source broadcast, filters recipients based on delivery status, and continues the new bulk messaging process after reviewing the selected contacts.
1.h - Meta Leads
Allows using potential customer data collected from Meta lead channels as the target audience.
1.i - Programmatic Broadcasts & Queue Management via Automation SDK
Using JS Code Blocks (Automation SDK) within Supsis AI Automations, bulk template messaging can be fully automated:
* Channel & Template Validation: supsis.channel.get and supsis.whatsapp.getTemplate methods pre-verify active WhatsApp channel status and Meta template availability.
* Advanced Target Filtering: supsis.contact.searchV2 dynamically filters recipient lists based on platform, assigned tags, and valid phone numbers.
* Sequential Queueing: Messages are added to supsis.queue.add and sent via supsis.whatsapp.sendTemplateMessage in the background.
* Queue Monitoring: supsis.queue.status tracks queue length, active jobs, and execution stats in real time.
2-) Template Selection
The Template Selection area allows choosing the message template to be used in bulk messaging. Users can search available templates, apply filters, review content structure via preview, and select the appropriate template to proceed with the sending process.
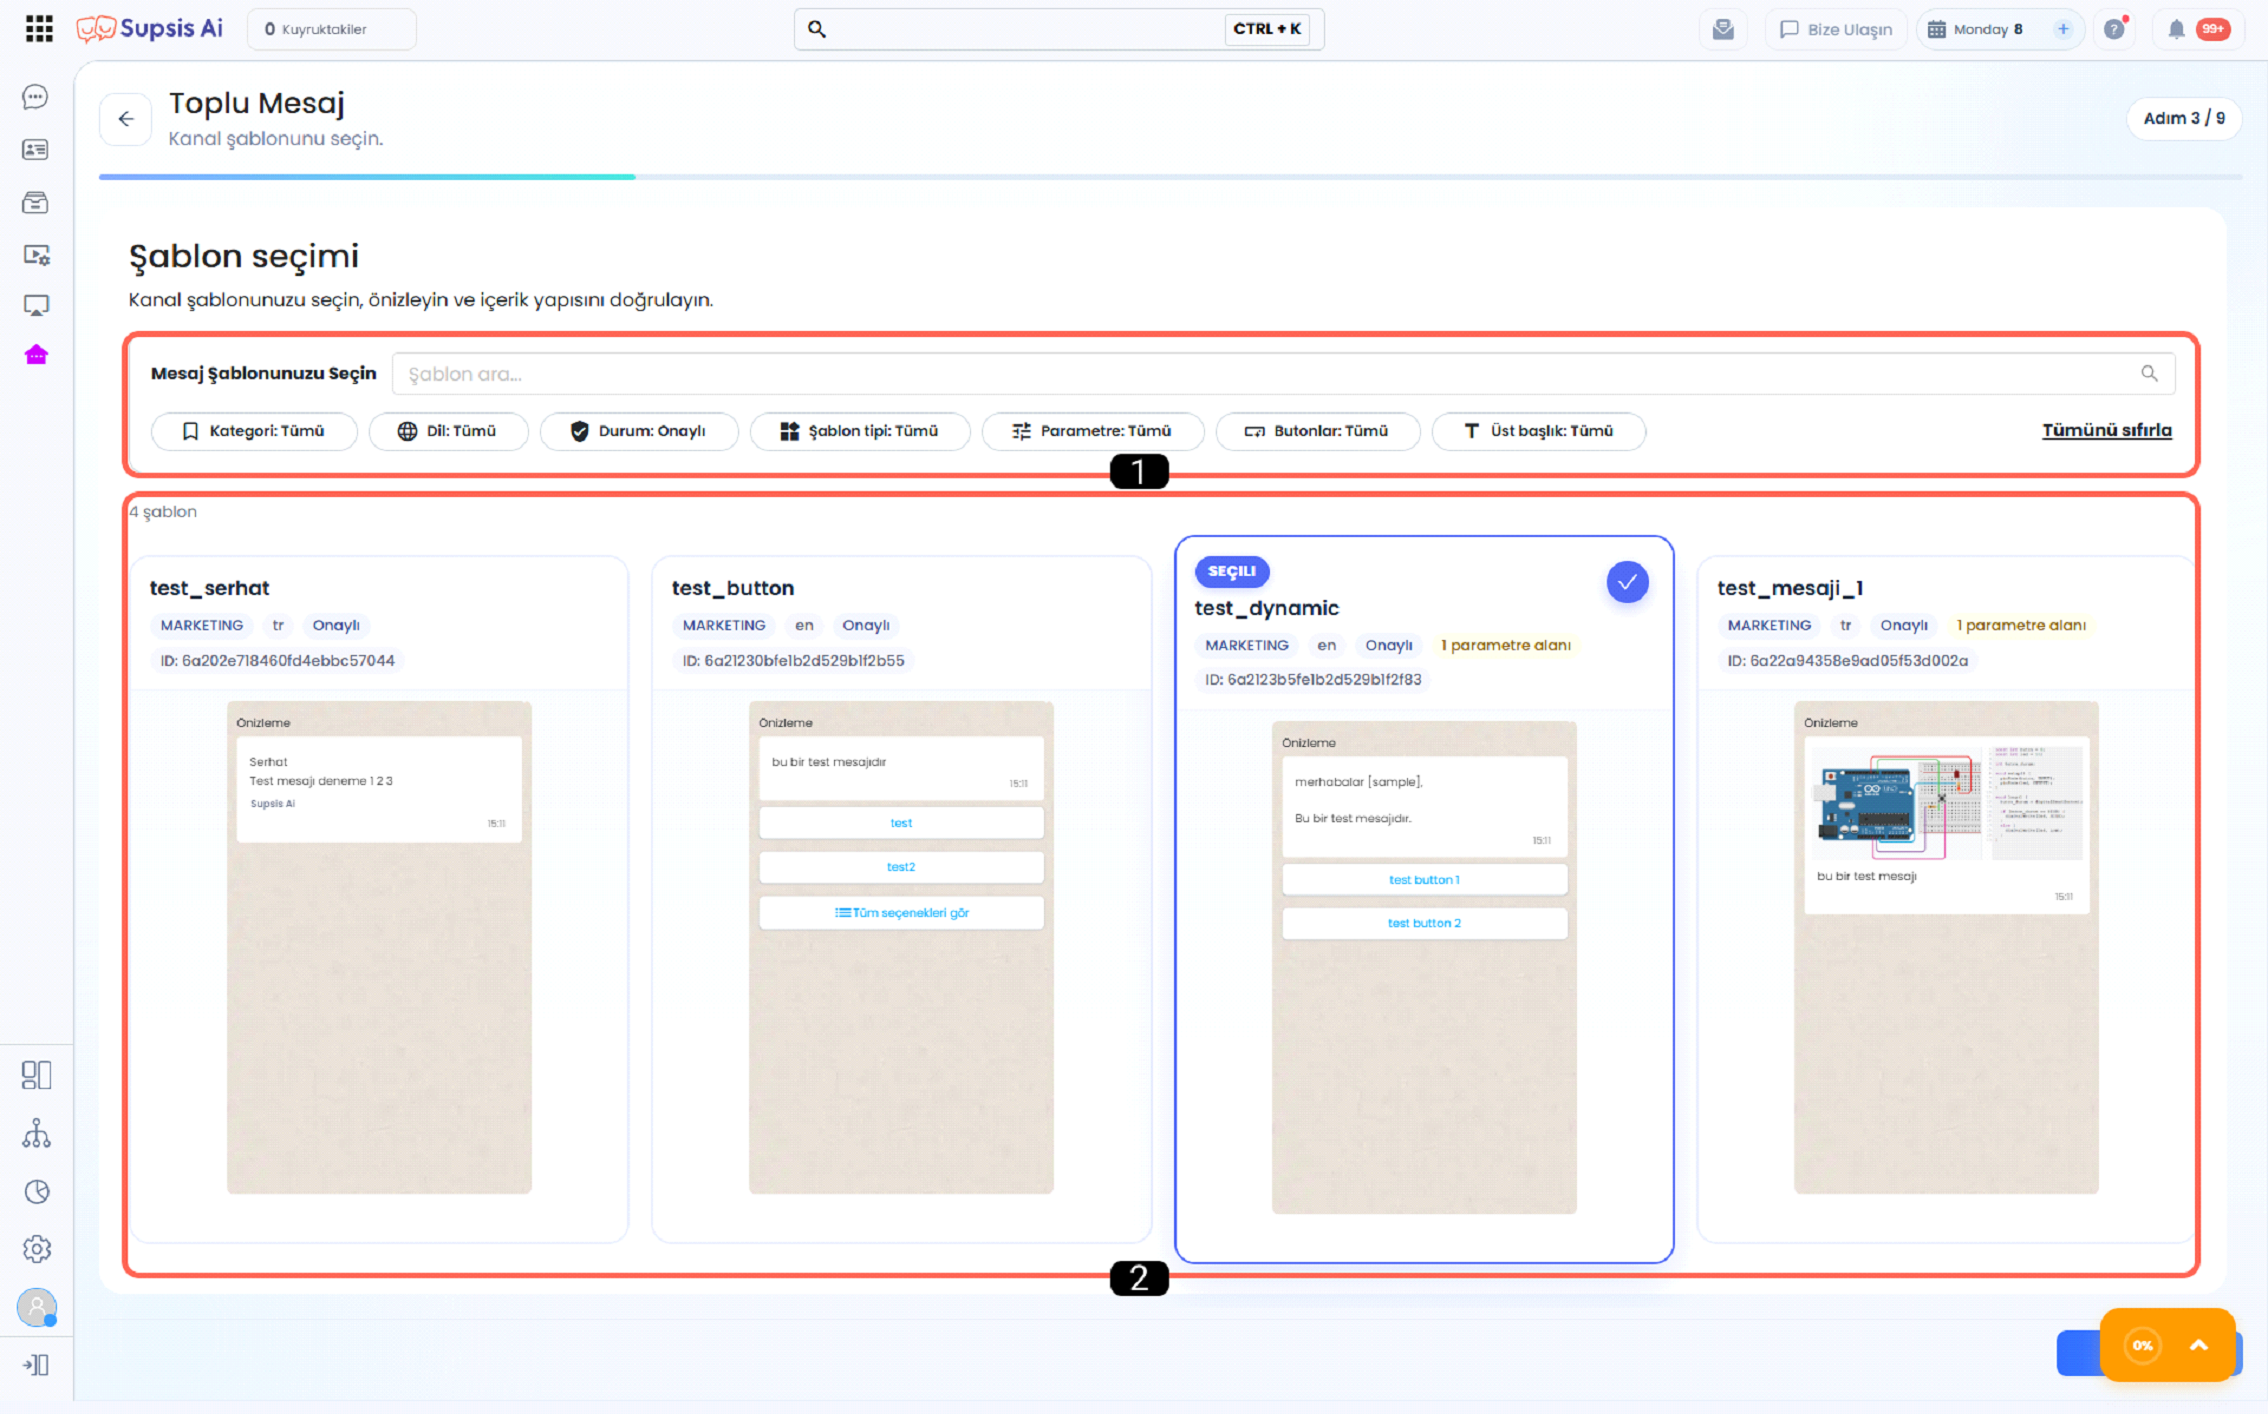
- Template Search and Filtering Area
- Message Template Cards
2.a – Template Search and Filtering Area
The Template Search and Filtering Area allows users to easily find message templates and list them according to specific criteria. Users can search by template name and apply filters based on category, language, status, template type, parameters, and buttons.
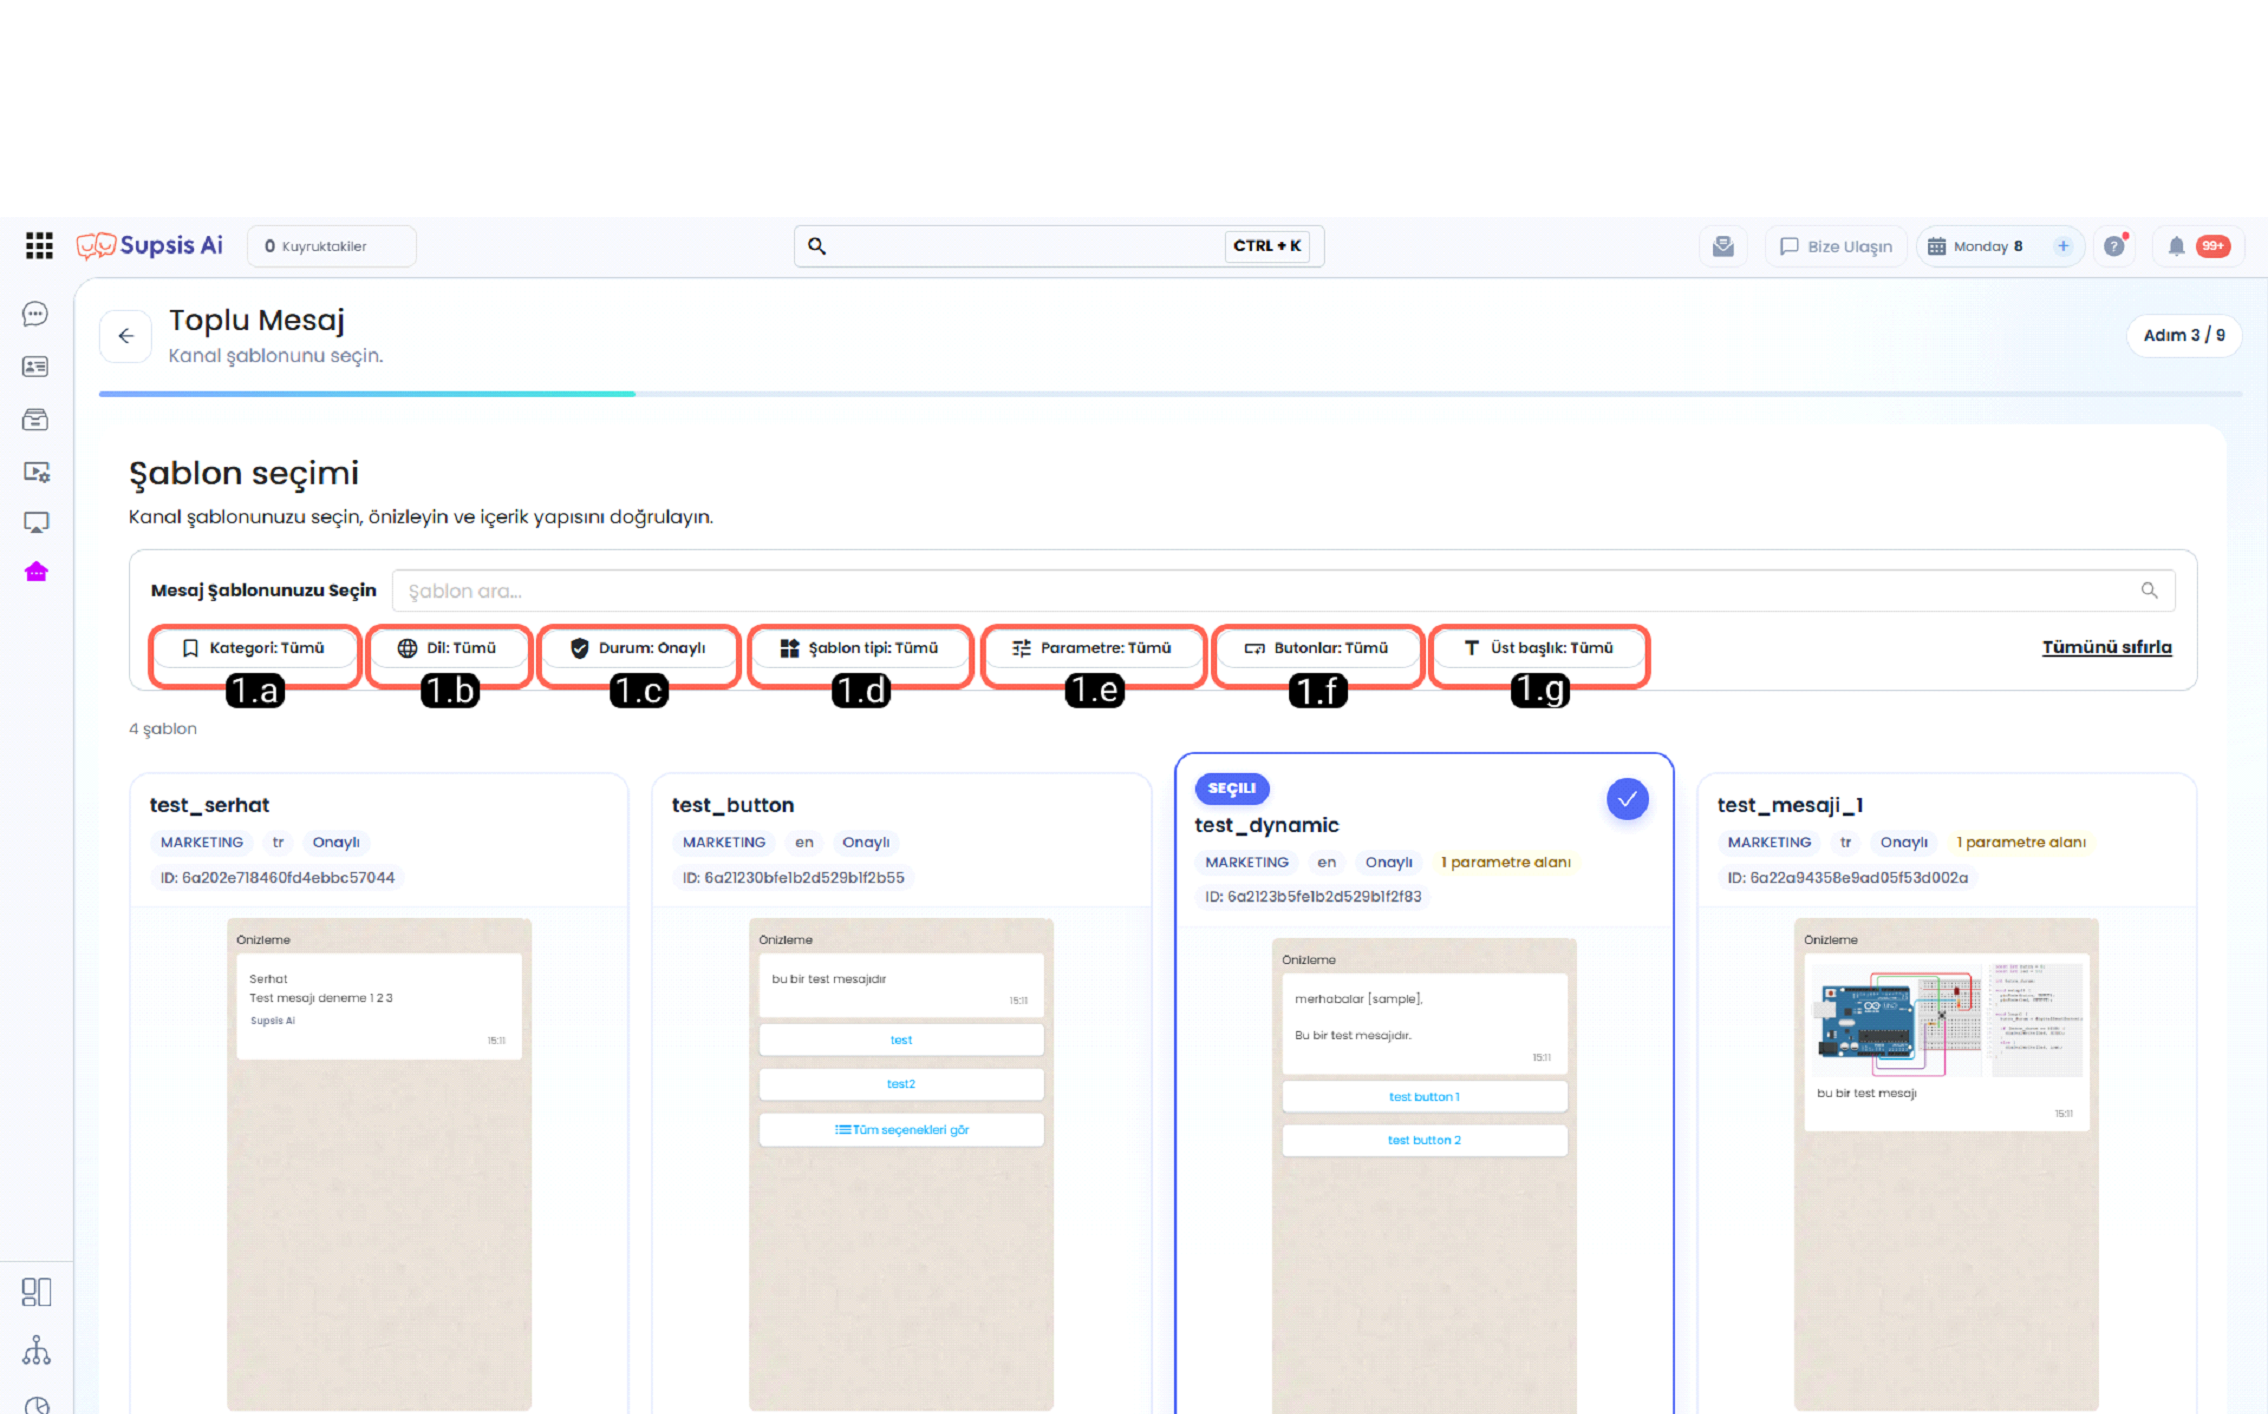
2.b – Category
A filtering field that defines the usage purpose of message templates. Users can quickly find relevant message structures by filtering templates by category.
2.c – Language
Allows filtering templates based on their language. In systems with multi-language templates, it lists only templates in the selected language.
2.d – Status
Used to filter message templates by status. Templates can be viewed as Approved, Pending, Rejected, or Paused, making it easier for users to find the required templates.
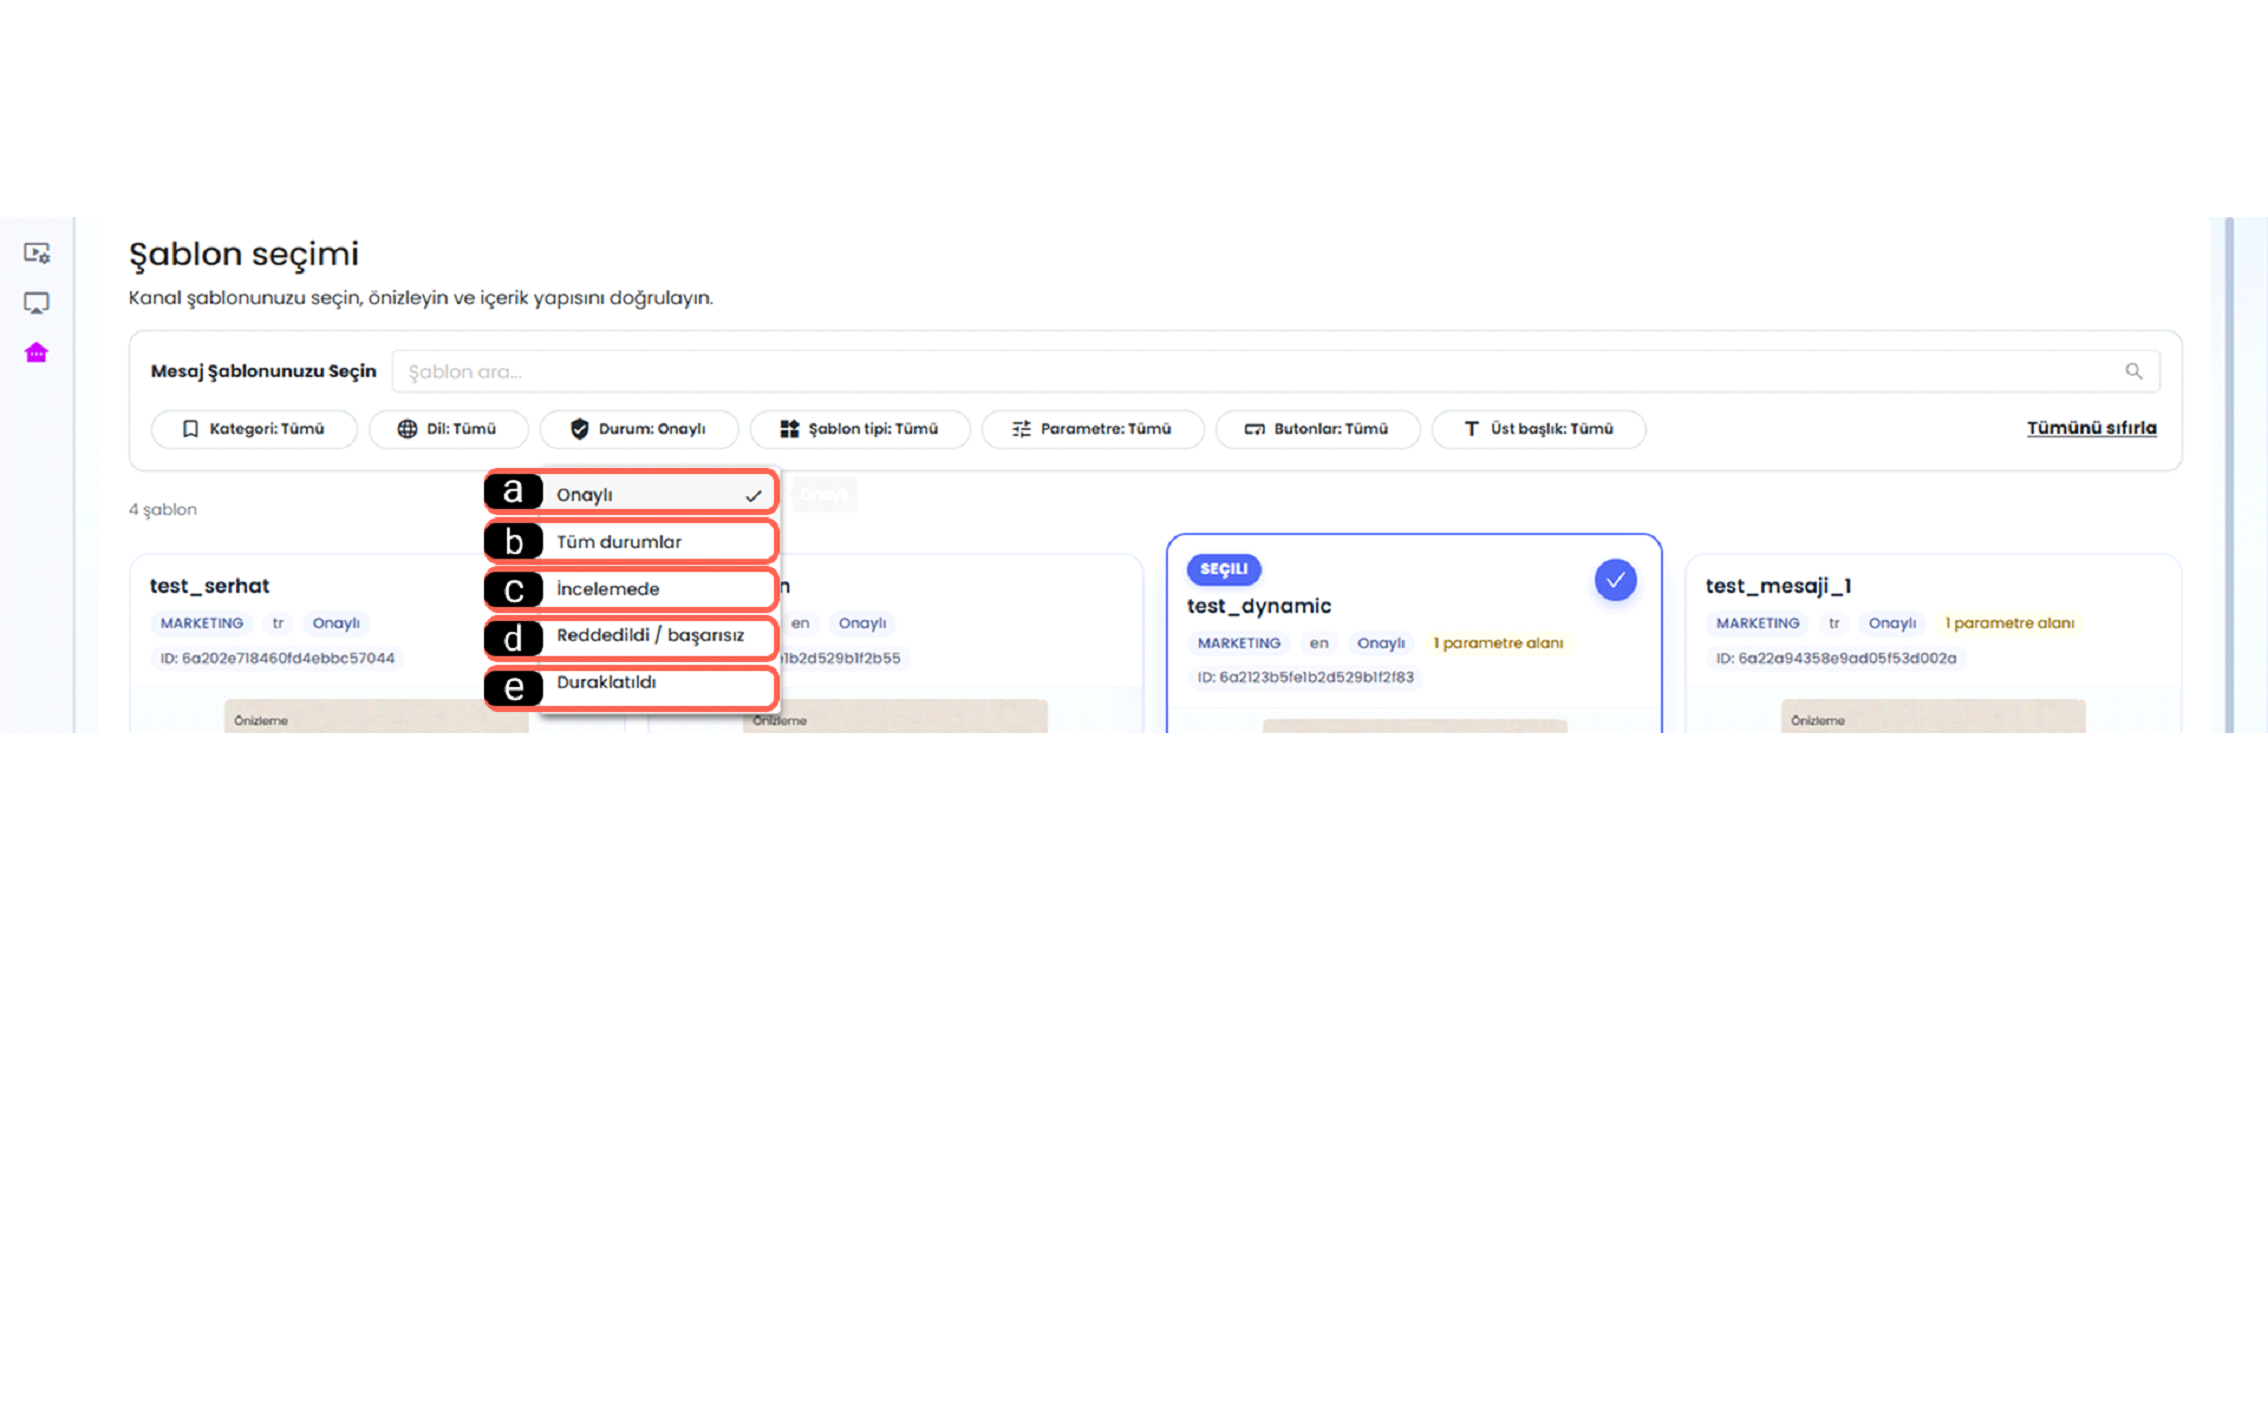
a - Approved
Lists templates that are approved and ready for sending. These templates can be used in bulk messaging.
b - All Statuses
Displays all message templates without applying any status filter. Approved, under review, rejected, and paused templates are listed together.
c - Under Review
Shows templates that have not yet completed the approval process. These templates are still under evaluation.
d - Rejected / Failed
Lists templates that failed approval or were deemed unsuitable. These may require editing.
e - Paused
Shows templates that have been temporarily disabled and cannot be used in active campaigns.
2.e – Template Type
Allows filtering templates based on their structure or type. This helps users find the most suitable template format.
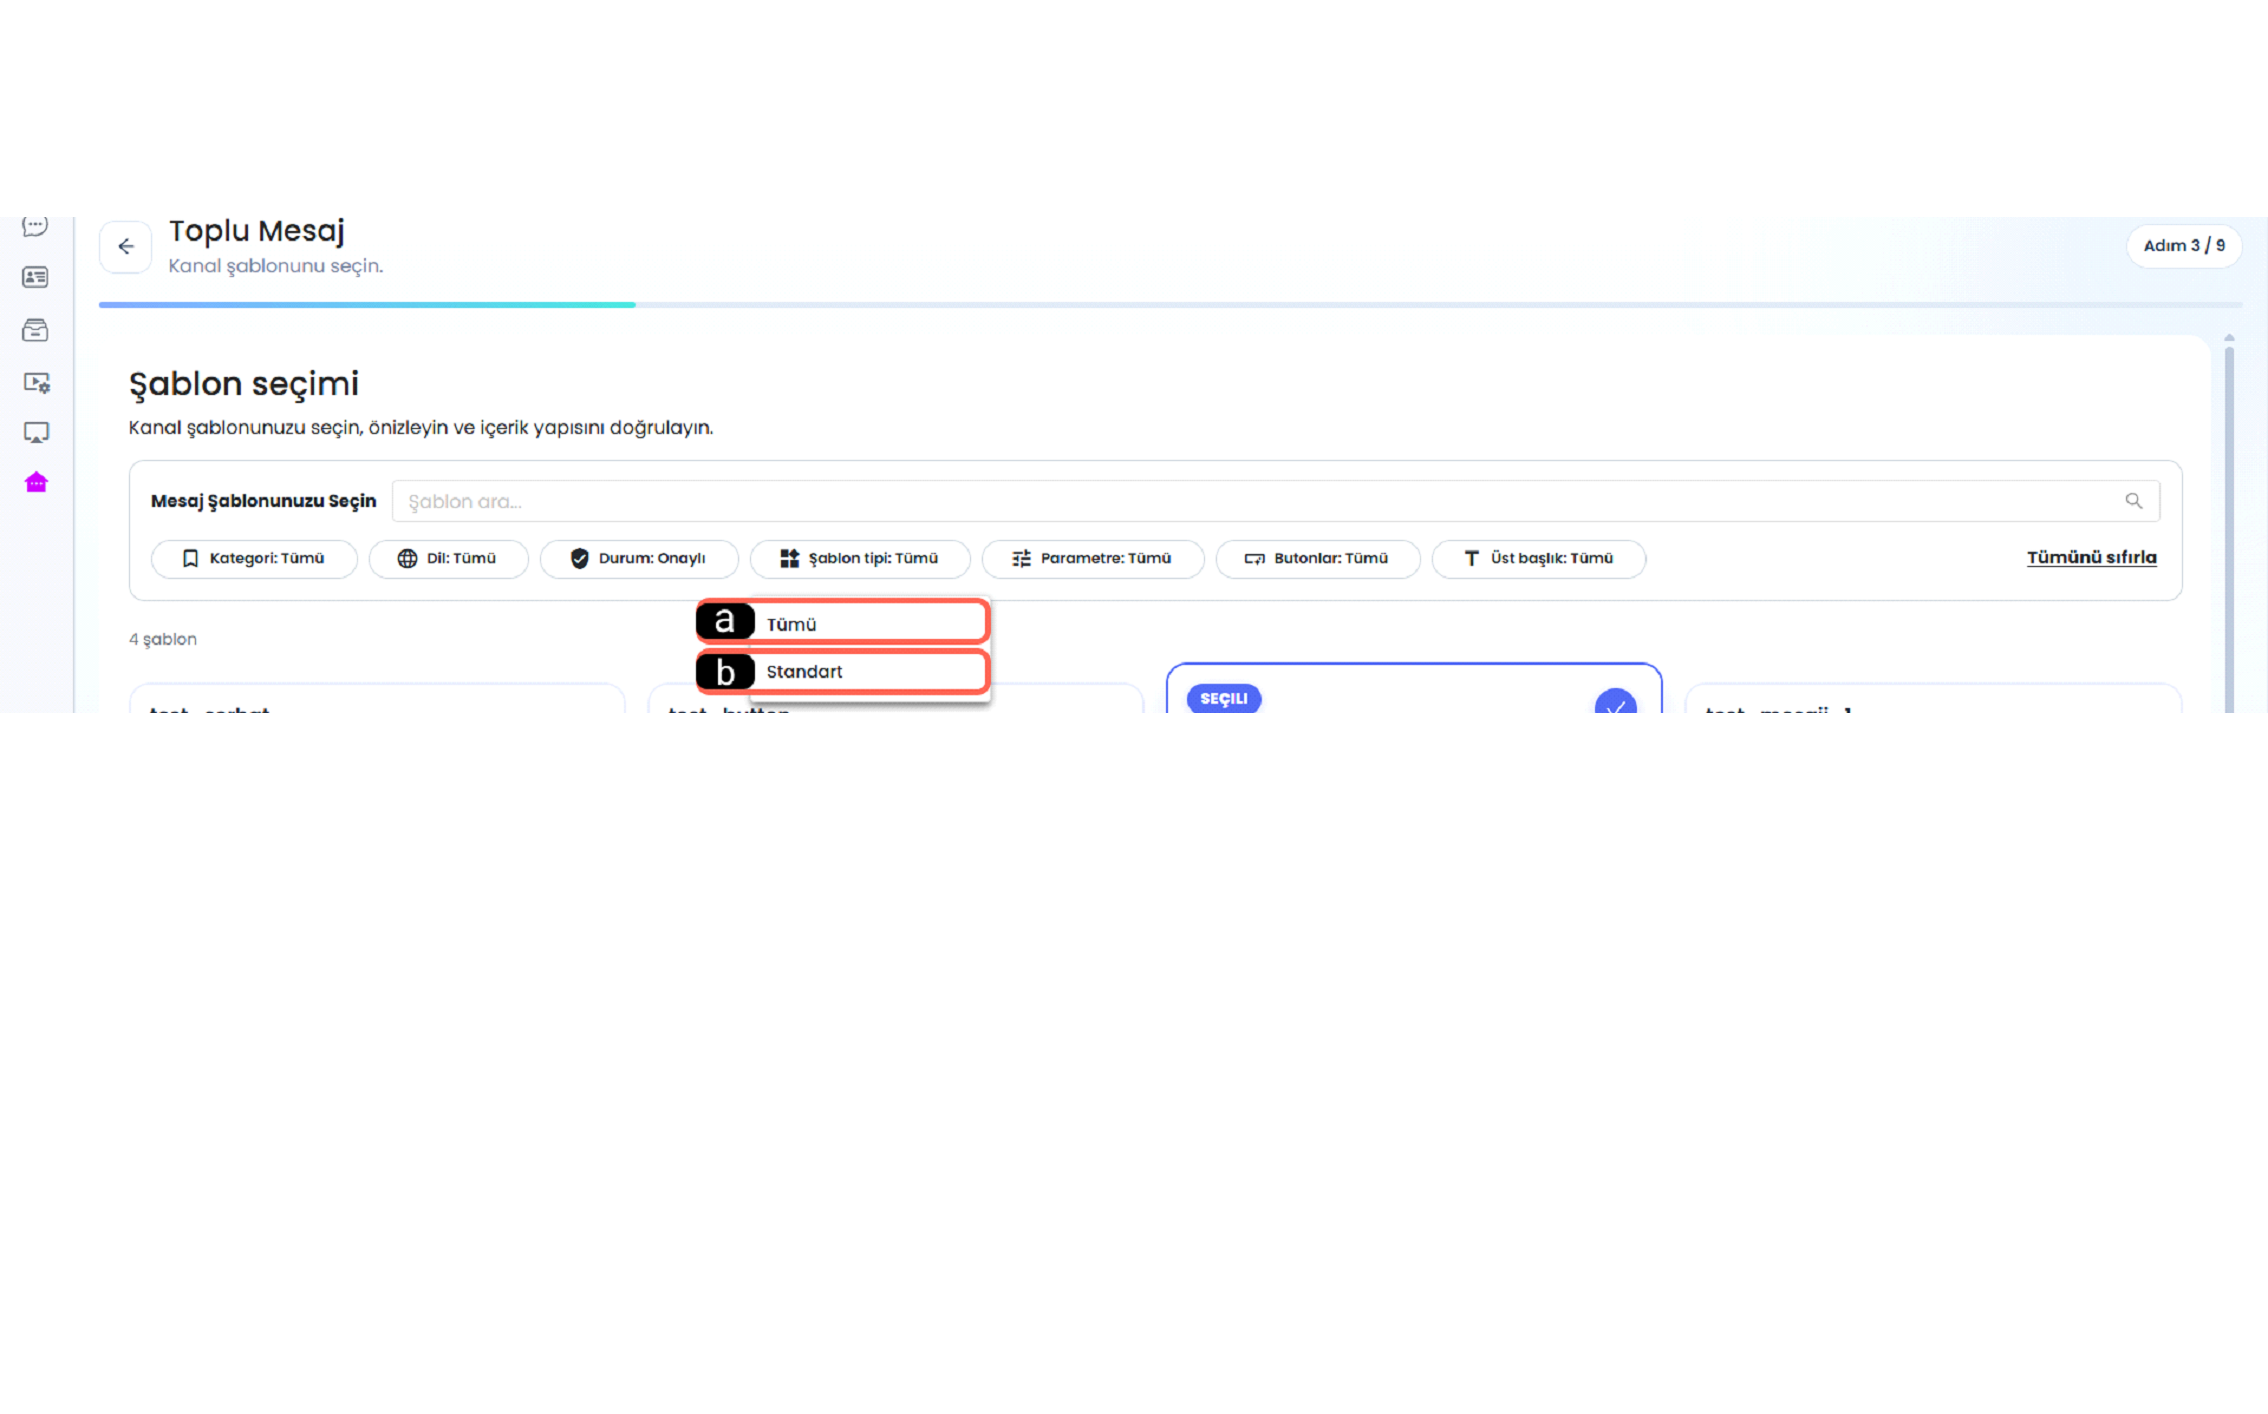
a - All
Displays all templates regardless of type.
b - Standard
Lists standard message templates used for basic messaging formats.
2.f – Parameter
Used to filter whether templates contain variable fields. Parameterized templates allow dynamic content such as names, order details, or custom text.
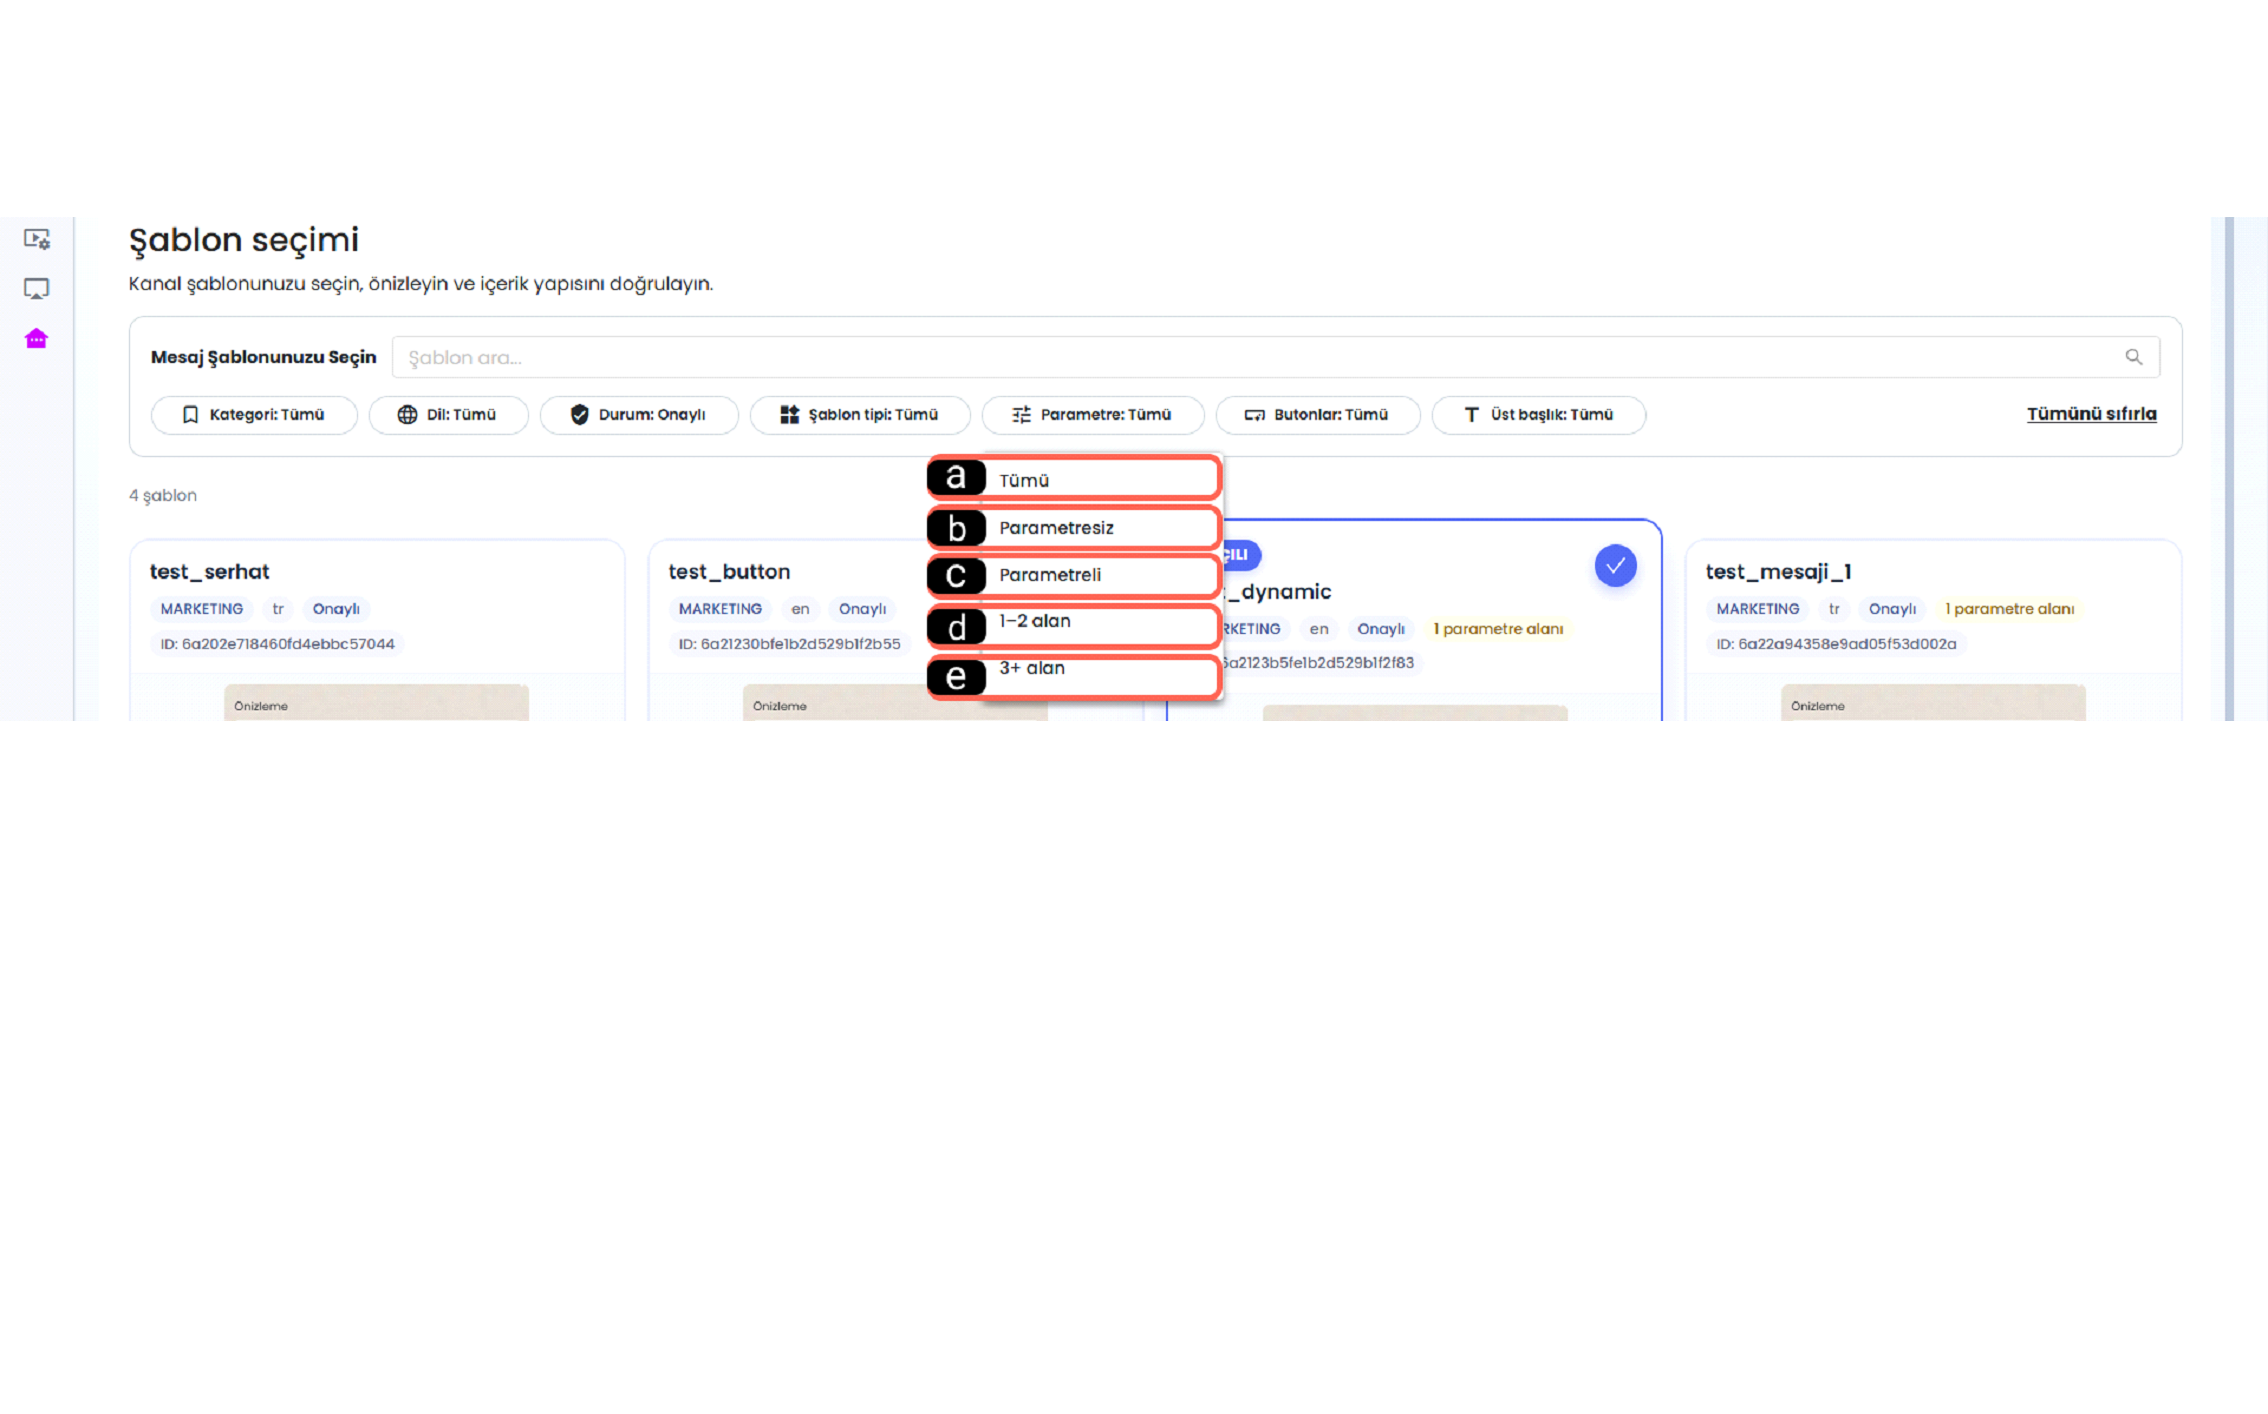
a - All
Displays all templates regardless of parameter usage.
b - No Parameters
Lists templates without any variable fields. Messages are sent identically to all recipients.
c - With Parameters
Displays templates containing variable fields that can be customized per recipient.
d - 1-2 Fields
Filters templates with a small number of variable fields for simpler personalization.
e - 3+ Fields
Lists templates with three or more variable fields for more detailed personalization.
2.g – Buttons
A filter used to determine whether templates contain action buttons such as links, copy codes, or navigation actions.
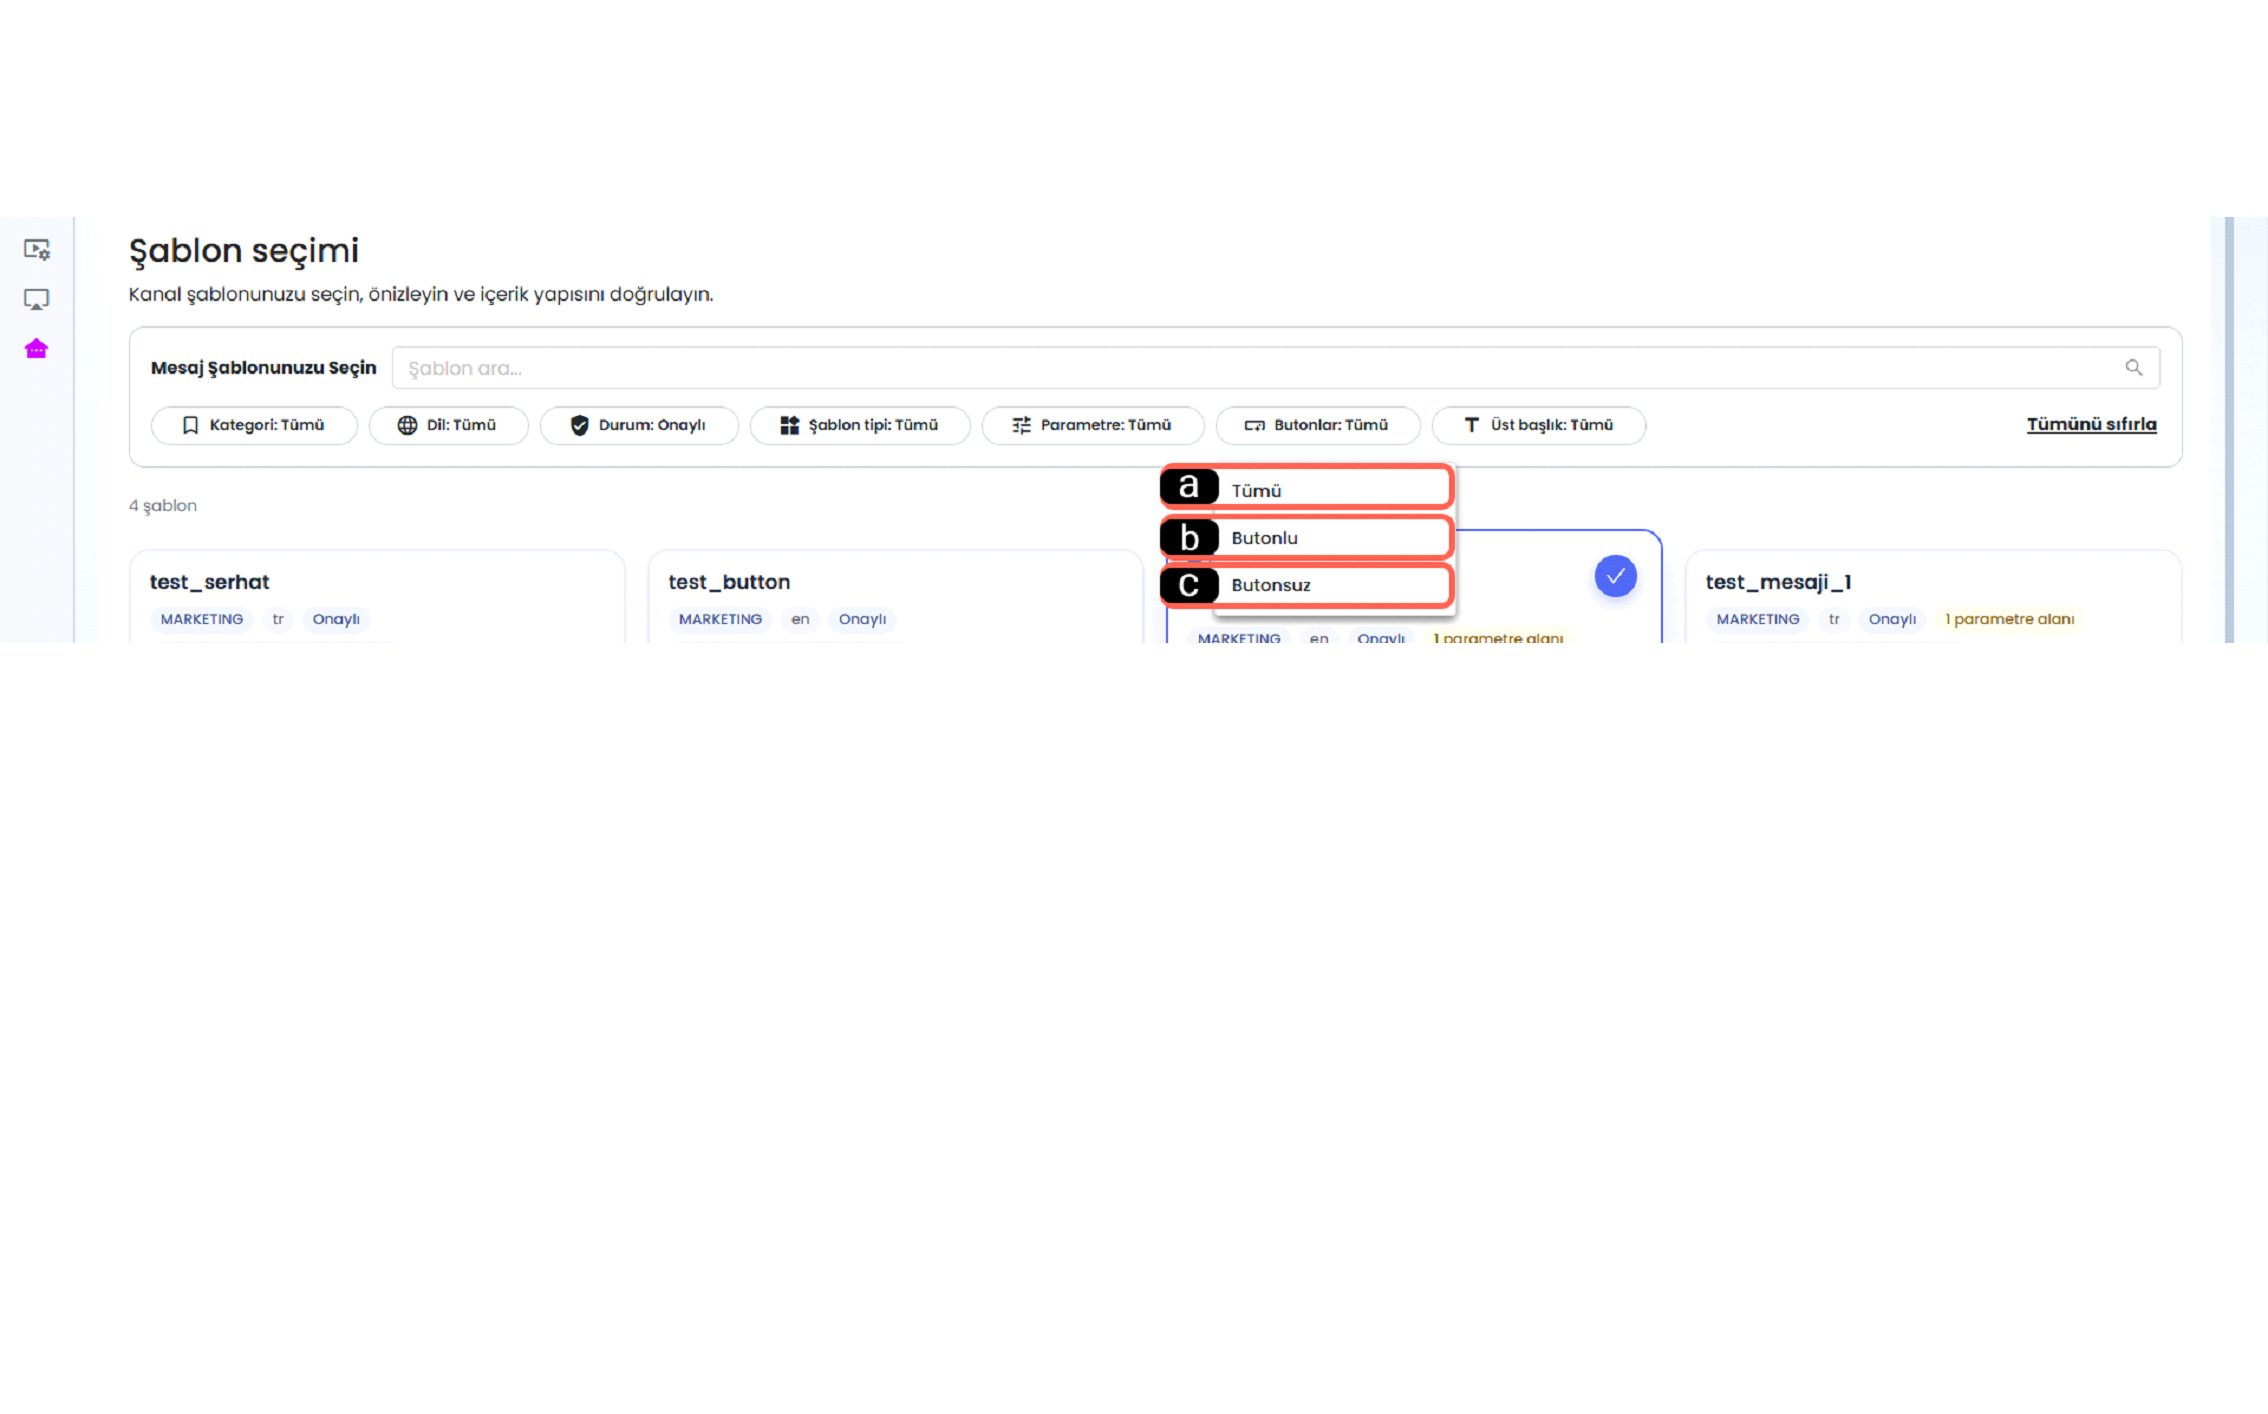
a - All
Displays all templates regardless of button usage.
b - With Buttons
Filters templates that contain interactive buttons.
c - Without Buttons
Shows templates without any buttons, typically text-only or informational messages.
2.h – Header
A filter that determines whether templates contain a header section such as title, image, or file.
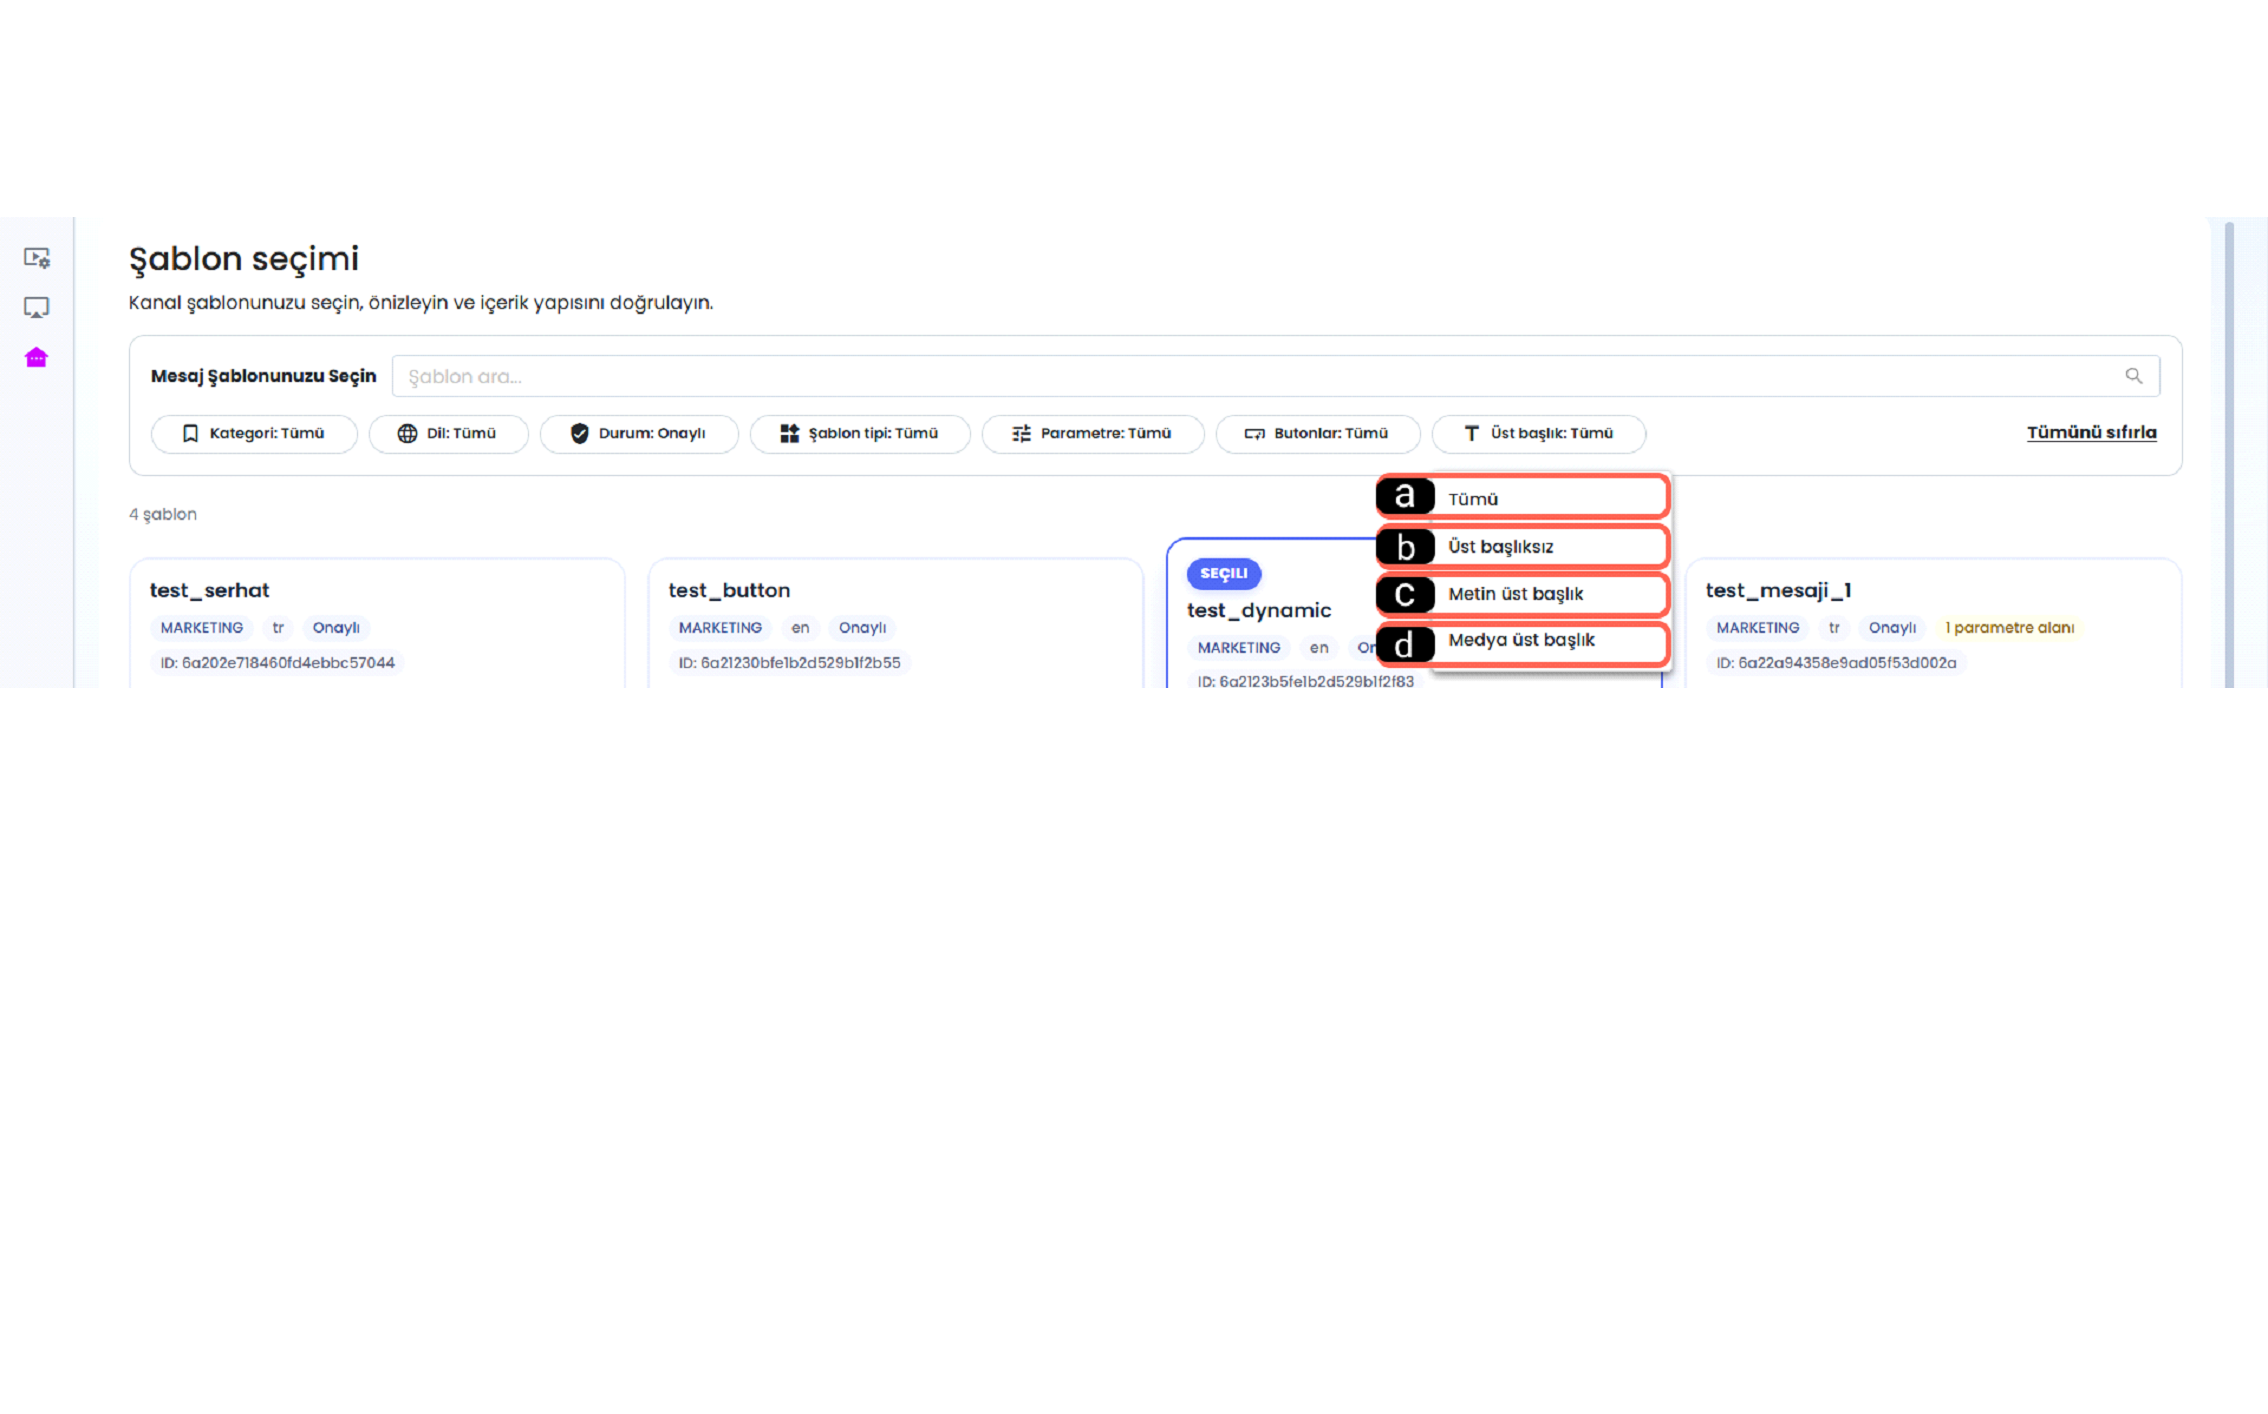
a - All
Displays all templates regardless of header usage.
b - No Header
Lists templates without any header section.
c - Text Header
Shows templates that contain a text-based header.
d - Media Header
Lists templates that contain media such as images, videos, or files in the header section.
2-) Message Template Cards
Message Template Cards display available templates for bulk messaging. Each card includes template name, category, language, approval status, parameter information, template ID, and message preview. Users select a template to define the message content for sending.
3-) Phone and Parameter Mapping
The Phone and Parameter Mapping area ensures alignment between selected audience data and the message template. It defines which phone number will be used and maps template variables with customer data to ensure correct message delivery.
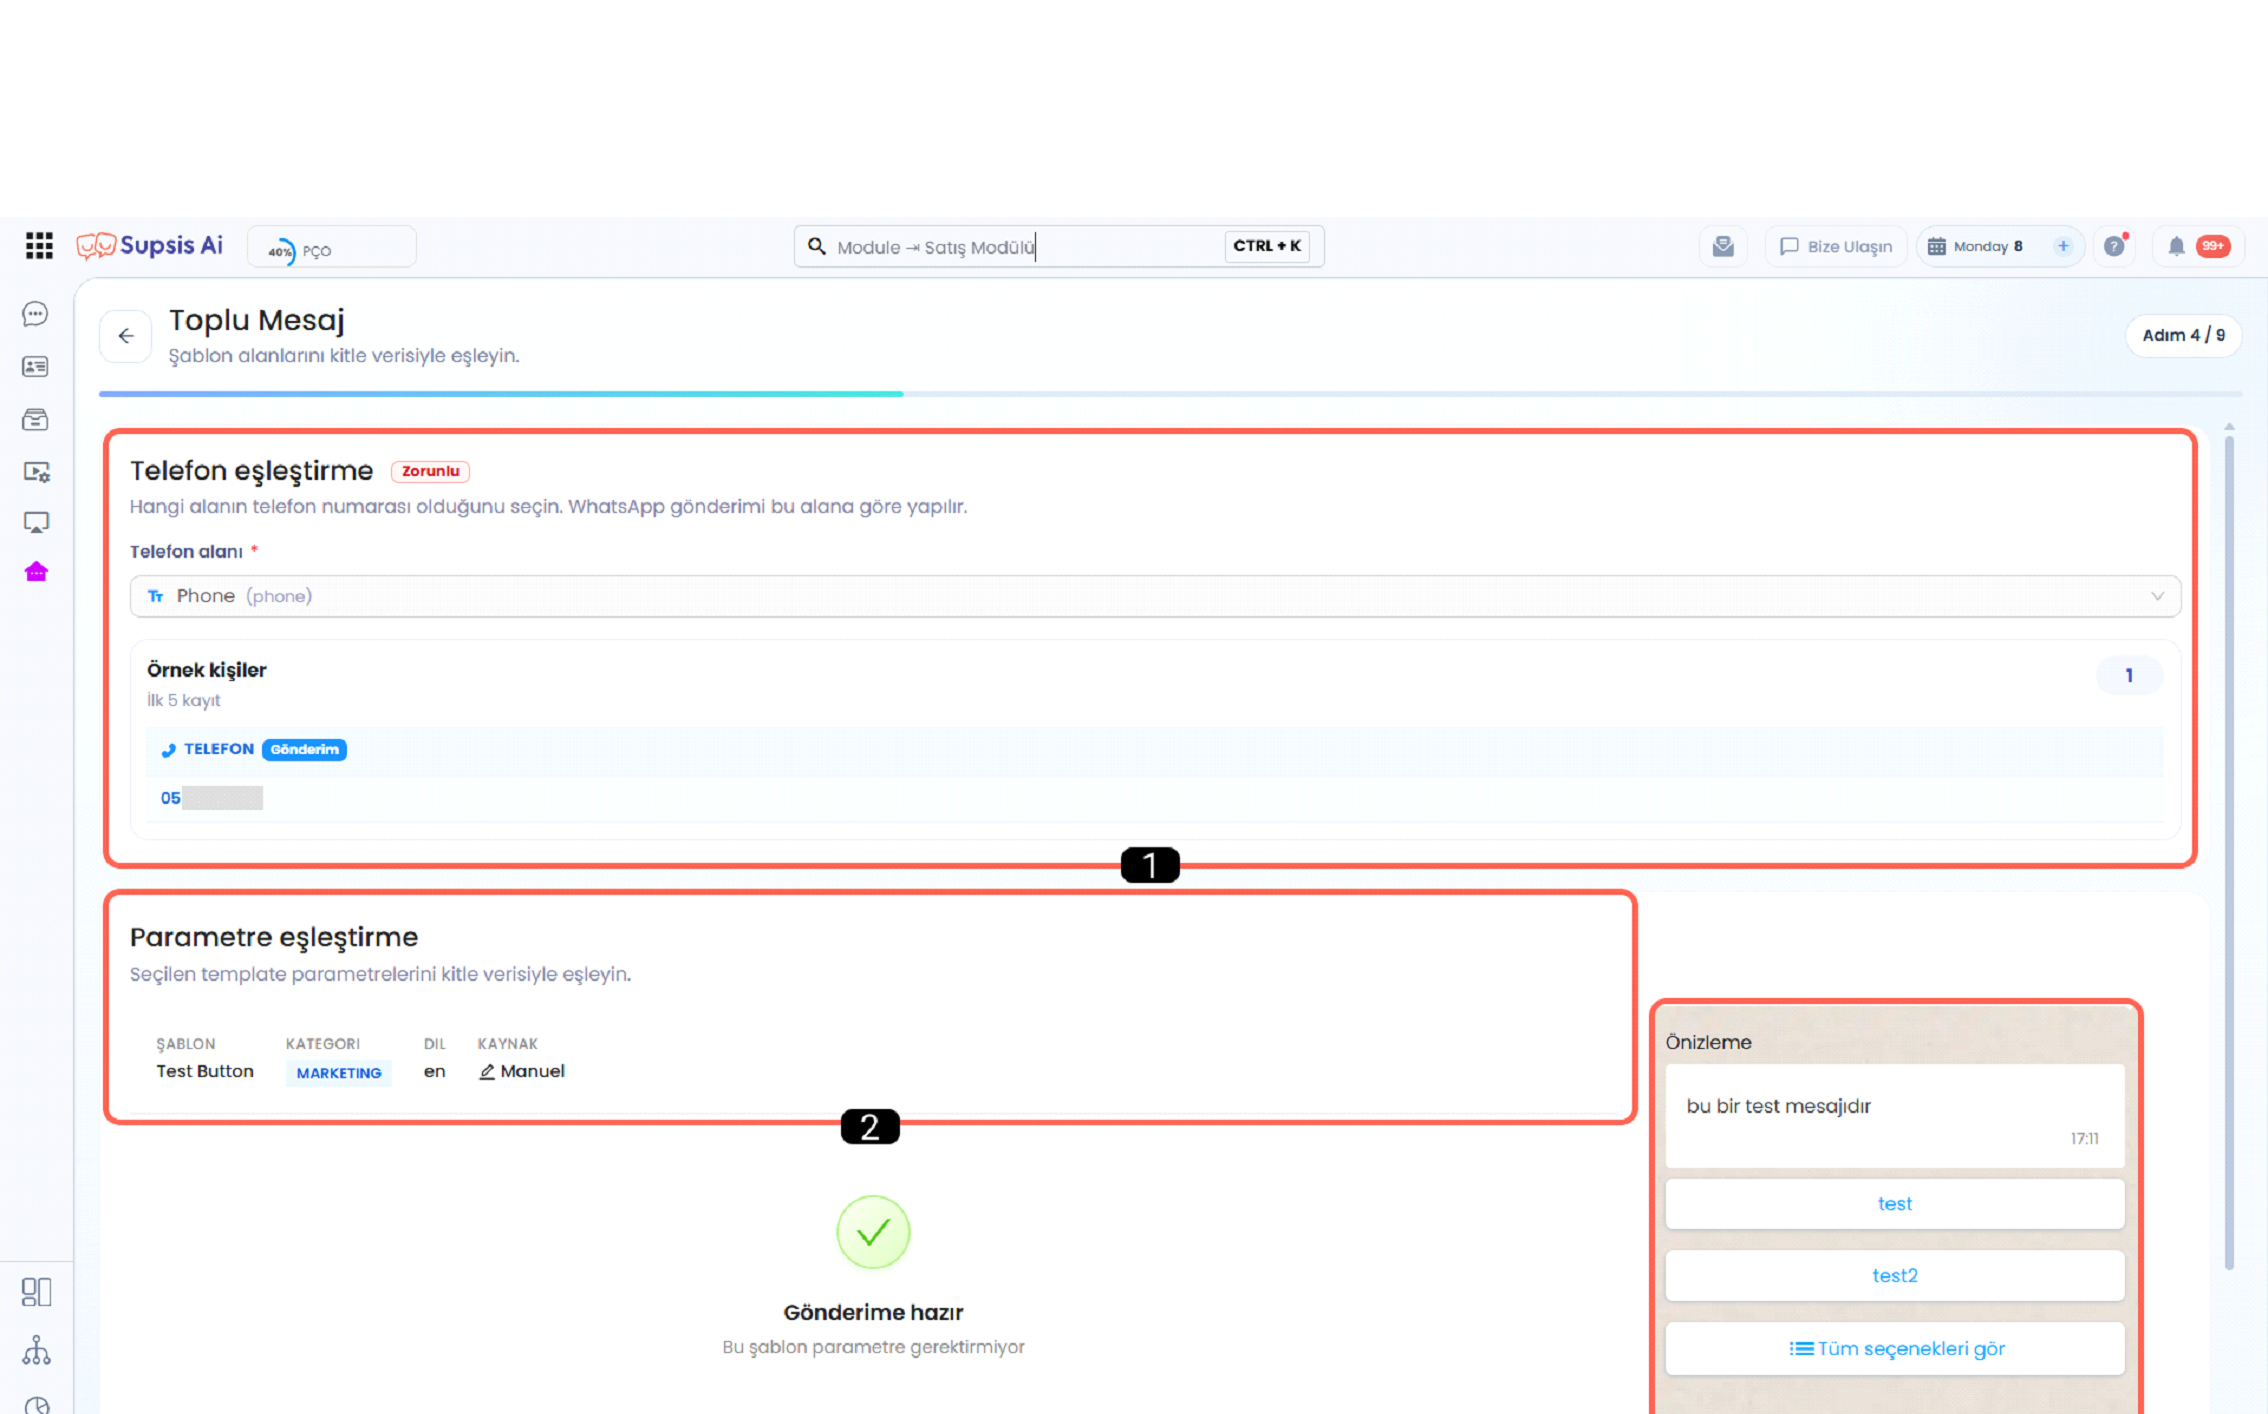
- Phone Field Mapping
- Template Parameter Mapping
- Template Preview
3.a – Phone Field Mapping
Defines which phone number field will be used for sending messages. Sample contacts are shown for verification before sending.
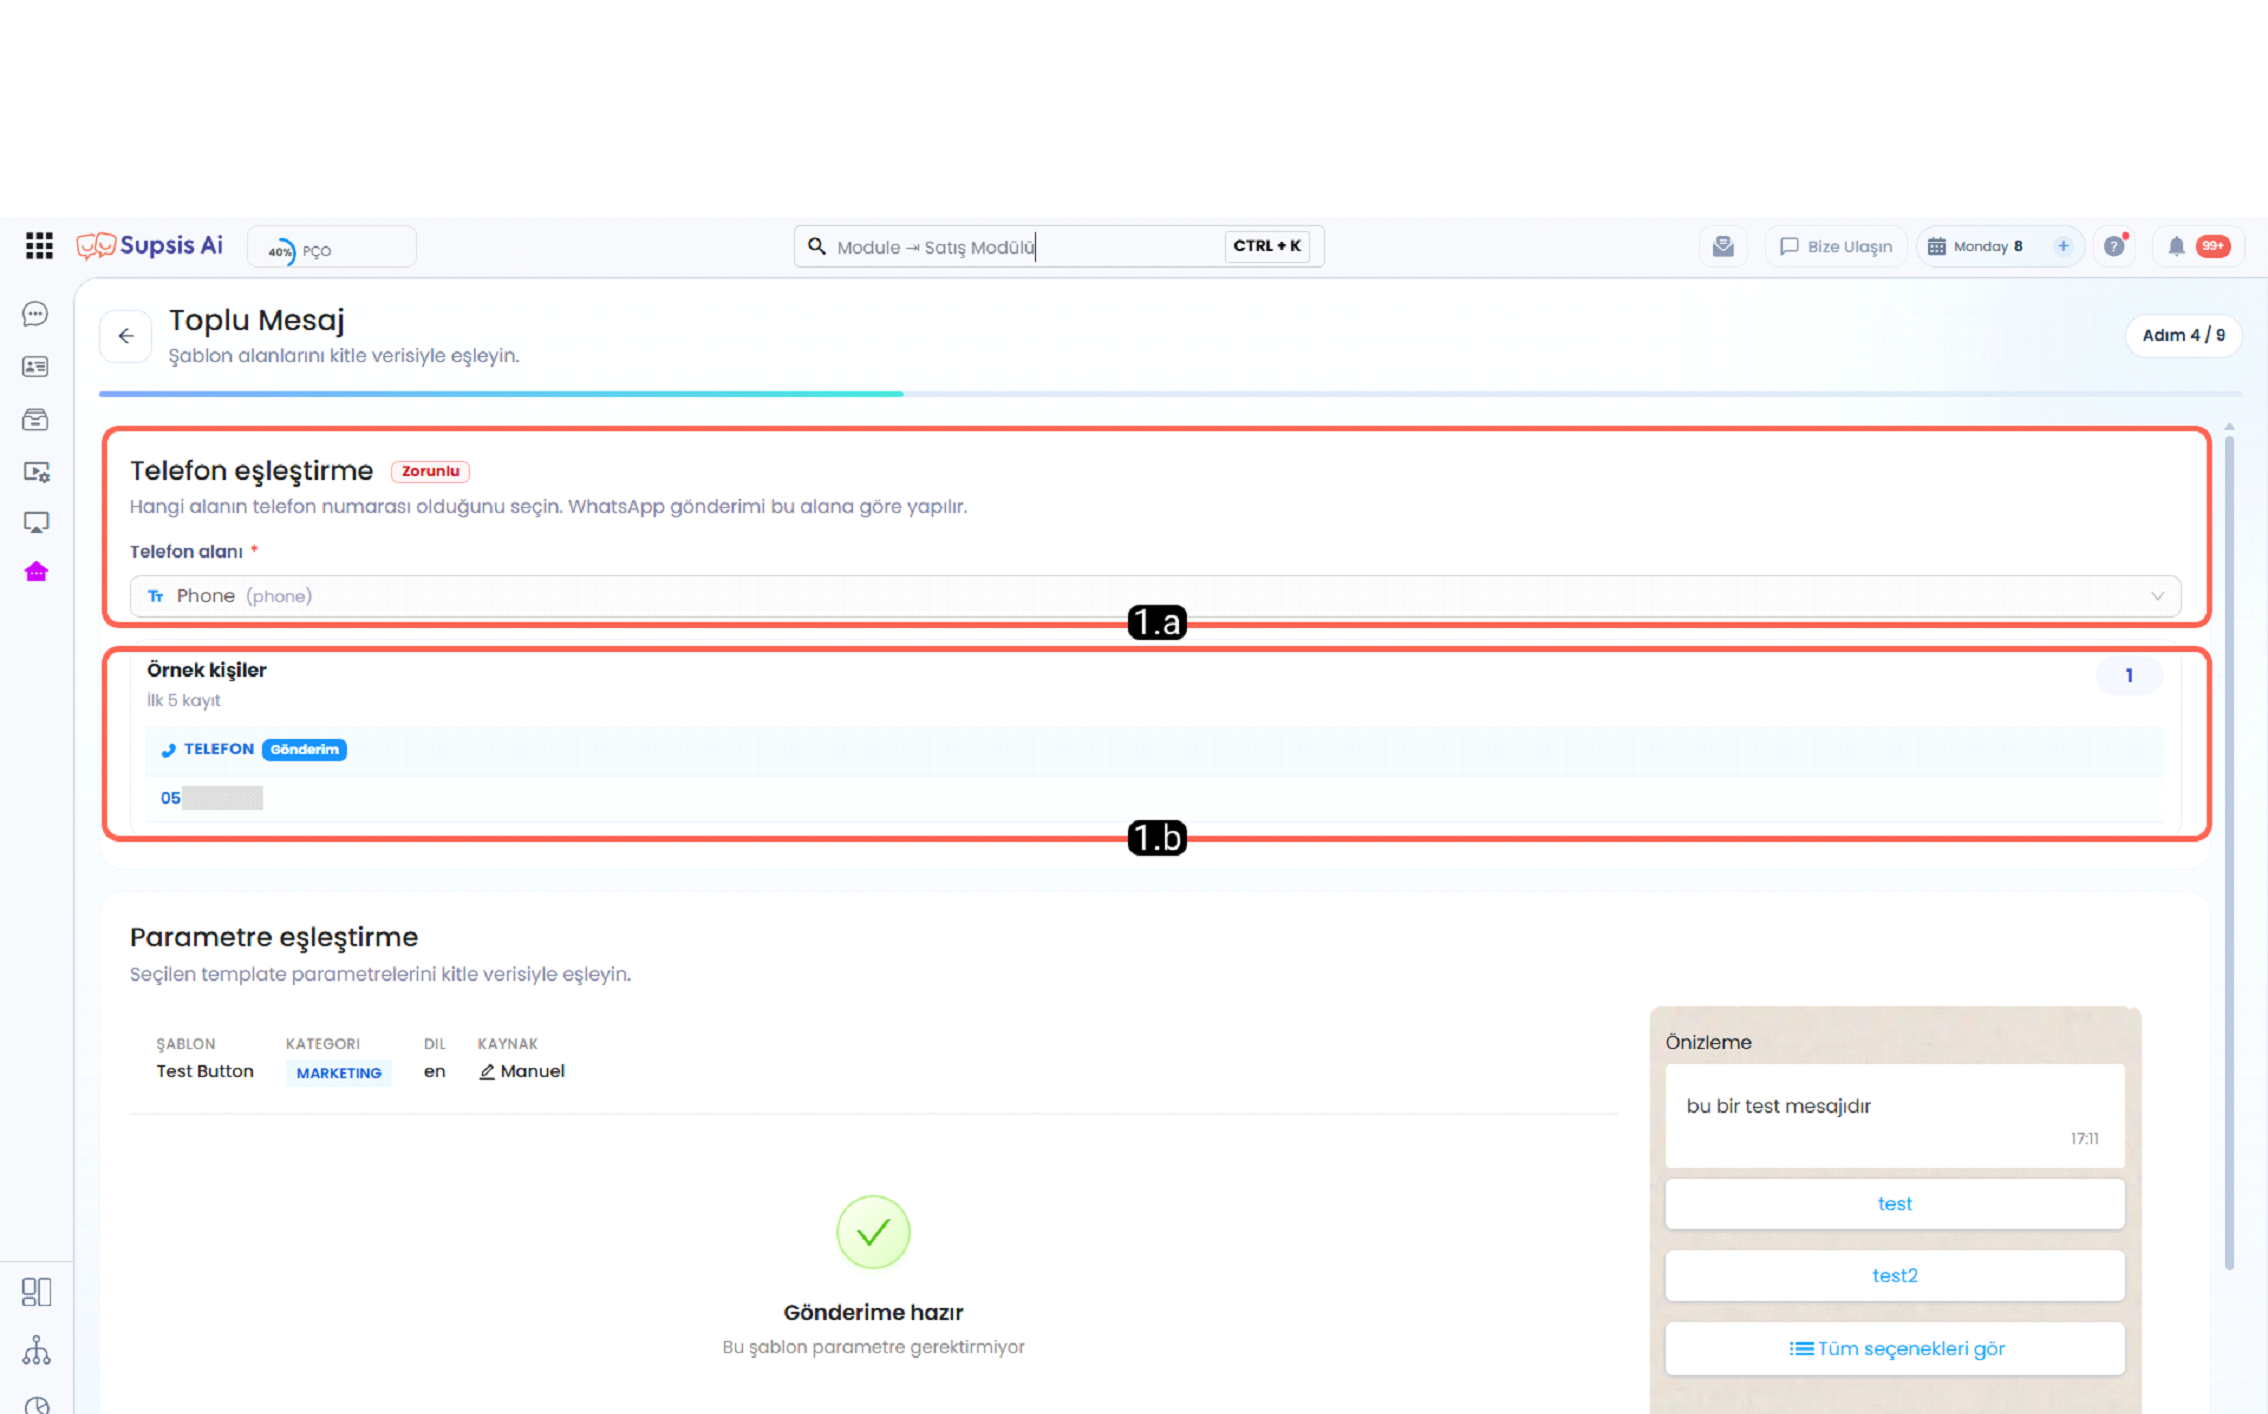
3.b – Phone Field Selection
Defines which data field will be used as the phone number source for WhatsApp messaging.
3.c – Sample Contacts
Displays sample records from the selected phone field for verification.
3.d – Template Parameter Mapping
Maps variable fields in the selected template with audience data. Template name, category, language, and source information are displayed for verification.
3-) Template Preview
Shows how the selected message template will appear to the recipient, including text, buttons, and media elements.
4-) Publishing Information and Sending Time
The Publishing Information and Sending Time area is the section where the name, description, and sending time of the bulk message to be created are determined. On this screen, the user can give the bulk message a broadcast name, add an optional description, and choose to send the message immediately or schedule it for a future date.
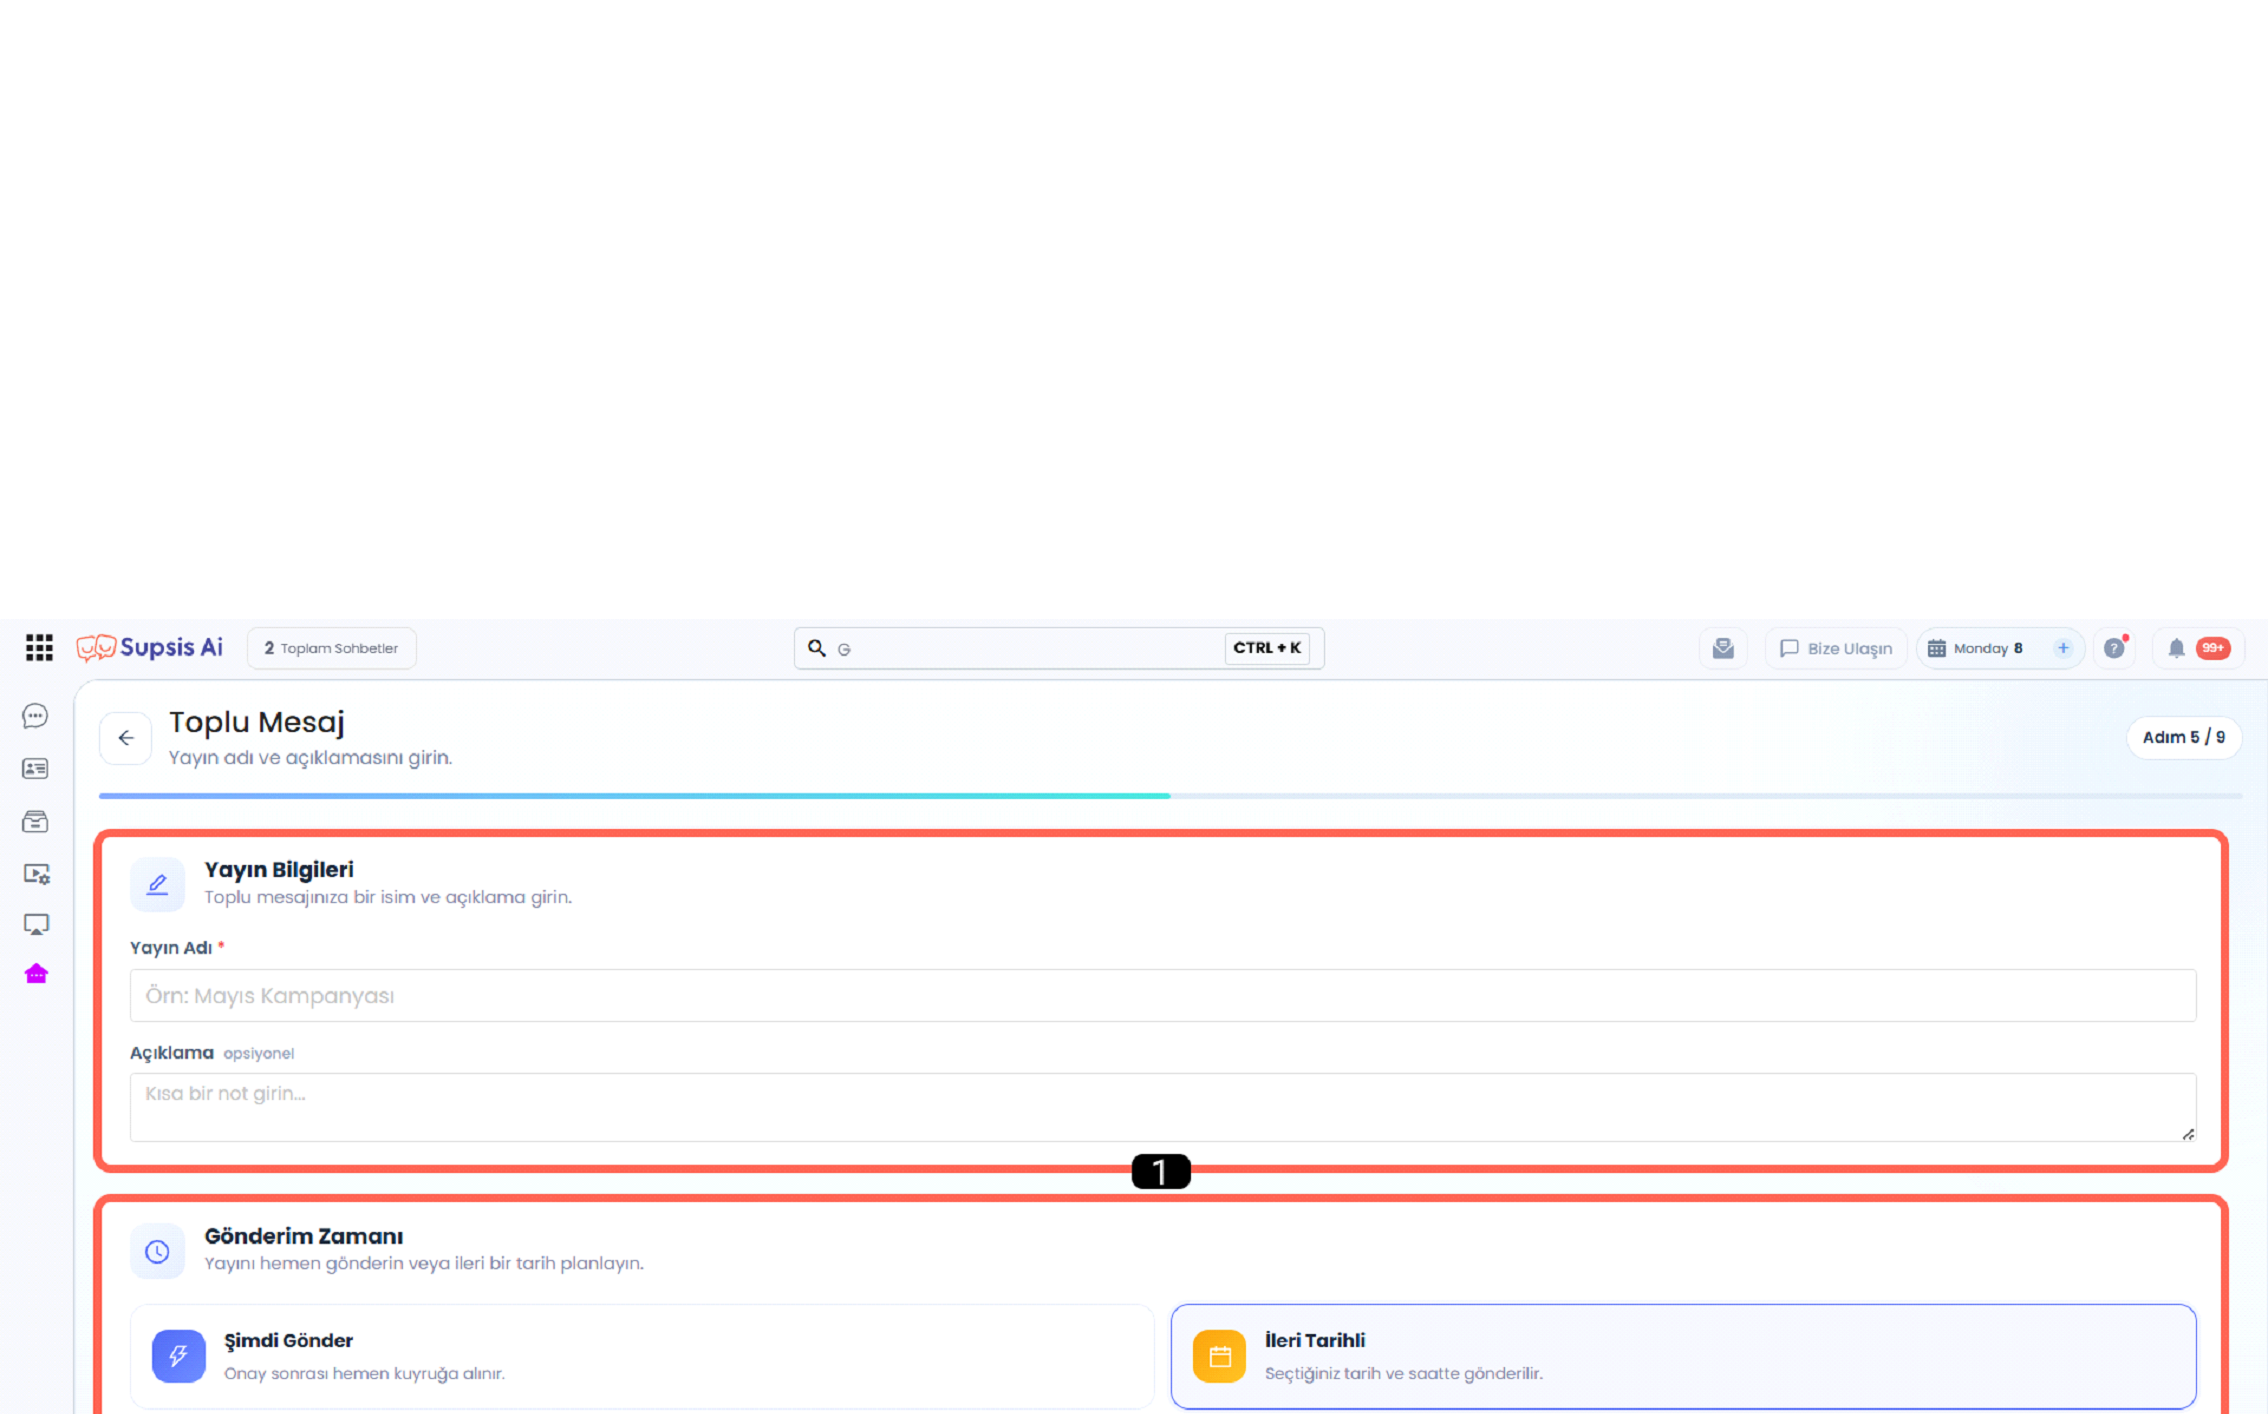
- Publishing Information Area
- Sending Time Scheduling Area
4.a – Publishing Information Area
The Publishing Information area is the section where basic details belonging to the created bulk message are entered. In this area, a broadcast name is determined for the bulk message, and an optional description can be added. The entered information allows the bulk message to be easily recognized and managed later in the list.
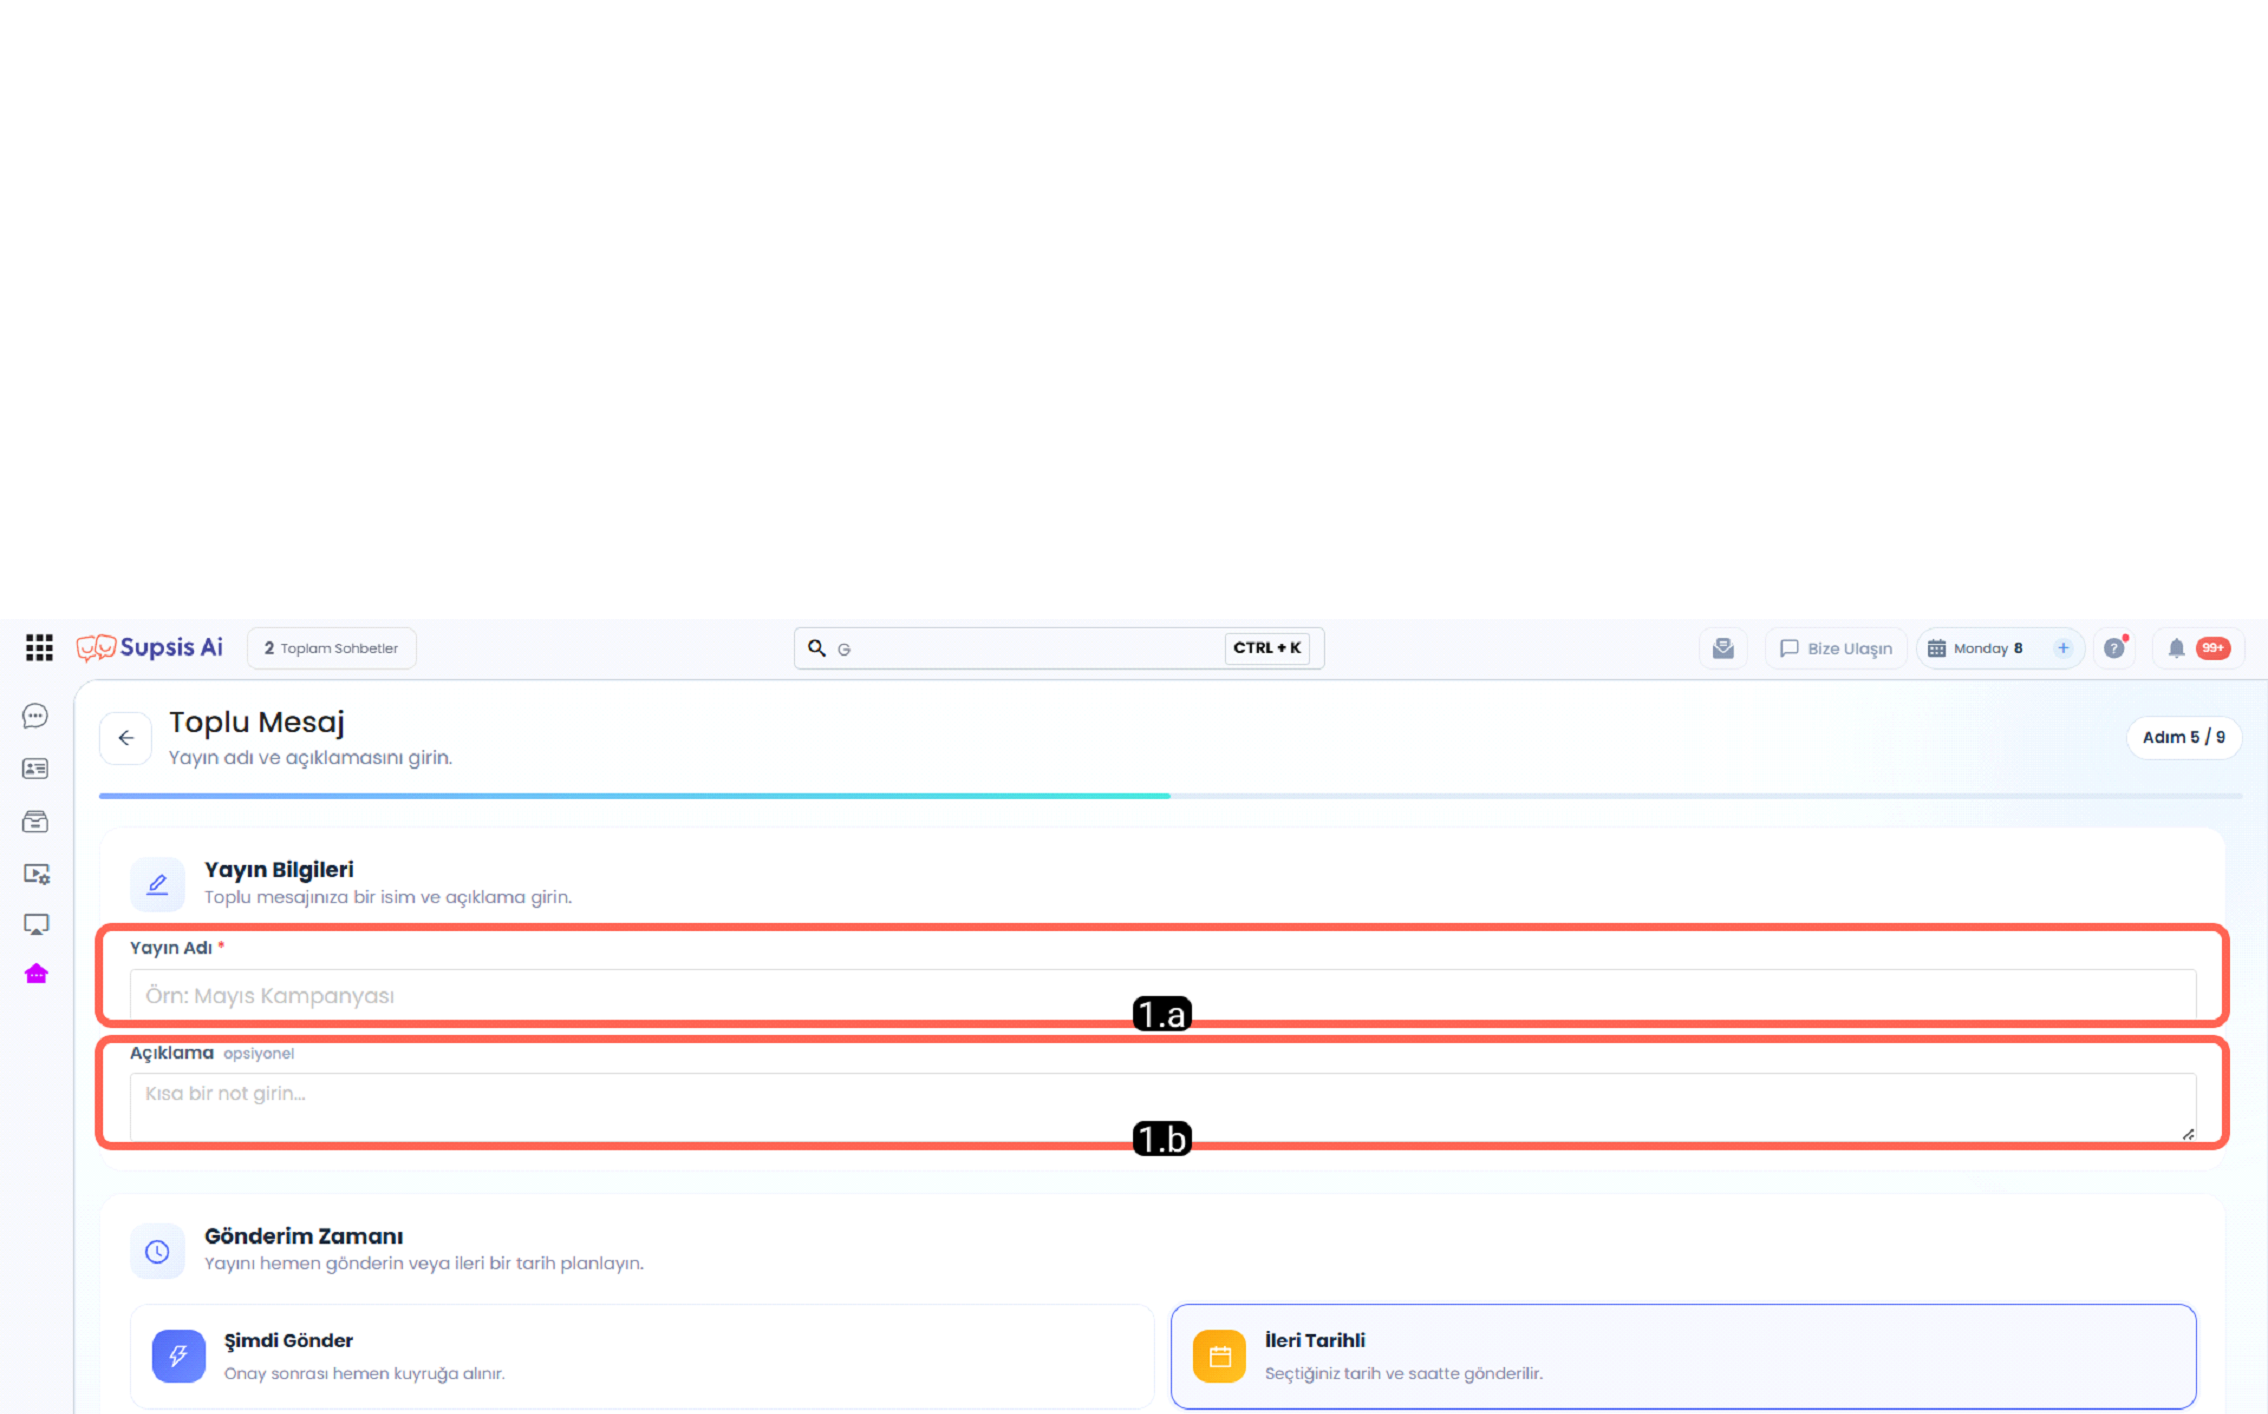
4.b – Publishing Name
The Publishing Name field is used to name the created bulk message. This name allows the bulk message to be easily distinguished on the list screen and found later.
4.c – Description
The Description field is used to add a short note or additional information related to the bulk message. This field is optional and allows writing an explanation about the purpose of the campaign.
4.d – Sending Time Scheduling Area
The Sending Time Scheduling Area is used to determine when the bulk message will be sent. The user can choose to send the message immediately or plan a future delivery so that it is sent automatically at the specified date and time.
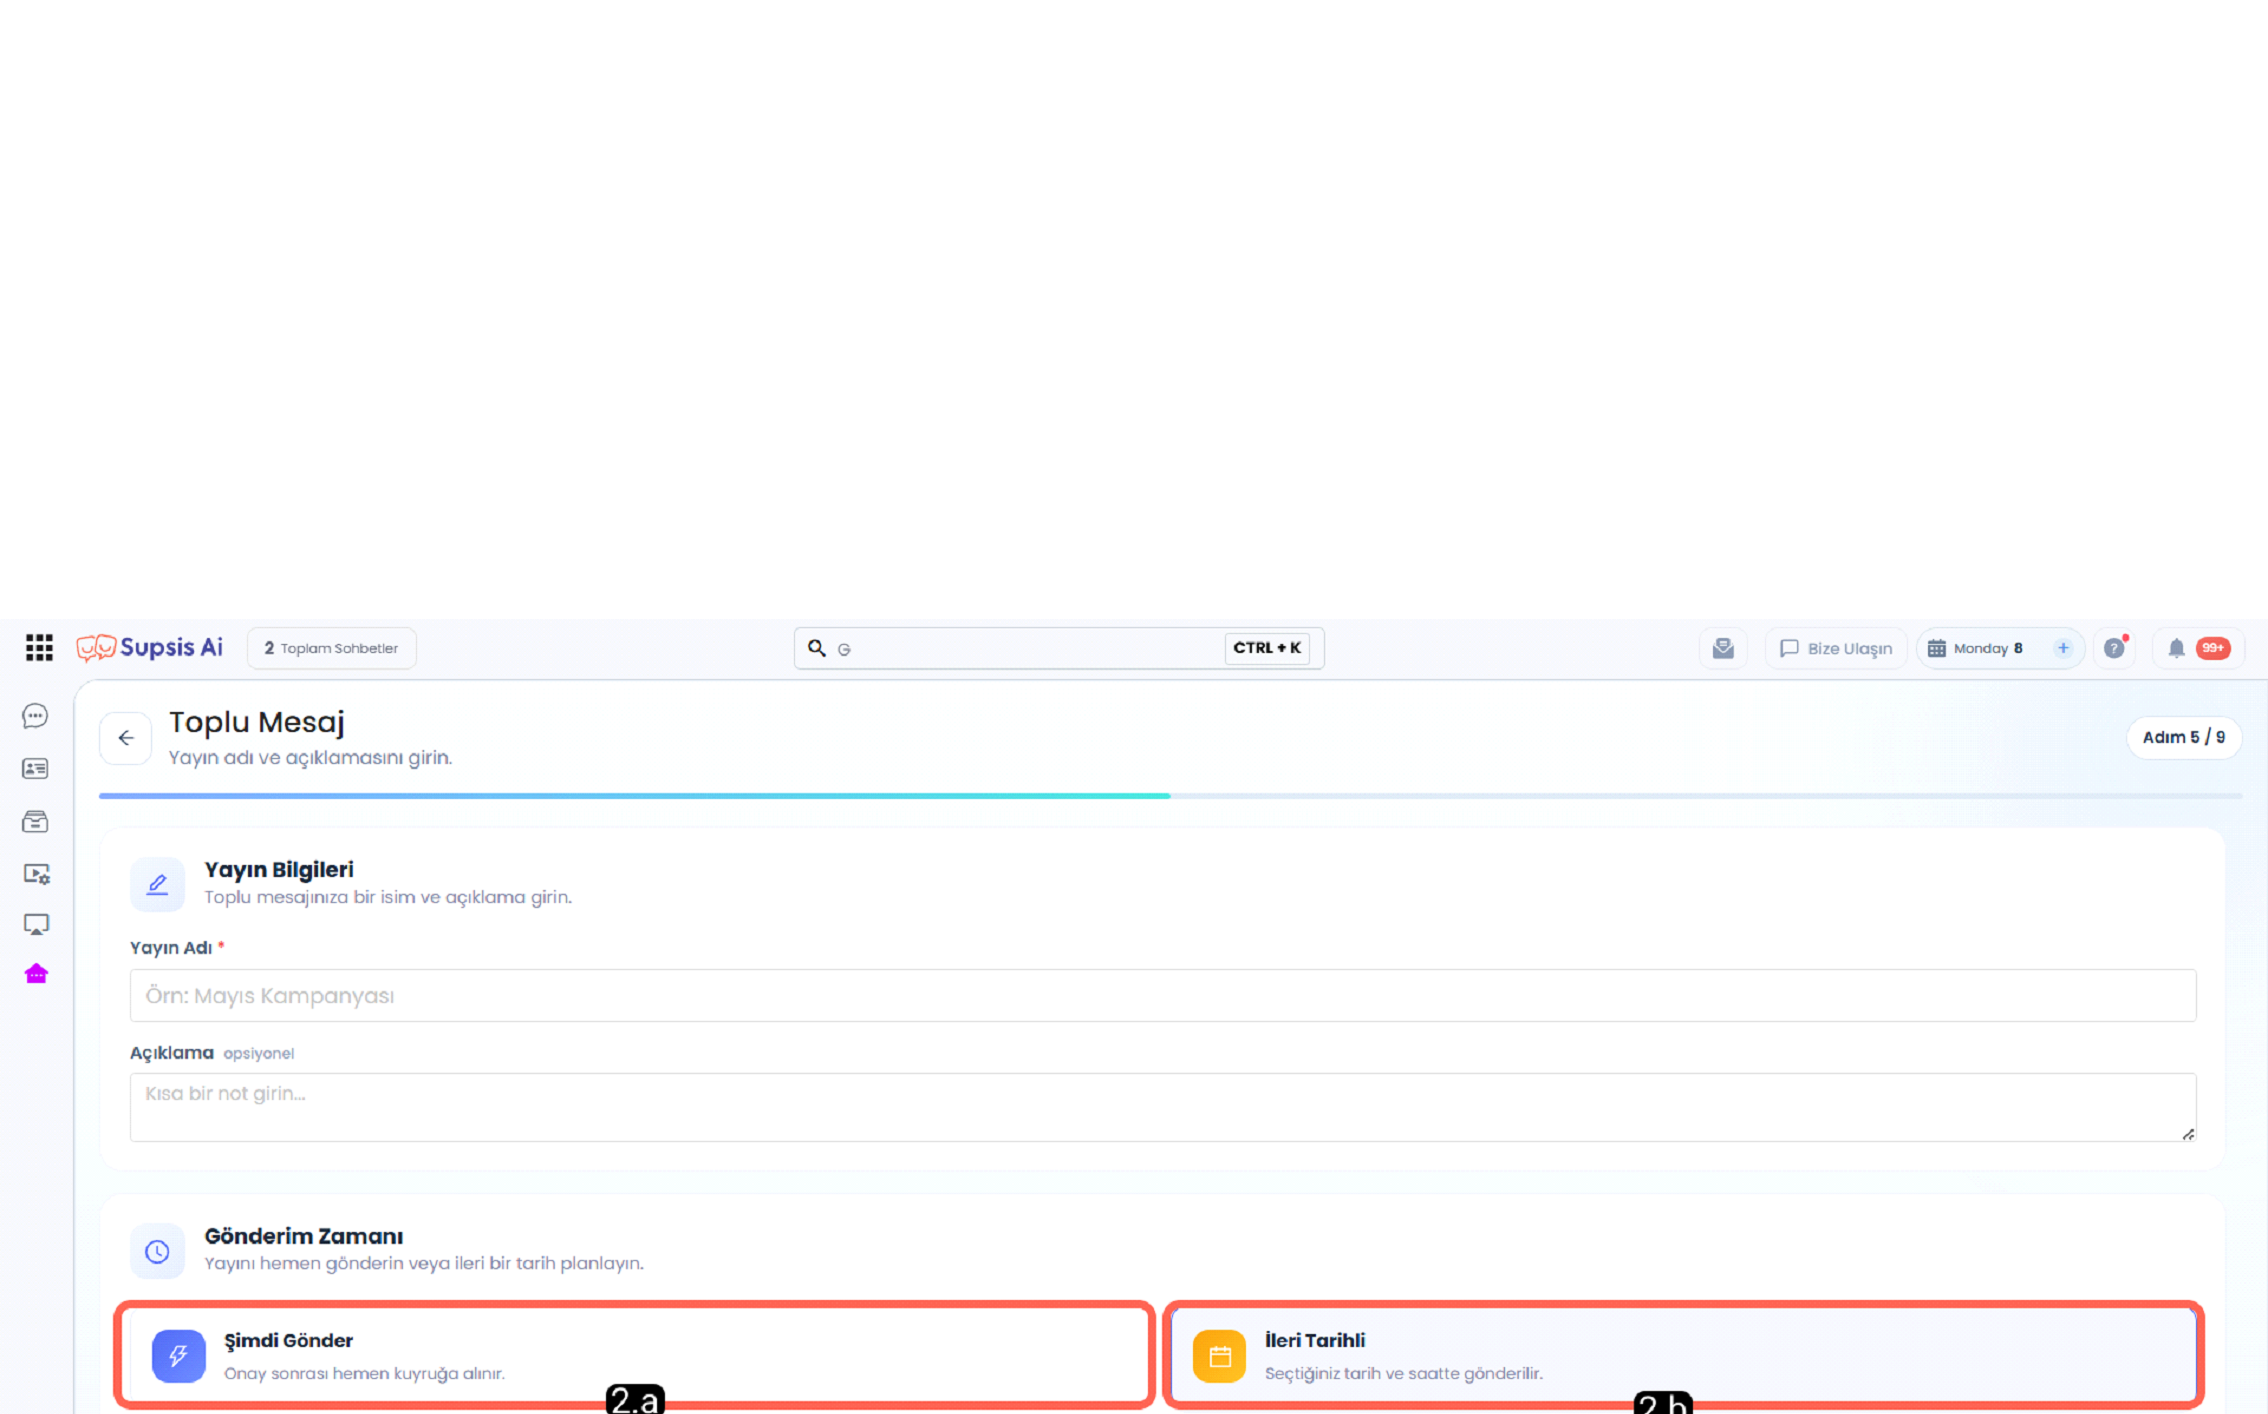
4.e – Send Now
The Send Now option ensures that the bulk message is placed in the sending queue immediately after approval. This option is used to start the sending process directly without scheduling the message for a future date.
4.f – Scheduled
The Scheduled option allows the bulk message to be sent at a designated date and time. When this option is used, the delivery time can be planned in advance.
a - Date
The Date field is used to determine which day the message will be sent when scheduled delivery is selected. The user can select the sending date from this field.
b - Time
The Time field determines at what time during the day the message will be sent for a scheduled delivery. The bulk message is planned according to the selected date and time information.
5-) Queue Selection
The Queue Selection area is used to determine at what speed and priority level the bulk message will be processed. In this section, the user can plan the sending process by selecting the appropriate option between the standard queue and the priority queue. The standard queue is the default sending option; the priority queue offers a faster and dedicated sending experience on eligible plans.
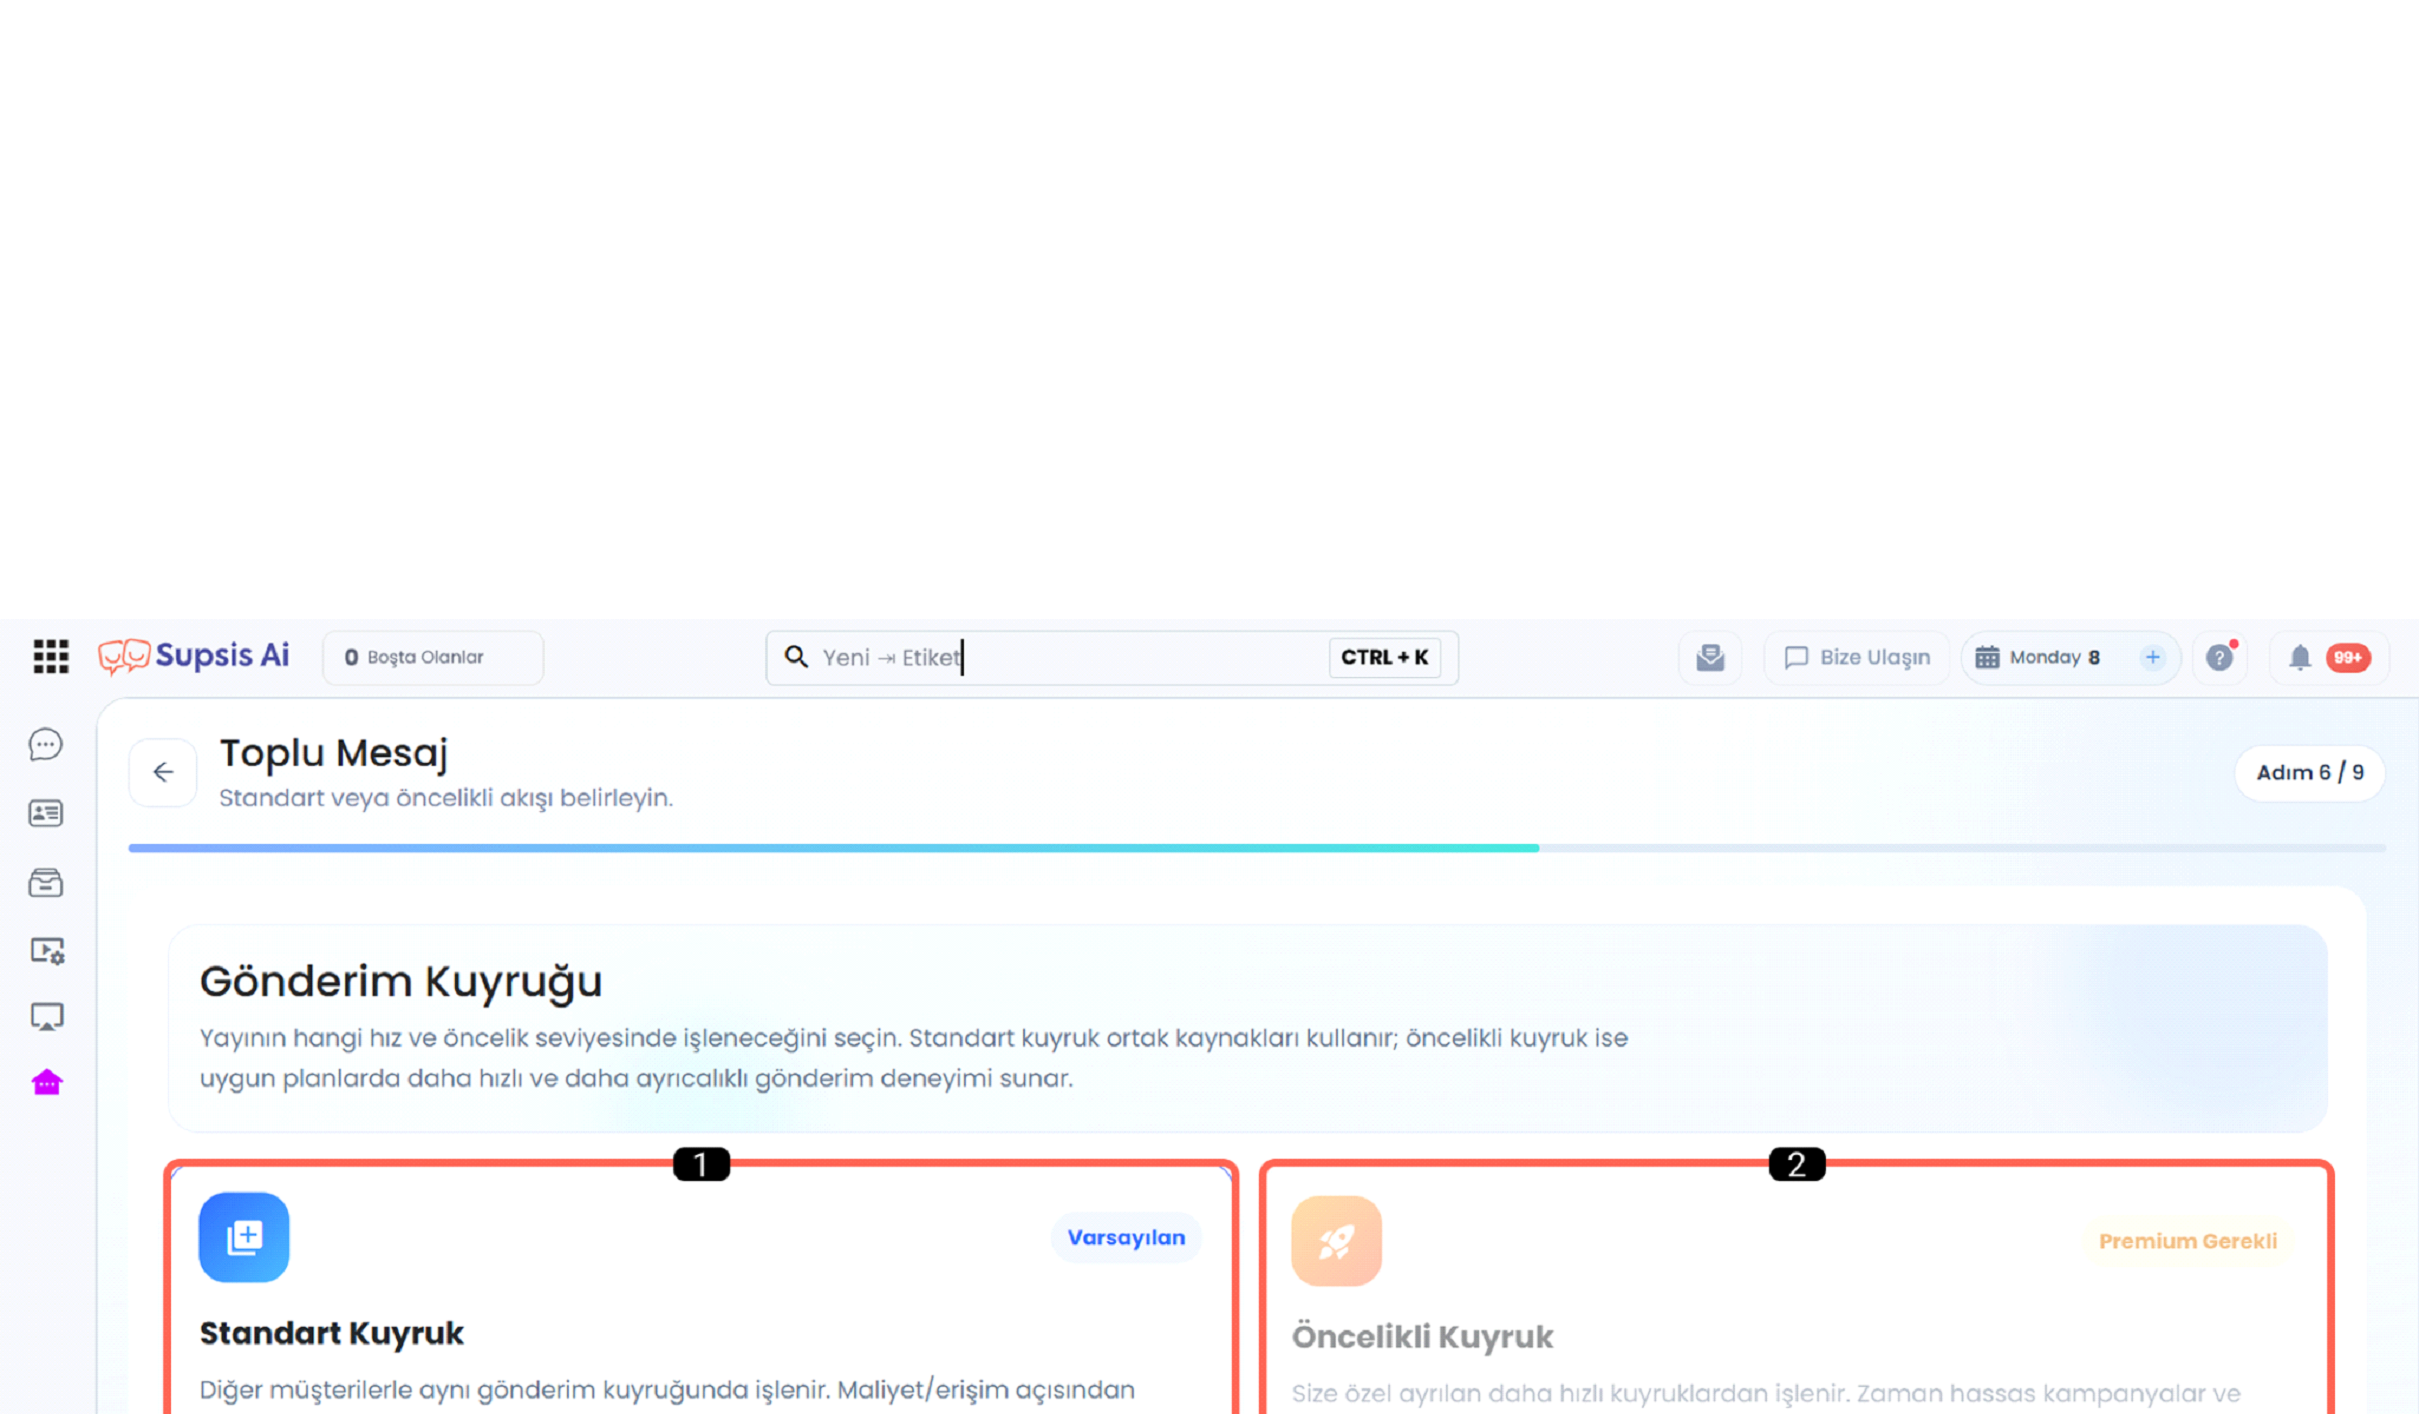
- Standard Queue
- Priority Queue
5.a – Standard Queue
The Standard Queue is the queue type that allows bulk message deliveries to be processed via the default sending order. Messages are queued and delivered according to system traffic and sending capacity. It offers a balanced and reliable sending process and is the preferred standard option for most campaigns and informational broadcasts.
5.b – Priority Queue
The Priority Queue is the queue type that ensures bulk message deliveries are processed with a higher priority compared to the standard queue. It can be used for time-sensitive campaigns, critical notifications, and broadcasts requiring rapid delivery. A Premium plan subscription is required to use this feature.
6-) Post Actions
The Post Actions area is used to define automated operations based on specific conditions after the bulk message delivery is completed. By adding a new post action in this section, the user can determine the actions that will run depending on the delivery or status outcome of the message. This way, post-bulk message operations can be managed in a more organized and automated manner.
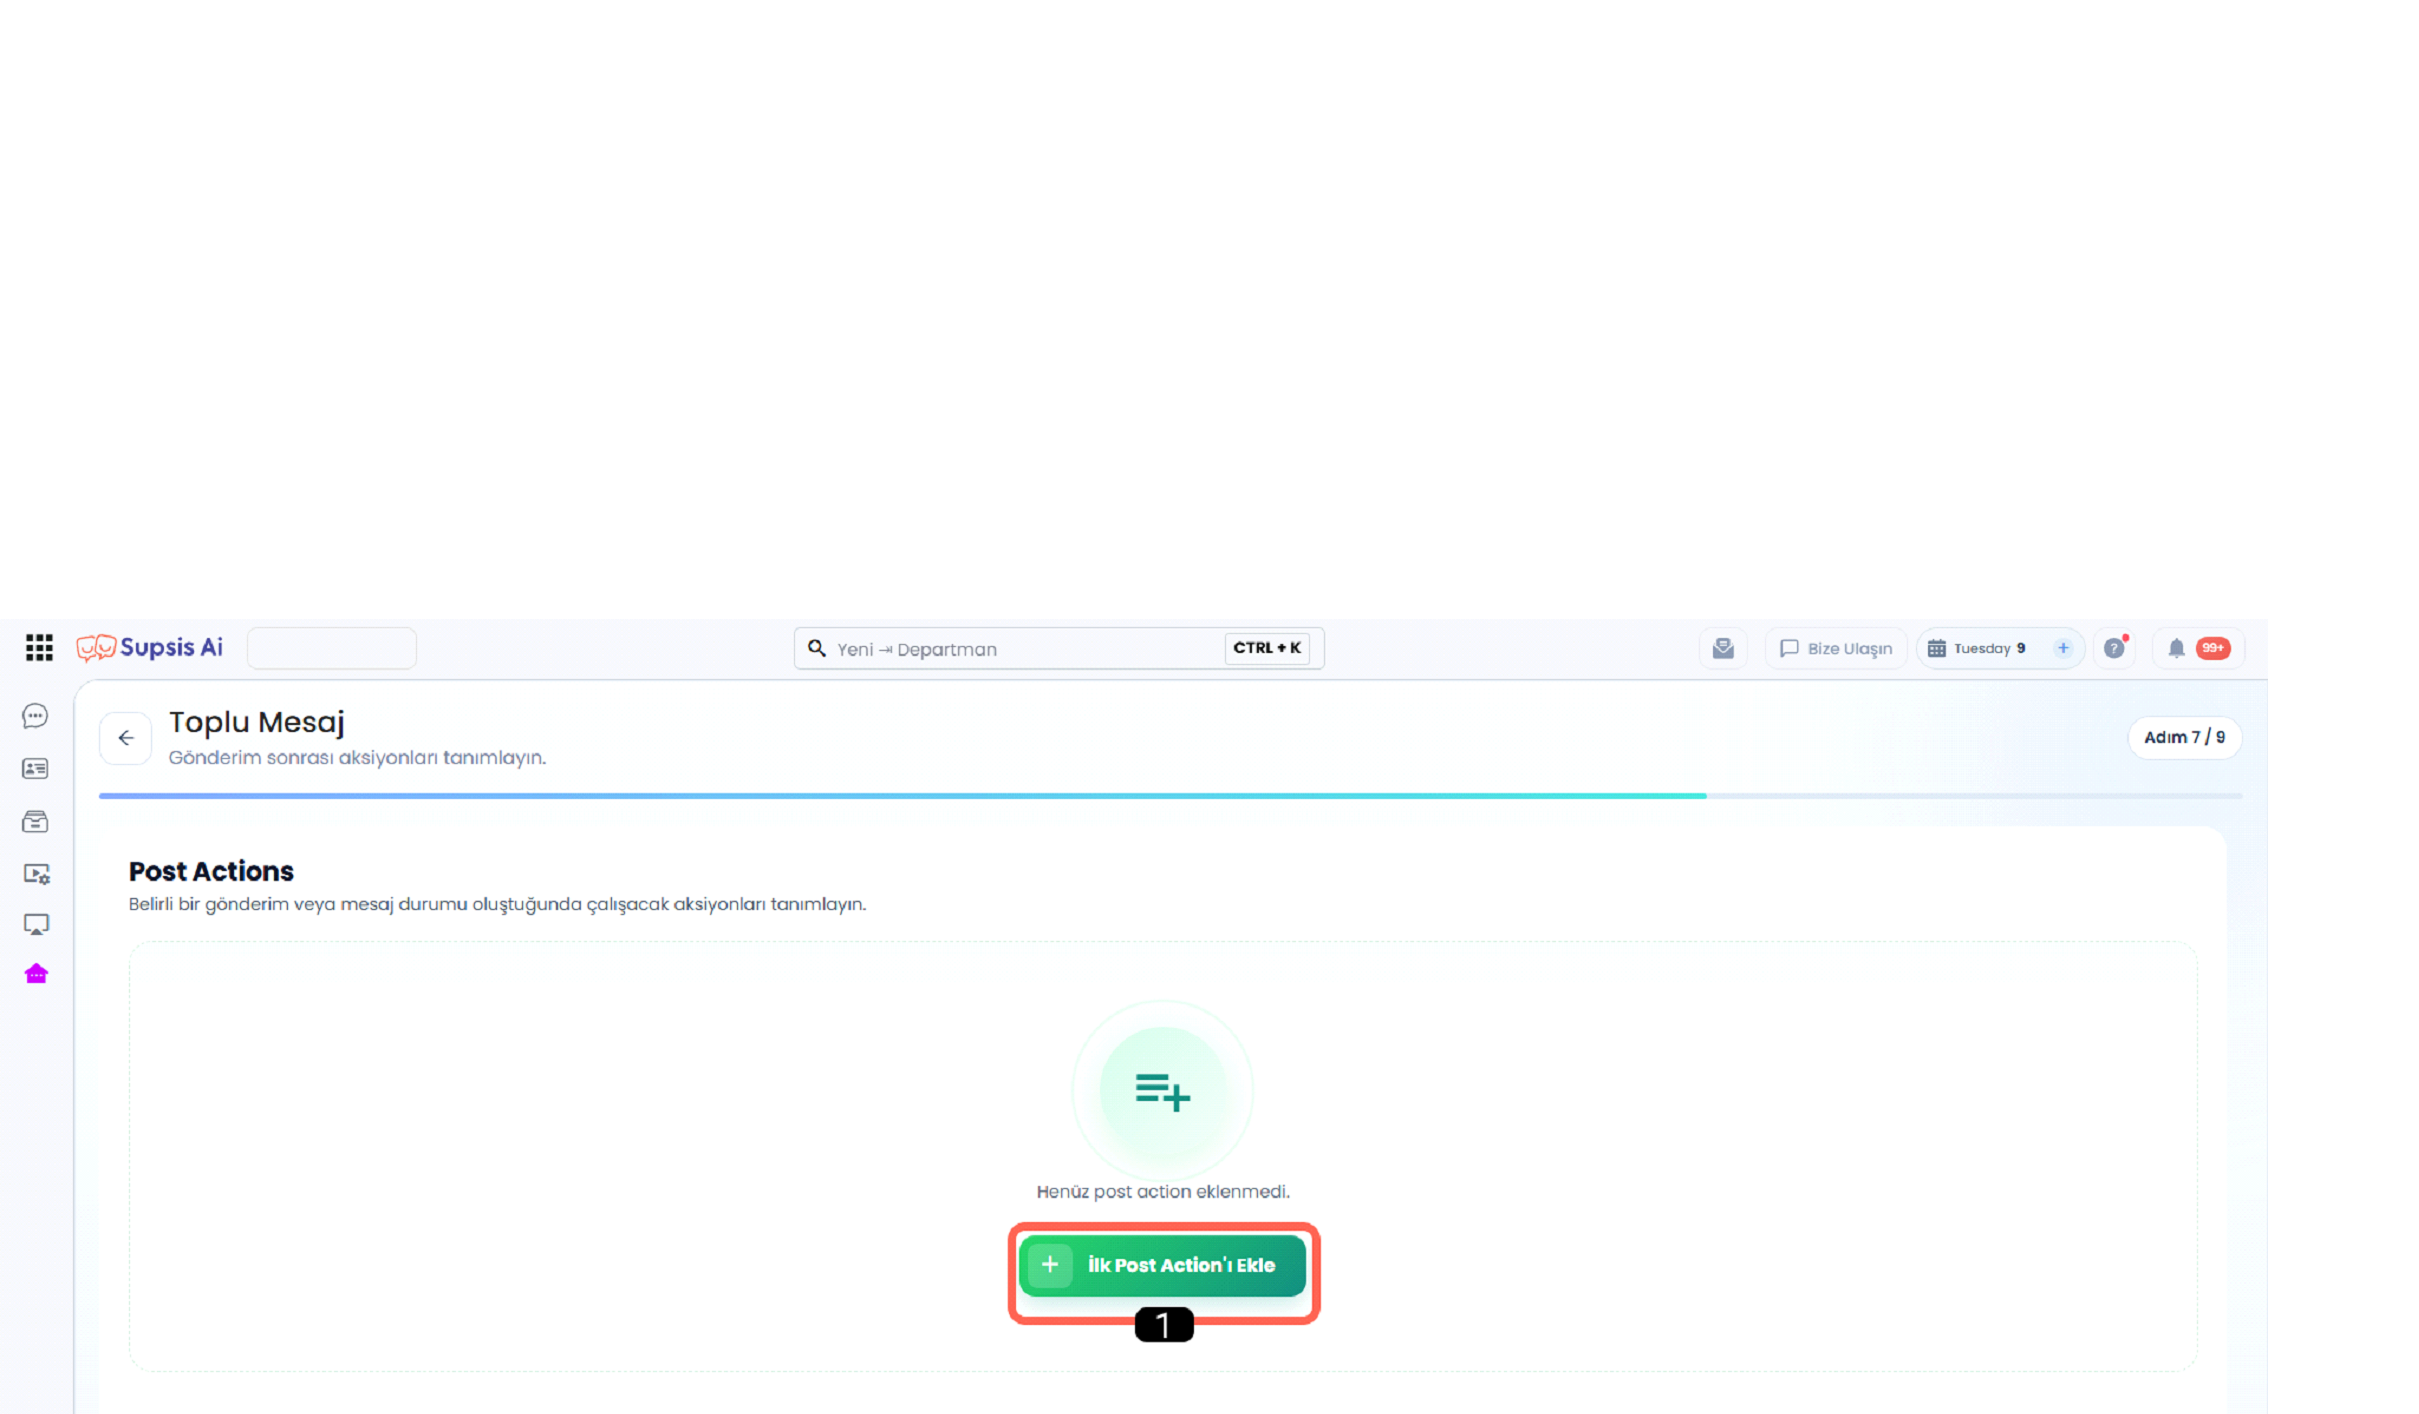
- Add First Post Action
6.a – Add First Post Action
The Add First Post Action area allows the definition of the initial action that will run after the bulk message is sent. This area is displayed when no post actions have been added yet, and the user can automate the post-sending process by creating a new action from here.
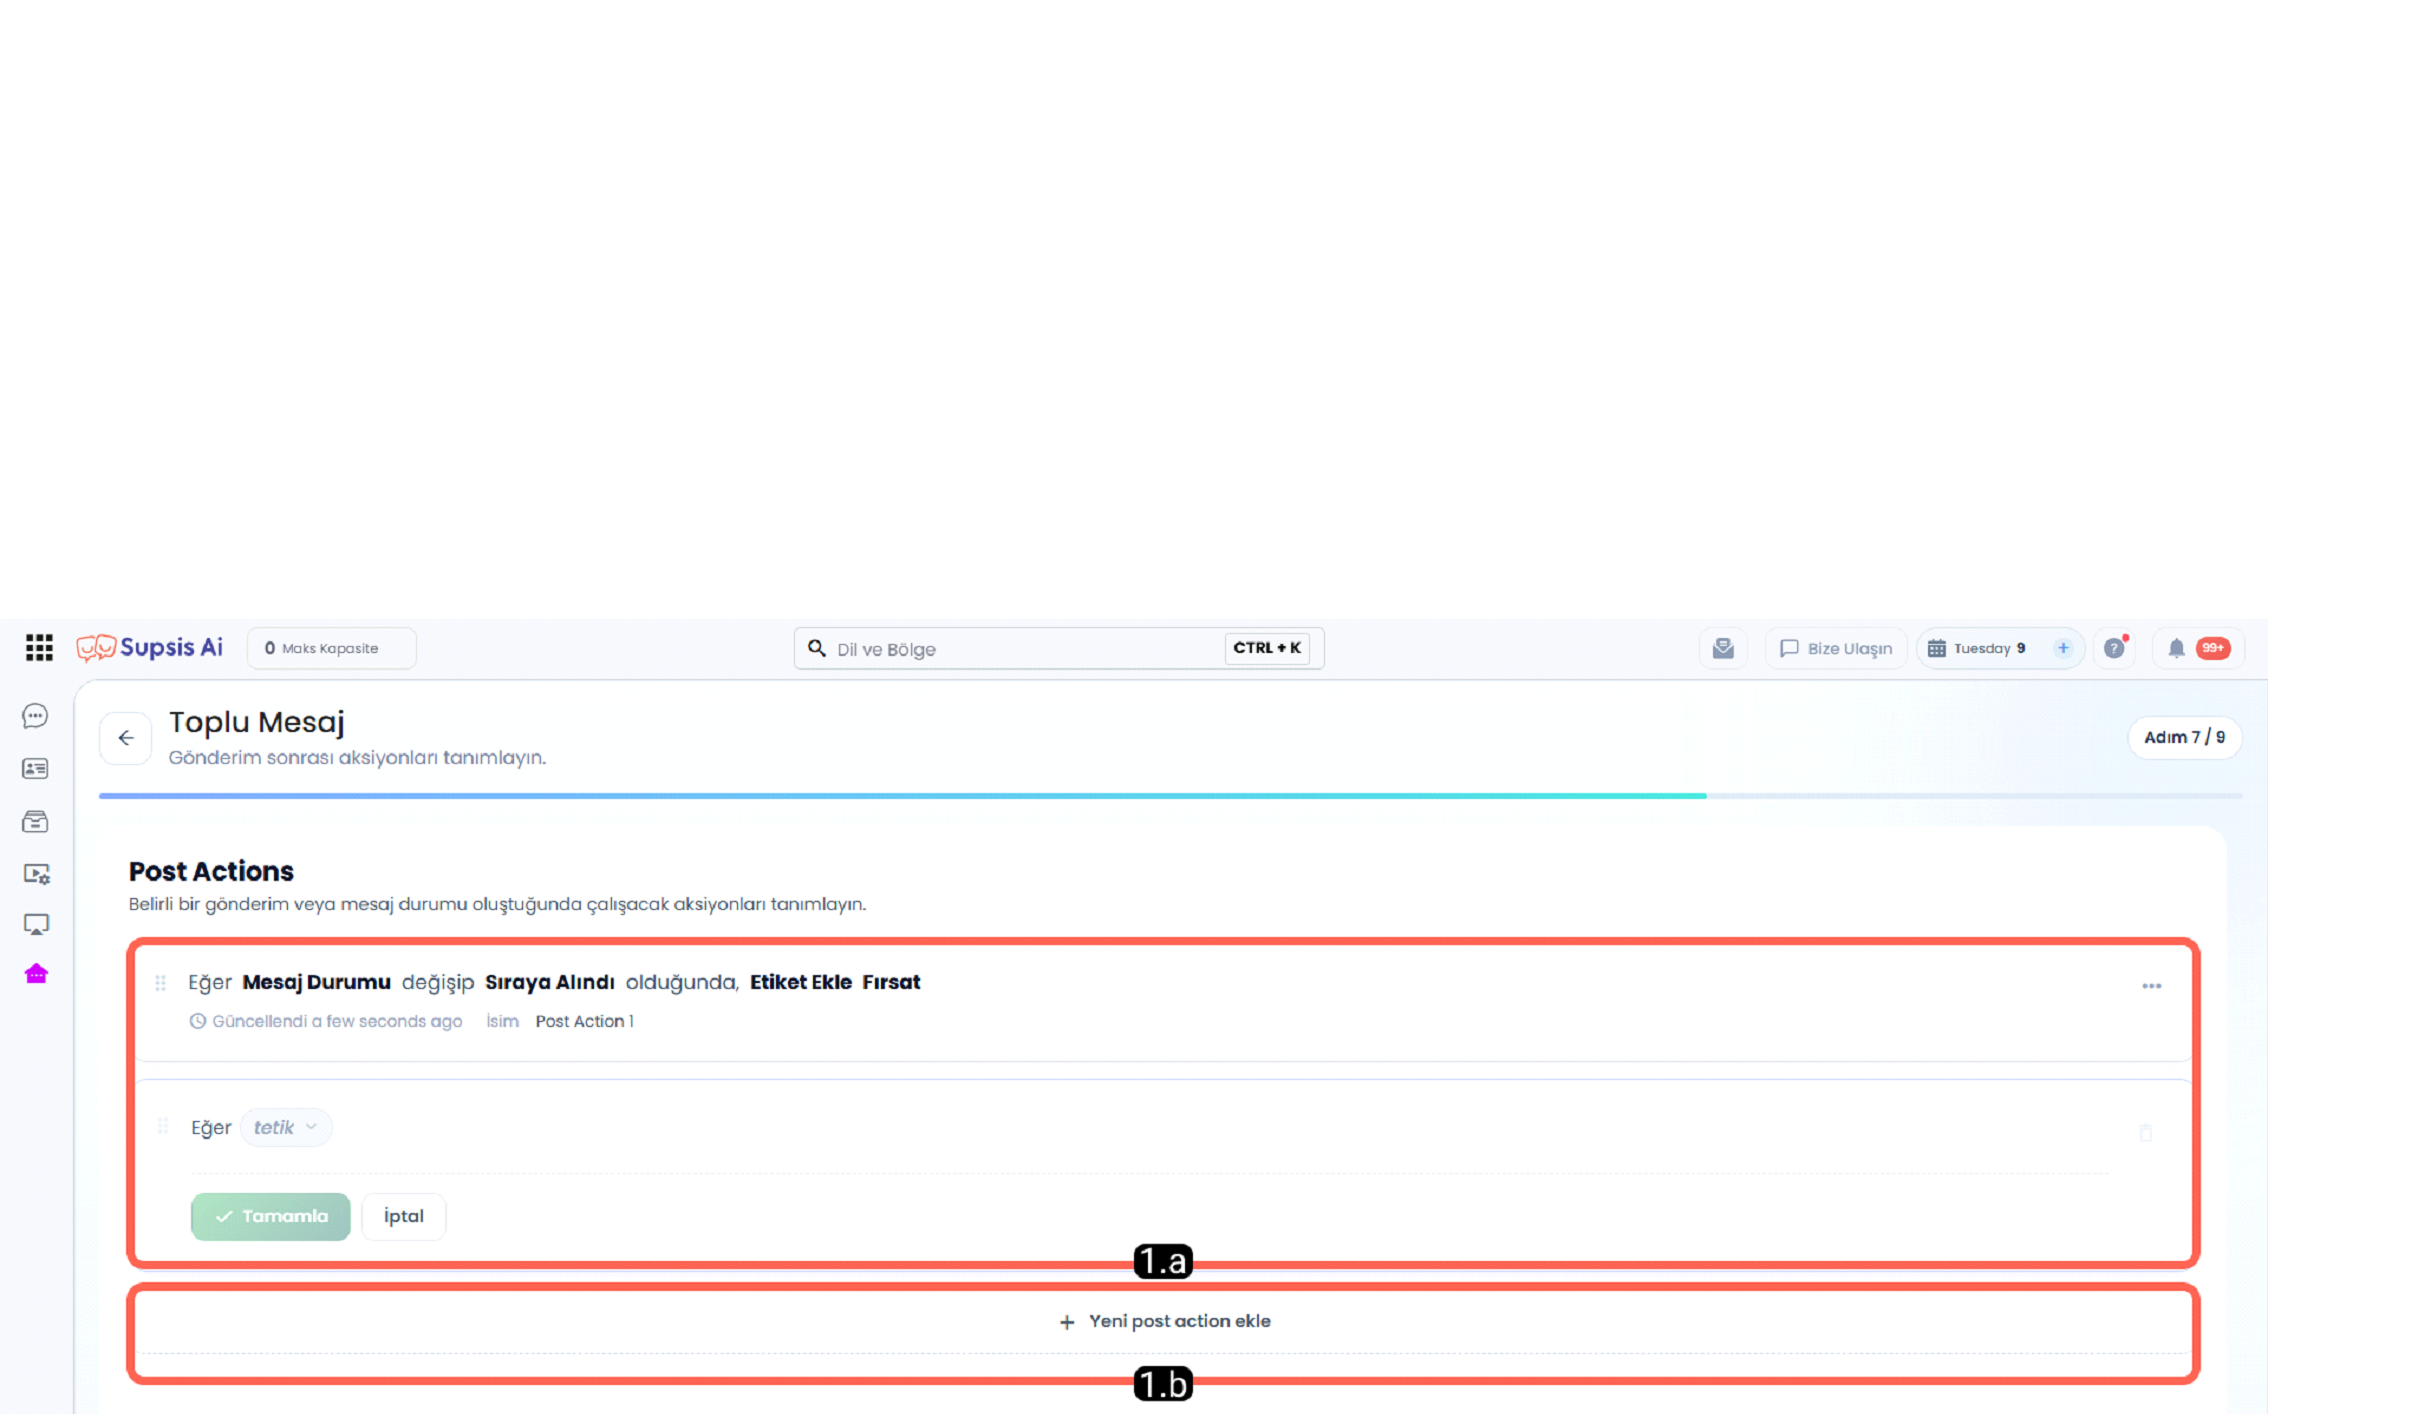
6.b – Post Action List
The Post Action List area is the section where the created post-sending actions are displayed. This area contains the defined trigger, message status, and the operation details to be applied. The user can review and manage existing post action records from here.
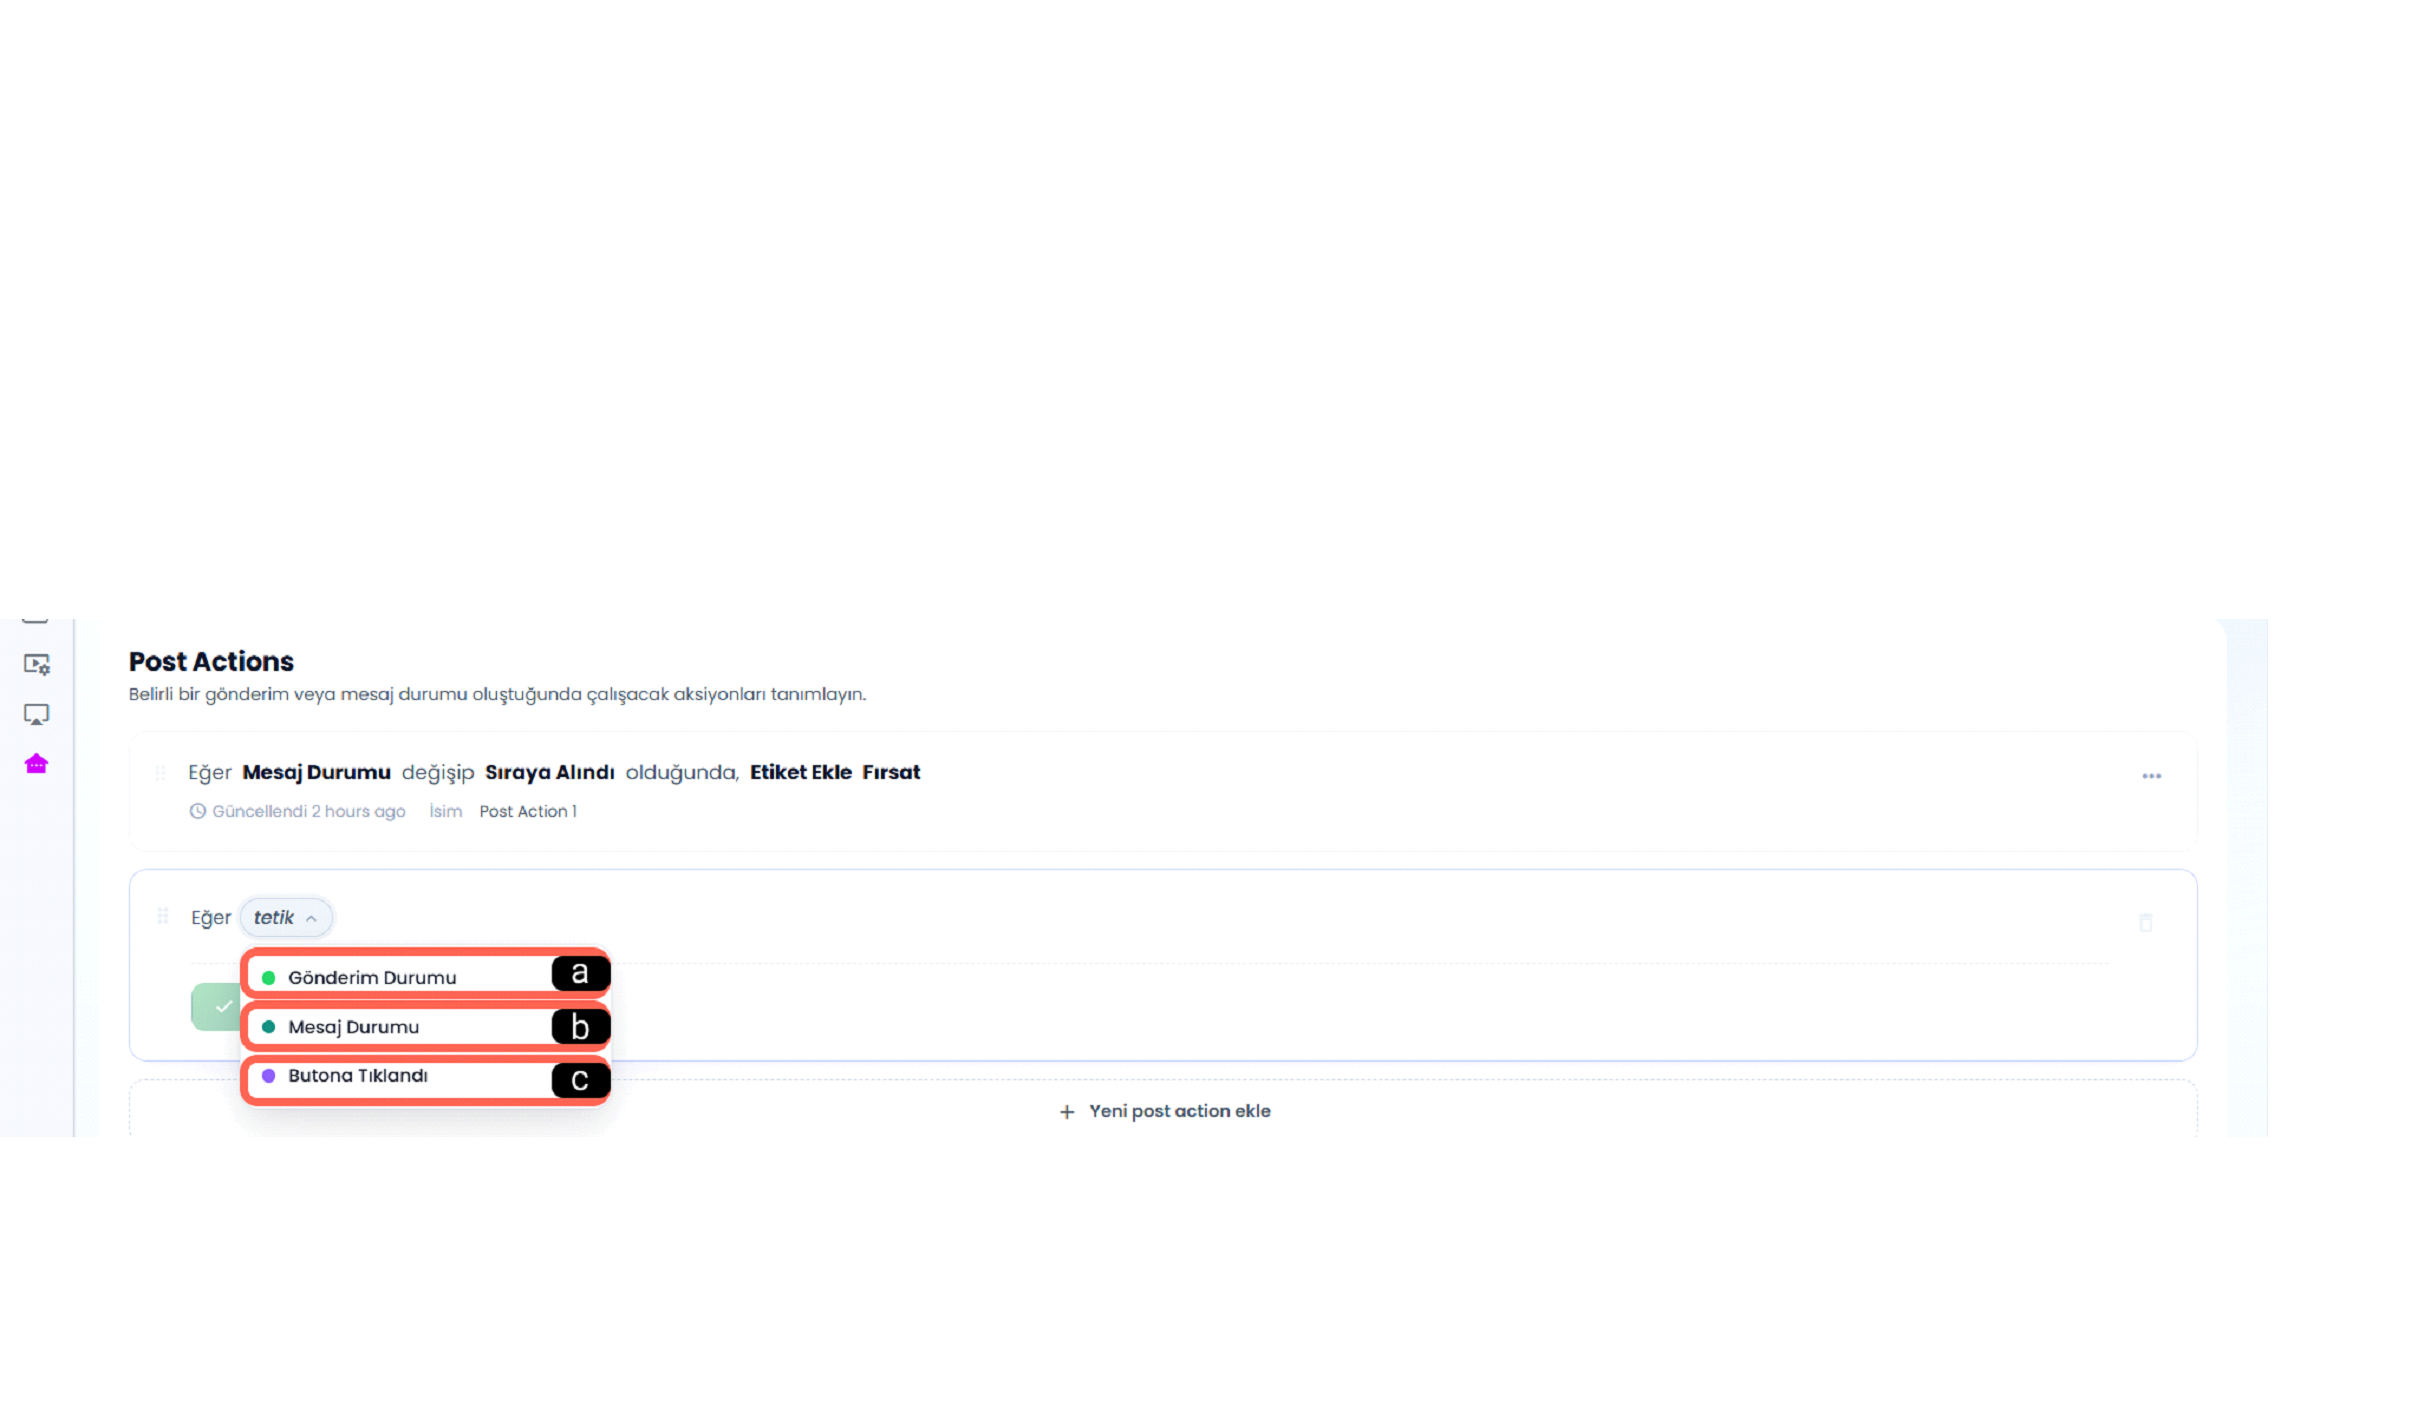
a - Delivery Status
Triggers actions based on status changes that occur during the overall sending process of the bulk message. It can be used in situations such as the message being queued, starting to process, or moving to a different stage in the delivery process. This allows automated operations tied to the sending process to be managed easily.
b - Message Status
Triggers actions based on recipient-level status changes of the sent messages. Relevant actions can automatically activate when situations occur such as the message being sent, delivered, read, or failing.
c - Button Clicked
Triggers an action when the user clicks on the buttons included within the message. This option is used to initiate automated operations based on user interactions.
Important Note - Template Buttons & Trigger Selection:
If your template message contains buttons and you want to trigger an action when a recipient clicks a button, you must select the trigger condition as "Button Clicked" rather than "Replied / Answered". Because a button click is not treated directly as a text reply by the system, selecting "Replied" will prevent the post action from executing.
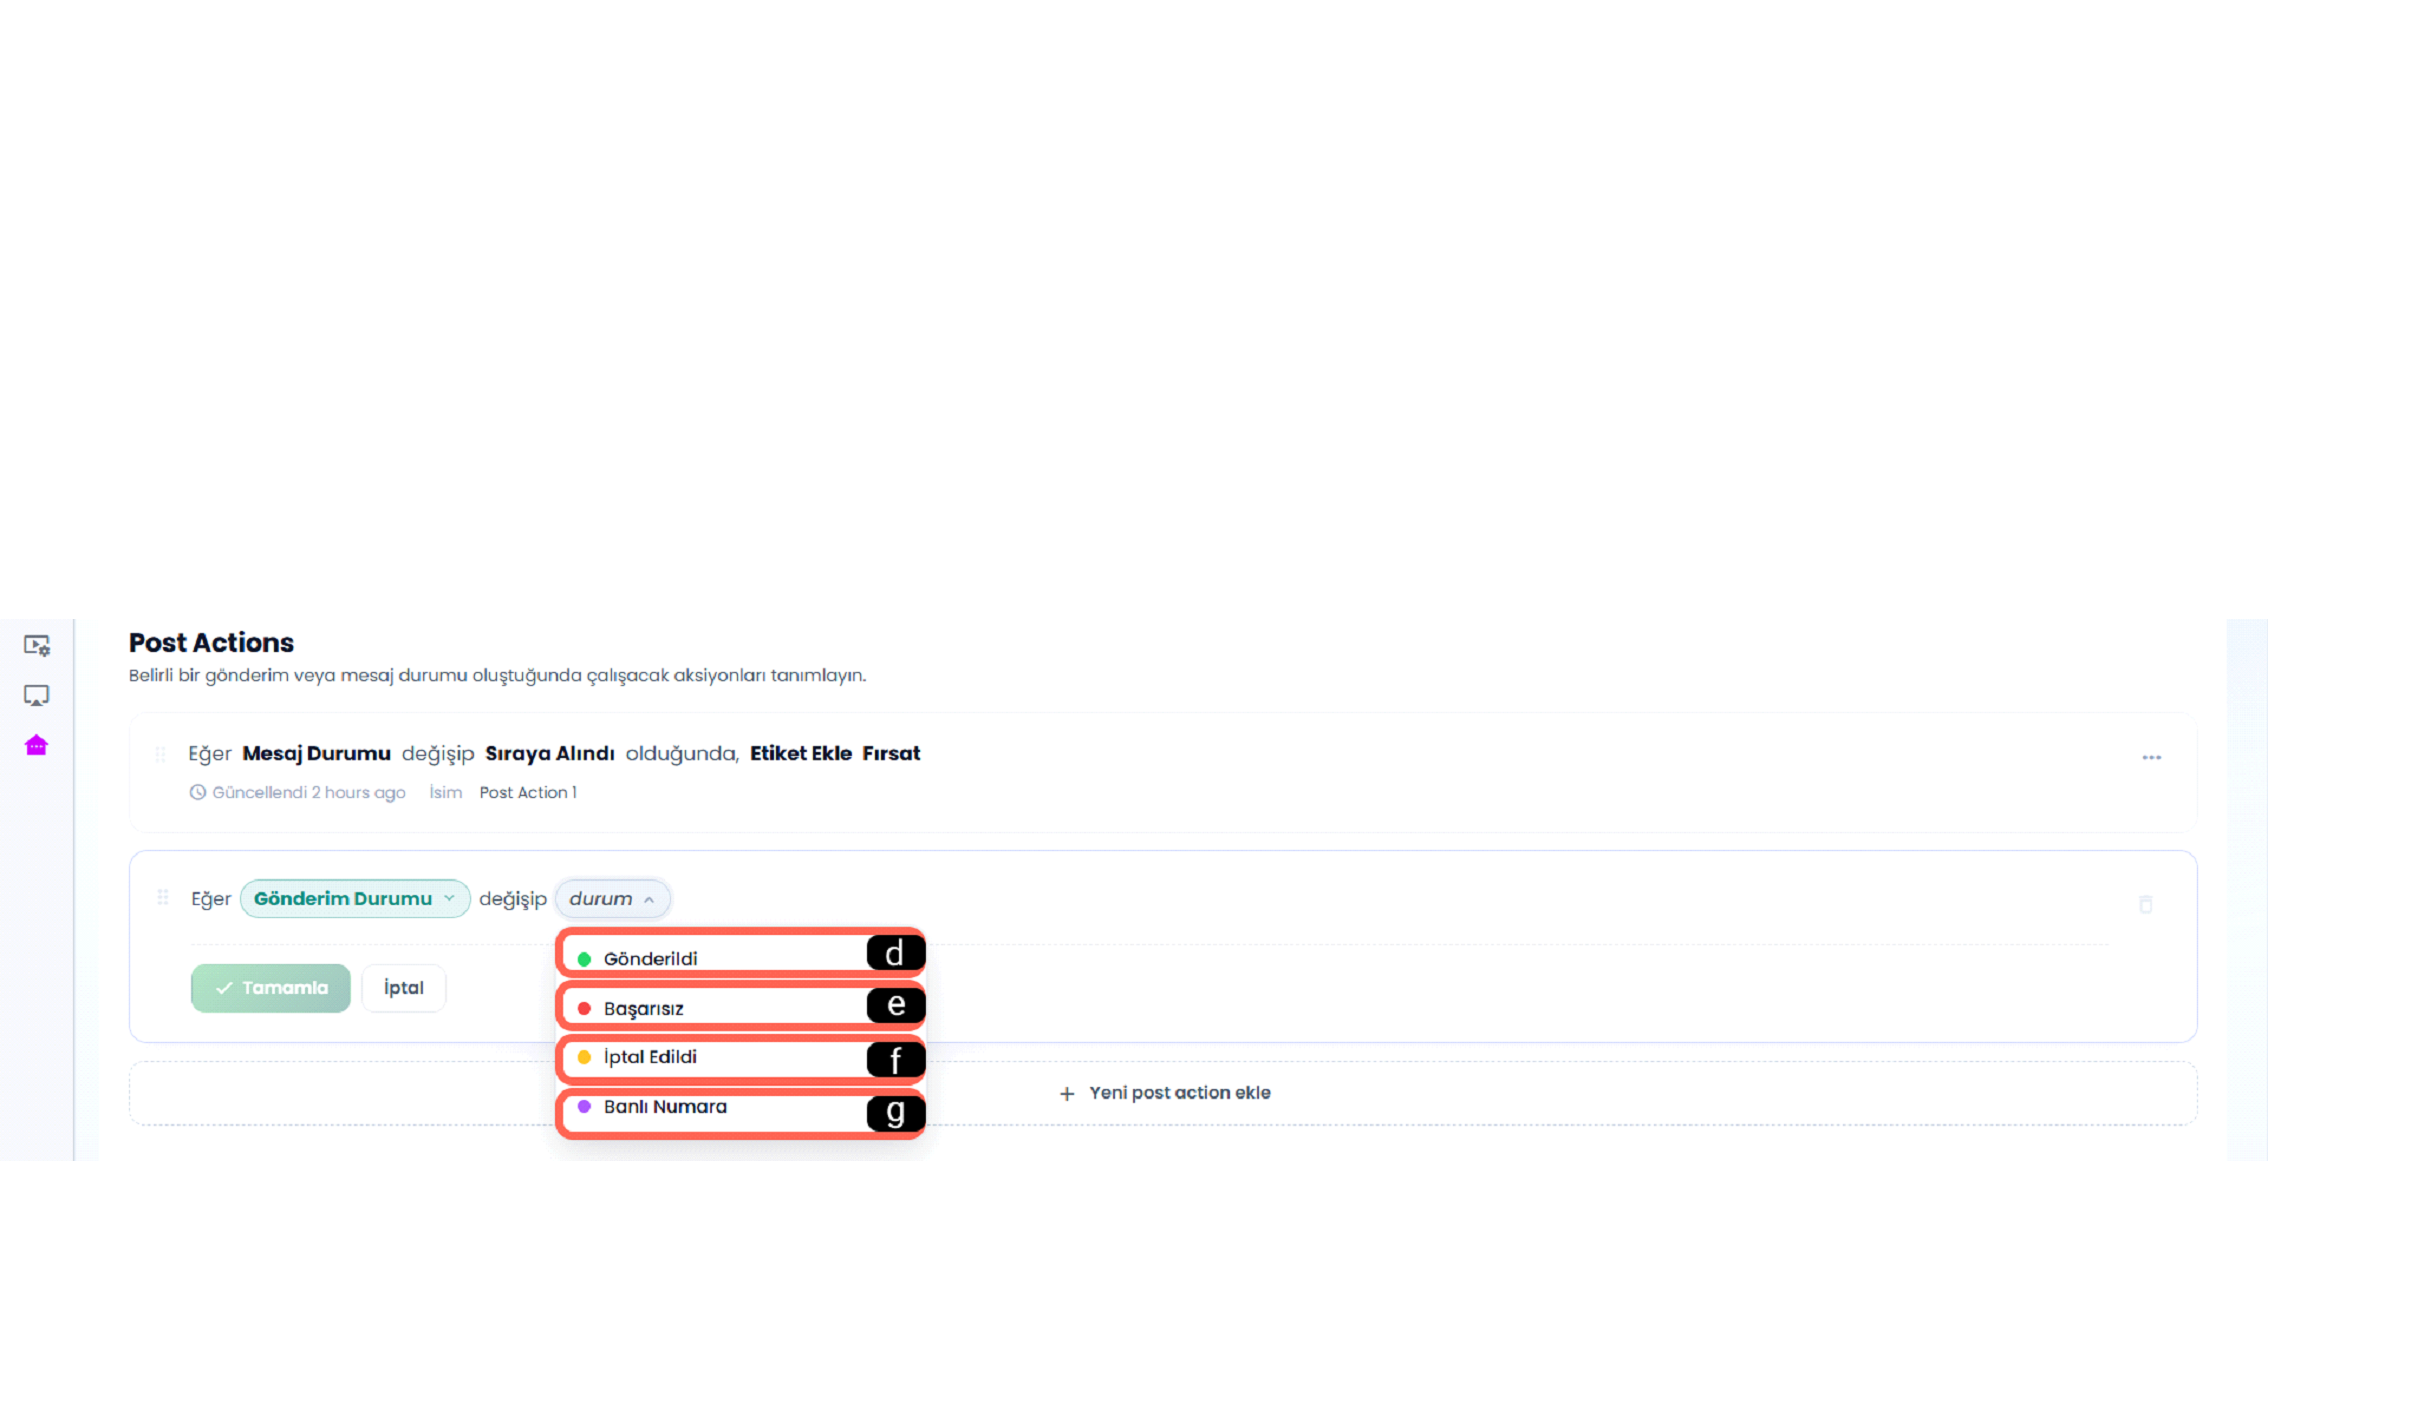
d - Sent
The Sent option is used to trigger an action when the bulk message delivery process is successfully completed.
e - Failed
The Failed option is used to trigger an action when an error occurs during bulk message sending or when the delivery cannot be completed.
f - Canceled
The Canceled option is used to trigger a corresponding action when the bulk message delivery is canceled.
g - Banned Number
The Banned Number option is used to trigger an action in the event that the number to be sent to is in a blocked or banned status.
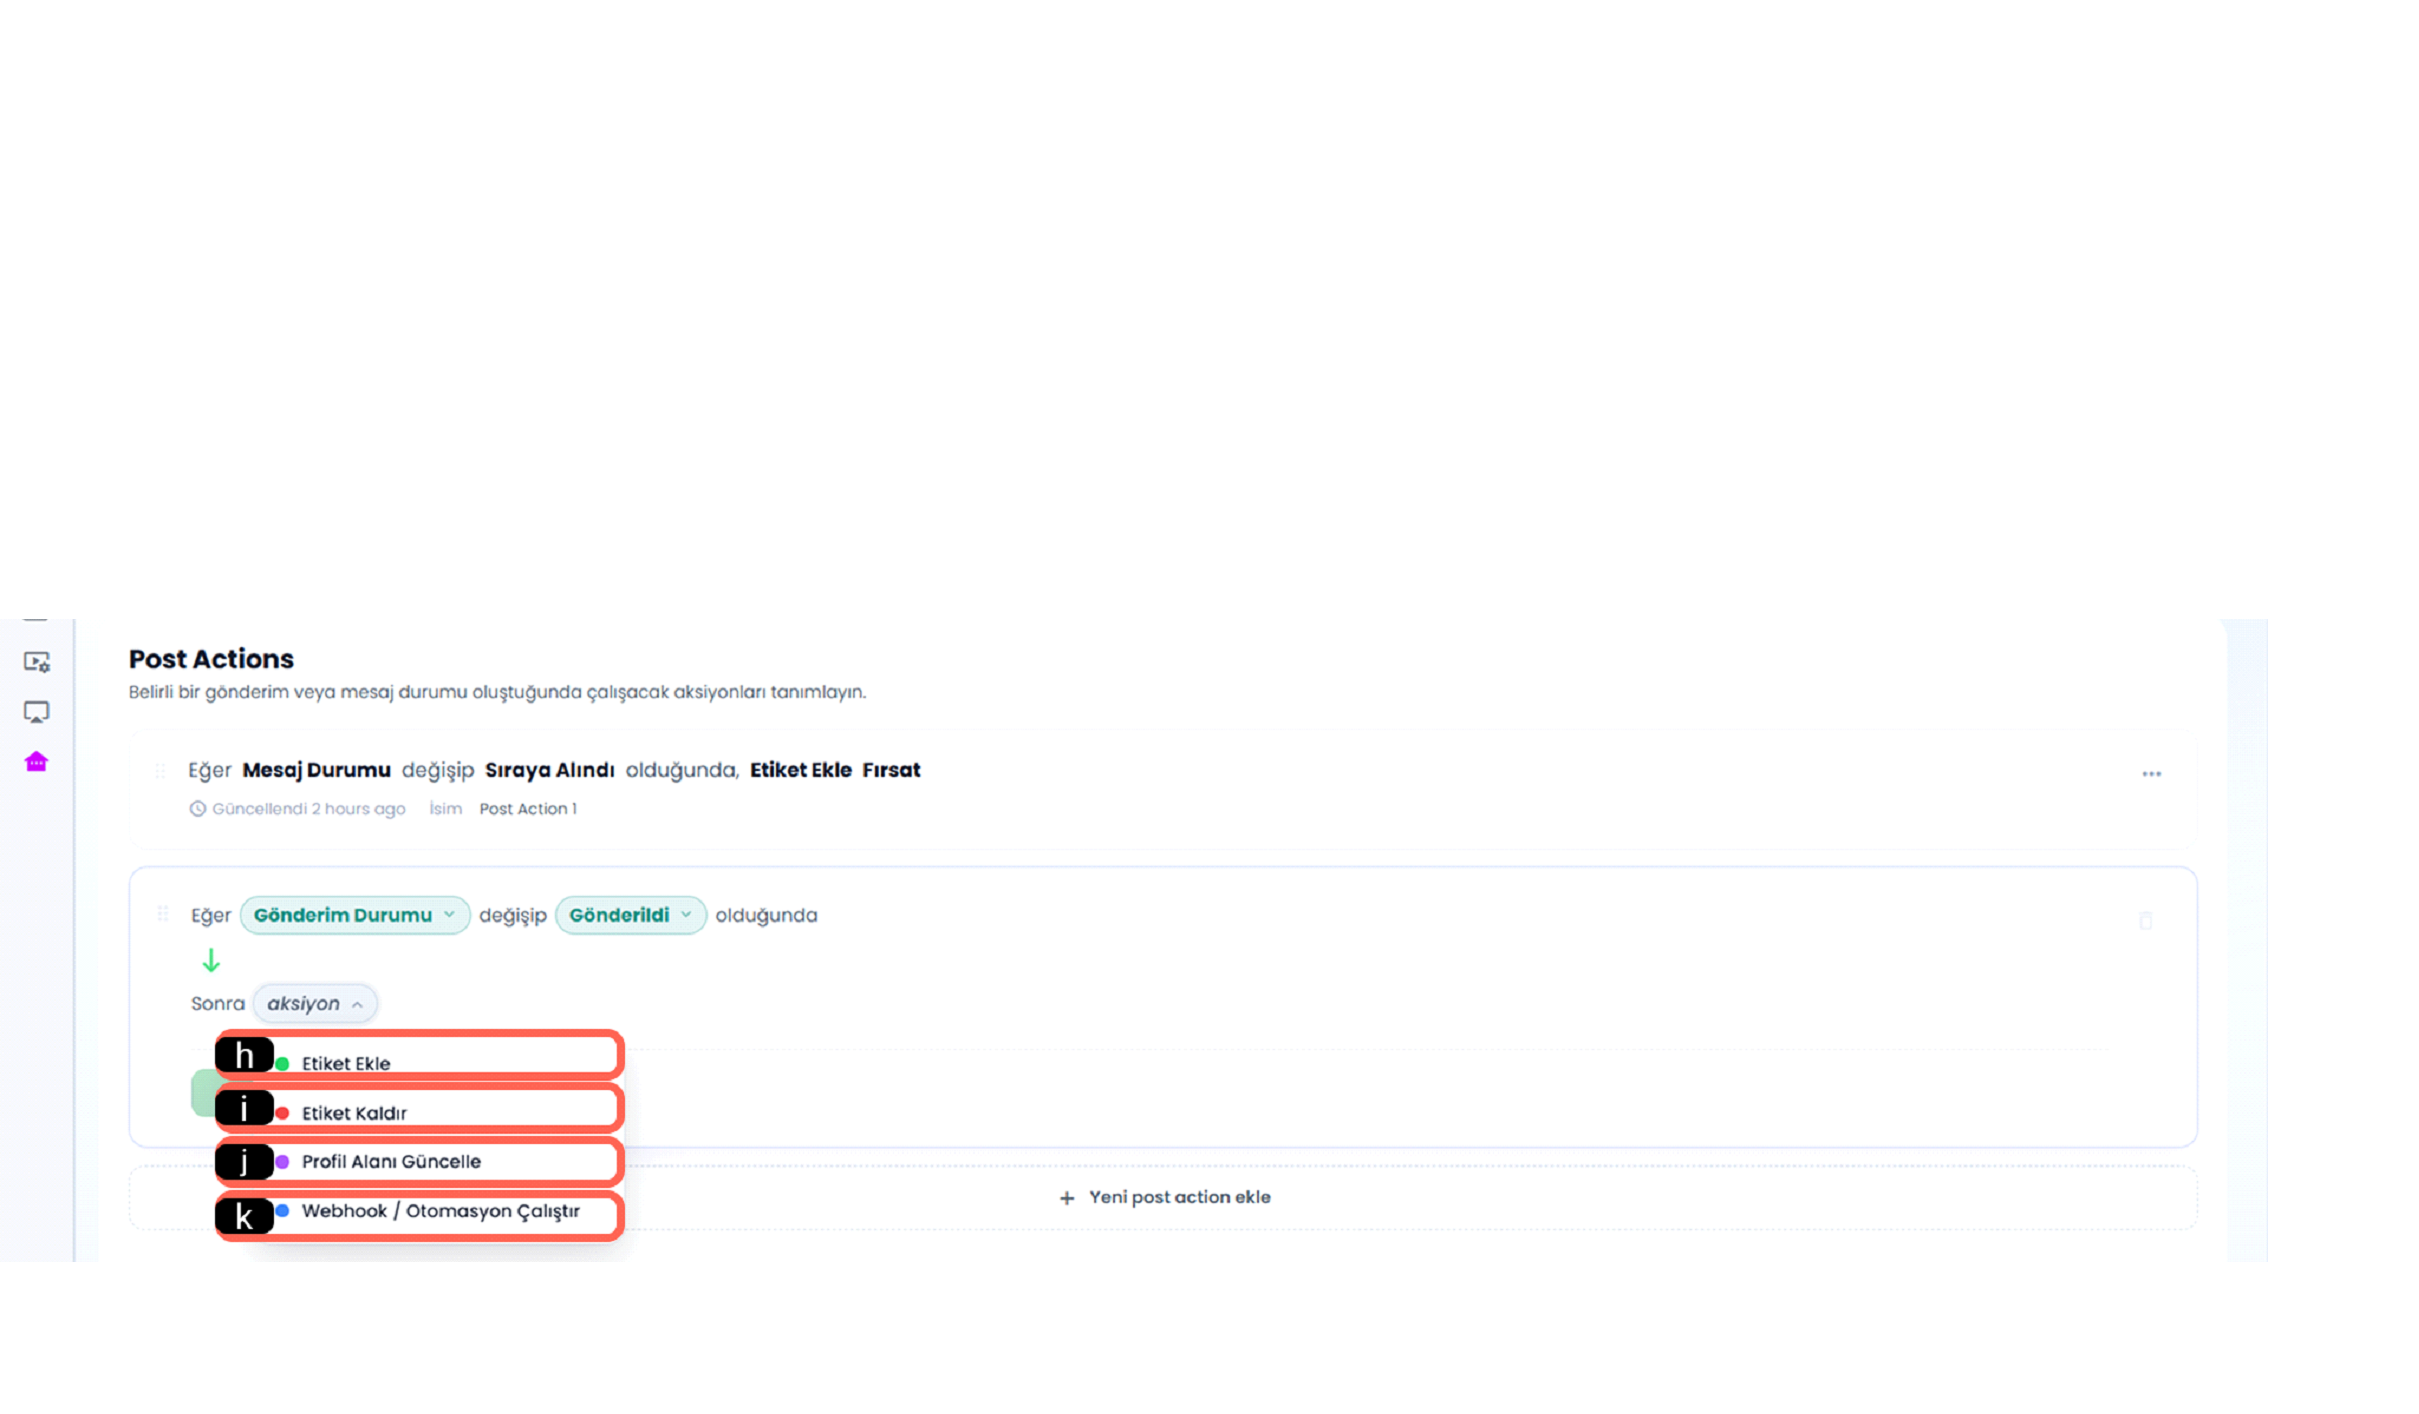
h - Add Tag
Automatically adds a tag to the relevant contact when the specified condition is met. This allows contacts to be categorized more easily after sending.
i - Remove Tag
Ensures that an existing tag is removed from the relevant contact when the specified condition is met. Contact information can be reorganized according to the updated status.
j - Update Profile Field
Automatically updates the selected field in the person's profile based on the defined condition. This operation helps keep customer information up to date.
k - Run Webhook / Automation
Triggers a webhook or automation when the specified condition occurs. This option connects the bulk messaging process with different systems or automations.
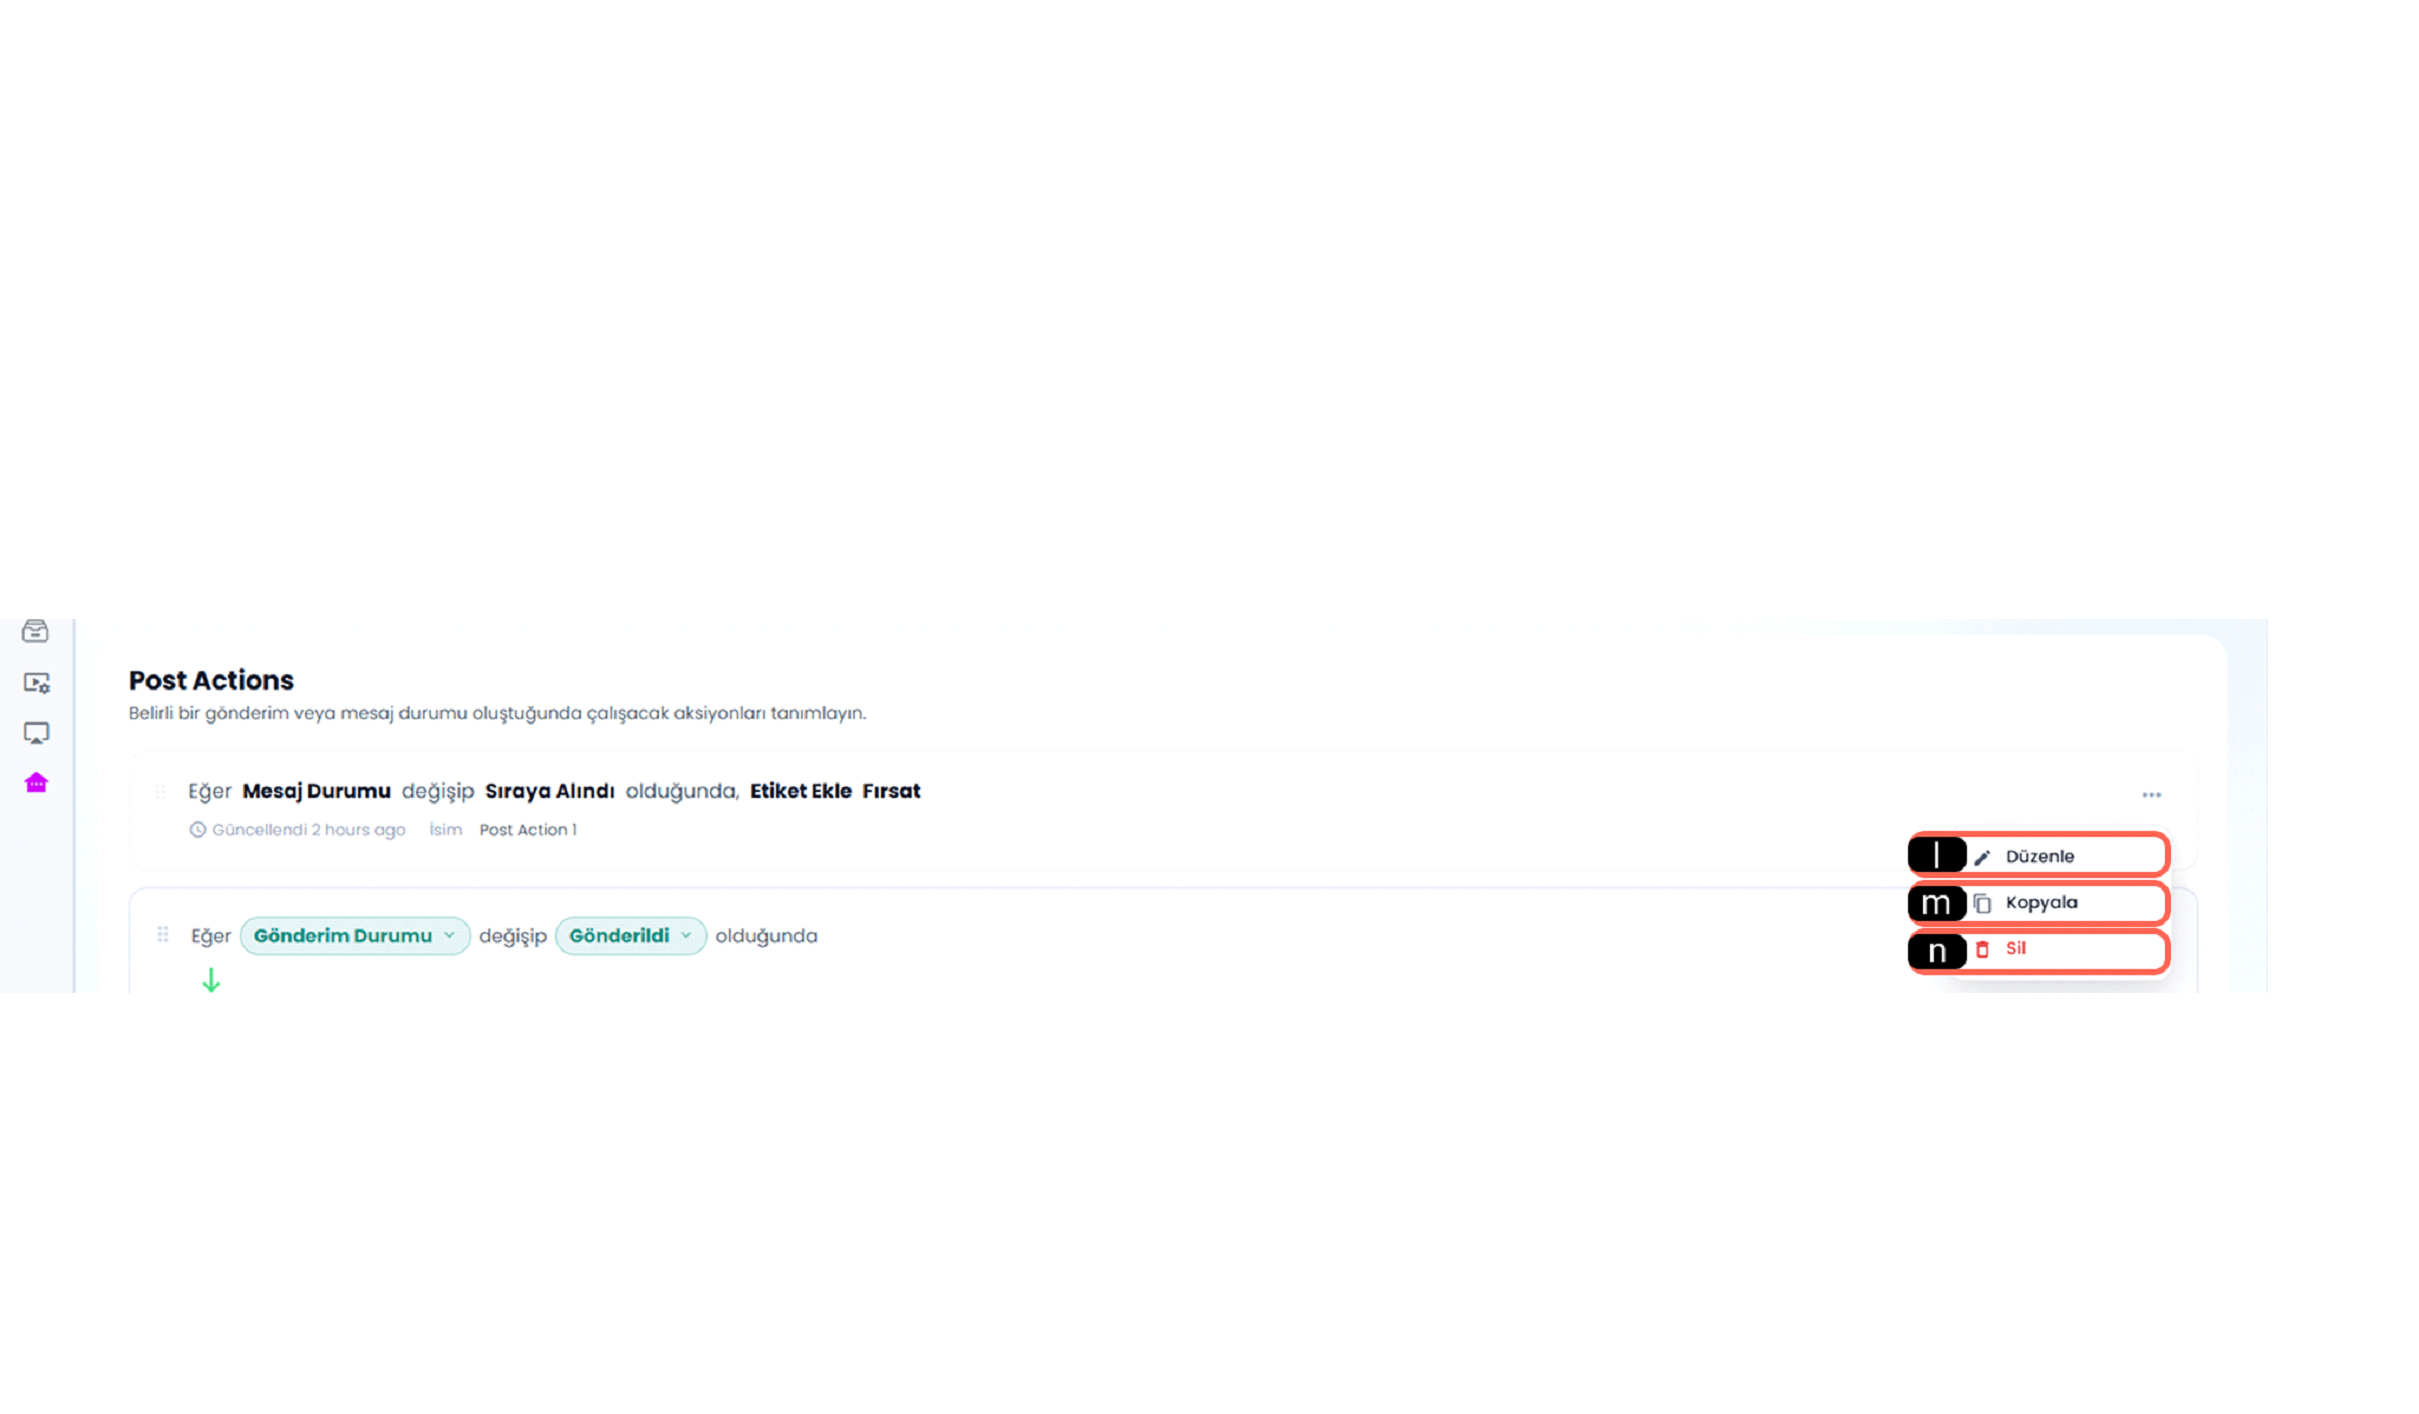
l - Edit
Used to change the content of an existing post action record. Through this option, the user can update the condition of the action or the operation to be performed.
m - Copy
Duplicates the selected post action record with the same settings. It speeds up the process when creating a similar action is desired.
n - Delete
Used to delete the selected post action record.
6.c – Add New Post Action
The Add New Post Action area is used to add a new post-sending action to the bulk message process. Through this option, the user can define a new operation to run when a specific message status occurs.
7-) Automations
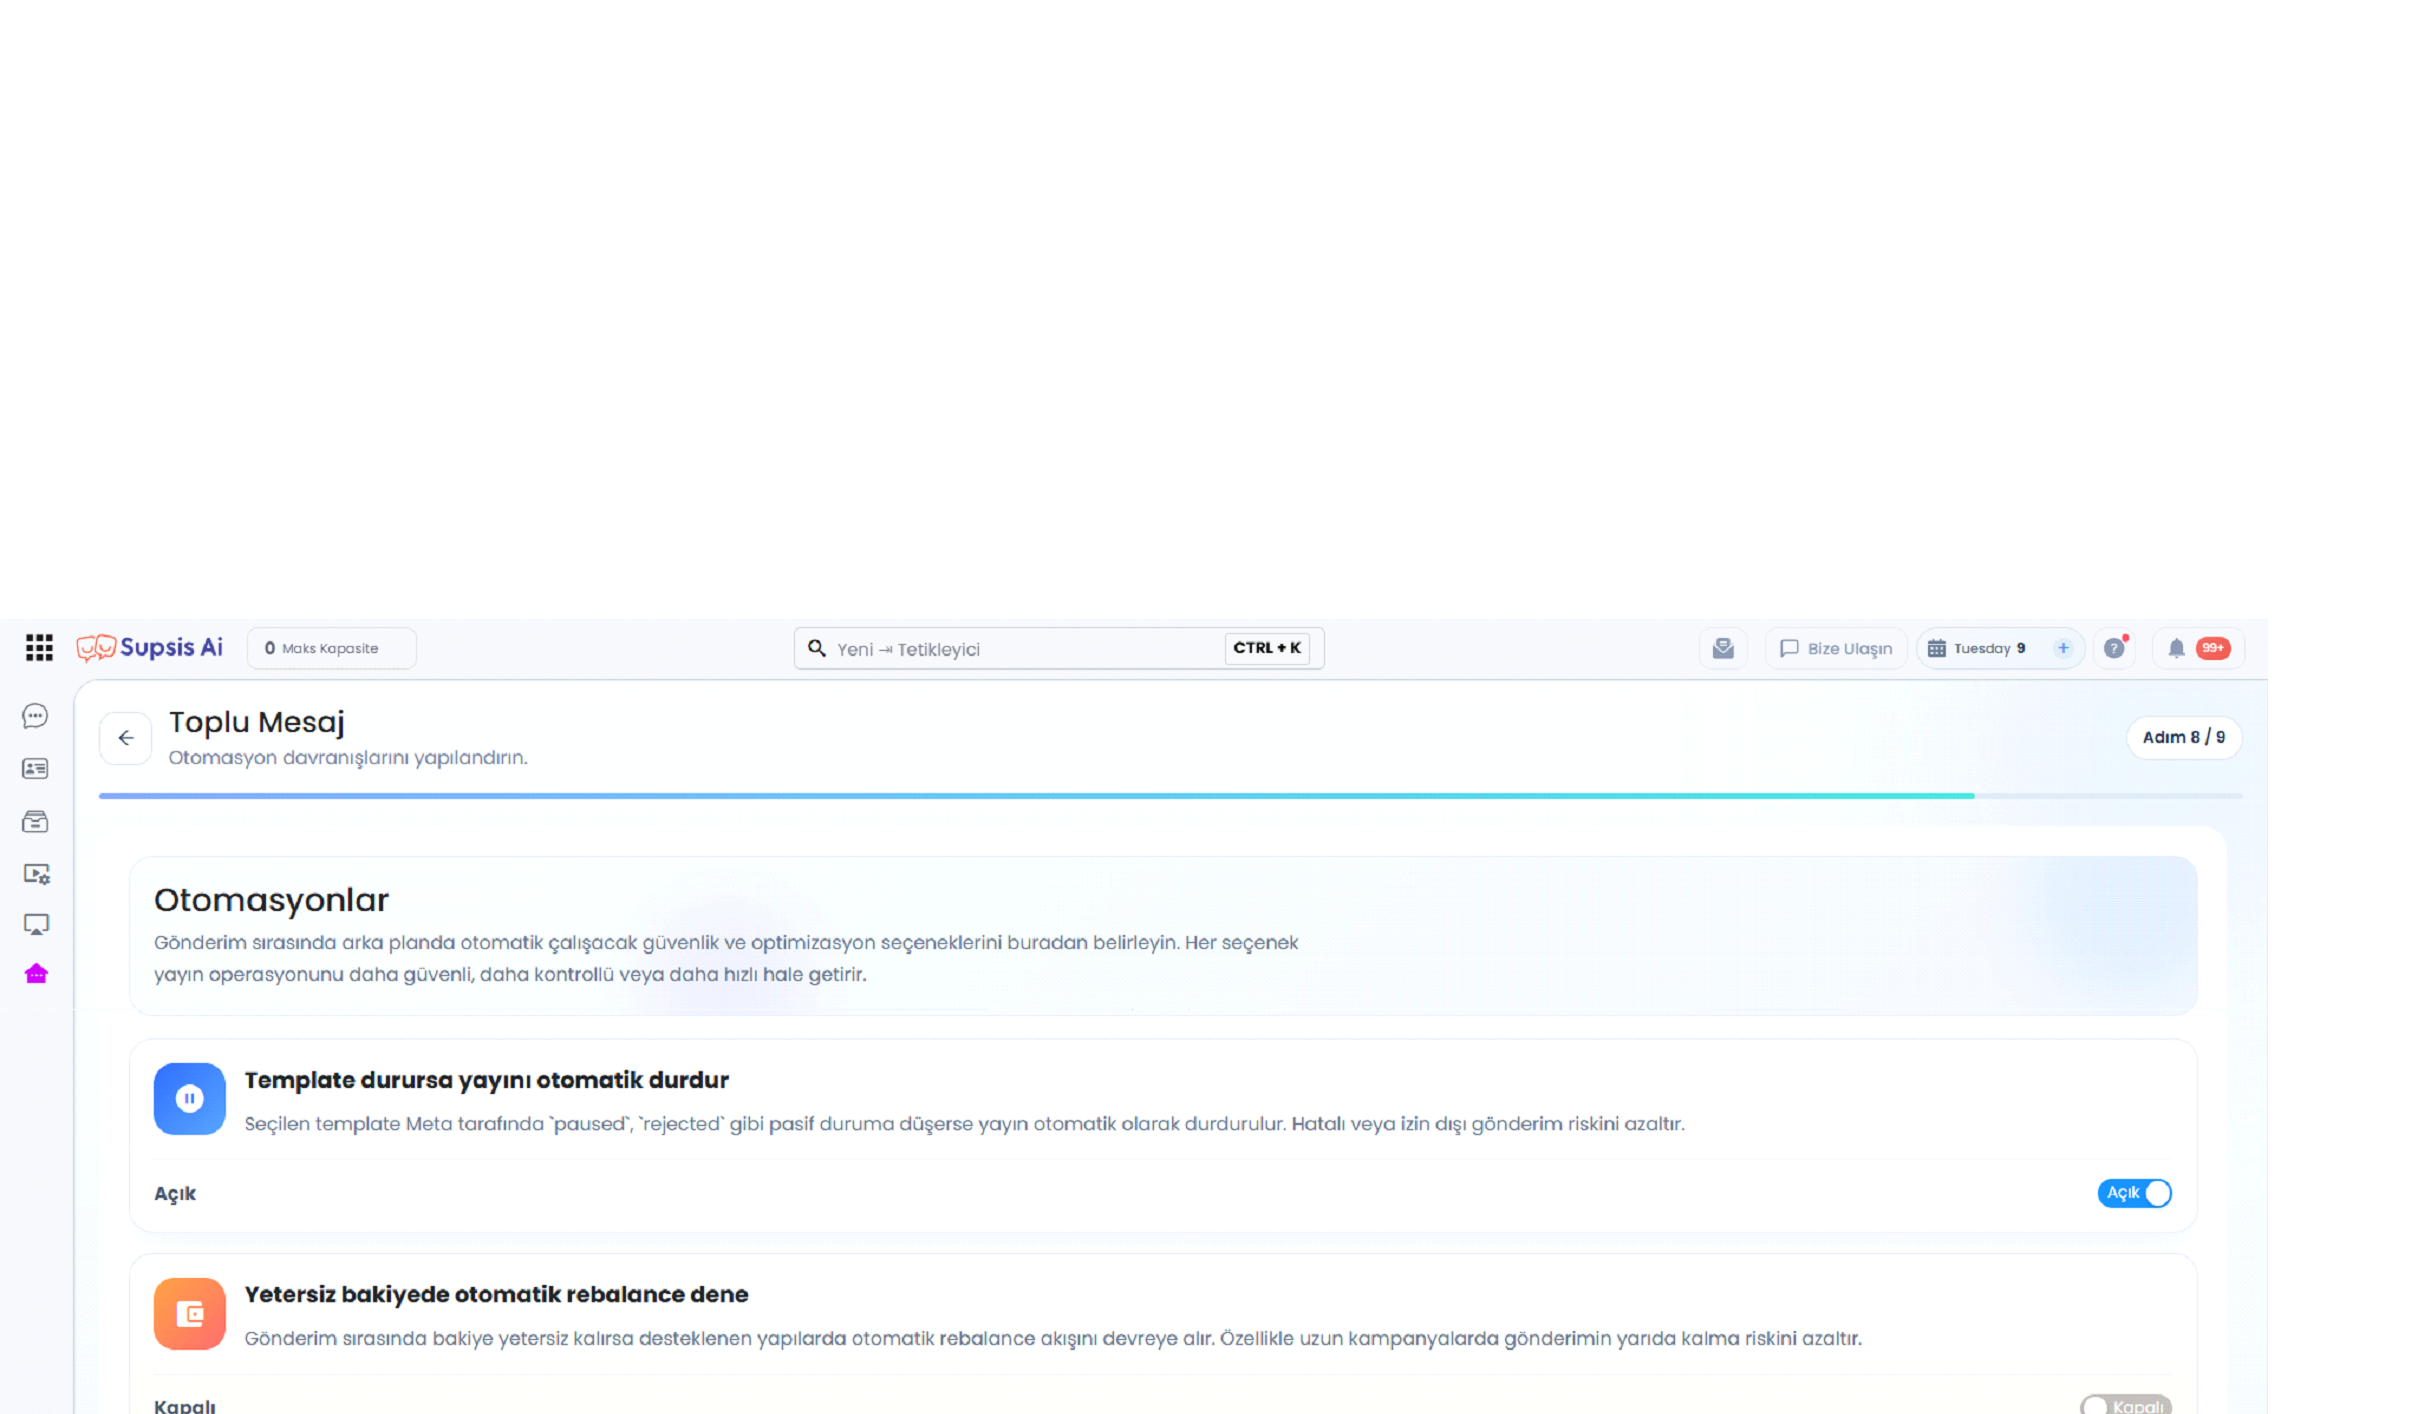
Defines security and system automation settings such as stopping campaigns when templates become inactive, retry logic, excluding banned numbers, and splitting campaigns into batches.
8-) Approval
The Broadcast Summary and Confirmation Screen is the section where all settings are reviewed one last time before the bulk message dispatch begins. This area provides a summary that includes the broadcast name, channel, selected template, audience source, dispatch queue, post-action details, automation status, and scheduled dispatch time. Additionally, estimated cost information is displayed, allowing the user to verify the broadcast and initiate it.
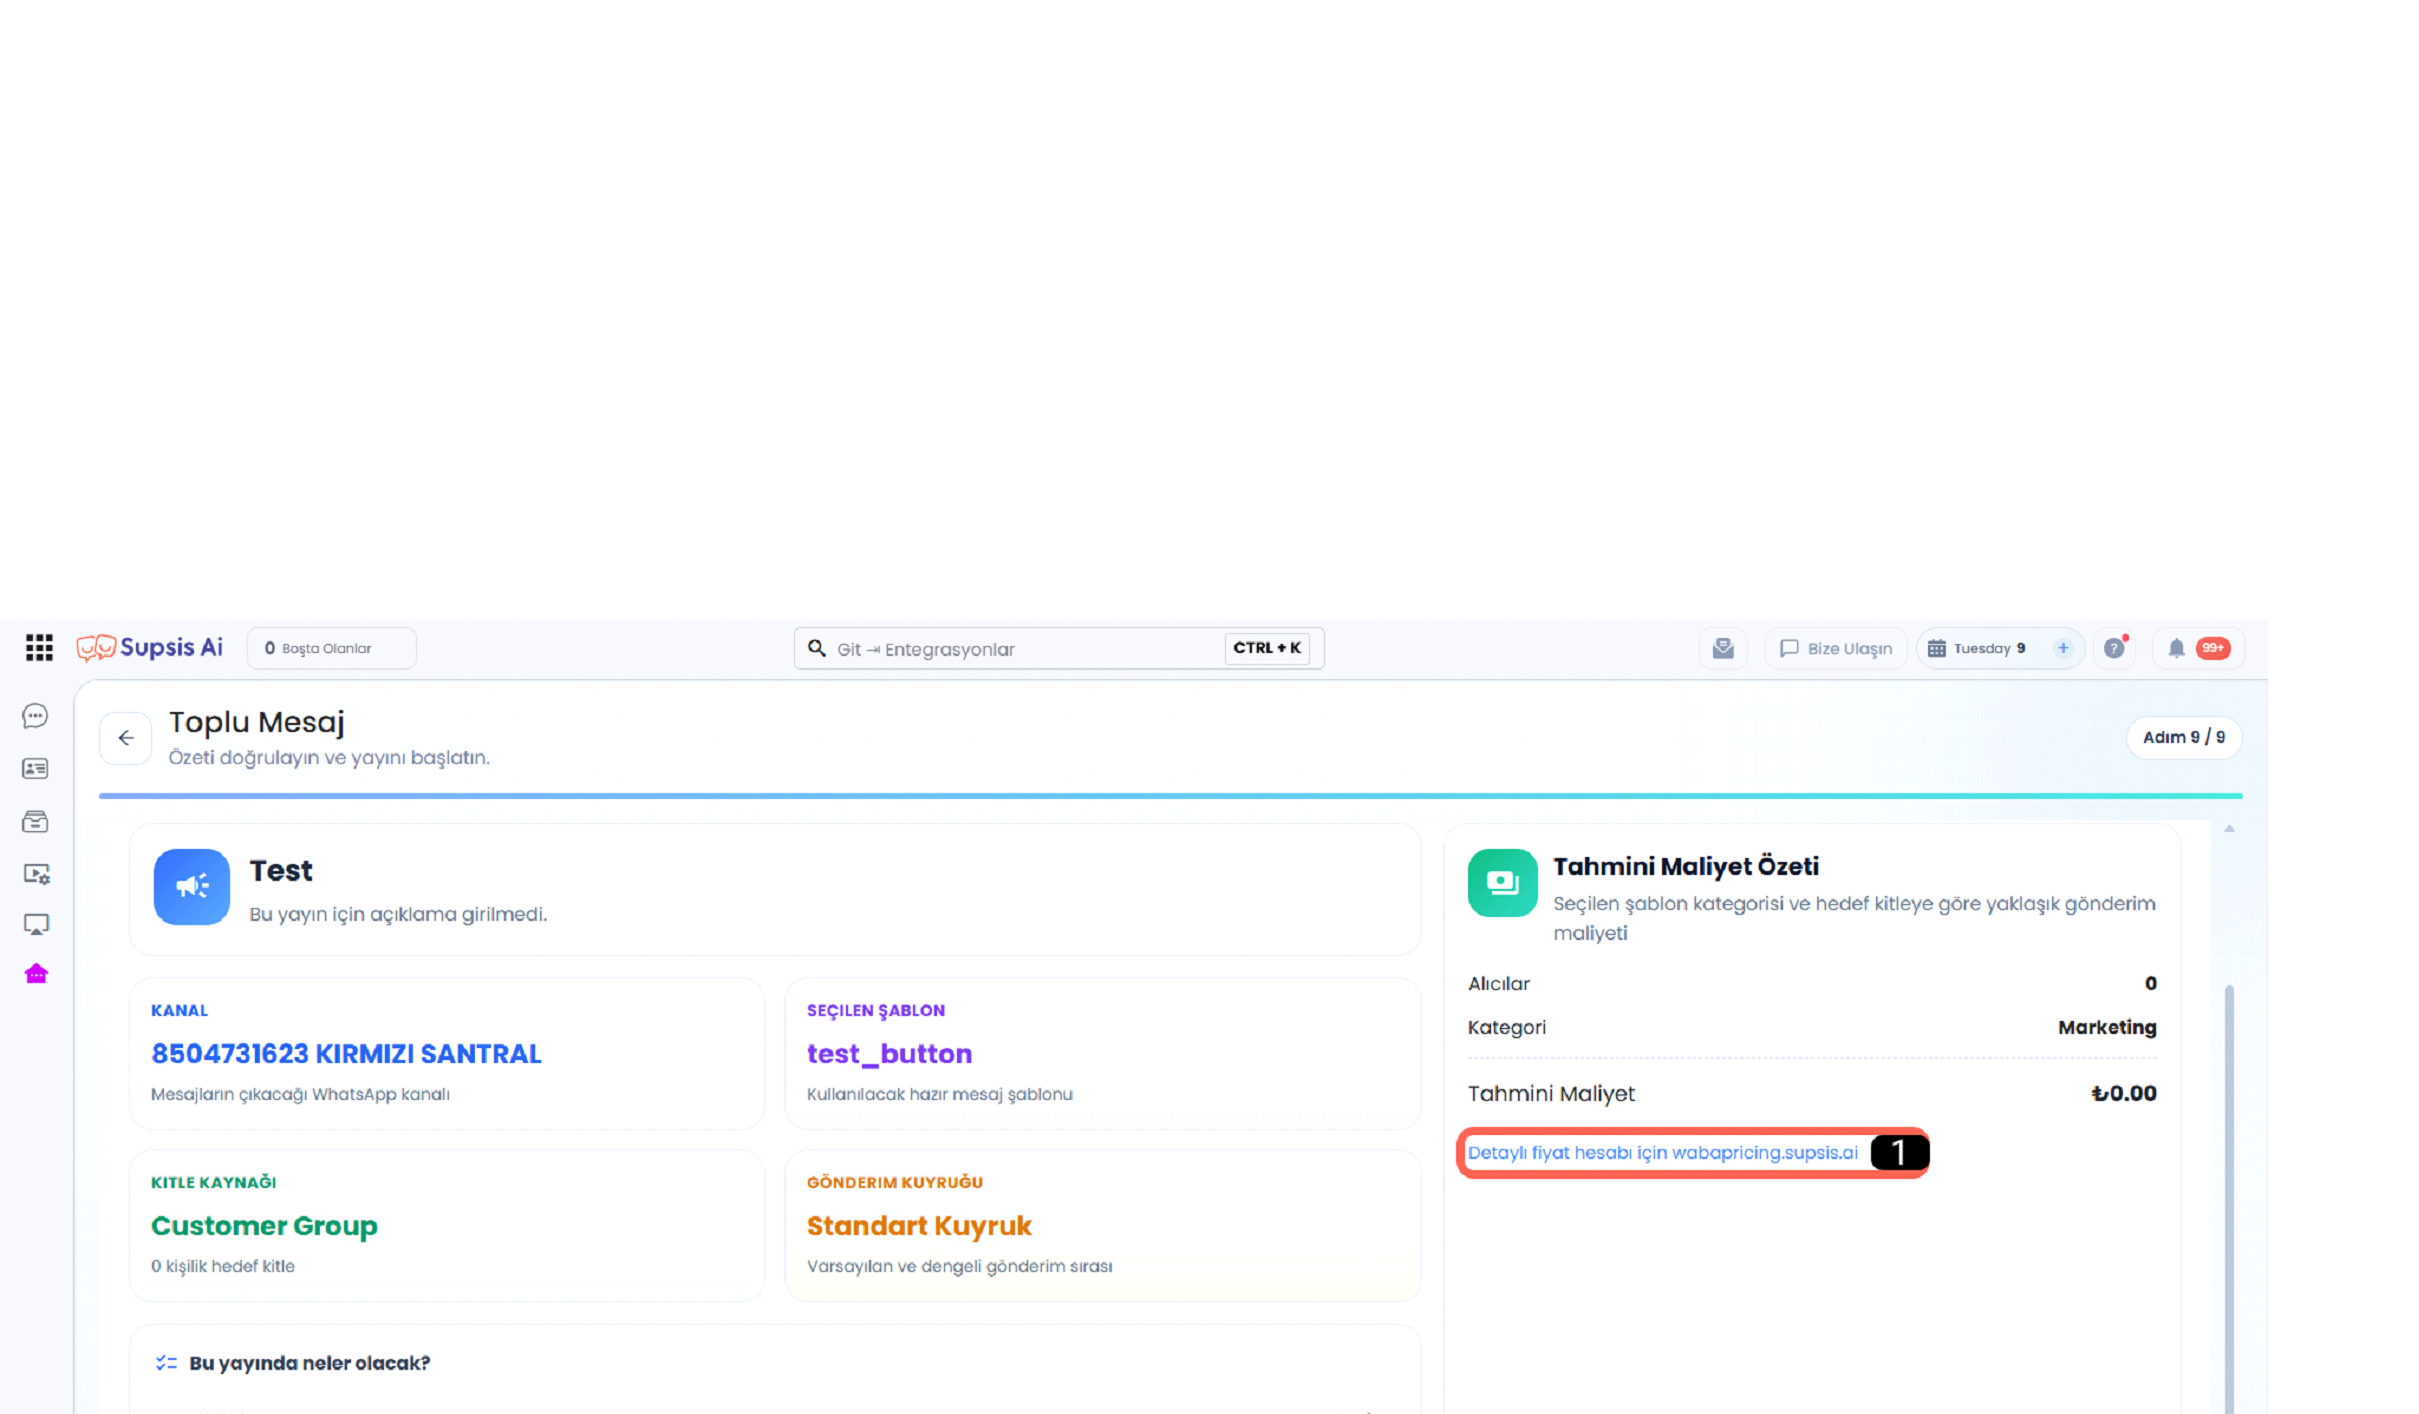
- Detailed Pricing Information
8.a – Detailed Pricing Information
Detailed pricing information for the WhatsApp Business API can be viewed via this link. Estimated costs can be calculated by selecting the country, currency, and message category. This allows for a clearer assessment of potential costs prior to sending bulk messages.