
4-) Chat
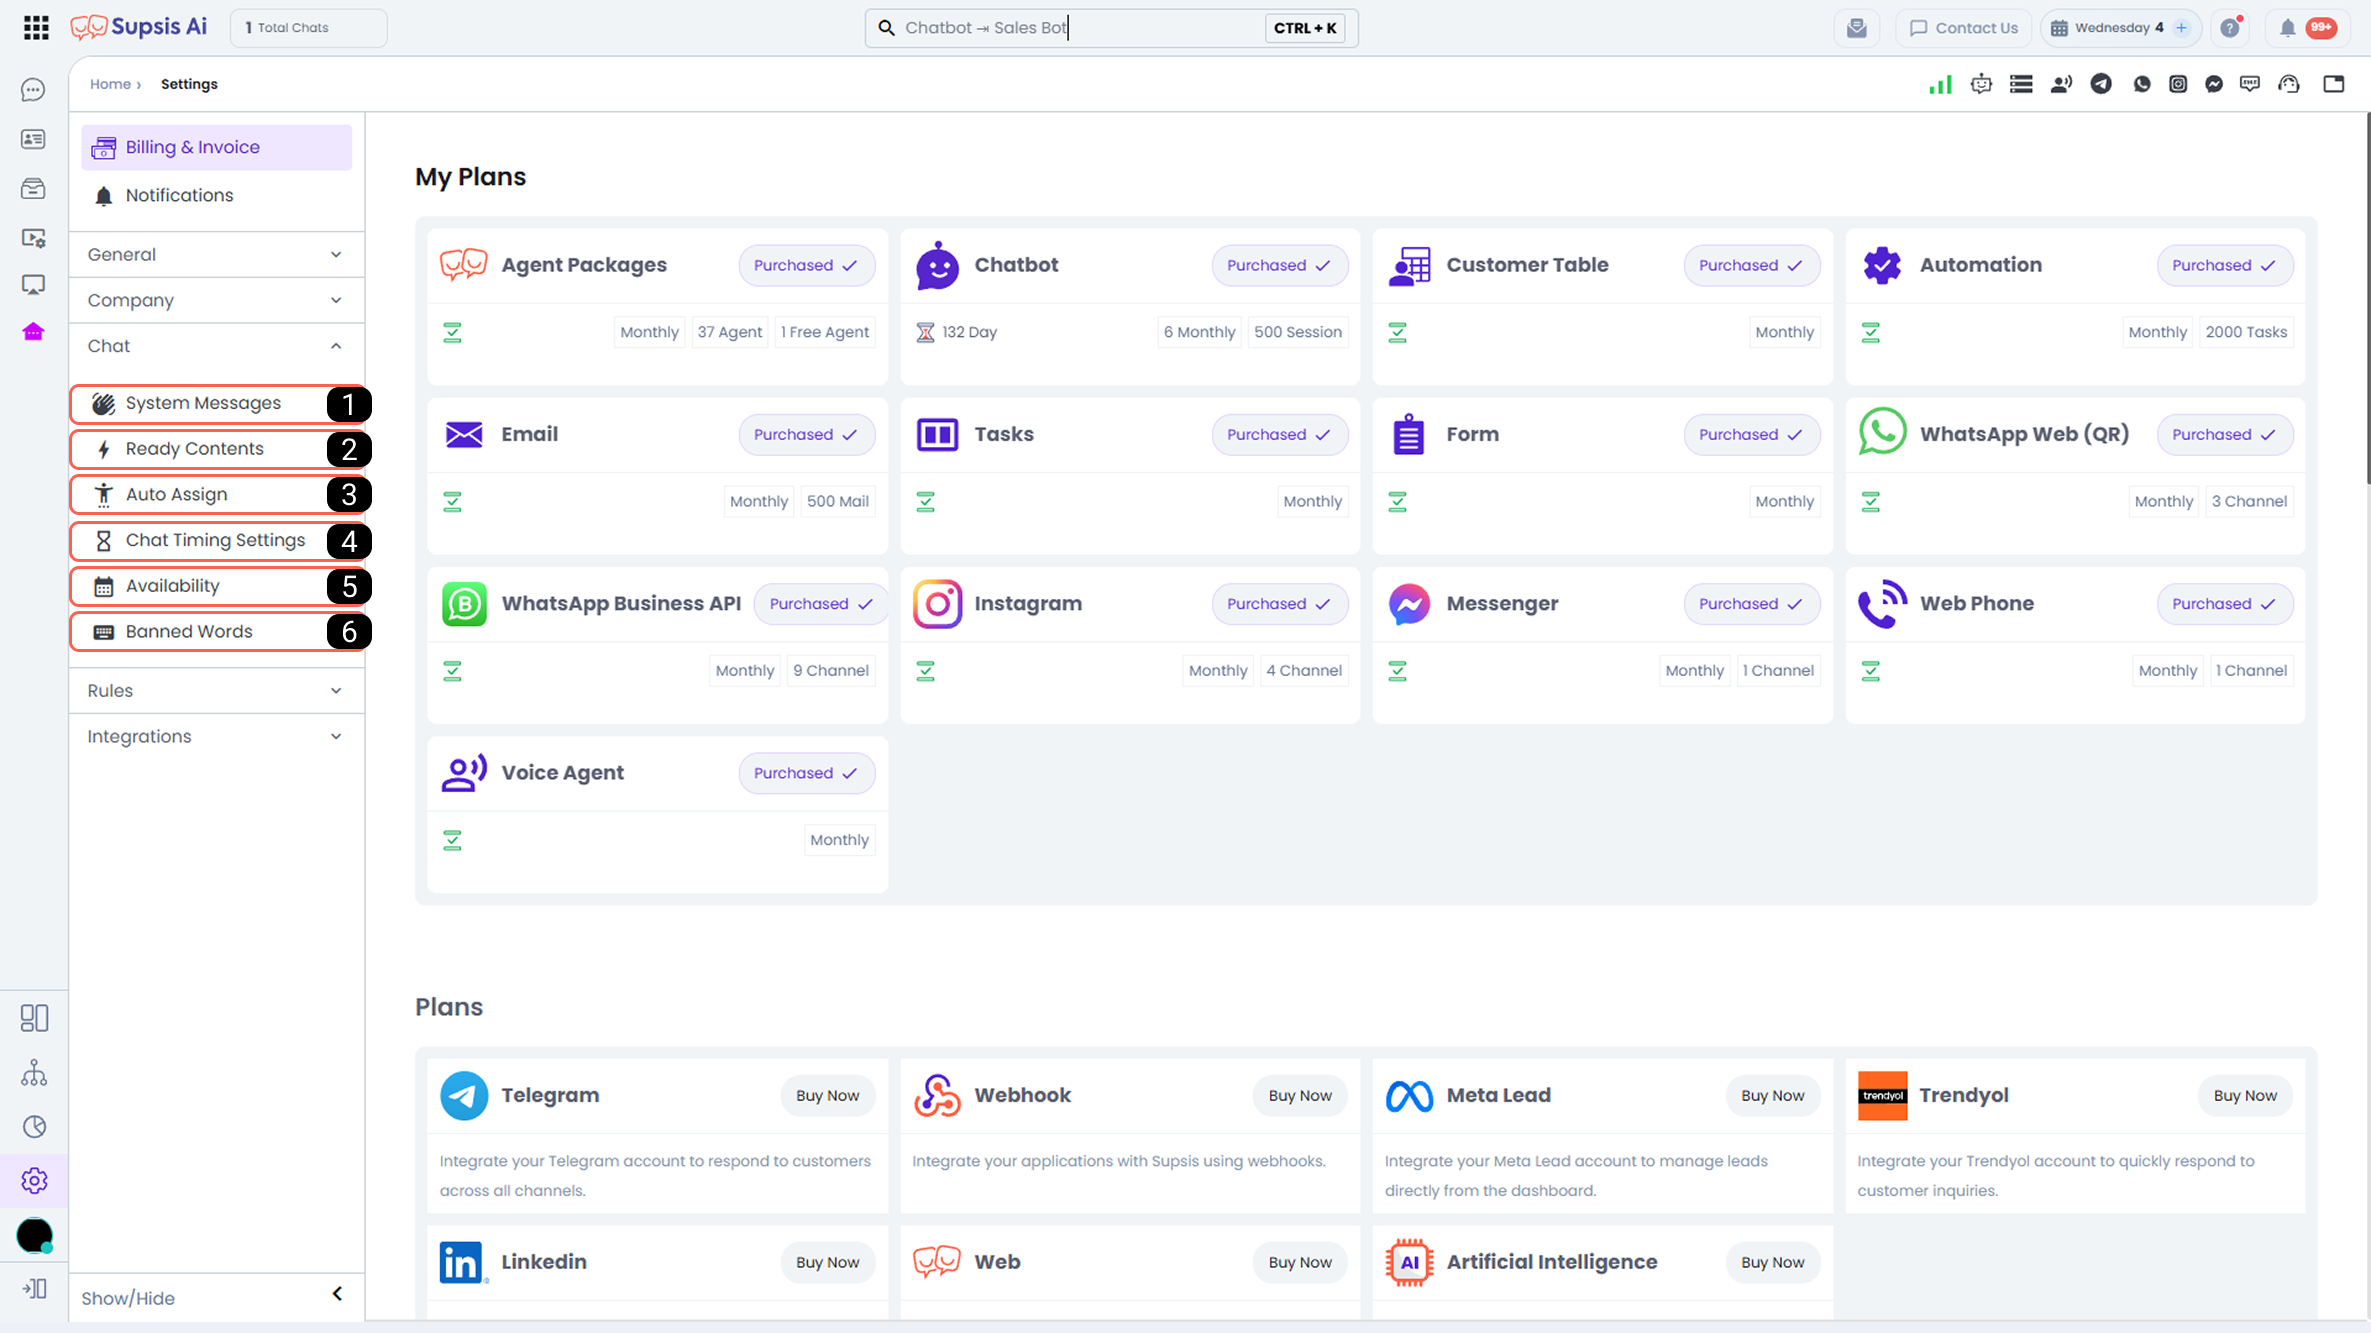
| No | Menu |
|---|---|
| 1 | System Messages |
| 2 | Quick Replies |
| 3 | Chat Assignment |
| 4 | Time Settings |
| 5 | Blocked Messages |
1-) System Messages
System messages are messages automatically sent by the system to customers who connect via the chat bubble when specific actions occur.
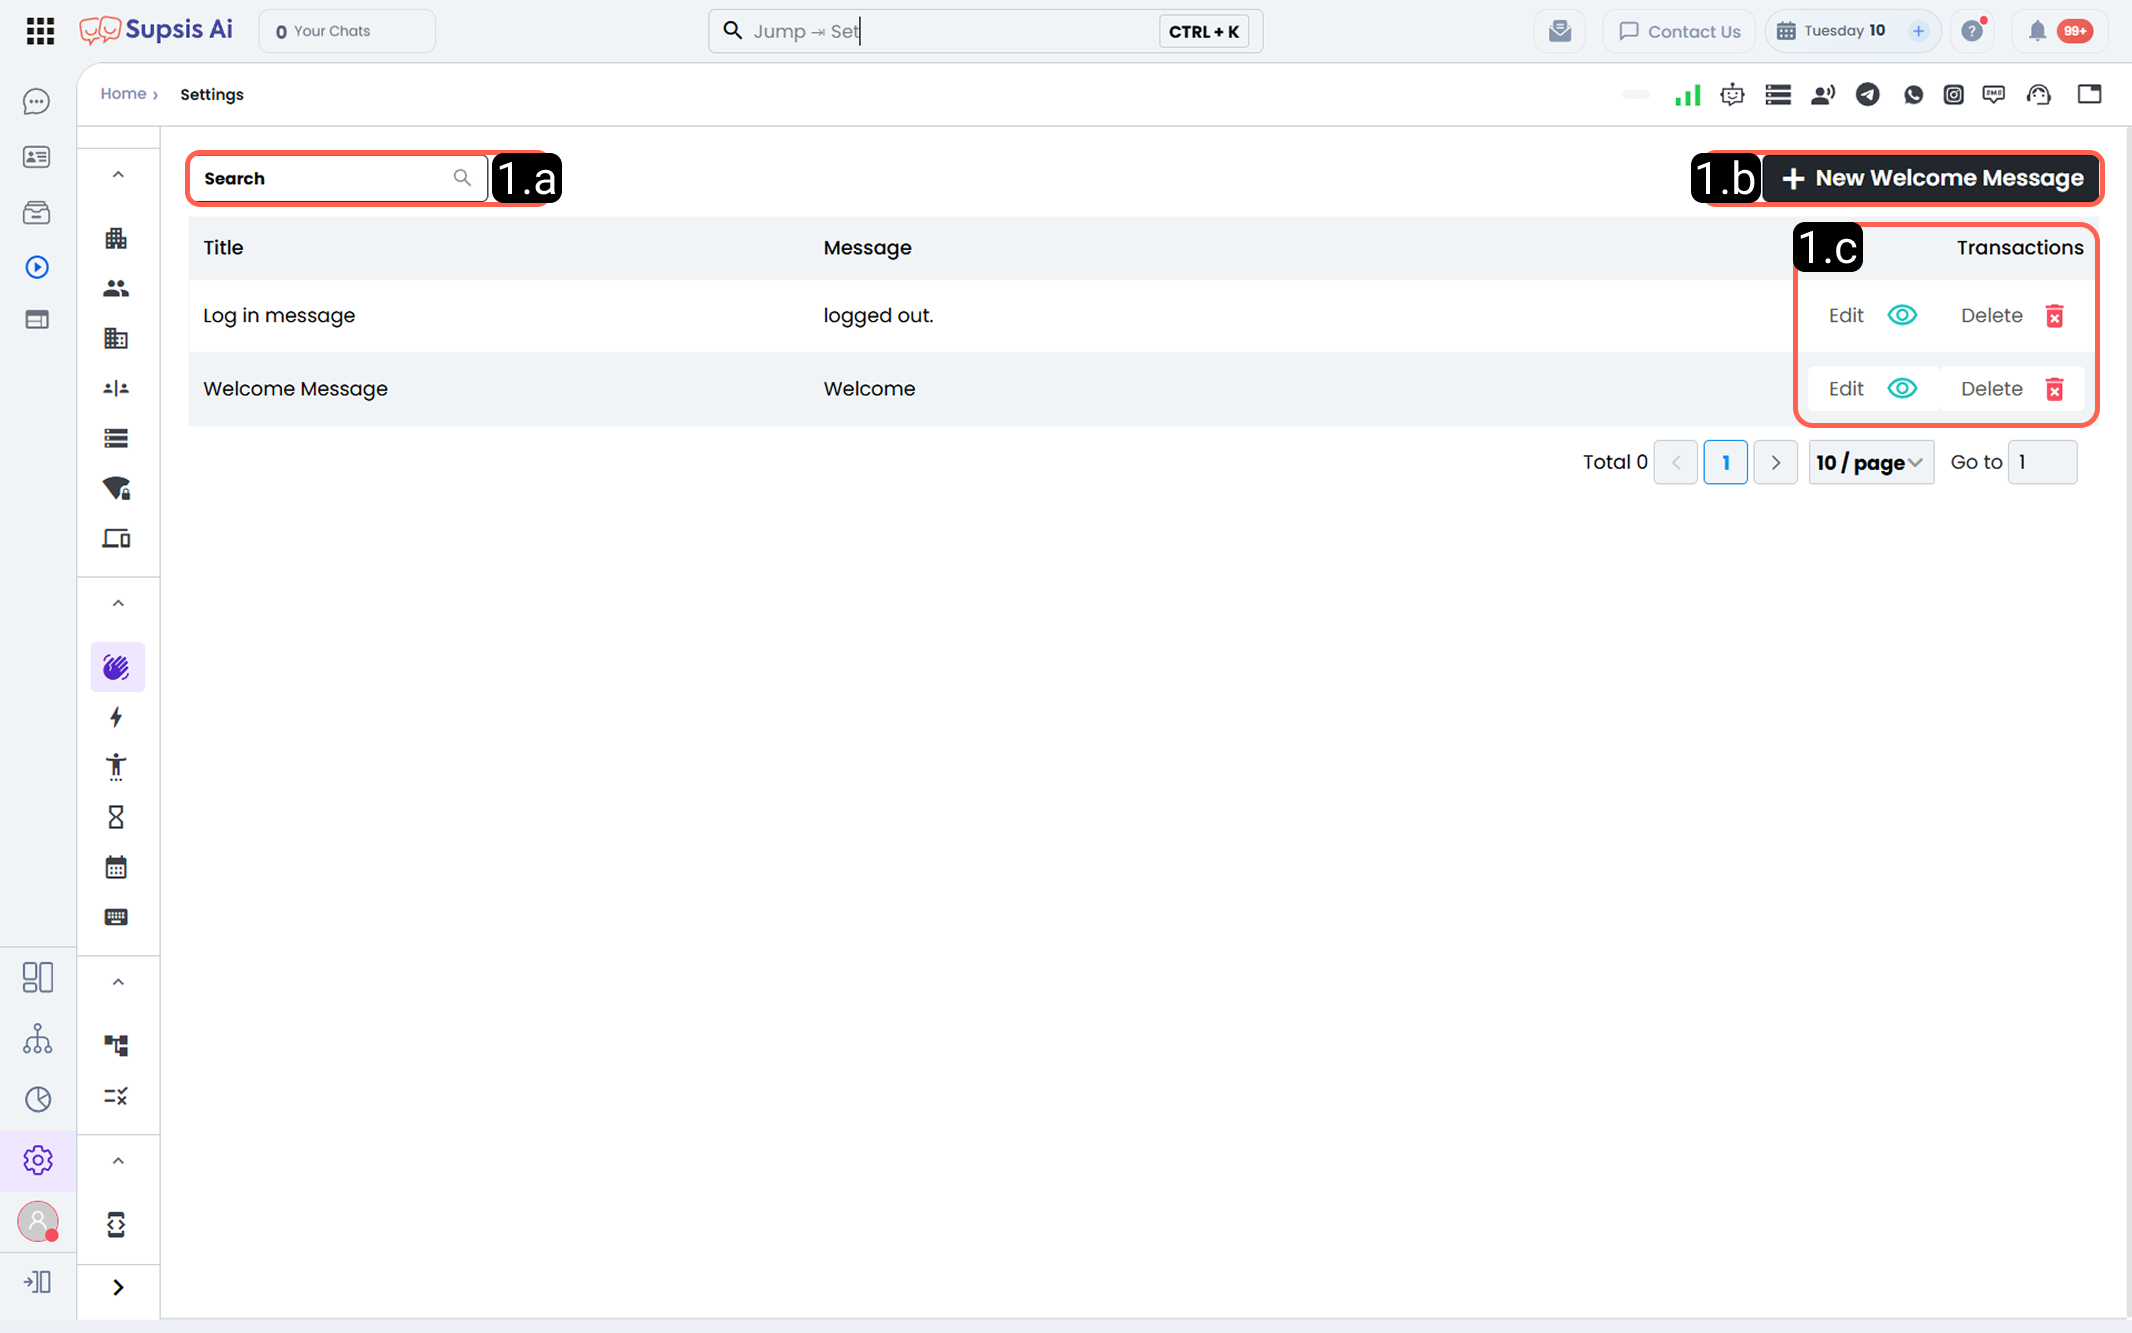
1.a – Search Bar:
You can search your welcome messages by title and message content using the search bar.
1.b – Create New Welcome Message:
Users
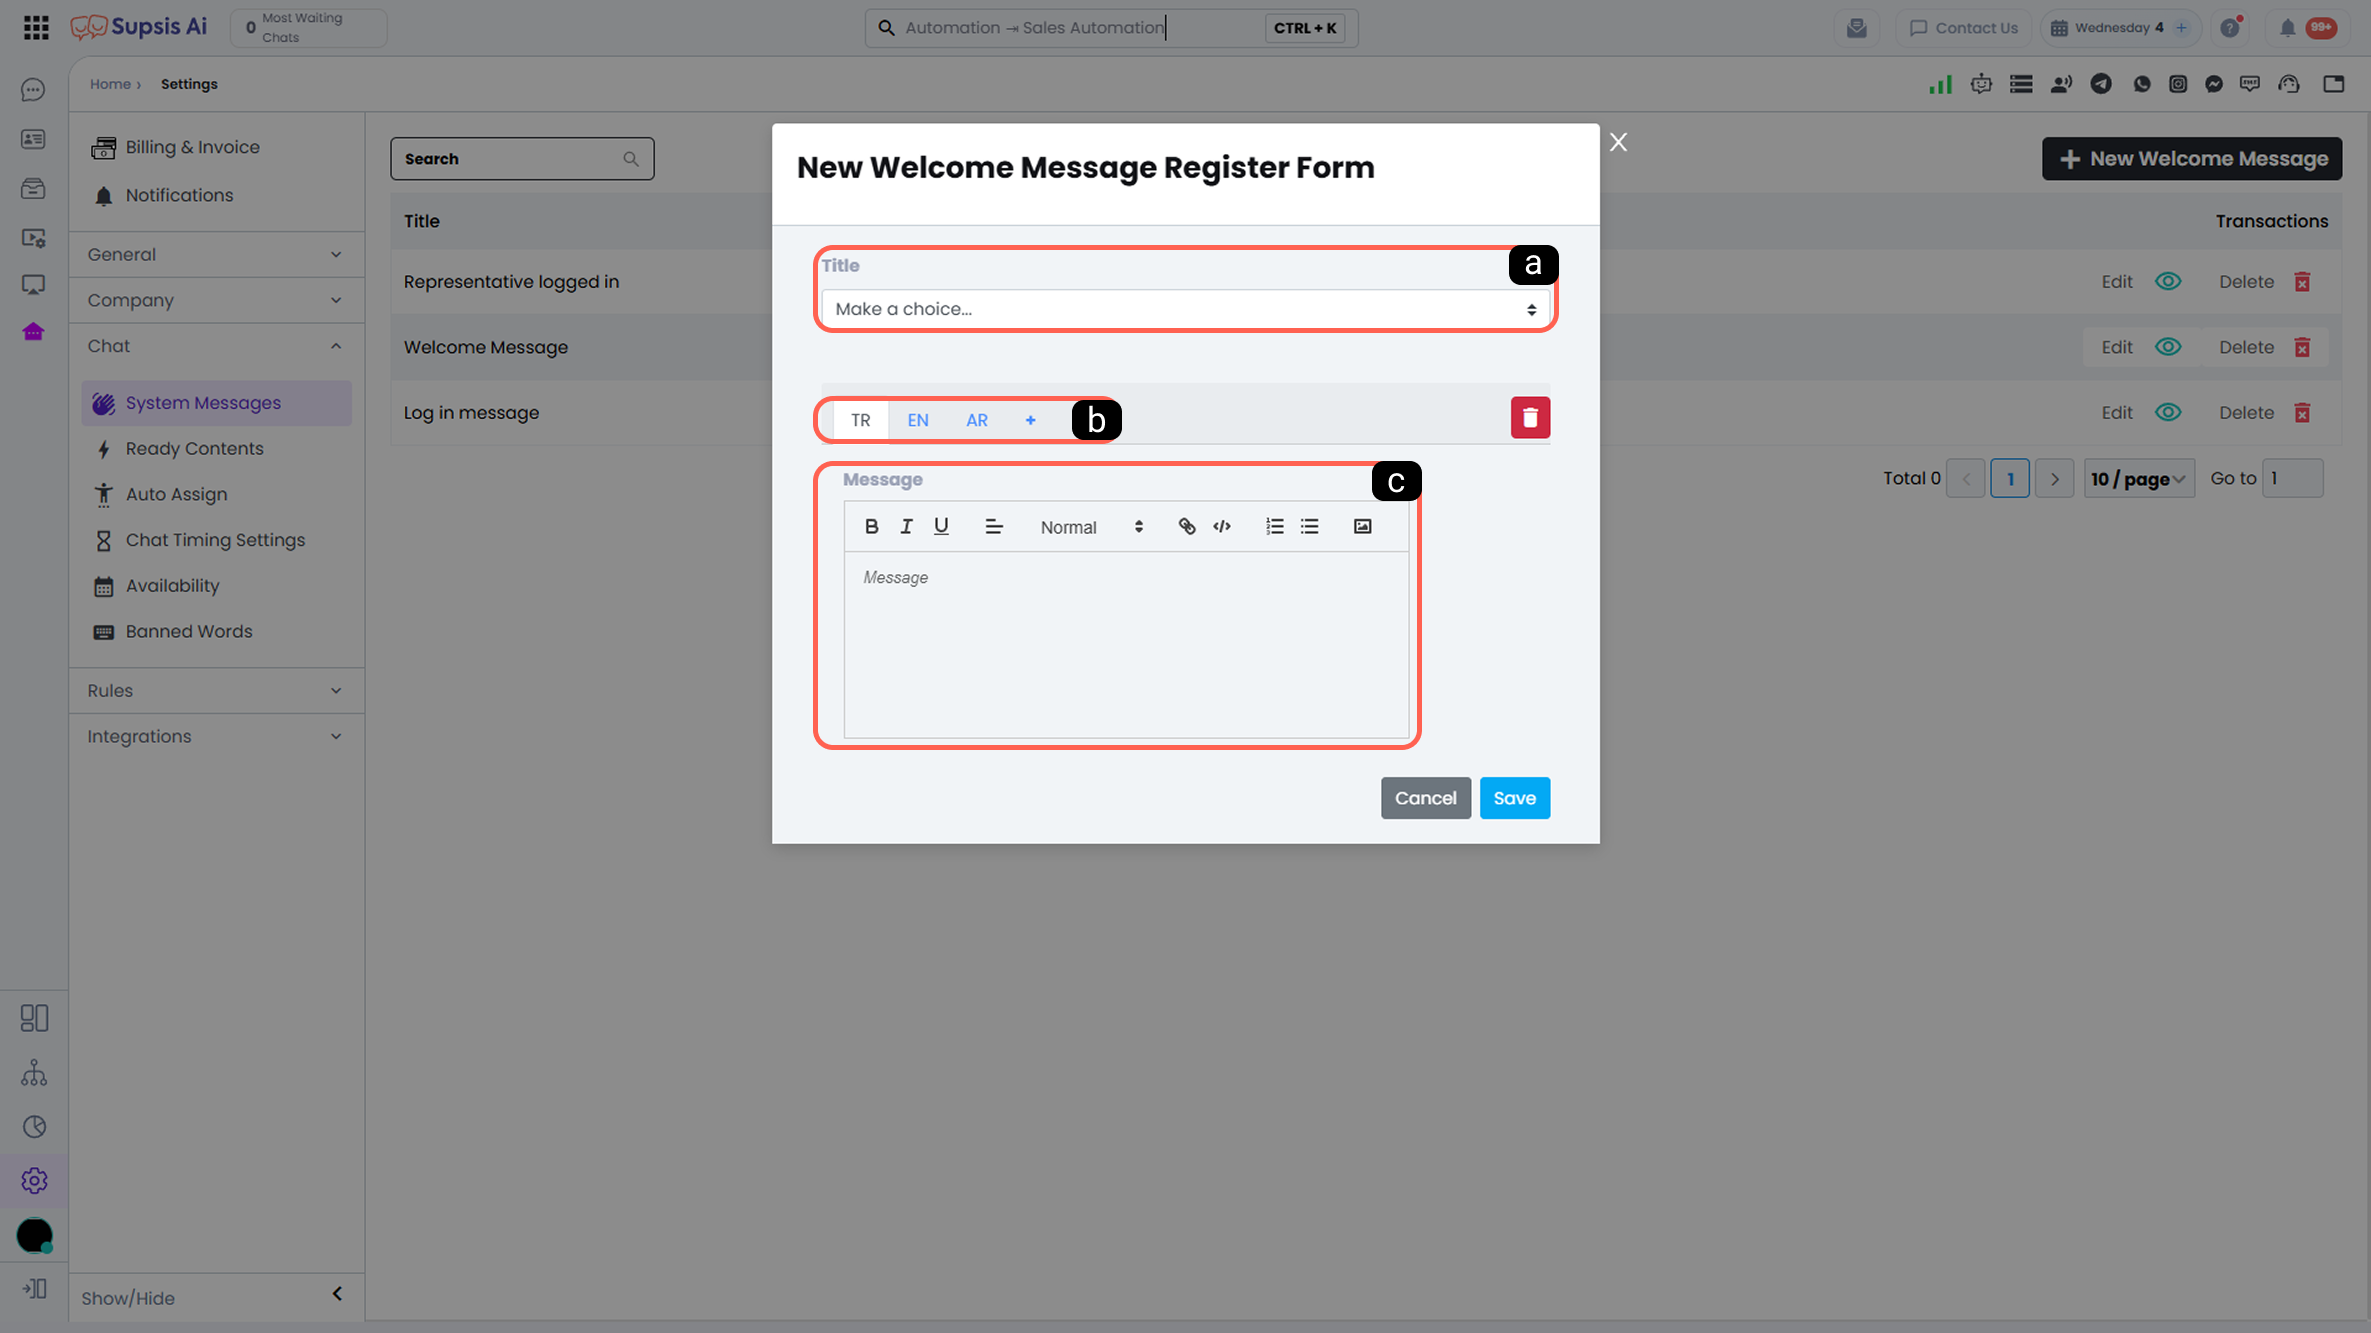
-
a – System Message Type:
You can determine under which condition the system message will be sent from this field.
Available system messages are:
Welcome Message: A predefined system message sent when a visitor connects via the chat bubble.
Agent Logged In: A predefined system message sent when an agent joins the chat session.
Session Closing Message: A predefined system message sent when the chat session time expires or when the session is ended by the agent or visitor. -
b – Language:
System messages can only be sent via the chat bubble. The chat bubble script automatically detects the visitor’s language from browser settings. The system message is sent according to the detected language. -
c – Message Content:
You can define the content of the message that will be automatically sent by the system when the selected system message type condition occurs.
1.c – Actions:
Actions allow you to perform operations on your existing welcome messages.
-
Edit
You can use the Eye icon to edit your system message content. All fields of the system message can be modified with this option. -
Trash Bin
You can use this option to remove the system message.
2-) Quick Replies (Rich Multi-Block Content Flows)
Quick Replies (Templates) are pre-configured message flow templates used to provide fast, consistent, and standardized responses to frequently asked questions, campaign announcements, and routine customer inquiries.
With the next-generation Multi-Block Quick Reply architecture, instead of sending plain text alone, you can define rich content sequences comprising Text, Image, Document, Audio, Video, Location, and Interactive Button Message blocks.
You can examine how quick replies are created, sent during live chat sessions, and displayed on agent and customer screens across the 4 main stages below:
| Stage No | View / Screen Name | Description |
|---|---|---|
| 1 | Quick Reply Creation Screen | The editor area where template name, keyboard shortcuts, language options, and message blocks are configured. |
| 2 | Quick Reply Preview & Sending Area | The preview modal that opens when an agent selects a template in live chat for flexible sending and block skipping. |
| 3 | Sender (Agent) Perspective View | The chronological message stream displayed on the agent's live chat panel after sending. |
| 4 | Recipient (Customer) Perspective View | The live view of the rich content delivered on the customer's channel (Chat Widget, WhatsApp, etc.). |
2.a – Quick Reply Creation Screen (Editor & Registration Form)
The management editor screen where quick replies are created, keyboard shortcuts are defined, and multi-block message sequences are built.
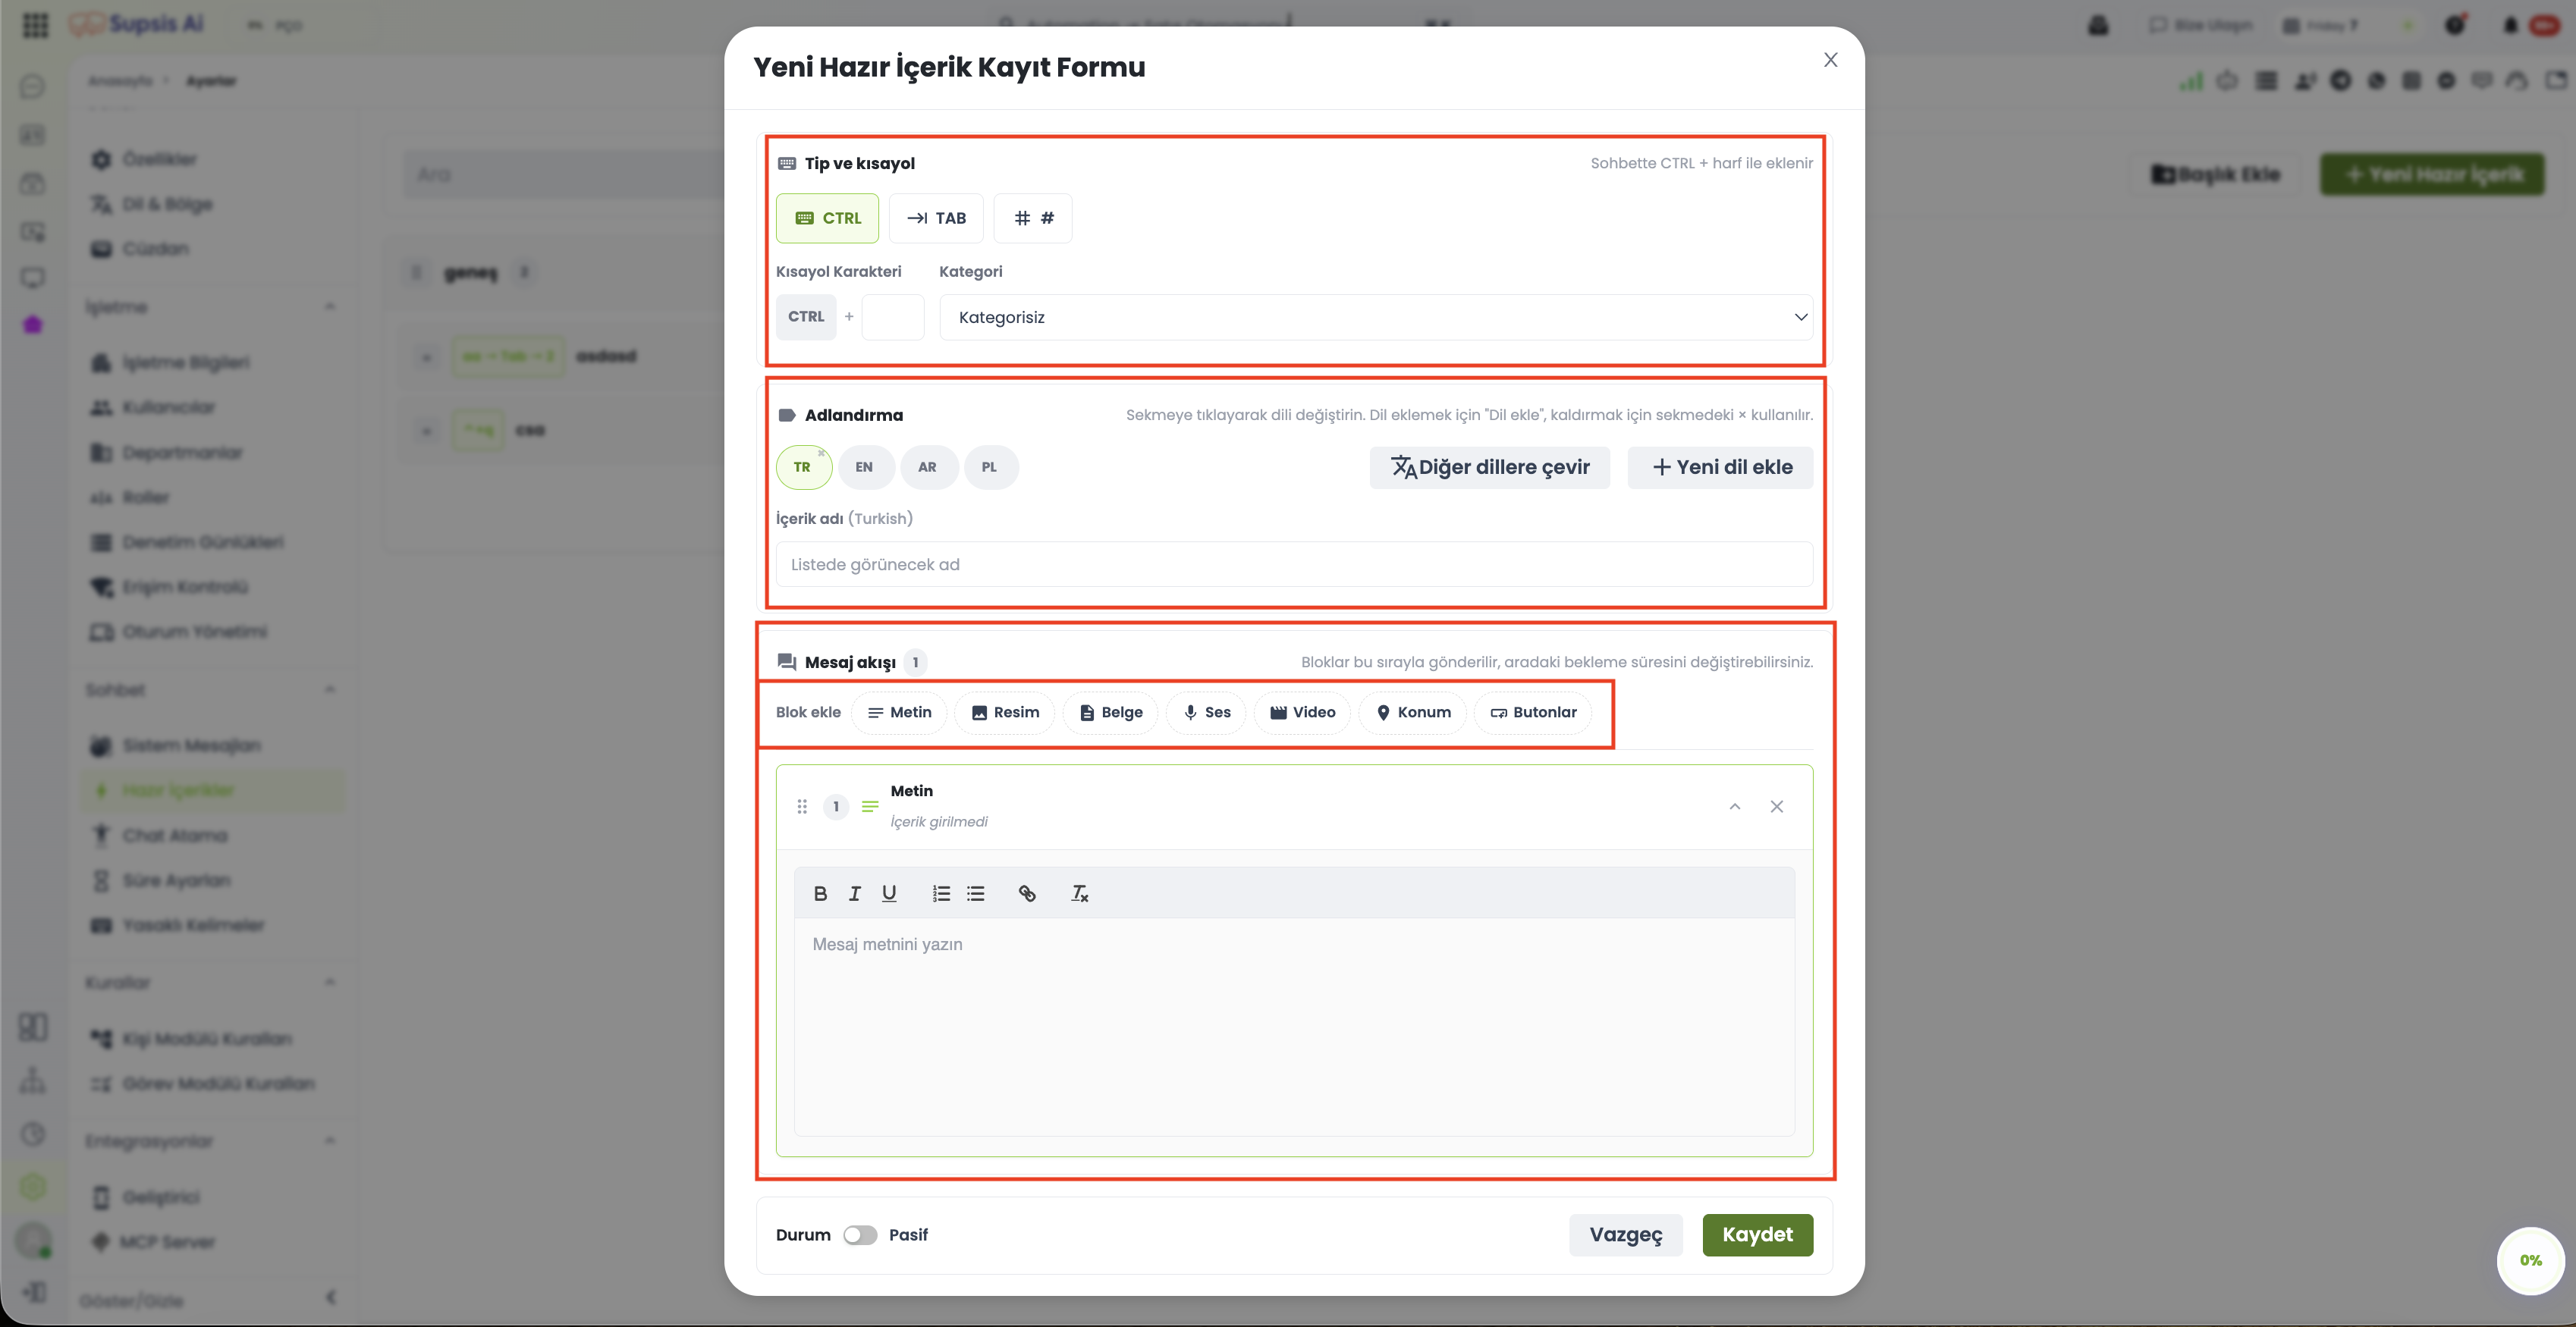
- 1.a – Type & Shortcut Selection (CTRL / TAB / HASH):
Determines how the quick reply is triggered in the chat input field via keyboard. - CTRL: Inserts content directly into the message input field via
CTRL + Lettercombination. - TAB: Triggers content after typing the letter sequence and pressing the
TABkey. - HASH (#): Performs flexible cursor-aligned tag searches by typing
#followed by a letter sequence. - 1.b – Category Selection & Naming:
Selects the category group (Welcome, Sales, Support, etc.) and display name in the template list. - 1.c – Multi-Language Management & Auto-Translation:
Define quick reply content in multiple languages (TR, EN, AR, PL, etc.). Clicking "Translate Selected Language to Other Languages" translates content across all defined tabs automatically. - 1.d – Message Flow & Block Addition (Up to 10 Blocks):
Add up to 10 blocks within a single flow, including Text, Image, Document, Audio, Video, Location, and Interactive Buttons. - 1.e – Delay Duration & Reordering:
Reorder blocks via drag-and-drop. Set a delay duration from 0 to 300 seconds before sending each block.
📌 Note (System Limits): Up to 10 blocks per quick reply flow and up to 3 interactive buttons (REPLY, URL, PHONE) per Buttons block.
2.b – Quick Reply Preview & Sending Area
The modal that opens when an agent selects a quick reply (via #, TAB, or menu) in the live chat window prior to sending.
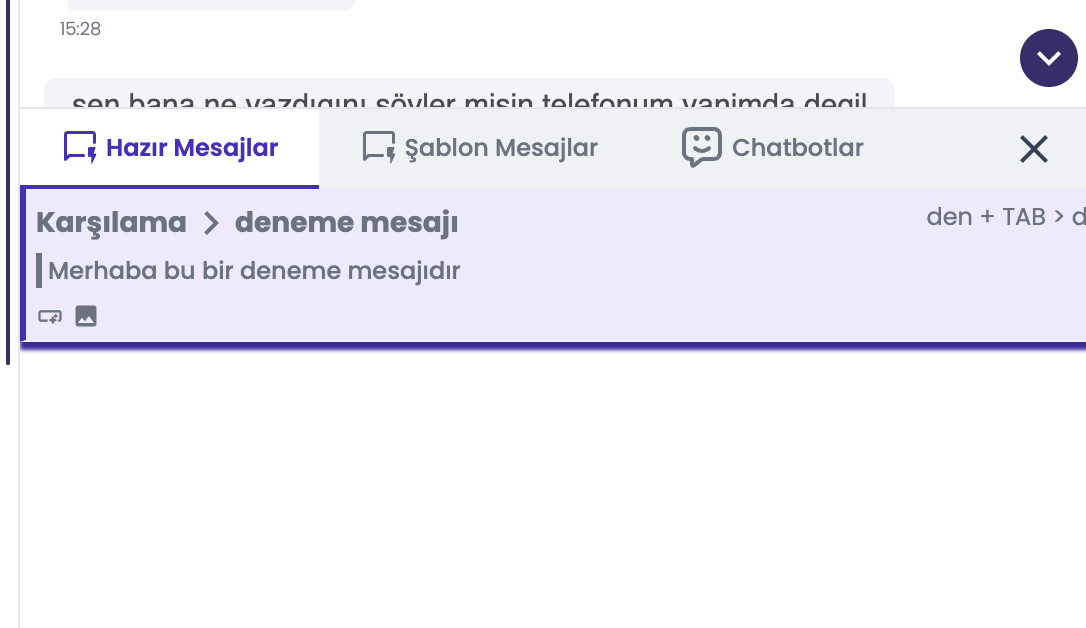
- 2.a – Language Selection:
Pre-selects the customer's preferred conversation language, with manual dropdown override support. - 2.b – Select / Skip Block Flexibility:
All flow blocks are listed sequentially. Agents can uncheck specific block checkboxes to skip sending them for that conversation. - 2.c – Delayed Sequential Delivery Orchestration:
Delay indicators are visually labeled. Upon clicking Send, the backend service orchestrates sequential delivery reliably in the background even if the agent navigates away.
2.c – Sender (Agent) Perspective View
The live chat stream view on the agent's Supsis dashboard as quick reply message blocks are delivered.
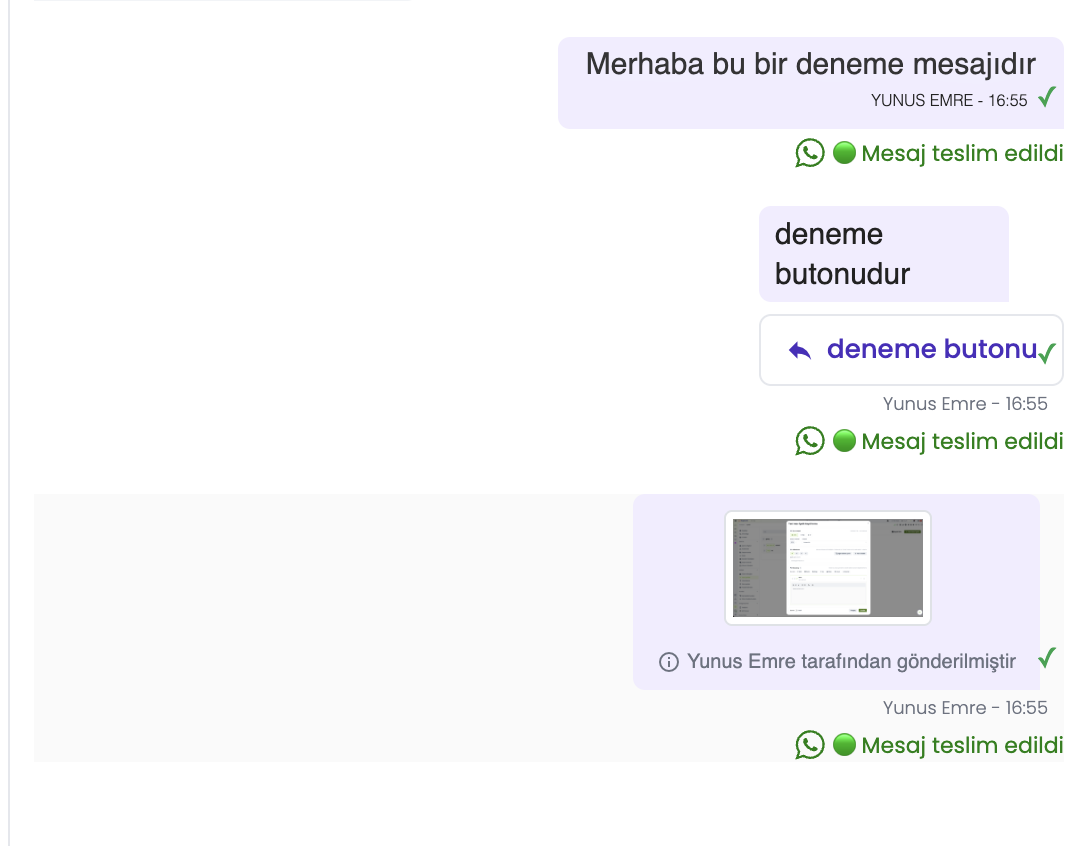
- 3.a – Chronological Message Flow:
Delivered text messages, images, and button blocks are listed in sequence with delivery timestamps. - 3.b – Delivery Statuses & Live Tracking:
Delivery checkmarks (✓✓) and background delayed block timers can be tracked live in real-time.
2.d – Recipient (Customer) Perspective View
The live channel view showing how the customer receives quick reply messages on their preferred platform (Chat Widget, WhatsApp, Instagram, Messenger, etc.).
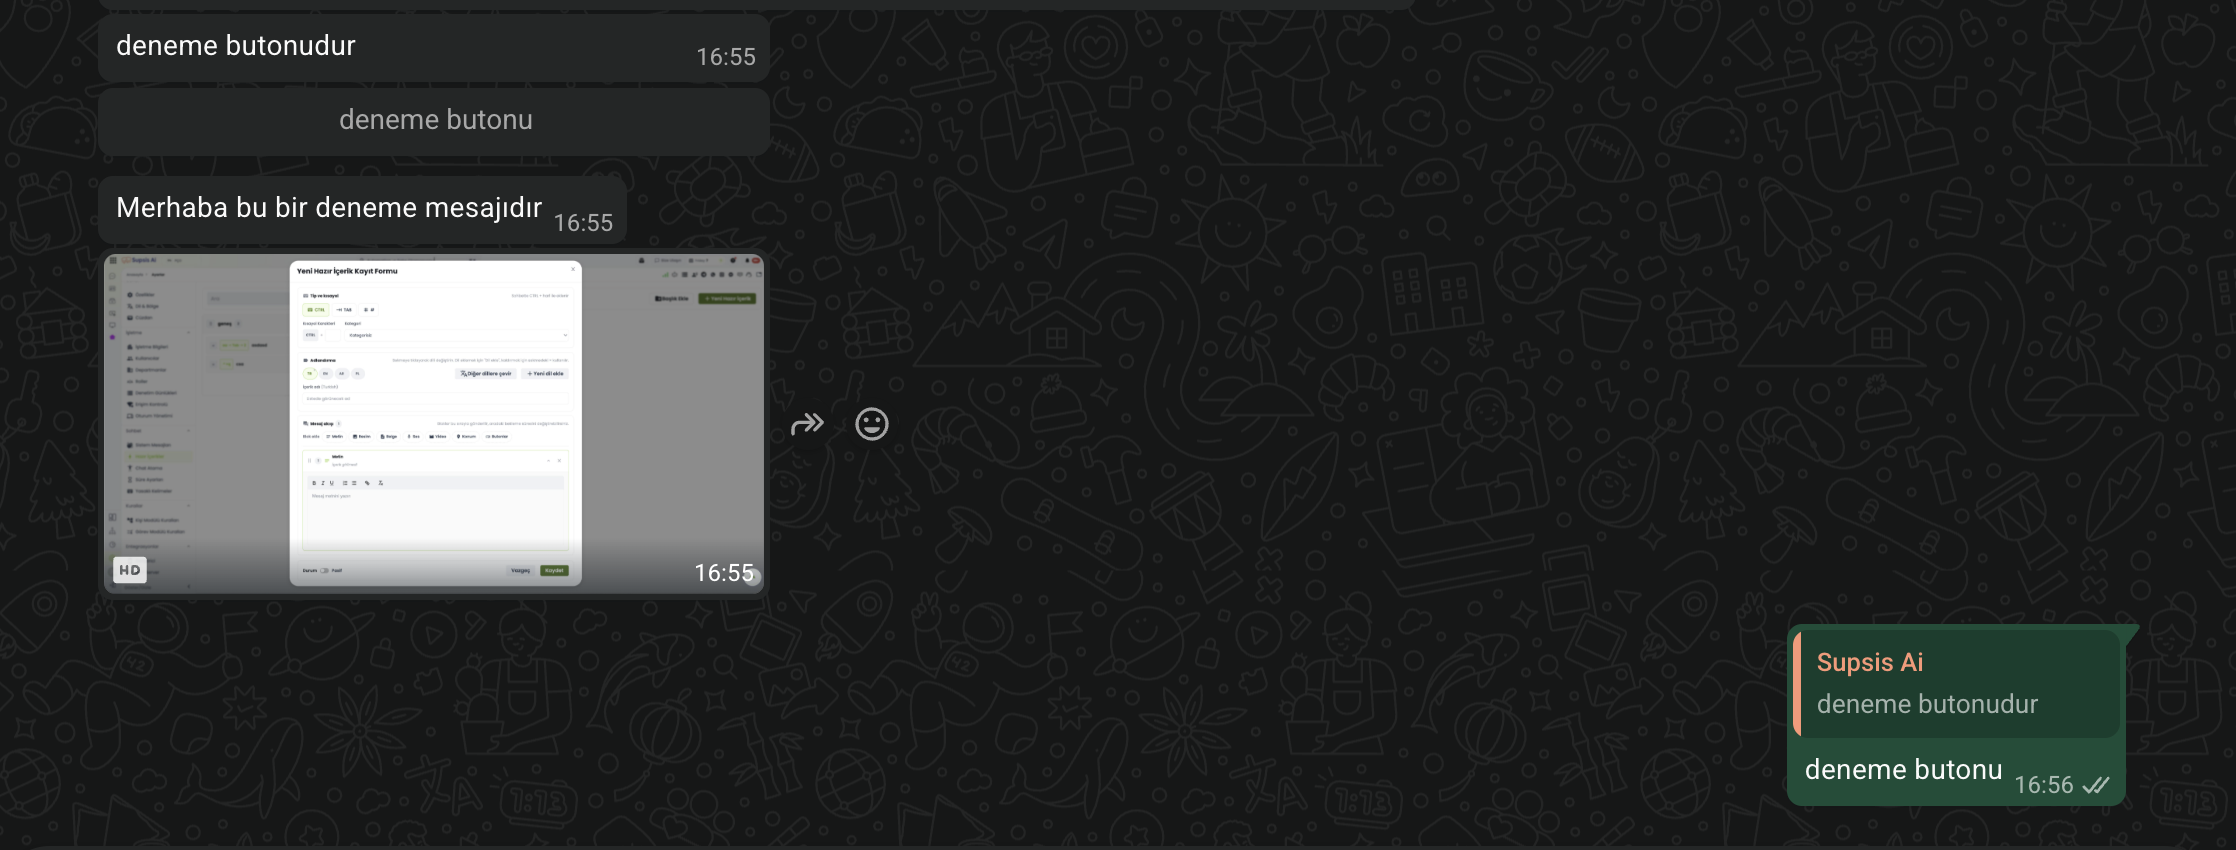
- 4.a – Native Channel UI Rendering:
Sent text, images, and interactive buttons render seamlessly in the native user interface format of the respective channel. - 4.b – One-Click Interactive Engagement:
Customer button taps (e.g., Quick Reply, Visit Website, Call Support) trigger immediate actions and stream customer responses back into the agent's chat panel.
2.e – Automation & Broadcast Integrations
Quick replies can be triggered automatically by system automations as well as manually by agents:
- Communication Rules: Select Send Quick Reply under
Communication Rules → Add Actionto send multi-block flows based on triggered rule conditions. - Broadcast Post-Actions: Trigger automated quick reply follow-ups after broadcast campaigns complete.
- Channel Fallback: Channels without interactive button support (e.g., SMS) automatically format button options into numbered text fallbacks.
3-) Chat Assignment
Chat Assignment ensures that customer conversations are directed to the right agents in a controlled manner.
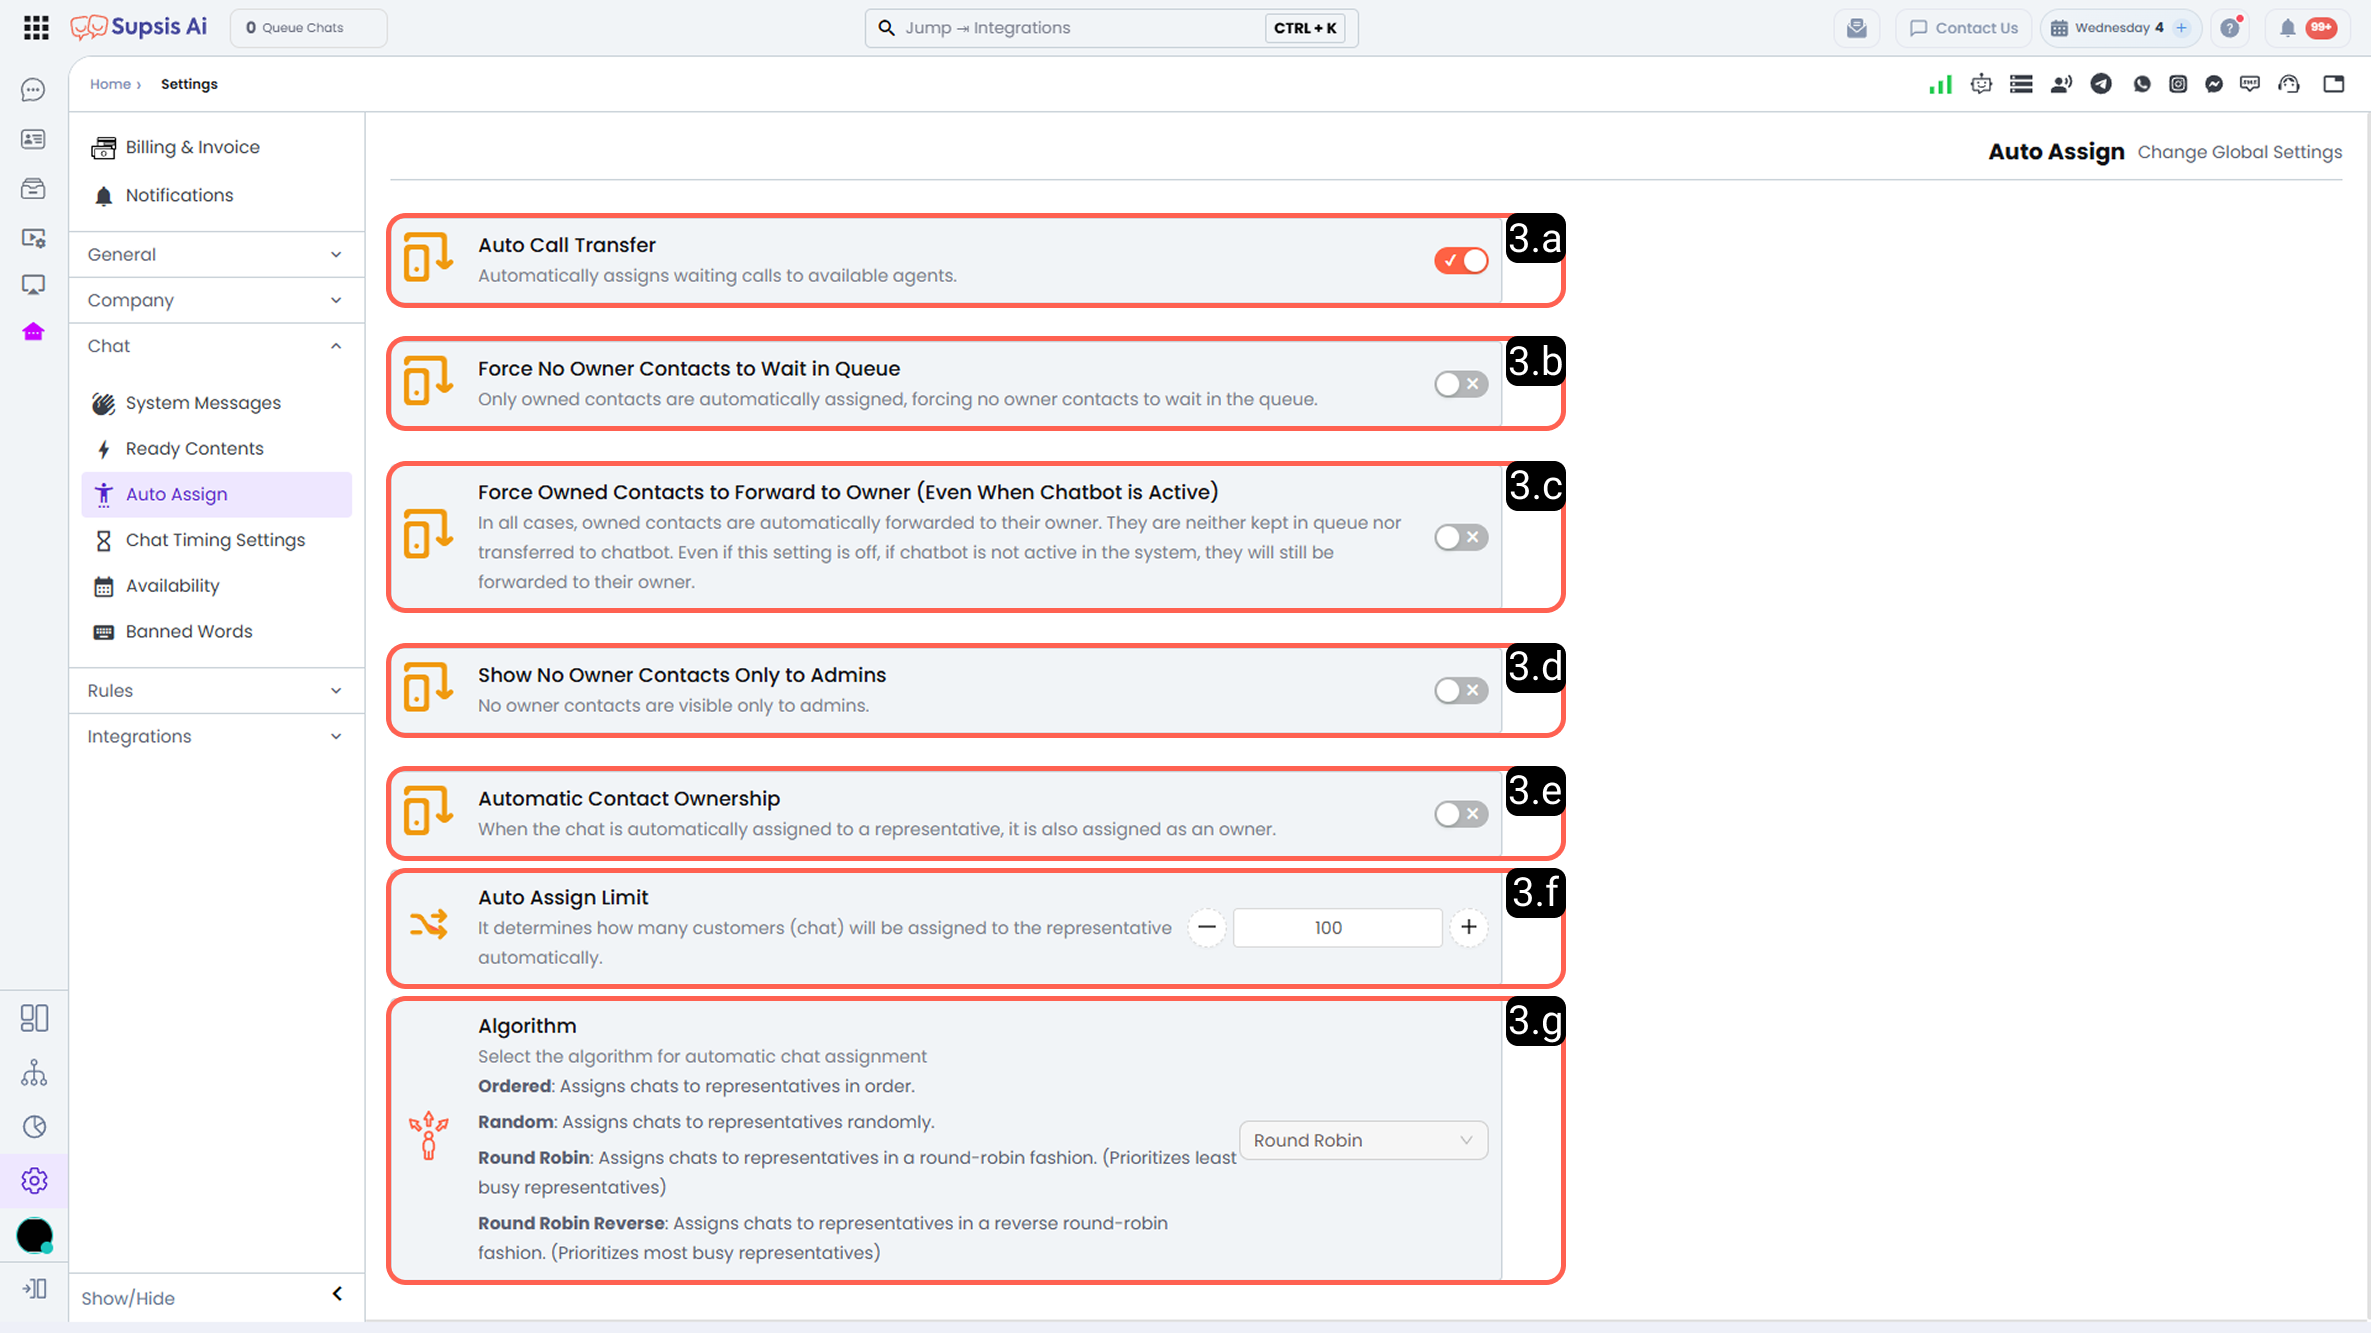
3.a – Automatic Conversation Transfer:
When enabled, waiting customer conversations are automatically assigned to available agents.
3.b – Force Unowned Contacts to Wait in Queue:
Only contacts with an assigned owner are included in automatic assignment.
3.c – Automatically Assign Owned Contacts to Their Owner (Even If Chatbot Is Active):
Owned contacts are directly routed to their assigned agent.
3.d – Show Unowned Contacts Only to Admins:
Unowned contacts are visible only to fully authorized users.
3.e – Automatic Contact Ownership:
When enabled, the assigned agent also becomes the contact owner.
3.f – Automatic Assignment Limit:
Defines the maximum number of automatic assignments per agent.
3.g – Algorithm:
- Ordered: Assigns chats sequentially.
- Random: Distributes chats randomly.
- Round Robin: Assigns chats prioritizing the least busy agents.
- Round Robin Reverse: Assigns chats prioritizing the most busy agents.
4-) Time Settings
Time Settings allow you to control time-based behaviors in conversations.
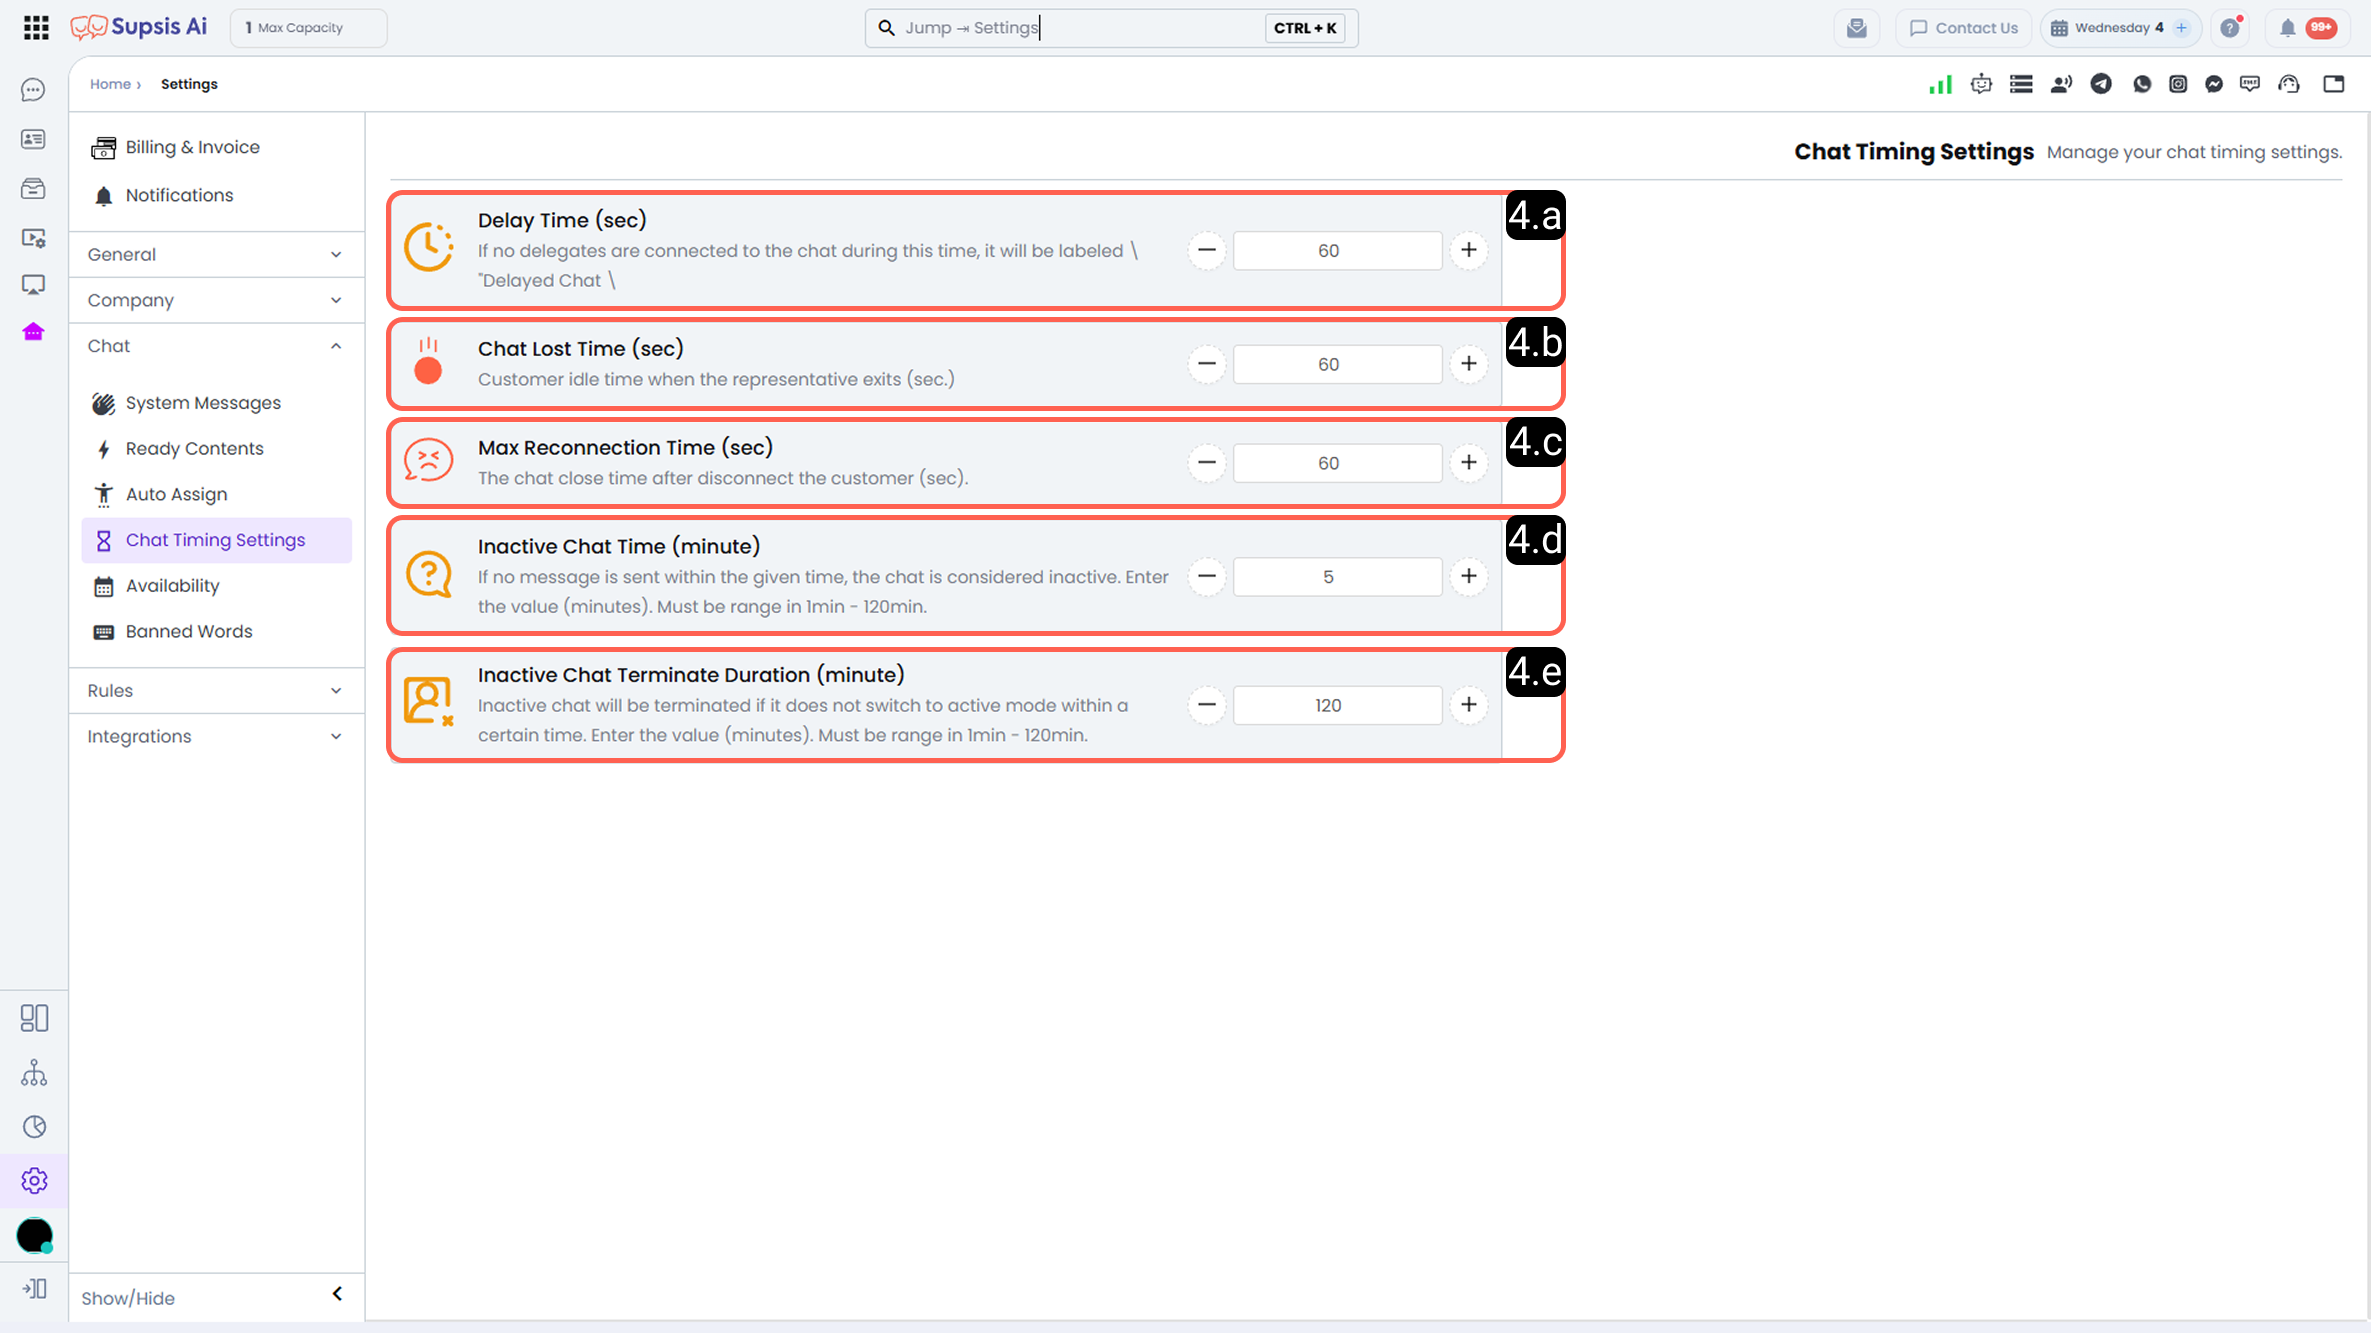
4.a – Delay Time:
If no agent joins within this time, the chat is labeled as “Delayed Chat.”
4.b – Idle Time:
Defines how long a contact can wait unassigned after an agent leaves the chat.
4.c – Auto Close Time:
Defines the time after which the chat is automatically closed after connection loss.
4.d – Inactive Chat Time:
If no message is sent within the defined period, the chat is considered inactive.
4.e – Inactive Chat Close Time:
Automatically closes the chat after the defined inactive duration.
5-) Blocked Messages
The Blocked Messages feature prevents agents from sending messages containing defined forbidden words.
Blocked word control applies only to agents; customers are not restricted.
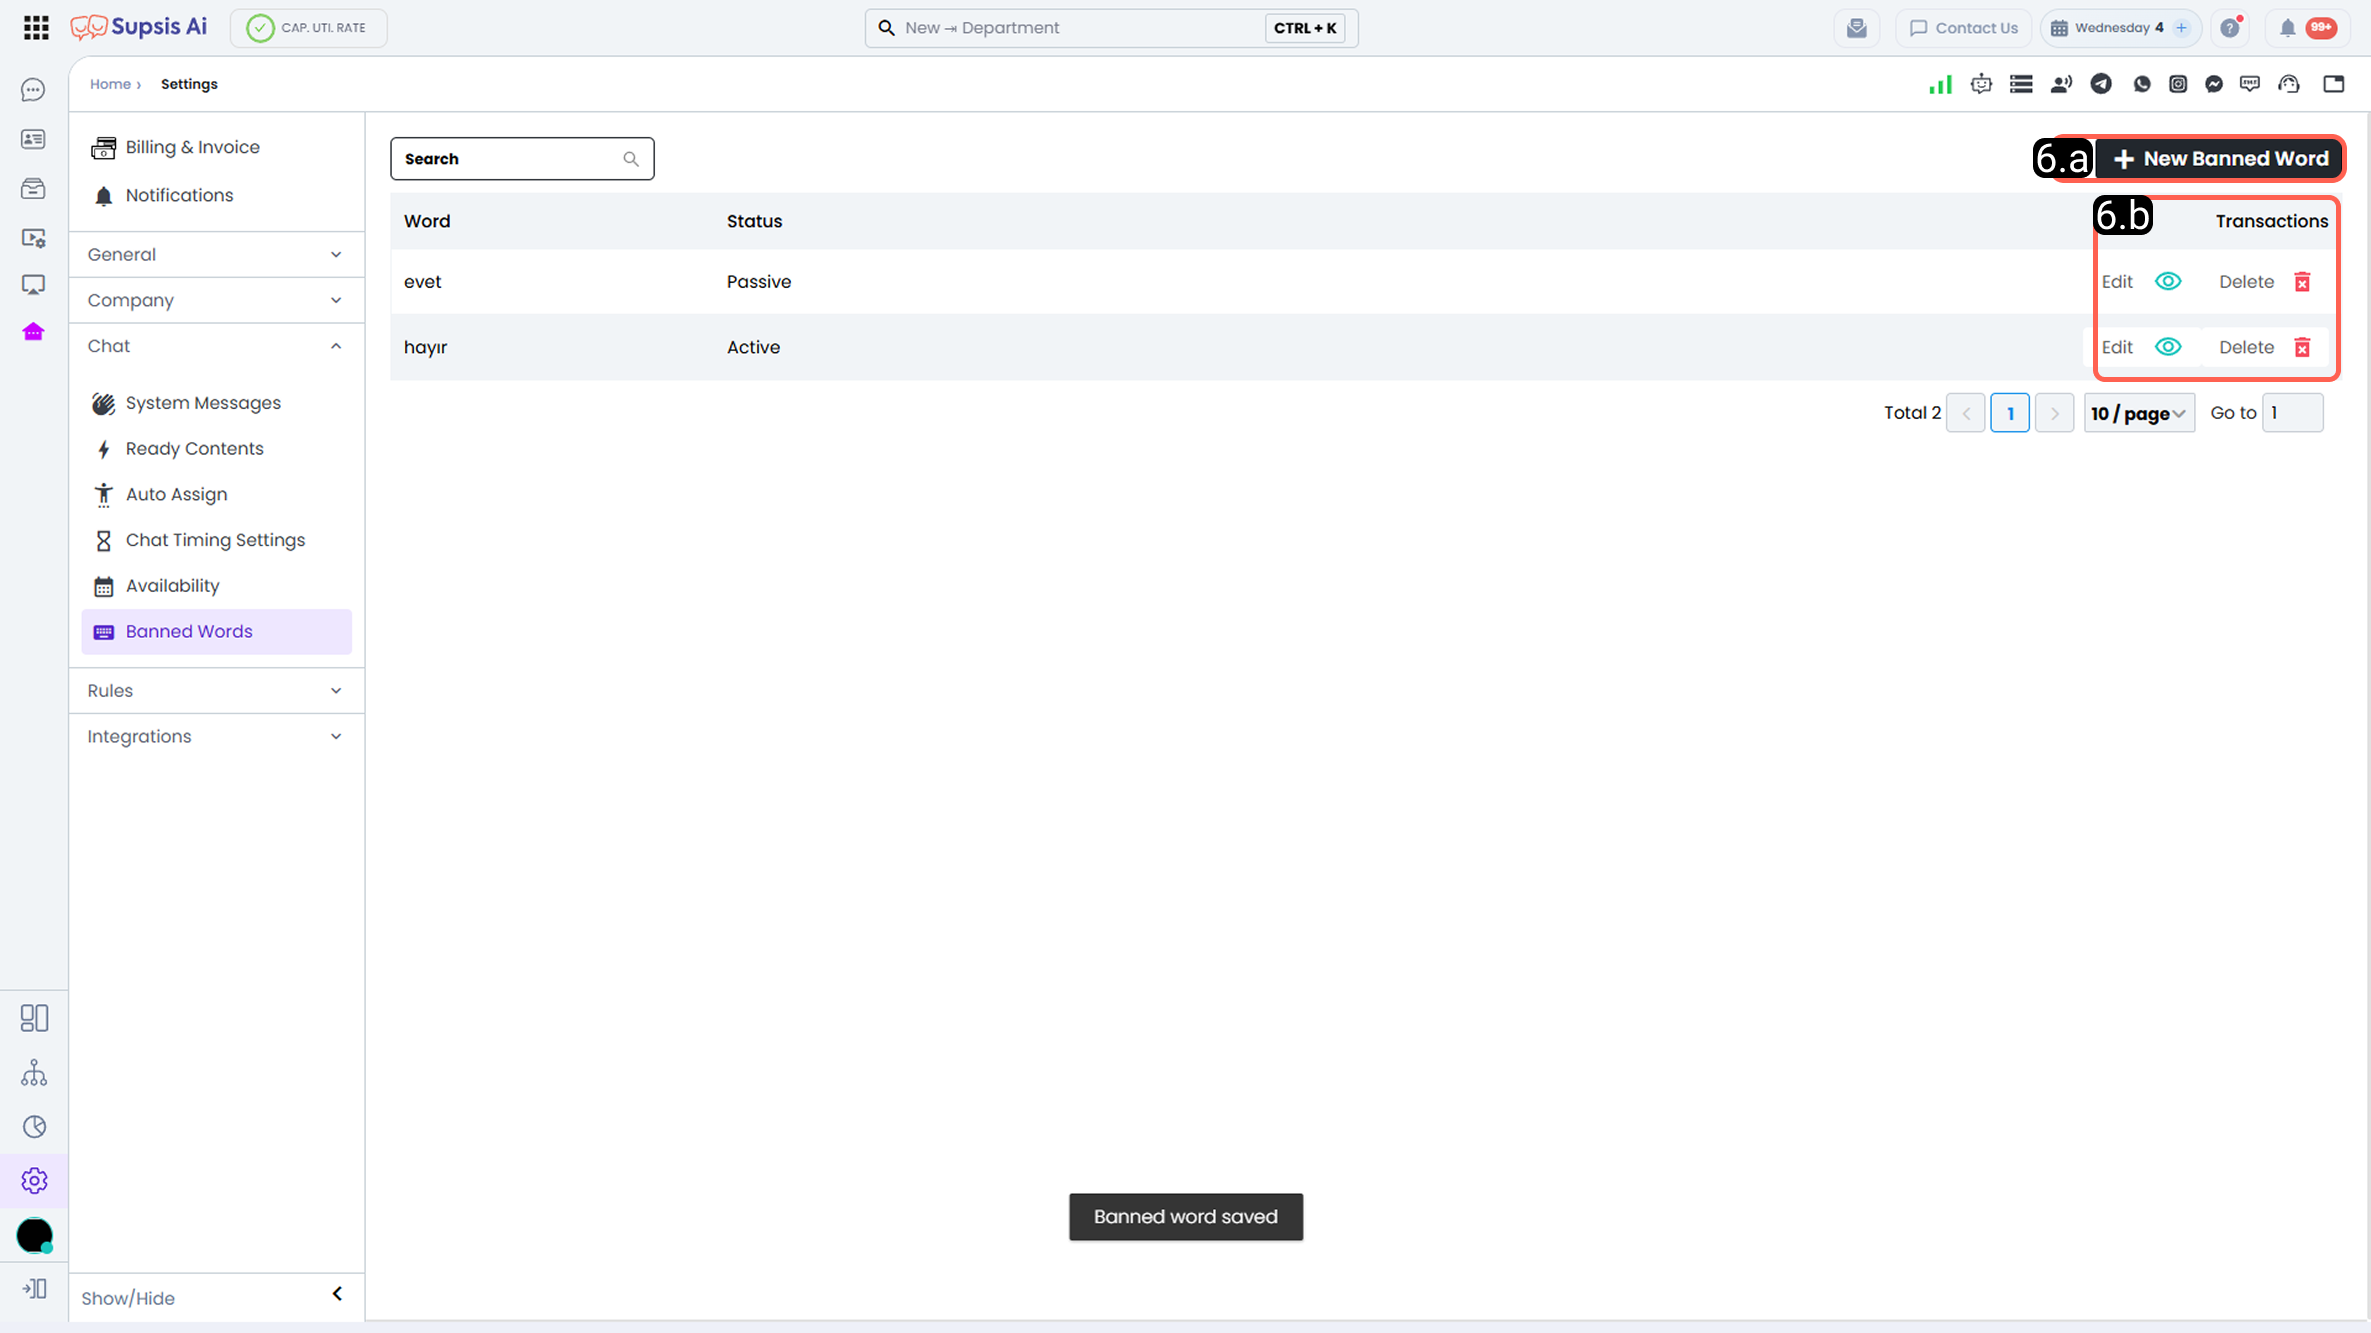
5.a – Add New Blocked Word:
Add a new blocked word.
5.b – Blocked Word Actions:
-
Edit
Edit the content and status (active/passive). -
Delete
Delete the blocked word from the system.