
Visitors
The Visitors field presents a profile list that includes all individuals located in the Contacts menu with whom you have communicated or who have been manually added to the system. Through this section, you can view comprehensive profile information belonging to visitors and filter the data within contact cards to list only the individuals you wish to take action on.
Additionally, based on the filter criteria you define, you can export the visitor list and easily organize your data for reporting, analysis, or use in different systems.
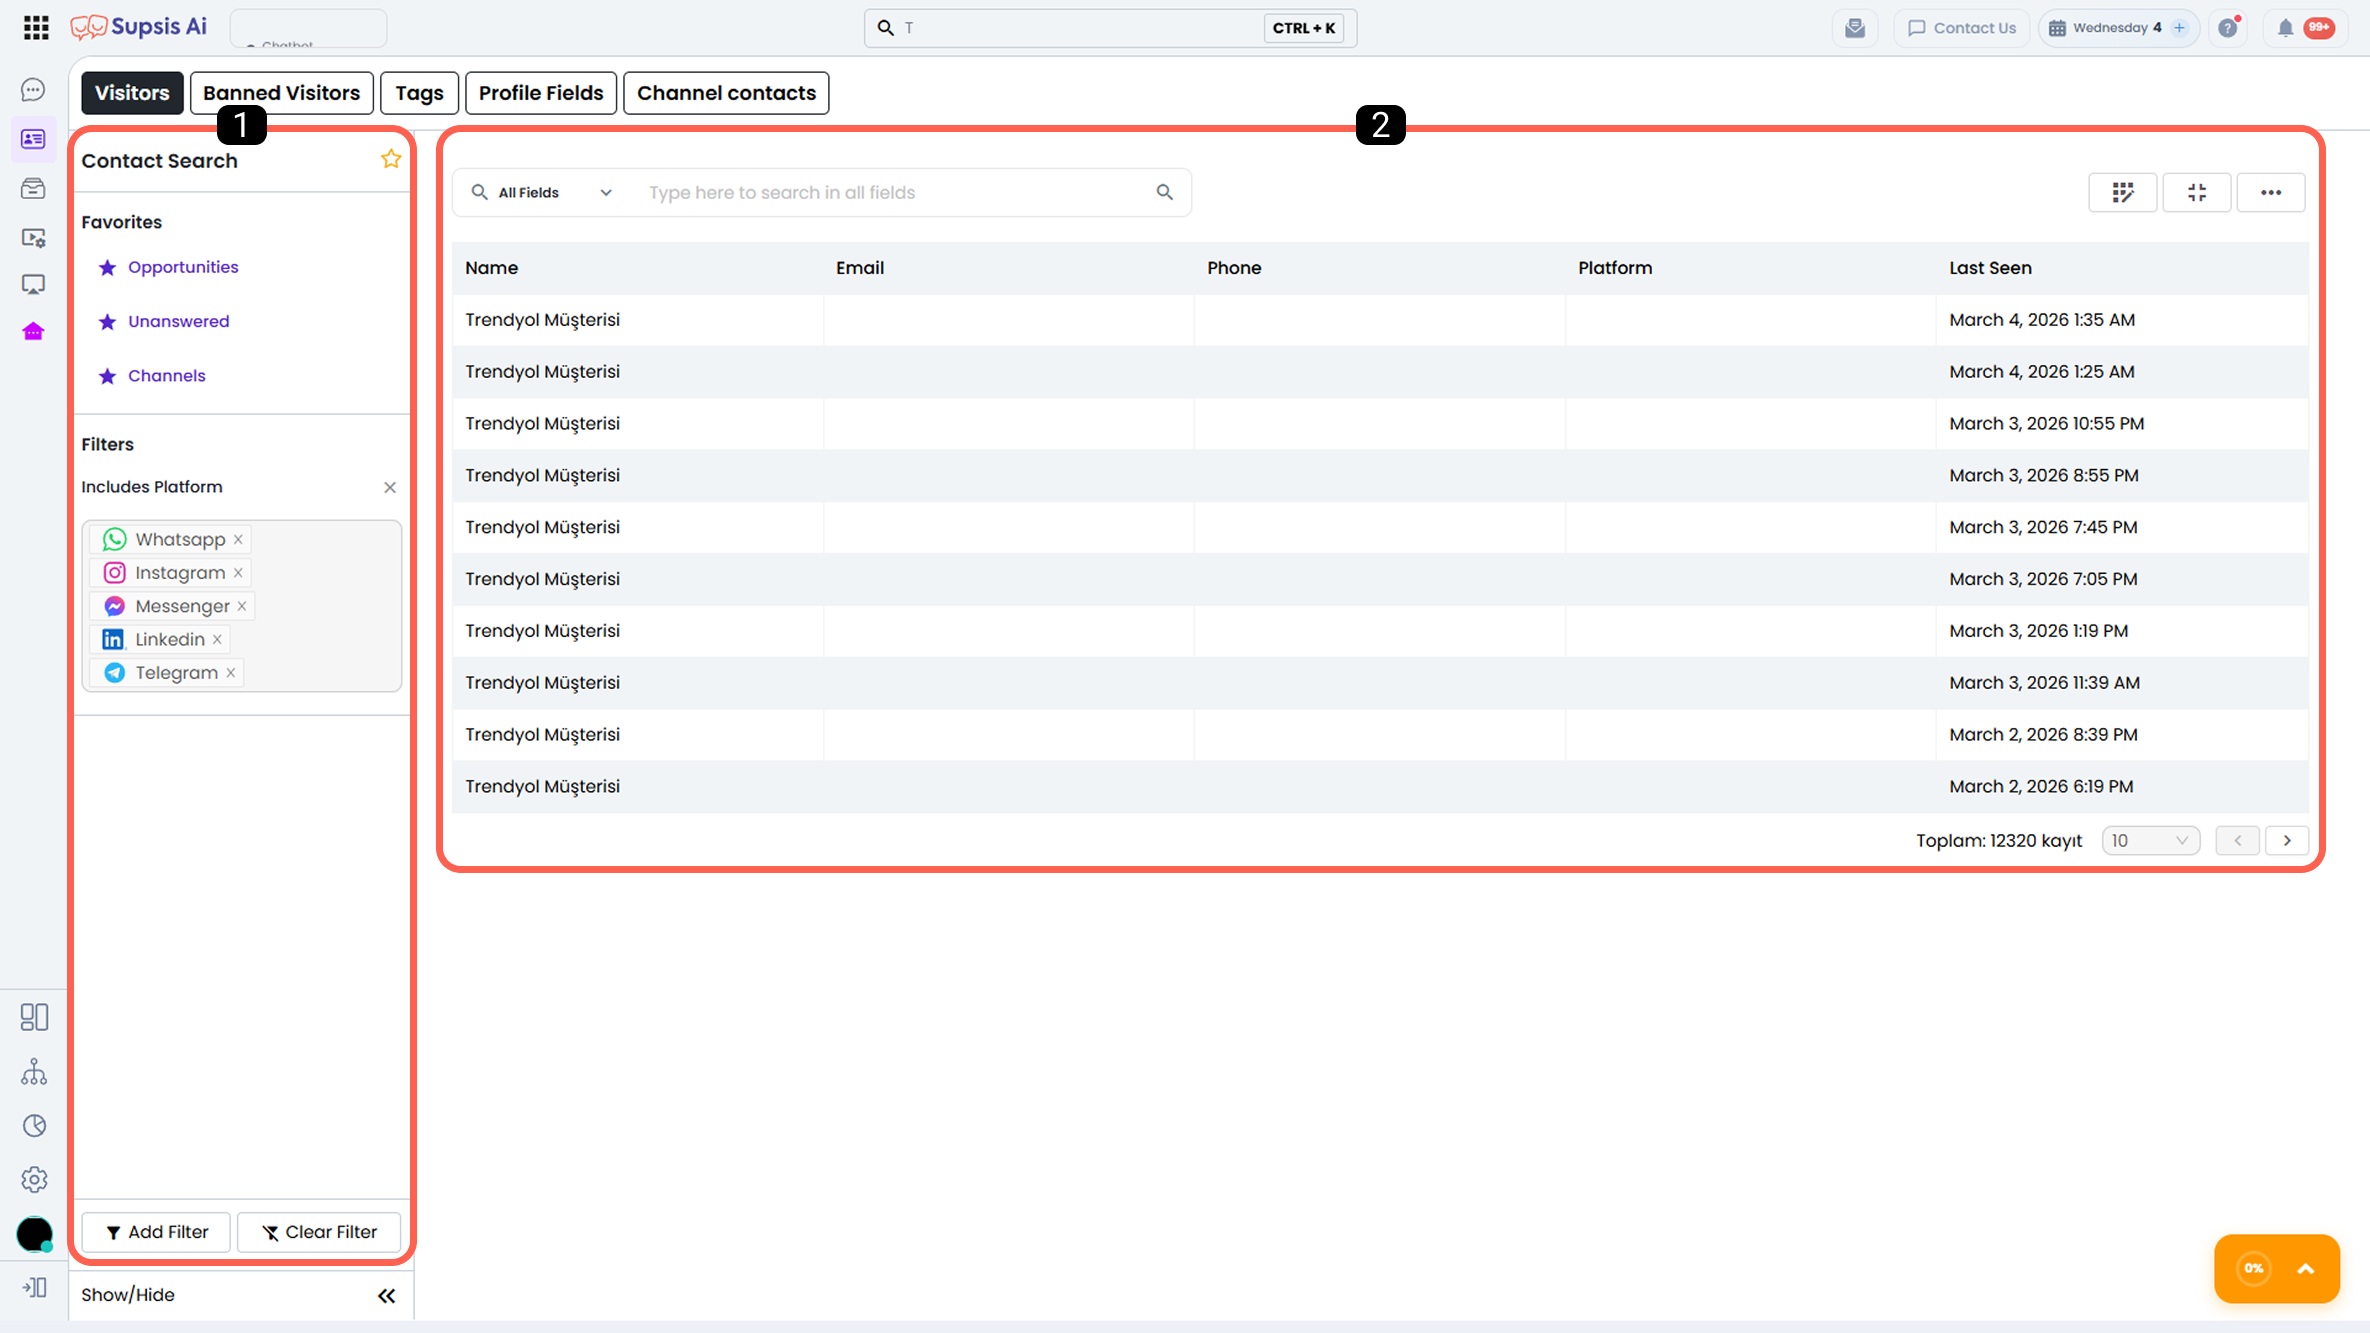
1-) Filters
The Filters section is used to list, monitor, or create suitable contact groups for export by applying specific criteria to individuals registered in the system. With the tools available in this section, you can narrow down and manage contact data according to your needs.
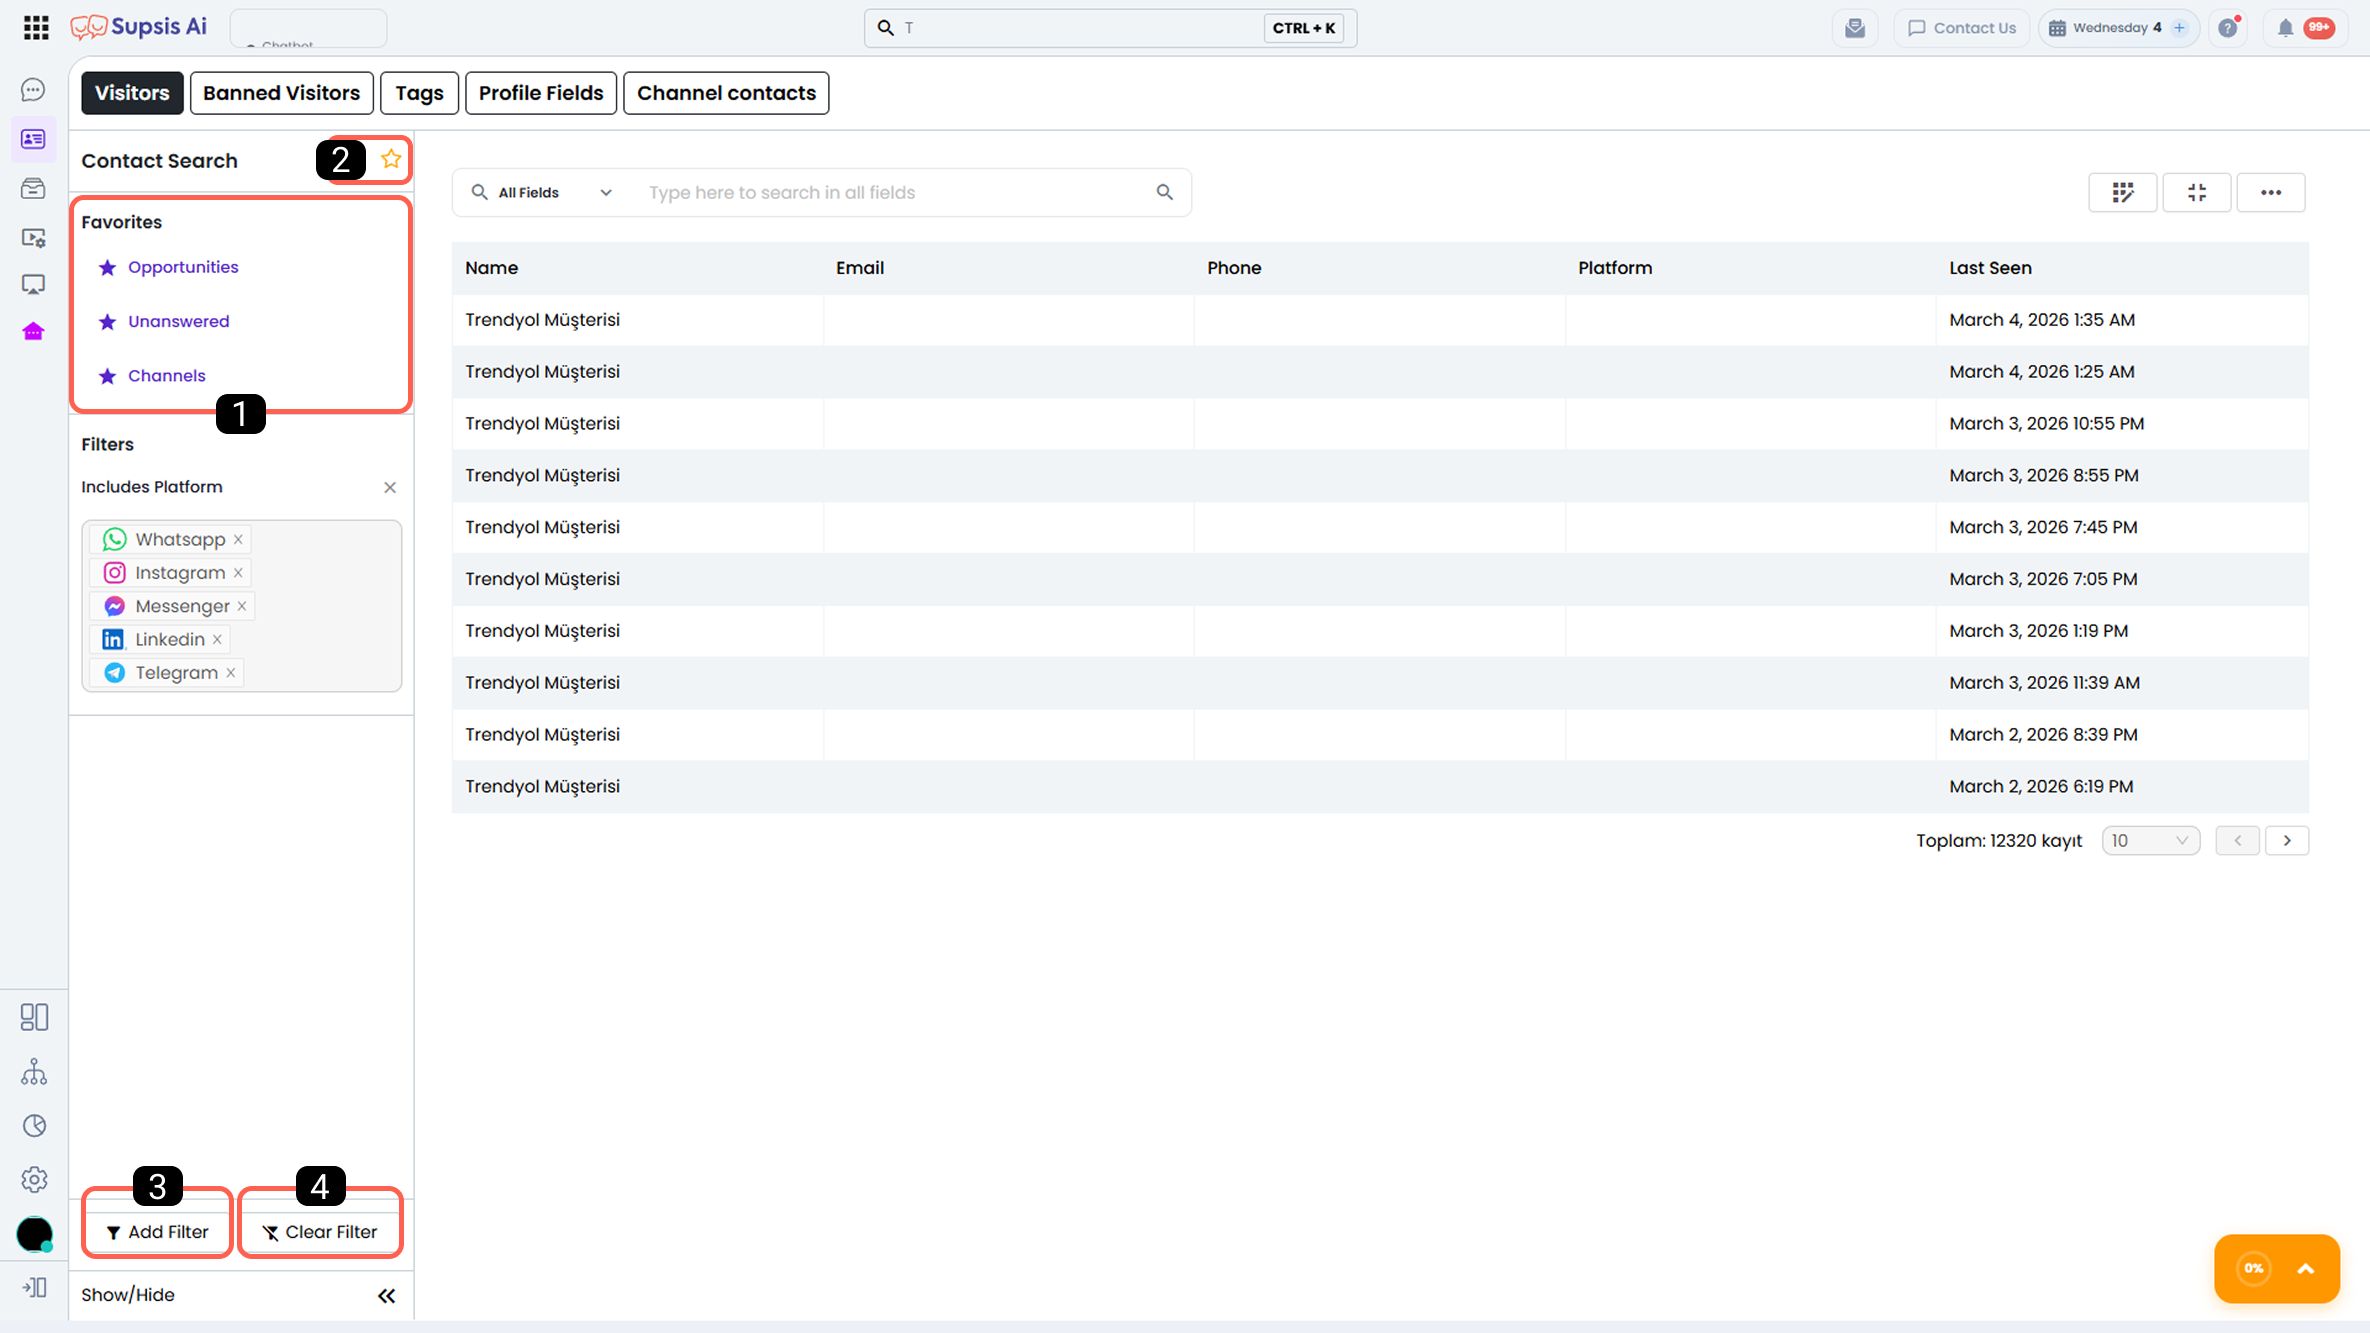
1-) Favorites
In this area, filters that you have previously created and saved via the Contacts and Conversations menus are listed. You can access the custom filters created in the Conversations menu from here and apply the same filters to contacts for monitoring or export operations.
1.a – Create Filter
Through this button, you can save the filter combinations you create. Saved filters appear in the Favorites section and can be named and reused in both the Conversations and Contacts menus. This allows you to quickly access contacts with similar attributes.
1.b – Create Filter
Contact Table Filters allow you to filter contact data in the system based on more specific criteria and quickly access only the records you are interested in.
Filters can be used individually or combined to perform detailed segmentation.
-
Name
Filters based on the name information located in the user profile card. -
Email
Filters based on the email address registered in the system. -
Phone
Allows you to list users from specific phone numbers by filtering based on phone number. -
WhatsApp Number
Allows you to filter by WhatsApp number and view only users contacted via WhatsApp. -
Platform
Filters based on the platform through which the user contacted you (e.g., WhatsApp, Webchat). -
Source Channel
Allows you to filter users coming from channels defined via integrations. -
Last Seen
Filters based on the date and time the user was last active in the system. -
First Seen
Filters based on the time the user was first registered in the system. -
Connection Time
Allows filtering based on a specific time range when the user connected to the system. -
Country
Filters based on the country information of the user.
This information may have been obtained through website visits, chatbot interactions, form submissions, or manual entry. -
City
Filters based on the city information of the user.
City information may originate from website visits, chatbot interactions, forms, or manual entry. -
Preferred Language
Filters contacts based on their preferred or configured language in the system (e.g., Turkishtr, Englishen, Germande, etc.). This enables language-based customer segmentation and targeted multi-language communications. -
Operating System
Filters based on the operating system used by the user when connecting to the system. -
Browser
Filters based on the internet browser used by the user to access the system. -
Visited Page
Filters based on the pages visited by the user on your website. -
Has Advertisement?
Allows you to review users who responded to advertisements by filtering advertisement-driven interactions. -
VIP Customer
Allows you to analyze special customer groups by filtering interactions belonging to users marked as VIP. -
User Values
Filters based on custom user fields created by you in the visitor profile card. -
Tags
Filters contacts based on tags assigned to their profile cards.
Filtering can be performed based on the presence, absence, or possession of a specific tag. -
Segments
Filters based on the segments the user belongs to. -
Preferred Representatives
Filters based on representatives assigned to the user.
This filter is used to examine representative-based customer data and track performance. -
Ownership
Filters conversations with assigned ownership, allowing you to view which representative or user managed specific conversations.
Filter Operators
After selecting one of the filter attributes, you must determine the appropriate filter operator according to the data content you want to display.
Operators define under which conditions the selected attribute will be filtered and directly affect the accuracy of the results.
-
Equals
Checks whether the selected field exactly matches the entered value. -
Not Equals
Checks whether the selected field differs from the entered value. -
Contains
Checks whether the selected field partially or completely contains the entered value. -
Does Not Contain
Lists records where the selected field does not contain the entered value. -
Starts With
Filters records where the selected field starts with the entered text. -
Ends With
Filters records where the selected field ends with the entered text. -
Is Empty
Lists records where the selected field contains no data. -
Is Not Empty
Lists contact records where the selected field contains content.
1.c – Clear Filter
Clears all active filter criteria and restores the contact list to its default view.
2-) Contacts Table
The Contacts Table is the main workspace that allows you to view all contact data registered in the Supsis system in a single table, add new contacts, and perform export operations.
Through this area, basic contact information, data obtained from communication channels, chat session details, and profile fields are listed in table format. Additionally, you can customize the table structure to display and download only the data you need.
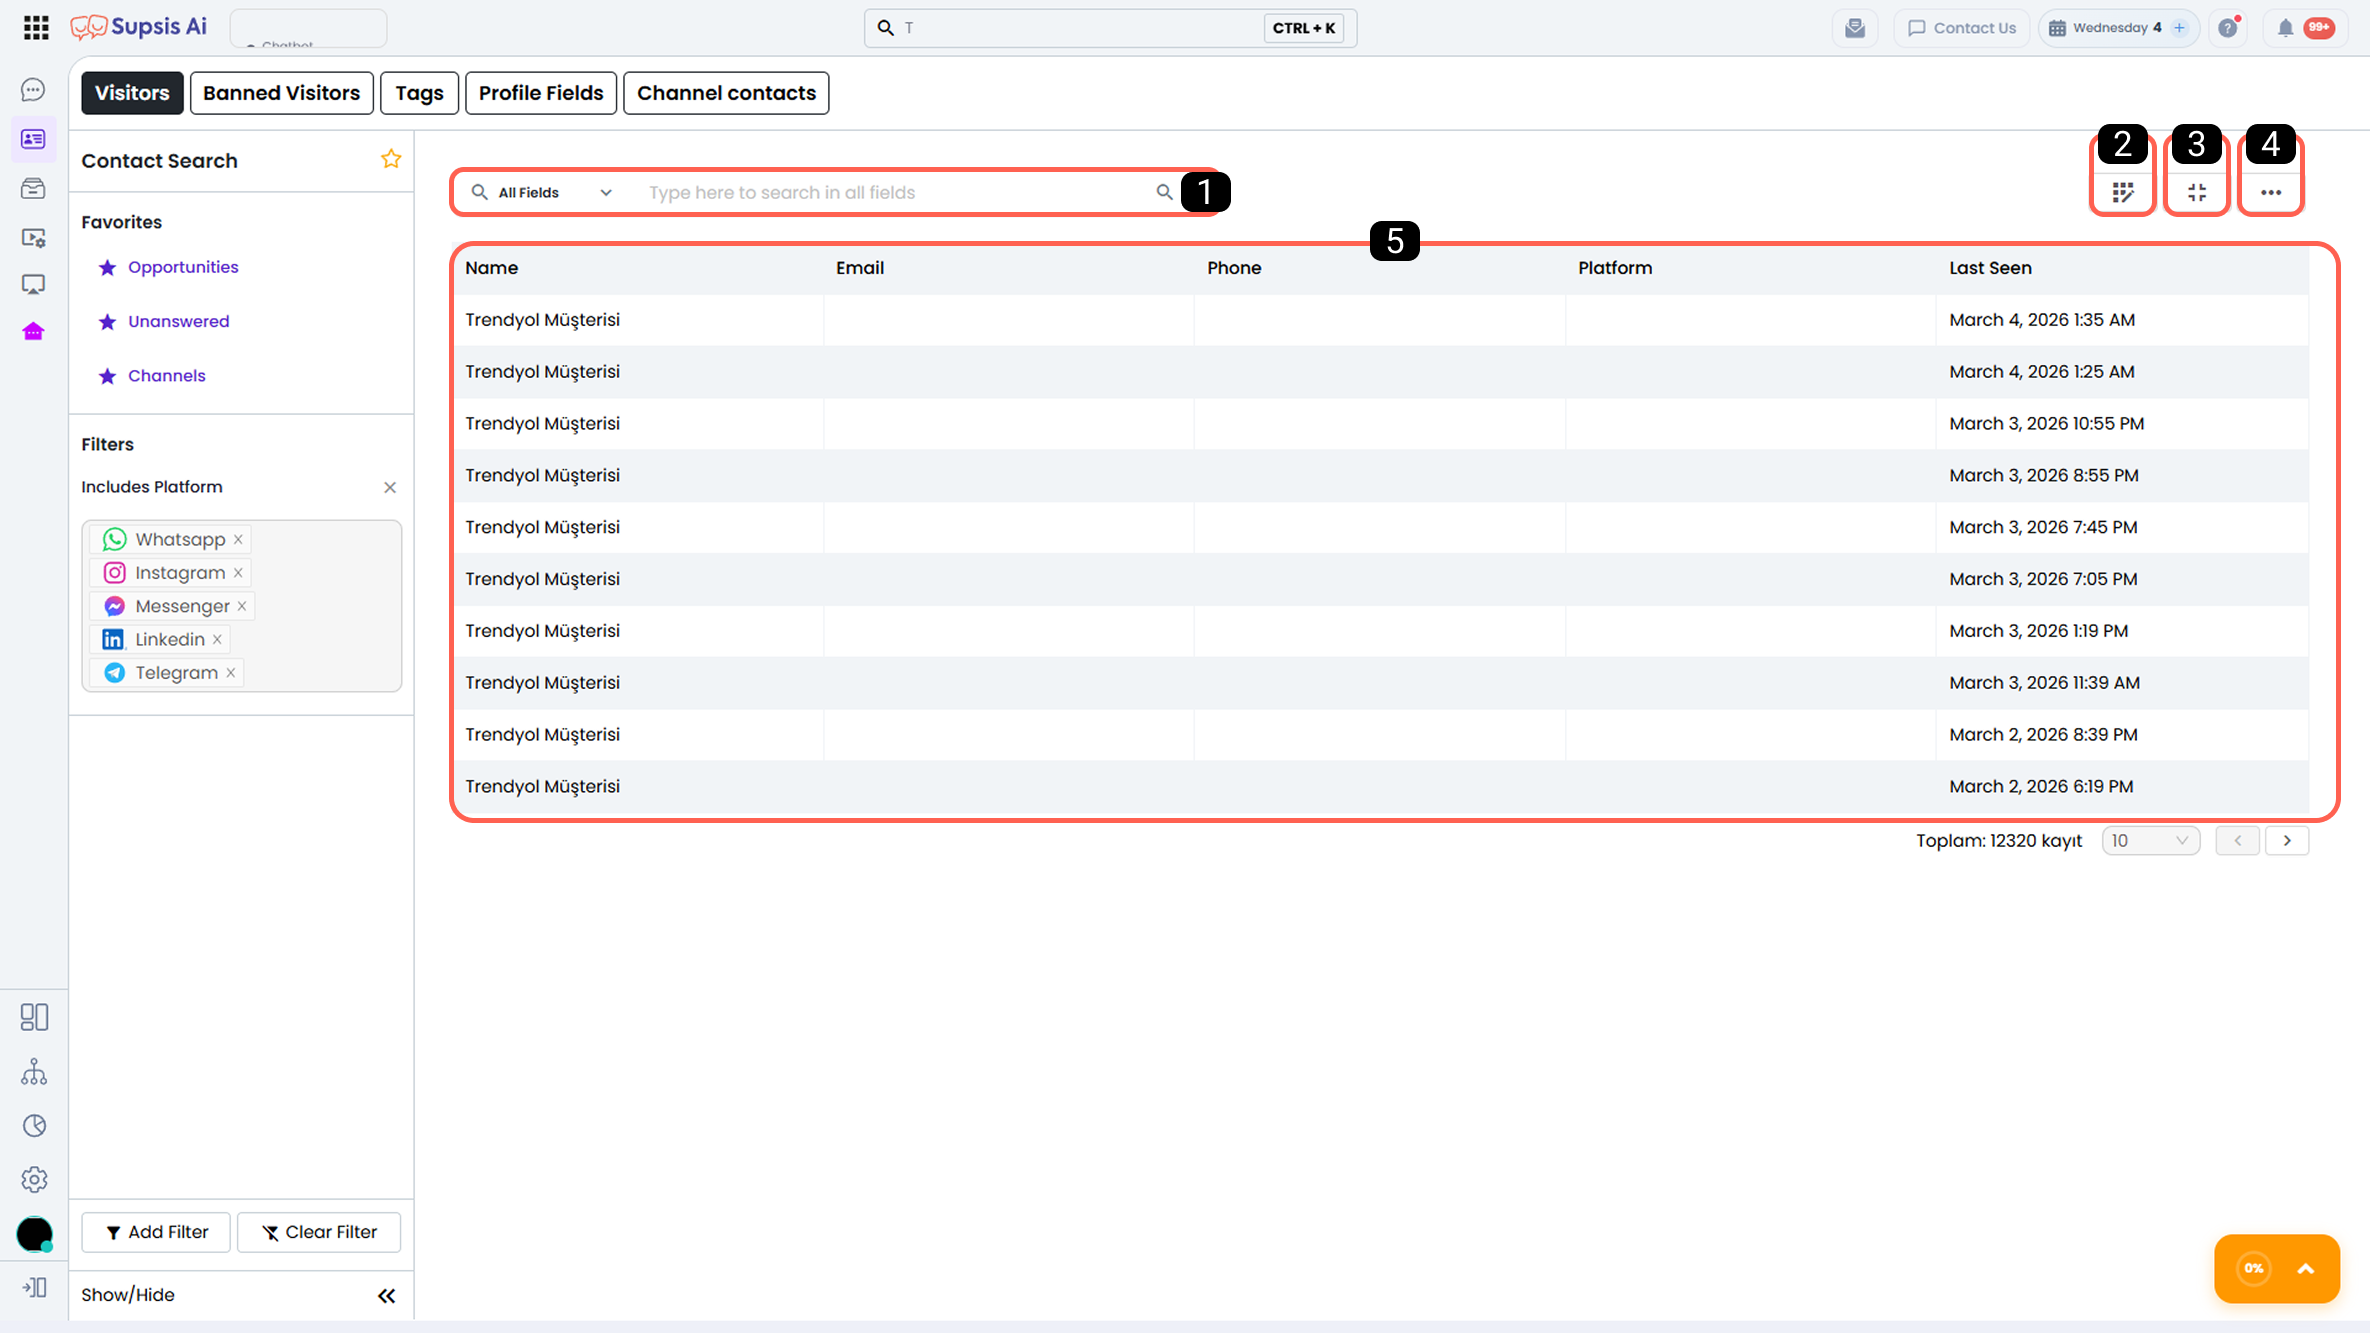
2.a – Search Bar
Through this area, you can quickly search among contact records listed in the table.
Search operations are performed based on name, email address, phone number, and user information. Matching contact records are instantly listed in the table according to the entered keyword.
2-) Table Settings
Table Settings is the customization area where you can define the columns and data content to be displayed in the table.
In this section, you can choose from:
- Basic contact information available in the Supsis system,
- Data obtained from communication channels,
- Details related to chat sessions,
- Profile fields included in the contact card.
Changes made in this section directly affect both the data displayed in the table and the content of the CSV file when exporting page data. This allows you to fully customize both the table and the downloadable data output according to your needs.
3-) Collapse / Expand
Through this area, you can collapse or expand the on-screen view of the contacts table.
The expanded view improves the readability of columns and their data, allowing for more comfortable data tracking.
4-) Data Download Operations
The Data Import / Export section allows you to export contact data, convert filtered contact records into bulk communication groups, and import contact data obtained from external sources into the Supsis system.
Operations performed in this section vary depending on active filters, contact attributes, and selected column structures, helping you streamline your data management processes.
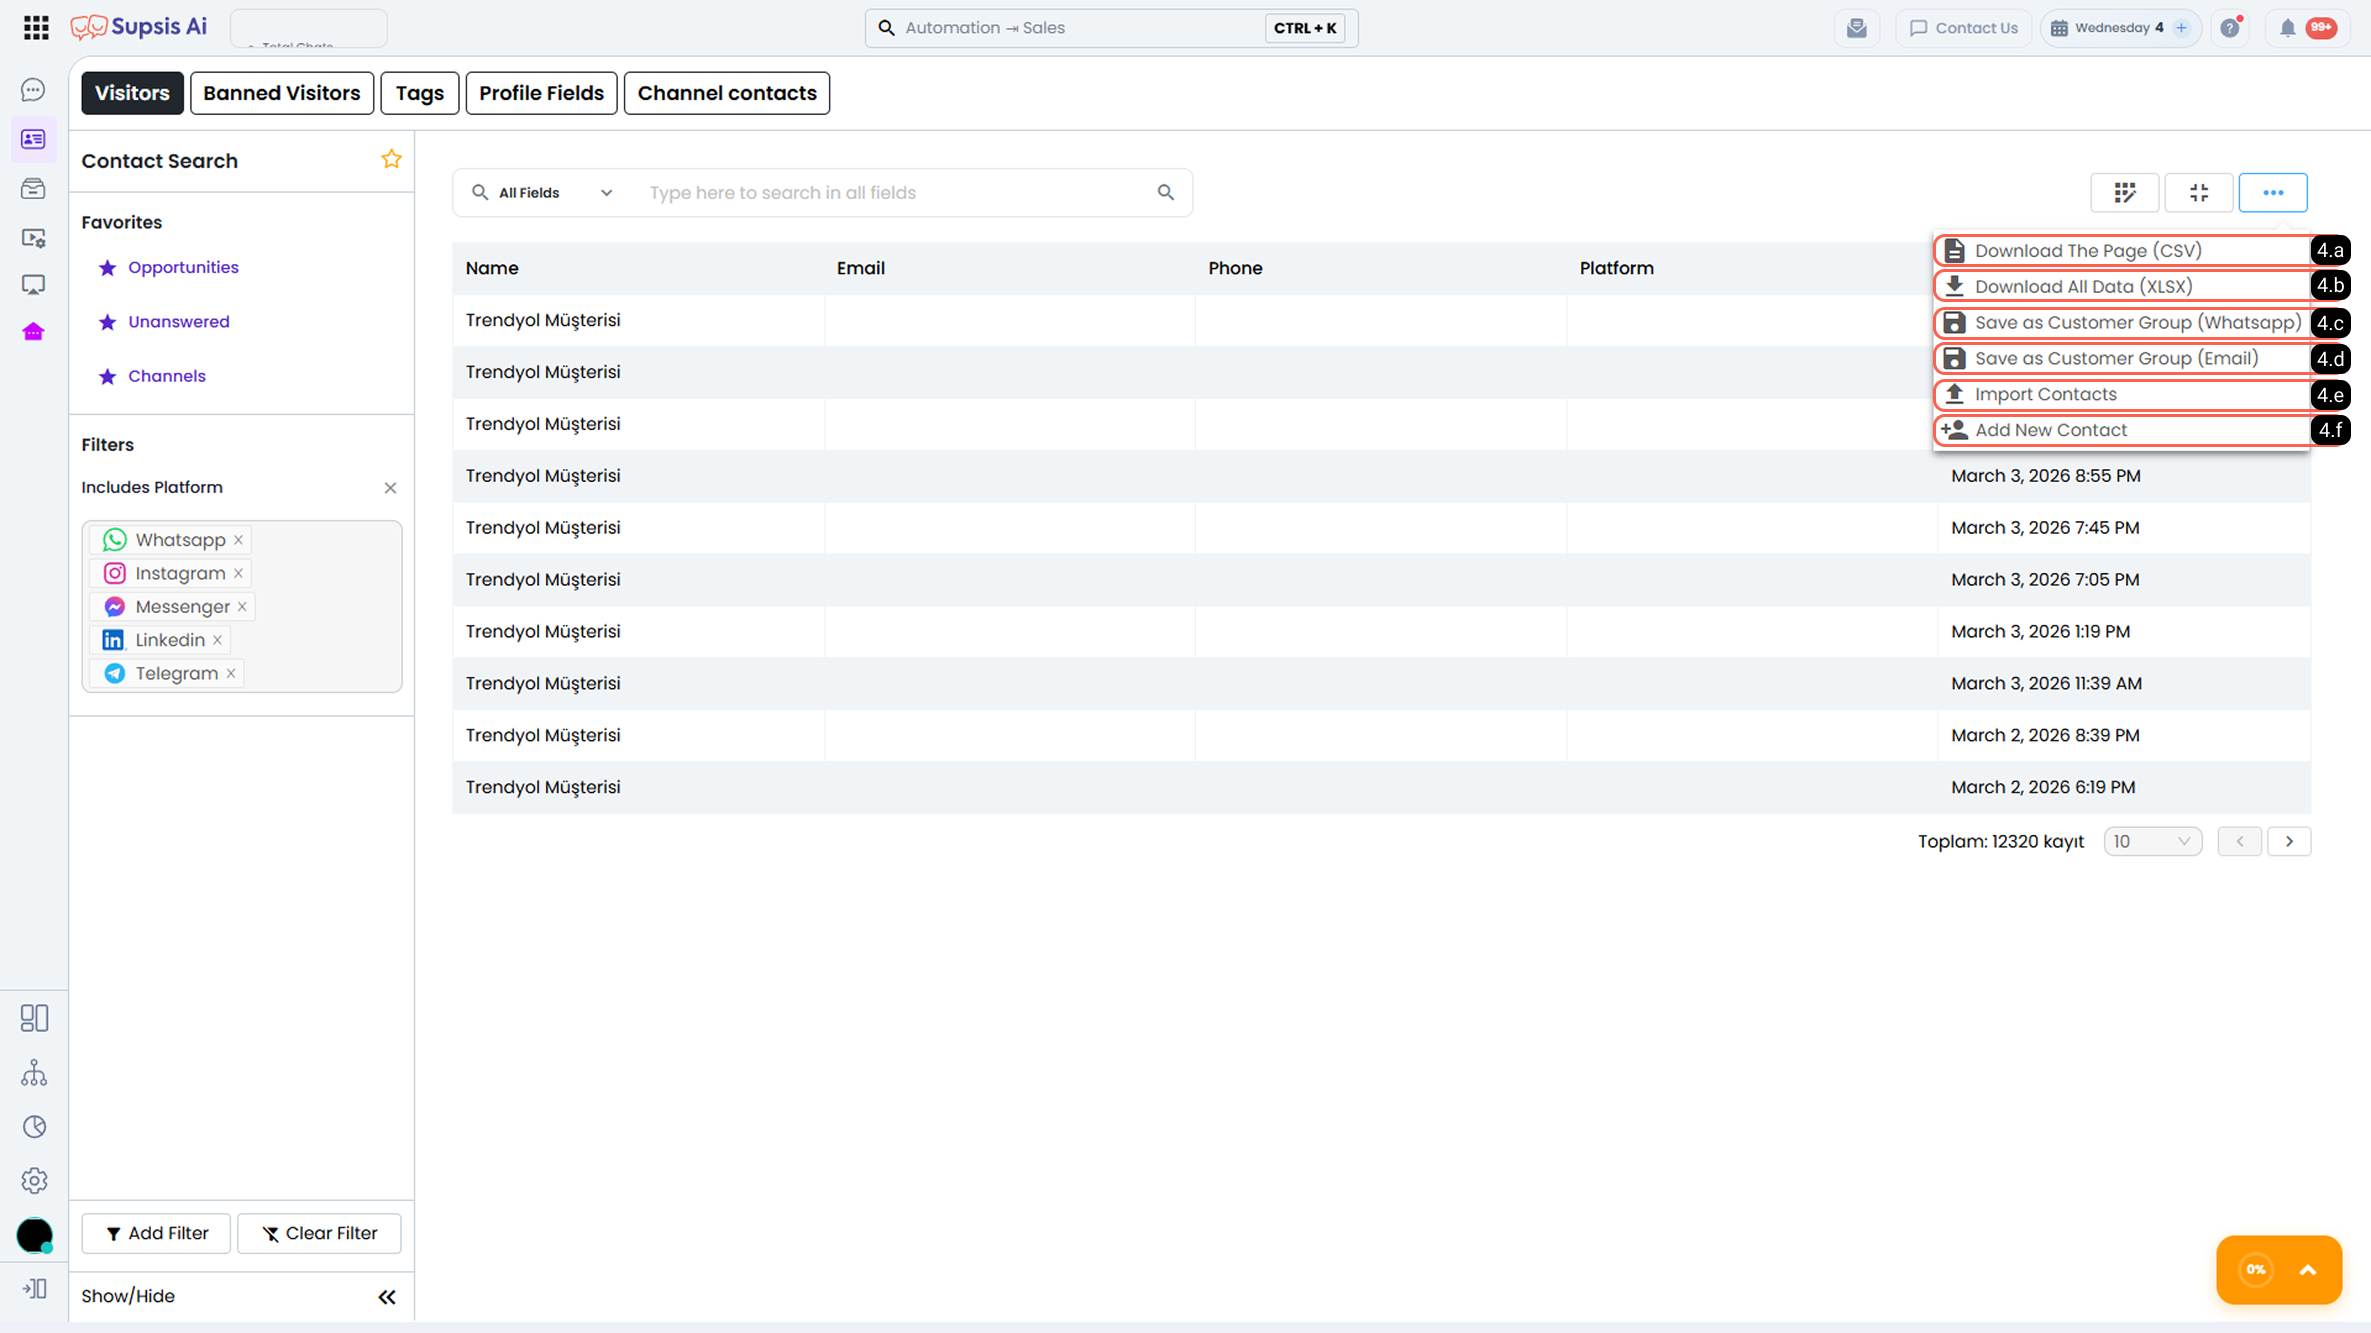
- 4.a – Download Page:
This option allows you to download only the data currently displayed in the table in CSV format. The number of records downloaded corresponds to the value set in Data Count / Page. To include more records in the CSV output, you must increase the Data Count / Page value before downloading.
You can determine which data appears in the table by editing columns in the Table Settings section.
This method is suitable for users who want a quick and limited data output.
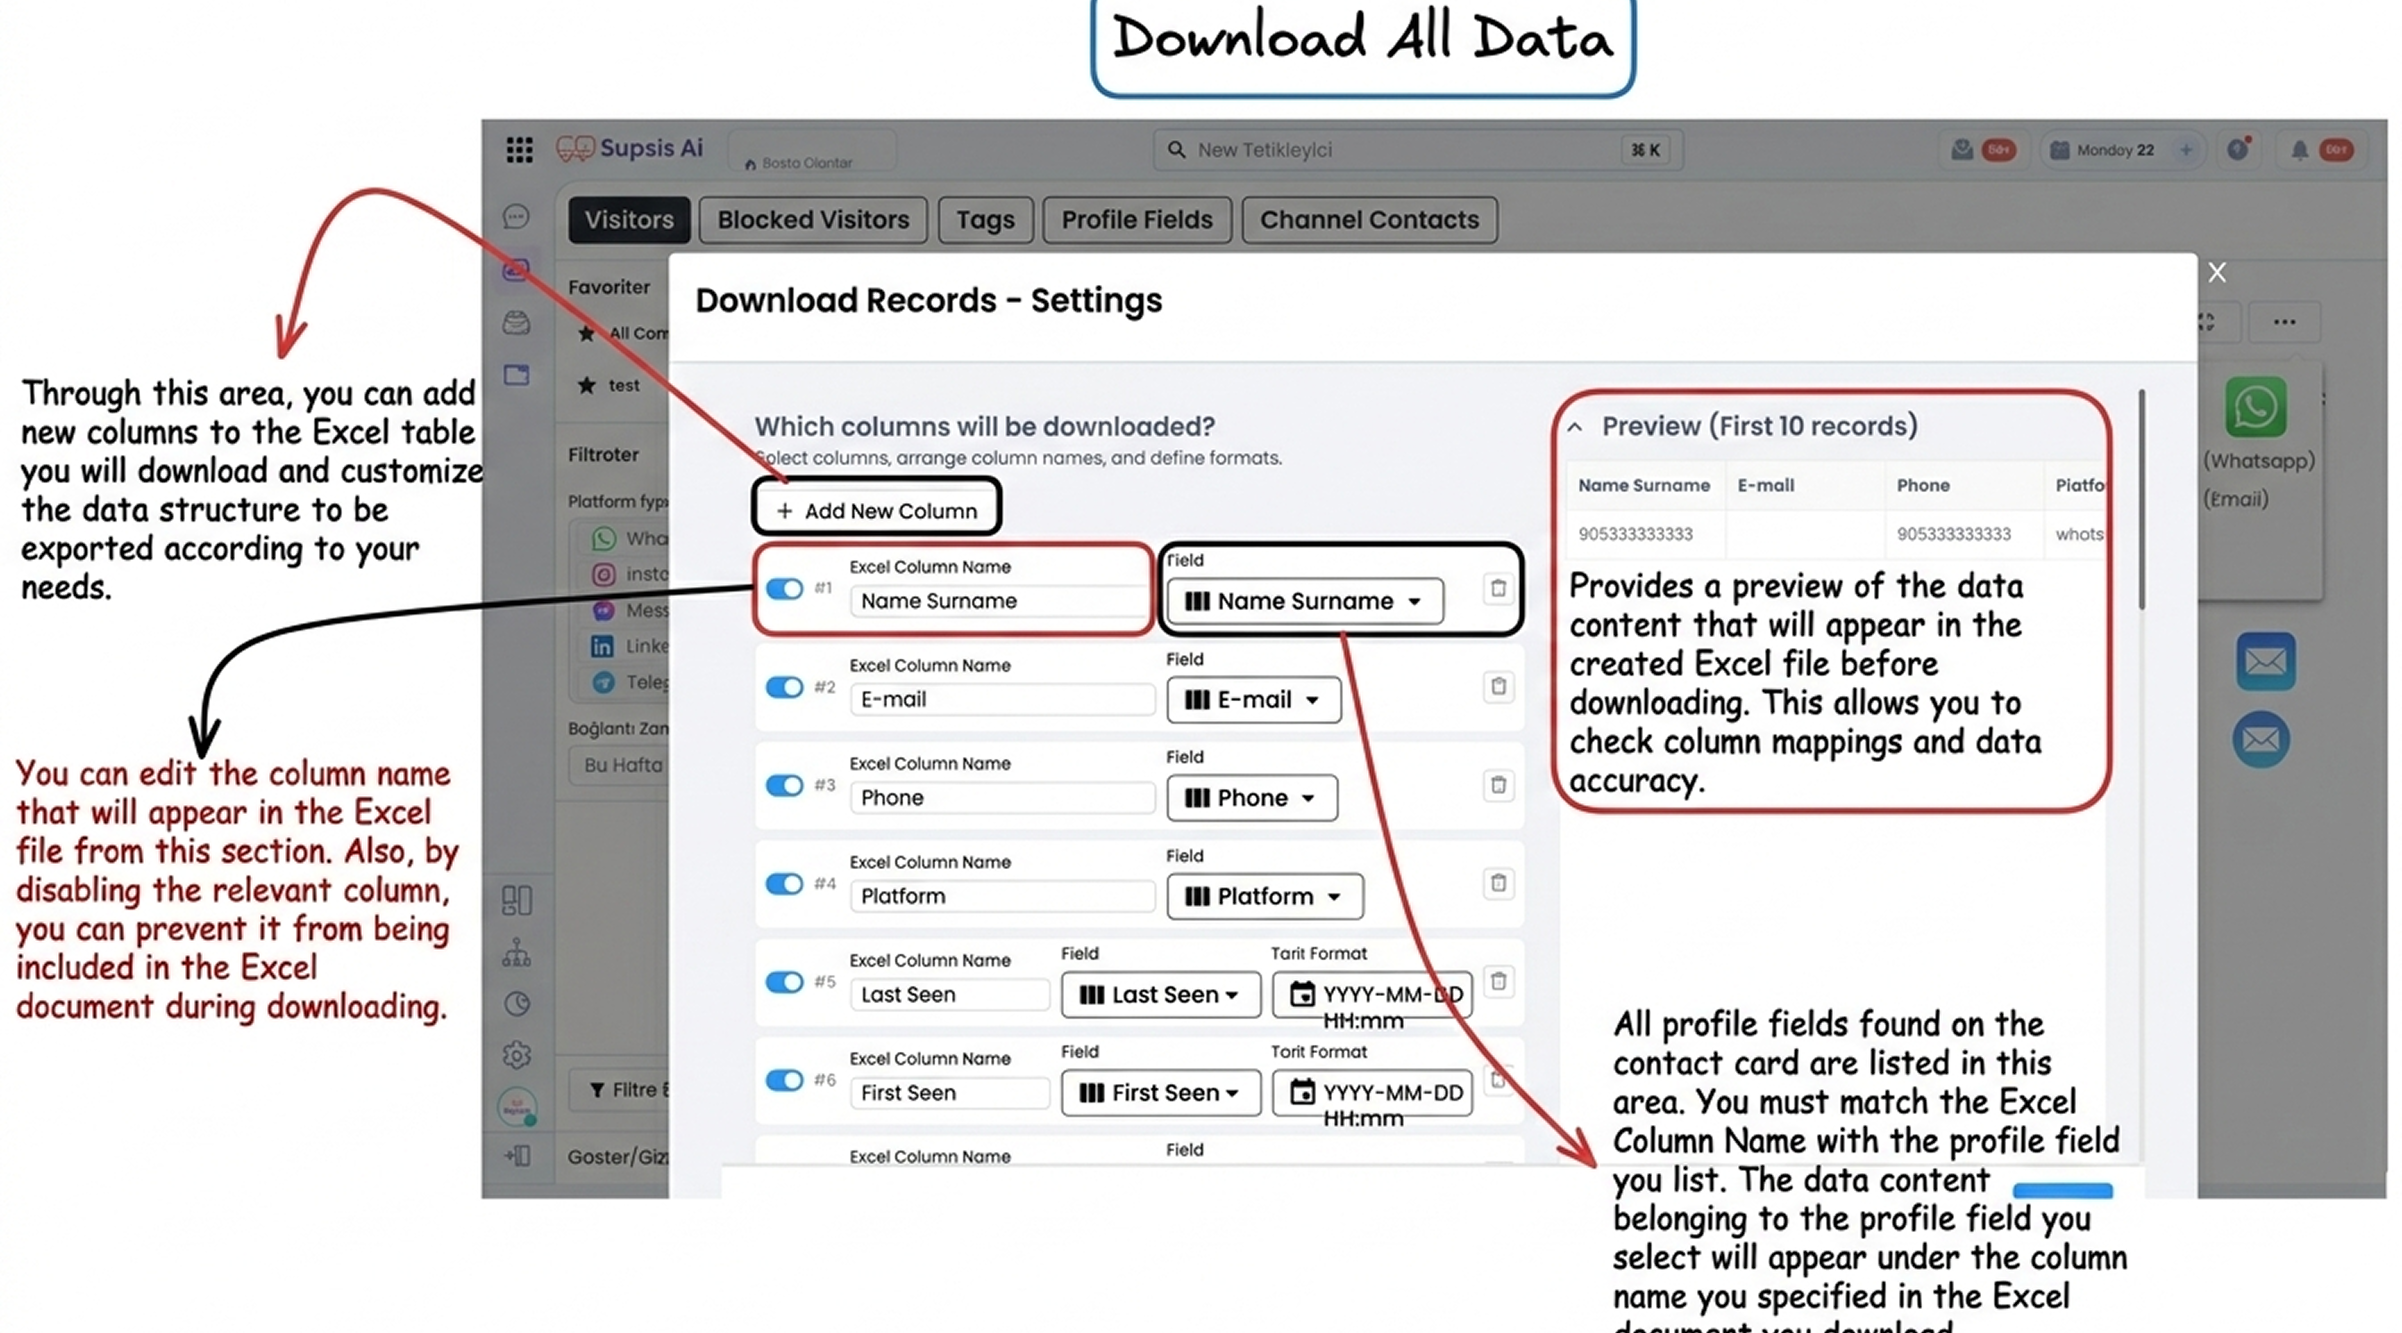
- 4.b – Download All Data:
This option allows you to download all contact records that match your applied filter criteria in Excel format. Visibility settings made in the table settings are not taken into account during this download process.
After clicking the button, you must match the columns to be included in the Excel file with Supsis contact card fields on the screen that opens.
This method is recommended for comprehensive reporting and archiving needs.
- 4.c – Save as Customer Group (WhatsApp):
You can save the contacts identified through filtering as a customer group for bulk messaging via WhatsApp. This feature enables mass targeting for campaigns and informational messages.
You can access, view, and manage the created groups by following:
Integration > WhatsApp Business API > Channel Selection > Customer Groups
- 4.d – Save as Customer Group (Mail):
Allows you to save filtered contacts as a customer group for bulk email sending. This method can be used for email campaigns and announcements.
Saved groups can be viewed and managed via the Mail Module by accessing the customer groups section.
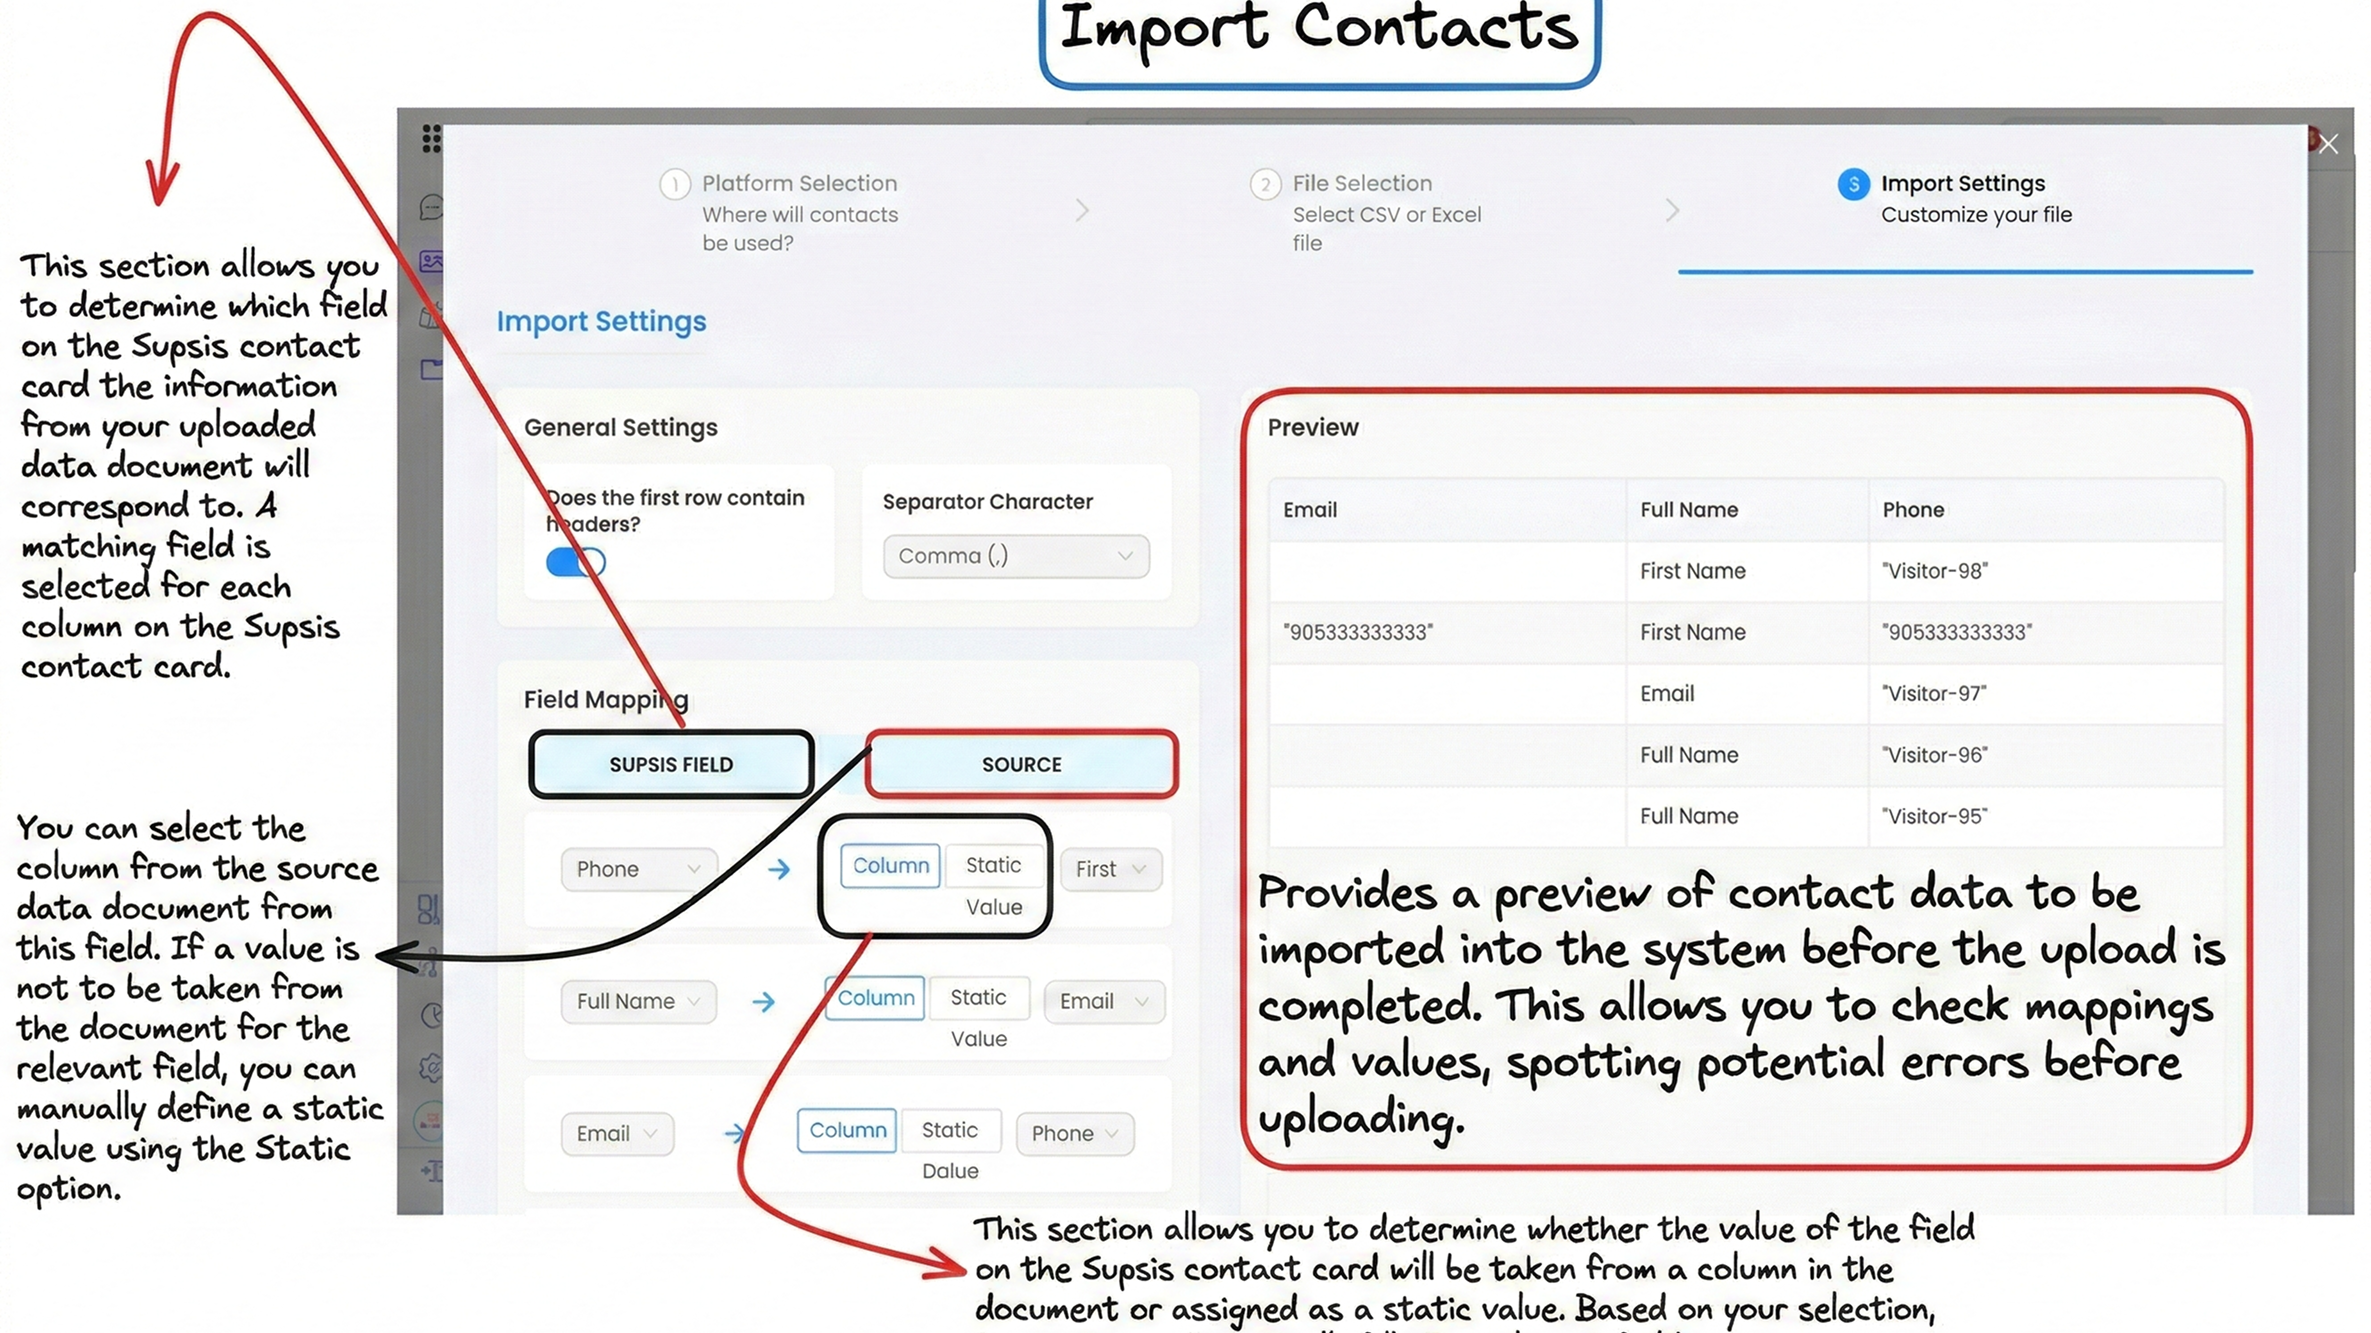
- 4.e – Import Contacts:
This area is used to add contacts to the Supsis system in bulk. The file you upload for import must be in Excel or CSV format.
Uploaded data is recorded in contact cards and can be actively used in: - Chat processes, - Chatbots and automations, - Filtering and segmentation operations.
Import Steps:
- Select which communication channel the data group belongs to (Webchat, Mail, WhatsApp, etc.).
- Drag and drop the file into the relevant area or upload it from the file selection screen.
- After uploading, match the columns in the file with Supsis contact card profile fields.
- Once matching is completed, the contacts are added to the system.
- 4.f – New Contact:
This option allows you to manually add a single contact. All information to be included in the contact card is entered manually in this section.
5-) Contact Profile Modal: Tab Memory & Prev / Next Navigation
The contact (visitor/customer) profile modal includes two productivity features designed to streamline bulk reviews and record navigation:
- Session-Based Tab Memory:
- When a specific tab (such as Notes, Emails, Actions, Tasks, or Chat History) is selected in the profile modal, closing the modal and opening another contact's profile preserves the active tab selection.
-
This tab memory persists in-memory throughout the current session (until page reload). If the selected tab is not available for a newly opened contact, it gracefully falls back to the default Profile tab.
-
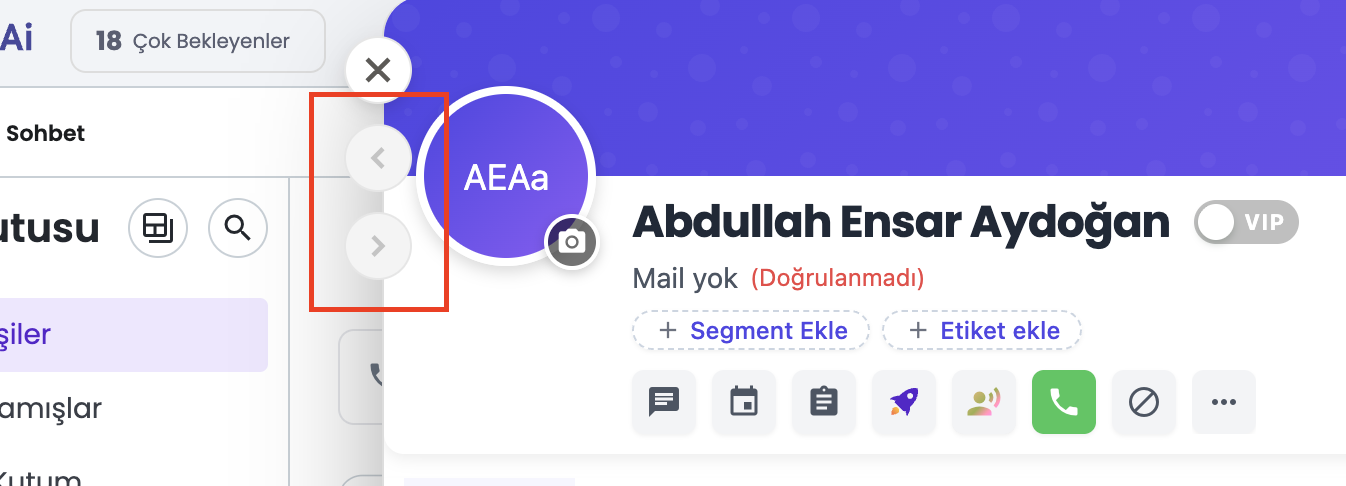
Previous & Next Contact Navigation:
- Located on the top-left corner of the profile modal below the close (
X) button, two navigation buttons allow moving to the Previous Contact (up chevron) and Next Contact (down/right chevron). - Contextual Lists: Allows stepping through contacts without closing the modal based on the origin list (Chat Inbox, Visitor List, Tables/Kanban view, WhatsApp Broadcast recipient list, etc.).
- Keyboard Shortcuts:
- macOS:
Cmd + Left Arrow/Cmd + Right Arrow - Windows / Linux:
Ctrl + Left Arrow/Ctrl + Right Arrow
- macOS:
- Note: Buttons become disabled (greyed out) at list boundaries. Shortcuts are automatically disabled while typing inside input fields or textareas.
6-) Table Preview
After completing filtering operations, this section presents a preview of the table you are about to download.