WhatsApp QR Integration Channel Details
WhatsApp QR Integration Channel Details
Channel Details:
- Detail
- Visibility
- Wallet
- Bulk Message Sending
- Customer Groups
- All Contacts (Directory)
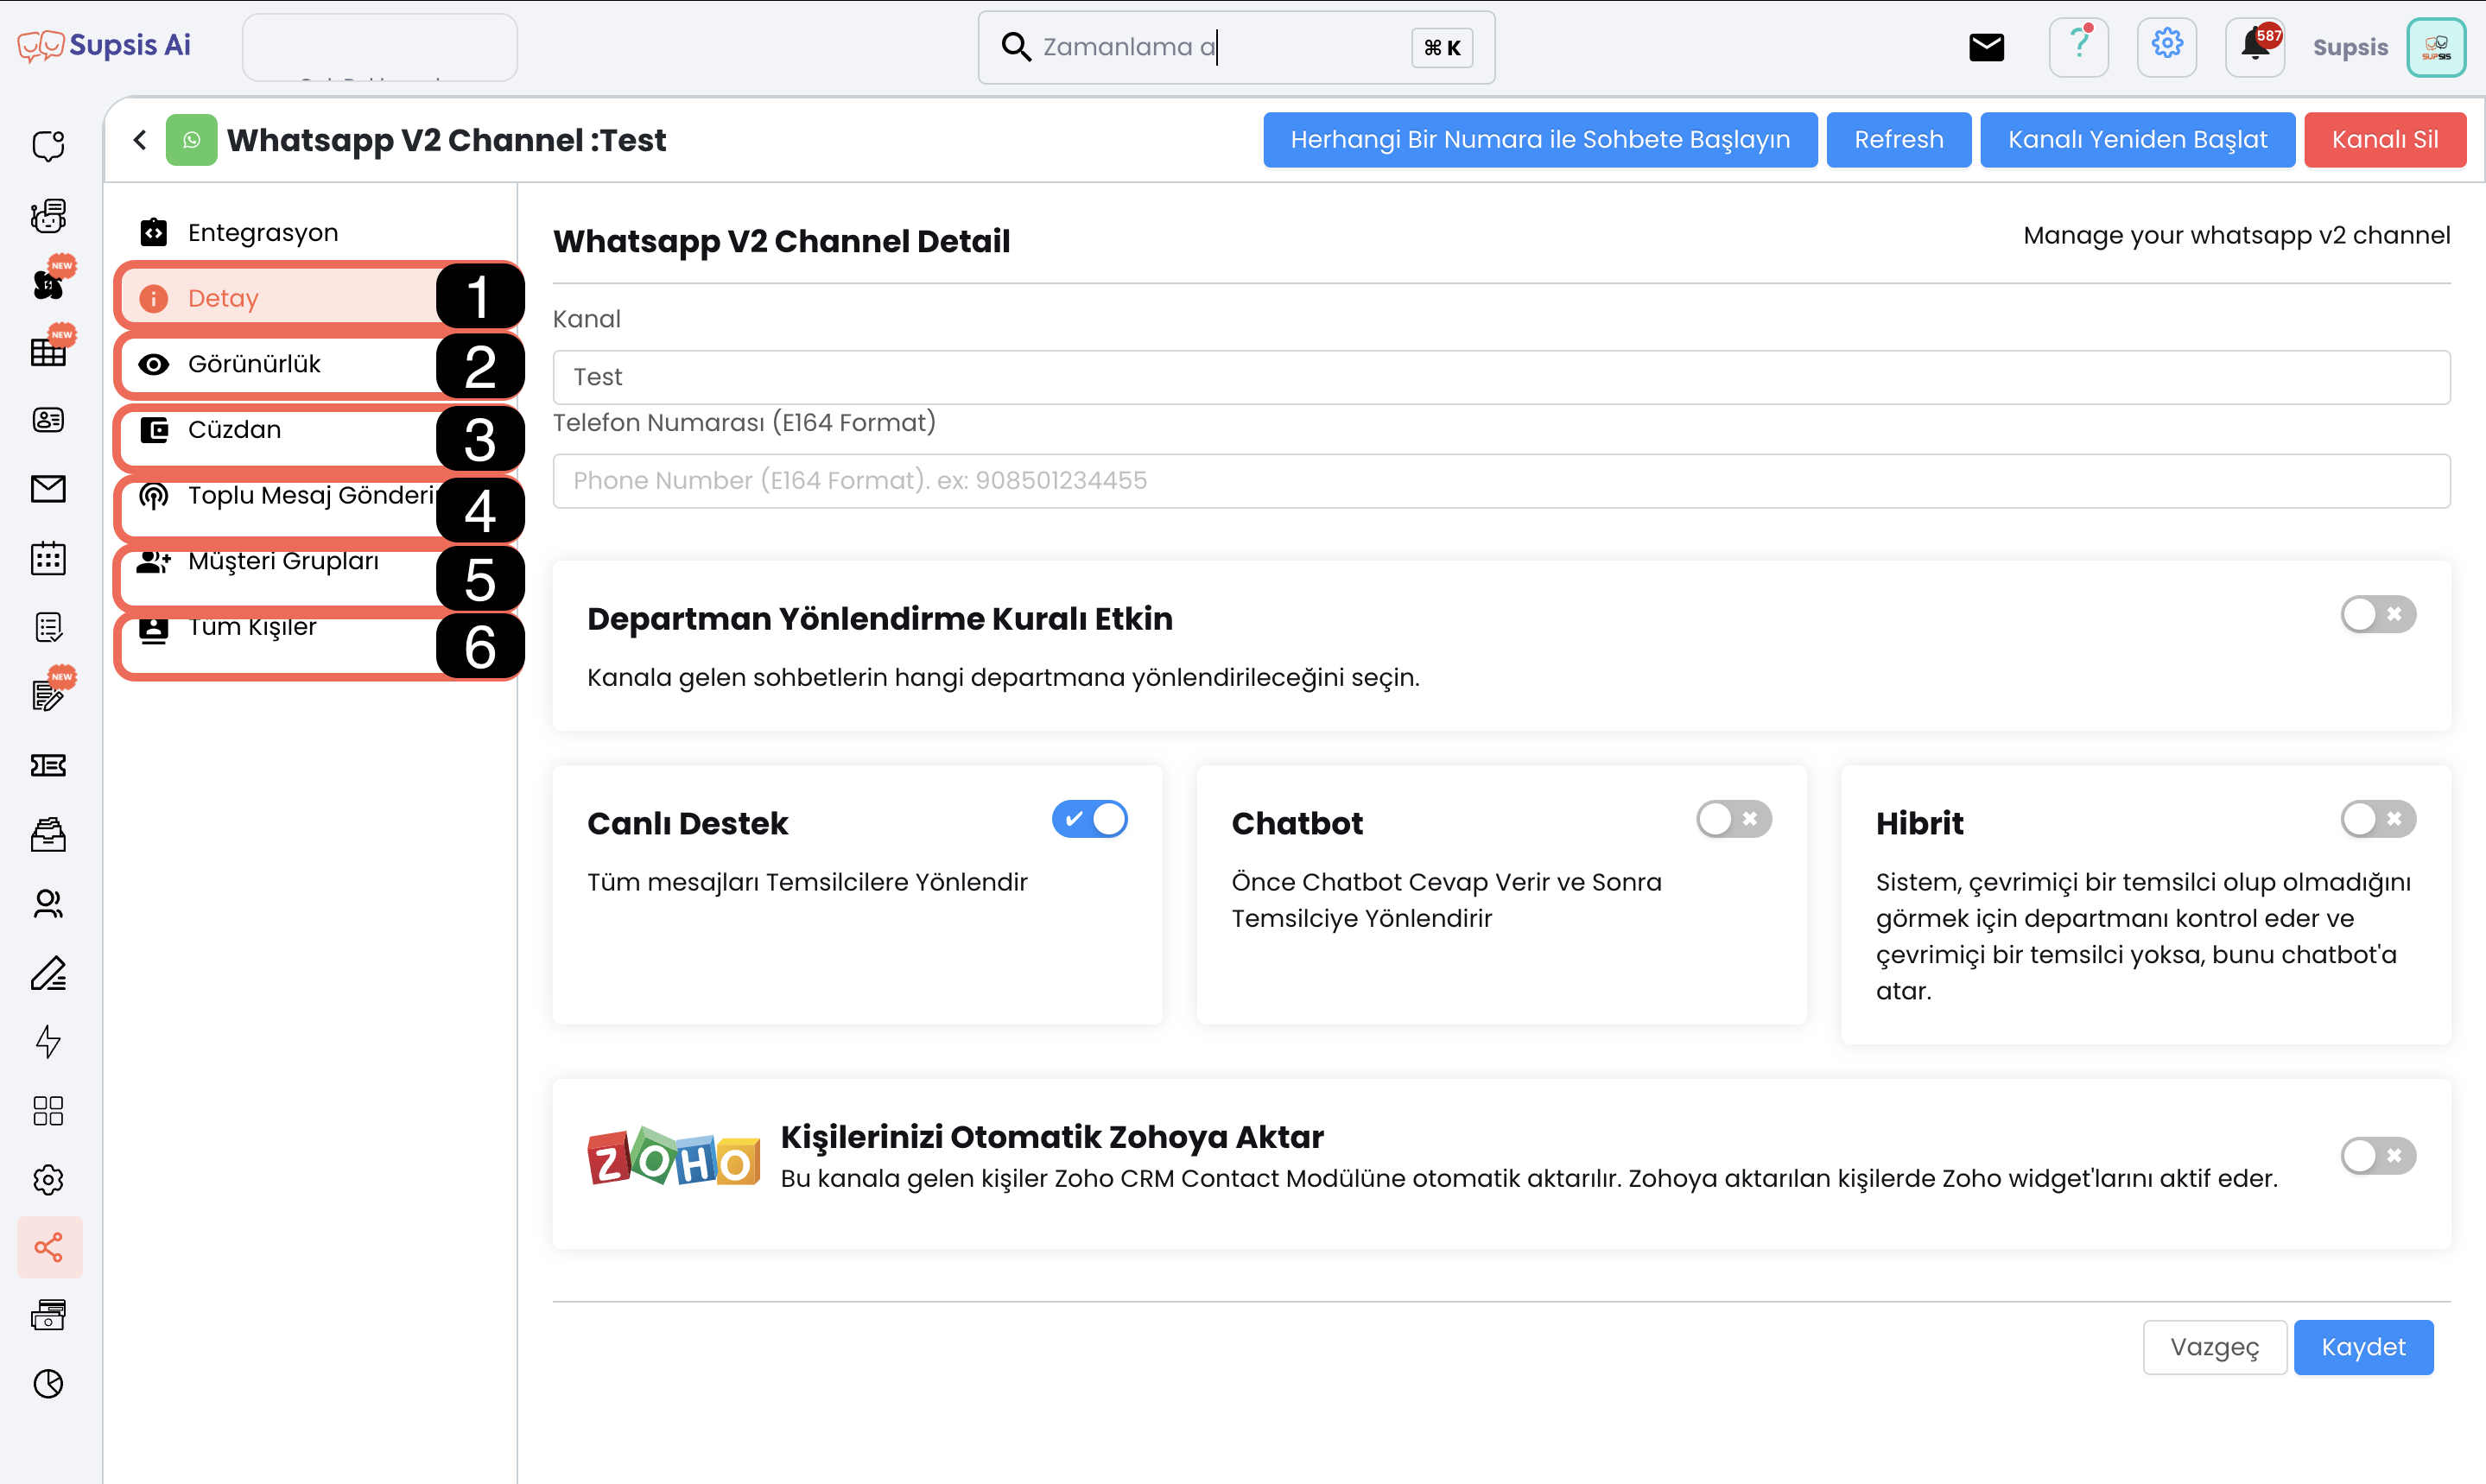
1.) Detail
The following features are available to enhance the channel's configuration and functionality:
Menu Items:
- Channel Name
- Phone Number
- Chat Redirection Rule
- Zoho CRM Integration
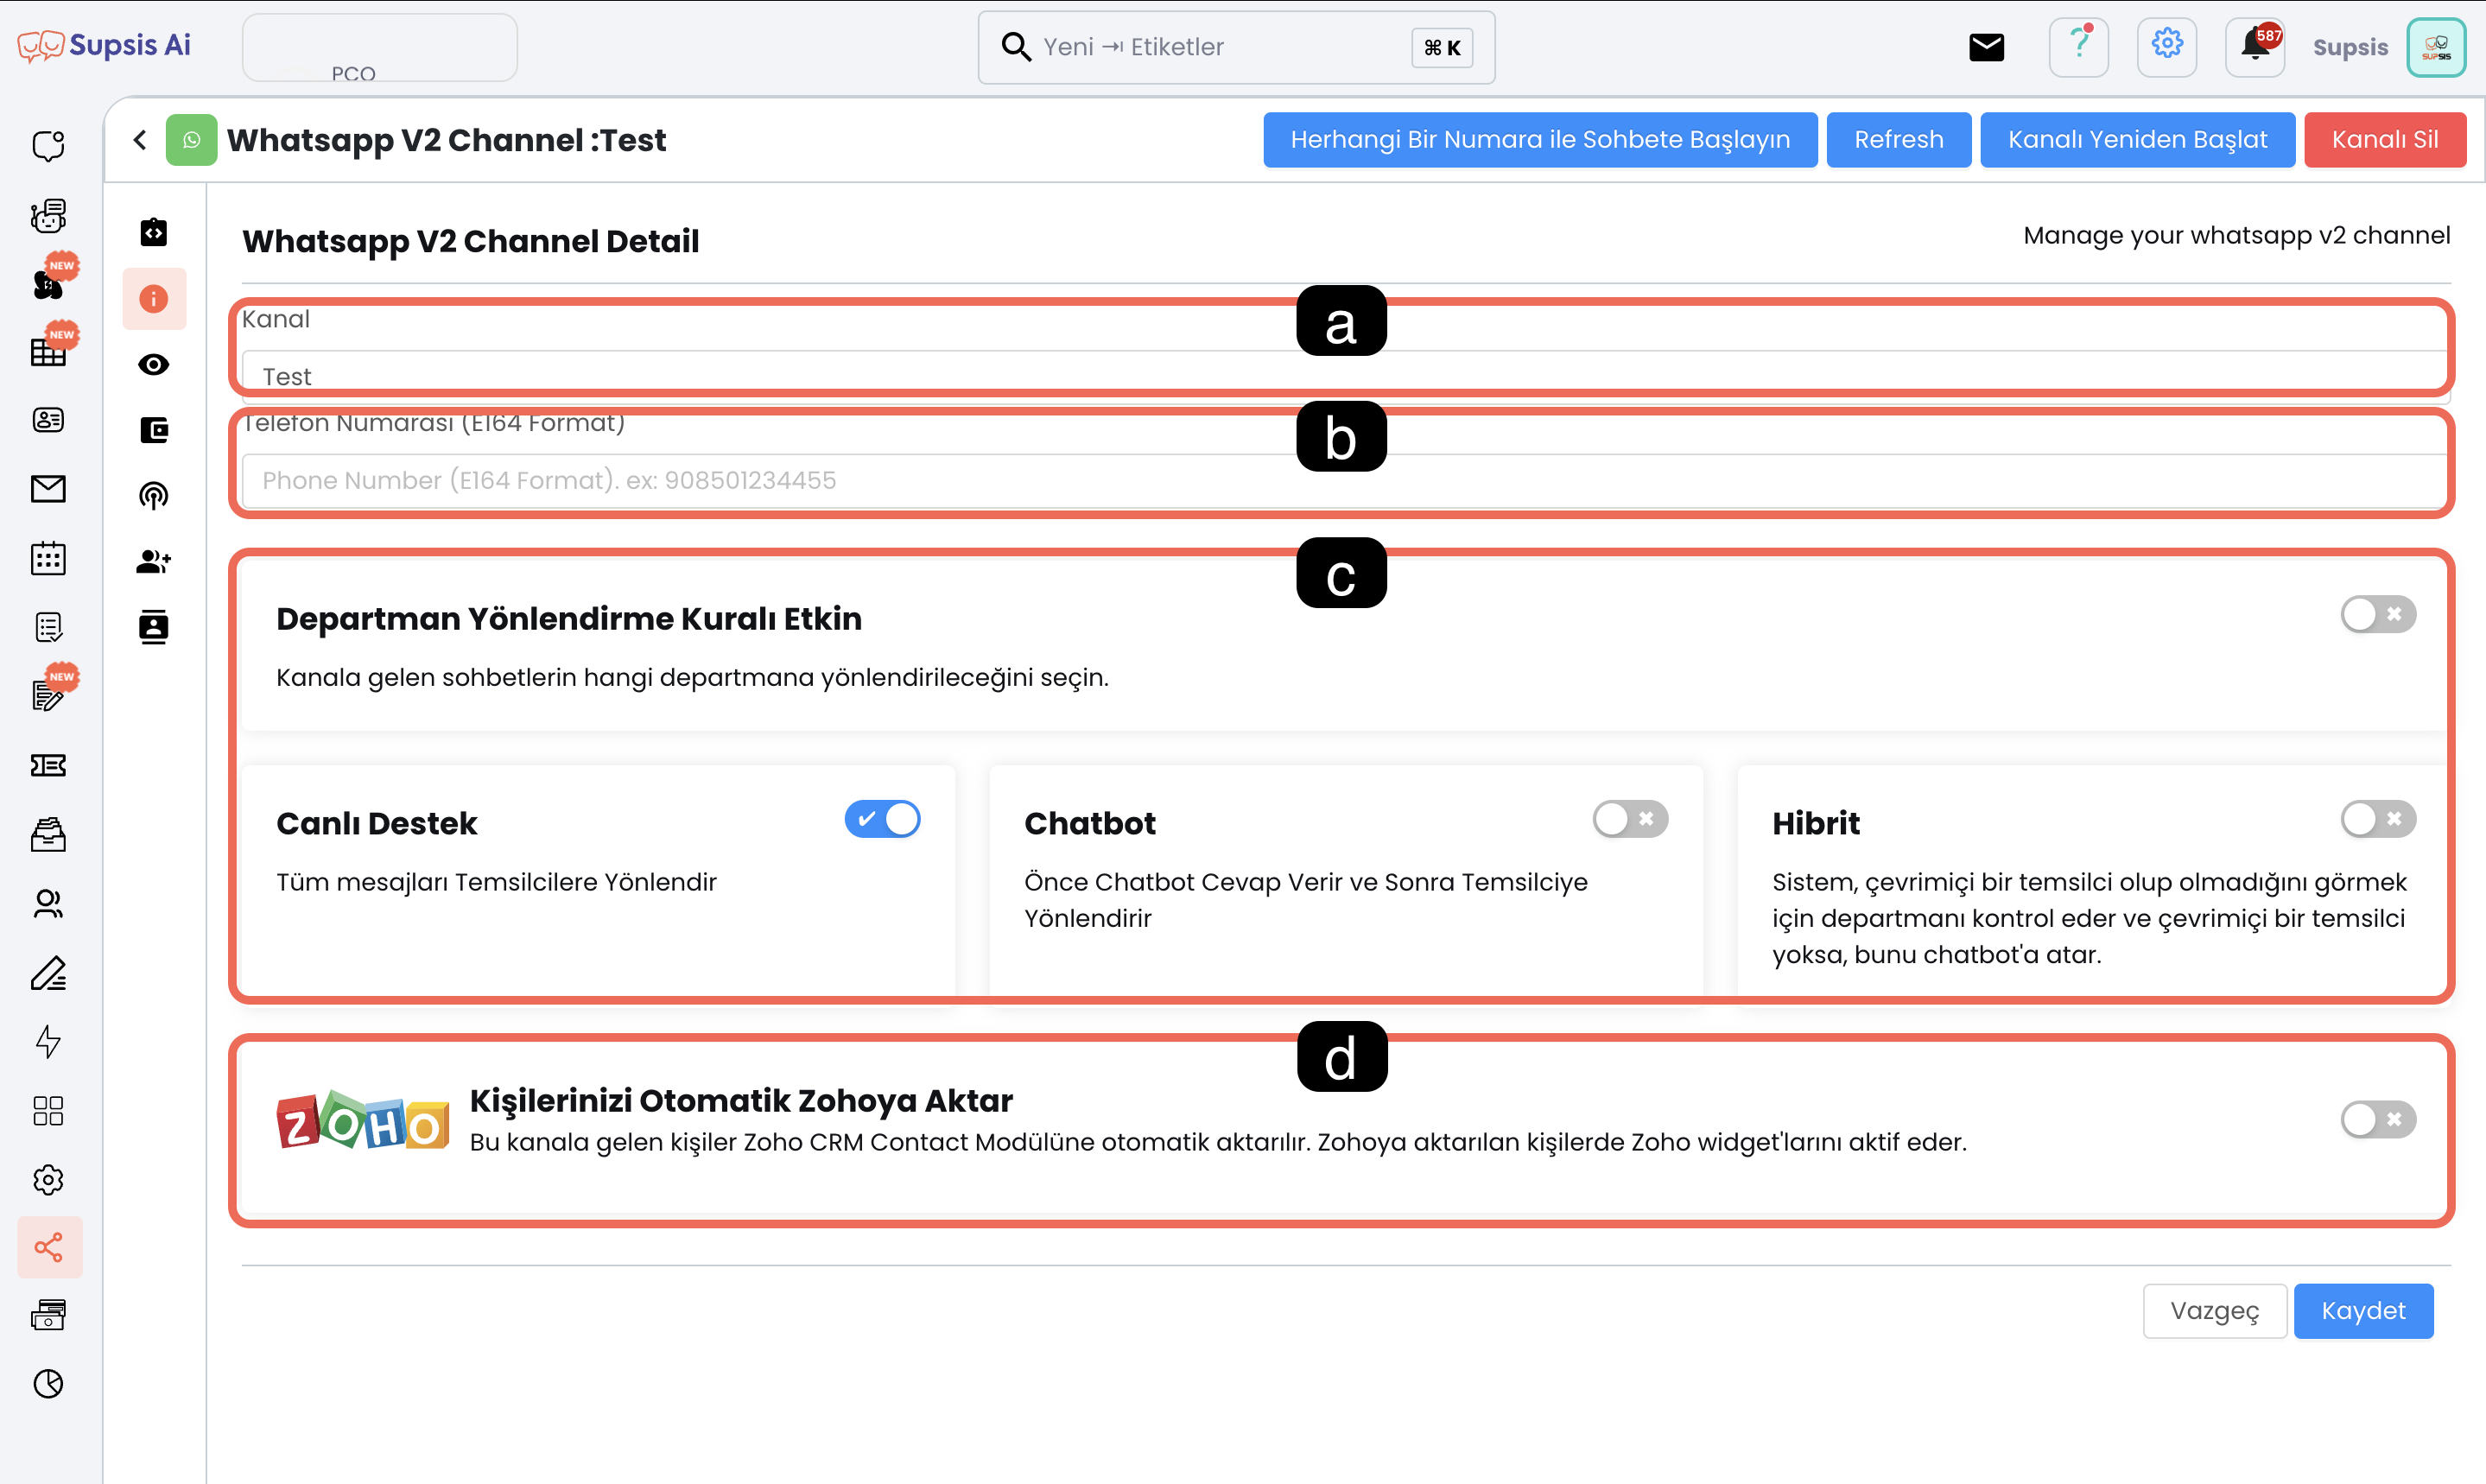
a) Channel Name
You can determine and edit your channel name from here. Channel names prevent confusion and provide convenience in the management process.
b) Phone Number
By entering the phone number connected to the WhatsApp channel in international E164 format (for example, "905xxxxxxxxx"), it is made suitable according to communication rules.
c) Chat Redirection Rule

- Department Redirection Rule Active: Redirects incoming messages to a specific department.
- Live Support: All messages are redirected to live support representatives.
- Hybrid: Controls representatives in only one department or all departments determined in the system. If there are no active representatives in the determined department or all departments, messages are automatically redirected to the determined chatbot scenario.
- Chatbot: The chatbot handles incoming messages and transfers the chat to support representatives in the chatbot scenario's transfer to representative steps.
d) Transfer Contacts to Zoho
Customer information from incoming messages is automatically transferred to the Zoho CRM system and provides additional analysis opportunities with Zoho widgets.
2) Visibility
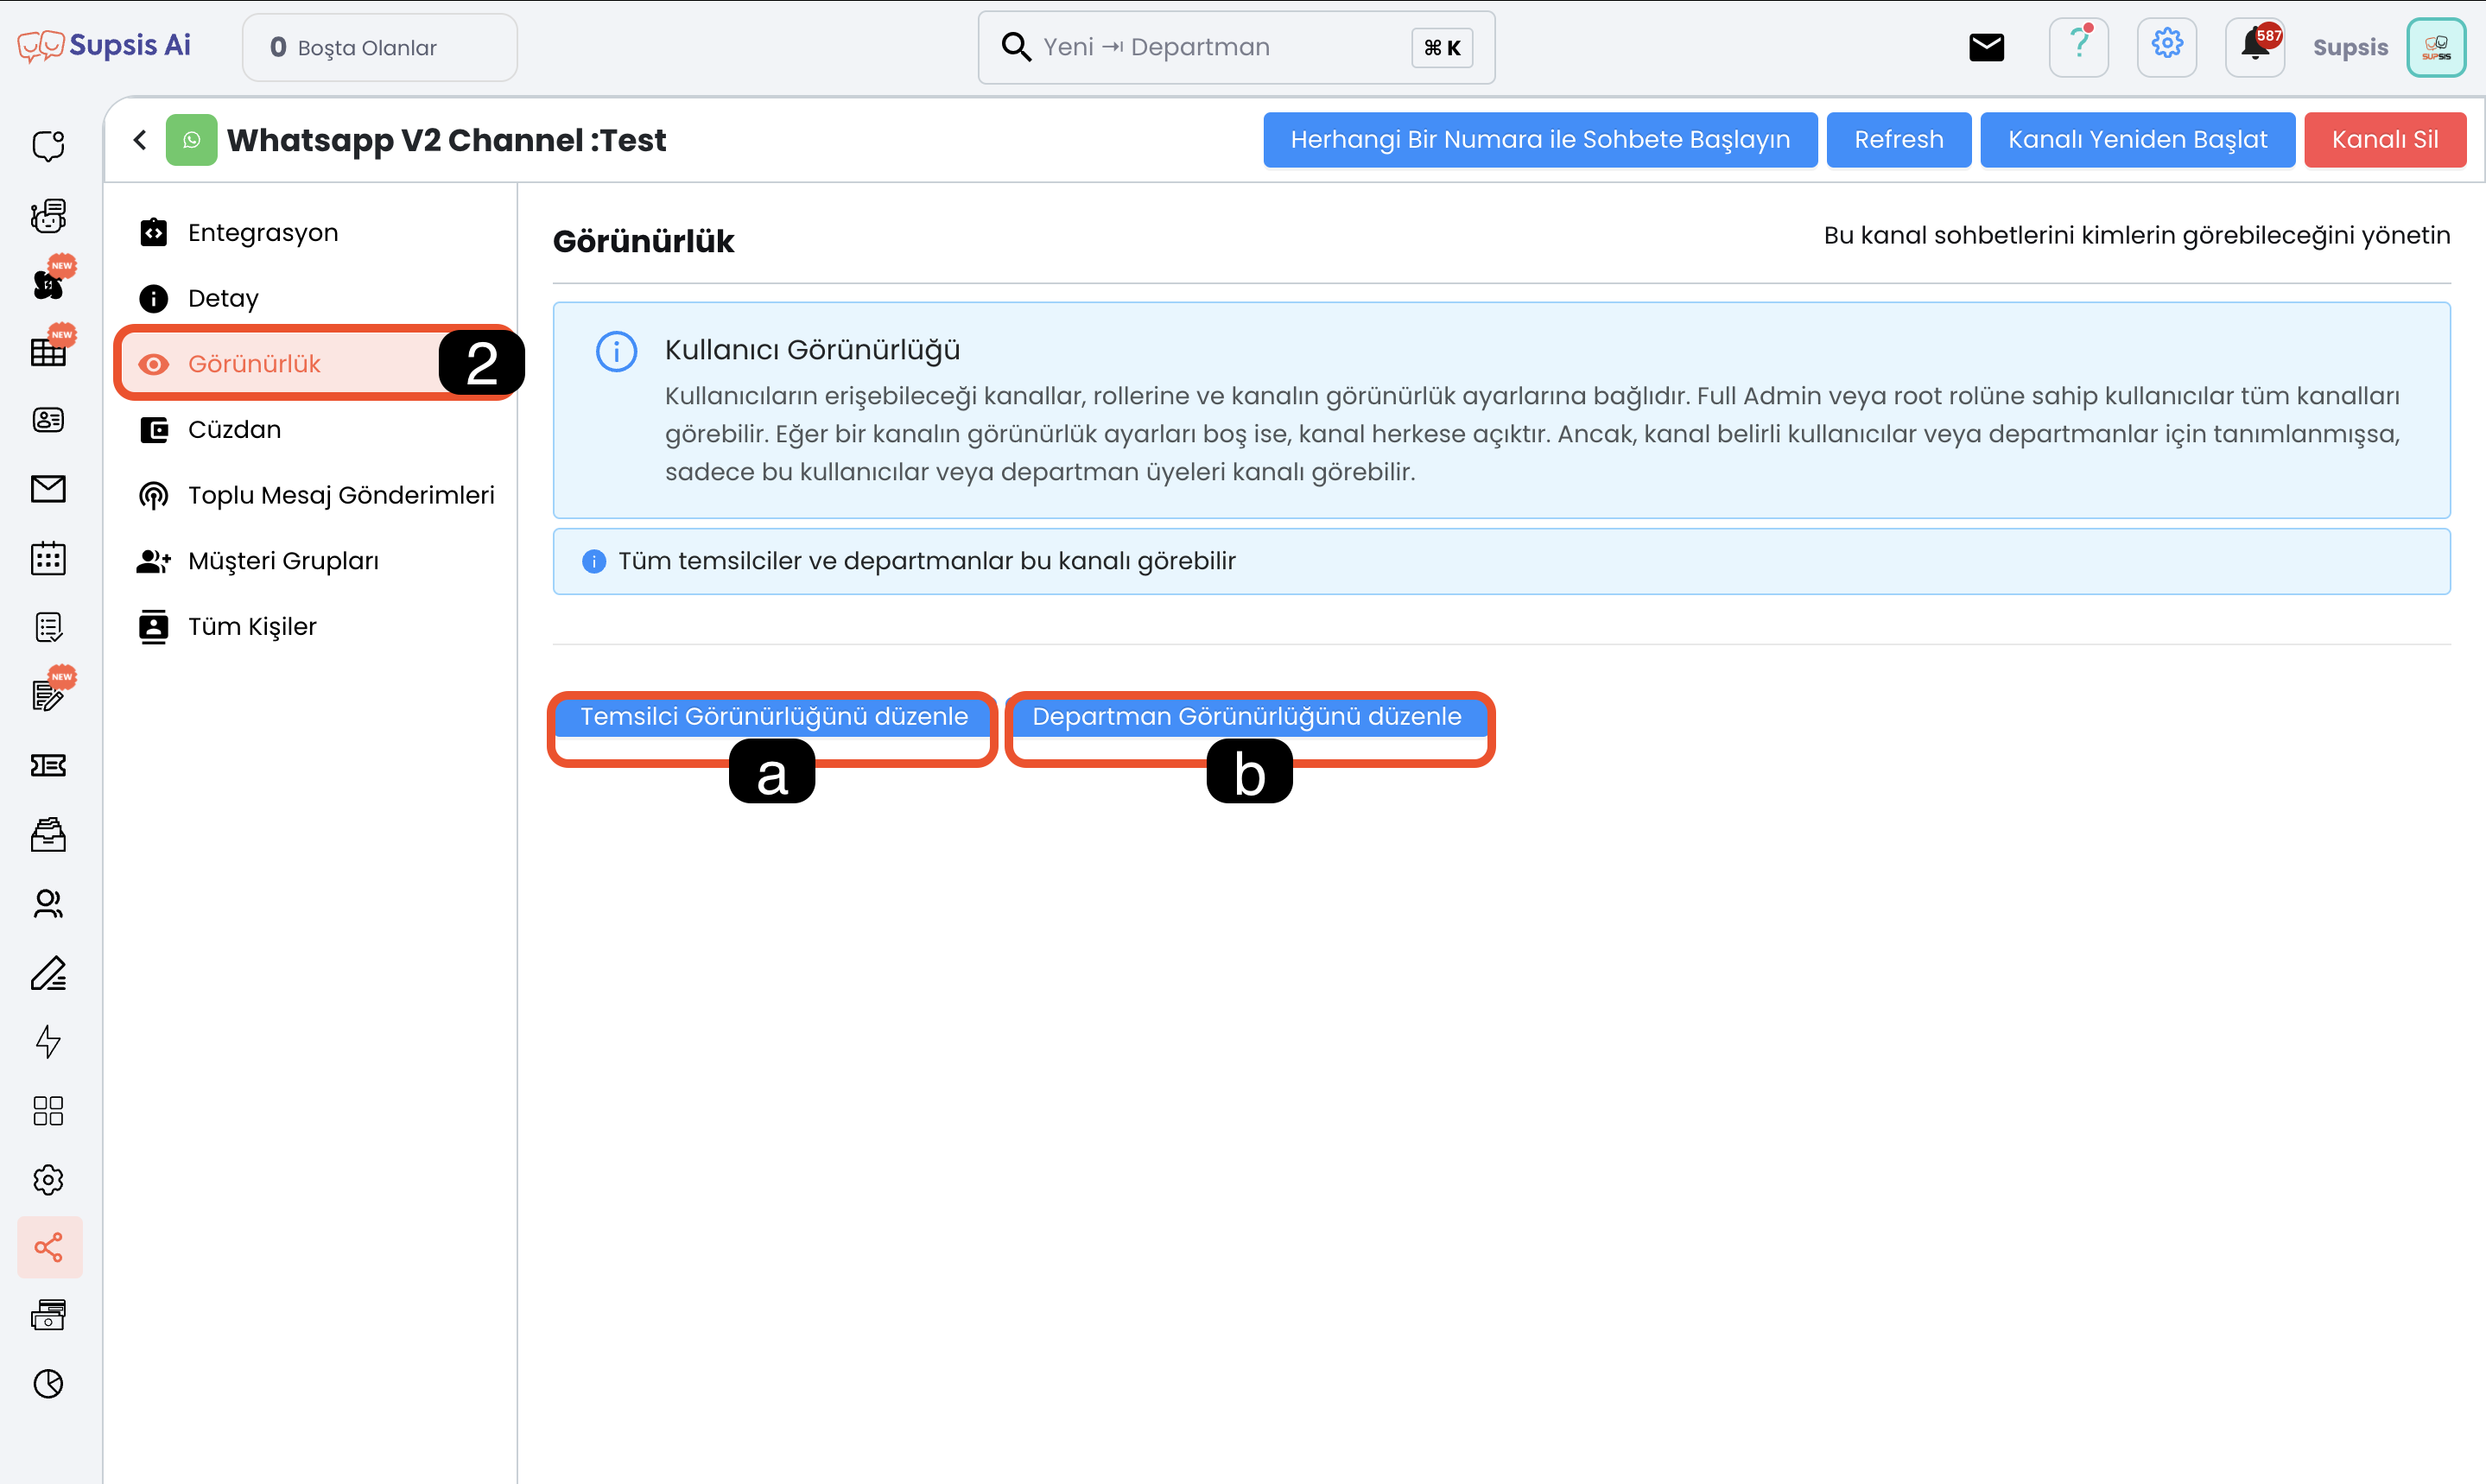
Visibility settings allow you to control content access to your WhatsApp channel. In this section, you can determine which representatives or departments can see and access the channel content. Thanks to this feature, you can increase privacy and security by ensuring that only authorized users can see and use the channel.
Menu Items:
- Representative Visibility
- Department Visibility
a) Representative Visibility
This setting determines which representatives can see the channel content. Only authorized representatives can access the channel, allowing you to manage user access in detail.
b) Department Visibility
This setting determines which departments can see the channel content. Only selected departments can access the channel, allowing you to make the channel specific to determined departments rather than a broader group.
NOTE: If visibility is not edited, all representatives can see the channel contents.
3) Wallet
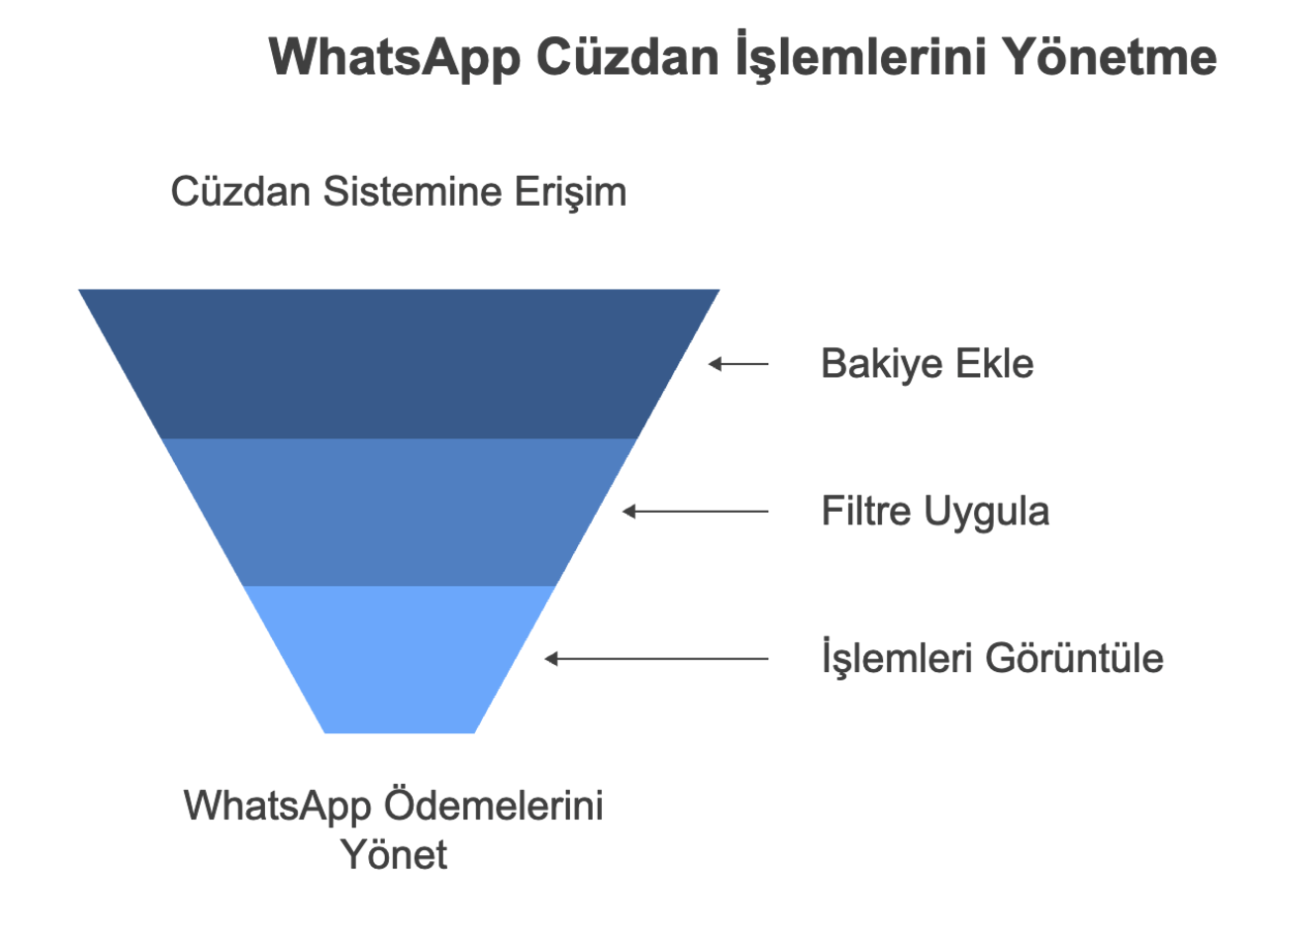
Supsis's wallet system, accessible both from within the channel and through the WP balance button at the top right, facilitates managing your WhatsApp usage balance and allows you to easily make payment transactions. Your balance top-ups are billed to you at the beginning of each month, providing regular payment tracking.
Menu Items:
- Add Balance
- Wallet Filters
- Wallet Transactions
a) Add Balance
This option allows you to quickly add balance to your WhatsApp wallet through card information registered in the system.
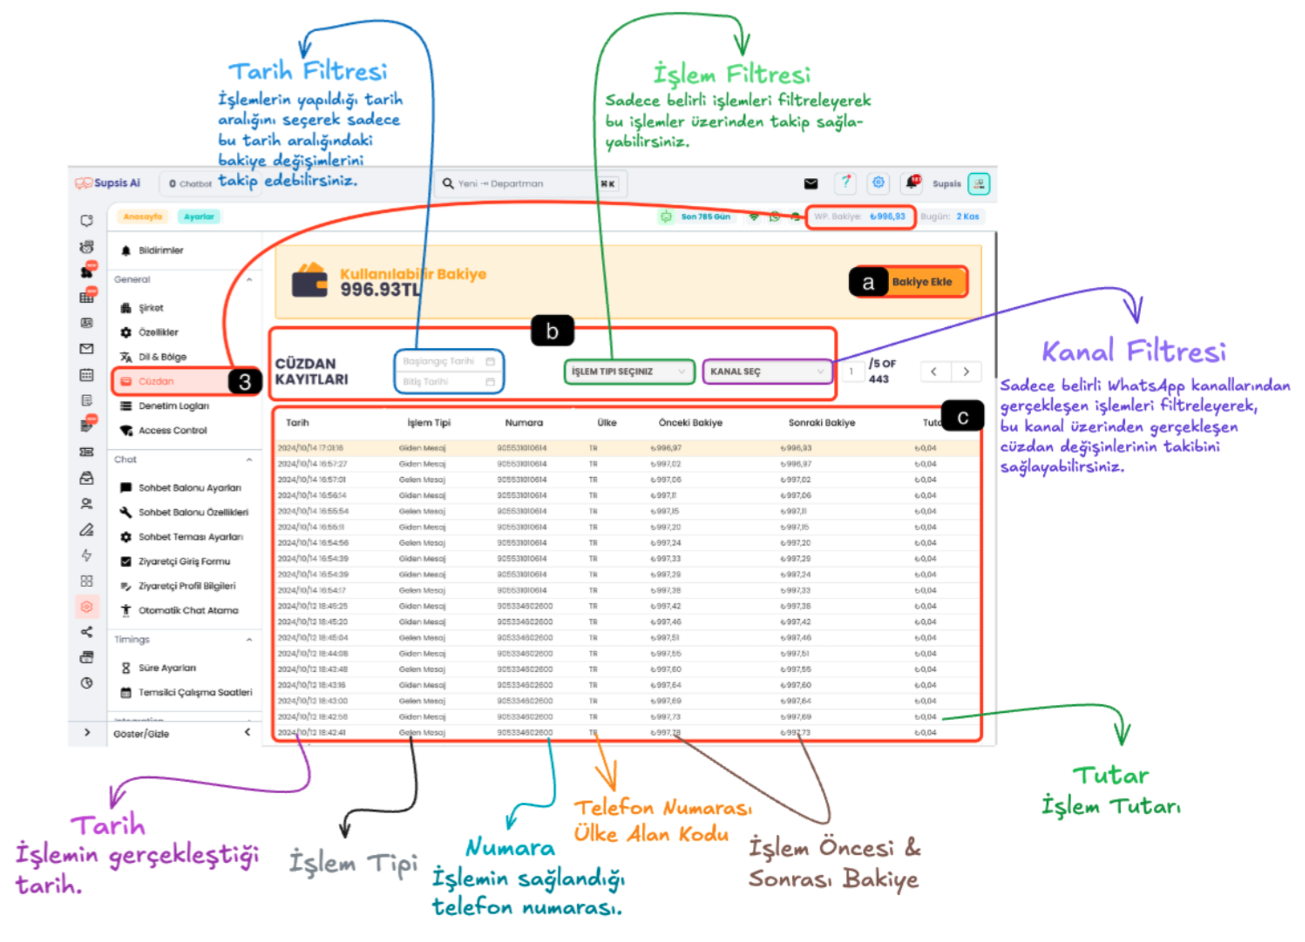
b) Wallet Filters
- Date Filter: You can monitor wallet history by viewing transactions within a specific date range.
- Transaction Filter: You can see details by selecting only specific transaction types and track the transactions you need.
- Channel Filter: You can see which channels your balance is used in by filtering transactions that occur only in specific WhatsApp channels.
c) Wallet Transactions
Presents all transactions made in the wallet in a detailed table. This table includes information such as transaction date, transaction type, number (phone number where the transaction occurred), previous and current balance, transaction amount. The table can be customized with filtering options for users to see their transactions more specifically.
4) Bulk Message Sending
It is possible to send bulk messages through WhatsApp Web QR Mode. However, this method has the risk of being perceived as spam and may lead to the closure of your account. WhatsApp carefully monitors bulk message sending because this is one of the platform's main revenue sources. To eliminate the risk of your account being closed, it is recommended to use the WhatsApp Business API module.
Menu Items:
- Create Bulk Message
- Past Sends
- Filter Past Sends
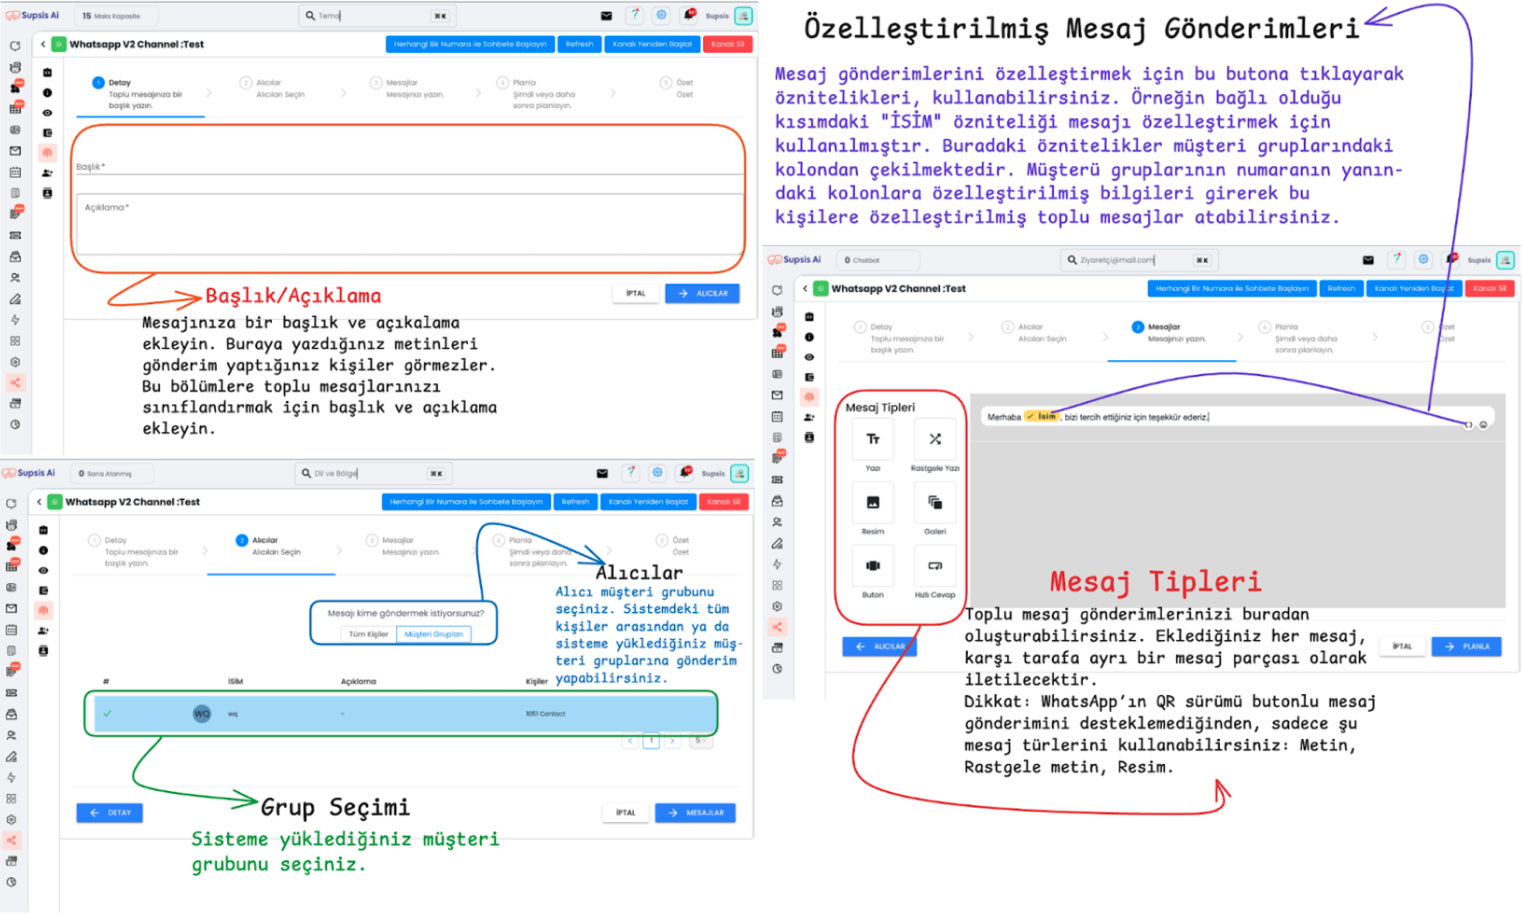
a) Create Bulk Message
You can create your bulk messages through this menu. Each message you add will be sent to the other party as a separate piece. Note: Since the WhatsApp QR version does not support button message sending, you can only use the following message types: - Text - Random text - Image
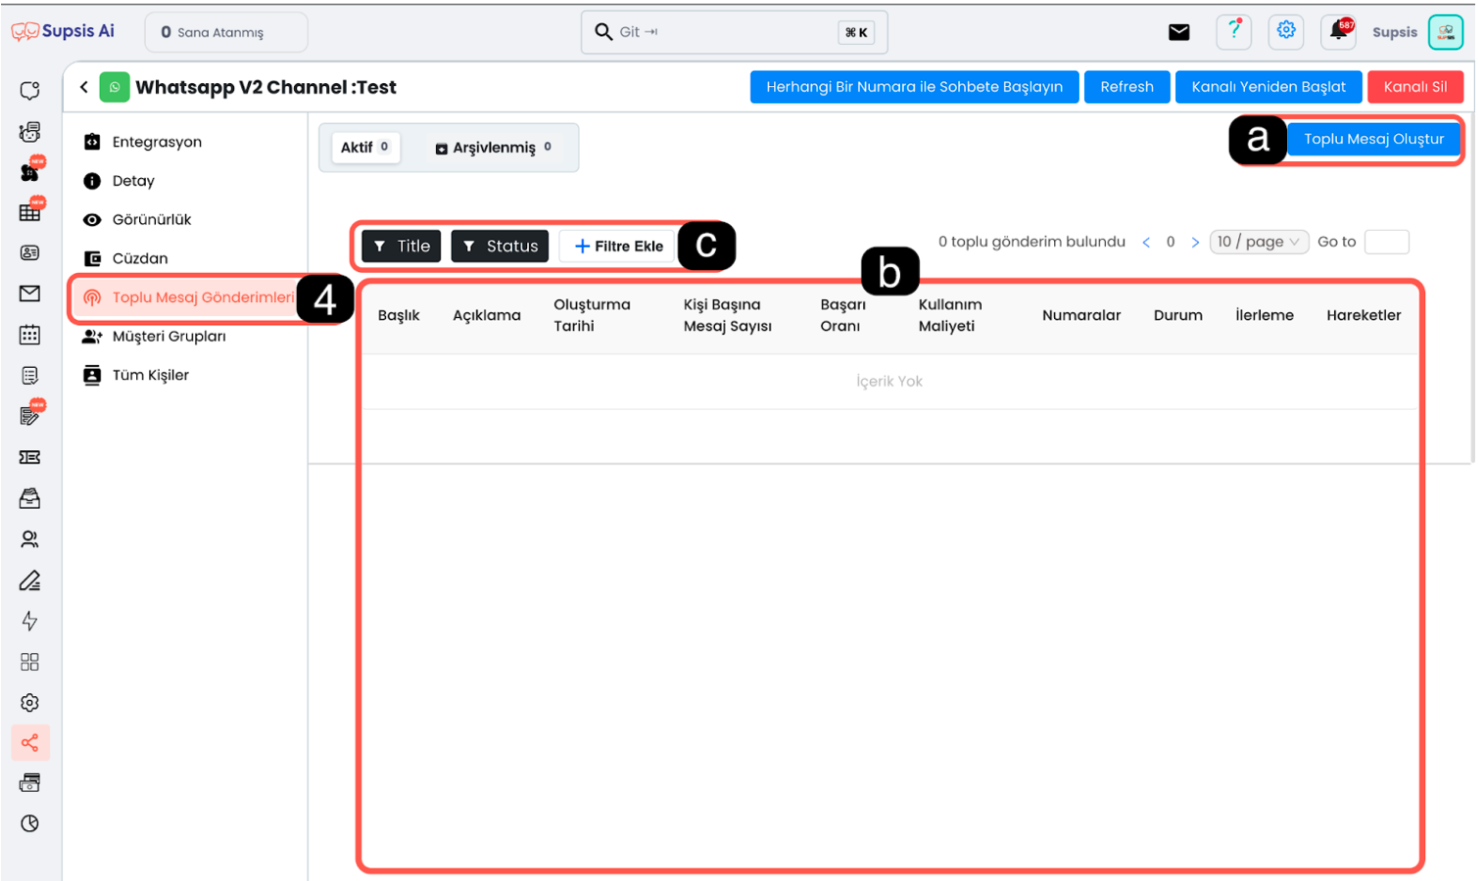
b) Past Sends
You can access the history of bulk messages you have sent from here. You can examine past send details and view their results.
c) Filter Past Sends
You can filter past sends according to various criteria. You have filtering options for your sends according to the following features: - Title - Description - Send status (status)
5) Customer Groups
The Customer Groups section helps you organize your bulk message sending in specific groups. From this section, you can create, name, add or edit groups.
Menu Items:
- Create Group
- Name Group
- Delete/Edit Group
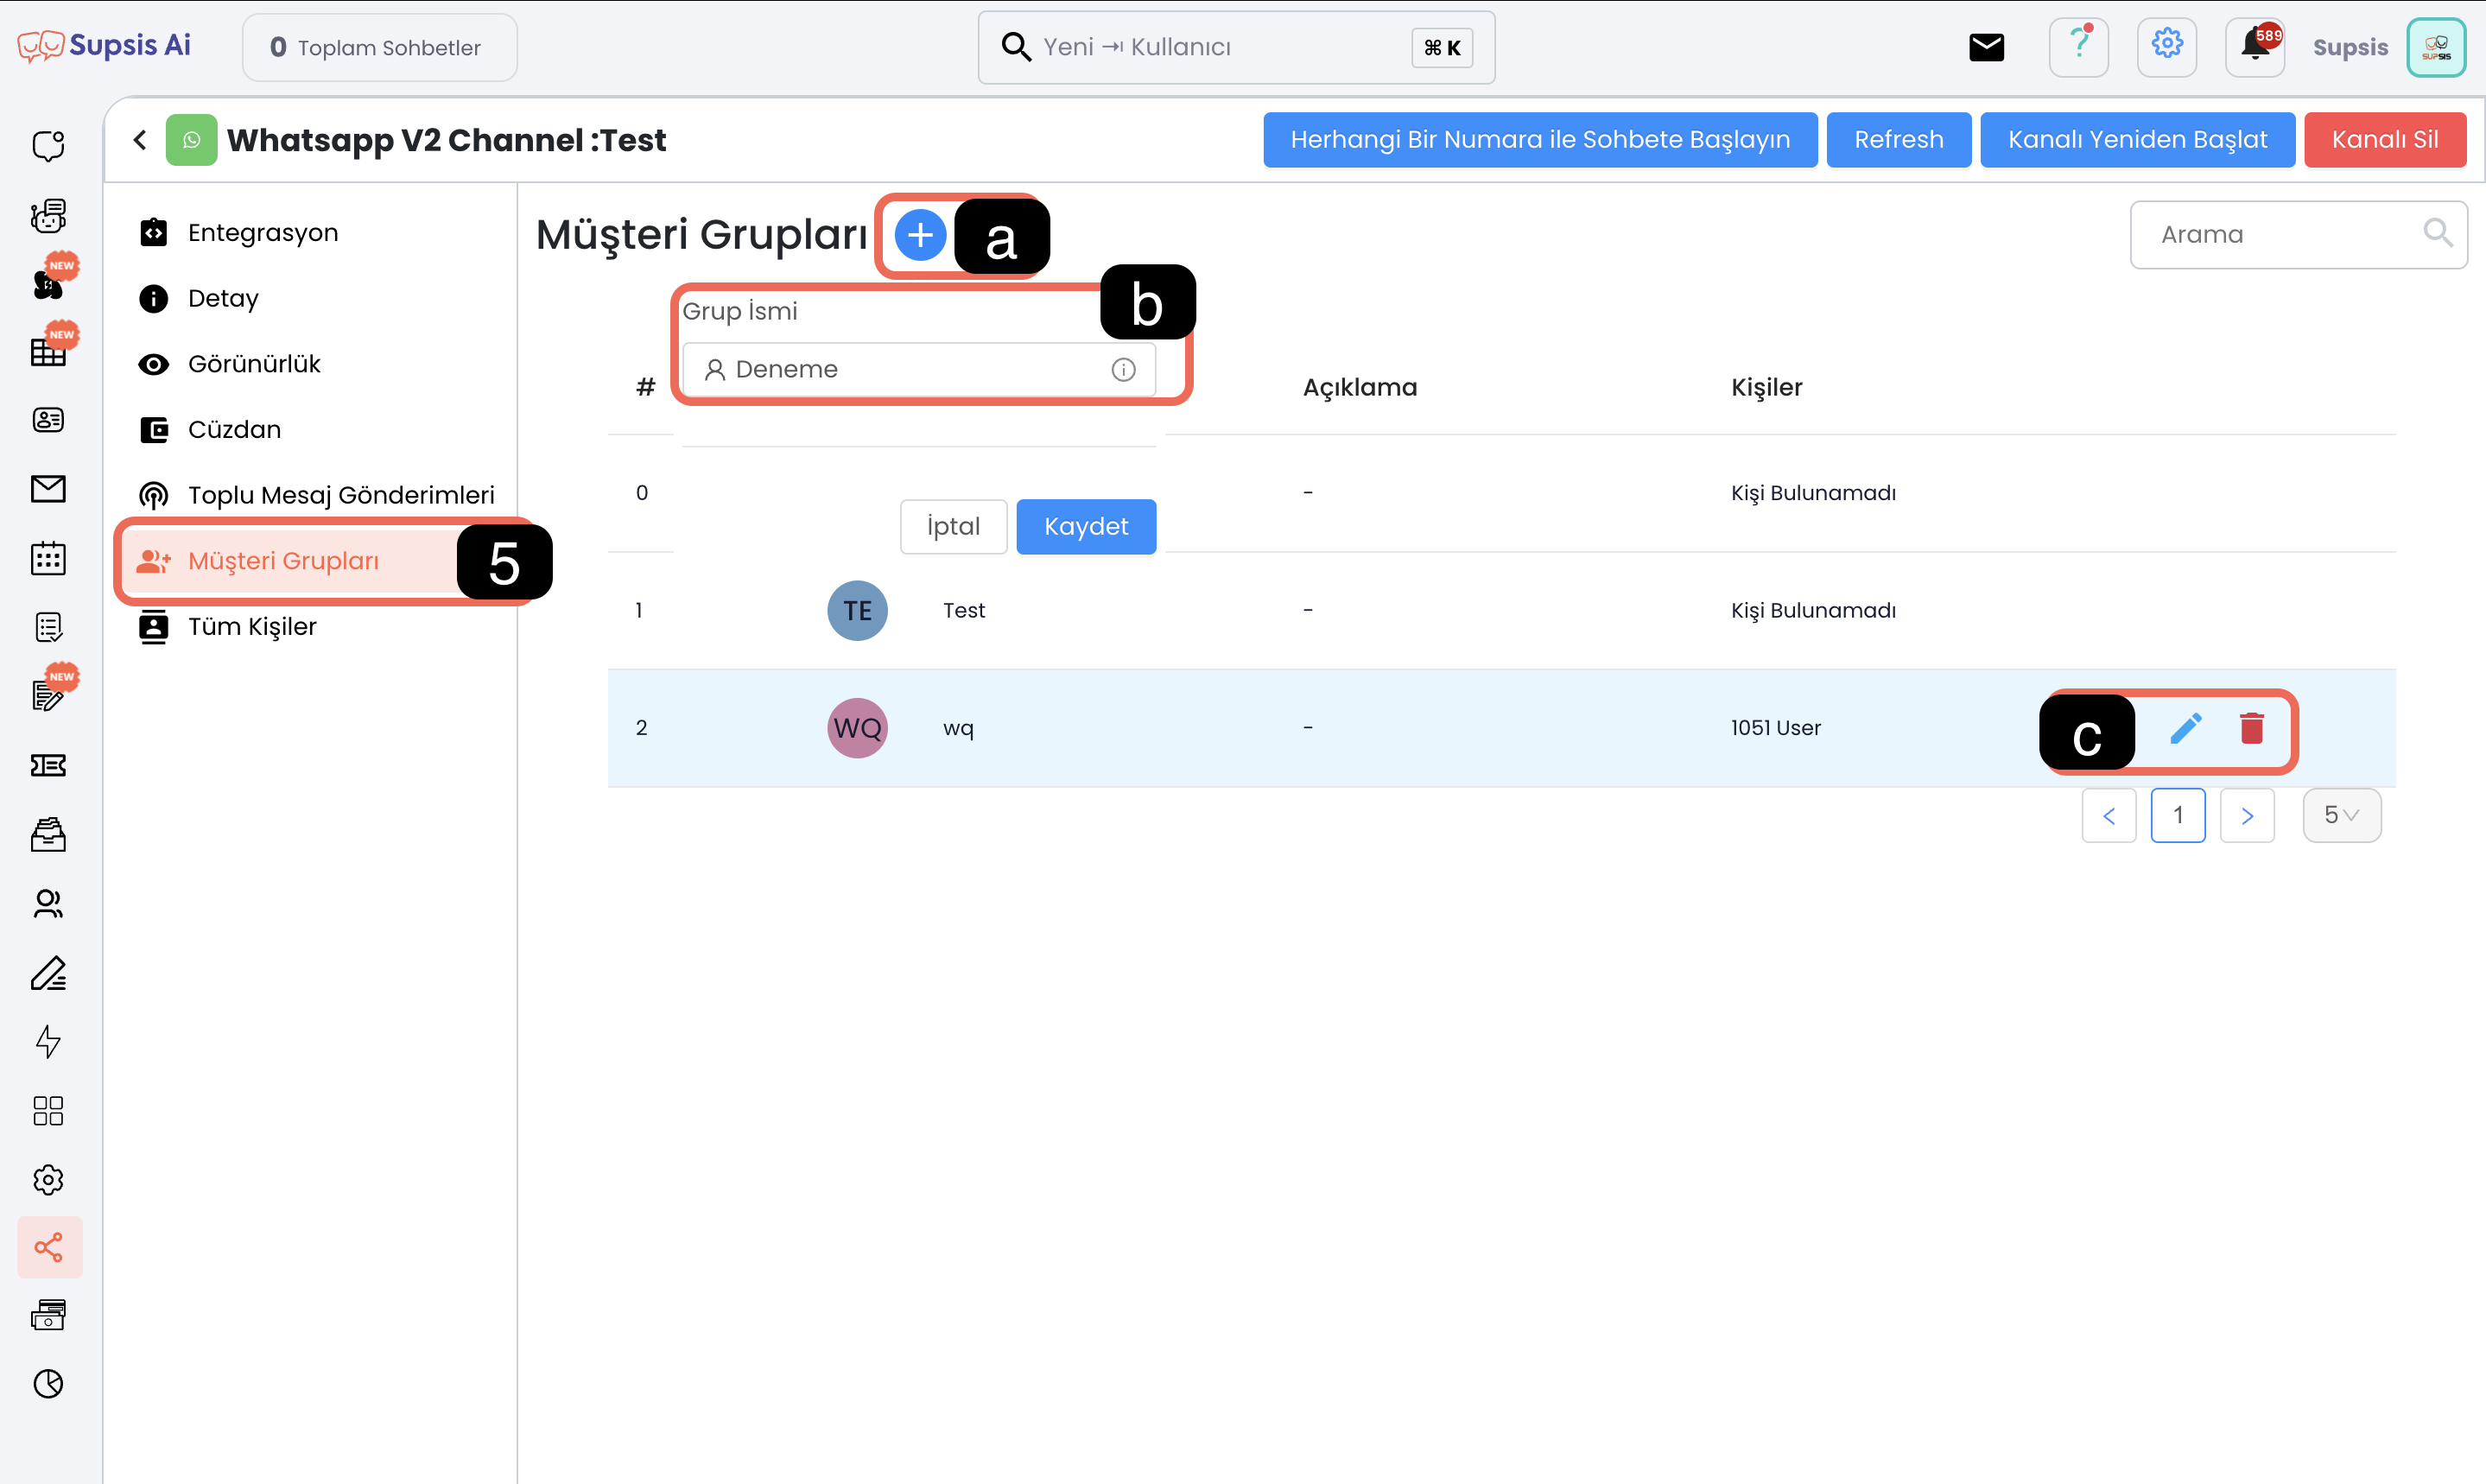
a) Create Group
To create a new customer group, you can add a group by pressing the "+" button.
b) Name Group
Give your created group a clear and classifying name so you can easily recognize it later.
c) Delete/Edit Group
You can edit or delete the groups you have created.
Group Contents:
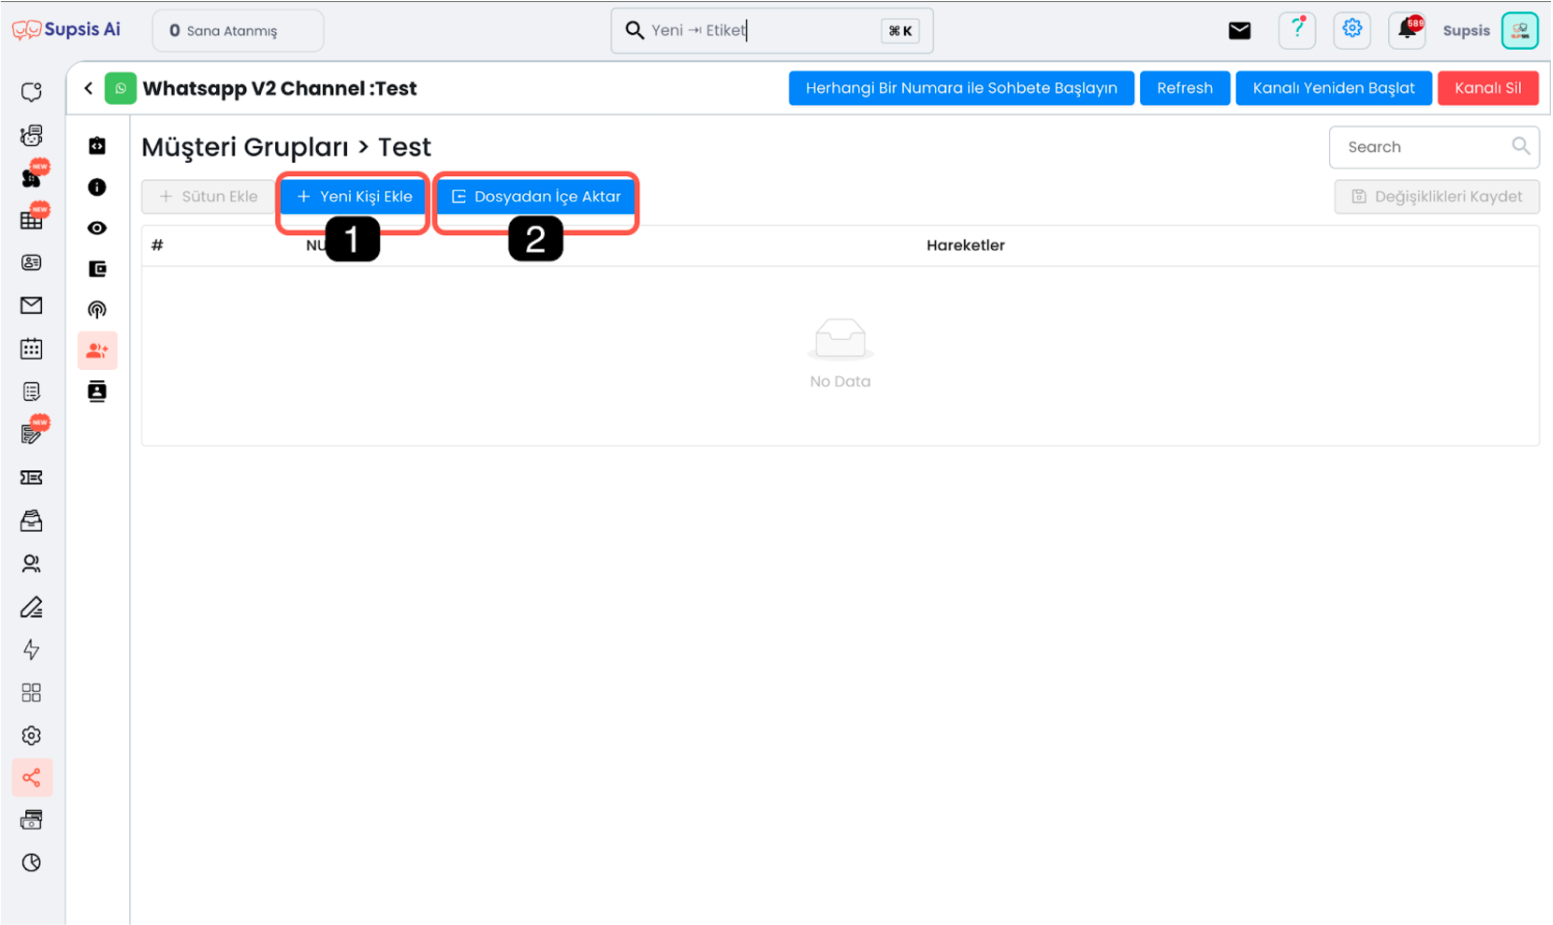
- Manual Contact Addition
- Bulk Contact Upload with File
1) Manual Contact Addition
You can add contacts one by one manually from this section.
2) Bulk Contact Addition with File
You can bulk import customer groups by uploading your Excel or CSV file.
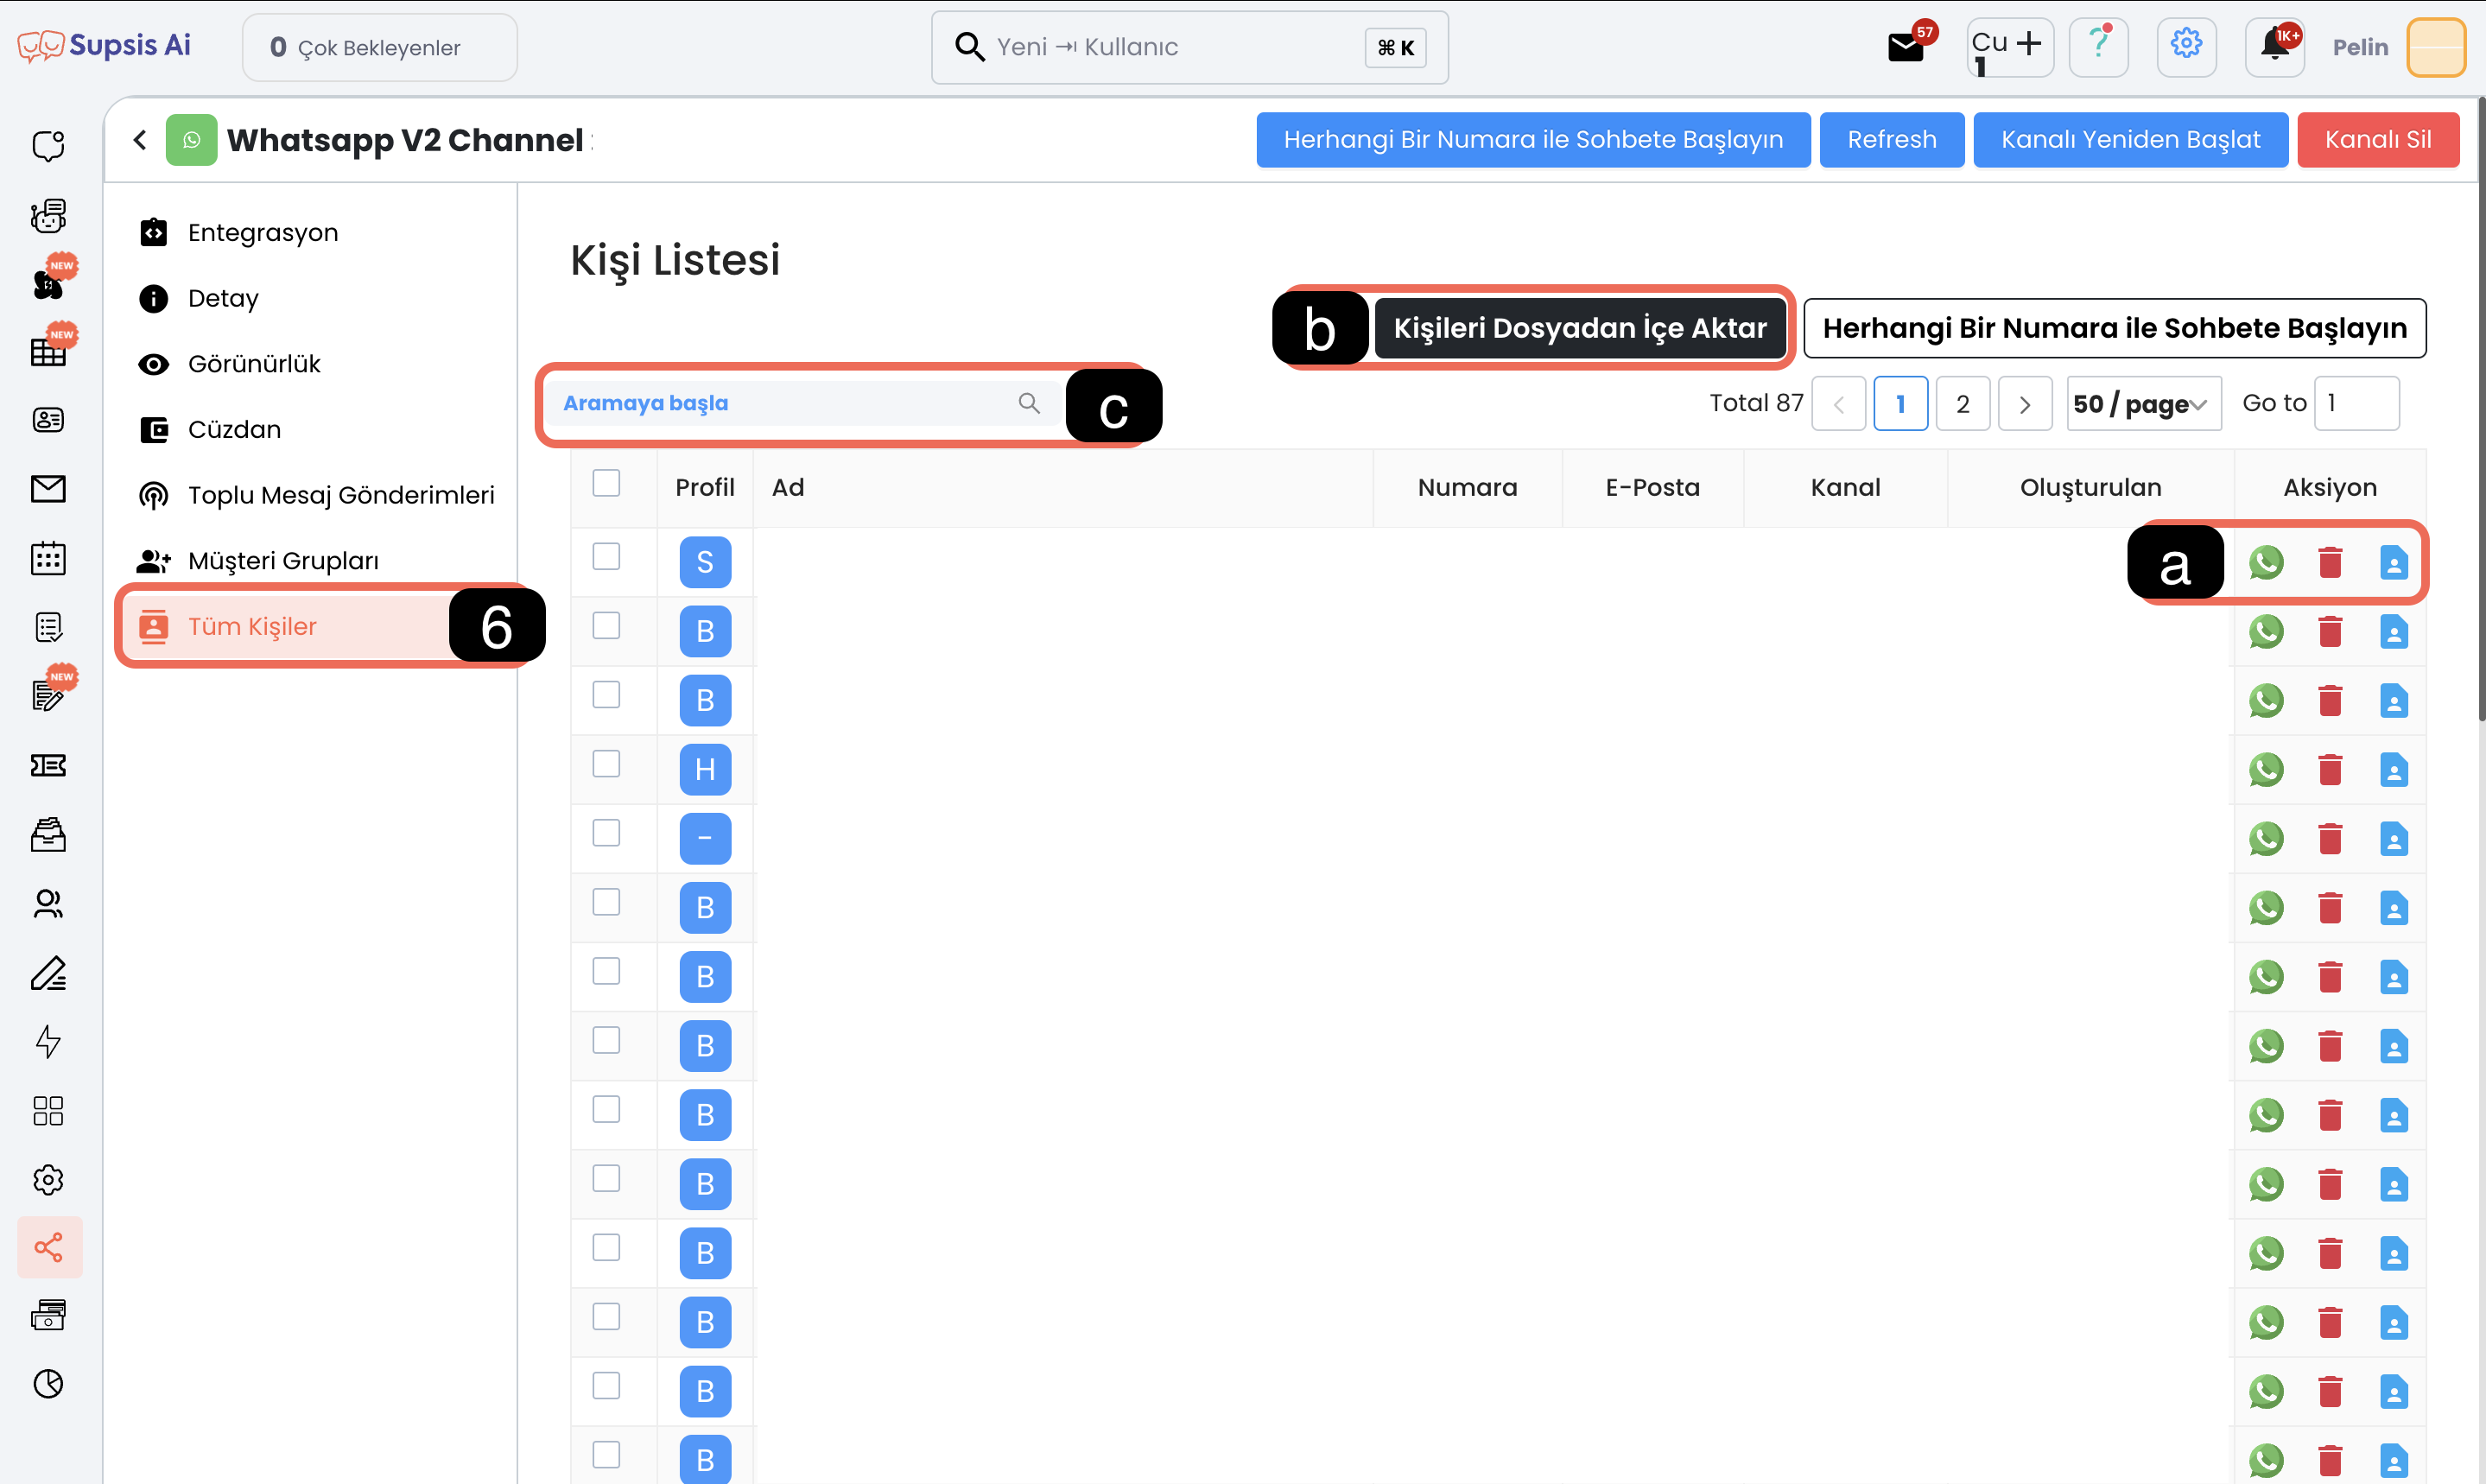
6) All Contacts (Directory)
In this section, a contact card is automatically created for all contacts you communicate with via WhatsApp. Thanks to these contact cards, you can access user information, start conversations and edit contacts.
Menu Items:
- Actions
- Import Contacts from File
- Search Contacts
a) Actions
This section offers different action options for each contact: - You can start a conversation directly via WhatsApp by clicking the WhatsApp logo. - You can delete the contact by pressing the Trash icon. - You can access the profile card containing the contact's detailed information by clicking the Profile icon.
b) Import Contacts from File
After clicking this button, select the documents you will upload to the system. Uploading contacts to the system will introduce these contacts to the Supsis system.
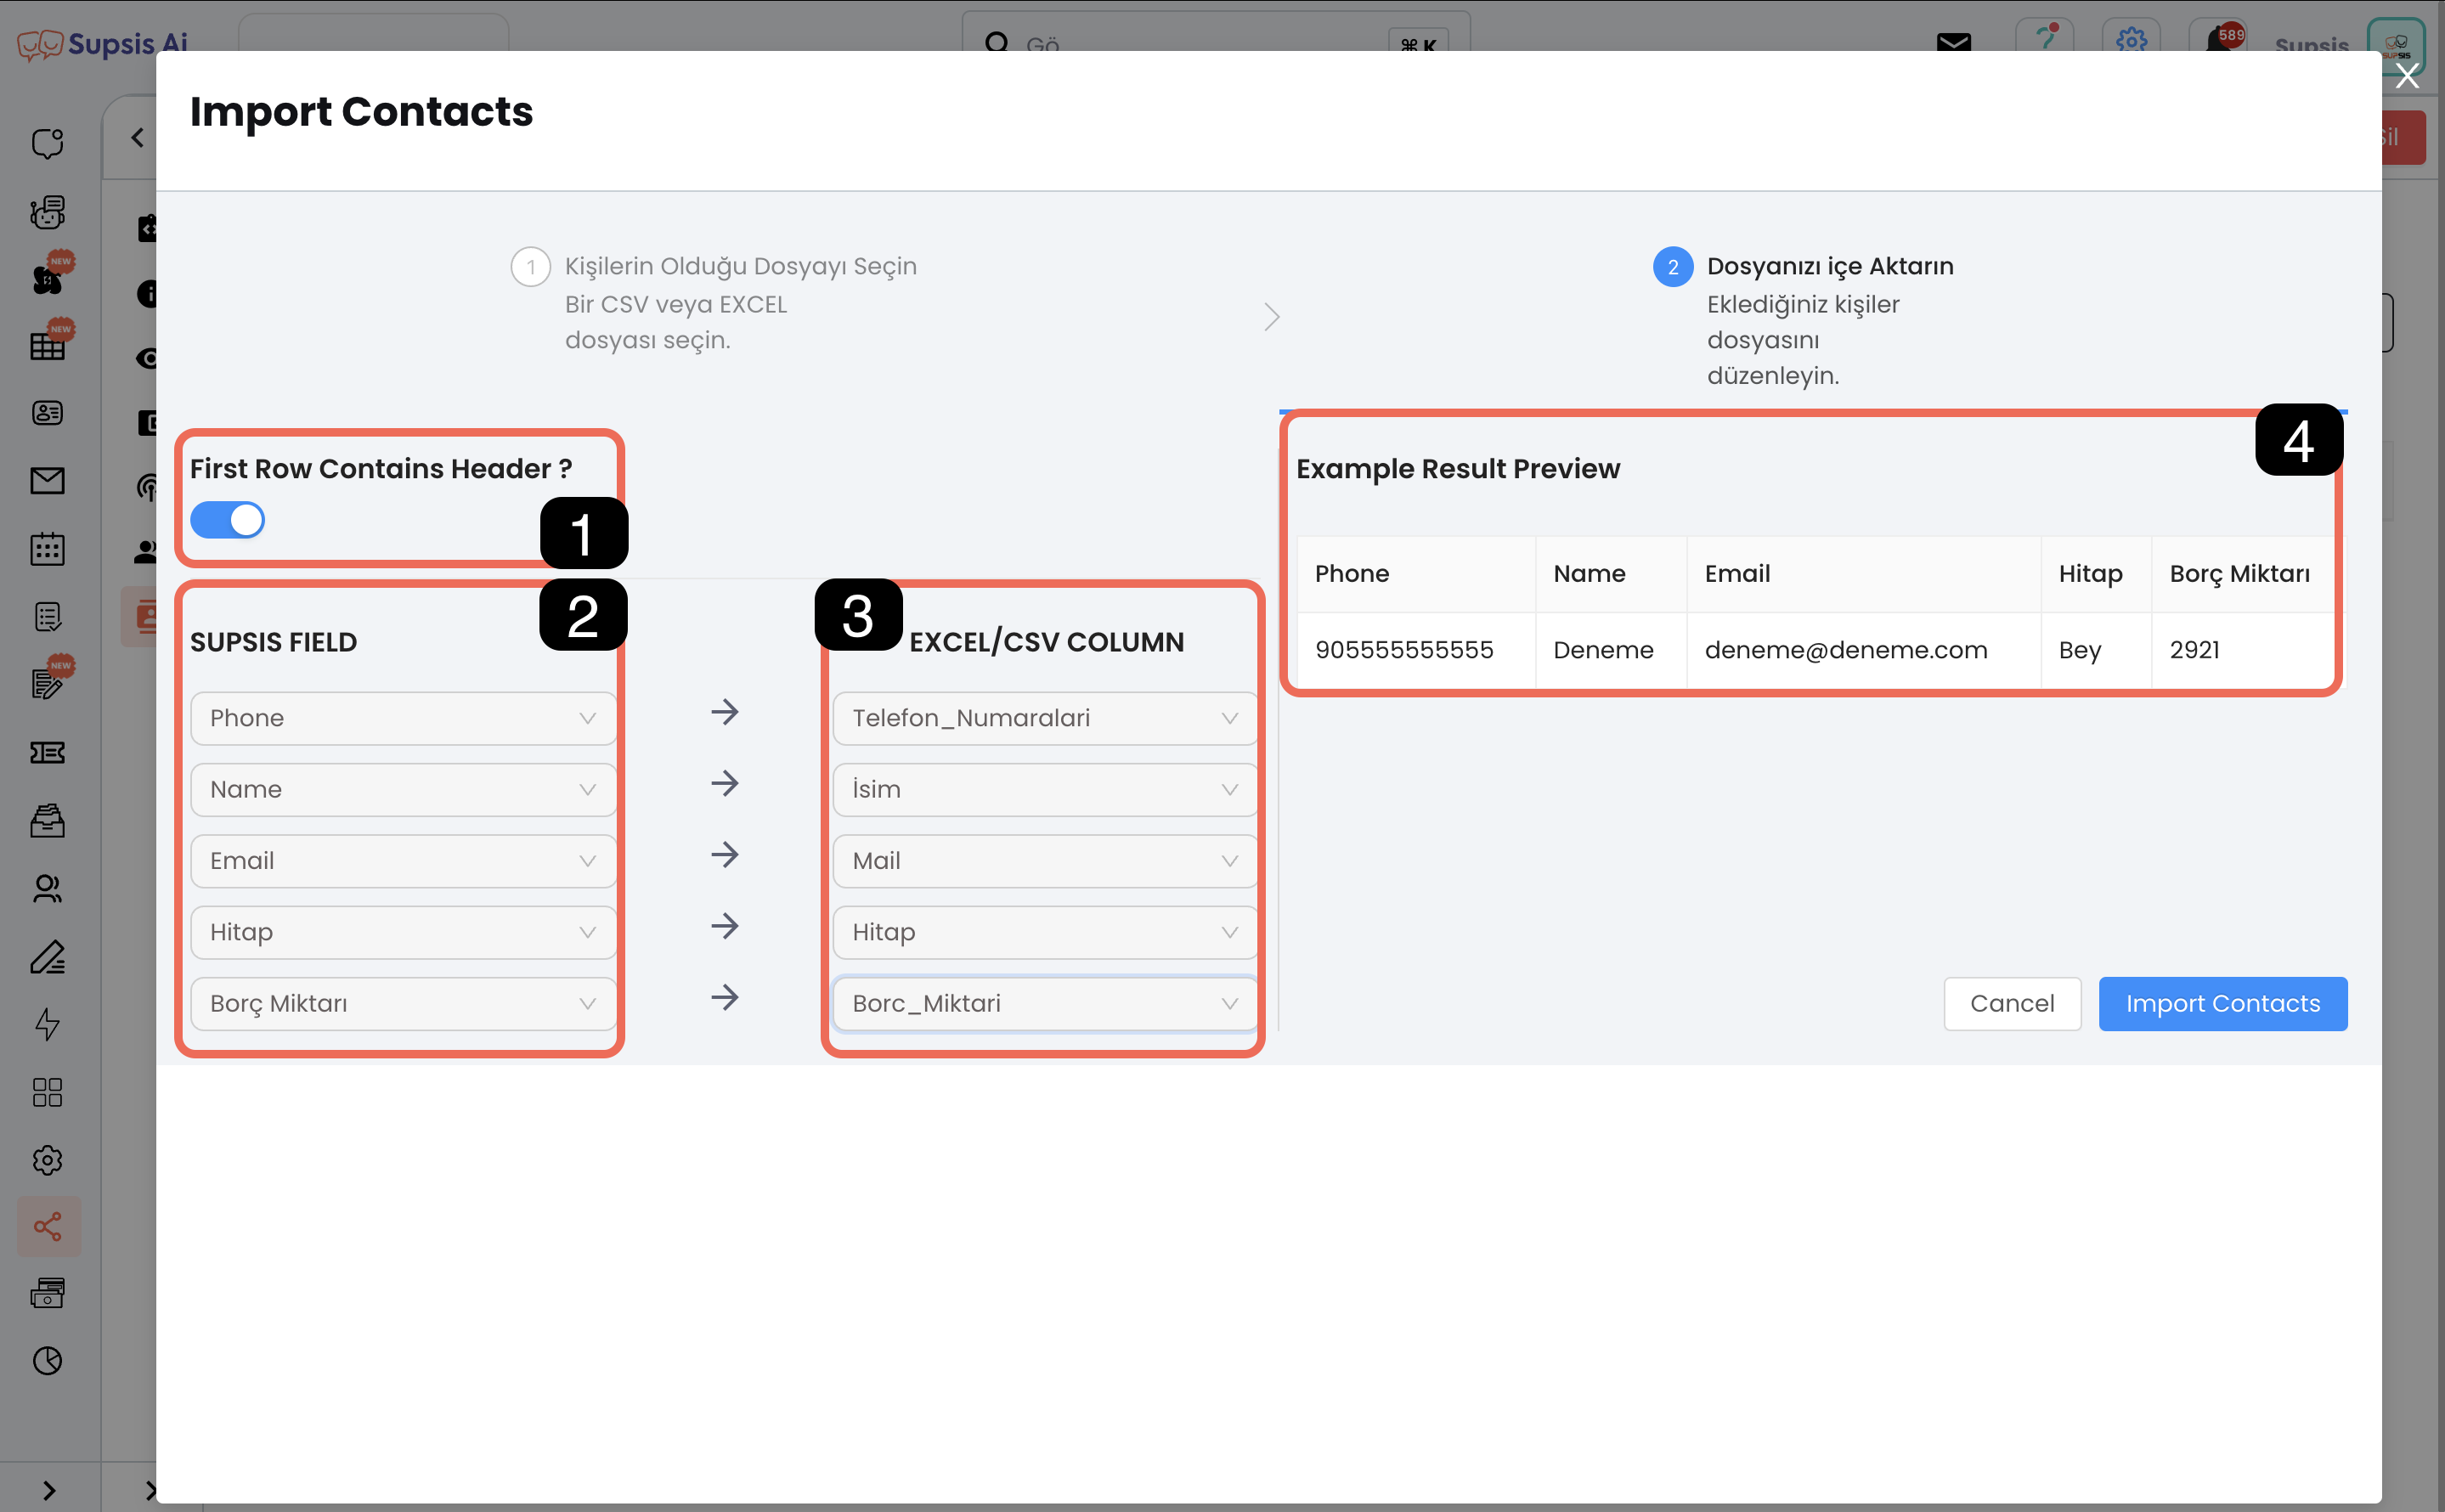
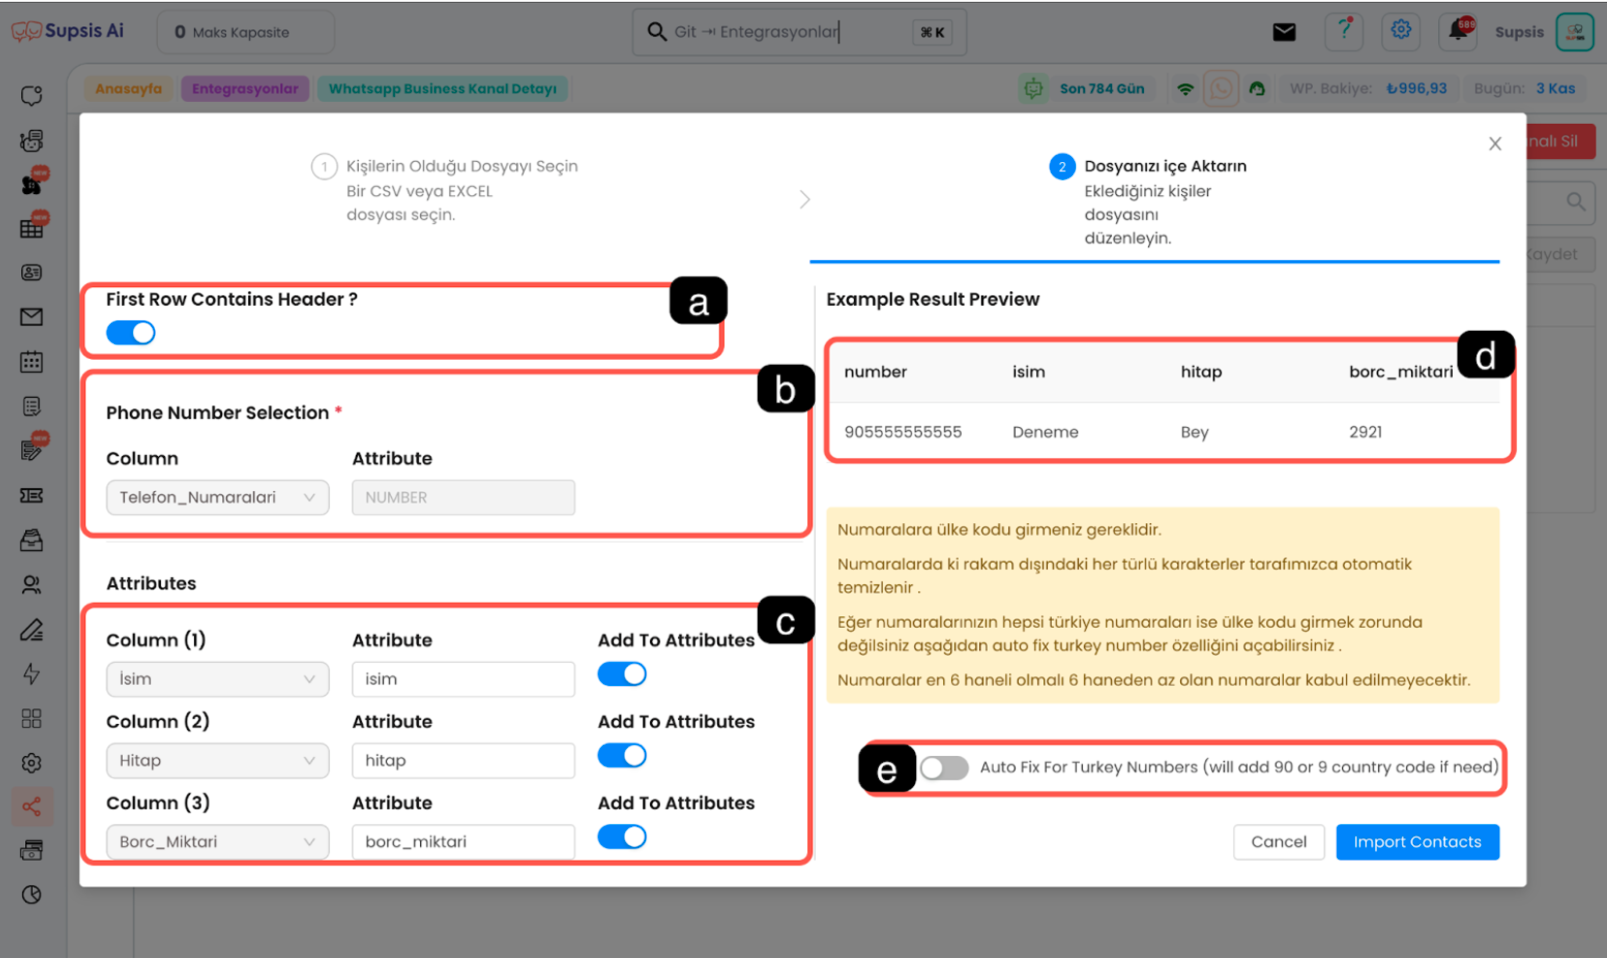
b.1 First Row Contains Header
If the first row of the file you upload contains headers (such as name, phone number), activate this option. If there is no header, turn off this option. This tick will automatically add a header row.
Separator Character
If a CSV file is being uploaded, the Separator Character section will also be active. You need to select the "," or ";" characters used to separate the information in the document from this section.
b.2 Supsis Field
To introduce the contacts in your document to Supsis, you need to match the attributes you created with the information in the Excel/CSV file. To create attributes: - Follow the steps Settings > Visitor Profile Information > New Add Button at Top Right.
b.3 Excel/CSV Columns
The columns in your Excel or CSV document will be shown in the right section. You need to match these columns with Supsis fields correctly and consistently.
b.4 Preview
You can use this preview area to check the accuracy of your matches. After reviewing the matches, upload the contacts to the system by clicking the "Import Contacts" button at the bottom right.
c) Search Contacts
You can quickly search WhatsApp contacts using the information in profile cards. You can access the contact you want by typing the relevant information in the search box.