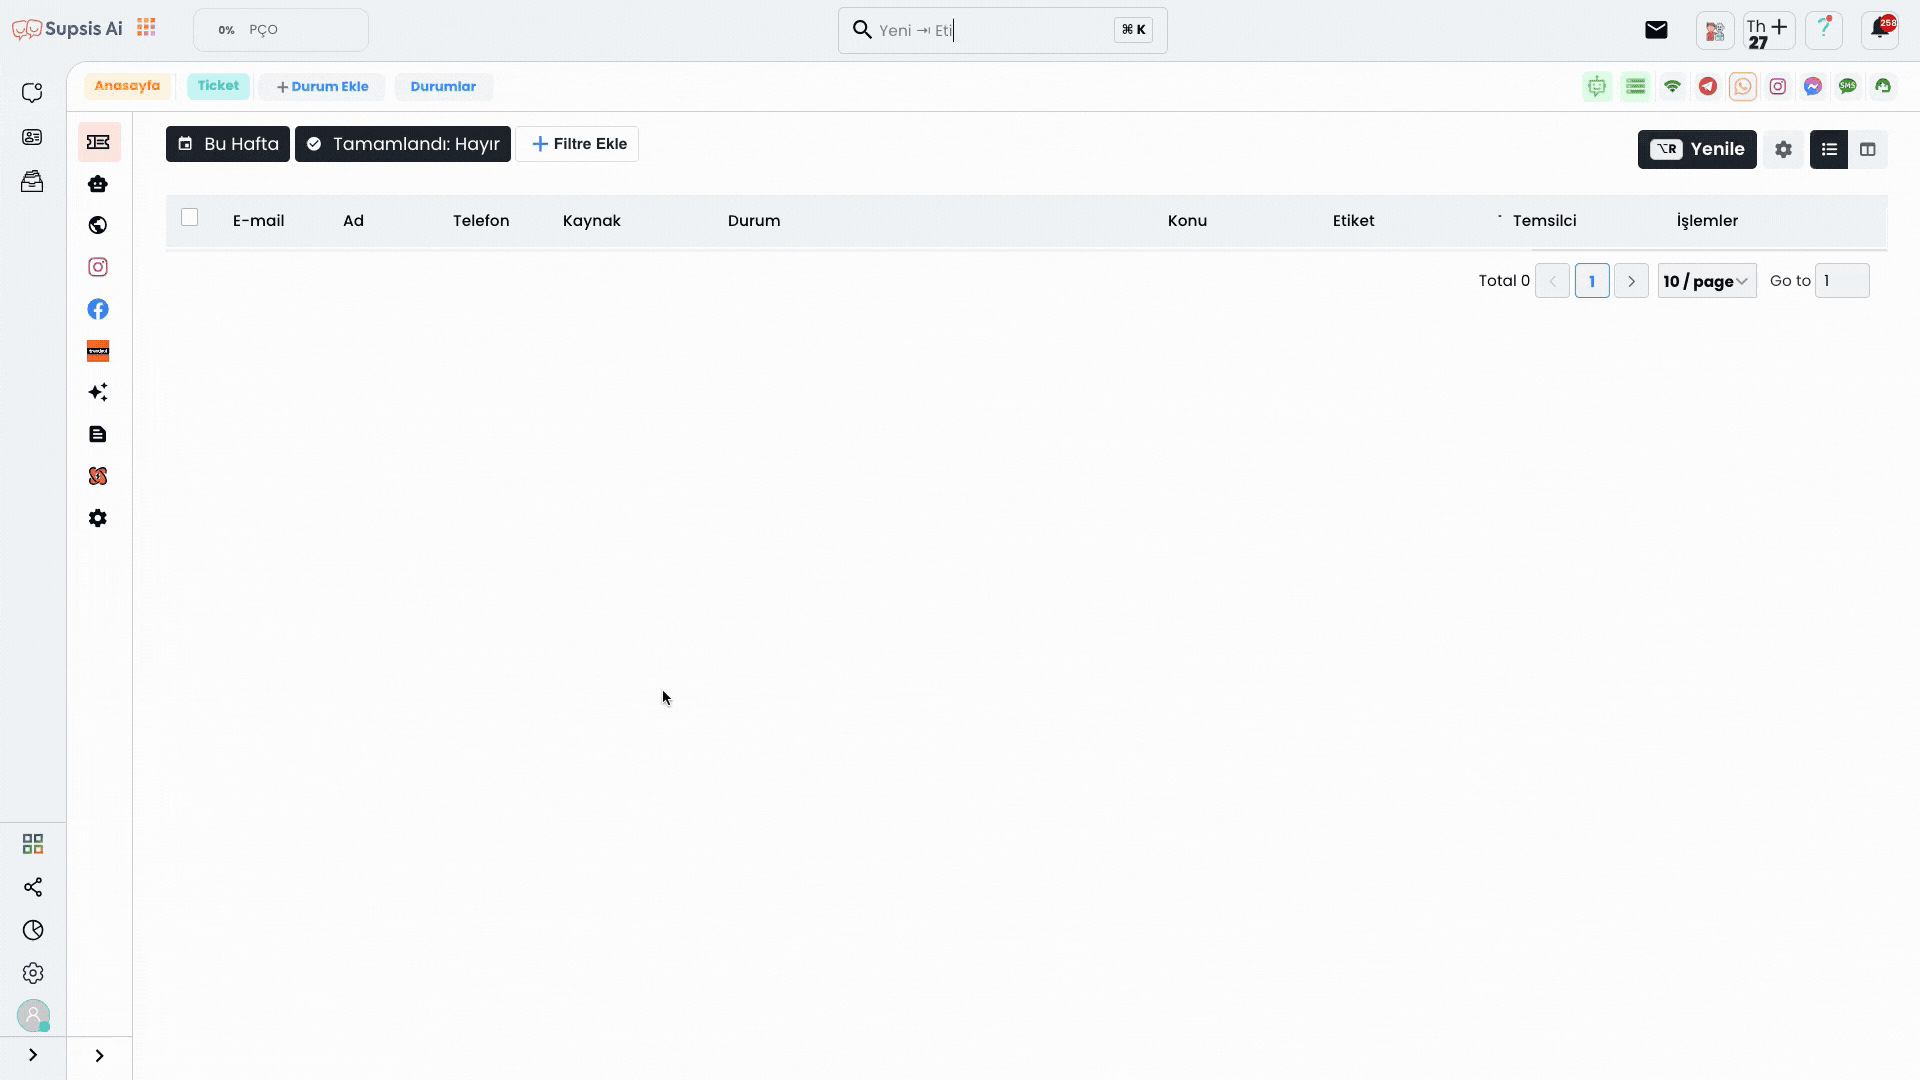
Ticket Page General Features and Usage
Tickets are an important feature for a customer support system. This feature allows you to track customer support requests, problems or complaints by assigning them to a specific topic. The ticket system allows detailed records to be kept for each request and the resolution process of requests to be monitored. This way, customer satisfaction is increased and customer support becomes more efficient.
Ticket Usage begins when a customer sends a support request. The ticket understands the customer's question or request and collects the necessary information. Then, the ticket directs the customer's request to the relevant units and creates a support ticket. This ticket includes information such as customer request, date and time information, priority level.
The function of the ticket is to provide a system for tracking and processing support requests. Thanks to this system, a business can handle customer requests faster and more effectively. Additionally, the ticket creates a time frame for processing and responding to customer requests and provides a performance metric for the business.
Ticket usage can help businesses adopt a more efficient approach to customer service. This feature can increase customer satisfaction and ensure customer loyalty by handling customer requests faster and more accurately.
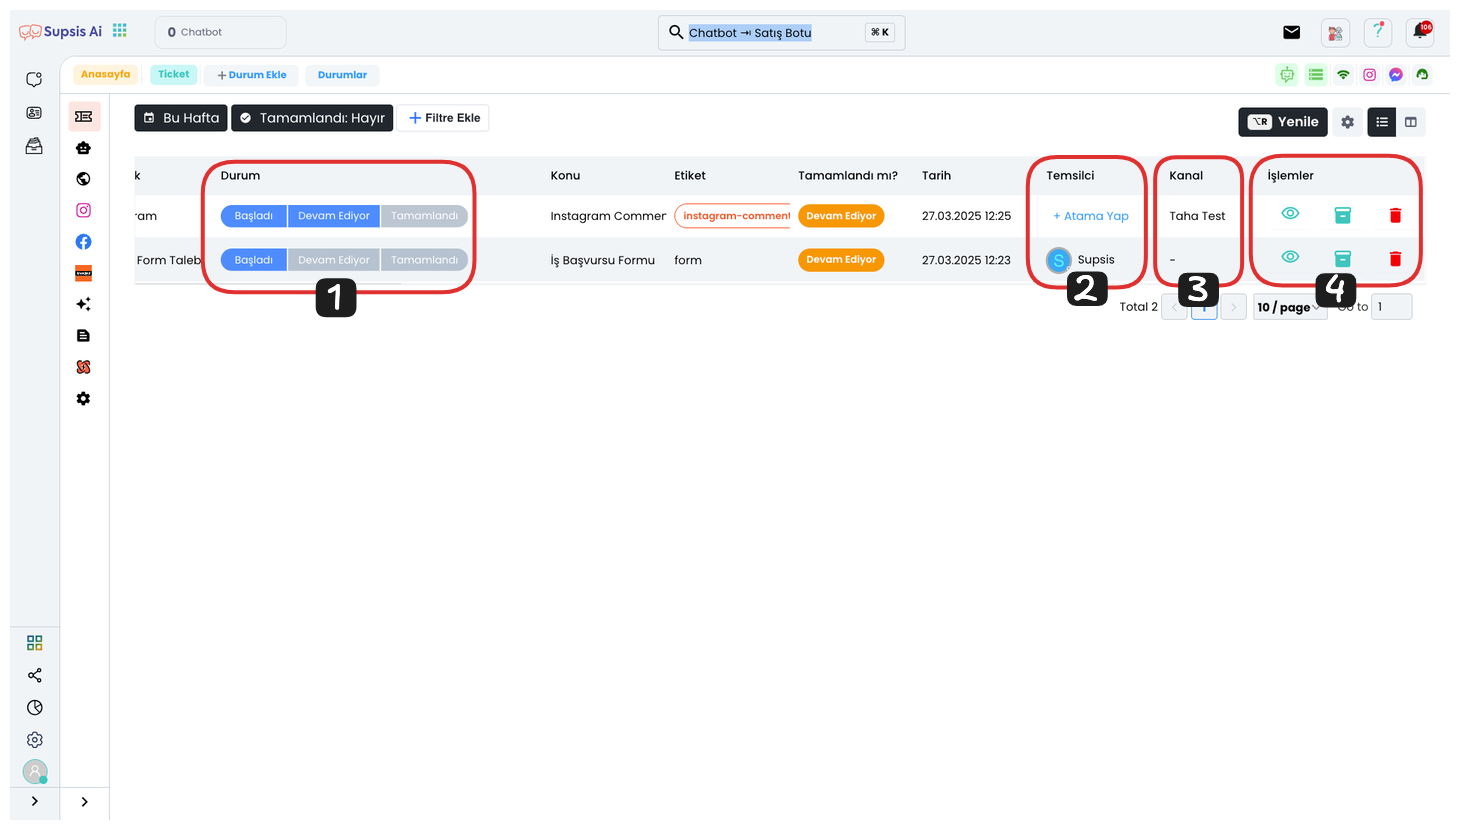
Ticket List Elements:
- Status
- Representative
- Channel
- Actions
1.) Status
Here you can select one of the statuses you have previously determined and quickly see what status the requests are in (For example: Pending, Spam, etc.). This feature facilitates the tracking of requests and allows you to get instant information about which stage they are in.
2.) Representative
You can determine which representative will handle the incoming request. This way, requests are directed to the right representative and thus requests are responded to faster and more effectively. This operation is an important step to increase customer satisfaction and speed up workflows.
3.) Channel
Here, you can see which channel the incoming request came from. For example, if you have multiple channels on Instagram, you can easily view which channel it belongs to from this area. This feature allows you to quickly track which platform requests come from.
4.) Actions
From the two buttons found, you can immediately respond to the request by clicking the "Pencil" icon, archive the request by clicking the "Archive" button, or delete the request by clicking the "Delete" button. Thanks to these options, you can quickly update and manage the status of the request.
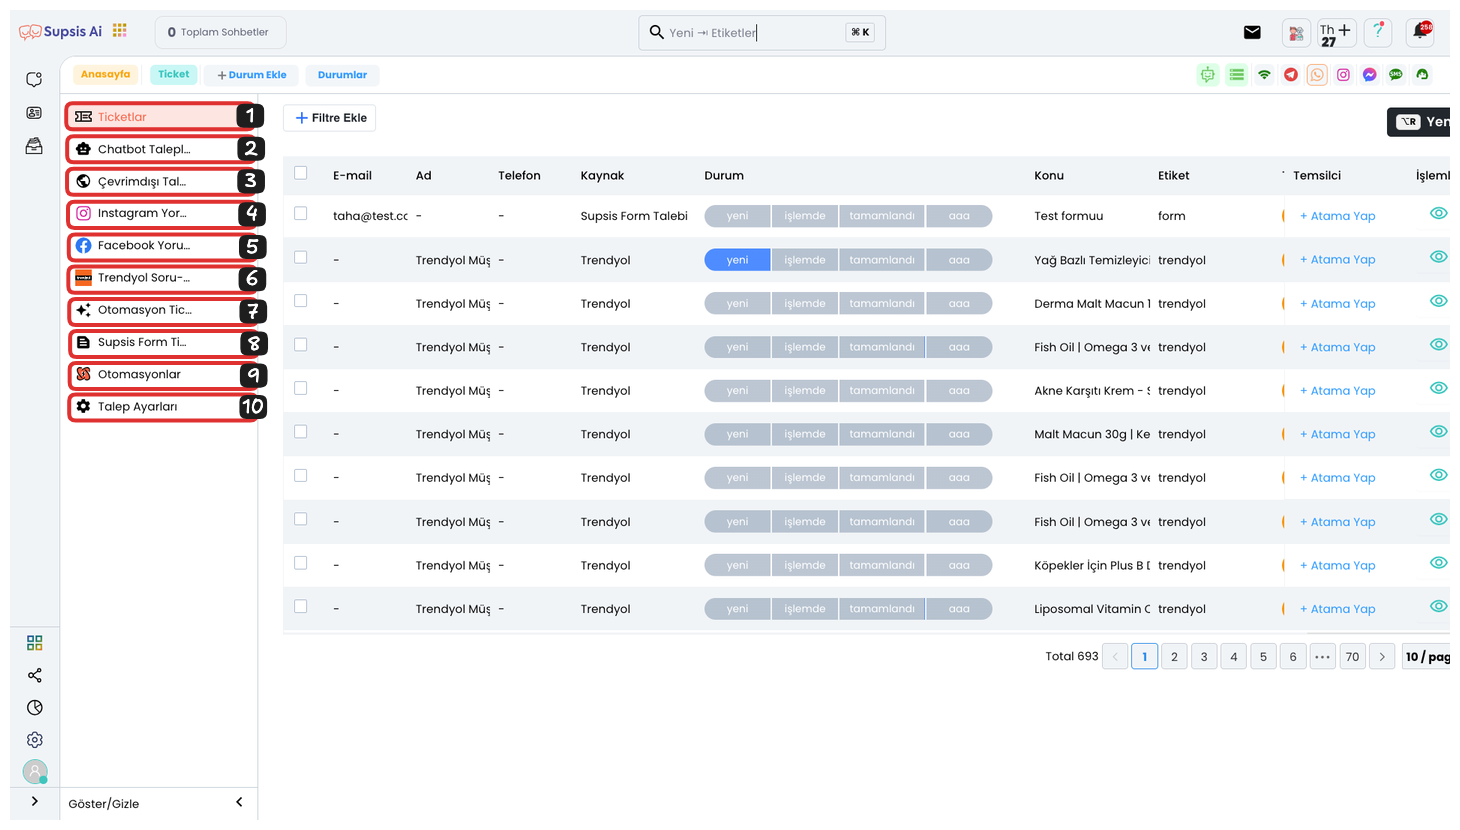
Ticket List Elements:
- Tickets
- Chatbot Requests
- Offline Requests
- Instagram Comments
- Facebook Comments
- Trendyol Q&A
- Automation Tickets
- Supsis Form Tickets
- Automations
- Request Settings
1.) Tickets
From here, you can view all the tickets you have received. In this area, you can track customer requests and related details in an organized way.
2.) Chatbot Requests
From here, you can view all tickets coming from Chatbots. This way, you can systematically monitor and manage support requests created through chatbots.
3.) Offline Requests
Here, you can view all offline requests coming from Web Forms. This way, you can easily track and manage requests received through web forms.
4.) Instagram Comments
Here, you can view comments made on your Instagram account as tickets. For this, you need to go to the "Comment Management" page from the channel (Instagram) section and activate the "Ticket" option. For more information about Instagram ticket retrieval, you can access  from here .
5.) Facebook Comments
Here, you can view comments made on your Facebook account as tickets. For this, you need to go to the "Comment Management" page from the channel (Messenger) section and activate the "Ticket" option. For more information about Facebook ticket retrieval, you can access from here .
6.) Trendyol Q&A
From here, you can view questions and answers coming to your Trendyol account as tickets. For this, you need to make sure that your Trendyol integration is active and the necessary settings are made.
7.) Automation Tickets
From here, you can view requests coming from Automation. These requests are tickets created by automatic processes and are included in the system with certain conditions or triggers. Thanks to automation, you can direct your customers faster and more efficiently, and systematically track their requests. This way, the need for manual operations decreases and you can manage your processes more organized.
8.) Supsis Form Tickets
From here, you can view all tickets coming from your Supsis Form. To be able to get tickets from Supsis Form, you can activate the option to redirect incoming responses to tickets from the ticket settings section. For more information about getting tickets from forms, you can access from here .
9.) Automations
From here, you can dynamically manage incoming ticket requests by creating a new event-based automation for your tickets. Event-based automations start automatic operations depending on the triggers you determine and make your workflow more efficient. This way, you can create a quick response process for each request, eliminate unnecessary manual interventions and increase customer satisfaction. Additionally, you can develop the most suitable solutions for your business with different automation scenarios.
10.) Request Settings
From here, you can configure the necessary settings to redirect incoming tickets to your email address. Thanks to this feature, notifications and requests related to tickets are sent directly to your email address, so you can respond to your requests quickly and make your management process more efficient. After filling in the necessary fields to make email redirection settings, you can access information about your tickets through your desired email address.
Creating Tickets via Chatbot
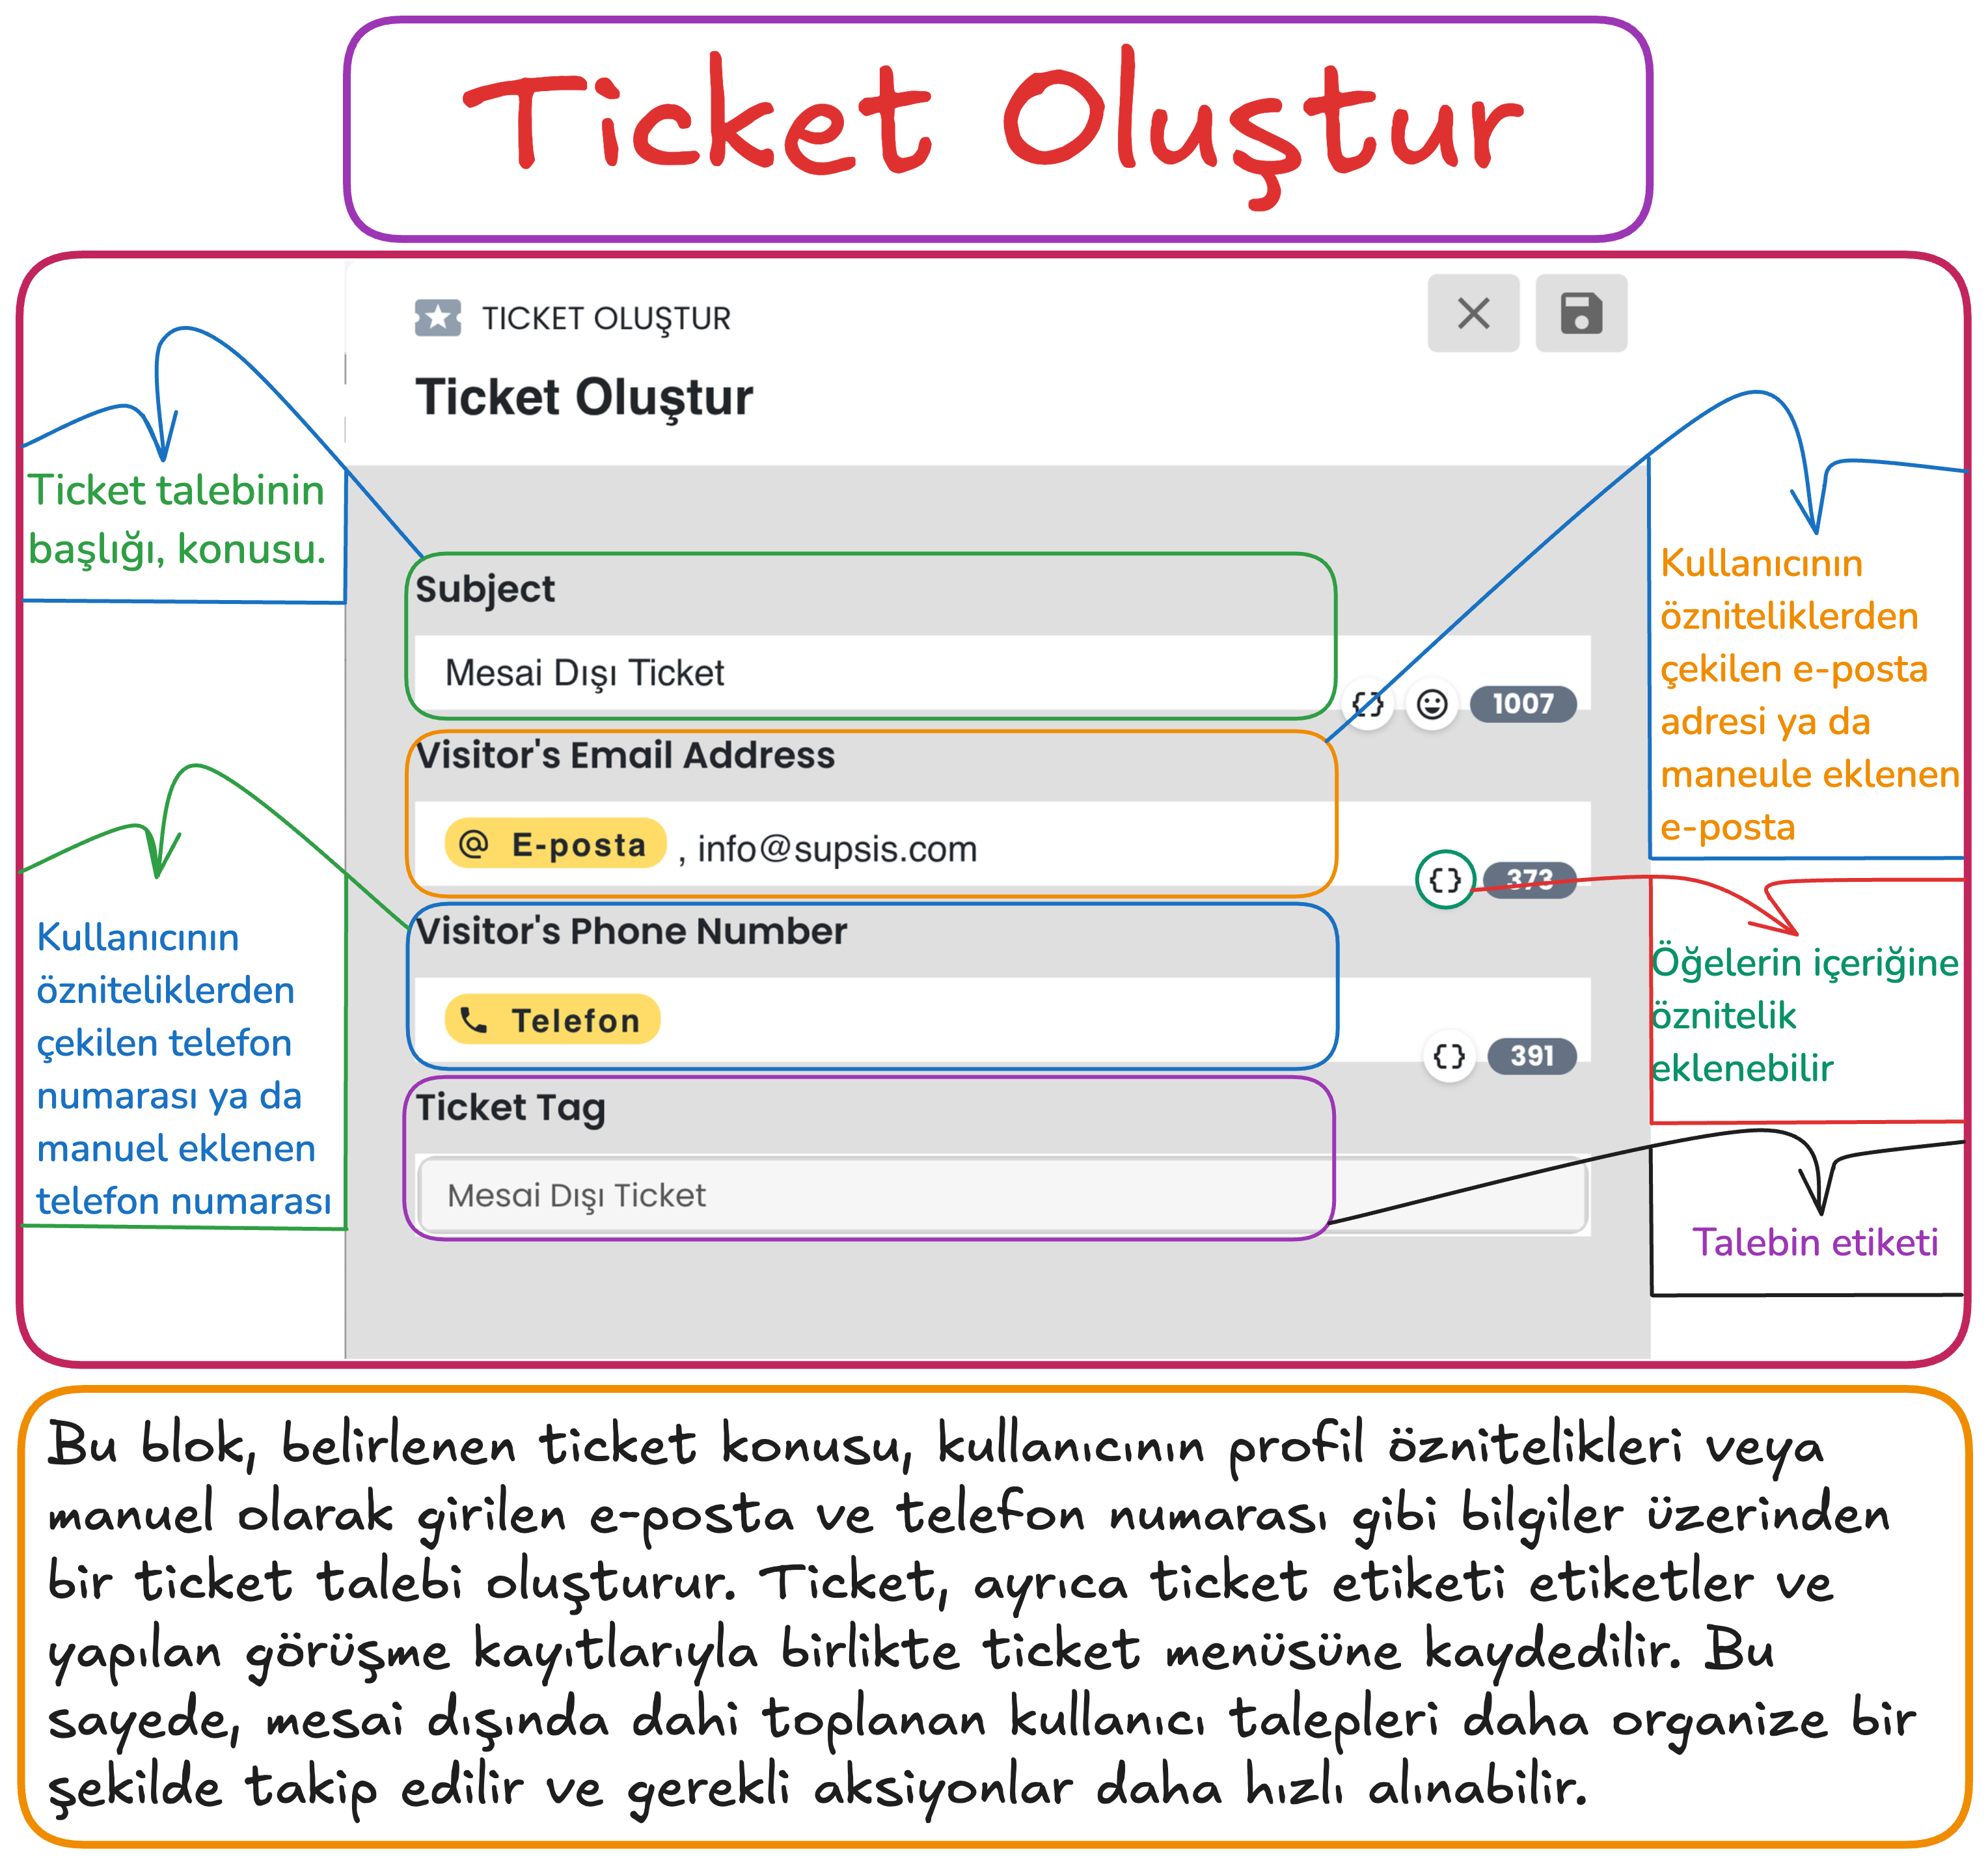
To create tickets via chatbot, you can use the Create Ticket block. This block allows you to systematically record and track customer requests.
Create Ticket saves this information to the ticket menu by recording user contact information and request details to ensure systematic management of support requests.
This step helps process user requests in a more organized and faster way by recording the user's contact information (email and phone number) and request topic.
Steps
- Request Subject:
- A title is entered according to the user's requests. For example, a general topic such as "After Hours Ticket" can be determined.
- The request subject facilitates quick search and analysis in the ticket system.
- Email Information (Visitor's Email Address):
- The user's email address is automatically added from the email information registered in the system.
- If there is no email address in the system, an email address can be entered manually.
- Email information facilitates the user's communication with the support team and tracking of the request.
- Phone Number (Visitor's Phone Number):
- The user's phone number is retrieved from the registered attributes in the system or can be added manually.
- Phone number can be used to provide easy access to the user and give quick responses.
- Ticket Tag:
- When creating a ticket record, a tag can be added according to the content of the request (for example, "After Hours Ticket").
- These tags enable filtering and categorization of tickets.
Important Note
Mandatory Email Information: To be able to create a ticket, the email address in the ticket block content must be filled in the form as attribute data or a manually entered email address. If the email address is not available, a manual address entry can be made or communication can be provided through phone number.
Example Create Ticket Usage
Create Ticket
The Create Ticket flow enables the creation of a support request (ticket) using the user's conversations via chatbot and the data received. This step adds the user's requests to the ticket menu to be examined and responded to by the support team later.
Flow Steps
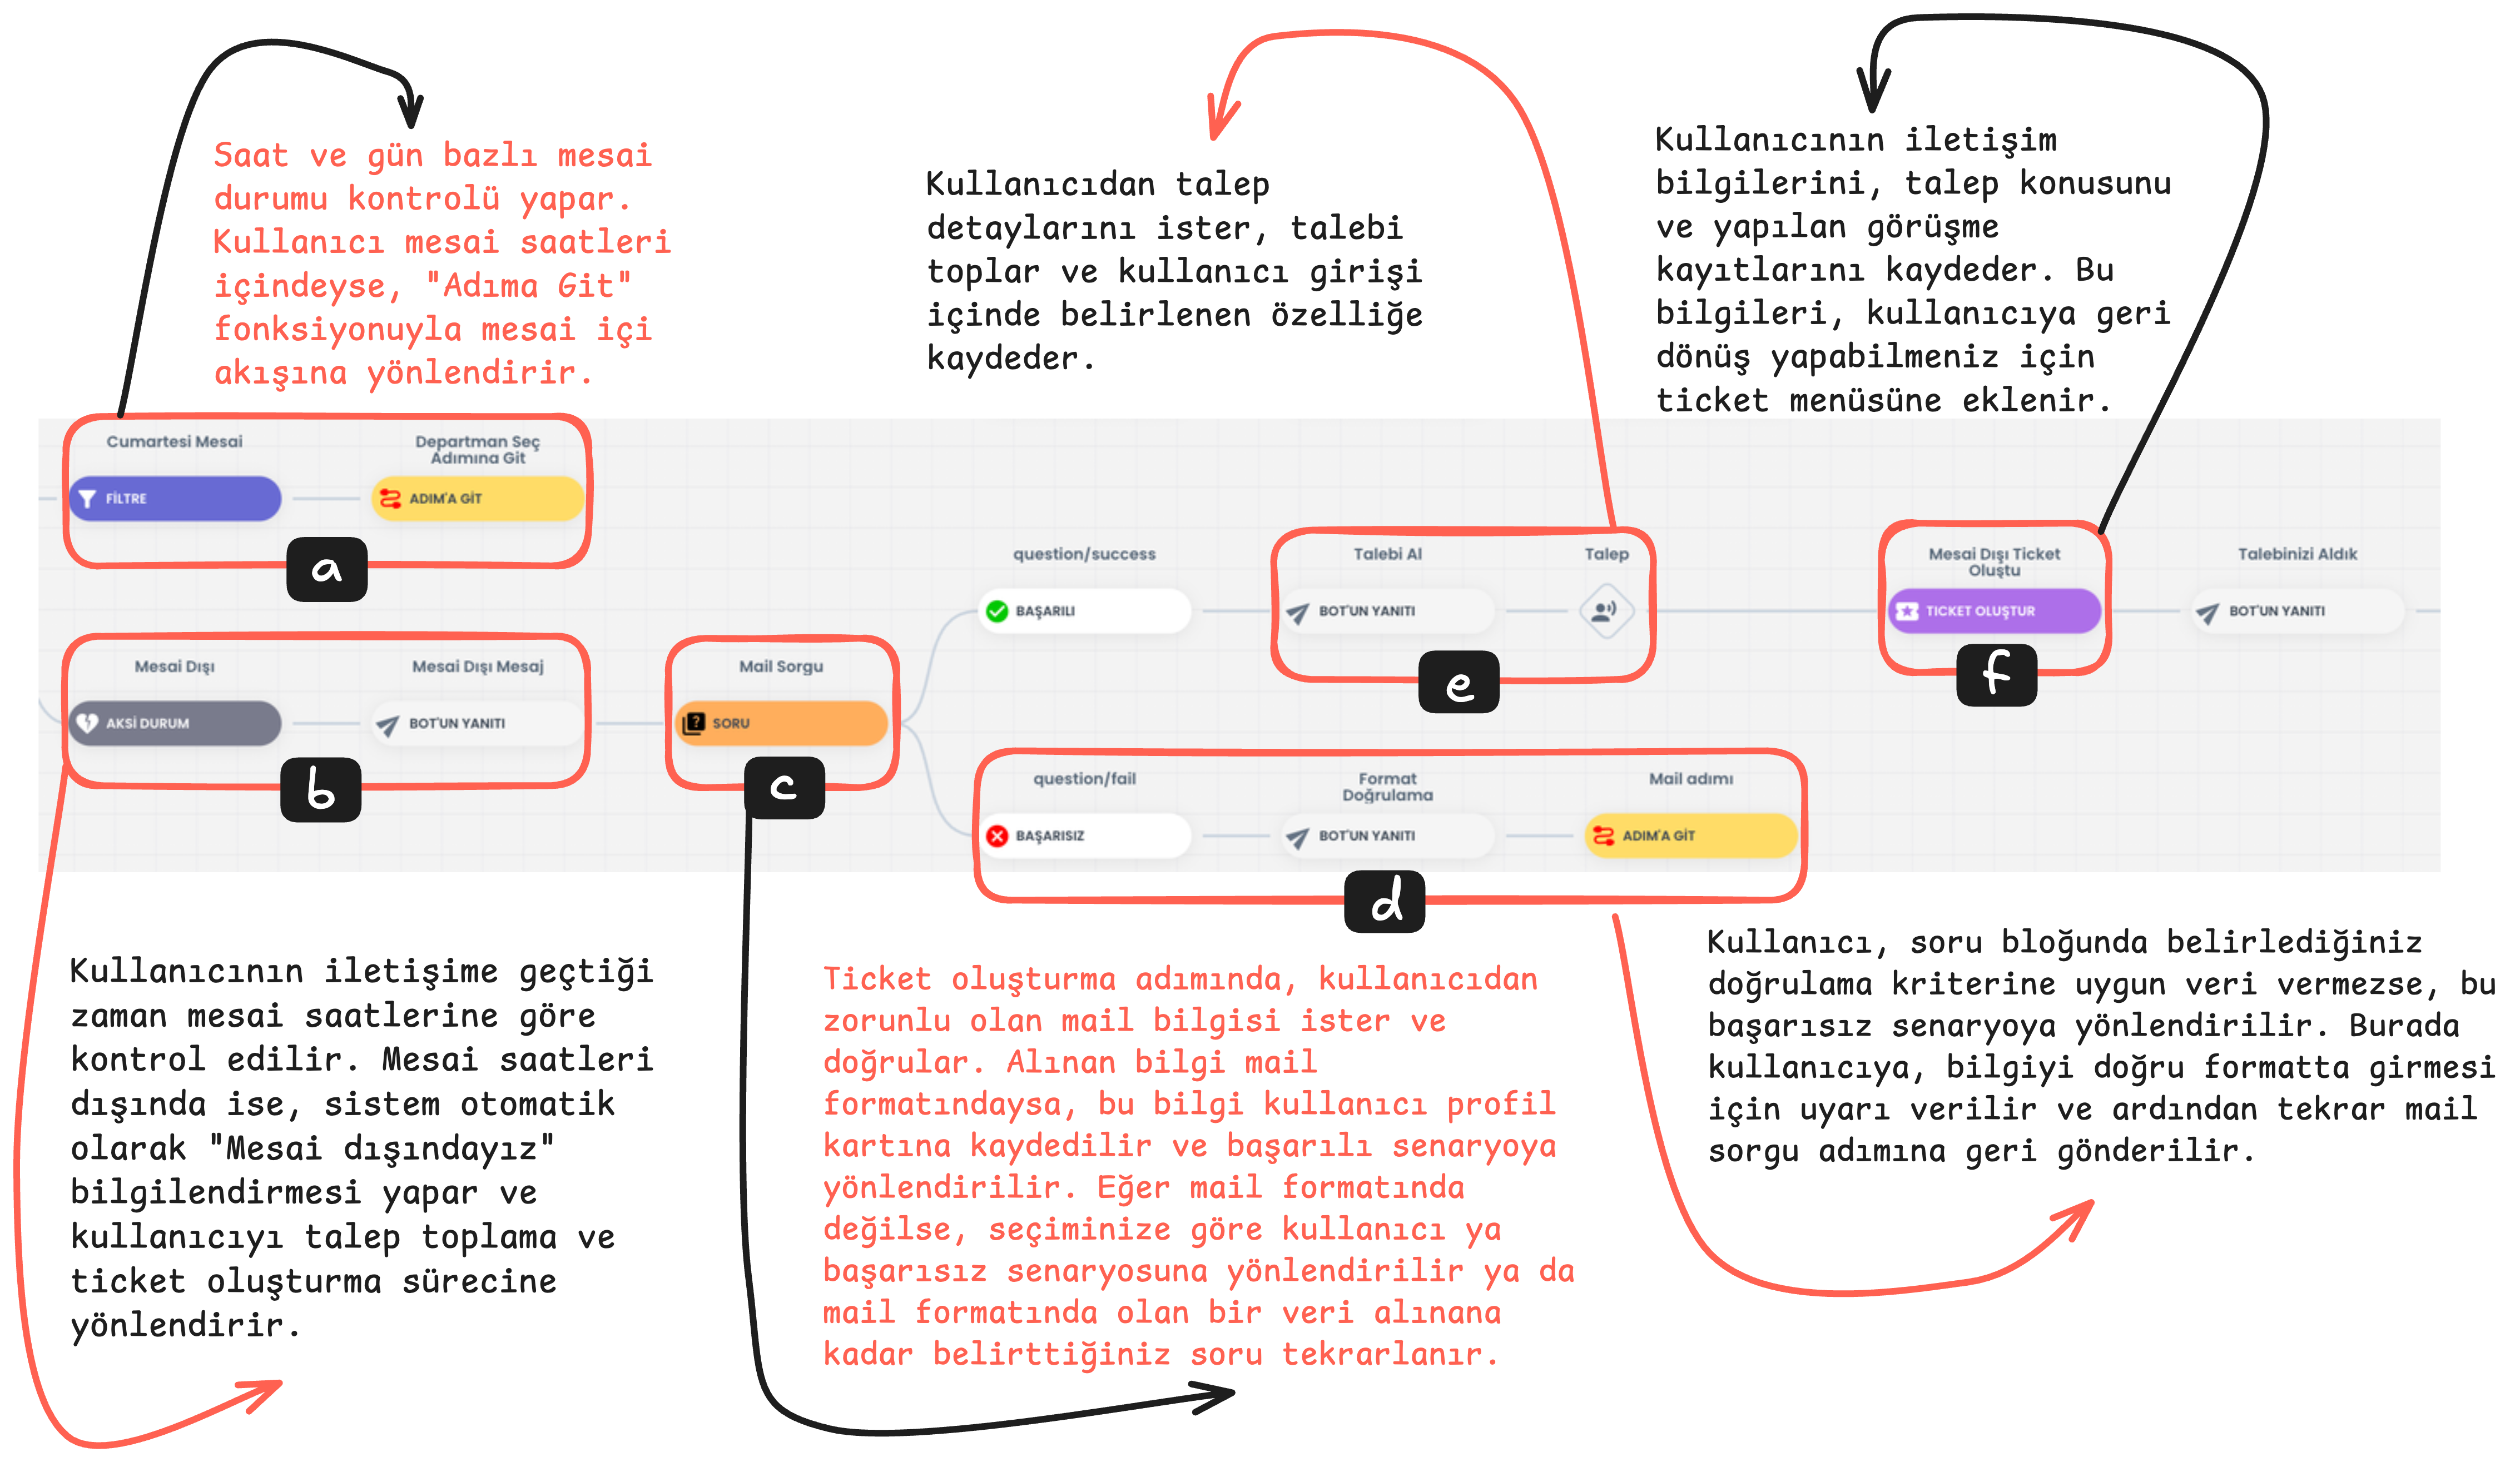
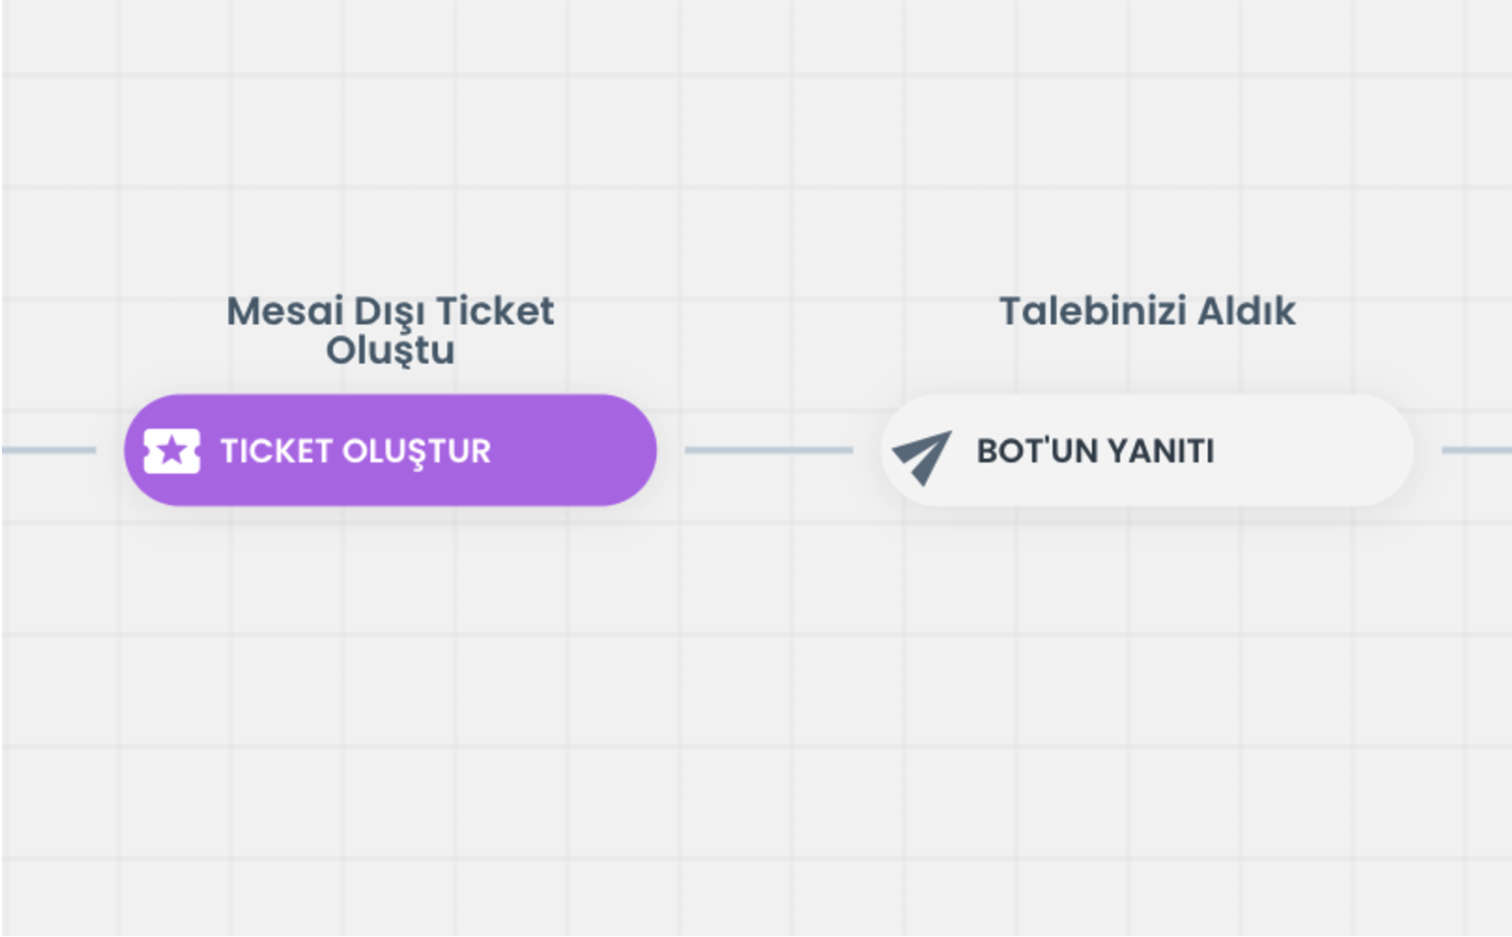
- Create After Hours Ticket:
- A ticket is created for support requests made by the user outside working hours.
- At this stage, the data previously provided by the user (email, phone number, etc.) is used and the support request is recorded in the system.
- We Received Your Request Response:
- After the ticket is created, an automatic response related to the receipt of the request is sent to the user: "We Received Your Request".
- This response indicates that the user's request has been received and will be processed, giving confidence to the user.
How to Do Ticket Email Redirection?
To perform the Ticket Email redirection operation, make sure your chatbot design is completed. (First add the ticket redirection rule, then you can design the chatbot.)
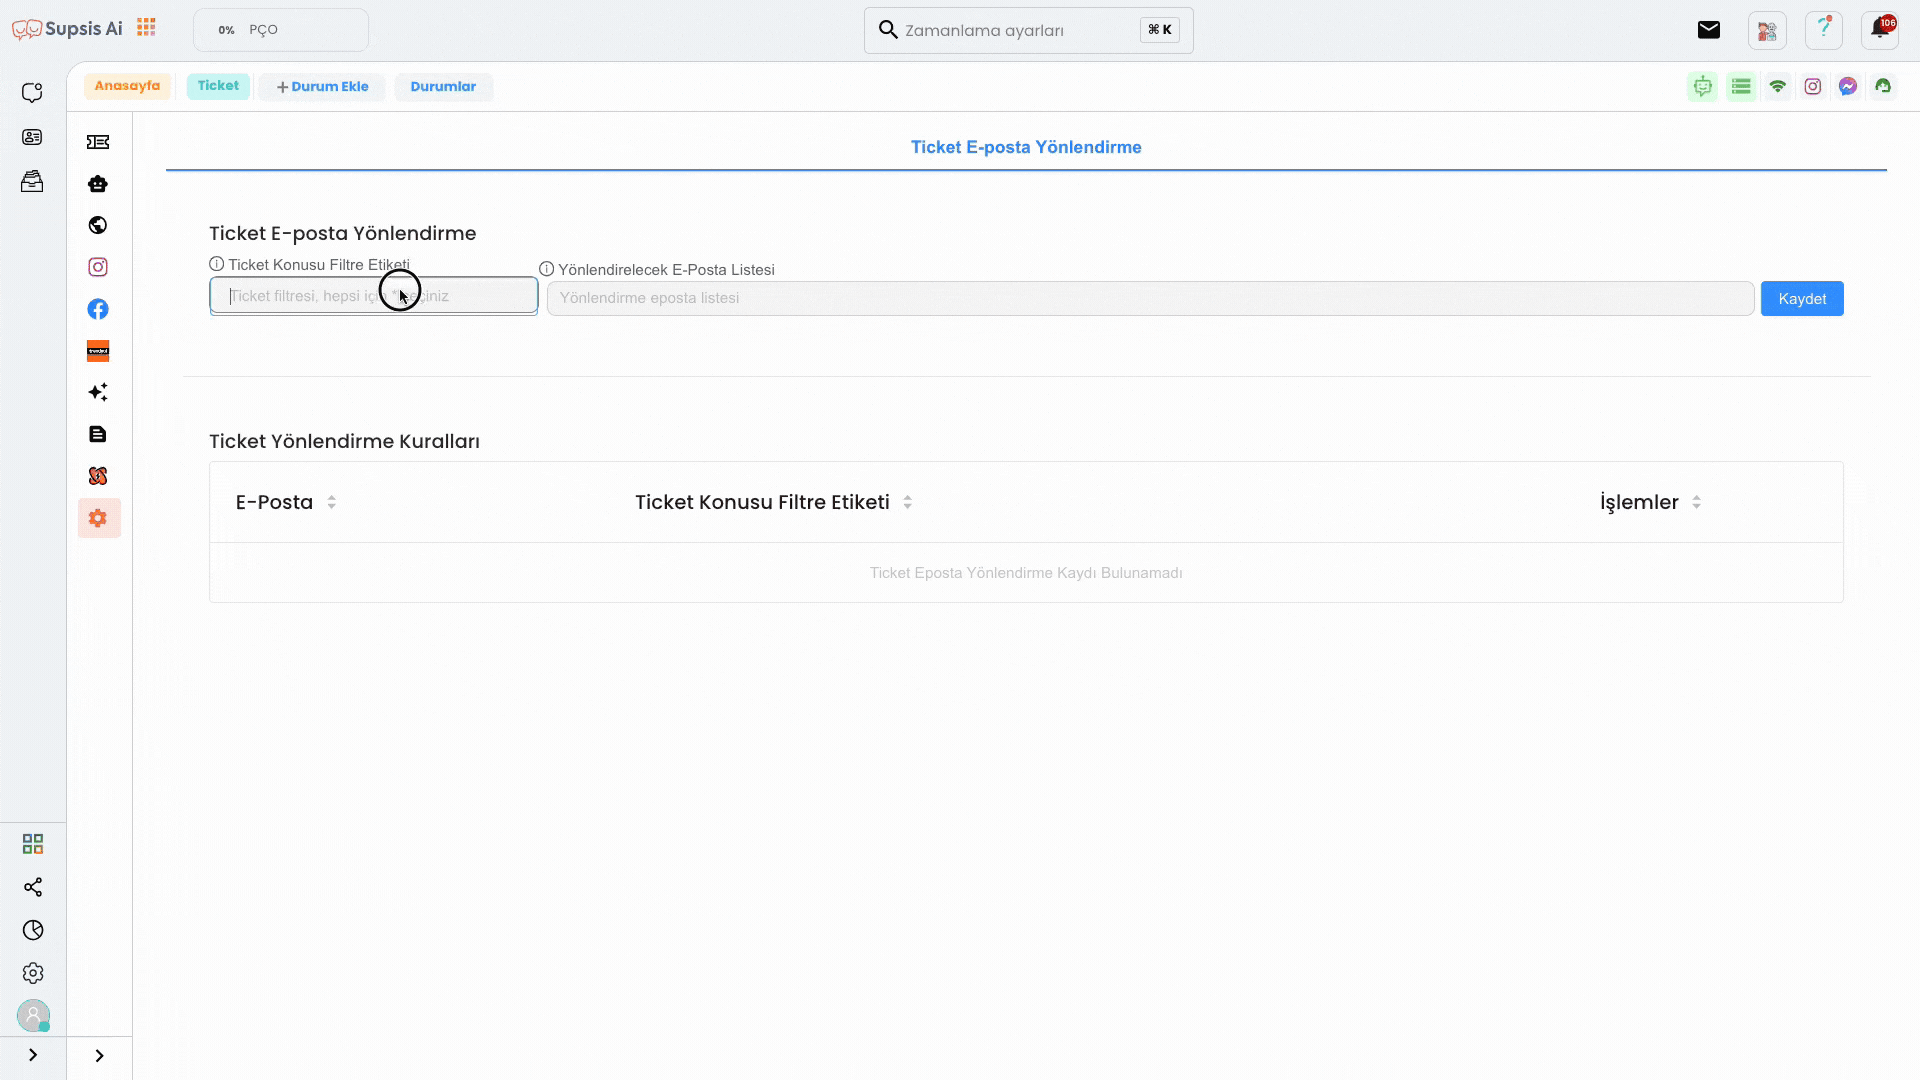
**Adding Ticket Redirection Rule:
-
Transition to Ticket Page:
Go to the "Ticket" page from the menu and then switch to the "Request Settings" tab. -
New Rule Addition Form:
Fill in the necessary form to add a new rule.-
Ticket Subject Filter Tag:
In this field, you can select the tags defined in the chatbot. For example, the '*' tag sends notifications to the email list you specified without distinguishing all newly opened tickets. -
Tag List:
The tags appearing in the list collect all topics in the "ticket" sections used in the chatbot design.
You can also enter a tag that is not in this list, but in this case, the ticket will only be redirected if it comes with the tags defined in the chatbot.
-
-
Email List:
When you click on the "Email list", the list of your representatives in the system is displayed. From here, you can select one or more representatives.
You can also manually write and add an email address that is not in the system. -
Saving:
After entering the necessary information, define the ticket redirection rule by pressing the "Save" button.
The ticket redirection rule will be successfully added to the email addresses you specified and you will be able to see it in the list below.
After this operation, incoming tickets will be redirected to the specified email addresses according to the rules you specified.