Visitor Login Form
The Visitor Login Form menu allows visitors to fill in necessary information before starting live chat. With this form, you can customize the information to be collected from users, form fields, and the internal appearance of the balloon, and add elements such as visual and social media links. The information collected in these fields is saved to the profile card, allowing customer representatives to quickly access the information they need and store the information.
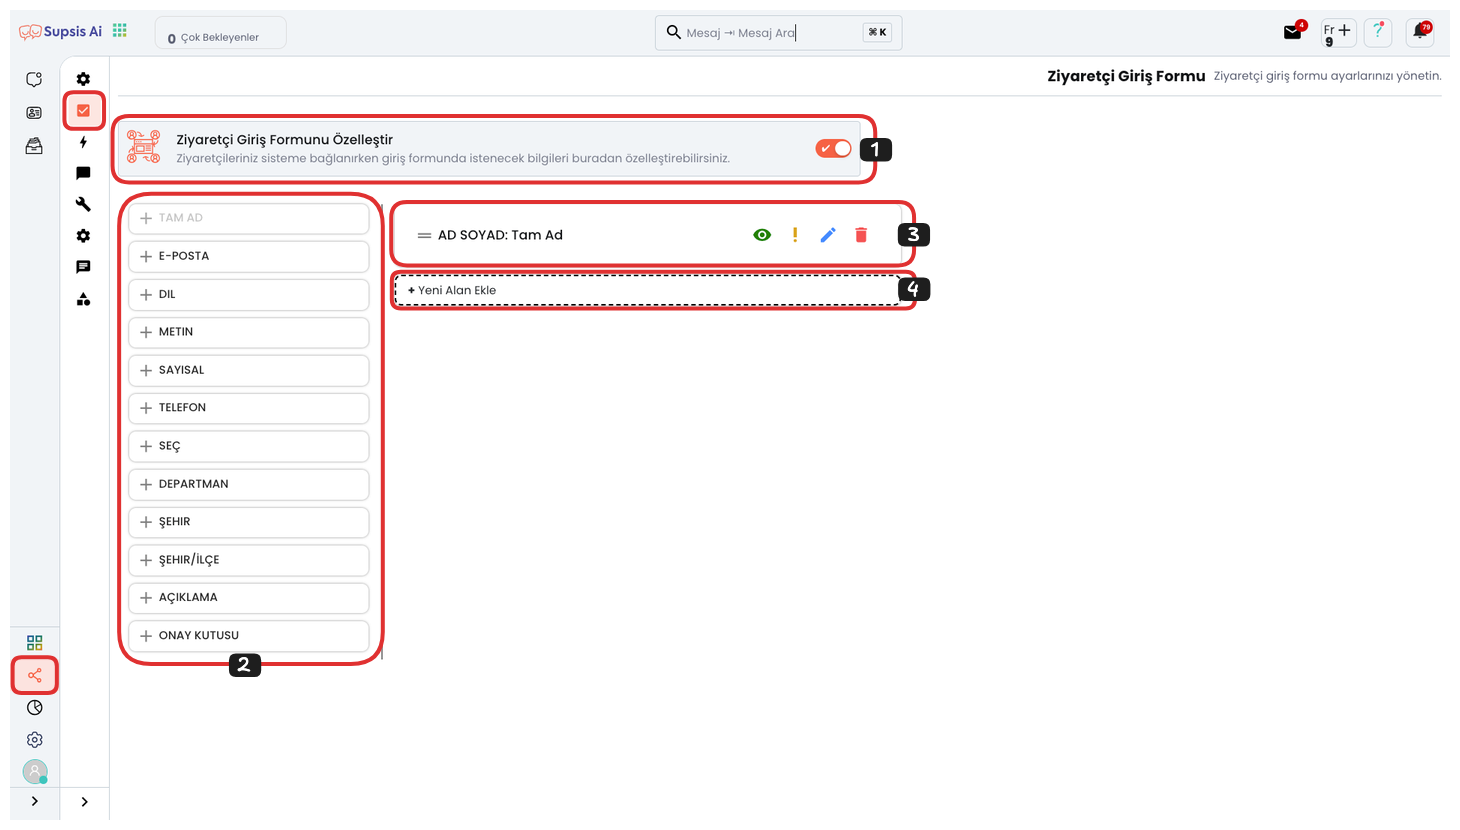
Visitor Login Form:
- Customize Visitor Login Form
- Add New Field
- Edit Existing Field
- Add Custom Field
1-) Customize Visitor Login Form
By activating this feature, you can open the form for use. This way, you can personalize the fields that will collect visitor information according to needs and customize the form according to the information you specify. By selecting the fields to be included in the form, you can optimize the user experience and make the information you collect more useful for customer representatives. This allows you to manage customer interactions more effectively.
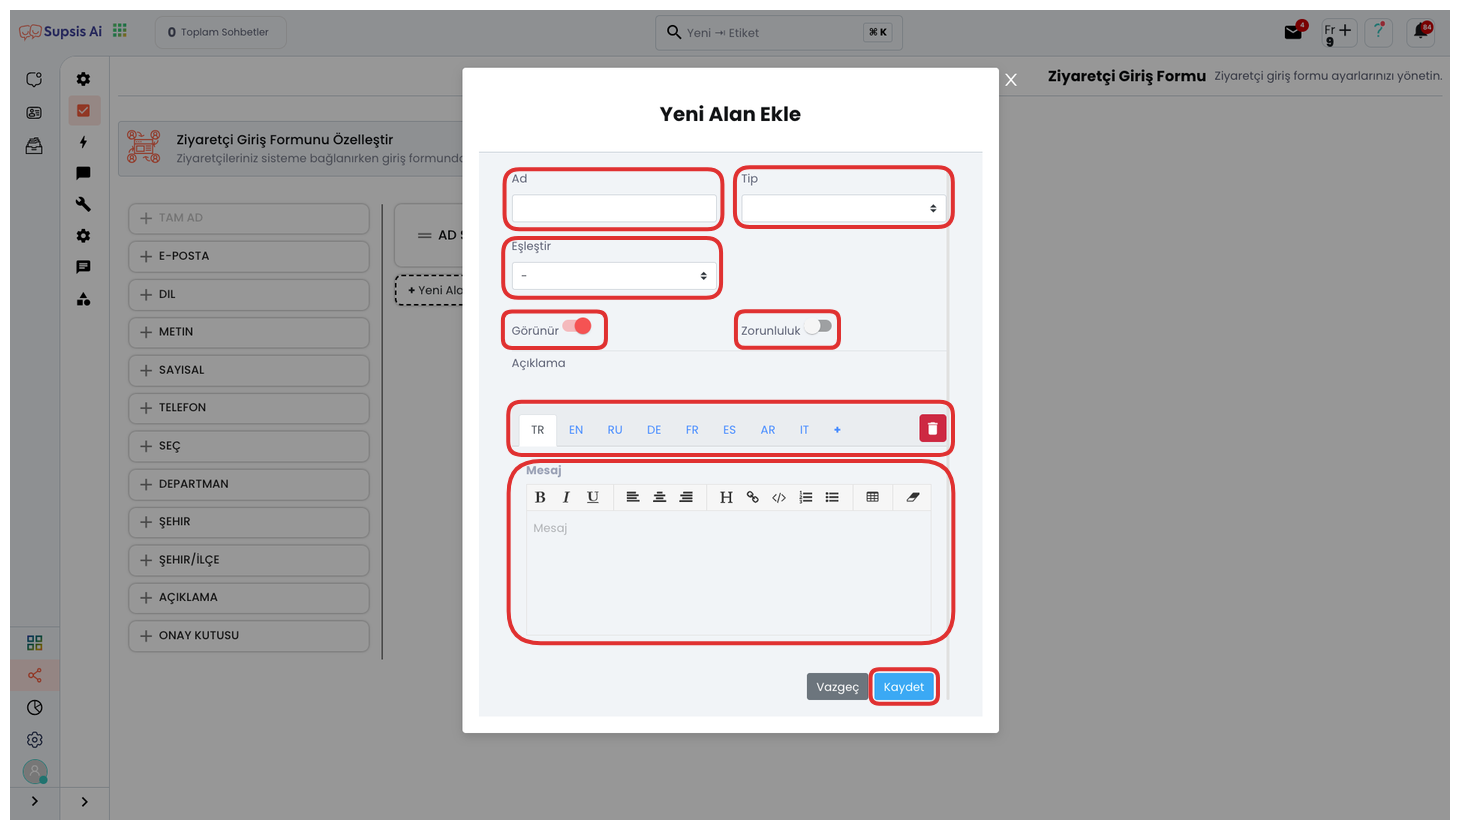
2-) Add New Field
You can use this option to add new fields to your form. When adding a new field, you can choose one of the following types:
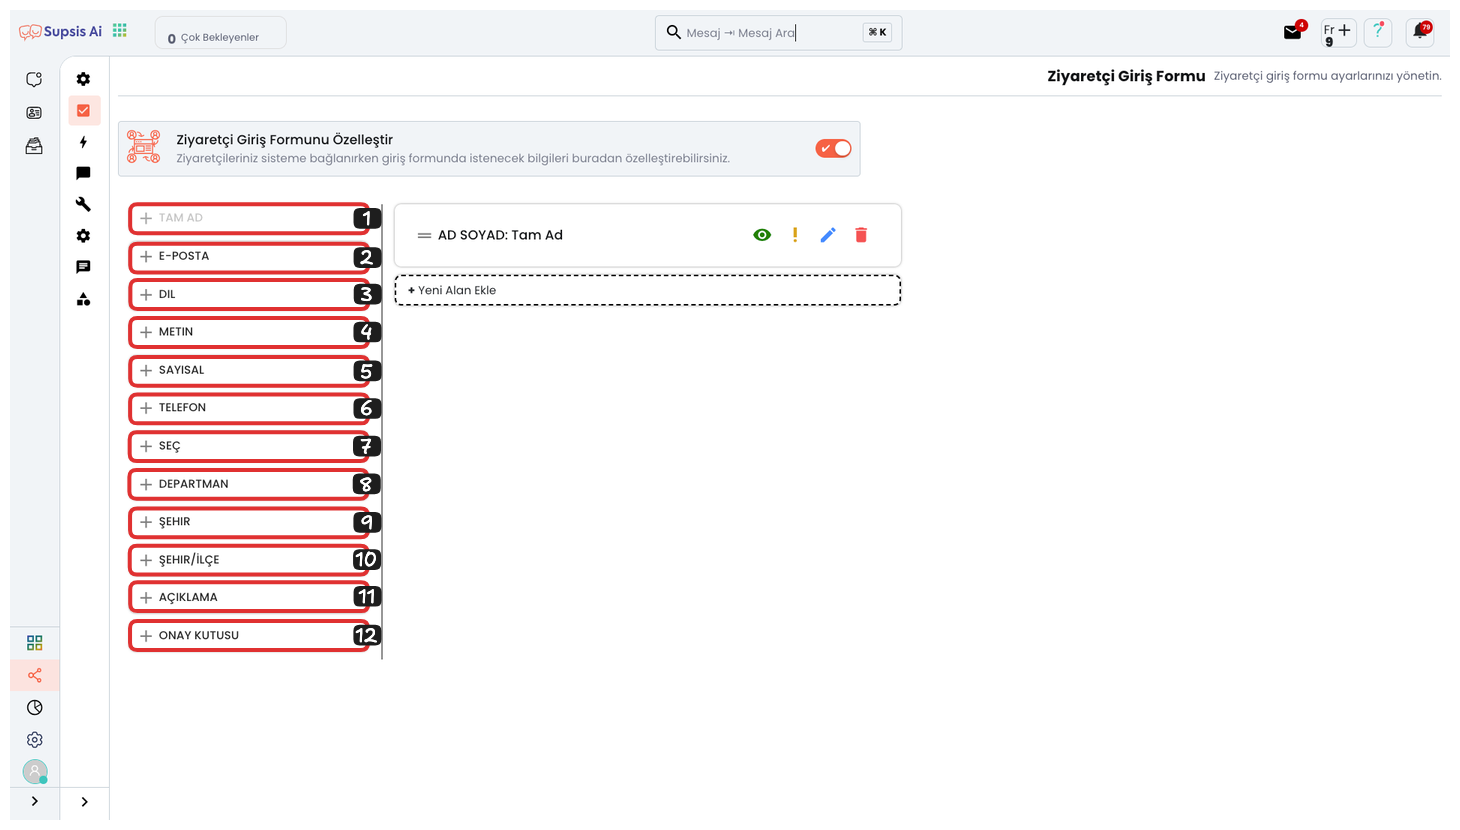
- Full Name
- Language
- Text
- Numeric
- Phone
- Select
- Department
- City
- City/District
- Description
- Checkbox
1-) Full Name: A field for the visitor to enter their full name.
2-) Email: A field for the visitor to enter their email address.
3-) Language: A field for the visitor to select their preferred language.
4-) Text: A field where you can freely write the message part and for the visitor to enter free text.
5-) Numeric: A field for the visitor to enter numeric data.
6-) Phone: A field for the visitor to enter their phone number.
7-) Select: A dropdown menu for the visitor to select one of the options you specify.
8-) Department: A field for the visitor to select the department they want to be assigned to.
9-) City: A field for the visitor to select a city.
10-) City/District: A field for the visitor to enter a city or district.
11-) Description: A field where you can add cosmetic values such as informative text, social media links, visuals, or GIFs to your form. The description field is only viewable, the visitor cannot perform any action in this field. You can see an example description in the image below.
12-) Checkbox: Creates a box that the visitor must approve. You can add items that need to be approved, such as GDPR or privacy agreements, to this box.
With these features, you can provide more effective support by collecting the information you need from your visitors and store the collected data.
3-) Edit Existing Field
- Managing Fields: You can view, edit, set requirements, or delete existing fields in the form. For each field, there are the following options:
- Eye: Determines whether the field will be visible or not.
- Exclamation: Sets whether the field is required or not.
- Trash: Removes the field from the form.
- Pencil: Allows you to edit the field's name, type, and cosmetic details.
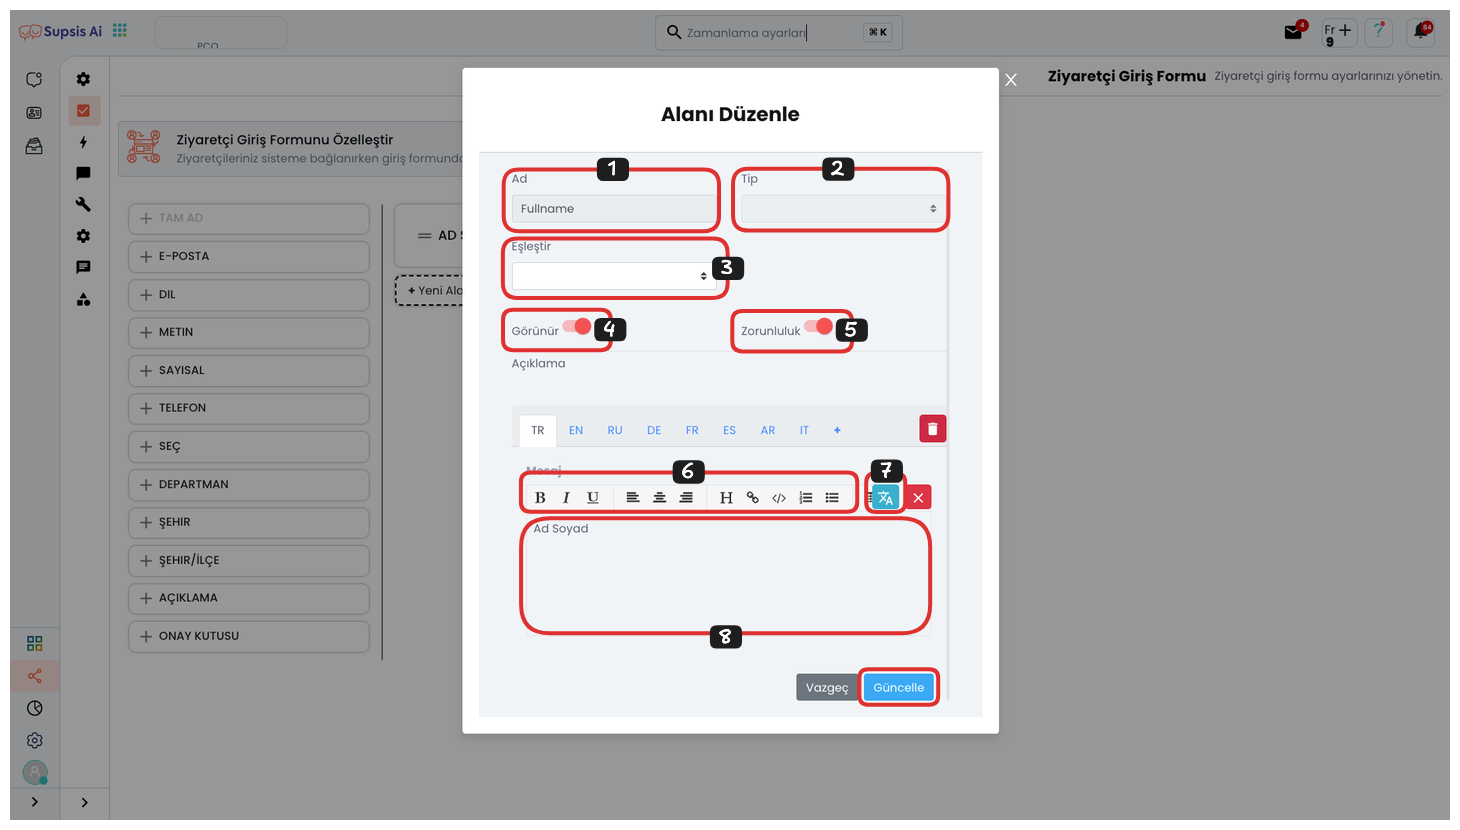
Edit
This is the section where you can set the field's cosmetics, field status, name, visibility, and requirements.
Edit Existing Field
- Name
- Type
- Map
- Visibility
- Requirement
- Cosmetic Details
- Translate Message to Other Languages
- Message
1-) Name: You can edit the form field name from here. This section is used when validating information entered in the form field and is not visible in the visitor login form; it only appears in the "Name" section of your Supsis panel. For example, if a field marked with the "Email" option is not filled in email format (example@example.xx) and this field is required, live support connection will not occur. The names of some form field types such as email and language cannot be edited.
2-) Type: You can create the most suitable form by editing the form field type from here.
3-) Map: Maps the information the visitor writes while filling out the form with the user values in the visitor's profile card. For example, if it's important for you to get the username of visitors connecting to live support, after selecting "Text" as the field type, you can write "Username" in the "Message" section. Then, map this information with the user value you created from Settings > Visitor Profile Information tab. This way, the required information is obtained before the user connects to live support and added to the profile card.
4-) Visibility: You can turn the visibility of the form field on or off. You can turn off the visibility of fields you want to temporarily close or activate in the future, but don't want to be visible right now. Additionally, if you are automatically sending visitor data and making mappings through the Supsis API, you can turn off the visibility of these fields. For example, if data such as the visitor's package level is automatically sent in e-commerce platforms, you can provide a cleaner interface by making these fields invisible. This data can be filtered by the chatbot or viewed by your representative during service.
5-) Requirement: Determines whether the form field is required or not. The user cannot connect to live support without filling in the required fields.
6-) Cosmetic Details: You can customize the cosmetic features of the form field from here. Settings such as adding links to messages or changing font type can be made from here.
7-) Translate Message to Other Languages: You can translate the content you write in the message section to other languages. This feature automatically presents the form field text in their own language for users who use different languages in their browser or device. You can select the relevant language from the "Languages" section, delete unnecessary languages from the trash icon, or add new languages with the "+" icon.
8-) Message: You can edit the name of the relevant field in the visitor form field from here. For example, if you want to change a form component named "Full Name" to "First Last Name", you can complete the process by editing this section.
4-) Add Custom Field
From this area, you can create your own custom field according to your needs. You can customize the form according to the information you want to collect from visitors by adding various form fields such as text, numeric data, or dropdown menus. This feature allows you to completely personalize your form, so you can create data fields that are only useful for your business and meet your users' needs.