Settings
To access the Settings menu, simply click on the marked card in the left section of the screen. This card opens the settings menu and allows you to access details.
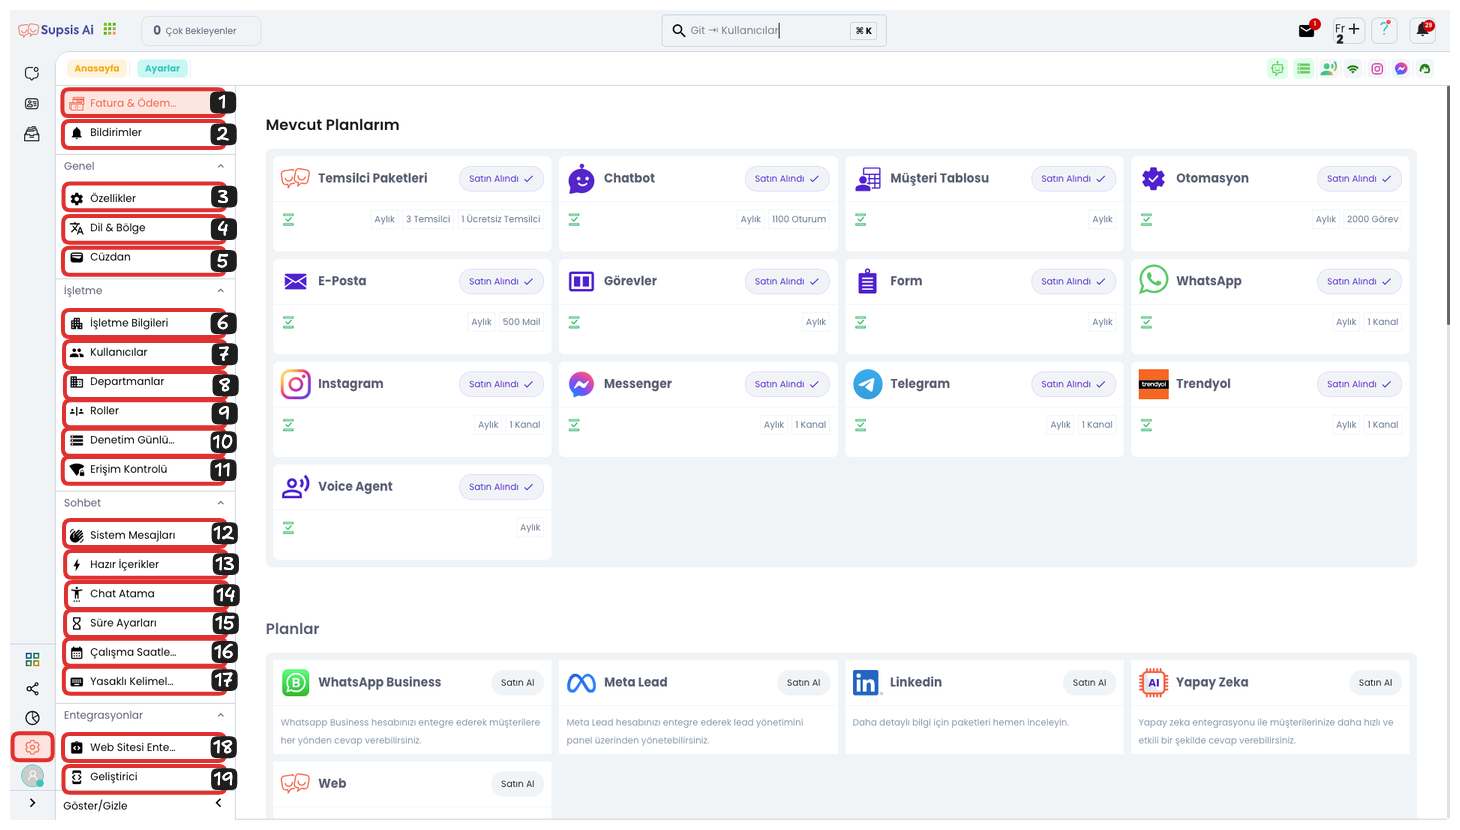
Settings Elements:
- Invoice & Payment
- Notifications
- Features
- Language & Region
- Wallet
- Company Information
- Users
- Departments
- Roles
- Audit Logs
- Access Control
- System Messages
- Ready Contents
- Chat Assignment
- Time Settings
- Working Hours
- Banned Words
- Website Integration
- Developer
 1-) Invoice & Payment
The Invoice and Payment page is where you make in-package purchases of modules on Supsis and track your invoice transactions. This section allows you to examine your payment history, view your invoices, and easily manage your payment transactions.
2-) Notifications
In the notification settings section, you can manage notifications sent by the system. You can customize the settings of notifications to be sent through web panel, mobile application, and email from here. You can make your notification traffic more efficient by selecting which events you want to be notified about and through which channel. This allows you to customize your notifications according to your needs and avoid unnecessary notifications.
3-) Features
From the Features menu, you can enable or disable additional functions and modules you want to use on the platform. These features include different messaging options and other functions that will enhance customer and representative experience. This way, you can provide more efficient use by customizing the platform according to your needs.
4-) Language & Region
In this section, you can configure the system's language and regional settings. By making settings such as date format and time zone that the Supsis site will use from here, you can get an experience suitable for the region you serve. This helps you provide a platform experience that is compatible with your users' local preferences.
5-) Wallet
In the Wallet section, you can track usage charges for WhatsApp platform services and manage payments. You can update your balance and examine your payment history. This section facilitates payment transactions and allows you to regularly track financial processes related to your platform usage.
6-) Company Information
In the Company Information section, you can manage your company's general information by filling in basic information such as your company's name, slogan, chatbot name, chatbot and company logos. This area allows updating visual and textual information belonging to your company.
7-) Users
The Users page is a tool that facilitates the management of users on our platform. This page allows you to view, edit, and manage user information. By managing user information, you can edit your representatives' information, roles, and departments. This feature helps make your team's structure and workflow more efficient.
8-) Departments
The Departments page ensures that incoming messages are directed to the right representatives by dividing users into specific groups. This structure makes transfers to the appropriate department based on visitor login form, chatbot selections, user behavior analysis, or requests from integrated communication channels. Department assignments can be made during the user creation process or through the user form. This way, each request is directed to the right department, ensuring that customer services are managed faster and more efficiently.
9-) Roles
The Roles Page uses the Role Management Module to manage users' permissions and access on the Supsis platform. This feature ensures that the platform is used securely and efficiently by assigning appropriate roles and permissions to each user. Additionally, you can provide a cleaner and easier interface for your representatives by closing the visibility of unused modules. This way, each representative only has access to tools suitable for their task, thus increasing efficiency and eliminating unnecessary complexity on the platform.
10-) Audit Logs
You can see the records of all changes and movements made in the system in this section. Audit Logs play a critical role in monitoring operations on the system. You can track every change made, logins-logouts, and other important events, and search according to specific dates and events using filtering options. This way, you can perform security and performance management more effectively by observing all activities in the system in detail.
11-) Access Control
Access Control allows you to limit panel access based on IP. With this feature, you can increase security by giving access permission only from specific IP addresses. For example, you can protect your sensitive data by restricting access from outside company IP addresses. This way, it is possible to ensure data security by ensuring that only authorized users have access to the system.
12-) System Messages
The System Messages Page only applies to your website. It includes notifications that are automatically sent to users who connect to live support from the chat balloon when a specific situation occurs. In Supsis AI, system messages can be customized according to various situations to inform users about their interactions. This way, users experience a more effective support experience by being informed with the right information at the right time.
13-) Ready Contents
The Ready Contents Page helps Supsis AI enable businesses to manage their customer services more efficiently and effectively. Ready contents are template messages that are pre-prepared to give quick and consistent responses to frequently asked questions and routine customer requests, which you can send with one click or shortcut keys. This way, customer representatives can give quick and accurate responses without wasting time, thus increasing customer satisfaction and improving service quality in a sustainable way.
14-) Chat Assignment
Automatic chat assignment settings ensure that incoming messages are automatically directed to representatives according to specific assignment limits and algorithms. You can set specific criteria to manage incoming message intensity and balance customer representatives' workload. This way, you can provide fast and efficient customer service by distributing equal workload to each representative.
15-) Time Settings
This section allows you to set defined durations in chat session durations. By making settings such as chat closure time and chat statuses from here, you can track service quality and improve quality. This way, while ensuring efficient management of customer interactions, you can optimize critical factors such as response times and closure times.
16-) Working Hours
You can define representatives' working hours in this section. This setting is important for optimizing the customer support process and providing service at the right time. By setting automatic messages from the ticket menu for messages coming outside representative working hours, you can receive customer requests even outside working hours and manage these requests through tickets. This way, customer requests can always be responded to quickly and effectively.
17-) Banned Words
It ensures that certain words are not used to ensure clean and quality communication during customer support. In the Banned Words menu, words that are not wanted to be used by representatives during chat are determined and these words are automatically blocked by the system. This feature is designed to ensure that representatives use more appropriate language towards customers and also creates a professional communication environment.
18-) Website Integration
In the website integration section, you can find the necessary codes and configuration instructions to integrate the chat balloon into your website. This section allows you to enable the chat function on your website by facilitating integration. Step-by-step guides and instructions allow you to perform the integration process quickly and smoothly.
19-) Developers
The Developer section provides development tools for API integrations and other technical features. This area includes API documentation, API token, and developer-oriented options, so you can easily perform system integrations. This feature provides access to all tools that technical teams need and speeds up the integration process by establishing seamless connections with external systems.