Chat Balloon Features
Chat Balloon Features provides visitors with quick access to various communication channels. Thanks to these settings, you can improve the customer experience and present your communication options in a user-friendly way. The chat balloon facilitates visitors' direct access to support, allows users to instantly access the information they need, and quickly initiates interaction. This feature increases customer satisfaction while strengthening your brand's accessibility and professionalism.
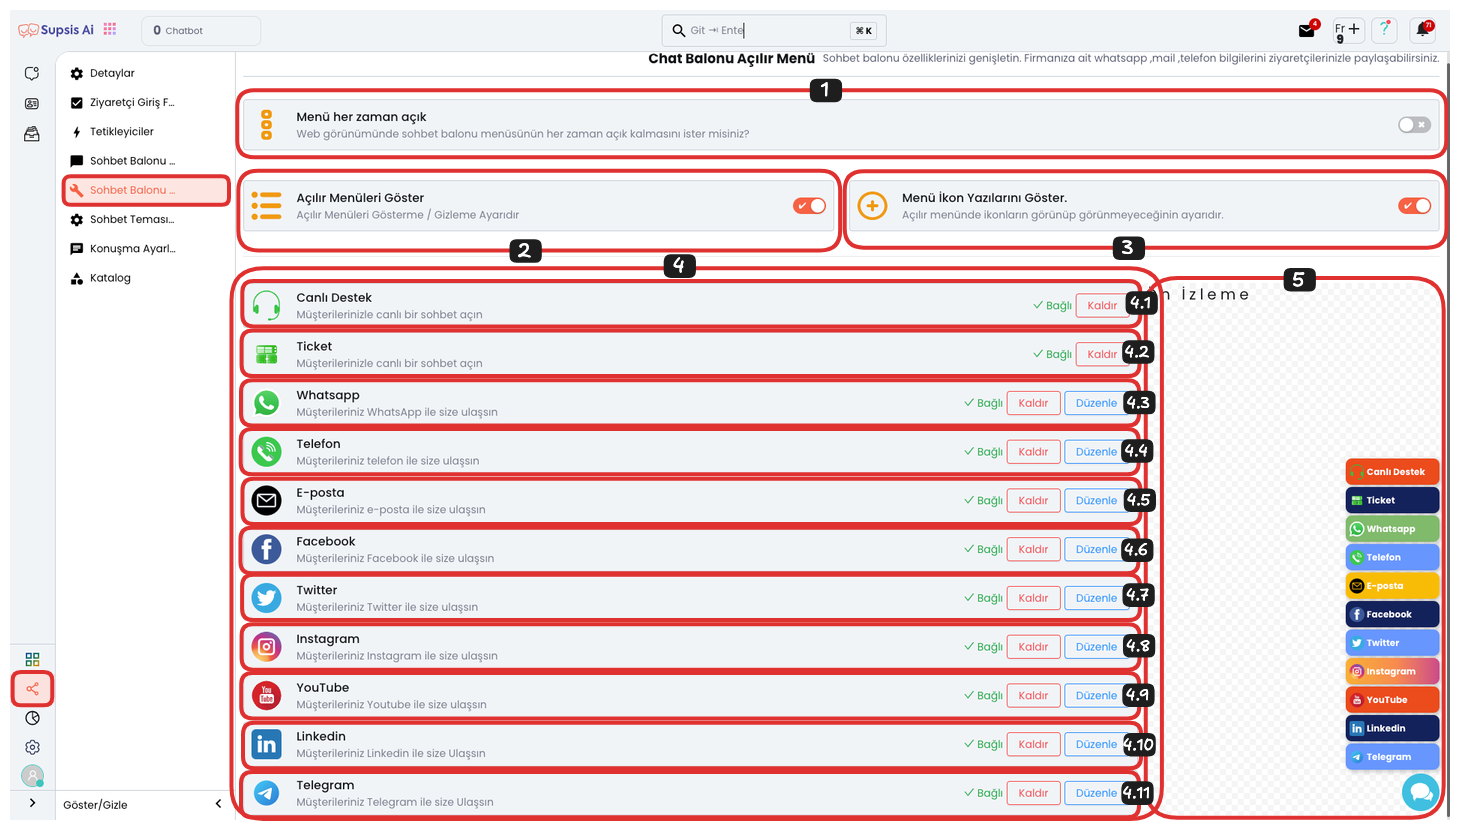
Chat Balloon Features:
- Menu Always Open
- Show Dropdown Menus
- Show Menu Icon Texts
- Communication Options
- Live Support
- Ticket
- Phone
- Youtube
- Telegram
- Preview
1-) Menu Always Open
Menu Always Open ensures that the dropdown menu remains constantly visible. This way, visitors can directly access all communication options without making any extra clicks. This feature allows users to quickly access the support they need and is ideal for increasing customer interaction. At the same time, the constant visibility of communication channels allows users to interact more easily and quickly.
2-) Show Dropdown Menus
Show Dropdown Menus ensures that dropdown menus are visible in the chat balloon when this option is enabled. Visitors can access all communication channels offered through the menu. This feature offers visitors different communication options, allowing them to quickly get support through their preferred channel. At the same time, it facilitates customer interactions by offering a user-friendly experience and provides diversified communication paths.
3-) Show Menu Icon Texts
Icon and Text Display makes communication channel icons more understandable by adding descriptive text next to communication channel icons. This way, visitors can see not only the icon but also the name of the communication channel that the icon represents. This feature allows users to more easily understand which communication channel they should choose, makes the interaction process more efficient, and offers a user-friendly experience.
4-) Communication Options
-
Connect: Allows you to add the relevant communication channel to the chat balloon. For example, you can connect channels such as WhatsApp, Telegram to the chat balloon, allowing your visitors to reach you through different communication channels.
-
Edit: You can use this button to customize each communication channel you add. By editing information such as communication channel name, icon, description, you ensure that each channel is user-friendly and understandable, and offer visitors an easy access experience.
-
Remove: Allows you to remove an unwanted channel from the communication options in the chat balloon. This way, you can create a cleaner and more organized communication menu by offering only the channels you prefer and want to use actively.
4.1-) Live Support
If you want to have a live support area in your chat balloon, you can activate this feature by saying "Connect". When this button is clicked, the visitor is transferred to live support and can get help immediately.
4.2-) Ticket
If you want to have a Ticket (Request) area in your chat balloon, you can activate this feature by saying "Connect". When this button is clicked, the visitor is directed to the ticket creation area and can record their support requests.
4.3-) WhatsApp
If you want to have a WhatsApp area in your chat balloon, you can activate this feature by saying "Connect". When this button is clicked, the visitor is directed to your WhatsApp line and can communicate quickly.
4.4-) Phone
If you want to have a Phone area in your chat balloon, you can activate this feature by saying "Connect". When this button is clicked, the visitor is directed to your phone number and can communicate by phone.
4.5-) Email
If you want to have an Email area in your chat balloon, you can activate this feature by saying "Connect". When this button is clicked, the visitor is directed to your email address and can start written communication.
4.6-) Facebook
If you want to have a Facebook area in your chat balloon, you can activate this feature by saying "Connect". When this button is clicked, the visitor is directed to your Facebook account and can communicate through social media.
4.7-) Twitter
If you want to have a Twitter area in your chat balloon, you can activate this feature by saying "Connect". When this button is clicked, the visitor is directed to your Twitter account and can interact through social media.
4.8-) Instagram
If you want to have an Instagram area in your chat balloon, you can activate this feature by saying "Connect". When this button is clicked, the visitor is directed to your Instagram account and can interact through visual content.
4.9-) Youtube
If you want to have a YouTube area in your chat balloon, you can activate this feature by saying "Connect". When this button is clicked, the visitor is directed to your YouTube channel and can access video content.
4.10-) Linkedin
If you want to have a LinkedIn area in your chat balloon, you can activate this feature by saying "Connect". When this button is clicked, the visitor is directed to your LinkedIn account and can communicate through the professional network.
4.11-) Telegram
If you want to have a Telegram area in your chat balloon, you can activate this feature by saying "Connect". When this button is clicked, the visitor is directed to your Telegram channel and can quickly start messaging.
5-) Preview
Preview, this area on the right shows how the adjustments made will appear instantly. This preview screen is useful for evaluating how the chat balloon will appear from visitors' perspective. Seeing the effects of changes made immediately allows you to quickly check whether the design and layout are suitable for the user experience. This way, you can evaluate visual harmony and functionality before making final adjustments.