Inbox
Inbox is a central area where you can manage all emails that reach you. Through this panel, you can not only view incoming emails but also perform many operations such as sending new emails and reviewing sent emails from a single screen. Thanks to its user-friendly interface, you can easily switch between emails and provide faster access by filtering important messages. Additionally, thanks to integrated artificial intelligence features, you can perform emotional analysis of incoming emails, summarize their content, or improve the emails you will send by editing them in terms of grammar, style, or content to make them more effective. These features both save time and strengthen professional communication.
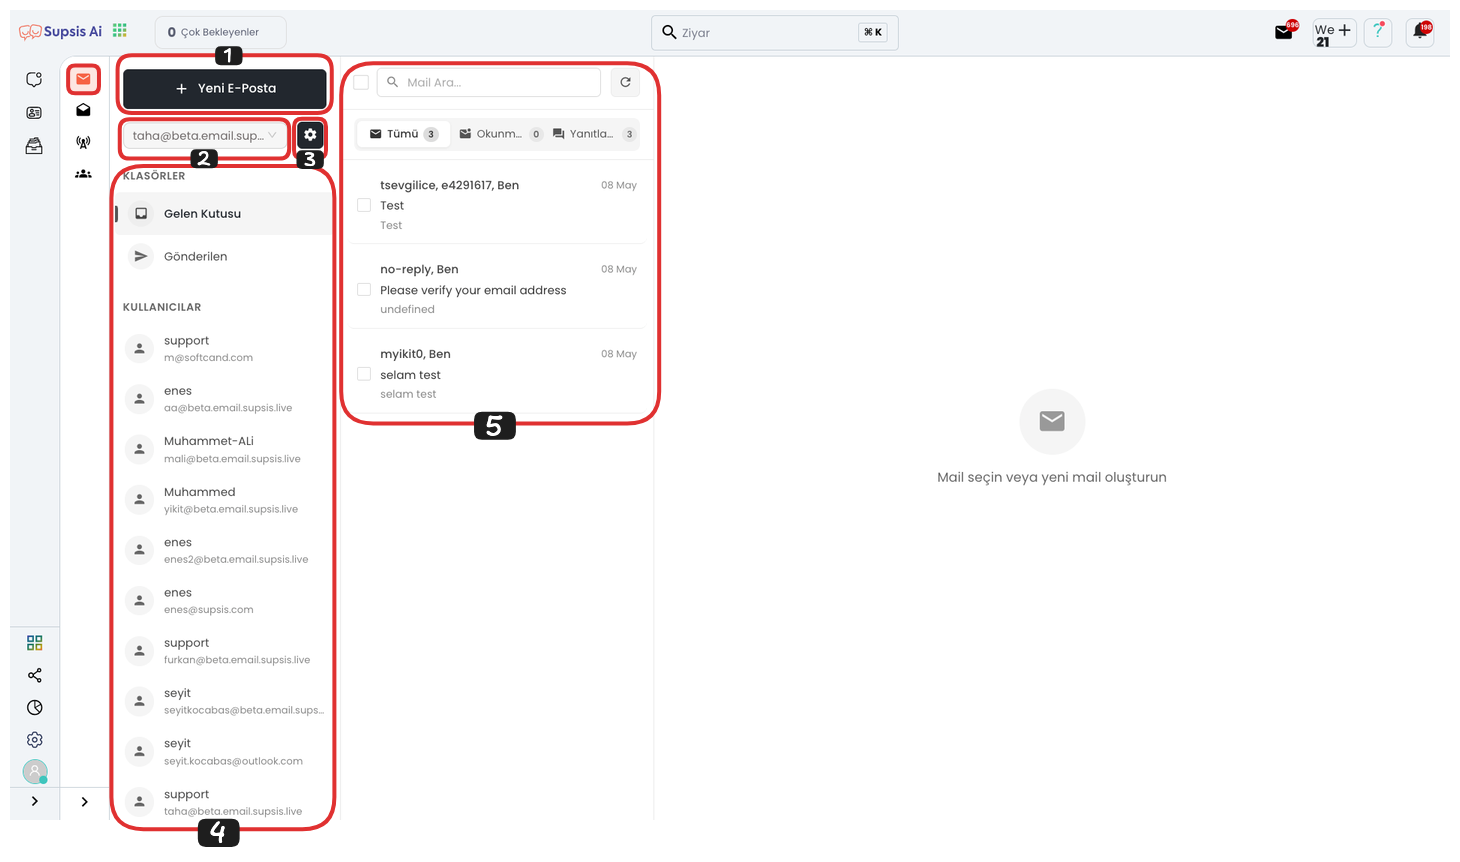
Inbox Features:
- New Email
- Select Email
- View Settings
- Folders
- Inbox
1-) New Email
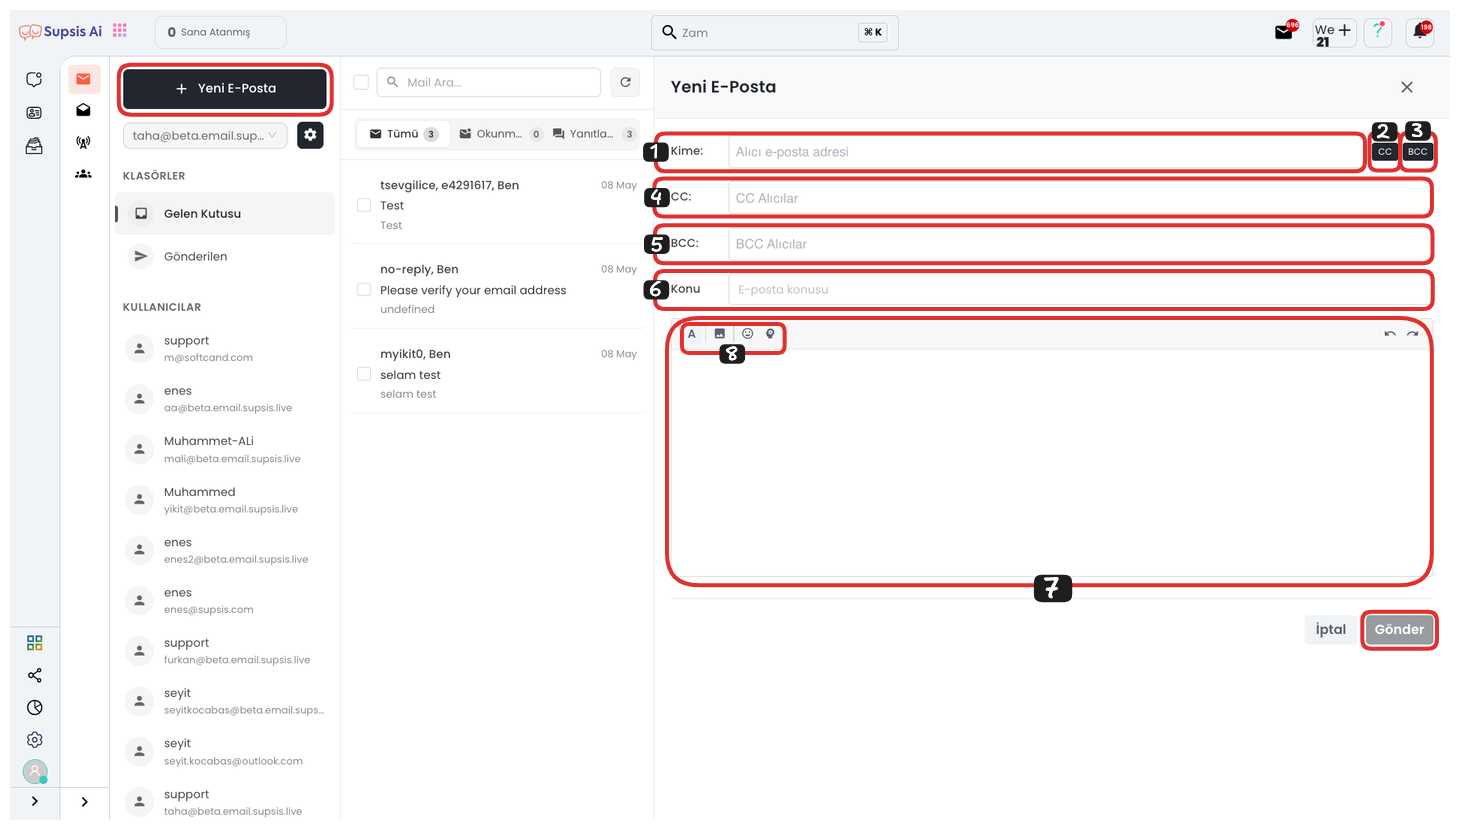
After clicking the "New Email" button, you can determine the person to whom you will send the email and the subject in the opened area. By clicking the "CC" and "BCC" buttons located on the right side of the "To" field, you can also add recipients to be copied or blind copied to the email. At the bottom of the page, you can write the email text to be sent. To edit the text, you can use formatting options such as font, size, and style by clicking the "A" icon. By clicking the "Image" icon, you can add images to the email, and by clicking the "Emoji" icon, you can add emotional expressions. Additionally, by using the "Artificial Intelligence" icon, you can automatically edit your email text or create improved content.

From this area, you can edit the email text you will send with artificial intelligence support in different ways. You can make your content professional and purposeful by using ready options such as Fix Grammar, Expand Text, Change Tone, Translate. Additionally, by writing your own request in the Custom Request field, you can have artificial intelligence make a completely personalized edit for you. Thanks to this feature, you can prepare your email content more effectively, accurately, and targeted.
After completing all these steps, you can send your email to recipients by clicking the "Send" button. With this operation, the content you have prepared is successfully sent to the person or groups you have determined through the system.
2-) Select Email
From this area, you can select the mail address you want to manage and actively use all the features of the Mails module through the selected address. Thus, you can perform operations such as sending emails, viewing inbox, using templates, and sending bulk emails directly through the panel with the relevant email account.
3-) View Settings
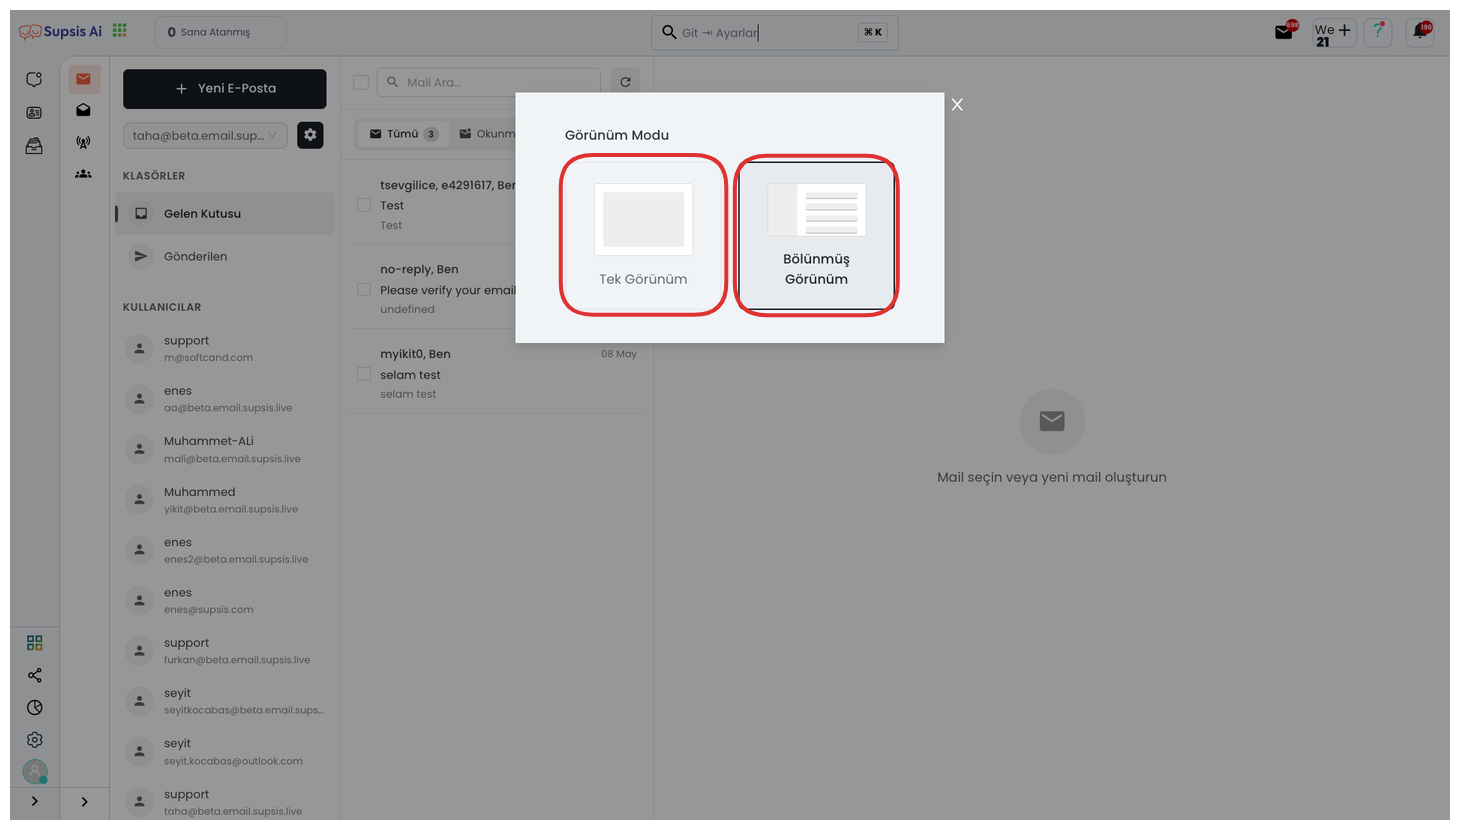
From this area, you can arrange the appearance of your module according to your preference. You can view all content on a single screen by setting the display format as Single View, or you can provide a more practical use by using the Split View option to see the list and detail areas side by side.
4-) Folders

From this area, you can access the "Inbox" section and check the emails that reach you. Through the "Sent" section, you can view the emails you have sent before. Additionally, by using the "Users" tab, you can view emails created by other users and registered in the system, and more easily track internal team communication.
5-) Inbox
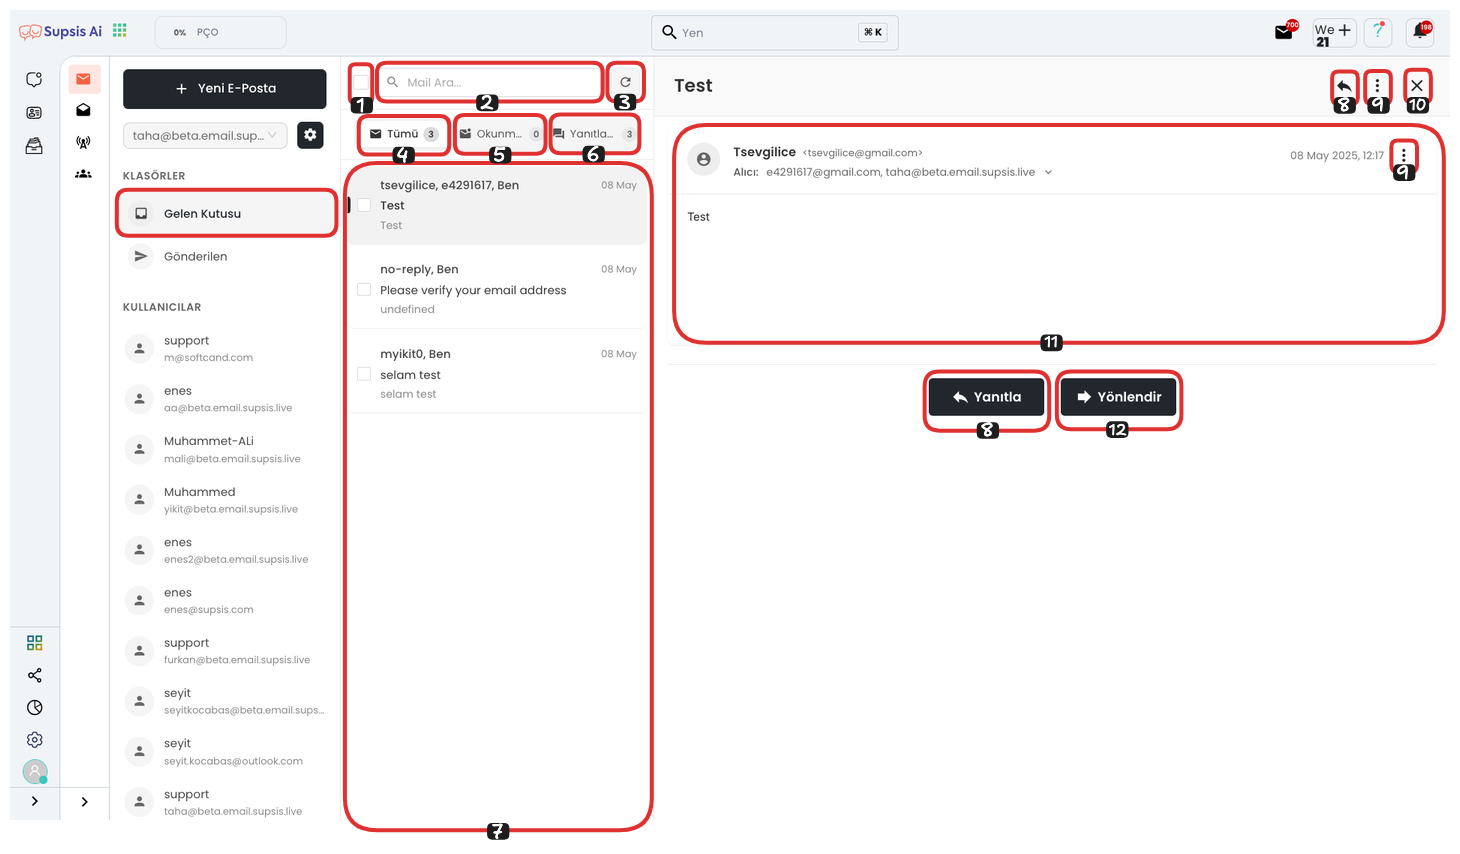
Inbox Features:
- Select All
- Search Mail
- Refresh
- All
- Unread
- Unanswered
- Incoming Mails
- Reply
- Three Dots
- Close
- Mail Content
- Forward
1-) Select All
Thanks to this feature, you can select all emails listed in your inbox at once. It saves time especially when you want to perform bulk operations on many emails. Operations such as bulk deletion, forwarding, or tagging can be easily performed on selected emails. This checkbox is usually located at the top of the list and covers all items with a single click.
2-) Search Mail
If you have difficulty finding a specific email, you can quickly search among emails thanks to this search field. You can easily find the email you are looking for by filtering according to various criteria such as sender name, subject title, email content, or date. This feature is particularly useful for users with heavy email traffic.
3-) Refresh
This button used to manually update the page refreshes your inbox instantly, allowing you to reach the most current emails. It is used to check if new emails have arrived. Although the system offers automatic refresh, users can update the mailbox by clicking this button when they want to provide instant control.
4-) All
This tab lists all emails in your inbox completely. All emails can be displayed in this area regardless of whether they are read, unread, answered, or unanswered. This view is ideal for making a general email scan or accessing past content.
5-) Unread
This tab shows only emails that have not yet been opened or reviewed. Thanks to this filtering, it becomes easier to notice missed emails. This view is quite functional to prevent important messages from being skipped in heavy email traffic.
6-) Unanswered
In this area, emails that have come to you but you have not yet answered are listed. This tab is used to quickly detect messages that require a response and maintain communication without interruption. It is of critical importance especially in sensitive communications such as customer relations, support requests, or business meetings.
7-) Incoming Mails
This area lists all email messages that reach you. You can select the relevant email by clicking the checkbox on the left side of each email. When you click on the email, the detailed content opens on the right side of the screen and you can view the entire message. This structure allows you to quickly switch between emails.
8-) Reply
This option is used when you want to directly reply to an email. You can quickly create a reply by reading the content of the selected email and entering your text in the reply area located right below it. This feature allows users to maintain communication continuously and instantly.
9-) Three Dots Menu
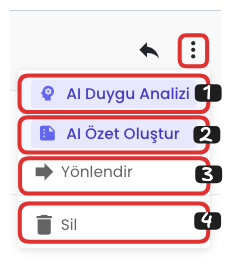
The three dots icon located in the upper right corner of the email opens a menu containing advanced operations. Through this menu, you can analyze the emotional tone of the email with the "AI Sentiment Analysis" option, and reach a short summary of the email with "AI Create Summary". Additionally, you can forward the relevant email to another address with the "Forward" option, or permanently delete the email with the "Delete" option.
10-) Close
This button used to close the mail detail screen removes the open email content from your screen. Thus, it becomes possible to view another email or return to the inbox. It ensures that the screen remains clean, especially when working with multiple emails.
11-) Mail Content
The complete content of the email you selected is displayed in this area. Sender information, subject, date, and the actual message text are located here. Additionally, if there are any attachments, links, or additional explanations, they are also shown in this section. Mail details are presented to the user with a highly readable structure.
12-) Forward
This feature allows you to forward the selected email to another person or department. The entire content of the email, including any attachments, is sent to the new recipient. This option is used when direct forwarding is desired instead of replying. It is quite functional especially in workflows or internal communication.