Let's Create an Example Flow Together
In this image, a chatbot flow example is shown step by step based on filters and actions. Here are the basic blocks used and their functions:
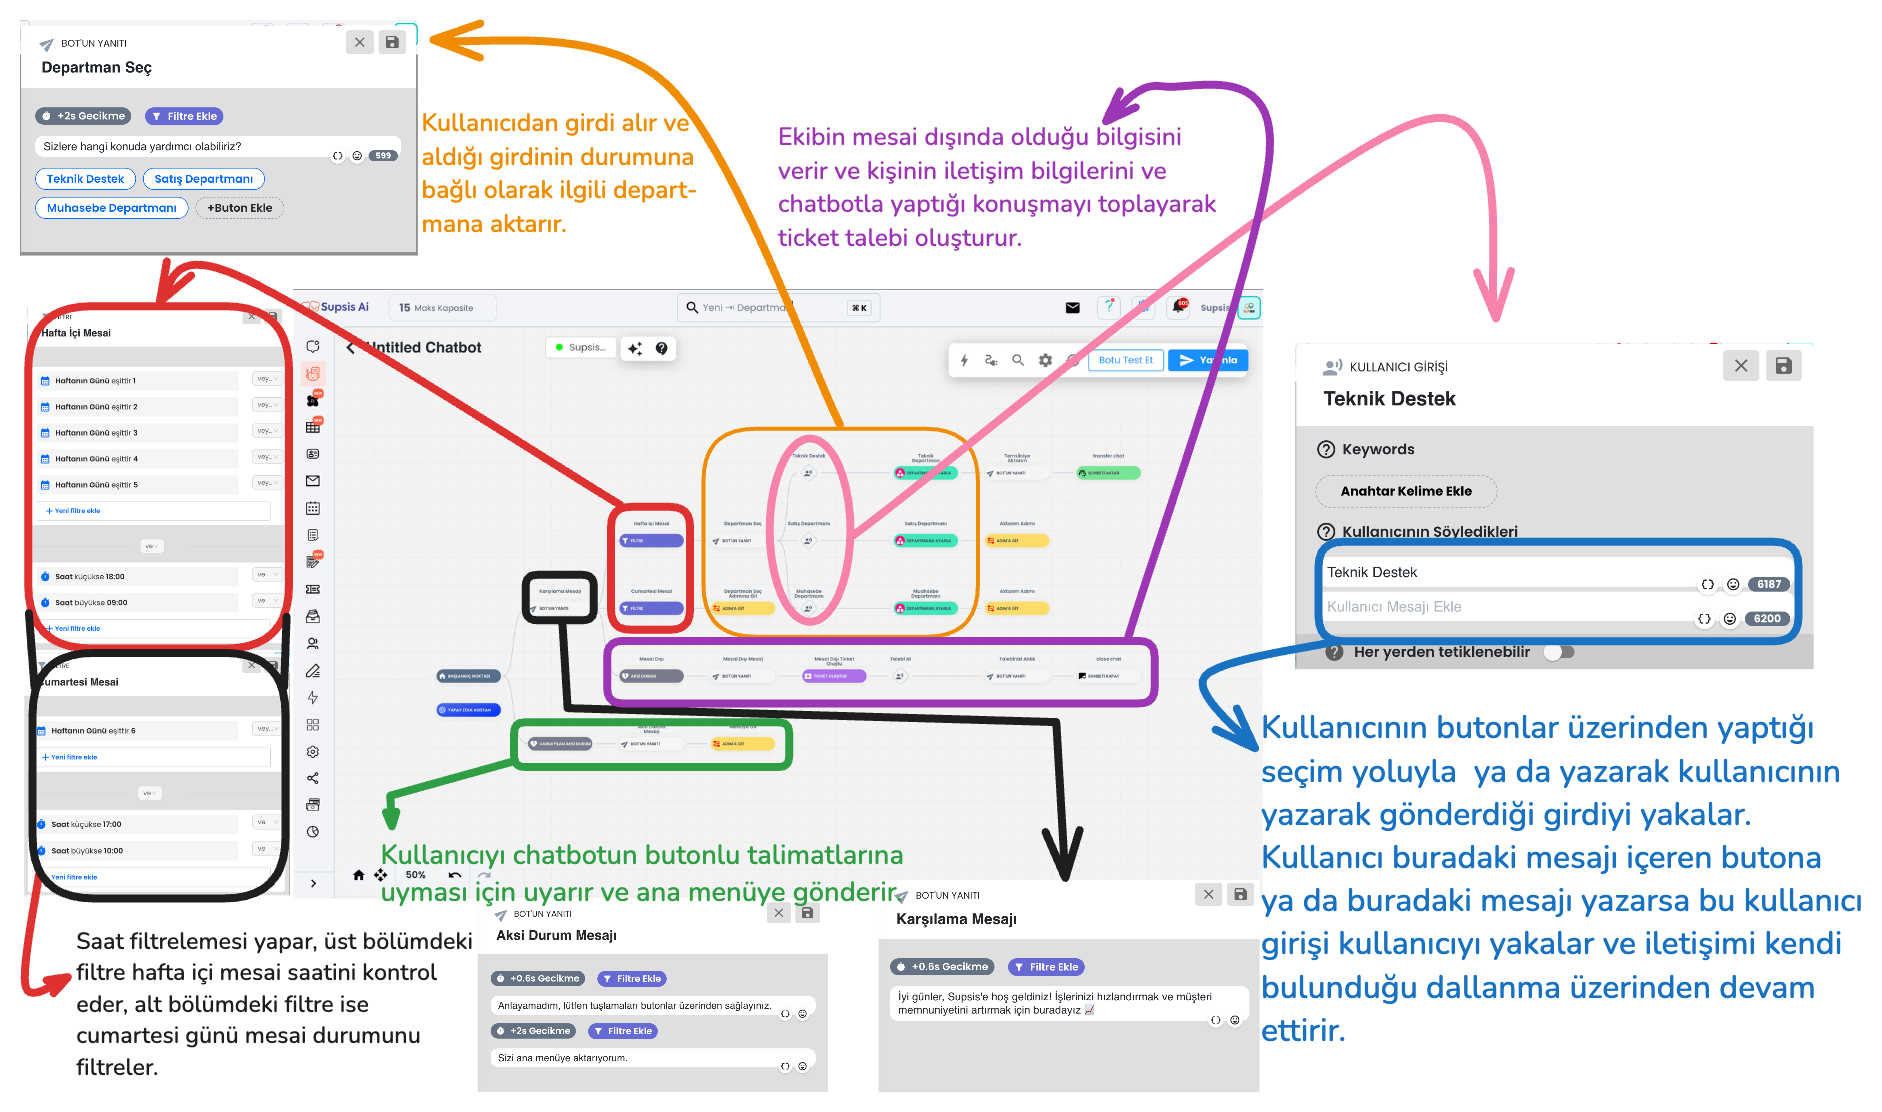
1-) Filters
This is the description of the filter section of the chatbot flow in the upper section.
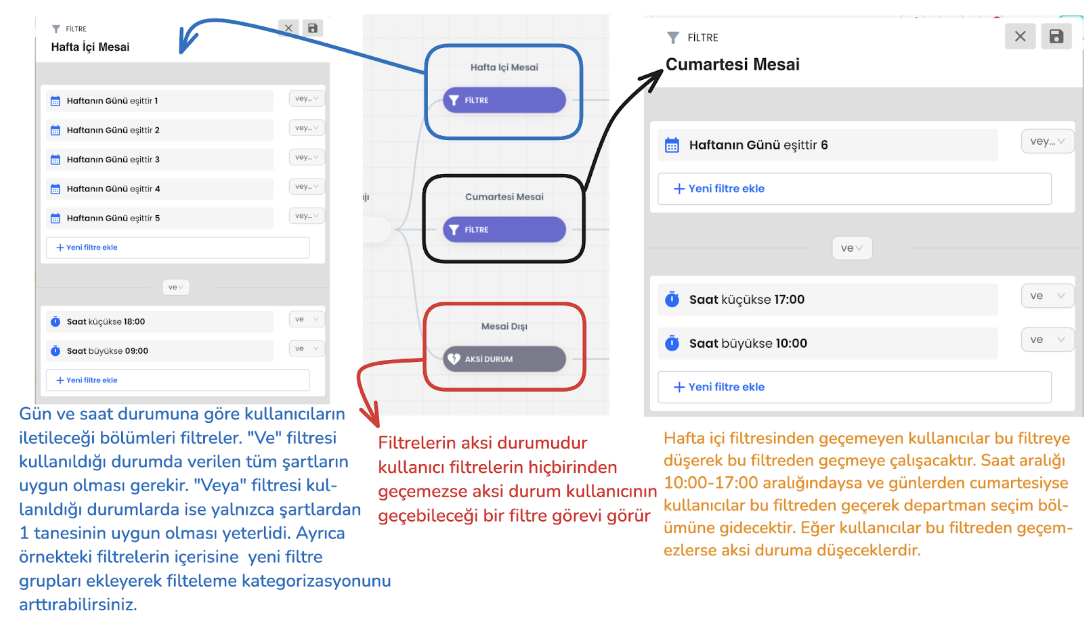
Filter Hierarchy: The user tries to pass through the defined filters starting from the top. If the user's input does not meet a filter condition, it moves to the filter below. This process continues sequentially among all filters. If the user cannot pass through any filter, the system is directed to the "Default (General) Otherwise" scenario.
Local Otherwise: The "Otherwise" block at the end of the filters comes into play when no filter condition is met. This serves as the last filter that the user can pass through and directs the user to take action.
2-) Bot Responses with Buttons (Quick Reply / Button / Gallery)
Bot responses manage the interaction style established with the user through the inputs received by the chatbot. Among the bot response types that direct users to buttons; there are various interaction options such as quick reply, button and gallery cards. Each response type has basically the same function, but offers a different experience to the user with small functional changes and visual changes. For example, the quick reply button type is used in the image below.
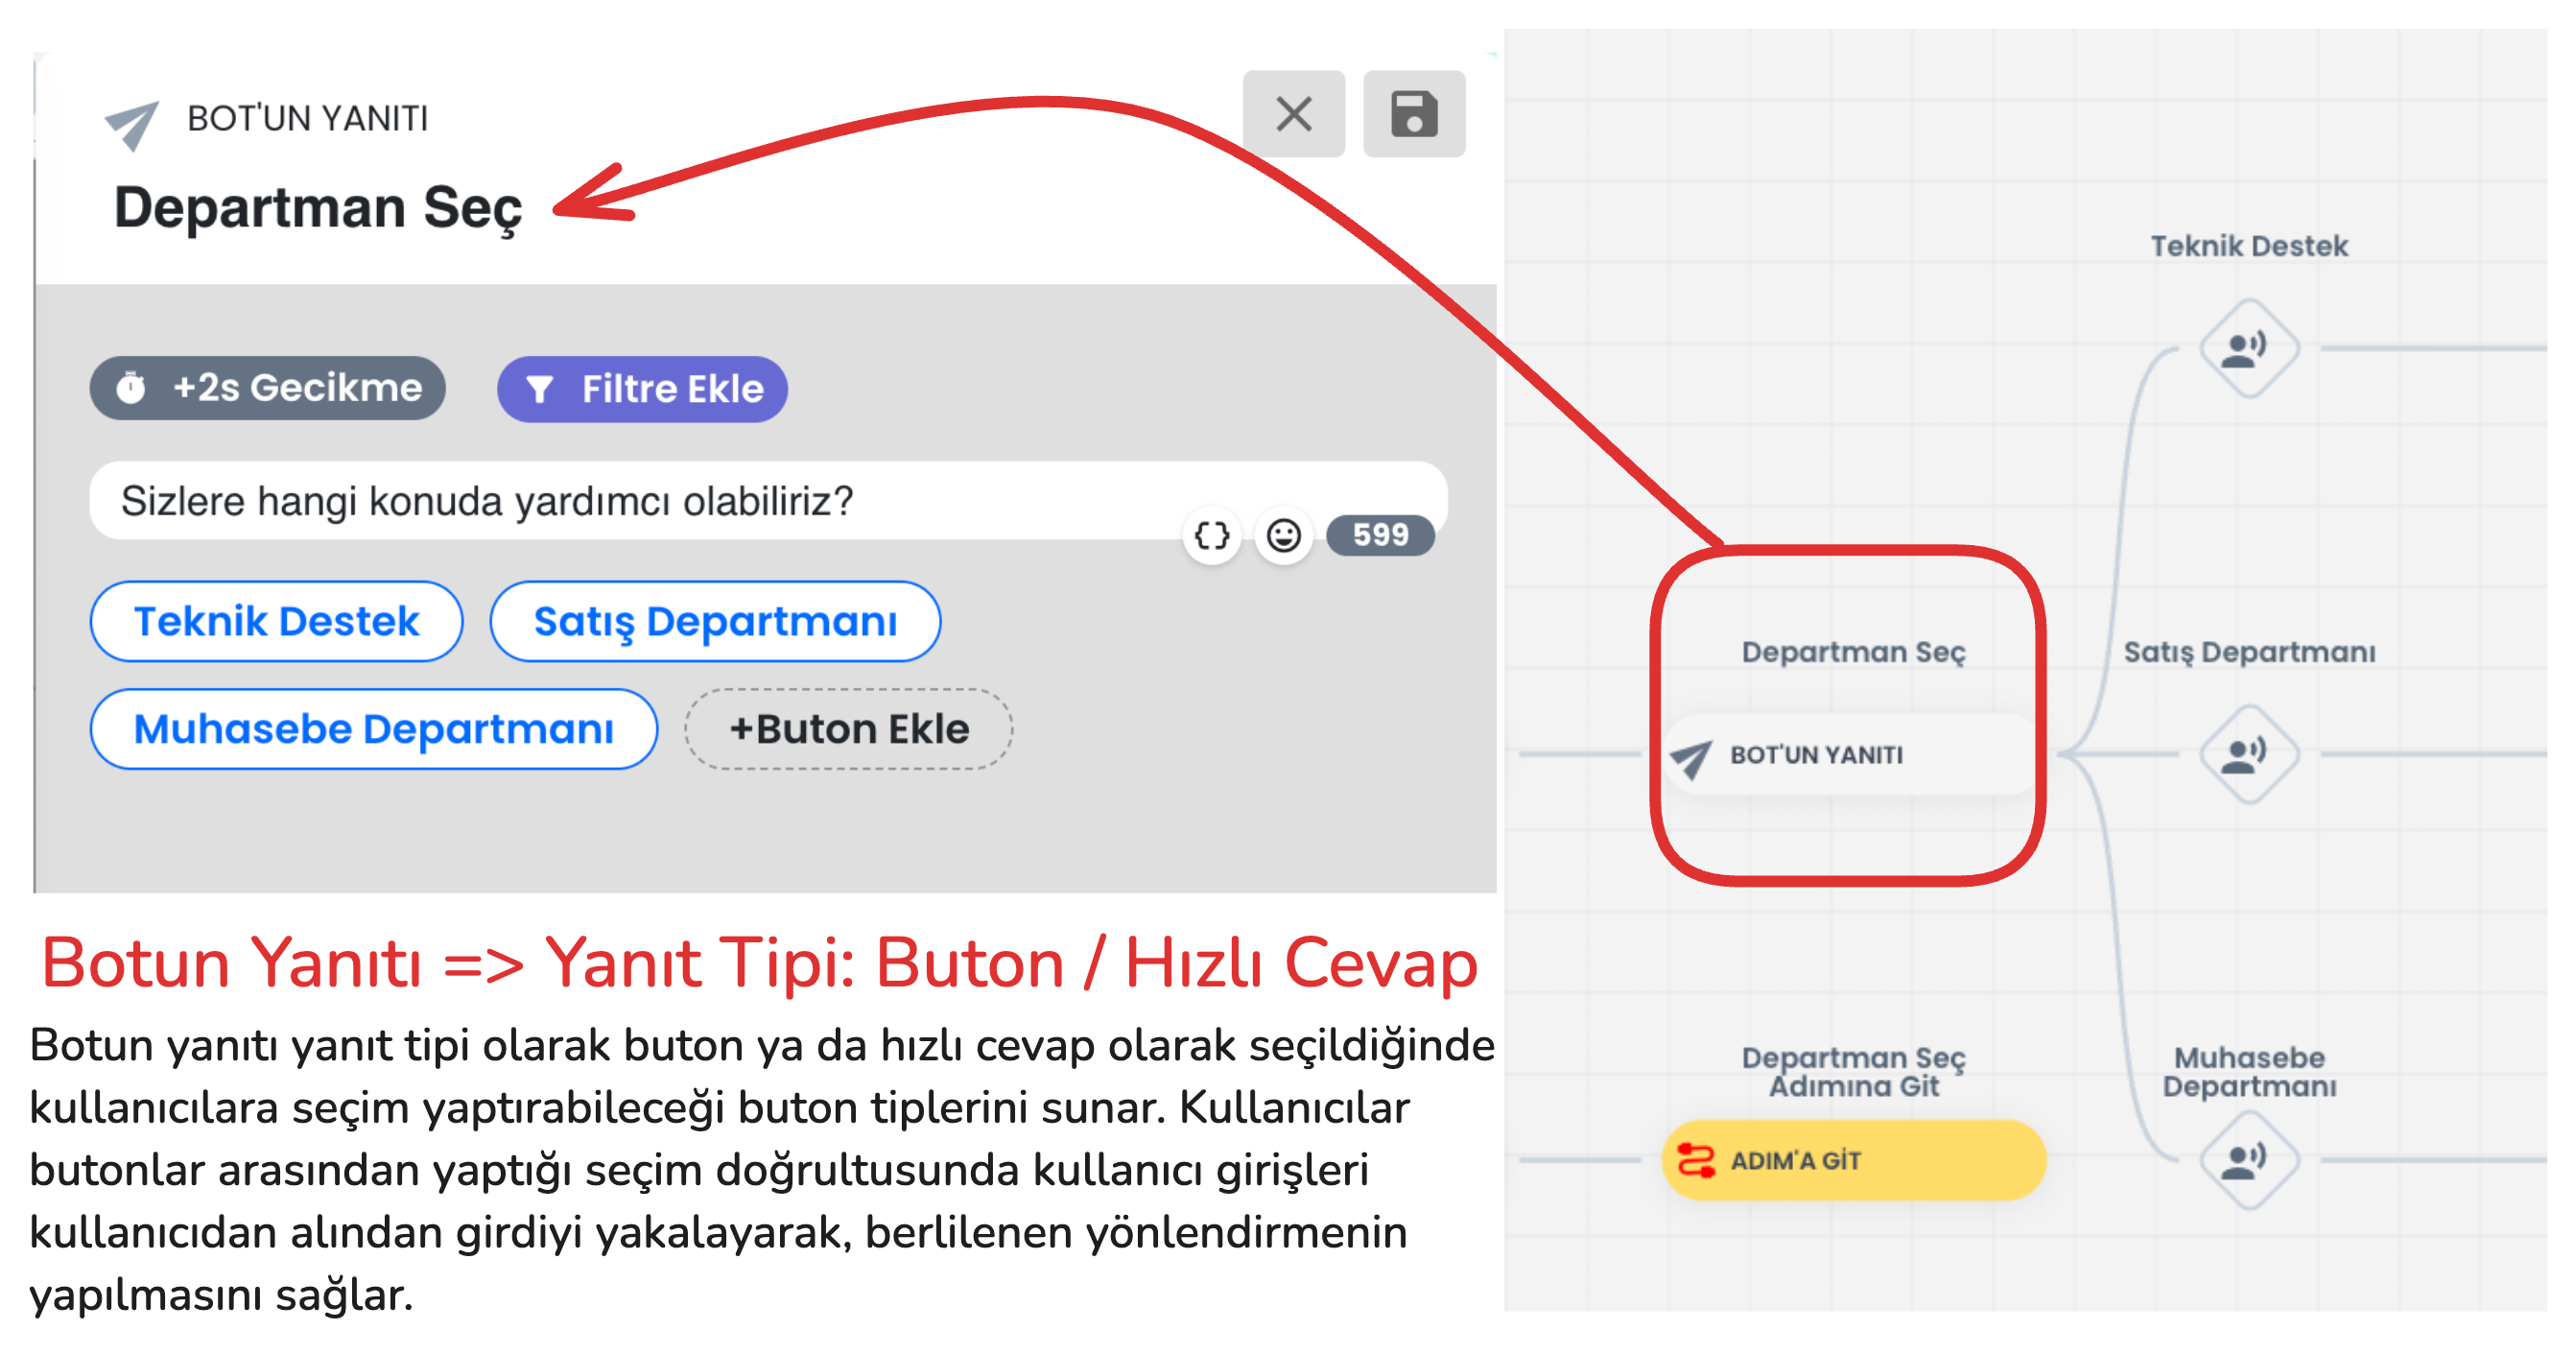
In addition to visual appearance differences between these button types, there are also functional differences. The functional differences between button types are explained in the section below. After learning the details and selecting the appropriate button type, you can set up your flow appropriately.
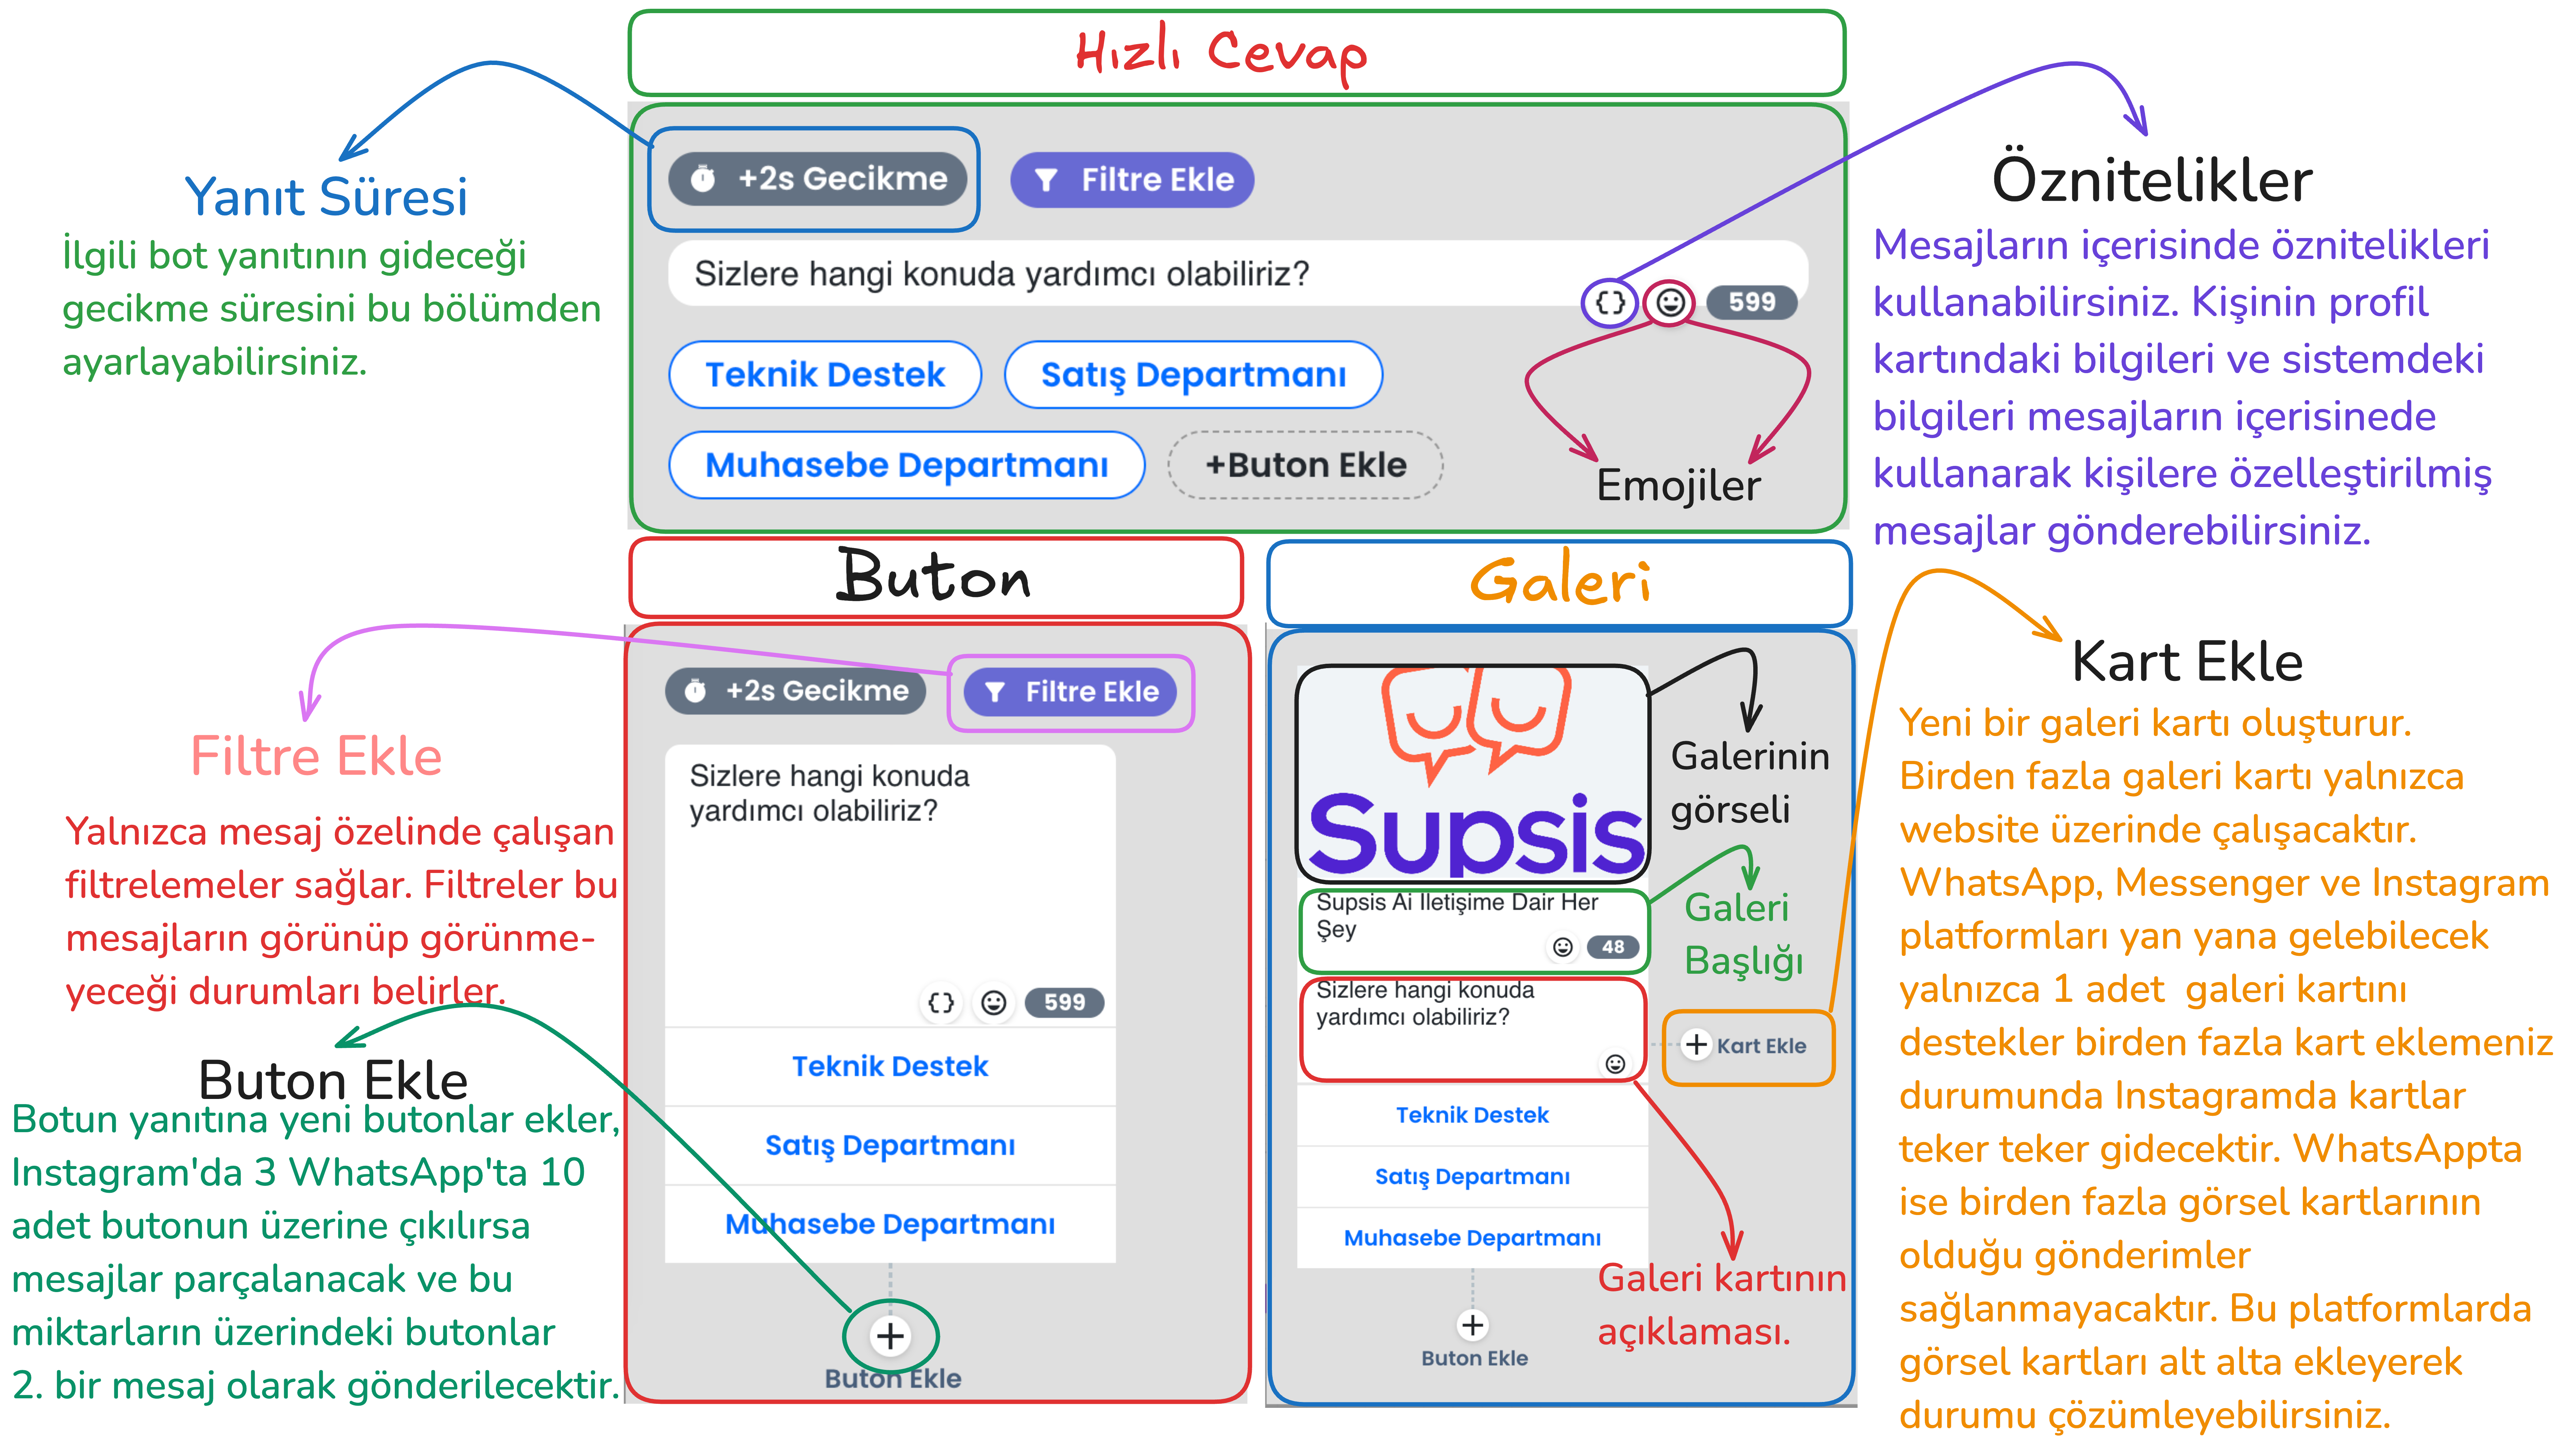
Quick Reply:
- Usage Purpose: Enables the user to make a quick selection. After the user makes a selection, this response disappears and the bot moves to the next step. This disappearing process is only valid on Instagram, Messenger and Website, buttons do not disappear on WhatsApp. On the WhatsApp platform, only the button's appearance changes. It has no functional effect.
- Features:
- Quick reply button type; takes input from the user specifically for website, Instagram and Messenger and disappears.
- On the Instagram platform, unlike other button types, it allows adding more than 3 buttons and buttons are presented just above the message box, button aesthetics change. However, on other platforms, this button type has no functional difference.
Button:
- Usage Purpose: Offers specific options to the user, has no additional features. Buttons remain on the screen after the user makes a selection on all platforms.
Gallery:
- Usage Purpose: Used to make a more interactive presentation by adding visuals and descriptions.
- Features:
- Can have a visual title, description and a maximum of 3 buttons below. In this bot response type, you can add as many buttons as you want on the website platform. On other platforms, a maximum of 3 buttons can be added.
- In WhatsApp, a maximum of 1 gallery card can be sent, if you add additional cards side by side, the bot's response will not go. On Instagram and Messenger side, each gallery card you add will go as a separate message.
In the example above, send message and go to block button types should be used to create the flow we use in the flow. Through these button types, the bot can understand the user's request and provide appropriate direction. However, there are additional button types you can use in addition to these button types.
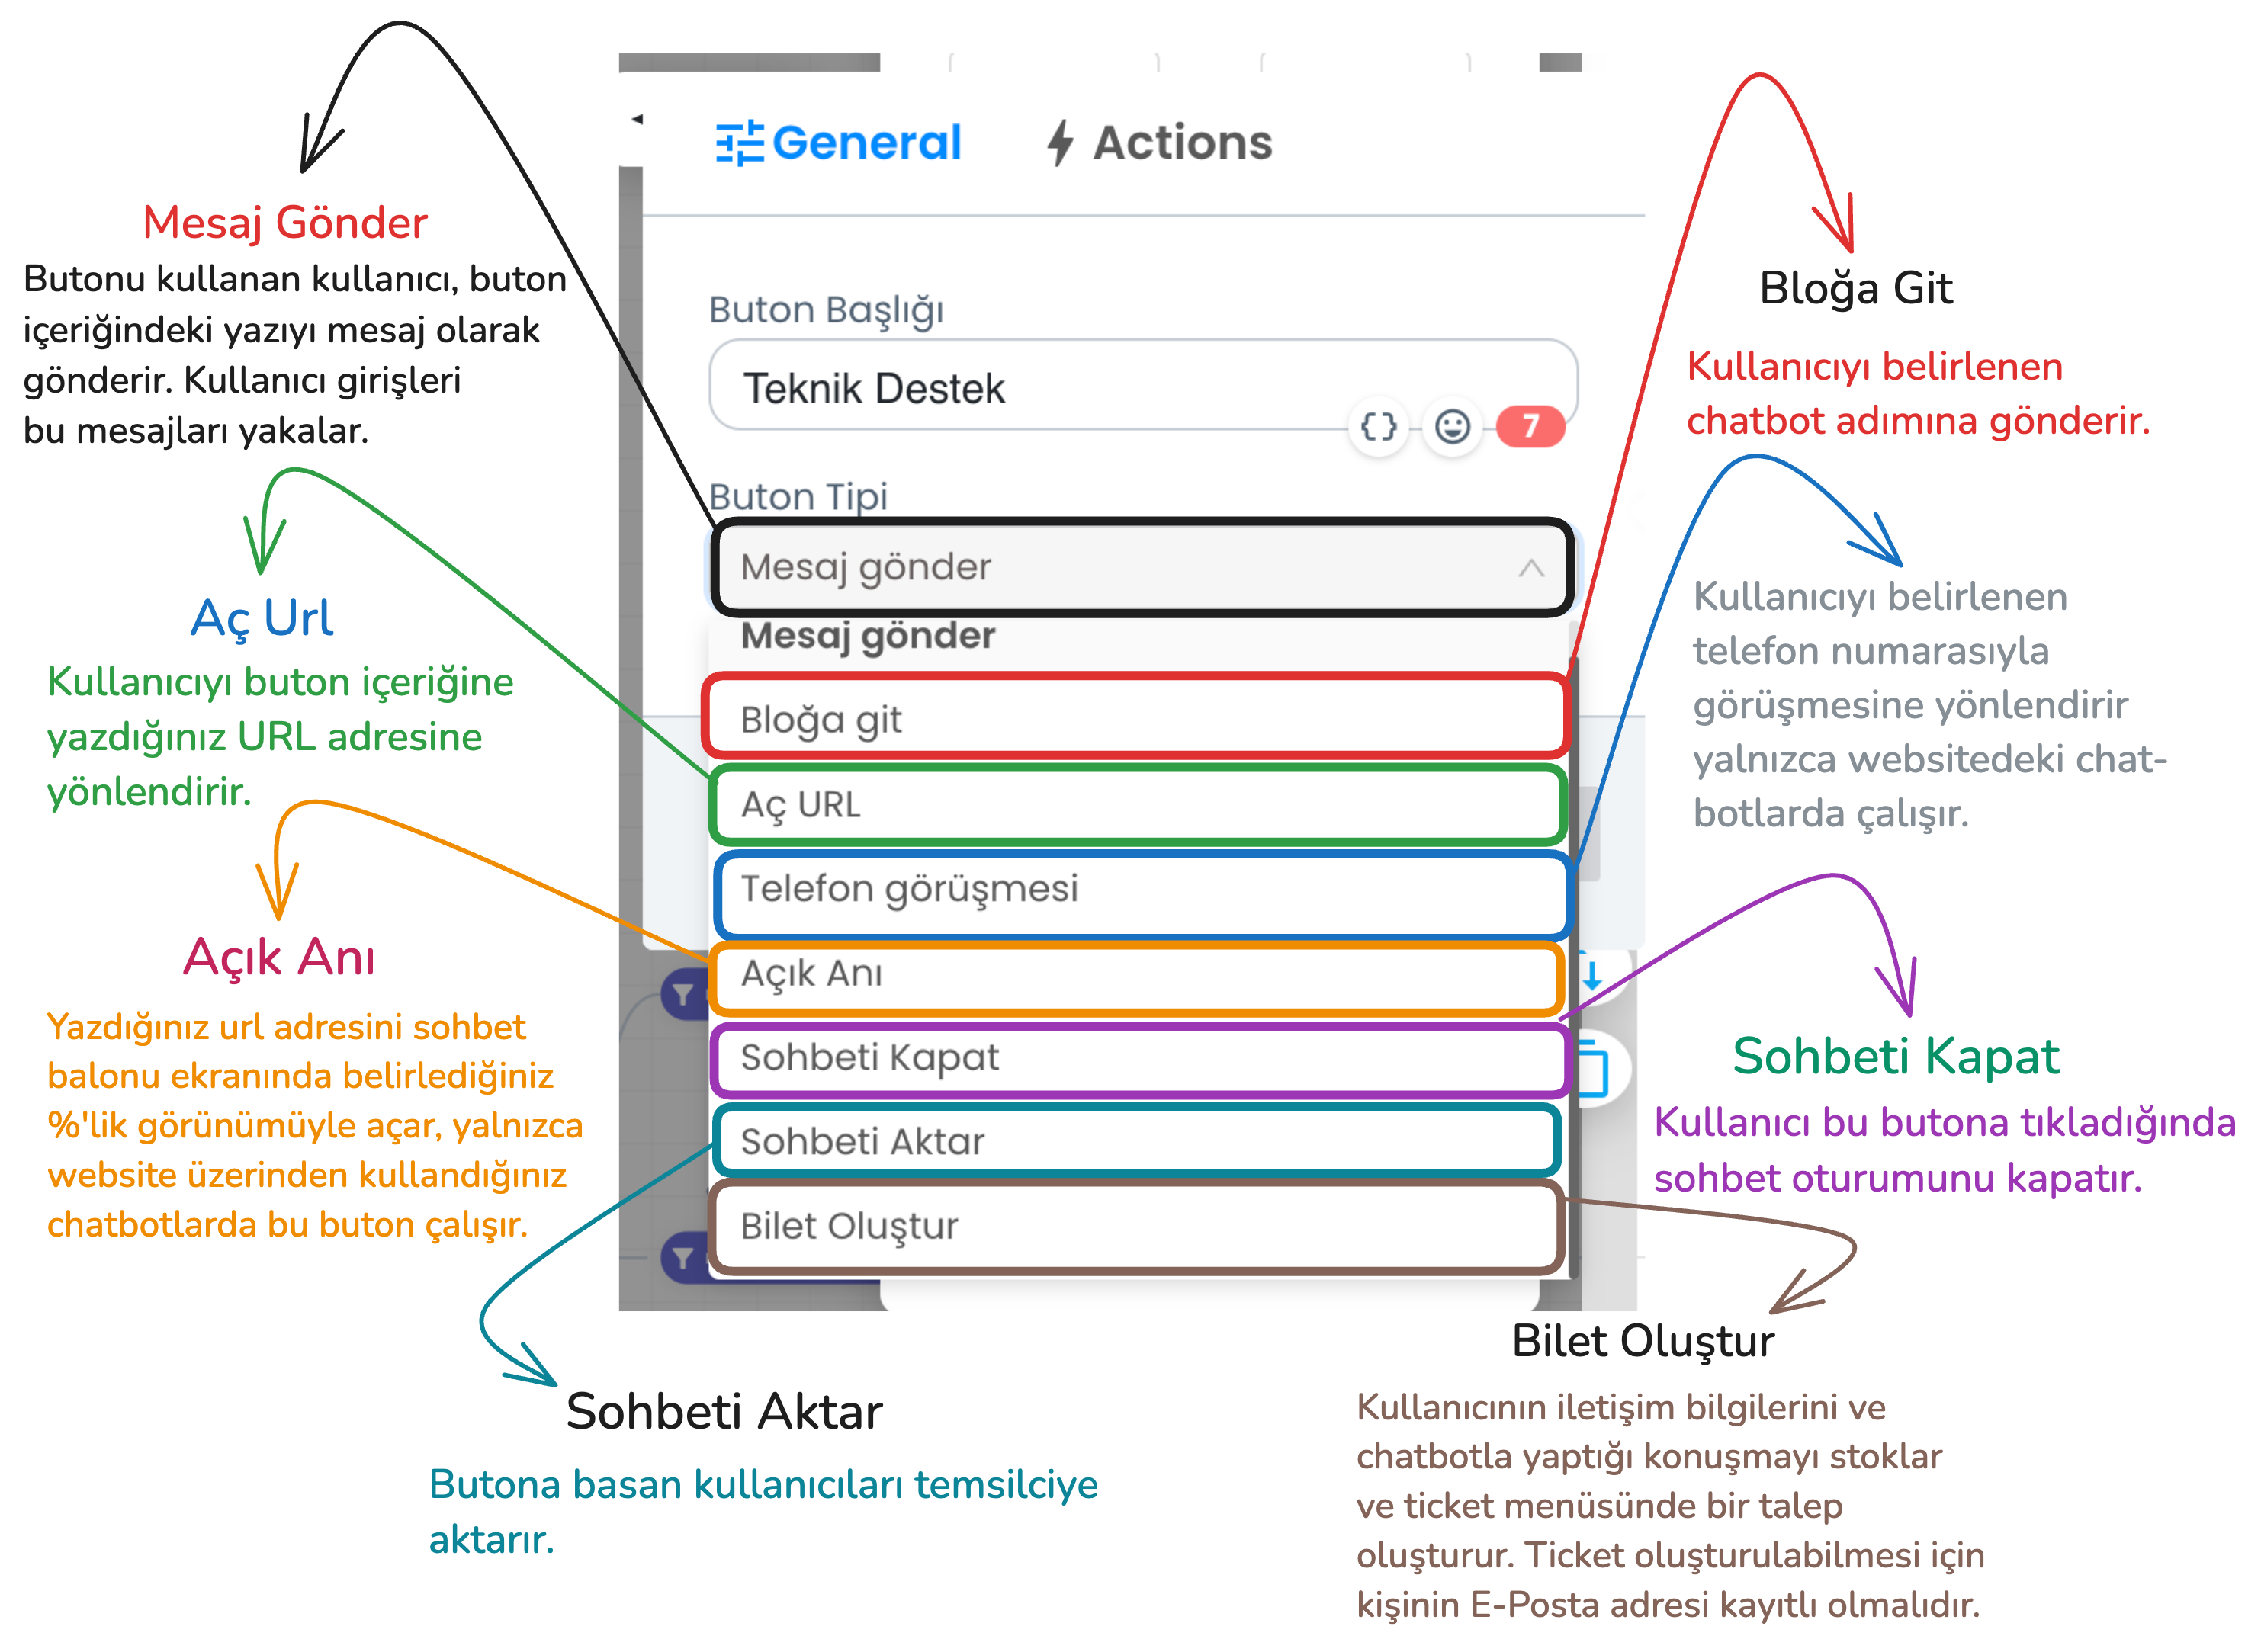
- Send Message: The user clicks the button to convey the message in the button's content, the bot processes the input received from the user and provides appropriate direction.
- Go to Block: Sends the user to the specified chatbot step.
- Open URL: Redirects the user to a URL you specify.
- Phone Call: Redirects the user to call a specific phone number (website chatbot only).
- Open Moment: Opens the specified URL on the chatbot screen in the size you specify.
- Close Chat: Ends the chat session of the user who presses this button.
- Transfer Chat: When the user clicks this button type, the chat session is transferred from the chatbot to the live support representative.
- Create Ticket: Saves the user's contact information and chat content and conveys it to the support team as a ticket. A ticket will only be created if the user's email information is available in the system.
Things to Consider
- Button Limits
- Instagram and Messenger: Maximum 3 buttons can be added in a single bot response.
- WhatsApp: Maximum 10 buttons can be added in a single bot response.
-
Limit Exceeded Situations:
- If 5 buttons are added in Instagram and Messenger, the first 3 buttons are displayed in the first message, and the remaining 2 buttons are displayed in the second message.
- If there are 12 buttons in a bot's response during WhatsApp usage, the first 10 buttons are sent in one message, and the remaining 2 buttons are sent in the next message.
-
Button Content Length
- Character Limit: WhatsApp, Instagram, Messenger and Telegram: 20 characters (If a button exceeds 20 characters, only the first 20 characters are shown).
-
Web: There is no character limitation.
-
Platform Limitations
- Some button types do not work on every platform. However, there are no restrictions on button usage on the website.
-
Supported Button Types (Instagram, Messenger, Telegram and WhatsApp): Send Message, Go to Block, Close Chat, Transfer Chat, Create Ticket (Ticket creation only becomes active if the user's email information is available).
-
Gallery Cards
- Web: There are no restrictions on the use of gallery cards on the website.
- Other Platforms:
- Maximum 3 buttons can be added to gallery cards.
- WhatsApp: More than one gallery card cannot be placed side by side; otherwise message sending will not be performed.
- If more than one gallery card is added on other platforms, the cards are transmitted by splitting.
These rules are critical for the chatbot to work properly on different platforms and must be taken into account during setup.
3-) User Input
User Inputs provide a section used for the correct processing, saving, validation of data received from chatbot users and triggering of determined actions. This area is important for providing more effective interaction with the inputs received from the user.
Main Components of the Block
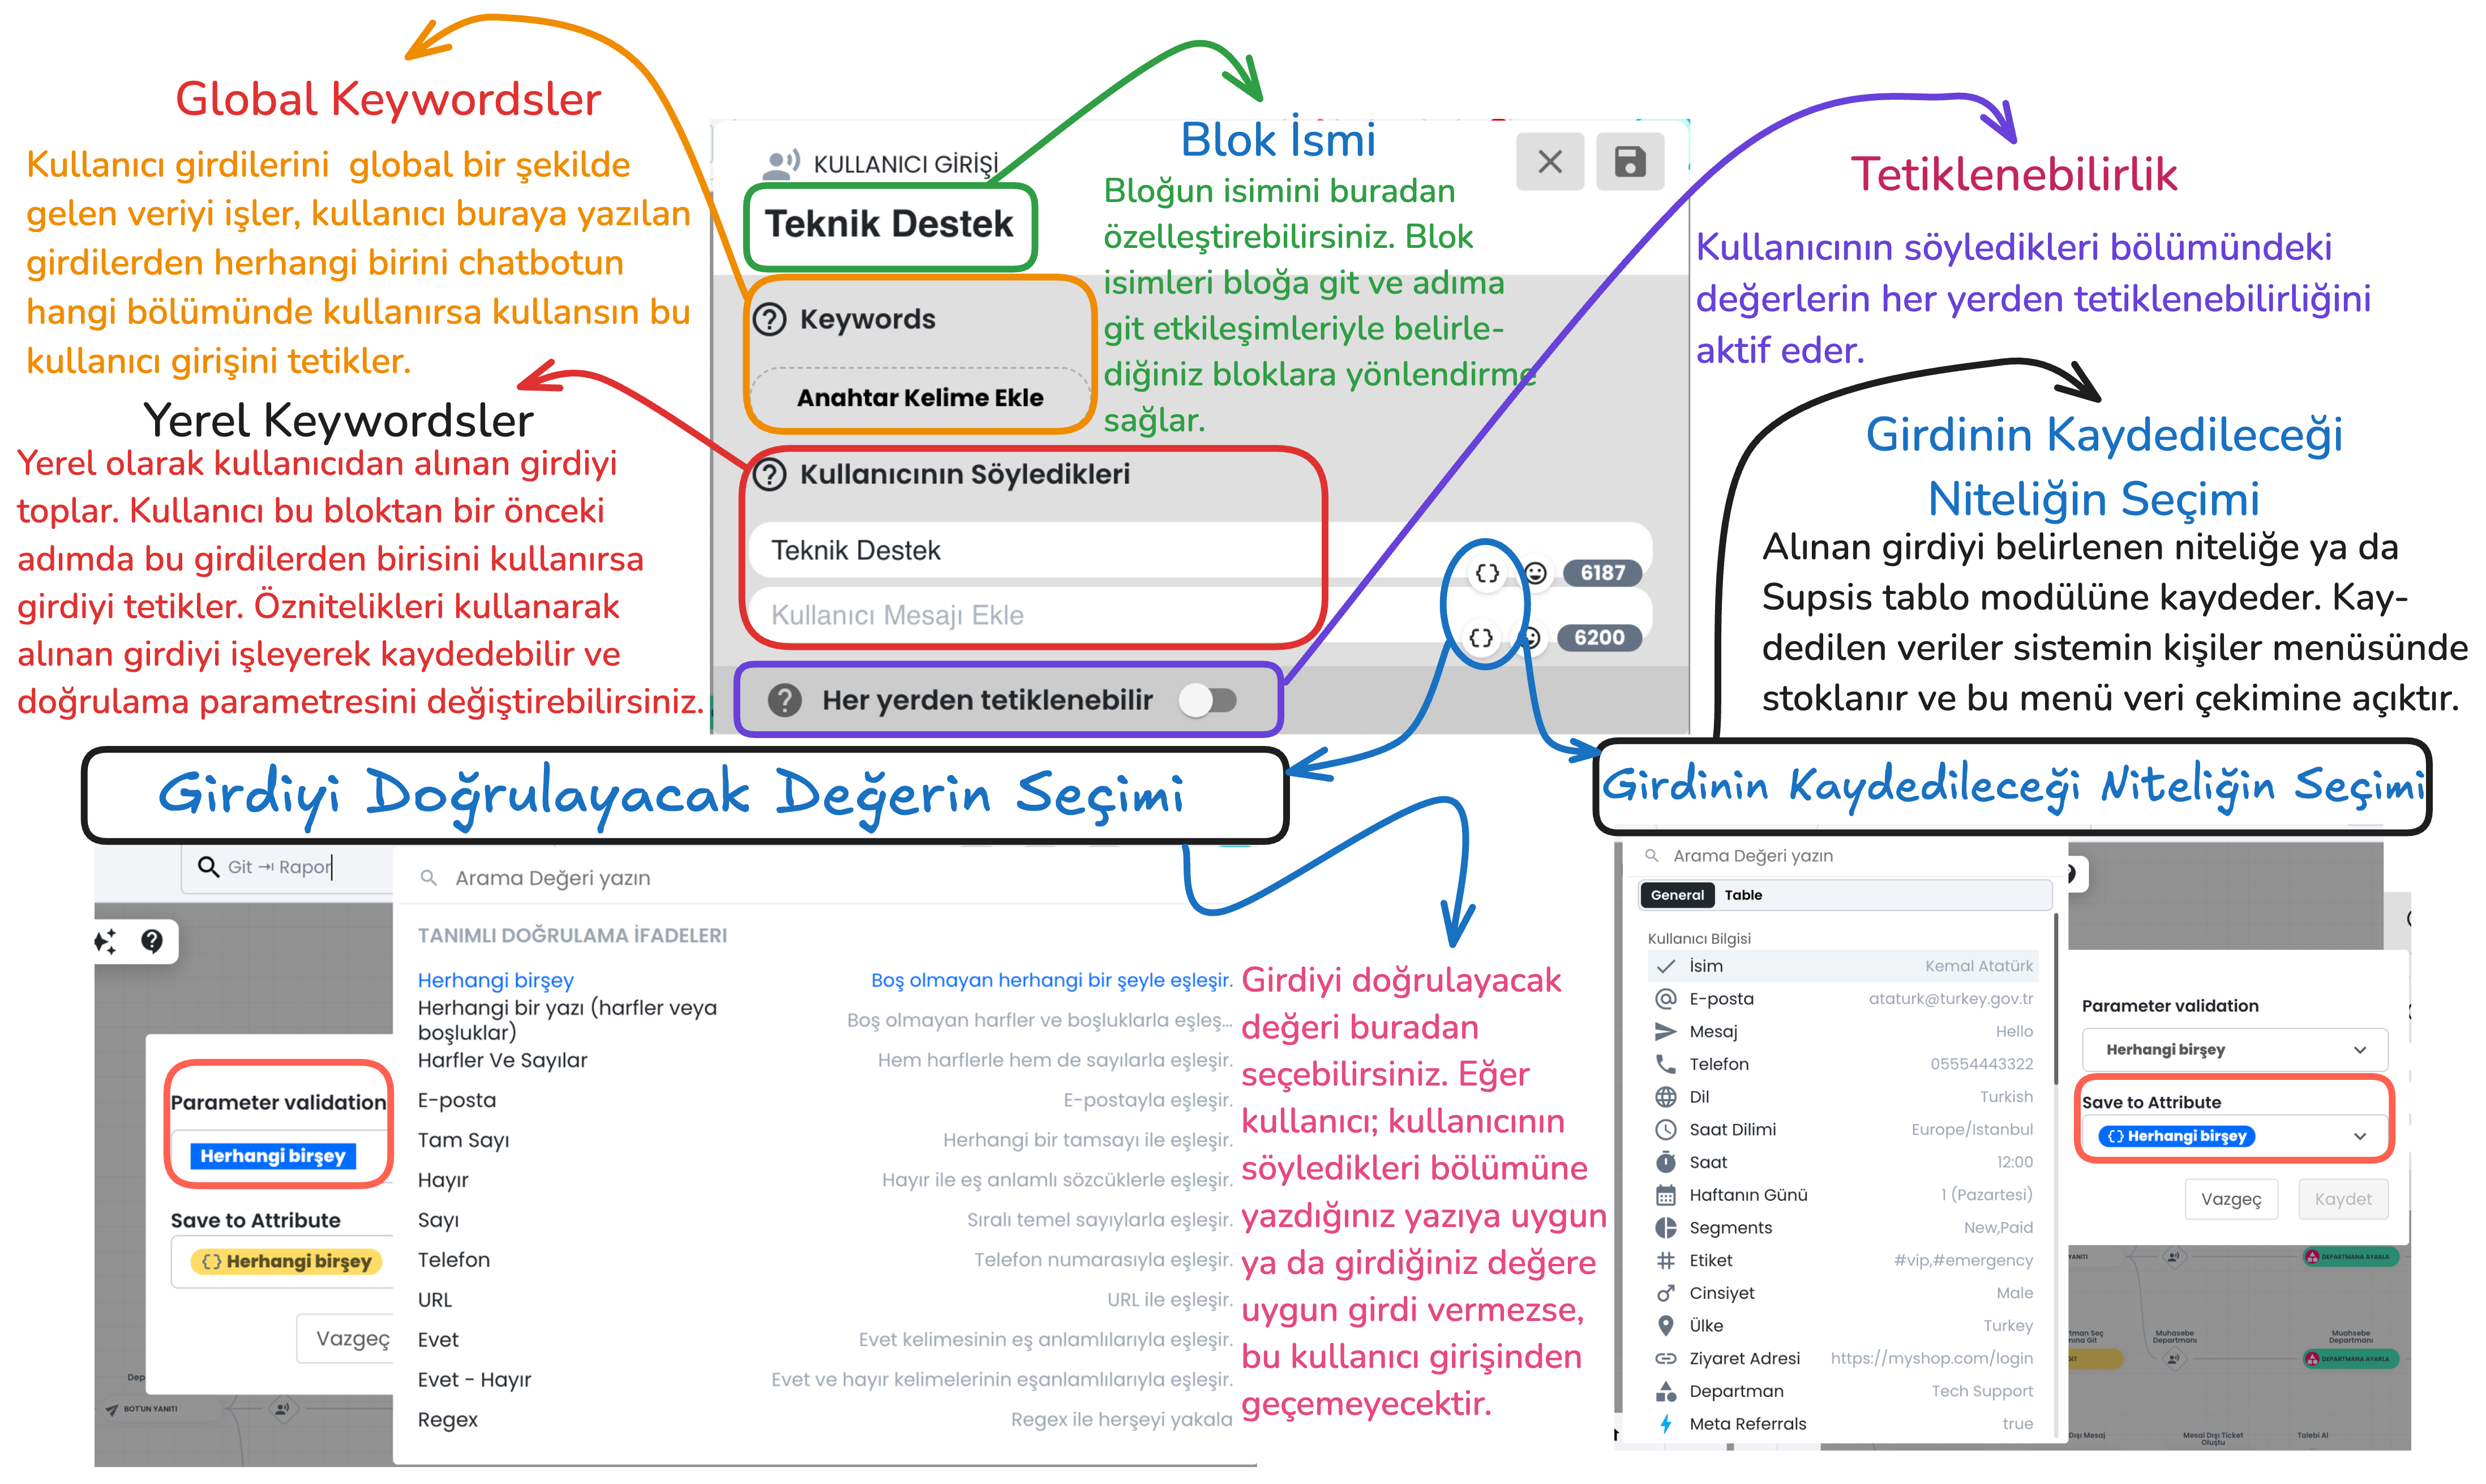
Global and Local Keywords
- Global Keywords: These are keywords that are valid anywhere throughout the entire chatbot. When the user writes one of these keywords, they can trigger the relevant user input regardless of which stage the chatbot is in.
- Local Keywords: These are keywords that are valid in a specific step. They are only used within the block in front of them and are not triggered in other steps. This provides more focused keyword usage.
Block Name
This section is used to customize the block name. The block name makes it easier to connect with other blocks. For example, "go to block" or "go to step" interactions determine the target through the block name and allow directing the user to the correct block.
Triggerable from Anywhere
When this feature is activated, the determined local keyword inputs become triggerable from anywhere within the entire chatbot. This makes local keywords work like global keywords.
Attributes
Selection of Value to Validate Input
Parameter Validation Chatbot offers various validation criteria to determine the accuracy of data received from the user:
- Regex: Regex codes can be used to provide more customized validation. You can easily create regex by writing the type of regex you want to create to ChatGPT and enter it in this section.
Selection of Attribute to Save Input
Save to Attribute The data received from the user is saved to a determined user attribute or to the determined section of the table module. For example, an input with email validation selected as the validation type can be saved to the "Email" attribute in the user's profile card. This saved data is stored in the person's profile card and can be retrieved from the system when needed.
Note: The confidence level in bot settings determines how strictly the chatbot will match incoming user inputs. - Low Confidence Level: The chatbot achieves a broader match with user messages and easily matches similar expressions. - High Confidence Level: The chatbot must fully match the user's messages. In this case, exact message matching is sought.
Button and User Input Interactions
1) Go to Block Button Type
With the "Go to Block" Button Type, when the user uses the determined button, they are directed to a predefined block. After selecting this button type, you can directly direct the user to this step by selecting the block name you want to go to from the "Go To" section. This feature allows the user to access the steps they need during chatbot interaction.
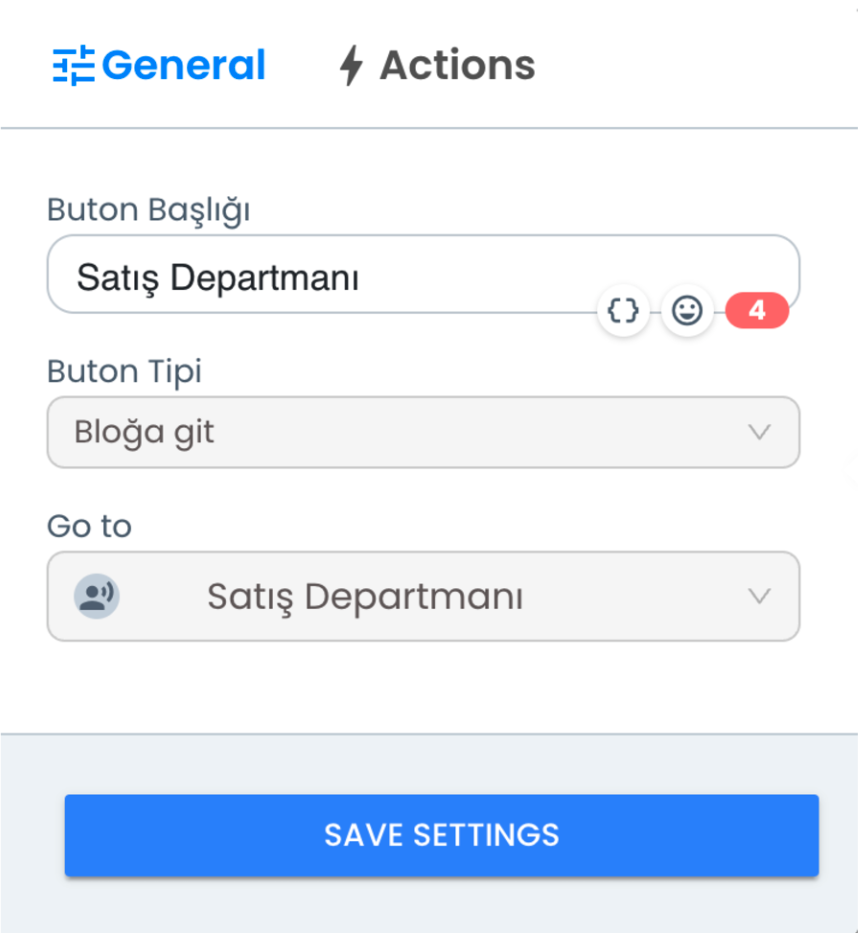
- Button Title: Determines the button name visible to the user.
- Go To Selection: You select the block name where the user will be directed when they click this button.
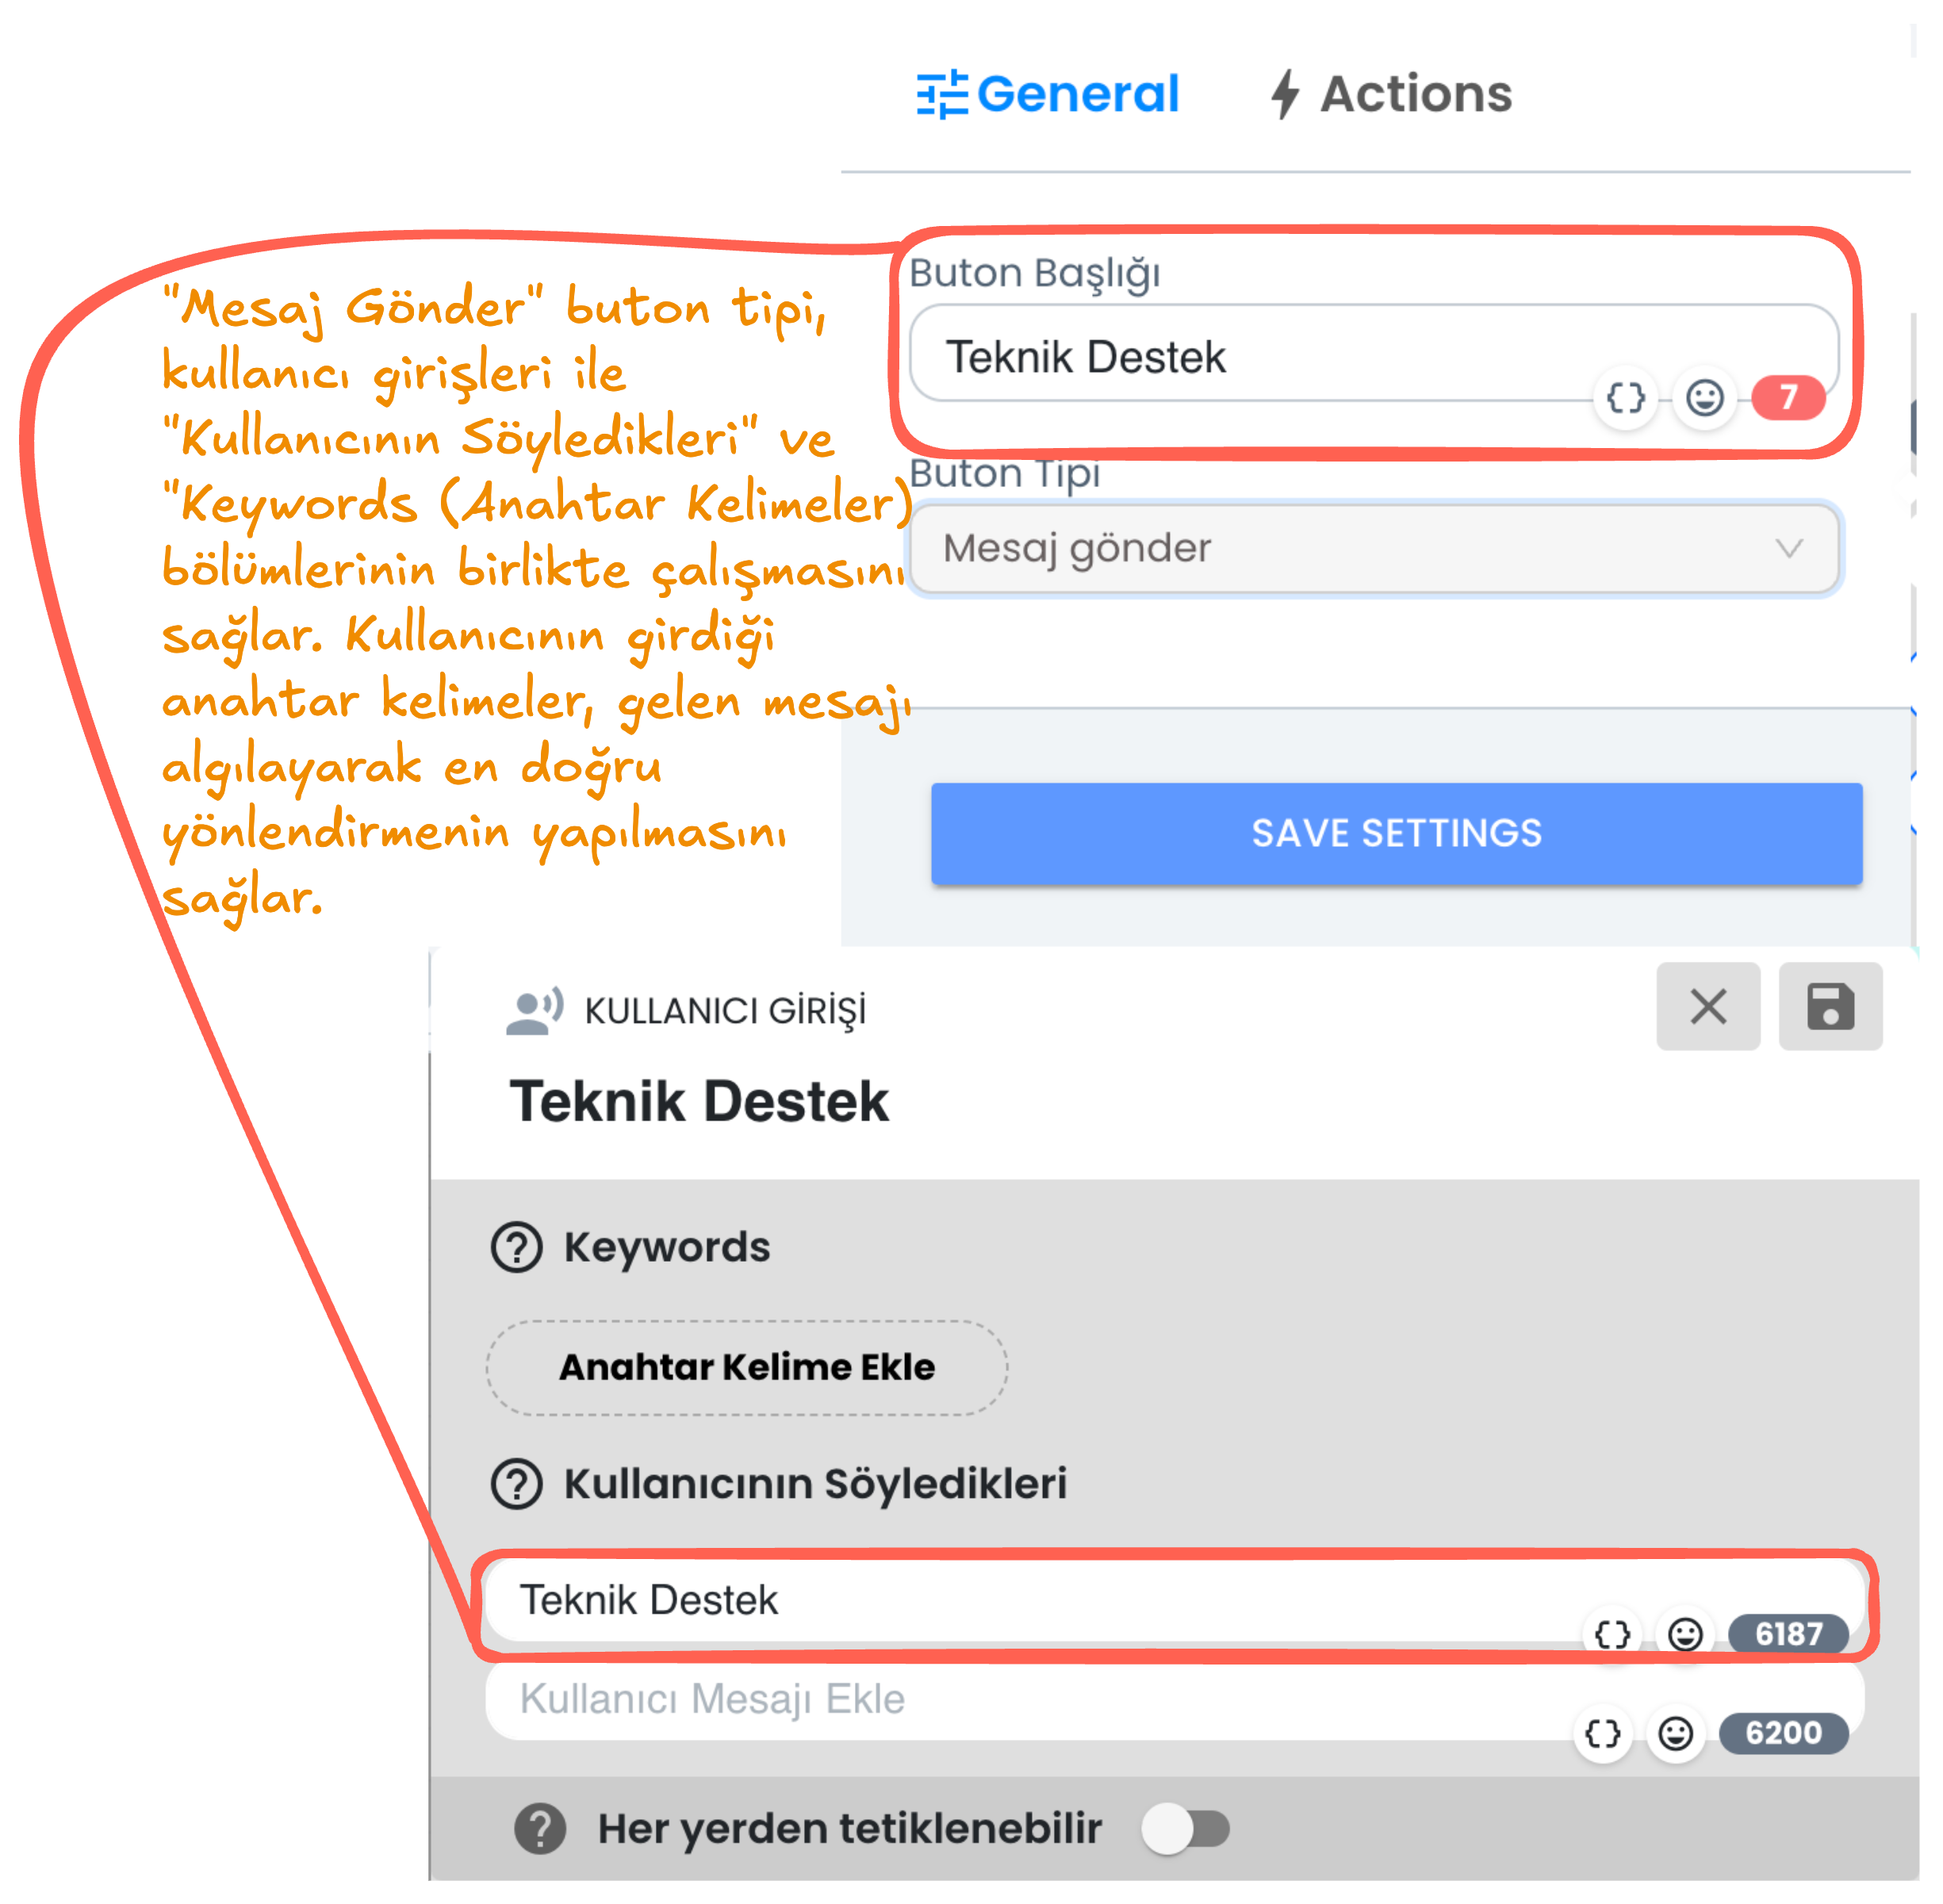
2) Send Message Button Type & User Input
"Send Message" Button Type allows the button the user clicks on to be sent to the chatbot as a message. By offering specific buttons to the user, button contents are analyzed through keywords and directed to relevant sections.
- Button Title: You can determine the button name visible to the user, when the user presses this button, the content in the button title is transmitted to the chatbot as a message.
- Keywords and What the User Says: By matching the message entered by the user or the input taken from the button content with keywords, it ensures that the chatbot continues through the correct user input. This way, when the user writes a specific word, the bot detects this message and provides the relevant direction.
Additional Features
1. Set Department, Add Tag, Transfer to Representative
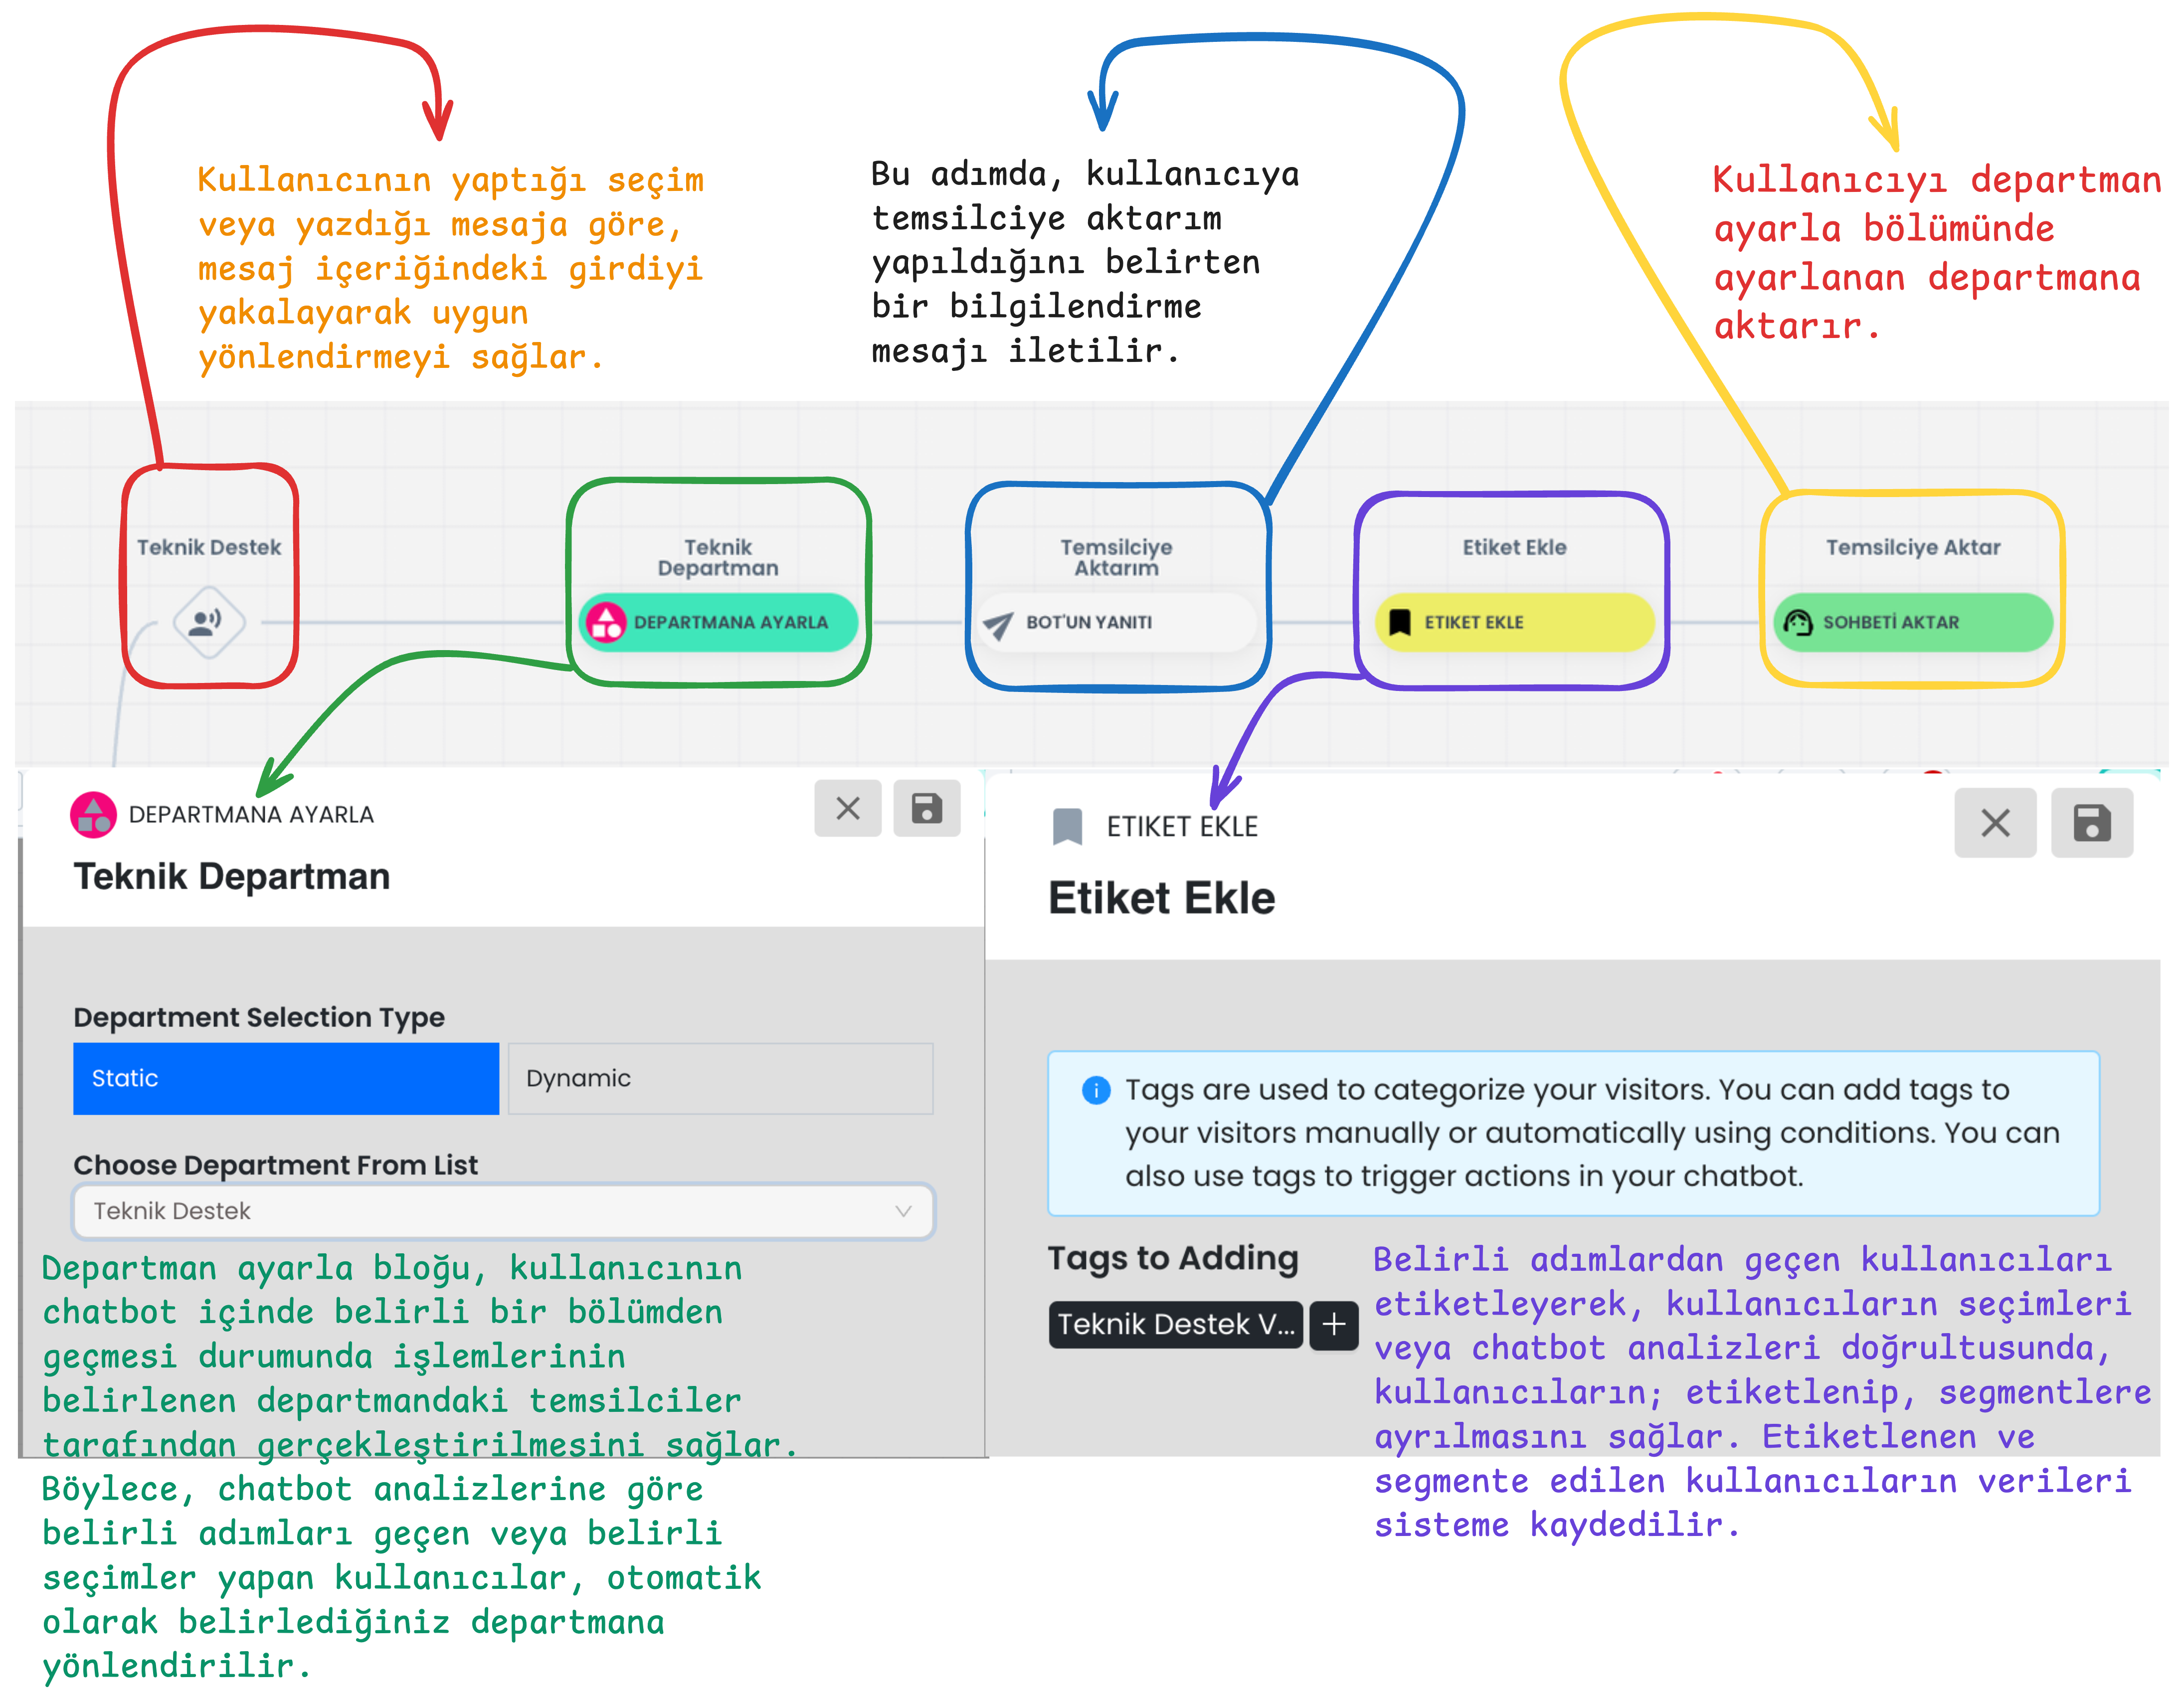
1-) User Input Direction:
- When users make a specific selection through buttons or send a specific message, the system automatically detects this input.
- Based on keywords in the message content or the user's selections, the request is analyzed through the chatbot and appropriate direction is provided.
- This way, whatever topic the user wants help with, the system takes the right action and directs the user to the appropriate department.
2-) Department Direction
- Set Department block directs users who come through specific blocks to determined departments. Only representatives in the determined departments can see the existence of this chat.
- For example, if the user made a "Technical Support" selection, the user passing through this step is automatically assigned to the technical support department.
- Analysis is performed according to the user's selections or interactions within the chatbot and appropriate department setting is made.
3-) Representative Transfer Information
- The user receives an information message that they will be transferred to a representative.
- This information gives the user confidence about the process and informs them that live support will be provided.
4-) Adding Tags
- Add Tag module adds tags to users' profile cards according to their selections or specific steps.
- Tagging is used for segmentation in user analyses and tracks interactions within the chatbot.
- Tags added to users are stored in the system for analysis in filtering and segmentation operations.
5-) Representative Transfer
- The user's session is transferred from the chatbot to the live support representative.
- If a department is set, they are directed to the determined department, if not set, they are directed to an appropriate representative according to the automatic chat assignment algorithm.
2. Filter, Go to Step, Process Data, Take Request, Create Ticket
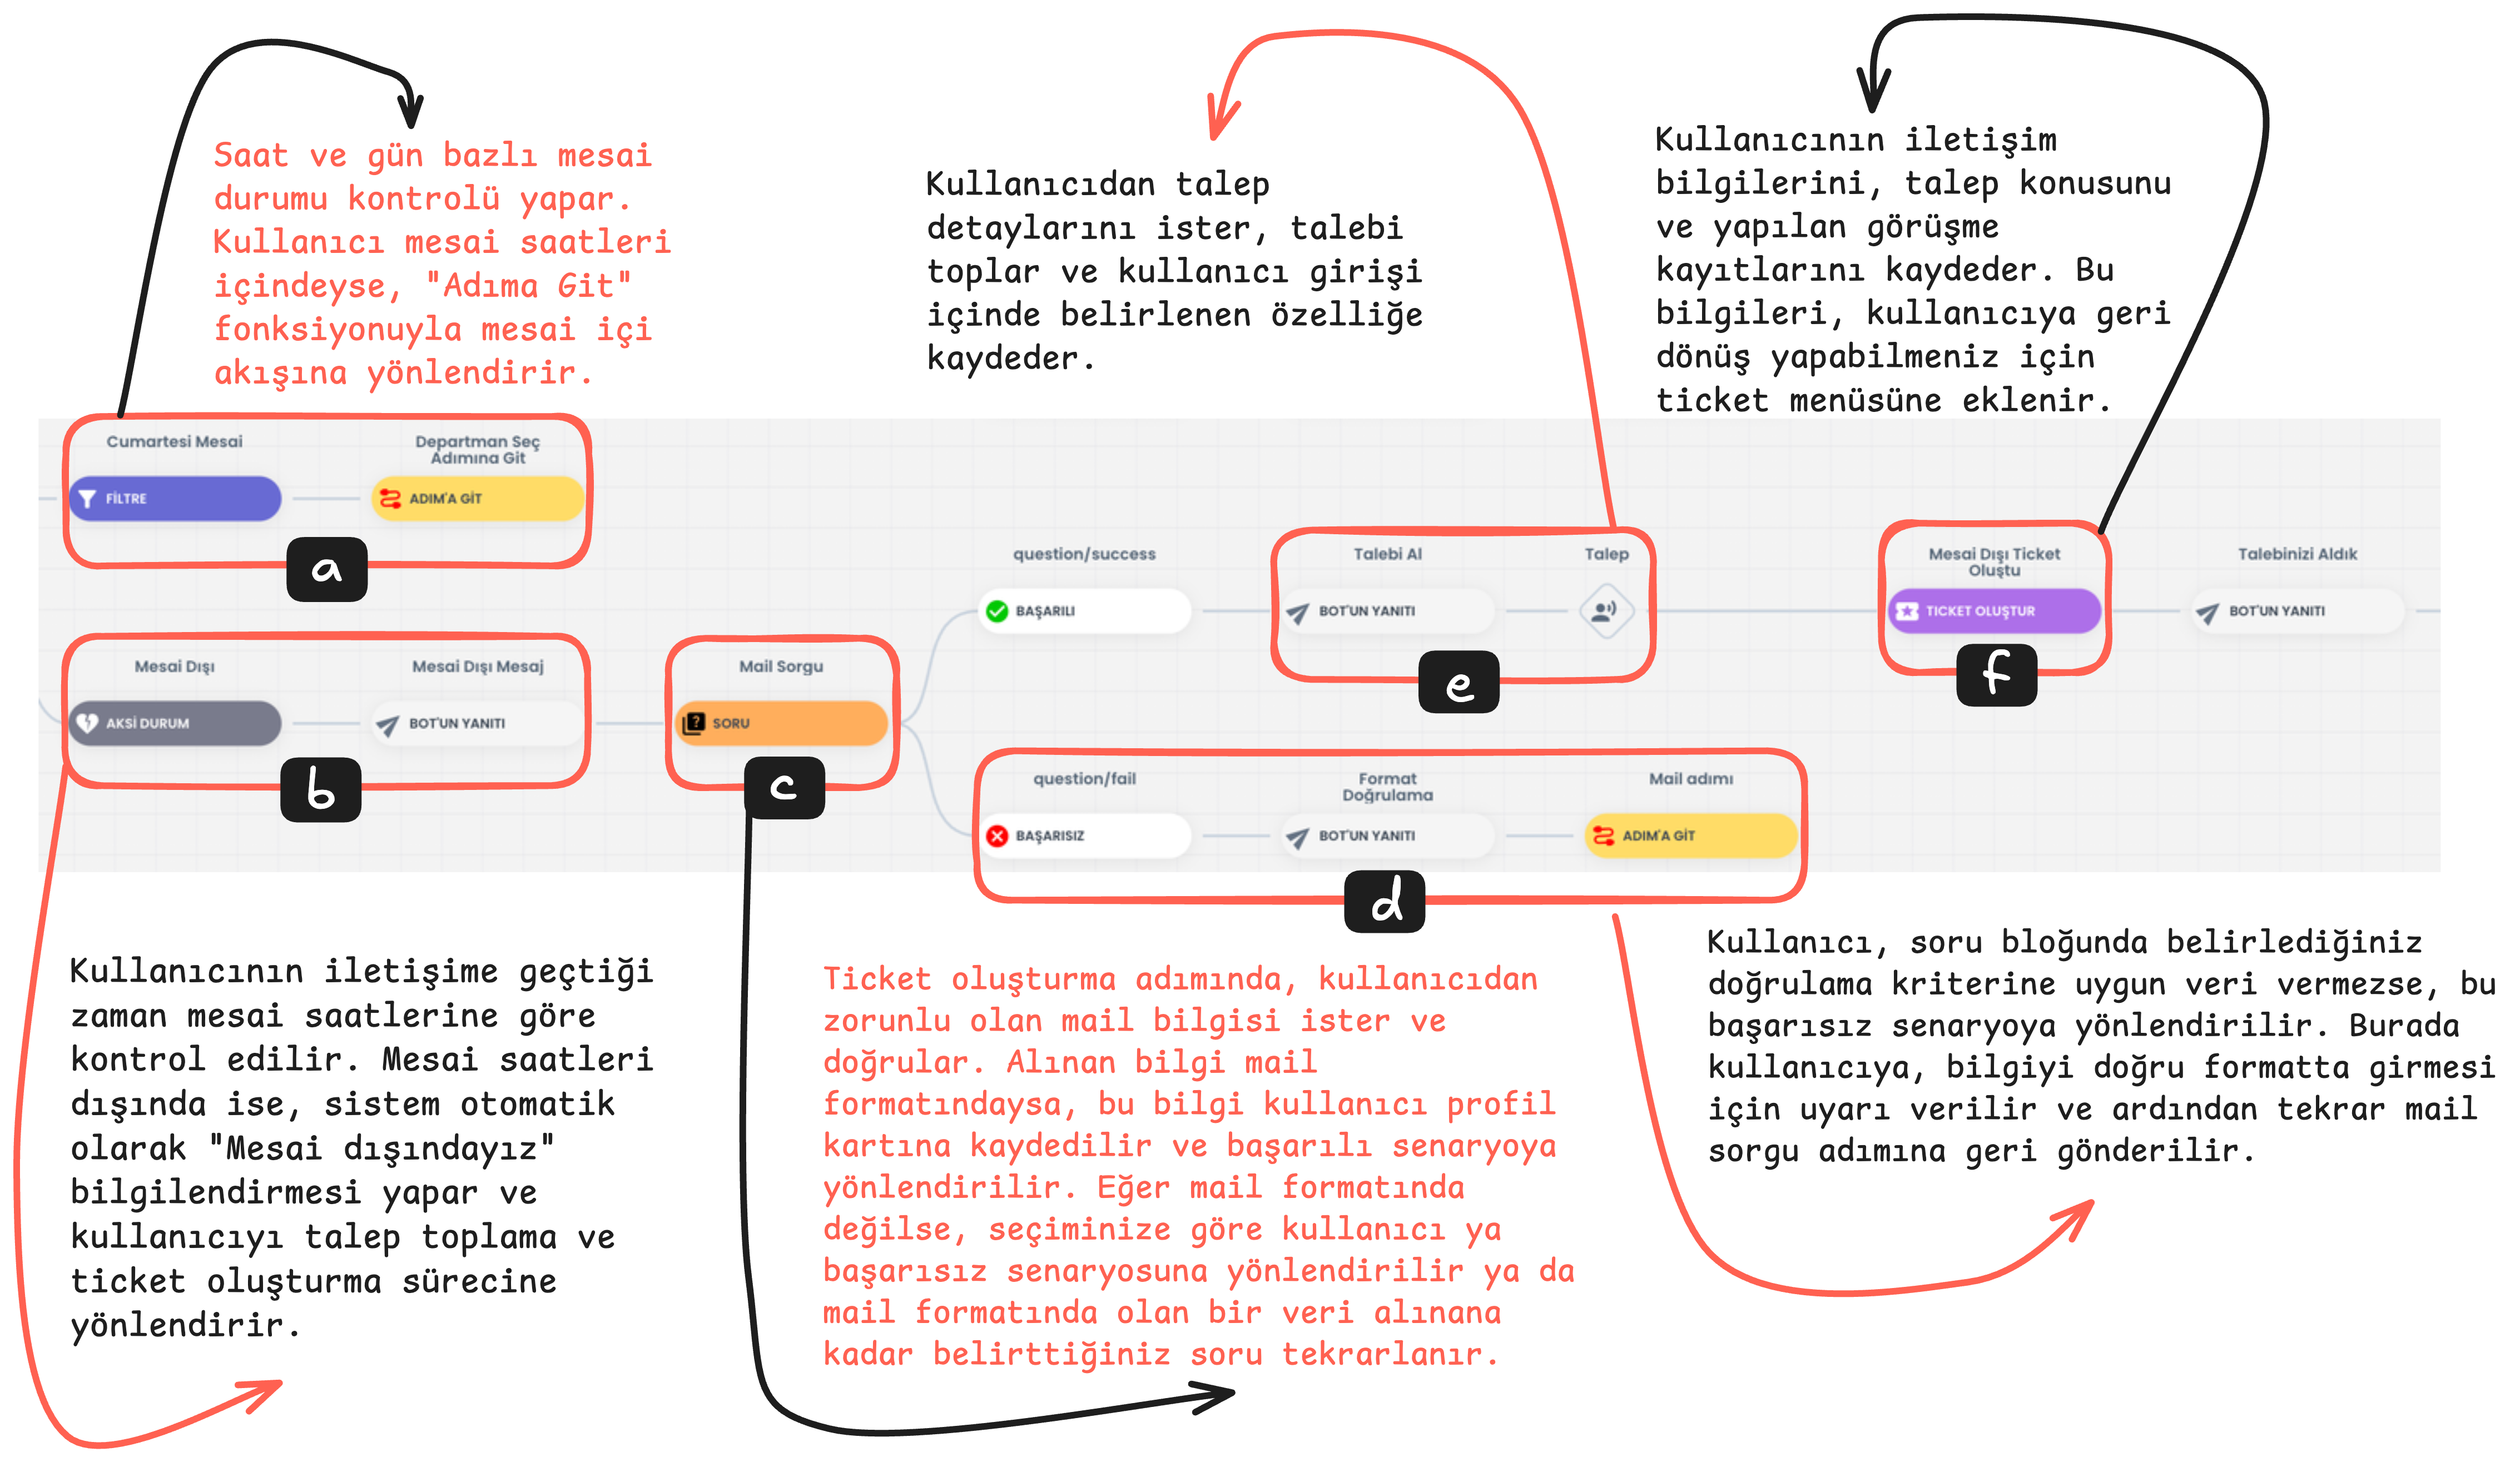
a) Working Hours Status Check and Go to Step
The hour and day when the user contacts is compared with working hours. If it is detected that they are within working hours, the user is directed to the working hours flow using the "Go to Step" function. This step ensures that the user receives support during business hours.

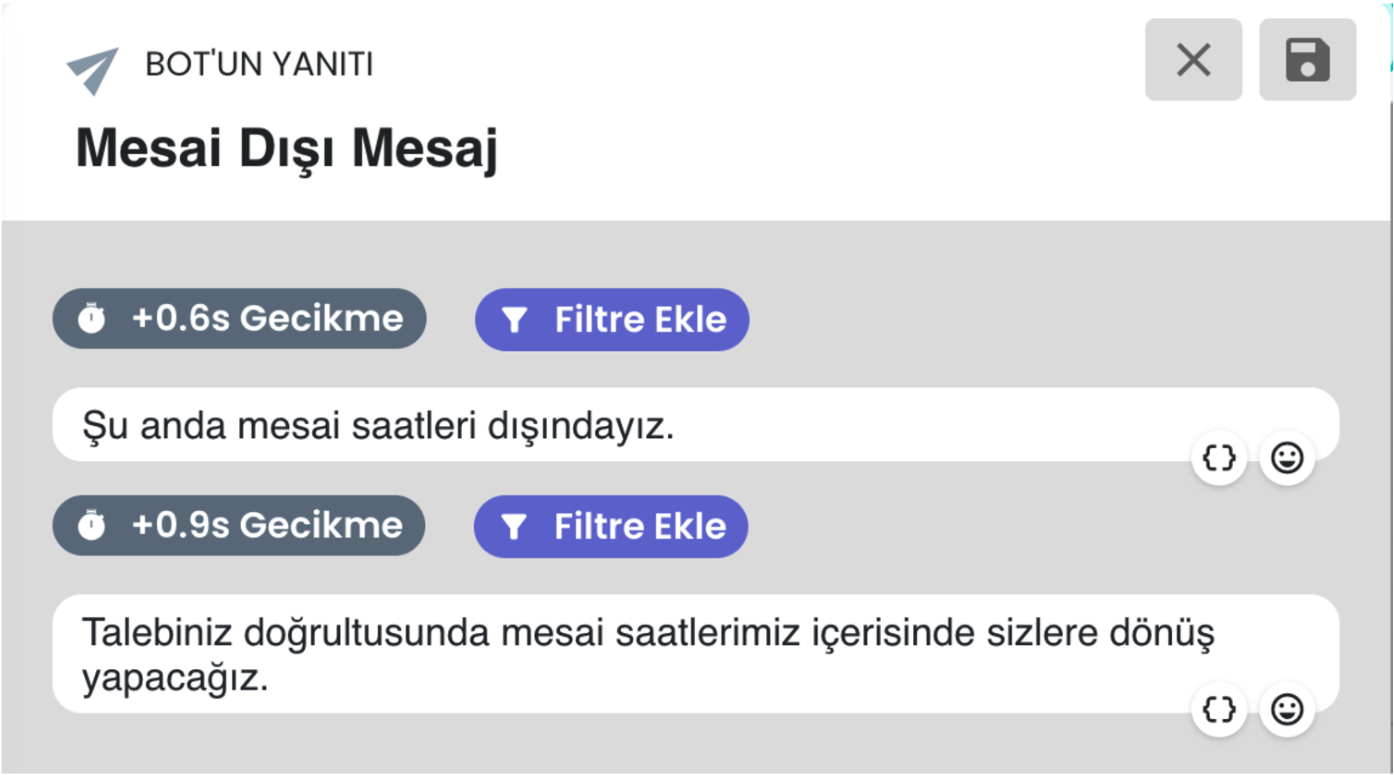
b) Outside Working Hours Status
If the user contacts outside working hours, the system automatically gives an "We are outside working hours" notification and directs the user to the request collection and ticket creation flow. This allows the user to convey their support request 24/7.
c) Question Block
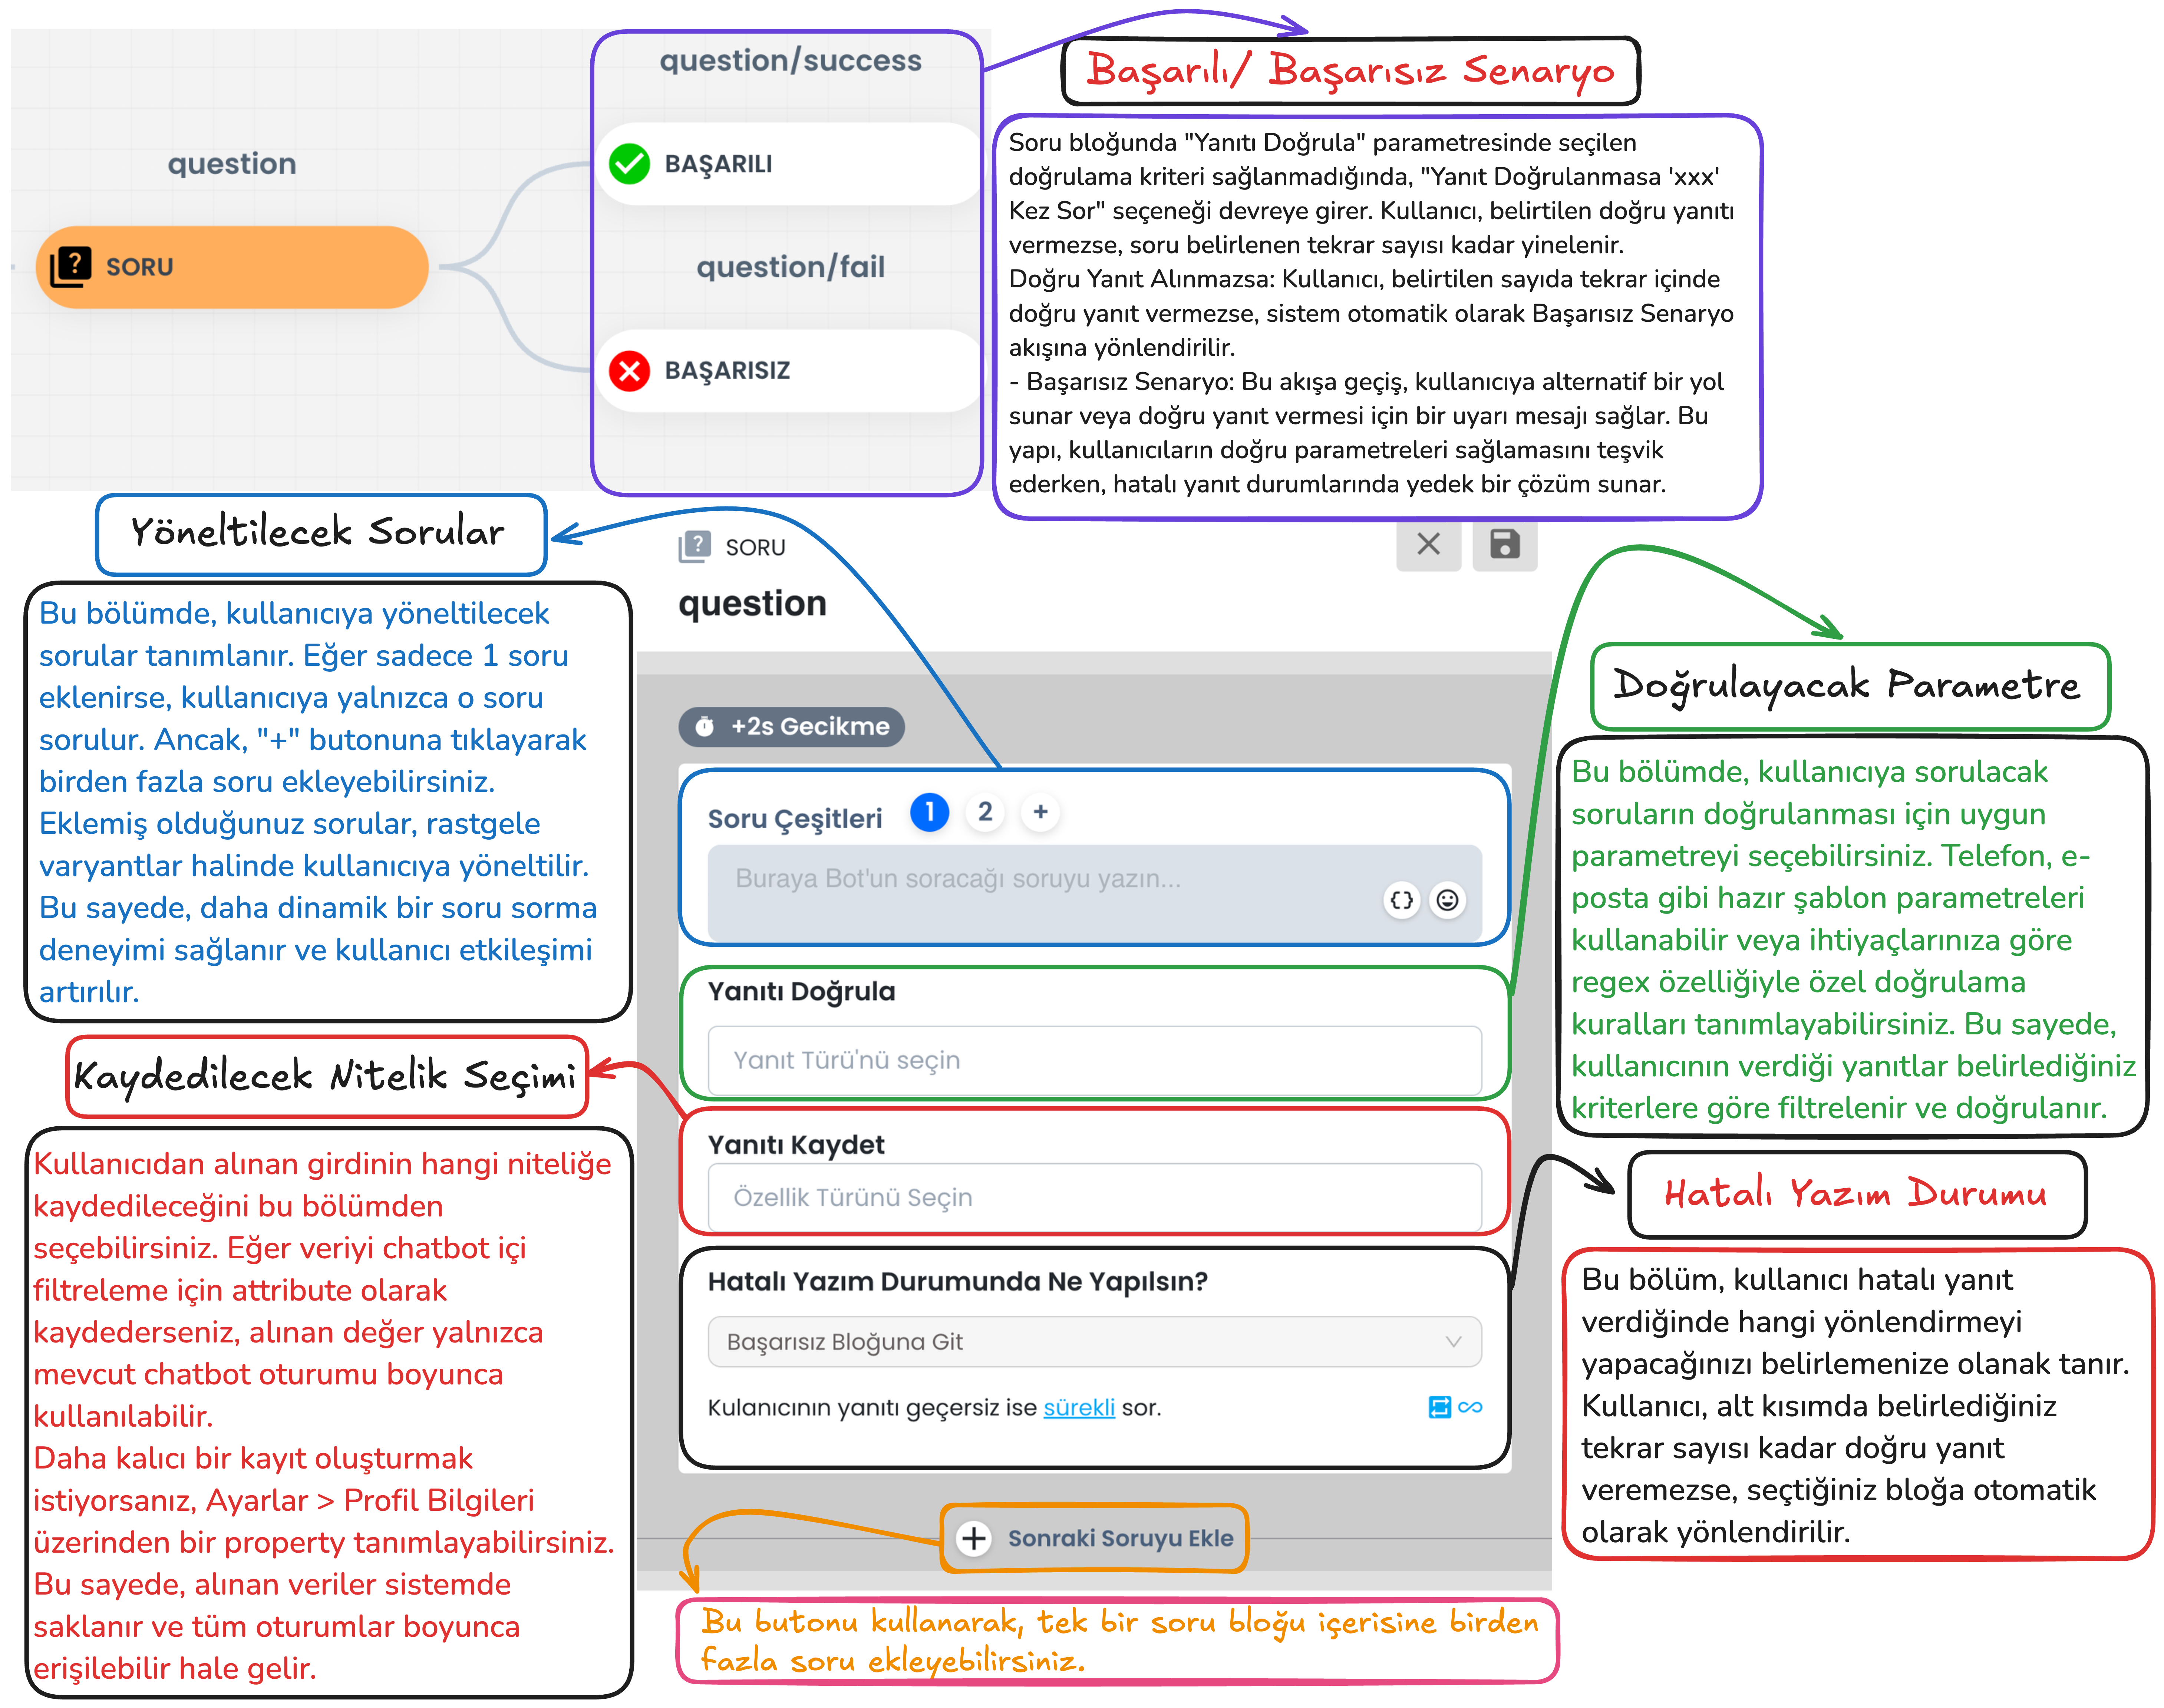
Question Block Email Query
In the ticket creation process, the user's email information is requested as mandatory. The Question Block takes the user's email address and checks whether this information is in the correct format.
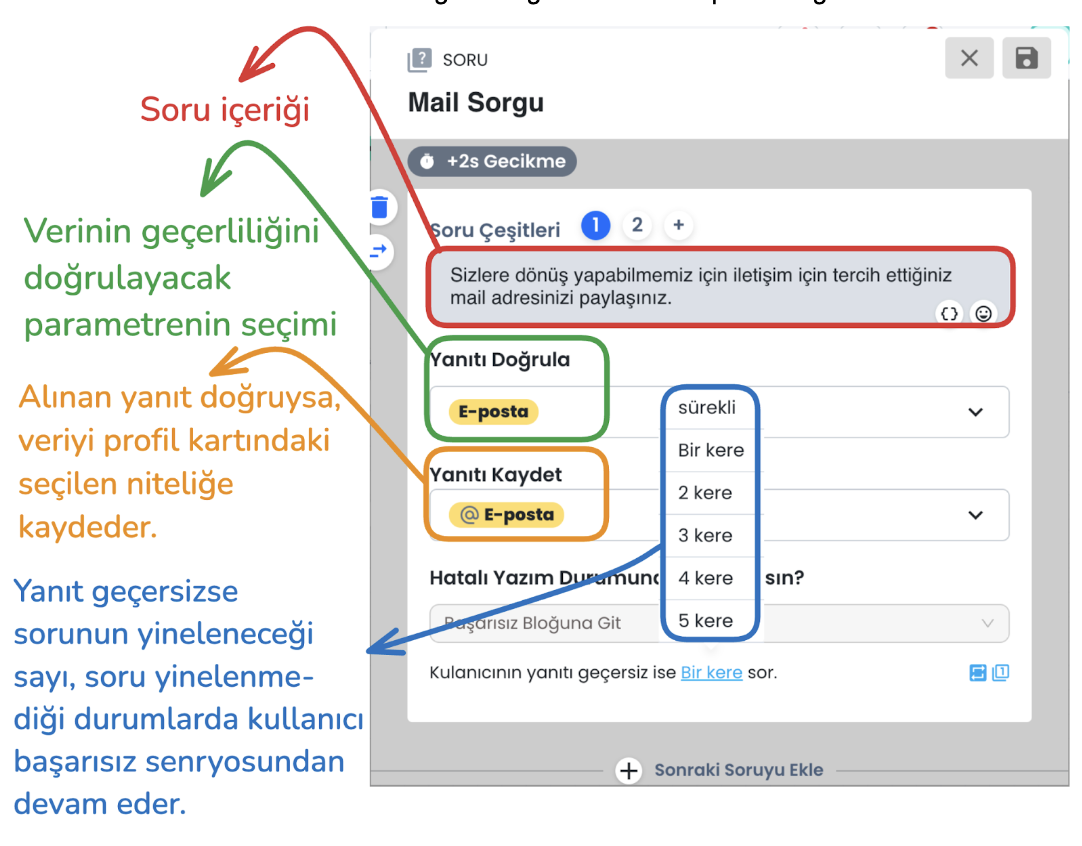
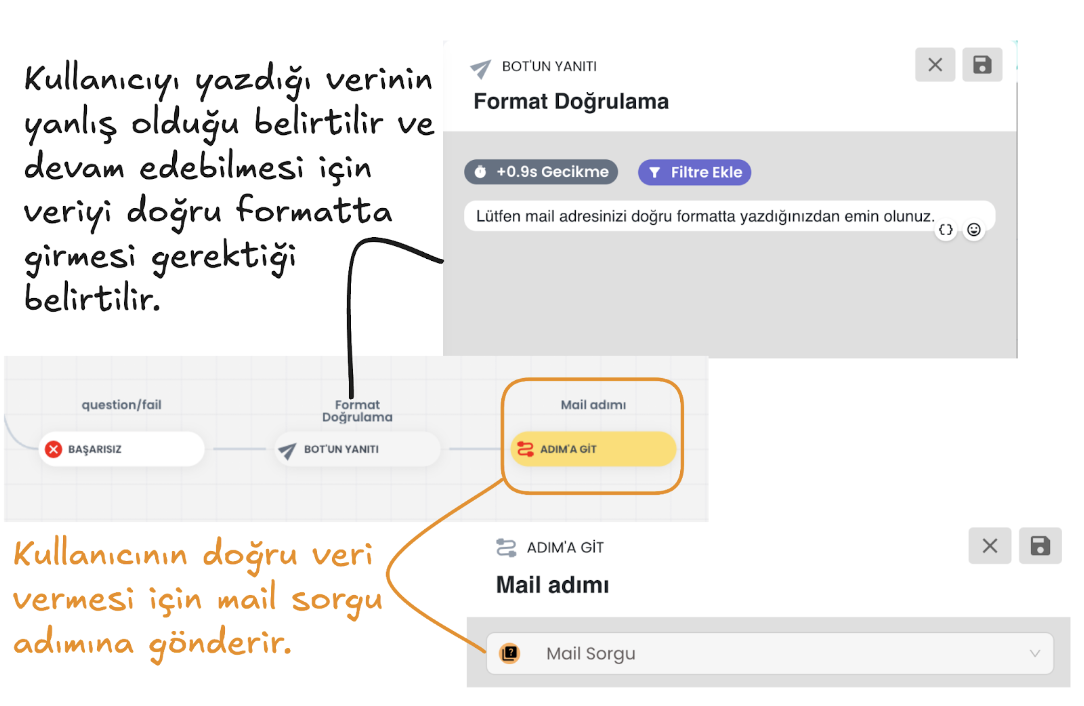
d) Question Block Failed Scenario
Email address format validation is performed. If the email address is not in the correct format and the user's response is invalid, it directs the user to the failed scenario according to the query count you select from the "ask the user's response if invalid .. times" section, or the same question is repeated until the correct email format is provided. When the email is entered correctly, the entered information is saved to the profile card and the user is directed to the successful scenario.
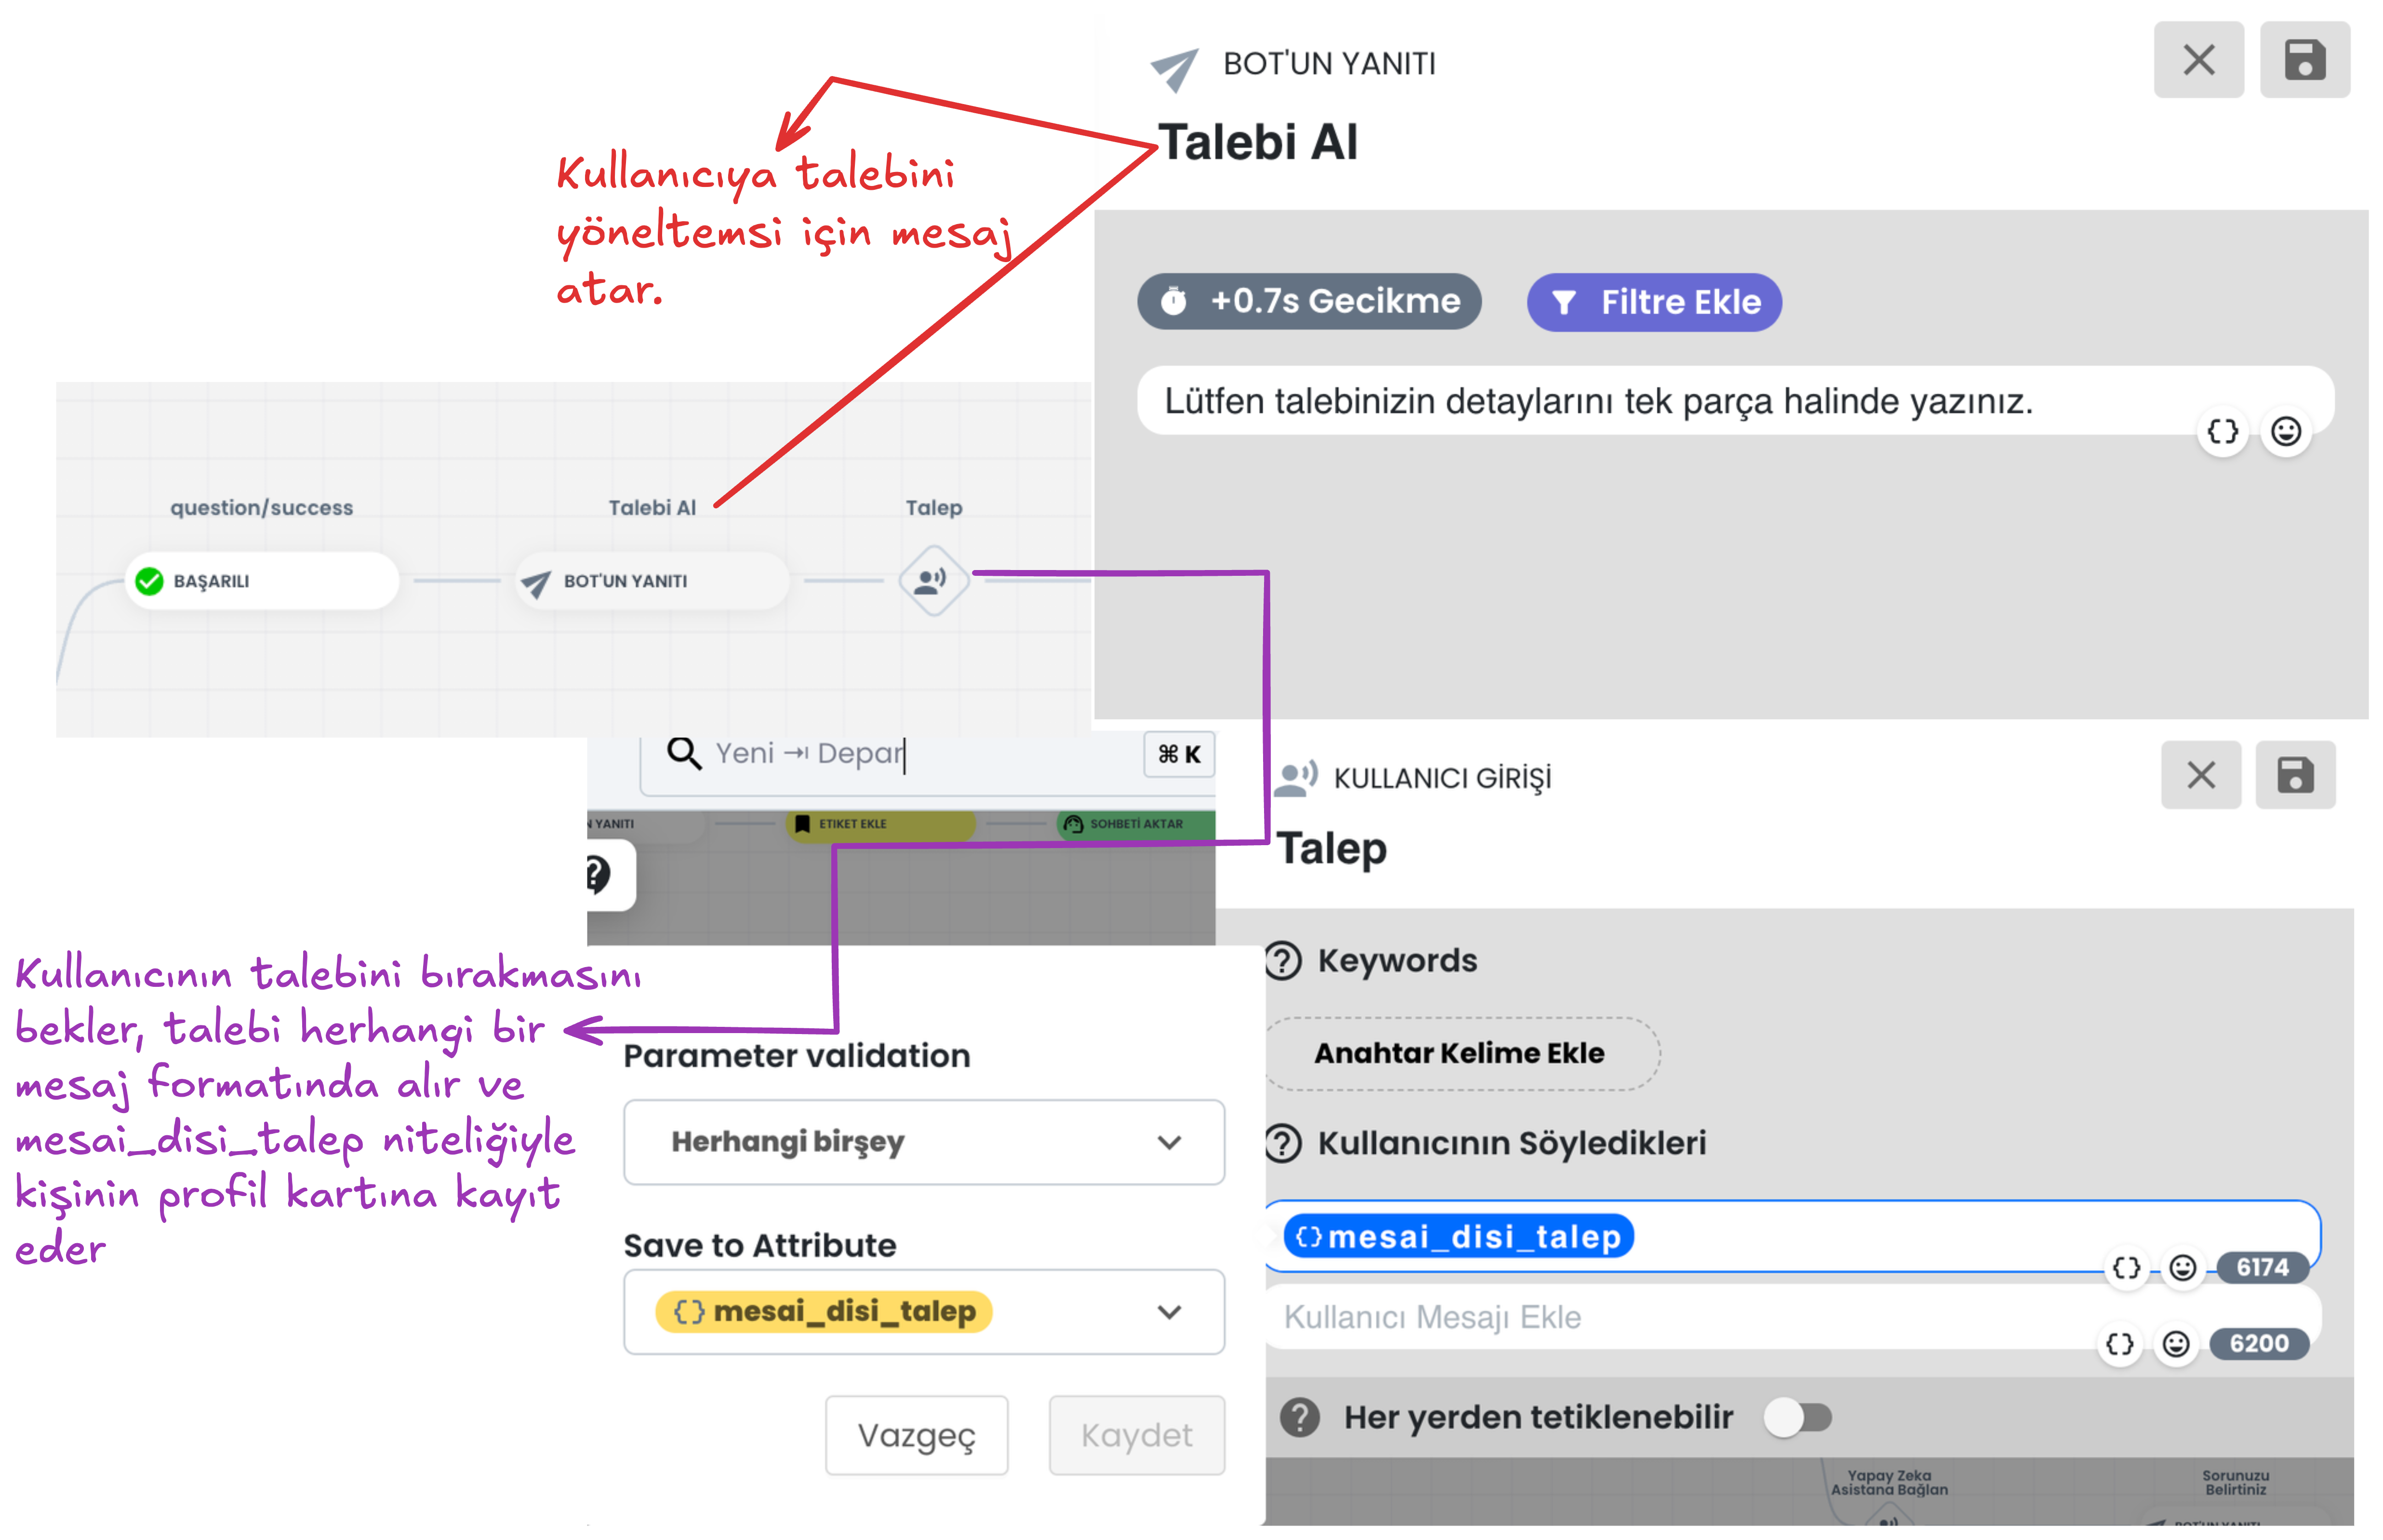
e) Successful Scenario: Request Collection and Saving
If the user provides the data correctly, they continue from the successful scenario. At this stage, they are asked to convey the request details. You can save this information provided by the user to the attribute you determine in the user profile, or you can continue without saving the data. This information allows the user to clearly express their support request.
f) Create Ticket
- The Create Ticket flow enables the creation of a support request (ticket) using the user's conversations and data received through the chatbot.
This step helps process user requests in a more organized and faster way by saving the user's contact information (email and phone number) and request topic.
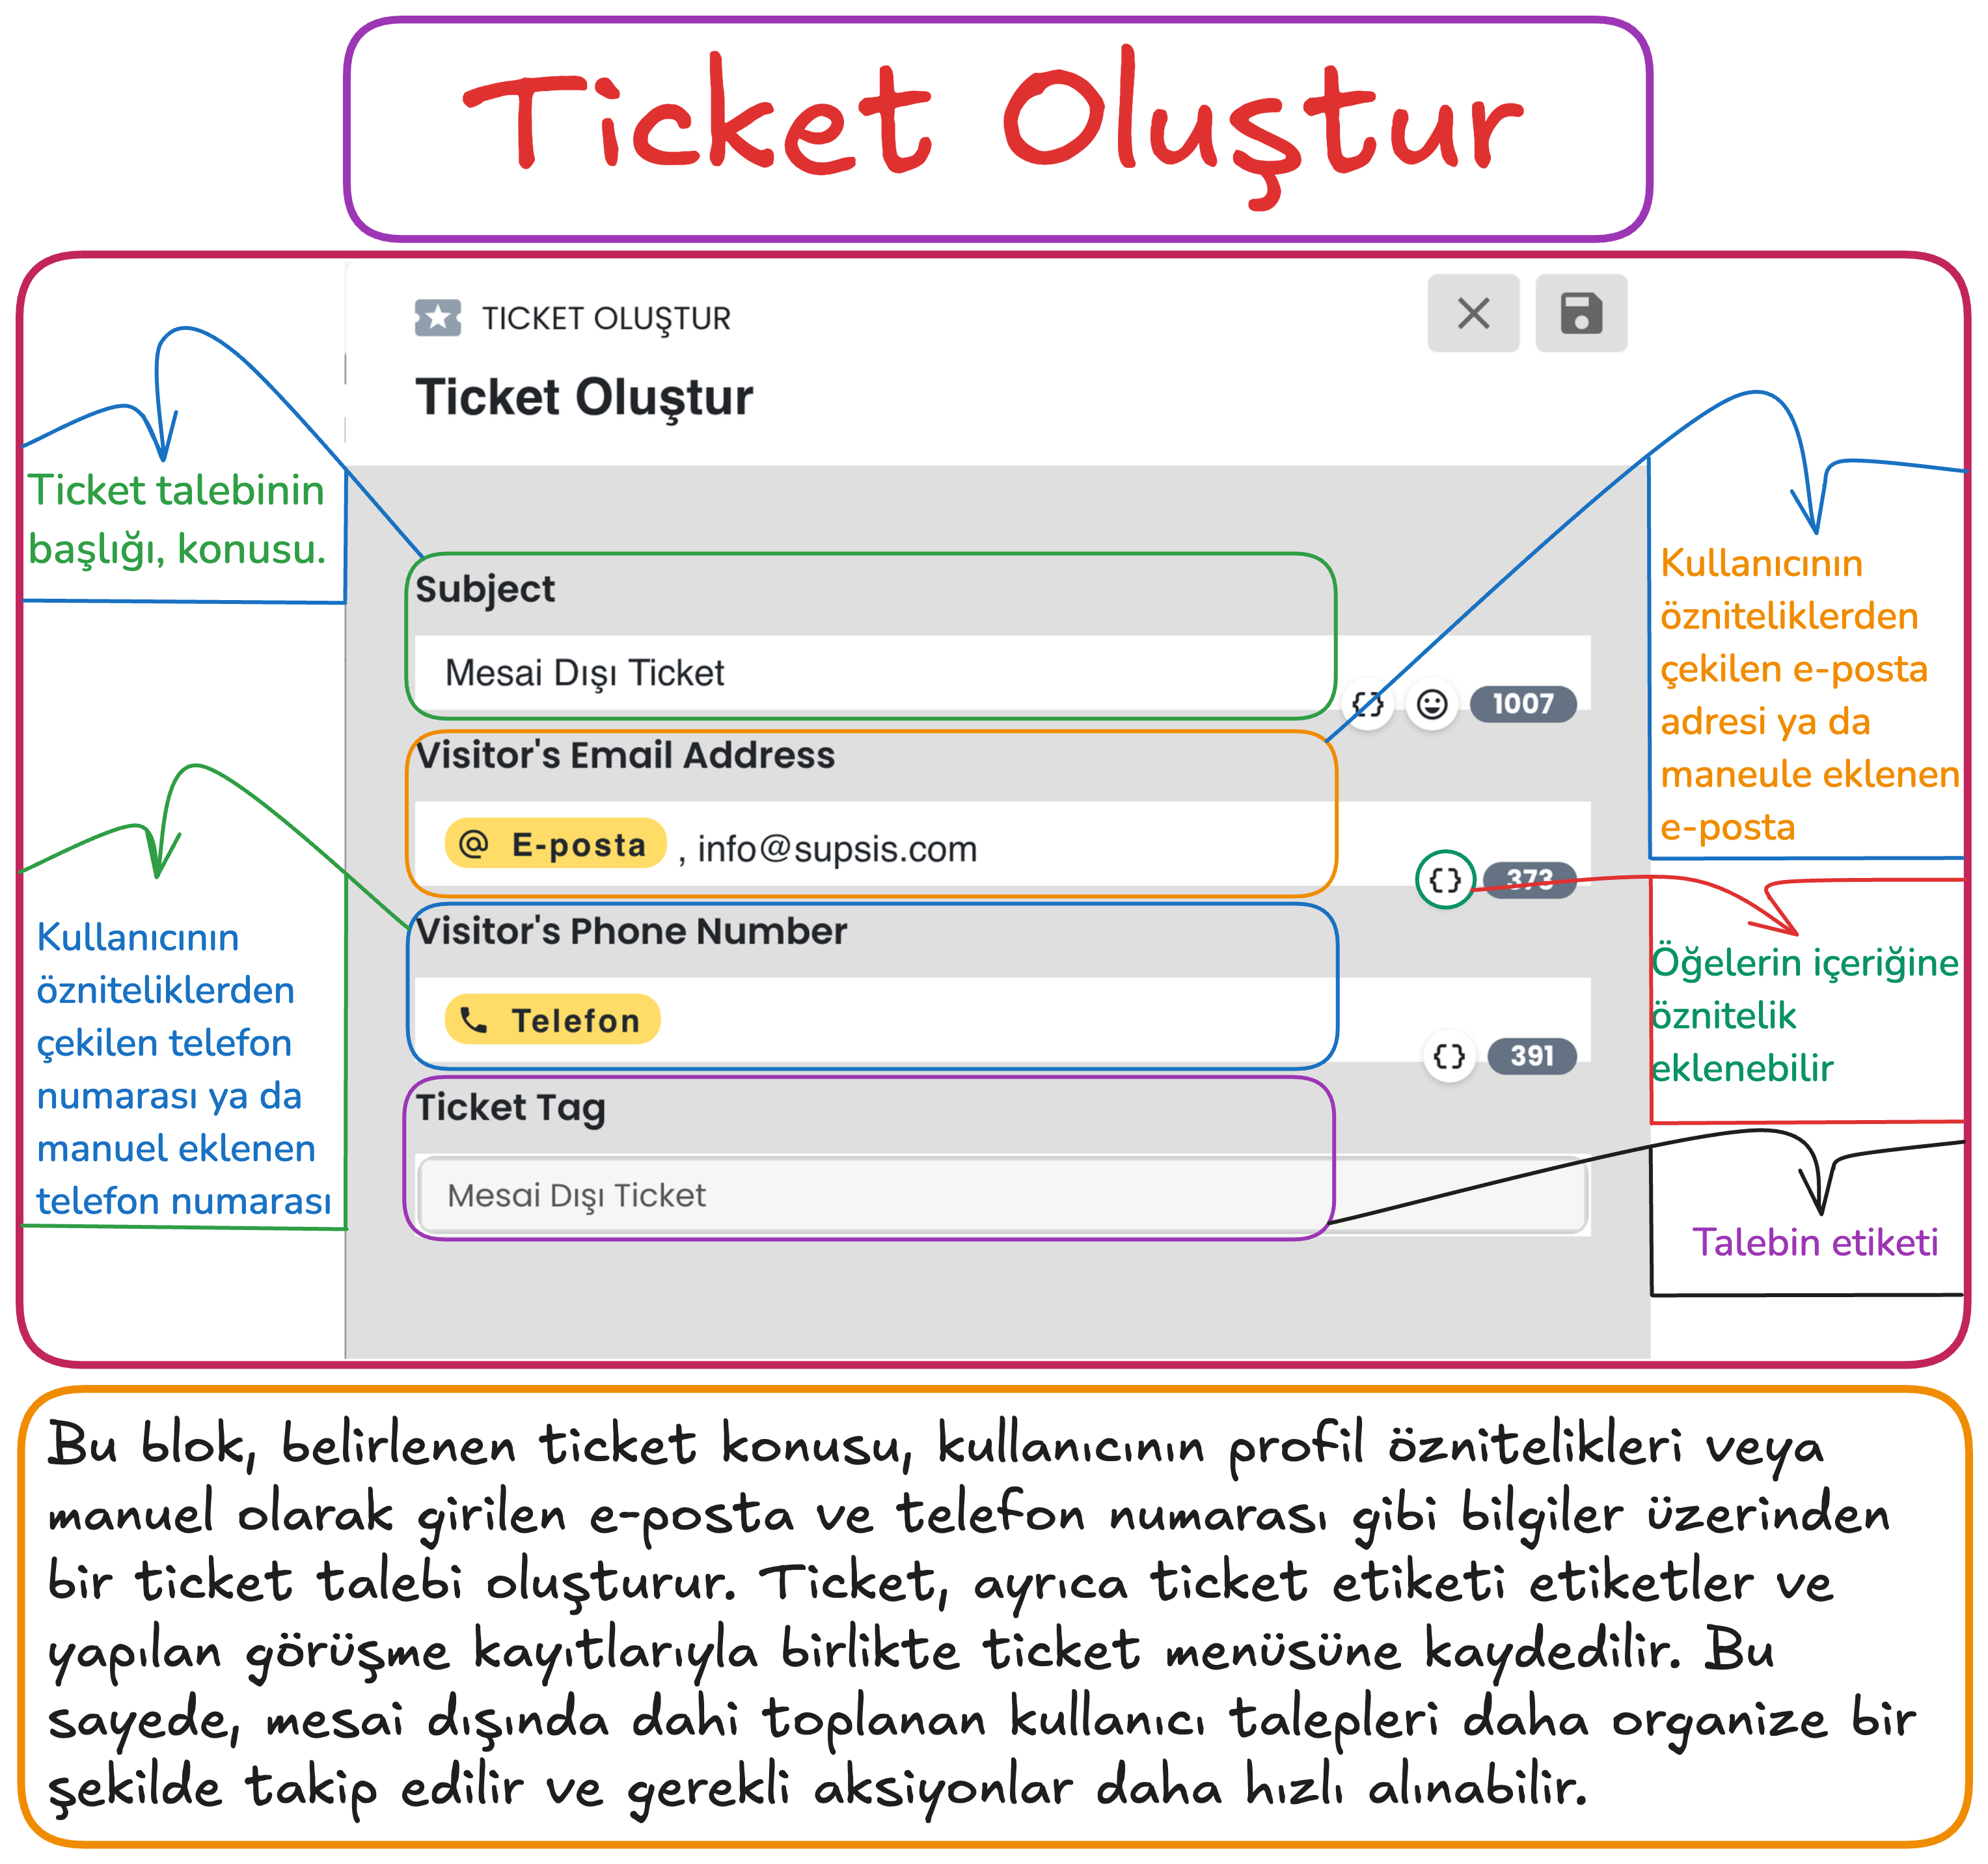
Steps:
- Request Subject:
- A title is entered according to the user's requests. For example, a general topic such as "Outside Working Hours Ticket" can be determined.
- The request subject facilitates quick search and analysis in the ticket system.
- Email Information (Visitor's Email Address):
- The user's email address, the email information registered in the system is automatically added.
- If there is no email address in the system, an email address can be entered manually.
- Email information facilitates the user's communication with the support team and tracking of the request.
- Phone Number (Visitor's Phone Number):
- The user's phone number is retrieved from registered attributes in the system or can be added manually.
- The phone number can be used to provide easy access to the user and respond quickly.
- Ticket Tag:
- A tag can be added according to the content of the request when creating the ticket record (for example, "Outside Working Hours Ticket").
- These tags enable filtering and categorization of tickets.
Important Note
Mandatory Email Information: To create a ticket, the email address in the ticket block content must be filled in as attribute data or a manually entered email address. If no email address is available, a manual address entry can be made or communication can be provided through the phone number.
3. Additional Menu
The Additional Menu can increase the quality of the chatbot experience and the solution status by offering various options to the user at the end of the chatbot flow. It can offer a more flexible and interactive experience. Below is an example chatbot menu. Through the buttons in this example menu, the user can: return to the main menu, end the chat, or be directed to the AI assistant to find answers to more complex questions and requests. At the additional menu stage, you can customize the chatbot additional menu content for your business by providing customizations as needed. The Additional Menu increases the support options offered by the chatbot to the user and provides flexibility. This way, the user can access the most appropriate direction for their needs.
![]()
1-) Return to Main Menu
When the user clicks this button, they return to the main menu step with the go to block interaction. This button allows the user to return to the very beginning in the chatbot flow and discover other options they need.
2-) Connect to AI Assistant
If there is a situation where the chatbot cannot respond (it automatically comes into play at this stage) or if the user wants to get support for complex situations outside working hours, they are directed to the AI assistant through a button you provide. If the AI module is activated, the AI assistant will automatically come into play in situations where the chatbot cannot respond. The AI assistant can help like a real staff member and answer questions according to the information you load into the system specific to your business and the instructions you give. By training the AI assistant, you can give it functions like a real human and make your customers feel that you are always with them. You can get support from 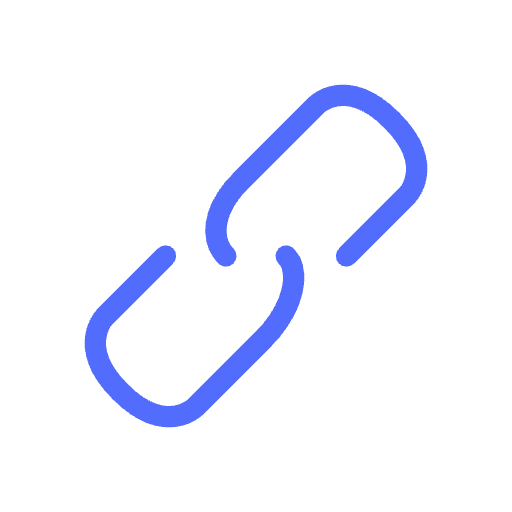 this documentation page to integrate AI into your chatbot system.
3-) Close Chat
With this option, the user can end the chat session. A farewell message is sent to the user who clicks the close chat button and the session is terminated.
Providing Integration and Publishing the Scenario
Providing Integration
By following the steps below, you can provide integration of the chatbot scenario with the relevant channel by selecting the platforms where the Chatbot will be used.
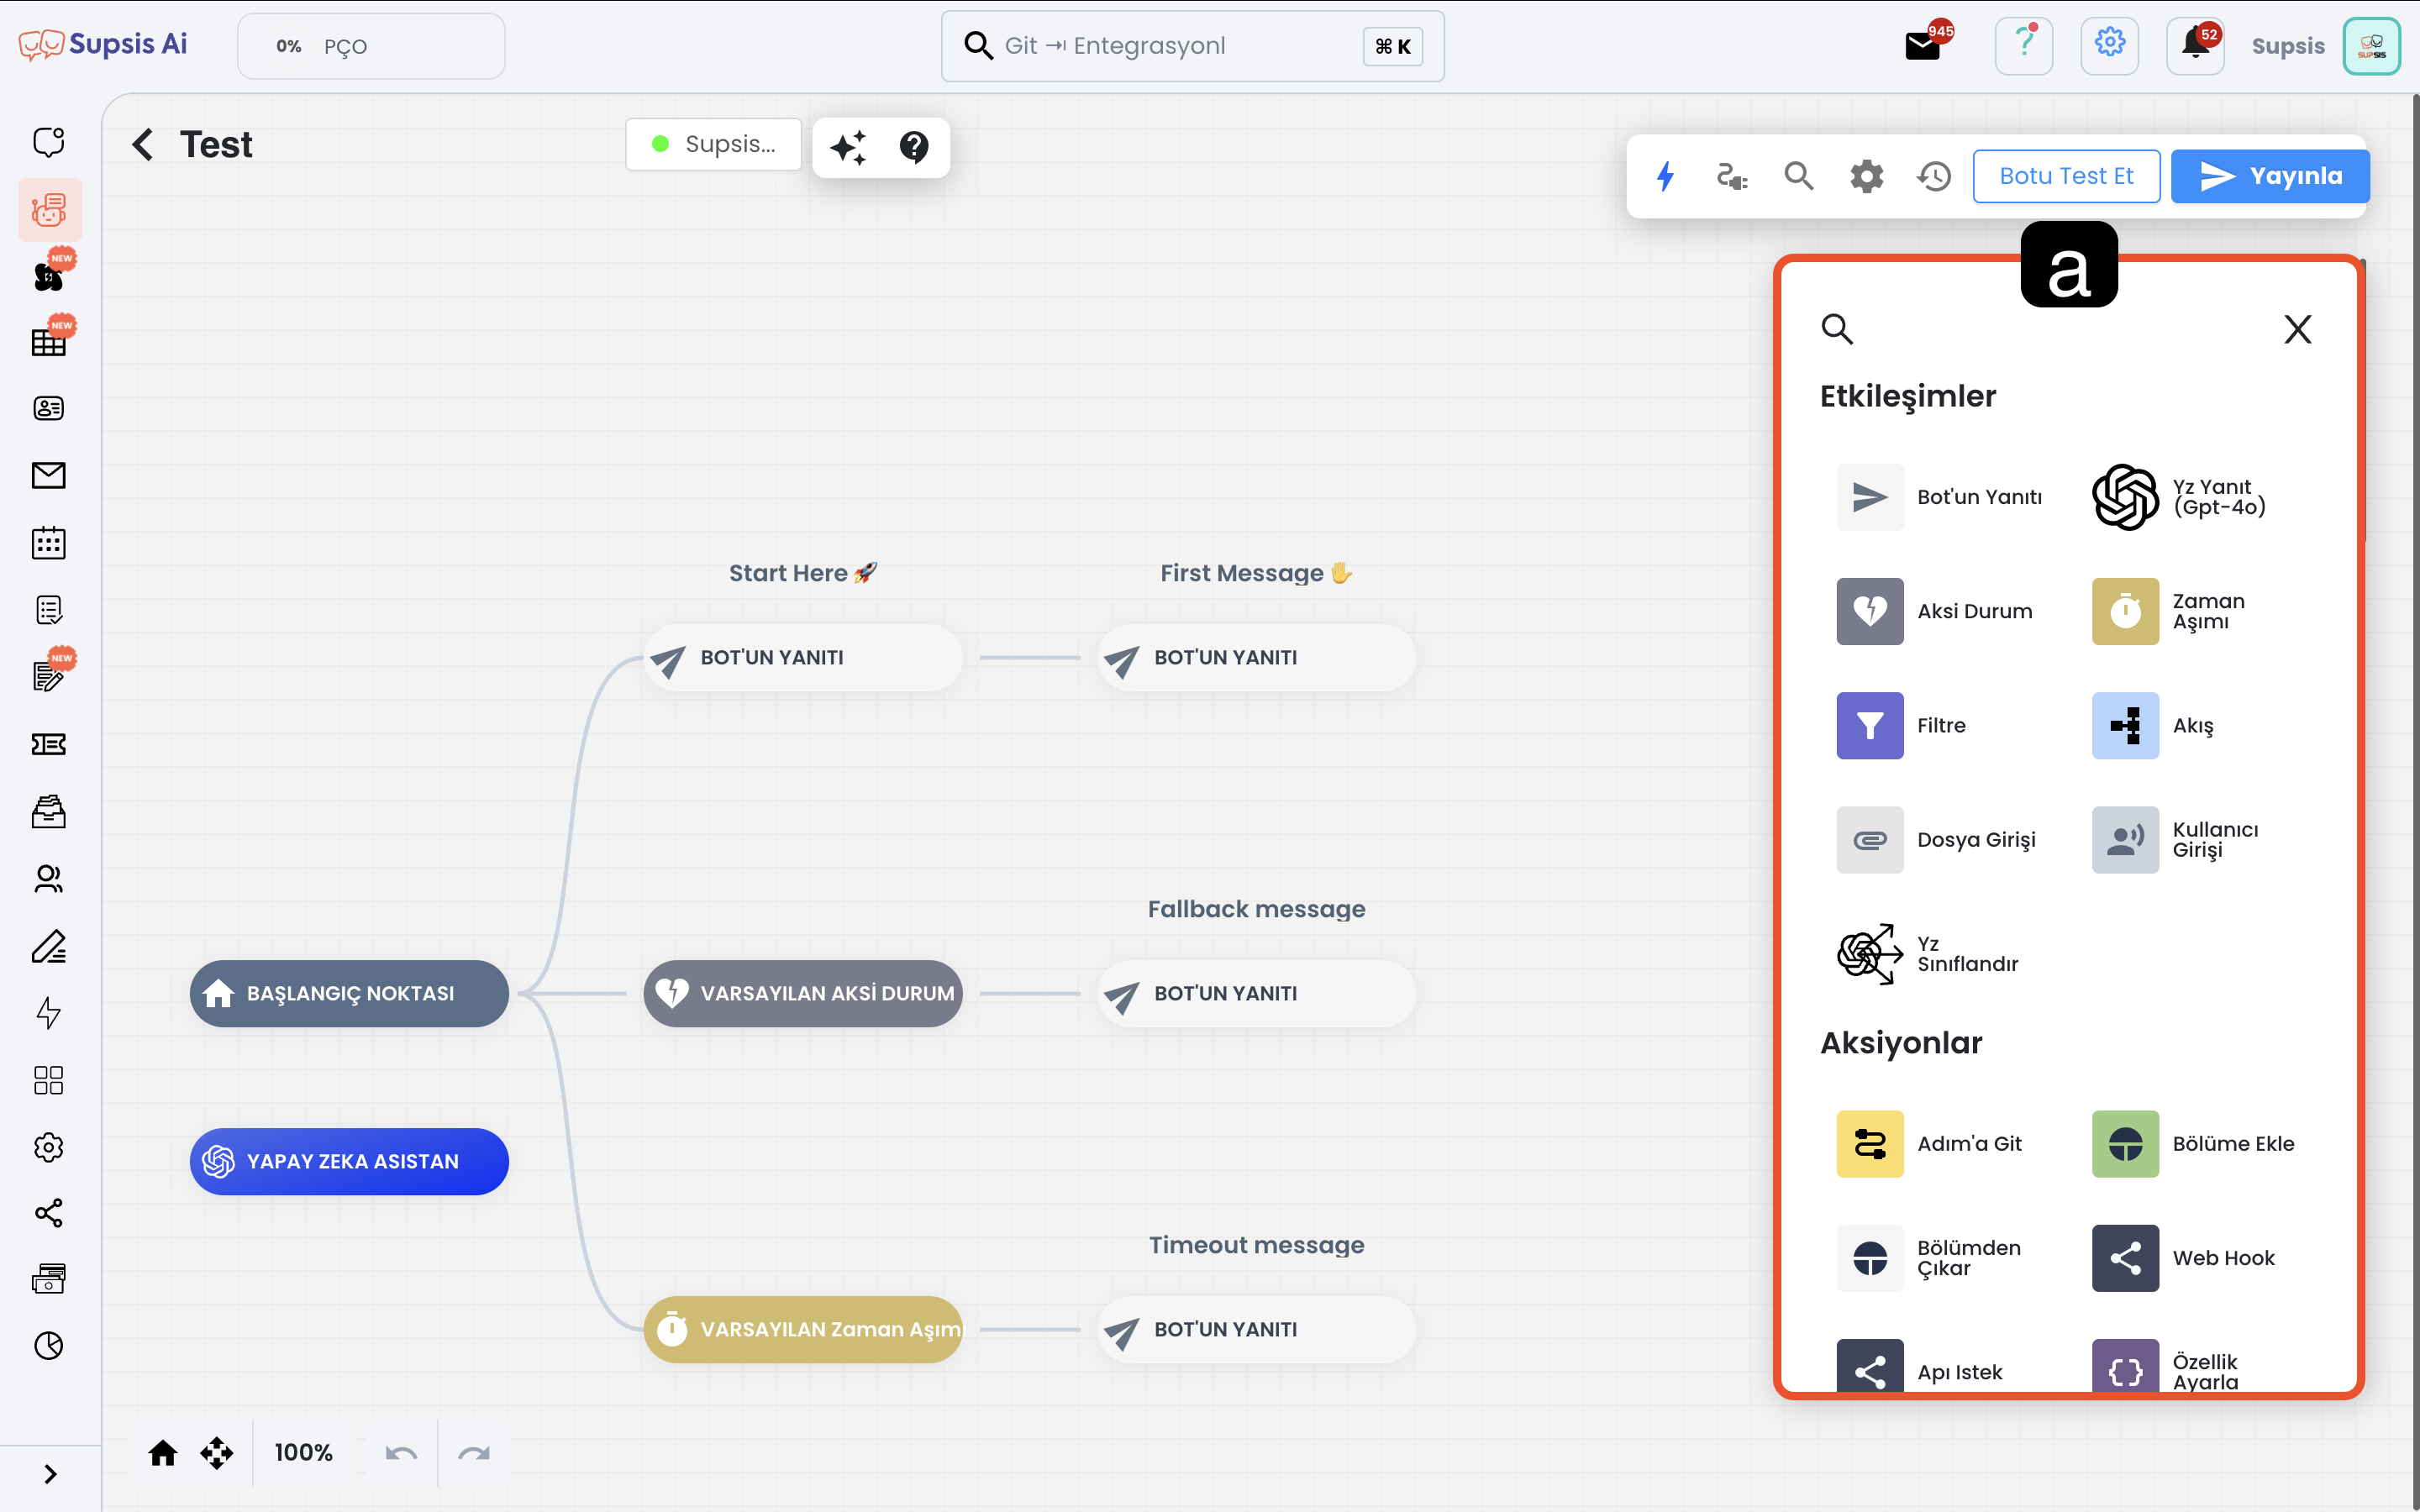
Press the connect button next to the communication channel where the chatbot will be integrated and make the appropriate scenario selection.
After providing scenario integration, you can activate the chatbot on that channel using the publish button in the upper right.