Chatbot Content
Basic Chatbot Blocks
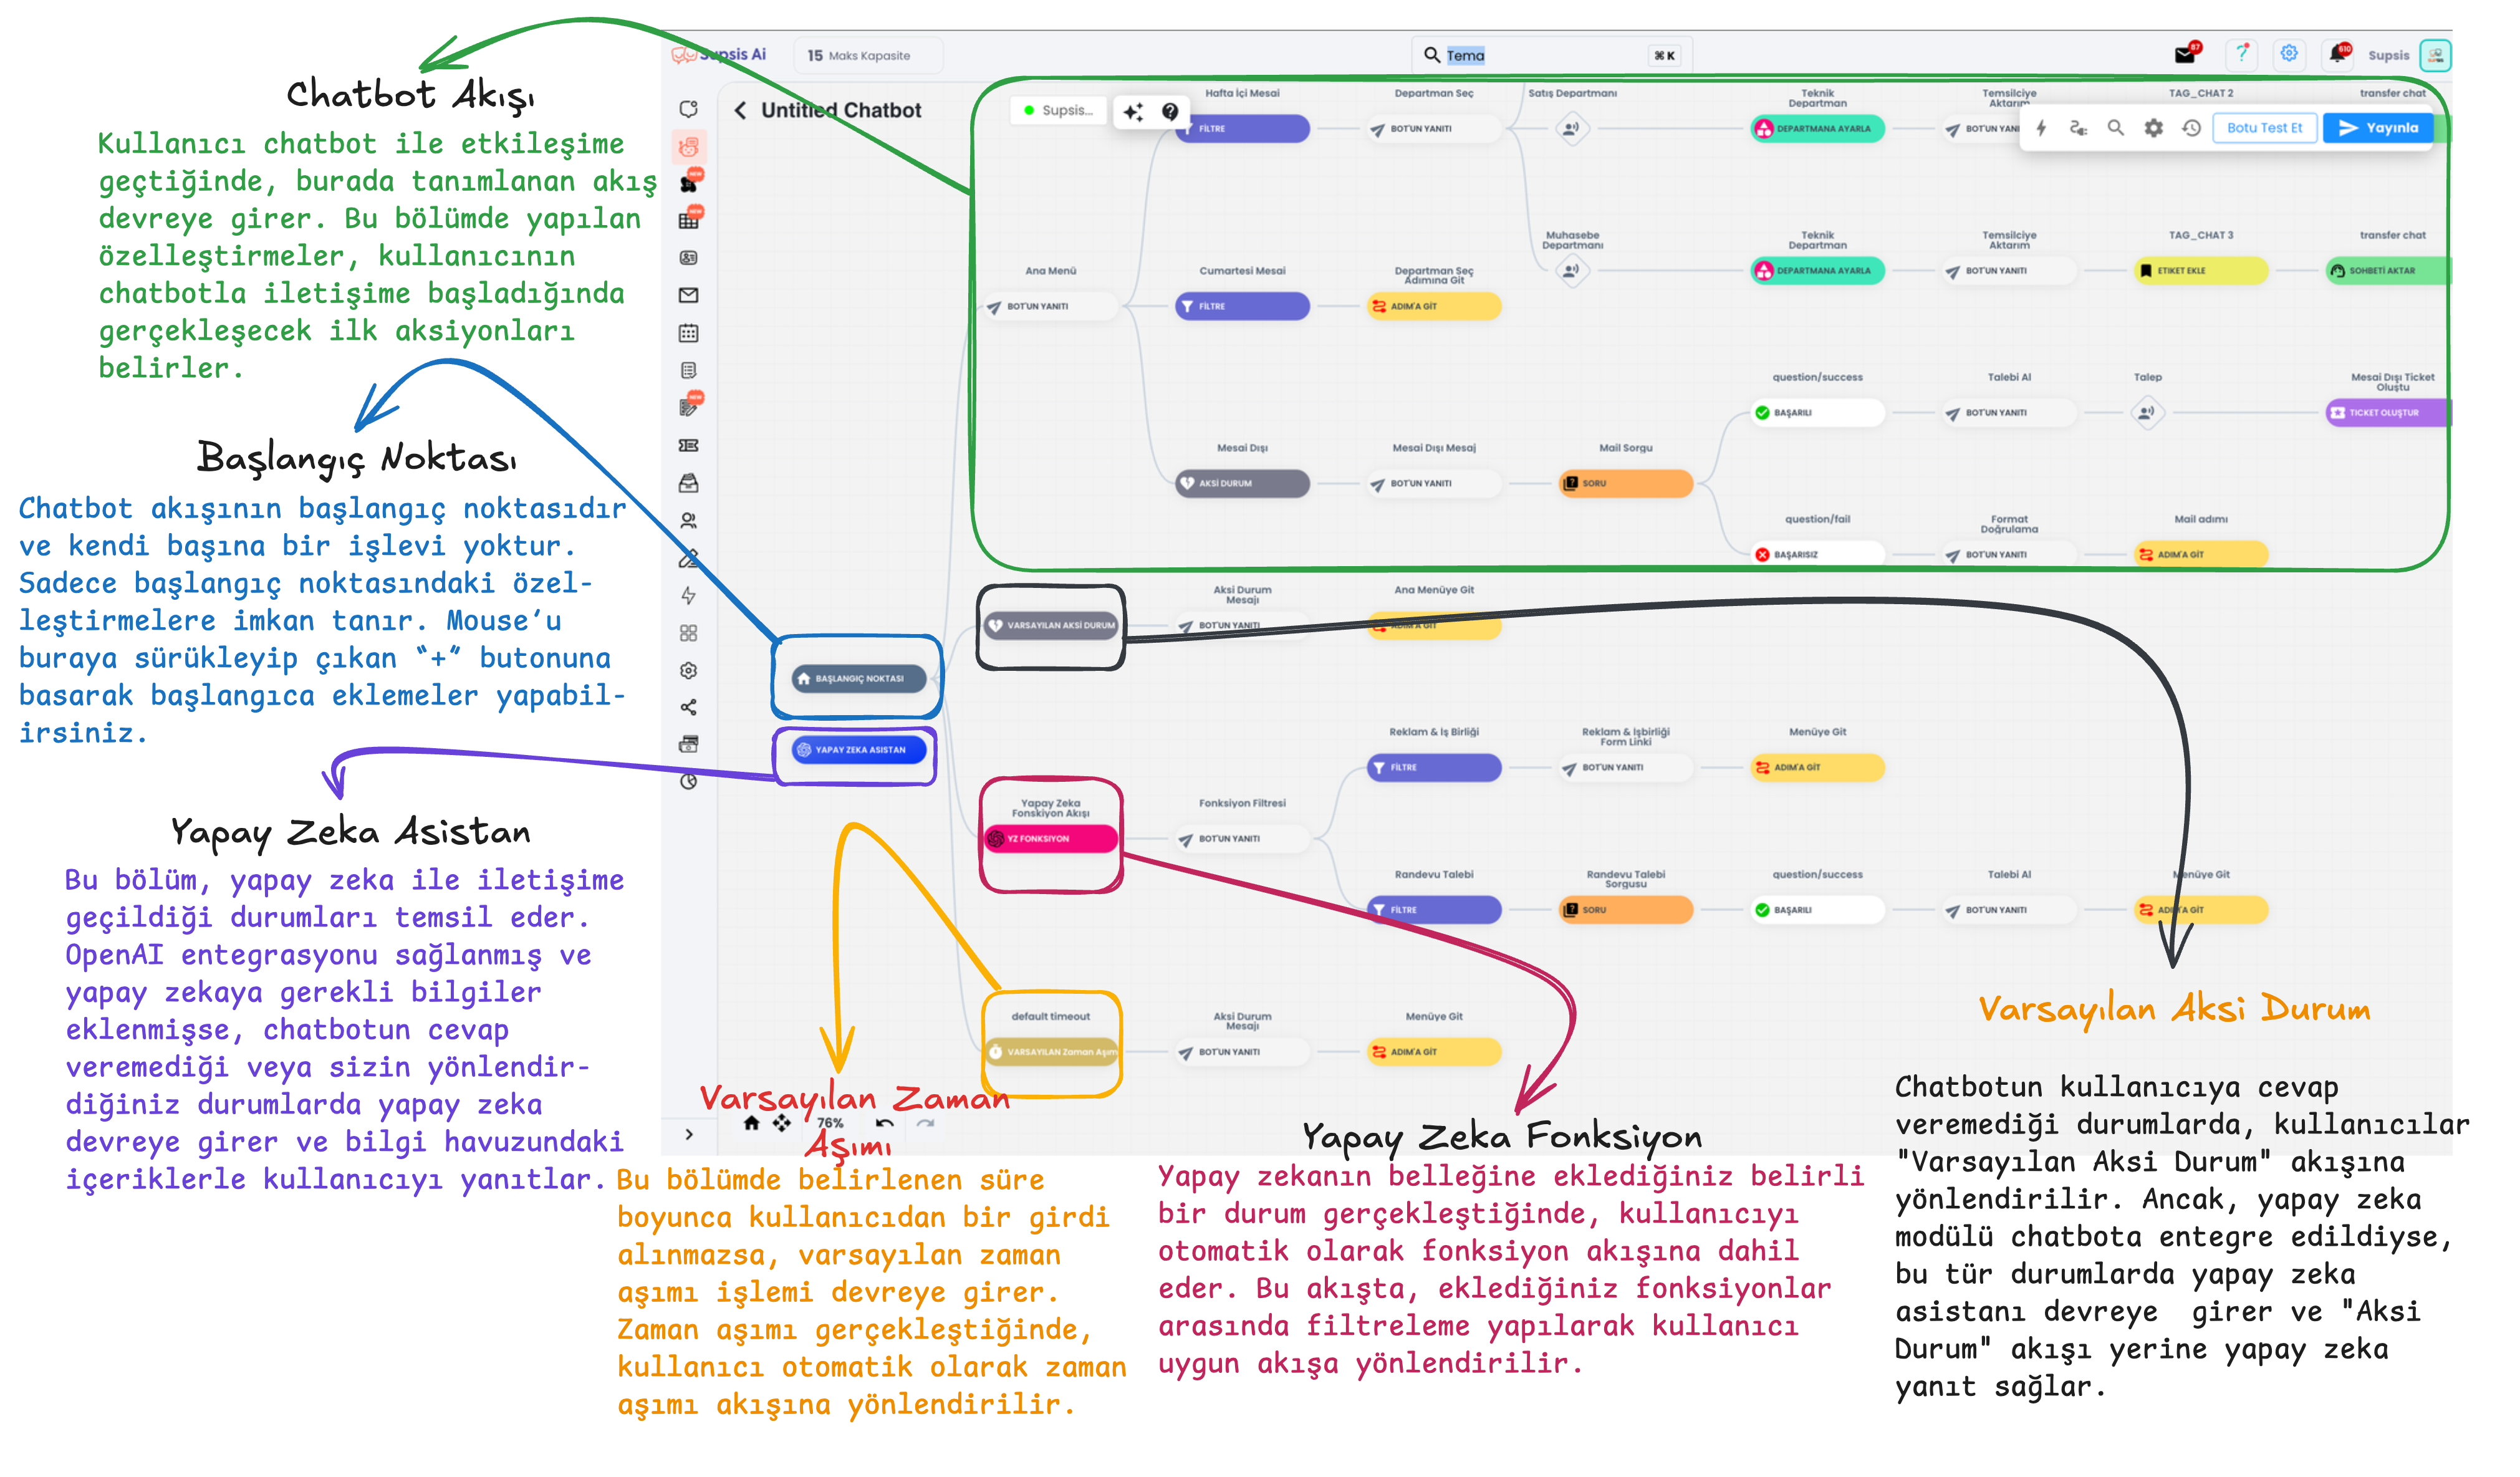
Starting Point: It is the starting point of the chatbot's flow and this section has no function within the flow. The chatbot starts from this point, you can provide starting point customizations by dragging your mouse over the starting point.
AI Assistant: When the chatbot cannot respond or provide support to the user, the artificial intelligence system comes into play. If OpenAI integration is provided and information is added to the AI knowledge pool, it provides responses to users at points where the chatbot cannot respond, based on the information within artificial intelligence. The AI assistant block in the image has no function, it only exists to show that the user is interacting with artificial intelligence during testing within the flow. To provide customizations within artificial intelligence, you need to click on the icon with stars in the upper section of the chatbot, and the section where you can access the AI knowledge pool is presented with card number 1 in the image below.
Default Timeout: If the user does not interact with the chatbot for the duration you specify through the default timeout, the chatbot evaluates this situation as "timeout" and triggers the actions you specify behind the default timeout.
Default Otherwise: When the chatbot cannot detect the input from the user, it redirects to the Default Otherwise flow. In this section, you can warn the user to proceed with the chatbot's directions and then send them to the chatbot step you specify. If you use the chatbot module integrated with artificial intelligence, the AI assistant will come into play in cases where the chatbot cannot respond and will answer the user's questions based on the information you have loaded into it.
Flow Start: When the user interacts with the chatbot, communication begins with the actions you specify at the flow start. This section contains the first actions or messages to be shown to the user. The flow started from the "Start Here" section starts from this point onwards with your
Chatbot Content
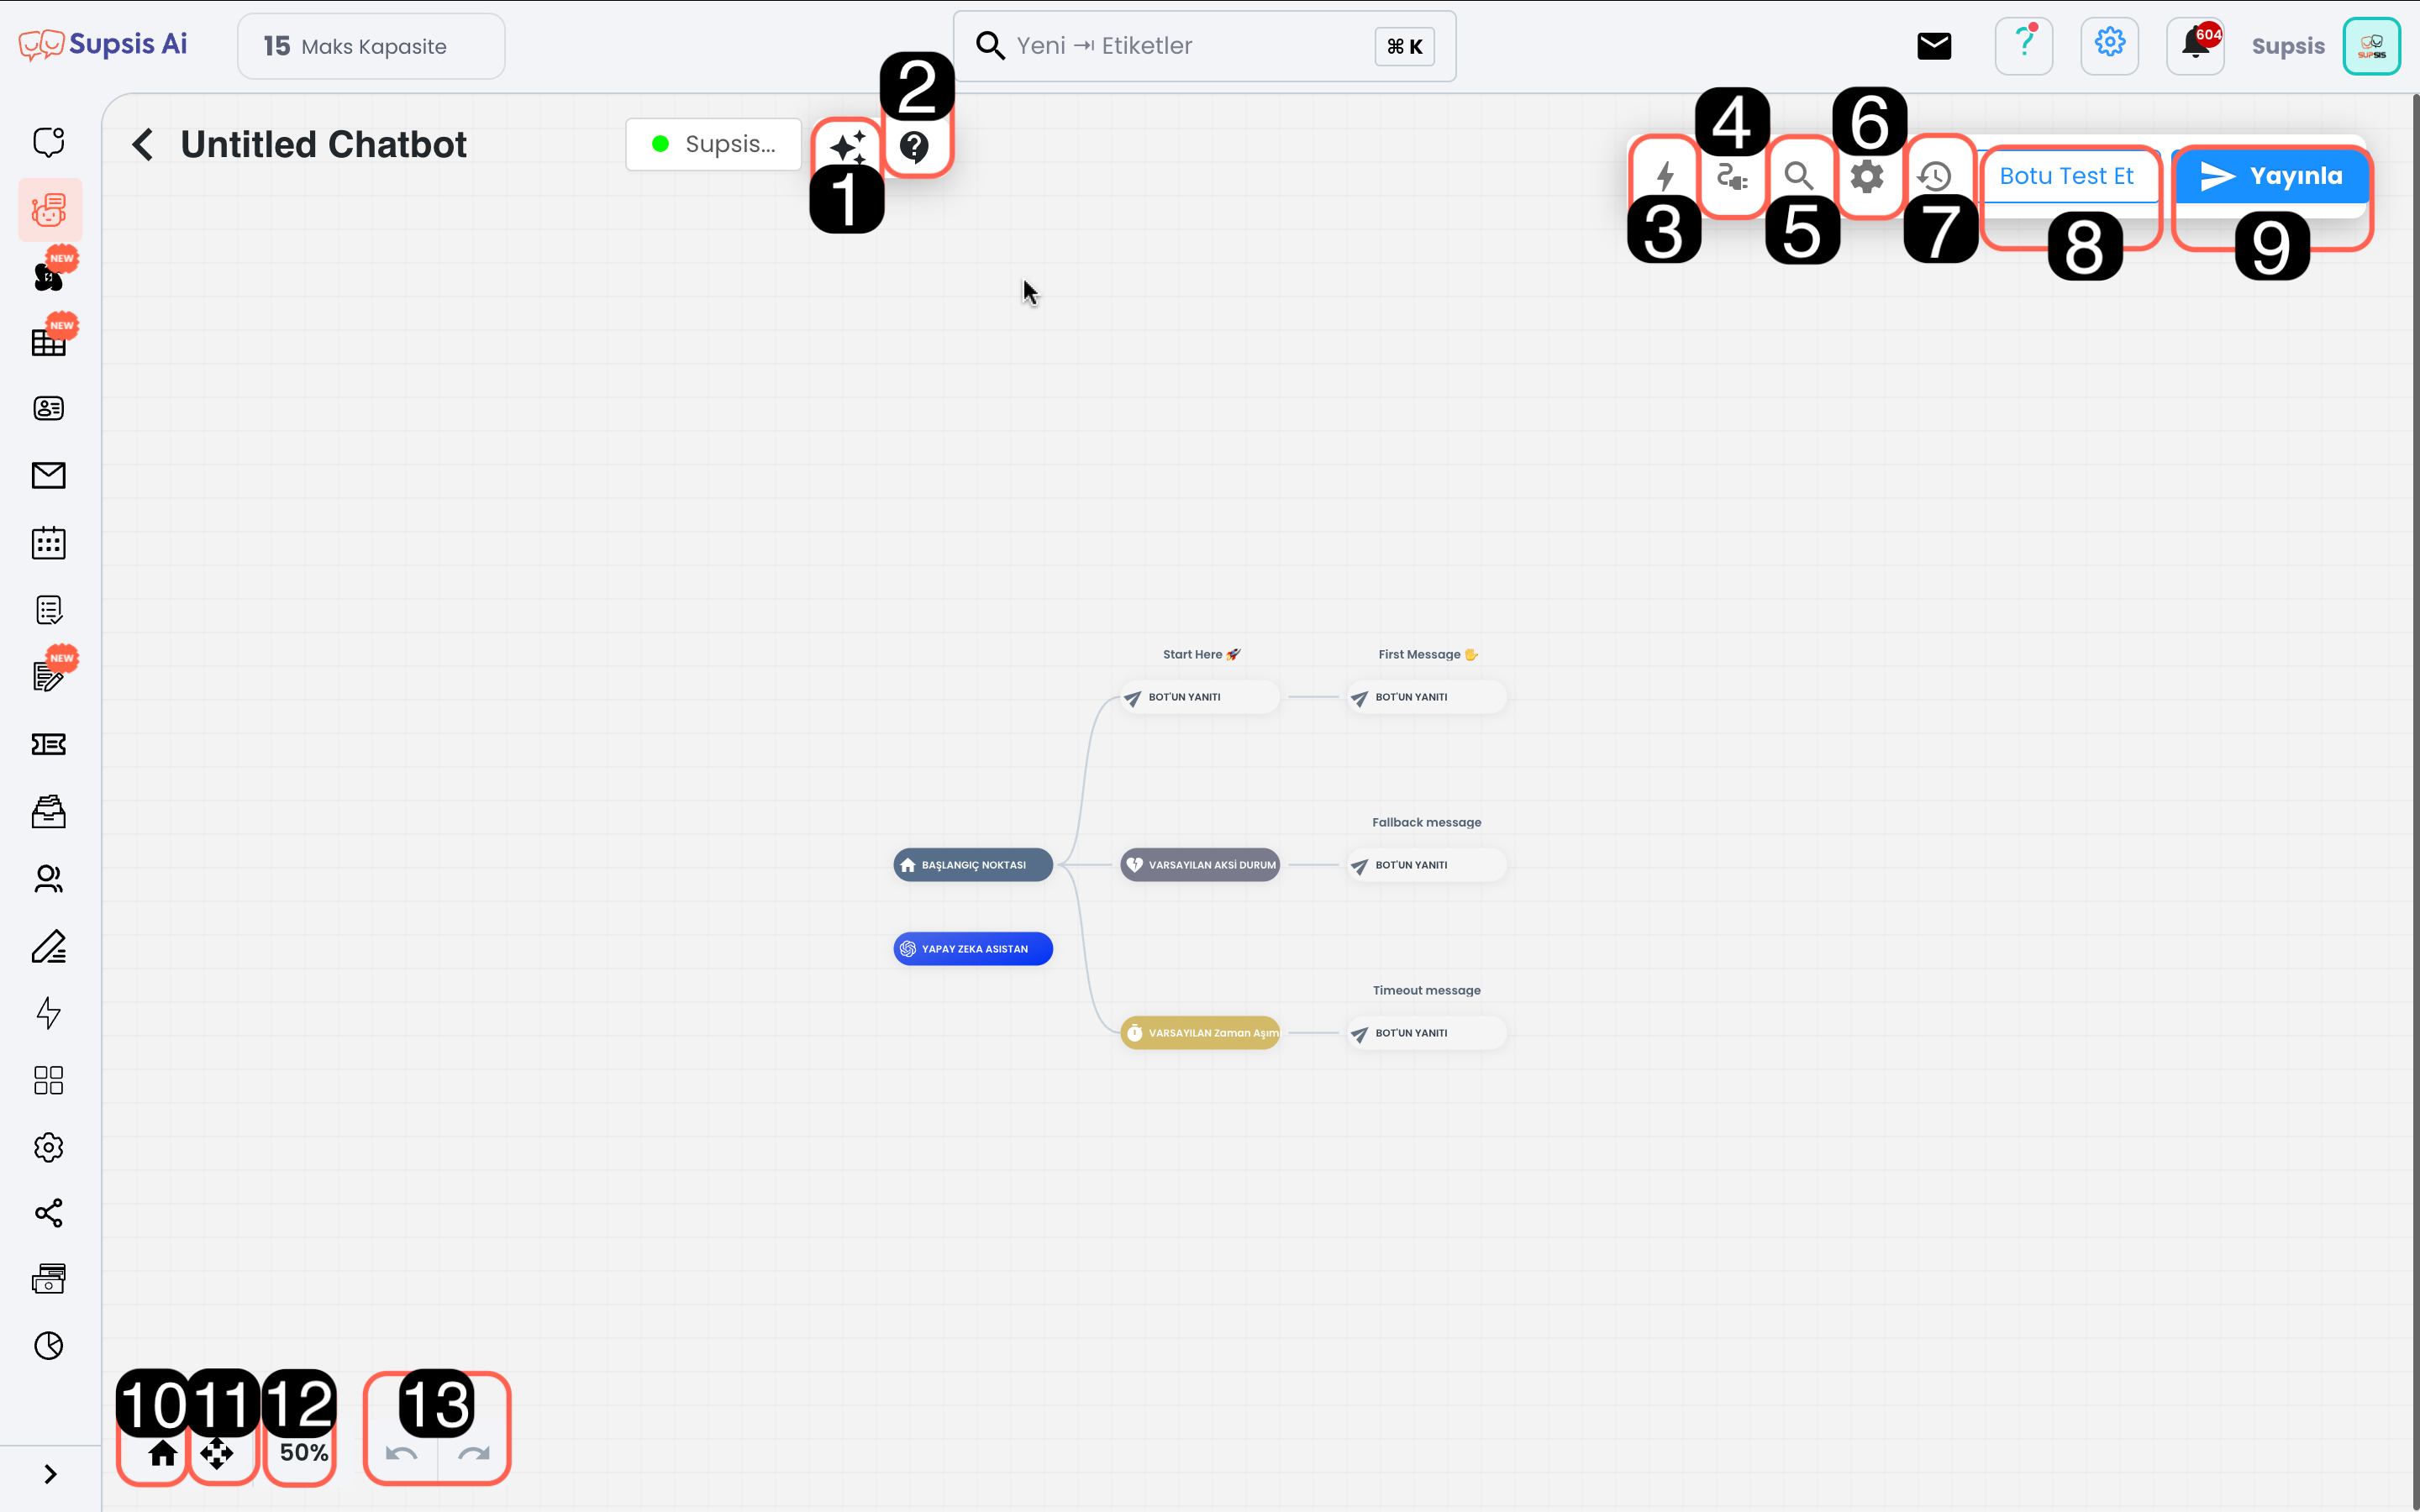
Module content:
- AI Knowledge Pool
- Access to Chatbot Documentation
- Chatbot Blocks
- Integration
- Search Blocks by Name
- Bot Settings
- Versions (Return to Old Chatbot Version)
- Test Bot
- Publish Scenario
- Return to Starting Point
- Fullscreen
- Chatbot Proximity Ratio
- Step Forward/Backward
1-) AI Knowledge Pool
The AI module needs a knowledge pool to respond to user questions. This section is where the information necessary for artificial intelligence, which will start working at points where the chatbot is insufficient, to give correct and comprehensive responses is managed. From here, you can add the information that artificial intelligence needs to respond to various questions that users might ask, and you can edit the style and function contents of artificial intelligence.
2-) Access to Chatbot Documentation
From this section, you can access user guides to get more information about chatbot setup. You can benefit from the documentation to understand each feature of the module in detail.
3-) Chatbot Blocks
These are the building blocks necessary for the chatbot to interact with users. Thanks to blocks, you can create different dialog flows and usage scenarios. For example, to enable the chatbot to capture specific user inputs, you can drag and drop user inputs and then immediately drag and drop the appropriate blocks for the chatbot's operation. These blocks determine how the chatbot will move. Each block performs a specific task and provides communication between the user and the chatbot.

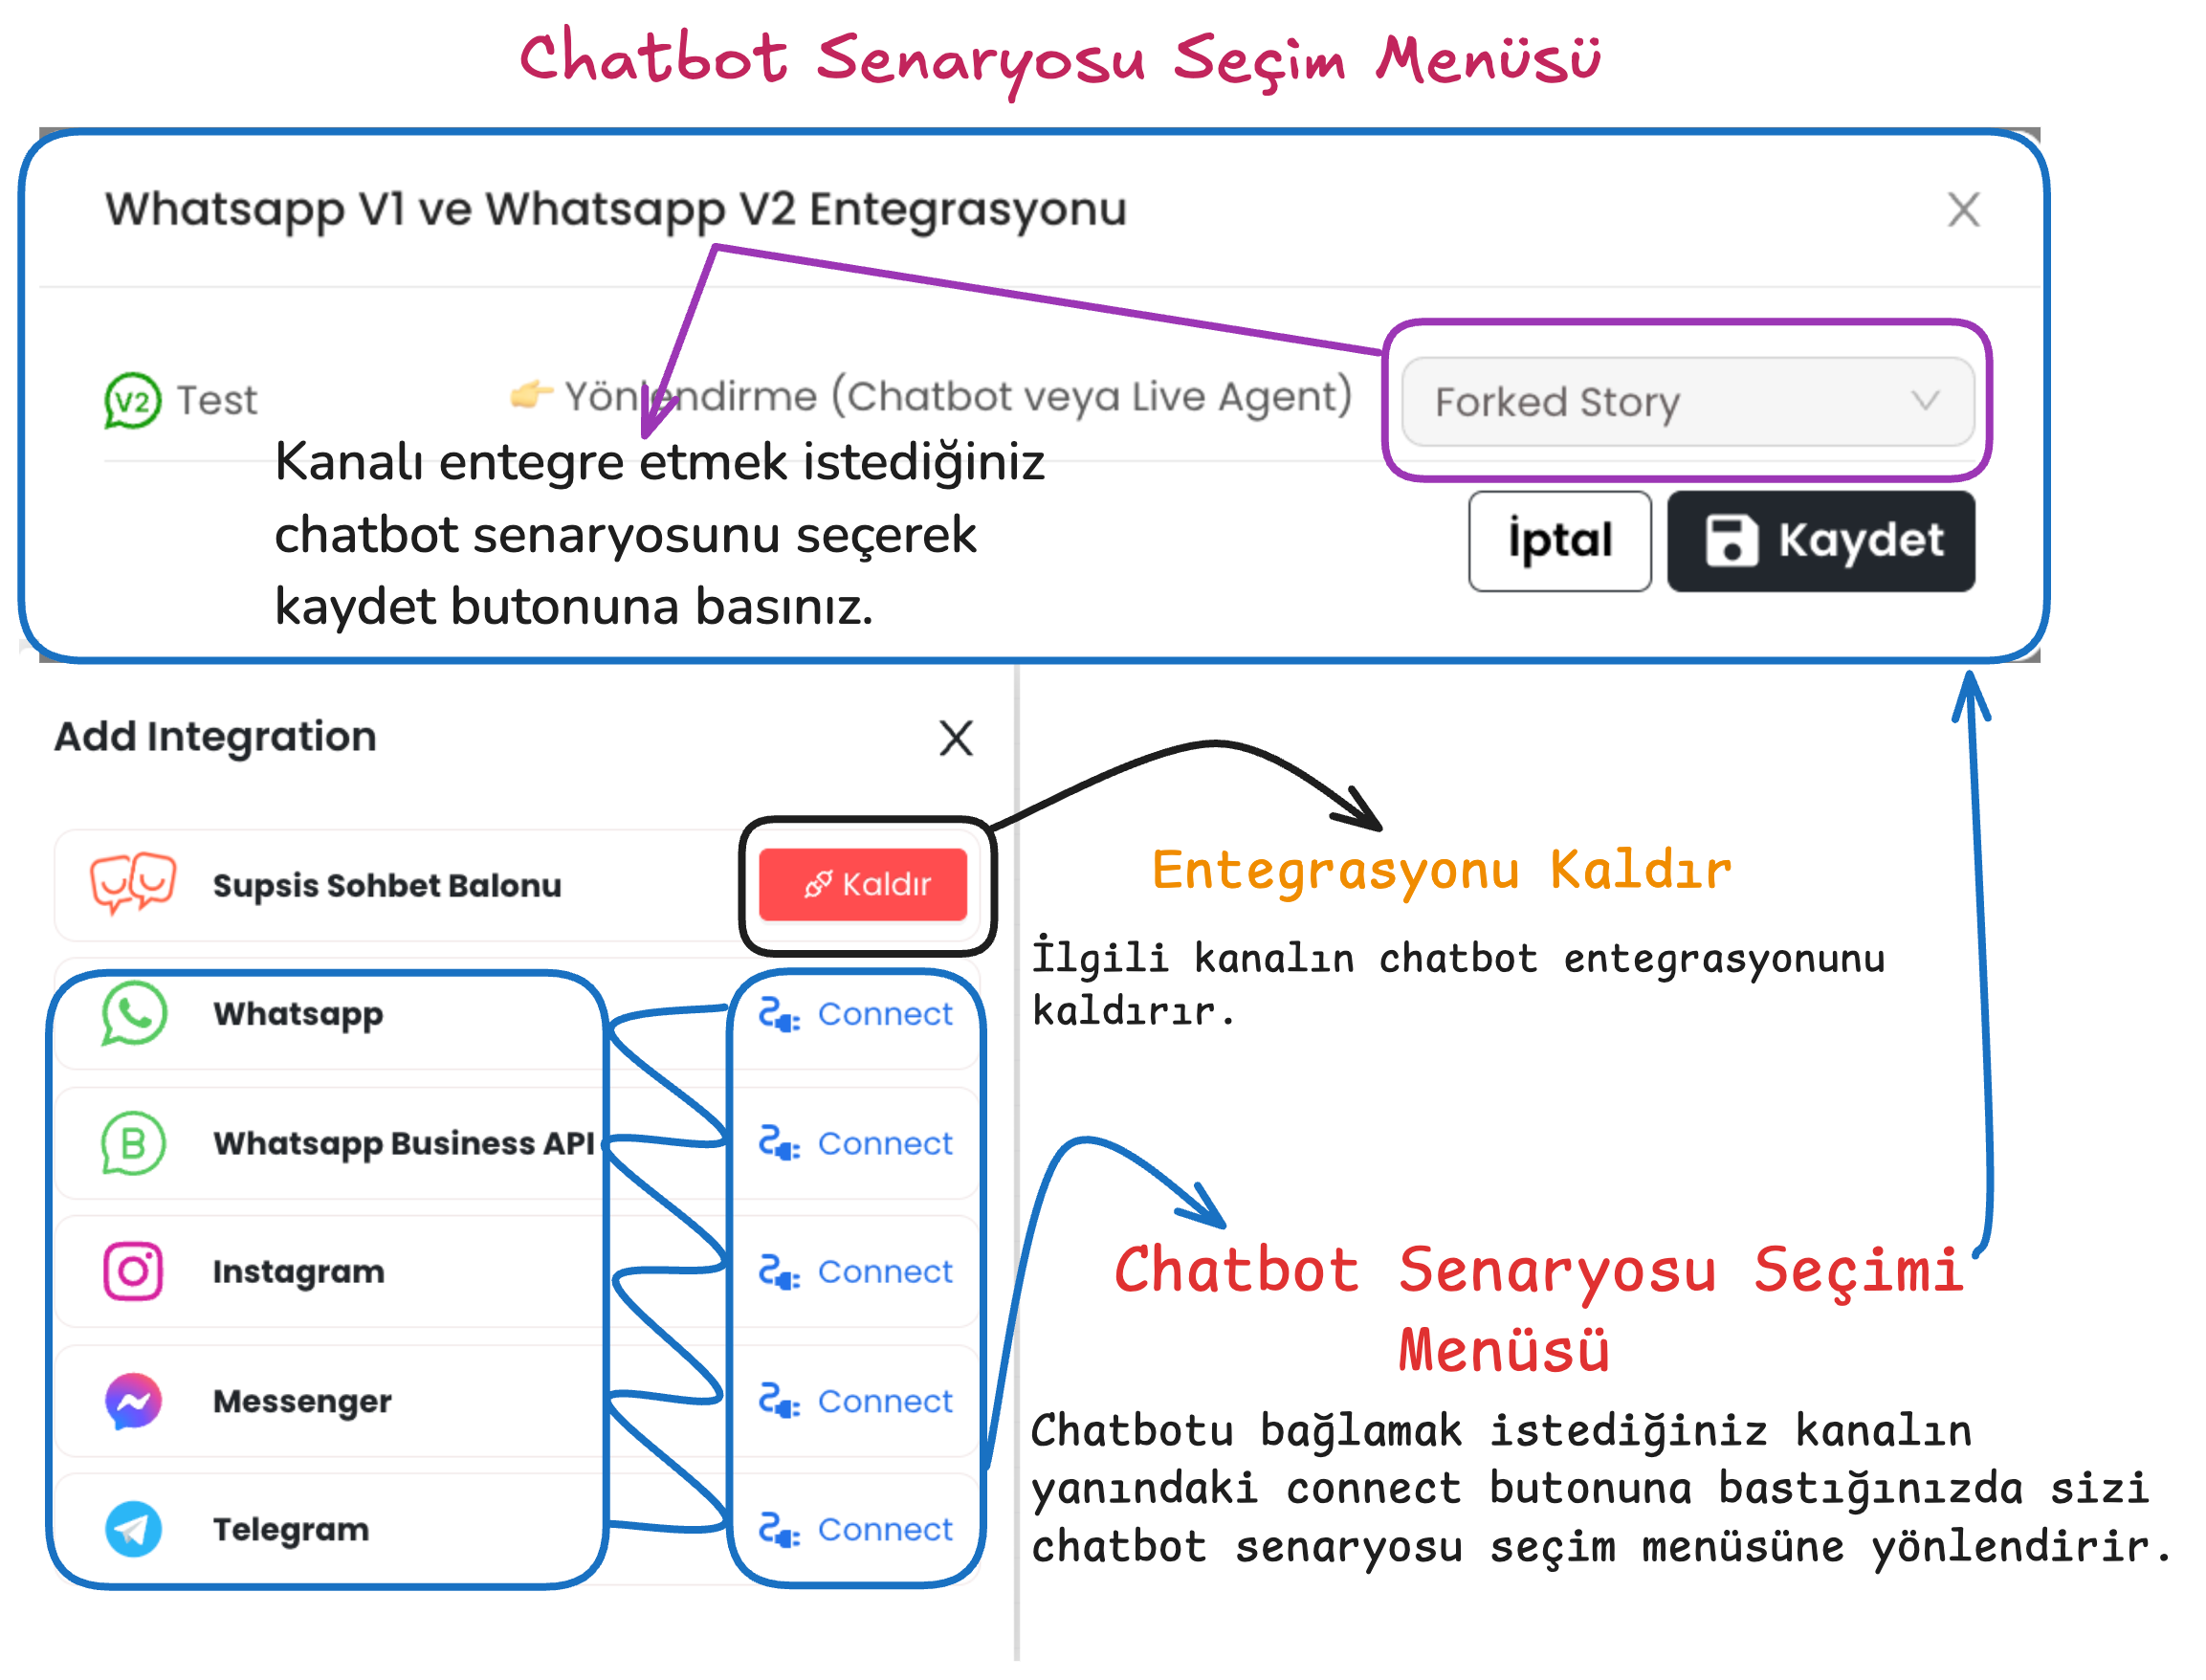
4-) Integration
Provides integration of the chatbot scenario with the platforms where the chatbot will be used. After pressing the connect button next to the communication channel where the chatbot will be integrated, you can make the appropriate scenario selection. After providing scenario integration, you can activate the selected chatbot using the publish button in the upper right.
5-) Search Blocks by Name
Allows you to search among the chatbot blocks you have created. When you want to reach a specific block in the chatbot, you can quickly find it by typing the block name here. This feature provides ease of access, especially in complex chatbot designs.
6-) Bot Settings
Allows you to configure general settings such as the chatbot's language, navigation tool that allows you to navigate within the scenario, confidence level and start message.
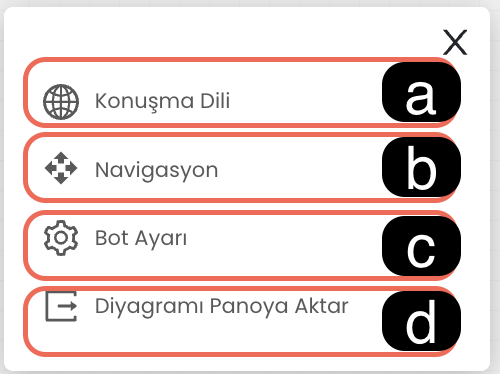
6.a. Conversation Language: Determines the language the chatbot will use when responding to users. This ensures that the chatbot responds to customers in the appropriate language.
6.b. Navigation: Allows you to select your preferred navigation tool for navigating in the chatbot editing screen. (For example: Trackpad or Mouse)
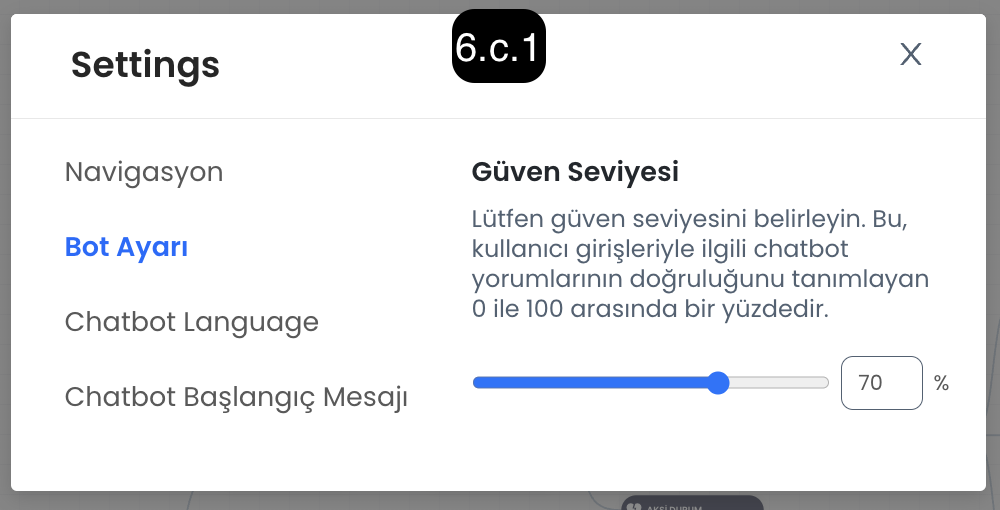
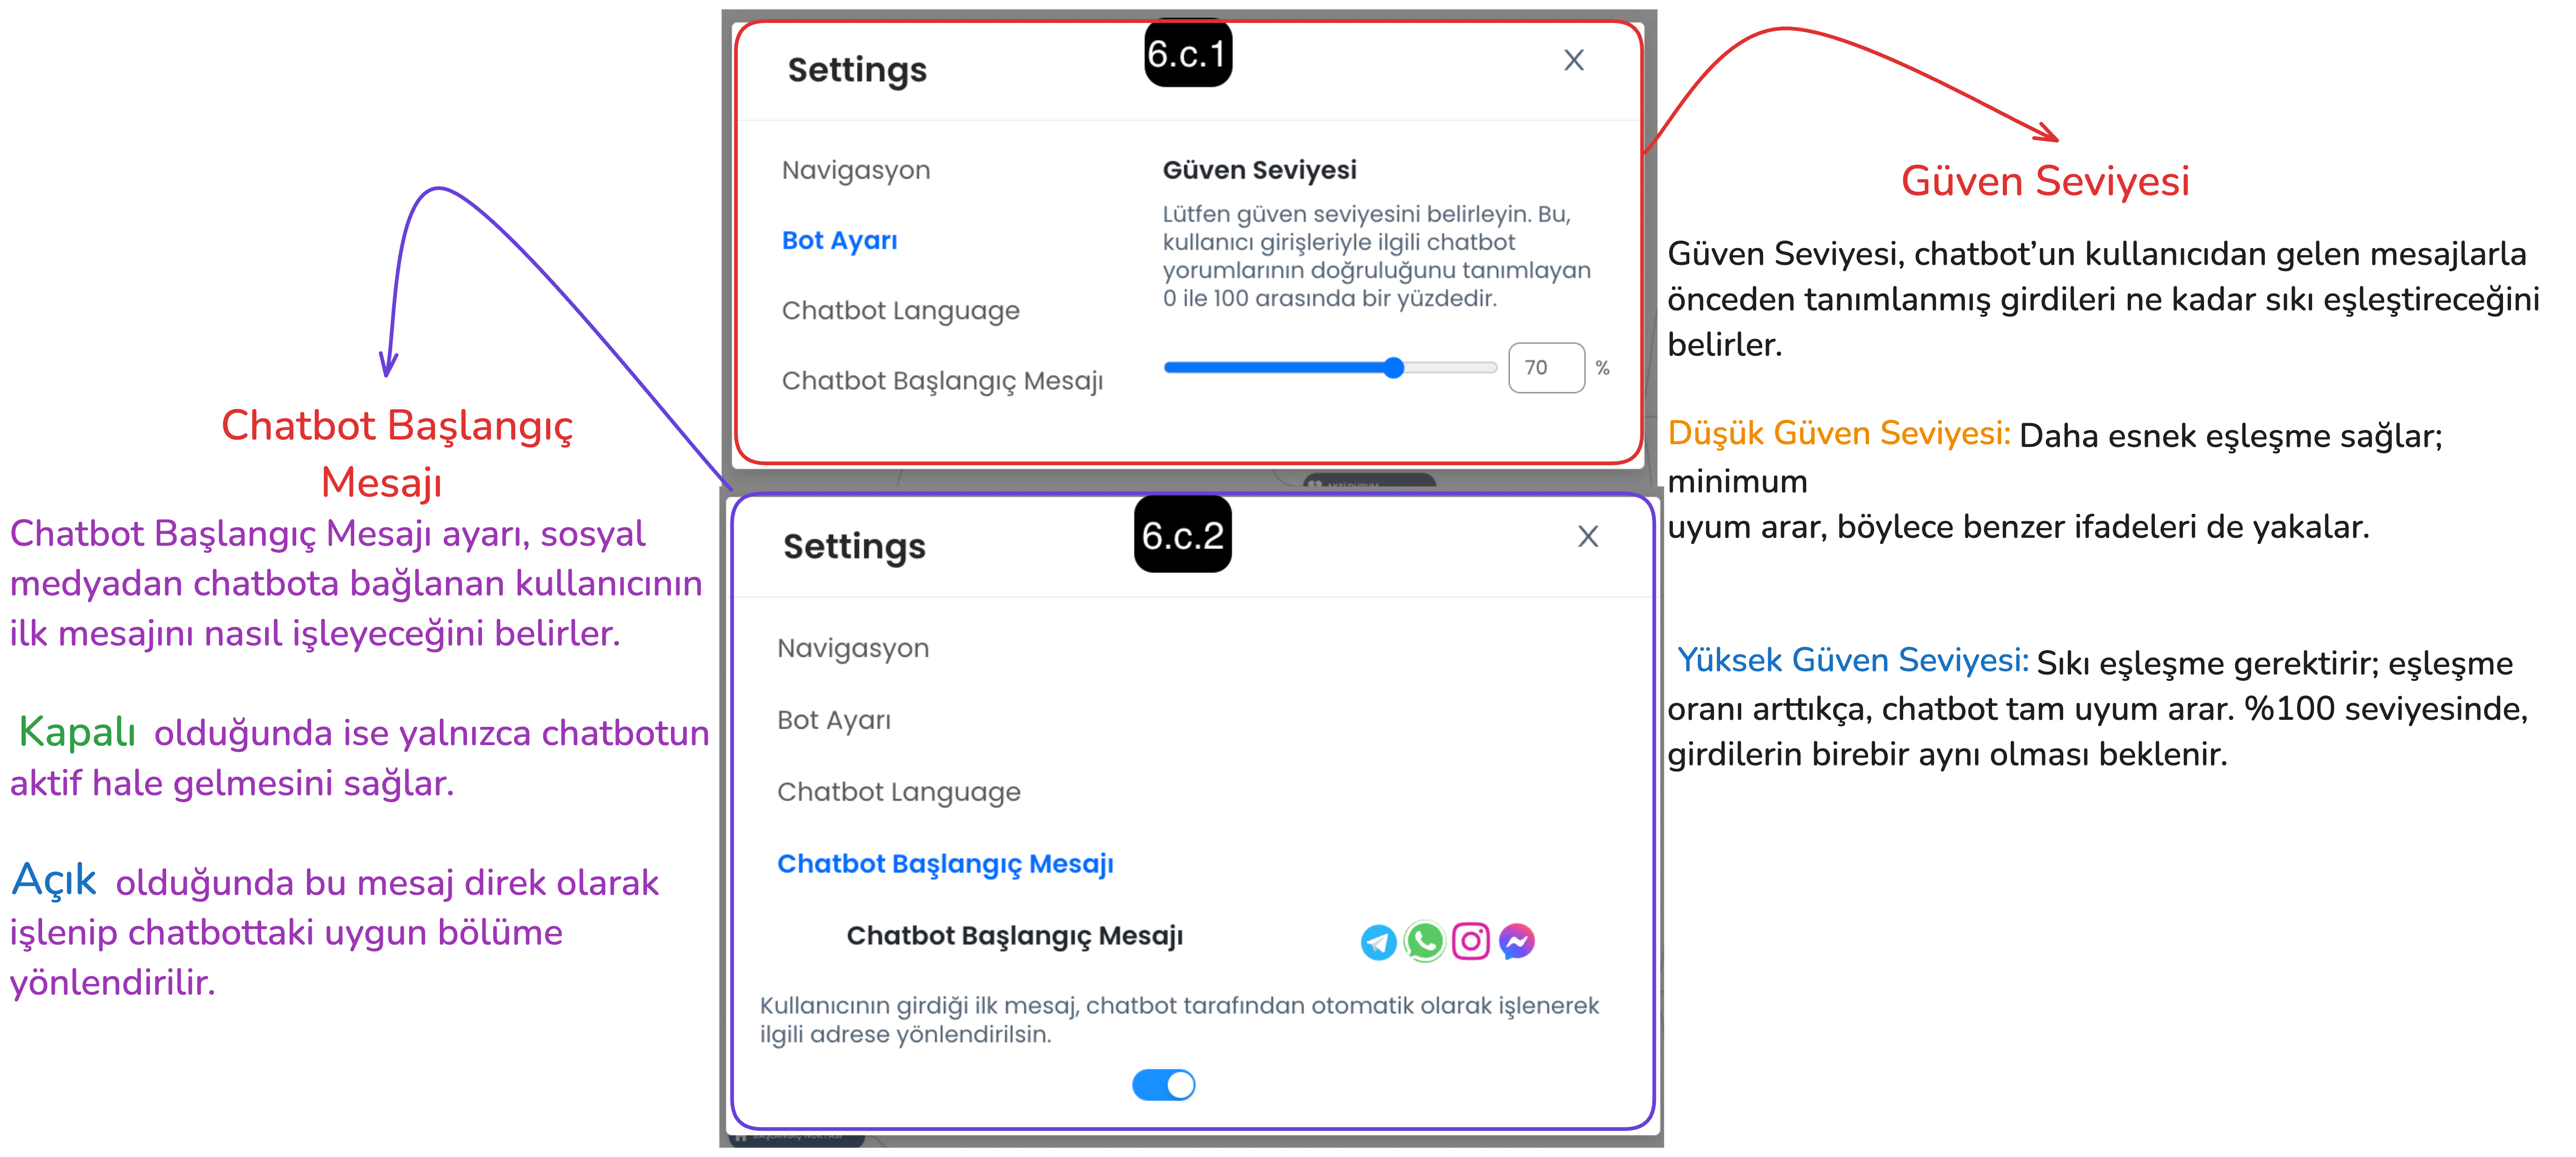
6.c. Bot Setting
Confidence Level: Determines how strictly the chatbot will evaluate incoming user messages. - Low Confidence Level: The chatbot achieves a broader match with user messages, easily recognizes similar expressions. - High Confidence Level: The chatbot must fully match the user's messages, in this case exact message matching is sought.
Start Message: Determines how the chatbot will handle the first message from the user. - When Open: The user's first message is automatically processed by the chatbot and the message is captured and directed to the appropriate section. - When Closed: It only wakes up the chatbot, the first message only starts the chatbot, the first message from the user is not processed directly.
6.d. Copy Diagram to Clipboard: You can copy the chatbot flow diagram using this button, and paste the chatbot diagram to this panel by using Ctrl+V buttons after entering the chatbot menu of your current panel or a different Supsis panel.
7-) Versions (Return to Old Version)
This feature is used when you want to undo incorrect arrangements made in your chatbot scenario or return to an old version. This way, you can activate an old version of the chatbot and prevent any disruption.
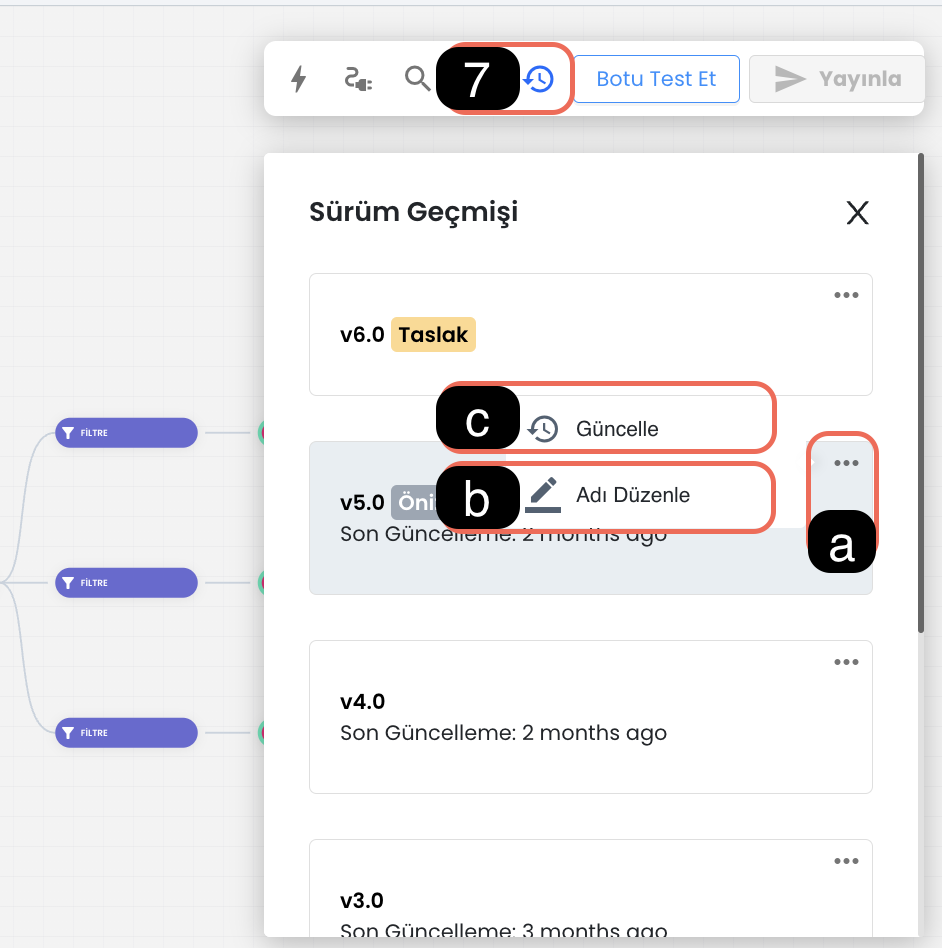
7.a. Version Settings: You can activate version settings using this button, through the settings you can name versions, edit their names or activate an old version.
7.b. Version Name: The version naming feature provides easy access to old versions. Each version can be named for easy identification.
7.c. Update Version: After selecting the version you want to return to, you can make transitions between versions by clicking the three dots and using the "Update" option. You can click on the relevant version to preview the content of the chatbot version.
8-) Test Bot
The "Test Bot" feature allows you to test your chatbot in a simulation environment before integrating it into your channels. This test environment allows you to observe how the chatbot will behave with customers. While the test environment generally offers an experience similar to the live environment, it may show differences in some cases. To test the customer experience more realistically, you can use the "Customer Test" page by following the steps in  this document .
9-) Publish Scenario
After making arrangements in your chatbot scenario or providing integration, you can activate the new version by pressing the "Publish" button. This process creates a new chatbot version and publishes new arrangements. If you encounter an adverse result while testing your updates, you can return to the created version and continue your use without problems.
10-) Return to Starting Point
With this button, you can quickly return to the chatbot's starting point.
11-) Fullscreen
You can use this button to view the chatbot scenario in full screen. Full screen mode provides a wide workspace, allowing you to work more comfortably on the scenario.
12-) Chatbot Proximity Ratio
This option allows you to zoom in and out on the chatbot's visual scenario flow. Settings can be arranged to zoom with mouse or trackpad:
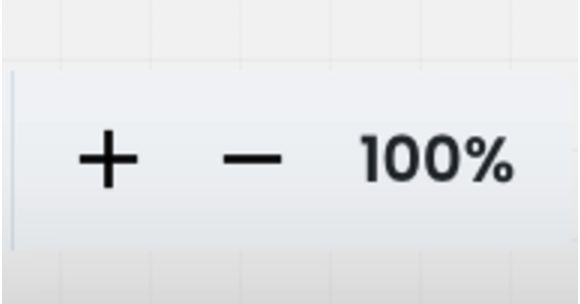
- "-" Button: Zooms out the view.
- "+" Button: Zooms in the view.
13-) Step Forward/Backward
You can use these buttons to take the changes you made on the chatbot to the previous step or forward step. This way, you can easily switch between your recent changes.