Chat Menu Details
Chat Menu allows you to view all your messages from all platforms in a central area. You can track, edit, and efficiently manage chats and chatbot conversations from various social media platforms such as WhatsApp, Messenger, LinkedIn here. This feature helps you manage your customer services through a single panel, creating a faster and more effective support process. The Chat Screen allows you to easily monitor all messages coming from different platforms and direct each one to the relevant agent. This increases customer satisfaction and shortens processing time.
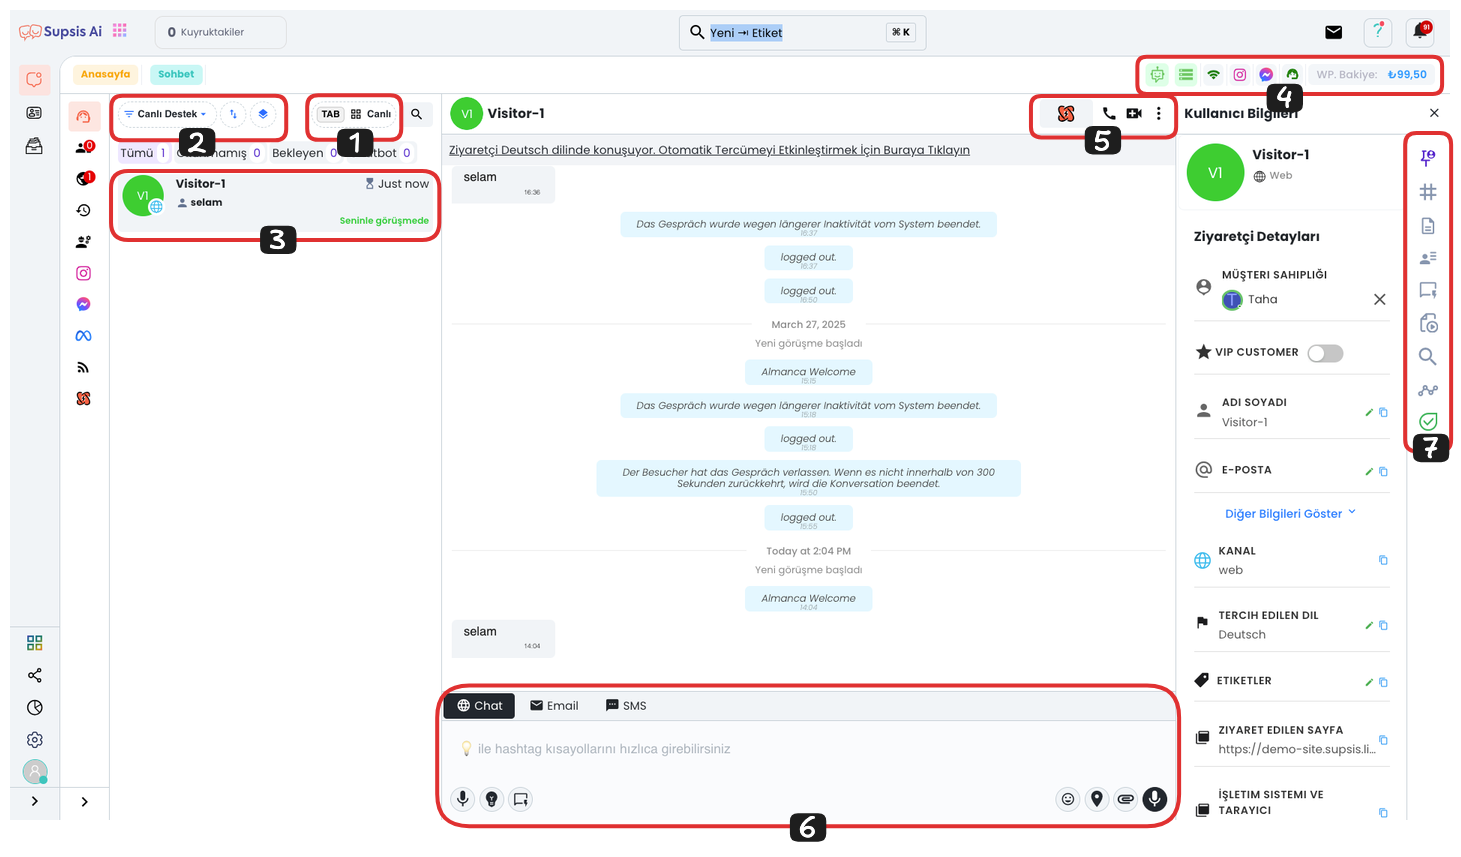
Chat Menu Items:
- TAB (Live) Menu
- Message View Customization Filter
- Basic Information About Chat Session
- System Information and Shortcuts
- Chat Actions
- In-Chat Options
- Chat Session Details and Shortcuts
1.) TAB (Live) Menu
By pressing the Tab key, you can easily see the number of your active conversations. You can also learn how many conversations each agent has. This feature is quite useful for tracking agents' workload.
If you want to watch all conversations simultaneously, you can observe all ongoing conversations instantly by clicking the "Watch All Live" option. This option helps you track how chats are progressing in real-time.
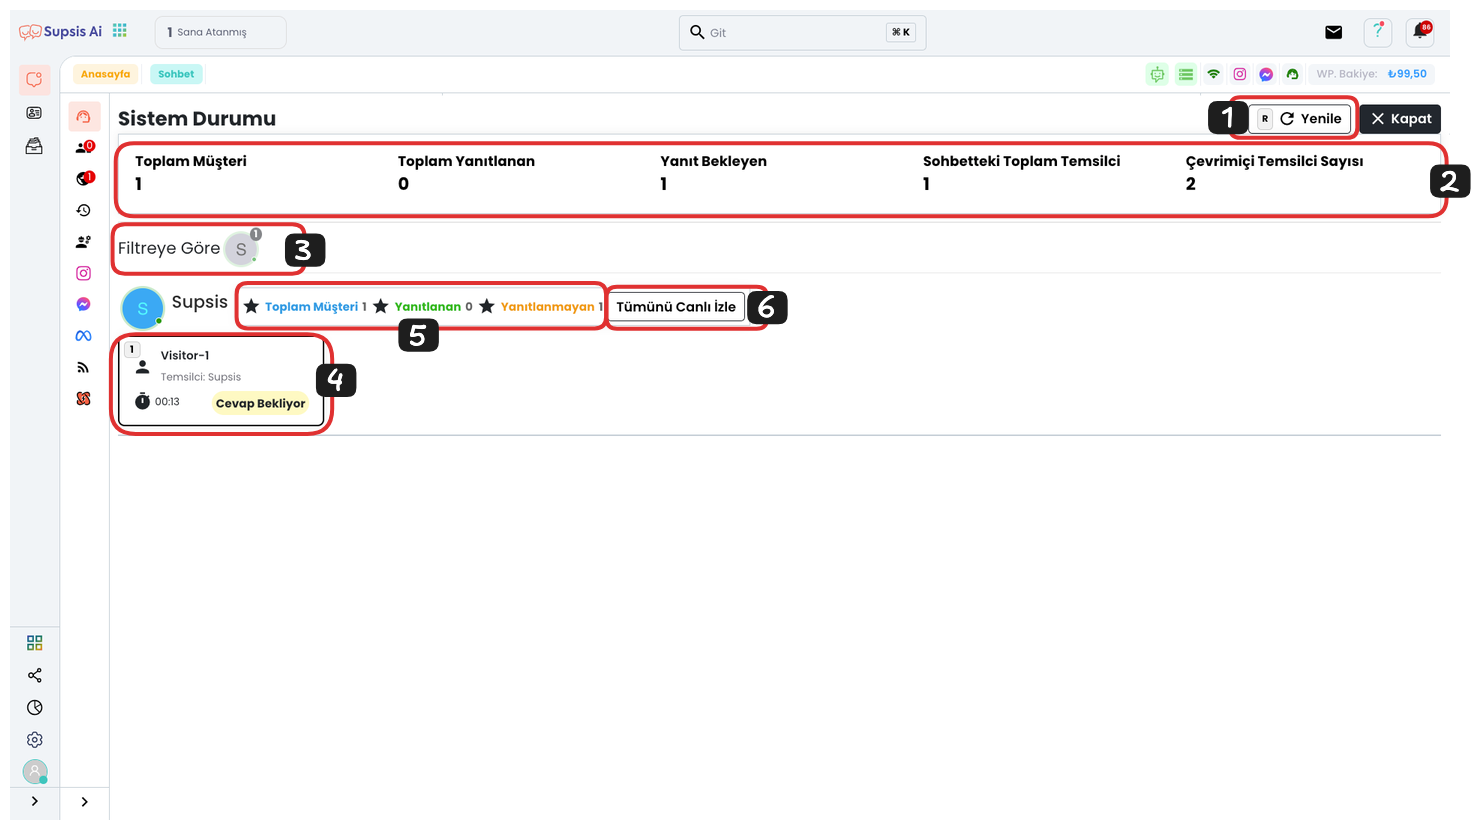
TAB (Live) Menu Items:
- Refresh
- Status of Chats in System
- Number of Chats on Agent and Filtering Agent's Chats
- Chat Status and Chat Access Shortcut
- Status of Chats on Agent
- Watch All Chats Live
1-) Refresh
Since the data in the menu is not real-time, you can refresh the page by clicking this button or pressing the "R" button to see the most current status in the system. This feature allows you to instantly update new incoming messages or changing chat statuses.
2-) Status of Chats in System
This section shows the general status of all active chats in the system. Numerical data related to status is listed as follows:
-
Total Customers: Total number of customers in the system.
-
Total Responded: Number of chats that have been responded to.
-
Awaiting Response: Number of chats where the customer is waiting for a response.
-
Total Agents in Chat: Total number of active agents.
-
Offline Agent Count: Number of agents who have set themselves to offline mode in the system.
Thanks to these indicators, the general status of the entire system can be quickly understood and intervention can be made when necessary.
3-) Number of Chats on Agent and Filtering Agent's Chats
This section displays the number of active chats on each agent. Chats assigned to each agent are shown numerically here. Additionally, you can filter chats assigned to that agent by clicking on the relevant agent's profile picture and watch only specific agent chats.
4-) Chat Status and Chat Access Shortcut
The status of each chat is shown in this section. Chat status is marked with labels such as "pending", "active", "awaiting response". This way, the status of chats on the agent and what stage they are in can be easily tracked. For quick access to the chat, the chat shortcut is also located in the number immediately to the left of the chat.
5-) Status of Chats on Agent
This section shows the status of active chats managed by each agent. You can track how many chats each agent has and what stage these chats are in. This is quite useful for observing workload on an agent basis.
6-) Live Watch All Chats
The Live Chat Tracking feature allows real-time monitoring of all chats conducted by agents. Through this section, you can track active chats assigned to a specific agent live. From the live menu tab, you can view all active chats of the relevant agent by clicking the "Watch All Live" button next to your agent. If you want to switch to a different agent, it is sufficient to select the agent profile from the top.
With the "Profile" button in the chat screen, you can access the profile information of the person you are talking to. You can select chats individually or in bulk using the marking area that appears when you bring the mouse to the upper left part of the chat window, and perform operations such as "End Conversation", "Forward", "Add Agent". You can also select all chats belonging to an agent at the same time with the "Select All" option. If you have not yet joined the conversation, you can join the chat with the "Join Conversation" button in the lower section.
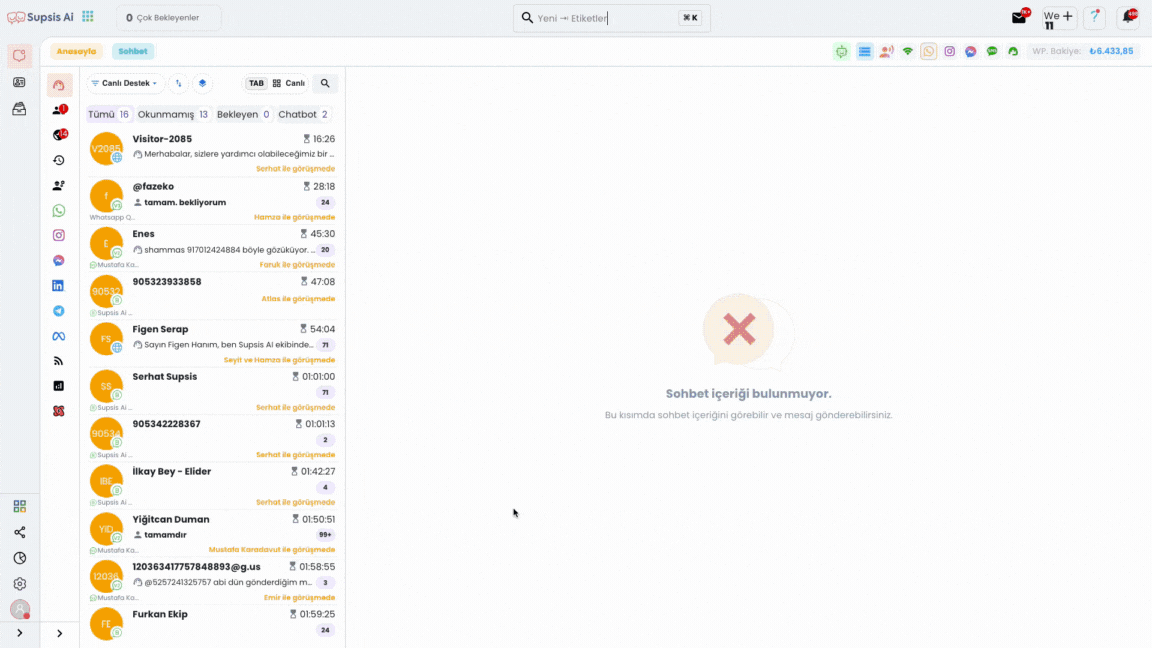
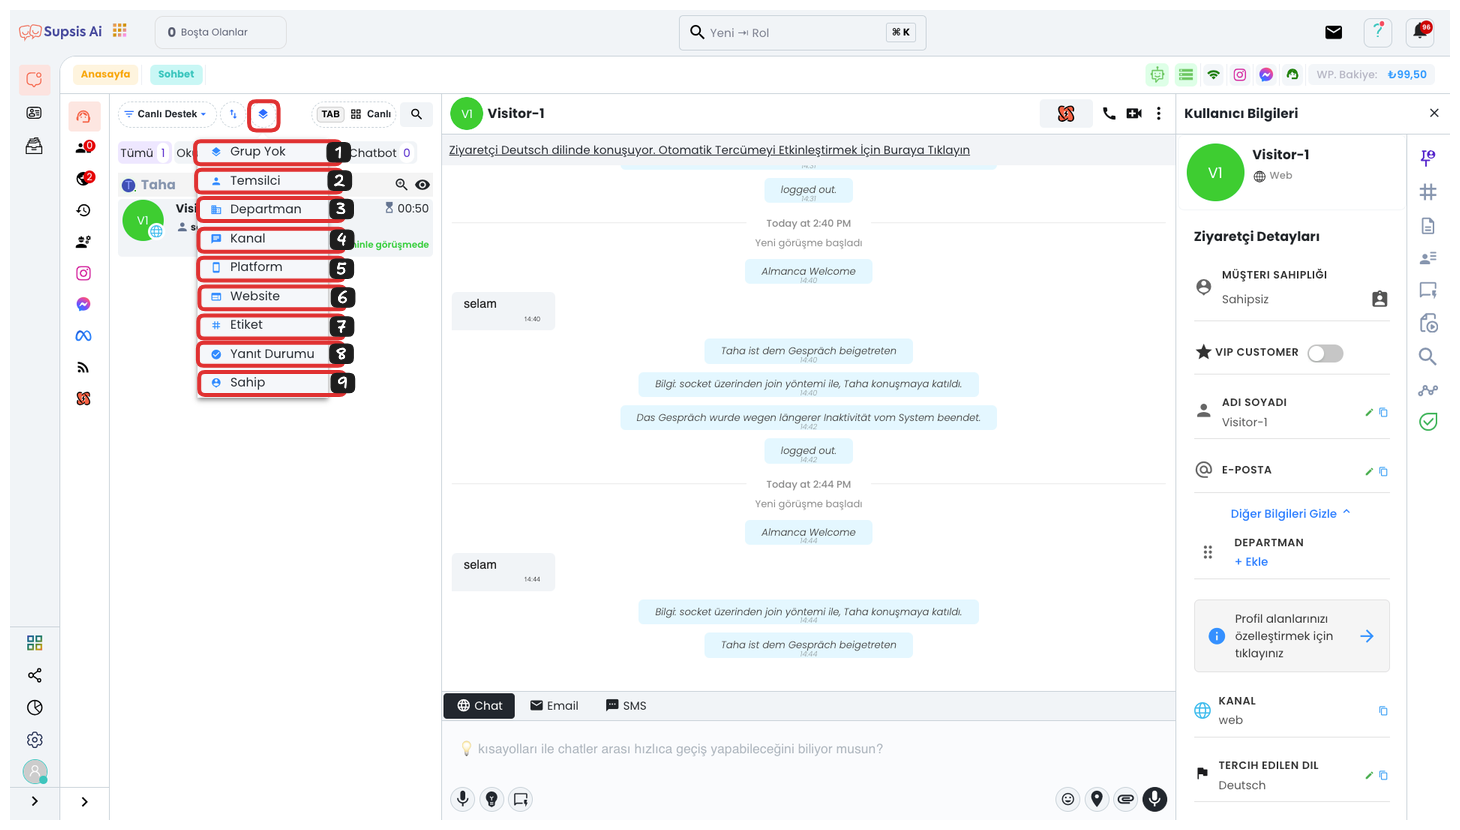
2.) Message View Customization Filter
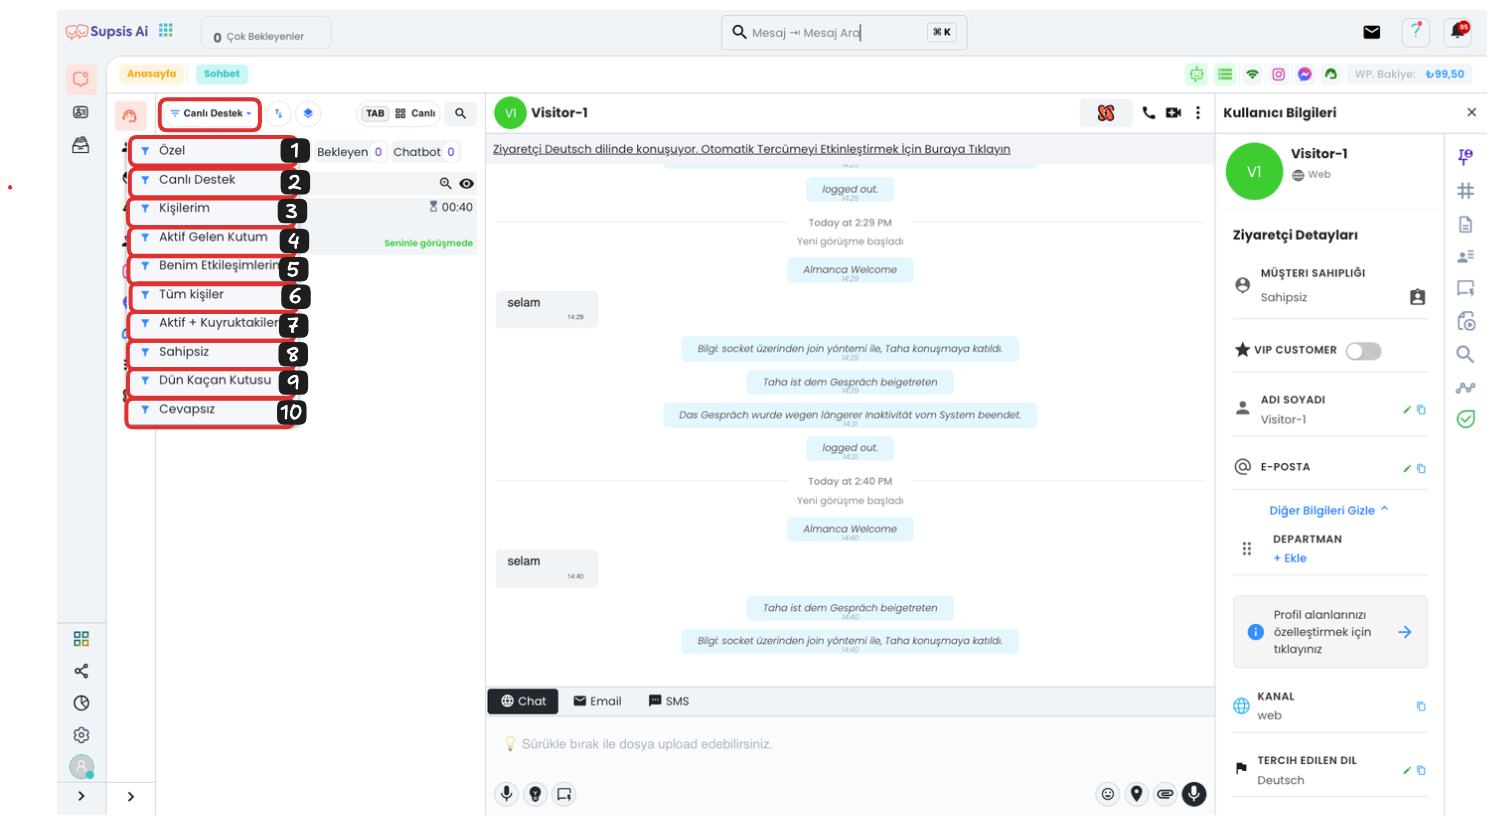
In the upper left part of the chat area, the "Live Support" option appears active by default. When you click on this area, you can access various filtering options:
- Custom: By selecting this option, you can view conversations with customized filters such as date, department, agent. By adjusting filters according to your needs, you can reach more targeted data.

1.1 Clear All: Clears the filter you have created and returns to default.
1.2 Last 24 Hours: Shows only chats from the last 24 hours.
1.3 Open: Shows only open and unclosed chats.
1.4 Add Filter: Allows you to add a new custom filter.
1.5 Save Filter: Saves the filter you have created for reuse.
-
Live Support: In the Live Support area, you can see chats of your customers who are actively continuing their conversation. This is useful for tracking real-time customer support requests.
-
My Contacts: Here, conversations where you have made ownership assignments are listed. This option ensures that only conversations interacting with you are displayed.
-
My Active Inbox: In this section, you can see your currently active conversations. All active customer conversations are located in this area.
-
My Interactions: With this option, you can view all conversations you have interacted with according to a specific date range. This way, you can focus only on chats you are involved in.
-
All Contacts: You can see all conversations coming to your panel with date filter from here. This option allows you to see all your chats centrally.
-
Active + Queue: You can track both active and queued conversations from here. This helps manage all live support requests in an organized manner.
-
Unassigned: This section contains all conversations that are not assigned to any agent and are waiting idle. These conversations should be assigned to an agent as soon as possible.
-
Yesterday's Missed Box: This option allows you to list all conversations that were not responded to or missed yesterday. It helps track missed conversations.
-
Unanswered: You can view all your unanswered conversations from here. This area is quite useful for tracking unanswered requests.
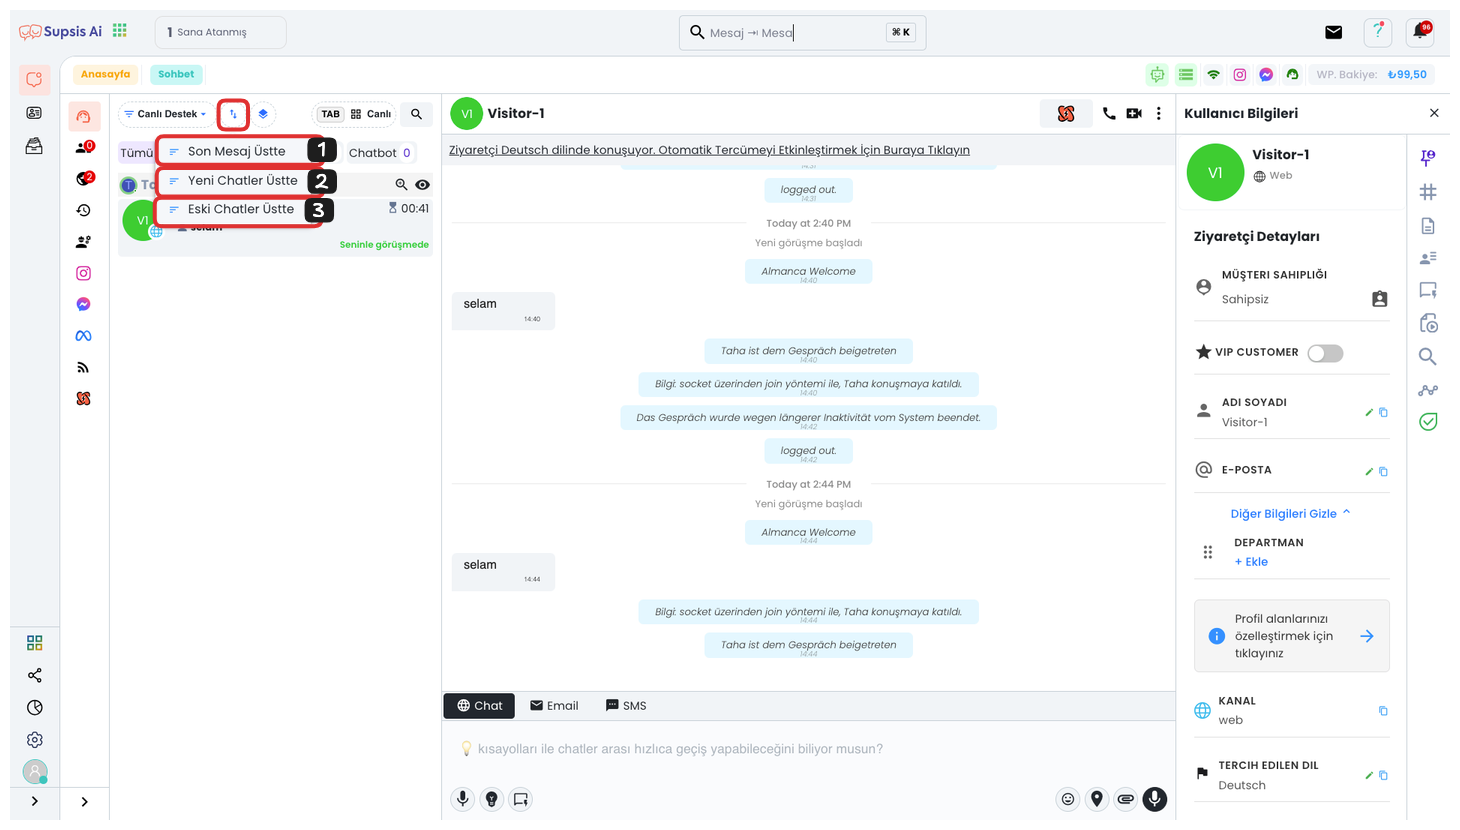
From this section, you can determine the sorting order of your messages. By using sorting options such as last message on top, new chats on top, or old chats on top, you can easily set in which order incoming messages will be displayed.
-
No Group: This option allows you to view messages that are not categorized and grouped. These messages are used to see uncategorized chats.
-
Agent: By sorting by agents, you can examine conversations assigned to each agent. This option is useful for seeing all conversations under a specific agent's management.
-
Department: By sorting by department, you can view all conversations belonging to a specific department. This option facilitates department-based task management.
-
Channel: You can sort your conversations by their incoming channels (e.g., Instagram, WhatsApp). This option is useful for tracking messages from a specific channel.
-
Platform: You can sort your conversations by their incoming platforms. For example, you can use this option to see which platform (WhatsApp, Instagram, etc.) incoming messages come from.
-
Website: This option can be used to sort messages from the website. It is useful for easily tracking customer requests from the web.
-
Tag: You can sort by tags you give to users. Using tags to see conversations in specific categories provides faster analysis and management.
-
Response Status: You can sort your conversations by response status (responded, awaiting response, etc.). This helps easily detect unanswered requests.
-
Owner: By sorting conversations by their ownership, you can systematically track conversations for which each agent is responsible.
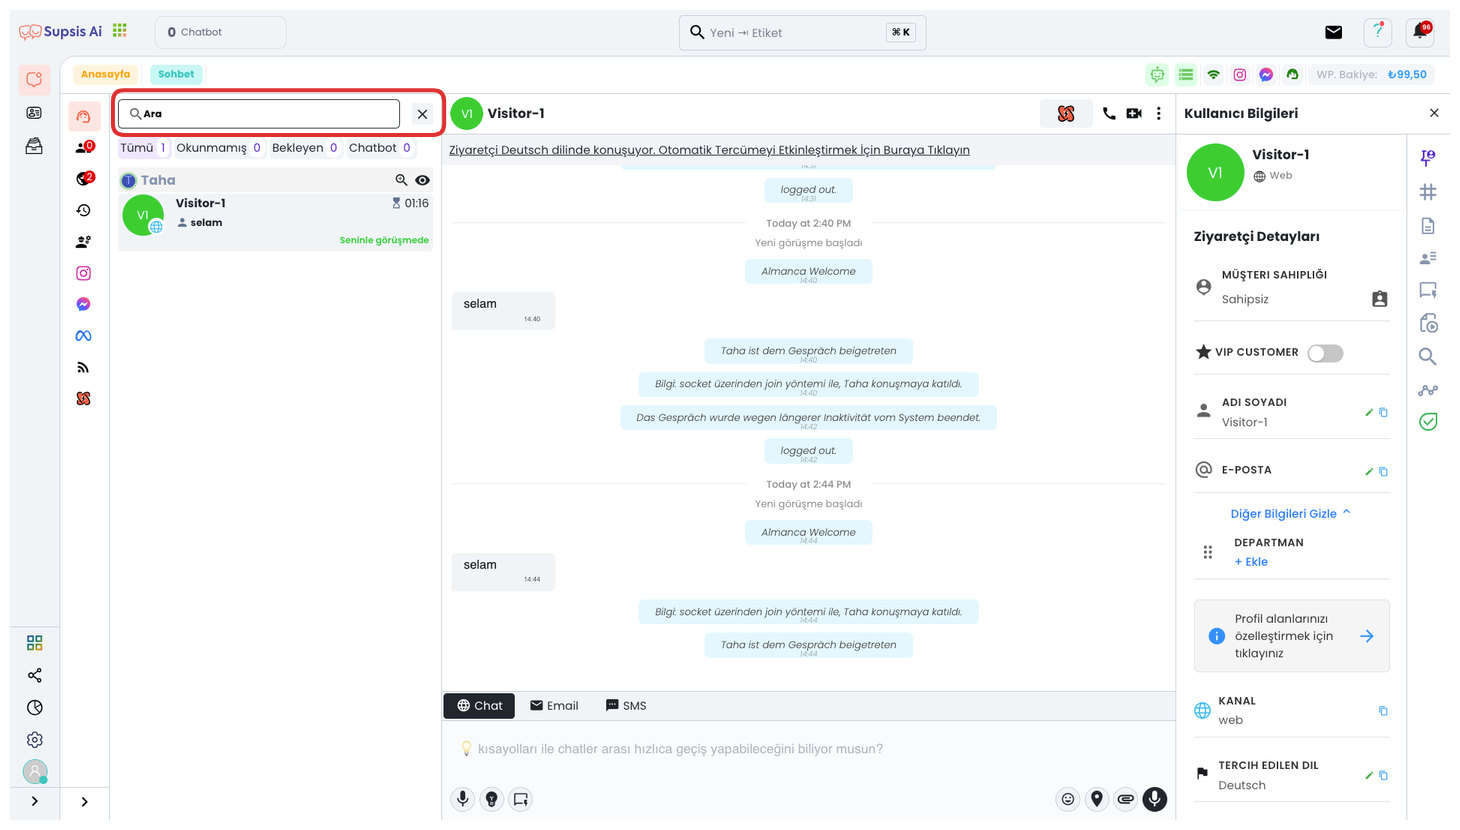
To manage your conversations more quickly and efficiently, you can easily filter the conversations you want on the screen using the search bar. This feature allows you to quickly find conversations related to a specific topic or user, especially in situations where there are many chats. By typing relevant keywords in the search bar, you can instantly access all or a specific part of the conversations you are looking for.
3.) Basic Information About Chat Session
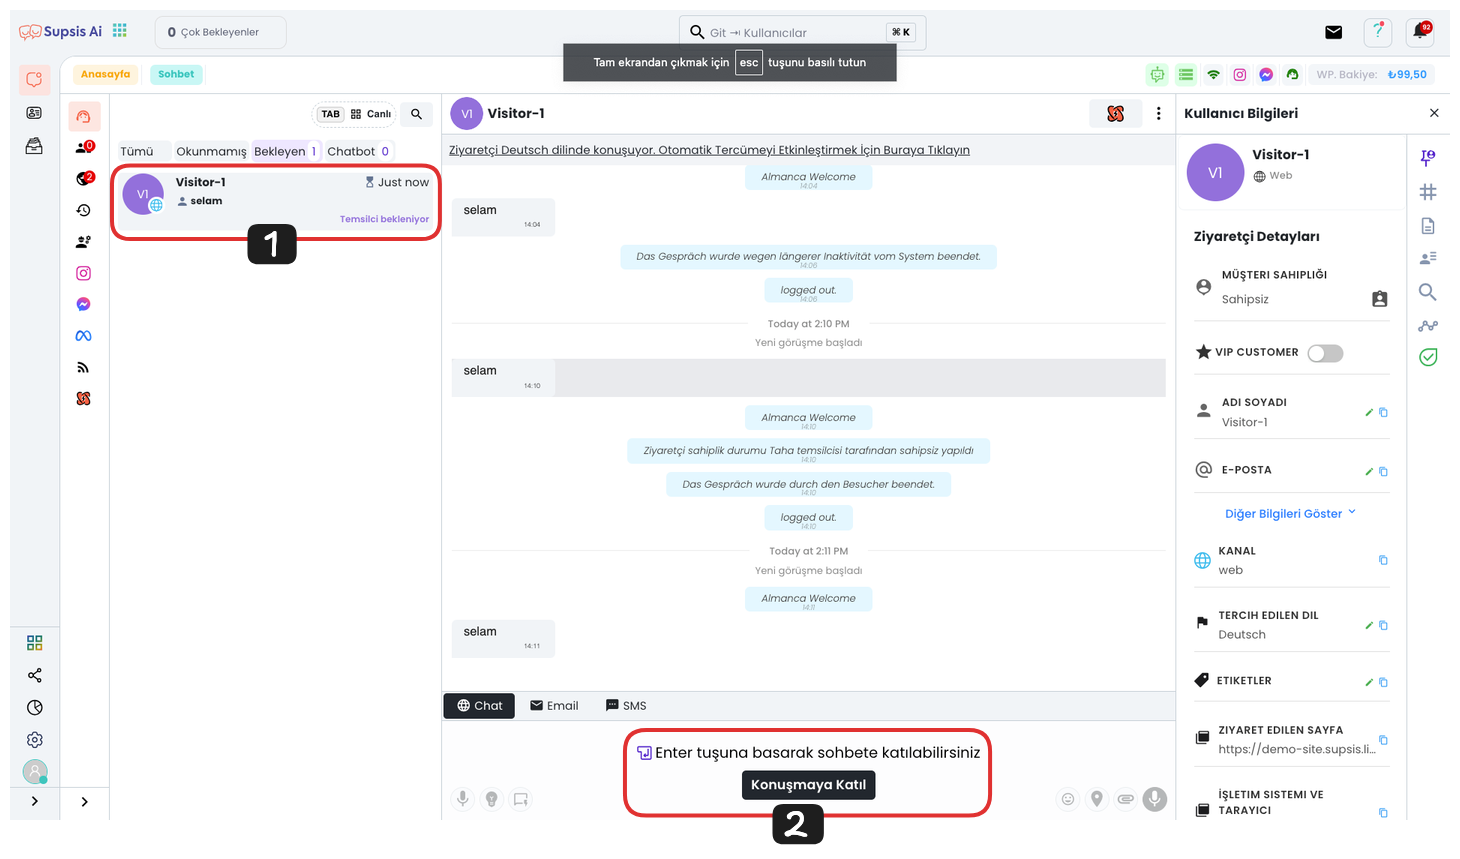
First, click on your incoming message and click the "Join Conversation" button on the opened page to join the conversation. With this operation, you can actively participate in the messaging process and interact with the customer.
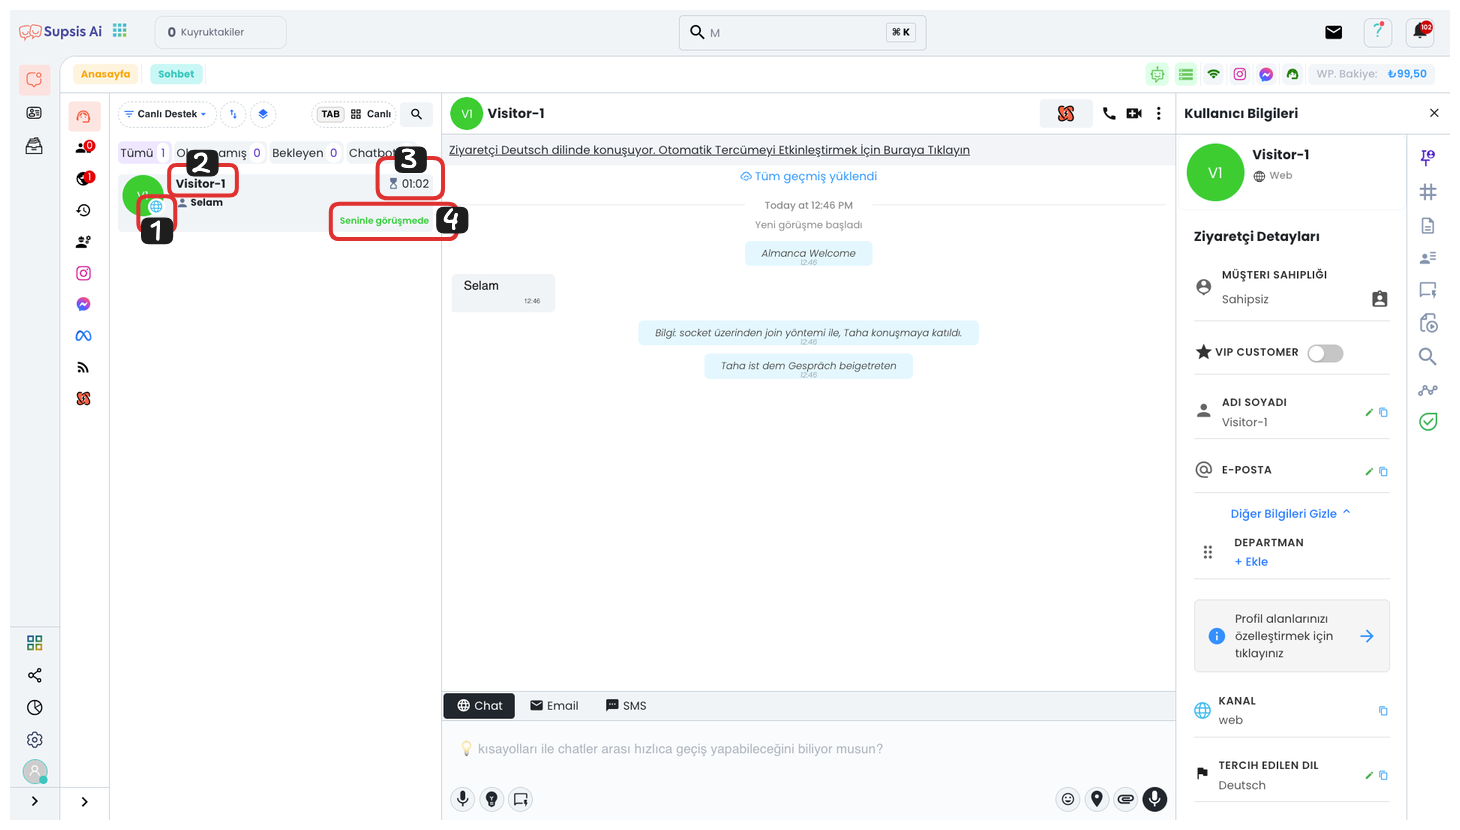
1-) Communication Channel
In this section, you can see which communication channel the customer connected to you through. For example, communications made through WhatsApp, Messenger, Instagram, Web, or other channels are represented by the visual of the communication channel from which they came.
2-) Person's Name
This field shows the name of the person you are communicating with.
3-) Chat Session Duration
You can track how long the conversation with the customer has been active from this section.
4-) Agents in Conversation
In this field, the agents participating in the conversation are listed. You can track which agent is continuing the conversation with the customer from this section.
4.) System Information and Shortcuts
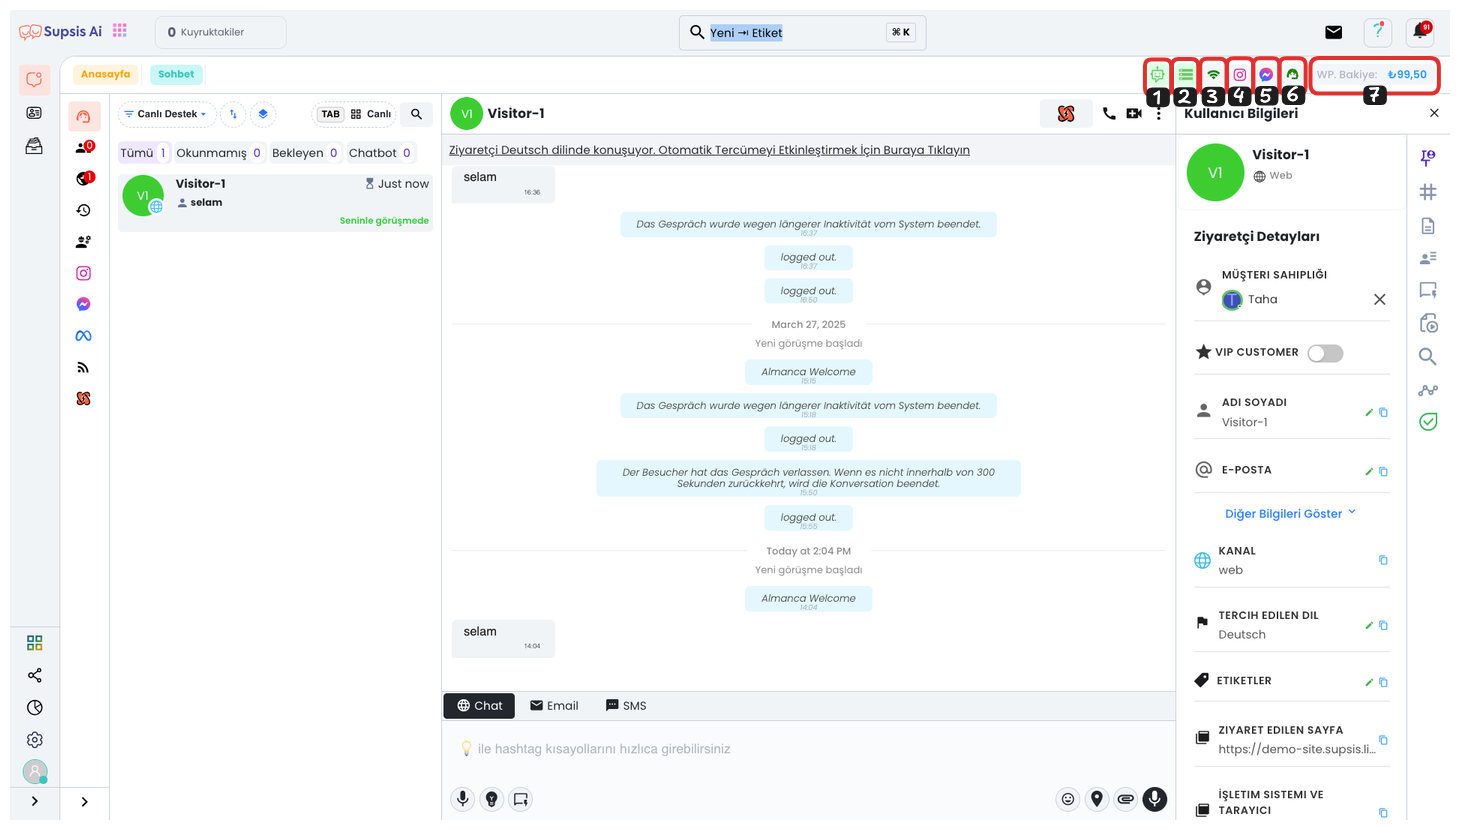
1-) Chatbot Session Tracking
This is the area where you can track the current and remaining session count of the chatbot. This area shows how many of your chatbot sessions are left and gives you a warning by changing color when your session count decreases. This way, you can make necessary interventions before your sessions run out and take preventive measures to ensure service continuity.
2-) Storage Tracking
In this area, you can track storage-related data such as Storage Area, Used Storage Area, Available Storage Area, Overflow Amount, and Overflow Fee. Thanks to this information, you can efficiently manage your storage usage and easily monitor storage overflow situations and related fees.
3-) Server Connection Status
You can track your system's server connection status from this section. When connection problems occur, this section will appear in red color to warn you. This way, you can quickly notice connection problems in the system and take necessary actions.
4-) Instagram Channels Shortcut
You can use this shortcut to quickly access your Instagram channels. This shortcut allows you to easily reach your Instagram contacts, comments on your Instagram posts, and other interactions. This way, you can quickly review and manage all comments and messages.
5-) Messenger Channels Shortcut
You can use this shortcut to access your Messenger channel. This shortcut allows you to quickly reach your Messenger contacts, comments on your Messenger posts, and other interactions. This way, you can easily manage all comments and messages and track your interactions more efficiently.
6-) Chat Reception Activity
This area shows whether chat reception in the system is active or not. If chat reception is closed, this section will turn red and customers will not be able to reach you through your website. You can easily track this situation from here and reactivate chat reception when necessary.
7-) WP Balance Tracking and Wallet Access Shortcut
You can use this shortcut to track your WhatsApp (WP) balance and access your wallet. Here, the balance status used for message sending via WhatsApp is shown. Thanks to this area, you can monitor your balance level and load additional balance when necessary.
5.) Chat Actions
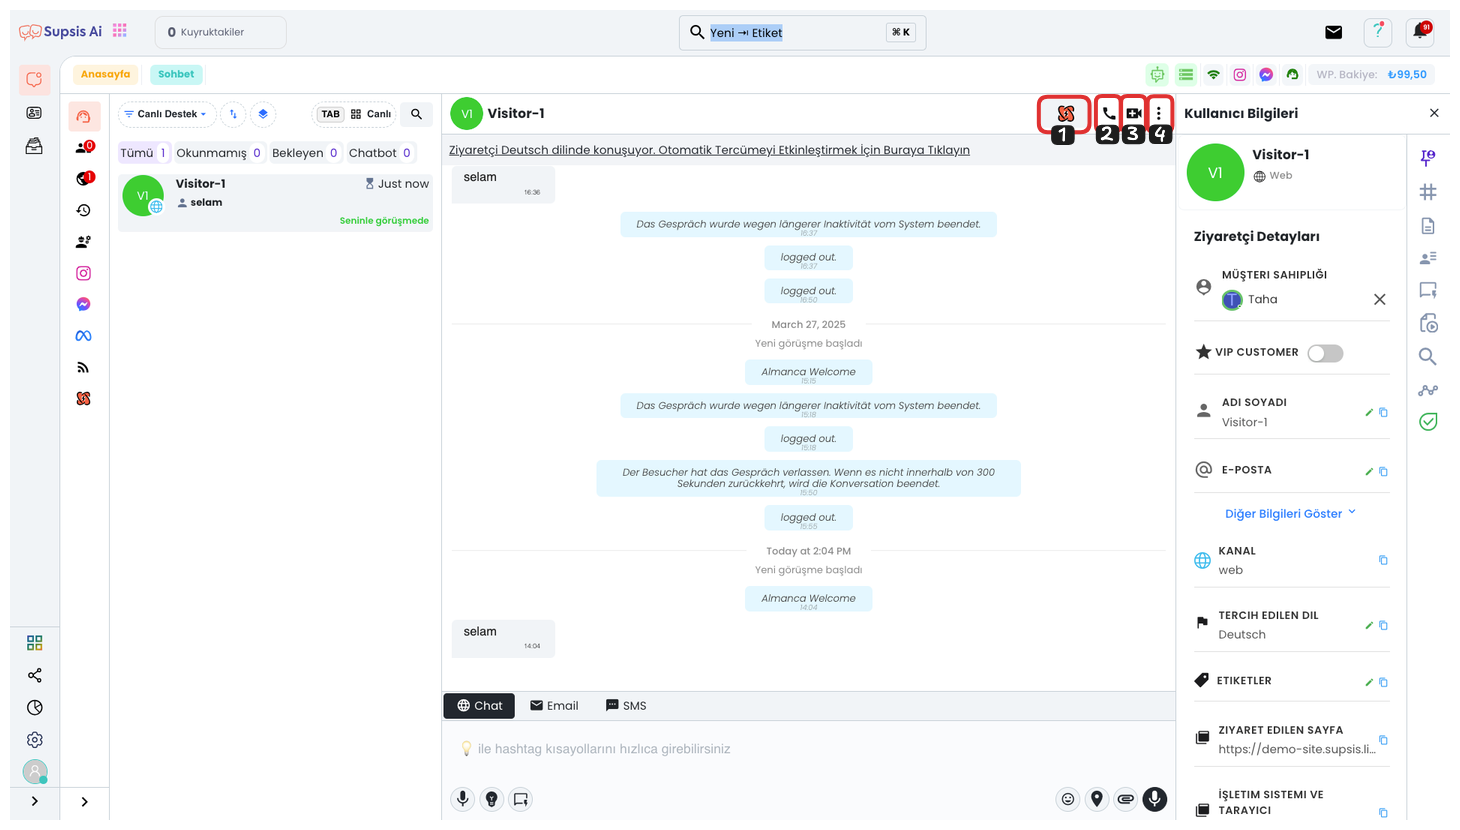
1-) Automation
From this area, you can view your existing event-based automations or create a new automation. You can manage, edit, or delete existing automations. In addition, you can make your business processes more efficient by creating new automation rules and triggers.
2-) Voice Call Feature
This feature can only be used for visitors coming through the website. Screen sharing and similar functions can also be activated when making voice calls. This allows you to communicate with visitors more effectively and quickly.
3-) Video Call Feature
The opportunity to make video calls is also offered only to visitors coming through the website. You can make a more interactive and efficient conversation with your customers by using extra functions such as screen sharing during video calls.
4-) Chat Actions
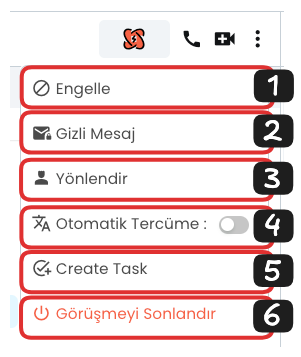
4.1. Block
With this option, you can block the person you have determined. The blocked person cannot continue messaging with you and does not receive your messages. This feature helps prevent unnecessary or unwanted communication.
4.2. Secret Message
You can send secret messages that only agents can see and the customer cannot see. This is used in internal team communication or for taking personal notes. When you communicate with the person again, you can view the secret messages you sent before by agents.
4.3. Forward Conversation
With this option, you can forward the current conversation to another agent. The forwarded agent can continue the conversation and help the customer more. This feature is useful in ensuring that the right agent helps the customer.
4.4. Automatic Translation
This feature, which is valid for visitors coming through the website, detects the visitor's language through the browser and automatically translates messages. Messages written by the visitor are automatically translated into your language; messages you write are also automatically translated into the visitor's language. This feature helps you communicate more easily by eliminating language barriers.
4.5. Create Task
You can quickly create tasks from this area. It is quite practical to add tasks for jobs determined during the conversation with the customer or points that need to be followed. This way, tasks become more organized and trackable.
4.6. End Conversation
With this option, you can end the current conversation. When the conversation is ended, the session will need to be restarted to continue the conversation. This feature allows you to determine whether the conversation is completed and end sessions.
6.) In-Chat Options
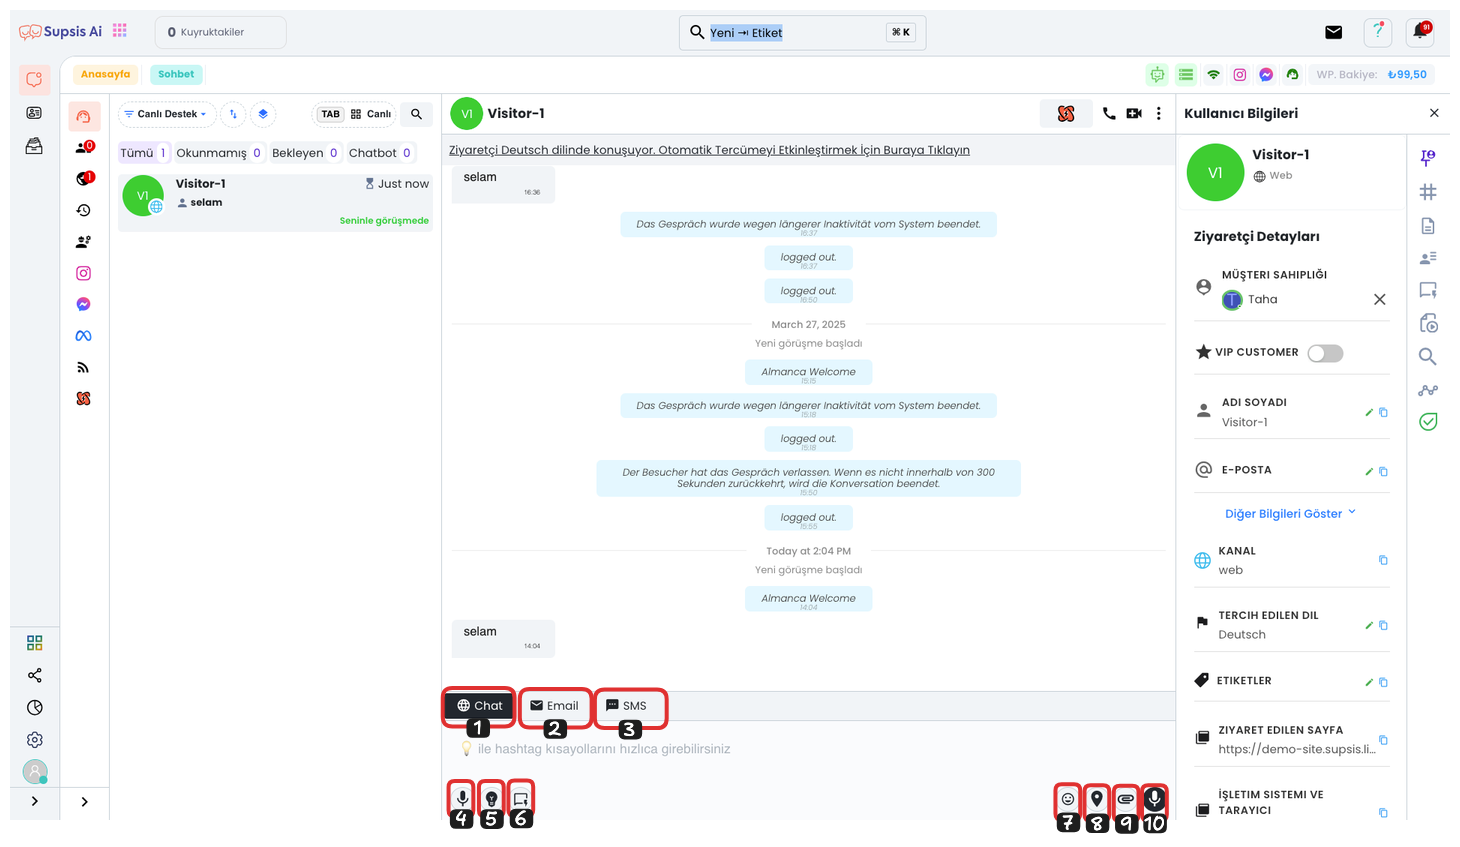
1-) Chat Message:
Allows you to send a message to the person via the current chat session. With this feature, you can perform instant messaging.
2-) Mail Message:
If you have provided Supsis & Mail integration and the person you are talking to has mail information in the Supsis system, you can send an email to the person using this button.
3-) SMS Message:
If you have provided Supsis & SMS integration and the person you are talking to has phone number information in the Supsis system, you can send an SMS to the person using this button.
4-) Speech to Text:
Converts the words you speak into text. This way, you can convert your messages to text by speaking. It is especially useful for quick message creation.
5-) Co-Pilot Feature:
You can activate Co-Pilot by clicking this button or pressing "Ctrl + ," keys. The features active with Co-Pilot are:

5.1. Long Sentence: Writes your message in a more detailed and longer way.
5.2. Change Tone: You can use a more professional, friendly, simple, decisive, or casual style by changing the tone of the message.
5.3. AI Response: Enables quick response creation by analyzing conversations made with the person through artificial intelligence.
5.4. Run Prompt: Automatically creates your message with commands you give to artificial intelligence.
5.5. Translation: You can translate the message into different languages.
5.6. Spell Check: Corrects spelling and punctuation errors in your message.
6-) Ready Content:
Allows you to quickly respond to frequently asked questions or routine customer requests through template messages. You can use messages created from the ready content menu. You can easily use your ready content by using the shortcut keys you have set (Tab, Ctrl, #) or by clicking on the relevant ready content.
7-) Emoji Button:
You can list emojis and add emojis to your messages using this button.
8-) Location Sending:
You can share your location information through this button and show location on the map to your customers or team members.
9-) File and Media Sending:
You can send files, media, and other documents with this button. You can easily share files such as photos, videos, and documents.
10-) Voice Message Sending:
You can send voice messages by clicking this button. You can quickly send voice messages using your microphone.
7-) Chat Session Details and Shortcuts

Customer General Information: You can click on the pin icon to view all general information about the customer. This allows you to quickly access important information about the customer and helps you manage your interaction with the customer more efficiently.
1-) Visitor Detail Section
You can access the details and basic information of the person you are chatting with from here. This section displays details such as the person's contact information and chat history.

-
Customer Ownership: With this feature, you can assign the customer writing to you to the agent you have determined. Customer ownership assignment allows agents to manage customer requests and chats more efficiently. This way, each agent establishes a more customized and personal communication with the customers assigned to them.
-
VIP CUSTOMER: The VIP customer option is a feature that highlights your important customers. With this option, you can pin your determined VIP customers to the top of the chat. This way, chats with these customers are always visible in the first row and become quickly accessible.
-
Customer Name and Surname: You can keep personal information up to date by editing your customer's name and surname information. This allows you to establish more personal and professional communication with the customer and ensures that correct and up-to-date information is in your database.
-
Customer Email: By entering your customer's email address, you can further strengthen their communication channels. Thanks to this field, you can provide quick feedback via email when communicating with the customer and collect all your communications in a central system.
-
Department Assignment: You can select the department suitable for customer requests from the departments you have created and direct your customer to the right department. This ensures that customers are answered quickly and effectively by the right team and organizes your workflow.
-
Customization: You can add special notes or additional information for each customer by customizing customer details. Thanks to this option, you can quickly access important information about your customer and provide a more personalized service.
-
Channel Information: You can see which channel your customer is communicating through (e.g.: WhatsApp, Instagram, Web). This information helps you remember which platform you are communicating with the customer and helps you develop channel-specific strategies.
-
Customer Language: You can overcome language barriers in communication by making adjustments according to your customer's language preference. This feature allows you to communicate more effectively with customers in different languages and increases customer satisfaction.
2-) User Values
You can see the details in the profile card belonging to the visitor from this section. Special information about the visitor is located on the profile card. To create profile card details, you can make settings by going to the "Settings > Visitor Profile Information" section. If you add the necessary data for you to this section, you can store data in the system, and later you can easily download this stored information by filtering as you wish through the conversation history.
3-) Notes
You can access the notes you have taken about the customer from here. By adding special notes for the customer, you can use this information in future communications and personalize customer relationships.
4-) Agent Details
You can see the information of the agent talking with the customer. Thanks to this feature, you can track which agent is communicating with which customer and provide agent change or support when necessary.
5-) Ready Content
You can quickly respond to customer requests by accessing ready content from here. You can communicate with the customer more efficiently and quickly by using the text templates you have created beforehand.
6-) Media and Documents
You can see the media files (images, videos) and documents shared in the chat from here. This allows you to examine the documents and images sent by the customer, so you can evaluate customer requests more accurately and quickly.
7-) Search Message
You can quickly find your old conversations by searching for a specific conversation in the chat. This feature helps you easily find information in past chats and allows you to provide more effective service.
8-) Meta Reference
If the customer came from Meta (Facebook/Instagram) ads, you can view this information here. This helps you analyze customer sources and allows you to better manage your marketing strategies.
9-) Flowlu
You can transfer the chat to the Flowlu platform. With Flowlu, you can manage customer interactions and processes more effectively and organize workflows.
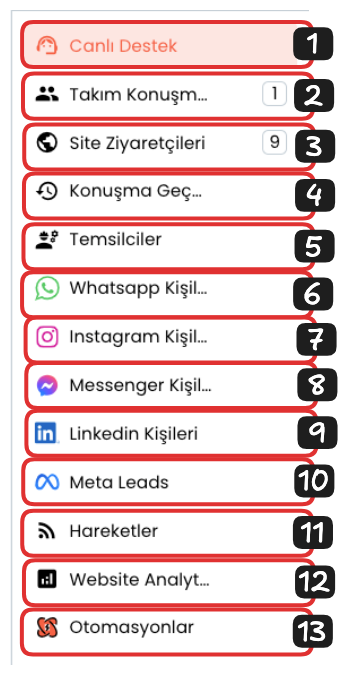
Chat Menu
-
Live Support: You can view your customers connected to live support from here and track active conversations.
-
Team Chat: You can communicate instantly with your agents through the panel and manage your internal team chats.
-
Site Visitors: You can view information about users visiting your site and perform visitor analysis.
-
Conversation History: You can examine all your past conversations from here and easily restart old chats.
-
Representatives: You can track the activity status, instant conversations, and performance reports of your agents.
-
WhatsApp Contacts: You can view your WhatsApp contacts from here and start chats.
-
Instagram Contacts: You can see your contacts connected via Instagram here and start chats.
-
Messenger Contacts: You can view your Messenger contacts and start new chats.
-
LinkedIn Contacts: You can see your contacts connected via LinkedIn here and start chats.
-
Meta Leads: With the Meta Leads feature, you can track and manage potential customer information from here.
-
Activities: You can track all operations, changes, and activities performed by all your agents on the panel.
-
Website Analysis: You can view all statistics and analysis reports of your website here.
-
Automations: You can view all automations you use in the chat module from here and create new automations.