automationContent
Automation Menu Content
- Automation Name
- Design
- Plan and Task
- Insights
- Automation Blocks
- Search Block by Name
- Settings
- Automation Simulation (Test) Screen
- Publish/Unpublish Automation
- Edit Block Name/Block Operations
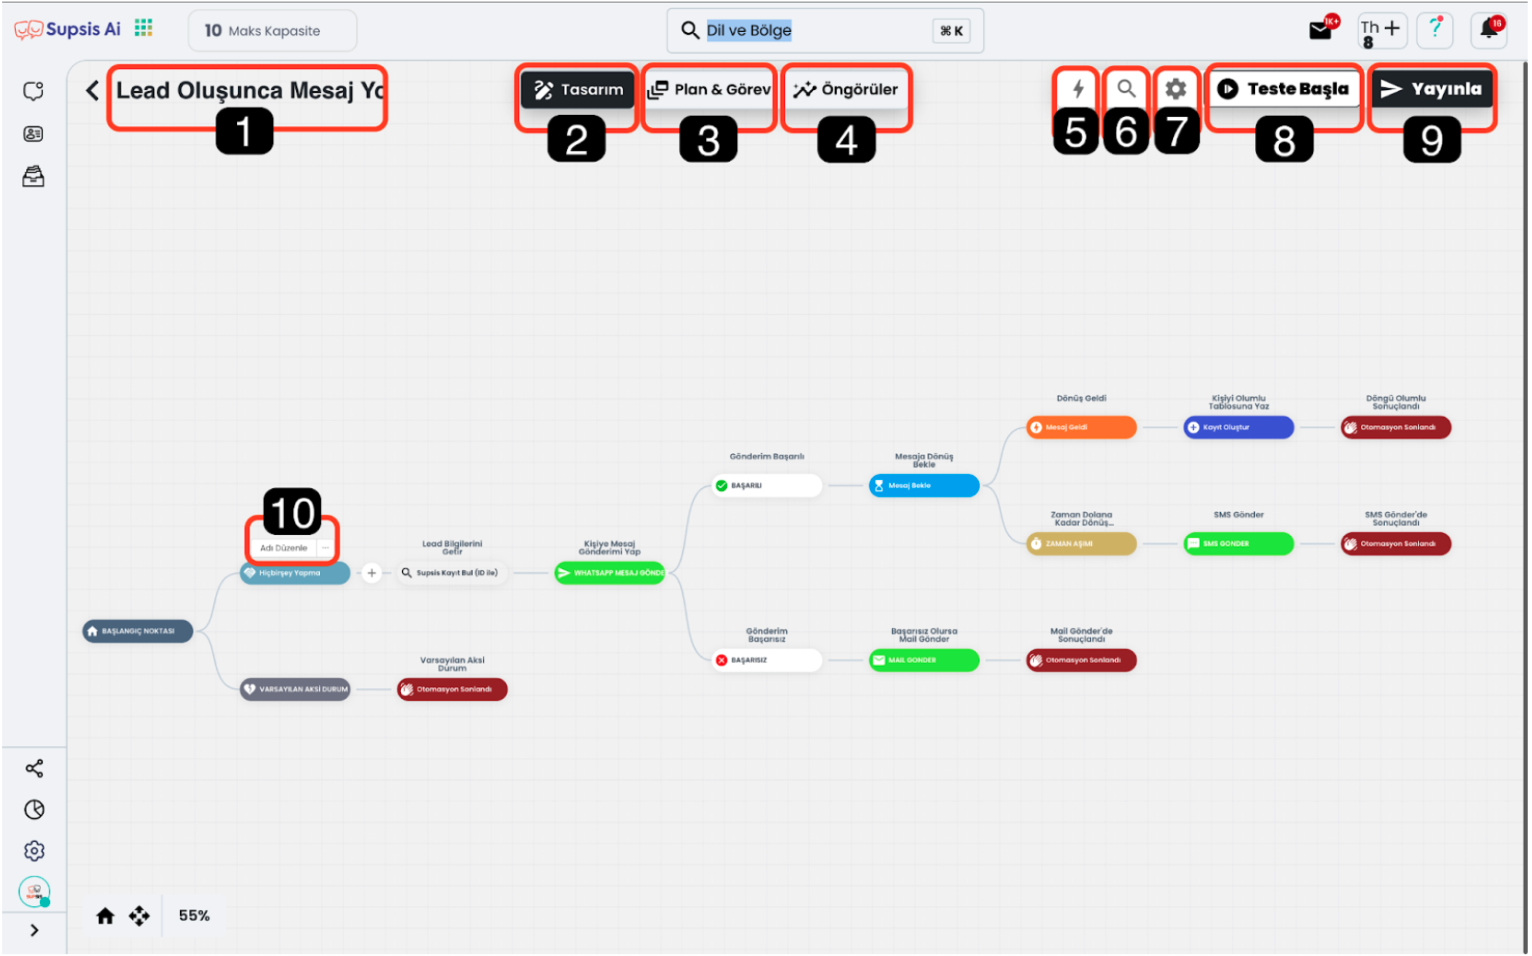
1-) Automation Name
A naming field that allows you to easily distinguish your automations by naming them.
2-) Design
You can access the design screen where you will design the automation diagram from this section.
3-) Plan and Task
You can view the working plans of the automation and current task statuses from here.
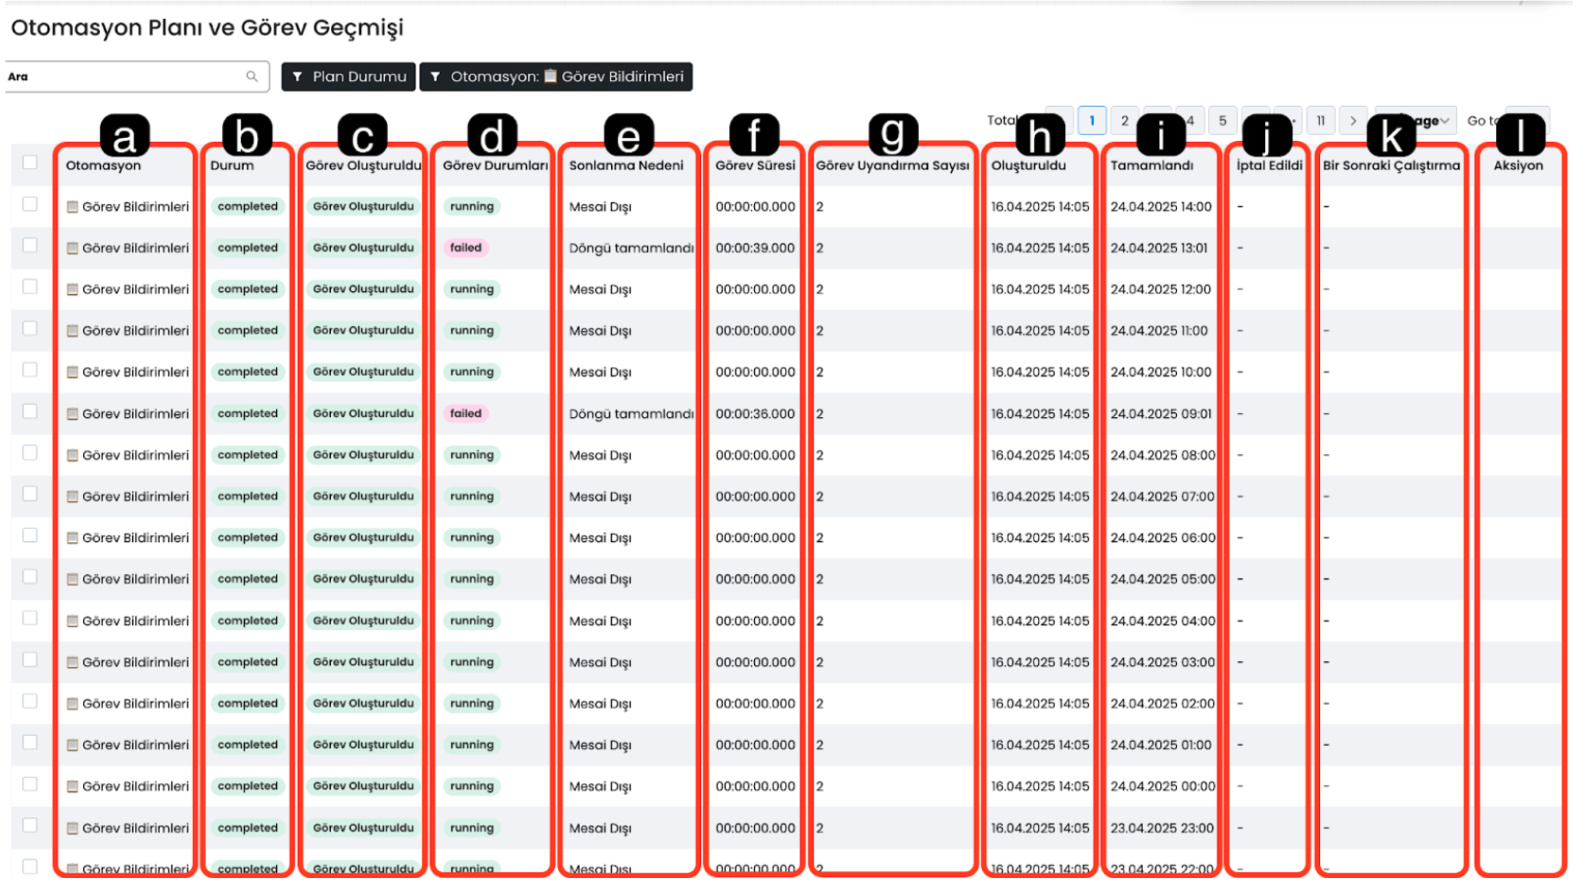
3.a-) Automation: You can view the automation name from which you view the plan content here.
3.b-) Status: Current task status.
3.c-) Task Created: Task creation status.
3.d-) Task Status: Current task status.
3.e-) Termination Reason: Task termination reason, this field contains the status added to the automation termination block that terminates the task. This way you can observe at which stage the automation flow was completed.
3.f-) Task Duration: You can observe the difference between the time the task was created and completed from here.
3.g-) Task Wake-up Count: Shows how many times the automation task was awakened in the session.
3.h-) Created: Shows the date when the automation started (was created).
3.i-) Completed: Shows the date when the automation was completed (terminated).
3.j-) Cancelled: Shows the cancellation reason if the automation was cancelled.
3.k-) Next Run: Shows the date when the automation will wake up and become active again if it entered the sleep and wait block.
3.l-) Action: Shows the action plan if there is an action plan.
4-) Insights
5-) Automation Blocks:
Contains the design blocks where you can create the automation diagram. We will discuss in detail in the later sections of our documentation what these blocks are used for and how to use them.
6-) Search Block by Name
Allows you to search by name among the blocks in the automation diagram.
7-) Settings
Allows you to access the settings section where you can configure the automation navigation.
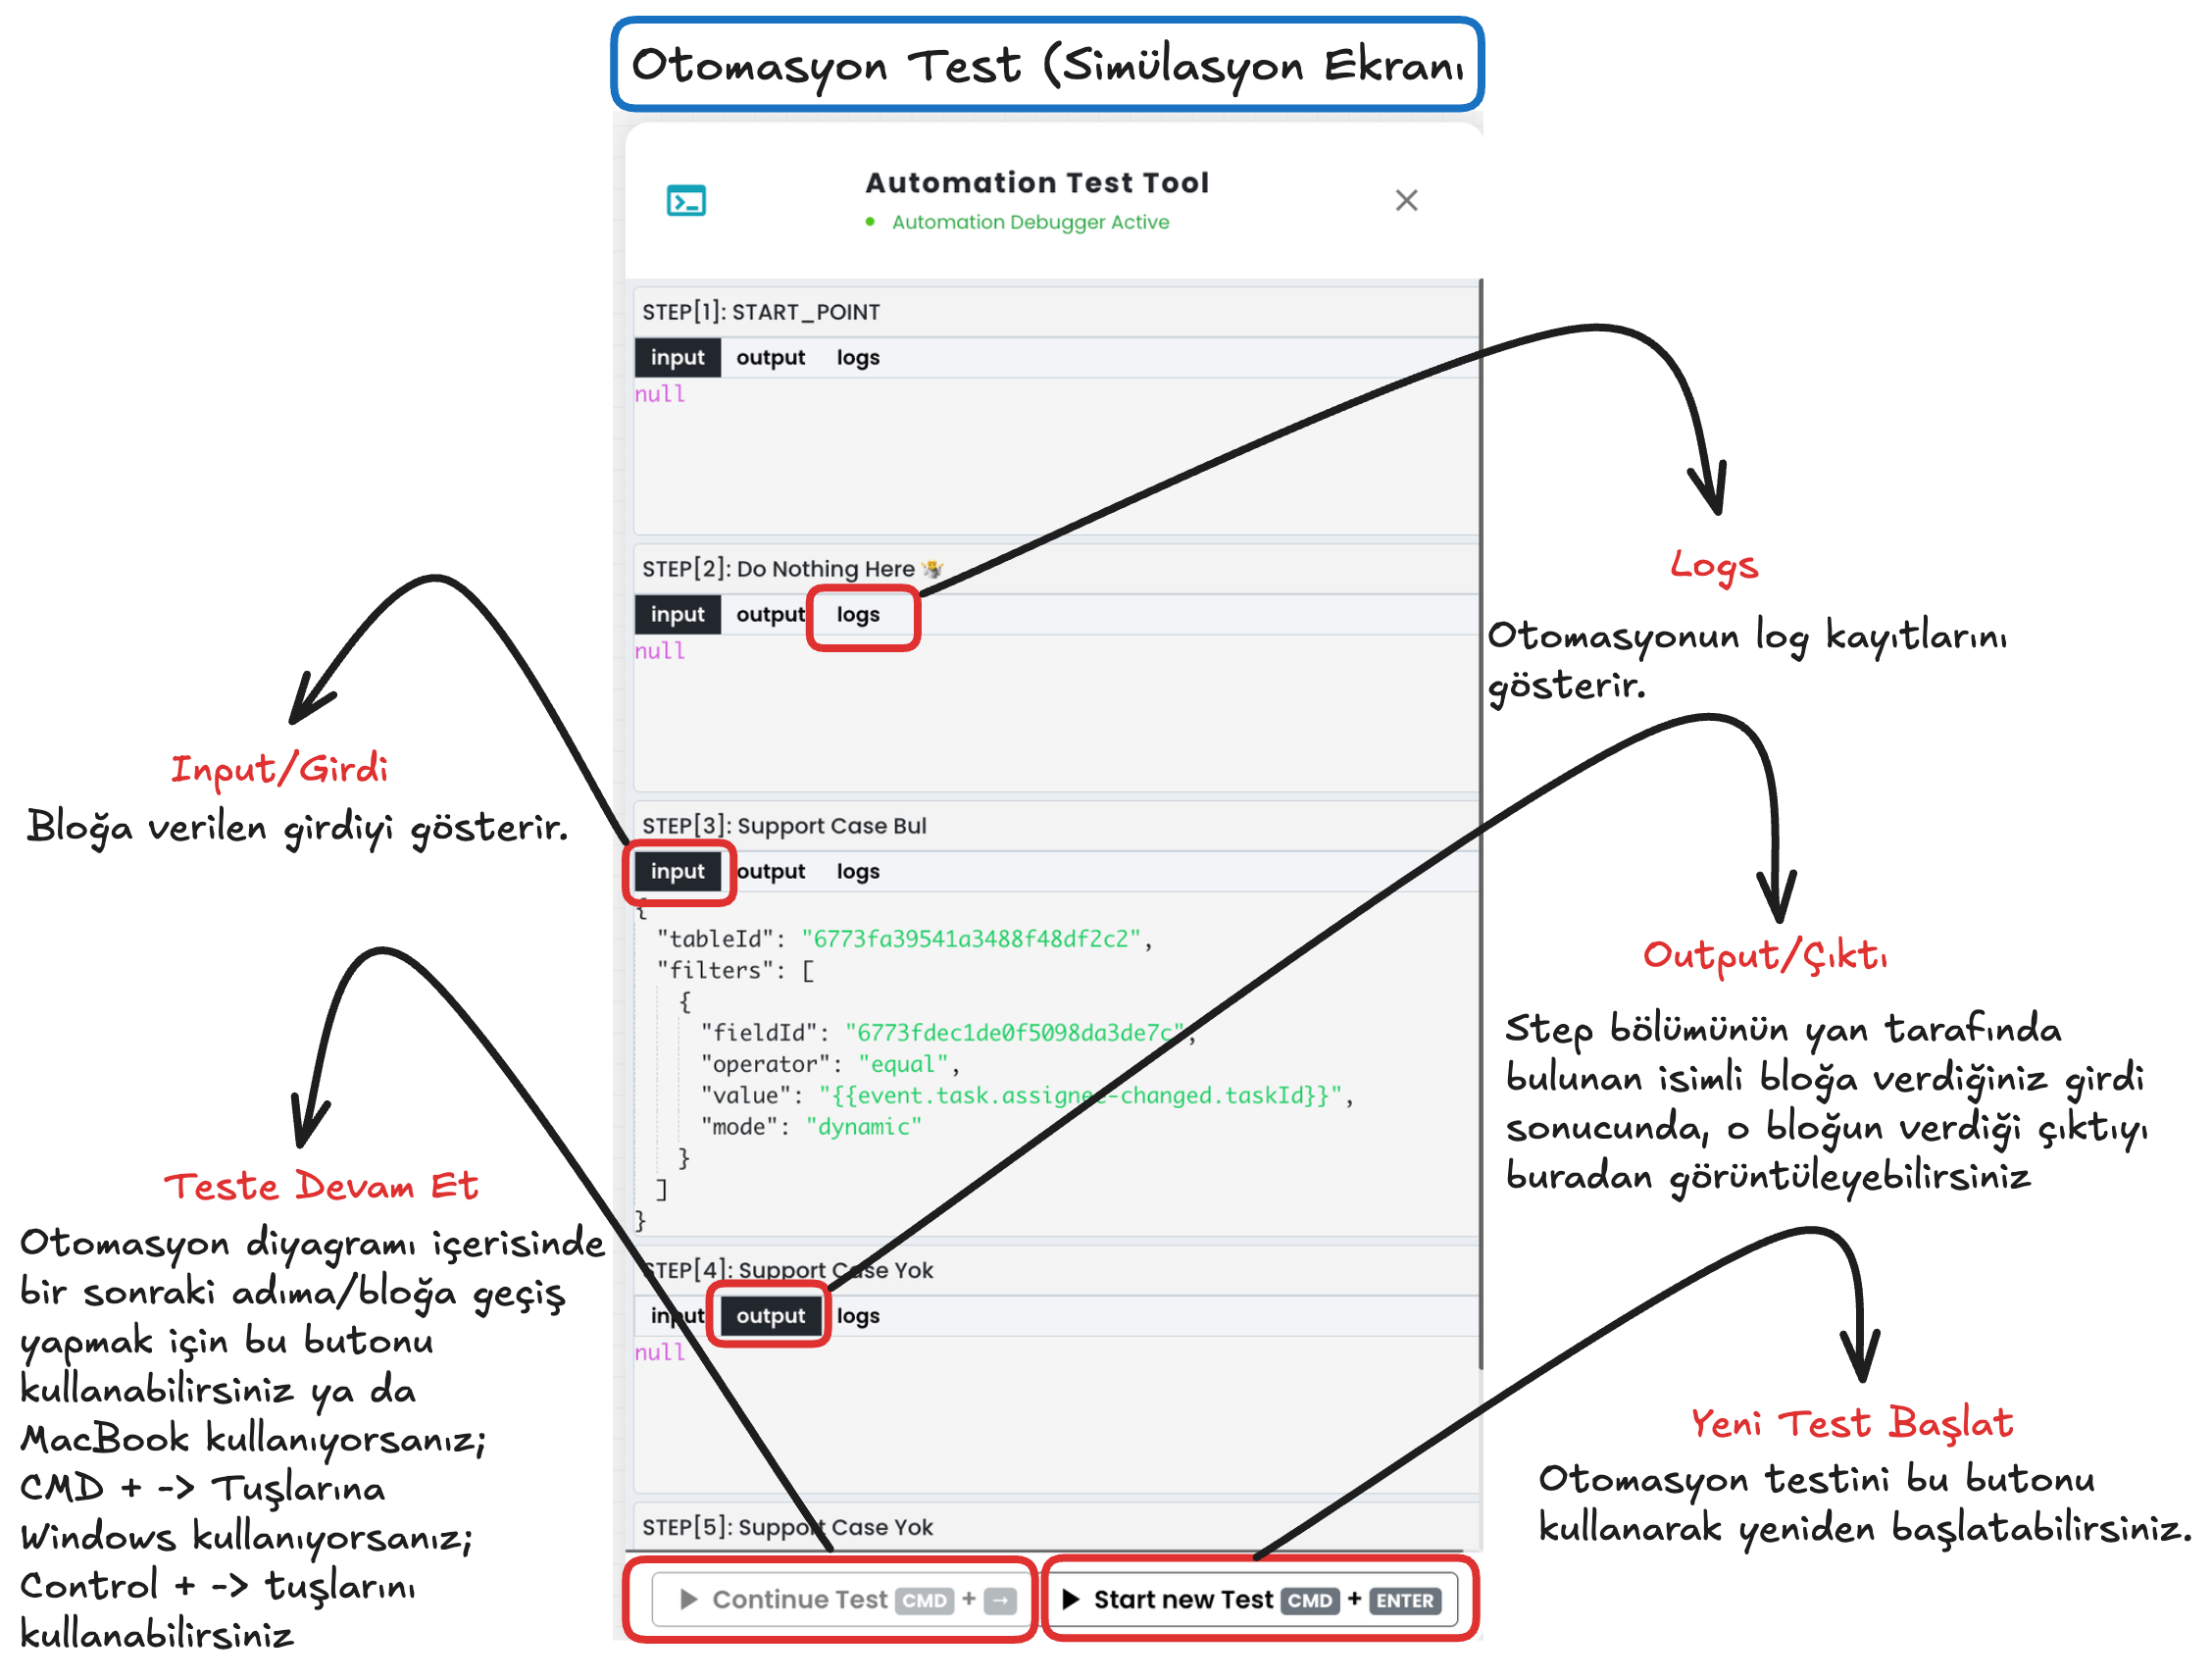
8-) Automation Simulation (Test) Screen
The test feature allows you to test your automation in a simulation environment before publishing it. This test environment allows you to simulate how the data returned in the automation will be processed. The test environment generally offers an experience similar to the live environment, but may show differences in some cases.
Test Screen Content:
9-) Publish/Unpublish Automation
You can use this button to open or close your automation scenario. If your automation is published, you can use the "Unpublish" button here to close it. If your automation is not already published, you can use the "Publish" button here to publish the automation.
10-) Edit Block Name/Block Operations
From this area, you can edit the name of the automation block and access the block interactions.
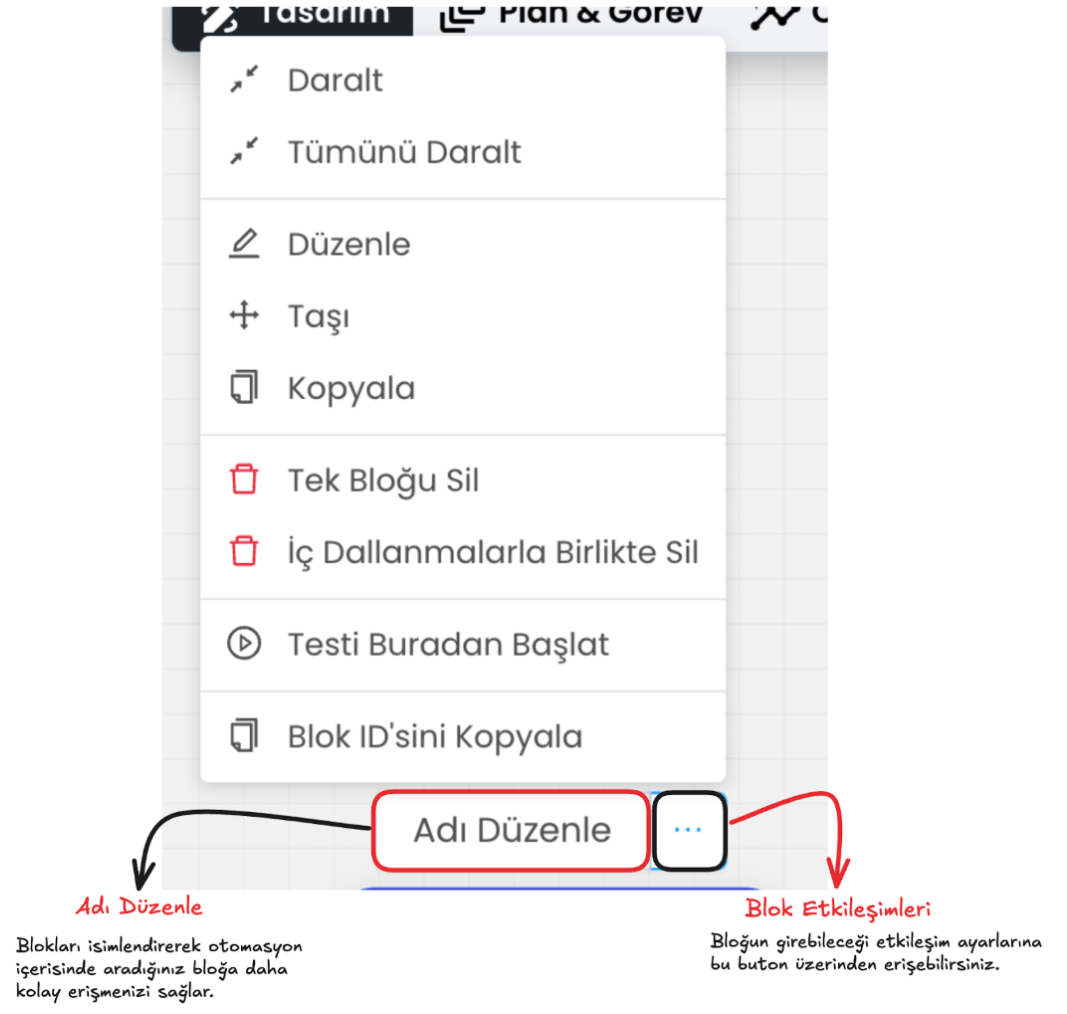
Block Interactions
Collapse: Collapses the block and collapses the flow behind the block. The collapse interaction only collapses the block you performed the operation on.
Collapse All: Collapses all blocks in the flow behind the block you performed the operation on.
Edit: Opens the screen where you will edit the action content that the block will perform. You can access this screen both through the edit button here and by clicking on the relevant block.
Move: Allows you to move the block and all the flow behind it on the diagram you are designing.
Copy: Allows you to copy the block and all the flow behind it to any area you want on the diagram you are designing. This interaction will also bring the data inside the block dynamically.
Delete Single Block: Deletes only the block you performed the operation on.
Delete with Internal Branches: Deletes the block you performed the operation on and all blocks in the flow behind it.
Start Test from Here: Starts the test/simulation screen from the block you provided the operation.
Copy Block ID: Copies the ID of the block you performed the operation on. You can read the data held by the block through the copied ID and perform step navigation functions.
Data Reading Methods
The automation module provides its functionality through the flow in the diagram you create in the design screen. The data you complete in the blocks is processed by the blocks and provides the defined tasks. In this section of our documentation, we will discuss the methods for reading the data that the blocks will process.
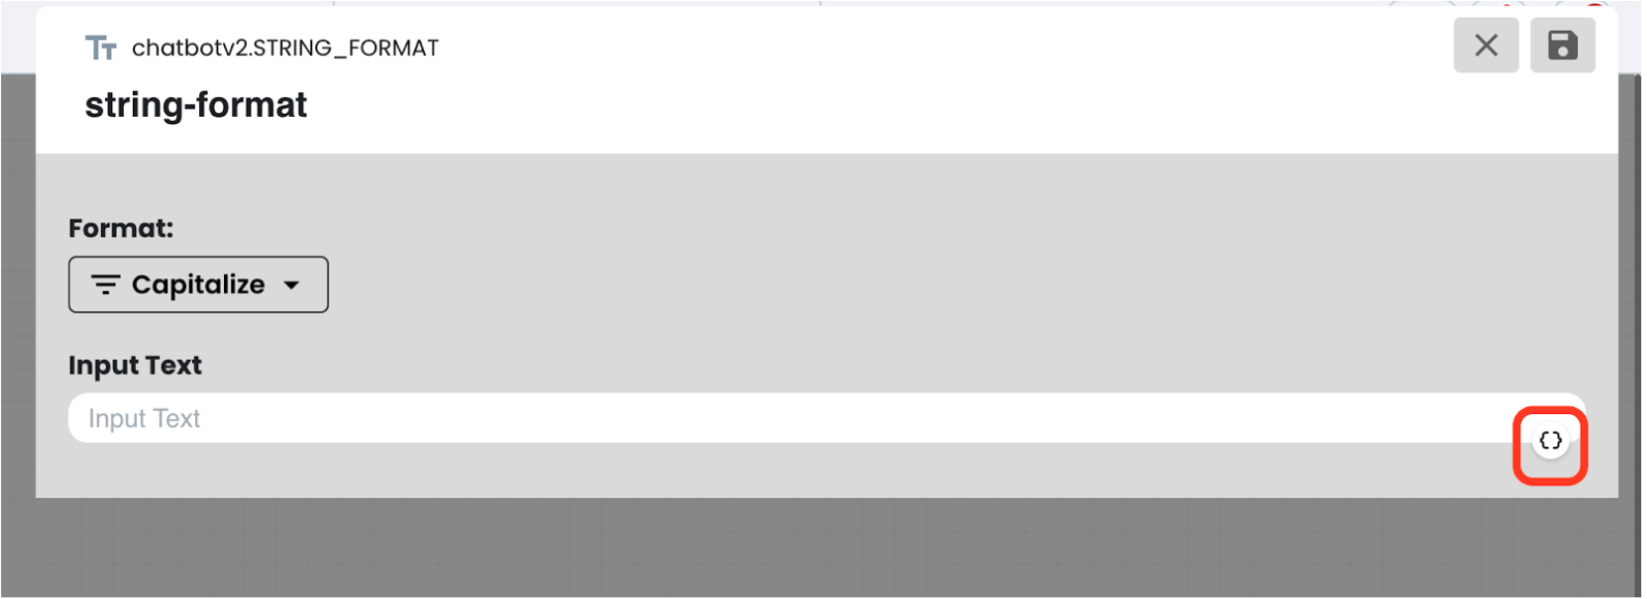
First, enter the block where you will add data and click the marked data printing button. When you click this button, the methods you can read data will appear.
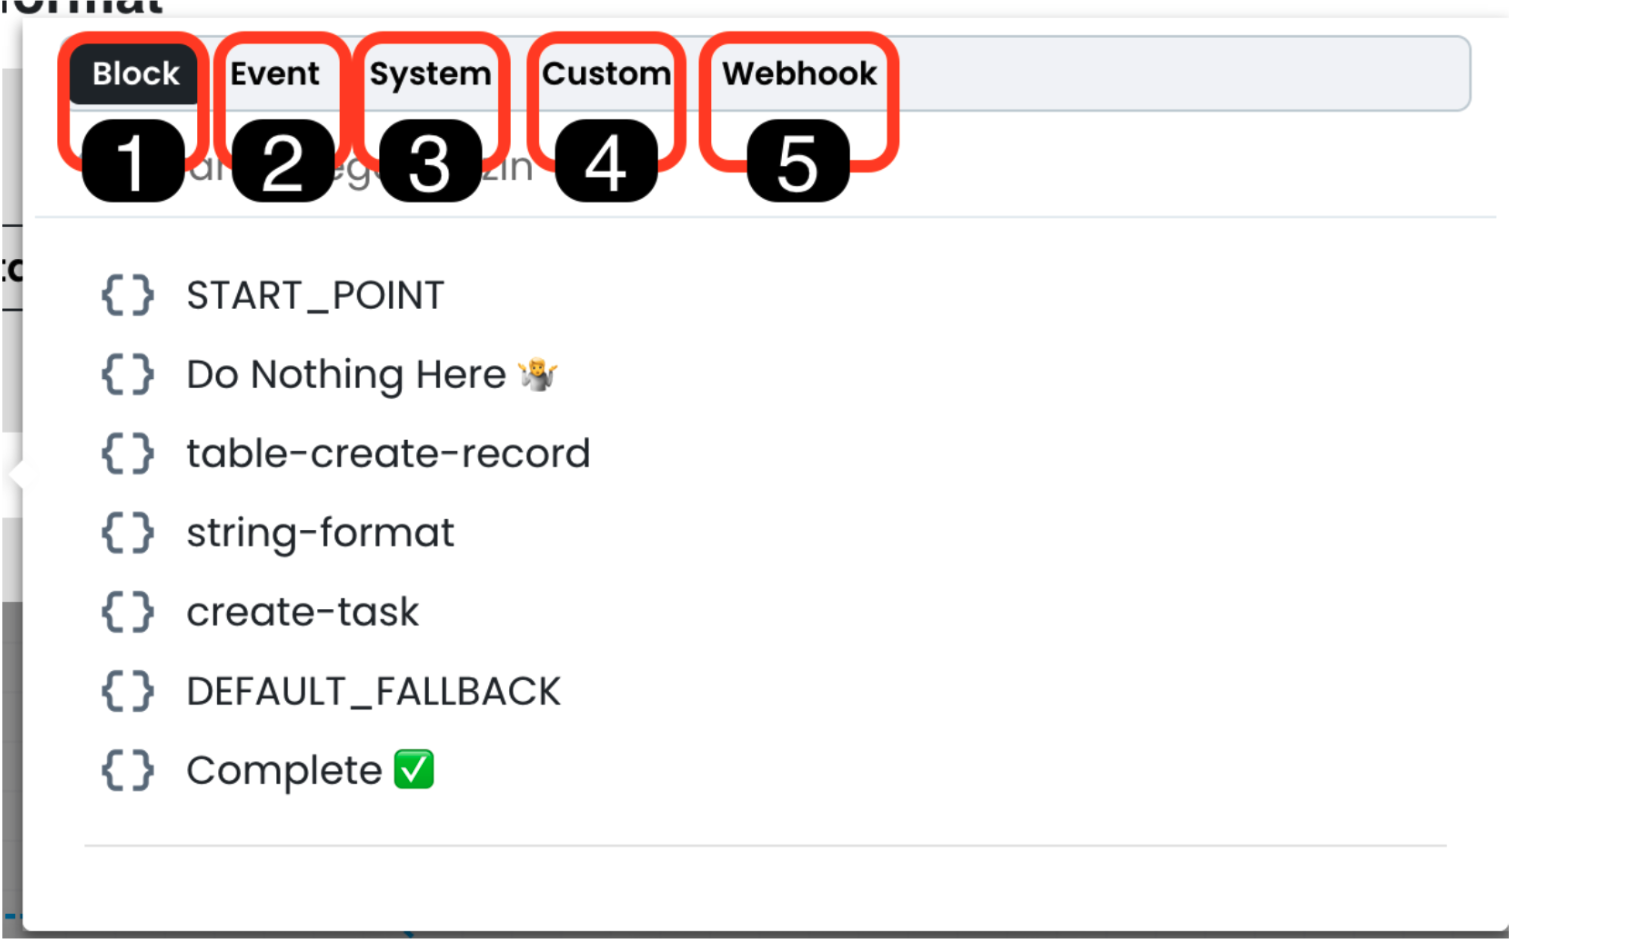
1-) Reading Data from Block
The blocks in your automation setup can query from Supsis panel modules or tables, and the query results are held within the blocks. The data within the block can be read through this method.
2-) Reading Data from Event
This method only works in event-based automations, when a specific event occurs in your Supsis panel, the automation is automatically triggered and starts the triggered automation with the information belonging to the trigger event. You can read the content of the trigger event that started the automation by clicking the event button.
3-) Reading System Data
You can read and process data such as date information and automation plan information that already exists in the system from this section.
4-) Custom (Random) Value Generation
From this section, you can create random and unique values and provide assignment of the random values you create.
5-) Reading System Data
You can read and process data such as date information and automation plan information that already exists in the system from this section.
6-) Reading Webhook Data
You can read the data content coming from the webhook through this section. The sub-headings that are dynamic and coming in the webhook content cannot be read from this section. You can read non-dynamic values by making selections, but you need to manually write the JSON path of the dynamic data content coming from your webhook.

Manually Entering Webhook Data:
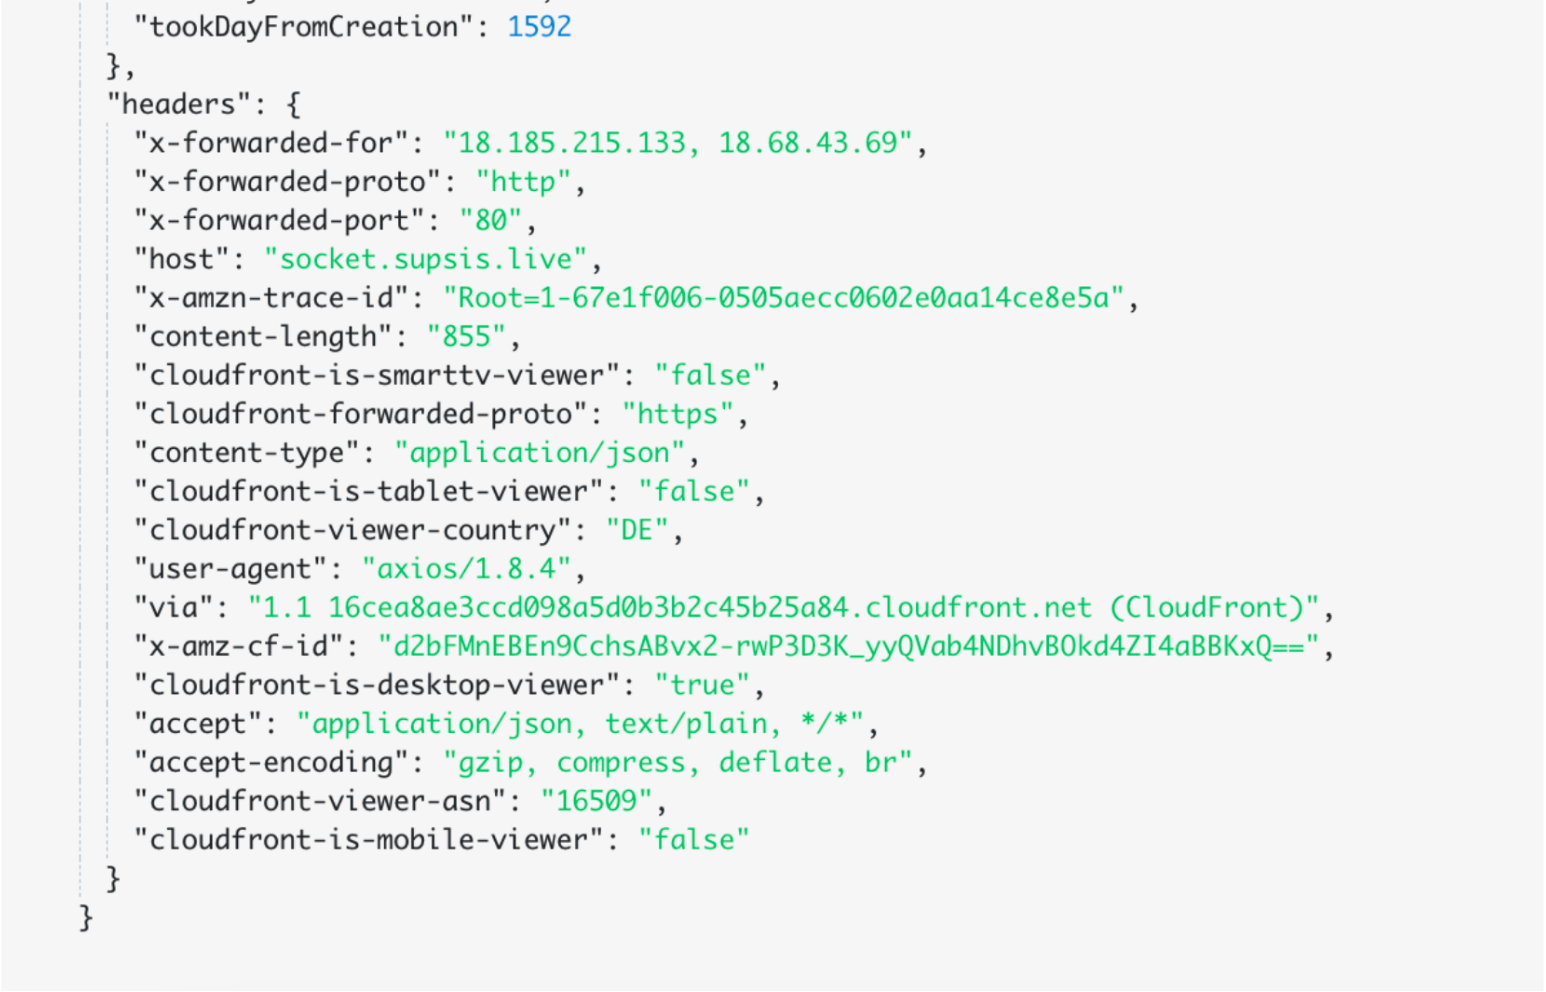
For example, to read the dynamic value "socket.supsis.live" right next to the "host" data in the JSON in the image, you need to write this value by hand. To use this value, you need to write the JSON path where the data is stored. To write the path equivalent of the "host" value we used as an example, first we need to write the webhook which is the method we get the data from, then the headers that contain all the JSON content in the screenshot, and the host value under the headers heading, adding "." under each sub-heading. Then, to dynamize the data, we need to add the data value inside curly braces.
To create curly braces:
If you are using Windows;
{ => for CTRL+7,
} =>, for CTRL+0,
If you are using MacBook;
{ for => Option+7,
} for =>, for Option+0,
you can use these buttons.
After writing the path, you need to add two curly braces to the beginning and end of the path value.
The path value for our example operation should be like this =>{{webhook.headers.host}}
When you give this value to any block, it will check the headers heading of the relevant JSON in your webhook, then read the socket.supsis.live value held by the host value which is its sub-heading.