Automation Blocks
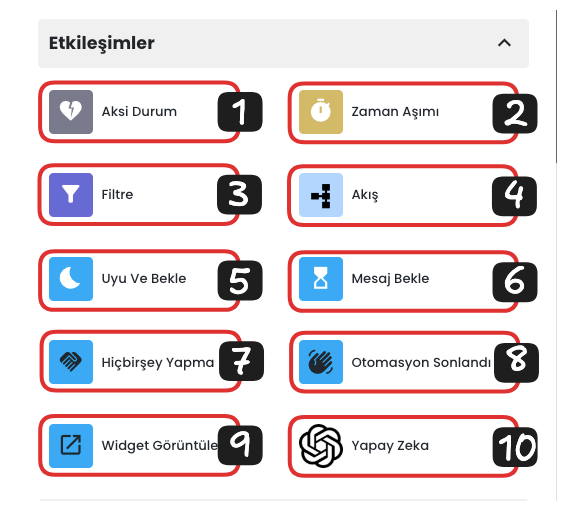
Interaction Blocks List
- Otherwise: Activates when the user makes an unexpected or undefined input. The Otherwise block redirects the user to an alternative flow.
- Timeout: If a user action is expected at a certain stage, it is triggered after a certain period when no action is taken, and is used to put the user back into the interactions you added behind this block.
- Filter: Filters data or values such as time and day within the automation, ensuring that actions behind the filter are taken.
- Flow: Allows the automation to create more complex scenarios. This block puts the specified part of the automation into a single flow, making complex scenarios more organized.
- Sleep and Wait: When the automation reaches this block, it makes the automation sleep for the duration specified in the block without doing anything, and allows it to continue operations when the duration is completed.
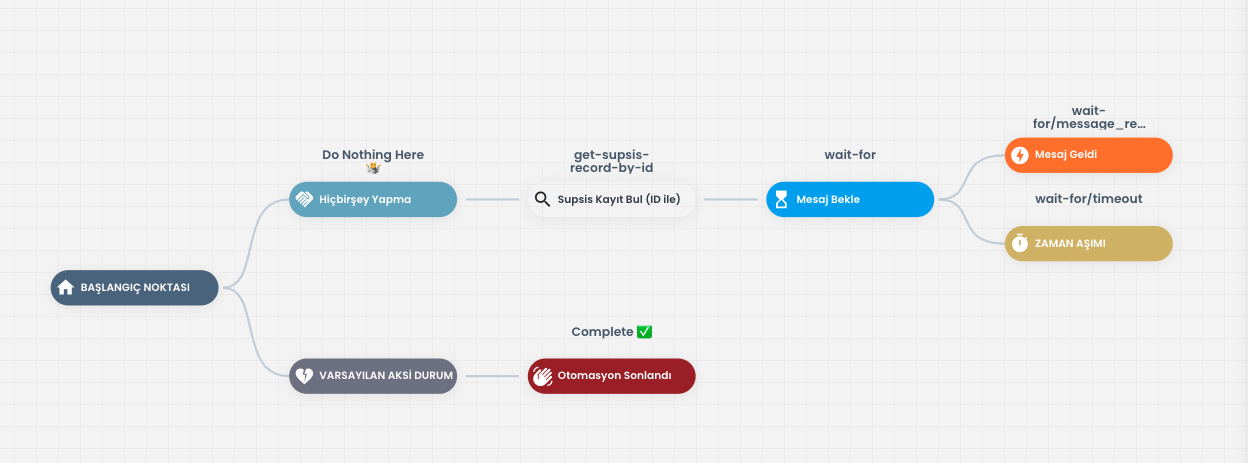
- Wait for Message: Waits for a message from the customer at a certain stage where you communicate with the customer. By integrating the timeout with the wait for message block, if the customer does not respond to the communication request for a certain period, it enters the flow behind the timeout.
- Do Nothing: Makes the automation wait without doing anything when it reaches the stage above this block.
- Automation Ended: Terminates the automation. By writing the reason for termination of the automation into this block, you can view at which block the automation ended.
- Display Widget: Allows you to display an external widget on your platform.
- AI Response: Answers user questions using the GPT-4.0 model according to the instructions and qualities you provide. This block uses artificial intelligence technology to provide more dynamic and intelligent responses.
1-) Otherwise
The Otherwise block activates when the automation receives an unexpected or undefined data input. When the value of the data does not meet any of the conditions in the stage at that moment, this block redirects the user to an alternative flow.
Note: If the user cannot meet the filter conditions or defined inputs, and there is no "Otherwise" block in the relevant step, the system automatically redirects to the "Default Otherwise" scenario.
Example Otherwise Usage:
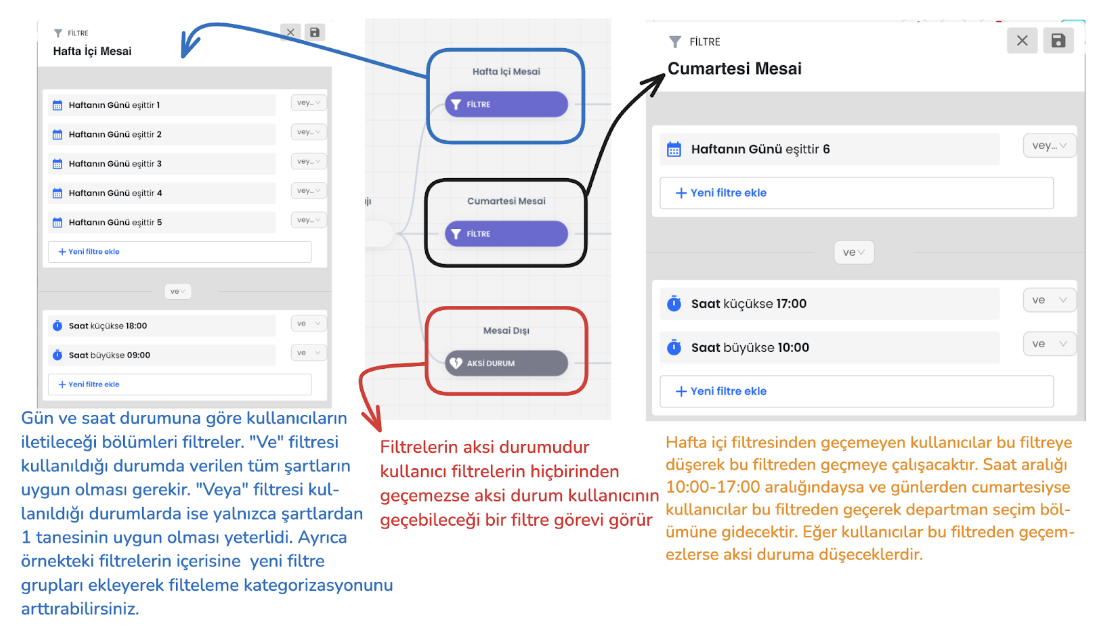
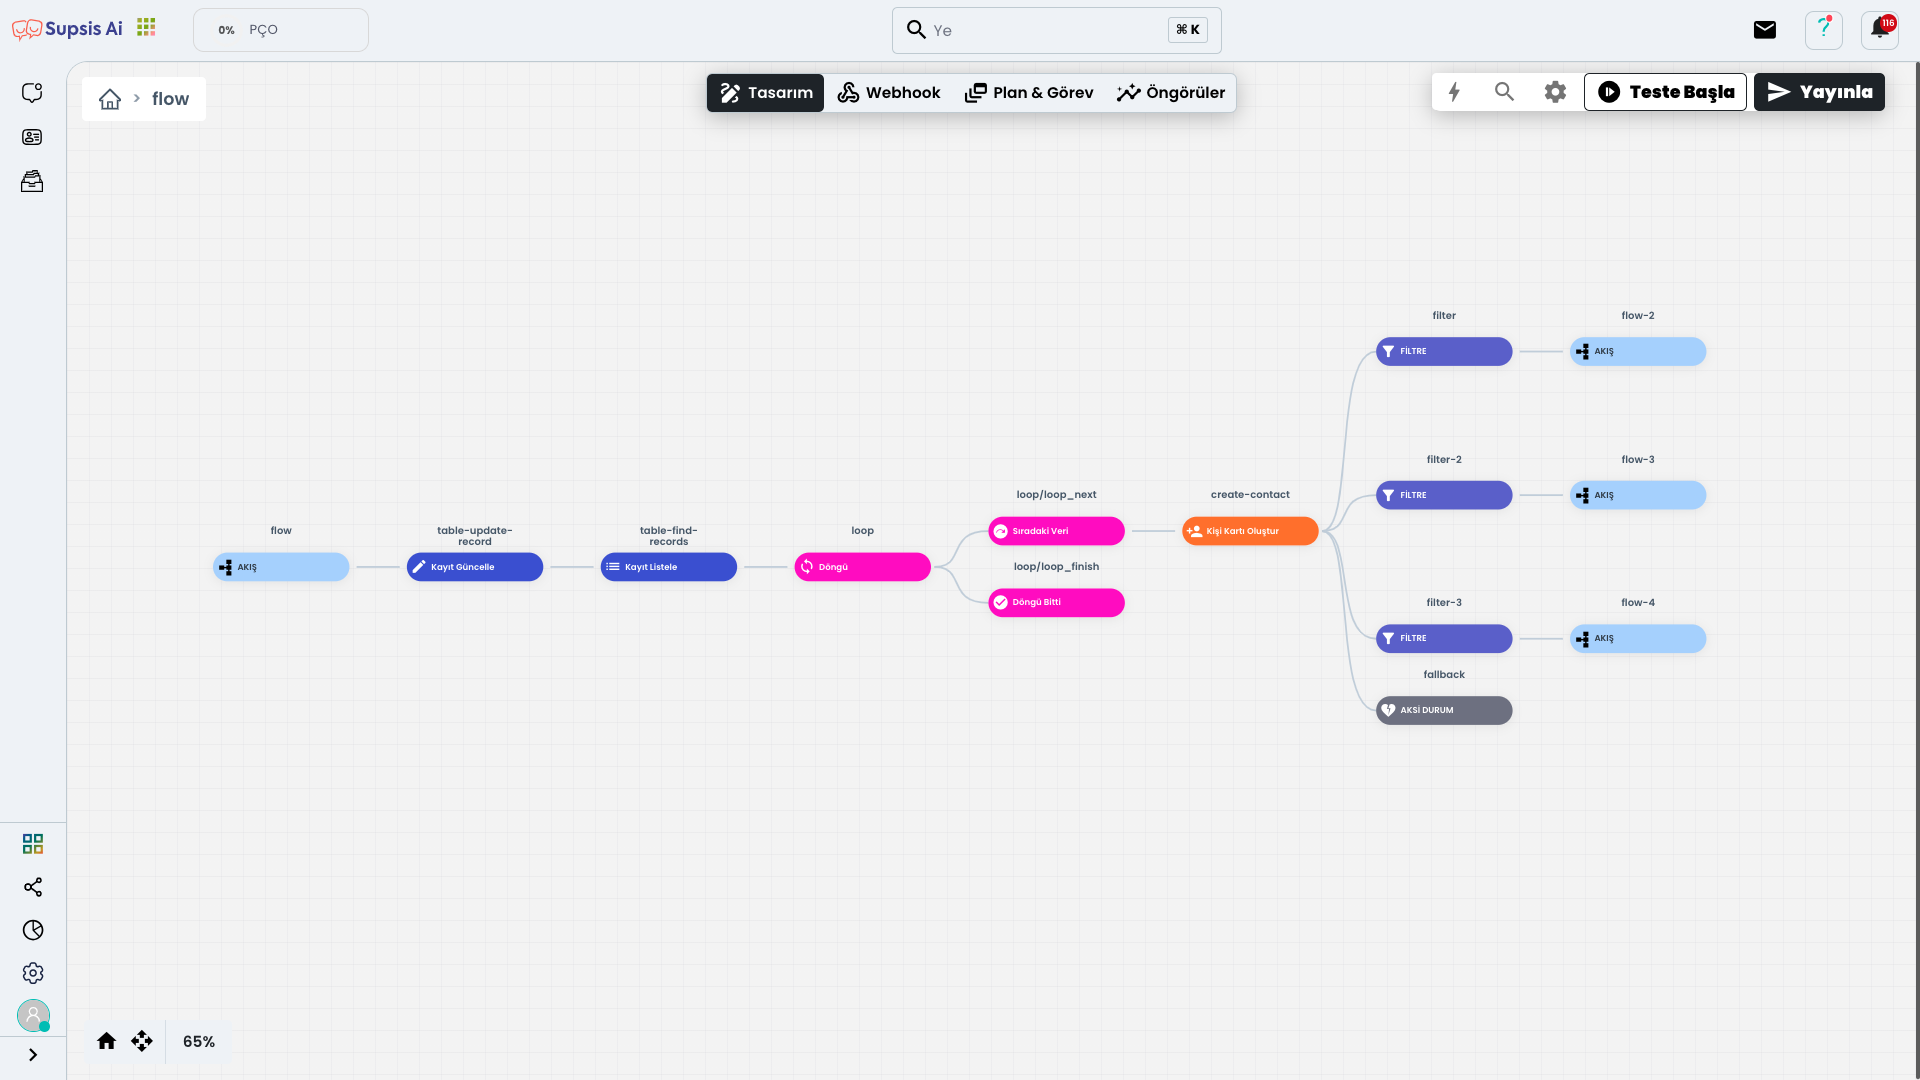
In the image below, the compliance status with filters is checked, if the data returned in the automation cannot pass through the filters, it is redirected to the otherwise block if available, or to the default otherwise scenario at the beginning of the chatbot flow if the otherwise scenario is not available.
- Weekday and Saturday Filters: The filter contents in the example are filters that direct the data returned according to working days to different flows. Data entries made within a certain time range on weekdays are directed to a different flow, while entries to be made on Saturday fall into another filter.
- Otherwise: Data that does not match any of the filters is directed to the otherwise filter. This indicates that the automation received the data outside working hours and a different redirection is made according to this situation.
- After Hours Scenario: If the data entry is made outside working hours, this block subjects it to an after-hours redirection. Thus, an appropriate scenario is presented to the user.
2-) Timeout
The timeout block can only be used when the automation expects action from customers. It is a function that activates when no response is received from the customer for the specified duration. In this case, the scenario you created immediately behind the timeout block becomes active.
You can make the settings of the duration you will determine for the Timeout Block from the area opened by clicking the "Wait for Message" block. In this area, you can determine the duration statically. That is, you can set the waiting time as Seconds, Minutes, Hours or Days.
This way, if no message is received at the end of the duration you determined, your automation automatically passes to the Timeout Block and the operation you determined is performed.
4-) Flow
The flow block is used to organize certain parts of the automation and classify scenarios within the automation. By dragging this block to any section you want in the automation flow, you can put the operations in that section into a single flow. By entering the flow block, you can easily access and edit the scenario inside it. This way, your automation gains a more organized structure and makes it easier to manage by classifying different functions.

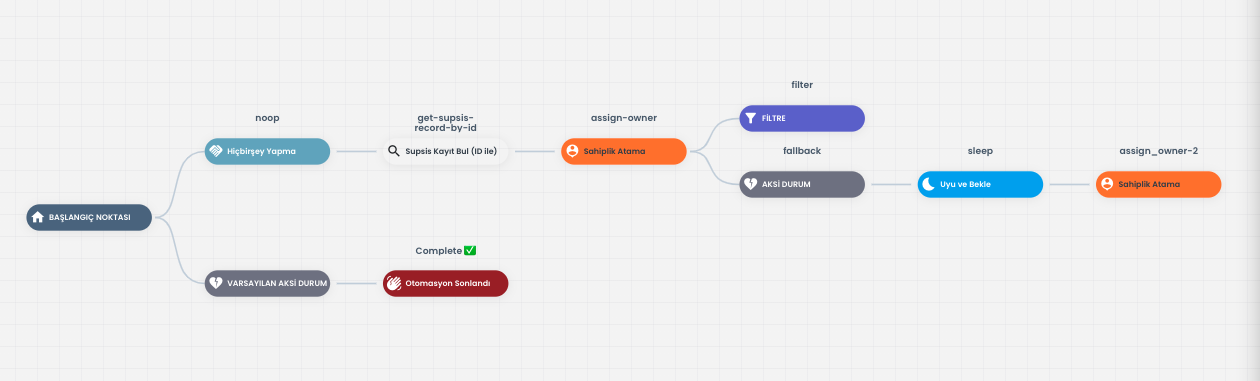
For example, you can create a more collective and organized automation scenario by using the "Timeout" Block. For this, you can structure your automation flow more organized by using the "Flow" block. This way, you can control the entire process in a single block while organizing your automation, and make quick and easy edits when necessary. The Flow block makes your automation modular and allows you to organize each stage distinctly.
In this example, the "Flow" block is used to make the operations that will be performed after the Timeout block more organized. This prevents the formation of a complex image and allows you to structure your operations more clearly. The Flow block creates an organized structure by collecting operations in a single area. Also, another Flow block can be used within a Flow block, this way you can make your automation even more modular and flexible. This feature allows you to manage different stages independently and provides a cleaner organization.
5-) Sleep and Wait
This area makes the automation wait for the duration specified within the Block. A duration selection can be made manually from the Duration section. Also, the waiting time can be written dynamically in the Timestamp section. The date data to be written dynamically must be in ISO String format. This way, the automation's waiting time and actions at a certain time become more flexible and adaptable.
For example, if you are going to assign ownership to a person and the representatives you want are not active, if you want to wait for a certain period and assign ownership after they become active, you can perform the waiting operation for the duration you want by using the "Sleep and Wait" block. This feature provides flexibility in your automation flows and gives time to wait for representatives to become active, thus ensuring that your automation works more efficiently.
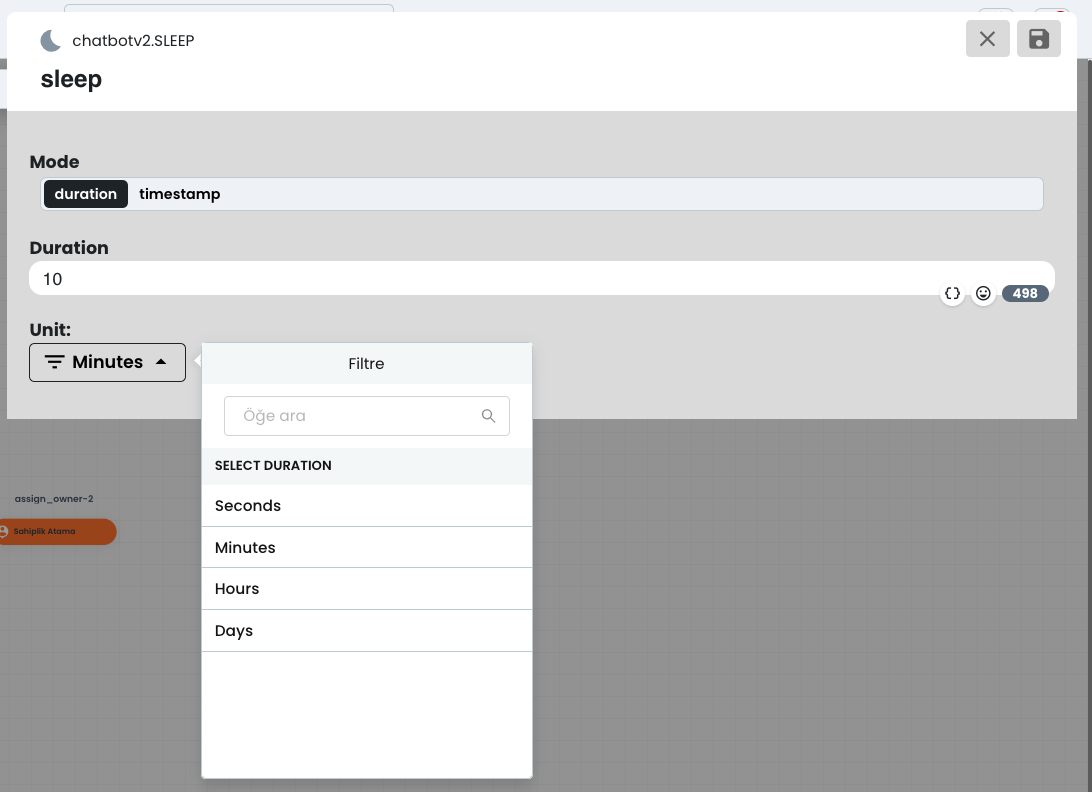
After selecting the unit amount from here, you can make unit selection as Seconds, Minutes, Hours, Days. After determining the duration you want, you can complete the operation by clicking the save button. This way, a waiting operation for the duration you determined in your automation flow is provided and your operation is completed in an organized manner.
6-) Wait for Message
This area allows the automation to wait for message return from a specific communication platform. By working integrated with timeout, it takes action according to messages coming within a certain period. This feature helps you track customer interactions on time and allows you to manage automatic processes efficiently.
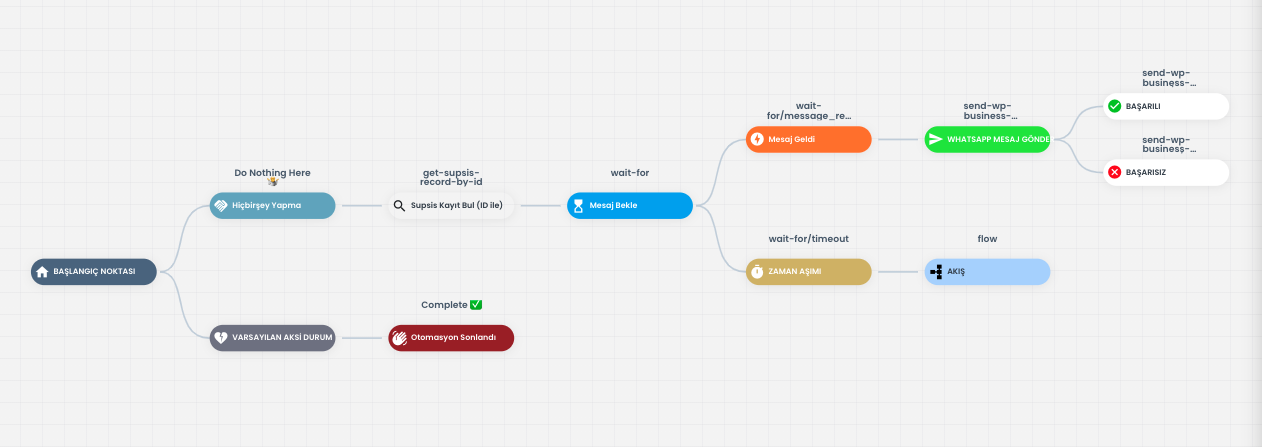
For example, after sending a message to the customer via WhatsApp, you can wait for a message for 2 days. If the customer does not respond within 2 days, the timeout is triggered and in this case another action automatically comes into play, for example an email is sent.
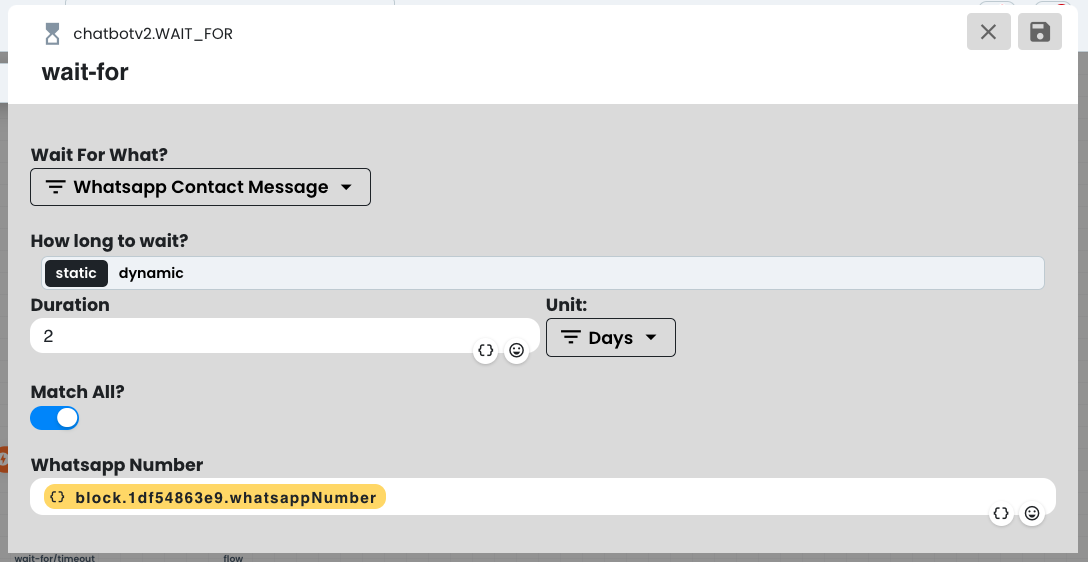
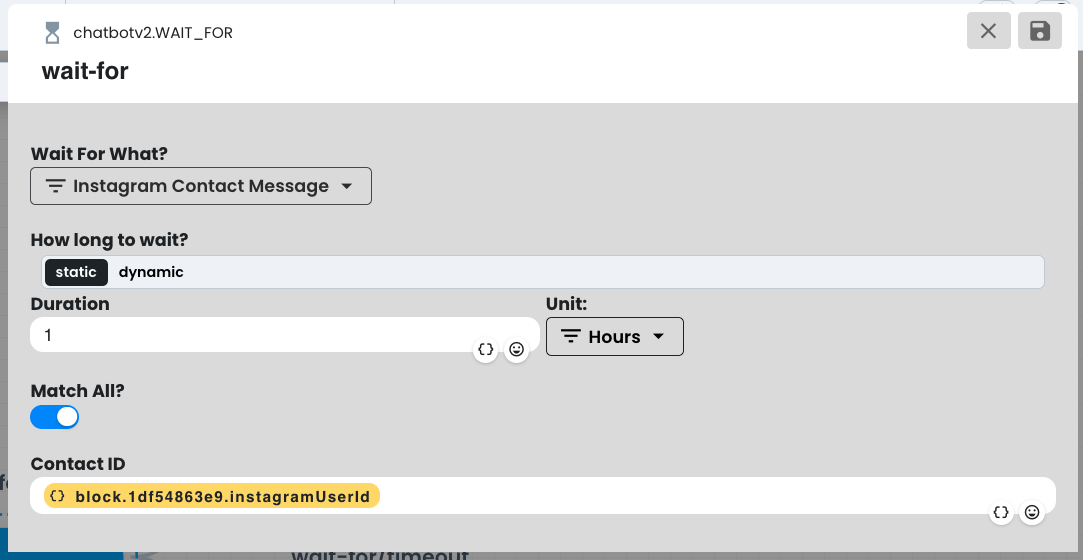
For this, click the "Send Message" button. From the opened section, specify in the "What to wait for" section what type of message you will wait for. Then, enter the unit number for the waiting time and select one of the options Seconds, Minutes, Hours or Days as the unit type. This setting will determine how long the automation will wait for the message.
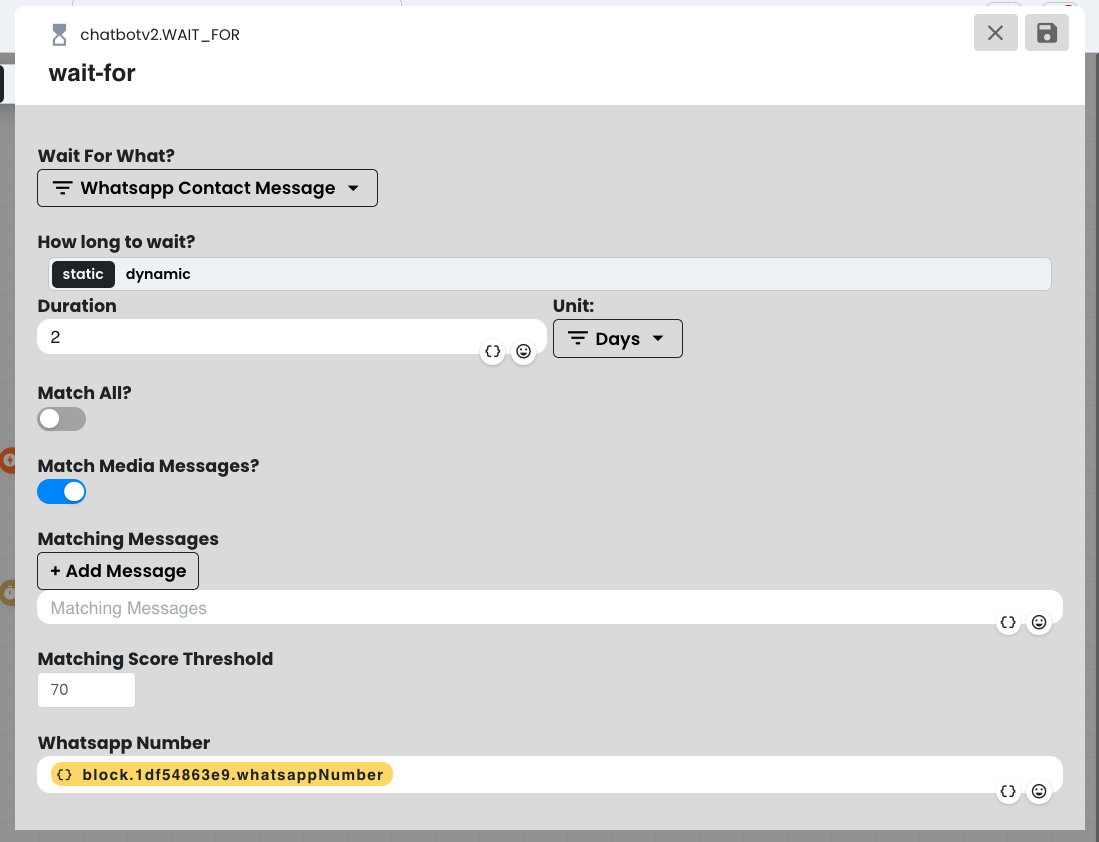
If you activate the "Match All" option, it accepts all incoming responses. If you do not activate this option, you can accept or not accept all media types from the opened section if you want. Also, if you want to customize the responses you want to receive, you can write the message you want to receive in the "Matching Messages" section. From the bottom section, you can determine the character count of the message. If you selected the WhatsApp option, you can enter the WhatsApp number. If you selected another type, you need to enter "Contact ID" or you can get it dynamically from the Supsis Record section. This way you can make message reception more specific.
7-) Do Nothing
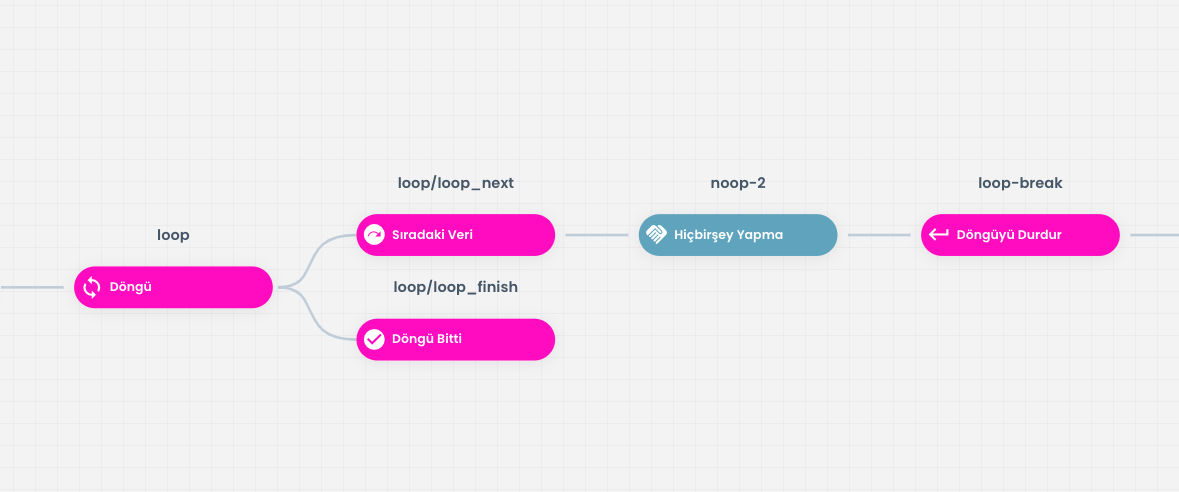
The Do Nothing block creates a visual gap between blocks, making the flow more organized. This block does not perform any operation and just passes without doing anything when the step is passed over. This feature is useful for keeping your chatbot flows more understandable and organized. The gap block prevents unnecessary complexity and provides users with a cleaner and more understandable experience.
8-) Automation Ended
The End Automation block is used to determine that a specific automation is completed and to ensure the termination of the process. You can add a message or description indicating the reason for termination of the automation into this block. This description can inform the user at which stage the automation was terminated.

For example, by adding a message like "A problem occurred while creating the customer request, the automation ended." you can indicate at which block the process ended. This can also be useful for people monitoring other processes in the system.
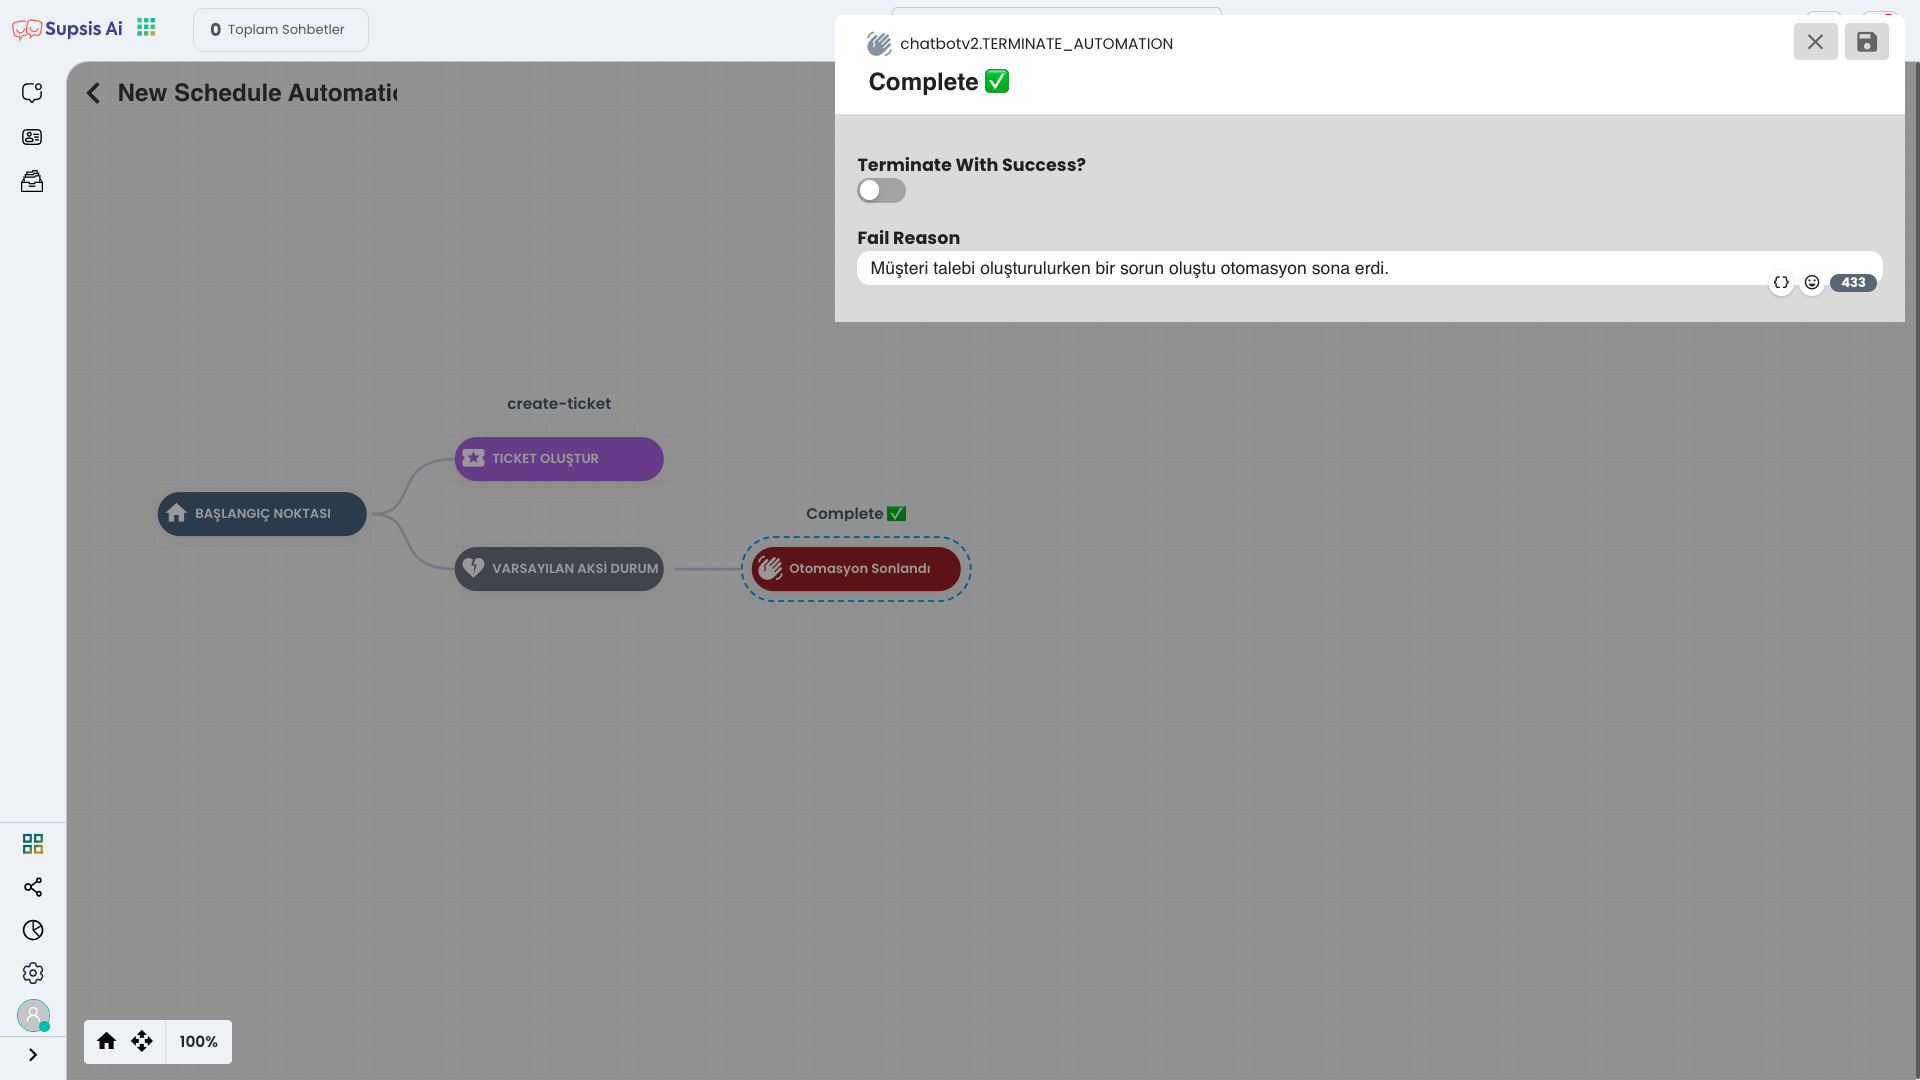
After clicking on the block, you can edit by changing the "Fail Reason" message. This allows you to customize the message that will be shown to the user in case of a failed or unsuccessful operation. Thanks to this feature, your chatbot's responses become more explanatory and user-friendly. You can edit the message as you wish and provide more meaningful feedback to users.
9-) Display Widget
This block allows you to display an external widget. This can be used for third-party tools or applications integrated into your website and helps increase the functionality of your site. Widgets can be used to provide users with additional information or provide interactive features, thus improving the customer experience.

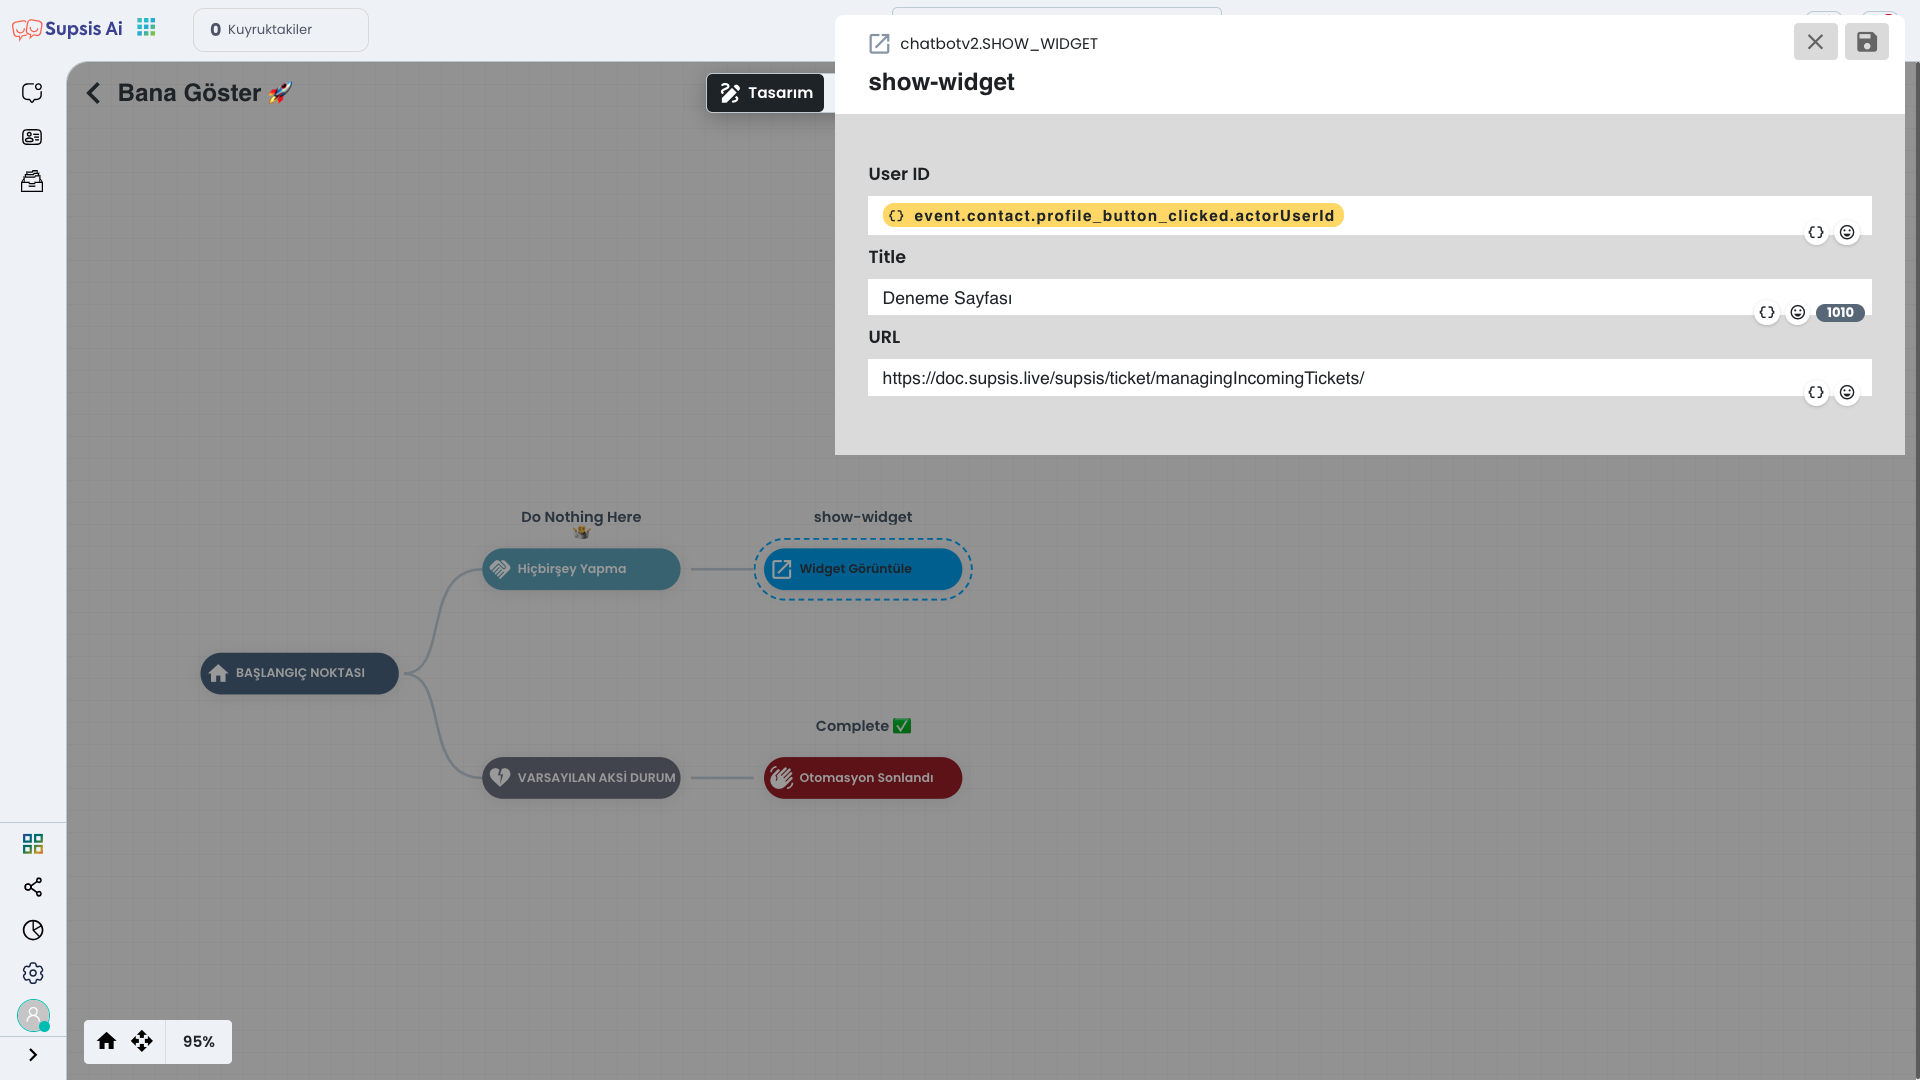
After clicking on the block, enter a name suitable for your widget in the name field and then enter the URL of the widget you want to open. Also, after filling the User ID field correctly, click the "Save" and then "Publish" buttons. After completing this operation, a button containing the same text as the name you gave to the automation is created. When this button is clicked, the widget at the URL you specified opens and you can serve your users through the widget.
By following these steps, you can easily create a widget display and similar automation.
And if you have successfully completed all these steps, your Widget Display button will work like this. When users click the relevant button in the automation flow, they will be able to view the widget through the widget URL you specified earlier.
10-) Artificial Intelligence
This block allows artificial intelligence to prepare dynamic answers according to the instructions you give or to get answers by asking questions. The automation uses artificial intelligence activation to create the most appropriate responses based on the data, received inputs and the instructions you give:
- Artificial Intelligence Instruction List: Contains the information, instructions or questions you ask that artificial intelligence should use when generating responses. By adding the instructions of the message you want to create and sample data to the instructions, you can provide a personalized experience with dynamic data from within the block using the information and data registered in the system.
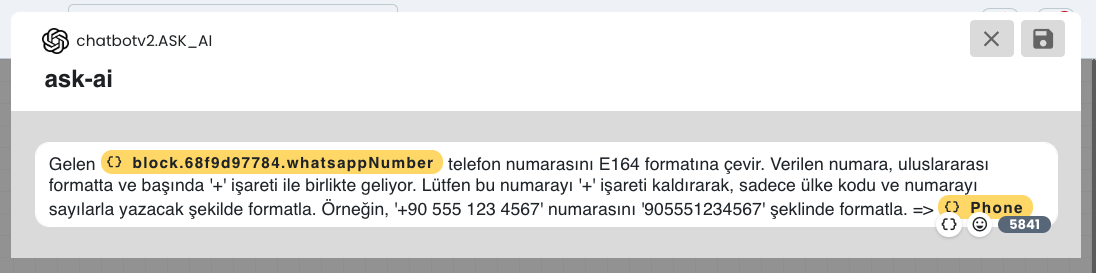
For example, you can convert the phone numbers you have received to the appropriate format with the help of artificial intelligence, then save this edited data to your system and use it in your processes.