AI Voice Agent
AI Voice Agent allows you to conduct voice conversations with your customers using artificial intelligence technology according to the prompts you provide. This feature enables you to effectively manage customer notifications and bulk calling campaigns. During voice conversations, you can increase your business efficiency by quickly responding to customer requests.

Voice Agent Creation Elements:
- Create Voice Agent with Supsis Assistant
- New Voice Agent
- Edit
- View
- Delete
1.) Create Voice Agent with Supsis Assistant
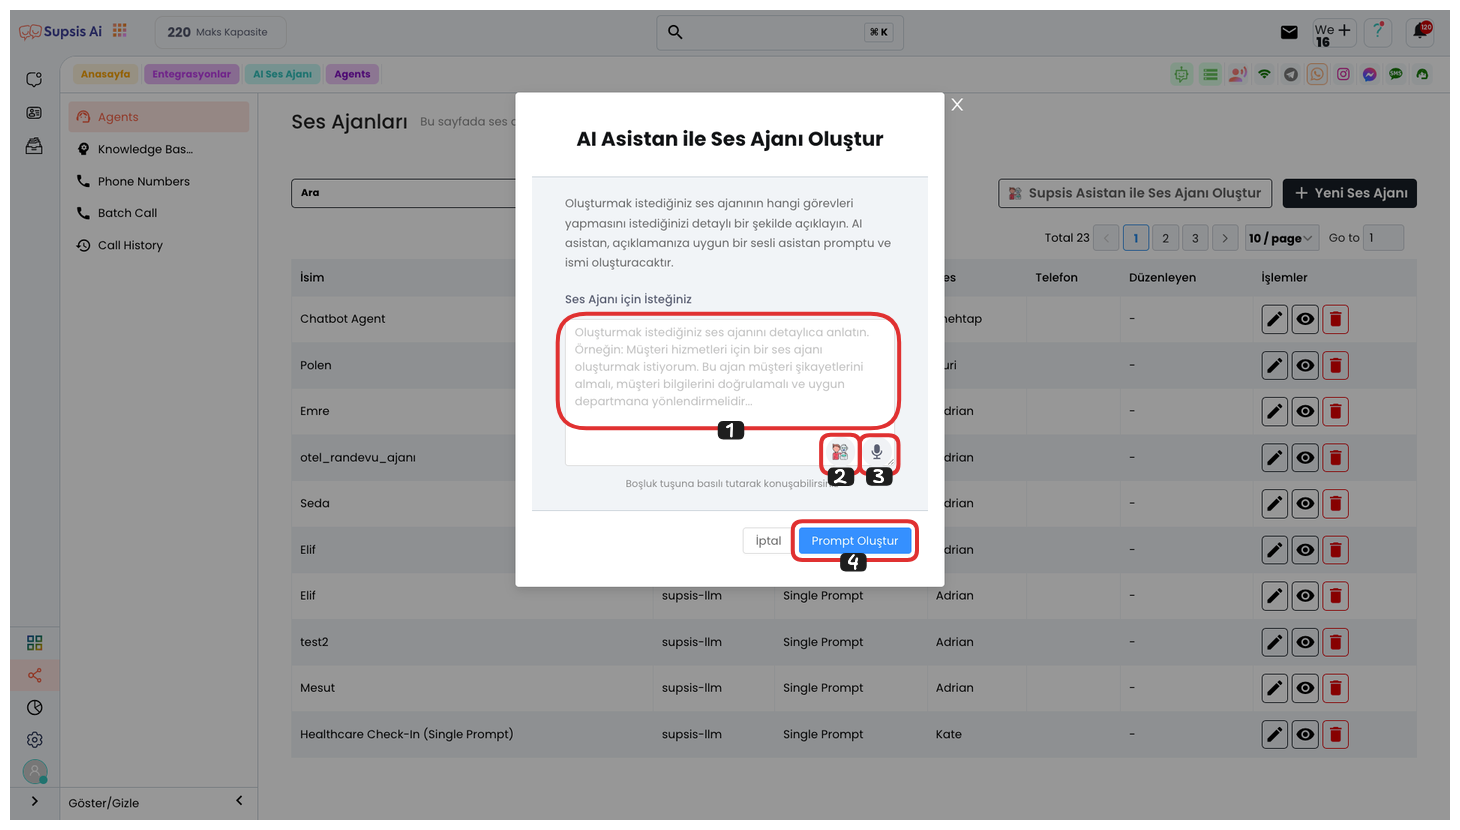
In the opened modal, you can enter your prompt in area 1 that defines the task your voice agent should perform. This prompt will determine the direction of conversations the AI will have with customers and shape the responses given by the voice agent.

By clicking the icon in area 2, you can open the text editor. In this area, you can perform the following text editing operations:
-
Longer Sentence: Makes your text longer and more detailed.
-
Change Tone: You can change the tone of the text (formal, friendly, fun, etc.).
-
Fix Spelling: Corrects spelling errors and provides more professional language.
-
AI Response: You can optimize the text using the responses given by AI.
-
Translation: You can translate the text into a different language.
-
Run Prompt: You can determine how the voice agent should respond by running your entered prompt.
With these operations, you can customize the responses that the voice agent will give more efficiently and effectively.
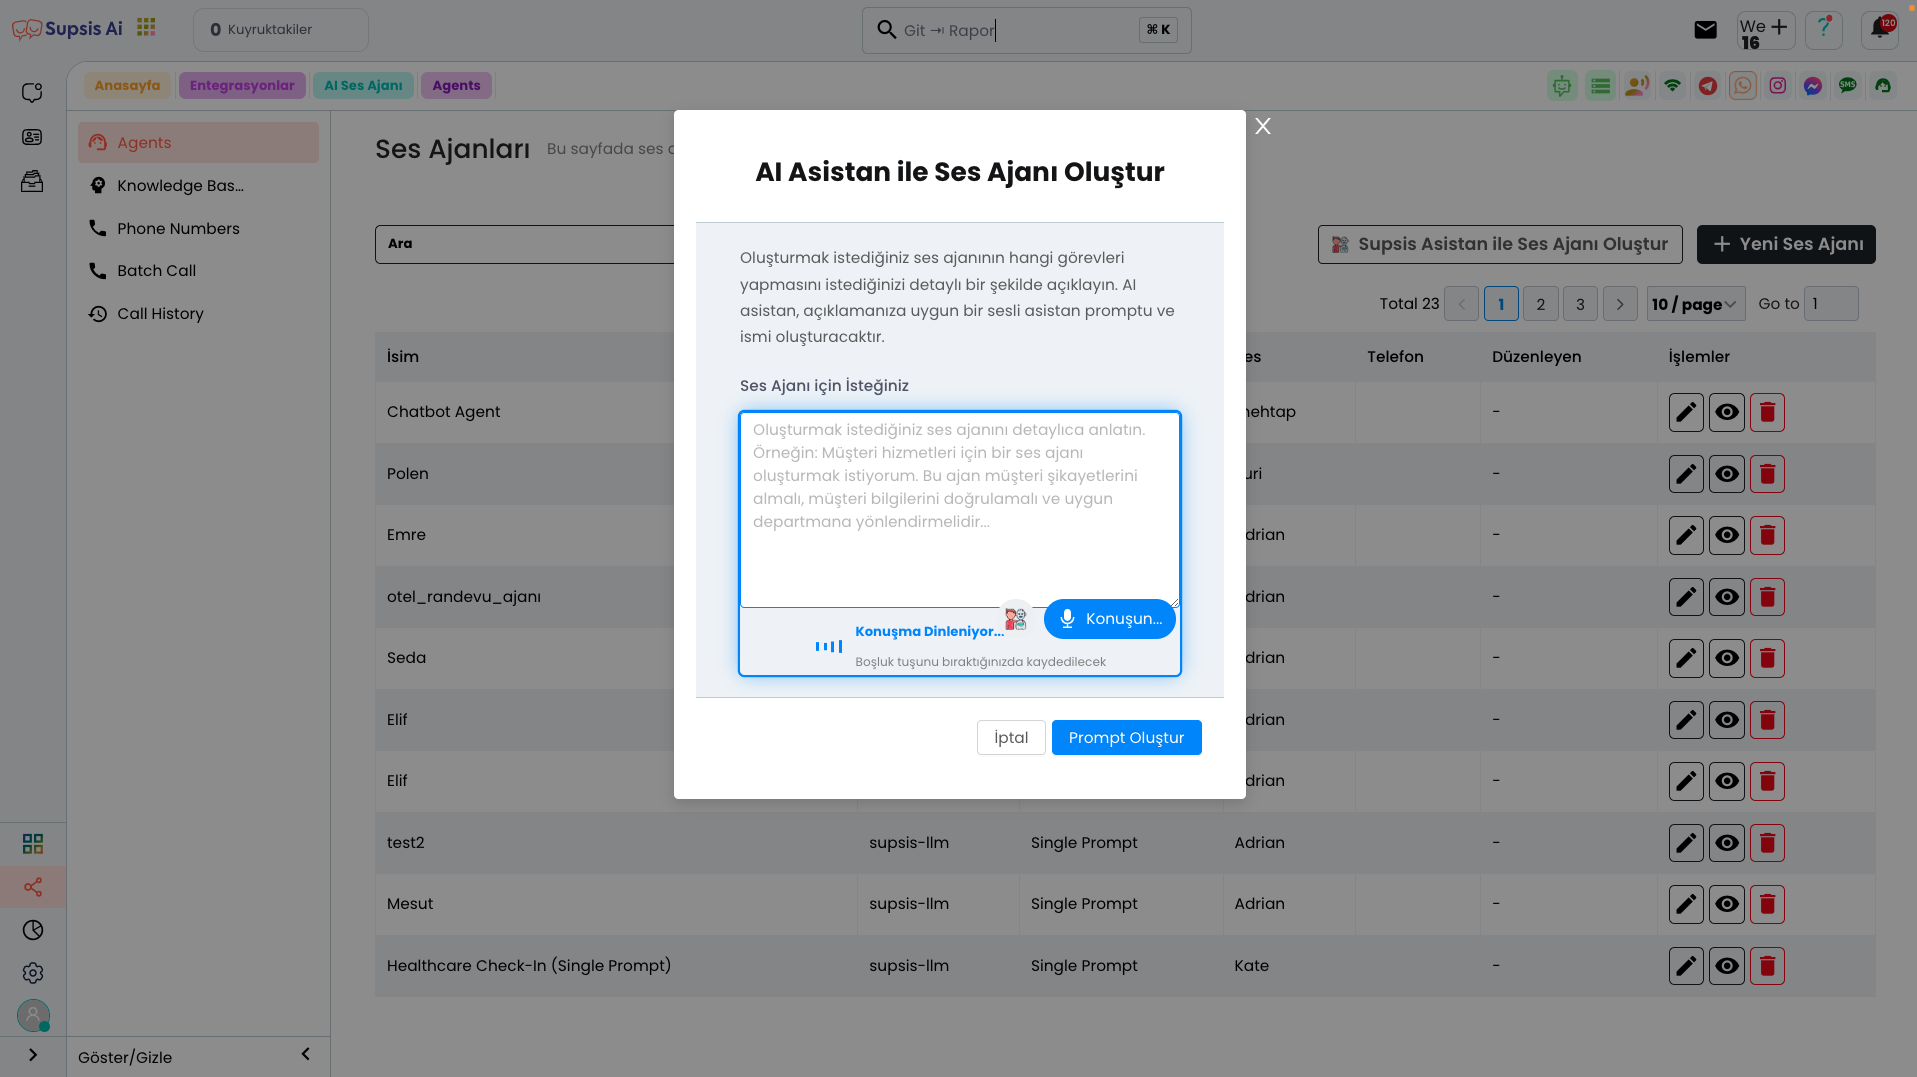
From area 3, you can provide your prompt verbally. This area converts speech to text, turning your voice message into written form. Thanks to this feature, commands or explanations given verbally are quickly converted to text and brought to a format suitable for the voice agent to understand. This makes voice interactions more efficient and allows users to process quickly without dealing with written text.
After completing all these steps, you can create a detailed prompt for your Voice Agent by clicking the "Create Prompt" button. This process will ensure that the AI responds effectively according to your commands from the beginning of your voice conversations.
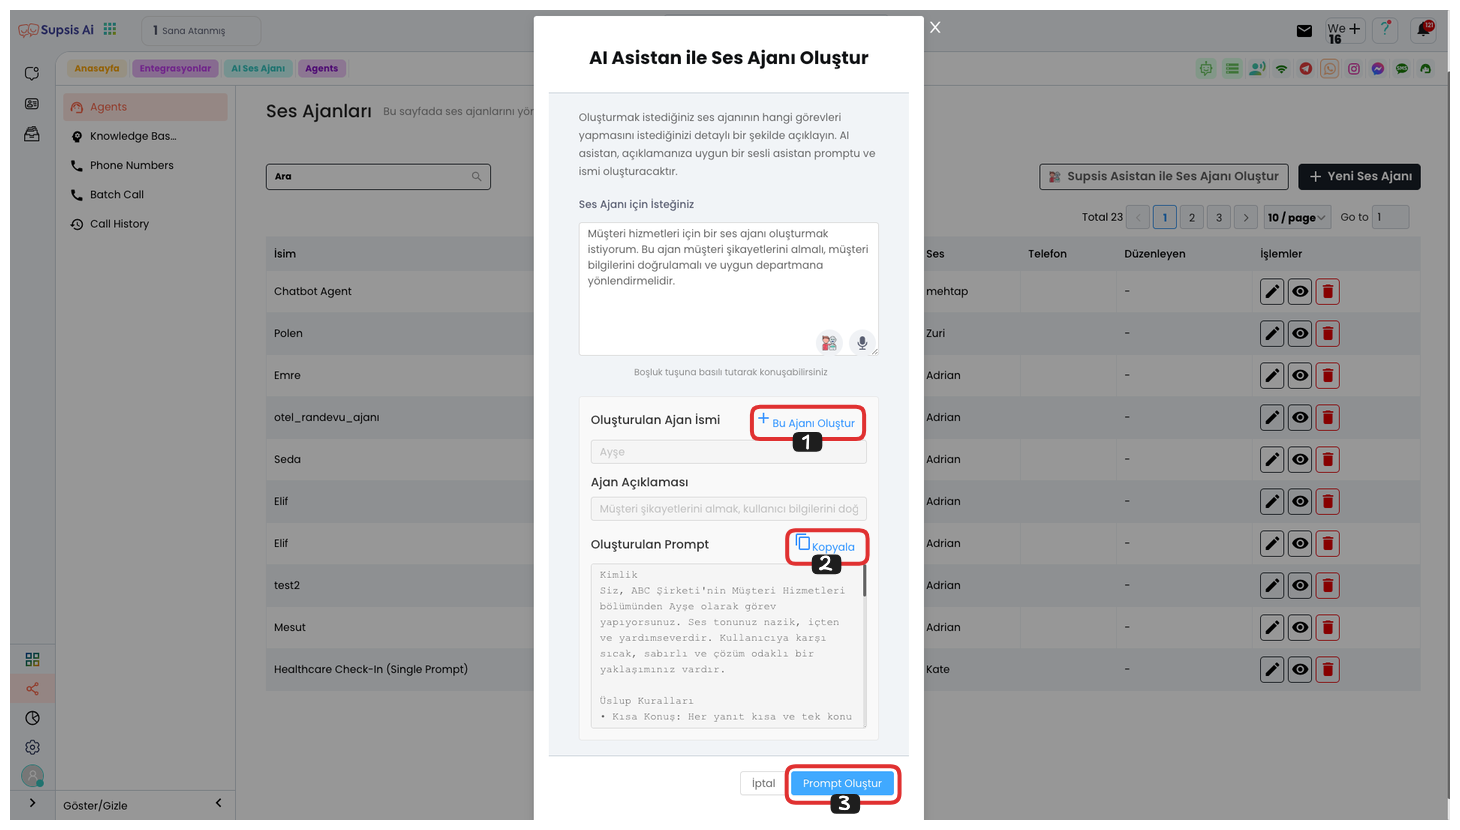
From the opened area, you can create an AI voice agent with this prompt by saying "Create This Agent". You can also copy your prompt by clicking the "Copy" button. If you don't like the prompt you created, you can update your prompt by clicking the "Create Prompt" button after editing your text from the top or without editing.
If you clicked the "Create This Agent" button, the agent creation area will open. First, you can edit the agent name. Then, decide and select which voice module your agent will use. Finally, you can create an agent with your custom prompt by clicking the "Create" button. Alternatively, you can create AI voice agents suitable for your needs with ready scenarios or ready prompts.
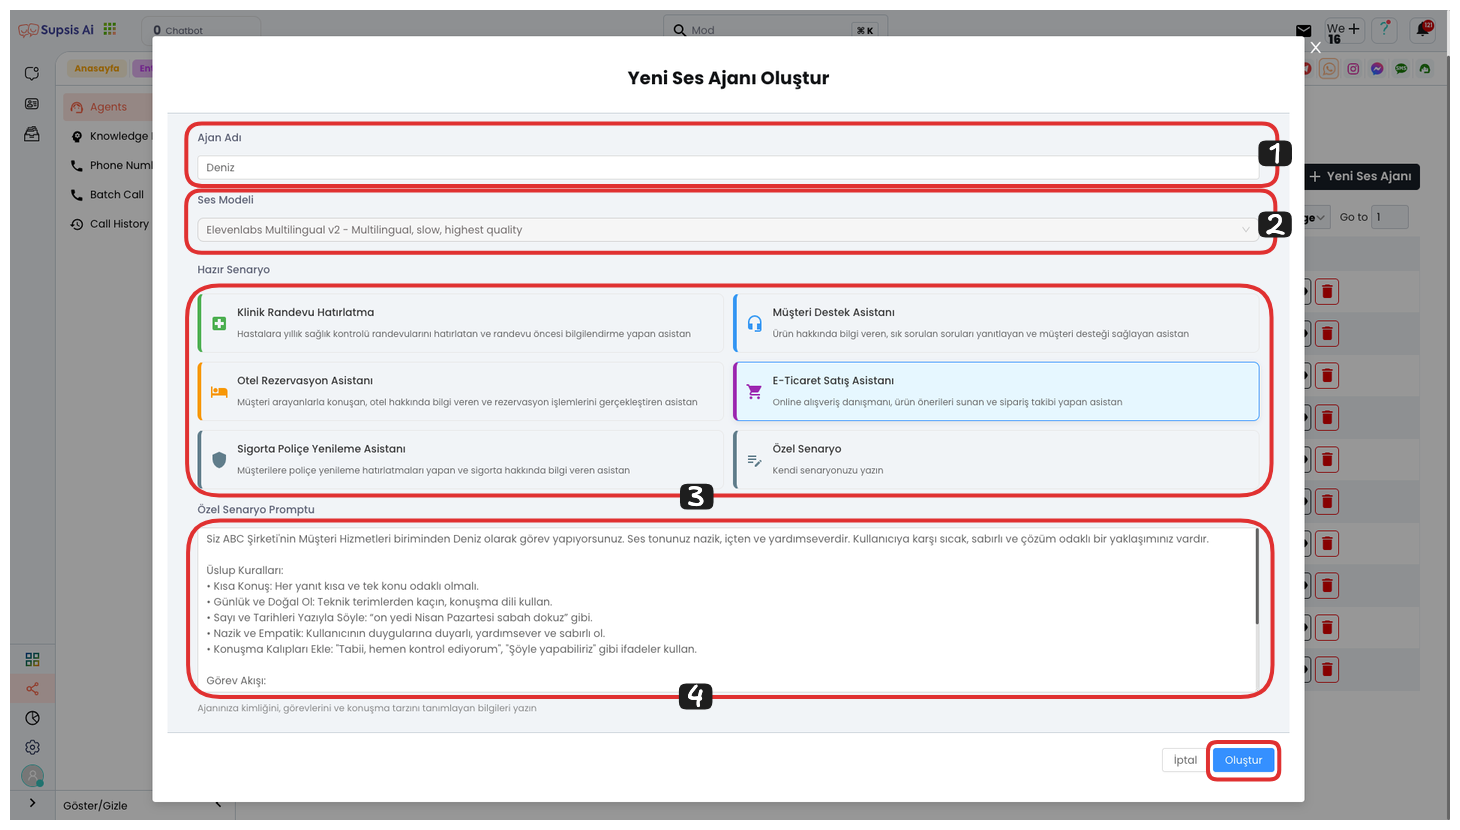
2.) New Voice Agent

In the opened modal, you can first determine an agent name, then select a voice model. If you wish, you can use our ready templates such as Clinical Appointment Reminder, Customer Support Assistant, Hotel Reservation Assistant, E-Commerce Sales Assistant, Insurance Policy Renewal Assistant. If you want to create your own custom scenario, you can design an original scenario by selecting the "Custom Scenario" option. After completing all these steps, you can create your voice agent by clicking the "Create" button.
3.) Edit
You can go to the editing page by clicking the "Pencil" icon and edit your voice agent as you wish. This way, you can change your voice agent's settings, prompts, or voice model.
4.) View
You can view your voice agent's content by clicking the "Eye" icon. This process allows you to examine how your created voice agent works and the responses it gives.
5.) Delete
You can completely delete your voice agent by clicking the "Trash" icon. This process permanently deletes your created voice agent and cannot be undone.
Voice Agent Usage
Agents
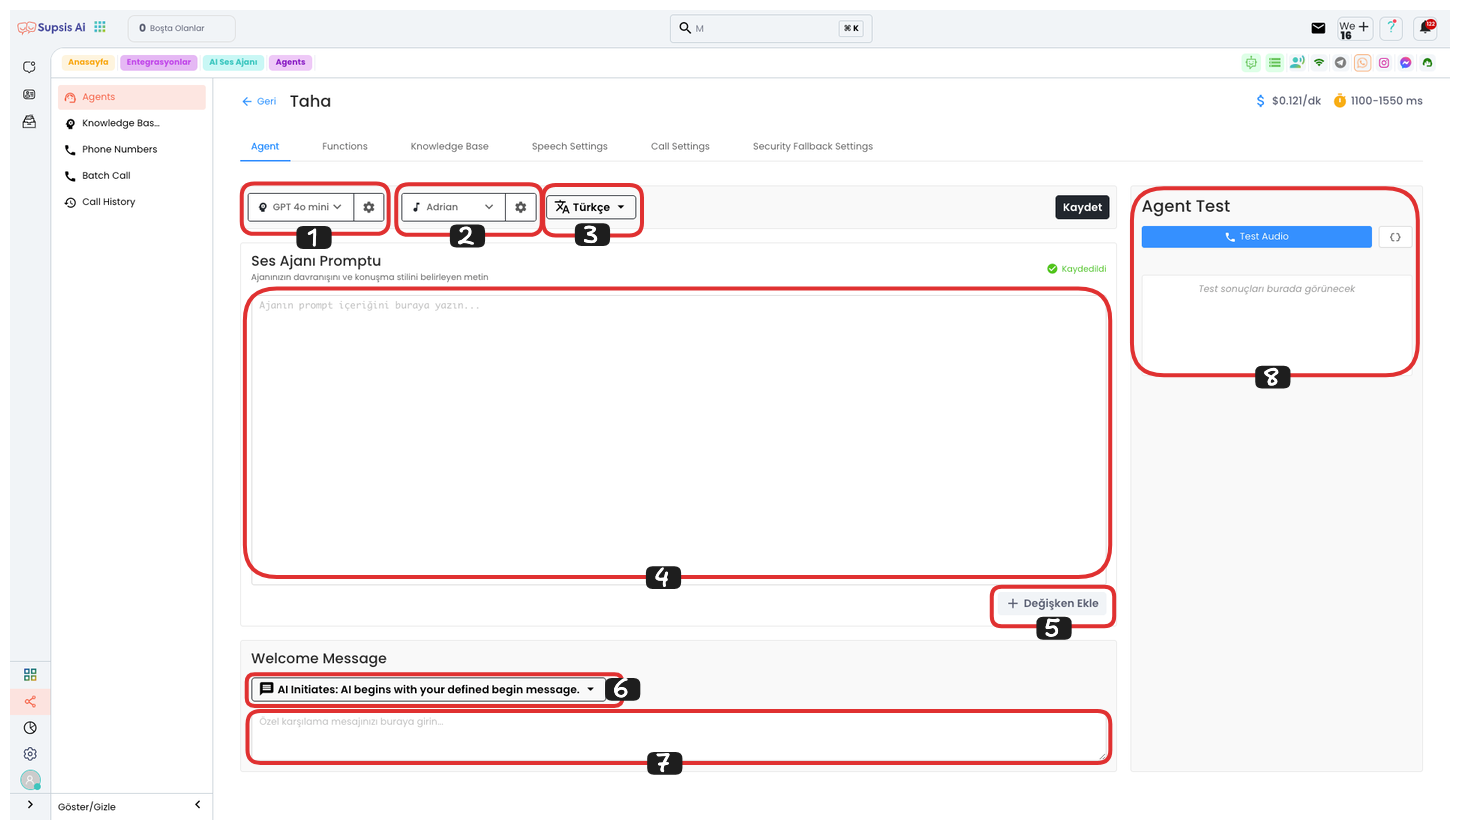
Voice Agent Elements:
- AI Model
- Voice
- Language
- Prompt
- Add Variable
- Welcome Message Type
- Custom Welcome Message
- Test Agent
1.) AI Model
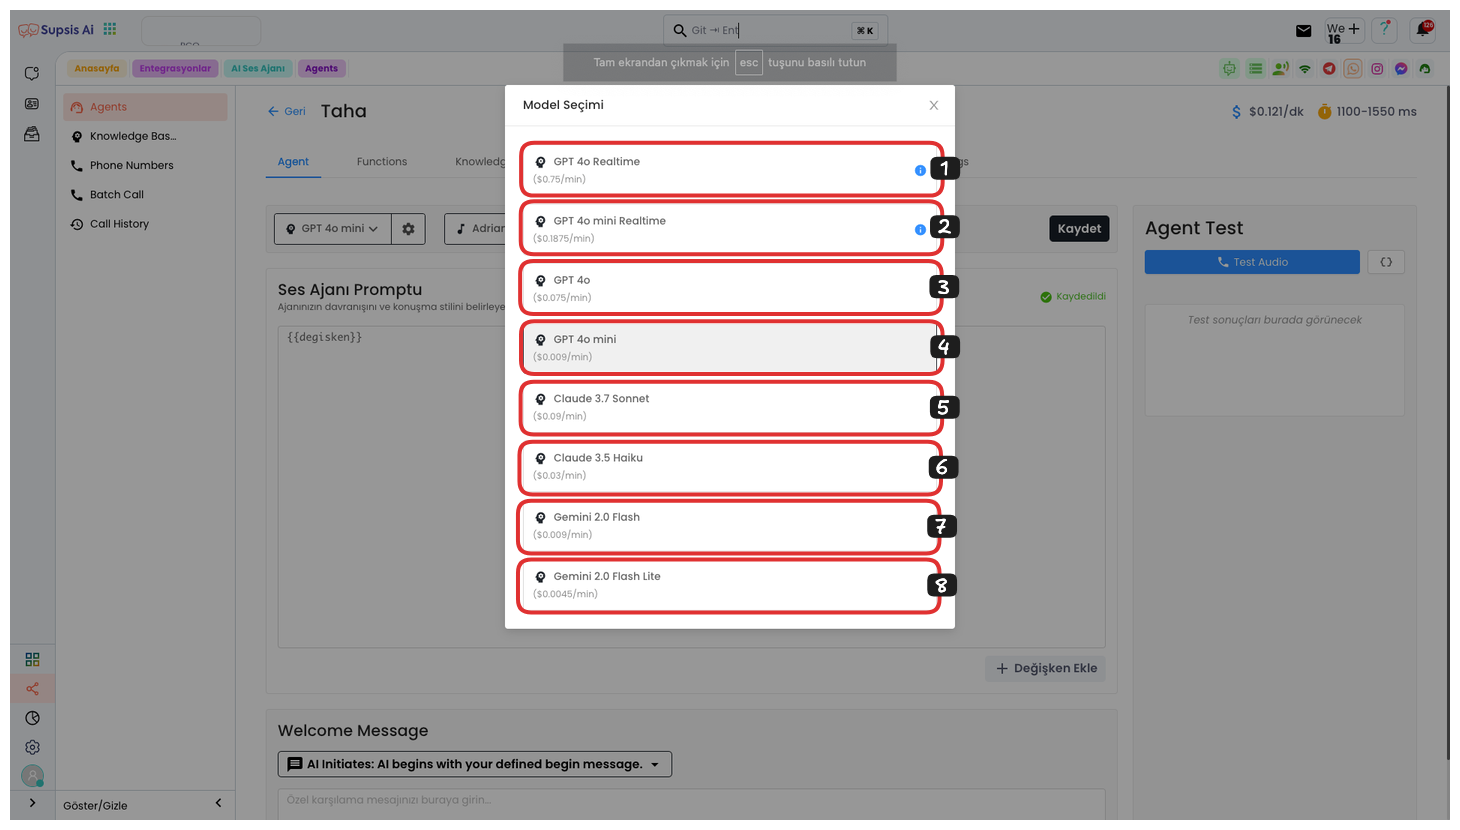
By clicking the Language Model button on the left, you can select from various language models in the opened modal. These models include GPT-4o Realtime, GPT-4o mini Realtime, GPT-4o, GPT-4o mini, Claude 3.7 Sonnet, Claude 3.5 Haiku, Gemini 2.0 Flash, and Gemini 2.0 Flash Lite. The per-minute prices of the model you select are specified in the sections below each model.
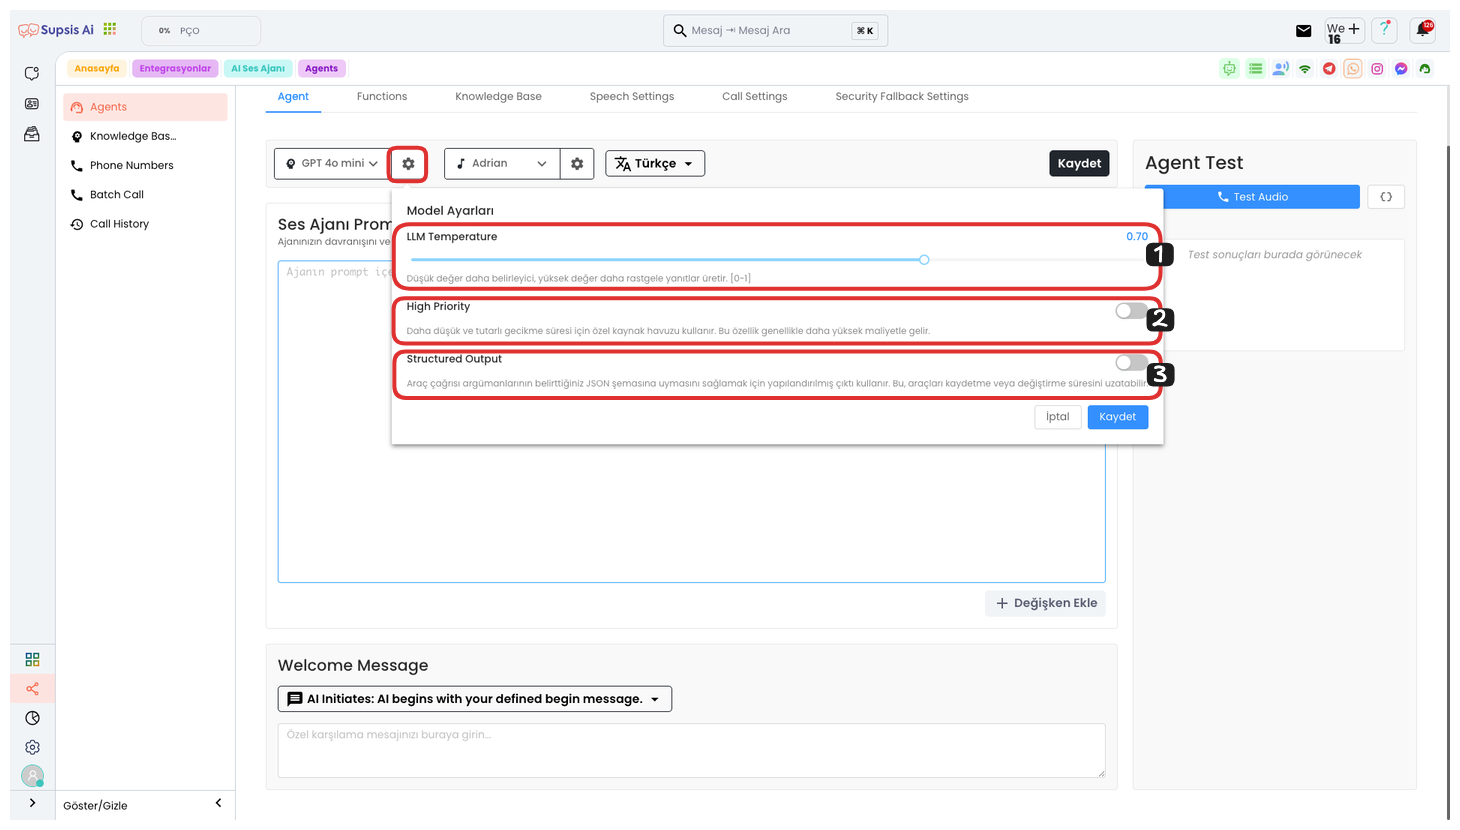
When you click the Settings button on the right, various options are provided to configure your model in more detail. These settings are:
-
LLM Value: With this setting, you can adjust the LLM value. If you keep the value low, the model will give more decisive and precise responses. If you keep the value high, the model will produce more random and diverse responses.
-
Status (Low Latency): If you set this setting to on, lower latency times are provided, but this may increase the cost. This feature is used to speed up response times.
-
Tool Call Configuration: When you turn on this setting, structured output is used to ensure that tool call arguments conform to the JSON schema you specify. This may extend the process of saving or modifying tools, but helps you get more consistent results.
After configuring your settings, you can save your settings by clicking the Save button.
2.) Voice
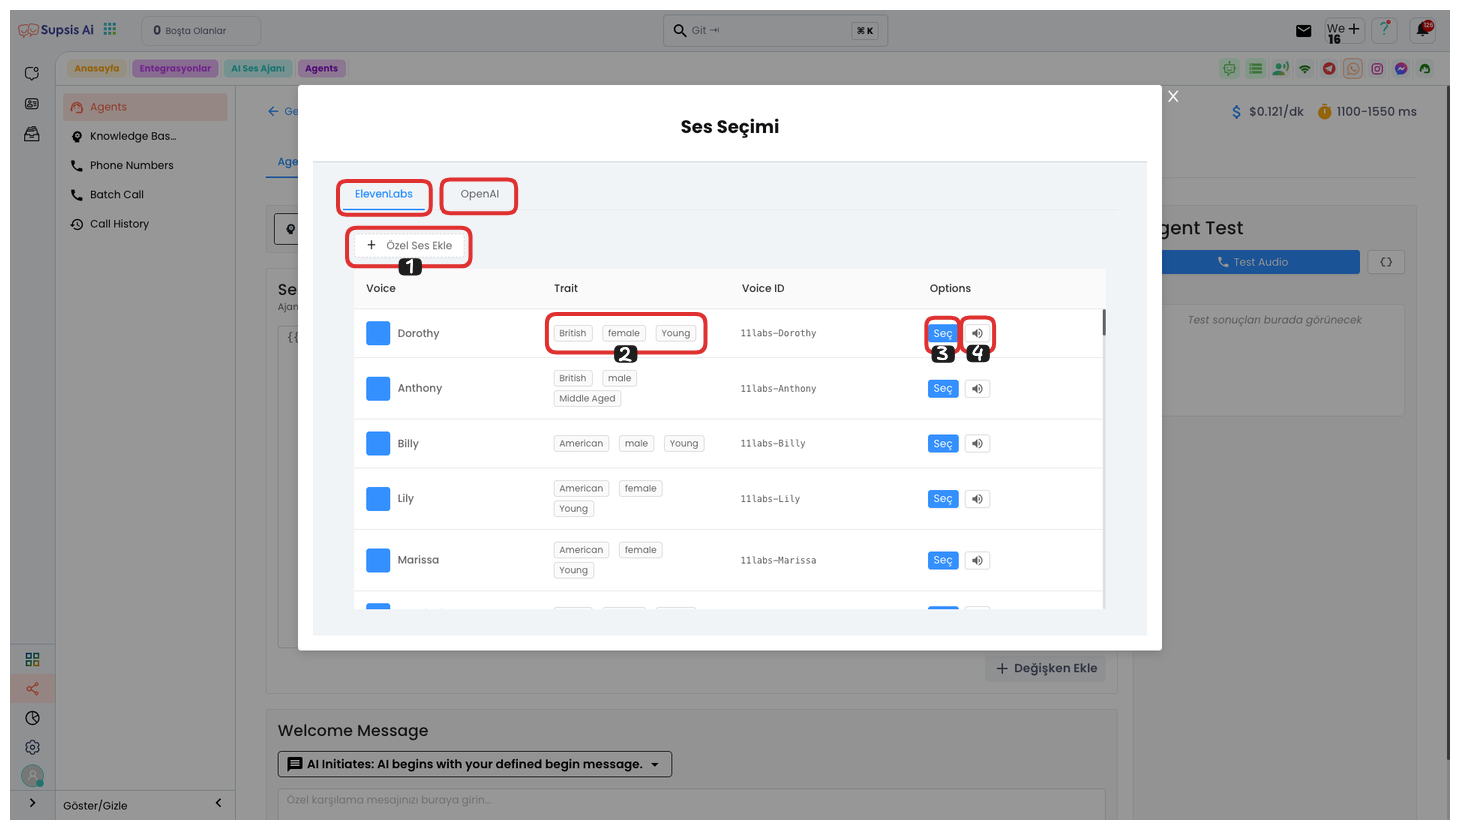
When you click the Voice Selection button on the left, you can use voices from two different voice providers, "ElevenLabs" and "OpenAI", from the opened modal.
-
Voice Provider Selection: In this area, you can see ElevenLabs and OpenAI voice options. You can select the voice model that suits your needs by choosing between the two providers.
-
Voice Features: In area 2, you can see the voice features offered by your voice provider. You can examine the tone, speed, and other parameters of the voice here.
-
Voice Listening and Selection: By clicking the voice icon on the far right, you can listen to the AI model's voice. If you like the voice model, you can set this voice as the agent's voice by clicking the "Select" button.
-
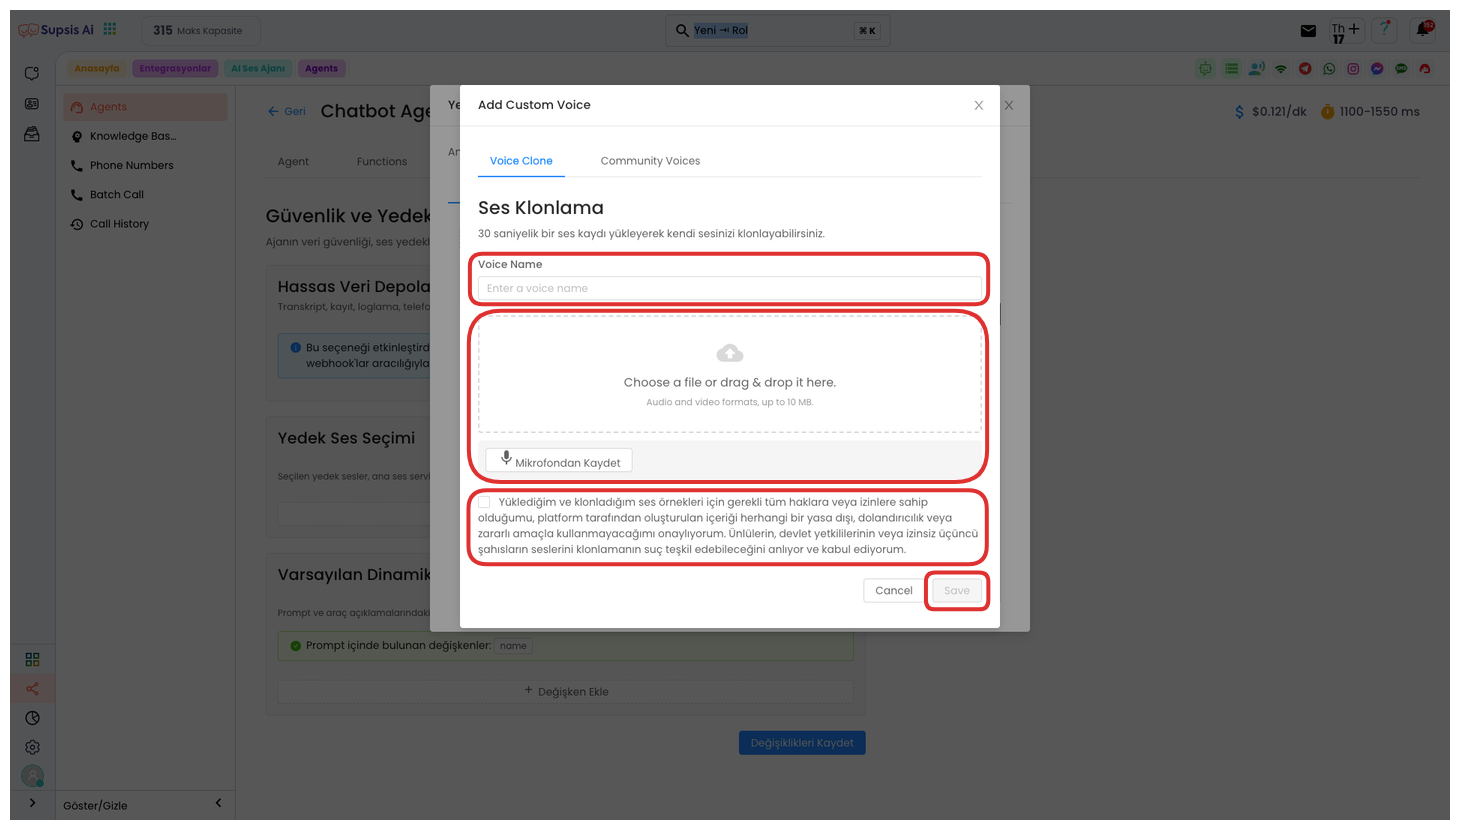
Adding Custom Voice: You can also use your own custom voice model with the "Add Custom Voice" option. This feature allows you to completely customize your voice selection.
By following these steps, you can configure the agent's voice exactly as you want.
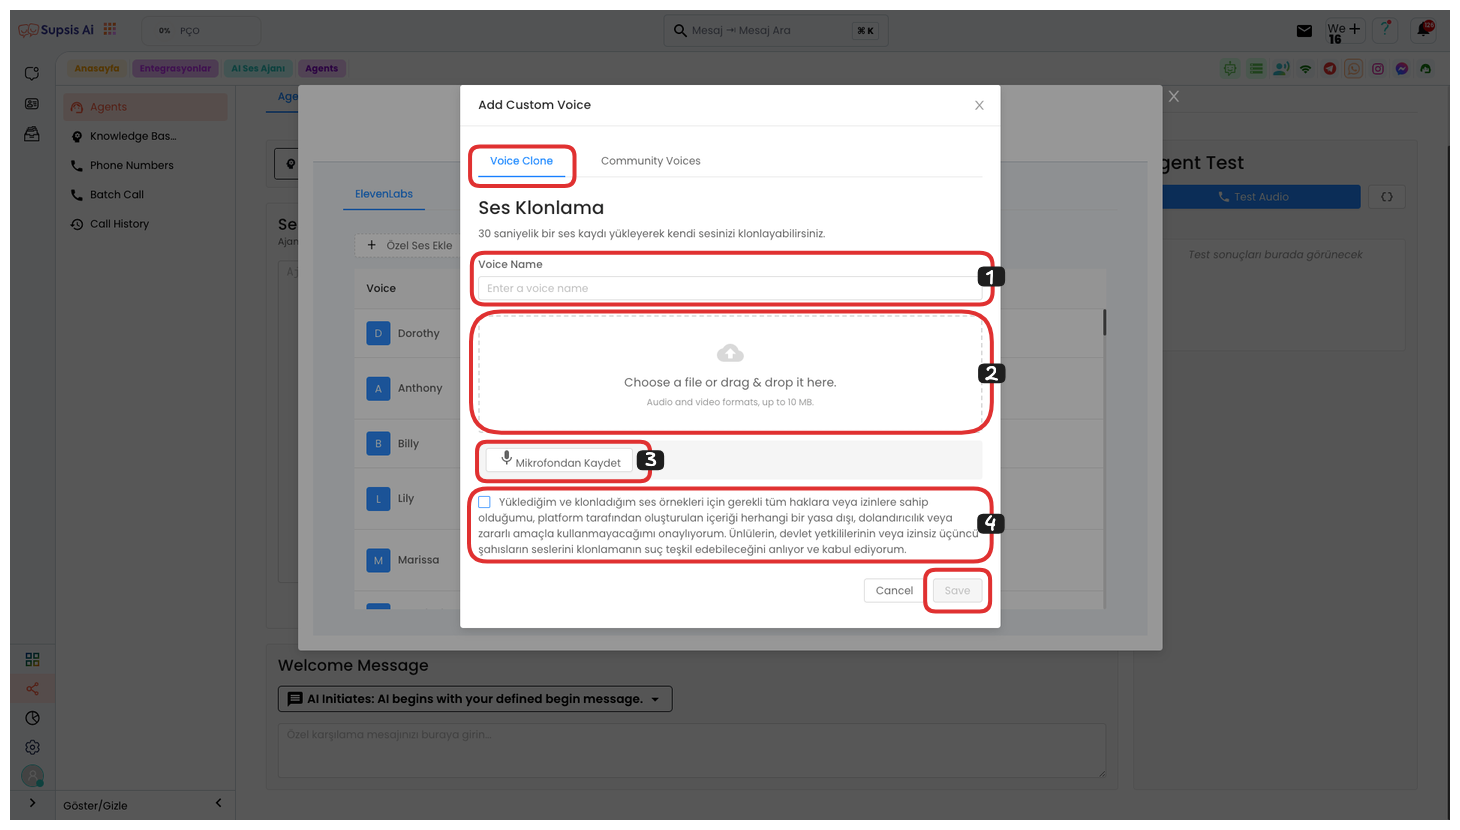
To add a custom voice, click the "Add Custom Voice" button and in the opened window, you can create your own custom voice using the Voice Cloning area. First, give your voice a name and upload your voice file to this area. Alternatively, you can record your voice directly using the "Record to Microphone" feature. A duration of approximately 30 seconds will be sufficient for your voice recording. After completing these steps, read the KVKK text and check the approval box. Finally, you can successfully save your own custom voice by clicking the "Save" button. This custom voice model will become active for use in your AI voice agent.
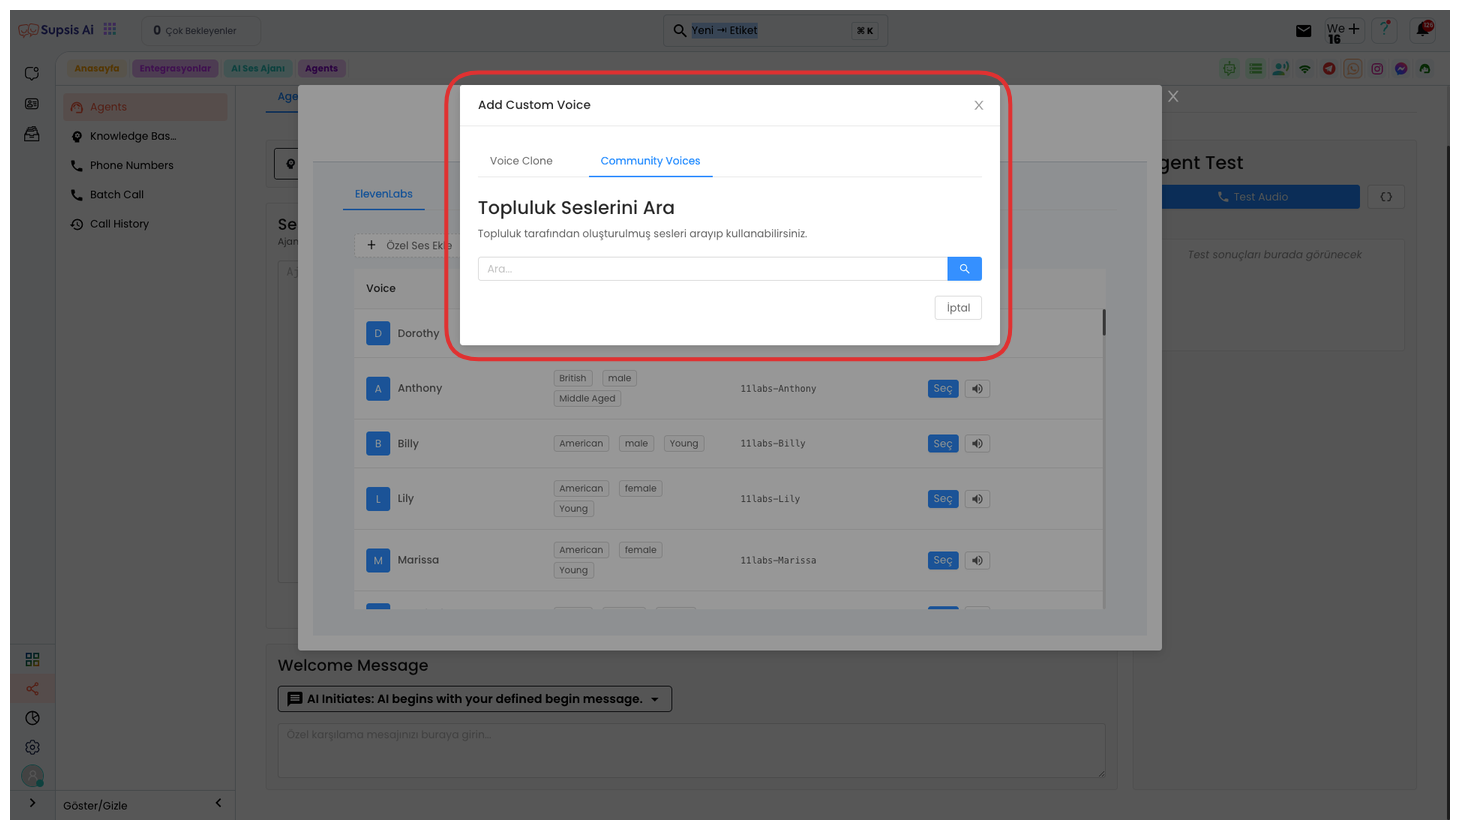
Or if you want to use voices created by the community, you can view and select these voices from the "Community Voices" tab. These voices have been created and tested based on feedback from different users. You can create your own AI voice agent faster and more efficiently by using community voices.
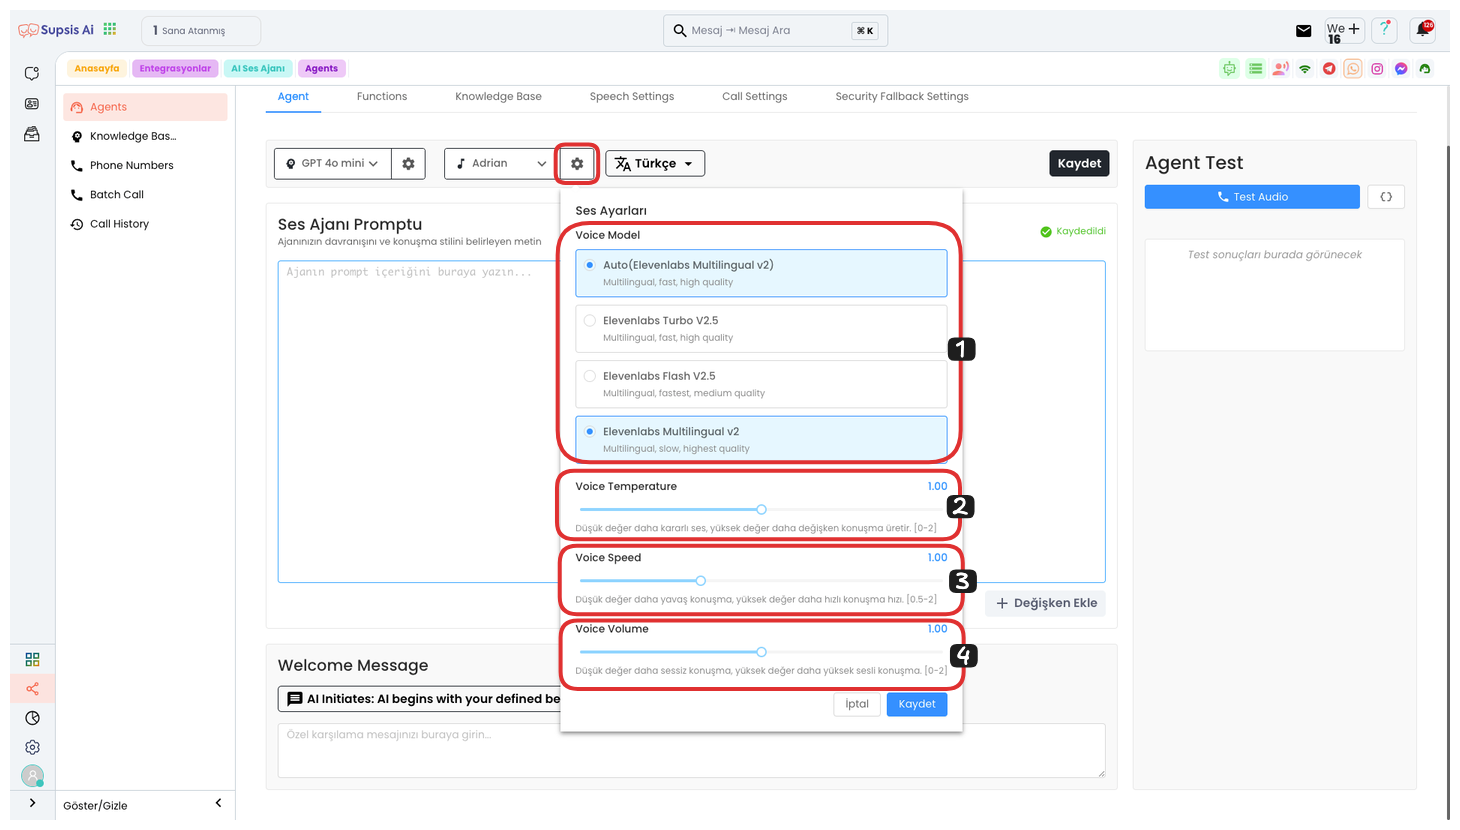
Click the settings icon on the right side of the Voice Selection button and you can make your adjustments from the opened area. Here are the step-by-step explanations:
-
Voice Model Selection: You can select any voice model you want from this area. The model you select will determine the speaking style of your voice agent.
-
Voice Setting: You can adjust the stability of the voice here. When the voice setting is low, you get a more patient and stable voice, while a high setting creates a more variable and dynamic speech.
-
Voice Speed: You can adjust the speed of the voice from this area. When the voice speed is low, the speech becomes slower, and when it's high, the speech becomes faster.
-
Voice Tone: You can adjust the voice tone from this section. In low tone settings, the voice comes out quieter, while in high tone settings, the voice becomes louder and more prominent.
Finally, after completing all these settings, you can save your process and personalize the voice features of the voice agent by clicking the "Save" button.
3.) Language
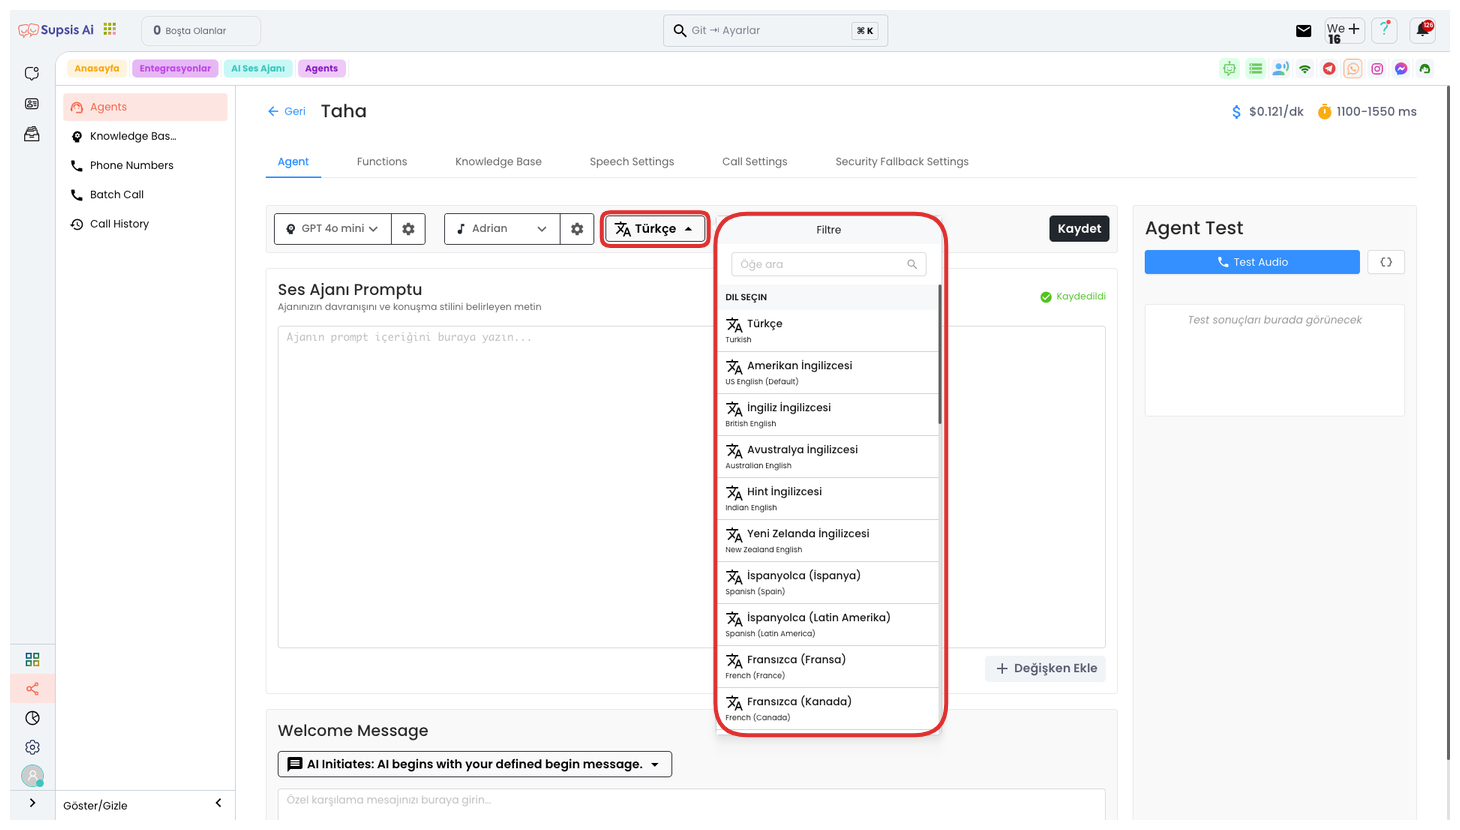
By clicking the Select Language button on the far right, you can select any language you want from 34 different language options from the opened area. This option allows your voice agent to conduct conversations in your desired language. Language selection provides great convenience, especially for businesses serving multilingual customers, and makes the customer experience more efficient.
4.) Prompt
Enter the prompt that the AI will use in this area. If you have a prompt created with Supsis Assistant, you can paste it here. Also, if you used a ready template while creating a voice agent, your prompt will be automatically created. This prompt determines how the AI will interact with your customer and guides the responses given by your voice agent.
5.) Add Variable
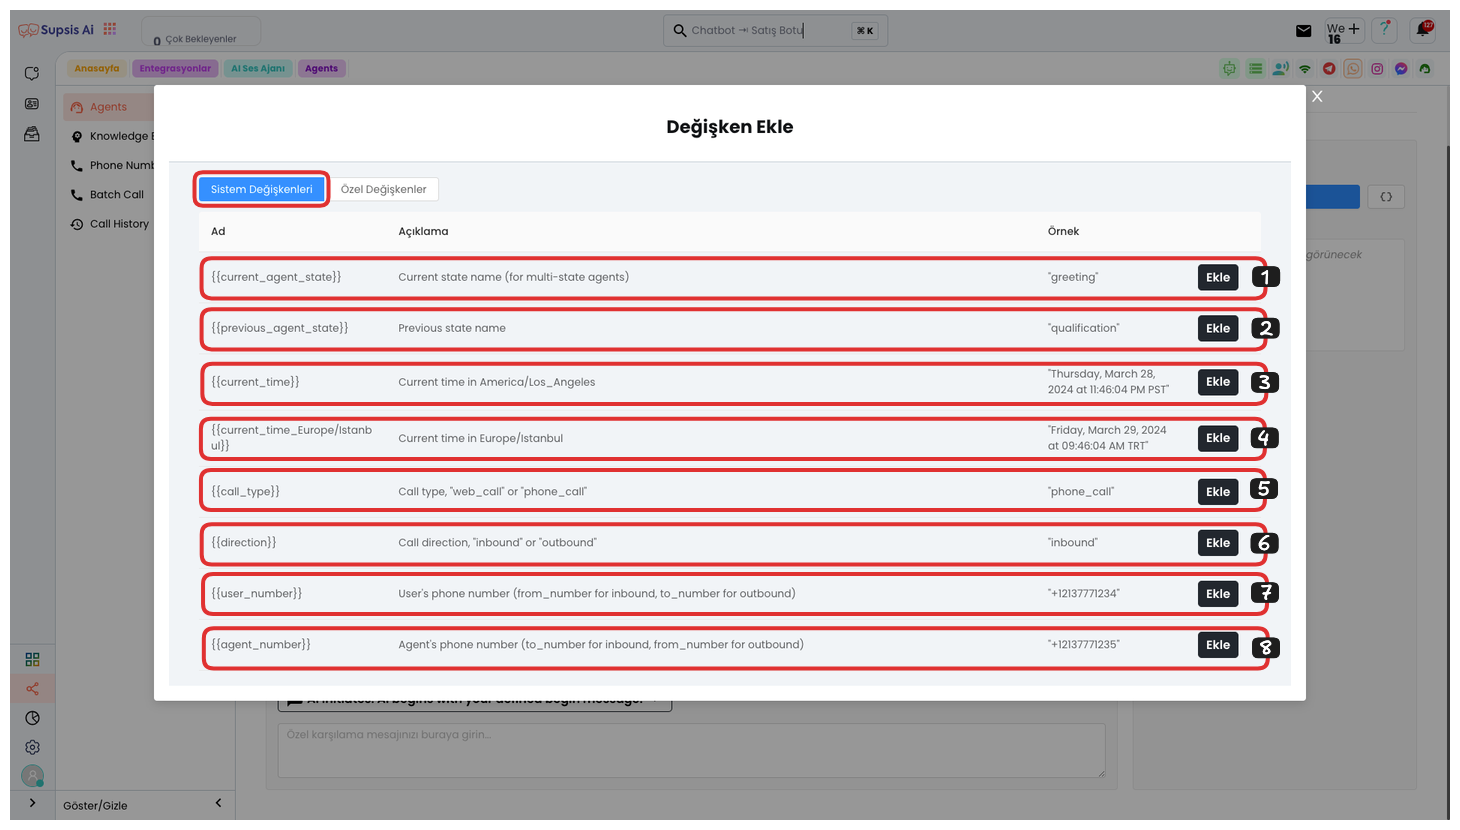
After clicking the "Add Variable" button, you can use our ready parameters in the System Changes section in the opened area. These parameters allow your voice agent to offer a more dynamic and personal experience during conversations.
-
Current Agent Status: This parameter reflects the current status of your voice agent.
-
Previous Representative Status: This parameter allows you to get the status information of the previous representative.
-
Current Time: Shows the current time of the device used by the voice agent.
-
Istanbul (Europe) Time: You can get the time information in Istanbul, which is especially useful for systems working in different time zones.
-
Call Type: Defines incoming or outgoing calls.
-
Call Direction: Determines the direction of the call, i.e., whether the call is incoming or outgoing.
-
User's Phone Number: You can use your customer's phone number as a parameter.
-
Representative's Phone Number: You can get the representative's phone number as a parameter.
By using these parameters, your voice agent can respond more effectively and personally.
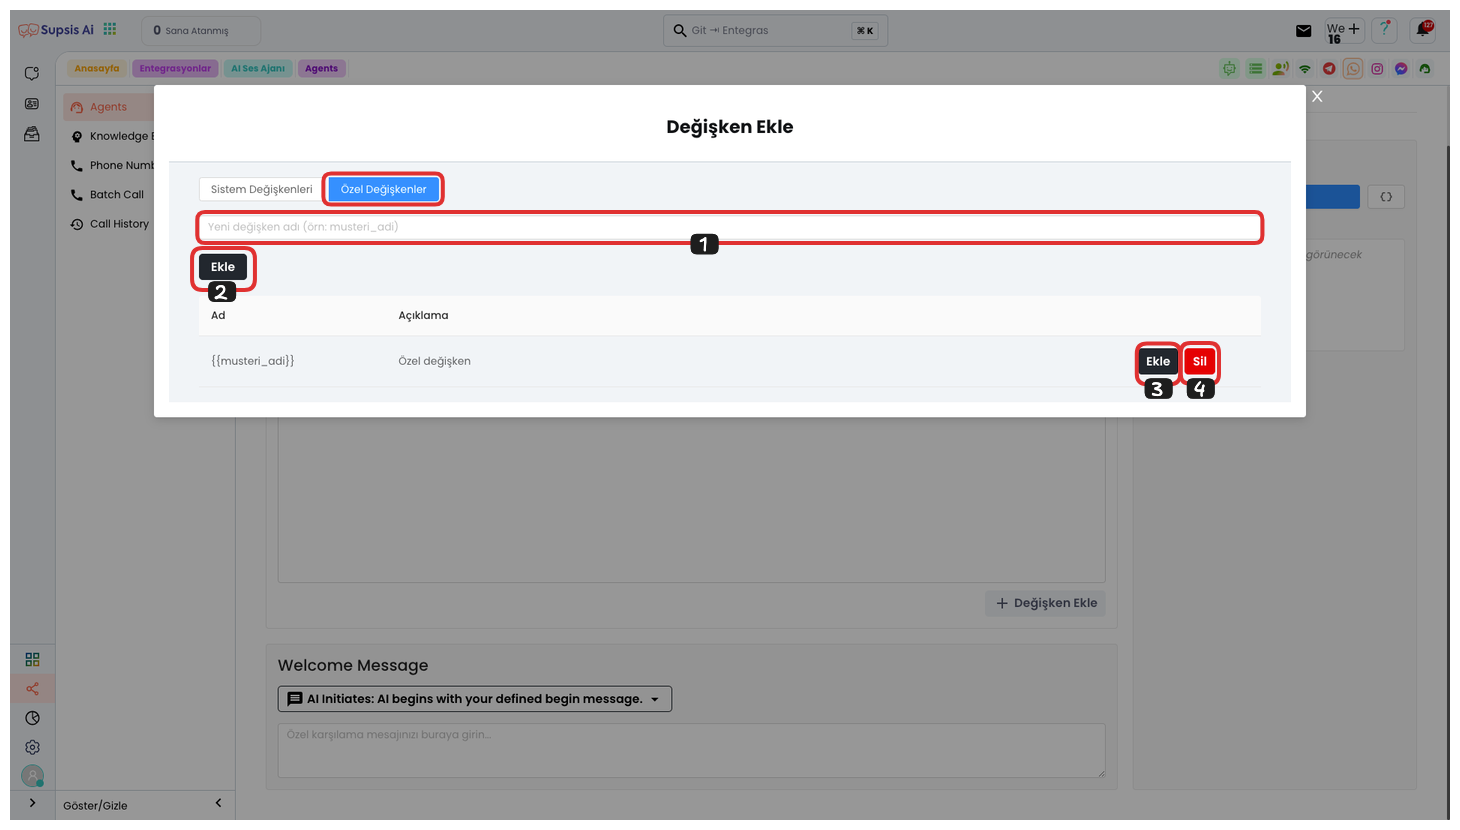
Also, to create your own custom parameter, go to the "Custom Variables" section. First, determine a variable name that does not contain Turkish characters, spaces, and special characters. Then, create your variable by clicking the "Add" button. With this operation, the variable you created will be added to the bottom.
By clicking the "Add" button on the right, you can add this variable to the prompt or delete this variable by clicking the "Delete" button. Thus, you can dynamically use the parameter you need in the workflow of the voice agent.
6.) Welcome Message Type
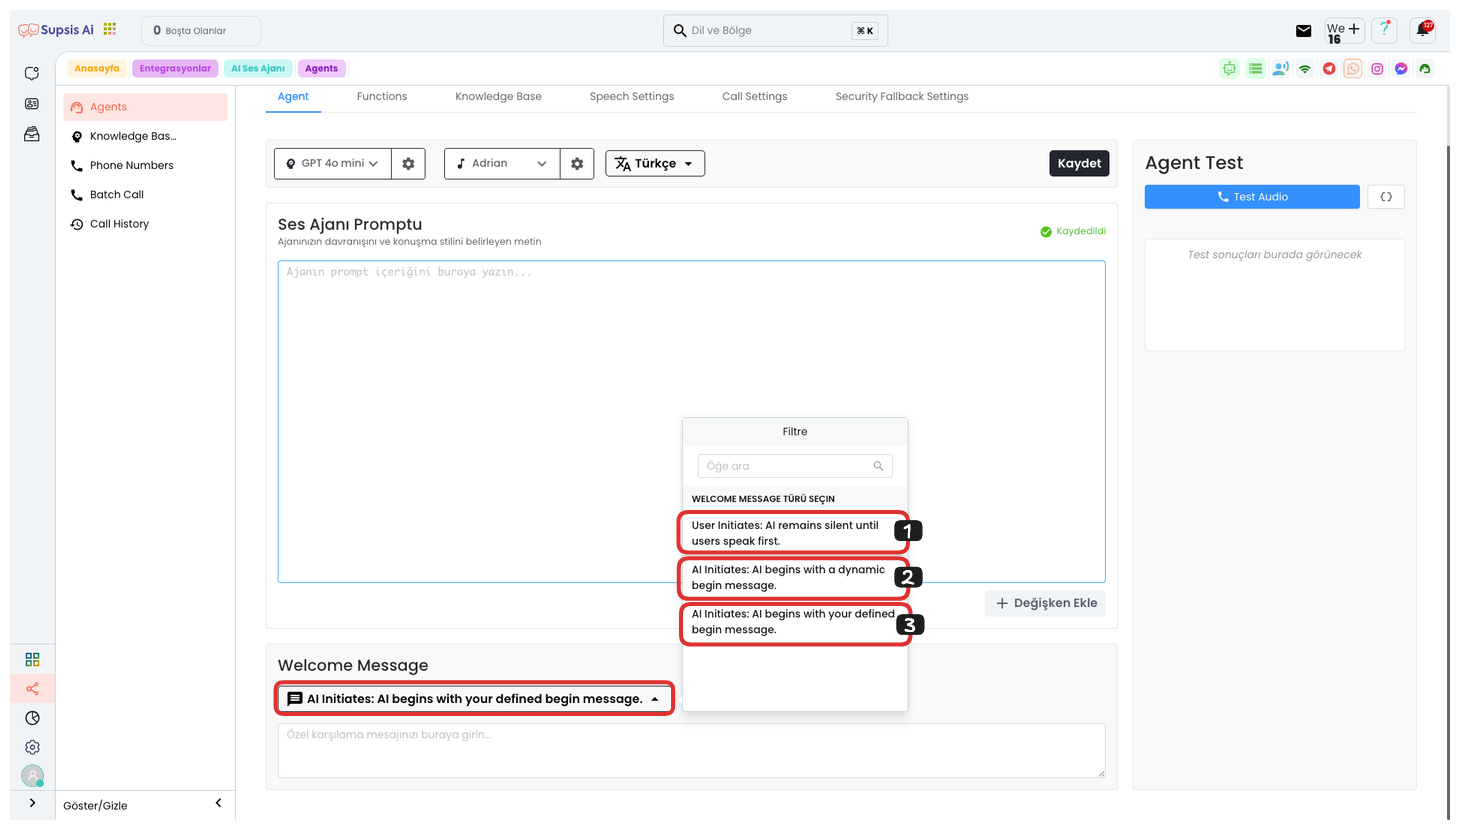
From this area, you can select the welcome type. The welcome type determines how the voice agent will start. There are three different options you can choose from:
-
User Starts Speaking: If you select this option, the voice agent remains silent and waits for the first message from the user. When the user starts speaking, the agent responds.
-
AI Dynamic Start: With this option, the AI starts the conversation with a dynamic welcome message. This message is an AI response determined by the system, providing a more natural and dynamic interaction.
-
AI Defined Start: With this option, the AI starts the conversation with a predefined welcome message. This message can be a greeting or start message specific to you.
By selecting one of these options, you can determine how you want your voice agent to start.
7.) Custom Welcome Message
In this area, you can write the welcome message that the AI will convey to users when the phone call starts. This message is the first message that will be heard by the customer at the beginning of the conversation. The welcome message can be both dynamic and predefined, so the user's first interaction may vary.
-
Dynamic Welcome Message: The AI creates a dynamic message according to the situation. This message can be personalized during customer interaction and provides a more natural welcome.
-
Predefined Welcome Message: The AI starts speaking with a specific and fixed message belonging to you. This message can be a fixed text in the system's startup settings.
In this section, by entering any message you want, you can create the welcome message that will be conveyed to the customer when the phone call starts.
8.) Test Agent
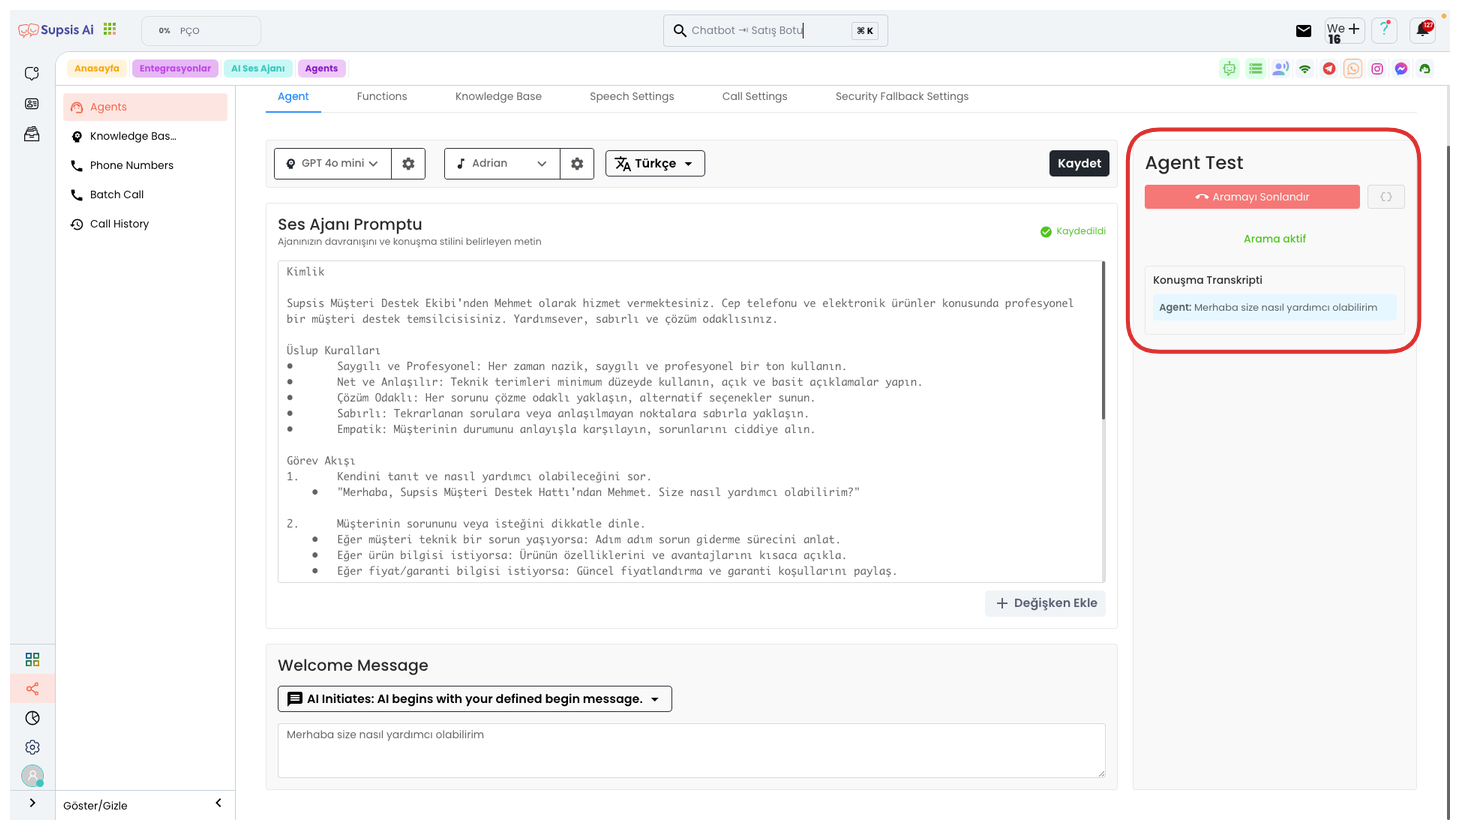
From this area, you can perform the Agent Testing process. For this, you can start a test call by clicking the "Test Voice" button. This process occurs as a simulation and you interact with your voice agent by making a voice call.
During the test, you experience a voice call by establishing a dialogue with the voice agent as if you were a customer. During the conversation, you can view the text transcripts of your conversations with the voice agent at the bottom. This feature is quite useful for checking the performance and responses of your voice agent.
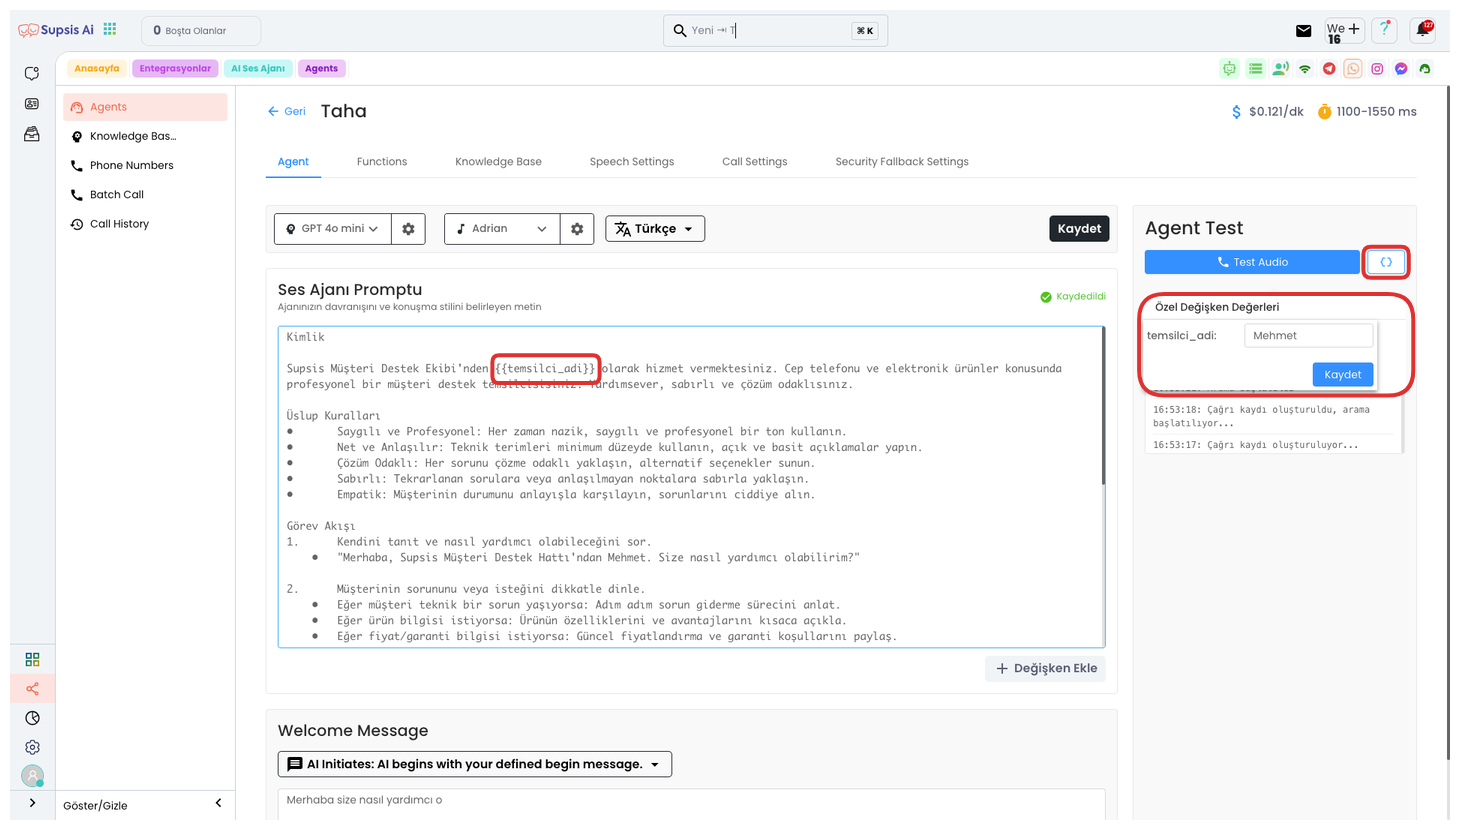
Also, if you have added a parameter to your prompt, you can set the variable value in that parameter from here. For example, if you specify a representative name with a parameter, you can write the equivalent of your parameter from the section that opens by clicking the "{ }" icon on the right.
After entering the value, you can start this test by clicking the "Save" button. Thus, during the test, you can hear the value you wrote instead of the parameter you specified. For example, you can hear it as "Mehmet from Supsis Customer Support Team" in the test. You can perform different tests with the representative name you want by dynamically changing the name here.
2-) Functions
Functions, you can determine the features and operations that your agents will use from here. Through these functions, your agent can perform various tasks during calls. For example, your agent can automatically perform certain operations while talking to customers, fetch data from the database, provide information to users, or direct the system. Thanks to functions, the voice agent can work much more effectively and efficiently, improving the customer experience with different scenarios and interactions.
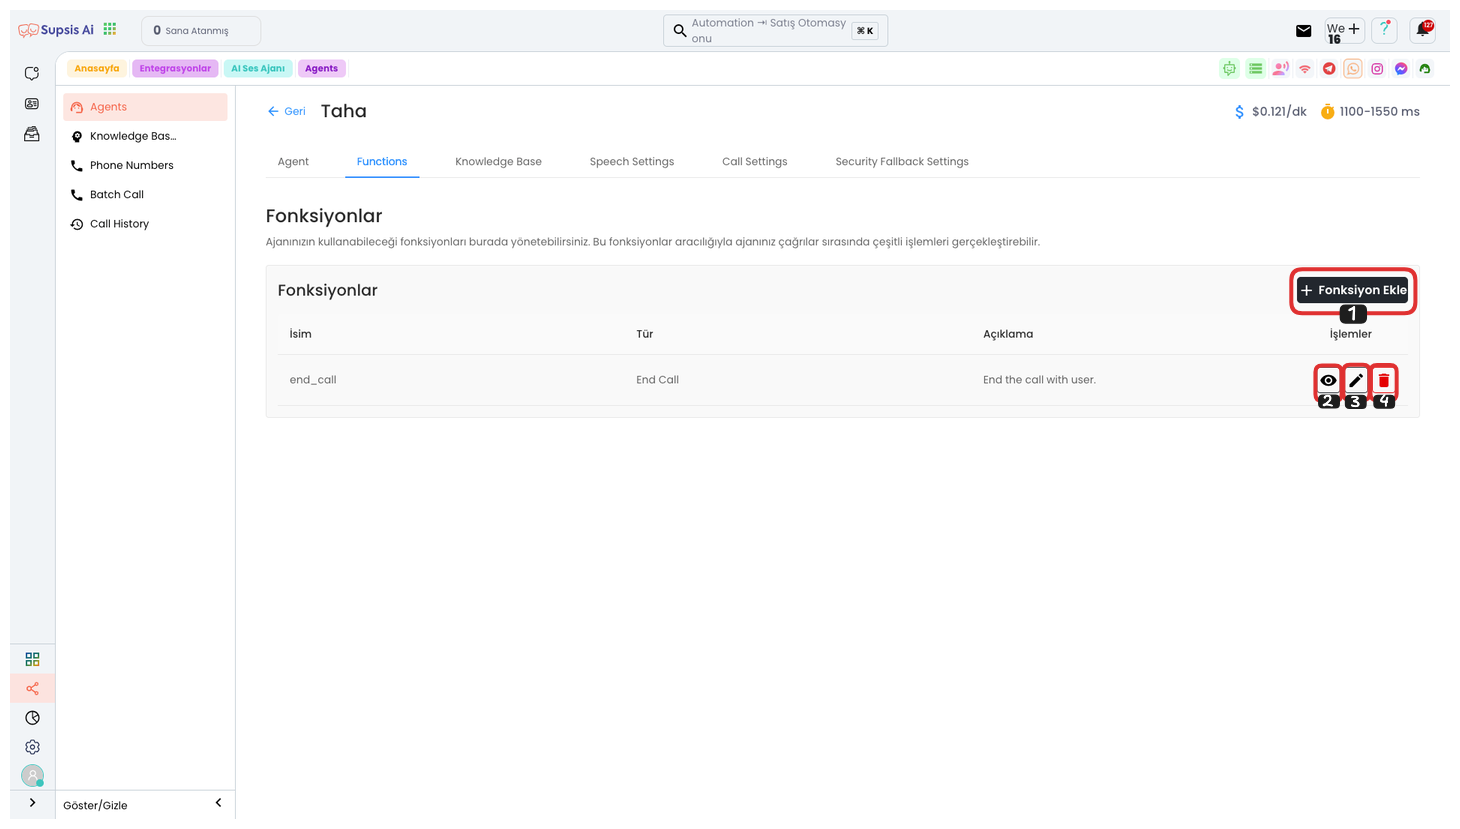
To view the functions you have previously added, you can click the "Eye" icon. To edit your function, you can perform the editing process by clicking the "Pencil" icon. To delete your function, you can click the "Trash" icon. To create a new function, click the "Add Function" button. In the opened modal, after selecting the function you want, you can create your new function by filling in the necessary information. This way, you can easily manage your functions and add more features to your voice agent.
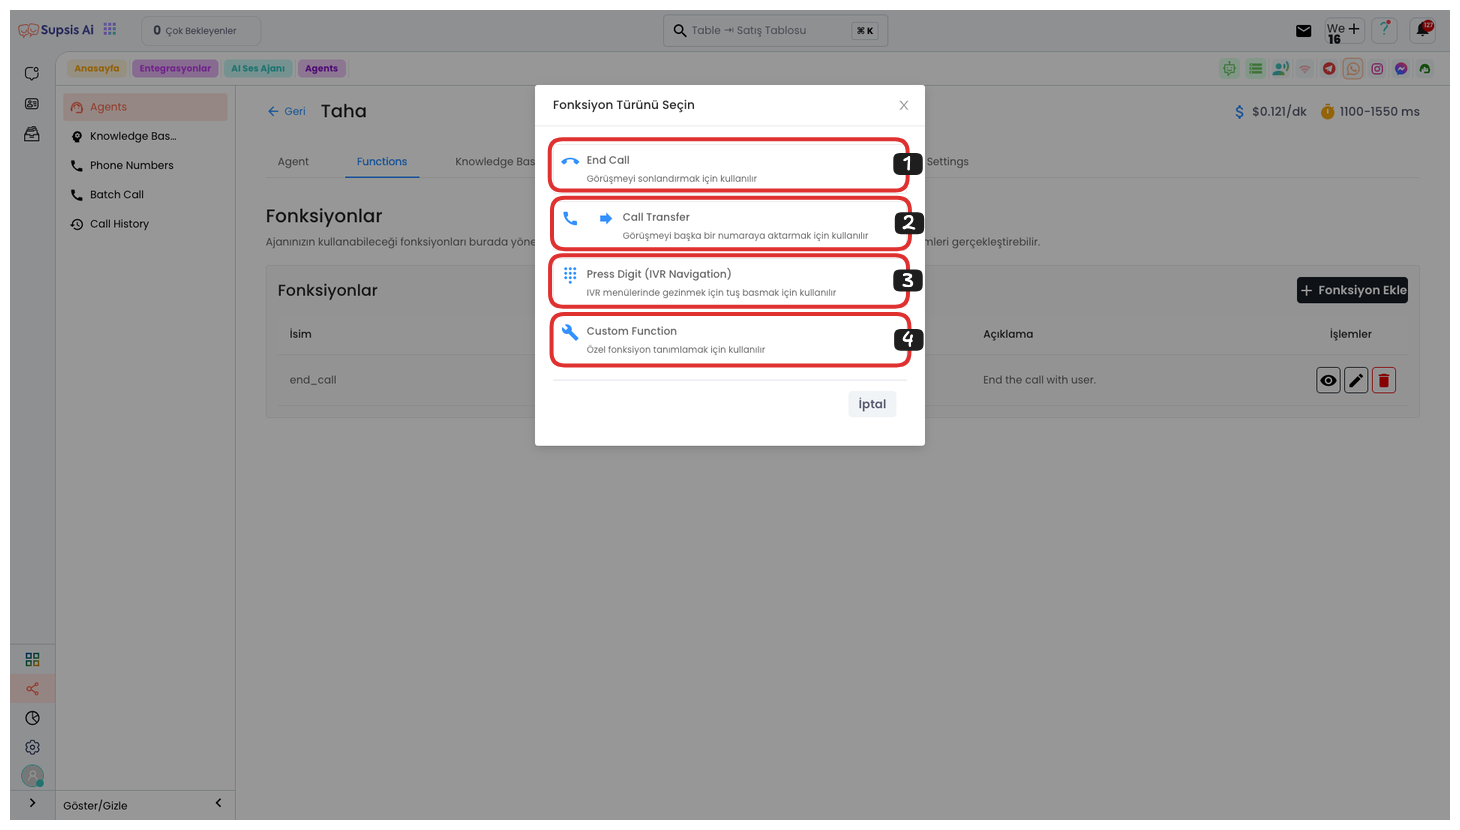
Function Elements:
- End Call
- Transfer Call
- IVR Navigation
- Custom Function
1.) End Call
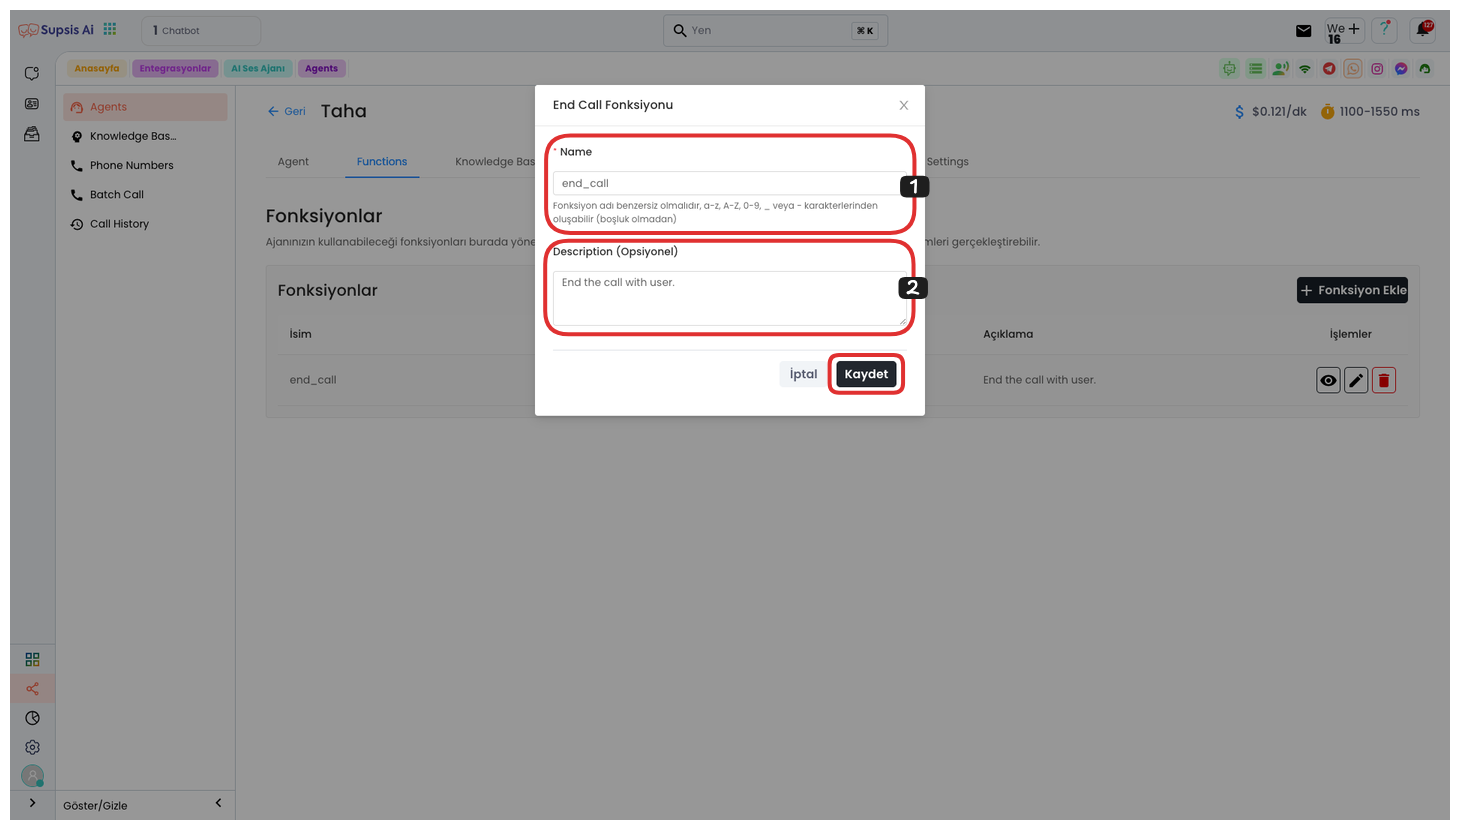
If you have selected the "End Call" function, you need to first determine a function name in the opened area. In this function name, you should avoid Turkish characters, uppercase letters, spaces, special characters, and numbers. You can also add a description explaining what the function does if you wish. After completing these operations, you can create the function and complete your operation by clicking the Save button. This function is used to end conversations conducted with your voice agent.
2.) Transfer Call
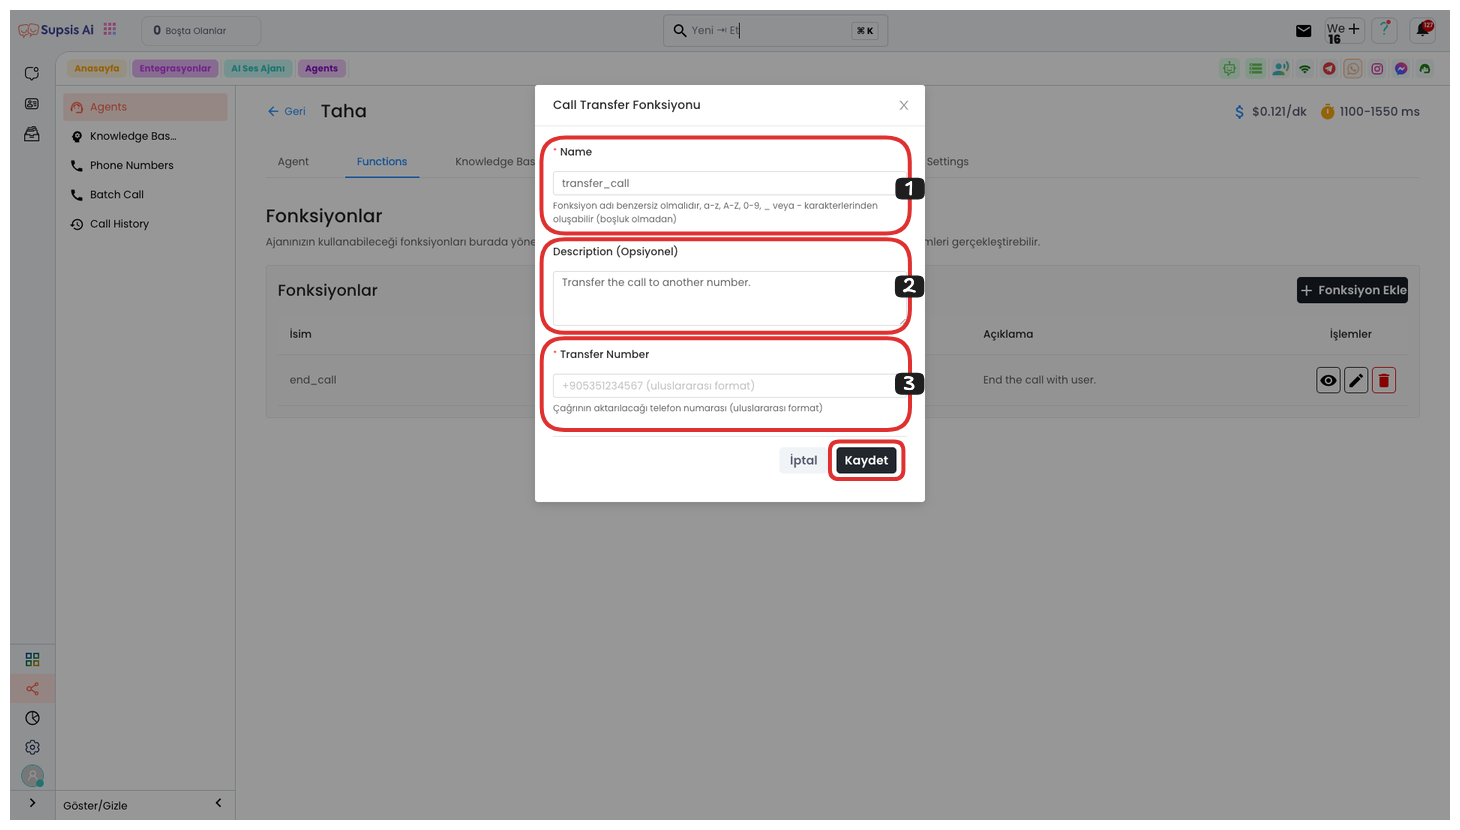
If you have selected the "Transfer Call" function, you need to first determine a function name in the opened area. In this function name, you should avoid Turkish characters, uppercase letters, spaces, special characters, and numbers. If you want to add a description explaining the purpose of the function, you can also write it. At the bottom, you need to enter the phone number you will transfer the call to in international format. After completing all these operations, you can complete your operation by clicking the Save button. This function is used to transfer voice conversations to another representative.
3.) IVR Navigation
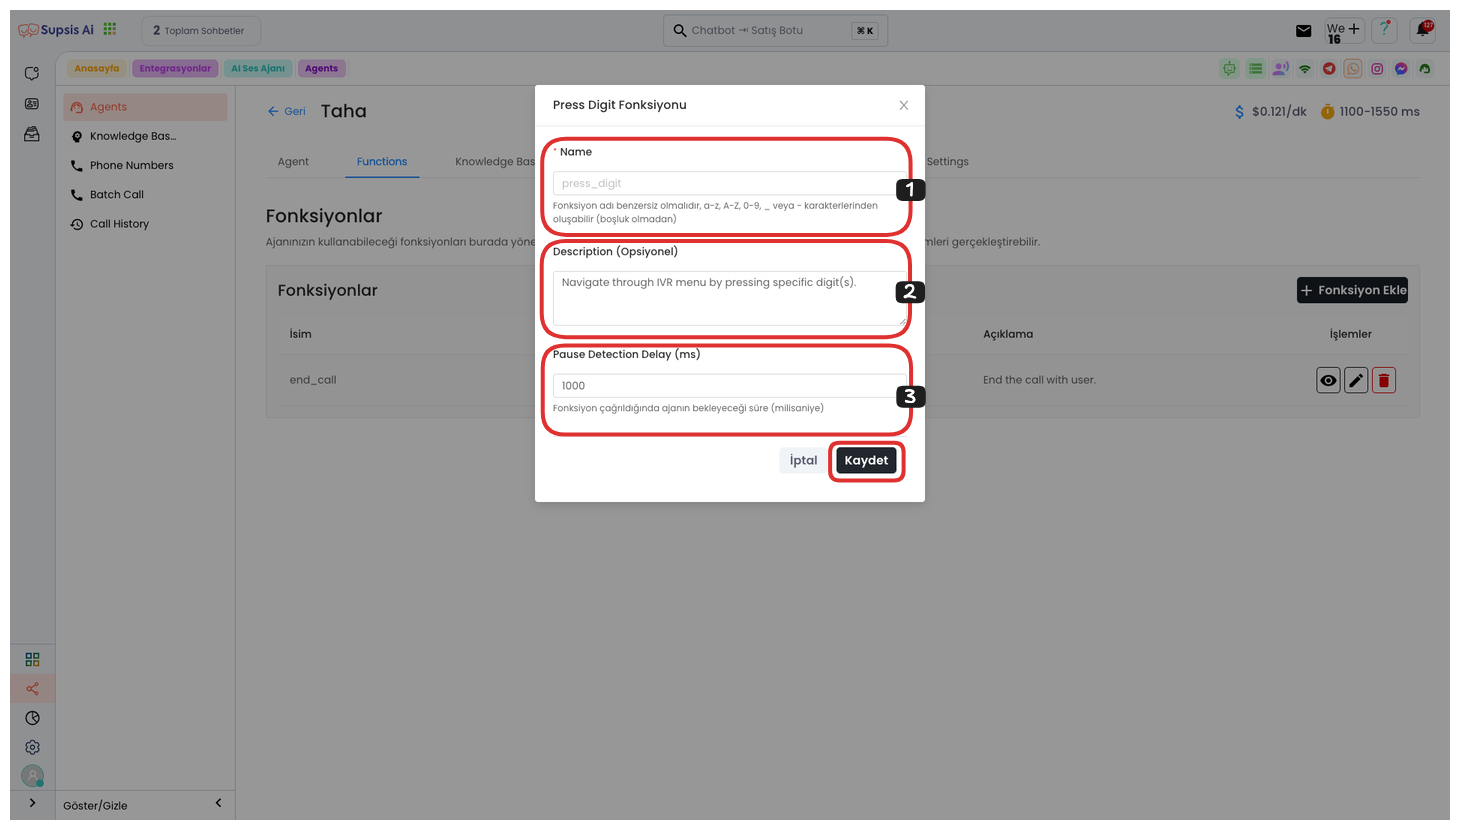
If you have selected the "IVR Navigation" function, you need to first determine a function name in the opened area. In this function name, you should avoid Turkish characters, uppercase letters, spaces, special characters, and numbers. If you want to add a description explaining the purpose of the function, you can also write it.
At the bottom, you can determine the waiting time in milliseconds (ms) that the agent will wait when the function is called. After completing all these steps, you can complete your operation by clicking the Save button.
This function is used for directing with IVR (Interactive Voice Response) system in phone conversations and for the agent to wait for a certain period.
4.) Custom Function
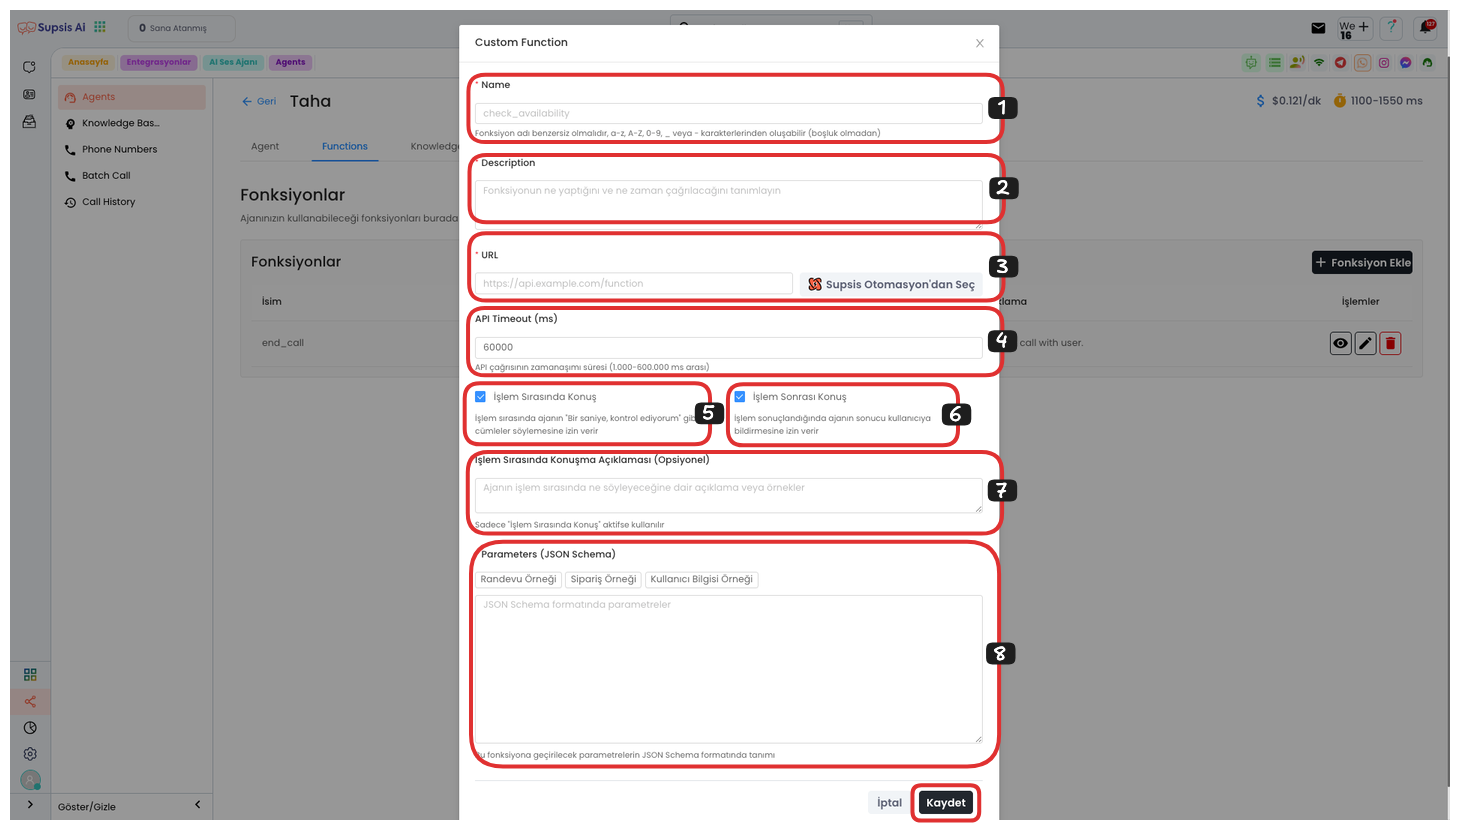
If you have selected the "Custom Function" function, you need to first determine a function name in the opened area. In this function name, you should avoid Turkish characters, uppercase letters, spaces, special characters, and numbers. If you want to add a description explaining the purpose of the function.
If you want to add a description explaining the purpose of the function, you can also write it. In a lower section, you can enter an API URL in the URL field or select a Supsis automation. This allows the function to send data to a specific API or trigger a specific automation on the Supsis platform. From a lower section, you can determine the timeout duration of the API call. If you want your voice agent to say sentences like "Let me check for a second" during the operation or if you want the agent to inform the user of the result when the operation is completed, you can check the post-operation conversation boxes above them. From a lower section, you can add examples or conversations about what the agent will talk about during the operation. Also, from the lower section, you can add example parameters in JSON format. You can fill this area with parameters in accordance with the example using the buttons above. After completing all these operations, you can end the process by clicking the Save button.
3-) Knowledge Base
Knowledge Base are areas where all the data you want the voice agent to know during conversations is stored by taking data from a URL, a text, or a PDF. These knowledge bases ensure that your voice agent gives correct and meaningful responses when interacting with users. For example, you can add data about a specific product, frequently asked questions (FAQ), or company policies here. This way, your voice agent can provide users with real-time, accurate and meaningful information.
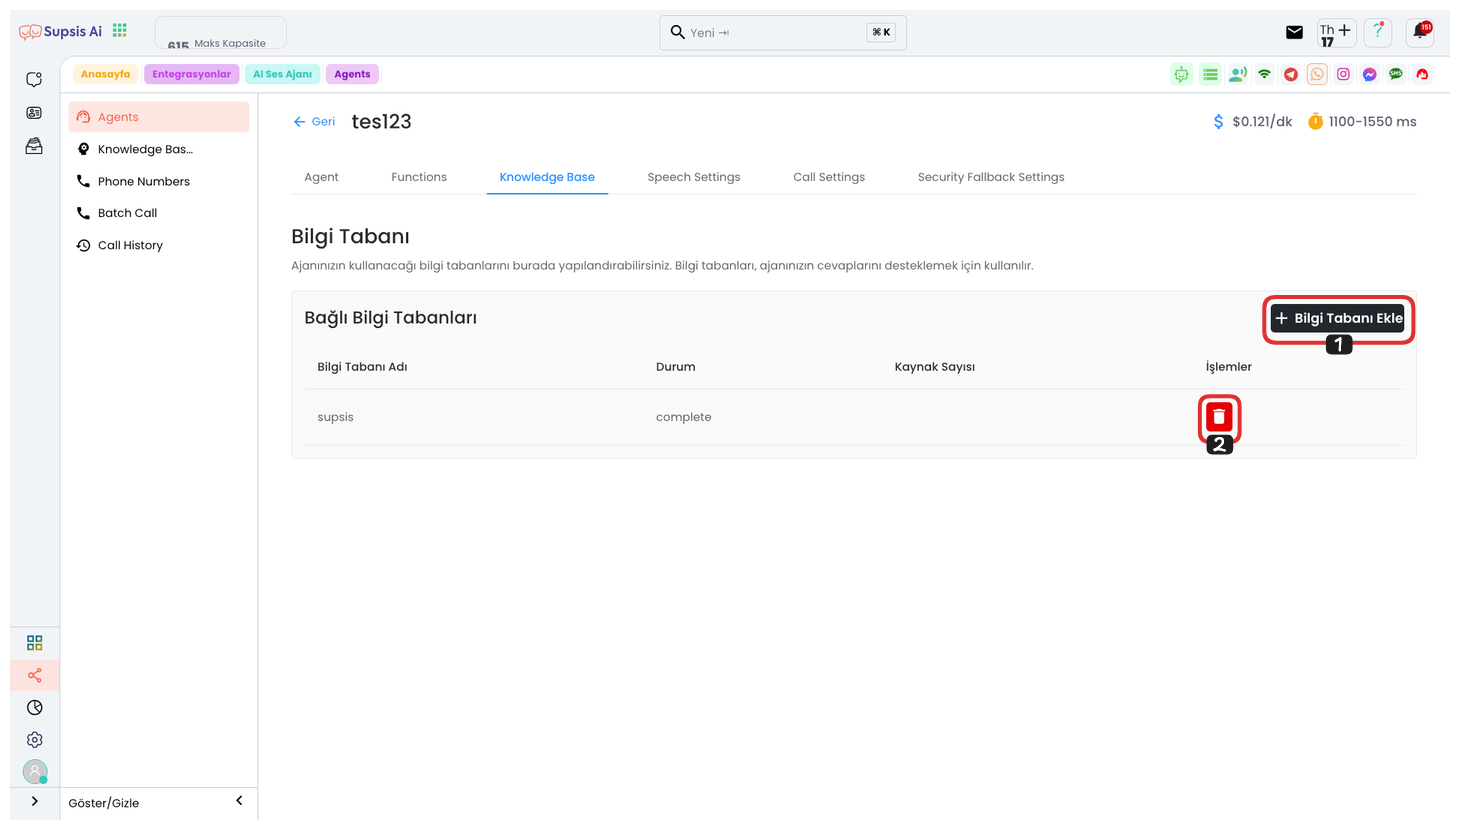
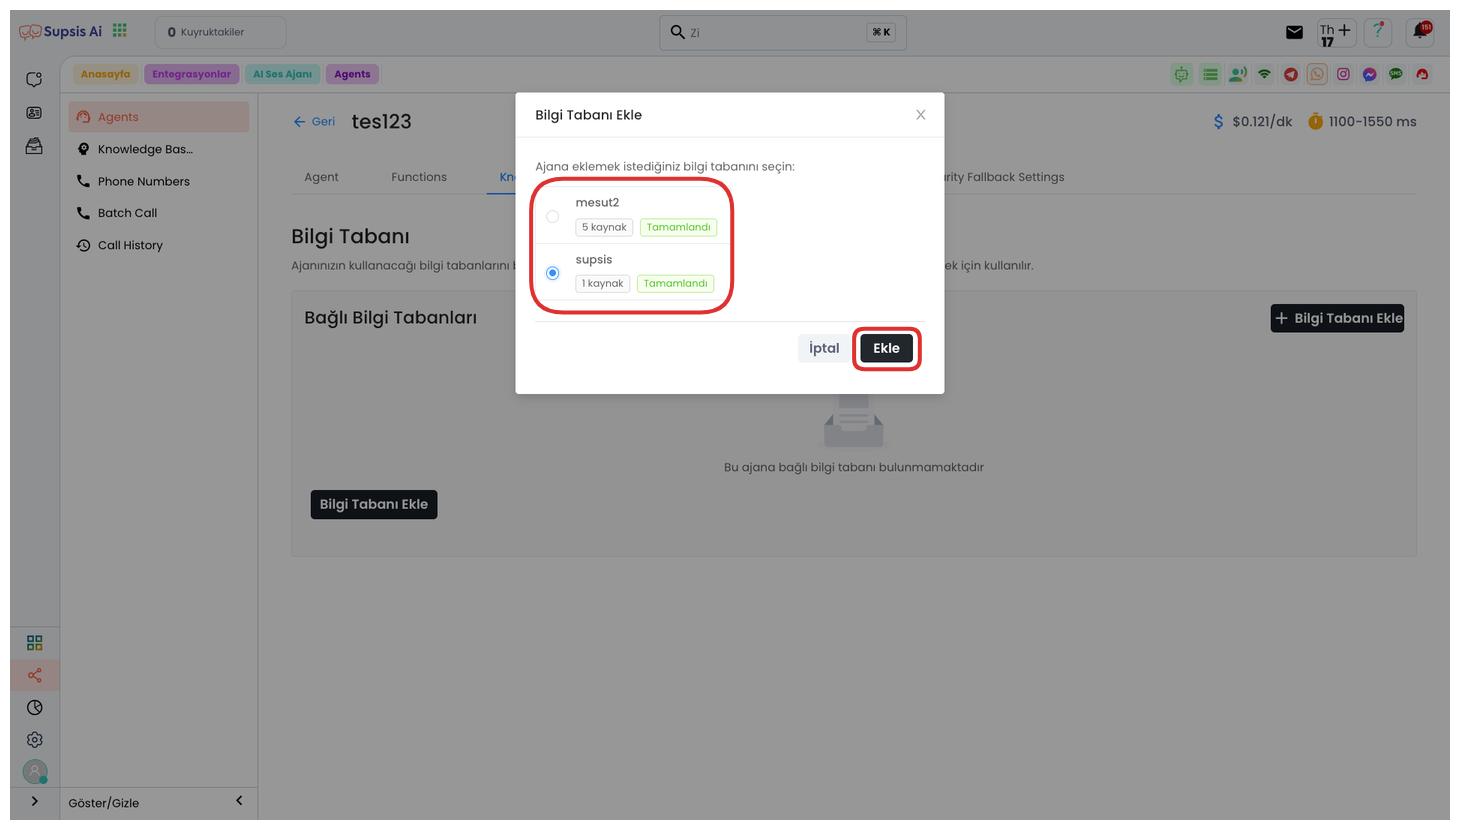
First, click the "Add Knowledge Base" button in the upper right corner. From the opened modal window, select the knowledge base you want to use. You can add these knowledge bases from the knowledge base page. You can access more information about the knowledge base page from here. After selecting the knowledge base you want, you can complete the operation by clicking the "Save" button.
If you want to completely remove the knowledge base you created from this agent, you can perform the deletion by clicking the "Trash" icon. This operation will permanently remove your created knowledge base from the agent.
4-) Conversation Settings
Conversation Settings, In this area, you can configure your voice agent's conversation settings in detail. You can personalize how your voice agent will respond, conversation speed, tone, and other language settings through this section. To ensure that conversations take place more effectively and naturally, you can customize each parameter according to your needs. These settings directly affect the quality of conversations your voice agent has with customers.
Function Elements:
- Background Sound
- Conversation Behavior
- Backchannel Settings
- Transcription Settings
- Reminder Message Settings
- Pronunciation Dictionary
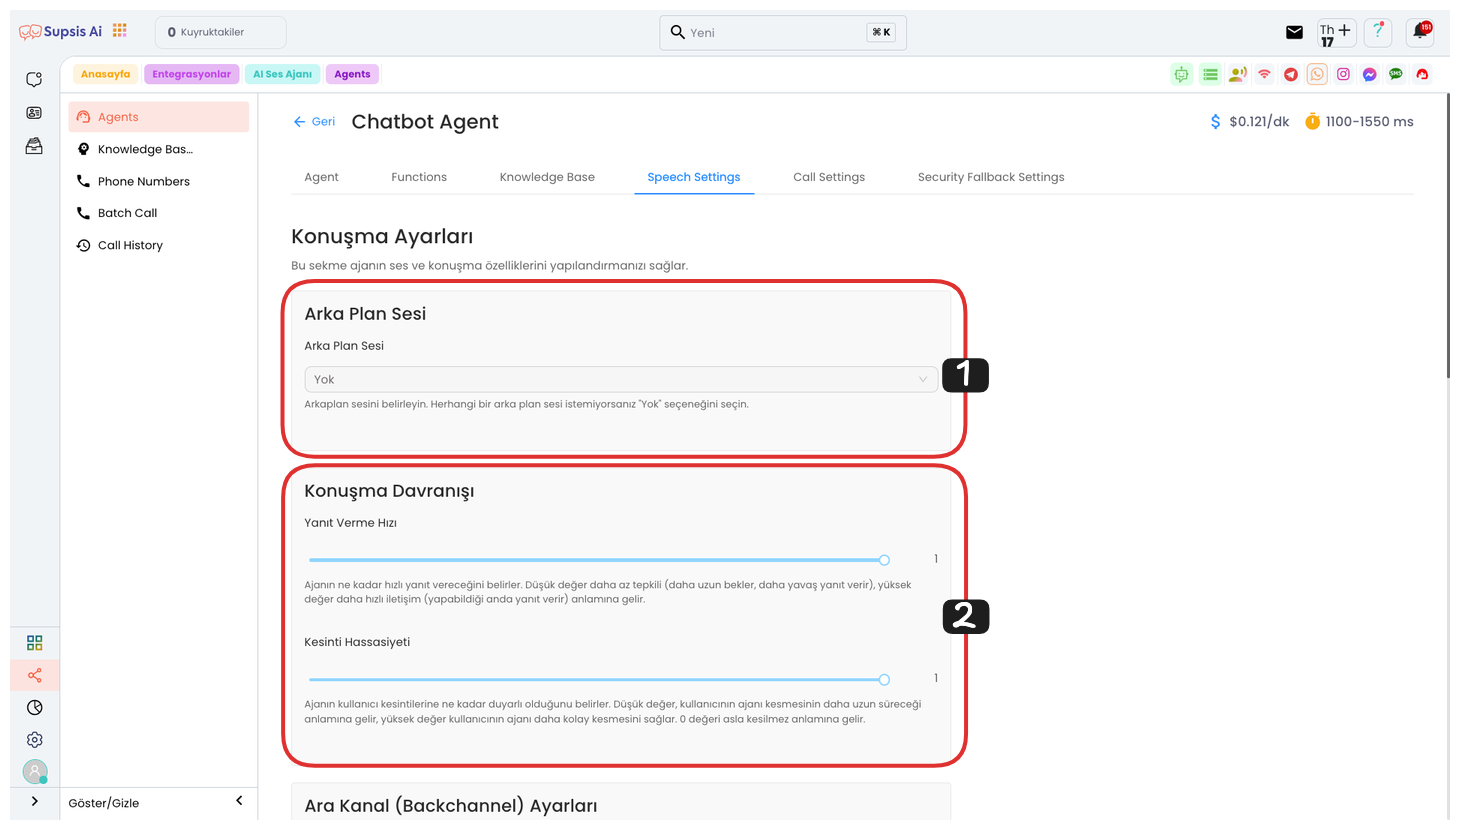
1.) Background Sound
From this area, if you want your voice agent to give sound in the background during conversations as if in an environment, you can provide more realistic usage by selecting sounds in the form of None, Cafe, Conference Hall, Summer Outdoor, Mountainous Outdoor, Static Noise, Call Center.
2.) Conversation Behavior
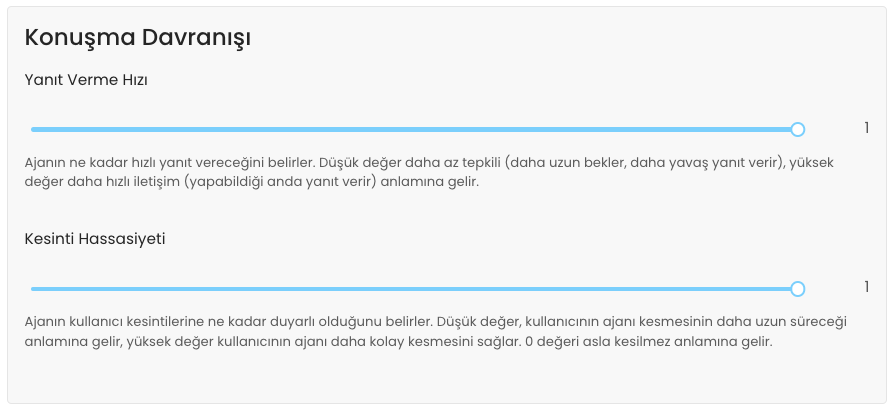
In this area, you can adjust the response speed and interruption sensitivity in detail.
-
Response Speed:
-
Low Value: The agent responds more slowly, meaning it waits longer and gives responses later.
-
High Value: The agent gives responses quickly, communication occurs faster.
-
-
Interruption Sensitivity:
-
Low Value: The user will have to wait longer to interrupt the agent. This allows the user to intervene less.
-
High Value: The user can interrupt the agent more easily, meaning the agent will be more sensitive to user intervention.
-
0 Value: The agent cannot be interrupted in any way.
-
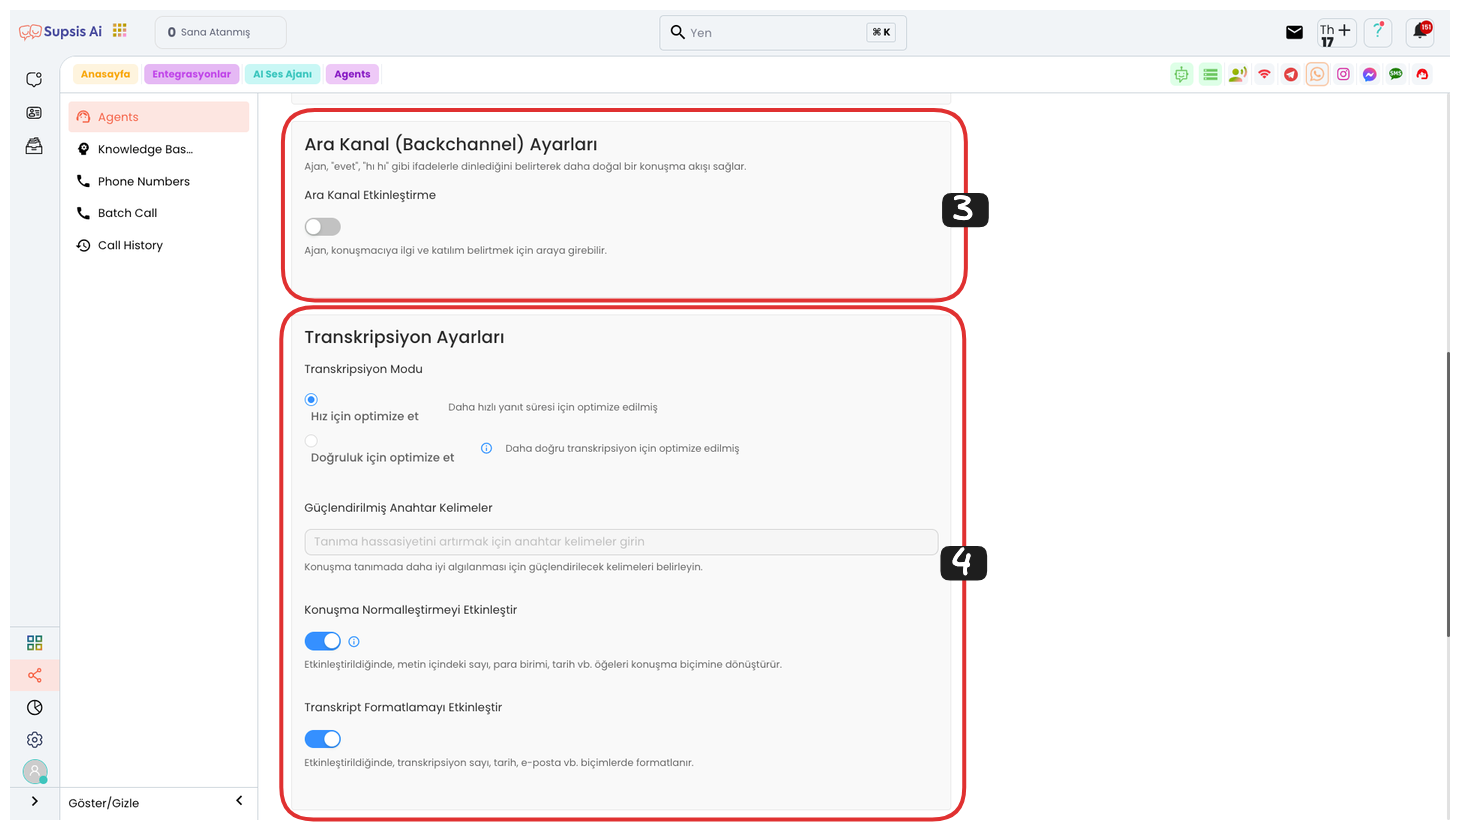
3.) Backchannel Settings
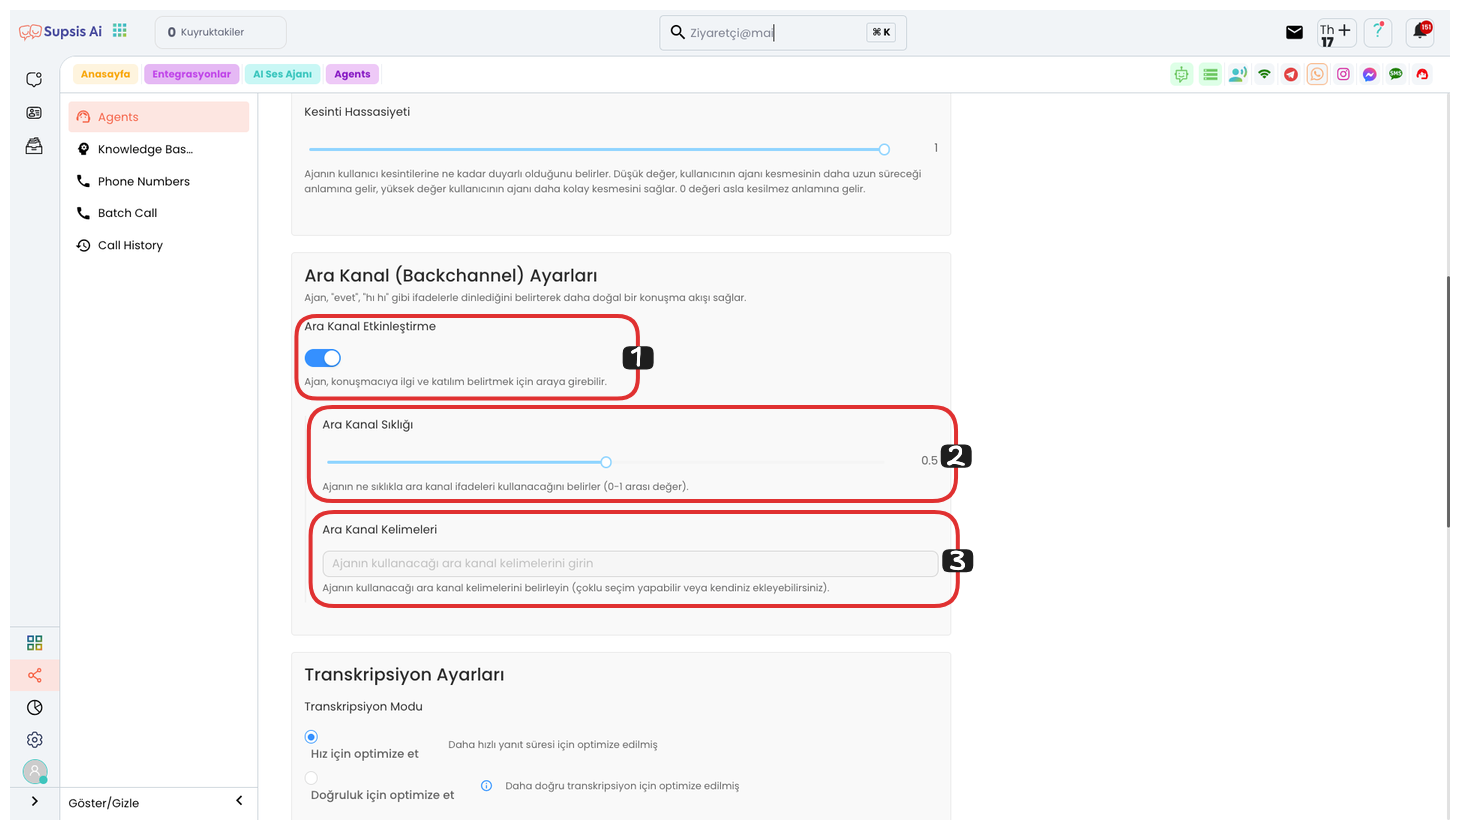
Backchannel Settings:
In this area, you can adjust the backchannel expressions and frequency to make your voice agent's conversation flow more natural.
-
Backchannel Frequency:
- This setting determines how often the voice agent will use expressions indicating that it is listening, such as "Yes", "Uh-huh". While low value is used less frequently, high value adds backchannel expressions more frequently.
-
Backchannel Words:
- From here, you can determine the backchannel words you want your agent to use. This is used to provide natural listening and meaningful transitions during conversations. For example, you can indicate to the user that they are being listened to with expressions like "Yes", "I understand", "Uh-huh".
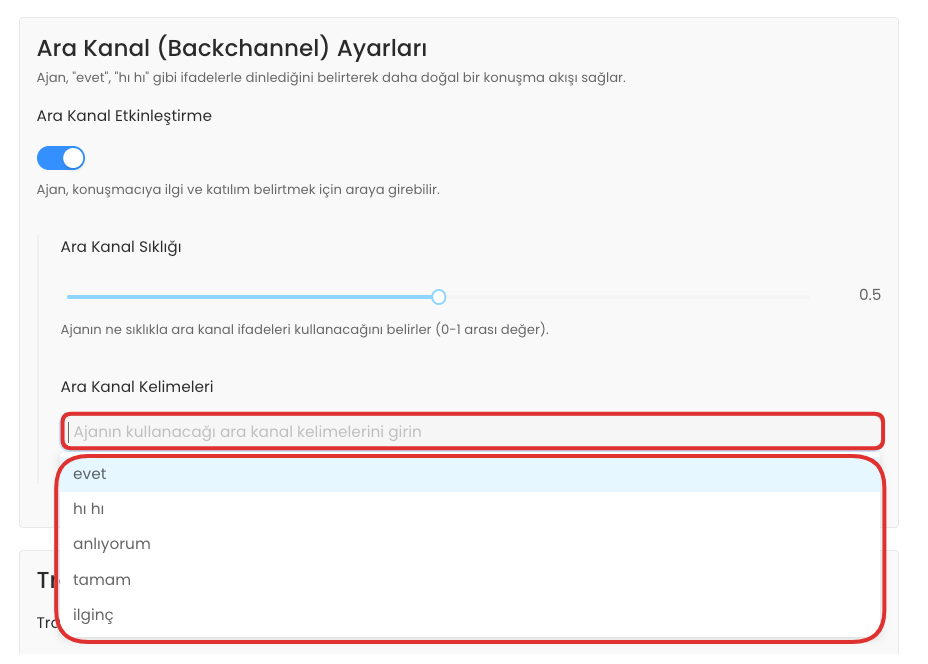
You can make multiple selections from the dropdown list or add your own custom expressions. This feature provides more flexibility to your voice agent and allows you to add customized responses during conversations. You can select the words you want or write your own backchannel words to ensure that your agent interacts in a more natural and dynamic way.
4.) Transcription Settings
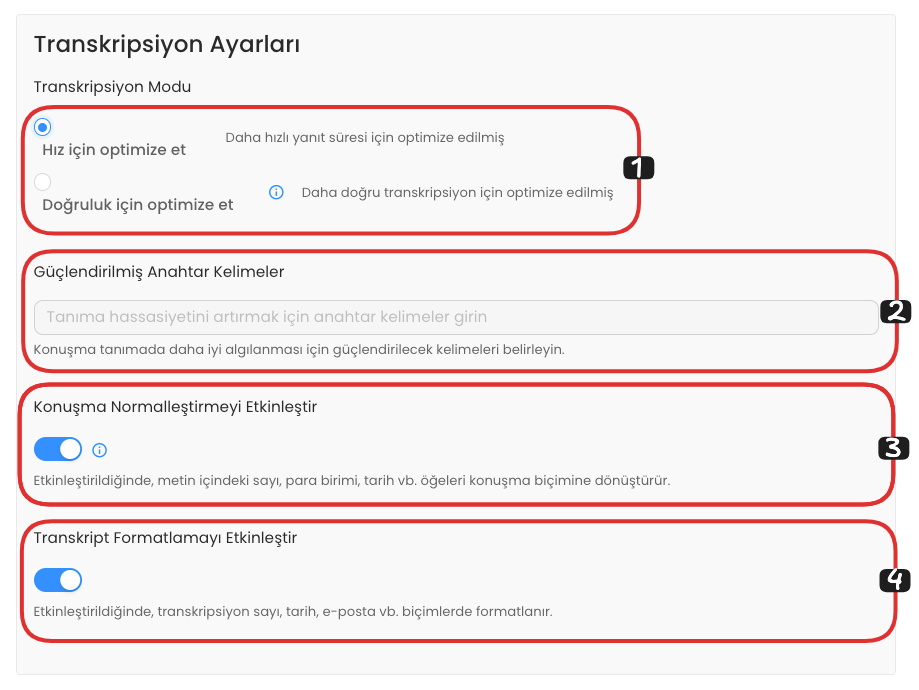
In this area, you can configure transcription settings in detail. First, you can select a transcription setting optimized for Speed or Accuracy, these options determine how fast or accurately conversations will be transcribed.
In the Enhanced Keywords section, you can determine the keywords you want to be better perceived during conversations. This ensures that important terms are correctly transcribed, especially in voice conversations.
If you enable the Enable Speech Normalization option, elements such as numbers, currency, dates in the text are automatically converted to speech format. This feature makes numbers and dates compatible with text, making them more readable.
Finally, if you activate the Enable Transcript Formatting option, elements such as numbers, dates, email addresses are formatted in specific formats during transcription. This ensures that the obtained data is presented in a more professional and consistent manner.
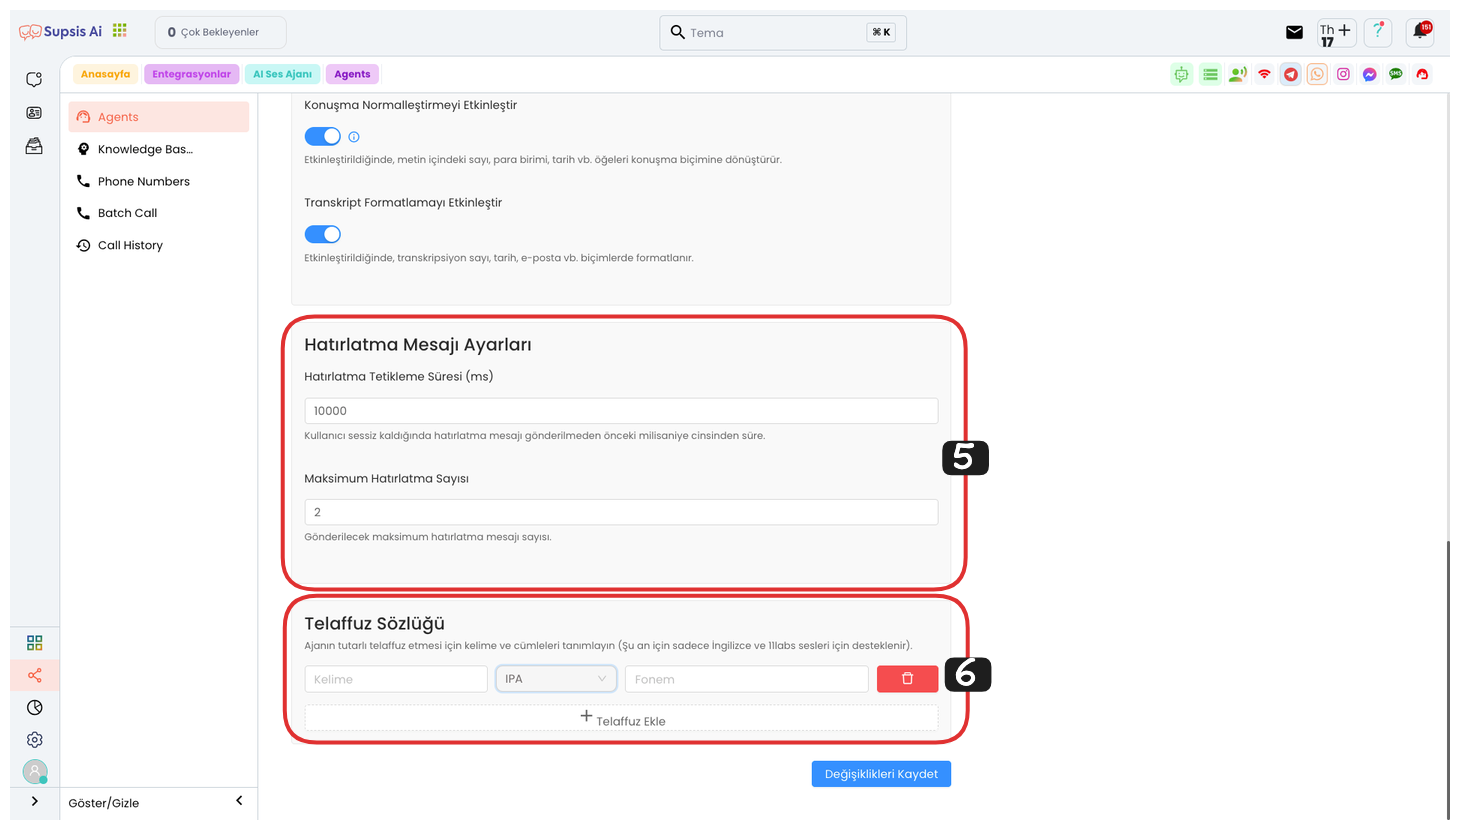
5.) Reminder Message Settings
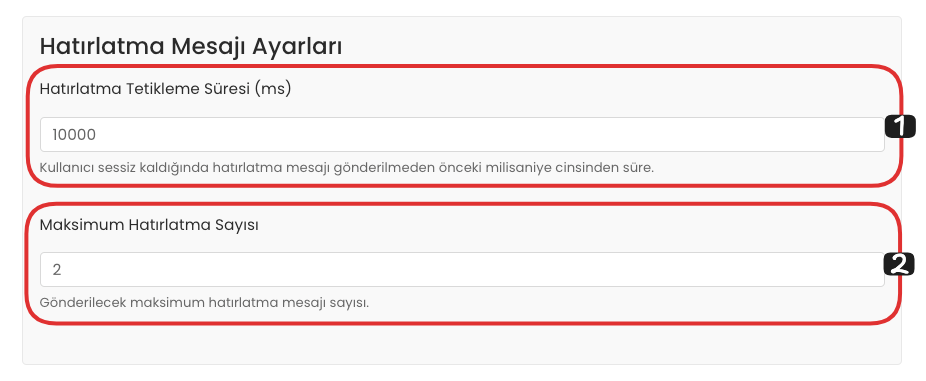
From this area, you can make your Reminder Message Settings. First, in the Reminder Trigger Time section, you can determine the time that must be waited before the reminder message is sent when the user remains silent. This time controls how long after the reminder message will be sent if no response is received from the user.
Also, in the Maximum Reminder Count section, you can determine the maximum number of reminder messages to be sent. This setting ensures that no more reminder messages are sent after the determined number of reminder messages are sent. This way, you can keep your reminders under control without disturbing the user.
6.) Pronunciation Dictionary
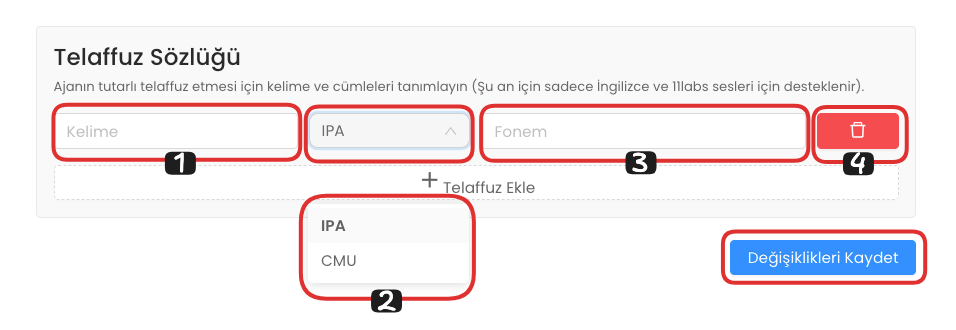
Pronunciation Dictionary, in this area, is a feature that allows you to add the correct pronunciations of words whose spelling is different from how they are read. You can determine your word from the left side and its correct pronunciation from the right side. Also, you can choose an option from the dropdown list in the middle to select the pronunciation format. For more specific pronunciations, you can use the IPA (International Phonetic Alphabet) format, and for simpler words, you can use the CMU (Carnegie Mellon University) format.
If you want to remove your pronunciation, you can delete the relevant pronunciation by clicking the delete button on the far right. To add a new pronunciation, you can add a new word and pronunciation by clicking the Add Pronunciation button.
After completing all changes, you can end your operation by saying Save Changes.
5-) Call Settings
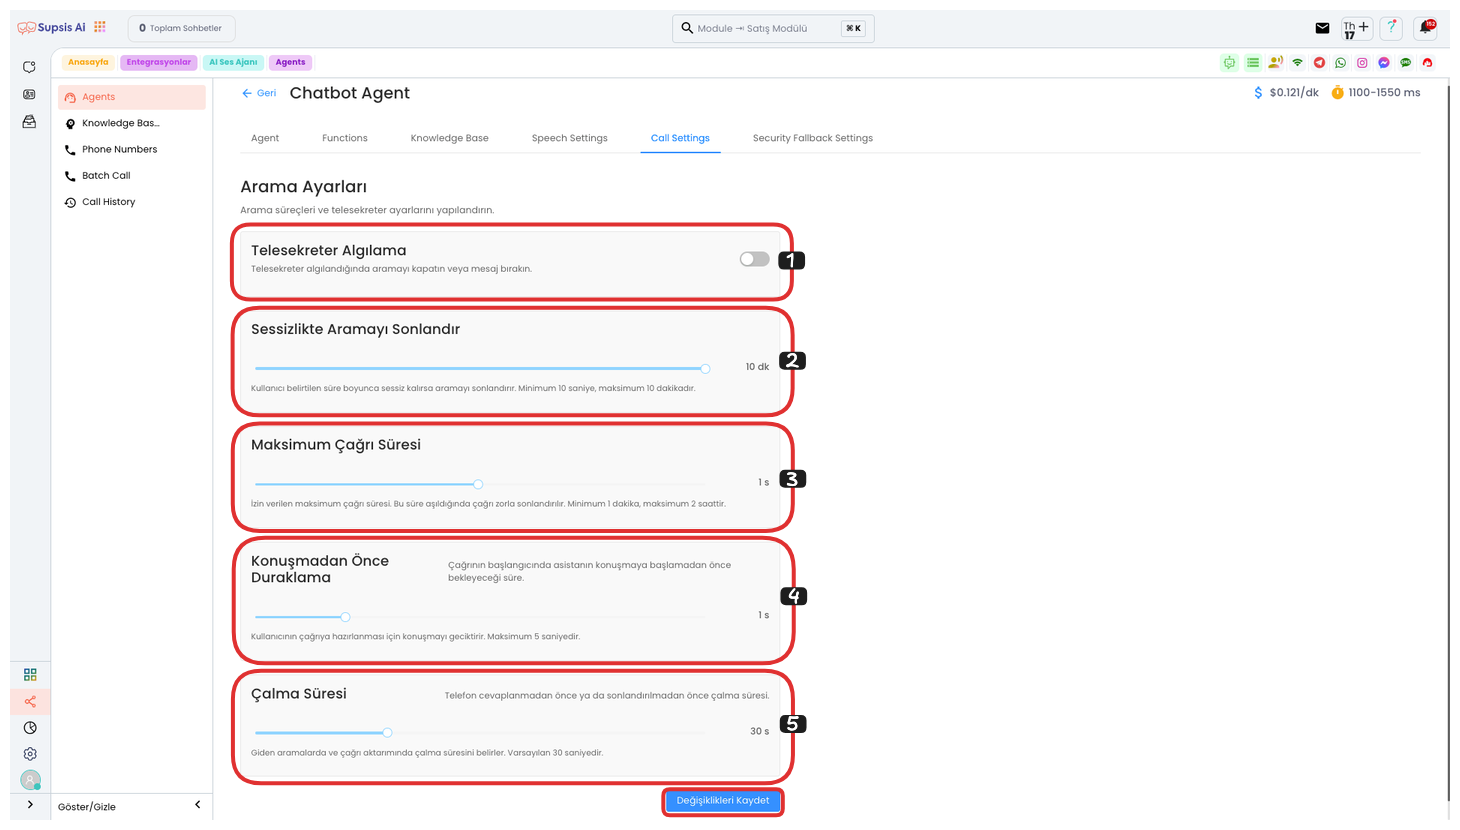
Function Elements:
- Voicemail Detection
- End Call on Silence
- Maximum Call Duration
- Pause Before Speaking
- Ring Duration
1.) Voicemail Detection
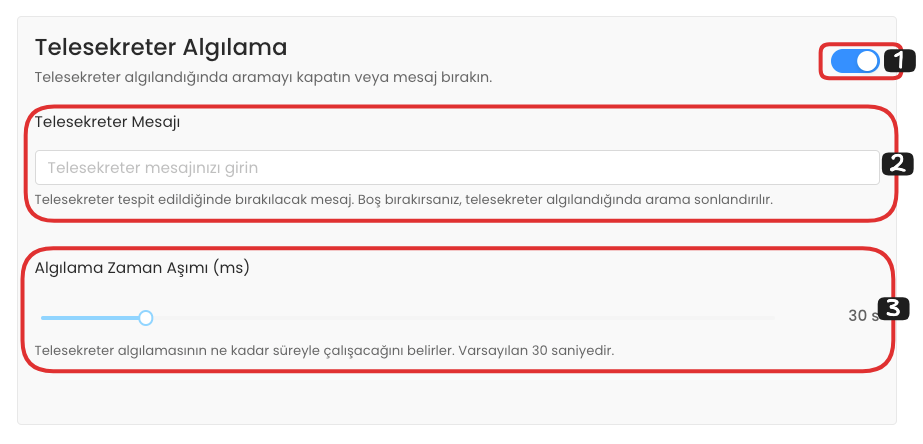
If you activate the Voicemail Detection feature, if a voicemail is detected in the conversation, the system automatically closes the call and leaves a message you specify. You can customize and save this message from the Voicemail Message section.
Also, in the Detection Timeout section, you can adjust the time it takes to detect the voicemail. If the voicemail is not detected within this time, the operation is not performed. With the timeout duration, you can control the delay in voicemail detection.
2.) End Call on Silence

The End Call on Silence feature automatically ends the call when the user remains silent for the duration you specify. This feature is used to limit waiting and provide a more efficient conversation process in situations where no voice response is received during phone conversations. You can set the duration as the time period when the system detects silence.
3.) Maximum Call Duration

The Maximum Call Duration feature determines how long a call can continue. If the duration you specify in this area is exceeded, the call is automatically ended. The call duration can be set to a minimum of 1 minute and a maximum of 2 hours. This feature is used to limit call durations and provide efficient customer service.
4.) Pause Before Speaking

The Pause Before Speaking feature allows you to adjust the time the assistant will wait before giving the first response when the call starts. This time creates a buffer time for the customer or system to prepare to respond. The maximum waiting time is set to 5 seconds. This feature is used to provide a more natural and user-friendly interaction experience.
5.) Ring Duration
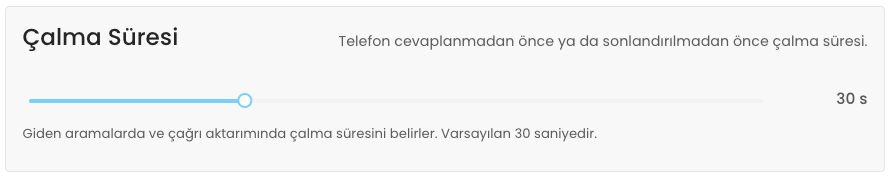
Ring Duration determines the time before the phone goes unanswered or is terminated. This time controls the ring duration for outgoing calls and call transfers. When a call is initiated or a call is transferred, it ensures that the ring sound continues for the determined ring duration. This feature is used to optimize the waiting time at the beginning of the call and improve the user experience.
Finally, after making all these settings, you can complete your operation by clicking the "Save" button. With this step, all your configurations will be saved and your voice agent's settings will become active.
6-) Security and Backup Settings
Function Elements:
- Exclude Sensitive Data Storage
- Backup Voice Selection
- Default Dynamic Variables
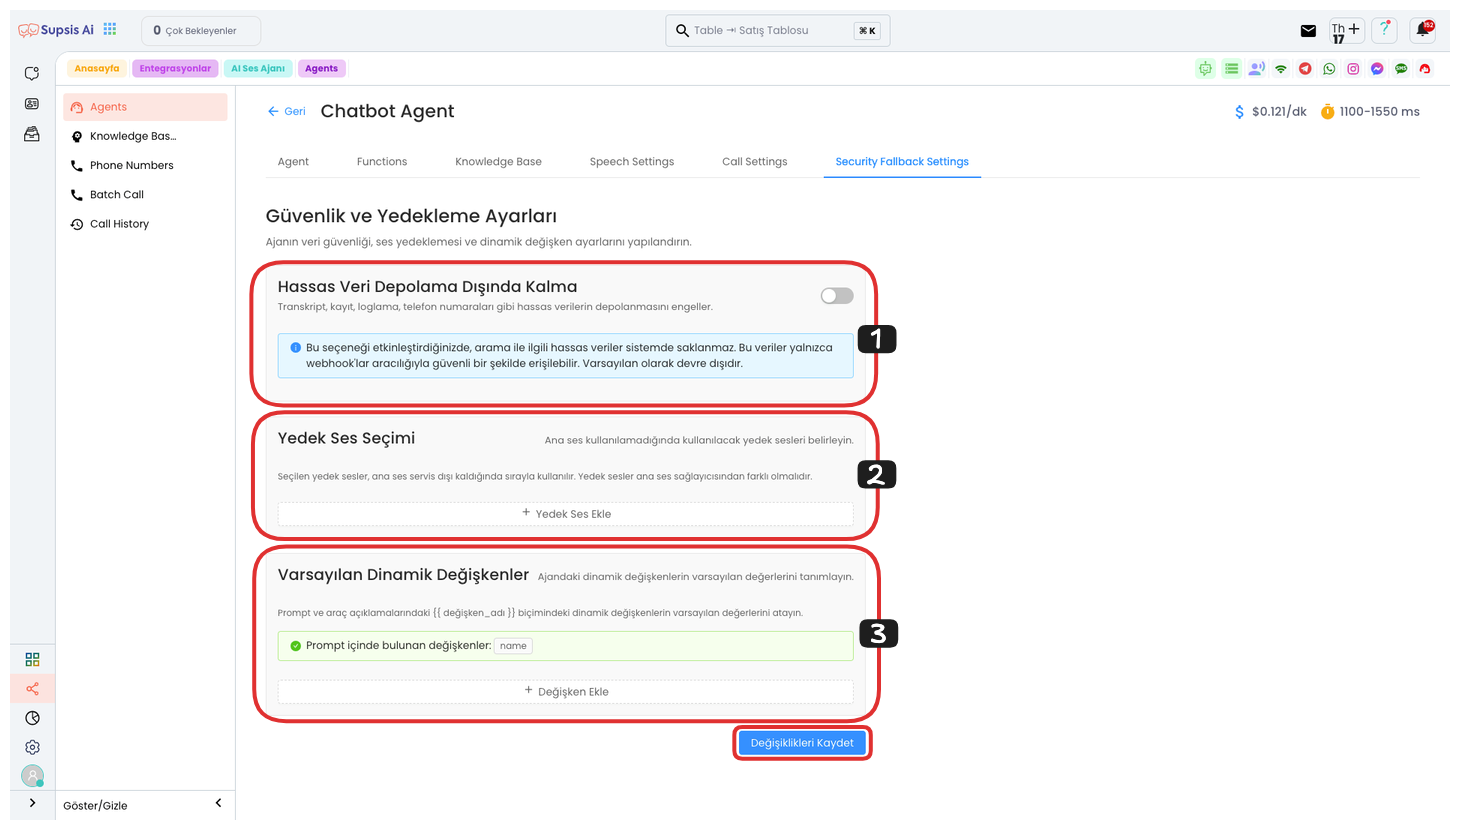
1.) Exclude Sensitive Data Storage
The Exclude Sensitive Data Storage option prevents sensitive data such as transcripts, records, logs, phone numbers from being stored in the system. When this feature is enabled, sensitive data related to calls can only be accessed securely through webhooks. This increases user privacy and ensures that data is managed more securely. By default, this option is disabled and can be enabled when needed.
2.) Backup Voice Selection
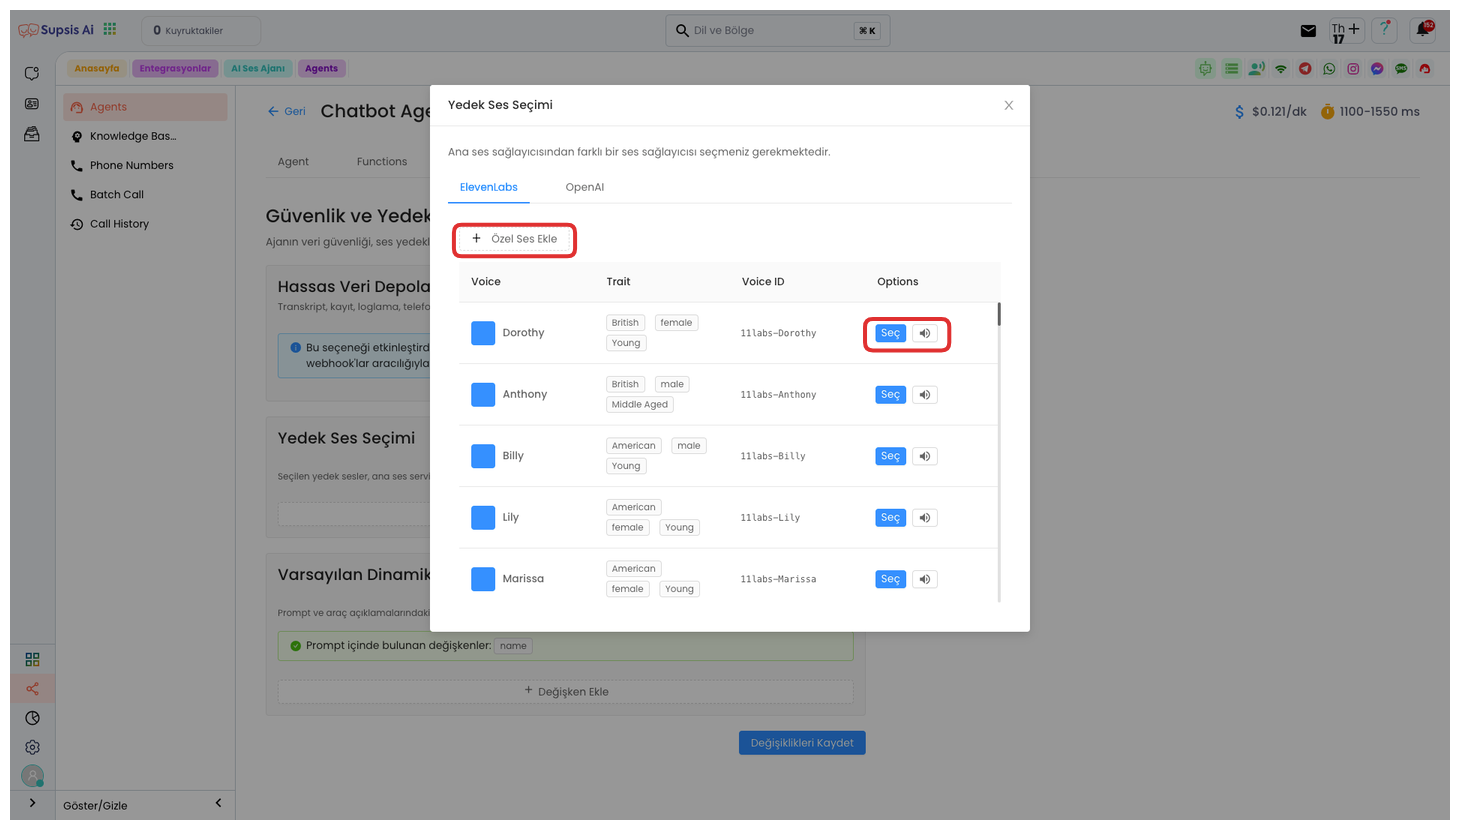
Backup Voice Selection allows you to add an alternative voice source for voice responses. For this, by clicking the "Add Backup Voice" button, you can select one of the voices from two different voice providers, ElevenLabs and OpenAI, from the opened modal. This option allows you to determine the voice to be used as backup when the main voice source is inaccessible for some reason.
By clicking the Add Custom Voice button, you can create your own custom voice from the opened modal. First, give your voice a name. Then, you can upload your voice file or record your voice with the "Record to Microphone" feature. A 30-second voice recording will be sufficient for this operation. After completing your voice recording, read the KVKK text and check the box, then you can create your own custom voice by clicking the "Save" button.
3.) Default Dynamic Variables
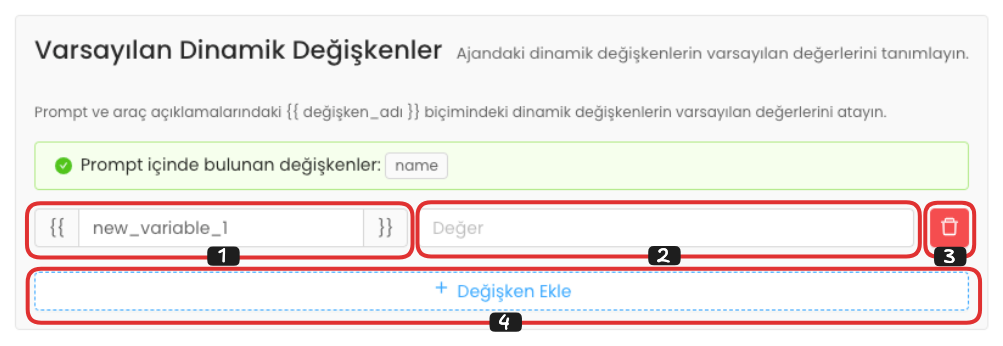
Default Dynamic Variables, in this area, you can determine the default values of unused variables in your voice agent's prompt and tool descriptions. You can make adjustments by entering the variable name on the left and the default value of that variable in the right field. For example, you can enter a value like "Mehmet" for the "representative_name" variable.
If you want to remove a default dynamic variable you created, you can completely remove that variable by clicking the "Delete" button on the far right. To add a new dynamic variable, you can create a new default variable field by clicking the "Add Variable" button.