Agents
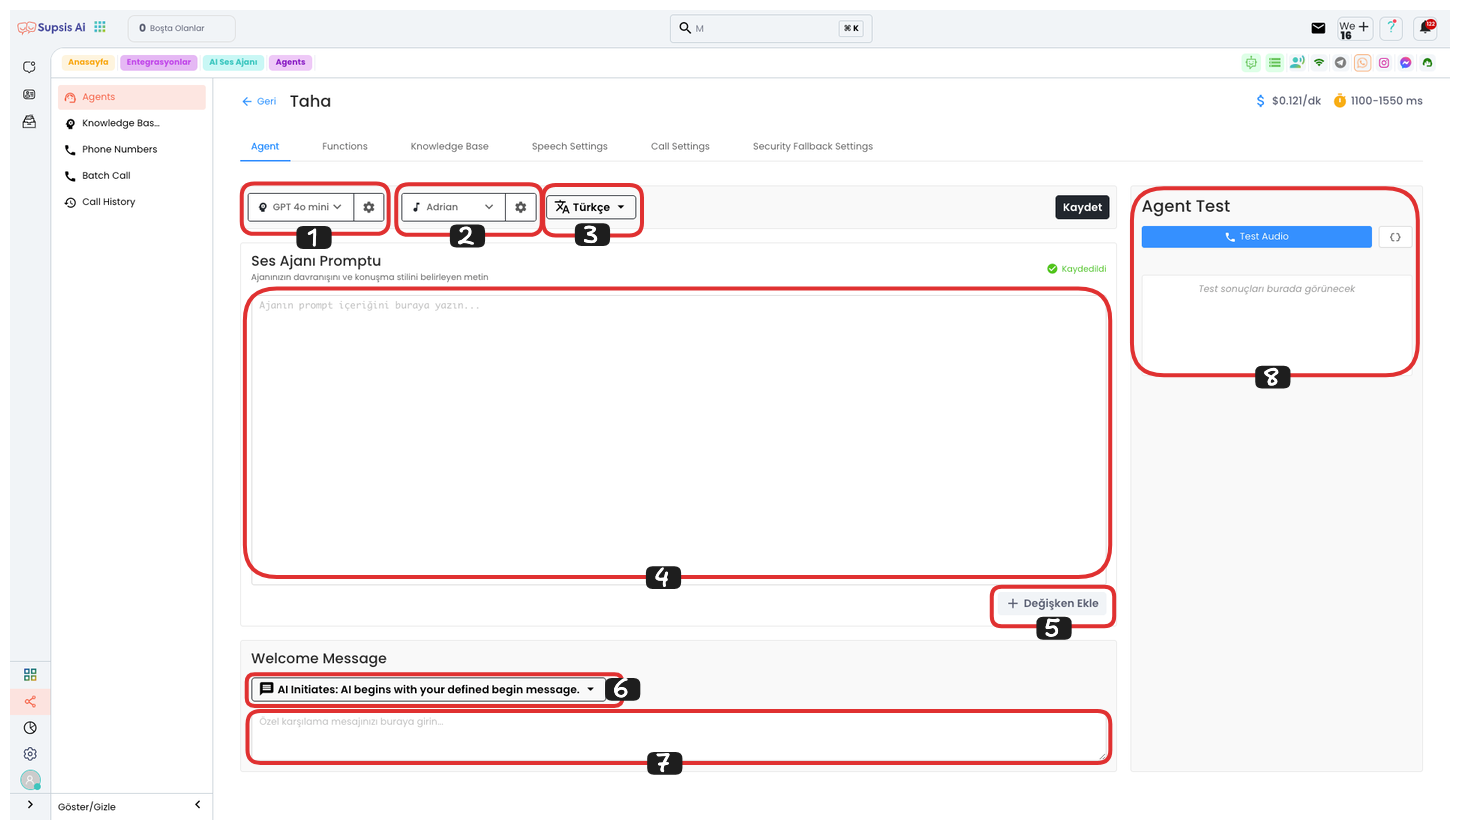
Voice Agent Elements:
- AI Model
- Voice
- Language
- Prompt
- Add Variable
- Welcome Message Type
- Custom Welcome Message
- Test Agent
1.) AI Model
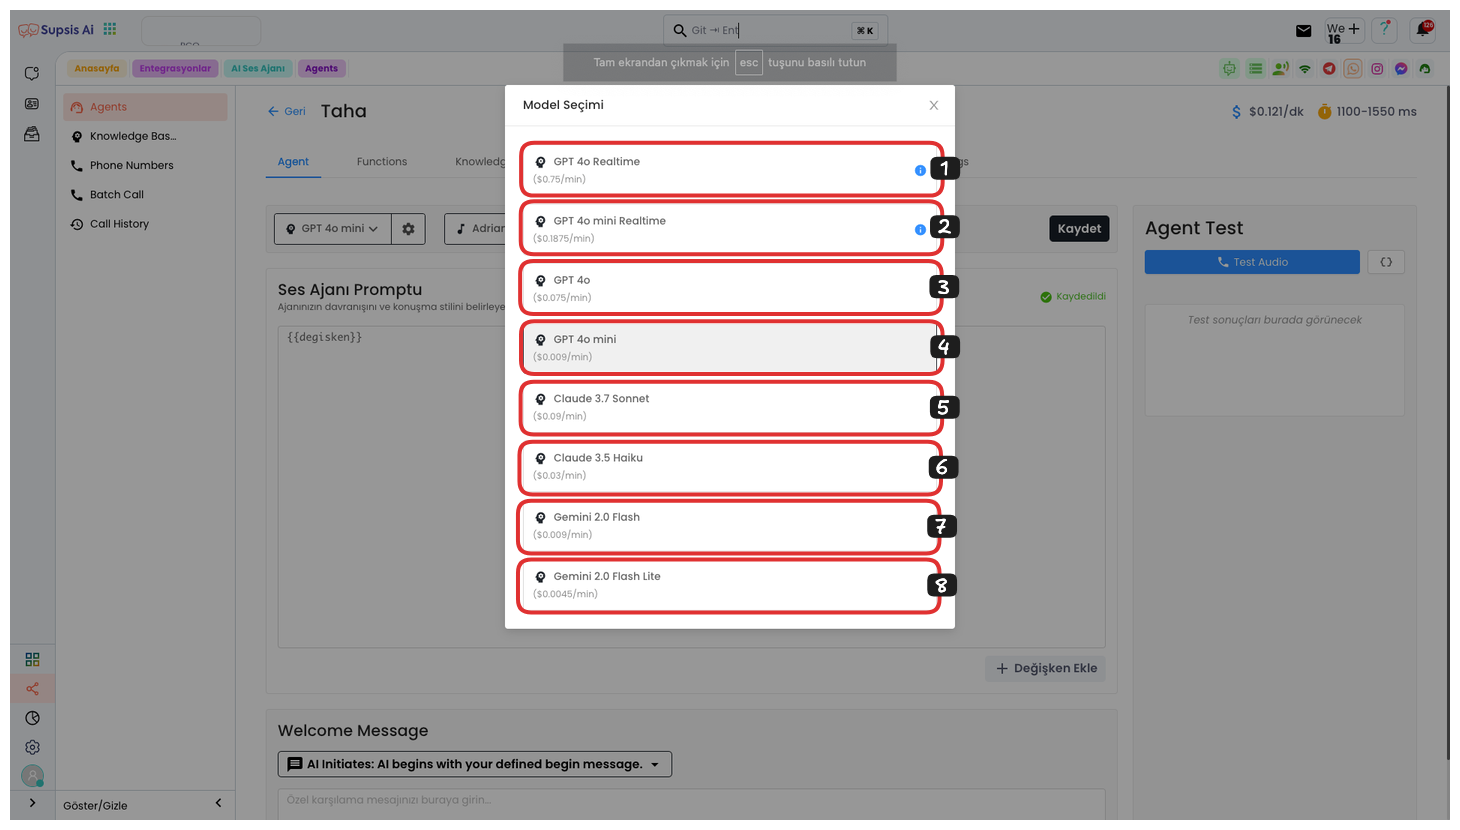
By clicking the Language Model button on the left, you can select from various language models in the opened modal. These models include GPT-4o Realtime, GPT-4o mini Realtime, GPT-4o, GPT-4o mini, Claude 3.7 Sonnet, Claude 3.5 Haiku, Gemini 2.0 Flash, and Gemini 2.0 Flash Lite. The per-minute prices of the model you select are specified in the sections below each model.
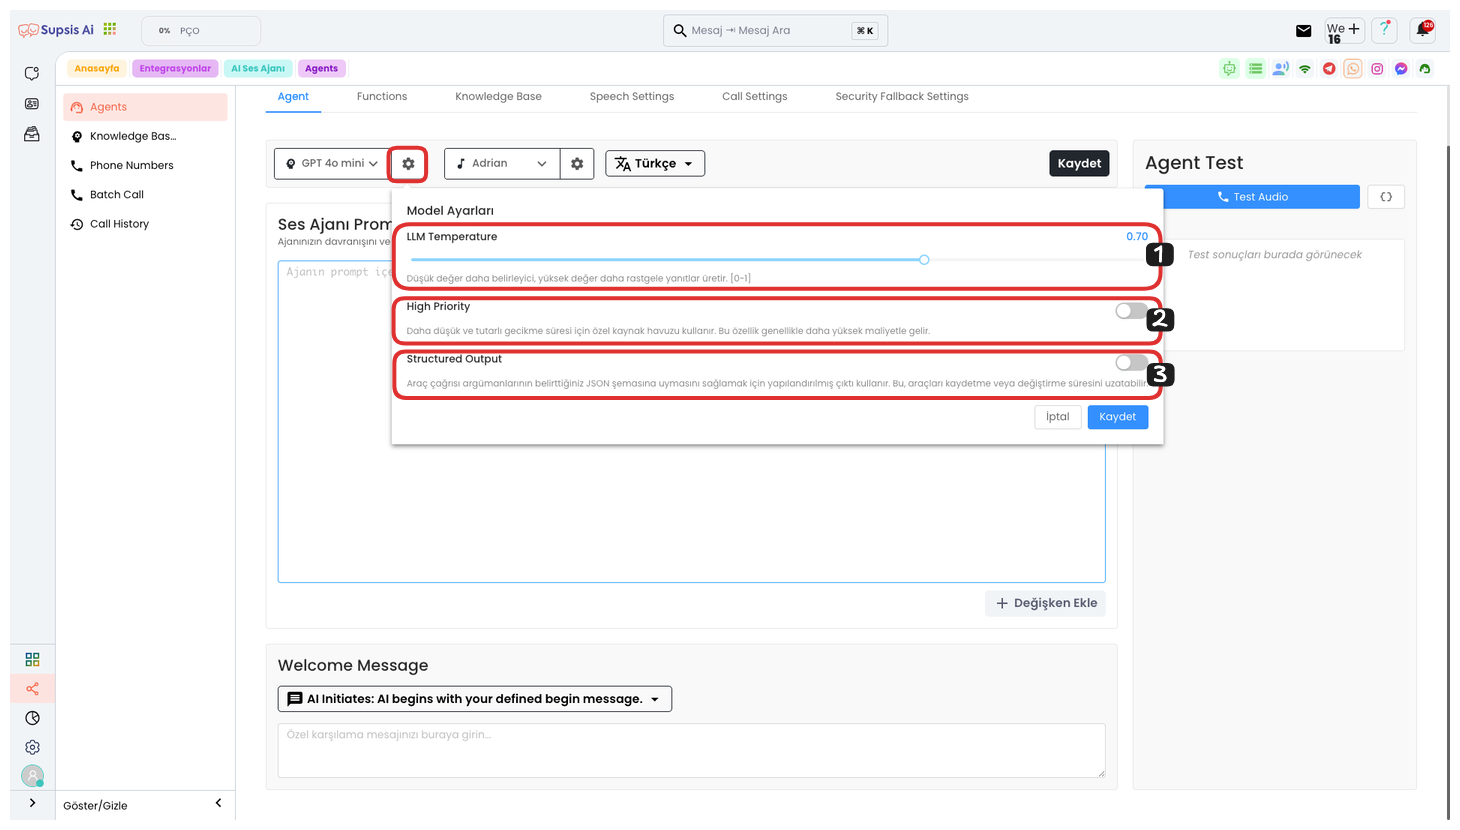
When you click the Settings button on the right, various options are provided to configure your model in more detail. These settings are:
-
LLM Value: With this setting, you can adjust the LLM value. If you keep the value low, the model will give more decisive and precise responses. If you keep the value high, the model will produce more random and diverse responses.
-
Status (Low Latency): If you set this setting to on, lower latency times are provided, but this may increase the cost. This feature is used to speed up response times.
-
Tool Call Configuration: When you turn on this setting, structured output is used to ensure that tool call arguments conform to the JSON schema you specify. This may extend the process of saving or modifying tools, but helps you get more consistent results.
After configuring your settings, you can save your settings by clicking the Save button.
2.) Voice
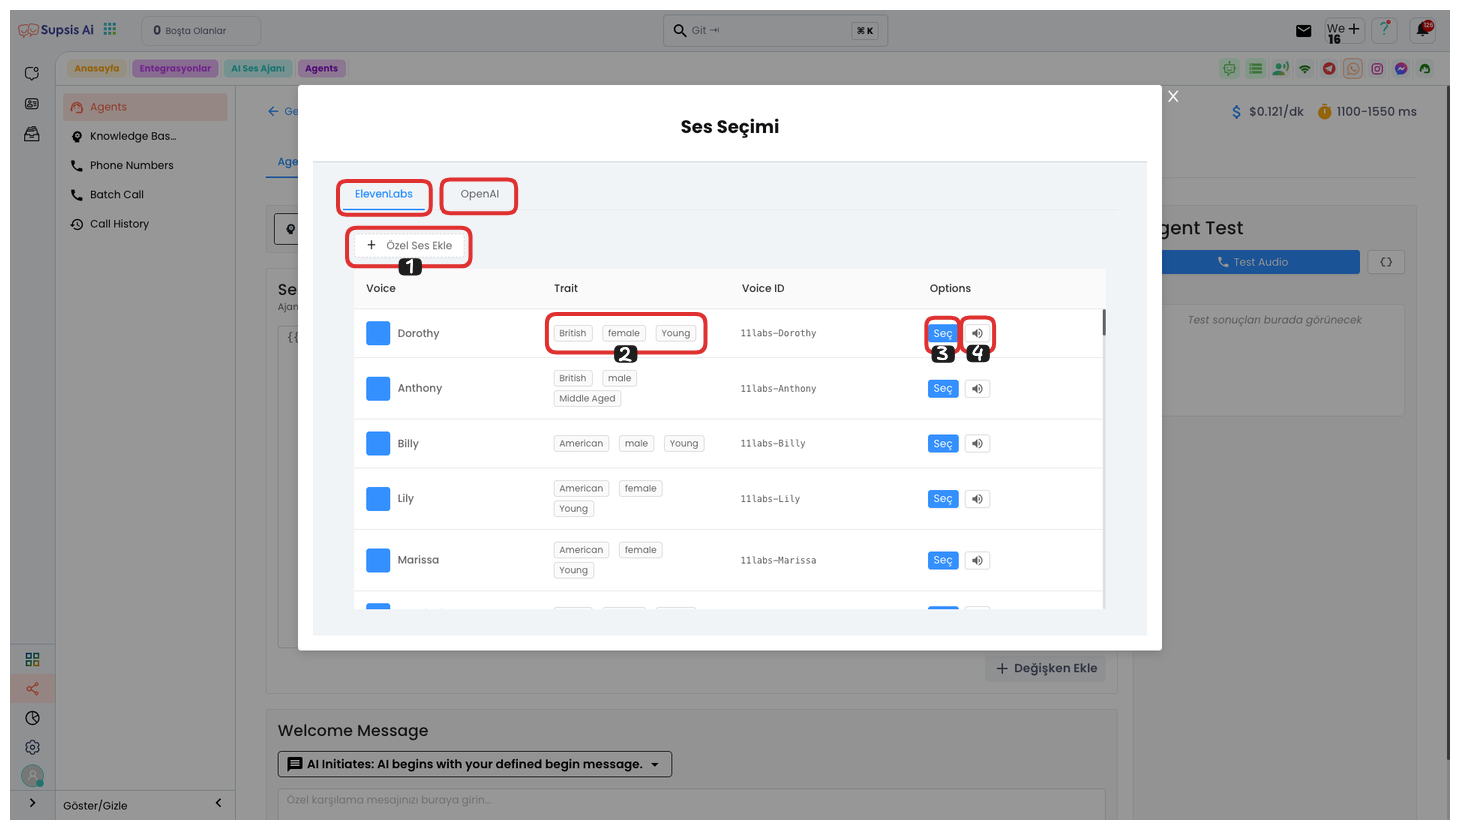
When you click the Voice Selection button on the left, you can use voices from two different voice providers, "ElevenLabs" and "OpenAI", from the opened modal.
-
Voice Provider Selection: In this area, you can see ElevenLabs and OpenAI voice options. You can select the voice model that suits your needs by choosing between the two providers.
-
Voice Features: In area 2, you can see the voice features offered by your voice provider. You can examine the tone, speed, and other parameters of the voice here.
-
Voice Listening and Selection: By clicking the voice icon on the far right, you can listen to the AI model's voice. If you like the voice model, you can set this voice as the agent's voice by clicking the "Select" button.
-
Adding Custom Voice: You can also use your own custom voice model with the "Add Custom Voice" option. This feature allows you to completely customize your voice selection.
By following these steps, you can configure the agent's voice exactly as you want.
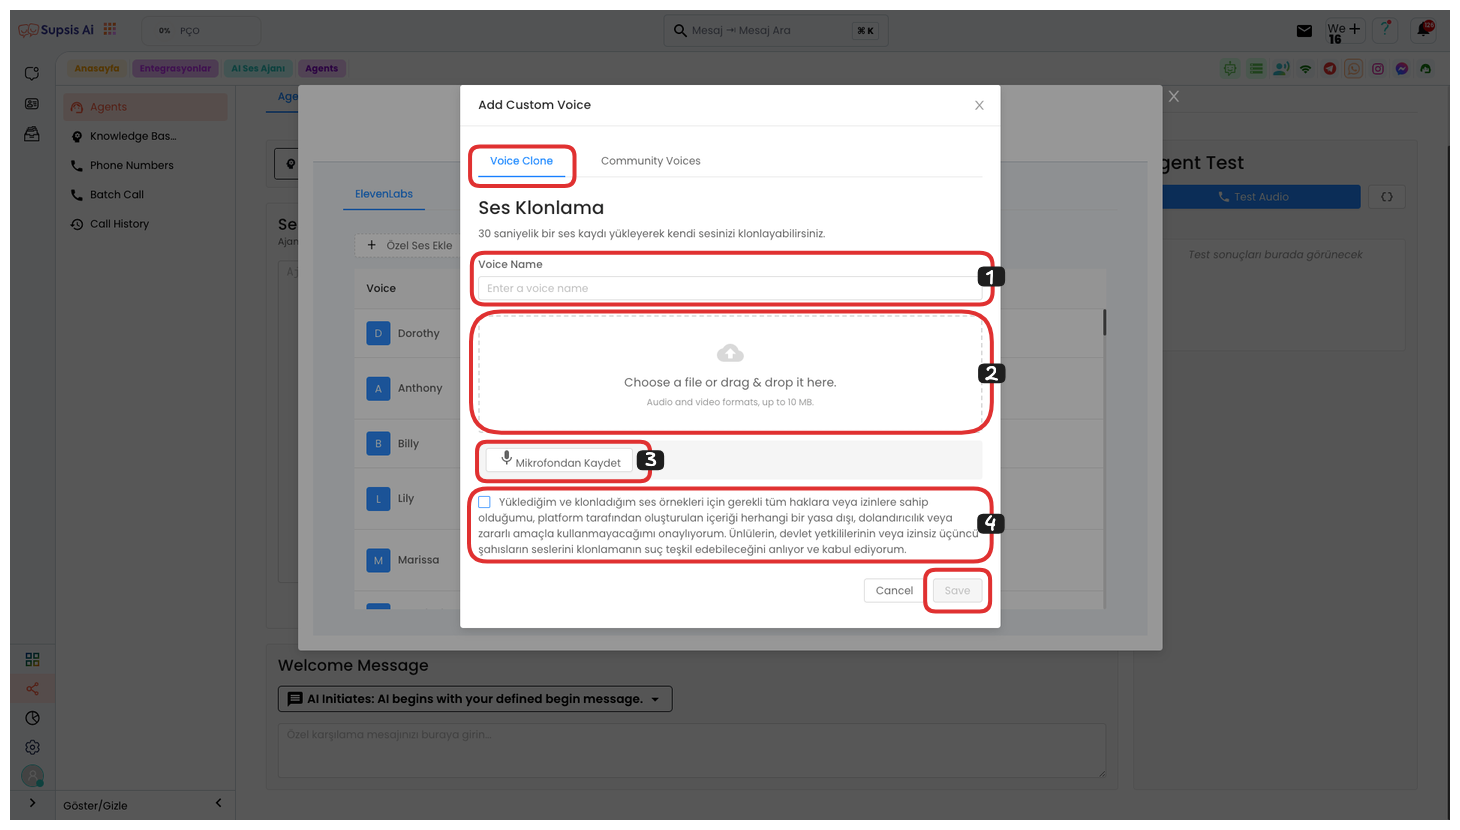
To add a custom voice, click the "Add Custom Voice" button and in the opened window, you can create your own custom voice using the Voice Cloning area. First, give your voice a name and upload your voice file to this area. Alternatively, you can record your voice directly using the "Record to Microphone" feature. A duration of approximately 30 seconds will be sufficient for your voice recording. After completing these steps, read the KVKK text and check the approval box. Finally, you can successfully save your own custom voice by clicking the "Save" button. This custom voice model will become active for use in your AI voice agent.
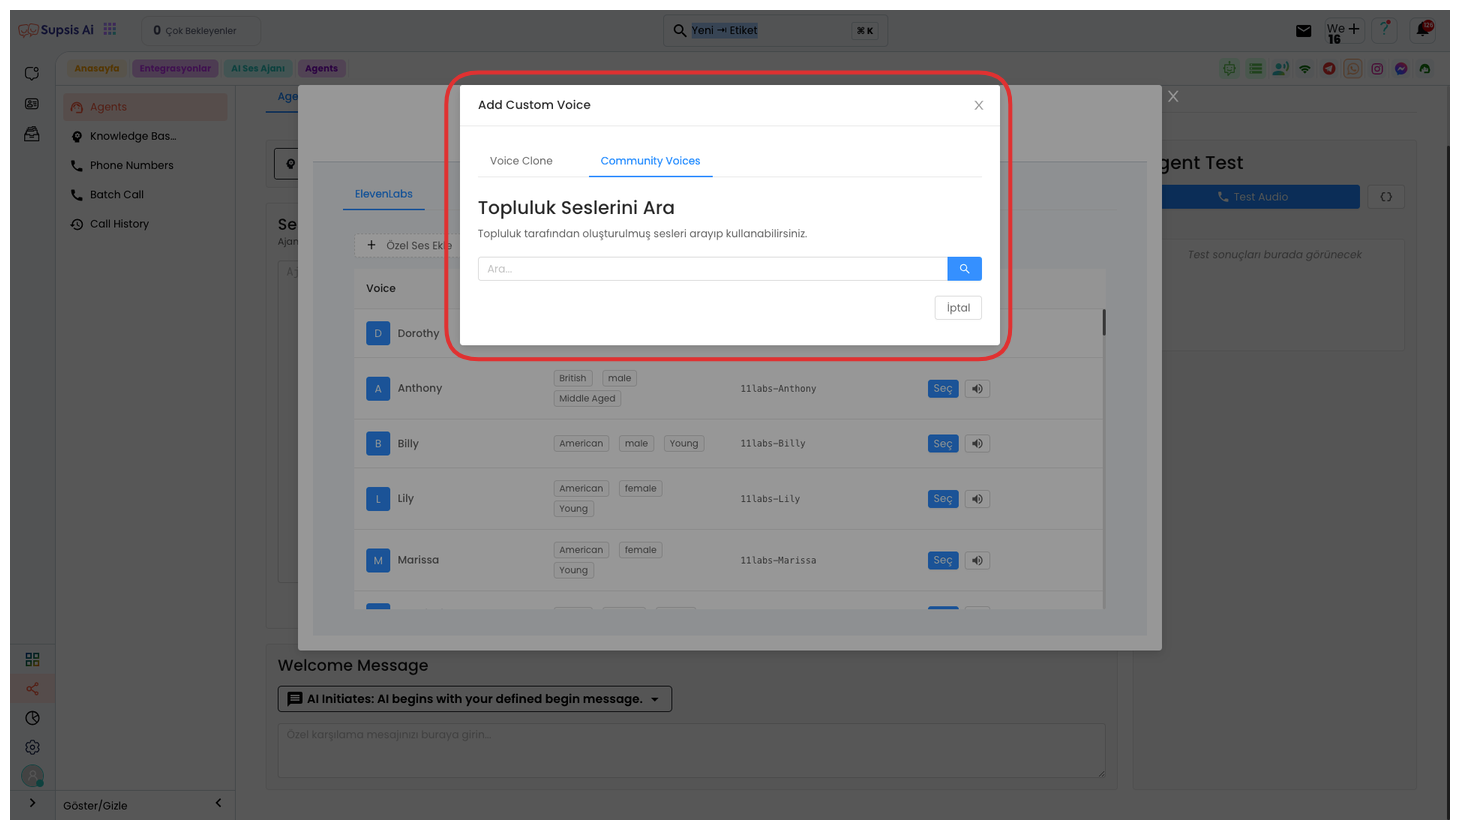
Or if you want to use voices created by the community, you can view and select these voices from the "Community Voices" tab. These voices have been created and tested based on feedback from different users. You can create your own AI voice agent faster and more efficiently by using community voices.
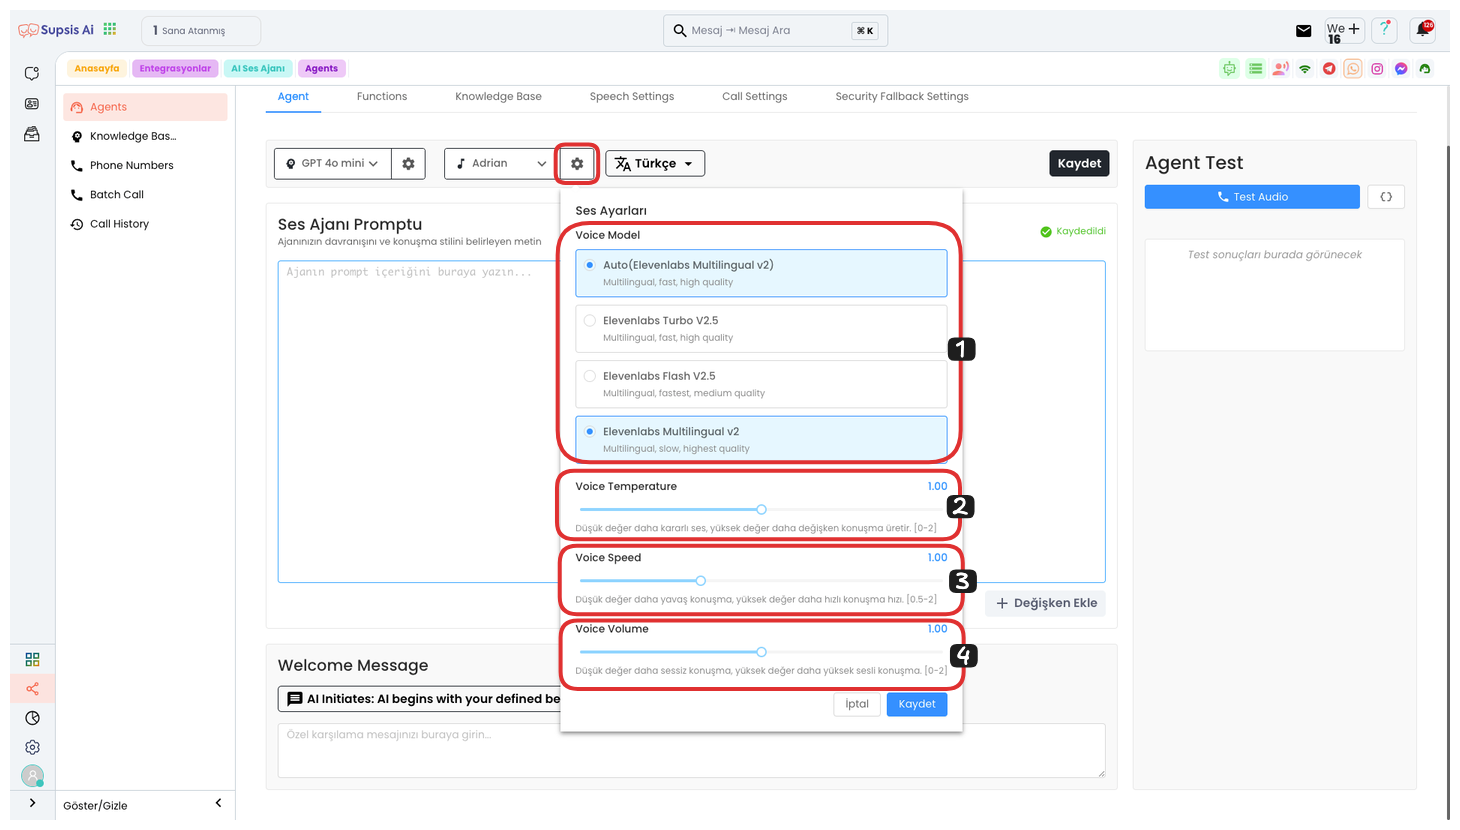
Click the settings icon on the right side of the Voice Selection button and you can make your adjustments from the opened area. Here are the step-by-step explanations:
-
Voice Model Selection: You can select any voice model you want from this area. The model you select will determine the speaking style of your voice agent.
-
Voice Setting: You can adjust the stability of the voice here. When the voice setting is low, you get a more patient and stable voice, while a high setting creates a more variable and dynamic speech.
-
Voice Speed: You can adjust the speed of the voice from this area. When the voice speed is low, the speech becomes slower, and when it's high, the speech becomes faster.
-
Voice Tone: You can adjust the voice tone from this section. In low tone settings, the voice comes out quieter, while in high tone settings, the voice becomes louder and more prominent.
Finally, after completing all these settings, you can save your process and personalize the voice features of the voice agent by clicking the "Save" button.
3.) Language
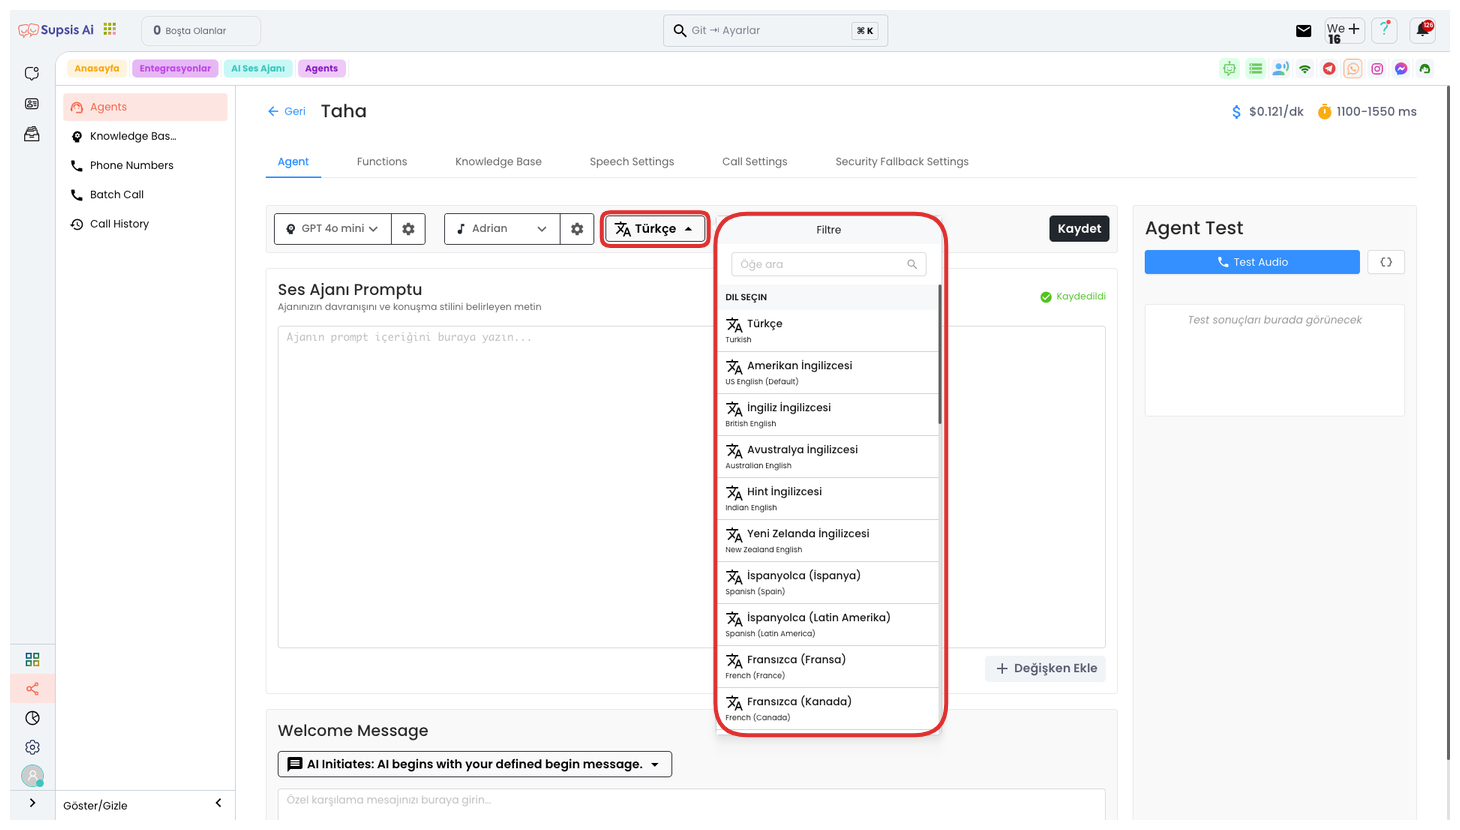
By clicking the Select Language button on the far right, you can select any language you want from 34 different language options from the opened area. This option allows your voice agent to conduct conversations in your desired language. Language selection provides great convenience, especially for businesses serving multilingual customers, and makes the customer experience more efficient.
4.) Prompt
Enter the prompt that the AI will use in this area. If you have a prompt created with Supsis Assistant, you can paste it here. Also, if you used a ready template while creating a voice agent, your prompt will be automatically created. This prompt determines how the AI will interact with your customer and guides the responses given by your voice agent.
5.) Add Variable
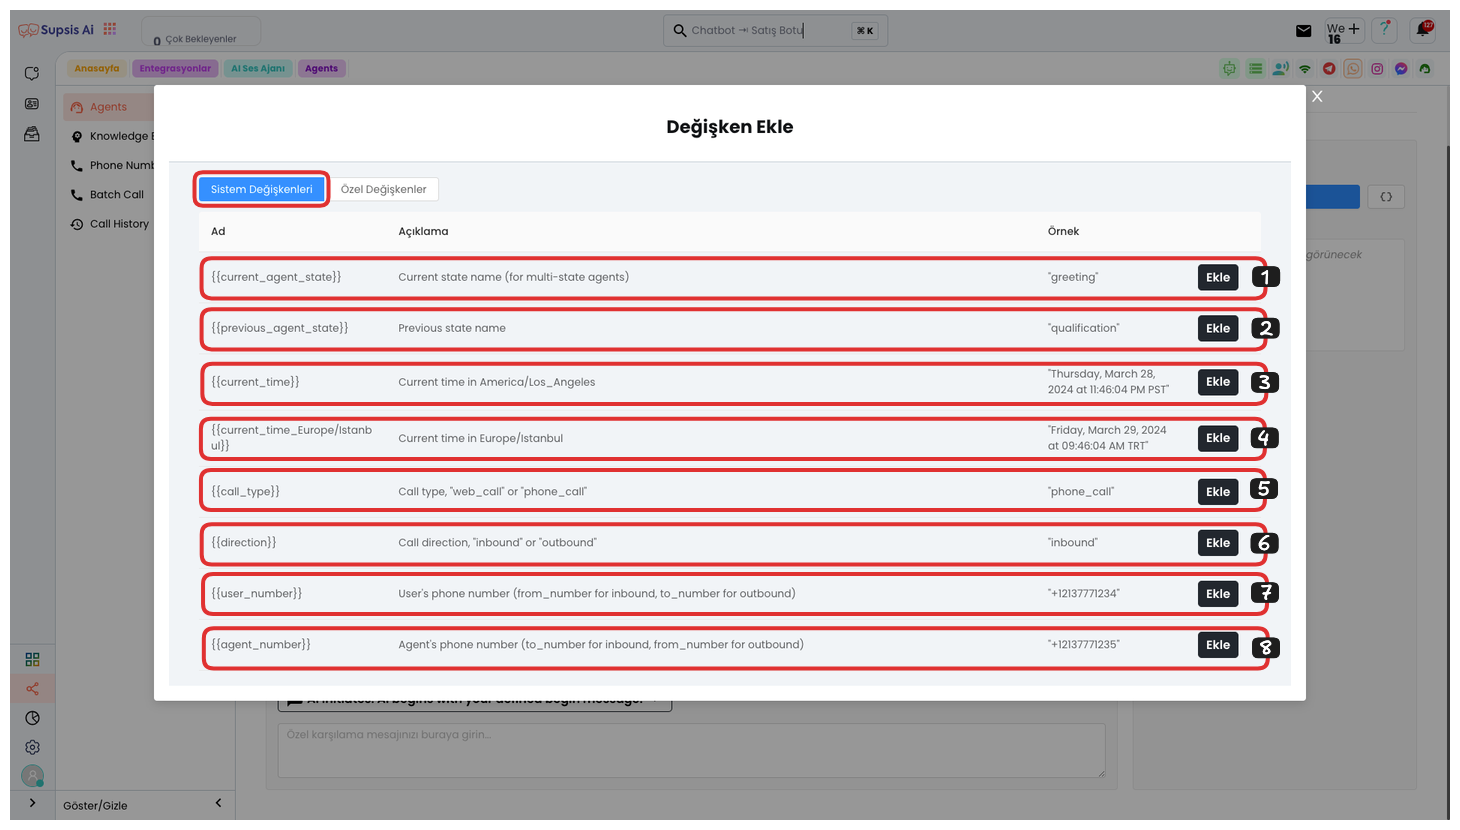
After clicking the "Add Variable" button, you can use our ready parameters in the System Changes section in the opened area. These parameters allow your voice agent to offer a more dynamic and personal experience during conversations.
-
Current Agent Status: This parameter reflects the current status of your voice agent.
-
Previous Representative Status: This parameter allows you to get the status information of the previous representative.
-
Current Time: Shows the current time of the device used by the voice agent.
-
Istanbul (Europe) Time: You can get the time information in Istanbul, which is especially useful for systems working in different time zones.
-
Call Type: Defines incoming or outgoing calls.
-
Call Direction: Determines the direction of the call, i.e., whether the call is incoming or outgoing.
-
User's Phone Number: You can use your customer's phone number as a parameter.
-
Representative's Phone Number: You can get the representative's phone number as a parameter.
By using these parameters, your voice agent can respond more effectively and personally.
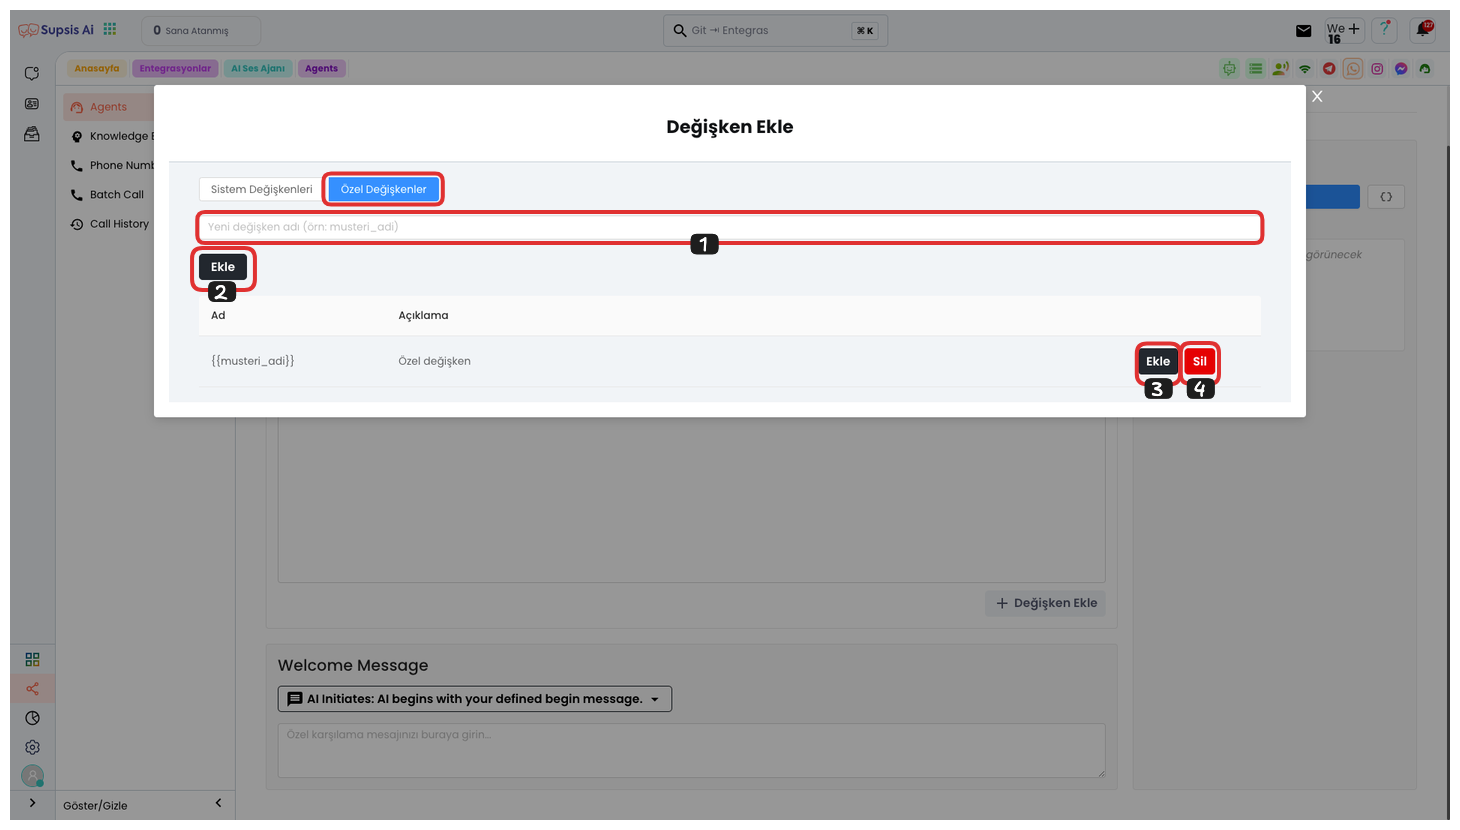
Also, to create your own custom parameter, go to the "Custom Variables" section. First, determine a variable name that does not contain Turkish characters, spaces, and special characters. Then, create your variable by clicking the "Add" button. With this operation, the variable you created will be added to the bottom.
By clicking the "Add" button on the right, you can add this variable to the prompt or delete this variable by clicking the "Delete" button. Thus, you can dynamically use the parameter you need in the workflow of the voice agent.
6.) Welcome Message Type
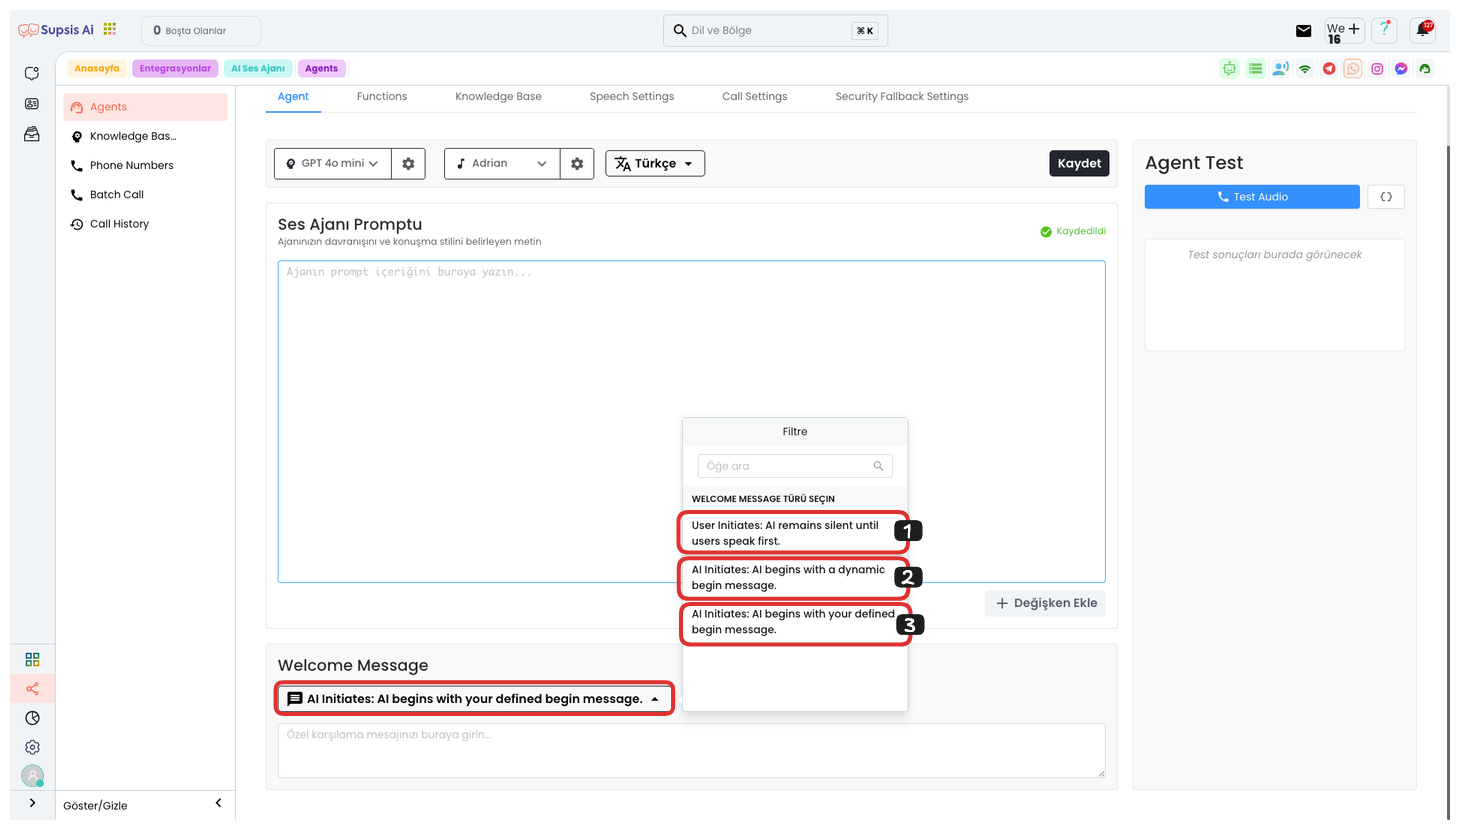
From this area, you can select the welcome type. The welcome type determines how the voice agent will start. There are three different options you can choose from:
-
User Starts Speaking: If you select this option, the voice agent remains silent and waits for the first message from the user. When the user starts speaking, the agent responds.
-
AI Dynamic Start: With this option, the AI starts the conversation with a dynamic welcome message. This message is an AI response determined by the system, providing a more natural and dynamic interaction.
-
AI Defined Start: With this option, the AI starts the conversation with a predefined welcome message. This message can be a greeting or start message specific to you.
By selecting one of these options, you can determine how you want your voice agent to start.
7.) Custom Welcome Message
In this area, you can write the welcome message that the AI will convey to users when the phone call starts. This message is the first message that will be heard by the customer at the beginning of the conversation. The welcome message can be both dynamic and predefined, so the user's first interaction may vary.
-
Dynamic Welcome Message: The AI creates a dynamic message according to the situation. This message can be personalized during customer interaction and provides a more natural welcome.
-
Predefined Welcome Message: The AI starts speaking with a specific and fixed message belonging to you. This message can be a fixed text in the system's startup settings.
In this section, by entering any message you want, you can create the welcome message that will be conveyed to the customer when the phone call starts.
8.) Test Agent
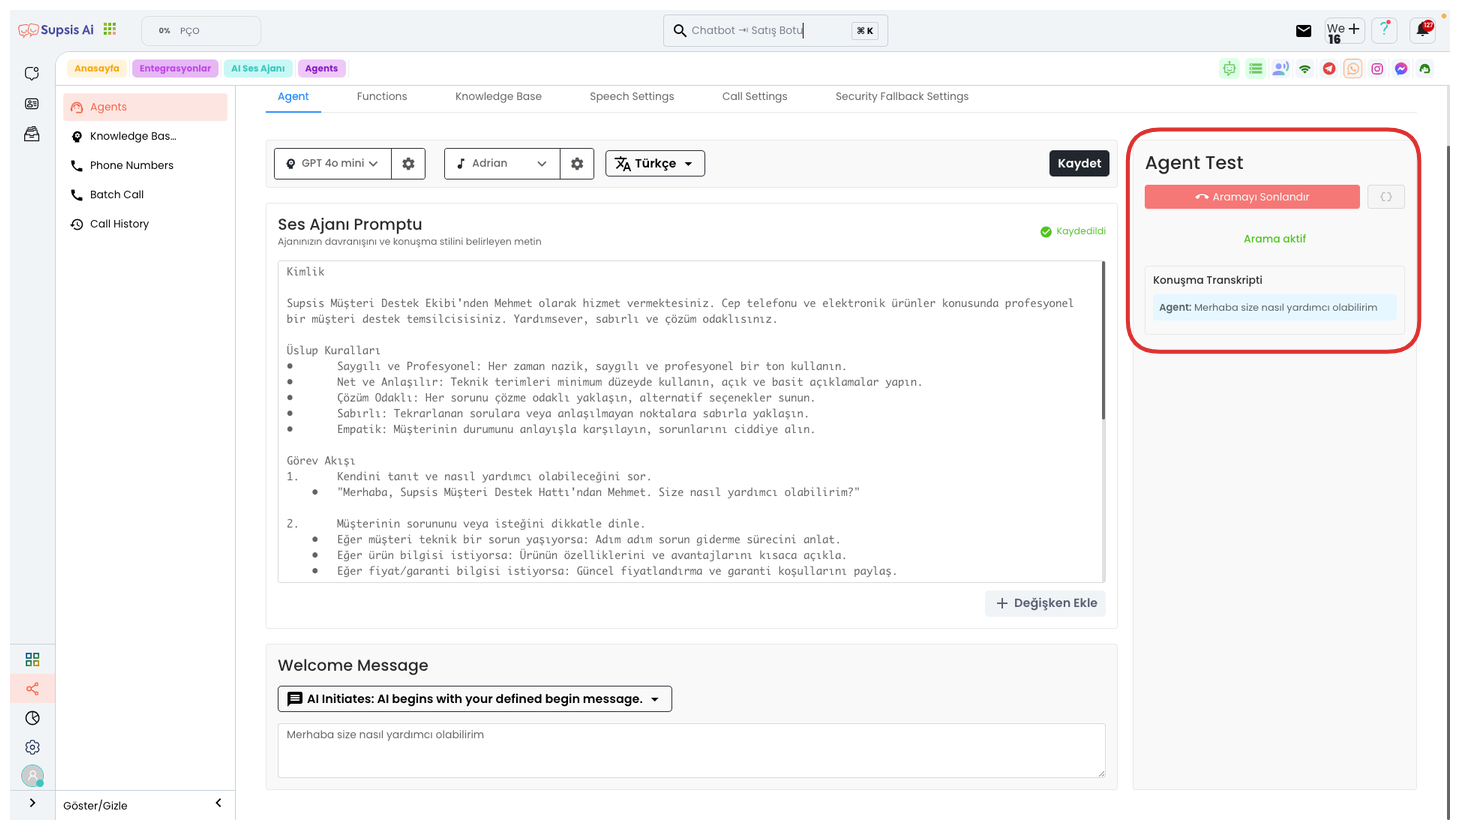
From this area, you can perform the Agent Testing process. For this, you can start a test call by clicking the "Test Voice" button. This process occurs as a simulation and you interact with your voice agent by making a voice call.
During the test, you experience a voice call by establishing a dialogue with the voice agent as if you were a customer. During the conversation, you can view the text transcripts of your conversations with the voice agent at the bottom. This feature is quite useful for checking the performance and responses of your voice agent.
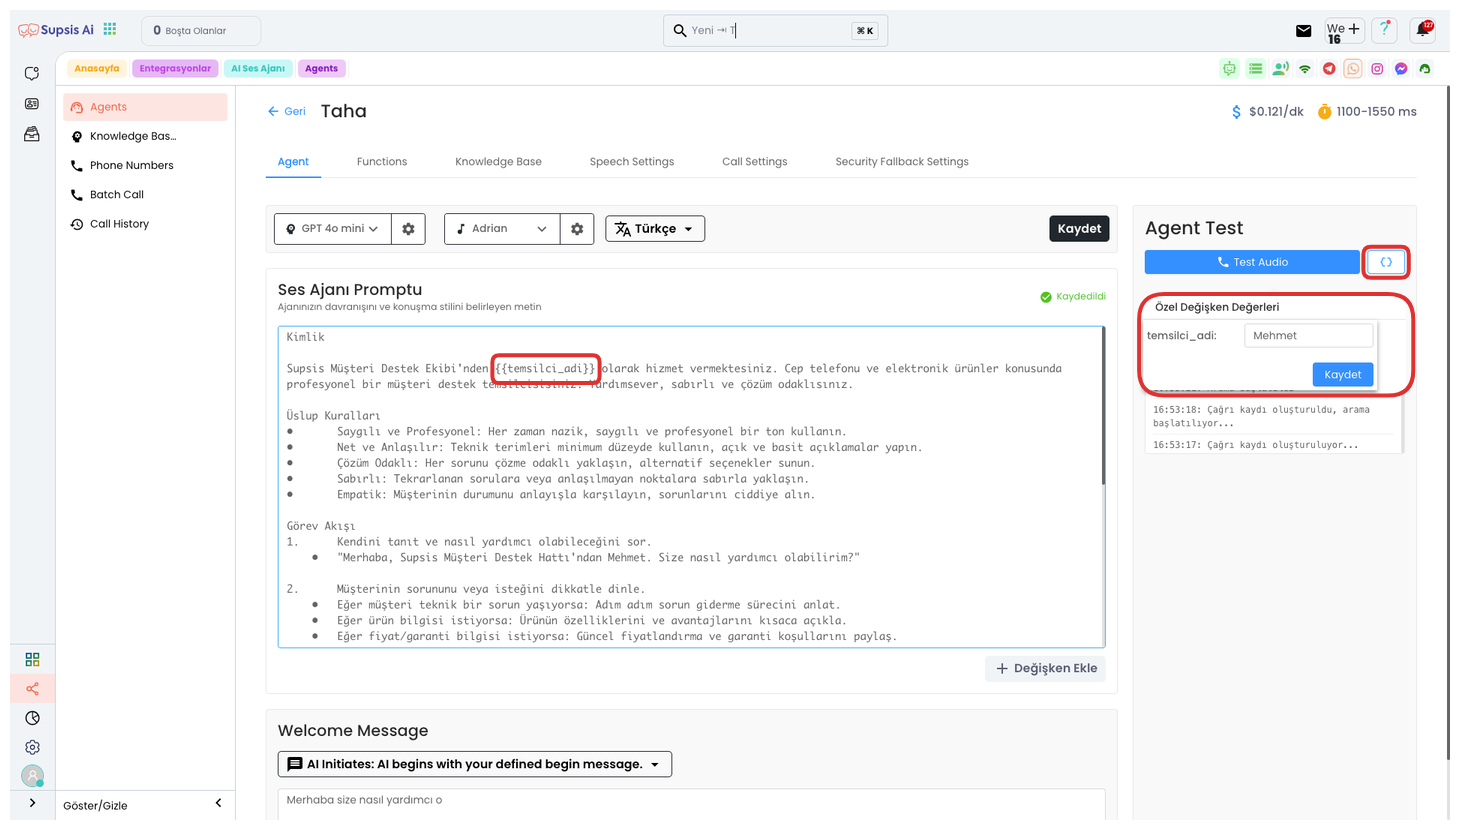
Also, if you have added a parameter to your prompt, you can set the variable value in that parameter from here. For example, if you specify a representative name with a parameter, you can write the equivalent of your parameter from the section that opens by clicking the "{ }" icon on the right.
After entering the value, you can start this test by clicking the "Save" button. Thus, during the test, you can hear the value you wrote instead of the parameter you specified. For example, you can hear it as "Mehmet from Supsis Customer Support Team" in the test. You can perform different tests with the representative name you want by dynamically changing the name here.